1. Overview
In this article, we’ll have a look at how to use Spring Boot with Hibernate.
We’ll build a simple Spring Boot application and see how easy it is to integrate it with Hibernate.
2. Bootstrapping the Application
We’ll use Spring Initializr to bootstrap our Spring Boot application. For this example, we’ll use only the needed configurations and dependencies to integrate Hibernate, adding Web, JPA, and H2 dependencies. We’ll explain these dependencies in the next section.
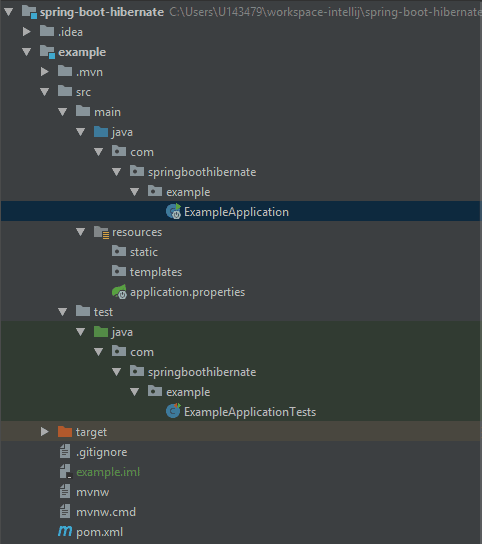
Let’s generate the project and open it up in our IDE. We can check the generated project structure and identify the configuration files we’ll need.
This is how the project structure will look like:

3. Maven Dependencies
If we open up pom.xml, we’ll see that we have spring-boot-starter-web and spring-boot-starter-test as maven dependencies. As their names suggest, these are starting dependencies in Spring Boot.
Let’s have a quick look at dependency that pulls in JPA:
<dependency>
    <groupId>org.springframework.boot</groupId>
    <artifactId>spring-boot-starter-data-jpa</artifactId>
</dependency>
This dependency includes JPA API, JPA Implementation, JDBC and other needed libraries. Since the default JPA implementation is Hibernate, this dependency is actually enough to bring it in as well.
Finally, we’ll use H2 as a very lightweight database for this example:
<dependency>
    <groupId>com.h2database</groupId>
    <artifactId>h2</artifactId>
    <scope>runtime</scope>
</dependency>
We can use the H2 console to check that the DB is up and running, also for a user-friendly GUI for our data entry. Let’s go ahead and enable it in application.properites:
spring.h2.console.enabled=true
This is all we needed to configure to include Hibernate and H2 for our example. We can check the configuration was successful on the logs when we start up the Spring Boot application:
HHH000412: Hibernate Core {#Version}
HHH000206: hibernate.properties not found
HCANN000001: Hibernate Commons Annotations {#Version}
HHH000400: Using dialect: org.hibernate.dialect.H2Dialect
We can now access the H2 console on localhost: http://localhost:8080/h2-console/.
4. Creating the Entity
To check that our H2 is working properly, we’ll first create a JPA entity in a new models folder:
@Entity
public class Book {

    @Id
    @GeneratedValue
    private Long id;
    private String name;

    // standard constructors

    // standard getters and setters
}
We have now a basic entity, which H2 can create a table from. Restarting the application and checking H2 console, a new table called Book will be created.
To add some initial data to our application, we need to create a new SQL file, with some insert statements and put it in our resources folder. We can use import.sql (Hibernate support) or data.sql (Spring JDBC support) files to load data.
Here are our example data:
insert into book values(1, 'The Tartar Steppe');
insert into book values(2, 'Poem Strip');
insert into book values(3, 'Restless Nights: Selected Stories of Dino Buzzati');
Again, we can restart the Spring Boot application and check the H2 console – the data is now in the Book table.
5. Creating the Repository and Service
We’ll continue creating the basic components in order to test our application. First, let’s add the JPA Repository in a new repositories folder:
@Repository
public interface BookRepository extends JpaRepository<Book, Long> {
}
We can use the JpaRepository interface from Spring framework, which provides a default implementation for the basic CRUD operations.
Next, let’s add the BookService in a new services folder:
@Service
public class BookService {

    @Autowired
    private BookRepository bookRepository;

    public List<Book> list() {
        return bookRepository.findAll();
    }
}
To test our application, we need to check that the data created can be fetched from the list() method of the service.
We’ll write the following SpringBootTest:
@RunWith(SpringRunner.class)
@SpringBootTest
public class BookServiceTest {

    @Autowired
    private BookService bookService;

    @Test
    public void whenApplicationStarts_thenHibernateCreatesInitialRecords() {
        List<Book> books = bookService.list();

        Assert.assertEquals(books.size(), 3);
    }
}
By running this test, we can check that Hibernate creates the Book data which are then fetched successfully by our service. That was it, Hibernate is running with Spring Boot.
6. Uppercase Table Name
Sometimes we may need to have the table names in our database written in uppercase letters. As we already know, by default Hibernate will generate the names of the tables in lowercase letters.
We could also try to explicitly set the table name, like this:
@Entity(name="BOOK")
public class Book {
    // members, standard getters and setters
}
However, that wouldn’t work. What works is setting this property in application.properties:
spring.jpa.hibernate.naming.physical-strategy=org.hibernate.boot.model.naming.PhysicalNamingStrategyStandardImpl
As a result, we can check in our database that the tables are created successfully with uppercase letters.
7. Conclusion
In this article, we looked at how easy it is to integrate Hibernate with Spring Boot. We used H2 database, as a very lightweight in-memory solution.
We gave a full example of an application, which uses all these technologies and eventually, we also gave a small hint on how to set the table names in uppercase in our database.
As always, all of the code snippets mentioned in this article can be found on our GitHub repository.