1. Overview
One of the main features of Docker is creating and isolating networks.
In this tutorial, we'll see how to extract information about networks and the containers they hold.
2. Networking in Docker
When we run a Docker container, we can define what ports we want to expose to the outside world. What this means is that we use (or create) an isolated network and put our container inside. We can decide how we'll communicate both with and inside this network.
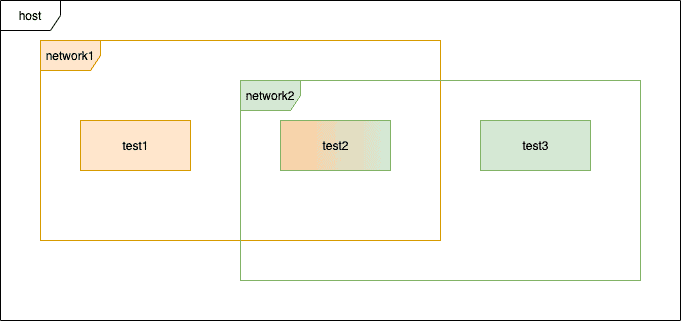
Let's create a few containers and configure networking between them. They will all internally work on port 8080, and they will be placed in two networks.
Each of them will host a simple “Hello World” HTTP service:
version: "3.5"
services:
  test1:
    image: node
    command: node -e "const http = require('http'); http.createServer((req, res) => { res.write('Hello from test1\n'); res.end() }).listen(8080)"
    ports:
      - "8080:8080"
    networks:
      - network1
  test2:
    image: node
    command: node -e "const http = require('http'); http.createServer((req, res) => { res.write('Hello from test2\n'); res.end() }).listen(8080)"
    ports:
      - "8081:8080"
    networks:
      - network1
      - network2
  test3:
    image: node
    command: node -e "const http = require('http'); http.createServer((req, res) => { res.write('Hello from test3\n'); res.end() }).listen(8080)"
    ports:
      - "8082:8080"
    networks:
      - network2
networks:
  network1:
    name: network1
  network2:
    name: network2
Here's a diagram of these containers for a more visual representation:

Let's start them all with the docker-compose command:
$ docker-compose up -d
Starting bael_test2_1 ... done
Starting bael_test3_1 ... done
Starting bael_test1_1 ... done
3. Inspecting the Network
Firstly, let's list all available Docker's networks:
$ docker network ls
NETWORK ID          NAME                DRIVER              SCOPE
86e6a8138c0d        bridge              bridge              local
73402de5766c        host                host                local
e943f7124776        network1            bridge              local
3b9a28673a16        network2            bridge              local
9361d16a834a        none                null                local
We can see the bridge network, which is the default network used when we use the docker run command. Also, we can see the networks we created with a docker-compose command.
Let's inspect them with the docker inspect command:
$ docker inspect network1 network2
[
    {
        "Name": "network1",
        "Id": "e943f7124776d45a1481ee26795b2dba3f2ab51f000d875a179a99ce832eee9f",
        "Created": "2020-08-22T10:38:22.198709146Z",
        "Scope": "local",
        "Driver": "bridge",
        "EnableIPv6": false,
        // output cutout for brevity
    }
],
    {
        "Name": "network2",
        // output cutout for brevity
    }
}
This will produce lengthy, detailed output. We rarely need all of this information. Fortunately, we can format it using Go templates and extract only the elements that suit our needs. Let's get only the subnet of network1:
$ docker inspect -f '{{range .IPAM.Config}}{{.Subnet}}{{end}}' network1
172.22.0.0/16
4. Inspecting the Container
Similarly, we can inspect a specific container. First, let's list all containers with their identifiers:
$ docker ps --format 'table {{.ID}}\t{{.Names}}'
CONTAINER ID        NAMES
78c10f03ad89        bael_test2_1
f229dde68f3b        bael_test3_1
b09a8f47e2a8        bael_test1_1
Now we'll use the container's ID as an argument to the inspect command to find its IP address. Similarly to networks, we can format output to get just the information we need. We'll check the second container and its address in both networks we created:
$ docker inspect 78c10f03ad89 --format '{{.NetworkSettings.Networks.network1.IPAddress}}'
172.22.0.2
$ docker inspect 78c10f03ad89 --format '{{.NetworkSettings.Networks.network2.IPAddress}}'
172.23.0.3
Alternatively, we can print hosts directly from a container using the docker exec command:
$ docker exec 78c10f03ad89 cat /etc/hosts
127.0.0.1	localhost
::1	localhost ip6-localhost ip6-loopback
fe00::0	ip6-localnet
ff00::0	ip6-mcastprefix
ff02::1	ip6-allnodes
ff02::2	ip6-allrouters
172.22.0.2	78c10f03ad89
172.23.0.3	78c10f03ad89
5. Communication Between Containers
Using knowledge about our Docker networks, we can establish communication between containers in the same network.
First, let's get inside the “test1” container:
$ docker exec -it b09a8f47e2a8 /bin/bashThen, use curl to send a request to the “test2” container:
root@b09a8f47e2a8:/# curl 172.22.0.2:8080
Hello from test2
Since we're inside the Docker's network, we can also use the alias instead of the IP address. Docker's builtin DNS service will resolve the address for us:
root@b09a8f47e2a8:/# curl test2:8080
Hello from test2
Mind that we can't connect to the “test3” container because it's in a different network. Connecting by the IP address will time out:
root@b09a8f47e2a8:/# curl 172.23.0.2:8080Connecting by the alias will also fail because the DNS service won't recognize it:
root@b09a8f47e2a8:/# curl test3:8080
curl: (6) Could not resolve host: test3
To make this work, we need to add “test3” container to “network1” (from outside of the container):
$ docker network connect --alias test3 network1 f229dde68f3bNow request to “test3” will work correctly:
root@b09a8f47e2a8:/# curl test3:8080
Hello from test3
6. Conclusion
In this tutorial, we've seen how to configure networks for Docker containers and then query information about them.
The post Getting Network Information from Docker first appeared on Baeldung.


