
1. Overview
IntelliJ IDEA relies heavily on indexing to deliver its intelligent features. Every time files are modified or opened, IntelliJ scans the project files to build an internal index. This allows the IDE to provide faster code lookups and accurate code analysis. While useful, frequent indexing can consume a significant amount of resources and hinder productivity, especially in large codebases.
Fortunately, there are several ways to stop, limit, or optimize the indexing process in IntelliJ IDEA. In this article, we’ll explore practical tips and techniques to manage IntelliJ IDEA’s indexing more efficiently.
2. Understand the Role of Indexing in IntelliJ IDEA
Indexing is a fundamental process in IntelliJ IDEA that involves scanning and analyzing the project’s source code to create an internal database. This database stores detailed information about code elements such as classes, methods, and variables.
The indexing process in IntelliJ IDEA works as follows:
- Code Scanning: IntelliJ scans the project’s files and extracts information about symbols and code structures.
- Database Creation: The extracted data is stored in an internal index, which the IDE uses to provide features like code completion, navigation, and search.
- Updates and Re-Indexing: The index is updated whenever there are changes to the codebase, such as modifications or additions. This ensures that the IDE’s features reflect the project’s current state.
While indexing is essential for enabling IntelliJ’s advanced features, it can consume significant system resources and time, especially in large projects. By understanding how indexing works, we can implement strategies to manage its impact, balancing performance with the IDE’s powerful capabilities.
3. Disable Synchronization on Frame or Tab Activation
IntelliJ IDEA automatically synchronizes and re-indexes files whenever we switch back to the IDE from another application or move between editor tabs. This can result in frequent and often unnecessary re-indexing that may disrupt our workflow.
Here are the steps to prevent this automatic behavior:
- Navigate to “File > Settings > Appearance & Behavior > System Settings”.
- Uncheck the “Synchronize external changes when switching to the IDE window or opening an editor tab” option.
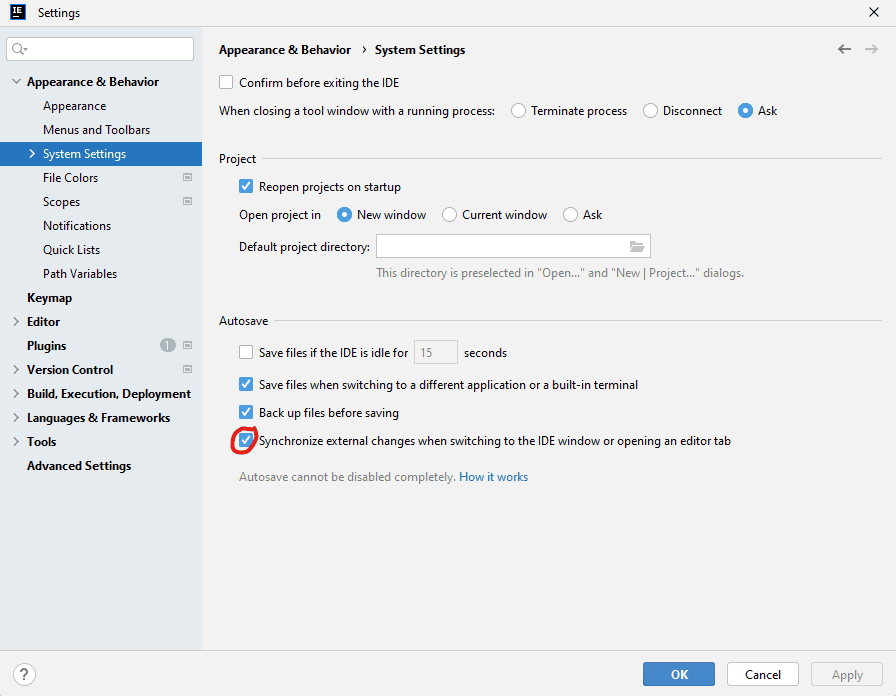
Disabling this setting stops IntelliJ from triggering an index update when we return to the IDE or change tabs. This allows us to control when to refresh and re-index the project manually, helping to minimize interruptions and improve overall efficiency.
4. Exclude Unnecessary Folders From Indexing
One of the most effective ways to limit indexing is by excluding folders that don’t need to be part of the index. Large folders such as build or logs don’t typically require indexing for IntelliJ to function correctly.
To exclude folders from indexing:
- Right-click on the folder in the project view.
- Select “Mark Directory as > Excluded”.
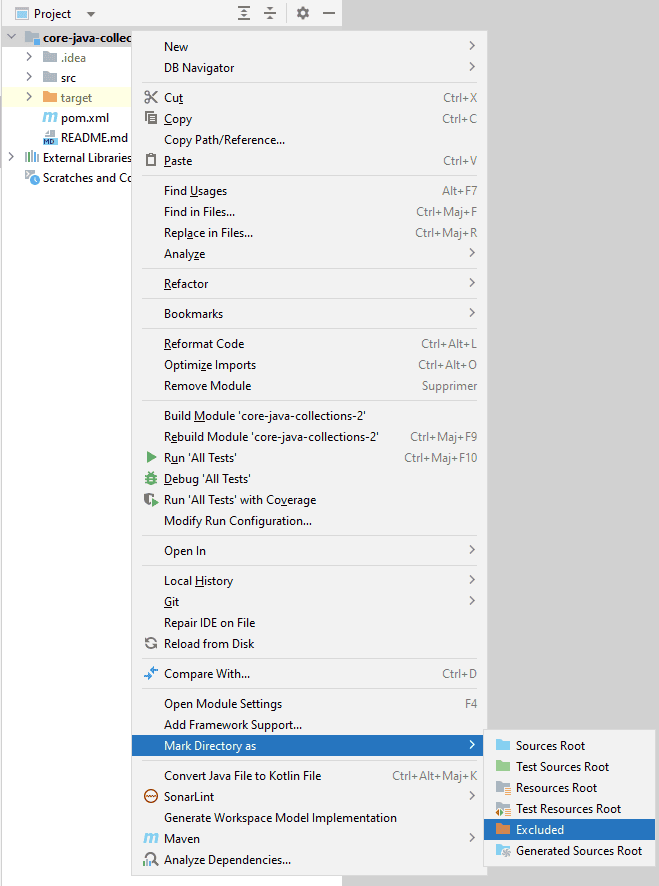
Excluding a folder from the indexing process reduces the number of files IntelliJ needs to scan, which speeds up indexing and minimizes its impact on performance.
5. Adjust Project Reload Settings
In large projects, particularly those using external build tools like Maven or Gradle, IntelliJ IDEA can automatically reload and re-index files whenever it detects changes in the build script. This mechanism can disrupt our workflow and affect performance. By adjusting this setting, we can gain more control over when the IDE updates and re-indexes the project.
To configure automatic project reload:
- Go to “File > Settings > Build, Execution, Deployment > Build Tools”.
- Locate the “Reload project after changes in the build scripts” option”.
- Choose the appropriate setting:
- Any changes: Automatically reloads the project after every change in the build script files.
- External changes (default): Reloads the project only when changes are detected from external sources, such as updates from version control. This prevents reloading after every minor change and allows us to control when to refresh the project.
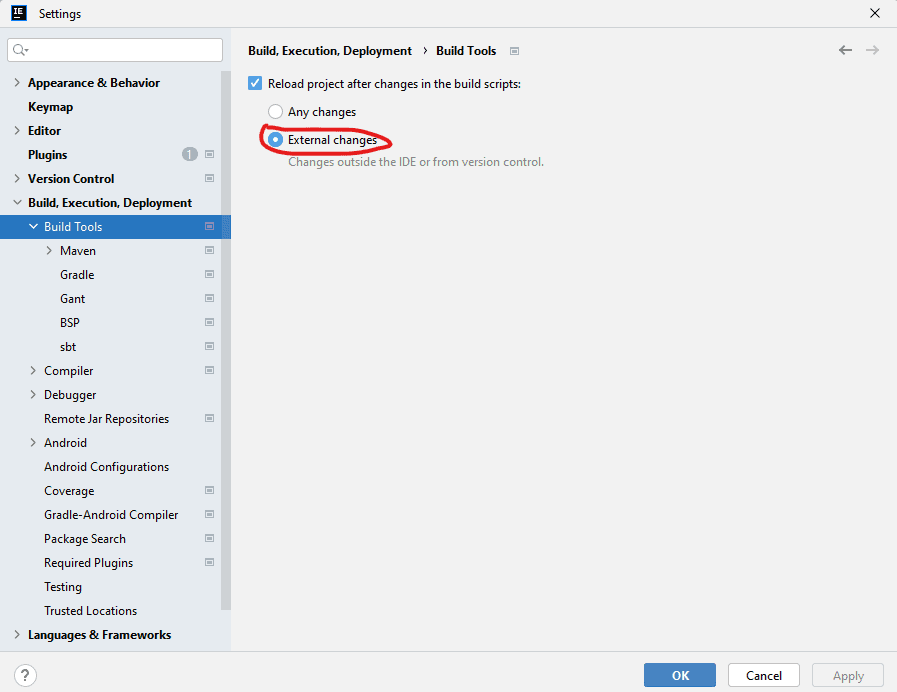
Selecting the “External changes” option ensures that the project isn’t reloaded unnecessarily, reducing the indexing frequency and allowing us to manage updates more effectively.
6. Invalidate Cache Only When Necessary
Occasionally, IntelliJ IDEA may experience issues with repeated indexing due to corrupted or outdated caches. In such cases, invalidating the cache can help resolve problems caused by stale or erroneous data, although it triggers a complete re-index.
To invalidate the cache:
- Go to “File > Invalidate Caches / Restart”.
- Choose “Invalidate and Restart”.
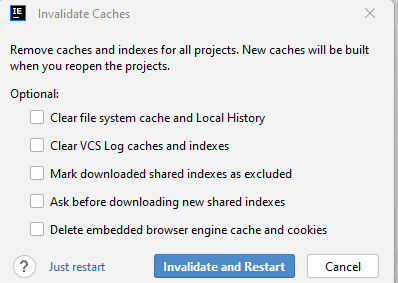
This action forces IntelliJ to rebuild its index from scratch, which can address issues with persistent or excessive indexing. However, since this process can be time-consuming and disrupt our workflow, it should be used sparingly and only when other methods haven’t resolved the problem.
7. Conclusion
Indexing is crucial for IntelliJ IDEA’s advanced features but can be disruptive if overly frequent. By disabling automatic synchronization, excluding unnecessary folders, adjusting project reload settings, and using cache invalidation sparingly, we can effectively manage IntelliJ IDEA’s indexing cycle.
These steps help balance the IDE’s powerful capabilities with a smoother development experience.


