
1. Introduction
In this tutorial, we’ll explore using CATS to automate testing for REST APIs configured with OpenAPI. Writing API tests manually can be tedious and time-consuming, but CATS simplifies the process by automatically generating and running hundreds of tests.
This reduces manual effort and improves API reliability by identifying potential issues early in development. Even for simple APIs, common errors can occur, and CATS helps us find and address them efficiently.
While CATS works with any OpenAPI-annotated application, we’ll demonstrate it using a Spring and Jackson-based application.
2. Testing Made Easy With CATS
CATS stands for Contract Auto Test Service. The contract refers to the OpenAPI specification of our REST API. The Auto Test is a fuzz test with random data and data returned by the API operations in some scenarios (like IDs). It’s an external CLI application that requires access to our API’s URL and its OpenAPI contract, either as a file or URL.
Some of its key features include:
- Automatic generation and running of tests based on the API Contract
- Automatic generation of HTML reports detailing test results
- Simple configuration for authorization requirements
Since tests are generated automatically, no maintenance is necessary, other than to rerun the generator when changing our OpenAPI specification.
This is especially handy for APIs with many endpoints. And since it includes fuzzing, it generates tests we’d never consider in the first place.
2.1. Installing CATS
We have a few installation options. The simplest two are downloading and running the JAR or binary. We’ll choose the binary option since it doesn’t require an environment with Java installed and configured, making it easier to run tests from anywhere.
After downloading it, we must add the cats binary to our environment path to run it from anywhere.
2.2. Running Tests
We need to specify at least two arguments to run cats: contract and server. In our case, the OpenAPI specification URL is at /api-docs:
$ cats --contract=http://localhost:8080/api-docs --server=http://localhost:8080We could also pass the contract as a JSON or YAML local file containing the specification.
Let’s check an example where this file is in the same directory where we’re running CATS:
$ cats --contract=api-docs.yml --server=http://localhost:8080By default, CATS will run tests on all paths in the specification, but it’s also possible to restrict it to only a few with pattern matching:
$ cats --server=http://localhost:8080 --paths="/path/a*,/path/b"This parameter would be helpful if we focused on a few paths per time in an extensive specification.
2.3. Including Authorization Headers
Usually, our API is secured by some form of authentication. In this case, we can include an authorization header in the command. Let’s check what it looks like when using Bearer authentication:
$ cats --server=http://localhost:8080 -H "Authorization=Bearer a-valid-token"2.4. Report Generation
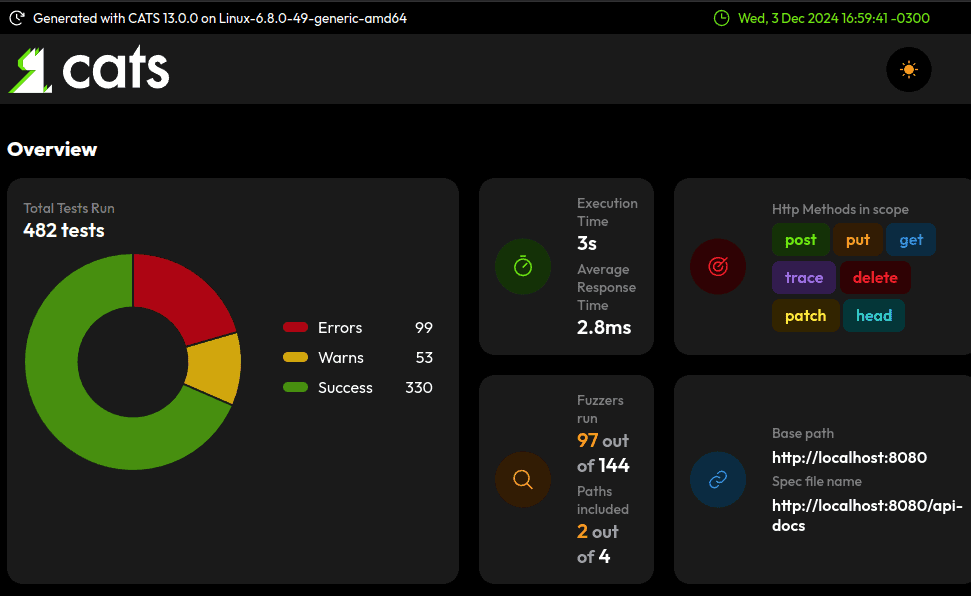
After running, it creates an HTML report locally:
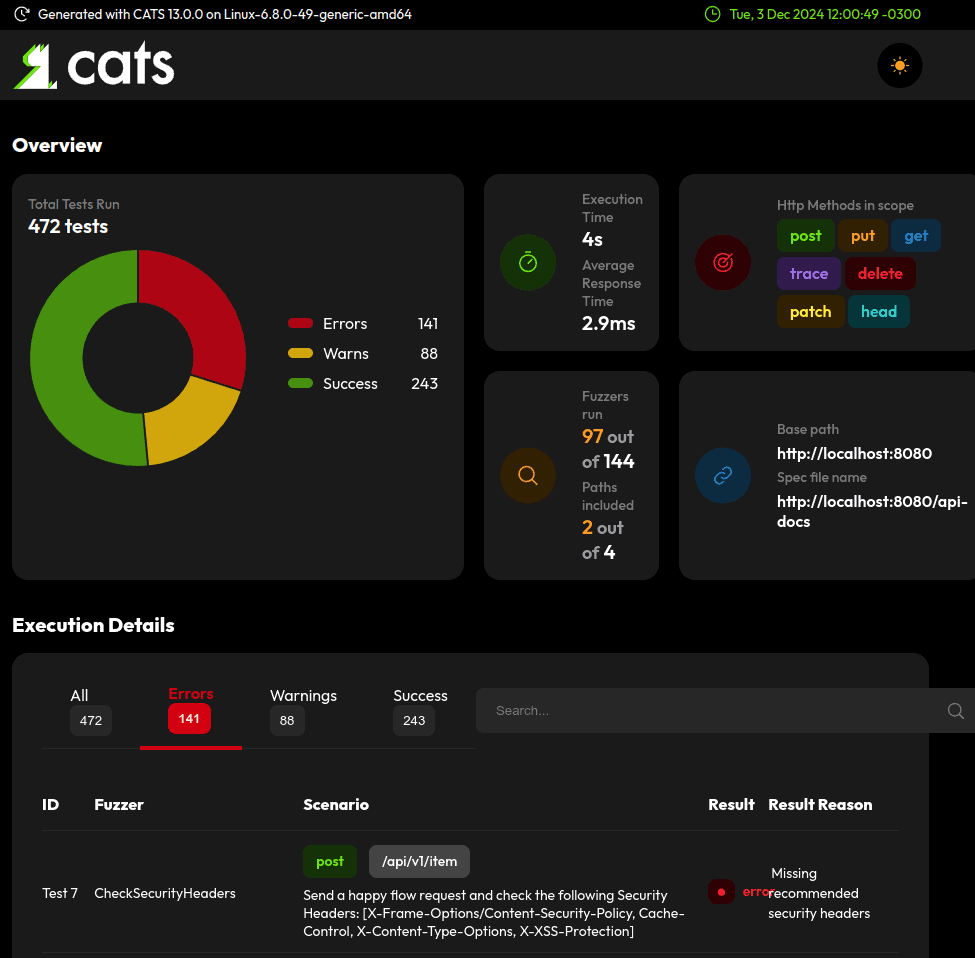
Later, we’ll review some of the errors to see how to refactor our code.
3. Project Setup
To showcase CATS, we’ll start with a simple REST CRUD API with @RestController and Bearer authentication. It’s essential to include @ApiResponse annotations, as these include important details in our OpenAPI definition, which CATS uses, like the media type and expected status code for unauthorized requests:
@RestController
@RequestMapping("/api/item")
@ApiResponse(responseCode = "401", description = "Unauthorized", content = {
  @Content(mediaType = MediaType.TEXT_PLAIN_VALUE, schema =
    @Schema(implementation = String.class)
  )
})
public class ItemController {
    private ItemService service;
    // endpoints ...
}
Our request mappings have the minimum number of Swagger annotations defined, relying on defaults where possible:
@PostMapping
@ApiResponse(responseCode = "200", description = "Success", content = {
  @Content(mediaType = MediaType.APPLICATION_JSON_VALUE, schema =
    @Schema(implementation = Item.class)
  )
})
public ResponseEntity<Item> post(@RequestBody Item item) {
    service.insert(item);
    return ResponseEntity.ok(item);
}
// GET and DELETE endpoints ...
For our payload class, we’ll include a few basic properties:
public class Item {
    private String id;
    private String name;
    private int value;
    // default getters and setters...
}
4. Analyzing Common Errors in the Report
Let’s analyze some of the errors that we got in the report so we can tackle them. Multiple similar tests are usually done for each field, so we’ll only show the detailed page for one of each.
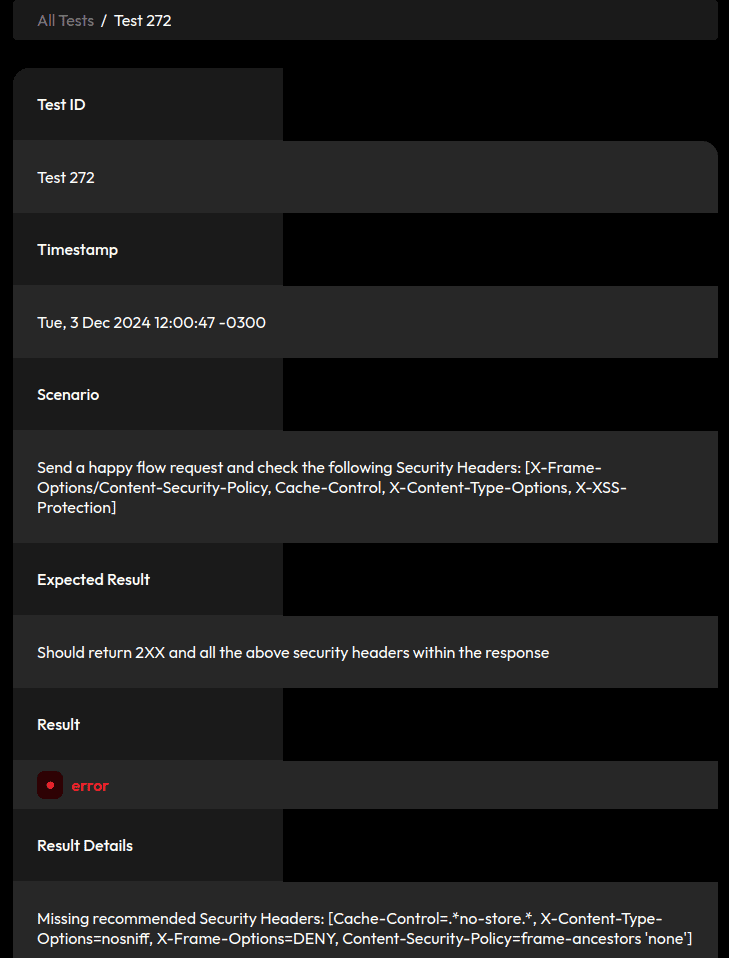
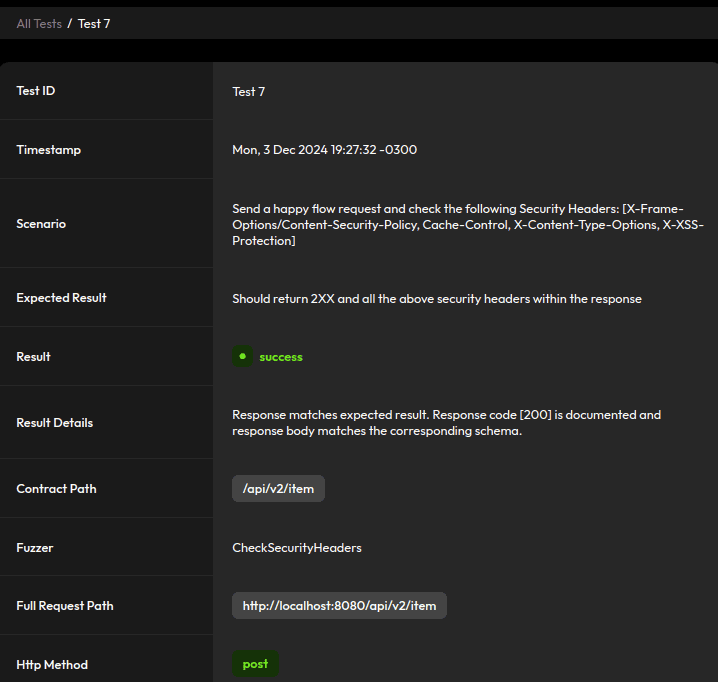
4.1. Missing Recommended Security Headers
There’s an OWASP-recommended set of security headers. The detailed test page in the report shows the ones we should include by default:
Spring Security includes all these headers by default, so let’s include spring-boot-starter-security in our project:
<dependency>
    <groupId>org.springframework.boot</groupId>
    <artifactId>spring-boot-starter-security</artifactId>
    <version>3.3.2</version>
</dependency>
There’s no need for a specific configuration in our SecurityFilterChain to include the security headers, so we’ll define a simple configuration with JWTs so we can pass a valid token when running cats:
@Configuration
@EnableWebSecurity
public class SecurityConfig {
    @Bean
    SecurityFilterChain securityFilterChain(HttpSecurity http) throws Exception {
        return http
          .oauth2ResourceServer(rs -> rs.jwt(jwt -> jwt.decoder(jwtDecoder())))
          .build();
    }
}
Implementing the jwtDecoder() method depends on our needs. We can use any other authentication method that uses the authorization header.
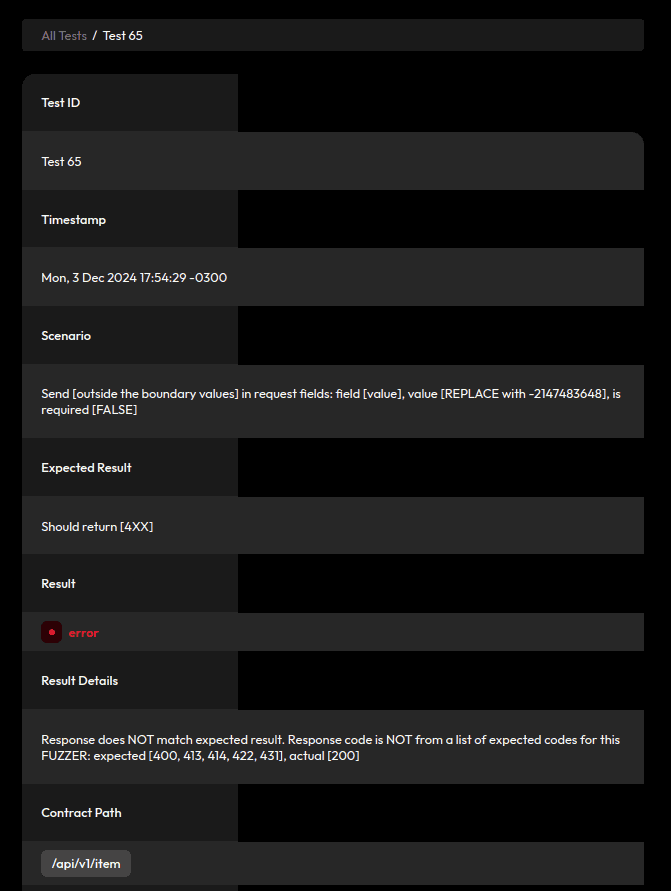
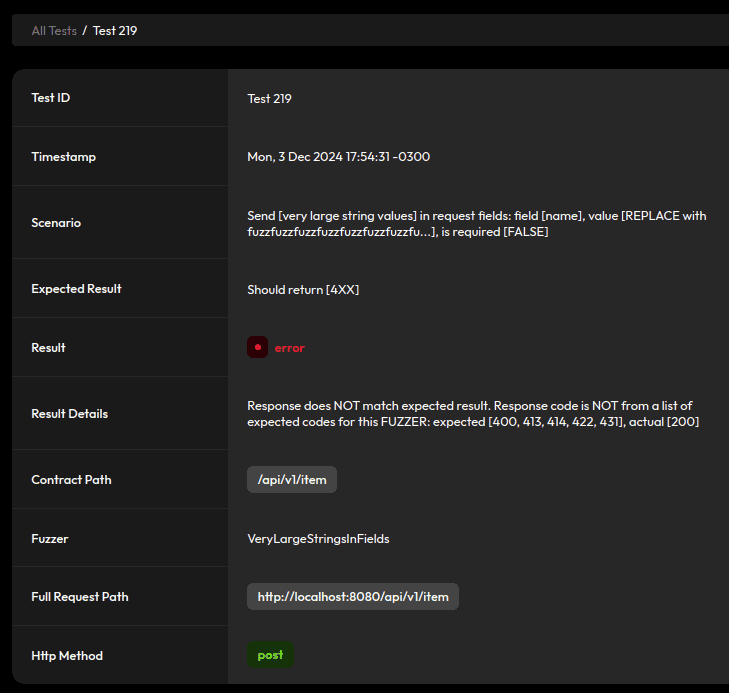
4.2. Send Very Large Values or Values Outside the Boundary in Request Fields
When our fields have a max length specified, CATS sends a larger value and expects the server to reject these requests with a 4XX status. The max length falls back to ten thousand when not specified:
Similarly, it sends requests with huge values and the same expectation:
Let’s start by customizing the ObjectMapper used in our application to address these issues.
The JsonFactoryBuilder contains a StreamReadConstraints configuration we can use to set some constraints, including a max length for Strings. Let’s define a max length of 100:
@Configuration
public class JacksonConfig {
    @Bean
    public ObjectMapper objectMapper() {
        JsonFactory factory = new JsonFactoryBuilder()
          .streamReadConstraints(
            StreamReadConstraints.builder()
            .maxStringLength(100)
            .build()
          ).build();
        return new ObjectMapper(factory);
    }
}
Of course, this max length will vary depending on the requirements of our application. Most importantly, while this impedes our application from receiving oversized requests, it won’t define the constraints in our API specification.
To do that, we can include some validation annotations in our payload class:
@Size(min = 37, max = 37)
private String id;
@NotNull
@Size(min = 1, max = 20)
private String name;
@Min(1)
@Max(100)
@NotNull
private int value;
Again, the values here will depend on our requirements, but including these boundaries helps define how CATS generates tests. Finally, to reject invalid requests, we’ll modify our POST method to use the @Valid annotation:
ResponseEntity<Item> post(@Valid @RequestBody Item item) {
    //...
}
4.3. Malformed JSON and Dummy Requests
By default, Jackson is very lenient with requests, even accepting some malformed JSON:
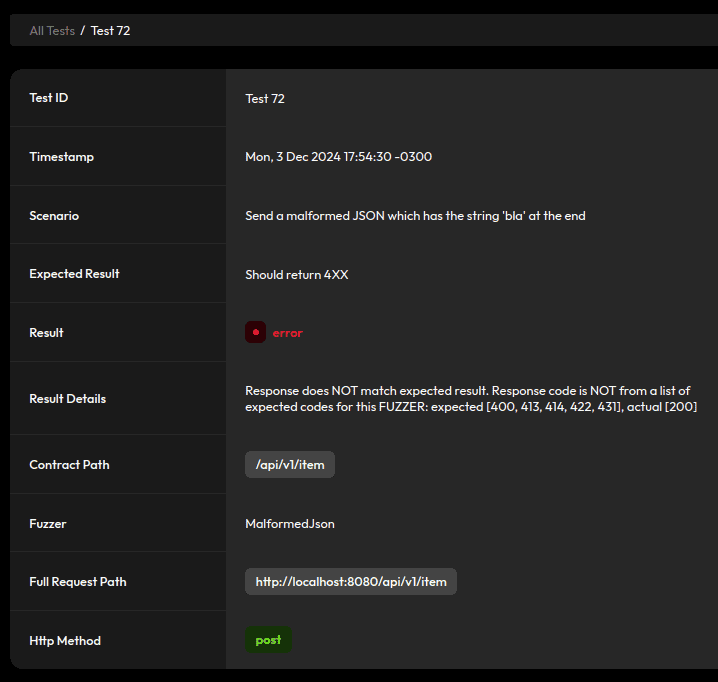
To prevent that, let’s go back to our JacksonConfig and enable an option to fail on trailing tokens:
mapper.enable(DeserializationFeature.FAIL_ON_TRAILING_TOKENS);It’ll also accept requests that mix fields that aren’t in our Item class with fields that are, as well as dummy requests and empty JSON bodies. We can get rid of those by enforcing deserialization to fail on unknown properties:
mapper.enable(DeserializationFeature.FAIL_ON_UNKNOWN_PROPERTIES);4.4. Decimal Numbers in Integers
Jackson will truncate decimal values to fit when we have an int property:

For example, a value of 0.34 truncates to zero. To avoid this, let’s turn off this feature:
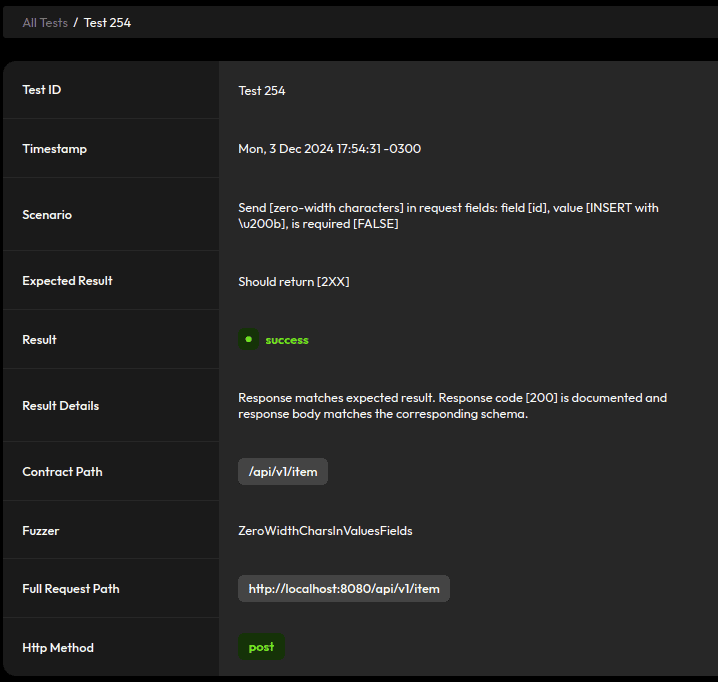
mapper.disable(DeserializationFeature.ACCEPT_FLOAT_AS_INT);4.5. Zero-Width Characters in Values
Some fuzzers include zero-width characters for field names and values:
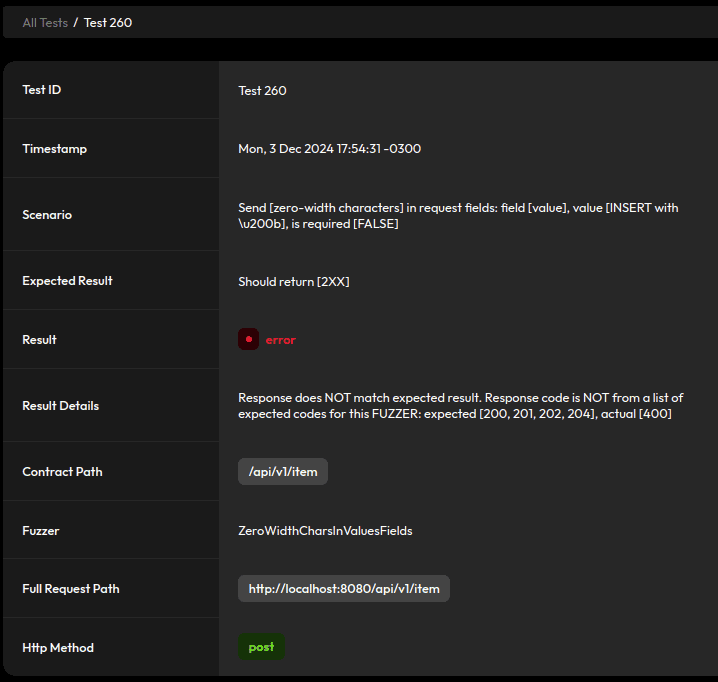
We already enabled FAIL_ON_UNKNOWN_PROPERTIES, so we need to include some sanitization and strip zero-width characters for field values. Let’s use a custom JSON deserializer for this, starting with a utility class that defines a regex pattern for some zero-width characters:
public class RegexUtils {
    private static final Pattern ZERO_WIDTH_PATTERN =
      Pattern.compile("[\u200B\u200C\u200D\u200F\u202B\u200E\uFEFF]");
    public static String removeZeroWidthChars(String value) {
        return value == null ? null
          : ZERO_WIDTH_PATTERN.matcher(value).replaceAll("");
    }
}
First, we use it in a custom deserializer to take care of String fields:
public class ZeroWidthStringDeserializer extends JsonDeserializer<String> {
    @Override
    public String deserialize(JsonParser parser, DeserializationContext context)
      throws IOException {
        return RegexUtils.removeZeroWidthChars(parser.getText());
    }
}
Then, we create another version for Integer fields:
public class ZeroWidthIntDeserializer extends JsonDeserializer<Integer> {
    @Override
    public Integer deserialize(JsonParser parser, DeserializationContext context)
      throws IOException {
        return Integer.valueOf(RegexUtils.removeZeroWidthChars(parser.getText()));
    }
}
Finally, we reference these deserializers in our Item fields with the @JsonDeserialize annotation:
@JsonDeserialize(using = ZeroWidthStringDeserializer.class)
private String id;
@JsonDeserialize(using = ZeroWidthStringDeserializer.class)
private String name;
@JsonDeserialize(using = ZeroWidthIntDeserializer.class)
private int value;
4.6. Bad Request Response and Schema
Many tests will result in a “Bad Request” after the changes we’ve made so far, so we’ll need to add an appropriate @ApiResponse annotation to our controller to avoid warnings in the report. Also, since the JSON response for bad requests is handled dynamically by Spring’s BasicErrorController, we need to create a class to serve as the schema in the annotation:
public class BadApiRequest {
    private long timestamp;
    private int status;
    private String error;
    private String path;
    // default getters and setters...
}
Now, we can include another definition in our controller:
@ApiResponse(responseCode = "400", description = "Bad Request", content = {
  @Content(
    mediaType = MediaType.APPLICATION_JSON_VALUE,
    schema = @Schema(implementation = BadApiRequest.class)
  )
})
5. Refactor Results
When rerunning the reports, we can see our changes resulted in a reduction of more than 40% in errors:
Let’s revisit some of the test cases we tackled. We now include default security headers:
Reject malformed JSON:

And sanitize inputs:
As a result, we have an overall safer API.
6. Useful Sub-Commands
CATS has sub-commands we can use to inspect a contract, replay tests, and more. Let’s see a couple of interesting ones.
6.1. Inspecting the API
To list all paths and operations defined in the API specification:
$ cats list --paths -c http://localhost:8080/api-docsThis command returns the results grouped by path:
2 paths and 4 operations:
◼ /api/v1/item: [POST, GET]
◼ /api/v1/item/{id}: [GET, DELETE]
6.2. Replaying Tests
During bug-fixing, a helpful command is replay, which reruns a specific test:
cats replay Test216We can get the test number and replace it in the command by looking at the report. The detailed report for each test also includes the complete replay command so we can copy and paste it into our terminal.
7. Conclusion
In this article, we explored how to use CATS for automated OpenAPI testing, significantly reducing manual effort and improving test coverage. By applying changes such as adding security headers, enforcing input validation, and configuring strict deserialization, the number of reported errors for our example application decreased by over 40%.
As always, the source code is available over on GitHub.
The post Automated Testing for OpenAPI Endpoints Using CATS first appeared on Baeldung.


