1. Overview
An HTTP server typically provides resources to a requesting client. There are a series of production-grade web servers in Java.
However, we can learn how an HTTP server works by implementing one using the ServerSocket class. The class allows us to create a server that listens to a TCP connection with an IP address and port number.
In this tutorial, we’ll learn how to create a simple server using the ServerSocket class. Also, we’ll perform GET requests with our simple HTTP server. Notably, this server is for educational purposes and unsuitable for production.
2. Basics of Web Server Using ServerSocket
First, a server listens for a connection from a client application. Client applications could be a browser, another program, API tools, and more. After a successful connection, the server responds to a client connection by providing a resource to the client.
The ServerSocket class provides methods to create a server on a specified port. It listens to incoming connections on the defined port using the accept() method.
The accept() method blocks until a connection is established, returning a Socket instance. The Socket instance provides access to the input and output stream for communication between the server and the client.
3. Creating a ServerSocket Instance
First, let’s create a ServerSocket object with a specified port:
int port = 8080;
ServerSocket serverSocket = new ServerSocket(port);
Next, let’s accept an incoming connection using the accept() method:
while (true) {
    Socket clientSocket = serverSocket.accept();
    //  ...
}
In the code above, we keep waiting for a connection using a while loop. Then, we invoke the accept() method on the ServerSocket object to listen and accept a connection.
When a connection is established, the method returns a Socket object that allows the server and the client to communicate over the established network.
4. Handling Input and Output
Typically, a server receives input from the client and sends an appropriate response. We can use the getInputStream() and getOutputStream() methods of the Socket class to facilitate communication by providing streams to read and write data to the client.
Let’s extend our example to read and write to the stream:
 while (true) {
    // ...
    BufferedReader in = new BufferedReader(
        new InputStreamReader(clientSocket.getInputStream())
    );
    BufferedWriter out = new BufferedWriter(
        new OutputStreamWriter(clientSocket.getOutputStream())
    );
    // ...
}
In the code above, we use the getInputStream() method on the clientSocket object to retrieve the input stream associated with the active connection between the client and server. The stream is wrapped in a BufferedReader to read textual data more efficiently.
Similarly, the getOutputStream() is wrapped in a BufferedWriter, which allows the server to send responses to the client conveniently.
In our case, the input includes an HTTP request, such as a GET request to the URL – http://localhost:8080.
Next, let’s write the server response by invoking the write() method on the BufferedWriter() object. A typical HTTP response has a header and body.
First, let’s write the response body:
String body = """
    <html>
        <head>
            <title>Baeldung Home</title>
        </head>
        <body>
            <h1>Baeldung Home Page</h1>
            <p>Java Tutorials</p>
            <ul>
                <li>
                    <a href="https://feeds.feedblitz.com/~/t/0/0/baeldung/~https://www.baeldung.com/get-started-with-java-series"> Java </a>
                </li>
                <li>
                    <a href="https://feeds.feedblitz.com/~/t/0/0/baeldung/~https://www.baeldung.com/spring-boot"> Spring </a>
                </li>
                <li>
                    <a href="https://feeds.feedblitz.com/~/t/0/0/baeldung/~https://www.baeldung.com/learn-jpa-hibernate"> Hibernate </a>
                </li>
            </ul>
         </body>
     </html>
""";
In the code above, we create a simple HTML page as the response body. Next, let’s calculate the content length to add it to the header:
int length = body.length();Next, let’s write the HTTP header and body to the output stream:
 while (true) {
    // ...
    String clientInputLine;
    while ((clientInputLine = in.readLine()) != null) {
        if (clientInputLine.isEmpty()) {
            break;
        }
        out.write("HTTP/1.0 200 OK\r\n");
        out.write("Date: " + now + "\r\n");
        out.write("Server: Custom Server\r\n");
        out.write("Content-Type: text/html\r\n");
        out.write("Content-Length: " + length + "\r\n");
        out.write("\r\n");
        out.write(body);
    }
}
In the code above, we define the HTTP header and the body using the write() method. Notably, we separate the header from the body using \r\n (blank line) to signify the end of the header.
5. Multithreaded Server
Our simple server handles requests on only a single thread, which impacts performance. A server must be able to handle multiple requests concurrently.
Let’s refactor our initial example to handle every request on a separate thread. First, let’s create a class named SimpleHttpServerMultiThreaded:
class SimpleHttpServerMultiThreaded {
    private final int port;
    private static final int THREAD_POOL_SIZE = 10;
    public SimpleHttpServerMultiThreaded(int port) {
        this.port = port;
    }
}
In the class above, we define two fields to represent the port number and the thread pool size. The port number is passed through the constructor when the server object is created.
Next, let’s define a method to handle the client communication:
void handleClient(Socket clientSocket) {
    try (BufferedReader in = new BufferedReader(
            new InputStreamReader(clientSocket.getInputStream()));
        BufferedWriter out = new BufferedWriter(
            new OutputStreamWriter(clientSocket.getOutputStream()))
    ) {
        String clientInputLine;
        while ((clientInputLine = in.readLine()) != null) {
            if (clientInputLine.isEmpty()) {
                break;
            }
        }
        LocalDateTime now = LocalDateTime.now();
        out.write("HTTP/1.0 200 OK\r\n");
        out.write("Date: " + now + "\r\n");
        out.write("Server: Custom Server\r\n");
        out.write("Content-Type: text/html\r\n");
        out.write("Content-Length: " + length + "\r\n");
        out.write("\r\n");
        out.write(body);
    } catch (IOException e) {
        // ...
    } finally {
        try {
            clientSocket.close();
        } catch (IOException e) {
            // ...
        }
    }
}
The method above demonstrates handling input and output communication with the client. The body and length are the same as the previous example in the last section.
Next, let’s create another method named start() to establish each connection on a separate thread:
void start() throws IOException {
    try (ExecutorService threadPool = Executors.newFixedThreadPool(THREAD_POOL_SIZE);
        ServerSocket serverSocket = new ServerSocket(port)) {
        while (true) {
            Socket clientSocket = serverSocket.accept();
            threadPool.execute(() -> handleClient(clientSocket));
        }
    }
}
In the code above, we create a thread pool by instantiating an ExecutorService. Next, we invoke the execute() method on the threadPool object to submit a task for each client connection.
By assigning client connections to the threads from the thread pool, the server can handle multiple requests concurrently, significantly improving performance.
Moreover, each time a client connects, the accept() method creates a new Socket instance. This Socket is specific to the client connection and provides a dedicated communication channel between the server and the client.
6. Testing the Server
Let’s execute our server by instantiating it in the main method:
static void main(String[] args) throws IOException {
int port = 8080;
SimpleHttpServerMultiThreaded server = new SimpleHttpServerMultiThreaded(port);
server.start();
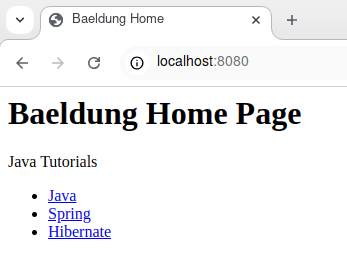
}Next, let’s open http://localhost:8080 in a browser to test the server:
7. Conclusion
In this article, we learned how to create a simple server using the ServerSocket class. Also, we saw an example of how to create a single-threaded and multi-threaded server using this class.
As always, the complete source code for the examples is available over on GitHub.
The post A Simple HTTP Server With Java ServerSocket first appeared on Baeldung.


