Quantcast
Channel: Baeldung
Viewing all 4713 articles
Browse latest View live

Transforming an Empty String into an Empty Optional

$
0
0

1. Introduction

In this quick tutorial, we’ll present different ways to transform a null or empty String into an empty Optional.

Getting an empty Optional out of null is straightforward — we just use Optional.ofNullable(). But, what if we want empty Strings to work this way as well?

So, let’s explore some different options for converting an empty String into an empty Optional.

2. Using Java 8

In Java 8, we can leverage the fact that if an Optional#filter‘s predicate isn’t met, then it returns an empty Optional:

@Test
public void givenEmptyString_whenFilteringOnOptional_thenEmptyOptionalIsReturned() {
    String str = "";
    Optional<String> opt = Optional.ofNullable(str).filter(s -> !s.isEmpty());
    Assert.assertFalse(opt.isPresent());
}

And we don’t even need to check for null here since ofNullable will short-circuit for us in cases where str is null.

Creating a special lambda for the predicate is a bit cumbersome, though. Can’t we get rid of it somehow?

3. Using Java 11

The answer to the above wish doesn’t actually come until Java 11.

In Java 11, we’ll still use Optional.filter(), but Java 11 introduces a new Predicate.not() API that makes it easy to negate method references.

So, let’s simplify what we did earlier, now using a method reference instead:

@Test
public void givenEmptyString_whenFilteringOnOptionalInJava11_thenEmptyOptionalIsReturned() {
    String str = "";
    Optional<String> opt = Optional.ofNullable(str).filter(Predicate.not(String::isEmpty));
    Assert.assertFalse(opt.isPresent());
}

4. Using Guava

We can also use Guava to satisfy our needs. However, in that case, we’ll use a slightly different approach.

Instead of calling a filter method on an outcome of Optional#ofNullable, we’ll first convert an empty String to null using Guava’s String#emptyToNull and only then pass it to Optional#ofNullable:

@Test
public void givenEmptyString_whenPassingResultOfEmptyToNullToOfNullable_thenEmptyOptionalIsReturned() {
    String str = "";
    Optional<String> opt = Optional.ofNullable(Strings.emptyToNull(str));
    Assert.assertFalse(opt.isPresent());
}

5. Conclusion

In this short article, we’ve explored different ways to transform an empty String to an empty Optional.

As usual, the examples used in this article can be found in our GitHub project.


A Guide to jBPM with Java

$
0
0

1. Introduction

In this tutorial, we’ll discuss the Business Process Management (BPM) System and its implementation in Java as jBPM System.

2. Business Process Management System

We can define Business Process Management as one of those fields whose scope extends beyond development to all aspects of a company.

BPM provides visibility towards the functional processes of the company. This allows us to find an optimal flow, depicted by a flow chart, by using iterative improvement. The improved flow increases profits and reduces costs.

BPM defines its own objectives, life cycle, practices, and a common language between all its participants, i.e., business processes.

3. The jBPM System

jBPM is the implementation of a BPM System in Java. It allows us to create a business process flow, execute it, and monitor its life cycle. The core of jBPM is a workflow engine, written in Java, that provides us with a tool to create and execute a process flow using the latest Business Process Modeling Notation (BPMN) 2.0 specifications.

jBPM focuses mainly on the executable business process. These processes have enough details so that they can be executed on the workflow engine.

Here is a graphical flowchart example of the execution order of our BPMN process model to aid in our understanding:

  1. We start executing the flow using the initial context, denoted by the green start node
  2. First, Task 1 will execute
  3. On the completion of Task 1, we’ll proceed with Task 2
  4. The execution stops upon encountering the red end node

4. IDE Plugins for jBPM Project

Let’s see how to install plugins to create a jBPM project and a BPMN 2.0 process in Eclipse and IntelliJ IDEA.

4.1. Eclipse Plugin

We’ll need to install a plugin to create jBPM projects. Let’s follow the steps below:

  1. In the Help section, click on Install New Software
  2. Add the Drools and jBPM update site
  3. Accept the terms of license agreement and complete the plugin installation
  4. Restart Eclipse

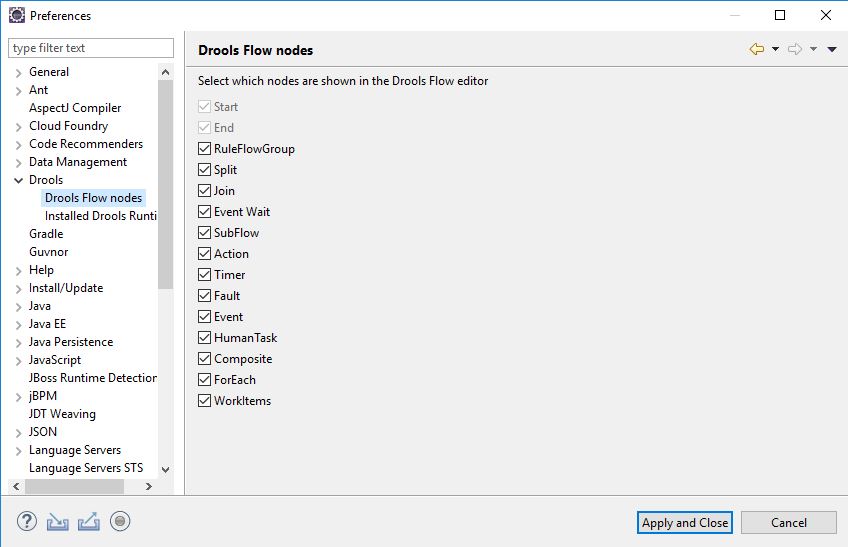
Once Eclipse restarts, we’ll need to go to Windows -> Preferences -> Drools -> Drools Flow Nodes:

After selecting all the options, we can click on “Apply and Close”. Now, we’re ready to create our first jBPM Project.

4.2. IntelliJ IDEA Plugin

IntelliJ IDEA has jBPM plugin installed by default, but that’s present only in the Ultimate and not the Community option.

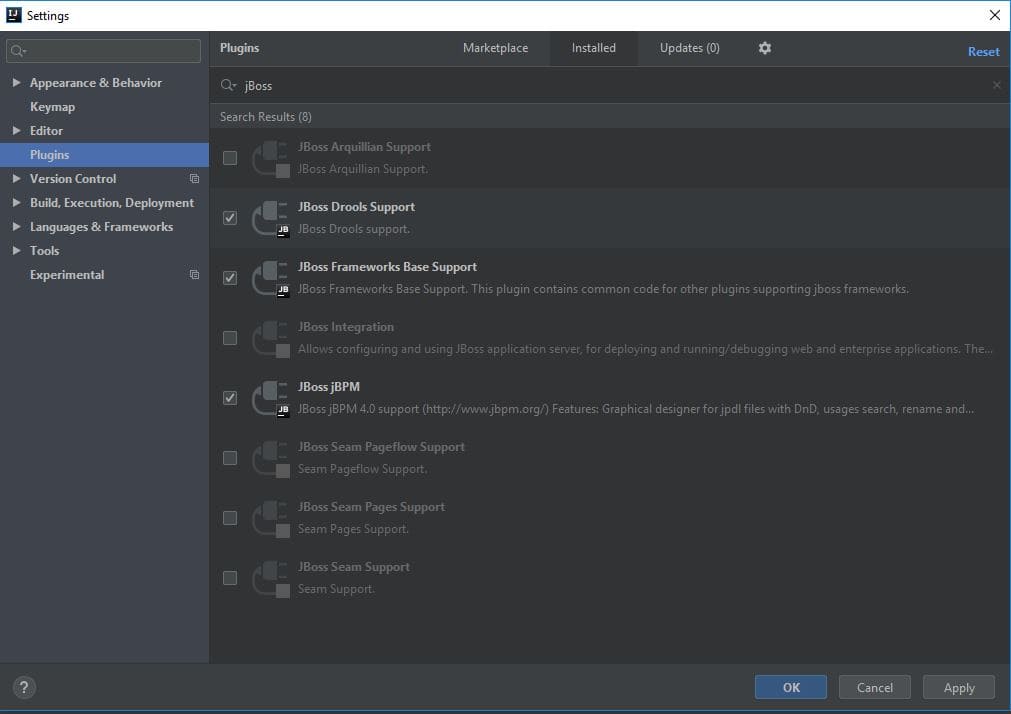
We just need to enable it by clicking Configure -> Settings -> Plugins -> Installed -> JBoss jBPM:

Currently, there is no BPMN 2.0 process designer for this IDE, though we can import the *.bpmn files from any other designer and run them.

5. Hello World Example

Let’s get our hands dirty in creating a simple Hello World project.

5.1. Create a jBPM Project

To create a new jBPM project in Eclipse, we’ll go to File -> New -> Other -> jBPM Project (Maven). After providing the name of our project we can hit finish. Eclipse will do all the hard work for us and will download the required Maven dependencies to create a sample jBPM project for us.

To create the same in IntelliJ IDEA, we can go to File -> New -> Project -> JBoss Drools. The IDE will download all the required dependencies and place them in the lib folder of the project.

5.2. Create the Hello World Process Model

Let’s create a small BPM process model that prints “Hello World” in the console.

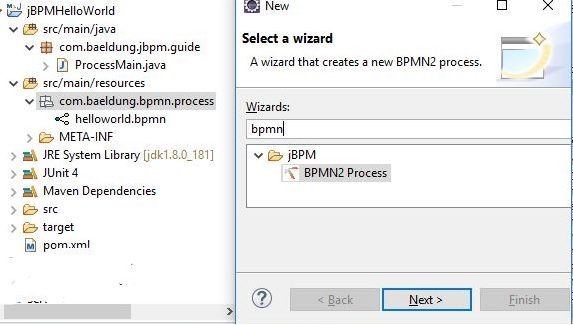
For this, we need to create a new BPMN file under src/main/resources:

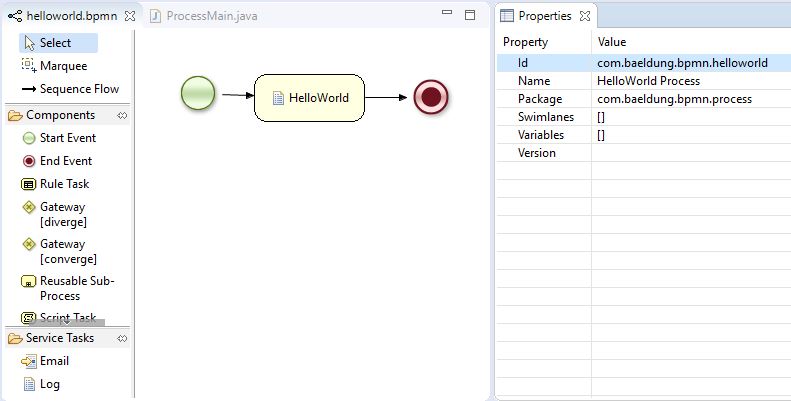
The file extension is .bpmn and it opens in the BPMN designer:

The left panel of the designer lists the nodes we selected earlier while setting up the Eclipse plugin. We’re going to use these nodes to create our process model. The middle panel is the workspace, where we’ll create the process models. The right side is the properties tab, where we can set the properties of a process or node.

In this HelloWorld model, we’ll be using the:

  • Start Event – required to start the process instance
  • Script Task – enables Java snippets
  • End Event – required to end the process instance

As mentioned earlier, IntelliJ IDEA doesn’t have a BPMN designer, but we can import the .bpmn files designed in Eclipse or a web designer.

5.3. Declare and Create the Knowledge Base (kbase)

All the BPMN files are loaded in kbase as processes. We need to pass the respective process ids to the jBPM engine in order to execute them.

We’ll create the kmodule.xml under the resources/META-INF with our kbase and BPMN file package declaration:

<kmodule xmlns="http://jboss.org/kie/6.0.0/kmodule">
    <kbase name="kbase" packages="com.baeldung.bpmn.process" />
</kmodule>

Once the declaration is done, we can use the KieContainer to load the kbase:

KieServices kService = KieServices.Factory.get();
KieContainer kContainer = kService.getKieClasspathContainer();
KieBase kbase = kContainer.getKieBase(kbaseId);

5.4. Create the jBPM Runtime Manager

We’ll use the JBPMHelper present in the org.jbpm.test package to build a sample runtime environment.

We require two things to create the environment: first, a data source to create the EntityManagerFactory, and second, our kbase.

JBPMHelper has methods to start an in-memory H2 server and set the data source. Using the same, we can create the EntityManagerFactory:

JBPMHelper.startH2Server();
JBPMHelper.setupDataSource();
EntityManagerFactory emf = Persistence.createEntityManagerFactory(persistenceUnit);

Once we’ve got everything ready, we can create our RuntimeEnvironment:

RuntimeEnvironmentBuilder runtimeEnvironmentBuilder = 
  RuntimeEnvironmentBuilder.Factory.get().newDefaultBuilder();
RuntimeEnvironment runtimeEnvironment = runtimeEnvironmentBuilder.
  entityManagerFactory(emf).knowledgeBase(kbase).get();

Using the RuntimeEnvironment, we can create our jBPM runtime manager:

RuntimeManager runtimeManager = RuntimeManagerFactory.Factory.get()
  .newSingletonRuntimeManager(runtimeEnvironment);

5.5. Execute Process Instance

Finally, we’ll use the RuntimeManager to get the RuntimeEngine:

RuntimeEngine engine = manager.getRuntimeEngine(initialContext);

Using RuntimeEngine, we’ll create a knowledge session and start the process:

KieSession ksession = engine.getKieSession();
ksession.startProcess(processId);

The process will start and print Hello World on the IDE console.

6. Conclusion

In this article, we introduced the BPM System, using its Java implementation —  jBPM.

This was a quick guide to kickstart a jBPM project. The example demonstrated here uses the minimal process in order to give a brief understanding of executing a process and can be found on GitHub.

To execute the process, we simply need to run the main method in the WorkflowProcessMain class.

The Dependency Inversion Principle in Java

$
0
0

1. Overview

The Dependency Inversion Principle (DIP) forms part of the collection of object-oriented programming principles popularly known as SOLID.

At the bare bones, the DIP is a simple – yet powerful – programming paradigm that we can use to implement well-structured, highly-decoupled, and reusable software components.

In this tutorial, we’ll explore different approaches for implementing the DIP — one in Java 8, and one in Java 11 using the JPMS (Java Platform Module System).

2. Dependency Injection and Inversion of Control are not DIP Implementations

First and foremost, let’s make a fundamental distinction to get the basics right: the DIP is neither dependency injection (DI) nor inversion of control (IoC). Even so, they all work great together.

Simply put, DI is about making software components to explicitly declare their dependencies or collaborators through their APIs, instead of acquiring them by themselves.

Without DI, software components are tightly coupled to each other. Hence, they’re hard to reuse, replace, mock and test, which results in rigid designs.

With DI, the responsibility of providing the component dependencies and wiring object graphs is transferred from the components to the underlying injection framework. From that perspective, DI is just a way to achieve IoC.

On the other hand, IoC is a pattern in which the control of the flow of an application is reversed. With traditional programming methodologies, our custom code has the control of the flow of an application. Conversely, with IoC, the control is transferred to an external framework or container.

The framework is an extendable codebase, which defines hook points for plugging in our own code.

In turn, the framework calls back our code through one or more specialized subclasses, using interfaces’ implementations, and via annotations. The Spring framework is a nice example of this last approach.

3. Fundamentals of DIP

To understand the motivation behind the DIP, let’s start with its formal definition, given by Robert C. Martin in his book, Agile Software Development: Principles, Patterns, and Practices:

  1. High-level modules should not depend on low-level modules. Both should depend on abstractions.
  2. Abstractions should not depend on details. Details should depend on abstractions.

So, it’s clear that at the core, the DIP is about inverting the classic dependency between high-level and low-level components by abstracting away the interaction between them.

In traditional software development, high-level components depend on low-level ones. Thus, it’s hard to reuse the high-level components.

3.1. Design Choices and the DIP

Let’s consider a simple StringProcessor class that gets a String value using a StringReader component, and writes it somewhere else using a StringWriter component:

public class StringProcessor {
    
    private final StringReader stringReader;
    private final StringWriter stringWriter;
    
    public StringProcessor(StringReader stringReader, StringWriter stringWriter) {
        this.stringReader = stringReader;
        this.stringWriter = stringWriter;
    }

    public void printString() {
        stringWriter.write(stringReader.getValue());
    }
}

Although the implementation of the StringProcessor class is basic, there are several design choices that we can make here.

Let’s break each design choice down into separate items, to understand clearly how each can impact the overall design:

  1. StringReader and StringWriter, the low-level components, are concrete classes placed in the same package. StringProcessor, the high-level component is placed in a different package. StringProcessor depends on StringReader and StringWriter. There is no inversion of dependencies, hence StringProcessor is not reusable in a different context.
  2. StringReader and StringWriter are interfaces placed in the same package along with the implementations. StringProcessor now depends on abstractions, but the low-level components don’t. We have not achieved inversion of dependencies yet.
  3. StringReader and StringWriter are interfaces placed in the same package together with StringProcessor. Now, StringProcessor has the explicit ownership of the abstractions. StringProcessor, StringReader, and StringWriter all depend on abstractions. We have achieved inversion of dependencies from top to bottom by abstracting the interaction between the components. StringProcessor is now reusable in a different context.
  4. StringReader and StringWriter are interfaces placed in a separate package from StringProcessor. We achieved inversion of dependencies, and it’s also easier to replace StringReader and StringWriter implementations. StringProcessor is also reusable in a different context.

Of all the above scenarios, only items 3 and 4 are valid implementations of the DIP.

3.2. Defining the Ownership of the Abstractions

Item 3 is a direct DIP implementation, where the high-level component and the abstraction(s) are placed in the same package. Hence, the high-level component owns the abstractions. In this implementation, the high-level component is responsible for defining the abstract protocol through which it interacts with the low-level components.

Likewise, item 4 is a more decoupled DIP implementation. In this variant of the pattern, neither the high-level component nor the low-level ones have the ownership of the abstractions.

The abstractions are placed in a separate layer, which facilitates switching the low-level components. At the same time, all the components are isolated from each other, which yields stronger encapsulation.

3.3. Choosing the Right Level of Abstraction

In most cases, choosing the abstractions that the high-level components will use should be fairly straightforward, but with one caveat worth noting: the level of abstraction.

In the example above, we used DI to inject a StringReader type into the StringProcessor class. This would be effective as long as the level of abstraction of StringReader is close to the domain of StringProcessor.

By contrast, we’d be just missing the DIP’s intrinsic benefits if StringReader is, for instance, a File object that reads a String value from a file. In that case, the level of abstraction of StringReader would be much lower than the level of the domain of StringProcessor.

To put it simply, the level of abstraction that the high-level components will use to interoperate with the low-level ones should be always close to the domain of the former.

4. Java 8 Implementations

We already looked in depth at the DIP’s key concepts, so now we’ll explore a few practical implementations of the pattern in Java 8.

4.1. Direct DIP Implementation

Let’s create a demo application that fetches some customers from the persistence layer and processes them in some additional way.

The layer’s underlying storage is usually a database, but to keep the code simple, here we’ll use a plain Map.

Let’s start by defining the high-level component:

public class CustomerService {

    private final CustomerDao customerDao;

    // standard constructor / getter

    public Optional<Customer> findById(int id) {
        return customerDao.findById(id);
    }

    public List<Customer> findAll() {
        return customerDao.findAll();
    }
}

As we can see, the CustomerService class implements the findById() and findAll() methods, which fetch customers from the persistence layer using a simple DAO implementation. Of course, we could’ve encapsulated more functionality in the class, but let’s keep it like this for simplicity’s sake.

In this case, the CustomerDao type is the abstraction that CustomerService uses for consuming the low-level component.

Since this a direct DIP implementation, let’s define the abstraction as an interface in the same package of CustomerService:

public interface CustomerDao {

    Optional<Customer> findById(int id);

    List<Customer> findAll();

}

By placing the abstraction in the same package of the high-level component, we’re making the component responsible for owning the abstraction. This implementation detail is what really inverts the dependency between the high-level component and the low-level one.

In addition, the level of abstraction of CustomerDao is close to the one of CustomerService, which is also required for a good DIP implementation.

Now, let’s create the low-level component in a different package. In this case, it’s just a basic CustomerDao implementation:

public class SimpleCustomerDao implements CustomerDao {

    // standard constructor / getter

    @Override
    public Optional<Customer> findById(int id) {
        return Optional.ofNullable(customers.get(id));
    }

    @Override
    public List<Customer> findAll() {
        return new ArrayList<>(customers.values());
    }
}

Finally, let’s create a unit test to check the CustomerService class’ functionality:

@Before
public void setUpCustomerServiceInstance() {
    var customers = new HashMap<Integer, Customer>();
    customers.put(1, new Customer("John"));
    customers.put(2, new Customer("Susan"));
    customerService = new CustomerService(new SimpleCustomerDao(customers));
}

@Test
public void givenCustomerServiceInstance_whenCalledFindById_thenCorrect() {
    assertThat(customerService.findById(1)).isInstanceOf(Optional.class);
}

@Test
public void givenCustomerServiceInstance_whenCalledFindAll_thenCorrect() {
    assertThat(customerService.findAll()).isInstanceOf(List.class);
}

@Test
public void givenCustomerServiceInstance_whenCalledFindByIdWithNullCustomer_thenCorrect() {
    var customers = new HashMap<Integer, Customer>();
    customers.put(1, null);
    customerService = new CustomerService(new SimpleCustomerDao(customers));
    Customer customer = customerService.findById(1).orElseGet(() -> new Customer("Non-existing customer"));
    assertThat(customer.getName()).isEqualTo("Non-existing customer");
}

The unit test exercises the CustomerService API. And, it also shows how to manually inject the abstraction into the high-level component. In most cases, we’d use some kind of DI container or framework to accomplish this.

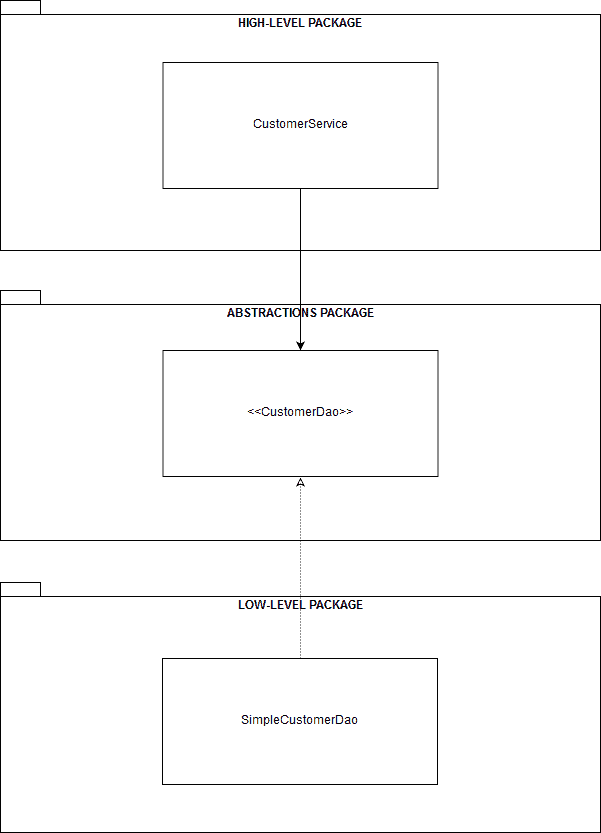
Additionally, the following diagram shows the structure of our demo application, from a high-level to a low-level package perspective:

4.2. Alternative DIP Implementation

As we discussed before, it’s possible to use an alternative DIP implementation, where we place the high-level components, the abstractions, and the low-level ones in different packages.

For obvious reasons, this variant is more flexible, yields better encapsulation of the components, and makes it easier to replace the low-level components.

Of course, implementing this variant of the pattern boils down to just placing CustomerService, MapCustomerDao, and CustomerDao in separate packages.

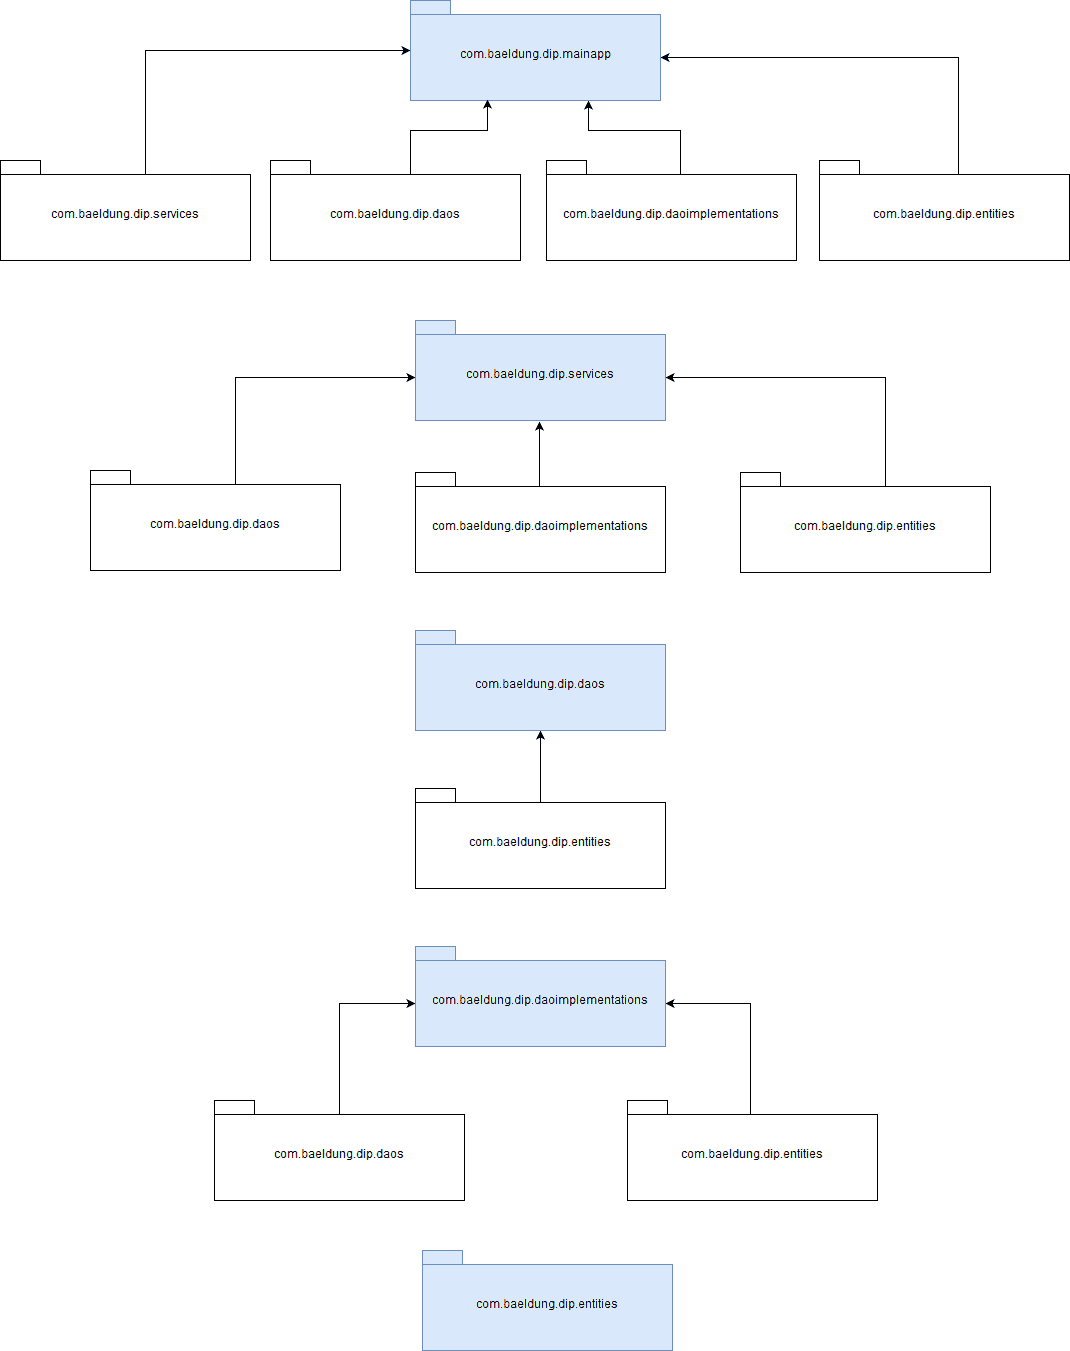
Therefore, a diagram is sufficient for showing how each component is laid out with this implementation:

5. Java 11 Modular Implementation

It’s fairly easy to refactor our demo application into a modular one.

This is a really nice way to demonstrate how the JPMS enforces best programming practices, including strong encapsulation, abstraction, and component reuse through the DIP.

We don’t need to reimplement our sample components from scratch. Hence, modularizing our sample application is just a matter of placing each component file in a separate module, along with the corresponding module descriptor.

Here’s how the modular project structure will look:

project base directory (could be anything, like dipmodular)
|- com.baeldung.dip.services
   module-info.java
     |- com
       |- baeldung
         |- dip
           |- services
             CustomerService.java
|- com.baeldung.dip.daos
   module-info.java
     |- com
       |- baeldung
         |- dip
           |- daos
             CustomerDao.java
|- com.baeldung.dip.daoimplementations 
    module-info.java 
      |- com 
        |- baeldung 
          |- dip 
            |- daoimplementations 
              SimpleCustomerDao.java  
|- com.baeldung.dip.entities
    module-info.java
      |- com
        |- baeldung
          |- dip
            |- entities
              Customer.java
|- com.baeldung.dip.mainapp 
    module-info.java 
      |- com 
        |- baeldung 
          |- dip 
            |- mainapp
              MainApplication.java

5.1. The High-Level Component Module

Let’s start by placing the CustomerService class in its own module.

We’ll create this module in the root directory com.baeldung.dip.services, and add the module descriptor, module-info.java:

module com.baeldung.dip.services {
    requires com.baeldung.dip.entities;
    requires com.baeldung.dip.daos;
    uses com.baeldung.dip.daos.CustomerDao;
    exports com.baeldung.dip.services;
}

For obvious reasons, we won’t go into the details on how the JPMS works. Even so, it’s clear to see the module dependencies just by looking at the requires directives.

The most relevant detail worth noting here is the uses directive. It states that the module is a client module that consumes an implementation of the CustomerDao interface.

Of course, we still need to place the high-level component, the CustomerService class, in this module. So, within the root directory com.baeldung.dip.services, let’s create the following package-like directory structure: com/baeldung/dip/services.

Finally, let’s place the CustomerService.java file in that directory.

5.2. The Abstraction Module

Likewise, we need to place the CustomerDao interface in its own module. Therefore, let’s create the module in the root directory com.baeldung.dip.daos, and add the module descriptor:

module com.baeldung.dip.daos {
    requires com.baeldung.dip.entities;
    exports com.baeldung.dip.daos;
}

Now, let’s navigate to the com.baeldung.dip.daos directory and create the following directory structure: com/baeldung/dip/daos. Let’s place the CustomerDao.java file in that directory.

5.3. The Low-Level Component Module

Logically, we need to put the low-level component, SimpleCustomerDao, in a separate module, too. As expected, the process looks very similar to what we just did with the other modules.

Let’s create the new module in the root directory com.baeldung.dip.daoimplementations, and include the module descriptor:

module com.baeldung.dip.daoimplementations {
    requires com.baeldung.dip.entities;
    requires com.baeldung.dip.daos;
    provides com.baeldung.dip.daos.CustomerDao with com.baeldung.dip.daoimplementations.SimpleCustomerDao;
    exports com.baeldung.dip.daoimplementations;
}

In a JPMS context, this is a service provider module, since it declares the provides and with directives.

In this case, the module makes the CustomerDao service available to one or more consumer modules, through the SimpleCustomerDao implementation.

Let’s keep in mind that our consumer module, com.baeldung.dip.services, consumes this service through the uses directive.

This clearly shows how simple it is to have a direct DIP implementation with the JPMS, by just defining consumers, service providers, and abstractions in different modules.

Likewise, we need to place the SimpleCustomerDao.java file in this new module. Let’s navigate to the com.baeldung.dip.daoimplementations directory, and create a new package-like directory structure with this name: com/baeldung/dip/daoimplementations.

Finally, let’s place the SimpleCustomerDao.java file in the directory.

5.4. The Entity Module

Additionally, we have to create another module where we can place the Customer.java class. As we did before, let’s create the root directory com.baeldung.dip.entities and include the module descriptor:

module com.baeldung.dip.entities {
    exports com.baeldung.dip.entities;
}

In the package’s root directory, let’s create the directory com/baeldung/dip/entities and add the following Customer.java file:

public class Customer {

    private final String name;

    // standard constructor / getter / toString
    
}

5.5. The Main Application Module

Next, we need to create an additional module that allows us to define our demo application’s entry point. Therefore, let’s create another root directory com.baeldung.dip.mainapp and place in it the module descriptor:

module com.baeldung.dip.mainapp {
    requires com.baeldung.dip.entities;
    requires com.baeldung.dip.daos;
    requires com.baeldung.dip.daoimplementations;
    requires com.baeldung.dip.services;
    exports com.baeldung.dip.mainapp;
}

Now, let’s navigate to the module’s root directory, and create the following directory structure: com/baeldung/dip/mainapp. In that directory, let’s add a MainApplication.java file, which simply implements a main() method:

public class MainApplication {

    public static void main(String args[]) {
        var customers = new HashMap<Integer, Customer>();
        customers.put(1, new Customer("John"));
        customers.put(2, new Customer("Susan"));
        CustomerService customerService = new CustomerService(new SimpleCustomerDao(customers));
        customerService.findAll().forEach(System.out::println);
    }
}

Finally, let’s compile and run the demo application — either from within our IDE or from a command console.

As expected, we should see a list of Customer objects printed out to the console when the application starts up:

Customer{name=John}
Customer{name=Susan}

In addition, the following diagram shows the dependencies of each module of the application:

6. Conclusion

In this tutorial, we took a deep dive into the DIP’s key concepts, and we also showed different implementations of the pattern in Java 8 and Java 11, with the latter using the JPMS.

All the examples for the Java 8 DIP implementation and the Java 11 implementation are available over on GitHub.

Case Insensitive Queries with Spring Data Repository

$
0
0

1. Overview

Spring Data JPA queries, by default, are case-sensitive. In other words, the field value comparisons are case-sensitive.

In this tutorial, we’ll explore how to quickly create a case insensitive query in a Spring Data JPA repository.

2. Dependencies

Firstly, let’s make sure we have Spring Data and H2 database dependencies in our pom.xml:

<dependency>
    <groupId>org.springframework.boot</groupId>
    <artifactId>spring-boot-starter-data-jpa</artifactId>
    <version>2.1.3.RELEASE</version>
</dependency>
<dependency>
    <groupId>com.h2database</groupId>
    <artifactId>h2</artifactId>
    <scope>runtime</scope>
    <version>1.4.199</version>
</dependency>

The latest versions of these are available on Maven Central.

3. Initial Setup

Let’s say we have a Passenger entity with id, firstName, and lastName attributes:

@Entity
class Passenger {
 
    @Id
    @GeneratedValue
    @Column(nullable = false)
    private Long id;
 
    @Basic(optional = false)
    @Column(nullable = false)
    private String firstName;
 
    @Basic(optional = false)
    @Column(nullable = false)
    private String lastName;
 
    // constructor, static factory, getters, setters
}

Also, let’s prepare our test class by populating the database with some sample Passenger data:

@DataJpaTest
@RunWith(SpringRunner.class)
public class PassengerRepositoryIntegrationTest {

    @PersistenceContext
    private EntityManager entityManager;
    @Autowired
    private PassengerRepository repository;

    @Before
    public void before() {
        entityManager.persist(Passenger.from("Jill", "Smith"));
        entityManager.persist(Passenger.from("Eve", "Jackson"));
        entityManager.persist(Passenger.from("Fred", "Bloggs"));
        entityManager.persist(Passenger.from("Ricki", "Bobbie"));
        entityManager.persist(Passenger.from("Siya", "Kolisi"));
    }
    
    //...
}

4. IgnoreCase for Case Insensitive Queries

Now, suppose we want to perform a case-insensitive search to find all passengers with a given firstName.

To do so, we’ll define our PassengerRepository as:

@Repository
public interface PassengerRepository extends JpaRepository<Passenger, Long> {
    List<Passenger> findByFirstNameIgnoreCase(String firstName);
}

Here, the IgnoreCase keyword ensures that the query matches are case insensitive.

We can also test that out with the help of a JUnit test:

@Test
public void givenPassengers_whenMatchingIgnoreCase_thenExpectedReturned() {
    Passenger jill = Passenger.from("Jill", "Smith");
    Passenger eve = Passenger.from("Eve", "Jackson");
    Passenger fred = Passenger.from("Fred", "Bloggs");
    Passenger siya = Passenger.from("Siya", "Kolisi");
    Passenger ricki = Passenger.from("Ricki", "Bobbie");

    List<Passenger> passengers = repository.findByFirstNameIgnoreCase("FrED");

    assertThat(passengers, contains(fred));
    assertThat(passengers, not(contains(eve)));
    assertThat(passengers, not(contains(siya)));
    assertThat(passengers, not(contains(jill)));
    assertThat(passengers, not(contains(ricki)));
}

Despite having passed “FrED” as the argument, our returned list of passengers contains a Passenger with the firstName as “Fred”. Clearly, with the help of the IgnoreCase keyword, we have achieved a case insensitive match.

5. Conclusion

In this quick tutorial, we learned how to create a case insensitive query in a Spring Data repository.

Finally, code examples are available over on Github.

EnvironmentPostProcessor in Spring Boot

$
0
0

1. Overview

As of Spring Boot 1.3, we’re able to use the EnvironmentPostProcessor to customize the application’s Environment before application context is refreshed.

In this tutorial, let’s take a look at how to load and transform the custom properties into the Environment, and then access those properties.

2. Spring Environment

The Environment abstraction in Spring represents the environment in which the current application is running.  In the meanwhile, it tends to unify the ways to access properties in a variety of property sources, such as properties files, JVM system properties, system environment variables, and servlet context parameters.

So in most cases, customizing the Environment means manipulation of various properties before they’re exposed to our beans. To start, please visit our previous article on manipulating properties with Spring.

3. A Quick Example

Let’s now build a simple price calculation application. It’ll calculate the price in either gross-based or net-based mode. The system environment variables from a third party will determine which calculation mode to choose.

3.1. Implementing EnvironmentPostProcessor

To do this, let’s implement the EnvironmentPostProcessor interface.

We’ll use it to read a couple of environment variables:

calculation_mode=GROSS 
gross_calculation_tax_rate=0.15

And we’ll use the post-processor to expose these in an application-specific way, in this case with a custom prefix:

com.baeldung.environmentpostprocessor.calculation.mode=GROSS
com.baeldung.environmentpostprocessor.gross.calculation.tax.rate=0.15

Then, we can quite simply add our new properties into the Environment:

@Order(Ordered.LOWEST_PRECEDENCE)
public class PriceCalculationEnvironmentPostProcessor implements EnvironmentPostProcessor {

    @Override
    public void postProcessEnvironment(ConfigurableEnvironment environment, 
      SpringApplication application) {
        PropertySource<?> system = environment.getPropertySources()
          .get(SYSTEM_ENVIRONMENT_PROPERTY_SOURCE_NAME);
        if (!hasOurPriceProperties(system)) {
          // error handling code omitted
        }
        Map<String, Object> prefixed = names.stream()
          .collect(Collectors.toMap(this::rename, system::getProperty));
        environment.getPropertySources()
          .addAfter(SYSTEM_ENVIRONMENT_PROPERTY_SOURCE_NAME, new MapPropertySource("prefixer", prefixed));
    }

}

Let’s see what we’ve done here. First, we asked environment to give us the PropertySource for environment variables. Calling the resulting system.getProperty is similar to calling Java’s System.getenv().get.

Then, so long as those properties exist in the environment, we’ll create a new map, prefixed. For brevity, we’ll skip the contents of rename, but check out the code sample for the complete implementation. The resulting map has the same values as system, but with prefixed keys.

Finally, we’ll add our new PropertySource to the Environment. Now, if a bean asks for com.baeldung.environmentpostprocessor.calculation.mode, the Environment will consult our map.

Note, by the way, that EnvironmentPostProcessor‘s Javadoc encourages us to either implement the Ordered interface or use the @Order annotation.

And this is, of course, just a single property source. Spring Boot allows us to cater to numerous sources and formats.

3.2. Registration in the spring.factories

To invoke the implementation in the Spring Boot bootstrap process, we need to register the class in the META-INF/spring.factories:

org.springframework.boot.env.EnvironmentPostProcessor=
  com.baeldung.environmentpostprocessor.PriceCalculationEnvironmentPostProcessor

3.3. Access the Properties using @Value Annotation

Let’s use these in a couple of classes. In the sample, we’ve got a PriceCalculator interface with two implementations: GrossPriceCalculator and NetPriceCalculator.

In our implementations, we can just use @Value to retrieve our new properties:

public class GrossPriceCalculator implements PriceCalculator {
    @Value("${com.baeldung.environmentpostprocessor.gross.calculation.tax.rate}")
    double taxRate;

    @Override
    public double calculate(double singlePrice, int quantity) {
        //calcuation implementation omitted
    }
}

This is nice as it’s the same way we access any other properties, like those we’ve defined in application.properties.

3.4. Access the Properties in Spring Boot Auto-configuration

Now, let’s see a complex case where we access the preceding properties in Spring Boot autoconfiguration.

We’ll create the autoconfiguration class to read those properties. This class will initialize and wire the beans in the application context according to the different property values:

@Configuration
@AutoConfigureOrder(Ordered.HIGHEST_PRECEDENCE)
public class PriceCalculationAutoConfig {
    @Bean
    @ConditionalOnProperty(name = 
      "com.baeldung.environmentpostprocessor.calculation.mode", havingValue = "NET")
    @ConditionalOnMissingBean
    public PriceCalculator getNetPriceCalculator() {
        return new NetPriceCalculator();
    }

    @Bean
    @ConditionalOnProperty(name = 
      "com.baeldung.environmentpostprocessor.calculation.mode", havingValue = "GROSS")
    @ConditionalOnMissingBean
    public PriceCalculator getGrossPriceCalculator() {
        return new GrossPriceCalculator();
    }
}

Similar to the EnvironmentPostProcessor implementation, the autoconfiguration class needs to be registered in the META-INF/spring.factories as well:

org.springframework.boot.autoconfigure.EnableAutoConfiguration=
  com.baeldung.environmentpostprocessor.autoconfig.PriceCalculationAutoConfig

This works because custom EnvironmentPostProcessor implementations kick in before Spring Boot autoconfiguration does. This combination makes Spring Boot autoconfiguration more powerful.

And, for more specifics about Spring Boot autoconfiguration, please have a look at the article on Custom Auto-Configuration with Spring Boot.

4. Test the Custom Implementation

Now it’s time to test our code. We can set the system environment variables in Windows by running:

set calculation_mode=GROSS
set gross_calculation_tax_rate=0.15

Or in Linux/Unix, we can export them instead:

export calculation_mode=GROSS 
export gross_calculation_tax_rate=0.15

After that, we could start the test with the mvn spring-boot:run command:

mvn spring-boot:run
  -Dstart-class=com.baeldung.environmentpostprocessor.PriceCalculationApplication
  -Dspring-boot.run.arguments="100,4"

5. Conclusion

To sum up, the EnvironmentPostProcessor implementation is able to load arbitrary files in a variety of formats from different locations. In addition, we can do any transformation we need to make the properties readily available in the Environment for later use. This freedom is certainly useful when we integrate Spring Boot-based application with the third-party configurations.

The source code can be found in the Github repository.

How to Read HTTP Headers in Spring REST Controllers

$
0
0

1. Introduction

In this quick tutorial, we’re going to look at how to access HTTP Headers in a Spring Rest Controller.

First, we’ll be using the @RequestHeader annotation to read headers individually as well as all together.

After that, we’ll take a deeper look at the @RequestHeader‘s attributes.

2. Accessing HTTP Headers

2.1. Individually

If we need access to a specific header, we can configure @RequestHeader with the header name:

@GetMapping("/greeting")
public ResponseEntity<String> greeting(@RequestHeader("accept-language") String language) {
    // code that uses the language variable
    return new ResponseEntity<String>(greeting, HttpStatus.OK);
}

Then, we can access the value using the variable passed into our method. If a header named accept-language isn’t found in the request, the method returns a “400 Bad Request” error.

Our headers don’t have to be strings. For example, if we know our header is a number, we can declare our variable as a numeric type:

@GetMapping("/double")
public ResponseEntity<String> doubleNumber(@RequestHeader("my-number") int myNumber) {
    return new ResponseEntity<String>(String.format("%d * 2 = %d", 
      myNumber, (myNumber * 2)), HttpStatus.OK);
}

2.2. All at Once

If we’re not sure which headers will be present, or we need more of them than we want in our method’s signature, we can use the @RequestHeader annotation without a specific name.

We have a few choices for our variable type: a Map, a MultiValueMap or a HttpHeaders object.

First, let’s get the request headers as a Map:

@GetMapping("/listHeaders")
public ResponseEntity<String> listAllHeaders(@RequestHeader Map<String, String> headers) {
    headers.forEach((key, value) -> {
        LOG.info(String.format("Header '%s' = %s", key, value));
    });

    return new ResponseEntity<String>(String.format("Listed %d headers", headers.size()), HttpStatus.OK);
}

If we use a Map and one of the headers has more than one value, we’ll get only the first value.  This is the equivalent of using the getFirst method on a MultiValueMap.

If our headers may have multiple values, we can get them as a MultiValueMap:

@GetMapping("/multiValue")
public ResponseEntity<String> multiValue(@RequestHeader MultiValueMap<String, String> headers) {
    headers.forEach((key, value) -> {
        LOG.info(String.format("Header '%s' = %s", key, value.stream().collect(Collectors.joining("|"))));
    });
        
    return new ResponseEntity<String>(String.format("Listed %d headers", headers.size()), HttpStatus.OK);
}

We can also get our headers as an HttpHeaders object:

@GetMapping("/getBaseUrl")
public ResponseEntity<String> getBaseUrl(@RequestHeader HttpHeaders headers) {
    InetSocketAddress host = headers.getHost();
    String url = "http://" + host.getHostName() + ":" + host.getPort();
    return new ResponseEntity<String>(String.format("Base URL = %s", url), HttpStatus.OK);
}

The HttpHeaders object has accessors for common application headers.

When we access a header by name from a Map, MultiValueMap or the HttpHeaders object, we’ll get a null if it isn’t present.

3. @RequestHeader Attributes

Now that we’ve gone over the basics of accessing request headers with the @RequestHeader annotation, let’s take a closer look at its attributes.

We’ve already used the name or value attributes implicitly when we’ve specifically named our header:

public ResponseEntity<String> greeting(@RequestHeader("accept-language") String language) {}

We can accomplish the same thing by using the name attribute:

public ResponseEntity<String> greeting(@RequestHeader(name = "accept-language") String language) {}

Next, let’s use the value attribute exactly the same way:

public ResponseEntity<String> greeting(@RequestHeader(value = "accept-language") String language) {}

When we name a header specifically, the header is required by default. If the header isn’t found in the request, the controller returns a 400 error.

Let’s use the required attribute to indicate that our header isn’t required:

@GetMapping("/nonRequiredHeader")
public ResponseEntity<String> evaluateNonRequiredHeader(
  @RequestHeader(value = "optional-header", required = false) String optionalHeader) {
    return new ResponseEntity<String>(
      String.format("Was the optional header present? %s!", (optionalHeader == null ? "No" : "Yes")), 
      HttpStatus.OK);
}

Since our variable will be null if the header isn’t present in the request, we need to be sure to do the appropriate null checking.

Let’s use the defaultValue attribute to provide a default value for our header:

@GetMapping("/default")
public ResponseEntity<String> evaluateDefaultHeaderValue(
  @RequestHeader(value = "optional-header", defaultValue = "3600") int optionalHeader) {
    return new ResponseEntity<String>(String.format("Optional Header is %d", optionalHeader), 
    HttpStatus.OK);
}

4. Conclusion

In this short tutorial, we learned how to access request headers in Spring REST controllers. First, we used the @RequestHeader annotation to supply request headers to our controller methods.

After a look a the basics, we took a detailed look at the attributes for the @RequestHeader annotation.

The example code is available over on GitHub.

Cannot Reference “X” Before Supertype Constructor Has Been Called

$
0
0

1. Overview

In this short tutorial, we’ll show how we can get the error Cannot reference “X” before supertype constructor has been called, and how to avoid it.

2. Constructors Chain

A constructor can call exactly one other constructor. This call must be in the first line of its body.

We can call a constructor of the same class with the keyword this, or we can call a constructor of the superclass with the keyword super.

When a constructor doesn’t call another constructor, the compiler adds a call to the no-argument constructor of the superclass.

3. Our Compilation error

This error boils down to trying to access instance level members before we invoke the constructor chain.

Let’s see a couple of ways we might run into this.

3.1. Referring To An Instance Method

In the next example, we’ll see the compilation error Cannot reference “X” before supertype constructor has been called at line 5. Note that constructor attempts to use the instance method getErrorCode() too early:

public class MyException extends RuntimeException {
    private int errorCode = 0;
    
    public MyException(String message) {
        super(message + getErrorCode()); // compilation error
    }

    public int getErrorCode() {
        return errorCode;
    }
}

This errors because, until super() has completed, there isn’t an instance of the class MyException. Therefore, we can’t yet make our call to the instance method getErrorCode().

3.2. Referring To An Instance Field

In the next example, we see our exception with an instance field instead of an instance method. Let’s take a look at how the first constructor tries to use an instance member before the instance itself is ready:

public class MyClass {

    private int myField1 = 10;
    private int myField2;

    public MyClass() {
        this(myField1); // compilation error
    }

    public MyClass(int i) {
        myField2 = i;
    }
}

A reference to an instance field can only be made after its class has been initialized, meaning after any call to this() or super().

So, why is there no compiler error in the second constructor, which also uses an instance field?

Remember that all classes are implicitly derived from class Object, and so there is an implicit super() call added by the compiler:

public MyClass(int i) {
    super(); // added by compiler
    myField2 = i;
}

Here, Object‘s constructor gets called before we access myField2, meaning we’re okay.

4. Solutions

The first possible solution to this problem is trivial: we don’t call the second constructor. We do explicitly in the first constructor what we wanted to do in the second constructor.

In this case, we’d copy the value of myField1 into myField2:

public class MyClass {

    private int myField1 = 10;
    private int myField2;

    public MyClass() {
        myField2 = myField1;
    }

    public MyClass(int i) {
        myField2 = i;
    }
}

In general, though, we probably need to rethink the structure of what we’re building.

But, if we’re calling the second constructor for a good reason, for example, to avoid repeating code, we can move the code into a method:

public class MyClass {

    private int myField1 = 10;
    private int myField2;

    public MyClass() {
        setupMyFields(myField1);
    }

    public MyClass(int i) {
        setupMyFields(i);
    }

    private void setupMyFields(int i) {
        myField2 = i;
    }
}

Again, this works because the compiler has implicitly called the constructor chain before invoking the method.

A third solution could be that we use static fields or methods. If we change myField1 to a static constant, then the compiler is also happy:

public class MyClass {

    private static final int SOME_CONSTANT = 10;
    private int myField2;

    public MyClass() {
        this(SOME_CONSTANT);
    }

    public MyClass(int i) {
        myField2 = i;
    }
}

We should note that making a field static means that it becomes shared with all the instances of this object, so it’s not a change to make too lightly.

For static to be the right answer, we need a strong reason. For example, maybe the value is not really a field, but instead a constant, so it makes sense to make it static and final. Maybe the construction method we wanted to call doesn’t need access to the instance members of the class, meaning it should be static.

5. Conclusion

We saw in this article how making a reference to instance members before the super() or this() call gives a compilation error. We saw this happen with an explicitly declared base class and also with the implicit Object base class.

We also demonstrated that this is an issue with the design of the constructor and showed how this can be fixed by repeating code in the constructor, delegating to a post-construction setup method, or the use of constant values or static methods to help with construction.

As always the source code for this example can be found over on GitHub.

Avoid Check for Null Statement in Java

$
0
0

1. Overview

Generally, null variables, references, and collections are tricky to handle in Java code. Not only are they hard to identify, but they’re also complex to deal with.

As a matter of fact, any miss in dealing with null cannot be identified at compile time and results in a NullPointerException at runtime.

In this tutorial, we’ll take a look at the need to check for null in Java and various alternatives that help us to avoid null checks in our code.

2. What Is NullPointerException?

According to the Javadoc for NullPointerException, it’s thrown when an application attempts to use null in a case where an object is required, such as:

  • Calling an instance method of a null object
  • Accessing or modifying a field of a null object
  • Taking the length of null as if it were an array
  • Accessing or modifying the slots of null as if it were an array
  • Throwing null as if it were a Throwable value

Let’s quickly see a few examples of the Java code that cause this exception:

public void doSomething() {
    String result = doSomethingElse();
    if (result.equalsIgnoreCase("Success")) 
        // success
    }
}

private String doSomethingElse() {
    return null;
}

Here, we tried to invoke a method call for a null reference. This would result in a NullPointerException.

Another common example is if we try to access a null array:

public static void main(String[] args) {
    findMax(null);
}

private static void findMax(int[] arr) {
    int max = arr[0];
    //check other elements in loop
}

This causes a NullPointerException at line 6.

Thus, accessing any field, method, or index of a null object causes a NullPointerException, as can be seen from the examples above.

A common way of avoiding the NullPointerException is to check for null:

public void doSomething() {
    String result = doSomethingElse();
    if (result != null && result.equalsIgnoreCase("Success")) {
        // success
    }
    else
        // failure
}

private String doSomethingElse() {
    return null;
}

In the real world, programmers find it hard to identify which objects can be null. An aggressively safe strategy could be to check null for every object. This, however, causes a lot of redundant null checks and makes our code less readable.

In the next few sections, we’ll go through some of the alternatives in Java that avoid such redundancy.

3. Handling null Through the API Contract

As discussed in the last section, accessing methods or variables of null objects causes a NullPointerException. We also discussed that putting a null check on an object before accessing it eliminates the possibility of NullPointerException.

However, often there are APIs that can handle null values. For example:

public void print(Object param) {
    System.out.println("Printing " + param);
}

public Object process() throws Exception {
    Object result = doSomething();
    if (result == null) {
        throw new Exception("Processing fail. Got a null response");
    } else {
        return result;
    }
}

The print() method call would just print “null” but won’t throw an exception. Similarly, process() would never return null in its response. It rather throws an Exception.

So for a client code accessing the above APIs, there is no need for a null check.

However, such APIs must make it explicit in their contract. A common place for APIs to publish such a contract is the JavaDoc.

This, however, gives no clear indication of the API contract and thus relies on the client code developers to ensure its compliance.

In the next section, we’ll see how a few IDEs and other development tools help developers with this.

4. Automating API Contracts

4.1. Using Static Code Analysis

Static code analysis tools help improve the code quality to a great deal. And a few such tools also allow the developers to maintain the null contract. One example is FindBugs.

FindBugs helps manage the null contract through the @Nullable and @NonNull annotations. We can use these annotations over any method, field, local variable, or parameter. This makes it explicit to the client code whether the annotated type can be null or not. Let’s see an example:

public void accept(@Nonnull Object param) {
    System.out.println(param.toString());
}

Here, @NonNull makes it clear that the argument cannot be null. If the client code calls this method without checking the argument for null, FindBugs would generate a warning at compile time. 

4.2. Using IDE Support

Developers generally rely on IDEs for writing Java code. And features such as smart code completion and useful warnings, like when a variable may not have been assigned, certainly help to a great extent.

Some IDEs also allow developers to manage API contracts and thereby eliminate the need for a static code analysis tool. IntelliJ IDEA provides the @NonNull and @Nullable annotations. To add the support for these annotations in IntelliJ, we must add the following Maven dependency:

<dependency>
    <groupId>org.jetbrains</groupId>
    <artifactId>annotations</artifactId>
    <version>16.0.2</version>
</dependency>

Now, IntelliJ will generate a warning if the null check is missing, like in our last example.

IntelliJ also provides a Contract annotation for handling complex API contracts.

5. Assertions

Until now, we’ve only talked about removing the need for null checks from the client code. But, that is rarely applicable in real-world applications.

Now, let’s suppose that we’re working with an API that cannot accept null parameters or can return a null response that must be handled by the client. This presents the need for us to check the parameters or the response for a null value.

Here, we can use Java Assertions instead of the traditional null check conditional statement:

public void accept(Object param){
    assert param != null;
    doSomething(param);
}

In line 2, we check for a null parameter. If the assertions are enabled, this would result in an AssertionError.

Although it is a good way of asserting pre-conditions like non-null parameters, this approach has two major problems:

  1. Assertions are usually disabled in a JVM
  2. false assertion results in an unchecked error that is irrecoverable

Hence, it is not recommended for programmers to use Assertions for checking conditions. In the following sections, we’ll discuss other ways of handling null validations.

6. Avoiding Null Checks Through Coding Practices

6.1. Preconditions

It’s usually a good practice to write code that fails early. Therefore, if an API accepts multiple parameters that aren’t allowed to be null, it’s better to check for every non-null parameter as a precondition of the API.

For example, let’s look at two methods – one that fails early, and one that doesn’t:

public void goodAccept(String one, String two, String three) {
    if (one == null || two == null || three == null) {
        throw new IllegalArgumentException();
    }

    process(one);
    process(two);
    process(three);
}

public void badAccept(String one, String two, String three) {
    if (one == null) {
        throw new IllegalArgumentException();
    } else {
        process(one);
    }

    if (two == null) {
        throw new IllegalArgumentException();
    } else {
        process(two);
    }

    if (three == null) {
        throw new IllegalArgumentException();
    } else {
        process(three);
    }
}

Clearly, we should prefer goodAccept() over badAccept().

As an alternative, we can also use Guava’s Preconditions for validating API parameters.

6.2. Using Primitives Instead of Wrapper Classes

Since null is not an acceptable value for primitives like int, we should prefer them over their wrapper counterparts like Integer wherever possible.

Consider two implementations of a method that sums two integers:

public static int primitiveSum(int a, int b) {
    return a + b;
}

public static Integer wrapperSum(Integer a, Integer b) {
    return a + b;
}

Now, let’s call these APIs in our client code:

int sum = primitiveSum(null, 2);

This would result in a compile-time error since null is not a valid value for an int.

And when using the API with wrapper classes, we get a NullPointerException:

assertThrows(NullPointerException.class, () -> wrapperSum(null, 2));

There are also other factors for using primitives over wrappers, as we covered in another tutorial, Java Primitives versus Objects.

6.3. Empty Collections

Occasionally, we need to return a collection as a response from a method. For such methods, we should always try to return an empty collection instead of null:

public List<String> names() {
    if (userExists()) {
        return Stream.of(readName()).collect(Collectors.toList());
    } else {
        return Collections.emptyList();
    }
}

Hence, we’ve avoided the need for our client to perform a null check when calling this method.

7. Using Objects 

Java 7 introduced the new Objects API. This API has several static utility methods that take away a lot of redundant code. Let’s look at one such method, requireNonNull():

public void accept(Object param) {
    Objects.requireNonNull(param);
    // doSomething()
}

Now, let’s test the accept() method:

assertThrows(NullPointerException.class, () -> accept(null));

So, if null is passed as an argument, accept() throws a NullPointerException.

This class also has isNull() and nonNull() methods that can be used as predicates to check an object for null.

8. Using Optional

Java 8 introduced a new Optional API in the language. This offers a better contract for handling optional values as compared to null. Let’s see how Optional takes away the need for null checks:

public Optional<Object> process(boolean processed) {
    String response = doSomething(processed);

    if (response == null) {
        return Optional.empty();
    }

    return Optional.of(response);
}

private String doSomething(boolean processed) {
    if (processed) {
        return "passed";
    } else {
        return null;
    }
}

By returning an Optional, as shown above, the process() method makes it clear to the caller that the response can be empty and must be handled at compile time.

This notably takes away the need for any null checks in the client code. An empty response can be handled differently using the declarative style of the Optional API:

assertThrows(Exception.class, () -> process(false).orElseThrow(() -> new Exception()));

Furthermore, it also provides a better contract to API developers to signify to the clients that an API can return an empty response.

Although we eliminated the need for a null check on the caller of this API, we used it to return an empty response. To avoid this, Optional provides an ofNullable method that returns an Optional with the specified value, or empty, if the value is null:

public Optional<Object> process(boolean processed) {
    String response = doSomething(processed);
    return Optional.ofNullable(response);
}

9. Libraries

9.1. Using Lombok

Lombok is a great library that reduces the amount of boilerplate code in our projects. It comes with a set of annotations that take the place of common parts of code we often write ourselves in Java applications, such as getters, setters, and toString(), to name a few.

Another of its annotations is @NonNull. So, if a project already uses Lombok to eliminate boilerplate code, @NonNull can replace the need for null checks.

Before we move on to see some examples, let’s add a Maven dependency for Lombok:

<dependency>
    <groupId>org.projectlombok</groupId>
    <artifactId>lombok</artifactId>
    <version>1.18.6</version>
</dependency>

Now, we can use @NonNull wherever a null check is needed:

public void accept(@NonNull Object param){
    System.out.println(param);
}

So, we simply annotated the object for which the null check would’ve been required, and Lombok generates the compiled class:

public void accept(@NonNull Object param) {
    if (param == null) {
        throw new NullPointerException("param");
    } else {
        System.out.println(param);
    }
}

If param is null, this method throws a NullPointerException. The method must make this explicit in its contract, and the client code must handle the exception.

9.2. Using StringUtils

Generally, String validation includes a check for an empty value in addition to null value. Therefore, a common validation statement would be:

public void accept(String param){
    if (null != param && !param.isEmpty())
        System.out.println(param);
}

This quickly becomes redundant if we have to deal with a lot of String types. This is where StringUtils comes handy. Before we see this in action, let’s add a Maven dependency for commons-lang3:

<dependency>
    <groupId>org.apache.commons</groupId>
    <artifactId>commons-lang3</artifactId>
    <version>3.8.1</version>
</dependency>

Let’s now refactor the above code with StringUtils:

public void accept(String param) {
    if (StringUtils.isNotEmpty(param))
        System.out.println(param);
}

So, we replaced our null or empty check with a static utility method isNotEmpty(). This API offers other powerful utility methods for handling common String functions.

10. Conclusion

In this article, we looked at the various reasons for NullPointerException and why it is hard to identify. Then, we saw various ways to avoid the redundancy in code around checking for null with parameters, return types, and other variables.

All the examples are available on GitHub.


BIRT Reporting with Spring Boot

$
0
0

1. Introduction

In this tutorial, we’re going to integrate BIRT (Business Intelligence and Reporting Tools) with Spring Boot MVC, to serve static and dynamic reports in HTML and PDF format.

2. What is BIRT

BIRT is an open source engine to create data visualizations that can be integrated into Java web applications.

It’s a top-level software project within the Eclipse Foundation and leverages contributions by IBM and Innovent Solutions. It was started and sponsored by Actuate at the end of 2004.

The framework allows creating reports integrated with a wide range of data sources.

3. Maven Dependencies

BIRT has two main components: a visual report designer to create report design files, and a runtime component for interpreting and rendering those designs.

In our example web application, we’re going to use both on top of Spring Boot.

3.1. BIRT Framework Dependencies

As we’re used to thinking in terms of dependency management, the first choice would be to look for BIRT in Maven Central.

However, the latest official version of the core library available is 4.6 from 2016, while on the Eclipse download page, we can find links for at least two newer versions (the current is 4.8).

If we choose to go for the official build, the easiest way to have the code up and running is to download the BIRT Report Engine package, which is a complete web application also useful for learning. We then need to copy its lib folder into our project (about 68MB in size) and tell the IDE to include all the jars in it.

It goes without saying that, using this approach, we’ll be able to compile only through the IDE, as Maven won’t find those jars unless we configure and install them manually (more than 100 files!) in our local repo.

Fortunately, Innovent Solutions has decided to take matters in its hands and published on Maven Central its own builds of the latest BIRT dependencies, which is great, as it manages for us all the needed dependencies.

Reading through comments in online forums, it’s unclear whether these artifacts are production-ready, but Innovent Solutions worked on the project next to the Eclipse team since the start, so our project relies on them.

Including BIRT is now very easy:

<dependency>
    <groupId>com.innoventsolutions.birt.runtime</groupId>
    <artifactId>org.eclipse.birt.runtime_4.8.0-20180626</artifactId>
    <version>4.8.0</version>
</dependency>

3.2. Spring Boot Dependencies

Now that BIRT is imported into our project, we just need to add the standard Spring Boot dependencies in our pom file.

There’s one pitfall, though, because the BIRT jar contains its own implementation of Slf4J, which doesn’t play nice with Logback and throws a conflict exception during startup.

As we can’t remove it from the jar, in order to fix this problem, we need to exclude Logback:

<dependency>
    <groupId>org.springframework.boot</groupId>
    <artifactId>spring-boot-starter-logging</artifactId>
    <exclusions>
        <exclusion>
            <groupId>ch.qos.logback</groupId>
            <artifactId>logback-classic</artifactId>
        </exclusion>
    </exclusions>
</dependency>

Now we’re finally ready to start!

4. BIRT Reports

In the BIRT framework, a report is a long XML configuration file, identified by the extension rptdesign.

It tells the Engine what to draw and where, from the style of a title up to the required properties to connect to a data source.

For a basic dynamic report, we need to configure three things:

  1. the data source (in our example we use a local CSV file, but it could easily be a database table)
  2. the elements we want to display (charts, tables, etc)
  3. the page design

The report is structured like an HTML page, with header, body, footer, scripts, and styles.

The framework provides an extensive set of components to choose from out-of-the-box, including integration to mainstream data sources, layouts, charts, and tables. And, we can extend it to add our own!

There are two ways to generate a report file: visual or programmatic.

5. The Eclipse Report Designer

To ease the creation of reports, the Eclipse team built a report design tool plugin for its popular IDE.

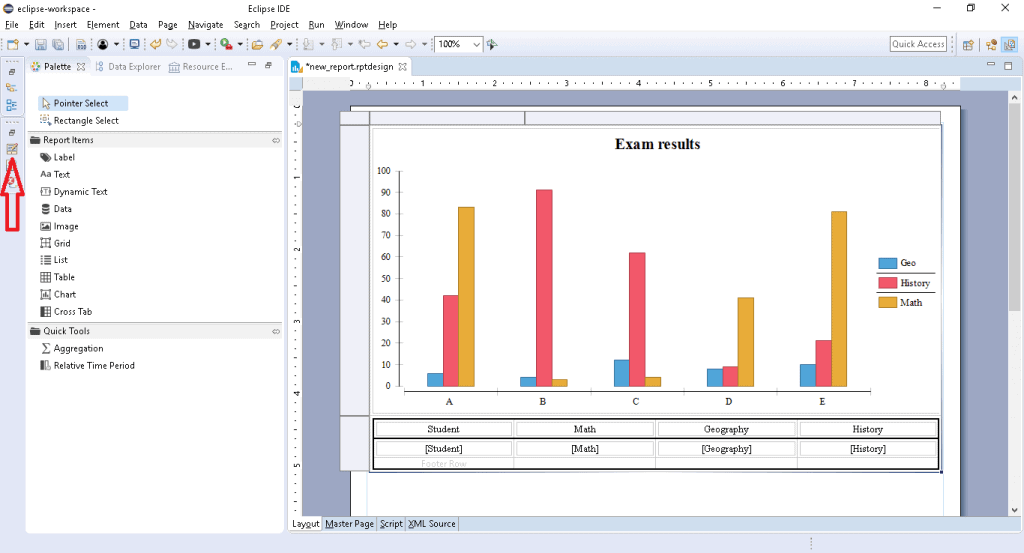
This tool features an easy drag & drop interface from the Palette on the left, which automatically opens the setup window for the new component we add to the page. We can also see the all customizations available for each component by clicking on it on the page and then on the Property Editor button (highlighted in the image below).

To visualize the entire page structure in a tree view, we just need to click on the Outline button.

The Data Explorer tab also contains the data sources defined for our report:

The sample report displayed in the image can be found at the path <project_root>/reports/csv_data_report.rptdesign

Another advantage of going for the visual designer is the online documentation, which focuses more on this tool instead of the programmatic approach.

If we’re already using Eclipse, we just need to install the BIRT Report Design plugin, which includes a predefined perspective and the visual editor.

For those developers who are not currently using Eclipse and don’t want to switch, there’s an Eclipse Report Designer package, which consists of a portable Eclipse installation with the BIRT plugin pre-installed.

Once the report file is finalized, we can save it in our project and go back to coding in our preferred environment.

6. The Programmatic Approach

We can also design a report using only code, but this approach is a lot harder due to the poor documentation available, so be prepared to dig into source code and online forums.

Also worth considering is that all the tedious design details like size, length, and grid position are a lot easier to deal with using the designer.

To prove this point, here’s an example of how to define a simple static page with an image and a text:

DesignElementHandle element = factory.newSimpleMasterPage("Page Master");
design.getMasterPages().add(element);

GridHandle grid = factory.newGridItem(null, 2, 1);
design.getBody().add(grid);

grid.setWidth("100%"); 

RowHandle row0 = (RowHandle) grid.getRows().get(0);

ImageHandle image = factory.newImage(null);
CellHandle cell = (CellHandle) row0.getCells().get(0);
cell.getContent().add(image);
image.setURL("\"https://www.baeldung.com/wp-content/themes/baeldung/favicon/favicon-96x96.png\"");

LabelHandle label = factory.newLabel(null);
cell = (CellHandle) row0.getCells().get(1);
cell.getContent().add(label);
label.setText("Hello, Baeldung world!");

This code will generate a simple (and ugly) report:

The sample report displayed in the image above can be found at this path: <project_root>/reports/static_report.rptdesign.

Once we’ve coded how the report should look and what data it should display, we can generate the XML file by running our ReportDesignApplication class.

7. Attaching a Data Source

We mentioned earlier that BIRT supports many different data sources.

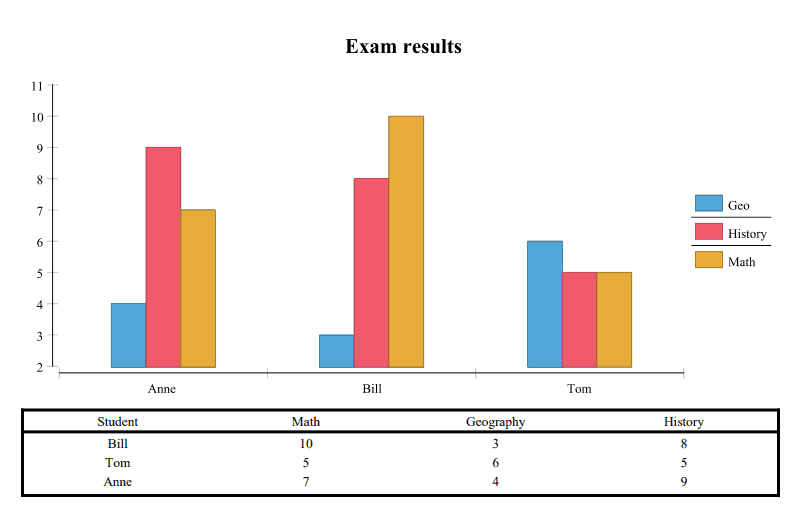
For our example project, we used a simple CSV file with three entries. It can be found in the reports folder and consists of three simple rows of data, plus headers:

Student, Math, Geography, History
Bill, 10,3,8
Tom, 5,6,5
Anne, 7, 4,9

7.1. Configuring the Data Source

To let BIRT use our file (or any other type of source), we have to configure a Data Source.

For our file, we created a Flat File Data Source with the report designer, all in just a few steps:

  1. Open the designer perspective and look at the outline on the right.
  2. Right-click on the Data Sources icon.
  3. Select the desired source type (in our case the flat file source).
  4. We can now choose either to load an entire folder or just one file. We used the second option (if our data file is in CSV format, we want to make sure to use the first line as column name indicator).
  5. Test the connection to make sure the path is correct.

We attached some pictures to show each step:

7.2. The Data Set

The data source is ready, but we still need to define our Data Set, which is the actual data shown in our report:

  1. Open the designer perspective and look at the outline on the right.
  2. Right-click on the Data Sets icon.
  3. Select the desired Data Source and the type (in our case there’s only one type).
  4. The next screen depends on the type of data source and data set we’re selected: in our case, we see a page where we can select the columns to include.
  5. Once the setup is complete, we can open the configuration at any time by double-clicking on our data set.
  6. In Output Columns, we can set the right type of the data displayed.
  7. We can then look at a preview by clicking on Preview Results.

Again, some pictures to clarify these steps:

7.3. Other Data Source Types

As mentioned in step 4 of the Data Set configuration, the options available may change depending on the Data Source referred.

For our CSV file, BIRT gives options related to which columns to show, the data type, and if we want to load the entire file. On the other hand, if we had a JDBC data source, we may have to write an SQL query or a stored procedure.

From the Data Sets menu, we can also join two or more data sets in a new data set.

8. Rendering the Report

Once the report file is ready, we have to pass it to the engine for rendering. To do this, there are a few things to implement.

8.1. Initializing the Engine

The ReportEngine class, which interprets the design files and generates the final result, is part of the BIRT runtime library.

It uses a bunch of helpers and tasks to do the job, making it quite resource-intensive:

There is a significant cost associated with creating an engine instance, due primarily to the cost of loading extensions. Therefore, we should create just one ReportEngine instance and use it to run multiple reports.

The report engine is created through a factory supplied by the Platform. Before creating the engine, we have to start the Platform, which will load the appropriate plug-ins:

@PostConstruct
protected void initialize() throws BirtException {
    EngineConfig config = new EngineConfig();
    config.getAppContext().put("spring", this.context);
    Platform.startup(config);
    IReportEngineFactory factory = (IReportEngineFactory) Platform
      .createFactoryObject(IReportEngineFactory.EXTENSION_REPORT_ENGINE_FACTORY);
    birtEngine = factory.createReportEngine(config);
    imageFolder = System.getProperty("user.dir") + File.separatorChar + reportsPath + imagesPath;
    loadReports();
}

When we don’t need it anymore, we can destroy it:

@Override
public void destroy() {
    birtEngine.destroy();
    Platform.shutdown();
}

8.2. Implementing the Output Format

BIRT already supports multiple output formats: HTML, PDF, PPT, and ODT, to name a few.

For the sample project, we implemented two of them with the methods generatePDFReport and generateHTMLReport.

They differ slightly depending on the specific properties needed, such as output format and image handlers.

In fact, PDFs embed images together with text, while HTML reports need to generate them and/or link them.

Thus, the PDF rendering function is quite straightforward:

private void generatePDFReport(IReportRunnable report, HttpServletResponse response, 
  HttpServletRequest request) {
    IRunAndRenderTask runAndRenderTask = birtEngine.createRunAndRenderTask(report);
    response.setContentType(birtEngine.getMIMEType("pdf"));
    IRenderOption options = new RenderOption();
    PDFRenderOption pdfRenderOption = new PDFRenderOption(options);
    pdfRenderOption.setOutputFormat("pdf");
    runAndRenderTask.setRenderOption(pdfRenderOption);
    runAndRenderTask.getAppContext().put(EngineConstants.APPCONTEXT_PDF_RENDER_CONTEXT, request);

    try {
        pdfRenderOption.setOutputStream(response.getOutputStream());
        runAndRenderTask.run();
    } catch (Exception e) {
        throw new RuntimeException(e.getMessage(), e);
    } finally {
        runAndRenderTask.close();
    }
}

While the HTML rendering function needs more settings:

private void generateHTMLReport(IReportRunnable report, HttpServletResponse response, 
  HttpServletRequest request) {
    IRunAndRenderTask runAndRenderTask = birtEngine.createRunAndRenderTask(report);
    response.setContentType(birtEngine.getMIMEType("html"));
    IRenderOption options = new RenderOption();
    HTMLRenderOption htmlOptions = new HTMLRenderOption(options);
    htmlOptions.setOutputFormat("html");
    htmlOptions.setBaseImageURL("/" + reportsPath + imagesPath);
    htmlOptions.setImageDirectory(imageFolder);
    htmlOptions.setImageHandler(htmlImageHandler);
    runAndRenderTask.setRenderOption(htmlOptions);
    runAndRenderTask.getAppContext().put(
      EngineConstants.APPCONTEXT_BIRT_VIEWER_HTTPSERVET_REQUEST, request);

    try {
        htmlOptions.setOutputStream(response.getOutputStream());
        runAndRenderTask.run();
    } catch (Exception e) {
        throw new RuntimeException(e.getMessage(), e);
    } finally {
        runAndRenderTask.close();
    }
}

Most noteworthy, we set the HTMLServerImageHandler instead of leaving the default handler. This small difference has a big impact on the generated img tag:

  • the default handler links the img tag to the file system path, blocked for security by many browsers
  • the HTMLServerImageHandler links to the server URL

With the setImageDirectory method, we specify where the engine will save the generated image file.

By default, the handler generates a new file at every request, so we could add a caching layer or a deletion policy.

8.3. Publishing the Images

In the HTML report case, image files are external, so they need to be accessible on the server path.

In the code above, with the setBaseImageURL method, we tell the engine what relative path should be used in the img tag link, so we need to make sure that the path is actually accessible!

For this reason, in our ReportEngineApplication, we configured Spring to publish the images folder:

@SpringBootApplication
@EnableWebMvc
public class ReportEngineApplication implements WebMvcConfigurer {
    @Value("${reports.relative.path}")
    private String reportsPath;
    @Value("${images.relative.path}")
    private String imagesPath;

    ...

    @Override
    public void addResourceHandlers(ResourceHandlerRegistry registry) {
        registry
          .addResourceHandler(reportsPath + imagesPath + "/**")
          .addResourceLocations("file:///" + System.getProperty("user.dir") + "/" 
            + reportsPath + imagesPath);
    }
}

Whatever the path we choose, we have to make sure the same path is used here and in the htmlOptions of the previous snippet, or our report won’t be able to display images.

9. Displaying the Report

The last component needed to get our application ready is a Controller to return the rendered result:

@RequestMapping(method = RequestMethod.GET, value = "/report/{name}")
@ResponseBody
public void generateFullReport(HttpServletResponse response, HttpServletRequest request,
  @PathVariable("name") String name, @RequestParam("output") String output) 
  throws EngineException, IOException {
    OutputType format = OutputType.from(output);
    reportService.generateMainReport(name, format, response, request);
}

With the output parameter, we can let the user choose the desired format — HTML or PDF.

10. Testing the Report

We can start the application by running the ReportEngineApplication class.

During startup, the BirtReportService class will load all the reports found in the <project_root>/reports folder.

To see our reports in action, we just need to point our browser to:

  • /report/csv_data_report?output=pdf
  • /report/csv_data_report?output=html
  • /report/static_report?output=pdf
  • /report/static_report?output=html

Here is how the csv_data_report report looks:

To reload a report after changing the design file, we just point our browser to /report/reload.

11. Conclusion

In this article, we integrated BIRT with Spring Boot, exploring the pitfalls and challenges, but also its power and flexibility.

The source code for the article is available over on GitHub.

Reversing a Binary Tree in Java

$
0
0

1. Overview

Reversing a binary tree is one of the problems that we might be asked to solve during a technical interview.

In this quick tutorial, we’ll see a couple of different ways of solving this problem.

2. Binary Tree

A binary tree is a data structure in which each element has at most two children, which are referred to as the left child and the right child. The top element of the tree is the root node, whereas the children are the interior nodes.

However, if a node has no child, it’s called a leaf.

Having said that, let’s create our object that represents a node:

public class TreeNode {

    private int value;
    private TreeNode rightChild;
    private TreeNode leftChild;

    // Getters and setters

}

Then, let’s create our tree that we’ll be using in our examples:

    TreeNode leaf1 = new TreeNode(1);
    TreeNode leaf2 = new TreeNode(3);
    TreeNode leaf3 = new TreeNode(6);
    TreeNode leaf4 = new TreeNode(9);

    TreeNode nodeRight = new TreeNode(7, leaf3, leaf4);
    TreeNode nodeLeft = new TreeNode(2, leaf1, leaf2);

    TreeNode root = new TreeNode(4, nodeLeft, nodeRight);

In the previous method, we created the following structure:

By reversing the tree from left to right, we’ll end up having the following structure:

3. Reversing the Binary Tree

3.1. Recursive Method

In the first example, we’ll use recursion to reverse the tree.

First of all, we’ll call our method using the tree’s root, then we’ll apply it on the left and the right children respectively until we reach the tree’s leaves:

public void reverseRecursive(TreeNode treeNode) {
    if(treeNode == null) {
        return;
    }

    TreeNode temp = treeNode.getLeftChild();
    treeNode.setLeftChild(treeNode.getRightChild());
    treeNode.setRightChild(temp);

    reverseRecursive(treeNode.getLeftChild());
    reverseRecursive(treeNode.getRightChild());
}

3.2. Iterative Method

In the second example, we’ll reverse the tree using an iterative approach. For that, we’re going to use a LinkedList, which we initialize with the root of our tree.

Then, for every node we poll from the list, we add its children to that list before we permutate them.

We keep adding and removing from the LinkedList until we reach the tree’s leaves:

public void reverseIterative(TreeNode root) {
    List<TreeNode> queue = new LinkedList<>();

    if(treeNode != null) {
        queue.add(treeNode);
    }

    while(!queue.isEmpty()) {
        TreeNode node = queue.poll();
        if(node.getLeftChild() != null){
            queue.add(node.getLeftChild());
        }
        if(node.getRightChild() != null){
            queue.add(node.getRightChild());
        }

        TreeNode temp = node.getLeftChild();
        node.setLeftChild(node.getRightChild());
        node.setRightChild(temp);
    }
}

4. Conclusion

In this quick article, we explored the two ways of reversing a binary tree. We have started by using a recursive method to reverse it. Then, we ended up using an iterative way to achieve the same result.

The complete source code of these examples and unit test cases can be found over on Github.

Spring Cloud Data Flow With Apache Spark

$
0
0

1. Introduction

Spring Cloud Data Flow is a toolkit for building data integration and real-time data processing pipelines.  

Pipelines, in this case, are Spring Boot applications that are built with the use of Spring Cloud Stream or Spring Cloud Task frameworks.

In this tutorial, we’ll show how to use Spring Cloud Data Flow with Apache Spark.

2. Data Flow Local Server

First, we need to run the Data Flow Server to be able to deploy our jobs.

To run the Data Flow Server locally, we need to create a new project with the spring-cloud-starter-dataflow-server-local dependency:

<dependency>
    <groupId>org.springframework.cloud</groupId>
    <artifactId>spring-cloud-starter-dataflow-server-local</artifactId>
    <version>1.7.4.RELEASE</version>
</dependency>

After that, we need to annotate the main class in the server with @EnableDataFlowServer:

@EnableDataFlowServer
@SpringBootApplication
public class SpringDataFlowServerApplication {
 
    public static void main(String[] args) {
        SpringApplication.run(
          SpringDataFlowServerApplication.class, args);
    }
}

Once we run this application, we’ll have a local Data Flow server on port 9393.

3. Creating a Project

We’ll create a Spark Job as a standalone local application so that we won’t need any cluster to run it.

3.1. Dependencies

First, we’ll add the Spark dependency:

<dependency>
    <groupId>org.apache.spark</groupId>
    <artifactId>spark-core_2.10</artifactId>
    <version>2.4.0</version>
</dependency>

3.2. Creating a Job

And for our job, let’s approximate pi:

public class PiApproximation {
    public static void main(String[] args) {
        SparkConf conf = new SparkConf().setAppName("BaeldungPIApproximation");
        JavaSparkContext context = new JavaSparkContext(conf);
        int slices = args.length >= 1 ? Integer.valueOf(args[0]) : 2;
        int n = (100000L * slices) > Integer.MAX_VALUE ? Integer.MAX_VALUE : 100000 * slices;

        List<Integer> xs = IntStream.rangeClosed(0, n)
          .mapToObj(element -> Integer.valueOf(element))
          .collect(Collectors.toList());

        JavaRDD<Integer> dataSet = context.parallelize(xs, slices);

        JavaRDD<Integer> pointsInsideTheCircle = dataSet.map(integer -> {
           double x = Math.random() * 2 - 1;
           double y = Math.random() * 2 - 1;
           return (x * x + y * y ) < 1 ? 1: 0;
        });

        int count = pointsInsideTheCircle.reduce((integer, integer2) -> integer + integer2);

        System.out.println("The pi was estimated as:" + count / n);

        context.stop();
    }
}

4. Data Flow Shell

Data Flow Shell is an application that’ll enable us to interact with the server. Shell uses the DSL commands to describe data flows.

To use the Data Flow Shell we need to create a project that’ll allow us to run it. First, we need the spring-cloud-dataflow-shell dependency:

<dependency>
    <groupId>org.springframework.cloud</groupId>
    <artifactId>spring-cloud-dataflow-shell</artifactId>
    <version>1.7.4.RELEASE</version>
</dependency>

After adding the dependency, we can create the class that’ll run our Data Flow shell:

@EnableDataFlowShell
@SpringBootApplication
public class SpringDataFlowShellApplication {
     
    public static void main(String[] args) {
        SpringApplication.run(SpringDataFlowShellApplication.class, args);
    }
}

5. Deploying the project

To deploy our project, we’ll use the so-called task runner that is available for Apache Spark in three versions: cluster, yarn, and client. We’re going to proceed with the local client version.

The task runner is what runs our Spark job.

To do that, we first need to register our task using Data Flow Shell:

app register --type task --name spark-client --uri maven://org.springframework.cloud.task.app:spark-client-task:1.0.0.BUILD-SNAPSHOT

The task allows us to specify multiple different parameters some of them are optional, but some of the parameters are necessary to deploy the Spark job properly:

  • spark.app-class, the main class of our submitted job
  • spark.app-jar, a path to the fat jar containing our job
  • spark.app-name, the name that’ll be used for our job
  • spark.app-args, the arguments that’ll be passed to the job

We can use the registered task spark-client to submit our job, remembering to provide the required parameters:

task create spark1 --definition "spark-client \
  --spark.app-name=my-test-pi --spark.app-class=com.baeldung.spring.cloud.PiApproximation \
  --spark.app-jar=/apache-spark-job-0.0.1-SNAPSHOT.jar --spark.app-args=10"

Note that spark.app-jar is the path to the fat-jar with our job.

After successful creation of the task, we can proceed to run it with the following command:

task launch spark1

This will invoke the execution of our task.

6. Summary

In this tutorial, we have shown how to use the Spring Cloud Data Flow framework to process data with Apache Spark. More information on the Spring Cloud Data Flow framework can be found in the documentation.

All code samples can be found on GitHub.

REST vs WebSockets

$
0
0

1. Overview

In this tutorial, we’ll go through the basics of client-server communication and explore this through two popular options available today. We’ll see how WebSocket, which is a new entrant, fares against the more popular choice of RESTful HTTP.

2. Basics of Network Communication

Before we deep-dive into the details of different options and their merits and demerits, let’s quickly refresh the landscape of network communication. This will help to put things in perspective and understand this better.

Network communications can be best understood in terms of the Open Systems Interconnection (OSI) model.

OSI model partitions the communication system into seven layers of abstraction:

At the top of this model is the Application layer which is of our interest in this tutorial. However, we’ll discuss some aspects in the top four layers as we go along comparing WebSocket and RESTful HTTP.

The application layer is closest to the end user and is responsible for interfacing with the applications participating in the communication. There are several popular protocols which are used in this layer like FTP, SMTP, SNMP, HTTP, and WebSocket.

3. Describing WebSocket and RESTful HTTP

While communication can happen between any number of systems, we are particularly interested in client-server communication. More specifically, we’ll focus on communication between a web browser and a web server. This is the frame we’ll use to compare WebSocket with RESTful HTTP.

But before we proceed any further, why not quickly understand what they are!

3.1. WebSockets

As the formal definition goes, WebSocket is a communication protocol which features bi-directional, full-duplex communication over a persistent TCP connection. Now, we’ll understand each part of this statement in detail as we go along.


WebSocket was standardized as a communication protocol by IETF as RFC 6455 in 2011. Most modern web browsers today support the WebSocket protocol.

3.2. RESTful HTTP

While we all are aware of HTTP because of its ubiquitous presence on the internet, it is also an application layer communication protocol. HTTP is a request-response based protocol, again we’ll understand this better later in the tutorial.

REST (Representational State Transfer) is an architectural style which puts a set of constraints on HTTP to create web services.

4. WebSocket Subprotocol

While WebSocket defines a protocol for bi-directional communication between client and server, it does not put any condition on the message to be exchanged. This is left open for parties in the communication to agree as part of subprotocol negotiation.

It’s not convenient to develop a subprotocol for non-trivial applications. Fortunately, there are many popular subprotocols like STOMP available for use. STOMP stands for Simple Text Oriented Messaging Protocol and works over WebSocket. Spring Boot has first class support for STOMP, which we’ll make use of in our tutorial.

5. Quick Setup in Spring Boot

There’s nothing better than seeing a working example. So, we’ll build simple use-cases in both WebSocket and RESTful HTTP to explore them further and then compare them. Let’s create a simple server and client component for both.

We’ll create a simple client using JavaScript which will send a name. And, we’ll create a server using Java which will respond with a greeting.

5.1. WebSocket

To use WebSocket in Spring Boot, we’ll need the appropriate starter:

<dependency>
    <groupId>org.springframework.boot</groupId>
    <artifactId>spring-boot-starter-websocket</artifactId>
</dependency>

We’ll now configure the STOMP endpoints:

@Configuration
@EnableWebSocketMessageBroker
public class WebSocketMessageBrokerConfig implements WebSocketMessageBrokerConfigurer {
 
    @Override
    public void registerStompEndpoints(StompEndpointRegistry registry) {
        registry.addEndpoint("/ws");
    }
 
    @Override
    public void configureMessageBroker(MessageBrokerRegistry config) {
        config.setApplicationDestinationPrefixes("/app");
        config.enableSimpleBroker("/topic");
    }
}

Let’s quickly define a simple WebSocket server which accepts a name and responds with a greeting:

@Controller
public class WebSocketController {
 
    @MessageMapping("/hello")
    @SendTo("/topic/greetings")
    public Greeting greeting(Message message) throws Exception {
        return new Greeting("Hello, " + HtmlUtils.htmlEscape(message.getName()) + "!");
    }
}

Finally, let’s build the client to communicate with this WebSocket server. As we are emphasizing browser-to-server communication, let’s create a client in JavaScript:

var stompClient = null;
function connect() {
    stompClient = Stomp.client('ws://localhost:8080/ws');
    stompClient.connect({}, function (frame) {
        stompClient.subscribe('/topic/greetings', function (response) {
            showGreeting(JSON.parse(response.body).content);
        });
    });
}
function sendName() {
	stompClient.send("/app/hello", {}, JSON.stringify({'name': $("#name").val()}));
}
function showGreeting(message) {
    $("#greetings").append("<tr><td>" + message + "</td></tr>");
}

This completes our working example of a WebSocket server and client. There is an HTML page in the code repository which provides a simple user interface to interact with.

While this just scratches the surface, WebSocket with Spring can be used to build complex chat clients and more.

5.2. RESTful HTTP

We’ll go through a similar set-up for RESTful service now. Our simple web service will accept a GET request with a name and responds with a greeting.

Let’s use Spring Boot’s web starter instead this time:

<dependency>
    <groupId>org.springframework.boot</groupId>
    <artifactId>spring-boot-starter-web</artifactId>
</dependency>

Now, we’ll define a REST endpoint leveraging powerful annotation support available in Spring:

@RestController
@RequestMapping(path = "/rest")
public class RestAPIController {
    @GetMapping(path="/{name}", produces = "application/json")
    public String getGreeting(@PathVariable("name") String name)
    {
        return "{\"greeting\" : \"Hello, " + name + "!\"}";
    }
}

Finally, let’s create a client in JavaScript:

var request = new XMLHttpRequest()
function sendName() {
    request.open('GET', 'http://localhost:8080/rest/'+$("#name").val(), true)
    request.onload = function () {
    	var data = JSON.parse(this.response)
    	showGreeting(data.greeting)
    }
    request.send()
}

function showGreeting(message) {
    $("#greetings").append("<tr><td>" + message + "</td></tr>");
}

That’s pretty much it! Again, there’s an HTML page in code repository to work with a user interface.

Although profound in its simplicity, defining production grade REST API can be much more extensive task!

6. Comparison of WebSocket and RESTful HTTP

Having created minimal, but working, examples of WebSocket and RESTful HTTP, we’re now ready to understand how do they fare against each other. We’ll examine this against several criteria in the next sub-sections.

It is important to note that while we can directly compare HTTP and WebSocket as they are both application layer protocols, it’s not natural to compare REST against WebSocket. As we saw earlier REST is an architectural style which leverages HTTP for communication.

Hence our comparison to WebSocket will mostly be regarding the capabilities, or lack thereof, in HTTP.

6.1. URL Scheme

A URL defines the unique location of a web resource and mechanism to retrieve it. In a client-server communication, more often than not we’re looking to get static or dynamic resources through their associated URL.

We’re all familiar with the HTTP URL scheme:

http://localhost:8080/rest

WebSocket URL scheme is not much different either:

ws://localhost:8080/ws

At the outset, the only difference seems to be the characters before the colon, but it abstracts a lot which happens under the hood. Let’s explore further.

6.2. Handshake

Handshake refers to the automatic way of negotiating communication protocol between communicating parties. HTTP is a stateless protocol and works in a request-response mechanism. On every HTTP request, a TCP connection is established with the server over the socket.

The client then waits until the server responds with the resource or an error. The next request from the client repeats everything as if the previous request never happened:

WebSocket works very differently compared to HTTP and starts with a handshake before actual communication.

Let’s see what comprise a WebSocket handshake:

In case of WebSocket, the client initiates a Protocol Handshake request in HTTP and then waits until the server responds accepting an upgrade to WebSocket from HTTP.

Of course, since Protocol Handshake happens over HTTP, it follows the sequence from the previous diagram. But once the connection is established, from there on client and server switches over to WebSocket for further communication.

6.3. Connection

As we saw in the previous subsection, one stark difference between WebSocket and HTTP is that WebSocket works on persistent TCP connection while HTTP creates a new TCP connection for every request.

Now obviously creating new TCP connection for every request is not very performant and HTTP has not been unaware of this. In fact, as part of HTTP/1.1, persistent connections were introduced to alleviate this shortcoming of HTTP.

Nevertheless, WebSocket has been designed from the ground up to work with persistent TCP connections.

6.4. Communication

The benefit of WebSocket over HTTP is a specific scenario that arises from the fact that the client can server can communicate in ways which were not possible with good old HTTP.

For instance, in HTTP, usually the client sends that request, and then the server responds with requested data. There is no generic way for the server to communicate with the client on its own. Of course, patterns and solutions have been devised to circumvent this like Server-Sent Events (SSE), but these were not completely natural.

With WebSocket, working over persistent TCP communication, it’s possible for server and client both to send data independent of each other, and in fact, to many communicating parties! This is referred to as bi-directional communication.

Another interesting feature of WebSocket communication is that it’s full-duplex. Now while this term may sound esoteric; it simply means that both server and client can send data simultaneously. Compare this with what happens in HTTP where the server has to wait until it receives the request in full before it can respond with data.

While the benefit of bi-directional and full-duplex communication may not be apparent immediately. we’ll see some of the use-cases where they unlock some real power.

6.5. Security

Last but not least, both HTTP and WebSocket leverage the benefits of TLS for security. While HTTP offers https as part of their URL scheme to use this, WebSocket has wss as part of their URL scheme for the same effect.

So the secured version of URLs from the previous subsection should look like:

https://localhost:443/rest
wss://localhost:443/ws

Securing either a RESTful service or a WebSocket communication is a subject of much depth and can not be covered here. For now, let’s just say that both are adequately supported in this regard.

7. Where Should We Use Them?

Now, we have seen enough of RESTful service over HTTP and simple communication over WebSocket to form our opinion around them. But where should we use what?

It’s important to remember that while WebSocket has emerged out of shortcomings in HTTP, it’s not, in fact, a replacement of HTTP. So they both have their place and their uses. Let’s quickly understand how can we make a decision.

For the bulk of the scenario where occasional communication is required with the server like getting the record of an employee, it’s still sensible to use REST service over HTTP/S. But for newer client-side applications like a stock-price application which requires real-time updates from the server, it’s much convenient to leverage WebSocket.

Generalizing, WebSocket is more suitable for cases where a push-based and real-time communication defines the requirement more appropriately. Additionally, WebSocket works well for scenarios where a message needs to be pushed to multiple clients simultaneously. These are the cases where client and server communication over RESTful services will find it difficult if not prohibitive.

Nevertheless, the use of WebSocket and RESTful services over HTTP needs to be drawn from the requirements. Like there are no silver bullets, we can’t just expect to pick one to solve every problem. Hence, we must use our wisdom coupled with knowledge in designing an efficient communication model.

8. Conclusion

In this tutorial, we reviewed the basics of network communication with an emphasis on application layer protocols HTTP and WebSocket. We saw some quick demonstrations of WebSocket and RESTful API over HTTP in Spring Boot.

And finally, we compared the features of HTTP and WebSocket protocols and briefly discussed when to use each.

As always, the code for the examples is available over on GitHub.

Java Weekly, Issue 276

$
0
0

Here we go…

1. Spring and Java

>> Running Kotlin Tests With Maven [petrikainulainen.net]

A useful, extensive walkthrough using Kotlin with Maven intelligently. Practical and to the point.

>> Java 12 Enhanced Switch [vojtechruzicka.com]

If you haven’t yet seen the new switch functionality, this is a good way to get up to speed.

>> Jumping from Javascript to Java. How hard can it be? [blog.scottlogic.com]

For some context, especially if you’re doing work in both languages.

Also worth reading:

Webinars and presentations:

Time to upgrade:

2. Technical and Musings

>> Domain-Oriented Observability [martinfowler.com]

Always a lot to learn here, especially if you’re focused on building observable systems, which is so often an afterthought in system architecture.

>> Creating Git shortcuts [blog.frankel.ch]

If you’re working with git – and chances are really good that you are – this is well worth a read. Maybe a couple of reads actually 🙂

Also worth reading:

3. Pick of the Week

>> Stackoverflow Developer Survey Results 2019 [insights.stackoverflow.com]

Compressed OOPs in the JVM

$
0
0

1. Overview

The JVM manages memory for us. This removes the memory management burden from the developers, so we don’t need to manipulate object pointers manually, which is proven to be time consuming and error-prone.

Under the hood, the JVM incorporates a lot of nifty tricks to optimize the memory management process. One trick is the use of Compressed Pointers, which we’re going evaluate in this article. First off, let’s see how the JVM represents objects at runtime.

2. Runtime Object Representation

The HotSpot JVM uses a data structure called oops or Ordinary Object Pointers to represent objects. These oops are equivalent to native C pointers. The instanceOops are a special kind of oop that represents the object instances in Java. Moreover, the JVM also supports a handful of other oops that are kept in the OpenJDK source tree.

Let’s see how the JVM lays out instanceOops in memory.

2.1. Object Memory Layout

The memory layout of an instanceOop is simple: it’s just the object header immediately followed by zero or more references to instance fields.

The JVM representation of an object header consists of:

  • One mark word which serves many purposes such as Biased LockingIdentity Hash Values, and GC. It’s not an oop, but for historical reasons, it resides in the OpenJDK’s oop source tree.
  • One Klass word which represents a pointer to class metadata. Before Java 7, they were held in the Permanent Generation but from the Java 8 onward, they are in the Metaspace.
  • A 32-bit length word an array-only field to represent array length.
  • A 32-bit gap to enforce object alignment. This makes things easier, as we will see later.

Immediately after the header, there are be zero or more references to instance fields. In this case, a word is a native machine word, so 32-bit on legacy 32-bit machines and 64-bit on more modern systems.

2.2. Anatomy of Waste

Suppose we’re going to switch from a legacy 32-bit architecture to a more modern 64-bit machine. At first, we may expect to get an immediate performance boost. However, that’s not always the case when the JVM is involved.

The main culprit for this possible performance degradation is 64-bit object references. 64-bit references take up twice the space of 32-bit references, so this leads to more memory consumption in general and more frequent GC cycles. The more time dedicated to GC cycles, the fewer CPU execution slices for our application threads.

So, should we switch back and use those 32-bit architectures again? Even if this were an option, we couldn’t have more than 4 GB of heap space in 32-bit process spaces without a bit more work.

3. Compressed OOPs

As it turns out, the JVM can avoid wasting memory by compressing the object pointers or oops, so we can have the best of both worlds: allowing more than 4 GB of heap space with 32-bit references in 64-bit machines!

3.1. Basic Optimization

As we saw earlier, the JVM adds padding to the objects so that their size is a multiple of 8 bytes. With these paddings, the last three bits in oops are always zero. This is because numbers that are a multiple of 8 always end in 000 in binary.

Since the JVM already knows that the last three bits are always zero, there’s no point in storing those insignificant zeros in the heap. Instead, it assumes they are there and stores 3 other more significant bits that we couldn’t fit into 32-bits previously. Now, we have a 32-bit address with 3 right-shifted zeros, so we’re compressing a 35-bit pointer into a 32-bit one. This means that we can use up to 32 GB –  232+3=235=32 GB – of heap space without using 64-bit references.

In order to make this optimization work, when the JVM needs to find an object in memory it shifts the pointer to left by 3 bits (basically adds those 3-zeros back on to the end). On the other hand, when loading a pointer to the heap, the JVM shifts the pointer to right by 3 bits to discard those previously added zeros. Basically, the JVM performs a little bit more computation to save some space. Luckily, bit shifting is a really trivial operation for most CPUs.

To enable oop compression, we can use the -XX:+UseCompressedOops tuning flag. The oop compression is the default behavior from Java 7 onwards whenever the maximum heap size is less than 32 GB. When the maximum heap size is more than 32 GB, the JVM will automatically switch off the oop compression. So memory utilization beyond a 32 Gb heap size needs to be managed differently.

3.2. Beyond 32 GB

It’s also possible to use compressed pointers when Java heap sizes are greater than 32GB. Although the default object alignment is 8 bytes, this value is configurable using the -XX:ObjectAlignmentInBytes tuning flag. The specified value should be a power of two and must be within the range of 8 and 256.

We can calculate the maximum possible heap size with compressed pointers as follows:

4 GB * ObjectAlignmentInBytes

For example, when the object alignment is 16 bytes, we can use up to 64 GB of heap space with compressed pointers.

Please note that as the alignment value increases, the unused space between objects will also increase. As a result, we may not realize any benefits from using compressed pointers with large Java heap sizes.

3.3. Futuristic GCs

ZGC, a new addition in Java 11, is an experimental and scalable low-latency garbage collector. It can handle different ranges of heap sizes while keeping the GC pauses under 10 milliseconds. Since ZGC needs to use 64-bit colored pointersit does not support compressed references. So, using an ultra-low latency GC like ZGC has to be traded off again using more memory.

4. Conclusion

In this article, we described a JVM memory management issue in 64-bit architectures. We looked at compressed pointers and object alignment, and saw how the JVM can address these issues, allowing us larger heap sizes with less wasteful pointers and a minimum of extra computation.

Guide to Spring Cloud Kubernetes

$
0
0

1. Overview

When we build a microservices solution, both Spring Cloud and Kubernetes are optimal solutions, as they provide components for resolving the most common challenges. However, if we decide to choose Kubernetes as the main container manager and deployment platform for our solution, we can still use Spring Cloud’s interesting features mainly through the Spring Cloud Kubernetes project.

This relatively new project undoubtedly provides easy integration with Kubernetes for Spring Boot applications. Before starting, it may be helpful to look at how to deploy a Spring Boot application on Minikube, a local Kubernetes environment.

In this tutorial, we’ll:

  • Install Minikube on our local machine
  • Develop a microservices architecture example with two independent Spring Boot applications communicating through REST
  • Set up the application on a one-node cluster using Minikube
  • Deploy the application using YAML config files

2. Scenario

In our example, we’re using the scenario of travel agents offering various deals to clients who will query the travel agents service from time to time. We’ll use it to demonstrate:

  • service discovery through Spring Cloud Kubernetes
  • configuration management and injecting Kubernetes ConfigMaps and secrets to application pods using Spring Cloud Kubernetes Config
  • load balancing using Spring Cloud Kubernetes Ribbon

3. Environment Setup

First and foremost, we need to install Minikube on our local machine and preferably a VM driver such as VirtualBox. It’s also recommended to look at Kubernetes and its main features before following this environment setup.

Let’s start the local single-node Kubernetes cluster:

minikube start --vm-driver=virtualbox

This command creates a Virtual Machine that runs a Minikube cluster using the VirtualBox driver. The default context in kubectl will now be minikube. However, to be able to switch between contexts, we use:

kubectl config use-context minikube

After starting Minikube, we can connect to the Kubernetes dashboard to access the logs and monitor our services, pods, ConfigMaps, and Secrets easily:

minikube dashboard

3.1. Deployment

Firstly, let’s get our example from GitHub.

At this point, we can either run the “deployment-travel-client.sh” script from the parent folder, or else execute each instruction one by one to get a good grasp of the procedure:

### build the repository
mvn clean install

### set docker env
eval $(minikube docker-env)

### build the docker images on minikube
cd travel-agency-service
docker build -t travel-agency-service .
cd ../client-service
docker build -t client-service .
cd ..

### secret and mongodb
kubectl delete -f travel-agency-service/secret.yaml
kubectl delete -f travel-agency-service/mongo-deployment.yaml

kubectl create -f travel-agency-service/secret.yaml
kubectl create -f travel-agency-service/mongo-deployment.yaml

### travel-agency-service
kubectl delete -f travel-agency-service/travel-agency-deployment.yaml
kubectl create -f travel-agency-service/travel-agency-deployment.yaml

### client-service
kubectl delete configmap client-service
kubectl delete -f client-service/client-service-deployment.yaml

kubectl create -f client-service/client-config.yaml
kubectl create -f client-service/client-service-deployment.yaml

# Check that the pods are running
kubectl get pods

4. Service Discovery

This project provides us with an implementation for the ServiceDiscovery interface in Kubernetes. In a microservices environment, there are usually multiple pods running the same service. Kubernetes exposes the service as a collection of endpoints that can be fetched and reached from within a Spring Boot Application running in a pod in the same Kubernetes cluster.

For instance, in our example, we have multiple replicas of the travel agent service, which is accessed from our client service as http://travel-agency-service:8080. However, this internally would translate into accessing different pods such as travel-agency-service-7c9cfff655-4hxnp.

Spring Cloud Kubernetes Ribbon uses this feature to load balance between the different endpoints of a service.

We can easily use Service Discovery by adding the spring-cloud-starter-kubernetes dependency on our client application:

<dependency>
    <groupId>org.springframework.cloud</groupId>
    <artifactId>spring-cloud-starter-kubernetes</artifactId>
</dependency>

Also, we should add @EnableDiscoveryClient and inject the DiscoveryClient into the ClientController by using @Autowired in our class:

@SpringBootApplication
@EnableDiscoveryClient
public class Application {
    public static void main(String[] args) {
        SpringApplication.run(Application.class, args);
    }
}
@RestController
public class ClientController {
    @Autowired
    private DiscoveryClient discoveryClient;
}

5. ConfigMaps

Typically, microservices require some kind of configuration management. For instance, in Spring Cloud applications, we would use a Spring Cloud Config Server.

However, we can achieve this by using ConfigMaps provided by Kubernetes – provided that we intend to use it for non-sensitive, unencrypted information only. Alternatively, if the information we want to share is sensitive, then we should opt to use Secrets instead.

In our example, we’re using ConfigMaps on the client-service Spring Boot application. Let’s create a client-config.yaml file to define the ConfigMap of the client-service:

apiVersion: v1 by d
kind: ConfigMap
metadata:
  name: client-service
data:
  application.properties: |-
    bean.message=Testing reload! Message from backend is: %s <br/> Services : %s

It’s important that the name of the ConfigMap matches the name of the application as specified in our “application.properties” file. In this case, it’s client-service. Next, we should create the ConfigMap for client-service on Kubernetes:

kubectl create -f client-config.yaml

Now, let’s create a configuration class ClientConfig with the @Configuration and @ConfigurationProperties and inject into the ClientController:

@Configuration
@ConfigurationProperties(prefix = "bean")
public class ClientConfig {

    private String message = "Message from backend is: %s <br/> Services : %s";

    // getters and setters
}
@RestController
public class ClientController {

    @Autowired
    private ClientConfig config;

    @GetMapping
    public String load() {
        return String.format(config.getMessage(), "", "");
    }
}

If we don’t specify a ConfigMap, then we should expect to see the default message, which is set in the class. However, when we create the ConfigMap, this default message gets overridden by that property.

Additionally, every time we decide to update the ConfigMap, the message on the page changes accordingly:

kubectl edit configmap client-service

6. Secrets

Let’s look at how Secrets work by looking at the specification of MongoDB connection settings in our example. We’re going to create environment variables on Kubernetes, which will then be injected into the Spring Boot application.

6.1. Create a Secret

The first step is to create a secret.yaml file, encoding the username and password to Base 64:

apiVersion: v1
kind: Secret
metadata:
  name: db-secret
data:
  username: dXNlcg==
  password: cDQ1NXcwcmQ=

Let’s apply the Secret configuration on the Kubernetes cluster:

kubectl apply -f secret.yaml

6.2. Create a MongoDB Service

We should now create the MongoDB service and the deployment travel-agency-deployment.yaml file. In particular, in the deployment part, we’ll use the Secret username and password that we defined previously:

apiVersion: extensions/v1beta1
kind: Deployment
metadata:
  name: mongo
spec:
  replicas: 1
  template:
    metadata:
      labels:
        service: mongo
      name: mongodb-service
    spec:
      containers:
      - args:
        - mongod
        - --smallfiles
        image: mongo:latest
        name: mongo
        env:
          - name: MONGO_INITDB_ROOT_USERNAME
            valueFrom:
              secretKeyRef:
                name: db-secret
                key: username
          - name: MONGO_INITDB_ROOT_PASSWORD
            valueFrom:
              secretKeyRef:
                name: db-secret
                key: password

By default, the mongo:latest image will create a user with username and password on a database named admin.

6.3. Setup MongoDB on Travel Agency Service

It’s important to update the application properties to add the database related information. While we can freely specify the database name admin, here we’re hiding the most sensitive information such as the username and the password:

spring.cloud.kubernetes.reload.enabled=true
spring.cloud.kubernetes.secrets.name=db-secret
spring.data.mongodb.host=mongodb-service
spring.data.mongodb.port=27017
spring.data.mongodb.database=admin
spring.data.mongodb.username=${MONGO_USERNAME}
spring.data.mongodb.password=${MONGO_PASSWORD}

Now, let’s take a look at our travel-agency-deployment property file to update the services and deployments with the username and password information required to connect to the mongodb-service.

Here’s the relevant section of the file, with the part related to the MongoDB connection:

env:
  - name: MONGO_USERNAME
    valueFrom:
      secretKeyRef:
        name: db-secret
        key: username
  - name: MONGO_PASSWORD
    valueFrom:
      secretKeyRef:
        name: db-secret
        key: password

7. Communication with Ribbon

In a microservices environment, we generally need the list of pods where our service is replicated in order to perform load-balancing. This is accomplished by using a mechanism provided by Spring Cloud Kubernetes Ribbon. This mechanism can automatically discover and reach all the endpoints of a specific service, and subsequently, it populates a Ribbon ServerList with information about the endpoints.

Let’s start by adding the spring-cloud-starter-kubernetes-ribbon dependency to our client-service pom.xml file:

<dependency>
    <groupId>org.springframework.cloud</groupId>
    <artifactId>spring-cloud-starter-kubernetes-ribbon</artifactId>
</dependency>

The next step is to add the annotation @RibbonClient to our client-service application:

@RibbonClient(name = "travel-agency-service")

When the list of the endpoints is populated, the Kubernetes client will search the registered endpoints living in the current namespace/project matching the service name defined using the @RibbonClient annotation.

We also need to enable the ribbon client in the application properties:

ribbon.http.client.enabled=true

8. Additional Features

8.1. Hystrix

Hystrix helps in building a fault-tolerant and resilient application. Its main aims are fail fast and rapid recovery.

In particular, in our example, we’re using Hystrix to implement the circuit breaker pattern on the client-server by annotating the Spring Boot application class with @EnableCircuitBreaker.

Additionally, we’re using the fallback functionality by annotating the method TravelAgencyService.getDeals() with @HystrixCommand(). This means that in case of fallback the getFallBackName() will be called and “Fallback” message returned:

@HystrixCommand(fallbackMethod = "getFallbackName", commandProperties = { 
    @HystrixProperty(name = "execution.isolation.thread.timeoutInMilliseconds", value = "1000") })
public String getDeals() {
    return this.restTemplate.getForObject("http://travel-agency-service:8080/deals", String.class);
}

private String getFallbackName() {
    return "Fallback";
}

8.2. Pod Health Indicator

We can take advantage of Spring Boot HealthIndicator and Spring Boot Actuator to expose health-related information to the user.

In particular, the Kubernetes health indicator provides:

  • pod name
  • IP address
  • namespace
  • service account
  • node name
  • a flag that indicates whether the Spring Boot application is internal or external to Kubernetes

9. Conclusion

In this article, we provide a thorough overview of the Spring Cloud Kubernetes project.

So why should we use it? If we root for Kubernetes as a microservices platform but still appreciate the features of Spring Cloud, then Spring Cloud Kubernetes gives us the best of both worlds.

The full source code of the example is available over on GitHub.


Copying a HashMap in Java

$
0
0

1. Overview

In this tutorial, we’ll explore the concept of a shallow vs deep copy of a HashMap along with several techniques to copy a HashMap in Java.

We’ll also consider some of the external libraries that can help us in specific cases.

2. Shallow vs Deep Copies

Firstly, let’s understand the concept of shallow and deep copies in HashMaps.

2.1. Shallow Copy

A shallow copy of a HashMap is a new HashMap with mappings to the same key and value objects as the original HashMap.

For example, we’ll create an Employee class and then a map with Employee instances as values:

public class Employee {
    private String name;

    // constructor, getters and setters
}
HashMap<String, Employee> map = new HashMap<>();
Employee emp1 = new Employee("John");
Employee emp2 = new Employee("Norman");
map.put("emp1", emp1);
map.put("emp2", emp2);

Now, we’ll verify that the original map and its shallow copy are different objects:

HashMap<String, Employee> shallowCopy = // shallow copy implementation
assertThat(shallowCopy).isNotSameAs(map);

Because this is a shallow copy, if we change an Employee instance’s properties, it will affect both the original map and its shallow copy:

emp1.setFirstName("Johny");
assertThat(shallowCopy.get("emp1")).isEqualTo(map.get("emp1"));

2.2. Deep Copy

A deep copy of a HashMap is a new HashMap that deeply copies all the mappings. Therefore, it creates new objects for all keys, values, and mappings.

Here, explicitly modifying the mappings (key-values) will not affect the deep copy:

HashMap<String, Employee> deepCopy = // deep copy implementation

emp1.setFirstName("Johny");

assertThat(deepCopy.get("emp1")).isNotEqualTo(map.get("emp1"));

3. HashMap API

3.1. Using the HashMap Constructor

HashMap‘s parameterized constructor HashMap(Map<? extends K,? extends V> m) provides a quick way to shallow copy an entire map:

HashMap<String, Employee> shallowCopy = new HashMap<String, Employee>(originalMap);

3.2. Using Map.clone()

Similar to the constructor, the HashMap#clone method also creates a quick shallow copy:

HashMap<String, Employee> shallowCopy = originalMap.clone();

3.3. Using Map.put()

A HashMap can easily be shallow-copied by iterating over each entry and calling the put() method on another map:

HashMap<String, Employee> shallowCopy = new HashMap<String, Employee>();
Set<Entry<String, Employee>> entries = originalMap.entrySet();
for (Map.Entry<String, Employee> mapEntry : entries) {
    shallowCopy.put(mapEntry.getKey(), mapEntry.getValue());
}

3.4. Using Map.putAll()

Instead of iterating through all of the entries, we can use the putAll() method, which shallow-copies all of the mappings in one step:

HashMap<String, Employee> shallowCopy = new HashMap<>();
shallowCopy.putAll(originalMap);    

We should note that put() and putAll() replace the values if there is a matching key.

It’s also interesting to note that, if we look at the HashMap‘s constructor, clone(), and putAll() implementation, we’ll find all of them use the same internal method to copy entries — putMapEntries().

4. Copying HashMap Using the Java 8 Stream API

We can use the Java 8 Stream API to create a shallow copy of a HashMap:

Set<Entry<String, Employee>> entries = originalMap.entrySet();
HashMap<String, Employee> shallowCopy = (HashMap<String, Employee>) entries.stream()
  .collect(Collectors.toMap(Map.Entry::getKey, Map.Entry::getValue));

5. Google Guava

Using Guava Maps, we can easily create immutable maps, along with the sorted and bi map. To make an immutable, shallow copy of any of these maps, we can use the copyOf method:

Map<String, Employee> map = ImmutableMap.<String, Employee>builder()
  .put("emp1",emp1)
  .put("emp2",emp2)
  .build();
Map<String, Employee> shallowCopy = ImmutableMap.copyOf(map);
    
assertThat(shallowCopy).isSameAs(map);

6. Apache Commons Lang

Now, Java doesn’t have any built-in deep copy implementations. So to make a deep copy, either we can override the clone() method or use a serialization-deserialization technique.

Apache Commons has SerializationUtils with a clone() method to create a deep copy. For this, any class to be included in deep copy must implement the Serializable interface:

public class Employee implements Serializable {
    // implementation details
}

HashMap<String, Employee> deepCopy = SerializationUtils.clone(originalMap);

7. Conclusion

In this quick tutorial, we’ve seen various techniques to copy a HashMap in Java, along with the concept of shallow and deep copy for HashMaps.

Also, we explored some of the external libraries that are quite handy for creating shallow and deep copies.

The complete source code of these implementations along with the unit tests are available in the GitHub project.

A Quick Guide To Using Cloud Foundry UAA

$
0
0

1. Overview

Cloud Foundry User Account and Authentication (CF UAA) is an identity management and authorization service. More precisely, it’s an OAuth 2.0 provider allowing authentication and issuing tokens to Client applications.

In this tutorial, we’re going to cover the basics of setting up a CF UAA server. We’ll then look at how to use it for protecting Resource Server applications.

But before, let’s clarify the role of UAA in the OAuth 2.0 authorization framework.

2. Cloud Foundry UAA and OAuth 2.0

Let’s start by understanding how UAA relates to the OAuth 2.0 specification.

The OAuth 2.0 specification defines four participants that can connect to each other: a Resource Owner, a Resource Server, a Client, and an Authorization Server.

As an OAuth 2.0 provider, UAA plays the role of the authorization server. This means its primary goal is issuing access tokens for client applications and validating these tokens for resource servers.

To allow the interaction of these participants, we need to first to set up a UAA server and then implement two more applications: one as a client and the other as a resource server.

We’ll use the authorization_code grant flow with the client. And we’ll use Bearer token authorization with the resource server. For a more secure and efficient handshake, we’ll use signed JWTs as our access tokens.

3. Setting Up a UAA Server

First, we’ll install UAA and populate it with some demo data.

Once installed, we’ll register a client application named webappclient. Then, we’ll create a user named appuser with two roles, resource.read and resource.write.

3.1. Installation

UAA is a Java web application that can be run in any compliant servlet container. In this tutorial, we’ll use Tomcat.

Let’s go ahead and download the UAA war and deposit it into our Tomcat deployment:

wget -O $CATALINA_HOME/webapps/uaa.war \
  https://search.maven.org/remotecontent?filepath=org/cloudfoundry/identity/cloudfoundry-identity-uaa/4.27.0/cloudfoundry-identity-uaa-4.27.0.war

Before we start it up, though, we’ll need to configure its data source and JWS key pair.

3.2. Required Configuration

By default, UAA reads configuration from uaa.yml on its classpath. But, since we’ve just downloaded the war file, it’ll be better for us to tell UAA a custom location on our file system.

We can do this by setting the UAA_CONFIG_PATH property:

export UAA_CONFIG_PATH=~/.uaa

Alternatively, we can set CLOUD_FOUNDRY_CONFIG_PATH. Or, we can specify a remote location with UAA_CONFIG_URL.

Then, we can copy UAA’s required configuration into our config path:

wget -qO- https://raw.githubusercontent.com/cloudfoundry/uaa/4.27.0/uaa/src/main/resources/required_configuration.yml \
  > $UAA_CONFIG_PATH/uaa.yml

Note that we are deleting the last three lines because we are going to replace them in a moment.

3.3. Configuring the Data Source

So, let’s configure the data source, where UAA is going to store information about clients.

For the purpose of this tutorial, we’re going to use HSQLDB:

export SPRING_PROFILES="default,hsqldb"

Of course, since this is a Spring Boot application, we could also specify this in uaa.yml as the spring.profiles property.

3.4. Configuring the JWS Key Pair

Since we are using JWT, UAA needs to have a private key to sign each JWT that UAA issues.

OpenSSL makes this simple:

openssl genrsa -out signingkey.pem 2048
openssl rsa -in signingkey.pem -pubout -out verificationkey.pem

The authorization server will sign the JWT with the private key, and our client and resource server will verify that signature with the public key.

We’ll export them to JWT_TOKEN_SIGNING_KEY and JWT_TOKEN_VERIFICATION_KEY:

export JWT_TOKEN_SIGNING_KEY=$(cat signingkey.pem)
export JWT_TOKEN_VERIFICATION_KEY=$(cat verificationkey.pem)

Again, we could specify these in uaa.yml via the jwt.token.signing-key and jwt.token.verification-key properties.

3.5. Starting up UAA

Finally, let’s start things up:

$CATALINA_HOME/bin/catalina.sh run

At this point, we should have a working UAA server available at http://localhost:8080/uaa.

If we go to http://localhost:8080/uaa/info, then we’ll see some basic startup info

3.6. Installing the UAA Command-Line Client

The CF UAA Command-Line Client is the main tool for administering UAA, but to use it, we need to install Ruby first:

sudo apt install rubygems
gem install cf-uaac

Then, we can configure uaac to point to our running instance of UAA:

uaac target http://localhost:8080/uaa

Note that if we don’t want to use command-line client, we can, of course, use UAA’s HTTP client.

3.7. Populating Clients and Users Using UAAC

Now that we have uaac installed, let’s populate UAA with some demo data. At a minimum, we’ll need: A client, a user, and resource.read and resource.write groups.

So, to do any administration, we’ll need to authentication ourselves. We’ll pick the default admin that ships with UAA, which has permissions to create other clients, users, and groups:

uaac token client get admin -s adminsecret

(Of course, we definitely need to change this account – via the oauth-clients.xml file – before shipping!)

Basically, we can read this command as: “Give me a token, using client credentials with the client_id of admin and a secret of adminsecret“.

If all goes well, we’ll see a success message:

Successfully fetched token via client credentials grant.

The token is stored in uaac‘s state.

Now, operating as admin, we can register a client named webappclient with client add:

uaac client add webappclient -s webappclientsecret \ 
--name WebAppClient \ 
--scope resource.read,resource.write,openid,profile,email,address,phone \ 
--authorized_grant_types authorization_code,refresh_token,client_credentials,password \ 
--authorities uaa.resource \ 
--redirect_uri http://localhost:8081/login/oauth2/code/uaa

And also, we can register a user named appuser with user add:

uaac user add appuser -p appusersecret --emails appuser@acme.com

Next, we’ll add two groups – resource.read and resource.write – using with group add:

uaac group add resource.read
uaac group add resource.write

And finally, we’ll assign these groups to appuser with member add:

uaac member add resource.read appuser
uaac member add resource.write appuser

Phew! So, what we’ve done so far is:

  • Installed and configured UAA
  • Installed uaac
  • Added a demo client, users, and groups

So, let’s keep in mind these pieces of information and jump to the next step.

4. OAuth 2.0 Client

In this section, we’ll use Spring Boot to create an OAuth 2.0 Client application.

4.1. Application Setup

Let’s start by accessing Spring Initializr and generating a Spring Boot web application. We choose only the Web and OAuth2 Client components:

<dependency>
    <groupId>org.springframework.boot</groupId>
    <artifactId>spring-boot-starter-web</artifactId>
</dependency>
<dependency>
    <groupId>org.springframework.boot</groupId>
    <artifactId>spring-boot-starter-oauth2-client</artifactId>
</dependency>

In this example, we’ve used version 2.1.3 of Spring Boot.

Next, we need to register our client, webappclient.

Quite simply, we’ll need to give the app the client-id, client-secret, and UAA’s issuer-uri. We’ll also specify the OAuth 2.0 scopes that this client wants the user to grant to it:

#registration
spring.security.oauth2.client.registration.uaa.client-id=webappclient
spring.security.oauth2.client.registration.uaa.client-secret=webappclientsecret
spring.security.oauth2.client.registration.uaa.scope=resource.read,resource.write,openid,profile

#provider
spring.security.oauth2.client.provider.uaa.issuer-uri=http://localhost:8080/uaa/oauth/token

For more information about these properties, we can have a look at the Java docs for the registration and provider beans.

And since we’re already using port 8080 for UAA, let’s have this run on 8081:

server.port=8081

4.2. Login

Now if we access the /login path, we should have a list of all registered clients. In our case, we have only one registered client:


Clicking on the link will redirect us to the UAA login page:

Here, let’s login with appuser/appusersecret.

Submitting the form should redirect us to an approval form where the user can authorize or deny access to our client:

The user can then grant which privileges she wants. For our purposes, we’ll select everything except resource:write.

Whatever the user checks will be the scopes in the resulting access token.

To prove this, we can copy the token shown at the index path, http://localhost:8081, and decode it using the JWT debuggerWe should see the scopes we checked on the approval page:

{
  "jti": "f228d8d7486942089ff7b892c796d3ac",
  "sub": "0e6101d8-d14b-49c5-8c33-fc12d8d1cc7d",
  "scope": [
    "resource.read",
    "openid",
    "profile"
  ],
  "client_id": "webappclient"
  // more claims
}

Once our client application receives this token, it can authenticate the user and they’ll have access to the app.

Now, an app that doesn’t show any data isn’t very useful, so our next step will be to stand up a resource server – which has the user’s data – and connect the client to it.

The completed resource server will have two protected APIs: one that requires the resource.read scope and another that requires resource.write.

What we’ll see is that the client, using the scopes we granted, will be able to call the read API but not write.

5. Resource Server

The resource server hosts the user’s protected resources.

It authenticates clients via the Authorization header and in consultation with an authorization server – in our case, that’s UAA.

5.1. Application Set Up

To create our resource server, we’ll use Spring Initializr again to generate a Spring Boot web application. This time, we’ll choose the Web and OAuth2 Resource Server components:

<dependency>
    <groupId>org.springframework.boot</groupId>
    <artifactId>spring-boot-starter-oauth2-resource-server</artifactId>
</dependency>
<dependency>
    <groupId>org.springframework.boot</groupId>
    <artifactId>spring-boot-starter-web</artifactId>
</dependency>

As with the Client application, we’re using the version 2.1.3 of Spring Boot.

The next step is to indicate the location of the running CF UAA in the application.properties file:

spring.security.oauth2.resourceserver.jwt.issuer-uri=http://localhost:8080/uaa/oauth/token

Of course, let’s pick a new port here, too. 8082 will work fine:

server.port=8082

And that’s it! We should have a working resource server and by default, all requests will require a valid access token in the Authorization header.

5.2. Protecting Resource Server APIs

Next, let’s add some endpoints worth protecting, though.

We’ll add a RestController with two endpoints, one authorized for users having the resource.read scope and the other for users having the resource.write scope:

@GetMapping("/read")
public String read(Principal principal) {
    return "Hello write: " + principal.getName();
}

@GetMapping("/write")
public String write(Principal principal) {
    return "Hello write: " + principal.getName();
}

Next, we’ll override the default Spring Boot configuration to protect the two resources:

@EnableWebSecurity
public class OAuth2ResourceServerSecurityConfiguration extends WebSecurityConfigurerAdapter {

   @Override
   protected void configure(HttpSecurity http) throws Exception {
      http.authorizeRequests()
        .antMatchers("/read/**").hasAuthority("SCOPE_resource.read")
        .antMatchers("/write/**").hasAuthority("SCOPE_resource.write")
        .anyRequest().authenticated()
      .and()
        .oauth2ResourceServer().jwt();
   }
}

Note that the scopes supplied in the access token are prefixed with SCOPE_ when they are translated to a Spring Security GrantedAuthority.

5.3. Requesting a Protected Resource From a Client

From the Client application, we’ll call the two protected resources using RestTemplate. Before making the request, we retrieve the access token from the context and add it to the Authorization header:

private String callResourceServer(OAuth2AuthenticationToken authenticationToken, String url) {
    OAuth2AuthorizedClient oAuth2AuthorizedClient = this.authorizedClientService.
      loadAuthorizedClient(authenticationToken.getAuthorizedClientRegistrationId(), 
      authenticationToken.getName());
    OAuth2AccessToken oAuth2AccessToken = oAuth2AuthorizedClient.getAccessToken();

    HttpHeaders headers = new HttpHeaders();
    headers.add("Authorization", "Bearer " + oAuth2AccessToken.getTokenValue());

    // call resource endpoint

    return response;
}

Note, though, that we can remove this boilerplate if we use WebClient instead of RestTemplate.

Then, we’ll add two calls to the resource server endpoints:

@GetMapping("/read")
public String read(OAuth2AuthenticationToken authenticationToken) {
    String url = remoteResourceServer + "/read";
    return callResourceServer(authenticationToken, url);
}

@GetMapping("/write")
public String write(OAuth2AuthenticationToken authenticationToken) {
    String url = remoteResourceServer + "/write";
    return callResourceServer(authenticationToken, url);
}

As expected, the call of the /read API will succeed, but not the /write one. The HTTP status 403 tells us that the user is not authorized.

6. Conclusion

In this article, we started with a brief overview of the OAuth 2.0 as it’s the base foundation for UAA, an OAuth 2.0 Authorization Server. Then, we configured it for issuing access tokens for a client and securing a resource server application.

The full source code for the examples is available over on Github.

Why Do Local Variables Used in Lambdas Have to Be Final or Effectively Final?

$
0
0

1. Introduction

Java 8 gives us lambdas, and by association, the notion of effectively final variables. Ever wondered why local variables captured in lambdas have to be final or effectively final?

Well, the JLS gives us a bit of a hint when it says “The restriction to effectively final variables prohibits access to dynamically-changing local variables, whose capture would likely introduce concurrency problems.” But, what does it mean?

In the next sections, we’ll dig deeper into this restriction and see why Java introduced it. We’ll show examples to demonstrate how it affects single-threaded and concurrent applications, and we’ll also debunk a common anti-pattern for working around this restriction.

2. Capturing Lambdas

Lambda expressions can use variables defined in an outer scope. We refer to these lambdas as capturing lambdas. They can capture static variables, instance variables, and local variables, but only local variables must be final or effectively final.

In earlier Java versions, we ran into this when an anonymous inner class captured a variable local to the method that surrounded it – we needed to add the final keyword before the local variable for the compiler to be happy.

As a bit of syntactic sugar, now the compiler can recognize situations where, while the final keyword isn’t present, the reference isn’t changing at all, meaning it’s effectively final. We could say that a variable is effectively final if the compiler wouldn’t complain were we to declare it final.

3. Local Variables in Capturing Lambdas

Simply put, this won’t compile:

Supplier<Integer> incrementer(int start) {
  return () -> start++;
}

start is a local variable, and we are trying to modify it inside of a lambda expression.

The basic reason this won’t compile is that the lambda is capturing the value of start, meaning making a copy of it. Forcing the variable to be final avoids giving the impression that incrementing start inside the lambda could actually modify the start method parameter.

But, why does it make a copy? Well, notice that we are returning the lambda from our method. Thus, the lambda won’t get run until after the start method parameter gets garbage collected. Java has to make a copy of start in order for this lambda to live outside of this method.

3.1. Concurrency Issues

For fun, let’s imagine for a moment that Java did allow local variables to somehow remain connected to their captured values.

What should we do here:

public void localVariableMultithreading() {
    boolean run = true;
    executor.execute(() -> {
        while (run) {
            // do operation
        }
    });
    
    run = false;
}

While this looks innocent, it has the insidious problem of “visibility”. Recall that each thread gets its own stack, and so how do we ensure that our while loop sees the change to the run variable in the other stack? The answer in other contexts could be using synchronized blocks or the volatile keyword.

However, because Java imposes the effectively final restriction, we don’t have to worry about complexities like this.

4. Static or Instance Variables in Capturing Lambdas

The examples before can raise some questions if we compare them with the use of static or instance variables in a lambda expression.

We can make our first example compile just by converting our start variable into an instance variable:

private int start = 0;

Supplier<Integer> incrementer() {
    return () -> start++;
}

But, why can we change the value of start here?

Simply put, it’s about where member variables are stored. Local variables are on the stack, but member variables are on the heap. Because we’re dealing with heap memory, the compiler can guarantee that the lambda will have access to the latest value of start.

We can fix our second example by doing the same:

private volatile boolean run = true;

public void instanceVariableMultithreading() {
    executor.execute(() -> {
        while (run) {
            // do operation
        }
    });

    run = false;
}

The run variable is now visible to the lambda even when it’s executed in another thread since we added the volatile keyword.

Generally speaking, when capturing an instance variable, we could think of it as capturing the final variable this. Anyway, the fact that the compiler doesn’t complain doesn’t mean that we shouldn’t take precautions, especially in multithreading environments.

5. Avoid Workarounds

In order to get around the restriction on local variables, someone may think of using variable holders to modify the value of a local variable.

Let’s see an example that uses an array to store a variable in a single-threaded application:

public int workaroundSingleThread() {
    int[] holder = new int[] { 2 };
    IntStream sums = IntStream
      .of(1, 2, 3)
      .map(val -> val + holder[0]);

    holder[0] = 0;

    return sums.sum();
}

We could think that the stream is summing 2 to each value, but it’s actually summing 0 since this is the latest value available when the lambda is executed.

Let’s go one step further and execute the sum in another thread:

public void workaroundMultithreading() {
    int[] holder = new int[] { 2 };
    Runnable runnable = () -> System.out.println(IntStream
      .of(1, 2, 3)
      .map(val -> val + holder[0])
      .sum());

    new Thread(runnable).start();

    // simulating some processing
    try {
        Thread.sleep(new Random().nextInt(3) * 1000L);
    } catch (InterruptedException e) {
        throw new RuntimeException(e);
    }

    holder[0] = 0;
}

What value are we summing here? It depends on how long our simulated processing takes. If it’s short enough to let the execution of the method terminate before the other thread is executed it’ll print 6, otherwise, it’ll print 12.

In general, these kinds of workarounds are error-prone and can produce unpredictable results, so we should always avoid them.

6. Conclusion

In this article, we’ve explained why lambda expressions can only use final or effectively final local variables. As we’ve seen, this restriction comes from the different nature of these variables and how Java stores them in memory. We’ve also shown the dangers of using a common workaround.

As always, the full source code for the examples is available over on GitHub.

Spring Security Kerberos Integration

$
0
0

1. Overview

In this tutorial, we’ll provide an overview of Spring Security Kerberos.

We’ll write a Kerberos client in Java that authorizes itself to access our Kerberized service. And we’ll run our own embedded Key Distribution Center to perform full, end-to-end Kerberos authentication. All that, without any external infrastructure required thanks to Spring Security Kerberos.

2. Kerberos and Its Benefits

Kerberos is a network authentication protocol that MIT created in the 1980s, specifically useful for centralizing authentication on a network.

In 1987, MIT released it to the Open Source community and it’s still under active development. In 2005, it was canonized as an IETF standard under RFC 4120.

Usually, Kerberos is used in corporate environments.  In there, it secures the environment in such a way that the user doesn’t have to authenticate to each service separately. This architectural solution is known as Single Sign-on.

Simply put, Kerberos is a ticketing system. A user authenticates once and receives a Ticket-granting Ticket (TGT). Then, the network infrastructure exchanges that TGT for Service Tickets. These service tickets allow the user to interact with infrastructure services, so long as the TGT is valid, which is usually for a couple of hours.

So, it’s great that the user only signs in one time. But there’s a security benefit, too: In such an environment, the user’s password is never sent over the network. Instead, Kerberos uses it as a factor to generate another secret key that’s gonna be used to message encryption and decryption.

Another benefit is that we can manage users from a central place, say one that’s backed by LDAP. Therefore, if we disable an account in our centralized database for a given user, then we’ll revoke his access in our infrastructure. Thus, the administrators don’t have to revoke the access separately in each service.

3. Kerberized Environment

So, let’s create an environment for authenticating with the Kerberos protocol. The environment will consist of three separate applications that will run simultaneously.

First, we’ll have a Key Distribution Center that will act as the authentication point. Next, we’ll write a Client and a Service Application that we’ll configure to use Kerberos protocol.

Now, running Kerberos requires a bit of installation and configuration. However, we’ll leverage Spring Security Kerberos, so we’ll run the Key Distribution Center programmatically, in embedded mode. Also, the MiniKdc shown below is useful in case of integration testing with Kerberized infrastructure.

3.1. Running a Key Distribution Center

First, we’ll launch our Key Distribution Center, that will issue the TGTs for us:

String[] config = MiniKdcConfigBuilder.builder()
  .workDir(prepareWorkDir())
  .principals("client/localhost", "HTTP/localhost")
  .confDir("minikdc-krb5.conf")
  .keytabName("example.keytab")
  .build();

MiniKdc.main(config);

Basically, we’ve given MiniKdc a set of principals and a configuration file; additionally, we’ve told MiniKdc what to call the keytab it generates.

MiniKdc will generate a krb5.conf file that we’ll supply to our client and service applications. This file contains the information where to find our KDC – the host and port for a given realm.

MiniKdc.main starts the KDC and should output something like:

Standalone MiniKdc Running
---------------------------------------------------
  Realm           : EXAMPLE.COM
  Running at      : localhost:localhost
  krb5conf        : .\spring-security-sso\spring-security-sso-kerberos\krb-test-workdir\krb5.conf

  created keytab  : .\spring-security-sso\spring-security-sso-kerberos\krb-test-workdir\example.keytab
  with principals : [client/localhost, HTTP/localhost]

3.2. Client Application

Our client will be a Spring Boot application that’s using a RestTemplate to make calls to external a REST API.

But, we’re going to use KerberosRestTemplate instead. It’ll need the keytab and the client’s principal:

@Configuration
public class KerberosConfig {

    @Value("${app.user-principal:client/localhost}")
    private String principal;

    @Value("${app.keytab-location}")
    private String keytabLocation;

    @Bean
    public RestTemplate restTemplate() {
        return new KerberosRestTemplate(keytabLocation, principal);
    }
}

And that’s it! KerberosRestTemplate negotiates the client side of the Kerberos protocol for us.

So, let’s create a quick class that will query some data from a Kerberized service, hosted at the endpoint app.access-url:

@Service
class SampleClient {

    @Value("${app.access-url}")
    private String endpoint;

    private RestTemplate restTemplate;

    // constructor, getter, setter

    String getData() {
        return restTemplate.getForObject(endpoint, String.class);
    }
}

So, let’s create our Service Application now so that this class has something to call!

3.3. Service Application

We’ll use Spring Security, configuring it with the appropriate Kerberos-specific beans.

Also, note that the service will have its principal and use the keytab, too:

@Configuration
@EnableWebSecurity
public class WebSecurityConfig extends WebSecurityConfigurerAdapter {

    @Value("${app.service-principal:HTTP/localhost}")
    private String servicePrincipal;

    @Value("${app.keytab-location}")
    private String keytabLocation;

    @Override
    protected void configure(HttpSecurity http) throws Exception {
        http
          .authorizeRequests()
            .antMatchers("/", "/home").permitAll()
            .anyRequest().authenticated()
            .and() 
          .exceptionHandling()
            .authenticationEntryPoint(spnegoEntryPoint())
            .and()
          .formLogin()
            .loginPage("/login").permitAll()
            .and()
          .logout().permitAll()
            .and()
          .addFilterBefore(spnegoAuthenticationProcessingFilter(authenticationManagerBean()),
            BasicAuthenticationFilter.class);
    }

    @Override
    protected void configure(AuthenticationManagerBuilder auth) throws Exception {
        auth
          .authenticationProvider(kerberosAuthenticationProvider())
          .authenticationProvider(kerberosServiceAuthenticationProvider());
    }

    @Bean
    public KerberosAuthenticationProvider kerberosAuthenticationProvider() {
        KerberosAuthenticationProvider provider = new KerberosAuthenticationProvider();
        // provider configuration
        return provider;
    }

    @Bean
    public SpnegoEntryPoint spnegoEntryPoint() {
        return new SpnegoEntryPoint("/login");
    }

    @Bean
    public SpnegoAuthenticationProcessingFilter spnegoAuthenticationProcessingFilter(
      AuthenticationManager authenticationManager) {
        SpnegoAuthenticationProcessingFilter filter = new SpnegoAuthenticationProcessingFilter();
        // filter configuration
        return filter;
    }

    @Bean
    public KerberosServiceAuthenticationProvider kerberosServiceAuthenticationProvider() {
        KerberosServiceAuthenticationProvider provider = new KerberosServiceAuthenticationProvider();
        // auth provider configuration  
        return provider;
    }

    @Bean
    public SunJaasKerberosTicketValidator sunJaasKerberosTicketValidator() {
        SunJaasKerberosTicketValidator ticketValidator = new SunJaasKerberosTicketValidator();
        // validator configuration
        return ticketValidator;
    }
}

Note that we’ve configured Spring Security for SPNEGO authentication. This way, we’ll be able to authenticate through the HTTP protocol, though we can also achieve SPNEGO authentication with core Java.

4. Testing

Now, we’ll run an integration test to show that our client successfully retrieves data from an external server over the Kerberos protocol. To run this test, we need to have our infrastructure running, so MiniKdc and our Service Application both must be started.

Basically, we’ll use our SampleClient from the Client Application to make a request to our Service Application. Let’s test it out:

@Autowired
private SampleClient sampleClient;

@Test
public void givenKerberizedRestTemplate_whenServiceCall_thenSuccess() {
    assertEquals("data from kerberized server", sampleClient.getData());
}

Note that we can also prove that the KerberizedRestTemplate is important by hitting the service without it:

@Test
public void givenRestTemplate_whenServiceCall_thenFail() {
    sampleClient.setRestTemplate(new RestTemplate());
    assertThrows(RestClientException.class, sampleClient::getData);
}

As a side note, there’s a chance our second test could re-use the ticket already stored in the credential cache. This would happen due to the automatic SPNEGO negotiation used in HttpUrlConnection.

As a result, the data might actually return, invalidating our test. Depending on our needs, then, we can disable ticket cache usage through the system property http.use.global.creds=false.

5. Conclusion

In this tutorial, we explored Kerberos for centralized user management and how Spring Security supports the Kerberos protocol and SPNEGO authentication mechanism.

We used MiniKdc to stand up an embedded KDC and also created a very simple Kerberized client and server. This setup was handy for exploration and especially handy when we created an integration test to test things out.

Now, we’ve just scratched the surface. To dive deeper, check out the Kerberos wiki page or its RFC. Also, the official documentation page will be useful. Other than that,  to see how the things could be done in core java, the following Oracle’s tutorial shows it in details.

As usual, the code can be found on our GitHub page.

Guide to Spock Extensions

$
0
0

1. Overview

In this tutorial, we’ll take a look at Spock extensions.

Sometimes, we might need to modify or enhance our spec’s lifecycle. For example, we’d like to add some conditional execution, retry on randomly failing integration test, and more. For this, we can use Spock’s extension mechanism.

Spock has a wide range of various extensions that we can hook onto a specification’s lifecycle.

Let’s discover how to use the most common extensions.

2. Maven Dependencies

Before we start, let’s set up our Maven dependencies:

<dependency>
    <groupId>org.spockframework</groupId>
    <artifactId>spock-core</artifactId>z
    <version>1.3-groovy-2.4</version>
    <scope>test</scope>
</dependency>
<dependency>
    <groupId>org.codehaus.groovy</groupId>
    <artifactId>groovy-all</artifactId>
    <version>2.4.7</version>
    <scope>test</scope>
</dependency>

3. Annotation-Based Extensions

Most of Spock‘s built-in extensions are based on annotations.

We can add annotations on a spec class or feature to trigger a specific behavior.

3.1. @Ignore

Sometimes we need to ignore some feature methods or spec classes. Like, we might need to merge our changes as soon as possible, but continuous integration still fails. We can ignore some specs and still make a successful merge.

We can use @Ignore on a method level to skip a single specification method:

@Ignore
def "I won't be executed"() {
    expect:
    true
}

Spock won’t execute this test method. And most IDEs will mark the test as skipped.

Additionally, we can use @Ignore on the class level:

@Ignore
class IgnoreTest extends Specification

We can simply provide a reason why our test suite or method is ignored:

@Ignore("probably no longer needed")

3.2. @IgnoreRest

Likewise, we can ignore all specifications except one, which we can mark with a @IgnoreRest annotation:

def "I won't run"() { }

@IgnoreRest
def 'I will run'() { }

def "I won't run too"() { }

3.3. @IgnoreIf

Sometimes, we’d like to conditionally ignore a test or two. In that case, we can use @IgnoreIf, which accepts a predicate as an argument:

@IgnoreIf({System.getProperty("os.name").contains("windows")})
def "I won't run on windows"() { }

Spock provides the set of properties and helper classes, to make our predicates easier to read and write:

  • os – Information about the operating system (see spock.util.environment.OperatingSystem).
  • jvm – the JVM’s information (see spock.util.environment.Jvm).
  • sys – System’s properties in a map.
  • env – Environment variables in a map.

We can re-write the previous example throughout the use of os property. Actually, it’s the spock.util.environment.OperatingSystem class with some useful methods, like for example isWindows():

@IgnoreIf({ os.isWindows() })
def "I'm using Spock helper classes to run only on windows"() {}

Note, that Spock uses System.getProperty(…) underhood. The main goal is to provide a clear interface, rather than defining complicated rules and conditions.

Also, as in the previous examples, we can apply the @IgnoreIf annotation at the class level.

3.4. @Requires

Sometimes, it’s easier to invert our predicate logic from @IgnoreIf. In that case, we can use @Requires:

@Requires({ System.getProperty("os.name").contains("windows") })
def "I will run only on Windows"()

So, while the @Requires makes this test run only if the OS is Windows, the @IgnoreIf, using the same predicate, makes the test run only if the OS is not Windows.

In general, it’s much better to say under which condition the test will execute, rather than when it gets ignored.

3.5. @PendingFeature

In TDD, we write tests first. Then, we need to write a code to make these tests pass. In some cases, we will need to commit our tests before the feature is implemented.

This is a good use case for @PendingFeature:

@PendingFeature
def 'test for not implemented yet feature. Maybe in the future it will pass'()

There is one main difference between @Ignore and @PendingFeature. In @PedingFeature, tests are executed, but any failures are ignored.

If a test marked with @PendingFeature ends without error, then it will be reported as a failure, to remind about removing annotation.

In this way, we can initially ignore fails of not implemented features, but in the future, these specs will become a part of normal tests, instead of being ignored forever.

3.6. @Stepwise

We can execute a spec’s methods in a given order with the @Stepwise annotation:

def 'I will run as first'() { }

def 'I will run as second'() { }

In general, tests should be deterministic. One should not depend on another. That’s why we should avoid using @Stepwise annotation.

But if we have to, we need to be aware that @Stepwise doesn’t override the behavior of @Ignore, @IgnoreRest, or @IgnoreIf. We should be careful with combining these annotations with @Stepwise.

3.7. @Timeout

We can limit the execution time of a spec’s single method and fail earlier:

@Timeout(1)
def 'I have one second to finish'() { }

Note, that this is the timeout for a single iteration, not counting the time spent in fixture methods.

By default, the spock.lang.Timeout uses seconds as a base time unit. But, we can specify other time units:

@Timeout(value = 200, unit = TimeUnit.SECONDS)
def 'I will fail after 200 millis'() { }

@Timeout on the class level has the same effect as applying it to every feature method separately:

@Timeout(5)
class ExampleTest extends Specification {

    @Timeout(1)
    def 'I have one second to finish'() {

    }

    def 'I will have 5 seconds timeout'() {}
}

Using @Timeout on a single spec method always overrides class level.

3.8. @Retry

Sometimes, we can have some non-deterministic integration tests. These may fail in some runs for reasons such as async processing or depending on other HTTP clients response. Moreover, the remote server with build and CI will fail and force us to run the tests and build again.

To avoid this situation, we can use @Retry annotation on a method or class level, to repeat failed tests:

@Retry
def 'I will retry three times'() { }

By default, it will retry three times.

It’s very useful to determine the conditions, under which we should retry our test. We can specify the list of exceptions:

@Retry(exceptions = [RuntimeException])
def 'I will retry only on RuntimeException'() { }

Or when there is a specific exception message:

@Retry(condition = { failure.message.contains('error') })
def 'I will retry with a specific message'() { }

Very useful is a retry with a delay:

@Retry(delay = 1000)
def 'I will retry after 1000 millis'() { }

And finally, like almost always, we can specify retry on the class level:

@Retry
class RetryTest extends Specification

3.9. @RestoreSystemProperties

We can manipulate environment variables with @RestoreSystemProperties.

This annotation, when applied, saves the current state of variables and restores them afterward. It also includes setup or cleanup methods:

@RestoreSystemProperties
def 'all environment variables will be saved before execution and restored after tests'() {
    given:
    System.setProperty('os.name', 'Mac OS')
}

Please note that we shouldn’t run the tests concurrently when we’re manipulating the system properties. Our tests might be non-deterministic.

3.10. Human-Friendly Titles

We can add a human-friendly test title by using the @Title annotation:

@Title("This title is easy to read for humans")
class CustomTitleTest extends Specification

Similarly, we can add a description of the spec with @Narrative annotation and with a multi-line Groovy String:

@Narrative("""
    as a user
    i want to save favourite items 
    and then get the list of them
""")
class NarrativeDescriptionTest extends Specification

3.11. @See

To link one or more external references, we can use the @See annotation:

@See("https://example.org")
def 'Look at the reference'()

To pass more than one link, we can  use the Groovy [] operand for creating a list:

@See(["https://example.org/first", "https://example.org/first"])
def 'Look at the references'()

3.12. @Issue

We can denote that a feature method refers to an issue or multiple issues:

@Issue("https://jira.org/issues/LO-531")
def 'single issue'() {

}

@Issue(["https://jira.org/issues/LO-531", "http://jira.org/issues/LO-123"])
def 'multiple issues'()

3.13. @Subject

And finally, we can indicate which class is the class under test with @Subject:

@Subject
ItemService itemService // initialization here...

Right now, it’s only for informational purposes.

4. Configuring Extensions

We can configure some of the extensions in the Spock configuration file. This includes describing how each extension should behave.

Usually, we create a configuration file in Groovycalled, for example, SpockConfig.groovy.

Of course, Spock needs to find our config file. First of all, it reads a custom location from the spock.configuration system property and then tries to find the file in the classpath. When not found, it goes to a location in the file system. If it’s still not found, then it looks for SpockConfig.groovy in the test execution classpath.

Eventually, Spock goes to a Spock user home, which is just a directory .spock within our home directory. We can change this directory by setting system property called spock.user.home or by an environment variable SPOCK_USER_HOME.

For our examples, we’ll create a file SpockConfig.groovy and put it on the classpath (src/test/resources/SpockConfig.Groovy).

4.1. Filtering the Stack Trace

By using a configuration file, we can filter (or not) the stack traces:

runner {
    filterStackTrace false
}

The default value is true.

To see how it works and practice, let’s create a simple test which throws a RuntimeException:

def 'stacktrace'() {
    expect:
    throw new RuntimeException("blabla")
}

When filterStackTrace is set to false, then we’ll see in the output:

java.lang.RuntimeException: blabla

  at sun.reflect.NativeConstructorAccessorImpl.newInstance0(Native Method)
  at sun.reflect.NativeConstructorAccessorImpl.newInstance(NativeConstructorAccessorImpl.java:62)
  at sun.reflect.DelegatingConstructorAccessorImpl.newInstance(DelegatingConstructorAccessorImpl.java:45)
  at java.lang.reflect.Constructor.newInstance(Constructor.java:423)
  at org.codehaus.groovy.reflection.CachedConstructor.invoke(CachedConstructor.java:83)
  at org.codehaus.groovy.runtime.callsite.ConstructorSite$ConstructorSiteNoUnwrapNoCoerce.callConstructor(ConstructorSite.java:105)
  at org.codehaus.groovy.runtime.callsite.CallSiteArray.defaultCallConstructor(CallSiteArray.java:60)
  at org.codehaus.groovy.runtime.callsite.AbstractCallSite.callConstructor(AbstractCallSite.java:235)
  at org.codehaus.groovy.runtime.callsite.AbstractCallSite.callConstructor(AbstractCallSite.java:247)
  // 34 more lines in the stack trace...

By setting this property to true, we’ll get:

java.lang.RuntimeException: blabla

  at extensions.StackTraceTest.stacktrace(StackTraceTest.groovy:10)

Although keep in mind, sometimes it’s useful to see the full stack trace.

4.2. Conditional Features in Spock Configuration File

Sometimes, we might need to filter stack traces conditionally. For example, we’ll need to see full stack traces in a Continuous Integration tool, but this isn’t necessary on our local machine.

We can add a simple condition, based for example on the environment variables:

if (System.getenv("FILTER_STACKTRACE") == null) {   
    filterStackTrace false
}

The Spock configuration file is a Groovy file, so it can contain snippets of Groovycode.

4.3. Prefix and URL in @Issue

Previously, we talked about the @Issue annotation. We can also configure this using the configuration file, by defining a common URL part with issueUrlPrefix. 

The other property is issueNamePrefix. Then, every @Issue value is preceded by the issueNamePrefix property.

We need to add these two properties in the report:

report {
    issueNamePrefix 'Bug '
    issueUrlPrefix 'https://jira.org/issues/'
}

4.4. Optimize Run Order

The other very helpful tool is optimizeRunOrder. Spock can remember which specs failed and how often and how much time it needs to execute a feature method.

Based on this knowledge, Spock will first run the features which failed in the last run. In the first place, it will execute the specs which failed more successively. Furthermore, the fastest specs will run first.

This behavior may be enabled in the configuration file. To enable optimizer, we use optimizeRunOrder property:

runner {
  optimizeRunOrder true
}

By default, the optimizer for run order is disabled.

4.5. Including and Excluding Specifications

Spock can exclude or include certain specs. We can lean on classes, super-classes, interfaces or annotations, which are applied on specification classes. The library can be of capable excluding or including single features, based on the annotation on a feature level.

We can simply exclude a test suite from class TimeoutTest by using the exclude property:

import extensions.TimeoutTest

runner {
    exclude TimeoutTest
}

TimeoutTest and all its subclasses will be excluded. If TimeoutTest was an annotation applied on a spec’s class, then this spec would be excluded.

We can specify annotations and base classes separately:

import extensions.TimeoutTest
import spock.lang.Issue
    exclude {
        baseClass TimeoutTest
        annotation Issue
}

The above example will exclude test classes or methods with the @Issue annotation as well as TimeoutTest or any of its subclasses.

To include any spec, we simply use include property. We can define the rules of include in the same way as exclude.

4.6. Creating a Report

Based on the test results and previously known annotations, we can generate a report with Spock. Additionally, this report will contain things like @Title, @See, @Issue, and @Narrative values.

We can enable generating a report in the configuration file. By default, it won’t generate the report.

All we have to do is pass values for a few properties:

report {
    enabled true
    logFileDir '.'
    logFileName 'report.json'
    logFileSuffix new Date().format('yyyy-MM-dd')
}

The properties above are:

  • enabled  – should or not generate the report
  • logFileDir – directory of report
  • logFileName – the name of the report
  • logFileSuffix – a suffix for every generated report basename separated with a dash

When we set enabled to true, then it’s mandatory to set logFileDir and logFileName properties. The logFileSuffix is optional.

We can also set all of them in system properties: enabled, spock.logFileDir, spock.logFileName and spock.logFileSuffix.

5. Conclusion

In this article, we described the most common Spock extensions.

We know that most of them are based on annotations. In addition, we learned how to create a Spock configuration file, and what the available configuration options are. In short, our newly acquired knowledge is very helpful for writing effective and easy to read tests.

The implementation of all our examples can be found in our Github project.

Viewing all 4713 articles
Browse latest View live


<script src="https://jsc.adskeeper.com/r/s/rssing.com.1596347.js" async> </script>