Quantcast
Channel: Baeldung
Viewing all 4778 articles
Browse latest View live

Guide to Java Parallel Collectors Library

$
0
0

1. Introduction

Parallel-collectors is a small library that provides a set of Java Stream API collectors that enable parallel processing – while at the same time circumventing main deficiencies of standard Parallel Streams.

2. Maven Dependencies

If we want to start using the library, we need to add a single entry in Maven’s pom.xml file:

<dependency>
    <groupId>com.pivovarit</groupId>
    <artifactId>parallel-collectors</artifactId>
    <version>1.1.0</version>
</dependency>

Or a single line in Gradle’s build file:

compile 'com.pivovarit:parallel-collectors:1.1.0'

The newest version can be found on Maven Central.

3. Parallel Streams Caveats

Parallel Streams were one of Java 8’s highlights, but they turned out to be applicable to heavy CPU processing exclusively.

The reason for this was the fact that Parallel Streams were internally backed by a JVM-wide shared ForkJoinPool, which provided limited parallelism and was used by all Parallel Streams running on a single JVM instance.

For example, imagine we have a list of ids and we want to use them to fetch a list of users and that this operation is expensive.

We could use Parallel Streams for that:

List<Integer> ids = Arrays.asList(1, 2, 3); 
List<String> results = ids.parallelStream() 
  .map(i -> fetchById(i)) // each operation takes one second
  .collect(Collectors.toList()); 

System.out.println(results); // [user-1, user-2, user-3]

And indeed, we can see that there’s a noticeable speedup. But it becomes problematic if we start running multiple parallel blocking operations… in parallel. This might quickly saturate the pool and result in potentially huge latencies. That’s why it’s important to build bulkheads by creating separate thread pools – to prevent unrelated tasks from influencing each other’s execution.

In order to provide a custom ForkJoinPool instance, we could leverage the trick described here, but this approach relied on an undocumented hack and was faulty until JDK10. We can read more in the issue itself – [JDK8190974].

4. Parallel Collectors in Action

Parallel Collectors, as the name suggests, are just standard Stream API Collectors that allow performing additional operations in parallel at collect() phase.

ParallelCollectors (which mirrors Collectors class) class is a facade providing access to the whole functionality of the library.

If we wanted to redo the above example, we could simply write:

ExecutorService executor = Executors.newFixedThreadPool(10);

List<Integer> ids = Arrays.asList(1, 2, 3);

CompletableFuture<List<String>> results = ids.stream()
  .collect(ParallelCollectors.parallelToList(i -> fetchById(i), executor, 4));

System.out.println(results.join()); // [user-1, user-2, user-3]

The result is the same, however, we were able to provide our custom thread pool, specify our custom parallelism level, and the result arrived wrapped in a CompletableFuture instance without blocking the current thread. 

Standard Parallel Streams, on the other hand, couldn’t achieve any of those.

4.1. ParallelCollectors.parallelToList/ToSet()

As intuitive as it gets, if we want to process a Stream in parallel and collect results into a List or Set, we can simply use ParallelCollectors.parallelToList or parallelToSet:

List<Integer> ids = Arrays.asList(1, 2, 3);

List<String> results = ids.stream()
  .collect(parallelToList(i -> fetchById(i), executor, 4))
  .join();

4.2. ParallelCollectors.parallelToMap()

If we want to collect Stream elements into a Map instance, just like with Stream API, we need to provide two mappers:

List<Integer> ids = Arrays.asList(1, 2, 3);

Map<Integer, String> results = ids.stream()
  .collect(parallelToMap(i -> i, i -> fetchById(i), executor, 4))
  .join(); // {1=user-1, 2=user-2, 3=user-3}

We can also provide a custom Map instance Supplier:

Map<Integer, String> results = ids.stream()
  .collect(parallelToMap(i -> i, i -> fetchById(i), TreeMap::new, executor, 4))
  .join();

And a custom conflict resolution strategy:

List<Integer> ids = Arrays.asList(1, 2, 3);

Map<Integer, String> results = ids.stream()
  .collect(parallelToMap(i -> i, i -> fetchById(i), TreeMap::new, (s1, s2) -> s1, executor, 4))
  .join();

4.3. ParallelCollectors.parallelToCollection()

Similarly to the above, we can pass our custom Collection Supplier if we want to obtain results packaged in our custom container:

List<String> results = ids.stream()
  .collect(parallelToCollection(i -> fetchById(i), LinkedList::new, executor, 4))
  .join();

4.4. ParallelCollectors.parallelToStream()

If the above isn’t enough, we can actually obtain a Stream instance and continue custom processing there:

Map<Integer, List<String>> results = ids.stream()
  .collect(parallelToStream(i -> fetchById(i), executor, 4))
  .thenApply(stream -> stream.collect(Collectors.groupingBy(i -> i.length())))
  .join();

4.5. ParallelCollectors.parallel()

This one allows us to stream results in completion order:

ids.stream()
  .collect(parallel(i -> fetchByIdWithRandomDelay(i), executor, 4))
  .forEach(System.out::println);

// user-1
// user-3
// user-2

In this case, we can expect the collector to return different results each time since we introduced a random processing delay.

4.6. ParallelCollectors.parallelOrdered()

This facility allows streaming results just like the above, but maintains original order:

ids.stream()
  .collect(parallelOrdered(i -> fetchByIdWithRandomDelay(i), executor, 4))
  .forEach(System.out::println);

// user-1
// user-2 
// user-3 

In this case, the collector will always maintain the order but might be slower than the above.

5. Limitations

At the point of writing, parallel-collectors don’t work with infinite streams even if short-circuiting operations are used – it’s a design limitation imposed by Stream API internals. Simply put, Streams treat collectors as non-short-circuiting operations so the stream needs to process all upstream elements before getting terminated.

The other limitation is that short-circuiting operations don’t interrupt the remaining tasks after short-circuiting.

6. Conclusion

We saw how the parallel-collectors library allows us to perform parallel processing by using custom Java Stream API Collectors and CompletableFutures to utilize custom thread pools, parallelism, and non-blocking style of CompletableFutures.

As always, code snippets are available over on GitHub.

For further reading, see the parallel-collectors library on GitHub, the author’s blog, and the author’s Twitter account.


Handling Maven Invalid LOC Header Error

$
0
0

1. Introduction

Sometimes when a jar in our local Maven repo is corrupt, we’ll see the error: Invalid LOC Header.

In this tutorial, we’re going to learn when it happens and how to handle and even at times prevent it.

2. When Does “Invalid LOC Header” Occur?

Maven downloads a project’s dependencies into a known location on our filesystem called a local repository. Every artifact that Maven downloads is also accompanied by its SHA1 and MD5 checksum files:

The purpose of these checksums is to ensure the integrity of the associated artifacts. Since networks and file systems can fail, just like anything else, there are times when artifacts get corrupted, making the artifact contents not match the signature.

In these situations, Maven builds throw an “invalid LOC header” error.

The solution is to remove the corrupt jar from the repository. Let’s see a couple of ways.

3. Delete the Local Repository

A quick-fix for the error is to delete the whole Maven local repository and build the project again:

rm -rf ${LOCAL_REPOSITORY}

This will erase the local cache and re-download all the project dependencies – not very efficient.

Note that the default local repository is at ${user.home}/.m2/repository unless we specified it in our settings.xml <localRepository> tag. We can also find the local repository by the command: mvn help:evaluate -Dexpression=settings.localRepository

4. Find the Corrupt Jar

Another solution is to identify the specific corrupt jar and delete it from the local repository.

When we use the Maven output stacktrace command, it’ll contain the corrupt jar details when it fails to process it.

We can enable debug level logging by adding -X to the build command:

mvn -X package

The resulting stack trace will indicate the corrupted jar towards the end of the log. After identifying the corrupted jar, we can locate it in the local repository and delete it. Now upon build, Maven will retry downloading the jar.

Also, we can test the integrity of the archive with the zip -T command:

find ${LOCAL_REPOSITORY} -name "*.jar" | xargs -L 1 zip -T | grep error

5. Validate Checksums

The two solutions mentioned earlier will only force Maven to re-download the jar. Of course, the issue could occur again in future downloads. We can prevent that by configuring Maven to validate the checksum while downloading the artifact from remote repository.

We can add the –strict-checksums or -C option to the Maven command. This will cause Maven to fail the build if the computed checksum doesn’t match the value in checksum files.

There are two options, either to fail the build if checksums don’t match:

-C,--strict-checksums

or warn which is the default option:

-c,--lax-checksums

Today Maven requires the signature files while uploading artifacts to the central repository. But there might be artifacts in the central repository that don’t have the signature files, particularly the historic ones. That is why the default option is warn.

For a more permanent solution, we can configure checksumPolicy in Maven’s settings.xml file. This property specifies the behavior when verification of an artifact checksum fails. To avoid problems in the future, let’s edit our settings.xml file to fail the download when the checksum fails:

<profiles>
    <profile>
        <repositories>
            <repository>
                <id>codehausSnapshots</id>
                <name>Codehaus Snapshots</name>
                <releases>
                    <enabled>false</enabled>
                    <updatePolicy>always</updatePolicy>
                    <checksumPolicy>fail</checksumPolicy>
                </releases>
            </repository>
        </repository>
    </profile>
</profiles>

We’d, of course, need to do this for each of our configured repositories.

6. Conclusion

In this quick write-up, we’ve seen when an invalid LOC header error can occur and options for how to handle it.

Spring Data MongoDB Tailable Cursors

$
0
0

1. Introduction

In this tutorial, we’re going to discuss how to use MongoDB as an infinite data stream by utilizing tailable cursors with Spring Data MongoDB.

2. Tailable Cursors

When we execute a query, the database driver opens a cursor to supply the matching documents. By default, MongoDB automatically closes the cursor when the client reads all results. Therefore, turning results in a finite data stream.

However, we can use capped collections with a tailable cursor that remains open, even after the client consumed all initially returned data – making the infinite data stream. This approach is useful for applications dealing with event streams, like chat messages, or stock updates.

Spring Data MongoDB project helps us utilizing reactive database capabilities, including tailable cursors.

3. Setup

To demonstrate the mentioned features, we’ll implement a simple logs counter application. Let’s assume there is some log aggregator that collects and persists all logs into a central place – our MongoDB capped collection.

Firstly, we’ll use the simple Log entity:

@Document
public class Log {
    private @Id String id;
    private String service;
    private LogLevel level;
    private String message;
}

Secondly, we’ll store the logs in our MongoDB capped collection. Capped collections are fixed-size collections that insert and retrieve documents based on the insertion order. We can create them with the MongoOperations.createCollection:

db.createCollection(COLLECTION_NAME, new CreateCollectionOptions()
  .capped(true)
  .sizeInBytes(1024)
  .maxDocuments(5));

For capped collections, we must define the sizeInBytes property. Moreover, the maxDocuments specifies the maximum number of documents a collection can have. Once reached, the older documents will be removed from the collection.

Thirdly, we’ll use the appropriate Spring Boot starter dependency:

<dependency>
    <groupId>org.springframework.boot</groupId>
    <artifactId>spring-boot-starter-data-mongodb-reactive</artifactId>
    <versionId>2.1.6.RELEASE</versionId>
</dependency>

4. Reactive Tailable Cursors

We can consume tailable cursors with both the imperative and the reactive MongoDB API. It’s highly recommended to use the reactive variant.

Let’s implement WARN level logs counter using a reactive approach. We’re able to create infinite stream queries with ReactiveMongoOperations.tail method.

A tailable cursor remains open and emits data – a Flux of entities – as new documents arrive in a capped collection and match the filter query:

private Disposable subscription;

public WarnLogsCounter(ReactiveMongoOperations template) {
    Flux<Log> stream = template.tail(
      query(where("level").is(LogLevel.WARN)), 
      Log.class);
    subscription = stream.subscribe(logEntity -> 
      counter.incrementAndGet()
    );
}

Once the new document, having the WARN log level, is persisted in the collection, the subscriber (lambda expression) will increment the counter.

Finally, we should dispose of the subscription to close the stream:

public void close() {
    this.subscription.dispose();
}

Also, please note that tailable cursors may become dead, or invalid if the query initially returns no match. In other words, even if new persisted documents match the filter query, the subscriber will not be able to receive them. This is a known limitation of MongoDB tailable cursors. We must ensure that there are matching documents in the capped collection, before creating a tailable cursor.

5. Tailable Cursors with a Reactive Repository

Spring Data projects offer a repository abstraction for different data stores, including the reactive versions.

MongoDB is no exception. Please check the Spring Data Reactive Repositories with MongoDB article for more details.

Moreover, MongoDB reactive repositories support infinite streams by annotating a query method with @Tailable. We can annotate any repository method returning Flux or other reactive types capable of emitting multiple elements:

public interface LogsRepository extends ReactiveCrudRepository<Log, String> {
    @Tailable
    Flux<Log> findByLevel(LogLevel level);
}

Let’s count INFO logs using this tailable repository method:

private Disposable subscription;

public InfoLogsCounter(LogsRepository repository) {
    Flux<Log> stream = repository.findByLevel(LogLevel.INFO);
    this.subscription = stream.subscribe(logEntity -> 
      counter.incrementAndGet()
    );
}

Similarly, as for WarnLogsCounter, we should dispose of the subscription to close the stream:

public void close() {
    this.subscription.dispose();
}

6. Tailable Cursors with a MessageListener

Nevertheless, if we can’t use the reactive API, we can leverage Spring’s messaging concept.

First, we need to create a MessageListenerContainer which will handle sent SubscriptionRequest objects. The synchronous MongoDB driver creates a long-running, blocking task that listens to new documents in the capped collection.

Spring Data MongoDB ships with a default implementation capable of creating and executing Task instances for a TailableCursorRequest:

private String collectionName;
private MessageListenerContainer container;
private AtomicInteger counter = new AtomicInteger();

public ErrorLogsCounter(MongoTemplate mongoTemplate,
  String collectionName) {
    this.collectionName = collectionName;
    this.container = new DefaultMessageListenerContainer(mongoTemplate);

    container.start();
    TailableCursorRequest<Log> request = getTailableCursorRequest();
    container.register(request, Log.class);
}

private TailableCursorRequest<Log> getTailableCursorRequest() {
    MessageListener<Document, Log> listener = message -> 
      counter.incrementAndGet();

    return TailableCursorRequest.builder()
      .collection(collectionName)
      .filter(query(where("level").is(LogLevel.ERROR)))
      .publishTo(listener)
      .build();
}

TailableCursorRequest creates a query filtering only the ERROR level logs. Each matching document will be published to the MessageListener that will increment the counter.

Note that we still need to ensure that the initial query returns some results. Otherwise, the tailable cursor will be immediately closed.

In addition, we should not forget to stop the container once we no longer need it:

public void close() {
    container.stop();
}

7. Conclusion

MongoDB capped collections with tailable cursors help us receive information from the database in a continuous way. We can run a query that will keep giving results until explicitly closed. Spring Data MongoDB offers us both the blocking and the reactive way of utilizing tailable cursors.

The source code of the complete example is available over on GitHub.

Guide to @EnableConfigurationProperties

$
0
0

1. Introduction

In this quick tutorial, we’ll show how to use an @EnableConfigurationProperties annotation with @ConfigurationProperties annotated classes.

2. Purpose of @EnableConfigurationProperties Annotation

@EnableConfigurationProperties annotation is strictly connected to @ConfiguratonProperties.

It enables support for @ConfigurationProperties annotated classes in our application. However, it’s worth to point out that the Spring Boot documentation says, every project automatically includes @EnableConfigurationProperties. Therefore, @ConfiguratonProperties support is implicitly turned on in every Spring Boot application.

In order to use a configuration class in our project, we need to register it as a regular Spring bean.

First of all, we can annotate such class with @Component. Alternatively, we can use a @Bean factory method.

However, in certain situations, we may prefer to keep a @ConfigurationProperties class as a simple POJO. This is when @EnableConfigurationProperties comes in handy. We can specify all configuration beans directly on this annotation.

This is a convenient way to quickly register @ConfigurationProperties annotated beans.

3. Using @EnableConfigurationProperties

Now, let’s see how to use @EnableConfigurationProperties in practice.

First, we need to define our example configuration class:

@ConfigurationProperties(prefix = "additional")
public class AdditionalProperties {

    private String unit;
    private int max;

    // standard getters and setters
}

Note that we annotated the AdditionalProperties only with @ConfigurationProperties. It’s still a simple POJO!

Finally, let’s register our configuration bean using @EnableConfigurationProperties:

@Configuration
@EnableConfigurationProperties(AdditionalProperties.class)
public class AdditionalConfiguration {
    
    @Autowired
    private AdditionalProperties additionalProperties;
    
    // make use of the bound properties
}

That’s all! We can now use AdditionalProperties like any other Spring bean.

4. Conclusion

In this quick tutorial, we presented a convenient way to quickly register a @ConfigurationProperties annotated class in Spring.

As usual, all the examples used in this article are available over on GitHub.

The Difference Between Collection.stream().forEach() and Collection.forEach()

$
0
0

1. Introduction

There are several options to iterate over a collection in Java. In this short tutorial, we’ll look at two similar looking approaches — Collection.stream().forEach() and Collection.forEach().

In most cases, both will yield the same results, however, there are some subtle differences we’ll look at.

2. Overview

First, let’s create a list to iterate over:

List<String> list = Arrays.asList("A", "B", "C", "D");

The most straightforward way is using the enhanced for-loop:

for(String s : list) {
    //do something with s
}

If we want to use functional-style Java, we can also use the forEach(). We can do so directly on the collection:

Consumer<String> consumer = s -> { System.out::println }; 
list.forEach(consumer);

Or, we can call forEach() on the collection’s stream:

list.stream().forEach(consumer);

Both versions will iterate over the list and print all elements:

ABCD ABCD

In this simple case, it doesn’t make a difference which forEach() we use.

3. Execution Order

Collection.forEach() uses the collection’s iterator (if one is specified). That means that the processing order of the items is defined. In contrast, the processing order of Collection.stream().forEach() is undefined.

In most cases, it doesn’t make a difference which of the two we choose.

3.1. Parallel Streams

Parallel streams allow us to execute the stream in multiple threads, and in such situation, the execution order is undefined. Java only requires all threads to finish before any terminal operation, such as Collectors.toList(), is called.

Let’s look at an example where we first call forEach() directly on the collection, and second, on a parallel stream:

list.forEach(System.out::print);
System.out.print(" ");
list.parallelStream().forEach(System.out::print);

If we run the code several times, we see that list.forEach() processes the items in insertion order, while list.parallelStream().forEach() produces a different result at each run.

One possible output is:

ABCD CDBA

Another one is:

ABCD DBCA

3.2. Custom Iterators

Let’s define a list with a custom iterator to iterate over the collection in reversed order:

class ReverseList extends ArrayList<String> {

    @Override
    public Iterator<String> iterator() {

        int startIndex = this.size() - 1;
        List<String> list = this;

        Iterator<String> it = new Iterator<String>() {

            private int currentIndex = startIndex;

            @Override
            public boolean hasNext() {
                return currentIndex >= 0;
            }

            @Override
            public String next() {
                String next = list.get(currentIndex);
                currentIndex--;
                return next;
             }

             @Override
             public void remove() {
                 throw new UnsupportedOperationException();
             }
         };
         return it;
    }
}

When we iterate over the list, again with forEach() directly on the collection and then on the stream:

List<String> myList = new ReverseList();
myList.addAll(list);

myList.forEach(System.out::print); 
System.out.print(" "); 
myList.stream().forEach(System.out::print);

We get different results:

DCBA ABCD

The reason for the different results is that forEach() used directly on the list uses the custom iterator, while stream().forEach() simply takes elements one by one from the list, ignoring the iterator.

4. Modification of the Collection

Many collections (e.g., ArrayList or HashSet) shouldn’t be structurally modified while iterating over them. If an element is removed or added during an iteration, we’ll get a ConcurrentModification exception.

Furthermore, collections are designed to fail-fast, which means that the exception is thrown as soon as there’s a modification.

Similarly, we’ll get a ConcurrentModification exception when we add or remove an element during the execution of the stream pipeline. However, the exception will be thrown later.

Another subtle difference between the two forEach() methods is that Java explicitly allows modifying elements using the iterator. Streams, in contrast, should be non-interfering.

Let’s look at removing and modifying elements in more detail.

4.1. Removing an Element

Let’s define an operation that removes the last element (“D”) of our list:

Consumer<String> removeElement = s -> {
    System.out.println(s + " " + list.size());
    if (s != null && s.equals("A")) {
        list.remove("D");
    }
};

When we iterate over the list, the last element is removed after the first element (“A”) is printed:

list.forEach(removeElement);

Since forEach() is fail-fast, we stop iterating and see an exception before the next element is processed:

A 4
Exception in thread "main" java.util.ConcurrentModificationException
	at java.util.ArrayList.forEach(ArrayList.java:1252)
	at ReverseList.main(ReverseList.java:1)

Let’s see what happens if we use stream().forEach() instead:

list.stream().forEach(removeElement);

Here, we continue iterating over the whole list before we see an exception:

A 4
B 3
C 3
null 3
Exception in thread "main" java.util.ConcurrentModificationException
	at java.util.ArrayList$ArrayListSpliterator.forEachRemaining(ArrayList.java:1380)
	at java.util.stream.ReferencePipeline$Head.forEach(ReferencePipeline.java:580)
	at ReverseList.main(ReverseList.java:1)

However, Java does not guarantee that a ConcurrentModificationException is thrown at all. That means we should never write a program that depends on this exception.

4.2. Changing Elements

We can change an element while iterating over a list:

list.forEach(e -> {
    list.set(3, "E");
});

However, while there is no problem with doing this using either Collection.forEach() or stream().forEach(), Java requires an operation on a stream to be non-interfering. This means that elements shouldn’t be modified during the execution of the stream pipeline.

The reason behind this is that the stream should facilitate parallel execution. Here, modifying elements of a stream could lead to unexpected behavior.

5. Conclusion

In this article, we saw some examples that show the subtle differences between Collection.forEach() and Collection.stream().forEach().

However, it’s important to note that all the examples shown above are trivial and are merely meant to compare the two ways of iterating over a collection. We shouldn’t write code whose correctness relies on the shown behavior.

If we don’t require a stream but only want to iterate over a collection, the first choice should be using forEach() directly on the collection.

The source code for the examples in this article is available over on GitHub.

Understanding getBean() in Spring

$
0
0

1. Introduction

In this tutorial, we’re going to go through different variants of the BeanFactory.getBean() method.

Simply put, as the name of the method also suggests, this is responsible for retrieving a bean instance from the Spring container.

2. Spring Beans Setup

First, let’s define a few Spring beans for testing. There are several ways in which we can provide bean definitions for the Spring container, but in our example, we’ll use annotation-based Java config:

@Configuration
class AnnotationConfig {

    @Bean(name = {"tiger", "kitty"})
    @Scope(value = "prototype")
    Tiger getTiger(String name) {
        return new Tiger(name);
    }

    @Bean(name = "lion")
    Lion getLion() {
        return new Lion("Hardcoded lion name");
    }

    interface Animal {}
}

We’ve created two beans. Lion has the default singleton scope. Tiger is explicitly set to prototype scope. Additionally, please note that we defined names for each bean that we’ll use in further requests.

3. The getBean() APIs

BeanFactory provides five different signatures of the getBean() method that we’re going to examine in the following subsections.

3.1. Retrieving Bean by Name

Let’s see how we can retrieve a Lion bean instance using its name:

Object lion = context.getBean("lion");

assertEquals(Lion.class, lion.getClass());

In this variant, we provide a name, and in return, we get an instance of Object class if a bean with the given name exists in the application context. Otherwise, both this and all other implementations throw NoSuchBeanDefinitionException if the bean lookup fails.

The main disadvantage is that after retrieving the bean, we have to cast it to the desired type. This may produce another exception if the returned bean has a different type than we expected.

Suppose we try to get a Tiger using the name “lion”.  When we cast the result to Tiger, it will throw a ClassCastException:

assertThrows(ClassCastException.class, () -> {
    Tiger tiger = (Tiger) context.getBean("lion");
});

3.2. Retrieving Bean by Name and Type

Here we need to specify both the name and type of the requested bean:

Lion lion = context.getBean("lion", Lion.class);

Compared to the previous method, this one is safer because we get the information about type mismatch instantly:

assertThrows(BeanNotOfRequiredTypeException.class, () -> 
    context.getBean("lion", Tiger.class));
}

3.3. Retrieving Bean by Type

With the third variant of getBean(), it is enough to specify only the bean type:

Lion lion = context.getBean(Lion.class);

In this case, we need to pay special attention to a potentially ambiguous outcome:

assertThrows(NoUniqueBeanDefinitionException.class, () -> 
    context.getBean(Animal.class));
}

In the example above, because both Lion and Tiger implement the Animal interface, merely specifying type isn’t enough to unambiguously determine the result. Therefore, we get a NoUniqueBeanDefinitionException.

3.4. Retrieving Bean by Name with Constructor Parameters

In addition to the bean name, we can also pass constructor parameters:

Tiger tiger = (Tiger) context.getBean("tiger", "Siberian");

This method is a bit different because it only applies to beans with prototype scope.

In the case of singletons, we’re going to get a BeanDefinitionStoreException.

Because a prototype bean will return a newly created instance every time it’s requested from the application container, we can provide constructor parameters on-the-fly when invoking getBean():

Tiger tiger = (Tiger) context.getBean("tiger", "Siberian");
Tiger secondTiger = (Tiger) context.getBean("tiger", "Striped");

assertEquals("Siberian", tiger.getName());
assertEquals("Striped", secondTiger.getName());

As we can see, each Tiger gets a different name according to what we specified as a second parameter when requesting the bean.

3.5. Retrieving Bean by Type With Constructor Parameters

This method is analogous to the last one, but we need to pass the type instead of the name as the first argument:

Tiger tiger = context.getBean(Tiger.class, "Shere Khan");

assertEquals("Shere Khan", tiger.getName());

Similar to retrieving a bean by name with constructor parameters, this method only applies to beans with prototype scope.

4. Usage Considerations

Despite being defined in the BeanFactory interface, the getBean() method is most frequently accessed through the ApplicationContext. Typically, we don’t want to use the getBean() method directly in our program.

Beans should be managed by the container. If we want to use one of them, we should rely on dependency injection rather than a direct call to ApplicationContext.getBean(). That way, we can avoid mixing application logic with framework-related details.

5. Conclusion

In this quick tutorial, we went through all implementations of the getBean() method from the BeanFactory interface and described the pros and cons of each.

All the code examples shown here are available over on GitHub.

Breaking Out of Nested Loops

$
0
0

1. Overview

In this tutorial, we’ll create some examples to show different ways to use break within a loop. Next, we’ll also see how to terminate a loop without using break at all.

2. The Problem

Nested loops are very useful, for instance, to search in a list of lists.

One example would be a list of students, where each student has a list of planned courses. Let’s say we want to find the name of one person that planned course 0.

First, we’d loop over the list of students. Then, inside that loop, we’d loop over the list of planned courses.

When we print the names of the students and courses we’ll get the following result:

student 0
  course 0
  course 1
student 1
  course 0
  course 1

We wanted to find the first student that planned course 0. However, if we just use loops then the application will continue searching after the course is found.

After we find a person who planned the specific course, we want to stop searching. Continuing to search would take more time and resources while we don’t need the extra information. That’s why we want to break out of the nested loop.

3. Break

The first option we have to go out of a nested loop is to simply use the break statement:

String result = "";
for (int outerCounter = 0; outerCounter < 2; outerCounter++) {
    result += "outer" + outerCounter;
    for (int innerCounter = 0; innerCounter < 2; innerCounter++) {
        result += "inner" + innerCounter;
        if (innerCounter == 0) {
            break;
        }
    }
}
return result;

We have an outer loop and an inner loop, both loops have two iterations. If the counter of the inner loop equals 0 we execute the break command. When we run the example, it will show the following result:

outer0inner0outer1inner0

Or we could adjust the code to make it a bit more readable:

outer 0
  inner 0
outer 1
  inner 0

Is this what we want?

Almost, the inner loop is terminated by the break statement after 0 is found. However, the outer loop continues, which is not what we want. We want to stop processing completely as soon as we have the answer.

4. Labeled Break

The previous example was a step in the right direction, but we need to improve it a bit. We can do that by using a labeled break:

String result = "";
myBreakLabel:
for (int outerCounter = 0; outerCounter < 2; outerCounter++) {
    result += "outer" + outerCounter;
    for (int innerCounter = 0; innerCounter < 2; innerCounter++) {
        result += "inner" + innerCounter;
        if (innerCounter == 0) {
            break myBreakLabel;
        }
    }
}
return result;

A labeled break will terminate the outer loop instead of just the inner loop. We achieve that by adding the myBreakLabel outside the loop and changing the break statement to stop myBreakLabel. After we run the example we get the following result:

outer0inner0

We can read it a bit better with some formatting:

outer 0
  inner 0

If we look at the result we can see that both the inner loop and the outer loop are terminated, which is what we wanted to achieve.

5. Return

As an alternative, we could also use the return statement to directly return the result when it’s found:

String result = "";
for (int outerCounter = 0; outerCounter < 2; outerCounter++) {
    result += "outer" + outerCounter;
    for (int innerCounter = 0; innerCounter < 2; innerCounter++) {
        result += "inner" + innerCounter;
        if (innerCounter == 0) {
            return result;
        }
    }
}
return "failed";

The label is removed and the break statement is replaced by a return statement.

When we execute the code above we get the same result as for the labeled break. Note that for this strategy to work, we typically need to move the block of loops into its own method.

6. Conclusion

So, we’ve just looked at what to do when we need to exit early from a loop, like when we’ve found the item we’re searching for. The break keyword is helpful for single loops, and we can use labeled breaks for nested loops.

Alternatively, we can use a return statement. Using return makes the code better readable and less error-prone as we don’t have to think about the difference between unlabeled and labeled breaks.

Feel free to have a look at the code over on GitHub.

Check If a String Is a Valid Date in Java

$
0
0

1. Introduction

In this tutorial, we’ll discuss the various ways to check if a String contains a valid date in Java. We’ll discuss the solutions before Java 8, after Java 8, and using the Apache Commons Validator.

2. Date Validation Overview

Whenever we receive data in any application, we need to verify that it’s valid before doing any further processing.

In the case of date inputs, we may need to verify the following:

  • The input contains the date in a valid format, such as MM/DD/YYYY
  • The various parts of the input are in a valid range
  • The input resolves to a valid date in the calendar

We can use regular expressions to do the above. However, regular expressions to handle various input formats and locales are complex and error-prone. In addition, they can degrade performance.

We’ll discuss the different ways to implement date validations in a flexible, robust, and efficient manner.

First, let’s write an interface for the date validation:

public interface DateValidator {
   boolean isValid(String dateStr);
}

In the next sections, we’ll implement this interface using the various approaches.

3. Validate Using DateFormat

Java has provided facilities to format and parse dates since the beginning. This functionality is in the DateFormat abstract class and its implementation — SimpleDateFormat.

Let’s implement the date validation using the parse method of the DateFormat class:

public class DateValidatorUsingDateFormat implements DateValidator {
    private String dateFormat;

    public DateValidatorUsingDateFormat(String dateFormat) {
        this.dateFormat = dateFormat;
    }

    @Override
    public boolean isValid(String dateStr) {
        DateFormat sdf = new SimpleDateFormat(this.dateFormat);
        sdf.setLenient(false);
        try {
            sdf.parse(dateStr);
        } catch (ParseException e) {
            return false;
        }
        return true;
    }
}

Since the DateFormat and related classes are not thread-safe, we are creating a new instance for each method call.

Next, let’s write the unit test for this class:

DateValidator validator = new DateValidatorUsingDateFormat("MM/dd/yyyy");

assertTrue(validator.isValid("02/28/2019"));        
assertFalse(validator.isValid("02/30/2019"));

This has been the most common solution before Java 8.

4. Validate Using LocalDate

Java 8 introduced an improved Date and Time API. It added the LocalDate class, which represents the date without time. This class is immutable and thread-safe.

LocalDate provides two static methods to parse dates. Both of them use a DateTimeFormatter to do the actual parsing:

public static LocalDate parse​(CharSequence text)
// parses dates using using DateTimeFormatter.ISO_LOCAL_DATE

public static LocalDate parse​(CharSequence text, DateTimeFormatter formatter)
// parses dates using the provided formatter

Let’s use the parse method to implement the date validation:

public class DateValidatorUsingLocalDate implements DateValidator {
    private DateTimeFormatter dateFormatter;
    
    public DateValidatorUsingLocalDate(DateTimeFormatter dateFormatter) {
        this.dateFormatter = dateFormatter;
    }

    @Override
    public boolean isValid(String dateStr) {
        try {
            LocalDate.parse(dateStr, this.dateFormatter);
        } catch (DateTimeParseException e) {
            return false;
        }
        return true;
    }
}

The implementation uses a DateTimeFormatter object for formatting. Since this class is thread-safe, we’re using the same instance across different method calls.

Let’s also add a unit test for this implementation:

DateTimeFormatter dateFormatter = DateTimeFormatter.BASIC_ISO_DATE;
DateValidator validator = new DateValidatorUsingLocalDate(dateFormatter);
        
assertTrue(validator.isValid("20190228"));
assertFalse(validator.isValid("20190230"));

5. Validate Using DateTimeFormatter

In the previous section, we saw that LocalDate uses a DateTimeFormatter object for parsing. We can also use the DateTimeFormatter class directly for formatting and parsing.

DateTimeFormatter parses a text in two phases. In Phase 1, it parses the text into various date and time fields based on the configuration. In Phase 2, it resolves the parsed fields into a date and/or time object.

The ResolverStyle attribute controls phase 2. It is an enum having three possible values:

  • LENIENT – resolves dates and times leniently
  • SMART – resolves dates and times in an intelligent manner
  • STRICT – resolves dates and times strictly

Now, let’s write the date validation using DateTimeFormatter directly:

public class DateValidatorUsingDateTimeFormatter implements DateValidator {
    private DateTimeFormatter dateFormatter;
    
    public DateValidatorUsingDateTimeFormatter(DateTimeFormatter dateFormatter) {
        this.dateFormatter = dateFormatter;
    }

    @Override
    public boolean isValid(String dateStr) {
        try {
            this.dateFormatter.parse(dateStr);
        } catch (DateTimeParseException e) {
            return false;
        }
        return true;
    }
}

Next, let’s add the unit test for this class:

DateTimeFormatter dateFormatter = DateTimeFormatter.ofPattern("uuuu-MM-dd", Locale.US)
    .withResolverStyle(ResolverStyle.STRICT);
DateValidator validator = new DateValidatorUsingDateTimeFormatter(dateFormatter);
        
assertTrue(validator.isValid("2019-02-28"));
assertFalse(validator.isValid("2019-02-30"));

In the above test, we’re creating a DateTimeFormatter based on pattern and locale. We are using the strict resolution for dates.

6. Validate Using Apache Commons Validator

The Apache Commons project provides a validation framework. This contains validation routines, such as date, time, numbers, currency, IP address, email, and URL.

For our goal in this article, let’s take a look at the GenericValidator class, which provides a couple of methods to check if a String contains a valid date:

public static boolean isDate(String value, Locale locale)
  
public static boolean isDate(String value,String datePattern, boolean strict)

To use the library, let’s add the commons-validator Maven dependency to our project:

<dependency>
    <groupId>commons-validator</groupId>
    <artifactId>commons-validator</artifactId>
    <version>1.6</version>
</dependency>

Next, let’s use the GenericValidator class to validate dates:

assertTrue(GenericValidator.isDate("2019-02-28", "yyyy-MM-dd", true));
assertFalse(GenericValidator.isDate("2019-02-29", "yyyy-MM-dd", true));

7. Conclusion

In this article, we looked at the various ways to check if a String contains a valid date. As usual, the full source code can be found over on GitHub.


Key Value Store with Chronicle Map

$
0
0

 1. Overview

In this tutorial, we’re going to see how we can use the Chronicle Map for storing key-value pairs. We’ll also be creating short examples to demonstrate its behavior and usage.

2. What is a Chronicle Map?

Following the documentation, “Chronicle Map is a super-fast, in-memory, non-blocking, key-value store, designed for low-latency, and/or multi-process applications”.

In a nutshell, it’s an off-heap key-value store. The map doesn’t require a large amount of RAM for it to function properly. It can grow based on the available disk capacity. Furthermore, it supports replication of the data in a multi-master server setup.

Let’s now see how we can set up and work with it.

3. Maven Dependency

To get started, we’ll need to add the chronicle-map dependency to our project:

<dependency>
    <groupId>net.openhft</groupId>
    <artifactId>chronicle-map</artifactId>
    <version>3.17.2</version>
</dependency>

4. Types of Chronicle Map

We can create a map in two ways: either as an in-memory map or as a persisted map.

Let’s see both of these in detail.

4.1. In-Memory Map

An in-memory Chronicle Map is a map store that is created within the physical memory of the server. This means it’s accessible only within the JVM process in which the map store is created.

Let’s see a quick example:

ChronicleMap<LongValue, CharSequence> inMemoryCountryMap = ChronicleMap
  .of(LongValue.class, CharSequence.class)
  .name("country-map")
  .entries(50)
  .averageValue("America")
  .create();

For the sake of simplicity, we’re creating a map that stores 50 country ids and their names. As we can see in the code snippet, the creation is pretty straightforward except for the averageValue() configuration. This tells the map to configure the average number of bytes taken by map entry values.

In other words, when creating the map, the Chronicle Map determines the average number of bytes taken by the serialized form of values. It does this by serializing the given average value using the configured value marshallers. It will then allocate the determined number of bytes for the value of each map entry.

One thing we have to note when it comes to the in-memory map is that the data is accessible only when the JVM process is alive. The library will clear the data when the process terminates.

4.2. Persisted Map

Unlike an in-memory map, the implementation will save a persisted map to disk. Let’s now see how we can create a persisted map:

ChronicleMap<LongValue, CharSequence> persistedCountryMap = ChronicleMap
  .of(LongValue.class, CharSequence.class)
  .name("country-map")
  .entries(50)
  .averageValue("America")
  .createPersistedTo(new File(System.getProperty("user.home") + "/country-details.dat"));

This will create a file called country-details.dat in the folder specified. If this file is already available in the specified path, then the builder implementation will open a link to the existing data store from this JVM process.

We can make use of the persisted map in cases where we want it to:

  • survive beyond the creator process; for example, to support hot application redeployment
  • make it global in a server; for example, to support multiple concurrent process access
  • act as a data store that we’ll save to the disk

5. Size Configuration

It’s mandatory to configure the average value and average key while creating a Chronicle Map, except in the case where our key/value type is either a boxed primitive or a value interface. In our example, we’re not configuring the average key since the key type LongValue is a value interface.

Now, let’s see what the options are for configuring the average number of key/value bytes:

  • averageValue() – The value from which the average number of bytes to be allocated for the value of a map entry is determined
  • averageValueSize() – The average number of bytes to be allocated for the value of a map entry
  • constantValueSizeBySample() – The number of bytes to be allocated for the value of a map entry when the size of the value is always the same
  • averageKey() – The key from which the average number of bytes to be allocated for the key of a map entry is determined
  • averageKeySize() – The average number of bytes to be allocated for the key of a map entry
  • constantKeySizeBySample() – The number of bytes to be allocated for the key of a map entry when the size of the key is always the same

6. Key And Value Types

There are certain standards that we need to follow when creating a Chronicle Map, especially when defining the key and value. The map works best when we create the key and value using the recommended types.

Here are some of the recommended types:

  • Value interfaces
  • Any class implementing Byteable interface from Chronicle Bytes
  • Any class implementing BytesMarshallable interface from Chronicle Bytes; the implementation class should have a public no-arg constructor
  • byte[] and ByteBuffer
  • CharSequence, String, and StringBuilder
  • Integer, Long, and Double
  • Any class implementing java.io.Externalizable; the implementation class should have a public no-arg constructor
  • Any type implementing java.io.Serializable, including boxed primitive types (except those listed above) and array types
  • Any other type, if custom serializers are provided

7. Querying a Chronicle Map

Chronicle Map supports single-key queries as well as multi-key queries.

7.1. Single-Key Queries

Single-key queries are the operations that deal with a single key. ChronicleMap supports all the operations from the Java Map interface and ConcurrentMap interface:

LongValue qatarKey = Values.newHeapInstance(LongValue.class);
qatarKey.setValue(1);
inMemoryCountryMap.put(qatarKey, "Qatar");

//...

CharSequence country = inMemoryCountryMap.get(key);

In addition to the normal get and put operations, ChronicleMap adds a special operation, getUsing(), that reduces the memory footprint while retrieving and processing an entry. Let’s see this in action:

LongValue key = Values.newHeapInstance(LongValue.class);
StringBuilder country = new StringBuilder();
key.setValue(1);
persistedCountryMap.getUsing(key, country);
assertThat(country.toString(), is(equalTo("Romania")));

key.setValue(2);
persistedCountryMap.getUsing(key, country);
assertThat(country.toString(), is(equalTo("India")));

Here we’ve used the same StringBuilder object for retrieving values of different keys by passing it to the getUsing() method. It basically reuses the same object for retrieving different entries. In our case, the getUsing() method is equivalent to:

country.setLength(0);
country.append(persistedCountryMap.get(key));

7.2. Multi-Key Queries

There may be use cases where we need to deal with multiple keys at the same time. For this, we can use the queryContext() functionality. The queryContext() method will create a context for working with a map entry.

Let’s first create a multimap and add some values to it:

Set<Integer> averageValue = IntStream.of(1, 2).boxed().collect(Collectors.toSet());
ChronicleMap<Integer, Set<Integer>> multiMap = ChronicleMap
  .of(Integer.class, (Class<Set<Integer>>) (Class) Set.class)
  .name("multi-map")
  .entries(50)
  .averageValue(averageValue)
  .create();

Set<Integer> set1 = new HashSet<>();
set1.add(1);
set1.add(2);
multiMap.put(1, set1);

Set<Integer> set2 = new HashSet<>();
set2.add(3);
multiMap.put(2, set2);

To work with multiple entries, we have to lock those entries to prevent inconsistency that may occur due to a concurrent update:

try (ExternalMapQueryContext<Integer, Set<Integer>, ?> fistContext = multiMap.queryContext(1)) {
    try (ExternalMapQueryContext<Integer, Set<Integer>, ?> secondContext = multiMap.queryContext(2)) {
        fistContext.updateLock().lock();
        secondContext.updateLock().lock();

        MapEntry<Integer, Set<Integer>> firstEntry = fistContext.entry();
        Set<Integer> firstSet = firstEntry.value().get();
        firstSet.remove(2);

        MapEntry<Integer, Set<Integer>> secondEntry = secondContext.entry();
        Set<Integer> secondSet = secondEntry.value().get();
        secondSet.add(4);

        firstEntry.doReplaceValue(fistContext.wrapValueAsData(firstSet));
        secondEntry.doReplaceValue(secondContext.wrapValueAsData(secondSet));
    }
} finally {
    assertThat(multiMap.get(1).size(), is(equalTo(1)));
    assertThat(multiMap.get(2).size(), is(equalTo(2)));
}

8. Closing the Chronicle Map

Now that we’ve finished working with our maps, let’s call the close() method on our map objects to release the off-heap memory and the resources associated with it:

persistedCountryMap.close();
inMemoryCountryMap.close();
multiMap.close();

One thing to keep in mind here is that all the map operations must be completed before closing the map. Otherwise, the JVM might crash unexpectedly.

9. Conclusion

In this tutorial, we’ve learned how to use a Chronicle Map to store and retrieve key-value pairs. Even though the community version is available with most of the core functionalities, the commercial version has some advanced features like data replication across multiple servers and remote calls.

All the examples we’ve discussed here can be found over the Github project.

Checking for Empty or Blank Strings in Java

$
0
0

1. Introduction

In this tutorial, we’ll go through some ways of checking for empty or blank strings in Java. We’ve got some native language approaches as well as a couple of libraries.

2. Empty vs. Blank

It’s, of course, pretty common to know when a string is empty or blank, but let’s make sure we’re on the same page with our definitions.

We consider a string to be empty if it’s either null or a string without any length. If a string only consists of whitespace only, then we call it blank.

For Java, whitespaces are characters like spaces, tabs and so on. Have a look at Character.isWhitespace for examples.

3. Empty Strings

3.1. With Java 6 and Above

If we are at least on Java 6, then the simplest way to check for an empty string is String#isEmpty:

boolean isEmptyString(String string) {
    return string == null || string.isEmpty();
}

To make it also null-safe we need to add an extra check.

3.2. With Java 5 and Below

String#isEmpty was introduced with Java 6. For Java 5 and below, we can use String#length instead.

boolean isEmptyString(String string) {
    return string == null || string.length() == 0;
}

In fact, String#isEmpty is just a shortcut to String#length.

4. Blank Strings

Both String#isEmpty and String#length can be used to check for empty strings.

If we also want to detect blank strings, we can achieve this with the help of String#trim. It will remove all leading and trailing whitespaces before performing the check.

boolean isBlankString(String string) {
    return string == null || string.trim().isEmpty();
}

To be precise, String#trim will remove all leading and trailing characters with a Unicode code less than or equal to U+0020.

And also remember that Strings are immutable, so calling trim won’t actually change the underlying string.

5. Bean Validation

Another way to check for blank strings is regular expressions. This comes handy for instance with Java Bean Validation:

@Pattern(regexp = "\\A(?!\\s*\\Z).+")
String someString;

The given regular expression ensures that empty or blank strings will not validate.

6. With Apache Commons

If it’s ok to add dependencies, we can use Apache Commons Lang. This has a host of helpers for Java.

If we use Maven, we need to add the commons-lang3 dependency to our pom:

<dependency>
    <groupId>org.apache.commons</groupId>
    <artifactId>commons-lang3</artifactId>
</dependency>

Among other things, this gives us StringUtils.

This class comes with methods like isEmpty, isBlank and so on:

StringUtils.isBlank(string)

This call does the same as our own isBlankString method. It’s null-safe and also checks for whitespaces.

7. With Guava

Another well-known library that brings certain string related utilities is Google’s Guava. Starting with version 23.1, there are two flavors of Guava: android and jre. The Android flavor targets Android and Java 7, whereas the JRE flavor goes for Java 8.

If we’re not targeting Android, we can just add the JRE flavor to our pom:

<dependency>
    <groupId>com.google.guava</groupId>
    <artifactId>guava</artifactId>
    <version>28.0-jre</version>
</dependency>

Guavas Strings class comes with a method Strings.isNullOrEmpty:

Strings.isNullOrEmpty(string)

It checks whether a given string is null or empty, but it will not check for whitespace-only strings.

8. Conclusion

There are several ways to check whether a string is empty or not. Often, we also want to check if a string is blank, meaning that it consists of only whitespace characters.

The most convenient way is to use Apache Commons Lang, which provides helpers such as StringUtils.isBlank. If we want to stick to plain Java, we can use a combination of String#trim with either String#isEmpty or String#length. For Bean Validation, regular expressions can be used instead.

Make sure to check out all these samples over on GitHub.

Checking If a String Is a Repeated Substring

$
0
0

1. Introduction

In this tutorial, we’ll show how we can check in Java if a String is a sequence of repeated substrings.

2. The Problem

Before we continue with the implementation, let’s set up some conditions. First, we’ll assume that our String has at least two characters. Second, there’s at least one repetition of a substring.

This is best illustrated with some examples by checking out a few repeated substrings:

"aa"
"ababab"
"barrybarrybarry"

And a few non-repeated ones:

"aba"
"cbacbac"
"carlosxcarlosy"

We’ll now show a few solutions to the problem.

3. A Naive Solution

Let’s implement the first solution.

The process is rather simple: we’ll check the String‘s length and eliminate the single character Strings at the very beginning.

Then, since the length of a substring can’t be larger than a half of the string’s length, we’ll iterate through the half of the String and create the substring in every iteration by appending the next character to the previous substring.

We’ll next remove those substrings from the original String and check if the length of the “stripped” one is zero. That would mean that it’s made only of its substrings:

public static boolean containsOnlySubstrings(String string) {

    if (string.length() < 2) {
        return false;
    }

    StringBuilder substr = new StringBuilder();
    for (int i = 0; i < string.length() / 2; i++) {
        substr.append(string.charAt(i));

        String clearedFromSubstrings = string.replaceAll(substr.toString(), "");

        if (clearedFromSubstrings.length() == 0) {
            return true;
        }
    }

    return false;
}

Let’s create some Strings to test our method:

String validString = "aa";
String validStringTwo = "ababab";
String validStringThree = "baeldungbaeldung";

String invalidString = "aca";
String invalidStringTwo = "ababa";
String invalidStringThree = "baeldungnonrepeatedbaeldung";

And, finally, we can easily check its validity:

assertTrue(containsOnlySubstrings(validString));
assertTrue(containsOnlySubstrings(validStringTwo));
assertTrue(containsOnlySubstrings(validStringThree));

assertFalse(containsOnlySubstrings(invalidString));
assertFalse(containsOnlySubstrings(invalidStringTwo));
assertFalse(containsOnlySubstrings(invalidStringThree));

Although this solution works, it’s not very efficient since we iterate through the half of the String and use replaceAll() method in every iteration.

Obviously, it comes with the cost regarding the performance. It’ll run in time O(n^2).

4. The Efficient Solution

Now, we’ll illustrate another approach.

Namely, we should make use of the fact that a String is made of the repeated substrings if and only if it’s a nontrivial rotation of itself.

The rotation here means that we remove some characters from the beginning of the String and put them at the end. For example, “eldungba” is the rotation of “baeldung”. If we rotate a String and get the original one, then we can apply this rotation over and over again and get the String consisting of the repeated substrings.

Next, we need to check if this is the case with our example. To accomplish this, we’ll make use of the theorem which says that if String A and String B have the same length, then we can say that A is a rotation of B if and only if A is a substring of BB. If we go with the example from the previous paragraph, we can confirm this theorem: baeldungbaeldung.

Since we know that our String A will always be a substring of AA, we then only need to check if the String A is a substring of AA excluding the first character:

public static boolean containsOnlySubstringsEfficient(String string) {
    return ((string + string).indexOf(string, 1) != string.length());
}

We can test this method the same way as the previous one. This time, we have O(n) time complexity.

We can find some useful theorems about the topic in String analysis research.

5. Conclusion

In this article, we illustrated two ways of checking if a String consists only of its substrings in Java.

All code samples used in the article are available over on GitHub.

Java Multi-line String

$
0
0

1. Overview

Due to the fact that there is no native multi-line string class in Java yet, it's a little bit tricky to create and utilize multi-line strings.

In this tutorial, we walk through several methods to make and use multi-line strings in Java.

2. Getting the Line Separator

Each operating system can have its own way of defining and recognizing new lines. In Java, it's very easy to get the operating system line separator:

String newLine = System.getProperty("line.separator");

We're going to use this newLine in the following sections to create multi-line strings.

3. String Concatenation

String concatenation is an easy native method which can be used to create multi-line strings:

public String stringConcatenation() {
    return "Get busy living"
            .concat(newLine)
            .concat("or")
            .concat(newLine)
            .concat("get busy dying.")
            .concat(newLine)
            .concat("--Stephen King");
}

Using the + operator is another way of achieving the same thing. Java compilers translate concat() and the + operator in the same way:

public String stringConcatenation() {
    return "Get busy living"
            + newLine
            + "or"
            + newLine
            + "get busy dying."
            + newLine
            + "--Stephen King";
}

4. String Join

Java 8 introduced String#join, which takes a delimiter along with some strings as arguments. It returns a final string having all input strings joined together with the delimiter:

public String stringJoin() {
    return String.join(newLine,
                       "Get busy living",
                       "or",
                       "get busy dying.",
                       "--Stephen King");
}

5. String Builder

StringBuilder is a helper class to build Strings. StringBuilder was introduced in Java 1.5 as a replacement for StringBuffer. It's a good choice for building huge strings in a loop:

public String stringBuilder() {
    return new StringBuilder()
            .append("Get busy living")
            .append(newLine)
            .append("or")
            .append(newLine)
            .append("get busy dying.")
            .append(newLine)
            .append("--Stephen King")
            .toString();
}

6. String Writer

StringWriter is another method that we can utilize to create a multi-line string. We don't need newLine here, because we use PrintWriter. The println function automatically adds new lines:

public String stringWriter() {
    StringWriter stringWriter = new StringWriter();
    PrintWriter printWriter = new PrintWriter(stringWriter);
    printWriter.println("Get busy living");
    printWriter.println("or");
    printWriter.println("get busy dying.");
    printWriter.println("--Stephen King");
    return stringWriter.toString();
}

7. Guava Joiner

Using an external library just for a simple task like this doesn't make much sense, however, if the project already uses the library for other purposes, we can utilize it. For example, Google's Guava library is very popular. Guava has a Joiner class that is able to build multi-line strings:

public String guavaJoiner() {
    return Joiner.on(newLine).join(ImmutableList.of("Get busy living",
        "or",
        "get busy dying.",
        "--Stephen King"));
}

8. Loading from a File

Java reads files exactly as they are. This means that if we have a multi-line string in a text file, we'll have the same string when we read the file. There are a lot of ways to read from a file in Java.

Actually, it's a good practice to separate long strings from code:

public String loadFromFile() throws IOException {
    return new String(Files.readAllBytes(Paths.get("src/main/resources/stephenking.txt")));
}

9. Using IDE Features

Many modern IDEs support multi-line copy/paste. Eclipse and IntelliJ IDEA are examples of such IDEs. We can simply copy our multi-line string and paste in inside two double quotes in these IDEs.

Obviously, this method doesn't work for string creation in run time, but it's a quick and easy way to get a multi-line string.

10. Conclusion

In this tutorial, we learned several methods to build multi-line strings in Java.

The good news is Java 13 will have native support for multi-line strings via Text Blocks. Needless to say, all the methods above will still work in Java 13.

The code for all the methods in this article is available over on Github.

Why to Choose Spring as Your Java Framework?

$
0
0

1. Overview

In this article, we’ll go through the main value proposition of Spring as one of the most popular Java frameworks.

More importantly, we’ll try to understand the reasons for Spring being our framework of choice. Details of Spring and its constituent parts have been widely covered in our previous tutorials. Hence we’ll skip the introductory “how” parts and mostly focus on “why”s.

2. Why Use Any Framework?

Before we begin any discussion in particular on Spring, let’s first understand why do we need to use any framework at all in the first place.

A general purpose programming language like Java is capable of supporting a wide variety of application. Not to mention that Java is actively being worked upon and improving every day.

Moreover, there are countless open source and proprietary libraries to support Java in this regard.

So why do we need a framework after all? Honestly, it isn’t absolutely necessary to use a framework to accomplish a task. But, it’s often advisable to use one for several reasons:

  • Helps us focus on the core task rather than the boilerplate associated with it
  • Brings together years of wisdom in the form of design patterns
  • Helps us adhere to the industry and regulatory standards
  • Brings down the total cost of ownership for the application

We’ve just scratched the surface here and we must say that the benefits and difficult to ignore. But it can’t be all positives, so what’s the catch:

  • Forces us to write an application in a specific manner
  • Binds to a specific version of language and libraries
  • Adds to the resource footprint of the application

Frankly, there are no silver bullets in software development and frameworks and certainly no exception to that. So the choice of which framework or none should be driven from the context.

Hopefully, we’ll be better placed to make this decision with respect to Spring in Java by the end of this article.

3. Brief Overview of Spring Ecosystem

Before we begin our qualitative assessment of Spring Framework, let’s have a closer look into what does Spring ecosystem look like.

Spring came into existence somewhere in 2003 at a time when Java Enterprise Edition was evolving fast and developing an enterprise application was exciting but nonetheless tedious!

Spring started out as an Inversion of Control (IoC) container for Java. We still relate Spring mostly to it and in fact, it forms the core of the framework and other projects that have been developed on top of it.

3.1. Spring Framework

Spring framework is divided into modules which makes it really easy to pick and choose in parts to use in any application:

  • Core: Provides core features like DI (Dependency Injection), Internationalisation, Validation, and AOP (Aspect Oriented Programming)
  • Data Access: Supports data access through JTA (Java Transaction API), JPA (Java Persistence API), and JDBC (Java Database Connectivity)
  • Web: Supports both Servlet API (Spring MVC) and of recently Reactive API (Spring WebFlux), and additionally supports WebSockets, STOMP, and WebClient
  • Integration: Supports integration to Enterprise Java through JMS (Java Message Service), JMX (Java Management Extension), and RMI (Remote Method Invocation)
  • Testing: Wide support for unit and integration testing through Mock Objects, Test Fixtures, Context Management, and Caching

3.2. Spring Projects

But what makes Spring much more valuable is a strong ecosystem that has grown around it over the years and that continues to evolve actively. These are structured as Spring projects which are developed on top of the Spring framework.

Although the list of Spring projects is a long one and it keeps changing, there are a few worth mentioning:

  • Boot: Provides us with a set of highly opinionated but extensible template for creating various projects based on Spring in almost no time. It makes it really easy to create standalone Spring applications with embedded Tomcat or a similar container.
  • Cloud: Provides support to easily develop some of the common distributed system patterns like service discovery, circuit breaker, and API gateway. It helps us cut down the effort to deploy such boilerplate patterns in local, remote or even managed platforms.
  • Security: Provides a robust mechanism to develop authentication and authorization for projects based on Spring in a highly customizable manner. With minimal declarative support, we get protection against common attacks like session fixation, click-jacking, and cross-site request forgery.
  • Mobile: Provides capabilities to detect the device and adapt the application behavior accordingly. Additionally, supports device-aware view management for optimal user experience, site preference management, and site switcher.
  • Batch: Provides a lightweight framework for developing batch applications for enterprise systems like data archival. Has intuitive support for scheduling, restart, skipping, collecting metrics, and logging. Additionally, supports scaling up for high-volume jobs through optimization and partitioning.

Needless to say that this is quite an abstract introduction to what Spring has to offer. But it provides us enough ground with respect to Spring’s organization and breadth to take our discussion further.

4. Spring in Action

It is customary to add a hello-world program to understand any new technology.

Let’s see how Spring can make it a cakewalk to write a program which does more than just hello-world. We’ll create an application that will expose CRUD operations as REST APIs for a domain entity like Employee backed by an in-memory database. What’s more, we’ll protect our mutation endpoints using basic auth. Finally, no application can really be complete without good, old unit tests.

4.1. Project Set-up

We’ll set up our Spring Boot project using Spring Initializr, which is a convenient online tool to bootstrap projects with the right dependencies. We’ll add Web, JPA, H2, and Security as project dependencies to get the Maven configuration set-up correctly.

More details on bootstrapping are available in one of our previous articles.

4.2. Domain Model and Persistence

With so little to be done, we are already ready to define our domain model and persistence.

Let’s first define the Employee as a simple JPA entity:

@Entity
public class Employee {
    @Id
    @GeneratedValue(strategy = GenerationType.AUTO)
    private Long id;
    @NotNull
    private String firstName;
    @NotNull
    private String lastName;
    // Standard constructor, getters and setters
}

Note the auto-generated id we’ve included in our entity definition.

Now we have to define a JPA repository for our entity. This is where Spring makes it really simple:

public interface EmployeeRepository 
  extends CrudRepository<Employee, Long> {
    List<Employee> findAll();
}

All we have to do is define an interface like this, and Spring JPA will provide us with an implementation fleshed out with default and custom operations. Quite neat! Find more details on working with Spring Data JPA in our other articles.

4.3. Controller

Now we have to define a web controller to route and handle our incoming requests:

@RestController
public class EmployeeController {
    @Autowired
    private EmployeeRepository repository;
    @GetMapping("/employees")
    public List<Employee> getEmployees() {
        return repository.findAll();
    }
    // Other CRUD endpoints handlers
}

Really, all we had to do was annotate the class and define routing meta information along with each handler method.

Working with Spring REST controllers is covered in great details in our previous article.

4.4. Security

So we have defined everything now, but what about securing operations like create or delete employees? We don’t want unauthenticated access to those endpoints!

Spring Security really shines in this area:

@EnableWebSecurity
public class WebSecurityConfig 
  extends WebSecurityConfigurerAdapter {
 
    @Override
    protected void configure(HttpSecurity http) 
      throws Exception {
        http
          .authorizeRequests()
            .antMatchers(HttpMethod.GET, "/employees", "/employees/**")
            .permitAll()
          .anyRequest()
            .authenticated()
          .and()
            .httpBasic();
    }
    // other necessary beans and definitions
}

There are more details here which require attention to understand but the most important point to note is the declarative manner in which we have only allowed GET operations unrestricted.

4.5. Testing

Now we’ have done everything, but wait, how do we test this?

Let’s see if Spring can make it easy to write unit tests for REST controllers:

@RunWith(SpringRunner.class)
@SpringBootTest(webEnvironment = WebEnvironment.RANDOM_PORT)
@AutoConfigureMockMvc
public class EmployeeControllerTests {
    @Autowired
    private MockMvc mvc;
    @Test
    @WithMockUser()
    public void givenNoEmployee_whenCreateEmployee_thenEmployeeCreated() throws Exception {
        mvc.perform(post("/employees").content(
            new ObjectMapper().writeValueAsString(new Employee("First", "Last"))
            .with(csrf()))
          .contentType(MediaType.APPLICATION_JSON)
          .accept(MediaType.APPLICATION_JSON))
          .andExpect(MockMvcResultMatchers.status()
            .isCreated())
          .andExpect(jsonPath("$.firstName", is("First")))
          .andExpect(jsonPath("$.lastName", is("Last")));
    }
    // other tests as necessary
}

As we can see, Spring provides us with the necessary infrastructure to write simple unit and integration tests which otherwise depend on the Spring context to be initialized and configured.

4.6. Running the Application

Finally, how do we run this application? This is another interesting aspect of Spring Boot. Although we can package this as a regular application and deploy traditionally on a Servlet container.

But where is fun this that! Spring Boot comes with an embedded Tomcat server:

@SpringBootApplication
public class Application {
    public static void main(String[] args) {
        SpringApplication.run(Application.class, args);
    }
}

This is a class which comes pre-created as part of the bootstrap and has all the necessary details to start this application using the embedded server.

Moreover, this is highly customizable.

5. Alternatives to Spring

While choosing to use a framework is relatively easier, choosing between frameworks can often be daunting with the choices we have. But for that, we must have at least a rough understanding of what alternatives are there for the features that Spring has to offer.

As we discussed previously, the Spring framework together with its projects offer a wide choice for an enterprise developer to pick from. If we do a quick assessment of contemporary Java frameworks, they don’t even come close to the ecosystem that Spring provides us.

However, for specific areas, they do form a compelling argument to pick as alternatives:

  • Guice: Offers a robust IoC container for Java applications
  • Play: Quite aptly fits in as a Web framework with reactive support
  • Hibernate: An established framework for data access with JPA support

Other than these there are some recent additions that offer wider support than a specific domain but still do not cover everything that Spring has to offer:

  • Micronaut: A JVM-based framework tailored towards cloud-native microservices
  • Quarkus: A new age Java stack which promises to deliver faster boot time and a smaller footprint

Obviously, it’s neither necessary nor feasible to iterate over the list completely but we do get the broad idea here.

6. So, Why Choose Spring?

Finally, we’ve built all the required context to address our central question, why Spring? We understand the ways a framework can help us in developing complex enterprise applications.

Moreover, we do understand the options we’ve got for specific concerns like web, data access, integration in terms of framework, especially for Java.

Now, where does Spring shine among all these? Let’s explore.

6.1. Usability

One of the key aspects of any framework’s popularity is how easy it is for developers to use it. Spring through multiple configuration options and Convention over Configuration makes it really easy for developers to start and then configure exactly what they need.

Projects like Spring Boot have made bootstrapping a complex Spring project almost trivial. Not to mention, it has excellent documentation and tutorials to help anyone get on-boarded.

6.2. Modularity

Another key aspect of Spring’s popularity is its highly modular nature. We’ve options to use the entire Spring framework or just the modules necessary. Moreover, we can optionally include one or more Spring projects depending upon the need.

What’s more, we’ve got the option to use other frameworks like Hibernate or Struts as well!

6.3. Conformance

Although Spring does not support all of Java EE specifications, it supports all of its technologies, often improving the support over the standard specification where necessary. For instance, Spring supports JPA based repositories and hence makes it trivial to switch providers.

Moreover, Spring supports industry specifications like Reactive Stream under Spring Web Reactive and HATEOAS under Spring HATEOAS.

6.4. Testability

Adoption of any framework largely also depends on the fact that how easy it is to test the application built on top of it. Spring at the core advocates and supports Test Driven Development (TDD).

Spring application is mostly composed of POJOs which naturally makes unit testing relatively much simpler. However, Spring does provide Mock Objects for scenarios like MVC where unit testing gets complicated otherwise.

6.5 Maturity

Spring has a long history of innovation, adoption, and standardization. Over the years, it’s become mature enough to become a default solution for most common problems faced in the development of large scale enterprise applications.

What’s even more exciting is how actively it’s being developed and maintained. Support for new language features and enterprise integration solutions are being developed every day.

6.6. Community Support

Last but not least, any framework or even library survive the industry through innovation and there’s no better place for innovation than community. Spring is an open source led by Pivotal Software and backed by a large consortium of organizations and individual developers.

This has meant that it remains contextual and often futuristic, as evident by the number of projects under its umbrella.

7. Reasons Not to Use Spring

There is a wide variety of application which can benefit from a different level of Spring usage, and that is changing as fast as Spring is growing.

However, we must understand that Spring like any other framework is helpful in managing the complexity of application development. It helps us to avoid common pitfalls and keeps the application maintainable as it grows over time.

This comes at the cost of an additional resource footprint and learning curve, however small that may be. If there is really an application which is simple enough and not expected to grow complex, perhaps it may benefit more to not use any framework at all!

8. Conclusion

In this article, we discussed the benefits of using a framework in application development. We further discussed briefly Spring Framework in particular.

While on the subject, we also looked into some of the alternate frameworks available for Java.

Finally, we discussed the reasons which can compel us to choose Spring as the framework of choice for Java.

We should end this article with a note of advice, though. However compelling it may sound, there is usually no single, one-size-fits-all solution in software development.

Hence, we must apply our wisdom in selecting the simplest of solutions for the specific problems we target to solve.

Setting the MySQL JDBC Timezone Using Spring Boot Configuration

$
0
0

1. Overview

Sometimes, when we’re storing dates in MySQL, we realize that the date from the database is different from our system or JVM.

Other times, we just need to run our app with another timezone.

In this tutorial, we’re going to see different ways to change the timezone of MySQL using Spring Boot configuration.

2. Timezone as a URL Param

One way we can specify the timezone is in the connection URL string as a parameter.

By default, MySQL uses useLegacyDatetimeCode=true. In order to select our timezone, we have to change this property to false. And of course, we also add the property serverTimezone to specify the timezone:

spring:
  datasource:
    url: jdbc:mysql://localhost:3306/test?serverTimezone=UTC&useLegacyDatetimeCode=false
    username: root
    password:

Also, we can, of course, configure the datasource with Java configuration instead.

We have more information about this property and others in the MySQL official documentation.

3. Spring Boot Property

Or, instead of indicating the timezone via the serverTimezone URL parameter, we can specify the time_zone property in our Spring Boot configuration:

spring.jpa.properties.hibernate.jdbc.time_zone=UTC

Or with YAML:

spring:
  jpa:
    properties:
      hibernate:
        jdbc:
          time_zone: UTC

But, it’s still necessary to add useLegacyDatetimeCode=false in the URL as we’ve seen before.

4. JVM Default Timezone

And of course, we can update the default timezone that Java has.

Again, we add useLegacyDatetimeCode=false in the URL as before. And then we just need to add a simple method:

@PostConstruct
void started() {
  TimeZone.setDefault(TimeZone.getTimeZone("UTC"));
}

But, this solution could generate other problems since it’s application-wide. Perhaps other parts of the applications need another timezone. For example, we may need to connect to different databases and they, for some reason, need dates to be stored in different timezones.

5. Conclusion

In this tutorial, we saw a few different ways to configure the MySQL JDBC timezone in Spring. We did it with a URL param, with a property, and by changing the JVM default timezone.

The full set of examples is over on GitHub.

Java Weekly, Issue 288

$
0
0

Here we go…

1. Spring and Java

>> Hiding Services & Runtime Discovery with Spring Cloud Gateway [spring.io]

A solid, ready-to-run example using Spring Cloud’s gateway and registry services. Good stuff.

>> Exercises in Programming Style: maps are objects too [blog.frankel.ch]

A functional solution to the word extraction problem seen previously in the series, this time using an immutable map in Kotlin.

>> Running Gradle inside Maven [andresalmiray.com]

And although Gradle builds don’t participate directly in the Maven reactor, you can execute a Gradle build within a multi-module Maven project with the right combination of plugins.

Also worth reading:

Webinars and presentations:

Time to upgrade:

2. Technical and Musing

>> How to use S3 POST signed URLs [advancedweb.hu]

An overview of how to use POST URLs to get around the shortcomings of their PUT counterparts.

>> Moving Control to the Endpoints [mnot.net]

And a look at the obstacles standing in the way of wider adoption of encrypted DNS solutions.

Also worth reading:

3. Comics

>> Measuring Excellence [dilbert.com]

>> When Wally Is Busy [dilbert.com]

>> Zombie Projects [dilbert.com]

4. Pick of the Week

A cool writeup from Datadog focused on how to how to actually get your log data processed:

>> How to collect, customize, and standardize Java logs [datadoghq.com]


If you’ve ever worked on any sufficiently large application, you know all too well that’s not a trivial task.


A Guide to NanoHTTPD

$
0
0

1. Introduction

NanoHTTPD is an open-source, lightweight, web server written in Java.

In this tutorial, we’ll create a few REST APIs to explore its features.

2. Project Setup

Let’s add the NanoHTTPD core dependency to our pom.xml:

<dependency>
    <groupId>org.nanohttpd</groupId>
    <artifactId>nanohttpd</artifactId>
    <version>2.3.1</version>
</dependency>

To create a simple server, we need to extend NanoHTTPD and override its serve method:

public class App extends NanoHTTPD {
    public App() throws IOException {
        super(8080);
        start(NanoHTTPD.SOCKET_READ_TIMEOUT, false);
    }

    public static void main(String[] args ) throws IOException {
        new App();
    }

    @Override
    public Response serve(IHTTPSession session) {
        return newFixedLengthResponse("Hello world");
    }
}

We defined our running port as 8080 and server to work as a daemon (no read timeout).

Once we’ll start the application, the URL http://localhost:8080/ will return the Hello world message. We’re using NanoHTTPD#newFixedLengthResponse method as a convenient way of building a NanoHTTPD.Response object.

Let’s try our project with cURL:

> curl 'http://localhost:8080/'
Hello world

3. REST API

In the way of HTTP methods, NanoHTTPD allows GET, POST, PUT, DELETE, HEAD, TRACE, and several others.

Simply put, we can find supported HTTP verbs via the method enum. Let’s see how this plays out.

3.1. HTTP GET

First, let’s take a look at GET. Say, for example, that we want to return content only when the application receives a GET request.

Unlike Java Servlet containers, we don’t have a doGet method available – instead, we just check the value via getMethod:

@Override
public Response serve(IHTTPSession session) {
    if (session.getMethod() == Method.GET) {
        String itemIdRequestParameter = session.getParameters().get("itemId").get(0);
        return newFixedLengthResponse("Requested itemId = " + itemIdRequestParameter);
    }
    return newFixedLengthResponse(Response.Status.NOT_FOUND, MIME_PLAINTEXT, 
        "The requested resource does not exist");
}

That was pretty simple, right? Let’s run a quick test by curling our new endpoint and see that the request parameter itemId is read correctly:

> curl 'http://localhost:8080/?itemId=23Bk8'
Requested itemId = 23Bk8

3.2. HTTP POST

We previously reacted to a GET and read a parameter from the URL.

In order to cover the two most popular HTTP methods, it’s time for us to handle a POST (and thus read the request body):

@Override
public Response serve(IHTTPSession session) {
    if (session.getMethod() == Method.POST) {
        try {
            session.parseBody(new HashMap<>());
            String requestBody = session.getQueryParameterString();
            return newFixedLengthResponse("Request body = " + requestBody);
        } catch (IOException | ResponseException e) {
            // handle
        }
    }
    return newFixedLengthResponse(Response.Status.NOT_FOUND, MIME_PLAINTEXT, 
      "The requested resource does not exist");
}
Notice that before when we asked for the request body, we first called the parseBody method. That’s because we wanted to load the request body for later retrieval.

We’ll include a body in our cURL command:

> curl -X POST -d 'deliveryAddress=Washington nr 4&quantity=5''http://localhost:8080/'
Request body = deliveryAddress=Washington nr 4&quantity=5

The remaining HTTP methods are very similar in nature, so we’ll skip those.

4. Cross-Origin Resource Sharing

Using CORS, we enable cross-domain communication. The most common use case is AJAX calls from a different domain.
 
The first approach that we can use is to enable CORS for all our APIs. Using the -cors argument, we’ll allow access to all domains. We can also define which domains we allow with –cors=”http://dashboard.myApp.com http://admin.myapp.com”.
 
The second approach is to enable CORS for individual APIs. Let’s see how to use addHeader to achieve this:
@Override 
public Response serve(IHTTPSession session) {
    Response response = newFixedLengthResponse("Hello world"); 
    response.addHeader("Access-Control-Allow-Origin", "*");
    return response;
}

Now when we cURL, we’ll get our CORS header back:

> curl -v 'http://localhost:8080'
HTTP/1.1 200 OK 
Content-Type: text/html
Date: Thu, 13 Jun 2019 03:58:14 GMT
Access-Control-Allow-Origin: *
Connection: keep-alive
Content-Length: 11

Hello world

5. File Upload

NanoHTTPD has a separate dependency for file uploads, so let’s add it to our project:

<dependency>
    <groupId>org.nanohttpd</groupId>
    <artifactId>nanohttpd-apache-fileupload</artifactId>
    <version>2.3.1</version>
</dependency>
<dependency>
    <groupId>javax.servlet</groupId>
    <artifactId>javax.servlet-api</artifactId>
    <version>4.0.1</version>
    <scope>provided</scope>
</dependency>

Please note that the servlet-api dependency is also needed (otherwise we’ll get a compilation error).

What NanoHTTPD exposes is a class called NanoFileUpload:

@Override
public Response serve(IHTTPSession session) {
    try {
        List<FileItem> files
          = new NanoFileUpload(new DiskFileItemFactory()).parseRequest(session);
        int uploadedCount = 0;
        for (FileItem file : files) {
            try {
                String fileName = file.getName(); 
                byte[] fileContent = file.get(); 
                Files.write(Paths.get(fileName), fileContent);
                uploadedCount++;
            } catch (Exception exception) {
                // handle
            }
        }
        return newFixedLengthResponse(Response.Status.OK, MIME_PLAINTEXT, 
          "Uploaded files " + uploadedCount + " out of " + files.size());
    } catch (IOException | FileUploadException e) {
        throw new IllegalArgumentException("Could not handle files from API request", e);
    }
    return newFixedLengthResponse(
      Response.Status.BAD_REQUEST, MIME_PLAINTEXT, "Error when uploading");
}

Hey, let’s try it out:

> curl -F 'filename=@/pathToFile.txt' 'http://localhost:8080'
Uploaded files: 1

6. Multiple Routes

A nanolet is like a servlet but has a very low profile. We can use them to define many routes served by a single server (unlike previous examples with one route).

Firstly, let’s add the required dependency for nanolets:

<dependency>
    <groupId>org.nanohttpd</groupId>
    <artifactId>nanohttpd-nanolets</artifactId>
    <version>2.3.1</version>
</dependency>

And now we’ll extend our main class using the RouterNanoHTTPD, define our running port and have the server run as a daemon.

The addMappings method is where we’ll define our handlers:

public class MultipleRoutesExample extends RouterNanoHTTPD {
    public MultipleRoutesExample() throws IOException {
        super(8080);
        addMappings();
        start(NanoHTTPD.SOCKET_READ_TIMEOUT, false);
    }
 
    @Override
    public void addMappings() {
        // todo fill in the routes
    }
}

The next step is to define our addMappings method. Let’s define a few handlers. 

The first one is an IndexHandler class to “/” path. This class comes with the NanoHTTPD library and returns by default a Hello World message. We can override the getText method when we want a different response:

addRoute("/", IndexHandler.class); // inside addMappings method

And to test our new route we can do:

> curl 'http://localhost:8080' 
<html><body><h2>Hello world!</h3></body></html>

Secondly, let’s create a new UserHandler class which extends the existing DefaultHandler. The route for it will be /users. Here we played around with the text, MIME type, and the status code returned:

public static class UserHandler extends DefaultHandler {
    @Override
    public String getText() {
        return "UserA, UserB, UserC";
    }

    @Override
    public String getMimeType() {
        return MIME_PLAINTEXT;
    }

    @Override
    public Response.IStatus getStatus() {
        return Response.Status.OK;
    }
}

To call this route we’ll issue a cURL command again:

> curl -X POST 'http://localhost:8080/users' 
UserA, UserB, UserC

Finally, we can explore the GeneralHandler with a new StoreHandler class. We modified the returned message to include the storeId section of the URL.

public static class StoreHandler extends GeneralHandler {
    @Override
    public Response get(
      UriResource uriResource, Map<String, String> urlParams, IHTTPSession session) {
        return newFixedLengthResponse("Retrieving store for id = "
          + urlParams.get("storeId"));
    }
}

Let’s check our new API:

> curl 'http://localhost:8080/stores/123' 
Retrieving store for id = 123

7. HTTPS

In order to use the HTTPS, we’ll need a certificate. Please refer to our article on SSL for more in-depth information.

We could use a service like Let’s Encrypt or we can simply generate a self-signed certificate as follows:

> keytool -genkey -keyalg RSA -alias selfsigned
  -keystore keystore.jks -storepass password -validity 360
  -keysize 2048 -ext SAN=DNS:localhost,IP:127.0.0.1  -validity 9999

Next, we’d copy this keystore.jks to a location on our classpath, like say the src/main/resources folder of a Maven project.

After that, we can reference it in a call to NanoHTTPD#makeSSLSocketFactory:

public class HttpsExample  extends NanoHTTPD {

    public HttpsExample() throws IOException {
        super(8080);
        makeSecure(NanoHTTPD.makeSSLSocketFactory(
          "/keystore.jks", "password".toCharArray()), null);
        start(NanoHTTPD.SOCKET_READ_TIMEOUT, false);
    }

    // main and serve methods
}

And now we can try it out. Please notice the use of the —insecure parameter, because cURL won’t be able to verify our self-signed certificate by default:

> curl --insecure 'https://localhost:8443'
HTTPS call is a success

8. WebSockets

NanoHTTPD supports WebSockets.

Let’s create the simplest implementation of a WebSocket. For this, we’ll need to extend the NanoWSD class. We’ll also need to add the NanoHTTPD dependency for WebSocket:

<dependency>
    <groupId>org.nanohttpd</groupId>
    <artifactId>nanohttpd-websocket</artifactId>
    <version>2.3.1</version>
</dependency>

For our implementation, we’ll just reply with a simple text payload:

public class WsdExample extends NanoWSD {
    public WsdExample() throws IOException {
        super(8080);
        start(NanoHTTPD.SOCKET_READ_TIMEOUT, false);
    }

    public static void main(String[] args) throws IOException {
        new WsdExample();
    }

    @Override
    protected WebSocket openWebSocket(IHTTPSession ihttpSession) {
        return new WsdSocket(ihttpSession);
    }

    private static class WsdSocket extends WebSocket {
        public WsdSocket(IHTTPSession handshakeRequest) {
            super(handshakeRequest);
        }

        //override onOpen, onClose, onPong and onException methods

        @Override
        protected void onMessage(WebSocketFrame webSocketFrame) {
            try {
                send(webSocketFrame.getTextPayload() + " to you");
            } catch (IOException e) {
                // handle
            }
        }
    }
}

Instead of cURL this time, we’ll use wscat:

> wscat -c localhost:8080
hello
hello to you
bye
bye to you

9. Conclusion

To sum it up, we’ve created a project that uses the NanoHTTPD library. Next, we defined RESTful APIs and explored more HTTP related functionalities. In the end, we also implemented a WebSocket.

The implementation of all these snippets is available over on GitHub.

A Guide to Apache Mesos

$
0
0

1. Overview

We usually deploy various applications on the same cluster of machines. For example, it’s common nowadays to have a distributed processing engine like Apache Spark or Apache Flink with distributed databases like Apache Cassandra in the same cluster.

Apache Mesos is a platform that allows effective resource sharing between such applications.

In this article, we’ll first discuss a few problems of resource allocation within applications deployed on the same cluster. Later, we’ll see how Apache Mesos provides better resource utilization between applications.

2. Sharing the Cluster

Many applications need to share a cluster. By and large, there are two common approaches:

  • Partition the cluster statically and run an application on each partition
  • Allocate a set of machines to an application

Although these approaches allow applications to run independently of each other, it doesn’t achieve high resource utilization.

For instance, consider an application that runs only for a short period followed by a period of inactivity. Now, since we have allocated static machines or partitions to this application, we have unutilized resources during the inactive period.

We can optimize resource utilization by reallocating free resources during the inactive period to other applications.

Apache Mesos helps with dynamic resource allocation between applications.

3. Apache Mesos

With both cluster sharing approaches we discussed above, applications are only aware of the resources of a particular partition or machine they are running. However, Apache Mesos provides an abstract view of all the resources in the cluster to applications.

As we’ll see shortly, Mesos acts as an interface between machines and applications. It provides applications with the available resources on all machines in the cluster. It frequently updates this information to include resources that are freed up by applications that have reached completion status. This allows applications to make the best decision about which task to execute on which machine.

In order to understand how Mesos works, let’s have a look at its architecture:

This image is part of the official documentation for Mesos. Here, Hadoop and MPI are two applications that share the cluster.

We’ll talk about each component shown here in the next few sections.

3.1. Mesos Master

Master is the core component in this setup and stores the current state of resources in the cluster. Additionally, it acts as an orchestrator between the agents and the applications by passing information about things like resources and tasks.

Since any failure in master results in the loss of state about resources and tasks, we deploy it in high availability configuration. As can be seen in the diagram above, Mesos deploys standby master daemons along with one leader. These daemons rely on Zookeeper for recovering state in case of a failure.

3.2. Mesos Agents

A Mesos cluster must run an agent on every machine. These agents report their resources to the master periodically and in turn, receive tasks which an application has scheduled to run. This cycle repeats after the scheduled task is either complete or lost.

We’ll see how applications schedule and execute tasks on these agents in the following sections.

3.3. Mesos Frameworks

Mesos allows applications to implement an abstract component that interacts with the Master to receive the available resources in the cluster and moreover make scheduling decisions based on them. These components are known as frameworks.

A Mesos framework is composed of two sub-components:

  • Scheduler – Enables applications to schedule tasks based on available resources on all the agents
  • Executor – Runs on all agents and contains all the information necessary to execute any scheduled task on that agent

This entire process is depicted with this flow:


First, the agents report their resources to the master. At this instant, master offers these resources to all registered schedulers. This process is known as resource offer, and we’ll discuss it in detail in the next section.

The scheduler then picks the best agent and executes various tasks on it through the Master. As soon as the executor completes the assigned task, agents re-publish their resources to the master. Master repeats this process of resource sharing for all frameworks in the cluster.

Mesos allows applications to implement their custom scheduler and executor in various programming languages. A Java implementation of scheduler must implement the Scheduler interface:

public class HelloWorldScheduler implements Scheduler {
 
    @Override
    public void registered(SchedulerDriver schedulerDriver, Protos.FrameworkID frameworkID, 
      Protos.MasterInfo masterInfo) {
    }
 
    @Override
    public void reregistered(SchedulerDriver schedulerDriver, Protos.MasterInfo masterInfo) {
    }
 
    @Override
    public void resourceOffers(SchedulerDriver schedulerDriver, List<Offer> list) {
    }
 
    @Override
    public void offerRescinded(SchedulerDriver schedulerDriver, OfferID offerID) {
    }
 
    @Override
    public void statusUpdate(SchedulerDriver schedulerDriver, Protos.TaskStatus taskStatus) {
    }
 
    @Override
    public void frameworkMessage(SchedulerDriver schedulerDriver, Protos.ExecutorID executorID, 
      Protos.SlaveID slaveID, byte[] bytes) {
    }
 
    @Override
    public void disconnected(SchedulerDriver schedulerDriver) {
    }
 
    @Override
    public void slaveLost(SchedulerDriver schedulerDriver, Protos.SlaveID slaveID) {
    }
 
    @Override
    public void executorLost(SchedulerDriver schedulerDriver, Protos.ExecutorID executorID, 
      Protos.SlaveID slaveID, int i) {
    }
 
    @Override
    public void error(SchedulerDriver schedulerDriver, String s) {
    }
}

As can be seen, it mostly consists of various callback methods for communication with the master in particular.

Similarly, the implementation of an executor must implement the Executor interface:

public class HelloWorldExecutor implements Executor {
    @Override
    public void registered(ExecutorDriver driver, Protos.ExecutorInfo executorInfo, 
      Protos.FrameworkInfo frameworkInfo, Protos.SlaveInfo slaveInfo) {
    }
  
    @Override
    public void reregistered(ExecutorDriver driver, Protos.SlaveInfo slaveInfo) {
    }
  
    @Override
    public void disconnected(ExecutorDriver driver) {
    }
  
    @Override
    public void launchTask(ExecutorDriver driver, Protos.TaskInfo task) {
    }
  
    @Override
    public void killTask(ExecutorDriver driver, Protos.TaskID taskId) {
    }
  
    @Override
    public void frameworkMessage(ExecutorDriver driver, byte[] data) {
    }
  
    @Override
    public void shutdown(ExecutorDriver driver) {
    }
}

We’ll see an operational version of scheduler and executor in a later section.

4. Resource Management

4.1. Resource Offers

As we discussed earlier, agents publish their resource information to the master. In turn, the master offers these resources to the frameworks running in the cluster. This process is known as a resource offer.

A resource offer consists of two parts – resources and attributes.

Resources are used to publish hardware information of the agent machine such as memory, CPU, and disk.

There are five predefined resources for every Agent:

  • cpu
  • gpus
  • mem
  • disk
  • ports

The values for these resources can be defined in one of the three types:

  • Scalar – Used to represent numerical information using floating point numbers to allow fractional values such as 1.5G of memory
  • Range – Used to represent a range of scalar values – for example, a port range
  • Set – Used to represent multiple text values

By default, Mesos agent tries to detect these resources from the machine.

However, in some situations, we can configure custom resources on an agent. The values for such custom resources should again be in any one of the types discussed above.

For instance, we can start our agent with these resources:

--resources='cpus:24;gpus:2;mem:24576;disk:409600;ports:[21000-24000,30000-34000];bugs(debug_role):{a,b,c}'

As can be seen, we’ve configured the agent with few of the predefined resources and one custom resource named bugs which is of set type.

In addition to resources, agents can publish key-value attributes to the master. These attributes act as additional metadata for the agent and help frameworks in scheduling decisions.

A useful example can be to add agents into different racks or zones and then schedule various tasks on the same rack or zone to achieve data locality:

--attributes='rack:abc;zone:west;os:centos5;level:10;keys:[1000-1500]'

Similar to resources, values for attributes can be either a scalar, a range, or a text type.

4.2. Resource Roles

Many modern-day operating systems support multiple users. Similarly, Mesos also supports multiple users in the same cluster. These users are known as roles. We can consider each role as a resource consumer within a cluster.

Due to this, Mesos agents can partition the resources under different roles based on different allocation strategies. Furthermore, frameworks can subscribe to these roles within the cluster and have fine-grained control over resources under different roles.

For example, consider a cluster hosting applications which are serving different users in an organization. So by dividing the resources into roles, every application can work in isolation from one another.

Additionally, frameworks can use these roles to achieve data locality.

For instance, suppose we have two applications in the cluster named producer and consumer. Here, producer writes data to a persistent volume which consumer can read afterward. We can optimize the consumer application by sharing the volume with the producer.

Since Mesos allows multiple applications to subscribe to the same role, we can associate the persistent volume with a resource role. Furthermore, the frameworks for both producer and consumer will both subscribe to the same resource role. Therefore, the consumer application can now launch the data reading task on the same volume as the producer application.

4.3. Resource Reservation

Now the question may arise as to how Mesos allocates cluster resources into different roles. Mesos allocates the resources through reservations.

There are two types of reservations:

  • Static Reservation
  • Dynamic Reservation

Static reservation is similar to the resource allocation on agent startup we discussed in the earlier sections:

 --resources="cpus:4;mem:2048;cpus(baeldung):8;mem(baeldung):4096"

The only difference here is that now the Mesos agent reserves eight CPUs and 4096m of memory for the role named baeldung.

Dynamic reservation allows us to reshuffle the resources within roles, unlike the static reservation. Mesos allows frameworks and cluster operators to dynamically change the allocation of resources via framework messages as a response to resource offer or via HTTP endpoints.

Mesos allocates all resources without any role into a default role named (*). Master offers such resources to all frameworks whether or not they have subscribed to it.

4.4. Resource Weights and Quotas

Generally, the Mesos master offers resources using a fairness strategy. It uses the weighted Dominant Resource Fairness (wDRF) to identify the roles that lack resources. The master then offers more resources to the frameworks that have subscribed to these roles.

Event though fair sharing of resources between applications is an important characteristic of Mesos, its not always necessary. Suppose a cluster hosting applications that have a low resource footprint along with those having a high resource demand. In such deployments, we would want to allocate resources based on the nature of the application.

Mesos allows frameworks to demand more resources by subscribing to roles and adding a higher value of weight for that role. Therefore, if there are two roles, one of weight 1 and another of weight 2, Mesos will allocate twice the fair share of resources to the second role.

Similar to resources, we can configure weights via HTTP endpoints.

Besides ensuring a fair share of resources to a role with weights, Mesos also ensures that the minimum resources for a role are allocated.

Mesos allows us to add quotas to the resource roles. A quota specifies the minimum amount of resources that a role is guaranteed to receive.

5. Implementing Framework

As we discussed in an earlier section, Mesos allows applications to provide framework implementations in a language of their choice. In Java, a framework is implemented using the main class – which acts as an entry point for the framework process – and an implementation of Scheduler and Executor discussed earlier.

5.1. Framework Main Class

Before we implement a scheduler and an executor, we’ll first implement the entry point for our framework that:

  • Registers itself with the master
  • Provides executor runtime information to agents
  • Starts the scheduler

We’ll first add a Maven dependency for Mesos:

<dependency>
    <groupId>org.apache.mesos</groupId>
    <artifactId>mesos</artifactId>
    <version>0.28.3</version>
</dependency>

Next, we’ll implement the HelloWorldMain for our framework. One of the first things we’ll do is to start the executor process on the Mesos agent:

public static void main(String[] args) {
  
    String path = System.getProperty("user.dir")
      + "/target/libraries2-1.0.0-SNAPSHOT.jar";
  
    CommandInfo.URI uri = CommandInfo.URI.newBuilder().setValue(path).setExtract(false).build();
  
    String helloWorldCommand = "java -cp libraries2-1.0.0-SNAPSHOT.jar com.baeldung.mesos.executors.HelloWorldExecutor";
    CommandInfo commandInfoHelloWorld = CommandInfo.newBuilder()
      .setValue(helloWorldCommand)
      .addUris(uri)
      .build();
  
    ExecutorInfo executorHelloWorld = ExecutorInfo.newBuilder()
      .setExecutorId(Protos.ExecutorID.newBuilder()
      .setValue("HelloWorldExecutor"))
      .setCommand(commandInfoHelloWorld)
      .setName("Hello World (Java)")
      .setSource("java")
      .build();
}

Here, we first configured the executor binary location. Mesos agent would download this binary upon framework registration. Next, the agent would run the given command to start the executor process.

Next, we’ll initialize our framework and start the scheduler:

FrameworkInfo.Builder frameworkBuilder = FrameworkInfo.newBuilder()
  .setFailoverTimeout(120000)
  .setUser("")
  .setName("Hello World Framework (Java)");
 
frameworkBuilder.setPrincipal("test-framework-java");
 
MesosSchedulerDriver driver = new MesosSchedulerDriver(new HelloWorldScheduler(),
  frameworkBuilder.build(), args[0]);

Finally, we’ll start the MesosSchedulerDriver that registers itself with the Master. For successful registration, we must pass the IP of the Master as a program argument args[0] to this main class:

int status = driver.run() == Protos.Status.DRIVER_STOPPED ? 0 : 1;

driver.stop();

System.exit(status);

In the class shown above, CommandInfo, ExecutorInfo, and FrameworkInfo are all Java representations of protobuf messages between master and frameworks.

5.2. Implementing Scheduler

Since Mesos 1.0, we can invoke the HTTP endpoint from any Java application to send and receive messages to the Mesos master. Some of these messages include, for example, framework registration, resource offers, and offer rejections.

For Mesos 0.28 or earlier, we need to implement the Scheduler interface:

For the most part, we’ll only focus on the resourceOffers method of the Scheduler. Let’s see how a scheduler receives resources and initializes tasks based on them.

First, we’ll see how the scheduler allocates resources for a task:

@Override
public void resourceOffers(SchedulerDriver schedulerDriver, List<Offer> list) {

    for (Offer offer : list) {
        List<TaskInfo> tasks = new ArrayList<TaskInfo>();
        Protos.TaskID taskId = Protos.TaskID.newBuilder()
          .setValue(Integer.toString(launchedTasks++)).build();

        System.out.println("Launching printHelloWorld " + taskId.getValue() + " Hello World Java");

        Protos.Resource.Builder cpus = Protos.Resource.newBuilder()
          .setName("cpus")
          .setType(Protos.Value.Type.SCALAR)
          .setScalar(Protos.Value.Scalar.newBuilder()
            .setValue(1));

        Protos.Resource.Builder mem = Protos.Resource.newBuilder()
          .setName("mem")
          .setType(Protos.Value.Type.SCALAR)
          .setScalar(Protos.Value.Scalar.newBuilder()
            .setValue(128));

Here, we allocated 1 CPU and 128M of memory for our task. Next, we’ll use the SchedulerDriver to launch the task on an agent:

        TaskInfo printHelloWorld = TaskInfo.newBuilder()
          .setName("printHelloWorld " + taskId.getValue())
          .setTaskId(taskId)
          .setSlaveId(offer.getSlaveId())
          .addResources(cpus)
          .addResources(mem)
          .setExecutor(ExecutorInfo.newBuilder(helloWorldExecutor))
          .build();

        List<OfferID> offerIDS = new ArrayList<>();
        offerIDS.add(offer.getId());

        tasks.add(printHelloWorld);

        schedulerDriver.launchTasks(offerIDS, tasks);
    }
}

Alternatively, Scheduler often finds the need to reject resource offers. For example, if the Scheduler cannot launch a task on an agent due to lack of resources, it must immediately decline that offer:

schedulerDriver.declineOffer(offer.getId());

5.3. Implementing Executor

As we discussed earlier, the executor component of the framework is responsible for executing application tasks on the Mesos agent.

We used the HTTP endpoints for implementing Scheduler in Mesos 1.0. Likewise, we can use the HTTP endpoint for the executor.

In an earlier section, we discussed how a framework configures an agent to start the executor process:

java -cp libraries2-1.0.0-SNAPSHOT.jar com.baeldung.mesos.executors.HelloWorldExecutor

Notably, this command considers HelloWorldExecutor as the main class. We’ll implement this main method to initialize the MesosExecutorDriver that connects with Mesos agents to receive tasks and share other information like task status:

public class HelloWorldExecutor implements Executor {
    public static void main(String[] args) {
        MesosExecutorDriver driver = new MesosExecutorDriver(new HelloWorldExecutor());
        System.exit(driver.run() == Protos.Status.DRIVER_STOPPED ? 0 : 1);
    }
}

The last thing to do now is to accept tasks from the framework and launch them on the agent. The information to launch any task is self-contained within the HelloWorldExecutor:

public void launchTask(ExecutorDriver driver, TaskInfo task) {
 
    Protos.TaskStatus status = Protos.TaskStatus.newBuilder()
      .setTaskId(task.getTaskId())
      .setState(Protos.TaskState.TASK_RUNNING)
      .build();
    driver.sendStatusUpdate(status);
 
    System.out.println("Execute Task!!!");
 
    status = Protos.TaskStatus.newBuilder()
      .setTaskId(task.getTaskId())
      .setState(Protos.TaskState.TASK_FINISHED)
      .build();
    driver.sendStatusUpdate(status);
}

Of course, this is just a simple implementation, but it explains how an executor shares task status with the master at every stage and then executes the task before sending a completion status.

In some cases, executors can also send data back to the scheduler:

String myStatus = "Hello Framework";
driver.sendFrameworkMessage(myStatus.getBytes());

6. Conclusion

In this article, we discussed resource sharing between applications running in the same cluster in brief. We also discussed how Apache Mesos helps applications achieve maximum utilization with an abstract view of the cluster resources like CPU and memory.

Later on, we discussed the dynamic allocation of resources between applications based on various fairness policies and roles. Mesos allows applications to make scheduling decisions based on resource offers from Mesos agents in the cluster.

Finally, we saw an implementation of Mesos framework in Java.

As usual, all examples are available over at GitHub.

Guide to MapDB

$
0
0

1. Introduction

In this article, we’ll look at the MapDB library — an embedded database engine accessed through a collection-like API.

We start by exploring the core classes DB and DBMaker that help configure, open, and manage our databases. Then, we’ll dive into some examples of MapDB data structures that store and retrieve data.

Finally, we’ll look at some of the in-memory modes before comparing MapDB to traditional databases and Java Collections.

2. Storing Data in MapDB

First, let’s introduce the two classes that we’ll be using constantly throughout this tutorial — DB and DBMaker. The DB class represents an open database. Its methods invoke actions for creating and closing storage collections to handle database records, as well as handling transactional events.

DBMaker handles database configuration, creation, and opening. As part of the configuration, we can choose to host our database either in-memory or on our file system.

2.1. A Simple HashMap Example

To understand how this works, let’s instantiate a new database in memory.

First, let’s create a new in-memory database using the DBMaker class:

DB db = DBMaker.memoryDB().make();

Once our DB object is up and running, we can use it to build an HTreeMap to work with our database records:

String welcomeMessageKey = "Welcome Message";
String welcomeMessageString = "Hello Baeldung!";

HTreeMap myMap = db.hashMap("myMap").createOrOpen();
myMap.put(welcomeMessageKey, welcomeMessageString);

HTreeMap is MapDB’s HashMap implementation. So, now that we have data in our database, we can retrieve it using the get method:

String welcomeMessageFromDB = (String) myMap.get(welcomeMessageKey);
assertEquals(welcomeMessageString, welcomeMessageFromDB);

Finally, now that we’re finished with the database, we should close it to avoid further mutation:

db.close();

To store our data in a file, rather than in memory, all we need to do is change the way that our DB object is instantiated:

DB db = DBMaker.fileDB("file.db").make();

Our example above uses no type parameters. As a result, we’re stuck with casting our results to work with specific types. In our next example, we’ll introduce Serializers to eliminate the need for casting.

2.2. Collections

MapDB includes different collection types. To demonstrate, let’s add and retrieve some data from our database using a NavigableSet, which works as you might expect of a Java Set:

Let’s start with a simple instantiation of our DB object:

DB db = DBMaker.memoryDB().make();

Next, let’s create our NavigableSet:

NavigableSet<String> set = db
  .treeSet("mySet")
  .serializer(Serializer.STRING)
  .createOrOpen();

Here, the serializer ensures that the input data from our database is serialized and deserialized using String objects.

Next, let’s add some data:

set.add("Baeldung");
set.add("is awesome");

Now, let’s check that our two distinct values have been added to the database correctly:

assertEquals(2, set.size());

Finally, since this is a set, let’s add a duplicate string and verify that our database still contains only two values:

set.add("Baeldung");

assertEquals(2, set.size());

2.3. Transactions

Much like traditional databases, the DB class provides methods to commit and rollback the data we add to our database.

To enable this functionality, we need to initialize our DB with the transactionEnable method:

DB db = DBMaker.memoryDB().transactionEnable().make();

Next, let’s create a simple set, add some data, and commit it to the database:

NavigableSet<String> set = db
  .treeSet("mySet")
  .serializer(Serializer.STRING)
  .createOrOpen();

set.add("One");
set.add("Two");

db.commit();

assertEquals(2, set.size());

Now, let’s add a third, uncommitted string to our database:

set.add("Three");

assertEquals(3, set.size());

If we’re not happy with our data, we can rollback the data using DB’s rollback method:

db.rollback();

assertEquals(2, set.size());

2.4. Serializers

MapDB offers a large variety of serializers, which handle the data within the collection. The most important construction parameter is the name, which identifies the individual collection within the DB object:

HTreeMap<String, Long> map = db.hashMap("indentification_name")
  .keySerializer(Serializer.STRING)
  .valueSerializer(Serializer.LONG)
  .create();

While serialization is recommended, it is optional and can be skipped. However, it’s worth noting that this will lead to a slower generic serialization process.

3. HTreeMap

MapDB’s HTreeMap provides HashMap and HashSet collections for working with our database. HTreeMap is a segmented hash tree and does not use a fixed-size hash table. Instead, it uses an auto-expanding index tree and does not rehash all of its data as the table grows. To top it off, HTreeMap is thread-safe and supports parallel writes using multiple segments.

To begin, let’s instantiate a simple HashMap that uses String for both keys and values:

DB db = DBMaker.memoryDB().make();

HTreeMap<String, String> hTreeMap = db
  .hashMap("myTreeMap")
  .keySerializer(Serializer.STRING)
  .valueSerializer(Serializer.STRING)
  .create();

Above, we’ve defined separate serializers for the key and the value. Now that our HashMap is created, let’s add data using the put method:

hTreeMap.put("key1", "value1");
hTreeMap.put("key2", "value2");

assertEquals(2, hTreeMap.size());

As HashMap works on an Object’s hashCode method, adding data using the same key causes the value to be overwritten:

hTreeMap.put("key1", "value3");

assertEquals(2, hTreeMap.size());
assertEquals("value3", hTreeMap.get("key1"));

4. SortedTableMap

MapDB’s SortedTableMap stores keys in a fixed-size table and uses binary search for retrieval. It’s worth noting that once prepared, the map is read-only.

Let’s walk through the process of creating and querying a SortedTableMap. We’ll start by creating a memory-mapped volume to hold the data, as well as a sink to add data. On the first invocation of our volume, we’ll set the read-only flag to false, ensuring we can write to the volume:

String VOLUME_LOCATION = "sortedTableMapVol.db";

Volume vol = MappedFileVol.FACTORY.makeVolume(VOLUME_LOCATION, false);

SortedTableMap.Sink<Integer, String> sink =
  SortedTableMap.create(
    vol,
    Serializer.INTEGER,
    Serializer.STRING)
    .createFromSink();

Next, we’ll add our data and call the create method on the sink to create our map:

for(int i = 0; i < 100; i++){
  sink.put(i, "Value " + Integer.toString(i));
}

sink.create();

Now that our map exists, we can define a read-only volume and open our map using SortedTableMap’s open method:

Volume openVol = MappedFileVol.FACTORY.makeVolume(VOLUME_LOCATION, true);

SortedTableMap<Integer, String> sortedTableMap = SortedTableMap
  .open(
    openVol,
    Serializer.INTEGER,
    Serializer.STRING);

assertEquals(100, sortedTableMap.size());

4.1. Binary Search

Before we move on, let’s understand how the SortedTableMap utilizes binary search in more detail.

SortedTableMap splits the storage into pages, with each page containing several nodes comprised of keys and values. Within these nodes are the key-value pairs that we define in our Java code.

SortedTableMap performs three binary searches to retrieve the correct value:

  1. Keys for each page are stored on-heap in an array. The SortedTableMap performs a binary search to find the correct page.
  2. Next, decompression occurs for each key in the node. A binary search establishes the correct node, according to the keys.
  3. Finally, the SortedTableMap searches over the keys within the node to find the correct value.

5. In-Memory Mode

MapDB offers three types of in-memory store. Let’s take a quick look at each mode, understand how it works, and study its benefits.

5.1. On-Heap

The on-heap mode stores objects in a simple Java Collection Map. It does not employ serialization and can be very fast for small datasets. 

However, since the data is stored on-heap, the dataset is managed by garbage collection (GC). The duration of GC rises with the size of the dataset, resulting in performance drops.

Let’s see an example specifying the on-heap mode:

DB db = DBMaker.heapDB().make();

5.2. Byte[]

The second store type is based on byte arrays. In this mode, data is serialized and stored into arrays up to 1MB in size. While technically on-heap, this method is more efficient for garbage collection.

This is recommended by default, and was used in our ‘Hello Baeldung’ example:

DB db = DBMaker.memoryDB().make();

5.3. DirectByteBuffer

The final store is based on DirectByteBuffer. Direct memory, introduced in Java 1.4, allows the passing of data directly to native memory rather than Java heap. As a result, the data will be stored completely off-heap.

We can invoke a store of this type with:

DB db = DBMaker.memoryDirectDB().make();

6. Why MapDB?

So, why use MapDB?

6.1. MapDB vs Traditional Database

MapDB offers a large array of database functionality configured with just a few lines of Java code. When we employ MapDB, we can avoid the often time-consuming setup of various services and connections needed to get our program to work.

Beyond this, MapDB allows us to access the complexity of a database with the familiarity of a Java Collection. With MapDB, we do not need SQL, and we can access records with simple get method calls.

6.2. MapDB vs Simple Java Collections

Java Collections will not persist the data of our application once it stops executing. MapDB offers a simple, flexible, pluggable service that allows us to quickly and easily persist the data in our application while maintaining the utility of Java collection types.

7. Conclusion

In this article, we’ve taken a deep dive into MapDB’s embedded database engine and collection framework.

We started by looking at the core classes DB and DBMaker to configure, open and manage our database. Then, we walked through some examples of data structures that MapDB offers to work with our records. Finally, we looked at the advantages of MapDB over a traditional database or Java Collection.

As always, the example code is available over on GitHub.

The Java SecureRandom Class

$
0
0

1. Introduction

In this short tutorial, we’ll learn about java.security.SecureRandom, a class that provides a cryptographically strong random number generator.

2. Comparison to java.util.Random

Standard JDK implementations of java.util.Random use a Linear Congruential Generator (LCG) algorithm for providing random numbers. The problem with this algorithm is that it’s not cryptographically strong. In other words, the generated values are much more predictable, therefore attackers could use it to compromise our system.

To overcome this issue, we should use java.security.SecureRandom in any security decisions. It produces cryptographically strong random values by using a cryptographically strong pseudo-random number generator (CSPRNG).

For a better understanding of the difference between LCG and CSPRNG, please look at the below chart presenting a distribution of values for both algorithms:


3. Generating Random Values

The most common way of using SecureRandom is to generate int, long, float, double or boolean values:

int randomInt = secureRandom.nextInt();
long randomLong = secureRandom.nextLong();
float randomFloat = secureRandom.nextFloat();
double randomDouble = secureRandom.nextDouble();
boolean randomBoolean = secureRandom.nextBoolean();

For generating int values we can pass an upper bound as a parameter:

int randomInt = secureRandom.nextInt(upperBound);

In addition, we can generate a stream of values for int, double and long:

IntStream randomIntStream = secureRandom.ints();
LongStream randomLongStream = secureRandom.longs();
DoubleStream randomDoubleStream = secureRandom.doubles();

For all streams we can explicitly set the stream size:

IntStream intStream = secureRandom.ints(streamSize);

and the origin (inclusive) and bound (exclusive) values as well:

IntStream intStream = secureRandom.ints(streamSize, originValue, boundValue);

We can also generate a sequence of random bytes. The nextBytes() function takes user-supplied byte array and fills it with random bytes:

byte[] values = new byte[124];
secureRandom.nextBytes(values);

4. Choosing An Algorithm

By default, SecureRandom uses the SHA1PRNG algorithm to generate random values. We can explicitly make it use another algorithm by invoking the getInstance() method:

SecureRandom secureRandom = SecureRandom.getInstance("NativePRNG");

Creating SecureRandom with the new operator is equivalent to SecureRandom.getInstance(“SHA1PRNG”).

All random number generators available in Java can be found on the official docs page.

5. Seeds

Every instance of SecureRandom is created with an initial seed. It works as a base for providing random values and changes every time we generate a new value.

Using the new operator or calling SecureRandom.getInstance() will get the default seed from /dev/urandom.

We can change the seed by passing it as a constructor parameter:

byte[] seed = getSecureRandomSeed();
SecureRandom secureRandom = new SecureRandom(seed);

or by invoking a setter method on the already created object:

byte[] seed = getSecureRandomSeed();
secureRandom.setSeed(seed);

Remember that if we create two instances of SecureRandom with the same seed, and the same sequence of method calls is made for each, they will generate and return identical sequences of numbers.

6. Conclusion

In this tutorial, we’ve learned how the SecureRandom works and how to use it for generating random values.

As always, all code presented in this tutorial can be found over on GitHub.

JWS + JWK in a Spring Security OAuth2 Application

$
0
0

1. Overview

In this tutorial, we’ll learn about JSON Web Signature (JWS), and how it can be implemented using the JSON Web Key (JWK) specification on applications configured with Spring Security OAuth2.

We should keep in mind that even though Spring is working to migrate all the Spring Security OAuth features to the Spring Security framework, this guide is still a good starting point to understand the basic concepts of these specifications and it should come in handy at the time of implementing them on any framework.

First, we’ll try to understand the basic concepts; like what’s JWS and JWK, their purpose and how we can easily configure a Resource Server to use this OAuth solution.

Then we’ll go deeper, we’ll analyze the specifications in detail by analyzing what OAuth2 Boot is doing behind the scenes, and by setting up an Authorization Server to use JWK.

2. Understanding the Big Picture of JWS and JWK

Before starting, it’s important that we understand correctly some basic concepts. It’s advisable to go through our OAuth and our JWT articles first since these topics are not part of the scope of this tutorial.

JWS is a specification created by the IETF that describes different cryptographic mechanisms to verify the integrity of data, namely the data in a JSON Web Token (JWT). It defines a JSON structure that contains the necessary information to do so.

It’s a key aspect in the widely-used JWT spec since the claims need to be either signed or encrypted in order to be considered effectively secured.

In the first case, the JWT is represented as a JWS. While if it’s encrypted, the JWT will be encoded in a JSON Web Encryption (JWE) structure.

The most common scenario when working with OAuth is having just signed JWTs. This is because we don’t usually need to “hide” information but simply verify the integrity of the data.

Of course, whether we’re handling signed or encrypted JWTs, we need formal guidelines to be able to transmit public keys efficiently.

This is the purpose of JWK, a JSON structure that represents a cryptographic key, defined also by the IETF.

Many Authentication providers offer a “JWK Set” endpoint, also defined in the specifications. With it, other applications can find information on public keys to process JWTs.

For instance, a Resource Server uses the kid (Key Id) field present in the JWT to find the correct key in the JWK set.

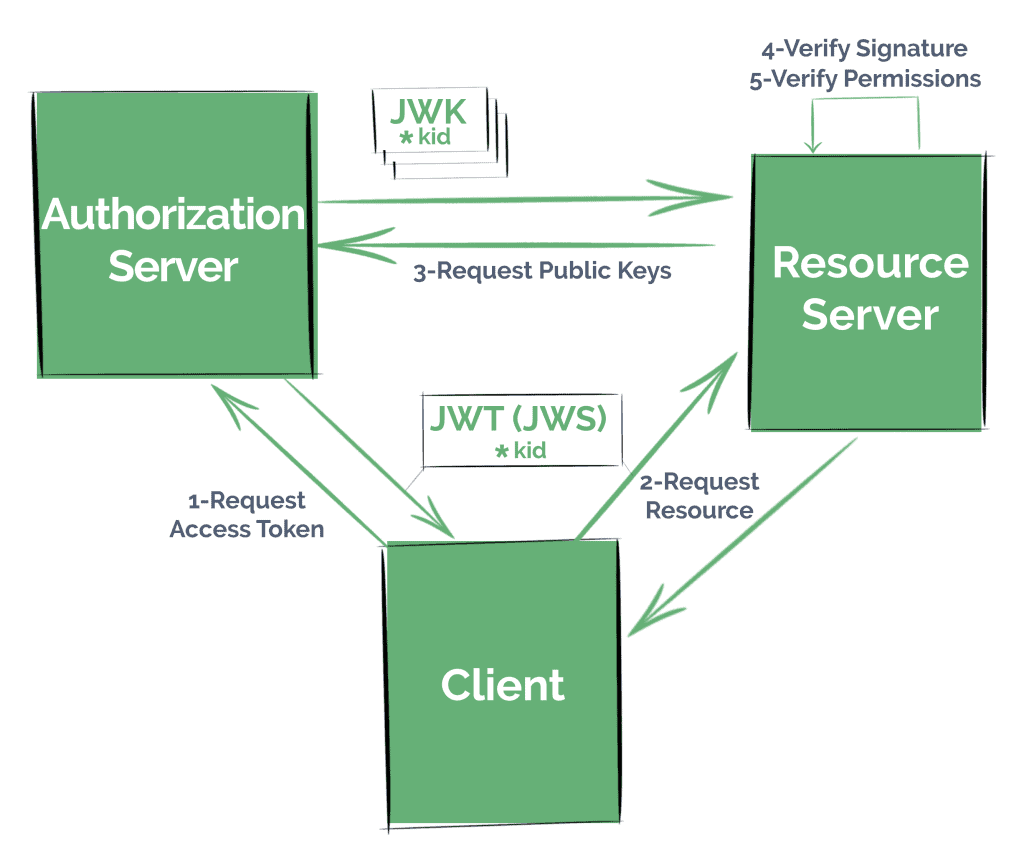
2.1. Implementing a Solution Using JWK

Commonly, if we want our application to serve resource in a secure manner, like by using a standard security protocol such as OAuth 2.0, we’ll need to follow the next steps:

  1. Register Clients in an Authorization Server – either in our own service, or in a well-known provider like Okta, Facebook or Github
  2. These Clients will request an access token from the Authorization Server, following any of the OAuth strategies we might have configured
  3. They will then try to access the resource presenting the token (in this case, as a JWT) to the Resource Server
  4. The Resource Server has to verify that the token hasn’t been manipulated by checking its signature as well as validate its claims
  5. And finally, our Resource Server retrieves the resource, now being sure that the Client has the correct permissions

3. JWK and the Resource Server Configuration

Later on, we’ll see how to set up our own Authorization server that serves JWTs and a ‘JWK Set’ endpoint.

At this point, though, we’ll focus on the simplest – and probably most common – scenario where we’re pointing at an existing Authorization server.

All we have to do is indicate how the service has to validate the access token it receives, like what public key it should use to verify the JWT’s signature.

We’ll use Spring Security OAuth’s Autoconfig features to achieve this in a simple and clean way, using only application properties.

3.1. Maven Dependency

We’ll need to add the OAuth2 auto-configuration dependency to our Spring application’s pom file:

<dependency>
    <groupId>org.springframework.security.oauth.boot</groupId>
    <artifactId>spring-security-oauth2-autoconfigure</artifactId>
    <version>2.1.6.RELEASE</version>
</dependency>

As usual, we can check the latest version of the artifact in Maven Central.

Note that this dependency is not managed by Spring Boot, and therefore we need to specify its version.

It should match the version of Spring Boot we’re using anyway.

3.2. Configuring the Resource Server

Next, we’ll have to enable the Resource Server features in our application with the @EnableResourceServer annotation:

@SpringBootApplication
@EnableResourceServer
public class ResourceServerApplication {

    public static void main(String[] args) {
        SpringApplication.run(ResourceServerApplication.class, args);
    }
}

Now we need to indicate how our application can obtain the public key necessary to validate the signature of the JWTs it receives as Bearer tokens.

OAuth2 Boot offers different strategies to verify the token.

As we said before, most Authorization servers expose a URI with a collection of keys that other services can use to validate the signature.

We’ll configure the JWK Set endpoint of a local Authorization Server we’ll work on further ahead.

Let’s add the following in our application.properties:

security.oauth2.resource.jwk.key-set-uri=
  http://localhost:8081/sso-auth-server/.well-known/jwks.json

We’ll have a look at other strategies as we analyze this subject in detail.

Note: the new Spring Security 5.1 Resource Server only supports JWK-signed JWTs as authorization, and Spring Boot also offers a very similar property to configure the JWK Set endpoint:

spring.security.oauth2.resourceserver.jwk-set-uri=
  http://localhost:8081/sso-auth-server/.well-known/jwks.json

3.3. Spring Configurations Under the Hood

The property we added earlier translates in the creation of a couple of Spring beans.

More precisely, OAuth2 Boot will create:

  • a JwkTokenStore with the only ability to decode a JWT and verifying its signature
  • DefaultTokenServices instance to use the former TokenStore

4. The JWK Set Endpoint in the Authorization Server

Now we’ll go deeper on this subject, analyzing some key aspects of JWK and JWS as we configure an Authorization Server that issues JWTs and serves its JWK Set endpoint.

Note that since Spring Security doesn’t yet offer features to set up an Authorization Server, creating one using Spring Security OAuth capabilities is the only option at this stage. It will be compatible with Spring Security Resource Server, though.

4.1. Enabling Authorization Server Features

The first step is configuring our Authorization server to issue access tokens when required.

We’ll also add the spring-security-oauth2-autoconfigure dependency as we did with Resource Server.

First, we’ll use the @EnableAuthorizationServer annotation to configure the OAuth2 Authorization Server mechanisms:

@Configuration
@EnableAuthorizationServer
public class JwkAuthorizationServerConfiguration {

    // ...

}

And we’ll register an OAuth 2.0 Client using properties:

security.oauth2.client.client-id=bael-client
security.oauth2.client.client-secret=bael-secret

With this, our application will retrieve random tokens when requested with the corresponding credentials:

curl bael-client:bael-secret\
  @localhost:8081/sso-auth-server/oauth/token \
  -d grant_type=client_credentials \
  -d scope=any

As we can see, Spring Security OAuth retrieves a random string value by default, not JWT-encoded:

"access_token": "af611028-643f-4477-9319-b5aa8dc9408f"

4.2. Issuing JWTs

We can easily change this by creating a JwtAccessTokenConverter bean in the context:

@Bean
public JwtAccessTokenConverter accessTokenConverter() {
    return new JwtAccessTokenConverter();
}

and using it in a JwtTokenStore instance:

@Bean
public TokenStore tokenStore() {
    return new JwtTokenStore(accessTokenConverter());
}

So with these changes, let’s request a new access token, and this time we’ll obtain a JWT, encoded as a JWS, to be accurate.

We can easily identify JWSs; their structure consists of three fields (header, payload, and signature) separated by a dot:

"access_token":"eyJhbGciOiJIUzI1NiIsInR5cCI6IkpXVCJ9
  .
  eyJzY29wZSI6WyJhbnkiXSwiZXhwIjoxNTYxOTcy...
  .
  XKH70VUHeafHLaUPVXZI9E9pbFxrJ35PqBvrymxtvGI"

By default, Spring signs the header and payload using a Message Authentication Code (MAC) approach.

We can verify this by analyzing the JWT in one of the many JWT decoder/verifier online tools we can find out there.

If we decode the JWT we obtained, we’ll see that the value of the alg attribute is HS256, which indicates an HMAC-SHA256 algorithm was used to sign the token.

In order to understand why we don’t need JWKs with this approach, we have to understand how MAC hashing function works.

4.3. The Default Symmetric Signature

MAC hashing uses the same key to sign the message and to verify its integrity; it’s a symmetric hashing function.

Therefore, for security purposes, the application can’t publicly share its signing key.

Only for academic reasons, we’ll make public the Spring Security OAuth /oauth/token_key endpoint:

security.oauth2.authorization.token-key-access=permitAll()

And we’ll customize the signing key value when we configure the JwtAccessTokenConverter bean:

converter.setSigningKey("bael");

To know exactly which symmetric key is being used.

Note: even if we don’t publish the signing key, setting up a weak signing key is a potential threat to dictionary attacks.

Once we know the signing key, we can manually verify the token integrity using the online tool we mentioned before.

The Spring Security OAuth library also configures a /oauth/check_token endpoint which validates and retrieves the decoded JWT.

This endpoint is also configured with a denyAll() access rule and should be secured consciously. For this purpose, we could use the security.oauth2.authorization.check-token-access property as we did for the token key before.

4.4. Alternatives for the Resource Server Configuration

Depending on our security needs, we might consider that securing one of the recently mentioned endpoints properly – whilst making them accessible to the Resource Servers – is enough.

If that’s the case, then we can leave the Authorization Server as-is, and choose another approach for the Resource Server.

The Resource Server will expect the Authorization Server to have secured endpoints, so for starters, we’ll need to provide the client credentials, with the same properties we used in the Authorization Server:

security.oauth2.client.client-id=bael-client
security.oauth2.client.client-secret=bael-secret

Then we can choose to use the /oauth/check_token endpoint (a.k.a. the introspection endpoint) or obtain a single key from /oauth/token_key:

## Single key URI:
security.oauth2.resource.jwt.key-uri=
  http://localhost:8081/sso-auth-server/oauth/token_key
## Introspection endpoint:
security.oauth2.resource.token-info-uri=
  http://localhost:8081/sso-auth-server/oauth/check_token

Alternatively, we can just configure the key that will be used to verify the token in the Resource Service:

## Verifier Key
security.oauth2.resource.jwt.key-value=bael

With this approach, there will be no interaction with the Authorization Server, but of course, this means less flexibility on changes with the Token signing configuration.

As with the key URI strategy, this last approach might be recommended only for asymmetric signing algorithms.

4.5. Creating a Keystore File

Let’s not forget our final objective. We want to provide a JWK Set endpoint as the most well-known providers do.

If we’re going to share keys, it’ll be better if we use asymmetric cryptography (particularly, digital signature algorithms) to sign the tokens.

The first step towards this is creating a keystore file.

One easy way to achieve this is:

  1. open the command line in the /bin directory of any JDK or JRE you have in handy:
cd $JAVA_HOME/bin
  1. run the keytool command, with the corresponding parameters:
./keytool -genkeypair \
  -alias bael-oauth-jwt \
  -keyalg RSA \
  -keypass bael-pass \
  -keystore bael-jwt.jks \
  -storepass bael-pass

Notice we used an RSA algorithm here, which is asymmetric.

  1. answer the interactive questions and generate the keystore file

4.6. Adding the Keystore File to Our Application

We have to add the keystore to our project resources.

This is a simple task, but keep in mind this is a binary file. That means it can’t be filtered, or it’ll become corrupted.

If we’re using Maven, one alternative is to put the text files in a separate folder and configure the pom.xml accordingly:

<build>
    <resources>
        <resource>
            <directory>src/main/resources</directory>
            <filtering>false</filtering>
        </resource>
        <resource>
            <directory>src/main/resources/filtered</directory>
            <filtering>true</filtering>
        </resource>
    </resources>
</build>

4.7. Configuring the TokenStore

The next step is configuring our TokenStore with the pair of keys; the private to sign the tokens, and the public to validate the integrity.

We’ll create a KeyPair instance employing the keystore file in the classpath, and the parameters we used when we created the .jks file:

ClassPathResource ksFile =
  new ClassPathResource("bael-jwt.jks");
KeyStoreKeyFactory ksFactory =
  new KeyStoreKeyFactory(ksFile, "bael-pass".toCharArray());
KeyPair keyPair = ksFactory.getKeyPair("bael-oauth-jwt");

And we’ll configure it in our JwtAccessTokenConverter bean, removing any other configuration:

converter.setKeyPair(keyPair);

We can request and decode a JWT again to check the alg parameter changed.

If we have a look at the Token Key endpoint, we’ll see the public key obtained from the keystore.

It’s easily identifiable by the PEM “Encapsulation Boundary” header; the string starting with “—–BEGIN PUBLIC KEY—–.

4.8. The JWK Set Endpoint Dependencies

The Spring Security OAuth library doesn’t support JWK out of the box.

Consequently, we’ll need to add another dependency to our project, nimbus-jose-jwt which provides some basic JWK implementations:

<dependency>
    <groupId>com.nimbusds</groupId>
    <artifactId>nimbus-jose-jwt</artifactId>
    <version>7.3</version>
</dependency>

Remember we can check the latest version of the library using the Maven Central Repository Search Engine.

4.9. Creating the JWK Set Endpoint

Let’s start by creating a JWKSet bean using the KeyPair instance we configured previously:

@Bean
public JWKSet jwkSet() {
    RSAKey.Builder builder = new RSAKey.Builder((RSAPublicKey) keyPair().getPublic())
      .keyUse(KeyUse.SIGNATURE)
      .algorithm(JWSAlgorithm.RS256)
      .keyID("bael-key-id");
    return new JWKSet(builder.build());
}

Now creating the endpoint is quite simple:

@RestController
public class JwkSetRestController {

    @Autowired
    private JWKSet jwkSet;

    @GetMapping("/.well-known/jwks.json")
    public Map<String, Object> keys() {
        return this.jwkSet.toJSONObject();
    }
}

The Key Id field we configured in the JWKSet instance translates into the kid parameter.

This kid is an arbitrary alias for the key, and it’s usually used by the Resource Server to select the correct entry from the collection since the same key should be included in the JWT Header.

We face a new problem now; since Spring Security OAuth doesn’t support JWK, the issued JWTs won’t include the kid Header.

Let’s find a workaround to solve this.

4.9. Adding the kid Value to the JWT Header

We’ll create a new class extending the JwtAccessTokenConverter we’ve been using, and that allows adding header entries to the JWTs:

public class JwtCustomHeadersAccessTokenConverter
  extends JwtAccessTokenConverter {

    // ...

}

First of all, we’ll need to:

  • configure the parent class as we’ve been doing, setting up the KeyPair we configured
  • obtain a Signer object that uses the private key from the keystore
  • of course, a collection of custom headers we want to add to the structure

Let’s configure the constructor based on this:

private Map<String, String> customHeaders = new HashMap<>();
final RsaSigner signer;

public JwtCustomHeadersAccessTokenConverter(
  Map<String, String> customHeaders,
  KeyPair keyPair) {
    super();
    super.setKeyPair(keyPair);
    this.signer = new RsaSigner((RSAPrivateKey) keyPair.getPrivate());
    this.customHeaders = customHeaders;
}

Now we’ll override the encode method. Our implementation will be the same as the parent one, with the only difference that we’ll also pass the custom headers when creating the String token:

private JsonParser objectMapper = JsonParserFactory.create();

@Override
protected String encode(OAuth2AccessToken accessToken,
  OAuth2Authentication authentication) {
    String content;
    try {
        content = this.objectMapper
          .formatMap(getAccessTokenConverter()
          .convertAccessToken(accessToken, authentication));
    } catch (Exception ex) {
        throw new IllegalStateException(
          "Cannot convert access token to JSON", ex);
    }
    String token = JwtHelper.encode(
      content,
      this.signer,
      this.customHeaders).getEncoded();
    return token;
}

We’re ready to go. Remember to change the Resource Server’s properties back. We need to use only the key-set-uri property we set up at the beginning of the tutorial.

We can ask for an Access Token, check it’s kid value, and use it to request a resource.

Once the public key is retrieved, the Resource Server stores it internally, mapping it to the Key Id for future requests.

5. Conclusion

We’ve learned quite a lot in this comprehensive guide about JWT, JWS, and JWK. Not only Spring-specific configurations, but also general Security concepts, seeing them in action with a practical example.

We’ve seen the basic configuration of a Resource Server that handles JWTs using a JWK Set endpoint.

Lastly, we’ve extended the basic Spring Security OAuth features, by setting up an Authorization Server exposing a JWK Set endpoint efficiently.

We can find both services in our OAuth Github repo, as always.

Viewing all 4778 articles
Browse latest View live