Quantcast
Channel: Baeldung
Viewing all 4728 articles
Browse latest View live

Selection Sort in Java

$
0
0

1. Introduction

In this tutorial, we’ll learn Selection Sort, see its implementation in Java, and analyze its performance.

2. Algorithm Overview

Selection Sort begins with the element in the 1st position of an unsorted array and scans through subsequent elements to find the smallest element. Once found, the smallest element is swapped with the element in the 1st position.

The algorithm then moves on to the element in the 2nd position and scans through subsequent elements to find the index of the 2nd smallest element. Once found, the second smallest element is swapped with the element in the 2nd position.

This process goes on until we reach the n-1th element of the array, which puts the n-1th smallest element in the n-1th position. The last element automatically falls in place, in the n-1th iteration, thereby sorting the array.

We find the largest element instead of the smallest element to sort the array in descending order.

Let’s see an example of an unsorted array and sort it in ascending order to visually understand the algorithm.

2.1. An Example

Consider the following unsorted array:

int[] arr = {5, 4, 1, 6, 2}

Iteration 1

Considering the above working of the algorithm, we start with the element in 1st position – 5 – and scan through all subsequent elements to find the smallest element – 1. We then swap the smallest element with the element in 1st position.

The modified array nows looks like:

{1, 4, 5, 6, 2}

Total comparisons made: 4

Iteration 2

In the second iteration, we move on to the 2nd element – 4 – and scan through subsequent elements to find the second smallest element – 2. We then swap the second smallest element with the element in 2nd position.

The modified array now looks like:

{1, 2, 5, 6, 4}

Total comparisons made: 3

Continuing similarly, we have the following iterations:

Iteration 3

{1, 2, 4, 6, 5}

Total comparisons made: 2

Iteration 4

{1, 2, 4, 5, 6}

Total comparisons made: 1

3. Implementation

Let’s implement Selection Sort using a couple of for loops:

public static void sortAscending(final int[] arr) {
    for (int i = 0; i < arr.length - 1; i++) {
        int minElementIndex = i;
        for (int j = i + 1; j < arr.length; j++) {
            if (arr[minElementIndex] > arr[j]) {
                minElementIndex = j;
            }
        }

        if (minElementIndex != i) {
            int temp = arr[i];
            arr[i] = arr[minElementIndex];
            arr[minElementIndex] = temp;
        }
    }
}

Of course, to reverse it we could do something quite similar:

public static void sortDescending(final int[] arr) {
    for (int i = 0; i < arr.length - 1; i++) {
        int maxElementIndex = i;
        for (int j = i + 1; j < arr.length; j++) {
            if (arr[maxElementIndex] < arr[j]) {
                maxElementIndex = j;
            }
        }

        if (maxElementIndex != i) {
            int temp = arr[i];
            arr[i] = arr[maxElementIndex];
            arr[maxElementIndex] = temp;
        }
    }
}

And with a bit more elbow grease, we could combine these using Comparators.

4. Performance Overview

4.1. Time

In the example that we saw earlier, selecting the smallest element required a total of (n-1) comparisons followed by swapping it to the 1st position. Similarly, selecting the next smallest element required total (n-2) comparisons followed by swapping in the 2nd position, and so on.

Thus, starting from index 0, we perform n-1, n-2, n-3, n-4 …. 1 comparisons. The last element automatically falls in place due to previous iterations and swaps.

Mathematically, the sum of the first n-1 natural numbers will tell us how many comparisons we need in order to sort an array of size n using Selection Sort. 

The formula for the sum of n natural numbers is n(n+1)/2.

In our case, we need the sum of first n-1 natural numbers. Therefore, we replace n with n-1 in the above formula to get:

(n-1)(n-1+1)/2 = (n-1)n/2 = (n^2-n)/2

As n^2 grows prominently as n grows, we consider the higher power of n as the performance benchmark, making this algorithm have a time complexity of O(n^2).

4.2. Space

In terms of auxiliary space complexity, Selection Sort requires one extra variable to hold the value temporarily for swapping. Therefore, Selection Sort’s space complexity is O(1).

5. Conclusion

Selection Sort is a very simple sorting algorithm to understand and implement. Unfortunately, its quadratic time complexity makes it an expensive sorting technique. Also, since the algorithm has to scan through each element, the best case, average case, and worst-case time complexity is the same.

Other sorting techniques like Insertion Sort and Shell Sort also have quadratic worst-case time complexity, but they perform better in best and average cases.

Check out the complete code for Selection Sort on GitHub.


@TestInstance Annotation in JUnit 5

$
0
0

1. Introduction

Test classes often contain member variables referring to the system under test, mocks, or data resources used in the test. By default, both JUnit 4 and 5 create a new instance of the test class before running each test method. This provides a clean separation of state between tests.

In this tutorial, we are going to learn how JUnit 5 allows us to modify the lifecycle of the test class using the @TestInstance annotation. We’ll also see how this can help us with managing large resources or more complex relationships between tests.

2. Default Test Lifecycle

Let’s start by looking at the default test class lifecycle, common to JUnit 4 and 5:

class AdditionTest {

    private int sum = 1;

    @Test
    void addingTwoReturnsThree() {
        sum += 2;
        assertEquals(3, sum);
    }

    @Test
    void addingThreeReturnsFour() {
        sum += 3;
        assertEquals(4, sum);
    }
}

This code could easily be JUnit 4 or 5 test code, apart from the missing public keyword that JUnit 5 does not require.

These tests pass because a new instance of AdditionTest is created before each test method is called. This means that the value of the variable sum is always set to 1 before the execution of each test.

If there were only one shared instance of the test object, the variable sum would retain its state after every test. As a result, the second test would fail.

3. The @BeforeClass and @BeforeAll annotations

There are times when we need an object to exist across multiple tests. Let’s imagine we would like to read a large file to use as test data. Since it might be time-consuming to repeat that before every test, we might prefer to read it once and keep it for the whole test fixture.

JUnit 4 addresses this with its @BeforeClass annotation:

private static String largeContent;

@BeforeClass
public static void setUpFixture() {
    // read the file and store in 'largeContent'
}

We should note that we have to make the variables and the methods annotated with JUnit 4’s @BeforeClass static.

JUnit 5 provides a different approach. It provides the @BeforeAll annotation which is used on a static function, to work with static members of the class.

However, @BeforeAll can also be used with an instance function and instance members if the test instance lifecycle is changed to per-class.

4. The @TestInstance annotation

The @TestInstance annotation lets us configure the lifecycle of JUnit 5 tests.

@TestInstance has two modes. One is LifeCycle.PER_METHOD (the default). The other is LifeCycle.PER_CLASS. The latter enables us to ask JUnit to create only one instance of the test class and reuse it between tests.

Let’s annotate our test class with the @TestInstance annotation and use the LifeCycle.PER_CLASS mode:

@TestInstance(LifeCycle.PER_CLASS)
class TweetSerializerUnitTest {

    private String largeContent;

    @BeforeAll
    void setUpFixture() {
        // read the file
    }

}

As we can see, none of the variables or functions are static. We are allowed to use an instance method for @BeforeAll when we use the PER_CLASS lifecycle.

We should also note that the changes made to the state of the instance variables by one test will now be visible to the others.

5. Uses of @TestInstance(PER_CLASS)

5.1. Expensive Resources

This annotation is useful when instantiation of a class before every test is quite expensive. An example could be establishing a database connection, or loading a large file.

Solving this previously led to a complex mix of static and instance variables, which is now cleaner with a shared test class instance.

5.2. Deliberately Sharing State

Sharing state is usually an anti-pattern in unit tests, but can be useful in integration tests. The per-class lifecycle supports sequential tests that intentionally share state. This may be necessary to avoid later tests having to repeat steps from earlier tests, especially if getting the system under test to the right state is slow.

When sharing state, to execute all the tests in sequence, JUnit 5 provides us with the type-level @TestMethodOrder annotation. Then we can use the @Order annotation on the test methods to execute them in the order of our choice.

@TestMethodOrder(OrderAnnotation.class)
class OrderUnitTest {

    @Test
    @Order(1)
    void firstTest() {
        // ...
    }

    @Test
    @Order(2)
    void secondTest() {
        // ...
    }

}

5.3. Sharing Some State

The challenge with sharing the same instance of the test class is that some members may need to be cleaned between tests, and some may need to be maintained for the duration of the whole test.

We can reset variables that need to be cleaned between tests with methods annotated with @BeforeEach or @AfterEach.

6. Conclusion

In this tutorial, we learned about the @TestInstance annotation and how it can be used to configure the lifecycle of JUnit 5 tests.

We also looked at why it might be useful to share a single instance of the test class, in terms of handling shared resources or deliberately writing sequential tests.

As always, the code for this tutorial can be found on GitHub.

MyBatis with Spring

$
0
0

1. Introduction

MyBatis is one of the most commonly used open-source frameworks for implementing SQL databases access in Java applications.

In this quick tutorial, we’ll present how to integrate MyBatis with Spring and Spring Boot.

For those not yet familiar with this framework, be sure to check out our article on working with MyBatis.

2. Defining the Model

Let’s start by defining simple POJO that we’ll use throughout our article:

public class Article {
    private Long id;
    private String title;
    private String author;

    // constructor, standard getters and setters
}

And an equivalent SQL schema.sql file:

CREATE TABLE IF NOT EXISTS `ARTICLES`(
    `id`          INTEGER PRIMARY KEY,
    `title`       VARCHAR(100) NOT NULL,
    `author`      VARCHAR(100) NOT NULL
);

Next, let’s create a data.sql file, which simply inserts one record into our articles table:

INSERT INTO ARTICLES
VALUES (1, 'Working with MyBatis in Spring', 'Baeldung');

Both SQL files must be included in the classpath.

3. Spring

To start using MyBatis, we have to include two main dependencies — MyBatis and MyBatis-Spring:

<dependency>
    <groupId>org.mybatis</groupId>
    <artifactId>mybatis</artifactId>
    <version>3.5.2</version>
</dependency>

<dependency>
    <groupId>org.mybatis</groupId>
    <artifactId>mybatis-spring</artifactId>
    <version>2.0.2</version>
</dependency>

Apart from that, we’ll need basic Spring dependencies:

<dependency>
    <groupId>org.springframework</groupId>
    <artifactId>spring-context</artifactId>
    <version>5.1.8.RELEASE</version>
</dependency>

<dependency>
    <groupId>org.springframework</groupId>
    <artifactId>spring-beans</artifactId>
    <version>5.1.8.RELEASE</version>
</dependency>

In our examples, we’ll use the H2 embedded database to simplify the setup and EmbeddedDatabaseBuilder class from the spring-jdbc module for configuration:

<dependency>
    <groupId>com.h2database</groupId>
    <artifactId>h2</artifactId>
    <version>1.4.199</version>
</dependency>

<dependency>
    <groupId>org.springframework</groupId>
    <artifactId>spring-jdbc</artifactId>
    <version>5.1.8.RELEASE</version>
</dependency>

3.1. Annotation Based Configuration

Spring simplifies the configuration for MyBatis. The only required elements are javax.sql.Datasource, org.apache.ibatis.session.SqlSessionFactory, and at least one mapper.

First, let’s create a configuration class:

@Configuration
@MapperScan("com.baeldung.mybatis")
public class PersistenceConfig {

    @Bean
    public DataSource dataSource() {
        return new EmbeddedDatabaseBuilder()
          .setType(EmbeddedDatabaseType.H2)
          .addScript("schema.sql")
          .addScript("data.sql")
          .build();
    }

    @Bean
    public SqlSessionFactory sqlSessionFactory() throws Exception {
        SqlSessionFactoryBean factoryBean = new SqlSessionFactoryBean();
        factoryBean.setDataSource(dataSource());
        return factoryBean.getObject();
    }
}

We also applied a @MapperScan annotation from MyBatis-Spring that scans defined packages and automatically picks up interfaces using any of the mapper annotations, such as @Select or @Delete.

Using @MapperScan also ensures that every provided mapper is automatically registered as a Bean and can be later used with the @Autowired annotation.

We can now create a simple ArticleMapper interface:

public interface ArticleMapper {
    @Select("SELECT * FROM ARTICLES WHERE id = #{id}")
    Article getArticle(@Param("id") Long id);
}

And finally, test our setup:

@RunWith(SpringJUnit4ClassRunner.class)
@ContextConfiguration(classes = PersistenceConfig.class)
public class ArticleMapperIntegrationTest {

    @Autowired
    ArticleMapper articleMapper;

    @Test
    public void whenRecordsInDatabase_shouldReturnArticleWithGivenId() {
        Article article = articleMapper.getArticle(1L);

        assertThat(article).isNotNull();
        assertThat(article.getId()).isEqualTo(1L);
        assertThat(article.getAuthor()).isEqualTo("Baeldung");
        assertThat(article.getTitle()).isEqualTo("Working with MyBatis in Spring");
    }
}

In the above example, we’ve used MyBatis to retrieve the only record we inserted previously in our data.sql file.

3.2. XML Based Configuration

As previously described, to use MyBatis with Spring, we need Datasource, SqlSessionFactory, and at least one mapper.

Let’s create the required bean definitions in the beans.xml configuration file:

<jdbc:embedded-database id="dataSource" type="H2">
    <jdbc:script location="schema.sql"/>
    <jdbc:script location="data.sql"/>
</jdbc:embedded-database>
    
<bean id="sqlSessionFactory" class="org.mybatis.spring.SqlSessionFactoryBean">
    <property name="dataSource" ref="dataSource" />
</bean>

<bean id="articleMapper" class="org.mybatis.spring.mapper.MapperFactoryBean">
    <property name="mapperInterface" value="com.baeldung.mybatis.ArticleMapper" />
    <property name="sqlSessionFactory" ref="sqlSessionFactory" />
</bean>

In this example, we also used the custom XML schema provided by spring-jdbc to configure our H2 datasource.

To test this configuration, we can reuse the previously implemented test class. However, we have to adjust the context configuration, which we can do by applying the annotation:

@ContextConfiguration(locations = "classpath:/beans.xml")

4. Spring Boot

Spring Boot provides mechanisms that simplify the configuration of MyBatis with Spring even more.

First, let’s add the mybatis-spring-boot-starter dependency to our pom.xml:

<dependency>
    <groupId>org.mybatis.spring.boot</groupId>
    <artifactId>mybatis-spring-boot-starter</artifactId>
    <version>2.1.0</version>
</dependency>

By default, if we use an auto-configuration feature, Spring Boot detects the H2 dependency from our classpath and configures both Datasource and SqlSessionFactory for us. In addition, it also executes both schema.sql and data.sql on startup.

If we don’t use an embedded database, we can use configuration via an application.yml or application.properties file or define a Datasource bean pointing to our database.

The only thing we have left to do is to define a mapper interface, in the same manner as before, and annotate it with the @Mapper annotation from MyBatis. As a result, Spring Boot scans our project, looking for that annotation, and registers our mappers as beans.

After that, we can test our configuration using the previously defined test class by applying annotations from spring-boot-starter-test:

@RunWith(SpringRunner.class)
@SpringBootTest

5. Conclusion

In this article, we explored multiple ways of configuring MyBatis with Spring.

We looked at examples of using annotation-based and XML configuration and showed the auto-configuration features of MyBatis with Spring Boot.

As always, the complete code used in this article is available over on GitHub.

Calculating Logarithms in Java

$
0
0

1. Introduction

In this short tutorial, we’ll learn how to calculate logarithms in Java. We’ll cover both common and natural logarithms as well as logarithms with a custom base.

2. Logarithms

A logarithm is a mathematical formula representing the power to which we must raise a fixed number (the base) to produce a given number.

In its simplest form, it answers the question: How many times do we multiply one number to get another number?

We can define logarithm by the following equation:

{\displaystyle \log _{b}(x)=y\quad }exactly if{\displaystyle \quad b^{y}=x.}

3. Calculating Common Logarithms

Logarithms of base 10 are called common logarithms.

To calculate a common logarithm in Java we can simply use the Math.log10() method:

@Test
public void givenLog10_shouldReturnValidResults() {
    assertEquals(Math.log10(100), 2);
    assertEquals(Math.log10(1000), 3);
}

4. Calculating Natural Logarithms

Logarithms of the base e are called natural logarithms.

To calculate a natural logarithm in Java we use the Math.log() method:

@Test
public void givenLog10_shouldReturnValidResults() {
    assertEquals(Math.log(Math.E), 1);
    assertEquals(Math.log(10), 2.30258);
}

5. Calculating Logarithms With Custom Base

To calculate a logarithm with custom base in Java, we use the following identity:

{\displaystyle \log _{b}x={\frac {\log _{10}x}{\log _{10}b}}={\frac {\log _{e}x}{\log _{e}b}}.\,}
@Test
public void givenCustomLog_shouldReturnValidResults() {
    assertEquals(customLog(2, 256), 8);
    assertEquals(customLog(10, 100), 2);
}

private static double customLog(double base, double logNumber) {
    return Math.log(logNumber) / Math.log(base);
}

6. Conclusion

In this tutorial, we’ve learned how to calculate logarithms in Java. As always all source code is available on GitHub.

The K-Means Clustering Algorithm in Java

$
0
0

1. Overview

Clustering is an umbrella term for a class of unsupervised algorithms to discover groups of things, people, or ideas that are closely related to each other.

In this apparently simple one-liner definition, we saw a few buzzwords. What exactly is clustering? What is an unsupervised algorithm?In this tutorial, we’re going to, first, shed some lights on these concepts. Then, we’ll see how they can manifest themselves in Java.

2. Unsupervised Algorithms

Before we use most learning algorithms, we should somehow feed some sample data to them and allow the algorithm to learn from those data. In Machine Learning terminology, we call that sample dataset training data. Also, the whole process is known as the training process.

Anyway, we can classify learning algorithms based on the amount of supervision they need during the training process. The two main types of learning algorithms in this category are:

  • Supervised Learning: In supervised algorithms, the training data should include the actual solution for each point. For example, if we’re about to train our spam filtering algorithm, we feed both the sample emails and their label, i.e. spam or not-spam, to the algorithm. Mathematically speaking, we’re going to infer the f(x) from a training set including both xs and ys.
  • Unsupervised Learning: When there are no labels in training data, then the algorithm is an unsupervised one. For example, we have plenty of data about musicians and we’re going discover groups of similar musicians in the data.

3. Clustering

Clustering is an unsupervised algorithm to discover groups of similar things, ideas, or people. Unlike supervised algorithms, we’re not training clustering algorithms with examples of known labels. Instead, clustering tries to find structures within a training set where no point of the data is the label.

3.1. K-Means Clustering

K-Means is a clustering algorithm with one fundamental property: the number of clusters is defined in advance. In addition to K-Means, there are other types of clustering algorithms like Hierarchical Clustering, Affinity Propagation, or Spectral Clustering.

3.2. How K-Means Works

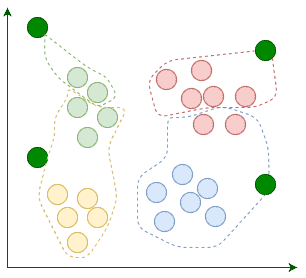
Suppose our goal is to find a few similar groups in a dataset like:

First Step

K-Means begins with k randomly placed centroids. Centroids, as their name suggests, are the center points of the clusters. For example, here we’re adding four random centroids:

Random Centroids

Then we assign each existing data point to its nearest centroid:

Assignment

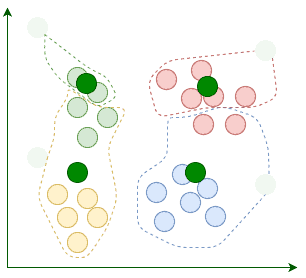
After the assignment, we move the centroids to the average location of points assigned to it. Remember, centroids are supposed to be the center points of clusters:


The current iteration concludes each time we’re done relocating the centroids. We repeat these iterations until the assignment between multiple consecutive iterations stops changing:

When the algorithm terminates, those four clusters are found as expected. Now that we know how K-Means works, let’s implement it in Java.

3.3. Feature Representation

When modeling different training datasets, we need a data structure to represent model attributes and their corresponding values. For example, a musician can have a genre attribute with a value like Rock. We usually use the term feature to refer to the combination of an attribute and its value.

To prepare a dataset for a particular learning algorithm, we usually use a common set of numerical attributes that can be used to compare different items. For example, if we let our users tag each artist with a genre, then at the end of the day, we can count how many times each artist is tagged with a specific genre:

The feature vector for an artist like Linkin Park is [rock -> 7890, nu-metal -> 700, alternative -> 520, pop -> 3]. So if we could find a way to represent attributes as numerical values, then we can simply compare two different items, e.g. artists, by comparing their corresponding vector entries.

Since numeric vectors are such versatile data structures, we’re going to represent features using themHere’s how we implement feature vectors in Java:

public class Record {
    private final String description;
    private final Map<String, Double> features;

    // constructor, getter, toString, equals and hashcode
}

3.4. Finding Similar Items

In each iteration of K-Means, we need a way to find the nearest centroid to each item in the dataset. One of the simplest ways to calculate the distance between two feature vectors is to use Euclidean Distance. The Euclidean distance between two vectors like [p1, q1] and [p2, q2] is equal to:

Let’s implement this function in Java. First, the abstraction:

public interface Distance {
    double calculate(Map<String, Double> f1, Map<String, Double> f2);
}

In addition to Euclidean distance, there are other approaches to compute the distance or similarity between different items like the Pearson Correlation Coefficient. This abstraction makes it easy to switch between different distance metrics.

Let’s see the implementation for Euclidean distance:

public class EuclideanDistance implements Distance {

    @Override
    public double calculate(Map<String, Double> f1, Map<String, Double> f2) {
        double sum = 0;
        for (String key : f1.keySet()) {
            Double v1 = f1.get(key);
            Double v2 = f2.get(key);

            if (v1 != null && v2 != null) {
                sum += Math.pow(v1 - v2, 2);
            }
        }

        return Math.sqrt(sum);
    }
}

First, we calculate the sum of squared differences between corresponding entries. Then, by applying the sqrt function, we compute the actual Euclidean distance.

3.5. Centroid Representation

Centroids are in the same space as normal features, so we can represent them similar to features:

public class Centroid {

    private final Map<String, Double> coordinates;

    // constructors, getter, toString, equals and hashcode
}

Now that we have a few necessary abstractions in place, it’s time to write our K-Means implementation. Here’s a quick look at our method signature:

public class KMeans {

    private static final Random random = new Random();

    public static Map<Centroid, List<Record>> fit(List<Record> records, 
      int k, 
      Distance distance, 
      int maxIterations) { 
        // omitted
    }
}

Let’s break down this method signature:

  • The dataset is a set of feature vectors. Since each feature vector is a Record, then the dataset type is List<Record>
  • The parameter determines the number of clusters, which we should provide in advance
  • distance encapsulates the way we’re going to calculate the difference between two features
  • K-Means terminates when the assignment stops changing for a few consecutive iterations. In addition to this termination condition, we can place an upper bound for the number of iterations, too. The maxIterations argument determines that upper bound
  • When K-Means terminates, each centroid should have a few assigned features, hence we’re using a Map<Centroid, List<Record>> as the return type. Basically, each map entry corresponds to a cluster

3.6. Centroid Generation

The first step is to generate randomly placed centroids.

Although each centroid can contain totally random coordinates, it’s a good practice to generate random coordinates between the minimum and maximum possible values for each attribute. Generating random centroids without considering the range of possible values would cause the algorithm to converge more slowly.

First, we should compute the minimum and maximum value for each attribute, and then, generate the random values between each pair of them:

private static List<Centroid> randomCentroids(List<Record> records, int k) {
    List<Centroid> centroids = new ArrayList<>();
    Map<String, Double> maxs = new HashMap<>();
    Map<String, Double> mins = new HashMap<>();

    for (Record record : records) {
        record.getFeatures().forEach((key, value) -> {
            // compares the value with the current max and choose the bigger value between them
            maxs.compute(key, (k1, max) -> max == null || value > max ? value : max);

            // compare the value with the current min and choose the smaller value between them
            mins.compute(key, (k1, min) -> min == null || value < min ? value : min);
        });
    }

    Set<String> attributes = records.stream()
      .flatMap(e -> e.getFeatures().keySet().stream())
      .collect(toSet());
    for (int i = 0; i < k; i++) {
        Map<String, Double> coordinates = new HashMap<>();
        for (String attribute : attributes) {
            double max = maxs.get(attribute);
            double min = mins.get(attribute);
            coordinates.put(attribute, random.nextDouble() * (max - min) + min);
        }

        centroids.add(new Centroid(coordinates));
    }

    return centroids;
}

Now, we can assign each record to one of these random centroids.

3.7. Assignment

First off, given a Record, we should find the centroid nearest to it:

private static Centroid nearestCentroid(Record record, List<Centroid> centroids, Distance distance) {
    double minimumDistance = Double.MAX_VALUE;
    Centroid nearest = null;

    for (Centroid centroid : centroids) {
        double currentDistance = distance.calculate(record.getFeatures(), centroid.getCoordinates());

        if (currentDistance < minimumDistance) {
            minimumDistance = currentDistance;
            nearest = centroid;
        }
    }

    return nearest;
}

Each record belongs to its nearest centroid cluster:

private static void assignToCluster(Map<Centroid, List<Record>> clusters,  
  Record record, 
  Centroid centroid) {
    clusters.compute(centroid, (key, list) -> {
        if (list == null) {
            list = new ArrayList<>();
        }

        list.add(record);
        return list;
    });
}

3.8. Centroid Relocation

If, after one iteration, a centroid does not contain any assignments, then we won’t relocate it. Otherwise, we should relocate the centroid coordinate for each attribute to the average location of all assigned records:

private static Centroid average(Centroid centroid, List<Record> records) {
    if (records == null || records.isEmpty()) { 
        return centroid;
    }

    Map<String, Double> average = centroid.getCoordinates();
    records.stream().flatMap(e -> e.getFeatures().keySet().stream())
      .forEach(k -> average.put(k, 0.0));
        
    for (Record record : records) {
        record.getFeatures().forEach(
          (k, v) -> average.compute(k, (k1, currentValue) -> v + currentValue)
        );
    }

    average.forEach((k, v) -> average.put(k, v / records.size()));

    return new Centroid(average);
}

Since we can relocate a single centroid, now it’s possible to implement the relocateCentroids method:

private static List<Centroid> relocateCentroids(Map<Centroid, List<Record>> clusters) {
    return clusters.entrySet().stream().map(e -> average(e.getKey(), e.getValue())).collect(toList());
}

This simple one-liner iterates through all centroids, relocates them, and returns the new centroids.

3.9. Putting It All Together

In each iteration, after assigning all records to their nearest centroid, first, we should compare the current assignments with the last iteration.

If the assignments were identical, then the algorithm terminates. Otherwise, before jumping to the next iteration, we should relocate the centroids:

public static Map<Centroid, List<Record>> fit(List<Record> records, 
  int k, 
  Distance distance, 
  int maxIterations) {

    List<Centroid> centroids = randomCentroids(records, k);
    Map<Centroid, List<Record>> clusters = new HashMap<>();
    Map<Centroid, List<Record>> lastState = new HashMap<>();

    // iterate for a pre-defined number of times
    for (int i = 0; i < maxIterations; i++) {
        boolean isLastIteration = i == maxIterations - 1;

        // in each iteration we should find the nearest centroid for each record
        for (Record record : records) {
            Centroid centroid = nearestCentroid(record, centroids, distance);
            assignToCluster(clusters, record, centroid);
        }

        // if the assignments do not change, then the algorithm terminates
        boolean shouldTerminate = isLastIteration || clusters.equals(lastState);
        lastState = clusters;
        if (shouldTerminate) { 
            break; 
        }

        // at the end of each iteration we should relocate the centroids
        centroids = relocateCentroids(clusters);
        clusters = new HashMap<>();
    }

    return lastState;
}

4. Example: Discovering Similar Artists on Last.fm

Last.fm builds a detailed profile of each user’s musical taste by recording details of what the user listens to. In this section, we’re going to find clusters of similar artists. To build a dataset appropriate for this task, we’ll use three APIs from Last.fm:

  1. API to get a collection of top artists on Last.fm.
  2. Another API to find popular tags. Each user can tag an artist with something, e.g. rock. So, Last.fm maintains a database of those tags and their frequencies.
  3. And an API to get the top tags for an artist, ordered by popularity. Since there are many such tags, we’ll only keep those tags that are among the top global tags.

4.1. Last.fm’s API

To use these APIs, we should get an API Key from Last.fm and send it in every HTTP request. We’re going to use the following Retrofit service for calling those APIs:

public interface LastFmService {

    @GET("/2.0/?method=chart.gettopartists&format=json&limit=50")
    Call<Artists> topArtists(@Query("page") int page);

    @GET("/2.0/?method=artist.gettoptags&format=json&limit=20&autocorrect=1")
    Call<Tags> topTagsFor(@Query("artist") String artist);

    @GET("/2.0/?method=chart.gettoptags&format=json&limit=100")
    Call<TopTags> topTags();

    // A few DTOs and one interceptor
}

So, let’s find the most popular artists on Last.fm:

// setting up the Retrofit service

private static List<String> getTop100Artists() throws IOException {
    List<String> artists = new ArrayList<>();
    // Fetching the first two pages, each containing 50 records.
    for (int i = 1; i <= 2; i++) {
        artists.addAll(lastFm.topArtists(i).execute().body().all());
    }

    return artists;
}

Similarly, we can fetch the top tags:

private static Set<String> getTop100Tags() throws IOException {
    return lastFm.topTags().execute().body().all();
}

Finally, we can build a dataset of artists along with their tag frequencies:

private static List<Record> datasetWithTaggedArtists(List<String> artists, 
  Set<String> topTags) throws IOException {
    List<Record> records = new ArrayList<>();
    for (String artist : artists) {
        Map<String, Double> tags = lastFm.topTagsFor(artist).execute().body().all();
            
        // Only keep popular tags.
        tags.entrySet().removeIf(e -> !topTags.contains(e.getKey()));

        records.add(new Record(artist, tags));
    }

    return records;
}

4.2. Forming Artist Clusters

Now, we can feed the prepared dataset to our K-Means implementation:

List<String> artists = getTop100Artists();
Set<String> topTags = getTop100Tags();
List<Record> records = datasetWithTaggedArtists(artists, topTags);

Map<Centroid, List<Record>> clusters = KMeans.fit(records, 7, new EuclideanDistance(), 1000);
// Printing the cluster configuration
clusters.forEach((key, value) -> {
    System.out.println("-------------------------- CLUSTER ----------------------------");

    // Sorting the coordinates to see the most significant tags first.
    System.out.println(sortedCentroid(key)); 
    String members = String.join(", ", value.stream().map(Record::getDescription).collect(toSet()));
    System.out.print(members);

    System.out.println();
    System.out.println();
});

If we run this code, then it would visualize the clusters as text output:

------------------------------ CLUSTER -----------------------------------
Centroid {classic rock=65.58333333333333, rock=64.41666666666667, british=20.333333333333332, ... }
David Bowie, Led Zeppelin, Pink Floyd, System of a Down, Queen, blink-182, The Rolling Stones, Metallica, 
Fleetwood Mac, The Beatles, Elton John, The Clash

------------------------------ CLUSTER -----------------------------------
Centroid {Hip-Hop=97.21428571428571, rap=64.85714285714286, hip hop=29.285714285714285, ... }
Kanye West, Post Malone, Childish Gambino, Lil Nas X, A$AP Rocky, Lizzo, xxxtentacion, 
Travi$ Scott, Tyler, the Creator, Eminem, Frank Ocean, Kendrick Lamar, Nicki Minaj, Drake

------------------------------ CLUSTER -----------------------------------
Centroid {indie rock=54.0, rock=52.0, Psychedelic Rock=51.0, psychedelic=47.0, ... }
Tame Impala, The Black Keys

------------------------------ CLUSTER -----------------------------------
Centroid {pop=81.96428571428571, female vocalists=41.285714285714285, indie=22.785714285714285, ... }
Ed Sheeran, Taylor Swift, Rihanna, Miley Cyrus, Billie Eilish, Lorde, Ellie Goulding, Bruno Mars, 
Katy Perry, Khalid, Ariana Grande, Bon Iver, Dua Lipa, Beyoncé, Sia, P!nk, Sam Smith, Shawn Mendes, 
Mark Ronson, Michael Jackson, Halsey, Lana Del Rey, Carly Rae Jepsen, Britney Spears, Madonna, 
Adele, Lady Gaga, Jonas Brothers

------------------------------ CLUSTER -----------------------------------
Centroid {indie=95.23076923076923, alternative=70.61538461538461, indie rock=64.46153846153847, ... }
Twenty One Pilots, The Smiths, Florence + the Machine, Two Door Cinema Club, The 1975, Imagine Dragons, 
The Killers, Vampire Weekend, Foster the People, The Strokes, Cage the Elephant, Arcade Fire, 
Arctic Monkeys

------------------------------ CLUSTER -----------------------------------
Centroid {electronic=91.6923076923077, House=39.46153846153846, dance=38.0, ... }
Charli XCX, The Weeknd, Daft Punk, Calvin Harris, MGMT, Martin Garrix, Depeche Mode, The Chainsmokers, 
Avicii, Kygo, Marshmello, David Guetta, Major Lazer

------------------------------ CLUSTER -----------------------------------
Centroid {rock=87.38888888888889, alternative=72.11111111111111, alternative rock=49.16666666, ... }
Weezer, The White Stripes, Nirvana, Foo Fighters, Maroon 5, Oasis, Panic! at the Disco, Gorillaz, 
Green Day, The Cure, Fall Out Boy, OneRepublic, Paramore, Coldplay, Radiohead, Linkin Park, 
Red Hot Chili Peppers, Muse

Since centroid coordinations are sorted by the average tag frequency, we can easily spot the dominant genre in each cluster. For example, the last cluster is a cluster of a good old rock-bands, or the second one is filled with rap stars.

Although this clustering makes sense, for the most part, it’s not perfect since the data is merely collected from user behavior.

5. Visualization

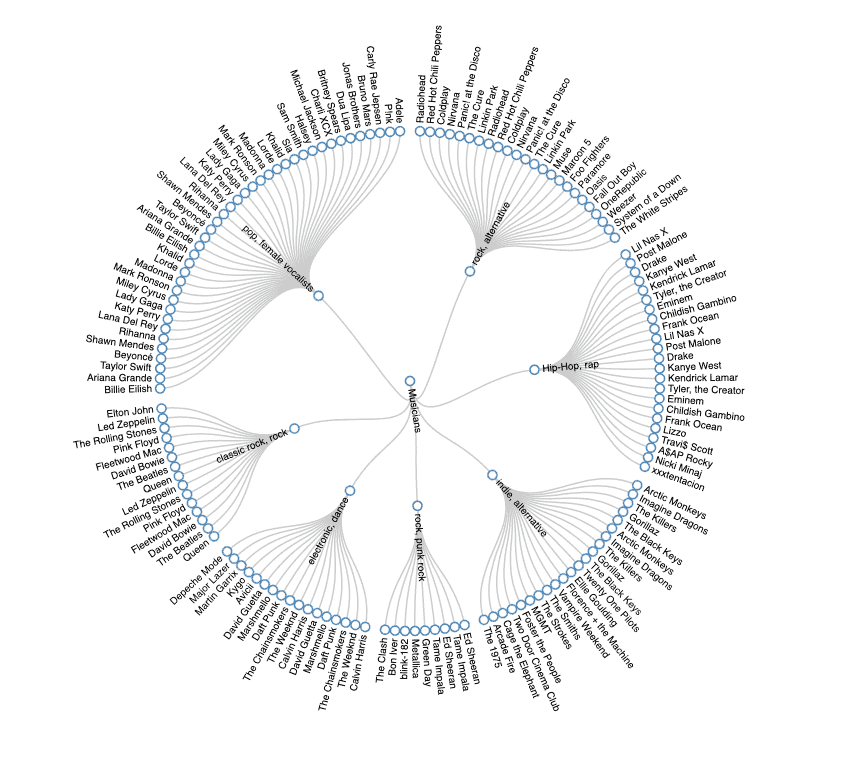
A few moments ago, our algorithm visualized the cluster of artists in a terminal-friendly way. If we convert our cluster configuration to JSON and feed it to D3.js, then with a few lines of JavaScript, we’ll have a nice human-friendly Radial Tidy-Tree:

We have to convert our Map<Centroid, List<Record>> to a JSON with a similar schema like this d3.js example.

6. Number of Clusters

One of the fundamental properties of K-Means is the fact that we should define the number of clusters in advance. So far, we used a static value for k, but determining this value can be a challenging problem. There are two common ways to calculate the number of clusters:

  1. Domain Knowledge
  2. Mathematical Heuristics

If we’re lucky enough that we know so much about the domain, then we might be able to simply guess the right number. Otherwise, we can apply a few heuristics like Elbow Method or Silhouette Method to get a sense on the number of clusters.

Before going any further, we should know that these heuristics, although useful, are just heuristics and may not provide clear-cut answers.

6.1. Elbow Method

To use the elbow method, we should first calculate the difference between each cluster centroid and all its members. As we group more unrelated members in a cluster, the distance between the centroid and its members goes up, hence the cluster quality decreases.

One way to perform this distance calculation is to use the Sum of Squared ErrorsSum of squared errors or SSE is equal to the sum of squared differences between a centroid and all its members:

public static double sse(Map<Centroid, List<Record>> clustered, Distance distance) {
    double sum = 0;
    for (Map.Entry<Centroid, List<Record>> entry : clustered.entrySet()) {
        Centroid centroid = entry.getKey();
        for (Record record : entry.getValue()) {
            double d = distance.calculate(centroid.getCoordinates(), record.getFeatures());
            sum += Math.pow(d, 2);
        }
    }
        
    return sum;
}

Then, we can run the K-Means algorithm for different values of k and calculate the SSE for each of them:

List<Record> records = // the dataset;
Distance distance = new EuclideanDistance();
List<Double> sumOfSquaredErrors = new ArrayList<>();
for (int k = 2; k <= 16; k++) {
    Map<Centroid, List<Record>> clusters = KMeans.fit(records, k, distance, 1000);
    double sse = Errors.sse(clusters, distance);
    sumOfSquaredErrors.add(sse);
}

At the end of the day, it’s possible to find an appropriate by plotting the number of clusters against the SSE:

Usually, as the number of clusters increases, the distance between cluster members decreases. However, we can’t choose any arbitrary large values for k, since having multiple clusters with just one member defeats the whole purpose of clustering.

The idea behind the elbow method is to find an appropriate value for in a way that the SSE decreases dramatically around that value. For example, k=9 can be a good candidate here.

7. Conclusion

In this tutorial, first, we covered a few important concepts in Machine Learning. Then we got aquatinted with the mechanics of the K-Means clustering algorithm. Finally, we wrote a simple implementation for K-Means, tested our algorithm with a real-world dataset from Last.fm, and visualized the clustering result in a nice graphical way.

As usual, the sample code is available on our GitHub project, so make sure to check it out!

How an In-Place Sorting Algorithm Works

$
0
0

1. Introduction

In this tutorial, we’ll explain how the in-place sorting algorithm works.

2. In-Place Algorithms

The in-place algorithms are those that don’t need any auxiliary data structure in order to transform the input data. Basically, it means that the algorithm doesn’t use extra space for input manipulation. It practically overrides the input with the output.

However, in reality, the algorithm actually may require a small and non-constant additional space for auxiliary variables. The complexity of this space is in most cases O(log n), although sometimes anything less than linear is allowed.

3. Pseudocode

Let’s now see some pseudocode and compare the in-place algorithm with the out-of-place one.

We’ll assume that we want to reverse an array of n numbers.

3.1. In-Place Algorithm

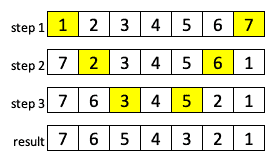
If we think about the problem, we’ll see that we have an input array and reversed array as the output. In the end, we don’t actually need our original array, only the reversed one.

Then, why wouldn’t we overwrite the input instead of moving its values to the completely new array, as it might look like a most obvious method? To do that, we’ll only need one additional variable to temporarily store the values that we’re currently working with:

reversInPlace(array A[n])
    for i from 0 to n/2
    temp = A[i]
    A[i] = A[n - 1 - i]
    A[n - 1 - i] = temp

It’s noteworthy to mention that no matter how big the array is, the extra space that we need will always be O(1) in this case.

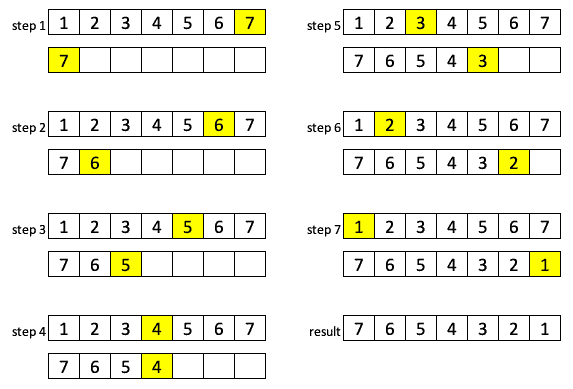
The illustration shows that we need fewer steps than in the previous case:

3.2. Out-of-Place Algorithm

On the other hand, we can also do this in a pretty simple, more obvious manner. We can create a new array of the same size, copy the values from the original one in the corresponding order and then delete the original array:

reverseOutOfPlace(array A[n])
    create new array B[n]
    for i from 0 to n - 1
        B[i] = A[i]
    delete A
    return B

Although this will do what we wanted it to do, it’s not efficient enough. We have O(n) extra space required since we have two arrays to manipulate with. Besides that, creating and removing a new array is usually a slow operation.

Let’s see the illustration of the process:

4. Java Implementation

Let’s now see how we can implement in Java what we learned in the previous section.

Firstly, we’ll implement an in-place algorithm:

public static int[] reverseInPlace(int A[]) {
    int n = A.length;
    for (int i = 0; i < n / 2; i++) {
        int temp = A[i];
        A[i] = A[n - 1 - i];
        A[n - 1 - i] = temp;
    }
    return A;
}

We can test easily that this works as expected:

@Test
public void givenArray_whenInPlaceSort_thenReversed() {
    int[] input = {1, 2, 3, 4, 5, 6, 7};
    int[] expected = {7, 6, 5, 4, 3, 2, 1};
    assertArrayEquals("the two arrays are not equal", expected,
      InOutSort.reverseInPlace(input));
}

Secondly, let’s check out the out-of-place algorithm implementation:

public static int[] reverseOutOfPlace(int A[]) {
    int n = A.length;
    int[] B = new int[n];
    for (int i = 0; i < n; i++) {
        B[n - i - 1] = A[i];
    }
    return B;
}

The test is pretty straightforward:

@Test
public void givenArray_whenOutOfPlaceSort_thenReversed() {
    int[] input = {1, 2, 3, 4, 5, 6, 7};
    int[] expected = {7, 6, 5, 4, 3, 2, 1};
    assertArrayEquals("the two arrays are not equal", expected,
      InOutSort.reverseOutOfPlace(input));
}

5. Examples

There are many sorting algorithms that are using in-place approach. Some of them are insertion sort, bubble sort, heap sort, quicksort, and shell sort and you can learn more about them and check-out their Java implementations.

Also, we need to mention comb sort and heapsort. All these have space complexity O(log n).

It could be also useful to learn more about the Theory of Big-O Notation, as well as to check out some Practical Java Examples about the complexity of the algorithm.

6. Conclusion

In this article, we described the so-called in-place algorithms, illustrated how they work using pseudocode and a few examples, listed several algorithms that work on this principle, and finally implemented the basic examples in Java.

As usual, the entire code could be found over on GitHub.

Linux Commands – Delete Files Older Than X

$
0
0

1. Overview

We often need to tidy up files on our workstations or servers. Our applications may produce logs or temporary files. One common use case is to delete files that are above a certain age.

In this tutorial, we’ll look at ways to delete files by age on Linux. These commands may also work in other POSIX shells.

2. Finding and Deleting Files

We’re going to need to find the files that match our criteria in order to apply the delete action.

For this, we’ll use the find command. The find command even provides a delete capability that we can use.

2.1. Delete Files Older than X Minutes

Let’s start by using find to delete files whose file names start with access and end with .log, and which are older than 15 minutes:

find . -name "access*.log" -type f -mmin +15 -delete

Let’s have a closer look at how this command is constructed.

First, we’ve specified the starting point for files lookup, it’s the current working directory “.”.

Then, we have the file name criteria prefixed with the -name switch.

The switch -type f means we want to look for files only.

The -mmin stands for the modification time, and +15 means we want files that were last modified at 15 minutes ago or earlier.

The action flag -delete asks find to delete all the files it finds. We should note that this will look recursively through the file system hierarchy, starting from the current working directory.

2.2. Delete Files Older than X Days

It only takes a small change to the find command to switch from minutes to days:

find . -name "access*.log" -type f -mtime +5 -delete

Here, the -mtime switch says we want to delete files that were modified at least 5 days ago.

2.3. Delete Files Older than X days With an Older Version of find

Using older distributions, the find tool might not have the -delete switch.

In this instance there’s another way:

find . -name "access*log" -exec rm {} \;

In this version, the -exec switch allows us to use the rm command on each file found.

2.4. Delete Files Older than X days With a Prompt

We might be concerned that an incorrectly constructed delete command might end up with deleting wrong files. A small variation of the above command will prompt us before deletion.

Let’s add the -i switch to the rm command:

find . -name "access*log" -exec rm -i {} \;

This way, we can decide which files get deleted.

3. Avoiding Accidental File Deletion

Deleting files is fairly easy, but we must remember we’re doing it for all the files that match the find predicate. This means a simple typo or unexpected order of the command line switches might cause unexpected damage.

As an example, let’s look at the following command:

find . -delete -name file.txt

We might assume that this would delete only file.txt from the current working directory. However, since the -delete switch comes first, the -name is ignored. This mistake will delete everything in our current directory!

Here are some general rules we should follow to improve safety when deleting with find:

  • Make sure the find command is correct by previewing it, running it without the -delete switch
  • Always check the -delete option is at the end of the find arguments
  • Never delete the files as the root user unless absolutely necessary

4. Summary

In this tutorial, we’ve looked at how we can delete files older than some period of time.

Next, we looked at what might go wrong if given switches are out of the necessary order.

Finally, we’ve had a brief look at general rules we should follow when running such commands on our system.

The find command is very handy and has lots of additional switches. We can find out more about it with either man find or find –help.

How Long a Linux Process Has Been Running

$
0
0

1. Overview

Linux comes with a handful of monitoring tools which can help us to get some insight about the OS itself. The ps utility from the Procps package is one of those tools which can report some stats about the current processes in the OS.

In this tutorial, we’re going to see how we can use the ps utility to find the uptime for a particular process.

2. Process Uptime

In order to see how long a particular Linux (or even Mac) process has been running, assuming that we already know the Process Id, we can enter the following command in our Bash shell:

>> ps -p <process_id> -o etime

Let’s break down the command:

  • ps helps us to see a snapshot of current processes in the operating system. ps stands for “Process Status”
  • Using -p <process_id> option we can specify the process id. For example, -p20 or -p 20 are representing a process with 20 as the process id
  • The -o <format> lets us specify a custom format for the output. That is, <format> is an argument in the form of a blank-separated or comma-separated list, which offers a way to specify individual output columns. Here we’re justing going to know about the process elapsed time, so we’re using the etime as the single output column. By the way, etime stands for “Elapsed Time”.

For example, if we run the above command for a process id of 1:

>> ps -p 1 -o etime

We would get the process’s elapsed time:

ELAPSED
03:24:30

This particular process has been running for 3 hours, 24 minutes and 30 seconds. In order to see the elapsed time in seconds, let’s use etimes instead of etime:

>> ps -p 1 -o etimes
ELAPSED
12270

Please note that we can’t use the etimes option on a Mac.

3. Elapsed Output Format

By default, etime represents elapsed time since the process was started, in the [[DD-]hh:]mm:ss format. For example, for a process that has been running for 20 days, the elapsed time output would be something like:

ELAPSED
20-11:59:45

The DD and hh parts are optional, so when the elapsed time is less than a day or less than an hour, they won’t show up in the output:

ELAPSED
21:51

This process has been running for 21 minutes and 51 seconds.

4. Custom Column Header

As we saw in the previous examples, the -o etime option prints the elapsed time under a column header named ELAPSED. We can rename this header using the -o etime=<header_name> syntax:

>> ps -p 1 -o etime=Uptime
Uptime
03:24:30

Also, we can even remove the header altogether:

>> ps -p 1 -o etime=
03:24:30

Same is true for etimes:

>> ps -p 1 -o etimes=
12270

This comes in handy when we’re going to write a script and we only care about the numerical output.

5. Conclusion

In this tutorial, we used the ps command-line utility to find out how long a particular process is running. Also, we learned how to customize the output generated by ps.


Java Weekly, Issue 294

$
0
0

Here we go…

1. Spring and Java

>> New language features since Java 8 [advancedweb.hu]

The title says it all — and there’s a great section about the var keyword.

>> Nuances of Overloading and Overriding in Java [software.rajivprab.com]

If you think you have it down already, here’s a great way to test your knowledge.

>> Who Needs Lombok Anyhow [gregorriegler.com]

And why making your code as transparent as possible may be preferred over the “magic” in your code produced by Lombok.

Also worth reading:

Webinars and presentations:

Time to upgrade:

2. Technical and Musing

>> Documenting Software Architecture [herbertograca.com]

A nice round-up of the diagrams and documents at our disposal when describing our system architecture.

>> How to limit the SQL query result set to Top-N rows only [vladmihalcea.com]

And a look at both the SQL:2008 standard syntax and a few database-specific alternatives.

Also worth reading:

3. Comics

>> Working From Home [dilbert.com]

>> Bad Analogy Guy Fits In [dilbert.com]

>> Engineering Secret [dilbert.com]

4. Pick of the Week

>> How NOT to design APIs [usejournal.com]

Java String equalsIgnoreCase()

$
0
0

1. Overview

In this tutorial, we’ll look at determining if two String values are the same when we ignore case.

2. Using the equalsIgnoreCase()

equalsIgnoreCase() accepts another String and returns a boolean value:

String lower = "equals ignore case";
String UPPER = "EQUALS IGNORE CASE";

assertThat(lower.equalsIgnoreCase(UPPER)).isTrue();

3. Using Apache Commons Lang

The Apache Commons Lang library contains a class called StringUtils that provides a method similar to the method above, but it has the added benefit of handling null values:

String lower = "equals ignore case"; 
String UPPER = "EQUALS IGNORE CASE"; 

assertThat(StringUtils.equalsIgnoreCase(lower, UPPER)).isTrue();
assertThat(StringUtils.equalsIgnoreCase(lower, null)).isFalse();

4. Conclusion

In this article, we took a quick look at determining if two String values are the same when we ignore case. Now, things get a bit trickier when we internationalize, as case-sensitivity is specific to a language – stay tuned for more info.

All code examples can, of course, be found in the GitHub repository.

A Guide to SirixDB

$
0
0

1. Overview

In this tutorial, we’ll give an overview of what SirixDB is and its most important design goals.

Next, we’ll give a walk through a low level cursor-based transactional API.

2. SirixDB Features

SirixDB is a log-structured, temporal NoSQL document store, which stores evolutionary data. It never overwrites any data on-disk. Thus, we’re able to restore and query the full revision history of a resource in the database efficiently. SirixDB ensures, that a minimum of storage-overhead is created for each new revision.

Currently, SirixDB offers two built-in native data models, namely a binary XML store as well as a JSON store.

2.1. Design Goals

Some of the most important core principles and design goals are:

  • Concurrency – SirixDB contains very few locks and aims to be as suitable for multithreaded systems as possible
  • Asynchronous REST API – operations can happen independently; each transaction is bound to a specific revision and only one read-write transaction on a resource is permitted concurrently to N read-only transactions
  • Versioning/Revision history – SirixDB stores a revision history of every resource in the database while keeping storage-overhead to a minimum. Read and write performance is tunable. It depends on the versioning type, which we can specify for creating a resource
  • Data integrity – SirixDB, like ZFS, stores full checksums of the pages in the parent pages. That means that almost all data corruption can be detected upon reading in the future, as the SirixDB developers aim to partition and replicate databases in the future
  • Copy-on-write semantics – similarly to the file systems Btrfs and ZFS, SirixDB uses CoW semantics, meaning that SirixDB never overwrites data. Instead, database page fragments are copied and written to a new location
  • Per revision and per record versioning – SirixDB does not only version on a per-page, but also on a per-record basis. Thus, whenever we change a potentially small fraction
    of records in a data page, it does not have to copy the whole page and write it to a new location on a disk or flash drive. Instead, we can specify one of several versioning strategies known from backup systems or a sliding snapshot algorithm during the creation of a database resource. The versioning type we specify is used by SirixDB to version data pages
  • Guaranteed atomicity (without a WAL) – the system will never enter an inconsistent state (unless there is hardware failure), meaning that unexpected power-off won’t ever damage the system. This is accomplished without the overhead of a write-ahead-log (WAL)
  • Log-structured and SSD friendly – SirixDB batches writes and syncs everything sequentially to a flash drive during commits. It never overwrites committed data

We first want to introduce the low-level API exemplified with JSON data before switching our focus to higher levels in future articles. For instance an XQuery-API for querying both XML and JSON databases or an asynchronous, temporal RESTful API. We can basically use the same low-level API with subtle differences to store, traverse and compare XML resources as well.

In order to use SirixDB, we at least have to use Java 11.

3. Maven Dependency to Embed SirixDB

To follow the examples, we first have to include the sirix-core dependency, for instance, via Maven:

<dependency>
    <groupId>io.sirix</groupId>
    <artifactId>sirix-core</artifactId>
    <version>0.9.3</version>
</dependency>

Or via Gradle:

dependencies {
    compile 'io.sirix:sirix-core:0.9.3'
}

4. Tree-Encoding in SirixDB

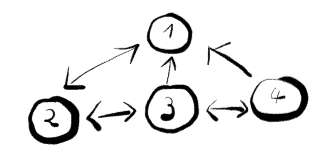
A node in SirixDB references other nodes by a firstChild/leftSibling/rightSibling/parentNodeKey/nodeKey encoding:

The numbers in the figure are auto-generated unique, stable node IDs generated with a simple sequential number generator.

Every node may have a first child, a left sibling, a right sibling, and a parent node. Furthermore, SirixDB is able to store the number of children, the number of descendants and hashes of each node.

In the following sections, we’ll introduce the core low-level JSON API of SirixDB.

5. Create a Database With a Single Resource

First, we want to show how to create a database with a single resource. The resource is going to be imported from a JSON file and stored persistently in the internal, binary format of SirixDB:

var pathToJsonFile = Paths.get("jsonFile");
var databaseFile = Paths.get("database");

Databases.createJsonDatabase(new DatabaseConfiguration(databaseFile));

try (var database = Databases.openJsonDatabase(databaseFile)) {
    database.createResource(ResourceConfiguration.newBuilder("resource").build());

    try (var manager = database.openResourceManager("resource");
         var wtx = manager.beginNodeTrx()) {
        wtx.insertSubtreeAsFirstChild(JsonShredder.createFileReader(pathToJsonFile));
        wtx.commit();
    }
}

We first create a database. Then we open the database and create the first resource. Various options for creating a resource exist (see the official documentation).

We then open a single read-write transaction on the resource to import the JSON file. The transaction provides a cursor for navigation through moveToX methods. Furthermore, the transaction provides methods to insert, delete or modify nodes. Note that the XML API even provides methods for moving nodes in a resource and copying nodes from other XML resources.

To properly close the opened read-write transaction, the resource manager and the database we use Java’s try-with-resources statement.

We exemplified the creation of a database and resource on JSON data, but creating an XML database and resource is almost identical.

In the next section, we’ll open a resource in a database and show navigational axes and methods.

6. Open a Resource in a Database and Navigate

6.1. Preorder Navigation in a JSON resource

To navigate through the tree structure, we’re able to reuse the read-write transaction after committing. In the following code we’ll, however, open the resource again and begin a read-only transaction on the most recent revision:

try (var database = Databases.openJsonDatabase(databaseFile);
     var manager = database.openResourceManager("resource");
     var rtx = manager.beginNodeReadOnlyTrx()) {
    
    new DescendantAxis(rtx, IncludeSelf.YES).forEach((unused) -> {
        switch (rtx.getKind()) {
            case OBJECT:
            case ARRAY:
                LOG.info(rtx.getDescendantCount());
                LOG.info(rtx.getChildCount());
                LOG.info(rtx.getHash());
                break;
            case OBJECT_KEY:
                LOG.info(rtx.getName());
                break;
            case STRING_VALUE:
            case BOOLEAN_VALUE:
            case NUMBER_VALUE:
            case NULL_VALUE:
                LOG.info(rtx.getValue());
                break;
            default:
        }
    });
}

We use the descendant axis to iterate over all nodes in preorder (depth-first). Hashes of nodes are built bottom-up for all nodes per default depending on the resource configuration.

Array nodes and Object nodes have no name and no value. We can use the same axis to iterate through XML resources, only the node types differ.

SirixDB offers a bunch of axes as for instance all XPath-axes to navigate through XML and JSON resources. Furthermore, it provides a LevelOrderAxis, a PostOrderAxis, a NestedAxis to chain axis and several ConcurrentAxis variants to fetch nodes concurrently and in parallel.

In the next section, we’ll show how to use the VisitorDescendantAxis, which iterates in preorder, guided by return types of a node visitor.

6.2. Visitor Descendant Axis

As it’s very common to define behavior based on the different node-types SirixDB uses the visitor pattern.

We can specify a visitor as a builder argument for a special axis called VisitorDescendantAxis. For each type of node, there’s an equivalent visit-method. For instance, for object key nodes it is the method VisitResult visit(ImmutableObjectKeyNode node).

Each method returns a value of type VisitResult. The only implementation of the VisitResult interface is the following enum:

public enum VisitResultType implements VisitResult {
    SKIPSIBLINGS,
    SKIPSUBTREE,
    CONTINUE,
    TERMINATE
}

The VisitorDescendantAxis iterates through the tree structure in preorder. It uses the VisitResultTypes to guide the traversal:

  • SKIPSIBLINGS means that the traversal should continue without visiting the right siblings of the current node the cursor points to
  • SKIPSUBTREE means to continue without visiting the descendants of this node
  • We use CONTINUE if the traversal should continue in preorder
  • We can also use TERMINATE to terminate the traversal immediately

The default implementation of each method in the Visitor interface returns VisitResultType.CONTINUE for each node type. Thus, we only have to implement the methods for the nodes, which we’re interested in. If we’ve implemented a class which implements the Visitor interface called MyVisitor we can use the VisitorDescendantAxis in the following way:

var axis = VisitorDescendantAxis.newBuilder(rtx)
  .includeSelf()
  .visitor(new MyVisitor())
  .build();

while (axis.hasNext()) axis.next();

The methods in MyVisitor are called for each node in the traversal. The parameter rtx is a read-only transaction. The traversal begins with the node the cursor currently points to.

6.3. Time Travel Axis

One of the most distinctive features of SirixDB is thorough versioning. Thus, SirixDB not only offers all kinds of axes to iterate through the tree structure within one revision. We’re also able to use one of the following axes to navigate in time:

  • FirstAxis
  • LastAxis
  • PreviousAxis
  • NextAxis
  • AllTimeAxis
  • FutureAxis
  • PastAxis

The constructors take a resource manager as well as a transactional cursor as parameters.  The cursor navigates to the same node in each revision.

If another revision in the axis – as well as the node in the respective revision – exists, then the axis returns a new transaction. The return values are read-only transactions opened on the respective revisions, whereas the cursor points to the same node in the different revisions.

We’ll show a simple example for the PastAxis:

var axis = new PastAxis(resourceManager, rtx);
if (axis.hasNext()) {
    var trx = axis.next();
    // Do something with the transactional cursor.
}

6.4. Filtering

SirixDB provides several filters, which we’re able to use in conjunction with a FilterAxis. The following code, for instance, traverses all children of an object node and filters for object key nodes with the key “a” as in {“a”:1, “b”: “foo”}.

new FilterAxis<JsonNodeReadOnlyTrx>(new ChildAxis(rtx), new JsonNameFilter(rtx, "a"))

The FilterAxis optionally takes more than one filter as its argument. The filter either is a JsonNameFilter, to filter for names in object keys or one of the node type filters: ObjectFilter, ObjectRecordFilter, ArrayFilter, StringValueFilter, NumberValueFilter, BooleanValueFilter and NullValueFilter.

The axis can be used as follows for JSON resources to filter by object key names with the name “foobar”:

var axis = new VisitorDescendantAxis.Builder(rtx).includeSelf().visitor(myVisitor).build();
var filter = new JsonNameFilter(rtx, "foobar");
for (var filterAxis = new FilterAxis<JsonNodeReadOnlyTrx>(axis, filter); filterAxis.hasNext();) {
    filterAxis.next();
}

Alternatively, we could simply stream over the axis (without using the FilterAxis at all) and then filter by a predicate.

rtx is of type NodeReadOnlyTrx in the following example:

var axis = new PostOrderAxis(rtx);
var axisStream = StreamSupport.stream(axis.spliterator(), false);

axisStream.filter((unusedNodeKey) -> new JsonNameFilter(rtx, "a"))
  .forEach((unused) -> /* Do something with the transactional cursor */);

7. Modify a Resource in a Database

Obviously, we want to be able to modify a resource. SirixDB stores a new compact snapshot during each commit.

After opening a resource we have to start the single read-write transaction as we’ve seen before.

7.1. Simple Update Operations

Once we navigated to the node we want to modify, we’re able to update for instance the name or the value, depending on the node type:

if (wtx.isObjectKey()) wtx.setObjectKeyName("foo");
if (wtx.isStringValue()) wtx.setStringValue("foo");

We can insert new object records via insertObjectRecordAsFirstChild and insertObjectRecordAsRightSibling. Similar methods exist for all node types. Object records are composed of two nodes: An object key node and an object value node.

SirixDB checks for consistency and as such it throws an unchecked SirixUsageException if a method call is not permitted on a specific node type.

Object records, that is key/value pairs, for instance can only be inserted as a first child if the cursor is located on an object node. We insert both an object key node as well as one of the other node types as the value with the insertObjectRecordAsX methods.

We can also chain the update methods – for this example, wtx is located on an object node:

wtx.insertObjectRecordAsFirstChild("foo", new StringValue("bar"))
   .moveToParent().trx()
   .insertObjectRecordAsRightSibling("baz", new NullValue());

First, we insert an object key node with the name “foo” as the first child of an object node. Then, a StringValueNode is created as the first child of the newly created object record node.

The cursor is moved to the value node after the method call. Thus we first have to move the cursor to the object key node, the parent again. Then, we’re able to insert the next object key node and its child, a NullValueNode as a right sibling.

7.2. Bulk Insertions

More sophisticated bulk insertion methods exist, too, as we’ve already seen when we imported JSON data. SirixDB provides a method to insert JSON data as a first child (insertSubtreeAsFirstChild) and as a right sibling (insertSubtreeAsRightSibling).

To insert a new subtree based on a String we can use:

var json = "{\"foo\": \"bar\",\"baz\": [0, \"bla\", true, null]}";
wtx.insertSubtreeAsFirstChild(JsonShredder.createStringReader(json));

The JSON API currently doesn’t offer the possibility to copy subtrees. However, the XML API does. We’re able to copy a subtree from another XML resource in SirixDB:

wtx.copySubtreeAsRightSibling(rtx);

Here, the node the read-only transaction (rtx) currently points to is copied with its subtree as a new right sibling of the node that the read-write transaction (wtx) points to.

SirixDB always applies changes in-memory and then flushes them to a disk or the flash drive during a transaction commit. The only exception is if the in-memory cache has to evict some entries into a temporary file due to memory constraints.

We can either commit() or rollback() the transaction. Note that we can reuse the transaction after one of the two method calls.

SirixDB also applies some optimizations under the hood when invoking bulk insertions.

In the next section, we’ll see other possibilities on how to start a read-write transaction.

7.3. Start a Read-Write Transaction

As we’ve seen we can begin a read-write transaction and create a new snapshot by calling the commit method. However, we can also start an auto-committing transactional cursor:

resourceManager.beginNodeTrx(TimeUnit.SECONDS, 30);
resourceManager.beginNodeTrx(1000);
resourceManager.beginNodeTrx(1000, TimeUnit.SECONDS, 30);

Either we auto-commit every 30 seconds, after every 1000th modification or every 30 seconds and every 1000th modification.

We’re also able to start a read-write transaction and then revert to a former revision, which we can commit as a new revision:

resourceManager.beginNodeTrx().revertTo(2).commit();

All revisions in between are still available. Once we have committed more than one revision we can open a specific revision either by specifying the exact revision number or by a timestamp:

var rtxOpenedByRevisionNumber = resourceManager.beginNodeReadOnlyTrx(2);

var dateTime = LocalDateTime.of(2019, Month.JUNE, 15, 13, 39);
var instant = dateTime.atZone(ZoneId.of("Europe/Berlin")).toInstant();
var rtxOpenedByTimestamp = resourceManager.beginNodeReadOnlyTrx(instant);

8. Compare Revisions

To compute the differences between any two revisions of a resource, once stored in SirixDB, we can invoke a diff-algorithm:

DiffFactory.invokeJsonDiff(
  new DiffFactory.Builder(
    resourceManager,
    2,
    1,
    DiffOptimized.HASHED,
    ImmutableSet.of(observer)));

The first argument to the builder is the resource manager, which we already used several times. The next two parameters are the revisions to compare. The fourth parameter is an enum, which we use to determine if SirixDB should take hashes into account to speed up the diff-computation or not.

If a node changes due to update operations in SirixDB, all ancestor nodes adapt their hash values, too. If the hashes and the node keys in the two revisions are identical, SirixDB skips the subtree during the traversal of the two revisions, because there are no changes in the subtree when we specify DiffOptimized.HASHED.

An immutable set of observers is the last argument. An observer has to implement the following interface:

public interface DiffObserver {
    void diffListener(DiffType diffType, long newNodeKey, long oldNodeKey, DiffDepth depth);
    void diffDone();
}

The diffListener method as the first parameter specifies the type of diff encountered between two nodes in each revision. The next two arguments are the stable unique node identifiers of the compared nodes in the two revisions. The last argument depth specifies the depth of the two nodes, which SirixDB just compared.

9. Serialize to JSON

At some point in time we want to serialize a JSON resource in SirixDBs binary encoding back to JSON:

var writer = new StringWriter();
var serializer = new JsonSerializer.Builder(resourceManager, writer).build();
serializer.call();

To serialize revision 1 and 2:

var serializer = new
JsonSerializer.Builder(resourceManager, writer, 1, 2).build();
serializer.call();

And all stored revisions:

var serializer = new
JsonSerializer.Builder(resourceManager, writer, -1).build();
serializer.call();

10. Conclusion

We’ve seen how to use the low-level transactional cursor API to manage JSON databases and resources in SirixDB. Higher level-APIs hide some of the complexity.

The complete source code is available over on GitHub.

Interpolation Search in Java

$
0
0

1. Introduction

In this tutorial, we’ll walk through interpolation search algorithms and discuss their pros and cons. Furthermore, we’ll implement it in Java and talk about the algorithm’s time complexity.

2. Motivation

Interpolation search is an improvement over binary search tailored for uniformly distributed data.

Binary search halves the search space on each step regardless of the data distribution, thus it’s time complexity is always O(log(n)).

On the other hand, interpolation search time complexity varies depending on the data distribution. It is faster than binary search for uniformly distributed data with the time complexity of O(log(log(n))). However, in the worst-case scenario, it can perform as poor as O(n).

Similar to binary search, interpolation search can only work on a sorted array. It places a probe in a calculated position on each iteration. If the probe is right on the item we are looking for, the position will be returned; otherwise, the search space will be limited to either the right or the left side of the probe.

The probe position calculation is the only difference between binary search and interpolation search.

In binary search, the probe position is always the middlemost item of the remaining search space.

In contrary, interpolation search computes the probe position based on this formula:

Let’s take a look at each of the terms:

  • probe: the new probe position will be assigned to this parameter.
  • lowEnd: the index of the leftmost item in the current search space.
  • highEnd: the index of the rightmost item in the current search space.
  • data[]: the array containing the original search space.
  • item: the item that we are looking for.

To better understand how interpolation search works, let’s demonstrate it with an example.

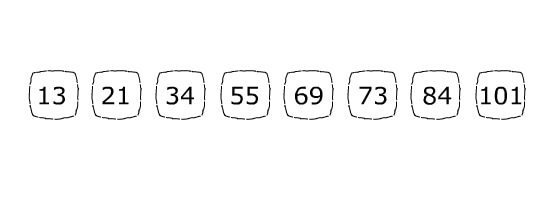
Let’s say we want to find the position of 84 in the array below:

The array’s length is 8, so initially highEnd = 7 and lowEnd = 0 (because array’s index starts from 0, not 1).

In the first step, the probe position formula will result in probe = 5:

Because 84 (the item we are looking for) is greater than 73 (the current probe position item), the next step will abandon the left side of the array by assigning lowEnd = probe + 1. Now the search space consists of only 84 and 101. The probe position formula will set probe = 6 which is exactly the 84’s index:

Since the item we were looking for is found, position 6 will be returned.

4. Implementation in Java

Now that we understood how the algorithm works, let’s implement it in Java.

First, we initialize lowEnd and highEnd:

int highEnd = (data.length - 1);
int lowEnd = 0;

Next, we set up a loop and in each iteration, we calculate the new probe based on the aforementioned formula. The loop condition makes sure that we are not out of the search space by comparing item to data[lowEnd] and data[highEnd]:

while (item >= data[lowEnd] && item <= data[highEnd] && lowEnd <= highEnd) {
    int probe
      = lowEnd + (highEnd - lowEnd) * (item - data[lowEnd]) / (data[highEnd] - data[lowEnd]);
}

We also check if we’ve found the item after every new probe assignment.

Finally, we adjust lowEnd or highEnd to decrease the search space on each iteration:

public int interpolationSearch(int[] data, int item) {

    int highEnd = (data.length - 1);
    int lowEnd = 0;

    while (item >= data[lowEnd] && item <= data[highEnd] && lowEnd <= highEnd) {

        int probe
          = lowEnd + (highEnd - lowEnd) * (item - data[lowEnd]) / (data[highEnd] - data[lowEnd]);

        if (highEnd == lowEnd) {
            if (data[lowEnd] == item) {
                return lowEnd;
            } else {
                return -1;
            }
        }

        if (data[probe] == item) {
            return probe;
        }

        if (data[probe] < item) {
            lowEnd = probe + 1;
        } else {
            highEnd = probe - 1;
        }
    }
    return -1;
}

5. Conclusion

In this article, we explored interpolation search with an example. We implemented it in Java, too.

The examples shown in this tutorial are available over on Github.

Debugging with Eclipse

$
0
0

1. Overview

In this quick guide, we’ll see how to debug Java programs using the Eclipse IDE.

2. Basic Concepts

Eclipse has great support for debugging an application. It visualizes step-by-step execution and helps us uncover bugs.

To demonstrate the debugging features in Eclipse, we’ll use a sample program PerfectSquareCounter. This program counts the total perfect squares and even perfect squares under a given number:

public class PerfectSquareCounter {

    static int evenPerfectSquareNumbers = 0;

    public static void main(String[] args) {
        int i = 100;
        System.out.println("Total Perfect Squares: " + calculateCount(i));
        System.out.println("Even Perfect Squares : " + evenPerfectSquareNumbers);
    }

    public static int calculateCount(int i) {
        int perfectSquaresCount = 0;
        for (int number = 1; number <= i; number++) {
            if (isPerfectSquare(number)) {
                perfectSquaresCount++;
                if (number % 2 == 0) {
                    evenPerfectSquareNumbers++;
                }
            }
        }
        return perfectSquaresCount;
    }

    private static boolean isPerfectSquare(int number) {
        double sqrt = Math.sqrt(number);
        return sqrt - Math.floor(sqrt) == 0;
    }
}

2.1. Debug Mode

First, we need to start the Java program within Eclipse in debug mode. This can be achieved in two ways:

  • Right-click on the editor and select Debug As -> Java Application (shown in below screenshot)
  • Debug the program from the toolbar (highlighted in below screenshot)

2.2. Breakpoints

We need to define the points at which the program execution should pause for investigation. These are called breakpoints and are applicable for methods. They can also be defined anytime before or during execution.

Basically, there are 3 ways to add breakpoints to the program:

  • Right-click on the marker bar (vertical ruler) corresponding to the line and select Toggle Breakpoint (shown in the below screenshot)
  • Press Ctrl+Shift+B on the necessary line while in the editor
  • Double-click on the marker bar (vertical ruler) corresponding to the necessary line

2.3. Code-Flow Controls

Now that the debugger stops at the given breakpoints, we can proceed with further execution.

Let’s assume that the debugger is currently positioned as per the below screenshot, at Line 16:

The most commonly used debug options are:

  • Step Into (F5) – This operation goes inside the methods used in the current line (if any); else, it proceeds to the next line. In this example, it will take the debugger inside the method isPerfectSquare()
  • Step Over (F6) – This operation processes the current line and proceeds to the next line. In this example, this will execute the method isPerfectSquare() and proceed to the next line
  • Step Return (F7) – This operation finishes the current method and takes us back to the calling method. Since in this case, we have a breakpoint in the loop, it will be still within the method, else it would go back to the main method
  • Resume (F8) – This operation will simply continue with the execution until the program ends unless we hit any further breakpoint

2.4. Debug Perspective

When we start the program in debug mode, Eclipse will prompt with an option to switch to the Debug perspective. The Debug perspective is a collection of some useful views that help us visualize and interact with the debugger.

We can also switch to the Debug perspective manually at any time.

Here are some of the most useful views that this contains:

  • Debug view – This shows the different threads and call stack traces
  • Variables view – This shows the values of the variables at any given point. If we need to see the static variables, we need to explicitly specify that
  • Breakpoints – This shows the different breakpoints and watchpoints (which we will see below)
  • Debug Shell – This allows us to write and evaluate custom code while debugging (an example is covered later)

3. Techniques

In this section, we’ll go through some important techniques that will help us to master debugging in Eclipse.

3.1. Variables

We can see the values of variables during the execution under the Variables view. In order to see the static variables, we can select the drop-down option Java -> Show Static Variables.

Using the variables view, it’s possible to change any value to the desired value during the execution.

For example, if we need to skip few numbers and directly start with the number 80, we could do that by changing the value of the variable number:

3.2. Inspecting Values

If we need to inspect the value of a Java expression or statement, we can select the particular expression in the editor, right-click, and Inspect, as shown below. A handy shortcut is to hit Ctrl+Shift+I on the expression to see the value:

In case we need to permanently inspect this expression, we can right-click and Watch. Now, this gets added to the Expressions view and the value of this expression can be seen for different runs.

3.3. Debug Shell

In the context of the debugging session, we can write and run custom code to evaluate possibilities. This is done in the Debug Shell.

For example, if we need to cross-check the correctness of the sqrt functionality, we could do it in the Debug Shell. On the code, Right-click -> Inspect to see the value:

3.4. Conditional Breakpoints

There will be cases in which we want to debug only for specific conditions. We can achieve this by adding conditions to a breakpoint in one of two ways:

  • Right-click on the breakpoint and choose Breakpoint Properties
  • In Breakpoint view, select the breakpoint and specify the condition

For example, we can specify the breakpoint to suspend the execution only if number is equal to 10:

3.5. Watchpoints

What breakpoints are for methods, watchpoints are for class-level variables. In this current example, the breakpoint on evenPerfectSquareNumbers declaration is called a watchpoint. Now, the debugger will pause the execution every time the field is accessed or modified on a watchpoint.

This is the default behavior, which can be changed in the watchpoint’s properties.

In this example, the debugger will stop execution every time a perfect square is an even number:

3.6. Trigger Points

Let’s assume that we’re debugging a complex issue in an application with a huge amount of source code. The debugger will keep suspending the flow due to scattered breakpoints.

When a breakpoint is marked as a trigger point, it means that the rest of the breakpoints will be enabled only if this breakpoint is hit.

For example, in the screenshot below, the breakpoint on isPerfectSquare() is supposed to be hit for every iteration in the loop. However, we’ve specified the breakpoint on calculateCount() method as a trigger point, along with a condition.

So, when the iteration count reaches 10, this will trigger the rest of the breakpoints. Hence, from now on, if the breakpoint on isPerfectSquare() is hit, the execution will get suspended:

3.7. Remote Debugging

Finally, if the application is running outside Eclipse, we can still use all the above functionalities, provided that the remote application allows debugging. From Eclipse, we would select Debug as Remote Java Application.

4. Conclusion

In this quick guide, we’ve seen the basics and different techniques of debugging programs in Eclipse IDE. As always, the source code used in this exercise is available over on GitHub.

Implementing The OAuth 2.0 Authorization Framework Using Java EE

$
0
0

1. Overview

In this tutorial, we’re going to provide an implementation for the OAuth 2.0 Authorization Framework using Java EE And MicroProfile. Most importantly, we’re going to implement the interaction of the OAuth 2.0 roles through the Authorization Code grant type. The motivation behind this writing is to give support for projects that are implemented using Java EE as this doesn’t yet provide support for OAuth.

For the most important role, the Authorization Server, we’re going to implement the Authorization Endpoint, the Token Endpoint and additionally, the JWK Key Endpoint, which is useful for the Resource Server to retrieve the public key.

As we want the implementation to be simple and easy for a quick setup, we’re going to use a pre-registered store of clients and users, and obviously a JWT store for access tokens.

2. OAuth 2.0 Overview

In this section, we’re going to give a brief overview of the OAuth 2.0 roles and the Authorization Code grant flow.

2.1. Roles

The OAuth 2.0 framework implies the collaboration between the four following roles:

  • Resource Owner: Usually, this is the end-user – it’s the entity that has some resources worth protecting
  • Resource Server: An service that protects the resource owner’s data, usually publishing it through a REST API
  • Client: An application that uses the resource owner’s data
  • Authorization Server: An application that grants permission – or authority – to clients in the form of expiring tokens

2.2. Authorization Grant Types

grant type is how a client gets permission to use the resource owner’s data, ultimately in the form of an access token.

Naturally, different types of clients prefer different types of grants:

  • Authorization Code: Preferred most often – whether it is a web application, a native application, or a single-page application, though native and single-page apps require additional protection called PKCE
  • Refresh Token: A special renewal grant, suitable for web applications to renew their existing token
  • Client Credentials: Preferred for service-to-service communication, say when the resource owner isn’t an end-user
  • Resource Owner Password: Preferred for first-party authentication of native applicationssay when the mobile app needs its own login page

In addition, the client can use the implicit grant type. However, it’s usually more secure to use the authorization code grant with PKCE.

2.3. Authorization Code Grant Flow

Since the authorization code grant flow is the most common, let’s also review how that works, and that’s actually what we’ll build in this tutorial.

An application – a client – requests permission by redirecting to the authorization server’s /authorize endpoint. To this endpoint, the application gives a callback endpoint.

The authorization server will usually ask the end-user – the resource owner – for permission. If the end-user grants permission, then the authorization server redirects back to the callback with a code.

The application receives this code and then makes an authenticated call to the authorization server’s /token endpoint. By “authenticated”, we mean that the application proves who it is as part of this call. If all appears in order, the authorization server responds with the token.

With the token in hand, the application makes its request to the API – the resource server – and that API will verify the token. It can ask the authorization server to verify the token using its /introspect endpoint. Or, if the token is self-contained, the resource server can optimize by locally verifying the token’s signature, as is the case with JWT.

2.4. What Does Java EE support?

Not much, yet. In this tutorial, we’ll build most things from the ground up.

3. OAuth 2.0 Authorization Server

In this implementation, we’ll focus on the most commonly used grant type: Authorization Code.

3.1. Client and User Registration

An authorization server would, of course, need to know about the clients and users before it can authorize their requests. And it’s common for an authorization server to have a UI for this.

For simplicity, though, we’ll use a pre-configured client:

INSERT INTO clients (client_id, client_secret, redirect_uri, scope, authorized_grant_types) 
VALUES ('webappclient', 'webappclientsecret', 'http://localhost:9180/callback', 
  'resource.read resource.write', 'authorization_code refresh_token');
@Entity
@Table(name = "clients")
public class Client {
    @Id
    @Column(name = "client_id")
    private String clientId;
    @Column(name = "client_secret")
    private String clientSecret;

    @Column(name = "redirect_uri")
    private String redirectUri;

    @Column(name = "scope")
    private String scope;

    // ...
}

And a pre-configured user:

INSERT INTO users (user_id, password, roles, scopes)
VALUES ('appuser', 'appusersecret', 'USER', 'resource.read resource.write');
@Entity
@Table(name = "users")
public class User implements Principal {
    @Id
    @Column(name = "user_id")
    private String userId;

    @Column(name = "password")
    private String password;

    @Column(name = "roles")
    private String roles;

    @Column(name = "scopes")
    private String scopes;

    // ...
}

Note that for the sake of this tutorial, we’ve used passwords in plain text, but in a production environment, they should be hashed.

For the rest of this tutorial, we’ll show how appuser – the resource owner – can grant access to webappclient – the application – by implementing Authorization Code.

3.2. Authorization Endpoint

The main role of the authorization endpoint is to first authenticate the user and then ask for the permissions – or scopes – that the application wants.

As instructed by the OAuth2 specs, this endpoint should support the HTTP GET method, although it can also support the HTTP POST method. In this implementation, we’ll support only the HTTP GET method.

First, the authorization endpoint requires that the user be authenticated. The spec doesn’t require a certain way here, so let’s use Form Authentication from the Java EE 8 Security API:

@FormAuthenticationMechanismDefinition(
  loginToContinue = @LoginToContinue(loginPage = "/login.jsp", errorPage = "/login.jsp")
)

The user will be redirected to /login.jsp for authentication and then will be available as a CallerPrincipal through the SecurityContext API:

Principal principal = securityContext.getCallerPrincipal();

We can put these together using JAX-RS:

@FormAuthenticationMechanismDefinition(
  loginToContinue = @LoginToContinue(loginPage = "/login.jsp", errorPage = "/login.jsp")
)
@Path("authorize")
public class AuthorizationEndpoint {
    //...    
    @GET
    @Produces(MediaType.TEXT_HTML)
    public Response doGet(@Context HttpServletRequest request,
      @Context HttpServletResponse response,
      @Context UriInfo uriInfo) throws ServletException, IOException {
        
        MultivaluedMap<String, String> params = uriInfo.getQueryParameters();
        Principal principal = securityContext.getCallerPrincipal();
        // ...
    }
}

At this point, the authorization endpoint can start processing the application’s request, which must contain response_type and client_id parameters and – optionally, but recommended – the redirect_uri, scope, and state parameters.

The client_id should be a valid client, in our case from the clients database table.

The redirect_uri, if specified, should also match what we find in the clients database table.

And, because we’re doing Authorization Code, response_type is code. 

Since authorization is a multi-step process, we can temporarily store these values in the session:

request.getSession().setAttribute("ORIGINAL_PARAMS", params);

And then prepare to ask the user which permissions the application may use, redirecting to that page:

String allowedScopes = checkUserScopes(user.getScopes(), requestedScope);
request.setAttribute("scopes", allowedScopes);
request.getRequestDispatcher("/authorize.jsp").forward(request, response);

3.3. User Scopes Approval

At this point, the browser renders an authorization UI for the user, and the user makes a selection. Then, the browser submits the user’s selection in an HTTP POST:

@POST
@Consumes(MediaType.APPLICATION_FORM_URLENCODED)
@Produces(MediaType.TEXT_HTML)
public Response doPost(@Context HttpServletRequest request, @Context HttpServletResponse response,
  MultivaluedMap<String, String> params) throws Exception {
    MultivaluedMap<String, String> originalParams = 
      (MultivaluedMap<String, String>) request.getSession().getAttribute("ORIGINAL_PARAMS");

    // ...

    String approvalStatus = params.getFirst("approval_status"); // YES OR NO

    // ... if YES

    List<String> approvedScopes = params.get("scope");

    // ...
}

Next, we generate a temporary code that refers to the user_id, client_id, and redirect_uri, all of which the application will use later when it hits the token endpoint.

So let’s create an AuthorizationCode JPA Entity with an auto-generated id:

@Entity
@Table(name ="authorization_code")
public class AuthorizationCode {
@Id
@GeneratedValue(strategy=GenerationType.AUTO)
@Column(name = "code")
private String code;

//...

}

And then populate it:

AuthorizationCode authorizationCode = new AuthorizationCode();
authorizationCode.setClientId(clientId);
authorizationCode.setUserId(userId);
authorizationCode.setApprovedScopes(String.join(" ", authorizedScopes));
authorizationCode.setExpirationDate(LocalDateTime.now().plusMinutes(2));
authorizationCode.setRedirectUri(redirectUri);

When we save the bean, the code attribute is auto-populated, and so we can get it and send it back to the client:

appDataRepository.save(authorizationCode);
String code = authorizationCode.getCode();

Note that our authorization code will expire in two minutes – we should be as conservative as we can with this expiration. It can be short since the client is going to exchange it right away for an access token.

We then redirect back to the application’s redirect_uri, giving it the code as well as any state parameter that the application specified in its /authorize request:

StringBuilder sb = new StringBuilder(redirectUri);
// ...

sb.append("?code=").append(code);
String state = params.getFirst("state");
if (state != null) {
    sb.append("&state=").append(state);
}
URI location = UriBuilder.fromUri(sb.toString()).build();
return Response.seeOther(location).build();

Note again that redirectUri is whatever exists in the clients table, not the redirect_uri request parameter.

So, our next step is for the client to receive this code and exchange it for an access token using the token endpoint.

3.4. Token Endpoint

As opposed to the authorization endpoint, the token endpoint doesn’t need a browser to communicate with the client, and we’ll, therefore, implement it as a JAX-RS endpoint:

@Path("token")
public class TokenEndpoint {

    List<String> supportedGrantTypes = Collections.singletonList("authorization_code");

    @Inject
    private AppDataRepository appDataRepository;

    @Inject
    Instance<AuthorizationGrantTypeHandler> authorizationGrantTypeHandlers;

    @POST
    @Produces(MediaType.APPLICATION_JSON)
    @Consumes(MediaType.APPLICATION_FORM_URLENCODED)
    public Response token(MultivaluedMap<String, String> params,
       @HeaderParam(HttpHeaders.AUTHORIZATION) String authHeader) throws JOSEException {
        //...
    }
}

The token endpoint requires a POST, as well as encoding the parameters using the application/x-www-form-urlencoded media type.

As we discussed, we’ll be supporting only the authorization code grant type:

List<String> supportedGrantTypes = Collections.singletonList("authorization_code");

So, the received grant_type as a required parameter should be supported:

String grantType = params.getFirst("grant_type");
Objects.requireNonNull(grantType, "grant_type params is required");
if (!supportedGrantTypes.contains(grantType)) {
    JsonObject error = Json.createObjectBuilder()
      .add("error", "unsupported_grant_type")
      .add("error_description", "grant type should be one of :" + supportedGrantTypes)
      .build();
    return Response.status(Response.Status.BAD_REQUEST)
      .entity(error).build();
}

Next, we check the client authentication through via HTTP Basic authentication. That is, we check if the received client_id and client_secret, through the Authorization header, matches a registered client:

String[] clientCredentials = extract(authHeader);
String clientId = clientCredentials[0];
String clientSecret = clientCredentials[1];
Client client = appDataRepository.getClient(clientId);
if (client == null || clientSecret == null || !clientSecret.equals(client.getClientSecret())) {
    JsonObject error = Json.createObjectBuilder()
      .add("error", "invalid_client")
      .build();
    return Response.status(Response.Status.UNAUTHORIZED)
      .entity(error).build();
}

Finally, we delegate the production of the TokenResponse to a corresponding grant type handler:

public interface AuthorizationGrantTypeHandler {
    TokenResponse createAccessToken(String clientId, MultivaluedMap<String, String> params) throws Exception;
}

As we’re more interested in the authorization code grant type, we’ve provided an adequate implementation as a CDI bean and decorated it with the Named annotation:

@Named("authorization_code")

At runtime, and according to the received grant_type value, the corresponding implementation is activated through the CDI Instance mechanism:

String grantType = params.getFirst("grant_type");
//...
AuthorizationGrantTypeHandler authorizationGrantTypeHandler = 
  authorizationGrantTypeHandlers.select(NamedLiteral.of(grantType)).get();

It’s now time to produce /token‘s response.

3.5. RSA Private And Public Keys

Before generating the token, we need an RSA private key for signing tokens.

For this purpose, we’ll be using OpenSSL:

# PRIVATE KEY
openssl genpkey -algorithm RSA -out private-key.pem -pkeyopt rsa_keygen_bits:2048

The private-key.pem is provided to the server through the MicroProfile Config signingKey property using the file META-INF/microprofile-config.properties:

signingkey=/META-INF/private-key.pem

The server can read the property using the injected Config object:

String signingkey = config.getValue("signingkey", String.class);

Similarly, we can generate the corresponding public key:

# PUBLIC KEY
openssl rsa -pubout -in private-key.pem -out public-key.pem

And use the MicroProfile Config verificationKey to read it:

verificationkey=/META-INF/public-key.pem

The server should make it available for the resource server for the purpose of verification. This is done through a JWK endpoint.

Nimbus JOSE+JWT is a library that can be a big help here. Let’s first add the nimbus-jose-jwt dependency:

<dependency>
    <groupId>com.nimbusds</groupId>
    <artifactId>nimbus-jose-jwt</artifactId>
    <version>7.7</version>
</dependency>

And now, we can leverage Nimbus’s JWK support to simplify our endpoint:

@Path("jwk")
@ApplicationScoped
public class JWKEndpoint {

    @GET
    public Response getKey(@QueryParam("format") String format) throws Exception {
        //...

        String verificationkey = config.getValue("verificationkey", String.class);
        String pemEncodedRSAPublicKey = PEMKeyUtils.readKeyAsString(verificationkey);
        if (format == null || format.equals("jwk")) {
            JWK jwk = JWK.parseFromPEMEncodedObjects(pemEncodedRSAPublicKey);
            return Response.ok(jwk.toJSONString()).type(MediaType.APPLICATION_JSON).build();
        } else if (format.equals("pem")) {
            return Response.ok(pemEncodedRSAPublicKey).build();
        }

        //...
    }
}

We’ve used the format parameter to switch between the PEM and JWK formats. The MicroProfile JWT which we’ll use for implementing the resource server supports both these formats.

3.6. Token Endpoint Response

It’s now time for a given AuthorizationGrantTypeHandler to create the token response. In this implementation, we’ll support only the structured JWT Tokens.

For creating a token in this format, we’ll again use the Nimbus JOSE+JWT library, but there are numerous other JWT libraries, too.

So, to create a signed JWT, we first have to construct the JWT header:

JWSHeader jwsHeader = new JWSHeader.Builder(JWSAlgorithm.RS256).type(JOSEObjectType.JWT).build();

Then, we build the payload which is a Set of standardized and custom claims:

Instant now = Instant.now();
Long expiresInMin = 30L;
Date in30Min = Date.from(now.plus(expiresInMin, ChronoUnit.MINUTES));

JWTClaimsSet jwtClaims = new JWTClaimsSet.Builder()
  .issuer("http://localhost:9080")
  .subject(authorizationCode.getUserId())
  .claim("upn", authorizationCode.getUserId())
  .audience("http://localhost:9280")
  .claim("scope", authorizationCode.getApprovedScopes())
  .claim("groups", Arrays.asList(authorizationCode.getApprovedScopes().split(" ")))
  .expirationTime(in30Min)
  .notBeforeTime(Date.from(now))
  .issueTime(Date.from(now))
  .jwtID(UUID.randomUUID().toString())
  .build();
SignedJWT signedJWT = new SignedJWT(jwsHeader, jwtClaims);

In addition to the standard JWT claims, we’ve added two more claims – upn and groups – as they’re needed by the MicroProfile JWT. The upn will be mapped to the Java EE Security CallerPrincipal and the groups will be mapped to Java EE Roles.

Now that we have the header and the payload, we need to sign the access token with an RSA private key. The corresponding RSA public key will be exposed through the JWK endpoint or made available by other means so that the resource server can use it to verify the access token.

As we’ve provided the private key as a PEM format, we should retrieve it and transform it into an RSAPrivateKey:

SignedJWT signedJWT = new SignedJWT(jwsHeader, jwtClaims);
//...
String signingkey = config.getValue("signingkey", String.class);
String pemEncodedRSAPrivateKey = PEMKeyUtils.readKeyAsString(signingkey);
RSAKey rsaKey = (RSAKey) JWK.parseFromPEMEncodedObjects(pemEncodedRSAPrivateKey);

Next, we sign and serialize the JWT:

signedJWT.sign(new RSASSASigner(rsaKey.toRSAPrivateKey()));
String accessToken = signedJWT.serialize();

And finally we construct a token response:

return Json.createObjectBuilder()
  .add("token_type", "Bearer")
  .add("access_token", accessToken)
  .add("expires_in", expiresInMin * 60)
  .add("scope", authorizationCode.getApprovedScopes())
  .build();

which is, thanks to JSON-P, serialized to JSON format and sent to the client:

{
  "access_token": "acb6803a48114d9fb4761e403c17f812",
  "token_type": "Bearer",  
  "expires_in": 1800,
  "scope": "resource.read resource.write"
}

4. OAuth 2.0 Client

In this section, we’ll be building a web-based OAuth 2.0 Client using the Servlet, MicroProfile Config, and JAX RS Client APIs.

More precisely, we’ll be implementing two main servlets: one for requesting the authorization server’s authorization endpoint and getting a code using the authorization code grant type, and another servlet for using the received code and requesting an access token from the authorization server’s token endpoint.

Additionally, we’ll be implementing two more servlets: One for getting a new access token using the refresh token grant type, and another for accessing the resource server’s APIs.

4.1. OAuth 2.0 Client Details

As the client is already registered within the authorization server, we first need to provide the client registration information:

  • client_id: Client Identifier and it’s usually issued by the authorization server during the registration process.
  • client_secret: Client Secret.
  • redirect_uri: Location where to receive the authorization code.
  • scope: Client requested permissions.

Additionally, the client should know the authorization server’s authorization and token endpoints:

  • authorization_uri: Location of the authorization server authorization endpoint that we can use to get a code.
  • token_uri: Location of the authorization server token endpoint that we can use to get a token.

All this information is provided through the MicroProfile Config file, META-INF/microprofile-config.properties:

# Client registration
client.clientId=webappclient
client.clientSecret=webappclientsecret
client.redirectUri=http://localhost:9180/callback
client.scope=resource.read resource.write

# Provider
provider.authorizationUri=http://127.0.0.1:9080/authorize
provider.tokenUri=http://127.0.0.1:9080/token

4.2. Authorization Code Request

The flow of getting an authorization code starts with the client by redirecting the browser to the authorization server’s authorization endpoint.

Typically, this happens when the user tries to access a protected resource API without authorization, or by explicitly by invoking the client /authorize path:

@WebServlet(urlPatterns = "/authorize")
public class AuthorizationCodeServlet extends HttpServlet {

    @Inject
    private Config config;

    @Override
    protected void doGet(HttpServletRequest request, 
      HttpServletResponse response) throws ServletException, IOException {
        //...
    }
}

In the doGet() method, we start by generating and storing a security state value:

String state = UUID.randomUUID().toString();
request.getSession().setAttribute("CLIENT_LOCAL_STATE", state);

Then, we retrieve the client configuration information:

String authorizationUri = config.getValue("provider.authorizationUri", String.class);
String clientId = config.getValue("client.clientId", String.class);
String redirectUri = config.getValue("client.redirectUri", String.class);
String scope = config.getValue("client.scope", String.class);

We’ll then append these pieces of information as query parameters to the authorization server’s authorization endpoint:

String authorizationLocation = authorizationUri + "?response_type=code"
  + "&client_id=" + clientId
  + "&redirect_uri=" + redirectUri
  + "&scope=" + scope
  + "&state=" + state;

And finally, we’ll redirect the browser to this URL:

response.sendRedirect(authorizationLocation);

After processing the request, the authorization server’s authorization endpoint will generate and append a code, in addition to the received state parameter, to the redirect_uri and will redirect back the browser http://localhost:9081/callback?code=A123&state=Y.

4.3. Access Token Request

The client callback servlet, /callback, begins by validating the received state:

String localState = (String) request.getSession().getAttribute("CLIENT_LOCAL_STATE");
if (!localState.equals(request.getParameter("state"))) {
    request.setAttribute("error", "The state attribute doesn't match!");
    dispatch("/", request, response);
    return;
}

Next, we’ll use the code we previously received to request an access token through the authorization server’s token endpoint:

String code = request.getParameter("code");
Client client = ClientBuilder.newClient();
WebTarget target = client.target(config.getValue("provider.tokenUri", String.class));

Form form = new Form();
form.param("grant_type", "authorization_code");
form.param("code", code);
form.param("redirect_uri", config.getValue("client.redirectUri", String.class));

TokenResponse tokenResponse = target.request(MediaType.APPLICATION_JSON_TYPE)
  .header(HttpHeaders.AUTHORIZATION, getAuthorizationHeaderValue())
  .post(Entity.entity(form, MediaType.APPLICATION_FORM_URLENCODED_TYPE), TokenResponse.class);

As we can see, there’s no browser interaction for this call, and the request is made directly using the JAX-RS client API as an HTTP POST.

As the token endpoint requires the client authentication, we have included the client credentials client_id and client_secret in the Authorization header.

The client can use this access token to invoke the resource server APIs which is the subject of the next subsection.

4.4. Protected Resource Access

At this point, we have a valid access token and we can call the resource server’s /read and /write APIs.

To do that, we have to provide the Authorization header. Using the JAX-RS Client API, this is simply done through the Invocation.Builder header() method:

resourceWebTarget = webTarget.path("resource/read");
Invocation.Builder invocationBuilder = resourceWebTarget.request();
response = invocationBuilder
  .header("authorization", tokenResponse.getString("access_token"))
  .get(String.class);

5. OAuth 2.0 Resource Server

In this section, we’ll be building a secured web application based on JAX-RS, MicroProfile JWT, and MicroProfile Config. The MicroProfile JWT takes care of validating the received JWT and mapping the JWT scopes to Java EE roles.

5.1. Maven Dependencies

In addition to the Java EE Web API dependency, we need also the MicroProfile Config and MicroProfile JWT APIs:

<dependency>
    <groupId>javax</groupId>
    <artifactId>javaee-web-api</artifactId>
    <version>8.0</version>
    <scope>provided</scope>
</dependency>
<dependency>
    <groupId>org.eclipse.microprofile.config</groupId>
    <artifactId>microprofile-config-api</artifactId>
    <version>1.3</version>
</dependency>
<dependency>
    <groupId>org.eclipse.microprofile.jwt</groupId>
    <artifactId>microprofile-jwt-auth-api</artifactId>
    <version>1.1</version>
</dependency>

5.2. JWT Authentication Mechanism

The MicroProfile JWT provides an implementation of the Bearer Token Authentication mechanism. This takes care of processing the JWT present in the Authorization header, makes available a Java EE Security Principal as a JsonWebToken which holds the JWT claims, and maps the scopes to Java EE roles. Take a look at the JAVA EE Security API for more background.

To enable the JWT authentication mechanism in the server, we need to add the LoginConfig annotation in the JAX-RS application:

@ApplicationPath("/api")
@DeclareRoles({"resource.read", "resource.write"})
@LoginConfig(authMethod = "MP-JWT")
public class OAuth2ResourceServerApplication extends Application {
}

Additionally, MicroProfile JWT needs the RSA public key in order to verify the JWT signature. We can provide this either by introspection or, for simplicity, by manually copying the key from the authorization server. In either case, we need to provide the location of the public key:

mp.jwt.verify.publickey.location=/META-INF/public-key.pem

Finally, the MicroProfile JWT needs to verify the iss claim of the incoming JWT, which should be present and match the value of the MicroProfile Config property:

mp.jwt.verify.issuer=http://127.0.0.1:9080

Typically, this is the location of the Authorization Server.

5.3. The Secured Endpoints

For demonstration purposes, we’ll add a resource API with two endpoints. One is a read endpoint that’s accessible by users having the resource.read scope and another write endpoint for users with resource.write scope.

The restriction on the scopes is done through the @RolesAllowed annotation:

@Path("/resource")
@RequestScoped
public class ProtectedResource {

    @Inject
    private JsonWebToken principal;

    @GET
    @RolesAllowed("resource.read")
    @Path("/read")
    public String read() {
        return "Protected Resource accessed by : " + principal.getName();
    }

    @POST
    @RolesAllowed("resource.write")
    @Path("/write")
    public String write() {
        return "Protected Resource accessed by : " + principal.getName();
    }
}

6. Running All Servers

To run one server, we just need to invoke the Maven command in the corresponding directory:

mvn package liberty:run-server

The authorization server, the client and the resource server will be running and available respectively at the following locations:

# Authorization Server
http://localhost:9080/

# Client
http://localhost:9180/

# Resource Server
http://localhost:9280/

So, we can access the client home page and then we click on “Get Access Token” to start the authorization flow. After receiving the access token, we can access the resource server’s read and write APIs.

Depending on the granted scopes, the resource server will respond either by a successful message or we’ll get an HTTP 403 forbidden status.

7. Conclusion

In this article, we’ve provided an implementation of an OAuth 2.0 Authorization Server that can be used with any compatible OAuth 2.0 Client and Resource Server.

To explain the overall framework, we have also provided an implementation for the client and the resource server. To implement all these components, we’ve used using Java EE 8 APIs, especially, CDI, Servlet, JAX RS, JAVA EE Security. Additionally, we have used the pseudo-Java EE APIs of the MicroProfile: MicroProfile Config and MicroProfile JWT.

The full source code for the examples is available over on GitHub. Note that the code includes an example of both the authorization code and refresh token grant types.

Creating a Triangle with for Loops in Java

$
0
0

1. Introduction

In this tutorial, we’re going to explore several ways to print a triangle in Java. We know that there are many types of triangles. However, we’re going to explore only a couple of them: the right and isosceles triangles.

2. Building a Right Triangle

The right triangle is the simplest type of triangle we’re going to study. Let’s have a quick look at the output we want to obtain:

*
**
***
****
*****

Here, we notice that the triangle is made of 5 rows, each having a number of stars equal to the current row number. Of course, this observation can be generalized: for each row from 1 to N, we have to print r stars, where r is the current row and N is the total number of rows.

So, let’s build the triangle using two for loops:

public static String printARightTriangle(int N) {
    StringBuilder result = new StringBuilder();
    for (int r = 1; r <= N; r++) {
        for (int j = 1; j <= r; j++) {
            result.append("*");
        }
        result.append(System.lineSeparator());
    }
    return result.toString();
}

3. Building an Isosceles Triangle

Now, let’s take a look at the form of an isosceles triangle:

    *
   ***
  *****
 *******
*********

What do we see in this case? We notice that, in addition to the stars, we also need to print some spaces for each row. So, we have to figure it out how many spaces and stars we have to print for each row. Of course, the number of spaces and stars depends on the current row.

First, we see that we need to print 4 spaces for the first row and, as we get down the triangle, we need 3 spaces, 2 spaces, 1 space, and no spaces at all for the last row. Generalizing, we need to print N – r spaces for each row.

Second, comparing with the first example, we realize that here we need an odd number of stars: 1, 3, 5, 7…

So, we need to print r x 2 – 1 stars for each row.

3.1. Using Nested for Loops

Based on the above observations, let’s create our second example:

public static String printAnIsoscelesTriangle(int N) {
    StringBuilder result = new StringBuilder();
    for (int r = 1; r <= N; r++) {
        for (int sp = 1; sp <= N - r; sp++) {
            result.append(" ");
        }
        for (int c = 1; c <= (r * 2) - 1; c++) {
            result.append("*");
        }
        result.append(System.lineSeparator());
    }
    return result.toString();
}

3.2. Using a Single for Loop

Actually, we have another way that consists only of a single for loop – it uses the Apache Commons Lang 3 library.

We’re going to use the for loop to iterate over the rows of the triangle as we did in the previous examples. Then, we’ll use the StringUtils.repeat() method in order to generate the necessary characters for each row:

public static String printAnIsoscelesTriangleUsingStringUtils(int N) {
    StringBuilder result = new StringBuilder();

    for (int r = 1; r <= N; r++) {
        result.append(StringUtils.repeat(' ', N - r));
        result.append(StringUtils.repeat('*', 2 * r - 1));
        result.append(System.lineSeparator());
    }
    return result.toString();
}

Or, we can do a neat trick with the substring() method.

We can extract the StringUtils.repeat() methods above to build a helper string and then apply the String.substring() method on it. The helper string is a concatenation of the maximum number of spaces and the maximum number of stars that we need to print the rows of the triangle.

Looking at the previous examples, we notice that we need a maximum number of N – 1 spaces for the first row and a maximum number of N x 2 – 1 stars for the last row:

String helperString = StringUtils.repeat(' ', N - 1) + StringUtils.repeat('*', N * 2 - 1);
// for N = 10, helperString = "    *********"

For instance, when N = 5 and r = 3, we need to print ”  *****”, which is included in the helperString variable. All we need to do is to find the right formula for the substring() method.

Now, let’s see the complete example:

public static String printAnIsoscelesTriangleUsingSubstring(int N) {
    StringBuilder result = new StringBuilder();
    String helperString = StringUtils.repeat(' ', N - 1) + StringUtils.repeat('*', N * 2 - 1);

    for (int r = 0; r < N; r++) {
        result.append(helperString.substring(r, N + 2 * r));
        result.append(System.lineSeparator());
    }
    return result.toString();
}

Similarly, with just a bit more work, we could make the triangle print upside down.

4. Complexity

If we take a look again at the first example, we notice an outer loop and an inner loop each having a maximum of N steps. Therefore, we have O(N^2) time complexity, where N is the number of rows of the triangle.

The second example is similar — the only difference is that we have two inner loops, which are sequential and do not increase the time complexity.

The third example, however, uses only a for loop with N steps. But, at every step, we’re calling either the StringUtils.repeat() method or the substring() method on the helper string, each having O(N) complexity. So, the overall time complexity remains the same.

Finally, if we’re talking about the auxiliary space, we can quickly realize that, for all examples, the complexity stays in the StringBuilder variable. By adding the entire triangle to the result variable, we cannot have less than O(N^2) complexity.

Of course, if we directly printed the characters, we’d have constant space complexity for the first two examples. But, the third example uses the helper string and the space complexity would be O(N).

5. Conclusion

In this tutorial, we’ve learned how to print two common types of triangles in Java.

First, we’ve studied the right triangle, which is the simplest type of triangle we can print in Java. Then, we’ve explored two ways of building an isosceles triangle. The first one uses only for loops and the other one takes advantage of the StringUtils.repeat() and the String.substring() method and helps us write less code.

Finally, we’ve analyzed the time and space complexity for each example.

As always, all the examples can be found over on GitHub.


Memento Design Pattern in Java

$
0
0

1. Overview

In this tutorial, we’ll learn what the Memento Design Pattern is and how to use it. First, we’ll go through a bit of theory. And then, we’ll create an example where we’ll illustrate the usage of the pattern.

2. What is the Memento Design Pattern?

2.1. Definition

The Memento Design Pattern, described by the Gang of Four in their book, is a behavioral design pattern. The Memento Design Pattern offers a solution to implement undoable actions. We can do this by saving the state of an object at a given instant and restoring it if the actions performed since need to be undone.

Practically, the object whose state needs to be saved is called an Originator. The Caretaker is the object triggering the save and restore of the state, which is called the Memento.

The Memento object should expose as little information as possible to the Caretaker. This is to ensure that we don’t expose the internal state of the Originator to the outside world, as it would break encapsulation principles. However, the Originator should access enough information in order to restore to the original state.

Let’s see a quick class diagram illustrating how the different objects interact with each other:

As we can see, the Originator can produce and consume a Memento. Meanwhile, the Caretaker only keeps the state before restoring it. The internal representation of the Originator is kept hidden from the external world.

Here, we used a single field to represent the state of the Originator, though we’re not limited to one field and could have used as many fields as necessary. Plus, the state held in the Memento object doesn’t have to match the full state of the Originator. As long as the kept information is sufficient to restore the state of the Originator, we’re good to go.

2.2. When to Use Memento Design Pattern?

Typically, the Memento Design Pattern will be used in situations where some actions are undoable, therefore requiring to rollback to a previous state. However, if the state of the Originator is heavy, using the Memento Design Pattern can lead to an expensive creation process and increased use of memory.

3. Example

3.1. Sample Problem

Let’s now see an example of the Memento Design Pattern. Let’s imagine we have a text editor:

public class TextEditor {

    private TextWindow textWindow;

    public TextEditor(TextWindow textWindow) {
        this.textWindow = textWindow;
    }
}

It has a text window, which holds the currently entered text, and provides a way to add more text:

public class TextWindow {

    private StringBuilder currentText;

    public TextWindow() {
        this.currentText = new StringBuilder();
    }

    public void addText(String text) {
        currentText.append(text);
    }
}

3.2. Memento

Now, let’s imagine we want our text editor to implement some save and undo features. When saving, we want our current text to be saved. Thus, when undoing subsequent changes, we’ll have our saved text restored.

In order to do that, we’ll make use of the Memento Design Pattern. First, we’ll create an object holding the current text of the window:

public class TextWindowState {

    private String text;

    public TextWindowState(String text) {
        this.text = text;
    }

    public String getText() {
        return text;
    }
}

This object is our Memento. As we can see, we choose to use String instead of StringBuilder to prevent any update of the current text by outsiders.

3.3. Originator

After that, we’ll have to provide the TextWindow class with methods to create and consume the Memento object, making the TextWindow our Originator:

public TextWindowState save() {
    return new TextWindowState(wholeText.toString());
}

public void restore(TextWindowState save) {
    currentText = new StringBuilder(save.getText());
}

The save() method allows us to create the object, while the restore() method consumes it to restore the previous state.

3.4. Caretaker

Finally, we have to update our TextEditor class. As the Caretaker, it will hold the state of the Originator and ask to restore it when needed:

private TextWindowState savedTextWindow;

public void hitSave() {
    savedTextWindow = textWindow.save();
}

public void hitUndo() {
    textWindow.restore(savedTextWindow);
}

3.5. Testing the Solution

Let’s see if it works through a sample run. Imagine we add some text to our editor, save it, then add some more and, finally, undo. In order to achieve that, we’ll add a print() method on our TextEditor that returns a String of the current text:

TextEditor textEditor = new TextEditor(new TextWindow());
textEditor.write("The Memento Design Pattern\n");
textEditor.write("How to implement it in Java?\n");
textEditor.hitSave();
 
textEditor.write("Buy milk and eggs before coming home\n");
 
textEditor.hitUndo();

assertThat(textEditor.print()).isEqualTo("The Memento Design Pattern\nHow to implement it in Java?\n");

As we can see, the last sentence is not part of the current text, as the Memento was saved before adding it.

4. Conclusion

In this short article, we explained the Memento Design Pattern and what it can be used for. We also went through an example illustrating its usage in a simple text editor.

The full code used in this article can be found over on GitHub.

Finding the Least Common Multiple in Java

$
0
0

1. Overview

The Least Common Multiple (LCM) of two non-zero integers (a, b) is the smallest positive integer that is perfectly divisible by both a and b.

In this tutorial, we’ll learn about different approaches to find the LCM of two or more numbers. We must note that negative integers and zero aren’t candidates for LCM.

2. Calculating LCM of Two Numbers Using a Simple Algorithm

We can find the LCM of two numbers by using the simple fact that multiplication is repeated addition.

2.1. Algorithm

The simple algorithm to find the LCM is an iterative approach that makes use of a few fundamental properties of LCM of two numbers.

Firstly, we know that the LCM of any number with zero is zero itself. So, we can make an early exit from the procedure whenever either of the given integers is 0.

Secondly, we can also make use of the fact that the lower bound of the LCM of two non-zero integers is the larger of the absolute values of the two numbers.

Moreover, as explained earlier, the LCM can never be a negative integer. So, we’ll only use absolute values of the integers for finding the possible multiples until we find a common multiple.

Let’s see the exact procedure that we need to follow for determining lcm(a, b):

  1. If a = 0 or b = 0, then return with lcm(a, b) = 0, else go to step 2.
  2. Calculate absolute values of the two numbers.
  3. Initialize lcm as the higher of the two values computed in step 2.
  4. If lcm is divisible by the lower absolute value, then return.
  5. Increment lcm by the higher absolute value among the two and go to step 4.

Before we start with the implementation of this simple approach, let’s do a dry-run to find lcm(12, 18).

As both 12 and 18 are positive, let’s jump to step 3, initializing lcm = max(12, 18) = 18, and proceed further.

In our first iteration, lcm = 18, which isn’t perfectly divisible by 12. So, we increment it by 18 and continue.

In the second iteration, we can see that lcm = 36 and is now perfectly divisible by 12. So, we can return from the algorithm and conclude that lcm(12, 18) is 36.

2.2. Implementation 

Let’s implement the algorithm in Java. Our lcm() method needs to accept two integer arguments and give their LCM as a return value.

We can notice that the above algorithm involves performing a few mathematical operations on the numbers such as finding absolute, minimum, and maximum values. For this purpose, we can use the corresponding static methods of the Math class such as abs(), min(), and max(), respectively.

Let’s implement our lcm() method:

public static int lcm(int number1, int number2) {
    if (number1 == 0 || number2 == 0) {
        return 0;
    }
    int absNumber1 = Math.abs(number1);
    int absNumber2 = Math.abs(number2);
    int absHigherNumber = Math.max(absNumber1, absNumber2);
    int absLowerNumber = Math.min(absNumber1, absNumber2);
    int lcm = absHigherNumber;
    while (lcm % absLowerNumber != 0) {
        lcm += absHigherNumber;
    }
    return lcm;
}

Next, let’s also validate this method:

@Test
public void testLCM() {
    Assert.assertEquals(36, lcm(12, 18));
}

The above test case verifies the correctness of the lcm() method by asserting that lcm(12, 18) is 36.

3. Using the Prime Factorization Approach

The fundamental theorem of arithmetic states that it’s possible to uniquely express every integer greater than one as a product of powers of prime numbers.

So, for any integer N > 1, we have N = (2k1) * (3k2) * (5k3) *…

Using the result of this theorem, we’ll now understand the prime factorization approach to find the LCM of two numbers.

3.1. Algorithm

The prime factorization approach calculates the LCM from the prime decomposition of the two numbers. We can use the prime factors and exponents from the prime factorization to calculate LCM of the two numbers:

When, |a| = (2p1) * (3p2) * (5p3) * …
and |b| = (2q1) * (3q2) * (5q3) * …
then, lcm(a, b) = (2max(p1, q1)) * (3max(p2, q2)) * (5max(p3, q3)) …

Let’s see how to calculate the LCM of 12 and 18 using this approach:

Firstly, we need to represent the absolute values of the two numbers as products of prime factors:
12 = 2 * 2 * 3 = 2² * 3¹
18 = 2 * 3 * 3 = 2¹ * 3²

We can notice here that the prime factors in the above representations are 2 and 3.

Next, let’s determine the exponent of each prime factor for the LCM. We do this by taking its higher power from the two representations.

Using this strategy, the power of 2 in the LCM will be max(2, 1) = 2, and the power of 3 in the LCM will be max(1, 2) = 2.

Finally, we can compute the LCM by multiplying the prime factors with a corresponding power obtained in the previous step. Consequently, we have lcm(12, 18) = 2² * 3² = 36.

3.2. Implementation

Our Java implementation uses prime factorization representation of the two numbers to find the LCM.

For this purpose, our getPrimeFactors() method needs to accept an integer argument and give us its prime factorization representation. In Java, we can represent prime factorization of a number using a HashMap where each key denotes the prime factor and the value associated with the key signifies the exponent of the corresponding factor.

Let’s see an iterative implementation of the getPrimeFactors() method:

public static Map<Integer, Integer> getPrimeFactors(int number) {
    int absNumber = Math.abs(number);

    Map<Integer, Integer> primeFactorsMap = new HashMap<Integer, Integer>();

    for (int factor = 2; factor <= absNumber; factor++) {
        while (absNumber % factor == 0) {
            Integer power = primeFactorsMap.get(factor);
            if (power == null) {
                power = 0;
            }
            primeFactorsMap.put(factor, power + 1);
            absNumber /= factor;
        }
    }

    return primeFactorsMap;
}

We know that the prime factorization maps of 12 and 18 are {2 → 2, 3 → 1} and {2 → 1, 3 → 2} respectively. Let’s use this to test the above method:

@Test
public void testGetPrimeFactors() {
    Map<Integer, Integer> expectedPrimeFactorsMapForTwelve = new HashMap<>();
    expectedPrimeFactorsMapForTwelve.put(2, 2);
    expectedPrimeFactorsMapForTwelve.put(3, 1);

    Assert.assertEquals(expectedPrimeFactorsMapForTwelve, 
      PrimeFactorizationAlgorithm.getPrimeFactors(12));

    Map<Integer, Integer> expectedPrimeFactorsMapForEighteen = new HashMap<>();
    expectedPrimeFactorsMapForEighteen.put(2, 1);
    expectedPrimeFactorsMapForEighteen.put(3, 2);

    Assert.assertEquals(expectedPrimeFactorsMapForEighteen, 
      PrimeFactorizationAlgorithm.getPrimeFactors(18));
}

Our lcm() method first uses the getPrimeFactors() method to find prime factorization map for each number. Next, it uses the prime factorization map of both the numbers to find their LCM. Let’s see an iterative implementation of this method:

public static int lcm(int number1, int number2) {
    if(number1 == 0 || number2 == 0) {
        return 0;
    }

    Map<Integer, Integer> primeFactorsForNum1 = getPrimeFactors(number1);
    Map<Integer, Integer> primeFactorsForNum2 = getPrimeFactors(number2);

    Set<Integer> primeFactorsUnionSet = new HashSet<>(primeFactorsForNum1.keySet());
    primeFactorsUnionSet.addAll(primeFactorsForNum2.keySet());

    int lcm = 1;

    for (Integer primeFactor : primeFactorsUnionSet) {
        lcm *= Math.pow(primeFactor, 
          Math.max(primeFactorsForNum1.getOrDefault(primeFactor, 0),
            primeFactorsForNum2.getOrDefault(primeFactor, 0)));
    }

    return lcm;
}

As a good practice, we shall now verify the logical correctness of the lcm() method:

@Test
public void testLCM() {
    Assert.assertEquals(36, PrimeFactorizationAlgorithm.lcm(12, 18));
}

4. Using the Euclidean Algorithm

There’s an interesting relation between the LCM and GCD (Greatest Common Divisor) of two numbers that says that the absolute value of the product of two numbers is equal to the product of their GCD and LCM.

As stated, gcd(a, b) * lcm(a, b) = |a * b|.

Consequently, lcm(a, b) = |a * b|/gcd(a, b).

Using this formula, our original problem of finding lcm(a,b) has now been reduced to just finding gcd(a,b).

Granted, there are multiple strategies to finding GCD of two numbers. However, the Euclidean algorithm is known to be one of the most efficient of all.

For this reason, let’s briefly understand the crux of this algorithm, which can be summed up in two relations:

  • gcd (a, b) = gcd(|a%b|, |a| ); where |a| >= |b|
  • gcd(p, 0) = gcd(0, p) = |p|

Let’s see how we can find lcm(12, 18) using the above relations:

We have gcd(12, 18) = gcd(18%12, 12) = gcd(6,12) = gcd(12%6, 6) = gcd(0, 6) = 6

Therefore, lcm(12, 18) = |12 x 18| / gcd(12, 18) = (12 x 18) / 6 = 36

We’ll now see a recursive implementation of the Euclidean algorithm:

public static int gcd(int number1, int number2) {
    if (number1 == 0 || number2 == 0) {
        return number1 + number2;
    } else {
        int absNumber1 = Math.abs(number1);
        int absNumber2 = Math.abs(number2);
        int biggerValue = Math.max(absNumber1, absNumber2);
        int smallerValue = Math.min(absNumber1, absNumber2);
        return gcd(biggerValue % smallerValue, smallerValue);
    }
}

The above implementation uses the absolute values of numbers — since GCD is the largest positive integer that perfectly divides the two numbers, we’re not interested in negative divisors.

We’re now ready to verify if the above implementation works as expected:

@Test
public void testGCD() {
    Assert.assertEquals(6, EuclideanAlgorithm.gcd(12, 18));
}

4.1. LCM of Two Numbers

Using the earlier method to find GCD, we can now easily calculate LCM. Again, our lcm() method needs to accept two integers as input to return their LCM. Let’s see how we can implement this method in Java:

public static int lcm(int number1, int number2) {
    if (number1 == 0 || number2 == 0)
        return 0;
    else {
        int gcd = gcd(number1, number2);
        return Math.abs(number1 * number2) / gcd;
    }
}

We can now verify the functionality of the above method:

@Test
public void testLCM() {
    Assert.assertEquals(36, EuclideanAlgorithm.lcm(12, 18));
}

4.2. LCM of Large Numbers Using the BigInteger Class

To calculate the LCM of large numbers, we can leverage the BigInteger class.

Internally, the gcd() method of the BigInteger class uses a hybrid algorithm to optimize computation performance. Moreover, since the BigInteger objects are immutable, the implementation leverages mutable instances of the MutableBigInteger class to avoid frequent memory reallocations.

To begin with, it uses the conventional Euclidean algorithm to repeatedly replace the higher integer by its modulus with the lower integer.

As a result, the pair not only gets smaller and smaller but also closer to each other after successive divisions. Eventually, the difference in the number of ints required to hold the magnitude of the two MutableBigInteger objects in their respective int[] value arrays reaches either 1 or 0.

At this stage, the strategy is switched to the Binary GCD algorithm to get even faster computation results.

In this case, as well, we’ll compute LCM by dividing the absolute value of the product of the numbers by their GCD. Similar to our prior examples, our lcm() method takes two BigInteger values as input and returns the LCM for the two numbers as a BigInteger. Let’s see it in action:

public static BigInteger lcm(BigInteger number1, BigInteger number2) {
    BigInteger gcd = number1.gcd(number2);
    BigInteger absProduct = number1.multiply(number2).abs();
    return absProduct.divide(gcd);
}

Finally, we can verify this with a test case:

@Test
public void testLCM() {
    BigInteger number1 = new BigInteger("12");
    BigInteger number2 = new BigInteger("18");
    BigInteger expectedLCM = new BigInteger("36");
    Assert.assertEquals(expectedLCM, BigIntegerLCM.lcm(number1, number2));
}

5. Conclusion

In this tutorial, we discussed various methods to find the least common multiple of two numbers in Java.

Moreover, we also learned about the relation between the product of numbers with their LCM and GCD. Given algorithms that can compute the GCD of two numbers efficiently, we’ve also reduced the problem of LCM calculation to one of GCD computation.

As always, the complete source code for the Java implementation used in this article is available on GitHub.

Validating Lists in a Spring Controller

$
0
0

1. Introduction

Validating user inputs is a common requirement in any application. In this tutorial, we’ll go over ways to validate a List of objects as a parameter to a Spring controller. We’ll add validation in the controller layer to ensure that the user-specified data satisfies the specified conditions.

2. Adding Constraints to a Bean

For our example, we’ll use a simple Spring controller that manages a database of movies. We’ll focus on a method that accepts a list of movies and adds them to the database after performing validations on the list.

So, let’s start by adding constraints on the Movie bean using javax validation:

public class Movie {

    private String id;

    @NotEmpty(message = "Movie name cannot be empty.")
    private String name;

    // standard setters and getters
}

3. Adding Validation Annotations in the Controller

Let’s look at our controller. First, we’ll add the @Validated annotation to the controller class:

@Validated
@RestController
@RequestMapping("/movies")
public class MovieController {

    @Autowired
    private MovieService movieService;

    //...
}

Next, let’s write the controller method where we’ll validate the list of Movie objects passed in.

We’ll add the @NotEmpty annotation to our list of movies to validate that there should be at least one element in the list. At the same time, we’ll add the @Valid annotation to ensure that the Movie objects themselves are valid:

@PostMapping
public void addAll(
  @RequestBody 
  @NotEmpty(message = "Input movie list cannot be empty.")
  List<@Valid Movie> movies) {
    movieService.addAll(movies);
}

If we call the controller method with an empty Movie list input, then the validation will fail because of the @NotEmpty annotation, and we’ll see the message:

Input movie list cannot be empty.

The @Valid annotation will make sure that the constraints specified in the Movie class are evaluated for each object in the list. Hence, if we pass a Movie with an empty name in the list, validation will fail with the message:

Movie name cannot be empty.

4. Custom Validators

We can also add custom constraint validators to the input list.

For our example, the custom constraint will validate the condition that the input list size is restricted to a maximum of four elements. Let’s create this custom constraint annotation:

@Constraint(validatedBy = MaxSizeConstraintValidator.class)
@Retention(RetentionPolicy.RUNTIME)
public @interface MaxSizeConstraint {
    String message() default "The input list cannot contain more than 4 movies.";
    Class<?>[] groups() default {};
    Class<? extends Payload>[] payload() default {};
}

Now, we’ll create a validator that will apply the above constraint:

public class MaxSizeConstraintValidator implements ConstraintValidator<MaxSizeConstraint, List<Movie>> {
    @Override
    public boolean isValid(List<Movie> values, ConstraintValidatorContext context) {
        return values.size() <= 4
    }
}

Finally, we’ll add the @MaxSizeConstraint annotation to our controller method:

@PostMapping
public void addAll(
  @RequestBody
  @NotEmpty(message = "Input movie list cannot be empty.")
  @MaxSizeConstraint
  List<@Valid Movie> movies) {
    movieService.addAll(movies);
}

Here, @MaxSizeConstraint will validate the size of the input. So, if we pass more than four Movie objects in the input list, the validation will fail.

5. Handling the Exception

If any of the validations fail, ConstraintViolationException is thrown. Now, let’s see how we can add an exception handling component to catch this exception.

@ExceptionHandler(ConstraintViolationException.class)
public ResponseEntity handle(ConstraintViolationException constraintViolationException) {
    Set<ConstraintViolation<?>> violations = constraintViolationException.getConstraintViolations();
    String errorMessage = "";
    if (!violations.isEmpty()) {
        StringBuilder builder = new StringBuilder();
        violations.forEach(violation -> builder.append(" " + violation.getMessage()));
        errorMessage = builder.toString();
    } else {
        errorMessage = "ConstraintViolationException occured.";
    }
    return new ResponseEntity<>(errorMessage, HttpStatus.BAD_REQUEST);
 }

6. Testing the API

Now, we’ll test our controller with valid and invalid inputs.

Firstly, let’s provide valid input to the API:

curl -v -d [{"name":"Movie1"}] -H "Content-Type: application/json" -X POST http://localhost:8080/movies

In this scenario, we’ll get an HTTP status 200 response:

...
HTTP/1.1 200
...

Next, we’ll check our API response when we pass invalid inputs.

Let’s try an empty list:

curl -d [] -H "Content-Type: application/json" -X POST http://localhost:8080/movies

In this scenario, we’ll get an HTTP status 400 response. This is because the input doesn’t satisfy the @NotEmpty constraint.

Input movie list cannot be empty.

Next, let’s try passing five Movie objects in the list:

curl -d [{"name":"Movie1"},{"name":"Movie2"},{"name":"Movie3"},{"name":"Movie4"},{"name":"Movie5"}] 
  -H "Content-Type: application/json" -X POST http://localhost:8080/movies

This will also result in HTTP status 400 response because we fail the @MaxSizeConstraint constraint:

The input list cannot contain more than 4 movies.

7. Conclusion

In this quick article, we learned how to validate a list of objects in Spring.

As always, the full source code of the examples is over on GitHub.

Java Naming and Directory Interface Overview

$
0
0

1. Introduction

The Java Naming and Directory Interface (JNDI) provides consistent use of naming and/or directory services as a Java API. This interface can be used for binding objects, looking up or querying objects, as well as detecting changes on the same objects.

While JNDI usage includes a diverse list of supported naming and directory services, in this tutorial we’ll focus on JDBC while exploring JNDI’s API.

2. JNDI Description

Any work with JNDI requires an understanding of the underlying service as well as an accessible implementation. For example, a database connection service calls for specific properties and exception handling.

However, JNDI’s abstraction decouples the connection configuration from the application.

Let’s explore Name and Context, which contain the core functionality of JNDI.

2.1. Name Interface

Name objectName = new CompositeName("java:comp/env/jdbc");

The Name interface provides the ability to manage the component names and syntax for JNDI names. The first token of the string represents the global context, after that each string added represents the next sub-context:

Enumeration<String> elements = objectName.getAll();
while(elements.hasMoreElements()) {
  System.out.println(elements.nextElement());
}

Our output looks like:

java:comp
env
jdbc

As we can see, / is the delimiter for Name sub-contexts. Now, let’s add a sub-context:

objectName.add("example");

Then we test our addition:

assertEquals("example", objectName.get(objectName.size() - 1));

2.2. Context Interface

Context contains the properties for the naming and directory service. Here, let’s use some helper code from Spring for convenience to build a Context:

SimpleNamingContextBuilder builder = new SimpleNamingContextBuilder(); 
builder.activate();

Spring’s SimpleNamingContextBuilder creates a JNDI provider and then activates the builder with the NamingManager:

JndiTemplate jndiTemplate = new JndiTemplate();
ctx = (InitialContext) jndiTemplate.getContext();

Finally, JndiTemplate helps us access the InitialContext.

3. JNDI Object Binding and Lookup

Now that we’ve seen how to use Name and Context, let’s use JNDI to store a JDBC DataSource:

ds = new DriverManagerDataSource("jdbc:h2:mem:mydb");

3.1. Binding JNDI Objects

As we have a context, let’s bind the object to it:

ctx.bind("java:comp/env/jdbc/datasource", ds);

In general, services should store an object reference, serialized data, or attributes in a directory context. It all depends on the needs of the application.

Note that using JNDI this way is less common. Typically, JNDI interfaces with data that is managed outside the application runtime.

However, if the application can already create or find its DataSource, it might be easier to wire that using Spring. In contrast, if something outside of our application bound objects in JNDI, then the application could consume them.

3.2. Looking Up JNDI Objects

Let’s look up our DataSource:

DataSource ds = (DataSource) ctx.lookup("java:comp/env/jdbc/datasource");

And then let’s test to ensure that DataSource is as expected:

assertNotNull(ds.getConnection());

4. Common JNDI Exceptions

Working with JNDI may sometimes result in runtime exceptions. Here are some common ones.

4.1. NameNotFoundException

ctx.lookup("badJndiName");

Since this name is not bound in this context, we see this stack trace:

javax.naming.NameNotFoundException: Name [badJndiName] not bound; 0 bindings: []
  at org.springframework.mock.jndi.SimpleNamingContext.lookup(SimpleNamingContext.java:140)
  at java.naming/javax.naming.InitialContext.lookup(InitialContext.java:409)

We should note that the stack trace contains all objects bound, which is useful for tracking down why the exception occurred.

4.2. NoInitialContextException

Any interaction with the InitialContext can throw NoInitialContextException:

assertThrows(NoInitialContextException.class, () -> {
  JndiTemplate jndiTemplate = new JndiTemplate();
  InitialContext ctx = (InitialContext) jndiTemplate.getContext();
  ctx.lookup("java:comp/env/jdbc/datasource");
}).printStackTrace();

We should note that this use of JNDI is valid, as we used it earlier. However, this time there is no JNDI context provider, and an exception will be thrown:

javax.naming.NoInitialContextException: Need to specify class name in environment or system property, 
  or in an application resource file: java.naming.factory.initial
    at java.naming/javax.naming.spi.NamingManager.getInitialContext(NamingManager.java:685)

5. Role of JNDI in Modern Application Architecture

While JNDI plays less of a role in lightweight, containerized Java applications such as Spring Boot, there are other uses. Three Java technologies that still use JNDI are JDBC, EJB, and JMS. All have a wide array of uses across Java enterprise applications.

For example, a separate DevOps team may manage environment variables such as username and password for a sensitive database connection in all environments. A JNDI resource can be created in the web application container, with JNDI used as a layer of consistent abstraction that works in all environments.

This setup allows developers to create and control a local definition for development purposes while connecting to sensitive resources in a production environment through the same JNDI name.

6. Conclusion

In this tutorial, we saw connecting, binding, and looking up an object using the Java Naming and Directory Interface. We also looked at the common exceptions thrown by JNDI.

Finally, we looked at how JNDI fits into modern application architecture.

As always, the code is available over on GitHub.

Calling Default Serializer from Custom Serializer in Jackson

$
0
0

1. Introduction

Serializing our complete data structure to JSON using an exact one-on-one representation of all the fields may not be appropriate sometimes or simply may not be what we want. Instead, we may want to create an extended or simplified view of our data. This is where custom Jackson serializers come into play.

However, implementing a custom serializer can be tedious, especially if our model objects have lots of fields, collections, or nested objects. Fortunately, the Jackson library has several provisions that can make this job a lot simpler.

In this short tutorial, we’ll take a look at custom Jackson serializers and show how to access default serializers inside a custom serializer.

2. Sample Data Model

Before we dive into the customization of Jackson, let’s have a look at our sample Folder class that we want to serialize:

public class Folder {
    private Long id;
    private String name;
    private String owner;
    private Date created;
    private Date modified;
    private Date lastAccess;
    private List<File> files = new ArrayList<>();

    // standard getters and setters
}

And the File class, which is defined as a List inside our Folder class:

public class File {
    private Long id;
    private String name;

    // standard getters and setters
}

3. Custom Serializers in Jackson

The main advantage of using custom serializers is that we do not have to modify our class structure. Plus, we can easily decouple our expected behavior from the class itself.

So, let’s imagine that we want a reduced view of our Folder class:

{
    "name": "Root Folder",
    "files": [
        {"id": 1, "name": "File 1"},
        {"id": 2, "name": "File 2"}
    ]
}

As we’ll see over the next sections, there are several ways we can achieve our desired output in Jackson.

3.1. Brute Force Approach

First, without using Jackson’s default serializers, we can create a custom serializer in which we do all the heavy lifting ourselves.

Let’s create a custom serializer for our Folder class to achieve this:

public class FolderJsonSerializer extends StdSerializer<Folder> {

    public FolderJsonSerializer() {
        super(Folder.class);
    }

    @Override
    public void serialize(Folder value, JsonGenerator gen, SerializerProvider provider)
      throws IOException {
        gen.writeStartObject();
        gen.writeStringField("name", value.getName());

        gen.writeArrayFieldStart("files");
        for (File file : value.getFiles()) {
            gen.writeStartObject();
            gen.writeNumberField("id", file.getId());
            gen.writeStringField("name", file.getName());
            gen.writeEndObject();
        }
        gen.writeEndArray();

        gen.writeEndObject();
    }
}

Thus, we can serialize our Folder class to a reduced view containing only the fields that we want.

3.2. Using Internal ObjectMapper

Although custom serializers provide us the flexibility of altering every property in detail, we can make our job easier by reusing Jackson’s default serializers.

One way of using the default serializers is to access the internal ObjectMapper class:

@Override
public void serialize(Folder value, JsonGenerator gen, SerializerProvider provider) throws IOException {
    gen.writeStartObject();
    gen.writeStringField("name", value.getName());

    ObjectMapper mapper = (ObjectMapper) gen.getCodec();
    gen.writeFieldName("files");
    String stringValue = mapper.writeValueAsString(value.getFiles());
    gen.writeRawValue(stringValue);

    gen.writeEndObject();
}

So, Jackson simply handles the heavy lifting by serializing the List of File objects, and then our output will be the same.

3.3. Using SerializerProvider

Another way of calling the default serializers is to use the SerializerProvider. Therefore, we delegate the process to the default serializer of the type File.

Now, let’s simplify our code a little bit with the help of SerializerProvider:

@Override
public void serialize(Folder value, JsonGenerator gen, SerializerProvider provider) throws IOException {
    gen.writeStartObject();
    gen.writeStringField("name", value.getName());

    provider.defaultSerializeField("files", value.getFiles(), gen);

    gen.writeEndObject();
}

And, just as before, we get the same output.

4. A Possible Recursion Problem

Depending on the use case, we may need to extend our serialized data by including more details for Folder. This might be for a legacy system or an external application to be integrated that we do not have a chance to modify.

Let’s change our serializer to create a details field for our serialized data to simply expose all the fields of the Folder class:

@Override
public void serialize(Folder value, JsonGenerator gen, SerializerProvider provider) throws IOException {
    gen.writeStartObject();
    gen.writeStringField("name", value.getName());

    provider.defaultSerializeField("files", value.getFiles(), gen);

    // this line causes exception
    provider.defaultSerializeField("details", value, gen);

    gen.writeEndObject();
}

This time we get a StackOverflowError exception.

When we define a custom serializer, Jackson internally overrides the original BeanSerializer instance that is created for the type Folder. Consequently, our SerializerProvider finds the customized serializer every time, instead of the default one, and this causes an infinite loop.

So, how do we solve this problem? We’ll see one usable solution for this scenario in the next section.

5. Using BeanSerializerModifier

A possible workaround is using BeanSerializerModifier to store the default serializer for the type Folder before Jackson internally overrides it.

Let’s modify our serializer and add an extra field — defaultSerializer:

private final JsonSerializer<Object> defaultSerializer;

public FolderJsonSerializer(JsonSerializer<Object> defaultSerializer) {
    super(Folder.class);
    this.defaultSerializer = defaultSerializer;
}

Next, we’ll create an implementation of BeanSerializerModifier to pass the default serializer:

public class FolderBeanSerializerModifier extends BeanSerializerModifier {

    @Override
    public JsonSerializer<?> modifySerializer(
      SerializationConfig config, BeanDescription beanDesc, JsonSerializer<?> serializer) {

        if (beanDesc.getBeanClass().equals(Folder.class)) {
            return new FolderJsonSerializer((JsonSerializer<Object>) serializer);
        }

        return serializer;
    }
}

Now, we need to register our BeanSerializerModifier as a module to make it work:

ObjectMapper mapper = new ObjectMapper();

SimpleModule module = new SimpleModule();
module.setSerializerModifier(new FolderBeanSerializerModifier());

mapper.registerModule(module);

Then, we use the defaultSerializer for the details field:

@Override
public void serialize(Folder value, JsonGenerator gen, SerializerProvider provider) throws IOException {
    gen.writeStartObject();
    gen.writeStringField("name", value.getName());

    provider.defaultSerializeField("files", value.getFiles(), gen);

    gen.writeFieldName("details");
    defaultSerializer.serialize(value, gen, provider);

    gen.writeEndObject();
}

Lastly, we may want to remove the files field from the details since we already write it into the serialized data separately.

So, we simply ignore the files field in our Folder class:

@JsonIgnore
private List<File> files = new ArrayList<>();

Finally, the problem is solved and we get our expected output as well:

{
    "name": "Root Folder",
    "files": [
        {"id": 1, "name": "File 1"},
        {"id": 2, "name": "File 2"}
    ],
    "details": {
        "id":1,
        "name": "Root Folder",
        "owner": "root",
        "created": 1565203657164,
        "modified": 1565203657164,
        "lastAccess": 1565203657164
    }
}

6. Conclusion

In this tutorial, we learned how to call default serializers inside a custom serializer in Jackson Library.

Like always, all the code examples used in this tutorial are available over on GitHub.

Viewing all 4728 articles
Browse latest View live


<script src="https://jsc.adskeeper.com/r/s/rssing.com.1596347.js" async> </script>