Quantcast
Channel: Baeldung
Viewing all 4731 articles
Browse latest View live

The XOR Operator in Java

$
0
0

1. Overview

In this short tutorial, we're going to learn about the Java XOR operator. We'll go through a bit of theory about XOR operations, and then we'll see how to implement them in Java.

2. The XOR Operator

Let's begin with a little reminder of the semantics of the XOR operation. The XOR logical operation, or exclusive or, takes two boolean operands and returns true if and only if the operands are different. Thus, it returns false if the two operands have the same value.

So, the XOR operator can be used, for example, when we have to check for two conditions that can't be true at the same time.

Let's consider two conditions, A and B. Then the following table shows the possible values of A XOR B:

XOR Operator Table

The A XOR B operation is equivalent to (A AND !B) OR (!A AND B). Parentheses have been included for clarity, but are optional, as the AND operator takes precedence over the OR operator.

3. How to Do it in Java?

Now, let's see how to express the XOR operation in Java. Of course, we have the possibility to use the && and || operators, but this can be a bit wordy, as we're going to see.

Imagine a Car class having two boolean attributes: diesel and manual. And now, let's say we want to tell if the car is either diesel or manual, but not both.

Let's check this using the && and || operators:

Car car = Car.dieselAndManualCar();
boolean dieselXorManual = (car.isDiesel() && !car.isManual()) || (!car.isDiesel() && car.isManual());

That's a bit long, especially considering that we have an alternative — the Java XOR operator, represented by the ^ symbol. It's a bitwise operator — that is, an operator comparing the matching bits of two values in order to return a result. In the XOR case, if two bits of the same position have the same value, the resulting bit will be 0. Otherwise, it'll be 1.

So, instead of our cumbersome XOR implementation, we can directly use the ^ operator:

Car car = Car.dieselAndManualCar();
boolean dieselXorManual = car.isDiesel() ^ car.isManual();

As we can wee, the ^ operator allows us to be more concise in expressing XOR operations.

Finally, it's worth mentioning that the XOR operator, like the other bitwise operators, works with every primitive type. For example, let's consider two integers 1 and 3, whose binary representations are 00000001 and 000000011, respectively. Then, using the XOR operator between them will result in the integer 2:

assertThat(1 ^ 3).isEqualTo(2);

Only the second bit is different in those two numbers, therefore the result of the XOR operator on this bit will be 1. All other bits are identical, thus their bitwise XOR result is 0, giving us a final value of 00000010 — the binary representation of the integer 2.

4. Conclusion

In this article, we learned about the Java XOR operator. We saw that it offers a concise way to express XOR operations. As usual, the full code of the article can be found over on GitHub.


Stable Sorting Algorithms

$
0
0

1. Overview

In this tutorial, we'll learn what stable sorting algorithms are and how they work. Further, we'll explore when the stability of sorting matters.

2. Stability in Sorting Algorithms

The stability of a sorting algorithm is concerned with how the algorithm treats equal (or repeated) elements. Stable sorting algorithms preserve the relative order of equal elements, while unstable sorting algorithms don't. In other words, stable sorting maintains the position of two equals elements relative to one another.

Let A be a collection of elements and < be a strict weak ordering on the elements. Further, let B be the collection of elements in A in the sorted order. Let's consider two equal elements in A at indices i and j, i.e, A[i] and A[j], that end up at indices m and n respectively in B. We can classify the sorting as stable if:

i < j and A[i] = A[j] and m < n

Let's understand the concept with the help of an example. We have an array of integers A:  [ 5, 8, 9, 8, 3 ]. Let's represent our array using color-coded balls, where any two balls with the same integer will have a different color which would help us keep track of equal elements (8 in our case):

Stable sorting maintains the order of the two equal balls numbered 8, whereas unstable sorting may invert the relative order of the two 8s.

3. When Stability Matters

3.1. Distinguishing between Equal Elements

All sorting algorithms use a key to determine the ordering of the elements in the collection, called the sort key.

If the sort key is the (entire) element itself, equal elements are indistinguishable, such as integers or strings.

On the other hand, equal elements are distinguishable if the sort key is made up of one or more, but not all attributes of the element, such as age in an Employee class.

3.2. Stable Sorting is Important, Sometimes

We don't always need stable sorting. Stability is not a concern if:

  • equal elements are indistinguishable, or
  • all the elements in the collection are distinct

When equal elements are distinguishable, stability is imperative.  For instance, if the collection already has some order, then sorting on another key must preserve that order.

For example, let's say we are computing the word count of each distinct word in a text file. Now, we need to report the results in decreasing order of count, and further sorted alphabetically in case two words have the same count:

Input:
how much wood would woodchuck chuck if woodchuck could chuck wood

Output:
chuck       2
wood        2
woodchuck   2
could       1
how         1
if          1
much        1
would       1

Once we have sorted the elements by count, we need to sort it further lexicographically. At this point, the sorting algorithm must maintain the relative order of the counts:

First pass, sorted by count:
(wood, 2)
(chuck, 2)
(woodchuck, 2)
(much, 1)
(could, 1)
(would, 1)
(if, 1)
(how, 1)

Second pass, sorted lexicographically while preserving the previous relative order:
(chuck, 2)
(wood, 2)
(woodchuck, 2)
(could, 1)
(how, 1)
(if, 1)
(much, 1)
(would, 1)

3.3. Radix Sort

Radix Sort is an integer sorting algorithm that depends on a sorting subroutine that must be stable. It is a non-comparison based sorting algorithm that sorts a collection of integers. It groups keys by individual digits that share the same significant position and value.

Let's unpack the formal definition and restate the basic idea:

for each digit 'k' from the least significant digit (LSD) to the most significant digit (MSD) of a number:
  apply counting-sort algorithm on digit 'k' to sort the input array

We are using Counting Sort as a subroutine in Radix Sort. Counting Sort is a stable integer sorting algorithm. We don't have to understand how it works, but that Counting Sort is stable.

Let's look at an illustrative example:

Each invocation of the Counting Sort subroutine preserves the order from the previous invocations. For example, while sorting on the tens' place digit (second invocation) 9881 shifts downwards, but stays above 9888 maintaining their relative order.

Thus, Radix Sort utilizes the stability of the Counting Sort algorithm and provides linear time integer sorting.

4. Stable and Unstable Sorting Algorithms

Several common sorting algorithms are stable by nature, such as Merge SortTimsortCounting SortInsertion Sort, and Bubble Sort. Others such as Quicksort, Heapsort and Selection Sort are unstable.

We can modify unstable sorting algorithms to be stable. For instance, we can use extra space to maintain stability in Quicksort.

5. Conclusion

In this tutorial, we learned about stable sorting algorithms and looked at when stability matters, using Radix Sort as an example.

Java Weekly, Issue 296

$
0
0

Here we go…

1. Spring and Java

>> Why Clojure? [blog.cleancoder.com]

With minimal syntax and grammar, Clojure is essentially a Lisp variant for the Java ecosystem. And a personal favorite.

>> HttpClient Executors [javaspecialists.eu]

Now that HttpClient is out of incubator stage in Java 11, there are some behavioral changes to be aware of – when it comes to setting executors.

>> Introduction to Spring MVC Test Framework [petrikainulainen.net]

A quick look at the key components of the framework and how to get started with it.

>> Pollution-Free Dependency Management with Gradle [reflectoring.io]

And a good way to future-proof your Gradle build against changes to transitive dependencies. Very cool.


Also worth reading:

Webinars and presentations:

Time to upgrade:

2. Technical and Musing

>> Scenarios using custom DSLs [lizkeogh.com]

A few tips for writing your own custom DSLs to implement behavior-driven testing.

>> To Find a Niche, Learn Why Your Company Pays Your Salary [daedtech.com]

No matter how you get the job done, in the end, it's all about how you're helping the company make or save money.

Also worth reading:

3. Comics

>> Inexperienced Employee Advice [dilbert.com]

>> Wally Writes Fiction [dilbert.com]

>> Skipping Teambuilding [dilbert.com]

4. Pick of the Week

>> The Attention Diet [markmanson.net]

Building Java Applications with Bazel

$
0
0

1. Overview

Bazel is an open-source tool for building and testing source code, similar to Maven and Gradle. It supports projects in multiple languages and builds outputs for multiple platforms.

In this tutorial, we'll go through the steps required to build a simple Java application using Bazel. For illustration, we'll begin with a multi-module Maven project and then build the source code using Bazel.

We'll start by installing Bazel.

2. Project Structure

Let's create a multi-module Maven project:

bazel (root)
    pom.xml
    WORKSPACE (bazel workspace)
    |— bazelapp
        pom.xml
        BUILD (bazel build file)
        |— src
            |— main
                |— java
            |— test
                |— java
    |— bazelgreeting
        pom.xml
        BUILD (bazel build file)
        |— src
            |— main
                |— java
            |— test
                |— java

The presence of the WORKSPACE file sets up the workspace for Bazel. There could be one or a multiple of them in a project. For our example, we'll keep only one file at the top-level project directory.

The next important file is the BUILD file, which contains the build rules. It identifies each rule with a unique target name.

Bazel offers the flexibility to have as many BUILD files as we need, configured to any level of granularity. This would mean we can build a smaller number of Java classes by configuring BUILD rules accordingly. To keep things simple, we will keep minimal BUILD files in our example.

Since the output of the Bazel BUILD configuration is typically a jar file, we'll refer each directory containing the BUILD file as a build package.

3. Build File

3.1. Rule Configuration

It's time to configure our first build rule to build the Java binaries. Let's configure one in the BUILD file belonging to the bazelapp module:

java_binary (
    name = "BazelApp",
    srcs = glob(["src/main/java/com/baeldung/*.java"]),
    main_class = "com.baeldung.BazelApp"
)

Let's understand the configuration settings one-by-one:

  • java_binary – the name of the rule; it requires additional attributes for building the binaries
  • name – the name of the build target
  • srcs – an array of the file location patterns that tell which Java files to build
  • main_class – the name of the application main class (optional)

3.2. Build Execution

We are now good to build the app. From the directory containing the WORKSPACE file, let's execute the bazel build command in a shell to build our target:

$ bazel build //bazelapp:BazelApp

The last argument is the target name configured in one of the BUILD files. It has the pattern “//<path_to_build>:<target_name>“.

The first part of the pattern, “//”, indicates we're starting in our workspace directory. The next, “bazelapp”, is the relative path to the BUILD file from the workspace directory. Finally, “BazelApp” is the target name to build.

3.3. Build Output

We should now notice two binary output files from the previous step:

bazel-bin/bazelapp/BazelApp.jar
bazel-bin/bazelapp/BazelApp

The BazelApp.jar contains all the classes, while BazelApp is a wrapper script to execute the jar file.

3.4. Deployable JAR

We may need to ship the jar and its dependencies to different locations for deployment.

The wrapper script from the section above specifies all the dependencies (jar files) as part of BazelApp.jar‘s startup command.

However, we can also make a fat jar containing all the dependencies:

$ bazel build //bazelapp:BazelApp_deploy.jar

Suffixing the name of the target with “_deploy” instructs Bazel to package all the dependencies within the jar and make it ready for deployment.

4. Dependencies

So far, we've only built using the files in bazelapp. But, most every app has dependencies.

In this section, we'll see how to package the dependencies together with the jar file.

4.1. Building Libraries

Before we do that, though, we need a dependency that bazelapp can use.

Let's create another Maven module named bazelgreeting and configure the BUILD file for the new module with the java_library rule. We'll name this target “greeter”:

java_library (
    name = "greeter",
    srcs = glob(["src/main/java/com/baeldung/*.java"])
)

Here, we've used the java_library rule for creating the library. After building this target, we'll get the libgreetings.jar file:

INFO: Found 1 target...
Target //bazelgreeting:greetings up-to-date:
  bazel-bin/bazelgreeting/libgreetings.jar

4.2. Configuring Dependencies

To use greeter in bazelapp, we'll need some additional configurations. First, we need to make the package visible to bazelapp. We can achieve this by adding the visibility attribute in the java_library rule of the greeter package:

java_library (
    name = "greeter",
    srcs = glob(["src/main/java/com/baeldung/*.java"]),
    visibility = ["//bazelapp:__pkg__"]
)

The visibility attribute makes the current package visible to those listed in the array.

Now in the bazelapp package, we must configure the dependency on the greeter package. Let's do this with the deps attribute:

java_binary (
    name = "BazelApp",
    srcs = glob(["src/main/java/com/baeldung/*.java"]),
    main_class = "com.baeldung.BazelApp",
    deps = ["//bazelgreeting:greeter"]
)

The deps attribute makes the current package dependent on those listed in the array.

5. External Dependencies

We can work on projects that have multiple workspaces and depend on each other. Or, we can import libraries from remote locations. We can categorize such external dependencies as:

  • Local Dependencies: We manage them within the same workspace as we have seen in the previous section or span across multiple workspaces
  • HTTP Archives: We import the libraries from a remote location over HTTP

There are many Bazel rules available to manage external dependencies. We'll see how to import jar files from the remote location in the subsequent sections.

5.1. HTTP URL Locations

For our example, let's import Apache Commons Lang into our application. Since we have to import this jar from the HTTP location, we will use the http_jar rule. We'll first load the rule from the Bazel HTTP build definitions and configure it in the WORKSPACE file with Apache Commons's location:

load("@bazel_tools//tools/build_defs/repo:http.bzl", "http_jar")

http_jar (
    name = "apache-commons-lang",
    url = "https://repo1.maven.org/maven2/org/apache/commons/commons-lang3/3.9/commons-lang3-3.9.jar"
)

We must further add dependencies in the BUILD file of the “bazelapp” package:

deps = ["//bazelgreeting:greeter", "@apache-commons-lang//jar"]

Note, we need to specify the same name used in the http_jar rule from the WORKSPACE file.

5.2. Maven Dependencies

Managing individual jar files becomes a tedious task. Alternatively, we can configure the Maven repository using the rules_jvm_external rule in our WORKSPACE file. This will enable us to fetch as many dependencies we want in our project from repositories.

First, we must import the rules_jvm_external rule from a remote location using the http_archive rule in the WORKSPACE file:

load("@bazel_tools//tools/build_defs/repo:http.bzl", "http_archive")

RULES_JVM_EXTERNAL_TAG = "2.0.1"
RULES_JVM_EXTERNAL_SHA = "55e8d3951647ae3dffde22b4f7f8dee11b3f70f3f89424713debd7076197eaca"

http_archive(
    name = "rules_jvm_external",
    strip_prefix = "rules_jvm_external-%s" % RULES_JVM_EXTERNAL_TAG,
    sha256 = RULES_JVM_EXTERNAL_SHA,
    url = "https://github.com/bazelbuild/rules_jvm_external/archive/%s.zip" % RULES_JVM_EXTERNAL_TAG,
)

Next, we'll use the maven_install rule and configure the Maven repository URL and the required artifacts:

load("@rules_jvm_external//:defs.bzl", "maven_install")

maven_install(
    artifacts = [
        "org.apache.commons:commons-lang3:3.9" ], 
    repositories = [ 
        "https://repo1.maven.org/maven2", 
    ] )

At last, we'll add the dependency in the BUILD file:

deps = ["//bazelgreeting:greeter", "@maven//:org_apache_commons_commons_lang3"]

It resolves the names of the artifacts using underscore (_) characters.

6. Conclusion

In this tutorial, we learned basic configurations to build a Maven style Java project with the Bazel build tool.

The source code is also available over GitHub. It exists as a Maven project and is also configured with the Bazel WORKSPACE and BUILD files.

Concatenating Text Files into a Single File in Linux

$
0
0

1. Overview

Linux provides us commands to perform various operations on files. One such activity is the concatenation – or merging – of files.

In this quick tutorial, we'll see how to concatenate files into a single file.

2. Introducing cat Command

To concatenate files, we'll use the cat (short for concatenate) command.

Let's say we have two text files, A.txt and B.txt.

A.txt:

Content from file A.

B.txt:

Content from file B.

Now, let's merge these files into file C.txt:

cat A.txt B.txt > C.txt

The cat command concatenates files and prints the result to the standard output. Hence, to write the concatenated output to a file, we've used the output redirection symbol ‘>'. This sends the concatenated output to the file specified.

The above script will create the file C.txt with the concatenated contents:

Content from file A.
Content from file B.

Note that if the file C.txt already exists, it'll simply be overwritten.

Sometimes, we might want to append the content to the output file rather than overwriting it. We can do this by using the double output redirection symbol >>:

cat A.txt B.txt >> C.txt

The examples above concatenate two files. But, if we want to concatenate more than two, we specify all these files one after another:

cat A.txt B.txt C.txt D.txt E.txt > F.txt

This'll concatenate all the files in the order specified.

3. Concatenating Multiple Files Using a Wildcard

If the number of files to be concatenated is large, it is cumbersome to type in the name of each file. So, instead of specifying each file to be concatenated, we can use wildcards to specify the files.

For example, to concatenate all files in the current directory, we can use the asterisk(*) wildcard:

cat *.txt > C.txt

We have to be careful while using wildcards if the output file already exists if the wildcard specified includes the output file, we'll get an error:

cat: C.txt: input file is output file

It's worth noting that when using wildcards, the order of the files isn't predictable. Consequently, we'll have to employ the method we saw in the previous section if the order in which the files are to be concatenated is important.

Going a step further, we can also use pipes to feed the contents of the input files to the cat command. For example, we can echo the contents of all files in the current directory and feed it's output to cat:

echo *.txt | xargs cat > D.txt

4. Conclusion

In this tutorial, we saw how easy it is to concatenate multiple files using the Linux cat command.

Parsing an XML File Using StAX

$
0
0

1. Introduction

In this tutorial, we'll illustrate how to parse an XML file using StAX. We'll implement a simple XML parser and see how it works with an example.

2. Parsing with StAX

StAX is one of the several XML libraries in Java. It's a memory-efficient library included in the JDK since Java 6. StAX doesn't load the entire XML into memory. Instead, it pulls data from a stream in a forward-only fashion. The stream is read by an XMLEventReader object.

3. XMLEventReader Class

In StAX, any start tag or end tag is an event. XMLEventReader reads an XML file as a stream of events. It also provides the methods necessary to parse the XML. The most important methods are:

  • isStartElement(): checks if the current event is a StartElement (start tag)
  • isEndElement(): checks if the current event is an EndElement (end tag)
  • asCharacters(): returns the current event as characters
  • getName(): gets the name of the current event
  • getAttributes(): returns an Iterator of the current event's attributes

4. Implementing a Simple XML Parser

Needless to say, the first step to parse an XML is to read it. We need an XMLInputFactory to create an XMLEventReader for reading our file:

XMLInputFactory xmlInputFactory = XMLInputFactory.newInstance();
XMLEventReader reader = xmlInputFactory.createXMLEventReader(new FileInputStream(path));

Now that the XMLEventReader is ready, we move forward through the stream with nextEvent():

while (reader.hasNext()) {
    XMLEvent nextEvent = reader.nextEvent();
}

Next, we need to find our desired start tag first:

if (nextEvent.isStartElement()) {
    StartElement startElement = nextEvent.asStartElement();
    if (startElement.getName().getLocalPart().equals("desired")) {
        //...
    }
}

Consequently, we can read the attributes and data:

String url = startElement.getAttributeByName(new QName("url")).getValue();
String name = nextEvent.asCharacters().getData();

We can also check if we've reached an end tag:

if (nextEvent.isEndElement()) {
    EndElement endElement = nextEvent.asEndElement();
}

5. Parsing Example

To get a better understanding, let's run our parser on a sample XML file:

<?xml version="1.0" encoding="UTF-8"?>
<websites>
    <website url="https://baeldung.com">
        <name>Baeldung</name>
        <category>Online Courses</category>
        <status>Online</status>
    </website>
    <website url="http://example.com">
        <name>Example</name>
        <category>Examples</category>
        <status>Offline</status>
    </website>
    <website url="http://localhost:8080">
        <name>Localhost</name>
        <category>Tests</category>
        <status>Offline</status>
    </website>
</websites>

Let's parse the XML and store all data into a list of entity objects called websites:

while (reader.hasNext()) {
    XMLEvent nextEvent = reader.nextEvent();
    if (nextEvent.isStartElement()) {
        StartElement startElement = nextEvent.asStartElement();
        switch (startElement.getName().getLocalPart()) {
            case "website":
                website = new WebSite();
                Attribute url = startElement.getAttributeByName(new QName("url"));
                if (url != null) {
                    website.setUrl(url.getValue());
                }
                break;
            case "name":
                nextEvent = reader.nextEvent();
                website.setName(nextEvent.asCharacters().getData());
                break;
            case "category":
                nextEvent = reader.nextEvent();
                website.setCategory(nextEvent.asCharacters().getData());
                break;
            case "status":
                nextEvent = reader.nextEvent();
                website.setStatus(nextEvent.asCharacters().getData());
                break;
        }
    }
    if (nextEvent.isEndElement()) {
        EndElement endElement = nextEvent.asEndElement();
        if (endElement.getName().getLocalPart().equals("website")) {
            websites.add(website);
        }
    }
}

To get all the properties of each website, we check startElement.getName().getLocalPart() for each event. We then set the corresponding property accordingly. When we reach the website's end element, we know that our entity is complete, so we add the entity to our websites list.

6. Conclusion

In this tutorial, we learned how to parse an XML file using StAX library. The example XML file and the full parser code are available over on Github.

Getting the Absolute Directory of a File in Linux

$
0
0

1. Introduction

In this tutorial, we will see how to get the absolute directory of a given file using two common Linux file system tools.

2. Prerequisites

Unfortunately, there currently isn't a single command to obtain the absolute directory of a file. Instead, we must break the operation into two parts, using the output of one command as the input for the other command.

2.1. readlink

To obtain the full path of a file, we use the readlink command. readlink prints the absolute path of a symbolic link, but as a side-effect, it also prints the absolute path for a relative path.

For example, suppose we have the following directory structure:

/
└── home/
    └── example/
        ├── foo/
        |   └── file.txt
        └── link -> foo/

We use the -f flag to canonicalize the path of either a relative path or a symbolic link. Therefore, if we change directory to /home/example/, we can execute any of the following commands:

readlink -f foo/file.txt
readlink -f link/file.txt
readlink -f ./foo/file.txt
readlink -f ../example/foo/file.txt

These commands will output:

/home/example/foo/file.txt

In the case of the first command, readlink resolves the relative path of foo/ to the absolute path of /home/example/foo/.

In the second case, readlink resolves the symbolic link of link/ to the same absolute path.

For the final two commands, readlink canonicalizes the relative paths and resolves to the same absolute path as the previous examples.

Note that the -f flag requires that all but the last component in the supplied path — file.txt in our case — must exist. If the path does not exist, no output is returned. For example, executing readlink -f bar/file.txt will produce no output since the bar/ directory doesn't exist. In contrast, executing readlink -f  foo/other.txt will return /home/example/foo/other.txt since all but the final component exists.

Instead, we can use the -m flag if we do not care if any of the components in the supplied path exists. Likewise, we can use the -e flag if we wish for all components in the supplied path to exist.

2.2. dirname

The second prerequisite is the dirname command, which prints the directory containing the supplied path.

If we supply a directory, dirname outputs the path containing that directory. For example, we can execute:

dirname /home/example/foo/

This will produce:

/home/example

Note that dirname prints the absolute directory because we supplied an absolute path. If we changed directory to /home/ and executed dirname example/foo/dirname would output example. As a rule, if a relative path is provided, dirname will output a relative directory, and if an absolute path is provided, dirname will output an absolute directory.

When supplying a file, dirname outputs the path containing that file. For example, we can execute:

dirname foo/file.txt

This will produce:

foo

3. Absolute Directory of File

To obtain the absolute directory of a file, we combine the readlink and dirname commands. We can do this in one of two ways.

3.1. xargs

First, we can use the xargs command, which converts input into arguments for a supplied command. By piping the output from readlink into xargs and supplying the command dirname as an argument to xargs, we can obtain this desired absolute directory:

readlink -f foo/file.txt | xargs dirname

This results in:

/home/example/foo

3.2. Command Substitution

Similarly, we can use command substitution$(command) — where a command is executed in a sub-shell, and the output from that command replaces its call. Therefore, we can execute the following:

dirname $(readlink -f foo/file.txt)

This command results in:

/home/example/foo

Equivalently, we could also execute the following command, and the output would remain the same:

dirname `readlink -f foo/file.txt`

Note that command substitution works with bash, but will not necessarily work with other shells.

4. Conclusion

In this tutorial, we looked at the readlink and dirname commands and how they can be used to obtain the absolute path of a relative path and the directory containing a path, respectively. By combining these commands — either through xargs or command substitution — we can obtain the absolute directory of a file.

Counting Sort in Java

$
0
0

1. Overview

General-purpose sorting algorithms like Merge Sort make no assumption about the input, so they can't beat the O(n log n) in the worst case. Counting Sort, on the contrary, has an assumption about the input which makes it a linear time sorting algorithm.

In this tutorial, we're going to get acquainted with the mechanics of the Counting Sort and then implement it in Java.

2. Counting Sort

Counting sort, as opposed to most classic sorting algorithms, does not sort the given input by comparing the elements. Instead, it assumes that the input elements are n integers in the range [0, k]. When k = O(n), then the counting sort will run in O(n) time.

Please note, then, that we can't use the counting sort as a general-purpose sorting algorithm. However, when the input is aligned with this assumption, it's pretty fast!

2.1. Frequency Array

Let's suppose we're going to sort an input array with values in the [0, 5] range:

First, we should count the occurrence of each number in the input array. If we represent the countings with array C, then C[i] represents the frequency of number in the input array:

For example, since 5 appears 3 times in the input array, the value for the index 5 is equal to 3.

Now given the array C, we should determine how many elements are less than or equal to each input element. For example:

  • One element is less than or equal to zero, or in other words, there is only one zero value, which is equal to C[0]
  • Two elements are less than or equal to one, which is equal to C[0] + C[1]
  • Four values are less than or equal to two, which is equal to C[0] + C[1] + C[2]

So if we keep computing the summation of consecutive elements in C, we can know how many elements are less than or equal to number n-1 in the input array. Anyway, by applying this simple formula we can update the as the following:


2.2. The Algorithm

Now we can use the auxiliary array to sort the input array. Here's how the counting sort works:

  • It iterates the input array in reverse
  • For each element i, C[i] – 1 represents the location of number i in the sorted array. This is because of the fact that there are C[i] elements less than or equal to i
  • Then, it decrements the C[i] at the end of each round

In order to sort the sample input array, we should first start with the number 5, since it's the last element. According to C[5], there are 11 elements are less than or equal to the number 5.

So, 5 should be the 11th element in the sorted array, hence the index 10:

Since we moved 5 to the sorted array, we should decrement the C[5]. Next element in the reversed order is 2. Since there are 4 elements less than or equal to 2, this number should be the 4th element in the sorted array:

Similarly, we can find the right spot for the next element which is 0:

If we keep iterating in reverse and move each element appropriately, we would end up with something like:

3. Counting Sort – Java Implementation

3.1. Computing the Frequency Array

First off, given an input array of elements and the k, we should compute the array C:

int[] countElements(int[] input, int k) {
    int[] c = new int[k + 1];
    Arrays.fill(c, 0);

    for (int i : input) {
        c[i] += 1;
    }

    for (int i = 1; i < c.length; i++) {
	c[i] += c[i - 1];
    }

    return c;
}

Let's breakdown the method signature:

  • input represents an array of numbers we're going to sort
  • The input array is an array of integers in the range of [0, k] – so represents the maximum number in the input
  • The return type is an array of integers representing the array

And here's how the countElements method works:

  • First, we initialized the array. As the [0, k] range contains k+1 numbers, we're creating an array capable of containing k+1 numbers
  • Then for each number in the input, we're computing the frequency of that number
  • And finally, we're adding consecutive elements together to know how many elements are less than or equal to a particular number

Also, we can verify that the countElements method works as expected:

@Test
void countElements_GivenAnArray_ShouldCalculateTheFrequencyArrayAsExpected() {
    int k = 5;
    int[] input = { 4, 3, 2, 5, 4, 3, 5, 1, 0, 2, 5 };
    
    int[] c = CountingSort.countElements(input, k);
    int[] expected = { 1, 2, 4, 6, 8, 11 };
    assertArrayEquals(expected, c);
}

3.2. Sorting the Input Array

Now that we can calculate the frequency array, we should be able to sort any given set of numbers:

int[] sort(int[] input, int k) {
    int[] c = countElements(input, k);

    int[] sorted = new int[input.length];
    for (int i = input.length - 1; i >= 0; i--) {
        int current = input[i];
	sorted[c[current] - 1] = current;
	c[current] -= 1;
    }

    return sorted;
}

Here's how the sort method works:

  • First, it computes the array
  • Then, it iterates the input array in reverse and for each element in the input, finds its correct spot in the sorted array. The ith element in the input should be the C[i]th element in the sorted array. Since Java arrays are zero-indexed, the C[i]-1 entry is the C[i]th element – for example, sorted[5] is the sixth element in the sorted array
  • Each time we find a match, it decrements the corresponding C[i] value

Similarly, we can verify that the sort method works as expected:

@Test
void sort_GivenAnArray_ShouldSortTheInputAsExpected() {
    int k = 5;
    int[] input = { 4, 3, 2, 5, 4, 3, 5, 1, 0, 2, 5 };

    int[] sorted = CountingSort.sort(input, k);

    // Our sorting algorithm and Java's should return the same result
    Arrays.sort(input);
    assertArrayEquals(input, sorted);
}

4. Revisiting the Counting Sort Algorithm

4.1. Complexity Analysis

Most classic sorting algorithms, like merge sort, sort any given input by just comparing the input elements to each other. These type of sorting algorithms are known as comparison sorts. In the worst case, comparison sorts should take at least O(n log n) to sort elements.

Counting Sort, on the other hand, does not sort the input by comparing the input elements, so it's clearly not a comparison sort algorithm.

Let's see how much time it consumes to sort the input:

  • It computes the array in O(n+k) time: It once iterates an input array with size in O(n) and then iterates the in O(k) – so that would be O(n+k) in total
  • After computing the C, it sorts the input by iterating the input array and performing a few primitive operations in each iteration. So, the actual sort operation takes O(n)

In total, counting sort takes O(n+k) time to run:

O(n + k) + O(n) = O(2n + k) = O(n + k)

If we assume k=O(n), then counting sort algorithm sorts the input in linear time. As opposed to general-purpose sorting algorithms, counting sorts makes an assumption about the input and takes less than the O(n log n) lower bound to execute.

 4.2. Stability

A few moments ago, we laid a few peculiar rules about the mechanics of counting sort but never cleared the reason behind them. To be more specific:

  • Why should we iterate the input array in reverse?
  • Why we decrement the C[i] each time we're using it?

Let's iterate from the beginning to better understand the first rule. Suppose we're going to sort a simple array of integers like the following:

In the first iteration, we should find the sorted location for the first 1:

So the first occurrence of number 1 gets the last index in the sorted array. Skipping the number 0, let's see what happens to the second occurrence of number 1:

The appearance order of elements with the same value is different in the input and sorted array, so the algorithm is not stable when we're iterating from the beginning.

What happens if we don't decrement the C[i] value after each use? Let's see:

Both occurrences of number 1 are getting the last place in the sorted array. So if we don't decrement the C[i] value after each use, we could potentially lose a few numbers while sorting them!

5. Conclusion

In this tutorial, first, we learned how the Counting Sort works internally. Then we implemented this sorting algorithm in Java and wrote a few tests to verify its behavior. And finally, we proved that the algorithm is a stable sorting algorithm with linear time complexity.

As usual, the sample codes are available on our GitHub project, so make sure to check it out!


Java ‘public’ Access Modifier

$
0
0

1. Overview

In this article, we'll cover the public modifier in-depth, and we'll discuss when and how to use it with classes and members. Additionally, we'll illustrate the drawbacks of using public data fields. For a general overview of access modifiers, please read our article on Access Modifiers in Java.

2. When to Use the Public Access Modifier

Public classes and interfaces, along with public members, define an API. It's that part of our code that others can see and use to control the behavior of our objects.

However, overusing the public modifier violates the Object-Oriented Programming (OOP) encapsulation principle and has a few downsides:

  • It increases the size of an API, making it harder for clients to use
  • It's becomes harder to change our code because clients rely on it — any future changes might break their code

3. Public Interfaces and Classes

3.1. Public Interfaces

A public interface defines a specification that can have one or more implementations. These implementations can be either provided by us or written by others.

For example, the Java API exposes the Connection interface to define database connection operations, leaving actual implementation to each vendor. At run-time, we get the desired connection based on the project setup:

Connection connection = DriverManager.getConnection(url);

The getConnection method returns an instance of a technology-specific implementation.

3.2. Public Classes

We define public classes so that clients can use their members by instantiation and static referencing:

assertEquals(0, new BigDecimal(0).intValue()); //instance member
assertEquals(2147483647, Integer.MAX_VALUE); //static member

Moreover, we can design public classes for inheritance by using the optional abstract modifier. When we're using the abstract modifier, the class is like a skeleton that has fields and pre-implemented methods that any concrete implementation can use, in addition to having abstract methods that each subclass needs to implement.

For example, the Java collections framework provides the AbstractList class as a basis for creating customized lists:

public class ListOfThree<E> extends AbstractList<E> {

    @Override
    public E get(int index) {
        //custom implementation
    }

    @Override
    public int size() {
        //custom implementation
    }

}

So, we only have to implement the get() and size() methods. Other methods like indexOf() and containsAll() are already implemented for us.

3.3. Nested Public Classes and Interfaces

Similar to public top-level classes and interfaces, nested public classes and interfaces define an API datatype. However, they are particularly useful in two ways:

  • They indicate to the API end user that the enclosing top-level type and its enclosed types have a logical relationship and are used together
  • They make our codebase more compact by reducing the number of source code files that we would've used if we'd declared them as top-level classes and interfaces

An example is the Map.Entry interface from the core Java API:

for (Map.Entry<String, String> entry : mapObject.entrySet()) { }

Making Map.Entry a nested interface strongly relates it to the java.util.Map interface and has saved us from creating another file inside the java.util package.

Please read the nested classes article for more details.

4. Public Methods

Public methods enable users to execute ready-made operations. An example is the public toLowerCase method in the String API:

assertEquals("alex", "ALEX".toLowerCase());

We can safely make a public method static if it doesn't use any instance fields. The parseInt method from the Integer class is an example of a public static method:

assertEquals(1, Integer.parseInt("1"));

Constructors are usually public so that we can instantiate and initialize objects, although sometimes they might be private like in singletons.

5. Public Fields

Public fields allow changing the state of an object directly. The rule of thumb is that we shouldn't use public fields. There are several reasons for this, as we're about to see.

5.1. Thread-Safety

Using public visibility with non-final fields or final mutable fields is not thread-safe. We can't control changing their references or states in different threads.

Please check our article on thread-safety to learn more about writing thread-safe code.

5.2. Taking Actions on Modifications

We have no control over a non-final public field because its reference or state can be set directly.

Instead, it's better to hide the fields using a private modifier and use a public setter:

public class Student {

    private int age;
    
    public void setAge(int age) {
        if (age < 0 || age > 150) {
            throw new IllegalArgumentException();
        }
    
        this.age = age;
    }
}

5.3. Changing the Data Type

Public fields, mutable or immutable, are part of the client's contract. It's harder to change the data representation of these fields in a future release because clients may need to refactor their implementations.

By giving fields private scope and using accessors, we have the flexibility to change the internal representation while maintaining the old data type as well:

    
public class Student {

    private StudentGrade grade; //new data representation
   
    public void setGrade(int grade) {        
        this.grade = new StudentGrade(grade);
    }

    public int getGrade() {
        return this.grade.getGrade().intValue();
    }
}

The only exception for using public fields is the use of static final immutable fields to represent constants:

public static final String SLASH = "/";

6. Conclusion

In this article, we saw that the public modifier is used to define an API. Also, we described how overusing this modifier may restrict the ability to introduce improvements to our implementation. Finally, we discussed why it's a bad practice to use public modifiers for fields.

And, as always, the code samples of this article are available over on GitHub.

Java ‘private’ Access Modifier

$
0
0

1. Overview

In the Java programming language, fields, constructors, methods, and classes can be marked with access modifiers. In this tutorial, we'll talk about the private access modifier in Java.

2. The Keyword

The private access modifier is important because it allows encapsulation and information hiding, which are core principles of object-oriented programming. Encapsulation is responsible for bundling methods and data, while information hiding is a consequence of encapsulation — it hides an object's internal representation.

The first thing to remember is that elements declared as private can be accessed only by the class in which they're declared.

3. Fields

Now, we'll see some simple code examples to better understand the subject.

First, let's create an Employee class containing a couple of private instance variables:

public class Employee {
    private String privateId;
    private boolean manager;
    //...
}

In this example, we marked the privateId variable as private because we want to add some logic to the id generation. And, as we can see, we did the same thing with manager attribute because we don't want to allow direct modification of this field.

4. Constructors

Let's now create a private constructor:

private Employee(String id, String name, boolean managerAttribute) {
    this.name = name;
    this.privateId = id + "_ID-MANAGER";
}

By marking our constructor as private, we can use it only from inside our class.

Let's add a static method that will be our only way to use this private constructor from outside the Employee class:

public static Employee buildManager(String id, String name) {
    return new Employee(id, name, true);
}

Now we can get a manager instance of our Employee class by simply writing:

Employee manager = Employee.buildManager("123MAN","Bob");

And behind the scenes, of course, the buildManager method calls our private constructor.

5. Methods

Let's now add a private method to our class:

private void setManager(boolean manager) {
    this.manager = manager;
}

And let's suppose, for some reason, we have an arbitrary rule in our company in which only an employee named “Carl” can be promoted to manager, although other classes aren't aware of this. We'll create a public method with some logic to handle this rule that calls our private method:

public void elevateToManager() {
    if ("Carl".equals(this.name)) {
        setManager(true);
    }
}

6. private In Action

Let's see an example of how to use our Employee class from outside:

public class ExampleClass {

    public static void main(String[] args) {
        Employee employee = new Employee("Bob","ABC123");
        employee.setPrivateId("BCD234");
        System.out.println(employee.getPrivateId());
    }
}

After executing ExampleClass, we'll see its output on the console:

BCD234_ID

In this example, we used the public constructor and the public method changeId(customId) because we can't access the private variable privateId directly.

Let's see what happens if we try to access a private method, constructor, or variable from outside our Employee class:

public class ExampleClass {

    public static void main(String[] args) {
        Employee employee = new Employee("Bob","ABC123",true);
        employee.setManager(true);
        employee.privateId = "ABC234";
    }
}

We'll get compilation errors for each of our illegal statements:

The constructor Employee(String, String, boolean) is not visible
The method setManager(boolean) from the type Employee is not visible
The field Employee.privateId is not visible

7. Classes

There is one special case where we can create a private class — as an inner class of some other class. Otherwise, if we were to declare an outer class as private, we'd be forbidding other classes from accessing it, making it useless:

public class PublicOuterClass {

    public PrivateInnerClass getInnerClassInstance() {
        PrivateInnerClass myPrivateClassInstance = this.new PrivateInnerClass();
        myPrivateClassInstance.id = "ID1";
        myPrivateClassInstance.name = "Bob";
        return myPrivateClassInstance;
    }

    private class PrivateInnerClass {
        public String name;
        public String id;
    }
}

In this example, we created a private inner class inside our PublicOuterClass by specifying the private access modifier.

Because we used the private keyword, if we, for some reason, try to instantiate our PrivateInnerClass from outside the PublicOuterClass, the code won't compile and we'll see the error:

PrivateInnerClass cannot be resolved to a type

8. Conclusion

In this quick tutorial, we've discussed the private access modifier in Java. It's a good way to achieve encapsulation, which leads to information hiding. As a result, we can ensure that we expose only the data and behaviors we want to other classes.

As always, the code example is available over on GitHub.

Implementing a Simple Blockchain in Java

$
0
0

1. Overview

In this tutorial, we'll learn the basic concepts of blockchain technology. We'll also implement a basic application in Java that focuses on the concepts.

Further, we'll discuss some advanced concepts and practical applications of this technology.

2. What is Blockchain?

So, let's first understand what exactly blockchain is…

Well, it traces its origin back to the whitepaper published by Satoshi Nakamoto on Bitcoin, back in 2008.

Blockchain is a decentralized ledger of information. It consists of blocks of data connected through the use of cryptography. It belongs to a network of nodes connected over the public network. We'll understand this better when we attempt to build a basic tutorial later on.

There are some important attributes that we must understand, so let's go through them:

  • Tamper-proof: First and foremost, data as part of a block is tamper-proof. Every block is referenced by a cryptographic digest, commonly known as a hash, making the block tamper-proof.
  • Decentralized: The entire blockchain is completely decentralized across the network. This means that there is no master node, and every node in the network has the same copy.
  • Transparent: Every node participating in the network validates and adds a new block to its chain through consensus with other nodes. Hence, every node has complete visibility of the data.

3. How Does Blockchain Work?

Now, let's understand how blockchain works.

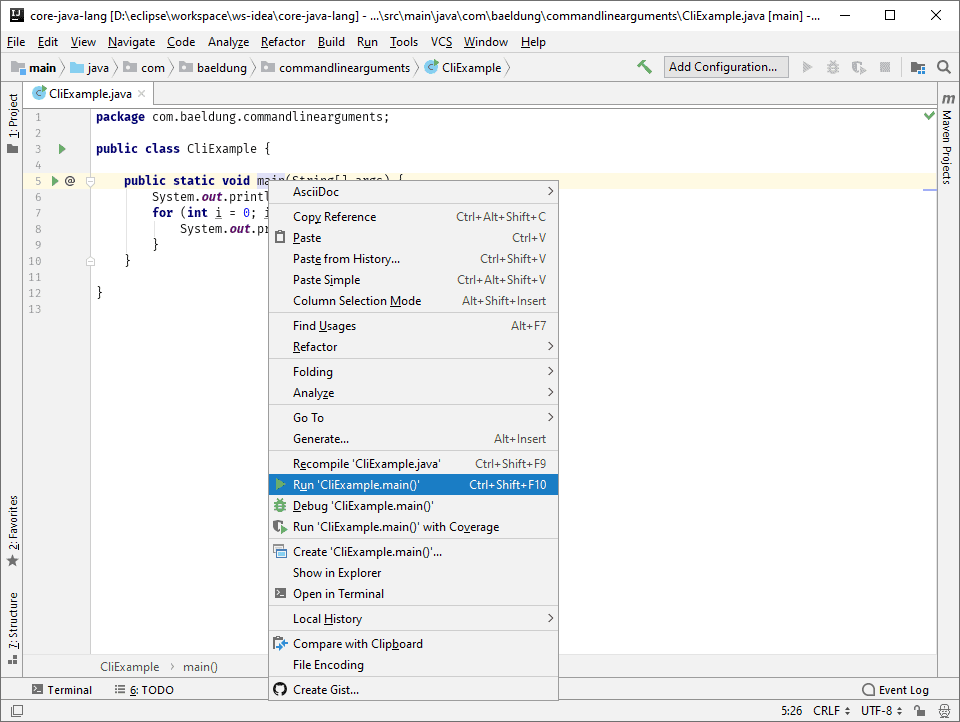
The fundamental units of a blockchain are blocks. A single block can encapsulate several transactions or other valuable data:

3.1. Mining a Block

We represent a block by a hash value. Generating the hash value of a block is called “mining” the block. Mining a block is typically computationally expensive to do as it serves as the “proof of work”.

The hash of a block typically consists of the following data:

  • Primarily, the hash of a block consists of the transactions it encapsulates
  • The hash also consists of the timestamp of the block's creation
  • It also includes a nonce, an arbitrary number used in cryptography
  • Finally, the hash of the current block also includes the hash of the previous block

Multiple nodes in the network can compete to mine the block at the same time. Apart from generating the hash, nodes also have to verify that the transactions being added in the block are legitimate. The first to mine a block wins the race!

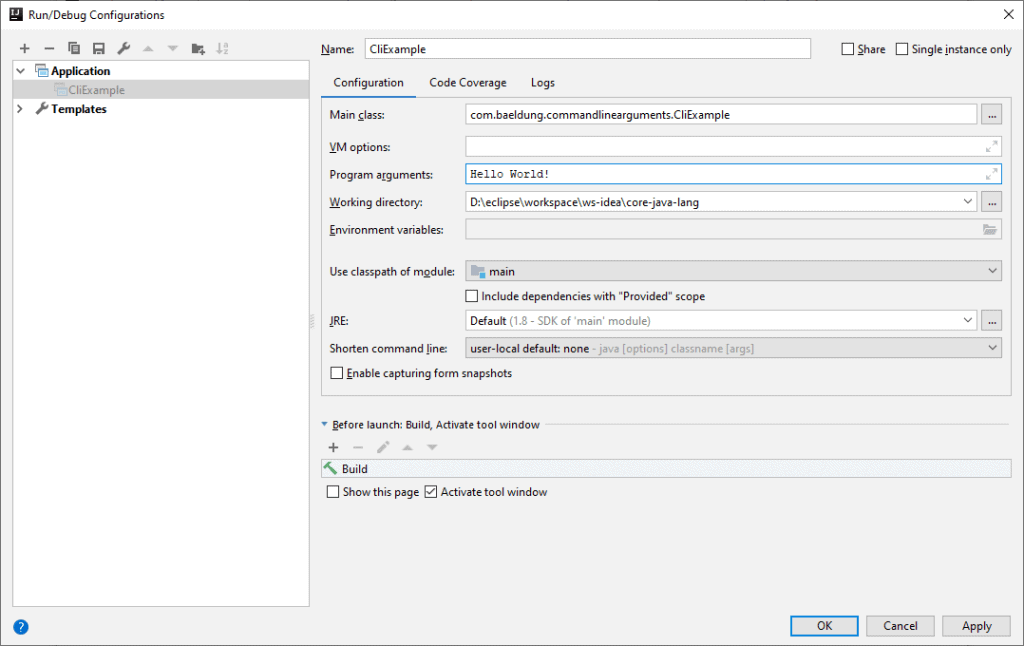
3.2. Adding a Block into Blockchain

While mining a block is computationally expensive, verifying that a block is legitimate is relatively much easier. All nodes in the network participate in verifying a newly mined block.

Thus, a newly mined block is added into the blockchain on the consensus of the nodes.

Now, there are several consensus protocols available which we can use for verification. The nodes in the network use the same protocol to detect malicious branch of the chain. Hence, a malicious branch even if introduced will soon be rejected by the majority of the nodes.

4. Basic Blockchain in Java

Now we've got enough context to start building a basic application in Java.

Our simple example here will illustrate the basic concepts we just saw. A production-grade application entails a lot of considerations which are beyond the scope of this tutorial. We'll, however, touch upon some advanced topics later on.

4.1. Implementing a Block

Firstly, we need to define a simple POJO that will hold the data for our block:

public class Block {
    private String hash;
    private String previousHash;
    private String data;
    private long timeStamp;
    private int nonce;
 
    public Block(String data, String previousHash, long timeStamp) {
        this.data = data;
        this.previousHash = previousHash;
        this.timeStamp = timeStamp;
        this.hash = calculateBlockHash();
    }
    // standard getters and setters
}

Let's understand what we've packed here:

  • Hash of the previous block, an important part to build the chain
  • The actual data, any information having value, like a contract
  • The timestamp of the creation of this block
  • A nonce, which is an arbitrary number used in cryptography
  • Finally, the hash of this block, calculated based on other data

4.2. Calculating the Hash

Now, how do we calculate the hash of a block? We've used a method calculateBlockHash but have not seen an implementation yet. Before we implement this method, it's worth spending some time to understand what exactly is a hash.

A hash is an output of something known as a hash function. A hash function maps input data of arbitrary size to output data of fixed size. The hash is quite sensitive to any change in the input data, however small that may be.

Moreover, it's impossible to get the input data back just from its hash. These properties make the hash function quite useful in cryptography.

So, let's see how we can generate the hash of our block in Java:

public String calculateBlockHash() {
    String dataToHash = previousHash 
      + Long.toString(timeStamp) 
      + Integer.toString(nonce) 
      + data;
    MessageDigest digest = null;
    byte[] bytes = null;
    try {
        digest = MessageDigest.getInstance("SHA-256");
        bytes = digest.digest(dataToHash.getBytes(UTF_8));
    } catch (NoSuchAlgorithmException | UnsupportedEncodingException ex) {
        logger.log(Level.SEVERE, ex.getMessage());
    }
    StringBuffer buffer = new StringBuffer();
    for (byte b : bytes) {
        buffer.append(String.format("%02x", b));
    }
    return buffer.toString();
}

Quite a lot of things happening here, let's understand them in detail:

  • First, we concatenate different parts of the block to generate a hash from
  • Then, we get an instance of the SHA-256 hash function from MessageDigest
  • Then, we generate the hash value of our input data, which is a byte array
  • Finally, we transform the byte array into a hex string, a hash is typically represented as a 32-digit hex number

4.3. Have We Mined the Block Yet?

Everything sounds simple and elegant so far, except for the fact that we've not mined the block yet. So what exactly entails mining a block, which has captured the fancy of developers for some time now!

Well, mining a block means solving a computationally complex task for the block. While calculating the hash of a block is somewhat trivial, finding the hash starting with five zeroes is not. Even more complicated would be to find a hash starting with ten zeroes, and we get a general idea.

So, how exactly can we do this? Honestly, the solution is much less fancy! It's with brute force that we attempt to achieve this goal. We make use of nonce here:

public String mineBlock(int prefix) {
    String prefixString = new String(new char[prefix]).replace('\0', '0');
    while (!hash.substring(0, prefix).equals(prefixString)) {
        nonce++;
        hash = calculateBlockHash();
    }
    return hash;
}

Let's see what we trying to do here are:

  • We start by defining the prefix we desire to find
  • Then we check whether we've found the solution
  • If not we increment the nonce and calculate the hash in a loop
  • The loop goes on until we hit the jackpot

We're starting with the default value of nonce here and incrementing it by one. But there are more sophisticated strategies to start and increment a nonce in real-world applications. Also, we're not verifying our data here, which is typically an important part.

4.4. Let's Run the Example

Now that we've our block defined along with its functions, we can use this to create a simple blockchain. We'll store this in an ArrayList:

List<Block> blockchain = new ArrayList<>();
int prefix = 4;
String prefixString = new String(new char[prefix]).replace('\0', '0');

Additionally, we've defined a prefix of four, which effectively means that we want our hash to start with four zeroes.

Let's see how can we add a block here:

@Test
public void givenBlockchain_whenNewBlockAdded_thenSuccess() {
    Block newBlock = new Block(
      "The is a New Block.", 
      blockchain.get(blockchain.size() - 1).getHash(),
      new Date().getTime());
    newBlock.mineBlock(prefix);
    assertTrue(newBlock.getHash().substring(0, prefix).equals(prefixString));
    blockchain.add(newBlock);
}

4.5. Blockchain Verification

How can a node validate that a blockchain is valid? While this can be quite complicated, let's think about a simple version:

@Test
public void givenBlockchain_whenValidated_thenSuccess() {
    boolean flag = true;
    for (int i = 0; i < blockchain.size(); i++) {
        String previousHash = i==0 ? "0" : blockchain.get(i - 1).getHash();
        flag = blockchain.get(i).getHash().equals(blockchain.get(i).calculateBlockHash())
          && previousHash.equals(blockchain.get(i).getPreviousHash())
          && blockchain.get(i).getHash().substring(0, prefix).equals(prefixString);
            if (!flag) break;
    }
    assertTrue(flag);
}

So, here we're making three specific checks for every block:

  • The stored hash of the current block is actually what it calculates
  • The hash of the previous block stored in the current block is the hash of the previous block
  • The current block has been mined

5. Some Advanced Concepts

While our basic example brings out the basic concepts of a blockchain, it's certainly not complete. To put this technology into practical use, several other considerations need to be factored in.

While it's not possible to detail all of them, let's go through some of the important ones:

5.1. Transaction Verification

Calculating the hash of a block and finding the desired hash is just one part of mining. A block consists of data, often in the form of multiple transactions. These must be verified before they can be made part of a block and mined.

A typical implementation of blockchain sets a restriction on how much data can be part of a block. It also sets up rules on how a transaction can be verified. Multiple nodes in the network participate in the verification process.

5.2. Alternate Consensus Protocol

We saw that consensus algorithm like “Proof of Work” is used to mine and validate a block. However, this is not the only consensus algorithm available for use.

There are several other consensus algorithms to choose from, like Proof of Stake, Proof of Authority, and Proof of Weight. All of these have their pros and cons. Which one to use depends upon the type of application we intend to design.

5.3. Mining Reward

A blockchain network typically consists of voluntary nodes. Now, why would anyone want to contribute to this complex process and keep it legit and growing?

This is because nodes are rewarded for verifying the transactions and mining a block. These rewards are typically in the form of coin associated with the application. But an application can decide the reward to be anything of value.

5.4. Node Types

A blockchain completely relies on its network to operate. In theory, the network is completely decentralized, and every node is equal. However, in practice, a network consists of multiple types of nodes.

While a full node has a complete list of transactions, a light node only has a partial list. Moreover, not all nodes participate in verification and validation.

5.5. Secure Communication

One of the hallmarks of blockchain technology is its openness and anonymity. But how does it provide security to transactions being carried within? This is based on cryptography and public key infrastructure.

The initiator of a transaction uses their private key to secure it and attach it to the public key of the recipient. Nodes can use the public keys of the participants to verify transactions.

6. Practical Applications of Blockchain

So, blockchain seems to be an exciting technology, but it also must prove useful. This technology has been around for some time now and – needless to say – it has proved to be disruptive in many domains.

Its application in many other areas is being actively pursued. Let's understand the most popular applications:

  • Currency: This is by far the oldest and most widely known use of blockchain, thanks to the success of Bitcoin. They provide secure and frictionless money to people across the globe without any central authority or government intervention.
  • Identity: Digital identity is fast becoming the norm in the present world. However, this is mired by security issues and tampering. Blockchain is inevitable in revolutionizing this area with completely secure and tamper-proof identities.
  • Healthcare: Healthcare industry is loaded with data, mostly handled by central authorities. This decreases transparency, security, and efficiency in handling such data. Blockchain technology can provide a system without any third party to provide much-needed trust.
  • Government: This is perhaps an area which is well open to disruption by the blockchain technology. Government is typically at the center of several citizen services which are often laden with inefficiencies and corruption. Blockchain can help establish much better government-citizen relations.

7. Tools of the Trade

While our basic implementation here is useful to elicit the concepts, it's not practical to develop a product on blockchain from scratch. Thankfully, this space has matured now, and we do have some quite useful tools to start from.

Let's go through some of the popular tools to work within this space:

  • Solidity: Solidity is a statically-typed and object-oriented programming language designed for writing smart contracts. It can be used to write smart contracts on various blockchain platforms like Ethereum.
  • Remix IDE: Remix is a powerful open-source tool to write smart contracts in Solidity. This enables the user to write smart contracts right from the browser.
  • Truffle Suite: Truffle provides a bunch of tools to get a developer up and started in developing distributed apps. This includes Truffle, Ganache, and Drizzle.
  • Ethlint/Solium: Solium allows developers to ensure that their smart contracts written on Solidity is free from style and security issues. Solium also helps in fixing these issues.
  • Parity: Parity helps in setting up the development environment for smart contract on Etherium. It provides a fast and secure way to interact with the blockchain.

8. Conclusion

To sum up, in this tutorial, we went through the basic concepts of blockchain technology. We understood how a network mine and add a new block in the blockchain. Further, we implemented the basic concepts in Java. We also discussed some of the advanced concepts related to this technology.

Finally, we wrapped up with some practical applications of blockchain and as well as available tools.

As always, the code can be found over on GitHub.

A Guide to Spring Boot Configuration Metadata

$
0
0

1. Overview

When writing a Spring Boot application, it's helpful to map configuration properties onto Java beans. What's the best way to document these properties, though?

In this tutorial, we’ll explore the Spring Boot Configuration Processor and the associated JSON metadata files that document each property's meaning, constraints, and so on.

2. Configuration Metadata

Most of the applications we work on as developers must be configurable to some extent. However, usually, we don’t really understand what a configuration parameter does, if it has a default value, if it's deprecated, and at times, we don't even know the property exists.

To help us out, Spring Boot generates configuration metadata in a JSON file, which gives us useful information on how to use the properties. So, the configuration metadata is a descriptive file which contains the necessary information for interaction with the configuration properties.

The really nice thing about this file is that IDEs can read it, too, giving us autocomplete of Spring properties, as well as other configuration hints.

3. Dependencies

In order to generate this configuration metadata, we’ll use the configuration processor from the spring-boot-configuration-processor dependency.

So, let’s go ahead and add the dependency as optional:

<dependency>
    <groupId>org.springframework.boot</groupId>
    <artifactId>spring-boot-configuration-processor</artifactId>
    <version>2.1.7.RELEASE</version>
    <optional>true</optional>
</dependency>

This dependency will provide us with a Java annotation processor invoked when we build our project. We’ll talk in detail about this later on.

It’s a best practice to add a dependency as optional in Maven in order to prevent @ConfigurationProperties from being applied to other modules that our project uses.

4. Configuration Properties Example

To see the processor in action, let’s imagine we have a few properties that we need to include in our Spring Boot application via a Java bean:

@Configuration
@ConfigurationProperties(prefix = "database")
public class DatabaseProperties {
	
    public static class Server {

        private String ip;
        private int port;

        // standard getters and setters
    }
	
    private String username;
    private String password;
    private Server server;
	
    // standard getters and setters
}

To do this, we'd use the @ConfigurationProperties annotation. The configuration processor scans for classes and methods with this annotation to access the configuration parameters and generate configuration metadata.

Let's add a couple of these properties into a properties file. In this case, we'll call it databaseproperties-test.properties:

#Simple Properties
database.username=baeldung
database.password=password

And, just to be sure, we'll also add a test to make sure that we are all lined up:

@RunWith(SpringRunner.class)
@SpringBootTest(classes = AnnotationProcessorApplication.class)
@TestPropertySource("classpath:databaseproperties-test.properties")
public class DatabasePropertiesIntegrationTest {

    @Autowired
    private DatabaseProperties databaseProperties;

    @Test
    public void whenSimplePropertyQueriedThenReturnsPropertyValue() 
      throws Exception {
        Assert.assertEquals("Incorrectly bound Username property", 
          "baeldung", databaseProperties.getUsername());
        Assert.assertEquals("Incorrectly bound Password property", 
          "password", databaseProperties.getPassword());
    }
    
}

We’ve also added the nested properties database.server.id and database.server.port via the inner class Server. We should add the inner class Server as well as a field server with its own getter and setter.

In our test, let’s do a quick check to make sure we can set and read successfully nested properties as well:

@Test
public void whenNestedPropertyQueriedThenReturnsPropertyValue() 
  throws Exception {
    Assert.assertEquals("Incorrectly bound Server IP nested property",
      "127.0.0.1", databaseProperties.getServer().getIp());
    Assert.assertEquals("Incorrectly bound Server Port nested property", 
      3306, databaseProperties.getServer().getPort());
}

Okay, now we're ready to use the processor.

5. Generating Configuration Metadata

We mentioned earlier that the configuration processor generates a file – it does this uses annotation processing.

So, after compiling our project, we'll see a file called spring-configuration-metadata.json inside target/classes/META-INF:

{
  "groups": [
    {
      "name": "database",
      "type": "com.baeldung.autoconfiguration.annotationprocessor.DatabaseProperties",
      "sourceType": "com.baeldung.autoconfiguration.annotationprocessor.DatabaseProperties"
    },
    {
      "name": "database.server",
      "type": "com.baeldung.autoconfiguration.annotationprocessor.DatabaseProperties$Server",
      "sourceType": "com.baeldung.autoconfiguration.annotationprocessor.DatabaseProperties",
      "sourceMethod": "getServer()"
    }
  ],
  "properties": [
    {
      "name": "database.password",
      "type": "java.lang.String",
      "sourceType": "com.baeldung.autoconfiguration.annotationprocessor.DatabaseProperties"
    },
    {
      "name": "database.server.ip",
      "type": "java.lang.String",
      "sourceType": "com.baeldung.autoconfiguration.annotationprocessor.DatabaseProperties$Server"
    },
    {
      "name": "database.server.port",
      "type": "java.lang.Integer",
      "sourceType": "com.baeldung.autoconfiguration.annotationprocessor.DatabaseProperties$Server",
      "defaultValue": 0
    },
    {
      "name": "database.username",
      "type": "java.lang.String",
      "sourceType": "com.baeldung.autoconfiguration.annotationprocessor.DatabaseProperties"
    }
  ],
  "hints": []
}

Next, let's see how changing annotations on our Java beans affect the metadata.

5.1. Additional Information on Configuration Metadata

First, let’s add JavaDoc comments on Server.

Second, let’s give a default value to the database.server.port field and finally add the @Min and @Max annotations:

public static class Server {

    /**
     * The IP of the database server
     */
    private String ip;

    /**
     * The Port of the database server.
     * The Default value is 443.
     * The allowed values are in the range 400-4000.
     */
    @Min(400)
    @Max(800)
    private int port = 443;

    // standard getters and setters
}

If we check the spring-configuration-metadata.json file now, we'll see this extra information reflected:

{
  "groups": [
    {
      "name": "database",
      "type": "com.baeldung.autoconfiguration.annotationprocessor.DatabaseProperties",
      "sourceType": "com.baeldung.autoconfiguration.annotationprocessor.DatabaseProperties"
    },
    {
      "name": "database.server",
      "type": "com.baeldung.autoconfiguration.annotationprocessor.DatabaseProperties$Server",
      "sourceType": "com.baeldung.autoconfiguration.annotationprocessor.DatabaseProperties",
      "sourceMethod": "getServer()"
    }
  ],
  "properties": [
    {
      "name": "database.password",
      "type": "java.lang.String",
      "sourceType": "com.baeldung.autoconfiguration.annotationprocessor.DatabaseProperties"
    },
    {
      "name": "database.server.ip",
      "type": "java.lang.String",
      "description": "The IP of the database server",
      "sourceType": "com.baeldung.autoconfiguration.annotationprocessor.DatabaseProperties$Server"
    },
    {
      "name": "database.server.port",
      "type": "java.lang.Integer",
      "description": "The Port of the database server. The Default value is 443.
        The allowed values are in the range 400-4000",
      "sourceType": "com.baeldung.autoconfiguration.annotationprocessor.DatabaseProperties$Server",
      "defaultValue": 443
    },
    {
      "name": "database.username",
      "type": "java.lang.String",
      "sourceType": "com.baeldung.autoconfiguration.annotationprocessor.DatabaseProperties"
    }
  ],
  "hints": []
}

We can check the differences with the database.server.ip and database.server.port fields. Indeed, the extra information is quite helpful. As a result, it's much easier for developers and IDEs to understand what each property does.

We should also make sure we trigger the build to get the updated file. In Eclipse, if we check the Build Automatically option, each save action will trigger a build. In IntelliJ, we should trigger the build manually.

5.2. Understanding the Metadata Format

Let’s have a closer look at the JSON metadata file and discuss its components.

Groups are higher-level items used to group other properties, without specifying a value itself. In our example, we have the database group, which is also the prefix of the configuration properties. We also have a server group, which we created via an inner class and groups ip and port properties.

Properties are configuration items for which we can specify a value. These properties are set in .properties or .yml files and can have extra information, like default values and validations, as we saw in the example above.

Hints are additional information to help the user set the property value. For example, if we have a set of allowed value for a property, we can provide a description of what each of them does. The IDE will provide auto-competition help for these hints.

Each component on the configuration metadata has its own attributes to explain in finer details the configuration properties.

6. Conclusion

In this article, we looked at the Spring Boot Configuration Processor and its ability to create configuration metadata. Using this metadata makes it a lot easier to interact with our configuration parameters.

We gave an example of a generated configuration metadata and explained in details its format and components.

We also saw how helpful the autocomplete support on our IDE can be.

As always, all of the code snippets mentioned in this article can be found on our GitHub repository.

Java Weekly, Issue 297

$
0
0

Here we go…

1. Spring and Java

>> Candidate JEPs: Records and Sealed Types [marxsoftware.com]

Two related Java preview feature proposals that, when taken together, may be combined to form algebraic data types.

>> Quick Guide to Building a Spring Boot Starter [reflectoring.io]

Building your own starter can help with cross-cutting concerns and isn't all that difficult.

>> Jabel – use Javac 12+ syntax when targeting Java 8 [github.com]

And an annotation processor that instruments the Java 12+ compiler to generate Java 8 bytecode, even when sources contain JVM 9+ language features such as switch statements and var declarations.

Also worth reading:

Webinars and presentations:

2. Technical and Musing

>> Modern applications at AWS [allthingsdistributed.com]

Amazon's journey from monolith to distributed architecture paved the way for the AWS we know today.

>> Don't get locked up into avoiding lock-in [martinfowler.com]

And though lock-in can be costly, the up-front effort needed to avoid it may not be worth the investment in the long run.

Also worth reading:

3. Comics

>> The Inexperienced Employee [dilbert.com]

>> Unconscious Bias [dilbert.com]

>> Acquaintance Price Chart [dilbert.com]

4. Pick of the Week

>> The Secret to Being a Top Developer Is Building Things! Here’s a List of Fun Apps to Build! [medium.com]

Command-Line Arguments in Java

$
0
0

1. Introduction

It's quite common to run applications from the command-line using arguments. Especially on the server-side. Usually, we don't want the application to do the same thing on every run: we want to configure it's behavior some way.

In this short tutorial, we'll explore how can we handle command-line arguments in Java.

2. Accessing Command-Line Arguments in Java

Since the main method is the entry point of a Java application, the JVM passes the command-line arguments through its arguments.

The traditional way is to use a String array:

public static void main(String[] args) {
    // handle arguments
}

However, Java 5 introduced varargs, which are arrays in sheep's clothing. Therefore, we can define our main with a String vararg:

public static void main(String... args) {
    // handle arguments
}

They're identical, therefore choosing between them is entirely up to personal taste and preference.

The method parameter of the main method contains the command-line arguments in the same order we passed at execution. If we want to access how much arguments did we get, we only have to check the length of the array.

For example, we can print the number of arguments and their value on the standard output:

public static void main(String[] args) {
    System.out.println("Argument count: " + args.length);
    for (int i = 0; i < args.length; i++) {
        System.out.println("Argument " + i + ": " + args[i]);
    }
}

Note that in some languages, the first argument will be the name of the application. On the other hand, in Java, this array contains only the arguments.

3. How to Pass Command-Line Arguments

Now that we have an application that handles command-line arguments, we're eager to try it. Let's see what options we have.

3.1. Command Line

The most obvious way is the command-line. Let's assume we already compiled the class com.baeldung.commandlinearguments.CliExample with our main method in it.

Then we can run it with the following command:

java com.baeldung.commandlinearguments.CliExample

It produces the following output:

Argument count: 0

Now, we can pass arguments after the class name:

java com.baeldung.commandlinearguments.CliExample Hello World!

And the output is:

Argument count: 2
Argument 0: Hello
Argument 1: World!

Usually, we publish our application as a jar file, not as a bunch of .class files. Let's say, we packaged it in the cli-example.jar, and we set com.baeldung.commandlinearguments.CliExample as the main class.

Now we can run it without arguments the following way:

java -jar cli-example.jar

Or with arguments:

java -jar cli-example.jar Hello World!
Argument count: 2 
Argument 0: Hello 
Argument 1: World!

Note, that Java will treat every argument we pass after the class name or the jar file name as the arguments of our application. Therefore, everything we pass before that are arguments for the JVM itself.

3.2. Eclipse

While we're working on our application, we'll want to check if it works the way we want.

In Eclipse, we can run applications with the help of run configurations. For example, a run configuration defines which JVM to use, what is the entry point, the classpath, and so on. And of course, we can specify command-line arguments.

The easiest way to create an appropriate run configuration is to right-click on our main method, then choose Run As > Java Application from the context menu:

With this, we instantly run our application with settings that honor our project settings.

To provide arguments, we should then edit that run configuration. We can do it through the Run > Run Configurations… menu option. Here, we should click the Arguments tab and fill the Program arguments textbox:

Hitting Run will run the application and pass the arguments we just entered.

3.3. IntelliJ

IntelliJ uses a similar process to run applications. It calls these options simply as configurations.

First, we need to right-click on the main method, then choose Run ‘CliExample.main()':

This will run our program, but it will also add it to the Run list for further configuration.

So, then to configure arguments, we should choose Run > Edit Configurations… and edit the Program arguments textbox:

After that, we should hit OK and rerun our application, for example with the run button in the toolbar.

3.4. NetBeans

NetBeans also falls into line with its running and configuration processes.

We should run our application first by right-clicking on the main method and choosing Run File:

Like before, this creates a run configuration and runs the program.

Next, we have to configure the arguments in that run configuration. We can do that by choosing Run > Set Project Configuration > Customize… Then we should Run on the left and fill the Arguments text field:

After that, we should hit OK and start the application.

4. Third-Party Libraries

Manual handling of the command-line arguments is straightforward in simple scenarios. However, as our requirements become more and more complex, so does our code. Therefore, if we want to create an application with multiple command-line options, it would be easier to use a third-party library.

Fortunately, there're a plethora of those libraries which support most use cases. Two popular examples are Picocli and Spring Shell.

5. Conclusion

It's always a good idea to make your application's behavior configurable. In this article, we saw how to do that using command-line arguments. Additionally, we covered various ways to pass those arguments.

As usual, the examples are available over on GitHub.

Convert Character Array to String in Java

$
0
0

1. Overview

In this quick tutorial, we'll cover various ways to convert a character array to a String in Java.

2. String Constructor

The String class has a constructor that accepts a char array as an argument:

@Test 
public void whenStringConstructor_thenOK() {
    final char[] charArray = { 'b', 'a', 'e', 'l', 'd', 'u', 'n', 'g' };
    String string = new String(charArray);
    assertThat(string, is("baeldung"));
}

This is one of the easiest ways of converting a char array to a String. It internally invokes String#valueOf to create a String object.

3. String.valueOf()

And speaking of valueOf(), we can even use it directly:

@Test
public void whenStringValueOf_thenOK() {
    final char[] charArray = { 'b', 'a', 'e', 'l', 'd', 'u', 'n', 'g' };
    String string = String.valueOf(charArray);
    assertThat(string, is("baeldung"));
}

String#copyValueOf is another method that's semantically equivalent to the valueOf() method but was of any significance only in a first few Java releases. As of today, the copyValueOf() method is redundant and we don't recommend using it.

4. StringBuilder‘s toString()

What if we want to form a String from an array of char arrays?

Then, we can first instantiate a StringBuilder instance and use its append(char[]) method to append all contents together.

Later, we'll use the toString() method to get its String representation:

@Test
public void whenStringBuilder_thenOK() {
    final char[][] arrayOfCharArray = { { 'b', 'a' }, { 'e', 'l', 'd', 'u' }, { 'n', 'g' } };    
    StringBuilder sb = new StringBuilder();
    for (char[] subArray : arrayOfCharArray) {
        sb.append(subArray);
    }
    assertThat(sb.toString(), is("baeldung"));
}

We can further optimize the above code by instantiating the StringBuilder of the exact length we need.

5. Java 8 Streams

With Arrays.stream(T[] object) method, we can open a stream over an array of type T.

Considering we have a Character array, we can use the Collectors.joining() operation to form a String instance:

@Test
public void whenStreamCollectors_thenOK() {
    final Character[] charArray = { 'b', 'a', 'e', 'l', 'd', 'u', 'n', 'g' };
    Stream<Character> charStream = Arrays.stream(charArray);
    String string = charStream.map(String::valueOf).collect(Collectors.joining());
    assertThat(string, is("baeldung"));
}

The caveat with this approach is that we are invoking the valueOf() over each Character element and so it'll be pretty slow.

6. Guava Common Base Joiner

Let's say though that the string we need to create is a delimited string. Guava gives us a handy method:

@Test
public void whenGuavaCommonBaseJoiners_thenOK() {
    final Character[] charArray = { 'b', 'a', 'e', 'l', 'd', 'u', 'n', 'g' };
    String string = Joiner.on("|").join(charArray);
    assertThat(string, is("b|a|e|l|d|u|n|g"));
}

Again, note that the join() method will only accept a Character array and not the primitive char array.

7. Conclusion

In this tutorial, we explored ways of converting a given character array to its String representation in Java.

As usual, all code examples can be found in the GitHub repository.


Add a Header to a Jersey SSE Client Request

$
0
0

1. Overview

In this tutorial, we'll see an easy way to send headers in Server-Sent Event (SSE) client requests using the Jersey Client API.

We'll also cover the proper way to send basic key/value headers, authentication headers, and restricted headers using the default Jersey transport connector.

2. Straight to the Point

Probably we've all run into this situation while trying to send headers using SSEs:

We use a SseEventSource to receive SSEs, but to build the SseEventSource, we need a WebTarget instance that doesn't provide us with a way to add headers. The Client instance is no help either. Sound familiar?

Remember though, headers aren't related to SSE, but to the client request itself, so we really ought to be looking there.

Let's see what we can do, then, with ClientRequestFilter.

3. Dependencies

To start our journey, we need the jersey-client dependency as well as Jersey's SSE dependency in our Maven pom.xml file:

<dependency>
    <groupId>org.glassfish.jersey.core</groupId>
    <artifactId>jersey-client</artifactId>
    <version>2.29</version>
</dependency>
<dependency>
    <groupId>org.glassfish.jersey.media</groupId>
    <artifactId>jersey-media-sse</artifactId>
    <version>2.29</version>
</dependency>

Note that Jersey supports JAX-RS 2.1 as of 2.29, so it looks like we'll be able to use features from that.

4. ClientRequestFilter

First, we'll implement the filter that will add the header to each client request:

public class AddHeaderOnRequestFilter implements ClientRequestFilter {

    public static final String FILTER_HEADER_VALUE = "filter-header-value";
    public static final String FILTER_HEADER_KEY = "x-filter-header";

    @Override
    public void filter(ClientRequestContext requestContext) throws IOException {
        requestContext.getHeaders().add(FILTER_HEADER_KEY, FILTER_HEADER_VALUE);
    }
}

After that, we'll register it and consume it.

For our examples, we'll use https://sse.example.org as an imaginary endpoint from which we want our client to consume events. In reality, we'd change this to the real SSE Event server endpoint that we want our client to consume.

Client client = ClientBuilder.newBuilder()
  .register(AddHeaderOnRequestFilter.class)
  .build();

WebTarget webTarget = client.target("https://sse.example.org/");

SseEventSource sseEventSource = SseEventSource.target(webTarget).build();
sseEventSource.register((event) -> { /* Consume event here */ });
sseEventSource.open();
// do something here until ready to close
sseEventSource.close();

Now, what if we need to send more complex headers like authentication headers to our SSE endpoint?

Let's go together to the next sections to learn more about headers in the Jersey Client API.

5. Headers in Jersey Client API

Is important to know that the default Jersey transport connector implementation makes use of the HttpURLConnection class from the JDK. This class restricts the use of some headers. To avoid that restriction, we can set the system property:

System.setProperty("sun.net.http.allowRestrictedHeaders", "true");

We can find a list of restricted headers in the Jersey docs.

5.1. Simple General Headers

The most straightforward way to define a header is calling WebTarget#request to obtain an Invocation.Builder that provides the header method.

public Response simpleHeader(String headerKey, String headerValue) {
    Client client = ClientBuilder.newClient();
    WebTarget webTarget = client.target("https://sse.example.org/");
    Invocation.Builder invocationBuilder = webTarget.request();
    invocationBuilder.header(headerKey, headerValue);
    return invocationBuilder.get();
}

And, actually, we can compact this quite nicely for added readability:

public Response simpleHeaderFluently(String headerKey, String headerValue) {
    Client client = ClientBuilder.newClient();

    return client.target("https://sse.example.org/")
      .request()
      .header(headerKey, headerValue)
      .get();
}

From here we'll use only the fluent form for the samples as it's easier to understand.

5.2. Basic Authentication

Actually, the Jersey Client API provides the HttpAuthenticationFeature class that allows us to send authentication headers easily:

public Response basicAuthenticationAtClientLevel(String username, String password) {
    HttpAuthenticationFeature feature = HttpAuthenticationFeature.basic(username, password);
    Client client = ClientBuilder.newBuilder().register(feature).build();

    return client.target("https://sse.example.org/")
      .request()
      .get();
}

Since we registered feature while building the client, it'll be applied to every request. The API handles the encoding of the username and password that the Basic specification requires.

Note, by the way, that we are implying HTTPS as the mode for our connection. While this is always a valuable security measure, it's fundamental when using Basic authentication as, otherwise, the password is exposed as plaintext. Jersey also supports more sophisticated security configurations.

Now, we can also spec the creds at request-time as well:

public Response basicAuthenticationAtRequestLevel(String username, String password) {
    HttpAuthenticationFeature feature = HttpAuthenticationFeature.basicBuilder().build();
    Client client = ClientBuilder.newBuilder().register(feature).build();

    return client.target("https://sse.example.org/")
      .request()
      .property(HTTP_AUTHENTICATION_BASIC_USERNAME, username)
      .property(HTTP_AUTHENTICATION_BASIC_PASSWORD, password)
      .get();
}

5.3. Digest Authentication

Jersey's HttpAuthenticationFeature also supports Digest authentication:

public Response digestAuthenticationAtClientLevel(String username, String password) {
    HttpAuthenticationFeature feature = HttpAuthenticationFeature.digest(username, password);
    Client client = ClientBuilder.newBuilder().register(feature).build();

    return client.target("https://sse.example.org/")
      .request()
      .get();
}

And, likewise, we can override at request-time:

public Response digestAuthenticationAtRequestLevel(String username, String password) {
    HttpAuthenticationFeature feature = HttpAuthenticationFeature.digest();
    Client client = ClientBuilder.newBuilder().register(feature).build();

    return client.target("http://sse.example.org/")
      .request()
      .property(HTTP_AUTHENTICATION_DIGEST_USERNAME, username)
      .property(HTTP_AUTHENTICATION_DIGEST_PASSWORD, password)
      .get();
}

5.4. Bearer Token Authentication with OAuth 2.0

OAuth 2.0 supports the notion of Bearer tokens as another authentication mechanism.

We'll need Jersey's oauth2-client dependency to give us OAuth2ClientSupportFeature which is similar to HttpAuthenticationFeature:

<dependency>
    <groupId>org.glassfish.jersey.security</groupId>
    <artifactId>oauth2-client</artifactId>
    <version>2.29</version>
</dependency>

To add a bearer token, we'll follow a similar pattern as before:

public Response bearerAuthenticationWithOAuth2AtClientLevel(String token) {
    Feature feature = OAuth2ClientSupport.feature(token);
    Client client = ClientBuilder.newBuilder().register(feature).build();

    return client.target("https://sse.examples.org/")
      .request()
      .get();
}

Or, we can override at the request level, which is specifically handy when the token changes due to rotation:

public Response bearerAuthenticationWithOAuth2AtRequestLevel(String token, String otherToken) {
    Feature feature = OAuth2ClientSupport.feature(token);
    Client client = ClientBuilder.newBuilder().register(feature).build();

    return client.target("https://sse.example.org/")
      .request()
      .property(OAuth2ClientSupport.OAUTH2_PROPERTY_ACCESS_TOKEN, otherToken)
      .get();
}

5.5. Bearer Token Authentication with OAuth 1.0

Fourthly, if we need to integrate with a legacy code that uses OAuth 1.0, we'll need Jersey's oauth1-client dependency:

<dependency>
    <groupId>org.glassfish.jersey.security</groupId>
    <artifactId>oauth1-client</artifactId>
    <version>2.29</version>
</dependency>

And similarly to OAuth 2.0, we've got OAuth1ClientSupport that we can use:

public Response bearerAuthenticationWithOAuth1AtClientLevel(String token, String consumerKey) {
    ConsumerCredentials consumerCredential = 
      new ConsumerCredentials(consumerKey, "my-consumer-secret");
    AccessToken accessToken = new AccessToken(token, "my-access-token-secret");

    Feature feature = OAuth1ClientSupport
      .builder(consumerCredential)
      .feature()
      .accessToken(accessToken)
      .build();

    Client client = ClientBuilder.newBuilder().register(feature).build();

    return client.target("https://sse.example.org/")
      .request()
      .get();
}

With the request-level again being enabled by the OAuth1ClientSupport.OAUTH_PROPERTY_ACCESS_TOKEN property.

6. Conclusion

To summarize, in this article, we covered how to add headers to SSE client requests in Jersey using filters. We also specifically covered how to work with authentication headers.

The code for this example is available over on GitHub.

How to Avoid the Java FileNotFoundException When Loading Resources

$
0
0

1. Overview

In this tutorial, we'll explore an issue that can come up when reading resource files in a Java application: At runtime, the resource folder is seldom in the same location on disk as it is in our source code.

Let's see how Java allows us to access resource files after our code has been packaged.

2. Reading Files

Let's say our application reads a file during startup:

try (FileReader fileReader = new FileReader("src/main/resources/input.txt"); 
     BufferedReader reader = new BufferedReader(fileReader)) {
    String contents = reader.lines()
      .collect(Collectors.joining(System.lineSeparator()));
}

If we run the above code in an IDE, the file loads without an error. This is because our IDE uses our project directory as its current working directory and the src/main/resources directory is right there for the application to read.

Now let's say we use the Maven JAR plugin to package our code as a JAR.

When we run it at the command line:

java -jar core-java-io2.jar

We'll see the following error:

Exception in thread "main" java.io.FileNotFoundException: src/main/resources/input.txt (No such file or directory)
	at java.io.FileInputStream.open0(Native Method)
	at java.io.FileInputStream.open(FileInputStream.java:195)
	at java.io.FileInputStream.<init>(FileInputStream.java:138)
	at java.io.FileInputStream.<init>(FileInputStream.java:93)
	at java.io.FileReader.<init>(FileReader.java:58)
	at com.baeldung.resource.MyResourceLoader.loadResourceWithReader(MyResourceLoader.java:14)
	at com.baeldung.resource.MyResourceLoader.main(MyResourceLoader.java:37)

3. Source Code vs Compiled Code

When we build a JAR, the resources get placed into the root directory of the packaged artifacts.

In our example, we see the source code setup has input.txt in src/main/resources in our source code directory.

In the corresponding JAR structure, however, we see:

META-INF/MANIFEST.MF
META-INF/
com/
com/baeldung/
com/baeldung/resource/
META-INF/maven/
META-INF/maven/com.baeldung/
META-INF/maven/com.baeldung/core-java-io2/
input.txt
com/baeldung/resource/MyResourceLoader.class
META-INF/maven/com.baeldung/core-java-io2/pom.xml
META-INF/maven/com.baeldung/core-java-io2/pom.properties

Here, input.txt is at the root directory of the JAR. So when the code executes, we'll see the FileNotFoundException.

Even if we changed the path to /input.txt the original code could not load this file as resources are not usually addressable as files on disk. The resource files are packaged inside the JAR and so we need a different way of accessing them.

4. Resources

Let's instead use resource loading to load resources from the classpath instead of a specific file location. This will work regardless of how the code is packaged:

try (InputStream inputStream = getClass().getResourceAsStream("/input.txt");
    BufferedReader reader = new BufferedReader(new InputStreamReader(inputStream))) {
    String contents = reader.lines()
      .collect(Collectors.joining(System.lineSeparator()));
}

ClassLoader.getResourceAsStream() looks at the classpath for the given resource. The leading slash on the input to getResourceAsStream() tells the loader to read from the base of the classpath. The contents of our JAR file are on the classpath, so this method works.

An IDE typically includes src/main/resources on its classpath and, thus, finds the files.

5. Conclusion

In this article, we implemented loading files as classpath resources, to allow our code to work consistently regardless of how it was packaged.

As always, the example code is available over on GitHub.

Primitive Collections in Eclipse Collections

$
0
0

1. Introduction

In this tutorial, we'll talk about primitive collections in Java and how Eclipse Collections can help.

2. Motivation

Suppose we want to create a simple list of integers:

List<Integer> myList = new ArrayList<>; 
int one = 1; 
myList.add(one);

Since collections can only hold object references, behind the scenes, the one is converted to an Integer in the process. The boxing and unboxing aren't free, of course. As a result, there's a performance loss in this process.

So, first, using primitive collections from Eclipse Collections can give us a speed boost.

Second, it reduces memory footprint. The graph below compares memory usage between the traditional ArrayList and IntArrayList from Eclipse Collections:

*Image extracted from https://www.eclipse.org/collections/#concept

And of course, let's not forget, the variety of implementations is a big seller for Eclipse Collections.

Note also that Java up to this point doesn't have support for primitive collections. However, Project Valhalla through JEP 218 aims to add it.

3. Dependencies

We'll use Maven to include the required dependencies:

<dependency>
    <groupId>org.eclipse.collections</groupId>
    <artifactId>eclipse-collections-api</artifactId>
    <version>10.0.0</version>
</dependency>

<dependency>
    <groupId>org.eclipse.collections</groupId>
    <artifactId>eclipse-collections</artifactId>
    <version>10.0.0</version>
</dependency>

4. long List

Eclipse Collections has memory-optimized lists, sets, stacks, maps, and bags for all the primitive types. Let's jump into a few examples.

First, let's take a look at a list of longs:

@Test
public void whenListOfLongHasOneTwoThree_thenSumIsSix() {
    MutableLongList longList = LongLists.mutable.of(1L, 2L, 3L);
    assertEquals(6, longList.sum());
}

5. int List

Likewise, we can create an immutable list of ints:

@Test
public void whenListOfIntHasOneTwoThree_thenMaxIsThree() {
    ImmutableIntList intList = IntLists.immutable.of(1, 2, 3);
    assertEquals(3, intList.max());
}

6. Maps

In addition to the Map interface methods, Eclipse Collections present new ones for each primitive pairing:

@Test
public void testOperationsOnIntIntMap() {
    MutableIntIntMap map = new IntIntHashMap();
    assertEquals(5, map.addToValue(0, 5));
    assertEquals(5, map.get(0));
    assertEquals(3, map.getIfAbsentPut(1, 3));
}

7. From Iterable to Primitive Collections

Also, Eclipse Collections works with Iterable:

@Test
public void whenConvertFromIterableToPrimitive_thenValuesAreEqual() {
    Iterable<Integer> iterable = Interval.oneTo(3);
    MutableIntSet intSet = IntSets.mutable.withAll(iterable);
    IntInterval intInterval = IntInterval.oneTo(3);
    assertEquals(intInterval.toSet(), intSet);
}

Further, we can create a primitive map from Iterable:

@Test
public void whenCreateMapFromStream_thenValuesMustMatch() {
    Iterable<Integer> integers = Interval.oneTo(3);
    MutableIntIntMap map = 
      IntIntMaps.mutable.from(
        integers,
        key -> key,
        value -> value * value);
    MutableIntIntMap expected = IntIntMaps.mutable.empty()
      .withKeyValue(1, 1)
      .withKeyValue(2, 4)
      .withKeyValue(3, 9);
    assertEquals(expected, map);
}

8. Streams On Primitives

Since Java already comes with primitive streams, and Eclipse Collections integrates nicely with them:

@Test
public void whenCreateDoubleStream_thenAverageIsThree() {
    DoubleStream doubleStream = DoubleLists
      .mutable.with(1.0, 2.0, 3.0, 4.0, 5.0)
      .primitiveStream();
    assertEquals(3, doubleStream.average().getAsDouble(), 0.001);
}

9. Conclusion

In conclusion, this tutorial presented primitive collections from Eclipse Collections. We demonstrated reasons to utilize it and presented how easily we can add it to our applications.

As always the code is available over on GitHub.

Intro to DataStax Java Driver for Apache Cassandra

$
0
0

1. Overview

The DataStax Distribution of Apache Cassandra is a production-ready distributed database, compatible with open-source Cassandra. It adds a few features that aren't available in the open-source distribution, including monitoring, improved batch, and streaming data processing.

DataStax also provides a Java client for its distribution of Apache Cassandra. This driver is highly tunable and can take advantage of all the extra features in the DataStax distribution, yet it's fully compatible with the open-source version, too.

In this tutorial, we'll see how to use the DataStax Java Driver for Apache Cassandra to connect to a Cassandra database and perform basic data manipulation.

2. Maven Dependency

In order to use the DataStax Java Driver for Apache Cassandra, we need to include it in our classpath.

With Maven, we simply have to add the java-driver-core dependency to our pom.xml:

<dependency>
    <groupId>com.datastax.oss</groupId>
    <artifactId>java-driver-core</artifactId>
    <version>4.1.0</version>
</dependency>

<dependency>
    <groupId>com.datastax.oss</groupId>
    <artifactId>java-driver-query-builder</artifactId>
    <version>4.1.0</version>
</dependency>

3. Using the DataStax Driver

Now that we have the driver in place, let's see what we can do with it.

3.1. Connect to the Database

In order to get connected to the database, we'll create a CqlSession:

CqlSession session = CqlSession.builder().build();

If we don't explicitly define any contact point, the builder will default to 127.0.0.1:9042.

Let's create a connector class, with some configurable parameters, to build the CqlSession:

public class CassandraConnector {

    private CqlSession session;

    public void connect(String node, Integer port, String dataCenter) {
        CqlSessionBuilder builder = CqlSession.builder();
        builder.addContactPoint(new InetSocketAddress(node, port));
        builder.withLocalDatacenter(dataCenter);

        session = builder.build();
    }

    public CqlSession getSession() {
        return this.session;
    }

    public void close() {
        session.close();
    }
}

3.2. Create Keyspace

Now that we have a connection to the database, we need to create our keyspace. Let's start by writing a simple repository class for working with our keyspace.

For this tutorial, we'll use the SimpleStrategy replication strategy with the number of replicas set to 1:

public class KeyspaceRepository {

    public void createKeyspace(String keyspaceName, int numberOfReplicas) {
        CreateKeyspace createKeyspace = SchemaBuilder.createKeyspace(keyspaceName)
          .ifNotExists()
          .withSimpleStrategy(numberOfReplicas);

        session.execute(createKeyspace.build());
    }

    // ...
}

Also, we can start using the keyspace in the current session:

public class KeyspaceRepository {

    //...
 
    public void useKeyspace(String keyspace) {
        session.execute("USE " + CqlIdentifier.fromCql(keyspace));
    }
}

3.3. Create Table

The driver provides statements to configure and execute queries in the database. For example, we can set the keyspace to use individually in each statement.

We'll define the Video model and create a table to represent it:

public class Video {
    private UUID id;
    private String title;
    private Instant creationDate;

    // standard getters and setters
}

Let's create our table, having the possibility to define the keyspace in which we want to perform the query. We'll write a simple VideoRepository class for working with our video data:

public class VideoRepository {
    private static final String TABLE_NAME = "videos";

    public void createTable() {
        createTable(null);
    }

    public void createTable(String keyspace) {
        CreateTable createTable = SchemaBuilder.createTable(TABLE_NAME)
          .withPartitionKey("video_id", DataTypes.UUID)
          .withColumn("title", DataTypes.TEXT)
          .withColumn("creation_date", DataTypes.TIMESTAMP);

        executeStatement(createTable.build(), keyspace);
    }

    private ResultSet executeStatement(SimpleStatement statement, String keyspace) {
        if (keyspace != null) {
            statement.setKeyspace(CqlIdentifier.fromCql(keyspace));
        }

        return session.execute(statement);
    }

    // ...
}

Note that we're overloading the method createTable.

The idea behind overloading this method is to have two options for the table creation:

  • Create the table in a specific keyspace, sending keyspace name as the parameter, independently of which keyspace is the session currently using
  • Start using a keyspace in the session, and use the method for the table creation without any parameter — in this case, the table will be created in the keyspace the session is currently using

3.4. Insert Data

In addition, the driver provides prepared and bounded statements.

The PreparedStatement is typically used for queries executed often, with changes only in the values.

We can fill the PreparedStatement with the values we need. After that, we'll create a BoundStatement and execute it.

Let's write a method for inserting some data into the database:

public class VideoRepository {

    //...
 
    public UUID insertVideo(Video video, String keyspace) {
        UUID videoId = UUID.randomUUID();

        video.setId(videoId);

        RegularInsert insertInto = QueryBuilder.insertInto(TABLE_NAME)
          .value("video_id", QueryBuilder.bindMarker())
          .value("title", QueryBuilder.bindMarker())
          .value("creation_date", QueryBuilder.bindMarker());

        SimpleStatement insertStatement = insertInto.build();

        if (keyspace != null) {
            insertStatement = insertStatement.setKeyspace(keyspace);
        }

        PreparedStatement preparedStatement = session.prepare(insertStatement);

        BoundStatement statement = preparedStatement.bind()
          .setUuid(0, video.getId())
          .setString(1, video.getTitle())
          .setInstant(2, video.getCreationDate());

        session.execute(statement);

        return videoId;
    }

    // ...
}

3.5. Query Data

Now, let's add a method that creates a simple query to get the data we've stored in the database:

public class VideoRepository {
 
    // ...
 
    public List<Video> selectAll(String keyspace) {
        Select select = QueryBuilder.selectFrom(TABLE_NAME).all();

        ResultSet resultSet = executeStatement(select.build(), keyspace);

        List<Video> result = new ArrayList<>();

        resultSet.forEach(x -> result.add(
            new Video(x.getUuid("video_id"), x.getString("title"), x.getInstant("creation_date"))
        ));

        return result;
    }

    // ...
}

3.6. Putting it All Together

Finally, let's see an example using each section we've covered in this tutorial:

public class Application {
 
    public void run() {
        CassandraConnector connector = new CassandraConnector();
        connector.connect("127.0.0.1", 9042, "datacenter1");
        CqlSession session = connector.getSession();

        KeyspaceRepository keyspaceRepository = new KeyspaceRepository(session);

        keyspaceRepository.createKeyspace("testKeyspace", 1);
        keyspaceRepository.useKeyspace("testKeyspace");

        VideoRepository videoRepository = new VideoRepository(session);

        videoRepository.createTable();

        videoRepository.insertVideo(new Video("Video Title 1", Instant.now()));
        videoRepository.insertVideo(new Video("Video Title 2",
          Instant.now().minus(1, ChronoUnit.DAYS)));

        List<Video> videos = videoRepository.selectAll();

        videos.forEach(x -> LOG.info(x.toString()));

        connector.close();
    }
}

After we execute our example, as a result, we can see in the logs that the data was properly stored in the database:

INFO com.baeldung.datastax.cassandra.Application - [id:733249eb-914c-4153-8698-4f58992c4ad4, title:Video Title 1, creationDate: 2019-07-10T19:43:35.112Z]
INFO com.baeldung.datastax.cassandra.Application - [id:a6568236-77d7-42f2-a35a-b4c79afabccf, title:Video Title 2, creationDate: 2019-07-09T19:43:35.181Z]

4. Conclusion

In this tutorial, we covered the basic concepts of the DataStax Java Driver for Apache Cassandra. We connected to the database and created a keyspace and table. Also, we inserted data into the table and ran a query to retrieve it.

As always, the source code for this tutorial is available over on Github.

Removing an Element From an ArrayList

$
0
0

1. Overview

In this tutorial, we're going to see how to remove elements from an ArrayList in Java using different techniques. Given a list of sports, let's see how we can get rid of some elements of the following list:

List<String> sports = new ArrayList<>();
sports.add("Football");
sports.add("Basketball");
sports.add("Baseball");
sports.add("Boxing");
sports.add("Cycling");

2. ArrayList#remove

ArrayList has two available methods to remove an element, passing the index of the element to be removed, or passing the element itself to be removed, if present. We're going to see both usages.

2.1. Remove by Index

Using remove passing an index as parameter, we can remove the element at the specified position in the list and shift any subsequent elements to the left, subtracting one from their indices. After execution, remove method will return the element that has been removed:

sports.remove(1); // since index starts at 0, this will remove "Basketball"
assertEquals(4, sports.size());
assertNotEquals(sports.get(1), "Basketball");

2.2. Remove by Element

Another way is to remove the first occurrence of an element from a list using this method. Formally speaking, we're removing the element with the lowest index if exists, if not, the list is unchanged:

sports.remove("Baseball");
assertEquals(4, sports.size());
assertFalse(sports.contains("Baseball"));

3. Removing While Iterating

Sometimes we want to remove an element from an ArrayList while we're looping it. Due to not generate a ConcurrentModificationException, we need to use Iterator class to do it properly.

Let's see how we can get rid of an element in a loop:

Iterator<String> iterator = sports.iterator();
while (iterator.hasNext()) {
    if (iterator.next().equals("Boxing")) {
        iterator.remove();
    }
}

4. ArrayList#removeIf (JDK 8+)

If we're using JDK 8 or higher versions, we can take advantage of ArrayList#removeIf which removes all of the elements of the ArrayList that satisfy a given predicate.

sports.removeIf(p -> p.equals("Cycling"));
assertEquals(4, sports.size());
assertFalse(sports.contains("Cycling"));

Finally, we can do it using third party libraries like Apache Commons and, if we want to go deeper, we can see how to remove all specific occurrences in an efficient way.

5. Conclusion

In this tutorial, we looked at the various ways of removing elements from an ArrayList in Java.

As usual, all the examples used at this tutorial are available on GitHub.

Viewing all 4731 articles
Browse latest View live


<script src="https://jsc.adskeeper.com/r/s/rssing.com.1596347.js" async> </script>