Quantcast
Channel: Baeldung
Viewing all 4770 articles
Browse latest View live

Cucumber Hooks

$
0
0

1. Introduction

Cucumber hooks can come in handy when we want to perform specific actions for every scenario or step, but without having these actions explicitly in the Gherkin code.

In this tutorial, we'll look at the @Before@BeforeStep, @AfterStep, and @After Cucumber hooks.

2. Overview of Hooks in Cucumber

2.1. When Should Hooks Be Used?

Hooks can be used to perform background tasks that are not part of business functionality. Such tasks could be:

  • Starting up a browser
  • Setting or clearing cookies
  • Connecting to a database
  • Checking the state of the system
  • Monitoring

A use case for monitoring would be to update a dashboard with the test progress in real-time.

Hooks are not visible in the Gherkin code. Therefore, we should not see them as a replacement for a Cucumber Background or a given step.

We'll look at an example where we use hooks to take screenshots during test execution.

2.2. Scope of Hooks

Hooks affect every scenario. Therefore, it's good practice to define all hooks in a dedicated configuration class.

It's not necessary to define the same hooks in every glue code class. If we define hooks in the same class with our glue code, we'd have less readable code.

3. Hooks

Let's first look at the individual hooks. We'll then look at a full example where we'll see how hooks execute when combined.

3.1. @Before

Methods annotated with @Before will execute before every scenario. In our example, we'll start up the browser before every scenario:

@Before
public void initialization() {
    startBrowser();
}

If we annotate several methods with @Before, we can explicitly define the order in which the steps are executed:

@Before(order=2)
public void beforeScenario() {
    takeScreenshot();
}

The above method executes second, as we pass 2 as a value for the order parameter to the annotation. We can also pass 1 as a value for the order parameter of our initialization method:

@Before(order=1)
public void initialization()

So, when we execute a scenario, initialization() executes first, and beforeScenario() executes second.

3.2. @BeforeStep

Methods annotated with @BeforeStep execute before every step. Let's use the annotation to take a screenshot before every step:

@BeforeStep
public void beforeStep() {
    takeScreenshot();
}

3.3. @AfterStep

Methods annotated with @AfterStep execute after every step:

@AfterStep
public void afterStep() {
    takeScreenshot();
}

We've used @AfterStep here to take a screenshot after every step. This happens regardless of whether the step finishes successfully or fails.

3.4. @After

Methods annotated with @After execute after every scenario:

@After
public void afterScenario() {
    takeScreenshot();
    closeBrowser();
}

In our example, we'll take a final screenshot and close the browser. This happens regardless of whether the scenario finishes successfully.

3.5. The Scenario Parameter

The methods annotated with a hook annotation can accept a parameter of type Scenario:

@After
public void beforeScenario(Scenario scenario) { 
    // some code
}

The object of type Scenario contains information on the current scenario. Included are the scenario name, number of steps, names of steps, and status (pass or fail). This can be useful if we want to perform different actions for passed and failed tests.

4. Hook Execution

4.1. Happy Flow

Let's now look at what happens when we run a Cucumber scenario with all four types of hooks:

Feature: Book Store With Hooks
  Background: The Book Store
    Given The following books are available in the store
      | The Devil in the White City          | Erik Larson |
      | The Lion, the Witch and the Wardrobe | C.S. Lewis  |
      | In the Garden of Beasts              | Erik Larson |

  Scenario: 1 - Find books by author
    When I ask for a book by the author Erik Larson
    Then The salesperson says that there are 2 books

  Scenario: 2 - Find books by author, but isn't there
    When I ask for a book by the author Marcel Proust
    Then The salesperson says that there are 0 books

Looking at the result of a test run in the IntelliJ IDE, we can see the execution order:

First, our two @Before hooks execute. Then before and after every step, the @BeforeStep and @AfterStep hooks run, respectively. Finally, the @After hook runs. All hooks execute for both scenarios.

4.2. Unhappy Flow: A Step Fails

Let's see what happens if a step fails. As we can see in the screenshot below, both the @Before and @After hooks of the failing step are executed. The subsequent steps are skipped, and finally, the @After hook executes:

The behavior of @After is similar to the finally-clause after a try-catch in Java. We could use it to perform clean-up tasks if a step failed. In our example, we still take a screenshot even if the scenario fails.

4.3. Unhappy Flow: A Hook Fails

Let's look at what happens when a hook itself fails. In the example below, the first @BeforeStep fails.

In this case, the actual step doesn't run, but it's @AfterStep hook does. Subsequent steps won't run either, whereas the @After hook is executed at the end:

5. Conditional Execution with Tags

Hooks are defined globally and affect all scenarios and steps. However, with the help of Cucumber tags, we can define exactly which scenarios a hook should be executed for:

@Before(order=2, value="@Screenshots")
public void beforeScenario() {
    takeScreenshot();
}

This hook will be executed only for scenarios that are tagged with @Screenshots:

@Screenshots
Scenario: 1 - Find books by author 
When I ask for a book by the author Erik Larson 
Then The salesperson says that there are 2 books

6. Java 8

We can add Cucumber Java 8 Support to define all hooks with lambda expressions.

Recall our initialization hook from the example above:

@Before(order=2)
public void initialization() {
    startBrowser();
}

Rewritten with a lambda expression, we get:

public BookStoreWithHooksRunSteps() {
    Before(2, () -> startBrowser());
}

The same also works for @BeforeStep, @After, and @AfterStep.

7. Conclusion

In this article, we looked at how to define Cucumber hooks.

We discussed in which cases we should use them and when we should not. Then, we saw in which order hooks execute and how we can achieve conditional execution.

Finally, we saw how we could define hooks with Java 8 lambda notation.

As usual, the complete source code of this article is available over on GitHub.


Introduction to Greedy Algorithms with Java

$
0
0

1. Introduction

In this tutorial, we're going to introduce greedy algorithms in the Java ecosystem.

2. Greedy problem

When facing a mathematical problem, there may be several ways to design a solution. We can implement an iterative solution, or some advanced techniques, such as divide and conquer principle (e.g. Quicksort algorithm) or approach with dynamic programming (e.g. Knapsack problem) and many more.

Most of the time, we're searching for an optimal solution, but sadly, we don't always get such an outcome. However, there are cases where even a suboptimal result is valuable. With the help of some specific strategies, or heuristics, we might earn ourselves such a precious reward.

In this context, given a divisible problem, a strategy that at each stage of the process takes the locally optimal choice or “greedy choice” is called a greedy algorithm.

We stated that we should address a “divisible” problem: A situation that can be described as a set of subproblems with, almost, the same characteristics. As a consequence, most of the time, a greedy algorithm will be implemented as a recursive algorithm.

A greedy algorithm can be a way to lead us to a reasonable solution in spite of a harsh environment; lack of computational resources, execution-time constraint, API limitations, or any other kind of restrictions.

2.1. Scenario

In this short tutorial, we're going to implement a greedy strategy to extract data from a social network using its API.

Let's say we'd like to reach more users on the “little-blue-bird” social. The best way to achieve our goal is to post original content or re-tweet something that will arouse some interest to a broad audience.

How do we find such an audience? Well, we must find an account with many followers and tweet some content for them.

2.2. Classic vs. Greedy

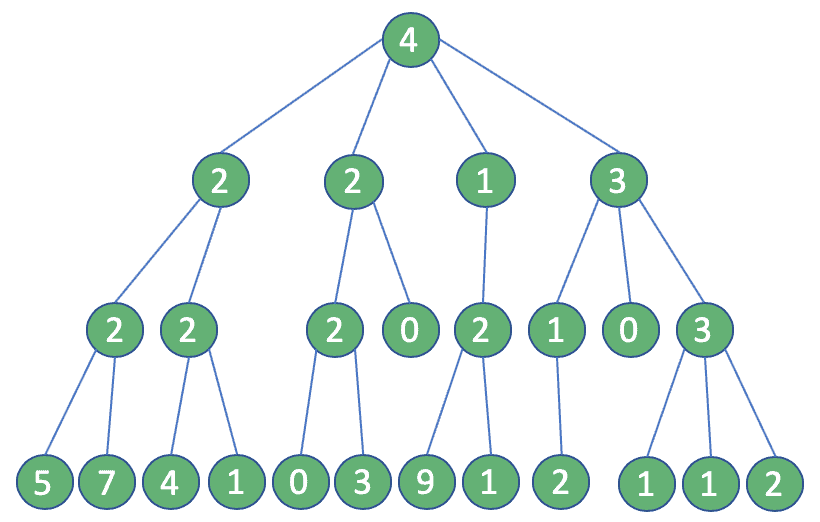
We take into account the following situation: Our account has four followers, each of which has, as depicted in the image below, respectively 2, 2, 1 and 3 followers, and so on:

With this purpose in our minds, we'll take the one with more followers among the followers of our account. Then we'll repeat the process two more times until we reach the 3rd degree of connection (four steps in total).

In this way, we define a path made of users, leading us to the vastest followers-base from our account. If we can address some content to them, they'll surely reach our page.

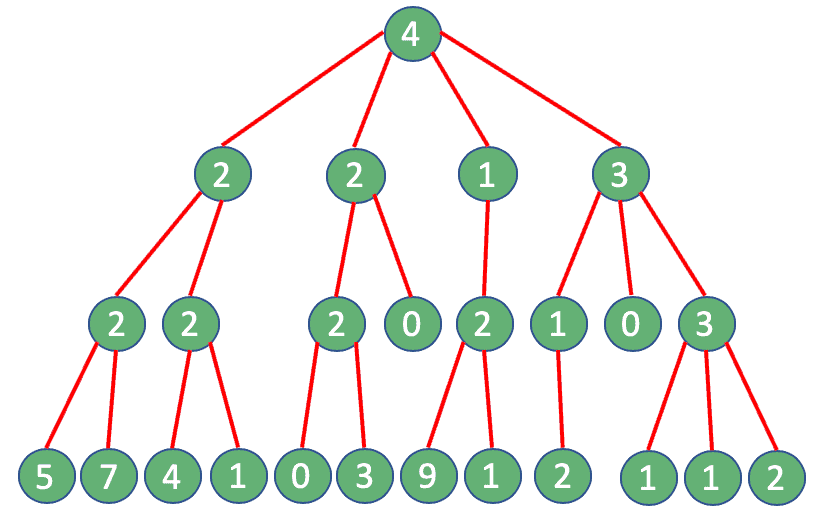
We can start with a “traditional” approach. At every single step, we'll perform a query to get the followers of an account. As a result of our selection process, the number of accounts will increase every step.

Surprisingly, in total, we would end up performing 25 queries:

Here a problem arises: For example, Twitter API limits this type of query to 15 every 15 minutes. If we try to perform more calls than allowed, we'll get a “Rate limit exceeded code – 88“, or “Returned in API v1.1 when a request cannot be served due to the application's rate limit having been exhausted for the resource“. How can we overcome such a limit?

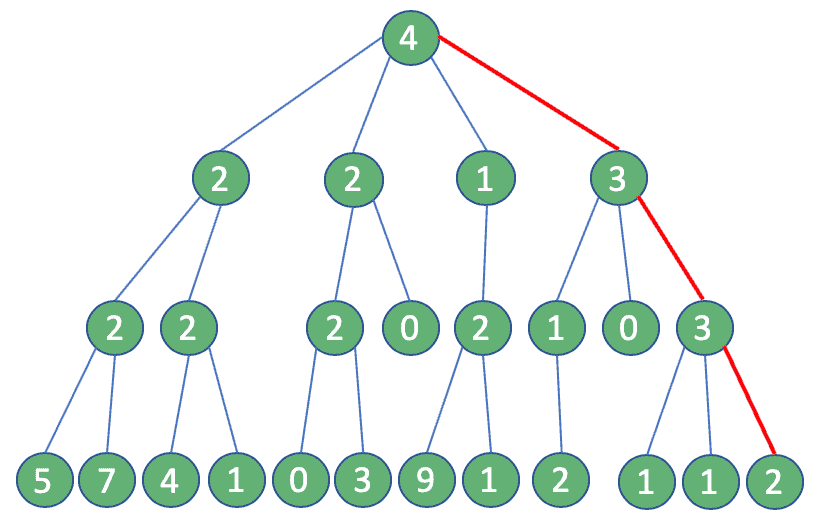
Well, the answer is right in front of us: A greedy algorithm. If we use this approach, at each step, we can assume that the user with the most followers is the only one to consider: In the end, we need only four queries. Quite an improvement!

The outcome of those two approaches will be different. In the first case, we get 16, the optimal solution, while in the latter, the maximum number of reachable followers is merely 12.

Will this difference be so valuable? We'll decide later.

3. Implementation

To implement the above logic, we initialize a small Java program, where we'll mimic the Twitter API. We'll also make use of the Lombok library.

Now, let's define our component SocialConnector in which we'll implement our logic. Note that we're going to put a counter to simulate calls restrictions, but we'll lower it to four:

public class SocialConnector {
    private boolean isCounterEnabled = true;
    private int counter = 4;
    @Getter @Setter
    List users;

    public SocialConnector() {
        users = new ArrayList<>();
    }

    public boolean switchCounter() {
        this.isCounterEnabled = !this.isCounterEnabled;
        return this.isCounterEnabled;
    }
}

Then we're going to add a method to retrieve the followers' list of a specific account:

public List getFollowers(String account) {
    if (counter < 0) {
        throw new IllegalStateException ("API limit reached");
    } else {
        if (this.isCounterEnabled) {
            counter--;
        }
        for (SocialUser user : users) {
            if (user.getUsername().equals(account)) {
                return user.getFollowers();
            }
        }
     }
     return new ArrayList<>();
}

To support our process, we need some classes to model our user entity:

public class SocialUser {
    @Getter
    private String username;
    @Getter
    private List<SocialUser> followers;

    @Override
    public boolean equals(Object obj) {
        return ((SocialUser) obj).getUsername().equals(username);
    }

    public SocialUser(String username) {
        this.username = username;
        this.followers = new ArrayList<>();
    }

    public SocialUser(String username, List<SocialUser> followers) {
        this.username = username;
        this.followers = followers;
    }

    public void addFollowers(List<SocialUser> followers) {
        this.followers.addAll(followers);
    }
}

3.1. Greedy Algorithm

Finally, it's time to implement our greedy strategy, so let's add a new component – GreedyAlgorithm – in which we'll perform the recursion:

public class GreedyAlgorithm {
    int currentLevel = 0;
    final int maxLevel = 3;
    SocialConnector sc;
    public GreedyAlgorithm(SocialConnector sc) {
        this.sc = sc;
    }
}

Then we need to insert a method findMostFollowersPath in which we'll find the user with most followers, count them, and then proceed to the next step:

public long findMostFollowersPath(String account) {
    long max = 0;
    SocialUser toFollow = null;

    List followers = sc.getFollowers(account);
    for (SocialUser el : followers) {
        long followersCount = el.getFollowersCount();
        if (followersCount > max) {
            toFollow = el;
            max = followersCount;
        }
    }
    if (currentLevel < maxLevel - 1) {
        currentLevel++;
        max += findMostFollowersPath(toFollow.getUsername());
    } 
    return max;
}

Remember: Here is where we perform a greedy choice. As such, every time we call this method, we'll choose one and only one element from the list and move on: We won't ever go back on our decisions!

Perfect! We are ready to go, and we can test our application. Before that, we need to remember to populate our tiny network and finally, execute the following unit test:

public void greedyAlgorithmTest() {
    GreedyAlgorithm ga = new GreedyAlgorithm(prepareNetwork());
    assertEquals(ga.findMostFollowersPath("root"), 5);
}

3.2. Non-Greedy Algorithm

Let's create a non-greedy method, merely to check with our eyes what happens. So, we need to start with building a NonGreedyAlgorithm class:

public class NonGreedyAlgorithm {
    int currentLevel = 0;
    final int maxLevel = 3; 
    SocialConnector tc;

    public NonGreedyAlgorithm(SocialConnector tc, int level) {
        this.tc = tc;
        this.currentLevel = level;
    }
}

Let's create an equivalent method to retrieve followers:

public long findMostFollowersPath(String account) {		
    List<SocialUser> followers = tc.getFollowers(account);
    long total = currentLevel > 0 ? followers.size() : 0;

    if (currentLevel < maxLevel ) {
        currentLevel++;
        long[] count = new long[followers.size()];
        int i = 0;
        for (SocialUser el : followers) {
            NonGreedyAlgorithm sub = new NonGreedyAlgorithm(tc, currentLevel);
            count[i] = sub.findMostFollowersPath(el.getUsername());
            i++;
        }

        long max = 0;
        for (; i > 0; i--) {
            if (count[i-1] > max) {
                max = count[i-1];
            }
        }		
        return total + max;
     }	
     return total;
}

As our class is ready, we can prepare some unit tests: One to verify the call limit exceeds and another one to check the value returned with a non-greedy strategy:

public void nongreedyAlgorithmTest() {
    NonGreedyAlgorithm nga = new NonGreedyAlgorithm(prepareNetwork(), 0);
    Assertions.assertThrows(IllegalStateException.class, () -> {
        nga.findMostFollowersPath("root");
    });
}

public void nongreedyAlgorithmUnboundedTest() {
    SocialConnector sc = prepareNetwork();
    sc.switchCounter();
    NonGreedyAlgorithm nga = new NonGreedyAlgorithm(sc, 0);
    assertEquals(nga.findMostFollowersPath("root"), 6);
}

4. Results

It's time to review our work!

First, we tried out our greedy strategy, checking its effectiveness. Then we verified the situation with an exhaustive search, with and without the API limit.

Our quick greedy procedure, which makes locally optimal choices each time, returns a numeric value. On the other hand, we don't get anything from the non-greedy algorithm, due to an environment restriction.

Comparing the two methods' output, we can understand how our greedy strategy saved us, even if the retrieved value that is not optimal. We can call it a local optimum.

5. Conclusion

In mutable and fast-changing contexts like social media, problems that require finding an optimal solution can become a dreadful chimera: Hard to reach and, at the same time, unrealistic.

Overcoming limitations and optimizing API calls is quite a theme, but, as we've discussed, greedy strategies are effective. Choosing this kind of approach saves us much pain, returning valuable results in exchange.

Keep in mind that not every situation is suitable: We need to evaluate our circumstances every time.

As always, the example code from this tutorial is available over on GitHub.

Guide to the @Serial Annotation in Java 14

$
0
0

1. Introduction

In this quick tutorial, we'll take a look at the new @Serial annotation introduced with Java 14.

Similarly to @Override, this annotation is used in combination with the serial lint flag to perform compile-time checks for the serialization-related members of a class.

Although the annotation is already available as per build 25, the lint check has yet to be released.

2. Usage

Let's start by annotating with @Serial any of the seven serialization-related methods and fields:

public class MySerialClass implements Serializable {

    @Serial
    private static final ObjectStreamField[] serialPersistentFields = null;
	
    @Serial
    private static final long serialVersionUID = 1;
	
    @Serial
    private void writeObject(ObjectOutputStream stream) throws IOException {
        // ...
    }
	
    @Serial
    private void readObject(ObjectInputStream stream) throws IOException, ClassNotFoundException {
        // ...
    }

    @Serial
    private void readObjectNoData() throws ObjectStreamException {
        // ...
    }

    @Serial
    private Object writeReplace() throws ObjectStreamException {
        // ...
        return null;
    }

    @Serial
    private Object readResolve() throws ObjectStreamException {
        // ...
        return null;
    }

}

After that, we need to compile our class with the serial lint flag:

javac -Xlint:serial MySerialClass.java

The compiler will then check the signatures and the types of the annotated members and issue a warning if they don't match the expected ones.

Furthermore, the compiler will also throw an error if @Serial is applied:

  • when a class is not implementing the Serializable interface:
public class MyNotSerialClass {
    @Serial 
    private static final long serialVersionUID = 1; // Compilation error
}
public enum MyEnum { 
    @Serial 
    private void readObjectNoData() throws ObjectStreamException {} // Compilation error 
}
  • to writeObject(), readObject(), readObjectNoData() and serialPersistentFields in an Externalizable class since those classes use different serialization methods:
public class MyExternalizableClass implements Externalizable {
    @Serial 
    private void writeObject(ObjectOutputStream stream) throws IOException {} // Compilation error 
}

3. Conclusion

This short article went through the new @Serial annotation usage.

As always, all the code in the article is available over on GitHub.

Obtaining a Power Set of a Set in Java

$
0
0

1. Introduction

In this tutorial, we'll study the process of generating a power set of a given set in Java.

As a quick reminder, for every set of size n, there is a power set of size 2n. We'll learn how to get it using various techniques.

2. Definition of a Power Set

The power set of a given set S is the set of all subsets of S, including S itself and the empty set.

For example, for a given set:

{"APPLE", "ORANGE", "MANGO"}

the power set is:

{
    {},
    {"APPLE"},
    {"ORANGE"},
    {"APPLE", "ORANGE"},
    {"MANGO"},
    {"APPLE", "MANGO"},
    {"ORANGE", "MANGO"},
    {"APPLE", "ORANGE", "MANGO"}
}

As it is also a set of subsets, the order of its internal subsets is not important and they can appear in any order:

{
    {},
    {"MANGO"},
    {"ORANGE"},
    {"ORANGE", "MANGO"},
    {"APPLE"},
    {"APPLE", "MANGO"},
    {"APPLE", "ORANGE"},
    {"APPLE", "ORANGE", "MANGO"}
}

3. Guava Library

The Google Guava library has some useful Set utilities, such as the power set. Thus, we can easily use it to get the power set of the given set, too:

@Test
public void givenSet_WhenGuavaLibraryGeneratePowerSet_ThenItContainsAllSubsets() {
    ImmutableSet<String> set = ImmutableSet.of("APPLE", "ORANGE", "MANGO");
    Set<Set<String>> powerSet = Sets.powerSet(set);
    Assertions.assertEquals((1 << set.size()), powerSet.size());
    MatcherAssert.assertThat(powerSet, Matchers.containsInAnyOrder(
      ImmutableSet.of(),
      ImmutableSet.of("APPLE"),
      ImmutableSet.of("ORANGE"),
      ImmutableSet.of("APPLE", "ORANGE"),
      ImmutableSet.of("MANGO"),
      ImmutableSet.of("APPLE", "MANGO"),
      ImmutableSet.of("ORANGE", "MANGO"),
      ImmutableSet.of("APPLE", "ORANGE", "MANGO")
   ));
}

Guava powerSet internally operates over the Iterator interface in the way when the next subset is requested, the subset is calculated and returned. So, the space complexity is reduced to O(n) instead of O(2n).

But, how does Guava achieve this?

4. Power Set Generation Approach

4.1. Algorithm

Let's now discuss the possible steps for creating an algorithm for this operation.

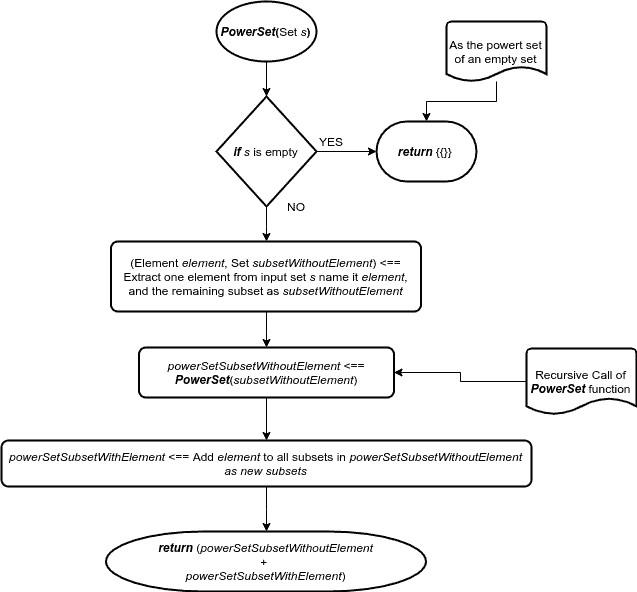
The power set of an empty set is {{}} in which it contains only one empty set, so that's our simplest case.

For every set S other than the empty set, we first extract one element and name it – element. Then, for the rest of the elements of a set subsetWithoutElement, we calculate their power set recursively – and name it something like powerSetSubsetWithoutElement. Then, by adding the extracted element to all sets in powerSetSubsetWithoutElement, we get powerSetSubsetWithElement.

Now, the power set S is the union of a powerSetSubsetWithoutElement and a powerSetSubsetWithElement:


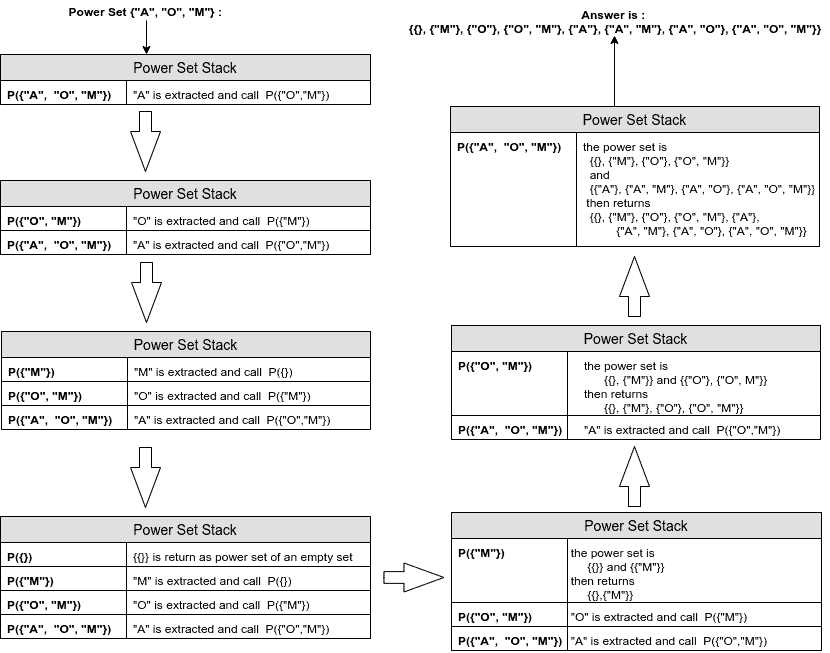
Let's see an example of the recursive power set stack for the given set {“APPLE”, “ORANGE”, “MANGO”}.

To improve the readability of the image we use short forms of names: P means power set function and “A”, “O”, “M” are short forms of “APPLE”, “ORANGE”, and “MANGO”, respectively:

4.2. Implementation

So, first, let's write the Java code for extracting one element and get the remaining subsets:

T element = set.iterator().next();
Set<T> subsetWithoutElement = new HashSet<>();
for (T s : set) {
    if (!s.equals(element)) {
        subsetWithoutElement.add(s);
    }
}

We'll then want to get the powerset of subsetWithoutElement:

Set<Set<T>> powersetSubSetWithoutElement = recursivePowerSet(subsetWithoutElement);

Next, we need to add that powerset back into the original:

Set<Set<T>> powersetSubSetWithElement = new HashSet<>();
for (Set<T> subsetWithoutElement : powerSetSubSetWithoutElement) {
    Set<T> subsetWithElement = new HashSet<>(subsetWithoutElement);
    subsetWithElement.add(element);
    powerSetSubSetWithElement.add(subsetWithElement);
}

Finally the union of powerSetSubSetWithoutElement and powerSetSubSetWithElement is the power set of the given input set:

Set<Set<T>> powerSet = new HashSet<>();
powerSet.addAll(powerSetSubSetWithoutElement);
powerSet.addAll(powerSetSubSetWithElement);

If we put all our code snippets together, we can see our final product:

public Set<Set<T>> recursivePowerSet(Set<T> set) {
    if (set.isEmpty()) {
        Set<Set<T>> ret = new HashSet<>();
        ret.add(set);
        return ret;
    }

    T element = set.iterator().next();
    Set<T> subSetWithoutElement = getSubSetWithoutElement(set, element);
    Set<Set<T>> powerSetSubSetWithoutElement = recursivePowerSet(subSetWithoutElement);
    Set<Set<T>> powerSetSubSetWithElement = addElementToAll(powerSetSubSetWithoutElement, element);

    Set<Set<T>> powerSet = new HashSet<>();
    powerSet.addAll(powerSetSubSetWithoutElement);
    powerSet.addAll(powerSetSubSetWithElement);
    return powerSet;
}

4.3. Notes for Unit Tests

Now let's test. We've got a bit of criteria here to confirm:

  • First, we check the size of the power set and it must be 2n for a set of size n.
  • Then, every element will occur only one time in a subset and 2n-1 different subsets.
  • Finally, every subset must appear once.

If all these conditions passed, we can be sure that our function works. Now, since we've used Set<Set>, we already know that there's no repetition. In that case, we only need to check the size of the power set, and the number of occurrences of each element in the subsets.

To check the size of the power set we can use:

MatcherAssert.assertThat(powerSet, IsCollectionWithSize.hasSize((1 << set.size())));

And to check the number of occurrences of each element:

Map<String, Integer> counter = new HashMap<>();
for (Set<String> subset : powerSet) { 
    for (String name : subset) {
        int num = counter.getOrDefault(name, 0);
        counter.put(name, num + 1);
    }
}
counter.forEach((k, v) -> Assertions.assertEquals((1 << (set.size() - 1)), v.intValue()));

Finally, if we can put all together into one unit test:

@Test
public void givenSet_WhenPowerSetIsCalculated_ThenItContainsAllSubsets() {
    Set<String> set = RandomSetOfStringGenerator.generateRandomSet();
    Set<Set<String>> powerSet = new PowerSet<String>().recursivePowerSet(set);
    MatcherAssert.assertThat(powerSet, IsCollectionWithSize.hasSize((1 << set.size())));
   
    Map<String, Integer> counter = new HashMap<>();
    for (Set<String> subset : powerSet) {
        for (String name : subset) {
            int num = counter.getOrDefault(name, 0);
            counter.put(name, num + 1);
        }
    }
    counter.forEach((k, v) -> Assertions.assertEquals((1 << (set.size() - 1)), v.intValue()));
}

5. Optimization

In this section, we'll try to minimize the space and reduce the number of internal operations to calculate the power set in an optimal way.

5.1. Data Structure

As we can see in the given approach, we need a lot of subtractions in the recursive call, which consumes a large amount of time and memory.

Instead, we can map each set or subset to some other notions to reduce the number of operations.

First, we need to assign an increasing number starting from 0 to each object in the given set S which means we work with an ordered list of numbers.

For example for the given set {“APPLE”, “ORANGE”, “MANGO”} we get:

“APPLE” -> 0

“ORANGE” -> 1

“MANGO” -> 2

So, from now on, instead of generating subsets of S, we generate them for the ordered list of [0, 1, 2], and as it is ordered we can simulate subtractions by a starting index.

For example, if the starting index is 1 it means that we generate the power set of [1,2].

To retrieve mapped id from the object and vice-versa, we store both sides of mapping. Using our example, we store both (“MANGO” -> 2) and (2 -> “MANGO”). As the mapping of numbers started from zero, so for the reverse map there we can use a simple array to retrieve the respective object.

One of the possible implementations of this function would be:

private Map<T, Integer> map = new HashMap<>();
private List<T> reverseMap = new ArrayList<>();

private void initializeMap(Collection<T> collection) {
    int mapId = 0;
    for (T c : collection) {
        map.put(c, mapId++);
        reverseMap.add(c);
    }
}

Now, to represent subsets there are two well-known ideas:

  1. Index representation
  2. Binary representation

5.2. Index Representation

Each subset is represented by the index of its values. For example, the index mapping of the given set {“APPLE”, “ORANGE”, “MANGO”} would be:

{
   {} -> {}
   [0] -> {"APPLE"}
   [1] -> {"ORANGE"}
   [0,1] -> {"APPLE", "ORANGE"}
   [2] -> {"MANGO"}
   [0,2] -> {"APPLE", "MANGO"}
   [1,2] -> {"ORANGE", "MANGO"}
   [0,1,2] -> {"APPLE", "ORANGE", "MANGO"}
}

So, we can retrieve the respective set from a subset of indices with the given mapping:

private Set<Set<T>> unMapIndex(Set<Set<Integer>> sets) {
    Set<Set<T>> ret = new HashSet<>();
    for (Set<Integer> s : sets) {
        HashSet<T> subset = new HashSet<>();
        for (Integer i : s) {
            subset.add(reverseMap.get(i));
        }
        ret.add(subset);
    }
    return ret;
}

5.3. Binary Representation

Or, we can represent each subset using binary. If an element of the actual set exists in this subset its respective value is 1; otherwise it is 0.

For our fruit example, the power set would be:

{
    [0,0,0] -> {}
    [1,0,0] -> {"APPLE"}
    [0,1,0] -> {"ORANGE"}
    [1,1,0] -> {"APPLE", "ORANGE"}
    [0,0,1] -> {"MANGO"}
    [1,0,1] -> {"APPLE", "MANGO"}
    [0,1,1] -> {"ORANGE", "MANGO"}
    [1,1,1] -> {"APPLE", "ORANGE", "MANGO"}
}

So, we can retrieve the respective set from a binary subset with the given mapping:

private Set<Set<T>> unMapBinary(Collection<List<Boolean>> sets) {
    Set<Set<T>> ret = new HashSet<>();
    for (List<Boolean> s : sets) {
        HashSet<T> subset = new HashSet<>();
        for (int i = 0; i < s.size(); i++) {
            if (s.get(i)) {
                subset.add(reverseMap.get(i));
            }
        }
        ret.add(subset);
    }
    return ret;
}

5.4. Recursive Algorithm Implementation

In this step, we'll try to implement the previous code using both data structures.

Before calling one of these functions, we need to call the initializeMap method to get the ordered list. Also, after creating our data structure, we need to call the respective unMap function to retrieve the actual objects:

public Set<Set<T>> recursivePowerSetIndexRepresentation(Collection<T> set) {
    initializeMap(set);
    Set<Set<Integer>> powerSetIndices = recursivePowerSetIndexRepresentation(0, set.size());
    return unMapIndex(powerSetIndices);
}

So, let's try our hand at the index representation:

private Set<Set<Integer>> recursivePowerSetIndexRepresentation(int idx, int n) {
    if (idx == n) {
        Set<Set<Integer>> empty = new HashSet<>();
        empty.add(new HashSet<>());
        return empty;
    }
    Set<Set<Integer>> powerSetSubset = recursivePowerSetIndexRepresentation(idx + 1, n);
    Set<Set<Integer>> powerSet = new HashSet<>(powerSetSubset);
    for (Set<Integer> s : powerSetSubset) {
        HashSet<Integer> subSetIdxInclusive = new HashSet<>(s);
        subSetIdxInclusive.add(idx);
        powerSet.add(subSetIdxInclusive);
    }
    return powerSet;
}

Now, let's see the binary approach:

private Set<List<Boolean>> recursivePowerSetBinaryRepresentation(int idx, int n) {
    if (idx == n) {
        Set<List<Boolean>> powerSetOfEmptySet = new HashSet<>();
        powerSetOfEmptySet.add(Arrays.asList(new Boolean[n]));
        return powerSetOfEmptySet;
    }
    Set<List<Boolean>> powerSetSubset = recursivePowerSetBinaryRepresentation(idx + 1, n);
    Set<List<Boolean>> powerSet = new HashSet<>();
    for (List<Boolean> s : powerSetSubset) {
        List<Boolean> subSetIdxExclusive = new ArrayList<>(s);
        subSetIdxExclusive.set(idx, false);
        powerSet.add(subSetIdxExclusive);
        List<Boolean> subSetIdxInclusive = new ArrayList<>(s);
        subSetIdxInclusive.set(idx, true);
        powerSet.add(subSetIdxInclusive);
    }
    return powerSet;
}

5.5. Iterate through [0, 2n)

Now, there is a nice optimization we can do with the binary representation. If we look at it, we can see that each row is equivalent to the binary format of a number in [0, 2n).

So, if we iterate through numbers from 0 to 2n, we can convert that index to binary, and use it to create a boolean representation of each subset:

private List<List<Boolean>> iterativePowerSetByLoopOverNumbers(int n) {
    List<List<Boolean>> powerSet = new ArrayList<>();
    for (int i = 0; i < (1 << n); i++) {
        List<Boolean> subset = new ArrayList<>(n);
        for (int j = 0; j < n; j++)
            subset.add(((1 << j) & i) > 0);
        powerSet.add(subset);
    }
    return powerSet;
}

5.6. Minimal Change Subsets by Gray Code

Now, if we define any bijective function from binary representation of length n to a number in [0, 2n), we can generate subsets in any order that we want.

Gray Code is a well-known function that is used to generate binary representations of numbers so that the binary representation of consecutive numbers differ by only one bit (even the difference of the last and first numbers is one).

We can thus optimize this just a bit further:

private List<List<Boolean>> iterativePowerSetByLoopOverNumbersWithGrayCodeOrder(int n) {
    List<List<Boolean>> powerSet = new ArrayList<>();
    for (int i = 0; i < (1 << n); i++) {
        List<Boolean> subset = new ArrayList<>(n);
        for (int j = 0; j < n; j++) {
            int grayEquivalent = i ^ (i >> 1);
            subset.add(((1 << j) & grayEquivalent) > 0);
        }
        powerSet.add(subset);
    }
    return powerSet;
}

6. Lazy Loading

To minimize the space usage of power set, which is O(2n), we can utilize the Iterator interface to fetch every subset, and also every element in each subset lazily.

6.1. ListIterator

First, to be able to iterate from 0 to 2n, we should have a special Iterator that loops over this range but not consuming the whole range beforehand.

To solve this problem, we'll use two variables; one for the size, which is 2n, and another for the current subset index. Our hasNext() function will check that position is less than size:

abstract class ListIterator<K> implements Iterator<K> {
    protected int position = 0;
    private int size;
    public ListIterator(int size) {
        this.size = size;
    }
    @Override
    public boolean hasNext() {
        return position < size;
    }
}

And our next() function returns the subset for the current position and increases the value of position by one:

@Override
public Set<E> next() {
    return new Subset<>(map, reverseMap, position++);
}

6.2. Subset

To have a lazy load Subset, we define a class that extends AbstractSet, and we override some of its functions.

By looping over all bits that are 1 in the receiving mask (or position) of the Subset, we can implement the Iterator and other methods in AbstractSet.

For example, the size() is the number of 1s in the receiving mask:

@Override
public int size() { 
    return Integer.bitCount(mask);
}

And the contains() function is just whether the respective bit in the mask is 1 or not:

@Override
public boolean contains(@Nullable Object o) {
    Integer index = map.get(o);
    return index != null && (mask & (1 << index)) != 0;
}

We use another variable – remainingSetBits – to modify it whenever we retrieve its respective element in the subset we change that bit to 0. Then, the hasNext() checks if remainingSetBits is not zero (that is, it has at least one bit with a value of 1):

@Override
public boolean hasNext() {
    return remainingSetBits != 0;
}

And the next() function uses the right-most 1 in the remainingSetBits, then converts it to 0, and also returns the respective element:

@Override
public E next() {
    int index = Integer.numberOfTrailingZeros(remainingSetBits);
    if (index == 32) {
        throw new NoSuchElementException();
    }
    remainingSetBits &= ~(1 << index);
    return reverseMap.get(index);
}

6.3. PowerSet

To have a lazy-load PowerSet class, we need a class that extends AbstractSet<Set<T>>.

The size() function is simply 2 to the power of the set's size:

@Override
public int size() {
    return (1 << this.set.size());
}

As the power set will contain all possible subsets of the input set, so contains(Object o) function checks if all elements of the object o are existing in the reverseMap (or in the input set):

@Override
public boolean contains(@Nullable Object obj) {
    if (obj instanceof Set) {
        Set<?> set = (Set<?>) obj;
        return reverseMap.containsAll(set);
    }
    return false;
}

To check equality of a given Object with this class, we can only check if the input set is equal to the given Object:

@Override
public boolean equals(@Nullable Object obj) {
    if (obj instanceof PowerSet) {
        PowerSet<?> that = (PowerSet<?>) obj;
        return set.equals(that.set);
    }
    return super.equals(obj);
}

The iterator() function returns an instance of ListIterator that we defined already:

@Override
public Iterator<Set<E>> iterator() {
    return new ListIterator<Set<E>>(this.size()) {
        @Override
        public Set<E> next() {
            return new Subset<>(map, reverseMap, position++);
        }
    };
}

The Guava library uses this lazy-load idea and these PowerSet and Subset are the equivalent implementations of the Guava library.

For more information, check their source code and documentation.

Furthermore, if we want to do parallel operation over subsets in PowerSet, we can call Subset for different values in a ThreadPool.

7. Summary

To sum up, first, we studied what is a power set. Then, we generated it by using the Guava Library. After that, we studied the approach and how we should implement it, and also how to write a unit test for it.

Finally, we utilized the Iterator interface to optimize the space of generation of subsets and also their internal elements.

As always the source code is available over on GitHub.

Looking for Java Developer to Help with Brainstorming Topics for the Site (Remote) (Part Time)

$
0
0

Who?

I'm looking for an experienced Java developer, optionally with knowledge of the Spring ecosystem – to help us brainstorm new topics for the site.

The Work

The process of brainstorming new topics is, at the core, a simple one – finding areas of the Java ecosystem to explain and explore here on the site (full example below).

But, there is still quite a bit of complexity in the details of finding good topics for Baeldung.

You'll naturally get access to our internal topic research documentation and video library – so you can hit the ground running.

An Example

Let's say we need to write about JSON processing in Java, with Jackson.

Here are a few potential topics that would make sense in this area:

  • The Basic Jackson Annotations
  • How to Ignore a Field with Jackson
  • How to Solve an Infinite Recursion Issue with Jackson
  • Dealing with Null in Jackson
  • etc

The Eval

If you apply, the evaluation process for the job will also be very simple – we're going to go with a time-boxed, 5-hour topic push.

You're going to be spending an hour or so watching the documentation videos and the rest finding some actual topics.

Of course, the process is paid normally.

The Admin Details

Type of Engagement: Fully Remote

Time: 6-10 Hours / Week

Systems we use: JIRA, Slack, GitHub, Email

Budget: 20$ – 25$ / hour

Apply

You can apply with a quick message here.

Best of luck,

Eugen.

Efficiently Merge Sorted Java Sequences

$
0
0

1. Overview

In this short tutorial, we'll see how we can efficiently merge sorted arrays using a heap.

2. The Algorithm

Since our problem statement is to use a heap to merge the arrays, we'll use a min-heap to solve our problem. A min-heap is nothing but a binary tree in which the value of each node is smaller than the values of its child nodes.

Usually, the min-heap is implemented using an array in which the array satisfies specific rules when it comes to finding the parent and children of a node.

For an array A[] and an element at index i:

  • A[(i-1)/2] will return its parent
  • A[(2*i)+1] will return the left child
  • A[(2*i)+2] will return the right child

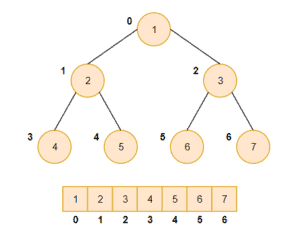
Here's a picture of min-heap and its array representation:

Let's now create our algorithm that merges a set of sorted arrays:

  1. Create an array to store the results, with the size determined by adding the length of all the input arrays.
  2. Create a second array of size equal to the number of input arrays, and populate it with the first elements of all the input arrays.
  3. Transform the previously created array into a min-heap by applying the min-heap rules on all nodes and their children.
  4. Repeat the next steps until the result array is fully populated.
  5. Get the root element from the min-heap and store it in the result array.
  6. Replace the root element with the next element from the array in which the current root is populated.
  7. Apply min-heap rule again on our min-heap array.

Our algorithm has a recursive flow to create the min-heap, and we have to visit all the elements of the input arrays.

The time complexity of this algorithm is O(k log n), where k is the total number of elements in all the input arrays, and n is the total number of sorted arrays.

Let's now see a sample input and the expected result after running the algorithm so that we can gain a better understanding of the problem. So for these arrays:

{ { 0, 6 }, { 1, 5, 10, 100 }, { 2, 4, 200, 650 } }

The algorithm should return a result array:

{ 0, 1, 2, 4, 5, 6, 10, 100, 200, 650 }

3. Java Implementation

Now that we have a basic understanding of what a min-heap is and how the merge algorithm works, let's look at the Java implementation. We'll use two classes — one to represent the heap nodes and the other to implement the merge algorithm.

3.1. Heap Node Representation

Before implementing the algorithm itself, let's create a class that represents a heap node. This will store the node value and two supporting fields:

public class HeapNode {

    int element;
    int arrayIndex;
    int nextElementIndex = 1;

    public HeapNode(int element, int arrayIndex) {
        this.element = element;
        this.arrayIndex = arrayIndex;
    }
}

Note that we've purposefully omitted the getters and setters here to keep things simple. We'll use the arrayIndex property to store the index of the array in which the current heap node element is taken. And we'll use the nextElementIndex property to store the index of the element that we'll be taking after moving the root node to the result array.

Initially, the value of nextElementIndex will be 1. We'll be incrementing its value after replacing the root node of the min-heap.

3.2. Min-Heap Merge Algorithm

Our next class is to represent the min-heap itself and to implement the merge algorithm:

public class MinHeap {

    HeapNode[] heapNodes;

    public MinHeap(HeapNode heapNodes[]) {
        this.heapNodes = heapNodes;
        heapifyFromLastLeafsParent();
    }

    int getParentNodeIndex(int index) {
        return (index - 1) / 2;
    }

    int getLeftNodeIndex(int index) {
        return (2 * index + 1);
    }

    int getRightNodeIndex(int index) {
        return (2 * index + 2);
    }

    HeapNode getRootNode() {
        return heapNodes[0];
    }

    // additional implementation methods
}

Now that we've created our min-heap class, let's add a method that will heapify a subtree where the root node of the subtree is at the given index of the array:

void heapify(int index) {
    int leftNodeIndex = getLeftNodeIndex(index);
    int rightNodeIndex = getRightNodeIndex(index);
    int smallestElementIndex = index;
    if (leftNodeIndex < heapNodes.length 
      && heapNodes[leftNodeIndex].element < heapNodes[index].element) {
        smallestElementIndex = leftNodeIndex;
    }
    if (rightNodeIndex < heapNodes.length
      && heapNodes[rightNodeIndex].element < heapNodes[smallestElementIndex].element) {
        smallestElementIndex = rightNodeIndex;
    }
    if (smallestElementIndex != index) {
        swap(index, smallestElementIndex);
        heapify(smallestElementIndex);
    }
}

When we use an array to represent a min-heap, the last leaf node will always be at the end of the array. So when transforming an array into a min-heap by calling the heapify() method iteratively, we only need to start the iteration from the last leaf's parent node:

void heapifyFromLastLeafsParent() {
    int lastLeafsParentIndex = getParentNodeIndex(heapNodes.length);
    while (lastLeafsParentIndex >= 0) {
        heapify(lastLeafsParentIndex);
        lastLeafsParentIndex--;
    }
}

Our next method will do the actual implementation of our algorithm. For our better understanding, let's split the method into two parts and see how it works:

int[] merge(int[][] array) {
    // transform input arrays
    // run the minheap algorithm
    // return the resulting array
}

The first part transforms the input arrays into a heap node array that contains all the first array's elements and finds the resulting array's size:

HeapNode[] heapNodes = new HeapNode[array.length];
int resultingArraySize = 0;

for (int i = 0; i < array.length; i++) {
    HeapNode node = new HeapNode(array[i][0], i);
    heapNodes[i] = node;
    resultingArraySize += array[i].length;
}

And the next part populates the result array by implementing the steps 4, 5, 6, and 7 of our algorithm:

MinHeap minHeap = new MinHeap(heapNodes);
int[] resultingArray = new int[resultingArraySize];

for (int i = 0; i < resultingArraySize; i++) {
    HeapNode root = minHeap.getRootNode();
    resultingArray[i] = root.element;

    if (root.nextElementIndex < array[root.arrayIndex].length) {
        root.element = array[root.arrayIndex][root.nextElementIndex++];
    } else {
        root.element = Integer.MAX_VALUE;
    }
    minHeap.heapify(0);
}

4. Testing the Algorithm

Let's now test our algorithm with the same input we mentioned previously:

int[][] inputArray = { { 0, 6 }, { 1, 5, 10, 100 }, { 2, 4, 200, 650 } };
int[] expectedArray = { 0, 1, 2, 4, 5, 6, 10, 100, 200, 650 };

int[] resultArray = MinHeap.merge(inputArray);

assertThat(resultArray.length, is(equalTo(10)));
assertThat(resultArray, is(equalTo(expectedArray)));

5. Conclusion

In this tutorial, we learned how we can efficiently merge sorted arrays using min-heap.

The example we've demonstrated here can be found over on Github.

Java Weekly, Issue 315

$
0
0

1. Spring and Java

>> Manage multiple Java SDKs with SDKMAN! with ease [blog.codeleak.pl]

A good intro to this handy tool for installing and switching between multiple versions of Java, Maven, Gradle, Spring Boot CLI, and more. Very cool.

>> One-Stop Guide to Profiles with Spring Boot [reflectoring.io]

A nice intro to profiles, along with practical advice regarding when to use them and, just as important, when not to use them.

>> Rethinking the Java DTO [blog.scottlogic.com]

And an interesting approach to request/response DTO design in Java using a proliferation of enums, interfaces, and Lombok annotations.

Also worth reading:

Webinars and presentations:

2. Technical

>> Microservice Observability, Part 2: Evolutionary Patterns for Solving Observability Problems [bravenewgeek.com]

A roundup of strategies, patterns, and best practices for building an observability pipeline.

Also worth reading:

3. Musings

>> On Developers' Productivity [blog.frankel.ch]

A fresh look at the myth of the 10x developer and the problems associated with evaluating developer productivity.

Also worth reading:

4. Comics

And my favorite Dilberts of the week:

>> Inefficiency [dilbert.com]

>> Incompetent Employees [dilbert.com]

>> Court of Stupidity [dilbert.com]

5. Pick of the Week

>> Keep earning your title, or it expires [sivers.org]

Get String Value of Excel Cell with Apache POI

$
0
0

1. Overview

A Microsoft Excel cell can have different types like string, numeric, boolean, and formula.

In this quick tutorial, we'll show how to read the cell value as a string – regardless of the cell type – with Apache POI.

2. Apache POI

To begin with, we first need to add the poi dependency to our project pom.xml file:

<dependency>
    <groupId>org.apache.poi</groupId>
    <artifactId>poi</artifactId>
    <version>4.1.1</version>
</dependency>

Apache POI uses the Workbook interface to represent an Excel file. It also uses SheetRow, and Cell interfaces to model different levels of elements in an Excel file. At the Cell level, we can use its getCellType() method to get the cell type. Apache POI supports the following cell types:

  • BLANK
  • BOOLEAN
  • ERROR
  • FORMULA
  • NUMERIC
  • STRING

If we want to display the Excel file content on the screen, we would like to get the string representation of a cell, instead of its raw value. Therefore, for cells that are not of type STRING, we need to convert their data into string values.

3. Get Cell String Value

We can use DataFormatter to fetch the string value of an Excel cell. It can get a formatted string representation of the value stored in a cell. For example, if a cell's numeric value is 1.234, and the format rule of this cell is two decimal points, we'll get string representation “1.23”:

Cell cell = // a numeric cell with value of 1.234 and format rule "0.00"

DataFormatter formatter = new DataFormatter();
String strValue = formatter.formatCellValue(cell);

assertEquals("1.23", strValue);

Therefore, the result of DataFormatter.formatCellValue() is the display string exactly as it appears in Excel.

4. Get String Value of a Formula Cell

If the cell's type is FORMULA, the previous method will return the original formula string, instead of the calculated formula value. Therefore, to get the string representation of the formula value, we need to use FormulaEvaluator to evaluate the formula:

Workbook workbook = // existing Workbook setup
FormulaEvaluator evaluator = workbook.getCreationHelper().createFormulaEvaluator();

Cell cell = // a formula cell with value of "SUM(1,2)"

DataFormatter formatter = new DataFormatter();
String strValue = formatter.formatCellValue(cell, evaluator);

assertEquals("3", strValue);

This method is general to all cell types. If the cell type is FORMULA, we'll evaluate it using the given FormulaEvaluator. Otherwise, we'll return the string representation without any evaluations.

5. Summary

In this quick article, we showed how to get the string representation of an Excel cell, regardless of its type. As always, the source code for the article is available over on GitHub.


Partitioning and Sorting Arrays with Many Repeated Entries

$
0
0

1. Overview

The run-time complexity of algorithms is often dependent on the nature of the input.

In this tutorial, we’ll see how the trivial implementation of the Quicksort algorithm has a poor performance for repeated elements.

Further, we’ll learn a few Quicksort variants to efficiently partition and sort inputs with a high density of duplicate keys.

2. Trivial Quicksort

Quicksort is an efficient sorting algorithm based on the divide and conquer paradigm. Functionally speaking, it operates in-place on the input array and rearranges the elements with simple comparison and swap operations.

2.1. Single-pivot Partitioning

A trivial implementation of the Quicksort algorithm relies heavily on a single-pivot partitioning procedure. In other words, partitioning divides the array A=[ap, ap+1, ap+2,…, ar] into two parts A[p..q] and A[q+1..r] such that:

  • All elements in the first partition, A[p..q] are lesser than or equal to the pivot value A[q]
  • All elements in the second partition, A[q+1..r] are greater than or equal to the pivot value A[q]

After that, the two partitions are treated as independent input arrays and fed themselves to the Quicksort algorithm. Let's see Lomuto's Quicksort in action:

2.2. Performance with Repeated Elements

Let’s say we have an array A = [4, 4, 4, 4, 4, 4, 4] that has all equal elements.

On partitioning this array with the single-pivot partitioning scheme, we'll get two partitions. The first partition will be empty, while the second partition will have N-1 elements. Further, each subsequent invocation of the partition procedure will reduce the input size by only one. Let's see how it works:

Since the partition procedure has linear time complexity, the overall time complexity, in this case, is quadratic. This is the worst-case scenario for our input array.

3. Three-way Partitioning

To efficiently sort an array having a high number of repeated keys, we can choose to handle the equal keys more responsibly. The idea is to place them in the right position when we first encounter them. So, what we're looking for is a three partition state of the array:

  • The left-most partition contains elements which are strictly less than the partitioning key
  • The middle partition contains all elements which are equal to the partitioning key
  • The right-most partition contains all elements which are strictly greater than the partitioning key

We'll now dive deeper into a couple of approaches that we can use to achieve three-way partitioning.

4. Dijkstra's Approach

Dijkstra's approach is an effective way of doing three-way partitioning. To understand this, let's look into a classic programming problem.

4.1. Dutch National Flag Problem

Inspired by the tricolor flag of the Netherlands, Edsger Dijkstra proposed a programming problem called the Dutch National Flag Problem (DNF).

In a nutshell, it's a rearrangement problem where we're given balls of three colors placed randomly in a line, and we're asked to group the same colored balls together. Moreover, the rearrangement must ensure that groups follow the correct order.

Interestingly, the DNF problem makes a striking analogy with the 3-way partitioning of an array with repeated elements.

We can categorize all the numbers of an array into three groups with respect to a given key:

  • The Red group contains all elements that are strictly lesser than the key
  • The White group contains all elements that are equal to the key
  • The Blue group contains all elements that strictly greater than the key

4.2. Algorithm

One of the approaches to solve the DNF problem is to pick the first element as the partitioning key and scan the array from left to right. As we check each element, we move it to its correct group, namely Lesser, Equal, and Greater.

To keep track of our partitioning progress, we'd need the help of three pointers, namely lt, current, and gt. At any point in time, the elements to the left of lt will be strictly less than the partitioning key, and the elements to the right of gt will be strictly greater than the key.

Further, we'll use the current pointer for scanning, which means that all elements lying between the current and gt pointers are yet to be explored:

To begin with, we can set lt and current pointers at the very beginning of the array and the gt pointer at the very end of it:

For each element read via the current pointer, we compare it with the partitioning key and take one of the three composite actions:

  • If input[current] < key, then we exchange input[current] and input[lt] and increment both current and lt pointers
  • If input[current] == key, then we increment current pointer
  • If input[current] > key, then we exchange input[current] and input[gt] and decrement gt

Eventually, we'll stop when the current and gt pointers cross each other. With that, the size of the unexplored region reduces to zero, and we'll be left with only three required partitions.

Finally, let's see how this algorithm works on an input array having duplicate elements:

4.3. Implementation

First, let's write a utility procedure named compare() to do a three-way comparison between two numbers:

public static int compare(int num1, int num2) {
    if (num1 > num2)
        return 1;
    else if (num1 < num2)
        return -1;
    else
        return 0;
}

Next, let's add a method called swap() to exchange elements at two indices of the same array:

public static void swap(int[] array, int position1, int position2) {
    if (position1 != position2) {
        int temp = array[position1];
        array[position1] = array[position2];
        array[position2] = temp;
    }
}

To uniquely identify a partition in the array, we'll need its left and right boundary-indices. So, let's go ahead and create a Partition class:

public class Partition {
    private int left;
    private int right;
}

Now, we're ready to write our three-way partition() procedure:

public static Partition partition(int[] input, int begin, int end) {
    int lt = begin, current = begin, gt = end;
    int partitioningValue = input[begin];

    while (current <= gt) {
        int compareCurrent = compare(a[current], partitioningValue);
        switch (compareCurrent) {
            case -1:
                swap(input, current++, lt++);
                break;
            case 0:
                current++;
                break;
            case 1:
                swap(input, current, gt--);
                break;
        }
    }
    return new Partition(lt, gt);
}

Finally, let's write a quicksort() method that leverages our 3-way partitioning scheme to sort the left and right partitions recursively:

public static void quicksort(int[] input, int begin, int end) {
    if (end <= begin)
        return;

    Partition middlePartition = partition(input, begin, end);

    quicksort(input, begin, middlePartition.getLeft() - 1);
    quicksort(input, middlePartition.getRight() + 1, end);
}

5. Bentley-McIlroy's Approach

Jon Bentley and Douglas McIlroy co-authored an optimized version of the Quicksort algorithm. Let's understand and implement this variant in Java:

5.1. Partitioning Scheme

The crux of the algorithm is an iteration-based partitioning scheme. In the start, the entire array of numbers is an unexplored territory for us:

We then start exploring the elements of the array from the left and right direction. Whenever we enter or leave the loop of exploration, we can visualize the array as a composition of five regions:

  • On the extreme two ends, lies the regions having elements that are equal to the partitioning value
  • The unexplored region stays in the center and its size keeps on shrinking with each iteration
  • On the left of the unexplored region lies all elements lesser than the partitioning value
  • On the right side of the unexplored region are elements greater than the partitioning value

Eventually, our loop of exploration terminates when there are no elements to be explored anymore. At this stage, the size of the unexplored region is effectively zero, and we're left with only four regions:

Next, we move all the elements from the two equal-regions in the center so that there is only one equal-region in the center surrounding by the less-region on the left and the greater-region on the right. To do so, first, we swap the elements in the left equal-region with the elements on the right end of the less-region. Similarly, the elements in the right equal-region are swapped with the elements on the left end of the greater-region.

Finally, we'll be left with only three partitions, and we can further use the same approach to partition the less and the greater regions.

5.2. Implementation

In our recursive implementation of the three-way Quicksort, we'll need to invoke our partition procedure for sub-arrays that'll have a different set of lower and upper bounds. So, our partition() method must accept three inputs, namely the array along with its left and right bounds.

public static Partition partition(int input[], int begin, int end){
	// returns partition window
}

For simplicity, we can choose the partitioning value as the last element of the array. Also, let's define two variables left=begin and right=end to explore the array inward.

Further, We'll also need to keep track of the number of equal elements lying on the leftmost and rightmost. So, let's initialize leftEqualKeysCount=0 and rightEqualKeysCount=0, and we're now ready to explore and partition the array.

First, we start moving from both the directions and find an inversion where an element on the left is not less than partitioning value, and an element on the right is not greater than partitioning value. Then, unless the two pointers left and right have crossed each other, we swap the two elements.

In each iteration, we move elements equal to partitioningValue towards the two ends and increment the appropriate counter:

while (true) {
    while (input[left] < partitioningValue) left++; 
    
    while (input[right] > partitioningValue) {
        if (right == begin)
            break;
        right--;
    }

    if (left == right && input[left] == partitioningValue) {
        swap(input, begin + leftEqualKeysCount, left);
        leftEqualKeysCount++;
        left++;
    }

    if (left >= right) {
        break;
    }

    swap(input, left, right);

    if (input[left] == partitioningValue) {
        swap(input, begin + leftEqualKeysCount, left);
        leftEqualKeysCount++;
    }

    if (input[right] == partitioningValue) {
        swap(input, right, end - rightEqualKeysCount);
        rightEqualKeysCount++;
    }
    left++; right--;
}

In the next phase, we need to move all the equal elements from the two ends in the center. After we exit the loop, the left-pointer will be at an element whose value is not less than partitioningValue. Using this fact, we start moving equal elements from the two ends towards the center:

right = left - 1;
for (int k = begin; k < begin + leftEqualKeysCount; k++, right--) { 
    if (right >= begin + leftEqualKeysCount)
        swap(input, k, right);
}
for (int k = end; k > end - rightEqualKeysCount; k--, left++) {
    if (left <= end - rightEqualKeysCount)
        swap(input, left, k);
}

In the last phase, we can return the boundaries of the middle partition:

return new Partition(right + 1, left - 1);

Finally, let's take a look at a demonstration of our implementation on a sample input

6. Algorithm Analysis

In general, the Quicksort algorithm has an average-case time complexity of O(n*log(n)) and worst-case time complexity of O(n2). With a high density of duplicate keys, we almost always get the worst-case performance with the trivial implementation of Quicksort.

However, when we use the three-way partitioning variant of Quicksort, such as DNF partitioning or Bentley's partitioning, we're able to prevent the negative effect of duplicate keys. Further, as the density of duplicate keys increase, the performance of our algorithm improves as well. As a result, we get the best-case performance when all keys are equal, and we get a single partition containing all equal keys in linear time.

Nevertheless, we must note that we're essentially adding overhead when we switch to a three-way partitioning scheme from the trivial single-pivot partitioning.

For DNF based approach, the overhead doesn't depend on the density of repeated keys. So, if we use DNF partitioning for an array with all unique keys, then we'll get poor performance as compared to the trivial implementation where we're optimally choosing the pivot.

But, Bentley-McIlroy's approach does a smart thing as the overhead of moving the equal keys from the two extreme ends is dependent on their count. As a result, if we use this algorithm for an array with all unique keys, even then, we'll get reasonably good performance.

In summary, the worst-case time complexity of both single-pivot partitioning and three-way partitioning algorithms is O(nlog(n)). However, the real benefit is visible in the best-case scenarios, where we see the time complexity going from O(nlog(n)) for single-pivot partitioning to O(n) for three-way partitioning.

7. Conclusion

In this tutorial, we learned about the performance issues with the trivial implementation of the Quicksort algorithm when the input has a large number of repeated elements.

With a motivation to fix this issue, we learned different three-way partitioning schemes and how we can implement them in Java.

As always, the complete source code for the Java implementation used in this article is available on GitHub.

Asynchronous Programming in Java

$
0
0

1. Overview

With the growing demand for writing non-blocking code, we need ways to execute the code asynchronously.

In this tutorial, we'll look at a few ways to achieve asynchronous programming in Java. Also, we'll explore a few Java libraries that provide out-of-the-box solutions.

2. Asynchronous Programming in Java

2.1. Thread

We can create a new thread to perform any operation asynchronously. With the release of lambda expressions in Java 8, it's cleaner and more readable.

Let's create a new thread that computes and prints the factorial of a number:

int number = 20;
Thread newThread = new Thread(() -> {
    System.out.println("Factorial of " + number + " is: " + factorial(number));
});
newThread.start();

2.2. FutureTask

Since Java 5, the Future interface provides a way to perform asynchronous operations using the FutureTask.

We can use the submit method of the ExecutorService to perform the task asynchronously and return the instance of the FutureTask.

So, let's find the factorial of a number:

ExecutorService threadpool = Executors.newCachedThreadPool();
Future<Long> futureTask = threadpool.submit(() -> factorial(number));

while (!futureTask.isDone()) {
    System.out.println("FutureTask is not finished yet..."); 
} 
long result = futureTask.get(); 

threadpool.shutdown();

Here, we've used the isDone method provided by the Future interface to check if the task is completed. Once finished, we can retrieve the result using the get method.

2.3. CompletableFuture

Java 8 introduced CompletableFuture with a combination of a Future and CompletionStage. It provides various methods like supplyAsync, runAsync, and thenApplyAsync for asynchronous programming.

So, let's use the CompletableFuture in place of the FutureTask to find the factorial of a number:

CompletableFuture<Long> completableFuture = CompletableFuture.supplyAsync(() -> factorial(number));
while (!completableFuture.isDone()) {
    System.out.println("CompletableFuture is not finished yet...");
}
long result = completableFuture.get();

We don't need to use the ExecutorService explicitly. The CompletableFuture internally uses ForkJoinPool to handle the task asynchronously. Hence, it makes our code a lot cleaner.

3. Guava

Guava provides the ListenableFuture class to perform asynchronous operations.

First, we'll add the latest guava Maven dependency:

<dependency>
    <groupId>com.google.guava</groupId>
    <artifactId>guava</artifactId>
    <version>28.2-jre</version>
</dependency>

Then, let's find the factorial of a number using the ListenableFuture:

ExecutorService threadpool = Executors.newCachedThreadPool();
ListeningExecutorService service = MoreExecutors.listeningDecorator(threadpool);
ListenableFuture<Long> guavaFuture = (ListenableFuture<Long>) service.submit(()-> factorial(number));
long result = guavaFuture.get();

Here, the MoreExecutors class provides the instance of the ListeningExecutorService class. Then, the ListeningExecutorService.submit method performs the task asynchronously and returns the instance of the ListenableFuture.

Guava also has a Futures class that provides methods like submitAsync, scheduleAsync, and transformAsync to chain the ListenableFutures similar to the CompletableFuture.

For instance, let's see how to use Futures.submitAsync in place of the ListeningExecutorService.submit method:

ListeningExecutorService service = MoreExecutors.listeningDecorator(threadpool);
AsyncCallable<Long> asyncCallable = Callables.asAsyncCallable(new Callable<Long>() {
    public Long call() {
        return factorial(number);
    }
}, service);
ListenableFuture<Long> guavaFuture = Futures.submitAsync(asyncCallable, service);

Here, the submitAsync method requires an argument of AsyncCallable, which is created using the Callables class.

Additionally, the Futures class provides the addCallback method to register the success and failure callbacks:

Futures.addCallback(
  factorialFuture,
  new FutureCallback<Long>() {
      public void onSuccess(Long factorial) {
          System.out.println(factorial);
      }
      public void onFailure(Throwable thrown) {
          thrown.getCause();
      }
  }, 
  service);

4. EA Async

Electronic Arts brought the async-await feature from .NET to the Java ecosystem through the ea-async library.

The library allows writing asynchronous (non-blocking) code sequentially. Therefore, it makes asynchronous programming easier and scales naturally.

First, we'll add the latest ea-async Maven dependency to the pom.xml:

<dependency>
    <groupId>com.ea.async</groupId>
    <artifactId>ea-async</artifactId>
    <version>1.2.3</version>
</dependency>

Then, let's transform the previously discussed CompletableFuture code by using the await method provided by EA's Async class:

static { 
    Async.init(); 
}

public long factorialUsingEAAsync(int number) {
    CompletableFuture<Long> completableFuture = CompletableFuture.supplyAsync(() -> factorial(number));
    long result = Async.await(completableFuture);
}

Here, we make a call to the Async.init method in the static block to initialize the Async runtime instrumentation.

Async instrumentation transforms the code at runtime and rewrites the call to the await method, to behave similarly to using the chain of CompletableFuture.

Therefore, the call to the await method is similar to calling Future.join.

We can use the – javaagent JVM parameter for compile-time instrumentation. This is an alternative to the Async.init method:

java -javaagent:ea-async-1.2.3.jar -cp <claspath> <MainClass>

Let's examine another example of writing asynchronous code sequentially.

First, we'll perform a few chain operations asynchronously using the composition methods like thenComposeAsync and thenAcceptAsync of the CompletableFuture class:

CompletableFuture<Void> completableFuture = hello()
  .thenComposeAsync(hello -> mergeWorld(hello))
  .thenAcceptAsync(helloWorld -> print(helloWorld))
  .exceptionally(throwable -> {
      System.out.println(throwable.getCause()); 
      return null;
  });
completableFuture.get();

Then, we can transform the code using EA's Async.await():

try {
    String hello = await(hello());
    String helloWorld = await(mergeWorld(hello));
    await(CompletableFuture.runAsync(() -> print(helloWorld)));
} catch (Exception e) {
    e.printStackTrace();
}

The implementation resembles the sequential blocking code. However, the await method doesn't block the code.

As discussed, all calls to the await method will be rewritten by the Async instrumentation to work similarly to the Future.join method.

So, once the asynchronous execution of the hello method is finished, the Future result is passed to the mergeWorld method. Then, the result is passed to the last execution using the CompletableFuture.runAsync method.

5. Cactoos

Cactoos is a Java library based on object-oriented principles.

It is an alternative to Google Guava and Apache Commons that provides common objects for performing various operations.

First, let's add the latest cactoos Maven dependency:

<dependency>
    <groupId>org.cactoos</groupId>
    <artifactId>cactoos</artifactId>
    <version>0.43</version>
</dependency>

The library provides an Async class for asynchronous operations.

So, we can find the factorial of a number using the instance of Cactoos's Async class:

Async<Integer, Long> asyncFunction = new Async<Integer, Long>(input -> factorial(input));
Future<Long> asyncFuture = asyncFunction.apply(number);
long result = asyncFuture.get();

Here, the apply method executes the operation using the ExecutorService.submit method and returns an instance of the Future interface.

Similarly, the Async class has the exec method that provides the same feature without a return value.

Note: the Cactoos library is in the initial stages of development and may not be appropriate for production use yet.

6. Jcabi-Aspects

Jcabi-Aspects provides the @Async annotation for asynchronous programming through AspectJ AOP aspects.

First, let's add the latest jcabi-aspects Maven dependency:

<dependency>
    <groupId>com.jcabi</groupId>
    <artifactId>jcabi-aspects</artifactId>
    <version>0.22.6</version>
</dependency>

The jcabi-aspects library requires AspectJ runtime support. So, we'll add the aspectjrt Maven dependency:

<dependency>
    <groupId>org.aspectj</groupId>
    <artifactId>aspectjrt</artifactId>
    <version>1.9.5</version>
</dependency>

Next, we'll add the jcabi-maven-plugin plugin that weaves the binaries with AspectJ aspects. The plugin provides the ajc goal that does all the work for us:

<plugin>
    <groupId>com.jcabi</groupId>
    <artifactId>jcabi-maven-plugin</artifactId>
    <version>0.14.1</version>
    <executions>
        <execution>
            <goals>
                <goal>ajc</goal>
            </goals>
        </execution>
    </executions>
    <dependencies>
        <dependency>
            <groupId>org.aspectj</groupId>
            <artifactId>aspectjtools</artifactId>
            <version>1.9.1</version>
        </dependency>
        <dependency>
            <groupId>org.aspectj</groupId>
            <artifactId>aspectjweaver</artifactId>
            <version>1.9.1</version>
        </dependency>
    </dependencies>
</plugin>

So, we're all set to use the AOP aspects for asynchronous programming:

@Async
@Loggable
public Future<Long> factorialUsingAspect(int number) {
    Future<Long> factorialFuture = CompletableFuture.completedFuture(factorial(number));
    return factorialFuture;
}

When we compile the code, the library will inject AOP advice in place of the @Async annotation through AspectJ weaving, for the asynchronous execution of the factorialUsingAspect method.

So, let's compile the class using the Maven command:

mvn install

The output from the jcabi-maven-plugin may look like:

 --- jcabi-maven-plugin:0.14.1:ajc (default) @ java-async ---
[INFO] jcabi-aspects 0.18/55a5c13 started new daemon thread jcabi-loggable for watching of @Loggable annotated methods
[INFO] Unwoven classes will be copied to /tutorials/java-async/target/unwoven
[INFO] jcabi-aspects 0.18/55a5c13 started new daemon thread jcabi-cacheable for automated cleaning of expired @Cacheable values
[INFO] ajc result: 10 file(s) processed, 0 pointcut(s) woven, 0 error(s), 0 warning(s)

We can verify if our class is woven correctly by checking the logs in the jcabi-ajc.log file, generated by the Maven plugin:

Join point 'method-execution(java.util.concurrent.Future 
com.baeldung.async.JavaAsync.factorialUsingJcabiAspect(int))' 
in Type 'com.baeldung.async.JavaAsync' (JavaAsync.java:158) 
advised by around advice from 'com.jcabi.aspects.aj.MethodAsyncRunner' 
(jcabi-aspects-0.22.6.jar!MethodAsyncRunner.class(from MethodAsyncRunner.java))

Then, we'll run the class as a simple Java application, and the output will look like:

17:46:58.245 [main] INFO com.jcabi.aspects.aj.NamedThreads - 
jcabi-aspects 0.22.6/3f0a1f7 started new daemon thread jcabi-loggable for watching of @Loggable annotated methods
17:46:58.355 [main] INFO com.jcabi.aspects.aj.NamedThreads - 
jcabi-aspects 0.22.6/3f0a1f7 started new daemon thread jcabi-async for Asynchronous method execution
17:46:58.358 [jcabi-async] INFO com.baeldung.async.JavaAsync - 
#factorialUsingJcabiAspect(20): 'java.util.concurrent.CompletableFuture@14e2d7c1[Completed normally]' in 44.64µs

So, we can see a new daemon thread jcabi-async is created by the library that performed the task asynchronously.

Similarly, the logging is enabled by the @Loggable annotation provided by the library.

7. Conclusion

In this article, we've seen a few ways of asynchronous programming in Java.

To begin with, we explored Java's in-built features like FutureTask and CompletableFuture for asynchronous programming. Then, we've seen a few libraries like EA Async and Cactoos with out-of-the-box solutions.

Also, we examined the support of performing tasks asynchronously using Guava's ListenableFuture and Futures classes. Last, we explored the jcabi-AspectJ library that provides AOP features through its @Async annotation for asynchronous method calls.

As usual, all the code implementations are available over on GitHub.

Generating Random Numbers

$
0
0

1. Overview

In this tutorial, we'll explore different ways of generating random numbers in Java.

2. Using Java API

The Java API provides us with several ways to achieve our purpose. Let’s see some of them.

2.1. java.lang.Math

The random method of the Math class will return a double value in a range from 0.0 (inclusive) to 1.0 (exclusive). Let's see how we'd use it to get a random number in a given range defined by min and max:

int randomWithMathRandom = (int) ((Math.random() * (max - min)) + min);

2.2. java.util.Random

Before Java 1.7, the most popular way of generating random numbers was using nextInt. There were two ways of using this method, with and without parameters. The no-parameter invocation returns any of the int values with approximately equal probability. So, it's very likely that we'll get negative numbers:

Random random = new Random();
int randomWithNextInt = random.nextInt();

If we use the netxInt invocation with the bound parameter, we'll get numbers within a range:

int randomWintNextIntWithinARange = random.nextInt(max - min) + min;

This will give us a number between 0 (inclusive) and parameter (exclusive). So, the bound parameter must be greater than 0. Otherwise, we'll get a java.lang.IllegalArgumentException.

Java 8 introduced the new ints methods that return a java.util.stream.IntStream. Let’s see how to use them.

The ints method without parameters returns an unlimited stream of int values:

IntStream unlimitedIntStream = random.ints();

We can also pass in a single parameter to limit the stream size:

IntStream limitedIntStream = random.ints(streamSize);

And, of course, we can set the maximum and minimum for the generated range:

IntStream limitedIntStreamWithinARange = random.ints(streamSize, min, max);

2.3. java.util.concurrent.ThreadLocalRandom

Java 1.7 release brought us a new and more efficient way of generating random numbers via the ThreadLocalRandom class. This one has three important differences from the Random class:

  • We don’t need to explicitly initiate a new instance of ThreadLocalRandom. This helps us to avoid mistakes of creating lots of useless instances and wasting garbage collector time
  • We can’t set the seed for ThreadLocalRandom, which can lead to a real problem. If we need to set the seed, then we should avoid this way of generating random numbers
  • Random class doesn’t perform well in multi-threaded environments

Now, let’s see how it works:

int randomWithThreadLocalRandomInARange = ThreadLocalRandom.current().nextInt(min, max);

With Java 8 or above, we have new possibilities. Firstly, we have two variations for the nextInt method:

int randomWithThreadLocalRandom = ThreadLocalRandom.current().nextInt();
int randomWithThreadLocalRandomFromZero = ThreadLocalRandom.current().nextInt(max);

Secondly, and more importantly, we can use the ints method:

IntStream streamWithThreadLocalRandom = ThreadLocalRandom.current().ints();

2.4. java.util.SplittableRandom

Java 8 has also brought us a really fast generator — the SplittableRandom class.

As we can see in the JavaDoc, this is a generator for use in parallel computations. It's important to know that the instances are not thread-safe. So, we have to take care when using this class.

We have available the nextInt and ints methods. With nextInt we can set directly the top and bottom range using the two parameters invocation:

SplittableRandom splittableRandom = new SplittableRandom();
int randomWithSplittableRandom = splittableRandom.nextInt(min, max);

This way of using checks that the max parameter is bigger than min. Otherwise, we'll get an IllegalArgumentException. However, it doesn't check if we work with positive or negative numbers. So, any of the parameters can be negative. Also, we have available one- and zero-parameter invocations. Those work in the same way as we have described before.

We have available the ints methods, too. This means that we can easily get a stream of int values. To clarify, we can choose to have a limited or unlimited stream. For a limited stream, we can set the top and bottom for the number generation range:

IntStream limitedIntStreamWithinARangeWithSplittableRandom = splittableRandom.ints(streamSize, min, max);

2.5. java.security.SecureRandom

If we have security-sensitive applications, we should consider using SecureRandom. This is a cryptographically strong generator. Default-constructed instances don't use cryptographically random seeds. So, we should either:

  • Set the seed — consequently, the seed will be unpredictable
  • Set the java.util.secureRandomSeed system property to true

This class inherits from java.util.Random. So, we have available all the methods we saw above. For example, if we need to get any of the int values, then we'll call nextInt without parameters:

SecureRandom secureRandom = new SecureRandom();
int randomWithSecureRandom = secureRandom.nextInt();

On the other hand, if we need to set the range, we can call it with the bound parameter:

int randomWithSecureRandomWithinARange = secureRandom.nextInt(max - min) + min;

We must remember that this way of using it throws IllegalArgumentException if the parameter is not bigger than zero.

3. Using Third-Party APIs

As we have seen, Java provides us with a lot of classes and methods for generating random numbers. However, there are also third-party APIs for this purpose.

We're going to take a look at some of them.

3.1. org.apache.commons.math3.random.RandomDataGenerator

There are a lot of generators in the commons mathematics library from the Apache Commons project. The easiest, and probably the most useful, is the RandomDataGenerator. It uses the Well19937c algorithm for the random generation. However, we can provide our algorithm implementation.

Let’s see how to use it. Firstly, we have to add the dependency:

<dependency>
    <groupId>org.apache.commons</groupId>
    <artifactId>commons-math3</artifactId>
    <version>3.6.1</version>
</dependency>

The latest version of commons-math3 can be found on Maven Central.

Then we can start working with it:

RandomDataGenerator randomDataGenerator = new RandomDataGenerator();
int randomWithRandomDataGenerator = randomDataGenerator.nextInt(min, max);

3.2. it.unimi.dsi.util.XoRoShiRo128PlusRandom

Certainly, this is one of the fastest random number generator implementations. It has been developed at the Information Sciences Department of the Milan University.

The library is also available at Maven Central repositories. So, let's add the dependency:

<dependency>
    <groupId>it.unimi.dsi</groupId>
    <artifactId>dsiutils</artifactId>
    <version>2.6.0</version>
</dependency>

This generator inherits from java.util.Random. However, if we take a look at the JavaDoc, we realize that there's only one way of using it —  through the nextInt method. Above all, this method is only available with the zero- and one-parameter invocations. Any of the other invocations will directly use the java.util.Random methods.

For example, if we want to get a random number within a range, we would write:

XoRoShiRo128PlusRandom xoroRandom = new XoRoShiRo128PlusRandom();
int randomWithXoRoShiRo128PlusRandom = xoroRandom.nextInt(max - min) + min;

4. Conclusion

There are several ways to implement random number generation. However, there is no best way. Consequently, we should choose the one that best suits our needs.

The full example can be found over on GitHub.

DevOps Overview

$
0
0

1. Overview

In this article, we'll understand the basics of DevOps principles and practices. We'll see why this is relevant and helpful in software development. We'll also understand how we can adopt DevOps meaningfully and what tools are there to help us along this journey.

2. Historical Context

We won't be able to appreciate DevOps as it stands today without looking back into history a little bit. The early days of software development were mostly characterized by what we call waterfall methodology. What this effectively means is that software was conceptualized, designed, developed, tested, and distributed in succession.

Every step was as detailed as possible, as going back was very costly. What this effectively meant was a much higher waiting period between thought and action. However, this was not such a problem as the technology landscape was much less volatile and disruptions far too spread.

Interestingly, this model didn't last long. As the pace of technology changed and disruptions started to happen often, businesses started to feel the heat. They needed new ideas to be tested faster. This meant faster changes in all aspects of the business, including software.

This gave birth to a whole new world of software development methodologies that are loosely seen under the umbrella of Agile. The agile manifesto sets forth a set of principles to be followed for software delivery in small increments with a faster feedback loop. There are several agile frameworks like Scrum and Kanban in practice.

3. What is DevOps?

We've seen that incremental development with faster feedback has become the cornerstone of software delivery today. But how do we achieve that? While traditional agile methodologies take us to a reasonable point, is it still not ideal.

Agile methodologies keep refining themselves as they continuously strive to break silos.

Traditionally, we always had different teams that were responsible for developing and delivering software. These teams often operated in their silos. This effectively translated into a much longer feedback cycle, which is not something we desire with agile methodologies.

So, it doesn't require a lot of reasoning to understand that well-integrated, cross-functional agile teams are much better suited to deliver their objectives. DevOps is the practice that encourages communication, collaboration, integration, and automation between software development and operations teams. This better enables us to realize incremental development with faster feedback.

The following diagram explains a possible workflow for practicing DevOps:


While we will go through the details of these steps later in the tutorial, let's understand some of the key principles of DevOps:

  • Value-centric approach (as realized by end-user)
  • Collaborative culture (with effective communication, processes, and tools)
  • Automation of processes (to enhance efficiency and reduce errors)
  • Measurable outcomes (to measure against the goals)
  • Continuous feedback (with a tendency to improve quicky)

4. How to Start the Journey?

While the theory is straightforward and appealing, the real challenges are in practicing DevOps meaningfully. As we've gathered so far, DevOps is mostly about people, rather than teams.

Common objectives, effective communication, and cross-functional skills are the hallmarks of such teams. Since a large part of this change is cultural, it's often slow and not without friction.

4.1. Motivation

Just because there's a popular practice out there does not necessarily make it suitable for us. We need to understand our motivation for any shift — more so if we're making a change towards agile. It's useful to set out by defining the goals we want to achieve.

The goals of DevOps in any organization are dependent on that organization's ambition, culture, and maturity. Here are some of the more common DevOps goals:

  • Better experience to end-users
  • Faster time to market
  • Improved mean time to recovery

4.2. Adoption

Remember that DevOps is not an end state but a continuous process of improvement to achieve the goals. Hence, everyone on the team must strive to identify impediments and remove them swiftly. Here are a few activities that can help us get started:

  • Clearly understand the current state of ideation to the production cycle
  • Gather some of the obvious bottlenecks and use metrics to make factual decisions
  • Prioritize the bottlenecks that will add the most value when removed
  • Define an iterative plan to deliver value incrementally for prioritized items
  • Follow the short cycles of Develop-Deploy-Measure to achieve the goals

5. DevOps Practices

There are several practices to follow, but the idea should not use any as a gold standard. We should carefully examine every practice in the background of our state and objectives and then make informed decisions. However, almost all the practices tend to focus on automating processes as much as possible.

5.1. Agile Planning

Agile planning is the practice of defining the work in short increments. While the end objective should be clear, it's not necessary to define and detail the entire application upfront. The key here is to prioritize work based on the value it can deliver.

Then, it should be broken in an iteration of short but functioning increments.

5.2. Infrastructure-as-Code (IaC)

This is the practice of managing and provisioning infrastructure through machine-readable configuration files. We also manage these configurations in a version control system like we manage our codebase. There are many domain-specific languages available to create these configuration files declaratively.

5.3. Test Automation

Software testing has been traditionally a manual effort often conducted in silos. This does not marry well with agile principles. Hence, it's imperative that we try to automate software testing at all levels, such as unit testing, functional testing, security testing, and performance testing.

5.4. Continuous Integration (CI)

Continuous integration is the practice of merging working code more often in small increments to a shared repository. Usually, there are automated builds and checks frequently running on this shared repository to alert us of any code breaks as soon as possible.

5.5. Continuous Delivery/Deployment (CD)

Continuous delivery is the practice of releasing software in small increments as soon as it passes all checks. This is often practiced together with Continuous Integration and can benefit from an automated release mechanism (referred to as Continuous Deployment).

5.6. Continuous Monitoring

Monitoring – perhaps the center of DevOps – enables faster feedback loops. Identifying the right metrics to monitor all aspects of the software, including infrastructure, is crucial. Having the right metrics, coupled with real-time and effective analytics, can help identify and resolve problems faster. Moreover, it feeds directly into the agile planning.

This list is far from complete and is ever-evolving. Teams practicing DevOps are continuously figuring out better ways to achieve their goals. Some of the other practices worth mentioning are Containerization, Cloud-Native Development, and Microservices, to name a few.

6. Tools of the Trade

No discussion on DevOps can be complete without talking about the tools. This is one area where there has been an explosion in the last few years. There may be a new tool out there by the time we finish reading this tutorial! While this is tempting and overwhelming at the same time, it's necessary to exercise caution.

We mustn't start our DevOps journey with tools as the first thing in our minds. We must explore and establish our goals, people (culture), and practices before finding the right tools. Being clear on that, let's see what are some of the time-tested tools available to us.

6.1. Planning

As we've seen, a mature DevOps always starts with agile planning. While clear on the objectives, it's only necessary to prioritize and define work for few short iterations. The feedback from these early iterations is invaluable in shaping the future ones and the entire software eventually. An effective tool here would help us exercise this process with ease.

Jira is a top-rated issue tracking product developed by Atlassian. It has a lot of built-in agile planning and monitoring tools. Largely, it's a commercial product that we can either run on-premise or use as a hosted application.

6.2. Development

The idea behind agile is to prototype faster and seek feedback on the actual software. Developers must make changes and merge faster into a shared version of the software. It's even more important for communication between team members to be fluid and fast.

Let's look at some of the ubiquitous tools in this domain.

Git is a distributed version control system. It's fairly popular, and there are numerous hosted services providing git repositories and value-added functions. Originally developed by Linus Torvalds, it makes collaboration between software developers quite convenient.

Confluence is a collaboration tool developed by Atlassian. Collaboration is the key to success for any agile team. The actual semantics of collaboration is pretty contextual, but a tool that makes an effort seamless is nevertheless invaluable. Confluence fits this spot accurately. Moreover, it integrates well with Jira!

Slack is an instant messaging platform developed by Slack Technologies. As we discussed, agile teams should be able to collaborate and communicate, preferably in real-time. Apart from instant messaging, Slack offers many ways to communicate with a single user or a group of users — and it integrates well with other tools like Jira and GitHub!

6.3. Integration

Changes merged by developers should be continuously inspected for compliance. What constitutes compliance is specific to team and application. However, it's common to see static and dynamic code analysis, as well as functional and non-functional metric measurements, as components of compliance.

Let's look briefly at a couple of popular integration tools.

Jenkins is a compelling, open-source, and free automation server. It has been in the industry for years and has matured enough to service a large spectrum of automation use cases. It offers a declarative way to define an automation routine and a variety of ways to trigger it automatically or manually. Moreover, it has a rich set of plugins that serve several additional features to create powerful automation pipelines.

SonarQube is an open-source continuous inspection platform developed by SonarSource. SonarQube has a rich set of static analysis rules for many programming languages. This helps detect code smells as early as possible. Moreover, SonarQube offers a dashboard that can integrate other metrics like code coverage, code complexity, and many more. And, it works well with Jenkins Server.

6.4. Delivery

To deliver changes and new features to software quickly is important. As soon as we've established that the changes merged in the repository comply with our standards and policies, we should be able to deliver it to the end-users fastly. This helps us gather feedback and shape the software better.

There are several tools here that can help us to automate some aspects of delivery to the point where we achieve continuous deployment.

Docker is a prevalent tool for containerizing any type of application quickly. It leverages OS-level virtualization to isolate software in packages called containers. Containerization has an immediate benefit in terms of more reliable software delivery. Docker Containers talk to each other through well-defined channels. Moreover, this is pretty lightweight compared to other ways of isolation like Virtual Machines.

Chef/Puppet/Ansible are configuration management tools. As we know, an actual running instance of a software application is a combination of the codebase build and its configurations. And while the codebase build is often immutable across environments, configurations are not. This is where we need a configuration management tool to deploy our application with ease and speed. There are several popular tools in this space, each having their quirks, but Chef, Puppet, and Ansible pretty much cover the bases.

HashiCorp Terraform can help us with infrastructure provisioning, which has been a tedious and time-consuming task since the days of private data centers. But with more and more adoption of cloud, infrastructure is often seen as a disposable and repeatable construct. However, this can only be achieved if we've got a tool with which we can define simple to complex infrastructure declaratively and create it at the click of a button. It may sound like a dream sequence, but Terraform is actively trying to bridge that gap!

6.5. Monitoring

Finally, to be able to observe the deployment and measure it against the targets is essential. There can be a host of metrics we can collect from systems and applications. These include some of the business metrics that are specific to our application.

The idea here is to be able to collect, curate, store, and analyze these metrics in almost real-time. There are several new products, both open source, and commercial, which are available in this space.

Elastic-Logstash-Kibana (ELK) is a stack of three open-source projects — Elasticsearch, Logstash, and Kibana. Elasticsearch is a highly-scalable search and analytics engine. Logstash provides us a server-side data processing pipeline capable of consuming data from a wide variety of sources. Finally, Kibana helps us visualize this data. Together, this stack can be used to aggregate data like logs from all the applications and analyze them in real-time.

Prometheus is an open-source system monitoring and alerting tool originally developed by SoundCloud. It comes with a multi-dimensional data model, a flexible query language, and can pull time-series data over HTTP. Grafana is another open-source analytics and monitoring solution that works with several databases. Together, Prometheus and Grafana can give us a real-time handle on pretty much any metric that our systems are capable of producing.

7. DevOps Extensions (Or are they really!)

We have seen that DevOp, fundamentally, is a continuous effort to remove impediments towards faster and iterative value-based delivery of software. Now, one of the immediate conclusions is that there can not be an end-state here.

What people realized as friction between development and operations teams is not the only friction. Breaking silos within an organization to increase collaboration is the central idea. Now, people soon started to realize that similar frictions exist between development and testing teams, and between development and security teams. Many traditional setups have dedicated security and performance teams.

The full potential of DevOps can never be realized until we can break almost all boundaries between teams and help them collaborate much more efficiently. This inherently means bringing teams like testing, security, and performance into the fold.

The confusion is largely in its nomenclature. DevOps makes us understand that it's mostly about development and operations teams. Hence, over time, new terms have emerged, encompassing other teams. But largely, it's just DevOps being realized more effectively!

7.1. DevTestOps

The cornerstone of DevOps is delivering high-quality software in small increments and more often. There are many aspects to the emphasis on quality here. In a sense, we often assume that the DevOps practices we adopt will help us achieve this. And, it's also true that many of the practices we discussed earlier focus on ensuring high quality at all times.

But functional testing of software has a much wider scope. Quite often, we tend to keep the higher-order testing like end-to-end testing towards the end of software delivery. More importantly, this is often the responsibility of a separate team that engages late in the process. This is where things start to deviate from the DevOps principles.

What we should rather do is to integrate software testing, at all levels, from the very beginning. Right from the planning stage, software testing should be considered an integral aspect of delivery. Moreover, the same team should be responsible for developing and testing the software. This is what the practice of DevTestOps is widely known as. This is often also referred to as Continuous Testing and Shifting Left.

7.2. DevSecOps

Security is an integral part of any software development and has its share of complexity. This often means that we have a separate team of security specialists who we engage with right when we're ready to ship the product. The vulnerabilities they identify at this stage can be costly to fix. This again does not resonate well with the principles of DevOps.

By this time, we should already have the solution we need to apply, and that is we should bring on the security concerns and personnel early in the game. We should motivate teams to think about security at every stage. Security is no doubt a very specialized domain, and hence we may need to bring in a specialist within the team. But the idea here is to consider some of the best practices right from the beginning.

As we move along, there are several tools available that can automate scanning for a bulk of vulnerabilities. We can also plug this into our Continuous Integration cycles to obtain fast feedback! Now, we can't integrate everything into the Continuous Integration as we must keep it light, but there can always be other periodic scans running separately.

8. Conclusion

In this article, we went through the basics of DevOps principles, practices, and tools available for use. We understood the context where DevOps is relevant and the reasons it can be of use to us. We also discussed briefly where to begin in the journey of adopting DevOps.

Further, we touched upon some of the popular practices and tools available for us to use in this journey. We also understood some of the other popular terms around DevOps like DevTestOps and DevSecOps.

Finally, we must understand that DevOps is not an end-state, but rather, a journey that may never finish! But the fun part here is the journey itself. All the while, we must never lose sight of our goals, and we should focus on the key principles. It's quite easy to fall for the shine of a popular tool or term in the industry. But we must always remember that anything is only useful if it helps us deliver value to our audience more efficiently.

Java Preview Features

$
0
0

1. Overview

In this tutorial, we're going to explore the motivation behind Java preview features, their difference compared to experimental features, and how to enable them with different tools.

2. Why Preview Features

As it's probably clear to everyone by now, Java feature releases are delivered every six months. This means less waiting time for new Java features, but at the same time, it means also less time to react to feedback about new features.

This is Java we're talking about here. It's used to develop a huge number of production systems. As a result, even a small malfunction in one implementation or a poor feature design could turn out to be very costly.

There must be a way to ensure new features are stable. More importantly, they have to suit the needs of the community. But how?

Thanks to JEP-12, “review language and VM features” can be included in the deliveries. This way, the community can check out new features in real-life scenarios – surely not in production, however.

Based on community feedback, a preview feature could be refined, possibly several times over multiple releases. Eventually, the feature may become permanent. But in some cases, the provided reviews could lead to withdrawing a preview feature entirely.

3. Preview Versus Experimental Features

Java preview features are completely specified and developed features that are going through evaluation. Therefore, they have just not reached the final state yet.

Because of their high quality, different JDK implementations must include all preview features planned within each Java delivery. However, a Java release still can't support preview features from earlier releases.

Preview features are essentially just a way to encourage the community to review and provide feedback. Moreover, not every Java feature must go through a preview stage in order to become final.

Here's what JEP-12 has to say about preview features:

A preview language or VM feature is a new feature whose design, specification, and implementation are all complete, but which would benefit from a period of broad exposure and evaluation before either achieving final and permanent status in the Java SE Platform or else being refined or removed.

On the other hand, experimental features are far from complete. Their artifacts are clearly separated from the JDK artifacts.

Experimental features are unstable and, as such, they impose a risk upon the language. Consequently, different JDK implementations may include different sets of experimental features.

4. Using Preview Features

Preview features are disabled by default. To enable them, we must use the enable-preview argument, which enables all preview features at once.

The Java compiler, as well as the JVM, must be of the same Java version that includes the preview feature we want to use.

Let's try to compile and run a piece of code that uses text blocks, a preview feature within JDK 13:

String query = """
    SELECT 'Hello World'
    FROM DUAL;
    """;
System.out.println(query);

Of course, we need to make sure we're using JDK 13 with our favorite IDE. We can, for instance, download the OpenJDK release 13 and add it to our IDE's Java runtime.

4.1. With Eclipse

At first, Eclipse will mark the code with red, as it won't compile. The error message will tell us to enable preview features in order to use text blocks.

We need to right-click on the project and select Properties from the pop-up menu. Next, we go to Java Compiler. Now, we can choose to enable preview features either for this specific project or for the entire workspace.

Next, we have to uncheck Use default compliance settings, and only then can we check Enable preview features for Java 13:

4.2. With IntelliJ IDEA

As we'd expect, the code won't compile in IntelliJ by default either, even with Java 13, and we'll get an error message similar to the one we saw in Eclipse.

We can enable preview features from Project Structure in the File menu. From Project, we need to select 13 (Preview) as the Project language level:

This should do it. However, if the error still persists, we have to manually add the compiler arguments to enable preview features. Assuming it's a Maven project, the compiler plugin in the pom.xml should contain:

<build>
    <plugins>
        <plugin>
            <groupId>org.apache.maven.plugins</groupId>
            <artifactId>maven-compiler-plugin</artifactId>
            <configuration>
                <source>13</source>
                <target>13</target>
                <compilerArgs>
                    --enable-preview
                </compilerArgs>
            </configuration>
        </plugin>
    </plugins>
</build>

If required, we can enable preview features for other Maven plugins within their respective configurations in a similar way.

4.3. From Command Line

At compile time, the javac command needs two arguments — enable-preview and release:

javac --release 13 --enable-preview ClassUsingTextBlocks.java

Let's recall that a JDK release N doesn't support preview features of release N-1 or any previous releases. Therefore, we'll get an error if we try to execute the previous command with JDK 14.

Long story short, the release argument must set N to the JDK release version of the compiler (and JVM) being used in order to enable preview features.

The release argument is just an extra guard to ensure code using preview features won't be eagerly used in production.

At runtime, the java command only requires the enable-preview argument:

java --enable-preview ClassUsingTextBlocks

However, only code using the preview features of that specific JDK release would run.

5. Conclusion

In this article, we've introduced preview features in Java, why we have them, and how they differ from experimental features. Then, using the text blocks preview feature in JDK 13, we explained step by step how to use preview features from Eclipse, IntelliJ, Maven, and the command line.

Introduction to Big Queue

$
0
0

1. Overview

In this tutorial, we're going to take a quick look at Big Queue, a Java implementation of a persistent queue.

We'll talk a bit about its architecture, and then we'll learn how to use it through quick and practical examples.

2. Usage

We'll need to add the bigqueue dependency to our project:

<dependency>
    <groupId>com.leansoft</groupId>
    <artifactId>bigqueue</artifactId>
    <version>0.7.0</version>
</dependency>

We also need to add its repository:

<repository>
    <id>github.release.repo</id>
    <url>https://raw.github.com/bulldog2011/bulldog-repo/master/repo/releases/</url>
</repository>

If we're used to working with basic queues, it'll be a breeze to adapt to Big Queue as its API is quite similar.

2.1. Initialization

We can initialize our queue by simpling calling its constructor:

@Before
public void setup() {
    String queueDir = System.getProperty("user.home");
    String queueName = "baeldung-queue";
    bigQueue = new BigQueueImpl(queueDir, queueName);
}

The first argument is the home directory for our queue.

The second argument represents our queue's name. It'll create a folder inside our queue's home directory where we can persist data.

We should remember to close our queue when we're done to prevent memory leaks:

bigQueue.close();

2.2. Inserting

We can add elements to the tail by simply calling the enqueue method:

@Test
public void whenAddingRecords_ThenTheSizeIsCorrect() {
    for (int i = 1; i <= 100; i++) {
        bigQueue.enqueue(String.valueOf(i).getBytes());
    }
 
    assertEquals(100, bigQueue.size());
}

We should note that Big Queue only supports the byte[] data type, so we are responsible for serializing our records when inserting.

2.3. Reading

As we might've expected, reading data is just as easy using the dequeue method:

@Test
public void whenAddingRecords_ThenTheyCanBeRetrieved() {
    bigQueue.enqueue(String.valueOf("new_record").getBytes());

    String record = new String(bigQueue.dequeue());
 
    assertEquals("new_record", record);
}

We also have to be careful to properly deserialize our data when reading.

Reading from an empty queue throws a NullPointerException.

We should verify that there are values in our queue using the isEmpty method:

if(!bigQueue.isEmpty()){
    // read
}

To empty our queue without having to go through each record, we can use the removeAll method:

bigQueue.removeAll();

2.4. Peeking

When peeking, we simply read a record without consuming it:

@Test
public void whenPeekingRecords_ThenSizeDoesntChange() {
    for (int i = 1; i <= 100; i++) {
        bigQueue.enqueue(String.valueOf(i).getBytes());
    }
 
    String firstRecord = new String(bigQueue.peek());

    assertEquals("1", firstRecord);
    assertEquals(100, bigQueue.size());
}

2.5. Deleting Consumed Records

When we're calling the dequeue method, records are removed from our queue, but they remain persisted on disk.

This could potentially fill up our disk with unnecessary data.

Fortunately, we can delete the consumed records using the gc method:

bigQueue.gc();

Just like the garbage collector in Java cleans up unreferenced objects from heap, gc cleans consumed records from our disk.

3. Architecture and Features

What's interesting about Big Queue is the fact that its codebase is extremely small — just 12 source files occupying about 20KB of disk space.

On a high level, it's just a persistent queue that excels at handling large amounts of data.

3.1. Handling Large Amounts of Data

The size of the queue is limited only by our total disk space available. Every record inside our queue is persisted on disk, in order to be crash-resistant.

Our bottleneck will be the disk I/O, meaning that an SSD will significantly improve the average throughput over an HDD.

3.2. Accessing Data Extremely Fast

If we take a look at its source code, we'll notice that the queue is backed by a memory-mapped file. The accessible part of our queue (the head) is kept in RAM, so accessing records will be extremely fast.

Even if our queue would grow extremely large and would occupy terabytes of disk space, we would still be able to read data in O(1) time complexity.

If we need to read lots of messages and speed is a critical concern, we should consider using an SSD over an HDD, as moving data from disk to memory would be much faster.

3.3. Advantages

A great advantage is its ability to grow very large in size. We can scale it to theoretical infinity by just adding more storage, hence its name “Big”.

In a concurrent environment, Big Queue can produce and consume around 166MBps of data on a commodity machine.

If our average message size is 1KB, it can process 166k messages per second.

It can go up to 333k messages per second in a single-threaded environment — pretty impressive!

3.4. Disadvantages

Our messages remain persisted to disk, even after we've consumed them, so we have to take care of garbage-collecting data when we no longer need it.

We are also responsible for serializing and deserializing our messages.

4. Conclusion

In this quick tutorial, we learned about Big Queue and how we can use it as a scalable and persistent queue.

As always, the code is available over on Github.

Java Weekly, Issue 316

$
0
0

1. Spring and Java

>> A Bottom-Up View of Kotlin Coroutines [infoq.com]

A peek under-the-hood at coroutines – a feature not natively supported by the JVM – and how they work in Kotlin.

>> RFC-7807 problem details with Spring Boot and JAX-RS [blog.codecentric.de]

A great overview of this IETF standard for communicating problems and errors to API clients.

>> Key annotations you need to know when working with JPA and Hibernate [thoughts-on-java.org]

An excellent primer for newbies, and a nice review for the more experienced JPA connoisseur.

Also worth reading:

Webinars and presentations:

Time to upgrade:

2. Technical

>> How to solve CORS problems when redirecting to S3 signed URLs [advancedweb.hu]

A guide to the headers and HTTP status codes to use in this scenario.

>> Istio as an Example of When Not to Do Microservices [blog.christianposta.com]

A case study of a failed microservices architecture — and why a monolith was ultimately the better solution.

Also worth reading:

3. Musings

>> Solving Problems Properly Is Often Not Viable [techblog.bozho.net]

An interesting look at the market forces that preclude rewrites of poorly-designed systems.

Also worth reading:

4. Comics

And my favorite Dilberts of the week:

>> Mind Reading [dilbert.com]

>> Old Strategy [dilbert.com]

>> Smarter Than An Engineer [dilbert.com]

5. Pick of the Week

>> One Thing [randsinrepose.com]


New Java 13 Features

$
0
0

1. Overview

September 2019 saw the release of JDK 13, per Java's new release cadence of six months. In this article, we'll take a look at the new features and improvements introduced in this version.

2. Preview Developer Features

Java 13 has brought in two new language features, albeit in the preview mode. This implies that these features are fully implemented for developers to evaluate, yet are not production-ready. Also, they can either be removed or made permanent in future releases based on feedback.

We need to specify –enable-preview as a command-line flag to use the preview features. Let's look at them in-depth.

2.1. Switch Expressions (JEP 354)

We initially saw switch expressions in JDK 12. Java 13's switch expressions build on the previous version by adding a new yield statement.

Using yield, we can now effectively return values from a switch expression:

@Test
@SuppressWarnings("preview")
public void whenSwitchingOnOperationSquareMe_thenWillReturnSquare() {
    var me = 4;
    var operation = "squareMe";
    var result = switch (operation) {
        case "doubleMe" -> {
            yield me * 2;
        }
        case "squareMe" -> {
            yield me * me;
        }
        default -> me;
    };

    assertEquals(16, result);
}

As we can see, it's now easy to implement the strategy pattern using the new switch.

2.2. Text Blocks (JEP 355)

The second preview feature is text blocks for multi-line Strings such as embedded JSON, XML, HTML, etc.

Earlier, to embed JSON in our code, we would declare it as a String literal:

String JSON_STRING = "{\r\n" + "\"name\" : \"Baeldung\",\r\n" + "\"website\" : \"https://www.%s.com/\"\r\n" + "}";

Now let's write the same JSON using String text blocks:

String TEXT_BLOCK_JSON = """
{
    "name" : "Baeldung",
    "website" : "https://www.%s.com/"
}
""";

As is evident, there is no need to escape double quotes or to add a carriage return. By using text blocks, the embedded JSON is much simpler to write and easier to read and maintain.

Moreover, all String functions are available:

@Test
public void whenTextBlocks_thenStringOperationsWorkSame() {        
    assertThat(TEXT_BLOCK_JSON.contains("Baeldung")).isTrue();
    assertThat(TEXT_BLOCK_JSON.indexOf("www")).isGreaterThan(0);
    assertThat(TEXT_BLOCK_JSON.length()).isGreaterThan(0);
}

Also, java.lang.String now has three new methods to manipulate text blocks:

  • stripIndent() – mimics the compiler to remove incidental white space
  • translateEscapes() – translates escape sequences such as “\\t” to “\t”
  • formatted() – works the same as String::format, but for text blocks

Let's take a quick look at a String::formatted example:

assertThat(TEXT_BLOCK_JSON.formatted("baeldung").contains("www.baeldung.com")).isTrue();
assertThat(String.format(JSON_STRING,"baeldung").contains("www.baeldung.com")).isTrue();

Since text blocks are a preview feature and can be removed in a future release, these new methods are marked for deprecation.

3. Dynamic CDS Archives (JEP 350)

Class data sharing (CDS) has been a prominent feature of Java HotSpot VM for a while now. It allows class metadata to be shared across different JVMs to reduce startup time and memory footprint. JDK 10 extended this ability by adding application CDS (AppCDS) – to give developers the power to include application classes in the shared archive. JDK 12 further enhanced this feature to include CDS archives by default.

However, the process of archiving application classes was tedious. To generate archive files, developers had to do trial runs of their applications to create a class list first, and then dump it into an archive. After that, this archive could be used to share metadata between JVMs.

With dynamic archiving, JDK 13 has simplified this process. Now we can generate a shared archive at the time the application is exiting. This has eliminated the need for trial runs.

To enable applications to create a dynamic shared archive on top of the default system archive, we need to add an option -XX:ArchiveClassesAtExit and specify the archive name as argument:

java -XX:ArchiveClassesAtExit=<archive filename> -cp <app jar> AppName

We can then use the newly created archive to run the same app with -XX:SharedArchiveFile option:

java -XX:SharedArchiveFile=<archive filename> -cp <app jar> AppName

4. ZGC: Uncommit Unused Memory (JEP 351)

The Z Garbage Collector was introduced in Java 11 as a low-latency garbage collection mechanism, such that GC pause times never exceeded 10 ms. However, unlike other HotSpot VM GCs such as G1 and Shenandoah, it was not equipped to return unused heap memory to the operating system. Java 13 added this capability to the ZGC. We now get a reduced memory footprint along with performance improvement.

Starting with Java 13, the ZGC now returns uncommitted memory to the operating system by default, up until the specified minimum heap size is reached. If we do not want to use this feature, we can go back to the Java 11 way by:

  • Using option -XX:-ZUncommit, or
  • Setting equal minimum (-Xms) and maximum (-Xmx) heap sizes

Additionally, ZGC now has a maximum supported heap size of 16TB. Earlier, 4TB was the limit.

5. Reimplement the Legacy Socket API (JEP 353)

We have seen Socket (java.net.Socket and java.net.ServerSocket) APIs as an integral part of Java since its onset. However, they were never modernized in the last twenty years. Written in legacy Java and C, they were cumbersome and difficult to maintain.

Java 13 bucked this trend and replaced the underlying implementation to align the API with the futuristic user-mode threads. Instead of PlainSocketImpl, the provider interface now points to NioSocketImpl. This newly coded implementation is based on the same internal infrastructure as java.nio.

Again, we do have a way to go back to using PlainSocketImpl. We can start the JVM with the system property -Djdk.net.usePlainSocketImpl set as true to use the older implementation. The default is NioSocketImpl.

6. Miscellaneous Changes

Apart from the JEPs listed above, Java 13 has given us a few more notable changes:

  • java.nio – method FileSystems.newFileSystem(Path, Map<String, ?>) added
  • java.time – new official Japanese era name added
  • javax.crypto – support for MS Cryptography Next Generation (CNG)
  • javax.security – property jdk.sasl.disabledMechanisms added to disable SASL mechanisms
  • javax.xml.crypto – new String constants introduced to represent Canonical XML 1.1 URIs
  • javax.xml.parsers – new methods added to instantiate DOM and SAX factories with namespaces support
  • Unicode support upgraded to version 12.1
  • Support added for Kerberos principal name canonicalization and cross-realm referrals

Additionally, a few APIs are proposed for removal. These include the three String methods listed above, and the javax.security.cert API.

Among the removals include the rmic tool and old features from the JavaDoc tool. Pre-JDK 1.4 SocketImpl implementations are also no longer supported.

7. Conclusion

In this article, we saw all five JDK Enhancement Proposals implemented by Java 13. We also listed down some other notable additions and deletions.

As usual, source code is available over on GitHub.

What Causes java.lang.reflect.InvocationTargetException?

$
0
0

1. Overview

When working with Java Reflection API, it is common to encounter java.lang.reflect.InvocationTargetException. In this tutorial, we’ll take a look at it and how to handle it with a simple example

2. Cause of InvocationTargetException

It mainly occurs when we work with the reflection layer and try to invoke a method or constructor that throws an underlying exception itself.

The reflection layer wraps the actual exception thrown by the method with the InvocationTargetException. Let’s try to understand it with an example.

Let's write a class with a method that intentionally throws an exception:

public class InvocationTargetExample {
    public int divideByZeroExample() {
        return 1 / 0;
    }
}

Now, let’s invoke the above method using reflection in a Simple JUnit 5 Test:

InvocationTargetExample targetExample = new InvocationTargetExample(); 
Method method =
  InvocationTargetExample.class.getMethod("divideByZeroExample");
 
Exception exception =
  assertThrows(InvocationTargetException.class, () -> method.invoke(targetExample));

In the above code, we have asserted the InvocationTargetException, which is thrown while invoking the method. An important thing to note here is that the actual exception – ArithmeticException in this case – gets wraped into an InvocationTargetException.

Now, the question that comes to mind is, why doesn't reflection throw the actual exception in the first place?

The reason is that it allows us to understand whether the Exception occurred due to failure in calling the method through the reflection layer or whether it occurred within the method itself.

3. How to Handle InvocationTargetException?

Here, the actual underlying exception is the cause of InvocationTargetException, so we can use Throwable.getCause() to get more information about it.

Let's see how we can use getCause() to get the actual exception in the same example used above:

assertEquals(ArithmeticException.class, exception.getCause().getClass());

Here, we've used the getCause() method on the same exception object that was thrown. And we have asserted ArithmeticException.class as the cause of the exception.

So, once we get the underlying exception, we can re-throw the same, wrap it in some custom exception, or simply log the exception based on our requirement.

4. Conclusion

In this short article, we've seen how the reflection layer wraps any underlying exception. We have also seen how to determine the underlying cause of the InvocationTargetException and how to handle such a scenario with a simple example.

As usual, the code used in this article is available over on GitHub.

Java Weekly, Issue 317

$
0
0

1. Spring and Java

>> Reactive BookStore Service Broker [spring.io]

A quick example demonstrating the Reactive API support available in several Spring projects. Very cool.

>> Groovy 3.0 Adds New Java-Like Features [infoq.com]

Some of the highlights include lambda expressions, try-with-resources, and an enhanced for-loop.

>> Enforcing Java Record Invariants With Bean Validation [morling.dev]

And an experiment with the Java 14 Records preview feature and Byte Buddy.

Also worth reading:

Webinars and presentations:

Time to upgrade:

2. Technical

>> One-Time Passwords Do Not Provide Non-Repudiation [techblog.bozho.net]

As secure hardware modules become the norm in smartphone tech, it may be time to say goodbye to the OTP.

>> Seven ways of handling image and machine learning data with AWS SageMaker and S3 [blog.codecentric.de]

And some common approaches for preserving your ML data as you port your Jupyter notebooks to SageMaker.

Also worth reading:

3. Musings

>> On Pair Programming [martinfowler.com]

A strong case for pair programming, along with some dos and don'ts to keep in mind when implementing it in your team.

Also worth reading:

4. Comics

And my favorite Dilberts of the week:

>> Master Engineer [dilbert.com]

>> Poison Pill [dilbert.com]

>> Wally Stopped Trying [dilbert.com]

5. Pick of the Week

>> Work Less, Get More Done: Analytics For Maximizing Productivity [kalzumeus.com]

Introduction to Jsoniter

$
0
0

1. Introduction

JavaScript Object Notation, or JSON, has gained a lot of popularity as a data interchange format in recent years. Jsoniter is a new JSON parsing library aimed at offering a more flexible and more performant JSON parsing than the other available parsers.

In this tutorial, we'll see how to parse JSON objects using the Jsoniter library for Java.

2. Dependencies

The latest version of Jsoniter can be found from the Maven Central repository.

Let's start by adding the dependencies to the pom.xml:

<dependency>
    <groupId>com.jsoniter<groupId> 
    <artifactId>jsoniter</artifactId>
    <version>0.9.23</version>
</dependency>

Similarly, we can add the dependency to our build.gradle file:

compile group: 'com.jsoniter', name: 'jsoniter', version: '0.9.23'

3. JSON Parsing Using Jsoniter

Jsoniter provides 3 APIs to parse JSON documents:

  • Bind API
  • Any API
  • Iterator API

Let's look into each of the above APIs.

3.1. JSON Parsing Using the Bind API

The bind API uses the traditional way of binding the JSON document to Java classes.

Let's consider the JSON document with student details:

{"id":1,"name":{"firstName":"Joe","surname":"Blogg"}}

Let's now define the Student and Name schema classes to represent the above JSON:

public class Student {
    private int id;
    private Name name;
    
    // standard setters and getters
}
public class Name {
    private String firstName;
    private String surname;
    
    // standard setters and getters
}

De-serializing the JSON to a Java object using the bind API is very simple. We use the deserialize method of JsonIterator:

@Test
public void whenParsedUsingBindAPI_thenConvertedToJavaObjectCorrectly() {
    String input = "{\"id\":1,\"name\":{\"firstName\":\"Joe\",\"surname\":\"Blogg\"}}";
    
    Student student = JsonIterator.deserialize(input, Student.class);

    assertThat(student.getId()).isEqualTo(1);
    assertThat(student.getName().getFirstName()).isEqualTo("Joe");
    assertThat(student.getName().getSurname()).isEqualTo("Blogg");
}

The Student schema class declares the id to be of int datatype. However, what if the JSON that we receive contains a String value for the id instead of a number? For example:

{"id":"1","name":{"firstName":"Joe","surname":"Blogg"}}

Notice how the id in the JSON is a string value “1” this time. Jsoniter provides Maybe decoders to deal with this scenario.

3.2. Maybe Decoders

Jsoniter's Maybe decoders come in handy when the datatype of a JSON element is fuzzy. The datatype for the student.id field is fuzzy — it can either be a String or an int. To handle this, we need to annotate the id field in our schema class using the MaybeStringIntDecoder:

public class Student {
    @JsonProperty(decoder = MaybeStringIntDecoder.class)
    private int id;
    private Name name;
    
    // standard setters and getters
}

We can now parse the JSON even when the id value is a String:

@Test
public void givenTypeInJsonFuzzy_whenFieldIsMaybeDecoded_thenFieldParsedCorrectly() {
    String input = "{\"id\":\"1\",\"name\":{\"firstName\":\"Joe\",\"surname\":\"Blogg\"}}";
    
    Student student = JsonIterator.deserialize(input, Student.class);

    assertThat(student.getId()).isEqualTo(1); 
}

Similarly, Jsoniter offers other decoders such as MaybeStringLongDecoder and MaybeEmptyArrayDecoder.

Let's now imagine that we were expecting to receive a JSON document with the Student details but we receive the following document instead:

{"error":404,"description":"Student record not found"}

What happened here? We were expecting a success response with Student data but we received an error response. This is a very common scenario but how would we handle this?

One way is to perform a null check to see if we received an error response before extracting the Student data. However, the null checks can lead to some hard-to-read code, and the problem is made worse if we have a multi-level nested JSON.

Jsoniter's parsing using the Any API comes to the rescue.

3.3. JSON Parsing Using the Any API

When the JSON structure itself is dynamic, we can use Jsoniter's Any API that provides a schema-less parsing of the JSON. This works similarly to parsing the JSON into a Map<String, Object>.

Let's parse the Student JSON as before but using the Any API this time:

@Test
public void whenParsedUsingAnyAPI_thenFieldValueCanBeExtractedUsingTheFieldName() {
    String input = "{\"id\":1,\"name\":{\"firstName\":\"Joe\",\"surname\":\"Blogg\"}}";
    
    Any any = JsonIterator.deserialize(input);

    assertThat(any.toInt("id")).isEqualTo(1);
    assertThat(any.toString("name", "firstName")).isEqualTo("Joe");
    assertThat(any.toString("name", "surname")).isEqualTo("Blogg"); 
}

Let's understand this example. First, we use the JsonIterator.deserialize(..) to parse the JSON. However, we do not specify a schema class in this instance. The result is of type Any.

Next, we read the field values using the field names. We read the “id” field value using the Any.toInt method. The toInt method converts the “id” value to an integer. Similarly, we read the “name.firstName” and “name.surname” field values as string values using the toString method.

Using the Any API, we can also check if an element is present in the JSON. We can do this by looking up the element and then inspecting the valueType of the lookup result. The valueType will be INVALID when the element is not present in the JSON.

For example:

@Test
public void whenParsedUsingAnyAPI_thenFieldValueTypeIsCorrect() {
    String input = "{\"id\":1,\"name\":{\"firstName\":\"Joe\",\"surname\":\"Blogg\"}}";
    
    Any any = JsonIterator.deserialize(input);

    assertThat(any.get("id").valueType()).isEqualTo(ValueType.NUMBER);
    assertThat(any.get("name").valueType()).isEqualTo(ValueType.OBJECT);
    assertThat(any.get("error").valueType()).isEqualTo(ValueType.INVALID);
}

The “id” and “name” fields are present in the JSON and hence their valueType is NUMBER and OBJECT respectively. However, the JSON input does not have an element by the name “error” and so the valueType is INVALID.

Going back to the scenario mentioned at the end of the previous section, we need to detect whether the JSON input we received is a success or an error response. We can check if we received an error response by inspecting the valueType of the “error” element:

String input = "{\"error\":404,\"description\":\"Student record not found\"}";
Any response = JsonIterator.deserialize(input);

if (response.get("error").valueType() != ValueType.INVALID) {
    return "Error!! Error code is " + response.toInt("error");
}
return "Success!! Student id is " + response.toInt("id");

When run, the above code will return “Error!! Error code is 404”.

Next, we'll look at using the Iterator API to parse JSON documents.

3.4. JSON Parsing Using the Iterator API

If we wish to perform the binding manually, we can use Jsoniter's Iterator API. Let's consider the JSON:

{"firstName":"Joe","surname":"Blogg"}

We'll use the Name schema class that we used earlier to parse the JSON using the Iterator API:

@Test
public void whenParsedUsingIteratorAPI_thenFieldValuesExtractedCorrectly() throws Exception {
    Name name = new Name();    
    String input = "{\"firstName\":\"Joe\",\"surname\":\"Blogg\"}";
    JsonIterator iterator = JsonIterator.parse(input);

    for (String field = iterator.readObject(); field != null; field = iterator.readObject()) {
        switch (field) {
            case "firstName":
                if (iterator.whatIsNext() == ValueType.STRING) {
                    name.setFirstName(iterator.readString());
                }
                continue;
            case "surname":
                if (iterator.whatIsNext() == ValueType.STRING) {
                    name.setSurname(iterator.readString());
                }
                continue;
            default:
                iterator.skip();
        }
    }

    assertThat(name.getFirstName()).isEqualTo("Joe");
    assertThat(name.getSurname()).isEqualTo("Blogg");
}

Let's understand the above example. First, we parse the JSON document as an iterator. We use the resulting JsonIterator instance to iterate over the JSON elements:

  1. We start by invoking the readObject method which returns the next field name (or a null if the end of the document has been reached).
  2. If the field name is not of interest to us, we skip the JSON element by using the skip method. Otherwise, we inspect the data type of the element by using the whatIsNext method. Invoking the whatIsNext method is not mandatory but is useful when the datatype of the field is unknown to us.
  3. Finally, we extract the value of the JSON element using the readString method.

4. Conclusion

In this article, we discussed the various approaches offered by Jsoniter for parsing the JSON documents as Java objects.

First, we looked at the standard way of parsing a JSON document using a schema class.

Next, we looked at handling fuzzy data types and the dynamic structures when parsing JSON documents using the Maybe decoders and Any datatype, respectively.

Finally, we looked at the Iterator API for binding the JSON manually to a Java object.

As always the source code for the examples used in this article is available over on GitHub.

List All Available Redis Keys

$
0
0

1. Overview

Collections are an essential building block typically seen in almost all modern applications. So, it's no surprise that Redis offers a variety of popular data structures such as lists, sets, hashes, and sorted sets for us to use.

In this tutorial, we'll learn how we can effectively read all available Redis keys that match a particular pattern.

2. Explore Collections

Let's imagine that our application uses Redis to store information about balls used in different sports. We should be able to see information about each ball available from the Redis collection. For simplicity, we'll limit our data set to only three balls:

  • Cricket ball with a weight of 160 g
  • Football with a weight of 450 g
  • Volleyball with a weight of 270 g

As usual, let's first clear our basics by working on a naive approach to exploring Redis collections.

3. Naive Approach Using redis-cli

Before we start writing Java code to explore the collections, we should have a fair idea of how we'll do it using the redis-cli interface. Let's assume that our Redis instance is available at 127.0.0.1 on port 6379, for us to explore each collection type with the command-line interface.

3.1. Linked List

First, let's store our data set in a Redis linked list named balls in the format of sports-name_ball-weight with the help of the rpush command:

% redis-cli -h 127.0.0.1 -p 6379
127.0.0.1:6379> RPUSH balls "cricket_160"
(integer) 1
127.0.0.1:6379> RPUSH balls "football_450"
(integer) 2
127.0.0.1:6379> RPUSH balls "volleyball_270"
(integer) 3

We can notice that a successful insertion into the list outputs the new length of the list. However, in most cases, we'll be blind to the data insertion activity. As a result, we can find out the length of the linked list using the llen command:

127.0.0.1:6379> llen balls
(integer) 3

When we already know the length of the list, it's convenient to use the lrange command to retrieve the entire data set easily:

127.0.0.1:6379> lrange balls 0 2
1) "cricket_160"
2) "football_450"
3) "volleyball_270"

3.2. Set

Next, let's see how we can explore the data set when we decide to store it in a Redis set. To do so, we first need to populate our data set in a Redis set named balls using the sadd command:

127.0.0.1:6379> sadd balls "cricket_160" "football_450" "volleyball_270" "cricket_160"
(integer) 3

Oops! We had a duplicate value in our command. But, since we were adding values to a set, we don't need to worry about duplicates. Of course, we can see the number of items added from the output response-value.

Now, we can leverage the smembers command to see all the set members:

127.0.0.1:6379> smembers balls
1) "volleyball_270"
2) "cricket_160"
3) "football_450"

3.3. Hash

Now, let's use Redis's hash data structure to store our dataset in a hash key named balls such that hash's field is the sports name and the field value is the weight of the ball. We can do this with the help of hmset command:

127.0.0.1:6379> hmset balls cricket 160 football 450 volleyball 270
OK

To see the information stored in our hash, we can use the hgetall command:

127.0.0.1:6379> hgetall balls
1) "cricket"
2) "160"
3) "football"
4) "450"
5) "volleyball"
6) "270"

3.4. Sorted Set

In addition to a unique member-value, sorted-sets allows us to keep a score next to them. Well, in our use case, we can keep the name of the sport as the member value and the weight of the ball as the score. Let's use the zadd command to store our dataset:

127.0.0.1:6379> zadd balls 160 cricket 450 football 270 volleyball
(integer) 3

Now, we can first use the zcard command to find the length of the sorted set, followed by the zrange command to explore the complete set:

127.0.0.1:6379> zcard balls
(integer) 3
127.0.0.1:6379> zrange balls 0 2
1) "cricket"
2) "volleyball"
3) "football"

3.5. Strings

We can also see the usual key-value strings as a superficial collection of items. Let's first populate our dataset using the mset command:

127.0.0.1:6379> mset balls:cricket 160 balls:football 450 balls:volleyball 270
OK

We must note that we added the prefix “balls:so that we can identify these keys from the rest of the keys that may be lying in our Redis database. Moreover, this naming strategy allows us to use the keys command to explore our dataset with the help of prefix pattern matching:

127.0.0.1:6379> keys balls*
1) "balls:cricket"
2) "balls:volleyball"
3) "balls:football"

4. Naive Java Implementation

Now that we have developed a basic idea of the relevant Redis commands that we can use to explore collections of different types, it's time for us to get our hands dirty with code.

4.1. Maven Dependency

In this section, we'll be using the Jedis client library for Redis in our implementation:

<dependency>
    <groupId>redis.clients</groupId>
    <artifactId>jedis</artifactId>
    <version>3.2.0</version>
</dependency>

4.2. Redis Client

The Jedis library comes with the Redis-CLI name-alike methods. However, it's recommended that we create a wrapper Redis client, which will internally invoke Jedis function calls.

Whenever we're working with Jedis library, we must keep in mind that a single Jedis instance is not thread-safe. Therefore, to get a Jedis resource in our application, we can make use of JedisPool, which is a threadsafe pool of network connections.

And, since we don't want multiple instances of Redis clients floating around at any given time during the life cycle of our application, we should create our RedisClient class on the principle of the singleton design pattern.

First, let's create a private constructor for our client that'll internally initialize the JedisPool when an instance of RedisClient class is created:

private static JedisPool jedisPool;

private RedisClient(String ip, int port) {
    try {
        if (jedisPool == null) {
            jedisPool = new JedisPool(new URI("http://" + ip + ":" + port));
        }
    } catch (URISyntaxException e) {
        log.error("Malformed server address", e);
    }
}

Next, we need a point of access to our singleton client. So, let's create a static method getInstance() for this purpose:

private static volatile RedisClient instance = null;

public static RedisClient getInstance(String ip, final int port) {
    if (instance == null) {
        synchronized (RedisClient.class) {
            if (instance == null) {
                instance = new RedisClient(ip, port);
            }
        }
    }
    return instance;
}

Finally, let's see how we can create a wrapper method on top of Jedis's lrange method:

public List lrange(final String key, final long start, final long stop) {
    try (Jedis jedis = jedisPool.getResource()) {
        return jedis.lrange(key, start, stop);
    } catch (Exception ex) {
        log.error("Exception caught in lrange", ex);
    }
    return new LinkedList();
}

Of course, we can follow the same strategy to create the rest of the wrapper methods such as lpush, hmset, hgetall, sadd, smembers, keys, zadd, and zrange.

4.3. Analysis

All the Redis commands that we can use to explore a collection in a single go will naturally have an O(n) time complexity in the best case.

We are perhaps a bit liberal, calling this approach as naive. In a real-life production instance of Redis, it's quite common to have thousands or millions of keys in a single collection. Further, Redis's single-threaded nature brings more misery, and our approach could catastrophically block other higher-priority operations.

So, we should make it a point that we're limiting our naive approach to be used only for debugging purposes.

5. Iterator Basics

The major flaw in our naive implementation is that we're requesting Redis to give us all of the results for our single fetch-query in one go. To overcome this issue, we can break our original fetch query into multiple sequential fetch queries that operate on smaller chunks of the entire dataset.

Let's assume that we have a 1,000-page book that we're supposed to read. If we follow our naive approach, we'll have to read this large book in a single sitting without any breaks. That'll be fatal to our well-being as it'll drain our energy and prevent us from doing any other higher-priority activity.

Of course, the right way is to finish the book over multiple reading sessions. In each session, we resume from where we left off in the previous session — we can track our progress by using a page bookmark.

Although the total reading time in both cases will be of comparable value, nonetheless, the second approach is better as it gives us room to breathe.

Let's see how we can use an iterator-based approach for exploring Redis collections.

6. Redis Scan

Redis offers several scanning strategies to read keys from collections using a cursor-based approach, which is, in principle, similar to a page bookmark.

6.1. Scan Strategies

We can scan through the entire key-value collection store using the Scan command. However, if we want to limit our dataset by collection types, then we can use one of the variants:

  • Sscan can be used for iterating through sets
  • Hscan helps us iterate through pairs of field-value in a hash
  • Zscan allows an iteration through members stored in a sorted set

We must note that we don't really need a server-side scan strategy specifically designed for the linked lists. That's because we can access members of the linked list through indexes using the lindex or lrange command. Plus, we can find out the number of elements and use lrange in a simple loop to iterate the entire list in small chunks.

Let's use the SCAN command to scan over keys of string type. To start the scan, we need to use the cursor value as “0”, matching pattern string as “ball*”:

127.0.0.1:6379> mset balls:cricket 160 balls:football 450 balls:volleyball 270
OK
127.0.0.1:6379> SCAN 0 MATCH ball* COUNT 1
1) "2"
2) 1) "balls:cricket"
127.0.0.1:6379> SCAN 2 MATCH ball* COUNT 1
1) "3"
2) 1) "balls:volleyball"
127.0.0.1:6379> SCAN 3 MATCH ball* COUNT 1
1) "0"
2) 1) "balls:football"

With each completed scan, we get the next value of cursor to be used in the subsequent iteration. Eventually, we know that we've scanned through the entire collection when the next cursor value is “0”.

7. Scanning With Java

By now, we have enough understanding of our approach that we can start implementing it in Java.

7.1. Scanning Strategies

If we peek into the core scanning functionality offered by the Jedis class, we'll find strategies to scan different collection types:

public ScanResult<String> scan(final String cursor, final ScanParams params);
public ScanResult<String> sscan(final String key, final String cursor, final ScanParams params);
public ScanResult<Map.Entry<String, String>> hscan(final String key, final String cursor,
  final ScanParams params);
public ScanResult<Tuple> zscan(final String key, final String cursor, final ScanParams params);

Jedis requires two optional parameters, search-pattern and result-size, to effectively control the scanning – ScanParams makes this happen. For this purpose, it relies on the match() and count() methods, which are loosely based on the builder design pattern:

public ScanParams match(final String pattern);
public ScanParams count(final Integer count);

Now that we've soaked in the basic knowledge about Jedis's scanning approach, let's model these strategies through a ScanStrategy interface:

public interface ScanStrategy<T> {
    ScanResult<T> scan(Jedis jedis, String cursor, ScanParams scanParams);
}

First, let's work on the simplest scan strategy, which is independent of the collection-type and reads the keys, but not the value of the keys:

public class Scan implements ScanStrategy<String> {
    public ScanResult<String> scan(Jedis jedis, String cursor, ScanParams scanParams) {
        return jedis.scan(cursor, scanParams);
    }
}

Next, let's pick up the hscan strategy, which is tailored to read all the field keys and field values of a particular hash key:

public class Hscan implements ScanStrategy<Map.Entry<String, String>> {

    private String key;

    @Override
    public ScanResult<Entry<String, String>> scan(Jedis jedis, String cursor, ScanParams scanParams) {
        return jedis.hscan(key, cursor, scanParams);
    }
}

Finally, let's build the strategies for sets and sorted sets. The sscan strategy can read all the members of a set, whereas the zscan strategy can read the members along with their scores in the form of Tuples:

public class Sscan implements ScanStrategy<String> {

    private String key;

    public ScanResult<String> scan(Jedis jedis, String cursor, ScanParams scanParams) {
        return jedis.sscan(key, cursor, scanParams);
    }
}

public class Zscan implements ScanStrategy<Tuple> {

    private String key;

    @Override
    public ScanResult<Tuple> scan(Jedis jedis, String cursor, ScanParams scanParams) {
        return jedis.zscan(key, cursor, scanParams);
    }
}

7.2. Redis Iterator

Next, let's sketch out the building blocks needed to build our RedisIterator class:

  • String-based cursor
  • Scanning strategy such as scan, sscan, hscan, zscan
  • Placeholder for scanning parameters
  • Access to JedisPool to get a Jedis resource

We can now go ahead and define these members in our RedisIterator class:

private final JedisPool jedisPool;
private ScanParams scanParams;
private String cursor;
private ScanStrategy<T> strategy;

Our stage is all set to define the iterator-specific functionality for our iterator. For that, our RedisIterator class must implement the Iterator interface:

public class RedisIterator<T> implements Iterator<List<T>> {
}

Naturally, we are required to override the hasNext() and next() methods inherited from the Iterator interface.

First, let's pick the low-hanging fruit – the hasNext() method – as the underlying logic is straight-forward. As soon as the cursor value becomes “0”, we know that we're done with the scan. So, let's see how we can implement this in just one-line:

@Override
public boolean hasNext() {
    return !"0".equals(cursor);
}

Next, let's work on the next() method that does the heavy lifting of scanning:

@Override
public List next() {
    if (cursor == null) {
        cursor = "0";
    }
    try (Jedis jedis = jedisPool.getResource()) {
        ScanResult scanResult = strategy.scan(jedis, cursor, scanParams);
        cursor = scanResult.getCursor();
        return scanResult.getResult();
    } catch (Exception ex) {
        log.error("Exception caught in next()", ex);
    }
    return new LinkedList();
}

We must note that ScanResult not only gives the scanned results but also the next cursor-value needed for the subsequent scan.

Finally, we can enable the functionality to create our RedisIterator in the RedisClient class:

public RedisIterator iterator(int initialScanCount, String pattern, ScanStrategy strategy) {
    return new RedisIterator(jedisPool, initialScanCount, pattern, strategy);
}

7.3. Read With Redis Iterator

As we've designed our Redis iterator with the help of the Iterator interface, it's quite intuitive to read the collection values with the help of the next() method as long as hasNext() returns true.

For the sake of completeness and simplicity, we'll first store the dataset related to the sports-balls in a Redis hash. After that, we'll use our RedisClient to create an iterator using Hscan scanning strategy. Let's test our implementation by seeing this in action:

@Test
public void testHscanStrategy() {
    HashMap<String, String> hash = new HashMap<String, String>();
    hash.put("cricket", "160");
    hash.put("football", "450");
    hash.put("volleyball", "270");
    redisClient.hmset("balls", hash);

    Hscan scanStrategy = new Hscan("balls");
    int iterationCount = 2;
    RedisIterator iterator = redisClient.iterator(iterationCount, "*", scanStrategy);
    List<Map.Entry<String, String>> results = new LinkedList<Map.Entry<String, String>>();
    while (iterator.hasNext()) {
        results.addAll(iterator.next());
    }
    Assert.assertEquals(hash.size(), results.size());
}

We can follow the same thought process with little modification to test and implement the remaining strategies to scan and read the keys available in different types of collections.

8. Conclusion

We started this tutorial with an intention to learn about how we can read all the matching keys in Redis.

We found out that there is a simple way offered by Redis to read keys in one go. Although simple, we discussed how this puts a strain on the resources and is therefore not suitable for production systems. On digging deeper, we came to know that there's an iterator-based approach for scanning through matching Redis keys for our read-query.

As always, the complete source code for the Java implementation used in this article is available over on GitHub.

Viewing all 4770 articles
Browse latest View live


<script src="https://jsc.adskeeper.com/r/s/rssing.com.1596347.js" async> </script>