Quantcast
Channel: Baeldung
Viewing all 4755 articles
Browse latest View live

Introduction to Mockito’s AdditionalAnswers

$
0
0

1. Overview

In this tutorial, we'll get familiar with Mockito's AdditionalAnswers class and its methods.

2. Returning Arguments

The main purpose of the AdditionalAnswers class is to return parameters passed to a mocked method.

For example, when updating an object, the method being mocked usually just returns the updated object. Using the methods from AdditionalAnswers, we can instead return a specific parameter passed as an argument to the method, based on its position in the parameter list.

Furthermore, AdditionalAnswers has different implementations of the Answer class.

To begin our demonstration, let's create a library project.

Firstly, we'll create one simple model:

public class Book {

    private Long bookId;
    private String title;
    private String author;
    private int numberOfPages;
 
    // constructors, getters and setters

}

Additionally, we need a repository class for book retrieval:

public class BookRepository {
    public Book getByBookId(Long bookId) {
        return new Book(bookId, "To Kill a Mocking Bird", "Harper Lee", 256);
    }

    public Book save(Book book) {
        return new Book(book.getBookId(), book.getTitle(), book.getAuthor(), book.getNumberOfPages());
    }

    public Book selectRandomBook(Book bookOne, Book bookTwo, Book bookThree) {
        List<Book> selection = new ArrayList<>();
        selection.add(bookOne);
        selection.add(bookTwo);
        selection.add(bookThree);
        Random random = new Random();
        return selection.get(random.nextInt(selection.size()));
    }
}

Correspondingly, we have a service class that invokes our repository methods:

public class BookService {
    private final BookRepository bookRepository;

    public BookService(BookRepository bookRepository) {
        this.bookRepository = bookRepository;
    }

    public Book getByBookId(Long id) {
        return bookRepository.getByBookId(id);
    }

    public Book save(Book book) {
        return bookRepository.save(book);
    }

    public Book selectRandomBook(Book book1, Book book2, Book book3) {
        return bookRepository.selectRandomBook(book1, book2, book3);
    }
}

With this in mind, let's create some tests.

2.1. Returning the First Argument

For our test class, we need to enable the use of annotations with Mockito tests by annotating the JUnit test class to run with MockitoJUnitRunner. Furthermore, we'll need to mock our service and repository class:

@RunWith(MockitoJUnitRunner.class)
public class BookServiceUnitTest {
    @InjectMocks
    private BookService bookService;

    @Mock
    private BookRepository bookRepository;

    // test methods

}

Firstly, lets create a test returning the first argument – AdditionalAnswers.returnsFirstArg():

@Test
public void givenSaveMethodMocked_whenSaveInvoked_ThenReturnFirstArgument_UnitTest() {
    Book book = new Book("To Kill a Mocking Bird", "Harper Lee", 256);
    Mockito.when(bookRepository.save(any(Book.class))).then(AdditionalAnswers.returnsFirstArg());

    Book savedBook = bookService.save(book);

    assertEquals(savedBook, book);
}

In other words, we'll mock the save method from our BookRepository class, which accepts the Book object.

When we run this test, it will indeed return the first argument, which is equal to the Book object we saved.

2.2. Returning the Second Argument

Secondly, we create a test using AdditionalAnswers.returnsSecondArg():

@Test
public void givenCheckifEqualsMethodMocked_whenCheckifEqualsInvoked_ThenReturnSecondArgument_UnitTest() {
    Book book1 = new Book(1L, "The Stranger", "Albert Camus", 456);
    Book book2 = new Book(2L, "Animal Farm", "George Orwell", 300);
    Book book3 = new Book(3L, "Romeo and Juliet", "William Shakespeare", 200);

    Mockito.when(bookRepository.selectRandomBook(any(Book.class), any(Book.class),
      any(Book.class))).then(AdditionalAnswers.returnsSecondArg());

    Book secondBook = bookService.selectRandomBook(book1, book2, book3);

    assertEquals(secondBook, book2);
}

In this case, when our selectRandomBook method executes, the method will return the second book.

2.3. Returning the Last Argument

Similarly, we can use AdditionalAnswers.returnsLastArg() to get the last argument that we passed to our method:

@Test
public void givenCheckifEqualsMethodMocked_whenCheckifEqualsInvoked_ThenReturnLastArgument_UnitTest() {
    Book book1 = new Book(1L, "The Stranger", "Albert Camus", 456);
    Book book2 = new Book(2L, "Animal Farm", "George Orwell", 300);
    Book book3 = new Book(3L, "Romeo and Juliet", "William Shakespeare", 200);

    Mockito.when(bookRepository.selectRandomBook(any(Book.class), any(Book.class), 
      any(Book.class))).then(AdditionalAnswers.returnsLastArg());

    Book lastBook = bookService.selectRandomBook(book1, book2, book3);
    assertEquals(lastBook, book3);
}

Here, the method invoked will return the third book, as it is the last parameter.

2.4. Returning the Argument at Index

Finally, let's write a test using the method that enables us to return an argument at a given indexAdditionalAnswers.returnsArgAt(int index):

@Test
public void givenCheckifEqualsMethodMocked_whenCheckifEqualsInvoked_ThenReturnArgumentAtIndex_UnitTest() {
    Book book1 = new Book(1L, "The Stranger", "Albert Camus", 456);
    Book book2 = new Book(2L, "Animal Farm", "George Orwell", 300);
    Book book3 = new Book(3L, "Romeo and Juliet", "William Shakespeare", 200);

    Mockito.when(bookRepository.selectRandomBook(any(Book.class), any(Book.class), 
      any(Book.class))).then(AdditionalAnswers.returnsArgAt(1));

    Book bookOnIndex = bookService.selectRandomBook(book1, book2, book3);

    assertEquals(bookOnIndex, book2);
}

In the end, since we asked for the argument from index 1, we'll get the second argument — specifically, book2 in this case.

3. Conclusion

Altogether, this tutorial has covered the methods of Mockito's AdditionalAnswers class.

The implementation of these examples and code snippets are available over on GitHub.


Convert String to Integer in Groovy

$
0
0

1. Overview

In this short tutorial, we'll show different ways to convert from String to Integer in Groovy.

2.  Casting with as

The first method that we can use for the conversion is the as keyword, which is the same as calling the class's asType() method:

@Test
void givenString_whenUsingAsInteger_thenConvertToInteger() {
    def stringNum = "123"
    Integer expectedInteger = 123
    Integer integerNum = stringNum as Integer

    assertEquals(integerNum, expectedInteger)
}

Like the above, we can use as int:

@Test
void givenString_whenUsingAsInt_thenConvertToInt() {
    def stringNum = "123"
    int expectedInt = 123
    int intNum = stringNum as int

    assertEquals(intNum, expectedInt)
}

3. toInteger

Another method is from the java.lang package:

@Test
void givenString_whenUsingToInteger_thenConvertToInteger() {
    def stringNum = "123"
    int expectedInt = 123
    int intNum = stringNum.toInteger()

    assertEquals(intNum, expectedInt)
}

4. Integer#parseInt

A third way is to use Java's static method Integer.parseInt():

@Test
void givenString_whenUsingParseInt_thenConvertToInteger() {
    def stringNum = "123"
    int expectedInt = 123
    int intNum = Integer.parseInt(stringNum)

    assertEquals(intNum, expectedInt)
}

5. Integer#intValue

An alternative method is to create a new Integer object and call its intValue method:

@Test
void givenString_whenUsingIntValue_thenConvertToInteger() {
    def stringNum = "123"
    int expectedInt = 123
    int intNum = new Integer(stringNum).intValue()

    assertEquals(intNum, expectedInt)
}

Or, in this case, we can also use just new Integer(stringNum):

@Test
void givenString_whenUsingNewInteger_thenConvertToInteger() {
    def stringNum = "123"
    int expectedInt = 123
    int intNum = new Integer(stringNum)

    assertEquals(intNum, expectedInt)
}

6. Integer#valueOf

Similar to Integer.parseInt(), we can also use Java's static method Integer#valueOf:

@Test
void givenString_whenUsingValueOf_thenConvertToInteger() {
    def stringNum = "123"
    int expectedInt = 123
    int intNum = Integer.valueOf(stringNum)

    assertEquals(intNum, expectedInt)
}

7. DecimalFormat

And for our last method, we can apply Java's DecimalFormat class:

@Test
void givenString_whenUsingDecimalFormat_thenConvertToInteger() {
    def stringNum = "123"
    int expectedInt = 123
    DecimalFormat decimalFormat = new DecimalFormat("#")
    int intNum = decimalFormat.parse(stringNum).intValue()

    assertEquals(intNum, expectedInt)
}

8. Exception Handling

So, if conversion fails, like if there are non-numeric characters, a NumberFormatException will be thrown. Additionally, in the case where String is null, NullPointerException will be thrown:

@Test(expected = NumberFormatException.class)
void givenInvalidString_whenUsingAs_thenThrowNumberFormatException() {
    def invalidString = "123a"
    invalidString as Integer
}

@Test(expected = NullPointerException.class)
void givenNullString_whenUsingToInteger_thenThrowNullPointerException() {
    def invalidString = null
    invalidString.toInteger()
}

To prevent this from happening, we can use the isInteger method:

@Test
void givenString_whenUsingIsInteger_thenCheckIfCorrectValue() {
    def invalidString = "123a"
    def validString = "123"
    def invalidNum = invalidString?.isInteger() ? invalidString as Integer : false
    def correctNum = validString?.isInteger() ? validString as Integer : false

    assertEquals(false, invalidNum)
    assertEquals(123, correctNum)
}

9. Summary

In this short article, we've shown some effective ways to switch from String to Integer objects in Groovy.

When it comes to choosing the best method to convert an object type, all of the above are equally good. The most important thing is to avoid errors by first checking if the value of the String in our application can be non-numeric, empty, or null.

As usual, all code examples can be found over on GitHub.

How to Get String From Mono in Reactive Java

$
0
0

1. Overview

In our Intro to Project Reactor, we learned about Mono<T>, which is a publisher of an instance of type T.

In this quick tutorial, we'll show both a blocking and a non-blocking way to extract from the Monoblock and subscribe.

2. Blocking Way

In general, Mono completes successfully by emitting an element at some point in time.

Let's start with an example publisher Mono<String>:

Mono<String> blockingHelloWorld() {
    return Mono.just("Hello world!");
}

String result = blockingHelloWorld().block();
assertEquals("Hello world!", result);

Here, we're blocking the execution as long as the publisher doesn't emit the value. However, it can take any amount of time to finish.

To get more control, let's set an explicit duration:

String result = blockingHelloWorld().block(Duration.of(1000, ChronoUnit.MILLIS));
assertEquals(expected, result);

If the publisher doesn't emit a value within the set duration, a RuntimeException is thrown.

Additionally, Mono could be empty and the block() method above will return null. We can, instead, make use of blockOptional in that case:

Optional<String> result = Mono.<String>empty().blockOptional();
assertEquals(Optional.empty(), result);

In general, blocking contradicts the principles of reactive programming. It's highly discouraged to block the execution in reactive applications.

So, now let's see how to get the value in a non-blocking way.

3. Non-Blocking Way 

First of all, we should subscribe in a non-blocking way using the subscribe() method. Also, we'll specify the consumer of the final value:

blockingHelloWorld()
  .subscribe(result -> assertEquals(expected, result));

Here, even if it takes some time to produce the value, the execution immediately continues without blocking on the subscribe() call.

In some cases, we want to consume the value in intermediate steps. Therefore, we can use an operator to add behavior:

blockingHelloWorld()
  .doOnNext(result -> assertEquals(expected, result))
  .subscribe();

4. Conclusion

In this short article, we have explored two ways of consuming a value produced by Mono<String>.

As always, the code example can be found over on GitHub.

Writing Templates for Test Cases Using JUnit 5

$
0
0

1. Overview

The JUnit 5 library offers many new features over its previous versions. One such feature is test templates. In short, test templates are a powerful generalization of JUnit 5's parameterized and repeated tests.

In this tutorial, we're going to learn how to create a test template using JUnit 5.

2. Maven Dependencies

Let's start by adding the dependencies to our pom.xml.

We need to add the main JUnit 5  junit-jupiter-engine dependency:

<dependency>
    <groupId>org.junit.jupiter</groupId>
    <artifactId>junit-jupiter-engine</artifactId>
    <version>5.6.2</version>
</dependency>

In addition to this, we'll also need to add the junit-jupiter-api dependency:

<dependency>
    <groupId>org.junit.jupiter</groupId>
    <artifactId>junit-jupiter-api</artifactId>
    <version>5.6.2</version>
</dependency>

Likewise, we can add the necessary dependencies to our build.gradle file:

testCompile group: 'org.junit.jupiter', name: 'junit-jupiter-engine', version: '5.6.2'
testCompile group: 'org.junit.jupiter', name: 'junit-jupiter-api', version: '5.6.2'

3. The Problem Statement

Before looking at test templates, let's briefly take a look at JUnit 5's parameterized tests. Parameterized tests allow us to inject different parameters into the test method. As a result, when using parameterized tests, we can execute a single test method multiple times with different parameters.

Let's assume that we would now like to run our test method multiple times — not just with different parameters, but also under a different invocation context each time.

In other words, we would like the test method to be executed multiple times, with each invocation using a different combination of configurations such as:

  • using different parameters
  • preparing the test class instance differently — that is, injecting different dependencies into the test instance
  • running the test under different conditions, such as enabling/disabling a subset of invocations if the environment is “QA
  • running with a different lifecycle callback behavior — perhaps we want to set up and tear down a database before and after a subset of invocations

Using parameterized tests quickly proves limited in this case. Thankfully, JUnit 5 offers a powerful solution for this scenario in the form of test templates.

4. Test Templates

Test templates themselves are not test cases. Instead, as their name suggests, they are just templates for given test cases. They are a powerful generalization of parameterized and repeated tests.

Test templates are invoked once for each invocation context provided to them by the invocation context provider(s).

Let's now look at an example for the test templates. As we established above, the main actors are:

  • a test target method
  • a test template method
  • one or more invocation context providers registered with the template method
  • one or more invocation contexts provided by each invocation context provider

4.1. The Test Target Method

For this example, we're going to use a simple UserIdGeneratorImpl.generate method as our test target.

Let's define the UserIdGeneratorImpl class:

public class UserIdGeneratorImpl implements UserIdGenerator {
    private boolean isFeatureEnabled;

    public UserIdGeneratorImpl(boolean isFeatureEnabled) {
        this.isFeatureEnabled = isFeatureEnabled;
    }

    public String generate(String firstName, String lastName) {
        String initialAndLastName = firstName.substring(0, 1).concat(lastName);
        return isFeatureEnabled ? "bael".concat(initialAndLastName) : initialAndLastName;
    }
}

The generate method, which is our test target, takes the firstName and lastName as parameters and generates a user id. The format of the user id varies, depending on whether a feature switch is enabled or not.

Let's see how this looks:

Given feature switch is disabled When firstName = "John" and lastName = "Smith" Then "JSmith" is returned
Given feature switch is enabled When firstName = "John" and lastName = "Smith" Then "baelJSmith" is returned

Next, let's write the test template method.

4.2. The Test Template Method

Here is a test template for our test target method UserIdGeneratorImpl.generate:

public class UserIdGeneratorImplUnitTest {
    @TestTemplate
    @ExtendWith(UserIdGeneratorTestInvocationContextProvider.class)
    public void whenUserIdRequested_thenUserIdIsReturnedInCorrectFormat(UserIdGeneratorTestCase testCase) {
        UserIdGenerator userIdGenerator = new UserIdGeneratorImpl(testCase.isFeatureEnabled());

        String actualUserId = userIdGenerator.generate(testCase.getFirstName(), testCase.getLastName());

        assertThat(actualUserId).isEqualTo(testCase.getExpectedUserId());
    }
}

Let's take a closer look at the test template method.

To begin with, we create our test template method by marking it with the JUnit 5 @TestTemplate annotation.

Following that, we register a context provider, UserIdGeneratorTestInvocationContextProvider, using the @ExtendWith annotation. We can register multiple context providers with the test template. However, for the purpose of this example, we register a single provider.

Also, the template method receives an instance of the UserIdGeneratorTestCase as a parameter. This is simply a wrapper class for the inputs and the expected result of the test case:

public class UserIdGeneratorTestCase {
    private boolean isFeatureEnabled;
    private String firstName;
    private String lastName;
    private String expectedUserId;

    // Standard setters and getters
}

Finally, we invoke the test target method and assert that that result is as expected

Now, it's time to define our invocation context provider.

4.3. The Invocation Context Provider

We need to register at least one TestTemplateInvocationContextProvider with our test template. Each registered TestTemplateInvocationContextProvider provides a Stream of TestTemplateInvocationContext instances.

Previously, using the @ExtendWith annotation, we registered UserIdGeneratorTestInvocationContextProvider as our invocation provider.

Let's define this class now:

public class UserIdGeneratorTestInvocationContextProvider implements TestTemplateInvocationContextProvider {
    //...
}

Our invocation context implements the TestTemplateInvocationContextProvider interface, which has two methods:

  • supportsTestTemplate
  • provideTestTemplateInvocationContexts

Let's start by implementing the supportsTestTemplate method:

@Override
public boolean supportsTestTemplate(ExtensionContext extensionContext) {
    return true;
}

The JUnit 5 execution engine calls the supportsTestTemplate method first to validate if the provider is applicable for the given ExecutionContext. In this case, we simply return true.

Now, let's implement the provideTestTemplateInvocationContexts method:

@Override
public Stream<TestTemplateInvocationContext> provideTestTemplateInvocationContexts(
  ExtensionContext extensionContext) {
    boolean featureDisabled = false;
    boolean featureEnabled = true;
 
    return Stream.of(
      featureDisabledContext(
        new UserIdGeneratorTestCase(
          "Given feature switch disabled When user name is John Smith Then generated userid is JSmith",
          featureDisabled,
          "John",
          "Smith",
          "JSmith")),
      featureEnabledContext(
        new UserIdGeneratorTestCase(
          "Given feature switch enabled When user name is John Smith Then generated userid is baelJSmith",
          featureEnabled,
          "John",
          "Smith",
          "baelJSmith"))
    );
}

The purpose of the provideTestTemplateInvocationContexts method is to provide a Stream of TestTemplateInvocationContext instances. For our example, it returns two instances, provided by the methods featureDisabledContext and featureEnabledContext. Consequently, our test template will run twice.

Next, let's look at the two TestTemplateInvocationContext instances returned by these methods.

4.4. The Invocation Context Instances

The invocation contexts are implementations of the TestTemplateInvocationContext interface and implement the following methods:

  • getDisplayName – provide a test display name
  • getAdditionalExtensions – return additional extensions for the invocation context

Let's define the featureDisabledContext method that returns our first invocation context instance:

private TestTemplateInvocationContext featureDisabledContext(
  UserIdGeneratorTestCase userIdGeneratorTestCase) {
    return new TestTemplateInvocationContext() {
        @Override
        public String getDisplayName(int invocationIndex) {
            return userIdGeneratorTestCase.getDisplayName();
        }

        @Override
        public List<Extension> getAdditionalExtensions() {
            return asList(
              new GenericTypedParameterResolver(userIdGeneratorTestCase), 
              new BeforeTestExecutionCallback() {
                  @Override
                  public void beforeTestExecution(ExtensionContext extensionContext) {
                      System.out.println("BeforeTestExecutionCallback:Disabled context");
                  }
              }, 
              new AfterTestExecutionCallback() {
                  @Override
                  public void afterTestExecution(ExtensionContext extensionContext) {
                      System.out.println("AfterTestExecutionCallback:Disabled context");
                  }
              }
            );
        }
    };
}

Firstly, for the invocation context returned by the featureDisabledContext method, the extensions that we register are:

  • GenericTypedParameterResolver – a parameter resolver extension
  • BeforeTestExecutionCallback – a lifecycle callback extension that runs immediately before the test execution
  • AfterTestExecutionCallback – a lifecycle callback extension that runs immediately after the test execution

However, for the second invocation context, returned by the featureEnabledContext method, let's register a different set of extensions (keeping the GenericTypedParameterResolver):

private TestTemplateInvocationContext featureEnabledContext(
  UserIdGeneratorTestCase userIdGeneratorTestCase) {
    return new TestTemplateInvocationContext() {
        @Override
        public String getDisplayName(int invocationIndex) {
            return userIdGeneratorTestCase.getDisplayName();
        }
    
        @Override
        public List<Extension> getAdditionalExtensions() {
            return asList(
              new GenericTypedParameterResolver(userIdGeneratorTestCase), 
              new DisabledOnQAEnvironmentExtension(), 
              new BeforeEachCallback() {
                  @Override
                  public void beforeEach(ExtensionContext extensionContext) {
                      System.out.println("BeforeEachCallback:Enabled context");
                  }
              }, 
              new AfterEachCallback() {
                  @Override
                  public void afterEach(ExtensionContext extensionContext) {
                      System.out.println("AfterEachCallback:Enabled context");
                  }
              }
            );
        }
    };
}

For the second invocation context, the extensions that we register are:

  • GenericTypedParameterResolver – a parameter resolver extension
  • DisabledOnQAEnvironmentExtension – an execution condition to disable the test if the environment property (loaded from the application.properties file) is “qa
  • BeforeEachCallback – a lifecycle callback extension that runs before each test method execution
  • AfterEachCallback – a lifecycle callback extension that runs after each test method execution

From the above example, it is clear to see that:

  • the same test method is run under multiple invocation contexts
  • each invocation context uses its own set of extensions that differ both in number and nature from the extensions in other invocation contexts

As a result, a test method can be invoked multiple times under a completely different invocation context each time. And by registering multiple context providers, we can provide even more additional layers of invocation contexts under which to run the test.

5. Conclusion

In this article, we looked at how JUnit 5's test templates are a powerful generalization of parameterized and repeated tests.

To begin with, we looked at some limitations of the parameterized tests. Next, we discussed how test templates overcome the limitations by allowing a test to be run under a different context for each invocation.

Finally, we looked at an example of creating a new test template. We broke the example down to understand how templates work in conjunction with the invocation context providers and invocation contexts.

As always, the source code for the examples used in this article is available over on GitHub.

HTTP/2 in Jetty

$
0
0

1. Overview

The HTTP/2 protocol comes with a push feature that allows the server to send multiple resources to the client for a single request. Hence, it improves the loading time of the page by reducing the multiple round-trips needed to fetch all the resources. Jetty supports the HTTP/2 protocol for both client and server implementations.

In this tutorial, we'll explore HTTP/2 support in Jetty and create a Java web application to examine the HTTP/2 Push feature.

2. Getting Started

2.1. Downloading Jetty

Jetty requires JDK 8 or later and ALPN (Application-Layer Protocol Negotiation) support for running HTTP/2.

Typically, the Jetty server is deployed over SSL and enables the HTTP/2 protocol via the TLS extension (ALPN).

First, we'll need to download the latest Jetty distribution and set the JETTY_HOME variable.

2.2. Enabling the HTTP/2 Connector

Next, we can use a Java command to enable the HTTP/2 connector on the Jetty server:

java -jar $JETTY_HOME/start.jar --add-to-start=http2

This command adds HTTP/2 protocol support to the SSL connector on port 8443. Also, it transitively enables the ALPN module for protocol negotiation:

INFO  : server          transitively enabled, ini template available with --add-to-start=server
INFO  : alpn-impl/alpn-1.8.0_131 dynamic dependency of alpn-impl/alpn-8
INFO  : alpn-impl       transitively enabled
INFO  : alpn            transitively enabled, ini template available with --add-to-start=alpn
INFO  : alpn-impl/alpn-8 dynamic dependency of alpn-impl
INFO  : http2           initialized in ${jetty.base}/start.ini
INFO  : ssl             transitively enabled, ini template available with --add-to-start=ssl
INFO  : threadpool      transitively enabled, ini template available with --add-to-start=threadpool
INFO  : bytebufferpool  transitively enabled, ini template available with --add-to-start=bytebufferpool
INFO  : Base directory was modified

Here, the logs show the information of modules like ssl and alpn-impl/alpn-8 that are transitively enabled for the HTTP/2 connector.

2.3. Starting the Jetty Server

Now, we're ready to start the Jetty server:

java -jar $JETTY_HOME/start.jar

When the server starts, the logging will show the modules that are enabled:

INFO::main: Logging initialized @228ms to org.eclipse.jetty.util.log.StdErrLog
...
INFO:oejs.AbstractConnector:main: Started ServerConnector@42dafa95{SSL, (ssl, alpn, h2)}{0.0.0.0:8443}
INFO:oejs.Server:main: Started @872ms

2.4. Enabling Additional Modules

Similarly, we can enable other modules like http and http2c:

java -jar $JETTY_HOME/start.jar --add-to-start=http,http2c

Let's verify the logs:

INFO:oejs.AbstractConnector:main: Started ServerConnector@6adede5{SSL, (ssl, alpn, h2)}{0.0.0.0:8443}
INFO:oejs.AbstractConnector:main: Started ServerConnector@dc24521{HTTP/1.1, (http/1.1, h2c)}{0.0.0.0:8080}
INFO:oejs.Server:main: Started @685ms

Also, we can list all the modules provided by Jetty:

java -jar $JETTY_HOME/start.jar --list-modules

The output will look like:

Available Modules:
==================
tags: [-internal]
Modules for tag '*':
--------------------
     Module: alpn 
           : Enables the ALPN (Application Layer Protocol Negotiation) TLS extension.
     Depend: ssl, alpn-impl
        LIB: lib/jetty-alpn-client-${jetty.version}.jar
        LIB: lib/jetty-alpn-server-${jetty.version}.jar
        XML: etc/jetty-alpn.xml
    Enabled: transitive provider of alpn for http2
    // ...

Modules for tag 'connector':
----------------------------
     Module: http2 
           : Enables HTTP2 protocol support on the TLS(SSL) Connector,
           : using the ALPN extension to select which protocol to use.
       Tags: connector, http2, http, ssl
     Depend: ssl, alpn
        LIB: lib/http2/*.jar
        XML: etc/jetty-http2.xml
    Enabled: ${jetty.base}/start.ini
    // ...

Enabled Modules:
================
    0) alpn-impl/alpn-8 dynamic dependency of alpn-impl
    1) http2           ${jetty.base}/start.ini
    // ...

2.5. Additional Configuration

Similar to the –list-modules argument, we can use –list-config to list all the XML config files for each module:

java -jar $JETTY_HOME/start.jar --list-config

To configure the common properties like host and port for the Jetty server, we can make changes in the start.ini file:

jetty.ssl.host=0.0.0.0
jetty.ssl.port=8443
jetty.ssl.idleTimeout=30000

Also, there are a few http2 properties like maxConcurrentStreams and maxSettingsKeys that we can configure:

jetty.http2.maxConcurrentStreams=128
jetty.http2.initialStreamRecvWindow=524288
jetty.http2.initialSessionRecvWindow=1048576
jetty.http2.maxSettingsKeys=64
jetty.http2.rateControl.maxEventsPerSecond=20

3. Setting Up a Jetty Server Application

3.1. Maven Configuration

Now that we've got Jetty configured, it's time to create our application.

Let's add the jetty-maven-plugin Maven plugin to our pom.xml along with Maven dependencies like http2-server, jetty-alpn-openjdk8-server, and jetty-servlets:

<build>
    <plugins>
        <plugin>
            <groupId>org.eclipse.jetty</groupId>
            <artifactId>jetty-maven-plugin</artifactId>
            <version>9.4.27.v20200227</version>
            <dependencies>
                <dependency>
                    <groupId>org.eclipse.jetty.http2</groupId>
                    <artifactId>http2-server</artifactId>
                    <version>9.4.27.v20200227</version>
                </dependency>
                <dependency>
                    <groupId>org.eclipse.jetty</groupId>
                    <artifactId>jetty-alpn-openjdk8-server</artifactId>
                    <version>9.4.27.v20200227</version>
                </dependency>
                <dependency>
                    <groupId>org.eclipse.jetty</groupId>
                    <artifactId>jetty-servlets</artifactId>
                    <version>9.4.27.v20200227</version>
                </dependency>
            </dependencies>
        </plugin>
    </plugins>
</build>

Then, we'll compile the classes using the Maven command:

mvn clean package

And lastly, we can deploy our unassembled Maven app to the Jetty server:

mvn jetty:run-forked

By default, the server starts on port 8080 with the HTTP/1.1 protocol:

oejmp.Starter:main: Started Jetty Server
oejs.AbstractConnector:main: Started ServerConnector@4d910fd6{HTTP/1.1, (http/1.1)}{0.0.0.0:8080}
oejs.Server:main: Started @1045ms

3.2. Configure HTTP/2 in jetty.xml

Next, we'll configure the Jetty server with the HTTP/2 protocol in our jetty.xml file by adding the appropriate Call element:

<?xml version="1.0" encoding="UTF-8"?>
<!DOCTYPE Configure PUBLIC "-//Jetty//Configure//EN" "http://www.eclipse.org/jetty/configure_9_0.dtd">
<Configure id="Server" class="org.eclipse.jetty.server.Server">
    <!-- sslContextFactory and httpConfig configs-->

    <Call name="addConnector">
        <Arg>
            <New class="org.eclipse.jetty.server.ServerConnector">
                <Arg name="server"><Ref id="Server"/></Arg>
                <Arg name="factories">
                    <Array type="org.eclipse.jetty.server.ConnectionFactory">
                        <Item>
                            <New class="org.eclipse.jetty.server.SslConnectionFactory">
                                <Arg name="sslContextFactory"><Ref id="sslContextFactory"/></Arg>
                                <Arg name="next">alpn</Arg>
                            </New>
                        </Item>
                        <Item>
                            <New class="org.eclipse.jetty.alpn.server.ALPNServerConnectionFactory">
                                <Arg>h2</Arg>
                            </New>
                        </Item>
                        <Item>
                            <New class="org.eclipse.jetty.http2.server.HTTP2ServerConnectionFactory">
                                <Arg name="config"><Ref id="httpConfig"/></Arg>
                            </New>
                        </Item>
                    </Array>
                </Arg>
                <Set name="port">8444</Set>
            </New>
        </Arg>
    </Call>

    <!-- other Call elements -->
</Configure>

Here, the HTTP/2 connector is configured with ALPN on port 8444 along with sslContextFactory and httpConfig configs.

Also, we can add other modules like h2-17 and h2-16 (draft versions of h2) by defining comma-separated arguments in jetty.xml:

<Item> 
    <New class="org.eclipse.jetty.alpn.server.ALPNServerConnectionFactory"> 
        <Arg>h2,h2-17,h2-16</Arg> 
    </New> 
</Item>

Then, we'll configure the location of the jetty.xml in our pom.xml:

<plugin>
    <groupId>org.eclipse.jetty</groupId>
    <artifactId>jetty-maven-plugin</artifactId>
    <version>9.4.27.v20200227</version>
    <configuration>
        <stopPort>8888</stopPort>
        <stopKey>quit</stopKey>
        <jvmArgs>
            -Xbootclasspath/p:
            ${settings.localRepository}/org/mortbay/jetty/alpn/alpn-boot/8.1.11.v20170118/alpn-boot-8.1.11.v20170118.jar
        </jvmArgs>
        <jettyXml>${basedir}/src/main/config/jetty.xml</jettyXml>
        <webApp>
            <contextPath>/</contextPath>
        </webApp>
    </configuration>
    ...
</plugin>

Note: To enable HTTP/2 in our Java 8 app, we've added the alpn-boot jar to the JVM BootClasspath. However, ALPN support is already available in Java 9 or later.

Let's re-compile our classes and re-run the application to verify if the HTTP/2 protocol is enabled:

oejmp.Starter:main: Started Jetty Server
oejs.AbstractConnector:main: Started ServerConnector@6fadae5d{SSL, (ssl, http/1.1)}{0.0.0.0:8443}
oejs.AbstractConnector:main: Started ServerConnector@1810399e{SSL, (ssl, alpn, h2)}{0.0.0.0:8444}

Here, we can observe that port 8443 is configured with the HTTP/1.1 protocol and 8444 with HTTP/2.

3.3. Configure the PushCacheFilter

Next, we need a filter that pushes the secondary resources like images, JavaScript, and CSS to the client.

To do so, we can use the PushCacheFilter class available in the org.eclipse.jetty.servlets package. PushCacheFilter builds a cache of secondary resources associated with a primary resource like index.html and pushes them to the client.

Let's configure the PushCacheFilter in our web.xml:

<filter>
    <filter-name>push</filter-name>
    <filter-class>org.eclipse.jetty.servlets.PushCacheFilter</filter-class>
    <init-param>
        <param-name>ports</param-name>
        <param-value>8444</param-value>
    </init-param>
</filter>
<filter-mapping>
    <filter-name>push</filter-name>
    <url-pattern>/*</url-pattern>
</filter-mapping>

3.4. Configure Jetty Servlet and Servlet Mapping

Then, we'll create the Http2JettyServlet class to access the images, and we'll add the servlet-mapping in our web.xml file:

<servlet>
    <servlet-name>http2Jetty</servlet-name>
    <servlet-class>com.baeldung.jetty.http2.Http2JettyServlet</servlet-class>
</servlet>
<servlet-mapping>
    <servlet-name>http2Jetty</servlet-name>
    <url-pattern>/images/*</url-pattern>
</servlet-mapping>

4. Setting up the HTTP/2 Client

Finally, to verify the HTTP/2 Push feature and the improved page-load time, we'll create an http2.html file that loads a few images (secondary resources):

<!DOCTYPE html>
<html>
<head>
    <title>Baeldung HTTP/2 Client in Jetty</title>
</head>
<body>
    <h2>HTTP/2 Demo</h2>
    <div>
        <img src="images/homepage-latest_articles.jpg" alt="latest articles" />
        <img src="images/homepage-rest_with_spring.jpg" alt="rest with spring" />
        <img src="images/homepage-weekly_reviews.jpg" alt="weekly reviews" />
    </div>
</body>
</html>

5. Testing the HTTP/2 Client

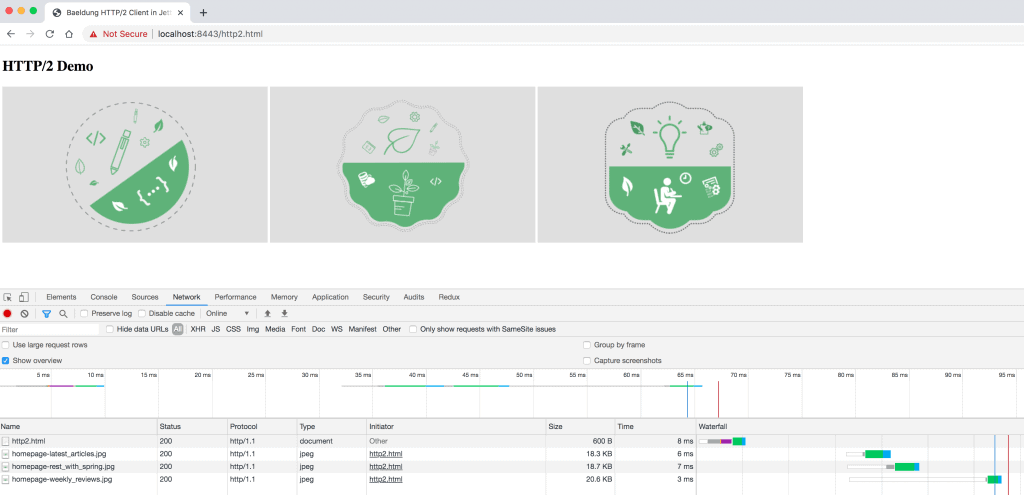
To get a baseline for the page-load time, let's access the HTTP/1.1 application at https://localhost:8443/http2.html with the Developer Tools to verify the protocol and load time:


Here, we can observe that the images are loaded in 3-6ms using the HTTP/1.1 protocol.

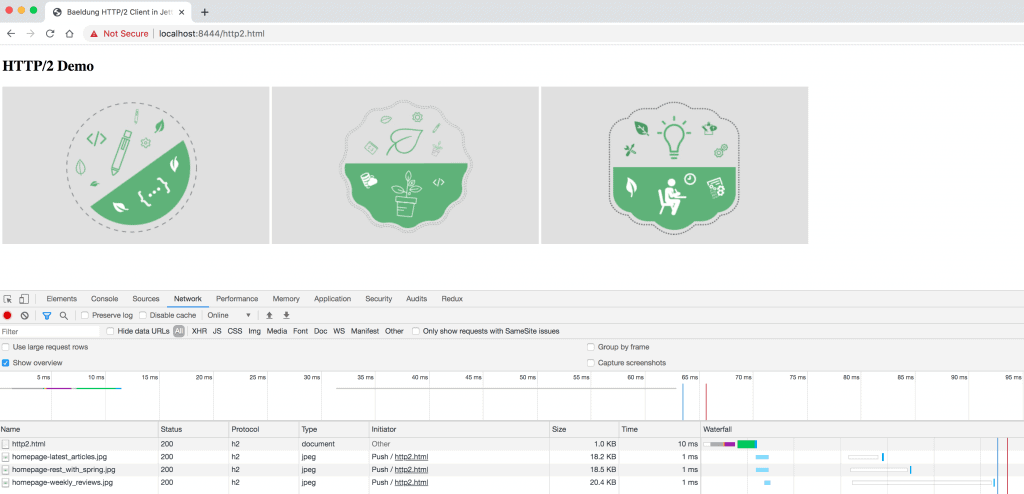
Then, we'll access the HTTP/2 application, which has Push enabled, at https://localhost:8444/http2.html:


Here, we observe that the protocol is h2, the initiator is Push, and the loading time is 1ms for all the images (secondary resources).

Therefore, the PushCacheFilter caches the secondary resources for http2.html, pushes them on port 8444, and provides a great improvement in the load time of the page.

6. Conclusion

In this tutorial, we've explored HTTP/2 in Jetty.

First, we examined how to start Jetty with the HTTP/2 protocol along with its configurations.

Then, we've seen a Java 8 web application with the HTTP/2 Push feature, configured with a PushCacheFilter, and observed how the load time of a page containing secondary resources improved over what we saw with the HTTP/1.1 protocol.

As usual, all the code implementations are available over on GitHub.

Introduction to DBUnit

$
0
0

1. Introduction

In this tutorial, we'll take a look at DBUnit, a unit testing tool used to test relational database interactions in Java.

We'll see how it helps us get our database to a known state and assert against an expected state.

2. Dependencies

First, we can add DBUnit to our project from Maven Central by adding the dbunit dependency to our pom.xml:

<dependency>
  <groupId>org.dbunit</groupId>
  <artifactId>dbunit</artifactId>
  <version>2.7.0</version>
  <scope>test</scope>
</dependency>

We can look up the most recent version on Maven Central.

3. Hello World Example

Next, let's define a database schema:

schema.sql:

CREATE TABLE IF NOT EXISTS CLIENTS
(
    `id`         int AUTO_INCREMENT NOT NULL,
    `first_name` varchar(100)       NOT NULL,
    `last_name`  varchar(100)       NOT NULL,
    PRIMARY KEY (`id`)
);

CREATE TABLE IF NOT EXISTS ITEMS
(
    `id`       int AUTO_INCREMENT NOT NULL,
    `title`    varchar(100)       NOT NULL,
    `produced` date,
    `price`    float,
    PRIMARY KEY (`id`)
);

3.1. Defining the Initial Database Contents

DBUnit lets us define and load our test dataset in a simple declarative way.

We define each table row with one XML element, where the tag name is a table name, and attribute names and values map to column names and values respectively. The row data can be created for multiple tables. We have to implement the getDataSet() method of DataSourceBasedDBTestCase to define the initial data set, where we can use the FlatXmlDataSetBuilder to refer to our XML file:

data.xml:

<?xml version="1.0" encoding="UTF-8"?>
<dataset>
    <CLIENTS id='1' first_name='Charles' last_name='Xavier'/>
    <ITEMS id='1' title='Grey T-Shirt' price='17.99' produced='2019-03-20'/>
    <ITEMS id='2' title='Fitted Hat' price='29.99' produced='2019-03-21'/>
    <ITEMS id='3' title='Backpack' price='54.99' produced='2019-03-22'/>
    <ITEMS id='4' title='Earrings' price='14.99' produced='2019-03-23'/>
    <ITEMS id='5' title='Socks' price='9.99'/>
</dataset>

3.2. Initializing the Database Connection and Schema

Now that we've got our schema, we have to initialize our database.

We have to extend the DataSourceBasedDBTestCase class and initialize the database schema in its getDataSource() method:

DataSourceDBUnitTest.java:

public class DataSourceDBUnitTest extends DataSourceBasedDBTestCase {
    @Override
    protected DataSource getDataSource() {
        JdbcDataSource dataSource = new JdbcDataSource();
        dataSource.setURL(
                "jdbc:h2:mem:default;DB_CLOSE_DELAY=-1;init=runscript from 'classpath:schema.sql'");
        dataSource.setUser("sa");
        dataSource.setPassword("sa");
        return dataSource;
    }

    @Override
    protected IDataSet getDataSet() throws Exception {
        return new FlatXmlDataSetBuilder().build(getClass()
                .getClassLoader()
                .getResourceAsStream("data.xml"));
    }
}

Here, we passed a SQL file to an H2 in-memory database in its connection string. If we want to test on other databases we will need to provide our custom implementation for it.

Keep in mind that, in our example, DBUnit will reinitialize the database with the given test data before each test method execution.

There are multiple ways to configure this via getSetUpOperation and getTearDownOperation:

@Override
protected DatabaseOperation getSetUpOperation() {
    return DatabaseOperation.REFRESH;
}

@Override
protected DatabaseOperation getTearDownOperation() {
    return DatabaseOperation.DELETE_ALL;
}

The REFRESH operation, tells DBUnit to refresh all its data. This will ensure that all caches are cleared up and our unit test gets no influence from another unit test. The DELETE_ALL operation, ensures that all the data gets removed at the end of each unit test. In our case we are telling  DBUnit that during set up, using the getSetUpOperation method implementation we will refresh all caches. Finally we tell DBUnit to remove all data during the tear down operation using the getTearDownOperation method implementation.

3.3. Comparing the Expected State and the Actual State

Now, let's examine our actual test case. For this first test, we'll keep it simple – we'll load our expected dataset and compare it to the dataset retrieved from our DB connection:

@Test
public void givenDataSetEmptySchema_whenDataSetCreated_thenTablesAreEqual() throws Exception {
    final IDataSet expectedDataSet = getDataSet();
    final ITable expectedTable = expectedDataSet.getTable("CLIENTS");
    final IDataSet databaseDataSet = getConnection().createDataSet();
    final ITable actualTable = databaseDataSet.getTable("CLIENTS");
    Assertion.assertEquals(expectedTable, actualTable);
}

4. Deep Dive Into Assertions

In the previous section, we saw a basic example of comparing the actual contents of a table with an expected data set. Now we're going to discover DBUnit's support for customizing data assertions.

4.1. Asserting with a SQL Query

A straightforward way to check the actual state is with a SQL query.

In this example, we'll insert a new record into the CLIENTS table, then verify the contents of the newly created row. We defined the expected output in a separate XML file, and extracted the actual row value by an SQL query:

@Test
public void givenDataSet_whenInsert_thenTableHasNewClient() throws Exception {
    try (InputStream is = getClass().getClassLoader().getResourceAsStream("dbunit/expected-user.xml")) {
        IDataSet expectedDataSet = new FlatXmlDataSetBuilder().build(is);
        ITable expectedTable = expectedDataSet.getTable("CLIENTS");
        Connection conn = getDataSource().getConnection();

        conn.createStatement()
            .executeUpdate(
            "INSERT INTO CLIENTS (first_name, last_name) VALUES ('John', 'Jansen')");
        ITable actualData = getConnection()
            .createQueryTable(
                "result_name",
                "SELECT * FROM CLIENTS WHERE last_name='Jansen'");

        assertEqualsIgnoreCols(expectedTable, actualData, new String[] { "id" });
    }
}

The getConnection() method of the DBTestCase ancestor class returns a DBUnit-specific representation of the data source connection (an IDatabaseConnection instance). The createQueryTable() method of the IDatabaseConnection can be used to fetch actual data from the database, for comparison with the expected database state, using the Assertion.assertEquals() method. The SQL query passed onto createQueryTable() is the query we want to test. It returns a Table instance that we use to make our assert.

4.2. Ignoring Columns

Sometimes in database tests, we want to ignore some columns of the actual tables. These are usually auto-generated values that we can't strictly control, like generated primary keys or current timestamps.

We could do this by omitting the columns from the SELECT clauses in the SQL queries, but DBUnit provides a more convenient utility for achieving this. With the static methods of the DefaultColumnFilter class we can create a new ITable instance from an existing one by excluding some of the columns, as shown here:

@Test
public void givenDataSet_whenInsert_thenGetResultsAreStillEqualIfIgnoringColumnsWithDifferentProduced()
   throws Exception {
    final Connection connection = tester.getConnection().getConnection();
    final String[] excludedColumns = { "id", "produced" };
    try (final InputStream is = getClass().getClassLoader()
        .getResourceAsStream("dbunit/expected-ignoring-registered_at.xml")) {
        final IDataSet expectedDataSet = new FlatXmlDataSetBuilder().build(is);
        final ITable expectedTable = excludedColumnsTable(expectedDataSet.getTable("ITEMS"), 
          excludedColumns);

        connection.createStatement()
          .executeUpdate("INSERT INTO ITEMS (title, price, produced)  VALUES('Necklace', 199.99, now())");

        final IDataSet databaseDataSet = tester.getConnection()
          .createDataSet();
        final ITable actualTable = excludedColumnsTable(databaseDataSet.getTable("ITEMS"), 
          excludedColumns);

        Assertion.assertEquals(expectedTable, actualTable);
    }
}

4.3. Investigating Multiple Failures

If DBUnit finds an incorrect value, then it immediately throws an AssertionError.

In specific cases, we can use the DiffCollectingFailureHandler class, which we can pass to the Assertion.assertEquals() method as a third argument.

This failure handler will collect all failures instead of stopping on the first one, meaning that the Assertion.assertEquals() method will always succeed if we use the DiffCollectingFailureHandler. Therefore, we'll have to programmatically check if the handler found any errors:

@Test
public void givenDataSet_whenInsertUnexpectedData_thenFailOnAllUnexpectedValues() throws Exception {
    try (final InputStream is = getClass().getClassLoader()
        .getResourceAsStream("dbunit/expected-multiple-failures.xml")) {
        final IDataSet expectedDataSet = new FlatXmlDataSetBuilder().build(is);
        final ITable expectedTable = expectedDataSet.getTable("ITEMS");
        final Connection conn = getDataSource().getConnection();
        final DiffCollectingFailureHandler collectingHandler = new DiffCollectingFailureHandler();

        conn.createStatement()
            .executeUpdate("INSERT INTO ITEMS (title, price) VALUES ('Battery', '1000000')");
        final ITable actualData = getConnection().createDataSet()
            .getTable("ITEMS");

        Assertion.assertEquals(expectedTable, actualData, collectingHandler);
        if (!collectingHandler.getDiffList()
            .isEmpty()) {
            String message = (String) collectingHandler.getDiffList()
                .stream()
                .map(d -> formatDifference((Difference) d))
                .collect(joining("\n"));
            logger.error(() -> message);
        }
    }
}

private static String formatDifference(Difference diff) {
    return "expected value in " + diff.getExpectedTable()
        .getTableMetaData()
        .getTableName() + "." + 
        diff.getColumnName() + " row " + 
        diff.getRowIndex() + ":" + 
        diff.getExpectedValue() + ", but was: " + 
        diff.getActualValue();
}

Furthermore, the handler provides the failures in the form of Difference instances, which lets us format the errors.

After running the test we get a formatted report:

java.lang.AssertionError: expected value in ITEMS.price row 5:199.99, but was: 1000000.0
expected value in ITEMS.produced row 5:2019-03-23, but was: null
expected value in ITEMS.title row 5:Necklace, but was: Battery

	at com.baeldung.dbunit.DataSourceDBUnitTest.givenDataSet_whenInsertUnexpectedData_thenFailOnAllUnexpectedValues(DataSourceDBUnitTest.java:91)

It's important to notice that at this point we expected the new item to have a price of 199.99 but it was 1000000.0. Then we see that the production date to be 2019-03-23, but in the end it was null. Finally the expected item was a Necklace and instead we got a Battery.

5. Conclusion

In this article, we saw how DBUnit provides a declarative way of defining test data to test data access layers of Java applications.

As always, the full source code for the examples is available over on GitHub.

How to Test GraphQL Using Postman

$
0
0

1. Overview

In this short tutorial, we'll show how to test GraphQL endpoints using Postman.

2. Schema Overview and Methods

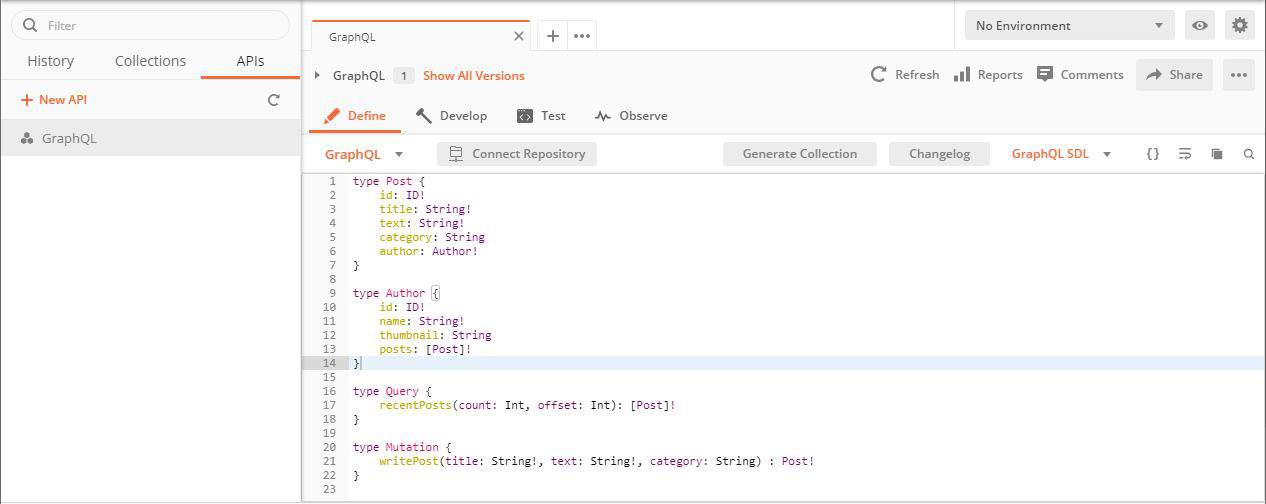
We'll use the endpoints created in our GraphQL tutorial. As a reminder, the schema contains definitions describing posts and authors:

type Post {
    id: ID!
    title: String!
    text: String!
    category: String
    author: Author!
}
 
type Author {
    id: ID!
    name: String!
    thumbnail: String
    posts: [Post]!
}

Plus, we've got methods for displaying posts and writing new ones:

type Query {
    recentPosts(count: Int, offset: Int): [Post]!
}
 
type Mutation {
    writePost(title: String!, text: String!, category: String) : Post!
}

When using a mutation to save data, the required fields are marked with an exclamation mark. Also note that in our Mutation, the returned type is Post, but in Query, we'll get a list of Post objects.

The above schema can be loaded in the Postman API section — just add New API with GraphQL type and press Generate Collection:

Once we load our schema, we can easily write sample queries using Postman's autocomplete support for GraphQL.

3. GraphQL Requests in Postman

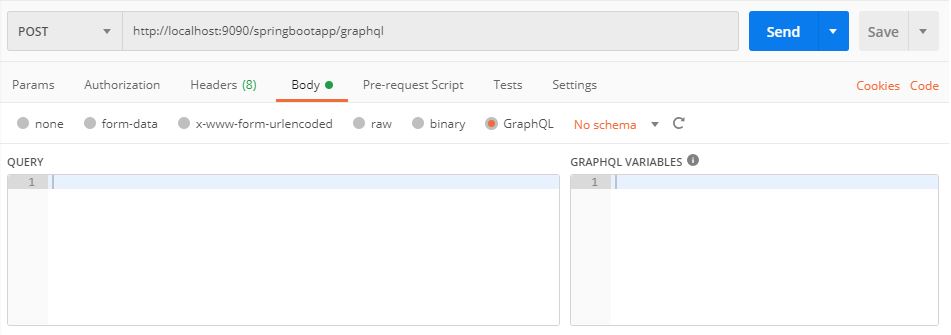
First of all, Postman allows us to send the body in GraphQL format — we just choose the GraphQL option below:

Then, we can write a native GraphQL query, like one that gets us the title, category, and author name into the QUERY section:

query {
    recentPosts(count: 1, offset: 0) {
        title
        category
        author {
            name
        }
    }
}

And, as a result, we'll get:

{
    "data": {
        "recentPosts": [
            {
                "title": "Post",
                "category": "test",
                "author": {
                    "name": "Author 0"
                }
            }
        ]
    }
}

It's also possible to send a request using the raw format, but we have to add Content-Type: application/graphql to the headers section. And, in this case, the body looks the same.

For example, we can update title, text, category and get an id and title as a response:

mutation {
    writePost (
        title: "Post", 
        text: "test", 
        category: "test",
    ) {
        id
        title
    }
}

The type of operation – like query and mutation – can be omitted from the query body as long as we use a shorthand syntax. In this case, we can't use the name of the operation and variables, but it's recommended to use the operation name for easier logging and debugging.

4. Using Variables

In the variables section, we can create a schema in JSON format that will assign values to the variables. This avoids typing arguments in a query string:

So, we can modify the recentPosts body in the QUERY section to dynamically assign values from variables:

query recentPosts ($count: Int, $offset: Int) {
    recentPosts (count: $count, offset: $offset) {
        id
        title
        text
        category
    }
}

And we can edit the GRAPHQL VARIABLES section with what we'd like our variables to be set to:

{
  "count": 1,
  "offset": 0
}

5. Summary

We can easily test GraphQL using Postman, which also allows us to import the schema and generate queries for it.

A collection of requests can be found over on GitHub.

Handling java.net.ConnectException

$
0
0

1. Introduction

In this quick tutorial, we'll discuss some possible causes of java.net.ConnectException. Then, we'll show how to check the connection with the help of two publicly available commands and a small Java example.

2. What Causes java.net.ConnectException

The java.net.ConnectException exception is one of the most common Java exceptions related to networking. We may encounter it when we're establishing a TCP connection from a client application to a server. As it's a checked exception, we should handle it properly in our code in a try-catch block.

There are many possible causes of this exception:

  • The server we are trying to connect to is simply not started, therefore, we can't obtain a connection
  • The host and port combination we are using to connect to the server might be incorrect
  • A firewall might block connections from specific IP addresses or ports

3. Catching the Exception Programmatically

We usually connect to the server programmatically using the java.net.Socket class. To establish a TCP connection, we must make sure we're connecting to the correct host and port combination:

String host = "localhost";
int port = 5000;

try {
    Socket clientSocket = new Socket(host, port);

    // do something with the successfully opened socket

    clientSocket.close();
} catch (ConnectException e) {
    // host and port combination not valid
    e.printStackTrace();
} catch (Exception e) {
    e.printStackTrace();
}

If the host and port combination is incorrect, Socket will throw a java.net.ConnectException. In our code example above, we print the stack trace to better determine what's going wrong. No visible stack trace means that our code successfully connected to the server.

In this case, we should check the connection details before proceeding. We should also check that our firewall isn't preventing the connection.

4. Checking Connections With the CLI

Through the CLI, we can use the ping command to check whether the server we're trying to connect to is running.

For example, we can check if the Baeldung server is started:

ping baeldung.com

If the Baeldung server is running, we should see information about sent and received packages.

PING baeldung.com (104.18.63.78): 56 data bytes
64 bytes from 104.18.63.78: icmp_seq=0 ttl=57 time=7.648 ms
64 bytes from 104.18.63.78: icmp_seq=1 ttl=57 time=14.493 ms

telnet is another useful CLI tool that we can use to connect to a specified host or IP address. Additionally, we can also pass an exact port that we want to test. Otherwise, default port 23 will be used.

For example, if we want to connect to the Baeldung website on port 80, we can run:

telnet baeldung.com 80

It's worth noting that ping and telnet commands may not always work — even if the server we're trying to reach is running and we're using the correct host and port combination. This is often the case in production systems, which are usually heavily secured to prevent unauthorized access. Besides, a firewall blocking specific internet traffic might be another cause of failure.

5. Conclusion

In this quick tutorial, we've discussed the common Java network exception, java.net.ConnectException.

We started with an explanation of possible causes of that exception. We showed how to catch the exception programmatically, along with two useful CLI commands that might help to determine the cause.

As always, the code shown in this article is available over on GitHub.


The Map.computeIfAbsent() Method

$
0
0

1. Overview

In this tutorial, we'll look briefly at the new default method computeIfAbsent of the Map interface introduced in Java 8.

Specifically, we will look at its signature, usage and how it handles different cases.

2. Map.computeIfAbsent Method

Let's start by looking at the signature of computeIfAbsent:

default V computeIfAbsent(K key, Function<? super K, ? extends V> mappingFunction)

The computeIfAbsent method takes two parameters. The first parameter is the key and the second parameter is the mappingFunction. It's important to know that mapping function is only called if the mapping is not present.

2.1. Key Related to a Non-Null Value

Firstly, it checks if the key is present in the map. If the key is present and a non-null value is related to the key, then it returns that value:

Map<String, Integer> stringLength = new HashMap<>();
stringLength.put("John", 5);
assertEquals((long)stringLength.computeIfAbsent("John", s -> s.length()), 5);

As we see, the key “John” has a non-null mapping present, it returns the value 5. If our mapping function were used, we'd expect the function to return the length of 4.

2.2. Using the Mapping Function to Compute the Value

Furthermore, if the key is not present in the map or null value is related to the key, then it attempts to compute the value using the given mappingFunction. Also, it enters the calculated value into the map unless the calculated value is null.

Let's take a look at the usage of the mappingFunction in the computeIfAbsent method:

Map<String, Integer> stringLength = new HashMap<>();
assertEquals((long)stringLength.computeIfAbsent("John", s -> s.length()), 4);
assertEquals((long)stringLength.get("John"), 4);

Since the key “John” is not present, it computes the value by passing the key as a parameter to the mappingFunction.

2.3. Mapping Function Returns null

Also, if the mappingFunction returns null, the map records no mapping:

Map<String, Integer> stringLength = new HashMap<>();
assertEquals(stringLength.computeIfAbsent("John", s -> null), null);
assertNull(stringLength.get("John"));

2.4. Mapping Function Throws an Exception

Finally, if the mappingFunction throws an unchecked exception, then the exception is re-thrown, and the map records no mapping:

@Test(expected = RuntimeException.class)
public void whenMappingFunctionThrowsException_thenExceptionIsRethrown() {
    Map<String, Integer> stringLength = new HashMap<>();
    stringLength.computeIfAbsent("John", s -> { throw new RuntimeException(); });
}

We see that the mappingFunction throws a RuntimeException, which propagates back to the computeIfAbsent method.

3. Conclusion

In this quick article, we looked at the computeIfAbsent method, its signature and its usage. Finally, we saw how it handles different cases.

As always, all these code samples are available over on GitHub.

Should We Close a Java Stream?

$
0
0

1. Overview

With the introduction of lambda expressions in Java 8, it's possible to write code in a more concise and functional way. Streams and Functional Interfaces are the heart of this revolutionary change in the Java platform.

In this quick tutorial, we'll learn whether we should explicitly close Java 8 streams by looking at them from a resource perspective.

2. Closing Streams

Java 8 streams implement the AutoCloseable interface:

public interface Stream<T> extends BaseStream<...> {
    // omitted
}
public interface BaseStream<...> extends AutoCloseable {
    // omitted
}

Put simply, we should think of streams as resources that we can borrow and return when we're done with them. As opposed to most resources, we don't have to always close streams.

This may sound counter-intuitive at first, so let's see when we should and when we shouldn't close Java 8 streams.

2.1. Collections, Arrays, and Generators

Most of the time, we create Stream instances from Java collections, arrays, or generator functions. For instance, here, we're operating on a collection of String via the Stream API:

List<String> colors = List.of("Red", "Blue", "Green")
  .stream()
  .filter(c -> c.length() > 4)
  .map(String::toUpperCase)
  .collect(Collectors.toList());

Sometimes, we're generating a finite or infinite sequential stream:

Random random = new Random();
random.ints().takeWhile(i -> i < 1000).forEach(System.out::println);

Additionally, we can also use array-based streams:

String[] colors = {"Red", "Blue", "Green"};
Arrays.stream(colors).map(String::toUpperCase).toArray()

When dealing with these sorts of streams, we shouldn't close them explicitly. The only valuable resource associated with these streams is memory, and Garbage Collection (GC) takes care of that automatically.

2.2. IO Resources

Some streams, however, are backed by IO resources such as files or sockets. For example, the Files.lines() method streams all lines for the given file:

Files.lines(Paths.get("/path/to/file"))
  .flatMap(line -> Arrays.stream(line.split(",")))
  // omitted

Under the hood, this method opens a FileChannel instance and then closes it upon stream closure. Therefore, if we forget to close the stream, the underlying channel will remain open and then we would end up with a resource leak.

To prevent such resource leaks, it's highly recommended to use the try-with-resources idiom to close IO-based streams:

try (Stream<String> lines = Files.lines(Paths.get("/path/to/file"))) {
    lines.flatMap(line -> Arrays.stream(line.split(","))) // omitted
}

This way, the compiler will close the channel automatically. The key takeaway here is to close all IO-based streams.

Please note that closing an already closed stream would throw IllegalStateException.

3. Conclusion

In this short tutorial, we saw the differences between simple streams and IO-heavy ones. We also learned how those differences inform our decision on whether or not to close Java 8 streams.

As usual, the sample code is available over on GitHub.

Recommended Package Structure of a Spring Boot Project

$
0
0

1. Overview

When building a new Spring Boot project, there's a high degree of flexibility on how we can organize our classes.

Still, there are some recommendations that we need to keep in mind.

2. Default Package

Given the fact that Spring Boot annotations like @ComponentScan, @EntityScan, @ConfigurationPropertiesScan and @SpringBootApplication use packages to define scanning locations, it's recommended that we avoid using the default package — that is, we should always declare the package in our classes.

3. Main Class

The @SpringBootApplication annotation triggers component scanning for the current package and its sub-packages. Therefore, the main class of the project should reside in the base package.

This is configurable, and we can still locate it elsewhere by specifying the base package manually. However, in most cases, it's not worth the hassle.

Even more, a JPA-based project would need to have a few additional annotations on the main class:

@SpringBootApplication(scanBasePackages = "example.baeldung.com")
@EnableJpaRepositories("example.baeldung.com")
@EntityScan("example.baeldung.com")

Also, be aware that extra configuration might be needed.

4. Design

The design of the package structure is independent of Spring Boot. Therefore, it should be imposed by the requirements of our project.

One popular strategy is package-by-feature, which enhances modularity and enables package-private visibility inside sub-packages.

Let's take, for example, the PetClinic project. This project was built by Spring developers to illustrate their view on how a common Spring Boot project should be structured.

It's organized in a package-by-feature manner. Hence, we have the main package, org.springframework.samples.petclinic, and 5 sub-packages:

  • org.springframework.samples.petclinic.model
  • org.springframework.samples.petclinic.owner
  • org.springframework.samples.petclinic.system
  • org.springframework.samples.petclinic.vet
  • org.springframework.samples.petclinic.visit

Each of them represents a domain or a feature of the application, grouping highly-coupled classes inside and enabling high cohesion.

5. Conclusion

In this small article, we've discussed some recommendations that we need to bear in mind when building a Spring Boot project and learned about how we can design the package structure.

Hibernate Error “No Persistence Provider for EntityManager”

$
0
0

1. Introduction

In this tutorial, we'll see how to solve a common Hibernate error — “No persistence provider for EntityManager”. Simply put, persistence provider refers to the specific JPA implementation used in our application to persist objects to the database.

To learn more about JPA and its implementations, we can refer to our article on the difference between JPA, Hibernate, and EclipseLink.

2. What Causes the Error

We'll see the error when the application doesn't know which persistence provider should be used. This occurs when the persistence provider is neither mentioned in the persistence.xml file nor configured in the PersistenceUnitInfo implementation class.

3. Fixing the Error

To fix this error, we simply need to define the persistence provider in the persistence.xml file:

<provider>org.hibernate.jpa.HibernatePersistenceProvider</provider>

Or, if we're using Hibernate version 4.2 or older:

<provider>org.hibernate.ejb.HibernatePersistence</provider>

In case we've implemented the PersistenceUnitInfo interface in our application, we must also override the
getPersistenceProviderClassName() method:

@Override
public String getPersistenceProviderClassName() {
    return HibernatePersistenceProvider.class.getName();
}

To ensure all the necessary Hibernate jars are available, it's important to add the hibernate-core dependency in the pom.xml file:

<dependency>
    <groupId>org.hibernate</groupId>
    <artifactId>hibernate-core</artifactId>
    <version>${hibernate.version}</version>
</dependency>

4. Conclusion

To summarize, we've seen the possible causes of the Hibernate error “No persistence provider for EntityManager” and various ways to solve it.

As usual, the sample Hibernate project is available over on GitHub.

A Guide to Atomikos

$
0
0

1. Introduction

Atomikos is a transaction library for Java applications. In this tutorial, we'll understand why and how to use Atomikos.

In the process, we'll also go through the basics of transactions and why we need them.

Then, we'll create a simple application with transactions leveraging different APIs from Atomikos.

2. Understanding the Basics

Before we discuss Atomikos, let's understand what exactly transactions are and a few concepts related to them. Put simply, a transaction is a logical unit of work whose effect is visible outside the transaction either in entirety or not at all.

Let's take an example to understand this better. A typical retail application reserves the inventory and then places an order:

Here, we'd like these two operations to either happen together or not happen at all. We can achieve this by wrapping these operations into a single transaction.

2.1. Local vs. Distributed Transaction

A transaction can involve multiple independent operations. These operations can execute on the same resource or different resources. We refer to the participating components in a transaction like a database as a resource here.

Transactions within a single resource are known local transaction while those spawning across multiple resources are known as the distributed transaction:

Here, inventory and orders can be two tables in the same database, or they can be two different databases — possibly running on different machines altogether.

2.2. XA Specification and Java Transaction API

XA refers to eXtended Architecture, which is a specification for distributed transaction processing. The goal of XA is to provide atomicity in global transactions involving heterogeneous components.

XA specification provides integrity through a protocol known as a two-phase commit. Two-phase commit is a widely-used distributed algorithm to facilitate the decision to commit or rollback a distributed transaction.

Java Transaction API (JTA) is a Java Enterprise Edition API developed under the Java Community Process. It enables Java applications and application servers to perform distributed transactions across XA resources.

JTA is modeled around XA architecture, leveraging two-phase commit. JTA specifies standard Java interfaces between a transaction manager and the other parties in a distributed transaction.

3. Introduction to Atomikos

Now that we've gone through the basics of transactions, we're ready to learn Atomikos. In this section, we'll understand what exactly Atomikos is and how it relates to concepts like XA and JTA. We'll also understand the architecture of Atomikos and go through its product offerings.

3.1. What Is Atomikos

As we have seen, JTA provides interfaces in Java for building applications with distributed transactions. Now, JTA is just a specification and does not offer any implementation. For us to run an application where we leverage JTA, we need an implementation of JTA. Such an implementation is called a transaction manager.

Typically, the application server provides a default implementation of the transaction manager. For instance, in the case of Enterprise Java Beans (EJB), EJB containers manage transaction behavior without any explicit intervention by application developers. However, in many cases, this may not be ideal, and we may need direct control over the transaction independent of the application server.

Atomikos is a lightweight transaction manager for Java that enables applications using distributed transactions to be self-contained. Essentially, our application doesn't need to rely on a heavyweight component like an application server for transactions. This brings the concept of distributed transactions closer to a cloud-native architecture.

3.2. Atomikos Architecture

Atomikos is built primarily as a JTA transaction manager and, hence, implements XA architecture with a two-phase commit protocol. Let's see a high-level architecture with Atomikos:

Here, Atomikos is facilitating a two-phase-commit-based transaction spanning across a database and a message queue.

3.3. Atomikos Product Offerings

Atomikos is a distributed transaction manager that offers more features than what JTA/XA mandates. It has an open-source product and a much more comprehensive commercial offering:

  • TransactionsEssentials: Atomikos' open-source product providing JTA/XA transaction manager for Java applications working with databases and message queues. This is mostly useful for testing and evaluation purposes.
  • ExtremeTransactions: the commercial offering of Atomikos, which offers distributed transactions across composite applications, including REST services apart from databases and message queues. This is useful to build applications performing Extreme Transaction Processing (XTP).

In this tutorial, we'll use the TransactionsEssentials library to build and demonstrate the capabilities of Atomikos.

4. Setting up Atomikos

As we've seen earlier, one of the highlights of Atomikos is that it's an embedded transaction service. What this means is that we can run it in the same JVM as our application. Thus, setting up Atomikos is quite straightforward.

4.1. Dependencies

First, we need to set up the dependencies. Here, all we have to do is declare the dependencies in our Maven pom.xml file:

<dependency>
    <groupId>com.atomikos</groupId>
    <artifactId>transactions-jdbc</artifactId>
    <version>5.0.6</version>
</dependency>
<dependency>
    <groupId>com.atomikos</groupId>
    <artifactId>transactions-jms</artifactId>
    <version>5.0.6</version>
</dependency>

We're using Atomikos dependencies for JDBC and JMS in this case, but similar dependencies are available on Maven Central for other XA-complaint resources.

4.2. Configurations

Atomikos provides several configuration parameters, with sensible defaults for each of them. The easiest way to override these parameters is to provide a transactions.properties file in the classpath. We can add several parameters for the initialization and operation of the transaction service. Let's see a simple configuration to override the directory where log files are created:

com.atomikos.icatch.file=path_to_your_file

Similarly, there are other parameters that we can use to control the timeout for transactions, set unique names for our application, or define shutdown behavior.

4.3. Databases

In our tutorial, we'll build a simple retail application, like the one we described earlier, which reserves inventory and then places an order. We'll use a relational database for simplicity. Moreover, we'll use multiple databases to demonstrate distributed transactions. However, this can very well extend to other XA-complaint resources like message queues and topics.

Our inventory database will have a simple table to host product inventories:

CREATE TABLE INVENTORY (
    productId VARCHAR PRIMARY KEY,
    balance INT
);

And, our order database will have a simple table to host placed orders:

CREATE TABLE ORDERS (
    orderId VARCHAR PRIMARY KEY,
    productId VARCHAR,
    amount INT NOT NULL CHECK (amount <= 5)
);

This is a very basic database schema and useful only for the demonstration. However, it's important to note that our schema constraint does not allow order with a product quantity of more than five.

5. Working With Atomikos

Now, we're ready to use one of the Atomikos libraries to build our application with distributed transactions. In the following subsections, we'll use the built-in Atomikos resource adapters to connect with our back-end database systems. This is the quickest and easiest way to get started with Atomikos.

5.1. Instantiating UserTransaction

We will leverage JTA UserTransaction to demarcate transaction boundaries. All other steps related to transaction service will be automatically taken care of. This includes enlisting and delisting resources with the transaction service.

Firstly, we need to instantiate a UserTransaction from Atomikos:

UserTransactionImp utx = new UserTransactionImp();

5.2. Instantiating DataSource

Then, we need to instantiate a DataSource from Atomikos. There are two versions of DataSource that Atomikos makes available.

The first, AtomikosDataSourceBean, is aware of an underlying XADataSource:

AtomikosDataSourceBean dataSource = new AtomikosDataSourceBean();

While AtomikosNonXADataSourceBean uses any regular JDBC driver class:

AtomikosNonXADataSourceBean dataSource = new AtomikosNonXADataSourceBean();

As the name suggests, AtomikosNonXADataSource is not XA compliant. Hence transactions executed with such a data source can not be guaranteed to be atomic. So why would we ever use this? We may have some database that does not support XA specification. Atomikos does not prohibit us from using such a data source and still try to provide atomicity if there is a single such data source in the transaction. This technique is similar to Last Resource Gambit, a variation of the two-phase commit process.

Further, we need to appropriately configure the DataSource depending upon the database and driver.

5.3. Performing Database Operations

Once configured, it's fairly easy to use DataSource within the context of a transaction in our application:

public void placeOrder(String productId, int amount) throws Exception {
    String orderId = UUID.randomUUID().toString();
    boolean rollback = false;
    try {
        utx.begin();
        Connection inventoryConnection = inventoryDataSource.getConnection();
        Connection orderConnection = orderDataSource.getConnection();
        
        Statement s1 = inventoryConnection.createStatement();
        String q1 = "update Inventory set balance = balance - " + amount + " where productId ='" +
          productId + "'";
        s1.executeUpdate(q1);
        s1.close();
        
        Statement s2 = orderConnection.createStatement();
        String q2 = "insert into Orders values ( '" + orderId + "', '" + productId + "', " + amount + " )";
        s2.executeUpdate(q2);
        s2.close();
        
        inventoryConnection.close();
        orderConnection.close();
    } catch (Exception e) {
        rollback = true;
    } finally {
        if (!rollback)
            utx.commit();
        else
            utx.rollback();
    }
}

Here, we are updating the database tables for inventory and order within the transaction boundary. This automatically provides the benefit of these operations happening atomically.

5.4. Testing Transactional Behavior

Finally, we must be able to test our application with simple unit tests to validate that the transaction behavior is as expected:

@Test
public void testPlaceOrderSuccess() throws Exception {
    int amount = 1;
    long initialBalance = getBalance(inventoryDataSource, productId);
    Application application = new Application(inventoryDataSource, orderDataSource);
    
    application.placeOrder(productId, amount);
    
    long finalBalance = getBalance(inventoryDataSource, productId);
    assertEquals(initialBalance - amount, finalBalance);
}
  
@Test
public void testPlaceOrderFailure() throws Exception {
    int amount = 10;
    long initialBalance = getBalance(inventoryDataSource, productId);
    Application application = new Application(inventoryDataSource, orderDataSource);
    
    application.placeOrder(productId, amount);
    
    long finalBalance = getBalance(inventoryDataSource, productId);
    assertEquals(initialBalance, finalBalance);
}

Here, we're expecting a valid order to decrease the inventory, while we're expecting an invalid order to leave the inventory unchanged. Please note that, as per our database constraint, any order with a quantity of more than five of a product is considered an invalid order.

5.5. Advanced Atomikos Usage

The example above is the simplest way to use Atomikos and perhaps sufficient for most of the requirements. However, there are other ways in which we can use Atomikos to build our application. While some of these options make Atomikos easy to use, others offer more flexibility. The choice depends on our requirements.

Of course, it's not necessary to always use Atomikos adapters for JDBC/JMS. We can choose to use the Atomikos transaction manager while working directly with XAResource. However, in that case, we have to explicitly take care of enlisting and delisting XAResource instances with the transaction service.

Atomikos also makes it possible to use more advanced features through a proprietary interface, UserTransactionService. Using this interface, we can explicitly register resources for recovery. This gives us fine-grained control over what resources should be recovered, how they should be recovered, and when recovery should happen.

6. Integrating Atomikos

While Atomikos provides excellent support for distributed transactions, it's not always convenient to work with such low-level APIs. To focus on the business domain and avoid the clutter of boilerplate code, we often need the support of different frameworks and libraries. Atomikos supports most of the popular Java frameworks related to back-end integrations. We'll explore a couple of them here.

6.1. Atomikos With Spring and DataSource

Spring is one of the popular frameworks in Java that provides an Inversion of Control (IoC) container. Notably, it has fantastic support for transactions as well. It offers declarative transaction management using Aspect-Oriented Programming (AOP) techniques.

Spring supports several transaction APIs, including JTA for distributed transactions. We can use Atomikos as our JTA transaction manager within Spring without much effort. Most importantly, our application remains pretty much agnostic to Atomikos, thanks to Spring.

Let's see how we can solve our previous problem, this time leveraging Spring. We'll begin by rewriting the Application class:

public class Application {
    private DataSource inventoryDataSource;
    private DataSource orderDataSource;
    
    public Application(DataSource inventoryDataSource, DataSource orderDataSource) {
        this.inventoryDataSource = inventoryDataSource;
        this.orderDataSource = orderDataSource;
    }
    
    @Transactional(rollbackFor = Exception.class)
    public void placeOrder(String productId, int amount) throws Exception {
        String orderId = UUID.randomUUID().toString();
        Connection inventoryConnection = inventoryDataSource.getConnection();
        Connection orderConnection = orderDataSource.getConnection();
        
        Statement s1 = inventoryConnection.createStatement();
        String q1 = "update Inventory set balance = balance - " + amount + " where productId ='" + 
          productId + "'";
        s1.executeUpdate(q1);
        s1.close();
        
        Statement s2 = orderConnection.createStatement();
        String q2 = "insert into Orders values ( '" + orderId + "', '" + productId + "', " + amount + " )";
        s2.executeUpdate(q2);
        s2.close();
        
        inventoryConnection.close();
        orderConnection.close();
    }
}

As we can see here, most of the transaction-related boilerplate code has been replaced by a single annotation at the method level. Moreover, Spring takes care of instantiating and injecting DataSource, which our application depends on.

Of course, we have to provide relevant configurations to Spring. We can use a simple Java class to configure these elements:

@Configuration
@EnableTransactionManagement
public class Config {
    @Bean(initMethod = "init", destroyMethod = "close")
    public AtomikosDataSourceBean inventoryDataSource() {
        AtomikosDataSourceBean dataSource = new AtomikosDataSourceBean();
        // Configure database holding order data
        return dataSource;
    }
    
    @Bean(initMethod = "init", destroyMethod = "close")
    public AtomikosDataSourceBean orderDataSource() {
        AtomikosDataSourceBean dataSource = new AtomikosDataSourceBean();
        // Configure database holding order data
        return dataSource;
    }
    
    @Bean(initMethod = "init", destroyMethod = "close")
    public UserTransactionManager userTransactionManager() throws SystemException {
        UserTransactionManager userTransactionManager = new UserTransactionManager();
        userTransactionManager.setTransactionTimeout(300);
        userTransactionManager.setForceShutdown(true);
        return userTransactionManager;
    }
    
    @Bean
    public JtaTransactionManager jtaTransactionManager() throws SystemException {
        JtaTransactionManager jtaTransactionManager = new JtaTransactionManager();
        jtaTransactionManager.setTransactionManager(userTransactionManager());
        jtaTransactionManager.setUserTransaction(userTransactionManager());
        return jtaTransactionManager;
    }
    
    @Bean
    public Application application() {
        return new Application(inventoryDataSource(), orderDataSource());
    }
}

Here, we are configuring AtomikosDataSourceBean for the two different databases holding our inventory and order data. Moreover, we're also providing the necessary configuration for the JTA transaction manager.

Now, we can test our application for transactional behavior as before. Again, we should be validating that a valid order reduces our inventory balance, while an invalid order leaves it unchanged.

6.2. Atomikos With Spring, JPA, and Hibernate

While Spring has helped us cut down boilerplate code to a certain extent, it's still quite verbose. Some tools can make working with relational databases in Java even easier. Java Persistence API (JPA) is a specification that describes the management of relational data in Java applications. This simplifies the data access and manipulation code to a large extent.

Hibernate is one of the most popular implementations of the JPA specification. Atomikos has great support for several JPA implementations, including Hibernate. As before, our application remains agnostic to Atomikos as well as Hibernate, thanks to Spring and JPA!

Let's see how Spring, JPA, and Hibernate can make our application even more concise while providing the benefits of distributed transactions through Atomikos. As before, we will begin by rewriting the Application class:

public class Application {
    @Autowired
    private InventoryRepository inventoryRepository;
    @Autowired
    private OrderRepository orderRepository;
    
    @Transactional(rollbackFor = Exception.class)
    public void placeOrder(String productId, int amount) throws SQLException { 
        String orderId = UUID.randomUUID().toString();
        Inventory inventory = inventoryRepository.findOne(productId);
        inventory.setBalance(inventory.getBalance() - amount);
        inventoryRepository.save(inventory);
        Order order = new Order();
        order.setOrderId(orderId);
        order.setProductId(productId);
        order.setAmount(new Long(amount));
        orderRepository.save(order);
    }
}

As we can see, we're not dealing with any low-level database APIs now. However, for this magic to work, we do need to configure Spring Data JPA classes and configurations. We'll begin by defining our domain entities:

@Entity
@Table(name = "INVENTORY")
public class Inventory {
    @Id
    private String productId;
    private Long balance;
    // Getters and Setters
}
@Entity
@Table(name = "ORDERS")
public class Order {
    @Id
    private String orderId;
    private String productId;
    @Max(5)
    private Long amount;
    // Getters and Setters
}

Next, we need to provide the repositories for these entities:

@Repository
public interface InventoryRepository extends JpaRepository<Inventory, String> {
}
  
@Repository
public interface OrderRepository extends JpaRepository<Order, String> {
}

These are quite simple interfaces, and Spring Data takes care of elaborating these with actual code to work with database entities.

Finally, we need to provide the relevant configurations for a data source for both inventory and order databases and the transaction manager:

@Configuration
@EnableJpaRepositories(basePackages = "com.baeldung.atomikos.spring.jpa.inventory",
  entityManagerFactoryRef = "inventoryEntityManager", transactionManagerRef = "transactionManager")
public class InventoryConfig {
    @Bean(initMethod = "init", destroyMethod = "close")
    public AtomikosDataSourceBean inventoryDataSource() {
        AtomikosDataSourceBean dataSource = new AtomikosDataSourceBean();
        // Configure the data source
        return dataSource;
    }
    
    @Bean
    public EntityManagerFactory inventoryEntityManager() {
        HibernateJpaVendorAdapter vendorAdapter = new HibernateJpaVendorAdapter();
        LocalContainerEntityManagerFactoryBean factory = new LocalContainerEntityManagerFactoryBean();
        factory.setJpaVendorAdapter(vendorAdapter);
        // Configure the entity manager factory
        return factory.getObject();
    }
}
@Configuration
@EnableJpaRepositories(basePackages = "com.baeldung.atomikos.spring.jpa.order", 
  entityManagerFactoryRef = "orderEntityManager", transactionManagerRef = "transactionManager")
public class OrderConfig {
    @Bean(initMethod = "init", destroyMethod = "close")
    public AtomikosDataSourceBean orderDataSource() {
        AtomikosDataSourceBean dataSource = new AtomikosDataSourceBean();
        // Configure the data source
        return dataSource;
    }
    
    @Bean
    public EntityManagerFactory orderEntityManager() {
        HibernateJpaVendorAdapter vendorAdapter = new HibernateJpaVendorAdapter();
        LocalContainerEntityManagerFactoryBean factory = new LocalContainerEntityManagerFactoryBean();
        factory.setJpaVendorAdapter(vendorAdapter);
        // Configure the entity manager factory
        return factory.getObject();
    }
}
@Configuration
@EnableTransactionManagement
public class Config {
    @Bean(initMethod = "init", destroyMethod = "close")
    public UserTransactionManager userTransactionManager() throws SystemException {
        UserTransactionManager userTransactionManager = new UserTransactionManager();
        userTransactionManager.setTransactionTimeout(300);
        userTransactionManager.setForceShutdown(true);
        return userTransactionManager;
    }
    
    @Bean
    public JtaTransactionManager transactionManager() throws SystemException {
        JtaTransactionManager jtaTransactionManager = new JtaTransactionManager();
        jtaTransactionManager.setTransactionManager(userTransactionManager());
        jtaTransactionManager.setUserTransaction(userTransactionManager());
        return jtaTransactionManager;
    }
    
    @Bean
    public Application application() {
        return new Application();
    }
}

This is still quite a lot of configuration that we have to do. This is partly because we're configuring Spring JPA for two separate databases. Also, we can further reduce these configurations through Spring Boot, but that's beyond the scope of this tutorial.

As before, we can test our application for the same transactional behavior. There's nothing new this time, except for the fact that we're using Spring Data JPA with Hibernate now.

7. Atomikos Beyond JTA

While JTA provides excellent transaction support for distributed systems, these systems must be XA-complaint like most relational databases or message queues. However, JTA is not useful if one of these systems doesn't support XA specification for a two-phase commit protocol. Several resources fall under this category, especially within a microservices architecture.

Several alternative protocols support distributed transactions. One of these is a variation of two-phase commit protocol that makes use of compensations. Such transactions have a relaxed isolation guarantee and are known as compensation-based transactions. Participants commit the individual parts of the transaction in the first phase itself, offering a compensation handler for a possible rollback in the second phase.

There are several design patterns and algorithms to implement a compensation-based transaction. For example, Sagas is one such popular design pattern. However, they are usually complex to implement and error-prone.

Atomikos offers a variation of compensation-based transaction called Try-Confirm/Cancel (TCC). TCC offers better business semantics to the entities under a transaction. However, this is possible only with advanced architecture support from the participants, and TCC is only available under the Atomikos commercial offering, ExtremeTransactions.

8. Alternatives to Atomikos

We have gone through enough of Atomikos to appreciate what it has to offer. Moreover, there's a commercial offering from Atomikos with even more powerful features. However, Atomikos is not the only option when it comes to choosing a JTA transaction manager. There are a few other credible options to choose from. Let's see how they fare against Atomikos.

8.1. Narayana

Narayana is perhaps one of the oldest open-source distributed transaction managers and is currently managed by Red Hat. It has been widely used across the industry, and it has evolved through community support and influenced several specifications and standards.

Narayana provides support for a wide range of transaction protocols like JTA, JTS, Web-Services, and REST, to name a few. Further, Narayana can be embedded in a wide range of containers.

Compared to Atomikos, Narayana provides pretty much all the features of a distributed transaction manager. In many cases, Narayana is more flexible to integrate and use in applications. For instance, Narayana has language bindings for both C/C++ and Java. However, this comes at the cost of added complexity, and Atomikos is comparatively easier to configure and use.

8.2. Bitronix

Bitronix is a fully working XA transaction manager that provides all services required by the JTA API. Importantly, Bitronix is an embeddable transaction library that provides extensive and useful error reporting and logging. For a distributed transaction, this makes it easier to investigate failures. Moreover, it has excellent support for Spring's transactional capabilities and works with minimal configurations.

Compared to Atomikos, Bitronix is an open-source project and does not have a commercial offering with product support. The key features that are part of Atomikos' commercial offering but are lacking in Bitronix include support for microservices and declarative elastic scaling capability.

9. Conclusion

To sum up, in this tutorial, we went through the basic details of transactions. We understood what distributed transactions are and how a library like Atomikos can facilitate in performing them. In the process, we leveraged the Atomikos APIs to create a simple application with distributed transactions.

We also understood how Atomikos works with other popular Java frameworks and libraries. Finally, we went through some of the alternatives to Atomikos that are available to us.

As usual, the source code for this article can be found over on GitHub.

Oracle Connection Pooling With Spring

$
0
0

1. Overview

Oracle is one of the most popular databases in large production environments. So, as Spring developers, it's very common to have to work with these databases.

In this tutorial, we're going to talk about how we can make this integration.

2. The Database

The first thing we need is, of course, the database. If we don't have one installed, we can get and install any of the databases available on the Oracle Database Software Downloads. But in case we don't want to do any installation, we can also build any of the Oracle database images for Docker.

In this case, we're going to use an Oracle Database 12c Release 2 (12.2.0.2) Standard Edition Docker image. Consequently, this keeps us from having to install new software on our computer.


3. Connection Pooling

Now we have the database ready for incoming connections. Next, then, let's learn some different ways to do connection pooling in Spring. 

3.1. HikariCP

The easiest way for connection pooling with Spring is using autoconfiguration. The spring-boot-starter-jdbc dependency includes HikariCP as the preferred pooling data source. Therefore, if we take a look into our pom.xml we'll see:

<dependency>
    <groupId>org.springframework.boot</groupId>
    <artifactId>spring-boot-starter-data-jpa</artifactId>
</dependency>

The spring-boot-starter-data-jpa dependency includes the spring-boot-starter-jdbc dependency transitively for us.

Now we only have to add our configuration into the application.properties file:

# OracleDB connection settings
spring.datasource.url=jdbc:oracle:thin:@//localhost:11521/ORCLPDB1
spring.datasource.username=books
spring.datasource.password=books
spring.datasource.driver-class-name=oracle.jdbc.OracleDriver

# HikariCP settings
spring.datasource.hikari.minimumIdle=5
spring.datasource.hikari.maximumPoolSize=20
spring.datasource.hikari.idleTimeout=30000
spring.datasource.hikari.maxLifetime=2000000
spring.datasource.hikari.connectionTimeout=30000
spring.datasource.hikari.poolName=HikariPoolBooks

# JPA settings
spring.jpa.database-platform=org.hibernate.dialect.Oracle12cDialect
spring.jpa.hibernate.use-new-id-generator-mappings=false
spring.jpa.hibernate.ddl-auto=create

As you can see, we have three different section configuration settings:

  • The OracleDB connection settings section is where we configured the JDBC connection properties as we always do
  • The HikariCP settings section is where we configure the HikariCP connection pooling. In case we need advanced configuration we should check the HikariCP configuration property list
  • The JPA settings section is some basic configuration for using Hibernate

That is all we need. It couldn't be easier, could it?

3.2. Tomcat and Commons DBCP2 Connection Pooling

Spring recommends HikariCP for its performance. On the other hand, it also supports Tomcat and Commons DBCP2 in Spring Boot autoconfigured applications.

It tries to use the HikariCP. If it isn't available, then tries to use the Tomcat pooling. If neither of those is available, then it tries to use Commons DBCP2.

We can also specify the connection pool to use. In that case, we just need to add a new property to our application.properties file:

spring.datasource.type=org.apache.tomcat.jdbc.pool.DataSource

If we need to configure specific settings, we have available their prefixes:

  • spring.datasource.hikari.* for HikariCP configuration
  • spring.datasource.tomcat.* for Tomcat pooling configuration
  • spring.datasource.dbcp2.* for Commons DBC2 configuration

And, actually, we can set spring.datasource.type to any other DataSource implementation. It isn't necessary to be any of the three mentioned above.

But in that case, we will just have a basic out-of-the-box configuration. There will be many cases where we will need some advanced configurations. Let's see some of them.

3.3. Oracle Universal Connection Pooling

If we want to use advanced configurations, we need to explicitly define the DataSource bean and set the properties. Probably the easiest way of doing this is by using the @Configuration and @Bean annotations.

Oracle Universal Connection Pool (UCP) for JDBC provides a full-featured implementation for caching JDBC connections. It reuses the connections instead of creating new ones. It also gives us a set of properties for customizing pool behavior.

If we want to use UCP, we need to download the ucp and ons JARs from the Oracle JDBC and UCP Downloads page. Second, we need to install them as Maven artifacts and declare the dependencies in our pom.xml:

<dependency>
    <groupId>com.oracle</groupId>
    <artifactId>ucp</artifactId>
    <version>12.2.0.1</version>
</dependency>

<dependency>
    <groupId>com.oracle</groupId>
    <artifactId>ons</artifactId>
    <version>12.2.0.1</version>
</dependency>

Now we're ready to declare and configure the UCP connection pool:

@Configuration
@Profile("oracle-ucp")
public class OracleUCPConfiguration {

    @Bean
    public DataSource dataSource() throws SQLException {
        PoolDataSource dataSource = PoolDataSourceFactory.getPoolDataSource();
        dataSource.setUser("books");
        dataSource.setPassword("books");
        dataSource.setConnectionFactoryClassName("oracle.jdbc.pool.OracleDataSource");
        dataSource.setURL("jdbc:oracle:thin:@//localhost:11521/ORCLPDB1");
        dataSource.setFastConnectionFailoverEnabled(true);
        dataSource.setInitialPoolSize(5);
        dataSource.setMinPoolSize(5);
        dataSource.setMaxPoolSize(10);
        return dataSource;
    }
}

In the above example, we've customized some pool properties:

  • setInitialPoolSize specifies the number of available connections created after the pool is initiated
  • setMinPoolSize specifies the minimum number of available and borrowed connections that our pool is maintaining, and
  • setMaxPoolSize specifies the maximum number of available and borrowed connections that our pool is maintaining

If we need to add more configuration properties, we should check the PoolDataSource JavaDoc or the developer's guide.

4. Older Oracle Versions

For versions prior to 11.2, like Oracle 9i or 10g, we should create an OracleDataSource instead of using Oracle's Universal Connection Pooling.

In our OracleDataSource instance, we turn on connection caching via setConnectionCachingEnabled:

@Configuration
@Profile("oracle")
public class OracleConfiguration {
    @Bean
    public DataSource dataSource() throws SQLException {
        OracleDataSource dataSource = new OracleDataSource();
        dataSource.setUser("books");
        dataSource.setPassword("books");
        dataSource.setURL("jdbc:oracle:thin:@//localhost:11521/ORCLPDB1");
        dataSource.setFastConnectionFailoverEnabled(true);
        dataSource.setImplicitCachingEnabled(true);
        dataSource.setConnectionCachingEnabled(true);
        return dataSource;
    }
}

In the above example, we were creating the OracleDataSource for connection pooling and configured some parameters. We can check all the configurable parameters on the OracleDataSource JavaDoc.

5. Conclusion

Nowadays, configuring Oracle database connection pooling using Spring is a piece of cake.

We've seen how to do it just using autoconfiguration and programmatically. Even though Spring recommends the use of HikariCP, other options are available. We should be careful and choose the right implementation for our current needs.

The full example can be found over on GitHub.

Log Groups in Spring Boot 2.1

$
0
0

1. Overview

Spring Boot provides many auto-configurations to facilitate writing enterprise applications. However, it was always a bit cumbersome to apply the same logging configuration to a set of loggers.

In this quick tutorial, we're going to see how the new log groups feature is going to fix this issue.

2. Log Groups

As of Spring Boot 2.1, it's possible to group multiple loggers together and then configure them at the same time.

In order to use this feature, first, we should declare a group via the logging.group configuration property:

logging.group.rest=com.baeldung.web,org.springframework.web,org.springframework.http

Here we're creating a group named rest containing three different logger names. Grouping loggers is as simple as separating their respective logger names with a comma.

Then we can apply configurations to all loggers in a group at once. For instance, here we're changing the log level for this group to debug:

logging.level.rest=DEBUG

As a result, Spring Boot applies the same log level for all three group members.

2.1. Built-in Groups

By default, Spring Boot comes with two built-in groups: sql and web. 

Currently, the web group consists of the following loggers:

  • org.springframework.core.codec
  • org.springframework.http
  • org.springframework.web
  • org.springframework.boot.actuate.endpoint.web
  • org.springframework.boot.web.servlet.ServletContextInitializerBeans

Similarly, the sql group contains the following loggers:

  • org.springframework.jdbc.core
  • org.hibernate.SQL
  • org.jooq.tools.LoggerListener

Configuring the log level for either of these groups would be applied to all group members automatically.

3. Conclusion

In this short article, we familiarized ourselves with the log groups in Spring Boot. This feature enables us to apply a log configuration to a set of loggers at once.

As usual, the sample code is available over on GitHub.


Java Weekly, Issue 330

$
0
0

1. Spring and Java

>> Spring Tips: The GraalVM Native Image Builder Feature [spring.io]

A quick intro to GraalVM support for building blazingly fast native images from Spring Boot apps. Very cool!

>> Building Modern Web Apps with Spring Boot and Vaadin [vaadin.com]

A complete, step-by-step tutorial series, covering everything from environment setup to production deployment.

>> Spring Autowiring – It's a kind of magic – Part 2 [blog.scottlogic.com]

And another example where autowiring goes above and beyond, this time by filling in the gaps of an incomplete configuration.

Also worth reading:

Webinars and presentations:

Time to upgrade:

2. Technical

>> Patterns for Managing Source Code Branches [martinfowler.com]

The first installment of this series focuses on a couple of base patterns: source branching and mainline.

Also worth reading:

3. Musings

>> When scaling your workload is a matter of saving lives [allthingsdistributed.com]

CTO Werner Vogels describes Amazon.com's contribution towards studying the impact of COVID-19 for scenario planning.

Also worth reading:

4. Comics

And my favorite Dilberts of the week:

>> Poster Of Our Values [dilbert.com]

>> No Handshaking [dilbert.com]

>> Coronavirus [dilbert.com]

5. Pick of the Week

>> Stop Trying to Change Yourself [markmanson.net]

Using ThymeLeaf and FreeMarker Emails Templates with Spring

$
0
0

1. Overview

In our previous article, we saw how to use Spring to write and send text emails.

But it's also possible to use Spring template engines to write beautiful HTML emails with dynamic content.

In this tutorial, we're going to learn how to do it using the most famous of them: Thymeleaf and FreeMarker.

2. Spring HTML Emails

Let's start from the Spring Email tutorial.

First, we'll add a method to the EmailServiceImpl class to send emails with an HTML body:

private void sendHtmlMessage(String to, String subject, String htmlBody) throws MessagingException {

    MimeMessage message = emailSender.createMimeMessage();
    MimeMessageHelper helper = new MimeMessageHelper(message, true, "UTF-8");
    helper.setTo(to);
    helper.setSubject(subject);
    helper.setText(htmlBody, true);
    emailSender.send(message);

}

We're using MimeMessageHelper to populate the message. The important part is the true value passed to setText method: it specifies the HTML content type.

Let's see now how to build this htmlBody using Thymeleaf and FreeMarker templates.

3. Thymeleaf Configuration

Let's start with our Spring @Configuration annotated class. In the sample code, we'll isolate it in EmailConfiguration class.

First, we should provide the template resolver by specifying the template files directory:

@Bean
public SpringResourceTemplateResolver thymeleafTemplateResolver() {
    SpringResourceTemplateResolver templateResolver = new SpringResourceTemplateResolver();
    templateResolver.setPrefix("/WEB-INF/views/mail/");
    templateResolver.setSuffix(".html");
    templateResolver.setTemplateMode("HTML");
    templateResolver.setCharacterEncoding("UTF-8");
    return templateResolver;
}

Then, we have to provide the factory method for the Thymeleaf engine:

@Bean
public SpringTemplateEngine thymeleafTemplateEngine() {
    SpringTemplateEngine templateEngine = new SpringTemplateEngine();
    templateEngine.setTemplateResolver(thymeleafTemplateResolver());
    return templateEngine;
}

4. FreeMarker Configuration

In the same fashion as Thymeleaf, in the EmailConfiguration class, we'll configure the template resolver for FreeMarker templates (.ftl):

@Bean 
public FreeMarkerViewResolver freemarkerViewResolver() { 
    FreeMarkerViewResolver resolver = new FreeMarkerViewResolver(); 
    resolver.setSuffix(".ftl"); 
    return resolver; 
}

And this time, the templates path will be configured in the FreeMarkerConfigurer bean:

@Bean 
public FreeMarkerConfigurer freemarkerConfig() { 
    FreeMarkerConfigurer freeMarkerConfigurer = new FreeMarkerConfigurer(); 
    freeMarkerConfigurer.setTemplateLoaderPath("/WEB-INF/views/mail");
    return freeMarkerConfigurer; 
}

5. Localization with Thymeleaf and FreeMarker

In order to manage translations with Thymeleaf, we can specify a MessageSource instance to the engine:

@Bean
public ResourceBundleMessageSource emailMessageSource() {
    ResourceBundleMessageSource messageSource = new ResourceBundleMessageSource();
    messageSource.setBasename("/mailMessages");
    return messageSource;
}
@Bean
public SpringTemplateEngine thymeleafTemplateEngine() {
   ...
   templateEngine.setTemplateEngineMessageSource(emailMessageSource());
   ...
}

Then, we'd create resource bundles for each locale we support:

src/main/resources/mailMessages_xx_YY.properties

As FreeMarker proposes localization by duplicating the templates, we don't have to configure messages source there.

6. Thymeleaf Emails Templates

Next, let's have a look at the template-thymeleaf.html file:

<!DOCTYPE html>
<html xmlns:th="http://www.thymeleaf.org">
  <head>
    <meta http-equiv="Content-Type" content="text/html; charset=UTF-8" />
  </head>
  <body>
    <p th:text="#{greetings(${recipientName})}"></p>
    <p th:text="${text}"></p>
    <p th:text="#{regards}"></p>
    <p>
      <em th:text="#{signature(${senderName})}"></em> <br />
    </p>
  </body>
</html>

As can be seen, we've used Thymeleaf notation, that is, ${…} for variables and #{…} for localized strings.

As the template engine is correctly configured, it's very simple to use it:  We'll just create a Context object that contains template variables (passed as a Map here).

Then, we'll pass it to the process method along with the template name:

@Autowired
private SpringTemplateEngine thymeleafTemplateEngine;

@Override
public void sendMessageUsingThymeleafTemplate(
    String to, String subject, Map<String, Object> templateModel)
        throws MessagingException {
                
    Context thymeleafContext = new Context();
    thymeleafContext.setVariables(templateModel);
    String htmlBody = thymeleafTemplateEngine.process("template-thymeleaf.html", thymeleafContext);
    
    sendHtmlMessage(to, subject, htmlBody);
}

Now let's see how to do the same thing with FreeMarker.

7. FreeMarker Emails Templates

As can be seen, FreeMarker's syntax is more simple, but again it does not manage localized strings. So here's the English version:

<!DOCTYPE html>
<html>
    <head>
      <meta http-equiv="Content-Type" content="text/html; charset=UTF-8" />
    </head>
    <body>
      <p>Hi ${recipientName}</p>
      <p>${text}</p>
      <p>Regards,</p>
      <p>
        <em>${senderName} at Baeldung</em> <br />
      </p>
    </body>
</html>

Then, we should use FreeMarkerConfigurer class to get the template file, and finally FreeMarkerTemplateUtils to inject data from our Map:

@Autowired
private FreeMarkerConfigurer freemarkerConfigurer;

@Override
public void sendMessageUsingFreemarkerTemplate(
    String to, String subject, Map<String, Object> templateModel)
        throws IOException, TemplateException, MessagingException {
        
    Template freemarkerTemplate = freemarkerConfigurer.createConfiguration()
      .getTemplate("template-freemarker.ftl");
    String htmlBody = FreeMarkerTemplateUtils.processTemplateIntoString(freemarkerTemplate, templateModel);

    sendHtmlMessage(to, subject, htmlBody);
}

To go further, we'll see how to add a logo to our email signature.

8. Emails With Embedded Images

Since it's very common to include images in an HTML email, we'll see how to do this using a CID attachment.

The first change concerns the sendHtmlMessage method. We have to set MimeMessageHelper as multi-part by passing true to the second argument of the constructor:

MimeMessageHelper helper = new MimeMessageHelper(message, true, "UTF-8");

Then, we have to get the image file as a resource. We can use the @Value annotation for this:

@Value("classpath:/mail-logo.png")
Resource resourceFile;

Notice that the mail-logo.png file is in the src/main/resources directory.

Back to the sendHtmlMessage method, we'll add resourceFile as an inline attachment, to be able to reference it with CID:

helper.addInline("attachment.png", resourceFile);

Finally, the image has to be referenced from both Thymeleaf and FreeMarker emails using CID notation:

<img src="cid:attachment.png" />

9. Conclusion

In this article, we've seen how to send Thymeleaf and FreeMarker emails, including rich HTML content.

To conclude, most of the work is related to Spring; therefore the use of one or the other is quite similar for a simple need such as sending emails.

As always, the full source code of the examples can be found over on GitHub.

Using a List of Values in a JdbcTemplate IN Clause

$
0
0

1. Introduction

In a SQL statement, we can use the IN operator to test whether an expression matches any value in a list. Therefore, we can use the IN operator instead of multiple OR conditions.

In this tutorial, we'll show how to pass a list of values into the IN clause of a Spring JDBC template query.

2. Passing a List Parameter to IN Clause

The IN operator allows us to specify multiple values in a WHERE clause. For example, we can use it to find all employees whose id is in a specified id list:

SELECT * FROM EMPLOYEE WHERE id IN (1, 2, 3)

Typically, the total number of values inside the IN clause is variable. Therefore, we need to create a placeholder that can support a dynamic list of values.

2.1. With JdbcTemplate

With JdbcTemplate, we can use ‘?' characters as placeholders for the list of values. The number of ‘?' characters will be the same as the size of the list:

List<Employee> getEmployeesFromIdList(List<Integer> ids) {
    String inSql = String.join(",", Collections.nCopies(ids.size(), "?"));
 
    List<Employee> employees = jdbcTemplate.query(
      String.format("SELECT * FROM EMPLOYEE WHERE id IN (%s)", inSql), 
      ids.toArray(), 
      (rs, rowNum) -> new Employee(rs.getInt("id"), rs.getString("first_name"), 
        rs.getString("last_name")));

    return employees;
}

In this method, we first generate a placeholder string that contains ids.size() ‘?' characters separated with commas. Then, we put this string into the IN clause of our SQL statement. For example, if we have three numbers in the ids list, the SQL statement is:

SELECT * FROM EMPLOYEE WHERE id IN (?,?,?)

In the query method, we pass the ids list as a parameter to match the placeholders inside the IN clause. This way, we can execute a dynamic SQL statement based on the input list of values.

2.2. With NamedParameterJdbcTemplate

Another way to handle the dynamic list of values is to use NamedParameterJdbcTemplate. For example, we can directly create a named parameter for the input list:

List<Employee> getEmployeesFromIdListNamed(List<Integer> ids) {
    SqlParameterSource parameters = new MapSqlParameterSource("ids", ids);
 
    List<Employee> employees = namedJdbcTemplate.query(
      "SELECT * FROM EMPLOYEE WHERE id IN (:ids)", 
      parameters, 
      (rs, rowNum) -> new Employee(rs.getInt("id"), rs.getString("first_name"),
        rs.getString("last_name")));

    return employees;
}

In this method, we first construct a MapSqlParameterSource object that contains the input id list. Then, we only use one named parameter to represent the dynamic list of values.

Under the hood, NamedParameterJdbcTemplate substitutes the named parameters for the ‘?' placeholders and uses JdbcTemplate to execute the query.

3. Handling a Large List

When we have a large number of values in a list, we should consider alternative ways to pass them into the JdbcTemplate query.

For example, the Oracle database doesn't support more than 1,000 literals in an IN clause.

One way to do that is to create a temporary table for the list. However, different databases can have different ways to create temporary tables. For example, we can use the CREATE GLOBAL TEMPORARY TABLE statement to create a temporary table in the Oracle database.

Let's create a temporary table for the H2 database:

List<Employee> getEmployeesFromLargeIdList(List<Integer> ids) {
    jdbcTemplate.execute("CREATE TEMPORARY TABLE IF NOT EXISTS employee_tmp (id INT NOT NULL)");

    List<Object[]> employeeIds = new ArrayList<>();
    for (Integer id : ids) {
        employeeIds.add(new Object[] { id });
    }
    jdbcTemplate.batchUpdate("INSERT INTO employee_tmp VALUES(?)", employeeIds);

    List<Employee> employees = jdbcTemplate.query(
      "SELECT * FROM EMPLOYEE WHERE id IN (SELECT id FROM employee_tmp)", 
      (rs, rowNum) -> new Employee(rs.getInt("id"), rs.getString("first_name"),
      rs.getString("last_name")));

    jdbcTemplate.update("DELETE FROM employee_tmp");
 
    return employees;
}

Here, we first create a temporary table to hold all values of the input list. Then, we insert the input list's values into this table.

In our resulting SQL statement, the values in the IN clause are from the temporary table, and we've avoided constructing an IN clause with a large number of placeholders.

Finally, after we finish the query, we clean up the temporary table for future reuse.

4. Conclusion

In this tutorial, we showed how to use JdbcTemplate and NamedParameterJdbcTemplate to pass a list of values for the IN clause of a SQL query. Also, we provided an alternative way to handle a large number of list values by using a temporary table.

As always, the source code for the article is available over on GitHub.

A Guide to jpackage in Java 14

$
0
0

1. Overview

In this tutorial, we'll explore the new packaging tool introduced in Java 14, named jpackage.

2. Introduction

jpackage is a command-line tool to create native installers and packages for Java applications.

It's an incubating feature under the jdk.incubator.jpackage module. In other words, the tool's command-line options or application layout aren't yet stable. Once stable, the Java SE Platform or the JDK will include this feature in an LTE release.

3. Why jpackage?

It's standard practice while distributing software to deliver an installable package to the end-user. This package is compatible with the user's native platform and hides the internal dependencies and setup configurations. For example, we use DMG files on macOS and MSI files on Windows.

This allows the distribution, installation, and uninstallation of the applications in a manner that's familiar to our end users.

jpackage allows developers to create such an installable package for their JAR files. The user doesn't have to explicitly copy the JAR file or even install Java to run the application. The installable package takes care of all of this.

4. Packaging Prerequisite

The key prerequisites for using the jpackage command are:

  1. The system used for packaging must contain the application to be packaged, a JDK, and software needed by the packaging tool.
  2. And, it needs to have the underlying packaging tools used by jpackage:
    • RPM, DEB on Linux: On Red Hat Linux, we need the rpm-build package; on Ubuntu Linux, we need the fakeroot package
    • PKG, DMG on macOS: Xcode command line tools are required when the –mac-sign option is used to request that the package be signed, and when the –icon option is used to customize the DMG image
    • EXE, MSI on Windows: On Windows, we need the third party tool WiX 3.0 or later
  3. Finally, the application packages must be built on the target platform. This means to package the application for multiple platforms, we must run the packaging tool on each platform.

5. Package Creation

Let's create a sample package for an application JAR. As mentioned in the above section, the application JAR should be pre-built, and it will be used as an input to the jpackage tool.

For example, we can use the following command to create a package:

jpackage --input target/ \
  --name JPackageDemoApp \
  --main-jar JPackageDemoApp.jar \
  --main-class com.baeldung.java14.jpackagedemoapp.JPackageDemoApp \
  --type dmg \
  --java-options '--enable-preview'

Let's go through each of the options used:

  • –input: location of the input jar files(s)
  • –name: give a name to the installable package
  • –main-jar: JAR file to launch at the start of the application
  • –main-class: main class name in the JAR to launch at the start of the application. This is optional if the MANIFEST.MF file in the main JAR contains the main class name.
  • –type: what kind of the installer do we want to create? This depends on the base OS on which we're running the jpackage command. On macOS, we can pass package type as DMG or PKG. The tool supports MSI and EXE options on Windows and DEB and RPM options on Linux.
  • –java-options: options to pass to the Java runtime

The above command will create the JPackageDemoApp.dmg file for us.

We can then use this file to install the application on the macOS platform. After the installation, we'd be able to use the application just like any other software.

6. Conclusion

In this article, we saw the usage of the jpackage command-line tool introduced in Java 14.

How to Determine the Data Type in Groovy

$
0
0

1. Introduction

In this quick tutorial, we're going to explore different ways to find the data type in Groovy.

Actually, it's different depending on what we're doing:

  • First, we'll look at what to do for primitives
  • Then, we'll see how collections bring some unique challenges
  • And finally, we'll look at objects and class variables

2. Primitive Types

Groovy supports the same number of primitive types as Java. We can find the data type of primitives in three ways.

To begin, let's imagine we have multiple representations of a person's age.

First of all, let's start with the instanceof operator:

@Test
public void givenWhenParameterTypeIsInteger_thenReturnTrue() {
    Person personObj = new Person(10)
    Assert.assertTrue(personObj.ageAsInt instanceof Integer);
}

instanceof is a binary operator that we can use to check if an object is an instance of a given type. It returns true if the object is an instance of that particular type and false otherwise.

Also, Groovy 3 adds the new !instanceof operator. It returns true if the object is not an instance of a type and false otherwise.

Then, we can also use the getClass() method from the Object class. It returns the runtime class of an instance:

@Test
public void givenWhenParameterTypeIsDouble_thenReturnTrue() {
    Person personObj = new Person(10.0)
    Assert.assertTrue((personObj.ageAsDouble).getClass() == Double)
}

Lastly, let's apply the .class operator to find the data type:

@Test
public void givenWhenParameterTypeIsString_thenReturnTrue() {
    Person personObj = new Person("10 years")
    Assert.assertTrue(personObj.ageAsString.class == String)
}

Similarly, we can find the data type of any primitive type.

3. Collections

Groovy provides support for various collection types.

Let's define a simple list in Groovy:

@Test
public void givenGroovyList_WhenFindClassName_thenReturnTrue() {
    def ageList = ['ageAsString','ageAsDouble', 10]
    Assert.assertTrue(ageList.class == ArrayList)
    Assert.assertTrue(ageList.getClass() == ArrayList)
}

But on maps, the .class operator cannot be applied:

@Test
public void givenGrooyMap_WhenFindClassName_thenReturnTrue() {
    def ageMap = [ageAsString: '10 years', ageAsDouble: 10.0]
    Assert.assertFalse(ageMap.class == LinkedHashMap)
}

In the above code snippet, ageMap.class will try to retrieve the value of the key class from the given map. For maps, it is recommended to apply getClass() than .class.

4. Objects & Class Variables

In the above sections, we used various strategies to find the data type of primitives and collections.

To see how class variables work, let’s suppose we have a class Person:

@Test
public void givenClassName_WhenParameterIsInteger_thenReturnTrue() {
    Assert.assertTrue(Person.class.getDeclaredField('ageAsInt').type == int.class)
}

Remember that the getDeclaredField() returns all the fields of a certain class.

We can find the type of any object using instanceof, getClass() and .class operators:

@Test
public void givenWhenObjectIsInstanceOfType_thenReturnTrue() {
    Person personObj = new Person()
    Assert.assertTrue(personObj instanceof Person)
}

Moreover, we can also use the Groovy membership operator in:

@Test
public void givenWhenInstanceIsOfSubtype_thenReturnTrue() {
    Student studentObj = new Student()
    Assert.assertTrue(studentObj in Person)
}

5. Conclusion

In this short article, we saw how to find the data type in Groovy. By comparison, the getClass() method is safer than .class operator. We also discussed the working of in operator along with instanceof operator. Additionally, we learned how to get all the fields of a class and apply the .type operator.

As always, all the code snippets can be found over on GitHub.

Viewing all 4755 articles
Browse latest View live