Quantcast
Channel: Baeldung
Viewing all 4867 articles
Browse latest View live

The Java HashMap Under the Hood

$
0
0

1. Overview

In this article, we are going to explore the most popular implementation of Map interface from the Java Collections Framework.

Before we get started with the implementation, it’s important to point out that the primary List and Set collection interfaces extend Collection but Map does not.

Simply put, the HashMap stores values by key and provides APIs for adding, retrieving and manipulating stored data in various ways. The implementation is based on the the principles of a hashtable, which sounds a little complex at first but is actually very easy to understand.

Key-value pairs are stored in what is known as buckets which together make up what is called a table, which is actually an internal array.

Once we know the key under which an object is stored or is to be stored, storage and retrieval operations occur in constant time, O(1) in a well-dimensioned hash map.

To understand how hash maps work under the hood, one needs to understand the storage and retrieval mechanism employed by the HashMap. We’ll focus a lot on these.

Finally, HashMap related questions are quite common in interviews, so this is a solid way to either prepare an interview or prepare for it.

2. The put() API

To store a value in a hash map, we call the put API which takes two parameters; a key and the corresponding value:

V put(K key, V value);

When a value is added to the map under a key, the hashCode() API of the key object is called to retrieve what is known as the initial hash value.

To see this in action, let us create an object that will act as a key. We will only create a single attribute to use as a hash code to simulate the first phase of hashing:

public class MyKey {
    private int id;
   
    @Override
    public int hashCode() {
        System.out.println("Calling hashCode()");
        return id;
    }

    // constructor, setters and getters 
}

We can now use this object to map a value in the hash map:

@Test
public void whenHashCodeIsCalledOnPut_thenCorrect() {
    MyKey key = new MyKey(1);
    Map<MyKey, String> map = new HashMap<>();
    map.put(key, "val");
}

Nothing much happening in the above code, but pay attention to the console output. Indeed the hashCode method gets invoked:

Calling hashCode()

Next, the hash() API of the hash map is called internally to compute the final hash value using the initial hash value.

This final hash value ultimately boils down to an index in the internal array or what we call a bucket location.

The hash function of HashMap looks like this:

static final int hash(Object key) {
    int h;
    return (key == null) ? 0 : (h = key.hashCode()) ^ (h >>> 16);
}

What we should note here is only the use of the hash code from the key object to compute a final hash value.

While inside the put function, the final hash value is used like this:

public V put(K key, V value) {
    return putVal(hash(key), key, value, false, true);
}

Notice that an internal putVal function is called and given the final hash value as the first parameter.

One may wonder why the key is again used inside this function since we have already used it to compute the hash value.

The reason is that hash maps store both key and value in the bucket location as a Map.Entry object.

As discussed before, all Java collections framework interfaces extend Collection interface but Map does not. Compare the declaration of Map interface we saw earlier to that of Set interface:

public interface Set<E> extends Collection<E>

The reason is that maps do not exactly store single elements as do other collections but rather a collection of key-value pairs.

So the generic methods of Collection interface such as add, toArray do not make sense when it comes to Map.

The concept we have covered in the last three paragraphs makes for one of the most popular Java Collections Framework interview questions. So, it’s worth understanding.

One special attribute with the hash map is that it accepts null values and null keys:

@Test
public void givenNullKeyAndVal_whenAccepts_thenCorrect(){
    Map<String, String> map = new HashMap<>();
    map.put(null, null);
}

When a null key is encountered during a put operation, it is automatically assigned a final hash value of 0, which means it becomes the first element of the underlying array.

This also means that when the key is null, there is no hashing operation and therefore, the hashCode API of the key is not invoked, ultimately avoiding a null pointer exception.

During a put operation, when we use a key that was already used previously to store a value, it returns the previous value associated with the key:

@Test
public void givenExistingKey_whenPutReturnsPrevValue_thenCorrect() {
    Map<String, String> map = new HashMap<>();
    map.put("key1", "val1");

    String rtnVal = map.put("key1", "val2");

    assertEquals("val1", rtnVal);
}

otherwise, it returns null:

@Test
public void givenNewKey_whenPutReturnsNull_thenCorrect() {
    Map<String, String> map = new HashMap<>();

    String rtnVal = map.put("key1", "val1");

    assertNull(rtnVal);
}

When put returns null, it could also mean that the previous value associated with the key is null, not necessarily that it’s a new key-value mapping:

@Test
public void givenNullVal_whenPutReturnsNull_thenCorrect() {
    Map<String, String> map = new HashMap<>();

    String rtnVal = map.put("key1", null);

    assertNull(rtnVal);
}

The containsKey API can be used to distinguish between such scenarios as we will see in the next subsection.

3. The get API

To retrieve an object already stored in the hash map, we must know the key under which it was stored. We call the get API and pass to it the key object:

@Test
public void whenGetWorks_thenCorrect() {
    Map<String, String> map = new HashMap<>();
    map.put("key", "val");

    String val = map.get("key");

    assertEquals("val", val);
}

Internally, the same hashing principle is used. The hashCode() API of the key object is called to obtain the initial hash value:

@Test
public void whenHashCodeIsCalledOnGet_thenCorrect() {
    MyKey key = new MyKey(1);
    Map<MyKey, String> map = new HashMap<>();
    map.put(key, "val");
    map.get(key);
}

This time, the hashCode API of MyKey is called twice; once for put and once for get:

Calling hashCode()
Calling hashCode()

This value is then rehashed by calling the internal hash() API to obtain the final hash value.

As we saw in the previous section, this final hash value ultimately boils down to a bucket location or an index of the internal array.

The value object stored in that location is then retrieved and returned to the calling function.

When the returned value is null, it could mean that the key object is not associated with any value in the hash map:

@Test
public void givenUnmappedKey_whenGetReturnsNull_thenCorrect() {
    Map<String, String> map = new HashMap<>();

    String rtnVal = map.get("key1");

    assertNull(rtnVal);
}

Or it could simply mean that the key was explicitly mapped to a null instance:

@Test
public void givenNullVal_whenRetrieves_thenCorrect() {
    Map<String, String> map = new HashMap<>();
    map.put("key", null);
        
    String val=map.get("key");
        
    assertNull(val);
}

To distinguish between the two scenarios, we can use the containsKey API, to which we pass the key and it returns true if and only if a mapping was created for the specified key in the hash map:

@Test
public void whenContainsDistinguishesNullValues_thenCorrect() {
    Map<String, String> map = new HashMap<>();

    String val1 = map.get("key");
    boolean valPresent = map.containsKey("key");

    assertNull(val1);
    assertFalse(valPresent);

    map.put("key", null);
    String val = map.get("key");
    valPresent = map.containsKey("key");

    assertNull(val);
    assertTrue(valPresent);
}

For both cases in the above test, the return value of the get API call is null but we are able to distinguish which one is which.

4. Collection Views In HashMap

HashMap offers three views that enable us to treat its keys and values as another collection. We can get a set of all keys of the map:

@Test
public void givenHashMap_whenRetrievesKeyset_thenCorrect() {
    Map<String, String> map = new HashMap<>();
    map.put("name", "baeldung");
    map.put("type", "blog");

    Set<String> keys = map.keySet();

    assertEquals(2, keys.size());
    assertTrue(keys.contains("name"));
    assertTrue(keys.contains("type"));
}

The set is backed by the map itself. So any change made to the set is reflected in the map:

@Test
public void givenKeySet_whenChangeReflectsInMap_thenCorrect() {
    Map<String, String> map = new HashMap<>();
    map.put("name", "baeldung");
    map.put("type", "blog");

    assertEquals(2, map.size());

    Set<String> keys = map.keySet();
    keys.remove("name");

    assertEquals(1, map.size());
}

We can also obtain a collection view of the values:

@Test
public void givenHashMap_whenRetrievesValues_thenCorrect() {
    Map<String, String> map = new HashMap<>();
    map.put("name", "baeldung");
    map.put("type", "blog");

    Collection<String> values = map.values();

    assertEquals(2, values.size());
    assertTrue(values.contains("baeldung"));
    assertTrue(values.contains("blog"));
}

Just like the key set, any changes made in this collection will be reflected in the underlying map.

Finally, we can obtain a set view of all entries in the map:

@Test
public void givenHashMap_whenRetrievesEntries_thenCorrect() {
    Map<String, String> map = new HashMap<>();
    map.put("name", "baeldung");
    map.put("type", "blog");

    Set<Entry<String, String>> entries = map.entrySet();

    assertEquals(2, entries.size());
    for (Entry<String, String> e : entries) {
        String key = e.getKey();
        String val = e.getValue();
        assertTrue(key.equals("name") || key.equals("type"));
        assertTrue(val.equals("baeldung") || val.equals("blog"));
    }
}

Remember that a hash map specifically contains unordered elements, therefore we assume any order when testing the keys and values of entries in the for each loop.

Many times, you will use the collection views in a loop as in the last example, and more specifically using their iterators.

Just remember that the iterators for all the above views are fail-fast.

If any structural modification is made on the map, after the iterator has been created, a concurrent modification exception will be thrown:

@Test(expected = ConcurrentModificationException.class)
public void givenIterator_whenFailsFastOnModification_thenCorrect() {
    Map<String, String> map = new HashMap<>();
    map.put("name", "baeldung");
    map.put("type", "blog");

    Set<String> keys = map.keySet();
    Iterator<String> it = keys.iterator();
    map.remove("type");
    while (it.hasNext()) {
        String key = it.next();
    }
}

The only allowed structural modification is a remove operation performed through the iterator itself:

public void givenIterator_whenRemoveWorks_thenCorrect() {
    Map<String, String> map = new HashMap<>();
    map.put("name", "baeldung");
    map.put("type", "blog");

    Set<String> keys = map.keySet();
    Iterator<String> it = keys.iterator();

    while (it.hasNext()) {
        it.next();
        it.remove();
    }

    assertEquals(0, map.size());
}

The final thing to remember about these collection views is the performance of iterations. This is where a hash map performs quite poorly compared with its counterparts linked hash map and tree map.

Iteration over a hash map happens in worst case O(n) where n is the sum of its capacity and the number of entries.

5. HashMap Performance

The performance of a hash map is affected by two parameters: Initial Capacity and Load Factor. The capacity is the number of buckets or the underlying array length and the initial capacity is simply the capacity during creation.

The load factor or LF, in short, is a measure of how full the hash map should be after adding some values before it is resized.

The default initial capacity is 16 and default load factor is 0.75. We can create a hash map with custom values for initial capacity and LF:

Map<String,String> hashMapWithCapacity=new HashMap<>(32);
Map<String,String> hashMapWithCapacityAndLF=new HashMap<>(32, 0.5f);

The default values set by the Java team are well optimized for most cases. However, if you need to use your own values, which is very okay, you need to understand the performance implications so that you know what you are doing.

When the number of hash map entries exceeds the product of LF and capacity, then rehashing occurs i.e. another internal array is created with twice the size of the initial one and all entries are moved over to new bucket locations in the new array.

A low initial capacity reduces space cost but increases the frequency of rehashing. Rehashing is obviously a very expensive process. So as a rule, if you anticipate many entries, you should set a considerably high initial capacity.

On the flip side, if you set the initial capacity too high, you will pay the cost in iteration time. As we saw in the previous section.

So a high initial capacity is good for a large number of entries coupled with little to no iteration.

A low initial capacity is good for few entries with a lot of iteration.

6. Collisions in the HashMap

A collision, or more specifically, a hash code collision in a HashMap, is a situation where two or more key objects produce the same final hash value and hence point to the same bucket location or array index.

This scenario can occur because according to the equals and hashCode contract, two unequal objects in Java can have the same hash code.

It can also happen because of the finite size of the underlying array, that is, before resizing. The smaller this array, the higher the chances of collision.

That said, it’s worth mentioning that Java implements a hash code collision resolution technique which we will see using an example.

Keep in mind that it’s the hash value of the key that determines the bucket the object will be stored in. And so, if the hash codes of any two keys collide, their entries will still be stored in the same bucket.

And by default, the implementation uses a linked list as the bucket implementation.

The initially constant time O(1) put and get operations will occur in linear time O(n) in the case of a collision. This is because after finding the bucket location with the final hash value, each of the keys at this location will be compared with the provided key object using the equals API.

To simulate this collision resolution technique, let’s modify our earlier key object a little:

public class MyKey {
    private String name;
    private int id;

    public MyKey(int id, String name) {
        this.id = id;
        this.name = name;
    }
    
    // standard getters and setters
 
    @Override
    public int hashCode() {
        System.out.println("Calling hashCode()");
        return id;
    } 
 
    // toString override for pretty logging

    @Override
    public boolean equals(Object obj) {
        System.out.println("Calling equals() for key: " + obj);
        // generated implementation
    }

}

Notice how we’re simply returning the id attribute as the hash code – and thus force a collision to occur.

Also, note that we’ve added log statements in our equals and hashCode implementations – so that we know exactly when the logic is called.

Let’s now go ahead to store and retrieve some objects that collide at some point:

@Test
public void whenCallsEqualsOnCollision_thenCorrect() {
    HashMap<MyKey, String> map = new HashMap<>();
    MyKey k1 = new MyKey(1, "firstKey");
    MyKey k2 = new MyKey(2, "secondKey");
    MyKey k3 = new MyKey(2, "thirdKey");

    System.out.println("storing value for k1");
    map.put(k1, "firstValue");
    System.out.println("storing value for k2");
    map.put(k2, "secondValue");
    System.out.println("storing value for k3");
    map.put(k3, "thirdValue");

    System.out.println("retrieving value for k1");
    String v1 = map.get(k1);
    System.out.println("retrieving value for k2");
    String v2 = map.get(k2);
    System.out.println("retrieving value for k3");
    String v3 = map.get(k3);

    assertEquals("firstValue", v1);
    assertEquals("secondValue", v2);
    assertEquals("thirdValue", v3);
}

In the above test, we create three different keys – one has a unique id and the other two have the same id. Since we use id as the initial hash value, there will definitely be a collision during both storage and retrieval of data with these keys.

In addition to that, thanks to the collision resolution technique we saw earlier, we expect each of our stored values to be retrieved correctly, hence the assertions in the last three lines.

When we run the test, it should pass, indicating that collisions were resolved and we will use the logging produced to confirm that the collisions indeed occurred:

storing value for k1
Calling hashCode()
storing value for k2
Calling hashCode()
storing value for k3
Calling hashCode()
Calling equals() for key: MyKey [name=secondKey, id=2]
retrieving value for k1
Calling hashCode()
retrieving value for k2
Calling hashCode()
retrieving value for k3
Calling hashCode()
Calling equals() for key: MyKey [name=secondKey, id=2]

Notice that during storage operations, k1 and k2 were successfully mapped to their values using only the hash code.

However, storage of k3 was not so simple, the system detected that its bucket location already contained a mapping for k2. Therefore, equals comparison was used to distinguish them and a linked list was created to contain both mappings.

Any other subsequent mapping whose key hashes to the same bucket location will follow the same route and end up replacing one of the nodes in the linked list or be added to the head of the list if equals comparison returns false for all existing nodes.

Likewise, during retrieval, k3 and k2 were equals-compared to identify the correct key whose value should be retrieved.

On a final note, from Java 8, the linked lists are dynamically replaced with balanced binary search trees in collision resolution after the number of collisions in a given bucket location exceed a certain threshold.

This change offers a performance boost, since, in the case of a collision, storage and retrieval happen in O(log n).

This section is very common in technical interviews, especially after the basic storage and retrieval questions.

7. Conclusion

In this article, we have explored HashMap implementation of Java Map interface.

The full source code for all the examples used in this article can be found in the GitHub project.


Guide to @JsonFormat in Jackson

$
0
0

1. Overview

In this article, we try to understand how to use @JsonFormat in Jackson. It is a Jackson annotation that is used to specify how to format fields and/or properties for JSON output. Specifically, this annotation allows you to specify how to format

Specifically, this annotation allows you to specify how to format Date and Calendar values according to a SimpleDateFormat format.

2. Maven Dependency

@JsonFormat is defined in the jackson-databind package so we need the following Maven Dependency:

<dependency>
    <groupId>com.fasterxml.jackson.core</groupId>
    <artifactId>jackson-databind</artifactId>
    <version>2.8.5</version>
</dependency>

3. Getting Started

3.1. Using the Default Format

To get started, we will demonstrate the concepts of using the @JsonFormat annotation with a class representing a user.

Since we are trying to explain the details of the annotation, the User object will be created on request (and not stored or loaded from a database) and serialized to JSON:

public class User {
    private String firstName;
    private String lastName;
    private Date createdDate = new Date();

    // standard constructor, setters and getters
}

Building and running this code example returns the following output:

{"firstName":"John","lastName":"Smith","createdDate":1482047026009}

As you can see, the createdDate field is shown as the number of seconds since epoch which is the default format used for Date fields.

3.2. Using the Annotation on a Getter

Let us now use @JsonFormat to specify the format that the createdDate field should be serialized. Here is the User class updated for this change. The createdDate field has been annotated as shown to specify the date format.

The data format used for the pattern argument is specified by SimpleDateFormat:

@JsonFormat(shape = JsonFormat.Shape.STRING, pattern = "yyyy-MM-dd@HH:mm:ss.SSSZ")
private Date createdDate;

With this change in place, we build the project again and run it. The output is shown below:

{"firstName":"John","lastName":"Smith","createdDate":"2016-12-18@07:53:34.740+0000"}

As you can see, the createdDate field has been formatted using the specified SimpleDateFormat format using the @JsonFormat annotation.

The above example demonstrates using the annotation on a field. It can also be used in a getter method (a property) as follows.

For instance, you may have a property which is being computed on invocation. You can use the annotation on the getter method in such a case. Note that the pattern has also been changed to return just the date part of the instant:

@JsonFormat(shape = JsonFormat.Shape.STRING, pattern = "yyyy-MM-dd")
public Date getCurrentDate() {
    return new Date();
}

The resultant output is as follows:

{ ... , "currentDate":"2016-12-18", ...}

3.3. Specifying the Locale

In addition to specifying the date format, you can also specify the locale to be used for serialization. Not specifying this parameter results in serialization being performed with the default locale:

@JsonFormat(shape = JsonFormat.Shape.STRING, pattern = "yyyy-MM-dd@HH:mm:ss.SSSZ", locale = "en_GB")
public Date getCurrentDate() {
    return new Date();
}

3.4. Specifying the Shape

Using @JsonFormat with shape set to JsonFormat.Shape.NUMBER results in the default output for Date types — as the number of seconds since the epoch. The parameter pattern is not applicable to this case and is ignored:

@JsonFormat(shape = JsonFormat.Shape.NUMBER)
public Date getDateNum() {
    return new Date();
}

The output is as shown below:

{ ..., "dateNum":1482054723876 }

4. Conclusion

In conclusion, @JsonFormat is used to control the output format of Date and Calendar types as demonstrated above.

The sample code shown above is available over on GitHub.

Java Web Weekly, Issue 157

$
0
0

This is the last Java Web Weekly of 2016. Lots to cover in this one so let’s jump right into it.

1. Spring and Java

>> Is Gartner’s Report of Java EE’s Demise Greatly Exaggerated? [infoq.com]

An interesting discussion about the legitimacy of the Gartner’s report about the Java EE market position.

>> Java EE 8 – Community Survey Results and Next Steps [oracle.com]

And the results of the Java EE 8 community survey.

>> This Year in Spring – 2016 edition [spring.io]

High level summary of what in the Spring ecosystem in 2016.

>> Hibernate Tips: How to cascade a persist operation to child entities [thoughts-on-java.org]

A quick solution to the problem of propagating the persist operation down the entity hierarchy.

>> Refactoring to Reactive – Anatomy of a JDBC migration [infoq.com]

A detailed step-by-step insight into a process of going Reactive with RxJava and JDBC.

>> Java Type Inference Won’t Support Mutability Specification [infoq.com]

A very informative update explaining why we won’t be getting the “val” alongside “var” when making use of local variable type inference.

>> Anemic Objects Are OK [techblog.bozho.net]

A few notes about the pragmatic approach to Object Oriented Programming. Bozho is confronting Yegor Bugayenko’s and Vlad Mihalcea’s arguments.

>> Spring From the Trenches: Disabling Cookie Management of Apache HTTP Client 4 and RestTemplate [petrikainulainen.net]

A short example showing how to disable Cookie Management in the HTTP Client 4 (and making sure that RestTemplate actually uses it).

Also worth reading:

Webinars and presentations:

Time to upgrade:

2. Musings and Technical

>> Toward a Galvanizing Definition of Technical Debt [michaelfeathers.silvrback.com]

Michael Feathers straightens up and explains what technical debt actually is.

>> Progress Bars are Surprisingly Difficult [prog21.dadgum.com]

A short write-up about how hard it is to actually create an accurate Progress Bar 🙂

>> The threat of technological unemployment [lemire.me]

A few philosophical thoughts about the future threat of technological unemployment.

>> Windows and PHP are snowballs. Respect them. [virtuouscode.com]

A short explanation why you should respect Windows and PHP even when you do not like them 🙂

Also worth reading:

3. Comics

And my favorite Dilberts of the week:

>> Remind me why I went to college? [dilbert.com]

>> That man has someplace to be [dilbert.com]

>> How’d you get the black eye? [dilbert.com]

4. Pick of the Week

>> What’s an hour? [m.signalvnoise.com]

Introduction to Javaslang

$
0
0

1. Overview

In this article, we are going to explore exactly what Javaslang is, why we need it and how to use it in our projects.

Javaslang is a functional library for Java 8+ that provides immutable data types and functional control structures.

1.1. Maven Dependency

In order to use Javaslang, you need to add the dependency:

<dependency>
    <groupId>io.javaslang</groupId>
    <artifactId>javaslang</artifactId>
    <version>2.1.0-alpha</version>
</dependency>

It is recommended to always use the latest version. You can get it by following this link.

2. Option

The main goal of Option is to eliminate null checks in our code by leveraging the Java type system.

Option is an object container in Javaslang with a similar end goal like Optional in Java 8. Javaslang’s Option implements Serializable, Iterable, and has a richer API.

Since any object reference in Java can have a null value, we usually have to check for nullity with if statements before using it. These checks make the code robust and stable:

@Test
public void givenValue_whenNullCheckNeeded_thenCorrect() {
    Object object = null;
    if (object == null) {
        object = "someDefaultValue";
    }
    assertNotNull(possibleNullObj);
}

Without checks, the application can crash due to a simple NPE:

@Test(expected = NullPointerException.class)
public void givenValue_whenNullCheckNeeded_thenCorrect2() {
    Object possibleNullObj = null;
    assertEquals("somevalue", possibleNullObj.toString());
}

However, the checks make the code verbose and not so readable, especially when the if statements end up being nested multiple times.

Option solves this problem by totally eliminating nulls and replacing them with a valid object reference for each possible scenario.

With Option a null value will evaluate to an instance of None, while a non-null value will evaluate to an instance of Some:

@Test
public void givenValue_whenCreatesOption_thenCorrect() {
    Option<Object> noneOption = Option.of(null);
    Option<Object> someOption = Option.of("val");

    assertEquals("None", noneOption.toString());
    assertEquals("Some(val)", someOption.toString());
}

Therefore, instead of using object values directly, it’s advisable to wrap them inside an Option instance as shown above.

Notice, that we did not have to do a check before calling toString yet we did not have to deal with a NullPointerException as we had done before. Option’s toString returns us meaningful values in each call.

In the second snippet of this section, we needed a null check, in which we would assign a default value to the variable, before attempting to use it. Option can deal with this in a single line, even if there is a null:

@Test
public void givenNull_whenCreatesOption_thenCorrect() {
    String name = null;
    Option<String> nameOption = Option.of(name);
   
    assertEquals("baeldung", nameOption.getOrElse("baeldung"));
}

Or a non-null:

@Test
public void givenNonNull_whenCreatesOption_thenCorrect() {
    String name = "baeldung";
    Option<String> nameOption = Option.of(name);

    assertEquals("baeldung", nameOption.getOrElse("notbaeldung"));
}

Notice how, without null checks, we can get a value or return a default in a single line.

3. Tuple

There is no direct equivalent of a tuple data structure in Java. A tuple is a common concept in functional programming languages. Tuples are immutable and can hold multiple objects of different types in a type-safe manner.

Javaslang brings tuples to Java 8. Tuples are of type Tuple1, Tuple2 to Tuple8 depending on the number of elements they are to take.

There is currently an upper limit of eight elements. We access elements of a tuple like tuple._n where n is similar to the notion of an index in arrays:

public void whenCreatesTuple_thenCorrect1() {
    Tuple2<String, Integer> java8 = Tuple.of("Java", 8);
    String element1 = java8._1;
    int element2 = java8._2();

    assertEquals("Java", element1);
    assertEquals(8, element2);
}

Notice that the first element is retrieved with n==1. So a tuple does not use a zero base like an array. The types of the elements that will be stored in the tuple must be declared in its type declaration as shown above and below:

@Test
public void whenCreatesTuple_thenCorrect2() {
    Tuple3<String, Integer, Double> java8 = Tuple.of("Java", 8, 1.8);
    String element1 = java8._1;
    int element2 = java8._2();
    double element3 = java8._3();
        
    assertEquals("Java", element1);
    assertEquals(8, element2);
    assertEquals(1.8, element3, 0.1);
}

A tuple’s place is in storing a fixed group of objects of any type that are better processed as a unit and can be passed around. A more obvious use case is returning more than one object from a function or a method in Java.

4. Try

In Javaslang, Try is a container for a computation which may result in an exception.

As Option wraps a nullable object so that we don’t have to explicitly take care of nulls with if checks, Try wraps a computation so that we don’t have to explicitly take care of exceptions with try-catch blocks.

Take the following code for example:

@Test(expected = ArithmeticException.class)
public void givenBadCode_whenThrowsException_thenCorrect() {
    int i = 1 / 0;
}

Without try-catch blocks, the application would crash. In order to avoid this, you would need to wrap the statement in a try-catch block. With Javaslang, we can wrap the same code in a Try instance and get a result:

@Test
public void givenBadCode_whenTryHandles_thenCorrect() {
    Try<Integer> result = Try.of(() -> 1 / 0);

    assertTrue(result.isFailure());
}

Whether the computation was successful or not can then be inspected by choice at any point in the code.

In the above snippet, we have chosen to simply check for success or failure. We can also choose to return a default value:

@Test
public void givenBadCode_whenTryHandles_thenCorrect2() {
    Try<Integer> computation = Try.of(() -> 1 / 0);
    int result = result.getOrElse(-1);

    assertEquals(-1, result);
}

Or even to explicitly throw an exception of our choice:

@Test(expected = ArithmeticException.class)
public void givenBadCode_whenTryHandles_thenCorrect3() {
    Try<Integer> result = Try.of(() -> 1 / 0);
    result.getOrElseThrow(ArithmeticException::new);
}

In all the above cases, we have control over what happens after the computation, thanks to Javaslang’s Try.

5. Functional Interfaces

With the arrival of Java 8, functional interfaces are inbuilt and easier to use, especially when combined with lambdas.

However, Java 8 only provides only two basic functional interfaces. One takes only a single parameter and produces a result:

@Test
public void givenJava8Function_whenWorks_thenCorrect() {
    Function<Integer, Integer> square = (num) -> num * num;
    int result = square.apply(2);

    assertEquals(4, result);
}

The second only takes two parameters and produces a result:

@Test
public void givenJava8BiFunction_whenWorks_thenCorrect() {
    BiFunction<Integer, Integer, Integer> sum = 
      (num1, num2) -> num1 + num2;
    int result = sum.apply(5, 7);

    assertEquals(12, result);
}

On the flip side, Javaslang extends the idea of functional interfaces in Java further by supporting up to a maximum of eight parameters and spicing up the API with methods for memoization, composition, and currying.

Just like tuples, these functional interfaces are named according to the number of parameters they take: Function0, Function1, Function2 etc. With Javaslang, we would have written the above two functions like this:

@Test
public void givenJavaslangFunction_whenWorks_thenCorrect() {
    Function1<Integer, Integer> square = (num) -> num * num;
    int result = square.apply(2);

    assertEquals(4, result);
}

and this:

@Test
public void givenJavaslangBiFunction_whenWorks_thenCorrect() {
    Function2<Integer, Integer, Integer> sum = 
      (num1, num2) -> num1 + num2;
    int result = sum.apply(5, 7);

    assertEquals(12, result);
}

When there is no parameter but we still need an output, in Java 8 we would need to use a Consumer type, in Javaslang Function0 is there to help:

@Test
public void whenCreatesFunction_thenCorrect0() {
    Function0<String> getClazzName = () -> this.getClass().getName();
    String clazzName = getClazzName.apply();

    assertEquals("com.baeldung.javaslang.JavaSlangTest", clazzName);
}

How about a five parameter function, it’s just a matter of using Function5:

@Test
public void whenCreatesFunction_thenCorrect5() {
    Function5<String, String, String, String, String, String> concat = 
      (a, b, c, d, e) -> a + b + c + d + e;
    String finalString = concat.apply(
      "Hello ", "world", "! ", "Learn ", "Javaslang");

    assertEquals("Hello world! Learn Javaslang", finalString);
}

We can also combine the static factory method FunctionN.of for any of the functions to create a Javaslang function from a method reference. Like if we have the following sum method:

public int sum(int a, int b) {
    return a + b;
}

We can create a function out of it like this:

@Test
public void whenCreatesFunctionFromMethodRef_thenCorrect() {
    Function2<Integer, Integer, Integer> sum = Function2.of(this::sum);
    int summed = sum.apply(5, 6);

    assertEquals(11, summed);
}

6. Collections

The Javaslang team has put a lot of effort in designing a new collections API that meets the requirements of functional programming i.e. persistence, immutability.

Java collections are mutable, making them a great source of program failure, especially in the presence of concurrency. The Collection interface provides methods such as this:

interface Collection<E> {
    void clear();
}

This method removes all elements in a collection(producing a side-effect) and returns nothing. Classes such as ConcurrentHashMap were created to deal with the already created problems.

Such a class does not only add zero marginal benefits but also degrades the performance of the class whose loopholes it is trying to fill.

With immutability, we get thread-safety for free: no need to write new classes to deal with a problem that should not be there in the first place.

Other existing tactics to add immutability to collections in Java still create more problems, namely, exceptions:

@Test(expected = UnsupportedOperationException.class)
public void whenImmutableCollectionThrows_thenCorrect() {
    java.util.List<String> wordList = Arrays.asList("abracadabra");
    java.util.List<String> list = Collections.unmodifiableList(wordList);
    list.add("boom");
}

All the above problems are non-existent in Javaslang collections.

To create a list in Javaslang:

@Test
public void whenCreatesJavaslangList_thenCorrect() {
    List<Integer> intList = List.of(1, 2, 3);

    assertEquals(3, intList.length());
    assertEquals(new Integer(1), intList.get(0));
    assertEquals(new Integer(2), intList.get(1));
    assertEquals(new Integer(3), intList.get(2));
}

APIs are also available to perform computations on the list in place:

@Test
public void whenSumsJavaslangList_thenCorrect() {
    int sum = List.of(1, 2, 3).sum().intValue();

    assertEquals(6, sum);
}

Javaslang collections offer most of the common classes found in the Java Collections Framework and actually all features are implemented.

The takeaway is immutability, removal of void return types and side-effect producing APIs, a richer set of functions to operate on the underlying elements, very short, robust and compact code compared to Java’s collection operations.

A full coverage of Javaslang collections is beyond the scope of this article.

7. Validation

Javaslang brings the concept of Applicative Functor to Java from the functional programming world. In the simplest of terms, an Applicative Functor enables us to perform a sequence of actions while accumulating the results.

The class javaslang.control.Validation facilitates the accumulation of errors. Remember that, usually, a program terminates as soon as an error is encountered.

However, Validation continues processing and accumulating the errors for the program to act on them as a batch.

Consider that we are registering users by name and age and we want to take all input first and decide whether to create a Person instance or return a list of errors. Here is our Person class:

public class Person {
    private String name;
    private int age;

    // standard constructors, setters and getters, toString
}

Next, we create a class called PersonValidator. Each field will be validated by one method and another method can be used to combine all the results into one Validation instance:

class PersonValidator {
    String NAME_ERR = "Invalid characters in name: ";
    String AGE_ERR = "Age must be at least 0";

    public Validation<List<String>, Person> validatePerson(
      String name, int age) {
        return Validation.combine(
          validateName(name), validateAge(age)).ap(Person::new);
    }

    private Validation<String, String> validateName(String name) {
        String invalidChars = name.replaceAll("[a-zA-Z ]", "");
        return invalidChars.isEmpty() ? 
          Validation.valid(name) 
            : Validation.invalid(NAME_ERR + invalidChars);
    }

    private Validation<String, Integer> validateAge(int age) {
        return age < 0 ? Validation.invalid(AGE_ERR)
          : Validation.valid(age);
    }
}

The rule for age is that it should be an integer greater than 0 and the rule for name is that it should contain no special characters:

@Test
public void whenValidationWorks_thenCorrect() {
    PersonValidator personValidator = new PersonValidator();

    Validation<List<String>, Person> valid = 
      personValidator.validatePerson("John Doe", 30);

    Validation<List<String>, Person> invalid = 
      personValidator.validatePerson("John? Doe!4", -1);

    assertEquals(
      "Valid(Person [name=John Doe, age=30])", 
        valid.toString());

    assertEquals(
      "Invalid(List(Invalid characters in name: ?!4, 
        Age must be at least 0))", 
          invalid.toString());
}

 A valid value is contained in a Validation.Valid instance, a list of validation errors is contained in a Validation.Invalid instance. So any validation method must return one of the two.

Inside Validation.Valid is an instance of Person while inside Validation.Invalid is a list of errors.

8. Lazy

Lazy is a container which represents a value computed lazily i.e. computation is deferred until the result is required. Furthermore, the evaluated value is cached or memoized and returned again and again each time it is needed without repeating the computation:

@Test
public void givenFunction_whenEvaluatesWithLazy_thenCorrect() {
    Lazy<Double> lazy = Lazy.of(Math::random);
    assertFalse(lazy.isEvaluated());
        
    double val1 = lazy.get();
    assertTrue(lazy.isEvaluated());
        
    double val2 = lazy.get();
    assertEquals(val1, val2, 0.1);
}

In the above example, the function we are evaluating is Math.random. Notice that, in the second line, we check the value and realize that the function has not yet been executed. This is because we still haven’t shown interest in the return value.

In the third line of code, we show interest in the computation value by calling Lazy.get. At this point, the function executes and Lazy.evaluated returns true.

We also go ahead and confirm the memoization bit of Lazy by attempting to get the value again. If the function we provided was executed again, we would definitely receive a different random number.

However, Lazy again lazily returns the initially computed value as the final assertion confirms.

9. Pattern Matching

Pattern matching is a native concept in almost all functional programming languages. There is no such thing in Java for now.

Instead, whenever we want to perform a computation or return a value based on the input we receive, we use multiple if statements to resolve the right code to execute:

@Test
public void whenIfWorksAsMatcher_thenCorrect() {
    int input = 3;
    String output;
    if (input == 0) {
        output = "zero";
    }
    if (input == 1) {
        output = "one";
    }
    if (input == 2) {
        output = "two";
    }
    if (input == 3) {
        output = "three";
    }
    else {
        output = "unknown";
    }

    assertEquals("three", output);
}

We can suddenly see the code spanning multiple lines while just checking three cases. Each check is taking up three lines of code. What if we had to check up to a hundred cases, those would be about 300 lines, not nice!

Another alternative is using a switch statement:

@Test
public void whenSwitchWorksAsMatcher_thenCorrect() {
    int input = 2;
    String output;
    switch (input) {
    case 0:
        output = "zero";
        break;
    case 1:
        output = "one";
        break;
    case 2:
        output = "two";
        break;
    case 3:
        output = "three";
        break;
    default:
        output = "unknown";
        break;
    }

    assertEquals("two", output);
}

Not any better. We are still averaging 3 lines per check. A lot of confusion and potential for bugs. Forgetting a break clause is not an issue at compile time but can result in hard-to-detect bugs later on.

In Javaslang, we replace the entire switch block with a Match method. Each case or if statement is replaced by a Case method invocation.

Finally, atomic patterns like $() replace the condition which then evaluates an expression or value. We also provide this as the second parameter to Case:

@Test
public void whenMatchworks_thenCorrect() {
    int input = 2;
    String output = Match(input).of(
      Case($(1), "one"), 
      Case($(2), "two"), 
      Case($(3), "three"),
      Case($(), "?"));
 
    assertEquals("two", output);
}

Notice how compact the code is, averaging only one line per check. The pattern matching API is way more powerful than this and can do more complex stuff.

For example, we can replace the atomic expressions with a predicate. Imagine we are parsing a console command for help and version flags:

Match(arg).of(
    Case(isIn("-h", "--help"), o -> run(this::displayHelp)),
    Case(isIn("-v", "--version"), o -> run(this::displayVersion)),
    Case($(), o -> run(() -> {
        throw new IllegalArgumentException(arg);
    }))
);

Some users may be more familiar with the shorthand version (-v) while others, with the full version (–version). A good designer must consider all these cases.

Without the need for several if statements, we have taken care of multiple conditions. We will learn more about predicates, multiple conditions, and side-effects in pattern matching in a separate article.

10. Conclusion

In this article, we have introduced Javaslang, the popular functional programming library for Java 8. We have tackled the major features that we can quickly adapt to improve our code.

The full source code for this article is available in the Github project.

A Custom Media Type for a Spring REST API

$
0
0

1. Overview

In this tutorial, we’re going to take a look at defining custom media types and producing them by Spring REST controller.

A good use case for using custom media type is versioning an API.

2. API – Version 1

Let’s start with a simple example – an API exposing a single Resource by id.

We’re going to start with a Version 1 of the Resource we’re exposing to the client. In order to do that, we’re going to use a custom HTTP header – “application/vnd.baeldung.api.v1+json”.

The client will ask for this custom media type via the Accept header.

Here’s our simple endpoint:

@RequestMapping(
  method = RequestMethod.GET, 
  value = "/public/api/items/{id}", 
  produces = "application/vnd.baeldung.api.v1+json"
)
@ResponseBody
public BaeldungItem getItem( @PathVariable("id") String id ) {
    return new BaeldungItem("itemId1");
}

Notice the produces parameter here – specifying the custom media type that this API is able to handle.

Now, the BaeldungItem Resource – which has a single field – itemId:

public class BaeldungItem {
    private String itemId;
    
    // standard getters and setters
}

Last but not least let’s write an integration test for endpoint:

@Test
public void givenServiceEndpoint_whenGetRequestFirstAPIVersion_then200() {
    given()
      .accept("application/vnd.baeldung.api.v1+json")
    .when()
      .get(URL_PREFIX + "/public/api/items/1")
    .then()
      .contentType(ContentType.JSON).and().statusCode(200);
}

3. API – Version 2

Now let’s assume that we need to change the details that we’re exposing to the client with our Resource.

We used to expose a raw id – let’s say that now we need to hide that and expose a name instead, to get a bit more flexibility.

It’s important to understand that this change is not backwards compatible; basically – it’s a breaking change.

Here’s our new Resource definition:

public class BaeldungItemV2 {
    private String itemName;

    // standard getters and setters
}

And so, what we’ll need to do here is – migrate our API to a second version.

We’re going to do that by creating the next version of our custom media type and defining a new endpoint:

@RequestMapping(
  method = RequestMethod.GET, 
  value = "/public/api/items/{id}", 
  produces = "application/vnd.baeldung.api.v2+json"
)
@ResponseBody
public BaeldungItemV2 getItemSecondAPIVersion(@PathVariable("id") String id) {
    return new BaeldungItemV2("itemName");
}

And so we now have the exact same endpoint, but capable of handling the new V2 operation.

When the client will ask for “application/vnd.baeldung.api.v1+json” – Spring will delegate to the old operation and the client will receive a BaeldungItem with a itemId field (V1).

But when the client now sets the Accept header to “application/vnd.baeldung.api.v2+json” – they’ll correctly hit the new operation and get back the Resource with the itemName field (V2):

@Test
public void givenServiceEndpoint_whenGetRequestSecondAPIVersion_then200() {
    given()
      .accept("application/vnd.baeldung.api.v2+json")
    .when()
      .get(URL_PREFIX + "/public/api/items/2")
    .then()
      .contentType(ContentType.JSON).and().statusCode(200);
}

Note how the test is similar but is using the different Accept header.

4. Custom Media Type On Class Level

Finally, let’s talk about a class-wide definition of the media type – that’s possible as well:

@RestController
@RequestMapping(
  value = "/", 
  produces = "application/vnd.baeldung.api.v1+json"
)
public class CustomMediaTypeController

As expected, the @RequestMapping annotation easily works on class level and allows us to specify the value, produces and consumes parameters.

5. Conclusion

This articles illustrated examples when defining Custom Media Types could be useful in versioning public API.

The implementation of all these examples and code snippets can be found in the GitHub project – this is an Maven project, so it should be easy to import and run as it is.

Spring Security Context Propagation with @Async

$
0
0

1. Introduction

In this tutorial, we are going to focus on the propagation of the Spring Security principal with @Async.

By default, the Spring Security Authentication is bound to a ThreadLocal – so, when the execution flow runs in a new thread with @Async, that’s not going to be an authenticated context.

That’s not ideal – let’s fix it.

2. Maven Dependencies

In order to use the async integration in Spring Security, we need to include the following section in the dependencies of our pom.xml:

<dependency>
    <groupId>org.springframework.security</groupId>
    <artifactId>spring-security-config</artifactId>
    <version>4.2.1.RELEASE</version>
</dependency>

The latest version of Spring Security dependencies can be found here.

3. Spring Security Propagation with @Async

Let’s first write a simple example:

@RequestMapping(method = RequestMethod.GET, value = "/async")
@ResponseBody
public Object standardProcessing() throws Exception {
    log.info("Outside the @Async logic - before the async call: "
      + SecurityContextHolder.getContext().getAuthentication().getPrincipal());
    
    asyncService.asyncCall();
    
    log.info("Inside the @Async logic - after the async call: "
      + SecurityContextHolder.getContext().getAuthentication().getPrincipal());
    
    return SecurityContextHolder.getContext().getAuthentication().getPrincipal();
}

We want to check if the Spring SecurityContext is propagated to the new thread. First, we log the context before the async call, next we run asynchronous method and finally we log the context again. The asyncCall() method has the following implementation:

@Async
@Override
public void asyncCall() {
    log.info("Inside the @Async logic: "
      + SecurityContextHolder.getContext().getAuthentication().getPrincipal());
}

As we can see, it’s only one line of code that will output the context inside the new thread of asynchronous method.

4. Before the SecurityContextHolder Strategy

Before we’ll set up the SecurityContextHolder strategy, the context inside the @Async method will have a null value.

In particular, if we’ll run the async logic, we’ll be able to log the Authentication object in the main program, but when we’ll log it inside the @Async, it’s going to be null. This is an example logs output:

web - 2016-12-30 22:41:58,916 [http-nio-8081-exec-3] INFO
  o.baeldung.web.service.AsyncService -
  Outside the @Async logic - before the async call:
  org.springframework.security.core.userdetails.User@76507e51:
  Username: temporary; ...

web - 2016-12-30 22:41:58,921 [http-nio-8081-exec-3] INFO
  o.baeldung.web.service.AsyncService -
  Inside the @Async logic - after the async call:
  org.springframework.security.core.userdetails.User@76507e51:
  Username: temporary; ...

  web - 2016-12-30 22:41:58,926 [SimpleAsyncTaskExecutor-1] ERROR
  o.s.a.i.SimpleAsyncUncaughtExceptionHandler -
  Unexpected error occurred invoking async method
  'public void org.baeldung.web.service.AsyncServiceImpl.asyncCall()'.
  java.lang.NullPointerException: null

So, as you can see, inside the executor thread, our call fails with a NPE, as expected – because the Principal isn’t available there.

To prevent that behaviour, we need to enable the SecurityContextHolder.MODE_INHERITABLETHREADLOCAL strategy:

SecurityContextHolder.setStrategyName(SecurityContextHolder.MODE_INHERITABLETHREADLOCAL);

5. After the SecurityContextHolder Strategy

Now, we should have access to the principal inside the async thread, just as we have access to it outside.

Let’s run and have a look at the logging information to make sure that’s the case:

web - 2016-12-30 22:45:18,013 [http-nio-8081-exec-3] INFO
  o.baeldung.web.service.AsyncService -
  Outside the @Async logic - before the async call:
  org.springframework.security.core.userdetails.User@76507e51:
  Username: temporary; ...

web - 2016-12-30 22:45:18,018 [http-nio-8081-exec-3] INFO
  o.baeldung.web.service.AsyncService -
  Inside the @Async logic - after the async call:
  org.springframework.security.core.userdetails.User@76507e51:
  Username: temporary; ...

web - 2016-12-30 22:45:18,019 [SimpleAsyncTaskExecutor-1] INFO
  o.baeldung.web.service.AsyncService -
  Inside the @Async logic:
  org.springframework.security.core.userdetails.User@76507e51:
  Username: temporary; ...

And here we are – just as we expected, we’re seeing the same principal inside the async executor thread.

6. Use Cases

There are a few interesting use cases where we might want to make sure the SecurityContext gets propagated like this:

  • we want to make multiple external requests which can run in parallel and which may take significant time to execute
  • we have some significant processing to do locally and our external request can execute in parallel to that
  • other represent fire-and-forget scenarios, like for example sending an email

7. Conclusion

In this quick tutorial, we presented the Spring support for sending asynchronous requests with propagated SecurityContext. From a programming model perspective, the new capabilities appear deceptively simple.

Please note, that if multiple method calls were previously chained together in a synchronous fashion, converting to an asynchronous approach may require synchronizing results.

This example is also available as a Maven project on over on Github.

Basic Introduction to JMX

$
0
0

1. Introduction

The Java Management Extensions (JMX) framework was introduced in Java 1.5 and has found widespread acceptance in the Java developers community since its inception.

It provides an easily configurable, scalable, reliable and more or less friendly infrastructure for managing Java application either locally or remotely. The framework introduces the concept of MBeans for real time management of applications.

This article is a beginner’s step by step guide to create and setup a basic MBean and manage it through JConsole.

2. JMX Architecture

JMX architecture follows a three layered approach:

  1. Instrumentation layer: MBeans registered with the JMX agent through which resources are managed
  2. JMX agent layer: the core component (MbeanServer) which maintains registry of managed MBeans and provides an interface to access them
  3. Remote management layer: usually client side tool like JConsole

3. Creating an MBean Class

While creating MBeans, there is a particular design pattern which we must conform to. The model MBean class MUST implements an interface with the following name: “model class name” plus MBean.

So let’s define our MBean interface and the class implementing it:

public interface GameMBean {

    public void playFootball(String clubName);

    public String getPlayerName();

    public void setPlayerName(String playerName);

}
public class Game implements GameMBean {

    private String playerName;

    @Override
    public void playFootball(String clubName) {
        System.out.println(
          this.playerName + " playing football for " + clubName);
    }

    @Override
    public String getPlayerName() {
        System.out.println("Return playerName " + this.playerName);
        return playerName;
    }

    @Override
    public void setPlayerName(String playerName) {
        System.out.println("Set playerName to value " + playerName);
        this.playerName = playerName;
    }
}

The Game class overrides a method  playFootball() of the parent interface. Apart from this, the class has a member variable playerName and getter/setter for it.

Note that getter/setter are also declared in the parent interface.

4. Instrumenting with the JMX Agent

JMX agents are the entities running either locally or remotely which provide the management access to the MBeans registered with them.

Let’s use PlatformMbeanServer – the core component of JMX agent and register the Game MBean with it.

We’ll use another entity – ObjectName – to register the Game class instance with the PlatformMbeanServer; this is a String consisting of two parts:

  • domain: can be an arbitrary String, but according to MBean naming conventions, it should have Java package name (avoids naming conflicts)
  • key: a list of  “key=value” pairs separated by comma

In this example, here’s our ObjectName: “com.baledung.tutorial:type=basic,name=game”.

We’ll get the MBeanServer from the factory class java.lang.management.ManagementFactory:

MBeanServer server = ManagementFactory.getPlatformMBeanServer();

And we’ll register the model MBean class using its custom ObjectName:

ObjectName objectName = null;
try {
    objectName = new ObjectName("com.baeldung.tutorial:type=basic,name=game");
} catch (MalformedObjectNameException e) {
    e.printStackTrace();
}

Finally, just to be able to test it – we’ll add a while loop to prevent the application from terminating before we can access the MBean through JConsole:

while (true) {
}

5. Accessing the MBean

5.1. Connecting from the Client Side

  1. Start the application in the Eclipse
  2. Start Jconsole (located in the bin folder of the JDK installation directory of your machine)
  3. Connection -> new Connection -> select the local Java process of this tutorial -> Connect  ->Insecure SSl connection warning -> Continue with insecure connection
  4. After connection is established, click on the top right MBeans tab of the View pane
  5. List of registered MBeans will be appear in left column
  6. Click com.baeldung.tutorial -> basic -> game
  7. Under game, there will be two rows, one each for attributes and operations

Here’s a quick look at the JConsole part of the process:

5.2. Managing the MBean

The basics of MBean management are simple:

  • Attributes can read or written
  • Methods can be invoked and arguments can be supplied to them or values returned from them

Let’s see what that means for the Game MBean in practice:

  • attribute: type a new value for the attribute playerName – for example “Messi” and click Refresh button

       The Following log will appear in the Eclipse console:

       Set playerName to value Messi

  • operations: type a value for the String argument of method playFootBall() – for example “Barcelona” and click on the method button. A window alert for successful invocation will appear

The following log will appear in the eclipse console:

       Messi playing football for Barcelona

6. Conclusion

This tutorial touched upon the basics of setting up a JMX enabled application by use of MBeans. Also, it discussed about using a typical client side tool like JConsole to manage the instrumented MBean.

The domain of JMX technology is very wide in scope and reach. This tutorial can be considered a beginner’s step towards that.

Source code of this tutorial can be found over on Github.

Servlet 3 Async Support with Spring MVC and Spring Security

$
0
0

1. Introduction

In this quick tutorial, we’re going to focus on the Servlet 3 support for async requests, and how Spring MVC and Spring Security handle these.

The most basic motivation for asynchronicity in web applications is to handle long running requests. In most use cases, we’ll need to make sure the Spring Security principal is propagated to these threads.

And of course Spring Security integrates with @Async outside the scope of MVC and processing HTTP requests as well.

2. Maven Dependencies

In order to use the async integration in Spring MVC, we need to include the following dependencies into our pom.xml:

<dependency>
    <groupId>org.springframework.security</groupId>
    <artifactId>spring-security-web</artifactId>
    <version>4.2.1.RELEASE</version>
</dependency>
<dependency>
    <groupId>org.springframework.security</groupId>
    <artifactId>spring-security-config</artifactId>
    <version>4.2.1.RELEASE</version>
</dependency>

The latest version of Spring Security dependencies can be found here.

3. Spring MVC and @Async

According to the official docs, Spring Security integrates with WebAsyncManager.

The first step is to ensure our springSecurityFilterChain is set up for processing asynchronous requests. We can do it either in Java config, by adding following line to our Servlet config class:

dispatcher.setAsyncSupported(true);

or in XML config:

<filter>
    <filter-name>springSecurityFilterChain</filter-name>
    <filter-class>org.springframework.web.filter.DelegatingFilterProxy</filter-class>
    <async-supported>true</async-supported>
</filter>
<filter-mapping>
    <filter-name>springSecurityFilterChain</filter-name>
    <url-pattern>/*</url-pattern>
    <dispatcher>REQUEST</dispatcher>
    <dispatcher>ASYNC</dispatcher>
</filter-mapping>

We also need to enable the async-supported parameter in our servlet configuration:

<servlet>
    ...
    <async-supported>true</async-supported>
    ...
</servlet>

Now we are ready to send asynchronous requests with SecurityContext propagated with them.

Internal mechanisms within Spring Security will ensure that our SecurityContext is no longer cleared out when a response is committed in another Thread resulting in a user logout.

4. Use Cases

Let’s see this in action with a simple example:

@Override
public Callable<Boolean> checkIfPrincipalPropagated() {
    Object before 
      = SecurityContextHolder.getContext().getAuthentication().getPrincipal();
    log.info("Before new thread: " + before);

    return new Callable<Boolean>() {
        public Boolean call() throws Exception {
            Object after 
              = SecurityContextHolder.getContext().getAuthentication().getPrincipal();
            log.info("New thread: " + after);
            return before == after;
        }
    };
}

We want to check if the Spring SecurityContext is propagated to the new thread. 

The method presented above will automatically have its Callable executed with the SecurityContext included, as seen in logs:

web - 2017-01-02 10:42:19,011 [http-nio-8081-exec-3] INFO
  o.baeldung.web.service.AsyncService - Before new thread:
  org.springframework.security.core.userdetails.User@76507e51:
  Username: temporary; Password: [PROTECTED]; Enabled: true;
  AccountNonExpired: true; credentialsNonExpired: true;
  AccountNonLocked: true; Granted Authorities: ROLE_ADMIN

web - 2017-01-02 10:42:19,020 [MvcAsync1] INFO
  o.baeldung.web.service.AsyncService - New thread:
  org.springframework.security.core.userdetails.User@76507e51:
  Username: temporary; Password: [PROTECTED]; Enabled: true;
  AccountNonExpired: true; credentialsNonExpired: true;
  AccountNonLocked: true; Granted Authorities: ROLE_ADMIN

Without setting up the SecurityContext to be propagated, the second request will end up with null value.

There are also other important use cases to use asynchronous requests with propagated SecurityContext:

  • we want to make multiple external requests which can run in parallel and which may take significant time to execute
  • we have some significant processing to do locally and our external request can execute in parallel to that
  • other represent fire-and-forget scenarios, like for example sending an email

Do note that, if our multiple method calls were previously chained together in a synchronous fashion, converting these to an asynchronous approach may require synchronizing results.

5. Conclusion

In this short tutorial, we illustrated the Spring support for processing asynchronous requests in an authenticated context

From a programming model perspective, the new capabilities appear deceptively simple. But there are certainly some aspects that do require a more in-depth understanding.

This example is also available as a Maven project over on Github.


Java Web Weekly, Issue 158

$
0
0

1. Spring and Java

>> Introducing Kotlin support in Spring Framework 5.0 [spring.io]

Very cool news – Kotlin is coming to Spring 5.

>> Your Brilliant Java Career [javaspecialists.eu]

A short write-up on the importance of health in your programming career 🙂

>> If You’ve Written Java Code in 2016 – Here Are the Trends You Couldn’t Have Missed [takipi.com]

A summary of trends and buzzwords that ruled 2016.

>> Running Spring Boot Apps on Windows with Ansible [codecentric.de]

A quick tutorial explaining how to run Spring Boot applications on Windows with Ansible.

>> Why I’m putting all my cards on hypermedia APIs at the moment [insaneprogramming.be]

Self-discovering APIs might be more important than we think.

>> Damn you, REST libraries [insaneprogramming.be]

A few thoughts about how popular libraries can negatively influence the design of your applications

>> 10 Java Blogs to Follow in 2017 [sitepoint.com]

Pretty self-explanatory 🙂

>> 5 tips to write efficient queries with JPA and Hibernate [thoughts-on-java.org]

Five “rules of thumb” for JPA and Hibernate users

Also worth reading:

Webinars and presentations:

Time to upgrade:

2. Technical

>> Exploratory Infrastructure projects [frankel.ch]

Some thoughts about applying Agile methodologies to Ops reality

>> Is Technical Debt Just a Metaphor? [michaelfeathers.silvrback.com]

Another article from Michael Feathers about the Technical Debt

Also worth reading:

3. Musings

>> 10 ways for a conference to upset their speakers [troyhunt.com]

A list of annoying things that conference speakers need to deal with.

Or, from a different perspective, things that conference organizers can improve to put on a great event.

>> Topic Modeling of the codecentric Blog Articles [codecentric.de]

A very interesting case study of topic modeling of technical articles.

>> Why I don’t call myself a tester, or: defining what I do [ontestautomation.com]

Putting labels on things might be misleading sometimes, especially when it comes to what we do, which is inherently very complex.

>> Betting against techno-unemployment [lemire.me]

A more critical view about the danger of techno-unemployment.

>> Resolutions Like You Mean It [daedtech.com]

That’s how engineers should approach New Year’s resolutions 🙂

>> Working remotely, coworking spaces, and mental health [bitquabit.com]

Working remotely might be not that enjoyable in the long term 🙂

Also worth reading:

4. Comics

And my favorite Dilberts of the week:

>> You just earned “lazy” on your next review [dilbert.com]

>> How many nuts are in there? [dilbert.com]

>> You have been offending your co-workers [dilbert.com]

5. Pick of the Week

>> How to take Fridays “off” (and still be insanely productive) [growthlab.com]

Dijkstra Algorithm in Java

$
0
0

1. Overview

The emphasis in this article is the shortest path problem (SPP), being one of the fundamental theoretic problems known in graph theory, and how the Dijkstra algorithm can be used to solve it.

The basic goal of the algorithm is to determine the shortest path between a starting node, and the rest of the graph.

2. Shortest Path Problem With Dijkstra

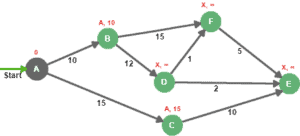
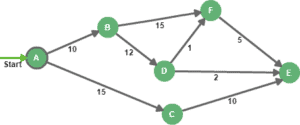
Given a positively weighted graph and a starting node (A), Dijkstra determines the shortest path and distance from the source to all destinations in the graph:


The core idea of the Dijkstra algorithm is to continuously eliminate longer paths between the starting node and all possible destinations.

To keep track of the process, we need to have two distinct sets of nodes, settled and unsettled.

Settled nodes are the ones with a known minimum distance from the source. The unsettled nodes set gathers nodes that we can reach from the source, but we don’t know the minimum distance from the starting node.

Here’s a list of steps to follow in order to solve the SPP with Dijkstra:

  • Set distance to startNode to zero.
  • Set all other distances to an infinite value.
  • We add the startNode to the unsettled nodes set.
  • While the unsettled nodes set is not empty we:
    • Choose an evaluation node from the unsettled nodes set, the evaluation node should be the one with the lowest distance from the source.
    • Calculate new distances to direct neighbors by keeping the lowest distance at each evaluation.
    • Add neighbors that are not yet settled to the unsettled nodes set.

These steps can be aggregated into two stages, Initialization and Evaluation. Let’s see how does that apply to our sample graph:

2.1. Initialization

Before we start exploring all paths in the graph, we first need to initialize all nodes with an infinite distance and an unknown predecessor, except the source.

As part of the initialization process, we need to assign the value 0 to node A (we know that the distance from node A to node A is 0 obviously)

So, each node in the rest of the graph will be distinguished with a predecessor and a distance:

To finish the initialization process, we need to add node A to the unsettled nodes set it to get picked first in the evaluation step. Keep in mind, the settled nodes set is still empty.

2.2. Evaluation

Now that we have our graph initialized, we pick the node with the lowest distance from the unsettled set, then we evaluate all adjacent nodes that are not in settled nodes:

The idea is to add the edge weight to the evaluation node distance, then compare it to the destination’s distance. e.g. for node B, 0+10 is lower than INFINITY, so the new distance for node B is 10, and the new predecessor is A, the same applies to node C.

Node A is then moved from the unsettled nodes set to the settled nodes.

Nodes B and C are added to the unsettled nodes because they can be reached, but they need to be evaluated.

Now that we have two nodes in the unsettled set, we choose the one with the lowest distance (node B), then we reiterate until we settle all nodes in the graph:

Here’s a table that summarizes the iterations that were performed during evaluation steps:

Iteration Unsettled Settled EvaluationNode A B C D E F
1 A A 0 A-10 A-15 X-∞ X-∞ X-∞
2 B, C A B 0 A-10 A-15 B-22 X-∞ B-25
3 C, F, D A, B C 0 A-10 A-15 B-22 C-25 B-25
4 D, E, F A, B, C D 0 A-10 A-15 B-22 D-24 D-23
5 E, F A, B, C, D F 0 A-10 A-15 B-22 D-24 D-23
6 E A, B, C, D, F E 0 A-10 A-15 B-22 D-24 D-23
Final ALL NONE 0 A-10 A-15 B-22 D-24 D-23


The notation B-22, for example, means that node B is the immediate predecessor, with a total distance of 22 from node A.

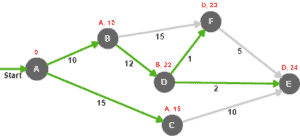
Finally, we can calculate the shortest paths from node A are as follows:

  • Node B : A –> B (total distance = 10)
  • Node C : A –> C (total distance = 15)
  • Node D : A –> B –> D (total distance = 22)
  • Node E : A –> B –> D –> E (total distance = 24)
  • Node F : A –> B –> D –> F (total distance = 23)

3. Java Implementation

In this simple implementation we will represent a graph as a set of nodes:

public class Graph {

    private Set<Node> nodes = new HashSet<>();
    
    public void addNode(Node nodeA) {
        nodes.add(nodeA);
    }

    // getters and setters 
}

A node can be described with a name, a LinkedList in reference to the shortestPath, a distance from the source, and an adjacency list named adjacentNodes:

public class Node {
    
    private String name;
    
    private List<Node> shortestPath = new LinkedList<>();
    
    private Integer distance = Integer.MAX_VALUE;
    
    Map<Node, Integer> adjacentNodes = new HashMap<>();

    public void addDestination(Node destination, int distance) {
        adjacentNodes.put(destination, distance);
    }
 
    public Node(String name) {
        this.name = name;
    }
    
    // getters and setters
}

The adjacentNodes attribute is used to associate immediate neighbors with edge length. This is a simplified implementation of an adjacency list, which is more suitable for the Dijkstra algorithm than the adjacency matrix.

As for the shortestPath attribute, it is a list of nodes that describes the shortest path calculated from the starting node.

By default, all node distances are initialized with Integer.MAX_VALUE to simulate an infinite distance as described in the initialization step.

Now, let’s implement the Dijkstra algorithm:

public static Graph calculateShortestPathFromSource(Graph graph, Node source) {
    source.setDistance(0);

    Set<Node> settledNodes = new HashSet<>();
    Set<Node> unsettledNodes = new HashSet<>();

    unsettledNodes.add(source);

    while (unsettledNodes.size() != 0) {
        Node currentNode = getLowestDistanceNode(unsettledNodes);
        unsettledNodes.remove(currentNode);
        for (Entry < Node, Integer> adjacencyPair: 
          currentNode.getAdjacentNodes().entrySet()) {
            Node adjacentNode = adjacencyPair.getKey();
            Integer edgeWeight = adjacencyPair.getValue();
            if (!settledNodes.contains(adjacentNode)) {
                calculateMinimumDistance(adjacentNode, edgeWeight, currentNode);
                unsettledNodes.add(adjacentNode);
            }
        }
        settledNodes.add(currentNode);
    }
    return graph;
}

The getLowestDistanceNode() method, returns the node with the lowest distance from the unsettled nodes set, while the calculateMinimumDistance() method compares the actual distance with the newly calculated one while following the newly explored path:

private static Node getLowestDistanceNode(Set < Node > unsettledNodes) {
    Node lowestDistanceNode = null;
    int lowestDistance = Integer.MAX_VALUE;
    for (Node node: unsettledNodes) {
        int nodeDistance = node.getDistance();
        if (nodeDistance < lowestDistance) {
            lowestDistance = nodeDistance;
            lowestDistanceNode = node;
        }
    }
    return lowestDistanceNode;
}
private static void CalculateMinimumDistance(Node evaluationNode,
  Integer edgeWeigh, Node sourceNode) {
    Integer sourceDistance = sourceNode.getDistance();
    if (sourceDistance + edgeWeigh < evaluationNode.getDistance()) {
        evaluationNode.setDistance(sourceDistance + edgeWeigh);
        LinkedList<Node> shortestPath = new LinkedList<>(sourceNode.getShortestPath());
        shortestPath.add(sourceNode);
        evaluationNode.setShortestPath(shortestPath);
    }
}

Now that all the necessary pieces are in place, let’s apply the Dijkstra algorithm on the sample graph being the subject of the article:

Node nodeA = new Node("A");
Node nodeB = new Node("B");
Node nodeC = new Node("C");
Node nodeD = new Node("D"); 
Node nodeE = new Node("E");
Node nodeF = new Node("F");

nodeA.addDestination(nodeB, 10);
nodeA.addDestination(nodeC, 15);

nodeB.addDestination(nodeD, 12);
nodeB.addDestination(nodeF, 15);

nodeC.addDestination(nodeE, 10);

nodeD.addDestination(nodeE, 2);
nodeD.addDestination(nodeF, 1);

nodeF.addDestination(nodeE, 5);

Graph graph = new Graph();

graph.addNode(nodeA);
graph.addNode(nodeB);
graph.addNode(nodeC);
graph.addNode(nodeD);
graph.addNode(nodeE);
graph.addNode(nodeF);

graph = Dijkstra.calculateShortestPathFromSource(graph, nodeA);

After calculation, the shortestPath and distance attributes are set for each node in the graph, we can iterate through them to verify that the results match exactly what was found in the previous section.

4. Conclusion

In this article, we’ve seen how the Dijkstra algorithm solves the SPP, and how to implement it in Java.

The implementation of this simple project can be found in the following GitHub project link.

Introduction to Spring Reactor

$
0
0

1. Overview

In this quick article, we’ll introduce the Spring Reactor project. We’ll set up an a real-life scenario for a reactive, event-driven application.

2. The Basics of Spring Reactor

2.1. Why Reactor?

The reactive design pattern is an event-based architecture for asynchronous handling of a large volume of concurrent service requests coming from single or multiple service handlers.

And the Spring Reactor project is based on the this pattern and has the clear and ambitious goal of building asynchronous, reactive applications on the JVM.

2.2. Example Scenarios

Before we get started, here are a few interesting scenarios where leveraging the reactive architectural style will make sense, just to get an idea of where you might apply it:

  • Notification service of large online shopping application like Amazon
  • Huge transaction processing services of banking sector
  • Share trade business where share prices changes simultaneously

One quick note to be aware of is that the event bus implementation offers no persistence of events; just like the default Spring Event bus, it’s an in-memory implementation.

3. Maven Dependencies

Let’s start to use Spring Reactor by adding the following dependency into our pom.xml:

<dependency>
    <groupId>io.projectreactor</groupId>
    <artifactId>reactor-bus</artifactId>
    <version>2.0.8.RELEASE</version>
</dependency>

You can check the latest version of reactor-bus in Central Maven Repository.

4. Building a Demo Application

To better understand the benefits of the reactor-based approach, let’s look at a practical example.

We’re going to build a simple notification app, which would notify users via mail and SMS – after they finish their order on an online store.

A typical synchronous implementation would naturally be bound by the throughput of the SMS service. Spikes in traffic, such holidays would generally be problematic.

With a reactive approach, the system can be more flexible and adapt better to failures or timeouts in these types of external systems, such as SMS or email servers.

Let’s have a look at the application – starting with the more traditional aspects and moving on to the more reactive constructs.

4.1. Simple POJO

First, let’s create a POJO class to represent the notification data:

public class NotificationData {
	
    private long id;
    private String name;
    private String email;
    private String mobile;
    
    // getter and setter methods
}

4.2. The Service Layer

Let’s now set up a simple service layer:

public interface NotificationService {

    void initiateNotification(NotificationData notificationData) 
      throws InterruptedException;

}

And the implementation, simulating a long operation here:

@Service
public class NotificationServiceimpl implements NotificationService {
	
    @Override
    public void initiateNotification(NotificationData notificationData) 
      throws InterruptedException {

      System.out.println("Notification service started for "
        + "Notification ID: " + notificationData.getId());
		
      Thread.sleep(5000);
		
      System.out.println("Notification service ended for "
        + "Notification ID: " + notificationData.getId());
    }
}

Notice that to illustrate real life scenario of sending messages via SMS gateway or Email gateway, we’re intentionally introducing a 5 seconds delay in the initiateNotification method by Thread.sleep(5000). 

And so, when the thread hits the service – it will be blocked for 5 seconds.

4.3. The Consumer

Let’s now jump into the more reactive aspects of our application and implement a consumer – which we’ll then map to the reactor event bus:

@Service
public class NotificationConsumer implements 
  Consumer<Event<NotificationData>> {

    @Autowired
    private NotificationService notificationService;
	
    @Override
    public void accept(Event<NotificationData> notificationDataEvent) {
        NotificationData notificationData = notificationDataEvent.getData();
        
        try {
            notificationService.initiateNotification(notificationData);
        } catch (InterruptedException e) {
            // ignore        
        }	
    }
}

As you can see, the consumer is simply implementing Consumer<T> interface – with a single accept method. It’s this simple implementation that runs the main logic, just like a typical Spring listener.

4.4. The Controller

Finally, now that we’re able to consume the events, let’s also generate them.

We’re going to do that in a simple controller:

@Controller
public class NotificationController {

    @Autowired
    private EventBus eventBus;

    @GetMapping("/startNotification/{param}")
    public void startNotification(@PathVariable Integer param) {
        for (int i = 0; i < param; i++) {
            NotificationData data = new NotificationData();
            data.setId(i);

            eventBus.notify("notificationConsumer", Event.wrap(data));

            System.out.println(
              "Notification " + i + ": notification task submitted successfully");
        }
    }
}

This is quite self-explanatory – we’re sending events through the EventBus here – using a unique key.

So, simply put – when a client hits the URL with param value 10, a total of 10 events will be sent through the bus.

4.5. The Java Config

We’re almost done; let’s just put everything together with the Java Config and create our Boot application:

import static reactor.bus.selector.Selectors.$;

@Configuration
@EnableAutoConfiguration
@ComponentScan
public class Application implements CommandLineRunner {
	
    @Autowired
    private EventBus eventBus;
	
    @Autowired
    private NotificationConsumer notificationConsumer;
	
    @Bean
    Environment env() {
        return Environment.initializeIfEmpty().assignErrorJournal();
    }
    
    @Bean
    EventBus createEventBus(Environment env) {
        return EventBus.create(env, Environment.THREAD_POOL);
    }

    @Override
    public void run(String... args) throws Exception {
        eventBus.on($("notificationConsumer"), notificationConsumer);
    }

    public static void main(String[] args){
        SpringApplication.run(Application.class, args);
    }
}

It’s here that we’re creating the EventBus bean via the static create API in EventBus.

In our case, we’re instantiating the event bus with a default thread pool available in the environment.

If we wanted a bit more control over the bus, we could also provide a thread count to the implementation:

EventBus evBus = EventBus.create(
  env, 
  Environment.newDispatcher(
    REACTOR_THREAD_COUNT,REACTOR_THREAD_COUNT,   
    DispatcherType.THREAD_POOL_EXECUTOR));

Next – also notice how we’re using the static import of the $ attribute here. 

The feature provides a type-safe mechanism to include constants(in our case it’s $ attribute) into code without having to reference the class that originally defined the field.

We’re making use of this functionality in our run method implementation – where we’re registering our consumer to be triggered when the matching notification.

This is based on a unique selector key that enables each consumer to be identified.

5. Test the Application

After running a Maven build, we can now simply run java -jar name_of_the_application.jar to run the application.

Let’s now create a small JUnit test class to test the application. We would use Spring Boot’s SpringJUnit4ClassRunner to create the test case:

@RunWith(SpringJUnit4ClassRunner.class)
@ContextConfiguration(classes = {Application.class}) 
public class DataLoader {

    @Test
    public void exampleTest() {
        RestTemplate restTemplate = new RestTemplate();
        restTemplate.getForObject(
          "http://localhost:8080/startNotification/10", String.class);
    }
}

Now, let’s run this test case to test the application:

Notification 0: notification task submitted successfully
Notification 1: notification task submitted successfully
Notification 2: notification task submitted successfully
Notification 3: notification task submitted successfully
Notification 4: notification task submitted successfully
Notification 5: notification task submitted successfully
Notification 6: notification task submitted successfully
Notification 7: notification task submitted successfully
Notification 8: notification task submitted successfully
Notification 9: notification task submitted successfully
Notification service started for Notification ID: 1
Notification service started for Notification ID: 2
Notification service started for Notification ID: 3
Notification service started for Notification ID: 0
Notification service ended for Notification ID: 1
Notification service ended for Notification ID: 0
Notification service started for Notification ID: 4
Notification service ended for Notification ID: 3
Notification service ended for Notification ID: 2
Notification service started for Notification ID: 6
Notification service started for Notification ID: 5
Notification service started for Notification ID: 7
Notification service ended for Notification ID: 4
Notification service started for Notification ID: 8
Notification service ended for Notification ID: 6
Notification service ended for Notification ID: 5
Notification service started for Notification ID: 9
Notification service ended for Notification ID: 7
Notification service ended for Notification ID: 8
Notification service ended for Notification ID: 9

As you can see, as soon as the endpoint hit, all 10 tasks get submitted instantly without creating any blocking. And once submitted, the notification events get processed in parallel.

Keep in mind that in our scenario there’s no need to process these events in any order.

6. Conclusion

In this small application, we definitely get a throughput increase, along with a more well behaved application overall.

However, this scenario is just scratching the surface, and represents just a good base to start understanding the reactive paradigm.

As always, the source code is available over on GitHub.

Introduction to Nashorn

$
0
0

1. Introduction

This article is focused on Nashorn – the new default JavaScript engine for the JVM as of Java 8.

Many sophisticated techniques have been used to make Nashorn orders of magnitude more performant than its predecessor called Rhino, so it is a worthwhile change.

Let’s have a look at some of the ways in which it can be used.

2. Command Line

JDK 1.8 includes a command line interpreter called jjs which can be used to run JavaScript files or, if started with no arguments, as a REPL (interactive shell):

$ $JAVA_HOME/bin/jjs hello.js
Hello World

Here the file hello.js contains a single instruction: print(“Hello World”);

The same code can be run in the interactive manner:

$ $JAVA_HOME/bin/jjs
jjs> print("Hello World")
Hello World

You can also instruct the *nix runtime to use jjs for running a target script by adding a #!$JAVA_HOME/bin/jjs as the first line:

#!$JAVA_HOME/bin/jjs
var greeting = "Hello World";
print(greeting);

And then the file can be run as normal:

$ ./hello.js
Hello World

3. Embedded Script Engine

The second, and probably more common way to run JavaScript from within the JVM is via the ScriptEngine. JSR-223 defines a set of scripting APIs, allowing for a pluggable script engine architecture that can be used for any dynamic language (provided it has a JVM implementation, of course).

Let’s create a JavaScript engine:

ScriptEngine engine = new ScriptEngineManager().getEngineByName("nashorn");

Object result = engine.eval(
   "var greeting='hello world';" +
   "print(greeting);" +
   "greeting");

Here we create a new ScriptEngineManager and immediately ask it to give us a ScriptEngine named nashorn. Then, we pass a couple instructions and obtain the result which predictably, turns out to be a Stringhello world“.

4. Passing Data to the Script

Data can be passed into the engine by defining a Bindings object and passing it as a second parameter to the eval function:

Bindings bindings = engine.createBindings();
bindings.put("count", 3);
bindings.put("name", "baeldung");

String script = "var greeting='Hello ';" +
  "for(var i=count;i>0;i--) { " +
  "greeting+=name + ' '" +
  "}" +
  "greeting";

Object bindingsResult = engine.eval(script, bindings);

Running this snippet produces: “Hello baeldung baeldung baeldung“.

5. Invoking JavaScript Functions

It’s of course possible to call JavaScript functions from your Java code:

engine.eval("function composeGreeting(name) {" +
  "return 'Hello ' + name" +
  "}");
Invocable invocable = (Invocable) engine;

Object funcResult = invocable.invokeFunction("composeGreeting", "baeldung");

This will return “Hello baeldung“.

6. Using Java Objects 

Since we are running in the JVM it is possible to use native Java objects from within JavaScript code.

This is accomplished by using a Java object:

Object map = engine.eval("var HashMap = Java.type('java.util.HashMap');" +
  "var map = new HashMap();" +
  "map.put('hello', 'world');" +
  "map");

7. Language Extensions

Nashorn is targeting ECMAScript 5.1 but it does provide extensions to make JavaScript usage a tad nicer.

7.1. Iterating Collections with for-each

For-each is a convenient extension to make iteration over various collections easier:

String script = "var list = [1, 2, 3, 4, 5];" +
  "var result = '';" +
  "for each (var i in list) {" +
  "result+=i+'-';" +
  "};" +
  "print(result);";

engine.eval(script);

Here, we join elements of an array by using for-each iteration construct.

The resulting output will be 1-2-3-4-5-.

7.2. Function Literals

In simple function declarations you can omit curly braces:

function increment(in) ++in

Obviously, this can only be done for simple, one-liner functions.

7.3. Conditional Catch Clauses

It is possible to add guarded catch clauses that only execute if the specified condition is true:

try {
    throw "BOOM";
} catch(e if typeof e === 'string') {
    print("String thrown: " + e);
} catch(e) {
    print("this shouldn't happen!");
}

This will print “String thrown: BOOM“.

7.4. Typed Arrays and Type Conversions

It is possible to use Java typed arrays and to convert to and from JavaScript arrays:

function arrays(arr) {
    var javaIntArray = Java.to(arr, "int[]");
    print(javaIntArray[0]);
    print(javaIntArray[1]);
    print(javaIntArray[2]);
}

Nashorn performs some type conversions here to make sure that all the values from the dynamically typed JavaScript array can fit into the integer-only Java arrays.

The result of calling above function with argument [100, “1654”, true] results in the output of 100, 1654 and 1 (all numbers).

The String and boolean values were implicitly converted to their logical integer counterparts.

7.5. Setting Object’s Prototype with Object.setPrototypeOf

Nashorn defines an API extension that enables us to change the prototype of an object:

Object.setPrototypeOf(obj, newProto)

This function is generally considered a better alternative to Object.prototype.__proto__ so it should be the preferred way to set object’s prototype in all new code.

7.6. Magical __noSuchProperty__ and __noSuchMethod__

It is possible to define methods on an object that will be invoked whenever an undefined property is accessed or an undefined method is invoked:

var demo = {
    __noSuchProperty__: function (propName) {
        print("Accessed non-existing property: " + propName);
    },
	
    __noSuchMethod__: function (methodName) {
        print("Invoked non-existing method: " + methodName);
    }
};

demo.doesNotExist;
demo.callNonExistingMethod()

This will print:

Accessed non-existing property: doesNotExist
Invoked non-existing method: callNonExistingMethod

7.7. Bind Object Properties with Object.bindProperties

Object.bindProperties can be used to bind properties from one object into another:

var first = {
    name: "Whiskey",
    age: 5
};

var second = {
    volume: 100
};

Object.bindProperties(first, second);

print(first.volume);

second.volume = 1000;
print(first.volume);

Notice, that this creates is a “live” binding and any updates to the source object are also visible through the binding target.

7.8. Locations

Current file name, directory and a line can be obtained from global variables __FILE__, __DIR__, __LINE__:

print(__FILE__, __LINE__, __DIR__)

7.9. Extensions to String.prototype 

There are two simple, but very useful extensions that Nashorn provides on the String prototype. These are trimRight and trimLeft functions which, unsurprisingly, return a copy of the String with the whitespace removed:

print("   hello world".trimLeft());
print("hello world     ".trimRight());

Will print “hello world” twice without leading or trailing spaces.

7.10. Java.asJSONCompatible Function

Using this function, we can obtain an object that is compatible with Java JSON libraries expectations.

Namely, that if it itself, or any object transitively reachable through it is a JavaScript array, then such objects will be exposed as JSObject that also implements the List interface for exposing the array elements.

Object obj = engine.eval("Java.asJSONCompatible(
  { number: 42, greet: 'hello', primes: [2,3,5,7,11,13] })");
Map<String, Object> map = (Map<String, Object>)obj;
 
System.out.println(map.get("greet"));
System.out.println(map.get("primes"));
System.out.println(List.class.isAssignableFrom(map.get("primes").getClass()));

This will print “hello” followed by [2, 3, 5, 7, 11, 13] followed by true.

8. Loading Scripts

It’s also possible to load another JavaScript file from within the ScriptEngine:

load('classpath:script.js')

A script can also be loaded from a URL:

load('http://www.baeldung.com/script.js')

Keep in mind that JavaScript does not have a concept of namespaces so everything gets piled on into the global scope. This makes it possible for loaded scripts to create naming conflicts with your code or each other. This can be mitigated by using the loadWithNewGlobal function:

var math = loadWithNewGlobal('classpath:math_module.js')
math.increment(5);

With the following math_module.js:

var math = {
    increment: function(num) {
        return ++num;
    }
};

math;bai

Here we are defining an object named math that has a single function called increment. Using this paradigm we can even emulate basic modularity!

8. Conclusion

This article explored some features of the Nashorn JavaScript engine. Examples showcased here used string literal scripts, but for real-life scenarios you most likely want to keep your script in separate files and load them using a Reader class.

As always, the code in this write-up is all available over on Github.

Introduction to PMD

$
0
0

1. Overview

Simply put, PMD is a source code analyzer to find common programming flaws like unused variables, empty catch blocks, unnecessary object creation, and so forth.

It supports Java, JavaScript, Salesforce.com Apex, PLSQL, Apache Velocity, XML, XSL.

In this article, we’ll focus on how to use PMD to perform static analysis in a Java project.

2. Prerequisites

Let’s start with setting up PMD into a Maven project – using and configuring the maven-pmd-plugin:

<project>
    ...
    <reporting>
        <plugins>
            <plugin>
                <groupId>org.apache.maven.plugins</groupId>
                <artifactId>maven-pmd-plugin</artifactId>
                <version>3.7</version>
                <configuration>
                    <rulesets>
                        <ruleset>/rulesets/java/braces.xml</ruleset>
                        <ruleset>/rulesets/java/naming.xml</ruleset>
                    </rulesets>
                </configuration>
            </plugin>
        </plugins>
    </reporting>
</project>

You can find the latest version of maven-pmd-plugin here.

Notice how we’re adding rulesets in the configuration here – these are a relative path to already define rules from the PMD core library.

Finally, before running everything, let’s create a simple Java class with some glaring issues – something that PMD can start reporting problems on:

public class Ct {

    public int d(int a, int b) {
        if (b == 0)
            return Integer.MAX_VALUE;
        else
            return a / b;
    }
}

3. Run PMD

With the simple PMD config and the sample code – let’s generate a report in the build target folder:

mvn site

The generated report is called pmd.html and is located in the target/site folder:

Files

com/baeldung/pmd/Cnt.java

Violation                                                                             Line

Avoid short class names like Cnt                                   1–10 
Avoid using short method names                                  3 
Avoid variables with short names like b                        3 
Avoid variables with short names like a                        3 
Avoid using if...else statements without curly braces 5 
Avoid using if...else statements without curly braces 7 

As you can see – we’re not getting results. The report shows violations and line numbers in your Java code, according to PMD.

4. Rulesets

The PMD plugin uses five default rulesets:

  • basic.xml
  • empty.xml
  • imports.xml
  • unnecessary.xml
  • unusedcode.xml

You may use other rulesets or create your own rulesets, and configure these in the plugin:

<project>
    ...
    <reporting>
        <plugins>
            <plugin>
                <groupId>org.apache.maven.plugins</groupId>
                <artifactId>maven-pmd-plugin</artifactId>
                <version>3.7</version>
                <configuration>
                    <rulesets>
                        <ruleset>/rulesets/java/braces.xml</ruleset>
                        <ruleset>/rulesets/java/naming.xml</ruleset>
                        <ruleset>/usr/pmd/rulesets/strings.xml</ruleset>
                        <ruleset>http://localhost/design.xml</ruleset>
                    </rulesets>
                </configuration>
            </plugin>
        </plugins>
    </reporting>
</project>

Notice that we’re using either a relative address, an absolute address or even a URL – as the value of the ‘ruleset’ value in configuration.

A clean strategy for customizing which rules to use for a project is to write a custom ruleset file. In this file, we can define which rules to use, add custom rules, and customize which rules to include/exclude from the official rulesets.

5. Custom Ruleset

Let’s now choose the specific rules we want to use from existing sets of rules in PMD – and let’s also customize them.

First, we’ll create a new ruleset.xml file. We can of course use one of the existing rulesets files as an example and copy and paste that into our new file, delete all the old rules from it, and change the name and description:

<?xml version="1.0"?>
<ruleset name="Custom ruleset"
  xmlns="http://pmd.sourceforge.net/ruleset/2.0.0"
  xmlns:xsi="http://www.w3.org/2001/XMLSchema-instance"
  xsi:schemaLocation="http://pmd.sourceforge.net/ruleset/2.0.0
  http://pmd.sourceforge.net/ruleset_2_0_0.xsd">
    <description>
        This ruleset checks my code for bad stuff
    </description>
</ruleset>

Secondly, let’s add some rule references:

<!-- We'll use the entire 'strings' ruleset -->
<rule ref="rulesets/java/strings.xml"/>

Or add some specific rules:

<rule ref="rulesets/java/unusedcode.xml/UnusedLocalVariable"/>
<rule ref="rulesets/java/unusedcode.xml/UnusedPrivateField"/>
<rule ref="rulesets/java/imports.xml/DuplicateImports"/>
<rule ref="rulesets/java/basic.xml/UnnecessaryConversionTemporary"/>

We can customize the message and priority of the rule:

<rule ref="rulesets/java/basic.xml/EmptyCatchBlock"
  message="Must handle exceptions">
    <priority>2</priority>
</rule>

And you also can customize a rule’s property value like this:

<rule ref="rulesets/java/codesize.xml/CyclomaticComplexity">
    <properties>
        <property name="reportLevel" value="5"/>
    </properties>
</rule>

Notice that you can customize individual referenced rules. Everything but the class of the rule can be overridden in your custom ruleset.

Next – you can also excluding rules from a ruleset:

<rule ref="rulesets/java/braces.xml">
    <exclude name="WhileLoopsMustUseBraces"/>
    <exclude name="IfElseStmtsMustUseBraces"/>
</rule>

Next – you can also exclude files from a ruleset using exclude patterns, with an optional overriding include pattern.

A file will be excluded from processing when there is a matching exclude pattern, but no matching include pattern.

Path separators in the source file path are normalized to be the ‘/’ character, so the same ruleset can be used on multiple platforms transparently.

Additionally, this exclude/include technique works regardless of how PMD is used (e.g. command line, IDE, Ant), making it easier to keep the application of your PMD rules consistent throughout your environment.

Here’s a quick example:

<?xml version="1.0"?>
<ruleset ...>
    <description>My ruleset</description>
    <exclude-pattern>.*/some/package/.*</exclude-pattern>
    <exclude-pattern>
       .*/some/other/package/FunkyClassNamePrefix.*
    </exclude-pattern>
    <include-pattern>.*/some/package/ButNotThisClass.*</include-pattern>
    <rule>...
</ruleset>

6. Conclusion

In this quick article we introduced PMD – a flexible and highly configurable tool focused on static analysis of Java code

As always, the full code presented in this tutorial is available over on Github.

Spring Performance Logging

$
0
0

1. Overview

In this tutorial, we’ll look into a couple of basic options the Spring Framework offers for performance monitoring.

2. PerformanceMonitorInterceptor

A simple solution to get basic monitoring functionality for the execution time of our methods, we can make use of the PerformanceMonitorInterceptor class out of Spring AOP (Aspect Oriented Programming).

Spring AOP allows the defining of cross-cutting concerns in applications, meaning code that intercepts the execution of one or more methods, in order to add extra functionality.

The PerformanceMonitorInterceptor class is an interceptor that can be associated with any custom method to be executed at the same time. This class uses a StopWatch instance to determine the beginning and ending time of the method run.

Let’s create a simple Person class and a PersonService class with two methods that we will monitor:

public class Person {
    private String lastName;
    private String firstName;
    private LocalDate dateOfBirth;

    // standard constructors, getters, setters
}
public class PersonService {
    
    public String getFullName(Person person){
        return person.getLastName()+" "+person.getFirstName();
    }
    
    public int getAge(Person person){
        Period p = Period.between(person.getDateOfBirth(), LocalDate.now());
        return p.getYears();
    }
}

In order to make use of the Spring monitoring interceptor, we need to define a pointcut and advisor:

@Configuration
@EnableAspectJAutoProxy
@Aspect
public class AopConfiguration {
    
    @Pointcut(
      "execution(public String com.baeldung.performancemonitor.PersonService.getFullName(..))"
    )
    public void monitor() { }
    
    @Bean
    public PerformanceMonitorInterceptor performanceMonitorInterceptor() {
        return new PerformanceMonitorInterceptor(true);
    }

    @Bean
    public Advisor performanceMonitorAdvisor() {
        AspectJExpressionPointcut pointcut = new AspectJExpressionPointcut();
        pointcut.setExpression("com.baeldung.performancemonitor.AopConfiguration.monitor()");
        return new DefaultPointcutAdvisor(pointcut, performanceMonitorInterceptor());
    }
    
    @Bean
    public Person person(){
        return new Person("John","Smith", LocalDate.of(1980, Month.JANUARY, 12));
    }
 
    @Bean
    public PersonService personService(){
        return new PersonService();
    }
}

The pointcut contains an expression that identifies the methods that we want to be intercepted — in our case the getFullName() method of the PersonService class.

After configuring the performanceMonitorInterceptor() bean, we need to associate the interceptor with the pointcut. This is achieved through an advisor, as shown in the example above.

Finally, the @EnableAspectJAutoProxy annotation enables AspectJ support for our beans. Simply put, AspectJ is a library created to make the use of Spring AOP easier through convenient annotations like @Pointcut.

After creating the configuration, we need to set the log level of the interceptor class to TRACE, as this is the level at which it logs messages.

For example, using Jog4j, we can achieve this through the log4j.properties file:

log4j.logger.org.springframework.aop.interceptor.PerformanceMonitorInterceptor=TRACE, stdout

For every execution of the getAge() method, we will see the TRACE message in the console log:

2017-01-08 19:19:25 TRACE 
  PersonService:66 - StopWatch 
  'com.baeldung.performancemonitor.PersonService.getFullName': 
  running time (millis) = 10

3. Custom Performance Monitoring Interceptor

If we want more control over the way the performance monitoring is done, we can implement our own custom interceptor.

For this, let’s extend the AbstractMonitoringInterceptor class and override the invokeUnderTrace() method to log the start, end, and duration of a method, as well as a warning if the method execution lasts more than 10 ms:

public class MyPerformanceMonitorInterceptor extends AbstractMonitoringInterceptor {
    
    public MyPerformanceMonitorInterceptor() {
    }

    public MyPerformanceMonitorInterceptor(boolean useDynamicLogger) {
            setUseDynamicLogger(useDynamicLogger);
    }

    @Override
    protected Object invokeUnderTrace(MethodInvocation invocation, Log log) 
      throws Throwable {
        String name = createInvocationTraceName(invocation);
        long start = System.currentTimeMillis();
        log.info("Method " + name + " execution started at:" + new Date());
        try {
            return invocation.proceed();
        }
        finally {
            long end = System.currentTimeMillis();
            long time = end - start;
            log.info("Method "+name+" execution lasted:"+time+" ms");
            log.info("Method "+name+" execution ended at:"+new Date());
            
            if (time > 10){
                log.warn("Method execution longer than 10 ms!");
            }            
        }
    }
}

The same steps for associating the custom interceptor to one or more methods as in the preceding section need to be followed.

Let’s define a pointcut for the getAge() method of PersonService and associate it to the interceptor we have created:

@Pointcut("execution(public int com.baeldung.performancemonitor.PersonService.getAge(..))")
public void myMonitor() { }
    
@Bean
public MyPerformanceMonitorInterceptor myPerformanceMonitorInterceptor() {
    return new MyPerformanceMonitorInterceptor(true);
}
    
@Bean
public Advisor myPerformanceMonitorAdvisor() {
    AspectJExpressionPointcut pointcut = new AspectJExpressionPointcut();
    pointcut.setExpression("com.baeldung.performancemonitor.AopConfiguration.myMonitor()");
    return new DefaultPointcutAdvisor(pointcut, myPerformanceMonitorInterceptor());
}

Let’s sets the log level to INFO for the custom interceptor:

log4j.logger.com.baeldung.performancemonitor.MyPerformanceMonitorInterceptor=INFO, stdout

The execution of the getAge() method produced the following output:

2017-01-08 19:19:25 INFO PersonService:26 - 
  Method com.baeldung.performancemonitor.PersonService.getAge 
  execution started at:Sun Jan 08 19:19:25 EET 2017
2017-01-08 19:19:25 INFO PersonService:33 - 
  Method com.baeldung.performancemonitor.PersonService.getAge execution lasted:50 ms
2017-01-08 19:19:25 INFO PersonService:34 - 
  Method com.baeldung.performancemonitor.PersonService.getAge 
  execution ended at:Sun Jan 08 19:19:25 EET 2017
2017-01-08 19:19:25 WARN PersonService:37 - 
  Method execution longer than 10 ms!

4. Conclusion

In this quick tutorial, we’ve introduced simple performance monitoring in Spring.

As always, the full source code for this article can be found over on Github.

How to Work with Dates in Thymeleaf

$
0
0

1. Introduction

Thymeleaf is a Java template engine designed to work directly with Spring. For an intro to Thymeleaf and Spring, have a look at this write-up.

Besides these basic functions, Thymeleaf offers us a set of utility objects that will help us perform common tasks in our application.

In this article, we will discuss the processing and formatting of the new and old Java Date classes with handful features of Thymeleaf 3.0.

2. Maven Dependencies

First, let’s see the configuration needed to integrate Thymeleaf with Spring into our pom.xml:

<dependency>
    <groupId>org.thymeleaf</groupId>
    <artifactId>thymeleaf</artifactId>
    <version>3.0.3.RELEASE</version>
</dependency>
<dependency>
    <groupId>org.thymeleaf</groupId>
    <artifactId>thymeleaf-spring4</artifactId>
    <version>3.0.3.RELEASE</version>
</dependency>

The latest versions of thymeleaf and thymeleaf-spring4 can be found on Maven Central. Note that, for a Spring 3 project, the thymeleaf-spring3 library must be used instead of thymeleaf-spring4.

Moreover, in order to work with new Java 8 Date classes, we will add the following dependency to our pom.xml:

<dependency>
    <groupId>org.thymeleaf.extras</groupId>
    <artifactId>thymeleaf-extras-java8time</artifactId>
    <version>3.0.0.RELEASE</version>
</dependency>

The thymeleaf extras is an optional module, fully supported by the official Thymeleaf team, that was created for compatibility with the Java 8 Time API. It adds a #temporals object to the Context as a utility object processor during expression evaluations. This means that it can be used to evaluate expressions in Object-Graph Navigation Language (OGNL) and Spring Expression Language (SpringEL).

3. Old and New: java.util and java.time

The Time package is a new date, time, and calendar API for the Java SE platform. The main difference between old legacy Date and is that the new API distinguishes between machine and human views of a timeline. The machine view reveals a sequence of integral values relative to the epoch, whereas view reveals a set of fields (e.g., year or day).

To work with new Time package, we need to configure our template engine to use the new Java8TimeDialect:

private TemplateEngine templateEngine(ITemplateResolver templateResolver) {
    SpringTemplateEngine engine = new SpringTemplateEngine();
    engine.addDialect(new Java8TimeDialect());
    engine.setTemplateResolver(templateResolver);
    return engine;
}

This will add the #temporals object similar to the ones in the Standard Dialect, allowing the formatting and creation of Temporal objects from Thymeleaf templates.

In order to test the processing of new and old classes, we’ll create the following variables and add them as model objects to our controller class:

model.addAttribute("standardDate", new Date());
model.addAttribute("localDateTime", LocalDateTime.now());
model.addAttribute("localDate", LocalDate.now());
model.addAttribute("timestamp", Instant.now());

Now we are ready to use Expression and Temporals Utility Objects provided by Thymeleaf.

3.1. Format Dates

The first function that we want to cover is formatting of a Date object (which is added to the Spring model parameters). We decided to use ISO8601 format:

<h1>Format ISO</h1>
<p th:text="${#dates.formatISO(standardDate)}"></p>
<p th:text="${#temporals.formatISO(localDateTime)}"></p>
<p th:text="${#temporals.formatISO(localDate)}"></p>
<p th:text="${#temporals.formatISO(timestamp)}"></p>

No matter how our Date was set on the back-end side, it will be shown accordingly to selected standard. The standardDate is going to be processed by the #dates utility. The new LocalDateTime, LocalDate and Instant classes are going to be processed by the #temporals utility. This is the final result we’ll see in the browser:

This is the final result we’ll see in the browser:

Moreover, if we want to set the format manually, we can do it by using:

<h1>Format manually</h1>
<p th:text="${#dates.format(standardDate, 'dd-MM-yyyy HH:mm')}"></p>
<p th:text="${#temporals.format(localDateTime, 'dd-MM-yyyy HH:mm')}"></p>
<p th:text="${#temporals.format(localDate, 'MM-yyyy')}"></p>

As we can observe, we cannot process the Instant class with #temporals.format(…) — it will result in UnsupportedTemporalTypeException. Moreover, formatting the LocalDate is only possible if we’ll specify only the particular date fields, skipping the time fields.

The final result:

3.2. Obtain Specific Date Fields

In order to obtain the specific fields of the java.util.Date class, we should use the following utility objects:

${#dates.day(date)}
${#dates.month(date)}
${#dates.monthName(date)}
${#dates.monthNameShort(date)}
${#dates.year(date)}
${#dates.dayOfWeek(date)}
${#dates.dayOfWeekName(date)}
${#dates.dayOfWeekNameShort(date)}
${#dates.hour(date)}
${#dates.minute(date)}
${#dates.second(date)}
${#dates.millisecond(date)}

For the new java.time package, we should stick with #temporals utilities:

${#temporals.day(date)}
${#temporals.month(date)}
${#temporals.monthName(date)}
${#temporals.monthNameShort(date)}
${#temporals.year(date)}
${#temporals.dayOfWeek(date)}
${#temporals.dayOfWeekName(date)}
${#temporals.dayOfWeekNameShort(date)}
${#temporals.hour(date)}
${#temporals.minute(date)}
${#temporals.second(date)}
${#temporals.millisecond(date)}

Let’s look at a few examples. First, let’s show today’s day of the week:

<h1>Show only which day of a week</h1>
<p th:text="${#dates.day(standardDate)}"></p>
<p th:text="${#temporals.day(localDateTime)}"></p>
<p th:text="${#temporals.day(localDate)}"></p>

Next, let’s show the name of the week day:

<h1>Show the name of the week day</h1>
<p th:text="${#dates.dayOfWeekName(standardDate)}"></p>
<p th:text="${#temporals.dayOfWeekName(localDateTime)}"></p>
<p th:text="${#temporals.dayOfWeekName(localDate)}"></p>

And finally, let’s show the current second of the day:

<h1>Show the second of the day</h1>
<p th:text="${#dates.second(standardDate)}"></p>
<p th:text="${#temporals.second(localDateTime)}"></p>

Please note that in order to work with time parts, you would need to use LocalDateTime, as LocalDate will throw an error.

4. Conclusion

In this quick tutorial, we discussed Java Date processing features implemented in the Thymeleaf framework, version 3.0.

The full implementation of this tutorial can be found in the GitHub project – this is a Maven-based project that is easy to import and run.

How to test? Our suggestion is to play with the code in a browser first, then check our existing JUnit tests as well.

Please note that our examples do not cover all available options in Thymeleaf. If you want to learn about all types of utilities, then take a look at our article covering Spring and Thymeleaf Expressions.


A Custom Data Binder in Spring MVC

$
0
0

1. Overview

This article will show how we can use Spring’s Data Binding mechanism in order to make our code more clear and readable by applying automatic primitives to objects conversions.

2. Bind Request Parameters

By default, Spring only knows how to convert simple types. In other words, once we submit data to controller Int, String or Boolean type of data, it will be bound to appropriate Java types automatically.

But in real-world projects, that won’t be enough, as we might need to bind more more complex types of objects.

2.1. Individual Objects

Let’s start simple and first bind a simple type; we’ll have to provide a custom implementation of the Converter<S, T> interface where S is the type we are converting from, and T is the type we are converting to:

@Component
public class StringToLocalDateTimeConverter
  implements Converter<String, LocalDateTime> {

    @Override
    public LocalDateTime convert(String source) {
        return LocalDateTime.parse(
          source, DateTimeFormatter.ISO_LOCAL_DATE_TIME);
    }
}

Now we can use the following syntax in our controller:

@GetMapping("/findbydate/{date}")
public GenericEntity findByDate(@PathVariable("date") LocalDateTime date) {
    return ...;
}

2.2. Hierarchy of Objects

Sometimes we need to convert the entire tree of the object hierarchy and it makes sense to have a more centralized binding rather than a set of individual converters.

In this case, we can implement ConverterFactory<S, R> where S will be the type we are converting from and R to be the base type defining the range of classes we can convert to:

@Component
public class StringToEnumConverterFactory
  implements ConverterFactory<String, Enum> {

    private static class StringToEnumConverter<T extends Enum> 
      implements Converter<String, T> {

        private Class<T> enumType;

        public StringToEnumConverter(Class<T> enumType) {
            this.enumType = enumType;
        }

        public T convert(String source) {
            return (T) Enum.valueOf(this.enumType, source.trim());
        }
    }

    @Override
    public <T extends Enum> Converter<String, T> getConverter(
      Class<T> targetType) {
        return new StringToEnumConverter(targetType);
    }
}

As we can see, the only method that must implement is getConverter() which returns converter for needed type. The conversion process then is delegated to this converter.

So, suppose we have an Enum:

public enum Modes {
    ALPHA, BETA;
}

We can let Spring convert incoming values automatically:

@GetMapping("/findbymode/{mode}")
public GenericEntity findByEnum(@PathVariable("mode") Modes mode) {
    return ...;
}

3. Bind Domain Objects

There are cases when we want to bind data to objects, but it comes either in a non-direct way (for example, from Session, Header or Cookie variables) or even stored in a data source. In those cases, we need to use a different solution.

3.1. Custom Argument Resolver

First of all, we will define an annotation for such parameters:

@Retention(RetentionPolicy.RUNTIME)
@Target(ElementType.PARAMETER)
public @interface Version {
}

Then, we will implement a custom HandlerMethodArgumentResolver:

public class HeaderVersionArgumentResolver
  implements HandlerMethodArgumentResolver {

    @Override
    public boolean supportsParameter(MethodParameter methodParameter) {
        return methodParameter.getParameterAnnotation(Version.class) != null;
    }

    @Override
    public Object resolveArgument(
      MethodParameter methodParameter, 
      ModelAndViewContainer modelAndViewContainer, 
      NativeWebRequest nativeWebRequest, 
      WebDataBinderFactory webDataBinderFactory) throws Exception {
 
        HttpServletRequest request 
          = (HttpServletRequest) nativeWebRequest.getNativeRequest();

        return request.getHeader("Version");
    }
}

The last thing is letting Spring know where to search for them:

@Configuration
public class WebConfig extends WebMvcConfigurerAdapter {

    //...

    @Override
    public void addArgumentResolvers(
      List<HandlerMethodArgumentResolver> argumentResolvers) {
        argumentResolvers.add(new HeaderVersionArgumentResolver());
    }
}

That’s it. Now we can use it in a controller:

@GetMapping("/entity/{id}")
public ResponseEntity findByVersion(
  @PathVariable Long id, @Version String version) {
    return ...;
}

As we can see, HandlerMethodArgumentResolver‘s resolveArgument() method returns an Object. In other words, we could return any object, not only String.

4. Conclusion

As a result, we got rid of many routine conversions and let Spring do most stuff for us. At the end, let’s conclude:

  • For individual simple type to object conversions we should use Converter implementation
  • For encapsulating conversion logics for range of objects, we can try ConverterFactory implementation
  • For any data comes indirectly or it is required to apply additional logics to retrieve the associated data it’s better to use HandlerMethodArgumentResolver

As usually, all the examples can be always found at our GitHub repository.

A Guide to MongoDB with Java

$
0
0

1. Overview

In this article, we’ll have a look at integrating MongoDB, a very popular NoSQL open source database with a standalone Java client.

MongoDB is written in C++ and has quite a number of solid features such as map-reduce, auto-sharding, replication, high availability etc.

2. MongoDB

Let’s start with a few key points about MongoDB itself:

  • stores data in JSON-like documents that can have various structures
  • uses dynamic schemas, which means that we can create records without predefining anything
  • the structure of a record can be changed simply by adding new fields or deleting existing ones

The above-mentioned data model gives us the ability to represent hierarchical relationships, to store arrays and other more complex structures easily.

3. Terminologies

Understanding concepts in MongoDB becomes easier if we can compare them to relational database structures.

Let’s see the analogies between Mongo and a traditional MySQL system:

  • Table in MySQL becomes a Collection in Mongo
  • Row becomes a Document
  • Column becomes a Field
  • Joins are defined as linking and embedded documents

This is a simplistic way to look at the MongoDB core concepts of course, but nevertheless useful.

Now, let’s dive into implementation to understand this powerful database.

4. Maven Dependencies

We need to start by defining the dependency of a Java Driver for MongoDB:

<dependency>
    <groupId>org.mongodb</groupId>
    <artifactId>mongo-java-driver</artifactId>
    <version>3.4.1</version>
</dependency>

To check if any new version of the library has been released – track the releases here.

5. Using MongoDB

Now, let’s start implementing Mongo queries with Java. We will follow with the basic CRUD operations as they are the best to start with.

5.1. Make a Connection with MongoClient

First, let’s make a connection to a MongoDB server. With version >= 2.10.0, we’ll use the MongoClient:

MongoClient mongoClient = new MongoClient("localhost", 27017);

And for older versions use Mongo class:

Mongo mongo = new Mongo("localhost", 27017);

5.2. Connecting to a Database

Now, let’s connect to our database. It is interesting to note that we don’t need to create one. When Mongo sees that database doesn’t exist, it will create it for us:

DB database = mongoClient.getDB("myMongoDb");

Sometimes, by default, MongoDB runs in authenticated mode. In that case, we need to authenticate while connecting to a database.

We can do it as presented below:

MongoClient mongoClient = new MongoClient();
DB database = mongoClient.getDB("myMongoDb");
boolean auth = database.authenticate("username", "pwd".toCharArray());

5.3. Show Existing Databases

Let’s display all existing databases. When we want to use command line, the syntax to show databases is similar to MySQL:

show databases;

In Java, we display databases using snippet below:

mongoClient.getDatabaseNames().forEach(System.out::println);

The output will be:

local      0.000GB
myMongoDb  0.000GB

Above, local is the default Mongo database.

5.4. Create a Collection

Let’s start by creating a Collection (table equivalent for MongoDB) for our database. Once we have connected to our database, we can make a Collection as:

database.createCollection("customers", null);

Now, let’s display all existing collections for current database:

database.getCollectionNames().forEach(System.out::println);

The output will be:

customers

5.5. Save – Insert

The save operation has save-or-update semantics: if an id is present, it performs an update, if not – it does an insert.

When we save a new customer:

DBCollection collection = database.getCollection("customers");
BasicDBObject document = new BasicDBObject();
document.put("name", "Shubham");
document.put("company", "Baeldung");
collection.insert(document);

The entity will be inserted into a database:

{
    "_id" : ObjectId("33a52bb7830b8c9b233b4fe6"),
    "name" : "Shubham",
    "company" : "Baeldung"
}

Next, we’ll look at the same operation – save – with update semantics.

5.6. Save – Update

Let’s now look at save with update semantics, operating on an existing customer:

{
    "_id" : ObjectId("33a52bb7830b8c9b233b4fe6"),
    "name" : "Shubham",
    "company" : "Baeldung"
}

Now, when we save the existing customer – we will update it:

BasicDBObject query = new BasicDBObject();
query.put("name", "Shubham");

BasicDBObject newDocument = new BasicDBObject();
newDocument.put("name", "John");

BasicDBObject updateObject = new BasicDBObject();
updateObject.put("$set", newDocument);

collection.update(query, updateObject);

The database will look like this:

{
    "_id" : ObjectId("33a52bb7830b8c9b233b4fe6"),
    "name" : "John",
    "company" : "Baeldung"
}

As you can see, in this particular example, save uses the semantics of update, because we use object with given _id.

5.7. Read a Document from a Collection

Let’s search for a Document in a Collection by making a query:

BasicDBObject searchQuery = new BasicDBObject();
searchQuery.put("name", "John");
DBCursor cursor = collection.find(searchQuery);

while (cursor.hasNext()) {
    System.out.println(cursor.next());
}

It will show the only Document we have by now in our Collection:

[
    {
      "_id" : ObjectId("33a52bb7830b8c9b233b4fe6"),
      "name" : "John",
      "company" : "Baeldung"
    }
]

5.8. Delete a Document

Let’s move forward to our last CRUD operation, deletion:

BasicDBObject searchQuery = new BasicDBObject();
searchQuery.put("name", "John");

collection.remove(searchQuery);

With above command executed, our only Document will be removed from the Collection.

6. Conclusion

This article was a quick introduction to using MongoDB from Java.

The implementation of all these examples and code snippets can be found over on GitHub – this is a Maven based project, so it should be easy to import and run as it is.

Parsing HTML in Java with Jsoup

$
0
0

1. Overview

Jsoup is an open source Java library used mainly for extracting data from HTML. It also allows you to manipulate and output HTML. It has a steady development line, great documentation, and a fluent and flexible API. Jsoup can also be used to parse and build XML.

In this tutorial, we’ll use the Spring Blog to illustrate a scraping exercise that demonstrates several features of jsoup:

  • Loading: fetching and parsing the HTML into a Document
  • Filtering: selecting the desired data into Elements and traversing it
  • Extracting: obtaining attributes, text, and HTML of nodes
  • Modifying: adding/editing/removing nodes and editing their attributes

2. Maven Dependency

To make use of the jsoup library in your project, add the dependency to your pom.xml:

<dependency>
    <groupId>org.jsoup</groupId>
    <artifactId>jsoup</artifactId>
    <version>1.10.2</version>
</dependency>

You can find the latest version of jsoup in the Maven Central repository.

3. Jsoup at a Glance

Jsoup loads the page HTML and builds the corresponding DOM tree. This tree works the same way as the DOM in a browser, offering methods similar to jQuery and vanilla JavaScript to select, traverse, manipulate text/HTML/attributes and add/remove elements.

If you’re comfortable with client-side selectors and DOM traversing/manipulation, you’ll find jsoup very familiar. Check how easy it is to print the paragraphs of a page:

Document doc = Jsoup.connect("http://example.com").get();
doc.select("p").forEach(System.out::println);

Bear in mind that jsoup interprets HTML only — it does not interpret JavaScript. Therefore changes to the DOM that would normally take place after page loads in a JavaScript-enabled browser will not be seen in jsoup.

4. Loading

The loading phase comprises the fetching and parsing of the HTML into a Document. Jsoup guarantees the parsing of any HTML, from the most invalid to the totally validated ones, as a modern browser would do. It can be achieved by loading a String, an InputStream, a File or a URL.

Let’s load a Document from the Spring Blog URL:

String blogUrl = "https://spring.io/blog";
Document doc = Jsoup.connect(blogUrl).get();

Notice the get method, it represents an HTTP GET call. You could also do an HTTP POST with the post method (or you could use a method which receives the HTTP method type as a parameter).

If you need to detect abnormal status codes (e.g. 404), you should catch the HttpStatusException exception:

try {
   Document doc404 = Jsoup.connect("https://spring.io/will-not-be-found").get();
} catch (HttpStatusException ex) {
   //...
}

Sometimes, the connection needs to be a bit more customized. Jsoup.connect(…) returns a Connection which allows you to set, among other things, the user agent, referrer, connection timeout, cookies, post data, and headers:

Connection connection = Jsoup.connect(blogUrl);
connection.userAgent("Mozilla");
connection.timeout(5000);
connection.cookie("cookiename", "val234");
connection.referrer("http://google.com");
connection.header("headersecurity", "xyz123");
Document docCustomConn = connection.get();

Since the connection follows a fluent interface, you can chain these methods before calling the desired HTTP method:

Document docCustomConn = Jsoup.connect(blogUrl)
  .userAgent("Mozilla")
  .timeout(5000)
  .cookie("cookiename", "val234")
  .cookie("anothercookie", "ilovejsoup")
  .referrer("http://google.com")
  .header("headersecurity", "xyz123")
  .get();

You can learn more about the Connection settings by browsing the corresponding Javadoc.

5. Filtering

Now that we have the HTML converted into a Document, it’s time to navigate it and find what we are looking for. This is where the resemblance with jQuery/JavaScript is more evident, as its selectors and traversing methods are similar.

5.1. Selecting

The Document select method receives a String representing the selector, using the same selector syntax as in a CSS or JavaScript, and retrieves the matching list of Elements. This list can be empty but not null.

Let’s take a look at some selections using the select method:

Elements links = doc.select("a");
Elements sections = doc.select("section");
Elements logo = doc.select(".spring-logo--container");
Elements pagination = doc.select("#pagination_control");
Elements divsDescendant = doc.select("header div");
Elements divsDirect = doc.select("header > div");

You can also use more explicit methods inspired by the browser DOM instead of the generic select:

Element pag = doc.getElementById("pagination_control");
Elements desktopOnly = doc.getElementsByClass("desktopOnly");

Since Element is a superclass of Document, you can learn more about working with the selection methods in the Document and Element Javadocs.

5.2. Traversing

Traversing means navigating across the DOM tree. Jsoup provides methods that operate on the Document, on a set of Elements, or on a specific Element, allowing you to navigate to a node’s parents, siblings, or children.

Also, you can jump to the first, the last, and the nth (using a 0-based index) Element in a set of Elements:

Element firstSection = sections.first();
Element lastSection = sections.last();
Element secondSection = sections.get(2);
Elements allParents = firstSection.parents();
Element parent = firstSection.parent();
Elements children = firstSection.children();
Elements siblings = firstSection.siblingElements();

You can also iterate through selections. In fact, anything of type Elements can be iterated:

sections.forEach(el -> System.out.println("section: " + el));

You can make a selection restricted to a previous selection (sub-selection):

Elements sectionParagraphs = firstSection.select(".paragraph");

6. Extracting

We now know how to reach specific elements, so it’s time to get their content — namely their attributes, HTML, or child text.

Take a look at this example that selects the first article from the blog and gets its date, its first section text, and finally, its inner and outer HTML:

Element firstArticle = doc.select("article").first();
Element timeElement = firstArticle.select("time").first();
String dateTimeOfFirstArticle = timeElement.attr("datetime");
Element sectionDiv = firstArticle.select("section div").first();
String sectionDivText = sectionDiv.text();
String articleHtml = firstArticle.html();
String outerHtml = firstArticle.outerHtml();

Here are some tips to bear in mind when choosing and using selectors:

  • Rely on “View Source” feature of your browser and not only on the page DOM as it might have changed (selecting at the browser console might yield different results than jsoup)
  • Know your selectors as there are a lot of them and it’s always good to have at least seen them before; mastering selectors takes time
  • Use a playground for selectors to experiment with them (paste a sample HTML there)
  • Be less dependent on page changes: aim for the smallest and least compromising selectors (e.g. prefer id. based)

7. Modifying

Modifying encompasses setting attributes, text, and HTML of elements, as well as appending and removing elements. It is done to the DOM tree previously generated by jsoup – the Document.

7.1. Setting Attributes and Inner Text/HTML

As in jQuery, the methods to set attributes, text, and HTML bear the same names but also receive the value to be set:

  • attr() – sets an attribute’s values (it creates the attribute if it does not exist)
  • text() – sets element inner text, replacing content
  • html() – sets element inner HTML, replacing content

Let’s look at a quick example of these methods:

timeElement.attr("datetime", "2016-12-16 15:19:54.3");
sectionDiv.text("foo bar");
firstArticle.select("h2").html("<div><span></span></div>");

7.2. Creating and Appending Elements

To add a new element, you need to build it first by instantiating Element. Once the Element has been built, you can append it to another Element using the appendChild method. The newly created and appended Element will be inserted at the end of the element where appendChild is called:

Element link = new Element(Tag.valueOf("a"), "")
  .text("Checkout this amazing website!")
  .attr("href", "http://baeldung.com")
  .attr("target", "_blank");
firstArticle.appendChild(link);

7.3. Removing Elements

To remove elements, you need to select them first and run the remove method.

For example, let’s remove all <li> tags that contain the “navbar-link” class from Document, and all images from the first article:

doc.select("li.navbar-link").remove();
firstArticle.select("img").remove();

7.4. Converting the Modified Document to HTML

Finally, since we were changing the Document, we might want to check our work.

To do this, we can explore the Document DOM tree by selecting, traversing, and extracting using the presented methods, or we can simply extract its HTML as a String using the html() method:

String docHtml = doc.html();

The String output is a tidy HTML.

8. Conclusion

Jsoup is a great library to scrape any page. If you’re using Java and don’t require browser-based scraping, it’s a library to take into account. It’s familiar and easy to use since it makes use of the knowledge you may have on front-end development and follows good practices and design patterns.

You can learn more about scraping web pages with jsoup by studying the jsoup API and reading the jsoup cookbook.

The source code used in this tutorial can be found in the GitHub project.
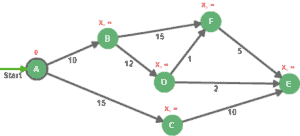
Java Web Weekly, Issue 159

$
0
0

1. Spring and Java

>> Java 9 Will Change the Way You Traverse Stack Traces [takipi.com]

The upcoming Java release will feature a very interesting Stack-Walking API.

>> Feedback on Feeding Spring Boot metrics to Elasticsearch [frankel.ch]

A short tutorial explaining how to integrate Spring Boot metrics with Elasticsearch.

>> Java Enums to Be Enhanced with Sharper Type Support [infoq.com]

Java Enums will get some enhancements. Not in Java 9 though 🙂

>> The truth about Optional [insaneprogramming.be]

Optional is not a panacea. Use it where it was designed to be used.

>> Fixing Bugs in Running Java Code with Dynamic Attach [sitepoint.com]

About patching JVM applications on the fly 🙂

>> Why HTTP/2 with TLS is not supported properly in Java – And what you can do about it [vanwilgenburg.com]

An in-depth insight into a compatibility of TLS-enabled HTTP/2 and Java.

>> 2017 Predictions [adambien.blog]

Adam Bien’s 11 predictions for 2017.

>> Staring Into My Java Crystal Ball [azul.com]

And another writeup focused on 2017, this time all about the upcoming Java releases.

>> The JVM is not that heavy [opensourcery.co.za]

Some actual numbers opposing the “JVM is to heavy” direction.

>> Jigsaw’s Missing Pieces [wildfly.org]

Notes from the Wildfly lead on the state of the Jigsaw implementation, and more importantly the gaps in that implementation.

Also worth reading:

Webinars and presentations:

Time to upgrade:

2. Technical

>> The Dark Path [cleancoder.com]

Uncle Bob’s thoughts about features available in languages such as Kotlin or Swift.

>> Semantic Versioning is not enough [scottlogic.com]

A few thoughts about the flaws of Semantic Versioning.

>> Flexible group-based permissions management! [dynatrace.com]

This is supposed to be an internal update from Dynatrace.

Ignoring that aspect entirely – it’s a solid, mature example of how a permission management UI can be implemented.

Also worth reading:

3. Musings

>> If You Build It, They Won’t Come [daedtech.com]

Do not underestimate the power of the sales and marketing 🙂

>> Publicly Dogfooding Your Culture [zachholman.com]

A very interesting write-up about the importance of transparency when growing a company.

>> Choose wisely [ontestautomation.com]

A few thoughts about APIs and automated testing.

Also worth reading:

4. Comics

And my favorite Dilberts of the week:

>> I’m your CEO, but I’m still like a regular person [dilbert.com]

>> It takes money to make money [dilbert.com]

>> This went differently than expected [dilbert.com]

5. Pick of the Week

>> Quitting something you love [sivers.org]

A Guide to the Spring Task Scheduler

$
0
0

1. Overview

In this article, we’ll discuss the Spring task scheduling mechanismsTaskScheduler and it’s pre-built implementations along with the different triggers to use. If you want to read more about scheduling in Spring, check @Async and @Scheduled articles.

TaskScheuler was introduced in Spring 3.0 with a variety of methods to run at some point in the future, it also returns a representation object of ScheduledFuture interface, which could be used to cancel scheduled task or check if it’s done or not.

All we need to do is to select a runnable task for scheduling then select a proper scheduling policy.

2. ThreadPoolTaskScheduler

ThreadPoolTaskScheduler is well suited for internal thread management, as it delegates tasks to the ScheduledExecutorService and implements the TaskExecutor interface – so that single instance of it is able to handle asynchronous potential executions as well as the @Scheduled annotation.

Let’s now define ThreadPoolTaskScheduler bean at ThreadPoolTaskSchedulerConfig:

@Configuration
@ComponentScan(
  basePackages="org.baeldung.taskscheduler",
  basePackageClasses={ThreadPoolTaskSchedulerExamples.class})
public class ThreadPoolTaskSchedulerConfig {

    @Bean
    public ThreadPoolTaskScheduler threadPoolTaskScheduler(){
        ThreadPoolTaskScheduler threadPoolTaskScheduler
          = new ThreadPoolTaskScheduler();
        threadPoolTaskScheduler.setPoolSize(5);
        threadPoolTaskScheduler.setThreadNamePrefix(
          "ThreadPoolTaskScheduler");
        return threadPoolTaskScheduler;
    }
}

The configured bean threadPoolTaskScheduler can execute tasks asynchronously based on the configured pool size of 5.

Note that all ThreadPoolTaskScheduler related thread names will be prefixed with ThreadPoolTaskScheduler.

Let’s implement a simple task we can then schedule:

class RunnableTask implements Runnable{
    private String message;
    
    public RunnableTask(String message){
        this.message = message;
    }
    
    @Override
    public void run() {
        System.out.println(new Date()+" Runnable Task with "+message
          +" on thread "+Thread.currentThread().getName());
    }
}

We can now simple schedule this task to be executed by the scheduler:

taskScheduler.schedule(
  new Runnabletask("Specific time, 3 Seconds from now"),
  new Date(System.currentTimeMillis + 3000)
);

The taskScheduler will schedule this runnable task at a known date, exactly 3 seconds after the current time.

Let’s now go a bit more in depth with the ThreadPoolTaskScheduler scheduling mechanisms.

3. Schedule Runnable task with Fixed Delay

Scheduling with a fixed delay can be done with two simple mechanisms:

3.1. Scheduling after a Fixed Delay of  The Last Scheduled Execution

Let’s configure a task to run after a fixed delay of 1000 milliseconds:

taskScheduler.scheduleWithFixedDelay(
  new RunnableTask("Fixed 1 second Delay"), 1000);

The RunnableTask will always run 1000 milliseconds later between the completion of one execution and the start of the next.

3.2. Scheduling after a Fixed Delay of a Specific Date

Let’s configure a task to run after a fixed delay of a given start time:

taskScheduler.scheduleWithFixedDelay(
  new RunnableTask("Current Date Fixed 1 second Delay"),
  new Date(),
  1000);

The RunnableTask will be invoked at the specified execution time which mainly the time in which @PostConstruct method starts and subsequently with 1000 milliseconds delay.

4. Scheduling at a Fixed Rate

There are two simple mechanisms for scheduling runnable tasks at fixed rate:

4.1. Scheduling The RunnableTask at a Fixed Rate

Let’s schedule a task to run at a fixed rate of milliseconds:

taskScheduler.scheduleAtFixedRate(
  new RunnableTask("Fixed Rate of 2 seconds") , 2000);

The next RunnableTask will run always after 2000 milliseconds no matter the status of last execution which may be still running.

4.2. Scheduling The RunnableTask at a Fixed Rate from a Given Date

taskScheduler.scheduleAtFixedRate(new RunnableTask(
  "Fixed Rate of 2 seconds"), new Date(), 3000);

The RunnableTask will run 3000 milliseconds after the current time.

5. Scheduling with CronTrigger

CronTrigger is used to schedule a task based on a cron expression:

CronTrigger cronTrigger 
  = new CronTrigger("10 * * * * ?");

The provided trigger can be used to run a task according to a certain specified cadence or schedule:

taskScheduler.schedule(new RunnableTask("Cron Trigger"), cronTrigger);

In this case, the RunnableTask will be executed at the 10th second of every minute.

6. Scheduling with PeriodicTrigger

Let’s use PeriodicTrigger for scheduling a task with a fixed delay of 2000 milliseconds:

PeriodicTrigger periodicTrigger 
  = new PeriodicTrigger(2000, TimeUnit.MICROSECONDS);

The configured PeriodicTrigger bean would be used to run a task after a fixed delay of 2000 millisecond.

Now let’s schedule the RunnableTask with the PeriodicTrigger:

taskScheduler.schedule(
  new RunnableTask("Periodic Trigger"), periodicTrigger);

We also can configure PeriodicTrigger to be initialized at a fixed rate rather than fixed delay, also we can set an initial delay for the first scheduled task by a given milliseconds.

All we need to do is to add two lines of code before return statement at the periodicTrigger bean:

periodicTrigger.setFixedRate(true);
periodicTrigger.setInitialDelay(1000);

We used setFixedRate method to schedule the task at fixed rate rather than with a fixed delay, then setInitialDelay method is used to set initial delay only for the first runnable task to run.

7. Conclusion

In this quick article, we’ve illustrated how to schedule a runnable task using the Spring support for tasks.

We looked at running the task with a fixed delay, at a fixed rate and according to a specified trigger.

And, as always, the code is available as a Maven project over in Github.

Viewing all 4867 articles
Browse latest View live