Quantcast
Channel: Baeldung
Viewing all 4464 articles
Browse latest View live

Format Swagger Text Descriptions

$
0
0

1. Introduction

The OpenAPI specification (formerly Swagger specification) standardizes REST API documentation language and is platform agnostic. We can create OpenAPI documents in YAML or JSON formats.

On the other hand, Swagger is a collection of tools for implementing and working with the standard. Some are free, some are open-source, and some are commercial. These tools help us to design, document, and consume the REST APIs.

In this article, we'll learn how to format text descriptions in our OpenAPI documents.

2. OpenAPI Editors

Several tools support us in creating OpenAPI documents. A few popular tools are:

Several other editors provide support in creating OpenAPI documents. However, the most popular and widely used editor is Swagger Editor. Hence, we'll learn about formatting our OpenAPI documents with the help of Swagger Editor.

3. YAML vs. JSON Formatting

An OpenAPI document is represented either in JSON or YAML format. However, formatting the documentation is straightforward while using YAML.

For instance, to mark a word or a sentence as a heading, we use the below snippet in YAML:

 description: |
    # This is a heading in *italics*
    This is in the next line
    
    This is in **bold**

The YAML representation uses a | (pipe) to represent scalar literals, which can be multi-line.

Now, Let's define the same thing in JSON:

{
    "description": "# This is a heading in *italics*\nThis is in the next line\n\nThis is in **bold**
}

Comparatively, in JSON representation, the escape sequences make the formatting counter-intuitive. Henceforth, we'll only look at formatting techniques for OpenAPI specification documents written in YAML.

Finally, OpenAPI specification allows the formatting of description fields at all levels. Thus, according to the specification, wherever the description field is permissible, we can format it, and the description field conforms to the CommonMark formatting style.

Now, let's enhance our API documents by formatting them.

4. Headings

Like we use <h1> to <h6> headings in HTML, we can use markdown headings to highlight the text. A # represents a heading. We can use # up to six levels to emphasize the text. The higher the number of #, the lesser the text emphasis is.

A text followed by a # is brighter and bigger than a text accompanied by ######.

For instance, consider the YAML:

openapi: 3.0.1
info:
  title: Petstore
  description: |
    # Pet Store APIs
    ## This is a sample Petstore server
    ### Contains APIs to manage the pet store
    #### Note that the APIs support Basic Authentication and OAUTH
    ##### The samples contain Request and Response models
    ###### There are status codes defined as well

Swagger renders the text as:

5. Text Emphasis

To enhance the readability of the description text, we can emphasize it by making it bold or italic.

Placing a text between ** and ** or within __ and __ makes the text bold. Similarly, placing the text within * and * or _ and _ will make the text italics. For instance, for the YAML:

openapi: 3.0.1
info:
  title: Petstore
  description: |
    ## This document contains  
    
    **Pet Store APIs** *Note: All the APIs return application/json*.  
    __User APIs__  _Note: These APIs contain attachments and only support image/jpeg as the content type_

Swagger renders the YAML as:

6. Tables

Next, let's see how to add tables to our OpenAPI documents.

There are a set of rules to be followed to render tables. Firstly, each column in the table should start and end with a | (pipe) symbol. Secondly, divide each of the table headers with at least one – (hyphen) symbol. However, the maximum number of – (hyphen) is not restricted.

For instance, let's add a table to define HTTP status codes for our POST API:

paths:
  /pet:
    post:
      tags:
      - pet
      description: |
        
        **The below table defines the HTTP Status codes that this API may return**
        
        | Status Code      | Description | Reason                             |
        | ---------------- | ------------| -----------------------------------|
        | 201              | CREATED     | If a pet is created successfuly.   |
        | 400              | BAD REQUEST | If the request is not valid.       |
        | 401              | UNAUTHORIZED| If the credentials are invalid.    |

Swagger generates:

7. Lists

Now, let's see how to format the description text to contain lists.

7.1. Ordered List

The description text items should start with a number followed by a . (period). However, the numbering order of the items isn't essential. That is, the snippets:

description: |
  1. Available
  3. Pending
  1. Sold
description: |
  1. Available
  200. Pending
  30. Sold
description: |
  1. Available
  100. Pending
  50. Sold

generate the same output:

1. Available
2. Pending
3. Sold

The numbering of the items depends on the starting item. For instance, if we start the item number with 10, the following items will be numbered 11, 12, 13, etc. The below YAML:

description: |
  10. Available
  120. Pending
  50. Sold

generates:

10. Available
11. Pending
12. Sold

Similarly, the same rules apply for ordered sub-lists as well. Indent a sub-list to its parent item. As an example, consider the YAML:

description: |
  1. Available
  2. Pending
     1. Pending in Store
     200. Pending in Cart
  3. Sold

which generates:

1. Available
2. Pending
    1. Pending in Store
    2. Pending in Cart
3. Sold

7.2. Unordered List

Use * (asterisks) or + (plus) or a – (hyphen) to create an unordered list. That is, each item in the list should begin with one of these symbols. For example:

description: |
  * Available
  * Pending
  * Sold
description: |
  + Available
  + Pending
  + Sold
description: |
  - Available
  - Pending
  - Sold

all the above snippets generate an unordered list.

Similarly, to generate unordered sub-lists, indent the items with their parent item and start with a * (asterisks) or + (plus) or a – (hyphen). For instance, the YAML:

- Available
- Pending
   * Pending in Store
   + Pending in Cart
- Sold

generates an unordered list with a sub-list. Note the mix and match of the delimiters. It is possible to mix the delimiters, which create the same results.

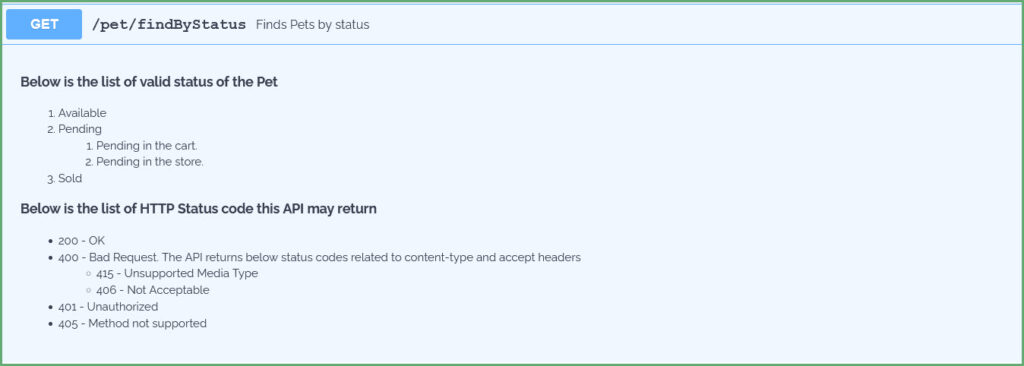
Finally, let's place all this together into a YAML:

/pet/findByStatus:
   get:
     summary: Finds Pets by status
     description: | 
       __Below is the list of valid status of the Pet__  
        
       1. Available
       2. Pending
          1. Pending in the cart
          2. Pending in the store 
       3. Sold  
        
       **Below is the list of HTTP Status code this API may return**
       * 200 - OK
       * 400 - Bad Request. The API returns below status codes related to content-type and accept headers
         + 415 - Unsupported Media Type
         - 406 - Not Acceptable
       * 401 - Unauthorized
       * 405 - Method not supported

This YAML generates:

8. Miscellaneous

8.1. Line Breaks and Paragraphs

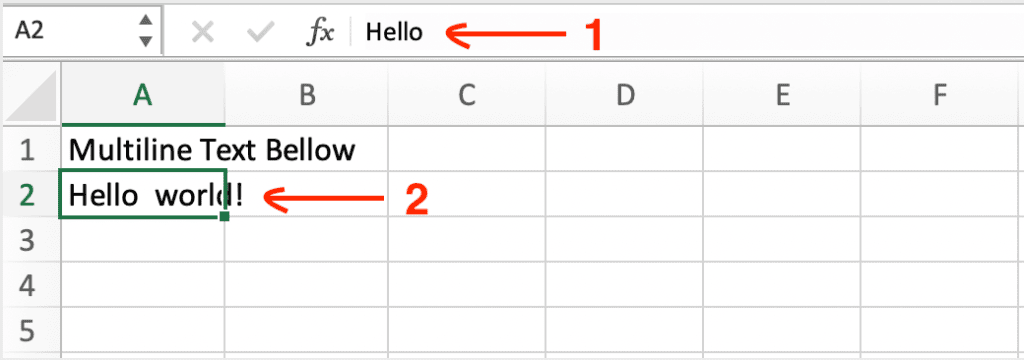
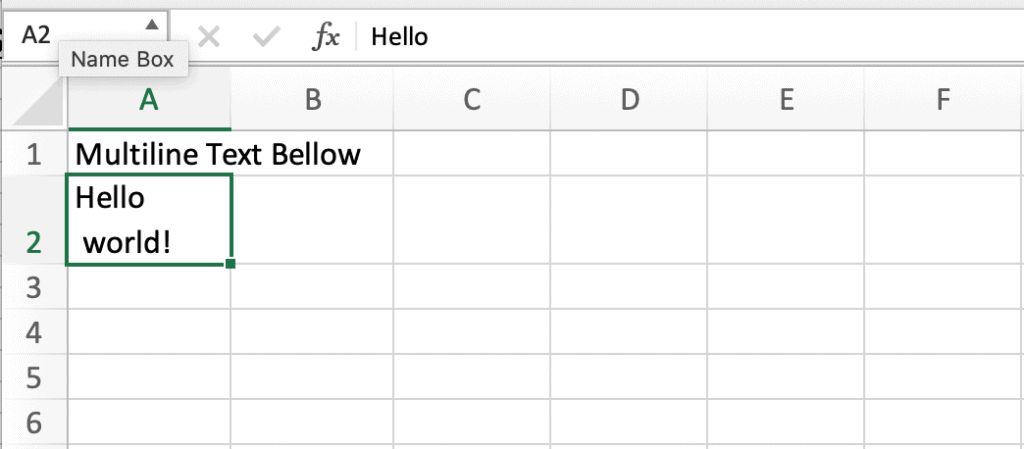
Next, to insert a linebreak, type two spaces and the return key. Note that just providing a return key does not align the text to the following line. Similarly, to insert a paragraph, insert an empty line.
Now, let's add a few line breaks and paragraphs to our description:
description: |
  Returns a single pet.  
  *Note: The API may throw a HTTP 404 if there are no pets found with a given id.*
  
  The API returns a 200 OK if there is a pet with given Id. Also, this API returns the status of the pet
  

This YAML generates:

8.2. Code

Next, let's add a bit of code to our OpenAPI document. Code blocks start and end with “`. For example, consider the YAML:
description: |
  The API returns user details for a given username. 
  The API can be invoked using *curl* like below:
  ```
  curl --header accept: application/json -u username:password http://localhost:8080/api/v2/user/jhondoe
  ```
  **Sample Output**
  ```
  {
    "id": 2,
    "username": "jhondoe"
    "email": "jhon.doe@mail.com"
  }
  ```
The above YAML generates:

8.3. Images

Finally, to add an image to the document, the image has to be added to description text in the format:
![Alt Text](<path to image>)
Swagger uses the Alt Text when the images fail to load or when we hover over the image. Also, the path to the image could be absolute or relative. Consider the YAML:
description: |
   # Pet Store APIs
   ![Baeldung](https://www.baeldung.com/wp-content/uploads/2017/06/homepage-weekly_reviews.jpg)
Swagger generates:

9. Conclusion

In this article, we have seen how to format the description field in our OpenAPI documents. YAML scalar literals enable the formatting of the description across the document. Consequently, an OpenAPI document can contain any or all of the supported constructs, such as lists, tables, and images.

Thus, documenting an API improves the ease of use. After all, well-documented and formatted APIs are what we all want for easy integrations and consumption.


Remove Accents and Diacritics From a String in Java

$
0
0

1. Overview

Many alphabets contain accent and diacritical marks. To search or index data reliably, we might want to convert a string with diacritics to a string containing only ASCII characters. Unicode defines a text normalization procedure that helps do this.

In this tutorial, we’ll see what Unicode text normalization is, how we can use it to remove diacritical marks, and the pitfalls to watch out for. Then, we will see some examples using the Java Normalizer class and Apache Commons StringUtils.

2. The Problem at a Glance

Let's say that we are working with text containing the range of diacritical marks we want to remove:

āăąēîïĩíĝġńñšŝśûůŷ

After reading this article, we'll know how to get rid of diacritics and end up with:

aaaeiiiiggnnsssuuy

3. Unicode Fundamentals

Before jumping straight into code, let's learn some Unicode basics.

To represent a character with a diacritical or accent mark, Unicode can use different sequences of code points. The reason for that is historical compatibility with older characters sets.

Unicode normalization is the decomposition of characters using equivalence forms defined by the standard.

3.1. Unicode Equivalence Forms

To compare sequences of code points, Unicode defines two terms: canonical equivalence and compatibility.

Canonically equivalent code points have the same appearance and meaning when displayed. For example, the letter “ś” (Latin letter “s” with acute) can be represented with one code point +U015B or two code points +U0073 (Latin letter “s”) and +U0301 (acute symbol).

On the other hand, compatible sequences can have distinct appearances but the same meaning in some contexts. For instance, the code point +U013F (Latin ligature “Ŀ”) is compatible with the sequence +U004C (Latin letter “L”) and +U00B7 (symbol “·”). Moreover, some fonts can show the middle dot inside the L and some following it.

Canonically equivalent sequences are compatible, but the opposite is not always true.

3.2. Character Decomposition

Character decomposition replaces the composite character with code points of a base letter, followed by combining characters (according to the equivalence form). For example, this procedure will decompose the letter “ā” into characters “a” and “-“.

3.3. Matching Diacritical and Accent Marks

Once we have separated the base character from the diacritical mark, we must create an expression matching unwanted characters. We can use either a character block or a category.

The most popular Unicode code block is Combining Diacritical Marks. It is not very large and contains just 112 most common combining characters. On the other side, we can also use the Unicode category Mark. It consists of code points that are combining marks and divides further into three subcategories:

  • Nonspacing_Mark: this category includes 1,839 code points
  • Enclosing_Mark: contains 13 code points
  • Spacing_Combining_Mark: contains 443 points

The major difference between a Unicode character block and category is that the character block contains a contiguous range of characters. On the other side, a category can have many character blocks. For example, it is precisely the case of Combining Diacritical Marks: all code points belonging to this block are also included in the Nonspacing_Mark category.

4. Algorithm

Now that we understand the base Unicode terms, we can plan the algorithm to remove diacritical marks from a String.

First, we will separate base characters from accent and diacritical marks using the Normalizer class. Moreover, we will perform the compatibility decomposition represented as the Java enum NFKD. Additionally, we use compatibility decomposition because it decomposes more ligatures than the canonical method (for example, ligature “fi”).

Second, we will remove all characters matching the Unicode Mark category using the \p{M} regex expression. We pick this category because it offers the broadest range of marks.

5. Using Core Java

Let's start with some examples using core Java.

5.1. Check if a String Is Normalized

Before we perform a normalization, we might want to check that the String isn't already normalized:

assertFalse(Normalizer.isNormalized("āăąēîïĩíĝġńñšŝśûůŷ", Normalizer.Form.NFKD));

5.2. String Decomposition

If our String is not normalized, we proceed to the next step. To separate ASCII characters from diacritical marks, we will perform Unicode text normalization using compatibility decomposition:

private static String normalize(String input) {
    return input == null ? null : Normalizer.normalize(input, Normalizer.Form.NFKD);
}

After this step, both letters “â” and “ä” will be reduced to “a” followed by respective diacritical marks.

5.3. Removal of Code Points Representing Diacritical and Accent Marks

Once we have decomposed our String, we want to remove unwanted code points. Therefore, we will use the Unicode regular expression \p{M}:

static String removeAccents(String input) {
    return normalize(input).replaceAll("\\p{M}", "");
}

5.4. Tests

Let's see how our decomposition works in practice. Firstly, let's pick characters having normalization form defined by Unicode and expect to remove all diacritical marks:

@Test
void givenStringWithDecomposableUnicodeCharacters_whenRemoveAccents_thenReturnASCIIString() {
    assertEquals("aaaeiiiiggnnsssuuy", StringNormalizer.removeAccents("āăąēîïĩíĝġńñšŝśûůŷ"));
}

Secondly, let's pick a few characters without decomposition mapping:

@Test
void givenStringWithNondecomposableUnicodeCharacters_whenRemoveAccents_thenReturnOriginalString() {
    assertEquals("łđħœ", StringNormalizer.removeAccents("łđħœ"));
}

As expected, our method was unable to decompose them.

Additionally, we can create a test to validate the hex codes of decomposed characters:

@Test
void givenStringWithDecomposableUnicodeCharacters_whenUnicodeValueOfNormalizedString_thenReturnUnicodeValue() {
    assertEquals("\\u0066 \\u0069", StringNormalizer.unicodeValueOfNormalizedString("fi"));
    assertEquals("\\u0061 \\u0304", StringNormalizer.unicodeValueOfNormalizedString("ā"));
    assertEquals("\\u0069 \\u0308", StringNormalizer.unicodeValueOfNormalizedString("ï"));
    assertEquals("\\u006e \\u0301", StringNormalizer.unicodeValueOfNormalizedString("ń"));
}

5.5. Compare Strings Including Accents Using Collator

Package java.text includes another interesting class – Collator. It enables us to perform locale-sensitive String comparisons. An important configuration property is the Collator's strength. This property defines the minimum level of difference considered significant during a comparison.

Java provides four strength values for a Collator:

  • PRIMARY: comparison omitting case and accents
  • SECONDARY: comparison omitting case but including accents and diacritics
  • TERTIARY: comparison including case and accents
  • IDENTICAL: all differences are significant

Let's check some examples, first with primary strength:

Collator collator = Collator.getInstance();
collator.setDecomposition(2);
collator.setStrength(0);
assertEquals(0, collator.compare("a", "a"));
assertEquals(0, collator.compare("ä", "a"));
assertEquals(0, collator.compare("A", "a"));
assertEquals(1, collator.compare("b", "a"));

Secondary strength turns on accent sensitivity:

collator.setStrength(1);
assertEquals(1, collator.compare("ä", "a"));
assertEquals(1, collator.compare("b", "a"));
assertEquals(0, collator.compare("A", "a"));
assertEquals(0, collator.compare("a", "a"));

Tertiary strength includes case:

collator.setStrength(2);
assertEquals(1, collator.compare("A", "a"));
assertEquals(1, collator.compare("ä", "a"));
assertEquals(1, collator.compare("b", "a"));
assertEquals(0, collator.compare("a", "a"));
assertEquals(0, collator.compare(valueOf(toChars(0x0001)), valueOf(toChars(0x0002))));

Identical strength makes all differences important. The penultimate example is interesting, as we can detect the difference between Unicode control code points +U001 (code for “Start of Heading”) and +U002 (“Start of Text”):

collator.setStrength(3);
assertEquals(1, collator.compare("A", "a"));
assertEquals(1, collator.compare("ä", "a"));
assertEquals(1, collator.compare("b", "a"));
assertEquals(-1, collator.compare(valueOf(toChars(0x0001)), valueOf(toChars(0x0002))));
assertEquals(0, collator.compare("a", "a")));

One last example worth mentioning shows that if the character doesn't have a defined decomposition rule, it won't be considered equal to another character with the same base letter. This is due to the fact that Collator won't be able to perform the Unicode decomposition:

collator.setStrength(0);
assertEquals(1, collator.compare("ł", "l"));
assertEquals(1, collator.compare("ø", "o"));

6. Using Apache Commons StringUtils

Now that we've seen how to use core Java to remove accents, we'll check what Apache Commons Text offers. As we'll soon learn, it's easier to use, but we have less control over the decomposition process. Under the hood it uses the Normalizer.normalize() method with NFD decomposition form and \p{InCombiningDiacriticalMarks} regular expression:

static String removeAccentsWithApacheCommons(String input) {
    return StringUtils.stripAccents(input);
}

6.1. Tests

Let's see this method in practice — first, only with decomposable Unicode characters:

@Test
void givenStringWithDecomposableUnicodeCharacters_whenRemoveAccentsWithApacheCommons_thenReturnASCIIString() {
    assertEquals("aaaeiiiiggnnsssuuy", StringNormalizer.removeAccentsWithApacheCommons("āăąēîïĩíĝġńñšŝśûůŷ"));
}

As expected, we got rid of all the accents.

Let's try a string containing ligature and letters with stroke:

@Test 
void givenStringWithNondecomposableUnicodeCharacters_whenRemoveAccentsWithApacheCommons_thenReturnModifiedString() {
    assertEquals("lđħœ", StringNormalizer.removeAccentsWithApacheCommons("łđħœ"));
}

As we can see, the StringUtils.stripAccents() method manually defines the translation rule for Latin ł and Ł characters. But, unfortunately, it doesn't normalize other ligatures.

7. Limitations of Character Decomposition in Java

To sum up, we saw that some characters do not have defined decomposition rules. More specifically, Unicode doesn't define decomposition rules for ligatures and characters with the stroke. Because of that, Java won't be able to normalize them, either. If we want to get rid of these characters, we have to define transcription mapping manually.

Finally, it's worth considering whether we need to get rid of accents and diacritics. For some languages, a letter stripped from diacritical marks won't make much sense. In such cases, a better idea is to use the Collator class and compare two Strings, including locale information.

8. Conclusion

In this article, we looked into removing accents and diacritical marks using core Java and the popular Java utility library, Apache Commons. We also saw a few examples and learned how to compare text containing accents, as well as a few things to watch out for when working with text containing accents.

As always, the full source code of the article is available over on GitHub.


Parallel Test Execution for JUnit 5

$
0
0

1. Introduction

In this article, we'll cover how to execute parallel unit tests using JUnit 5. First, we'll cover basic configuration and minimal requirements to start using this feature. Next, we'll show code examples for different situations, and in the end, we'll talk about the synchronization of shared resources.

Parallel test execution is an experimental feature available as an opt-in since version 5.3.

2. Configuration

First, we need to create a junit-platform.properties file in our src/test/resources folder to enable parallel test execution. We enable the parallelization feature by adding the following line in the mentioned file:

junit.jupiter.execution.parallel.enabled = true

Let's check our configuration by running a few tests. First, we'll create the FirstParallelUnitTest class and two tests in it:

public class FirstParallelUnitTest{
    @Test
    public void first() throws Exception{
        System.out.println("FirstParallelUnitTest first() start => " + Thread.currentThread().getName());
        Thread.sleep(500);
        System.out.println("FirstParallelUnitTest first() end => " + Thread.currentThread().getName());
    }
    @Test
    public void second() throws Exception{
        System.out.println("FirstParallelUnitTest second() start => " + Thread.currentThread().getName());
        Thread.sleep(500);
        System.out.println("FirstParallelUnitTest second() end => " + Thread.currentThread().getName());
    }
}

When we run our tests, we get the following output in the console:

FirstParallelUnitTest second() start => ForkJoinPool-1-worker-19
FirstParallelUnitTest second() end => ForkJoinPool-1-worker-19
FirstParallelUnitTest first() start => ForkJoinPool-1-worker-19
FirstParallelUnitTest first() end => ForkJoinPool-1-worker-19

In this output, we can notice two things. First, our tests run sequentially. Second, we use the ForkJoin thread pool. By enabling parallel execution, the JUnit engine starts using the ForkJoin thread pool.

Next, we need to add a configuration to utilize this thread pool. We need to choose a parallelization strategy. JUnit provides two implementations (dynamic and fixed) and a custom option to create our implementation.

Dynamic strategy determines the number of threads  based on the number of processors/cores multiplied by factor parameter (defaults to 1) specified using:

junit.jupiter.execution.parallel.config.dynamic.factor

On the other hand, the fixed strategy relies on a predefined number of threads specified by:

junit.jupiter.execution.parallel.config.fixed.parallelism

To use the custom strategy, we need to create it first by implementing the ParallelExecutionConfigurationStrategy interface.

3. Test Parallelization Within a Class

We already enabled parallel execution and picked a strategy. Now it's time to execute tests in parallel within the same class. There are two ways to configure this. One is using @Execution(ExecutionMode.CONCURRENT) annotation, and the second is using properties file and line:

junit.jupiter.execution.parallel.mode.default = concurrent

After we choose how to configure this and running our FirstParallelUnitTest class, we can see the following output:

FirstParallelUnitTest second() start => ForkJoinPool-1-worker-5
FirstParallelUnitTest first() start => ForkJoinPool-1-worker-19
FirstParallelUnitTest second() end => ForkJoinPool-1-worker-5
FirstParallelUnitTest first() end => ForkJoinPool-1-worker-19

From the output, we can see that both tests start simultaneously and in two different threads. Note that output can change from one run to another. This is expected when using the ForkJoin thread pool.

There is also an option to run all tests within the FirstParallelUnitTest class in the same thread. In the current scope, using parallelism and the same thread option is not viable so let's expand our scope and add one more test class in the next section.

4. Test Parallelization Within a Module

Before we introduce a new property, we'll create SecondParallelUnitTest class that has two methods similar to FirstParallelUnitTest:

public class SecondParallelUnitTest{
    @Test
    public void first() throws Exception{
        System.out.println("SecondParallelUnitTest first() start => " + Thread.currentThread().getName());
        Thread.sleep(500);
        System.out.println("SecondParallelUnitTest first() end => " + Thread.currentThread().getName());
    }
    @Test
    public void second() throws Exception{
        System.out.println("SecondParallelUnitTest second() start => " + Thread.currentThread().getName());
        Thread.sleep(500);
        System.out.println("SecondParallelUnitTest second() end => " + Thread.currentThread().getName());
    }
}

Before we run our tests in the same batch, we need to set property:

junit.jupiter.execution.parallel.mode.classes.default = concurrent

When we run both tests classes, we get the following output:

SecondParallelUnitTest second() start => ForkJoinPool-1-worker-23
FirstParallelUnitTest first() start => ForkJoinPool-1-worker-19
FirstParallelUnitTest second() start => ForkJoinPool-1-worker-9
SecondParallelUnitTest first() start => ForkJoinPool-1-worker-5
FirstParallelUnitTest first() end => ForkJoinPool-1-worker-19
SecondParallelUnitTest first() end => ForkJoinPool-1-worker-5
FirstParallelUnitTest second() end => ForkJoinPool-1-worker-9
SecondParallelUnitTest second() end => ForkJoinPool-1-worker-23

From the output, we can see that all four tests run in parallel in different threads.

Combining two properties we mentioned in this and previous section and their values (same_thread and concurrent), we get four different modes of execution:

  1. (same_thread, same_thread) – all tests run sequentially
  2. (same_thread, concurrent) – tests from one class run sequentially, but multiple classes run in parallel
  3. (concurrent, same_thread) – tests from one class run parallel, but each class run separately
  4. (concurrent, concurrent) – tests run in parallel

5. Synchronization

In ideal situations, all our unit tests are independent and isolated. However, sometimes that's hard to implement because they depend on shared resources. Then, when running tests in parallel, we need to synchronize over common resources in our tests. JUnit5 provides us with such mechanisms in the form of @ResourceLock annotation.

Similarly, as before, let's create ParallelResourceLockUnitTest class:

public class ParallelResourceLockUnitTest{
    private List<String> resources;
    @BeforeEach
    void before() {
        resources = new ArrayList<>();
        resources.add("test");
    }
    @AfterEach
    void after() {
        resources.clear();
    }
    @Test
    @ResourceLock(value = "resources")
    public void first() throws Exception {
        System.out.println("ParallelResourceLockUnitTest first() start => " + Thread.currentThread().getName());
        resources.add("first");
        System.out.println(resources);
        Thread.sleep(500);
        System.out.println("ParallelResourceLockUnitTest first() end => " + Thread.currentThread().getName());
    }
    @Test
    @ResourceLock(value = "resources")
    public void second() throws Exception {
        System.out.println("ParallelResourceLockUnitTest second() start => " + Thread.currentThread().getName());
        resources.add("second");
        System.out.println(resources);
        Thread.sleep(500);
        System.out.println("ParallelResourceLockUnitTest second() end => " + Thread.currentThread().getName());
    }
}

@ResourceLock allows us to specify which resource is shared and the type of lock we want to use (default is ResourceAccessMode.READ_WRITE). With the current setup, the JUnit engine will detect that our tests both use a shared resource and will execute them sequentially:

ParallelResourceLockUnitTest second() start => ForkJoinPool-1-worker-5
[test, second]
ParallelResourceLockUnitTest second() end => ForkJoinPool-1-worker-5
ParallelResourceLockUnitTest first() start => ForkJoinPool-1-worker-19
[test, first]
ParallelResourceLockUnitTest first() end => ForkJoinPool-1-worker-19

6. Conclusion

In this article, first, we covered how to configure parallel execution. Next, what are available strategies for parallelism and how to configure a number of threads. After that, we covered how different configurations affect test execution. In the end, we covered the synchronization of shared resources.

As always, code from this article can be found over on GitHub.


Introduction to the Evrete Rule Engine

$
0
0

1. Introduction

This article provides a first hands-on overview of Evrete — a new open-source Java rule engine.

Historically, Evrete has been developed as a lightweight alternative to the Drools Rule Engine. It is fully compliant with the Java Rule Engine specification and uses the classical forward-chaining RETE algorithm with several tweaks and features for processing large amounts of data.

It requires Java 8 and higher, has zero dependencies, seamlessly operates on JSON and XML objects, and allows functional interfaces as rules' conditions and actions.

Most of its components are extensible through Service Provider Interfaces, and one of these SPI implementations turns annotated Java classes into executable rulesets. We will give it a try today as well.

2. Maven Dependencies

Before we jump to the Java code, we need to have the evrete-core Maven dependency declared in our project's pom.xml:

<dependency>
    <groupId>org.evrete</groupId>
    <artifactId>evrete-core</artifactId>
    <version>2.1.04</version>
</dependency>

3. Use Case Scenario

To make the introduction less abstract, let's imagine that we run a small business, today is the end of the financial year, and we want to compute total sales per customer.

Our domain data model will include two simple classes — Customer and Invoice:

public class Customer {
    private double total = 0.0;
    private final String name;
    public Customer(String name) {
        this.name = name;
    }
    public void addToTotal(double amount) {
        this.total += amount;
    }
    // getters and setters
}
public class Invoice {
    private final Customer customer;
    private final double amount;
    public Invoice(Customer customer, double amount) {
        this.customer = customer;
        this.amount = amount;
    }
    // getters and setters
}

On a side note, the engine supports Java Records out of the box and allows the developers to declare arbitrary class properties as functional interfaces.

Later in this introduction, we will be given a collection of invoices and customers, and logic suggests we need two rules to handle the data:

  • The first rule clears each customer's total sales value
  • The second rule matches invoices and customers and updates each customer's total.

Once again, we'll implement these rules with fluid rule builder interfaces and as annotated Java classes. Let's start with the Rule builder API.

4. Rule Builder API

Rule builders are central building blocks for developing domain-specific languages (DSL) for rules. Developers will use them when parsing Excel sources, plain text, or whichever other DSL format needs to be turned into rules.

In our case, though, we're primarily interested in their ability to embed rules straight into the developer's code.

4.1. Ruleset Declaration

With rule builders, we can declare our two rules using fluent interfaces:

KnowledgeService service = new KnowledgeService();
Knowledge knowledge = service
  .newKnowledge()
  .newRule("Clear total sales")
  .forEach("$c", Customer.class)
  .execute(ctx -> {
      Customer c = ctx.get("$c");
      c.setTotal(0.0);
  })
  .newRule("Compute totals")
  .forEach(
      "$c", Customer.class,
      "$i", Invoice.class
  )
  .where("$i.customer == $c")
  .execute(ctx -> {
      Customer c = ctx.get("$c");
      Invoice i = ctx.get("$i");
      c.addToTotal(i.getAmount());
  });

First, we created an instance of KnowledgeService, which is essentially a shared executor service. Usually, we should have one instance of KnowledgeService per application.

The resulting Knowledge instance is a pre-compiled version of our two rules. We did this for the same reasons we compile sources in general — to ensure correctness and launch the code faster.

Those familiar with the Drools rule engine will find our rule declarations semantically equivalent to the following DRL version of the same logic:

rule "Clear total sales"
  when
    $c: Customer
  then
    $c.setTotal(0.0);
end
rule "Compute totals"
  when
    $c: Customer
    $i: Invoice(customer == $c)
  then
    $c.addToTotal($i.getAmount());
end

4.2. Mocking Test Data

We will test our ruleset on three customers and 100k invoices with random amounts and randomly distributed among the customers:

List<Customer> customers = Arrays.asList(
  new Customer("Customer A"),
  new Customer("Customer B"),
  new Customer("Customer C")
);
Random random = new Random();
Collection<Object> sessionData = new LinkedList<>(customers);
for (int i = 0; i < 100_000; i++) {
    Customer randomCustomer = customers.get(random.nextInt(customers.size()));
    Invoice invoice = new Invoice(randomCustomer, 100 * random.nextDouble());
    sessionData.add(invoice);
}

Now, the sessionData variable contains a mix of Customer and Invoice instances that we will insert into a rule session.

4.3. Rule Execution

All we will need to do now is to feed all the 100,003 objects (100k invoices plus three customers) to a new session instance and call its fire() method:

knowledge
  .newStatelessSession()
  .insert(sessionData)
  .fire();
for(Customer c : customers) {
    System.out.printf("%s:\t$%,.2f%n", c.getName(), c.getTotal());
}

The last lines will print the resulting sales volumes for each customer:

Customer A:	$1,664,730.73
Customer B:	$1,666,508.11
Customer C:	$1,672,685.10

5. Annotated Java Rules

Although our previous example works as expected, it does not make the library compliant with the specification, which expects rule engines to:

  • “Promote declarative programming by externalizing business or application logic.”
  • “Include a documented file-format or tools to author rules, and rule execution sets external to the application.”

Simply put, that means that a compliant rule engine must be able to execute rules authored outside its runtime.

And Evrete's Annotated Java Rules extension module addresses this requirement. The module is, in fact, a “showcase” DSL, which relies solely on the library's core API.

Let's see how it works.

5.1. Installation

Annotated Java Rules is an implementation of one of Evrete's Service Provider Interfaces (SPI) and requires an additional evrete-dsl-java Maven dependency:

<dependency>
    <groupId>org.evrete</groupId>
    <artifactId>evrete-dsl-java</artifactId>
    <version>2.1.04</version>
</dependency>

5.2. Ruleset Declaration

Let's create the same ruleset using annotations. We'll choose plain Java source over classes and bundled jars:

public class SalesRuleset {
    @Rule
    public void rule1(Customer $c) {
        $c.setTotal(0.0);
    }
    @Rule
    @Where("$i.customer == $c")
    public void rule2(Customer $c, Invoice $i) {
        $c.addToTotal($i.getAmount());
    }
}

This source file can have any name and does not need to follow Java naming conventions. The engine will compile the source as-is on the fly, and we need to make sure that:

  • our source file contains all the necessary imports
  • third-party dependencies and domain classes are on the engine's classpath

Then we tell the engine to read our ruleset definition from an external location:

KnowledgeService service = new KnowledgeService();
URL rulesetUrl = new URL("ruleset.java"); // or file.toURI().toURL(), etc
Knowledge knowledge = service.newKnowledge(
  "JAVA-SOURCE",
  rulesetUrl
);

And that's it. Provided that the rest of our code remains intact, we'll get the same three customers printed along with their random sales volumes.

A few notes on this particular example:

  • We've chosen to build rules from plain Java (the “JAVA-SOURCE” argument), thus allowing the engine to infer fact names from method arguments.
  • Had we selected .class or .jar sources, the method arguments would have required @Fact annotations.
  • The engine has automatically ordered rules by method name. If we swap the names, the reset rule will clear previously computed volumes. As a result, we will see zero sales volumes.

5.3. How It Works

Whenever a new session is created, the engine couples it with a new instance of an annotated rule class. Essentially, we can consider instances of these classes as sessions themselves.

Therefore, class variables, if defined, become accessible to rule methods.

If we defined condition methods or declared new fields as methods, those methods would also have access to class variables.

As regular Java classes, such rulesets can be extended, reused, and packed into libraries.

5.4. Additional Features

Simple examples are well-suited for introductions but leave many important topics behind. For Annotated Java Rules, those include:

  • Conditions as class methods
  • Arbitrary property declarations as class methods
  • Phase listeners, inheritance model, and access to the runtime environment
  • And, above all, use of class fields across the board — from conditions to actions and field definitions

6. Conclusion

In this article, we briefly tested a new Java rule engine. The key takeaways include:

  1. Other engines may be better at providing ready-to-use DSL solutions and rule repositories.
  2. Evrete is instead designed for developers to build arbitrary DSLs.
  3. Those used to author rules in Java might find the “Annotated Java rules” package as a better option.

It's worth mentioning other features not covered in this article but mentioned in the library's API:

  • Declaring arbitrary fact properties
  • Conditions as Java predicates
  • Changing rule conditions and actions on-the-fly
  • Conflict resolution techniques
  • Appending new rules to live sessions
  • Custom implementations of library's extensibility interfaces

The official documentation is located at https://www.evrete.org/docs/.

Code samples and unit tests are available over on GitHub.


Pattern Matching for Switch

$
0
0

1. Overview

The Java SE 17 release introduces pattern matching for switch expressions and statements (JEP 406) as a preview feature. Pattern matching provides us more flexibility when defining conditions for switch cases.

In addition to case labels that can now contain patterns, the selector expression is no longer limited to just a few types. Before pattern matching, switch cases supported only simple testing of a selector expression that needs to match a constant value exactly.

In this tutorial, we will cover three different pattern types that can be applied in switch statements. We'll also explore some switch specifics, like covering all values, ordering subclasses, and handling null values.

2. Switch Statement

We use switch in Java to transfer control to one of the several predefined case statements. Which statement gets selected depends on the value of the switch selector expression.

In the earlier versions of Java, the selector expression had to be a number, a string, or a constant. Also, the case labels could only contain constants:

final String b = "B";
switch (args[0]) {
    case "A" -> System.out.println("Parameter is A");
    case b -> System.out.println("Parameter is b");
    default -> System.out.println("Parameter is unknown");
};

In our example, if variable b wasn't final, the compiler would throw a constant expression required error.

3. Pattern Matching

Pattern matching, in general, was first introduced as a preview feature in Java SE 14.

It was limited to only one form of a pattern – the type pattern. A type pattern consists of a type name and the variable to bind the result to.

Applying type patterns to the instanceof operator simplifies type checking and casting. Moreover, it enables us to combine both into a single expression:

if (o instanceof String s) {
    System.out.printf("Object is a string %s", s);
} else if (o instanceof Number n) {
    System.out.printf("Object is a number %n", n);
}

This built-in language enhancement helps us write less code with enhanced readability.

4. Patterns for Switch

Pattern matching for instanceof became a permanent feature in Java SE 16.

With Java 17, the application of pattern matching now also expands to switch expressions.

However, it is still a preview feature, so we need to enable preview to use it:

java --enable-preview --source 17 PatternMatching.java

4.1. Type Pattern

Let's look at how type patterns and the instanceof operator can be applied in switch statements.

As an example, we'll create a method that converts different types to double using if-else statements. Our method will simply return zero if the type is not supported:

static double getDoubleUsingIf(Object o) {
    double result;
    if (o instanceof Integer) {
        result = ((Integer) o).doubleValue();
    } else if (o instanceof Float) {
        result = ((Float) o).doubleValue();
    } else if (o instanceof String) {
        result = Double.parseDouble(((String) o));
    } else {
        result = 0d;
    }
    return result;
}

We can solve the same problem with less code using type patterns in switch:

static double getDoubleUsingSwitch(Object o) {
    return switch (o) {
        case Integer i -> i.doubleValue();
        case Float f -> f.doubleValue();
        case String s -> Double.parseDouble(s);
        default -> 0d;
    };
}

In earlier versions of Java, the selector expression was limited to only a few types. However, with type patterns, the switch selector expression can be of any type.

4.2. Guarded Pattern

Type patterns help us transfer control based on a particular type. However, sometimes, we also need to perform additional checks on the passed value.

For example, we may use an if statement to check the length of a String:

static double getDoubleValueUsingIf(Object o) {
    return switch (o) {
        case String s -> {
            if (s.length() > 0) {
                yield Double.parseDouble(s);
            } else {
                yield 0d;
            }
        }
        default -> 0d;
    };
}

We can solve the same problem using guarded patterns. They use a combination of a pattern and a boolean expression:

static double getDoubleValueUsingGuardedPatterns(Object o) {
    return switch (o) {
        case String s && s.length() > 0 -> Double.parseDouble(s);
        default -> 0d;
    };
}

Guarded patterns enable us to avoid additional if conditions in switch statements. Instead, we can move our conditional logic to the case label.

4.3. Parenthesized Pattern

In addition to having conditional logic in the cases label, parenthesized patterns enable us to group them.

We can simply use parentheses in our boolean expressions when performing additional checks:

static double getDoubleValueUsingParenthesizedPatterns(Object o) {
    return switch (o) {
        case String s && s.length() > 0 && !(s.contains("#") || s.contains("@")) -> Double.parseDouble(s);
        default -> 0d;
    };
}

By using parentheses, we can avoid having additional if-else statements.

5. Switch Specifics

Let's now look at a couple of specific cases to consider while using pattern matching in switch.

5.1. Covering All Values

When using pattern matching in switch, the Java compiler will check the type coverage.

Let's consider an example switch condition accepting any object but covering only the String case:

static double getDoubleUsingSwitch(Object o) {
    return switch (o) {
        case String s -> Double.parseDouble(s);
    };
}

Our example will result in the following compilation error:

[ERROR] Failed to execute goal ... on project core-java-17: Compilation failure
[ERROR] /D:/Projects/.../HandlingNullValuesUnitTest.java:[10,16] the switch expression does not cover all possible input values

This is because the switch case labels are required to include the type of the selector expression.

The default case label may also be applied instead of a specific selector type.

5.2. Ordering Subclasses

When using subclasses with pattern matching in switch, the order of the cases matters.

Let's consider an example where the String case comes after the CharSequence case.

static double getDoubleUsingSwitch(Object o) {
    return switch (o) {
        case CharSequence c -> Double.parseDouble(c.toString());
        case String s -> Double.parseDouble(s);
        default -> 0d;
    };
}

Since String is a subclass of CharSequence, our example will result in the following compilation error:

[ERROR] Failed to execute goal ... on project core-java-17: Compilation failure
[ERROR] /D:/Projects/.../HandlingNullValuesUnitTest.java:[12,18] this case label is dominated by a preceding case label

The reasoning behind this error is that there is no chance that the execution goes to the second case since any string object passed to the method would be handled in the first case itself.

5.3. Handling Null Values

In earlier versions of Java, each passing of a null value to a switch statement would result in a NullPointerException.

However, with type patterns, it is now possible to apply the null check as a separate case label:

static double getDoubleUsingSwitch(Object o) {
    return switch (o) {
        case String s -> Double.parseDouble(s);
        case null -> 0d;
        default -> 0d;
    };
}

If there is no null-specific case label, a pattern label of total type will match null values:

static double getDoubleUsingSwitchTotalType(Object o) {
    return switch (o) {
        case String s -> Double.parseDouble(s);
        case Object ob -> 0d;
    };
}

We should note that a switch expression cannot have both a null case and a total type case.

Such a switch statement will result in the following compilation error:

[ERROR] Failed to execute goal ... on project core-java-17: Compilation failure
[ERROR] /D:/Projects/.../HandlingNullValuesUnitTest.java:[14,13] switch has both a total pattern and a default label

Finally, a switch statement using pattern matching can still throw a NullPointerException.

However, it can do so only when the switch block doesn't have a null-matching case label.

6. Conclusion

In this article, we explored pattern matching for switch expressions and statements, a preview feature in Java SE 17. We saw that by using patterns in case labels, that selection is determined by pattern matching rather than a simple equality check.

In the examples, we covered three different pattern types that can be applied in switch statements. Finally, we explored a couple of specific cases, including covering all values, ordering subclasses, and handling null values.

As always, the complete source code is available over on GitHub.


Java Weekly, Issue 408

$
0
0

1. Spring and Java

>> Sip of Java – Serialization Filters [inside.java]

Having more control on deserializing incoming data – solving security and obscurity issues of Java serialization in Java 17.

>> Kotlin and FaaS, an impossible union? [blog.frankel.ch]

The problem with cold starts, JVM, and FaaS: proposing a few alternatives if you still insist to use Kotlin in the FaaS world. An interesting read.

>> Faster Charset Encoding? [cl4es.github.io]

A technically deep article on how, after a few trials and errors, the speed of charset encoding increased in Java.

Also worth reading:

Webinars and presentations:

Time to upgrade:

2. Technical & Musings

>> Data pipeline asset management with Dataflow [netflixtechblog.medium.com]

Meet Dataflow: how workflow management is done at Netflix's scale by its data engineers!

>> Use KPNG to Write Specialized kube-proxiers [kubernetes.io]

Beyond iptable-based proxies in K8S: an interesting article on how to use custom proxies instead of built-in ones.

Also worth reading:

3. Comics

And my favorite Dilberts of the week:

>> Feeling Lonely [dilbert.com]

>> Sunday Creative Ideas [dilbert.com]

>> Progress Report [dilbert.com]

4. Pick of the Week

>> Your idea sucks, now go do it anyway [blog.asmartbear.com]


Saving Date Values in Spring Data Cassandra

$
0
0

1. Overview

Apache Cassandra is a scalable NoSQL database. It provides continuous availability with no single point of failure. In addition, Cassandra is able to handle large amounts of data with exceptional performance.

In this tutorial, we'll look at connecting to Cassandra using Spring Data and Docker. Moreover, we'll make use of the Spring Data repository abstraction to work with Cassandra's data layer.

We'll see how to save different Java date values in Cassandra. Finally, we'll investigate how those date values are mapped to Cassandra types.

2. Spring Data for Cassandra

Spring Data for Apache Cassandra offers Spring developers a familiar interface for working with Cassandra. This project applies core Spring concepts to the development of solutions using Cassandra data storage.

Spring Data lets us create repositories based on common Spring interfaces. It also allows the use of QueryBuilders to eliminate the need to learn Cassandra Query Language (CQL). The project provides simple annotations that enable rich object mapping.

There are two important helper classes:

  • CqlTemplate handles common data access operations
  • CassandraTemplate provides object mapping

The project has noticeable similarities with Spring's core JDBC support.

3. Setting Up a Test Environment

In order to get started, we'll need to set up a connection to a Cassandra instance.

Note that we can also connect to an Astra DB database instead, which is a cloud-based database built on Apache Cassandra.

This guide will show you how to connect to a Datastax Astra DB.

3.1. Cassandra Container

Let's configure and start Cassandra using the Testcontainers library. To begin with, we'll define a Cassandra container and expose it on a specific port:

@Container
public static final CassandraContainer cassandra = (CassandraContainer) new CassandraContainer("cassandra:3.11.2")
    .withExposedPorts(9042);

Next, we'll need to override test properties required for Spring Data to be able to establish a connection with the Cassandra container:

TestPropertyValues.of(
    "spring.data.cassandra.keyspace-name=" + KEYSPACE_NAME,
    "spring.data.cassandra.contact-points=" + cassandra.getContainerIpAddress(),
    "spring.data.cassandra.port=" + cassandra.getMappedPort(9042)
).applyTo(configurableApplicationContext.getEnvironment());

Finally, before creating any objects/tables, we'll need to create a keyspace:

session.execute("CREATE KEYSPACE IF NOT EXISTS " + KEYSPACE_NAME + " WITH replication = {'class':'SimpleStrategy','replication_factor':'1'};");

A keyspace is simply a data container in Cassandra. In fact, it is very similar to a database in an RDBMS.

3.2. Cassandra Repository

Spring Data’s repository support significantly eases implementing DAOs. Let's start by creating a simple DAO.

The @Table annotation provided in the org.springframework.data.cassandra.core.mapping package enables domain object mapping:

@Table
public class Person {
    @PrimaryKey
    private UUID id;
    private String firstName;
    private String lastName;
    public Person(UUID id, String firstName, String lastName) {
        this.id = id;
        this.firstName = firstName;
        this.lastName = lastName;
    }
    //getters, setters, equals and hash code
}

Next, we'll define a Spring Data repository for our DAO by extending the CassandraRepository interface:

@Repository
public interface PersonRepository extends CassandraRepository<Person, UUID> {}

Finally, we'll need to define two additional properties before we can start writing integration tests:

spring.data.cassandra.schema-action=create_if_not_exists
spring.data.cassandra.local-datacenter=datacenter1

The first property will ensure that Spring Data automatically creates the annotated tables for us.

We should note that this setting is not recommended for production systems.

4. Using Date Values

In modern versions of Spring Data for Apache Cassandra, working with date values is quite straightforward. Spring Data will automatically ensure that Java date types are correctly mapped to and from an Apache Cassandra representation.

4.1. LocalDate Type

Let's add a new field birthDate of type LocalDate to our Person DAO:

@Test
public void givenValidPersonUsingLocalDate_whenSavingIt_thenDataIsPersisted() {
    UUID personId = UUIDs.timeBased();
    Person newPerson = new Person(personId, "Luka", "Modric");
    newPerson.setBirthDate(LocalDate.of(1985, 9, 9));
    personRepository.save(newPerson);
    List<Person> savedPersons = personRepository.findAllById(List.of(personId));
    assertThat(savedPersons.get(0)).isEqualTo(newPerson);
}

Spring Data automatically converts Java's LocalDate to Cassandra's date type. The LocalDate value in the DAO is identical after saving and fetching the record from Cassandra.

4.2. LocalDateTime Type

Let's add another field called lastVisitedDate of type LocalDateTime to our Person DAO:

@Test
public void givenValidPersonUsingLocalDateTime_whenSavingIt_thenDataIsPersisted() {
    UUID personId = UUIDs.timeBased();
    Person newPerson = new Person(personId, "Luka", "Modric");
    newPerson.setLastVisitedDate(LocalDateTime.of(2021, 7, 13, 11, 30));
    personRepository.save(newPerson);
    List<Person> savedPersons = personRepository.findAllById(List.of(personId));
    assertThat(savedPersons.get(0)).isEqualTo(newPerson);
}

Spring Data automatically converts Java's LocalDateTime to Cassandra's timestamp type. The LocalDateTime value in the DAO is identical after saving and fetching the record from Cassandra.

4.3. Legacy Date Type

Finally, let's add a field called lastPurchasedDate of the legacy type Date to our Person DAO:

@Test
public void givenValidPersonUsingLegacyDate_whenSavingIt_thenDataIsPersisted() {
    UUID personId = UUIDs.timeBased();
    Person newPerson = new Person(personId, "Luka", "Modric");
    newPerson.setLastPurchasedDate(new Date(LocalDate.of(2021, 7, 13).toEpochDay()));
    personRepository.save(newPerson);
    List<Person> savedPersons = personRepository.findAllById(List.of(personId));
    assertThat(savedPersons.get(0)).isEqualTo(newPerson);
}

As with LocalDateTime, Spring Data converts Java's java.util.Date to Cassandra's timestamp type.

4.4. Mapped Cassandra Types

Let's check the data that was saved in Cassandra by using CQLSH. It's a command-line shell for interacting with Cassandra through CQL.

In order to check what data has been stored in the Cassandra container during test execution, we can simply put a breakpoint in our test. During the paused test execution, we can then connect to the Docker container CLI via the Docker Desktop application:

After connecting to the Docker container CLI, we should first select the keyspace and then the table:

# cqlsh
Connected to Test Cluster at 127.0.0.1:9042.
[cqlsh 5.0.1 | Cassandra 3.11.2 | CQL spec 3.4.4 | Native protocol v4]
Use HELP for help.
cqlsh> USE test;
cqlsh:test> select * from person;

As a result, CQLSH will display us a formatted output of the data saved in the table:

 id                                   | birthdate  | firstname | lastname | lastpurchaseddate | lastvisiteddate
--------------------------------------+------------+-----------+----------+-------------------+-----------------
 9abef910-e3fd-11eb-9829-c5149ac796de | 1985-09-09 |      Luka |   Modric |              null |            null

However, we would also like to check the data types used for the specific date columns:

cqlsh:test> DESC TABLE person;

The output returns a CQL command used to create the table. Therefore, it contains all data types definitions:

CREATE TABLE test.person (
    id uuid PRIMARY KEY,
    birthdate date,
    firstname text,
    lastname text,
    lastpurchaseddate timestamp,
    lastvisiteddate timestamp
)

5. Conclusion

In this article, we explored working with different date values in Spring Data for Apache Cassandra.

In the examples, we covered working with LocalDate, LocalDateTime, and the legacy Date Java type. We saw how to connect to a Cassandra instance started using Testcontainers. Finally, we used the Spring Data repository abstraction to manipulate with data stored in Cassandra.

As always, the source code is available over on GitHub.


Dockerfile Strategies for Git

$
0
0

1. Introduction

.Git is the leading version control system for software development. The Dockerfile, on the other hand, contains all the commands to automatically build an image of our application. These two products are the perfect combination for anyone seeking to adopt DevOps.

In this tutorial, we’ll learn a few solutions to combine these two technologies. We’ll go into details of each solution and cover its pros and cons.

2. Dockerfile Inside a Git Repository

The easiest solution for always having access to the Git repository inside a Dockerfile is to keep the Dockerfile directly in the Git repository:

ProjectFolder/
  .git/
  src/
  pom.xml
  Dockerfile
  ...

The above setup we'll give us access to the whole project source directory. Next, we can include it in our container with an ADD command, for example:

ADD . /project/

We can of course limit the scope of copying to a build directory:

ADD /build/ /project/

or a build output like .jar file:

ADD /output/project.jar /project/

The greatest advantage of this solution is that we can test any code changes without committing them to the repository. Everything will live in the same local directory.

One thing to remember here is to create a .dockerignore file. It's similar to the .gitignore file, but in this case, it excludes files and directories that match patterns in it from the Docker context. This helps us avoid unnecessarily sending large or sensitive files and directories to the Docker build process and potentially adding them to images.

3. Clone the Git Repository

Another easy solution is to just fetch our git repository during the image build process. We can achieve it by simply adding the SSH key to the local store and invoke the git clone command:

ADD ssh-private-key /root/.ssh/id_rsa
RUN git clone git@github.com:eugenp/tutorials.git

The above command will fetch the whole repository and place it in the ./tutorials directory in our container.

Unfortunately, this solution has some downsides as well.

First of all, we'll store our private SSH key in the Docker image that may bring potential security issues. We can apply a workaround by using username and password for the git repository:

ARG username=$GIT_USERNAME
ARG password=$GIT_PASSWORD
RUN git clone https://username:password@github.com:eugenp/tutorials.git

and pass them as environment variables from our machine. This way we'll keep the git credentials outside of our image.

Secondly, this step will be cached on later builds, even when our repository changes. That's because the line with a RUN command is unchanged unless you break the cache on an earlier step. Although, we can resolve it by adding –no-cache parameter to the docker build command.

Another minor drawback is that we have to install the git package in our container.

4. Volume Mapping

A third solution we could use is volume mapping. It brings us the ability to mount directories from our machine into the Docker container. It's a preferred mechanism for storing data used by Docker containers.

We can do it by adding the following line in our Dockerfile:

VOLUME /build/ /project/

This will create /project directory on the container and mount it to the /build directory on our machine.

Volume mapping will be the best choice when our Git repository is used just for the building process. By keeping the repository outside of the container we don't increase its size and allow the repository content to outside the lifecycle of a given container.

One thing that we need to keep in mind is that volume mapping gives the Docker container write access to mounted directories. Improper usage of this feature may lead to some unwanted changes in the git repository directory.

5. Git Submodules

In cases when we keep the Dockerfile and source code in separate repositories or our Docker build requires multiple source repositories, we might consider using Git submodules.

Firstly we'll have to create a new Git repository and place our Dockerfile in there. Next, we can define our submodules by adding them to the .gitmodules file:

[submodule "project"]
  path = project
  url = https://github.com/eugenp/tutorials.git
  branch = master

Now, we can use the submodule like a standard directory. For example, we can copy its content to our container:

ADD /build/ /project/

Remember that submodules are not updated automatically. We need to run the following git command to fetch the latest changes:

git submodule update --init --recursive

6. Overview

In this tutorial, we’ve learned a few ways to use a Git repository inside a Dockerfile. As always, all the source code is available over on GitHub.


Getting a Character by Index From a String in Java

$
0
0

1. Introduction

The charAt() method of the String class returns the character at a given position of a String. This is a useful method that has been available from version 1.0 of the Java language.

In this tutorial, we will explore the usage of this method with some examples. We'll also learn how to get the character at a position as a String.

2. The charAt() Method

Let's take a look at the method signature from the String class:

public char charAt(int index) {...}

This method returns the char at the index specified in the input parameter. The index ranges from 0 (the first character) to the total length of the string – 1 (the last character).

Now, let's see an example:

String sample = "abcdefg";
Assert.assertEquals('d', sample.charAt(3));

In this case, the result was the fourth character of the string – the character “d”.

3. Expected Exception

The runtime exception IndexOutOfBoundsException is thrown if the parameter index is negative or if it's equal to or greater than the length of the string:

String sample = "abcdefg";
assertThrows(IndexOutOfBoundsException.class, () -> sample.charAt(-1));
assertThrows(IndexOutOfBoundsException.class, () -> sample.charAt(sample.length()));

4. Get Character as a String

As we mentioned earlier, the charAt() method returns a char. Often, we need a String literal instead.

There are different ways to convert the result to a String. Let's assume below String literal for all the examples:

String sample = "abcdefg";

4.1. Using the Character.toString() Method

We can wrap the result of charAt() with Character.toString() method:

assertEquals("a", Character.toString(sample.charAt(0)));

4.2. Using the String.valueOf() Method

Finally, we can use the static method String.valueOf():

assertEquals("a", String.valueOf(sample.charAt(0)));

5. Conclusion

In this article, we learned how to use the charAt() method to get a character at a given position of a String. We also saw what exception could occur when using it and a few different ways of getting the character as a String.

And, as always, all the snippets can be found over on Github.


States of a Docker Container

$
0
0

1. Overview

A Docker container is an instance of a Docker image that runs some process inside it. As the state of this process changes, the behavior of the container is also affected. Thus, a container can be found in different states throughout its lifecycle.

In this tutorial, we'll learn about all the possible states of a Docker container.

Let's first look into how to find the state of a Docker container, and then we'll go through different states of the container.

2. Find the Current State of a Docker Container

Before we dive deep into different states of a Docker container, let's first look into how to find the state of any Docker container.

By default, the docker ps command displays the current state of all the Docker containers:

$ docker ps -a
CONTAINER ID   IMAGE      COMMAND       CREATED              STATUS                          PORTS     NAMES
8f0b524f2d32   centos:7   "/bin/bash"   46 seconds ago       Created                                   strange_beaver
e6d798254d45   centos:7   "/bin/bash"   About a minute ago   Exited (0) About a minute ago             wizardly_cohen

The output displays all the containers present on the machine with their STATUS (fifth column) and a bunch of other details.

We can also use the docker inspect command to get the status of a single container:

$ docker inspect -f '{{.State.Status}}' mycontainer
running

Here, mycontainer is the container name for which we wish to find the current state. We can also replace it with the Docker container id.

3. Possible States of a Docker Container

At any particular instance, a Docker container can be found in 6 possible states. Let's now deep dive into each of these states:

3.1. Created

Docker assigns the created state to the containers that were never started ever since they were created. Hence, no CPU or memory is used by the containers in this state.

The Docker containers created using the docker create command shows the status as created:

$ docker create --name mycontainer httpd
dd109e4be16219f1a6b9fc1cbfb050c1ae035d6a2c301ea0e93eb7d5252b8d2e
$ docker inspect -f '{{.State.Status}}' mycontainer
created

Here, we have created a Docker container, mycontainer, using the official Docker image of httpd. Since we have used the docker create command to launch the container, so the status is shown as created. 

Such containers are useful when we need to keep ourselves prepared for some big tasks. In such situations, we create the container so that it's ready to go when we start it.

3.2. Running

When we start a container having created a state using the docker start command, it attains the running state.

This state signifies that the processes are running in the isolated environment inside the container.

$ docker create --name mycontainer httpd
8d60cb560afc1397d6732672b2b4af16a08bf6289a5a0b6b5125c5635e8ee749
$ docker inspect -f '{{.State.Status}}' mycontainer
created
$ docker start mycontainer
mycontainer
$ docker inspect -f '{{.State.Status}}' mycontainer
running

In the above example, we first created a Docker container using the official httpd Docker image. Then, the status of the container was created. When we start the mycontainer, the httpd server process and all other relevant processes begin to run. Hence the status of the same container has now changed to running.

The container ran using the docker run command also attained the same status:

$ docker run -itd --name mycontainer httpd
685efd4c1c4a658fd8a0d6ca66ee3cf88ab75a127b9b439026e91211d09712c7
$ docker inspect -f '{{.State.Status}}' mycontainer
running

In this state, there is no compromise in the CPU and memory consumption by the container.

3.3. Restarting

Simply put, this state denotes that the container is under the process of restart. 

Docker supports four types of restart policies, namely – no, on-failure, always, unless-stopped. Restart policy decides the behavior of the container when it exit.

By default, the restart policy is set to no, which means that the container will not be started automatically after it exits.

Let's update the restart policy to always and verify the Docker container state using the below example:

$ docker run -itd --restart=always --name mycontainer centos:7 sleep 5
f7d0e8becdac1ebf7aae25be2d02409f0f211fcc191aea000041d158f89be6f6

The above command will run the mycontainer and execute the sleep 5 command and exit. But since we have updated the restart policy for this container, it will automatically restart the container after it exits.

After 5 seconds, the state of the container will be restarting:

$ docker inspect -f '{{.State.Status}}' mycontainer
restarting

3.4. Exited

This state is achieved when the process inside the container terminates. In this state, no CPU and memory is consumed by the container.

There could be several reasons why a running container would exit. Let's look into a few of them:

  • The process inside the container was completed, and so it exited.
  • The process inside the container encountered an exception while running.
  • A container is intentionally stopped using the docker stop command.
  • No interactive terminal was set to a container running bash.
$ docker run -itd --name mycontainer centos:7 sleep 10
596a10ddb635b83ad6bb9daffb12c1e2f230280fe26be18559c53c1dca6c755f

Here, we have started a centos container, mycontainer, and passed the command sleep 10. This will exit the container after 10 seconds of sleep. We can verify the same by running the following command after 10 seconds:

$ docker inspect -f '{{.State.Status}}' mycontainer
exited

A container in the exited state cannot be accessed using the docker exec command. However, we can start the container using the docker start or docker restart and then access it.

$ docker start mycontainer

3.5. Paused

Paused is the state of a Docker container that suspends all the processes for an indefinite time. 

A Docker container can be paused using the docker pause command.

$ docker run -itd --name mycontainer centos:7 sleep 1000
1a44702cea17eec42195b057588cf72825174db311a35374e250d3d1da9d70c5

In the above example, we started a Docker container using the centos Docker image and ran the command sleep 1000. This will exit the container after 1000 seconds of sleep.

Now let's pause this container after a few seconds, say 100 seconds:

$ docker pause mycontainer
mycontainer
$ docker inspect -f '{{.State.Status}}' mycontainer
paused

A paused container consumes the same memory used while running the container, but the CPU is released completely. Let's verify this using the docker stat command:

$ docker stats --no-stream
CONTAINER ID   NAME          CPU %     MEM USAGE / LIMIT    MEM %     NET I/O       BLOCK I/O   PIDS
1a44702cea17   mycontainer   0.00%     1.09MiB / 7.281GiB   0.01%     1.37kB / 0B   0B / 0B     1

Notice that the CPU is 0%, but the memory usage is not zero.

We can use the docker unpause command to resume the container:

$ docker unpause mycontainer
mycontainer

On unpausing the container, it will resume from the same point where we paused it. In our example above, we paused the container after 100 seconds of sleep. So when we unpause the container, it will resume its sleep from 100. Therefore, the container will stop after 900 seconds of sleep from this point. (total sleep was set to 1000).

Now the question is when to pause a Docker container? Consider a situation when a Docker container is performing some CPU-intensive task. At the same time, we wish to run another CPU-intensive container with high priority. Of course, we can run both containers simultaneously, but it will slow down the execution due to a lack of resources.

In such cases, we can pause one of the containers with low priority for some time and let the other container use the complete CPU. Once it's done, we can unpause the execution of the first container.

3.6. Dead

The dead state of a Docker container means that the container is non-functioning. This state is achieved when we try to remove the container, but it cannot be removed because some resources are still in use by an external process. Hence, the container is moved to the dead state.

Containers in a dead state cannot be restarted. They can only be removed.

Since a container in a dead state is partially removed, so it does not consume any memory or CPU. 

4. Conclusion

In this tutorial, we went through different states of a Docker container.

First, we looked into a couple of ways to find the state of a Docker container. Later, we learned the importance of each state and how to achieve those states using different Docker commands.

Using Test Containers With Spring Data Cassandra

$
0
0

1. Overview

Apache Cassandra is an open-source distributed NoSQL database. It was designed to handle large amounts of data with fast read-write performance and with no single point of failure.

In this tutorial, we'll look at testing a Spring Boot application that uses a Cassandra database. We'll explain how to set up integration tests using a Cassandra container from the Testcontainers library. In addition, we'll make use of the Spring Data repository abstraction to work with Cassandra's data layer.

Finally, we'll show how to reuse a shared Cassandra container instance across multiple integration tests.

2. Test Containers

Testcontainers is a Java library that provides lightweight, throwaway instances of Docker containers. Hence, we commonly use it in Spring for integration testing of applications that use databases. Testcontainers enables us to test on a real database instance without requiring us to install and manage the database on our local machine.

2.1. Maven Dependencies

Cassandra containers are available in the Cassandra Testcontainers module. This enables the usage of containerized Cassandra instances.

Unlike the cassandra-unit library, the Testcontainers library is fully compatible with JUnit 5. Let's start by listing the required Maven dependencies:

<dependency>
    <groupId>org.testcontainers</groupId>
    <artifactId>testcontainers</artifactId>
    <version>1.15.3</version>
    <scope>test</scope>
</dependency>
<dependency>
    <groupId>org.testcontainers</groupId>
    <artifactId>cassandra</artifactId>
    <version>1.15.3</version>
    <scope>test</scope>
</dependency>
<dependency>
    <groupId>org.testcontainers</groupId>
    <artifactId>junit-jupiter</artifactId>
    <version>1.15.3</version>
    <scope>test</scope>
<dependency>

2.2. Cassandra Container

Containerized database instances are commonly used for integration testing. As well as ensuring that our data access layer code is fully compatible with the specific database version.

To begin with, we'll need to annotate our test class with both @SpringBootTest and @Testcontainers:

@SpringBootTest
@Testcontainers
class CassandraSimpleIntegrationTest {}

Then, we can define a Cassandra container and expose its specific port:

@Container
public static final CassandraContainer cassandra 
  = (CassandraContainer) new CassandraContainer("cassandra:3.11.2").withExposedPorts(9042);

Here we're exposing the container port 9042. We should note, however, that Testcontainers will link it to a random host port, which we can get later on.

Using the above, the Testcontainers library automatically takes care of starting a dockerized Cassandra container instance for us aligned with the lifecycle of the test class:

@Test
void givenCassandraContainer_whenSpringContextIsBootstrapped_thenContainerIsRunningWithNoExceptions() {
    assertThat(cassandra.isRunning()).isTrue();
}

Now we have a running Cassandra container. However, the Spring application does not yet know about it.

2.3. Overriding Test Properties

In order for Spring Data to be able to establish a connection with the Cassandra container, we'll need to provide a few connection properties. We'll override the default Cassandra connection properties by defining system properties via the java.lang.System class:

@BeforeAll
static void setupCassandraConnectionProperties() {
    System.setProperty("spring.data.cassandra.keyspace-name", KEYSPACE_NAME);
    System.setProperty("spring.data.cassandra.contact-points", cassandra.getContainerIpAddress());
    System.setProperty("spring.data.cassandra.port", String.valueOf(cassandra.getMappedPort(9042)));
}

Now we configured Spring Data to connect with our Cassandra container. However, we'll still need to create a keyspace.

2.4. Creating a Keyspace

As the last step before creating any tables in Cassandra, we'll need to create a keyspace:

private static void createKeyspace(Cluster cluster) {
    try (Session session = cluster.connect()) {
        session.execute("CREATE KEYSPACE IF NOT EXISTS " + KEYSPACE_NAME +
          " WITH replication = \n" +
          "{'class':'SimpleStrategy','replication_factor':'1'};");
    }
}

A keyspace in Cassandra is very similar to a database in an RDBMS. It defines how data replicates on nodes in a Cassandra cluster.

3. Spring Data for Cassandra

Spring Data for Apache Cassandra applies core Spring concepts to the development of applications using Cassandra. It provides repositories, query builders, and simple annotations for rich object mapping. Thus, it offers a familiar interface to Spring developers working with different databases.

3.1. Data Access Object

Let's start by preparing a simple DAO class which we'll be using later in our integration tests:

@Table
public class Car {
    @PrimaryKey
    private UUID id;
    private String make;
    private String model;
    private int year;
    public Car(UUID id, String make, String model, int year) {
        this.id = id;
        this.make = make;
        this.model = model;
        this.year = year;
    }
    //getters, setters, equals and hashcode
}

The key here is to annotate the class with @Table annotation from the org.springframework.data.cassandra.core.mapping package. In fact, this annotation enables automatic domain object mapping.

3.2. Cassandra Repository

Spring Data makes it very simple to create a repository for our DAO. To begin with, we'll need to enable Cassandra repositories in our Spring Boot main class:

@SpringBootApplication
@EnableCassandraRepositories(basePackages = "org.baeldung.springcassandra.repository")
public class SpringCassandraApplication {}

Then, we simply need to create an interface that extends the CassandraRepository:

@Repository
public interface CarRepository extends CassandraRepository<Car, UUID> {}

Before starting with the integration tests, we'll need to define two additional properties:

spring.data.cassandra.local-datacenter=datacenter1
spring.data.cassandra.schema-action=create_if_not_exists

The first property defines the default local data center name. The second one will ensure that Spring Data automatically creates the required database tables for us. We should note that this setting shouldn't be used in production systems.

Since we are using Testcontainers, we don't need to worry about dropping the tables once the tests are finished. A new container will be started for us every time we run our tests.

4. Integration Tests

Now that have our Cassandra container, a simple DAO class, and a Spring Data repository set up, we are ready to start writing integration tests.

4.1. Saving Record Test

Let's start by testing the insertion of a new record into the Cassandra database:

@Test
void givenValidCarRecord_whenSavingIt_thenRecordIsSaved() {
    UUID carId = UUIDs.timeBased();
    Car newCar = new Car(carId, "Nissan", "Qashqai", 2018);
    carRepository.save(newCar);
    List<Car> savedCars = carRepository.findAllById(List.of(carId));
    assertThat(savedCars.get(0)).isEqualTo(newCar);
}

4.2. Updating Record Test

Then, we can write a similar test for updating an existing database record:

@Test
void givenExistingCarRecord_whenUpdatingIt_thenRecordIsUpdated() {
    UUID carId = UUIDs.timeBased();
    Car existingCar = carRepository.save(new Car(carId, "Nissan", "Qashqai", 2018));
    existingCar.setModel("X-Trail");
    carRepository.save(existingCar);
    List<Car> savedCars = carRepository.findAllById(List.of(carId));
    assertThat(savedCars.get(0).getModel()).isEqualTo("X-Trail");
}

4.3. Deleting Record Test

Finally, let's write a test for deleting an existing database record:

@Test
void givenExistingCarRecord_whenDeletingIt_thenRecordIsDeleted() {
    UUID carId = UUIDs.timeBased();
    Car existingCar = carRepository.save(new Car(carId, "Nissan", "Qashqai", 2018));
    carRepository.delete(existingCar);
    List<Car> savedCars = carRepository.findAllById(List.of(carId));
    assertThat(savedCars.isEmpty()).isTrue();
}

5. Shared Container Instance

Most of the time, when working with integration tests, we would like to reuse the same database instance across multiple tests. We can share the same container instance by making use of multiple nested test classes:

@Testcontainers
@SpringBootTest
class CassandraNestedIntegrationTest {
    private static final String KEYSPACE_NAME = "test";
    @Container
    private static final CassandraContainer cassandra 
      = (CassandraContainer) new CassandraContainer("cassandra:3.11.2").withExposedPorts(9042);
    // Set connection properties and create keyspace
    @Nested
    class ApplicationContextIntegrationTest {
        @Test
        void givenCassandraContainer_whenSpringContextIsBootstrapped_thenContainerIsRunningWithNoExceptions() {
            assertThat(cassandra.isRunning()).isTrue();
        }
    }
    @Nested
    class CarRepositoryIntegrationTest {
        @Autowired
        private CarRepository carRepository;
        @Test
        void givenValidCarRecord_whenSavingIt_thenRecordIsSaved() {
            UUID carId = UUIDs.timeBased();
            Car newCar = new Car(carId, "Nissan", "Qashqai", 2018);
            carRepository.save(newCar);
            List<Car> savedCars = carRepository.findAllById(List.of(carId));
            assertThat(savedCars.get(0)).isEqualTo(newCar);
        }
        // Tests for update and delete
    }
}

Since Docker containers take time to start up, a shared container instance between multiple nested test classes will ensure faster execution. We should note, however, that this shared instance won't be automatically cleared between tests.

6. Conclusion

In this article, we explored using a Cassandra container for testing a Spring Boot application that uses a Cassandra database.

In the examples, we covered setting up a dockerized Cassandra container instance, overriding test properties, creating a keyspace, a DAO class, and a Cassandra repository interface.

We saw how to write integration tests that make use of a Cassandra container. Thus our example tests required no mocking. Finally, we saw how to reuse the same container instance across multiple nested tests classes.

As always, the source code is available over on GitHub.


Java Map – keySet() vs. entrySet() vs. values() Methods

$
0
0

1. Overview

In this tutorial, we'll discuss the three methods keySet(), entrySet() and values() of the Map interface in Java. These methods are used to retrieve a set of keys, a set of key-value mappings, and collection of values, respectively.

2. Map Initialization

While we can use these methods on any class implementing the Map interface like HashMap, TreeMap, and LinkedHashMap, we'll work with HashMap here.

Let's create and initialize a HashMap whose key is of type String and value is of type Integer:

Map<String, Integer> map = new HashMap<>();
map.put("one", 1);
map.put("two", 2);

3. The keySet() Method

The keySet() method returns the Set of keys contained in the Map

Let's apply the method keySet() to the Map and store it in a Set variable actualValues:

Set<String> actualValues = map.keySet();

Now, let's confirm that the size of the returned Set is 2:

assertEquals(2, actualValues.size());

Further, we can see that the returned Set contains the keys of the Map:

assertTrue(actualValues.contains("one"));
assertTrue(actualValues.contains("two"));

4. The entrySet() Method

The entrySet() method returns the set of key-value mappings. The method doesn't take any parameters and has a return type Set of Map.Entry. 

Let's apply the method entrySet() to the Map:

Set<Map.Entry<String, Integer>> actualValues = map.entrySet();

As we can see, actualValues is a Set of Map.Entry objects.

Map.Entry is a static interface that holds both the key and the value. Internally, it has two implementations – AbstractMap.SimpleEntry and AbstractMap.SimpleImmutableEntry.

As before, let's confirm that the size of the returned Set is 2:

assertEquals(2, actualValues.size());

Furthermore, we can see that the returned Set contains the key-value entries of the Map:

assertTrue(actualValues.contains(new SimpleEntry<>("one", 1)));
assertTrue(actualValues.contains(new SimpleEntry<>("two", 2)));

Here, we've chosen the AbstractMap.SimpleEntry implementation of the interface Map.Entry for our test.

5. The values() Method

The values() method returns the Collection of values contained in the Map. The method doesn't take any parameters and has a return type Collection. 

Let's apply the method values() to the Map and store it in a Collection variable actualValues:

Collection<Integer> actualValues = map.values();

Now, let's verify the size of the returned Collection:

assertEquals(2, actualValues.size());

Further, we can see that the returned Set contains the values of the Map:

assertTrue(actualValues.contains(1));
assertTrue(actualValues.contains(2));

6. Conclusion

In this article, we've discussed the keySet()entrySet(), and values() methods of the Map interface.

As usual, the complete source code is available over on GitHub.


Convert an Object to a Byte Array in Java

$
0
0

1. Overview

In this short tutorial, we'll learn how to convert a Java object to a byte array and vice versa.

2. Use Plain Java

For example, suppose we have a User class:

public class User implements Serializable {
    private String name;
    @Override
    public String toString() {
        return "User{name=" + name +  "}";
    }
    // getters and setters
}

We can use a ByteArrayOutputStream and ObjectOutputStream object to serializable an object to a byte array.

Let's not forget to use try-with-resources so that we don't have to worry about closing streams:

User user = new User();
user.setName("Josh");
try (ByteArrayOutputStream bos = new ByteArrayOutputStream(); 
     ObjectOutputStream oos = new ObjectOutputStream(bos)) {
    oos.writeObject(user);
}

Then we'll use ByteArrayInputStream and ObjectInputStream to deserialize our received byte array to an object before finally casting it to User:

try (ByteArrayInputStream bis = new ByteArrayInputStream(data);
     ObjectInputStream ois = new ObjectInputStream(bis)) {
    User deserializedUser = (User) ois.readObject();
    System.out.println(deserializedUser);
}

Note that our User class must implement the Serializable interface. Otherwise, the above code will throw a NotSerializableException.

3. Use Apache Commons Lang

We can use the SerializationUtils class from the Apache Commons Lang library to achieve the same goal.

This class has a method named serialize(), which is used to serialize an object to a byte array:

byte[] data = SerializationUtils.serialize(user);

And a deserialize() method to deserialize byte array to object:

User deserializedUser = SerializationUtils.deserialize(data);

The above methods have parameters of type Serializable. So, our User class still needs to implement the Serializable interface, just as it did in our plain Java example.

4. Use the SerializationUtils Class of Spring Framework

Finally, if our project is already using Spring Framework, we can use the SerializationUtils class from the org.springframework.util package. The method names are the same as the ones in the Apache Commons Lang library.

First, we can serialize our User object to a byte array:

byte[] data = SerializationUtils.serialize(user);

And we can deserialize the result back to a User object:

User deserializedUser = SerializationUtils.deserialize(data);

As usual, our User class must implement the Serializable interface or we'll get a NotSerializableException when we run the above code.

5. Conclusion

In summary, we've learned three different ways to convert a Java object to a byte array and vice versa. All of these methods require the input object to implement the Serializable interface to get the job done.


Getting Started With Apache Derby

$
0
0

1. Overview

In this tutorial, we'll learn about the Apache Derby database engine, which is a Java-based relational database engine developed by the Apache Software Foundation as an open-source project.

We'll start with installing and configuring it and then look at the tools it provides for interacting with it. After creating a sample database, we'll learn how to execute SQL commands using Derby's command-line tools. Finally, we'll see how to connect to the database programmatically using plain JDBC and through a Spring Boot application.

2. Deployment Modes

Apache Derby has two basic deployment options: a simple embedded option and a client/server option.

In the embedded mode, Derby runs inside of the same Java virtual machine (JVM) as a simple one-user Java application. Due to its automated startup and shutdown, it is usually invisible to end-users and does not require administrator intervention. In this mode, we can set up a temporary database without having to manage it.

In the client/server mode, Derby runs in the Java virtual machine (JVM) that hosts the server when started by an application that provides multi-user connectivity across a network.

3. Installation And Configuration

Let's see how we can install Apache Derby.

3.1. Installation

First, we can download the latest version of Apache Derby from here. After that, we extract the file downloaded. The extracted installation contains several subdirectories:

$ ls 
bin  demo  docs  index.html  javadoc  KEYS  lib  LICENSE  NOTICE  RELEASE-NOTES.html  test
  • bin contains the scripts for executing utilities and setting up the environment
  • demo contains example programs
  • javadoc contains the API documentation
  • docs contain the Apache Derby documentation
  • lib contains the Apache Derby .jar files
  • test contains regression tests for Apache Derby

3.2. Configuration

We'll need to configure a couple of things before we start the database engine.

First, we'll set the DERBY_HOME environment variable to where we extracted the Apache Derby bin. For example, we can use the below command if the Apache Derby is installed in the /opt/derby-db directory:

export DERBY_HOME=/opt/derby-db

Then, we add the DERBY_HOME/bin directory to the PATH environment variable so that we can run the Derby scripts from any directory:

export PATH="$DERBY_HOME/bin:$PATH"

3.3. Derby Libraries

There are various libraries provided by Apache Derby in the lib directory:

$ ls
derbyclient.jar     derbynet.jar            derbyshared.jar
derby.jar           derbyoptionaltools.jar  derbytools.jar
derbyrun.jar        derby.war               derbyLocale_XX.jar ...

Each of the libraries is described below:

  • derby.jar: Needed for embedded environments. For client/server environments, we only need this library on the server.
  • derbyshared.jar: Required by all configurations, regardless of whether we are running an embedded engine, a network server, a remote client, or the database tools.
  • derbytools.jar: Required to run all the Apache Derby tools (IJ, DBLook, and import/export). Also required if we are running a network server or if our application directly references the JDBC drivers.
  • derbyrun.jar: Used to start the Apache Derby tools
  • derbynet.jar: Required to start the Apache Derby Network Server
  • derbyclient.jar: Required to use the Apache Derby network client driver
  • derbyLocale_XX.jar: Required to localize the messages of Apache Derby

4. Tools

Apache Derby provides many tools for different applications. We can run the Apache Derby tools and utilities with derbyrun.jar using shortened names, and we do not need to set the java CLASSPATH environment variable. The derbyrun.jar file must be in the same folder as the other Derby JAR files.

4.1. IJ

IJ is a JDBC-based Java command-line application. Its primary purpose is to allow the execution of Derby SQL statements interactively or through scripts.

First, let's run the IJ tool:

$ $DERBY_HOME/bin/ij
ij version 10.13
ij> 

We can also use the following command to execute it:

$ java -jar $DERBY_HOME/lib/derbyrun.jar ij
ij version 10.13
ij> 

Note that all commands end with a semicolon. If we execute a command without a semicolon, the command line will move to the following line.

In the section on using SQL statements, we'll see how to execute several commands using IJ.

In addition, IJ can use properties to execute commands. This can help us save some repetitive work by using the properties supported by the IJ tool.

We can set IJ properties in the following ways:

  • By specifying a properties file using the -p property-file option on the command line
  • By using the -D option on the command line

We can create a properties file, add all properties that are needed, and then run the following command:

$ java -jar derbyrun.jar ij -p file-name.properties

If the file-name.properties file doesn't exist in the current directory, we'll get a java.io.FileNotFoundException.

For example, suppose we want to create a connection to a specific database with a specific name. We can do it with the ij.database property:

$ java -jar -Dij.protocol=jdbc:derby: -Dij.database=baeldung derbyrun.jar ij
ij version 10.13
CONNECTION0* - 	jdbc:derby:baeldung
* = current connection

4.2. DBLook

The dblook tool provides the DDL (Data Definition Language) of the database. For example, we can write the DDL of the baeldung database to the console:

$ $DERBY_HOME/bin/dblook -d jdbc:derby:baeldung
-- Timestamp: 2021-08-23 01:29:48.529
-- Source database is: baeldung
-- Connection URL is: jdbc:derby:baeldung
-- appendLogs: false
-- ----------------------------------------------
-- DDL Statements for schemas
-- ----------------------------------------------
CREATE SCHEMA "basic_users";
-- ----------------------------------------------
-- DDL Statements for tables
-- ----------------------------------------------
CREATE TABLE "APP"."authors" ("id" INTEGER NOT NULL, "first_name" VARCHAR(255) , "last_name" VARCHAR(255));
-- ----------------------------------------------
-- DDL Statements for keys
-- ----------------------------------------------
-- PRIMARY/UNIQUE
ALTER TABLE "APP"."authors" ADD CONSTRAINT "SQL0000000000-582f8014-017b-6e26-ada1-00000644e000" PRIMARY KEY ("id");

The dblook has other options that are described below.

We can use -o for writing the DDL to a file like baeldung.sql:

$ sudo $DERBY_HOME/bin/dblook -d jdbc:derby:baeldung -o baeldung.sql

We also can specify the schema with -z and the table with -t:

$ sudo $DERBY_HOME/bin/dblook -d jdbc:derby:baeldung -o baeldung.sql -z SCHEMA_NAME -t "TABLE_NAME"

4.3. Sysinfo

The Apache Derby sysinfo tool displays information regarding our Java environment and the Derby version. In addition, the sysinfo tool displays system information on the console:

$ java -jar $DERBY_HOME/lib/derbyrun.jar sysinfo
------------------ Java Information ------------------
Java Version:    11.0.11
Java Vendor:     Ubuntu
Java home:       /usr/lib/jvm/java-11-openjdk-amd64
Java classpath:  /opt/derby-db/lib/derbyrun.jar
OS name:         Linux
OS architecture: amd64
OS version:      5.11.0-27-generic
Java user name:  arash
Java user home:  /home/arash
Java user dir:   /opt/derby-db
java.specification.name: Java Platform API Specification
java.specification.version: 11
java.runtime.version: 11.0.11+9-Ubuntu-0ubuntu2.20.04
--------- Derby Information --------
[/opt/derby-db/lib/derby.jar] 10.13.1.1 - (1873585)
[/opt/derby-db/lib/derbytools.jar] 10.13.1.1 - (1873585)
[/opt/derby-db/lib/derbynet.jar] 10.13.1.1 - (1873585)
[/opt/derby-db/lib/derbyclient.jar] 10.13.1.1 - (1873585)
[/opt/derby-db/lib/derbyshared.jar] 10.13.1.1 - (1873585)
[/opt/derby-db/lib/derbyoptionaltools.jar] 10.13.1.1 - (1873585)

5. SQL Statements In Apache Derby

Here we'll examine some of the essential SQL statements that Apache Derby provided. We'll look at each statement's syntax with an example.

5.1. Create Database

We can create a new database with the connect command and create=true attribute in our connection string:

ij> connect 'jdbc:derby:databaseName;create=true';

5.2. Connect to Database

IJ automatically loads the appropriate driver based on the URL syntax when we interact interactively with a Derby database:

ij> connect 'jdbc:derby:baeldung' user 'user1' password 'pass123';

5.3. Create Schema

The CREATE SCHEMA statement defines a schema, which is a way to identify a specific namespace for a set of objects:

CREATE SCHEMA schema_name AUTHORIZATION userName;

Schema names cannot exceed 128 characters and must be unique within the database also. In addition, schema names cannot begin with the prefix SYS.

Here is an example of a schema named baeldung_authors:

ij> CREATE SCHEMA baeldung_authors;

In addition, we can create a schema for baeldung_authors that just specific user with ID arash can access:

ij> CREATE SCHEMA baeldung_authors AUTHORIZATION arash;

5.4. Drop Schema

We can drop a schema by using the DROP SCHEMA statement, and also, the target schema must be empty for DROP SCHEMA to succeed. We cannot drop the APP schema (the default user schema) or the SYS schema:

DROP SCHEMA schema_name RESTRICT;

By using the RESTRICT keyword, we can enforce the rule that there cannot be any objects defined in a specified schema for the schema to be deleted from the database.

Let's see an example to drop the schema:

ij> DROP SCHEMA baeldung_authors RESTRICT;

5.5. Create Table

We can use the CREATE TABLE statement to create a table, which contains columns and constraints:

CREATE TABLE table_name (
   column_name1 column_data_type1 constraint (optional),
   column_name2 column_data_type2 constraint (optional),
);

Let's see an example:

ij> CREATE TABLE posts(post_id INT NOT NULL, publish_date DATE NOT NULL,
    view_number INT DEFAULT 0, PRIMARY KEY (post_id));

If we do not specify a default value, NULL is inserted in the column as the default value

Other SQL statements like INSERT, UPDATE, DELETE, and SELECT for CRUD actions are similar to standard SQL.

6. JDBC Programming With Apache Derby

Here we're going to learn how to create a Java application that uses Apache Derby as a database engine.

6.1. Maven Dependencies

There are two Derby drivers in Maven: derby and derbynet. The former is used for embedded applications, while the latter is used for client/server applications.

Let's add a Maven dependency for derby:

<dependency>
    <groupId>org.apache.derby</groupId>
    <artifactId>derby</artifactId>
    <version>10.13.1.1</version>
</dependency>

Also, we add Maven dependency for derbyclient:

<dependency>
    <groupId>org.apache.derby</groupId>
    <artifactId>derbyclient</artifactId>
    <version>10.13.1.1</version>
</dependency>

6.2. JDBC URL Connection

We can connect to the database with different connection string parameters for client/server and embedded applications.

In the below syntax, we can use it for embedded mode:

jdbc:derby:[subsubprotocol:][databaseName][;attribute=value]

And also, we can use the syntax below for client/server mode:

jdbc:derby://server[:port]/databaseName[;attribute=value]

The database URL doesn't contain the hostname and port number in embedded mode. For example:

String urlConnection = "jdbc:derby:baeldung;create=true";

6.3. Use Apache Derby In Embedded Mode

Let's connect to an Apache Derby database in embedded mode, create it in the current directory if it doesn't already exist, create a table, and insert rows into the table using SQL statements:

String urlConnection = "jdbc:derby:baeldung;create=true";
Connection con = DriverManager.getConnection(urlConnection);
Statement statement = con.createStatement();
String sql = "CREATE TABLE authors (id INT PRIMARY KEY,first_name VARCHAR(255),last_name VARCHAR(255))";
statement.execute(sql);
sql = "INSERT INTO authors VALUES (1, 'arash','ariani')";
statement.execute(sql);

6.4. Use Apache Derby In Client/Server Mode

First, we run the command below to start up the Apache Derby in client/server mode:

$ java -jar $DERBY_HOME/lib/derbyrun.jar server start 
Sat Aug 28 20:47:58 IRDT 2021 : Security manager installed using the Basic server security policy.
Sat Aug 28 20:47:58 IRDT 2021 : Apache Derby Network Server - 10.13.1.1 -
(1873585) started and ready to accept connections on port 1527

We use the JDBC API to connect to an Apache Derby server on localhost and select all entries from the authors table in the baeldung database:

String urlConnection = "jdbc:derby://localhost:1527/baeldung";
   try (Connection con = DriverManager.getConnection(urlConnection)) {
       Statement statement = con.createStatement();
       String sql = "SELECT * FROM authors";
       ResultSet result = statement.executeQuery(sql);
         while (result.next()) {
           // We can print or use ResultSet here
         }
   } catch (SQLException ex) {
       ex.printStackTrace();
 }

7. Apache Derby With Spring Boot

This section will not explain how to create an application based on Spring Boot in detail, but only the settings relating to interacting with the Apache Derby database.

7.1. Dependencies for Apache Derby

We just have to add the Spring Data and Apache Derby dependencies from Spring Boot to the project to incorporate Apache Derby into it:

<dependency>
    <groupId>org.springframework.boot</groupId>
    <artifactId>spring-boot-starter-data-jpa</artifactId>
</dependency>
<dependency>
    <groupId>org.apache.derby</groupId>
    <artifactId>derbyclient</artifactId>
    <version>10.13.1.1</version>
</dependency>

7.2. Spring Boot Configuration

We can use Derby as our persistent database by adding these application properties:

spring.datasource.url=jdbc:derby://localhost:1527/baeldung 
spring.jpa.properties.hibernate.dialect=org.hibernate.dialect.DerbyTenSevenDialect 
spring.jpa.hibernate.ddl-auto=update
spring.datasource.driver-class-name=org.apache.derby.jdbc.ClientDriver

8. Conclusion

In this tutorial, we've looked into installing and configuring the Apache Derby. After that, we had an overview of tools and some of the most important SQL statements. We covered JDBC programming with snippet codes in Java and finally learned how to configure Spring Boot to use Apache Derby as a persistent database.

As usual, the examples used in this article are available over on GitHub.


Multiline Text in Excel Cell Using Apache POI

$
0
0

1. Introduction

We can programmatically create multiline text in a Microsoft Excel spreadsheet with Apache POI. However, it won't be displayed as multiple lines. This is because using code to add text to a cell will not automatically adjust the cell height and apply needed formatting to turn it into multiline text.

This short tutorial will demonstrate the code needed to properly show such text.

2. Apache POI and Maven Dependency

Apache POI is an open-source library that allows a software developer to create and manipulate Microsoft Office documents. As a prerequisite, readers can refer to our article on working with Microsoft Excel in Java and tutorial on how to insert a row in Excel using Apache POI.

To begin with, we first need to add the Apache POI dependency to our project pom.xml file:

<dependency>
    <groupId>org.apache.poi</groupId> 
    <artifactId>poi</artifactId> 
    <version>5.0.0</version> 
</dependency>

3. Adding and Formatting Multiline Text

Let's start by having a cell with multiline text:

cell.setCellValue("Hello \n world!");

If we are to generate and save an Excel file with just the above code. It will look like bellow image:

We can click at 1 and 2 as pointed in the above image to verify that the text is indeed a multiline text.

Using code, format the cell and expand its row height to any value equal to or greater than two lines of text:

cell.getRow()
  .setHeightInPoints(cell.getSheet().getDefaultRowHeightInPoints() * 2);

After that, we need to set cell style to wrap the text:

CellStyle cellStyle = cell.getSheet().getWorkbook().createCellStyle();
cellStyle.setWrapText(true);
cell.setCellStyle(cellStyle);

Saving a file generated with the above code and viewing it in Microsoft Excel will show multiline text in a cell.

After formatting

4. Summary

In this tutorial, we have learned how to add multiline text to a cell using Apache POI. We then make sure that it is visible as two lines of text by applying some formatting to the cell. Otherwise, the cell will be displayed as one line.

As always, the source code for the article is available over on GitHub.


Parallel Test Execution for JUnit 5

$
0
0

1. Introduction

In this article, we'll cover how to execute parallel unit tests using JUnit 5. First, we'll cover basic configuration and minimal requirements to start using this feature. Next, we'll show code examples for different situations, and in the end, we'll talk about the synchronization of shared resources.

Parallel test execution is an experimental feature available as an opt-in since version 5.3.

2. Configuration

First, we need to create a junit-platform.properties file in our src/test/resources folder to enable parallel test execution. We enable the parallelization feature by adding the following line in the mentioned file:

junit.jupiter.execution.parallel.enabled = true

Let's check our configuration by running a few tests. First, we'll create the FirstParallelUnitTest class and two tests in it:

public class FirstParallelUnitTest{
    @Test
    public void first() throws Exception{
        System.out.println("FirstParallelUnitTest first() start => " + Thread.currentThread().getName());
        Thread.sleep(500);
        System.out.println("FirstParallelUnitTest first() end => " + Thread.currentThread().getName());
    }
    @Test
    public void second() throws Exception{
        System.out.println("FirstParallelUnitTest second() start => " + Thread.currentThread().getName());
        Thread.sleep(500);
        System.out.println("FirstParallelUnitTest second() end => " + Thread.currentThread().getName());
    }
}

When we run our tests, we get the following output in the console:

FirstParallelUnitTest second() start => ForkJoinPool-1-worker-19
FirstParallelUnitTest second() end => ForkJoinPool-1-worker-19
FirstParallelUnitTest first() start => ForkJoinPool-1-worker-19
FirstParallelUnitTest first() end => ForkJoinPool-1-worker-19

In this output, we can notice two things. First, our tests run sequentially. Second, we use the ForkJoin thread pool. By enabling parallel execution, the JUnit engine starts using the ForkJoin thread pool.

Next, we need to add a configuration to utilize this thread pool. We need to choose a parallelization strategy. JUnit provides two implementations (dynamic and fixed) and a custom option to create our implementation.

Dynamic strategy determines the number of threads  based on the number of processors/cores multiplied by factor parameter (defaults to 1) specified using:

junit.jupiter.execution.parallel.config.dynamic.factor

On the other hand, the fixed strategy relies on a predefined number of threads specified by:

junit.jupiter.execution.parallel.config.fixed.parallelism

To use the custom strategy, we need to create it first by implementing the ParallelExecutionConfigurationStrategy interface.

3. Test Parallelization Within a Class

We already enabled parallel execution and picked a strategy. Now it's time to execute tests in parallel within the same class. There are two ways to configure this. One is using @Execution(ExecutionMode.CONCURRENT) annotation, and the second is using properties file and line:

junit.jupiter.execution.parallel.mode.default = concurrent

After we choose how to configure this and run our FirstParallelUnitTest class, we can see the following output:

FirstParallelUnitTest second() start => ForkJoinPool-1-worker-5
FirstParallelUnitTest first() start => ForkJoinPool-1-worker-19
FirstParallelUnitTest second() end => ForkJoinPool-1-worker-5
FirstParallelUnitTest first() end => ForkJoinPool-1-worker-19

From the output, we can see that both tests start simultaneously and in two different threads. Note that output can change from one run to another. This is expected when using the ForkJoin thread pool.

There is also an option to run all tests within the FirstParallelUnitTest class in the same thread. In the current scope, using parallelism and the same thread option is not viable so let's expand our scope and add one more test class in the next section.

4. Test Parallelization Within a Module

Before we introduce a new property, we'll create SecondParallelUnitTest class that has two methods similar to FirstParallelUnitTest:

public class SecondParallelUnitTest{
    @Test
    public void first() throws Exception{
        System.out.println("SecondParallelUnitTest first() start => " + Thread.currentThread().getName());
        Thread.sleep(500);
        System.out.println("SecondParallelUnitTest first() end => " + Thread.currentThread().getName());
    }
    @Test
    public void second() throws Exception{
        System.out.println("SecondParallelUnitTest second() start => " + Thread.currentThread().getName());
        Thread.sleep(500);
        System.out.println("SecondParallelUnitTest second() end => " + Thread.currentThread().getName());
    }
}

Before we run our tests in the same batch, we need to set property:

junit.jupiter.execution.parallel.mode.classes.default = concurrent

When we run both tests classes, we get the following output:

SecondParallelUnitTest second() start => ForkJoinPool-1-worker-23
FirstParallelUnitTest first() start => ForkJoinPool-1-worker-19
FirstParallelUnitTest second() start => ForkJoinPool-1-worker-9
SecondParallelUnitTest first() start => ForkJoinPool-1-worker-5
FirstParallelUnitTest first() end => ForkJoinPool-1-worker-19
SecondParallelUnitTest first() end => ForkJoinPool-1-worker-5
FirstParallelUnitTest second() end => ForkJoinPool-1-worker-9
SecondParallelUnitTest second() end => ForkJoinPool-1-worker-23

From the output, we can see that all four tests run in parallel in different threads.

Combining two properties we mentioned in this and previous section and their values (same_thread and concurrent), we get four different modes of execution:

  1. (same_thread, same_thread) – all tests run sequentially
  2. (same_thread, concurrent) – tests from one class run sequentially, but multiple classes run in parallel
  3. (concurrent, same_thread) – tests from one class run parallel, but each class run separately
  4. (concurrent, concurrent) – tests run in parallel

5. Synchronization

In ideal situations, all our unit tests are independent and isolated. However, sometimes that's hard to implement because they depend on shared resources. Then, when running tests in parallel, we need to synchronize over common resources in our tests. JUnit5 provides us with such mechanisms in the form of @ResourceLock annotation.

Similarly, as before, let's create ParallelResourceLockUnitTest class:

public class ParallelResourceLockUnitTest{
    private List<String> resources;
    @BeforeEach
    void before() {
        resources = new ArrayList<>();
        resources.add("test");
    }
    @AfterEach
    void after() {
        resources.clear();
    }
    @Test
    @ResourceLock(value = "resources")
    public void first() throws Exception {
        System.out.println("ParallelResourceLockUnitTest first() start => " + Thread.currentThread().getName());
        resources.add("first");
        System.out.println(resources);
        Thread.sleep(500);
        System.out.println("ParallelResourceLockUnitTest first() end => " + Thread.currentThread().getName());
    }
    @Test
    @ResourceLock(value = "resources")
    public void second() throws Exception {
        System.out.println("ParallelResourceLockUnitTest second() start => " + Thread.currentThread().getName());
        resources.add("second");
        System.out.println(resources);
        Thread.sleep(500);
        System.out.println("ParallelResourceLockUnitTest second() end => " + Thread.currentThread().getName());
    }
}

@ResourceLock allows us to specify which resource is shared and the type of lock we want to use (default is ResourceAccessMode.READ_WRITE). With the current setup, the JUnit engine will detect that our tests both use a shared resource and will execute them sequentially:

ParallelResourceLockUnitTest second() start => ForkJoinPool-1-worker-5
[test, second]
ParallelResourceLockUnitTest second() end => ForkJoinPool-1-worker-5
ParallelResourceLockUnitTest first() start => ForkJoinPool-1-worker-19
[test, first]
ParallelResourceLockUnitTest first() end => ForkJoinPool-1-worker-19

6. Conclusion

In this article, first, we covered how to configure parallel execution. Next, what are available strategies for parallelism and how to configure a number of threads? After that, we covered how different configurations affect test execution. In the end, we covered the synchronization of shared resources.

As always, code from this article can be found over on GitHub.


Java Weekly, Issue 409

$
0
0

1. Spring and Java

>> Hibernate Reactive: is it worth it? [in.relation.to]

Now that the first stable version is released, let's see when to use Hibernate Reactive and which scenarios are more suitable for it!

>> Choosing a cache [blog.frankel.ch]

How to choose a caching abstraction? A quick overview of different parameters that affect using a particular cache framework.

>> Sip of Java – Record Serialization [inside.java]

Serialization made easy – a quick write-up on how Java Records are serialized: easy to understand, better compatibility, and versioning!

Also worth reading:

Webinars and presentations:

Time to upgrade:

2. Technical

>> Cloud Native Buildpacks / Paketo.io in GitLab CI without Docker & pack CLI [blog.codecentric.de]

No more Dockerfiles! building and CI/CD has never been easier with GitLab, Kubernetes, and Paketo.

Also worth reading:

3. Musings

>> A year of mob programming, part 1: metaphors [giorgiosironi.com]

Mob programming through the lens of a racing car driver: a short but great read about the experience of using Mob programming.

Also worth reading:

4. Comics

And my favorite Dilberts of the week:

>> Selling The Upgrade [dilbert.com]

>> Wally Loves Alexa [dilbert.com]

>> Ai Will Enslave Us [dilbert.com]

5. Pick of the Week

>> If software engineering is in demand, why is it so hard to get a software engineering job? [betterprogramming.pub]


Multiline Text in Excel Cell Using Apache POI

$
0
0

1. Introduction

We can programmatically create multiline text in a Microsoft Excel spreadsheet with Apache POI. However, it won't be displayed as multiple lines. This is because using code to add text to a cell will not automatically adjust the cell height and apply needed formatting to turn it into multiline text.

This short tutorial will demonstrate the code needed to properly show such text.

2. Apache POI and Maven Dependency

Apache POI is an open-source library that allows a software developer to create and manipulate Microsoft Office documents. As a prerequisite, readers can refer to our article on working with Microsoft Excel in Java and tutorial on how to insert a row in Excel using Apache POI.

To begin with, we first need to add the Apache POI dependency to our project pom.xml file:

<dependency>
    <groupId>org.apache.poi</groupId> 
    <artifactId>poi</artifactId> 
    <version>5.0.0</version> 
</dependency>

3. Adding and Formatting Multiline Text

Let's start by having a cell with multiline text:

cell.setCellValue("Hello \n world!");

If we are to generate and save an Excel file with just the above code. It will look like bellow image:

We can click at 1 and 2 as pointed in the above image to verify that the text is indeed a multiline text.

Using code, format the cell and expand its row height to any value equal to or greater than two lines of text:

cell.getRow()
  .setHeightInPoints(cell.getSheet().getDefaultRowHeightInPoints() * 2);

After that, we need to set cell style to wrap the text:

CellStyle cellStyle = cell.getSheet().getWorkbook().createCellStyle();
cellStyle.setWrapText(true);
cell.setCellStyle(cellStyle);

Saving a file generated with the above code and viewing it in Microsoft Excel will show multiline text in a cell.

After formatting

4. Summary

In this tutorial, we have learned how to add multiline text to a cell using Apache POI. We then make sure that it is visible as two lines of text by applying some formatting to the cell. Otherwise, the cell will be displayed as one line.

As always, the source code for the article is available over on GitHub.


LDAP Authentication Using Pure Java

$
0
0

1. Introduction

In this article, we'll cover how to authenticate a user with LDAP using pure Java. Furthermore, we'll explore how to search for a user's distinguished name (DN). This is important because LDAP requires the DN to authenticate the user.

To do the search and user authentication, we'll use the directory service access capabilities of the Java Naming and Directory Interface (JNDI).

First, we'll briefly discuss what LDAP and JNDI are. Then we'll discuss how to authenticate with LDAP through the JNDI API.

2. What Is LDAP?

The Lightweight Directory Access Protocol (LDAP) defines a way for clients to send requests and receive responses from directory services. We call a directory service using this protocol an LDAP server.

The data served by an LDAP server is stored in an information model based on X.500. This is a group of computer networking standards for electronic directory services.

3. What Is JNDI?

JNDI provides a standard API for applications to discover and access naming and directory services. Its fundamental purpose is to provide a way for applications to access components and resources. This being, both locally and over a network.

Naming services underly this capability because they provide single-point access to services, data, or objects by name in a hierarchical namespace. The name given to each of these local or network-accessible resources is configured on the server hosting the naming service.

We can access directory services, like LDAP, by using the naming service interface of JNDI. This is because a directory service is merely a specialized type of naming service that enables each named entry to have a list of attributes associated with it.

Besides attributes, each directory entry may have one or more children. This enables entries to be linked hierarchically. In JNDI, children of directory entries are represented as subcontexts of their parent context.

A key benefit of the JNDI API is that it's independent of any underlying service provider implementation, for example, LDAP. Therefore, we can use JNDI to access an LDAP directory service without needing to use protocol-specific APIs.

No external libraries are needed to use JNDI because it's part of the Java SE platform. Further, being a core technology in Java EE, it is widely used to implement enterprise applications.

4. JNDI API Concepts to Authenticate with LDAP

Before discussing the example code, let's cover some fundamentals about using the JNDI API for LDAP-based authentication.

To connect to an LDAP server, we first need to create a JNDI InitialDirContext object. When doing so, we need to pass environment properties into its constructor as a Hashtable to configure it.

Amongst others, we need to add properties to this Hashtable for the user name and password that we wish to authenticate with. To do so, we must set the user's DN and his password to the Context.SECURITY_PRINCIPAL and Context.SECURITY_CREDENTIALS properties, respectively.

InitialDirContext implements DirContext, the main JNDI directory service interface. Through this interface, we can use our new context to perform various directory service operations on the LDAP server. These include binding names and attributes to objects and searching for directory entries.

It's worth noting that the objects returned by JNDI will have the same names and attributes as their underlying LDAP entries. Thus, to search for an entry, we can use its name and attributes as criteria to look it up.

Once we have retrieved a directory entry through JNDI, we can look at its attributes using the Attributes interface. Further, we can use the Attribute interface to inspect each of them.

5. What If We Don’t Have the User’s DN?

Sometimes we don't have the DN of the user immediately available to authenticate with. To get around this, we first need to create an InitialDirContext using administrator credentials. After that, we can use it to search for the relevant user from the directory server and get his DN.

Then once we have the user's DN, we can authenticate him by creating a new InitialDirContext, this time with his credentials. To do this, we first need to set the user's DN and password in the environment properties. After that, we need to pass these properties into the InitDirContext‘s constructor when creating it.

Now that we've discussed authenticating a user through LDAP using the JNDI API, let's go through the example code.

6. Example Code

In our example, we'll use the embedded version of the ApacheDS directory server. This is an LDAP server built using Java and designed to run in embedded mode within unit tests.

Let's look at how to set it up.

6.1. Setting up the Embedded ApacheDS Server

To use the embedded ApacheDS server, we need to define the Maven dependency:

<dependency>
    <groupId>org.apache.directory.server</groupId>
    <artifactId>apacheds-test-framework</artifactId>
    <version>2.0.0.AM26</version>
    <scope>test</scope>
</dependency>

Next, we need to create a unit test class using JUnit 4. To use the embedded ApacheDS server in this class, we must declare that it extends AbstractLdapTestUnit from the ApacheDS library. As this library is not compatible with JUnit 5 yet, we need to use JUnit 4.

Additionally, we need to include Java annotations above our unit test class declaration to configure the server. We can see which values to give them from the full code example, which we will explore later.

Lastly, we'll also need to add users.ldif to the classpath. This is so the ApacheDS server can load LDIF formatted directory entries from this file when we run our code example. When doing so, the server will load the entry for the user Joe Simms.

Next, we'll discuss the example code that will authenticate the user. To run it against the LDAP server, we'll need to add our code to a method in our unit test class. This will authenticate Joe through LDAP using his DN and password, as defined in the file.

6.2. Authenticating the User

To authenticate the user, Joe Simms, we need to create a new InitialDirContext object. This creates a connection to the directory server and authenticates the user through LDAP using his DN and password.

To do this, we first need to add these environment properties into a Hashtable:

Hashtable<String, String> environment = new Hashtable<String, String>();
environment.put(Context.INITIAL_CONTEXT_FACTORY, "com.sun.jndi.ldap.LdapCtxFactory");
environment.put(Context.PROVIDER_URL, "ldap://localhost:10389");
environment.put(Context.SECURITY_AUTHENTICATION, "simple");
environment.put(Context.SECURITY_PRINCIPAL, "cn=Joe Simms,ou=Users,dc=baeldung,dc=com");
environment.put(Context.SECURITY_CREDENTIALS, "12345");

Next, inside a new method called authenticateUser, we'll create the InitialDirContext object by passing the environment properties into its constructor. Then, we'll close the context to free up resources:

DirContext context = new InitialDirContext(environment);
context.close();

Lastly, we'll authenticate the user:

assertThatCode(() -> authenticateUser(environment)).doesNotThrowAnyException();

Now that we've covered the case where user authentication succeeds, let's examine when it fails.

6.3. Handling User Authentication Failure

Applying the same environment properties as previously, let's make the authentication fail by using the wrong password:

environment.put(Context.SECURITY_CREDENTIALS, "wrongpassword");

Then, we'll check that authenticating the user with this password fails as expected:

assertThatExceptionOfType(AuthenticationException.class).isThrownBy(() -> authenticateUser(environment));

Next, let's discuss how to authenticate the user when we don't have his DN.

6.4. Looking up the User’s DN as Administrator

Sometimes when we want to authenticate a user, we don't have his DN immediately at hand. In this situation, we first need to create a directory context with administrator credentials to look up the user's DN and then authenticate the user with that.

As before, we first need to add some environment properties in a Hashtable. But this time, we'll use the administrator's DN as the Context.SECURITY_PRINCIPAL, together with his default admin password as the Context.SECURITY_CREDENTIALS property:

Hashtable<String, String> environment = new Hashtable<String, String>();
environment.put(Context.INITIAL_CONTEXT_FACTORY, "com.sun.jndi.ldap.LdapCtxFactory");
environment.put(Context.PROVIDER_URL, "ldap://localhost:10389");
environment.put(Context.SECURITY_AUTHENTICATION, "simple");
environment.put(Context.SECURITY_PRINCIPAL, "uid=admin,ou=system");
environment.put(Context.SECURITY_CREDENTIALS, "secret");

Next, we'll create an InitialDirContext object with those properties:

DirContext adminContext = new InitialDirContext(environment);

This will create a directory context, with the connection to the server authenticated as the administrator. This gives us security rights to search for the user's DN.

Now we'll define the filter for our search based on the user's CN, i.e., his common name.

String filter = "(&(objectClass=person)(cn=Joe Simms))";

Then, using this filter to search for the user, we'll create a SearchControls object:

String[] attrIDs = { "cn" };
SearchControls searchControls = new SearchControls();
searchControls.setReturningAttributes(attrIDs);
searchControls.setSearchScope(SearchControls.SUBTREE_SCOPE);

Next, we'll search for the user with our filter and SearchControls:

NamingEnumeration<SearchResult> searchResults
  = adminContext.search("dc=baeldung,dc=com", filter, searchControls);
  
String commonName = null;
String distinguishedName = null;
if (searchResults.hasMore()) {
    
    SearchResult result = (SearchResult) searchResults.next();
    Attributes attrs = result.getAttributes();
    
    distinguishedName = result.getNameInNamespace();
    assertThat(distinguishedName, isEqualTo("cn=Joe Simms,ou=Users,dc=baeldung,dc=com")));
    commonName = attrs.get("cn").toString();
    assertThat(commonName, isEqualTo("cn: Joe Simms")));
}

Let's authenticate the user now that we have his DN.

6.5. Authenticating with the User’s Looked up DN

With the user's DN now at hand to authenticate with, we'll replace the administrator's DN and password in the existing environment properties with the user's ones:

environment.put(Context.SECURITY_PRINCIPAL, distinguishedName);
environment.put(Context.SECURITY_CREDENTIALS, "12345");

Then, with these in place, let's authenticate the user:

assertThatCode(() -> authenticateUser(environment)).doesNotThrowAnyException();

Lastly, we'll close the administrator's context to free up resources:

adminContext.close();

7. Conclusion

In this article, we discussed how to use JNDI to authenticate a user with LDAP utilizing the user's DN and password.

Also, we examined how to look up the DN if we don't have it.

As usual, the complete source code for the examples can be found over on GitHub.


Remove Beginning and Ending Double Quotes from a String

$
0
0

1. Overview

In this article, we're going to study different approaches for removing beginning and ending double quotes from a String in Java.

What we'll explore here can be useful for processing text extracted from files or received from other sources.

2. Simple Approach: The substring Method

Let's first start with a simple approach by using the substring method. This method can be called on a String object to return a specific sub-string.

The method requires two parameters:

  1. beginIndex — the index of the character where the sub-string should begin
  2. endIndex — the index after where the sub-string should end

Thus, considering that our input String is enclosed in double-quotes, we can use the substring method:

String input = "\"text wrapped in double quotes\"";
String result = input.substring(1, input.length() - 1);
System.out.println("Input: " + input);
System.out.println("Result: " + result);

By executing the code above, we have the following output:

Input: "text wrapped in double quotes"
Result: text wrapped in double quotes

When we are unsure whether the String will be enclosed in double-quotes or not, we should check it before running the substring method:

if (input != null && input.length() >= 2 
      && input.charAt(0) == '\"' && input.charAt(input.length() - 1) == '\"') {
    result = input.substring(1, input.length() - 1);
}

In the example above, we check that the String has at least two characters and that it starts and ends with double quotes.

3. Using the replaceAll Method

In addition to the substring method, we can also use the replaceAll method. This method replaces all parts of the String that match a given regular expression. Using replaceAll, we can remove all occurrences of double quotes by replacing them with empty strings:

String result = input.replaceAll("\"", "");

On one hand, this approach has the advantage of removing all occurrences of double quotes, even if the string has multiple lines. On the other hand, with this approach, we're unable to remove only the double quotes at the beginning and end of the String.

To remove double quotes just from the beginning and end of the String, we can use a more specific regular expression:

String result = input.replaceAll("^\"|\"$", "");

After executing this example, occurrences of double quotes at the beginning or at end of the String will be replaced by empty strings.

To understand this approach, let's break down our regular expression.

First, we have a caret symbol (^) followed by escaped double quotes (\”) for matching double quotes at the beginning of the String. Then, there is a pipe symbol (|) to indicate a matching alternative — similar to the OR logical operator.

Finally, we have escaped double quotes followed by a dollar symbol ($) for matching double quotes at the end of the String.

4. Using Guava

Another possible approach for removing double quotes from the beginning and end of a String is to use the CharMatcher class from the Guava library:

String result = CharMatcher.is('\"').trimFrom(input);

This approach is simpler to understand and removes only the beginning and end quotes from the String. However, for this approach to work, we need to add the guava library to our project:

<dependency>
    <groupId>com.google.guava</groupId>
    <artifactId>guava</artifactId>
    <version>${guava-version}</version>
</dependency>

In this case, we need to set the ${guava-version} property to the version we want to use.

5. Conclusion

In this article, we explored different alternatives for removing double quotes at the beginning and at the end of a String. We can apply any of these approaches in practice. Each of them has advantages and disadvantages.

For example, when using the Guava library, we have a simple and elegant solution. However, in case Guava wasn't included in our project, this solution would require the addition of a new dependency.

As always, the code presented in this article is available over on GitHub.

       
Viewing all 4464 articles
Browse latest View live


<script src="https://jsc.adskeeper.com/r/s/rssing.com.1596347.js" async> </script>