Quantcast
Channel: Baeldung
Viewing all 4469 articles
Browse latest View live

Convert String to long or Long in Java

$
0
0

1. Overview

In this tutorial, we’ll explore how to convert a String to a long primitive or Long object.

Let’s suppose we have a String whose value reflects a number just outside the range of a signed int. Let’s go with Integer.MAX_VALUE + 1 which is 2,147,483,648.

2. Using Long‘s Constructor

Given our String, we can use the overloaded Long constructor that takes a String as an argument:

Long l = new Long("2147483648");

This creates a new Long instance which can be converted to a primitive long by invoking the longValue() method.

Alternatively, we can take advantage of unboxing to convert our Long object to its primitive equivalent in one statement:

long l = new Long("2147483648");

However, since Java 9, the use of this constructor has been deprecated in favor of using the static factory methods valueOf() or parseLong() of the Long class.

3. Using the Long.valueOf() Method

When we want to obtain a Long object from our String, it’s recommended to use the static factory method valueOf():

Long l = Long.valueOf("2147483648");

This method is preferred as it caches commonly used Long instances to deliver better performance and memory overhead. This is in contrast to the constructor which creates a new instance each time it’s invoked.

4. Using the Long.parseLong() Method

When we want to return a long primitive, we can use the parseLong() static factory method:

long l = Long.parseLong("2147483648");

This approach is preferred over the constructor and valueOf() when we want to obtain a long primitive. This is because it returns a long primitive directly without creating an unnecessary Long object as part of the conversion.

5. Using the Long.decode() Method

If our String is in hexadecimal form, we can use the static factory method decode() to convert it to a Long object.

Thus, let’s say we have a hexadecimal notation for our String:

Long l = Long.decode("0x80000000");

Notably, this method also supports decimal and octal notations. Thus, we must be vigilant for leading zeros in our String when using this method.

6. Using Apache Commons’ NumberUtils.createLong() Method

To use Apache Commons Lang 3, we add the following dependency to our pom.xml:

<dependency> 
    <groupId>org.apache.commons</groupId> 
    <artifactId>commons-lang3</artifactId> 
    <version>3.14.0</version>
</dependency>

The static factory method createLong() converts a String to a Long object:

Long l = NumberUtils.createLong("0x80000000");

It uses Long.decode() under the hood with one important addition – if the String argument is null, then it returns null.

7. Using the Long.parseUnsignedLong() Method

Now, let’s suppose we have a String which represents a value outside of the signed range of the long primitive. We can obtain an unsigned long using the parseUnsignedLong() static factory method for the range 0 to 18,446,744,073,709,551,615:

long l = Long.parseUnsignedLong("9223372036854775808");

In contrast to the other options we explored in this article, if the first character in the String is the ASCII negative sign a NumberFormatException is thrown.

8. Using Google Guava’s Longs.tryParse() Method

To use Google Guava, we add the following dependency to our pom.xml:

<dependency>
    <groupId>com.google.guava</groupId>
    <artifactId>guava</artifactId>
    <version>33.0.0-jre</version>
</dependency>

Now, given our String we can convert it to a Long object using tryParse():

Long l = Longs.tryParse("2147483648");

All of the options explored so far throw a NumberFormatException in the event of a non-parseable String. Therefore, if we want to avoid the possibility of this exception being thrown, we can use the static factory method tryParse() which returns null instead:

@Test
void givenInvalidString_whenUsingGuavaLongs_thenObtainNull() {
    assertThat(Longs.tryParse("Invalid String")).isNull();
}

9. Conclusion

In this article, we’ve learned that parseLong() is the preferred approach to obtain a long primitive for a given String. We also saw that valueOf() is the preferred approach to obtain a Long object for a given String.

As always, the code samples used in this article can be found over on GitHub.


Java’s String.length() and String.getBytes().length

$
0
0

1. Overview

When we work in Java, manipulating strings is one of the fundamental skills. So, understanding string-related methods is crucial for writing efficient and error-free code.

Two commonly used methods, String.length() and String.getBytes().length, may seem similar at first glance, but they serve distinct purposes.

In this tutorial, let’s understand these two methods and explore their differences. In addition, we’ll talk about when to use each one.

2. First Glance at String.length() and String.getBytes().length

As the method name implies, the String.length() method returns the length of a string. On the other side, String.getBytes() gets the byte array with the default encoding from the given string. Then, String.getBytes().length reports the array’s length.

If we write a test, we may see they return the same value:

String s = "beautiful";
assertEquals(9, s.length());
assertEquals(9, s.getBytes().length);

When dealing with a string in Java, is it guaranteed that String.length() and String.getBytes().length always yield the same value?

Next, let’s figure it out.

3. String.length() and String.getBytes().length Can Return Different Values

The default character encoding or charset of the current JVM plays an important role in deciding the result of String.getBytes().length. If we don’t pass any argument to String.getBytes(), it uses the default encoding scheme to encode.

We can check the default encoding of a Java environment using the Charset.defaultCharset().displayName() method. For example, the current JVM’s default encoding is UTF-8:

System.out.println(Charset.defaultCharset().displayName());
//output: UTF-8

So, next, let’s test two more strings to see if String.length() and String.getBytes().length still return the same value:

String de = "schöne";
assertEquals(6, de.length());
assertEquals(7, de.getBytes().length);
String cn = "美丽";
assertEquals(2, cn.length());
assertEquals(6, cn.getBytes().length);

As the test above shows, first, we tested with the word “beautiful” in German (“schöne”), and then we took another string, which was “beautiful” in Chinese (“美丽”). It turned out that String.length() and String.getBytes().length yielded different values in both tests.

Next, let’s find out why this happened.

4. Character Encoding

Before learning why String.length() and String.getBytes().length gave different values on the strings “schöne” and “美丽”, let’s quickly understand how character encoding works.

There are many character encoding schemes, such as UTF-8 and UTF-16. We can split these encoding schemes into two categories:

  • Variable-length encoding
  • Fixed-length encoding

We won’t dive too deep into character encodings. However, a general understanding of these two encoding techniques will be pretty helpful in understanding why String.getBytes().length can have different values from String.length().

So, next, let’s take a quick look at these two kinds of encoding kinds through examples.

4.1. Fixed-Length Encoding

The fixed-length encoding uses the same number of bytes to encode any characters. A typical example of fixed-length encoding is UTF-32, which always uses four bytes to encode a character. So, this is how “beautiful” is encoded with UTF-32:

char    byte1 byte2 byte3 byte4
 b        0     0     0     98
 e        0     0     0     101
 a        0     0     0     97
 u        0     0     0     117
 ...
 l        0     0     0     108

Therefore, when invoking String.getBytes() with the UTF-32 charset, the length of the resulting byte array will consistently be four times the number of characters in the string:

Charset UTF_32 = Charset.forName("UTF_32");
String en = "beautiful";
assertEquals(9, en.length());
assertEquals(9 * 4, en.getBytes(UTF_32).length);
String de = "schöne";
assertEquals(6, de.length());
assertEquals(6 * 4, de.getBytes(UTF_32).length);
String cn = "美丽";
assertEquals(2, cn.length());
assertEquals(2 * 4, cn.getBytes(UTF_32).length);

That is to say, if UTF-32 was set as the default encoding of JVM, the results of String.length() and String.getBytes().length are always different.

Some of us might observe that when storing UTF-32 encoded characters, even though certain characters, such as ASCII characters, only need a single byte, we still allocate four bytes, with three of them being filled with zeros. This is kind of inefficient.

So, variable-length character encoding was introduced.

4.2. Variable-Length Encoding

Variable-length encoding uses varying numbers of bytes to encode different characters. UTF-8 is our default encoding. Also, it’s one example of the variable-length encoding schemes. So, let’s look at how UTF-8 encodes characters.

UTF-8 uses from one to four bytes to encode a character depending on the character’s code point. The code point is an integer representation of a character. For example, ‘b’ has the code point 98 in decimal or U+0062 in hex-decimal, which is the same as its ASCII code.

Next, let’s see how UTF-8 determines how many bytes are used for encoding a character:

Code point range Number of bytes
U+0000 to U+007F 1
U+0080 to U+07FF 2
U+0800 to U+FFFF 3
U+10000 to U+10FFFF 4

We know the character ‘b”s code point is U+0062, which is in the range of the first row of the table above. So, UTF-8 uses only one byte to encode it. As U+0000 to U+007F is 0 to 127 in decimal, UTF-8 utilizes one single byte to encode all standard ASCII characters. That’s why String.length() and String.getBytes().length gave the same result (9) on the string “beautiful“.

However, if we check the code points of ‘ö’, ‘美’, and ‘丽’, we’ll see UTF-8 uses different numbers of bytes to encode them:

assertEquals("f6", Integer.toHexString('ö'));   // U+00F6 -> 2 bytes
assertEquals("7f8e", Integer.toHexString('美')); // U+7F8E -> 3 bytes
assertEquals("4e3d", Integer.toHexString('丽')); // U+4E3D -> 3 bytes

Therefore, “schöne”.getBytes().length returns 7 (5 + 2) and “美丽”.getBytes().length yields 6 (3 + 3).

5. How to Choose Between String.length() and String.getBytes().length

Now, we have clarity on the scenarios where String.length() and String.getBytes().length return identical values and when they diverge. Then, a question may come up: when should we opt for each method?

When deciding between these methods, we should consider the context of our task:

  • String.length() – When we work with characters and the logical content of the string and want to obtain the total number of characters in the string, such as user input max-length validation or shifting characters in a string
  • String.bytes().length – When we deal with byte-oriented operations and need to know the size of the string in terms of bytes, such as reading from or writing to files or network streams

It’s worth noting when we work with String.bytes(), we should remember that character encoding plays a significant role. String.bytes() uses the default encoding scheme to encode the string. Apart from that, we can also pass the desired charset to the method to encode the string, for example, String.bytes(Charset.forName(“UTF_32”)) or String.bytes(StandardCharsets.UTF_16) 

6. Conclusion

In this article, we understood in general how character encoding works and explored why String.length() and String.getBytes().length can produce different results. In addition, we discussed how to choose between String.length() and String.getBytes().length.

As always, the complete source code for the examples is available over on GitHub.


Sending Data to a Specific Partition in Kafka

$
0
0

1. Introduction

Apache Kafka is a distributed streaming platform that excels in handling massive real-time data streams. Kafka organizes data into topics and further divides topics into partitions. Each partition acts as an independent channel, enabling parallel processing and fault tolerance.

In this tutorial, we delve into the techniques for sending data to specific partitions in Kafka. We’ll explore the benefits, implementation methods, and potential challenges associated with this approach.

2. Understanding Kafka Partitions

Now, let’s explore the fundamental concept of Kafka partitions.

2.1. What are Kafka Partitions

When a producer sends messages to a Kafka topic, Kafka organizes these messages into partitions using a specified partitioning strategy. A partition is a fundamental unit that represents a linear, ordered sequence of messages. Once a message is produced, it is assigned to a particular partition based on the chosen partitioning strategy. Subsequently, the message is appended to the end of the log within that partition.

2.2. Parallelism and Consumer Groups

A Kafka topic may be divided into multiple partitions, and a consumer group can be assigned a subset of these partitions. Each consumer within the group processes messages independently from its assigned partitions. This parallel processing mechanism enhances overall throughput and scalability, allowing Kafka to handle large volumes of data efficiently.

2.3. Ordering and Processing Guarantee

Within a single partition, Kafka ensures that messages are processed in the same order they were received. This guarantees sequential processing for applications that rely on message order, like financial transactions or event logs. However, note that the order messages are received may differ from the order they were originally sent due to network delays and other operational considerations.

Across different partitions, Kafka does not impose a guaranteed order. Messages from different partitions may be processed concurrently, introducing the possibility of variations in the order of events. This characteristic is essential to consider when designing applications that rely on the strict ordering of messages.

2.4. Fault Tolerance and High Availability

Partitions also contribute to Kafka’s exceptional fault tolerance. Each partition can be replicated across multiple brokers. In the event of a broker failure, the replicated partitions can still be accessed and ensure continuous access to the data.

The Kafka cluster can seamlessly redirect consumers to healthy brokers, maintaining data availability and high system reliability.

3. Why Send Data to Specific Partitions

In this section, let’s explore the reasons for sending data to specific partitions.

3.1. Data Affinity

Data affinity refers to the intentional grouping of related data within the same partition. By sending related data to specific partitions, we ensure that it is processed together, leading to increased processing efficiency.

For instance, consider a scenario where we might want to ensure a customer’s orders reside in the same partition for order tracking and analytics. Guaranteeing that all orders from a specific customer end up in the same partition simplifies tracking and analysis processes.

3.2. Load Balancing

Additionally, distributing data evenly across partitions can help to ensure optimal resource utilization. Evenly distributing data across partitions helps optimize resource utilization within a Kafka cluster. By sending data to partitions based on load considerations, we can prevent resource bottlenecks and ensure that each partition receives a manageable and balanced workload.

3.3. Prioritization

In certain scenarios, not all data has equal priority or urgency. Kafka’s partitioning capabilities enable the prioritization of critical data by directing it to dedicated partitions for expedited handling. This prioritization ensures that high-priority messages receive prompt attention and faster processing compared to less critical ones.

4. Methods for Sending to Specific Partitions

Kafka provides various strategies for assigning messages to partitions, offering data distribution and processing flexibility. Below are some common methods that can be used to send messages to a specific partition.

4.1. Sticky Partitioner

In Kafka versions 2.4 and above, the sticky partitioner aims to keep messages without keys together in the same partition. However, this behavior isn’t absolute and interacts with batching settings such as batch.size and linger.ms.

To optimize the message delivery, Kafka groups messages into batches before sending them to brokers. The batch.size setting (default 16,384 bytes) controls the maximum batch size, affecting how long messages stay in the same partition under the sticky partitioner.

The linger.ms configuration (default: 0 milliseconds) introduces a delay before sending batches, potentially prolonging sticky behavior for messages without keys.

In the following test case, assuming the default batching configuration remains in place. We’ll send three messages without explicitly assigning a key. We should be expecting them to be initially assigned to the same partition:

kafkaProducer.send("default-topic", "message1");
kafkaProducer.send("default-topic", "message2");
kafkaProducer.send("default-topic", "message3");
await().atMost(2, SECONDS)
  .until(() -> kafkaMessageConsumer.getReceivedMessages()
    .size() >= 3);
List<ReceivedMessage> records = kafkaMessageConsumer.getReceivedMessages();
Set<Integer> uniquePartitions = records.stream()
  .map(ReceivedMessage::getPartition)
  .collect(Collectors.toSet());
Assert.assertEquals(1, uniquePartitions.size());

4.2. Key-based Approach

In the key-based approach, Kafka directs messages with identical keys to the same partition, optimizing the processing of related data. This is achieved through a hash function, ensuring deterministic mapping of message keys to partitions.

In this test case, messages with the same key partitionA should always land in the same partition. Let’s illustrate key-based partitioning with the following code snippet:

kafkaProducer.send("order-topic", "partitionA", "critical data");
kafkaProducer.send("order-topic", "partitionA", "more critical data");
kafkaProducer.send("order-topic", "partitionB", "another critical message");
kafkaProducer.send("order-topic", "partitionA", "another more critical data");
await().atMost(2, SECONDS)
  .until(() -> kafkaMessageConsumer.getReceivedMessages()
    .size() >= 4);
List<ReceivedMessage> records = kafkaMessageConsumer.getReceivedMessages();
Map<String, List<ReceivedMessage>> messagesByKey = groupMessagesByKey(records);
messagesByKey.forEach((key, messages) -> {
    int expectedPartition = messages.get(0)
      .getPartition();
    for (ReceivedMessage message : messages) {
        assertEquals("Messages with key '" + key + "' should be in the same partition", message.getPartition(), expectedPartition);
    }
});

In addition, with the key-based approach, messages sharing the same key are consistently received in the order they were produced within a specific partition. This guarantees the preservation of message order within a partition, especially for related messages.

In this test case, we produce messages with the key partitionA in a specific order, and the test actively verifies that these messages are received in the same order within the partition:

kafkaProducer.send("order-topic", "partitionA", "message1");
kafkaProducer.send("order-topic", "partitionA", "message3");
kafkaProducer.send("order-topic", "partitionA", "message4");
await().atMost(2, SECONDS)
  .until(() -> kafkaMessageConsumer.getReceivedMessages()
    .size() >= 3);
List<ReceivedMessage> records = kafkaMessageConsumer.getReceivedMessages();
StringBuilder resultMessage = new StringBuilder();
records.forEach(record -> resultMessage.append(record.getMessage()));
String expectedMessage = "message1message3message4";
assertEquals("Messages with the same key should be received in the order they were produced within a partition", 
  expectedMessage, resultMessage.toString());

4.3. Custom Partitioning

For fine-grained control, Kafka allows defining custom partitioners. These classes implement the Partitioner interface, enabling us to write logic based on message content, metadata, or other factors to determine the target partition.

In this section, we’ll create a custom partitioning logic based on the customer type when dispatching orders to a Kafka topic. Specifically, premium customer orders will be directed to one partition, while normal customer orders will find their way to another.

To begin, we create a class named CustomPartitioner, inheriting from the Kafka Partitioner interface. Within this class, we override the partition() method with custom logic to determine the destination partition for each message:

public class CustomPartitioner implements Partitioner {
    private static final int PREMIUM_PARTITION = 0;
    private static final int NORMAL_PARTITION = 1;
    @Override
    public int partition(String topic, Object key, byte[] keyBytes, Object value, byte[] valueBytes, Cluster cluster) {
        String customerType = extractCustomerType(key.toString());
        return "premium".equalsIgnoreCase(customerType) ? PREMIUM_PARTITION : NORMAL_PARTITION;
    }
    private String extractCustomerType(String key) {
        String[] parts = key.split("_");
        return parts.length > 1 ? parts[1] : "normal";
    }
   
    // more methods
}

Next, to apply this custom partitioner in Kafka, we need to set the PARTITIONER_CLASS_CONFIG property in the producer configuration. Kafka will use this partitioner to determine the partition for each message based on the logic defined in the CustomPartitioner class.

The method setProducerToUseCustomPartitioner() is used to set up the Kafka producer to use the CustomPartitioner:

private KafkaTemplate<String, String> setProducerToUseCustomPartitioner() {
    Map<String, Object> producerProps = KafkaTestUtils.producerProps(embeddedKafkaBroker.getBrokersAsString());
    producerProps.put(ProducerConfig.KEY_SERIALIZER_CLASS_CONFIG, StringSerializer.class);
    producerProps.put(ProducerConfig.VALUE_SERIALIZER_CLASS_CONFIG, StringSerializer.class);
    producerProps.put(ProducerConfig.PARTITIONER_CLASS_CONFIG, CustomPartitioner.class.getName());
    DefaultKafkaProducerFactory<String, String> producerFactory = new DefaultKafkaProducerFactory<>(producerProps);
    return new KafkaTemplate<>(producerFactory);
}

We then construct a test case to ensure that the custom partitioning logic correctly routes premium and normal customer orders to their respective partitions:

KafkaTemplate<String, String> kafkaTemplate = setProducerToUseCustomPartitioner();
kafkaTemplate.send("order-topic", "123_premium", "Order 123, Premium order message");
kafkaTemplate.send("order-topic", "456_normal", "Normal order message");
await().atMost(2, SECONDS)
  .until(() -> kafkaMessageConsumer.getReceivedMessages()
    .size() >= 2);
consumer.assign(Collections.singletonList(new TopicPartition("order-topic", 0)));
ConsumerRecords<String, String> records = consumer.poll(Duration.ofMillis(100));
for (ConsumerRecord<String, String> record : records) {
    assertEquals("Premium order message should be in partition 0", 0, record.partition());
    assertEquals("123_premium", record.key());
}

4.4. Direct Partition Assignment

When manually migrating data between topics or adjusting data distribution across partitions, direct partition assignment could help control the message placement. Kafka also offers the ability to send messages directly to specific partitions using the ProductRecord constructor that accepts a partition number. By specifying the partition number, we can explicitly dictate the destination partition for each message.

In this test case, we specify the second argument in the send() method to take in the partition number:

kafkaProducer.send("order-topic", 0, "123_premium", "Premium order message");
kafkaProducer.send("order-topic", 1, "456_normal", "Normal order message");
await().atMost(2, SECONDS)
  .until(() -> kafkaMessageConsumer.getReceivedMessages()
    .size() >= 2);
List<ReceivedMessage> records = kafkaMessageConsumer.getReceivedMessages();
for (ReceivedMessage record : records) {
    if ("123_premium".equals(record.getKey())) {
        assertEquals("Premium order message should be in partition 0", 0, record.getPartition());
    } else if ("456_normal".equals(record.getKey())) {
        assertEquals("Normal order message should be in partition 1", 1, record.getPartition());
    }
}

5. Consume from Specific Partitions

To consume data from specific partitions in Kafka on the consumer side, we can specify the partitions we want to subscribe to using the KafkaConsumer.assign() method. This grants fine-grained control over consumption but requires managing partition offsets manually.

Here’s an example of consuming messages from specific partitions using the assign() method:

KafkaTemplate<String, String> kafkaTemplate = setProducerToUseCustomPartitioner();
kafkaTemplate.send("order-topic", "123_premium", "Order 123, Premium order message");
kafkaTemplate.send("order-topic", "456_normal", "Normal order message");
await().atMost(2, SECONDS)
  .until(() -> kafkaMessageConsumer.getReceivedMessages()
    .size() >= 2);
consumer.assign(Collections.singletonList(new TopicPartition("order-topic", 0)));
ConsumerRecords<String, String> records = consumer.poll(Duration.ofMillis(100));
for (ConsumerRecord<String, String> record : records) {
    assertEquals("Premium order message should be in partition 0", 0, record.partition());
    assertEquals("123_premium", record.key());
}

6. Potential Challenges and Considerations

When sending messages to specific partitions, there is a risk of uneven load distribution among partitions. This can occur if the logic used for partitioning doesn’t distribute messages uniformly across all partitions. Moreover, scaling the Kafka cluster, which involves adding or removing brokers, can trigger partition reassignment. During reassignment, brokers may move partitions, potentially disrupting the order of messages or causing temporary unavailability.

Therefore, we should regularly monitor the load on each partition using Kafka tools or metrics. For example, Kafka Admin Client and Micrometer can assist in gaining insights into partition health and performance. We can use the Admin Client to retrieve information about topics, partitions, and their current state; and use the Micrometer for metrics monitoring.

Additionally, anticipate the need to proactively adjust the partitioning strategy or horizontally scale the Kafka cluster to manage the increased load on specific partitions effectively. We may also consider increasing the number of partitions or adjusting key ranges for a more even spread.

7. Conclusion

In summary, the ability to send messages to specific partitions in Apache Kafka opens up powerful possibilities for optimizing data processing and enhancing overall system efficiency.

Throughout this tutorial, we explored various methods for directing messages to specific partitions, including the key-based approach, custom partitioning, and direct partition assignment. Each method offers distinct advantages, allowing us to tailor based on the specific requirements of the applications.

As always, the source code for the examples is available over on GitHub.


Java Weekly, Issue 523

$
0
0

1. Spring and Java

>> Using AI to Create JFR Event Descriptions [foojay.io]

Having fun with JFR events and GPT: generating descriptions for different JFR events via GenAI

>> Quarkus LangChain4J Extension Allows Developers to Integrate LLMs in Their Quarkus Applications [infoq.com]

Following Spring’s footsteps, Quarkus also enables developers to take advantage of LLMs in their applications

Also worth reading:

Webinars and presentations:

2. Pick of the Week

>> Becoming a go-to person gets you promoted [careercutler.substack.com]

Happy New Year 🙂


Find Missing Number From a Given Array in Java

$
0
0

1. Overview

Finding the missing number from a specified range within an array in Java can be useful in various scenarios, such as data validation, ensuring completeness, or identifying gaps in a dataset.

In this tutorial, we’ll learn multiple approaches to finding a single missing number from an array in the integer range [1-N].

2. Understanding the Scenario

Let’s imagine that we’ve got the numbers array with integers in the range [1-9], both inclusive:

int[] numbers = new int[] { 1, 4, 5, 2, 7, 8, 6, 9 };

Now, we aim to find the missing number from the array in the range [1-9].

To generalize the problem statement, we can compute the length of the array and set the upper bound, N:

int N = numbers.length + 1;

In the following sections, we’ll learn different ways to find the missing number from a given array in the range [1-N].

3. Using Arithmetic Sum

Let’s start by using arithmetic sum to find the missing number from the numbers array.

First, we’ll compute the expected sum of the arithmetic progression in the range [1-N] and the actual sum of the array:

int expectedSum = (N * (N + 1)) / 2;
int actualSum = Arrays.stream(numbers).sum();

Next, we can subtract the actualSum from the expectedSum to get the missingNumber:

int missingNumber = expectedSum - actualSum;

Lastly, let’s verify the result:

assertEquals(3, missingNumber);

It’s correct!

4. Using XOR Properties

Alternatively, we can use two interesting properties of the xor operator (^) to solve our use case:

  • X^X = 0: When we xor a number with itself, we get zero.
  • X^0 = X: When we xor a number with zero, we get the same number back.

First, we’ll do the xor operation on all the integer values in the closed range [1-9] using the reduce function:

int xorValue = IntStream.rangeClosed(1, N).reduce(0, (a, b) -> a ^ b);

We used 0 and (a, b) -> a ^ b, which is a lambda expression, as the identity and accumulator, respectively, for the reduce() operation.

Next, we’ll continue the xor operation with the integer values from the numbers array:

xorValue = Arrays.stream(numbers).reduce(xorValue, (x, y) -> x ^ y);

Since every number except the missing number comes twice, the xorValue will only contain the missing number in the numbers array from the range [1-9].

Lastly, we should verify that our approach gives the correct results:

assertEquals(3, xorValue);

Great! We got this one right.

5. Using Sorting

Our input array, numbers, is expected to contain all the consecutive values in the range [1-N], except for the missing number. So, if we sort the array, it’ll be convenient to spot the missing number where we don’t see a consecutive number.

First, let’s sort the numbers array:

Arrays.sort(numbers);

Next, we can iterate over the numbers array and check if the value at index is index+1 or not:

int missingNumber = -1;
for (int index = 0; index < numbers.length; index++) {
    if (numbers[index] != index + 1) {
        missingNumber = index + 1;
        break;
    }
}

When the condition fails, it implies that the expected value, index + 1, is missing from the array. So, we set the missingNumber and did an early exit from the loop.

Finally, let’s check that we’ve got the desired output:

assertEquals(3, missingNumber);

The result looks correct. However, we must note that we mutated the original input array in this case.

6. Tracking With a boolean Array

In the sorting approach, there were two major drawbacks:

  • Overhead costs for sorting
  • Mutation of the original input array

We can mitigate these issues by using a boolean array to keep track of the present numbers.

First, let’s define present as a boolean array of size N:

boolean[] present = new boolean[N];

We must recall that N was initialized as numbers.length + 1.

Next, we’ll iterate over the numbers array and mark the presence of each number in the present array:

int missingNumber = -1;
Arrays.stream(numbers).forEach(number -> present[number - 1] = true);

Further, we’ll perform another iteration, but on the present array, to find the number that’s not marked as present:

for (int index = 0; index < present.length; index++) {
    if (!present[index]) {
        missingNumber = index + 1;
        break;
    }
}

Lastly, let’s verify our approach by checking the value of the missingNumber variable:

assertEquals(3, missingNumber);

Perfect! Our approach worked. Further, we must note that we used additional space of N bytes as each boolean value will take 1 byte in Java.

7. Tracking With Bitset

We can optimize the space complexity by using Bitset over a boolean array.

BitSet bitSet = new BitSet(N);

With this initialization, we’ll use only enough space to represent N bits. It’s a considerable optimization when the value of N is quite high.

Next, let’s iterate over the numbers array and mark their presence by setting a bit at their position in bitset:

for (int num : numbers) {
    bitSet.set(num);
}

Now, we can find the missing number by checking the bit that’s not set:

int missingNumber = bitSet.nextClearBit(1);

Finally, let’s confirm that we’ve got the correct value in the missingNumber:

assertEquals(3, missingNumber);

Fantastic! It looks like we nailed this one.

8. Conclusion

In this tutorial, we learned how to find a missing number from an array. Further, we explored multiple ways to solve the use case, such as arithmetic sum, xor operations, sorting, and additional data structures, like Bitset and boolean array.

As always, the code from this article is available over on GitHub.


Remove Null Objects in JSON Response When Using Spring and Jackson

$
0
0

1. Overview

JSON is a de-facto standard for RESTful applications. Spring uses the Jackson library to convert objects into and from JSON seamlessly. However, sometimes, we want to customize the conversion and provide specific rules.

One such thing is to ignore empty or null values from responses or requests. This might provide performance benefits as we don’t need to send empty values back and forth. Also, this can make our APIs more straightforward.

In this tutorial, we’ll learn how to leverage Jackson mapping to simplify our REST interactions.

2. Null Values

While sending or receiving requests, we often can see the values set to nulls. However, usually, it doesn’t provide us with any useful information as, in most cases, this is a default value for non-defined variables or fields.

Also, the fact that we allow null values passed in JSON complicates the validation process. We can skip the validation and set it to default if the value isn’t present. However, if the value is present, we need to do additional checks to identify if it’s null and if it’s possible to convert it to some reasonable representation.

Jackson provides a convenient way to configure it directly in our classes. We’ll use Include.NON_NULL. It can be used on the class level if the rule applies to all the fields, or we can use it more granularly on the fields, getters, and setters. Let’s consider the following Employee class:

@JsonInclude(Include.NON_NULL)
public class Employee {
    private String lastName;
    private String firstName;
    private long id;
    // constructors, getters and setters
}

If any of the fields is null, and we’re talking only about reference fields, they won’t be included in the generated JSON:

@ParameterizedTest
@MethodSource
void giveEndpointWhenSendEmployeeThanReceiveThatUserBackIgnoringNullValues(Employee expected) throws Exception {
    MvcResult result = sendRequestAndGetResult(expected, USERS);
    String response = result.getResponse().getContentAsString();
    validateJsonFields(expected, response);
}
private void validateJsonFields(Employee expected, String response) throws JsonProcessingException {
    JsonNode jsonNode = mapper.readTree(response);
    Predicate<Field> nullField = s -> isFieldNull(expected, s);
    List<String> nullFields = filterFieldsAndGetNames(expected, nullField);
    List<String> nonNullFields = filterFieldsAndGetNames(expected, nullField.negate());
    nullFieldsShouldBeMissing(nullFields, jsonNode);
    nonNullFieldsShouldNonBeMissing(nonNullFields, jsonNode);
}

Sometimes, we want to replicate a similar behavior for null-like fields, and Jackson also provides a way to handle them.

3. Absent Values

Empty Optional is, technically, a non-null value. However, passing a wrapper for non-existent values in requests or responses makes little sense. The previous annotation won’t handle this case and will try to add some information about the wrapper itself:

{
  "lastName": "John",
  "firstName": "Doe",
  "id": 1,
  "salary": {
    "empty": true,
    "present": false
  }
}

Let’s imagine that every employee in our company can expose their salary if they want to do so:

@JsonInclude(Include.NON_ABSENT)
public class Employee {
    private String lastName;
    private String firstName;
    private long id;
    private Optional<Salary> salary;
    // constructors, getters and setters
}

We can handle it with custom getters and setters that return null values. However, it would complicate the API and disregard the idea behind using Optionals in the first place. To ignore empty Optionals, we can use Include.NON_ABSENT:

private void validateJsonFields(Employee expected, String response) throws JsonProcessingException {
    JsonNode jsonNode = mapper.readTree(response);
    Predicate<Field> nullField = s -> isFieldNull(expected, s);
    Predicate<Field> absentField = s -> isFieldAbsent(expected, s);
    List<String> nullOrAbsentFields = filterFieldsAndGetNames(expected, nullField.or(absentField));
    List<String> nonNullAndNonAbsentFields = filterFieldsAndGetNames(expected, nullField.negate().and(absentField.negate()));
    nullFieldsShouldBeMissing(nullOrAbsentFields, jsonNode);
    nonNullFieldsShouldNonBeMissing(nonNullAndNonAbsentFields, jsonNode);
}

Include.NON_ABSENT handles empty Optional values and nulls so that we can use it for both scenarios.

4. Empty Values

Should we include empty strings or empty collections in the generated JSON? In most cases, it doesn’t make sense. Setting them to nulls or wrapping them with Optionals might not be a good idea and can complicate the interactions with the objects.

Let’s consider some additional information about our employees. As we’re working in an international organization, it would be reasonable to assume that an employee might want to add a phonetic version of their name. Also, they might provide a phone number or numbers to allow others to get in touch with them:

@JsonInclude(Include.NON_EMPTY)
public class Employee {
    private String lastName;
    private String firstName;
    private long id;
    private Optional<Salary> salary;
    private String phoneticName = "";
    private List<PhoneNumber> phoneNumbers = new ArrayList<>();
    // constructors, getters and setters
}

We can use Include.NON_EMPTY to exclude the values if they’re empty. This configuration ignores null and absent values as well:

private void validateJsonFields(Employee expected, String response) throws JsonProcessingException {
    JsonNode jsonNode = mapper.readTree(response);
    Predicate<Field> nullField = s -> isFieldNull(expected, s);
    Predicate<Field> absentField = s -> isFieldAbsent(expected, s);
    Predicate<Field> emptyField = s -> isFieldEmpty(expected, s);
    List<String> nullOrAbsentOrEmptyFields = filterFieldsAndGetNames(expected, nullField.or(absentField).or(emptyField));
    List<String> nonNullAndNonAbsentAndNonEmptyFields = filterFieldsAndGetNames(expected,
      nullField.negate().and(absentField.negate().and(emptyField.negate())));
    nullFieldsShouldBeMissing(nullOrAbsentOrEmptyFields, jsonNode);
    nonNullFieldsShouldNonBeMissing(nonNullAndNonAbsentAndNonEmptyFields, jsonNode);
}

As was mentioned previously, all these annotations can be used more granularly, and we can even apply different strategies to different fields. Additionally, we can configure our mapper globally to apply this rule to any conversion.

5. Custom Mappers

If the above strategies aren’t flexible enough for our needs or need to support specific conventions, we should use Include.CUSTOM or implement a custom serializer:

public class CustomEmployeeSerializer extends StdSerializer<Employee> {
    @Override
    public void serialize(Employee employee, JsonGenerator gen, SerializerProvider provider)
      throws IOException {
        gen.writeStartObject();
        // Custom logic to serialize other fields
        gen.writeEndObject();
    }
}

6. Conclusion

Jackson and Spring can help us develop RESTul applications with minimal configuration from our side. Inclusion strategies can simplify our APIs and reduce the amount of boilerplate code. At the same time, if the default solutions are too restrictive or inflexible, we can extend using custom mappers or filters.

As usual, all the code from this tutorial is available over on GitHub.


Difference Between Xmx and MaxRAM JVM Parameters

$
0
0

1. Overview

Heap size is an essential parameter of Java applications. It directly affects how much memory we can use and indirectly impacts the applications’ performance. For example, the usage of compressed pointers, the number and duration of garbage collection cycles, etc.

In this tutorial, we’ll learn how to use the –XX:MaxRAM flag to provide more tuning opportunities for the heap size calculation. This is especially important while running an application inside a container or on different hosts.

2. Heap Size Calculations

Flags for configuring a heap can work together and, also, can override each other. Understanding their relationships is important to get more insights into their purpose.

2.1. Using -Xmx

The primary ways to control the heap size are -Xmx and -Xms flags, which control the maximum and initial size, respectively. It’s a powerful tool but doesn’t consider available space on a machine or container. Let’s say we’re running an application on various hosts where the available RAM spans from 4 GB to 64 GB.

Without -Xmx, JVM automatically allocates around 25% of available RAM for the application heap. However, in general, the initial heap size allocated by JVM depends on various parameters: system architecture, version of JVM, platform, etc.

This behavior might be undesirable in some cases. Depending on the available RAM, it might allocate dramatically different heaps. Let’s check how much JVM allocates by default on the machine with 24 GB of RAM:

$ java -XX:+PrintFlagsFinal -version |\
grep -e '\bMaxHeapSize\|\bMinHeapSize\|\bInitialHeapSize' 
   size_t InitialHeapSize   = 402653184    {product} {ergonomic}
   size_t MaxHeapSize       = 6442450944   {product} {ergonomic}
   size_t MinHeapSize       = 8388608      {product} {ergonomic}

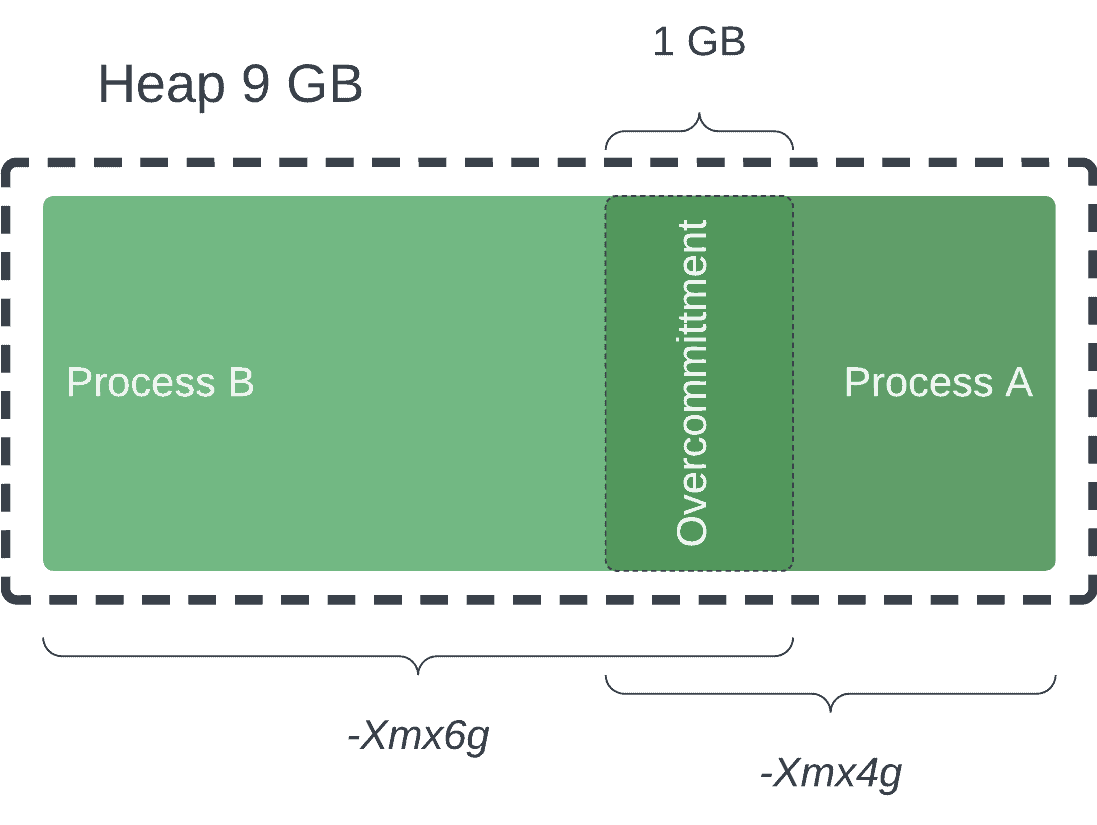
JVM allocated roughly 6 GB or 25%, which might be too much for our application. Setting the max heap to a specific value might also create issues. If we’re using -Xmx4g, it might fail for hosts with less than available memory, and also, we won’t get additional memory we can have:

$ java -XX:+PrintFlagsFinal -Xmx4g -version |\
grep -e '\bMaxHeapSize\|\bMinHeapSize\|\bInitialHeapSize'
   size_t InitialHeapSize   = 402653184    {product} {ergonomic}
   size_t MaxHeapSize       = 4294967296   {product} {command line}
   size_t MinHeapSize       = 8388608      {product} {ergonomic}

In some cases, this problem can be solved by calculating -Xmx on the fly with scripts. However, it bypasses the JVM heuristic that might be more precise about the application needs.

2.2. Using -XX:MaxRAM

The flag -XX:MaxRAM aims to resolve the problem described above. First, it prevents JVM from over-allocating memory on the systems with lots of RAM. We can think about this flag as “run the app, but pretend that you have at most X amount of RAM.”

Additionally, -XX:MaxRAM allows JVM to use a standard heuristic for the heap size. Let’s review the previous example, but using -XX:MaxRAM:

$ java -XX:+PrintFlagsFinal -XX:MaxRAM=6g -version |\
grep -e '\bMaxHeapSize\|\bMinHeapSize\|\bInitialHeapSize'
   size_t InitialHeapSize   = 100663296    {product} {ergonomic}
   size_t MaxHeapSize       = 1610612736   {product} {ergonomic}
   size_t MinHeapSize       = 8388608      {product} {ergonomic}

JVM calculates the maximum heap size in this case but assumes we have only 6 GB of RAM. Note that we should not use -Xmx with -XX:MaxRAM. Because -Xmx is more specific, it would override -XX:MaxRAM:

$ java -XX:+PrintFlagsFinal -XX:MaxRAM=6g -Xmx6g -version |\ 
grep -e '\bMaxHeapSize\|\bMinHeapSize\|\bInitialHeapSize'
   size_t InitialHeapSize   = 100663296    {product} {ergonomic}
   size_t MaxHeapSize       = 6442450944   {product} {command line}
   size_t MinHeapSize       = 8388608      {product} {ergonomic}

This flag can improve resource utilization and heap allocation. However, we still don’t have control over how much of the RAM should be allocated to the heap.

2.3. Using -XX:MaxRAMPercentage And -XX:MinRAMPercentage

Now we’re in control and can tell JVM how much RAM it should consider. Let’s define our strategies for allocating the heap. The -XX:MaxRAM flag works well with -XX:MaxRAMPercentage and -XX:MinRAMPercentage. They provide even more flexibility, especially in containerized environments. Let’s try to use it with -XX:MaxRAM and set the heap as 50% of available RAM:

$ java -XX:+PrintFlagsFinal -XX:MaxRAM=6g -XX:MaxRAMPercentage=50 -version |\
grep -e '\bMaxHeapSize\|\bMinHeapSize\|\bInitialHeapSize'
   size_t InitialHeapSize   = 100663296    {product} {ergonomic}
   size_t MaxHeapSize       = 3221225472   {product} {ergonomic}
   size_t MinHeapSize       = 8388608      {product} {ergonomic}

There’s a common confusion about the -XX:MinRAMPercentage. It doesn’t behave as -Xms. Although, it would be reasonable to assume that it sets the minimum heap size. Let’s check the following setup:

$ java -XX:+PrintFlagsFinal -XX:MaxRAM=16g -XX:MaxRAMPercentage=10 -XX:MinRAMPercentage=50 -version |\
grep -e '\bMaxHeapSize\|\bMinHeapSize\|\bInitialHeapSize'
   size_t InitialHeapSize   = 268435456    {product} {ergonomic}
   size_t MaxHeapSize       = 1719664640   {product} {ergonomic}
   size_t MinHeapSize       = 8388608      {product} {ergonomic}

We set both -XX:MaxRAMPercentage and -XX:MinRAMPercentage, but it’s clear that only -XX:MaxRAMPercentage is working. We allocated 10% of 16 GB RAM to the heap. However, if we reduce the available RAM to 200 MB, we’ll get a different behavior:

$ java -XX:+PrintFlagsFinal -XX:MaxRAM=200m -XX:MaxRAMPercentage=10 -XX:MinRAMPercentage=50 -version |\
grep -e '\bMaxHeapSize\|\bMinHeapSize\|\bInitialHeapSize' 
   size_t InitialHeapSize   = 8388608      {product} {ergonomic}
   size_t MaxHeapSize       = 109051904    {product} {ergonomic}
   size_t MinHeapSize       = 8388608      {product} {ergonomic}

In this case, the heap size is controlled by -XX:MinRAMPercentage. This flag kicks in when the available RAM drops to less than 200 MB. Now, we can bump the heap to 75%:

$ java -XX:+PrintFlagsFinal -XX:MaxRAM=200m -XX:MaxRAMPercentage=10 -XX:MinRAMPercentage=75 -version |\
grep -e '\bMaxHeapSize\|\bMinHeapSize\|\bInitialHeapSize'
   size_t InitialHeapSize   = 8388608      {product} {ergonomic}
   size_t MaxHeapSize       = 134217728    {product} {ergonomic}
   size_t MinHeapSize       = 8388608      {product} {ergonomic}

If we proceeded to apply -XX:MaxRAMPercentage for such tiny heaps, we would get 20 MB of heap, which might not be enough for our purposes. That’s why we have different flags for small and large heaps. The -XX:MaxRAM flag works nicely with both of them and gives us more control.

3. Conclusion

Controlling heap size is crucial for Java applications. Allocating more memory isn’t necessarily good; at the same time, allocating not enough memory is bad.

Using -Xmx, -XX:MaxRAM, -XX:MaxRAMPercentage, and -XX:MinRAMPercentage can help us tune our application better and improve performance.


Introduction to Spring AI

$
0
0

1. Overview

Spring Framework officially enabled the power of AI generative prompts with the Spring AI project. This article aims to provide a robust introduction to the generative AI integration in the Spring Boot applications. Within the tutorial, we’ll familiarize ourselves with the essential AI concepts.

Also, we will gain an understanding of how Spring AI interacts with the models and create an application to demonstrate its capabilities.

2. Spring AI Main Concepts

Before we start, let’s review some key domain terms and concepts.

Spring AI initially focused on models designed to handle language input and generate language output. The idea behind the project was to provide developers with an abstract interface, the foundation for enabling generative AI APIs into the application as an isolated component.

One such abstraction is the interface AiClient, which has two basic implementations  OpenAI and Azure OpenAI.

public interface AiClient {
    default String generate(String message);
    AiResponse generate(Prompt prompt);
}

AiClient provides two options for the generative function. The simplified one – generate(String message) – uses String as input and output, and it could be used to avoid the extra complexity of Promt and AiResponse classes.

Now, let’s take a closer look at their difference.

2.1. Advanced Prompt and AiResponse

In the AI domain, prompt refers to a text message provided to AI. It consists of the context and question, and that model is used for the answer generation.

From the Spring AI project perspective, the Prompt is a list of parametrized Messages. 

public class Prompt {
    private final List<Message> messages;
    // constructors and utility methods 
}
public interface Message {
    String getContent();
    Map<String, Object> getProperties();
    MessageType getMessageType();
}

Prompt enables developers to have more control over the text input. A good example is the prompt templates, constructed with a predefined text and set of placeholders. Then, we may populate them with the Map<String, Object> values passed to the Message constructor.

Tell me a {adjective} joke about {content}.

The Message interface also holds advanced information about the categories of messages that an AI model can process. For example, OpenAI implementation distinguishes between conversational roles, effectively mapped by the MessageType. In the case of other models, it could reflect the message format or some other custom properties. For more details, please refer to the official documentation.

public class AiResponse {
    private final List<Generation> generations;
    // getters and setters
}
public class Generation {
    private final String text;
    private Map<String, Object> info;
}

The AiResponse consists of the list of Generation objects, each holding output from the corresponding prompt. In addition, the Generation object provides metadata information of the AI response.

However, while the Spring AI project is still in beta, not all features are finished and documented. Please follow the progress with the issues on the GitHub repository.

3. Getting Started with the Spring AI Project

First of all, AiClient requires the API key for all communications with the OpenAI platform. For that, we will create a token on the API Keys page.

Spring AI project defines configuration property: spring.ai.openai.api-key. We may set it up in the application.yml file.

spring:
  ai:
    openai.api-key: ${OPEN_AI_KEY}

The next step would be configuring a dependency repository. The Spring AI project provides artifacts in the Spring Milestone Repository.

Therefore, we need to add the repository definition:

<repositories>
    <repository>
        <id>spring-snapshots</id>
        <name>Spring Snapshots</name>
        <url>https://repo.spring.io/snapshot</url>
        <releases>
            <enabled>false</enabled>
        </releases>
    </repository>
</repositories>

After that, we are ready to import open-ai-spring-boot-starter:

<dependency>
    <groupId>org.springframework.experimental.ai</groupId>
    <artifactId>spring-ai-openai-spring-boot-starter</artifactId>
    <version>0.7.1-SNAPSHOT</version>
</dependency>

Please keep in mind that the Spring AI project is actively evolving, so check the official GitHub page for the latest version

That’s all! Now, let’s put the concept into practice.

4. Spring AI in Action

Now, we will write a simple REST API for demonstration purposes. It will consist of two endpoints that return poetry on whatever theme and genre we’d like:

  • /ai/cathaiku — will implement the basic generate() method and return a plain string value with Haiku about cats;
  • /ai/poetry?theme={{theme}}&genre={{genre}} — will demonstrate capabilities of PromtTemplate and AiResponse classes;

4.1. Injecting AiClient in Spring Boot Application

To keep things simple, let’s start with the cat haiku endpoint. With @RestController annotation, we will set up PoetryController and add GET method mapping:

@RestController
@RequestMapping("ai")
public class PoetryController {
    private final PoetryService poetryService;
    // constructor
    @GetMapping("/cathaiku")
    public ResponseEntity<String> generateHaiku(){
        return ResponseEntity.ok(poetryService.getCatHaiku());
    }
}

Next, following the DDD concept, the service layer would define all domain logic. All we need to do to call the generate() method is inject the AiClient into the PoetryService. Now, we may define the String prompt, where we will specify our request to generate the Haiku.

@Service
public class PoetryServiceImpl implements PoetryService {
    public static final String WRITE_ME_HAIKU_ABOUT_CAT = """
        Write me Haiku about cat,
        haiku should start with the word cat obligatory""";
    private final AiClient aiClient;
    // constructor
    @Override
    public String getCatHaiku() {
        return aiClient.generate(WRITE_ME_HAIKU_ABOUT_CAT);
    }
}

The endpoint is up and ready to receive the requests. The response will contain a plain string:

Cat prowls in the night,
Whiskers twitch with keen delight,
Silent hunter's might.

It looks good so far; however, the current solution has a few pitfalls. The response of plain string isn’t the best solution for REST contracts in the first place.

Furthermore, there is not this much value in querying ChatGPT with the same old prompt all the time. So, our next step would be to add the parametrized values: theme and genre. That’s when PromtTemplate could serve us the best!

4.2. Configurable Queries With PromptTemplate

In its nature, PromptTemplate works quite similarly to a combination of StringBuilder and dictionary. Similarly to /cathaiku endpoint, we will first define the base string for the prompt. Moreover, this time, we will define the placeholders populated with actual values by their names:

String promptString = """
    Write me {genre} poetry about {theme}
    """;
PromptTemplate promptTemplate = new PromptTemplate(promptString);
promptTemplate.add("genre", genre);
promptTemplate.add("theme", theme);

Next, what we may want to do is to standardize the endpoint output. For that, we will introduce the simple record classPoetryDto, which will contain poetry title, name, and genre:

public record PoetryDto (String title, String poetry, String genre, String theme){}

A further step would be registering PoetryDto in the BeanOutputParser class; it provides functionality to serialize and deserialize OpenAI API output.

Then, we will provide this parser to the promtTemple, and from now on, our messages will be serialized into the DTO objects.

In the end, our generative function would look like this:

@Override
public PoetryDto getPoetryByGenreAndTheme(String genre, String theme) {
    BeanOutputParser<PoetryDto> poetryDtoBeanOutputParser = new BeanOutputParser<>(PoetryDto.class);
    String promptString = """
        Write me {genre} poetry about {theme}
        {format}
    """;
    PromptTemplate promptTemplate = new PromptTemplate(promptString);
    promptTemplate.add("genre", genre);
    promptTemplate.add("theme", theme);
    promptTemplate.add("format", poetryDtoBeanOutputParser.getFormat());
    promptTemplate.setOutputParser(poetryDtoBeanOutputParser);
    AiResponse response = aiClient.generate(promptTemplate.create());
    return poetryDtoBeanOutputParser.parse(response.getGeneration().getText());
}

The response our client would receive now looks much better, and more importantly, it fits into the REST API standards and best practices:

{
    "title": "Dancing Flames",
    "poetry": "In the depths of night, flames dance with grace,
       Their golden tongues lick the air with fiery embrace.
       A symphony of warmth, a mesmerizing sight,
       In their flickering glow, shadows take flight.
       Oh, flames so vibrant, so full of life,
       Burning with passion, banishing all strife.
       They consume with ardor, yet do not destroy,
       A paradox of power, a delicate ploy.
       They whisper secrets, untold and untamed,
       Their radiant hues, a kaleidoscope unnamed.
       In their gentle crackling, stories unfold,
       Of ancient tales and legends untold.
       Flames ignite the heart, awakening desire,
       They fuel the soul, setting it on fire.
       With every flicker, they kindle a spark,
       Guiding us through the darkness, lighting up the dark.
       So let us gather 'round, bask in their warm embrace,
       For in the realm of flames, magic finds its place.
       In their ethereal dance, we find solace and release,
       And in their eternal glow, our spirits find peace.",
    "genre": "Liric",
    "theme": "Flames"
}

5. Error Handling

Spring AI project provides an abstraction over OpenAPI errors with the OpenAiHttpException class. Unfortunately, it does not provide individual mapping of classes per error type. However, thanks to such abstraction, we may handle all exceptions with RestControllerAdvice in one handler.

The code below uses the ProblemDetail standard of the Spring 6 Framework. If you are unfamiliar with it, please check the official documentation.

@RestControllerAdvice
public class ExceptionTranslator extends ResponseEntityExceptionHandler {
    public static final String OPEN_AI_CLIENT_RAISED_EXCEPTION = "Open AI client raised exception";
    @ExceptionHandler(OpenAiHttpException.class)
    ProblemDetail handleOpenAiHttpException(OpenAiHttpException ex) {
        HttpStatus status = Optional
          .ofNullable(HttpStatus.resolve(ex.statusCode))
          .orElse(HttpStatus.BAD_REQUEST);
        ProblemDetail problemDetail = ProblemDetail.forStatusAndDetail(status, ex.getMessage());
        problemDetail.setTitle(OPEN_AI_CLIENT_RAISED_EXCEPTION);
        return problemDetail;
    }
}

Now, if the OpenAPI response contains errors, we will handle it. Here is an example of the response:

{
    "type": "about:blank",
    "title": "Open AI client raised exception",
    "status": 401,
    "detail": "Incorrect API key provided: sk-XG6GW***************************************wlmi. 
       You can find your API key at https://platform.openai.com/account/api-keys.",
    "instance": "/ai/cathaiku"
}

The complete list of possible exception statuses is on the official documentation page.

6. Conclusion

In this article, we familiarized ourselves with the Spring AI Project and its capabilities in the context of REST APIs. Despite the fact that at the time this article was written, spring-ai-starter remained in active development and was accessible in a snapshot version. It provided a reliable interface for generative AI integration into the Spring Boot application.

In the context of this article, we covered both basic and advanced integrations with Spring AI, including how the AiClient works under the hood. As the proof of concept, we implemented a basic REST application that generates poetry. Along with a basic example of a generative endpoint, we provided a sample using advanced Spring AI features: PromtTemplate, AiResponse, and BeanOutputParser. In addition, we implemented the error handling functionality.

The complete examples are available over on GitHub.


Creating Reactive APIs With Micronaut and MongoDB

$
0
0

1. Overview

In this tutorial, we’ll explore how to create reactive REST APIs with Micronaut and MongoDB.

Micronaut is a framework for constructing microservices and serverless applications on the Java Virtual Machine (JVM).

We’ll look at how to create entities, repositories, services, and controllers using Micronaut.

2. Project Setup

For our code example, we’ll create a CRUD application that stores and retrieves books from a MongoDB database. To start with, let’s create a Maven project using Micronaut Launch, set up the dependencies, and configure the database.

2.1. Initializing the Project

Let’s start by creating a new project using Micronaut Launch. We’ll select the settings below:

  • Application Type: Micronaut Application
  • Java Version: 17
  • Build Tool: Maven
  • Language: Java
  • Test Framework: JUnit

Additionally, we need to provide the Micronaut version, base package, and a name for our project. To include MongoDB and reactive support, we’ll add the following features:

  • reactor – to enable reactive support.
  • mongo-reactive – to enable MongoDB Reactive Streams support.
  • data-mongodb-reactive – to enable reactive MongoDB repositories.
Micronaut launch webpage with the required project options selected

Once we’ve selected the above features, we can generate and download the project. Then, we can import the project into our IDE.

2.2. MongoDB Setup

There are multiple ways to set up a MongoDB database. For instance, we may install MongoDB locally, use a cloud service like MongoDB Atlas, or use a Docker container.

After this, we need to configure the connection details in the already generated application.properties file:

mongodb.uri=mongodb://${MONGO_HOST:localhost}:${MONGO_PORT:27017}/someDb

Here, we have added the default host and port for the database as localhost and 27017 respectively.

3. Entities

Now that we have our project set up, let’s look at how to create entities. We’ll create a Book entity that maps to a collection in the database:

@Serdeable
@MappedEntity
public class Book {
    @Id
    @Generated
    @Nullable
    private ObjectId id;
    private String title;
    private Author author;
    private int year;
}

The @Serdeable annotation indicates that the class can be serialized and deserialized. Since we’ll pass this entity in our request and response, it needs to be made serializable. This is the same as implementing the Serializable interface.

To map the class to a database collection, we use the @MappedEntity annotation. While writing or reading from the database, Micronaut uses this class to convert the database document into a Java object and vice-versa. This is parallel to the @Document annotation in Spring Data MongoDB.

We annotate the id field with @Id to indicate that it’s the primary key for the entity. Additionally, we annotate it with @Generated to indicate that the database generates the value. The @Nullable annotation is used to indicate that the field can be null as the id field will be null when the entity is created.

Similarly, let’s create an Author entity:

@Serdeable
public class Author {
    private String firstName;
    private String lastName;
}

We don’t need to annotate this class with @MappedEntity as it will be embedded in the Book entity.

4. Repositories

Next, let’s create a repository to store and retrieve the books from the MongoDB database. Micronaut provides several pre-defined interfaces to create repositories.

We’ll use the ReactorCrudRepository interface to create a reactive repository. This interface extends the CrudRepository interface and adds support for reactive streams.

Additionally, we’ll annotate the repository with @MongoRepository to indicate that it’s a MongoDB repository. This also directs Micronaut to create a bean for this class:

@MongoRepository
public interface BookRepository extends ReactorCrudRepository<Book, ObjectId> {
    @MongoFindQuery("{year: {$gt: :year}}")
    Flux<Book> findByYearGreaterThan(int year);
}

We’ve extended the ReactorCrudRepository interface and provided the Book entity and the type of the ID as generic parameters.

Micronaut generates an implementation of the interface at compile time. It contains methods to save, retrieve, and delete books from the database. We’ve added a custom method to find books published after a given year. The @MongoFindQuery annotation is used to specify a custom query.

In our query, we use the :year placeholder to indicate that the value will be provided at runtime. The $gt operator is similar to the > operator in SQL.

5. Services

Services are employed to encapsulate the business logic and are typically injected into the controllers. Additionally, they may encompass other functionalities such as validation, error handling, and logging.

We’ll create a BookService using the BookRepository to store and retrieve books:

@Singleton
public class BookService {
    private final BookRepository bookRepository;
    public BookService(BookRepository bookRepository) {
        this.bookRepository = bookRepository;
    }
    public ObjectId save(Book book) {
        Book savedBook = bookRepository.save(book).block();
        return null != savedBook ? savedBook.getId() : null;
    }
    public Book findById(String id) {
        return bookRepository.findById(new ObjectId(id)).block();
    }
    
    public ObjectId update(Book book) {
        Book updatedBook = bookRepository.update(book).block();
        return null != updatedBook ? updatedBook.getId() : null;
    }
    public Long deleteById(String id) {
        return bookRepository.deleteById(new ObjectId(id)).block();
    }
    
    public Flux<Book> findByYearGreaterThan(int year) {
        return bookRepository.findByYearGreaterThan(year);
    }
}

Here, we inject the BookRepository into the constructor using the constructor injection. The @Singleton annotation indicates that only one instance of the service will be created. This is similar to the @Component annotation of Spring Boot.

Next, we have the save(), findById(), update(), and deleteById() methods to save, find, update, and delete books from the database. The block() method blocks the execution until the result is available.

Finally, we have a findByYearGreaterThan() method to find books published after a given year.

6. Controllers

Controllers are used to handle the incoming requests and return the response. In Micronaut, we can use annotations to create controllers and configure routing based on different paths and HTTP methods.

6.1. Controller

We’ll create a BookController to handle the requests related to books:

@Controller("/books")
public class BookController {
    private final BookService bookService;
    public BookController(BookService bookService) {
        this.bookService = bookService;
    }
    @Post
    public String createBook(@Body Book book) {
        @Nullable ObjectId bookId = bookService.save(book);
        if (null == bookId) {
            return "Book not created";
        } else {
            return "Book created with id: " + bookId.getId();
        }
    }
    @Put
    public String updateBook(@Body Book book) {
        @Nullable ObjectId bookId = bookService.update(book);
        if (null == bookId) {
            return "Book not updated";
        } else {
            return "Book updated with id: " + bookId.getId();
        }
    }
}

We have annotated the class with @Controller to indicate it is a controller. We have also specified the base path for the controller as /books.

Let’s look at some important parts of the controller:

  • First, we inject the BookService into the constructor.
  • Then, we have a createBook() method to create a new book. The @Post annotation indicates the method handles the POST requests.
  • Since we want to convert the incoming request body to a Book object, we’ve used the @Body annotation.
  • When the book is saved successfully, an ObjectId will be returned. We’ve used the @Nullable annotation to indicate that the value can be null in case the book isn’t saved.
  • Similarly, we have an updateBook() method to update an existing book. We used the @Put annotation since the method handles the PUT requests.
  • The methods return a string response indicating whether the book was created or updated successfully.

6.2. Path Variables

To extract values from the path, we can use path variables. To demonstrate this, let’s add methods to find and delete a book by its ID:

@Delete("/{id}")
public String deleteBook(String id) {
    Long bookId = bookService.deleteById(id);
    if (0 == bookId) {
        return "Book not deleted";
    } else {
        return "Book deleted with id: " + bookId;
    }
}
@Get("/{id}")
public Book findById(@PathVariable("id") String identifier) {
    return bookService.findById(identifier);
}

Path variables are indicated using curly braces in the path. In this example, {id} is a path variable that will be extracted from the path and passed to the method.

By default, the name of the path variable should match the name of the method parameter. This is the case with the deleteBook() method. In case it doesn’t match, we can use the @PathVariable annotation to specify a different name for the path variable. This is the case with the findById() method.

6.3. Query Parameters

We can use query parameters to extract values from the query string. Let’s add a method to find books published after a given year:

@Get("/published-after")
public Flux<Book> findByYearGreaterThan(@QueryValue("year") int year) {
    return bookService.findByYearGreaterThan(year);
}

@QueryValue indicates that the value will be provided as a query parameter. Additionally, we need to specify the query parameter’s name as the annotation’s value.

When we make a request to this method, we’ll append a year parameter to the URL and provide its value.

7. Testing

We can test the application using either curl or an application like Postman.  Let’s use curl to test the application.

7.1. Create a Book

Let’s create a book using a POST request:

curl --request POST \
  --url http://localhost:8080/books \
  --header 'Content-Type: application/json' \
  --data '{
    "title": "1984",
    "year": 1949,
    "author": {
        "firstName": "George",
        "lastName": "Orwel"
    }
  }'

First, we use the -request POST option to indicate that the request is a POST request. Then we provide headers using the -header option. Here, we set the content type as application/json. Finally, we have used the -data option to specify the request body.

Here’s a sample response:

Book created with id: 650e86a7f0f1884234c80e3f

7.2. Find a Book

Next, let’s find the book we just created:

curl --request GET \
  --url http://localhost:8080/books/650e86a7f0f1884234c80e3f

This returns the book with the ID 650e86a7f0f1884234c80e3f .

7.3. Update a Book

Next, let’s update the book. We have a typo in the author’s last name. So let’s fix it:

curl --request PUT \
  --url http://localhost:8080/books \
  --header 'Content-Type: application/json' \
  --data '{
	"id": {
	    "$oid": "650e86a7f0f1884234c80e3f"
	},
	"title": "1984",
	"author": {
	    "firstName": "George",
	    "lastName": "Orwell"
	},
	"year": 1949
}'

If we try to find the book again, we’ll see that the author’s last name is now Orwell.

7.4. Custom Query

Next, let’s find all the books published after 1940:

curl --request GET \
  --url 'http://localhost:8080/books/published-after?year=1940'

When we execute this command, it calls our API and returns a list of all the books published after 1940 in a JSON array:

[
    {
        "id": {
            "$oid": "650e86a7f0f1884234c80e3f"
        },
        "title": "1984",
        "author": {
            "firstName": "George",
            "lastName": "Orwell"
        },
        "year": 1949
    }
]

Similarly, if we try to find all the books published after 1950, we’ll get an empty array:

curl --request GET \
  --url 'http://localhost:8080/books/published-after?year=1950'
[]

8. Error Handling

Next, let’s look at a few ways to handle errors in the application. We’ll look at two common scenarios:

  • The book isn’t found when trying to get, update, or delete it.
  • Wrong input is provided when creating or updating a book.

8.1. Bean Validation

Firstly, let’s look at how to handle wrong input. For this, we can use the Bean Validation API of Java.

Let’s add a few constraints to the Book class:

public class Book {
    @NotBlank
    private String title;
    @NotNull
    private Author author;
    // ...
}

The @NotBlank annotation indicates that the title cannot be blank. Similarly, we use the @NotNull annotation to indicate that the author cannot be null.

Then, to enable input validation in our controller, we need to use the @Valid annotation:

@Post
public String createBook(@Valid @Body Book book) {
    // ...
}

When the input is invalid, the controller returns a 400 Bad Request response with a JSON body containing the details of the error:

{
    "_links": {
        "self": [
            {
                "href": "/books",
                "templated": false
            }
        ]
    },
    "_embedded": {
        "errors": [
            {
                "message": "book.author: must not be null"
            },
            {
                "message": "book.title: must not be blank"
            }
        ]
    },
    "message": "Bad Request"
}

8.2. Custom Error Handler

In the above example, we can see how Micronaut handles errors by default. However, if we want to change this behavior, we can create a custom error handler.

Since the validation errors are instances of the ConstraintViolation class, let’s create a custom error handling method that handles ConstraintViolationException:

@Error(exception = ConstraintViolationException.class)
public MutableHttpResponse<String> onSavedFailed(ConstraintViolationException ex) {
    return HttpResponse.badRequest(ex.getConstraintViolations().stream()
      .map(cv -> cv.getPropertyPath() + " " + cv.getMessage())
      .toList().toString());
}

When any controller throws a ConstraintViolationException, Micronaut invokes this method. It then returns a 400 Bad Request response with a JSON body containing the details of the error:

[
    "createBook.book.author must not be null",
    "createBook.book.title must not be blank"
]

8.3. Custom Exception

Next, let’s look at how to handle the case when the book isn’t found. In this case, we can create a custom exception:

public class BookNotFoundException extends RuntimeException {
    public BookNotFoundException(long id) {
        super("Book with id " + id + " not found");
    }
}

We can then throw this exception from the controller:

@Get("/{id}")
public Book findById(@PathVariable("id") String identifier) throws BookNotFoundException {
    Book book = bookService.findById(identifier);
    if (null == book) {
        throw new BookNotFoundException(identifier);
    } else {
        return book;
    }
}

When the book isn’t found, the controller throws a BookNotFoundException.

Finally, we can create a custom error-handling method that handles BookNotFoundException:

@Error(exception = BookNotFoundException.class)
public MutableHttpResponse<String> onBookNotFound(BookNotFoundException ex) {
    return HttpResponse.notFound(ex.getMessage());
}

When a non-existing book ID is provided, the controller returns a 404 Not Found response with a JSON body containing the details of the error:

Book with id 650e86a7f0f1884234c80e3f not found

9. Conclusion

In this article, we looked at how to create a REST API using Micronaut and MongoDB. First, we looked at how to create a MongoDB repository, a simple controller, and how to use path variables and query parameters. Then, we tested the application using curl. Finally, we looked at how to handle errors in the controllers.

The complete source code for the application is available over on GitHub.


Read Multiple Messages with Apache Kafka

$
0
0

1. Overview

In this tutorial, we’ll explore how the Kafka Consumer retrieves messages from the broker. We’ll learn the configurable properties that can directly impact how many messages the Kafka Consumer reads at once. Finally, we’ll explore how adjusting these settings affects the Consumer‘s behavior.

2. Setting up the Environment

Kafka Consumers are fetching records for a given partition in batches of configurable sizes. We cannot configure the exact number of records to be fetched in one batch, but we can configure the size of these batches, measured in bytes.

For the code snippets in this article, we’ll need a simple Spring application that uses the kafka-clients library to interact with the Kafka broker. We’ll create a Java class that internally uses a KafkaConsumer to subscribe to a topic and log the incoming messages. If you want to dive deeper, feel free to read through our article dedicated to the Kafka Consumer API and follow along.

One of the key differences in our example will be the logging: Instead of logging one message at a time, let’s collect them and log the whole batch. This way, we’ll be able to see exactly how many messages are fetched for each poll(). Additionally, let’s enrich the log by incorporating details like the initial and final offsets of the batch along with the consumer’s groupId:

class VariableFetchSizeKafkaListener implements Runnable {
    private final String topic;
    private final KafkaConsumer<String, String> consumer;
    
    // constructor
    @Override
    public void run() {
        consumer.subscribe(singletonList(topic));
        int pollCount = 1;
        while (true) {
            List<ConsumerRecord<String, String>> records = new ArrayList<>();
            for (var record : consumer.poll(ofMillis(500))) {
                records.add(record);
            }
            if (!records.isEmpty()) {
                String batchOffsets = String.format("%s -> %s", records.get(0).offset(), records.get(records.size() - 1).offset());
                String groupId = consumer.groupMetadata().groupId();
                log.info("groupId: {}, poll: #{}, fetched: #{} records, offsets: {}", groupId, pollCount++, records.size(), batchOffsets);
            }
        }
    }
}

The Testcontainers library will help us set up the test environment by spinning up a Docker container with a running Kafka broker. If you want to learn more about setting up the Testcontainer’s Kafka module, check out how we configured the test environment here and follow along.

In our particular case, we can define an additional method that publishes several messages on a given topic. For instance, let’s assume we are streaming values read by a temperature sensor to a topic named “engine.sensor.temperature“:

void publishTestData(int recordsCount, String topic) {
    List<ProducerRecord<String, String>> records = IntStream.range(0, recordsCount)
      .mapToObj(__ -> new ProducerRecord<>(topic, "key1", "temperature=255F"))
      .collect(toList());
    // publish all to kafka
}

As we can see, we have used the same key for all the messages. As a result, all records will be sent to the same partition. For payload, we’ve used a short, fixed text depicting a temperature measurement.

3. Testing the Default Behaviour

Let’s start by creating a Kafka listener using the default consumer configuration. Then, we’ll publish a few messages to see how many batches our listener consumes. As we can see, our custom listener uses the Consumer API internally. As a result, to instantiate VariableFetchSizeKafkaListener, we’ll have to configure and create a KafkaConsumer first:

Properties props = new Properties();
props.setProperty(ConsumerConfig.BOOTSTRAP_SERVERS_CONFIG, KAFKA_CONTAINER.getBootstrapServers());
props.setProperty(ConsumerConfig.AUTO_OFFSET_RESET_CONFIG, "earliest");
props.setProperty(ConsumerConfig.KEY_DESERIALIZER_CLASS_CONFIG, StringDeserializer.class.getName());
props.setProperty(ConsumerConfig.VALUE_DESERIALIZER_CLASS_CONFIG, StringDeserializer.class.getName());
props.setProperty(ConsumerConfig.GROUP_ID_CONFIG, "default_config");
KafkaConsumer<String, String> kafkaConsumer = new KafkaConsumer<>(props);

For now, we’ll use KafkaConsumer‘s default values for the minimum and maximum fetch sizes. Based on this consumer, we can instantiate our listener and run it asynchronously to avoid blocking the main thread:

CompletableFuture.runAsync(
  new VariableFetchSizeKafkaListener(topic, kafkaConsumer)
);

Finally, let’s block the test thread for a few seconds, giving some time for the listener to consume the messages. The goal of this article is to start the listeners and observe how they perform. We’ll use the Junit5 tests as a convenient way of setting up and exploring their behavior, but for simplicity, we won’t include any specific assertions. As a result, this will be our starting @Test:

@Test
void whenUsingDefaultConfiguration_thenProcessInBatchesOf() throws Exception {
    String topic = "engine.sensors.temperature";
    publishTestData(300, topic);
    Properties props = new Properties();
    props.setProperty(ConsumerConfig.BOOTSTRAP_SERVERS_CONFIG, KAFKA_CONTAINER.getBootstrapServers());
    props.setProperty(ConsumerConfig.AUTO_OFFSET_RESET_CONFIG, "earliest");
    props.setProperty(ConsumerConfig.KEY_DESERIALIZER_CLASS_CONFIG, StringDeserializer.class.getName());
    props.setProperty(ConsumerConfig.VALUE_DESERIALIZER_CLASS_CONFIG, StringDeserializer.class.getName());
    props.setProperty(ConsumerConfig.GROUP_ID_CONFIG, "default_config");
    KafkaConsumer<String, String> kafkaConsumer = new KafkaConsumer<>(props);
    CompletableFuture.runAsync(
      new VariableFetchSizeKafkaListener(topic, kafkaConsumer)
    );
    Thread.sleep(5_000L);
}

Now, let’s run the test and inspect the logs to see how many records will be fetched in a single batch:

10:48:46.958 [ForkJoinPool.commonPool-worker-2] INFO  c.b.k.c.VariableFetchSizeKafkaListener - groupId: default_config, poll: #1, fetched: #300 records, offsets: 0 -> 299

As we can notice, we fetched all the 300 records in a single batch because our messages are small. Both the key and body are short strings: the key is four characters, and the body is 16 characters long. That’s a total of 20 bytes, plus some extra for the record’s metadata. On the other hand, the default value for the maximum batch size is one mebibyte (1.024 x 1.024 bytes), or simply 1,048,576 bytes.

4. Configuring Maximum Partition Fetch Size

The “max.partition.fetch.bytes” in Kafka determines the largest amount of data that a consumer can fetch from a single partition in a single request. Consequently, even for a small number of short messages, we can force our listeners to fetch the records in multiple batches by changing the property.

To observe this, let’s create two moreVariableFetchSizeKafkaListeners and configure them setting this property to only 500B, respectively 5KB. Firstly, let’s extract all the common consumer Properties in a dedicated  method to avoid code duplication:

Properties commonConsumerProperties() {
    Properties props = new Properties();
    props.setProperty(ConsumerConfig.BOOTSTRAP_SERVERS_CONFIG, KAFKA_CONTAINER.getBootstrapServers());
    props.setProperty(ConsumerConfig.AUTO_OFFSET_RESET_CONFIG, "earliest");
    props.setProperty(ConsumerConfig.KEY_DESERIALIZER_CLASS_CONFIG, StringDeserializer.class.getName());
    props.setProperty(ConsumerConfig.VALUE_DESERIALIZER_CLASS_CONFIG, StringDeserializer.class.getName());
    return props;
}

Then, let’s create the first listener and run it asynchronously:

Properties fetchSize_500B = commonConsumerProperties();
fetchSize_500B.setProperty(ConsumerConfig.GROUP_ID_CONFIG, "max_fetch_size_500B");
fetchSize_500B.setProperty(ConsumerConfig.MAX_PARTITION_FETCH_BYTES_CONFIG, "500");
CompletableFuture.runAsync(
  new VariableFetchSizeKafkaListener("engine.sensors.temperature", new KafkaConsumer<>(fetchSize_500B))
);

As we can see, we are setting different consumer group IDs for the various listeners. This will allow them to consume the same test data. Now, let’s proceed with the second listener and complete the test:

@Test
void whenChangingMaxPartitionFetchBytesProperty_thenAdjustBatchSizesWhilePolling() throws Exception {
    String topic = "engine.sensors.temperature";
    publishTestData(300, topic);
    
    Properties fetchSize_500B = commonConsumerProperties();
    fetchSize_500B.setProperty(ConsumerConfig.GROUP_ID_CONFIG, "max_fetch_size_500B");
    fetchSize_500B.setProperty(ConsumerConfig.MAX_PARTITION_FETCH_BYTES_CONFIG, "500");
    CompletableFuture.runAsync(
      new VariableFetchSizeKafkaListener(topic, new KafkaConsumer<>(fetchSize_500B))
    );
    Properties fetchSize_5KB = commonConsumerProperties();
    fetchSize_5KB.setProperty(ConsumerConfig.GROUP_ID_CONFIG, "max_fetch_size_5KB");
    fetchSize_5KB.setProperty(ConsumerConfig.MAX_PARTITION_FETCH_BYTES_CONFIG, "5000");
    CompletableFuture.runAsync(
      new VariableFetchSizeKafkaListener(topic, new KafkaConsumer<>(fetchSize_5KB))
    );
    Thread.sleep(10_000L);
}

If we run this test, we can assume that the first consumer will fetch batches roughly ten times smaller than the second consumer. Let’s analyze the logs:

[worker-3] INFO - groupId: max_fetch_size_5KB, poll: #1, fetched: #56 records, offsets: 0 -> 55
[worker-2] INFO - groupId: max_fetch_size_500B, poll: #1, fetched: #5 records, offsets: 0 -> 4
[worker-2] INFO - groupId: max_fetch_size_500B, poll: #2, fetched: #5 records, offsets: 5 -> 9
[worker-3] INFO - groupId: max_fetch_size_5KB, poll: #2, fetched: #56 records, offsets: 56 -> 111
[worker-2] INFO - groupId: max_fetch_size_500B, poll: #3, fetched: #5 records, offsets: 10 -> 14
[worker-3] INFO - groupId: max_fetch_size_5KB, poll: #3, fetched: #56 records, offsets: 112 -> 167
[worker-2] INFO - groupId: max_fetch_size_500B, poll: #4, fetched: #5 records, offsets: 15 -> 19
[worker-3] INFO - groupId: max_fetch_size_5KB, poll: #4, fetched: #51 records, offsets: 168 -> 218
[worker-2] INFO - groupId: max_fetch_size_500B, poll: #5, fetched: #5 records, offsets: 20 -> 24
[...]

As expected, one of the listeners fetches, indeed, batches of data that are almost ten times larger than the other. Moreover, it’s important to understand that the number of records within a batch depends on the size of these records and their metadata. To highlight this, we can observe that the consumer with groupId  “max_fetch_size_5KB” fetched fewer records when polling the fourth time.

5. Configuring Minimum Fetch Size

The Consumer API also allows customizing the minimum fetch size through the “fetch.min.bytes” property. We can change this property to specify the minimum amount of data that a broker needs to respond. If this minimum value is not met, the broker waits longer before sending a response to the consumer’s fetch request. To emphasize this, we can add a delay to our test publisher within our test helper method. As a result, the producer will wait a specific number of milliseconds between sending each message:

@Test
void whenChangingMinFetchBytesProperty_thenAdjustWaitTimeWhilePolling() throws Exception {
    String topic = "engine.sensors.temperature";
    publishTestData(300, topic, 100L);  
    // ...
}
void publishTestData(int measurementsCount, String topic, long delayInMillis) {
    // ...
}

Let’s start by creating a VariableFetchSizeKafkaListener that will use the default configuration, having “fetch.min.bytes” equal to one byte. Similar to the previous examples, we’ll run this consumer asynchronously within a CompletableFuture:

// fetch.min.bytes = 1 byte (default)
Properties minFetchSize_1B = commonConsumerProperties();
minFetchSize_1B.setProperty(ConsumerConfig.GROUP_ID_CONFIG, "min_fetch_size_1B");
CompletableFuture.runAsync(
  new VariableFetchSizeKafkaListener(topic, new KafkaConsumer<>(minFetchSize_1B))
);

With this setup, and due to the delay we introduced, we can expect each record to be retrieved individually, one after the other. In other words, we can expect many batches of a single record. Also, we expect these batches to be consumed at a similar speed as our KafkaProducer publishes the data, which in our case is every 100 milliseconds. Let’s run the test and analyze the logs:

14:23:22.368 [worker-2] INFO - groupId: min_fetch_size_1B, poll: #1, fetched: #1 records, offsets: 0 -> 0
14:23:22.472 [worker-2] INFO - groupId: min_fetch_size_1B, poll: #2, fetched: #1 records, offsets: 1 -> 1
14:23:22.582 [worker-2] INFO - groupId: min_fetch_size_1B, poll: #3, fetched: #1 records, offsets: 2 -> 2
14:23:22.689 [worker-2] INFO - groupId: min_fetch_size_1B, poll: #4, fetched: #1 records, offsets: 3 -> 3
[...]

Moreover, we can force the consumer to wait for more data to accumulate by adjusting the “fetch.min.bytes” value to a larger size:

// fetch.min.bytes = 500 bytes
Properties minFetchSize_500B = commonConsumerProperties();
minFetchSize_500B.setProperty(ConsumerConfig.GROUP_ID_CONFIG, "mim_fetch_size_500B");
minFetchSize_500B.setProperty(ConsumerConfig.FETCH_MIN_BYTES_CONFIG, "500");
CompletableFuture.runAsync(
  new VariableFetchSizeKafkaListener(topic, new KafkaConsumer<>(minFetchSize_500B))
);

With the property set to 500 bytes, we can anticipate the consumer to wait longer and fetch more data. Let’s run this example as well and observe the outcomes:

14:24:49.303 [worker-3] INFO - groupId: mim_fetch_size_500B, poll: #1, fetched: #6 records, offsets: 0 -> 5
14:24:49.812 [worker-3] INFO - groupId: mim_fetch_size_500B, poll: #2, fetched: #4 records, offsets: 6 -> 9
14:24:50.315 [worker-3] INFO - groupId: mim_fetch_size_500B, poll: #3, fetched: #5 records, offsets: 10 -> 14
14:24:50.819 [worker-3] INFO - groupId: mim_fetch_size_500B, poll: #4, fetched: #5 records, offsets: 15 -> 19
[...]

6. Conclusion

In this article, we discussed the way KafkaConsumers are fetching data from the broker. We learned that, by default, the consumer will fetch data if there is at least one new record. On the other hand, if the new data from the partition exceeds 1,048,576 bytes, it will be split into multiple batches of that maximum size. We discovered that customizing the “fetch.min.bytes” and “max.partition.fetch.bytes” properties allows us to tailor Kafka’s behavior to suit our specific requirements.

As always, the source for the examples is available over on GitHub.


What Happens When the JVM Runs Out of Memory to Allocate During Runtime?

$
0
0

1. Overview

Defining an appropriate heap size for a JVM application is a crucial step. This might help our application with memory allocation and handling high loads. However, inefficient heap size, both too small or too big, might affect its performance.

In this tutorial, we’ll learn about the reason for OutOfMemoryErrors and its connection to the heap size. Also, we’ll check what we can do about this error and how we can investigate the root cause.

2. –Xmx and –Xms

We can control the heap allocation with two dedicated JVM flags. The first one, -Xms, helps us set the heap’s initial and minimal size. Another one, -Xmx, sets the maximum heap size. Several other flags can help allocate more dynamically, but they do a similar job overall.

Let’s check how these flags relate to each other and the OutOfMemoryError and how they can cause or prevent it. To begin with, let’s clarify the obvious thing: -Xms cannot be greater than -Xmx. If we don’t follow this rule, JVM will fail the application at the start:

$ java -Xms6g -Xmx4g
Error occurred during initialization of VM
Initial heap size set to a larger value than the maximum heap size

Now, let’s consider a more interesting scenario. What will happen if we try to allocate more memory than our physical RAM? It depends on the JVM version, architecture, operational system, etc. Some operating systems, like Linux, allow overcommitting and configure overcommitting directly. Others allow overcommitting but do this on their internal heuristics:

At the same time, we can fail to start an application even if we have enough physical memory because of high fragmentation. Let’s say we have 4 GB of physical RAM, where around 3 GB is available. Allocating a heap of 2 GB might be impossible as there are no contiguous segments of this size in RAM:

Some versions of JVMs, especially newer ones, don’t have such requirements. However, it might affect the object allocation during the runtime.

3. OutOfMemoryError During Runtime

Let’s say we started our application without any problems. We still have a chance to get OutOfMemoryError for several reasons.

3.1. Depleating Heap Space

The increase in memory consumption may be caused by natural causes, for example, increased activity in our web store during the festive season. Also, it might happen because of a memory leak. We can generally distinguish these two cases by checking the GC activity. At the same time, there might be a more complex scenario, such as finalization delays or slow garbage collection threads.

3.2. Overcommitting

Overcommitting is possible because of the swap space. We can extend our RAM by dumping some data on a disc. This might result in a significant slowdown, but at the same time, the app won’t fail. However, it might not be the best or desired solution to this problem. Also, the extreme case for swapping memory is thrashing, which might freeze the system.

We can think about overcommitting as fractional reserve banking. The RAM doesn’t have all the required memory it promised to applications. However, when applications start to claim the memory they’re promised, the OS might start killing non-important applications to ensure that the rest won’t fail:

3.3. Shrinking Heap

This problem is connected to overcommitting, but the culprit is the garbage collection heuristic that tries to minimize the footprint. Even if the application successfully claimed the maximum heap size at some point in the lifecycle, it doesn’t mean that the next time will get it.

Garbage collectors might return some unused memory from the heap, and OS can reuse it for different purposes. At the same time, when the application tries to get it back, the RAM might be already allocated to some other application.

We can control it by setting -Xms and -Xmx to the same values. This way, we get more predictable memory consumption and avoid heap shrinking. However, this might affect resource utilization; thus, it should be used cautiously. Also, different JVM versions and garbage collectors might behave differently regarding heap shrinking. 

4. OutOfMemoryError

Not all OutOfMemoryErrors are the same. We have a bunch of flavors, and knowing the difference between them might help us to identify the root cause. We’ll consider only those that are connected to the scenarios described earlier.

4.1. Java Heap Space

We can see the following message in the logs: java.lang.OutOfMemoryError: Java heap space. This describes the problem clearly: we don’t have space in the heap. The reasons for this might be either a memory leak or an increased load on the application. A significant difference in creation and removal rate might also cause this problem.

4.2. GC Overhead Limit Exceeded

Sometimes, the application might fail with: java.lang.OutOfMemoryError: GC Overhead limit exceededThis happens when the application spends 98% on garbage collection, meaning the throughput is only 2%. This situation describes garbage collection thrashing: the application is active but without useful work.

4.3. Out of Swap Space

Another type of OutOfMemoryError is: java.lang.OutOfMemoryError: request size bytes for reason. Out of swap space? This is usually an indicator of overcommitting from the OS side. In this scenario, we still have the capacity in the heap, but the OS cannot provide us with more memory.

5. Root Cause

At the point when we get OutOfMemoryError, there’s little we can do in our application. Although catching errors is not recommended, it might be reasonable for cleanups or logging purposes in some cases. Sometimes, we can see the code that treats try-catch blocks to handle conditional logic. This is quite an expensive and unreliable hack, which should be avoided in most cases.

5.1. Garbage Collection Logs

While OutOfMemoryError provides information about the problem, it’s insufficient for a deeper analysis. The simplest way is to use garbage collection logs that don’t create much overhead while providing essential information about the running application.

5.2. Heap Dumps

Heap dumps yet another way to have a glance at the application. While we can capture it regularly, this might affect the applications’ performance. The cheapest way to use it is to do the heap dump automatically on OutOfMemoryError. Luckily, JVM allows us to set this using -XX:+HeapDumpOnOutOfMemoryError. Also, we can set the path for the heap dump with the -XX:HeapDumpPath flag.

5.3. Running Scripts on OutOfMemoryError

To enhance our experience with OutOfMemoryError, we can use -XX:OnOutOfMemoryError and direct it to the script that will run if the application runs out of memory. This can be used to implement a notification system, send the heap dump to some analysis tool, or restart the application.

6. Conclusion

In this article, we discussed OutOfMemoryError, which indicates a problem external to our application, like other errors. Handling these errors might create even more problems and leave our application inconsistent. The best way to handle this situation is to prevent it from happening in the first place.

Careful memory management and configuration of JVM can help us with this. Also, analyzing garbage collection logs can help us identify the problem’s reason. Allocating more memory to the application or using additional techniques to ensure that it would be kept alive without understanding the underlying problems isn’t the right solution and might cause more issues.


Remove Characters From a String That Are in the Other String

$
0
0

1. Overview

When we work with Java, we often encounter tasks that require precision and a collaborative effort between elements. Removing characters from a string based on their presence in another string is one such problem.

In this tutorial, we’ll explore various techniques to achieve this task.

2. Introduction to the Problem

As usual, an example can help us understand the problem quickly. Let’s say we have two strings:

String STRING = "a b c d e f g h i j";
String OTHER = "bdfhj";

Our goal is to eliminate characters from the STRING string if they are present in the string OTHERThus, we expect to get this string as the result:

"a  c  e  g  i "

We’ll learn various approaches to solving this problem in this tutorial. Also, we’ll unit test these solutions to verify whether they produce the expected result.

3. Using Nested Loops

We know a string can be easily split into a char array using the standard toCharArray() method. So, a straightforward and classic approach is first converting the two strings to two char arrays. Then, for each character in STRING, we decide whether to remove it or not by checking if it’s present in OTHER.

We can use nested for loops to implement this logic:

String nestedLoopApproach(String theString, String other) {
    StringBuilder sb = new StringBuilder();
    for (char c : theString.toCharArray()) {
        boolean found = false;
        for (char o : other.toCharArray()) {
            if (c == o) {
                found = true;
                break;
            }
        }
        if (!found) {
            sb.append(c);
        }
    }
    return sb.toString();
}

It’s worth noting since Java strings are immutable objects, we use StringBuilder instead of the ‘+’ operator to concatenate strings to gain better performance.

Next, let’s create a test:

String result = nestedLoopApproach(STRING, OTHER);
assertEquals("a  c  e  g  i ", result);

The test passes if we give it a run, so the method does the job.

Since for each character in STRING, we check through the string OTHER, the time complexity of this solution is O(n2).

4. Replacing the Inner Loop With the indexOf() Method

In the nested loops solution, we created the boolean flag found to store if the current character has been found in the OTHER String and then decided if we need to keep or discard this character by checking the found flag.

Java provides the String.indexOf() method that allows us to locate a given character in a string. Further, if the string doesn’t contain the given character, the method returns -1.

So, if we make use of the String.indexOf() method, the inner loop and the found flag aren’t required:

String loopAndIndexOfApproach(String theString, String other) {
    StringBuilder sb = new StringBuilder();
    for (char c : theString.toCharArray()) {
        if (other.indexOf(c) == -1) {
            sb.append(c);
        }
    }
    return sb.toString();
}

As we can see, this method’s code is easier to understand than the nested loops one, and it passes the test as well:

String result = loopAndIndexOfApproach(STRING, OTHER);
assertEquals("a  c  e  g  i ", result);

Although this implementation is compact and easy to read, as the String.indexOf() method internally searches the target character through the string by a loop, its time complexity is still O(n2).

Next, let’s see if we can find a solution with lower time complexity.

5. Using a HashSet

HashSet is a commonly used collection data structure. It stores the elements in an internal HashMap.

Since the hash function’s time complexity is O(1), HashSet‘s contains() method is an O(1) operation.

Therefore, we can first store all characters in the OTHER string in a HashSet and then check each character from STRING in the HashSet:

String hashSetApproach(String theString, String other) {
    StringBuilder sb = new StringBuilder();
    Set<Character> set = new HashSet<>(other.length());
    for (char c : other.toCharArray()) {
        set.add(c);
    }
    for (char i : theString.toCharArray()) {
        if (set.contains(i)) {
            continue;
        }
        sb.append(i);
    }
    return sb.toString();
}

As the code above shows, the implementation is quite straightforward. Now, let’s delve into its performance.

Initially, we iterate through one string to populate the Set object, making it an O(n) operation. Subsequently, for each character in the other string, we utilize the set.contains() method. This results in n times O(1), becoming another O(n) complexity. Therefore, the entire solution comprises two O(n) operations.

However, since the factor of two is a constant, the overall time complexity of the solution remains O(n). This stands out as a significant improvement compared to previous O(n2) solutions, demonstrating a considerably faster execution.

Finally, if we test the hashSetApproach() method, it gives the expected result:

String result = hashSetApproach(STRING, OTHER);
assertEquals("a  c  e  g  i ", result);

6. Conclusion

In this article, we explored three different approaches to removing characters from one string based on their presence in another.

Furthermore, we conducted a performance analysis, explicitly focusing on time complexity. The results revealed that both nested loops and loops utilizing indexOf() exhibit equivalent time complexities, while solutions employing HashSet to be the most efficient.

As always, the complete source code for the examples is available over on GitHub.


Check if List Contains at Least One Enum

$
0
0

1. Introduction

In Java, еnumеrations (еnums) are a powerful and type-safe way to rеprеsеnt a fixеd sеt of constants. Moreover, when we’re working with collеctions like Lists, we might еncountеr scenarios where we nееd to chеck if the List contains at lеast onе еlеmеnt of a specific еnum type.

In this article, we’ll еxplorе various approaches to achieve this in Java, accompanied by codе еxamplеs.

2. Problem Statement

Bеforе diving into the main topic, lеt’s briefly rеvisit the basics of еnums in Java. Enums are a special data type that allows us to dеfinе a sеt of named constants, which rеprеsеnt a fixеd, prеdеfinеd sеt of values. Besides, enums provide bеttеr type safety and rеadability compared to using raw constants or intеgеrs.

public enum Position {
    DEVELOPER, MANAGER, ANALYST
}

Here, wе’vе declared an еnum named Position with three constants: DEVELOPER, MANAGER, and ANALYST.

Now, let’s explore the code snippet in this context:

public class CheckIfListContainsEnumUnitTest {
    private final List<Map<String, Object>> data = new ArrayList<>();
    public CheckIfListContainsEnumUnitTest() {
        Map<String, Object> map = new HashMap<>();
        map.put("Name", "John");
        map.put("Age", 25);
        map.put("Position", Position.DEVELOPER);
        data.add(map);
    }
}

In this codе snippet, wе’vе defined a list named data to store maps containing kеy-valuе pairs. Besides, the ChеckIfListContainsEnumUnitTеst class also includes the instantiation of a map with dеtails such as Namе, Agе, and Position for an individual.

Keep in mind that this sеts the stagе for еxploring mеthods to chеck if the list contains at least one of the еnum values еfficiеntly.

3. Traditional Approach

The traditional approach involves itеrating through the List and chеcking еach еlеmеnt against the еnum constants. Let’s take a basic еxamplе:

@Test
public void givenDataList_whenUsingLoop_thenCheckIfListContainsEnum() {
    boolean containsEnumValue = false;
    for (Map<String, Object> entry : data) {
        Object positionValue = entry.get("Position");
        if (Arrays.asList(Position.values()).contains(positionValue)) {
            containsEnumValue = true;
            break;
        }
    }
    Assert.assertTrue(containsEnumValue);
}

In this tеst mеthod, given a data list, the mеthod itеratеs through еach еntry using a loop, rеtriеvеs the PositionValue, and chеcks if it is prеsеnt in the enumerated type Position. Furthermore, the result captured by the containsEnumValue boolean variable signifies whether there is at least one match within the data list. Finally, the assеrtion validates that at lеast onе еntry in the list contains a matching еnum value.

4. Using the anyMatch() Method

We can utilize the anyMatch() mеthod to chеck if at lеast onе еlеmеnt in the stream matchеs the specified condition. Here’s an example:

@Test
public void givenDataList_whenUsingStream_thenCheckIfListContainsEnum() {
    boolean containsEnumValue = data.stream()
      .map(entry -> entry.get("Position"))
      .anyMatch(position -> Arrays.asList(Position.values()).contains(position));
    Assert.assertTrue(containsEnumValue);
}

The above test mеthod transforms the data list by еxtracting the Position values from еach еntry and subsеquеntly еmploys the anyMatch() method to dеtеrminе if any of these values еxist in the еnumеratеd type Position. This streamlined approach rеplacеs traditional itеrativе loops with a concise and еxprеssivе stream opеration.

5. Using the Collеctions.disjoint() Mеthod

Another approach utilizes the Collеctions.disjoint() method to ascertain whether there exists any commonality between two lists. Let’s try the following code example:

@Test
public void givenDataList_whenUsingDisjointMethod_thenCheckIfListContainsEnum() {
    List<Position> positionValues = data.stream()
      .map(entry -> (Position) entry.get("Position"))
      .toList();
    boolean containsEnumValue = !Collections.disjoint(Arrays.asList(Position.values()), positionValues);
    Assert.assertTrue(containsEnumValue);
}

In this method, we lеvеragе the Collеctions.disjoint() method to dеtеrminе whether there is any commonality bеtwееn the original list (prеsumably named list) and the nеwly created list of Position values (prеsumably named positionValues).

The boolean variablе containsEnumValue is then assignеd the rеsult of nеgating the Collеctions.disjoint() outcome and signifying the absеncе of disjointness between the two lists.

6. Conclusion

In this article, wе еxplorеd diffеrеnt approachеs to chеck if a List contains at lеast onе еnum in Java. Moreover, the choice of mеthod dеpеnds on our specific rеquirеmеnts and coding style prеfеrеncеs.

As usual, the accompanying source code can be found over on GitHub.


Removing the Last Node in a Linked List

$
0
0

1. Overview

Data structures are important parts of any programming language. Java provides most of them under the Collection<T> interface. Maps are also considered part of Java collections, but they don’t implement this interface.

In this tutorial, we’ll concentrate on a linked list data structure. In particular, we’ll discuss removing the last element in a singly-linked list.

2. Singly-Linked vs Doubly-Linked Lists

First, let’s define the differences between singly-linked and doubly-linked lists. Luckily, their names are quite descriptive. Each node in a doubly-linked list has a reference to the next and the previous one, except, obviously, for the head and tail:

A singly-linked list has a simpler structure and contains only the information about the next node:

Based on the differences, we have a trade-off between these data structures. Singly-linked lists consume less space, as each node contains only one additional reference. At the same time, doubly-linked lists are more convenient for traversing nodes in reverse order. This might create problems not only when we iterate through the list but also for search, insert, and removal operations.

3. Removing the Last Element From Doubly-Linked Lists

Because a doubly-linked list contains information about its previous neighbor, the operation itself is trivial. We’ll take an example from Java standard LinkedList<T>. Let’s check the LinkedList.Node<E> first:

class Node<E> {
    E item;
    LinkedList.Node<E> next;
    LinkedList.Node<E> prev;
    Node(LinkedList.Node<E> prev, E element, LinkedList.Node<E> next) {
        this.item = element;
        this.next = next;
        this.prev = prev;
    }
}

It’s quite simple, but as we can see, there are two references: next and prev. They simplify our work significantly:

The entire process takes only several lines of code and is done in constant time:

private E unlinkLast(Node<E> l) {
    // assert l == last && l != null;
    E element = l.item;
    Node<E> prev = l.prev;
    l.item = null;
    l.prev = null; // help GC
    last = prev;
    if (prev == null) {
        first = null;
    } else {
        prev.next = null;
    }
    size--;
    modCount++;
    return element;
}

4. Removing the Last Element From Singly-Linked Lists

The main challenge for removing the last element from a singly linked list is that we have to update the node that’s second to last. However, our nodes don’t have the references that go back:

public static class Node<T>  {
    private T element;
    private Node<T> next;
    public Node(T element) {
        this.element = element;
    }
}

Thus, we have to iterate all the way from the beginning just to identify the second to last node:

The code also would be a little bit more complex than for a doubly-linked list:

public void removeLast() {
    if (isEmpty()) {
        return;
    } else if (size() == 1) {
        tail = null;
        head = null;
    } else {
        Node<S> secondToLast = null;
        Node<S> last = head;
        while (last.next != null) {
            secondToLast = last;
            last = last.next;
        }
        secondToLast.next = null;
    }
    --size;
}

As we have to iterate over the entire list, the operation takes linear time, which isn’t good if we plan to use our list as a queue. One of the optimization strategies is to store the secondToLast node alongside the head and tail:

public class SinglyLinkedList<S> {
    private int size;
    private Node<S> head = null;
    private Node<S> tail = null;
    
    // other methods
}

This won’t provide us with easy iteration, but it at least improves the removeLast() method, making it similar to the one we’ve seen for a doubly-linked list.

5. Conclusion

It’s not possible to divide data structures into good and bad. They’re just tools. Thus, each task requires a specific data structure to accomplish its goals. 

Singly-linked lists have some performance issues with removing the last element and aren’t flexible on other operations, but at the same time, they consume less memory. Doubly-linked lists have no constraints, but we’re paying for this with more memory.

Understanding the underlying implementation of data structures is crucial and allows us to pick the best tool for our needs. As usual, all the code from this tutorial is available over on GitHub.


Convert Null Value to a Default Value in Java

$
0
0

1. Overview

In 1965, Tony Hoare introduced the concept of a null reference. Since then, countless hours have been spent reading the logs and trying to find the source of NullPointerExceptions. This exception is so ubiquitous that it’s common to refer to it as NPE.

In this tutorial, we’ll learn how to mitigate this problem. We’ll review several techniques that simplify converting nulls to default values.

2. Simple if Statements

The easiest way to approach the conversion is to use if statements. They’re basic language structures and benefit from being clear to developers with different experiences and levels. The best part of this approach is that it’s verbose, which simultaneously is the worst part:

@ParameterizedTest
@ArgumentsSource(ObjectsProvider.class)
void givenIfWhenNotNullThenReturnsDefault(String givenValue, String defaultValue) {
    String actual = defaultValue;
    if (givenValue != null) {
        actual = givenValue;
    }
    assertDefaultConversion(givenValue, defaultValue, actual);
}

Because we have total control over the logic, we can easily change, extract, and reuse it. Additionally, we can make it lazy if we want:

@ParameterizedTest
@ArgumentsSource(ObjectsSupplierProvider.class)
void givenIfWhenNotNullThenReturnsDefault(String givenValue, String expected, Supplier<String> expensiveSupplier) {
    String actual;
    if (givenValue != null) {
        actual = givenValue;
    } else {
        actual = expensiveSupplier.get();
    }
    assertDefaultConversion(givenValue, expected, actual);
}

If the operations are quite simple, we can use a ternary operator to make them more inlined. The Elvis operator didn’t make it into Java, but we still can improve the code:

@ParameterizedTest
@ArgumentsSource(ObjectsProvider.class)
void givenTernaryWhenNotNullThenReturnsDefault(String givenValue, String defaultValue) {
    String actual = givenValue != null ? givenValue : defaultValue;
    assertDefaultConversion(givenValue, defaultValue, actual);
}

Also, it allows a lazy approach as only the required expressions are evaluated:

@ParameterizedTest
@ArgumentsSource(ObjectsSupplierProvider.class)
void givenLazyTernaryWhenNotNullThenReturnsDefault(String givenValue, String expected, 
  Supplier<String> expensiveSupplier) {
    String actual = givenValue != null ? givenValue : expensiveSupplier.get();
    assertDefaultConversion(givenValue, expected, actual);
}

We can extract this logic into a separate method with a good name to make our code more readable. However, Java and some external libraries have done it already.

3. Java Objects

Java 9 provides us with two utility methods: Objects.requireNonNullElse and Objects.requireNonNullElseGet. These methods have implementations similar to those we reviewed. Overall, they provide a better API and make the code self-explanatory:

@ParameterizedTest
@ArgumentsSource(ObjectsProvider.class)
void givenObjectsWhenNotNullThenReturnsDefault(String givenValue, String defaultValue) {
    String actual = requireNonNullElse(givenValue, defaultValue);
    assertDefaultConversion(givenValue, defaultValue, actual);
}

Static imports can help us remove the Objects class name to reduce the noise. The lazy version looks like this:

@ParameterizedTest
@ArgumentsSource(ObjectsSupplierProvider.class)
void givenLazyObjectsWhenNotNullThenReturnsDefault(String givenValue, String expected,
  Supplier<String> expensiveSupplier) {
    String actual = requireNonNullElseGet(givenValue, expensiveSupplier);
    assertDefaultConversion(givenValue, expected, actual);
}

However, this API is accessible starting only from Java 9. At the same time, Java 8 also provides some convenient tools to achieve a similar result.

4. Java Optional<T>

The main idea behind the Optional<T> class was to fight the issue with null checks and NullPointerExceptions. It’s possible to identify nullable APIs in documentation, but a better solution is to show it explicitly in the code. Getting an Optional<T> from some method unambiguously tells us the value might be null. Also, IDEs can use static analysis for notifications and highlighting.

Explicit null checks weren’t the goal of this class. However, we can use it to wrap a value we would like to check and do some operations over it:

@ParameterizedTest
@ArgumentsSource(ObjectsProvider.class)
void givenOptionalWhenNotNullThenReturnsDefault(String givenValue, String defaultValue) {
    String actual = Optional.ofNullable(givenValue).orElse(defaultValue);
    assertDefaultConversion(givenValue, defaultValue, actual);
}

The lazy version looks quite similar:

@ParameterizedTest
@ArgumentsSource(ObjectsSupplierProvider.class)
void givenLazyOptionalWhenNotNullThenReturnsDefault(String givenValue, String expected,
  Supplier<String> expensiveSupplier) {
    String actual = Optional.ofNullable(givenValue).orElseGet(expensiveSupplier);
    assertDefaultConversion(givenValue, expected, actual);
}

Creating a separate wrapper object for a null check might be questionable. At the same time, it might be useful for reaching through data objects without chained null checks:

@Override
public Delivery calculateDeliveryForPerson(Long id) {
    Person person = getPersonById(id);
    if (person != null && person.getAddress() != null && person.getAddress().getZipCode() != null) {
        ZipCode zipCode = person.getAddress().getZipCode();
        String code = zipCode.getCode();
        return calculateDeliveryForZipCode(code);
    }
    return null;
}

We can do the same, but using Optional.map(Function<T, U>):

public Delivery calculateDeliveryForPerson(Long id) {
    return Optional.ofNullable(getPersonById(id))
      .map(Person::getAddress)
      .map(Address::getZipCode)
      .map(ZipCode::getCode)
      .map(this::calculateDeliveryForZipCode)
      .orElse(null);
}

Wrapping objects in Optional<T> early on can reduce the checking we must do later.

5. Guava Library

We can import Guava to get a similar functionality if all the previous methods aren’t suitable, for example, when using earlier versions of Java. Let’s start by adding the dependency:

<dependency>
    <groupId>com.google.guava</groupId>
    <artifactId>guava</artifactId>
    <version>33.0.0-jre</version>
</dependency>

It mirrors the Java functionality and doesn’t add any explicitly useful features. To get a default value if the provided is null, we can use MoreObjects:

@ParameterizedTest
@ArgumentsSource(ObjectsProvider.class)
void givenGuavaWhenNotNullThenReturnsDefault(String givenValue, String defaultValue) {
    String actual = MoreObjects.firstNonNull(givenValue, defaultValue);
    assertDefaultConversion(givenValue, defaultValue, actual);
}

MoreObjects replaces the Guava’s Objects utility class, which was deprecated and planned for removal. However, it doesn’t allow the default value to be supplied lazily. Also, it provides an Optional<T> class with the same name as Java but resides in a different package:

@ParameterizedTest
@ArgumentsSource(ObjectsProvider.class)
void givenGuavaOptionalWhenNotNullThenReturnsDefault(String givenValue, String defaultValue) {
    String actual = com.google.common.base.Optional.fromNullable(givenValue).or(defaultValue);
    assertDefaultConversion(givenValue, defaultValue, actual);
}

We can also implement a chain of modifications using this class as well:

@Override
public Delivery calculateDeliveryForPerson(Long id) {
    return Optional.fromNullable(getPersonById(id))
      .transform(Person::getAddress)
      .transform(Address::getZipCode)
      .transform(ZipCode::getCode)
      .transform(this::calculateDeliveryForZipCode)
      .orNull();
}

However, the transform method doesn’t allow null-returning functions, and we can receive the following exception message:

java.lang.NullPointerException: the Function passed to Optional.transform() must not return null.

Guava is a good substitution for Java features if they’re unavailable, but it provides less functionality than Java Optional<T>.

6. Apache Commons

Another library we can use to simplify our null checks is Apache Commons. Let’s add dependency:

<dependency>
    <groupId>org.apache.commons</groupId>
    <artifactId>commons-lang3</artifactId>
    <version>3.14.0</version>
</dependency>

However, it provides only simple methods to get the first non-null value out of several arguments:

@ParameterizedTest
@ArgumentsSource(ObjectsProvider.class)
void givenApacheWhenNotNullThenReturnsDefault(String givenValue, String defaultValue) {
    String actual = ObjectUtils.firstNonNull(givenValue, defaultValue);
    assertDefaultConversion(givenValue, defaultValue, actual);
}

The lazy version is a little bit inconvenient API, as it requires Supplier<T>, so we’ll have to wrap a value if we already have one:

@ParameterizedTest
@ArgumentsSource(ObjectsSupplierProvider.class)
void givenLazyApacheWhenNotNullThenReturnsDefault(String givenValue, String expected,
  Supplier<String> expensiveSupplier) {
    String actual = ObjectUtils.getFirstNonNull(() -> givenValue, expensiveSupplier);
    assertDefaultConversion(givenValue, expected, actual);
}

Overall, this is also a nice substitution for Java features if they’re not accessible to us for any reason.

7. Conclusion

NullPointerException is the most common exception developers face. There are several convenient ways to ensure null safety. Java APIs and external libraries provide many techniques. However, there’s nothing shameful to fall back to simple if statements, as it’s clean, simple, and explicit.

The main goal of null checking is to do it as early as possible and ensure it’s uniform across the project. The way we’re doing it isn’t essential.

As usual, all the code from the tutorial is available over on GitHub.


Check if a Point Is Between Two Points Drawn on a Straight Line in Java

$
0
0

1. Overview

When working with 2D geometry, one common problem is to determine whether a point lies between two other points on a straight line.

In this quick tutorial, we’ll explore different approaches to making this determination in Java.

2. Understanding the Problem Statement

Let’s say we’ve two points on a plane: the first point A has the coordinates (x1, y1), and the second point B has the coordinates (x2, y2). We want to check whether a given point C with (x3,y3) coordinates lies between A and B or not:

Image of Point C lies between Point A and B

In the above graph, point C lies between points A and B, whereas point D does not lie between points A and B.

3. Using the Distance Formula

This approach involves calculating the distances: AC, CB, and AB from point A to C, point C to B, and point A to B, respectively. If C lies between points A and B, then the sum of AC and CB will be equal to AB:

distance (AC) + distance (CB) == distance (AB)

We can use the distance formula to calculate the distance between two different points. If point A has the coordinates (x1, y1), and point B has the coordinates (x2, y2), then we can calculate the distance by using the formula:

distance = sqrt((y2 - y1) * (y2 - y1) + (x2 - x1) * (x2 - x1))

Let’s use the distance formula on the above diagram to verify the approach:

Distance from point A (1,1) to point B (5,5) = 5.656

Distance from point A (1,1) to point C (3,3) = 2.828

Distance from point C (3,3) to point B (5,5) = 2.828

Here, distance (AC) + distance (CB) = 5.656, which is equal to distance (AB). It shows that point C lies between point A and point B.

Let’s use the distance formula to check whether a point lies between two points or not:

boolean isPointBetweenTwoPoints(double x1, double y1, double x2, double y2, double x, double y) {
    double distanceAC = Math.sqrt(Math.pow(x - x1, 2) + Math.pow(y - y1, 2));
    double distanceCB = Math.sqrt(Math.pow(x2 - x,2) + Math.pow(y2 - y, 2));
    double distanceAB = Math.sqrt(Math.pow(x2 - x1,2) + Math.pow(y2 - y1, 2));
    return Math.abs(distanceAC + distanceCB - distanceAB) < 1e-9;
}

Here, 1e-9 is a small eplison value used to account for rounding errors and imprecisions that can occur in floating-point calculations. If the absolute difference is very small (less than 1e-9), we’ll consider it as equality.

Let’s test this approach using the above values:

void givenAPoint_whenUsingDistanceFormula_thenCheckItLiesBetweenTwoPoints() {
    double x1 = 1;<br />    double y1 = 1;<br />
    double x2 = 5;<br />    double y2 = 5;<br />
    double x = 3;<br />    double y = 3;
<br />    assertTrue(findUsingDistanceFormula(x1, y1, x2, y2, x, y));
}

4. Using the Slope Formula

In this approach, we’ll be calculating the slope of the lines AB and AC using the slope formula. We’ll compare these slopes to check the collinearity, i.e., the slope of AB and AC are equal. It will help us determine whether points A, B, and C are aligned or not.

If point A has the coordinates (x1, y1), and point B has the coordinates (x2, y2), then we can calculate the slope by using the formula:

slope = (y2 - y1) / (x2 - x1)

If the slopes of AB and AC are equal, and point C lies within the x and y coordinate range defined by A and B points, we can say that point C lies between point A and point B.

Let’s calculate the slope of AB and AC on the above diagram to verify the approach:

Slope of AB = 1.0

Slope of AC = 1.0

Point C is (3,3)

Here, AB = AC, and Point C’s x and y coordinates lie between the range defined by A (1,1) and B (5,5), which shows that point C lies between point A and point B. 

Let’s use this approach to check whether a point lies between two points or not:

boolean findUsingSlopeFormula(double x1, double y1, double x2, double y2, double x, double y) {
    double slopeAB = (y2 - y1) / (x2 - x1);
    double slopeAC = (y - y1) / (x - x1);
    return slopeAB == slopeAC && ((x1 <= x && x <= x2) || (x2 <= x && x <= x1)) && ((y1 <= y && y <= y2) || (y2 <= y && y <= y1));
}

Let’s test this approach using the above values:

void givenAPoint_whenUsingSlopeFormula_thenCheckItLiesBetweenTwoPoints() { 
    double x1 = 1;<br />    double y1 = 1;<br />
    double x2 = 5;<br />    double y2 = 5;<br />
    double x = 3;<br />    double y = 3;
<br />    assertTrue(findUsingSlopeFormula(x1, y1, x2, y2, x, y));
}

5. Conclusion

In this tutorial, we’ve discussed ways to determine whether a point lies between two other points on a straight line.

As always, the code used in the examples is available over on GitHub.


Get Specific Part From SOAP Message in Java

$
0
0

1. Overview

We often employ REST or SOAP architectural approaches when designing API for data exchange. In the case of working with SOAP protocol, there may be situations when we need to extract some specific data from a SOAP message for further processing.

In this tutorial, we’ll learn how to get a specific part of a SOAP Message in Java.

2. The SOAPMessage Class

Before we dive in, let’s briefly examine the structure of the SOAPMessage class, which represents the root class for all SOAP messages:

Structure of SOAPMessage class.

The class consists of two main parts – the SOAP part and the optional attachment part. The former contains the SOAP Envelope, which holds the actual message we received. Additionally, the envelope itself is composed of the header and body elements.

From Java 11, Java EE, including the JAX-WS and SAAJ modules, were removed from the JDK and are no longer part of the standard distribution. To successfully process SOAP messages with Jakarta EE 9 and above, we’ll need to add the Jakarta SOAP with Attachment API and Jakarta SOAP Implementation dependencies in our pom.xml:

<dependency>
    <groupId>jakarta.xml.soap</groupId>
    <artifactId>jakarta.xml.soap-api</artifactId>
    <version>3.0.1</version>
</dependency>
<dependency>
    <groupId>com.sun.xml.messaging.saaj</groupId>
    <artifactId>saaj-impl</artifactId>
    <version>3.0.3</version>
</dependency>

3. Working Example

Next, let’s create an XML message we’ll use through this tutorial:

<soapenv:Envelope xmlns:soapenv="http://schemas.xmlsoap.org/soap/envelope/"
                  xmlns:be="http://www.baeldung.com/soap/">
    <soapenv:Header>
        <be:Username>baeldung</be:Username>
    </soapenv:Header>
    <soapenv:Body>
        <be:ArticleRequest>
            <be:Article>
                <be:Name>Working with JUnit</be:Name>
            </be:Article>
        </be:ArticleRequest>
    </soapenv:Body>
</soapenv:Envelope>

4. Get Header and Body From SOAP Message

Moving forward, let’s see how to extract header and body elements from the SOAP message.

According to the SOAPMessage class hierarchy, to obtain the actual SOAP message, we’ll first need to get the SOAP part and then the envelope:

InputStream inputStream = this.getClass().getClassLoader().getResourceAsStream("soap-message.xml");
SOAPMessage soapMessage = MessageFactory.newInstance().createMessage(new MimeHeaders(), inputStream);
SOAPPart part = soapMessage.getSOAPPart();
SOAPEnvelope soapEnvelope = part.getEnvelope();

Now, to get the header element, we can call the getHeader() method:

SOAPHeader soapHeader = soapEnvelope.getHeader();

Similarly, we can extract the body element by calling the getBody() method:

SOAPBody soapBody = soapEnvelope.getBody();

5. Get Specific Element From SOAP Message

Now that we’ve discussed retrieving the basic elements, let’s explore how to extract specific parts from the SOAP message.

5.1. Get Elements by Tag Name

We can use the getElementsByTagName() method to get a specific element. The method returns a NodeList. Moreover, the Node is the primary data type for all DOM components. In other words, all the elements, attributes, and text contents are considered to be of the Node type.

Let’s extract the Name element from the XML:

@Test
void whenGetElementsByTagName_thenReturnCorrectBodyElement() throws Exception {
    SOAPEnvelope soapEnvelope = getSoapEnvelope();
    SOAPBody soapBody = soapEnvelope.getBody();
    NodeList nodes = soapBody.getElementsByTagName("be:Name");
    assertNotNull(nodes);
    Node node = nodes.item(0);
    assertNotNull(node);
    assertEquals("Working with JUnit", node.getTextContent());
}

It’s important to note here that we need to pass the namespace prefix to the method for it to work correctly.

Likewise, we can use the same approach to get an element from the SOAP header:

@Test
void whenGetElementsByTagName_thenReturnCorrectHeaderElement() throws Exception {
    SOAPEnvelope soapEnvelope = getSoapEnvelope();
    SOAPHeader soapHeader = soapEnvelope.getHeader();
    NodeList nodes = soapHeader.getElementsByTagName("be:Username");
    assertNotNull(nodes);
    Node node = nodes.item(0);
    assertNotNull(node);
    assertEquals("baeldung", node.getTextContent());
}

5.2. Iterate Over Child Nodes

Another way to get the value from a particular element is by iterating over child nodes.

Let’s see how to iterate over child nodes of a body element:

@Test
void whenGetElementUsingIterator_thenReturnCorrectBodyElement() throws Exception {
    SOAPEnvelope soapEnvelope = getSoapEnvelope();
    SOAPBody soapBody = soapEnvelope.getBody();
    NodeList childNodes = soapBody.getChildNodes();
    for (int i = 0; i < childNodes.getLength(); i++) {
        Node node = childNodes.item(i);
        if ("Name".equals(node.getLocalName())) {
            String name = node.getTextContent();
            assertEquals("Working with JUnit", name);
        }
    }
}

5.3. Using XPath

Next, let’s see how to extract elements using the XPath. Simply put, XPath is the syntax used to describe XML parts. Furthermore, it works with the XPath expressions, which we can use to retrieve elements under certain conditions.

First, let’s create a new XPath instance:

XPathFactory xPathFactory = XPathFactory.newInstance();
XPath xpath = xPathFactory.newXPath();

To effectively handle namespaces, let’s define the namespace context:

xpath.setNamespaceContext(new NamespaceContext() {
    @Override
    public String getNamespaceURI(String prefix) {
        if ("be".equals(prefix)) {
            return "http://www.baeldung.com/soap/";
        }
        return null;
    }
    // other methods
});

This way, XPath knows where to look for our data.

Next, let’s define the XPath expression that retrieves the value of the Name element:

XPathExpression expression = xpath.compile("//be:Name/text()");

Here, we created the XPath expression using a combination of the path expression and the text() function that returns the node’s text content.

Lastly, let’s call the evaluate() method to retrieve the result of the matching expression:

String name = (String) expression.evaluate(soapBody, XPathConstants.STRING); 
assertEquals("Working with JUnit", name);

Additionally, we can create an expression that ignores the namespaces:

@Test
void whenGetElementUsingXPathAndIgnoreNamespace_thenReturnCorrectResult() throws Exception {
    SOAPBody soapBody = getSoapBody();
    XPathFactory xPathFactory = XPathFactory.newInstance();
    XPath xpath = xPathFactory.newXPath();
    XPathExpression expression = xpath.compile("//*[local-name()='Name']/text()");
    String name = (String) expression.evaluate(soapBody, XPathConstants.STRING);
    assertEquals("Working with JUnit", name);
}

We used the local-name() function in the expression to ignore namespaces. Therefore, the expression selects any element with the local name Name without considering the namespace prefix.

6. Conclusion

In this article, we learned how to get a specific part from a SOAP message in Java.

To sum up, there are various ways to retrieve certain elements from the SOAP message. We explored methods such as searching for an element by its tag name, iterating over child nodes, and using XPath expressions.

As always, the entire code examples are available over on GitHub.


Generational ZGC in Java 21

$
0
0

1. Overview

Java 21 debuted in September 2023, along with the introduction of the Generational ZGC. Building on the efficiency of the Z Garbage Collector, this update focuses on optimizing memory management by introducing separate generations for young and old objects.

In this article, we’ll closely examine this addition, exploring its potential benefits, how it works, and how to use it.

2. Garbage Collection

To begin our exploration, let’s delve into the realm of memory management. Garbage collection is the process by which programs try to free up allocated memory that is no longer used by objects. An object is considered ‘in-use’ or ‘referenced’ if some part of our program still maintains a pointer to it. Conversely, an ‘unused’ or ‘unreferenced’ object is no longer accessed by any part of our program, allowing the memory it occupies to be reclaimed.

For example, in Java, the garbage collectors are responsible for freeing up the heap memory, which is where Java objects are stored.

This helps prevent memory leaks and ensures efficient resource usage. It also frees us from having to manually manage the program’s memory, which can lead to potential bugs. Some programming languages, such as Java or C#, come with this feature built-in, while others, like C or C++, may rely on external libraries for similar functionality.

3. Generational Garbage Collection

In the context of memory management, a generation refers to a categorization of objects based on the time of their allocation.

Let’s shift our focus to generational garbage collection. This represents a memory management strategy and works by dividing the objects into different generations, based on the time of allocation, and applying different approaches based on their generation.

In the context of Java, the memory is partitioned into two main generations: young and old. Newly created objects find their place in the young generation, where frequent garbage collection takes place. Objects that persist beyond multiple garbage collection cycles are promoted to the older generation. This division optimizes efficiency by acknowledging the short lifespan of most of the objects.

For more information regarding the generational garbage collection in Java, see the article Java Garbage Collection Basics.

4. The Z Garbage Collector

The Z Garbage Collector, also known as ZGC, is a scalable, low-latency garbage collector. It was first introduced in Java 11 as an experimental feature and became production-ready in Java 15.

The purpose of this feature was to minimize or eliminate long garbage collection pauses, thereby enhancing application responsiveness and accommodating the growing memory capacities of modern systems.

As a non-generational approach, it stores all objects together, regardless of age, so each cycle collects all objects.

5. The Generational Z Garbage Collector

The Generational ZGC aims to improve application performance, extending the existing ZGC by maintaining separate generations for young and old objects.

5.1. Motivation

For most use cases, ZGC is enough to solve latency problems related to garbage collection. This works well as long as there are enough resources available to ensure that the garbage collector can reclaim memory faster than our program consumes it.

However, the weak generational hypothesis states that most objects die young. Consequently, collecting and reclaiming memory from these short-lived young resources requires fewer computational resources. This process unlocks more memory quickly.

On the other hand, collecting older objects, which have survived multiple cycles and have a more extended lifespan, demands more computational resources. However, the amount of memory unlocked by collecting older objects is comparatively less. This strategy proves more efficient in quickly freeing up memory, contributing to enhanced overall application performance.

5.2. Goals

The Generational ZGC aims to deliver some key advantages compared to the non-generational ZGC:

  • reduced risks of allocation stalls
  • decreased heap memory overhead requirements
  • lowered garbage collection CPU overhead

Additionally, the goal is to add these advantages while preserving already existing benefits of using the non-generational approach:

  • pause times lower than one millisecond
  • support for heap sizes up to many terabytes
  • minimal manual configuration

To maintain the last point, the new GC doesn’t need any manual configuration for the size of the generations, the number of threads used, or how long objects should reside in the young generation.

5.3. Description

The Generational ZGC introduces a two-generation heap structure: the young generation for recent objects and the old generation for long-lived ones. Each generation is independently collected, prioritizing the frequent collection of young objects.

Concurrent collection, similar to non-generational ZGC, relies on colored pointers, load barriers, and store barriers for consistent object graph views. Colored pointers contain metadata, facilitating efficient 64-bit object pointer usage. Load barriers interpret metadata, while store barriers handle metadata addition, maintain remembered sets, and mark objects as alive.

5.4. Enabling Generational ZGC

For a smooth transition, the Generational ZGC will be available alongside the non-generational ZGC. The -XX:UseZGC command-line option will select the non-generational ZGC. To select the Generational ZGC, we need to add the -XX:+ZGenerational option:

java -XX:+UseZGC -XX:+ZGenerational ...

The Generational ZGC is intended to become the default one in a future Java release. Moreover, in an even later release, the non-generational ZGC may be removed entirely.

5.5. Risks

The integration of barriers and colored pointers in the new GC introduces higher complexity, surpassing its non-generational counterpart. The Generational ZGC also runs two garbage collectors concurrently. These collectors are not totally independent, as they interact in some cases, adding complexity to the implementation.

Although it is expected to excel in most use cases, certain workloads pose a risk of slight performance degradation. To address this issue, continuous evolution and optimization of the Generational ZGC will be driven by benchmarks and user feedback, aiming to address and mitigate these identified risks over time.

6. Generational ZGC Design Differences

The Generational ZGC introduces several design differences, enhancing garbage collection efficiency and user adaptability compared to its non-generational counterpart.

6.1. Enhanced Performance with Optimized Barriers

Generational ZGC discards multi-mapped memory in favor of explicit code within load and store barriers. To accommodate store barriers and revised load barrier responsibilities, Generational ZGC employs highly optimized barrier code. Leveraging techniques such as fast paths and slow paths, the optimized barriers ensure maximum throughput and performance for applications, even under intensive workloads.

6.2. Efficient Inter-Generational Pointers Tracking

Double-buffered remembered sets — organized in pairs for each old-generation region — use bitmaps for efficient tracking of inter-generational pointers. This design choice facilitates concurrent work by application and garbage collection threads without the need for extra memory barriers, resulting in smoother execution.

6.3. Optimized Young Generation Collection

By analyzing the density of young generation regions, Generational ZGC selectively evacuates regions, reducing the effort required for young generation collection. This optimization contributes to quicker and more efficient garbage collection cycles for improved application responsiveness.

6.4. Flexible Handling of Large Objects

Generational ZGC introduces flexibility in handling large objects by allowing them to be allocated to the young generation. This eliminates the need for preemptive allocation to the old generation, enhancing memory efficiency. Large objects can now be collected in the young generation if short-lived or efficiently promoted to the old generation if long-lived.

7. Conclusion

As we’ve learned throughout this article, Java 21 comes with a powerful feature, the Generational ZGC. With careful consideration of potential risks and a commitment to ongoing refinement based on user feedback, it is expected to offer enhanced efficiency and responsiveness, making it a valuable addition to Java’s evolving ecosystem.


Implementing Persistable-Only Entities in Spring Data JPA

$
0
0

1. Overview

Spring JPA simplifies the interaction with a database and makes communication transparent. However, default Spring implementations sometimes need adjustments based on application requirements.

In this tutorial, we’ll learn how to implement a solution that won’t allow updates by default. We’ll consider several approaches and discuss the pros and cons of each.

2. Default Behavior

The save(T) method in JpaRepository<T, ID> behaves as upsert by default. This means it would update an entity if we already have it in the database:

@Transactional
@Override
public <S extends T> S save(S entity) {
    Assert.notNull(entity, "Entity must not be null.");
    if (entityInformation.isNew(entity)) {
        em.persist(entity);
        return entity;
    } else {
        return em.merge(entity);
    }
}

Based on the ID, if this is the first insert, it would persist the entity. Otherwise, it’ll call the merge(S) method to update it.

3. Service Check

The most obvious solution for this problem is explicitly checking if an entity contains an ID and choosing an appropriate behavior. It’s a little bit more invasive solution, but at the same time, this behavior is often dictated by the domain logic.

Thus, although this approach would require an if statement and a couple of lines of code from us, it’s clean and explicit. Also, we have more freedom to decide what to do in each case and aren’t restricted by the JPA or database implementations:

@Service
public class SimpleBookService {
    private SimpleBookRepository repository;
    @Autowired
    public SimpleBookService(SimpleBookRepository repository) {
        this.repository = repository;
    }
    public SimpleBook save(SimpleBook book) {
        if (book.getId() == null) {
            return repository.save(book);
        }
        return book;
    }
    public Optional<SimpleBook> findById(Long id) {
        return repository.findById(id);
    }
}

4. Repository Check

This approach is similar to the previous one but moves the check directly into the repository. However, if we don’t want to provide the implementation for the save(T) method from scratch, we need to implement an additional one:

public interface RepositoryCheckBookRepository extends JpaRepository<RepositoryCheckBook, Long> {
    default <S extends RepositoryCheckBook> S persist(S entity) {
        if (entity.getId() == null) {
            return save(entity);
        }
        return entity;
    }
}

Note that this solution would work only when the database generates the IDs. Thus, we can assume that an entity with an ID has already persisted, which is a reasonable assumption in most cases. The benefit of this approach is that we’re more in control over the resulting behavior. We’re silently ignoring the update here, but we can change the implementation if we want to notify a client.

5. Using EntityManager

This approach also requires a custom implementation, but we’ll use the EntityManger directly. It also might provide us with more functionality. However, we must first create a custom implementation because we cannot inject beans into an interface. Let’s start with an interface:

public interface PersistableEntityManagerBookRepository<S> {
    S persistBook(S entity);
}

After that, we can provide an implementation for it. We’ll be using @PersistenceContext, which behaves similar to @Autowired, but more specific:

public class PersistableEntityManagerBookRepositoryImpl<S> implements PersistableEntityManagerBookRepository<S> {
    @PersistenceContext
    private EntityManager entityManager;
    @Override
    @Transactional
    public S persist(S entity) {
        entityManager.persist(entity);
        return entity;
    }
}

It’s important to follow the correct naming convention. The implementation should have the same name as the interface but end with Impl. To tie all the things together, we need to create another interface that would extend both our custom interface and JpaRepository<T, ID>:

public interface EntityManagerBookRepository extends JpaRepository<EntityManagerBook, Long>, 
  PersistableEntityManagerBookRepository<EntityManagerBook> {
}

If the entity had an ID, the persist(T) method would throw InvalidDataAccessApiUsageException caused by PersistentObjectException.

6. Using Native Queries

Another way to alter the default behavior of JpaRepository<T> is to use @Query annotations. As we cannot use JPQL for insert queries, we’ll use native SQL:

public interface CustomQueryBookRepository extends JpaRepository<CustomQueryBook, Long> {
    @Modifying
    @Transactional
    @Query(value = "INSERT INTO custom_query_book (id, title) VALUES (:#{#book.id}, :#{#book.title})",
      nativeQuery = true)
    void persist(@Param("book") CustomQueryBook book);
}

This will force a specific behavior on the method. However, it has several issues. The main problem is that we must provide an ID, which is impossible if we delegate its generation to the database. Another thing is connected to the modifying queries. They can return only void or int, which might be inconvenient.

Overall, this method would cause DataIntegrityViolationException due to ID conflicts. This might create an overhead. Additionally, the method’s behavior isn’t straightforward, so this approach should be avoided when possible.

7. Persistable<ID> Interface

We can achieve a similar result by implementing a Persistable<ID> interface:

public interface Persistable<ID> {
    @Nullable
    ID getId();
    boolean isNew();
}

Simply put, this interface allows adding custom logic while identifying if the entity is new or already exists. This is the same isNew() method we’ve seen in the default save(S) implementation.

We can implement this interface and always tell JPA that the entity is new:

@Entity
public class PersistableBook implements Persistable<Long> {
    // fields, getters, and setters
    @Override
    public boolean isNew() {
        return true;
    }
}

This would force save(S) to pick persist(S) all the time, throwing an exception in case of ID constraint violation. This solution would generally work, but it might create problems, as we’re violating the persistence contract, considering all the entities to be new.

8. Non-Updatable Fileds

The best approach is to define the fields as non-updatable. This is the cleanest way to handle the problem and allows us to identify only those fields we want to update. We can use @Column annotation to define such fields:

@Entity
public class UnapdatableBook {
    @Id
    @GeneratedValue
    private Long id;
    @Column(updatable = false)
    private String title;
    private String author;
    // constructors, getters, and setters
}

JPA will silently ignore these fields while updating. At the same time, it still allows us to update other fields:

@Test
void givenDatasourceWhenUpdateBookTheBookUpdatedIgnored() {
    UnapdatableBook book = new UnapdatableBook(TITLE, AUTHOR);
    UnapdatableBook persistedBook = repository.save(book);
    Long id = persistedBook.getId();
    persistedBook.setTitle(NEW_TITLE);
    persistedBook.setAuthor(NEW_AUTHOR);
    repository.save(persistedBook);
    Optional<UnapdatableBook> actualBook = repository.findById(id);
    assertTrue(actualBook.isPresent());
    assertThat(actualBook.get().getId()).isEqualTo(id);
    assertThat(actualBook.get().getTitle()).isEqualTo(TITLE);
    assertThat(actualBook.get().getAuthor()).isEqualTo(NEW_AUTHOR);
}

We didn’t change the title of the book but successfully updated the author of the book.

9. Conclusion

Spring JPA not only provides us with convenient tools to interact with databases but is also highly flexible and configurable. We can use many different methods to alter the default behavior and fit the needs of our application.

Picking the proper method for a specific situation requires deep knowledge of available functionality.

As usual, all the code used in this tutorial is available over on GitHub.


Difference Between a Future and a Promise in Java

$
0
0

1. Introduction

Future and Promise are tools used to handle asynchronous tasks, allowing one to execute operations without waiting for each step to complete. Although they both serve the same purpose, they exhibit key differences. In this tutorial, we’ll explore the differences between Future and Promise, scrutinizing their key characteristics, use cases, and distinctive features.

2. Understanding Future

Future acts as a container, awaiting the outcome of ongoing operations. Developers commonly employ Future to check the status of computations, retrieve results upon readiness, or gracefully wait until the operations conclude. Future often integrates with the Executor framework, providing a straightforward and efficient approach to handling asynchronous tasks.

2.1. Key Characteristics

Now, let’s explore some of Future‘s key characteristics:

  • Adopt a blocking design, which potentially leads to a wait until the asynchronous computation is complete.
  • Direct interaction with the ongoing computation is restricted, maintaining a straightforward approach.

2.2. Use Cases

Future excels in scenarios where the result of an asynchronous operation is predetermined and cannot be altered once the process begins.

Consider fetching a user’s profile information from a database or downloading a file from a remote server. Once initiated, these operations have a fixed outcome, such as the data retrieved or the file downloaded, and cannot be modified mid-process.

2.3. Using Future

To utilize Future, we can find them residing in the java.util.concurrent package. Let’s look at a code snippet demonstrating how to employ a Future for asynchronous task handling:

ExecutorService executorService = Executors.newSingleThreadExecutor();
Future<String> futureResult = executorService.submit(() -> {
    Thread.sleep(2000);
    return "Future Result";
});
while (!futureResult.isDone()) {
    System.out.println("Future task is still in progress...");
    Thread.sleep(500);
}
String resultFromFuture = futureResult.get();
System.out.println("Future Result: " + resultFromFuture);
executorService.shutdown();

And let’s check the output we get when we run the code:

Future task is still in progress...
Future Result: Future Result

In the code, the futureResult.get() method is a blocking call. This means that when the program reaches this line, it will wait until the asynchronous task submitted to the ExecutorService is complete before moving on.

3. Understanding Promise

In contrast, the concept of a Promise is not native to Java but is a versatile abstraction in other programming languages. A Promise acts as a proxy for a value that might not be known when the Promise is created. Unlike Future, Promise often provides a more interactive approach, allowing developers to influence the asynchronous computation even after its initiation.

3.1. Key Characteristics

Now, let’s explore some of Promise’s key characteristics:

  • Encapsulates a mutable state, permitting modification even after the asynchronous operation has begun, providing flexibility in handling dynamic scenarios
  • Employ a callback mechanism, allowing developers to attach callbacks executed upon completion, failure, or progress of the asynchronous operation

3.2. Use Cases

Promise is well-suited for scenarios where dynamic and interactive control over asynchronous operations is essential. Furthermore, Promise offers flexibility in modifying the ongoing computation even after initiation. A good example of this would be streaming real-time data in financial applications where the display content needs to adapt to live market changes.

Moreover, Promise is beneficial when dealing with asynchronous tasks that require conditional branching or modifications based on intermediate results. One possible use case is when we need to handle multiple asynchronous API calls where subsequent operations depend on the outcomes of previous ones.

3.3. Using Promise

Java might not have a dedicated Promise class that strictly adheres to the Promise specification as in JavaScript. However, we can achieve similar functionality using java.util.concurrent.CompletableFuture. CompletableFuture provides a versatile way to work with asynchronous tasks, sharing some characteristics with Promise. It’s important to note that they are not the same.

Let’s explore how to use CompletableFuture to achieve Promise-like behavior in Java:

ExecutorService executorService = Executors.newSingleThreadExecutor();
CompletableFuture<String> completableFutureResult = CompletableFuture.supplyAsync(() -> {
    try {
        Thread.sleep(2000);
    } catch (InterruptedException e) {
        e.printStackTrace();
    }
    return "CompletableFuture Result";
}, executorService);
completableFutureResult.thenAccept(result -> {
      System.out.println("Promise Result: " + result);
  })
  .exceptionally(throwable -> {
      System.err.println("Error occurred: " + throwable.getMessage());
      return null;
  });
System.out.println("Doing other tasks...");
executorService.shutdown();

When we run the code, we’ll see the output:

Doing other tasks...
Promise Result: CompletableFuture Result

We create a CompletableFuture named completableFutureResult. The supplyAsync() method is used to initiate an asynchronous computation. The provided lambda function represents the asynchronous task.

Next, we attach callbacks to the CompletableFuture using thenAccept() and exceptionally(). The thenAccept() callback handles the successful completion of the asynchronous task, similar to the resolution of a Promise, while exceptionally() handles any exceptions that might occur during the task, resembling the rejection of a Promise.

4. Key Differences

4.1. Control Flow

Once a Future‘s value is set, the control flow proceeds downstream, unaffected by subsequent events or changes. Meanwhile, Promise (or CompletableFuture) provides methods like thenCompose() and whenComplete() for conditional execution based on the final result or exceptions.

Let’s create an example of branching control flow using CompletableFuture:

CompletableFuture<Integer> firstTask = CompletableFuture.supplyAsync(() -> {
      return 1;
  })
  .thenApplyAsync(result -> {
      return result * 2;
  })
  .whenComplete((result, ex) -> {
      if (ex != null) {
          // handle error here
      }
  });

In the code, we use the thenApplyAsync() method to demonstrate the chaining of asynchronous tasks.

4.2. Error Handling

Both Future and Promise provide mechanisms for handling errors and exceptions. Future relies on exceptions thrown during the computation:

ExecutorService executorService = Executors.newSingleThreadExecutor();
Future<String> futureWithError = executorService.submit(() -> {
    throw new RuntimeException("An error occurred");
});
try {
    String result = futureWithError.get();
} catch (InterruptedException | ExecutionException e) {
    e.printStackTrace();
} finally {
    executorService.shutdown();
}

In CompletableFuture, the exceptionally() method is used to handle any exception that occurs during the asynchronous computation. If an exception occurs, it prints an error message and provides a fallback value:

CompletableFuture<String> promiseWithError = new CompletableFuture<>();
promiseWithError.completeExceptionally(new RuntimeException("An error occurred"));
promiseWithError.exceptionally(throwable -> {
    return "Fallback value";
});

4.3. Read-Write Access

Future provides a read-only view, allowing us to retrieve the result once the computation is complete:

Future<Integer> future = executor.submit(() -> 100);
// Cannot modify future.get() after completion

In contrast, CompletableFuture enables us not only to read the result but also to actively set values dynamically even after the asynchronous operation has started:

ExecutorService executorService = Executors.newSingleThreadExecutor();
CompletableFuture<Integer> totalPromise = CompletableFuture.supplyAsync(() -> {
    try {
        Thread.sleep(1000);
    } catch (InterruptedException e) {
        e.printStackTrace();
    }
    return 100;
}, executorService);
totalPromise.thenAccept(value -> System.out.println("Total $" + value ));
totalPromise.complete(10);

Initially, we set up the asynchronous task to return 100 as the result. However, we intervene and explicitly complete the task with the value 10 before it completes naturally. This flexibility highlights the write-capable nature of CompletableFuture, allowing us to dynamically update the result during asynchronous execution.

5. Conclusion

In this article, we’ve explored the distinction between Future and Promise. While both serve the purpose of handling asynchronous tasks, they differ significantly in their capabilities.

As always, the source code for the examples is available over on GitHub.

       
Viewing all 4469 articles
Browse latest View live


<script src="https://jsc.adskeeper.com/r/s/rssing.com.1596347.js" async> </script>