Quantcast
Channel: Baeldung
Viewing all 4470 articles
Browse latest View live

Role-Based Access Control in Quarkus

$
0
0
Contact Us Featured

1. Overview

In this tutorial, we’ll discuss Role-Based Access Control (RBAC) and how we can implement this functionality using Quarkus.

RBAC is a well-known mechanism for implementing a complex security system. Quarkus is a modern cloud-native full-stack Java framework that supports RBAC out of the box.

Before we start, it’s important to note that roles can be applied in many ways. In enterprises, roles are typically just aggregations of permissions used to identify a particular group of actions a user can perform. In Jakarta, roles are tags that allow the execution of resource actions (equivalent to permission). There are different ways of implementing RBAC systems.

In this tutorial, we’ll use permissions assigned to resources to control access, and the roles will group a list of permissions.

2. RBAC

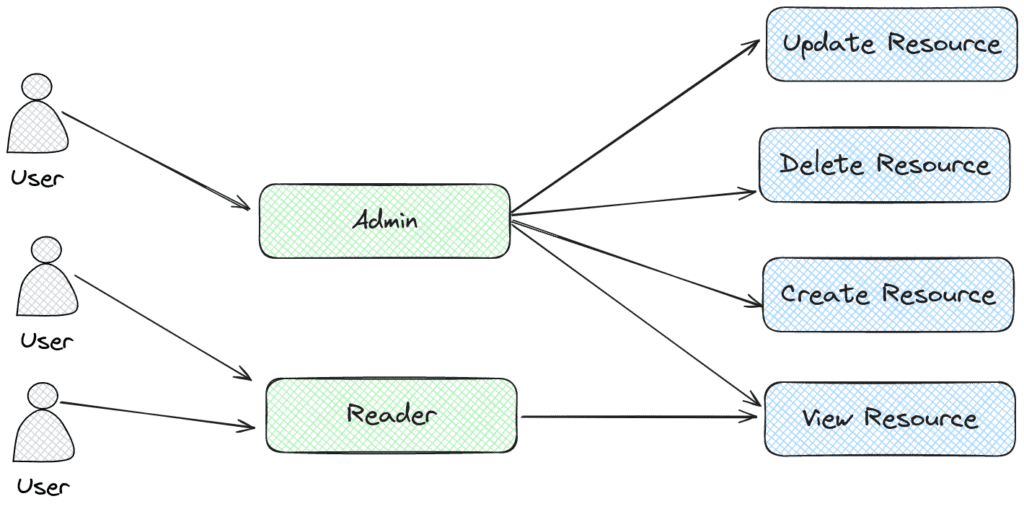
Role-based access control is a security model that grants application users access based on predefined permissions. System admins can assign and validate these permissions to particular resources upon an access attempt. To help manage permissions, they create roles to group them:

RBAC diagram

In order to demonstrate the implementation of an RBAC system using Quarkus, we’ll need some other tools like JSON Web Tokens (JWT), JPA, and Quarkus Security module. The JWT helps us implement a simple and self-contained way to validate identities and authorization, so for the sake of simplicity, we are leveraging it for our example. Similarly, JPA will help us handle the communication between domain logic and the database, while Quarkus will be the glue of all these components.

3. JWT

JSON Web Tokens (JWT) are a secure means to transmit information between user and server as a compact, URL-safe JSON object. This token is signed digitally for verification and is typically used for authentication and secure data exchange in web-based applications. During authentication, the server issues a JWT containing the user’s identity and claims, which the client will use in subsequent requests to access protected resources:JWT diagram
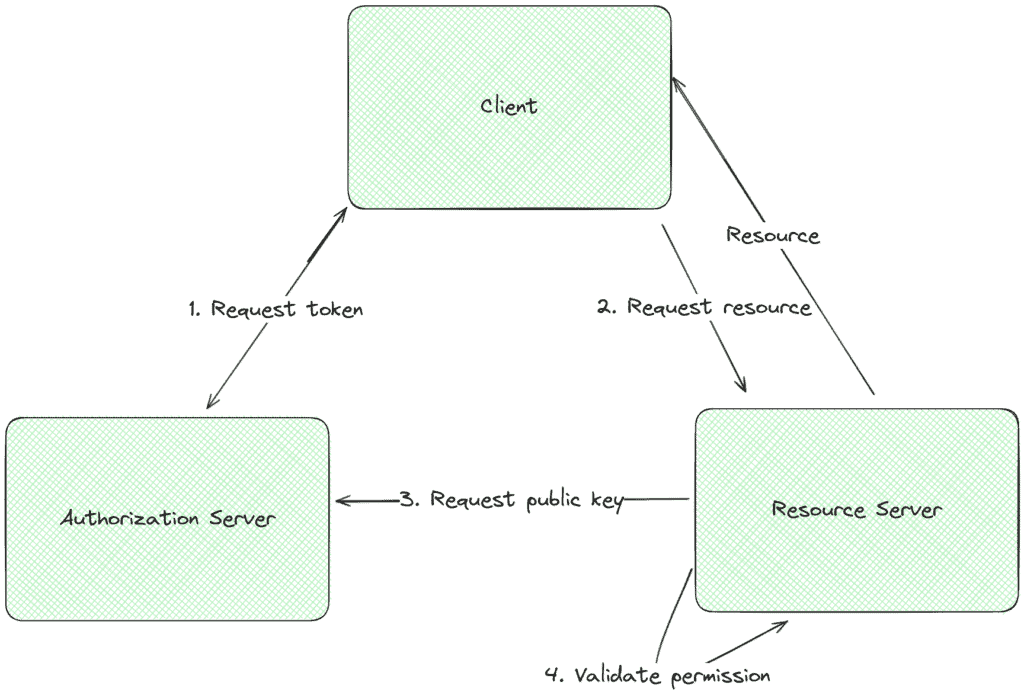
The client requests the token by providing some credentials, and then the authorization server provides the signed token; later, when trying to access a resource, the client offers the JWT token, which the resource server verifies and validates against the required permissions. Considering these foundational concepts, let’s explore how to integrate RBAC and JWT in a Quarkus application.

4. Data Design

In order to keep it simple, we’ll create a basic RBAC system to use in this example. For this, let’s use the following tables: Database Quarkus RBAC

This allows us to represent the users, their roles, and the permissions that compose each role. JPA database tables will represent our domain objects:

@Entity
@Table(name = "users")
public class User {
    @Id
    @GeneratedValue(strategy = GenerationType.AUTO)
    private Long id;
    @Column(unique = true)
    private String username;
    @Column
    private String password;
    @Column(unique = true)
    private String email;
    @ManyToMany(fetch = FetchType.LAZY)
    @JoinTable(name = "user_roles",
      joinColumns = @JoinColumn(name = "user_id"),
      inverseJoinColumns = @JoinColumn(name = "role_name"))
    private Set<Role> roles = new HashSet<>();
    // Getter and Setters
}

The user’s table holds the credentials to log in and the relation between the user and the roles:

@Entity
@Table(name = "roles")
public class Role {
    @Id
    private String name;
    @Roles
    @Convert(converter = PermissionConverter.class)
    private Set<Permission> permissions = new HashSet<>();
    // Getters and Setters
}

Again, to keep it simple, the permissions are stored in a column using comma-separated values, and for that, we use the PermissionConverter.

5. JSON Web Token and Quarkus

In terms of credentials, to use the JWT tokens and enable the login, we need the following dependencies:

<dependency>
    <groupId>io.quarkus</groupId>
    <artifactId>quarkus-smallrye-jwt-build</artifactId>
    <version>3.9.4</version>
</dependency>
<dependency>
    <groupId>io.quarkus</groupId>
    <artifactId>quarkus-smallrye-jwt</artifactId>
    <version>3.9.4</version>
</dependency>
<dependency>
    <groupId>io.quarkus</groupId>
    <artifactId>quarkus-test-security</artifactId>
    <scope>test</scope>
    <version>3.9.4</version>
</dependency>
<dependency>
    <groupId>io.quarkus</groupId>
    <artifactId>quarkus-test-security-jwt</artifactId>
    <scope>test</scope>
    <version>3.9.4</version>
</dependency>

Such modules give us the tools to implement token generation, permission validation, and testing our implementation. Now, to define the dependencies and Quarkus versions, we’ll use the BOM parent, which contains the specific versions compatible with the framework. For this example, we’ll need:

Next, in order to implement the token signature, we need RSA public and private keys. Quarkus has a simple way of configuring it. Once generated, we have to config the following properties:

mp.jwt.verify.publickey.location=publicKey.pem
mp.jwt.verify.issuer=my-issuer
smallrye.jwt.sign.key.location=privateKey.pem

Quarkus, by default, looks at the /resources or the absolute path provided. The framework uses the keys to sign the claims and validate the token.

6. Credentials

Now, to create the JWT token and set its permissions, we need to validate the user’s credentials. The code below is an example of how we can do this:

@Path("/secured")
public class SecureResourceController {
    // other methods...
    @POST
    @Path("/login")
    @Consumes(MediaType.APPLICATION_JSON)
    @Produces(MediaType.APPLICATION_JSON)
    @PermitAll
    public Response login(@Valid final LoginDto loginDto) {
        if (userService.checkUserCredentials(loginDto.username(), loginDto.password())) {
            User user = userService.findByUsername(loginDto.username());
            String token = userService.generateJwtToken(user);
            return Response.ok().entity(new TokenResponse("Bearer " + token,"3600")).build();
        } else {
            return Response.status(Response.Status.UNAUTHORIZED).entity(new Message("Invalid credentials")).build();
        }
    }
}

The login endpoint validates the user credentials and emits the token as a response in the case of success. Another important thing to notice is the @PermitAll, which makes sure this endpoint is public and doesn’t require any authentication. However, we’ll look at permission in more detail soon.

Here, another important piece of code we’ll pay special attention to is the generateJwtToken method, which creates and signs a token.

public String generateJwtToken(final User user) {
    Set<String> permissions = user.getRoles()
      .stream()
      .flatMap(role -> role.getPermissions().stream())
      .map(Permission::name)
      .collect(Collectors.toSet());
    return Jwt.issuer(issuer)
      .upn(user.getUsername())
      .groups(permissions)
      .expiresIn(3600)
      .claim(Claims.email_verified.name(), user.getEmail())
      .sign();
}

In this method, we retrieve the permission list provided by each role and inject it into the token. The issuer also defines the token, the important claims, and the time to live, and then, finally, we sign the token. Once the user receives it, it will be used to authenticate all subsequent calls. The token contains all the server needs to authenticate and authorize the respective user. The user only needs to send the bearer token to the Authentication header to authenticate the call.

7. Permissions

As mentioned before, Jakarta uses @RolesAllowed to assign permission to resources. Although it calls them roles, they work like permissions (given the concepts defined by us previously), which means we only need to annotate our endpoints with it to secure them, like:

@Path("/secured")
public class SecureResourceController {
    private final UserService userService;
    private final SecurityIdentity securityIdentity;
    // constructor
    @GET
    @Path("/resource")
    @Consumes(MediaType.APPLICATION_JSON)
    @Produces(MediaType.APPLICATION_JSON)
    @RolesAllowed({"VIEW_ADMIN_DETAILS"})
    public String get() {
        return "Hello world, here are some details about the admin!";
    }
    @GET
    @Path("/resource/user")
    @Consumes(MediaType.APPLICATION_JSON)
    @Produces(MediaType.APPLICATION_JSON)
    @RolesAllowed({"VIEW_USER_DETAILS"})
    public Message getUser() {
        return new Message("Hello "+securityIdentity.getPrincipal().getName()+"!");
    }
    //...
}

Looking at the code, we can see how simple it is to add permission control to our endpoints. In our case, the /secured/resource/user now requires the VIEW_USER_DETAILS permission and the /secured/resourcerequires VIEW_ADMIN_DETAILS. We can also observe that it’s possible to assign a list of permissions instead of only one. In this case, Quarkus will require at least one of the permissions listed in @RolesAllowed. 

Another important remark is that the token contains the permissions and information about the currently logged user (the principal in the security identity).

8. Testing

Quarkus offers many tools that make testing our application simple and easy to implement. Using such tools, we can configure the creation and setup of the JWTs as well as their context, making the test intention clear and easy to understand. The following test shows it:

@QuarkusTest
class SecureResourceControllerTest {
    @Test
    @TestSecurity(user = "user", roles = "VIEW_USER_DETAILS")
    @JwtSecurity(claims = {
        @Claim(key = "email", value = "user@test.io")
    })
    void givenSecureAdminApi_whenUserTriesToAccessAdminApi_thenShouldNotAllowRequest() {
        given()
          .contentType(ContentType.JSON)
          .get("/secured/resource")
          .then()
          .statusCode(403);
    }
    @Test
    @TestSecurity(user = "admin", roles = "VIEW_ADMIN_DETAILS")
    @JwtSecurity(claims = {
        @Claim(key = "email", value = "admin@test.io")
    })
    void givenSecureAdminApi_whenAdminTriesAccessAdminApi_thenShouldAllowRequest() {
        given()
          .contentType(ContentType.JSON)
          .get("/secured/resource")
          .then()
          .statusCode(200)
          .body(equalTo("Hello world, here are some details about the admin!"));
    }
    //...
}

The @TestSecurity annotation allows for the definition of the security properties, while the @JwtSecurity allows for the definition of the Token’s claims. With both tools, we can test a multitude of scenarios and use cases.

The tools we saw so far are already enough to implement a robust RBAC system using Quarkus. However, it has more options.

9. Quarkus Security

Quarkus also offers a robust security system that can be integrated with our RBAC solution. Let’s check how we can combine such functionality with our RBAC implementation. First, we need to know the concepts, as the Quarkus permission system doesn’t work with roles. However, it’s possible to create a map between roles permissions. Let’s see how:

quarkus.http.auth.policy.role-policy1.permissions.VIEW_ADMIN_DETAILS=VIEW_ADMIN_DETAILS
quarkus.http.auth.policy.role-policy1.permissions.VIEW_USER_DETAILS=VIEW_USER_DETAILS
quarkus.http.auth.policy.role-policy1.permissions.SEND_MESSAGE=SEND_MESSAGE
quarkus.http.auth.policy.role-policy1.permissions.CREATE_USER=CREATE_USER
quarkus.http.auth.policy.role-policy1.permissions.OPERATOR=OPERATOR
quarkus.http.auth.permission.roles1.paths=/permission-based/*
quarkus.http.auth.permission.roles1.policy=role-policy1

Using the application properties file, we define a role-policy, which maps roles to permissions. The mapping works like quarkus.http.auth.policy.{policyName}.permissions.{roleName}={listOfPermissions}. In the example about the roles and permissions, they have the same name and map one to one. However, it’s possible this is not mandatory, and it’s also possible to map a role to a list of permissions. Then, once the mapping is done, we define the path in which this policy will be applied using the last two lines of the configuration.

The resource permission setup would also be a bit different, like:

@Path("/permission-based")
public class PermissionBasedController {
    private final SecurityIdentity securityIdentity;
    public PermissionBasedController(SecurityIdentity securityIdentity) {
        this.securityIdentity = securityIdentity;
    }
    @GET
    @Path("/resource/version")
    @Consumes(MediaType.APPLICATION_JSON)
    @Produces(MediaType.APPLICATION_JSON)
    @PermissionsAllowed("VIEW_ADMIN_DETAILS")
    public String get() {
        return "2.0.0";
    }
    @GET
    @Consumes(MediaType.APPLICATION_JSON)
    @Produces(MediaType.APPLICATION_JSON)
    @Path("/resource/message")
    @PermissionsAllowed(value = {"SEND_MESSAGE", "OPERATOR"}, inclusive = true)
    public Message message() {
        return new Message("Hello "+securityIdentity.getPrincipal().getName()+"!");
    }
}

The setup is similar, in our case the only change is the @PermissionsAllowed annotation instead of the @RolesAllowed. Moreover, permission also allows for different behaviors, such as the inclusive flag, with changes in the behavior of the permission matching mechanism from OR to AND. We use the same setup as before for testing with behaviors:

@QuarkusTest
class PermissionBasedControllerTest {
    @Test
    @TestSecurity(user = "admin", roles = "VIEW_ADMIN_DETAILS")
    @JwtSecurity(claims = {
        @Claim(key = "email", value = "admin@test.io")
    })
    void givenSecureVersionApi_whenUserIsAuthenticated_thenShouldReturnVersion() {
        given()
          .contentType(ContentType.JSON)
          .get("/permission-based/resource/version")
          .then()
          .statusCode(200)
          .body(equalTo("2.0.0"));
    }
    @Test
    @TestSecurity(user = "user", roles = "SEND_MESSAGE")
    @JwtSecurity(claims = {
        @Claim(key = "email", value = "user@test.io")
    })
    void givenSecureMessageApi_whenUserOnlyHasOnePermission_thenShouldNotAllowRequest() {
        given()
          .contentType(ContentType.JSON)
          .get("/permission-based/resource/message")
          .then()
          .statusCode(403);
    }
    @Test
    @TestSecurity(user = "new-operator", roles = {"SEND_MESSAGE", "OPERATOR"})
    @JwtSecurity(claims = {
        @Claim(key = "email", value = "operator@test.io")
    })
    void givenSecureMessageApi_whenUserOnlyHasBothPermissions_thenShouldAllowRequest() {
        given()
          .contentType(ContentType.JSON)
          .get("/permission-based/resource/message")
          .then()
          .statusCode(200)
          .body("message", equalTo("Hello new-operator!"));
    }
}

The Quarkus security module offers many other features, but they won’t be covered in this article.

10. Conclusion

In this article, we discussed the RBAC system and how we can leverage the Quarkus framework to implement it. We also saw some nuances on how to use role or permission and their conceptual difference in this implementation. Finally, we observed the difference between the Jakarta implementation and the Quarkus security module and how they can help test such functionality in both scenarios.

As usual, all code samples used in this article are available over on GitHub.
       

Continue the Test Even After Assertion Failure in TestNG

$
0
0
Contact Us Featured

1. Overview

TestNG is a popular Java testing framework that’s an alternative to JUnit. While both frameworks offer their own paradigms, they both include the idea of assertions: logical statements that halt program execution if they evaluate to false, failing the test. A simple assertion in TestNG could look something like this:

@Test 
void testNotNull() {
    assertNotNull("My String"); 
}

But what happens if we need to make multiple assertions in a single test? In this article, we’ll explore TestNG’s SoftAssert, a technique for executing multiple assertions together.

2. Setup

For our exercise, let’s define a simple Book class:

public class Book {
    private String isbn;
    private String title;
    private String author;
    // Standard getters and setters...
}

We can also define an interface that models a simple service that looks up a Book based on its ISBN:

interface BookService {
    Book getBook(String isbn);
}

We can then mock this service in the unit test, which we’ll define later. This setup lets us define a scenario we can test in a realistic way: a service that returns an object that may be null or whose member variables may be null. Let’s start writing a unit test for this.

3. Basic Assertions Versus TestNG’s SoftAssert

To illustrate the benefits of SoftAssert, we’ll start by creating a unit test using basic TestNG assertions that fail and compare the feedback we get to the same test utilizing SoftAssert.

3.1. Using Traditional Assertions

To start, we’ll create a test using assertNotNull(), which takes a value to test and an optional message:

@Test
void givenBook_whenCheckingFields_thenAssertNotNull() {
    Book gatsby = bookService.getBook("9780743273565");
    assertNotNull(gatsby.isbn, "ISBN");
    assertNotNull(gatsby.title, "title");
    assertNotNull(gatsby.author, "author");
}

Then, we’ll define a mock implementation (using Mockito) of BookService that returns a Book instance:

@BeforeMethod
void setup() {
    bookService = mock(BookService.class);
    Book book = new Book();
    when(bookService.getBook(any())).thenReturn(book);
}

Running our test, we can see that we neglected to set the isbn field:

java.lang.AssertionError: ISBN expected object to not be null

Let’s fix this in our mock and run the test again:

@BeforeMethod void setup() {
    bookService = mock(BookService.class);
    Book book = new Book();
    book.setIsbn("9780743273565");
    when(bookService.getBook(any())).thenReturn(book);
}

We now receive a different error:

java.lang.AssertionError: title expected object to not be null

Again, we forgot to initialize a field in our mock, leading to another necessary change.

As we can see, this cycle of testing, making changes, and re-running the test isn’t only frustrating but time-consuming. This effect is, of course, multiplied by the size and complexity of the class. This problem is further compounded in the case of integration tests. Failures in remote deployment environments may be difficult or impossible to reproduce locally. Integration tests are typically more complex and, therefore, have longer execution times. Coupling this with the time needed to deploy test changes means the cycle time of each additional test re-run is costly.

Luckily, we can avoid this problem by using SoftAssert to evaluate multiple assertions without halting program execution immediately.

3.2. Grouping Assertions With SoftAssert

Let’s update our example above to use SoftAssert:

@Test void givenBook_whenCheckingFields_thenAssertNotNull() {
    Book gatsby = bookService.getBook("9780743273565"); 
    
    SoftAssert softAssert = new SoftAssert();
    softAssert.assertNotNull(gatsby.isbn, "ISBN");
    softAssert.assertNotNull(gatsby.title, "title");
    softAssert.assertNotNull(gatsby.author, "author");
    softAssert.assertAll();
}

Let’s break this down:

  • first, we create an instance of SoftAssert
  • next, we make a crucial change: we make our assertions against the instance of SoftAssert rather than using TestNG’s basic assertNonNull() method
  • finally, it’s equally important to note we need to call the assertAll() method on the SoftAssert instance once we’re ready to get the result of all our assertions

Now, if we run this with our original mock that neglected to set any member variable values for Book, we’ll see a single error message containing all of the assertion failures:

java.lang.AssertionError: The following asserts failed:
    ISBN expected object to not be null,
    title expected object to not be null,
    author expected object to not be null

This shows how using SoftAssert is a good practice when a single test requires more than one assertion.

3.3. Considerations for SoftAssert

While SoftAssert is easy to setup and use, there is an important consideration to keep in mind: statefulness. Because SoftAssert records the failure of each assertion internally, it’s not suitable to share across multiple test methods. For this reason, we should make sure to create a new instance of SoftAssert in each test method.

4. Conclusion

In this tutorial, we’ve learned how to make multiple assertions using TestNG’s SoftAssert and how this can be a valuable tool for writing clean tests with reduced debugging time. We also learned that SoftAssert is stateful and instances shouldn’t be shared among multiple tests.

As always, all of the code can be found over on GitHub.


Get 2’s Complement of a Number in Java

$
0
0

1. Introduction

Two’s complement is a fundamental concept in computer science, particularly when dealing with signed binary numbers. It enables the representation of both positive and negative integers within a fixed number of bits.

In this tutorial, we’ll calculate the 2’s complement of a number in Java.

2. What is Two’s Complement?

In computer systems, values are represented using a series of binary digits consisting of 0’s and 1’s. Different ways to encode the values in a binary representation exist, such as Signed magnitude, 1’s complement, 2’s complement, and so on.

Two’s complement notation is a very efficient way to store and perform operations on signed numbers. Here, the most significant bit (MSB) indicates the sign of the number, with 0 denoting a positive number and 1 a negative number. This representation streamlines addition and subtraction operations on binary numbers.

3. Algorithm

Let’s look at the algorithm for calculating 2’s complement of a number. The two’s complement value is identical to its binary representation for positive numbers. However, for a negative number, we can determine the two’s complement using the following algorithm:

if number >= 0
  convert to binary and return
else
  take the absolute value and convert to binary
  calculate 1's complement by flipping 1s and 0s
  Add 1 to the 1's complement and return the value

This algorithm calculates the 2’s complement value of the given number.

4. Implementation

We can implement the above algorithm in Java.

4.1. Algorithm Implementation

We’ll implement the logic step by step, as defined in the algorithm. We get the required number of bits for the representation from the user as input and the number itself. Moreover, we use BigInteger to represent the input number to support larger numbers.

Initially, we check whether the number is negative or not. We can convert the number to binary format if it’s non-negative and return the result. Otherwise, we proceed with the calculation of the two’s complement by invoking the respective method:

public static String decimalToTwosComplementBinary(BigInteger num, int numBits) {
    if (!canRepresentInNBits(num, numBits)) {
        throw new IllegalArgumentException(numBits + " bits is not enough to represent the number " + num
    }
    var isNegative = num.signum() == -1;
    var absNum = num.abs();
    // Convert the abs value of the number to its binary representation
    String binary = absNum.toString(2);
    // Pad the binary representation with zeros to make it numBits long
    while (binary.length() < numBits) {
        binary = "0" + binary;
    }
    // If the input number is negative, calculate two's complement
    if (isNegative) {
        binary = performTwosComplement(binary);
    }
    return formatInNibbles(binary);
}

We can use the toString() method with a radix value of 2 on the BigInteger to transform the number into its binary representation. Before converting, we take the absolute value of the input as the logic for 2’s complement is different for negative and positive numbers. Additionally, we append extra zeroes to the left of the binary value to ensure it aligns with the specified number of bits. Moreover, we verify if the number can be represented within the given number of bits:

private static boolean canRepresentInNBits(BigInteger number, int numBits) {
    BigInteger minValue = BigInteger.ONE.shiftLeft(numBits - 1).negate(); // -2^(numBits-1)
    BigInteger maxValue = BigInteger.ONE.shiftLeft(numBits - 1).subtract(BigInteger.ONE); // 2^(numBits-1) - 1
    return number.compareTo(minValue) >= 0 && number.compareTo(maxValue) <= 0;
}

Now, let’s look at the implementation of the method performTwosComplement() that calculates the two’s complement for the negative number:

private static String performTwosComplement(String binary) {
    StringBuilder result = new StringBuilder();
    boolean carry = true;
    // Perform one's complement
    StringBuilder onesComplement = new StringBuilder();
    for (int i = binary.length() - 1; i >= 0; i--) {
        char bit = binary.charAt(i);
        onesComplement.insert(0, bit == '0' ? '1' : '0');
    }
    // Addition by 1
    for (int i = onesComplement.length() - 1; i >= 0; i--) {
        char bit = onesComplement.charAt(i);
        if (bit == '1' && carry) {
            result.insert(0, '0');
        } else if (bit == '0' && carry) {
            result.insert(0, '1');
            carry = false;
        } else {
            result.insert(0, bit);
        }
    }
    if (carry) {
        result.insert(0, '1');
    }
    return result.toString();
}

In this method, we initially calculate the 1’s complement of the given binary number by flipping the 1’s to 0’s and vice versa. Subsequently, we increment the resulting 1’s complement value by one,  giving us the two’s complement value of the given binary string.

For better readability, we can implement a method to format the binary string in a group of nibbles(4 bits):

private static String formatInNibbles(String binary) {
    StringBuilder formattedBin = new StringBuilder();
    for (int i = 1; i <= binary.length(); i++) {
        if (i % 4 == 0 && i != binary.length()) {
            formattedBin.append(binary.charAt(i - 1)).append(" ");
        } else {
            formattedBin.append(binary.charAt(i - 1));
        }
    }
    return formattedBin.toString();
}

The algorithm for computing the two’s complement is now fully implemented.

4.2. Alternative Implementation

Alternatively, based on the property of the binary addition, we can calculate the two’s complement more easily. In this method, we start iterating from the rightmost side of the binary string. Upon detecting the first 1, we invert all the bits on the left side of this bit. Let’s proceed with the implementation of this approach:

private static String performTwosComplementUsingShortCut(String binary) {
    int firstOneIndexFromRight = binary.lastIndexOf('1');
    if (firstOneIndexFromRight == -1) {
        return binary;
    }
    String rightPart = binary.substring(firstOneIndexFromRight);
    String leftPart = binary.substring(0, firstOneIndexFromRight);
    String leftWithOnes = leftPart.chars().mapToObj(c -> c == '0' ? '1' : '0')
            .map(String::valueOf).collect(Collectors.joining(""));
    return leftWithOnes + rightPart;
}

This method provides a simpler approach to calculating the two’s complement of the given number.

5. Testing the Implementations

Now that the implementations are ready, let’s write the unit tests to check their accuracy. We can use the parameterized test from JUnit to cover multiple cases in a single test:

@ParameterizedTest(name = "Twos Complement of {0} with number of bits {1}")
@CsvSource({
    "0, 4, 0000",
    "1, 4, 0001",
    "-1, 4, 1111",
    "7, 4, 0111",
    "-7, 4, 1001",
    "12345, 16, 0011 0000 0011 1001",
    "-12345, 16, 1100 1111 1100 0111"
})
public void givenNumberAndBits_getTwosComplement(String number, int noOfBits, String expected) {
    String twosComplement = TwosComplement.decimalToTwosComplementBinary(new BigInteger(number), noOfBits);
    Assertions.assertEquals(expected, twosComplement);
}

In this single test, we’ve included cases for various input numbers.

Similarly, we can also write the test for the second approach.

6. Conclusion

In this article, we discussed the calculation of two’s complement of a given number. In addition to the conventional algorithm, we introduced a simpler alternative for computation. Furthermore, we covered the implementations through parameterized tests to validate their accuracy.

As always, the sample code used in this article is available over on GitHub.


Create HashMap with Character Count of a String in Java

$
0
0
Contact Us Featured

1. Introduction

Handling character counts within a string is common in various programming scenarios. One efficient approach is to utilize a HashMap to store the frequency of each character in the string.

In this tutorial, we’ll explore how to create a HashMap containing the character count of a given string in Java.

2. Using Traditional Looping

One of the simplest methods to create a HashMap with a string’s character count is traditional looping. In this approach, we iterate through each character in the string and update the count of each character in the HashMap accordingly.

Let’s see how this can be implemented:

String str = "abcaadcbcb";

@Test
public void givenString_whenUsingLooping_thenVerifyCounts() {
    Map<Character, Integer> charCount = new HashMap<>();
    for (char c : str.toCharArray()) {
        charCount.merge(c, 1, Integer::sum);
    }
    assertEquals(3, charCount.get('a').intValue());
}

In the test method, we first instantiate a map object named charCount that will hold the character counts. Afterward, we iterate over each character in the string str. For each character, we use the charCount.merge() method of the Map interface to update the count of occurrences in the charCount map.

If the character is encountered for the first time, we initialize its count to 1; otherwise, we increment the existing count by 1. Finally, we verify that the charCount map correctly stores the count of the character ‘a‘ as 3.

3. Using Java Streams

Alternatively, we can utilize Java Streams to achieve the same result with a more concise and functional approach. With Streams, we can easily group and count the occurrences of characters in the string. Here’s how we can implement it using Java Streams:

@Test
public void givenString_whenUsingStreams_thenVerifyCounts() {
    Map<Character, Integer> charCount = str.chars()
        .boxed()
        .collect(toMap(
          k -> (char) k.intValue(),
          v -> 1,
          Integer::sum));
    assertEquals(3, charCount.get('a').intValue());
}

Here, we first convert the str string into an IntStream using the chars() method. Next, each integer representing a Unicode code point is boxed into a Character object using the boxed() method, resulting in a Stream<Character>. Moreover, by employing the collect() method, we accumulate the stream elements into a Map<Character, Integer>.

The toMap() collector is crucial in mapping each character to its count. Within this collector, we define three parameters: a key mapper function that converts each character into a Character object; a value mapper function that assigns a count of 1 to each character encountered; and a merge function, Integer::sum, which aggregates the counts of characters with the same key by summing their values.

4. Conclusion

In this article, we created a HashMap with a string’s character count. Whether through traditional looping or utilizing Java Streams, the key is to efficiently iterate through the string’s characters and update the count in the HashMap.

As always, the complete code samples for this article can be found over on GitHub.


Setting Default TimeZone in Spring Boot Application

$
0
0

1. Overview

Sometimes, we want to be able to specify the TimeZone used by an application. For a service running globally, this could mean that all servers are posting events using the same TimeZone, no matter their location.

We can achieve this in a few different ways. One approach involves the use of JVM arguments when we execute the application. The other approach is to make the change programmatically in our code at various points of the bootup lifecycle.

In this short tutorial, we’ll examine a few ways to set the default TimeZone of a Spring Boot Application. First, we’ll see how to achieve this via the command line, and then, we’ll dive into some options for doing this programmatically at startup in our Spring Boot code. Finally, we’ll examine the differences between these approaches.

2. Main Concepts

The default value for TimeZone is based on the operating system of the machine where the JVM is running. We can change this:

  • By passing JVM arguments, using the user.timezone argument, in different ways depending on weather we run a task or a JAR
  • Programmatically, using the bean lifecycle configuration options (during/before creation of beans) or even inside a class, during execution

Setting the default TimeZone in a Spring Boot Application affects different components, such as logs’ timestamps, schedulers, JPA/Hibernate timestamps, and more. This means our choice of where to do this depends on when we need it to take effect. For example, do we want it during some bean’s creation or after WebApplicationContext is initialized?

It’s important to be precise about when to set this value because it could lead to unwanted application behavior. For example, an alarm service might set an alarm before the time zone change takes effect, which might then cause the alarm to activate at the wrong time.

Another factor to think of, before we decide on which option to go with, is testability. Using JVM arguments is the easier option, but testing it might be trickier and more prone to bugs. There’s no guarantee that the unit tests will run with the same JVM arguments as the production deployment.

3. Setting Default TimeZone on bootRun Task

If we use the bootRun task to run the application, we can pass the default TimeZone using JVM arguments in the command line. In this case, the value we set is available from the very beginning of the execution:

mvn spring-boot:run -Dspring-boot.run.jvmArguments="-Duser.timezone=Europe/Athens"

4. Setting Default TimeZone on JAR Execution

Similar to running the bootRun task, we can pass the default TimeZone value in the command line when executing the JAR file. And again, the value we set is available from the very beginning of the execution:

java -Duser.timezone=Europe/Athens -jar spring-core-4-0.0.1-SNAPSHOT.jar

5. Setting Default TimeZone on Spring Boot Startup

Let’s see how to insert our time zone change in different parts of Spring’s startup process.

5.1. Main Method

First, suppose we set the value inside the main method. In this case, we have it available from the very early stages of the execution, even before detecting the Spring Profile:

@SpringBootApplication
public class MainApplication {
    public static void main(String[] args) {
        TimeZone.setDefault(TimeZone.getTimeZone("GMT+08:00"));
        SpringApplication.run(MainApplication.class, args);
    }
}

Though this is the first step of the lifecycle, it doesn’t take advantage of the possibilities we have with our Spring configuration. We either have to hardcode the timezone or programmatically read it from something like an environment variable.

5.2. BeanFactoryPostProcessor

Second, BeanFactoryPostProcessor is a factory hook that we can use to modify the application context’s bean definitions. This way, we set the value just before any bean instantiation happens:

@Component
public class GlobalTimezoneBeanFactoryPostProcessor implements BeanFactoryPostProcessor {
    @Override
    public void postProcessBeanFactory(ConfigurableListableBeanFactory beanFactory) throws BeansException {
        TimeZone.setDefault(TimeZone.getTimeZone("GMT+08:00"));
    }
}

5.3. PostConstruct

Last, we can use PostConstruct of our MainApplication class to set the default TimeZone value just after the initialization of WebApplicationContext is completed. At this point, we can inject the TimeZone value from our configuration properties:

@SpringBootApplication
public class MainApplication {
    @Value("${application.timezone:UTC}")
    private String applicationTimeZone;
    public static void main(String[] args) {
        SpringApplication.run(MainApplication.class, args);
    }
    @PostConstruct
    public void executeAfterMain() {
        TimeZone.setDefault(TimeZone.getTimeZone(applicationTimeZone));
    }
}

6. Conclusion

In this brief tutorial, we learned several ways of setting the default TimeZone in a Spring Boot Application. We discussed the impact that changing the default value might have, and based on these factors, we should be able to decide on the right approach for our use cases.

As always, all the source code is available over on GitHub.


Get Nextval From Sequence With Spring JPA

$
0
0

1. Introduction

Sequences are number generators for unique IDs to avoid duplicate entries in a database. Spring JPA offers ways to work with sequences automatically for most situations. However, there might be specific scenarios where we need to retrieve the next sequence value manually before persisting an entity. For instance, we might want to generate a unique invoice number before saving the invoice details to the database.

In this tutorial, we’ll explore a few approaches for fetching the next value from a database sequence using Spring Data JPA.

2. Setting up Project Dependencies

Before we dive into using sequences with Spring Data JPA, let’s ensure our project is properly set up. We’ll need to add the Spring Data JPA and PostgreSQL driver dependencies to our Maven pom.xml file and create the sequence in the database.

2.1. Maven Dependencies

First, let’s add the necessary dependencies to our Maven project:

<dependency>
    <groupId>org.springframework.boot</groupId>
    <artifactId>spring-boot-starter-data-jpa</artifactId>
</dependency>
<dependency>
    <groupId>org.postgresql</groupId>
    <artifactId>postgresql</artifactId>
    <scope>runtime</scope>
</dependency>

2.2. Test Data

Below is the SQL script that we use to prepare our database before running the test cases. We can save this script in a .sql file and place it inside the src/test/resources directory of our project:

DROP SEQUENCE IF EXISTS my_sequence_name;
CREATE SEQUENCE my_sequence_name START 1;

This command creates a sequence starting from 1, which increments by 1 for each call to NEXTVAL.

Then, we use the @Sql annotation with the executionPhase attribute set to BEFORE_TEST_METHOD in the test class to insert test data into the database before each test method execution:

@Sql(scripts = "/testsequence.sql", executionPhase = Sql.ExecutionPhase.BEFORE_TEST_METHOD)

3. Using @SequenceGenerator

Spring JPA can work with the sequence behind the scenes to automatically assign a unique number whenever we add a new item. We typically use the @SequenceGenerator annotation in JPA to configure a sequence generator. This generator can be used to automatically generate primary keys in entity classes.

Additionally, it’s often combined with the @GeneratedValue annotation to specify the strategy for generating primary key values. Here’s how we can use @SequenceGenerator to configure primary key generation:

@Entity
public class MyEntity {
    @Id
    @GeneratedValue(strategy = GenerationType.SEQUENCE, generator = "mySeqGen")
    @SequenceGenerator(name = "mySeqGen", sequenceName = "my_sequence_name", allocationSize = 1)
    private Long id;
    // Other entity fields and methods
}

The @GeneratedValue annotation with the GenerationType.SEQUENCE strategy indicates that primary key values will be generated using a sequence. Subsequently, the generator attribute associates this strategy with a designated sequence generator named “mySeqGen“.

Moreover, the @SequenceGenerator annotation configures the sequence generator named “mySeqGen“. It specifies the name of the database sequence “my_sequence_name” and an optional parameter allocation size.

allocationSize is an integer value specifying how many sequence numbers to pre-fetch from the database at once. For example, if we set allocationSize to 50, the persistence provider requests 50 sequence numbers in a single call and stores them internally. It then uses these pre-fetched numbers for future entity ID generation. This can be beneficial for applications with high write volumes.

With this configuration, when we persist a new MyEntity instance, the persistence provider automatically obtains the next value from the sequence named “my_sequence_name“. The retrieved sequence number is then assigned to the entity’s id field before saving it to the database.

Here’s an example illustrating how to retrieve the sequence number along with the entity’s ID after persisting it:

MyEntity entity = new MyEntity();
myEntityRepository.save(entity);
long generatedId = entity.getId();
assertNotNull(generatedId);
assertEquals(1L, generatedId);

After saving the entity, we can access the generated ID using the getId() method on the entity object.

4. Spring Data JPA Custom Query

In some scenarios, we might need the next number or unique ID before saving it to the database. To do this, Spring Data JPA offers a way to query the next sequence using custom queries. This approach involves using a native SQL query within the repository to access the sequence.

The specific syntax for retrieving the next value depends on the database system. For instance, in PostgreSQL or Oracle, we use the NEXTVAL function to obtain the next value from the sequence. Here’s an example implementation using the @Query annotation:

@Repository
public interface MyEntityRepository extends JpaRepository<MyEntity, Long> {
    @Query(value = "SELECT NEXTVAL('my_sequence_name')", nativeQuery = true)
    Long getNextSequenceValue();
}

In the example, we annotate the getNextSequenceValue() method with @Query. With the @Query annotation, we can specify a native SQL query that retrieves the next value from the sequence using the NEXTVAL function. This enables direct access to the sequence value:

@Autowired
private MyEntityRepository myEntityRepository;
long generatedId = myEntityRepository.getNextSequenceValue();
assertNotNull(generatedId);
assertEquals(1L, generatedId);

Since this approach involves writing database-specific code, if we change databases, we might need to adjust the SQL query.

5. Using EntityManager

Alternatively, Spring JPA also provides the EntityManager API, which we can use for directly retrieving the next sequence value. This method offers finer-grained control but bypasses JPA’s object-relational mapping features.

Below is an example of how we can use the EntityManager API in Spring Data JPA to retrieve the next value from a sequence:

@PersistenceContext
private EntityManager entityManager;
public Long getNextSequenceValue(String sequenceName) {
    BigInteger nextValue = (BigInteger) entityManager.createNativeQuery("SELECT NEXTVAL(:sequenceName)")
      .setParameter("sequenceName", sequenceName)
      .getSingleResult();
    return nextValue.longValue();
}

We use the createNativeQuery() method to create a native SQL query. In this query, the NEXTVAL function is called to retrieve the next value from the sequence. We can notice that the NEXTVAL function in PostgreSQL returns a value of type BigInteger. Therefore, we use the longValue() method to convert the BigInteger to a Long.

With the getNextSequenceValue() method, we can call it this way:

@Autowired
private MyEntityService myEntityService;
long generatedId = myEntityService.getNextSequenceValue("my_sequence_name");
assertNotNull(generatedId);
assertEquals(1L, generatedId);

6. Conclusion

In this article, we’ve explored various approaches to fetch the next value from a database sequence using Spring Data JPA. Spring JPA offers seamless integration with database sequences through annotations like @SequenceGenerator and @GeneratedValue. In scenarios where we need the next sequence value before saving an entity, we can use custom queries with Spring Data JPA.

As always, the source code for the examples is available over on GitHub.


Intro to Apache Commons Configuration Project

$
0
0
start here featured

1. Overview

At deployment time we may need to provide some configuration to the application. This can be from multiple external sources.

Apache Commons Configuration provides a unified approach to manage configuration from different sources.

In this tutorial, we’ll explore how Apache Commons Configuration can help us configure our application.

2. Introduction to Apache Commons Configuration

The Apache Commons Configuration provides an interface for Java applications to access and use configuration data from varied sources. Through configuration builders, it offers typed access to both single and multi-valued characteristics.

It handles properties consistently across several sources, including files, databases, and hierarchical documents such as XML.

2.1. Maven Dependency

Let’s start by adding the latest versions of the configurations library and bean utils to the pom.xml:

<dependency>
    <groupId>org.apache.commons</groupId>
    <artifactId>commons-configuration2</artifactId>
    <version>2.10.0</version>
</dependency>
<dependency>
    <groupId>commons-beanutils</groupId>
    <artifactId>commons-beanutils</artifactId>
    <version>1.9.4</version>
</dependency>

2.2. Setup

Let’s define some common configuration files we may encounter.

We’ll create a flat-file format – a .properties file:

db.host=baeldung.com
db.port=9999
db.user=admin
db.password=bXlTZWNyZXRTdHJpbmc=
db.url=${db.host}:${db.port}
db.username=${sys:user.name}
db.external-service=${const:com.baeldung.commons.configuration.ExternalServices.BAELDUNG_WEBSITE}

Let’s create another in a hierarchical XML format:

<?xml version="1.0" encoding="UTF-8"?>
<!DOCTYPE configuration SYSTEM "validation-sample.dtd">
<configuration>
    <appender name="STDOUT" class="ch.qos.logback.core.ConsoleAppender">
        <encoder>
            <pattern>Pattern1</pattern>
            <pattern>Pattern2</pattern>
        </encoder>
    </appender>
    <root>
        <appender-ref ref="STDOUT" />
    </root>
</configuration>

3. Configurations Helper Class

Apache Commons Configuration provides the Configurations utility class to read the same from different sources for a quick start with standard options. This is a thread-safe class, which helps us create varied configuration objects with default parameters.

Additionally, we can also provide custom parameters passing the Parameters instance.

3.1. Reading a Properties File

We’ll read the properties file via the Configurations class and access it via the Configuration class. There are multiple ways to read a file or get the test resources folder. We can read or cast the properties to numbers or a List of certain object types. Finally, we can also provide default values.

Let’s try to access the configurations from the properties file:

Configurations configs = new Configurations();
Configuration config = configs.properties(new File("src/test/resources/configuration/file.properties"));
String dbHost = config.getString("db.host");
int dbPort = config.getInt("db.port");
String dbUser = config.getString("db.user");
String dbPassword = config.getString("undefinedKey", "defaultValue");
assertEquals("baeldung.com", dbHost);
assertEquals(9999, dbPort);
assertEquals("admin", dbUser);
assertEquals("defaultValue", dbPassword);

3.2. Reading an XML file

We’ll use the XMLConfiguration class to access the properties from the XML file, which extends the Configuration class:

Configurations configs = new Configurations();
XMLConfiguration config = configs.xml(new File("src/test/resources/configuration/hierarchical.xml"));
String appender = config.getString("appender[@name]");
List<String> encoderPatterns = config.getList(String.class, "appender.encoder.pattern");
String pattern1 = config.getString("appender.encoder.pattern(0)");

The traversal of the different elements is via the dot ‘.’ notation which enables accessing the hierarchical nature of the input file.

4. Configuration From Properties File

In addition to using the Configurations class, the Apache Commons Configuration provides support to read/access this format with additional features. The configuration object for the properties file is instantiated using the FileBasedConfigurationBuilder.

Let’s look at an example of how we can use this builder to access the properties file:

Parameters params = new Parameters();
FileBasedConfigurationBuilder<FileBasedConfiguration> builder = 
  new FileBasedConfigurationBuilder<FileBasedConfiguration>(PropertiesConfiguration.class)
    .configure(params.properties()
    .setFileName("src/test/resources/configuration/file1.properties"));

Subsequently, we can use the standard methods to access the attributes. Additionally, we can provide custom implementations for IO operations on the property file by extending the PropertiesReader or PropertiesWriter classes of the PropertiesConfiguration class.

It’s also possible to link further property files via the include and includeOptional flag by specifying the file name as the value. The difference between these two flags is that if the property file isn’t found, then the include flag throws ConfigurationException.

First, we create a new property file named file1.properties. This file includes the initial properties file using include and also a non-existent file using includeOptional:

db.host=baeldung.com
include=file.properties
includeOptional=file2.properties

Now, let’s verify that we can read from both property files:

Configuration config = builder.getConfiguration();
String dbHost = config.getString("db.host");
int dbPort = config.getInt("db.port");

5. Configuration From an XML

Configuration via XML is also a common practice during application development. The library provides XMLConfiguration to access attributes from an XML file.

A standard requirement with XML files is that of validating the same to ensure there are no discrepancies. XMLConfiguration provides two flags to validate the structure and content of the file. We can set the validating flag to enable a validating parser or set the schemaValidation flag to true, to enable validating against a schema in addition to normal validation.

Let’s define a schema for the XML file we’ve defined previously:

<!ELEMENT configuration (appender+, root)>
<!ELEMENT appender (encoder?)>
<!ATTLIST appender
    name CDATA #REQUIRED
    class CDATA #REQUIRED
    >
<!ELEMENT encoder (pattern+)>
<!ELEMENT pattern (#PCDATA)>
<!ELEMENT root (appender-ref+)>
<!ELEMENT appender-ref EMPTY>
<!ATTLIST appender-ref
    ref CDATA #REQUIRED
    >

Now let’s run a test with schemaValidation true to verify the behavior:

Parameters params = new Parameters();
FileBasedConfigurationBuilder<XMLConfiguration> builder = new FileBasedConfigurationBuilder<>(XMLConfiguration.class)
  .configure(params.xml()
  .setFileName("src/test/resources/configuration/hierarchical.xml")
  .setValidating(true));
XMLConfiguration config = builder.getConfiguration();
String appender = config.getString("appender[@name]");
List<String> encoderPatterns = config.getList(String.class, "appender.encoder.pattern");
assertEquals("STDOUT", appender);
assertEquals(2, encoderPatterns.size());

6. Multi-Tenant Configurations

In a multi-tenant application setup, multiple clients share a common code base and are differentiated by the configuration properties for each client. The library provides support to handle this scenario with MultiFileConfigurationBuilder.

We need to pass a file pattern for the properties file which contains a client-identifying parameter. Finally, this parameter can be resolved using interpolation which is then resolved as the configuration name:

System.setProperty("tenant", "A");
String filePattern = "src/test/resources/configuration/tenant-${sys:tenant}.properties";
MultiFileConfigurationBuilder<PropertiesConfiguration> builder = new MultiFileConfigurationBuilder<>(
  PropertiesConfiguration.class)
    .configure(new Parameters()
      .multiFile()
      .setFilePattern(filePattern)
      .setPrefixLookups(ConfigurationInterpolator.getDefaultPrefixLookups()));
Configuration config = builder.getConfiguration();
String tenantAName = config.getString("name");
assertEquals("Tenant A", tenantAName);

We’ve defined a file pattern; for this example, we’ve provided the tenant value from the System properties.

We’ve also provided the DefaultPrefixLookups which will be used to instantiate the ConfigurationInterpolator for the MultiFileConfigurationBuilder.

7. Handling Different Data Types

The library supports the handling of various data types. Let’s take a look at a few scenarios in the following sub-sections.

7.1. Missing Properties

It’s possible to try to access properties not present in the configuration. In such cases, if the return value is an object type, then a null is returned.

However, if the return value is a primitive type, then a NoSuchElementException is thrown. We can override this behavior by passing a default value to be returned by the method:

PropertiesConfiguration propertiesConfig = new PropertiesConfiguration();
String objectProperty = propertiesConfig.getString("anyProperty");
int primitiveProperty = propertiesConfig.getInt("anyProperty", 1);
assertNull(objectProperty);
assertEquals(1, primitiveProperty);

In the example above, we’ve provided the default value 1 to the primitive int property. Now let’s verify the exception is thrown if we don’t provide the default value:

assertThrows(NoSuchElementException.class, () -> propertiesConfig.getInt("anyProperty"));

7.2. Handling Lists and Arrays

Apache Commons Configuration supports the handling of properties with multiple values. We need to define a delimiter to identify and convert multi-value properties. We can achieve this by setting the ListDelimiterHandler in the configuration.

Let’s write a test to set the delimiter on the configuration, and then read the multi-value properties:

PropertiesConfiguration propertiesConfig = new PropertiesConfiguration();
propertiesConfig.setListDelimiterHandler(new DefaultListDelimiterHandler(';'));
propertiesConfig.addProperty("delimitedProperty", "admin;read-only;read-write");
propertiesConfig.addProperty("arrayProperty", "value1;value2");
List<Object> delimitedProperties = propertiesConfig.getList("delimitedProperty");
String[] arrayProperties = propertiesConfig.getStringArray("arrayProperty");

In the snippet above, we can extract the properties as List or Array based on the set delimiter.

Also, if we extract the multi-value property as a String, we  get the first value of the same:

assertEquals("value1", propertiesConfig.getString("arrayProperty"));

8. Interpolation and Expressions

At times we may need to use existing configurations from the underlying system. The library supports resolving configuration via interpolation or expressions as well.

8.1. Interpolation

The library supports interpolation, which allows us to define placeholders in the configuration, and the properties are resolved at runtime. We can access system properties, environment properties, or a constant member of a class:

System.setProperty("user.name", "Baeldung");
String dbUrl = config.getString("db.url");
String userName = config.getString("db.username");
String externalService = config.getString("db.external-service");

8.2. Using Expressions

In addition to the interpolation options we saw in the previous section, the library also provides lookups using expressions. We can perform string lookups via the Apache Commons Jexl library.

Let’s include this dependency and then take a look at an example of how we can use it in our configurations:

<dependency>
    <groupId>org.apache.commons</groupId>
    <artifactId>commons-jexl</artifactId>
    <version>2.1.1</version>
</dependency>

Let’s define the property containing the expression:

db.data-dump-location=${expr:System.getProperty("user.home")}/dump.dat

Initially, we set the System property for the test case. Then, we access the DefaultPrefixLookups to add the expr lookup. Next, to resolve the System variable in our expression, we’ve mapped the same to the appropriate class and added a default ConfigurationInterpolator:

System.setProperty("user.home", "/usr/lib");
Map<String, Lookup> lookups = new HashMap<>(ConfigurationInterpolator.getDefaultPrefixLookups());
ExprLookup.Variables variables = new ExprLookup.Variables();
variables.add(new ExprLookup.Variable("System", "Class:java.lang.System"));
ExprLookup exprLookup = new ExprLookup(variables);
exprLookup.setInterpolator(new ConfigurationInterpolator());
lookups.put("expr", exprLookup);

Finally, we’ve resolved the configuration expression after adding the updated lookups to the Configuration:

FileBasedConfigurationBuilder<FileBasedConfiguration> builder = 
  new FileBasedConfigurationBuilder<FileBasedConfiguration>(
    PropertiesConfiguration.class).configure(params.properties()
      .setFileName("src/test/resources/configuration/file1.properties")
      .setPrefixLookups(lookups));

9. Data Type Conversion and Decoding

Another common scenario is converting properties from one data type to another or configuring encoded secrets. Let’s explore how the Apache Commons Configuration library handles these scenarios.

9.1. Data Type Conversions

The library supports out-of-the-box data type conversion and tries to convert the property value based on the called method. If a value cannot be converted, the underlying implementation throws a ConversionException.

Let’s see the data type conversion for different data types:

config.addProperty("stringProperty", "This is a string");
config.addProperty("numericProperty", "9999");
config.addProperty("booleanProperty", "true");
assertEquals("This is a string", config.getString("stringProperty"));
assertEquals(9999, config.getInt("numericProperty"));
assertTrue(config.getBoolean("booleanProperty"));

Now let’s assert that an exception is thrown when the data type conversion cannot happen:

config.addProperty("numericProperty", "9999a");
assertThrows(ConversionException.class,()->config.getInt("numericProperty"));

9.2. Encoded Properties

It’s common to have encoded secrets or credentials in application properties and the library supports reading these encoded properties. It exposes the interface ConfigurationDecoder which has a decode() method. This method expects an encoded string and we can provide our custom implementation to decode the same.

We can use this custom implementation with the Configuration to decode the encoded properties.

Let’s define a simple implementation of the ConfigurationDecoder interface:

public class CustomDecoder implements ConfigurationDecoder {
    @Override
    public String decode(String encodedValue) {
        return new String(Base64.decodeBase64(encodedValue));
    }
}

Now let’s use it to decode an encoded property:

((AbstractConfiguration) config).setConfigurationDecoder(new CustomDecoder());
assertEquals("mySecretString", config.getEncodedString("db.password"));

10. Copying Configurations

We can copy or append one configuration to another. For flat configurations, the append() or copy() methods of the AbstractConfiguration class allow us to make a copy of the configuration. However, the copy() method overrides existing properties.

Let’s take a look at a couple of examples that demonstrate the same.

10.1. copy() Method

We use the copy() method to copy the configuration from an existing one:

Configuration baseConfig = configs.properties(new File("src/test/resources/configuration/file.properties"));
Configuration subConfig = new PropertiesConfiguration();
subConfig.addProperty("db.host","baeldung");
((AbstractConfiguration) subConfig).copy(baseConfig);
String dbHost = subConfig.getString("db.host");
assertEquals("baeldung.com", dbHost);

10.2. append() Method

In the example below, let’s use the append() method to copy the configuration. However, it doesn’t override the existing properties:

Configuration baseConfig = configs.properties(new File("src/test/resources/configuration/file.properties"));
Configuration subConfig = new PropertiesConfiguration();
subConfig.addProperty("db.host","baeldung");
((AbstractConfiguration) subConfig).append(baseConfig);
String dbHost = subConfig.getString("db.host");
assertEquals("baeldung", dbHost);

10.3. Copying Hierarchical Configurations

For hierarchical configurations, using the append() or copy() methods doesn’t preserve the hierarchical nature of the configurations. In this case, we can either use the clone() method or pass the existing configuration to the constructor of the new one.

Let’s look at how we can make a copy of the same:

XMLConfiguration baseConfig = configs.xml(new File("src/test/resources/configuration/hierarchical.xml"));
XMLConfiguration subConfig = new XMLConfiguration();
subConfig = (XMLConfiguration) baseConfig.clone();
//subConfig = new XMLConfiguration(baseConfig);

The effect remains the same if we switch from the clone() method to the constructor initialization.

11. Conclusion

In this article, first, we explored a quick way to start with Apache Commons configuration with the Configuration class.

Then, we saw how to read and access varied configuration files with more specific implementations. Next, we also explored multi-tenant configuration scenarios.

Finally,  we went over some of the additional features available within the library for common scenarios.

As always, the code can be found over on GitHub.


Resolving Security Exception: java.security.UnrecoverableKeyException: Cannot Recover Key

$
0
0
start here featured

1. Introduction

In this tutorial, we’ll examine how to deal with java.security.UnrecoverableKeyException. We’ll also explore the details of what this exception actually means and what causes it. Finally, we’ll review possible solutions to this problem.

2. Theory Background

In Java, we have a notion of a keystore. It is essentially a file that contains some secrets. What it can contain, in particular, is certificate chains along with private keys for them. Since the certificate is just a fancy public-key wrapper, we can essentially state that the keystore contains an asymmetric key pair.

Usually, it is a good practice to protect our private keys with a password (‘password’ also commonly referred to as ‘passphrase’). It is a good practice not only in Java keystores but also in cybersecurity in general. The way this protection is usually implemented is by encrypting the private key with the password using a symmetric key encryption algorithm, such as various flavors of AES instances.

What is important for us here is that private keys in the keystore can be encrypted with the password, just like we described. This feature is available not in all keystore types, for instance JKS keystores support private key password protection, but PKCS12 keystores does not. In our example, we’ll need a password protection feature, so we’re going to work with JKS keystores from now on.

3. UnrecoverableKeyException Origins

A java.security.UnrecoverableKeyException typically occurs when we’re working with KeyManagerFactory, specifically when we invoke init() method on it. This is the class from JSSE that allows us to retrieve KeyManager instances. KeyManager is basically the interface that represents the abstraction responsible to authenticate us as clients to our peers.

The init() method takes two arguments – the source keystore to get credentials for authentication from and the password for private key decryption. The java.security.UnrecoverableKeyException occurs when KeyManagerFactory cannot recover the certificate chain’s private key. Here comes the question – what does ‘recover’ actually mean? Well, it means that the private key for the certificate chain cannot be decrypted with the given password. So, therefore, the most common by far source of java.security.UnrecoverableKeyException is the wrong password for the private key in the keystore.

To sum up, if the password/passphrase we provided for KeyManagerFactory for private keys is incorrect, then KeyManagerFactory won’t be able to decrypt the keys, and therefore, we have this error.

4. Simulating The Exception

Let’s get our hands dirty and try to simulate this error. For this, we’ll need a JKS keystore with a private key and corresponding certificate pair. We can achieve this by using the keytool:

$ keytool -genkey -alias single-entry -storetype JKS -keyalg RSA -validity 365 -keystore single_entry_keystore.jks

Once we run this command, keytool will prompt us for a couple of additional information. In our case, it would be some additional info to generate a certificate (CN, expiration, etc.) and the password for both the keystore and the private key. Let’s assume that we’ve chosen an ‘admin123’ password for the keystore and a ‘privateKeyPassword’ passphrase for the private key.

In order to load this keystore in Java, we would do this:

public static X509ExtendedKeyManager initializeKeyManager() 
  throws NoSuchAlgorithmException, KeyStoreException, IOException, CertificateException, UnrecoverableKeyException, URISyntaxException {
    KeyManagerFactory kmf = KeyManagerFactory.getInstance(KeyManagerFactory.getDefaultAlgorithm());
    KeyStore instance = KeyStore.getInstance(KeyStore.getDefaultType());
    InputStream resourceAsStream = Files.newInputStream(Paths.get(ClassLoader.getSystemResource("single_entry_keystore.jks").toURI()));
    instance.load(resourceAsStream, "admin123".toCharArray());
    kmf.init(instance, "privateKeyPassword".toCharArray());
    return (X509ExtendedKeyManager) kmf.getKeyManagers()[0];
}

We obtained the instance of KeyManager from the Keysotre we’ve just created. This code works fine since both passwords are correct. If we changed the password for the private key in the example above, we would get a java.security.UnrecoverableKeyException. So, just using the correct password would solve this problem.

5. UnrecoverableKeyException Edge Cases

There are some corner cases, that can cause the java.security.UnrecoverableKeyException that most people are unaware of. Let’s discuss them one by one.

5.1. Multiple Private Key Entries

For instance, let’s imagine a scenario where we do not have a single private key/certificate chain in the keystore but multiple of them. Let’s create a new keystore with two keys in it:

$ keytool -genkey -alias entry-1 -storetype JKS -keyalg RSA -validity 365 -keystore multi_entry_keystore.jks
$ keytool -genkey -alias entry-2 -storetype JKS -keyalg RSA -validity 365 -keystore multi_entry_keystore.jks

So here, we’ve added two private keys with certificate entries to the keystore. Let’s assume that we’ve added the first private key with password ‘abc123’, and the second one with the password ‘bcd456’. That should be perfectly fine, after all, keystore can have multiple keys encrypted with different passwords, no problem here so far.

Now, the code for building KeyManager for the given keystore would not change – it would look exactly like we already did above. The only problem here is that the KeyManagerFactory.init() method only accepts one password for the private key decryption.

That seems strange – what password exactly are we supposed to provide here – ‘abc123’, or ‘bcd456’? Well, it turned out that Sun JSSE implementation of KeyManagerFactory, which is used in an overwhelming amount of JDKs, is, by default, expecting a single password for each private key in the keystore. That’s right, even though having two private keys in the keystore encrypted with different passwords is technically not a problem. There is no restriction on this from a theoretical standpoint; however, there is one from the API standpoint.

We cannot have different passwords for any two given keys in the keystore. If we violate this rule, the KeyManagerFactory implementation would try to decrypt all keys with the provided password, and of course, it would fail for at least one key. Therefore, KeyManagerFactory.init() would throw an exception because it could not decrypt the key – and that’s right, it was not able indeed. So we absolutely need to keep this in mind.

5.2. External Libraries Restrictions

As Software Engineers, we don’t often interact with JSSE directly. Frameworks usually hide this by creating multiple layers of abstraction for us. However, we should understand that we still interact with KeyManager and other JSSE classes indirectly by using various clients, such as Apache HTTP client or Apache Tomcat.

And these frameworks can and often do impose various constraints on what passwords they expect. For instance, the current Apache Tomcat implementation relies on the fact that the keystore password is equal to the password of the private keys in the keystore. These restrictions can differ from one library to another, but now, as we understand the cause of java.security.UnrecoverableKeyException, we should know where to dig. So, be aware of the frameworks used in the project and their implementation limitations.

6. Conclusion

In this article, we’ve explored everything we need to know about java.security.UnrecoverableKeyException – what causes it, and ways to fix it. We’ve understood that java.security.UnrecoverableKeyException is thrown by KeyManagerFactory to signal the inability to decrypt the private keys inside the keystore. That, as mentioned, happens primarily due to an incorrect decryption key (the password).

There are some nuances to know about as well. For instance, we cannot have multiple private keys within the keystore with different passwords. This is not acceptable from a JSSE standpoint. We should also beware of the constraints of different frameworks for dealing with keystores and private keys.

As always, the source code for this article will be available over on GitHub.


Spring WebClient exchange() vs retrieve()

$
0
0

1. Overview

WebClient is an interface that simplifies the process of performing HTTP requests. Unlike RestTemplate, it’s a reactive and non-blocking client that can consume and manipulate HTTP responses. Though it’s designed to be non-blocking it can also be used in a blocking scenario.

In this tutorial, we’ll dive into key methods from the WebClient interface, including retrieve(), exchangeToMono(), and exchangeToFlux(). Also, we’ll explore the differences and similarities between these methods, and look at examples to showcase different use cases. Additionally, we’ll use the JSONPlaceholder API to fetch user data.

2. Example Setup

To begin, let’s bootstrap a Spring Boot application and add the spring-boot-starter-webflux dependency to the pom.xml:

<dependency>
    <groupId>org.springframework.boot</groupId>
    <artifactId>spring-boot-starter-webflux</artifactId>
    <version>3.2.4</version>
</dependency>

This dependency provides the WebClient interface, enabling us to perform HTTP requests.

Also, let’s see a sample GET response from a request to https://jsonplaceholder.typicode.com/users/1:

{
  "id": 1,
  "name": "Leanne Graham",
// ...
}

Furthermore, let’s create a POJO class named User:

class User {
    private int id;
    private String name;
   // standard constructor,getter, and setter
}

The JSON response from the JSONPlaceholder API will be deserialized and mapped to an instance of a User class.

Finally, let’s create an instance of WebClient with the base URL:

WebClient client = WebClient.create("https://jsonplaceholder.typicode.com/users");

Here, we define the base URL for HTTP requests.

3. The exchange() Method

The exchange() method returns ClientResponse directly, thereby providing access to the HTTP status code, headers, and response body. Simply put, the ClientResponse represents an HTTP response returned by WebClient.

However, this method was deprecated since Spring version 5.3 and has been replaced by the exchangeToMono() or exchangeToFlux() method, based on what we emit. The two methods allow us to decode responses based on the response status.

3.1. Emitting a Mono

Let’s see an example that uses exchangeToMono() to emit a Mono:

@GetMapping("/user/exchange-mono/{id}")
Mono<User> retrieveUsersWithExchangeAndError(@PathVariable int id) {
    return client.get()
      .uri("/{id}", id)
      .exchangeToMono(res -> {
          if (res.statusCode().is2xxSuccessful()) {
              return res.bodyToMono(User.class);
          } else if (res.statusCode().is4xxClientError()) {
              return Mono.error(new RuntimeException("Client Error: can't fetch user"));
          } else if (res.statusCode().is5xxServerError()) {
              return Mono.error(new RuntimeException("Server Error: can't fetch user"));
          } else {
              return res.createError();
           }
     });
}

In the code above, we retrieve a user and decode responses based on the HTTP status code.

3.2. Emitting a Flux

Furthermore, let’s use exchangeToFlux() to fetch a collection of users:

@GetMapping("/user-exchange-flux")
Flux<User> retrieveUsersWithExchange() {
   return client.get()
     .exchangeToFlux(res -> {
         if (res.statusCode().is2xxSuccessful()) {
             return res.bodyToFlux(User.class);
         } else {
             return Flux.error(new RuntimeException("Error while fetching users"));
         }
    });
}

Here, we use the exchangeToFlux() method to map the response body to a Flux of User objects and return a custom error message if the request fails.

3.3. Retrieving Response Body Directly

Notably, exchangeToMono() or exchangeToFlux() can be used without specifying the response status code:

@GetMapping("/user-exchange")
Flux<User> retrieveAllUserWithExchange(@PathVariable int id) {
    return client.get().exchangeToFlux(res -> res.bodyToFlux(User.class))
      .onErrorResume(Flux::error);
}

Here, we retrieve the user without specifying the status code.

3.4. Altering Response Body

Furthermore, let’s see an example that alters the response body:

@GetMapping("/user/exchange-alter/{id}")
Mono<User> retrieveOneUserWithExchange(@PathVariable int id) {
    return client.get()
      .uri("/{id}", id)
      .exchangeToMono(res -> res.bodyToMono(User.class))
      .map(user -> {
          user.setName(user.getName().toUpperCase());
          user.setId(user.getId() + 100);
          return user;
      });
}

In the code above, after mapping the response body to the POJO class, we alter the response body by adding 100 to the id and capitalizing the name.

Notably, we can also alter the response body with the retrieve() method.

3.5. Extracting Response Headers

Also, we can extract the response headers:

@GetMapping("/user/exchange-header/{id}")
Mono<User> retrieveUsersWithExchangeAndHeader(@PathVariable int id) {
  return client.get()
    .uri("/{id}", id)
    .exchangeToMono(res -> {
        if (res.statusCode().is2xxSuccessful()) {
            logger.info("Status code: " + res.headers().asHttpHeaders());
            logger.info("Content-type" + res.headers().contentType());
            return res.bodyToMono(User.class);
        } else if (res.statusCode().is4xxClientError()) {
            return Mono.error(new RuntimeException("Client Error: can't fetch user"));
        } else if (res.statusCode().is5xxServerError()) {
            return Mono.error(new RuntimeException("Server Error: can't fetch user"));
        } else {
            return res.createError();
        }
    });
}

Here, we log the HTTP header and the content type to the console. Unlike the retrieve() method that needs to return ResponseEntity to access the headers and the response code, exchangeToMono() gives us access directly because it returns ClientResponse.

4. The retrieve() Method

The retrieve() method simplifies the extraction of a response body from an HTTP request. It returns ResponseSpec, which allows us to specify how the response body should be processed without the need to access the complete ClientResponse.

The ClientResponse includes the response code, headers, and body. Therefore, the ResponseSpec includes the response body without the response code and header.

4.1. Emitting a Mono

Here’s an example code that retrieves an HTTP response body:

@GetMapping("/user/{id}")
Mono<User> retrieveOneUser(@PathVariable int id) {
    return client.get()
      .uri("/{id}", id)
      .retrieve()
      .bodyToMono(User.class)
      .onErrorResume(Mono::error);
}

In the code above, we retrieve JSON from the base URL by making an HTTP call to the /users endpoint with a specific id. Then, we mapped the response body to the User object.

4.2. Emitting a Flux

Additionally, let’s see an example that makes a GET request to the /users endpoint:

@GetMapping("/users")
Flux<User> retrieveAllUsers() {
    return client.get()
      .retrieve()
      .bodyToFlux(User.class)
      .onResumeError(Flux::error);
}

Here, the method emits a Flux of User objects when it maps the HTTP response to the POJO class.

4.3. Returning ResponseEntity

In the case where we intend to access the response status and headers with the retrieve() method, we can return ResponseEntity:

@GetMapping("/user-id/{id}")
Mono<ResponseEntity<User>> retrieveOneUserWithResponseEntity(@PathVariable int id) {
    return client.get()
      .uri("/{id}", id)
      .accept(MediaType.APPLICATION_JSON)
      .retrieve()
      .toEntity(User.class)
      .onErrorResume(Mono::error);
}

The response obtained using the toEntity() method contains the HTTP headers, status code, and response body.

4.4. Custom Error With onStatus() Handler

Also, when there is a 400 or 500 HTTP error, it returns the WebClientResponseException error by default. However, we can customize the exception to give a custom error response using the onStatus() handler:

@GetMapping("/user-status/{id}")
Mono<User> retrieveOneUserAndHandleErrorBasedOnStatus(@PathVariable int id) {
    return client.get()
      .uri("/{id}", id)
      .retrieve()
      .onStatus(HttpStatusCode::is4xxClientError, 
        response -> Mono.error(new RuntimeException("Client Error: can't fetch user")))
      .onStatus(HttpStatusCode::is5xxServerError, 
        response -> Mono.error(new RuntimeException("Server Error: can't fetch user")))
      .bodyToMono(User.class);
}

Here, we check the HTTP status code and use the onStatus() handler to define a custom error response.

5. Performance Comparison

Next, let’s write a performance test to compare the execution times of retrieve() and exchangeToFlux() using Java Microbench Harness (JMH)

First, let’s create a class named RetrieveAndExchangeBenchmarkTest:

@State(Scope.Benchmark)
@BenchmarkMode(Mode.AverageTime)
@Warmup(iterations = 3, time = 10, timeUnit = TimeUnit.MICROSECONDS)
@Measurement(iterations = 3, time = 10, timeUnit = TimeUnit.MICROSECONDS)
public class RetrieveAndExchangeBenchmarkTest {
  
    private WebClient client;
    @Setup
    public void setup() {
        this.client = WebClient.create("https://jsonplaceholder.typicode.com/users");
    }
}

Here, we set the benchmark mode to AverageTime, which means it measures the average time for the test to execute. Also, we define the number of iterations and the time to run each iteration.

Next, we create an instance of WebClient and use the @Setup annotation to make it run before each benchmark.

Let’s write a benchmark method that retrieves a collection of users using the retrieve() method:

@Benchmark
Flux<User> retrieveManyUserUsingRetrieveMethod() {
    return client.get()
      .retrieve()
      .bodyToFlux(User.class)
      .onErrorResume(Flux::error);;
}

Finally, let’s define a method that emits a Flux of User objects using the exchangeToFlux() method:

@Benchmark
Flux<User> retrieveManyUserUsingExchangeToFlux() {
    return client.get()
      .exchangeToFlux(res -> res.bodyToFlux(User.class))
      .onErrorResume(Flux::error);
}

Here’s the benchmark result:

Benchmark                             Mode  Cnt   Score    Error  Units
retrieveManyUserUsingExchangeToFlux   avgt   15  ≈ 10⁻⁴            s/op
retrieveManyUserUsingRetrieveMethod   avgt   15  ≈ 10⁻³            s/op

Both methods demonstrate efficient performance. However, the exchangeToFlux() is slightly faster when retrieving a collection of users than the retrieve() method.

6. Key Differences and Similarities

Both retrieve() and exchangeToMono() or exchangeToFlux() can be used to make HTTP requests and extract the HTTP response.

The retrieve() method only allows us to consume the HTTP body and emit a Mono or Flux because it returns ResponseSpec. However, if we want to access the status code and headers, we can use the retrieve() method with ResponseEntity. Also, it allows us to report errors based on the HTTP status code using the onStatus() handler.

Unlike the retrieve() method, the exchangeToMono() and exchnageToFlux() allow us to consume HTTP response and access the headers and response code directly because they return ClientResponse. Furthermore, they provides more control over error handling because we can decode responses based on the HTTP status code.

Notably, in the case where the intention is to consume only the response body, the retrieve() method is advised.

However, if we need more control over the response, the exchangeToMono() or exchangeToFlux() may be the better choice.

7. Conclusion

In this article, we learned how to use the retrieve(), exchangeToMono(), and exchangeToFlux() methods to handle HTTP response and further map the response to a POJO class. Additionally, we compared the performance between the retrieve() and exchangeToFlux() methods.

The retrieve() method is good for scenarios where we only need to consume the response body, and don’t need access to the status code or headers. It simplifies the process by returning ResponseSpec, which provides a straightforward way to handle the response body.

As always, the complete source code for the examples is available over on GitHub.


Java Weekly, Issue 540

$
0
0

1. Spring and Java

>> The best way to use the JPA OneToOne optional attribute [vladmihalcea.com]

Avoiding n+1 query issues by taking advantage of attributes of OneToOne in JPA

>> Spring AI: Getting Started [vojtechruzicka.com]

And a look at getting started with Spring AI and easily integrating Artificial Intelligence functionality into your Spring Boot application

Also worth reading:

Webinars and presentations:

Time to upgrade:

2. Technical & Musings

>> Using my new Raspberry Pi to run an existing GitHub Action [foojay.io]

A quick and practical guide on how to set up a GitHub action runner on a Raspberry Pi

Also worth reading:

3. Pick of the Week

>> Distracting software engineers is much more harmful than you think [zaidesanton.substack.com]


Convert From int to short in Java

$
0
0
Contact Us Featured

1. Overview

When we work with Java, we often encounter scenarios where we need to convert data types to suit specific requirements. One common conversion is from int to short.

In this tutorial, we’ll explore how to convert an int to a short and the potential pitfalls to watch out for.

2. Introduction to the Problem

Java offers several primitive data types to store numerical values, each with its range and precision. The int data type, for example, is a 32-bit signed integer capable of holding values ranging from -2^31 to 2^31 – 1. On the other hand, the short data type is a 16-bit signed integer, accommodating values from -2^15 to 2^15 – 1.

Since int‘s range is broader than short‘s, converting int to short can have potential pitfalls, which we’ll discuss in detail in the following sections.

Next, let’s explore converting an int to a short in Java.

3. Casting int to short

The most straightforward way to convert an int to a short is by casting. An example can clearly show how it works:

short expected = 42;
int i = 42;
short result = (short) i;
assertEquals(expected, result);

In Java, integers are of two types: primitive int and Integer. Next, let’s look at how to convert an Integer instance to a short.

4. Using the Integer.shortValue() Method

The Integer class provides the shortValue() method. As its name implies, shortValue() allows us to convert the given Integer to a short value conveniently:

short expected = 42;
Integer intObj = 42;
short result = intObj.shortValue();
assertEquals(expected, result);

However, if we take a look at the shortValue() method’s implementation, we observe that it internally casts the Integer value to a short value:

public short shortValue() {
    return (short)value;
}

We’ve noted that the int range is larger than short in Java. Consequently, we may wonder: What happens if the given integer exceeds the short range? Next, let’s delve into this aspect in detail.

5. Potential Pitfalls

Casting an integer whose value exceeds the range of short may yield “surprising” results. Next, let’s check a couple of conversion examples:

int oneMillion = 1_000_000;
short result = (short) oneMillion;
assertEquals(16960, result);

In this example, the integer value is one million, which exceeds the maximum value of short (32767). After casting, we obtain a short value of 16960.

Moreover, if we change the integer to two million, we even get a negative number (-31616):

int twoMillion = 2_000_000;
result = (short) twoMillion;
assertEquals(-31616, result);

Next, we’ll figure out why we get these “surprising” numbers.

To address this question, let’s first understand how a short is represented as a binary number in Java.

5.1. short: the 16-Bit Signed Integer

We’ve learned that short is a 16-bit signed integer in Java. The most significant bit (MSB) represents the sign of the integer: 0 for positive numbers and 1 for negative numbers. For example, the short value 42 is stored in this way:

short 42:
    00000000 00101010
    ^
    MSB

Following this rule, some might think -42 can be represented as “10000000 00101010“. However, it isn’t:

short -42:
    11111111 11010110
    ^
    MSB

This is because Java employs two’s complement to represent negative numbers. Simply put, in two’s complement calculations, there are two steps: first, invert each bit, then add one to the inverted binary number.

Next, let’s understand why -42 can be represented as “11111111 11010110”:

Binary          : 11111111 11010110 (MSB: 1 -> Negative)
Invert bits     : 00000000 00101001
+ 1             : 00000000 00101010
Decimal         : 42
Result          : -42

Now that we know how short is stored, let’s understand what happens if we cast an int to a short.

5.2. How Casting Works

In Java, an int is a 32-bit signed integer, providing 16 bits more than a short. Consequently, when we cast an int to a short, the int‘s 16 high-order bits are truncated.

An example can clarify it quickly. Let’s see how it works when we cast the int value 42 to a short:

42 (int)      : 00000000 00000000 00000000 00101010
cast to short :                   00000000 00101010
Result        : 42

Now, we can understand why we obtained the “surprising” result when we cast the integer of one million to short. Since short has a narrower range than int, the high-order bits that exceed short‘s capacity are discarded during the casting process, leading to unexpected values in the resulting short:

1 million (int)  : 00000000 00001111 01000010 01000000
Cast to short    :                   01000010 01000000
Decimal          :                   16960

In the “casting the integer of two million” example, we got a negative number since the MSB is 1 after truncating the high-order bits:

2 million (int)  : 00000000 00011110 10000100 10000000
Cast to short    :                   10000100 10000000
MSB: 1 -> Negative
Invert bits      :                   01111011 01111111
+ 1              :                   01111011 10000000 
Decimal          :                   31616
Result           :                   -31616

5.3. Creating intToShort()

It’s essential to be cautious when casting int to short, as it can lead to data loss or unexpected behavior if the int value is outside the range of short. We should always check if the int value is between Short.MIN_VALUE and Short.MAX_VALUE before casting:

short intToShort(int i) {
    if (i < Short.MIN_VALUE || i > Short.MAX_VALUE) {
        throw new IllegalArgumentException("Int is out of short range");
    }
    return (short) i;
}

Then, when the input integer is out of the range of short, it throws an exception:

short expected = 42;
int int42 = 42;
assertEquals(expected, intToShort(int42));
 
int oneMillion = 1_000_000;
assertThrows(IllegalArgumentException.class, () -> intToShort(oneMillion));

6. Conclusion

In this article, we’ve explored how to convert an int to a short in Java and discussed the potential pitfalls when we cast an int whose value is outside the range of short.

As always, the complete source code for the examples is available over on GitHub.


Compare the Numbers of Different Types

$
0
0

1. Overview

Sometimes, we must compare the numbers, ignoring their classes or types. This is especially helpful if the format isn’t uniform and the numbers might be used in different contexts.

In this tutorial, we’ll learn how to compare primitives and numbers of different classes, such as Integers, Longs, and Floats. We’ll also check how to compare floating points to whole numbers.

2. Comparing Different Classes

Let’s check how Java compares different primitives, wrapper classes, and types of numbers. To clarify, in the context of this article, we’ll refer to the “types” as floating point and whole numbers and not as the classes or primitive types.

2.1. Comparing Whole Primitives

In Java, we have several primitives to represent whole numbers. For simplicity’s sake, we’ll talk only about int, long, and double. If we want to check if one number is equal to another one, we can do it without any issues while using primitives:

@ValueSource(strings = {"1", "2", "3", "4", "5"})
@ParameterizedTest
void givenSameNumbersButDifferentPrimitives_WhenCheckEquality_ThenTheyEqual(String number) {
    int integerNumber = Integer.parseInt(number);
    long longNumber = Long.parseLong(number);
    assertEquals(longNumber, integerNumber);
}

At the same time, this approach doesn’t work well with overflows. Technically, in this example, it would clearly identify that the numbers aren’t equal:

@ValueSource(strings = {"1", "2", "3", "4", "5"})
@ParameterizedTest
void givenSameNumbersButDifferentPrimitivesWithIntegerOverflow_WhenCheckEquality_ThenTheyNotEqual(String number) {
    int integerNumber = Integer.MAX_VALUE + Integer.parseInt(number);
    long longNumber = Integer.MAX_VALUE + Long.parseLong(number);
    assertNotEquals(longNumber, integerNumber);
}

However, if we experience an overflow in both values, it can lead to incorrect results. Though it’s hard to shoot ourselves in the foot, it is still possible with some manipulations:

@Test
void givenSameNumbersButDifferentPrimitivesWithLongOverflow_WhenCheckEquality_ThenTheyEqual() {
    long longValue = BigInteger.valueOf(Long.MAX_VALUE)
      .add(BigInteger.ONE)
      .multiply(BigInteger.TWO).longValue();
    int integerValue = BigInteger.valueOf(Long.MAX_VALUE)
      .add(BigInteger.ONE).intValue();
    assertThat(longValue).isEqualTo(integerValue);
}

This test would consider the numbers equal, although one is twice as big as the other. The approach might work for small numbers if we don’t expect them to overflow.

2.2. Comparing Whole and Floating Point Primitives

While comparing whole numbers to floating point numbers using primitives, we have a similar situation:

@ValueSource(strings = {"1", "2", "3", "4", "5"})
@ParameterizedTest
void givenSameNumbersButDifferentPrimitivesTypes_WhenCheckEquality_ThenTheyEqual(String number) {
    int integerNumber = Integer.parseInt(number);
    double doubleNumber = Double.parseDouble(number);
    assertEquals(doubleNumber, integerNumber);
}

This happens because the integers would be upcasted to doubles or floats. That’s why if we have even a small difference between the numbers, the equality operation would behave as expected:

@ValueSource(strings = {"1", "2", "3", "4", "5"})
@ParameterizedTest
void givenDifferentNumbersButDifferentPrimitivesTypes_WhenCheckEquality_ThenTheyNotEqual(String number) {
    int integerNumber = Integer.parseInt(number);
    double doubleNumber = Double.parseDouble(number) + 0.0000000000001;
    assertNotEquals(doubleNumber, integerNumber);
}

However, we still have some issues with the precision and overflow. Thus, we cannot be entirely sure of the correctness of the results, even when we compare the same types of numbers:

@Test
void givenSameNumbersButDifferentPrimitivesWithDoubleOverflow_WhenCheckEquality_ThenTheyEqual() {
    double firstDoubleValue = BigDecimal.valueOf(Double.MAX_VALUE).add(BigDecimal.valueOf(42)).doubleValue();
    double secondDoubleValue = BigDecimal.valueOf(Double.MAX_VALUE).doubleValue();
    assertEquals(firstDoubleValue, secondDoubleValue);
}

Imagine that we need to compare the fraction using two different percentage representations. In the first case, we use floating point numbers, where 1 represents 100%. In the second case, we use whole numbers to identify percentages:

@Test
void givenSameNumbersWithDoubleRoundingErrors_WhenCheckEquality_ThenTheyNotEqual() {
    double doubleValue = 0.3 / 0.1;
    int integerValue = 30 / 10;
    assertNotEquals(doubleValue, integerValue);
}

Therefore, we cannot rely on primitive comparison, especially if we use calculations involving floating point numbers.

3. Comparing Wrappers Classes

While using wrapper classes, we’ll receive a different result from the one we got comparing primitives:

@ValueSource(strings = {"1", "2", "3", "4", "5"})
@ParameterizedTest
void givenSameNumbersButWrapperTypes_WhenCheckEquality_ThenTheyNotEqual(String number) {
    Float floatNumber = Float.valueOf(number);
    Integer integerNumber = Integer.valueOf(number);
    assertNotEquals(floatNumber, integerNumber);
}

Although the Float and Integer numbers were created from the same numerical representations, they aren’t equal. However, the issue might be because we compare different types of numbers: floating point and whole numbers. Let’s check the behavior with Integer and Long:

@ValueSource(strings = {"1", "2", "3", "4", "5"})
@ParameterizedTest
void givenSameNumbersButDifferentWrappers_WhenCheckEquality_ThenTheyNotEqual(String number) {
    Integer integerNumber = Integer.valueOf(number);
    Long longNumber = Long.valueOf(number);
    assertNotEquals(longNumber, integerNumber);
}

Oddly enough, we have the same result. The main issue here is that we try to compare different classes in the Number hierarchy. In most cases, the first step in the equals() method is to check if the types are the same. For example, Long has the following implementation:

public boolean equals(Object obj) {
    if (obj instanceof Long) {
        return value == ((Long)obj).longValue();
    }
    return false;
}

This is done to avoid any issues with transitivity and is generally a good rule to follow. However, it doesn’t solve the problem of comparing two numbers with different representations.

4. BigDecimal

While comparing integers with floating point numbers, we can take the same route as in the previous case: convert the numbers to the representation with the most precision and compare them. The BigDecimal class is the perfect fit for this.

We’ll consider two cases, the number with the same scale and the numbers with different scales:

static Stream<Arguments> numbersWithDifferentScaleProvider() {
    return Stream.of(
      Arguments.of("0", "0.0"), Arguments.of("1", "1.0"),
      Arguments.of("2", "2.0"), Arguments.of("3", "3.0"),
      Arguments.of("4", "4.0"), Arguments.of("5", "5.0"),
      Arguments.of("6", "6.0"), Arguments.of("7", "7.0")
    );
}
static Stream<Arguments> numbersWithSameScaleProvider() {
    return Stream.of(
      Arguments.of("0", "0"), Arguments.of("1", "1"),
      Arguments.of("2", "2"), Arguments.of("3", "3"),
      Arguments.of("4", "4"), Arguments.of("5", "5"),
      Arguments.of("6", "6"), Arguments.of("7", "7")
    );
}

We won’t check the different numbers as it’s a trivial case. Also, we won’t see cases where comparison rules are heavily based on domain logic.

Let’s check the numbers with the same scale first:

@MethodSource("numbersWithSameScaleProvider")
@ParameterizedTest
void givenBigDecimalsWithSameScale_WhenCheckEquality_ThenTheyEqual(String firstNumber, String secondNumber) {
    BigDecimal firstBigDecimal = new BigDecimal(firstNumber);
    BigDecimal secondBigDecimal = new BigDecimal(secondNumber);
    assertEquals(firstBigDecimal, secondBigDecimal);
}

The BigDecimal behaves as expected. Now let’s check the numbers with different scales:

@MethodSource("numbersWithDifferentScaleProvider")
@ParameterizedTest
void givenBigDecimalsWithDifferentScale_WhenCheckEquality_ThenTheyNotEqual(String firstNumber, String secondNumber) {
    BigDecimal firstBigDecimal = new BigDecimal(firstNumber);
    BigDecimal secondBigDecimal = new BigDecimal(secondNumber);
    assertNotEquals(firstBigDecimal, secondBigDecimal);
}

The BigDecimal treats numbers 1 and 1.0 as different. The reason is that the equals() method in BigDecimal uses the scale while comparing. Even if numbers differ only in the trailing zeroes, they would be considered non-equal.

However, another method in the BigDecimal API provides the logic we need for our case: the compareTo() method. It doesn’t consider trailing zeros and works perfectly to compare numbers:

@MethodSource("numbersWithDifferentScaleProvider")
@ParameterizedTest
void givenBigDecimalsWithDifferentScale_WhenCompare_ThenTheyEqual(String firstNumber, String secondNumber) {
    BigDecimal firstBigDecimal = new BigDecimal(firstNumber);
    BigDecimal secondBigDecimal = new BigDecimal(secondNumber);
    assertEquals(0, firstBigDecimal.compareTo(secondBigDecimal));
}

Thus, while BigDecimal is a good and the most reasonable choice to solve this problem, we should consider the quirk with the equals() and compareTo() methods.

5. AssertJ

If we use the AssertJ library, we can simplify the assertion code and make it more readable:

@MethodSource("numbersWithDifferentScaleProvider")
@ParameterizedTest
void givenBigDecimalsWithDifferentScale_WhenCompareWithAssertJ_ThenTheyEqual(String firstNumber, String secondNumber) {
    BigDecimal firstBigDecimal = new BigDecimal(firstNumber);
    BigDecimal secondBigDecimal = new BigDecimal(secondNumber);
    assertThat(firstBigDecimal).isEqualByComparingTo(secondBigDecimal);
}

Additionally, we can provide a comparator for more complex logic if needed.

6. Conclusion

Often, we need to compare the numbers as they are, ignoring the types and classes. By default, Java can work with some values, but in general, direct comparison of primitives is error-prone, and comparing wrappers won’t work as intended.

The BigDecimal is an excellent solution to the issue. However, it has a non-intuitive behavior regarding the equals() and hashCode() methods. Thus, we should consider it while comparing the numbers and using BigDecimals.

As usual, all the code from this article is available over on GitHub.


assertEquals() vs. assertSame() in JUnit

$
0
0
start here featured

1. Overview

JUnit is a popular testing framework. As a part of its API, it provides a convenient way to check and compare objects. However, the difference between the two methods, assertEquals() and assertSame(), isn’t always obvious.

In this tutorial, we’ll check the assertEquals() and assertSame() methods. They’re present in both JUnit4 and JUnit5 and behave the same way. However, in this article, we’ll use JUnit5 in the examples.

2. Identity and Equality

When we compare two objects, we use two concepts: identity and equality. Identity checks if two objects or elements are identical. For example, two people cannot be considered identical in the physical sense. In computer science, it’s easier as we work with the concepts of references.

The sun people see in any part of the world is identical. Any image of the sun in a movie or a picture is the same sun we can see through our windows. Thus, we have different representations of a single underlying object.

At the same time, equality doesn’t necessarily consider object identity but checks if they can be regarded as equal. It is a more flexible concept that can be represented differently depending on the context. For example, people cannot be considered identical (in the physical sense) but can be equal in different aspects: height, age, occupation, etc.

Two identical objects are equal by default, but two equal objects aren’t necessarily identical.

3. equals() and ==

In Java, the concepts of identity and equality can be represented with the == and the equals() method. We can see their behavior with Strings:

@ParameterizedTest
@ValueSource(strings = {"Hello", "World"})
void givenAString_WhenCompareInJava_ThenItEqualsAndSame(String string) {
    assertTrue(string.equals(string));
    assertTrue(string == string);
}

This shows that if we have the same object, it would be both identical and equal to itself. However, if we have different instances with the same content, we’ll have a different picture:

@ParameterizedTest
@ValueSource(strings = {"Hello", "World"})
void givenAStrings_WhenCompareNewStringsInJava_ThenItEqualsButNotSame(String string) {
    assertTrue(new String(string).equals(new String(string)));
    assertFalse(new String(string) == new String(string));
}

Here, the objects are equal but not identical. Sometimes, we might have issues with classes when we don’t provide an implementation for the equals() and hashCode() methods:

public class Person {
    private final String firstName;
    private final String lastName;
    // constructors, getters, and setters
}

Even with the same values, two instances won’t be identical, which is reasonable based on the explanation above. However, they also won’t be equal:

@Test
void givePeople_WhenCompareWithoutOverridingEquals_TheyNotEqual() {
    Person firstPerson = new Person("John", "Doe");
    Person secondPerson = new Person("John", "Doe");
    assertNotEquals(firstPerson, secondPerson);
}

This is because we’ll use the implementation of the equals() method from the Object class:

public boolean equals(Object obj) {
    return (this == obj);
}

As we can see, the default behavior falls back into identity comparison and checks the references instead of the objects’ contents. That’s why it’s important to provide a valid implementation of the equals() and hashCode() methods.

4. JUnit

After getting familiar with the concepts of identity and equality, it’s easier to understand the behavior of the assertEquals() and assertSame() methods. The first one is using equals() method to compare the elements:

@ParameterizedTest
@ValueSource(strings = {"Hello", "World"})
void givenAString_WhenCompare_ThenItEqualsAndSame(String string) {
    assertEquals(string, string);
    assertSame(string, string);
}

At the same time, the second one uses identity and checks both objects point to the same location in the heap:

@ParameterizedTest
@ValueSource(strings = {"Hello", "World"})
void givenAStrings_WhenCompareNewStrings_ThenItEqualsButNotSame(String string) {
    assertEquals(new String(string), new String(string));
    assertNotSame(new String(string), new String(string));
}

5. Conclusion

Identity and equality are related concepts but differ significantly in what they consider during comparison. Understanding these concepts can help us avoid subtle bugs and write more robust code.

As usual, all the code from this article is available over on GitHub.


Print Distinct Characters of a String in Java

$
0
0

1. Introduction

In Java programming, printing distinct characters from a string is a fundamental task often required in text processing and analysis.

In this tutorial, we’ll explore various approaches to handling and processing unique characters.

2. Using Set Collection

One effective way to print distinct characters from a string is by utilizing a Set collection in Java. A Set automatically handles duplicates, allowing us to collect unique characters efficiently. Here’s how you can implement this method:

String inputString = "BBaaeelldduunngg";
@Test
public void givenString_whenUsingSet_thenFindDistinctCharacters() {
    Set<Character> distinctChars = new HashSet<>();
    for (char ch : inputString.toCharArray()) {
        distinctChars.add(ch);
    }
    assertEquals(Set.of('B', 'a', 'e', 'l', 'd', 'u', 'n', 'g'), distinctChars);
}

In this approach, we first iterate over each character of the input string named inputString. It adds each character to a HashSet named distinctChars, which automatically eliminates duplicates due to the properties of a Set.

Finally, we verify that the distinct characters collected match the expected set of unique characters using the assertEquals() method.

3. Using Java Streams

Another approach to obtaining distinct characters is by leveraging Java Streams. Streams provide a concise and functional way to work with collections, including extracting distinct elements. Here’s an example:

@Test
public void givenString_whenUsingStreams_thenFindDistinctCharacters() {
    Set<Character> distinctChars = inputString.chars()
      .mapToObj(c -> (char) c)
      .collect(Collectors.toSet());
    assertEquals(Set.of('B', 'a', 'e', 'l', 'd', 'u', 'n', 'g'), distinctChars);
}

Here, we convert the input string inputString into an IntStream of character values using the inputString.chars() method. Then, we map back each character value to its corresponding char value using the mapToObj(c -> (char) c).

Moreover, we utilize the Collectors.toSet() terminal operation to collect these characters into a Set<Character> that automatically ensures that duplicates are eliminated due to the properties of a Set.

4. Using LinkedHashMap

We can use a LinkedHashMap as an efficient way to maintain unique characters in a string. Here’s an example of this approach:

@Test
public void givenString_whenUsingLinkedHashMap_thenFindDistinctCharacters() {
    Map<Character, Integer> charCount = new LinkedHashMap<>();
    for (char ch : inputString.toCharArray()) {
        charCount.put(ch, 1);
    }
    assertEquals("[B, a, e, l, d, u, n, g]", charCount.keySet().toString());
}

In this method, we iterate over each character and use the charCount.put(ch, 1) method to add it to the LinkedHashMap. Furthermore, the value 1 associated with each character isn’t important for this use case; it’s just a placeholder to occupy the map.

It is noteworthy that the LinkedHashMap maintains the order of insertion, so as we iterate through the string, characters are added in the order they first appear.

5. Conclusion

In conclusion, printing distinct characters from a string in Java can be accomplished using various methods, including Set collections, Java Streams, and LinkedHashMap. Each approach offers unique advantages, depending on the specific requirements of our application.

As always, the complete code samples for this article can be found over on GitHub.


How to Use Pair With Java PriorityQueue

$
0
0

1. Overview

The PriorityQueue is one of the most powerful data structures. It’s uncommon in enterprise applications, but we often use it for coding challenges and algorithm implementations.

In this tutorial, we’ll learn how to use Comparators with PriorityQueues and how to change the sorting order in such queues. We’ll then check a more generalized example with a custom class and how we can apply similar logic to a Pair class.

For the Pair class, we’ll use the implementation from Apache Commons. However, numerous options are available, and we can choose the one that best suits our needs.

2. PriorityQueue

First, let’s discuss the data structure itself. This structure’s main superpower is that it maintains the order of the elements while pushing them into the queue.

However, like other queues, it doesn’t provide an API to access the elements inside. We can only access the element in the front of the queue.

At the same time, we have several methods to remove elements from the queue: removeAt() and removeEq(). We can also use a couple of methods from the AbstractCollection. While helpful, they don’t provide random access to the elements.

3. Order

As was mentioned previously, the main feature of the PriorityQueue is that it maintains an order of elements. Unlike LIFO/FIFO, the order doesn’t depend on the order of insertions.

Thus, we should have a general idea of the order of the elements in the queue. We can use it with Comparable elements or provide a custom Comparator while creating a queue.

Because we have these two options, the parametrization doesn’t require the elements to implement the Comparable interface. Let’s check the following class:

public class Book {
    private final String author;
    private final String title;
    private final int publicationYear;
    // constuctor and getters
}

Parametrizing a queue with non-comparable objects is incorrect but won’t result in exceptions:

@ParameterizedTest
@MethodSource("bookProvider")
void givenBooks_whenUsePriorityQueueWithoutComparatorWithoutAddingElements_thenNoExcetption(List<Book> books) {
    PriorityQueue<Book> queue = new PriorityQueue<>();
    assertThat(queue).isNotNull();
}

At the same time, if we try to push such elements into the queue, it won’t be able to identify their natural order and throw ClassCastException:

@ParameterizedTest
@MethodSource("bookProvider")
void givenBooks_whenUsePriorityQueueWithoutComparator_thenThrowClassCastExcetption(List<Book> books) {
    PriorityQueue<Book> queue = new PriorityQueue<>();
    assertThatExceptionOfType(ClassCastException.class).isThrownBy(() -> queue.addAll(books));
}

This is a usual approach for such cases. Collections.sort() behaves similarly while attempting to sort non-comparable elements. We should consider this, as it won’t issue any compile-time errors.

4. Comparator

As was mentioned previously, we can identify the order of the queue in two different ways: implement the Comparable interface or provide a Comparator while initializing a queue.

4.1. Comparable Interface

The Comparable interface is useful when the elements have the idea of natural ordering, and we don’t need to provide it explicitly for our queue. Let’s take the example of the Meeting class:

public class Meeting implements Comparable {
    private final LocalDateTime startTime;
    private final LocalDateTime endTime;  
    private final String title;
    // constructor, getters, equals, and hashCode
    @Override
    public int compareTo(Meeting meeting) {
        return this.startTime.compareTo(meeting.startTime);
    }
}

In this case, the general order would be the starting time of a meeting. This isn’t a strict requirement, and different domains can have different ideas of natural order, but it’s good enough for our example.

We can use the Meeting class directly without additional work from our side:

@Test
void givenMeetings_whenUseWithPriorityQueue_thenSortByStartDateTime() {
    Meeting projectDiscussion = new Meeting(
      LocalDateTime.parse("2025-11-10T19:00:00"),
      LocalDateTime.parse("2025-11-10T20:00:00"),
      "Project Discussion"
    );
    Meeting businessMeeting = new Meeting(
      LocalDateTime.parse("2025-11-15T14:00:00"),
      LocalDateTime.parse("2025-11-15T16:00:00"),
      "Business Meeting"
    );
    PriorityQueue<Meeting> meetings = new PriorityQueue<>();
    meetings.add(projectDiscussion);
    meetings.add(businessMeeting);
    assertThat(meetings.poll()).isEqualTo(projectDiscussion);
    assertThat(meetings.poll()).isEqualTo(businessMeeting);
}

However, if we need to diverge from the default ordering, we should provide a custom Comparator.

4.2. Comparator

While creating a new PriorityQueue, we can pass a Comparator to the constructor and identify the order we want to use. Let’s take the Book class as an example. It created issues previously as it doesn’t implement the Comparable interface or provide no natural ordering.

Imagine we want to order our books by the year to create a reading list. We want to read older ones first to get more insight into the development of science fiction ideas and also understand the influences of the previously published books:

@ParameterizedTest
@MethodSource("bookProvider")
void givenBooks_whenUsePriorityQueue_thenSortThemBySecondElement(List<Book> books) {
    PriorityQueue<Book> queue = new PriorityQueue<>(Comparator.comparingInt(Book::getPublicationYear));
    queue.addAll(books);
    Book previousBook = queue.poll();
    while (!queue.isEmpty()) {
        Book currentBook = queue.poll();
        assertThat(previousBook.getPublicationYear())
          .isLessThanOrEqualTo(currentBook.getPublicationYear());
        previousBook = currentBook;
    }
}

Here, we use the method reference to create a comparator that would sort the books by year. We can add books to our reading queue and pick older books first.

5. Pair

After checking the examples with custom classes, using Pairs with a PriorityQueue is a trivial task. In general, there’s no difference in usage. Let’s consider that our Pairs contain the title and the year of publishing:

@ParameterizedTest
@MethodSource("pairProvider")
void givenPairs_whenUsePriorityQueue_thenSortThemBySecondElement(List<Pair<String, Integer>> pairs) {
    PriorityQueue<Pair<String, Integer>> queue = new PriorityQueue<>(Comparator.comparingInt(Pair::getSecond));
    queue.addAll(pairs);
    Pair<String, Integer> previousEntry = queue.poll();
    while (!queue.isEmpty()) {
        Pair<String, Integer> currentEntry = queue.poll();
        assertThat(previousEntry.getSecond()).isLessThanOrEqualTo(currentEntry.getSecond());
        previousEntry = currentEntry;
    }
}

As we can see, the last two examples are virtually identical. The only difference is that our Comparator uses the Pair class. For this example, we used Pair implementation from Apache Commons. However, there are a bunch of other options.

Also, we can use Map.Entry if none other options are available in our codebase or we don’t want to add new dependencies:

@ParameterizedTest
@MethodSource("mapEntryProvider")
void givenMapEntries_whenUsePriorityQueue_thenSortThemBySecondElement(List<Map.Entry<String, Integer>> pairs) {
    PriorityQueue<Map.Entry<String, Integer>> queue = new PriorityQueue<>(Comparator.comparingInt(Map.Entry::getValue));
    queue.addAll(pairs);
    Map.Entry<String, Integer> previousEntry = queue.poll();
    while (!queue.isEmpty()) {
        Map.Entry<String, Integer> currentEntry = queue.poll();
        assertThat(previousEntry.getValue()).isLessThanOrEqualTo(currentEntry.getValue());
        previousEntry = currentEntry;
    }
}

At the same time, we can easily create a new class to represent a pair. Optionally, we can use an array or a List parametrized by Object, but it’s not recommended as this breaks the type safety.

The combination of a Pair and a PriorityQueue is quite common for graph traversal algorithms, such as Dijkstra’s. Other languages, like JavaScript and Python, can create data structures on the fly. In contrast, Java requires some initial setup with additional classes or interfaces.

6. Conclusion

The PriorityQueue is an excellent data structure to implement more performant and straightforward algorithms. It allows customization with Comparators so that we can provide any sorting rules based on our domain requirements.

Combining PriorityQueue and Pairs helps us write more robust and easy-to-understand code. However, it’s often considered a more advanced data structure, and not all developers are fluent with its API.

As always, all the code is available over on GitHub.


Converting Float ArrayList to Primitive Array in Java

$
0
0
Contact Us Featured

1. Overview

Sequences of data are integral to any project and any programming language. In Java, there are two ways to represent a sequence of elements: Collections and arrays.

In this tutorial, we’ll learn how to convert an ArrayList of wrapper classes into an array of primitives. While this sounds like a trivial task, some quirks in the Java APIs make this process less straightforward.

2. Simple For Loop

The easiest way to make this conversion is to use a declarative style with a for loop:

@ParameterizedTest
@MethodSource("floatListProvider")
void givenListOfWrapperFloat_whenConvertToPrimitiveArray_thenGetCorrectResult(List<Float> floats) {
    float[] actual = new float[floats.size()];
    for (int i = 0; i < floats.size(); i++) {
        actual[i] = floats.get(i);
    }
    compareSequences(floats, actual);
}

The main benefit of this code is that it’s explicit and easy to follow. However, we must take care of too many things for such a trivial task.

3. Converting to an Array of Float

The Collection API provides a nice method to convert a List into an array but doesn’t handle unboxing. However, it’s useful enough to consider it in this article:

@ParameterizedTest
@MethodSource("floatListProvider")
void givenListOfWrapperFloat_whenConvertToWrapperArray_thenGetCorrectResult(List<Float> floats) {
    Float[] actual = floats.toArray(new Float[0]);
    assertSequences(floats, actual);
}

The List class has the toArray() method, which can help us with conversion. However, the API is a bit confusing. We need to pass an array to ensure the correct type. The result will be of the same type as the array we pass.

Because we need to pass an instance, it’s unclear what size we should use and if the resulting array would be cropped. In this case, we shouldn’t worry about the size at all, and toArray() will take care of and expand an array if necessary.

At the same time, it’s fine to pass an array of specific size straight away:

@ParameterizedTest
@MethodSource("floatListProvider")
void givenListOfWrapperFloat_whenConvertToWrapperArrayWithPreSizedArray_thenGetCorrectResult(List<Float> floats) {
    Float[] actual = floats.toArray(new Float[floats.size()]);
    assertSequences(floats, actual);
}

Although it seems to be an optimization over the previous version, it’s not necessarily true. Java compiler would take care of the size without any problems. Additionally, calling the size() while creating an array might create issues in a multithreaded environment. Thus, using an empty array is recommended, as shown previously.

4. Unboxing Arrays

While we have the concept of unboxing for numeric values and booleans, trying to unbox arrays would result in a compile-time error. Thus, we should unbox each element separately. Here’s the variation of an example we’ve seen before:

@ParameterizedTest
@MethodSource("floatListProvider")
void givenListOfWrapperFloat_whenUnboxToPrimitiveArray_thenGetCorrectResult(List<Float> floats) {
    float[] actual = new float[floats.size()];
    Float[] floatArray = floats.toArray(new Float[0]);
    for (int i = 0; i < floats.size(); i++) {
        actual[i] = floatArray[i];
    }
    assertSequences(floats, actual);
}

We have two issues here. First, we’re using additional space for temporary arrays; it doesn’t affect the time complexity as we have to use the space for the result anyway.

The second issue is that the for loop doesn’t do much, as we use implicit unboxing here. It would be a good idea to eliminate it. We can do this with the help of utility class from Apache Commons:

@ParameterizedTest
@MethodSource("floatListProvider")
void givenListOfWrapperFloat_whenConvertToPrimitiveArrayWithArrayUtils_thenGetCorrectResult(List<Float> floats) {
    float[] actual = ArrayUtils.toPrimitive(floats.toArray(new Float[]{}));
    assertSequences(floats, actual);
}

This way, we get a nice one-liner solution to our problem. The toPrimitive() method just encapsulated the logic we used previously, with additional checks:

public static float[] toPrimitive(final Float[] array) {
    if (array == null) {
        return null;
    }
    if (array.length == 0) {
        return EMPTY_FLOAT_ARRAY;
    }
    final float[] result = new float[array.length];
    for (int i = 0; i < array.length; i++) {
        result[i] = array[i].floatValue();
    }
    return result;
}

It’s a nice and clean solution but requires some additional libraries. Alternatively, we can implement and use a similar method in our code.

5. Streams

When working with Collections, we can use streams to replicate the logic we used in loops. The Stream API can help us to convert a List and unbox the values at the same time. However, there’s a caveat: Java doesn’t have FloatStream.

If we’re not too picky about the floating point numbers, we can use DoubleStream to convert ArrayList<Float> to double[]:

@ParameterizedTest
@MethodSource("floatListProvider")
void givenListOfWrapperFloat_whenConvertingToPrimitiveArrayUsingStreams_thenGetCorrectResult(List<Float> floats) {
    double[] actual = floats.stream().mapToDouble(Float::doubleValue).toArray();
    assertSequences(floats, actual);
}

We successfully converted the List but in a slightly different floating-point representation. This is because we have only IntStream, LongStream, and DoubleStream available.

6. Custom Collectors

At the same time, we can implement a custom Collector and have all the logic inside it:

public class FloatCollector implements Collector<Float, float[], float[]> {
    private final int size;
    private int index = 0;
    public FloatCollector(int size) {
        this.size = size;
    }
    @Override
    public Supplier<float[]> supplier() {
        return () -> new float[size];
    }
    @Override
    public BiConsumer<float[], Float> accumulator() {
        return (array, number) -> {
            array[index] = number;
            index++;
        };
    }
    // other non-important methods
}

Other non-important methods include some stubs to allow our code to run and a no-op finalizer:

public class FloatCollector implements Collector<Float, float[], float[]> {
    // important methods
    @Override
    public BinaryOperator<float[]> combiner() {
        return null;
    }
    @Override
    public Function<float[], float[]> finisher() {
        return Function.identity();
    }
    @Override
    public Set<Characteristics> characteristics() {
        return Collections.emptySet();
    }
}

And now we can showcase our new and a little bit hacky Collector:

@ParameterizedTest
@MethodSource("floatListProvider")
void givenListOfWrapperFloat_whenConvertingWithCollector_thenGetCorrectResult(List<Float> floats) {
    float[] actual = floats.stream().collect(new FloatCollector(floats.size()));
    assertSequences(floats, actual);
}

While playing with Stream API interfaces is interesting, this solution is overly complex and doesn’t provide any benefits in this particular case. Also, this collector might work in a multithreaded environment, and we should take thread-safety into account.

7. Conclusion

Working with arrays and Collections is usual for any application. While Lists provide a better interface, sometimes we need to convert them into simple arrays.

Additional unboxing during this process makes it more challenging than it should be. However, a couple of tricks, custom methods, or third-party libraries can help streamline it.

As usual, all the code from this tutorial is available over on GitHub.
       

Handling Nulls in ArrayList.addAll()

$
0
0

1. Overview

Working comfortably with Collection API is one of the most crucial skills of a Java developer. In this tutorial, we’ll concentrate on the ArrayList and its addAll() method.

While addAll() is the most convenient way to add a sequence of elements to a target ArrayList, it doesn’t work well with nulls.

2. null and addAll()

As was stated previously, the addAll() method doesn’t work well with null. It would throw the NullPointerException if we pass a null reference:

@ParameterizedTest
@NullSource
void givenNull_whenAddAll_thenAddThrowsNPE(List<String> list) {
    ArrayList<String> strings = new ArrayList<>();
    assertThatExceptionOfType(NullPointerException.class)
      .isThrownBy(() -> strings.addAll(list));
}

While it’s good that this exception is explicit, it’s not very good that we may learn about the issue only at runtime.

3. Simple Check

The most basic way we can ensure that we don’t pass null to the addAll() method is to have a simple if statement with a check:

@ParameterizedTest
@NullSource
void givenNull_whenAddAllWithCheck_thenNoNPE(List<String> list) {
    ArrayList<String> strings = new ArrayList<>();
    assertThatNoException().isThrownBy( () -> {
        if (list != null) {
            strings.addAll(list);
        }
    });
}

This is a perfectly valid way to handle this situation. However, it might be seen as too verbose and imperative. Let’s try to make this code more straightforward.

4. Custom Check Method

Let’s take the previous solution and refactor it a bit. All we need to do is to extract the null check logic to a separate method:

private static void addIfNonNull(List<String> list, ArrayList<String> strings) {
    if (list != null) {
        strings.addAll(list);
    }
}

The client code would look a bit better as we moved the implementation away:

@ParameterizedTest
@NullSource
void givenNull_whenAddAllWithExternalizedCheck_thenNoNPE(List<String> list) {
    ArrayList<String> strings = new ArrayList<>();
    assertThatNoException().isThrownBy( () -> {
        addIfNonNull(list, strings);
    });
}

However, in this case, we’re passing the list to a method and mutating it inside. This is the tradeoff in this case: the code is more readable, but it’s unclear how we mutate the List.

5. Empty by Default

Another approach is to transparently convert null to an empty List. We’ll be using CollectionUtils from the Apache Commons library. However, as the logic is trivial, we can implement it ourselves as well:

@ParameterizedTest
@NullSource
void givenNull_whenAddAllWithCollectionCheck_thenNoNPE(List<String> list) {
    ArrayList<String> strings = new ArrayList<>();
    assertThatNoException().isThrownBy( () -> {
        strings.addAll(CollectionUtils.emptyIfNull(list));
    });
}

This might be a better approach, especially if we use this list elsewhere. At the same time, the best way to use this conversion is to apply it as early as possible, preventing passing nulls throughout our application. For example, nullable types in Kotlin aim to solve this issue.

6. Optional

While Kotlin has nullable types, Java approaches this issue using Optional. This is just a wrapper class that notifies users that the object might not be present. However, it contains a nice API to work with nullable values:

@ParameterizedTest
@NullSource
void givenNull_whenAddAllWithOptional_thenNoNPE(List<String> list) {
    ArrayList<String> strings = new ArrayList<>();
    assertThatNoException().isThrownBy( () -> {
        Optional.ofNullable(list).ifPresent(strings::addAll);
    });
}

This is a simple solution to implement null checks. It doesn’t require any third-party libraries, and the logic is easy to read and reason about.

7. Streams

If we’re working with a collection of nullable Lists, we can use the filter() method to ignore nulls:

@ParameterizedTest
@MethodSource("listProvider")
void givenCollectionOfNullableLists_whenFilter_thenNoNPE(List<List<String>> listOfLists) {
    ArrayList<String> strings = new ArrayList<>();
    assertThatNoException().isThrownBy(() -> {
        listOfLists.stream().filter(Objects::nonNull).forEach(strings::addAll);
    });
}

The API is similar to the one that was used by Optional and is relatively easy to understand.

8. Conclusion

Tracking null values in an application might be challenging. However, it’s crucial to account for cases where we can get a NullPointerException to ensure the application’s robustness.

We can use various techniques to address these issues, from simple if statements and Optionals to third-party API solutions. However, we should remember to account for them as early as possible. The best way to do so is not to allow null values in the first place.

As always, all the code from this tutorial is available over on GitHub.


Authenticate Using Social Login in Spring Authorization Server

$
0
0

1. Introduction

In this tutorial, we’ll demonstrate how to setup the back end of a web application that uses Spring’s social login feature. We’ll use Spring Boot and the OAuth2.0 dependency. We’ll also use Google as the social login provider.

2. Register With Social Login Provider

Before we start the project setup, we need to obtain the ID and secret from the social login provider. Considering we’re using Google as the provider, let’s go to their api console to start the process.

Once we’ve reached the Google API console, we need to create a new project. Once we have selected an appropriate project name, we’ll start the process to obtain the credentials:

Google API console Google Console new project details

Moving forward, we’ll need to set up the OAuth consent screen. For this, we’ll need to select the following option:

Configure consent screen

This action brings forward a new page with more options:

Configure consent screen 2

Here, we’ll choose the “External” option so anyone with a Google account can log in to our application. Next, we’ll click the “Create” button.

The next page, “Edit app registration,” asks us to introduce some information about our application. On the right-hand menu, we can see some examples of where the “App Name” will be used.

Here, we’ll want to use the name of our business. Furthermore, we can add our business’s logo, which is used in the examples illustrated. Finally, we’ll need to add the “User support email”. This point of contact is whom people wanting to know more about their consent will be reaching out to:

OAuth consent screen app details

Before we move further, we’ll need to add an email address at the bottom of the screen. This contact will receive notifications from Google about changes to the created project (not illustrated here).

For the purpose of this demonstration, we’ll leave the fields below empty:

App domain information

Furthermore, we’ll proceed through the next steps without filling in anything else.

When we’ve finished configuring the “OAuth consent screen,” we can proceed to the credentials setup.

2.2. Credentials Setup – Key and Secret

For this, we’ll need to select the “Credentials” option (arrow 1). A new menu appears in the middle of the page. On it, we’ll select the “CREATE CREDENTIALS” option (arrow 2). From the dropdown, we’ll select “OAuth client ID” option (arrow 3):

Credentials setup 1

Next, we’re going to select the “Web application” option. This is what we’re building for the demonstration:

Credentials setup 2

After this selection, more elements will appear on the page. We’ll have to name our application. In this case, we’ll use “Spring-Social-Login”. Next, we’ll provide the URL. In this case, we’ll use http://localhost:8080/login/oauth2/code/google:

Credentials setup 3

Once we’ve filled in these fields, we’ll navigate to the bottom of the page and click the “Create” button. A pop-up will appear containing the key and secret. We can either download a JSON or save them somewhere locally:

Credentials setup 4

We’re done with the setup for Google. If we want to use another provider, e.g. GitHub, we’ll have to follow a similar process.

3. Spring Boot Project Setup

Now, let’s set up the project before we add the social login functionality. As mentioned in the beginning, we’re using Spring Boot. Let’s go to Spring Initializr and set up a new Maven project. We’ll keep it simple, we’ll use the Spring Web and OAuth2 dependencies:

Project setup 1

After we open the project in our favorite IDE and we start it, the homepage should look like this:

Project setup 2

This is Spring Security’s default login page. We’ll add the social login functionality here.

4. Social Login Implementation

First, we’ll create a HomeController class that will contain two routes, one public and one private:

@GetMapping("/")
public String home() {
    return "Hello, public user!";
}
@GetMapping("/secure")
public String secured() {
    return "Hello, logged in user!";
}

Next, we’ll need to override the default security configurations. For this, we’ll need a new class, SecurityConfig, which we’ll annotate with @Configuration and @EnableWebSecurity. Inside this configuration class, we’ll configure the security filter.

This security filter allows anyone to access the home page (auth.requestMatchers(“/”).permitAll()) and any other requests need to be authenticated:

@Configuration
@EnableWebSecurity
public class SecurityConfig {
    @Bean
    SecurityFilterChain securityFilterChain(HttpSecurity http) throws Exception {
        return http
          .authorizeHttpRequests(auth -> {
              auth.requestMatchers("/").permitAll();
              auth.anyRequest().authenticated();
          })
          .oauth2Login(Customizer.withDefaults())
          .formLogin(Customizer.withDefaults())
          .build();
    }
}

Futhermore, we use formLogin for the user and password authentication and oauth2Login for the social media login feature. 

Next, we’ll need to add the ID and the secret in the applications.properties file:

spring.security.oauth2.client.registration.google.client-id = REPLACE_ME
spring.security.oauth2.client.registration.google.client-secret = REPLACE_ME

And this should be it. After we start the application, the homepage will be different. By default, it will display the message we’ve configured in the public endpoint. When we try to access the /secure endpoint, we’ll be redirected to the login page, which will look like this:

Project setup 3

Clicking on Google redirects us to the Google sign-in page:

Project setup 4

After successfully logging in, we’ll be redirected to the /secure endpoint we set up earlier, and the respective message will be displayed.

5. Conclusion

In this article, we’ve demonstrated how to set up a Spring Boot maven project using the OAuth2 social login feature.

We’ve implemented this feature using the Google API console. First, we’ve set up the Google project and application. Next, we’ve obtained the credentials. Afterward, we set up the project, and lastly, we set up the security configurations to make social login available.

As always, the code is available over on GitHub.
       

Remove All Characters Before a Specific Character in Java

$
0
0

1. Introduction

When working with strings in Java, we may encounter scenarios where we need to remove all characters before a particular delimiter or character. Fortunately, we can accomplish this task using various techniques in Java, such as traditional looping, string manipulation methods, or regular expressions.

In this tutorial, we’ll explore several approaches to remove all characters before a specified character in a string.

2. Using Indexing and Substrings

One straightforward approach to removing all characters before a specific character involves finding the index of the desired character and then using the substring() method to extract the substring starting from that index.

Here’s a simple example:

String inputString = "Hello World!";
char targetCharacter = 'W';
@Test
public void givenString_whenUsingSubstring_thenCharactersRemoved() {
    int index = inputString.indexOf(targetCharacter);
    if (index != -1) {
        String result = inputString.substring(index);
        assertEquals("World!", result);
    } else {
        assertEquals(inputString, inputString);
    }
}

In this example, we initialize a String named inputString and a target character targetChar. We first find the index of the targetChar using the indexOf() method. If the targetChar is found (index != -1), it extracts the substring starting from the index using substring(). Then we validate the result string using assertEquals() to ensure it matches the expected value (World!). Otherwise, it returns the original string.

3. Using Regular Expressions

Another approach involves using regular expressions (regex) to replace all characters before the specified character with an empty string.

Let’s check a simple implementation:

@Test
public void givenString_whenUsingRegex_thenCharactersRemoved() {
    int index = inputString.indexOf(targetCharacter);
    if (index != -1) {
        String result = targetCharacter + inputString.replaceAll(".*" + targetCharacter, "");
        assertEquals("World!", result);
    } else {
        assertEquals(inputString, inputString);
    }
}

Here, we utilize the replaceAll() with a regex pattern that matches any sequence of characters (.*) followed by the target character. Moreover, we prepend the targetCharacter at the beginning of the replacement string, ensuring that it’s included in the final result.

This pattern effectively removes all characters till the occurrence of the target character in the string.

4. Using StringBuilder

We can also leverage StringBuilder to remove all characters before a specific character by locating the target character and then manipulating the string as follows:

@Test
public void givenString_whenUsingStringBuilder_thenCharactersRemoved() {
    StringBuilder sb = new StringBuilder(inputString);
    int index = sb.indexOf(String.valueOf(targetCharacter));
    if (index != -1) {
        sb.delete(0, index);
        assertEquals("World!", sb.toString());
    } else {
        assertEquals(inputString, inputString);
    }
}

In this implementation, we first define a StringBuilder object. Moreover, we utilize the indexOf() method to find the index of the target character. Finally, we delete all characters before that index using the delete() method.

5. Conclusion

In conclusion, removing all characters before a specific character in a string is a common task in string manipulation. Hence, we explored several methods to achieve this in Java, including using indexing and substring extraction, regular expressions, and StringBuilder.

As always, the complete code samples for this article can be found over on GitHub.


Finding The Index of the Smallest Element in an Array

$
0
0

1. Overview

Operations on arrays are essential, and we might need them in any application. Sometimes, they’re hidden behind more convenient interfaces like Collections API. However, this is the basic knowledge we should acquire early in our careers.

In this tutorial, we’ll learn how to find the index of the smallest element in an array. We’ll discuss the methods to do so regardless of the types of the elements, but for simplicity, we’ll use an array of integers.

2. Simple Iteration

The simplest solution is often the best one. This is true for several reasons: it’s easier to implement, change, and understand. Thus, let’s check how we can find the index of the smallest element using a basic for loop:

@ParameterizedTest
@MethodSource("primitiveProvider")
void givenArray_whenUsingForLoop_thenGetCorrectResult(int[] array, int expectedIndex) {
    int minValue = Integer.MAX_VALUE;
    int minIndex = -1;
    for (int i = 0; i < array.length; i++) {
        if (array[i] < minValue) {
            minValue = array[i];
            minIndex = i;
        }
    }
    assertThat(minIndex).isEqualTo(expectedIndex);
}

The implementation is quite verbose. However, we aim to resolve the problem and not minimize the number of lines we use. This is a robust and simple solution that is easy to read and change. Also, it doesn’t require a deep understanding of more advanced Java APIs.

The for loop can be replaced by while or, if we feel especially fancy, even do-while. The method we use to iterate over an array isn’t very important.

At the same time, if we’re working with reference types, we can apply this logic only to comparable objects, and instead of the < operator, use the compareTo() method.

3. Two-Step Approach

In another approach, we can split the task into two separate steps: finding the smallest element and finding its index. Although it would be less performant than the first one, it still has the same time complexity.

Let’s modify our first approach:

@ParameterizedTest
@MethodSource("primitiveProvider")
void givenArray_whenUsingForLoopAndLookForIndex_thenGetCorrectResult(int[] array, int expectedIndex) {
    int minValue = Integer.MAX_VALUE;
    for (int number : array) {
        if (number < minValue) {
            minValue = number;
        }
    }
    int minIndex = -1;
    for (int i = 0; i < array.length; i++) {
        if (array[i] == minValue) {
            minIndex = i;
            break;
        }
    }
    assertThat(minIndex).isEqualTo(expectedIndex);
}

Here, we need to use two separate loops. At the same time, we can simplify the first one, as we don’t need the index and may break out of the second one earlier. Please note that it doesn’t improve performance compared to the first approach.

4. Primitive Streams

We can eliminate the first loop from the previous approach. In this case, we can use Stream API and, in particular, IntStream:

@ParameterizedTest
@MethodSource("primitiveProvider")
void givenArray_whenUsingIntStreamAndLookForIndex_thenGetCorrectResult(int[] array, int expectedIndex) {
    int minValue = Arrays.stream(array).min().orElse(Integer.MAX_VALUE);
    int minIndex = -1;
    for (int i = 0; i < array.length; i++) {
        if (array[i] == minValue) {
            minIndex = i;
            break;
        }
    }
    assertThat(minIndex).isEqualTo(expectedIndex);
}

IntStreams provide convenient methods for operations on a sequence of primitive values. We used the min() method and converted our imperative loop into a declarative stream.

Let’s try to refactor the second loop into a declarative one:

@ParameterizedTest
@MethodSource("primitiveProvider")
void givenArray_whenUsingIntStreamAndLookForIndexWithIntStream_thenGetCorrectResult(int[] array, int expectedIndex) {
    int minValue = Arrays.stream(array).min().orElse(Integer.MAX_VALUE);
    int minIndex = IntStream.range(0, array.length)
      .filter(index -> array[index] == minValue)
      .findFirst().orElse(-1);
    assertThat(minIndex).isEqualTo(expectedIndex);
}

In this case, we used IntStream.range() for iteration and compared the element to the minimal one. This approach is declarative and should be considered as the way to go. However, the readability of the code suffered, especially for developers with little experience with streams.

We can replace the logic to find the smallest element with a one-liner using the Apache Commons ArrayUtils class:

@ParameterizedTest
@MethodSource("primitiveProvider")
void givenArray_whenUsingIntStreamAndLookForIndexWithArrayUtils_thenGetCorrectResult(int[] array, int expectedIndex) {
    int minValue = Arrays.stream(array).min().orElse(Integer.MAX_VALUE);
    int minIndex = ArrayUtils.indexOf(array, minValue);
    assertThat(minIndex).isEqualTo(expectedIndex);
}

This makes the solution more readable but requires additional dependencies. If we don’t want to add more dependencies, we can use Lists, as they contain the indexOf() method by default:

@ParameterizedTest
@MethodSource("referenceTypesProvider")
void givenArray_whenUsingReduceAndList_thenGetCorrectResult(Integer[] array, int expectedIndex) {
    List<Integer> list = Arrays.asList(array);
    int minValue = list.stream().reduce(Integer.MAX_VALUE, Integer::min);
    int index = list.indexOf(minValue);
    assertThat(index).isEqualTo(expectedIndex);
}

However, converting an array to a List would affect the space complexity of our solution, increasing it from constant to linear. We won’t consider this approach in further examples, as it doesn’t provide any significant benefits.

5. Arrays and Reference Types

While primitive streams provide a nice API for computations, they’re not applicable for reference types. In this case, we can use the reduce() method:

@ParameterizedTest
@MethodSource("referenceTypesProvider")
void givenArray_whenUsingReduce_thenGetCorrectResult(Integer[] array, int expectedIndex) {
    int minValue = Arrays.stream(array).reduce(Integer.MAX_VALUE, Integer::min);
    int minIndex = ArrayUtils.indexOf(array, minValue);
    assertThat(minIndex).isEqualTo(expectedIndex);
}

The reduce() method takes the identified value; in our case, it’s the Integer.MAX_VALUE and the method reference to the min() method. We use the reduce() method somewhat unconventionally, filtering instead of aggregating. Here, we used ArrayUtils, but the solution with a for loop or filter() would also work.

6. Indexes In Streams

We can use indexes directly with the Stream solution as we did previously with filter(). This way, we can do all the logic inside the reduce() method:

@ParameterizedTest
@MethodSource("primitiveProvider")
void givenArray_whenUsingReduceWithRange_thenGetCorrectResult(int[] array, int expectedIndex) {
    int index = IntStream.range(0, array.length)
      .reduce((a, b) -> array[a] <= array[b] ? a : b)
      .orElse(-1);
    assertThat(index).isEqualTo(expectedIndex);
}

We pass the index of the smallest element along the stream. However, this approach might not be readable and requires a deeper knowledge of the Stream API.

7. Conclusion

Arrays are the most basic data structures in Java. Being comfortable with manipulating and iterating them is a valuable skill, though we don’t usually use arrays directly.

The most straightforward approach is usually the best, as it’s understandable and explicit. Using Streams requires a deeper knowledge of functional programming and might affect the readability of the code in both ways: better or worse. Thus, Stream API should be used with caution.

As usual, all the code from the article is available over on GitHub.

       
Viewing all 4470 articles
Browse latest View live


<script src="https://jsc.adskeeper.com/r/s/rssing.com.1596347.js" async> </script>