Quantcast
Channel: Baeldung
Viewing all 4476 articles
Browse latest View live

Git Integration in IntelliJ IDEA

$
0
0

1. Introduction

IntelliJ IDEA offers extensive support for working with the Git version control system. In this tutorial, we’ll look at a selection of features that the IDE provides.

Since regular updates are made to IntelliJ, we won’t look at every feature in too much detail. Instead, we’ll get an overview of what’s available. The screenshots in this tutorial are based on IntelliJ IDEA 2023.3.6 with dark mode, and we’ll work with the Baeldung GitHub repository to illustrate the examples.

2. Git Configuration

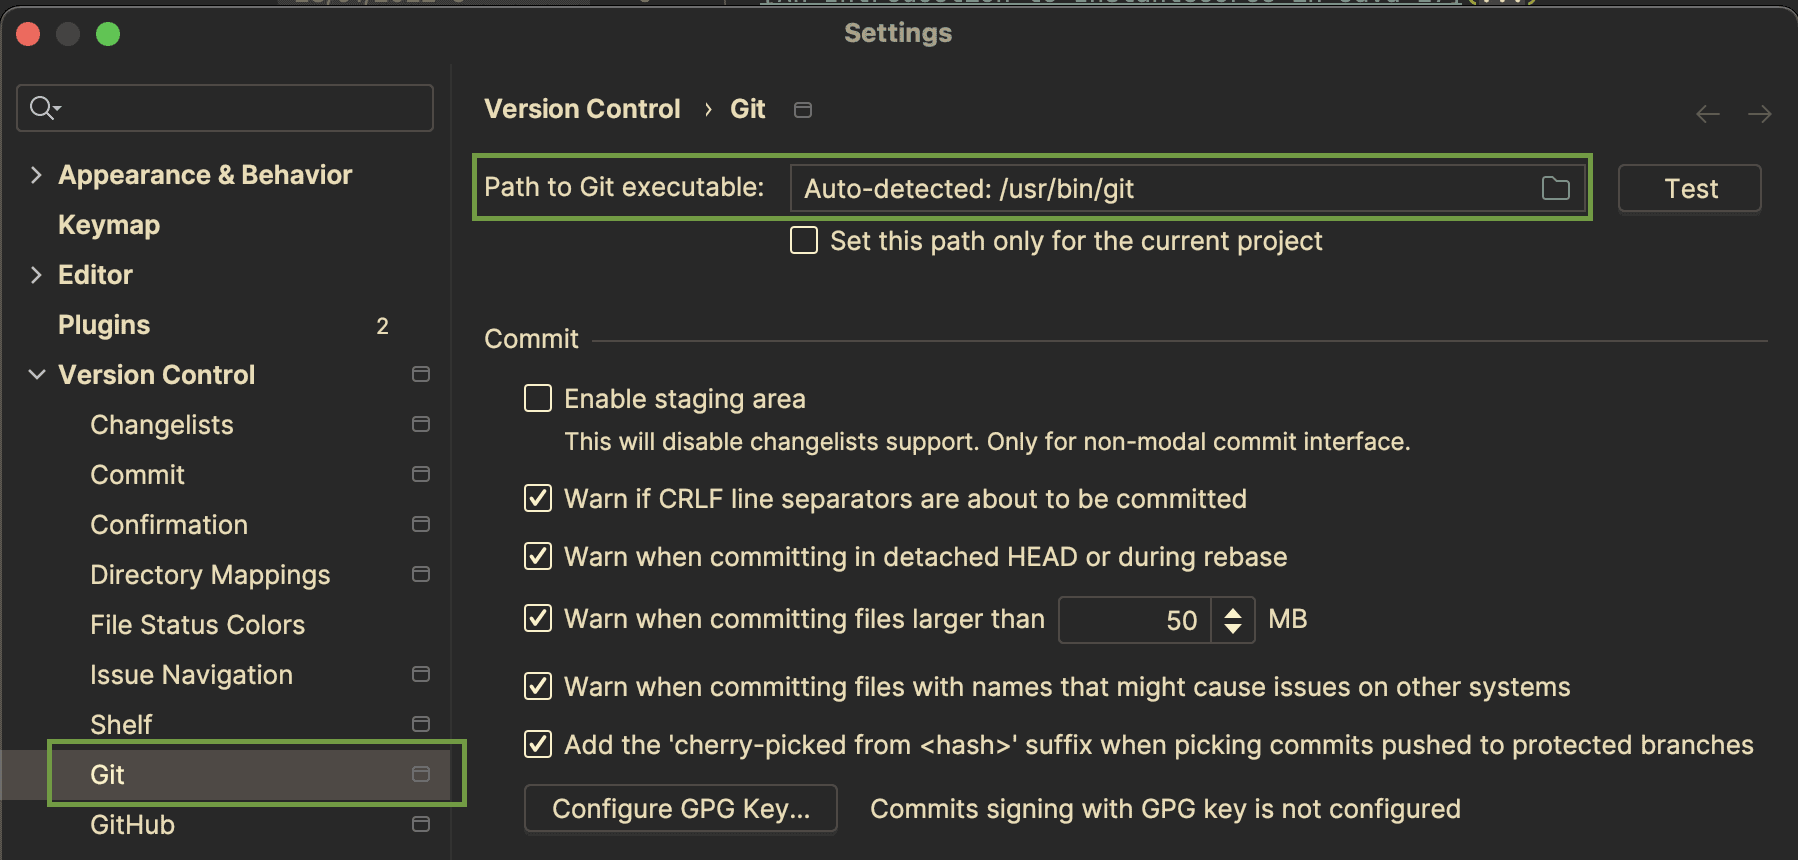
Before we can work with Git in IntelliJ, we need to install it on our system and configure the path in the IDE’s settings:

Git settings in IntelliJ

This setting tells IntelliJ to use the Git executable installed on our system.

3. Project Configuration

There are several ways of using Git with an IntelliJ project:

  1. We can create a new project from an existing remote repository.
  2. We can import a local source folder already configured as a Git repository.
  3. We can add Git support to an existing project.

Let’s have a look at these three options in more detail.

3.1. Cloning an Existing Repository

Let’s clone an existing remote repository by going to File -> New -> Project from Version Control, pasting the URL of the repository, and specifying the directory in which we want to create the local repository:

Clone a remore repository

Behind the scenes, IntelliJ will run the git clone command and open the project in the IDE.

3.2. Opening an Existing Project

Next, let’s create a new project from a local directory by opening the folder that contains the project using File -> New -> Project from Existing Sources:

If there’s a .git directory present, IntelliJ will automatically make all Git functionality available to the project.

3.3. Creating a New Git Repository

Finally, let’s enable version control with Git for a project that doesn’t use Git yet. First, let’s locate the VCS menu item in the top menu bar. Then, let’s go to VCS -> Enable Version Control Integration:

Here, we can select Git as the version control system to use:

IntelliJ will run the git init command and create a .git folder in the main project folder.

3.4. Available Git Actions in the IDE

Once we’ve configured Git integration for our project, we have several actions available in the IDE:

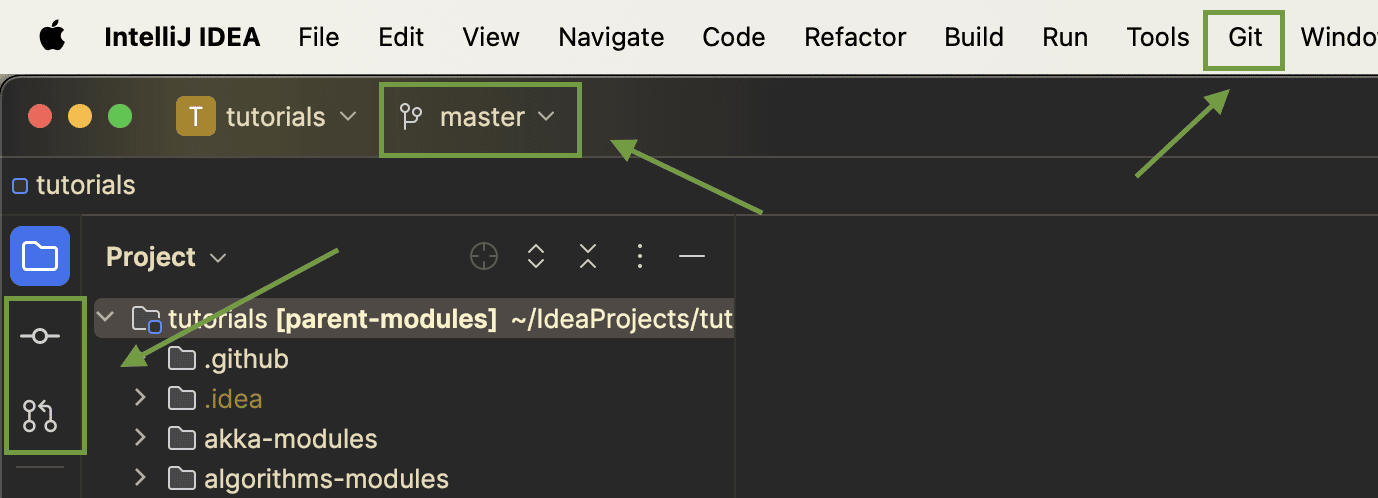
Git menu and toolbar items in IntelliJ

We can see the Git menu item in the top menu bar, the current branch in the top toolbar, and the commit and pull request buttons in the left toolbar.

We’ll look at these actions in more detail in the following sections.

4. Creating a New Branch

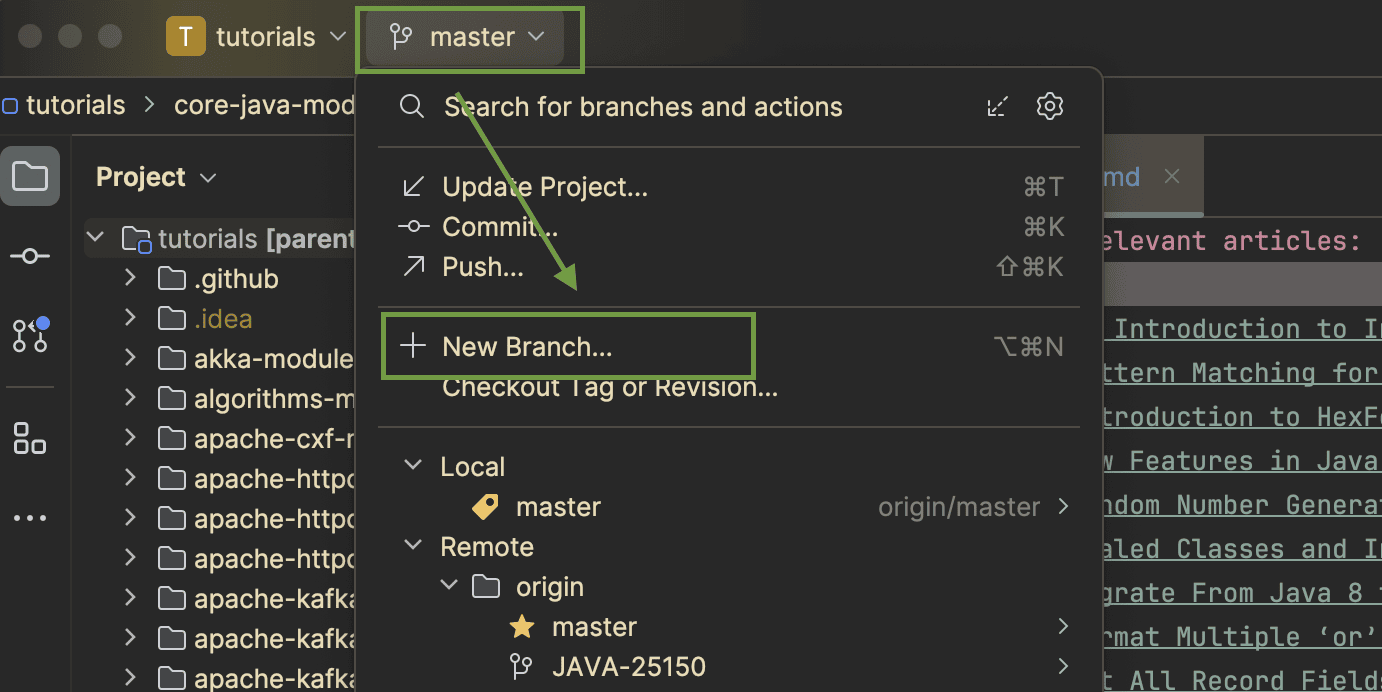
We can create a new branch using the branch drop-down button in the toolbar. The drop-down also lists the existing local and remote branches:

Create a new branch

5. Committing Changes

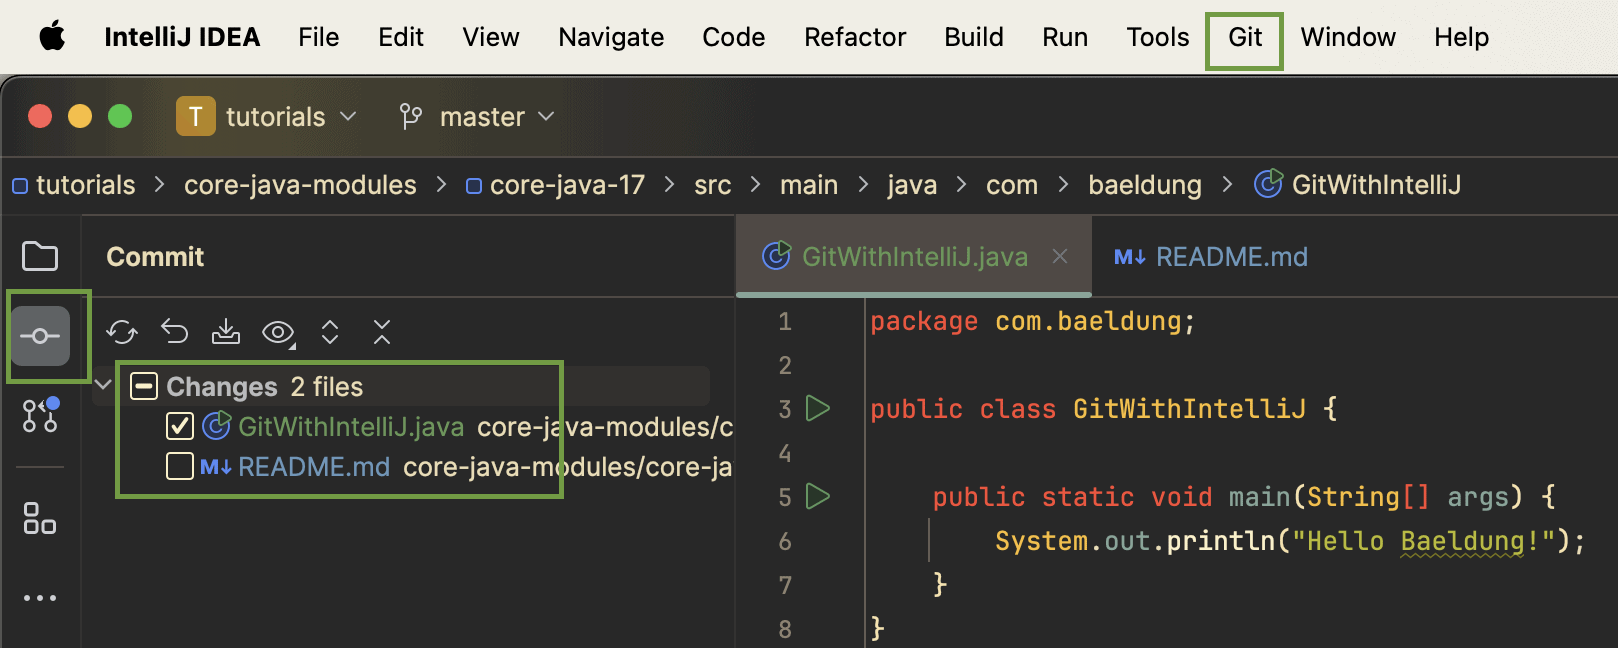
The commit tool window lists all files that contain changes in the current branch:

Comitting changes

We can click on each file that contains a change and review the update:

Show the diff between two files

When committing, we can select all files or individual ones by selecting the appropriate checkboxes.

6. Conflict Resolution

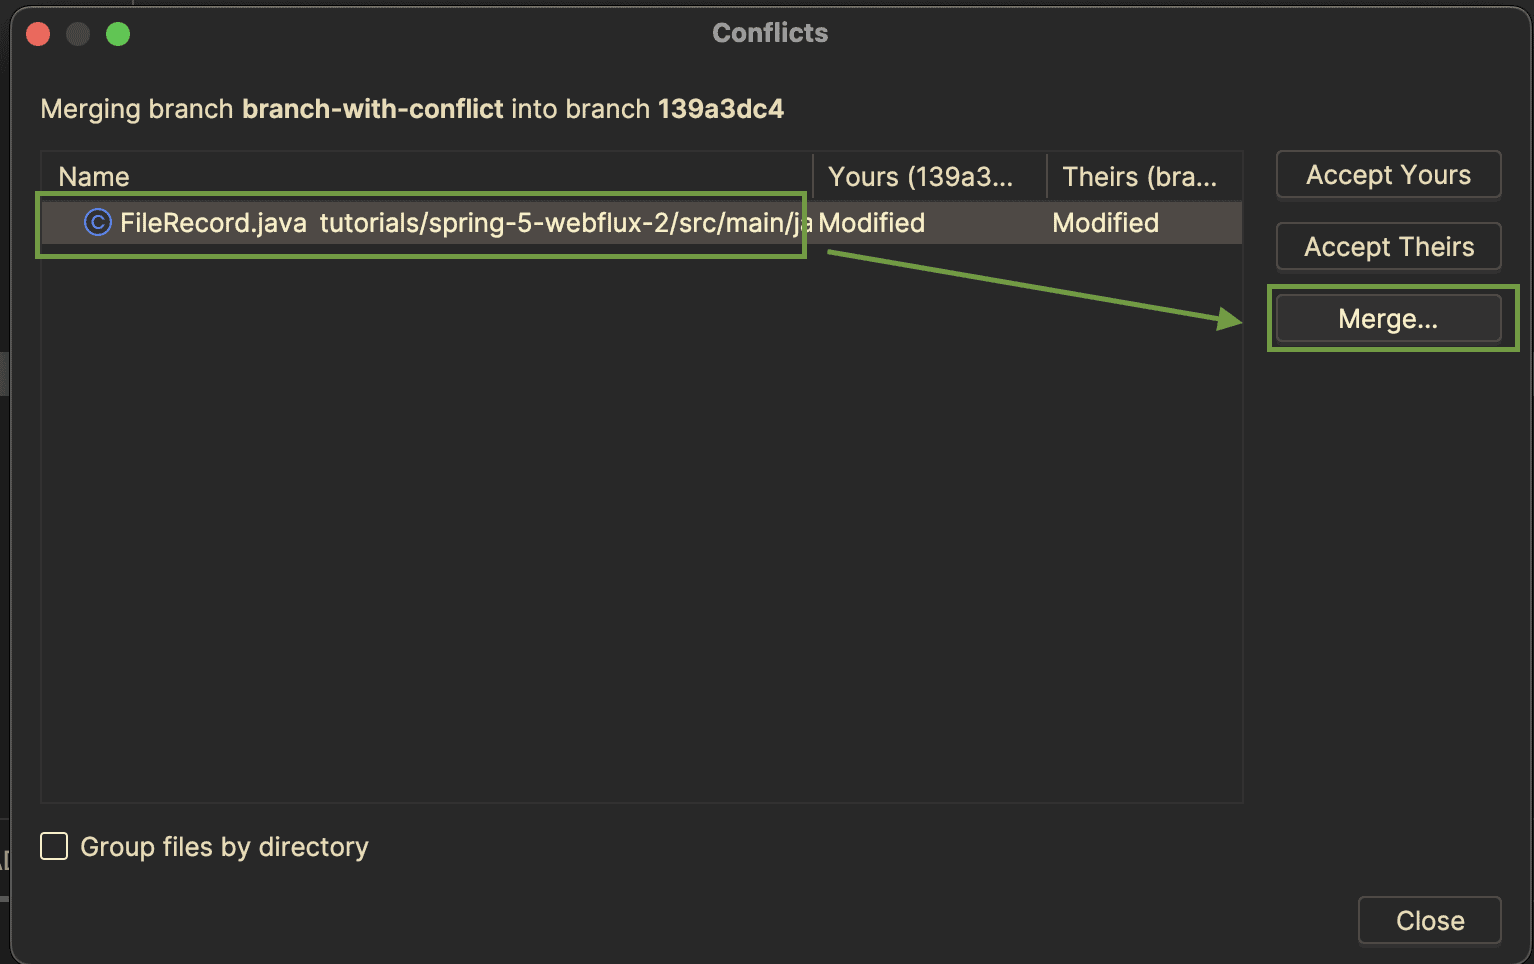
IntelliJ has great support for conflict resolution while merging or rebasing branches:

Conflict resolution

For every file that contains a conflict, we have the option to open a dialog box that allows us to perform conflict resolution. The local file is on the left, the file from the branch to be merged is on the right, and the result is in the middle.

We can choose to either accept the change on the left or the right. Moreover, the IDE provides a handy button with a magic wand icon. We can press that button and IntelliJ will resolve conflicts automatically where possible:

Conflict resolution

7. Git History

As developers, we often use Git History to see how a class, or any other file in the project, has changed over time. IntelliJ makes it easy to dive into the Git history of a project through several easy-to-use features. In this section, we’ll look at three: Git blame, the Git file history, and the Git commit history.

7.1. Git Blame

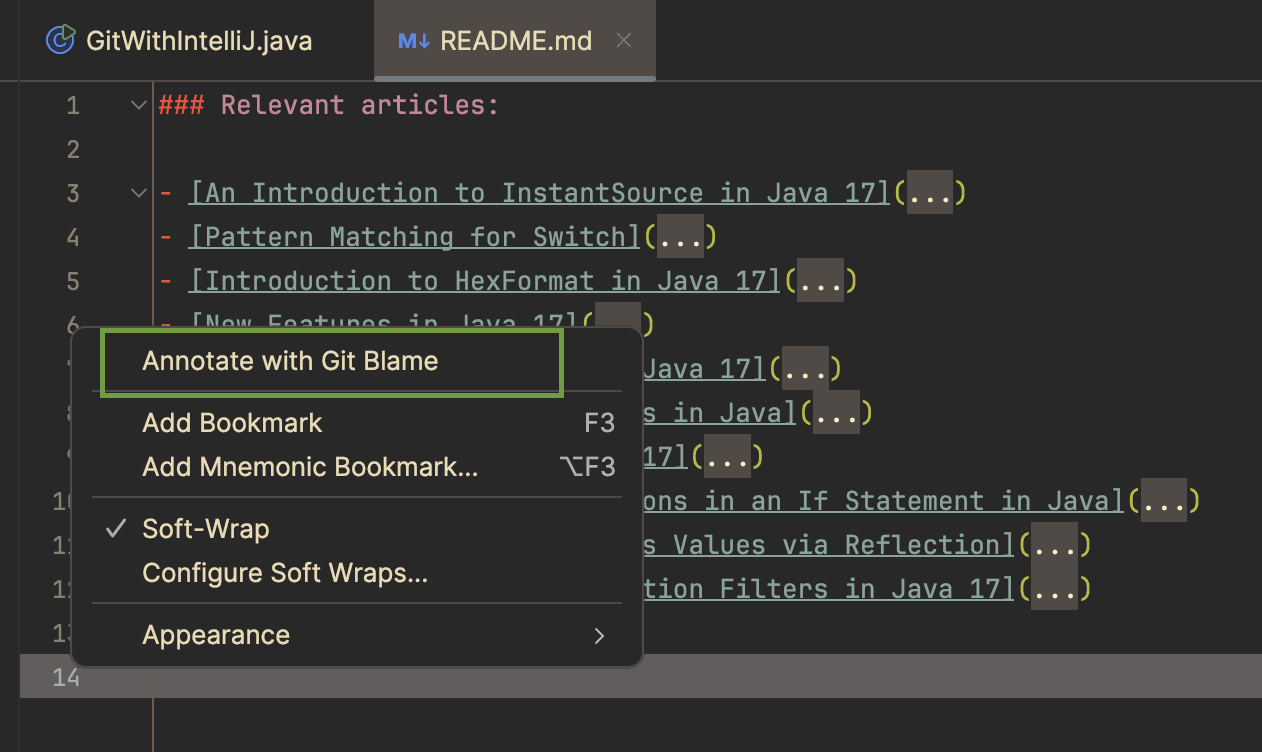
With Git Blame, we can see who did the last edit of each line. To show this information, we can either right-click anywhere in a file or on the line numbers on the left side of the editor and select Annotate with Git Blame:

Git blame

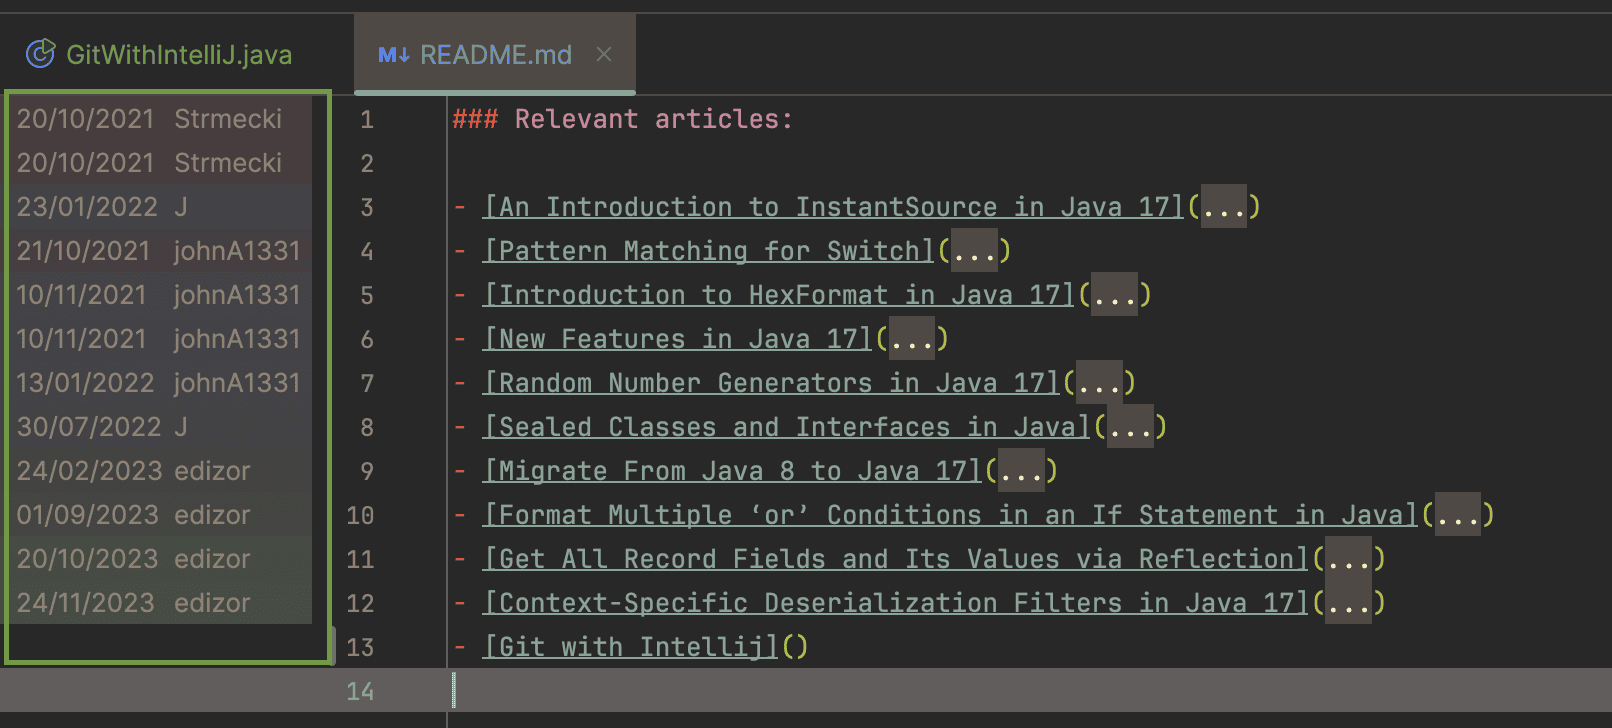
IntelliJ will show the date and username of the last edit next to every line:

Git blame

Blank lines indicate modifications that haven’t been committed yet. Thus, Git Blame is also a convenient way to show our current changes to a file.

7.2. Git File History

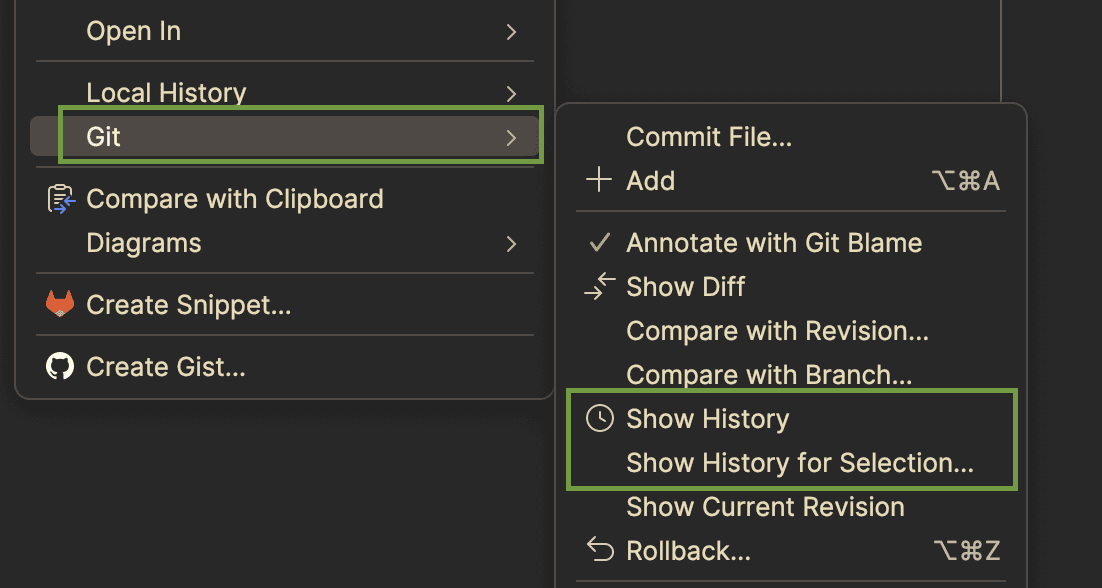
Furthermore, we can show the entire Git history of a file (if not rewritten or otherwise deleted) by right-clicking on the file in the editor or the project window:

Git file history

IntelliJ will display the list of commits that include the selected file. We can open each version of a file, see the diff to any other version, and even check out a specific version.

7.3. Git Commit History

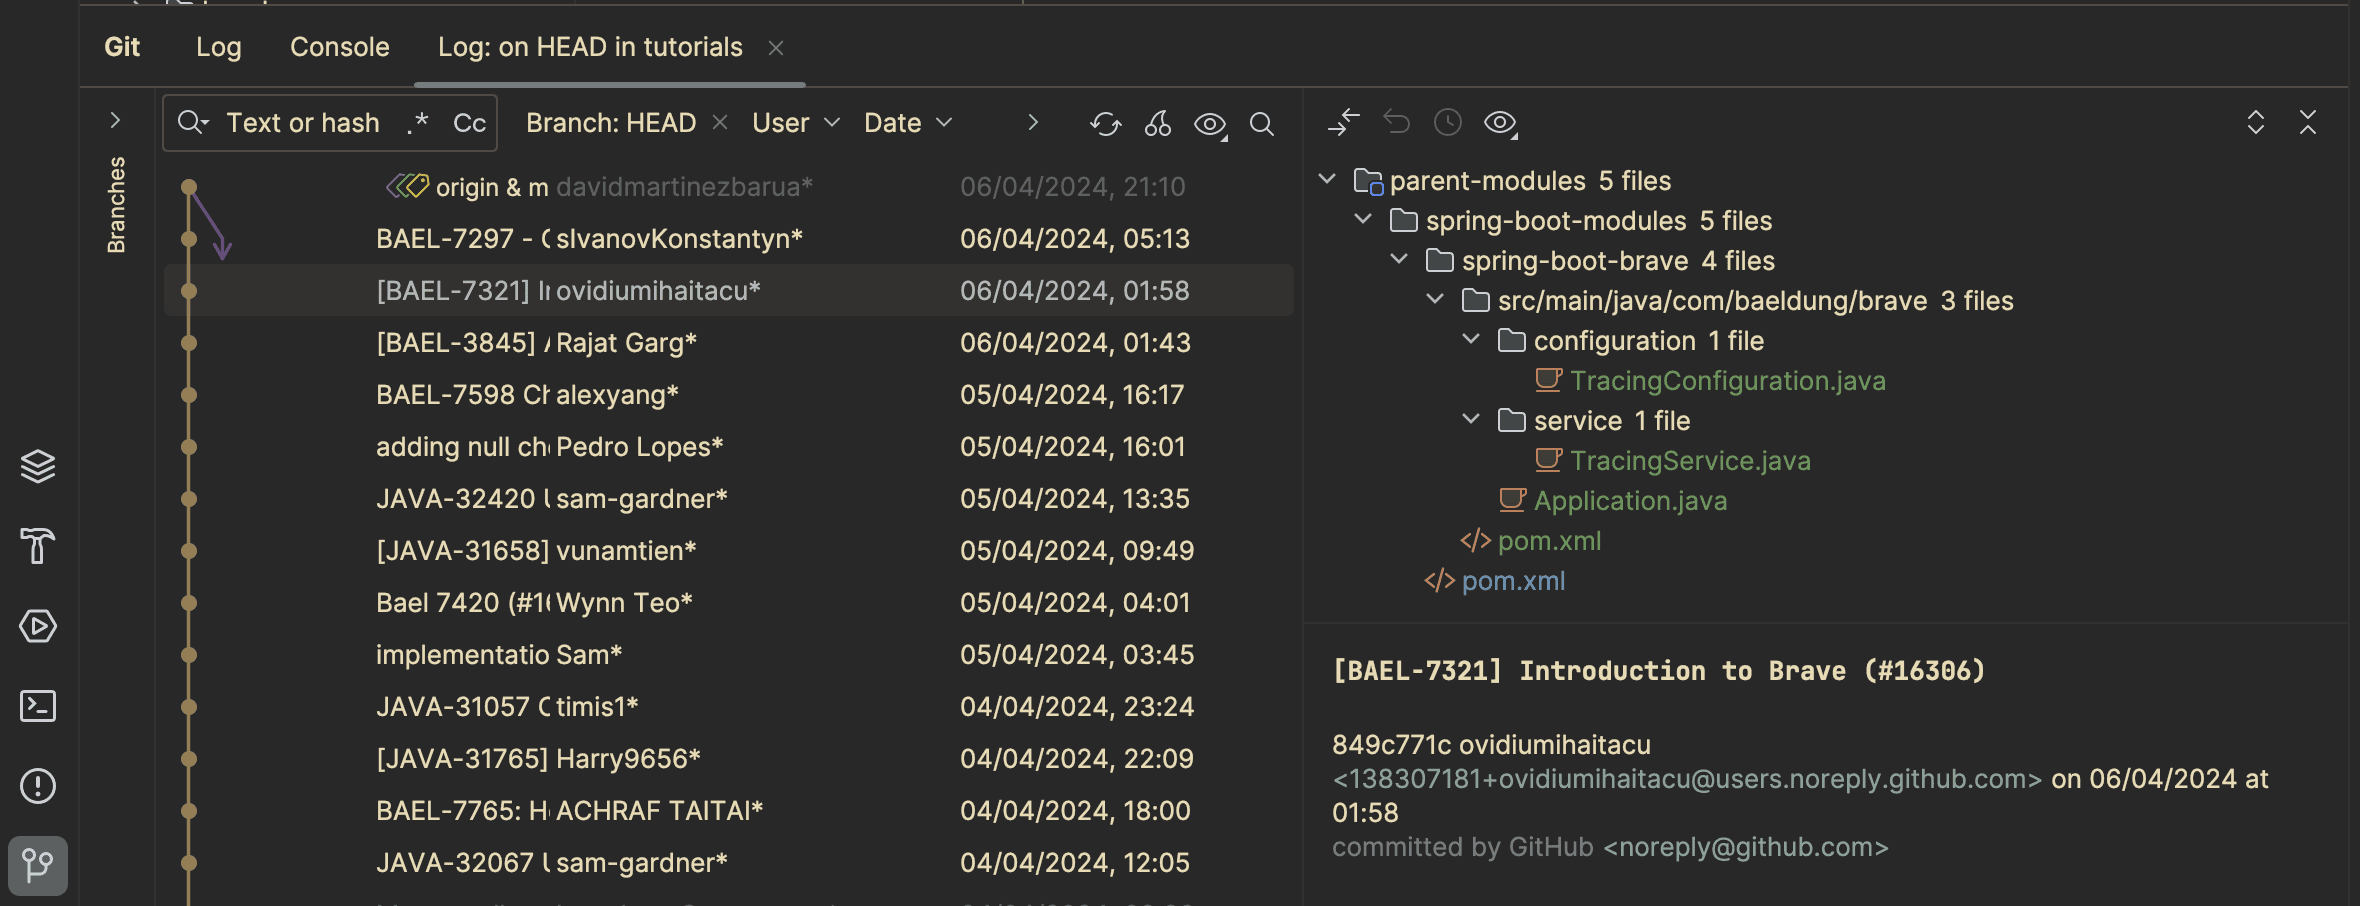
In addition, we can see the commit history of the entire project. When we right-click on the project’s root folder in the project window and select Show History, we can see all commits and the changes included in each of them:

Git commit history

8. Multi-Module Setup

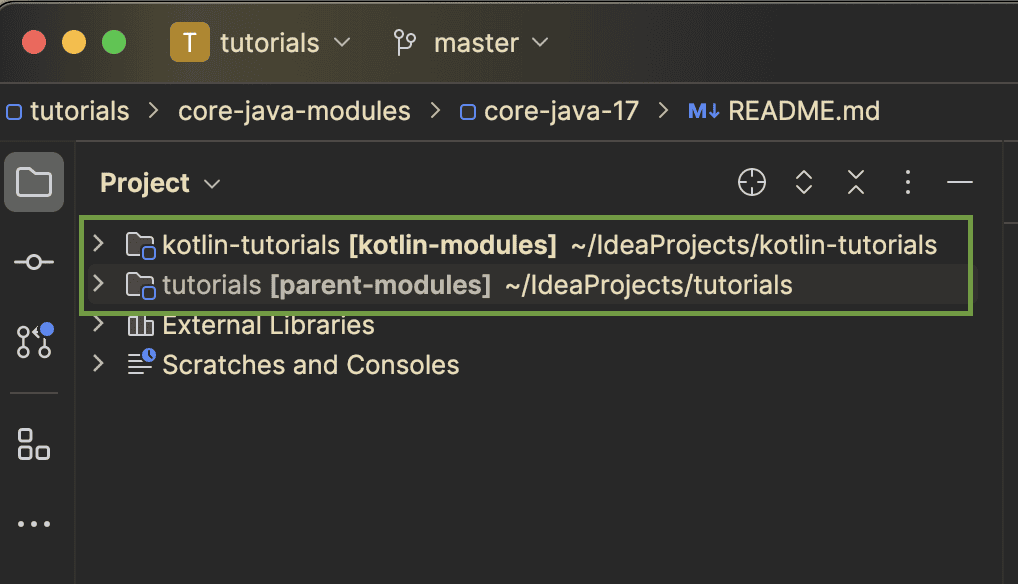
IntelliJ also offers great support for multi-module projects. We can create a multi-module project by importing several projects into a single IntelliJ window:

Multi module setup

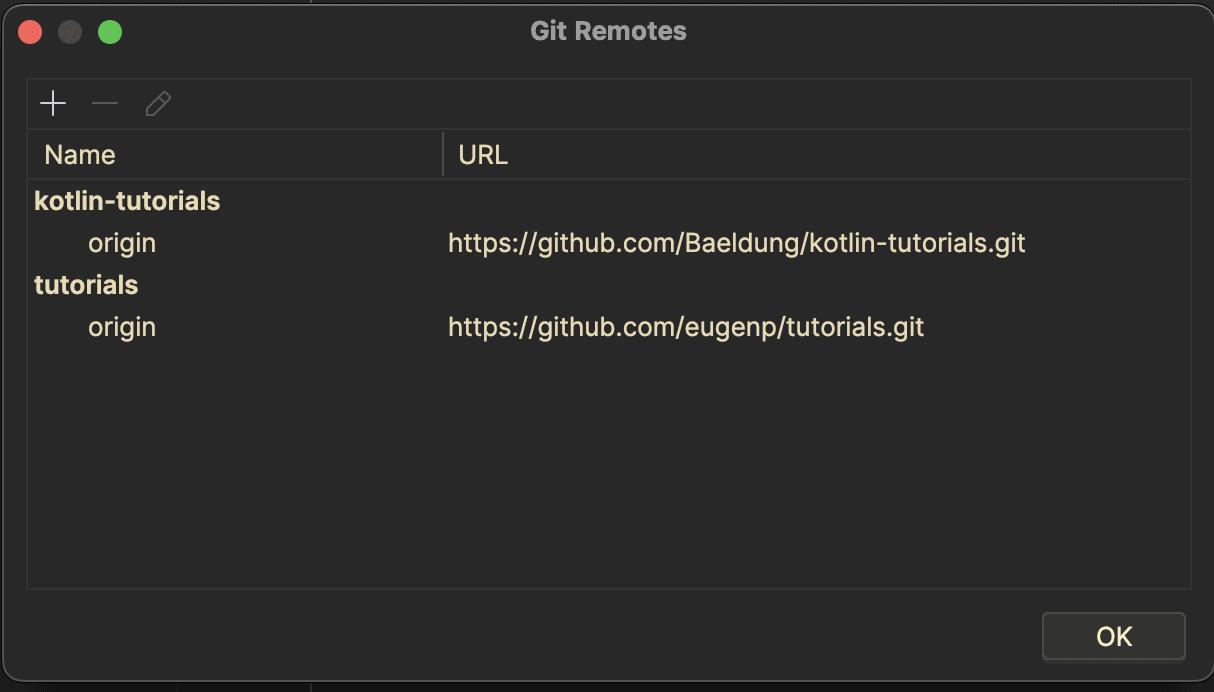
Every module can be associated with a different Git repository. We can see the remotes by going to Git -> Manage Remotes in the main menu:

Multi module remote repositories

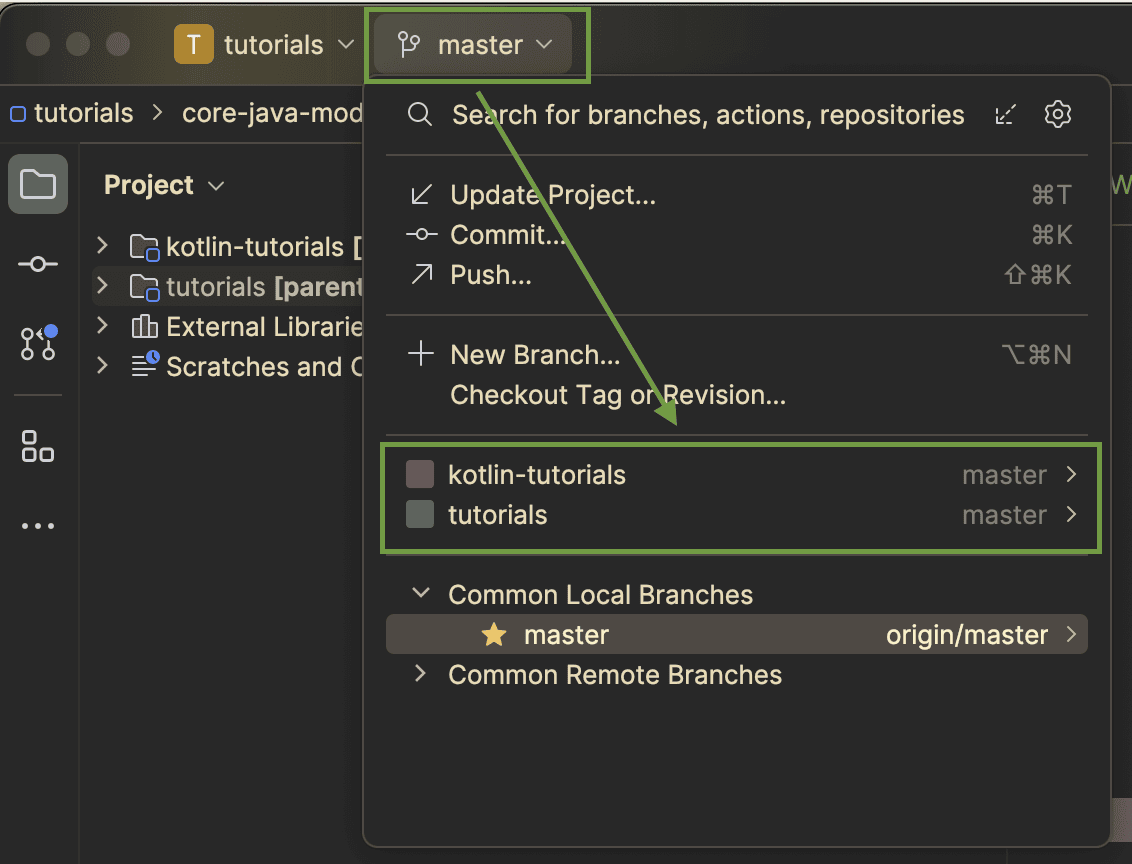
Moreover, we can work on different branches per module:

Multi module branches

In the above example, we have two modules, the Baeldung tutorials project and the Balding Kotlin tutorials. Both have different remote repositories and we’re currently working in the master branch of both projects.

9. Pull Requests

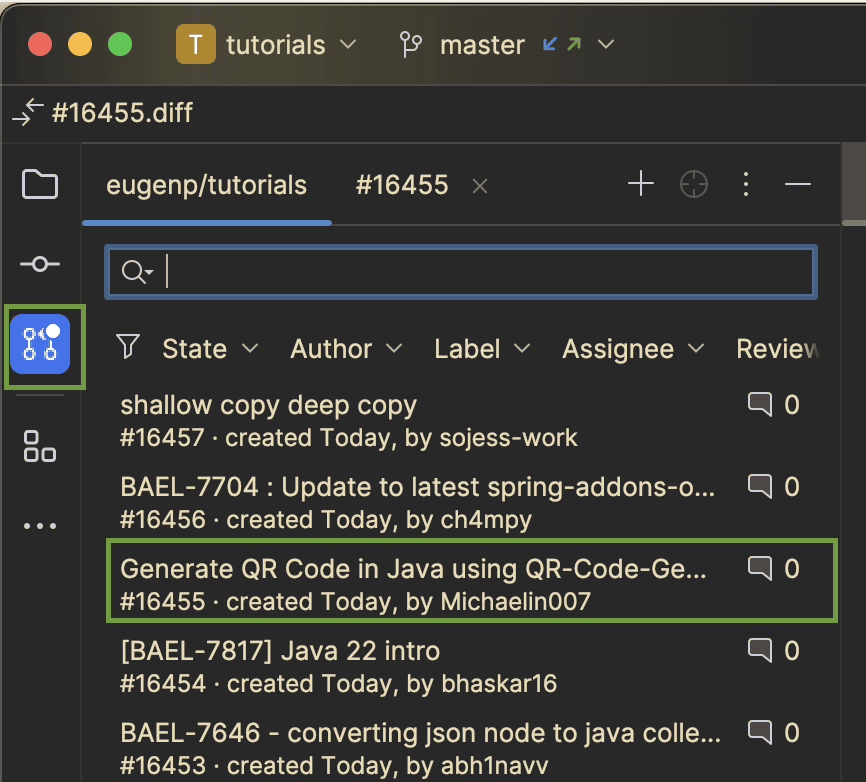
Another handy feature that IntelliJ offers is the possibility to check out and review pull requests. We can click on the PR icon in the left toolbar and see a list of all pull requests for the repository:

Display pull requests

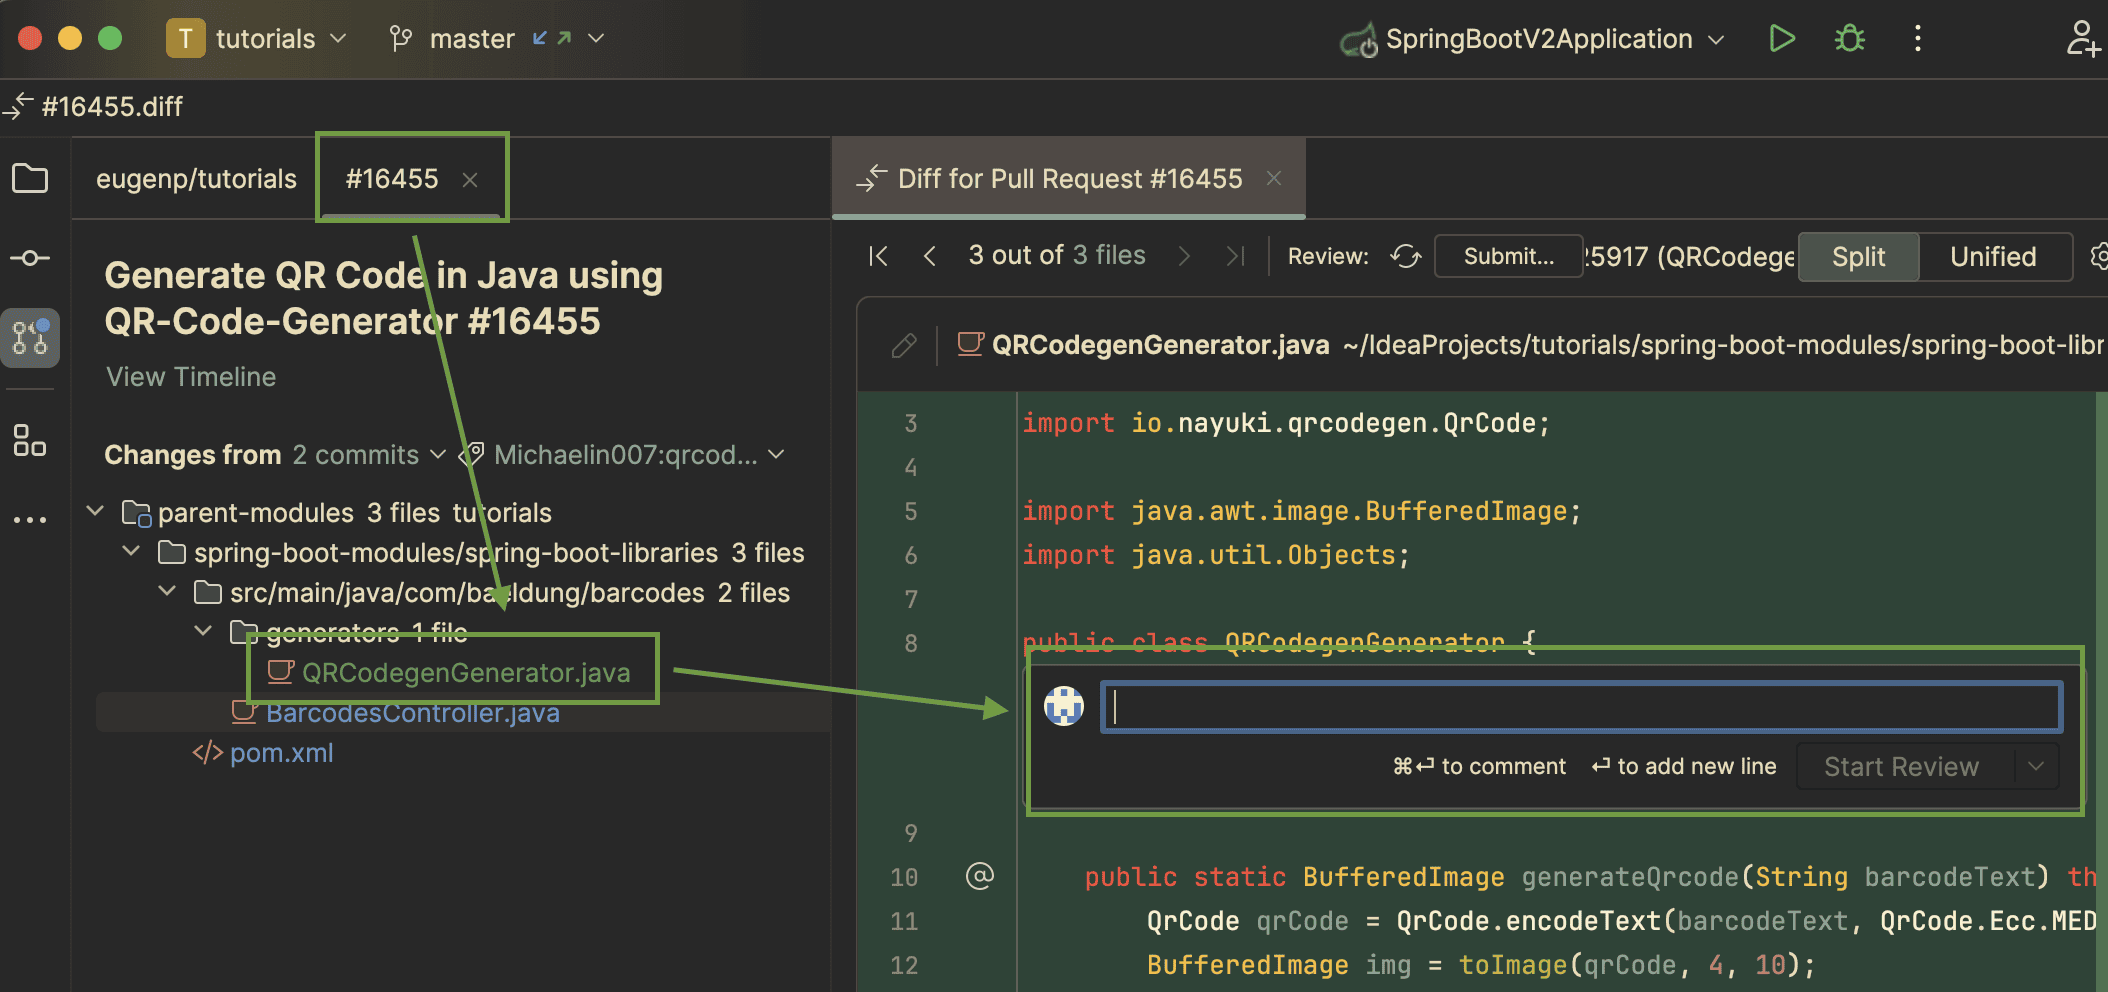
We can see the list of files included in a specific PR. We can also add comments directly in the IDE:

Comment a pull request

Furthermore, we can check out a PR like any other branch.

10. Conclusion

IntelliJ offers great Git integration and an intuitive user interface for working with the most common Git features.

In this article, we learned how to configure IntelliJ to use with Git, create repositories and branches, commit changes, and resolve merge conflicts. Furthermore, we learned how to retrieve the Git history, review pull requests, and work with multi-module projects.

To learn more, see the official IntelliJ documentation.


Check if Two Strings Are Permutations of Each Other in Java

$
0
0

1. Overview

A permutation or anagram is a word or phrase formed by rearranging the letters of a different word or phrase. In other words, a permutation contains the same characters as another string, but the order of the arrangement of the characters can vary.

In this tutorial, we’ll examine solutions to check whether a string is a permutation or anagram of another string.

2. What Is a String Permutation?

Let’s look at a permutation example and see how to start thinking about a solution.

2.1. Permutation

Let’s look at the permutations of the word CAT:

Cat string possible permutations

Notably, there are six permutations (including CAT itself). We can count n! (factorial of n) where n is the string’s length.

2.2. How to Approach a Solution

As we can see, there are many possible permutations of a string. We might think of creating an algorithm that loops over all the string’s permutations to check whether one is equal to the string we’re comparing.

That works, but we must first create all possible permutations, which can be expensive, especially with large strings.

However, we notice that no matter the permutation, it contains the same characters as the original. For example, CAT and TAC have the same characters [A,C,T], even if in a different sequence.

Therefore, we could store the characters of the strings in a data structure and then find a way to compare them.

Notably, we can say that two strings aren’t permutations if they have different lengths.

3. Sorting

The most straightforward approach to solving this problem is sorting and comparing the two strings.

Let’s look at the algorithm:

boolean isPermutationWithSorting(String s1, String s2) {
    if (s1.length() != s2.length()) {
        return false;
    }
    char[] s1CharArray = s1.toCharArray();
    char[] s2CharArray = s2.toCharArray();
    Arrays.sort(s1CharArray);
    Arrays.sort(s2CharArray);
    return Arrays.equals(s1CharArray, s2CharArray);
}

Notably, a string is an array of primitive characters. Therefore, we’ll sort both strings’ character arrays and compare them with the equals() method.

Let’s look at the algorithm complexity:

  • Time complexity: O(n log n) for sorting
  • Space complexity: O(n) auxiliary space for sorting

We can now look at some tests where we check permutations of a simple word and a sentence:

@Test
void givenTwoStringsArePermutation_whenSortingCharsArray_thenPermutation() {
    assertTrue(isPermutationWithSorting("baeldung", "luaebngd"));
    assertTrue(isPermutationWithSorting("hello world", "world hello"));
}
Let’s also test negative cases with character mismatch and different string lengths:
@Test
void givenTwoStringsAreNotPermutation_whenSortingCharsArray_thenNotPermutation() {
    assertFalse(isPermutationWithSorting("baeldung", "luaebgd"));
    assertFalse(isPermutationWithSorting("baeldung", "luaebngq"));
}

4. Count Frequencies

If we consider our words finite characters, we can use their frequencies in an array of the same dimension. We can consider the 26 letters of our alphabet or the extended ASCII encoding more generically, up to 256 positions in our array.

4.1. Two Counters

We can use two counters, one for each word:

boolean isPermutationWithTwoCounters(String s1, String s2) {
    if (s1.length() != s2.length()) {
        return false;
    }
    int[] counter1 = new int[256];
    int[] counter2 = new int[256];
    for (int i = 0; i < s1.length(); i++) {
        counter1[s1.charAt(i)]++;
    }
    for (int i = 0; i < s2.length(); i++) {
        counter2[s2.charAt(i)]++;
    }
    return Arrays.equals(counter1, counter2);
}

After saving the frequencies in each counter, we can check if the counters are equal.

Let’s look at the algorithm complexity:

  • Time complexity: O(n) for accessing the counters
  • Space complexity: O(1) constant size of the counters

Next, let’s look at positive and negative test cases:

@Test
void givenTwoStringsArePermutation_whenTwoCountersCharsFrequencies_thenPermutation() {
    assertTrue(isPermutationWithTwoCounters("baeldung", "luaebngd"));
    assertTrue(isPermutationWithTwoCounters("hello world", "world hello"));
}
@Test
void givenTwoStringsAreNotPermutation_whenTwoCountersCharsFrequencies_thenNotPermutation() {
    assertFalse(isPermutationWithTwoCounters("baeldung", "luaebgd"));
    assertFalse(isPermutationWithTwoCounters("baeldung", "luaebngq"));
}

4.2. One Counter

We can be smarter and use only one counter:

boolean isPermutationWithOneCounter(String s1, String s2) {
    if (s1.length() != s2.length()) {
        return false;
    }
    int[] counter = new int[256];
    for (int i = 0; i < s1.length(); i++) {
        counter[s1.charAt(i)]++;
        counter[s2.charAt(i)]--;
    }
    for (int count : counter) {
        if (count != 0) {
            return false;
        }
    }
    return true;
}

We add and remove the frequencies in the same loop using only one counter. Therefore, we finally need to check whether all frequencies equal zero.

Let’s look at the algorithm complexity:

  • Time complexity: O(n) for accessing the counter
  • Space complexity: O(1) constant size of the counter

Let’s look again at some tests:

@Test
void givenTwoStringsArePermutation_whenOneCounterCharsFrequencies_thenPermutation() {
    assertTrue(isPermutationWithOneCounter("baeldung", "luaebngd"));
    assertTrue(isPermutationWithOneCounter("hello world", "world hello"));
}
@Test
void givenTwoStringsAreNotPermutation_whenOneCounterCharsFrequencies_thenNotPermutation() {
    assertFalse(isPermutationWithOneCounter("baeldung", "luaebgd"));
    assertFalse(isPermutationWithOneCounter("baeldung", "luaebngq"));
}

4.3. Using HashMap

We can use a map instead of an array to count the frequencies. The idea is the same, but using a map allows us to store more characters. This helps with Unicode, including, for instance, East European, African, Asian, or emoji characters.

Let’s look at the algorithm:

boolean isPermutationWithMap(String s1, String s2) {
    if (s1.length() != s2.length()) {
        return false;
    }
    Map<Character, Integer> charsMap = new HashMap<>();
    for (int i = 0; i < s1.length(); i++) {
        charsMap.merge(s1.charAt(i), 1, Integer::sum);
    }
    for (int i = 0; i < s2.length(); i++) {
        if (!charsMap.containsKey(s2.charAt(i)) || charsMap.get(s2.charAt(i)) == 0) {
            return false;
        }
        charsMap.merge(s2.charAt(i), -1, Integer::sum);
    }
    return true;
}

Once we know the frequencies of a string’s characters, we can check whether the other string contains all the required matches.

Notably, while using maps, we don’t compare arrays positionally as in previous examples. Therefore, we already know if either a key in the map doesn’t exist or the frequency value doesn’t correspond.

Let’s look at the algorithm complexity:

  • Time complexity: O(n) for accessing the map in constant time
  • Space complexity: O(m) where m is the number of characters we store in the map depending on the complexity of the strings

For testing, this time, we can also add non-ASCII characters:

@Test
void givenTwoStringsArePermutation_whenCountCharsFrequenciesWithMap_thenPermutation() {
    assertTrue(isPermutationWithMap("baelduňg", "luaebňgd"));
    assertTrue(isPermutationWithMap("hello world", "world hello"));
}

For the negative cases, to get 100% test coverage, we must consider the case when the map doesn’t contain the key or there is a value mismatch:

@Test
void givenTwoStringsAreNotPermutation_whenCountCharsFrequenciesWithMap_thenNotPermutation() {
    assertFalse(isPermutationWithMap("baelduňg", "luaebgd"));
    assertFalse(isPermutationWithMap("baeldung", "luaebngq"));
    assertFalse(isPermutationWithMap("baeldung", "luaebngg"));
}

5. String That Contains a Permutation

What if we want to check whether a string contains another string as a permutation? For example, we can see that the string acab includes ba as a permutation; ab is a permutation of ba and is included in acab starting at the third character.

We could go through all the permutations discussed earlier, but that wouldn’t be efficient. Counting frequencies wouldn’t work, either. For instance, checking if cb is a permutation inclusion of acab leads to a false positive.

However, we can still use counters as a starting point and then check the permutation using a sliding window technique.

We use a frequency counter for every string. We start by adding to the counter of the potential permutation. Then, we loop on the second string’s characters and follow this pattern:

  • add a new succeeding character to the new window considered
  • remove one preceding character when exceeding the window length

The window has the length of the potential permutation string. Let’s picture this in a diagram:

Permutation inclusion algorithm diagram

Let’s look at the algorithm. s2 is the string for which we want to check the inclusion. Furthermore, we narrow the case to the 26 characters of the alphabet for simplicity:

boolean isPermutationInclusion(String s1, String s2) {
    int ns1 = s1.length(), ns2 = s2.length();
    if (ns1 < ns2) {
        return false;
    }
    int[] s1Count = new int[26];
    int[] s2Count = new int[26];
    for (char ch : s2.toCharArray()) {
        s2Count[ch - 'a']++;
    }
    for (int i = 0; i < ns1; ++i) {
        s1Count[s1.charAt(i) - 'a']++;
        if (i >= ns2) {
            s1Count[s1.charAt(i - ns2) - 'a']--;
        }
        if (Arrays.equals(s1Count, s2Count)) {
            return true;
        }
    }
    return false;
}

Let’s look at the final loop where we apply the sliding window. We add to the frequency counter. However, when the window exceeds the permutation length, we remove an occurrence of the character.

Notably, if the strings have the same length, we fall into the anagram case we have seen earlier.

Let’s look at the algorithm complexity. Let l1 and l2 be the length of the strings s1 and s2:

  • Time complexity: O(l1 + 26*(l2 -l1)) depending on the difference between the strings and the character’s range
  • Space complexity: O(1) constant space to keep track of the frequencies

Let’s look at some positive test cases where we check both an exact match or a permutation:

@Test
void givenTwoStrings_whenIncludePermutation_thenPermutation() {
    assertTrue(isPermutationInclusion("baeldung", "ea"));
    assertTrue(isPermutationInclusion("baeldung", "ae"));
}

Let’s look at some negative test cases:

@Test
void givenTwoStrings_whenNotIncludePermutation_thenNotPermutation() {
    assertFalse(isPermutationInclusion("baeldung", "au"));
    assertFalse(isPermutationInclusion("baeldung", "baeldunga"));
}

6. Conclusion

In this article, we saw some algorithms for checking whether a string is a permutation of another string. Sorting and comparing the string characters is a straightforward solution. More interestingly, we can achieve linear complexity by storing the character frequencies in counters and comparing them. We can obtain the same result using a map instead of an array of frequencies. Finally, we also saw a variation of the problem by using sliding windows to check whether a string contains a permutation of another string.

As always, the code presented in this article is available over on GitHub.


Understanding Maven Dependency Graph or Tree

$
0
0

1. Overview

Working on large Maven projects can be intimidating, as can keeping track of all the dependencies between modules and libraries and resolving conflicts between them.

In this tutorial, we’ll learn about the Maven dependency graph or tree. First, we’ll learn how to create a dependency tree, filter dependencies, and create different output formats. Later, we’ll discuss visualizing different approaches to viewing the dependency tree graphically.

2. Project Setup

In real-life projects, the dependency tree grows very fast and becomes complex. However, for our example, we’ll create a small project with two modules, module1 and module2, each with two to three dependencies. Additionally, module1 depends on module2.

We’ll create our first module module2, and add the commons-collections, slf4j-api, spring-bean, and junit dependencies:

<dependencies>
    <dependency>
        <groupId>commons-collections</groupId>
        <artifactId>commons-collections</artifactId>
        <version>3.2.2</version>
    </dependency>
    <dependency>
        <groupId>org.slf4j</groupId>
        <artifactId>slf4j-api</artifactId>
        <version>1.7.25</version>
    </dependency>
    <dependency>
        <groupId>org.springframework</groupId>
        <artifactId>spring-bean</artifactId>
        <version>6.1.1</version>
    </dependency>
    <dependency>
        <groupId>junit</groupId>
        <artifactId>junit</artifactId>
        <version>4.13.2</version>
        <scope>test</scope>
    </dependency>
</dependencies>

Now, we create a new module module1, and add commons-collections , spring-core, slf4j-api, and our module2 as dependencies:

<dependencies>
    <dependency>
        <groupId>commons-collections</groupId>
        <artifactId>commons-collections</artifactId>
        <version>3.2.2</version>
    </dependency>
    <dependency>
        <groupId>org.springframework</groupId>
        <artifactId>spring-core</artifactId>
        <version>6.1.1</version>
    </dependency>
    <dependency>
        <groupId>org.slf4j</groupId>
        <artifactId>slf4j-api</artifactId>
        <version>1.7.25</version>
    </dependency>
    <dependency>
        <groupId>com.baeldung.module2</groupId>
        <artifactId>module2</artifactId>
        <version>1.0</version>
    </dependency>
</dependencies>

We’re not concerned with the library functionalities here, but rather with how they’re derived for our project, to detect version conflicts, identify unnecessary dependencies, resolve build or run-time issues, and visualize the dependency tree.

3. Methods for Analyzing Dependency Graph or Tree

There are multiple ways to analyze the dependency tree or graph.

3.1. Using the Maven Dependency Plugin

maven-dependency-plugin displays the dependency tree for a given project in text format by default.

Let’s run the Maven command under the module2 directory to get the dependency tree for our module2:

$ mvn dependency:tree 
// output snippet
[INFO] com.baeldung.module2:module2:jar:1.0
[INFO] +- commons-collections:commons-collections:jar:3.2.2:compile
[INFO] +- org.slf4j:slf4j-api:jar:1.7.25:compile
[INFO] +- org.springframework:spring-beans:jar:6.1.1:compile
[INFO] |  \- org.springframework:spring-core:jar:6.1.1:compile
[INFO] |     \- org.springframework:spring-jcl:jar:6.1.1:compile
[INFO] \- junit:junit:jar:4.13.2:test
[INFO]    \- org.hamcrest:hamcrest-core:jar:1.3:test

Now, let’s run the Maven command under the module1 directory to get its dependency tree:

$ mvn dependency:tree 
// output snippet
[INFO] com.baeldung.module1:module1:jar:1.0
[INFO] +- commons-collections:commons-collections:jar:3.2.2:compile
[INFO] +- org.springframework:spring-core:jar:6.1.1:compile
[INFO] |  \- org.springframework:spring-jcl:jar:6.1.1:compile
[INFO] +- org.slf4j:slf4j-api:jar:1.7.25:compile
[INFO] \- com.baeldung.module2:module2:jar:1.0:compile
[INFO]    \- org.springframework:spring-beans:jar:6.1.1:compile

By default, the output is in text format, and we can see how dependencies are getting included in our project.

We can filter the dependency tree output by excluding or including artifacts using this plugin.

For example, if we need to include only slf4j in the dependency tree, we can use the -Dinclude option to include all the dependencies:

$ mvn dependency:tree -Dincludes=org.slf4j
//output
[INFO] com.baeldung.module1:module1:jar:1.0
[INFO] \- org.slf4j:slf4j-api:jar:1.7.25:compile

If we need to exclude only slf4j in the tree, we can use the -Dexcludes option to exclude all the dependencies:

$ mvn dependency:tree -Dexcludes=org.slf4j
//output
[INFO] com.baeldung.module1:module1:jar:1.0
[INFO] +- commons-collections:commons-collections:jar:3.2.2:compile
[INFO] +- org.springframework:spring-core:jar:6.1.1:compile
[INFO] |  \- org.springframework:spring-jcl:jar:6.1.1:compile
[INFO] \- com.baeldung.module2:module2:jar:1.0:compile
[INFO]    \- org.springframework:spring-beans:jar:6.1.1:compile

Now, if we need to analyze all the dependencies in detail, we can use the –Dverbose option:

$ mvn dependency:tree -Dverbose
//output
[INFO] com.baeldung.module1:module1:jar:1.0
[INFO] +- commons-collections:commons-collections:jar:3.2.2:compile
[INFO] +- org.springframework:spring-core:jar:6.1.1:compile
[INFO] |  \- org.springframework:spring-jcl:jar:6.1.1:compile
[INFO] +- org.slf4j:slf4j-api:jar:1.7.25:compile
[INFO] \- com.baeldung.module2:module2:jar:1.0:compile
[INFO]    +- (commons-collections:commons-collections:jar:3.2.2:compile - omitted for duplicate)
[INFO]    +- (org.slf4j:slf4j-api:jar:1.7.25:compile - omitted for duplicate)
[INFO]    \- org.springframework:spring-beans:jar:6.1.1:compile
[INFO]       \- (org.springframework:spring-core:jar:6.1.1:compile - omitted for duplicate)

Here, we can see that the spring-core from module1 is picked, and the one from module2 is removed.

Furthermore, for a complex project, reading this format is tedious. This plugin allows us to create another output format, like dot, graphml, or tgf, from the same dependency tree. It’s possible to visualize these output formats later using different editors.

Now, let’s get the same dependency tree in graphml format, and store the output in dependency.graphml:

$ mvn dependency:tree -DoutputType=graphml -DoutputFile=dependency.graphml

Here, we can use any online available graphml reader tool to visualize the dependency tree.

For our example, we’ll use the yED editor. We can import the dependency.graphml file in the yED editor. Although yED doesn’t format the graph by default, it offers multiple formats that we can use.

To customize, we’ll go to Layout > Hierarchic > Orientation > Left to Right > Apply. We can do a lot of other customizations on the tool as well, as per our needs:

yED editor dependency graph screenshot

3.2. Using Eclipse/IntelliJ like IDE

Most developers work with IDEs like Eclipse and IntelliJ, and these have the Maven dependency tree plugin.

First, we’ll start with the Eclipse m2e plugin, which provides a helpful dependency view.

After installing the plugin (if not already done), we’ll open module1‘s pom.xml and select Dependency Hierarchy from the tabs. The left side shows the hierarchy of jars in our project (same as the -Dverbose output). The resolved list is shown on the right. These are the jars used in our project:

Eclipse dependency Graph screenshot

IntelliJ also has a dependency analyzer tool. The default IntelliJ IDEA Community Edition provides a similar view as the Eclipse m2e plugin. We need to select the project, right-click on it, and select Dependency Analyser:

IntelliJ Community version dependency Graph

However, IntelliJ IDEA Ultimate provides more options and a more advanced graph. For this, we select the module1 project and right-click on it, select Maven, and click on Show Diagram:

IntelliJ Ultimate Version dependency Graph

3.3. Using Third-Party Lib

We’ve got a few third-party tools to help analyze the big dependency tree. They can import the graphml file created using the mvn dependency:tree and further use it for analyzing the graph visually.

Here are a few tools we can use to visualize complex dependency trees:

4. Conclusion

In this article, we discussed how to get the dependency tree of Maven projects and learned about filtering the dependency tree. Later, we looked at a few tools and plugins to visualize the dependency tree.

As always, the full source code with all examples is available over on GitHub.


Add an Aggregation to an Elasticsearch Query

$
0
0
Contact Us Featured

1. Overview

Elasticsearch is a search and analytics engine suitable for scenarios requiring flexible filtering. Sometimes, we need to retrieve the requested data and its aggregated information. In this tutorial, we’ll explore how we can do this.

2. Elasticsearch Search With Aggregation

Let’s begin by exploring Elasticsearch’s aggregation functionality.

Once we have an Elasticsearch instance running on localhost, let’s create an index named store-items with a few documents in it:

POST http://localhost:9200/store-items/_doc
{
    "type": "Multimedia",
    "name": "PC Monitor",
    "price": 1000
}
...
POST http://localhost:9200/store-items/_doc
{
    "type": "Pets",
    "name": "Dog Toy",
    "price": 10
}

Now, let’s query it without applying any filters:

GET http://localhost:9200/store-items/_search

Now let’s take a look at the response:

{
...
    "hits": {
        "total": {
            "value": 5,
            "relation": "eq"
        },
        "max_score": 1.0,
        "hits": [
            {
                "_index": "store-items",
                "_type": "_doc",
                "_id": "J49VVI8B6ADL84Kpbm8A",
                "_score": 1.0,
                "_source": {
                    "_class": "com.baeldung.model.StoreItem",
                    "type": "Multimedia",
                    "name": "PC Monitor",
                    "price": 1000
                }
            },
            {
                "_index": "store-items",
                "_type": "_doc",
                "_id": "KI9VVI8B6ADL84Kpbm8A",
                "_score": 1.0,
                "_source": {
                    "type": "Pets",
                    "name": "Dog Toy",
                    "price": 10
                }
            },
 ...
        ]
    }
}

We have a few documents related to store items in the response. Each document corresponds to a specific type of store item.

Next, let’s say we want to know how many items we have for each type. Let’s add the aggregation section to the request body and search the index again:

GET http://localhost:9200/store-items/_search
{
    "aggs": {
        "type_aggregation": {
            "terms": {
                "field": "type"
            }
        }
    }
}

We’ve added the aggregation named type_aggregation that uses the terms aggregation.

As we can see in the response, there is a new aggregations section where we can find information about the number of documents for each type:

{
...
    "aggregations": {
        "type_aggregation": {
            "doc_count_error_upper_bound": 0,
            "sum_other_doc_count": 0,
            "buckets": [
                {
                    "key": "Multimedia",
                    "doc_count": 2
                },
                {
                    "key": "Pets",
                    "doc_count": 2
                },
                {
                    "key": "Home tech",
                    "doc_count": 1
                }
            ]
        }
    }
}

3. Spring Data Elasticsearch  Search With Aggregation

Let’s implement the functionality from the previous section using Spring Data Elasticsearch. Let’s begin by adding the dependency:

<dependency>
    <groupId>org.springframework.data</groupId>
    <artifactId>spring-data-elasticsearch</artifactId>
</dependency>

In the next step, we provide an Elasticsearch configuration class:

@Configuration
@EnableElasticsearchRepositories(basePackages = "com.baeldung.spring.data.es.aggregation.repository")
@ComponentScan(basePackages = "com.baeldung.spring.data.es.aggregation")
public class ElasticSearchConfig {
    @Bean
    public RestClient elasticsearchRestClient() {
        return RestClient.builder(HttpHost.create("localhost:9200"))
          .setHttpClientConfigCallback(httpClientBuilder -> {
              httpClientBuilder.addInterceptorLast((HttpResponseInterceptor) (response, context) ->
                  response.addHeader("X-Elastic-Product", "Elasticsearch"));
              return httpClientBuilder;
            })
          .build();
    }
    @Bean
    public ElasticsearchClient elasticsearchClient(RestClient restClient) {
        return ElasticsearchClients.createImperative(restClient);
    }
    @Bean(name = { "elasticsearchOperations", "elasticsearchTemplate" })
    public ElasticsearchOperations elasticsearchOperations(
        ElasticsearchClient elasticsearchClient) {
        ElasticsearchTemplate template = new ElasticsearchTemplate(elasticsearchClient);
        template.setRefreshPolicy(null);
        return template;
    }
}

Here we’ve specified a low-level Elasticsearch REST client and its wrapper bean implementing the ElasticsearchOperations interface. Now, let’s create a StoreItem entity:

@Document(indexName = "store-items")
public class StoreItem {
    @Id
    private String id;
    @Field(type = Keyword)
    private String type;
    @Field(type = Keyword)
    private String name;
    @Field(type = Keyword)
    private Long price;
    //getters and setters
}

We’ve utilized the same store-items index as in the last section. Since we cannot use the built-in abilities of the Spring Data repository to retrieve aggregations, we’ll need to create a repository extension. Let’s create an extension interface:

public interface StoreItemRepositoryExtension {
    SearchPage<StoreItem> findAllWithAggregations(Pageable pageable);
}

Here we have the findAllWithAggregations() method, which consumes a Pageable interface implementation and returns a SearchPage with our items. Next, let’s create an implementation of this interface:

@Component
public class StoreItemRepositoryExtensionImpl implements StoreItemRepositoryExtension {
    @Autowired
    private ElasticsearchOperations elasticsearchOperations;
    @Override
    public SearchPage<StoreItem> findAllWithAggregations(Pageable pageable) {
        Query query = NativeQuery.builder()
          .withAggregation("type_aggregation",
            Aggregation.of(b -> b.terms(t -> t.field("type"))))
          .build();
        SearchHits<StoreItem> response = elasticsearchOperations.search(query, StoreItem.class);
        return SearchHitSupport.searchPageFor(response, pageable);
    }
}

We’ve constructed the native query, incorporating the aggregation section. Following the pattern from the previous section, we use type_aggregation as the aggregation name. Then, we utilize the terms aggregation type to calculate the number of documents per specified field in the response.

Finally, let’s create a Spring Data repository where we’ll extend ElasticsearchRepository to support generic Spring Data functionality and StoreItemRepositoryExtension to incorporate our custom method implementation:

@Repository
public interface StoreItemRepository extends ElasticsearchRepository<StoreItem, String>,
  StoreItemRepositoryExtension {
}

After that, let’s create a test for our aggregation functionality:

@ExtendWith(SpringExtension.class)
@ContextConfiguration(classes = ElasticSearchConfig.class)
public class ElasticSearchAggregationManualTest {
    private static final List<StoreItem> EXPECTED_ITEMS = List.of(
      new StoreItem("Multimedia", "PC Monitor", 1000L),
      new StoreItem("Multimedia", "Headphones", 200L), 
      new StoreItem("Home tech", "Barbecue Grill", 2000L), 
      new StoreItem("Pets", "Dog Toy", 10L),
      new StoreItem("Pets", "Cat shampoo", 5L));
...
    @BeforeEach
    public void before() {
        repository.saveAll(EXPECTED_ITEMS);
    }
...
} 

We’ve created a test data set with five items, featuring a few store items for each type. We populate this data in Elasticsearch before our test case starts executing. Moving on, let’s call our findAllWithAggregations() method and see what it returns:

@Test
void givenFullTitle_whenRunMatchQuery_thenDocIsFound() {
    SearchHits<StoreItem> searchHits = repository.findAllWithAggregations(Pageable.ofSize(2))
      .getSearchHits();
    List<StoreItem> data = searchHits.getSearchHits()
      .stream()
      .map(SearchHit::getContent)
      .toList();
    Assertions.assertThat(data).containsAll(EXPECTED_ITEMS);
    Map<String, Long> aggregatedData = ((ElasticsearchAggregations) searchHits
      .getAggregations())
      .get("type_aggregation")
      .aggregation()
      .getAggregate()
      .sterms()
      .buckets()
      .array()
      .stream()
      .collect(Collectors.toMap(bucket -> bucket.key()
        .stringValue(), MultiBucketBase::docCount));
    Assertions.assertThat(aggregatedData).containsExactlyInAnyOrderEntriesOf(
      Map.of("Multimedia", 2L, "Home tech", 1L, "Pets", 2L));
}

As we can see in the response, we’ve retrieved search hits from which we can extract the exact query results. Additionally, we retrieved the aggregation data, which contains all the expected aggregations for our search results.

4. Conclusion

In this article, we’ve explored how to integrate Elasticsearch aggregation functionality into Spring Data repositories. We utilized the terms aggregation to do this. However, there are many other types of aggregations available that we can employ to cover a wide range of aggregation functionality.

As usual, the full source code can be found over on GitHub.


Java Weekly, Issue 542

$
0
0

1. Spring and Java

>> Optimizing JVM for the Cloud: Strategies for Success [infoq.com]

The JVM was never designed with the cloud in mind, but it can surely be optimized really well for it 🙂

>> JEP 476: Simplifying Java Development with Module Import [infoq.com]

No more verbose imports… finally!

>> JEP targeted to JDK 23: 467: Markdown Documentation Comments [openjdk.org]

Markdown in JavaDocs?! Well, who would have thought? 🙂

Also worth reading:

Webinars and presentations:

Time to upgrade:

2. Technical & Musings

>> Hacking our way to better team meetings [allthingsdistributed.com]

That’s what happens when engineers start engineering… meetings.

>> Feature Flags: Make or Buy? [reflectoring.io]

Complex feature flag management is a solved problem, and if it’s not core to your business, just take it off the shelf.

Also worth reading:

3. Pick of the Week

>> Why reading whitepapers takes your career to the next level (and how to do it) [highgrowthengineer.com]


How to Make Multiple REST Calls in CompletableFuture

$
0
0

1. Introduction

When creating software capabilities, an everyday activity is retrieving data from different sources and aggregating it in the response. In microservices, those sources are often external REST APIs.

In this tutorial, we’ll use Java’s CompletableFuture to efficiently retrieve data from multiple external REST APIs in parallel.

2. Why Use Parallelism in REST Calls

Let’s imagine a scenario where we need to update various fields in an object, each field value coming from an external REST call. One alternative is to call each API sequentially to update each field.

However, waiting for one REST call to complete to start another increases our service’s response time. For instance, if we call two APIs that take 5 seconds each, the total time would be at least 10 seconds since the second call needs to wait for the first to complete.

Instead, we can call all APIs in parallel so that the total time would be the time of the slowest REST call. For example, one call takes 7 seconds, and another 5 seconds. In that case, we’ll wait 7 seconds since we have processed everything in parallel and must wait for all the results to complete.

Hence, parallelism is an excellent alternative to reduce our services’ response times, making them more scalable and improving user experience.

3. Using CompletableFuture for Parallelism

The CompletableFuture class in Java is a handy tool for combining and running different parallel tasks and handling individual task errors.

In the following sections, we’ll use it to combine and run three REST calls for each object in an input list.

3.1. Creating the Demo Application

Let’s first define our target POJO for updates:

public class Purchase {
    String orderDescription;
    String paymentDescription;
    String buyerName;
    String orderId;
    String paymentId;
    String userId;
    // all-arg constructor, getters and setters
}

The Purchase class has three fields that should be updated, each one by a different REST call queried by an ID.

Let’s first create a class that defines a RestTemplate bean and a domain URL for the REST calls:

@Component
public class PurchaseRestCallsAsyncExecutor {
    RestTemplate restTemplate;
    static final String BASE_URL = "https://internal-api.com";
    // all-arg constructor
}

Now, let’s define the /orders API call:

public String getOrderDescription(String orderId) {
    ResponseEntity<String> result = restTemplate.getForEntity(String.format("%s/orders/%s", BASE_URL, orderId),
        String.class);
    return result.getBody();
}

Then, let’s define the /payments API call:

public String getPaymentDescription(String paymentId) {
    ResponseEntity<String> result = restTemplate.getForEntity(String.format("%s/payments/%s", BASE_URL, paymentId),
        String.class);
    return result.getBody();
}

And finally, we define the /users API call:

public String getUserName(String userId) {
    ResponseEntity<String> result = restTemplate.getForEntity(String.format("%s/users/%s", BASE_URL, userId),
        String.class);
    return result.getBody();
}

All three methods use the getForEntity() method to make the REST call and wrap the result in a ResponseEntity object.

Then, we call getBody() to get the response body from the REST call.

3.2. Making Multiple REST Calls With CompletableFuture

Now, let’s create the method that builds and runs a set of three CompletableFutures:

public void updatePurchase(Purchase purchase) {
    CompletableFuture.allOf(
      CompletableFuture.supplyAsync(() -> getOrderDescription(purchase.getOrderId()))
        .thenAccept(purchase::setOrderDescription),
      CompletableFuture.supplyAsync(() -> getPaymentDescription(purchase.getPaymentId()))
        .thenAccept(purchase::setPaymentDescription),
      CompletableFuture.supplyAsync(() -> getUserName(purchase.getUserId()))
        .thenAccept(purchase::setBuyerName)
    ).join();
}

We used the allOf() method to build the steps of our CompletableFuture. Each argument is a parallel task in the form of another CompletableFuture built with the REST call and its result.

To build each parallel task, we first used the supplyAsync() method to provide the Supplier from which we’ll retrieve our data. Then, we use thenAccept() to consume the result from supplyAsync() and set it on the corresponding field in the Purchase class.

At the end of allOf(), we’ve just built the tasks up to there. No action was taken.

Finally, we call join() at the end to run all tasks in parallel and collect their results. Since join() is a thread-blocking operation, we only call it at the end instead of at each task step. This is to optimize the application performance by having fewer thread blocks.

Since we didn’t provide a customized ExecutorService to the supplyAsync() method, all tasks run in the same executor. By default, Java uses ForkJoinPool.commonPool().

In general, it’s a good practice to specify a custom ExecutorService to supplyAsync() so we will have more control over our thread pool parameters.

3.3. Executing Multiple REST Calls for Each Element in a List

To apply our updatePurchase() method on a collection, we can simply call it in a forEach() loop:

public void updatePurchases(List<Purchase> purchases) {
    purchases.forEach(this::updatePurchase);
}

Our updatePurchases() method receives a list of Purchases and applies the previously created updatePurchase() method to each element.

Each call to updatePurchases() runs three parallel tasks as defined in our CompletableFuture. Hence, each purchase has its own CompletableFuture object to run the three parallel REST calls.

4. Handling Errors

In distributed systems, it’s pretty common to have service unavailability or network failures. Those failures might happen in external REST APIs that we, as the clients of that API, are unaware of. For instance, if the application is down, the request sent over the wire never completes.

4.1. Handling Errors Gracefully Using handle()

Exceptions may occur during the REST call execution. For instance, if the API service is down or if we input invalid parameters, we’ll get errors.

Hence, we can handle each REST call exception individually using the handle() method:

public <U> CompletableFuture<U> handle(BiFunction<? super T, Throwable, ? extends U> fn)

The method argument is a BiFunction containing the result and the exception from the previous task as arguments.

To illustrate, let’s add the handle() step into one of our CompletableFuture‘s steps:

public void updatePurchaseHandlingExceptions(Purchase purchase) {
    CompletableFuture.allOf(
        CompletableFuture.supplyAsync(() -> getPaymentDescription(purchase.getPaymentId()))
          .thenAccept(purchase::setPaymentDescription)
          .handle((result, exception) -> {
              if (exception != null) {
                  // handle exception
                  return null;
              }
              return result;
          })
    ).join();
}

In the example, handle() gets a Void type from setOrderDescription() called by thenAccept().

Then, it stores in exception any error thrown inside the thenAccept() actions. Hence, we used it to check for an error and handle it properly in the if statement.

Finally, handle() returns the value passed as an argument if no exception was thrown. Otherwise, it returns null.

4.2. Handling REST Call Timeouts

When we work with CompletableFuture, we can specify a task timeout similar to the one we define in our REST calls. Hence, if a task isn’t completed in the specified time, Java finishes the task execution with a TimeoutException.

To do that, let’s modify one of our CompletableFuture’s tasks to handle timeouts:

public void updatePurchaseHandlingExceptions(Purchase purchase) {
    CompletableFuture.allOf(
        CompletableFuture.supplyAsync(() -> getOrderDescription(purchase.getOrderId()))
          .thenAccept(purchase::setOrderDescription)
          .orTimeout(5, TimeUnit.SECONDS)
          .handle((result, exception) -> {
              if (exception instanceof TimeoutException) {
                  // handle exception
                  return null;
              }
              return result;
          })
    ).join();
}

We’ve added the orTimeout() line to our CompletableFuture builder to stop the task execution abruptly if it doesn’t complete in 5 seconds.

We’ve also added an if statement in the handle() method to handle TimeoutException separately.

Adding timeouts to CompletableFuture guarantees that the task always finishes. This is important to avoid a thread hanging indefinitely, waiting for the result of an operation that may never finish. Therefore, it decreases the number of threads in a long-time RUNNING state and increases the application’s health.

5. Conclusion

A common task when working with distributed systems is to make REST calls to different APIs to build a proper response.

In this article, we’ve seen how to use CompletableFuture to build a set of parallel REST call tasks for every object in a collection.

We’ve also seen how to handle timeouts and general exceptions gracefully using the handle() method.

As always, the source code is available over on GitHub.


The Difference Between doAnswer() and thenReturn() in Mockito

$
0
0

1. Overview

Mockito is a widely used unit testing framework for Java applications. It provides various APIs to mock the behavior of objects. In this tutorial, we’ll explore the usage of doAnswer() and thenReturn() stubbing techniques, and compare them. We can use both APIs for stubbing or mocking methods, but in some cases, we can only use one.

2. Dependencies

Our code will use Mockito in combination with JUnit 5 for our code examples, and we need to add a few dependencies to our pom.xml file:

<dependency>
    <groupId>org.junit.jupiter</groupId>
    <artifactId>junit-jupiter-api</artifactId>
    <version>5.10.0</version>
    <scope>test</scope>
</dependency>
<dependency>
    <groupId>org.junit.jupiter</groupId>
    <artifactId>junit-jupiter-engine</artifactId>
    <version>5.10.0</version>
    <scope>test</scope>
</dependency>
<dependency>
    <groupId>org.mockito</groupId>
    <artifactId>mockito-core</artifactId>
    <version>5.11.0</version>
    <scope>test</scope>
</dependency>

We can find the JUnit 5 API library, the JUnit 5 Engine library, and the Mockito library in the Maven Central repository.

3. Stubbing Methods Using thenReturn()

We can use the thenReturn() stubbing technique in Mockito to stub methods that return a value. To demonstrate, we’ll test the get() and add() operations of a list using thenReturn() and doAnswer():

public class BaeldungList extends AbstractList<String> {
    @Override
    public String get(final int index) {
        return null;
    }
    @Override
    public void add(int index, String element) {
        // no-op
    }
    @Override
    public int size() {
        return 0;
    }
}

In the sample code above, the get() method returns a String. First, we’ll stub the get() method using thenReturn() and validate the invocation by asserting its return value is the same as the stubbed method:

@Test
void givenThenReturn_whenGetCalled_thenValue() {
    BaeldungList myList = mock(BaeldungList.class);
    when(myList.get(anyInt()))
      .thenReturn("answer me");
    assertEquals("answer me", myList.get(1));
}

3.1. Stubbing Methods to Return Multiple Values Using thenReturn()

In addition to this, the thenReturn() API allows returning different values in consecutive calls. We can chain its invocations to return multiple values. Moreover, we can pass multiple values in a single method call:

@Test
void givenThenReturn_whenGetCalled_thenReturnChaining() {
    BaeldungList myList = mock(BaeldungList.class);
    when(myList.get(anyInt()))
      .thenReturn("answer one")
      .thenReturn("answer two");
    assertEquals("answer one", myList.get(1));
    assertEquals("answer two", myList.get(1));
}
@Test
void givenThenReturn_whenGetCalled_thenMultipleValues() {
    BaeldungList myList = mock(BaeldungList.class);
    when(myList.get(anyInt()))
      .thenReturn("answer one", "answer two");
    assertEquals("answer one", myList.get(1));
    assertEquals("answer two", myList.get(1));
}

4. Stubbing void Methods Using doAnswer()

The add() method is a void method and does not return anything. We can’t stub the add() method with thenReturn() as the thenReturn() stubbing can’t be used with void methods. Instead, we’ll use doAnswer() as it allows the stubbing of void methods.  So, we’ll stub the add() method using doAnswer(), and the Answer provided in the stub is invoked when the add() method is called:

@Test
void givenDoAnswer_whenAddCalled_thenAnswered() {
    BaeldungList myList = mock(BaeldungList.class);
    doAnswer(invocation -> {
        Object index = invocation.getArgument(0);
        Object element = invocation.getArgument(1);
        // verify the invocation is called with the correct index and element
        assertEquals(3, index);
        assertEquals("answer", element);
        // return null as this is a void method
        return null;
    }).when(myList)
      .add(any(Integer.class), any(String.class));
    myList.add(3, "answer");
}

In the doAnswer(), we validate that the invocation to the add() method is called, and we assert the parameters it’s called with are as expected.

4.1. Stubbing Non-void Methods Using doAnswer()

Since we can stub methods with an Answer that returns a value instead of null, we can use the doAnswer() method to stub non-void methods. For example, we’ll test the get() method by stubbing it with doAnswer() and returning an Answer that returns a String:

@Test
void givenDoAnswer_whenGetCalled_thenAnswered() {
    BaeldungList myList = mock(BaeldungList.class);
    doAnswer(invocation -> {
        Object index = invocation.getArgument(0);
        // verify the invocation is called with the index
        assertEquals(1, index);
        // return the value we want 
        return "answer me";
    }).when(myList)
      .get(any(Integer.class));
    assertEquals("answer me", myList.get(1));
}

4.2. Stubbing Methods to Return Multiple Values Using doAnswer()

We must note that we can only return one Answer in the doAnswer() method. However, we can put conditional logic in the doAnswer() method that returns different values based on the arguments received by the invocation. So, in the sample code below, we’ll return different values depending on the index we call the get() method with:

@Test
void givenDoAnswer_whenGetCalled_thenAnsweredConditionally() {
    BaeldungList myList = mock(BaeldungList.class);
    doAnswer(invocation -> {
        Integer index = invocation.getArgument(0);
        switch (index) {
            case 1: 
                return "answer one";
            case 2: 
                return "answer two";
            default: 
                return "answer " + index;
        }
    }).when(myList)
      .get(anyInt());
    assertEquals("answer one", myList.get(1));
    assertEquals("answer two", myList.get(2));
    assertEquals("answer 3", myList.get(3));
}

5. Conclusion

The Mockito framework provides many stubbing/mocking techniques such as doAnswer(), doReturn(), thenReturn(), thenAnswer(), and many more to facilitate various types and styles of Java code and its testing. We have used the doAnswer() and the thenReturn() to stub non-void methods and perform similar tests. However, we can only use doAnswer() to stub a void method, as the thenReturn() method is unable to perform this function. As usual, all of our code samples are available over on GitHub.


How to Set JVM Arguments in IntelliJ IDEA?

$
0
0

1. Overview

IntelliJ IDEA is among the most popular and powerful IDEs for developing software in various programming languages.

In this tutorial, we’ll learn how to configure JVM arguments in IntelliJ IDEA, allowing us to tune the JVM for development and debugging.

2. Basics of JVM Arguments

We can choose JVM arguments to match our specific needs depending on the requirements of our application. The correct JVM arguments can improve an application’s performance and stability and make it easier to debug our application.

2.1. Types of JVM Arguments

There are a few categories of JVM arguments:

  • Memory allocation – such as -Xms (initial heap size) or -Xmx (maximum heap size)
  • Garbage collection – such as -XX:+UseConcMarkSweepGC (enables the concurrent mark-sweep garbage collector) or -XX:+UseParallelGC (enables the parallel garbage collector)
  • Debugging – such as -XX:+HeapDumpOnOutOfMemoryError (heap dump when an OutOfMemoryError occurs) or -agentlib:jdwp=transport=dt_socket,server=y,suspend=n,address=5005 for remote debugging through JDWP on port 5005.
  • System properties – such as -Djava.version (Java version) or -Dcustom.property=value (defines a custom property with its value).

2.2. When to Use JVM Arguments

The decision to set specific JVM arguments depends on several factors, including the complexity of the application and its performance requirements.

While setting JVM arguments is sometimes a technical necessity, it may also be a part of the team’s workflow. For instance, a team may have a policy of setting the JVM argument for enabling profiling to identify performance bottlenecks.

Using commonly used JVM arguments can enhance our application’s performance and functionality.

3. Setting JVM Arguments in IntelliJ IDEA

Before we delve into the steps for setting up JVM arguments in the IDE, let’s first understand why it can be beneficial.

3.1. Why JVM Arguments Matter in IntelliJ IDEA

IntelliJ IDEA offers a user-friendly interface for configuring JVM arguments when the IDE runs our JVM. This is easier than going to the command line and running java manually.

Alternative methods of setting JVM arguments benefit from being environment-independent, as the configurations made in IntelliJ IDEA are specific to the IDE.

3.2. Setting JVM Arguments With Run/Debug Configurations

Let’s launch IntelliJ IDEA and open an existing project or a new one for which we’ll configure JVM arguments. We continue by clicking “Run” and selecting “Edit Configurations…”.

From there, we can create a run/debug configuration for our application by clicking the plus symbol and selecting “Application”:

Run configuration with VM options

We’ll add the text field for adding JVM arguments by selecting “Add VM options” in the “Modify options” dropdown and add all the required JVM arguments to the newly added text field.

With the desired configuration in place, we can run or debug our application using the configured JVM arguments.

4. Setting JVM Arguments With a VM Options File

Using a file with custom JVM arguments in IntelliJ IDEA is convenient for managing complex or extensive configurations, offering a more organized and manageable approach.

Let’s open a text editor, add all the required JVM arguments, and save the file with a meaningful name and the .vmoptions extension:

Custom JVM options file

For instance, we might name it custom_jvm_args.vmoptions.

Following the steps from the previous section in “Run/Debug Configurations”, let’s add the text field for JVM arguments.

Now, we’ll add the path to our custom file and not individual JVM arguments using the following format: @path/to/our/custom_jvm_args.vmoptions:

Run configuration with VM options file

5. Managing IntelliJ IDEA JVM Arguments

Configuring JVM arguments for IntelliJ IDEA isn’t typical for regular development, but we need to adjust them in some scenarios.

We might be working with an atypically large project or complex codebase, which would require the IDE to run with more memory than the default settings provide. Alternatively, we might use specific external tools or plugins integrated into IntelliJ IDEA, which require specific JVM arguments to run correctly.

A default configuration is located in the IDE’s installation directory. However, it isn’t recommended that this be changed as it gets overridden when we upgrade the IDE.

Instead, let’s edit a copy of the default configuration, which overrides the default configuration, by navigating to “Help” and then “Edit Custom VM Options…”:

IntelliJ IDEA custom VM options

Here, we can set the required JVM arguments.

6. Conclusion

In this article, we looked at setting JVM arguments in IntelliJ IDEA for our applications. We discussed the importance of setting JVM arguments during development.

Additionally, we briefly discussed configuring the JVM arguments for the IDE and the scenarios that might require it.

We also learned the basics of JVM arguments, including different types of arguments and their proper usage.
       

Extract Text From a HTML Tag with Regex

$
0
0
Contact Us Featured

1. Introduction

When working with HTML content in Java, extracting specific text from HTML tags is common. While using regular expressions (regex) for parsing HTML is generally discouraged due to its complex structure, it can sometimes be sufficient for simple tasks.

In this tutorial, we’ll see how to extract text from HTML tags using regex in Java.

2. Using Pattern and Matcher Classes

Java provides the Pattern and Matcher classes from java.util.regex, allowing us to define and apply regular expressions to extract text from strings. Below is an example of how to extract text from a specified HTML tag using regex:

@Test
void givenHtmlContentWithBoldTags_whenUsingPatternMatcherClasses_thenExtractText() {
    String htmlContent = "<div>This is a <b>Baeldung</b> article for <b>extracting text</b> from HTML tags.</div>";
    String tagName = "b";
    String patternString = "<" + tagName + ">(.*?)</" + tagName + ">";
    Pattern pattern = Pattern.compile(patternString);
    Matcher matcher = pattern.matcher(htmlContent);
    List<String> extractedTexts = new ArrayList<>();
    while (matcher.find()) {
        extractedTexts.add(matcher.group(1));
    }
    assertEquals("Baeldung", extractedTexts.get(0));
    assertEquals("extracting text", extractedTexts.get(1));
}

Here, we first define the HTML content, denoted as htmlContent, which contains HTML with <b> tags. Moreover, we specify the tag name tagName as “b” to extract text from <b> tags.

Then, we compile the regex pattern using the compile() method, where patternString is “<b>(.*?)</b>” to match and extract text within <b> tags. Afterward, we use a while loop with the find() method to iterate over all matches and add them to the list named extractedTexts.

Finally, we assert that two texts (“Baeldung” and “extracting text“) are extracted from the <b> tags.

To handle cases where tag contents may contain newlines, we can modify the pattern string by adding (?s) as follows:

String patternString = "(?s)<" + tagName + ">(.*?)</" + tagName + ">";

Here, we use a regex pattern “(?s)<p>(.*?)</p>” with dotall mode enabled (?s) to match <p> tags across multiple lines.

3. Using JSoup for HTML Parsing and Extraction

For more complex HTML parsing tasks, especially those involving nested tags, using a dedicated library like JSoup is recommended. Let’s demonstrate how to use JSoup to extract text from <p> tags, including handling nested tags:

@Test
void givenHtmlContentWithNestedParagraphTags_thenExtractAllTextsFromHtmlTag() {
    String htmlContent = "<div>This is a <p>multiline\nparagraph <strong>with nested</strong> content</p> and <p>line breaks</p>.</div>";
    Document doc = Jsoup.parse(htmlContent);
    Elements paragraphElements = doc.select("p");
    List<String> extractedTexts = new ArrayList<>();
    for (Element paragraphElement : paragraphElements) {
        String extractedText = paragraphElement.text();
        extractedTexts.add(extractedText);
    }
    assertEquals(2, extractedTexts.size());
    assertEquals("multiline paragraph with nested content", extractedTexts.get(0));
    assertEquals("line breaks", extractedTexts.get(1));
}

Here, we use the parse() method to parse the htmlContent string, converting it into a Document object. Next, we employ the select() method on the doc object to select all <p> elements within the parsed document.

Subsequently, we iterate over the selected paragraphElements collection, extracting text content from each <p> element using the paragraphElement.text() method.

4. Conclusion

In conclusion, we have explored different approaches to extracting text from HTML tags in Java. Firstly, we discussed using the Pattern and Matcher classes for regex-based text extraction. Additionally, we examined leveraging JSoup for more complex HTML parsing tasks.

As always, the complete source code for the examples is available over on GitHub.


How to Compile Java to WASM (Web Assembly)

$
0
0

1. Overview

In the fast-paced world of web development, the introduction of WASM (WebAssembly) has presented developers with new possibilities. It allows them to leverage the speed and adaptability of compiled languages on the web platform.

In this tutorial, we’ll explore the process of compiling Java to WebAssembly and investigate the available tools and methodologies.

2. What is WASM (WebAssembly)

WebAssembly is a low-level binary instruction format that can be run in modern web browsers. It allows developers to run code written in languages like C, C++, and others on web browsers at near-native speeds. WebAssembly is designed to run alongside JavaScript, allowing both to work together.

WebAssembly isn’t intended to be written by hand. Instead, it’s designed as an effective compilation target for source languages like C, C++, and Rust. We can import WebAssembly modules into a web (or Node.js) application, thus exposing its functions for utilization through JavaScript.

We need a specialized compiler to convert the source code into the WASM format for using native languages with WebAssembly. To execute the format in the browser, we must load and initialize the binary file using JavaScript. The below figure illustrates the path from native code to a WASM file:

How to Use WASM in browser

JS serves as the central interface between WASM, HTML, and CSS, as WASM currently lacks direct access to a web page’s Document Object Model (DOM). WASM provides imports and exports for interaction with JS. The exports consist of functions from the source code compiled to WASM, which JS can access and execute similarly to JS functions. The imports allow JS functions to be referenced within WASM.

3. Different Tools for Compiling Java to WASM

Java, one of the most popular programming languages, has also found its way into this ecosystem through various tools and frameworks. Now, we’ll look into different prominent tools for converting Java code into WebAssembly:

3.1. TeaVM

TeaVM is an ahead-of-time compiler for Java bytecode that emits JavaScript and WebAssembly that runs in a browser. The source code isn’t required to be Java, so TeaVM supports any JVM language, including Kotlin and Scala. TeaVM produces smaller JavaScript that performs better in the browser.

TeaVM optimizer can eliminate dead code and produce very small JavaScript. It reconstructs the original structure of a method, resulting in JavaScript that is almost similar to what we manually write. It also supports threads and is very fast.

3.2. JWebAssembly

JWebAssembly specializes in compiling Java bytecode to WebAssembly code. It can compile any language that compiles to Java bytecode like Groovy, Kotlin, and Scala. JWebAssembly leverages the LLVM toolchain to generate optimized WebAssembly output.

It also supports features such as native methods, exception handling, and garbage collection. JWebAssembly optimizer fine-tunes the WebAssembly output of individual methods post-transpilation. It ensures optimal performance before finalizing the output.

3.3. CheerpJ

CheerpJ is a WebAssembly-based JVM for the browser. It can execute Java applications from the browser without Java installation. CheerpJ can run any Java application, applet, and library on modern browsers.

CheerpJ supports 100% of the Java 8 SE Runtime, as well as native reflection and dynamic class creation. It also supports file access, networking, clipboard, audio, and printing. It is also compatible with Java Swing, Oracle Forms, EBS, and other third-party frameworks.

4. Conclusion

In this article, we understood WASM and looked at an overview of the tools used to convert Java code into WebAssembly.

TeaVM is excellent for writing new Java applications targeting the browser, whereas JWebAssembly has a limited runtime and is good for writing new applications from scratch. CheerpJ doesn’t require any change to the application’s source code; it’s meant to convert existing Java applications to HTML5.

The choice of Java as a WASM tool depends on project requirements, performance considerations, and developer preferences. By understanding the features and trade-offs of each tool, we can decide on the appropriate framework.


Disable Logging From a Specific Class in Logback

$
0
0

1. Overview

Logging is a critical component of any application, offering insights into its behavior and health. However, excessive logging can clutter output and obscure useful information, especially when verbose logs come from specific classes.

In this tutorial, we’ll explore how to disable logging from a specific class in Logback.

2. Why Disable Logging?

Disabling logging for specific classes can be beneficial in various scenarios:

  • Reducing Log Volume: reducing the volume of logs can help us focus on relevant information and reduce storage/processing costs.
  • Security: Some classes may log sensitive information inadvertently; silencing them can mitigate this risk.
  • Performance: Excessive logging can impact performance; disabling verbose loggers can help maintain optimal application performance.

3. Understanding Logback Configuration

Firstly, the Logback configuration is managed through an XML file, typically named logback.xml. This file defines loggers, appenders, and their formatting, allowing developers to control what gets logged and where.

A typical configuration includes one or more appenders and a root logger. Appenders define output destinations like the console or a file.

Here’s a simple example:

<configuration>
    <appender name="console" class="ch.qos.logback.core.ConsoleAppender">
        <encoder>
            <pattern>%d{HH:mm:ss.SSS} [%thread] %-5level %logger{36} - %msg %n</pattern>
        </encoder>
    </appender>
    <root level="INFO">
        <appender-ref ref="console"/>
    </root>
</configuration>

This configuration directs INFO level (and higher) logs to the console, formatted with a date, thread name, log level, and log message.

4. Disabling Logging From a Specific Class

To disable logging from a specific class in Logback, we can define a logger for that class with the level set to OFF. This will silence all logging calls from the class.

4.1. Our VerboseClass

Let’s create our example VerboseClass to illustrate this tutorial:

public class VerboseClass {
    private static final Logger logger = LoggerFactory.getLogger(VerboseClass.class);
    public void process() {
        logger.info("Processing data in VerboseClass...");
    }
    public static void main(String[] args) {
        VerboseClass instance = new VerboseClass();
        instance.process();
        logger.info("Main method completed in VerboseClass");
    }
}

Then we can run it to see the log output:

17:49:53.901 [main] INFO  c.b.l.disableclass.VerboseClass - Processing data in VerboseClass... 
17:49:53.902 [main] INFO  c.b.l.disableclass.VerboseClass - Main method completed in VerboseClass 

4.2. Disabling Logging for VerboseClass

To disable its logs, add a logger entry in logback.xml:

<logger name="com.baeldung.logback.disableclass.VerboseClass" level="OFF"/>

Here’s how the logback.xml would look with this logger added:

<configuration>
    <appender name="console" class="ch.qos.logback.core.ConsoleAppender">
        <encoder>
            <pattern>%d{HH:mm:ss.SSS} [%thread] %-5level %logger{36} - %msg %n</pattern>
        </encoder>
    </appender>
    <logger name="com.baeldung.logback.disableclass.VerboseClass" level="OFF"/>
    <root level="INFO">
        <appender-ref ref="console"/>
    </root>
</configuration>

With this configuration, VerboseClass will no longer output logs, while other classes will continue logging at the INFO level or above.

Finally, we can run this class again and see that no logs are displayed.

5. Conclusion

In summary, disabling logging from specific classes in Logback is a powerful feature that helps manage the signal-to-noise ratio in application logs. Setting the logging level to OFF for verbose or non-essential classes ensures that logs remain clear and meaningful. This also affects the overall performance and security of the application.

The example code from this article can be found over on GitHub.


Fault Tolerance in Java Using Failsafe

$
0
0

1. Introduction

In this article, we’re going to explore the Failsafe library and see how it can be incorporated into our code to make it more resilient to failure cases.

2. What Is Fault Tolerance?

No matter how well we build our applications, there will always be ways in which things can go wrong. Often, these are outside our control — for example, calling a remote service that isn’t available. As such, we must build our applications to tolerate these failures and give our users the best experience.

We can react to these failures in many different ways, depending on precisely what we’re doing and what went wrong. For example, if we’re calling a remote service that we know has intermittent outages, we could try again and hope the call works. Or we could try calling a different service that provides the same functionality.

There are also ways to structure our code to avoid these situations. For example, limiting the number of concurrent calls to the same remote service will reduce its load.

3. Dependencies

Before we can use Failsafe, we need to include the latest version in our build, which is 3.3.2 at the time of writing.

If we’re using Maven, we can include it in pom.xml:

<dependency>
    <groupId>dev.failsafe</groupId>
    <artifactId>failsafe</artifactId>
    <version>3.3.2</version>
</dependency>

Or if we’re using Gradle, we can include it in build.gradle:

implementation("dev.failsafe:failsafe:3.3.2")

At this point, we’re ready to start using it in our application.

4. Executing Actions With Failsafe

Failsafe works with the concept of policies. Each policy determines whether it considers the action a failure and how it will react to this.

4.1. Determining Failure

By default, a policy will consider an action a failure if it throws any Exception. However, we can configure the policy only to handle the exact set of exceptions that interest us, either by type or by providing a lambda that checks them:

policy
  .handle(IOException.class)
  .handleIf(e -> e instanceof IOException)

We can also configure them to treat particular results from our action as a failure, either as an exact value or by providing a lambda to check it for us:

policy
  .handleResult(null)
  .handleResultIf(result -> result < 0)

By default, policies always treat all exceptions as failures. If we add handling for exceptions, this will replace that behavior, but adding handling for particular results will be in addition to a policy’s exception handling. Further, all of our handle checks are additive – we can add as many as we want, and if any checks pass, the policy will consider the action failed.

4.2. Composing Policies

Once we’ve got our policies, we can build an executor from them. This is our means to execute functionality and get results out – either the actual result of our action or modified by our policies. We can either do this by passing all of our policies into Failsafe.with(), or we can extend this by using the compose() method:

Failsafe.with(defaultFallback, npeFallback, ioFallback)
  .compose(timeout)
  .compose(retry);

We can add as many policies as we need in whatever order. The policies are always executed in the order they’re added, each wrapping the next. So, the above will be:

Each of these will react appropriately to the exception or return value from the policy or action that it’s wrapping. This allows us to act as we need to. For example, the above applies the timeout across all of the retries. We could instead swap that to apply the timeout to each attempted retry individually.

4.3. Executing Actions

Once we’ve composed our policies, Failsafe returns a FailsafeExecutor instance to us. This instance then has a set of methods that we can use to execute our actions, depending on precisely what we want to execute and how we want it returned.

The most straightforward ways of executing an action are T get<T>(CheckedSupplier<T>) and void run(CheckedRunnable). CheckedSupplier and CheckedRunnable are both functional interfaces, meaning we can call these methods with lambdas or method references if desired.

The difference between these is that get() will return the result of the action, whereas run() will return void – and the action must also return void:

Failsafe.with(policy).run(this::runSomething);
var result = Failsafe.with(policy).get(this::doSomething);

In addition, we have various methods that can run our actions asynchronously, returning a CompletableFuture for our result. However, these are outside the scope of this article.

5. Failsafe Policies

Now that we know how to build a FailsafeExecutor to execute our actions, we need to construct the policies to use it. Failsafe provides several standard policies. Each uses the builder pattern to make constructing them easier.

5.1. Fallback Policy

The most straightforward policy that we can use is a Fallback. This policy will allow us to provide a new result for cases when the chained action fails.

The easiest way to use this is to simply return a static value:

Fallback<Integer> policy = Fallback.builder(0).build();

In this case, our policy will return a fixed value of “0” if the action fails for any reason.

In addition, we can use a CheckedRunnable or CheckedSupplier to generate our alternative value. Depending on our needs, this could be as simple as writing out log messages before returning a fixed value or as complicated as running an entirely different execution path:

Fallback<Result> backupService = Fallback.of(this::callBackupService)
  .build();
Result result = Failsafe.with(backupService)
  .get(this::callPrimaryService);

In this case, we’ll execute callPrimaryService(). If this fails, we’ll automatically execute callBackupService() and attempt to get a result that way.

Finally, we can use Fallback.ofException() to throw a specific exception in the case of any failure. This allows us to collapse any of the configured failure reasons down to a single expected exception, which we can then handle as needed:

Fallback<Result> throwOnFailure = Fallback.ofException(e -> new OperationFailedException(e));

5.2. Retry Policies

The Fallback policy allows us to give an alternative result when our action fails. Instead of this, the Retry policy allows us to simply try the original action again.

With no configuration, this policy will call the action up to three times and either return the result of it on success or throw a FailsafeException if we never got a success:

RetryPolicy<Object> retryPolicy = RetryPolicy.builder().build();

This is already really useful since it means that if we have an occasionally faulty action, we can retry it a couple of times before giving up.

However, we can go further and configure this behavior. The first thing we can do is to adjust the number of times it will retry using the withMaxAttempts() call:

RetryPolicy<Object> retryPolicy = RetryPolicy.builder()
  .withMaxAttempts(5)
  .build();

This will now execute the action up to five times instead of the default.

We can also configure it to wait a fixed amount of time between each attempt. This can be useful in cases where a short-lived failure, such as a networking blip, doesn’t instantly fix itself:

RetryPolicy<Object> retryPolicy = RetryPolicy.builder()
  .withDelay(Duration.ofMillis(250))
  .build();

There are also more complex variations to this that we can use. For example, withBackoff() will allow us to configure an incrementing delay:

RetryPolicy<Object> retryPolicy = RetryPolicy.builder()
  .withMaxAttempts(20)
  .withBackoff(Duration.ofMillis(100), Duration.ofMillis(2000))
  .build();

This will delay for 100 milliseconds after the first failure and 2,000 milliseconds after the 20th failure, gradually increasing the delay on intervening failures.

5.3. Timeout Policies

Where Fallback and Retry policies help us achieve a successful result from our actions, the Timeout policy does the opposite. We can use this to force a failure if the action we’re calling takes longer than we’d like. This can be invaluable if we need to fail when an action is taking too long.

When we construct our Timeout, we need to provide the target duration after which the action will fail:

Timeout<Object> timeout = Timeout.builder(Duration.ofMillis(100)).build();

By default, this will run the action to completion and then fail if it takes longer than the duration we provided.

Alternatively, we can configure it to interrupt the action when the timeout is reached instead of running to completeness. This is useful when we need to respond quickly rather than simply failing because it was too slow:

Timeout<Object> timeout = Timeout.builder(Duration.ofMillis(100))
  .withInterrupt()
  .build();

We can usefully compose Timeout policies with Retry policies as well. If we compose the timeout outside of the retry, then the timeout period spreads across all of the retries:

Timeout<Object> timeoutPolicy = Timeout.builder(Duration.ofSeconds(10))
  .withInterrupt()
  .build();
RetryPolicy<Object> retryPolicy = RetryPolicy.builder()
  .withMaxAttempts(20)
  .withBackoff(Duration.ofMillis(100), Duration.ofMillis(2000))
  .build();
Failsafe.with(timeoutPolicy, retryPolicy).get(this::perform);

This will attempt our action up to 20 times, with an increasing delay between each attempt, but will give up if the entire attempt takes longer than 10 seconds to execute.

Conversely, we can compose the timeout inside of the retry so that each individual attempt will have a timeout configured:

Timeout<Object> timeoutPolicy = Timeout.builder(Duration.ofMillis(500))
  .withInterrupt()
  .build();
RetryPolicy<Object> retryPolicy = RetryPolicy.builder()
  .withMaxAttempts(5)
  .build();
Failsafe.with(retryPolicy, timeoutPolicy).get(this::perform);

This will attempt the action five times, and each attempt will be canceled if it takes longer than 500ms.

5.4. Bulkhead Policies

So far, all the policies we’ve seen have been about controlling how our application reacts to failures. However, there are also policies that we can use to reduce the chance of failures in the first place.

Bulkhead policies exist to restrict the number of concurrent times an action is being performed. This can reduce the load on external services and, therefore, help to reduce the chance that they’ll fail.

When we construct a Bulkhead, we need to configure the maximum number of concurrent executions that it supports:

Bulkhead<Object> bulkhead = Bulkhead.builder(10).build();

By default, this will immediately fail any actions when the bulkhead is already at capacity.

We can also configure the bulkhead to wait when new actions come in, and if capacity opens up, then it’ll execute the waiting task:

Bulkhead<Object> bulkhead = Bulkhead.builder(10)
  .withMaxWaitTime(Duration.ofMillis(1000))
  .build();

Tasks will be allowed through the bulkhead in the order they’re executed as soon as capacity becomes available. Any task that has to wait longer than this configured wait time will fail as soon as the wait time expires. However, other tasks behind them may then get to execute successfully.

5.5. Rate Limiter Policies

Similar to bulkheads, rate limiters help restrict the number of executions of an action that can happen. However, unlike bulkheads, which only track the number of actions currently being executed, a rate limiter restricts the number of actions in a given period.

Failsafe gives us two rate limiters that we can use – bursty and smooth.

Bursty rate limiters work with a fixed time window and allow a maximum number of executions in this window:

RateLimiter<Object> rateLimiter = RateLimiter.burstyBuilder(100, Duration.ofSeconds(1))
  .withMaxWaitTime(Duration.ofMillis(200))
  .build();

In this case, we’re able to execute 100 actions every second. We’ve configured a wait time that actions can block until they’re executed or failed. These are called bursty because the counts drop back to zero at the end of the window, so we can suddenly allow executions to start again.

In particular, with our wait time, all executions blocking that wait time will suddenly be able to execute at the end of the rate limiter window.

Smooth rate limiters work instead by spreading the executions over the time window:

RateLimiter<Object> rateLimiter = RateLimiter.smoothBuilder(100, Duration.ofSeconds(1))
  .withMaxWaitTime(Duration.ofMillis(200))
  .build();

This looks very similar to before. However, in this case, the executions will be smoothed out over the window. This means instead of allowing 100 executions within a one-second window, we allow one execution every 1/100 seconds. Any executions faster than this will hit our wait time or else fail.

5.6. Circuit Breaker Policies

Unlike most other policies, we can use circuit breakers so our application can fail fast if the action is perceived to be already failing. For example, if we’re making calls to a remote service and know it’s not responding, then there’s no point in trying – we can immediately fail without spending the time and resources first.

Circuit breakers work in a three-state system. The default state is Closed, which means that all actions are attempted as if the circuit breaker weren’t present. However, if enough of those actions fail, the circuit breaker will move to Open.

The Open state means no actions are attempted, and all calls will immediately fail. The circuit breaker will remain like this for some time before moving to Half-Open.

The Half-Open state means that actions are attempted, but we have a different failure threshold to determine whether we move to Closed or Open.

For example:

CircuitBreaker<Object> circuitBreaker = CircuitBreaker.builder()
  .withFailureThreshold(7, 10)
  .withDelay(Duration.ofMillis(500))
  .withSuccessThreshold(4, 5)
  .build();

This setup will move from Closed to Open if we have 7 failures out of the last 10 requests, from Open to Half-Open after 500ms, from Half-Open to Closed if we have 4 successes out of the last 10 requests, or back to Open if we get 2 failures out of the last 5 requests.

We can also configure our failure threshold to be time-based. For example, let’s open the circuit if we have five failures in the last 30 seconds:

CircuitBreaker<Object> circuitBreaker = CircuitBreaker.builder()
  .withFailureThreshold(5, Duration.ofSeconds(30))
  .build();

We can additionally configure it to be a percentage of requests instead of a fixed number. For example, let’s open the circuit if we have a 20% failure rate in any 5-minute period that has at least 100 requests:

CircuitBreaker<Object> circuitBreaker = CircuitBreaker.builder()
  .withFailureRateThreshold(20, 100, Duration.ofMinutes(5))
  .build();

Doing this allows us to adjust to load much more quickly. If we have a very low load, we might not want to check for failures at all, but if we have a very high load, the chance of failures increases, so we want to react only if it gets over our threshold.

6. Summary

In this article, we’ve given a broad introduction to Failsafe. This library can do much more, so why not try it out and see?

All of the examples are available over on GitHub.


Add Global Exception Interceptor in gRPC Server

$
0
0
start here featured

1. Overview

In this tutorial, we’ll examine the role of interceptors in gRPC server applications to handle global exceptions.

Interceptors can validate or manipulate the request before it reaches the RPC methods. Hence, they are useful in handling common concerns like logging, security, caching, auditing, authentication and authorization, and much more for applications.

Applications may also use interceptors as global exception handlers.

2. Interceptors as Global Exception Handlers

Majorly, interceptors can help handle exceptions of two types:

  • Handle unknown runtime exceptions escaping from methods that couldn’t handle them
  • Handle exceptions that escape from any other downstream interceptors

Interceptors can help create a framework to handle exceptions in a centralized manner. This way the applications can have a consistent standard and robust approach to handle exceptions.

They can treat exceptions in various ways:

  • Log or persist the exceptions for auditing or reporting purposes
  • Create support tickets
  • Modify or enrich the error responses before sending it back to the clients

3. High-Level Design of a Global Exception Handler

The interceptor can forward the incoming request to the target RPC service. However, when the target RPC method throws an exception back, it can capture it and then handle it appropriately.

Let’s assume there’s an order processing microservice. We’ll develop a global exception handler with the help of an interceptor to catch the exception escaped from the RPC methods in the microservice. Additionally, the interceptor catches the exceptions that escaped from any of the downstream interceptors. Then, it calls a ticket service to raise tickets in a ticketing system. Finally, the response is sent back to the client.

Let’s take a look at the traversal path of the request when it fails in the RPC endpoint:


Similarly, let’s see the traversal path of the request when it fails in the log interceptor:


First, we’ll begin defining the base classes for the order processing service in the protobuf file order_processing.proto:

syntax = "proto3";
package orderprocessing;
option java_multiple_files = true;
option java_package = "com.baeldung.grpc.orderprocessing";
message OrderRequest {
  string product = 1;
  int32 quantity = 2;
  float price = 3;
}
message OrderResponse {
  string response = 1;
  string orderID = 2;
  string error = 3;
}
service OrderProcessor {
  rpc createOrder(OrderRequest) returns (OrderResponse){}
}

The order_processing.proto file defines OrderProcessor with a remote method createOrder() and two DTOs OrderRequest and OrderResponse.

Let’s have a look at the major classes we’ll implement in the upcoming sections:


Later, we can use the order_processing.proto file for generating the supporting Java source code for implementing OrderProcessorImpl and GlobalExeptionInterceptor. The Maven plugin generates the classes OrderRequest, OrderResponse, and OrderProcessorGrpc.

We’ll discuss each of these classes in the implementation section.

4. Implementation

We’ll implement an interceptor that can handle all kinds of exceptions. The exception could be explicitly raised due to some failed logic or it could be an exception due to some unforeseen error.

4.1. Implement Global Exception Handler

Interceptors in a gRPC application have to implement the interceptCall() method of the ServerInterceptor interface:

public class GlobalExceptionInterceptor implements ServerInterceptor {
    @Override
    public <ReqT, RespT> ServerCall.Listener<ReqT> interceptCall(ServerCall<ReqT, RespT> serverCall, Metadata headers,
        ServerCallHandler<ReqT, RespT> next) {
        ServerCall.Listener<ReqT> delegate = null;
        try {
            delegate = next.startCall(serverCall, headers);
        } catch(Exception ex) {
            return handleInterceptorException(ex, serverCall);
        }
        return new ForwardingServerCallListener.SimpleForwardingServerCallListener<ReqT>(delegate) {
            @Override
            public void onHalfClose() {
                try {
                    super.onHalfClose();
                } catch (Exception ex) {
                    handleEndpointException(ex, serverCall);
                }
            }
        };
    }
    private static <ReqT, RespT> void handleEndpointException(Exception ex, ServerCall<ReqT, RespT> serverCall) {
        String ticket = new TicketService().createTicket(ex.getMessage());
        serverCall.close(Status.INTERNAL
            .withCause(ex)
            .withDescription(ex.getMessage() + ", Ticket raised:" + ticket), new Metadata());
    }
    private <ReqT, RespT> ServerCall.Listener<ReqT> handleInterceptorException(Throwable t, ServerCall<ReqT, RespT> serverCall) {
        String ticket = new TicketService().createTicket(t.getMessage());
        serverCall.close(Status.INTERNAL
            .withCause(t)
            .withDescription("An exception occurred in a **subsequent** interceptor:" + ", Ticket raised:" + ticket), new Metadata());
        return new ServerCall.Listener<ReqT>() {
            // no-op
        };
    }
}

The method interceptCall() takes in three input parameters:

  • ServerCall: Helps receive response messages
  • Metadata: Holds the metadata of the incoming request
  • ServerCallHandler: Helps dispatch the incoming server call to the next processor in the interceptor chain

The method has two trycatch blocks. The first one handles the uncaught exception thrown from any subsequent downstream interceptors. In the catch block, we call the method handleInterceptorException() which creates a ticket for the exception. Finally, it returns an object of ServerCall.Listener which is a call-back method.

Similarly, the second trycatch block handles the uncaught exceptions thrown from the RPC endpoints. The interceptCall() method returns ServerCall.Listener that acts as a callback for incoming RPC messages. Specifically, it returns an instance of ForwardingServerCallListener.SimpleForwardingServerCallListener which is a subclass of ServerCall.Listener.

To handle the exception thrown from the downstream methods we’ve overridden the method onHalfClose() in the class ForwardingServerCallListener.SimpleForwardingServerCallListener. It gets invoked once the client has completed sending messages.

In this method, super.onHalfClose() forwards the request to the RPC endpoint createOrder() in the OrderProcessorImpl class. If there’s an uncaught exception in the endpoint, we catch the exception and then call handleEndpointException() to create a ticket. Finally, we call the method close() on the serverCall object to close the server call and send the response back to the client.

4.2. Register Global Exception Handler

We register the interceptor while creating the io.grpc.Server object during the boot-up:

public class OrderProcessingServer {
    public static void main(String[] args) throws IOException, InterruptedException {
        Server server = ServerBuilder.forPort(8080)
          .addService(new OrderProcessorImpl())
          .intercept(new LogInterceptor())
          .intercept(new GlobalExceptionInterceptor())
          .build();
        server.start();
        server.awaitTermination();
    }
}

We pass the GlobalExceptionInterceptor object to the intercept() method of io.grpc.ServerBuilder class. This ensures that any RPC call to the OrderProcessorImpl service goes through GlobalExceptionInterceptor. Similarly, we call the addService() method to register the OrderProcessorImpl service.  At the end, we invoke the start() method on the Server object to start the server application.

4.3. Handle Uncaught Exception From Endpoints

To demonstrate the exception handler, let’s first take a look at the OrderProcessorImpl class:

public class OrderProcessorImpl extends OrderProcessorGrpc.OrderProcessorImplBase {
    @Override
    public void createOrder(OrderRequest request, StreamObserver<OrderResponse> responseObserver) {
        if (!validateOrder(request)) {
             throw new StatusRuntimeException(Status.FAILED_PRECONDITION.withDescription("Order Validation failed"));
        } else {
            OrderResponse orderResponse = processOrder(request);
            responseObserver.onNext(orderResponse);
            responseObserver.onCompleted();
        }
    }
    private Boolean validateOrder(OrderRequest request) {
        int tax = 100/0;
        return false;
    }
    private OrderResponse processOrder(OrderRequest request) {
        return OrderResponse.newBuilder()
          .setOrderID("ORD-5566")
          .setResponse("Order placed successfully")
          .build();
    }
}

The RPC method createOrder() validates the order first and then processes it by calling the processOrder() method. In the validateOrder() method, we deliberately force a runtime exception by dividing a number by zero.

Now, let’s run the service and see how it handles the exception:

@Test
void whenRuntimeExceptionInRPCEndpoint_thenHandleException() {
    OrderRequest orderRequest = OrderRequest.newBuilder()
      .setProduct("PRD-7788")
      .setQuantity(1)
      .setPrice(5000)
      .build();
    try {
        OrderResponse response = orderProcessorBlockingStub.createOrder(orderRequest);
    } catch (StatusRuntimeException ex) {
        assertTrue(ex.getStatus()
          .getDescription()
          .contains("Ticket raised:TKT"));
    }
}

We create the OrderRequest object and then pass it to the createOrder() method in the client stub. As expected, the service throws back the exception. When we inspect the description in the exception, we find the ticket information embedded in it. Hence, it shows that the GlobalExceptionInterceptor did its job.

This is equally effective for streaming cases as well.

4.4. Handle Uncaught Exceptions From Interceptors

Let’s suppose there’s a second interceptor that gets invoked after the GlobalExceptionInterceptor. LogInterceptor logs all the incoming requests for auditing purposes. Let’s take a look at it:

public class LogInterceptor implements ServerInterceptor {
    @Override
    public <ReqT, RespT> ServerCall.Listener<ReqT> interceptCall(ServerCall<ReqT, RespT> serverCall, Metadata metadata,
        ServerCallHandler<ReqT, RespT> next) {
        logMessage(serverCall);
        ServerCall.Listener<ReqT> delegate = next.startCall(serverCall, metadata);
        return delegate;
    }
    private <ReqT, RespT> void logMessage(ServerCall<ReqT, RespT> call) {
        int result = 100/0;
    }
}

In LogInterceptor, the interceptCall() method invokes logMessage() to log the messages before forwarding the request to the RPC endpoint. The logMessage() method deliberately performs division by zero to raise a runtime exception for demonstrating the capability of GlobalExceptionInterceptor.

Let’s run the service and see how it handles the exception raised from LogInterceptor:

@Test
void whenRuntimeExceptionInLogInterceptor_thenHandleException() {
    OrderRequest orderRequest = OrderRequest.newBuilder()
        .setProduct("PRD-7788")
        .setQuantity(1)
        .setPrice(5000)
        .build();
    try {
        OrderResponse response = orderProcessorBlockingStub.createOrder(orderRequest);
    } catch (StatusRuntimeException ex) {
        assertTrue(ex.getStatus()
            .getDescription()
            .contains("An exception occurred in a **subsequent** interceptor:, Ticket raised:TKT"));
    }
    logger.info("order processing over");
}

First, we call the createOrder() method on the client stub. This time, the GlobalExceptionInterceptor catches the exception that escaped from the LogInterceptor in the first trycatch block.  Subsequently, the client receives the exception with ticket information embedded in the description.

5. Conclusion

In this article, we explored the role of interceptors in the gRPC framework as global exception handlers. They’re excellent tools for handling common concerns on exceptions, such as logging, creating tickets, enriching error responses, and much more.

The code used in this article can be found over on GitHub.


Mocking Protected Method in Java

$
0
0
start here featured

1. Overview

Mocking protected method in Java is similar to mocking a public one, with one caveat: visibility of this method in the test class. We have visibility of protected methods of class A from the same package classes and ones that extend A. So, if we try to test class A from a different package, we’ll face issues.

In this tutorial, we’ll approach the case of mocking protected method of the class under test. We’ll demonstrate both cases of having access to the method and not. We’ll do that by using Mockito spies instead of mocks since we want to stub just some behavior of the under-test class.

2. Mocking protected Method

Mocking protected method with Mockito is straightforward when we have access to it. We can get access in two ways. First, we change the scope of protected to public, or second, we move the test class into the same package as the class with the protected method.

But this isn’t an option sometimes, and so an alternative is to follow indirect practices. The most common ones, without using any external libraries, are:

  • to use JUnit5 and Reflection
  • to use an inner test class that extends the class under test

If we try to change the access modifier, this might lead to unwanted behavior. Using the most restrictive access level is good practice unless there is a good reason not to. Similarly, if it makes sense to change the location of the test, then moving it to the same package as the class with the protected method is an easy option.

If neither of these options works for our case, JUnit5 with Reflection is a good call, when there is only one protected method to stub in the class. For a class A with more than one protected method that we need to stub, creating an inner class that extends A is the cleaner solution.

3. Mocking Visible protected Method

In this section, we’ll handle the cases in which the test has access to the protected method, or we can make changes to get access. As mentioned before, the changes could be making the access modifier public or moving the test to the same package as the class with the protected method.

Let’s see the Movies class as an example, which has a protected method getTitle() to retrieve the value of private field title. It also contains a public method getPlaceHolder(), which is available to clients:

public class Movies {
    private final String title;
    public Movies(String title) {
        this.title = title;
    }
    public String getPlaceHolder() {
        return "Movie: " + getTitle();
    }
    protected String getTitle() {
        return title;
    }
}

In the test class, first, we assert that the initial value of the getPlaceholder() method is the one we expect. Then we stub the functionality of the protected method using Mockito spies and we assert that the new value getPlaceholder() returns contains the stubbed value of getTitle():

@Test
void givenProtectedMethod_whenMethodIsVisibleAndUseMockitoToStub_thenResponseIsStubbed() {
    Movies matrix = Mockito.spy(new Movies("The Matrix"));
    assertThat(matrix.getPlaceHolder()).isEqualTo("Movie: The Matrix");
    doReturn("something else").when(matrix).getTitle();
    assertThat(matrix.getTitle()).isEqualTo("something else");
    assertThat(matrix.getPlaceHolder()).isEqualTo("Movie: something else");
}

4. Mocking Non-Visible protected Method

Next, let’s see how mocking a protected method with Mockito is done when we don’t have access to it. The use case we’ll deal with is when the test class is in a different package than the class we want to stub. In such case, we have two options:

  • JUnit5 with Reflection
  • inner class which extends the class with the protected method

4.1. Using JUnit and Reflection

JUnit5 provides a class, ReflectionSupport, that handles common reflection cases for testing, like finding/invoking methods, etc. Let’s see how this works with our previous code:

@Test
void givenProtectedMethod_whenMethodIsVisibleAndUseMockitoToStub_thenResponseIsStubbed() throws NoSuchMethodException {
    Movies matrix = Mockito.spy(new Movies("The Matrix"));
    assertThat(matrix.getPlaceHolder()).isEqualTo("Movie: The Matrix");
    ReflectionSupport.invokeMethod(
            Movies.class.getDeclaredMethod("getTitle"),
            doReturn("something else").when(matrix));
    assertThat(matrix.getPlaceHolder()).isEqualTo("Movie: something else");
}

Here, we use the invokeMethod() of ReflectionSupport that sets the value of the protected method to be the stubbed Movie object, when invoked.

4.2. Using Inner Class

We can overcome the visibility issue by creating an inner class that extends the class under test and makes the protected method visible. The inner class can be a class on its own if we need to mock the same class’s protected method in different test classes.

In our case, it makes sense to have the MoviesWrapper class that extends Movies, from our previous code, as an inner class of the test class:

private static class MoviesWrapper extends Movies {
    public MoviesWrapper(String title) {
        super(title);
    }
    @Override
    protected String getTitle() {
        return super.getTitle();
    }
}

This way, we get access to getTitle() of Movies through the MoviesWrapper class. If, instead of an inner class we use a standalone one, the method access modifier might need to become public.

The test then uses the MoviesWrapper class as the class under test. This way we have access to getTitle() and can easily stub it using Mockito spies:

@Test
void givenProtectedMethod_whenMethodNotVisibleAndUseInnerTestClass_thenResponseIsStubbed() {
    MoviesWrapper matrix = Mockito.spy(new MoviesWrapper("The Matrix"));
    assertThat(matrix.getPlaceHolder()).isEqualTo("Movie: The Matrix");
    doReturn("something else").when(matrix).getTitle();
    assertThat(matrix.getPlaceHolder()).isEqualTo("Movie: something else");
}

5. Conclusion

In this article, we discussed the difficulties with visibility when mocking protected methods in Java and demonstrated the possible solutions. There are different options for each use case we might face and based on the examples, we should be able to pick the right one each time.

As always, all the source code is available over on GitHub.


Difference Between Optional.of() and Optional.ofNullable() in Java

$
0
0

1. Overview

In Java, a reference may or may not point to an object in memory. In other words, a reference can be null. As a result, this gives rise to the possibility of a NullPointerException being thrown.

To address this, the Optional class was introduced in Java 8. Wrapping a reference in an Optional allows us to better express the possibility of a value being present or not. Further, we can make use of the various utility methods on the Optional class such as isPresent() to avoid running into a NullPointerException.

We can use the the static factory methods Optional.of() and Optional.ofNullable() methods to obtain an Optional for a given reference. However, which one should we use? In this tutorial, we’ll explore the differences between these methods and understand when yo use which

2. The Optional.of() Method

We should use the Optional.of() static factory method when we’re sure that we have a non-null reference.

Let’s suppose we have a local String variable from which we want to obtain an Optional:

@Test
void givenNonNullReference_whenUsingOptionalOf_thenObtainOptional() {
    String s = "no null here";
    assertThat(Optional.of(s))
      .isNotEmpty()
      .hasValue("no null here");
}

From our assertion, we can see that our optional isn’t empty. In other words, the utility method isPresent(), which returns whether an Optional has a value or not, would return true. 

However, we’ll encounter a NullPointerException when we use this method on a null reference.

@Test
void givenNullReference_whenUsingOptionalOf_thenNullPointerExceptionThrown() {
    String s = null;
    assertThatThrownBy(() -> Optional.of(s))
      .isInstanceOf(NullPointerException.class);
}

3. The Optional.ofNullable() Method

We should use the Optional.ofNullable() static factory method when we have a reference that may or may not be null. Thus, we won’t encounter a NullPointerException for a reference that’s null. Instead, we’ll obtain an empty Optional:

@Test
void givenNullReference_whenUsingOptionalOfNullable_thenObtainOptional() {
    String s = null;
    assertThat(Optional.ofNullable(s)).isEmpty();
}

It’s fair to ask why we shouldn’t always use Optional.ofNullable() over Optional.of().

Using Optional.of() allows us to stop the execution of our code immediately by throwing an exception. This occurs, as we’ve previously discovered when obtaining an Optional for a reference that is null. In other words, the use of the Optional.of() method allows us to adhere to the principle of fail-early.

On a side note, we may encounter developers using these static factory methods as an entry point to make use of functional programming. This is achieved by using the methods on the Optional class that use function objects as method arguments such as map().

4. Conclusion

In this article, we learned the main differences between the static factory methods Optional.of() and Optional.ofNullable() and when it’s most appropriate to use them.

We saw how we can utilize the Optional class to help avoid throwing NullPointerException‘s.

Finally, we touched on the principle of fail-early and how adhering to this principle can influence which static factory method to use.

As always, the code samples used in this article are available over on GitHub.


How to Check if Optional Contains Value Equal to T Object

$
0
0
Contact Us Featured

1. Overview

Optional is a class that was introduced in Java 8 as part of the java.util package. It serves as a container that may or may not contain a non-null value. Optional can help us handle null values more effectively and avoid NullPointerExceptions in our code.

One common task when working with Optional is to check if it contains a value equal to a specific object. In this tutorial, we’ll explore various techniques for performing this check.

2. Introduction to the Problem

First, let’s clarify the requirement of the equality check. Let’s say we have two objects; one is a non-null valueOfT object of type T, and the other one is an opt instance of type Optional<T>.

If opt is empty, it doesn’t contain any value. That is to say, the value inside it cannot be equal to any target object, so the check will always return false. Conversely, if opt is “present”, we need to verify whether the value carried by opt is equal to valueOfT.

So, simply put, we’ll perform an “opt present and equals valueOfT” check.

In this tutorial, we’ll explore various methods to accomplish the task. To keep things straightforward, we’ll use String as an example of T to demonstrate each approach. Let’s create two String constants:

static final String A_B_C = "a b c";
static final String X_Y_Z = "x y z";

We’ll use these String values in unit tests to showcase the results of different methods.

Next, let’s dive into the code and examine how to implement the check.

3. Using Optional.equals()

The Optional class has overridden the equals() method. If two Optional objects are present and the values they hold are equal, the method returns true. Therefore, we can first create an Optional instance from valueOfT, and then perform the check using Optional.equals() with the given opt object:

opt.isPresent() && opt.equals(Optional.of(valueOfT));

Next, let’s check whether this approach works as expected.

First, let’s look at opt‘s absent case:

Optional<String> opt = Optional.empty();
assertFalse(opt.isPresent() && opt.equals(Optional.of(A_B_C)));

As we mentioned, if opt is empty, no matter what value valueOfT has, the entire check should return false.

Next, let’s see if this approach produces the expected result when opt is present:

opt = Optional.of(X_Y_Z);
assertFalse(opt.isPresent() && opt.equals(Optional.of(A_B_C)));
 
opt = Optional.of(A_B_C);
assertTrue(opt.isPresent() && opt.equals(Optional.of(A_B_C)));

As we can see, this approach solves the problem, but it creates an intermediate Optional object.

4. Using Optional.get()

A straightforward approach to checking whether the value contained in opt equals valueOfT is first to retrieve the value in opt using Optional.get(), and then verify its equality with valueOfT:

opt.isPresent() && opt.get().equals(valueOfT);

Next, let’s follow this pattern and use the same inputs to verify whether it yields correct results:

Optional<String> opt = Optional.empty();
assertFalse(opt.isPresent() && opt.get().equals(A_B_C));
 
opt = Optional.of(X_Y_Z);
assertFalse(opt.isPresent() && opt.get().equals(A_B_C));
 
opt = Optional.of(A_B_C);
assertTrue(opt.isPresent() && opt.get().equals(A_B_C));

As the code shows, this solution doesn’t create extra objects.

5. Using Optional.map() and Optional.orElse()

We expect to obtain a boolean value after the “opt present and equals valueOfT” check. Hence, we can perceive this problem as converting an Optional object to a boolean by adhering to a certain rule.

The Optional class provides map() to transform a present Optional to another Optional carrying a different value.

Moreover, the orElse() method returns the value wrapped by the Optional instance if it’s present. Otherwise, if the Optional is empty, orElse() returns the value we specify.

So, we can combine these two methods to perform the equality check and obtain a boolean from the given Optional:

opt.map(v -> v.equals(valueOfT)).orElse(false);

Next, let’s see if it works with our inputs:

Optional<String> opt = Optional.empty();
assertFalse(opt.map(A_B_C::equals).orElse(false));
 
opt = Optional.of(X_Y_Z);
assertFalse(opt.map(A_B_C::equals).orElse(false));
 
opt = Optional.of(A_B_C);
assertTrue(opt.map(A_B_C::equals).orElse(false));

This solution also results in an intermediate object, created by the Optional object map(). However, it’s a functional and fluent approach.

6. Conclusion

In this article, we explored three ways to check if an Optional contains a value equal to a specific object. These methods allow us to perform null-safe value comparison operations on Optional instances, ensuring robust and error-free code.

As always, the complete source code for the examples is available over on GitHub.


Looking for a Backend Java/Spring Developer with Integration Experience (Remote) (Part Time)

$
0
0
Contact Us Featured


About Us

Baeldung is a learning and media company with a focus on the programming space. We’re a flexible, entirely remote team.

Description

We’re looking for a Java developer with integration experience and minimal experience with Spring and Spring Boot. On the non-technical side, a good level of English is also important.

You’re going to be working on existing and new applications, primarily focused on integrating with third-party APIs.

The Admin Details

– rate: 23$ / hour
– time commitment – part-time (7-10h/ week)

We’re a remote-first team and have always been so – basically, you’ll work and communicate entirely async and self-guided.

Apply

You can apply with a quick message (and a link to your LinkedIn profile) through our contact here, or by email: jobs@baeldung.com.

Please indicate you’re applying for the “Backend Java/Spring Developer with Integration Experience” position.

Best of luck,

Eugen.

Finding Minimum and Maximum in a 2D Array

$
0
0

1. Overview

In this tutorial, we’ll discuss two techniques for finding the minimum and maximum values within a 2D array using Java. A 2D array is an arrangement of elements structured like a grid. It’s an array of arrays, where each inner array represents a row in the grid.

We’ll first examine the traditional approach utilizing nested for loops. Next, we’ll explore Stream API to accomplish the same task. Both methods have advantages and disadvantages. The best choice for a particular situation depends on our needs.

2. Identifying Extreme Values Using Nested For Loops

The first approach we’ll use is nested for loops. This technique offers a clear and intuitive method for iterating through every element within a 2D array. We achieve this by iterating each row and column of the array. As each element is visited, it’s compared to the current minimum and maximum values we’ve encountered so far:

@Test
void givenArrayWhenFindMinAndMaxUsingForLoopsThenCorrect() {
    int[][] array = {{8, 4, 1}, {2, 5, 7}, {3, 6, 9}};
    int min = array[0][0];
    int max = array[0][0];
    for (int[] row : array) {
        for (int currentValue : row) {
            if (currentValue < min) {
                min = currentValue;
            } else if (currentValue > max) {
                max = currentValue;
            }
        }
    }
    assertEquals(1, min);
    assertEquals(9, max);
}

The outer for loop iterates through each row in the 2D array. Then, the nested for loop iterates through each element within the current row. We check if the current element is less than the current minimum or greater than the current maximum, updating these values if necessary.

While simplicity makes this a viable choice, the potential inefficiency with large arrays makes it worthwhile to consider alternative approaches.

3. Identifying Extreme Values Using Stream

The Java Stream API offers a concise and declarative way to process data. We can convert the 2D array to a single Stream of elements using the flatMapToInt() method. This method transforms the 2D array into a unified Stream of individual elements, allowing us to find the min and max in a single and readable line of code using the summaryStatistics() method:

@Test
void givenArrayWhenFindMinAndMaxUsingStreamThenCorrect() {
    int[][] array = {{8, 4, 1}, {2, 5, 7}, {3, 6, 9}};
    IntSummaryStatistics stats = Arrays
      .stream(array)
      .flatMapToInt(Arrays::stream)
      .summaryStatistics();
    assertEquals(1, stats.getMin());
    assertEquals(9, stats.getMax());
}

The flatMapToInt() method flattens the nested structure of the 2D array into a Stream of individual elements.

From this unified Stream of all elements, we use the summaryStatistics() method. This method terminates the Stream and generates a summary of the contents. This summary includes the min and max but also provides the average, sum, and count of elements in the Stream.

While summaryStatistics() offers a convenient way to find both the min and max, the Stream API also provides dedicated methods min() and max() for finding the minimum and maximum element of a Stream, respectively. This approach is concise when we only need the min or max, not the other statistics.

3.1 Parallel Processing

For greater efficiency, we can use parallel processing with the Stream API. This involves utilizing multiple threads to distribute the computational workload, potentially reducing processing time in large arrays:

@Test
void givenArrayWhenFindMinAndMaxUsingParallelStreamThenCorrect() {
    int[][] array = {{8, 4, 1}, {2, 5, 7}, {3, 6, 9}};
    IntSummaryStatistics stats = Arrays
      .stream(array)
      .parallel()
      .flatMapToInt(Arrays::stream)
      .summaryStatistics();
    assertEquals(1, stats.getMin());
    assertEquals(9, stats.getMax());
}

While Stream API syntax may be less intuitive for beginners, its benefits in conciseness and performance make it a valuable tool.

4. Conclusion

In this quick article, we’ve explored two effective approaches for identifying the minimum and maximum values in a 2D array in Java. Nested for loops provide a straightforward and intuitive approach, particularly well-suited for situations where clarity and simplicity are important. On the other hand, Stream API offers a concise, expressive, and performant approach, perfect for handling large arrays.

As always, the code is available over on GitHub.


Finding the Next Higher Number With the Same Digits

$
0
0
Contact Us Featured

1. Introduction

In this tutorial, we’ll learn how to find the next higher number with the same set of digits as the original number in Java. This problem can be solved by using the concept of permutation, sorting, and a two-pointer approach.

2. Problem Statement

Given a positive integer, we need to find the next higher number that uses the exact same set of digits. For example, if the input is 123, we aim to rearrange its digits to form the next higher number with the same digits. In this case, the next higher number would be 132.

If the input is 654 or 444, then we return -1 to indicate that there is no next higher number possible.

3. Using Permutation

In this approach, we’ll utilize permutation to find the next greater number with the same digits as the input number. We’ll generate all possible permutations of the digits in the input number and add them to a TreeSet to ensure uniqueness and ordering. 

3.1. Implementation

First, we implement a method findPermutations() to generate all permutations of the digits in the input number num and add them to a TreeSet:

void findPermutations(int num, int index, StringBuilder sb, Set<Integer> hs) {
    if (index == String.valueOf(num).length()) {
        hs.add(Integer.parseInt(sb.toString()));
        return;
    }
    //...
}

The method first checks if the current index is equal to the length of the input number. If so, it means that a permutation has been fully generated, then we add the permutation to the TreeSet and return to end the recursion.

Otherwise, we iterate over the digits of the number starting from the current index to generate all the permutations:

for (int i = index; i < String.valueOf(num).length(); i++) {
    char temp = sb.charAt(index);
    sb.setCharAt(index, sb.charAt(i));
    sb.setCharAt(i, temp);
    //...
}

At each iteration, we swap the character at the current index index with the character at the iteration index i. This swapping action effectively creates different combinations of digits.

Following the swapping, the method recursively calls itself, with the updated index and the modified StringBuilder:

findPermutations(num, index + 1, sb, hs);
temp = sb.charAt(index);
sb.setCharAt(index, sb.charAt(i));
sb.setCharAt(i, temp); // Swap back after recursion

After the recursive call, we swap the characters back to their original positions to maintain the integrity of sb for subsequent iterations.

Let’s encapsulate the logic within a method:

int findNextHighestNumberUsingPermutation(int num) {
    Set<Integer> hs = new TreeSet();
    StringBuilder sb = new StringBuilder(String.valueOf(num));
    findPermutations(num, 0, sb, hs);
    for (int n : hs) {
        if (n > num) {
            return n;
        }
    }
    return -1;
}

Once all permutations are generated, we iterate through the TreeSet to find the smallest number greater than the input number. If such a number is found, it’s the next greater number. Otherwise, we return -1 to indicate that no such number exists.

3.2. Testing

Let’s validate the permutation solution:

assertEquals(536497, findNextHighestNumberUsingPermutation(536479));
assertEquals(-1, findNextHighestNumberUsingPermutation(987654));

3.3. Complexity Analysis

The time complexity of this implementation is O(n!) in the worst case, where n is the number of digits in the input number. The findPermutations() function generates all possible permutations of the digits n!, which remains the dominant factor in time complexity.

While TreeSet provides logarithmic complexity (log n) for insertion and retrieval, it doesn’t significantly impact the overall time complexity.

In the worst case, where all permutations are unique (no duplicates), the TreeSet could potentially hold all n! permutations of the digits. This leads to a space complexity of O(n!).

4. Using Sorting

In this method, we’ll employ a sorting approach to determine the next greater number with the same digits as the given input number.

4.1. Implementation

We begin by defining a method named findNextHighestNumberUsingSorting():

int findNextHighestNumberUsingSorting(int num) {
    String numStr = String.valueOf(num);
    char[] numChars = numStr.toCharArray();
    int pivotIndex;
    // ...
}

Inside the method, we convert the input number into a string and then into a character array. We also initialize a variable pivotIndex to identify the pivot point.

Next, we iterate over the numChars array from the rightmost digit to the left to identify the largest digit that is smaller than or equal to its right neighbor:

for (pivotIndex = numChars.length - 1; pivotIndex > 0; pivotIndex--) {
    if (numChars[pivotIndex] > numChars[pivotIndex - 1]) {
        break;
    }
}

This digit becomes the pivot point to identify the breaking point in the descending order of digits. If this condition is true, it means we’ve found a digit that is larger than its neighbor to the left (potential pivot). Then we break the loop because we don’t need to search further for a larger descending digit.

If no such pivot is found, it means that the number is already in descending order, therefore we return -1:

if (pivotIndex == 0) {
    return -1;
}

After identifying the pivot, the code searches for the smallest digit to the right of the pivot that is still greater than the pivot itself:

int pivot = numChars[pivotIndex - 1];
int minIndex = pivotIndex;
for (int j = pivotIndex + 1; j < numChars.length; j++) {
    if (numChars[j] > pivot && numChars[j] < numChars[minIndex]) {
        minIndex = j;
    }
}

This digit are swapped with the pivot later to create the next larger number. We iterate through the array starting from one position after the pivot using a loop to find the smallest digit that is greater than the pivot.

Once the minimum digit greater than the pivot is found, we swap its position with the pivot:

swap(numChars, pivotIndex - 1, minIndex);

This swap essentially brings the smallest digit that can be greater than the pivot to the position right before the pivot.

To create the next lexicographically larger number, the code needs to sort the digits to the right of the pivot in ascending order:

Arrays.sort(numChars, pivotIndex, numChars.length);
return Integer.parseInt(new String(numChars));

This results in the smallest permutation of the digits that is greater than the original number.

4.2. Testing

Now, let’s validate our sorting implementation:

assertEquals(536497, findNextHighestNumberUsingSorting(536479));
assertEquals(-1, findNextHighestNumberUsingSorting(987654));

In the first test case, the pivot is found at the index 4 (digit 7). Next, to find the smallest digit larger than the pivot (7), we iterate from pivotIndex + 1 to the end. 9 is greater than pivot (7) so the minimum digit greater than the pivot is found at the index 5 (digit 9).

Now, we swap numChars[4] (7) with numChars[5] (9). After we do the swapping and sorting, the numChars array becomes [5, 3, 6, 4, 9, 7].

4.3. Complexity Analysis

The time complexity of this implementation is O(n log n) and the space complexity is O(n). This is because the implementation of sorting the digits is in O(n log n) time and uses a character array to store the digits.

5. Using Two Pointers

This approach is more efficient than sorting. It utilizes two pointers to find the desired digits and manipulate them for the next higher number.

5.1. Implementation

Before we start the main logic, we create two helper methods to simplify the manipulation of characters within the array:

void swap(char[] numChars, int i, int j) {
    char temp = numChars[i];
    numChars[i] = numChars[j];
    numChars[j] = temp;
}
void reverse(char[] numChars, int i, int j) {
    while (i < j) {
        swap(numChars, i, j);
        i++;
        j--;
    }
}

Then we begin by defining a method named findNextHighestNumberUsingTwoPointer():

int findNextHighestNumberUsingTwoPointer (int num) {
    String numStr = String.valueOf(num);
    char[] numChars = numStr.toCharArray();
    int pivotIndex = numChars.length - 2;
    int minIndex = numChars.length - 1;
    // ...
}

Inside the method,  we convert the input number to a character array and initialize two variables:

  • pivotIndex: to track the pivot index from the right side of the array
  • minIndex: to find a digit greater than the pivot

We initialize the pivotIndex to the second last digit because if starts from the last digit (i.e., numChars.length – 1), there’s no digit to its right to compare it with. Subsequently, we use a while loop to find the first index pivotIndex from the right that has a digit smaller than or equal to the digit to its right: 

while (pivotIndex >= 0 && numChars[pivotIndex] >= numChars[pivotIndex+1]) {
    pivotIndexi--;
}

If the current digit is smaller, it means we’ve found the pivot point where the increasing trend breaks. Then the loop will be terminated.

If no such index is found, it means that the input number is the largest possible permutation, and there is no greater permutation possible:

if (pivotIndex == -1) {
    result = -1;
    return;
}

Otherwise, we use another while loop to find the first index minIndex from the right that has a digit that’s greater than the pivot digit pivotIndex:

while (numChars[minIndex] <= numChars[pivotIndex]) {
    minIndex--;
}

Next, we swap the digits at indices pivotIndex and minIndex using the swap() function:

swap(numChars, pivotIndex, minIndex);

This swap operation ensures that we explore different combinations of digits while generating permutations.

Finally, instead of sorting, we reverse the substring to the right of index pivotIndex to obtain the smallest permutation greater than the original number:

reverse(numChars, pivotIndex+1, numChars.length-1);
return Integer.parseInt(new String(numChars));

This effectively creates the smallest possible number greater than the original number using the remaining digits.

5.2. Testing

Let’s validate the two pointers implementation:

assertEquals(536497, findNextHighestNumberUsingSorting(536479));
assertEquals(-1, findNextHighestNumberUsingSorting(987654));

In the first test case, the pivotIndex remains as its initialized value (4) because numChars[4] (7) isn’t greater than numChars[5] (9). Therefore, the while loop breaks immediately.

In the second while loop, minIndex remains as its initialize value (5) as the numChars[5] (9) is not smaller than numChars[4] (7). Again, the while loop terminated.

Next, we swap numChars[4] (7) with numChars[5] (9). Since pivotIndex + 1 is 5 and minIndex is also 5, no reversing is needed. The numChars array becomes [5, 3, 6, 4, 9, 7].

5.3. Complexity Analysis

In the worst case, the loops iterating over the digits might traverse the entire character array numChars twice. This can happen when the input number is already in descending order (e.g., 987654).

Therefore, the time complexity of the function is O(n). Moreover, the space complexity is O(1) because it uses a constant amount of extra space for pointers and temporary variables.

6. Summary

Here’s a table summarizing the comparison of the three approaches and recommended use cases:

Approach Time Complexity Space Complexity Use Case
Permutation O(n!) O(n!) Use when the input number has a small number of digits
Sorting O(n log n) O(n) Use when the simplicity of implementation is important
Two Pointers O(n) O(1) Use when the input number has a large number of digits

7. Conclusion

In this article, we’ve explored three different approaches to finding the next higher number with the same set of digits as the original number in Java. Overall, the two-pointer approach offers a good balance between efficiency and simplicity for finding the next higher number with the same set of digits.

As always, the source code for the examples is available over on GitHub.


Difference Between Iterator.forEachRemaining() and Iterable.forEach()

$
0
0
Contact Us Featured

1. Introduction

The Iterator and Iterable interfaces are fundamental constructs for working with collections in Java. Practically, each interface provides methods for traversing elements, but they have distinct purposes and usage scenarios.

In this tutorial, we’ll delve into the differences between Iterator.forEachRemaining() and Iterable.forEach() to understand their unique functionalities.

2. The Iterator.forEachRemaining() Method

The Iterator interface provides a way to iterate over a collection of elements sequentially. The forEachRemaining() method of the Iterator interface was introduced in Java 8.

In addition, it provides a concise way to act on each remaining element in the iterator. Besides, it takes a Consumer functional interface as an argument, representing the action performed on each element.

Let’s suppose we have the following employee’s details, and we want to process them to make a simple report:

private final List<String> employeeDetails = Arrays.asList(
    "Alice Johnson, 30, Manager",
    "Bob Smith, 25, Developer",
    "Charlie Brown, 28, Designer"
);
String expectedReport =
    "Employee: Alice Johnson, 30, Manager\n" +
    "Employee: Bob Smith, 25, Developer\n" +
    "Employee: Charlie Brown, 28, Designer\n";

Here, we have initialized a list of employee details and specified an expected report format with each employee’s information formatted as (Employee: Name, Age, Role).

Now, let’s utilize the Iterator.forEachRemaining() method to iterate over the employeeDetails list and generate a report:

@Test
public void givenEmployeeDetails_whenUsingIterator_thenGenerateEmployeeReport() {
    StringBuilder report = new StringBuilder();
    employeeDetails.iterator().forEachRemaining(employee ->
        report.append("Employee: ").append(employee).append("\n")
    );
    assertEquals(expectedReport, report.toString());
}

In this test method, we process each element in the iterator, appending formatted employee information to the StringBuilder report. For each employee detail string in the employeeDetails list, the method appends the prefix “Employee:” followed by the employee details and a newline character.

After generating the report, we use the assertEquals() assertion to verify that the generated report (report) matches the expected report (expectedReport).

3. The Iterable.forEach() Method

The Iterable interface in Java represents a collection of objects that can be iterated over. The forEach() method of the Iterable interface was also introduced in Java 8.

The default method allows us to act as each element in the collection. Like Iterator.forEachRemaining(), it also uses a Consumer functional interface as an argument.

To provide context, let’s look at the implementation:

@Test
public void givenEmployeeDetails_whenUsingForEach_thenGenerateEmployeeReport() {
    StringBuilder report = new StringBuilder();
    employeeDetails.forEach(employee ->
        report.append("Employee: ").append(employee).append("\n")
    );
    assertEquals(expectedReport, report.toString());
}

Within the forEach() method, we use a lambda expression to append each formatted employee detail to StringBuilder’s report.

Similar to Iterator.forEachRemaining(), the lambda expression here receives each element as input, and we perform the same formatting operation of prefixing “Employee:” followed by the employee details and a newline character.

4. Key Differences

The following table succinctly summarizes the differences between Iterator.forEachRemaining() and Iterable.forEach() based on their usage, implementation, and flexibility:

Key Differences Iterator.forEachRemaining() Iterable.forEach()
Usage We can use it to act on each remaining element of an iterator. We can use it to act on each collection element directly without explicitly using an iterator.
Implementation Specific to the Iterator interface and operates directly on an iterator instance. The default method of the iterable interface operates directly on an iterable collection.
Flexibility It is useful when using an iterator to iterate over a subset of elements from a collection. It is more convenient to work directly with collections, especially when utilizing lambda expressions.

5. Conclusion

In this article, we discussed both the Iterator.forEachRemaining() and Iterable.forEach() methods to iterate over elements in a collection. Choosing the appropriate method based on whether we’re working directly with an iterator or a collection can be based on user preference.

As always, the complete code samples for this article can be found over on GitHub.

       
Viewing all 4476 articles
Browse latest View live


<script src="https://jsc.adskeeper.com/r/s/rssing.com.1596347.js" async> </script>