Quantcast
Channel: Baeldung
Viewing all 4476 articles
Browse latest View live

Guide to CompletableFuture join() vs get()

$
0
0
start here featured

1. Introduction

In Java’s concurrent programming, CompletableFuture is a powerful tool that allows us to write non-blocking code. When working with CompletableFuture, we’ll encounter two common methods: join() and get(). Both methods are used to retrieve the result of a computation once it is complete, but they have some crucial differences.

In this tutorial, we’ll explore the differences between these two methods.

2. Overview of CompletableFuture

Before diving into join() and get(), let’s briefly revisit what CompletableFuture is. A CompletableFuture represents a future result of an asynchronous computation. It provides a way to write asynchronous code in a more readable and manageable way compared to traditional approaches like callbacks. Let’s see an example to illustrate the usage of CompletableFuture.

First, let’s create a CompletableFuture:

CompletableFuture<String> future = new CompletableFuture<>();

Next, let’s complete the future with a value:

future.complete("Hello, World!");

Finally, we retrieve the value using join() or get():

String result = future.join(); // or future.get();
System.out.println(result); // Output: Hello, World!

3. The join() Method

The join() method is a straightforward way to retrieve the result of a CompletableFuture. It waits for the computation to complete and then returns the result. If the computation encounters an exception, join() throws an unchecked exception, specifically a CompletionException.

Here’s the syntax for join():

public T join()

Let’s review the characteristics of the join() method:

  • Returns the result once the computation is complete
  • Throws an unchecked exception – CompletionException – if any computation involved in completing the CompletableFuture results in an exception
  • Since CompletionException is an unchecked exception, it does not require explicit handling or declaration in method signatures

4. The get() Method

On the other hand, the get() method retrieves the computation’s result and throws a checked exception if the computation encounters an error. The get() method has two variants: one that waits indefinitely and one that waits for a specified timeout.

Let’s review the syntax for the two variants of get():

public T get() throws InterruptedException, ExecutionException
public T get(long timeout, TimeUnit unit) throws InterruptedException, ExecutionException, TimeoutException

And let’s look at the characteristics of the get() method:

  • Returns the result once the computation is complete
  • Throws a checked exception, which could be InterruptedException, ExecutionException, or TimeoutException
  • Requires explicit handling or declaration of checked exceptions in method signatures

The get() method is inherited from the Future interface, which CompletableFuture implements. The Future interface, introduced in Java 5, represents the result of an asynchronous computation. It defines the get() method to retrieve the result and handle exceptions that may occur during computation.

When CompletableFuture was introduced in Java 8, it was designed to be compatible with the existing Future interface to ensure backward compatibility with existing codebases. This necessitated the inclusion of the get() method in CompletableFuture.

5. Comparison: join() vs. get()

Let’s summarize the key differences between join() and get():

Aspect join() get()
Exception type Throws CompletionException (unchecked) Throws InterruptedException, ExecutionException, and TimeoutException (checked)
Exception handling Unchecked, no need to declare or catch Checked, must be declared or caught
Timeout support No timeout support Supports timeout
Origin Specific to CompletableFuture Inherited from Future interface
Usage Recommendation Preferred for new code For legacy compatibility

6. Tests

Let’s add some tests to ensure our understanding of join() and get() is correct:

@Test
public void givenJoinMethod_whenThrow_thenGetUncheckedException() {
    CompletableFuture<String> future = CompletableFuture.supplyAsync(() -> "Test join");
    assertEquals("Test join", future.join());
    CompletableFuture<String> exceptionFuture = CompletableFuture.failedFuture(new RuntimeException("Test join exception"));
    assertThrows(CompletionException.class, exceptionFuture::join);
}
@Test
public void givenGetMethod_whenThrow_thenGetCheckedException() {
    CompletableFuture<String> future = CompletableFuture.supplyAsync(() -> "Test get");
    try {
        assertEquals("Test get", future.get());
    } catch (InterruptedException | ExecutionException e) {
        fail("Exception should not be thrown");
    }
    CompletableFuture<String> exceptionFuture = CompletableFuture.failedFuture(new RuntimeException("Test get exception"));
    assertThrows(ExecutionException.class, exceptionFuture::get);
}

7. Conclusion

In this quick article, we’ve learned that join() and get() are both methods used to retrieve the result of a CompletableFuture, but they handle exceptions differently. The join() method throws unchecked exceptions, making it easier to use when we don’t want to handle exceptions explicitly. On the other hand, the get() method throws checked exceptions, providing more detailed exception handling and timeout support. Generally, join() should be preferred for new code due to its simplicity, while get() remains available for legacy compatibility.

The example code from this article can be found over on GitHub.


Java Weekly, Issue 548

$
0
0

1. Spring and Java

>> Getting Started with Jakarta Data and Hibernate [thorben-janssen.com]

Jakarta Data, a new specification in Jakarta EE 11: a repository abstraction on top of Jakarta Persistence and Jakarta NoSQL

>> Exploring New Features in JDK 23: Simplifying Java with Module Import Declarations with JEP 476 [foojay.io]

Are you tired of all those import statements in Java classes? Just use one single import statement to import everything from a module

>> How to map Java Enum to custom values with JPA and Hibernate [vladmihalcea.com]

And, let’s see how we can map Java Enum to custom values when using JPA and Hibernate

Also worth reading:

Webinars and presentations:

Time to upgrade:

2. Technical & Musings

>> Why is Kubernetes Debugging so Problematic? [foojay.io]

Demystifying the daunting task of debugging applications in K8S: guidelines and leveraging the right tools for debugging efficiently in K8S world

Also worth reading:

3. Pick of the Week

>> The Three Levels of Self-Awareness [markmanson.net]


Read Last N Lines From File in Java

$
0
0

1. Introduction

In this article, we’ll see how can we read the last N lines from a file using different standard Java packages and the Apache Commons IO library.

2. Sample Data

We’ll use the sample data and parameters defined below for all our examples in this tutorial.

Let’s start by creating a simple file named data.txt that we’ll use as an input file:

line 1
line 2
line 3
line 4
line 5
line 6
line 7
line 8
line 9
line 10

Furthermore, we’ll use the following sample values the number of last N lines to read, the output to verify, and the file path:

private static final String FILE_PATH = "src/test/resources/data.txt";
private static final int LAST_LINES_TO_READ = 3;
private static final String OUTPUT_TO_VERIFY = "line 8\nline 9\nline 10";

3. Using BufferedReader

Let’s explore the BufferedReader class which will allow us to read file line by line. It has the advantage of not storing the whole file in memory. We can use the Queue which is a FIFO structure. While we read the file we will start removing the first element as soon as the Queue size reaches the number of lines to read:

@Test
public void givenFile_whenUsingBufferedReader_thenExtractedLastLinesCorrect() throws IOException {
    try (BufferedReader br = Files.newBufferedReader(Paths.get(FILE_PATH))) {
        Queue<String> queue = new LinkedList<>();
        String line;
        while ((line = br.readLine()) != null){
            if (queue.size() >= LAST_LINES_TO_READ) {
                queue.remove();
            }
            queue.add(line);
        }
        assertEquals(OUTPUT_TO_VERIFY, String.join("\n", queue));
    }
}

4. Using Scanner

We can achieve the same result with a similar approach using the Scanner class:

@Test
public void givenFile_whenUsingScanner_thenExtractedLastLinesCorrect() throws IOException {
    try (Scanner scanner = new Scanner(new File(FILE_PATH))) {
        Queue<String> queue = new LinkedList<>();
        while (scanner.hasNextLine()){
            if (queue.size() >= LAST_LINES_TO_READ) {
                queue.remove();
            }
            queue.add(scanner.nextLine());
        }
        assertEquals(OUTPUT_TO_VERIFY, String.join("\n", queue));
    }
}

5. Using NIO2 Files

If we want to work with large files, we can use the Files class. Its Lines method provides a stream to read a file line by line. After that, we will use a similar Queue approach to read the required content:

@Test
public void givenLargeFile_whenUsingFilesAPI_thenExtractedLastLinesCorrect() throws IOException{
    try (Stream<String> lines = Files.lines(Paths.get(FILE_PATH))) {
        Queue<String> queue = new LinkedList<>();
        lines.forEach(line -> {
            if (queue.size() >= LAST_LINES_TO_READ) {
                queue.remove();
            }
            queue.add(line);
        });
        assertEquals(OUTPUT_TO_VERIFY, String.join("\n", queue));
    }
}

6. Using Apache Commons IO

We can use the Apache Commons IO library. We will use the FileUtils class and the ReversedLinesFileReader class.

6.1. Read File Using FileUtils Class

This class provides the readLines method using which we can read the whole file in the list. This causes the whole file content to be stored in memory. We can traverse the list and can read the required content:

@Test
public void givenFile_whenUsingFileUtils_thenExtractedLastLinesCorrect() throws IOException{
    File file = new File(FILE_PATH);
    List<String> lines = FileUtils.readLines(file, "UTF-8");
    StringBuilder stringBuilder = new StringBuilder();
    for (int i = (lines.size() - LAST_LINES_TO_READ); i < lines.size(); i++) {
        stringBuilder.append(lines.get(i)).append("\n");
    }
    assertEquals(OUTPUT_TO_VERIFY, stringBuilder.toString().trim());
}

6.2. Read File Using ReversedLinesFileReader Class

This class allows to read files in reverse order using its readLines method. This helps to directly read the required content from the last without applying any other logic or skipping the file content:

@Test
public void givenFile_whenUsingReverseFileReader_thenExtractedLastLinesCorrect() throws IOException{
    File file = new File(FILE_PATH);
    try (ReversedLinesFileReader rlfReader = new ReversedLinesFileReader(file, StandardCharsets.UTF_8)) {
        List<String> lastLines = rlfReader.readLines(LAST_LINES_TO_READ);
        StringBuilder stringBuilder = new StringBuilder();
        Collections.reverse(lastLines);
        lastLines.forEach(
          line -> stringBuilder.append(line).append("\n")
        );
        assertEquals(OUTPUT_TO_VERIFY, stringBuilder.toString().trim());
    }
}

7. Conclusion

In this article, we have looked at the different ways of reading the last N lines from a file. We should pick the approach considering whether an application can sustain more CPU usage or more memory usage.

All of the code in this article is available over on GitHub.


How to Fix PSQLException: Operator Does Not Exist: Character Varying = UUID

$
0
0

1. Introduction

In this tutorial, we’ll explore the PSQLException error: “operator does not exist: character varying = uuid” when using JPA to interact with PostgreSQL. We’ll delve into why this error occurs, identify common scenarios that trigger it, and see how to resolve it.

2. Causes of Exception

PostgreSQL distinguishes between character varying (string) and UUID data types. This distinction requires explicit type casting or conversion for comparisons between these types. Therefore, when we try to directly compare a UUID value with a string (VARCHAR) column, PostgreSQL raises an exception because it lacks an operator for this specific type of comparison.

Let’s consider an example where we have a User entity with a varchar column uuid:

@Entity
@Table(name = "User_Tbl")
public class User{
    @Id
    @GeneratedValue(strategy = GenerationType.IDENTITY)
    private Long id;
    @Column(columnDefinition = "varchar")
    private UUID uuid;
    // getters and setters
}

When we try to query the database with a UUID value, we get the error:

UUID testId = UUID.fromString("c3917b5b-18ed-4a84-a6f7-6be7a8c21d66");
User user = new User();
user.setUuid(testId);
user.setName("John Doeee");
userRepository.save(user);
Throwable throwable = assertThrows(InvalidDataAccessResourceUsageException.class,
  () -> userRepository.findByUuid(testId),
  "Expected ERROR: operator does not exist: character varying = uuid");
assertTrue(getRootCause(throwable) instanceof PSQLException);

3. Fix the Exception

To resolve this issue, we need to ensure that comparisons between character varying and UUID values are handled correctly. Let’s look at the recommended approaches.

3.1. Using CAST() Function

We can use the CAST() function in PostgreSQL to explicitly cast the UUID value to a string within our JPA query.

The CAST() function is a built-in PostgreSQL function that allows us to convert a value of one data type to another. This ensures that the comparison between the UUID value and varchar types is handled correctly by PostgreSQL.

Here’s an example of how to fix the query:

@Query("SELECT u FROM User u WHERE u.uuid = CAST(:uuid AS text)")
Optional<User> findByUuidWithCastFunction(@Param("uuid") UUID uuid);

By casting the character varying value to a UUID, we ensure that the database can perform the comparison correctly:

UUID testId = UUID.fromString("c3917b5b-18ed-4a84-a6f7-6be7a8c21d66");
Optional<User> userOptional = userRepository.findByUuidWithCastFunction(testId);
assertThat(userOptional.isPresent(), is(true));
assertThat(userOptional.get().getUuid(), equalTo(testId));

Let’s observe the generated SQL query including the CAST(:id AS text) operation:

Hibernate: 
    select
        user0_.id as id1_0_,
        user0_.name as name2_0_,
        user0_.uuid as uuid3_0_ 
    from
        user_tbl user0_ 
    where
        user0_.uuid=cast(? as text)

The cast(? as text) shows the usage of the CAST() function to convert the UUID parameter to a text type, ensuring compatibility with the varchar column in PostgreSQL.

3.2. Using a Custom Converter

In addition to using direct casting with SQL functions, we can use the @Converter annotation in JPA to define a custom converter for the UUID object and varchar column. This converter facilitates the seamless conversion between UUID objects and their string representations in the database.

First, let’s implement the UUIDConverter class that implements AttributeConverter<UUID, String>:

@Converter
public class UUIDConverter implements AttributeConverter<UUID, String> {
    @Override
    public String convertToDatabaseColumn(UUID uuid) {
        return uuid.toString();
    }
    @Override
    public UUID convertToEntityAttribute(String dbData) {
        return UUID.fromString(dbData);
    }
}

Next, we can use the @Convert annotation on the UUID field in our JPA entity:

@Entity
public class UserWithConverter{
    @Id
    @GeneratedValue(strategy = GenerationType.IDENTITY)
    private Long id;
    @Convert(converter = UUIDConverter.class)
    @Column(columnDefinition = "varchar")
    private UUID uuid;
    // getters and setters
}

The @Convert annotation configures JPA to automatically convert the UUID field to a string (VARCHAR) type when persisting the entity to the database, and vice versa when retrieving it:

Optional<UserWithConverter> userOptional = userWithConverterRepository.findByUuid(testId);
assertThat(userOptional.isPresent(), is(true));
assertThat(userOptional.get().getUuid(), equalTo(testId));

4. Conclusion

In this article, we discussed the PSQLExceptionoperator does not exist: character varying = uuid” and how to fix it by explicitly casting the UUID value to a character varying or by using a custom converter in JPA.

As always, the source code for the examples is available over on GitHub.


Testing CORS in Spring Boot

$
0
0

1. Overview

Cross-Origin Resource Sharing (CORS) is a security mechanism that allows a web page from one origin to access resources from another origin. It’s enforced by browsers to prevent websites from making unauthorized requests to different domains.

When building web applications with Spring Boot, it’s important to properly test our CORS configuration to ensure that our application can securely interact with authorized origins while blocking unauthorized ones.

More often than not, we identify CORS issues only after deploying our application. By testing our CORS configuration early, we can find and fix these problems during development itself, saving time and effort.

In this tutorial, we’ll explore how to write effective tests to verify our CORS configuration using MockMvc.

2. Configuring CORS in Spring Boot

There are various ways to configure CORS in a Spring Boot application. For this tutorial, we’ll use Spring Security and define a CorsConfigurationSource:

private CorsConfigurationSource corsConfigurationSource() {
    CorsConfiguration corsConfiguration = new CorsConfiguration();
    corsConfiguration.setAllowedOrigins(List.of("https://baeldung.com"));
    corsConfiguration.setAllowedMethods(List.of("GET"));
    corsConfiguration.setAllowedHeaders(List.of("X-Baeldung-Key"));
    corsConfiguration.setExposedHeaders(List.of("X-Rate-Limit-Remaining"));
    UrlBasedCorsConfigurationSource source = new UrlBasedCorsConfigurationSource();
    source.registerCorsConfiguration("/**", corsConfiguration);
    return source;
}

In our configuration, we’re allowing requests from https://baeldung.com origin, with GET method, X-Baeldung-Key header, and exposing the X-Rate-Limit-Remaining header in the response.

We’ve hardcoded the values in our configuration, but we can use @ConfigurationProperties to externalize them.

Next, let’s configure the SecurityFilterChain bean to apply our CORS configuration:

private static final String[] WHITELISTED_API_ENDPOINTS = { "/api/v1/joke" };
@Bean
public SecurityFilterChain configure(HttpSecurity http) {
    http
      .cors(corsConfigurer -> corsConfigurer.configurationSource(corsConfigurationSource()))
      .authorizeHttpRequests(authManager -> {
        authManager.requestMatchers(WHITELISTED_API_ENDPOINTS)
          .permitAll()
          .anyRequest()
          .authenticated();
      });
    return http.build();
}

Here, we’re configuring CORS using the corsConfigurationSource() method we defined earlier.

We also whitelist the /api/v1/joke endpoint, so it can be accessed without authentication. We’ll be using this API endpoint as a base to test our CORS configuration:

private static final Faker FAKER = new Faker();
@GetMapping(value = "/api/v1/joke")
public ResponseEntity<JokeResponse> generate() {
    String joke = FAKER.joke().pun();
    String remainingLimit = FAKER.number().digit();
    return ResponseEntity.ok()
      .header("X-Rate-Limit-Remaining", remainingLimit)
      .body(new JokeResponse(joke));
}
record JokeResponse(String joke) {};

We use Datafaker to generate a random joke and a remaining rate limit value. We then return the joke in the response body and include the X-Rate-Limit-Remaining header with the generated value.

3. Testing CORS Using MockMvc

Now that we’ve configured CORS in our application, let’s write some tests to ensure it’s working as expected. We’ll use MockMvc to send requests to our API endpoint and verify the response.

3.1. Testing Allowed Origins

First, let’s test that requests from our allowed origin are successful:

mockMvc.perform(get("/api/v1/joke")
  .header("Origin", "https://baeldung.com"))
  .andExpect(status().isOk())
  .andExpect(header().string("Access-Control-Allow-Origin", "https://baeldung.com"));

We also verify that the response includes the Access-Control-Allow-Origin header for our request from the allowed origin.

Next, let’s verify that requests from non-allowed origins are blocked:

mockMvc.perform(get("/api/v1/joke")
  .header("Origin", "https://non-baeldung.com"))
  .andExpect(status().isForbidden())
  .andExpect(header().doesNotExist("Access-Control-Allow-Origin"));

3.2. Testing Allowed Methods

To test allowed methods, we’ll simulate a preflight request using the HTTP OPTIONS method:

mockMvc.perform(options("/api/v1/joke")
  .header("Origin", "https://baeldung.com")
  .header("Access-Control-Request-Method", "GET"))
  .andExpect(status().isOk())
  .andExpect(header().string("Access-Control-Allow-Methods", "GET"));

We verify that the request succeeds and the Access-Control-Allow-Methods header is present in the response.

Similarly, let’s ensure that non-allowed methods are rejected:

mockMvc.perform(options("/api/v1/joke")
  .header("Origin", "https://baeldung.com")
  .header("Access-Control-Request-Method", "POST"))
  .andExpect(status().isForbidden());

3.3. Testing Allowed Headers

Now, we’ll test allowed headers by sending a preflight request with the Access-Control-Request-Headers header and verifying the Access-Control-Allow-Headers in the response:

mockMvc.perform(options("/api/v1/joke")
  .header("Origin", "https://baeldung.com")
  .header("Access-Control-Request-Method", "GET")
  .header("Access-Control-Request-Headers", "X-Baeldung-Key"))
  .andExpect(status().isOk())
  .andExpect(header().string("Access-Control-Allow-Headers", "X-Baeldung-Key"));

And let’s verify that our application rejects non-allowed headers:

mockMvc.perform(options("/api/v1/joke")
  .header("Origin", "https://baeldung.com")
  .header("Access-Control-Request-Method", "GET")
  .header("Access-Control-Request-Headers", "X-Non-Baeldung-Key"))
  .andExpect(status().isForbidden());

3.4. Testing Exposed Headers

Finally, let’s test that our exposed header is properly included in the response for allowed origins:

mockMvc.perform(get("/api/v1/joke")
  .header("Origin", "https://baeldung.com"))
  .andExpect(status().isOk())
  .andExpect(header().string("Access-Control-Expose-Headers", "X-Rate-Limit-Remaining"))
  .andExpect(header().exists("X-Rate-Limit-Remaining"));

We verify that the Access-Control-Expose-Headers header is present in the response and includes our exposed header X-Rate-Limit-Remaining. We also check that the actual X-Rate-Limit-Remaining header exists.

Similarly, let’s ensure that our exposed header is not included in the response for non-allowed origins:

mockMvc.perform(get("/api/v1/joke")
  .header("Origin", "https://non-baeldung.com"))
  .andExpect(status().isForbidden())
  .andExpect(header().doesNotExist("Access-Control-Expose-Headers"))
  .andExpect(header().doesNotExist("X-Rate-Limit-Remaining"));

4. Conclusion

In this article, we discussed how to write effective tests using MockMvc to verify that our CORS configuration is correctly allowing requests from authorized origins, methods, and headers while blocking unauthorized ones.

By thoroughly testing our CORS configuration, we can catch misconfigurations early and prevent unexpected CORS errors in production.

As always, all the code examples used in this article are available over on GitHub.


Guide to FileWriter vs. BufferedWriter

$
0
0

1. Overview

In this tutorial, we’ll look at the performance differences between two basic Java classes for writing files: FileWriter and BufferedWriter. While conventional wisdom on the web often suggests that BufferedWriter typically outperforms FileWriter, our goal is to put this assumption to the test.

After looking at the basic information about using classes, their inheritance, and their internal implementation, we’ll use the Java Microbenchmark Harness (JMH) to test whether BufferedWriter really has an advantage.

We’ll run the tests with JDK17 on Linux, but we can expect similar results with any recent version of the JDK on any operating system.

2. Basic Usage

FileWriter writes text to character files using a default buffer whose size isn’t specified in the Javadoc:

FileWriter writer = new FileWriter("testFile.txt");
writer.write("Hello, Baeldung!");
writer.close();

BufferedWriter is an alternative choice. It’s designed to wrap around other Writer classes, including FileWriter:

int BUFSIZE = 4194304; // 4MiB
BufferedWriter writer = new BufferedWriter(new FileWriter("testBufferedFile.txt"), BUFSIZE);
writer.write("Hello, Buffered Baeldung!");
writer.close();

In this case, we specified a 4MiB buffer. However, if we don’t set the size for the buffer, its default size isn’t specified in the Javadoc.

3. Inheritance

Here is a UML diagram illustrating the inheritance structure of FileWriter and BufferedWriter:

FileWrite and BufferedWriter Hierarchy

It’s helpful to understand that FileWriter and BufferedWriter both extend Writer, and the operation of FileWriter is based on OutputStreamWriter. Unfortunately, neither the analysis of inheritance hierarchies nor the Javadocs tell us enough about the default buffer size of FileWriter and BufferedWriter, so we’ll inspect the JDK source code to understand more.

4. Underlying Implementation

Looking at the underlying implementation of FileWriter, we see that its default buffer size is 8192 bytes from JDK10 to JDK18, and variable from 512 to 8192 in later versions. Specifically, FileWriter extends OutputStreamWriter, as we’ve just seen in the UML diagram, and OutputStreamWriter uses StreamEncoder, whose code contains DEFAULT_BYTE_BUFFER_SIZE = 8192 up to JDK18 and MAX_BYTE_BUFFER_CAPACITY = 8192 in later versions.

StreamEncoder isn’t a public class in the JDK API. It’s an internal class in the sun.nio.cs package that is used within the Java framework to handle encoding of character streams.

Its buffer size allows FileWriter to handle data efficiently by minimizing the number of I/O operations. Since the default character encoding in Java is typically UTF-8, 8192 bytes would correspond to approximately 8192 characters in most scenarios. Despite this efficient buffering, FileWriter is still considered to have no buffering capabilities due to outdated documentation.

The default buffer size of BufferedWriter is the same as FileWriter. We can verify it by checking its source code, which contains defaultCharBufferSize = 8192 from JDK10 to JDK18, and DEFAULT_MAX_BUFFER_SIZE = 8192 in later versions. However, BufferedWriter allows us to specify a different buffer size, as we’ve seen in the previous example.

5. Comparing Performance

Here we’ll compare FileWriter and BufferedWriter with JMH. If we want to replicate the tests on our machine, and if we’re using Maven, we’ll need to set up the JMH dependencies on pom.xml, add the JMH annotation processor to the Maven compiler plugin configuration, and make sure all the required classes and resources are available during execution. The Getting Started section of our JMH tutorial covers these points.

5.1. Disk Write Synchronization

To perform disk write benchmarking with JHM, it’s imperative to achieve full synchronization of disk operations by disabling the operating system cache. This step is critical because asynchronous disk writes can significantly affect the accuracy of I/O operations measurements. By default, operating systems store frequently accessed data in memory, reducing the number of actual disk writes and invalidating benchmark results.

On Linux systems, we can remount the filesystem with the sync option of mount to disable caching and ensure that all write operations are immediately synchronized to disk:

$ sudo mount -o remount,sync /path/to/mount

Similarly, the macOS mount has a sync option that ensures that all I/O to the filesystem is synchronous.

On Windows, we open the Device Manager and expand the Drives section. Then we right-click on the drive we want to configure, select Properties, and navigate to the Policies tab. Finally, we disable the Enable write caching on the device option.

5.2. Our Tests

Our code measures the performance of FileWriter and BufferedWriter under various write conditions. We run several benchmarks to test single writes and repeated writes (10, 1000, 10000, and 100000 times) to the benchmark.txt file.

We use JMH-specific annotations to configure the benchmark parameters such as @Benchmark, @State, @BenchmarkMode, and others to set the scope, mode, warm-up iterations, measurement iterations, and fork settings.

The main method sets up the environment by deleting any existing benchmark.txt file and adjusting the classpath before running the JMH benchmarking suite:

@State(Scope.Benchmark)
@BenchmarkMode(Mode.AverageTime)
@OutputTimeUnit(TimeUnit.MILLISECONDS)
@Warmup(iterations = 5, time = 1, timeUnit = TimeUnit.SECONDS)
@Measurement(iterations = 10, time = 10, timeUnit = TimeUnit.SECONDS)
@Fork(1)
public class BenchmarkWriters {
    private static final Logger log = LoggerFactory.getLogger(BenchmarkWriters.class);
    private static final String FILE_PATH = "benchmark.txt";
    private static final String CONTENT = "This is a test line.";
    private static final int BUFSIZE = 4194304; // 4MiB
    @Benchmark
    public void fileWriter1Write() {
        try (FileWriter writer = new FileWriter(FILE_PATH, true)) {
            writer.write(CONTENT);
            writer.close();
        } catch (IOException e) {
            log.error("Error in FileWriter 1 write", e);
        }
    }
    @Benchmark
    public void bufferedWriter1Write() {
        try (BufferedWriter writer = new BufferedWriter(new FileWriter(FILE_PATH, true), BUFSIZE)) {
            writer.write(CONTENT);
            writer.close();
        } catch (IOException e) {
            log.error("Error in BufferedWriter 1 write", e);
        }
    }
    @Benchmark
    public void fileWriter10Writes() {
        try (FileWriter writer = new FileWriter(FILE_PATH, true)) {
            for (int i = 0; i < 10; i++) {
                writer.write(CONTENT);
            }
            writer.close();
        } catch (IOException e) {
            log.error("Error in FileWriter 10 writes", e);
        }
    }
    @Benchmark
    public void bufferedWriter10Writes() {
        try (BufferedWriter writer = new BufferedWriter(new FileWriter(FILE_PATH, true), BUFSIZE)) {
            for (int i = 0; i < 10; i++) {
                writer.write(CONTENT);
            }
            writer.close();
        } catch (IOException e) {
            log.error("Error in BufferedWriter 10 writes", e);
        }
    }
    @Benchmark
    public void fileWriter1000Writes() {
        [...]
    }
    @Benchmark
    public void bufferedWriter1000Writes() {
        [...]
    }
    
    @Benchmark
    public void fileWriter10000Writes() {
        [...]
    }
    @Benchmark
    public void bufferedWriter10000Writes() {
        [...]
    }
    
    @Benchmark
    public void fileWriter100000Writes() {
        [...]
    }
    @Benchmark
    public void bufferedWriter100000Writes() {
        [...]
    }
    [...]
}

In these tests, each benchmark method opens and closes the file writer independently. The @Fork(1) annotation indicates that only one fork is used, so there are no multiple parallel executions of the same benchmark method. The code doesn’t explicitly create or manage threads, so all writes are done in the main thread of the benchmark.

All this means that the writes are indeed sequential and not concurrent, which is necessary to get valid measurements.

5.3. Results

These are the results with the BufferedWriter buffer size of 4MiB specified in the code:

Benchmark                                    Mode  Cnt     Score     Error  Units
BenchmarkWriters.bufferedWriter100000Writes  avgt   10  9170.583 ± 245.916  ms/op
BenchmarkWriters.bufferedWriter10000Writes   avgt   10   918.662 ±  15.105  ms/op
BenchmarkWriters.bufferedWriter1000Writes    avgt   10   114.261 ±   2.966  ms/op
BenchmarkWriters.bufferedWriter10Writes      avgt   10    37.999 ±   1.571  ms/op
BenchmarkWriters.bufferedWriter1Write        avgt   10    37.968 ±   2.219  ms/op
BenchmarkWriters.fileWriter100000Writes      avgt   10  9253.935 ± 261.032  ms/op
BenchmarkWriters.fileWriter10000Writes       avgt   10   951.684 ±  41.391  ms/op
BenchmarkWriters.fileWriter1000Writes        avgt   10   114.610 ±   4.366  ms/op
BenchmarkWriters.fileWriter10Writes          avgt   10    37.761 ±   1.836  ms/op
BenchmarkWriters.fileWriter1Write            avgt   10    37.912 ±   2.080  ms/op

Instead, these are the results without specifying a buffer value for BufferedWriter, i.e., using its default buffer:

Benchmark                                    Mode  Cnt     Score     Error  Units
BenchmarkWriters.bufferedWriter100000Writes  avgt   10  9117.021 ± 143.096  ms/op
BenchmarkWriters.bufferedWriter10000Writes   avgt   10   931.994 ±  34.986  ms/op
BenchmarkWriters.bufferedWriter1000Writes    avgt   10   113.186 ±   2.076  ms/op
BenchmarkWriters.bufferedWriter10Writes      avgt   10    40.038 ±   2.042  ms/op
BenchmarkWriters.bufferedWriter1Write        avgt   10    38.891 ±   0.684  ms/op
BenchmarkWriters.fileWriter100000Writes      avgt   10  9261.613 ± 305.692  ms/op
BenchmarkWriters.fileWriter10000Writes       avgt   10   932.001 ±  26.676  ms/op
BenchmarkWriters.fileWriter1000Writes        avgt   10   114.209 ±   5.988  ms/op
BenchmarkWriters.fileWriter10Writes          avgt   10    38.205 ±   1.361  ms/op
BenchmarkWriters.fileWriter1Write            avgt   10    37.490 ±   2.137  ms/op

In essence, these results show that the performance of FileWriter and BufferedWriter is nearly identical under all test conditions. Furthermore, specifying a larger buffer for BufferedWriter than the default one doesn’t provide any benefit.

6. Conclusion

In this article, we explored the performance differences between FileWriter and BufferedWriter using JHM. We began by looking at their basic usage and inheritance structures. Both classes have a default buffer size of 8192 bytes from JDK10 to JDK18, and variable from 512 to 8192 bytes in later versions.

We ran benchmarks to compare their performance under various conditions, ensuring accurate measurements by disabling operating system caching. The tests included single and repetitive writes using both the default and a specified 4MiB buffer for BufferedWriter.

Our results show that FileWriter and BufferedWriter have nearly identical performance in all scenarios. Furthermore, increasing the buffer size of BufferedWriter doesn’t significantly improve performance.

As always, the full source code is available over on GitHub.


Containerize a Spring Boot Application With Podman Desktop

$
0
0

1. Overview

In this tutorial, we’ll learn how to containerize a Spring Boot application using Podman Desktop. Podman is a containerization tool that allows us to manage containers without requiring a daemon process.

Podman Desktop is a desktop application with a graphical user interface for managing containers using Podman.

To demonstrate its usage, we’ll create a simple Spring Boot application, build a container image, and run a container using Podman Desktop.

2. Installing Podman Desktop

We need to install Podman Desktop on our local machine to get started. It’s available for Windows, macOS, and Linux operating systems. After downloading the installer, we can follow the installation instructions to set up Podman Desktop on our machine.

Here are a few important steps for setting up Podman Desktop:

  • Podman should be installed on the machine. If not installed, Podman Desktop prompts and installs it for us.
  • Once Podman is ready, we’ll be prompted to start a Podman machine. We can choose the default settings or customize them as needed. This is required before we can run containers.
  • Additionally, for Windows, we need to enable/install WSL2 (Windows Subsystem for Linux) before we can run Podman.

At the end of the installation process, we should have a Podman machine running that can be managed using the Podman Desktop application. We can verify this in the Dashboard section:

Podman Dashboard View

3. Creating a Spring Boot Application

Let’s create a small Spring Boot application. The application will have a REST controller that returns a “Hello, World!” message when we access the /hello endpoint.

We’ll use Maven to build the project and create a jar file. Then, we’ll create a Containerfile (also known as Dockerfile in the context of Docker). We’ll use this file to build a container image for our application using Podman Desktop.

3.1. Setting up the Project

To start with, we’ll add the Spring Boot Starter Web dependency to our project:

<dependencies>
    <dependency>
        <groupId>org.springframework.boot</groupId>
        <artifactId>spring-boot-starter-web</artifactId>
        <version>3.3.1</version>
    </dependency>
</dependencies>

This dependency provides the necessary libraries for creating a Spring Boot web application.

3.2. Controller

Next, let’s create our REST controller:

@RestController
public class HelloWorldController {
    @GetMapping("/hello")
    public String helloWorld() {
        return "Hello, World!";
    }
}

Here we use the @RestController annotation to mark the class as a controller and the @GetMapping annotation to map the method to the /hello endpoint. When we access this endpoint, it returns the “Hello, World!” message.

3.3. Building the Project

We can build the project using Maven by running the following command in the terminal:

mvn clean package

This command compiles the project, runs the tests, and creates a jar file in the target directory.

4. Containerfile

Now that we have our Spring Boot application ready, let’s create a Containerfile to build an image for our application. We’ll create this file in the root directory of our project:

FROM openjdk:17-alpine
WORKDIR /app
COPY target/spring-boot-podman-desktop-1.0-SNAPSHOT.jar app.jar
EXPOSE 8080
CMD ["java", "-jar", "app.jar"]

In this file:

  • First, we use the openjdk:17-alpine image as the base image.
  • Next, we set the working directory to /app.
  • Then, we copy the jar file generated by Maven to the /app directory.
  • We expose port 8080, the default port for Spring Boot applications.
  • Finally, we use the CMD command to specify we want to run the jar file using the java -jar command when the container starts.

5. Building an Image Using Podman Desktop

Once the Containerfile is set up, let’s use the Podman Desktop application to create the image.

First, we’ll go to the Images section and click on the Build button:

Podman images view with build button selected

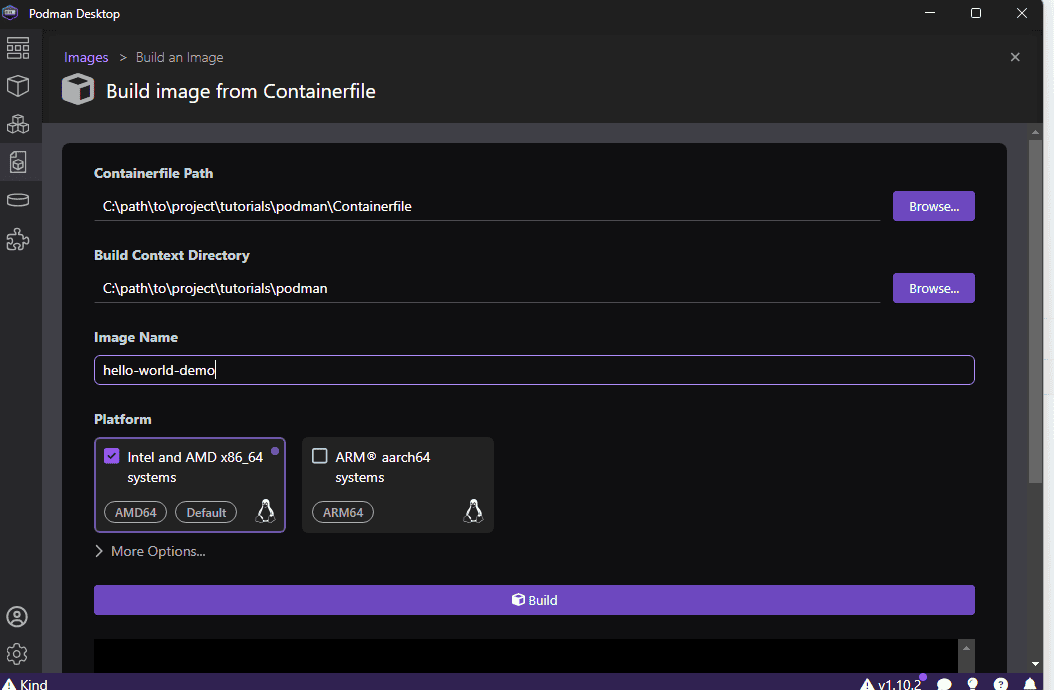
Next, we’ll fill in the details for the image:

  • Set the name for the image
  • Choose the Containerfile location
  • Use the project directory as the context directory
  • We can also choose the platform(s) for the image. We’ll use the default value.

Here’s an example of the parameters and values:

Podman create image parameters

After filling in the details, we can click the Build button to build the image. After the build is completed, we can find the image in the Images section.

6. Running a Container

Now that we have the image ready, we can run a container using the image. We can do this by clicking the Run button next to the hello-world-demo image in the Images section:

Running a container from podman images section

6.1. Starting a Container

Next, we’ll fill in the details for the container. Properties we set in our Containerfile will be pre-filled, and we can customize them as needed:Setting up container properties before running it

In this case, the port mapping and command are already filled. If needed, we can set other properties such as environment variables, volumes, etc. We can also set the name of the container.

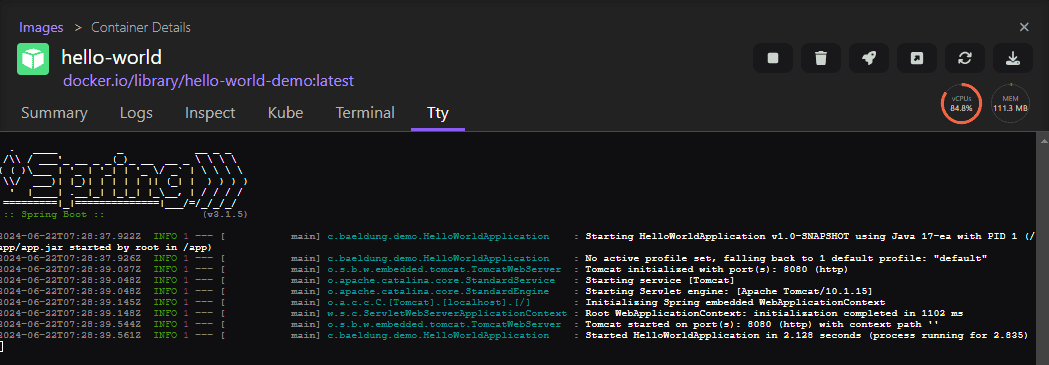
After filling in the details, we can click the Start Container button to start the container. This opens the Container Details section and displays the container logs:

Podman container starter logs

6.2. Testing the Application

Once the container starts, we can access the application by opening a browser and navigating to http://localhost:8080/hello. We’ll see the “Hello, World!” message on the page:

Container API test in browser.

6.3. Stopping the Container

To stop the container, we click on the Stop button in the Container Details section above.

Alternatively, we can go to the containers list and click on the Stop button for the container:Stop a container in Podman Desktop from the Containers section

7. Conclusion

In this article, we learned how to containerize a Spring Boot application using Podman Desktop. We created a simple Spring Boot application with an API endpoint and created a Containerfile for it. Then, we built an image using the Podman Desktop application and ran a container using the image. Finally, we tested that our endpoint was working after the container started.

As always, the code examples are available over on GitHub.


Fixing UnsupportedTemporalTypeException: Unsupported Field: InstantSeconds

$
0
0

1. Overview

When working with dates, we often leverage the Date-Time API. However, manipulating or accessing temporal data may lead to errors and exceptions when done improperly. One such specific exception is UnsupportedTemporalTypeException: “Unsupported Field: InstantSeconds” which typically denotes that the field InstantSeconds isn’t supported by the specified temporal object.

So, in this short tutorial, we’ll learn how to avoid this exception when working with the Date-Time API.

2. Practical Example

Before diving into the solution, let’s use a practical example to understand the root cause of the exception.

According to the documentation, UnsupportedTemporalTypeException signals that a ChronoField or ChronoUnit isn’t supported. In other words, the exception occurs when an unsupported field is used with a temporal object that doesn’t support that specific field.

Typically, the stack trace “Unsupported Field: InstantSeconds” says it all. It indicates that there’s something wrong with the field InstantSeconds which represents the concept of the sequential count of seconds from the epoch.

In short, not all temporal objects provided by the Date-Time API support this field. For example, attempting to apply operations involving InstantSeconds to LocalDateTime, LocalDate, and LocalTime results in UnsupportedTemporalTypeException.

Now, let’s see how to reproduce the exception in practice. To do so, we’ll try to convert a LocalDateTime to Instant:

@Test
void givenLocalDateTime_whenConvertingToInstant_thenThrowException() {
    assertThatThrownBy(() -> {
        LocalDateTime localDateTime = LocalDateTime.now();
        long seconds = localDateTime.getLong(ChronoField.INSTANT_SECONDS);
        Instant instant = Instant.ofEpochSecond(seconds);
    }).isInstanceOf(UnsupportedTemporalTypeException.class)
        .hasMessage("Unsupported field: InstantSeconds");
}

As we can see, the test failed because we attempted to access ChronoField.INSTANT_SECONDS using an instance of LocalDateTime.

In short, LocalDateTime doesn’t support INSTANT_SECONDS which denotes a single specific instant because the same LocalDateTime object could represent multiple different instants depending on the time zone. For instance, “2024-06-22T11:20:33” in New York differs from “2024-06-22T11:20:33” in Tokyo.

3. Solution

As we noted earlier, the main reason why LocalDateTime doesn’t support ChronoField.INSTANT_SECONDS is that it lacks sufficient information about the time zone to determine the exact instantaneous point on the global timeline.

So, the easiest solution would be to set the time zone before converting the LocalDateTime to Instant. For that purpose, we can use the ZonedDateTime class:

@Test
void givenLocalDateTime_whenConvertingUsingTimeZone_thenDoNotThrowException() {
    LocalDateTime localDateTime = LocalDateTime.now();
    ZonedDateTime zonedDateTime = localDateTime.atZone(ZoneId.systemDefault());
    assertThatCode(() -> {
        Instant instant = zonedDateTime.toInstant();
    }).doesNotThrowAnyException();
}

Here, we used the atZone() method to return a ZonedDateTime object formed from the given LocalDateTime at the specified time zone. Then, we called toInstant() to calculate the instant represented by the date-time based on the provided time zone.

4. Conclusion

In this short article, we learned the root cause behind UnsupportedTemporalTypeException. Furthermore, we saw how to reproduce and fix it in practice.

As always, the full source code of the examples is available over on GitHub.


A Guide to Structured Output in Spring AI

$
0
0

1. Introduction

Typically, when using large language models (LLMs), we don’t expect a structured response. Moreover, we got used to their unpredictable behavior, which often leads to outputs that do not always meet our expectations. However, there are methods to increase the likelihood of generating structured responses (though not with 100% probability) and even parsing these responses into usable code structures.

In this tutorial, we’ll explore Spring AI and tools that simplify and streamline this process, making it more accessible and straightforward.

2. Brief Introduction To the Chat Model

The basic structure that allows us to do prompts to the AI models is the ChatModel interface:

public interface ChatModel extends Model<Prompt, ChatResponse> {
    default String call(String message) {
        // implementation is skipped
    }
    @Override
    ChatResponse call(Prompt prompt);
}

The call() method functions as a mechanism for sending a message to the model and receiving a response, nothing more. It is natural to expect the prompt and response to be a String type. However, modern model implementations often feature more complex structures that enable finer tuning, enhancing the model’s predictability. For example, while the default call() method accepting a String parameter is available, it is more practical to utilize a Prompt. This Prompt can have multiple messages or include options like temperature to regulate the model’s apparent creativity.

We can autowire ChatModel and call it directly. For example, if we have spring-ai-openai-spring-boot-starter for OpenAI API in our dependencies, OpenAiChatModel implementation will be autowired.

3. Structured Output API

To get an output in the form of a data structure, Spring AI provides tools to wrap ChatModel‘s call using the Structured Output API. The core interface for this API is StructuredOutputConverter:

public interface StructuredOutputConverter<T> extends Converter<String, T>, FormatProvider {}

It combines two other interfaces, first one is FormatProvider:

public interface FormatProvider {
    String getFormat();
}

Before the ChatModel’s call(), getFormat() prepares the prompt, populates it with the required data schema, and specifically describes how the data should be formatted to avoid inconsistencies in response. For example, to get a response in JSON format, it uses this prompt:

public String getFormat() {
    String template = "Your response should be in JSON format.\n"
      + "Do not include any explanations, only provide a RFC8259 compliant JSON response following this format without deviation.\n"
      + "Do not include markdown code blocks in your response.\n
      + "Remove the ```json markdown from the output.\nHere is the JSON Schema instance your output must adhere to:\n```%s```\n";
    return String.format(template, this.jsonSchema);
}

These instructions are usually appended after the user’s input.

The second interface is Converter:

@FunctionalInterface
public interface Converter<S, T> {
    @Nullable
    T convert(S source);
 
    // default method
}

After call() returns the response, the converter parses it into the required data structure of type T. Here is a simple diagram of how StructuredOutputConverter works:

4. Available Converters

In this section, we’ll explore the available implementations of the StructuredOutputConverter with examples. We’ll demonstrate this by generating characters for a Dungeons & Dragons game:

public class Character {
    private String name;
    private int age;
    private String race;
    private String characterClass;
    private String cityOfOrigin;
    private String favoriteWeapon;
    private String bio;
    
    // constructor, getters, and setters
}

Please note that since Jackson’s ObjectMapper is used behind the scenes, we need empty constructors for our beans.

5. BeanOutputConverter for Beans

The BeanOutputConverter produces an instance of the specified class from the model’s response. It constructs a prompt to instruct the model on generating an RFC8259-compliant JSON. Let’s look at how to use it using ChatClient API:

@Override
public Character generateCharacterChatClient(String race) {
    return ChatClient.create(chatModel).prompt()
      .user(spec -> spec.text("Generate a D&D character with race {race}")
        .param("race", race))
        .call()
        .entity(Character.class); // <-------- we call ChatModel.call() here, not on the line before
}

In this method, ChatClient.create(chatModel) instantiates a ChatClient. The prompt() method initiates the builder chain with the request (ChatClientRequest). In our case, we only add the user’s text. Once the request is created, the call() method is invoked, returning a new CallResponseSpec with ChatModel and ChatClientRequest inside. The entity() method then creates a converter based on the provided type, completes the prompt, and invokes the AI model.

We may notice that we didn’t use BeanOutputConverter directly. That’s because we used a class as the parameter for the .entity() method, it means the BeanOutputConverter will handle the prompt and conversion.

For more control, we can write a low-level version of this approach. Here, we will use ChatModel.call() by ourselves, which we autowired beforehand:

@Override
public Character generateCharacterChatModel(String race) {
    BeanOutputConverter<Character> beanOutputConverter = new BeanOutputConverter<>(Character.class);
    String format = beanOutputConverter.getFormat();
    String template = """
                Generate a D&D character with race {race}
                {format}
                """;
    PromptTemplate promptTemplate = new PromptTemplate(template, Map.of("race", race, "format", format));
    Prompt prompt = new Prompt(promptTemplate.createMessage());
    Generation generation = chatModel.call(prompt).getResult();
    return beanOutputConverter.convert(generation.getOutput().getContent());
}

In the example above, we created BeanOutputConverter, extracted formatting guidelines for the model, and then added these guidelines to the custom prompt. We produced the final prompt by using PromptTemplate. PromptTemplate is a core prompt templating component for Spring AI and it uses StringTemplate engine under the hood. Then, we call the model to get Generation as a result. Generation represents the model’s response: we extract its content and then convert it to the Java object using the converter.

Here is the real response example we get from the OpenAI using our converter:

{
    name: "Thoren Ironbeard",
    age: 150,
    race: "Dwarf",
    characterClass: "Wizard",
    cityOfOrigin: "Sundabar",
    favoriteWeapon: "Magic Staff",
    bio: "Born and raised in the city of Sundabar, he is known for his skills in crafting and magic."
}

Dwarven wizard, what a rare sight!

6. MapOutputConverter and ListOutputConverter For Collections

MapOutputConverter and ListOutputConverter allow us to create responses structured as maps and lists, respectively. Here are high-level and low-level code examples with MapOutputConverter:

@Override
public Map<String, Object> generateMapOfCharactersChatClient(int amount) {
    return ChatClient.create(chatModel).prompt()
      .user(u -> u.text("Generate {amount} D&D characters, where key is a character's name")
        .param("amount", String.valueOf(amount)))
        .call()
        .entity(new ParameterizedTypeReference<Map<String, Object>>() {});
}
    
@Override
public Map<String, Object> generateMapOfCharactersChatModel(int amount) {
    MapOutputConverter outputConverter = new MapOutputConverter();
    String format = outputConverter.getFormat();
    String template = """
            "Generate {amount} of key-value pairs, where key is a "Dungeons and Dragons" character name and value (String) is his bio.
            {format}
            """;
    Prompt prompt = new Prompt(new PromptTemplate(template, Map.of("amount", String.valueOf(amount), "format", format)).createMessage());
    Generation generation = chatModel.call(prompt).getResult();
    return outputConverter.convert(generation.getOutput().getContent());
}

The reason why we used Object in Map<String, Object> is because for now, MapOutputConverter doesn’t support generic values. But worry not, later we will build our custom converter to support that.  For now, let’s check the examples for the ListOutputConverter, where we are free to use generics:

@Override
public List<String> generateListOfCharacterNamesChatClient(int amount) {
    return ChatClient.create(chatModel).prompt()
      .user(u -> u.text("List {amount} D&D character names")
        .param("amount", String.valueOf(amount)))
        .call()
        .entity(new ListOutputConverter(new DefaultConversionService()));
}
@Override
public List<String> generateListOfCharacterNamesChatModel(int amount) {
    ListOutputConverter listOutputConverter = new ListOutputConverter(new DefaultConversionService());
    String format = listOutputConverter.getFormat();
    String userInputTemplate = """
            List {amount} D&D character names
            {format}
            """;
    PromptTemplate promptTemplate = new PromptTemplate(userInputTemplate,
      Map.of("amount", amount, "format", format));
    Prompt prompt = new Prompt(promptTemplate.createMessage());
    Generation generation = chatModel.call(prompt).getResult();
    return listOutputConverter.convert(generation.getOutput().getContent());
}

7. Anatomy of the Converter or How To Build Our Own

Let’s create a converter that converts data from the AI model into Map<String, V> format, where V is a generic type. Like converters provided by Spring, our container will implement StructuredOutputConverter<T>, which will require us to add methods convert() and getFormat():

public class GenericMapOutputConverter<V> implements StructuredOutputConverter<Map<String, V>> {
    private final ObjectMapper objectMapper; // to convert response
    private final String jsonSchema; // schema for the instructions in getFormat()
    private final TypeReference<Map<String, V>> typeRef; // type reference for object mapper
    public GenericMapOutputConverter(Class<V> valueType) {
        this.objectMapper = this.getObjectMapper();
        this.typeRef = new TypeReference<>() {};
        this.jsonSchema = generateJsonSchemaForValueType(valueType);
    }
    public Map<String, V> convert(@NonNull String text) {
        try {
            text = trimMarkdown(text);
            return objectMapper.readValue(text, typeRef);
        } catch (JsonProcessingException e) {
            throw new RuntimeException("Failed to convert JSON to Map<String, V>", e);
        }
    }
    public String getFormat() {
        String raw = "Your response should be in JSON format.\nThe data structure for the JSON should match this Java class: %s\n" +
                "For the map values, here is the JSON Schema instance your output must adhere to:\n```%s```\n" +
                "Do not include any explanations, only provide a RFC8259 compliant JSON response following this format without deviation.\n";
        return String.format(raw, HashMap.class.getName(), this.jsonSchema);
    }
    private ObjectMapper getObjectMapper() {
        return JsonMapper.builder()
          .configure(DeserializationFeature.FAIL_ON_UNKNOWN_PROPERTIES, false)
          .build();
    }
    private String trimMarkdown(String text) {
        if (text.startsWith("```json") && text.endsWith("```")) {
            text = text.substring(7, text.length() - 3);
        }
        return text;
    }
    private String generateJsonSchemaForValueType(Class<V> valueType) {
        try {
            JacksonModule jacksonModule = new JacksonModule();
            SchemaGeneratorConfig config = new SchemaGeneratorConfigBuilder(SchemaVersion.DRAFT_2020_12, OptionPreset.PLAIN_JSON)
              .with(jacksonModule)
              .build();
            SchemaGenerator generator = new SchemaGenerator(config);
            JsonNode jsonNode = generator.generateSchema(valueType);
            ObjectWriter objectWriter = new ObjectMapper().writer(new DefaultPrettyPrinter()
              .withObjectIndenter(new DefaultIndenter().withLinefeed(System.lineSeparator())));
            return objectWriter.writeValueAsString(jsonNode);
        } catch (JsonProcessingException e) {
            throw new RuntimeException("Could not generate JSON schema for value type: " + valueType.getName(), e);
        }
    }
}

As we know, getFormat() provides an instruction for the AI model, it will follow a user’s prompt in the final request to the AI Model. This instruction specifies a map structure and provides our custom object’s schema for the values. We generated a schema using com.github.victools.jsonschema library. Spring AI already uses this library internally for its converters, which means we don’t need to import it explicitly.

Since we request a response in JSON format, in convert(), we use Jackson’s ObjectMapper for the parsing. Because of this, we trim the markdown like in Spring’s implementation for the BeanOutputConverter. AI models often use markdown to wrap the code snippets, by removing it we avoid exceptions from the ObjectMapper.

After that, we can use our implementation like this:

@Override
public Map<String, Character> generateMapOfCharactersCustomConverter(int amount) {
    GenericMapOutputConverter<Character> outputConverter = new GenericMapOutputConverter<>(Character.class);
    String format = outputConverter.getFormat();
    String template = """
            "Generate {amount} of key-value pairs, where key is a "Dungeons and Dragons" character name and value is character object.
            {format}
            """;
    Prompt prompt = new Prompt(new PromptTemplate(template, Map.of("amount", String.valueOf(amount), "format", format)).createMessage());
    Generation generation = chatModel.call(prompt).getResult();
    return outputConverter.convert(generation.getOutput().getContent());
}
@Override
public Map<String, Character> generateMapOfCharactersCustomConverterChatClient(int amount) {
    return ChatClient.create(chatModel).prompt()
      .user(u -> u.text("Generate {amount} D&D characters, where key is a character's name")
        .param("amount", String.valueOf(amount)))
        .call()
        .entity(new GenericMapOutputConverter<>(Character.class));
}

8. Conclusion

In this article, we explored how to work with large language models (LLMs) to generate structured responses. By leveraging StructuredOutputConverter, we can efficiently convert the model’s output into usable data structures. After that, we discussed the use cases of BeanOutputConverter, MapOutputConverter, and ListOutputConverter, providing practical examples for each. Additionally, we delved into creating a custom converter to handle more complex data types. With these tools, integrating AI-driven structured outputs into Java applications becomes more accessible and manageable, enhancing the reliability and predictability of LLM responses.

As always, the examples are available over on GitHub.


Protobuf vs. gRPC

$
0
0

1. Overview

In software development, microservices architecture has become a favorable approach for creating scalable and maintainable systems. Effective communication among microservices is crucial, with technologies such as REST, message queues, Protocol Buffers (Protobuf), and gRPC often at the forefront of this discussion.

In this tutorial, we’ll focus on Protobuf and gRPC, looking into their differences, similarities, advantages, and disadvantages to comprehensively understand their roles in microservices architecture.

2. Protobuf

Protocol Buffers are a language and platform-neutral mechanism for serializing and deserializing structured data. Google, its creator, proclaims them to be much faster, smaller, and simpler than other types of payloads, such as XML and JSON.

Protobuf uses a .proto file to define the structure of our data. Each file describes the data that might be transferred from one node to another, or stored in data sources. Once the schema is defined, we’ll use the Protobuf compiler (protoc) to generate source code in various languages:

syntax = "proto3"
message Person {
    string name = 1;
    int32 id = 2;
    string email = 3;
}

This is a protocol of a simple message of Person type that has three fields. Each field has a type and a unique identification number. name and email are of string type whereas id is of integer type.

2.1. Advantages of Protobuf

Let’s take a look at some advantages of using Protobuf

Protobuf data is compact and can be serialized and deserialized easily, making it highly efficient for speed and storage.

Protobuf supports multiple programming languages, such as Java, C++, Python, Go, etc, facilitating seamless cross-platform data interchange.

It also enables the addition or removal of fields from data structures without disrupting deployed programs, making versioning and updates seamless.

2.2. Disadvantages of Protobuf

Protobuf data is not human-readable, which complicates debugging without using specialized tools. Moreover, the initial setup and understanding of Protobuf schema is more complex than formats like JSON or XML.

3. gRPC

gRPC is a high-performance, open-source RPC framework initially developed by Google. It helps to eliminate boilerplate code and connect polyglot services in and across data centers. We can view gRPC as an alternative to REST, SOAP, or GraphQL, built on top of HTTP/2 to use features like multiplexing or streaming connections.

In gRPC, Protobuf is the default interface definition language (IDL), which means the gRPC services are defined using Protobuf. Clients can call the RPC methods included in the service definition. The protoc compiler generates client and server code based on the service definition:

syntax = "proto3";
service PersonService {
  rpc GetPerson (PersonRequest) returns (PersonResponse);
}
message PersonRequest {
  int32 id = 1;
}
message PersonResponse {
  string name = 1;
  string email = 2;
}

In this example, a PersonService service is defined as a GetPerson RPC method that takes a PersonRequest message and returns a PersonResponse message.

3.1. Advantages of gRPC

Let’s take a look at some advantages of using gRPC:

  • leverages HTTP/2, which provides header compression, multiplexing, and efficient binary data transmission which leads to lower latency and higher throughput
  • makes implementation easy as it can generate client and server stubs automatically in various languages from service definition
  • is suitable for real-time data exchange as it supports client-side, server-side, and bidirectional streaming

3.2. Disadvantages of gRPC

Now, we’ll look into some challenges with using gRPC.

Setting up gRPC for simple CRUD operations or lightweight applications, may not be justified, given the simpler alternatives like REST with JSON. Like Protobuf, gRPC’s binary protocol makes debugging harder without proper tools.

4. Comparing Protobuf and gRPC

To compare Protobuf and gRPC, we can use an analogy: Protobuf is like a language designed for efficiently packing suitcases for travel. Meanwhile, gRPC is akin to a comprehensive travel agency that manages everything from booking flights to arranging transportation, using Protobuf’s suitcase for carrying our luggage. Let’s compare the Protobuf and gRPC to understand how closely they relate.

Let’s take a look at the similarities and differences between Protobuf and gRPC:

Aspect Protobuf gRPC
Developer Developed by Google Developed by Google
File Usage Uses .proto file to define data structures Uses .proto file to define service methods and their request/response
Extensibility Designed to be extensible, allowing the addition of new fields without breaking existing implementations Designed to be extensible, allowing the addition of new methods without breaking existing implementations
Language and Platform Support Support multiple programming languages and platforms, making them versatile for different environments Support multiple programming languages and platforms, making them versatile for different environments
OSI Model Layer Works at layer 6 Operates at layers 5,6, and 7
Definition Only defines the data structure Allows us to define service methods and their request/response in .proto file
Role and Function Similar to a serialization/deserialization tool like JSON Manages a way a client and server can interact (like a web client/server with REST API)
Streaming Support Doesn’t have built-in support for streaming Supports streaming which allows communication in real-time for servers and clients

5. Conclusion

In this article, we discussed Protobuf and gRPC. Both are powerful tools, but their strength shines in different scenarios. The best choice depends on our specific needs and priorities. We should consider the trade-offs between speed, efficiency, readability, and ease of use while making a decision.

We can use Protobuf for efficient data serialization and exchange, and we can opt for gRPC when we need a full-fledged RPC framework with advanced features.


Insert JSON Object into PostgreSQL using Java preparedStatement

$
0
0

1. Introduction

In modern software development, handling JSON data has become ubiquitous due to its lightweight and versatile nature. PostgreSQL, with its robust support for JSON, provides an excellent platform for storing and querying JSON data. As a popular programming language, Java often interacts with databases using JDBC. This article demonstrates how to insert JSON objects into a PostgreSQL database using Java’s PreparedStatement.

2. Dependencies

Before diving into the code, we need to set up our environment. In addition to installing and running PostgreSQL, we also need to include the PostgreSQL JDBC driver and the org.json library in our project’s dependencies.

2.1. Installing And Running PostgreSQL

If PostgreSQL is not installed, we can download and install it from the official PostgreSQL website. Considering that PostgreSQL has had JSON support for a considerable time, we can choose any version starting from PostgreSQL 9. For this article, we will be utilizing the most recent and stable version, which is PostgreSQL 16. We need to ensure that PostgreSQL is up and running and accessible with the necessary credentials.

2.2. Including PostgreSQL JDBC Driver

Add the PostgreSQL JDBC driver to our project’s dependencies. For Maven projects, we need to specify the dependency in pom.xml:

<dependency>
    <groupId>org.postgresql</groupId>
    <artifactId>postgresql</artifactId>
    <version>42.7.3</version>
</dependency>

2.3. Including JSON Library Dependency

To work with JSON data in our Java code, we also need to include a JSON library as a dependency. There are several popular JSON libraries available for Java, such as Jackson, Gson, and org.json. For this article, we will be using the org.json library, which provides a simple and lightweight JSON processing solution. To include the org.json library in our project, we can add the following dependency to the pom.xml file for Maven projects:

<dependency>
    <groupId>org.json</groupId>
    <artifactId>json</artifactId>
    <version>20240303</version>
</dependency>

Now that we have the necessary dependencies in place, let’s proceed to the next sections for creating the table and writing the Java code to insert JSON data.

3. JSONB vs. JSON Type

PostgreSQL provides two main types for storing JSON data: JSONB and JSON. While both types serve the purpose of storing and manipulating JSON data, they have some differences.

The JSONB type offers efficient binary storage and indexing capabilities, resulting in faster query execution. It performs validation and transformation of JSON data during insertion, preserving the order of keys within JSON objects. PostgreSQL can automatically convert values of other data types to JSON.

On the other hand, the JSON type stores JSON data as plain text without binary representation or specialized indexing. It performs validation during insertion but lacks the optimization and key order preservation of JSONB. Explicit casting or conversion is required to convert values to JSON when using the JSONB type.

In this article, we’ll be utilizing the JSONB type to store and query JSON data in PostgreSQL.

4. Creating A PostgreSQL Table With JSON Column

First, we need to create a PostgreSQL table that includes a JSON column. Connect to the PostgreSQL instance we set up before and run the following SQL command:

CREATE TABLE users (
    id SERIAL PRIMARY KEY,
    name VARCHAR(100),
    info JSONB
);

This table has three columns: id, name, and info. The info column is of type JSONB, which stores JSON data in a binary format, providing efficient storage and query capabilities.

5. Writing Java Code To Insert JSON Data

Now, let’s move to the Java part. We’ll write a Java program to insert JSON data into the users table using PreparedStatement.

5.1. Establishing A Database Connection

First, we need to establish a JDBC connection to the PostgreSQL database. Here’s a method to get a database connection:

public class InsertJsonData {
    private static final String URL = "jdbc:postgresql://localhost:5432/database_name";
    private static final String USER = "username";
    private static final String PASSWORD = "password";
    public Connection getConnection() throws SQLException {
        return DriverManager.getConnection(URL, USER, PASSWORD);
    }
}

Please note that database_name, username, and password need to be replaced with the actual PostgreSQL database name, username, and password.

5.2. Inserting JSON Data

Next, we need to write a method to insert a JSON object into the users table:

public class InsertJsonData {
    public static void insertUser(String name, JSONObject info) {
        String sql = "INSERT INTO users (name, info) VALUES (?, ?::jsonb)";
        Connection conn = DatabaseConnection.getConnection();
        PreparedStatement pstmt = conn.prepareStatement(sql);
        pstmt.setString(1, name);
        pstmt.setString(2, info.toString());
        pstmt.executeUpdate();
        System.out.println("Data inserted successfully.");
    }
    public static void main(String[] args) {
        JSONObject jsonInfo = new JSONObject();
        jsonInfo.put("email", "john.doe@example.com");
        jsonInfo.put("age", 30);
        jsonInfo.put("active", true);
        insertUser("John Doe", jsonInfo);
    }
}

5.3. Code Breakdown

Let’s break down the code and explore some of its components:

  • Database Connection: The getConnection() method establishes a connection to the PostgreSQL database.
  • SQL Query: The INSERT INTO users (name, info) VALUES (?, ?::jsonb) query inserts a record into the users table. The ?::jsonb syntax is a PostgreSQL-specific syntax used for type casting. The double colon operator :: is a synonym for the CAST keyword in PostgreSQL, indicating a type conversion operation. By using ?::jsonb, we’re instructing PostgreSQL to cast the second parameter, which is a JSON string, to the jsonb data type before inserting it into the info column. This allows for proper handling and storage of JSON data within PostgreSQL.
  • PreparedStatement: The PreparedStatement sets the parameters and executes the SQL query. pstmt.setString(1, name) sets the name, and pstmt.setString(2, info.toString()) sets the JSON data.
  • JSON Handling: The JSONObject class from the org.json library creates and handles JSON data.

6. Conclusion

Inserting JSON objects into PostgreSQL using Java’s PreparedStatement is straightforward and efficient. This approach leverages PostgreSQL’s powerful JSON capabilities and Java’s robust JDBC API. Following the steps outlined in this article, we can seamlessly store JSON data in our PostgreSQL database and take advantage of its rich querying features.

In some cases, if Java Persistence API (JPA) is preferred for database operations, it may be beneficial to explore storing PostgreSQL JSONB data using Spring Boot and JPA. This approach provides another convenient way to insert JSON data into PostgreSQL database.

As always, the source code is available over on GitHub.


Message Conversion in Spring Cloud AWS v3

$
0
0

1. Overview

Message conversion is the process of transforming messages between different formats and representations as they’re transmitted and received by applications.

AWS SQS allows text payloads, and Spring Cloud AWS SQS integration provides familiar Spring abstractions to manage serializing and deserializing text payloads to and from POJOs and records using JSON by default.

In this tutorial, we’ll use an event-driven scenario to go through three common use cases for message conversion: POJO/record serialization and deserialization, setting a custom ObjectMapper, and deserializing to a subclass/interface implementation.

To test our use cases, we’ll leverage the environment and test setup from the Spring Cloud AWS SQS V3 introductory article.

2. Dependencies

Let’s start by importing the Spring Cloud AWS Bill of Materials, which manages versions for our dependencies, ensuring version compatibility between them:

<dependencyManagement>
    <dependencies>
        <dependency>
            <groupId>io.awspring.cloud</groupId>
            <artifactId>spring-cloud-aws</artifactId>
            <version>${spring-cloud-aws.version}</version>
            <type>pom</type>
            <scope>import</scope>
        </dependency>
    </dependencies>
</dependencyManagement>

Now, we can add the core and SQS starter dependencies:

<dependency>
    <groupId>io.awspring.cloud</groupId>
    <artifactId>spring-cloud-aws-starter</artifactId>
</dependency>
<dependency>
    <groupId>io.awspring.cloud</groupId>
    <artifactId>spring-cloud-aws-starter-sqs</artifactId>
</dependency>

For this tutorial, we’ll use the Spring Boot Web starter. Notably, we don’t specify a version, since we’re importing Spring Cloud AWS’ BOM:

<dependency>
    <groupId>org.springframework.boot</groupId>
    <artifactId>spring-boot-starter-web</artifactId>
</dependency>

Lastly, let’s add the test dependencies – LocalStack and TestContainers with JUnit 5, the awaitility library for verifying asynchronous message consumption, and AssertJ to handle the assertions using a fluent API, besides Spring Boot’s test dependency:

<dependency>
    <groupId>org.springframework.boot</groupId>
    <artifactId>spring-boot-starter-test</artifactId>
    <scope>test</scope>
</dependency>
<dependency>
    <groupId>org.testcontainers</groupId>
    <artifactId>localstack</artifactId>
    <scope>test</scope>
</dependency>
<dependency>
    <groupId>org.testcontainers</groupId>
    <artifactId>junit-jupiter</artifactId>
    <scope>test</scope>
</dependency>
<dependency>
    <groupId>org.awaitility</groupId>
    <artifactId>awaitility</artifactId>
    <scope>test</scope>
</dependency>
<dependency>
    <groupId>org.assertj</groupId>
    <artifactId>assertj-core</artifactId>
    <scope>test</scope>
</dependency>

3. Setting up the Local Test Environment

Now that we’ve added the dependencies, we’ll set our test environment up by creating the BaseSqsLiveTest which should be extended by our test suites:

@Testcontainers
public class BaseSqsLiveTest {
    private static final String LOCAL_STACK_VERSION = "localstack/localstack:3.4.0";
    @Container
    static LocalStackContainer localStack = new LocalStackContainer(DockerImageName.parse(LOCAL_STACK_VERSION));
    @DynamicPropertySource
    static void overrideProperties(DynamicPropertyRegistry registry) {
        registry.add("spring.cloud.aws.region.static", () -> localStack.getRegion());
        registry.add("spring.cloud.aws.credentials.access-key", () -> localStack.getAccessKey());
        registry.add("spring.cloud.aws.credentials.secret-key", () -> localStack.getSecretKey());
        registry.add("spring.cloud.aws.sqs.endpoint", () -> localStack.getEndpointOverride(SQS)
          .toString());
    }
}

4. Setting up the Queue Names

To leverage Spring Boot’s Configuration Externalization, we’ll add the queue names in our application.yml file:

events:
  queues:
    shipping:
      simple-pojo-conversion-queue: shipping_pojo_conversion_queue
      custom-object-mapper-queue: shipping_custom_object_mapper_queue
      deserializes-subclass: deserializes_subclass_queue

We now create a @ConfigurationProperties annotated class, which we’ll inject into our tests to retrieve the queue names:

@ConfigurationProperties(prefix = "events.queues.shipping")
public class ShipmentEventsQueuesProperties {
    private String simplePojoConversionQueue;
    private String customObjectMapperQueue;
    private String subclassDeserializationQueue;
    // ...getters and setters
}

Lastly, we add the @EnableConfigurationProperties annotation to a @Configuration class:

@EnableConfigurationProperties({ ShipmentEventsQueuesProperties.class })
@Configuration
public class ShipmentServiceConfiguration {
}

5. Setting up the Application

We’ll create a Shipment microservice that reacts to ShipmentRequestedEvents to illustrate our use cases.

First, let’s create the Shipment entity which will hold information about the shipments:

public class Shipment {
    private UUID orderId;
    private String customerAddress;
    private LocalDate shipBy;
    private ShipmentStatus status;
    public Shipment(){}
    public Shipment(UUID orderId, String customerAddress, LocalDate shipBy, ShipmentStatus status) {
        this.orderId = orderId;
        this.customerAddress = customerAddress;
        this.shipBy = shipBy;
        this.status = status;
    }
    
    // ...getters and setters
}

Next, let’s add a ShipmentStatus enum:

public enum ShipmentStatus {
    REQUESTED,
    PROCESSED,
    CUSTOMS_CHECK,
    READY_FOR_DISPATCH,
    SENT,
    DELIVERED
}

We’ll also need the ShipmentRequestedEvent:

public class ShipmentRequestedEvent {
    private UUID orderId;
    private String customerAddress;
    private LocalDate shipBy;
    public ShipmentRequestedEvent() {
    }
    public ShipmentRequestedEvent(UUID orderId, String customerAddress, LocalDate shipBy) {
        this.orderId = orderId;
        this.customerAddress = customerAddress;
        this.shipBy = shipBy;
    }
    public Shipment toDomain() {
        return new Shipment(orderId, customerAddress, shipBy, ShipmentStatus.REQUESTED);
    }
    // ...getters and setters
}

To process our shipments, we’ll create a simple ShipmentService class with a simulated repository that we’ll use to assert our tests:

@Service
public class ShipmentService {
    private static final Logger logger = LoggerFactory.getLogger(ShipmentService.class);
    private final Map<UUID, Shipment> shippingRepository = new ConcurrentHashMap<>();
    public void processShippingRequest(Shipment shipment) {
        logger.info("Processing shipping for order: {}", shipment.getOrderId());
        shipment.setStatus(ShipmentStatus.PROCESSED);
        shippingRepository.put(shipment.getOrderId(), shipment);
        logger.info("Shipping request processed: {}", shipment.getOrderId());
    }
    public Shipment getShipment(UUID requestId) {
        return shippingRepository.get(requestId);
    }
}

6. Processing POJOs and Records With Default Configuration

Spring Cloud AWS SQS pre-configures a SqsMessagingMessageConverter that serializes and deserializes POJOs and records to and from JSON when sending and receiving messages using SqsTemplate, @SqsListener annotations, or manually instantiated SqsMessageListenerContainers.

Our first use case will be sending and receiving a simple POJO to illustrate this default configuration. We’ll use the @SqsListener annotation to receive messages and Spring Boot’s auto-configuration to configure deserialization when necessary.

First, we’ll create the test to send the message:

@SpringBootTest
public class ShipmentServiceApplicationLiveTest extends BaseSqsLiveTest {
    @Autowired
    private SqsTemplate sqsTemplate;
    @Autowired
    private ShipmentService shipmentService;
    @Autowired
    private ShipmentEventsQueuesProperties queuesProperties;
    @Test
    void givenPojoPayload_whenMessageReceived_thenDeserializesCorrectly() {
        UUID orderId = UUID.randomUUID();
        ShipmentRequestedEvent shipmentRequestedEvent = new ShipmentRequestedEvent(orderId, "123 Main St", LocalDate.parse("2024-05-12"));
        sqsTemplate.send(queuesProperties.getSimplePojoConversionQueue(), shipmentRequestedEvent);
        await().atMost(Duration.ofSeconds(10))
            .untilAsserted(() -> {
                Shipment shipment = shipmentService.getShipment(orderId);
                assertThat(shipment).isNotNull();
                assertThat(shipment).usingRecursiveComparison()
                  .ignoringFields("status")
                  .isEqualTo(shipmentRequestedEvent);
                assertThat(shipment
                  .getStatus()).isEqualTo(ShipmentStatus.PROCESSED);
            });
    }
}

Here, we’re creating the event, sending it to the queue using the auto-configured SqsTemplate, and waiting for the status to become PROCESSED. which indicates the message has successfully been received and processed.

When the test is triggered, it fails after 10 seconds since we don’t have a listener for the queue yet.

Let’s address this by creating our first @SqsListener:

@Component
public class ShipmentRequestListener {
    private final ShipmentService shippingService;
    public ShipmentRequestListener(ShipmentService shippingService) {
        this.shippingService = shippingService;
    }
    @SqsListener("${events.queues.shipping.simple-pojo-conversion-queue}")
    public void receiveShipmentRequest(ShipmentRequestedEvent shipmentRequestedEvent) {
        shippingService.processShippingRequest(shipmentRequestedEvent.toDomain());
    }
}

And when we run the test again, it passes after a moment.

Notably, the listener has the @Component annotation and we’re referencing the queue name we set in the application.yml file.

This example shows how Spring Cloud AWS can deal with POJO conversion out-of-the-box, which works the same way for Java records.

7. Configuring a Custom Object Mapper

A common use case for message conversion is setting up a custom ObjectMapper with application-specific configurations.

For our next scenario, we’ll configure an ObjectMapper with a LocalDateDeserializer to read dates in the “dd-MM-yyyy” format.

Again, we’ll first create our test scenario. In this case, we’ll send the raw JSON payload directly through the SqsAsyncClient that is auto-configured by the framework:

    @Autowired
    private SqsAsyncClient sqsAsyncClient;
    @Test
    void givenShipmentRequestWithCustomDateFormat_whenMessageReceived_thenDeserializesDateCorrectly() {
        UUID orderId = UUID.randomUUID();
        String shipBy = LocalDate.parse("2024-05-12")
          .format(DateTimeFormatter.ofPattern("dd-MM-yyyy"));
        var jsonMessage = """
            {
                "orderId": "%s",
                "customerAddress": "123 Main St",
                "shipBy": "%s"
            }
            """.formatted(orderId, shipBy);
        sendRawMessage(queuesProperties.getCustomObjectMapperQueue(), jsonMessage);
        await().atMost(Duration.ofSeconds(10))
          .untilAsserted(() -> {
              var shipment = shipmentService.getShipment(orderId);
              assertThat(shipment).isNotNull();
              assertThat(shipment.getShipBy()).isEqualTo(LocalDate.parse(shipBy, DateTimeFormatter.ofPattern("dd-MM-yyyy")));
          });
    }
    private void sendRawMessage(String queueName, String jsonMessage) {
        sqsAsyncClient.getQueueUrl(req -> req.queueName(queueName))
          .thenCompose(resp -> sqsAsyncClient.sendMessage(req -> req.messageBody(jsonMessage)
              .queueUrl(resp.queueUrl())))
          .join();
    }

Let’s also add the listener for this queue:

@SqsListener("${events.queues.shipping.custom-object-mapper-queue}")
public void receiveShipmentRequestWithCustomObjectMapper(ShipmentRequestedEvent shipmentRequestedEvent) {
    shippingService.processShippingRequest(shipmentRequestedEvent.toDomain());
}

When we run the test now, it fails and we see a message similar to this in the stacktrace:

Cannot deserialize value of type `java.time.LocalDate` from String "12-05-2024"

That’s because we’re not using the standard “yyyy-MM-dd” date format.

To address that, we’ll need to configure an ObjectMapper capable of parsing this date format. We can simply declare it as a bean in a @Configuration annotated class and auto-configuration properly sets it to both the auto-configured SqsTemplate and @SqsListener methods:

@Bean
public ObjectMapper objectMapper() {
    ObjectMapper mapper = new ObjectMapper();
    JavaTimeModule module = new JavaTimeModule();
    LocalDateDeserializer customDeserializer = new LocalDateDeserializer(DateTimeFormatter.ofPattern("dd-MM-yyyy", Locale.getDefault()));
    module.addDeserializer(LocalDate.class, customDeserializer);
    mapper.registerModule(module);
    return mapper;
}

When we run the test once again, it passes as expected.

8. Configuring Inheritance and Interfaces Deserialization

Another common scenario is having a superclass or interface with a variety of subclasses or implementations, and it’s necessary to inform the framework to which specific class the message should be deserialized to based on criteria, such as a MessageHeader or part of the message.

To illustrate this use case, let’s add some complexity to our scenario, and include two types of shipment: InternationalShipment and DomesticShipment, each a subclass of Shipment with specific properties.

8.1. Creating the Entities and Events

public class InternationalShipment extends Shipment {
    private String destinationCountry;
    private String customsInfo;
    public InternationalShipment(UUID orderId, String customerAddress, LocalDate shipBy, ShipmentStatus status,
        String destinationCountry, String customsInfo) {
        super(orderId, customerAddress, shipBy, status);
        this.destinationCountry = destinationCountry;
        this.customsInfo = customsInfo;
    }
    // ...getters and setters
}
public class DomesticShipment extends Shipment {
    private String deliveryRouteCode;
    public DomesticShipment(UUID orderId, String customerAddress, LocalDate shipBy, ShipmentStatus status,
        String deliveryRouteCode) {
        super(orderId, customerAddress, shipBy, status);
        this.deliveryRouteCode = deliveryRouteCode;
    }
    public String getDeliveryRouteCode() {
        return deliveryRouteCode;
    }
    public void setDeliveryRouteCode(String deliveryRouteCode) {
        this.deliveryRouteCode = deliveryRouteCode;
    }
}

And let’s add their respective events:

public class DomesticShipmentRequestedEvent extends ShipmentRequestedEvent {
    private String deliveryRouteCode;
    public DomesticShipmentRequestedEvent(){}
    public DomesticShipmentRequestedEvent(UUID orderId, String customerAddress, LocalDate shipBy, String deliveryRouteCode) {
        super(orderId, customerAddress, shipBy);
        this.deliveryRouteCode = deliveryRouteCode;
    }
    public DomesticShipment toDomain() {
        return new DomesticShipment(getOrderId(), getCustomerAddress(), getShipBy(), ShipmentStatus.REQUESTED, deliveryRouteCode);
    }
    // ...getters and setters
}
public class InternationalShipmentRequestedEvent extends ShipmentRequestedEvent {
    private String destinationCountry;
    private String customsInfo;
    public InternationalShipmentRequestedEvent(){}
    public InternationalShipmentRequestedEvent(UUID orderId, String customerAddress, LocalDate shipBy, String destinationCountry,
        String customsInfo) {
        super(orderId, customerAddress, shipBy);
        this.destinationCountry = destinationCountry;
        this.customsInfo = customsInfo;
    }
    public InternationalShipment toDomain() {
        return new InternationalShipment(getOrderId(), getCustomerAddress(), getShipBy(), ShipmentStatus.REQUESTED, destinationCountry,
            customsInfo);
    }
    // ...getters and setters
}

8.2. Adding Service and Listener Logic

We’ll add two methods to our Service, each to process a different type of shipment:

@Service
public class ShipmentService {
    // ...previous code stays the same
    public void processDomesticShipping(DomesticShipment shipment) {
        logger.info("Processing domestic shipping for order: {}", shipment.getOrderId());
        shipment.setStatus(ShipmentStatus.READY_FOR_DISPATCH);
        shippingRepository.put(shipment.getOrderId(), shipment);
        logger.info("Domestic shipping processed: {}", shipment.getOrderId());
    }
    public void processInternationalShipping(InternationalShipment shipment) {
        logger.info("Processing international shipping for order: {}", shipment.getOrderId());
        shipment.setStatus(ShipmentStatus.CUSTOMS_CHECK);
        shippingRepository.put(shipment.getOrderId(), shipment);
        logger.info("International shipping processed: {}", shipment.getOrderId());
    }
}

And now let’s add the listener that processes the messages. It’s worth noting that we’re using the superclass type in the listener method, as this method receives messages from both subtypes:

@SqsListener(queueNames = "${events.queues.shipping.subclass-deserialization-queue}")
public void receiveShippingRequestWithType(ShipmentRequestedEvent shipmentRequestedEvent) {
    if (shipmentRequestedEvent instanceof InternationalShipmentRequestedEvent event) {
        shippingService.processInternationalShipping(event.toDomain());
    } else if (shipmentRequestedEvent instanceof DomesticShipmentRequestedEvent event) {
        shippingService.processDomesticShipping(event.toDomain());
    } else {
        throw new RuntimeException("Event type not supported " + shipmentRequestedEvent.getClass()
            .getSimpleName());
    }
}

8.3. Deserializing With Default Type Header Mapping

With the scenario set up, we can create the test. First, let’s create an event of each type:

@Test
void givenPayloadWithSubclasses_whenMessageReceived_thenDeserializesCorrectType() {
    var domesticOrderId = UUID.randomUUID();
    var domesticEvent = new DomesticShipmentRequestedEvent(domesticOrderId, "123 Main St", LocalDate.parse("2024-05-12"), "XPTO1234");
    var internationalOrderId = UUID.randomUUID();
    InternationalShipmentRequestedEvent internationalEvent = new InternationalShipmentRequestedEvent(internationalOrderId, "123 Main St", LocalDate.parse("2024-05-24"), "Canada", "HS Code: 8471.30, Origin: China, Value: $500");
}

Continuing on the same test method, we’ll now send the events. By default, SqsTemplate sends a header with the specific type information for deserialization. By leveraging this, we can simply send the messages using the auto-configured SqsTemplate and it deserializes the messages correctly:

sqsTemplate.send(queuesProperties.getSubclassDeserializationQueue(), internationalEvent);
sqsTemplate.send(queuesProperties.getSubclassDeserializationQueue(), domesticEvent);

Lastly, we assert that the status for each shipping corresponds to the appropriate status according to its type:

await().atMost(Duration.ofSeconds(10))
    .untilAsserted(() -> {
        var domesticShipment = (DomesticShipment) shipmentService.getShipment(domesticOrderId);
        assertThat(domesticShipment).isNotNull();
        assertThat(domesticShipment).usingRecursiveComparison()
          .ignoringFields("status")
          .isEqualTo(domesticEvent);
        assertThat(domesticShipment.getStatus()).isEqualTo(ShipmentStatus.READY_FOR_DISPATCH);
        var internationalShipment = (InternationalShipment) shipmentService.getShipment(internationalOrderId);
        assertThat(internationalShipment).isNotNull();
        assertThat(internationalShipment).usingRecursiveComparison()
          .ignoringFields("status")
          .isEqualTo(internationalEvent);
        assertThat(internationalShipment.getStatus()).isEqualTo(ShipmentStatus.CUSTOMS_CHECK);
    });

When we run the test now, it passes, which shows that each subclass was properly deserialized with the correct types and information.

8.4. Deserializing With Custom Type Header Mapping

It’s common to receive messages from services that might not use SqsTemplate to send messages, or perhaps the POJO or record representing the event is in a different package.

To simulate this scenario, let’s create a custom SqsTemplate in our test method, and configure it to send the messages without type information in the headers. For this scenario, we also need to inject an ObjectMapper that’s capable of serializing LocalDate instances, such as the one we’ve configured earlier or the one auto-configured by Spring Boot:

@Autowired
private ObjectMapper objectMapper;
var customTemplate = SqsTemplate.builder()
  .sqsAsyncClient(sqsAsyncClient)
  .configureDefaultConverter(converter -> {
        converter.doNotSendPayloadTypeHeader();
        converter.setObjectMapper(objectMapper);
    })
  .build();
customTemplate.send(to -> to.queue(queuesProperties.getSubclassDeserializationQueue())
  .payload(internationalEvent);
customTemplate.send(to -> to.queue(queuesProperties.getSubclassDeserializationQueue())
  .payload(domesticEvent);

Now, our test fails with messages similar to these in the stacktrace, as the framework has no way of knowing to which specific class to deserialize it to:

Could not read JSON: Unrecognized field "destinationCountry"
Could not read JSON: Unrecognized field "deliveryRouteCode"

To address this use case, the SqsMessagingMessageConverter class has the setPayloadTypeMapper method, which can be used to let the framework know the target class based on any property of the message. For this test, we’ll use a custom header as criteria.

First, let’s add our header configuration to our application.yml:

headers:
  types:
    shipping:
      header-name: SHIPPING_TYPE
      international: INTERNATIONAL
      domestic: DOMESTIC

We’ll also create a properties class to hold those values:

@ConfigurationProperties(prefix = "headers.types.shipping")
public class ShippingHeaderTypesProperties {
    private String headerName;
    private String international;
    private String domestic;
    // ...getters and setters
}

Next, let’s enable the properties class in our Configuration class:

@EnableConfigurationProperties({ ShipmentEventsQueuesProperties.class, ShippingHeaderTypesProperties.class })
@Configuration
public class ShipmentServiceConfiguration {
   // ...rest of code remains the same
}

We’ll now configure a custom SqsMessagingMessageConverter to use these headers and set it to the defaultSqsListenerContainerFactory bean:

@Bean
public SqsMessageListenerContainerFactory defaultSqsListenerContainerFactory(ObjectMapper objectMapper) {
    SqsMessagingMessageConverter converter = new SqsMessagingMessageConverter();
    converter.setPayloadTypeMapper(message -> {
        if (!message.getHeaders()
          .containsKey(typesProperties.getHeaderName())) {
            return Object.class;
        }
        String eventTypeHeader = MessageHeaderUtils.getHeaderAsString(message, typesProperties.getHeaderName());
        if (eventTypeHeader.equals(typesProperties.getDomestic())) {
            return DomesticShipmentRequestedEvent.class;
        } else if (eventTypeHeader.equals(typesProperties.getInternational())) {
            return InternationalShipmentRequestedEvent.class;
        }
        throw new RuntimeException("Invalid shipping type");
    });
    converter.setObjectMapper(objectMapper);
    return SqsMessageListenerContainerFactory.builder()
      .sqsAsyncClient(sqsAsyncClient)
      .configure(configure -> configure.messageConverter(converter))
      .build();
}

After that, we add the headers to our custom template in the test method:

customTemplate.send(to -> to.queue(queuesProperties.getSubclassDeserializationQueue())
  .payload(internationalEvent)
  .header(headerTypesProperties.getHeaderName(), headerTypesProperties.getInternational()));
customTemplate.send(to -> to.queue(queuesProperties.getSubclassDeserializationQueue())
  .payload(domesticEvent)
  .header(headerTypesProperties.getHeaderName(), headerTypesProperties.getDomestic()));

When we run the test again, it passes, asserting that the proper subclass type was deserialized for each event.

9. Conclusion

In this article, we went through three common use cases for Message Conversion: POJO/record serialization and deserialization with out-of-the-box settings, using a custom ObjectMapper to handle different date formats and other specific configurations, and two different ways of deserializing a message to a subclass/interface implementation.

We tested each scenario by setting up a local test environment and creating live tests to assert our logic.

As usual, the complete code used in this article is available over on GitHub.


Create a RAG (Retrieval Augmented Generation) Application with Redis and Spring AI

$
0
0
start here featured

1. Overview

In this tutorial, we’ll build a ChatBot using the Spring AI framework and RAG (Retrieval Augmented Generation) technique. With the help of Spring AI, we’ll integrate with the Redis Vector database to store and retrieve data to enhance the prompt for the LLM (Large Language Model). Once the LLM receives the prompt with the relevant data, it effectively generates a response with the latest data in natural language to the user query.

2. What is RAG?

LLM are Machine Learning models pre-trained on extensive data sets from the internet. To make an LLM function within a private enterprise, we must fine-tune it with the organization-specific knowledge base. However, fine-tuning is usually a time-consuming process that requires substantial computing resources. Moreover, there is a large probability of fine-tuned LLM generating irrelevant or misleading responses to queries. This behavior is often referred to as LLM hallucinations.

In such scenarios, RAG is an excellent technique to restrict or contextualize the responses of the LLM. A vector DB plays an important role in the RAG architecture to provide contextual information to the LLM. But, before an application can use it in RAG architecture, an ETL (Extract Transform and Load) process must populate it:


The Reader retrieves the organization’s knowledge base documents from different sources. Then, the Transformer splits the retrieved documents into smaller chunks and uses an embedding model to vectorize the contents. Finally, the writer loads the vectors or embeddings into the vector DB. Vector DBs are specialized databases that can store these embeddings in a multi-dimensional space.

In RAG, LLMs can respond to almost real-time data if the vector DB is updated periodically from the organization’s knowledge base.

Once the vector DB is ready with the data, the application can use it to retrieve the contextual data for user queries:

The application forms the prompt combining the user query with the contextual data from the vector DB and finally sends it to the LLM. The LLM generates the response in natural language within the boundary of the contextual data and sends it back to the application.

3. Implement RAG With Spring AI and Redis

The Redis stack offers vector search services, we’ll use the Spring AI framework to integrate with it and build a RAG-based ChatBot application. Additionally, we’ll use the GPT-3.5 Turbo LLM model from OpenAI to generate the final response.

3.1. Prerequisites

For the ChatBot Service, to authenticate the OpenAI service we’ll need the API secret key. We’ll create one, after creating an OpenAI account:


We’ll also create a Redis Cloud account to access a free Redis Vector DB:


For integration with the Redis Vector DB and the OpenAI service, we’ll update the Maven dependencies with the Spring AI libraries:

<dependency>
    <groupId>org.springframework.ai</groupId>
    <artifactId>spring-ai-openai-spring-boot-starter</artifactId>
    <version>1.0.0-M1</version>
</dependency>
<dependency>
    <groupId>org.springframework.ai</groupId>
    <artifactId>spring-ai-transformers-spring-boot-starter</artifactId>
    <version>1.0.0-M1</version>
</dependency>
<dependency>
    <groupId>org.springframework.ai</groupId>
    <artifactId>spring-ai-redis-spring-boot-starter</artifactId>
    <version>1.0.0-M1</version>
</dependency>
<dependency>
    <groupId>org.springframework.ai</groupId>
    <artifactId>spring-ai-pdf-document-reader</artifactId>
    <version>1.0.0-M1</version>
</dependency>

3.2. Key Classes for Loading Data Into Redis

In a Spring Boot application, we’ll create components for loading and retrieving data from the Redis Vector DB. For example, we’ll load an employee handbook PDF document into the Redis DB.

Now, let’s take a look at the classes involved:


DocumentReader is a Spring AI interface for reading documents. We’ll use the out-of-the-box PagePdfDocumentReader implementation of DocumentReader. Similarly, DocumentWriter and VectorStore are interfaces for writing data into storage systems. RedisVectorStore is one of the many out-of-the-box implementations of VectorStore, which we’ll use for loading and searching data in Redis Vector DB. We’ll write the DataLoaderService using the Spring AI framework classes discussed so far.

3.3. Implement Data Loader Service

Let’s understand the load() method in the DataLoaderService class:

@Service
public class DataLoaderService {
    private static final Logger logger = LoggerFactory.getLogger(DataLoaderService.class);
    @Value("classpath:/data/Employee_Handbook.pdf")
    private Resource pdfResource;
    @Autowired
    private VectorStore vectorStore;
    public void load() {
        PagePdfDocumentReader pdfReader = new PagePdfDocumentReader(this.pdfResource,
            PdfDocumentReaderConfig.builder()
              .withPageExtractedTextFormatter(ExtractedTextFormatter.builder()
                .withNumberOfBottomTextLinesToDelete(3)
                .withNumberOfTopPagesToSkipBeforeDelete(1)
                .build())
            .withPagesPerDocument(1)
            .build());
        var tokenTextSplitter = new TokenTextSplitter();
        this.vectorStore.accept(tokenTextSplitter.apply(pdfReader.get()));
    }
}

The load() method uses the PagePdfDocumentReader class to read a PDF file and load it to the Redis Vector DB. The Spring AI framework auto-configures the VectoreStore interface using the configuration properties in the namespace spring.ai.vectorstore:

spring:
  ai:
    vectorstore:
      redis:
        uri: redis://:PQzkkZLOgOXXX@redis-19438.c330.asia-south1-1.gce.redns.redis-cloud.com:19438
        index: faqs
        prefix: "faq:"
        initialize-schema: true

The framework injects the RedisVectorStore object, an implementation of the VectorStore interface, into the DataLoaderService.

The TokenTextSplitter class splits the document and finally, the VectorStore class loads the chunks into the Redis Vector DB.

3.4. Key Classes for Generating Final Response

Once the Redis Vector DB is ready, we can retrieve the contextual information relevant to the user query. Afterward, this context is used in forming the prompt for the LLM to generate the final response. Let’s look at the key classes:


The searchData() method in the DataRetrievalService class takes in the query and then retrieves the context data from the VectorStore. The ChatBotService uses this data to form the prompt using the PromptTemplate class and then sends it to the OpenAI service. The Spring Boot framework reads the relevant OpenAI-related properties from the application.yml file and then autoconfigures the OpenAIChatModel object.

Let’s jump on to the implementation to understand in detail.

3.5. Implement Chat Bot Service

Let’s take a look at the ChatBotService class:

@Service
public class ChatBotService {
    @Autowired
    private ChatModel chatClient;
    @Autowired
    private DataRetrievalService dataRetrievalService;
    private final String PROMPT_BLUEPRINT = """
      Answer the query strictly referring the provided context:
      {context}
      Query:
      {query}
      In case you don't have any answer from the context provided, just say:
      I'm sorry I don't have the information you are looking for.
    """;
    public String chat(String query) {
        return chatClient.call(createPrompt(query, dataRetrievalService.searchData(query)));
    }
    private String createPrompt(String query, List<Document> context) {
        PromptTemplate promptTemplate = new PromptTemplate(PROMPT_BLUEPRINT);
        promptTemplate.add("query", query);
        promptTemplate.add("context", context);
        return promptTemplate.render();
    }
}

The SpringAI framework creates ChatModel bean using the OpenAI configuration properties in the namespace spring.ai.openai:

spring:
  ai:
    vectorstore:
      redis:
        # Redis vector store related properties...
    openai:
      temperature: 0.3
      api-key: ${SPRING_AI_OPENAI_API_KEY}
      model: gpt-3.5-turbo
      #embedding-base-url: https://api.openai.com
      #embedding-api-key: ${SPRING_AI_OPENAI_API_KEY}
      #embedding-model: text-embedding-ada-002

The framework can also read the API key from the environment variable SPRING_AI_OPENAI_API_KEY which is a much secure option. We can enable the keys starting with the text embedding to create the OpenAiEmbeddingModel bean, which is used for creating vector embeddings out of the knowledge base documents.

The prompt for the OpenAI service must be unambiguous. Hence, we have strictly instructed in the prompt blueprint PROMPT_BLUEPRINT to form the response only from the context information.

In the chat() method we retrieve the documents, matching the query from the Redis Vector DB. We then use these documents and the user query to generate the prompt in the createPrompt() method. Finally, we invoke the call() method of the ChatModel class to receive the response from the OpenAI service.

Now, let’s check the chatbot service in action by asking it a question from the employee handbook loaded earlier into the Redis Vector DB:

@Test
void whenQueryAskedWithinContext_thenAnswerFromTheContext() {
    String response = chatBotService.chat("How are employees supposed to dress?");
    assertNotNull(response);
    logger.info("Response from LLM: {}", response);
}

Then, we’ll see the output:

Response from LLM: Employees are supposed to dress appropriately for their individual work responsibilities and position.

The output aligns with the employee handbook PDF document loaded into the Redis Vector DB.

Let’s see what happens if we ask something which is not in the employee handbook:

@Test
void whenQueryAskedOutOfContext_thenDontAnswer() {
    String response = chatBotService.chat("What should employees eat?");
    assertEquals("I'm sorry I don't have the information you are looking for.", response);
    logger.info("Response from the LLM: {}", response);
}

here, is the resulting output:

Response from the LLM: I'm sorry I don't have the information you are looking for.

The LLM couldn’t find anything in the context provided and hence couldn’t answer the query.

4. Conclusion

In this article, we discussed implementing an application based on the RAG architecture using the Spring AI framework. Forming the prompt with the contextual information is essential to generate the right response from the LLM. Hence, Redis Vector DB is an excellent solution for storing and performing similarity searches on the document vectors. Also, chunking the documents is equally important to fetch the right records and restrict the cost of the prompt tokens.

The code used for this article is available over on GitHub.


Resolving PostgreSQL JSON Type Mismatch Errors in JPA

$
0
0

1. Introduction

In this tutorial, we’ll explore the common PSQLException error: “column is of type json but the expression is of type character varying” when using JPA to interact with PostgreSQL. We’ll explore why this error occurs, identify common scenarios that trigger it, and demonstrate how to resolve it.

2. Common Causes

In PostgreSQL, the JSON or JSONB data types are used to store JSON data. However, if we attempt to insert a string (character varying) into a column that expects JSON, PostgreSQL throws the “column is of type json but expression is of type character varying” error. This is especially common when working with JPA and PostgreSQL, as JPA may try to save a string to a JSON column, leading to this error.

3. Demonstrating the Error

We’ll create a basic Spring Boot project with the necessary dependencies and test data to demonstrate the error. First, we need to add the PostgreSQL dependencies to our Maven pom.xml file:

<dependency>
    <groupId>org.postgresql</groupId>
    <artifactId>postgresql</artifactId>
    <version>42.7.1</version>
    <scope>runtime</scope>
</dependency>

Next, we create a JPA entity class that maps to the student table:

@Entity
@Table(name = "student")
public class Student {
    @Id
    @GeneratedValue(strategy = GenerationType.IDENTITY)
    private Long id;
    private String admitYear;
    @Column(columnDefinition = "json")
    private String address;
    // getters and setters
}

In this entity class, the address field is mapped to the address column in the student table. Notably, we’ve specified the columnDefinition attribute as JSON to indicate that this column is of type JSON.

Now, let’s try to save a Student object to the database:

Student student = new Student();
student.setAdmitYear("2024");
student.setAddress("{\"postCode\": \"TW9 2SF\", \"city\": \"London\"}");
Throwable throwable = assertThrows(Exception.class, () -> studentRepository.save(student));
assertTrue(ExceptionUtils.getRootCause(throwable) instanceof PSQLException);

In this code, we’ve created a Student object and set the address field to a JSON string. Then, we save this object to the database using the save() method of the studentRepository object.

However, this results in a PSQLException:

Caused by: org.postgresql.util.PSQLException: ERROR: column "address" is of type json but expression is of type character varying

This error occurs because JPA tries to save a string to a JSON column, which isn’t allowed.

4. Using @Type Annotation

To fix this error, we need to handle JSON types correctly. We can use the @Type annotation provided by the hibernate-types library. First, let’s add the hibernate-types dependency to our pom.xml:

<dependency>
    <groupId>com.vladmihalcea</groupId>
    <artifactId>hibernate-types-52</artifactId>
    <version>2.18.0</version>
</dependency>

Next, we update the entity to include the @TypeDef and @Type annotations:

@Entity
@Table(name = "student_json")
@TypeDefs({
    @TypeDef(name = "jsonb", typeClass = JsonBinaryType.class)
})
public class StudentWithTypeAnnotation {
    @Id
    @GeneratedValue(strategy = GenerationType.IDENTITY)
    private Long id;
    private String admitYear;
    @Type(type = "jsonb")
    @Column(columnDefinition = "json")
    private String address;
    // Getters and Setters
}

Here, @TypeDef(name = “jsonb”, typeClass = JsonBinaryType.class) registers a custom type named JSONB which uses the JsonBinaryType class from the hibernate-types-52 library. JsonBinaryType handles PostgreSQL’s JSONB data type, allowing JSON data to be stored and retrieved as JSONB efficiently.

The @Type annotation is used to specify a custom Hibernate type for a field. By specifying @Type(type = “jsonb”), we tell Hibernate to use the custom type JSONB registered via @TypeDef. This custom type handles the conversion between Java objects and JSONB data in PostgreSQL.

This setup ensures that JSON data is efficiently stored and retrieved in PostgreSQL using the JSONB data type:

StudentWithTypeAnnotation student = new StudentWithJson();
student.setAdmitYear("2024");
student.setAddress("{\"postCode\": \"TW9 2SF\", \"city\": \"London\"}");
studentWithTypeAnnotationRepository.save(student);
StudentWithTypeAnnotation retrievedStudent = studentWithTypeAnnotationRepository.findById(student.getId()).orElse(null);
assertThat(retrievedStudent).isNotNull();
assertThat(retrievedStudent.getAddress()).isEqualTo("{\"postCode\":\"TW9 2SF\",\"city\":\"London\"}");

5. Native Query

Moreover, when we insert JSON data into a PostgreSQL table using the @Query annotation with a native SQL query, we’ll encounter the same error. Let’s demonstrate this error by creating an insert native query:

@Query(value = "INSERT INTO student (admit_year, address) VALUES (:admitYear, :address) RETURNING *", nativeQuery = true)
Student insertJsonData(@Param("admitYear") String admitYear, @Param("address") String address);

When we call this method with a JSON string, we’ll expect to get an exception:

Throwable throwable = assertThrows(Exception.class, () -> 
  studentRepository.insertJsonData("2024","{\"postCode\": \"TW9 2SF\", \"city\": \"London\"}"));
assertTrue(ExceptionUtils.getRootCause(throwable) instanceof PSQLException);

To resolve it, we need to cast the JSON string to JSONB type before inserting it to avoid this error. Here’s an example of how to do it:

public interface StudentWithTypeAnnotationRepository extends JpaRepository<StudentWithTypeAnnotation, Long> {
    @Query(value = "INSERT INTO student (admit_year, address) VALUES (:admitYear, CAST(:address AS JSONB)) RETURNING *", nativeQuery = true)
    StudentWithTypeAnnotation insertJsonData(@Param("admitYear") String admitYear, @Param("address") String address);
}

In the above code, we use the CAST(:address AS JSONB) syntax to cast the :address parameter to JSONB type. Now, let’s test this method:

StudentWithTypeAnnotation student = studentWithJsonRepository.insertJsonData("2024","{\"postCode\": \"TW9 2SF\", \"city\": \"London\"}");
StudentWithTypeAnnotation retrievedStudent = studentWithJsonRepository.findById(student.getId()).orElse(null);
assertThat(retrievedStudent).isNotNull();
assertThat(retrievedStudent.getAddress()).isEqualTo("{\"city\": \"London\", \"postCode\": \"TW9 2SF\"}");

6. Conclusion

In this article, we’ve explored how to address the PSQLException error “column is of type json but the expression is of type character varying” that arises when using JPA to map Java objects to PostgreSQL JSON columns.

By using the @Type annotation and casting the JSON string to JSONB type when using native SQL queries, we can efficiently store and retrieve JSON data in PostgreSQL using the JSONB data type.

As always, the source code for the examples is available over on GitHub.


Guide to getResourceAsStream() and FileInputStream in Java

$
0
0
almost done featured

1. Overview

In this tutorial, we’ll explore the differences between different methods of reading files in Java. We’ll compare the getResourceAsStream() method and the FileInputStream class and discuss their use cases. We’ll also talk about the Files.newInputStream() method that is recommended over FileInputStream due to its memory and performance benefits.

Then we’ll look at code examples to learn how to read files using these methods.

2. Basics

Before we dive into the code examples, let’s understand the differences between getResourceAsStream() and FileInputStream and their popular use cases.

2.1. Reading Files Using getResourceAsStream()

The getResourceAsStream() method reads a file from the classpath. The file path passed to the getResourceAsStream() method should be relative to the classpath. The method returns an InputStream that can be used to read the file.

This method is commonly used to read configuration files, properties files, and other resources packaged with the application.

2.2. Reading Files Using FileInputStream

On the other hand, the FileInputStream class is used to read a file from the filesystem. This is useful when we need to read files not packaged with the application.

The file path passed to the FileInputStream constructor should be an absolute path or a path relative to the current working directory.

The FileInputStream objects can have memory and performance issues due to their use of finalizers. A better alternative to FileInputStream is the Files.newInputStream() method that works in the same way. We’ll use the Files.newInputStream() method in our code examples to read files from the filesystem.

These methods are commonly used to read files present externally on the filesystem such as log files, user data files, and secret files. 

3. Code Example

Let’s look at an example to demonstrate the usage of getResourceAsStream() and Files.newInputStream(). We’ll create a simple utility class that reads a file using both methods. Then we’ll test the methods by reading sample files both from the classpath and the filesystem.

3.1. Using getResourceAsStream()

First, let’s look at the usage of the getResourceAsStream() method. We’ll create a class named FileIOUtil and add a method that reads a file from the resources:

static String readFileFromResource(String filePath) {
    try (InputStream inputStream = FileIOUtil.class.getResourceAsStream(filePath)) {
        String result = null;
        if (inputStream != null) {
            result = new BufferedReader(new InputStreamReader(inputStream))
              .lines()
              .collect(Collectors.joining("\n"));
        }
        return result;
    } catch (IOException e) {
        LOG.error("Error reading file:", e);
        return null;
    }
}

In this method, we obtain an InputStream by passing the file’s path as an argument to the getResourceAsStream() method. This file path should be relative to the classpath. We then read the contents of the file using a BufferedReader. The method reads the contents line by line and joins them using the Collectors.joining() method. Finally, we return the contents of the file as a String.

In case of an exception, such as the file not being found, we catch the exception and return null.

3.2. Using Files.newInputStream()

Next, let’s define a similar method using the Files.newInputStream() method:

static String readFileFromFileSystem(String filePath) {
    try (InputStream inputStream = Files.newInputStream(Paths.get(filePath))) {
        return new BufferedReader(new InputStreamReader(inputStream))
          .lines()
          .collect(Collectors.joining("\n"));
    } catch (IOException e) {
        LOG.error("Error reading file:", e);
        return null;
    }
}

In this method, we use the Files.newInputStream() method to read the file from the filesystem. The file path should be absolute or relative to the project directory. Similar to the previous method, we read and return the contents of the file.

4. Testing

Now, let’s test both methods by reading a sample file. We’ll observe how file paths are passed to the methods in the case of a resource file and an external file.

4.1. Reading Files From Classpath

First, we’ll compare how the methods read a file from the classpath. Let’s create a file named test.txt under the src/main/resources directory and add some content to it:

Hello!
Welcome to the world of Java NIO.

We’ll read this file using both methods and validate the contents:

@Test
void givenFileUnderResources_whenReadFileFromResource_thenSuccess() {
    String result = FileIOUtil.readFileFromResource("/test.txt");
    assertNotNull(result);
    assertEquals(result, "Hello!\n" + "Welcome to the world of Java NIO.");
}
@Test
void givenFileUnderResources_whenReadFileFromFileSystem_thenSuccess() {
    String result = FileIOUtil.readFileFromFileSystem("src/test/resources/test.txt");
    assertNotNull(result);
    assertEquals(result, "Hello!\n" + "Welcome to the world of Java NIO.");
}

As we can see, both methods read the file test.txt and return its contents. We then compare the contents to ensure they match the expected value. The difference between the two methods is the file path we pass as an argument.

The readFileFromResource() method expects a path relative to the classpath. Since the file is directly under the src/main/resources directory, we pass /test.txt as the file path.

On the other hand, the readFileFromFileSystem() method expects an absolute path or a path relative to the current working directory. We pass src/main/resources/test.txt as the file path. Alternatively, we could pass the absolute path to the file like /path/to/project/src/main/resources/test.txt.

4.2. Reading Files From Filesystem

Next, let’s test how the methods read a file from the filesystem. We’ll create a file named external.txt outside the project directory and try to read this file using both methods.

Let’s create test methods to read the file using both methods:

@Test
void givenFileOutsideResources_whenReadFileFromFileSystem_thenSuccess() {
    String result = FileIOUtil.readFileFromFileSystem("../external.txt");
    assertNotNull(result);
    assertEquals(result, "Hello!\n" + "Welcome to the world of Java NIO.");
}
@Test
void givenFileOutsideResources_whenReadFileFromResource_thenNull() {
    String result = FileIOUtil.readFileFromResource("../external.txt");
    assertNull(result);
}

Here, we pass the relative path to the external.txt file. The readFileFromFileSystem() method reads the file directly from the filesystem and returns its contents.

If we try to read the file using the readFileFromResource() method, it returns null because the file is outside the classpath.

5. Conclusion

In this article, we explored the differences between reading a file from the classpath using getResourceAsStream() and reading a file from the filesystem using Files.newInputStream(). We discussed the use cases and behaviors of both methods and looked at examples that demonstrate their usage.

As always, the code examples are available over on GitHub.


Check Whether a Collection Contains an Element or Not Using Hamcrest

$
0
0

1. Overview

When we write unit tests in Java, especially with the JUnit framework, it’s common to verify that a Collection contains a specific element. As a powerful library, Hamcrest offers a simple and expressive way to perform these checks using Matchers.

In this quick tutorial, we’ll explore how to check whether a Collection contains a specific element using Hamcrest’s Matchers. Further, as arrays are commonly used data containers, we’ll also discuss how to perform the same check on arrays.

2. Setting up Hamcrest

Before diving into examples, we need to ensure that Hamcrest is included in our project. If we’re using Maven, we can add the following dependency to our pom.xml:

<dependency>
    <groupId>org.hamcrest</groupId>
    <artifactId>hamcrest</artifactId>
    <version>2.2</version>
    <scope>test</scope>
</dependency>

We can check Maven Central for the latest version of Hamcrest.

So, let’s prepare a List and an array as inputs:

static final List<String> LIST = List.of("a", "b", "c", "d", "e", "f");
static final String[] ARRAY = { "a", "b", "c", "d", "e", "f" };

Next, let’s check whether they contain or don’t contain a specific element.

3. Using Hamcrest Matchers and assertThat()

Hamcrest provides a rich set of Matchers to work with Collections. To check if a Collection contains a specific element, we can use the hasItem() Matcher from the org.hamcrest.Matchers class. Let’s walk through some examples to see how this works in practice.

First, let’s import static the hasItem() method to make the code easy to read:

import static org.hamcrest.Matchers.hasItem;

Then, we can use it to verify if a Collection contains or doesn’t contain an element:

assertThat(LIST, hasItem("a"));
assertThat(LIST, not(hasItem("x")));

In the above code, we used the not() method to negate the match parameter’s logic.

The hasItem() method is straightforward in verifying if a Collection contains an element. However, we cannot use it to check arrays.

To check if an array contains a specific element, we can use the hasItemInArray() method, also from the org.hamcrest.Matchers class:

assertThat(ARRAY, hasItemInArray("a"));
assertThat(ARRAY, not(hasItemInArray("x")));

As the examples show, we can easily solve our problem by employing Harmcrest’s convenient hasItem() and hasItemInArray().

4. Using JUnit’s assertTrue() and assertFalse()

We’ve seen Harmcrest’s Matchers, which are easy to use. Alternatively, we can use JUnit’s assertTrue() and assertFalse() methods to achieve the goal:

assertTrue(LIST.contains("a"));
assertFalse(LIST.contains("x"));

This time, we use Collection‘s contains() method to check if the target element exists in the Collection.

However, if the input is an array, unlike Collection.contains(), there is no simple one-shot method to check. Fortunately, we have multiple ways to check if an array contains a value in Java.

Next, let’s see how to use these methods with JUnit assertTrue() and assertFalse():

assertTrue(Arrays.stream(ARRAY).anyMatch("a"::equals));
assertFalse(Arrays.asList(ARRAY).contains("z"));

As the code shows, we can convert the array to a List or use Stream API to examine whether a specific value exists in the array.

From the above examples, we can also see that if we want to check whether a Collection contains an element or not, both Hamcrest Matchers and JUnit assertions with Collection.contains() approaches are straightforward. However, when we need to perform the same check on an array, Hamcrest Matchers can be a better choice, as they’re more compact and easier to understand.

5. Conclusion

In this quick article, we’ve explored various ways to assert if a Collection or array contains a specific element using JUnit and Hamcrest.

Using Hamcrest’s hasItem() or hasItemInArray(), we can easily verify the presence of a specific element within Collections or arrays in our unit tests. Further, the Matcher makes our tests more readable and expressive, enhancing the clarity and maintainability of our test code.

Alternatively, we can use methods provided by Java standard API to examine if the Collection and the array contain the target element, and then use JUnit’s standard assertTrue() and assertFalse() assertions to do the job.

As always, the complete source code for the examples is available over on GitHub.


Finding Max and Min Date in List Using Streams

$
0
0

1. Overview

In this article, we’ll explore how to find the maximal and minimal date in a list of those objects using Streams.

2. Example Setup

Java’s original Date API is still widely used, so we’ll showcase an example using it. However, since Java 8, LocalDate was introduced, and most Date methods were deprecated. Thus, we’ll also show an example that uses LocalDate.

Firstly, let’s create a base Event object that contains a lone Date property:

public class Event {
    Date date;
    // constructor, getter and setter
}

To add days to a Date, we’ll use Apache Commons’ DateUtils method addDays(). For that purpose, we need to add the latest version of the library to our pom.xml:

<dependency>
    <groupId>org.apache.commons</groupId>
    <artifactId>commons-lang3</artifactId>
    <version>3.14.0</version>
</dependency>

We can now define a list of three Event: the first one taking place today, the second one tomorrow, and the third one in a week:

Date TODAY = new Date();
Event TODAYS_EVENT = new Event(TODAY);
Date TOMORROW = DateUtils.addDays(TODAY, 1);
Event TOMORROWS_EVENT = new Event(TOMORROW);
Date NEXT_WEEK = DateUtils.addDays(TODAY, 7);
Event NEXT_WEEK_EVENT = new Event(NEXT_WEEK);
List<Event> events = List.of(TODAYS_EVENT, TOMORROWS_EVENT, NEXT_WEEK_EVENT);

Our goal is now to write a method that will be able to determine that NEXT_WEEK_EVENT is the maximal date in this Event list. We’ll also do the same with a LocalDate instead of a Date. Our LocalEvent will look like this:

public class LocalEvent {
    LocalDate date;
    // constructor, getter and setter
}

Building the Event list is a bit more straightforward since LocalDate already has a built-in plusDays() method:

LocalDate TODAY_LOCAL = LocalDate.now();
LocalEvent TODAY_LOCAL_EVENT = new LocalEvent(TODAY_LOCAL);
LocalDate TOMORROW_LOCAL = TODAY_LOCAL.plusDays(1);
LocalEvent TOMORROW_LOCAL_EVENT = new LocalEvent(TOMORROW_LOCAL);
LocalDate NEXT_WEEK_LOCAL = TODAY_LOCAL.plusWeeks(1);
LocalEvent NEXT_WEEK_LOCAL_EVENT = new LocalEvent(NEXT_WEEK_LOCAL);
List<LocalEvent> localEvents = List.of(TODAY_LOCAL_EVENT, TOMORROW_LOCAL_EVENT, NEXT_WEEK_LOCAL_EVENT);

3. Get the Max Date

To start, we’ll use the Stream API to stream our Event list. Then, we’ll need to apply the Date getter to each element of the Stream. Thus, we’ll obtain a Stream containing the dates of the events. We can now use the max() function for it. This will return the maximal Date in the Stream regarding the provided Comparator.

The Date class implements Comparable<Date>. As a result, the compareTo() method defines the natural date order. In a nutshell, it is possible to equivalently call the two following methods inside max():

  • Date‘s compareTo() can be referred to via a method reference
  • Comparator‘s naturalOrder() can be used directly

Lastly, let’s note that if the given Event list is null or empty, we can directly return null. This will ensure we don’t run into issues while streaming the list.

The method finally looks like this:

Date findMaxDateOf(List<Event> events) {
    if (events == null || events.isEmpty()) {
        return null;
    }
    return events.stream()
      .map(Event::getDate)
      .max(Date::compareTo)
      .get();
}

Alternatively, with naturalOrder(), it would read:

Date findMaxDateOf(List<Event> events) {
    if (events == null || events.isEmpty()) {
        return null;
    }
    return events.stream()
      .map(Event::getDate)
      .max(Comparator.naturalOrder())
      .get();
}

To conclude, we can now quickly test that our method returns the correct result for our list:

assertEquals(NEXT_WEEK, findMaxDateOf(List.of(TODAYS_EVENT, TOMORROWS_EVENT, NEXT_WEEK_EVENT);

With LocalDate, the reasoning is exactly the same. LocalDate indeed implements the ChronoLocalDate interface, which extends Comparable<ChronoLocalDate>. Thus, the natural order for LocalDate is defined by ChronoLocalDate‘s compareTo() method.

As a result, the method can be written:

LocalDate findMaxDateOf(List<LocalEvent> events) {
    if (events == null || events.isEmpty()) {
        return null;
    }
    return events.stream()
      .map(LocalEvent::getDate)
      .max(LocalDate::compareTo)
      .get();
}

Or, in a completely equivalent way:

LocalDate findMaxDateOf(List<LocalEvent> events) {
    if (events == null || events.isEmpty()) {
        return null;
    }
    return events.stream()
      .map(LocalEvent::getDate)
      .max(Comparator.naturalOrder())
      .get();
}

And we can write the following test to confirm it works:

assertEquals(NEXT_WEEK_LOCAL, findMaxDateOf(List.of(TODAY_LOCAL_EVENT, TOMORROW_LOCAL_EVENT, NEXT_WEEK_LOCAL_EVENT)));

4. Get the Min Date

Similarly, we can find the minimal date in a Date list:

Date findMinDateOf(List<Event> events) {
    if (events == null || events.isEmpty()) {
        return null;
    }
    return events.stream()
      .map(Event::getDate)
      .min(Date::compareTo)
      .get();
}

As we can see, the only change is that we used the min() function instead of max(). Let’s verify it gives us the earliest date of the three:

@Test
void givenEventList_whenFindMinDateOf_thenReturnMinDate() {
    assertEquals(TODAY, DateHelper.findMinDateOf(List.of(TODAYS_EVENT, TOMORROWS_EVENT, NEXT_WEEK_EVENT)));
}

If we are working with LocalDate, we’ll use this method:

LocalDate findMaxDateOfLocalEvents(List<LocalEvent> events) {
    if (events == null || events.isEmpty()) {
        return null;
    }
    return events.stream()
      .map(LocalEvent::getDate)
      .max(LocalDate::compareTo)
      .get();
}

Once again, the only change we made is replacing the call to max() with a call to the min() method. Finally, we can also test it:

@Test
void givenEventList_whenFindMinDateOfWithComparator_thenReturnMaxDate() {
    assertEquals(TODAY, DateHelper.findMinDateOfWithComparator(List.of(TODAYS_EVENT, TOMORROWS_EVENT, NEXT_WEEK_EVENT)));
}

5. Conclusion

In this tutorial, we saw how to get the maximum or minimum date in a list of objects. We’ve used both Date and LocalDate objects.

As always, the code can be found over on GitHub.


How to Fix Hibernate UnknownEntityException: Could not resolve root entity

$
0
0

1. Overview

In this short tutorial, we’ll elucidate how to solve the Hibernate UnknownEntityException: “Could not resolve root entity”.

First, we’ll explain the root cause leading to the exception. Then, we’ll illustrate how to reproduce and fix it in practice.

2. Understanding the Exception

Before jumping to the solution, let’s take a moment to understand the exception and its stack trace.

Typically, Hibernate throws “UnknownEntityException: Could not resolve root entity” to signal a failure to resolve a known mapped entity name in HQL or JPQL queries.

In short, Hibernate relies on JPA entities to do all the heavy lifting of object-relational mapping. As a result, it expects the entity name specified in queries to match a class name annotated by the @Entity annotation.

So, one of the most common causes of the exception is using a name that doesn’t match a valid entity class name.

3. Practical Example

Now that we know what causes Hibernate to fail with UnknownEntityException, let’s go down the rabbit hole and see how to reproduce it in practice.

First, let’s consider the Person entity class:

@Entity
public class Person {
    @Id
    private int id;
    private String firstName;
    private String lastName;
    // standard getters and setters
}

In this example, we define a person by their identifier, first name, and last name.

Here, we use the @Entity annotation to indicate that the Person class is a JPA entity. Furthermore, @Id denotes the field that represents the primary key.

Next, we’ll pretend to use the wrong entity name in an HQL query. For instance, let’s try to select all the persons using PERSON as the entity name instead of Person:

class UnknownEntityExceptionUnitTest {
    private static Session session;
    @BeforeAll
    static void init() {
        session = HibernateUtil.getSessionFactory().openSession();
        session.beginTransaction();
    }
    @AfterAll
    static void clear() {
        session.close();
    }
    @Test
    void whenUsingUnknownEntity_thenThrowUnknownEntityException() {
        assertThatThrownBy(() -> session.createQuery("FROM PERSON", Person.class))
          .hasRootCauseInstanceOf(UnknownEntityException.class)
          .hasRootCauseMessage("Could not resolve root entity 'PERSON'");
    }
}

As we can see, the test case fails with UnknownEntityException: Could not resolve root entity because Hibernate doesn’t recognize PERSON as a valid JPA entity.

4. Fixing the Exception

As we noted earlier, the main reason why Hibernate throws UnknownEntityException is that it fails to find an entity with the specified name. So, the easiest solution would be to use the correct entity name in HQL and JPQL queries.

So, let’s add a new test case and replace the wrong name PERSON with Person:

@Test
void whenUsingCorrectEntity_thenReturnResult() {
    Query<Person> query = session.createQuery("FROM Person", Person.class);
    assertThat(query.list()).isEmpty();
}

As shown above, the test case is successfully executed and doesn’t fail with the exception because we used Person this time which is a valid entity name.

5. Conclusion

In this short article, we saw what causes Hibernate to fail with UnknownEntityException: “Could not resolve root entity”. Then, we demonstrated using a practical example how to reproduce the exception and how to solve it.

As always, the full source code of the examples is available over on GitHub.


Java Weekly, Issue 549

$
0
0

1. Spring and Java

>> Why Update Data-Oriented Programming to Version 1.1? [inside.java]

An insightful journey into the world of data-oriented programming. A solid read.

>> Dynamic watermarking on the JVM [frankel.ch]

Adding watermarks to images in Java?! Nice!

Also worth reading:

Webinars and presentations:

Time to upgrade:

2. Technical & Musings

>> Impact of prompt masking on LLM agent planning performance [krasserm.io]

Always good to learn some AI internals 🙂

>> Is Ransomware Protection Working? [techblog.bozho.net]

No, it’s not – we need operating-system-level prevention.

Also worth reading:

3. Pick of the Week

>> Programmers Should Never Trust Anyone, Not Even Themselves [carbon-steel.github.io]


List All Files on the Remote Server in Java

$
0
0
Contact Us Featured

1. Overview

Interacting with a remote server is a common task in modern software development and system administration. Programmatic interaction with a remote server using an SSH client allows for deploying applications, managing configurations, transferring files, etc. The JSch, Apache Mina SSHD, and SSHJ libraries are popular SSH clients in Java.

In this tutorial, we’ll learn how to interact with a remote server using the JSch, Apache Mina SSHD, and SSHJ libraries. Also, we’ll see how to establish a connection to a remote server using a private key and list all folders in a specific directory from the server.

2. Using the JSch Library

JSch (Java Secure Channel) library provides classes to establish a connection to an SSH server. It’s a Java implementation of SSH2.

First, let’s add the JSch dependency to the pom.xml:

<dependency>
    <groupId>com.github.mwiede</groupId>
    <artifactId>jsch</artifactId>
    <version>0.2.18</version>
</dependency>

Next, let’s define our connection details to establish a connection to the remote server:

private static final String HOST = "HOST_NAME";
private static final String USER = "USERNAME";
private static final String PRIVATE_KEY = "PRIVATE_KEY";
private static final int PORT = 22;
private static final String REMOTE_DIR = "REMOTE_DIR";

Here, we define the host, the user, and the path to the authentication key. Also, we define the port and the remote directory we intend to list its folders.

Next, let’s create a JSch object and add the PRIVATE_KEY for authentication:

JSch jsch = new JSch();
jsch.addIdentity(PRIVATE_KEY);

Then, let’s create a session and connect to the remote server:

Session session = jsch.getSession(USER, HOST, PORT);
session.setConfig("StrictHostKeyChecking", "no");
session.connect();

The Session object allows us to create a new SSH session. For simplicity, we disable strict host key checking.

Furthermore, let’s open an SFTP channel over the established SSH connection:

ChannelSftp channelSftp = (ChannelSftp) session.openChannel("sftp");
channelSftp.connect();

Here, we create a secure file transfer protocol over the established session. The ChannelSftp object allows us to upload, download, list, etc. from the remote server.

2.1. Detailed File Listing

Now that we have an open SFTP channel, let’s retrieve the list of files in the specified remote directory:

Vector<ChannelSftp.LsEntry> files = channelSftp.ls(REMOTE_DIR);
for (ChannelSftp.LsEntry entry : files) {
    LOGGER.info(entry.getLongname());
}

In the code above, we invoke the ls() method on the ChannelSftp object which returns a Vector of ChannelSftp.LsEntry object, each representing a file or directory. Then, we loop over the list of files and directories and log the long name of each file or directory. The getLongname() method includes additional details like permissions, owner, group, and size.

2.2. File Name Only

If we are interested only in the filename, we can invoke the getFilename() method on ChannelSftp.LsEntry object:

Vector<ChannelSftp.LsEntry> files = channelSftp.ls(REMOTE_DIR);
for (ChannelSftp.LsEntry entry : files) {
    LOGGER.info(entry.getFilename());
}

Notably, we must close the SSH session and SFTP channel after successful operations:

channelSftp.disconnect();
session.disconnect();

Essentially, closing connections helps free resources.

3. Using the Apache Mina SSHD Library

The Apache Mina SSHD library aims to support Java applications that intend to provide SSH protocols for both the client and server side.

We can perform several SSH operations like file transfer, deployment, etc. To use the library, let’s add sshd-core and  sshd-sftp dependencies to the pom.xml:

<dependency>
    <groupId>org.apache.sshd</groupId>
    <artifactId>sshd-core</artifactId>
    <version>2.13.1</version>
</dependency>
<dependency>
    <groupId>org.apache.sshd</groupId>
    <artifactId>sshd-sftp</artifactId>
    <version>2.13.1</version>
</dependency>

Let’s maintain the connection details used in the previous section. First, let’s start the SSH client:

try (SshClient client = SshClient.setUpDefaultClient()) {
    client.start();
    client.setServerKeyVerifier(AcceptAllServerKeyVerifier.INSTANCE);
    // ...  
}

Next, let’s connect to the SSH server:

try (ClientSession session = client.connect(USER, HOST, PORT).verify(10000).getSession()) {
    FileKeyPairProvider fileKeyPairProvider = new FileKeyPairProvider(Paths.get(privateKey));
    Iterable<KeyPair> keyPairs = fileKeyPairProvider.loadKeys(null);
    for (KeyPair keyPair : keyPairs) {
        session.addPublicKeyIdentity(keyPair);
    }
    session.auth().verify(10000);
}

In the code above, we create a client session with our authentication credentials. Also, we use the FileKeyPairProvider object to load the private, and since our private key doesn’t require a passphrase, we pass null to the loadKeys() method.

3.1. Detailed File Listing

To list the folders on the remoter server, let’s create an SftpClientFactory object to open the SFTP channel over an already established SSH session:

SftpClientFactory factory = SftpClientFactory.instance();

Next, let’s read the remote directory and get an iterable of directory entries:

try (SftpClient sftp = factory.createSftpClient(session)) {
    Iterable<SftpClient.DirEntry> entriesIterable = sftp.readDir(REMOTE_DIR);
    List<SftpClient.DirEntry> entries = StreamSupport.stream(entriesIterable.spliterator(), false)
      .collect(Collectors.toList());
    for (SftpClient.DirEntry entry : entries) {
        LOGGER.info(entry.getLongFilename());
    }
}

Here, we read the remote directory and get an Iterable of directory entries which is converted to List. Then we log the long filename to the console. Since we use the try-with-resources block, we don’t need to close the session explicitly.

3.2. File Name Only

However, to get only the file name, we can use the getFilename() method on the directory entries instead of getLongFileName():

for (SftpClient.DirEntry entry : entries) {
    LOGGER.info(entry.getFilename());
}

The getFilename() eliminates other file information and only logs the filename.

4. Using the SSHJ Library

The SSHJ library is also a Java library that provides classes to connect and interact with a remote server. To use the library, let’s add its dependency to the pom.xml:

<dependency>
    <groupId>com.hierynomus</groupId>
    <artifactId>sshj</artifactId>
    <version>0.38.0</version>
</dependency>

Also, let’s maintain the connection details used in the previous sections.

Let’s create an SSHClient object to establish a connection to a remote server:

try (SSHClient sshClient = new SSHClient()) {
    sshClient.addHostKeyVerifier(new PromiscuousVerifier());
    sshClient.connect(HOST);
    sshClient.authPublickey(USER, PRIVATE_KEY);
    // ...
}

Then, let’s establish an SFTP channel on the established SSH session:

try (SFTPClient sftpClient = sshClient.newSFTPClient()) {
    List<RemoteResourceInfo> files = sftpClient.ls(REMOTE_DIR);
    for (RemoteResourceInfo file : files) {
        LOGGER.info("Filename: " + file.getName());
    }
}

In the code above, we invoke the ls() which accepts the remote directory on sftpClient and stores it as RemoteResourseInfo type. Then we loop through the file entries and log the file name to the console.

Finally, we can get more details about files by using the getAttributes() method:

LOGGER.info("Permissions: " + file.getAttributes().getPermissions());
LOGGER.info("Last Modification Time: " + file.getAttributes().getMtime());

Here, we further log the file permission and modification time by invoking the getPermissions() and getMtime() methods on the getAttributes() method.

5. Conclusion

In this article, we learned how to interact with remote servers using the JSch, Apache SSHD Mina, and SSHJ libraries. Also, we saw how to establish secure connections, authenticate with private keys, and perform basic file operations.

As always, the complete source code for the examples is available over on GitHub.

       
Viewing all 4476 articles
Browse latest View live


<script src="https://jsc.adskeeper.com/r/s/rssing.com.1596347.js" async> </script>