Quantcast
Channel: Baeldung
Viewing all 4535 articles
Browse latest View live

Why the Order of Maven Dependencies Is Important

$
0
0

1. Introduction

Maven is one of the most popular build and dependency management tools in the Java ecosystem. While it provides a convenient way to declare and use different frameworks and libraries in a project, some unexpected problems could arise when dealing with many dependencies in our applications.

To avoid such compile time and runtime issues, we’ll learn how to properly configure the list of dependencies. In this tutorial, we’ll also mention the tools we can use to detect and fix the inconsistencies between different versions of artifacts.

2. The Dependency Mechanism

For starters, let’s briefly review the main concepts of Maven.

As previously learned, a Project Object Model (POM) configures a Maven project. This XML file contains details about the project and configuration information necessary to build it.

The external libraries declared in the pom.xml file are called dependencies. Each dependency is uniquely defined using a set of identifiers – groupId, artifactId, and version – commonly referred to as Coordinates. Maven’s internal mechanisms automatically resolve and download dependencies from a central repository, making them available in our projects.

Complex projects usually have multiple dependencies, some of which depend on other libraries. Those explicitly listed in the project’s pom are called direct dependencies. On the other hand, the dependencies of direct ones are called transitive, and Maven automatically includes them.

Let’s explain those in more detail.

2.1. Transitive Dependencies

A transitive dependency is simply a dependency of a dependency. Let’s illustrate this:
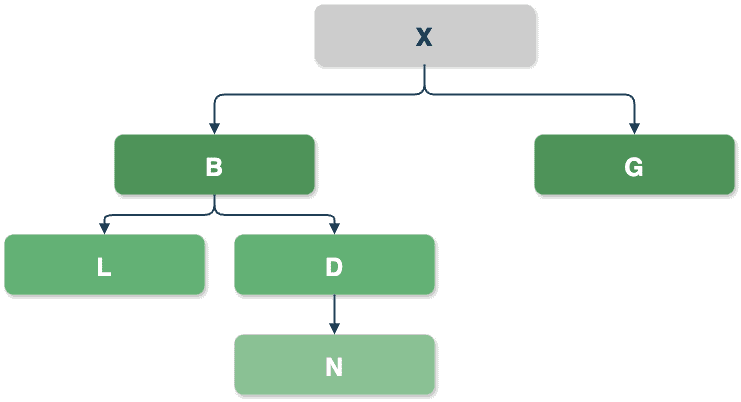
Transitive dependencies


As shown in the example graph above, our code base X depends on several other projects. One of X‘s dependencies is project B, which depends on projects L and D. These two, L and D, are the transitive dependencies of X. If D also depends on N, then N becomes another transitive dependency of X. On the other hand, project G is a direct dependency of X and has no additional dependencies, so there will be no transitives included on this path.

One of Maven’s key features is its ability to manage transitive dependencies. If our project relies on a library that, in turn, depends on others, Maven will eliminate the need to track all the dependencies required to compile and run an application.

In the example above, we would add dependencies B and G to our pom.xml, and Maven will take care of the rest. This is particularly useful for large enterprise applications since they can have hundreds of dependencies. In such scenarios, besides having duplicate dependencies, multiple direct dependencies may require different versions of the same JAR file. In other words, we would have dependencies that might not work together.

Luckily, a few other Maven features come in handy to limit the included dependencies.

2.2. Dependency Mediation

We’ve covered most of them in our other tutorials – dependency management, scope, exclusion, and optional dependencies. Here, we’ll focus on dependency mediation.

Let’s see this in action:
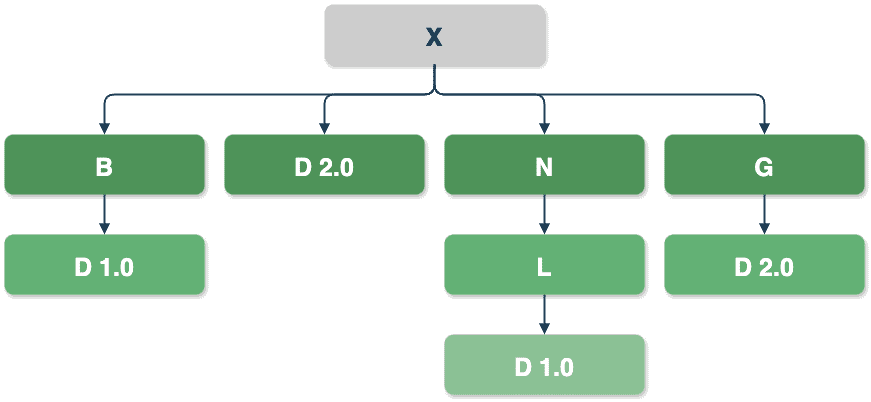
Dependency mediation


In the example above, Maven will resolve the conflicts by choosing the version of D nearest to the root of the dependency tree (X) – version D 2.0 via path X -> D 2.0.

In the path X -> G -> D 2.0, D is a transitive dependency, but since it is the same version as a direct D dependency, it is omitted due to duplication. Other transitive dependencies, i.e., X -> B -> D 1.0 and X -> N -> L -> D 1.0,  are omitted due to conflict since their versions differ from the direct dependency D.

On the other hand, if X doesn’t declare D as a direct dependency, dependencies X -> B -> D 1.0 and X -> G -> D 2.0 will have the same tree depth. When two dependencies are at the same level in the dependency tree, the first declaration wins, so D 1.0 will be used in the final build.

3. Dependency Ordering Problems

To demonstrate the scenario above, let’s switch to a more realistic example that uses common libraries – Apache POI and OpenCSV. Both depend on Apache Commons Collections, so our project adds this library as a transitive dependency.

3.1. Practical Example

We’ll intentionally select the older versions of Apache POI and OpenCSV dependencies, the ones that use different versions of Apache Commons Collections:

<dependencies>
    <dependency>
        <groupId>org.apache.poi</groupId>
        <artifactId>poi</artifactId>
        <version>5.3.0</version>
    </dependency>
    <dependency>
        <groupId>com.opencsv</groupId>
        <artifactId>opencsv</artifactId>
        <version>4.2</version>
    </dependency>
</dependencies>

Moreover, the two commons-collections4 libraries are at the same depth of the dependency tree. We can verify that using a mvn dependency:tree command. With it, we can list all dependencies in the project, both direct and transitive ones:

mvn dependency:tree -Dverbose
[INFO] --- maven-dependency-plugin:2.8:tree (default-cli) @ dependency-ordering ---
[INFO] com.baeldung:dependency-ordering:jar:0.0.1-SNAPSHOT
[INFO] +- org.apache.poi:poi:jar:5.3.0:compile
[INFO] |  \- org.apache.commons:commons-collections4:jar:4.4:compile
...
[INFO] +- com.opencsv:opencsv:jar:4.2:compile
[INFO] |  \- (org.apache.commons:commons-collections4:jar:4.1:compile - omitted for conflict with 4.4)
...

As we can see, the project will use version 4.4. Between versions 4.1 and 4.4., there were multiple changes. Besides many, in release 4.2, the method MapUtils.size(Map<?, ?>) was added.

Let’s make use of it in a simple test to demonstrate the dependency ordering issue:

@Test
void whenCorrectDependencyVersionIsUsed_thenShouldCompile() {
    assertEquals(0, MapUtils.size(new HashMap<>()));
}

The code compiles and the test passes successfully. Let’s now change the order of the dependencies in the pom.xml file and recompile the code.

Consequently, the following error occurs:

java: cannot find symbol
  symbol: method size(java.util.HashMap<java.lang.Object,java.lang.Object>)
  location: class org.apache.commons.collections4.MapUtils

Additionally, we can use the mvn dependency:tree command again to check if anything has changed:

$ mvn dependency:tree -Dverbose
[INFO] com.baeldung:dependency-ordering:jar:0.0.1-SNAPSHOT
[INFO] +- com.opencsv:opencsv:jar:4.2:compile
[INFO] |  \- org.apache.commons:commons-collections4:jar:4.1:compile
...
[INFO] +- org.apache.poi:poi:jar:5.3.0:compile
[INFO] |  \- (org.apache.commons:commons-collections4:jar:4.4:compile - omitted for conflict with 4.1)
...

Our code now uses an older version of the commons-collections4 library that doesn’t have the MapUtils.size method.

3.2. Common Exceptions Indicating a Dependency Resolution Problem

Besides the cannot find symbol error, dependency problems can manifest in various ways. Here are some of the most frequently encountered ones:

Custom and Core Maven plugins also require dependencies to be able to execute specific goals. If there is an issue, we will get back an error like this:

[ERROR] Failed to execute goal (…) on project (…): Execution (…) of goal (…) failed: A required class was missing while executing (…)

Unfortunately, not all dependency-related exceptions occur at compile time.

4. Tools for Resolving Dependency Issues

Luckily, there are several tools available that help ensure runtime safety.

4.1. Maven Dependency Plugin

The Apache Maven Dependency Plugin helps manage and analyze project dependencies. With the maven-dependency-plugin, we can find unused ones, display the project’s dependency tree, find duplicate dependencies, and much more.

4.2. Maven Enforcer Plugin

On the other hand, maven-enforcer-plugin allows us to enforce rules and guidelines within a project. One option the plugin provides is the ability to ban specific dependencies – this can include both direct and transitive dependencies. With the enforcer plugin, we can also make sure our project doesn’t have duplicate dependencies.

4.3. Maven Help Plugin

Since POMs can inherit configuration from other POMs, the final version could combine various POMs. The maven-help-plugin provides information about a project. To get more information that could help identify configuration issues, we can use the plugin’s effective-pom goal to display the effective POM as XML.

5. Conclusion

In this article, we’ve covered several techniques for improving the control of dependencies in our projects.

Frequently updating, adding new, and maintaining existing libraries includes ensuring compatibility among all dependencies, which could be challenging. However, existing Maven features help the process. While various plugins can automate dependency management and enforce version consistency, it’s important to remember Maven’s resolution rules.

To sum up, when encountering multiple versions of dependencies, Maven resolves conflicts by first using the depth of a dependency in the tree. Here, the definition closest to the root of the dependency tree is selected. On the other hand, if two dependency versions are at the same depth in the tree, Maven uses the one declared first in the project’s POM and makes it available in the final build.

As always, the complete source code with examples is available over on GitHub.


How to Send a Post Request in Camel

$
0
0

1. Overview

Apache Camel is a robust open-source integration framework. It provides a mature set of components to interact with various protocols and systems, including HTTP.

In this tutorial, we’ll explore the Apache Camel HTTP component and demonstrate how to initiate a POST request to JSONPlaceholder, a free fake API for testing and prototyping.

2. Apache Camel HTTP Component

The Apache Camel HTTP component provides functionality to communicate with an external web server. It supports various HTTP methods including GET, POST, PUT, DELETE, etc.

By default, the HTTP component uses port 80 for HTTP and port 443 for HTTPS. Here’s the general syntax for the HTTP component URI:

http://hostname[:port][/resourceUri][?options]

The component must start with the ‘http‘ or ‘https‘ scheme, followed by the hostname, optional port, resource path, and query parameters.

We can set the HTTP method using the httpMethod option in the URI:

https://jsonplaceholder.typicode.com/posts?httpMethod=POST

Also, we can set the HTTP method in the message header:

setHeader(Exchange.HTTP_METHOD, constant("POST"))

Setting the HTTP method is essential to initiate a request successfully.

3. Project Setup

To begin, let’s add the camel-core and camel-test-jnit5 dependencies to the pom.xml:

<dependency>
    <groupId>org.apache.camel</groupId>
    <artifactId>camel-core</artifactId>
    <version>4.6.0</version>
</dependency>
<dependency>
    <groupId>org.apache.camel</groupId>
    <artifactId>camel-test-junit5</artifactId>
    <version>4.6.0</version>
</dependency>

The camel-core dependency provides the core classes for system integration. One of the important classes is the RouteBuilder to create routes. The camel-test-junit5 provides support for testing Camel routes with JUnit 5.

Next, let’s add the camel-jackson and camel-http dependencies to the pom.xml:

<dependency>
    <groupId>org.apache.camel</groupId>
    <artifactId>camel-jackson</artifactId>
    <version>4.6.0</version>
</dependency>
<dependency>
    <groupId>org.apache.camel</groupId>
    <artifactId>camel-http</artifactId>
    <version>4.6.0</version>
</dependency>

The camel-http dependency provides support for HTTP components to communicate with external servers. Also, we added camel-jackson dependency for JSON serialization and deserialization using Jackson.

Then, let’s create a sample JSON payload for the POST request to “https://jsonplaceholder.typicode.com/post“:

{
  "userId": 1,
  "title": "Java 21",
  "body": "Virtual Thread",
}

Here, the payload contains the userId, title, and body. We expect the endpoint to return HTTP status code 201 on the successful creation of a new post.

4. Sending Post Request

To begin, let’s create a class named PostRequestRoute which extends the RouteBuilder class:

public class PostRequestRoute extends RouteBuilder { 
}

The RouteBuilder class allows us to override the configure() method to create a route.

4.1. Sending Post Request With JSON String

Let’s define a route that sends a POST request to our dummy server:

from("direct:post").process(exchange -> exchange.getIn()
  .setBody("{\"title\":\"Java 21\",\"body\":\"Virtual Thread\",\"userId\":\"1\"}"))
  .setHeader(Exchange.CONTENT_TYPE, constant("application/json"))
  .to("https://jsonplaceholder.typicode.com/posts?httpMethod=POST")
  .to("mock:post");

Here, we define a route and set the payload as  JSON String. The setBody() body method accepts the JSON string as an argument. Also, we set the HTTP method to POST by using the httpMethod option.

Then, we send the request to the JSONPlacehoder API. Finally, we forward the response to a mock endpoint.

4.2. Sending Post Request With POJO Class

However, defining a JSON string could be error-prone. For a more type-safe approach, let’s define a POJO class named Post:

public class Post {
    private int userId;
    private String title;
    private String body;
    // standard constructor, getters, setters
}

Next, let’s modify our route to use the POJO class:

from("direct:start").process(exchange -> exchange.getIn()
  .setBody(new Post(1, "Java 21", "Virtual Thread"))).marshal().json(JsonLibrary.Jackson)
  .setHeader(Exchange.HTTP_METHOD, constant("POST"))
  .setHeader(Exchange.CONTENT_TYPE, constant("application/json"))
  .to("https://jsonplaceholder.typicode.com/posts")
  .process(exchange -> log.info("The HTTP response code is: {}", exchange.getIn().getHeader(Exchange.HTTP_RESPONSE_CODE)))
  .process(exchange -> log.info("The response body is: {}", exchange.getIn().getBody(String.class)))
  .to("mock:result");

Here, we start from a direct endpoint named start. Then, we create a Post instance and set it as the request body. Also, we marshal the POJO to JSON using Jackson.

Next, we send the request to the fake API and log the response code and body. Finally, we forward the response to a mock endpoint for testing purposes.

5. Testing the Route

Let’s write a test to verify our route behavior. First, let’s create a test class that extends the CamelTestSupport class:

class PostRequestRouteUnitTest extends CamelTestSupport {
}

Then, let’s create a mock endpoint and producer template:

@EndpointInject("mock:result")
protected MockEndpoint resultEndpoint;
@Produce("direct:start")
protected ProducerTemplate template;

Next, let’s override the createRouteBuilder() method to use PostRequesteRoute:

@Override
protected RouteBuilder createRouteBuilder() {
    return new PostRequestRoute();
}

Finally, let’s write a test method:

@Test
void whenMakingAPostRequestToDummyServer_thenAscertainTheMockEndpointReceiveOneMessage() throws Exception {
    resultEndpoint.expectedMessageCount(1);
    resultEndpoint.message(0).header(Exchange.HTTP_RESPONSE_CODE)
      .isEqualTo(201);
    resultEndpoint.message(0).body()
      .isNotNull();
    template.sendBody(new Post(1, "Java 21", "Virtual Thread"));
    resultEndpoint.assertIsSatisfied();
}

In the code above, we define expectations for the mock endpoint and send a request using the template.sendBody() method. Finally, we ascertain that the expectations set for the mock endpoint are met.

6. Conclusion

In this article, we learn how to make a POST request to an external server using Apache Camel. We start by defining a route for sending POST requests using both JSON string and POJO.

Also, we saw how to use the HTTP component to communicate with an external API. Finally, we wrote a unit test to verify our route behavior.

As usual, the complete source code for the examples is available over on GitHub.


Apache Kafka Series

Multiple Criteria in Spring Data Mongo DB Query

$
0
0

1. Introduction

In this tutorial, we’ll explore how to create queries with multiple criteria in MongoDB using Spring Data JPA.

2. Setting up the Project

To start, we need to include the necessary dependencies in our project. We’ll add the Spring Data MongoDB starter dependency to our pom.xml file:

<dependency>
    <groupId>org.springframework.boot</groupId>
    <artifactId>spring-boot-starter-data-mongodb</artifactId>
    <version>3.3.1</version>
</dependency>

This dependency allows us to use Spring Data MongoDB functionalities in our Spring Boot project.

2.1. Defining the MongoDB Document and Repository

Next, we define a MongoDB document, which is a Java class annotated with @Document. This class maps to a collection in MongoDB. For example, let’s create a Product document:

@Document(collection = "products")
public class Product {
    @Id
    private String id;
    private String name;
    private String category;
    private double price;
    private boolean available;
    // Getters and setters
}

In Spring Data MongoDB, we can create a custom repository to define our own query methods. By injecting MongoTemplate, we can perform advanced operations on the MongoDB database. This class provides a rich set of methods for executing queries, aggregating data, and handling CRUD operations effectively:

@Repository
public class CustomProductRepositoryImpl implements CustomProductRepository {
    @Autowired
    private MongoTemplate mongoTemplate;
    @Override
    public List find(Query query, Class entityClass) {
        return mongoTemplate.find(query, entityClass);
    }
}

2.2. Sample Data in MongoDB

Before we begin writing queries, let’s assume we have the following sample data in our MongoDB products collection:

[
    {
        "name": "MacBook Pro M3",
        "price": 1500,
        "category": "Laptop",
        "available": true
    },
    {
        "name": "MacBook Air M2",
        "price": 1000,
        "category": "Laptop",
        "available": false
    },
    {
        "name": "iPhone 13",
        "price": 800,
        "category": "Phone",
        "available": true
    }
]

This data will help us test our queries effectively.

3. Building MongoDB Queries

When constructing complex queries in Spring Data MongoDB, we leverage methods like andOperator() and orOperator() to combine multiple conditions effectively. These methods are crucial for creating queries that require documents to satisfy multiple conditions simultaneously or alternatively.

3.1. Using addOperator()

The andOperator() method is used to combine multiple criteria with an AND operator. This means that all the criteria must be true for a document to match the query. This is useful when we need to enforce that multiple conditions are met.

Here’s how we can construct this query using the andOperator():

List<Product> findProductsUsingAndOperator(String name, int minPrice, String category, boolean available) {
    Query query = new Query();
    query.addCriteria(new Criteria().andOperator(Criteria.where("name")
      .is(name), Criteria.where("price")
      .gt(minPrice), Criteria.where("category")
      .is(category), Criteria.where("available")
      .is(available)));
   return customProductRepository.find(query, Product.class);
}

Suppose we want to retrieve a laptop named “MacBook Pro M3” with a price greater than $1000 and ensure it’s available in stock:

List<Product> actualProducts = productService.findProductsUsingAndOperator("MacBook Pro M3", 1000, "Laptop", true);
assertThat(actualProducts).hasSize(1);
assertThat(actualProducts.get(0).getName()).isEqualTo("MacBook Pro M3");

3.2. Using orOperator()

Conversely, the orOperator() method combines multiple criteria with an OR operator. This means that any one of the specified criteria must be true for a document to match the query. This is useful when retrieving documents that match at least one of several conditions.

Here’s how we can construct this query using the orOperator():

List<Product> findProductsUsingOrOperator(String category, int minPrice) {
    Query query = new Query();
    query.addCriteria(new Criteria().orOperator(Criteria.where("category")
      .is(category), Criteria.where("price")
      .gt(minPrice)));
    return customProductRepository.find(query, Product.class);
}

If we want to retrieve products that either belong to the “Laptop” category or have a price greater than $1000, we can invoke the method:

actualProducts = productService.findProductsUsingOrOperator("Laptop", 1000);
assertThat(actualProducts).hasSize(2);

3.3. Combining andOperator() and orOperator()

We can create complex queries by combining both andOperator() and orOperator() methods:

List<Product> findProductsUsingAndOperatorAndOrOperator(String category1, int price1, String name1, boolean available1) {
    Query query = new Query();
    query.addCriteria(new Criteria().orOperator(
      new Criteria().andOperator(
        Criteria.where("category").is(category1),
        Criteria.where("price").gt(price1)),
      new Criteria().andOperator(
        Criteria.where("name").is(name1),
        Criteria.where("available").is(available1)
      )
    ));
    return customProductRepository.find(query, Product.class);
}

In this method, we create a Query object and use the orOperator() to define the main structure of our criteria. Within this, we specify two conditions using andOperator(). For instance, we can retrieve products that either belong to the “Laptop” category with a price greater than $1000 or are named “MacBook Pro M3″ and are available in stock:

actualProducts = productService.findProductsUsingAndOperatorAndOrOperator("Laptop", 1000, "MacBook Pro M3", true);
assertThat(actualProducts).hasSize(1);
assertThat(actualProducts.get(0).getName()).isEqualTo("MacBook Pro M3");

3.4. Using Chain Methods

Moreover, we can utilize the Criteria class to construct queries in a fluent style by chaining multiple conditions together using and() method. This approach provides a clear and concise way to define complex queries without losing readability:

List<Product> findProductsUsingChainMethod(String name1, int price1, String category1, boolean available1) {
    Criteria criteria = Criteria.where("name").is(name1)
      .and("price").gt(price1)
      .and("category").is(category1)
      .and("available").is(available1);
    return customProductRepository.find(new Query(criteria), Product.class);
}

When invoking this method, we expect to find one product named “MacBook Pro M3” that costs more than $1000 and is available in stock:

actualProducts = productService.findProductsUsingChainMethod("MacBook Pro M3", 1000, "Laptop", true);
assertThat(actualProducts).hasSize(1);
assertThat(actualProducts.get(0).getName()).isEqualTo("MacBook Pro M3");

4. @Query Annotation for Multiple Criteria

In addition to our custom repository using MongoTemplate, we can create a new repository interface that extends MongoRepository to utilize the @Query annotation for multiple criteria queries. This approach allows us to define complex queries directly in our repository without needing to build them programmatically.

We can define a custom method in our ProductRepository interface:

public interface ProductRepository extends MongoRepository<Product, String> {
    @Query("{ 'name': ?0, 'price': { $gt: ?1 }, 'category': ?2, 'available': ?3 }")
    List<Product> findProductsByNamePriceCategoryAndAvailability(String name, double minPrice, String category, boolean available);
    
    @Query("{ $or: [{ 'category': ?0, 'available': ?1 }, { 'price': { $gt: ?2 } } ] }")
    List<Product> findProductsByCategoryAndAvailabilityOrPrice(String category, boolean available, double minPrice);
}

The first method, findProductsByNamePriceCategoryAndAvailability(), retrieves products that match all specified criteria. This includes the exact name of the product, a price greater than a specified minimum, the category the product belongs to, and whether the product is available in stock:

actualProducts = productRepository.findProductsByNamePriceCategoryAndAvailability("MacBook Pro M3", 1000, "Laptop",  true);
assertThat(actualProducts).hasSize(1);
assertThat(actualProducts.get(0).getName()).isEqualTo("MacBook Pro M3");

On the other hand, the second method, findProductsByCategoryAndAvailabilityOrPrice(), offers a more flexible approach. It finds products that either belong to a specific category and are available or have a price greater than the specified minimum:

actualProducts = productRepository.findProductsByCategoryAndAvailabilityOrPrice("Laptop", false, 600);
assertThat(actualProducts).hasSize(3);

5. Using QueryDSL

QueryDSL is a framework that allows us to construct type-safe queries programmatically. Let’s walk through setting up and using QueryDSL for handling multiple criteria queries in our Spring Data MongoDB project.

5.1. Adding QueryDSL Dependency

First, we need to include QueryDSL in our project. We can do this by adding the following dependency to our pom.xml file:

<dependency>
    <groupId>com.querydsl</groupId>
    <artifactId>querydsl-mongodb</artifactId>
    <version>5.1.0</version>
</dependency>

5.2. Generating Q Classes

QueryDSL requires generating helper classes for our domain objects. These classes, typically named with a “Q” prefix (e.g., QProduct), provide type-safe access to our entity fields. We can automate this generation process using the Maven plugin:

<plugin>
    <groupId>com.mysema.maven</groupId>
    <artifactId>apt-maven-plugin</artifactId>
    <version>1.1.3</version>
    <executions>
        <execution>
            <goals>
                <goal>process</goal>
            </goals>
            <configuration>
                <outputDirectory>target/generated-sources/java</outputDirectory>
                <processor>org.springframework.data.mongodb.repository.support.MongoAnnotationProcessor</processor>
            </configuration>
        </execution>
    </executions>
</plugin>

When the build process runs this configuration, the annotation processor generates Q classes for each of our MongoDB documents. For instance, if we have a Product class, it generates a QProduct class. This QProduct class provides type-safe access to the fields of the Product entity, allowing us to construct queries in a more structured and error-free way using QueryDSL.

Next, we need to modify our repository to extend QuerydslPredicateExecutor:

public interface ProductRepository extends MongoRepository<Product, String>, QuerydslPredicateExecutor<Product> {
}

5.3. Using AND with QueryDSL

In QueryDSL, we can construct complex queries using the Predicate interface, which represents a boolean expression. The and() method allows us to combine multiple conditions, ensuring that all specified criteria are satisfied for a document to match the query:

List<Product> findProductsUsingQueryDSLWithAndCondition(String category, boolean available, String name, double minPrice) {
    QProduct qProduct = QProduct.product;
    Predicate predicate = qProduct.category.eq(category)
      .and(qProduct.available.eq(available))
      .and(qProduct.name.eq(name))
      .and(qProduct.price.gt(minPrice));
    return StreamSupport.stream(productRepository.findAll(predicate).spliterator(), false)
      .collect(Collectors.toList());
}

In this method, we first create an instance of QProduct. We then construct a Predicate that combines several conditions using the and() method. Finally, we execute the query using productRepository.findAll(predicate), which retrieves all matching products based on the constructed predicate:

actualProducts = productService.findProductsUsingQueryDSLWithAndCondition("Laptop", true, "MacBook Pro M3", 1000);
assertThat(actualProducts).hasSize(1);
assertThat(actualProducts.get(0).getName()).isEqualTo("MacBook Pro M3");

5.4. Using OR With QueryDSL

We can also construct queries using the or() method, which allows us to combine multiple conditions with a logical OR operator. This means that a document matches the query if any of the specified criteria are satisfied.

Let’s create a method that finds products using QueryDSL with an OR condition:

List<Product> findProductsUsingQueryDSLWithOrCondition(String category, String name, double minPrice) {
    QProduct qProduct = QProduct.product;
    Predicate predicate = qProduct.category.eq(category)
      .or(qProduct.name.eq(name))
      .or(qProduct.price.gt(minPrice));
    return StreamSupport.stream(productRepository.findAll(predicate).spliterator(), false)
      .collect(Collectors.toList());
}

The or() method ensures that a product matches the query if any of these conditions are true:

actualProducts = productService.findProductsUsingQueryDSLWithOrCondition("Laptop", "MacBook", 800);
assertThat(actualProducts).hasSize(2);

5.4. Combining AND and OR With QueryDSL

We can also combine both and() and or() methods within our predicates. This flexibility allows us to specify conditions where some criteria must be true while others can be alternative conditions. Here’s an example of how to combine and() and or() in a single query:

List<Product> findProductsUsingQueryDSLWithAndOrCondition(String category, boolean available, String name, double minPrice) {
    QProduct qProduct = QProduct.product;
    Predicate predicate = qProduct.category.eq(category)
      .and(qProduct.available.eq(available))
      .or(qProduct.name.eq(name).and(qProduct.price.gt(minPrice)));
    return StreamSupport.stream(productRepository.findAll(predicate).spliterator(), false)
      .collect(Collectors.toList());
}

In this method, we construct the query by combining conditions with and() and or(). This allows us to build a query that matches products either in a specific category with a price greater than a specified amount or products with a specific name that are available:

actualProducts = productService.findProductsUsingQueryDSLWithAndOrCondition("Laptop", true, "MacBook Pro M3", 1000);
assertThat(actualProducts).hasSize(3);

6. Conclusion

In this article, we’ve explored various approaches for constructing queries with multiple criteria in Spring Data MongoDB. For straightforward queries with a few criteria, Criteria or chain methods might be sufficient due to their simplicity. However, if the queries involve complex logic with multiple conditions and nesting, using @Query annotations or QueryDSL is generally recommended due to their improved readability and maintainability.

As always, the source code for the examples is available over on GitHub.


How to Convert String to StringBuilder and Vice Versa in Java

$
0
0
start here featured

1. Overview

Working with Strings is a fundamental aspect of Java programming. StringBuilder is an often-used utility for String manipulations, such as concatenation, reversing, etc. Understanding how to convert between String and StringBuilder is essential for efficient String handling.

In this quick tutorial, we’ll explore how to perform these conversions effectively.

2. Introduction to the Problem

In Java, Strings are immutable, meaning once an object is created, it cannot be changed. On the other hand, StringBuilder is a mutable sequence of characters, which allows us to modify the contents without creating new objects.

Therefore, we often convert a String to a StringBuilder for manipulations and then convert the StringBuilder object back to a String to obtain the result.

We’ll first examine StringBuilder to String conversion and then the other way around. In the end, we’ll use the conversion techniques to solve a practical problem.

For simplicity, we’ll use unit test assertions to verify that we get the expected results.

3. Converting a StringBuilder to a String

Calling the StringBuilder.toString() method is the most straightforward way to convert a StringBuilder object to a String:

StringBuilder sb = new StringBuilder("Converting SB to String");
String result = sb.toString();
assertEquals("Converting SB to String", result);

The toString() method returns a String containing all characters in the StringBuilder object’s sequence in the same order.

However, sometimes we only convert a segment from the StringBuilder object’s sequence. In this case, we can use StringBuilder‘s substring() method:

result = sb.substring(11, 13);
assertEquals("SB", result);

In this example, we pass the begin and end indexes to the substring() method to get the required part from the StringBuilder‘s character sequence.

Next, let’s look at the opposite direction, how to convert String objects to a StringBuilder.

4. Converting Strings to a StringBuilder

To convert a String to a StringBuilder, we can simply pass the String object to StringBuilder‘s constructor:

String input = "Converting String to SB";
StringBuilder sb = new StringBuilder(input);
assertEquals(input, sb.toString());

Alternatively, we can first create an empty StringBuilder instance and then leverage the append() method to append our String value to the StringBuilder‘s character sequence:

String input = "C C++ C# Ruby Go Rust";
StringBuilder sb = new StringBuilder().append(input);
assertEquals(input, sb.toString());

When we aim to create a StringBuilder object from one single String, this may look a bit awkward compared to the constructor parameter approach. However, it can be handy to convert multiple String values to a StringBuilder object. Next, let’s see an example:

String[] strings = new String[] { "C ", "C++ ", "C# ", "Ruby ", "Go ", "Rust" };
StringBuilder sb2 = new StringBuilder();
for (String str : strings) {
    sb2.append(str);
}
assertEquals(input, sb2.toString());

As the above example shows, we want to convert an array of String values to a StringBuilder. So, after creating an empty StringBuilder, we call append() in a loop to append all elements from the String array to the StringBuilder‘s sequence.

5. A Practical Example: Concatenating and Reversing

Finally, let’s solve a practical problem using the conversion skills we’ve learned.

Let’s say we’re given three input String values. We need to perform some transformations and get a String result following these steps:

  • First, join the three String values using ” | “ as the separator
  • Reverse the join result

This is a typical String transformation problem that we can solve using StringBuilder. 

Next, let’s see how it gets solved:

String str1 = "c b a";
String str2 = "^_*";
String str3 = "z y x";
 
StringBuilder sb = new StringBuilder(str1)
  .append(" | ")
  .append(str2)
  .append(" | ")
  .append(str3)
  .reverse();
String result = sb.toString(); 
assertEquals("x y z | *_^ | a b c", result);

The above code creates a StringBuilder with str1 using the constructor, appends the separators and other Strings using append(), and then calls reverse() to reverse the character sequence.

Finally, sb.toString() converts the StringBuilder back to a String.

5. Conclusion

In this article, we’ve explored how to convert between String and StringBuilder. By understanding these conversions, we can efficiently manipulate Strings in our Java programs.

As always, the complete source code for the examples is available over on GitHub.


Sending WhatsApp Messages in Spring Boot Using Twilio

$
0
0
Contact Us Featured

1. Overview

WhatsApp Messenger is the leading messaging platform in the world, making it an essential tool for businesses to connect with their users.

By communicating over WhatsApp, we can enhance customer engagement, provide efficient support, and build stronger relationships with our users.

In this tutorial, we’ll explore how to send WhatsApp messages using Twilio within a Spring Boot application. We’ll walk through the necessary configuration, and implement functionality to send messages and handle user replies.

2. Setting up Twilio

To follow this tutorial, we’ll first need a Twilio account and a WhatsApp Business Account (WABA).

We’ll need to connect both of these accounts together by creating a WhatsApp Sender. Twilio offers a detailed setup tutorial that can be referenced to guide us through this process.

Once we set up our WhatsApp Sender successfully, we can proceed with sending messages to and receiving messages from our users.

3. Setting up the Project

Before we can use Twilio to send WhatsApp messages, we’ll need to include an SDK dependency and configure our application correctly.

3.1. Dependencies

Let’s start by adding the Twilio SDK dependency to our project’s pom.xml file:

<dependency>
    <groupId>com.twilio.sdk</groupId>
    <artifactId>twilio</artifactId>
    <version>10.4.1</version>
</dependency>

3.2. Defining Twilio Configuration Properties

Now, to interact with the Twilio service and send WhatsApp messages to our users, we need to configure our account SID and auth token to authenticate API requests. We’ll also need the messaging service SID to specify which messaging service, using our WhatsApp-enabled Twilio phone number, we want to use for sending the messages.

We’ll store these properties in our project’s application.yaml file and use @ConfigurationProperties to map the values to a POJO, which our service layer references when interacting with Twilio:

@Validated
@ConfigurationProperties(prefix = "com.baeldung.twilio")
class TwilioConfigurationProperties {
    @NotBlank
    @Pattern(regexp = "^AC[0-9a-fA-F]{32}$")
    private String accountSid;
    @NotBlank
    private String authToken;
    @NotBlank
    @Pattern(regexp = "^MG[0-9a-fA-F]{32}$")
    private String messagingSid;
    // standard setters and getters
}

We’ve also added validation annotations to ensure all the required properties are configured correctly. If any of the defined validations fail, it results in the Spring ApplicationContext failing to start up. This allows us to conform to the fail fast principle.

Below is a snippet of our application.yaml file, which defines the required properties that’ll be mapped to our TwilioConfigurationProperties class automatically:

com:
  baeldung:
    twilio:
      account-sid: ${TWILIO_ACCOUNT_SID}
      auth-token: ${TWILIO_AUTH_TOKEN}
      messaging-sid: ${TWILIO_MESSAGING_SID}

Accordingly, this setup allows us to externalize the Twilio properties and easily access them in our application.

3.3. Initializing Twilio at Startup

To invoke the methods exposed by the SDK successfully, we need to initialize it once at startup. To achieve this, we’ll create a TwilioInitializer class that implements the ApplicationRunner interface:

@Component
@EnableConfigurationProperties(TwilioConfigurationProperties.class)
class TwilioInitializer implements ApplicationRunner {
    private final TwilioConfigurationProperties twilioConfigurationProperties;
    // standard constructor
    @Override
    public void run(ApplicationArguments args) {
        String accountSid = twilioConfigurationProperties.getAccountSid();
        String authToken = twilioConfigurationProperties.getAuthToken();
        Twilio.init(accountSid, authToken);
    }
}

Using constructor injection, we inject an instance of our TwilioConfigurationProperties class we created earlier. Then we use the configured account SID and auth token to initialize the Twilio SDK in the run() method.

This ensures that Twilio is ready to use when our application starts up. This approach is better than initializing the Twilio client in our service layer each time we need to send a message.

4. Sending WhatsApp Messages

Now that we’ve defined our properties, let’s create a WhatsAppMessageDispatcher class and reference them to interact with Twilio.

For this demonstration, we’ll take an example where we want to notify our users whenever we publish a new article on our website. We’ll send them a WhatsApp message with a link to the article, so they can easily check it out.

4.1. Configuring Content SID

To restrict businesses from sending unsolicited or spammy messages, WhatsApp requires that all business-initiated notifications be templated and pre-registered. These templates are identified by a unique content SID, which must be approved by WhatsApp before we can use it in our application.

For our example, we’ll configure the following message template:

New Article Published. Check it out : {{ArticleURL}}

Here, {{ArticleURL}} is a placeholder that’ll be replaced with the actual URL of the newly published article when we send out the notification.

Now, let’s define a new nested class inside our TwilioConfigurationProperties class to hold our content SID:

@Valid
private NewArticleNotification newArticleNotification = new NewArticleNotification();
class NewArticleNotification {
    @NotBlank
    @Pattern(regexp = "^HX[0-9a-fA-F]{32}$")
    private String contentSid;
    // standard setter and getter
}

We again add validation annotations to ensure that we configure the content SID correctly and it matches the expected format.

Similarly, let’s add the corresponding content SID property to our application.yaml file:

com:
  baeldung:
    twilio:
      new-article-notification:
        content-sid: ${NEW_ARTICLE_NOTIFICATION_CONTENT_SID}

4.2. Implementing the Message Dispatcher

Now that we’ve configured our content SID, let’s implement the service method to send out notifications to our users:

public void dispatchNewArticleNotification(String phoneNumber, String articleUrl) {
    String messagingSid = twilioConfigurationProperties.getMessagingSid();
    String contentSid = twilioConfigurationProperties.getNewArticleNotification().getContentSid();
    PhoneNumber toPhoneNumber = new PhoneNumber(String.format("whatsapp:%s", phoneNumber));
    JSONObject contentVariables = new JSONObject();
    contentVariables.put("ArticleURL", articleUrl);
    Message.creator(toPhoneNumber, messagingSid)
      .setContentSid(contentSid)
      .setContentVariables(contentVariables.toString())
      .create();
}

In our dispatchNewArticleNotification() method, we’re using the configured messaging SID and content SID to send out a notification to the specified phone number. We’re also passing the article URL as a content variable, which will be used to replace the placeholder in our message template.

It’s important to note that we can also configure a static message template without any placeholders. In such case, we can simply omit the call to the setContentVariables() method.

5. Handling WhatsApp Replies

Once we’ve sent out our notifications, our users might reply with their thoughts or questions. When a user replies to our WhatsApp business account, a 24-hour session window is initiated during which we can communicate with our users using free-form messages, without the need for pre-approved templates.

To automatically handle user replies from our application, we need to configure a webhook endpoint in our Twilio messaging service. The Twilio service calls this endpoint whenever a user sends a message. We receive multiple parameters in the configured API endpoint that we can use to customize our response.

Let’s see how we can create such an API endpoint in our Spring Boot application.

5.1. Implementing the Reply Message Dispatcher

First, we’ll create a new service method in our WhatsAppMessageDispatcher class to dispatch a free-form reply message:

public void dispatchReplyMessage(String phoneNumber, String username) {
    String messagingSid = twilioConfigurationProperties.getMessagingSid();
    PhoneNumber toPhoneNumber = new PhoneNumber(String.format("whatsapp:%s", phoneNumber));
    String message = String.format("Hey %s, our team will get back to you shortly.", username);
    Message.creator(toPhoneNumber, messagingSid, message).create();
}

In our dispatchReplyMessage() method, we send a personalized message to the user, addressing them by their username and letting them know that our team will get back to them shortly.

It’s worth noting that we can even send multimedia messages to our users during the 24-hour session.

5.2. Exposing the Webhook Endpoint

Next, we’ll expose a POST API endpoint in our application. The path of this endpoint should match the webhook URL we’ve configured in our Twilio messaging service:

@PostMapping(value = "/api/v1/whatsapp-message-reply")
public ResponseEntity<Void> reply(@RequestParam("ProfileName") String username,
        @RequestParam("WaId") String phoneNumber) {
    whatsappMessageDispatcher.dispatchReplyMessage(phoneNumber, username);
    return ResponseEntity.ok().build();
}

In our controller method, we accept the ProfileName and WaId parameters from Twilio. These parameters contain the username and phone number of the user who sent the message, respectively. We then pass these values to our dispatchReplyMessage() method to send a response back to the user.

We’ve used the ProfileName and WaId parameters for our example. But as mentioned previously, Twilio sends multiple parameters to our configured API endpoint. For example, we can access the Body parameter to retrieve the text content of the user’s message. We could potentially store this message in a queue and route it to the appropriate support team for further processing.

6. Testing the Twilio Integration

Now that we’ve implemented the functionality to send WhatsApp messages using Twilio, let’s look at how we can test this integration.

Testing external services can be challenging, as we don’t want to make actual API calls to Twilio during our tests. This is where we’ll use MockServer, which will allow us to simulate the outgoing Twilio calls.

6.1. Configuring the Twilio REST Client

In order to route our Twilio API requests to MockServer, we need to configure a custom HTTP client for the Twilio SDK.

We’ll create a class in our test suite that creates an instance of TwilioRestClient with a custom HttpClient:

class TwilioProxyClient {
    private final String accountSid;
    private final String authToken;
    private final String host;
    private final int port;
    // standard constructor
    public TwilioRestClient createHttpClient() {
        SSLContext sslContext = SSLContextBuilder.create()
          .loadTrustMaterial((chain, authType) -> true)
          .build();
        
        HttpClientBuilder clientBuilder = HttpClientBuilder.create()
          .setSSLContext(sslContext)
          .setProxy(new HttpHost(host, port));
        HttpClient httpClient = new NetworkHttpClient(clientBuilder);
        return new Builder(accountSid, authToken)
          .httpClient(httpClient)
          .build();
    }
}

In our TwilioProxyClient class, we create a custom HttpClient that routes all requests through a proxy server specified by the host and port parameters. We also configure the SSL context to trust all certificates, as MockServer uses a self-signed certificate by default.

6.2. Configuring the Test Environment

Before we write our test, we’ll create an application-integration-test.yaml file in our src/test/resources directory with the following content:

com:
  baeldung:
    twilio:
      account-sid: AC123abc123abc123abc123abc123abc12
      auth-token: test-auth-token
      messaging-sid: MG123abc123abc123abc123abc123abc12
      new-article-notification:
        content-sid: HX123abc123abc123abc123abc123abc12

These dummy values bypass the validation we’d configured earlier in our TwilioConfigurationProperties class.

Now, let’s set up our test environment using the @BeforeEach annotation

@Autowired
private TwilioConfigurationProperties twilioConfigurationProperties;
private MockServerClient mockServerClient;
private String twilioApiPath;
@BeforeEach
void setUp() {
    String accountSid = twilioConfigurationProperties.getAccountSid();
    String authToken = twilioConfigurationProperties.getAuthToken();
    InetSocketAddress remoteAddress = mockServerClient.remoteAddress();
    String host = remoteAddress.getHostName();
    int port = remoteAddress.getPort();
    TwilioProxyClient twilioProxyClient = new TwilioProxyClient(accountSid, authToken, host, port);
    Twilio.setRestClient(twilioProxyClient.createHttpClient());
    
    twilioApiPath = String.format("/2010-04-01/Accounts/%s/Messages.json", accountSid);
}

In our setUp() method, we create an instance of our TwilioProxyClient class, passing in the host and port of the running MockServer instance. This client is then used to set a custom RestClient for the Twilio SDK. We also store the API path for sending messages in the twilioApiPath variable.

6.3. Validating the Twilio Request

Finally, let’s write a test case to verify that our dispatchNewArticleNotification() method sends the expected request to Twilio:

// Set up test data
String contentSid = twilioConfigurationProperties.getNewArticleNotification().getContentSid();
String messagingSid = twilioConfigurationProperties.getMessagingSid();
String contactNumber = "+911001001000";
String articleUrl = RandomString.make();
// Configure mock server expectations
mockServerClient
  .when(request()
    .withMethod("POST")
    .withPath(twilioApiPath)
    .withBody(new ParameterBody(
        param("To", String.format("whatsapp:%s", contactNumber)),
        param("ContentSid", contentSid),
        param("ContentVariables", String.format("{\"ArticleURL\":\"%s\"}", articleUrl)),
        param("MessagingServiceSid", messagingSid)
    ))
  )
  .respond(response()
    .withStatusCode(200)
    .withBody(EMPTY_JSON));
// Invoke method under test
whatsAppMessageDispatcher.dispatchNewArticleNotification(contactNumber, articleUrl);
// Verify the expected request was made
mockServerClient.verify(request()
  .withMethod("POST")
  .withPath(twilioApiPath)
  .withBody(new ParameterBody(
      param("To", String.format("whatsapp:%s", contactNumber)),
      param("ContentSid", contentSid),
      param("ContentVariables", String.format("{\"ArticleURL\":\"%s\"}", articleUrl)),
      param("MessagingServiceSid", messagingSid)
  )),
    VerificationTimes.once()
);

In our test method, we first set up the test data and configure MockServer to expect a POST request to the Twilio API path with specific parameters in the request body. We also instruct MockServer to respond with a 200 status code and an empty JSON body when this request is made.

Next, we invoke our dispatchNewArticleNotification() method with the test data and verify that the expected request was made to MockServer exactly once.

By using MockServer to simulate the Twilio API, we ensure that our integration works as expected without actually sending any messages or incurring any costs.

7. Conclusion

In this article, we explored how to send WhatsApp messages using Twilio from a Spring Boot application.

We walked through the necessary configurations and implemented the functionality to send templated notifications to our users with dynamic placeholders.

Finally, we handled user replies to our notifications by exposing a webhook endpoint to receive the reply data from Twilio and created a service method to dispatch a generic non-templated reply message.

As always, all the code examples used in this article are available over on GitHub.


Connect with PostgreSQL Database over SSL

$
0
0

1. Introduction

In the world of database management, ensuring secure communication between applications and databases is important. In this tutorial, we’ll look at how to connect to PostgreSQL over SSL from JDBC and Spring Boot.

2. PostgreSQL Configuration

We need to update the PostgreSQL server to allow connections over SSL. For this, we need to have or create our root(CA) certificate, server certificate, and private key ready. Let’s modify the PostgreSQL server configuration file, postgresql.conf  and provide the paths to the certificate files:

...
ssl = on
ssl_ca_file = '/opt/homebrew/var/postgresql@14/rootCA.crt'
ssl_cert_file = '/opt/homebrew/var/postgresql@14/localhost.crt'
#ssl_crl_file = ''
#ssl_crl_dir = ''
ssl_key_file = '/opt/homebrew/var/postgresql@14/localhost.key'
...

Now, let’s modify the PostgreSQL client configuration file pg_hba.conf and add the following under the IPv4 section:

...
# IPv4 local connections:
hostssl    all             all             0.0.0.0/0            cert
...

3. Maven Configuration

Let’s add the PostgreSQL JDBC driver dependency to our pom.xml file for connecting to the server:

<dependency>
    <groupId>org.postgresql</groupId>
    <artifactId>postgresql</artifactId>
    <version>42.7.3</version>
</dependency>

We are using the latest version of the driver at the time of writing this to enable us to use the pkcs-12 client certificate format.

4. Connecting From JDBC

A client certificate is required to establish a secure connection over SSL. As such, we need to have the client certificate and key files ready, with the certificate created using the same root certificate used to generate the server certificate.

However, we can’t use the private key to connect from JDBC directly and as such, we need to export the private key to a ‘pkcs-8’ compatible format:

openssl pkcs8 -topk8 -inform PEM -outform DER -in certs/pg_client.key -out certs/pg_client.pk8 -nocrypt

With the exported key, we can proceed to appropriately connect to the PostgreSQL server by defining the following properties:

  • The username and password
  • The certificate location
  • The pkcs-8 key location and lastly
  • The root CA certificate location.

To demonstrate this, let’s create a class PgJdbc with a method named checkConnectionSsl:

public class PgJdbc {
    public void checkConnectionSsl(String url, String username, String password, Map<String, String> extraProps) {
        Properties props = new Properties();
        props.putAll(extraProps);
        props.put("username", username);
        props.put("password", password);
        props.put("sslmode", "verify-ca");
        props.put("ssl", "true");
        try (Connection connection = DriverManager.getConnection(url, props)) {
            if (!connection.isClosed()) {
                connection.close();
            }
            System.out.println("Connection was successful");
        } catch (SQLException e) {
            System.out.println("Connection failed");
        }
    }
    // ...
}

The checkConnectionSsl method takes parameters that are required for connection. Depending on how we want to connect, we’ll pass the appropriate key-value pair through the extraProps property. We set the ssl property to true to indicate that we want to connect using SSL, and the sslmode property specifies the type of certificate validation.

Let’s add a main method and try establishing a connection:

public class PgJdbc {
    // ...
    public static void main(String[] args) {
        PgJdbc pg = new PgJdbc();
        String url = "jdbc:postgresql://localhost:5432/testdb";
        String username = "postgres";
        String password = "password";
        String BASE_PATH = Paths.get("certs")
          .toAbsolutePath()
          .toString();
        Map<String, String> connectionProperties = Map.of(
          "sslcert", BASE_PATH.concat("/pg_client.crt"),
          "sslkey", BASE_PATH.concat("/pg_client.pk8"),
          "sslrootcert", BASE_PATH.concat("/root.crt"));
        System.out.println("Connection without keystore and truststore");
        pg.checkConnectionSsl(url, username, password, connectionProperties);
    }
}
$ mvn clean compile -q exec:java -Dexec.mainClass="com.baeldung.pgoverssl.PgJdbc"
Connection was successful

As seen from the output above, we’ve been able to establish a successful connection.

5. Connecting From JDBC Using Keystore

It is also possible to establish the same connection using a keystore and truststore. This, however, requires converting the client certificate and the private key into a pkcs-12 compatible format and, afterward, creating a keystore from it and a trust store from the root CA certificate using the keytool utility included with Java.

Let’s export the certificate and key to a pkcs-12 format:

$ openssl pkcs12 -export -in certs/pg_client.crt -inkey certs/pg_client.key -out certs/pg_client.p12 -name postgres

Using the exported certificate, let’s create a keystore:

$ keytool -importkeystore -destkeystore certs/pg_client.jks -srckeystore certs/pg_client.p12 -srcstoretype pkcs12
Importing keystore certs/pg_client.p12 to certs/pg_client.jks...
Enter destination keystore password: 
...
Import command completed:  1 entries successfully imported, 0 entries failed or cancelled

And finally, we can create the truststore:

$ keytool -import -alias server -file certs/root.crt -keystore certs/truststore.jks -storepass password
...
Certificate was added to keystore

Now with the keystore and truststore, let’s modify the main methods and attempt to establish a connection:

public class PgJdbc {
    // ...
    public static void main(String[] args) {
        // ...
        System.setProperty("javax.net.ssl.keyStore", BASE_PATH.concat("/pg_client.jks"));
        System.setProperty("javax.net.ssl.keyStorePassword", "password");
        System.setProperty("javax.net.ssl.trustStore", BASE_PATH.concat("/truststore.jks"));
        System.setProperty("javax.net.ssl.trustStorePassword", "password");
        System.out.println("\nConnection using keystore and truststore");
        pg.checkConnectionSsl(url, username, password, Map.of("sslfactory", "org.postgresql.ssl.DefaultJavaSSLFactory"));
    }
}

Notice that we provided four System properties, with two being passwords. These passwords were provided at the the point of creating the keystore and truststore. Additionally, we had to provide the sslfactory parameter with DefaultJavaSSLFactory for validation.

Let’s test it again:

Connection using keystore and truststore
Connection was successful

And it’s a successful connection as well.

6. Connecting From Spring Boot

In a similar fashion, we can connect over SSL from a spring boot application. Let’s add the required dependencies for a basic Spring Boot application to the pom.xml file:

<parent>
    <groupId>org.springframework.boot</groupId>
    <artifactId>spring-boot-starter-parent</artifactId>
    <version>3.2.3</version>
</parent>
// ...
<dependency>
    <groupId>org.springframework.boot</groupId>
    <artifactId>spring-boot-starter-web</artifactId>
</dependency>
<dependency>
    <groupId>org.springframework.boot</groupId>
    <artifactId>spring-boot-starter-data-jpa</artifactId>
</dependency>

We’ll need a basic Spring Boot starter class:

@SpringBootApplication
public class PgSpringboot {
    public static void main(String[] args) {
        SpringApplication.run(PgSpringboot.class, args);
    }
}

Next, let’s configure application.yaml file with the required properties for the connection:

spring:
  application:
    name: postgresqlssltest
  datasource:
    url: jdbc:postgresql://localhost:5432/testdb?ssl=true&sslmode=verify-ca&sslrootcert=certs/root.crt&sslcert=certs/pg_client.crt&sslkey=certs/pg_client.pk8
    username: postgres
    password: "password"
    driver-class-name: org.postgresql.Driver
  jpa:
    hibernate:
      ddl-auto: update
    database-platform: org.hibernate.dialect.PostgreSQLDialect

Let’s attempt to connect to the PostgreSQL server by running the application :

$ mvn clean compile -q exec:java -Dexec.mainClass="com.baeldung.pgoverssl.PgSpringboot" -Dspring.config.location=classpath:./pgoverssl/application.yaml
...
2024-07-04T21:41:17.552+01:00  INFO 458 --- [postgresqlssltest] [ringboot.main()] com.zaxxer.hikari.HikariDataSource       : HikariPool-1 - Starting...
2024-07-04T21:41:18.290+01:00  INFO 458 --- [postgresqlssltest] [ringboot.main()] com.zaxxer.hikari.pool.HikariPool        : HikariPool-1 - Added connection org.postgresql.jdbc.PgConnection@4e331d3d
2024-07-04T21:41:18.291+01:00  INFO 458 --- [postgresqlssltest] [ringboot.main()] com.zaxxer.hikari.HikariDataSource       : HikariPool-1 - Start completed.
...

Just as we connected from JDBC, we’ve been able to successfully establish a connection to the PostgreSQL server using Spring Boot.

7. Conclusion

In this article, we’ve configured and securely established a database connection with a PostgreSQL server over SSL. However, it is important to note that the connection options we’ve implemented in the examples aren’t necessarily exhaustive.

The complete examples are available over on GitHub


Soft Assertions with AssertJ

$
0
0

1. Introduction

In this tutorial, we’ll examine AssertJ‘s soft assertions feature, review its motivation, and discuss similar solutions in other testing frameworks.

2. The Motivation

First, we should understand why soft assertions even exist. For that, let’s explore the following example:

@Test
void test_HardAssertions() {
    RequestMapper requestMapper = new RequestMapper();
    DomainModel result = requestMapper.map(new Request().setType("COMMON"));
    Assertions.assertThat(result.getId()).isNull();
    Assertions.assertThat(result.getType()).isEqualTo(1);
    Assertions.assertThat(result.getStatus()).isEqualTo("DRAFT");
}

This code is quite simple. We have a mapper, that maps the Request entity to some DomainModel instance. We want to test the behavior of this mapper. And, of course, we consider the mapper to work correctly only in case all assertions would pass.

Now, let’s say that our mapper is flawed and maps the id and status incorrectly. In this case, if we had launched this test, we would have gotten an AssertionFailedError error:

org.opentest4j.AssertionFailedError: 
expected: null
but was: "73a3f292-8131-4aa9-8d55-f0dba77adfdb"

That’s all good, except for one thing – although the mapping of id is indeed wrong, the mapping of status is also wrong. The test didn’t tell us that the status mapping is incorrect, it only complains about id. That happens because, by default, when we use assertions with assertj, we use them as hard assertions. It means that the very first assertion in the test that doesn’t pass will trigger an AssertionError immediately.

At first glance, it seems not a big deal since we would just launch the test twice – the first time to find out that our ID mapping is wrong, and finally to discover that our status mapping is wrong. However, in case our mapper is more complex, and it maps entities with dozens of fields, which is possible in real-life projects, it would cost us a significant amount of time to hunt down all the problems by continuously rerunning the test. Specifically, to address this inconvenience, assertj offers us soft assertions.

3. Soft Assertions in AssertJ

Soft assertions solve this problem by doing a very simple thing – by collecting all the errors encountered during all assertions and generating a single report. Let’s take a look at how soft assertions help us in assertj by rewriting the test above:

@Test
void test_softAssertions() {
    RequestMapper requestMapper = new RequestMapper();
    DomainModel result = requestMapper.map(new Request().setType("COMMON"));
    SoftAssertions.assertSoftly(softAssertions -> {
        softAssertions.assertThat(result.getId()).isNull();
        softAssertions.assertThat(result.getType()).isEqualTo(1);
        softAssertions.assertThat(result.getStatus()).isEqualTo("DRAFT");
    });
}

Here, we’re asking assertj to perform a bunch of assertions softly. It means that all assertions in the lambda expression above will execute no matter what, and in case some of them generate an error – these errors would be packed into a single report, like the one below:

org.assertj.core.error.AssertJMultipleFailuresError: 
Multiple Failures (3 failures)
-- failure 1 --
expected: null
 but was: "66f8625c-b5e4-4705-9a49-94db3b347f72"
at SoftAssertionsUnitTest.lambda$test_softAssertions$0(SoftAssertionsUnitTest.java:19)
-- failure 2 --
expected: 1
 but was: 0
at SoftAssertionsUnitTest.lambda$test_softAssertions$0(SoftAssertionsUnitTest.java:20)
-- failure 3 --
expected: "DRAFT"
 but was: "NEW"
at SoftAssertionsUnitTest.lambda$test_softAssertions$0(SoftAssertionsUnitTest.java:21)

It becomes very useful during debugging to shorten the time spent on catching all bugs. Furthermore, it’s worth to mention that there is another approach to writing tests with soft assertions in assertj:

@Test
void test_softAssertionsViaInstanceCreation() {
    RequestMapper requestMapper = new RequestMapper();
    DomainModel result = requestMapper.map(new Request().setType("COMMON"));
    SoftAssertions softAssertions = new SoftAssertions();
    softAssertions.assertThat(result.getId()).isNull();
    softAssertions.assertThat(result.getType()).isEqualTo(1);
    softAssertions.assertThat(result.getStatus()).isEqualTo("DRAFT");
    softAssertions.assertAll();
}

In this case, we’re just creating an instance of SoftAssertions directly, as opposed to the previous example, in which the SoftAssertions instance would still be created, but under the framework hood.

Regarding the differences between those two variants, from a functional standpoint, they are absolutely identical. So we can feel free to choose whatever approach we want.

4. Soft Assertions in Other Testing Frameworks

Because soft assertions are very useful as a feature, a lot of testing frameworks have already adopted them. The tricky thing is that in different frameworks, this feature may have different names or might not even have a name at all. For instance, we have an assertAll() in Junit5, that works in a similar manner, but has its own flavors. TestNG also has soft assertions as a feature, which is very similar to one in the assertj.

So, the point is that most famous testing frameworks have a soft assertion as a feature, although they may not have this name.

5. Summary

Let’s finally sum up all the differences and similarities between hard and soft assertions in a single table:

Hard Assertions Soft Assertions
Is a default assertion mode true false
Supported by most frameworks (including assertj) true true
Exhibit fail-fast behavior true false

6. Conclusion

In this article, we’ve explored soft assertions and their motivations. Contrary to hard assertions, soft assertions allow us to continue the test execution even if some of our assertions fail, in which case the framework generates a detailed report. This makes soft assertions a useful feature since they make debugging easier and faster.

Finally, soft assertions are not the unique feature of the Assertj. They are also present in other popular frameworks, possibly by different or without names.

As always, the code for the article is available over on GitHub.


Sort JSON Objects in Java

$
0
0

1. Overview

JSON is a widely employed structured data format typically used in most modern APIs and data services. It’s particularly popular in web applications due to its lightweight nature and compatibility with JavaScript.

Sometimes, it may be useful to sort the data before we display it in applications that fetch JSON.

In this quick tutorial, we’ll see a couple of approaches for sorting JSON objects in Java.

2. Getting Started

Let’s get started by defining a relatively simple JSON structure which models some imaginary Solar Events:

{
    "solar_events": [
        {
            "event_name": "Solar Eclipse",
            "date": "2024-04-08",
            "coordinates": {
                "latitude": 37.7749,
                "longitude": -122.4194
            },
            "size": "Large",
            "speed_km_per_s": 1000
        },
        {
            "event_name": "Solar Flare",
            "date": "2023-10-28",
            "coordinates": {
                "latitude": 0,
                "longitude": 0
            },
            "size": "Small",
            "speed_km_per_s": 100
        },
        {
            "event_name": "Sunspot",
            "date": "2023-11-15",
            "coordinates": {
                "latitude": 15,
                "longitude": -75
            },
            "size": "Large",
            "speed_km_per_s": 1500
        },
        {
            "event_name": "Coronal Mass Ejection",
            "date": "2024-01-10",
            "coordinates": {
                "latitude": -5,
                "longitude": 80
            },
            "size": "Medium",
            "speed_km_per_s": 500
        }
    ]
}

Throughout this tutorial, this JSON document will be the focus of our examples.

3. Using Jackson

In this first example, we’ll take a look at Jackson a multi-purpose Java library for processing JSON data.

First, we’ll need to add the jackson-databind dependency to our pom.xml:

<dependency>
    <groupId>com.fasterxml.jackson.core</groupId>
    <artifactId>jackson-databind</artifactId>
    <version>2.17.2</version>
</dependency>

We’ll also need to define a few simple POJO objects that we can use to deserialize our JSON string into a Java object:

class SolarEvent {
    @JsonProperty("event_name")
    private String eventName;
    @JsonProperty("date")
    private String date;
    @JsonProperty("coordinates")
    private Coordinates coordinates;
    @JsonProperty("type")
    private String type;
    @JsonProperty("class")
    private String eventClass;
    @JsonProperty("size")
    private String size;
    @JsonProperty("speed_km_per_s")
    private int speedKmPerS;
    // Getters and Setters
}
class Coordinates {
    @JsonProperty("latitude")
    private double latitude;
    @JsonProperty("longitude")
    private double longitude;
    // Getters and setters
}

We’ll also define a container object to hold our list of events:

class SolarEventContainer {
    @JsonProperty("solar_events")
    private List<SolarEvent> solarEvents;
    //Getters and setters
}

Now, we can go ahead and write a simple unit test to verify we can sort a list of solar events using a given attribute:

@Test
void givenJsonObjects_whenUsingJackson_thenSortedBySpeedCorrectly() throws IOException {
    ObjectMapper objectMapper = new ObjectMapper();
    SolarEventContainer container =
      objectMapper.readValue(new File("src/test/resources/solar_events.json"),
      SolarEventContainer.class);
    List<SolarEvent> events = container.getSolarEvents();
    Collections.sort(events, Comparator.comparingInt(event -> event.getSpeedKmPerS()));
    assertEquals(100, events.get(0).getSpeedKmPerS());
    assertEquals(500, events.get(1).getSpeedKmPerS());
    assertEquals(1000, events.get(2).getSpeedKmPerS());
    assertEquals(1500, events.get(3).getSpeedKmPerS());
}

Our first goal is to parse the JSON and deserialize it into our object model. For this, we’ve used Jackson’s standard ObjectMapper. We used the readValue() method to read the JSON from a file and convert our JSON into a SolarEventContainer object.

Now that we have a Java object model, we can go ahead and sort the objects based on any of the attributes in our class. For the sorting, we define a Comparator by using a lambda expression, and the comparingInt() static factory to sort our events using the getSpeedKmPerS() method.

Finally, our test confirmed that the speed attribute correctly ordered the events.

4. Using Gson

Now, let’s take a look at a similar approach using another popular JSON processing library Gson. As before, we’ll start by adding this dependency to our pom.xml:

<dependency>
    <groupId>com.google.code.gson</groupId>
    <artifactId>gson</artifactId>
    <version>2.11.0</version>
</dependency>

As always, the latest version is available from the Maven Repository.

Sometimes, it might not always be possible to have our own internal Java object model to work with, so in this example, we’ll see how we can work with the JSON Java objects that are available directly from this library:

@Test
public void givenJsonObject_whenUsingGson_thenSortedBySizeCorrectly() throws FileNotFoundException {
    JsonReader reader = new JsonReader(new FileReader("src/test/resources/solar_events.json"));
    JsonElement element = JsonParser.parseReader(reader);
    JsonArray events = element.getAsJsonObject().getAsJsonArray("solar_events");
    List<JsonElement> list = events.asList();
    Collections.sort(list, (a, b) -> {
        double latA = a.getAsJsonObject()
          .getAsJsonObject("coordinates")
          .get("latitude")
          .getAsDouble();
        double latB = b.getAsJsonObject()
          .getAsJsonObject("coordinates")
          .get("latitude")
          .getAsDouble();
        return Double.compare(latA, latB);
    });
    assertEquals(-5, getJsonAttributeAsInt(list.get(0)));
    assertEquals(0, getJsonAttributeAsInt(list.get(1)));
    assertEquals(15, getJsonAttributeAsInt(list.get(2)));
    assertEquals(37, getJsonAttributeAsInt(list.get(3)));
}
private int getJsonAttributeAsInt(JsonElement element) {
    return element.getAsJsonObject()
      .getAsJsonObject("coordinates")
      .get("latitude")
      .getAsInt();
}

As we can see, we use a similar approach to read in our sample JSON file, but this time, we retrieve a list of JsonElement objects, which represents each entry in our solar_events.json file.

Likewise, we can now sort the elements in the list using the Collections.sort method by supplying a custom comparator to parse and select the required values from the JSON objects. This is certainly a bit more verbose than the previous example and vulnerable to errors if our JSON structure changes or we mistype a JSON object or attribute name.

Finally, this time around, we check the elements have been sorted correctly using the latitude value. We also provide a small utility method to help us extract the values from the JSON elements.

5. Conclusion

In this short article, we learned how to sort JSON objects using two popular JSON processing Java libraries.

In the first example, we saw how to use our own Java object model with the popular Jackson library. Latterly, we learned how to work directly with the object model supplied by the Gson library.

As always, the full source code of the article is available over on GitHub.


Quarkus Testcontainers for Dependent Services

$
0
0
Contact Us Featured

1. Overview

In this article, we’ll see the power of using Testcontainers to help test a Quarkus application using ‘live’ service-to-service testing.

Testing in a microservices architecture is important and it can be difficult to reproduce a production-like system. Common options to enable testing include using manual API testing tools such as Postman, mocking services, or trusting in-memory databases. We might not perform a real service-to-service interaction until running a CI pipeline or deploying to upper environments. This can pose a problem, and delay delivery, by not thoroughly testing service interactions.

Testcontainers provides a solution to this by granting the ability to spin up dependencies and test against them directly in our local environment. This allows us to leverage any containerized application, service, or dependency and use in our test cases.

2. Solution Architecture

Our solution architecture is rather simple yet allows us to focus on a robust setup to prove the value in Testcontainers for service-to-service testing:

Solution architecture. The client calls the cusotmer service, which is the system under test, which then calls order service.

A client calls customer-service, our service under test, which returns customer data. customer-service relies on order-service to query orders for a specific customer. A PostgreSQL database backs each of our services.

3. Testcontainers Solution

First, let’s ensure we have the appropriate dependencies, org.testcontainers core and org.testcontainers.postgresql:

<dependency>
    <groupId>org.testcontainers</groupId>
    <artifactId>testcontainers</artifactId>
    <version>1.19.6</version>
    <scope>test</scope>
</dependency>
<dependency>
    <groupId>org.testcontainers</groupId>
    <artifactId>postgresql</artifactId>
    <version>1.19.6</version>
    <scope>test</scope>
</dependency>

Quarkus provides us with some very important classes that we’ll leverage to write tests against our specific dependencies. From the official Quarkus guides:

A very common need is to start some services that your Quarkus application depends on before the Quarkus application starts for testing. To address this need, Quarkus provides @io.quarkus.test.common.QuarkusTestResource and io.quarkus.test.common.QuarkusTestResourceLifecycleManager.

Next, let’s declare a class that implements QuarkusTestResourceLifecycleManager and will be responsible for configuring the dependent service and its PostgreSQL database:

public class CustomerServiceTestcontainersManager implements QuarkusTestResourceLifecycleManager {
}

Now, let’s use the Testcontainers API and modules, which are preconfigured implementations of various dependencies, to wire them up for testing:

private PostgreSQLContainer<?> postgreSQLContainer;
private GenericContainer<?> orderService;

Then, we’ll configure everything we need to connect and run our dependencies:

@Override
public Map<String, String> start() {
    Network network = Network.newNetwork();
    String networkAlias = "baeldung";
    postgreSQLContainer = new PostgreSQLContainer<>(DockerImageName.parse("postgres:14")).withExposedPorts(5432)
      .withDatabaseName("quarkus")
      .withUsername("quarkus")
      .withPassword("quarkus")
      .withNetwork(network)
      .withNetworkAliases(networkAlias);
    postgreSQLContainer.start();
    String jdbcUrl = String.format("jdbc:postgresql://%s:5432/quarkus", networkAlias);
    orderService = new GenericContainer<>(DockerImageName.parse("quarkus/order-service-jvm:latest")).withExposedPorts(8080)
      .withEnv("quarkus.datasource.jdbc.url", jdbcUrl)
      .withEnv("quarkus.datasource.username", postgreSQLContainer.getUsername())
      .withEnv("quarkus.datasource.password", postgreSQLContainer.getPassword())
      .withEnv("quarkus.hibernate-orm.database.generation", "drop-and-create")
      .withNetwork(network)
      .dependsOn(postgreSQLContainer)
      .waitingFor(Wait.forListeningPort());
    orderService.start();
    String orderInfoUrl = String.format("http://%s:%s/orderapi/v1", orderService.getHost(), orderService.getMappedPort(8080));
    return Map.of("quarkus.rest-client.order-api.url", orderInfoUrl);
}

Afterwards, we’ll need to stop our services once testing has completed:

@Override
public void stop() {
    if (orderService != null) {
        orderService.stop();
    }
    if (postgreSQLContainer != null) {
        postgreSQLContainer.stop();
    }
}

Here is where we can leverage Quarkus to manage the dependency lifecycle in our test class:

@QuarkusTestResource(CustomerServiceTestcontainersManager.class)
class CustomerResourceLiveTest {
}

Following that, we write a parameterized test that checks we’re returning a customer’s data, as well as their orders, from the dependent service:

@ParameterizedTest
@MethodSource(value = "customerDataProvider")
void givenCustomer_whenFindById_thenReturnOrders(long customerId, String customerName, int orderSize) {
    Customer response = RestAssured.given()
      .pathParam("id", customerId)
      .get()
      .thenReturn()
      .as(Customer.class);
    Assertions.assertEquals(customerId, response.id);
    Assertions.assertEquals(customerName, response.name);
    Assertions.assertEquals(orderSize, response.orders.size());
}
private static Stream<Arguments> customerDataProvider() {
    return Stream.of(Arguments.of(1, "Customer 1", 3), Arguments.of(2, "Customer 2", 1), Arguments.of(3, "Customer 3", 0));
}

Consequently, our output when running the test indicates the order service container has started:

Creating container for image: quarkus/order-service-jvm:latest
Container quarkus/order-service-jvm:latest is starting: 02ae38053012336ac577860997f74391eef3d4d5cd07cfffba5e27c66f520d9a
Container quarkus/order-service-jvm:latest started in PT1.199365S

So, we’ve successfully performed production-like testing using live dependencies, deploying what is needed to verify our service behavior end-to-end.

4. Conclusion

In this tutorial, we showcased Testcontainers as a solution for using containerized dependencies to test a Quarkus application over the wire.

Testcontainers aid us with executing reliable and repeatable tests by talking to those real services and providing a programmatic API for our test code.

As always, the source code is available over on GitHub.


Literal Syntax for byte[] Arrays Using Hex Notation

$
0
0

1. Introduction

Java provides various ways to work with byte[] arrays, which are essential for handling binary data. While initializing a byte[] array with decimal values is straightforward, using hexadecimal notation can make the representation of binary data more intuitive and readable.

This article will explore how to use hex notation for initializing byte[] arrays in Java, highlighting its advantages and applications.

2. Understanding byte[] Arrays

In Java, a byte[] array is used to store a sequence of bytes. Each byte can hold an 8-bit signed value ranging from -128 to 127. Byte arrays are often used for tasks such as file I/O operations, network communications, and cryptographic functions.

3. Basic Initialization of byte[] Arrays

Let’s start with a simple example of initializing a byte[] array using decimal values:

private static final Logger logger = LoggerFactory.getLogger(LiteralSyntaxForByteArraysUsingHexNotation.class);
public static void initializeByteArrayWithDecimal() {
    byte[] byteArray = {10, 20, 30, 40, 50};
    for (byte b : byteArray) {
        logger.info("{}", b);
    }
}

This method initializes a byte[] array with five decimal values and logs them:

[main] INFO com.baeldung.literalsyntaxforbytearraysusinghexnotation.LiteralSyntaxForByteArraysUsingHexNotation - 10
[main] INFO com.baeldung.literalsyntaxforbytearraysusinghexnotation.LiteralSyntaxForByteArraysUsingHexNotation - 20
[main] INFO com.baeldung.literalsyntaxforbytearraysusinghexnotation.LiteralSyntaxForByteArraysUsingHexNotation - 30
[main] INFO com.baeldung.literalsyntaxforbytearraysusinghexnotation.LiteralSyntaxForByteArraysUsingHexNotation - 40
[main] INFO com.baeldung.literalsyntaxforbytearraysusinghexnotation.LiteralSyntaxForByteArraysUsingHexNotation - 50

4. Using Hexadecimal Notation for byte[] Arrays

Hexadecimal notation is often more convenient for representing binary data because it aligns more naturally with byte boundaries. Each hex digit represents four bits, so two hex digits represent one byte. In Java, we can use the 0x prefix to denote a hexadecimal value.

Here’s how we can initialize the same byte[] array using hexadecimal notation:

public static void initializeByteArrayWithHex() {
    byte[] byteArray = {0x0A, 0x14, 0x1E, 0x28, 0x32};
    for (byte b : byteArray) {
        logger.info("0x{:02X}", b);
    }
}

This method initializes the byte[] array with the same values as before, but using hex notation, and logs them:

[main] INFO com.baeldung.literalsyntaxforbytearraysusinghexnotation.LiteralSyntaxForByteArraysUsingHexNotation - 0x0A
[main] INFO com.baeldung.literalsyntaxforbytearraysusinghexnotation.LiteralSyntaxForByteArraysUsingHexNotation - 0x14
[main] INFO com.baeldung.literalsyntaxforbytearraysusinghexnotation.LiteralSyntaxForByteArraysUsingHexNotation - 0x1E
[main] INFO com.baeldung.literalsyntaxforbytearraysusinghexnotation.LiteralSyntaxForByteArraysUsingHexNotation - 0x28
[main] INFO com.baeldung.literalsyntaxforbytearraysusinghexnotation.LiteralSyntaxForByteArraysUsingHexNotation - 0x32

5. Advantages of Using Hexadecimal Notation

Hexadecimal notation provides several benefits when working with byte[] arrays:

  • Readability: Hexadecimal notation is more compact and easier to read for those familiar with binary data. It reduces the likelihood of errors when interpreting raw byte values
  • Alignment with Byte Boundaries: Hex notation aligns perfectly with the byte boundaries, making it easier to understand and manipulate individual bytes
  • Common in Low-Level Programming: Hexadecimal notation is widely used in low-level programming, such as systems programming, networking, and cryptography. It is the standard way to represent binary data in these fields

6. Practical Applications

Hexadecimal notation is particularly useful in several practical applications:

  • File I/O Operations: Hexadecimal notation is useful when dealing with file headers and binary file formats. For example, the first few bytes of a file might represent a magic number that identifies the file type
  • Network Communications: Hexadecimal notation is often used to represent network packet headers. For example, the header of a TCP packet can be represented using a byte[] array initialized with hex values
  • Cryptographic Functions: Hexadecimal notation is commonly used to represent keys, hashes, and other cryptographic data

7. Conclusion

In conclusion, using hexadecimal notation to initialize byte[] arrays in Java provides a more readable and intuitive way to handle binary data, especially in fields like networking, file I/O, and cryptography. Moreover, by leveraging hex notation, we can reduce errors, enhance readability, and align our code with common practices in low-level programming.

As always, the complete code samples for this article can be found over on GitHub.


Checking if a File is an Image in Java

$
0
0

1. Overview

When working with file uploads in Java, it’s crucial to ensure that the uploaded files are indeed images, especially when filenames and extensions can be misleading.

In this tutorial, we’ll explore two ways to determine whether a file is an image: Checking the file’s actual content and verifying based on the file’s extension.

2. Checking File Content

One of the most reliable ways to determine if a file is an image is by inspecting its content. Let’s explore two methods to do this: Using Apache Tika and then using the built-in Java ImageIO class.

2.1 Using Apache Tika

mimeApache Tika is a powerful library for detecting and extracting metadata from various file types.

Let’s add Apache Tika core to our project dependencies:

<dependency>
    <groupId>org.apache.tika</groupId>
    <artifactId>tika-core</artifactId>
    <version>2.9.2</version>
</dependency>

Then, we can implement a method to check if a file is an image using this library:

public static boolean isImageFileUsingTika(File file) throws IOException {
    Tika tika = new Tika();
    String mimeType = tika.detect(file);
    return mimeType.startsWith("image/");
}

Apache Tika does not read the whole file into memory, only the first few bytes to check. Therefore, we should use Tika with trusted sources because checking only the first few bytes also means that attackers may be able to smuggle in executables that aren’t images.

2.2. Using Java ImageIO Class

Java’s built-in ImageIO class can also determine if a file is an image by attempting to read the file as an image:

public static boolean isImageFileUsingImageIO(File file) throws IOException {
    BufferedImage image = ImageIO.read(file);
    return image != null;
}

The ImageIO.read() method reads the whole file into memory, so it is inefficient if we only want to test if this file is an image.

3. Checking File Extension

A simpler but less reliable method is to check the file extension. This method doesn’t guarantee that the file content matches the extension, but it’s faster and easier.

Java’s built-in Files.probeContentType() method can determine the MIME type of a file based on its extension. Here’s how we can use it:

public static boolean isImageFileUsingProbeContentType(File file) throws IOException {
    Path filePath = file.toPath();
    String mimeType = Files.probeContentType(filePath);
    return mimeType != null && mimeType.startsWith("image/");
}

Of course, we can always write a Java method ourselves to check if a file extension is in a predefined list.

4. Summary of Methods

Let’s compare the pros and cons of each method:

  • Checking file content:
    • Using Apache Tika: Reads the first few bytes of a file. It’s reliable and efficient but should be used with trusted sources.
    • Using Java ImageIO: Attempts to read the file as an image. It’s most reliable but inefficient.
  • Checking file extension: Determines based on the file’s extension, which faster and easier, but also doesn’t guarantee that the file content is image.

5. Conclusion

In this tutorial, we explored different methods to check if a file is an image in Java. While checking the file content is more reliable, checking the file extension is faster and easier.

The example code from this tutorial can be found over on GitHub.


How to Convert Gson JsonArray to HashMap

$
0
0

1. Introduction

In this tutorial, we’ll explore how to convert a Gson JsonArray to a HashMap in Java. By the end of this tutorial, we’ll understand the process of iterating over a JsonArray, extracting its elements, and storing them in a HashMap.

2. Understanding Gson JsonArray and HashMap Structures

A Gson JsonArray is a part of the Gson library and we use it to represent an array of JSON elements. Here’s an example structure of a JsonArray:

[
    {"name": "John Doe", "age": 35},
    {"name": "Mary Jenn", "age": 41}
]

On the other hand, a HashMap is a collection that stores key-value pairs, where each key maps to a specific value. Each key in the HashMap must be unique, meaning that no two keys can map to the same value. If we attempt to add a duplicate key, the new value overwrites the existing value associated with that key.

3. Iterative Approach

In this approach, we manually iterate over each element of the JsonArray object and populate a HashMap with the key-value pairs extracted from each JsonObject:

Map<String, Integer> convertUsingIterative (JsonArray jsonArray) {
    Map<String, Integer> hashMap = new HashMap<>();
    for (JsonElement element : jsonArray) {
        JsonObject jsonObject = element.getAsJsonObject();
        String type = jsonObject.get("name").getAsString();
        Integer amount = jsonObject.get("age").getAsInt();
        hashMap.put(type, amount);
    }
    return hashMap;
}

We start by creating an empty HashMap to store the resulting key-value pairs. Then, we loop through each element in the JsonArray. Each JsonElement is converted to a JsonObject to facilitate the extraction of its fields.

When using Gson, numeric values are often represented as JsonPrimitive objects containing Number instances. In this example, we extract the values of name and age from the jsonObject using getAsString() and getAsInt() methods respectively.

In addition, to validate this approach, we can create a test case that constructs a sample JsonArray and asserts the expected results.

Before running our tests, we can use the @BeforeEach annotation to set up some test data:

@BeforeEach
void setUp() {
    jsonArray = new JsonArray();
    JsonObject jsonObject1 = new JsonObject();
    jsonObject1.addProperty("name", "John Doe");
    jsonObject1.addProperty("age", 35);
    jsonArray.add(jsonObject1);
    JsonObject jsonObject2 = new JsonObject();
    jsonObject2.addProperty("name", "Mary Jenn");
    jsonObject2.addProperty("age", 41);
    jsonArray.add(jsonObject2);
}

We can now proceed to write a test case that validates the conversion of a JsonArray to a HashMap:

Map<String, Integer> hashMap = JSONArrayToHashMapConverter.convertUsingIterative(jsonArray);
assertEquals(35, hashMap.get("John Doe"));
assertEquals(41, hashMap.get("Mary Jenn"));

This approach is straightforward and effective for scenarios where we need precise control over each element in the JsonArray.

4. Streams Approach

The second approach utilizes Java Streams, allowing us to perform the conversion in a more functional and concise manner. This method efficiently processes each element in the JsonArray and accumulates the results into a HashMap:

Map<String, Integer> convertUsingStreams (JsonArray jsonArray) {
    return StreamSupport.stream(jsonArray.spliterator(), false)
      .map(JsonElement::getAsJsonObject)
      .collect(Collectors.toMap(
        jsonObject -> jsonObject.get("name").getAsString(),
        jsonObject -> jsonObject.get("age").getAsInt()
    ));
}

We begin by creating a stream from the JsonArray. We achieve this with the StreamSupport.stream() method, which takes a Spliterator for the JsonArray and a flag indicating whether the stream should be parallel (in this case, false for sequential processing).

In the map() function, each JsonElement is converted to a JsonObject, which allows us to extract specific fields from the JSON objects. Next, we use the collect() method with Collectors.toMap() to gather these JsonObject entries into a HashMap.

To ensure this method works correctly, we can create a similar test case:

Map<String, Integer> hashMap = JSONArrayToHashMapConverter.convertUsingStreams(jsonArray);
assertEquals(35, hashMap.get("John Doe"));
assertEquals(41, hashMap.get("Mary Jenn")); 

We can use this method for processing large datasets efficiently and it’s well-suited for functional programming enthusiasts as well.

5. Using fromJson() Approach

In the final approach, we utilize Gson’s fromJson() method to convert a JsonArray into a list of maps. This approach leverages Gson’s built-in functionality to simplify the conversion process and then merges these maps into a single HashMap:

Map<String, Integer> convertUsingGson(JsonArray jsonArray) {
    Map<String, Integer> hashMap = new HashMap<>();
    Gson gson = new Gson();
    List<Map<String, Object>> list = new Gson().fromJson(jsonArray, List.class);
    for (Map<String, Object> entry : list) {
        String type = (String) map.get("name");
        Integer amount = ((Double) map.get("age")).intValue(); // Gson parses numbers as Double
        hashMap.put(type, amount);
    }
    return hashMap;
}

First, we use Gson to parse the JsonArray and convert it into a list of Map objects. Each Map represents a JSON object with key-value pairs. We iterate through each map object in the list and extract the name field as a String and the age field as a Double.

Moreover, we convert the age value to an Integer using intValue() because Gson parses numbers as Double by default. Let’s validate our implementation:

Map<String, Integer> hashMap = JSONArrayToHashMapConverter.convertUsingGson(jsonArray);
assertEquals(35, hashMap.get("John Doe"));
assertEquals(41, hashMap.get("Mary Jenn")); 

6. Conclusion

In this article, we’ve explored three methods to convert a Gson JsonArray to a HashMap in Java. The iterative method is useful for complex transformations, the stream approach is ideal for handling large JSON datasets efficiently. In contrast, the Gson method is best suited for straightforward conversions.

As always, the source code for the examples is available over on GitHub.


Introduction to Milvus

$
0
0

1. Overview

In this tutorial, we’ll explore Milvus, a highly scalable open-source vector database. It’s designed to store and index massive vector embeddings from deep neural networks and other machine-learning models. Milvus enables efficient similarity searches across diverse data types like text, images, voices, and videos. We’ll extensively explore the Milvus Java client SDK for integrating and managing Milvus DB through third-party applications. To explain, we’ll take the example of an application that stores the vectorized contents of books to enable similarity search.

2. Key Concepts

Before exploring the capabilities of Milvus’s Java SDK, let’s understand how Milvus logically organizes data:

  • Collection: A logical container for storing vectors, similar to a table in traditional databases
  • Field: Attributes of scalar and vector entities within a collection, defining the data types and other properties
  • Schema: Defines the structure and attributes of data within a collection
  • Index: Optimizes the search process by organizing vectors for efficient retrieval
  • Partition: A logical subdivision within a collection to manage and organize data more effectively

3. Prerequisite

Before we explore the Java APIs, we’ll take care of a few prerequisites for running the sample codes.

3.1. Milvus Database Instance

First, we’ll need an instance of Milvus DB. The easiest and quickest way is to get a fully managed free Milvus DB instance provided by Zilliz Cloud:   For this, we’ll need to register for a Zilliz cloud account and follow the documentation for creating a free DB cluster.

3.2. Maven Dependency

Before we start to explore the Milvus Java APIs we’ll need to import the necessary Maven dependency:

<dependency>
  <groupId>io.milvus</groupId>
  <artifactId>milvus-sdk-java</artifactId>
  <version>2.3.6</version>
</dependency>

4. Milvus Java Client SDK

The Milvus DB service endpoints are written using the gRPC framework. Hence, all their client SDKs in different programming languages such as Python, Go, and Java provide APIs on top of this gRPC framework. The Milvus Java Client SDK offers comprehensive support for CRUD (Create, Read, Update, and Delete) operations like any database. Additionally, it supports administrative operations such as creating collections, indexes, and partitions. To perform, the various DB operations, the API provides a corresponding request and request builder class. Developers can set the necessary parameters in the request object using the builder classes. Finally, this request object is sent to the back-end service with the help of a client class. This will become clearer once we go through the upcoming sections.

5. Create Milvus DB Client

The Java client SDK provides the MilvusClientV2 class for management and data operations in Milvus DB. The ConnectConfigBuilder class helps build the parent ConnectConfig class, which holds the connection information needed to create an instance of the MilvusClientV2 class:   Let’s look at the method for creating an instance of MilvusClientV2 to understand more about the classes involved:

MilvusClientV2 createConnection() {
    ConnectConfig connectConfig = ConnectConfig.builder()
      .uri(CONNECTION_URI)
      .token(API_KEY)
      .build();
    milvusClientV2 = new MilvusClientV2(connectConfig);
    return milvusClientV2;
}

ConnectConfig class supports username and password authentication but we’ve used the recommended API token. The ConnectConfigBuilder class takes the URI and the API token to create the ConnectConfig object. That is later used for creating the MilvusClientV2 object.

6. Create Collection

Before storing data in the Milvus Vector DB, we must create a collection. It involves creating field schemas and a collection and then forming a create collection request object. Finally, the client sends the request object to the DB service endpoint to create the collection in the Milvus DB.

6.1. Create Field Schemas and Collection Schema

Let’s first explore the relevant key classes in the Milvus Java SDK:   The FieldSchema class helps define the fields of a collection, while CollectionSchema uses the FieldSchema to define a collection. Additionally, the IndexParamBuilder class in IndexParam creates an index on the collection. We’ll explore the additional classes through the sample codes. First, let’s go through the steps for creating a FieldSchema object in the method createFieldSchema():

CreateCollectionReq.FieldSchema createFieldSchema(String name, String desc, DataType dataType,
    boolean isPrimary, Integer dimension) {
    CreateCollectionReq.FieldSchema fieldSchema = CreateCollectionReq.FieldSchema.builder()
      .name(name)
      .description(desc)
      .autoID(false)
      .isPrimaryKey(isPrimary)
      .dataType(dataType)
      .build();
    if (null != dimension) {
        fieldSchema.setDimension(dimension);
    }
    return fieldSchema;
}

The builder() method in the FieldSchema class returns an instance of its child FieldSchemaBuilder class. This class sets the important properties such as name, description, and data type for a collection field. The method isPrimaryKey() in the builder class helps mark a primary key field, while the setDimension() method in the FieldSchema class sets the mandatory dimension of a vector field. For example, let’s set the fields of a collection called Books in the method createFieldSchemas():

private static List<CreateCollectionReq.FieldSchema> createFieldSchemas() {
    List<CreateCollectionReq.FieldSchema> fieldSchemas = List.of(
      createFieldSchema("book_id", "Primary key", DataType.Int64, true, null),
      createFieldSchema("book_name", "Book Name", DataType.VarChar, false, null),
      createFieldSchema("book_vector", "vector field", DataType.FloatVector, false, 5)
    );
    return fieldSchemas;
}

The method returns a list of FieldSchema objects for the fields book_id, book_name, and book_vector for the Books collection. The book_vector field stores vectors with a dimension of 5, and book_id is the primary key. Precisely, we’ll store the vectorized texts of books in the book_vector field. Each FieldSchema object is created using the previously defined createFieldSchema() method. After creating the FieldSchema objects, we’ll use them in the createCollectionSchema() method for forming the Books CollectionSchema object:

private static CreateCollectionReq.CollectionSchema createCollectionSchema(
    List<CreateCollectionReq.FieldSchema> fieldSchemas) {
    return CreateCollectionReq.CollectionSchema.builder()
      .fieldSchemaList(fieldSchemas)
      .build();
}

The child CollectionSchemaBuilder sets the field schemas and finally builds the parent CollectionSchema object.

6.2. Create Collection Request and Collection

Let’s now look at the steps for creating the collection:

void whenCommandCreateCollectionInVectorDB_thenSuccess() {
    CreateCollectionReq createCollectionReq = CreateCollectionReq.builder()
      .collectionName("Books")
      .indexParams(List.of(createIndexParam("book_vector", "book_vector_indx")))
      .description("Collection for storing the details of books")
      .collectionSchema(createCollectionSchema(createFieldSchemas()))
      .build();
    milvusClientV2.createCollection(createCollectionReq);
    assertTrue(milvusClientV2.hasCollection(HasCollectionReq.builder()
      .collectionName("Books")
      .build()));
    }
}

We use the CreateCollectionReqBuilder class to build the CreateCollectionReq object by setting the CollectionSchema object and other parameters. Then, we pass this object to the createCollection() method of the MilvusClientV2 class to create the collection. Finally, we verify by calling the hasCollection(HasCollectionReq) method of MilvusClientV2. The CreateCollectionReqBuilder class also uses the indexParams() method to define indexes on the book_vector field. So, let’s look at the method createIndexParam() that helps create the IndexParam object:

IndexParam createIndexParam(String fieldName, String indexName) {
    return IndexParam.builder()
      .fieldName(fieldName)
      .indexName(indexName)
      .metricType(IndexParam.MetricType.COSINE)
      .indexType(IndexParam.IndexType.AUTOINDEX)
      .build();
}

The method uses the IndexParamBuilder class to set the various supported properties of an index in the Milvus DB. Moreover, the COSINE metric type property of the IndexPram object is important for calculating the similarity score between the vectors. Like relational DBs, indexes help boost query performance on frequently accessed fields in Milvus Vector DB. Let’s verify the details of the created Books collection in the Zilliz cloud console:  

7. Create Partition

Once the Books collection is created, we can focus on the classes for creating partitions for organizing the data efficiently.   The child CreatePartitionReqBuilder class helps create the parent CreateParitionReq object by setting the partition and the target collection name. Then, the request object is passed into the MilvusClientV2‘s createPartition() method. Let’s create a partition Health in the Books collection using the classes defined earlier:

void whenCommandCreatePartitionInCollection_thenSuccess() {
    CreatePartitionReq createPartitionReq = CreatePartitionReq.builder()
        .collectionName("Books")
        .partitionName("Health")
        .build();
    milvusClientV2.createPartition(createPartitionReq);
    assertTrue(milvusClientV2.hasPartition(HasPartitionReq.builder()
        .collectionName("Books")
        .partitionName("Health")
        .build()));
}

In the method, the createPartitionReqBuilder class creates the CreatePartitionReq object for the collection Books. Later, the MilvusClientV2 object invokes its createPartition() method with the request object. This resulted in the creation of the partition Health in the Books collection. Finally, we verify the presence of the partition by invoking the hasPartition() method of the MilvusClientV2 class.

8. Insert Data Into a Collection

After creating the collection Books in the Milvus DB, we can insert data into it. As usual, first, let’s take a look at the key classes:   The child InsertReqBuilder class helps create its parent InsertReq object by setting the collectionName and the data. The method data() of the InsertReqBuilder class takes chunks of documents in List<JSONObject> to insert into the Milvus DB. Finally, we pass the InsertReq object to the insert() method of the MilvusClientV2 object to create entries into the collection. For inserting data into the partition Health of the collection Books, we’ll use a few dummy data from a JSON file book_vectors.json:

[
  {
    "book_id": 1,
    "book_vector": [
      0.6428583619771759,
      0.18717933359890893,
      0.045491267667689295,
      0.8578131397291819,
      0.6431108625406422
    ],
    "book_name": "Yoga"
  },
  More objects...
...
]

Real-world applications use embedding models such as BERT and Word2Vec to create the vector dimensions of texts, images, voice samples, and more. Let’s look at the classes defined earlier, in action:

void whenCommandInsertDataIntoVectorDB_thenSuccess() throws IOException {
    List<JSONObject> bookJsons = readJsonObjectsFromFile("book_vectors.json");
    InsertReq insertReq = InsertReq.builder()
      .collectionName("Books")
      .partitionName("Health")
      .data(bookJsons)
      .build();
    InsertResp insertResp = milvusClientV2.insert(insertReq);
    assertEquals(bookJsons.size(), insertResp.getInsertCnt());
}

The readJsonObjectsFromFile() method reads the data from the JSON file and stores it in the bookJsons object. As explained earlier, we created the InsertReq object with the data and then passed it to the insert() method of the MilvusClientV2 object. Finally, the getInsertCnt() method in the InsertResp object gives the total count of records inserted. We can also verify the inserted records in the Zilliz cloud console:  

Milvus supports vector similarity searches on collections with the help of some key classes:   The SearchRequestBuilder sets the attributes such as topK nearest neighbors, query embeddings, and collection name of the parent SearchReq class. Additionally, we can set scalar expressions in the filter() method to get matching entities. Finally, the MilvusClientV2 class calls the search() method with the SearchReq object to fetch the records. As usual, let’s look at the sample code to understand more:

void givenSearchVector_whenCommandSearchDataFromCollection_thenSuccess() {
    List<Float> queryEmbedding = getQueryEmbedding("What are the benefits of Yoga?");
    SearchReq searchReq = SearchReq.builder()
      .collectionName("Books")
      .data(Collections.singletonList(queryEmbedding))
      .outputFields(List.of("book_id", "book_name"))
      .topK(2)
      .build();
    SearchResp searchResp = milvusClientV2.search(searchReq);
    List<List<SearchResp.SearchResult>> searchResults = searchResp.getSearchResults();
    searchResults.forEach(e -> e.forEach(el -> logger.info("book_id: {}, book_name: {}, distance: {}",
      el.getEntity().get("book_id"), el.getEntity().get("book_name"), el.getDistance()))
    );
}

First, the method getQueryEmbedding() converts the query into vector dimensions or embeddings. Then the SearchReqBuilder object creates the SearchReq object with all the search-related parameters. Interestingly, we can also control the field names in the result entity by setting it in the outputFields() method of the builder class. Finally, we call MilvusClientV2‘s search() method to get the query results:

book_id: 6, book_name: Yoga, distance: 0.8046049
book_id: 3, book_name: Tai Chi, distance: 0.5370003

The distance attribute in the search result signifies the similarity score. For our example, we considered the Cosine similarity (COSINE) to measure the similarity score.  Hence, the larger the cosine, the smaller the angle between the two vectors, indicating that these two vectors are more similar to each other. Additionally, Milvus supports more metric types on floating type embeddings such as Euclidean distance (L2) and Inner product (IP).

10. Delete Data in the Collection

Let’s begin with the usual class diagram to learn about the key classes involved in deleting data from a collection:   The delete() method in MilvusClientV2 deletes records in Milvus DB. It takes the DeleteReq object that allows specifying the records using the ids and filter fields. The child DeleteRequestBuilder class helps build the parent DeleteReq object. Let’s deep dive with the help of some sample code. Let’s look at the steps for deleting a record with book_id equal to 1 and 2 from the collection Books:

void givenListOfIds_whenCommandDeleteDataFromCollection_thenSuccess() {
    DeleteReq deleteReq = DeleteReq.builder()
      .collectionName("Books")
      .ids(List.of(1, 2))
      .build();
    DeleteResp deleteResp = milvusClientV2.delete(deleteReq);
    assertEquals(2, deleteResp.getDeleteCnt());
}

After calling the delete() method on the MilvusClientV2 object, we use the getDeleteCnt() method in the DeleteResp object to verify the number of records deleted. We can also use Scalar Expression Rules with the filter() method on the DeleteReqBuilder object to specify matching records for deletion:

void givenFilterCondition_whenCommandDeleteDataFromCollection_thenSuccess() {
    DeleteReq deleteReq = DeleteReq.builder()
      .collectionName("Books")
      .filter("book_id > 4")
      .build();
    DeleteResp deleteResp = milvusClientV2.delete(deleteReq);
    assertTrue(deleteResp.getDeleteCnt() >= 1 );
}

Based on the scalar condition defined in the filter() method, the records having book_id greater than 4 are deleted from the collection.

11. Conclusion

In this article, we explored the Milvus Java SDK. It covers almost all major operations related to managing the vector DB. The APIs are well-designed and intuitive to understand, hence, easier to adopt and build AI-driven applications. However, a basic understanding of vectors is equally important to use the APIs efficiently. As usual, the code used in this article is available over on GitHub.  


Convert Between org.joda.time.DateTime and java.sql.Timestamp in Java

$
0
0

1. Overview

Handling timestamps in Java is a common task that allows us to manipulate and display date and time information more еffеctivеly еspеcially when we’re dealing with databases or global applications. Two fundamental classes for handling timestamps and timezones are java.sql.Timestamp and org.joda.time.DateTime.

In this tutorial, we’ll look at various approaches to converting between org.joda.time.DateTime and java.sql.Timestamp.

2. Converting java.sql.Timestamp to org.joda.time.DateTime

First, we’ll look into multiple approaches to converting java.sql.Timestamp to org.joda.time.DateTime.

2.1. Using Constructor

One of the simplest approaches to convert java.sql.Timestamp to org.joda.time.DateTime involves using the constructor. In this approach, we’ll use the getTime() method to get the milliseconds since the Unix epoch and provide this value as input to the DateTime constructor.

Let’s look at how we can use the getTime() method:

DateTime convertToDateTimeUsingConstructor(Timestamp timestamp) {
    return new DateTime(timestamp.getTime());
}

Let’s see the following test code:

public void givenTimestamp_whenUsingConstructor_thenConvertToDateTime() {
    long currentTimeMillis = System.currentTimeMillis();
    Timestamp timestamp = new Timestamp(currentTimeMillis);
    DateTime expectedDateTime = new DateTime(currentTimeMillis);
    DateTime convertedDateTime = DateTimeAndTimestampConverter.convertToDateTimeUsingConstructor(timestamp);
    assertEquals(expectedDateTime, convertedDateTime);
}

2.2. Using the Instant class

The easiest way to think of the Instant class is as a single moment in the UTC zone. If we think of time as a line, Instant represents a single point on the line.

Under the hood, the Instant class is just counting the number of seconds and nanoseconds relative to the standard Unix epoch time of January 1, 1970, at 00:00:00. This point in time is denoted by 0 seconds and 0 nanoseconds, and everything else is just an offset from it.

Storing the number of seconds and nanoseconds relative to this specific time point allows the class to store negative and positive offsets. In other words, the Instant class can represent times before and after the epoch time.

Let’s look at how we can work with the Instant class to convert a Timestamp to DateTime:

DateTime convertToDateTimeUsingInstant(Timestamp timestamp) {
    Instant instant = timestamp.toInstant();
    return new DateTime(instant.toEpochMilli());
}

In the above method, we convert the provided timestamp to an Instant by using the toInstant() method of the Timestamp class, which represents a moment on the timeline in UTC. Then, we use the toEpcohMilli() method on the Instant object to get the number of milliseconds since the Unix epoch.

Let’s test this method by using the system’s current milliseconds:

@Test
public void givenTimestamp_whenUsingInstant_thenConvertToDateTime() {
    long currentTimeMillis = System.currentTimeMillis();
    Timestamp timestamp = new Timestamp(currentTimeMillis);
    DateTime expectedDateTime = new DateTime(currentTimeMillis);
    DateTime convertedDateTime = DateTimeAndTimestampConverter.convertToDateTimeUsingInstant(timestamp);
    assertEquals(expectedDateTime, convertedDateTime);
}

2.3. Using the LocalDateTime class

The java.timе packagе was introduced in Java 8 and offers a modern date and time API. LоcalDatеTimе is one of the classes in this packagе, which can store and manipulate data and time of different timezones. Let’s take a look at this approach:

DateTime convertToDateTimeUsingLocalDateTime(Timestamp timestamp) {
    LocalDateTime localDateTime = timestamp.toLocalDateTime();
    return new DateTime(localDateTime.atZone(ZoneId.systemDefault()).toInstant().toEpochMilli());
}

The toLocalDateTime() method of the Timestamp class converts the Timestamp to a LocalDateTime, which represents a date and time without timezone information. Let’s take a look at this approach:

@Test
public void givenTimestamp_whenUsingLocalDateTime_thenConvertToDateTime() {
    long currentTimeMillis = System.currentTimeMillis();
    Timestamp timestamp = new Timestamp(currentTimeMillis);
    DateTime expectedDateTime = new DateTime(currentTimeMillis);
    DateTime convertedDateTime = DateTimeAndTimestampConverter.convertToDateTimeUsingLocalDateTime(timestamp);
    assertEquals(expectedDateTime, convertedDateTime);
}

3. Converting org.joda.time.DateTime to java.sql.Timestamp

Now, we’ll look into multiple approaches to converting org.joda.time.DateTime to java.sql.Timestamp.

3.1. Using Constructor

We can also use the Timestamp constructor to convert org.joda.time.DateTime to java.sql.Timestamp. Here, we’ll use the getMillis() method of the DateTime class which will return the number of milliseconds since the Unix epoch, and then provide this value to the Timestamp constructor.

Let’s look at how we can use the getMillis() method:

Timestamp convertToTimestampUsingConstructor(DateTime dateTime) {
    return new Timestamp(dateTime.getMillis());
}

Now, let’s test this approach:

@Test
public void givenDateTime_whenUsingConstructor_thenConvertToTimestamp() {
    long currentTimeMillis = System.currentTimeMillis();
    DateTime dateTime = new DateTime(currentTimeMillis);
    Timestamp expectedTimestamp = new Timestamp(currentTimeMillis);
    Timestamp convertedTimestamp = DateTimeAndTimestampConverter.convertToTimestampUsingConstructor(dateTime);
    assertEquals(expectedTimestamp, convertedTimestamp);
}

3.2. Using the Instant class

Let’s look at how we can use the Instant class to convert the DateTime to java.sql.Timestamp:

Timestamp convertToTimestampUsingInstant(DateTime dateTime) {
    Instant instant = Instant.ofEpochMilli(dateTime.getMillis());
    return Timestamp.from(instant);
}

In the above method, we converted the provided dateTime to an Instant by providing the number of milliseconds since the Unix epoch. After that, we get the Timestamp from an Instant object using the Timestamp’s constructor.

Let’s see the following test code:

@Test
public void givenDateTime_whenUsingInstant_thenConvertToTimestamp() {
    long currentTimeMillis = System.currentTimeMillis();
    DateTime dateTime = new DateTime(currentTimeMillis);
    Timestamp expectedTimestamp = new Timestamp(currentTimeMillis);
    Timestamp convertedTimestamp = DateTimeAndTimestampConverter.convertToTimestampUsingInstant(dateTime);
    assertEquals(expectedTimestamp, convertedTimestamp);
}

3.3. Using the LocalDateTime class

Let’s use the LocalDateTime class to convert the DateTime to java.sql.Timestamp:

Timestamp convertToTimestampUsingLocalDateTime(DateTime dateTime) {
    Instant instant = Instant.ofEpochMilli(dateTime.getMillis());
    LocalDateTime localDateTime = LocalDateTime.ofInstant(instant, ZoneId.systemDefault());
    return Timestamp.valueOf(localDateTime);
}

In the above method, we converted the provided dateTime to an Instant by providing the number of milliseconds since the Unix epoch. LocalDateTime represents a date and time without a timezone. After this, we retrieve the system default time zone using the ZoneId.systemDefault() to ensure that the LocalDateTime is created using the local time zone settings.

Now, let’s run our test:

@Test
public void givenDateTime_whenUsingLocalDateTime_thenConvertToTimestamp() {
    long currentTimeMillis = System.currentTimeMillis();
    DateTime dateTime = new DateTime(currentTimeMillis);
    Timestamp expectedTimestamp = new Timestamp(currentTimeMillis);
    Timestamp convertedTimestamp = DateTimeAndTimestampConverter.convertToTimestampUsingLocalDateTime(dateTime);
    assertEquals(expectedTimestamp, convertedTimestamp);
}

4. Conclusion

In this quick tutorial, we learned how to convert between org.joda.time.DateTime to java.sql.Timestamp classes in Java.

As always, the code used in this article can be found over on GitHub.


Java Weekly, Issue 552

$
0
0

1. Spring and Java

>> JFR Event to Detect Invocations of Deprecated Methods [inside.java]

New in JDK 22, a JFR event to detect invoked deprecated methods — useful for finding the deprecated dependencies

>> JEP 481: Third Preview of Scoped Values API Brings Key Enhancements in JDK 23 [infoq.com]

Promoting better coding practices with another preview of scoped values: sharing data across methods and threads in a safer manner

>> Effective Java Logging [foojay.io]

And a useful anthology of some practices to follow and also some to avoid, to have more effective logs

Also worth reading:

Webinars and presentations:

Time to upgrade:

2. Pick of the Week

>> Why Facebook doesn’t use Git [graphite.dev]


Difference Between M2_HOME, MAVEN_HOME and using the PATH variable

$
0
0

1. Overview

As part of the Apache Maven installation process, we need to configure various environment variables to ensure our Maven installation works smoothly. In this tutorial, we’ll look at three of these variables: M2_HOME, MAVEN_HOME, and PATH. We’ll see how they influence our installation, depending on the version of Maven we’re using.

Let’s start by looking at how we’d configure the earliest version of Maven.

Note: Apache Maven 1.x and Maven 2.x have reached their end of life. Sections 2 and 3 demonstrate configurations only for illustrative purposes and don’t advocate for their use.

2. Maven 1.x

After verifying and extracting a ready-made binary distribution Maven archive, let’s navigate to the Maven directory’s bin folder. From here, we can run a maven command to see if it works out of the box:

$ maven -v

This command will produce an output indicating that we’re missing a required environment variable:

MAVEN_HOME must be set

Here, Maven informs us that the MAVEN_HOME environment variable not only indicates where the Maven directory was extracted, but it’s also a mandatory variable.

After adding this environment variable to our system, let’s run the previous command:

$ maven -v

We’ll get this result:

 __  __
|  \/  |__ _Apache__ ___
| |\/| / _` \ V / -_) ' \  ~ intelligent projects ~
|_|  |_\__,_|\_/\___|_||_|  v. 1.1

This shows that our system will work with the downloaded version of Maven.

Next, let’s consider how the usage of this variable changed in Maven 2.x.

3. Maven 2.x

After we’ve verified and extracted the downloaded Maven binaries, let’s navigate to the bin directory and run the version information command:

$ mvn -v

Unlike in the previous section, Maven 2.x does not complain about the MAVEN_HOME or M2_HOME variable not being set because version 2 made this variable optional. The command gives an output similar to the one below:

Apache Maven 2.2.1 (r801777; 2009-08-06 21:16:01+0200)
Java version: 1.8.0_412
Java home: /home/.sdkman/candidates/java/8.0.412.fx-librca/jre
Default locale: en, platform encoding: UTF-8
OS name: "linux"

In Maven 2.x, the MAVEN_HOME variable was renamed to M2_HOME. This means that to specify the installation location for Maven 2.x, we need to set the M2_HOME environment variable.

Next, let’s have a look at the latest version of Maven.

4. Maven 3.x

After verifying and extracting the binaries, let’s navigate to the bin directory and query the version information again:

$ mvn -v

The command gives an output similar to the one below:

Apache Maven 3.9.8 (36645f6c9b5079805ea5009217e36f2cffd34256)
Maven home: /home/dev-tools/apache-maven-3.9.8
Java version: 1.8.0_412, vendor: BellSoft, 
    runtime: /home/.sdkman/candidates/java/8.0.412.fx-librca/jre
Default locale: en, platform encoding: UTF-8
OS name: "linux"

Similar to version 2, Maven 3.x made the MAVEN_HOME variable optional. In Maven 3.x, MAVEN_HOME replaced M2_HOME as the variable used to specify the installation location.

5. Comparison Summary

Let’s summarize what we’ve discussed in a tabular format:

Maven Version Variable Name Is it Required
1.x MAVEN_HOME Yes
2.x M2_HOME Optional
3.x MAVEN_HOME Optional

6. Setting the PATH Variable

In the previous sections, we executed the Maven command from within the installation’s bin directory. To enable us to run Maven commands from outside the bin directory, we need to add it to our PATH environment variable. The Maven installation tutorial shows how to do this for different operating systems: Windows, Linux, and macOS.

Consequently, we should be able to run Maven commands from anywhere in our system.

7. Conclusion

In this tutorial, we examined three environment variables that affect our Maven installation: M2_HOME, MAVEN_HOME, and PATH. We saw that M2_HOME and MAVEN_HOME refer to the Maven installation directory, depending on the version. Additionally, we explained how setting the PATH variable makes Maven commands available from anywhere in our system.


Add Jar Files to Java Project Using Visual Studio Code

$
0
0

1. Overview

The Visual Studio Code (VSCode) editor is gaining popularity among Java developers. According to a survey by Baeldung, VSCode ranks third among Integrated Development Environments (IDEs) used by Java developers.

While build tools like Maven and Gradle simplify dependency management, beginners often start learning Java without them. VSCode provides an easy setup for manually adding JAR files to a Java project.

In this tutorial, we’ll learn how to add JAR files manually to a VSCode project through settings.json and the Reference Libraries section.

2. Why Add JAR Files Manually?

Adding JARs manually can be a great learning experience, especially for beginners who are learning about classpath management. Also, it can be ideal for a small project and quick prototyping. Furthermore, some legacy code may require manual JAR management.

However, manual JAR management may not be ideal for a large project because of the difficulty in managing the dependency versions and potential version conflicts. Also, it can be time-consuming for a larger project.

Build tools like Maven and Gradle solve these bottlenecks by simplifying the process of adding and updating external libraries.

3. Bootstrapping a Java Project With VSCode

To bootstrap a Java application with VSCode, we need to install the Java Extension Pack. Next, let’s open the Command Palette by clicking View at the toolbar and selecting the Command Palette option. Alternatively, we can use Ctrl + Shift + P shortcut keys.

Then, we need to type “Java: Create Java Project” and select it. Next, VSCode prompts us to select the build tool, let’s choose the “No build tools” option. Finally, we need to choose a name for the project and save it in a desired directory.

VSCode creates a new project with the following structure:

project structure of java project in vscode without build tool.

The .vscode folder contains the settings.json file. The lib folder can contain external jar files for the project. Finally, the src folder contains the source code.

4. Adding JAR File Through settings.json

After creating a project, our project contains a folder named .vscode which includes the settings.json file. The settings.json file allows us to specify the path to external dependencies, the output directory for compiled classes, and the path to the source code. This file is essential when managing dependency manually.

4.1. Understanding settings.json

The settings.json file manages the project settings. Here’s the initial content of the file:

{
    "java.project.sourcePaths": ["src"],
    "java.project.outputPath": "bin",
    "java.project.referencedLibraries": [
        "lib/**/*.jar"
    ]
}

The java.project.referencedLibraries key specifies the paths to JAR files. The values of the key are paths to the JAR files, typically defined as an array to accommodate multiple paths.

By default, it adds the lib folder already, any JAR file added to this folder is automatically added to the classpath.

4.2. Adding a JAR File

Let’s edit the App class created by default by logging ‘Hello World!‘ to the console using the SLF4J library:

class App {
    static Logger logger = LoggerFactory.getLogger(App.class);
    public static void main(String[] args) throws Exception {
        logger.info("Hello World!");
    }
}

However, the SLF4J library is not in our classpath, hence VSCode marks the Logger object with an error:

error as a result of not adding sl4j library to the classpath

Next, let’s download the slf4j-api-2.1.0-alpha1.jar and slf4j-simple-2.1.0-alpha1.jar and add them to the lib folder:

adding log library jar file to the lib folder

After adding the downloaded JAR files to the lib folder, we can import the dependency without error. Note the lib folder is registered by default.

However, we may decide to reference the JAR file from another folder entirely by specifying the JAR file path in settings.json:

{
    "java.project.sourcePaths": ["src"],
    "java.project.outputPath": "bin",
    "java.project.referencedLibraries": [
        "lib/**/*.jar",
        "/home/baeldung/Downloads/slf4j-api-2.1.0-alpha1.jar",
        "/home/baeldung/Downloads/slf4j-simple-2.1.0-alpha1.jar"
    ]
}

Here, we add the path to JAR files from different folders different from the lib folder.

5. Adding JAR File Through the Sidebar Option

VSCode by default creates a section named ‘JAVA PROJECTS‘ at the sidebar when working on a Java project. This section when expanded has the Referenced Libraries and JRE System Library options:

java program extension tab for reference libraries

To add a JAR file, let’s click on the plus sign to locate a JAR file and add it to our project:

Adding jar file via the java section plus sign

After clicking the plus sign and locating the file, the Referenced libraries option is updated. Notably, the settings.json file also gets updated with the path of the JAR file.

Also, when we add a JAR file via the settings.json file, the Referenced libraries get updated with the JAR file.

6. Conclusion

In this article, we learned how to create a Java project in VSCode without a build tool. Then, we deep-dived into how to add an external jar file to the project by specifying the file location in the settings.json file or by adding it through the Reference Libraries section.


How to Add String Arrays to ArrayList in Java

$
0
0

1. Overview

In Java, ArrayList is a commonly used List implementation. There are scenarios when we might need to add elements from multiple String arrays to an ArrayList.

In this quick tutorial, let’s explore how to accomplish this task efficiently.

2. Introduction to the Problem

Before diving into the code, let’s quickly understand the problem through an example.

Let’s say we have three String arrays:

final static String[] ARRAY1 = { "Java", "Kotlin", "Sql", "Javascript" };
final static String[] ARRAY2 = { "C", "C++", "C#", "Typescript" };
final static String[] ARRAY3 = { "Python", "Ruby", "Go", "Rust" };

Also, we have a method to produce a String List with two String elements:

List<String> initLanguageList() {
    List<String> languageList = new ArrayList<>();
    languageList.add("Languages");
    languageList.add(":");
    return languageList;
}

If we correctly add String elements from the three arrays in turn to the List that initLanguageList() produced, we expect to have a List carrying the following elements:

final static List<String> EXPECTED = List.of(
  "Languages", ":",
  "Java", "Kotlin", "Sql", "Javascript",
  "C", "C++", "C#", "Typescript",
  "Python", "Ruby", "Go", "Rust");

We can use List’s add() and addAll() methods to add one single String or a String Collection to a List<String> conveniently. However, these two methods cannot directly add an array of String elements to a List<String>.

Next, we’ll address different ways to add elements from multiple arrays to a List.

3. Converting Arrays to Lists and Then Using the addAll() Method

We know the List.addAll() method can add multiple elements to a List. But it accepts a Collection parameter instead of an array. So, the first idea to solve the problem is to convert arrays to Collections, such as Lists,  and then use List.addAll() to add array elements to the List. Moreover, to convert an array to a List, we can use the Arrays.asList() method:

List<String> languageList = initLanguageList();
for (String[] array : List.of(ARRAY1, ARRAY2, ARRAY3)) {
    languageList.addAll(Arrays.asList(array));
}
assertEquals(EXPECTED, languageList);

In this example, we first wrap the three arrays in a List. Then, we pass through each array using a loop. In the loop, we convert each array to a List, and pass it to the addAll() method.

4. Using the Collections.addAll() Method

We’ve noted List.addAll() doesn’t accept an array as the parameter. So, we converted arrays to Lists to feed List.addAll(). However, Collections.addAll() supports adding multiple elements as Varargs to a Collection object:

public static <T> boolean addAll(Collection<? super T> c, T... elements)

As Java treats Varargs argument as an array, we can directly pass an array as a parameter to Collections.addAll():

List<String> languageList = initLanguageList();
for (String[] array : List.of(ARRAY1, ARRAY2, ARRAY3)) {
    Collections.addAll(languageList, array);
}
assertEquals(EXPECTED, languageList);

As the test code shows, we replaced the previous List.addAll() call with Collections.addAll(), and we don’t need to convert arrays to Lists.

5. Using Stream‘s flatMap() Method

Java Stream API allows us to manipulate Collections fluently and conveniently. Next, let’s solve the problem using Stream API:

List<String> languageList = initLanguageList();
 
Stream.of(ARRAY1, ARRAY2, ARRAY3)
  .flatMap(Arrays::stream)
  .forEachOrdered(languageList::add);
assertEquals(EXPECTED, languageList);

As we can see, we first create a Stream object carrying the three String arrays. The flatMap() method is helpful in transforming and flattening collections of collections, including arrays of arrays, into a single stream. In this example, we use this method to flatten the steam of arrays into a single stream of String values.

Then, we pass a method reference (languageList::add) to Stream‘s forEachOrdered() method to add each array element to languageList.

If we run the test, it passes. The Stream.flatMap() approach leverages the power of Java streams to transform and flatten data structures, making our code concise and readable.

6. Conclusion

In this article, we’ve explored various ways to add elements from multiple String arrays to an ArrayList in Java. We can use the Arrays.asList() method or Collections.addAll() to solve the problem. Additionally, using Stream.flatMap() to add elements from multiple String arrays to an ArrayList is an efficient and elegant approach.

As always, the complete source code for the examples is available over on GitHub.


How to Sort Map Value List by Element Field Using Java Streams

$
0
0

1. Overview

In this tutorial, we’ll explore the benefits of Streams API in sorting elements in a List stored within a Map. In the process, we’ll also compare it with the more traditional approach of using the List#sort(Comparator) method and see which is more effective.

2. Problem Statement

Before we look at the solution, let’s discuss the problem first.

Let’s assume there’s an Employee class:

public class Employee {
    private String name;
    private int salary;
    private String department;
    private String sex;
    public Employee(String name, int salary, String department, String sex) {
        this.name = name;
        this.salary = salary;
        this.department = department;
        this.sex = sex;
    }
    
    //getter and setters ..
}

The Employee class has fields name, salary, department, and sex. Additionally, we’ve got a constructor helping us to create the Employee object.

We’ll create a list of Employee objects by reading the records from a CSV file emp_not_sorted.csv consisting of the employees’ data:

Sales,John Doe,48000,M
HR,Jane Smith,60000,F
IT,Robert Brown,75000,M
Marketing,Alice Johnson,55000,F
Sales,Chris Green,48000,M
HR,Emily White,62000,F
IT,Michael Black,72000,M
Marketing,Linda Blue,60000,F
More records...

The CSV file has columns for department, name, salary, and sex.

We’ll read this CSV file and store the records in a Map:

static void populateMap(String filePath) throws IOException {
    String[] lines = readLinesFromFile(filePath);
    Arrays.asList(lines)
      .forEach(e -> {
        String[] strArr = e.split(",");
            Employee emp = new Employee(strArr[1], Integer.valueOf(strArr[2]), strArr[0], strArr[3]);
            MAP_OF_DEPT_TO_MAP_OF_SEX_TO_EMPLOYEES.computeIfAbsent(emp.getDepartment(),
              k -> new HashMap<>())
                .computeIfAbsent(emp.getSex(), k -> new ArrayList<>())
                .add(emp);
        });
}

In the method, the MAP_OF_DEPT_TO_MAP_OF_SEX_TO_EMPLOYEES field is of type Map<String, Map<String, List>>. The outer key of the map is the department field while the inner key in the map consists of the sex field.

In the next section, we’ll access the Employee List in the inner Map and try sorting it by salary and then by the employees’ name.

Here’s the result we expect after sorting:

Sales,Chris Green,48000,M
Sales,John Doe,48000,M
Sales,Matthew Cyan,48000,M
Sales,David Grey,50000,M
Sales,James Purple,50000,M
Sales,Aiden White,55000,M
More records..
HR,Isabella Magenta,60000,F
HR,Jane Smith,60000,F
HR,Emily White,62000,F
HR,Sophia Red,62000,F
More records..

First, the records are sorted by salary and then by the name of the employees. We follow the same pattern for the other departments.

3. Solution Without Stream API

Traditionally, we’d go for the List#sort(Comparator) method:

void givenHashMapContainingEmployeeList_whenSortWithoutStreamAPI_thenSort() throws IOException {
    final List<Employee> lstOfEmployees = new ArrayList<>();
    MAP_OF_DEPT_TO_MAP_OF_SEX_TO_EMPLOYEES.forEach((dept, deptToSexToEmps) ->
        deptToSexToEmps.forEach((sex, emps) ->
        {
            emps.sort(Comparator.comparingInt(Employee::getSalary).thenComparing(Employee::getName));
            emps.forEach(this::processFurther);
            lstOfEmployees.addAll(emps);
        })
    );
    String[] expectedArray = readLinesFromFile(getFilePath("emp_sorted.csv"));
    String[] actualArray = getCSVDelimitedLines(lstOfEmployees);
    assertArrayEquals(expectedArray, actualArray);
}

We’ve used the forEach() method for iterating through the Map instead of the for or while loop over the Set of keys or the Entrys of the Map class. This method is part of the enhancements such as the Generics, Functional Programming, and Stream API that were brought in Java 8.

The List#sort(Comparator) method takes the Comparator Functional Interface introduced in Java 8. The Comparator#comparingInt() sorts by the field salary and returns a Comparator object which calls the thenComparing() method to sort on the name field. The chain of methods provides a flexible custom sorting logic with a function or a lambda expression. This style of code is more declarative and thus easier to understand.

The sort() method sorts the original Employee List object in the emps variable, violating the principle of immutability. This mutation can complicate troubleshooting and debugging while fixing programming defects. Moreover, it doesn’t return a List or a Stream object for further processing. Hence, we need to loop through the List object again for further processing. It breaks the flow making it less intuitive to understand.

4. Solution With Stream API

Considering the disadvantages discussed in the previous section, let’s address them with the help of Stream API:

void givenHashMapContainingEmployeeList_whenSortWithStreamAPI_thenSort() throws IOException {
    final List<Employee> lstOfEmployees = new ArrayList<>();
    MAP_OF_DEPT_TO_MAP_OF_SEX_TO_EMPLOYEES.forEach((dept, deptToSexToEmps) ->
      deptToSexToEmps.forEach((sex, emps) ->
        {
             List<Employee> employees = emps.stream()
               .sorted(Comparator.comparingInt(Employee::getSalary).thenComparing(Employee::getName))
               .map(this::processFurther)
               .collect(Collectors.toList());
             lstOfEmployees.addAll(employees);
        })
    );
    String[] expectedArray = readLinesFromFile(getFilePath("emp_sorted.csv"));
    String[] actualArray = getCSVDelimitedLines(lstOfEmployees);
    assertArrayEquals(expectedArray, actualArray);
}

Unlike the previous approach, the Stream#sorted(Comparator) method returns a Stream object. It works similarly to the List#sort(Comparator) method, but here we can further process each element of the Employee List with the help of the Stream#map() method. For example, the processFurther() function-argument in the map() method takes each employee element as a parameter to process it further.

We can perform multiple intermediate operations in a pipeline, concluding with a terminal operation like collect() or reduce(). Finally, we collect the sorted Employee list and later use it to verify if it was sorted by comparing it with the sorted employee data in the emp_sorted.csv file.

5. Conclusion

In this article, we discussed the Stream#sorted(Comparator) method and compared it to List#sort(Comparator).

We can conclude that Stream#sorted(Comparator) provides better continuity and readability to the code than List#sort(Comparator). While the Stream API has many powerful features, it’s essential to consider the principles of functional programming in Stream API such as immutability, statelessness, and pure functions. Without following them, we can end up with erroneous results.

As usual, the code used in this article is available over on GitHub.

       
Viewing all 4535 articles
Browse latest View live


<script src="https://jsc.adskeeper.com/r/s/rssing.com.1596347.js" async> </script>