Quantcast
Channel: Baeldung
Viewing all 4755 articles
Browse latest View live

A Simple Tagging Implementation with Elasticsearch

$
0
0

1. Overview

Tagging is a common design pattern that allows us to categorize and filter items in our data model.

In this article, we’ll implement tagging using Spring and Elasticsearch. We’ll be using both Spring Data and the Elasticsearch API.

First of all, we aren’t going to cover the basics of getting Elasticsearch and Spring Data – you can explore these here.

2. Adding Tags

The simplest implementation of tagging is an array of strings.  We can implement this by adding a new field to our data model like this:

@Document(indexName = "blog", type = "article")
public class Article {

    // ...

    @Field(type = String, index = not_analyzed)
    private String[] tags;

    // ...
}

Notice the use of the not_analyzed flag on the index. We only want exact matches of our tags to filter a result. This allows us to use similar but separate tags like elasticsearchIsAwesome and elasticsearchIsTerrible.

Analyzed fields would return partial hits which is a wrong behavior in this case.

3. Building Queries

Tags allow us to manipulate our queries in interesting ways. We can search across them like any other field, or we can use them to filter our results on match_all queries. We can also use them with other queries to tighten our results.

3.1. Searching Tags

The new tag field we created on our model is just like every other field in our index. We can search for any entity that has a specific tag like this:

@Query("{\"bool\": {\"must\": [{\"match\": {\"tags\": \"?0\"}}]}}")
Page<Article> findByTagUsingDeclaredQuery(String tag, Pageable pageable);

This example uses a Spring Data Repository to construct our query, but we can just as quickly use a Rest Template to query the Elasticsearch cluster manually.

Similarly, we can use the Elasticsearch API:

boolQuery().must(termQuery("tags", "elasticsearch"));

Assume we use the following documents in our index:

[
    {
        "id": 1,
        "title": "Spring Data Elasticsearch",
        "authors": [ { "name": "John Doe" }, { "name": "John Smith" } ],
        "tags": [ "elasticsearch", "spring data" ]
    },
    {
        "id": 2,
        "title": "Search engines",
        "authors": [ { "name": "John Doe" } ],
        "tags": [ "search engines", "tutorial" ]
    },
    {
        "id": 3,
        "title": "Second Article About Elasticsearch",
        "authors": [ { "name": "John Smith" } ],
        "tags": [ "elasticsearch", "spring data" ]
    },
    {
        "id": 4,
        "title": "Elasticsearch Tutorial",
        "authors": [ { "name": "John Doe" } ],
        "tags": [ "elasticsearch" ]
    },
]

Now we can use this query:

Page<Article> articleByTags = articleService.findByTagUsingDeclaredQuery("elasticsearch", new PageRequest(0, 10));

// articleByTags will contain 3 articles [ 1, 3, 4]
assertThat(articleByTags, containsInAnyOrder(
 hasProperty("id", is(1)),
 hasProperty("id", is(3)),
 hasProperty("id", is(4)))
);

3.2. Filtering All Documents

A common design pattern is to create a Filtered List View in the UI that shows all entities, but also allows the user to filter based on different criteria.

Let’s say we want to return all articles filtered by whatever tag the user selects:

@Query("{\"bool\": {\"must\": " +
  "{\"match_all\": {}}, \"filter\": {\"term\": {\"tags\": \"?0\" }}}}")
Page<Article> findByFilteredTagQuery(String tag, Pageable pageable);

Once again, we’re using Spring Data to construct our declared query.

Consequently, the query we’re using is split into two pieces. The scoring query is the first term, in this case, match_all. The filter query is next and tells Elasticsearch which results to discard.

Here is how we use this query:

Page<Article> articleByTags =
  articleService.findByFilteredTagQuery("elasticsearch", new PageRequest(0, 10));

// articleByTags will contain 3 articles [ 1, 3, 4]
assertThat(articleByTags, containsInAnyOrder(
  hasProperty("id", is(1)),
  hasProperty("id", is(3)),
  hasProperty("id", is(4)))
);

It is important to realize that although this returns the same results as our example above, this query will perform better.

3.3. Filtering Queries

Sometimes a search returns too many results to be usable. In that case, it’s nice to expose a filtering mechanism that can rerun the same search, just with the results narrowed down.

Here’s an example where we narrow down the articles an author has written, to just the ones with a specific tag:

@Query("{\"bool\": {\"must\": " + 
  "{\"match\": {\"authors.name\": \"?0\"}}, " +
  "\"filter\": {\"term\": {\"tags\": \"?1\" }}}}")
Page<Article> findByAuthorsNameAndFilteredTagQuery(
  String name, String tag, Pageable pageable);

Again, Spring Data is doing all the work for us.

Let’s also look at how to construct this query ourselves:

QueryBuilder builder = boolQuery().must(
  nestedQuery("authors", boolQuery().must(termQuery("authors.name", "doe"))))
  .filter(termQuery("tags", "elasticsearch"));

We can, of course, use this same technique to filter on any other field in the document. But tags lend themselves particularly well to this use case.

Here is how to use the above query:

SearchQuery searchQuery = new NativeSearchQueryBuilder().withQuery(builder)
  .build();
List<Article> articles = 
  elasticsearchTemplate.queryForList(searchQuery, Article.class);

// articles contains [ 1, 4 ]
assertThat(articleByTags, containsInAnyOrder(
 hasProperty("id", is(1)),
 hasProperty("id", is(4)))
);

4. Filter Context

When we build a query, we need to differentiate between the Query Context and the Filter Context. Every query in Elasticsearch has a Query Context so we should be used to seeing them.

Not every query type supports the Filter Context. Therefore if we want to filter on tags, we need to know which query types we can use.

The bool query has two ways to access the Filter Context. The first parameter, filter, is the one we use above. We can also use a must_not parameter to activate the context.

The next query type we can filter is constant_score. This is useful when uu want to replace the Query Context with the results of the Filter and assign each result the same score.

The final query type that we can filter based on tags is the filter aggregation. This allows us to create aggregation groups based on the results of our filter. In other words, we can group all articles by tag in our aggregation result.

5. Advanced Tagging

So far, we have only talked about tagging using the most basic implementation. The next logical step is to create tags that are themselves key-value pairs. This would allow us to get even fancier with our queries and filters.

For example, we could change our tag field into this:

@Field(type = Nested, index = not_analyzed)
private List<Tag> tags;

Then we’d just change our filters to use nestedQuery types.

Once we understand how to use key-value pairs it is a small step to using complex objects as our tag. Not many implementations will need a full object as a tag, but it’s good to know we have this option should we require it.

6. Conclusion

In this article, we’ve covered the basics of implementing tagging using Elasticsearch.

As always, examples can be found over on GitHub.


Compiling Java *.class Files with javac

$
0
0

1. Overview

This tutorial will introduce the javac tool and describes how to use it to compile Java source files into class files.

We’ll get started with a short description of the javac command, then examine the tool in more depth by looking at its various options.

2. The javac Command

We can specify options and source files when executing the javac tool:

javac [options] [source-files]

Where [options] denotes the options controlling operations of the tool, and [source-files] indicates one or more source files to be compiled.

All options are indeed entirely optional. Source files can be directly specified as arguments to the javac command or kept in a referenced argument file as described later. Notice that source files should be arranged in a directory hierarchy corresponding to the fully qualified names of the types they contain.

Options of javac are categorized into three groups: standard, cross-compilation, and extra. In this article, we’ll focus on the standard and extra options.

The cross-compilation options are used for the less common use case of compiling type definitions against a JVM implementation different from the compiler’s environment and won’t be addressed.

3. Type Definition

Let’s start by introducing the class we’re going to use to demonstrate the javac options:

public class Data {
    List<String> textList = new ArrayList();

    public void addText(String text) {
        textList.add(text);
    }

    public List getTextList() {
        return this.textList;
    }
}

The source code is placed in the file com/baeldung/javac/Data.java.

Note that we use *nix file separators in this article; on Windows machines, we must use the backslash (‘\’) instead of the forward slash (‘/’).

4. Standard Options

One of the most commonly used standard options of the javac command is -d, specifying the destination directory for generated class files. If a type isn’t part of the default package, a directory structure reflecting the package’s name is created to keep the class file of that type.

Let’s execute the following command in the directory containing the structure provided in the previous section:

javac -d javac-target com/baeldung/javac/Data.java

The javac compiler will generate the class file javac-target/com/baeldung/javac/Data.class. Note that on some systems, javac doesn’t automatically create the target directory, which is javac-target in this case. Therefore, we may need to do so manually.

Here are a couple of other frequently used options:

  • -cp (or -classpath, –class-path) – specifies where types required to compile our source files can be found. If this option is missing and the CLASSPATH environment variable isn’t set, the current working directory is used instead (as was the case in the example above).
  • -p (or –module-path) –  indicates the location of necessary application modules. This option is only applicable to Java 9 and above – please refer to this tutorial for a guide to the Java 9 module system.

If we want to know what’s going on during a compilation process, e.g. which classes are loaded and which are compiled, we can apply the -verbose option.

The last standard option we’ll cover is the argument file. Instead of passing arguments directly to the javac tool, we can store them in argument files. The names of those files, prefixed with the ‘@ character, are then used as command arguments.

When the javac command encounters an argument starting with ‘@, it interprets the following characters as the path to a file and expands the file’s content into an argument list. Spaces and newline characters can be used to separate arguments included in such an argument file.

Let’s assume we have two files, named options, and types, in the javac-args directory with the following content:

The options file:

-d javac-target
-verbose

The types file:

com/baeldung/javac/Data.java

We can compile the Data type like before with detail messages printed on the console by executing this command:

javac @javac-args/options @javac-args/types

Rather than keeping arguments in separate files, we can also store them all in a single file.

Suppose there is a file named arguments in the javac-args directory:

-d javac-target -verbose
com/baeldung/javac/Data.java

Let’s feed this file to javac to achieve the same result as with the two separate files before:

javac @javac-args/arguments

Notice the options we’ve gone through in this section are the most common ones only. For a complete list of standard javac options, check out this reference.

5. Extra Options

Extra options of javac are non-standard options, which are specific to the current compiler implementation and may be changed in the future. As such, we won’t go over these options in detail.

However, there is an option that’s very useful and worth mentioning, -Xlint. For a full description of the other javac extra options, follow this link.

The -Xlint option allows us to enable warnings during compilation. There are two ways to specify this option on the command line:

  • -Xlint – triggers all recommended warnings
  • -Xlint:key[,key]* – enables specific warnings

Here are some of the handiest -Xlint keys:

  • rawtypes – warns about the use of raw types
  • unchecked –  warns about unchecked operations
  • static – warns about the access to a static member from an instance member
  • cast – warns about unnecessary casts
  • serial – warns about serializable classes not having a serialversionUID
  • fallthrough – warns about the falling through in a switch statement

Now, create a file named xlint-ops in the javac-args directory with the following content:

-d javac-target
-Xlint:rawtypes,unchecked
com/baeldung/javac/Data.java

When running this command:

javac @javac-args/xlint-ops

we should see the rawtypes and unchecked warnings:

com/baeldung/javac/Data.java:7: warning: [rawtypes] found raw type: ArrayList
    List<String> textList = new ArrayList();
                                ^
  missing type arguments for generic class ArrayList<E>
  where E is a type-variable:
    E extends Object declared in class ArrayList
com/baeldung/javac/Data.java:7: warning: [unchecked] unchecked conversion
    List<String> textList = new ArrayList();
                            ^
  required: List<String>
  found:    ArrayList
...

6. Conclusion

This tutorial walked through the javac tool, showing how to use options to manage the typical compilation process.

In reality, we usually compile a program using an IDE or a build tool rather than directly relying on javac. However, a solid understanding of this tool will allow us to customize the compilation in advanced use cases.

As always, the source code for this tutorial can be found over on GitHub.

Custom Assertions with AssertJ

$
0
0

1. Overview

In this tutorial, we’ll walk through creating custom AssertJ assertions; the AssertJ’s basics can be found here.

Simply put, custom assertions allow creating assertions specific to our own classes, allowing our tests to better reflect the domain model.

2. Class Under Test

Test cases in this tutorial will be built around the Person class:

public class Person {
    private String fullName;
    private int age;
    private List<String> nicknames;

    public Person(String fullName, int age) {
        this.fullName = fullName;
        this.age = age;
        this.nicknames = new ArrayList<>();
    }

    public void addNickname(String nickname) {
        nicknames.add(nickname);
    }

    // getters
}

3. Custom Assertion Class

Writing a custom AssertJ assertion class is pretty simple. All we need to do is to declare a class that extends AbstractAssert, add a required constructor, and provide custom assertion methods.

The assertion class must extend the AbstractAssert class to give us access to essential assertion methods of the API, such as isNotNull and isEqualTo.

Here’s the skeleton of a custom assertion class for Person:

public class PersonAssert extends AbstractAssert<PersonAssert, Person> {

    public PersonAssert(Person actual) {
        super(actual, PersonAssert.class);
    }

    // assertion methods described later
}

We must specify two type arguments when extending the AbstractAssert class: the first is the custom assertion class itself, which is required for method chaining, and the second is the class under test.

To provide an entry point to our assertion class, we can define a static method that can be used to start an assertion chain:

public static PersonAssert assertThat(Person actual) {
    return new PersonAssert(actual);
}

Next, we’ll go over several custom assertions included in the PersonAssert class.

The first method verifies that the full name of a Person matches a String argument:

public PersonAssert hasFullName(String fullName) {
    isNotNull();
    if (!actual.getFullName().equals(fullName)) {
        failWithMessage("Expected person to have full name %s but was %s", 
          fullName, actual.getFullName());
    }
    return this;
}

The following method tests if a Person is an adult based on its age:

public PersonAssert isAdult() {
    isNotNull();
    if (actual.getAge() < 18) {
        failWithMessage("Expected person to be adult");
    }
    return this;
}

The last checks for the existence of a nickname:

public PersonAssert hasNickName(String nickName) {
    isNotNull();
    if (!actual.getNickNames().contains(nickName)) {
        failWithMessage("Expected person to have nickname %s", 
          nickName);
    }
    return this;
}

When having more than one custom assertion class, we may wrap all assertThat methods in a class, providing a static factory method for each of the assertion classes:

public class Assertions {
    public static PersonAssert assertThat(Person actual) {
        return new PersonAssert(actual);
    }

    // static factory methods of other assertion classes
}

The Assertions class shown above is a convenient entry point to all custom assertion classes.

Static methods of this class have the same name and are differentiated from each other by their parameter type.

4. In Action

The following test cases will illustrate the custom assertion methods we created in the previous section. Notice that the assertThat method is imported from our custom Assertions class, not the core AssertJ API.

Here’s how the hasFullName method can be used:

@Test
public void whenPersonNameMatches_thenCorrect() {
    Person person = new Person("John Doe", 20);
    assertThat(person)
      .hasFullName("John Doe");
}

This is a negative test case illustrating the isAdult method:

@Test
public void whenPersonAgeLessThanEighteen_thenNotAdult() {
    Person person = new Person("Jane Roe", 16);

    // assertion fails
    assertThat(person).isAdult();
}

and another test demonstrating the hasNickname method:

@Test
public void whenPersonDoesNotHaveAMatchingNickname_thenIncorrect() {
    Person person = new Person("John Doe", 20);
    person.addNickname("Nick");

    // assertion will fail
    assertThat(person)
      .hasNickname("John");
}

5. Assertions Generator

Writing custom assertion classes corresponding to the object model paves the way for very readable test cases.

However, if we have a lot of classes, it would be painful to manually create custom assertion classes for all of them. This is where the AssertJ assertions generator comes into play.

To use the assertions generator with Maven, we need to add a plugin to the pom.xml file:

<plugin>
    <groupId>org.assertj</groupId>
    <artifactId>assertj-assertions-generator-maven-plugin</artifactId>
    <version>2.1.0</version>
    <configuration>
        <classes>
            <param>com.baeldung.testing.assertj.custom.Person</param>
        </classes>
    </configuration>
</plugin>

The latest version of the assertj-assertions-generator-maven-plugin can be found here.

The classes element in the above plugin marks classes for which we want to generate assertions. Please see this post for other configurations of the plugin.

The AssertJ assertions generator creates assertions for each public property of the target class. The specific name of each assertion method depends on the field’s or property’s type. For a complete description of the assertions generator, check out this reference.

Execute the following Maven command in the project base directory:

mvn assertj:generate-assertions

We should see assertion classes generated in the folder target/generated-test-sources/assertj-assertions. For example, the generated entry point class for the generated assertions looks like this:

// generated comments are stripped off for brevity

package com.baeldung.testing.assertj.custom;

@javax.annotation.Generated(value="assertj-assertions-generator")
public class Assertions {

    @org.assertj.core.util.CheckReturnValue
    public static com.baeldung.testing.assertj.custom.PersonAssert
      assertThat(com.baeldung.testing.assertj.custom.Person actual) {
        return new com.baeldung.testing.assertj.custom.PersonAssert(actual);
    }

    protected Assertions() {
        // empty
    }
}

Now, we can copy the generated source files to the test directory, then add custom assertion methods to satisfy our testing requirements.

One important thing to notice is that the generated code isn’t guaranteed to be entirely correct. At this point, the generator isn’t a finished product, and the community is working on it.

Hence, we should use the generator as a supporting tool to make our life easier instead of taking it for granted.

6. Conclusion

In this tutorial, we’ve shown how to create custom assertions for creating readable test code with the AssertJ library, both manually and automatically.

If we have just a small number of classes under test, the manual solution is enough; otherwise, the generator should be used.

And, as always, the implementation of all the examples and code snippets can be found over on GitHub.

wait and notify() Methods in Java

$
0
0

1. Introduction

In this article, we’ll look at one of the most fundamental mechanisms in Java – thread synchronization.

We’ll first discuss some essential concurrency-related terms and methodologies.

And we’ll develop a simple application – where we’ll deal with concurrency issues, with the goal of better understanding wait() and notify().

2. Thread Synchronization in Java

In a multithreaded environment, multiple threads might try to modify the same resource. If threads aren’t managed properly, this will, of course, lead to consistency issues.

2.1. Guarded Blocks in Java

One tool we can use to coordinate actions of multiple threads in Java – is guarded blocks. Such blocks keep a check for a particular condition before resuming the execution.

With that in mind, we’ll make use of:

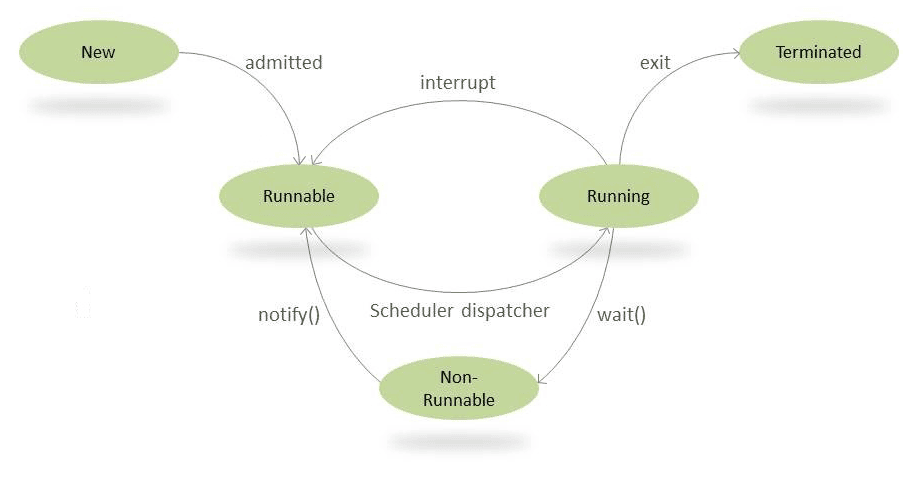
This can be better understood from the following diagram, that depicts the lifecycle of a Thread:

Please note that there are many ways of controlling this lifecycle; however, in this article, we’re going to focus only on wait() and notify().

3. The wait() Method

Simply put, when we call wait() – this forces the current thread to wait until some other thread invokes notify() or notifyAll() on the same object.

For this, the current thread must own the object’s monitor. According to Javadocs, this can happen when:

  • we’ve executed synchronized instance method for the given object
  • we’ve executed the body of a synchronized block on the given object
  • by executing synchronized static methods for objects of type Class

Note that only one active thread can own an object’s monitor at a time.

This wait() method comes with three overloaded signatures. Let’s have a look at these.

3.1. wait()

The wait() method causes the current thread to wait indefinitely until another thread either invokes notify() for this object or notifyAll().

3.2. wait(long timeout)

Using this method, we can specify a timeout after which thread will be woken up automatically. A thread can be woken up before reaching the timeout using notify() or notifyAll().

Note that calling wait(0) is the same as calling wait().

3.3. wait(long timeout, int nanos)

This is yet another signature providing the same functionality, with the only difference being that we can provide higher precision.

The total timeout period (in nanoseconds), is calculated as 1_000_000*timeout + nanos. 

4. notify() and notifyAll()

The notify() method is used for waking up threads that are waiting for an access to this object’s monitor.

There are two ways of notifying waiting threads.

4.1. notify()

For all threads waiting on this object’s monitor (by using any one of the wait() method), the method notify() notifies any one of them to wake up arbitrarily. The choice of exactly which thread to wake is non-deterministic and depends upon the implementation.

Since notify() wakes up a single random thread it can be used to implement mutually exclusive locking where threads are doing similar tasks, but in most cases, it would be more viable to implement notifyAll().

4.2. notifyAll()

This method simply wakes all threads that are waiting on this object’s monitor.

The awakened threads will complete in the usual manner – like any other thread.

But before we allow their execution to continue, always define a quick check for the condition required to proceed with the thread – because there may be some situations where the thread got woken up without receiving a notification (this scenario is discussed later in an example).

5. Sender-Receiver Synchronization Problem

Now that we understand the basics, let’s go through a simple SenderReceiver application – that will make use of the wait() and notify() methods to set up synchronization between them:

  • The Sender is supposed to send a data packet to the Receiver
  • The Receiver cannot process the data packet until the Sender is finished sending it
  • Similarly, the Sender mustn’t attempt to send another packet unless the Receiver has already processed the previous packet

Let’s first create Data class that consists of the data packet that will be sent from Sender to Receiver. We’ll use wait() and notifyAll() to set up synchronization between them:

public class Data {
    private String packet;
    
    // True if receiver should wait
    // False if sender should wait
    private boolean transfer = true;
 
    public synchronized void send(String packet) {
        while (!transfer) {
            try { 
                wait();
            } catch (InterruptedException e)  {
                Thread.currentThread().interrupt(); 
                Log.error("Thread interrupted", e); 
            }
        }
        transfer = false;
        
        this.packet = packet;
        notifyAll();
    }
 
    public synchronized String receive() {
        while (transfer) {
            try {
                wait();
            } catch (InterruptedException e)  {
                Thread.currentThread().interrupt(); 
                Log.error("Thread interrupted", e); 
            }
        }
        transfer = true;

        notifyAll();
        return packet;
    }
}

Let’s break down what’s going on here:

  • The packet variable denotes the data that is being transferred over the network
  • We have a boolean variable transfer – which the Sender and Receiver will use for synchronization:
    • If this variable is true, then the Receiver should wait for Sender to send the message
    • If it’s false, then Sender should wait for Receiver to receive the message
  • The Sender uses send() method to send data to the Receiver:
    • If transfer is false, we’ll wait by calling wait() on this thread
    • But when it is true, we toggle the status, set our message and call notifyAll() to wake up other threads to specify that a significant event has occurred and they can check if they can continue execution
  • Similarly, the Receiver will use receive() method:
    • If the transfer was set to false by Sender, then only it will proceed, otherwise we’ll call wait() on this thread
    • When the condition is met, we toggle the status, notify all waiting threads to wake up and return the data packet that was Receiver

5.1. Why Enclose wait() in a while Loop?

Since notify() and notifyAll() randomly wakes up threads that are waiting on this object’s monitor, it’s not always important that the condition is met. Sometimes it can happen that the thread is woken up, but the condition isn’t actually satisfied yet.

We can also define a check to save us from spurious wakeups – where a thread can wake up from waiting without ever having received a notification.

5.2. Why Do We Need to Synchronize send() and receive() Methods?

We placed these methods inside synchronized methods to provide intrinsic locks. If a thread calling wait() method does not own the inherent lock, an error will be thrown.

We’ll now create Sender and Receiver and implement the Runnable interface on both so that their instances can be executed by a thread.

Let’s first see how Sender will work:

public class Sender implements Runnable {
    private Data data;
 
    // standard constructors
 
    public void run() {
        String packets[] = {
          "First packet",
          "Second packet",
          "Third packet",
          "Fourth packet",
          "End"
        };
 
        for (String packet : packets) {
            data.send(packet);

            // Thread.sleep() to mimic heavy server-side processing
            try {
                Thread.sleep(ThreadLocalRandom.current().nextInt(1000, 5000));
            } catch (InterruptedException e)  {
                Thread.currentThread().interrupt(); 
                Log.error("Thread interrupted", e); 
            }
        }
    }
}

For this Sender:

  • We’re creating some random data packets that will be sent across the network in packets[] array
  • For each packet, we’re merely calling send() 
  • Then we’re calling Thread.sleep() with random interval to mimic heavy server-side processing

Finally, let’s implement our Receiver:

public class Receiver implements Runnable {
    private Data load;
 
    // standard constructors
 
    public void run() {
        for(String receivedMessage = load.receive();
          !"End".equals(receivedMessage);
          receivedMessage = load.receive()) {
            
            System.out.println(receivedMessage);

            // ...
            try {
                Thread.sleep(ThreadLocalRandom.current().nextInt(1000, 5000));
            } catch (InterruptedException e) {
                Thread.currentThread().interrupt(); 
                Log.error("Thread interrupted", e); 
            }
        }
    }
}

Here, we’re simply calling load.receive() in the loop until we get the last “End” data packet.

Let’s now see this application in action:

public static void main(String[] args) {
    Data data = new Data();
    Thread sender = new Thread(new Sender(data));
    Thread receiver = new Thread(new Receiver(data));
    
    sender.start();
    receiver.start();
}

We’ll receive the following output:

First packet
Second packet
Third packet
Fourth packet

And here we are – we’ve received all data packets in the right, sequential order and successfully established the correct communication between our sender and receiver.

6. Conclusion

In this article, we discussed some core synchronization concepts in Java; more specifically, we focused on how we can use wait() and notify() to solve interesting synchronization problems. And finally, we went through a code sample where we applied these concepts in practice.

Before we wind down here, it’s worth mentioning that all these low-level APIs, such as wait(), notify() and notifyAll() – are traditional methods that work well, but higher-level mechanism are often simpler and better – such as Java’s native Lock and Condition interfaces (available in java.util.concurrent.locks package).

For more information on the java.util.concurrent package, visit our overview of the java.util.concurrent article, and Lock and Condition are covered in the guide to java.util.concurrent.Locks, here.

As always, the complete code snippets used in this article are available over on GitHub.

Java Weekly, Issue 215

$
0
0

Here we go…

1. Spring and Java

>> Monitor and troubleshoot Java applications and services with Datadog 

Optimize performance with end-to-end tracing and out-of-the-box support for popular Java frameworks, application servers, and databases. Try it free.

>> Code First Java 9 Tutorial [blog.codefx.org]

Java 9 updates condensed into a single practical guide – super useful.

>> Reactive emoji tracker with WebClient and Reactor: consuming SSE [nurkiewicz.com]

>> Reactive emoji tracker with WebClient and Reactor: aggregating data [nurkiewicz.com]

A very interesting series showcasing how powerful reactive implementations can be.

>> EE4J: An Update [blogs.oracle.com]

A quick overview of the transfer and rebranding process of Java EE inside the Eclipse Foundation – if you want to keep track of what’s going on there.

>> Effective debugging with breakpoints [advancedweb.hu]

Back to debugging basics – certainly one of the more powerful skills you can build as a Java developer.

>> Java Magazine: Reactive Programming [blogs.oracle.com]

The reactive paradigm is finding its stride, no doubt about it.

Also worth reading:

Lot’s of fantastic presentations this week:

And a few solid releases:

2. Technical and Musings

>> How Long is Long Enough? Minimum Password Lengths by the World’s Top Sites [troyhunt.com]

A quick, interesting look at what minimum password rules are out there, in the wild. Quite interesting.

>> Positioning Strategy for the Aspiring Consultant [daedtech.com]

Doing consulting well is a long and complex journey. Speaking out of my own experience – it’s well worth it.

Also worth reading:

3. Pick of the Week

This week, I’m picking Datadog, the first sponsor I accepted for the Java Weekly newsletter (ever).

I soft-launched the sponsorships six months ago and refused a handful of companies up until this point – for various reasons (mainly because I wasn’t convinced by their products).

I hadn’t tried Datadog before, but I’ve used a lot of other APM solutions out there, so I knew what to expect. I’ve been playing with their system for a week now and I’m more than happy to have them as the first official sponsor.

It’s a solid, super mature solution, it’s actually useful from the very start, without me having to spend a full day setting it up, and it doesn’t cost an arm and a leg.

So, they’re my pick for this week.

Exploring the New HTTP Client in Java 9

$
0
0

1. Introduction

In this tutorial, we’ll explore Java 9’s new incubating HttpClient.

Until very recently, Java provided only the HttpURLConnection API – which is low-level and isn’t known for being feature-rich and user-friendly.

Therefore, some widely used third-party libraries were commonly used – such as Apache HttpClient, Jetty, and Spring’s RestTemplate.

2. Initial Setup

The HTTP Client module is bundled as an incubator module in JDK 9 and supports HTTP/2 with backward compatibility still facilitating HTTP/1.1.

To use it, we need to define our module using a module-info.java file which also indicates the required module to run our application:

module com.baeldung.java9.httpclient {   
  requires jdk.incubator.httpclient;
}

3. HTTP Client API Overview

Unlike HttpURLConnection, HTTP Client provides synchronous and asynchronous request mechanisms.

The API consists of 3 core classes:

  • HttpRequest – represents the request to be sent via the HttpClient
  • HttpClient – behaves as a container for configuration information common to multiple requests
  • HttpResponse – represents the result of an HttpRequest call

We’ll examine each of them in more details in the following sections. First, let’s focus on a request.

4. HttpRequest

HttpRequest, as the name suggests, is an object which represents request we want to send. New instances can be created using HttpRequest.Builder.

We can get it by calling HttpRequest.newBuilder(). Builder class provides a bunch of methods which we can use to configure our request.

We’ll cover the most important ones.

4.1. Setting URI

The first thing we have to do when creating a request is to provide the URL.

We can do that in two ways – by using the constructor for Builder with URI parameter or by calling method uri(URI) on the Builder instance:

HttpRequest.newBuilder(new URI("https://postman-echo.com/get"))
 
HttpRequest.newBuilder()
  .uri(new URI("https://postman-echo.com/get"))

The last thing we have to configure to create a basic request is an HTTP method.

4.2. Specifying the HTTP Method

We can define HTTP method which our request will use by calling one of the methods from Builder:

  • GET()
  • POST(BodyProcessor body)
  • PUT(BodyProcessor body)
  • DELETE(BodyProcessor body)

We’ll cover BodyProcessor in detail, later. Now, let’s just create a very simple GET request example:

HttpRequest request = HttpRequest.newBuilder()
  .uri(new URI("https://postman-echo.com/get"))
  .GET()
  .build();

This request has all parameters required by HttpClient. However, sometimes we need to add additional parameters to our request; here are some important ones are:

  • the version of the HTTP protocol
  • headers
  • a timeout

4.3. Setting HTTP Protocol Version

The API fully leverages the HTTP/2 protocol and uses it by default but we can define which version of protocol we want to use.

HttpRequest request = HttpRequest.newBuilder()
  .uri(new URI("https://postman-echo.com/get"))
  .version(HttpClient.Version.HTTP_2)
  .GET()
  .build();

Important to mention here is that the client will fallback to, e.g., HTTP/1.1 if HTTP/2 isn’t supported. 

4.4. Setting Headers

In case we want to add additional headers to our request, we can use the provided builder methods.

We can do that in one of two ways:

  • passing all headers as key-value pairs to the headers() method or by
  • using header() method for the single key-value header:
HttpRequest request = HttpRequest.newBuilder()
  .uri(new URI("https://postman-echo.com/get"))
  .headers("key1", "value1", "key2", "value2")
  .GET()
  .build();

HttpRequest request2 = HttpRequest.newBuilder()
  .uri(new URI("https://postman-echo.com/get"))
  .header("key1", "value1")
  .header("key2", "value2")
  .GET()
  .build();

The last useful method we can use to customize our request is timeout().

4.5. Setting a Timeout

Let’s now define the amount of time we want to wait for a response.

If the set time expires, a HttpTimeoutException will be thrown; the default timeout is set to infinity.

The timeout can be set with the Duration object – by calling method timeout() on the builder instance:

HttpRequest request = HttpRequest.newBuilder()
  .uri(new URI("https://postman-echo.com/get"))
  .timeout(Duration.of(10, SECONDS))
  .GET()
  .build();

5. Setting a Request Body

We can add a body to a request by using the request builder methods: POST(BodyProcessor body), PUT(BodyProcessor body) and DELETE(BodyProcessor body).

The new API provides a number of BodyProcessor implementations out-of-the-box which simplify passing the request body:

  • StringProcessor (reads body from a String, created with HttpRequest.BodyProcessor.fromString)
  • InputStreamProcessor (reads body from an InputStream, created with HttpRequest.BodyProcessor.fromInputStream)
  • ByteArrayProcessor (reads body from a byte array, created with HttpRequest.BodyProcessor.fromByteArray)
  • FileProcessor (reads body from a file at given path, created with HttpRequest.BodyProcessor.fromFile)

In case we don’t need a body, we can simply pass in an HttpRequest.noBody():

HttpRequest request = HttpRequest.newBuilder()
  .uri(new URI("https://postman-echo.com/post"))
  .POST(HttpRequest.noBody())
  .build();

5.1. StringBodyProcessor

Setting a request body with any BodyProcessor implementation is very simple and intuitive.

For example, if we want to pass simple String as a body, we can use StringBodyProcessor.

As we already mentioned, this object can be created with a factory method fromString(); it takes just a String object as an argument and creates a body from it:

HttpRequest request = HttpRequest.newBuilder()
  .uri(new URI("https://postman-echo.com/post"))
  .headers("Content-Type", "text/plain;charset=UTF-8")
  .POST(HttpRequest.BodyProcessor.fromString("Sample request body"))
  .build();

5.2. InputStreamBodyProcessor

To do that, the InputStream has to be passed as a Supplier (to make its creation lazy), so it’s a little bit different than described above StringBodyProcessor.

However, this is also quite straightforward:

byte[] sampleData = "Sample request body".getBytes();
HttpRequest request = HttpRequest.newBuilder()
  .uri(new URI("https://postman-echo.com/post"))
  .headers("Content-Type", "text/plain;charset=UTF-8")
  .POST(HttpRequest.BodyProcessor
   .fromInputStream(() -> new ByteArrayInputStream(sampleData)))
  .build();

Notice how we used a simple ByteArrayInputStream here; that can, of course, be any InputStream implementation.

5.3. ByteArrayProcessor

We can also use ByteArrayProcessor and pass an array of bytes as the parameter:

byte[] sampleData = "Sample request body".getBytes();
HttpRequest request = HttpRequest.newBuilder()
  .uri(new URI("https://postman-echo.com/post"))
  .headers("Content-Type", "text/plain;charset=UTF-8")
  .POST(HttpRequest.BodyProcessor.fromByteArray(sampleData))
  .build();

5.4. FileProcessor

To work with a File, we can make use of the provided FileProcessor; its factory method takes a path to the file as a parameter and creates a body from the content:

HttpRequest request = HttpRequest.newBuilder()
  .uri(new URI("https://postman-echo.com/post"))
  .headers("Content-Type", "text/plain;charset=UTF-8")
  .POST(HttpRequest.BodyProcessor.fromFile(
    Paths.get("src/test/resources/sample.txt")))
  .build();

We covered how to create HttpRequest and how to set additional parameters in it.

Now it’s time to take a deeper look on HttpClient class which is responsible for sending requests and receiving responses.

6. HttpClient

All requests are sent using HttpClient which can be instantiated using the HttpClient.newBuilder() method or by calling HttpClient.newHttpClient().

It provides a lot of useful and self-describing methods we can use to handle our request/response.

Let’s cover some of these here.

6.1. Setting a Proxy

We can define a proxy for the connection. Just merely call proxy() method on a Builder instance:

HttpResponse<String> response = HttpClient
  .newBuilder()
  .proxy(ProxySelector.getDefault())
  .build()
  .send(request, HttpResponse.BodyHandler.asString());

In our example, we used the default system proxy.

6.2. Setting the Redirect Policy

Sometimes the page we want to access has moved to a different address.

In that case, we’ll receive HTTP status code 3xx, usually with the information about new URI. HttpClient can redirect the request to the new URI automatically if we set appropriate redirect policy.

We can do it with the followRedirects() method on Builder:

HttpResponse<String> response = HttpClient.newBuilder()
  .followRedirects(HttpClient.Redirect.ALWAYS)
  .build()
  .send(request, HttpResponse.BodyHandler.asString());

All policies are defined and described in enum HttpClient.Redirect.

6.3. Setting Authenticator for a Connection

An Authenticator is an object which negotiates credentials (HTTP authentication) for a connection.

It provides different authentication schemes (like e.g., basic or digest authentication). In most cases, authentication requires username and password to connect to a server.

We can use PasswordAuthentication class which is just a holder of these values:

HttpResponse<String> response = HttpClient.newBuilder()
  .authenticator(new Authenticator() {
    @Override
    protected PasswordAuthentication getPasswordAuthentication() {
      return new PasswordAuthentication(
        "username", 
        "password".toCharArray());
    }
}).build()
  .send(request, HttpResponse.BodyHandler.asString());

In the example above we passed the username and password values as a plaintext; of course, in a production scenario, this will have to be different.

Note that not every request should use the same username and password. The Authenticator class provides a number of getXXX (e.g., getRequestingSite()) methods that can be used to find out what values should be provided.

Now we’re going to explore one of the most useful features of new HttpClient – asynchronous calls to the server.

6.4. Send Requests – Sync vs. Async

New HttpClient provides two possibilities for sending a request to a server:

  • send(…) – synchronously (blocks until the response comes)
  • sendAsync(…) – asynchronously (doesn’t wait for response, non-blocking)

Up until now, the send(…) method naturally waits for a response:

HttpResponse<String> response = HttpClient.newBuilder()
  .build()
  .send(request, HttpResponse.BodyHandler.asString());

This call returns an HttpResponse object, and we’re sure that the next instruction from our application flow will be executed only when the response is already here.

However, it has a lot of drawbacks especially when we are processing large amounts of data.

So, now, we can use sendAsync(…) method – which returns CompletableFeature<HttpResponse> – to process a request asynchronously:

CompletableFuture<HttpResponse<String>> response = HttpClient.newBuilder()
  .build()
  .sendAsync(request, HttpResponse.BodyHandler.asString());

The new API can also deal with multiple responses, and stream the request and response bodies:

List<URI> targets = Arrays.asList(
  new URI("https://postman-echo.com/get?foo1=bar1"),
  new URI("https://postman-echo.com/get?foo2=bar2"));
HttpClient client = HttpClient.newHttpClient();
List<CompletableFuture<String>> futures = targets.stream()
  .map(target -> client
    .sendAsync(
      HttpRequest.newBuilder(target).GET().build(),
      HttpResponse.BodyHandler.asString())
    .thenApply(response -> response.body()))
  .collect(Collectors.toList());

6.5. Setting Executor for Asynchronous Calls

We can also define an Executor which provides threads to be used by asynchronous calls.

This way we can, for example, limit the number of threads used for processing requests:

ExecutorService executorService = Executors.newFixedThreadPool(2);

CompletableFuture<HttpResponse<String>> response1 = HttpClient.newBuilder()
  .executor(executorService)
  .build()
  .sendAsync(request, HttpResponse.BodyHandler.asString());

CompletableFuture<HttpResponse<String>> response2 = HttpClient.newBuilder()
  .executor(executorService)
  .build()
  .sendAsync(request, HttpResponse.BodyHandler.asString());

By default, the HttpClient uses executor java.util.concurrent.Executors.newCachedThreadPool().

6.6. Defining a CookieManager

With new API and builder, it’s straightforward to set a CookieManager for our connection. We can use builder method cookieManager(CookieManager cookieManager) to define client-specific CookieManager.

Let’s, for example, define CookieManager which doesn’t allow to accept cookies at all:

HttpClient.newBuilder()
  .cookieManager(new CookieManager(null, CookiePolicy.ACCEPT_NONE))
  .build();

In case our CookieManager allows cookies to be stored, we can access them by checking CookieManager from our HttpClient:

httpClient.cookieManager().get().getCookieStore()

Now let’s focus on the last class from Http API – the HttpResponse.

7. HttpResponse Object

The HttpResponse class represents the response from the server. It provides a number of useful methods – but two the most important are:

  • statusCode() – returns status code (type int) for a response (HttpURLConnection class contains possible values)
  • body() – returns a body for a response (return type depends on the response BodyHandler parameter passed to the send() method)

The response object has other useful method which we’ll cover like uri(), headers(), trailers() and version().

7.1. URI of Response Object

The method uri() on the response object returns the URI from which we received the response.

Sometimes it can be different than URI in the request object, because a redirection may occur:

assertThat(request.uri()
  .toString(), equalTo("http://stackoverflow.com"));
assertThat(response.uri()
  .toString(), equalTo("https://stackoverflow.com/"));

7.2. Headers from Response

We can obtain headers from the response by calling method headers() on a response object:

HttpResponse<String> response = HttpClient.newHttpClient()
  .send(request, HttpResponse.BodyHandler.asString());
HttpHeaders responseHeaders = response.headers();

It returns HttpHeaders object as a return type. This is a new type defined in jdk.incubator.http package which represents a read-only view of HTTP Headers.

It has some useful methods which simplify searching for headers value.

7.3. Get Trailers from Response

The HTTP response may contain additional headers which are included after the response content. These headers are called trailer headers.

We can obtain them by calling method trailers() on HttpResponse:

HttpResponse<String> response = HttpClient.newHttpClient()
  .send(request, HttpResponse.BodyHandler.asString());
CompletableFuture<HttpHeaders> trailers = response.trailers();

Note that trailers() method returns CompletableFuture object.

7.4. Version of the Response

The method version() defines which version of HTTP protocol was used to talk with a server.

Remember, that even if we define that we want to use HTTP/2, the server can answer via HTTP/1.1.

The version in which server answered is specified in the response:

HttpRequest request = HttpRequest.newBuilder()
  .uri(new URI("https://postman-echo.com/get"))
  .version(HttpClient.Version.HTTP_2)
  .GET()
  .build();
HttpResponse<String> response = HttpClient.newHttpClient()
  .send(request, HttpResponse.BodyHandler.asString());
assertThat(response.version(), equalTo(HttpClient.Version.HTTP_1_1));

8. Conclusion

In this article, we explored Java 9’s HttpClient API which provides a lot of flexibility and powerful features.

As always, the complete code can be found over on GitHub.

Note: In the examples, we’ve used sample REST endpoints provided by https://postman-echo.com.

Asynchronous HTTP with async-http-client in Java

$
0
0

1. Overview

AsyncHttpClient (AHC) is a library build on top of Netty, with the purpose of easily executing HTTP requests and processing responses asynchronously.

In this article, we’ll present how to configure and use the HTTP client, how to execute a request and process the response using AHC.

2. Setup

The latest version of the library can be found in the Maven repository. We should be careful to use the dependency with the group id org.asynchttpclient and not the one with com.ning:

<dependency>
    <groupId>org.asynchttpclient</groupId>
    <artifactId>async-http-client</artifactId>
    <version>2.2.0</version>
</dependency>

3. HTTP Client Configuration

The most straightforward method of obtaining the HTTP client is by using the Dsl class. The static asyncHttpClient() method returns an AsyncHttpClient object:

AsyncHttpClient client = Dsl.asyncHttpClient();

If we need a custom configuration of the HTTP client, we can build the AsyncHttpClient object using the builder DefaultAsyncHttpClientConfig.Builder:

DefaultAsyncHttpClientConfig.Builder clientBuilder = Dsl.config()

This offers the possibility to configure timeouts, a proxy server, HTTP certificates and many more:

DefaultAsyncHttpClientConfig.Builder clientBuilder = Dsl.config()
  .setConnectTimeout(500)
  .setProxyServer(new ProxyServer(...));
AsyncHttpClient client = Dsl.asyncHttpClient(clientBuilder);

Once we’ve configured and obtained an instance of the HTTP client we can reuse it across out application. We don’t need to create an instance for each request because internally it creates new threads and connection pools, which will lead to performance issues.

Also, it’s important to note that once we’ve finished using the client we should call to close() method to prevent any memory leaks or hanging resources.

4. Creating an HTTP Request

There are two methods in which we can define an HTTP request using AHC:

  • bound
  • unbound

There is no major difference between the two request types in terms of performance. They only represent two separate APIs we can use to define a request. A bound request is tied to the HTTP client it was created from and will, by default, use the configuration of that specific client if not specified otherwise.

For example, when creating a bound request the disableUrlEncoding flag is read from the HTTP client configuration, while for an unbound request this is, by default set to false. This is useful because the client configuration can be changed without recompiling the whole application by using system properties passed as VM arguments:

java -jar -Dorg.asynchttpclient.disableUrlEncodingForBoundRequests=true

A complete list of properties can be found the ahc-default.properties file.

4.1. Bound Request

To create a bound request we use the helper methods from the class AsyncHttpClient that start with the prefix “prepare”. Also, we can use the prepareRequest() method which receives an already created Request object.

For example, the prepareGet() method will create an HTTP GET request:

BoundRequestBuilder getRequest = client.prepareGet("http://www.baeldung.com");

4.2. Unbound Request

An unbound request can be created using the RequestBuilder class:

Request getRequest = new RequestBuilder(HttpConstants.Methods.GET)
  .setUrl("http://www.baeldung.com")
  .build();

or by using the Dsl helper class, which actually uses the RequestBuilder for configuring the HTTP method and URL of the request:

Request getRequest = Dsl.get("http://www.baeldung.com").build()

5. Executing HTTP Requests

The name of the library gives us a hint about how the requests can be executed. AHC has support for both synchronous and asynchronous requests.

Executing the request depends on its type. When using a bound request we use the execute() method from the BoundRequestBuilder class and when we have an unbound request we’ll execute it using one of the implementations of the executeRequest() method from the AsyncHttpClient interface.

5.1. Synchronously

The library was designed to be asynchronous, but when needed we can simulate synchronous calls by blocking on the Future object. Both execute() and executeRequest() methods return a ListenableFuture<Response> object. This class extends the Java Future interface, thus inheriting the get() method, which can be used to block the current thread until the HTTP request is completed and returns a response:

Future<Response> responseFuture = boundGetRequest.execute();
responseFuture.get();
Future<Response> responseFuture = client.executeRequest(unboundRequest);
responseFuture.get();

Using synchronous calls is useful when trying to debug parts of our code, but it’s not recommended to be used in a production environment where asynchronous executions lead to better performance and throughput.

5.2. Asynchronously

When we talk about asynchronous executions, we also talk about listeners for processing the results. The AHC library provides 3 types of listeners that can be used for asynchronous HTTP calls:

  • AsyncHandler
  • AsyncCompletionHandler
  • ListenableFuture listeners

The AsyncHandler listener offers the possibility to control and process the HTTP call before it has completed. Using it can handle a series of events related to the HTTP call:

request.execute(new AsyncHandler<Object>() {
    @Override
    public State onStatusReceived(HttpResponseStatus responseStatus)
      throws Exception {
        return null;
    }

    @Override
    public State onHeadersReceived(HttpHeaders headers)
      throws Exception {
        return null;
    }

    @Override
    public State onBodyPartReceived(HttpResponseBodyPart bodyPart)
      throws Exception {
        return null;
    }

    @Override
    public void onThrowable(Throwable t) {

    }

    @Override
    public Object onCompleted() throws Exception {
        return null;
    }
});

The State enum lets us control the processing of the HTTP request. By returning State.ABORT we can stop the processing at a specific moment and by using State.CONTINUE we let the processing finish.

It’s important to mention that the AsyncHandler isn’t thread-safe and shouldn’t be reused when executing concurrent requests.

AsyncCompletionHandler inherits all the methods from the AsyncHandler interface and adds the onCompleted(Response) helper method for handling the call completion. All the other listener methods are overridden to return State.CONTINUE, thus making the code more readable:

request.execute(new AsyncCompletionHandler<Object>() {
    @Override
    public Object onCompleted(Response response) throws Exception {
        return response;
    }
});

The ListenableFuture interface lets us add listeners that will run when the HTTP call is completed.

Also, it let’s execute the code from the listeners – by using another thread pool:

ListenableFuture<Response> listenableFuture = client
  .executeRequest(unboundRequest);
listenableFuture.addListener(() -> {
    Response response = listenableFuture.get();
    LOG.debug(response.getStatusCode());
}, Executors.newCachedThreadPool());

Besides, the option to add listeners, the ListenableFuture interface lets us transform the Future response to a CompletableFuture.

7. Conclusion

AHC is a very powerful library, with a lot of interesting features. It offers a very simple way to configure an HTTP client and the capability of executing both synchronous and asynchronous requests.

As always, the source code for the article is available over on GitHub.

The Observer Pattern in Java

$
0
0

1. Overview

In this article, we’re going to describe the Observer pattern and take a look at a few Java implementation alternatives.

2. What is the Observer Pattern?

Observer is a behavioral design pattern. It specifies communication between objects: observable and observers. An observable is an object which notifies observers about the changes in its state.

For example, a news agency can notify channels when it receives news. Receiving news is what changes the state of the news agency, and it causes the channels to be notified.

Let’s see how we can implement it ourselves.

First, let’s define the NewsAgency class:

public class NewsAgency {
    private String news;
    private List<Channel> channels = new ArrayList<>();

    public void addObserver(Channel channel) {
        this.channels.add(channel);
    }

    public void removeObserver(Channel channel) {
        this.channels.remove(channel);
    }

    public void setNews(String news) {
        this.news = news;
        for (Channel channel : this.channels) {
            channel.update(this.news);
        }
    }
}

NewsAgency is an observable, and when news gets updated, the state of NewsAgency changes. When the change happens, NewsAgency notifies the observers about this fact by calling their update() method.

To be able to do that, the observable object needs to keep references to the observers, and in our case, it’s the channels variable.

Let’s now see how the observer, the Channel class, can look like. It should have the update() method which is invoked when the state of NewsAgency changes:

public class NewsChannel implements Channel {
    private String news;

    @Override
    public void update(Object news) {
        this.setNews((String) news);
    } 
}

The Channel interface has only one method:

public interface Channel {
    public void update(Object o);
}

Now, if we add an instance of NewsChannel to the list of observers, and change the state of NewsAgency, the instance of NewsChannel will be updated:

NewsAgency observable = new NewsAgency();
NewsChannel observer = new NewsChannel();

observable.addObserver(observer);
observable.setNews("news");
assertEquals(observer.getNews(), "news");

There’s a predefined Observer interface in Java core libraries, which makes implementing the observer pattern even simpler. Let’s look at it.

3. Implementation with Observer

The java.util.Observer interface defines the update() method, so there’s no need to define it ourselves as we did in the previous section.

Let’s see how we can use it in our implementation:

public class ONewsChannel implements Observer {

    private String news;

    @Override
    public void update(Observable o, Object news) {
        this.setNews((String) news);
    }
}

Here, the second argument comes from Observable as we’ll see below.

To define the observable, we need to extend Java’s Observable class:

public class ONewsAgency extends Observable {
    private String news;

    public void setNews(String news) {
        this.news = news;
        setChanged();
        notifyObservers(news);
    }
}

Note that we don’t need to call the observer’s update() method directly. We just call stateChanged() and notifyObservers(), and the Observable class is doing the rest for us.

Also, it contains a list of observers and exposes methods to maintain that list – addObserver() and deleteObserver().

To test the result, we just need to add the observer to this list and to set the news:

ONewsAgency observable = new ONewsAgency();
ONewsChannel observer = new ONewsChannel();

observable.addObserver(observer);
observable.setNews("news");
assertEquals(observer.getNews(), "news");

Observer interface isn’t perfect and is deprecated since Java 9. One of its cons is that Observable isn’t an interface but a class, that’s why subclasses can’t be used as observables.

Also, a developer could override some of the Observable‘s synchronized methods and disrupt their thread-safety.

Let’s look at the ProperyChangeListener interface, which is recommended instead of using Observer.

4. Implementation with PropertyChangeListener

In this implementation, an observable must keep a reference to the PropertyChangeSupport instance. It helps to send the notifications to observers when a property of the class is changed.

Let’s define the observable:

public class PCLNewsAgency {
    private String news;

    private PropertyChangeSupport support;

    public PCLNewsAgency() {
        support = new PropertyChangeSupport(this);
    }

    public void addPropertyChangeListener(PropertyChangeListener pcl) {
        support.addPropertyChangeListener(pcl);
    }

    public void removePropertyChangeListener(PropertyChangeListener pcl) {
        support.removePropertyChangeListener(pcl);
    }

    public void setNews(String value) {
        support.firePropertyChange("news", this.news, value);
        this.news = value;
    }
}

Using this support, we can add and remove observers, and notify them when the state of the observable changes:

support.firePropertyChange("news", this.news, value);

Here, the first argument is the name of the observed property. The second and the third arguments are its old and new value accordingly.

Observers should implement PropertyChangeListener:

public class PCLNewsChannel implements PropertyChangeListener {

    private String news;

    public void propertyChange(PropertyChangeEvent evt) {
        this.setNews((String) evt.getNewValue());
    }
}

Due to the PropertyChangeSupport class which is doing the wiring for us, we can restore the new property value from the event.

Let’s test the implementation to make sure that it also works:

PCLNewsAgency observable = new PCLNewsAgency();
PCLNewsChannel observer = new PCLNewsChannel();

observable.addPropertyChangeListener(observer);
observable.setNews("news");

assertEquals(observer.getNews(), "news");

5. Conclusion

In this article, we’ve examined two ways to implement the Observer design pattern in Java, with the PropertyChangeListener approach being preferred.

The source code for the article is available over on GitHub.


Flyweight Pattern in Java

$
0
0

1. Overview

In this article, we’ll take a look at the flyweight design pattern. This pattern is used to reduce the memory footprint. It can also improve performance in applications where object instantiation is expensive.

Simply put, the flyweight pattern is based on a factory which recycles created objects by storing them after creation. Each time an object is requested, the factory looks up the object in order to check if it’s already been created. If it has, the existing object is returned – otherwise, a new one is created, stored and then returned.

The flyweight object’s state is made up of an invariant component shared with other similar objects (intrinsic) and a variant component which can be manipulated by the client code (extrinsic).

It’s very important that the flyweight objects are immutable: any operation on the state must be performed by the factory.

2. Implementation

The main elements of the pattern are:

  • an interface which defines the operations that the client code can perform on the flyweight object
  • one or more concrete implementations of our interface
  • a factory to handle objects instantiation and caching

Let’s see how to implement each component.

2.1. Vehicle Interface

To begin with, we’ll create a Vehicle interface. Since this interface will be the return type of the factory method we need to make sure to expose all the relevant methods:

public void start();
public void stop();
public Color getColor();

2.2. Concrete Vehicle

Next up, let’s make a Car class as a concrete Vehicle. Our car will implement all the methods of the vehicle interface. As for its state, it’ll have an engine and a color field:

private Engine engine;
private Color color;

2.3. Vehicle Factory

Last but not least, we’ll create the VehicleFactory. Building a new vehicle is a very expensive operation so the factory will only create one vehicle per color.

In order to do that, we keep track of the created vehicles using a map as a simple cache:

private static Map<Color, Vehicle> vehiclesCache
  = new HashMap<>();

public static Vehicle createVehicle(Color color) {
    Vehicle newVehicle = vehiclesCache.computeIfAbsent(color, newColor -> { 
        Engine newEngine = new Engine();
        return new Car(newEngine, newColor);
    });
    return newVehicle;
}

Notice how the client code can only affect the extrinsic state of the object (the color of our vehicle) passing it as an argument to the createVehicle method.

3. Use Cases

3.1. Data Compression

The goal of the flyweight pattern is to reduce memory usage by sharing as much data as possible, hence, it’s a good basis for lossless compression algorithms. In this case, each flyweight object acts as a pointer with its extrinsic state being the context-dependent information.

A classic example of this usage is in a word processor. Here, each character is a flyweight object which shares the data needed for the rendering. As a result, only the position of the character inside the document takes up additional memory.

3.2. Data Caching

Many modern applications use caches to improve response time. The flyweight pattern is similar to the core concept of a cache and can fit this purpose well.

Of course, there are a few key differences in complexity and implementation between this pattern and a typical, general-purpose cache.

4. Conclusion

To sum up, this quick tutorial focused on the flyweight design pattern in Java. We also checked out some of the most common scenarios that involve the pattern.

All the code from the examples is available over on the GitHub project.

Priority-based Job Scheduling in Java

$
0
0

1. Introduction

In a multi-threaded environment, sometimes we need to schedule tasks based on custom criteria instead of just the creation time.

Let’s see how we can achieve this in Java – using a PriorityBlockingQueue.

2. Overview

Let us say we have jobs that we want to execute based on their priority:

public class Job implements Runnable {
    private String jobName;
    private JobPriority jobPriority;
    
    @Override
    public void run() {
        System.out.println("Job:" + jobName +
          " Priority:" + jobPriority);
        Thread.sleep(1000); // to simulate actual execution time
    }

    // standard setters and getters
}

For demonstration purposes, we’re printing the job name and priority in the run() method.

We also added sleep() so that we simulate a longer-running job; while the job is executing, more jobs will get accumulated in the priority queue.

Finally, JobPriority is a simple enum:

public enum JobPriority {
    HIGH,
    MEDIUM,
    LOW
}

3. Custom Comparator

We need to write a comparator defining our custom criteria; and, in Java 8, it’s trivial:

Comparator.comparing(Job::getJobPriority);

4. Priority Job Scheduler

With all the setup done, let’s now implement a simple job scheduler – which employs a single thread executor to look for jobs in the PriorityBlockingQueue and executes them:

public class PriorityJobScheduler {

    private ExecutorService priorityJobPoolExecutor;
    private ExecutorService priorityJobScheduler 
      = Executors.newSingleThreadExecutor();
    private PriorityBlockingQueue<Job> priorityQueue;

    public PriorityJobScheduler(Integer poolSize, Integer queueSize) {
        priorityJobPoolExecutor = Executors.newFixedThreadPool(poolSize);
        priorityQueue = new PriorityBlockingQueue<Job>(
          queueSize, 
          Comparator.comparing(Job::getJobPriority));
        priorityJobScheduler.execute(() -> {
            while (true) {
                try {
                    priorityJobPoolExecutor.execute(priorityQueue.take());
                } catch (InterruptedException e) {
                    // exception needs special handling
                    break;
                }
            }
        });
    }

    public void scheduleJob(Job job) {
        priorityQueue.add(job);
    }
}

The key here is to create an instance of PriorityBlockingQueue of Job type with a custom comparator. The next job to execute is picked from the queue using take() method which retrieves and removes the head of the queue.

The client code now simply needs to call the scheduleJob() – which adds the job to the queue. The priorityQueue.add() queues the job at appropriate position as compared to existing jobs in the queue, using the JobExecutionComparator.

Note that the actual jobs are executed using a separate ExecutorService with a dedicated thread pool.

5. Demo

Finally, here’s a quick demonstration of the scheduler:

private static int POOL_SIZE = 1;
private static int QUEUE_SIZE = 10;

@Test
public void whenMultiplePriorityJobsQueued_thenHighestPriorityJobIsPicked() {
    Job job1 = new Job("Job1", JobPriority.LOW);
    Job job2 = new Job("Job2", JobPriority.MEDIUM);
    Job job3 = new Job("Job3", JobPriority.HIGH);
    Job job4 = new Job("Job4", JobPriority.MEDIUM);
    Job job5 = new Job("Job5", JobPriority.LOW);
    Job job6 = new Job("Job6", JobPriority.HIGH);
    
    PriorityJobScheduler pjs = new PriorityJobScheduler(
      POOL_SIZE, QUEUE_SIZE);
    
    pjs.scheduleJob(job1);
    pjs.scheduleJob(job2);
    pjs.scheduleJob(job3);
    pjs.scheduleJob(job4);
    pjs.scheduleJob(job5);
    pjs.scheduleJob(job6);

    // clean up
}

In order to demo that the jobs are executed in the order of priority, we’ve kept the POOL_SIZE as 1 even though the QUEUE_SIZE is 10. We provide jobs with varying priority to the scheduler.

Here is a sample output we got for one of the runs:

Job:Job3 Priority:HIGH
Job:Job6 Priority:HIGH
Job:Job4 Priority:MEDIUM
Job:Job2 Priority:MEDIUM
Job:Job1 Priority:LOW
Job:Job5 Priority:LOW

The output could vary across runs. However, we should never have a case where a lower priority job is executed even when the queue contains a higher priority job.

6. Conclusion

In this quick tutorial, we saw how PriorityBlockingQueue can be used to execute jobs in a custom priority order.

As usual, source files can be found over on GitHub.

Using Conditions with AssertJ Assertions

$
0
0

1. Overview

In this tutorial, we’ll take a look at the AssertJ library, especially at defining and using conditions to create readable and maintainable tests.

AssertJ basics can be found here.

2. Class Under Test

Let’s have a look at the target class against which we’ll write test cases:

public class Member {
    private String name;
    private int age;

    // constructors and getters
}

3. Creating Conditions

We can define an assertion condition by simply instantiating the Condition class with appropriate arguments.

The most convenient way to create a Condition is to use the constructor that takes a Predicate as a parameter. Other constructors require us to create a subclass and override the matches method, which is less handy.

When constructing a Condition object, we must specify a type argument, which is the type of the value against which the condition is evaluated.

Let’s declare a condition for the age field of our Member class:

Condition<Member> senior = new Condition<>(
  m -> m.getAge() >= 60, "senior");

The senior variable now references a Condition instance which tests if a Person is senior based on its age.

The second argument to the constructor, the String “senior”, is a short description that will be used by AssertJ itself to build a user-friendly error message if the condition fails.

Another condition, checking whether a Person has the name “John”, looks like this:

Condition<Member> nameJohn = new Condition<>(
  m -> m.getName().equalsIgnoreCase("John"), 
  "name John"
);

4. Test Cases

Now, let’s see how to make use of Condition objects in our test class. Assume that the conditions senior and nameJohn are available as fields in our test class.

4.1. Asserting Scalar Values

The following test should pass as the age value is above the seniority threshold:

Member member = new Member("John", 65);
assertThat(member).is(senior);

Since the assertion with the is method passes, an assertion using isNot with the same argument will fail:

// assertion fails with an error message containing "not to be <senior>"
assertThat(member).isNot(senior);

Using the nameJohn variable, we can write two similar tests:

Member member = new Member("Jane", 60);
assertThat(member).doesNotHave(nameJohn);

// assertion fails with an error message containing "to have:\n <name John>"
assertThat(member).has(nameJohn);

The is and has methods, as well as the isNot and doesNotHave methods have the same semantics. Which we use is just a matter of choice. Nevertheless, it is recommended to pick the one that makes our test code more readable.

4.2. Asserting Collections

Conditions don’t work only with scalar values, but they can also verify the existence or non-existence of elements in a collection. Let’s take a look at a test case:

List<Member> members = new ArrayList<>();
members.add(new Member("Alice", 50));
members.add(new Member("Bob", 60));

assertThat(members).haveExactly(1, senior);
assertThat(members).doNotHave(nameJohn);

The haveExactly method asserts the exact number of elements meeting the given Condition, while the doNotHave method checks for the absence of elements.

The methods haveExactly and doNotHave are not the only ones working with collection conditions. For a complete list of those methods, see the AbstractIterableAssert class in the API documentation.

4.3. Combining Conditions

We can combine various conditions using three static methods of the Assertions class:

  • not – creates a condition that is met if the specified condition is not met
  • allOf – creates a condition that is met only if all of the specified conditions are met
  • anyOf – creates a condition that is met if at least one of the specified conditions is met

Here’s how the not and allOf methods can be used to combine conditions:

Member john = new Member("John", 60);
Member jane = new Member("Jane", 50);
        
assertThat(john).is(allOf(senior, nameJohn));
assertThat(jane).is(allOf(not(nameJohn), not(senior)));

Similarly, we can make use of anyOf:

Member john = new Member("John", 50);
Member jane = new Member("Jane", 60);
        
assertThat(john).is(anyOf(senior, nameJohn));
assertThat(jane).is(anyOf(nameJohn, senior));

5. Conclusion

This tutorial gave a guide to AssertJ conditions and how to use them to create very readable assertions in your test code.

The implementation of all the examples and code snippets can be found over on GitHub.

JPA Attribute Converters

$
0
0

1. Introduction

In this quick article, we’ll cover the usage of the Attribute Converters available in JPA 2.1 – which, simply put, allow us to map JDBC types to Java classes.

We’ll use Hibernate 5 as our JPA implementation here.

2. Creating a Converter

We’re going to show how to implement an attribute converter for a custom Java class.

First, let’s create a PersonName class – that will be converted later:

public class PersonName implements Serializable {

    private String name;
    private String surname;

    // getters and setters
}

Then, we’ll add an attribute of type PersonName to an @Entity class:

@Entity(name = "PersonTable")
public class Person {
   
    private PersonName personName;

    //...
}

Now we need to create a converter that transforms the PersonName attribute to a database column and vice-versa. In our case, we’ll convert the attribute to a String value that contains both name and surname fields.

To do so we have to annotate our converter class with @Converter and implement the AttributeConverter interface. We’ll parametrize the interface with the types of the class and the database column, in that order:

@Converter
public class PersonNameConverter implements 
  AttributeConverter<PersonName, String> {

    private static final String SEPARATOR = ", ";

    @Override
    public String convertToDatabaseColumn(PersonName personName) {
        if (personName == null) {
            return null;
        }

        StringBuilder sb = new StringBuilder();
        if (personName.getSurname() != null && !personName.getSurname()
            .isEmpty()) {
            sb.append(personName.getSurname());
            sb.append(SEPARATOR);
        }

        if (personName.getName() != null 
          && !personName.getName().isEmpty()) {
            sb.append(personName.getName());
        }

        return sb.toString();
    }

    @Override
    public PersonName convertToEntityAttribute(String dbPersonName) {
        if (dbPersonName == null || dbPersonName.isEmpty()) {
            return null;
        }

        String[] pieces = dbPersonName.split(SEPARATOR);

        if (pieces == null || pieces.length == 0) {
            return null;
        }

        PersonName personName = new PersonName();        
        String firstPiece = !pieces[0].isEmpty() ? pieces[0] : null;
        if (dbPersonName.contains(SEPARATOR)) {
            personName.setSurname(firstPiece);

            if (pieces.length >= 2 && pieces[1] != null 
              && !pieces[1].isEmpty()) {
                personName.setName(pieces[1]);
            }
        } else {
            personName.setName(firstPiece);
        }

        return personName;
    }
}

Notice that we had to implement 2 methods: convertToDatabaseColumn() and convertToEntityAttribute().

The two methods are used to convert from the attribute to a database column and vice-versa.

3. Using the Converter

To use our converter, we just need to add the @Convert annotation to the attribute and specify the converter class we want to use:

@Entity(name = "PersonTable")
public class Person {

    @Convert(converter = PersonNameConverter.class)
    private PersonName personName;
    
    // ...
}

Finally, let’s create a unit test to see that it really works.

To do so, we’ll first store a Person object in our database:

@Test
public void givenPersonName_whenSaving_thenNameAndSurnameConcat() {
    String name = "name";
    String surname = "surname";

    PersonName personName = new PersonName();
    personName.setName(name);
    personName.setSurname(surname);

    Person person = new Person();
    person.setPersonName(personName);

    Long id = (Long) session.save(person);

    session.flush();
    session.clear();
}

Next, we’re going to test that the PersonName was stored as we defined it in the converter – by retrieving that field from the database table:

@Test
public void givenPersonName_whenSaving_thenNameAndSurnameConcat() {
    // ...

    String dbPersonName = (String) session.createNativeQuery(
      "select p.personName from PersonTable p where p.id = :id")
      .setParameter("id", id)
      .getSingleResult();

    assertEquals(surname + ", " + name, dbPersonName);
}

Let’s also test that the conversion from the value stored in the database to the PersonName class works as defined in the converter by writing a query that retrieves the whole Person class:

@Test
public void givenPersonName_whenSaving_thenNameAndSurnameConcat() {
    // ...

    Person dbPerson = session.createNativeQuery(
      "select * from PersonTable p where p.id = :id", Person.class)
        .setParameter("id", id)
        .getSingleResult();

    assertEquals(dbPerson.getPersonName()
      .getName(), name);
    assertEquals(dbPerson.getPersonName()
      .getSurname(), surname);
}

4. Conclusion

In this brief tutorial, we showed how to use the newly introduced Attribute Converters in JPA 2.1.

As always, the full source code for the examples is available over on GitHub.

Introduction to Jinq with Spring

$
0
0

1. Introduction

Jinq provides an intuitive and handy approach for querying databases in Java. In this tutorial, we’ll explore how to configure a Spring project to use Jinq and some of its features illustrated with simple examples.

2. Maven Dependencies

We’ll need to add the Jinq dependency in the pom.xml file:

<dependency>
    <groupId>org.jinq</groupId>
    <artifactId>jinq-jpa</artifactId>
    <version>1.8.22</version>
</dependency>

For Spring, we’ll add the Spring ORM dependency in the pom.xml file:

<dependency>
    <groupId>org.springframework</groupId>
    <artifactId>spring-orm</artifactId>
    <version>5.0.3.RELEASE</version>
</dependency>

Finally, for testing, we’ll use an H2 in-memory database, so let’s also add this dependency to the pom.xml file:

<dependency>
    <groupId>com.h2database</groupId>
    <artifactId>h2</artifactId>
    <version>1.4.196</version>
</dependency>

3. Understanding Jinq

Jinq helps us to write easier and more readable database queries by exposing a fluent API that’s internally based on the Java Stream API.

Let’s see an example where we’re filtering cars by model:

jinqDataProvider.streamAll(entityManager, Car.class)
  .where(c -> c.getModel().equals(model))
  .toList();

Jinq translates the above code snippet into a SQL query in an efficient way, so the final query in this example would be:

select c.* from car c where c.model=?

Since we’re not using plain-text for writing queries and use a type-safe API instead this approach is less prone to errors.

Plus, Jinq aims to allow faster development by using common, easy-to-read expressions.

Nevertheless, it has some limitations in the number of types and operations we can use, as we’ll see next.

3.1. Limitations

Jinq supports only the basic types in JPA and a concrete list of SQL functions. It works by translating the lambda operations into a native SQL query by mapping all objects and methods into a JPA data type and a SQL function.

Therefore, we can’t expect the tool to translate every custom type or all methods of a type.

3.2. Supported Data Types

Let’s see the supported data types and methods supported:

  • String – equals(), compareTo() methods only
  • Primitive Data Types – arithmetic operations
  • Enums and custom classes – supports == and != operations only
  • java.util.Collection – contains()
  • Date API – equals(), before(), after() methods only

Note: if we wanted to customize the conversion from a Java object to a database object, we’d need to register our concrete implementation of an AttributeConverter in Jinq.

4. Integrating Jinq with Spring

Jinq needs an EntityManager instance to get the persistence context. In this tutorial, we’ll introduce a simple approach with Spring to make Jinq work with the EntityManager provided by Hibernate.

4.1. Repository Interface

Spring uses the concept of repositories to manage entities. Let’s look at our CarRepository interface where we have a method to retrieve a Car for a given model:

public interface CarRepository {
    Optional<Car> findByModel(String model);
}

4.2. Abstract Base Repository

Next, we’ll need a base repository to provide all the Jinq capabilities:

public abstract class BaseJinqRepositoryImpl<T> {
    @Autowired
    private JinqJPAStreamProvider jinqDataProvider;

    @PersistenceContext
    private EntityManager entityManager;

    protected abstract Class<T> entityType();

    public JPAJinqStream<T> stream() {
        return streamOf(entityType());
    }

    protected <U> JPAJinqStream<U> streamOf(Class<U> clazz) {
        return jinqDataProvider.streamAll(entityManager, clazz);
    }
}

4.3. Implementing the Repository

Now, all we need for Jinq is an EntityManager instance and the entity type class.

Let’s see the Car repository implementation using our Jinq base repository that we just defined:

@Repository
public class CarRepositoryImpl 
  extends BaseJinqRepositoryImpl<Car> implements CarRepository {

    @Override
    public Optional<Car> findByModel(String model) {
        return stream()
          .where(c -> c.getModel().equals(model))
          .findFirst();
    }

    @Override
    protected Class<Car> entityType() {
        return Car.class;
    }
}

4.4. Wiring the JinqJPAStreamProvider

In order to wire the JinqJPAStreamProvider instance, we’ll add the Jinq provider configuration:

@Configuration
public class JinqProviderConfiguration {

    @Bean
    @Autowired
    JinqJPAStreamProvider jinqProvider(EntityManagerFactory emf) {
        return new JinqJPAStreamProvider(emf);
    }
}

4.5. Configuring the Spring Application

The final step is to configure our Spring application using Hibernate and our Jinq configuration. As a reference, see our application.properties file, in which we use an in-memory H2 instance as the database:

spring.datasource.url=jdbc:h2:~/jinq
spring.datasource.username=sa
spring.datasource.password=
spring.jpa.hibernate.ddl-auto=create-drop

5. Query Guide

Jinq provides many intuitive options to customize the final SQL query with select, where, joins and more. Note that these have the same limitations that we have already introduced above.

5.1. Where

The where clause allows applying multiple filters to a data collection.

In the next example, we want to filter cars by model and description:

stream()
  .where(c -> c.getModel().equals(model)
    && c.getDescription().contains(desc))
  .toList();

And this is the SQL that Jinq translates:

select c.model, c.description from car c where c.model=? and locate(?, c.description)>0

5.2. Select

In case we want to retrieve only a few columns/fields from the database, we need to use the select clause.

In order to map multiple values, Jinq provides a number of Tuple classes with up to eight values:

stream()
  .select(c -> new Tuple3<>(c.getModel(), c.getYear(), c.getEngine()))
  .toList()

And the translated SQL:

select c.model, c.year, c.engine from car c

5.3. Joins

Jinq is able to resolve one-to-one and many-to-one relationships if the entities are properly linked.

For example, if we add the manufacturer entity in Car:

@Entity(name = "CAR")
public class Car {
    //...
    @OneToOne
    @JoinColumn(name = "name")
    public Manufacturer getManufacturer() {
        return manufacturer;
    }
}

And the Manufacturer entity with the list of Cars:

@Entity(name = "MANUFACTURER")
public class Manufacturer {
    // ...
    @OneToMany(mappedBy = "model")
    public List<Car> getCars() {
        return cars;
    }
}

We’re now able to get the Manufacturer for a given model:

Optional<Manufacturer> manufacturer = stream()
  .where(c -> c.getModel().equals(model))
  .select(c -> c.getManufacturer())
  .findFirst();

As expected, Jinq will use an inner join SQL clause in this scenario:

select m.name, m.city from car c inner join manufacturer m on c.name=m.name where c.model=?

In case we need to have more control over the join clauses in order to implement more complex relationships over the entities, like a many-to-many relation, we can use the join method:

List<Pair<Manufacturer, Car>> list = streamOf(Manufacturer.class)
  .join(m -> JinqStream.from(m.getCars()))
  .toList()

Finally, we could use a left outer join SQL clause by using the leftOuterJoin method instead of the join method.

5.4. Aggregations

All the examples we have introduced so far are using either the toList or the findFirst methods – to return the final result of our query in Jinq.

Besides these methods, we also have access to other methods to aggregate results.

For example, let’s use the count method to get the total count of the cars for a concrete model in our database:

long total = stream()
  .where(c -> c.getModel().equals(model))
  .count()

And the final SQL is using the count SQL method as expected:

select count(c.model) from car c where c.model=?

Jinq also provides aggregation methods like sum, average, min, max, and the possibility to combine different aggregations.

5.5. Pagination

In case we want to read data in batches, we can use the limit and skip methods.

Let’s see an example where we want to skip the first 10 cars and get only 20 items:

stream()
  .skip(10)
  .limit(20)
  .toList()

And the generated SQL is:

select c.* from car c limit ? offset ?

6. Conclusion

There we go. In this article, we’ve seen an approach for setting up a Spring application with Jinq using Hibernate (minimally).

We’ve also briefly explored Jinq’s benefits and some of its main features.

As always, the sources can be found over on GitHub.

Regular Expressions in Kotlin

$
0
0

1. Introduction

We can find use (or abuse) of regular expressions in pretty much every kind of software, from quick scripts to incredibly complex applications.

In this article, we’ll see how to use regular expressions in Kotlin.

We won’t be discussing regular expression syntax; a familiarity with regular expressions, in general, is required to adequately follow the article, and knowledge of the Java Pattern syntax specifically is recommended.

2. Setup

While regular expressions aren’t part of the Kotlin language, they do come with its standard library.

We probably already have it as a dependency of our project:

<dependency>
    <groupId>org.jetbrains.kotlin</groupId>
    <artifactId>kotlin-stdlib</artifactId>
    <version>1.2.21</version>
</dependency>

We can find the latest version of kotlin-stdlib on Maven Central.

3. Creating a Regular Expression Object

Regular expressions are instances of the kotlin.text.Regex class. We can create one in several ways.

A possibility is to call the Regex constructor:

Regex("a[bc]+d?")

or we can call the toRegex method on a String:

"a[bc]+d?".toRegex()

Finally, we can use a static factory method:

Regex.fromLiteral("a[bc]+d?")

Save from a difference explained in the next section, these options are equivalent and amount to personal preference. Just remember to be consistent!

Tip: regular expressions often contain characters that would be interpreted as escape sequences in String literals. We can thus use raw Strings to forget about multiple levels of escaping:

"""a[bc]+d?\W""".toRegex()

3.1. Matching Options

Both the Regex constructor and the toRegex method allow us to specify a single additional option or a set:

Regex("a(b|c)+d?", CANON_EQ)
Regex("a(b|c)+d?", setOf(DOT_MATCHES_ALL, COMMENTS))
"a(b|c)+d?".toRegex(MULTILINE)
"a(b|c)+d?".toRegex(setOf(IGNORE_CASE, COMMENTS, UNIX_LINES))

Options are enumerated in the RegexOption class, which we conveniently imported statically in the example above:

  • IGNORE_CASE – enables case-insensitive matching
  • MULTILINE – changes the meaning of ^ and $ (see Pattern)
  • LITERAL – causes metacharacters or escape sequences in the pattern to be given no special meaning
  • UNIX_LINES – in this mode, only the \n is recognized as a line terminator
  • COMMENTS – permits whitespace and comments in the pattern
  • DOT_MATCHES_ALL – causes the dot to match any character, including a line terminator
  • CANON_EQ – enables equivalence by canonical decomposition (see Pattern)

4. Matching

We use regular expressions primarily to match input Strings, and sometimes to extract or replace parts of them.

We’ll now look in detail at the methods offered by Kotlin’s Regex class for matching Strings.

4.1. Checking Partial or Total Matches

In these use cases, we’re interested in knowing whether a String or a portion of a String satisfies our regular expression.

If we only need a partial match, we can use containsMatchIn:

val regex = """a([bc]+)d?""".toRegex()

assertTrue(regex.containsMatchIn("xabcdy"))

If we want the whole String to match instead, we use matches:

assertTrue(regex.matches("abcd"))

Note that we can use matches as an infix operator as well:

assertFalse(regex matches "xabcdy")

4.2. Extracting Matching Components

In these use cases, we want to match a String against a regular expression and extract parts of the String.

We might want to match the entire String:

val matchResult = regex.matchEntire("abbccbbd")

Or we might want to find the first substring that matches:

val matchResult = regex.find("abcbabbd")

Or maybe to find all the matching substrings at once, as a Set:

val matchResults = regex.findAll("abcb abbd")

In either case, if the match is successful, the result will be one or more instances of the MatchResult class. In the next section, we’ll see how to use it.

If the match is not successful, instead, these methods return null or the empty Set in case of findAll.

4.3. The MatchResult Class

Instances of the MatchResult class represent successful matches of some input string against a regular expression; either complete or partial matches (see the previous section).

As such, they have a value, which is the matched String or substring:

val regex = """a([bc]+)d?""".toRegex()
val matchResult = regex.find("abcb abbd")

assertEquals("abcb", matchResult.value)

And they have a range of indices to indicate what portion of the input was matched:

assertEquals(IntRange(0, 3), matchResult.range)

4.4. Groups and Destructuring

We can also extract groups (matched substrings) from MatchResult instances.

We can obtain them as Strings:

assertEquals(listOf("abcb", "bcb"), matchResult.groupValues)

Or we can also view them as MatchGroup objects consisting of a value and a range:

assertEquals(IntRange(1, 3), matchResult.groups[1].range)

The group with index 0 is always the entire matched String. Indices greater than 0, instead, represent groups in the regular expression, delimited by parentheses, such as ([bc]+) in our example.

We can also destructure MatchResult instances in an assignment statement:

val regex = """([\w\s]+) is (\d+) years old""".toRegex()
val matchResult = regex.find("Mickey Mouse is 95 years old")
val (name, age) = matchResult!!.destructured

assertEquals("Mickey Mouse", name)
assertEquals("95", age)

4.5. Multiple Matches

MatchResult also has a next method that we can use to obtain the next match of the input String against the regular expression, if there is any:

val regex = """a([bc]+)d?""".toRegex()
var matchResult = regex.find("abcb abbd")

assertEquals("abcb", matchResult!!.value)

matchResult = matchResult.next()
assertEquals("abbd", matchResult!!.value)

matchResult = matchResult.next()
assertNull(matchResult)

As we can see, next returns null when there are no more matches.

5. Replacing

Another common use of regular expressions is replacing matching substrings with other Strings.

For this purpose, we have two methods readily available in the standard library.

One, replace, is for replacing all occurrences of a matching String:

val regex = """(red|green|blue)""".toRegex()
val beautiful = "Roses are red, Violets are blue"
val grim = regex.replace(beautiful, "dark")

assertEquals("Roses are dark, Violets are dark", grim)

The other, replaceFirst, is for replacing only the first occurrence:

val shiny = regex.replaceFirst(beautiful, "rainbow")

assertEquals("Roses are rainbow, Violets are blue", shiny)

5.1. Complex Replacements

For more advanced scenarios, when we don’t want to replace matches with constant Strings, but we want to apply a transformation instead, Regex still gives us what we need.

Enter the replace overload taking a closure:

val reallyBeautiful = regex.replace(beautiful) {
    m -> m.value.toUpperCase() + "!"
}

assertEquals("Roses are RED!, Violets are BLUE!", reallyBeautiful)

As we can see, for each match, we can compute a replacement String using that match.

6. Splitting

Finally, we might want to split a String into a list of substrings according to a regular expression. Again, Kotlin’s Regex has got us covered:

val regex = """\W+""".toRegex()
val beautiful = "Roses are red, Violets are blue"

assertEquals(listOf(
  "Roses", "are", "red", "Violets", "are", "blue"), regex.split(beautiful))

Here, the regular expression matches one or more non-word characters, so the result of the split operation is a list of words.

We can also put a limit on the length of the resulting list:

assertEquals(listOf("Roses", "are", "red", "Violets are blue"), regex.split(beautiful, 4))

7. Java Interoperability

If we need to pass our regular expression to Java code, or some other JVM language API that expects an instance of java.util.regex.Pattern, we can simply convert our Regex:

regex.toPattern()

8. Conclusions

In this article, we’ve examined the regular expression support in the Kotlin standard library.

For further information, see the Kotlin reference.

The implementation of all these examples and code snippets can be found in the GitHub project – this is a Maven project, so it should be easy to import and run as it’s.

Reliable Messaging with JGroups

$
0
0

1. Overview

JGroups is a Java API for reliable messages exchange. It features a simple interface that provides:

  • a flexible protocol stack, including TCP and UDP
  • fragmentation and reassembly of large messages
  • reliable unicast and multicast
  • failure detection
  • flow control

As well as many other features.

In this tutorial, we’ll create a simple application for exchanging String messages between applications and supplying shared state to new applications as they join the network.

2. Setup

2.1. Maven Dependency

We need to add a single dependency to our pom.xml:

<dependency>
    <groupId>org.jgroups</groupId>
    <artifactId>jgroups</artifactId>
    <version>4.0.10.Final</version>
</dependency>

The latest version of the library can be checked on Maven Central.

2.2. Networking

JGroups will try to use IPV6 by default. Depending on our system configuration, this may result in applications not being able to communicate.

To avoid this, we’ll set the java.net.preferIPv4Stack to true property when running our applications here:

java -Djava.net.preferIPv4Stack=true com.baeldung.jgroups.JGroupsMessenger

3. JChannels

Our connection to a JGroups network is a JChannel. The channel joins a cluster and sends and receives messages, as well as information about the state of the network.

3.1. Creating a Channel

We create a JChannel with a path to a configuration file. If we omit the file name, it will look for udp.xml in the current working directory.

We’ll create a channel with an explicitly named configuration file:

JChannel channel = new JChannel("src/main/resources/udp.xml");

JGroups configuration can be very complicated, but the default UDP and TCP configurations are sufficient for most applications. We’ve included the file for UDP in our code and will use it for this tutorial.

For more information on configuring the transport see the JGroups manual here.

3.2. Connecting a Channel

After we’ve created our channel, we need to join a cluster. A cluster is a group of nodes that exchange messages.

Joining a cluster requires a cluster name:

channel.connect("Baeldung");

The first node that attempts to join a cluster will create it if it doesn’t exist. We’ll see this process in action below.

3.3. Naming a Channel

Nodes are identified by a name so that peers can send directed messages and receive notifications about who is entering and leaving the cluster. JGroups will assign a name automatically, or we can set our own:

channel.name("user1");

We’ll use these names below, to track when nodes enter and leave the cluster.

3.4. Closing a Channel

Channel cleanup is essential if we want peers to receive timely notification that we have exited.

We close a JChannel with its close method:

channel.close()

4. Cluster View Changes

With a JChannel created we’re now ready to see the state of peers in the cluster and exchange messages with them.

JGroups maintains cluster state inside the View class. Each channel has a single View of the network. When the view changes, it’s delivered via the viewAccepted() callback.

For this tutorial, we’ll extend the ReceiverAdaptor API class that implements all of the interface methods required for an application.

It’s the recommended way to implement callbacks.

Let’s add viewAccepted to our application:

public void viewAccepted(View newView) {

    private View lastView;

    if (lastView == null) {
        System.out.println("Received initial view:");
        newView.forEach(System.out::println);
    } else {
        System.out.println("Received new view.");

        List<Address> newMembers = View.newMembers(lastView, newView);
        System.out.println("New members: ");
        newMembers.forEach(System.out::println);

        List<Address> exMembers = View.leftMembers(lastView, newView);
        System.out.println("Exited members:");
        exMembers.forEach(System.out::println);
    }
    lastView = newView;
}

Each View contains a List of Address objects, representing each member of the cluster. JGroups offers convenience methods for comparing one view to another, which we use to detect new or exited members of the cluster.

5. Sending Messages

Message handling in JGroups is straightforward. A Message contains a byte array and Address objects corresponding to the sender and the receiver.

For this tutorial we’re using Strings read from the command line, but it’s easy to see how an application could exchange other data types.

5.1. Broadcast Messages

A Message is created with a destination and a byte array; JChannel sets the sender for us. If the target is null the entire cluster will receive the message.

We’ll accept text from the command line and send it to the cluster:

System.out.print("Enter a message: ");
String line = in.readLine().toLowerCase();
Message message = new Message(null, line.getBytes());
channel.send(message);

If we run multiple instances of our program and send this message (after we implement the receive() method below), all of them would receive it, including the sender.

5.2. Blocking Our Messages

If we don’t want to see our messages, we can set a property for that:

channel.setDiscardOwnMessages(true);

When we run the previous test, the message sender does not receive its broadcast message.

5.3. Direct Messages

Sending a direct message requires a valid Address. If we’re referring to nodes by name, we need a way to look up an Address. Fortunately, we have the View for that.

The current View is always available from the JChannel:

private Optional<address> getAddress(String name) { 
    View view = channel.view(); 
    return view.getMembers().stream()
      .filter(address -> name.equals(address.toString()))
      .findAny(); 
}

Address names are available via the class toString() method, so we merely search the List of cluster members for the name we want.

So we can accept a name on from the console, find the associated destination, and send a direct message:

Address destination = null;
System.out.print("Enter a destination: ");
String destinationName = in.readLine().toLowerCase();
destination = getAddress(destinationName)
  .orElseThrow(() -> new Exception("Destination not found"); 
Message message = new Message(destination, "Hi there!"); 
channel.send(message);

6. Receiving Messages

We can send messages, now let’s add try to receive them now.

Let’s override ReceiverAdaptor’s empty receive method:

public void receive(Message message) {
    String line = Message received from: " 
      + message.getSrc() 
      + " to: " + message.getDest() 
      + " -> " + message.getObject();
    System.out.println(line);
}

Since we know the message contains a String, we can safely pass getObject() to System.out.

7. State Exchange

When a node enters the network, it may need to retrieve state information about the cluster. JGroups provides a state transfer mechanism for this.

When a node joins the cluster, it simply calls getState(). The cluster usually retrieves the state from the oldest member in the group – the coordinator.

Let’s add a broadcast message count to our application. We’ll add a new member variable and increment it inside receive():

private Integer messageCount = 0;

public void receive(Message message) {
    String line = "Message received from: " 
      + message.getSrc() 
      + " to: " + message.getDest() 
      + " -> " + message.getObject();
    System.out.println(line);

    if (message.getDest() == null) {
        messageCount++;
        System.out.println("Message count: " + messageCount);
    }
}

We check for a null destination because if we count direct messages, each node will have a different number.

Next, we override two more methods in ReceiverAdaptor:

public void setState(InputStream input) {
    try {
        messageCount = Util.objectFromStream(new DataInputStream(input));
    } catch (Exception e) {
        System.out.println("Error deserialing state!");
    }
    System.out.println(messageCount + " is the current messagecount.");
}

public void getState(OutputStream output) throws Exception {
    Util.objectToStream(messageCount, new DataOutputStream(output));
}

Similar to messages, JGroups transfers state as an array of bytes.

JGroups supplies an InputStream to the coordinator to write the state to, and an OutputStream for the new node to read. The API provides convenience classes for serializing and deserializing the data.

Note that in production code access to state information must be thread-safe.

Finally, we add the call to getState() to our startup, after we connect to the cluster:

channel.connect(clusterName);
channel.getState(null, 0);

getState() accepts a destination from which to request the state and a timeout in milliseconds. A null destination indicates the coordinator and 0 means do not timeout.

When we run this app with a pair of nodes and exchange broadcast messages, we see the message count increment.

Then if we add a third client or stop and start one of them, we’ll see the newly connected node print the correct message count.

8. Conclusion

In this tutorial, we used JGroups to create an application for exchanging messages. We used the API to monitor which nodes connected to and left the cluster and also to transfer cluster state to a new node when it joined.

Code samples, as always, can be found over on GitHub.


Introduction to ActiveWeb

$
0
0

1. Overview

In this article, we’re going to illustrate the Activeweb – a full stack web framework from JavaLite – providing everything necessary for the development of dynamic web applications or REST-ful web services.

2. Basic Concepts and Principles

Activeweb leverages “convention over configuration” – which means it’s configurable, but has sensible defaults and doesn’t require additional configuration. We just need to follow a few predefined conventions, like naming classes, methods, and fields in a certain predefined format.

It also simplifies development by recompiling and reloading the source into the running container (Jetty by default).

For dependency management, it uses Google Guice as the DI framework; to learn more about Guice, have a look at our guide here.

3. Maven Setup

To get started, let’s add the necessary dependencies first:

<dependency>
    <groupId>org.javalite</groupId>
    <artifactId>activeweb</artifactId>
    <version>1.15</version>
</dependency>

The latest version can be found here.

Additionally, for testing the application, we’ll need the activeweb-testing dependency:

<dependency>
    <groupId>org.javalite</groupId>
    <artifactId>activeweb-testing</artifactId>
    <version>1.15</version>
    <scope>test</scope>
</dependency>

Check out the latest version here.

4. Application Structure

As we discussed, the application structure needs to follow a certain convention; here’s what that looks like for a typical MVC application:

As we can see, controllers, service, config, and models should be located in their own sub-package in the app package.

The views should be located in WEB-INF/views directory, each having is own subdirectory based on the controller name. For example app.controllers.ArticleController should have an article/ sub-directory containing all the view files for that controller.

The deployment descriptor or the web.xml should typically contain a <filter> and the corresponding <filter-mapping>. Since the framework is a servlet filter, instead of a <servlet> configuration there is a filter configuration:

...
<filter>
    <filter-name>dispatcher</filter-name>
    <filter-class>org.javalite.activeweb.RequestDispatcher</filter-class>
...
</filter>
...

We also need an <init-param> root_controller to define the default controller for the application – akin to a home controller:

...
<init-param>
    <param-name>root_controller</param-name>
    <param-value>home</param-value>
</init-param>
...

5. Controllers

Controllers are the primary components of an ActiveWeb Application; and, as mentioned earlier all controllers should be located inside the app.controllers package:

public class ArticleController extends AppController {
    // ...
}

Notice that the controller is extending org.javalite.activeweb.AppController.

5.1. Controller URL Mapping

The controllers are mapped to a URL automatically based on the convention. For example, ArticleController will get mapped to:

http://host:port/contextroot/article

Now, this would be mapped them to the default a default action in the controller. Actions are nothing but methods inside the controller. Name the default method as index():

public class ArticleController extends AppController {
    // ...
    public void index() {
        render("articles");    
    }
    // ...
}

For other methods or actions append the method name to the URL:

public class ArticleController extends AppController {
    // ...
    
    public void search() {
        render("search");
    }
}

The URL:

http://host:port/contextroot/article/search

We can even have controller actions based on HTTP methods. Just annotate the method with either of @POST, @PUT, @DELETE, @GET, @HEAD. If we don’t annotate an action, it’s considered a GET by default.

5.2. Controller URL Resolution

The framework uses controller name and the sub-package name to generate the controller URL. For example app.controllers.ArticleController.java the URL:

http://host:port/contextroot/article

If the controller is inside a sub-package, the URL simply becomes:

http://host:port/contextroot/baeldung/article

For a controller name having more than a single word (for example app.controllers.PublishedArticleController.java), the URL will get separated using an underscore:

http://host:port/contextroot/published_article

5.3. Retrieving Request Parameters

Inside a controller, we get access to the request parameters using the param() or params() methods from the AppController class. The first method takes a String argument – the name of the param to retrieve:

public void search() {

    String keyword = param("key");  
    view("search",articleService.search(keyword));

}

And we can use the later to get all parameters if we need to:

public void search() {
        
    Map<String, String[]> criterion = params();
    // ...
}

6. Views

In ActiveWeb terminology, views are often referred as templates; this is mostly because it uses Apache FreeMarker template engine instead of JSPs. You can read more about FreeMarker in our guide, here.

Place the templates in WEB-INF/views directory. Every controller should have a sub-directory by its name holding all templates required by it.

6.1. Controller View Mapping

When a controller is hit, the default action index() gets executed and the framework will choose the WEB-INF/views/article/index.ftl template the from views directory for that controller. Similarly, for any other action, the view would be chosen based on the action name.

This isn’t always what we would like. Sometimes we might want to return some views based on internal business logic. In this scenario, we can control the process with the render() method from the parent org.javalite.activeweb.AppController class:

public void index() {
    render("articles");    
}

Note that the location of the custom views should also be in the same view directory for that controller. If it is not the case, prefix the template name with the directory name where the template resides and pass it to the render() method:

render("/common/error");

6.3. Views with Data

To send data to the views, the org.javalite.activeweb.AppController provides the view() method:

view("articles", articleService.getArticles());

This takes two params. First, the object name used to access the object in the template and second an object containing the data.

We can also use assign() method to pass data to the views. There is absolutely no difference between view() and assign() methods – we may choose any one of them:

assign("article", articleService.search(keyword));

Let’s map the data in the template:

<@content for="title">Articles</@content>
...
<#list articles as article>
    <tr>
        <td>${article.title}</td>
        <td>${article.author}</td>
        <td>${article.words}</td>
        <td>${article.date}</td>
    </tr>
</#list>
</table>

7. Managing Dependencies

In order to manage objects and instances, ActiveWeb uses Google Guice as a dependency management framework.

Let’s say we need a service class in our application; this would separate the business logic from the controllers.

Let’s first create a service interface:

public interface ArticleService {
    
    List<Article> getArticles();   
    Article search(String keyword);
    
}

And the implementation:

public class ArticleServiceImpl implements ArticleService {

    public List<Article> getArticles() {
        return fetchArticles();
    }

    public Article search(String keyword) {
        Article ar = new Article();
        ar.set("title", "Article with "+keyword);
        ar.set("author", "baeldung");
        ar.set("words", "1250");
        ar.setDate("date", Instant.now());
        return ar;
    }
}

Now, let’s bind this service as a Guice module:

public class ArticleServiceModule extends AbstractModule {

    @Override
    protected void configure() {
        bind(ArticleService.class).to(ArticleServiceImpl.class)
          .asEagerSingleton();
    }
}

Finally, register this in the application context and inject it into the controller, as required:

public class AppBootstrap extends Bootstrap {

    public void init(AppContext context) {
    }

    public Injector getInjector() {
        return Guice.createInjector(new ArticleServiceModule());
    }
}

Note that this config class name must be AppBootstrap and it should be located in the app.config package.

Finally, here’s how we inject it into the controller:

@Inject
private ArticleService articleService;

8. Testing

Unit tests for an ActiveWeb application are written using the JSpec library from JavaLite.

We’ll use the org.javalite.activeweb.ControllerSpec class from JSpec to test our controller, and we’ll name the test classes following a similar convention:

public class ArticleControllerSpec extends ControllerSpec {
    // ...
}

Notice, that the name is similar to the controller it is testing with a “Spec” at the end.

Here’s the test case:

@Test
public void whenReturnedArticlesThenCorrect() {
    request().get("index");
    a(responseContent())
      .shouldContain("<td>Introduction to Mule</td>");
}

Notice that the request() method simulates the call to the controller, and the corresponding HTTP method get(), takes the action name as an argument.

We can also pass parameters to the controller using the params() method:

@Test
public void givenKeywordWhenFoundArticleThenCorrect() {
    request().param("key", "Java").get("search");
    a(responseContent())
      .shouldContain("<td>Article with Java</td>");
}

To pass multiple parameters, we can chain method as well, with this fluent API.

9. Deploying the Application

It’s possible to deploy the application in any servlet container like Tomcat, WildFly or Jetty. Of course, the simplest way to deploy and test would be using the Maven Jetty plugin:

...
<plugin>
    <groupId>org.eclipse.jetty</groupId>
    <artifactId>jetty-maven-plugin</artifactId>
    <version>9.4.8.v20171121</version>
    <configuration>
        <reload>manual</reload>
        <scanIntervalSeconds>10000</scanIntervalSeconds>
    </configuration>
</plugin>
...

The latest version of the plugin is here.

Now, finally – we can fire it up:

mvn jetty:run

10. Conclusion

In this article, we learned about the basic concepts and conventions of the ActiveWeb framework. In addition to these, the framework has more features and capabilities than what we have discussed in here.

Please refer the official documentation for more details.

And, as always, the sample code used in the article is available over on GitHub.

Check if a String is a Palindrome

$
0
0

1. Introduction

In this article, we’re going to see how we can check whether a given String is a palindrome using Java.

A palindrome is a word, phrase, number, or other sequences of characters which reads the same backward as forward, such as “madam” or “racecar”.

2. Solutions

In the following sections, we’ll look at the various ways of checking if a given String is a palindrome or not.

2.1. A Simple Approach

We can simultaneously start iterating the given string forward and backward, one character at a time. If the there is a match the loop continues; otherwise, the loop exits:

public boolean isPalindrome(String text) {
    String clean = text.replaceAll("\\s+", "").toLowerCase();
    int length = clean.length();
    int forward = 0;
    int backward = length - 1;
    while (backward > forward) {
        char forwardChar = clean.charAt(forward++);
        char backwardChar = clean.charAt(backward--);
        if (forwardChar != backwardChar)
            return false;
    }
    return true;
}

2.2. Reversing the String

There are a few different implementations that fit this use case: we can make use of the API methods from StringBuilder and StringBuffer classes when checking for palindromes, or we can reverse the String without these classes.

Let’s take a look at the code implementations without the helper APIs first:

public boolean isPalindromeReverseTheString(String text) {
    StringBuilder reverse = new StringBuilder();
    String clean = text.replaceAll("\\s+", "").toLowerCase();
    char[] plain = clean.toCharArray();
    for (int i = plain.length - 1; i >= 0; i--) {
        reverse.append(plain[i]);
    }
    return (reverse.toString()).equals(clean);
}

In the above snippet, we simply iterate the given String from the last character and append each character to the next character, all the way through to the first character thereby reversing the given String. 

Finally, we test for equality between the given String and reversed String.

The same behavior could be achieved using API methods.

Let’s see a quick demonstration:

public boolean isPalindromeUsingStringBuilder(String text) {
    String clean = text.replaceAll("\\s+", "").toLowerCase();
    StringBuilder plain = new StringBuilder(clean);
    StringBuilder reverse = plain.reverse();
    return (reverse.toString()).equals(clean);
}

public boolean isPalindromeUsingStringBuffer(String text) {
    String clean = text.replaceAll("\\s+", "").toLowerCase();
    StringBuffer plain = new StringBuffer(clean);
    StringBuffer reverse = plain.reverse();
    return (reverse.toString()).equals(clean);
}

In the code snippet, we invoke the reverse() method from the StringBuilder and StringBuffer API to reverse the given String and test for equality.

2.3. Using Stream API

We can also use an IntStream to provide a solution:

public boolean isPalindromeUsingIntStream(String text) {
    String temp  = text.replaceAll("\\s+", "").toLowerCase();
    return IntStream.range(0, temp.length() / 2)
      .noneMatch(i -> temp.charAt(i) != temp.charAt(temp.length() - i - 1));
}

In the snippet above, we verify that none of the pairs of characters from each end of the String fulfills the Predicate condition.

2.4. Using Recursion

Recursion is a very popular method to solve these kinds of problems. In the example demonstrated we recursively iterate the given String and test to find out whether it’s a palindrome or not:

public boolean isPalindromeRecursive(String text){
    String clean = text.replaceAll("\\s+", "").toLowerCase();
    return recursivePalindrome(clean,0,clean.length()-1);
}

private boolean recursivePalindrome(String text, int forward, int backward) {
    if (forward == backward) {
        return true;
    }
    if ((text.charAt(forward)) != (text.charAt(backward))) {
        return false;
    }
    if (forward < backward + 1) {
        return recursivePalindrome(text, forward + 1, backward - 1);
    }

    return true;
}

3. Conclusion

In this quick tutorial, we saw how to find out whether a given String is a palindrome or not.

As always, the code examples for this article are available over on GitHub.

Introduction to Smooks

$
0
0

1. Overview

In this tutorial, we’ll introduce the Smooks framework.

We’ll describe what it’s, list its key features, and eventually learn how to use some of its more advanced functionality.

First of all, let’s briefly explain what the framework is meant to achieve.

2. Smooks

Smooks is a framework for data processing applications – dealing with structured data such as XML or CSV.

It provides both APIs and a configuration model that allow us to define transformations between predefined formats (for example XML to CSV, XML to JSON and more).

We can also use a number of tools to set up our mapping – including FreeMarker or Groovy scripts.

Besides transformations, Smooks also delivers other features like message validations or data splitting.

2.1. Key Features

Let’s take a look at Smooks’ main use cases:

  • Message conversion – transformation of data from various source formats to various output formats
  • Message enrichment – filling out the message with additional data, which comes from external data source like database
  • Data splitting – processing big files (GBs) and splitting them into smaller ones
  • Java binding – constructing and populating Java objects from messages
  • Message validation – performing validations like regex, or even creating your own validation rules

3. Initial Configuration

Let’s start with the Maven dependency we need to add to our pom.xml:

<dependency>
    <groupId>org.milyn</groupId>
    <artifactId>milyn-smooks-all</artifactId>
    <version>1.7.0</version>
</dependency>

The latest version can be found on Maven Central.

4. Java Binding

Let’s now start by focusing on binding messages to Java classes. We’ll go through a simple XML to Java conversion here.

4.1. Basic Concepts

We’ll start with a simple example. Consider the following XML:

<order creation-date="2018-01-14">
    <order-number>771</order-number>
    <order-status>IN_PROGRESS</order-status>
</order>

In order to accomplish this task with Smooks, we have to do two things: prepare the POJOs and the Smooks configuration.

Let’s see what our model looks like:

public class Order {

    private Date creationDate;
    private Long number;
    private Status status;
    // ...
}

public enum Status {
    NEW, IN_PROGRESS, FINISHED
}

Now, let’s move on to Smooks mappings.

Basically, the mappings are an XML file which contains transformation logic. In this article, we’ll use three different types of rules:

  • bean – defines the mapping of a concrete structured section to Java class
  • value – defines the mapping for the particular property of the bean. Can contain more advanced logic like decoders, which are used to map values to some data types (like date or decimal format)
  • wiring – allows us to wire a bean to other beans (for example Supplier bean will be wired to Order bean)

Let’s take a look at the mappings we’ll use in our case here:

<?xml version="1.0"?>
<smooks-resource-list 
  xmlns="http://www.milyn.org/xsd/smooks-1.1.xsd"
  xmlns:jb="http://www.milyn.org/xsd/smooks/javabean-1.2.xsd">

    <jb:bean beanId="order" 
      class="com.baeldung.smooks.model.Order" createOnElement="order">
        <jb:value property="number" data="order/order-number" />
        <jb:value property="status" data="order/order-status" />
        <jb:value property="creationDate" 
          data="order/@creation-date" decoder="Date">
            <jb:decodeParam name="format">yyyy-MM-dd</jb:decodeParam>
        </jb:value>
    </jb:bean>
</smooks-resource-list>

Now, with the configuration ready, let’s try to test if our POJO is constructed correctly.

First, we need to construct a Smooks object and pass input XML as a stream:

public Order converOrderXMLToOrderObject(String path) 
  throws IOException, SAXException {
 
    Smooks smooks = new Smooks(
      this.class.getResourceAsStream("/smooks-mapping.xml"));
    try {
        JavaResult javaResult = new JavaResult();
        smooks.filterSource(new StreamSource(this.class
          .getResourceAsStream(path)), javaResult);
        return (Order) javaResult.getBean("order");
    } finally {
        smooks.close();
    }
}

And finally, assert if the configuration is done properly:

@Test
public void whenConvert_thenPOJOsConstructedCorrectly() throws Exception {
    XMLToJavaConverter xmlToJavaOrderConverter = new XMLToJavaConverter();
    Order order = xmlToJavaOrderConverter
      .converOrderXMLToOrderObject("/order.xml");

    assertThat(order.getNumber(), is(771L));
    assertThat(order.getStatus(), is(Status.IN_PROGRESS));
    assertThat(
      order.getCreationDate(), 
      is(new SimpleDateFormat("yyyy-MM-dd").parse("2018-01-14"));
}

4.2. Advanced Binding – Referencing Other Beans and Lists

Let’s extend our previous example with supplier and order-items tags:

<order creation-date="2018-01-14">
    <order-number>771</order-number>
    <order-status>IN_PROGRESS</order-status>
    <supplier>
        <name>Company X</name>
        <phone>1234567</phone>
    </supplier>
    <order-items>
        <item>
            <quanitiy>1</quanitiy>
            <code>PX1234</code>
            <price>9.99</price>
        </item>
        <item>
            <quanitiy>1</quanitiy>
            <code>RX990</code>
            <price>120.32</price>
        </item>
    </order-items>
</order>

And now let’s update our model:

public class Order {
    // ..
    private Supplier supplier;
    private List<Item> items;
    // ...
}
public class Item {

    private String code;
    private Double price;
    private Integer quantity;
    // ...
}
public class Supplier {

    private String name;
    private String phoneNumber;
    // ...
}

We also have to extend the configuration mapping with the supplier and item bean definitions.

Notice that we’ve also defined separated items bean, which will hold all item elements in ArrayList.

Finally, we will use Smooks wiring attribute, to bundle it all together.

Take a look at how mappings will look like in this case:

<?xml version="1.0"?>
<smooks-resource-list 
  xmlns="http://www.milyn.org/xsd/smooks-1.1.xsd"
  xmlns:jb="http://www.milyn.org/xsd/smooks/javabean-1.2.xsd">

    <jb:bean beanId="order" 
      class="com.baeldung.smooks.model.Order" createOnElement="order">
        <jb:value property="number" data="order/order-number" />
        <jb:value property="status" data="order/order-status" />
        <jb:value property="creationDate" 
          data="order/@creation-date" decoder="Date">
            <jb:decodeParam name="format">yyyy-MM-dd</jb:decodeParam>
        </jb:value>
        <jb:wiring property="supplier" beanIdRef="supplier" />
        <jb:wiring property="items" beanIdRef="items" />
    </jb:bean>

    <jb:bean beanId="supplier" 
      class="com.baeldung.smooks.model.Supplier" createOnElement="supplier">
        <jb:value property="name" data="name" />
        <jb:value property="phoneNumber" data="phone" />
    </jb:bean>

    <jb:bean beanId="items" 
      class="java.util.ArrayList" createOnElement="order">
        <jb:wiring beanIdRef="item" />
    </jb:bean>
    <jb:bean beanId="item" 
      class="com.baeldung.smooks.model.Item" createOnElement="item">
        <jb:value property="code" data="item/code" />
        <jb:value property="price" decoder="Double" data="item/price" />
        <jb:value property="quantity" decoder="Integer" data="item/quantity" />
    </jb:bean>

</smooks-resource-list>

Finally, we’ll add a few assertions to our previous test:

assertThat(
  order.getSupplier(), 
  is(new Supplier("Company X", "1234567")));
assertThat(order.getItems(), containsInAnyOrder(
  new Item("PX1234", 9.99,1),
  new Item("RX990", 120.32,1)));

5. Messages Validation

Smooks comes with validation mechanism based on rules. Let’s take a look at how they are used.

Definition of the rules is stored in the configuration file, nested in the ruleBases tag, which can contain many ruleBase elements.

Each ruleBase element must have the following properties:

  • name – unique name, used just for reference
  • src – path to the rule source file
  • provider – fully qualified class name, which implements RuleProvider interface

Smooks comes with two providers out of the box: RegexProvider and MVELProvider.

The first one is used to validate individual fields in regex-like style.

The second one is used to perform more complicated validation in the global scope of the document. Let’s see them in action.

5.1. RegexProvider

Let’s use RegexProvider to validate two things: the format of the customer name, and phone number. RegexProvider as a source requires a Java properties file, which should contain regex validation in key-value fashion.

In order to meet our requirements, we’ll use the following setup:

supplierName=[A-Za-z0-9]*
supplierPhone=^[0-9\\-\\+]{9,15}$

5.2. MVELProvider

We’ll use MVELProvider to validate if the total price for each order-item is less then 200. As a source, we’ll prepare a CSV file with two columns: rule name and MVEL expression.

In order to check if the price is correct, we need the following entry:

"max_total","orderItem.quantity * orderItem.price < 200.00"

5.3. Validation Configuration

Once we’ve prepared the source files for ruleBases, we’ll move on to implementing concrete validations.

A validation is another tag in Smooks configuration, which contains the following attributes:

  • executeOn – path to the validated element
  • name – reference to the ruleBase
  • onFail – specifies what action will be taken when validation fails

Let’s apply validation rules to our Smooks configuration file and check how it looks like (note that if we want to use the MVELProvider, we’re forced to use Java binding, so that’s why we’ve imported previous Smooks configuration):

<?xml version="1.0"?>
<smooks-resource-list 
  xmlns="http://www.milyn.org/xsd/smooks-1.1.xsd"
  xmlns:rules="http://www.milyn.org/xsd/smooks/rules-1.0.xsd"
  xmlns:validation="http://www.milyn.org/xsd/smooks/validation-1.0.xsd">

    <import file="smooks-mapping.xml" />

    <rules:ruleBases>
        <rules:ruleBase 
          name="supplierValidation" 
          src="supplier.properties" 
          provider="org.milyn.rules.regex.RegexProvider"/>
        <rules:ruleBase 
          name="itemsValidation" 
          src="item-rules.csv" 
          provider="org.milyn.rules.mvel.MVELProvider"/>
    </rules:ruleBases>

    <validation:rule 
      executeOn="supplier/name" 
      name="supplierValidation.supplierName" onFail="ERROR"/>
    <validation:rule 
      executeOn="supplier/phone" 
      name="supplierValidation.supplierPhone" onFail="ERROR"/>
    <validation:rule 
      executeOn="order-items/item" 
      name="itemsValidation.max_total" onFail="ERROR"/>

</smooks-resource-list>

Now, with the configuration ready, let’s try to test if validation will fail on supplier’s phone number.

Again, we have to construct Smooks object and pass input XML as a stream:

public ValidationResult validate(String path) 
  throws IOException, SAXException {
    Smooks smooks = new Smooks(OrderValidator.class
      .getResourceAsStream("/smooks/smooks-validation.xml"));
    try {
        StringResult xmlResult = new StringResult();
        JavaResult javaResult = new JavaResult();
        ValidationResult validationResult = new ValidationResult();
        smooks.filterSource(new StreamSource(OrderValidator.class
          .getResourceAsStream(path)), xmlResult, javaResult, validationResult);
        return validationResult;
    } finally {
        smooks.close();
    }
}

And finally assert, if validation error occurred:

@Test
public void whenValidate_thenExpectValidationErrors() throws Exception {
    OrderValidator orderValidator = new OrderValidator();
    ValidationResult validationResult = orderValidator
      .validate("/smooks/order.xml");

    assertThat(validationResult.getErrors(), hasSize(1));
    assertThat(
      validationResult.getErrors().get(0).getFailRuleResult().getRuleName(), 
      is("supplierPhone"));
}

6. Message Conversion

The next thing we want to do is convert the message from one format to another.

In Smooks, this technique is also called templating and it supports:

  • FreeMarker (preferred option)
  • XSL
  • String template

In our example, we’ll use the FreeMarker engine to convert XML message to something very similar to EDIFACT, and even prepare a template for the email message based on XML order.

Let’s see how to prepare a template for EDIFACT:

UNA:+.? '
UNH+${order.number}+${order.status}+${order.creationDate?date}'
CTA+${supplier.name}+${supplier.phoneNumber}'
<#list items as item>
LIN+${item.quantity}+${item.code}+${item.price}'
</#list>

And for the email message:

Hi,
Order number #${order.number} created on ${order.creationDate?date} is currently in ${order.status} status.
Consider contacting the supplier "${supplier.name}" with phone number: "${supplier.phoneNumber}".
Order items:
<#list items as item>
${item.quantity} X ${item.code} (total price ${item.price * item.quantity})
</#list>

The Smooks configuration is very basic this time (just remember to import the previous configuration in order to import Java binding settings):

<?xml version="1.0"?>
<smooks-resource-list 
  xmlns="http://www.milyn.org/xsd/smooks-1.1.xsd"
  xmlns:ftl="http://www.milyn.org/xsd/smooks/freemarker-1.1.xsd">

    <import file="smooks-validation.xml" />

    <ftl:freemarker applyOnElement="#document">
        <ftl:template>/path/to/template.ftl</ftl:template>
    </ftl:freemarker>

</smooks-resource-list>

This time we need to just pass a StringResult to Smooks engine:

Smooks smooks = new Smooks(config);
StringResult stringResult = new StringResult();
smooks.filterSource(new StreamSource(OrderConverter.class
  .getResourceAsStream(path)), stringResult);
return stringResult.toString();

And we can, of course, test it:

@Test
public void whenApplyEDITemplate_thenConvertedToEDIFACT()
  throws Exception {
    OrderConverter orderConverter = new OrderConverter();
    String edifact = orderConverter.convertOrderXMLtoEDIFACT(
      "/smooks/order.xml");

   assertThat(edifact,is(EDIFACT_MESSAGE));
}

7. Conclusion

In this tutorial, we focused on how to convert messages to different formats, or transform them into Java objects using Smooks. We also saw how to perform validations based on regex or business logic rules.

As always, all the code used here can be found over on GitHub.

A Maze Solver in Java

$
0
0

1. Introduction

In this article, we’ll explore possible ways to navigate a maze, using Java.

Consider the maze to be a black and white image, with black pixels representing walls, and white pixels representing a path. Two white pixels are special, one being the entry to the maze and another exit.

Given such a maze, we want to find a path from entry to the exit.

2. Modelling the Maze

We’ll consider the maze to be a 2D integer array. Meaning of numerical values in the array will be as per the following convention:

  • 0 -> Road
  • 1 -> Wall
  • 2 -> Maze entry
  • 3 -> Maze exit
  • 4 -> Cell part of the path from entry to exit

We’ll model the maze as a graph. Entry and exit are the two special nodes, between which path is to be determined.

A typical graph has two properties, nodes, and edges. An edge determines the connectivity of graph and links one node to another.

Hence we’ll assume four implicit edges from each node, linking the given node to its left, right, top and bottom node.

Let’s define the method signature:

public List<Coordinate> solve(Maze maze) {
}

The input to the method is a maze, which contains the 2D array, with naming convention defined above.

The response of the method is a list of nodes, which forms a path from the entry node to the exit node.

3. Recursive Backtracker (DFS)

3.1. Algorithm

One fairly obvious approach is to explore all possible paths, which will ultimately find a path if it exists. But such an approach will have exponential complexity and will not scale well.

However, it’s possible to customize the brute force solution mentioned above, by backtracking and marking visited nodes, to obtain a path in a reasonable time. This algorithm is also known as Depth-first search.

This algorithm can be outlined as:

  1. If we’re at the wall or an already visited node, return failure
  2. Else if we’re the exit node, then return success
  3. Else, add the node in path list and recursively travel in all four directions. If failure is returned, remove the node from the path and return failure. Path list will contain a unique path when exit is found

Let’s apply this algorithm to the maze shown in Figure-1(a), where S is the starting point, and E is the exit.

For each node, we traverse each direction in order: right, bottom, left, top.

In 1(b), we explore a path and hit the wall. Then we backtrack till a node is found which has non-wall neighbors, and explore another path as shown in 1(c).

We again hit the wall and repeat the process to finally find the exit, as shown in 1(d):

3.2. Implementation

Let’s now see the Java implementation:

First, we need to define the four directions. We can define this in terms of coordinates. These coordinates, when added to any given coordinate, will return one of the neighboring coordinates:

private static int[][] DIRECTIONS 
  = { { 0, 1 }, { 1, 0 }, { 0, -1 }, { -1, 0 } };

We also need a utility method which will add two coordinates:

private Coordinate getNextCoordinate(
  int row, int col, int i, int j) {
    return new Coordinate(row + i, col + j);
}

We can now define the method signature solve. The logic here is simple – if there is a path from entry to exit, then return the path, else, return an empty list:

public List<Coordinate> solve(Maze maze) {
    List<Coordinate> path = new ArrayList<>();
    if (
      explore(
        maze, 
        maze.getEntry().getX(),
        maze.getEntry().getY(),
        path
      )
      ) {
        return path;
    }
    return Collections.emptyList();
}

Let’s define the explore method referenced above. If there’s a path then return true, with the list of coordinates in the argument path. This method has three main blocks.

First, we discard invalid nodes i.e. the nodes which are outside the maze or are part of the wall. After that, we mark the current node as visited so that we don’t visit the same node again and again.

Finally, we recursively move in all directions if the exit is not found:

private boolean explore(
  Maze maze, int row, int col, List<Coordinate> path) {
    if (
      !maze.isValidLocation(row, col) 
      || maze.isWall(row, col) 
      || maze.isExplored(row, col)
    ) {
        return false;
    }

    path.add(new Coordinate(row, col));
    maze.setVisited(row, col, true);

    if (maze.isExit(row, col)) {
        return true;
    }

    for (int[] direction : DIRECTIONS) {
        Coordinate coordinate = getNextCoordinate(
          row, col, direction[0], direction[1]);
        if (
          explore(
            maze, 
            coordinate.getX(), 
            coordinate.getY(), 
            path
          )
        ) {
            return true;
        }
    }

    path.remove(path.size() - 1);
    return false;
}

This solution uses stack size up to the size of the maze.

4. Variant – Shortest Path (BFS)

4.1. Algorithm

The recursive algorithm described above finds the path, but it isn’t necessarily the shortest path. To find the shortest path, we can use another graph traversal approach known as Breadth-first search.

In DFS, one child and all its grandchildren were explored first, before moving on to another child. Whereas in BFS, we’ll explore all the immediate children before moving on to the grandchildren. This will ensure that all nodes at a particular distance from the parent node, are explored at the same time.

The algorithm can be outlined as follows:

  1. Add the starting node in queue
  2. While the queue is not empty, pop a node, do following:
    1. If we reach the wall or the node is already visited, skip to next iteration
    2. If exit node is reached, backtrack from current node till start node to find the shortest path
    3. Else, add all immediate neighbors in the four directions in queue

One important thing here is that the nodes must keep track of their parent, i.e. from where they were added to the queue. This is important to find the path once exit node is encountered.

Following animation shows all the steps when exploring a maze using this algorithm. We can observe that all the nodes at same distance are explored first before moving onto the next level:

4.2. Implementation

Lets now implement this algorithm in Java. We will reuse the DIRECTIONS variable defined in previous section.

Lets first define a utility method to backtrack from a given node to its root. This will be used to trace the path once exit is found:

private List<Coordinate> backtrackPath(
  Coordinate cur) {
    List<Coordinate> path = new ArrayList<>();
    Coordinate iter = cur;

    while (iter != null) {
        path.add(iter);
        iter = iter.parent;
    }

    return path;
}

Let’s now define the core method solve. We’ll reuse the three blocks used in DFS implementation i.e. validate node, mark visited node and traverse neighboring nodes.

We’ll just make one slight modification. Instead of recursive traversal, we’ll use a FIFO data structure to track neighbors and iterate over them:

public List<Coordinate> solve(Maze maze) {
    LinkedList<Coordinate> nextToVisit 
      = new LinkedList<>();
    Coordinate start = maze.getEntry();
    nextToVisit.add(start);

    while (!nextToVisit.isEmpty()) {
        Coordinate cur = nextToVisit.remove();

        if (!maze.isValidLocation(cur.getX(), cur.getY()) 
          || maze.isExplored(cur.getX(), cur.getY())
        ) {
            continue;
        }

        if (maze.isWall(cur.getX(), cur.getY())) {
            maze.setVisited(cur.getX(), cur.getY(), true);
            continue;
        }

        if (maze.isExit(cur.getX(), cur.getY())) {
            return backtrackPath(cur);
        }

        for (int[] direction : DIRECTIONS) {
            Coordinate coordinate 
              = new Coordinate(
                cur.getX() + direction[0], 
                cur.getY() + direction[1], 
                cur
              );
            nextToVisit.add(coordinate);
            maze.setVisited(cur.getX(), cur.getY(), true);
        }
    }
    return Collections.emptyList();
}

5. Conclusion

In this tutorial, we described two major graph algorithms Depth-first search and Breadth-first search to solve a maze. We also touched upon how BFS gives the shortest path from the entry to the exit.

For further reading, look up other methods to solve a maze, like A* and Dijkstra algorithm.

As always, the full code can be found over on GitHub.

Java Weekly, Issue 216

$
0
0

Here we go…

1. Spring and Java

>> Monitor and troubleshoot Java applications and services with Datadog 

Optimize performance with end-to-end tracing and out-of-the-box support for popular Java frameworks, application servers, and databases. Try it free.

>> Spring Cloud Contract in a polyglot world [spring.io]

Proper integration testing is tricky and Contract Testing is another take that can significantly help with that story.

>> On Spring Data and REST [blog.sourced-bvba.be]

Another interesting but controversial feature of Spring Data.

>> Reactive Streams in Java 9 [dzone.com]

An introduction to Reactive Streams – this time, in core Java.

Also worth reading:

Webinars and presentations:

Time to upgrade:

2. Technical and Musings

>> Traffic Shadowing With Istio: Reducing the Risk of Code Release [blog.christianposta.com]

A cool and practical example of traffic mirroring with Istio.

Also worth reading:

3. Comics

And my favorite Dilberts of the week:

>> Anger Issues  [dilbert.com]

>> Wally Pivots [dilbert.com]

>> A Brilliant Engineer [dilbert.com]

4. Pick of the Week

Picking this very interesting “discussion” this week:

>> REST is the new SOAP [medium.freecodecamp.org]

>> A Response to REST is the new SOAP [philsturgeon.uk]

Viewing all 4755 articles
Browse latest View live


<script src="https://jsc.adskeeper.com/r/s/rssing.com.1596347.js" async> </script>