Quantcast
Channel: Baeldung
Viewing all 4818 articles
Browse latest View live

Basic IntelliJ Configuration

$
0
0

1. Overview

A good IDE is important for developer productivity. IntelliJ is currently one of the leading IDEs and supports many programming languages.

In this tutorial, we’ll start with some of the basic configurations in IntelliJ, focusing on the Java programming language. We’ll also list the most common shortcuts in IntelliJ for boosting developer productivity.

2. Installing IntelliJ

First, we need to download and install IntelliJ for our platform. For the features that we are going to go over, either the Ultimate or Community edition will do great.

3. Basic Project Configuration in IntelliJ

3.1. Configuring JDK

IntelliJ is written in Java and comes with a packaged JRE for running the IDE.

However, we’ll need to configure IntelliJ with a JDK to do any Java development. It can be configured either globally or per project.

First, let’s see how to configure a global JDK using the Switch IDE Boot JDK option:

The easiest way to find the Switch IDE Boot JDK option is from the “Find Action” wizard.

We can get there from the Help menu or by typing Ctrl+Shift+A or Cmd+Shift+A. Usually, it will list every installed JDK and allow us to choose the desired one.

Next, we’ll create a new Java project.

3.2. Creating a Java Project

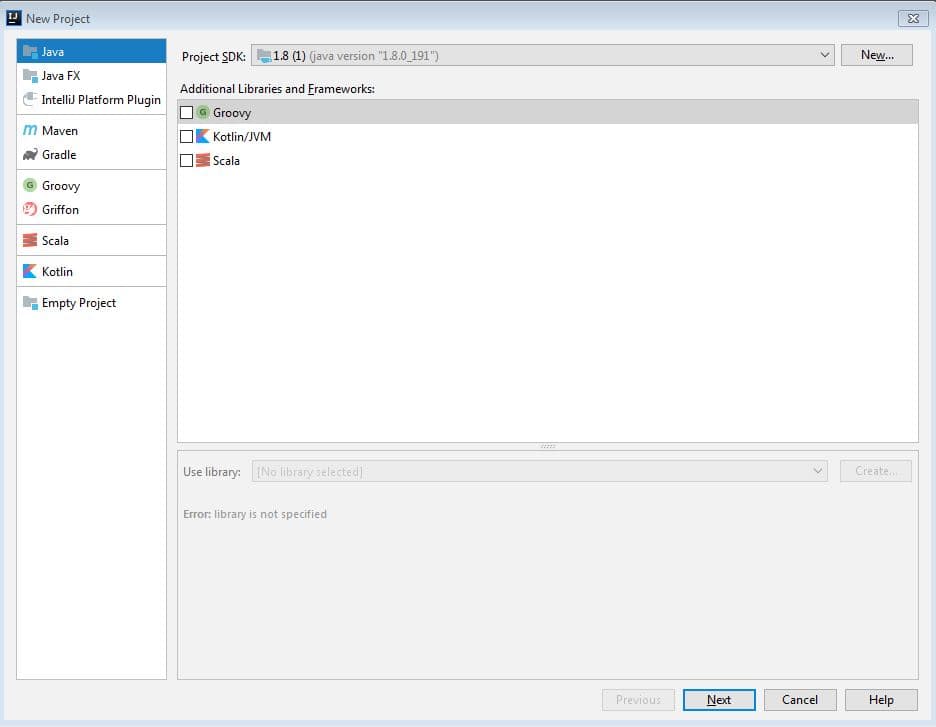
In order to create a new Java project, let’s bring up the New project wizard from File->New->Project:


Next, we’ll select Java in order to create a simple Java project.

Additionally, this window allows us to configure a project-specific JDK if we want to.

On the next screen, IntelliJ provides template projects like Hello World as a starting point, but let’s just select Finish and get started.

Now that we have a basic project structure, we can add a Java class by selecting the src folder and then either right-clicking or typing Alt+Insert. We’ll select Java Class from this menu and get a dialog where we can give it a name:

3.3. Configuring Libraries

A Java project usually depends on a lot of external or third-party libraries. And while Maven and Gradle are the typical go-tos for managing this, let’s take a look at how to do this natively in IntelliJ.

Let’s say we want to use the StringUtils API from the commons-lang3 library.

Like the JDK settings, we can also configure libraries at global and project level. Global libraries are shared by all projects. Both global and project specific libraries can be added by accessing the Project Structure dialog (File->Project Structure).

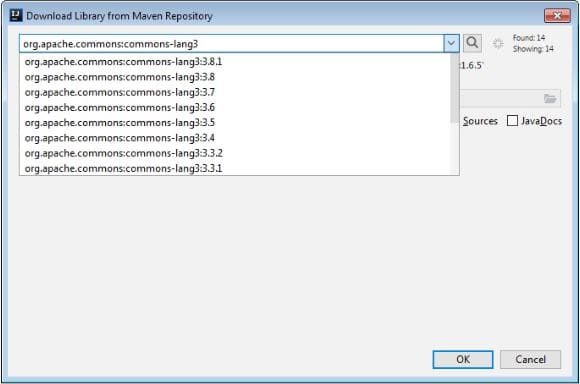
In order to add the library, we must download it first. Normally, the common source for any external library is the Maven Repository. Hence, IntelliJ allows us to download it directly from any pre-configured Maven repository. And of course, if no repository is configured, it will search the Maven Central.

IntelliJ will now download the commons-lang3.jar into a specified folder. Along with that, it also adds it to the project classpath.

Of course, remember that adding a library this way is IntelliJ-specific and not as portable as more robust options. It’s convenient, though, for simple projects.

In the next section, we’ll use this library and execute a simple Java program.

4. Running or Debugging an Application

4.1. Run/Debug Configurations

Before we run our Java program, let’s add some code to the class we added earlier. We’ll simply use the added library and call StringUtils.reverse() to reverse any text given as a program argument:
System.out.println(StringUtils.reverse(args[0]));

Now, there are 2 approaches for running this main method in IntelliJ. Firstly, we can simply run Ctrl + Shift +F10 or Control + Shift + R/D from the main class. IntelliJ will then create a temporary Run configuration.

However, since we have to pass a String to our StringReversal application as a program argument (the args[0] part), a temporary run configuration won’t work.

So, we can create a permanent Run/Debug Configuration.

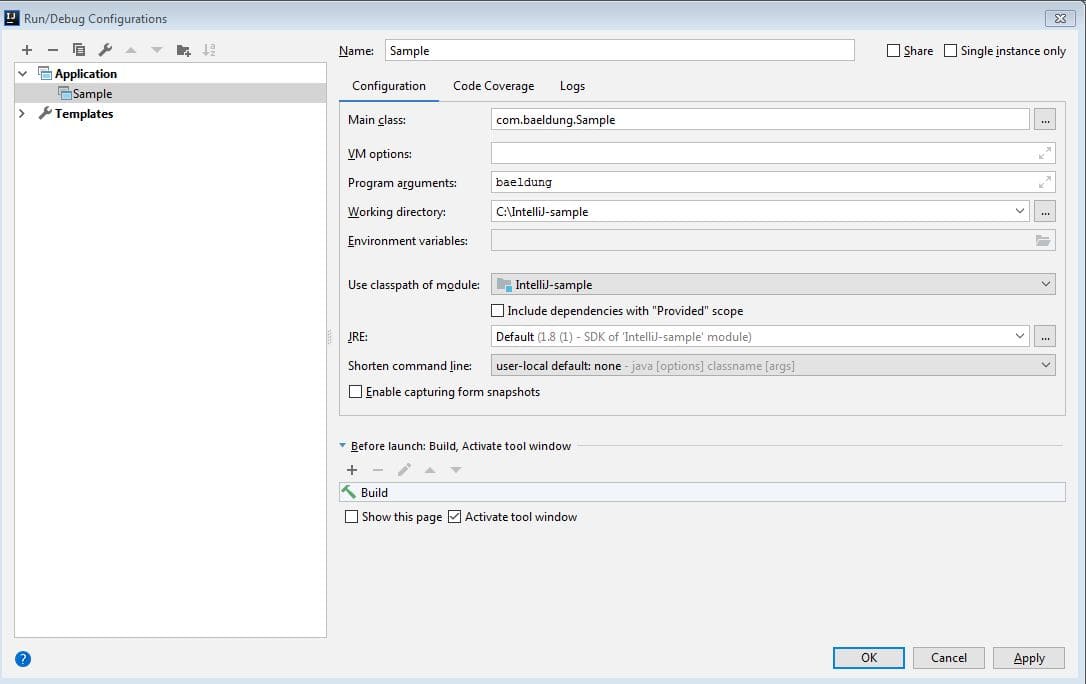
We’ll do that using the “Edit Configurations” window from the Run Navigation bar (Run->Edit Configurations):

Here, we specify the name of our class to run in Main Class. It needs to have a main method for this to work.

We’ll also pass a String – baeldung, in this case – as a Program Argument to our application.

And, while we won’t demo this here, we can also configure JVM options and environment variables, too, for our application.

Contrary to temporary run configurations, IntelliJ saves this configuration and allows us to execute it any time with a click of a button.

4.2. Debugging a Java Application

IntelliJ has great support for debugging many languages. Let’s debug our String Reversal utility as an example.

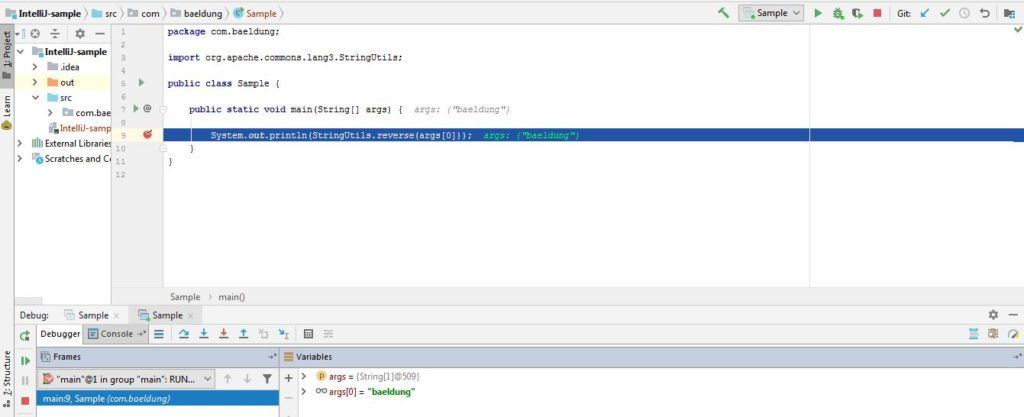
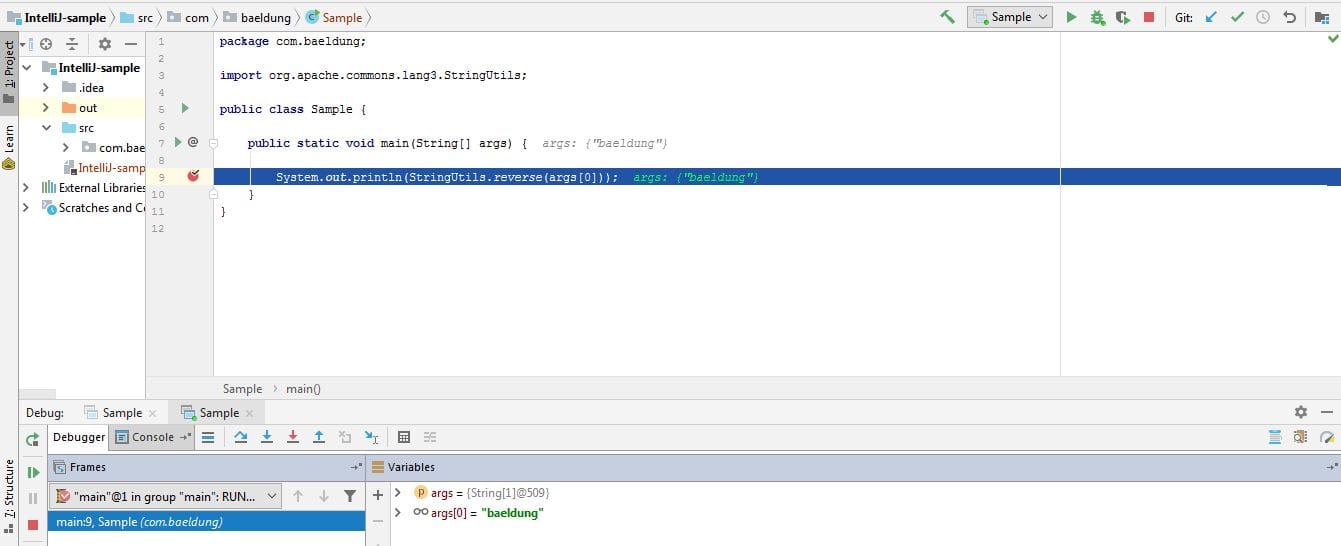
As with most IDEs, we can add a breakpoint on any line of our class from the editor by clicking on the side panel:

Now, we can debug the class by clicking on the debug icon from the Run/Debug configuration.

In this case, the program is suspended at line 9 as shown above, allowing us to inspect the thread stack, inspect variables or even evaluate expressions (Alt+F8 or Option/Alt + F8).

At this point, we can either Step Into (F7) the StringUtils.reverse() method, Step Over (F8) the line or Resume Program (F9), meaning run until either the next breakpoint or until the end of the application.

Usually, most IDEs allow the users to mark a line in a Java class as a breakpoint like we just used. In addition, IntelliJ allows us to configure more than just Line breakpoints. We can also do:

  • Temporary Breakpoint – A line breakpoint which is executed only once
  • Exception Breakpoint – A breakpoint on any exception class in Java. The debugger will pause when that exception is about to be thrown
  • Method Breakpoint – One that executes when entering or exiting a method
  • Field Breakpoint – And one that executes when a field is modified

A breakpoint can have conditional logic, too.

We can view and configure all the breakpoints in a project in the Breakpoints dialog Run->View Breakpoints (Ctrl+Shift+F8 or Cmd+Shift+F8).

4.3. Building Artifacts

Now that we’ve tested, debugged and fixed all the issues, we are ready to ship our application. Therefore, we need to create deployable binaries for our application.

We can create deployable .jar binaries in IntelliJ automatically. 

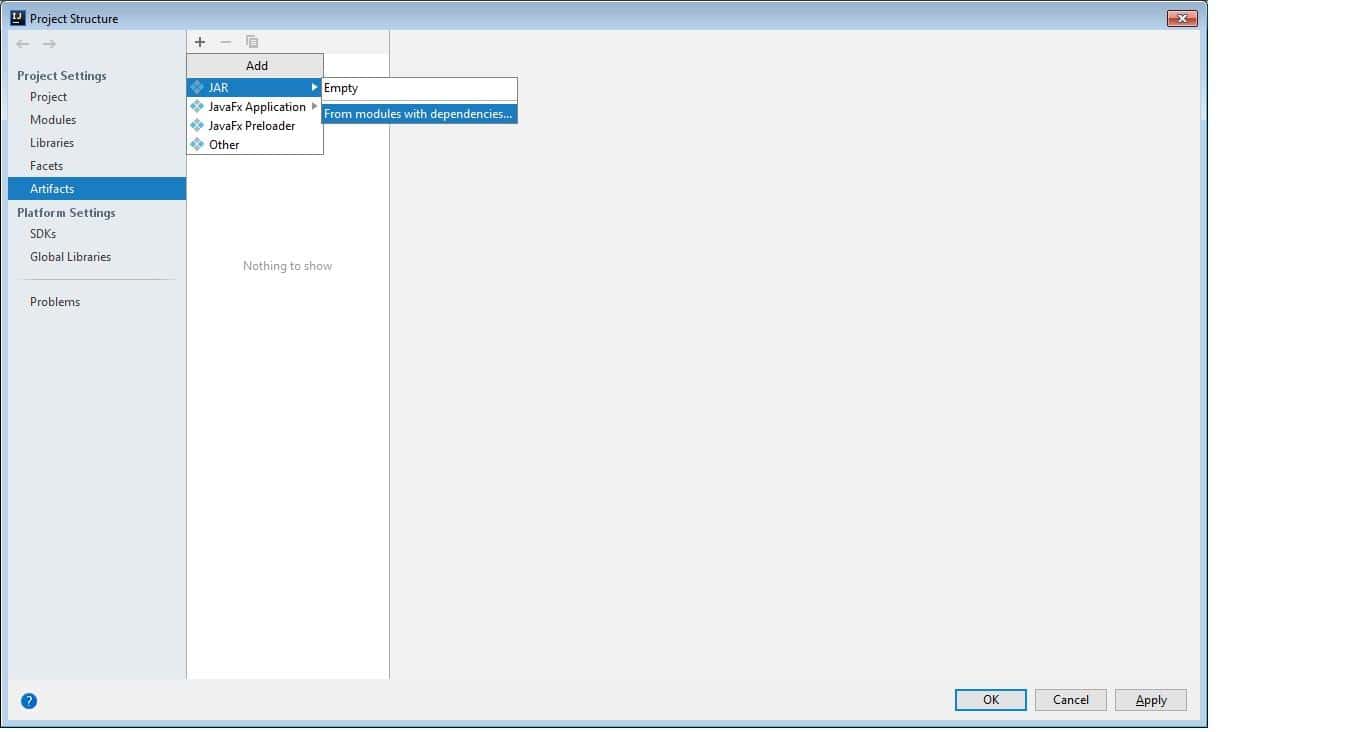
First, in the Project Structure (Ctrl+Alt+Shift+S or Cmd+;), we need to declare a new artifact.

We select “Artifacts”  and then click the plus button.

Next, we select a JAR artifact and also add dependencies in the JAR:

Next, we’ll go back to our Run/Debug Configuration dialog.

There, we need to add a Build Artifact task in the Before Launch window. As a result, a new executable jar is created for our application every time we execute our Run/Debug configuration.

Again, building artifacts is not IDE-agnostic. This mechanism is specific to IntelliJ. A build management tool could be a better approach, similar to what we discussed for dependency management.

5. Common Shortcuts in IntelliJ

The shortcuts are really useful in boosting developers productivity. The following is a quick cheat sheet for the most common ones.

5.1. Navigation

  • Search Class – Ctrl + N / Cmd + O
  • Search All files – Double Shift
  • Recent Files – Ctrl + E / Cmd + E
  • Switch between files – Ctrl + Tab / Cmd + Tab
  • Type Hierarchy – Ctrl + H / Control + H
  • Call Hierarchy – Ctrl + Alt + H /  Control + Alt+ H
  • File structure popup – Ctrl + F12 / Cmd + F12 (lists all methods and fields)
  • Go to declaration – Ctrl + B / Cmd + b
  • Go to implementations – Ctrl + Alt + B / Cmd + Alt+ B
  • Show Project Structure – Ctrl + Alt + Shift + S / Cmd + ;

5.2. Editor

  • Code Completion – Ctrl + Space / Control + Space
  • Method parameter info – Ctrl + P / Cmd + P
  • Method/Class documentation info – Ctrl + Q / Control + J
  • Reformat Code – Ctrl + Alt + L / Cmd + Alt + L
  • Optimize imports – Ctrl + Alt + O / Control + Alt + O
  • Duplicate line – Ctrl + D / Cmd + D
  • Delete line – Ctrl + Y / Cmd + Delete
  • Code selection – Ctrl + W / Alt + Up
  • Show quick actions – Alt + Enter / Alt + Return
  • System.out.println  sout + Ctrl + Enter / sout + Control + Space
  • public static void main  psvm + Ctrl + Enter / psvm + Control + Space

5.3. Refactoring

  • Rename class/method – Shift + F6
  • Extract Method – Ctrl + Alt + M / Cmd + Alt + M
  • Extract variable – Ctrl + Alt + V / Cmd + Alt + V
  • Extract field – Ctrl + Alt + F / Cmd + Alt + F
  • Extract constant – Ctrl + Alt + C / Cmd + Alt + C
  • Extract parameter – Ctrl + Alt + P / Cmd + Alt + P

6. Conclusion

In this article, we looked at some basic configurations in IntelliJ.

As an example, we created a Java project, added libraries, debugged it, and created an artifact, all in IntelliJ.

Lastly, we looked at shortcuts for some common actions.


Introduction to Arrow in Kotlin

$
0
0

1. Overview

Arrow is a library merged from KΛTEGORY and funKTionale.

In this tutorial, we’ll look at the basics of Arrow and how it can help us harness the power of functional programming in Kotlin.

We’ll discuss the data types in the core package and investigate a use-case about error handling.

2. Maven Dependency

To include Arrow in our project, we have to add the arrow-core dependency:

<dependency>
    <groupId>io.arrow-kt</groupId>
    <artifactId>arrow-core</artifactId>
    <version>0.7.3</version>
</dependency>

3. Functional Data Types

Let’s start by investigating the data types in the core module.

3.1. Introduction to Monads

Some of the discussed data types here are Monads. Very basically, Monads have the following properties:

  • They are a special data type that is basically a wrapper around one or more raw values
  • They have three public methods:
    • a factory method to wrap values
    • map
    • flatMap
  • These methods act nicely, that is they have no side-effects.

In the Java world, arrays and streams are Monads but Optional isn’t. For more on Monads maybe a bag of peanuts can help.

Now let’s see the first data type from the arrow-core module.

3.2. Id

Id is the simplest wrapper in Arrow.

We can create it with a constructor or with a factory method:

val id = Id("foo")
val justId = Id.just("foo");

And, it has an extract method to retrieve the wrapped value:

Assert.assertEquals("foo", id.extract())
Assert.assertEquals(justId, id)

The Id class fulfills the requirements of the Monad pattern.

3.3. Option

Option is a data type to model a value that might not be present, similar to Java’s Optional.

And while it isn’t technically a Monad, it’s still very helpful.

It can contain two types: The Some wrapper around the value or None when it has no value.

We have a few different ways to create an Option:

val factory = Option.just(42)
val constructor = Option(42)
val emptyOptional = Option.empty<Integer>()
val fromNullable = Option.fromNullable(null)

Assert.assertEquals(42, factory.getOrElse { -1 })
Assert.assertEquals(factory, constructor)
Assert.assertEquals(emptyOptional, fromNullable)

Now, there is a tricky bit here, which is that the factory method and constructor behave differently for null:

val constructor : Option<String?> = Option(null)
val fromNullable : Option<String?> = Option.fromNullable(null)
Assert.assertNotEquals(constructor, fromNullable)

We prefer the second since it doesn’t have a KotlinNullPointerException risk:

try {
    constructor.map { s -> s!!.length }
} catch (e : KotlinNullPointerException) {
    fromNullable.map { s -> s!!.length }
}

3.3. Either

As we’ve seen previously, Option can either have no value (None) or some value (Some).

Either goes further on this path and can have one of two values. Either has two generic parameters for the type of the two values which are denoted as right and left:

val rightOnly : Either<String,Int> = Either.right(42)
val leftOnly : Either<String,Int> = Either.left("foo")

This class is designed to be right-biased. So, the right branch should contain the business value, say, the result of some computation. The left branch can hold an error message or even an exception.

Therefore, the value extractor method (getOrElse) is designed toward the right side:

Assert.assertTrue(rightOnly.isRight())
Assert.assertTrue(leftOnly.isLeft())
Assert.assertEquals(42, rightOnly.getOrElse { -1 })
Assert.assertEquals(-1, leftOnly.getOrElse { -1 })

Even the map and the flatMap methods are designed to work with the right side and skip the left side:

Assert.assertEquals(0, rightOnly.map { it % 2 }.getOrElse { -1 })
Assert.assertEquals(-1, leftOnly.map { it % 2 }.getOrElse { -1 })
Assert.assertTrue(rightOnly.flatMap { Either.Right(it % 2) }.isRight())
Assert.assertTrue(leftOnly.flatMap { Either.Right(it % 2) }.isLeft())

We’ll investigate how to use Either for error handling in section 4.

3.4. Eval

Eval is a Monad designed to control the evaluation of operations. It has a built-in support for memoization and eager and lazy evaluation.

With the now factory method we can create an Eval instance from already computed values:

val now = Eval.now(1)

The map and flatMap operations will be executed lazily:

var counter : Int = 0
val map = now.map { x -> counter++; x+1 }
Assert.assertEquals(0, counter)

val extract = map.value()
Assert.assertEquals(2, extract)
Assert.assertEquals(1, counter)

As we can see the counter only changes after the value method is invoked.

The later factory method will create an Eval instance from a function. The evaluation will be deferred until the invocation of value and the result will be memoized:

var counter : Int = 0
val later = Eval.later { counter++; counter }
Assert.assertEquals(0, counter)

val firstValue = later.value()
Assert.assertEquals(1, firstValue)
Assert.assertEquals(1, counter)

val secondValue = later.value()
Assert.assertEquals(1, secondValue)
Assert.assertEquals(1, counter)

The third factory is always. It creates an Eval instance which will recompute the given function each time the value is invoked:

var counter : Int = 0
val later = Eval.always { counter++; counter }
Assert.assertEquals(0, counter)

val firstValue = later.value()
Assert.assertEquals(1, firstValue)
Assert.assertEquals(1, counter)

val secondValue = later.value()
Assert.assertEquals(2, secondValue)
Assert.assertEquals(2, counter)

4. Error Handling Patterns with Functional Data Types

Error handling by throwing exceptions has several drawbacks.

For methods which fail often and predictably, like parsing user input as a number, it’s costly and unnecessary to throw exceptions. The biggest part of the cost comes from the fillInStackTrace method. Indeed, in modern frameworks, the stack trace can grow ridiculously long with surprisingly little information about business logic.

Furthermore, handling checked exceptions can easily make the client’s code needlessly complicated. On the other hand, with runtime exceptions, the caller has no information about the possibility of an exception.

Next, we’ll implement a solution to find out if the even input number’s largest divisor is a square number. The user input will arrive as a String. Along with this example, we’ll investigate how Arrow’s data types can help with error handling

4.1. Error Handling with Option

First, we parse the input String as an integer.

Fortunately, Kotlin has a handy, exception-safe method:

fun parseInput(s : String) : Option<Int> = Option.fromNullable(s.toIntOrNull())

We wrap the parse result into an Option. Then, we’ll transform this initial value with some custom logic:

fun isEven(x : Int) : Boolean // ...
fun biggestDivisor(x: Int) : Int // ...
fun isSquareNumber(x : Int) : Boolean // ...

Thanks to the design of Option, our business logic won’t be cluttered with exception handling and if-else branches:

fun computeWithOption(input : String) : Option<Boolean> {
    return parseInput(input)
      .filter(::isEven)
      .map(::biggestDivisor)
      .map(::isSquareNumber)
}

As we can see, it’s pure business code without the burden of technical details.

Let’s see how a client can work with the result:

fun computeWithOptionClient(input : String) : String {
    val computeOption = computeWithOption(input)
    return when(computeOption) {
        is None -> "Not an even number!"
        is Some -> "The greatest divisor is square number: ${computeOption.t}"
    }
}

This is great, but the client has no detailed information about what was wrong with input.

Now, let’s look at how we can provide a more detailed description of an error case with Either.

4.2 Error Handling with Either

We have several options to return information about the error case with Either. On the left side, we could include a String message, error code, or even an exception.

For now, we create a sealed class for this purpose:

sealed class ComputeProblem {
    object OddNumber : ComputeProblem()
    object NotANumber : ComputeProblem()
}

We include this class in the returned Either. In the parse method we’ll use the cond factory function:

Either.cond( /Condition/, /Right-side provider/, /Left-side provider/)

So, instead of Option, we’ll use Either in our parseInput method:

fun parseInput(s : String) : Either<ComputeProblem, Int> =
  Either.cond(s.toIntOrNull() != null, { -> s.toInt() }, { -> ComputeProblem.NotANumber } )

This means that the Either will be populated with either the number or the error object.

All the other functions will be the same as before. However, the filter method is different for Either. It requires not only a predicate but a provider of the left side for the predicate’s false branch:

fun computeWithEither(input : String) : Either<ComputeProblem, Boolean> {
    return parseInput(input)
      .filterOrElse(::isEven) { -> ComputeProblem.OddNumber }
      .map (::biggestDivisor)
      .map (::isSquareNumber)
}

This is because, we need to supply the other side of the Either, in the case our filter returns false.

Now the client will know exactly what was wrong with their input:

fun computeWithEitherClient(input : String) {
    val computeWithEither = computeWithEither(input)
    when(computeWithEither) {
        is Either.Right -> "The greatest divisor is square number: ${computeWithEither.b}"
        is Either.Left -> when(computeWithEither.a) {
            is ComputeProblem.NotANumber -> "Wrong input! Not a number!"
            is ComputeProblem.OddNumber -> "It is an odd number!"
        }
    }
}

5. Conclusion

The Arrow library was created to support functional features in Kotlin. We have investigated the provided data types in the arrow-core package. Then we used Optional and Either for functional style error handling.

As always, the code is available over on GitHub.

A Guide to Constructors in Java

$
0
0

1. Introduction

Constructors are the gatekeepers of object-oriented design.

In this tutorial, we’ll see how they act as a single location from which to initialize the internal state of the object being created.

Let’s forge ahead and create a simple object that represents a bank account.

2. Setting Up a Bank Account

Imagine that we need to create a class that represents a bank account. It’ll contain a Name, Date of Creation and Balance.

Also, let’s override the toString method to print the details to the console:

class BankAccount {
    String name;
    LocalDateTime opened;
    double balance;
    
    @Override
    public String toString() {
        return String.format("%s, %s, %f", 
          this.name, this.opened.toString(), this.balance);
    }
}

Now, this class contains all of the necessary fields required to store information about a bank account, but it doesn’t contain a constructor yet.

This means that if we create a new object, the field values wouldn’t be initialized:

BankAccount account = new BankAccount();
account.toString();

Running the toString method above will result in an exception because the objects name and opened are still null:

java.lang.NullPointerException
    at com.baeldung.constructors.BankAccount.toString(BankAccount.java:12)
    at com.baeldung.constructors.ConstructorUnitTest
      .givenNoExplicitContructor_whenUsed_thenFails(ConstructorUnitTest.java:23)

3. A No-Argument Constructor

Let’s fix that with a constructor:

class BankAccount {
    public BankAccount() {
        this.name = "";
        this.opened = LocalDateTime.now();
        this.balance = 0.0d;
    }
}

Notice a few things about the constructor which we just wrote. First, it’s a method, but it has no return type. That’s because a constructor implicitly returns the type of the object that it creates. Calling new BankAccount() now will call the constructor above.

Secondly, it takes no arguments. This particular kind of constructor is called a no-argument constructor.

Why didn’t we need it for the first time, though? It’s because when we don’t explicitly write any constructor, the compiler adds a default, no-argument constructor.

This is why we were able to construct the object the first time, even though we didn’t write a constructor explicitly. The default, no argument constructor will simply set all members to their default values.

For objects, that’s null, which resulted in the exception that we saw earlier.

4. A Parameterized Constructor

Now, a real benefit of constructors is that they help us maintain encapsulation when injecting state into the object.

So, to do something really useful with this bank account, we need to be able to actually inject some initial values into the object.

To do that, let’s write a parameterized constructor, that is, a constructor that takes some arguments:

class BankAccount {
    public BankAccount() { ... }
    public BankAccount(String name, LocalDateTime opened, double balance) {
        this.name = name;
        this.opened = opened;
        this.balance = balance;
    }
}

Now we can do something useful with our BankAccount class:

    LocalDateTime opened = LocalDateTime.of(2018, Month.JUNE, 29, 06, 30, 00);
    BankAccount account = new BankAccount("Tom", opened, 1000.0f); 
    account.toString();

Notice, that our class now has 2 constructors. An explicit, no argument constructor and a parameterized constructor.

We can create as many constructors as we like, but we probably would like not to create too many. This would be a little confusing.

If we find too many constructors in our code, a few Creational Design Patterns might be helpful.

5. A Copy Constructor

Constructors need not be limited to initialization alone. They could also be used for creating behaviors. Imagine that we need to be able to create a new account from an existing one.

The new account should have the same name as the old account, today’s date of creation and no funds. We can do that using a copy constructor:

public BankAccount(BankAccount other) {
    this.name = other.name;
    this.opened = LocalDateTime.now();
    this.balance = 0.0f;
}

Now we have the following behavior:

LocalDateTime opened = LocalDateTime.of(2018, Month.JUNE, 29, 06, 30, 00);
BankAccount account = new BankAccount("Tim", opened, 1000.0f);
BankAccount newAccount = new BankAccount(account);

assertThat(account.getName()).isEqualTo(newAccount.getName());
assertThat(account.getOpened()).isNotEqualTo(newAccount.getOpened());
assertThat(newAccount.getBalance()).isEqualTo(0.0f);

6. Value Types

An interesting use of constructors in Java is in the creation of Value Objects. A value object is an object that does not change its internal state after initialization.

That is, the object is immutable. Immutability in Java is a bit nuanced and care should be taken when crafting objects.

Let’s go ahead and create an immutable class:

class Transaction {
    final BankAccount bankAccount;
    final LocalDateTime date;
    final double amount;

    public Transaction(BankAccount account, LocalDateTime date, double amount) {
        this.bankAccount = account;
        this.date = date;
        this.amount = amount;
    }
}

Notice, that we now use the final keyword when defining the members of the class. This means that each of those members can only be initialized within the constructor of the class. They cannot be reassigned later on inside any other method. We can read those values, but not change them.

If we create multiple constructors for the Transaction class, each constructor will need to initialize every final variable. Not doing so will result in a compilation error.

7. Conclusion

We’ve taken a tour through the different ways in which constructors build objects. When used judiciously, constructs form the basic building blocks of Object-Oriented design in Java.

As always, code samples can be found over on GitHub.

The Decorator Pattern in Java

$
0
0

1. Overview

A Decorator pattern can be used to attach additional responsibilities to an object either statically or dynamically. A Decorator provides an enhanced interface to the original object.

In the implementation of this pattern, we prefer composition over an inheritance – so that we can reduce the overhead of subclassing again and again for each decorating element. The recursion involved with this design can be used to decorate our object as many times as we require.

2. Decorator Pattern Example

Suppose we have a Christmas tree object and we want to decorate it. The decoration does not change the object itself; it’s just that in addition to the Christmas tree, we’re adding some decoration items like garland, tinsel, tree-topper, bubble lights, etc.:

For this scenario, we’ll follow the original Gang of Four design and naming conventions. First, we’ll create a ChristmasTree interface and its implementation:

public interface ChristmasTree {
    String decorate();
}

The implementation of this interface will look like:

public class ChristmasTreeImpl implements ChristmasTree {

    @Override
    public String decorate() {
        return "Christmas tree";
    }
}

We’ll now create an abstract TreeDecorator class for this tree. This decorator will implement the ChristmasTree interface as well as hold the same object. The implemented method from the same interface will simply call the decorate() method from our interface:

public abstract class TreeDecorator implements ChristmasTree {
    private ChristmasTree tree;
    
    // standard constructors
    @Override
    public String decorate() {
        return tree.decorate();
    }
}

We’ll now create some decorating element. These decorators will extend our abstract TreeDecorator class and will modify its decorate() method according to our requirement:

public class BubbleLights extends TreeDecorator {

    public BubbleLights(ChristmasTree tree) {
        super(tree);
    }
    
    public String decorate() {
        return super.decorate() + decorateWithBubbleLights();
    }
    
    private String decorateWithBubbleLights() {
        return " with Bubble Lights";
    }
}

For this case, the following is true:

@Test
public void whenDecoratorsInjectedAtRuntime_thenConfigSuccess() {
    ChristmasTree tree1 = new Garland(new ChristmasTreeImpl());
    assertEquals(tree1.decorate(), 
      "Christmas tree with Garland");
     
    ChristmasTree tree2 = new BubbleLights(
      new Garland(new Garland(new ChristmasTreeImpl())));
    assertEquals(tree2.decorate(), 
      "Christmas tree with Garland with Garland with Bubble Lights");
}

Note that in the first tree1 object, we’re only decorating it with only one Garland, while the other tree2 object we’re decorating with one BubbleLights and two Garlands. This pattern gives us this flexibility to add as many decorators as we want at runtime.

4. Conclusion

In this article, we had a look at the decorator design pattern. This is a good choice in the following cases:

  • When we wish to add, enhance or even remove the behavior or state of objects
  • When we just want to modify the functionality of a single object of class and leave others unchanged

The full source code for this example is available over on GitHub.

The Difference Between JPA, Hibernate and EclipseLink

$
0
0

1. Introduction

In this tutorial, we’ll be discussing Hibernate and the Java Persistence API (JPA) – with a focus on the differences between them.

We’ll start by exploring what JPA is, how it’s used, and the core concepts behind it.

Then, we’ll take a look at how Hibernate and EclipseLink fit into the picture.

2. Object-Relational Mapping

Before we dive into JPA, it’s important to understand the concept of Object-Relational Mapping – also known as ORM.

Object-relational mapping is simply the process of persisting any Java object directly to a database table. Usually, the name of the object being persisted becomes the name of the table, and each field within that object becomes a column. With the table set up, each row corresponds to a record in the application.

3. An Introduction to JPA

The Java Persistence API, or JPA, is a specification that defines the management of relational data in a Java application. The API maps out a set of concepts that defines which objects within the application should be persisted, and how it should persist them.

It’s important to note here that JPA is only a specification and that it needs an implementation to work – but more on that later.

Now, let’s discuss some of the core JPA concepts that an implementation must cover.

3.1. Entity

The javax.persistence.Entity class defines which objects should be persisted to the database. For each persisted entity, JPA creates a new table within the chosen database.

In addition, all chosen entities should define a primary key denoted by the @Id annotation. Together with the @GeneratedValue annotation, we define that the primary key should be automatically generated when the record is persisted to the database.

Let’s take a look a quick example of an entity described by JPA.

@Entity
public class Car {
  
    @GeneratedValue
    @Id
    public long id;

    // getters and setters

}

Remember, this will currently have no effect on the application – JPA doesn’t provide any implementation code.

3.2. Field Persistence

Another core concept of JPA is field persistence. When an object in Java is defined as an entity, all fields within it are automatically persisted as different columns within the entity table.

If there’s a field within a persisted object that we don’t want to persist to the database, we can declare the field transient with the @Transient annotation.

3.3. Relationships

Next, JPA specifies how we should manage relationships between different database tables within our application. As we’ve seen, JPA handles this with annotations. There are four relationship annotations that we need to keep in mind:

  1. @OneToOne
  2. @OneToMany
  3. @ManyToOne
  4. @ManyToMany

Let’s take a look at how this works:

@Entity
public class SteeringWheel {

    @OneToOne
    private Car car

    // getters and setters
}

In our example above, the SteeringWheel class describes a one to one relationship with our Car class from earlier.

3.4. Entity Manager

Finally, the javax.persistence.EntityManager class specifies operations to and from the database. The EntityManager contains common Create, Read, Update and Delete (CRUD) operations that are persisted to the database.

4. JPA Implementations

With JPA specification defining how and what we should persist, we now need to choose an implementation provider to supply the necessary code. Without such a provider, we would need to implement all of the relevant classes to conform with JPA, and that’s a lot of work!

There are plenty of providers to choose from, with each displaying its own pros and cons. When making a decision on which to use, we should consider a few of the following points:

  1. Project maturity – how long has the provider been around, and how well documented is it?
  2. Subprojects – does the provider have any useful subprojects for our new application?
  3. Community support – is there anyone to help us out when we end up with a critical bug?
  4. Benchmarking – how performant is the implementation?

While we won’t be going into depth on the benchmarking of different JPA providers, JPA Performance Benchmark (JPAB) contains valuable insight into this.

With that out of the way, let’s take a brief look at some of the top providers of JPA.

5. Hibernate

At its core, Hibernate is an object-relational mapping tool that provides an implementation of JPAHibernate is one of the most mature JPA implementations around, with a huge community backing the project.

It implements all of the javax.persistence classes we looked at earlier in the article as well as providing functionality beyond JPA – Hibernate tools, validation, and search. Although these Hibernate-specific APIs may be useful, they are not needed in applications that only require the base JPA functionality.

Let’s take a quick look at what Hibernate offers with the @Entity annotation.

Whilst fulfilling JPA contract, @org.hibernate.annotations.Entity adds additional metadata that goes beyond JPA specification. Doing so allows fine-tuning entity persistence. For example, let’s look at a few annotations offered by Hibernate that extends the functionality of @Entity:

  1. @Table allows us to specify the name of the table created for the entity
  2. @BatchSizespecifies the batch size when retrieving entities from the table

It’s also worth noting a few of the extra features that the JPA does not specify, that may prove useful in larger applications:

  1. Customizable CRUD statements with the @SQLInsert, @SQLUpate and @SQLDelete annotations
  2. Support for soft deleting
  3. Immutable entities with the @Immutable annotation

For a deeper dive into Hibernate and Java persistence – head over to our Spring persistence tutorial series.

6. EclipseLink

EclipseLink, built by the Eclipse Foundation, provides an open-sourced JPA implementation. Additionally, EclipseLink supports a number of other persistence standards such as Java Architecture for XML Binding (JAXB).

Simply put, rather than persisting an object to a database row, JAXB maps it to an XML representation.

Next, by comparing the same @Entity annotation implementation, we see that EclipseLink offers again different extensions. Whilst there is no annotation for @BatchSize as we saw earlier, EclipseLink offers other options that Hibernate doesn’t.

For example:

  1. @ReadOnly – specifies the entity to be persisted is read-only
  2. @Struct – defines the class to map to a database ‘struct’ type

To read more about what EclipseLink has to offer, head over to our guide on EclipseLink with Spring.

7. Conclusion

In this article, we’ve looked at the Java Persistence API, or JPA.

Finally, we explored how it differs from Hibernate and EclipseLink.

Java Weekly, Issue 256

$
0
0

Here we go…

1. Spring and Java

>> How to parse a String into an EntityGraph with Hibernate 5.4 [thoughts-on-java.org]

An overview of this handy new feature and you can now merge multiple entity graphs into one. Very cool.

>> Definitive Guide To Switch Expressions In Java 12 [blog.codefx.org]

A detailed look at this language preview feature that addresses many shortcomings of the traditional switch statement.

>> Spring Boot Admin Tutorial [vojtechruzicka.com]

If you need a UI to monitor and manage a Spring Boot app and don’t want to build and maintain it yourself, check out this tool that builds a UI on top of the Actuator endpoints.

>> The best way to use the JPQL DISTINCT keyword with JPA and Hibernate [vladmihalcea.com]

A great piece explaining the two meanings of the DISTINCT keyword and how to apply it correctly based on the underlying query type.

>> How to use JUnit 5 @MethodSource-parameterized tests with Kotlin [blog.oio.de]

And a simple workaround for using test argument factories with JUnit 5 and Kotlin.

Also worth reading:

Webinars and presentations:

Time to upgrade:

2. Technical and Musings

>> Getting Started With Istio Service Mesh Routing [infoq.com]

A thorough review of Istio’s routing capabilities and how to leverage them in a Kubernetes cluster.

>> How to Aggregate an Archive Log’s Deltas into a Snapshot with SQL [blog.jooq.org]

A nice write-up demonstrating a clever application of the Entity Attribute Value model that you can use to build easily-audited database entities.

Also worth reading:

3. Comics

And my favorite Dilberts of the week:

>> Bitter Losers [dilbert.com]

>> Changing the Website [dilbert.com]

>> Complaining Versus Hiding [dilbert.com]

4. Pick of the Week

>> The Oatmeal Insight [theoatmeal.com]

Java Interview Questions

$
0
0

1. Introduction

This article contains answers for some of the most important job interview questions about core Java. The answers to some of them may not be obvious so this article will help to clear things up.

2. Core-Java Language Questions for Beginners

Q1. Is Data Passed by Reference or by Value in Java?

Although the answer to this question is pretty simple, this question may be confusing for beginners. First, let’s clarify what the question is about:

  1. Passing by value – it means that we pass a copy of an object as a parameter into a method.
  2. Passing by reference – it means that we pass a reference to an object as a parameter into a method.

To answer the question we have to analyze two cases. They represent two types of data that we can pass to a method: a primitive and an object.

When we pass primitives to a method, its value is copied into a new variable. When it comes to objects, the value of the reference is copied into a new variable. So we can say that Java is a strictly pass-by-value language.

We can learn more about that in one of our articles: Pass-By-Value as a Parameter Passing Mechanism in Java.

Q2. What Is the Difference Between Import and Static Imports?

We can use regular imports to import a specific class or all classes defined in a different package:

import java.util.ArrayList; //specific class
import java.util.*; //all classes in util package

We can also use them to import public nested classes of an enclosing class:

import com.baeldung.A.*

However, we should be aware that the import above doesn’t import the class A itself.

There are also static imports which enable us to import static members or nested classes:

import static java.util.Collections.EMPTY_LIST;

The effect is that we can use the static variable EMPTY_LIST without prepending the fully qualified class name, i.e. as if it was declared in the current class.

Q3. Which Access Modifiers Are Available in Java and What Is Their Purpose?

There are four access modifiers in Java:

  1. private
  2. default (package)
  3. protected
  4. public

The private modifier assures that class members won’t be accessible outside the class. It can be applied to methods, properties, constructors, nested classes, but not to top-level classes themselves.

Unlike the private modifier, we can apply the default modifier to all types of class members and to the class itself. We can apply default visibility by not adding any access modifier at all. If we use default visibility our class or its members will be accessible only inside the package of our class. We should keep in mind that the default access modifier has nothing in common with the default keyword.

Similarly to the default modifier, all classes within one package can access protected members. What’s more, the protected modifier allows subclasses to access the protected members of a superclass, even if they are not within the same package. We can’t apply this access modifier to classes, only to class members.

The public modifier can be used together with class keyword and all class members. It makes classes and class members accessible in all packages and by all classes.

We can learn more in the Java Access Modifiers article.

Q4. Which Other Modifiers Are Available in Java and What Is Their Purpose?

There are five other modifiers available in Java:

  • static
  • final
  • abstract
  • synchronized
  • volatile

These do not control visibility.

First of all, we can apply the static keyword to fields and methods. Static fields or methods are class members, whereas non-static ones are object members. Class members don’t need any instance to be invoked. They are called with the class name instead of object reference name. This article goes into more detail about the static keyword.

Then, we have the final keyword. We can use it with fields, methods, and classes. When final is used on a field, it means that the field reference cannot be changed. So it can’t be reassigned to another object. When final is applied to a class or a method, it assures us that that class or method cannot be extended or overridden. The final keyword is explained in more detail in this article.

The next keyword is abstract. This one can describe classes and methods. When classes are abstract, they can’t be instantiated. Instead, they are meant to be subclassed. When methods are abstract, they are left without implementation and they can be overridden in subclasses.

The synchronized keyword may be the most advanced. We can use it with the instance as well as with static methods and code blocks. When we use this keyword, we make Java use a monitor lock to provide synchronization on a given code fragment. More information about synchronized can be found in this article.

The last keyword we’re going to discuss is volatile. We can only use it together with instance fields. It declares that the field value must be read from and written to main memory – bypassing the CPU cache. All reads and writes for a volatile variable are atomic. The volatile keyword is explained in detail in this article.

Q5. What Is the Difference Between JDK, JRE, and JVM?

JDK stands for Java Development Kit, which is a set of tools necessary for developers to write applications in Java. There are three types of JDK environments:

  • Standard Edition – development kit for creating portable desktop or server applications
  • Enterprise Edition – an extension to the Standard Edition with support for distributed computing or web services
  • Micro Edition – development platform for embedded and mobile applications

There are plenty of tools included in the JDK which help programmers with writing, debugging or maintaining applications. The most popular ones are a compiler (javac), an interpreter (java), an archiver (jar) and a documentation generator (javadoc).

JRE is a Java Runtime Environment. It’s a part of the JDK, but it contains the minimum functionality to run Java applications. It consists of a Java Virtual Machine, core classes, and supporting files. For example, it doesn’t have any compiler.

JVM is the acronym for Java Virtual Machine, which is a virtual machine able to run programs compiled to bytecode. It’s described by the JVM specification, as it’s important to ensure interoperability between different implementations. The most important function of a JVM is to enable users to deploy the same Java application into different operating systems and environments without worrying about what lies underneath.

For more information, let’s check the Difference Between JVM, JRE, and JDK article.

Q6. What Is the Difference Between Stack and Heap?

There are two parts of memory where all variables and objects are stored by the JVM. The first is the stack and the second is the heap.

The stack is a place where the JVM reserves blocks for local variables and additional data. The stack is a LIFO (last in first out) structure. It means that whenever a method is called, a new block is reserved for local variables and object references. Each new method invocation reserves the next block. When methods finish their execution, blocks are released in the reversed manner they were started.

Every new thread has its own stack.

We should be aware that the stack has much less memory space than the heap. And when a stack is full, the JVM will throw a StackOverflowError. It’s likely to occur when there is a bad recursive call and the recursion goes too deep.

Every new object is created on the Java heap which is used for a dynamic allocation. There is a garbage collector which is responsible for erasing unused objects which are divided into young (nursery) and old spaces. Memory access to the heap is slower than access to the stack. The JVM throws an OutOfMemoryError when the heap is full.

We can find more details in the Stack Memory and Heap Space in Java article.

Q7. What Is the Difference Between the Comparable and Comparator Interfaces?

Sometimes when we write a new class, we would like to be able to compare objects of that class. It’s especially helpful when we want to use sorted collections. There are two ways we can do this: with the Comparable interface or with the Comparator interface.

First, let’s look at the Comparable interface:

public interface Comparable<T> {
    int compareTo(T var1);
}

We should implement that interface by the class whose objects we want to sort.

It has the compareTo() method and returns an integer. It can return three values: -1, 0, and 1 which means that this object is less than, equal to or greater than the compared object.

It’s worth mentioning that the overridden compareT0() method should be consistent with the equals() method.

On the other hand, we can use the Comparator interface. It can be passed to the sort() methods of the Collection interface or when instantiating sorted collections. That’s why it’s mostly used to create a one-time sorting strategy.

What’s more, it’s also useful when we use a third-party class which doesn’t implement the Comparable interface.

Like the compareTo() method, the overridden compare() methods should be consistent with the equals() method, but they may optionally allow comparison with nulls.

Let’s visit the Comparator and Comparable in Java article for more information.

Q8. What Is the void Type and When Do We Use It?

Every time we write a method in Java, it must have a return type. If we want the method to return no value, we can use the void keyword.

We should also know that there is a Void class. It’s a placeholder class that may be used, for example, when working with generics. The Void class can neither be instantiated nor extended.

Q9. What Are the Methods of the Object Class and What Do They Do?

It’s important to know what methods the Object class contains and how they work. It’s also very helpful when we want to override those methods:

  • clone() – returns a copy of this object
  • equals() – returns true when this object is equal to the object passed as a parameter
  • finalize() – the garbage collector calls this method while it’s cleaning the memory
  • getClass() – returns the runtime class of this object
  • hashCode() – returns a hash code of this object. We should be aware that it should be consistent with the equals() method
  • notify() – sends a notification to a single thread waiting for the object’s monitor
  • notifyAll() – sends a notification to all threads waiting for the object’s monitor
  • toString() – returns a string representation of this object
  • wait() – there are three overloaded versions of this method. It forces the current thread to wait the specified amount of time until another thread calls notify() or notifyAll() on this object.

Q10. What Is an Enum and How We Can Use It?

Enum is a type of class that allows developers to specify a set of predefined constant values. To create such a class we have to use the enum keyword. Let’s imagine an enum of days of the week:

public enum Day {
    SUNDAY, MONDAY, TUESDAY, WEDNESDAY, THURSDAY, FRIDAY, SATURDAY 
}

To iterate over all constants we can use the static values() method. What’s more, enums enable us to define members such as properties and methods like regular classes.

Although it’s a special type of class, we can’t subclass it. An enum can, however, implement an interface.

Another interesting advantage of Enums is that they are thread-safe and so they are popularly used as singletons.

We can find more about Enums in one of our guides.

Q11. What Is a JAR?

JAR is a shortcut for Java archive. It’s an archive file packaged using the ZIP file format. We can use it to include the class files and auxiliary resources that are necessary for applications. It has many features:

  • Security – we can digitally sign JAR files
  • Compression – while using a JAR, we can compress files for efficient storage
  • Portability – we can use the same JAR file across multiple platforms
  • Versioning – JAR files can hold metadata about the files they contain
  • Sealing – we can seal a package within a JAR file. This means that all classes from one package must be included in the same JAR file
  • Extensions – we can use the JAR file format to package modules or extensions for existing software

Q12. What Is a NullPointerException?

The NullPointerException is probably the most common exception in the Java world.  It’s an unchecked exception and thus extends RuntimeException. We shouldn’t try to handle it.

This exception is thrown when we try to access a variable or call a method of a null reference, like when:

  • invoking a method of a null reference
  • setting or getting a field of a null reference
  • checking the length of a null array reference
  • setting or getting an item of a null array reference
  • throwing null

Q13. What Are Two Types of Casting in Java? Which Exception May Be Thrown While Casting? How Can We Avoid It?

We can distinguish two types of casting in Java. We can do upcasting which is casting an object to a supertype or downcasting which is casting an object to a subtype.

Upcasting is very simple, as we always can do that. For example, we can upcast a String instance to the Object type:

Object str = "string";

Alternatively, we can downcast a variable. It’s not as safe as upcasting as it involves a type check. If we incorrectly cast an object, the JVM will throw a ClassCastExcpetion at runtime. Fortunately, we can use the instanceof keyword to prevent invalid casting:

Object o = "string";
String str = (String) o; // it's ok

Object o2 = new Object();
String str2 = (String) o2; // ClassCastException will be thrown

if (o2 instanceof String) { // returns false
    String str3 = (String) o2;
}

We can learn more about type casting in this article.

3. Core-Java Language Questions for Advanced Programmers

Q1. Why Is String an Immutable Class?

We should know that String objects are treated differently than other objects by the JVM. One difference is that String objects are immutable. It means that we can’t change them once we have created them. There are several reasons why they behave that way:

  1. They are stored in the string pool which is a special part of the heap memory. It’s responsible for saving a lot of space.
  2. The immutability of the String class guarantees that its hash code won’t change. Due to that fact, Strings can be effectively used as keys in hashing collections. We can be sure that we won’t overwrite any data because of a change in hash codes.
  3. They can be used safely across several threads. No thread can change the value of a String object, so we get thread safety for free.
  4. Strings are immutable to avoid serious security issues. Sensitive data such as passwords could be changed by an unreliable source or another thread.

We can learn more about the immutability of Strings in this article.

Q2. What Is the Difference Between Dynamic Binding and Static Binding?

Binding in Java is a process of associating a method call with the proper method body. We can distinguish two types of binding in Java: static and dynamic.

The main difference between static binding and dynamic binding is that static binding occurs at compile time and dynamic binding at runtime.

Static binding uses class information for binding. It’s responsible for resolving class members that are private or static and final methods and variables. Also, static binding binds overloaded methods.

Dynamic binding, on the other hand, uses object information to resolve bindings. That’s why it’s responsible for resolving virtual and overridden methods.

Q3. What Is JIT?

JIT stands for “just in time”. It’s a component of the JRE that runs in the runtime and increases the performance of the application. Specifically, it’s a compiler which runs just after the program’s start.

This is different from the regular Java compiler which compiles the code long before the application is started. JIT can speed up the application in different ways.

For example, the JIT compiler is responsible for compiling bytecode into native instructions on the fly to improve performance. Also, it can optimize the code to the targeted CPU and operating system.

Additionally, it has access to many runtime statistics which may be used for recompilation for optimal performance. With this, it can also do some global code optimizations or rearrange code for better cache utilization.

Q4. What Is Reflection in Java?

Reflection is a very powerful mechanism in Java. Reflection is a mechanism of Java language which enables programmers to examine or modify the internal state of the program (properties, methods, classes etc.) at runtime. The java.lang.reflect package provides all required components for using reflection.

When using this feature, we can access all possible fields, methods, constructors that are included within a class definition. We can access them irrespective of their access modifier. It means that for example, we are able to access private members. To do that, we don’t have to know their names. All we have to do is to use some static methods of Class.

It’s worth to know that there is a possibility to restrict access via reflection. To do that we can use the Java security manager and the Java security policy file. They allow us to grant permissions to classes.

When working with modules since Java 9, we should know that by default, we aren’t able to use reflection on classes imported from another module. To allow other classes to use reflection to access the private members of a package we have to grant the “Reflection” Permission.

This article goes into more depth about Java Reflection.

Q5. What Is a Classloader?

The classloader is one of the most important components in Java. It’s a part of the JRE.

Simply put, the classloader is responsible for loading classes into the JVM. We can distinguish three types of classloaders:

  • Bootstrap classloader – it loads the core Java classes. They are located in the <JAVA_HOME>/jre/lib directory
  • Extension classloader – it loads classes located in <JAVA_HOME>/jre/lib/ext or in the path defined by the java.ext.dirs property
  • System classloader – it loads classes on the classpath of our application

A classloader loads classes “on demand”. It means that classes are loaded after they are called by the program. What’s more, a classloader can load a class with a given name only once. However, if the same class is loaded by two different class loaders, then those classes fail in an equality check.

There is more information about classloaders in the Class Loaders in Java article.

Q6. What Is the Difference Between Static and Dynamic Class Loading?

Static class loading takes place when we have source classes available at compile time. We can make use of it by creating object instances with the new keyword.

Dynamic class loading refers to a situation when we can’t provide a class definition at the compile time. Yet, we can do that at runtime. To create an instance of a class, we have to use the Class.forName() method:

Class.forName("oracle.jdbc.driver.OracleDriver")

Q7. What Is the Purpose of the Serializable Interface?

We can use the Serializable interface to enable serializability of a class, using Java’s Serialization API. Serialization is a mechanism for saving the state of an object as a sequence of bytes while deserialization is a mechanism for restoring the state of an object from a sequence of bytes. The serialized output holds the object’s state and some metadata about the object’s type and types of its fields.

We should know that subtypes of serializable classes are also serializable. However, if we want to make a class serializable, but its supertype is non-serializable we have to do two things:

  • implement the Serializable interface
  • assure that a no argument constructor is present in the superclass

We can read more about Serialization in one of our articles.

Removing Repeated Characters from a String

$
0
0

1. Overview

In this tutorial, we’ll discuss techniques in Java to remove repeated characters from a string.

For each technique, we’ll also talk briefly about its time and space complexity.

2. Using distinct

Let’s start by removing the duplicates from our string using the distinct method introduced in Java 8.

In the code below we are obtaining an instance of an IntStream from a given string object. Then, we’re using the distinct method to remove the duplicates. Then, we use forEach to loop over the distinct characters and append them to our StringBuilder:

StringBuilder sb = new StringBuilder();
str.chars().distinct().forEach(c -> sb.append((char) c));

Time Complexity: O(n) – runtime of the loop is directly proportional to the size of the input string

Auxiliary Space: O(n) – since distinct creates an intermediate LinkedHashSet to maintain the order

Maintains Order: Yes

And, while it’s nice that Java 8 buttons up this task for us so nicely, let’s compare it to efforts to roll our own.

3. Using indexOf

The naive approach to removing duplicates from a string simply involves looping over the input and using the method indexOf to check whether the character exists in the resulting string already:

StringBuilder sb = new StringBuilder();
int idx;
for (int i = 0; i < str.length(); i++) {
    char c = str.charAt(i);
    idx = str.indexOf(c, i + 1);
    if (idx == -1) {
        sb.append(c);
    }
}

Time Complexity: O(n * n) – runtime of the loop is directly proportional to the square of the size of the input data set

Auxiliary Space: O(1) – constant space is required to store our index and character values within the loop

Maintains Order: Yes

This does have the benefit of not having auxiliary space but performs much slower than the Core Java approach.

4. Using a Character Array

We can also remove duplicates from our string by converting it into a char array and then looping over each character and comparing it to all subsequent characters.

As we can see below, we create two for loops and are checking whether each element is repeated in the string. If a duplicate is found we increment repeatedCtr so that we don’t append it to the StringBuilder:

char[] chars = str.toCharArray();
StringBuilder sb = new StringBuilder();
boolean repeatedChar;
for (int i = 0; i < chars.length; i++) {
    repeatedChar = false;
    for (int j = i + 1; j < chars.length; j++) {
        if (chars[i] == chars[j]) {
            repeatedChar = true;
            break;
        }
    }
    if (!repeatedChar) {
        sb.append(chars[i]);
    }
}

Time Complexity: O(n * n) – we have an inner and outer loop both required iterations

Auxiliary Space: O(1) – constant space is required to store repeatedCtr which depends on the number of repeated characters in the input string

Maintains Order: No

Again, our second attempt performs poorly compared to the Core Java offering, but let’s see where we get with our next attempt.

5. Using Sorting

Alternatively, repeated characters can be eliminated by sorting our input string to group duplicates.  In order to do that, we have to convert the string to a char array and sort it using the Arrays static method sort. Finally, we will iterate over the sorted char array.

During every iteration, we’re going to compare each element of the array with the previous element. If the elements are different then we will append the current character to the StringBuilder:

StringBuilder sb = new StringBuilder();
if(!str.isEmpty()) {
    char[] chars = str.toCharArray();
    Arrays.sort(chars);

    sb.append(chars[0]);
    for (int i = 1; i < chars.length; i++) {
        if (chars[i] != chars[i - 1]) {
            sb.append(chars[i]);
        }
    }
}

Time Complexity: O(n log n) – comparison sorting on an array has a worst case time complexity of O(n log n)

Auxiliary Space: O(n) – the sort uses Quicksort which uses O(n) auxiliary space, and toCharArray makes a copy of the String anyway

Maintains Order: No

So, we are starting to see a space-time tradeoff. Here, we traded some space for some better performance. Let’s try that again with our final attempt.

6. Using a Set

Another way to remove repeated characters from a string is through the use of a Set. If we do not care about the order of characters in our output string we can use a HashSet. Otherwise, we can use a LinkedHashSet to maintain insertion order.

In both cases, we’ll loop over the input string and add each character to the Set. Once the characters are inserted into the set, we’ll iterate over it to add them to the StringBuilder and return our resulting string:

StringBuilder sb = new StringBuilder();
Set<Character> linkedHashSet = new LinkedHashSet<>();

for (int i = 0; i < str.length(); i++) {
    linkedHashSet.add(str.charAt(i));
}

for (Character c : linkedHashSet) {
    sb.append(c);
}

Time Complexity: O(n) – runtime of the loop is directly proportional to the size of the input string

Auxiliary Space: O(n) – space required for the Set depends on the size of the input string

Maintains Order: LinkedHashSet – Yes, HashSet – No

And now, we’ve matched the Core Java approach! It’s not very shocking to find out this is very similar to what distinct does already.

7. Conclusion

In this article, we covered a few ways to remove repeated characters from a string in Java. We also looked at the time and space complexity of these methods.

As always, code snippets can be found over on GitHub.


Gatling vs JMeter vs The Grinder: Comparing Load Test Tools

$
0
0

1. Introduction

Choosing the right tool for the job can be daunting. In this tutorial, we’ll simplify this by comparing three web application load testing tools – Apache JMeter, Gatling, and The Grinder–against a simple REST API.

2. Load Testing Tools

First, let’s quickly review some background on each.

2.1. Gatling

Gatling is a load testing tool that creates test scripts in Scala. Gatling’s recorder generates the Scala test scripts, a key feature for Gatling. Check out our Intro to Gatling tutorial for more information.

2.2. JMeter

JMeter is a load testing tool by Apache. It provides a nice GUI that we use can for configuration. A unique feature called logic controllers gives great flexibility to set up tests in the GUI.

Visit our Intro to JMeter tutorial for screenshots and more explanation.

2.3. The Grinder

And our final tool, The Grinder, provides a more programming-based scripting engine than the other two and uses Jython. However, The Grinder 3 does have functionality for recording scripts.

The Grinder also differs from the other two tools by allowing for console and agent processes. This functionality provides the ability for an agent process so that the load tests can scale up across multiple servers.  It’s specifically advertised as a load test tool built for developers to find deadlocks and slowdowns.

3. Test Case Setup

Next, for our test, we need an API. Our API functionality includes:

  • add/update a rewards record
  • view one/all rewards record
  • link a transaction to a customer rewards record
  • view transactions for a customer rewards record

Our Scenario:

A store is having a nationwide sale with new and returning customers who need customer rewards accounts to get savings. The rewards API checks for customer rewards account by the customer id. If no rewards account exists, add it, then link to the transaction.

After this, we query the transactions.

3.1. Our REST API

Let’s get a quick highlight of the API by viewing some of the method stubs:

@PostMapping(path="/rewards/add")
public @ResponseBody RewardsAccount addRewardsAcount(@RequestBody RewardsAccount body)

@GetMapping(path="/rewards/find/{customerId}")
public @ResponseBody Optional<RewardsAccount> findCustomer(@PathVariable Integer customerId)

@PostMapping(path="/transactions/add")
public @ResponseBody Transaction addTransaction(@RequestBody Transaction transaction)

@GetMapping(path="/transactions/findAll/{rewardId}")
public @ResponseBody Iterable<Transaction> findTransactions(@PathVariable Integer rewardId)

Note some of the relationships such as querying for transactions by the reward id and getting the rewards account by customer idThese relationships force some logic and some response parsing for our test scenario creation.

Luckily, our tools all handle it fairly well, some better than others.

3.2. Our Testing Plan

Next, we need test scripts.

To get a fair comparison, we’ll perform the same automation steps for each tool:

  1. Generate random customer account ids
  2. Post a transaction
  3. Parse the response for the random customer id and transaction id
  4. Query for a customer rewards account id with the customer id
  5. Parse the response for the rewards account id
  6. If no rewards account id exists then add one with a post
  7. Post the same initial transaction with updated rewards id using the transaction id
  8. Query for all transactions by rewards account id

Let’s take a closer look at Step 4 for each tool. And, make sure to check out the sample for all three completed scripts.

3.3. Gatling

For Gatling, familiarity with Scala adds a boon for developers since the Gatling API is robust and contains a lot of features.

Gatling’s API takes a builder DSL approach, as we can see in its step 4:

.exec(http("get_reward")
  .get("/rewards/find/${custId}")
  .check(jsonPath("$.id").saveAs("rwdId")))
.pause(1)

Of particular note is Gatling’s support for JSON Path when we need to read and verify an HTTP response. Here, we’ll pick up the reward id and save it to Gatling’s internal state. Notice the one-second pause, this necessary check prevents the next dependent request from failing. The check call and saveAs did not block subsequent exec requests.

Also, Gatling’s expression language makes for easier dynamic request body Strings:

.body(StringBody(
  """{ 
    "customerRewardsId":"${rwdId}",
    "customerId":"${custId}",
    "transactionDate":"${txtDate}" 
  }""")).asJson)

Lastly our configuration for this comparison. The 10 runs set as a repeat of the entire scenario, atOnceUsers method sets the threads/users:

val scn = scenario("RewardsScenario")
  .repeat(10) {
  ...
  }
  setUp(
    scn.inject(atOnceUsers(100))
  ).protocols(httpProtocol)

The entire Scala script is viewable at our Github repo.

3.4. JMeter

JMeter generates an XML file after the GUI configuration. The file contains JMeter specific objects with set properties and their values, for example:

<HTTPSamplerProxy guiclass="HttpTestSampleGui" testclass="HTTPSamplerProxy" testname="Add Transaction" enabled="true">
<JSONPostProcessor guiclass="JSONPostProcessorGui" testclass="JSONPostProcessor" testname="Transaction Id Extractor" enabled="true">

Check out the testname attributes, they can be labeled as we recognize them matching the logical steps above. The ability to add children, variables and dependency steps gives JMeter flexibility as scripting provides. Furthermore, we even set the scope for our variables!

Our configuration for runs and users in JMeter uses ThreadGroups and a LoopController:

<stringProp name="LoopController.loops">10</stringProp>
<stringProp name="ThreadGroup.num_threads">100</stringProp>

View the entire jmx file as a reference. While possible, writing tests in XML as .jmx files do not make sense with a full-featured GUI.

3.5. The Grinder

Without the functional programming of Scala and GUI, our Jython script for The Grinder looks pretty basic. Add some system Java classes, and we have a lot fewer lines of code.

customerId = str(random.nextInt());
result = request1.POST("http://localhost:8080/transactions/add",
  "{"'"customerRewardsId"'":null,"'"customerId"'":"+ customerId + ","'"transactionDate"'":null}")
txnId = parseJsonString(result.getText(), "id")

However, fewer lines of test setup code are balanced by the need for more string maintenance code such as parsing JSON strings. Also, the HTTPRequest API is slim on functionality.

With The Grinder, we define threads, processes and runs values in an external properties file:

grinder.threads = 100
grinder.processes = 1
grinder.runs = 10

Our full Jython script for The Grinder will look like this.

4. Test Runs

4.1. Test Execution

All three tools recommend using the command line for large load tests.

Gatling requires only that we have JAVA_HOME and GATLING_HOME set. To execute Gatling we use:

GATLING_HOME\bin\gatling.bat

JMeter needs a parameter to disable the GUI for the test as prompted when starting the GUI for configuration:

jmeter-n.cmd -t -l TestPlan.jmx -e -o [path to output folder]

Like Gatling, The Grinder requires that we set JAVA_HOME and GRINDERPATH. However, it needs a couple more properties, too:

set GRINDERPROPERTIES="%GRINDERPATH%\grinder.properties"
set CLASSPATH="%GRINDERPATH%\lib\grinder.jar";%CLASSPATH%

As mentioned above, we provide a grinder.properties file for additional configuration such as threads, runs, processes, and console hosts.

Finally, we bootstrap the console and agents with:

java -classpath %CLASSPATH% net.grinder.Console
java -classpath %CLASSPATH% net.grinder.Grinder %GRINDERPROPERTIES%

4.2. Test Results

Each of the tests ran ten runs with 100 users/threads. Let’s unpack some of the highlights:

Successful Requests Errors Total Test Time (s) Average Response Time (ms) Peak Throughput
Gatling 4100 Requests 100 (soft)* 31 64.5 132 req/s
JMeter 4135 Requests 0 35 81 1080 req/s
The Grinder 5000 Requests 0 5.57 65.72 1284 req/s

A glance shows The Grinder being 6x faster than the other two tools for total test. The other two clocked similarly at ~30 seconds. The same step between The Grinder and Gatling, creating 100 threads, took 1544ms and 16ms respectively.

And while The Grinder is high-speed, it comes at the cost of additional development time and less diversity of output data.

Additional note Gatling has 100 “soft” failures because of the logic check for a reward Id that doesn’t exist. The other tools do not count the if conditional failure as an error. This limitation is baked into the Gatling API.

5. Summary

Now it’s time to take an overall look at each of the load testing tools.

Gatling JMeter The Grinder
Project and Community 9 9 6
Performance 7 7 10
Scriptability/API 7 9 8
UI 8 8 5
Reports 9 7 6
Integration 7 9 7
Summary 7.8 8.2 7

Gatling:

  • Solid, polished load testing tool that outputs beautiful reports with Scala scripting
  • Open Source and Enterprise support levels for the product

JMeter:

  • Robust API (through GUI) for test script development with no coding required
  • Apache Foundation Support and great integration with Maven

The Grinder:

  • Fast performance load testing tool for developers using Jython
  • Cross-server scalability provides even more potential for large tests

Simply put, if speed and scalability is a need, then use The Grinder.

If great looking interactive graphs help show a performance gain to argue for a change, then use Gatling.

JMeter is the tool for complicated business logic or an integration layer with many message types. As part of the Apache Software Foundation, JMeter provides a mature product and a large community.

6. Conclusion

In conclusion, we see that the tools have comparable functionalities in some area while shining in others. The right tool for the right job is colloquial wisdom that works in software development.

Finally, the API and scripts can be found on Github.

Introduction to RESTX

$
0
0

1. Overview

In this tutorial, we’ll be taking a tour of the lightweight Java REST framework RESTX.

2. Features

Building a RESTful API is quite easy with the RESTX framework. It has all the defaults that we can expect from a REST framework like serving and consuming JSON, query and path parameters, routing and filtering mechanisms, usage statistics, and monitoring.

RESTX also comes with an intuitive admin web console and command line installer for easy bootstrapping.

It’s also licensed under the Apache License 2 and maintained by a community of developers. The minimum Java requirement for RESTX is JDK 7.

3. Configuration

RESTX comes with a handy shell/command app which is useful to quickly bootstrap a Java project.

We need to install the app first before we can proceed. The detailed installation instruction is available here.

4. Installing Core Plugins

Now, it’s time to install the core plugins to be able to create an app from the shell itself.

In the RESTX shell, let’s run the following command:

shell install

It will then prompt us to select the plugins for installation. We need to select the number which points to io.restx:restx-core-shell. The shell will automatically restart once installation completes.

5. Shell App Bootstrap

Using the RESTX shell it is very convenient to bootstrap a new app. It provides a wizard-based guide.

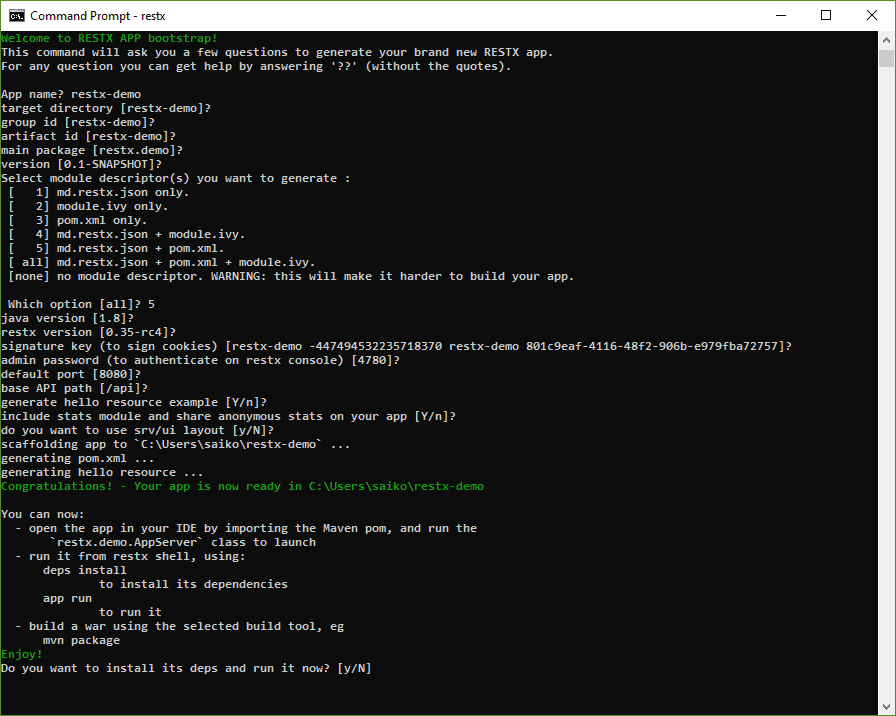
We start by executing the following command on the shell:

app new

This command will trigger the wizard. Then we can either go with the default options or change them as per our requirements:

Since we have chosen to generate a pom.xml, the project can be easily imported into any standard Java IDE.

In a few cases, we may need to tweak the IDE settings.

Our next step will be to build the project:

mvn clean install -DskipTests

Once the build is successful we can run the AppServer class as a Java Application from the IDE. This will start the server with the admin console, listening on port 8080.

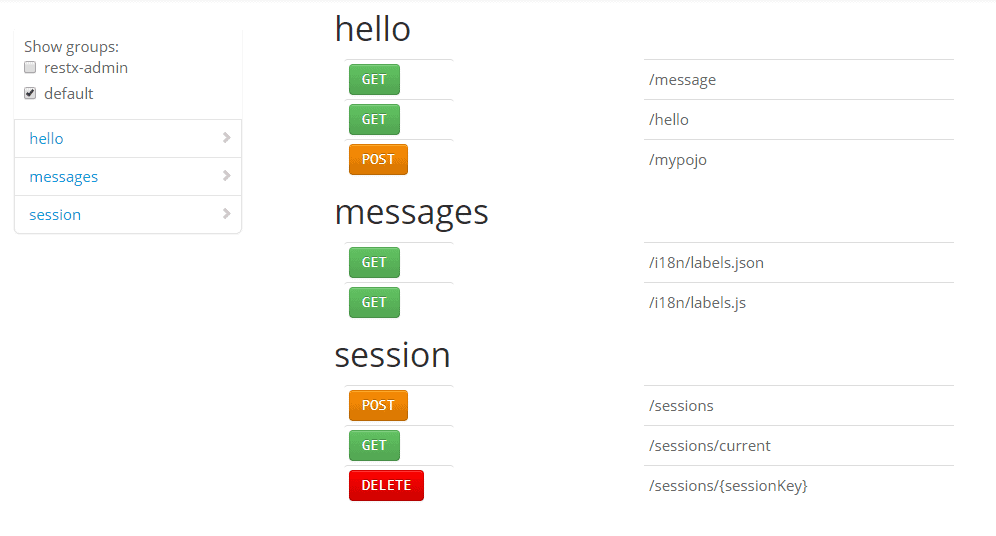
We can browse to http://127.0.0.1:8080/api/@/ui and see the basic UI.

The routes starting with /@/ are used for the admin console which is a reserved path in RESTX.

To log into the admin console we can use the default username “admin and the password we provided while creating the app.

Before we play around with the console, let’s explore the code and understand what the wizard generated.

6. A RESTX Resource

The routes are defined in <main_package>.rest.HelloResource class:

@Component
@RestxResource
public class HelloResource {
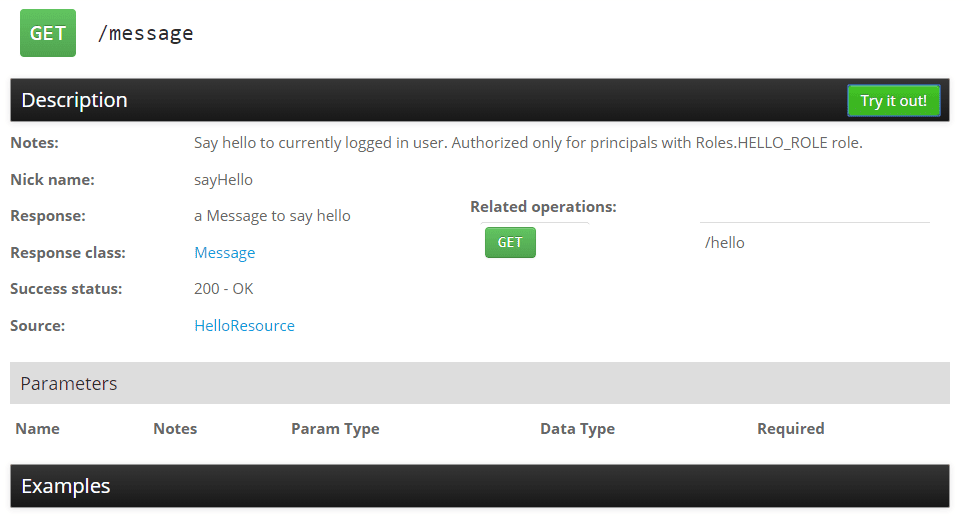
    @GET("/message")
    @RolesAllowed(Roles.HELLO_ROLE)
    public Message sayHello() {
        return new Message().setMessage(String.format("hello %s, it's %s", 
          RestxSession.current().getPrincipal().get().getName(),
          DateTime.now().toString("HH:mm:ss")));
    }
}

It’s immediately apparent that RESTX uses default J2EE annotations for security and REST bindings. For the most part, it uses its own annotations for dependency injection.

RESTX also supports many reasonable defaults for mapping method parameters to the request.

And, in addition to these standard annotations is @RestxResource, which declares it as a resource that RESTX recognizes.

The base path is added in the src/main/webapp/WEB-INF/web.xml. In our case, it’s /api, so we can send a GET request to http://localhost:8080/api/message, assuming proper authentication.

The Message class is just a Java bean that RESTX serializes to JSON.

We control the user access by specifying the RolesAllowed annotation using the HELLO_ROLE which was generated by the bootstrapper.

7. The Module Class

As noted earlier, RESTX uses J2EE-standard dependency injection annotations, like @Named, and invents its own where needed, likely taking a cue from the Dagger framework for @Module and @Provides.

It uses these to create the applications main module, which among other things, defines the admin password:

@Module
public class AppModule {
    
    @Provides
    public SignatureKey signatureKey() {
        return new SignatureKey("restx-demo -44749418370 restx-demo 801f-4116-48f2-906b"
            .getBytes(Charsets.UTF_8));
    }

    @Provides
    @Named("restx.admin.password")
    public String restxAdminPassword() {
        return "1234";
    }

    @Provides
    public ConfigSupplier appConfigSupplier(ConfigLoader configLoader) {
        return configLoader.fromResource("restx/demo/settings");
    } 
   
    // other provider methods to create components 
}

@Module defines a class that can define other components, similar to @Module in Dagger, or @Configuration in Spring.

@Provides exposes a component programmatically, like @Provides in Dagger, or @Bean in Spring.

And, finally, the @Named annotation is used to indicate the name of the component produced.

AppModule also provides a SignatureKey used to sign content sent to the clients. While creating the session for the sample app, for example, this will set a cookie, signed with the configured key:

HTTP/1.1 200 OK
...
Set-Cookie: RestxSessionSignature-restx-demo="ySfv8FejvizMMvruGlK3K2hwdb8="; RestxSession-restx-demo="..."
...

And check out RESTX’s components factory/dependency injection documentation for more.

8. The Launcher Class

And lastly, the AppServer class is used to run the application as a standard Java app in an embedded Jetty server:

public class AppServer {
    public static final String WEB_INF_LOCATION = "src/main/webapp/WEB-INF/web.xml";
    public static final String WEB_APP_LOCATION = "src/main/webapp";

    public static void main(String[] args) throws Exception {
        int port = Integer.valueOf(Optional.fromNullable(System.getenv("PORT")).or("8080"));
        WebServer server = 
            new Jetty8WebServer(WEB_INF_LOCATION, WEB_APP_LOCATION, port, "0.0.0.0");
        System.setProperty("restx.mode", System.getProperty("restx.mode", "dev"));
        System.setProperty("restx.app.package", "restx.demo");
        server.startAndAwait();
    }
}

Here, the dev mode is used during the development phase to enable features such as auto-compile which shortens the development feedback loop.

We can package the app as a war (web archive) file to deploy in a standalone J2EE web container.

Let’s find out how to test the app in the next section.

9. Integration Testing using Specs

One of the strong features of RESTX is its concept of “specs”. A sample spec would look like this:

title: should admin say hello
given:
  - time: 2013-08-28T01:18:00.822+02:00
wts:
  - when: |
      GET hello?who=xavier
    then: |
      {"message":"hello xavier, it's 01:18:00"}

The test is written in a Given-When-Then structure within a YAML file which basically defines how the API should respond (then) to a specific request (when) given a current state of the system (given).

The HelloResourceSpecTest class in src/test/resources will trigger the tests written in the specs above:

@RunWith(RestxSpecTestsRunner.class)
@FindSpecsIn("specs/hello")
public class HelloResourceSpecTest {}

The RestxSpecTestsRunner class is a custom JUnit runner. It contains custom JUnit rules to:

  • set up an embedded server
  • prepare the state of the system (as per the given section in the specs)
  • issue the specified requests, and
  • verify the expected responses

The @FindSpecsIn annotation points to the path of the spec files against which the tests should be run.

The spec helps to write integration tests and provide examples in the API docs. Specs are also useful to mock HTTP requests and record request/response pairs.

10. Manual Testing

We can also test manually over HTTP. We first need to log in, and to do this, we need to hash the admin password in the RESTX console:

hash md5 <clear-text-password>

And then we can pass that to the /sessions endpoint:

curl -b u1 -c u1 -X POST -H "Content-Type: application/json" 
  -d '{"principal":{"name":"admin","passwordHash":"1d528266b85cf052803a57288"}}'
  http://localhost:8080/api/sessions

(Note that Windows users need to download curl first.)

And now, if we use the session as part of our /message request:

curl -b u1 "http://localhost:8080/api/message?who=restx"

Then we’ll get something like this:

{"message" : "hello admin, it's 09:56:51"}

11. Exploring  the Admin Console

The admin console provides useful resources to control the app.

Let’s take a look at the key features by browsing to http://127.0.0.1:8080/admin/@/ui.

11.1. API Docs

The API docs section lists all available routes including all the options:

And we can click on individual routes and try them out on the console itself:

11.2. Monitoring

The JVM Metrics section shows the application metrics with active sessions, memory usage, and thread dump:

Under Application Metrics we have mainly two categories of elements monitored by default:

  • BUILD corresponds to the instantiation of the application components
  • HTTP corresponds to HTTP requests handled by RESTX

11.3. Stats

RESTX lets the user choose to collect and share anonymous stats on the application to give information to the RESTX community. We can easily opt out by excluding the restx-stats-admin module.

The stats report things like the underlying OS and the JVM version:

Because this page shows sensitive information, make sure to review its configuration options.

Apart from these, the admin console can also help us:

  • check the server logs (Logs)
  • view the errors encountered (Errors)
  • check the environment variables (Config)

12. Authorization

RESTX endpoints are secured by default. That means if for any endpoint:

@GET("/greetings/{who}")
public Message sayHello(String who) {
    return new Message(who);
}

When called without authentication will return a 401 by default.

To make an endpoint public, we need to use the @PermitAll annotation either at the method or class level:

@PermitAll 
@GET("/greetings/{who}")
public Message sayHello(String who) {
    return new Message(who);
}

Note that at the class level, all methods are public.

Further, the framework also allows specifying user roles using the @RolesAllowed annotation:

@RolesAllowed("admin")
@GET("/greetings/{who}")
public Message sayHello(String who) {
    return new Message(who);
}

With this annotation, RESTX will verify if the authenticated user also has an admin role assigned. In case an authenticated user without admin roles tries to access the endpoint, the application will return a 403 instead of a 401.

By default, the user roles and credentials are stored on the filesystem, in separate files.

So, the user id with the encrypted password is stored under /data/credentials.json file:

{
    "user1": "$2a$10$iZluUbCseDOvKnoe",
    "user2": "$2a$10$oym3Swr7pScdiCXu"
}

And, the user roles are defined in /data/users.json file:

[
    {"name":"user1", "roles": ["hello"]},
    {"name":"user2", "roles": []}
]

In the sample app, the files get loaded in the AppModule via the FileBasedUserRepository class:

new FileBasedUserRepository<>(StdUser.class, mapper, 
  new StdUser("admin", ImmutableSet.<String> of("*")), 
  Paths.get("data/users.json"), Paths.get("data/credentials.json"), true)

The StdUser class holds the user objects. It can be a custom user class but it needs to be serializable into JSON.

We can, of course, use a different UserRepository implementation, like one that hits a database.


13. Conclusion

This tutorial gave an overview of the lightweight Java-based RESTX framework.

The framework is still in development and there might be some rough edges using it. Check out the official documentation for more details.

The sample bootstrapped app is available in our GitHub repository.

Sorting Query Results with Spring Data

$
0
0

1. Introduction

In this tutorial, we’re going to learn how to sort query results with Spring Data.

First, we’ll take a look at the schema of the data that want to query and sort.

And then, we’ll dive right into how to achieve that Spring Data.

Let’s get started!

2. The Test Data

Below we have some example data. Although we have represented it here as a table we could use any one of the databases supported by Spring Data to persist it.

The question we want to answer is, “Who is occupying which seat on the airline?” but to make that more user-friendly we want to sort by seat number.

First Name Last Name Seat Number
Jill Smith 50
Eve Jackson 94
Fred Bloggs 22
Ricki Bobbie 36
Siya Kolisi 85

3. Domain

To create a Spring Data Repository we need to provide a domain class as well as an id type.

Here we’ve modeled our passenger as a JPA entity, but we could just as easily have modeled it as a MongoDB document or any other model abstraction:

@Entity
class Passenger {

    @Id
    @GeneratedValue
    @Column(nullable = false)
    private Long id;

    @Basic(optional = false)
    @Column(nullable = false)
    private String firstName;

    @Basic(optional = false)
    @Column(nullable = false)
    private String lastName;

    @Basic(optional = false)
    @Column(nullable = false)
    private int seatNumber;

    // constructor, getters etc.
}

4. Sorting with Spring Data

We have a few different options at our disposal for sorting with Spring Data.

4.1. Sorting with the OrderBy Method Keyword

One option would be to use Spring Data’s method derivation whereby the query is generated from the method name and signature.

All we need to do here to sort our data is include the keyword OrderBy in our method name along with the property name(s) and direction (Asc or Dsc) by which we want to sort.

We can use this convention to create a query that returns our passengers in ascending order by seat number:

interface PassengerRepository extends JpaRepository<Passenger, Long> {

    List<Passenger> findByOrderBySeatNumberAsc();
}

We can also combine this keyword with all the standard Spring Data method names.

Let’s see an example of a method that finds passengers by last name and orders by seat number:

List<Passenger> findByLastNameOrderBySeatNumberAsc(String lastName);

4.2. Sorting with a Sort Parameter

Our second option is to include a Sort parameter specifying the property name(s) and direction by which we want to sort:

List<Passenger> passengers = repository.findAll(Sort.by(Sort.Direction.ASC, "seatNumber"));

In this case, we’re using the findAll() method and adding the Sort option when calling it.

We can also add this parameter to a new method definition:

List<Passenger> findByLastName(String lastName, Sort sort);

Finally, if perhaps we are paging, we can specify our sort in a Pageable object:

Page<Passenger> page = repository.findAll(PageRequest.of(0, 1, Sort.by(Sort.Direction.ASC, "seatNumber")));

5. Conclusion

We have two easy options for sorting data with Spring Data through method derivation using the OrderBy keyword or using the Sort object as a method parameter.

As always, you can find the code over on GitHub.

Abstract Factory Pattern in Java

$
0
0

1. Overview

In this article, we’ll discuss the Abstract Factory design pattern.

The book Design Patterns: Elements of Reusable Object-Oriented Software states that an Abstract Factory “provides an interface for creating families of related or dependent objects without specifying their concrete classes”. In other words, this model allows us to create objects that follow a general pattern.

An example of the Abstract Factory design pattern in the JDK is the newInstance() of javax.xml.parsers.DocumentBuilderFactory class.

2. Abstract Factory Design Pattern Example

In this example, we’ll create two implementations of the Factory Method Design pattern: AnimalFactory and ColorFactory.

After that, we’ll manage access to them using an Abstract Factory AbstractFactory:

First, we’ll create a family of Animal class and will, later on, use it in our Abstract Factory.

Here’s the Animal interface:

public interface Animal {
    String getAnimal();
    String makeSound();
}

and a concrete implementation Duck:

public class Duck implements Animal {

    @Override
    public String getAnimal() {
        return "Duck";
    }

    @Override
    public String makeSound() {
        return "Squeks";
    }
}

Furthermore, we can create more concrete implementations of Animal interface (like Dog, Bear, etc.) exactly in this manner.

The Abstract Factory deals with families of dependent objects. With that in mind, we’re going to introduce one more family Color as an interface with a few implementations (White, Brown,…).

We’ll skip the actual code for now, but it can be found here.

Now that we’ve got multiple families ready, we can create an AbstractFactory interface for them:

public interface AbstractFactory {
    Animal getAnimal(String animalType) ;
    Color getColor(String colorType);
}

Next, we’ll implement an AnimalFactory using the Factory Method design pattern that we discussed in the previous section:

public class AnimalFactory implements AbstractFactory {

    @Override
    public Animal getAnimal(String animalType) {
        if ("Dog".equalsIgnoreCase(animalType)) {
            return new Dog();
        } else if ("Duck".equalsIgnoreCase(animalType)) {
            return new Duck();
        }

        return null;
    }

    @Override
    public Color getColor(String color) {
        throw new UnsupportedOperationException();
    }

}

Similarly, we can implement a factory for the Color interface using the same design pattern.

When all this is set, we’ll create a FactoryProvider class that will provide us with an implementation of AnimalFactory or ColorFactory depending on the argument that we supply to the getFactory() method:

public class FactoryProvider {
    public static AbstractFactory getFactory(String choice){
        
        if("Animal".equalsIgnoreCase(choice)){
            return new AnimalFactory();
        }
        else if("Color".equalsIgnoreCase(choice)){
            return new ColorFactory();
        }
        
        return null;
    }
}

3. When to Use Abstract Factory Pattern:

  • The client is independent of how we create and compose the objects in the system
  • The system consists of multiple families of objects, and these families are designed to be used together
  • We need a run-time value to construct a particular dependency

While the pattern is great when creating predefined objects, adding the new ones might be challenging. To support the new type of objects will require changing the AbstractFactory class and all of its subclasses.

4. Summary

In this article, we learned about the Abstract Factory design pattern.

Finally, as always, the implementation of these examples can be found over on GitHub.

Introduction to the Event Notification Model in CDI 2.0

$
0
0

1. Overview

CDI (Contexts and Dependency Injection) is the standard dependency injection framework of the Jakarta EE platform.

In this tutorial, we’ll take a look at CDI 2.0 and how it builds upon the powerful, type-safe injection mechanism of CDI 1.x by adding an improved, full-featured event notification model.

2. The Maven Dependencies

To get started, we’ll build a simple Maven project.

We need a CDI 2.0-compliant container, and Weld, the reference implementation of CDI, is a good fit:

<dependencies>
    <dependency>
        <groupId>javax.enterprise</groupId>
        <artifactId>cdi-api</artifactId>
        <version>2.0.SP1</version>
    </dependency>
    <dependency>
        <groupId>org.jboss.weld.se</groupId>
        <artifactId>weld-se-core</artifactId>
        <version>3.0.5.Final</version>
    </dependency>
</dependencies>

As usual, we can pull the latest versions of cdi-api and weld-se-core from Maven Central.

3. Observing and Handling Custom Events

Simply put, the CDI 2.0 event notification model is a classic implementation of the Observer pattern, based on the @Observes method-parameter annotation. Hence, it allows us to easily define observer methods, which can be automatically called in response to one or more events.

For instance, we could define one or more beans, which would trigger one or more specific events, while other beans would be notified about the events and would react accordingly.

To demonstrate more clearly how this works, we’ll build a simple example, including a basic service class, a custom event class, and an observer method that reacts to our custom events.

3.1. A Basic Service Class

Let’s start by creating a simple TextService class:

public class TextService {

    public String parseText(String text) {
        return text.toUpperCase();
    }
}

3.2. A Custom Event Class

Next, let’s define a sample event class, which takes a String argument in its constructor:

public class ExampleEvent {
    
    private final String eventMessage;

    public ExampleEvent(String eventMessage) {
        this.eventMessage = eventMessage;
    }
    
    // getter
}

3.3. Defining an Observer Method with the @Observes Annotation

Now that we’ve defined our service and event classes, let’s use the @Observes annotation to create an observer method for our ExampleEvent class:

public class ExampleEventObserver {
    
    public String onEvent(@Observes ExampleEvent event, TextService textService) {
        return textService.parseText(event.getEventMessage());
    } 
}

While at first sight, the implementation of the onEvent() method looks fairly trivial, it actually encapsulates a lot of functionality through the @Observes annotation.

As we can see, the onEvent() method is an event handler that takes ExampleEvent and TextService objects as arguments.

Let’s keep in mind that all the arguments specified after the @Observes annotation are standard injection points. As a result, CDI will create fully-initialized instances for us and inject them into the observer method.

3.4. Initializing our CDI 2.0 Container

At this point, we’ve created our service and event classes, and we’ve defined a simple observer method to react to our events. But how do we instruct CDI to inject these instances at runtime?

Here’s where the event notification model shows its functionality to its fullest. We simply initialize the new SeContainer implementation and fire one or more events through the fireEvent() method:

SeContainerInitializer containerInitializer = SeContainerInitializer.newInstance(); 
try (SeContainer container = containerInitializer.initialize()) {
    container.getBeanManager().fireEvent(new ExampleEvent("Welcome to Baeldung!")); 
}

Note that we’re using the SeContainerInitializer and SeContainer objects because we’re using CDI in a Java SE environment, rather than in Jakarta EE.

All the attached observer methods will be notified when the ExampleEvent is fired by propagating the event itself.

Since all the objects passed as arguments after the @Observes annotation will be fully initialized, CDI will take care of wiring up the whole TextService object graph for us, before injecting it into the onEvent() method.

In a nutshell, we have the benefits of a type-safe IoC container, along with a feature-rich event notification model.

4. The ContainerInitialized Event

In the previous example, we used a custom event to pass an event to an observer method and get a fully-initialized TextService object.

Of course, this is useful when we really need to propagate one or more events across multiple points of our application.

Sometimes, we simply need to get a bunch of fully-initialized objects that are ready to be used within our application classes, without having to go through the implementation of additional events.

To this end, CDI 2.0 provides the ContainerInitialized event class, which is automatically fired when the Weld container is initialized.

Let’s take a look at how we can use the ContainerInitialized event for transferring control to the ExampleEventObserver class:

public class ExampleEventObserver {
    public String onEvent(@Observes ContainerInitialized event, TextService textService) {
        return textService.parseText(event.getEventMessage());
    }    
}

And keep in mind that the ContainerInitialized event class is Weld-specific. So, we’ll need to refactor our observer methods if we use a different CDI implementation.

5. Conditional Observer Methods

In its current implementation, our ExampleEventObserver class defines by default an unconditional observer method. This means that the observer method will always be notified of the supplied event, regardless of whether or not an instance of the class exists in the current context.

Likewise, we can define a conditional observer method by specifying notifyObserver=IF_EXISTS as an argument to the @Observes annotation:

public String onEvent(@Observes(notifyObserver=IF_EXISTS) ExampleEvent event, TextService textService) { 
    return textService.parseText(event.getEventMessage());
}

When we use a conditional observer method, the method will be notified of the matching event only if an instance of the class that defines the observer method exists in the current context.

6. Transactional Observer Methods

We can also fire events within a transaction, such as a database update or removal operation. To do so, we can define transactional observer methods by adding the during argument to the @Observes annotation.

Each possible value of the during argument corresponds to a particular phase of a transaction:

  • BEFORE_COMPLETION
  • AFTER_COMPLETION
  • AFTER_SUCCESS
  • AFTER_FAILURE

If we fire the ExampleEvent event within a transaction, we need to refactor the onEvent() method accordingly to handle the event during the required phase:

public String onEvent(@Observes(during=AFTER_COMPLETION) ExampleEvent event, TextService textService) { 
    return textService.parseText(event.getEventMessage());
}

A transactional observer method will be notified of the supplied event only in the matching phase of a given transaction.

7. Observer Methods Ordering

Another nice improvement included in CDI 2.0’s event notification model is the ability for setting up an ordering or priority for calling observers of a given event.

We can easily define the order in which the observer methods will be called by specifying the @Priority annotation after @Observes.

To understand how this feature works, let’s define another observer method, aside from the one that ExampleEventObserver implements:

public class AnotherExampleEventObserver {
    
    public String onEvent(@Observes ExampleEvent event) {
        return event.getEventMessage();
    }   
}

In this case, both observer methods by default will have the same priority. Thus, the order in which CDI will invoke them is simply unpredictable.

We can easily fix this by assigning to each method an invocation priority through the @Priority annotation:

public String onEvent(@Observes @Priority(1) ExampleEvent event, TextService textService) {
    // ... implementation
}
public String onEvent(@Observes @Priority(2) ExampleEvent event) {
    // ... implementation
}

Priority levels follow a natural ordering. Therefore, CDI will call first the observer method with a priority level of 1 and will invoke second the method with a priority level of 2.

Likewise, if we use the same priority level across two or more methods, the order is again undefined.

8. Asynchronous Events

In all the examples that we’ve learned so far, we fired events synchronously. However, CDI 2.0 allows us to easily fire asynchronous events as well. Asynchronous observer methods can then handle these asynchronous events in different threads.

We can fire an event asynchronously with the fireAsync() method:

public class ExampleEventSource {
    
    @Inject
    Event<ExampleEvent> exampleEvent;
    
    public void fireEvent() {
        exampleEvent.fireAsync(new ExampleEvent("Welcome to Baeldung!"));
    }   
}

Beans fire up events, which are implementations of the Event interface. Therefore, we can inject them as any other conventional bean.

To handle our asynchronous event, we need to define one or more asynchronous observer methods with the @ObservesAsync annotation:

public class AsynchronousExampleEventObserver {

    public void onEvent(@ObservesAsync ExampleEvent event) {
        // ... implementation
    }
}

9. Conclusion

In this article, we learned how to get started using the improved event notification model bundled with CDI 2.0.

As usual, all the code samples shown in this tutorial are available over on GitHub.

Java CyclicBarrier vs CountDownLatch

$
0
0

1. Introduction

In this tutorial, we’ll compare CyclicBarrier and CountDownLatch and try to understand the similarities and differences between the two.

2. What Are These?

When it comes to concurrency, it can be challenging to conceptualize what each is intended to accomplish.

First and foremost, both CountDownLatch and CyclicBarrier are used for managing multi-threaded applications.

And, they are both intended to express how a given thread or group of threads should wait.

2.1. CountDownLatch

CountDownLatch is a construct that a thread waits on while other threads count down on the latch until it reaches zero.

We can think of this like a dish at a restaurant that is being prepared. No matter which cook prepares however many of the items, the waiter must wait until all the items are on the plate. If a plate takes items, any cook will count down on the latch for each item she puts on the plate.

2.2. CyclicBarrier

CyclicBarrier is a reusable construct where a group of threads waits together until all of the threads arrive. At that point, the barrier is broken and an action can optionally be taken.

We can think of this like a group of friends. Every time they plan to eat at a restaurant they decide a common point where they can meet. They wait for each other there, and only when everyone arrives can they go to the restaurant to eat together.

2.3. Further Reading

And for a lot more detail on each of these individually, refer to our previous tutorials on CountDownLatch and CyclicBarrier respectively.

3. Tasks vs. Threads

Let’s take a deeper dive into some of the semantic differences between these two classes.

As stated in the definitions, CyclicBarrier allows a number of threads to wait on each other, whereas CountDownLatch allows one or more threads to wait for a number of tasks to complete.

In short, CyclicBarrier maintains a count of threads whereas CountDownLatch maintains a count of tasks.

In the following code, we define a CountDownLatch with a count of two. Next, we call countDown() twice from a single thread:

CountDownLatch countDownLatch = new CountDownLatch(2);
Thread t = new Thread(() -> {
    countDownLatch.countDown();
    countDownLatch.countDown();
});
t.start();
countDownLatch.await();

assertEquals(0, countDownLatch.getCount());

Once the latch reaches zero, the call to await returns.

Note that in this case, we were able to have the same thread decrease the count twice.

CyclicBarrier, though, is different on this point.

Similar to the above example, we create a CyclicBarrier, again with a count of two and call await() on it, this time from the same thread:

CyclicBarrier cyclicBarrier = new CyclicBarrier(2);
Thread t = new Thread(() -> {
    try {
        cyclicBarrier.await();
        cyclicBarrier.await();    
    } catch (InterruptedException | BrokenBarrierException e) {
        // error handling
    }
});
t.start();

assertEquals(1, cyclicBarrier.getNumberWaiting());
assertFalse(cyclicBarrier.isBroken());

The first difference here is that the threads that are waiting are themselves the barrier.

Second, and more importantly, the second await() is useless. A single thread can’t count down a barrier twice.

Indeed, because t must wait for another thread to call await() – to bring the count to two – t‘s second call to await() won’t actually be invoked until the barrier is already broken!

In our test, the barrier hasn’t been crossed because we only have one thread waiting and not the two threads that would be required for the barrier to be tripped. This is also evident from the cyclicBarrier.isBroken() method, which returns false.

4. Reusability

The second most evident difference between these two classes is reusability. To elaborate, when the barrier trips in CyclicBarrier, the count resets to its original value. CountDownLatch is different because the count never resets.

In the given code, we define a CountDownLatch with count 7 and count it through 20 different calls:

CountDownLatch countDownLatch = new CountDownLatch(7);
ExecutorService es = Executors.newFixedThreadPool(20);
for (int i = 0; i < 20; i++) {
    es.execute(() -> {
        long prevValue = countDownLatch.getCount();
        countDownLatch.countDown();
        if (countDownLatch.getCount() != prevValue) {
            outputScraper.add("Count Updated");
        }
    }); 
} 
es.shutdown();

assertTrue(outputScraper.size() <= 7);

We observe that even though 20 different threads call countDown(), the count doesn’t reset once it reaches zero.

Similar to the above example, we define a CyclicBarrier with count 7 and wait on it from 20 different threads:

CyclicBarrier cyclicBarrier = new CyclicBarrier(7);

ExecutorService es = Executors.newFixedThreadPool(20);
for (int i = 0; i < 20; i++) {
    es.execute(() -> {
        try {
            if (cyclicBarrier.getNumberWaiting() <= 0) {
                outputScraper.add("Count Updated");
            }
            cyclicBarrier.await();
        } catch (InterruptedException | BrokenBarrierException e) {
            // error handling
        }
    });
}
es.shutdown();

assertTrue(outputScraper.size() > 7);

In this case, we observe that the value decreases every time a new thread runs, by resetting to the original value, once it reaches zero.

5. Conclusion

All in all, CyclicBarrier and CountDownLatch are both helpful tools for synchronization between multiple threads. However, they are fundamentally different in terms of the functionality they provide. Consider each carefully when determining which is right for the job.

As usual, all the discussed examples can be accessed over on Github.

Java equals() and hashCode() Contracts

$
0
0

1. Overview

In this tutorial, we’ll introduce two methods that closely belong together: equals() and hashCode(). We’ll focus on their relationship with each other, how to correctly override them, and why we should override both or neither.

2. equals()

The Object class defines both the equals() and hashCode() methods – which means that these two methods are implicitly defined in every Java class, including the ones we create:

class Money {
    int amount;
    String currencyCode;
}
Money income = new Money(55, "USD");
Money expenses = new Money(55, "USD");
boolean balanced = income.equals(expenses)

We would expect income.equals(expenses) to return true. But with the Money class in its current form, it won’t.

The default implementation of equals() in the class Object says that equality is the same as object identity. And income and expenses are two distinct instances.

2.1. Overriding equals()

Let’s override the equals() method so that it doesn’t consider only object identity, but rather also the value of the two relevant properties:

@Override
public boolean equals(Object o) {
    if (o == this)
        return true;
    if (!(o instanceof Money))
        return false;
    Money other = (Money)o;
    boolean currencyCodeEquals = (this.currencyCode == null && other.currencyCode == null)
      || (this.currencyCode != null && this.currencyCode.equals(other.currencyCode));
    return this.amount == other.amount && currencyCodeEquals;
}

2.2. equals() Contract

Java SE defines a contract that our implementation of the equals() method must fulfill. Most of the criteria are common sense. The equals() method must be:

  • reflexive: an object must equal itself
  • symmetric: x.equals(y) must return the same result as y.equals(x)
  • transitive: if x.equals(y) and y.equals(z) then also x.equals(z)
  • consistent: the value of equals() should change only if a property that is contained in equals() changes (no randomness allowed)

We can look up the exact criteria in the Java SE Docs for the Object class.

2.3. Violating equals() Symmetry with Inheritance

If the criteria for equals() is such common sense, how can we violate it at all? Well, violations happen most often, if we extend a class that has overridden equals(). Let’s consider a Voucher class that extends our Money class:

class WrongVoucher extends Money {

    private String store;

    @Override
    public boolean equals(Object o) {
        if (o == this)
            return true;
        if (!(o instanceof WrongVoucher))
            return false;
        WrongVoucher other = (WrongVoucher)o;
        boolean currencyCodeEquals = (this.currencyCode == null && other.currencyCode == null)
          || (this.currencyCode != null && this.currencyCode.equals(other.currencyCode));
        boolean storeEquals = (this.store == null && other.store == null)
          || (this.store != null && this.store.equals(other.store));
        return this.amount == other.amount && currencyCodeEquals && storeEquals;
    }

    // other methods
}

At first glance, the Voucher class and its override for equals() seem to be correct. And both equals() methods behave correctly as long as we compare Money to Money or Voucher to Voucher. But what happens, if we compare these two objects?

Money cash = new Money(42, "USD");
WrongVoucher voucher = new WrongVoucher(42, "USD", "Amazon");

voucher.equals(cash) => false // As expected.
cash.equals(voucher) => true // That's wrong.

That violates the symmetry criteria of the equals() contract.

2.4. Fixing equals() Symmetry with Composition

To avoid this pitfall, we should favor composition over inheritance.

Instead of subclassing Money, let’s create a Voucher class with a Money property:

class Voucher {

    private Money value;
    private String store;

    Voucher(int amount, String currencyCode, String store) {
        this.value = new Money(amount, currencyCode);
        this.store = store;
    }

    @Override
    public boolean equals(Object o) {
        if (o == this)
            return true;
        if (!(o instanceof Voucher))
            return false;
        Voucher other = (Voucher) o;
        boolean valueEquals = (this.value == null && other.value == null)
          || (this.value != null && this.value.equals(other.value));
        boolean storeEquals = (this.store == null && other.store == null)
          || (this.store != null && this.store.equals(other.store));
        return valueEquals && storeEquals;
    }

    // other methods
}

And now, equals will work symmetrically as the contract requires.

3. hashCode()

hashCode() returns an integer representing the current instance of the class. We should calculate this value consistent with the definition of equality for the class. Thus if we override the equals() method, we also have to override hashCode().

For some more details, check out our guide to hashCode().

3.1. hashCode() Contract

Java SE also defines a contract for the hashCode() method. A thorough look at it shows how closely related hashCode() and equals() are.

All three criteria in the contract of hashCode() mention in some ways the equals() method:

  • internal consistency: the value of hashCode() may only change if a property that is in equals() changes
  • equals consistency: objects that are equal to each other must return the same hashCode
  • collisions: unequal objects may have the same hashCode

3.2. Violating the Consistency of hashCode() and equals()

The 2nd criteria of the hashCode methods contract has an important consequence: If we override equals(), we must also override hashCode(). And this is by far the most widespread violation regarding the contracts of the equals() and hashCode() methods.

Let’s see such an example:

class Team {

    String city;
    String department;

    @Override
    public final boolean equals(Object o) {
        // implementation
    }
}

The Team class overrides only equals(), but it still implicitly uses the default implementation of hashCode() as defined in the Object class. And this returns a different hashCode() for every instance of the class. This violates the second rule.

Now if we create two Team objects, both with city “New York” and department “marketing”, they will be equal, but they will return different hashCodes.

3.3. HashMap Key with an Inconsistent hashCode()

But why is the contract violation in our Team class a problem? Well, the trouble starts when some hash-based collections are involved. Let’s try to use our Team class as a key of a HashMap:

Map<Team,String> leaders = new HashMap<>();
leaders.put(new Team("New York", "development"), "Anne");
leaders.put(new Team("Boston", "development"), "Brian");
leaders.put(new Team("Boston", "marketing"), "Charlie");

Team myTeam = new Team("New York", "development");
String myTeamLeader = leaders.get(myTeam);

We would expect myTeamLeader to return “Anne”. But with the current code, it doesn’t.

If we want to use instances of the Team class as HashMap keys, we have to override the hashCode() method so that it adheres to the contract: Equal objects return the same hashCode.

Let’s see an example implementation:

@Override
public final int hashCode() {
    int result = 17;
    if (city != null) {
        result = 31 * result + city.hashCode();
    }
    if (department != null) {
        result = 31 * result + department.hashCode();
    }
    return result;
}

After this change, leaders.get(myTeam) returns “Anne” as expected.

4. When Do We Override equals() and hashCode()?

Generally, we want to override either both of them or neither of them. We’ve just seen in Section 3 the undesired consequences if we ignore this rule.

Domain-Driven Design can help us decide circumstances when we should leave them be. For entity classes – for objects having an intrinsic identity – the default implementation often makes sense.

However, for value objects, we usually prefer equality based on their properties. Thus want to override equals() and hashCode(). Remember our Money class from Section 2: 55 USD equals 55 USD – even if they’re two separate instances.

5. Implementation Helpers

We typically don’t write the implementation of these methods by hand. As can be seen, there are quite a few pitfalls.

One common way is to let our IDE generate the equals() and hashCode() methods.

Apache Commons Lang and Google Guava have helper classes in order to simplify writing both methods.

Project Lombok also provides an @EqualsAndHashCode annotation. Note again how equals() and hashCode() “go together” and even have a common annotation.

6. Verifying the Contracts

If we want to check whether our implementations adhere to the Java SE contracts and also to some best practices, we can use the EqualsVerifier library.

Let’s add the EqualsVerifier Maven test dependency:

<dependency>
    <groupId>nl.jqno.equalsverifier</groupId>
    <artifactId>equalsverifier</artifactId>
    <version>3.0.3</version>
    <scope>test</scope>
</dependency>

Let’s verify that our Team class follows the equals() and hashCode() contracts:

@Test
public void equalsHashCodeContracts() {
    EqualsVerifier.forClass(Team.class).verify();
}

It’s worth noting that EqualsVerifier tests both the equals() and hashCode() methods.

EqualsVerifier is much stricter than the Java SE contract. For example, it makes sure that our methods can’t throw a NullPointerException. Also, it enforces that both methods, or the class itself, is final.

It’s important to realize that the default configuration of EqualsVerifier allows only immutable fields. This is a stricter check than what the Java SE contract allows. This adheres to a recommendation of Domain-Driven Design to make value objects immutable.

If we find some of the built-in constraints unnecessary, we can add a suppress(Warning.SPECIFIC_WARNING) to our EqualsVerifier call.

7. Conclusion 

In this article, we’ve discussed the equals() and hashCode() contracts. We should remember to:

  • Always override hashCode() if we override equals()
  • Override equals() and hashCode() for value objects
  • Be aware of the traps of extending classes that have overridden equals() and hashCode()
  • Consider using an IDE or a third-party library for generating the equals() and hashCode() methods
  • Consider using EqualsVerifier to test our implementation

Finally, all code examples can be found over on GitHub.


Graphs in Java

$
0
0

1. Overview

In this tutorial, we’ll understand the basic concepts of a graph as a data structure.

We’ll also explore its implementation in Java along with various operations possible on a graph. We will also discuss the Java libraries offering graph implementations.

2. Graph Data Structure

A graph is a data structure for storing connected data like a network of people on a social media platform.

A graph consists of vertices and edges. A vertex represents the entity (for example, people) and an edge represents the relationship between entities (for example, a person’s friendships).

Let’s define a simple Graph to understand this better:

Here, we’ve defined a simple graph with five vertices and six edges. The circles are vertices representing people and the lines connecting two vertices are edges representing friends on an online portal.

There are a few variations of this simple graph depending on the properties of the edges. Let’s briefly go through them in the next sections.

However, we’ll only focus on the simple graph presented here for the Java examples in this tutorial.

2.1. Directed Graph

The graph we’ve defined so far has edges without any direction. If these edges feature a direction in them, the resulting graph is known as a directed graph.

An example of this can be representing who send the friend request in a friendship on the online portal:

Here, we can see that the edges have a fixed direction. The edges can be bi-directional as well.

2.2. Weighted Graph

Again, our simple graph has edges which are unbiased or unweighted. If instead these edges carry relative weight, this graph is known as a weighted graph.

An example of a practical application of this can be representing how relatively old is a friendship on the online portal:

Here, we can see that the edges have weights associated with them. This provides a relative meaning to these edges.

3. Graph Representations

A graph can be represented in different forms like adjacency matrix and adjacency list. Each one has their pros and cons in a different set-up.

We’ll introduce these graph representations in this section.

3.1. Adjacency Matrix

An adjacency matrix is a square matrix with dimensions equivalent to the number of vertices in the graph.

The elements of the matrix typically have values ‘0’ or ‘1’. A value of ‘1’ indicates adjacency between the vertices in the row and column and a value of ‘0’ otherwise.

Let’s see how the adjacency matrix looks like for our simple graph from the previous section:

This representation is fairly easier to implement and efficient to query as well. However, it’s less efficient with respect to space occupied.

3.2. Adjacency List

An adjacency list is nothing but an array of lists. The size of the array is equivalent to the number of vertices in the graph.

The list at a specific index of the array represents the adjacent vertices of the vertex represented by that array index.

Let’s see what the adjacency list looks like for our simple graph from the previous section:

This representation is comparatively difficult to create and less efficient to query. However, it offers better space efficiency.

We’ll use the adjacency list to represent the graph in this tutorial.

4. Graphs in Java

Java doesn’t have a default implementation of the graph data structure.

However, we can implement the graph using Java Collections.

Let’s begin by defining a vertex:

class Vertex {
    String label;
    Vertex(String label) {
        this.label = label;
    }

    // equals and hashCode
}

The above definition of vertex just features a label but this can represent any possible entity like Person or City.

Also, note that we have to override the equals() and hashCode() methods as these are necessary to work with Java Collections.

As we discussed earlier, a graph is nothing but a collection of vertices and edges which can be represented as either an adjacency matrix or an adjacency list.

Let’s see how we can define this using an adjacency list here:

class Graph {
    private Map<Vertex, List<Vertex>> adjVertices;
    
    // standard constructor, getters, setters
}

As we can see here, the class Graph is using Map from Java Collections to define the adjacency list.

There are several operations possible on a graph data structure, such as creating, updating or searching through the graph.

We’ll go through some of the more common operations and see how we can implement them in Java.

5. Graph Mutation Operations

To start with, we’ll define some methods to mutate the graph data structure.

Let’s define methods to add and remove vertices:

void addVertex(String label) {
    adjVertices.putIfAbsent(new Vertex(label), new ArrayList<>());
}

void removeVertex(String label) {
    Vertex v = new Vertex(label);
    adjVertices.values()
      .stream()
      .map(e -> e.remove(v))
      .collect(Collectors.toList());
    adjVertices.remove(new Vertex(label));
}

These methods simply add and remove elements from the vertices Set.

Now, let’s also define a method to add an edge:

void addEdge(String label1, String label2) {
    Vertex v1 = new Vertex(label1);
    Vertex v2 = new Vertex(label2);
    adjVertices.get(v1).add(v2);
    adjVertices.get(v2).add(v1);
}

This method creates a new Edge and updates the adjacent vertices Map.

In a similar way, we’ll define the removeEdge() method:

void removeEdge(String label1, String label2) {
    Vertex v1 = new Vertex(label1);
    Vertex v2 = new Vertex(label2);
    List<Vertex> eV1 = adjVertices.get(v1);
    List<Vertex> eV2 = adjVertices.get(v2);
    if (eV1 != null)
        eV1.remove(v2);
    if (eV2 != null)
        eV2.remove(v1);
}

Next, let’s see how we can create the simple graph we have drawn earlier using the methods we’ve defined so far:

Graph createGraph() {
    Graph graph = new Graph();
    graph.addVertex("Bob");
    graph.addVertex("Alice");
    graph.addVertex("Mark");
    graph.addVertex("Rob");
    graph.addVertex("Maria");
    graph.addEdge("Bob", "Alice");
    graph.addEdge("Bob", "Rob");
    graph.addEdge("Alice", "Mark");
    graph.addEdge("Rob", "Mark");
    graph.addEdge("Alice", "Maria");
    graph.addEdge("Rob", "Maria");
    return graph;
}

We’ll finally define a method to get the adjacent vertices of a particular vertex:

List<Vertex> getAdjVertices(String label) {
    return adjVertices.get(new Vertex(label));
}

6. Traversing a Graph

Now that we have graph data structure and functions to create and update it defined, we can define some additional functions for traversing the graph. We need to traverse a graph to perform any meaningful action, like search within the graph.

There are two possible ways to traverse a graph, depth-first traversal and breadth-first traversal.

6.1. Depth-First Traversal

A depth-first traversal starts at an arbitrary root vertex and explores vertices as deeper as possible along each branch before exploring vertices at the same level.

Let’s define a method to perform the depth-first traversal:

Set<String> depthFirstTraversal(Graph graph, String root) {
    Set<String> visited = new LinkedHashSet<String>();
    Stack<String> stack = new Stack<String>();
    stack.push(root);
    while (!stack.isEmpty()) {
        String vertex = stack.pop();
        if (!visited.contains(vertex)) {
            visited.add(vertex);
            for (Vertex v : graph.getAdjVertices(vertex)) {              
                stack.push(v.label);
            }
        }
    }
    return visited;
}

Here, we’re using a Stack to store the vertices that need to be traversed.

Let’s run this on the graph we created in the previous subsection:

assertEquals("[Bob, Rob, Maria, Alice, Mark]", depthFirstTraversal(graph, "Bob").toString());

Please note that we’re using vertex “Bob” as our root for traversal here, but this can be any other vertex.

6.2. Breadth-First Traversal

Comparatively, a breadth-first traversal starts at an arbitrary root vertex and explores all neighboring vertices at the same level before going deeper in the graph.

Now let’s define a method to perform the breadth-first traversal:

Set<String> breadthFirstTraversal(Graph graph, String root) {
    Set<String> visited = new LinkedHashSet<String>();
    Queue<String> queue = new LinkedList<String>();
    queue.add(root);
    visited.add(root);
    while (!queue.isEmpty()) {
        String vertex = queue.poll();
        for (Vertex v : graph.getAdjVertices(vertex)) {
            if (!visited.contains(v.label)) {
                visited.add(v.label);
                queue.add(v.label);
            }
        }
    }
    return visited;
}

Note that a breadth-first traversal makes use of Queue to store the vertices which need to be traversed.

Let’s again run this traversal on the same graph:

assertEquals("[Bob, Alice, Rob, Mark, Maria]", breadthFirstTraversal(graph, "Bob").toString());

Again, the root vertex which is “Bob” here can as well be any other vertex.

7. Java Libraries for Graphs

It’s not necessary to always implement the graph from scratch in Java. There are several open source and mature libraries available which offers graph implementations.

In the next few subsections, we’ll go through some of these libraries.

7.1. JGraphT

JGraphT is one of the most popular libraries in Java for the graph data structure. It allows the creation of a simple graph, directed graph, weighted graph, amongst others.

Additionally, it offers many possible algorithms on the graph data structure. One of our previous tutorials covers JGraphT in much more detail.

7.2. Google Guava

Google Guava is a set of Java libraries that offer a range of functions including graph data structure and its algorithms.

It supports creating simple Graph, ValueGraph, and Network. These can be defined as Mutable or Immutable.

7.3. Apache Commons

Apache Commons is an Apache project that offers reusable Java components. This includes Commons Graph which offers a toolkit to create and manage graph data structure. This also provides common graph algorithms to operate on the data structure.

7.4. Sourceforge JUNG

Java Universal Network/Graph (JUNG) is a Java framework that provides extensible language for modeling, analysis, and visualization of any data that can be represented as a graph.

JUNG supports a number of algorithms which includes routines like clustering, decomposition, and optimization.

8. Conclusion

In this article, we discussed the graph as a data structure along with its representations. We defined a very simple graph in Java using Java Collections and also defined common traversals for the graph.

We also talked briefly about various libraries available in Java outside the Java platform which provides graph implementations.

As always, the code for the examples is available over on GitHub.

Retrieving a Class Name in Java

$
0
0

1. Overview

In this tutorial, we’ll learn about four ways to retrieve a class’s name from methods on the Class API: getSimpleName(), getName(), getTypeName() and getCanonicalName(). 

These methods can be confusing because of their similar names and their somewhat vague Javadocs. They also have some nuances when it comes to primitive types, object types, inner or anonymous classes, and arrays.

2. Retrieving Simple Name

Let’s begin with the getSimpleName() method.

In Java, there are two kinds of names: simple and qualified. A simple name consists of a unique identifier while a qualified name is a sequence of simple names separated by dots.

As its name suggests, getSimpleName() returns the simple name of the underlying class, that is the name it has been given in the source code.

Let’s imagine the following class:

package com.baeldung.className;
public class RetrieveClassName {}

Its simple name would be RetrieveClassName:

assertEquals("RetrieveClassName", RetrieveClassName.class.getSimpleName());

We can also get primitive types and arrays simple names. For primitive types that will simply be their names, like int, boolean or float.

And for arrays, the method will return the simple name of the type of the array followed by a pair opening and closing brackets for each dimension of the array ([]):

RetrieveClassName[] names = new RetrieveClassName[];
assertEquals("RetrieveClassName[]", names.getClass().getSimpleName());

Consequently, for a bidimensional String array, calling getSimpleName() on its class will return String[][].

Finally, there is the specific case of anonymous classes. Calling getSimpleName() on an anonymous class will return an empty string.

3. Retrieving Other Names

Now it’s time to have a look at how we would obtain a class’s name, type name, or canonical name. Unlike getSimpleName(), these names aim to give more information about the class.

The getCanonicalName() method always returns the canonical name as defined in the Java Language Specification.

As for the other methods, the output can differ a little bit according to the use cases. We’ll see what that means for different primitive and object types.

3.1. Primitive Types

Let’s start with primitive types, as they are simple. For primitive types, all three methods getName(), getTypeName() and getCanonicalName() will return the same result as getSimpleName():

assertEquals("int", int.class.getName());
assertEquals("int", int.class.getTypeName());
assertEquals("int", int.class.getCanonicalName());

3.2. Object Types

We’ll now see how these methods work with object types. Their behavior is generally the same: they all return the canonical name of the class.

In most cases, this is a qualified name which contains all the class packages simple names as well as the class simple name:

assertEquals("com.baeldung.className.RetrieveClassName", RetrieveClassName.class.getName());
assertEquals("com.baeldung.className.RetrieveClassName", RetrieveClassName.class.getTypeName());
assertEquals("com.baeldung.className.RetrieveClassName", RetrieveClassName.class.getSimpleName());

3.3. Inner Classes

What we’ve seen in the previous section is the general behavior of these method calls, but there are a few exceptions.

Inner classes are one of them. The getName() and getTypeName() methods behave differently than the getCanonicalName()  method for inner classes.

getCanonicalName() still returns the canonical name of the class, that is the enclosing class canonical name plus the inner class simple name separated by a dot.

On the other hand, the getName() and getTypeName() methods return pretty much the same but use a dollar as the separator between the enclosing class canonical name and the inner class simple name.

Let’s imagine an inner class InnerClass of our RetrieveClassName:

public class RetrieveClassName {
    public class InnerClass {}
}

Then each call denotes the inner class in a slightly different way:

assertEquals("com.baeldung.RetrieveClassName.InnerClass", 
  RetrieveClassName.InnerClass.class.getCanonicalName());
assertEquals("com.baeldung.RetrieveClassName$InnerClass", 
  RetrieveClassName.InnerClass.class.getName());
assertEquals("com.baeldung.RetrieveClassName$InnerClass", 
  RetrieveClassName.InnerClass.class.getTypeName());

3.4. Anonymous Classes

Anonymous classes are another exception.

As we’ve already seen they have no simple name, but they also don’t have a canonical name. Therefore, getCanonicalName() doesn’t return anything. In opposition to getSimpleName()getCanonicalName() will return null and not an empty string when called on an anonymous class.

As for getName() and getTypeName() they will return the calling class canonical name followed by a dollar and a number representing the position of the anonymous class among all anonymous classes created in the calling class.

Let’s illustrate this with an example. We’ll create here two anonymous classes and call getName() on the first and getTypeName() on the second, declaring them in com.baeldung.Main:

assertEquals("com.baeldung.Main$1", new RetrieveClassName() {}.getClass().getName());
assertEquals("com.baeldung.Main$2", new RetrieveClassName() {}.getClass().getTypeName());

We should note that the second call returns a name with an increased number at its end, as it’s applied on the second anonymous class.

3.5. Arrays

Finally, let’s see how arrays are handled by the above three methods.

To indicate we’re dealing with arrays, each method will update its standard result. The getTypeName() and getCanonicalName() methods will append pairs of brackets to their result.

Let’s see the following example where we call getTypeName() and getCanonicalName() on a bidimensional InnerClass array:

assertEquals("com.baeldung.RetrieveClassName$InnerClass[][]", 
  RetrieveClassName.InnerClass[][].class.getTypeName());
assertEquals("com.baeldung.RetrieveClassName.InnerClass[][]", 
  RetrieveClassName.InnerClass[][].class.getCanonicalName());

Note how the first call uses a dollar instead of a dot to separate the inner class part from the rest of the name.

Let’s now see how the getName() method works. When called on a primitive type array, it will return an opening bracket and a letter representing the primitive type. Let’s check that with the following example, calling that method on a bidimensional primitive integers array:

assertEquals("[[I", int[][].class.getName());

On the other hand, when called on an object array it will add an opening bracket and the L letter to its standard result and finish with a semi-colon. Let’s try it on an array of RetrieveClassName:

assertEquals("[Lcom.baeldung.className.RetrieveClassName;", RetrieveClassName[].class.getName());

4. Conclusion

In this article, we looked at four methods to access a class name in Java. These methods are: getSimpleName(), getName(), getTypeName() and getCanonicalName().

We learned that the first just returns the source code name of a class while the others provide more information such as package name and an indication of whether the class is inner or an anonymous class.

The code of this article can be found over on GitHub.

Logging a Reactive Sequence

$
0
0

1. Overview

With the introduction of Spring WebFlux, we got another powerful tool to write reactive, non-blocking applications. While using this technology is now way easier than before, debugging reactive sequences in Spring WebFlux can be quite cumbersome.

In this quick tutorial, we’ll see how to easily log events in asynchronous sequences and how to avoid some simple mistakes.

2. Maven Dependency

Let’s add the Spring WebFlux dependency to our project so we can create reactive streams:

<dependency>
    <groupId>org.springframework.boot</groupId>
    <artifactId>spring-boot-starter-webflux</artifactId>
</dependency>

We can get the latest spring-boot-starter-webflux dependency from Maven Central.

3. Creating a Reactive Stream

To begin let’s create a reactive stream using Flux and use the log() method to enable logging:

Flux<Integer> reactiveStream = Flux.range(1, 5).log();

Next, we will subscribe to it to consume generated values:

reactiveStream.subscribe();

4. Logging Reactive Stream

After running the above application we see our logger in action:

2018-11-11 22:37:04 INFO | onSubscribe([Synchronous Fuseable] FluxRange.RangeSubscription)
2018-11-11 22:37:04 INFO | request(unbounded)
2018-11-11 22:37:04 INFO | onNext(1)
2018-11-11 22:37:04 INFO | onNext(2)
2018-11-11 22:37:04 INFO | onNext(3)
2018-11-11 22:37:04 INFO | onNext(4)
2018-11-11 22:37:04 INFO | onNext(5)
2018-11-11 22:37:04 INFO | onComplete()

We see every event that occurred on our stream. Five values were emitted and then stream closed with an onComplete() event.

5. Advanced Logging Scenario

We can modify our application to see a more interesting scenario. Let’s add take() to Flux which will instruct the stream to provide only a specific number of events:

Flux<Integer> reactiveStream = Flux.range(1, 5).log().take(3);

After executing the code, we’ll see the following output:

2018-11-11 22:45:35 INFO | onSubscribe([Synchronous Fuseable] FluxRange.RangeSubscription)
2018-11-11 22:45:35 INFO | request(unbounded)
2018-11-11 22:45:35 INFO | onNext(1)
2018-11-11 22:45:35 INFO | onNext(2)
2018-11-11 22:45:35 INFO | onNext(3)
2018-11-11 22:45:35 INFO | cancel()

As we can see, take() caused the stream to cancel after emitting three events.

The placement of log() in your stream is crucial. Let’s see how placing log() after take() will produce different output:

Flux<Integer> reactiveStream = Flux.range(1, 5).take(3).log();

And the output:

2018-11-11 22:49:23 INFO | onSubscribe([Fuseable] FluxTake.TakeFuseableSubscriber)
2018-11-11 22:49:23 INFO | request(unbounded)
2018-11-11 22:49:23 INFO | onNext(1)
2018-11-11 22:49:23 INFO | onNext(2)
2018-11-11 22:49:23 INFO | onNext(3)
2018-11-11 22:49:23 INFO | onComplete()

As we can see changing the point of observation changed the output. Now the stream produced three events, but instead of cancel(), we see onComplete(). This is because we observe the output of using take() instead of what was requested by this method.

6. Conclusion

In this quick article, we saw how to log reactive streams using built-in log() method.

And as always, the source code for the above example can be found over on GitHub.

Create a Build Pipeline with Travis CI

$
0
0

1. Introduction

In modern software development, the term pipeline gets used a lot. But what is it?

Generally speaking, a build pipeline is a set of automated steps that move code from development to production.

Build pipelines are great for implementing continuous integration workflows for software. They allow us to build smaller changes with greater frequency, with the goal of finding bugs sooner and reducing their impact.

In this tutorial, we’ll look at building a simple build pipeline using Travis CI.

2. Steps in a Build Pipeline

A build pipeline can consist of many different steps, but at a minimum, it should include:

  • Compiling code: in our case, that means compiling Java source code into class files
  • Executing tests: like running unit tests and possibly integration tests
  • Deploying artifacts: packaging complied code into artifacts, say into jar files, and deploying them

If an application uses different technologies, then additional steps can be included in the build pipeline. For example, we might have an additional step that minifies JavaScript files or publishes updated API documentation.

3. What is Travis CI?

For our sample build pipeline, we’ll use Travis CI, a cloud-based continuous integration tool.

This has a number of features that make it a great choice for getting started with build pipelines:

  • Quickly integrates with any public GitHub repository
  • Supports every major programming language
  • Deploys to multiple different cloud platforms
  • Offers a variety of messaging and alerting tools

At a high level, it works by monitoring a GitHub repository for new commits.

When a new commit is made, it executes the steps of the build pipeline as defined in a configuration file (more on this below). If any step fails, the pipeline terminates and it will notify us.

Out of the box, Travis CI requires very little configuration. The only required configuration is specifying the programming language.

We can always provide more configuration to tailor our pipeline if needed. For example, we can limit what branches trigger builds, add additional steps to the pipeline, and much more.

3.1. Free and Paid Versions

It’s important to know that Travis CI currently has 2 offerings: a free and a paid version.

The free version, denoted by the .org domain name, offers full capabilities for any public GitHub repository. There are no limits to the number of builds or repositories, although there are resource limits imposed when your pipeline is running.

The paid version, which uses the .com domain name, is required for private GitHub repositories. It also offers more concurrent builds and unlimited build minutes compared to the free plan. There is a free trial for the first 100 builds to test out the paid version.

4. Creating a Build Pipeline with Travis CI

For this tutorial, we’ll be using the free version mentioned above. Any public repository can be used to create a free pipeline.

All we have to do is log in to Travis CI with our GitHub account and authorize it:

After we grant permissions to our GitHub account, we’re ready to begin configuring our build pipeline.

4.1. Configuring the Repository

Initially, all of our public repositories are considered inactive. To resolve this, we need to enable our repository from the account settings page.

This lists all of our public repositories, along with a toggle button. Clicking the toggle button will configure Travis CI to start monitoring that repository for new commits, using the default branch of master:

Note that each repository also has a Settings button. This is where we can configure different pipeline behavior:

  • Define which events trigger the pipeline (pushes, pull requests, and so on)
  • Set environment variables that are passed into the pipeline
  • Auto-cancel builds when new events are triggered

For this tutorial, the default settings will work fine. Later we’ll see how to override some of the default behavior.

4.2. Creating the Travis Configuration

The next step is to create a new file named .travis.yml in the root directory of our repository. This file contains all the information required to configure a pipeline. Without this file, the pipeline will not execute.

For this tutorial we just need to include the bare minimum configuration, which specifies the programming language:

language: java

That’s it! Without providing any more information, Travis CI will execute a simple pipeline that:

  • Compiles our source code
  • Executes our tests

Once we commit the .travis.yml file Travis will kick off our first build. Any further commits to master branch will trigger additional builds. The dashboard also allows us to manually trigger the pipeline at any time without requiring a commit or pull request.

5. Additional Configuration

In the previous section, we saw that a single line of configuration is all that we need to run our build pipeline. But most projects will require additional configuration to implement a meaningful pipeline.

This section outlines some of the more useful configurations we might want to add to our pipeline.

5.1. Changing the Default Build Command

The default command used to build Maven projects is:

mvn test -B

We can change this to any command by setting the script directive in .travis.yml:

script: mvn package -DskipTests

It’s possible to chain together multiple commands in a single script line using the && operator.

Some build commands are complex and may span multiple lines or have complex logic. For example, they may perform different actions based on environment variables.

In these cases, it’s recommended to place the build command in a stand-alone script, and call that script from inside the configuration file:

script: ./build.sh

5.2. Deploying Code

The default build settings for Java projects simply compile the code and execute tests. The resulting artifacts (.jar files, etc.) are discarded at the end of the pipeline unless we deploy them somewhere.

Travis CI supports a variety of well known 3rd party services. Artifacts can be copied to many popular cloud storage systems such as Amazon S3, Google Cloud Storage, Bintray, and more.

It can also deploy code directly to most popular cloud computing platforms such as AWS, Google App Engine, Heroku, and many more.

Below is an example configuration showing how we can deploy to Heroku. To generate encrypted properties, we have to use the Travis CLI tool.

deploy:
  provider: heroku
  api_key:
    secure: "ENCRYPTED_API_KEY"

Additionally, it provides a generic deployment option that allows us to write our own deployment script. This is helpful if we need to deploy artifacts to a 3rd party system that is not natively supported.

For example, we could write a shell script that securely copies the artifacts to a private FTP server:

deploy:
  provider: script
  script: bash ./custom-deploy.sh

5.3. Managing Which Branches Trigger the Pipeline

By default, the pipeline will execute for any commit on master. However, most large projects use some form of git branching to manage development cycles.

Travis CI supports both white and blacklisting of git branches to determine which commits should trigger the pipeline.

As an example, consider the following configuration:

branches:
  only:
  - release
  - stable
  except:
  - master
  - nightly

This would ignore commits on the master and nightly branches. Commits to the release and stable branches would trigger the pipeline. Note that the only directive always takes precedence over the except directive.

We can also use regular expressions to control which branches trigger the pipeline:

branches:
  only:
  - /^development.*$/

This would start the pipeline only for commits on branches that start with development.

5.4. Skipping Specific Commits

We can use the git commit message to skip individual commits. Travis CI will examine the message for the following patterns:

  • skip <KEYWORD>
  • <KEYWORD> skip

Where <KEYWORD> is any of the following values:

  • ci
  • travis
  • travis ci
  • travis-ci
  • travisci

If the commit message matches any of these patterns then the pipeline will not run.

5.5. Using Different Build Environments

The default build environment for Java projects is Ubuntu Linux. Pipelines can also execute on Mac OSX or Windows Server by adding the following configuration into .travis.yml:

os: osx # can also be 'windows'

Even with Linux, there are 3 different distributions that we can choose from:

os: linux
  dist: xenial # other choices are 'trusty' or 'precise'

The build platform documentation covers all available environments and their differences.

Just remember that if we change the platform, we might also need to change any custom build or deploy scripts to ensure compatibility. There are several ways to handle multiple operating systems in configuration.

5.6. Using Different JDK Versions

We can also test against a specific version of the JDK by setting the following configuration in the .travis.yml file:

jdk: oraclejdk8

Keep in mind that different build environments, even the different Linux distributions, can have different JDK versions available. Consult the documentation for each environment to see the full list of JDK versions.

6. Build Matrices

By default, each time our pipeline runs, it runs as a single job. This means all phases of the pipeline execute sequentially on a single virtual machine with the same settings.

But one of the great features of Travis CI is the ability to create a build matrix. This lets us run multiple jobs for each commit, using different values for some of the settings we saw earlier.

For example, we can use a build matrix to run our pipeline on both Linux and Mac OSX, or with both JDK 8 and 9.

There are two ways to create build matrices. First, we can provide an array of values for one or more of the language and environment configurations we saw earlier. For example:

language: java
jdk:
  - openjdk8
  - openjdk9
os:
  - linux
  - osx

Using this approach, Travis CI will automatically expand every combination of configuration to form multiple jobs. In the above example, the result would be four total jobs.

The second way to create a build matrix is to use the matrix.include directive. This lets us explicitly declare which combinations we want to run:

language: java
matrix:
  include:
  - jdk: openjdk8
    os: linux
  - jdk: openjdk9
    os: osx

The example above would result in two jobs.

Once again, if we build on multiple Operating Systems, we have to be careful to ensure our build and deployment scripts work for all cases. Shell scripts will not work on Windows, for example. We must use proper conditional statements to handle different Operating Systems.

There are more options that provide more granular control over which jobs to create, and how to handle failures.

7. Conclusion

In this article, we created a simple build pipeline using Travis CI. Using mostly out of the box configuration, we created a pipeline that builds code and runs tests.

We also saw a small sample of just how configurable Travis CI is. It works with a variety of programming languages and 3rd party cloud platforms. The one downside is that it currently only works with GitHub repositories.

As always, check out our GitHub page to see how we’re using Travis CI to manage our pipeline.

Join Array of Primitives with Separator in Java

$
0
0

1. Introduction

In this quick tutorial, we’ll learn how to join an array of primitives with a single-character separator in Java. For our examples, we’ll consider two arrays: an array of int and an array of char.

2. Defining the Problem

Let’s start by defining an array of int and an array of char for the examples, as well as the separator character we’ll use to join their contents:

int[] intArray = {1, 2, 3, 4, 5, 6, 7, 8, 9};
char[] charArray = {'a', 'b', 'c', 'd', 'e', 'f'};
char separatorChar = '-';
String separator = String.valueOf(separatorChar);

Note that we’ve included both a char and String separator since some of the methods we’ll show require a char argument, while others require a String argument.

The results of the joining operation will contain “1-2-3-4-5-6-7-8-9” for the int array, and “a-b-c-d-e-f” for the char array.

3. Collectors.joining()

Let’s start with one of the available methods from the  Java 8 Stream API — Collectors.joining().

First, we create a Stream from an array of primitives using the Arrays.stream() method found in the java.util package. Next, we map each element to String. And finally, we concatenate the elements with our given separator.

Let’s begin with our int array:

String joined = Arrays.stream(intArray)
  .mapToObj(String::valueOf)
  .collect(Collectors.joining(separator));

When joining our char array with this method, we must first wrap the char array into CharBuffer and then project it to char again. This is because the chars() method returns a Stream of int values.

Unfortunately, the Java Stream API does not provide a native method for wrapping a Stream of char.

Let’s join our char array:

String joined = CharBuffer.wrap(charArray).chars()
  .mapToObj(intValue -> String.valueOf((char) intValue))
  .collect(Collectors.joining(separator));

4. StringJoiner

Similarly to Collectors.joining(), this approach makes use of the Stream API, but instead of collecting elements, it iterates through elements and adds them to a StringJoiner instance:

StringJoiner intStringJoiner = new StringJoiner(separator);
Arrays.stream(intArray)
  .mapToObj(String::valueOf)
  .forEach(intStringJoiner::add);
String joined = intStringJoiner.toString();

Again, we have to wrap our char array into CharBuffer when using the Stream API:

StringJoiner charStringJoiner = new StringJoiner(separator);
CharBuffer.wrap(charArray).chars()
  .mapToObj(intChar -> String.valueOf((char) intChar))
  .forEach(charStringJoiner::add);
String joined = charStringJoiner.toString();

5. Apache Commons Lang

The Apache Commons Lang library provides some handy methods in the StringUtils and ArrayUtils classes that we can use to join our primitive arrays.

To use this library, we’ll need to add the commons-lang3 dependency to our pom.xml:

<dependency>
    <groupId>org.apache.commons</groupId>
    <artifactId>commons-lang3</artifactId>
    <version>3.8.1</version>
</dependency>

When working with a String separator, we’ll make use of both StringUtils and ArrayUtils.

Let’s use these together to join our int array:

String joined = StringUtils.join(ArrayUtils.toObject(intArray), separator);

Or, if we’re using a primitive char type as a separator, we can simply write:

String joined = StringUtils.join(intArray, separatorChar);

The implementations for joining our char array are quite similar:

String joined = StringUtils.join(ArrayUtils.toObject(charArray), separator);

And when using a char separator:

String joined = StringUtils.join(charArray, separatorChar);

6. Guava

Google’s Guava library provides the Joiner class that we can use to join our arrays. To use Guava in our project, we’ll need to add the guava Maven dependency:

<dependency>
    <groupId>com.google.guava</groupId>
    <artifactId>guava</artifactId>
    <version>27.0.1-jre</version>
</dependency>

Let’s join our int array using the Joiner class:

String joined = Joiner.on(separator).join(Ints.asList(intArray));

In this example, we also used the Ints.asList() method from Guava, which nicely transforms the array of primitives into a List of Integer.

Guava offers a similar method for converting a char array to a List of Character. As a result, joining our char array looks very much like the above example that used the int array:

String joined = Joiner.on(separator).join(Chars.asList(charArray));

7. StringBuilder

Finally, if we can’t use either Java 8 or third-party libraries, we can manually join an array of elements with StringBuilder. In this case, the implementation is identical for both types of arrays:

if (array.length == 0) {
    return "";
}
StringBuilder stringBuilder = new StringBuilder();
for (int i = 0; i < array.length - 1; i++) {
    stringBuilder.append(array[i]);
    stringBuilder.append(separator);
}
stringBuilder.append(array[array.length - 1]);
String joined = stringBuilder.toString();

8. Conclusion

This quick article illustrates a number of ways to join an array of primitives with a given separator character or string. We showed examples using native JDK solutions, as well as additional solutions using two third-party libraries — Apache Commons Lang and Guava.

As always, the complete code used in this article is available over on GitHub.

Viewing all 4818 articles
Browse latest View live


Latest Images

<script src="https://jsc.adskeeper.com/r/s/rssing.com.1596347.js" async> </script>