
1. Overview
Machine learning is essential in modern software development. We build models with various architectures, train them using different algorithms, and achieve incredible results by improving our systems with neural networks.
In this tutorial, we’ll explore the h2o platform. It helps us create, train, and tune models in a straightforward way.
2. Install the Open Source h2o Platform
We can download h2o from its website. From the destination folder, we can start our h2o platform:
java -jar h2o.jarAfter the application is started, we’re able to reach the web console on http://localhost:54321:
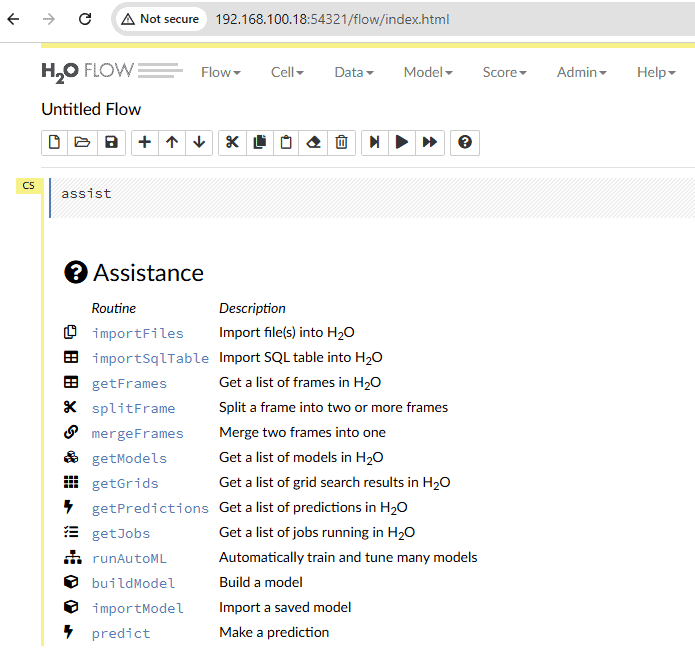
On the main page, we see a list of actions available in the H2O platform. We can also show this list using the menu bar. Let’s go to the top menu and select Assist Me under the Help option.
3. Prepare the Dataset
Before we start working with the platform, we need to prepare a dataset for our model training.
We’re going to solve one of the standard classification problems in machine learning. The popular dataset for this challenge is called iris.
In this dataset, we have different types of flowers with their properties. Let’s download it in the CSV format. In our dataset file we should see the following information:
"sepal.length","sepal.width","petal.length","petal.width","variety"
5.1,3.5,1.4,.2,"Setosa"
4.9,3,1.4,.2,"Setosa"
4.7,3.2,1.3,.2,"Setosa"
...
5.8,2.7,3.9,1.2,"Versicolor"
6,2.7,5.1,1.6,"Versicolor"
5.4,3,4.5,1.5,"Versicolor"
...
6.5,3,5.2,2,"Virginica"
6.2,3.4,5.4,2.3,"Virginica"
5.9,3,5.1,1.8,"Virginica"
Here we have an iris flower’s characteristics and the name for the flower that matches to specific set of characteristics.
4. Train the Model
Let’s train the model using the prepared dataset.
4.1. Import Dataset
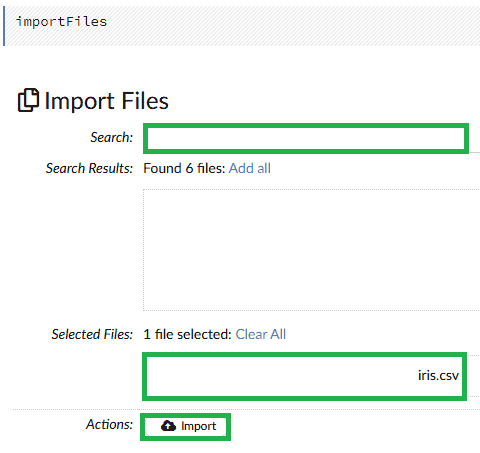
In the web console, we load our prepared dataset. We need to use the importFiles option. In the top menu, let’s select Import Files under the Data option. Then we select the folder with our dataset, search the files, and press the Import button:
4.2. Prepare Training and Test Datasets
After our dataset is uploaded, we can use getFrames function. In the top menu, let’s select List All Frames under the Data option. Then, we press the Parse button:

In the output of this operation, we can see the dataset columns descriptions and a few rows with examples.
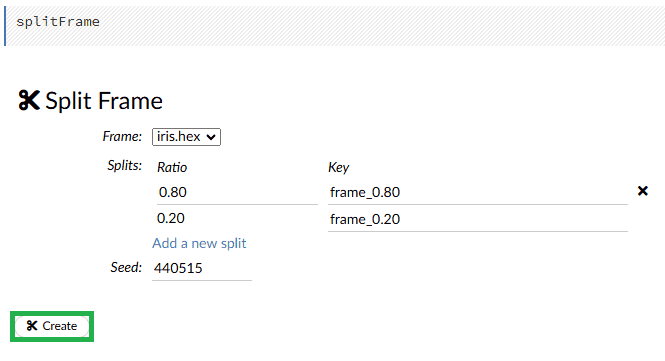
To follow standard machine learning practices and prepare data for our model, we need to split the dataset into training and testing parts. We’ll use the splitFrame function. In the top menu let’s select Split Frame under the Data option. Now, let’s apply a common 80/20 ratio for training and testing:
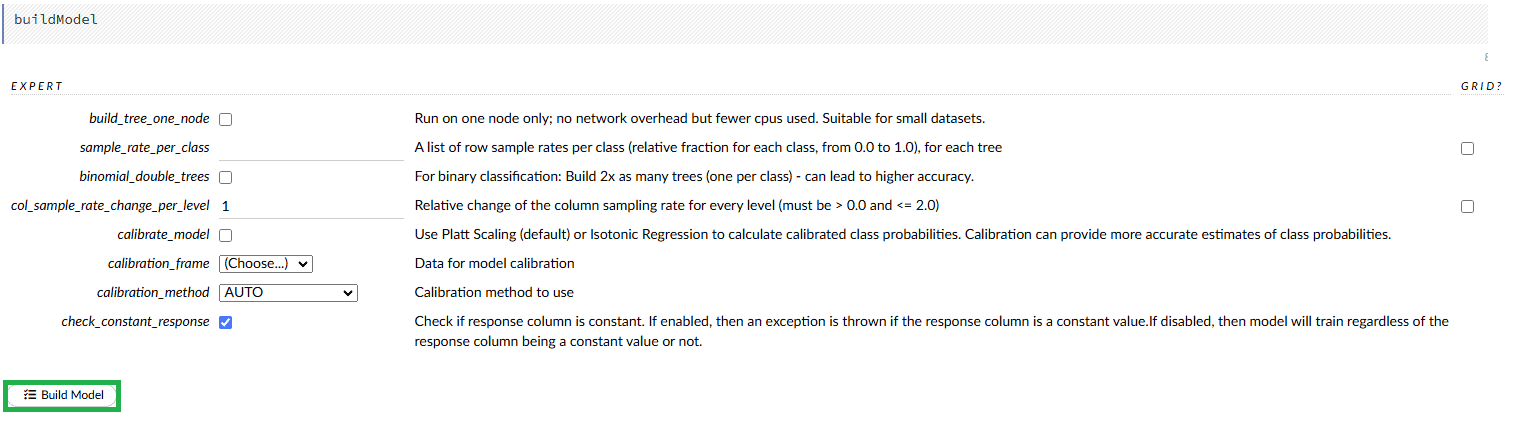
4.3. Build the Model
Now, let’s build the model. In the top menu let’s select the Model option. We’ll use the Random Forest algorithm, which works well for classification problems:
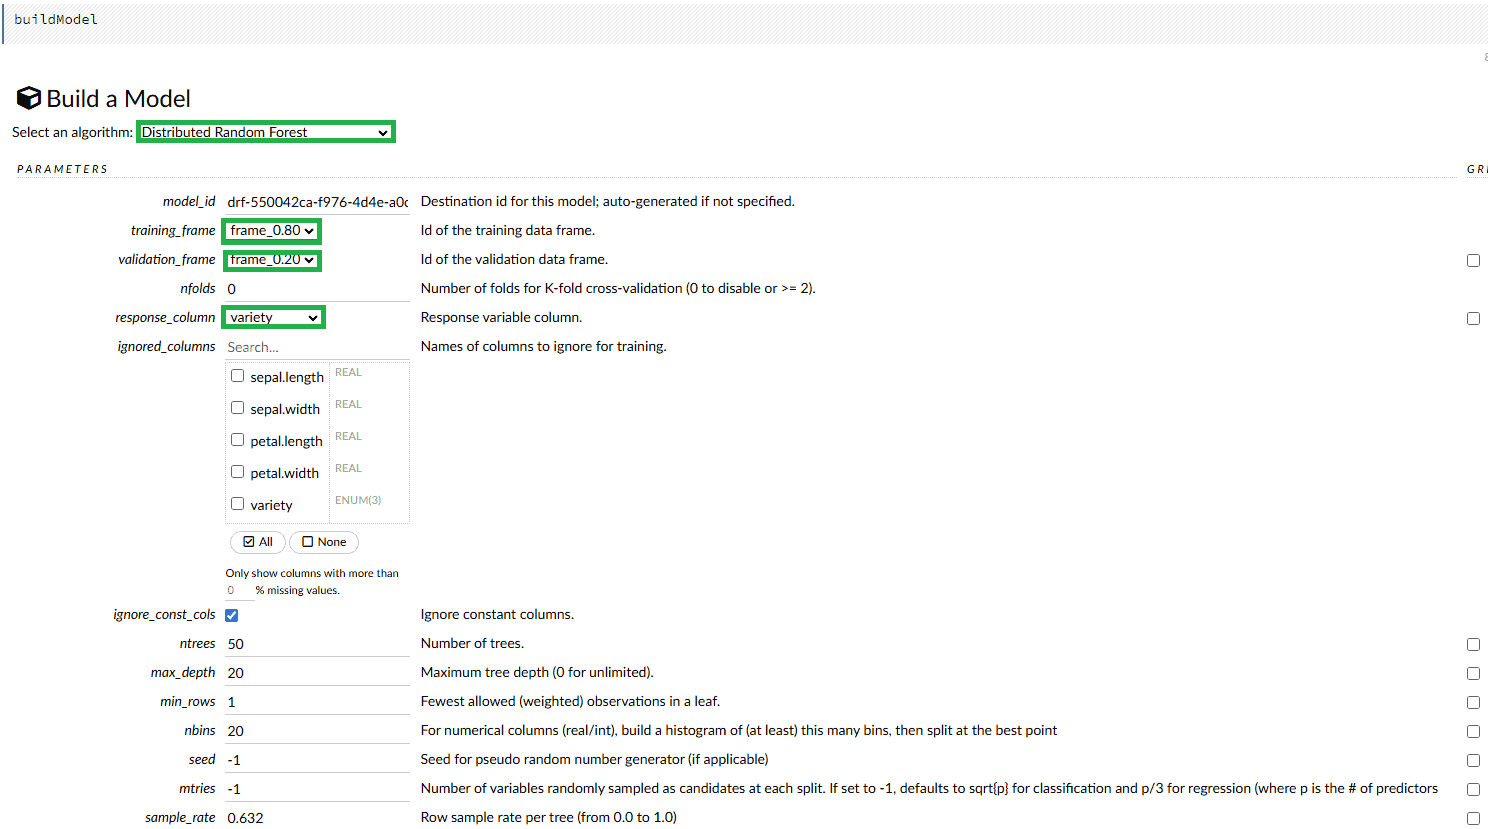
We need to specify training_frame, validation_frame, and response_column to make the model training process possible. There are many other properties we can modify to achieve better results, depending on the selected algorithm. After all the properties are configured, we press the Build Model button:
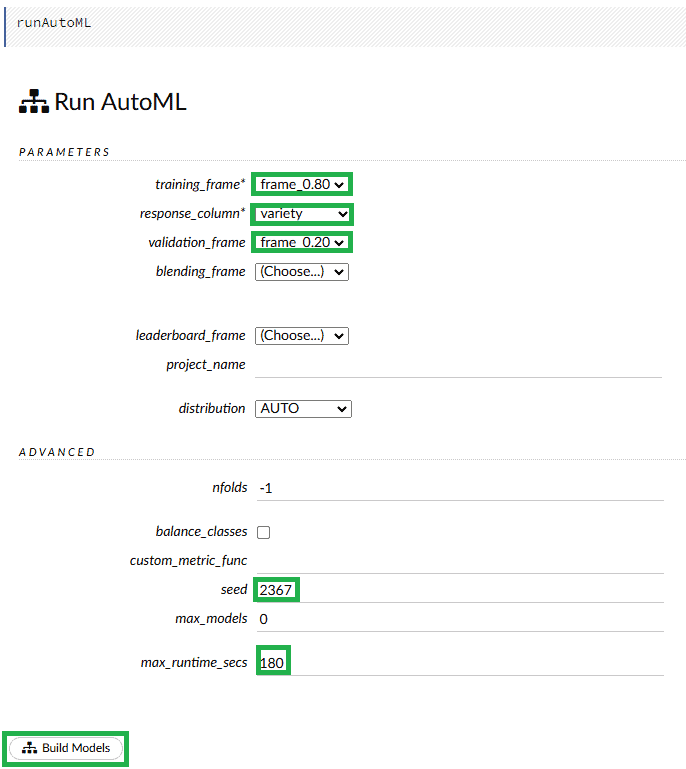
4.4. Auto ML Function
Another great feature in h2o is AutoML. In the top menu let’s select Run AutoML under the Model option. If we don’t know which exact algorithm we want to use, we can choose this function. Here we need to specify the same parameters as during the general build process. Additionally, we set the max_runtime_secs we want the platform to train all the models. During this time, the AutoML mechanism will be training the models. The higher the value we set, the more accurately the best model will be determined:
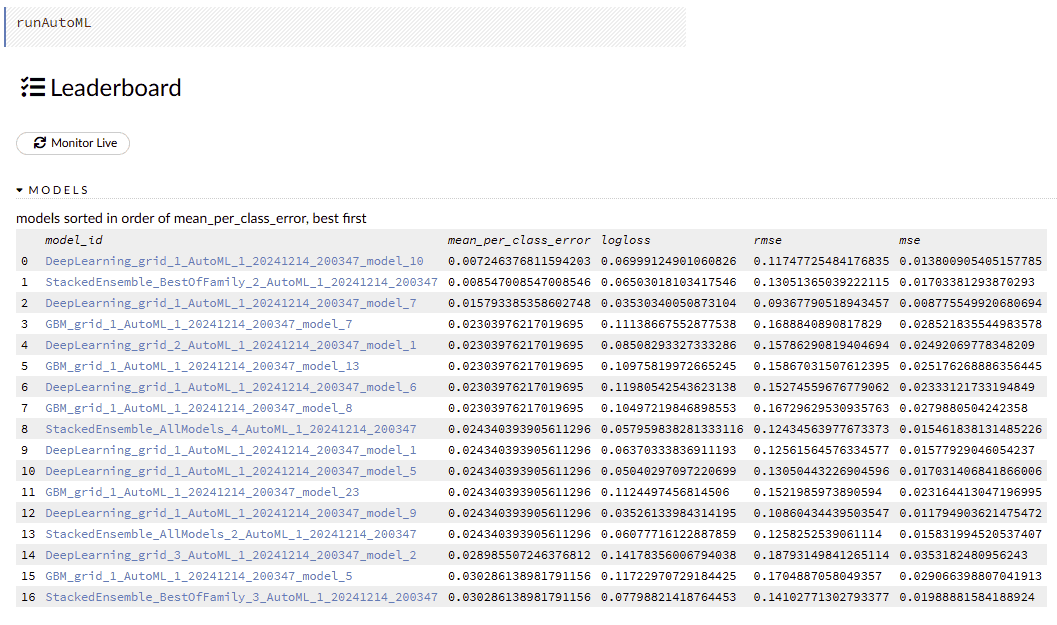
When we finish the model training process, we can see the leaderboard of all the models. From this list, we can choose a suitable trained model we want to use:
4.5. Download the Model
When we build the model, we can download the necessary artifacts. The Download Gen Model button lets us download a JAR archive with the required classes for Java applications:

We use the Download Model Deployment Package (MOJO) button to download the model itself:

5. Use the Model Predictions From Java Application
Now, let’s use our model in a Java application.
5.1. Add the h20 Archives
Let’s add the archives we downloaded from the h2o console into the libs folder inside our application project. Now, we can add it to the classpath.
5.2. Dependencies
Let’s add our model dependency:
<dependency>
    <groupId>ai.h2o</groupId>
    <artifactId>h2o-genmodel</artifactId>
    <version>1.0</version>
    <scope>system</scope>
    <systemPath>${project.basedir}/libs/h2o-genmodel.jar</systemPath>
</dependency>
We specify the path to our model archive. The groupId and artifactId are predefined in the h2o.
5.3. Use the Manually Built Model for Prediction
Now, let’s see how we can use our model in Java code:
public class H2OModelLiveTest {
    Logger logger = LoggerFactory.getLogger(H2OModelLiveTest.class);
    @Test
    public void givenH2OTrainedModel_whenPredictTheIrisByFeatures_thenExpectedFlowerShouldBeReturned() throws IOException, PredictException {
        String mojoFilePath = "libs/mojo.zip";
        MojoModel mojoModel = MojoModel.load(mojoFilePath);
        EasyPredictModelWrapper model = new EasyPredictModelWrapper(mojoModel);
        RowData row = new RowData();
        row.put("sepal.length", 5.1);
        row.put("sepal.width", 3.4);
        row.put("petal.length", 4.6);
        row.put("petal.width", 1.2);
        MultinomialModelPrediction prediction = model.predictMultinomial(row);
        Assertions.assertEquals("Versicolor", prediction.label);
        logger.info("Class probabilities: ");
        for (int i = 0; i < prediction.classProbabilities.length; i++) {
            logger.info("Class " + i + ": " + prediction.classProbabilities[i]);
        }
    }
}
We create a MojoModel from our MOJO archive and wrap it with the EasyPredictModelWrapper class. Next, we prepare a row with the flower criteria we want to classify. Then, we use the predictMultinomial() method to get the predictions. As we can see, this set of properties is classified as Versicolor. Additionally, we print all the output parameters.
The output shows that our classification is accurate with a probability of 0.9597, which is good enough for us:
19:33:48.648 [main] INFO  com.baeldung.h2o.H2OModelLiveTest - Class probabilities:
19:33:48.653 [main] INFO  com.baeldung.h2o.H2OModelLiveTest - Class 0: 0.016846955011789237
19:33:48.653 [main] INFO  com.baeldung.h2o.H2OModelLiveTest - Class 1: 0.9597659357519948
19:33:48.653 [main] INFO  com.baeldung.h2o.H2OModelLiveTest - Class 2: 0.023387109236216036
5.4. Use the AutoML Model for Prediction
Now, let’s run the prediction using the best model proposed by the AutoML h2o function:
@Test
public void givenH2OTrainedAutoMLModel_whenPredictTheIrisByFeatures_thenExpectedFlowerShouldBeReturned() throws IOException, PredictException {
    String mojoFilePath = "libs/automl_model.zip";
    MojoModel mojoModel = MojoModel.load(mojoFilePath);
    EasyPredictModelWrapper model = new EasyPredictModelWrapper(mojoModel);
    RowData row = new RowData();
    row.put("sepal.length", 5.1);
    row.put("sepal.width", 3.4);introduction-to-
    row.put("petal.length", 4.6);
    row.put("petal.width", 1.2);
    MultinomialModelPrediction prediction = model.predictMultinomial(row);
    Assertions.assertEquals("Versicolor", prediction.label);
    logger.info("Class probabilities: ");
    for (int i = 0; i < prediction.classProbabilities.length; i++) {
        logger.info("Class " + i + ": " + prediction.classProbabilities[i]);
    }
}
As we can see, this model also completed the classification successfully with the same result. However, the probability is lower in this case:
20:28:06.440 [main] INFO  com.baeldung.h2o.H2OModelLiveTest - Class probabilities:
20:28:06.443 [main] INFO  com.baeldung.h2o.H2OModelLiveTest - Class 0: 0.08536296008169375
20:28:06.443 [main] INFO  com.baeldung.h2o.H2OModelLiveTest - Class 1: 0.8451806663486182
20:28:06.443 [main] INFO  com.baeldung.h2o.H2OModelLiveTest - Class 2: 0.06945637356968806
6. Conclusion
In this article, we explored the h2o platform. Using this tool, we can train neural networks and prepare artifacts for Java applications. This is helpful when we want to avoid diving deep into the mainstream ML stack, which requires Python knowledge and additional libraries.
As always, the code is available over on GitHub.
The post Introduction to h2o first appeared on Baeldung.


