1. Introduction
JLine is a library for handing console input, giving us similar abilities to the GNU readline library or the ZSH line editor.
In this tutorial, we’ll examine JLine 3, learning what it is, what we can do with it, and how to use it.
2. Dependencies
Before using JLine, we need to include the latest version in our build, which is 3.28.0 at the time of writing.
If we’re using Maven, we can include this dependency in our pom.xml file:
<dependency>
    <groupId>org.jline</groupId>
    <artifactId>jline</artifactId>
    <version>3.28.0</version>
</dependency>
In addition to this, if we want to run on Windows, then we’ll also need a terminal provider library from JLine – the recommended one being JANSI:
<dependency>
    <groupId>org.jline</groupId>
    <artifactId>jline-terminal-jansi</artifactId>
    <version>3.28.0</version>
</dependency>
Note that this isn’t required on macOS and Linux systems, as JLine will use the Foreign Function and Memory API (FFM) or Java Native Interface (JNI) bindings on these OSes as appropriate.
At this point, we’re ready to start using JLine in our application.
3. Terminals
Within JLine, our central abstraction to work with is the Terminal. This represents the terminal or command-line interface from which we can read input and to which we can write output. We can construct these using the TerminalBuilder:
try(Terminal terminal = TerminalBuilder.builder().build()) {
    // Use the terminal here.
}
The terminal implements Closeable. This means we can use the try-with-resources pattern to ensure we close it correctly when we’re done.
If we don’t customize the builder, we’ll get a wrapper around the system terminal from which the application is running. Doing so will automatically detect the type of terminal from a set of supported types. This allows us to use more advanced input and output constructs. If no supported terminal type is detected, then this will instead fall back to a dumb terminal that has limited support for JLine features.
Once we’ve got our Terminal instance, we can interact with it directly. JLine exposes input and output to the terminal as either InputStream and OutputStream instances, or as Reader and Writer instances:
InputStream inputStream = terminal.input();
OutputStream outputStream = terminal.output();
Reader reader = terminal.reader();
PrintWriter writer = terminal.writer();
We can use these exactly as we’d expect. As is typically the case, if we’re writing to these output streams, then we need to flush them periodically as well to ensure the output shows up:
terminal.flush();JLine also offers some mechanisms to interrogate the terminal – querying for things such as size, cursor position, and so on:
Size size = terminal.getSize();Note that these only work if the terminal wrapper supports them – which the fallback dumb terminal may not.
4. Line Reader
While the Terminal is central to using JLine, the LineReader is the real reason for using this library. It works with a Terminal instance to accept user input and supports complex input and line editing.
Before we can use a LineReader, we need to construct it. Similar to before, we do this using the LineReaderBuilder:
LineReader lineReader = LineReaderBuilder.builder()
  .terminal(terminal)
  .build();
We need to provide the terminal we’ll be reading from at a minimum, though we’ll see later that many other options can also be provided.
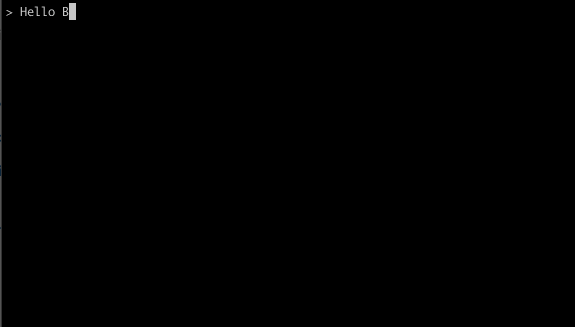
Once we’ve got a LineReader, we can use it to read input from our terminal:
try {
    String line = lineReader.readLine("> ");
    terminal.writer().println("Read: " + line);
} catch (Exception e) {
    // Handle exception
}
The LineReader.readLine() method has several overrides, but the simplest takes a String to use as the prompt for the user input. This will return the string that the user entered for us to use in our program:
This also includes the ability to edit the strings that we’re entering, both by simply deleting and re-entering characters at the end and also using the arrow keys to edit in the middle of the string:

Our readLine() method throws exceptions if the user input is interrupted. A UserInterruptException is thrown if an interrupt is received – typically caused by Ctrl + C. An EndOfFileException is thrown if the underlying input stream is closed or receives an EOF signal – such as by pressing Ctrl + D. We can then handle these exceptions in our code:
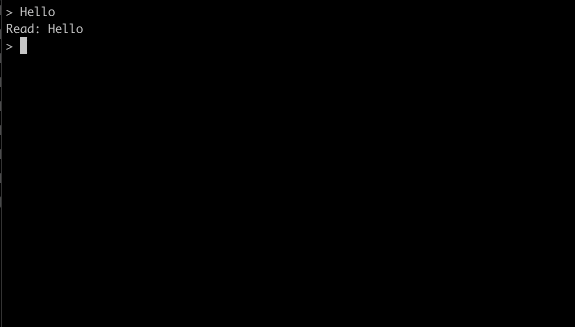
The more complex version of the readLine() method allows us to specify a left prompt, right prompt, initial value, and a character mask – for example, to accept password input:
String line = lineReader.readLine("> ", " <", '#', "Password");This will use “> ” for our left prompt and ” <” for a right prompt. It will mask all input characters with the “#” symbol and have a default value of “Password” for our input:
All the parameters are optional and can be replaced with null if not needed. Other alternatives for readLine() are ultimately just wrappers around this for easier use.
5. History
Along with accepting user input, the standard LineReader automatically gives us history. This means scrolling the history with the arrow keys and searching it using Ctrl + R and Ctrl + S. These are the same controls as Bash history:

We manage history using an instance of the History interface, which we associate with our LineReader at construction. By default, this will be an instance of the DefaultHistory class. This records history automatically as input is received and allows us to access it from our line reader. We’re also able to write our own implementations and wire them into the LineReader:
LineReader lineReader = LineReaderBuilder.builder()
  .terminal(terminal)
  .history(new DefaultHistory())
  .build();
The DefaultHistory implementation permits some configuration to be done on the LineReader that will affect how it works by providing some option flags and some variables:
LineReader lineReader = LineReaderBuilder.builder()
  .terminal(terminal)
  .option(LineReader.Option.HISTORY_IGNORE_DUPS, false)
  .variable(LineReader.HISTORY_FILE, Path.of("target/jline-history"))
  .variable(LineReader.HISTORY_SIZE, 5)
  .build();
This setup allows the history to record duplicate entries, saves all history to the file “target/jline-history” for sharing between executions, and limits recalling to the previous five entries:

6. Completion
In addition to typing out our input, JLine supports command completion with the Tab key. We configure this by providing a Completer instance to our LineReader at construction time:
LineReader lineReader = LineReaderBuilder.builder()
  .terminal(terminal)
  .completer(completer)
  .build();
We can also write our own implementation of this interface. However, JLine comes with several standard implementations we can use.
The simplest implementation that we can use is the StringsCompleter:
Completer completer = new StringsCompleter("foo", "bar", "baz");This takes a list of strings that act as completion candidates. When we hit the Tab key, we see candidates based on this list:

If only a single completion matches, this inserts it automatically. Otherwise, we’ll pick from the list of multiple possible matches.
We also have some other simple completers that we can use. These include the EnumCompleter, which selects from the entries in a Java enum, and the FilesCompleter, DirectoriesCompleter, and FileNameCompleter, which will offer completion options based on files and directories under a given path.
If we want, we can also combine multiple completers using an AggregateCompleter:
Completer completer = new AggregateCompleter(
  new StringsCompleter("foo", "bar", "baz"),
  new Completers.FilesCompleter(Path.of("/baseDir")),
  new Completers.DirectoriesCompleter(Path.of("/baseDir"))
);
This will now offer the set of fixed strings and all of the files and directories under the given path as our possible completion candidates:

Additionally, there are several more complex completers we can use, allowing us to define complex command structures:
- The ArgumentCompleter provides completion candidates for individual words in a command.
- The RegexCompleter matches the current command against a regular expression to determine what completions to offer next.
- The TreeCompleter allows us to build the possible command structure as a tree.
We’re able to combine all of these in whatever structure makes the most sense for our requirements.
7. Summary
This was a quick introduction to JLine. There’s a lot more that we can do with this library. Next time we need to accept user input in a text-based application, why not give it a try?
As usual, all of the examples from this article are available over on GitHub.
The post Introduction to JLine 3 first appeared on Baeldung.


