
1. Overview
In this tutorial, we’ll learn how to use Pkl (pronounced Pickle), a Configuration-as-Code language, to define configuration in Spring Boot applications.
Traditionally, we might define application configuration in YAML, JSON, or key-value-based property files. However, these are static formats, and validating the properties is challenging. Moreover, as the number of configuration properties grows defining more complex hierarchal configurations becomes increasingly difficult.
Therefore, using Configuration-as-Code (CaC), through special languages like Pkl, HCL (Hashicorp configuration language), and Dhal configuration language, can help us overcome the challenges of static property format files.
2. Introduction to Pkl
Configuration-as-Code is a popular concept that promotes the Don’t Repeat Yourself (DRY) principle and helps streamline configuration management. It adopts a declarative coding style, offering a structured and efficient approach to defining configuration templates. It also improves the readability of the configuration.
Pkl helps define various elements, such as object types, collections, maps, and a wide range of primitive data types. This flexibility makes the language extendable and helps model complex configurations easily with clarity and conciseness. Further, its type and validation mechanism helps catch configuration errors before application deployment.
Additionally, Pkl provides excellent tool support for easy adoption. It has tooling for generating code in different languages like Java, Kotlin, Go, and Swift. This is essential for embedding and reading Pickle configurations in applications built on these programming languages.
Further, IDEs like IntelliJ and VS Code have plugins to facilitate the development of configurations using Pkl. Pkl also comes with a CLI called pkl that helps evaluate pickle modules. One of its features is to convert .pkl configurations to JSON, YAML, and XML formats.
3. Spring Configuration Java Bean Binding
The most common approach to defining Spring configuration is to create property files and inject them using the @Value annotation. However, this often results in excessive boilerplate code.
Thankfully, the Spring Framework simplifies this process with the help of the @ConfigurationProperties annotation, enabling seamless binding of configurations to Java beans.
However, with this approach, we must still manually create the Java beans with any necessary validation on the member fields. As a result, configuration drift is difficult to detect and can often lead to critical bugs in the application. Therefore, a configuration definition language like Pkl with automated Java code generation support is a more robust way to integrate our application configuration.
4. Spring Boot Integration
Pkl offers libraries to generate POJOs from Pickle files. Later at runtime, the pkl-spring library can populate the Pickle configurations into the POJOs. Let’s learn how it can be integrated with a Spring Boot application.
4.1. Prerequisites
First, we’ll include the Maven dependencies for the pkl-spring library:
<dependency>
    <groupId>org.pkl-lang</groupId>
    <artifactId>pkl-spring</artifactId>
    <version>0.16.0</version>
</dependency>
Additionally, we’ll use the exec-maven-plugin to generate the POJOs from the Pickle configuration files:
<plugin>
    <groupId>org.codehaus.mojo</groupId>
    <artifactId>exec-maven-plugin</artifactId>
    <executions>
        <execution>
            <id>gen-pkl-java-bind</id>
            <phase>generate-sources</phase>
            <goals>
                <goal>java</goal>
            </goals>
            <configuration>
                <mainClass>org.pkl.codegen.java.Main</mainClass>
                <includeProjectDependencies>false</includeProjectDependencies>
                <additionalClasspathElements>
                    <classpathElement>${pkl-tools-filepath}/pkl-tools-0.27.2.jar</classpathElement>
                </additionalClasspathElements>
                <arguments>
                    <argument>${project.basedir}/src/main/resources/ToolIntegrationTemplate.pkl</argument>
                    <argument>-o</argument>
                    <argument>${project.build.directory}/generated-sources</argument>
                    <argument>--generate-spring-boot</argument>
                    <argument>--generate-getters</argument>
                </arguments>
            </configuration>
        </execution>
    </executions>
</plugin>
The Maven plugin executes the Java code generator tool pkl-tools:
java -cp pkl-tools-0.27.2.jar org.pkl.codegen.java.Main \
src/main/resources/ToolIntegration.pkl \
-o ${project.basedir}/src/main --generate-spring-boot
Assuming there’s a Pickle file ToolIntegrationTemplate.pkl, the tool generates the source code corresponding to the Pickle file in the target/generated-sources folder.
The –generate-spring-boot argument includes the necessary Spring Boot class level @ConfigurationProperties annotation into the Java bean. In addition, the –generate-getters argument declares the property keys private.
Luckily for Gradle users, the pkl-gladle plugin offers out-of-box support for generating POJOs.
4.2. Create Configurations in Pkl
Let’s consider a data integration application that fetches data from source systems such as Git and Jira and dispatches them to other target systems.
Let’s begin by defining the Pickle template ToolIntegrationTemplate.pkl to hold the connection properties:
module com.baeldung.spring.pkl.ToolIntegrationProperties
class Connection {
  url:String
  name:String
  credential:Credential
}
class Credential {
  user:String
  password:String
}
gitConnection: Connection
jiraConnection: Connection
Overall, we defined two Pkl classes Connection and Credential, and declared two objects gitConnection and jiraConnection of type Connection.
Next, let’s define gitConnection and jiraConnection in the application.pkl file:
amends "ToolIntegrationTemplate.pkl"
gitConnection {
  url = "https://api.github.com"
  name = "GitHub"
  credential {
    user = "gituser"
    password = read("env:GITHUB_PASSWORD")
  }
}
jiraConnection {
  url = "https://jira.atlassian.com"
  name = "Jira"
  credential {
    user = "jirauser"
    password = read("env:JIRA_PASSWORD")
  }
}
We’ve filled the template with the connection properties of the data sources. Notably, we’ve not hardcoded the passwords in the configuration file. Rather, we use the Pkl read() function to retrieve the passwords from the environment variables, preferably a secure approach.
4.3. Convert Pkl Template to POJO
After defining the configurations in the Pickle file, the POJOs can be generated by executing the Maven goal exec:java defined in the pom.xml file:
mvn exec:java@gen-pkl-java-bindEventually, the pkl-tools library generates a POJO and a property file:
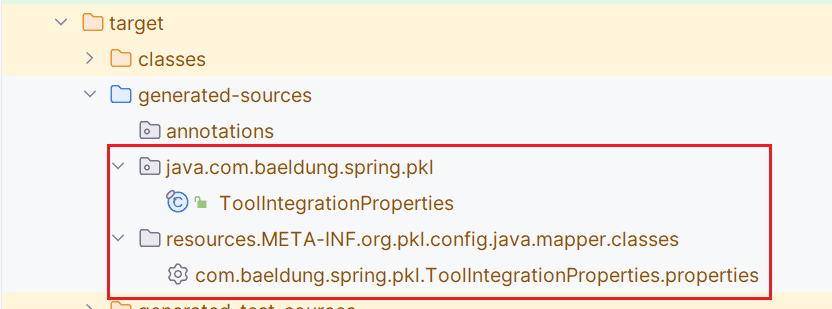
The ToolIntegrationProperties class constitutes two inner classes, Connection and Credential. It’s also annotated with @ConfigurationProperties which helps bind the properties in application.pkl with the ToolIntegrationProperties object.
4.4. Bind Pickle Configuration to POJO
Let’s first define the service classes JiraService and GitHubService that integrate with the source systems:
public class JiraService {
    private final ToolIntegrationProperties.Connection jiraConnection;
    public JiraService(ToolIntegrationProperties.Connection connection) {
        this.jiraConnection = connection;
    }
   // ...methods getting data from Jira
}
public class GitHubService {
private final ToolIntegrationProperties.Connection gitConnection;
public GitHubService(ToolIntegrationProperties.Connection connection) {
this.gitConnection = connection;
}
// ...methods getting data from GitHub
}Both the services have constructors that take the ToolIntegrationProperties as an argument. Later, the connection details from the argument are assigned to a class-level attribute of type ToolIntegrationProperties.Connection.
Next, we’ll define a configuration class that instantiates the services and declares them as Spring framework beans:
@Configuration
public class ToolConfiguration {
    @Bean
    public GitHubService getGitHubService(ToolIntegrationProperties toolIntegration) {
        return new GitHubService(toolIntegration.getGitConnection());
    }
    @Bean
    public JiraService getJiraService(ToolIntegrationProperties toolIntegration) {
        return new JiraService(toolIntegration.getJiraConnection());
    }
}
During application boot time, the Spring framework binds the method arguments with the configuration from the application.pkl file. Eventually, the beans are instantiated by invoking the service constructors.
4.5. Service Injection and Execution
Finally, we can inject the service beans using the @Autowired annotation in other Spring components.
Using a @SpringBootTest, we’ll verify if the application can load the Jira connection configurations from the Pickle file:
@SpringBootTest
public class SpringPklUnitTest {
    @Autowired
    private JiraService jiraService;
    @Test
    void whenJiraConfigsDefined_thenLoadFromApplicationPklFile() {
        ToolIntegrationProperties.Connection jiraConnection = jiraService.getJiraConnection();
        ToolIntegrationProperties.Credential jiraCredential = jiraConnection.getCredential();
        assertAll(
          () -> assertEquals("Jira", jiraConnection.getName()),
          () -> assertEquals("https://jira.atlassian.com", jiraConnection.getUrl()),
          () -> assertEquals("jirauser", jiraCredential.getUser()),
          () -> assertEquals("jirapassword", jiraCredential.getPassword()),
          () -> assertEquals("Reading issues from Jira URL https://jira.atlassian.com",
            jiraService.readIssues())
        );
    }
}
For demonstration, we’ve set the Git and JIRA passwords in the environment variables through the pom.xml file. After running the test, we confirm that the Jira connection and credential details match the values defined in the application.pkl file. Finally, we also presume that if implemented correctly, the JiraService#readIssues() executes successfully. For now, the method merely returns a dummy string.
Similarly, let’s check if the application after starting, loads the GitHub connection configurations from the Pickle file:
@SpringBootTest
public class SpringPklUnitTest {
    @Autowired
    private GitHubService gitHubService;
    @Test
    void whenGitHubConfigsDefined_thenLoadFromApplicationPklFile() {
        ToolIntegrationProperties.Connection gitHubConnection = gitHubService.getGitConnection();
        ToolIntegrationProperties.Credential gitHubCredential = gitHubConnection.getCredential();
        assertAll(
          () -> assertEquals("GitHub", gitHubConnection.getName()),
          () -> assertEquals("https://api.github.com", gitHubConnection.getUrl())
          () -> assertEquals("gituser", gitHubCredential.getUser()),
          () -> assertEquals("gitpassword", gitHubCredential.getPassword()),
          () -> assertEquals("Reading issues from GitHub URL https://api.github.com",
            gitHubService.readIssues())
        );
    }
}
As expected, this time, the GitHub connection and credential details also match the values defined in the application.pkl file. Therefore, with the correct connectivity details, we can presume that the GitHubServiceService#readIssues() if implemented correctly, will connect to GitHub and fetch the issues. Like JiraService#readIssues(), the method only returns a dummy string for now.
5. Conclusion
In this article, we learned the benefits and how to use Pickle files to define the Spring Boot application configuration. However, mastering Pkl language concepts is equally important for designing scalable and maintainable complex configurations. In addition, knowledge of the Spring framework’s feature to bind external properties to POJO is essential.
As always, the code used in this article is available over on GitHub.
The post Integrating Pkl With Spring Boot first appeared on Baeldung.


