
1. Introduction
Pulumi is a modern infrastructure-as-code (IaC) tool that allows developers to define and manage cloud resources using general-purpose programming languages like Java. Unlike traditional IaC tools that use domain-specific languages (DSLs), Pulumi leverages the power of Java to create reusable, modular, and type-safe infrastructure code.
In this article, we’ll use Pulumi with Java to create and manage AWS resources, including an S3 bucket, an EC2 instance, and a security group. We’ll also expose the EC2 instance to the internet, update the infrastructure, and destroy all resources.
2. Setting up Pulumi Using Java
Before we start, we must ensure we have the Pulumi CLI installed. We can install it from the official website.
After installing it, we can create a new Pulumi project using the AWS Java template:
$ pulumi new aws-javaThis generates a basic project structure. After that, we navigate to the project directory and install dependencies:
$ cd my-pulumi-project
$ mvn install
Now we have all the structure ready to start writing the code.
3. Creating Simple AWS Resources
In this section, we’ll see how we can create simple standalone resources in AWS. After that, we’ll explore how to make slightly more complicated architectures to expose a web service on the Internet.
Amazon S3 (Simple Storage Service) is a highly scalable object storage solution from AWS, widely used for storing files, backups, and media. This way, we can showcase Pulumi’s capabilities in a straightforward yet impactful way. With Pulumi, defining an S3 bucket is as simple as declaring a bucket resource:
var bucket = new Bucket("pulumi-bucket", BucketArgs.builder()
  .build());
Once we define our S3 bucket in Pulumi, we can deploy it to AWS. Pulumi provides a simple command to do this:
$ pulumi upWhen running pulumi up, Pulumi shows the resources that will be created:
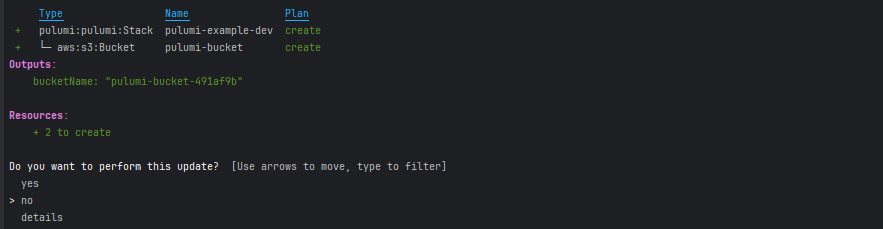
Pulumi analyzes the code and shows what resources will be created, modified, or deleted. Also, it asks for a confirmation, so we can review the planned changes before proceeding.
4. Creating a Web Server
Now that we’ve started with an S3 bucket, let’s take things further and build the infrastructure needed for a web service. To deploy an EC2 instance for serving web requests, we must configure a Virtual Private Cloud (VPC), a Subnet, an Internet Gateway, and other essential network components.
4.1. Creating the Network Infrastructure
A VPC (Virtual Private Cloud) is an isolated network within AWS where we can launch resources such as EC2 instances, databases, and other services. It allows us to define IP address ranges, create subnets, and configure routing rules for controlling how resources communicate.
Let’s create a VPC with a CIDR block of 10.0.0.0/16, meaning it can hold many IP addresses:
var vpc = new Vpc("vpc", VpcArgs.builder()
  .cidrBlock("10.0.0.0/16")
  .build());
A subnet is a subdivision of a VPC, allowing us to organize resources within smaller network segments. For our EC2 instance to be publicly accessible, it must be in a public subnet that automatically assigns public IP addresses to instances:
var subnet = new Subnet("subnet", SubnetArgs.builder()
  .vpcId(vpc.id())
  .cidrBlock("10.0.1.0/24")
  .mapPublicIpOnLaunch(true)
  .build());
By default, resources inside a VPC cannot access the internet. To allow traffic to flow in and out, we need an Internet Gateway (IGW). This AWS-managed service connects our VPC to the public internet:
var gateway = new InternetGateway("gateway", InternetGatewayArgs.builder()
  .vpcId(vpc.id())
  .build());
Even with an Internet Gateway, instances inside the subnet won’t automatically know how to reach the Internet. We need to configure a route table, which acts like a traffic control system, defining how network traffic flows. We set up a default route (0.0.0.0/0) that sends all outbound traffic to the internet through the gateway:
var routes = new RouteTable("routes", RouteTableArgs.builder()
  .vpcId(vpc.id())
  .routes(RouteTableRouteArgs.builder()
    .cidrBlock("0.0.0.0/0")
    .gatewayId(gateway.id())
    .build())
  .build());
var routeTableAssociation = new RouteTableAssociation("route-table-association", RouteTableAssociationArgs.builder()
  .subnetId(subnet.id())
  .routeTableId(routes.id())
  .build());
Also, we link the route table to the public subnet so that the EC2 instance inside it can use the Internet Gateway.
4.2. Security Group: Controlling Traffic
A Security Group is a virtual firewall that controls which types of network traffic are allowed to reach an EC2 instance. We’ll start by creating one and associating it with our VPC:
var securityGroup = new SecurityGroup("security-group", SecurityGroupArgs.builder()
  .name("allow_public")
  .vpcId(vpc.id())
  .build());
At this point, the security group exists but has no rules yet. AWS security groups default deny all the traffic until we define rules explicitly. For users to be able to access our server we need to allow HTTP inbound traffic:
var allowPort80Ipv4 = new SecurityGroupIngressRule("allowPort80Ingress", SecurityGroupIngressRuleArgs.builder()
  .securityGroupId(securityGroup.id())
  .cidrIpv4("0.0.0.0/0")
  .fromPort(80)
  .ipProtocol("tcp")
  .toPort(80)
  .build());
We attach the rule to our previously created security group and allow all traffic to port 80 (which is used for HTTP web traffic). We’ll also have to add a rule for outbound to let our service access the internet:
var allowAllTrafficIpv4 = new SecurityGroupEgressRule("allowAllTrafficEgress", SecurityGroupEgressRuleArgs.builder()
  .securityGroupId(securityGroup.id())
  .cidrIpv4("0.0.0.0/0")
  .ipProtocol("-1")
  .build());
This ensures our EC2 instance can download updates and install dependencies during setup
4.3. User Data: Automating Server Setup
When launching an EC2 instance, we can pass a user data script that runs automatically on startup:
String userData = """
    #!/bin/bash
    yum update -y
    yum install -y httpd
    systemctl start httpd
    systemctl enable httpd
    echo "<h1>Hello World, welcome to our Pulumi deployed infrastructure.</h1>" > /var/www/html/index.html
    """;
This script will:
- update the system
- install Apache HTTP Server
- start the web server
- create a basic HTML page
This ensures that when the EC2 instance starts, it immediately serves a webpage without any manual setup.
4.4. Launching the EC2 Instance
With security and automation in place, we can now define and deploy an EC2 instance:
var instance = new Instance("my-instance", InstanceArgs.builder()
  .instanceType(InstanceType.T2_Micro)
  .ami("ami-0e320147c22e46f12")
  .subnetId(subnet.id())
  .vpcSecurityGroupIds(Output.all(securityGroup.id()))
  .associatePublicIpAddress(true)
  .userData(userData) // Add user data to the instance
  .build());
The instance type is set to t2.micro, a small and cost-effective option. Also, this instance type is part of the AWS Free Tier. The Amazon Machine Image (AMI) used is Amazon Linux 2, a lightweight and AWS-optimized operating system. Since the instance needs to be publicly accessible, it’s assigned a public IP address. This makes it reachable from the internet, allowing us to test the web server later.
We can print the public IP address assigned to our EC2 instance in our console:
ctx.export("publicIp", instance.publicIp());This way, we can retrieve the instance’s public IP without manually checking the AWS console. After running pulumi up, the public IP will be displayed in the command output: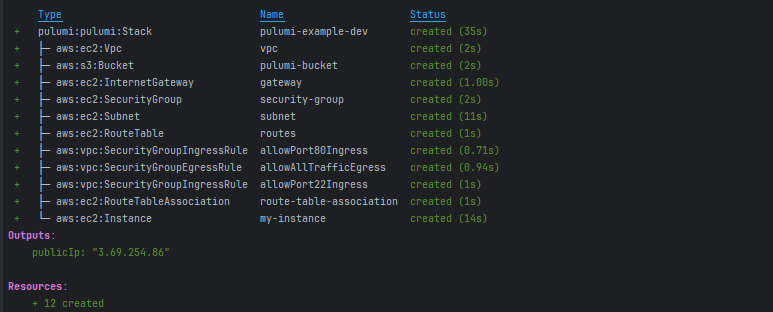
4.5. Verifying the Web Server Deployment
Once the EC2 instance is up, we can verify that the web server is accessible. However, before testing, we should wait a few minutes for the instance to complete its initialization. In particular, the web server might take some time to start, especially if updates and package installations are still in progress. The simplest way to verify the deployment is by entering the public IP of the instance into a web browser:

Now we can see the message from our user data script.
For a quick verification from the command line, we can use curl to send an HTTP request to the instance:
$ curl http://3.69.254.86/5. Destroying the Infrastructure
After testing our web server, we should remove the deployed resources to prevent unnecessary AWS costs. Cloud resources like EC2 instances incur charges as long as they exist, even if they aren’t actively used.
Pulumi makes it easy to tear down the infrastructure with a single command:
$ pulumi destroy
This command will:
- terminate the EC2 instance
- delete the security group, VPC, subnet, and route table
- remove the S3 bucket (note that we must first empty the bucket manually if it contains files)
Pulumi prompts for confirmation before proceeding with the deletion. After confirming, it sequentially removes all previously created resources.
6. Conclusion
In this tutorial, we demonstrated how to use Pulumi to create and manage AWS infrastructure, including an S3 bucket, a VPC, an EC2 instance, and related resources like security groups and route tables. Next, we broke down each part of the code to understand how Pulumi simplifies the provisioning of cloud infrastructure using familiar programming languages like Java.
By running pulumi up, we saw how easy it is to deploy resources, and with pulumi destroy, we can clean up those resources, avoiding any unwanted costs in AWS. Whether we’re provisioning simple storage with S3 or more complex networking and compute resources like EC2 instances, Pulumi provides a flexible and powerful way to manage cloud infrastructure programmatically.
All examples for this article can be found over on GitHub.
The post Introduction to Pulumi With Java first appeared on Baeldung.


