Quantcast
Channel: Baeldung
Viewing all 4752 articles
Browse latest View live

Spring Data JPA Projections

$
0
0

1. Overview

When using Spring Data JPA to implement the persistence layer, the repository typically returns one or more instances of the root class. However, more often than not, we don’t need all the properties of the returned objects.

In such cases, it may be desirable to retrieve data as objects of customized types. These types reflect partial views of the root class, containing only properties we care about. This is where projections come in handy.

2. Initial Setup

The first step is to set up the project and populate the database.

2.1. Maven Dependencies

For dependencies, please check out section 2 of this tutorial.

2.2. Entity Classes

Let’s define two entity classes:

@Entity
public class Address {
 
    @Id
    private Long id;
 
    @OneToOne
    private Person person;
 
    private String state;
 
    private String city;
 
    private String street;
 
    private String zipCode;

    // getters and setters
}

And:

@Entity
public class Person {
 
    @Id
    private Long id;
 
    private String firstName;
 
    private String lastName;
 
    @OneToOne(mappedBy = "person")
    private Address address;

    // getters and setters
}

The relationship between Person and Address entities is bidirectional one-to-one: Address is the owning side, and Person is the inverse side.

Notice in this tutorial, we use an embedded database — H2.

When an embedded database is configured, Spring Boot automatically generates underlying tables for the entities we defined.

2.3. SQL Scripts

We use the projection-insert-data.sql script to populate both the backing tables:

INSERT INTO person(id,first_name,last_name) VALUES (1,'John','Doe');
INSERT INTO address(id,person_id,state,city,street,zip_code) 
  VALUES (1,1,'CA', 'Los Angeles', 'Standford Ave', '90001');

To clean up the database after each test run, we can use another script, named projection-clean-up-data.sql:

DELETE FROM address;
DELETE FROM person;

2.4. Test Class

For confirming that projections produce correct data, we need a test class:

@DataJpaTest
@RunWith(SpringRunner.class)
@Sql(scripts = "/projection-insert-data.sql")
@Sql(scripts = "/projection-clean-up-data.sql", executionPhase = AFTER_TEST_METHOD)
public class JpaProjectionIntegrationTest {
    // injected fields and test methods
}

With the given annotations, Spring Boot creates the database, injects dependencies, and populates and cleans up tables before and after each test method’s execution.

3. Interface-Based Projections

When projecting an entity, it’s natural to rely on an interface, as we won’t need to provide an implementation.

3.1. Closed Projections

Looking back at the Address class, we can see it has many properties, yet not all of them are helpful. For example, sometimes a zip code is enough to indicate an address.

Let’s declare a projection interface for the Address class:

public interface AddressView {
    String getZipCode();
}

Then use it in a repository interface:

public interface AddressRepository extends Repository<Address, Long> {
    List<AddressView> getAddressByState(String state);
}

It’s easy to see that defining a repository method with a projection interface is pretty much the same as with an entity class.

The only difference is that the projection interface, rather than the entity class, is used as the element type in the returned collection.

Let’s do a quick test of the Address projection:

@Autowired
private AddressRepository addressRepository;

@Test
public void whenUsingClosedProjections_thenViewWithRequiredPropertiesIsReturned() {
    AddressView addressView = addressRepository.getAddressByState("CA").get(0);
    assertThat(addressView.getZipCode()).isEqualTo("90001");
    // ...
}

Behind the scenes, Spring creates a proxy instance of the projection interface for each entity object, and all calls to the proxy are forwarded to that object.

We can use projections recursively. For instance, here’s a projection interface for the Person class:

public interface PersonView {
    String getFirstName();

    String getLastName();
}

Now, let’s add a method with the return type PersonView – a nested projection – in the Address projection:

public interface AddressView {
    // ...
    PersonView getPerson();
}

Notice the method that returns the nested projection must have the same name as the method in the root class that returns the related entity.

Let’s verify nested projections by adding a few statements to the test method we’ve just written:

// ...
PersonView personView = addressView.getPerson();
assertThat(personView.getFirstName()).isEqualTo("John");
assertThat(personView.getLastName()).isEqualTo("Doe");

Note that recursive projections only work if we traverse from the owning side to the inverse side. Were we to do it the other way around, the nested projection would be set to null.

3.2. Open Projections

Up to this point, we’ve gone through closed projections, which indicate projection interfaces whose methods exactly match the names of entity properties.

There’s another sort of interface-based projections: open projections. These projections enable us to define interface methods with unmatched names and with return values computed at runtime.

Let’s go back to the Person projection interface and add a new method:

public interface PersonView {
    // ...

    @Value("#{target.firstName + ' ' + target.lastName}")
    String getFullName();
}

The argument to the @Value annotation is a SpEL expression, in which the target designator indicates the backing entity object.

Now, we’ll define another repository interface:

public interface PersonRepository extends Repository<Person, Long> {
    PersonView findByLastName(String lastName);
}

To make it simple, we only return a single projection object instead of a collection.

This test confirms open projections work as expected:

@Autowired
private PersonRepository personRepository;

@Testpublic void whenUsingOpenProjections_thenViewWithRequiredPropertiesIsReturned() {
    PersonView personView = personRepository.findByLastName("Doe");
 
    assertThat(personView.getFullName()).isEqualTo("John Doe");
}

Open projections have a drawback: Spring Data cannot optimize query execution as it doesn’t know in advance which properties will be used. Thus, we should only use open projections when closed projections aren’t capable of handling our requirements.

4. Class-Based Projections

Instead of using proxies Spring Data creates for us from projection interfaces, we can define our own projection classes.

For example, here’s a projection class for the Person entity:

public class PersonDto {
    private String firstName;
    private String lastName;

    public PersonDto(String firstName, String lastName) {
        this.firstName = firstName;
        this.lastName = lastName;
    }

    // getters, equals and hashCode
}

For a projection class to work in tandem with a repository interface, the parameter names of its constructor must match properties of the root entity class.

We must also define equals and hashCode implementations – they allow Spring Data to process projection objects in a collection.

Now, let’s add a method to the Person repository:

public interface PersonRepository extends Repository<Person, Long> {
    // ...

    PersonDto findByFirstName(String firstName);
}

This test verifies our class-based projection:

@Test
public void whenUsingClassBasedProjections_thenDtoWithRequiredPropertiesIsReturned() {
    PersonDto personDto = personRepository.findByFirstName("John");
 
    assertThat(personDto.getFirstName()).isEqualTo("John");
    assertThat(personDto.getLastName()).isEqualTo("Doe");
}

Notice with the class-based approach, we cannot use nested projections.

5. Dynamic Projections

An entity class may have many projections. In some cases, we may use a certain type, but in other cases, we may need another type. Sometimes, we also need to use the entity class itself.

Defining separate repository interfaces or methods just to support multiple return types is cumbersome. To deal with this problem, Spring Data provides a better solution: dynamic projections.

We can apply dynamic projections just by declaring a repository method with a Class parameter:

public interface PersonRepository extends Repository<Person, Long> {
    // ...

    <T> T findByLastName(String lastName, Class<T> type);
}

By passing a projection type or the entity class to such a method, we can retrieve an object of the desired type:

@Test
public void whenUsingDynamicProjections_thenObjectWithRequiredPropertiesIsReturned() {
    Person person = personRepository.findByLastName("Doe", Person.class);
    PersonView personView = personRepository.findByLastName("Doe", PersonView.class);
    PersonDto personDto = personRepository.findByLastName("Doe", PersonDto.class);

    assertThat(person.getFirstName()).isEqualTo("John");
    assertThat(personView.getFirstName()).isEqualTo("John");
    assertThat(personDto.getFirstName()).isEqualTo("John");
}

6. Conclusion

In this article, we went over various types of Spring Data JPA projections.

The source code for this tutorial is available over on GitHub. This is a Maven project and should be able to run as-is.


Guide to Guava Multiset

$
0
0

1. Overview

In this tutorial, we’ll explore one of the Guava collections – Multiset. Like a java.util.Set, it allows for efficient storage and retrieval of items without a guaranteed order.

However, unlike a Set, it allows for multiple occurrences of the same element by tracking the count of each unique element it contains.

2. Maven Dependency

First, let’s add the guava dependency:

<dependency>
    <groupId>com.google.guava</groupId>
    <artifactId>guava</artifactId>
    <version>27.1-jre</version>
</dependency>

3. Using Multiset

Let’s consider a bookstore which has multiple copies of different books. We might want to perform operations like adding a copy, getting the number of copies, and removing one copy when it’s sold. As a Set does not allow for multiple occurrences of the same element, it can’t handle this requirement.

Let’s get started by adding copies of a book title. The Multiset should return that the title exists and provide us with the correct count:

Multiset<String> bookStore = HashMultiset.create();
bookStore.add("Potter");

assertThat(bookStore.contains("Potter")).isTrue();
assertThat(bookStore.count("Potter")).isEqualTo(3);

Now let’s remove one copy. We expect the count to be updated accordingly:

bookStore.remove("Potter");
assertThat(bookStore.contains("Potter")).isTrue();
assertThat(bookStore.count("Potter")).isEqualTo(2);

And actually, we can just set the count instead of performing various add operations:

bookStore.setCount("Potter", 50); 
assertThat(bookStore.count("Potter")).isEqualTo(50);

Multiset validates the count value. If we set it to negative, an IllegalArgumentException is thrown:

assertThatThrownBy(() -> bookStore.setCount("Potter", -1))
  .isInstanceOf(IllegalArgumentException.class);

4. Comparison with Map

Without access to Multiset, we could achieve all of the operations above by implementing our own logic using java.util.Map:

Map<String, Integer> bookStore = new HashMap<>();
// adding 3 copies
bookStore.put("Potter", 3);

assertThat(bookStore.containsKey("Potter")).isTrue();
assertThat(bookStore.get("Potter")).isEqualTo(3);

// removing 1 copy
bookStore.put("Potter", 2);
assertThat(bookStore.get("Potter")).isEqualTo(2);

When we want to add or remove a copy using a Map, we need to remember the current count and adjust it accordingly. We also need to implement this logic in our calling code every time or construct our own library for this purpose. Our code would also need to control the value argument. If we’re not careful, we could easily set the value to null or negative even though both the values are invalid:

bookStore.put("Potter", null);
assertThat(bookStore.containsKey("Potter")).isTrue();

bookStore.put("Potter", -1);
assertThat(bookStore.containsKey("Potter")).isTrue();

As we can see, it is a lot more convenient to use Multiset instead of Map.

5. Concurrency

When we want to use Multiset in a concurrent environment, we can use ConcurrentHashMultiset, which is a thread-safe Multiset implementation.

We should note that being thread-safe does not guarantee consistency, though. Using the add or remove methods will work well in a multi-threaded environment, but what if several threads called the setCount method? 

If we use the setCount method, the final result would depend on the order of execution across threads, which cannot necessarily be predicted. The add and remove methods are incremental, and the ConcurrentHashMultiset is able to protect their behavior. Setting the count directly is not incremental and so can cause unexpected results when used concurrently.

However, there’s another flavor of the setCount method which updates the count only if its current value matches the passed argument. The method returns true if the operation succeeded, a form of optimistic locking:

Multiset<String> bookStore = HashMultiset.create();
// updates the count to 2 if current count is 0
assertThat(bookStore.setCount("Potter", 0, 2)).isTrue();
// updates the count to 5 if the current value is 50
assertThat(bookStore.setCount("Potter", 50, 5)).isFalse();

If we want to use the setCount method in concurrent code, we should use the above version to guarantee consistency. A multi-threaded client could perform a retry if changing the count failed.

6. Conclusion

In this short tutorial, we discussed when and how to use a Multiset, compared it with a standard Map and looked at how best to use it in a concurrent application.

As always, the source code for the examples can be found over on GitHub.

Spring Data JPA and Null Parameters

$
0
0

1. Overview

In this article, we’ll show the ways of handling null parameters in Spring Data JPA.

In some cases, when we search for records by parameters we want to find rows with null as the field value. Other times, we may want to ignore a null and skip that field in our query.

Below we’ll show how to implement each of these.

2. Quick Example

Let’s say we have a Customer entity:

@Entity
public class Customer {

    @Id
    @GeneratedValue
    private long id;
    private String name;
    private String email;

    public Customer(String name, String email) {
        this.name = name;
        this.email = email;
    }

    // getters/setters

}

Also, we have a JPA repository:

public interface CustomerRepository extends JpaRepository<Customer, Long> { 

   // method1
   // method2
}

We want to search for customers by name and email.

For this purpose, we’ll write two methods that handle null parameters differently.

3. Ways to Handle Null Parameters

Firstly, we’ll create a method that interprets null values of the parameters as IS NULL, and then we’ll create a method that ignores null parameters and excludes them from the WHERE clause.

3.1. IS NULL Query

The first method is very simple to create because null parameters in the query methods are interpreted as IS NULL by default.

Let’s create the method:

List<Customer> findByNameAndEmail(String name, String email);

Now if we pass a null email, the generated JPQL will include the IS NULL condition:

customer0_.email is null

To demonstrate this let’s create a test.

First, we’ll add some customers to the repository:

@Before
public void before() {
    entityManager.persist(new Customer("A", "A@example.com"));
    entityManager.persist(new Customer("D", null));
    entityManager.persist(new Customer("D", "D@example.com"));
}

Now let’s pass “D” as the value of the name parameter and null as the value of the email parameter to our query method. We can see that exactly one customer will be found:

List<Customer> customers = repository.findByNameAndEmail("D", null);

assertEquals(1, customers.size());

Customer actual = customers.get(0);

assertEquals(null, actual.getEmail());
assertEquals("D", actual.getName());

3.2. Avoid null Parameter with Alternative Methods

Sometimes we want to ignore some parameters and not include their corresponding fields in the WHERE clause.

We can add more query methods to our repository. For example, to ignore email we can add a method that only accepts name:

 List<Customer> findByName(String name);

But such a way of ignoring one of our columns scaled poorly as the number increases, as we would have to add many methods to achieve all the combinations.

3.3. Ignoring null Parameters Using the @Query Annotation

We can avoid creating additional methods by using the @Query annotation and adding a small complication to the JPQL statement:

@Query("SELECT c FROM Customer c WHERE (:name is null or c.name = :name) and (:email is null or c.email = :email)")
List<Customer> findCustomerByNameAndEmail(@Param("name") String name, @Param("email") String email);

Notice that if the: email parameter is null:

:email is null or s.email = :email

Then the clause is always true and so doesn’t influence the whole WHERE clause.

Let’s make sure that this works:

List<Customer> customers = repository.findCustomerByNameAndEmail("D", null);

assertEquals(2, customers.size());

We found two customers whose name is “D” ignoring their emails.

The generated JPQL WHERE clause looks like this:

where (? is null or customer0_.name=?) and (? is null or customer0_.email=?)

With this method, we are putting trust in the database server to recognize the clause regarding our query parameter being null and optimize the execution plan of the query so that it doesn’t have a significant performance overhead. For some queries or database servers, especially involving a huge table scan, there could be a performance overhead.

4. Conclusion

We’ve demonstrated how Spring Data JPA interprets null parameters in query methods and shown how to change the default behavior.

Perhaps in the future, we’ll be able to specify how to interpret null parameters using the @NullMeans annotation.  Notice that it’s a proposed feature at this time and is still under consideration.

To sum up, there are two main ways to interpret null parameters, and they would both be provided by the proposed @NullMeans annotation:

  • IS (is null) – the default option demonstrated in section 3.1.
  • IGNORED (exclude a null parameter from the WHERE clause) – achieved either by extra query methods (section 3.2.) or by using a workaround (section 3.3.)

As usual, the complete source code is available over on GitHub.

Setting the Log Level in Spring Boot when Testing

$
0
0

1. Overview

In this tutorial, we’ll show how to set the log level when running tests for a Spring Boot application.

Although we can mostly ignore the logs while our tests are passing, choosing the right log level can be critical if there is a need to diagnose failed tests.

2. The Importance of the Log Level

Configuring the log level correctly can save us a lot of time.

For example, if tests are failing on a CI server but passing on our development machine, we won’t be able to diagnose the failing tests unless we have enough log output. On the other side, if we log too much detail, it might be more difficult to find useful information.

To achieve the right amount of detail, we can fine-tune the logging levels of our application’s packages. If we find that a Java package is more critical for our tests, we can give it a lower level, like DEBUG. Similarly, to avoid having too much noise in our logs we can configure a higher level, say INFO or ERROR, for packages that are less important.

Let’s explore various ways of setting the logging level.

3. Logging Settings in application.properties

If we want to modify the log level in our tests, there is a property we can set in src/test/resources/application.properties:

logging.level.com.baeldung.testloglevel=DEBUG

This property will set the log level specifically for the com.baeldung.testloglevel package.

Similarly, we can change the logging level for all packages by setting the root log level:

logging.level.root=INFO

Now, let’s try out our logging settings by adding a REST endpoint that writes some logs:

@RestController
public class TestLogLevelController {

    private static final Logger LOG = LoggerFactory.getLogger(TestLogLevelController.class);

    @Autowired
    private OtherComponent otherComponent;

    @GetMapping("/testLogLevel")
    public String testLogLevel() {
        LOG.trace("This is a TRACE log");
        LOG.debug("This is a DEBUG log");
        LOG.info("This is an INFO log");
        LOG.error("This is an ERROR log");

        otherComponent.processData();

        return "Added some log output to console...";
    }

}

As expected, if we call this endpoint in our testswe’ll be able to see the DEBUG logs from TestLogLevelController:

2019-04-01 14:08:27.545 DEBUG 56585 --- [nio-8080-exec-1] c.b.testloglevel.TestLogLevelController  : This is a DEBUG log
2019-04-01 14:08:27.545  INFO 56585 --- [nio-8080-exec-1] c.b.testloglevel.TestLogLevelController  : This is an INFO log
2019-04-01 14:08:27.546 ERROR 56585 --- [nio-8080-exec-1] c.b.testloglevel.TestLogLevelController  : This is an ERROR log
2019-04-01 14:08:27.546  INFO 56585 --- [nio-8080-exec-1] c.b.component.OtherComponent  : This is an INFO log from another package
2019-04-01 14:08:27.546 ERROR 56585 --- [nio-8080-exec-1] c.b.component.OtherComponent  : This is an ERROR log from another package

Setting the log level like this is quite easy, and we should definitely do it this way if our tests are annotated with @SpringBootTest. However, if we don’t use that annotation, we’ll have to configure the log level in a different way.

3.1. Profile-based Logging Settings

Although putting the settings into src/test/application.properties would work it in most situations, there might be cases where we would like to have different settings for one test or a group of tests.

In that case, we can add a Spring profile to our test by using the ActiveProfiles annotation:

@RunWith(SpringRunner.class)
@SpringBootTest(webEnvironment = WebEnvironment.RANDOM_PORT, classes = TestLogLevelApplication.class)
@EnableAutoConfiguration(exclude = SecurityAutoConfiguration.class)
@ActiveProfiles("logging-test")
public class TestLogLevelWithProfileIntegrationTest {

    // ...

}

Our logging settings will then be in a special application-testloglevel.properties file within src/test/resources:

logging.level.com.baeldung.testloglevel=TRACE
logging.level.root=ERROR

If we call TestLogLevelController from our tests with the described settings, we will now see the TRACE logs from our controller, and there will be no more INFO logs from other packages:

2019-04-01 14:08:27.545 DEBUG 56585 --- [nio-8080-exec-1] c.b.testloglevel.TestLogLevelController  : This is a DEBUG log
2019-04-01 14:08:27.545  INFO 56585 --- [nio-8080-exec-1] c.b.testloglevel.TestLogLevelController  : This is an INFO log
2019-04-01 14:08:27.546 ERROR 56585 --- [nio-8080-exec-1] c.b.testloglevel.TestLogLevelController  : This is an ERROR log
2019-04-01 14:08:27.546 ERROR 56585 --- [nio-8080-exec-1] c.b.component.OtherComponent  : This is an ERROR log from another package

4. Configuring Logback

If we use Logback, which is used by default in Spring Boot, we can set the log level in the logback-test.xml file within src/test/resources:

<configuration>
    <include resource="/org/springframework/boot/logging/logback/base.xml"/>
    <appender name="STDOUT" class="ch.qos.logback.core.ConsoleAppender">
        <encoder>
            <pattern>%d{HH:mm:ss.SSS} [%thread] %-5level %logger{36} - %msg%n
            </pattern>
        </encoder>
    </appender>
    <root level="error">
        <appender-ref ref="STDOUT"/>
    </root>
    <logger name="com.baeldung.testloglevel" level="debug"/>
</configuration>

The above example shows how to set the log level in our Logback configuration for tests.  The root log level is set to INFO and the log level for our com.baeldung.testloglevel package is set to DEBUG.

Again, let’s check the output after applying the settings from above:

2019-04-01 14:08:27.545 DEBUG 56585 --- [nio-8080-exec-1] c.b.testloglevel.TestLogLevelController  : This is a DEBUG log
2019-04-01 14:08:27.545  INFO 56585 --- [nio-8080-exec-1] c.b.testloglevel.TestLogLevelController  : This is an INFO log
2019-04-01 14:08:27.546 ERROR 56585 --- [nio-8080-exec-1] c.b.testloglevel.TestLogLevelController  : This is an ERROR log
2019-04-01 14:08:27.546  INFO 56585 --- [nio-8080-exec-1] c.b.component.OtherComponent  : This is an INFO log from another package
2019-04-01 14:08:27.546 ERROR 56585 --- [nio-8080-exec-1] c.b.component.OtherComponent  : This is an ERROR log from another package

4.1. Profile-based Logback Configuration

Another way to set up a profile-specific configuration for our tests is to set the logging.config property in application.properties for our profile:

logging.config=classpath:logback-testloglevel.xml

Or, yet another, say if we want to have a single Logback configuration on our classpath, is to use the springProfile element in logback.xml:

<configuration>
    <include resource="/org/springframework/boot/logging/logback/base.xml"/>
    <appender name="STDOUT" class="ch.qos.logback.core.ConsoleAppender">
        <encoder>
            <pattern>%d{HH:mm:ss.SSS} [%thread] %-5level %logger{36} - %msg%n
            </pattern>
        </encoder>
    </appender>
    <root level="error">
        <appender-ref ref="STDOUT"/>
    </root>
    <springProfile name="logback-test1">
        <logger name="com.baeldung.testloglevel" level="info"/>
    </springProfile>
    <springProfile name="logback-test2">
        <logger name="com.baeldung.testloglevel" level="trace"/>
    </springProfile>
</configuration>

Now, if we call the TestLogLevelController in our tests with the profile logback-test1, we will get the following output:

2019-04-01 14:08:27.545  INFO 56585 --- [nio-8080-exec-1] c.b.testloglevel.TestLogLevelController  : This is an INFO log
2019-04-01 14:08:27.546 ERROR 56585 --- [nio-8080-exec-1] c.b.testloglevel.TestLogLevelController  : This is an ERROR log
2019-04-01 14:08:27.546  INFO 56585 --- [nio-8080-exec-1] c.b.component.OtherComponent  : This is an INFO log from another package
2019-04-01 14:08:27.546 ERROR 56585 --- [nio-8080-exec-1] c.b.component.OtherComponent  : This is an ERROR log from another package

On the other hand, If we change the profile to logback-test2, the output will be:

2019-04-01 14:08:27.545 DEBUG 56585 --- [nio-8080-exec-1] c.b.testloglevel.TestLogLevelController  : This is a DEBUG log
2019-04-01 14:08:27.545  INFO 56585 --- [nio-8080-exec-1] c.b.testloglevel.TestLogLevelController  : This is an INFO log
2019-04-01 14:08:27.546 ERROR 56585 --- [nio-8080-exec-1] c.b.testloglevel.TestLogLevelController  : This is an ERROR log
2019-04-01 14:08:27.546  INFO 56585 --- [nio-8080-exec-1] c.b.component.OtherComponent  : This is an INFO log from another package
2019-04-01 14:08:27.546 ERROR 56585 --- [nio-8080-exec-1] c.b.component.OtherComponent  : This is an ERROR log from another package

5. A Log4J Alternative

Alternatively, if we use Log4J2, we can set the log level in the log4j2-spring.xml file within src/test/resources:

<Configuration>
    <Appenders>
        <Console name="Console" target="SYSTEM_OUT">
            <PatternLayout
                    pattern="%d{HH:mm:ss.SSS} [%thread] %-5level %logger{36} - %msg%n" />
        </Console>
    </Appenders>

    <Loggers>
        <Logger name="com.baeldung.testloglevel" level="debug" />

        <Root level="info">
            <AppenderRef ref="Console" />
        </Root>
    </Loggers>
</Configuration>

We can set the path of our Log4J configuration by setting the logging.config property in application.properties:

logging.config=classpath:log4j-testloglevel.xml

Finally, let’s check the output after applying the above settings:

2019-04-01 14:08:27.545 DEBUG 56585 --- [nio-8080-exec-1] c.b.testloglevel.TestLogLevelController  : This is a DEBUG log
2019-04-01 14:08:27.545  INFO 56585 --- [nio-8080-exec-1] c.b.testloglevel.TestLogLevelController  : This is an INFO log
2019-04-01 14:08:27.546 ERROR 56585 --- [nio-8080-exec-1] c.b.testloglevel.TestLogLevelController  : This is an ERROR log
2019-04-01 14:08:27.546  INFO 56585 --- [nio-8080-exec-1] c.b.component.OtherComponent  : This is an INFO log from another package
2019-04-01 14:08:27.546 ERROR 56585 --- [nio-8080-exec-1] c.b.component.OtherComponent  : This is an ERROR log from another package

6. Conclusion

In this article, we’ve learned how to set the log level when testing a Spring Boot application. We explored a number of different ways of configuring it.

Setting the log level in Spring Boot’s application.properties showed itself as the easiest, especially when we are using the @SpringBootTest annotation.

As always, the source code for these examples is over on GitHub.

Spring Boot With H2 Database

$
0
0

1. Overview

In this tutorial, we’ll explore using H2 with Spring Boot. Just like other databases, there’s full intrinsic support for it in the Spring Boot ecosystem.

2. Dependencies

So, let’s begin with the h2 and spring-boot-starter-data-jpa dependencies:

<dependency>
    <groupId>org.springframework.boot</groupId>
    <artifactId>spring-boot-starter-data-jpa</artifactId>
    <version>2.1.4.RELEASE</version>
</dependency>
<dependency>
    <groupId>com.h2database</groupId>
    <artifactId>h2</artifactId>
    <scope>runtime</scope>
    <version>1.4.199</version>
</dependency>

Of course, Spring Boot manages these versions for us, so normally, we’ll just leave off the version element.

3. Database Configuration

By default, Spring Boot configures the application to connect to an in-memory store with the username sa and an empty password. However, we can change those parameters by adding the following properties to the application.properties file:

spring.datasource.url=jdbc:h2:mem:testdb
spring.datasource.driverClassName=org.h2.Driver
spring.datasource.username=sa
spring.datasource.password=password
spring.jpa.database-platform=org.hibernate.dialect.H2Dialect

By design, the in-memory database is volatile and data will be lost when we restart the application.

We can change that behavior by using file-based storage. To do this we need to update the spring.datasource.url:

spring.datasource.url=jdbc:h2:file:/data/demo

The path, like /data/demo here, has to be absolute. The database can also operate in other modes.

4. Database Operations

Carrying out CRUD operations with H2 within Spring Boot is the same as with other SQL databases and our tutorials in the Spring Persistence series does a good job of covering this.

In the meantime, let’s add a data.sql file in src/main/resources:

DROP TABLE IF EXISTS billionaires;

CREATE TABLE billionaires (
  id INT AUTO_INCREMENT  PRIMARY KEY,
  first_name VARCHAR(250) NOT NULL,
  last_name VARCHAR(250) NOT NULL,
  career VARCHAR(250) DEFAULT NULL
);

INSERT INTO billionaires (first_name, last_name, career) VALUES
  ('Aliko', 'Dangote', 'Billionaire Industrialist'),
  ('Bill', 'Gates', 'Billionaire Tech Entrepreneur'),
  ('Folrunsho', 'Alakija', 'Billionaire Oil Magnate');

Spring Boot will automatically pick up the data.sql and run it against our configured H2 database during application startup. This is a good way to seed the database for testing or other purposes.

5. Accessing the H2 Console

H2 database has an embedded GUI console for browsing the contents of a database and running SQL queries. By default, the H2 console is not enabled in Spring. So to enable it, we need to add the following property to application.properties:

spring.h2.console.enabled=true

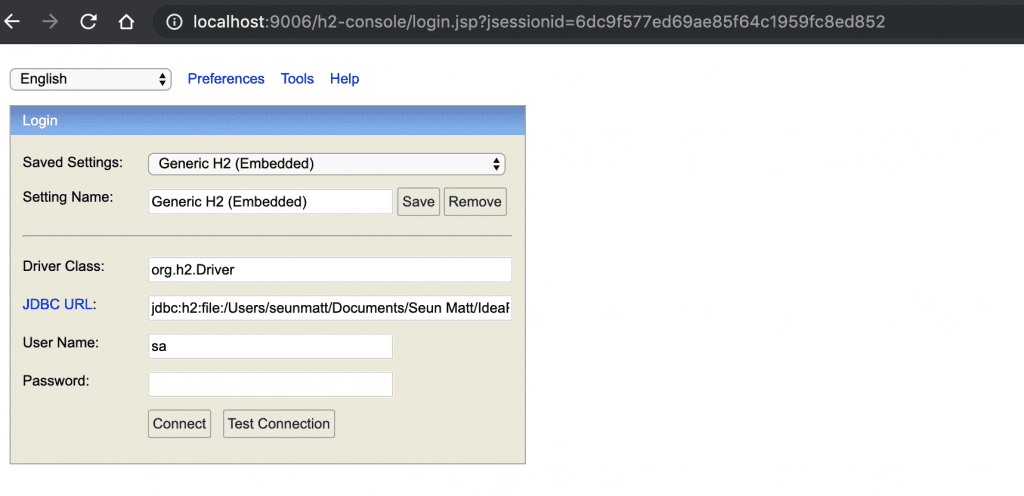
Then, after starting the application, we can navigate to http://localhost:8080/h2-console which will present us with a login page. On the login page, we’ll supply the same credentials as we used in the application.properties:

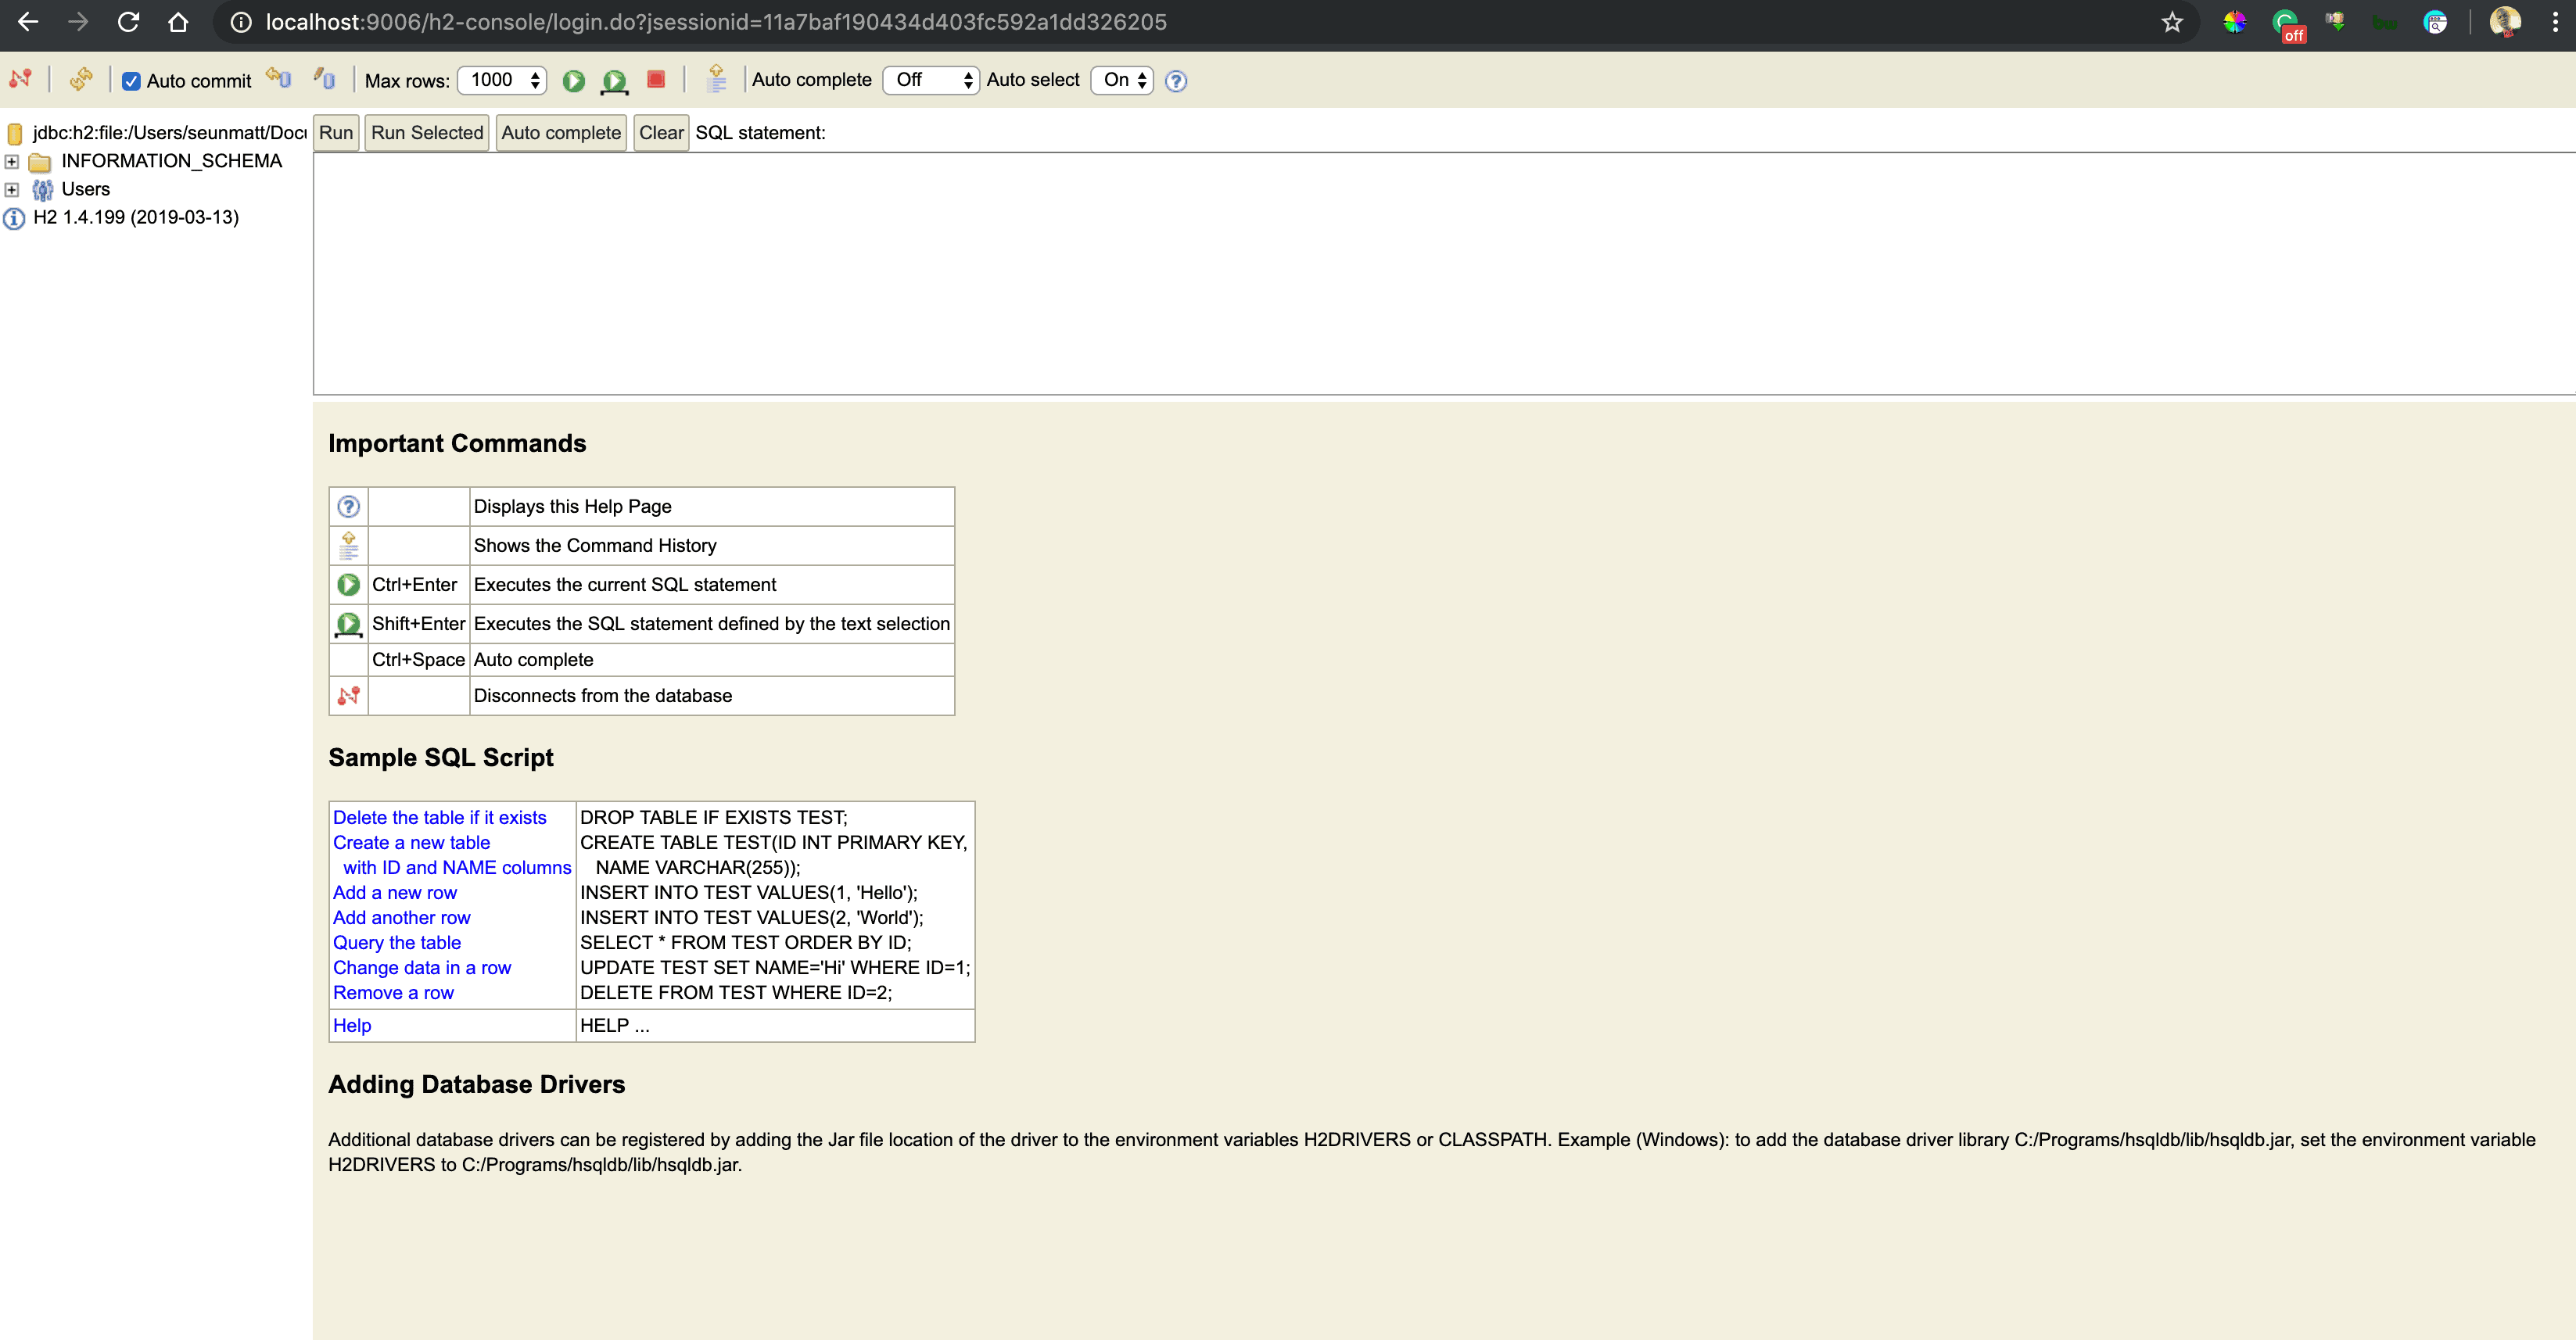
Once we connect, we’ll see a comprehensive webpage that lists all the tables on the left side of the page and a textbox for running SQL queries:

The web console has an auto-complete feature that suggests SQL keywords. The fact that the console is lightweight makes it handy for visually inspecting the database or executing raw SQL directly.

Moreover, we can further configure the console by specifying the following properties in the project’s application.properties with our desired values:

spring.h2.console.path=/h2-console
spring.h2.console.settings.trace=false
spring.h2.console.settings.web-allow-others=false

In the snippet above, we set the console path to be /h2-console which is relative to the address and port of our running application. Therefore if our app is running at http://localhost:9001 then the console will be available at http://localhost:9001/h2-console.

Furthermore, we set spring.h2.console.settings.trace to false to prevent trace output and we can also disable remote access by setting spring.h2.console.settings.web-allow-others to false.

6. Conclusion

The H2 database is fully compatible with Spring Boot. We’ve seen how to configure it and how to use the H2 console for managing our running database.

The complete source code is available over on Github.

How to Configure Spring Boot Tomcat

$
0
0

1. Overview

Spring Boot web applications include a pre-configured, embedded web server by default. In some situations though, we’d like to modify the default configuration to meet custom requirements.

In this tutorial, we’ll look at a few common use cases for configuring the Tomcat embedded server through the application.properties file.

2. Common Embedded Tomcat Configurations

2.1. Server Address And Port

The most common configuration we may wish to change is the port number:

server.port=80

If we don’t provide the server.port parameter it’s set to 8080 by default.

In some cases, we may wish to set a network address to which the server should bind. In other words, we define an IP address where our server will listen:

server.address=my_custom_ip

By default, the value is set to 0.0.0.0 which allows connection via all IPv4 addresses. Setting another value, for example, localhost – 127.0.0.1 – will make the server more selective.

2.2. Error Handling

By default, Spring Boot provides a standard error web page. This page is called the Whitelabel. It’s enabled by default but if we don’t want to display any error information we can  disable it:

server.error.whitelabel.enabled=false

The default path to a Whitelabel is /error. We can customize it by setting the server.error.path parameter:

server.error.path=/user-error

We can also set properties that will determine which information about the error is presented. For example, we can include the error message and the stack trace:

server.error.include-exception=true
server.error.include-stacktrace=always

Our tutorials Exception Message Handling for REST and Customize Whitelabel Error Page explain more about handling errors in Spring Boot.

2.3. Server Connections

When running on a low resource container we might like to decrease the CPU and memory load. One way of doing that is to limit the number of simultaneous requests that can be handled by our application. Conversely, we can increase this value to use more available resources to get better performance.

In Spring Boot, we can define the maximum amount of Tomcat worker threads:

server.tomcat.max-threads=200

When configuring a web server, it also might be useful to set the server connection timeout. This represents the maximum amount of time the server will wait for the client to make their request after connecting before the connection is closed:

server.connection-timeout=5s

We can also define the maximum size of a request header:

server.max-http-header-size=8KB

The maximum size of a request body:

server.tomcat.max-swallow-size=2MB

Or a maximum size of the whole post request:

server.tomcat.max-http-post-size=2MB

2.4. SSL

To enable SSL support in our Spring Boot application we need to set the server.ssl.enabled property to true and define an SSL protocol:

server.ssl.enabled=true
server.ssl.protocol=TLS

We should also configure the password, type, and path to the key store that holds the certificate:

server.ssl.key-store-password=my_password
server.ssl.key-store-type=keystore_type
server.ssl.key-store=keystore-path

And we must also define the alias that identifies our key in the key store:

server.ssl.key-alias=tomcat

For more information about SSL configuration, visit our HTTPS using self-signed certificate in Spring Boot article.

2.5. Tomcat Server Access Logs

Tomcat access logs are very useful when trying to measure page hit counts, user session activity, and so on.

To enable access logs, simply set:

server.tomcat.accesslog.enabled=true

We should also configure other parameters such as directory name, prefix, suffix, and date format appended to log files:

server.tomcat.accesslog.directory=logs
server.tomcat.accesslog.file-date-format=yyyy-MM-dd
server.tomcat.accesslog.prefix=access_log
server.tomcat.accesslog.suffix=.log

3. Conclusion

In this tutorial, we’ve learned a few common Tomcat embedded server configurations. To view more possible configurations, please visit the official Spring Boot application properties docs page.

As always, the source code for these examples is available over on GitHub.

Spring Data Web Support

$
0
0

1. Overview

Spring MVC and Spring Data each do a great job simplifying application development in their own right. But, what if we put them together?

In this tutorial, we’ll take a look at Spring Data’s web support and how its resolvers can reduce boilerplate and make our controllers more expressive.

Along the way, we’ll peek at Querydsl and what its integration with Spring Data looks like.

2. A Bit of Background

Spring Data’s web support is a set of web-related features implemented on top of the standard Spring MVC platform, aimed at adding extra functionality to the controller layer.

Spring Data web support’s functionality is built around several resolver classes. Resolvers streamline the implementation of controller methods that interoperate with Spring Data repositories and also enrich them with additional features.

These features include fetching domain objects from the repository layer, without having to explicitly call the repository implementations, and constructing controller responses that can be sent to clients as segments of data that support pagination and sorting.

Also, requests to controller methods that take one or more request parameters can be internally resolved to Querydsl queries.

3. A Demo Spring Boot Project

To understand how we can use Spring Data web support to improve our controllers’ functionality, let’s create a basic Spring Boot project.

Our demo project’s Maven dependencies are fairly standard, with a few exceptions that we’ll discuss later on:

<dependency>
    <groupId>org.springframework.boot</groupId>
    <artifactId>spring-boot-starter-data-jpa</artifactId>
</dependency>
<dependency>
    <groupId>org.springframework.boot</groupId>
    <artifactId>spring-boot-starter-web</artifactId>
</dependency>
<dependency>
    <groupId>com.h2database</groupId>
    <artifactId>h2</artifactId>
    <scope>runtime</scope>
</dependency>
<dependency>
    <groupId>org.springframework.boot</groupId>
    <artifactId>spring-boot-starter-test</artifactId>
    <scope>test</scope>
</dependency>

In this case, we included spring-boot-starter-web, as we’ll use it for creating a RESTful controller, spring-boot-starter-jpa for implementing the persistence layer, and spring-boot-starter-test for testing the controller API.

Since we’ll use H2 as the underlying database, we included com.h2database as well.

Let’s keep in mind that spring-boot-starter-web enables Spring Data web support by default. Hence, we don’t need to create any additional @Configuration classes to get it working within our application.

Conversely, for non-Spring Boot projects, we’d need to define a @Configuration class and annotate it with the @EnableWebMvc and @EnableSpringDataWebSupport annotations.

3.1. The Domain Class

Now, let’s add a simple User JPA entity class to the project, so we can have a working domain model to play with:

@Entity
@Table(name = "users")
public class User {

    @Id
    @GeneratedValue(strategy = GenerationType.AUTO)
    private long id;
    private final String name;
   
    // standard constructor / getters / toString

}

3.2. The Repository Layer

To keep the code simple, the functionality of our demo Spring Boot application will be narrowed to just fetching some User entities from an H2 in-memory database.

Spring Boot makes it easy to create repository implementations that provide minimal CRUD functionality out-of-the-box. Therefore, let’s define a simple repository interface that works with the User JPA entities:

@Repository
public interface UserRepository extends PagingAndSortingRepository<User, Long> {}

There’s nothing inherently complex in the definition of the UserRepository interface, except that it extends PagingAndSortingRepository.

This signals Spring MVC to enable automatic paging and sorting capabilities on database records.

3.3. The Controller Layer

Now, we need to implement at least a basic RESTful controller that acts as the middle tier between the client and the repository layer.

Therefore, let’s create a controller class, which takes a UserRepository instance in its constructor and adds a single method for finding User entities by id:

@RestController
public class UserController {

    @GetMapping("/users/{id}")
    public User findUserById(@PathVariable("id") User user) {
        return user;
    }
}

3.4.  Running the Application

Finally, let’s define the application’s main class and populate the H2 database with a few User entities:

@SpringBootApplication
public class Application {

    public static void main(String[] args) {
        SpringApplication.run(Application.class, args);
    }

    @Bean
    CommandLineRunner initialize(UserRepository userRepository) {
        return args -> {
            Stream.of("John", "Robert", "Nataly", "Helen", "Mary").forEach(name -> {
                User user = new User(name);
                userRepository.save(user);
            });
            userRepository.findAll().forEach(System.out::println);
        };
    }
}

Now, let’s run the application. As expected, we see the list of persisted User entities printed out to the console on startup:

User{id=1, name=John}
User{id=2, name=Robert}
User{id=3, name=Nataly}
User{id=4, name=Helen}
User{id=5, name=Mary}

4. The DomainClassConverter Class

For now, the UserController class only implements the findUserById() method.

At first sight, the method implementation looks fairly simple. But it actually encapsulates a lot of Spring Data web support functionality behind the scenes.

Since the method takes a User instance as an argument, we might end up thinking that we need to explicitly pass the domain object in the request. But, we don’t.

Spring MVC uses the DomainClassConverter class to convert the id path variable into the domain class’s id type and uses it for fetching the matching domain object from the repository layer. No further lookup is necessary.

For instance, a GET HTTP request to the http://localhost:8080/users/1 endpoint will return the following result:

{
  "id":1,
  "name":"John"
}

Hence, we can create an integration test and check the behavior of the findUserById() method:

@Test
public void whenGetRequestToUsersEndPointWithIdPathVariable_thenCorrectResponse() throws Exception {
    mockMvc.perform(MockMvcRequestBuilders.get("/users/{id}", "1")
      .contentType(MediaType.APPLICATION_JSON_UTF8))
      .andExpect(MockMvcResultMatchers.status().isOk())
      .andExpect(MockMvcResultMatchers.jsonPath("$.id").value("1"));
    }
}

Alternatively, we can use a REST API test tool, such as Postman, to test the method.

The nice thing about DomainClassConverter is that we don’t need to explicitly call the repository implementation in the controller method.

By simply specifying the id path variable, along with a resolvable domain class instance, we’ve automatically triggered the domain object’s lookup.

5. The PageableHandlerMethodArgumentResolver Class

Spring MVC supports the use of Pageable types in controllers and repositories.

Simply put, a Pageable instance is an object that holds paging information. Therefore, when we pass a Pageable argument to a controller method, Spring MVC uses the PageableHandlerMethodArgumentResolver class to resolve the Pageable instance into a PageRequest object, which is a simple Pageable implementation.

5.1. Using Pageable as a Controller Method Parameter

To understand how the PageableHandlerMethodArgumentResolver class works, let’s add a new method to the UserController class:

@GetMapping("/users")
public Page<User> findAllUsers(Pageable pageable) {
    return userRepository.findAll(pageable);
}

In contrast to the findUserById() method, here we need to call the repository implementation to fetch all the User JPA entities persisted in the database.

Since the method takes a Pageable instance, it returns a subset of the entire set of entities, stored in a Page<User> object.

A Page object is a sublist of a list of objects that exposes several methods we can use for retrieving information about the paged results, including the total number of result pages, and the number of the page that we’re retrieving.

By default, Spring MVC uses the PageableHandlerMethodArgumentResolver class to construct a PageRequest object, with the following request parameters:

  • page: the index of page that we want to retrieve – the parameter is zero-indexed and its default value is 0
  • size: the number of pages that we want to retrieve – the default value is 20
  • sort: one or more properties that we can use for sorting the results, using the following format: property1,property2(,asc|desc) – for instance, ?sort=name&sort=email,asc

For example, a GET request to the http://localhost:8080/users endpoint will return the following output:

{
  "content":[
    {
      "id":1,
      "name":"John"
    },
    {
      "id":2,
      "name":"Robert"
    },
    {
      "id":3,
      "name":"Nataly"
    },
    {
      "id":4,
      "name":"Helen"
    },
    {
      "id":5,
      "name":"Mary"
    }],
  "pageable":{
    "sort":{
      "sorted":false,
      "unsorted":true,
      "empty":true
    },
    "pageSize":5,
    "pageNumber":0,
    "offset":0,
    "unpaged":false,
    "paged":true
  },
  "last":true,
  "totalElements":5,
  "totalPages":1,
  "numberOfElements":5,
  "first":true,
  "size":5,
  "number":0,
  "sort":{
    "sorted":false,
    "unsorted":true,
    "empty":true
  },
  "empty":false
}

As we can see, the response includes the first, pageSize, totalElements, and totalPages JSON elements. This is really useful since a front-end can use these elements for easily creating a paging mechanism.

In addition, we can use an integration test to check the findAllUsers() method:

@Test
public void whenGetRequestToUsersEndPoint_thenCorrectResponse() throws Exception {
    mockMvc.perform(MockMvcRequestBuilders.get("/users")
      .contentType(MediaType.APPLICATION_JSON_UTF8))
      .andExpect(MockMvcResultMatchers.status().isOk())
      .andExpect(MockMvcResultMatchers.jsonPath("$['pageable']['paged']").value("true"));
}

5.2. Customizing the Paging Parameters

In many cases, we’ll want to customize the paging parameters. The simplest way to accomplish this is by using the @PageableDefault annotation:

@GetMapping("/users")
public Page<User> findAllUsers(@PageableDefault(value = 2, page = 0) Pageable pageable) {
    return userRepository.findAll(pageable);
}

Alternatively, we can use PageRequest‘s of() static factory method to create a custom PageRequest object and pass it to the repository method:

@GetMapping("/users")
public Page<User> findAllUsers() {
    Pageable pageable = PageRequest.of(0, 5);
    return userRepository.findAll(pageable);
}

The first parameter is the zero-based page index, while the second one is the size of the page that we want to retrieve.

In the example above, we created a PageRequest object of User entities, starting with the first page (0), with the page having 5 entries.

Additionally, we can build a PageRequest object using the page and size request parameters:

@GetMapping("/users")
public Page<User> findAllUsers(@RequestParam("page") int page, 
  @RequestParam("size") int size, Pageable pageable) {
    return userRepository.findAll(pageable);
}

Using this implementation, a GET request to the http://localhost:8080/users?page=0&size=2 endpoint will return the first page of User objects, and the size of the result page will be 2:

{
  "content": [
    {
      "id": 1,
      "name": "John"
    },
    {
      "id": 2,
      "name": "Robert"
    }
  ],
   
  // continues with pageable metadata
  
}

6. The SortHandlerMethodArgumentResolver Class

Paging is the de-facto approach for efficiently managing large numbers of database records. But, on its own, it’s pretty useless if we can’t sort the records in some specific way.

To this end, Spring MVC provides the SortHandlerMethodArgumentResolver class. The resolver automatically creates Sort instances from request parameters or from @SortDefault annotations.

6.1. Using the sort Controller Method Parameter

To get a clear idea of how the SortHandlerMethodArgumentResolver class works, let’s add the findAllUsersSortedByName() method to the controller class:

@GetMapping("/sortedusers")
public Page<User> findAllUsersSortedByName(@RequestParam("sort") String sort, Pageable pageable) {
    return userRepository.findAll(pageable);
}

In this case, the SortHandlerMethodArgumentResolver class will create a Sort object by using the sort request parameter.

As a result, a GET request to the http://localhost:8080/sortedusers?sort=name endpoint will return a JSON array, with the list of User objects sorted by the name property:

{
  "content": [
    {
      "id": 4,
      "name": "Helen"
    },
    {
      "id": 1,
      "name": "John"
    },
    {
      "id": 5,
      "name": "Mary"
    },
    {
      "id": 3,
      "name": "Nataly"
    },
    {
      "id": 2,
      "name": "Robert"
    }
  ],
  
  // continues with pageable metadata
  
}

6.2. Using the Sort.by() Static Factory Method

Alternatively, we can create a Sort object by using the Sort.by() static factory method, which takes a non-null, non-empty array of String properties to be sorted.

In this case, we’ll sort the records only by the name property:

@GetMapping("/sortedusers")
public Page<User> findAllUsersSortedByName() {
    Pageable pageable = PageRequest.of(0, 5, Sort.by("name"));
    return userRepository.findAll(pageable);
}

Of course, we could use multiple properties, as long as they’re declared in the domain class.

6.3. Using the @SortDefault Annotation

Likewise, we can use the @SortDefault annotation and get the same results:

@GetMapping("/sortedusers")
public Page<User> findAllUsersSortedByName(@SortDefault(sort = "name", 
  direction = Sort.Direction.ASC) Pageable pageable) {
    return userRepository.findAll(pageable);
}

Finally, let’s create an integration test to check the method’s behavior:

@Test
public void whenGetRequestToSorteredUsersEndPoint_thenCorrectResponse() throws Exception {
    mockMvc.perform(MockMvcRequestBuilders.get("/sortedusers")
      .contentType(MediaType.APPLICATION_JSON_UTF8))
      .andExpect(MockMvcResultMatchers.status().isOk())
      .andExpect(MockMvcResultMatchers.jsonPath("$['sort']['sorted']").value("true"));
}

7. Querydsl Web Support

As we mentioned in the introduction, Spring Data web support allows us to use request parameters in controller methods to build Querydsl‘s Predicate types and to construct Querydsl queries.

To keep things simple, we’ll just see how Spring MVC converts a request parameter into a Querydsl BooleanExpression, which in turn is passed to a QuerydslPredicateExecutor.

To accomplish this, first we need to add the querydsl-apt and querydsl-jpa Maven dependencies to the pom.xml file:

<dependency>
    <groupId>com.querydsl</groupId>
    <artifactId>querydsl-apt</artifactId>
</dependency>
<dependency>
    <groupId>com.querydsl</groupId>
    <artifactId>querydsl-jpa</artifactId>
</dependency>

Next, we need to refactor our UserRepository interface, which must also extend the QuerydslPredicateExecutor interface:

@Repository
public interface UserRepository extends PagingAndSortingRepository<User, Long>,
  QuerydslPredicateExecutor<User> {
}

Finally, let’s add the following method to the UserController class:

@GetMapping("/filteredusers")
public Iterable<User> getUsersByQuerydslPredicate(@QuerydslPredicate(root = User.class) 
  Predicate predicate) {
    return userRepository.findAll(predicate);
}

Although the method implementation looks fairly simple, it actually exposes a lot of functionality beneath the surface.

Let’s say that we want to fetch from the database all the User entities that match a given name. We can achieve this by just calling the method and specifying a name request parameter in the URL:

http://localhost:8080/filteredusers?name=John

As expected, the request will return the following result:

[
  {
    "id": 1,
    "name": "John"
  }
]

As we did before, we can use an integration test to check the getUsersByQuerydslPredicate() method:

@Test
public void whenGetRequestToFilteredUsersEndPoint_thenCorrectResponse() throws Exception {
    mockMvc.perform(MockMvcRequestBuilders.get("/filteredusers")
      .param("name", "John")
      .contentType(MediaType.APPLICATION_JSON_UTF8))
      .andExpect(MockMvcResultMatchers.status().isOk())
      .andExpect(MockMvcResultMatchers.jsonPath("$[0].name").value("John"));
}

This is just a basic example of how Querydsl web support works. But it actually doesn’t reveal all of its power.

Now, let’s say that we want to fetch a User entity that matches a given id. In such a case, we just need to pass an id request parameter in the URL:

http://localhost:8080/filteredusers?id=2

In this case, we’ll get this result:

[
  {
    "id": 2,
    "name": "Robert"
  }
]

It’s clear to see that Querydsl web support is a very powerful feature that we can use to fetch database records matching a given condition.

In all the cases, the whole process boils down to just calling a single controller method with different request parameters.

8. Conclusion

In this tutorial, we took an in-depth look at Spring web support’s key components and learned how to use it within a demo Spring Boot project.

As usual, all the examples shown in this tutorial are available over on GitHub.

Anonymous Classes in Java

$
0
0

1. Introduction

In this tutorial, we’ll consider anonymous classes in Java.

We’ll describe how we can declare and create instances of them. We’ll also briefly discuss their properties and limitations.

2. Anonymous Class Declaration

Anonymous classes are inner classes with no name. Since they have no name, we can’t use them in order to create instances of anonymous classes. As a result, we have to declare and instantiate anonymous classes in a single expression at the point of use.

We may either extend an existing class or implement an interface.

2.1. Extend a Class

When we instantiate an anonymous class from an existent one, we use the following syntax:

In the parentheses, we specify the parameters that are required by the constructor of the class that we are extending:

new Book("Design Patterns") {
    @Override
    public String description() {
        return "Famous GoF book.";
    }
}

Naturally, if the parent class constructor accepts no arguments, we should leave the parentheses empty.

2.2. Implement an Interface

We may instantiate an anonymous class from an interface as well:

Obviously, Java’s interfaces have no constructors, so the parentheses always remain empty. This is the only way we should do it to implement the interface’s methods:

new Runnable() {
    @Override
    public void run() {
        ...
    }
}

Once we have instantiated an anonymous class, we can assign that instance to a variable in order to be able to reference it somewhere later.

We can do this using the standard syntax for Java expressions:

Runnable action = new Runnable() {
    @Override
    public void run() {
        ...
    }
};

As we already mentioned, an anonymous class declaration is an expression, hence it must be a part of a statement. This explains why we have put a semicolon at the end of the statement.

Obviously, we can avoid assigning the instance to a variable if we create that instance inline:

List<Runnable> actions = new ArrayList<Runnable>();
actions.add(new Runnable() {
    @Override
    public void run() {
        ...
    }
});

We should use this syntax with great care as it might easily suffer the code readability especially when the implementation of the run() method takes a lot of space.

3. Anonymous Class Properties

There are certain particularities in using anonymous classes with respect to usual top-level classes. Here we briefly touch the most practical issues. For the most precise and updated information, we may always look at the Java Language Specification.

3.1. Constructor

The syntax of anonymous classes does not allow us to make them implement multiple interfaces. During construction, there might exist exactly one instance of an anonymous class. Therefore, they can never be abstract. Since they have no name, we can’t extend them. For the same reason, anonymous classes cannot have explicitly declared constructors.

In fact, the absence of a constructor doesn’t represent any problem for us for the following reasons:

  1. we create anonymous class instances at the same moment as we declare them
  2. from anonymous class instances, we can access local variables and enclosing class’s members

3.2. Static Members

Anonymous classes cannot have any static members except for those that are constant.

For example, this won’t compile:

new Runnable() {
    static final int x = 0;
    static int y = 0; // compilation error!

    @Override
    public void run() {...}
};

Instead, we’ll get the following error:

The field y cannot be declared static in a non-static inner type, unless initialized with a constant expression

3.3. Scope of Variables

Anonymous classes capture local variables that are in the scope of the block in which we have declared the class:

int count = 1;
Runnable action = new Runnable() {
    @Override
    public void run() {
        System.out.println("Runnable with captured variables: " + count);
    }           
};

As we see, the local variables count and action are defined in the same block. For this reason, we can access count from within the class declaration.

Note that in order to be able to use local variables, they must be effectively final. Since JDK 8, it is not required anymore that we declare variables with the keyword final. Nevertheless, those variables must be final. Otherwise, we get a compilation error:

[ERROR] local variables referenced from an inner class must be final or effectively final

In order the compiler decides that a variable is, in fact, immutable, in the code, there should be only one place in which we assign a value to it. We might find more information about effectively final variables in our article “Why Do Local Variables Used in Lambdas Have to Be Final or Effectively Final?

Let us just mention that as every inner class, an anonymous class can access all members of its enclosing class.

4. Anonymous Class Use Cases

There might be a big variety of applications of anonymous classes. Let’s explore some possible use cases.

4.1. Class Hierarchy and Encapsulation

We should use inner classes in general use cases and anonymous ones in very specific ones in order to achieve a cleaner hierarchy of classes in our application. When using inner classes, we may achieve a finer encapsulation of the enclosing class’s data. If we define the inner class functionality in a top-level class, then the enclosing class should have public or package visibility of some of its members. Naturally, there are situations when it is not very appreciated or even accepted.

4.2. Cleaner Project Structure

We usually use anonymous classes when we have to modify on the fly the implementation of methods of some classes. In this case, we can avoid adding new *.java files to the project in order to define top-level classes. This is especially true if that top-level class would be used just one time.

4.3. UI Event Listeners

In applications with a graphical interface, the most common use case of anonymous classes is to create various event listeners. For example, in the following snippet:

button.addActionListener(new ActionListener() {
    public void actionPerformed(ActionEvent e) {
        ...
    }
}

we create an instance of an anonymous class that implements interface ActionListener. Its actionPerformed method gets triggered when a user clicks the button.

Since Java 8, lambda expressions seem to be a more preferred way though.

5. General Picture

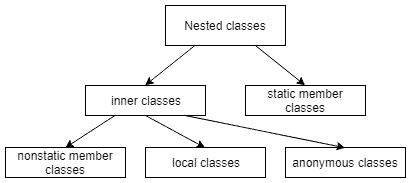
Anonymous classes that we considered above are just a particular case of nested classes. Generally, a nested class is a class that is declared inside another class or interface:

Looking at the diagram, we see that anonymous classes along with local and nonstatic member ones form the so-called inner classes. Together with static member classes, they form the nested classes.

6. Conclusion

In this article, we’ve considered various aspects of Java anonymous classes. We’ve described as well a general hierarchy of nested classes.

As always, the complete code is available over in our GitHub repository.


Persisting Maps with Hibernate

$
0
0

1. Introduction

In Hibernate, we can represent one-to-many relationships in our Java beans by having one of our fields be a List.

In this quick tutorial, we’ll explore various ways of doing this with a Map instead.

2. Maps Are Different from Lists

Using a Map to represent a one-to-many relationship is different from a List because we have a key.

This key turns our entity relationship into a ternary association, where each key refers to a simple value or an embeddable object or an entity. Because of this, to use a Map, we’ll always need a join table to store the foreign key that references the parent entity – the key, and the value.

But this join table will be a bit different from other join tables in that the primary key won’t necessarily be foreign keys to the parent and the target. Instead, we’ll have the primary key be a composite of a foreign key to the parent and a column that is the key to our Map.

The key-value pair in the Map may be of two types: Value Type and Entity Type. In the following sections, we’ll look at the ways to represent these associations in Hibernate.

3. Using @MapKeyColumn

Let’s say we have an Order entity and we want to keep track of name and price of all the items in an order. So, we want to introduce a Map<String, Double> to Order which will map the item’s name to its price:

@Entity
@Table(name = "orders")
public class Order {
    @Id
    @GeneratedValue
    @Column(name = "id")
    private int id;

    @ElementCollection
    @CollectionTable(name = "order_item_mapping", 
      joinColumns = {@JoinColumn(name = "order_id", referencedColumnName = "id")})
    @MapKeyColumn(name = "item_name")
    @Column(name = "price")
    private Map<String, Double> itemPriceMap;

    //standard getters and setters
}

We need to indicate to Hibernate where to get the key and the value. For the key, we’ve used @MapKeyColumn, indicating that the Map‘s key is the item_name column of our join table, order_item_mapping. Similarly, @Column specifies that the Map’s value corresponds to the price column of the join table.

Also, itemPriceMap object is a value type map, thus we must use the @ElementCollection annotation.

In addition to basic value type objects, @Embeddable objects can also be used as the Map‘s values in a similar fashion.

4. Using @MapKey

As we all know, requirements changes over time — so, now, let’s say we need to store some more attributes of Item along with itemName and itemPrice:

@Entity
@Table(name = "item")
public class Item {
    @Id
    @GeneratedValue
    @Column(name = "id")
    private int id;

    @Column(name = "name")
    private String itemName;

    @Column(name = "price")
    private double itemPrice;

    @Column(name = "item_type")
    @Enumerated(EnumType.STRING)
    private ItemType itemType;

    @Temporal(TemporalType.TIMESTAMP)
    @Column(name = "created_on")
    private Date createdOn;
   
    //standard getters and setters
}

Accordingly, let’s change Map<String, Double> to Map<String, Item> in the Order entity class:

@Entity
@Table(name = "orders")
public class Order {
    @Id
    @GeneratedValue
    @Column(name = "id")
    private int id;

    @OneToMany(cascade = CascadeType.ALL)
    @JoinTable(name = "order_item_mapping", 
      joinColumns = {@JoinColumn(name = "order_id", referencedColumnName = "id")},
      inverseJoinColumns = {@JoinColumn(name = "item_id", referencedColumnName = "id")})
    @MapKey(name = "itemName")
    private Map<String, Item> itemMap;

}

Note that this time, we’ll use the @MapKey annotation so that Hibernate will use Item#itemName as the map key column instead of introducing an additional column in the join table. So, in this case, the join table order_item_mapping doesn’t have a key column — instead, it refers to the Item‘s name.

This is in contrast to @MapKeyColumn. When we use @MapKeyColumn, the map key resides in the join table. This is the reason why we can’t define our entity mapping using both the annotations in conjunction.

Also, itemMap is an entity type map, therefore we have to annotate the relationship using @OneToMany or @ManyToMany.

5. Using @MapKeyEnumerated and @MapKeyTemporal

Whenever we specify an enum as the Map key, we use @MapKeyEnumerated. Similarly, for temporal values, @MapKeyTemporal is used. The behavior is quite similar to the standard @Enumerated and @Temporal annotations respectively.

By default, these are similar to @MapKeyColumn in that a key column will be created in the join table. If we want to reuse the value already stored in the persisted entity, we should additionally mark the field with @MapKey.

6. Using @MapKeyJoinColumn

Next, let’s say we also need to keep track of the seller of each item. One way we might do this is to add a Seller entity and tie that to our Item entity:

@Entity
@Table(name = "seller")
public class Seller {

    @Id
    @GeneratedValue
    @Column(name = "id")
    private int id;

    @Column(name = "name")
    private String sellerName;
   
    // standard getters and setters

}
@Entity
@Table(name = "item")
public class Item {
    @Id
    @GeneratedValue
    @Column(name = "id")
    private int id;

    @Column(name = "name")
    private String itemName;

    @Column(name = "price")
    private double itemPrice;

    @Column(name = "item_type")
    @Enumerated(EnumType.STRING)
    private ItemType itemType;

    @Temporal(TemporalType.TIMESTAMP)
    @Column(name = "created_on")
    private Date createdOn;

    @ManyToOne(cascade = CascadeType.ALL)
    @JoinColumn(name = "seller_id")
    private Seller seller;
 
    // standard getters and setters
}

In this case, let’s assume our use-case is to group all Order‘s Items by Seller. Hence, let’s change Map<String, Item> to Map<Seller, Item>:

@Entity
@Table(name = "orders")
public class Order {
    @Id
    @GeneratedValue
    @Column(name = "id")
    private int id;

    @OneToMany(cascade = CascadeType.ALL)
    @JoinTable(name = "order_item_mapping", 
      joinColumns = {@JoinColumn(name = "order_id", referencedColumnName = "id")},
      inverseJoinColumns = {@JoinColumn(name = "item_id", referencedColumnName = "id")})
    @MapKeyJoinColumn(name = "seller_id")
    private Map<Seller, Item> sellerItemMap;

    // standard getters and setters

}

We need to add @MapKeyJoinColumn to achieve this since that annotation allows Hibernate to keep the seller_id column (the map key) in the join table order_item_mapping along with the item_id column. So then, at the time of reading the data from the database, we can perform a GROUP BY operation easily.

7. Conclusion

In this article, we learned about the several ways of persisting Map in Hibernate depending upon the required mapping.

As always, the source code of this tutorial can be found over Github.

Types of SQL Joins

$
0
0

1. Introduction

In this tutorial, we’ll show different types of SQL joins and how they can be easily implemented in Java.

2. Defining the Model

Let’s start by creating two simple tables:

CREATE TABLE AUTHOR
(
  ID int NOT NULL PRIMARY KEY,
  FIRST_NAME varchar(255),
  LAST_NAME varchar(255)
);

CREATE TABLE ARTICLE
(
  ID int NOT NULL PRIMARY KEY,
  TITLE varchar(255) NOT NULL,
  AUTHOR_ID int,
  FOREIGN KEY(AUTHOR_ID) REFERENCES AUTHOR(ID)
);

And fill them with some test data:

INSERT INTO AUTHOR VALUES 
(1, 'Siena', 'Kerr'),
(2, 'Daniele', 'Ferguson'),
(3, 'Luciano', 'Wise'),
(4, 'Jonas', 'Lugo');

INSERT INTO ARTICLE VALUES
(1, 'First steps in Java', 1),
(2, 'SpringBoot tutorial', 1),
(3, 'Java 12 insights', null),
(4, 'SQL JOINS', 2),
(5, 'Introduction to Spring Security', 3);

Note that in our sample data set, not all authors have articles, and vice-versa. This will play a big part in our examples, which we’ll see later.

Let’s also define a POJO that we’ll use for storing the results of JOIN operations throughout our tutorial:

class ArticleWithAuthor {

    private String title;
    private String authorFirstName;
    private String authorLastName;

    // standard constructor, setters and getters
}

In our examples, we’ll extract a title from the ARTICLE table and authors data from the AUTHOR table.

3. Configuration

For our examples, we’ll use an external PostgreSQL database running on port 5432. Apart from the FULL JOIN, which is not supported in either MySQL or H2, all provided snippets should work with any SQL provider.

For our Java implementation, we’ll need a PostgreSQL driver:

<dependency>
    <groupId>org.postgresql</groupId>
    <artifactId>postgresql</artifactId>
    <version>42.2.5</version>
    <scope>test</scope>
</dependency>

Let’s first configure a java.sql.Connection to work with our database:

Class.forName("org.postgresql.Driver");
Connection connection = DriverManager.
  getConnection("jdbc:postgresql://localhost:5432/myDb", "user", "pass");

Next, let’s create a DAO class and some utility methods:

class ArticleWithAuthorDAO {

    private final Connection connection;

    // constructor

    private List<ArticleWithAuthor> executeQuery(String query) {
        try (Statement statement = connection.createStatement()) {
            ResultSet resultSet = statement.executeQuery(query);
            return mapToList(resultSet);
        } catch (SQLException e) {
            e.printStackTrace();
        }
            return new ArrayList<>();
    }

    private List<ArticleWithAuthor> mapToList(ResultSet resultSet) throws SQLException {
        List<ArticleWithAuthor> list = new ArrayList<>();
        while (resultSet.next()) {
            ArticleWithAuthor articleWithAuthor = new ArticleWithAuthor(
              resultSet.getString("TITLE"),
              resultSet.getString("FIRST_NAME"),
              resultSet.getString("LAST_NAME")
            );
            list.add(articleWithAuthor);
        }
        return list;
    }
}

In this article, we’ll not dive into details about using ResultSet, Statement, and Connection. These topics are covered in our JDBC related articles.

Let’s start exploring SQL joins in sections below.

4. Inner Join

Let’s start with possibly the simplest type of join. The INNER JOIN is an operation that selects rows matching a provided condition from both tables. The query consists of at least three parts: select columns, join tables and join condition.

Bearing that in mind, the syntax itself becomes pretty straightforward:

SELECT ARTICLE.TITLE, AUTHOR.LAST_NAME, AUTHOR.FIRST_NAME
  FROM ARTICLE INNER JOIN AUTHOR 
  ON AUTHOR.ID=ARTICLE.AUTHOR_ID

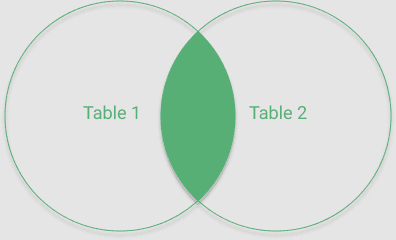
We can also illustrate the result of INNER JOIN as a common part of intersecting sets:

Let’s now implement the method for the INNER JOIN in the ArticleWithAuthorDAO class:

List<ArticleWithAuthor> articleInnerJoinAuthor() {
    String query = "SELECT ARTICLE.TITLE, AUTHOR.LAST_NAME, AUTHOR.FIRST_NAME "
      + "FROM ARTICLE INNER JOIN AUTHOR ON AUTHOR.ID=ARTICLE.AUTHOR_ID";
    return executeQuery(query);
}

And test it:

@Test
public void whenQueryWithInnerJoin_thenShouldReturnProperRows() {
    List<ArticleWithAuthor> articleWithAuthorList = articleWithAuthorDAO.articleInnerJoinAuthor();

    assertThat(articleWithAuthorList).hasSize(4);
    assertThat(articleWithAuthorList)
      .noneMatch(row -> row.getAuthorFirstName() == null || row.getTitle() == null);
}

As we mentioned before, the INNER JOIN selects only common rows by a provided condition. Looking at our inserts, we see that we have one article without an author and one author without an article. These rows are skipped because they don’t fulfill the provided condition. As a result, we retrieve four joined results, and none of them has empty authors data nor empty title.

5. Left Join

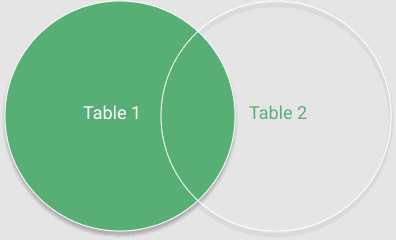
Next, let’s focus on the LEFT JOIN. This kind of join selects all rows from the first table and matches corresponding rows from the second table. For when there is no match, columns are filled with null values.

Before we dive into Java implementation, let’s have a look at a graphical representation of the LEFT JOIN:

In this case, the result of the LEFT JOIN includes every record from the set representing the first table with intersecting values from the second table.

Now, let’s move to the Java implementation:

List<ArticleWithAuthor> articleLeftJoinAuthor() {
    String query = "SELECT ARTICLE.TITLE, AUTHOR.LAST_NAME, AUTHOR.FIRST_NAME "
      + "FROM ARTICLE LEFT JOIN AUTHOR ON AUTHOR.ID=ARTICLE.AUTHOR_ID";
    return executeQuery(query);
}

The only difference to the previous example is that we used the LEFT keyword instead of the INNER keyword.

Before we test our LEFT JOIN method, let’s again take a look at our inserts. In this case, we’ll receive all the records from the ARTICLE table and their matching rows from the AUTHOR table. As we mentioned before, not every article has an author yet, so we expect to have null values in place of author data:

@Test
public void whenQueryWithLeftJoin_thenShouldReturnProperRows() {
    List<ArticleWithAuthor> articleWithAuthorList = articleWithAuthorDAO.articleLeftJoinAuthor();

    assertThat(articleWithAuthorList).hasSize(5);
    assertThat(articleWithAuthorList).anyMatch(row -> row.getAuthorFirstName() == null);
}

6. Right Join

The RIGHT JOIN is much like the LEFT JOIN, but it returns all rows from the second table and matches rows from the first table. Like in case of the LEFT JOIN, empty matches are replaced by null values.

The graphical representation of this kind of join is a mirror reflection of the one we’ve illustrated for the LEFT JOIN:

Let’s implement the RIGHT JOIN in Java:

List<ArticleWithAuthor> articleRightJoinAuthor() {
    String query = "SELECT ARTICLE.TITLE, AUTHOR.LAST_NAME, AUTHOR.FIRST_NAME "
      + "FROM ARTICLE RIGHT JOIN AUTHOR ON AUTHOR.ID=ARTICLE.AUTHOR_ID";
    return executeQuery(query);
}

Again, let’s look at our test data. Since this join operation retrieves all records from the second table we expect to retrieve five rows, and because not every author has already written an article, we expect some null values in the TITLE column:

@Test
public void whenQueryWithRightJoin_thenShouldReturnProperRows() {
    List<ArticleWithAuthor> articleWithAuthorList = articleWithAuthorDAO.articleRightJoinAuthor();

    assertThat(articleWithAuthorList).hasSize(5);
    assertThat(articleWithAuthorList).anyMatch(row -> row.getTitle() == null);
}

7. Full Outer Join

This join operation is probably the most tricky one. The FULL JOIN selects all rows from both the first and the second table regardless of whether the condition is met or not.

We can also represent the same idea as all values from each of the intersecting sets:

Let’s have a look at the Java implementation:

List<ArticleWithAuthor> articleOuterJoinAuthor() {
    String query = "SELECT ARTICLE.TITLE, AUTHOR.LAST_NAME, AUTHOR.FIRST_NAME "
      + "FROM ARTICLE FULL JOIN AUTHOR ON AUTHOR.ID=ARTICLE.AUTHOR_ID";
    return executeQuery(query);
}

Now, we can test our method:

@Test
public void whenQueryWithFullJoin_thenShouldReturnProperRows() {
    List<ArticleWithAuthor> articleWithAuthorList = articleWithAuthorDAO.articleOuterJoinAuthor();

    assertThat(articleWithAuthorList).hasSize(6);
    assertThat(articleWithAuthorList).anyMatch(row -> row.getTitle() == null);
    assertThat(articleWithAuthorList).anyMatch(row -> row.getAuthorFirstName() == null);
}

Once more, let’s look at the test data. We have five different articles, one of which has no author, and four authors, one of which has no assigned article. As a result of the FULL JOIN, we expect to retrieve six rows. Four of them are matched against each other, and the remaining two are not. For that reason, we also assume that there will be at least one row with null values in both AUTHOR data columns and one with a null value in the TITLE column.

8. Conclusion

In this article, we explored the basic types of SQL joins. We looked at examples of four types of joins and how they can be implemented in Java.

As always, the complete code used in this article is available over on GitHub.

Guide to Guava Multiset

$
0
0

1. Overview

In this tutorial, we’ll explore one of the Guava collections – Multiset. Like a java.util.Set, it allows for efficient storage and retrieval of items without a guaranteed order.

However, unlike a Set, it allows for multiple occurrences of the same element by tracking the count of each unique element it contains.

2. Maven Dependency

First, let’s add the guava dependency:

<dependency>
    <groupId>com.google.guava</groupId>
    <artifactId>guava</artifactId>
    <version>27.1-jre</version>
</dependency>

3. Using Multiset

Let’s consider a bookstore which has multiple copies of different books. We might want to perform operations like adding a copy, getting the number of copies, and removing one copy when it’s sold. As a Set does not allow for multiple occurrences of the same element, it can’t handle this requirement.

Let’s get started by adding copies of a book title. The Multiset should return that the title exists and provide us with the correct count:

Multiset<String> bookStore = HashMultiset.create();
bookStore.add("Potter");

assertThat(bookStore.contains("Potter")).isTrue();
assertThat(bookStore.count("Potter")).isEqualTo(3);

Now let’s remove one copy. We expect the count to be updated accordingly:

bookStore.remove("Potter");
assertThat(bookStore.contains("Potter")).isTrue();
assertThat(bookStore.count("Potter")).isEqualTo(2);

And actually, we can just set the count instead of performing various add operations:

bookStore.setCount("Potter", 50); 
assertThat(bookStore.count("Potter")).isEqualTo(50);

Multiset validates the count value. If we set it to negative, an IllegalArgumentException is thrown:

assertThatThrownBy(() -> bookStore.setCount("Potter", -1))
  .isInstanceOf(IllegalArgumentException.class);

4. Comparison with Map

Without access to Multiset, we could achieve all of the operations above by implementing our own logic using java.util.Map:

Map<String, Integer> bookStore = new HashMap<>();
// adding 3 copies
bookStore.put("Potter", 3);

assertThat(bookStore.containsKey("Potter")).isTrue();
assertThat(bookStore.get("Potter")).isEqualTo(3);

// removing 1 copy
bookStore.put("Potter", 2);
assertThat(bookStore.get("Potter")).isEqualTo(2);

When we want to add or remove a copy using a Map, we need to remember the current count and adjust it accordingly. We also need to implement this logic in our calling code every time or construct our own library for this purpose. Our code would also need to control the value argument. If we’re not careful, we could easily set the value to null or negative even though both the values are invalid:

bookStore.put("Potter", null);
assertThat(bookStore.containsKey("Potter")).isTrue();

bookStore.put("Potter", -1);
assertThat(bookStore.containsKey("Potter")).isTrue();

As we can see, it is a lot more convenient to use Multiset instead of Map.

5. Concurrency

When we want to use Multiset in a concurrent environment, we can use ConcurrentHashMultiset, which is a thread-safe Multiset implementation.

We should note that being thread-safe does not guarantee consistency, though. Using the add or remove methods will work well in a multi-threaded environment, but what if several threads called the setCount method? 

If we use the setCount method, the final result would depend on the order of execution across threads, which cannot necessarily be predicted. The add and remove methods are incremental, and the ConcurrentHashMultiset is able to protect their behavior. Setting the count directly is not incremental and so can cause unexpected results when used concurrently.

However, there’s another flavor of the setCount method which updates the count only if its current value matches the passed argument. The method returns true if the operation succeeded, a form of optimistic locking:

Multiset<String> bookStore = HashMultiset.create();
// updates the count to 2 if current count is 0
assertThat(bookStore.setCount("Potter", 0, 2)).isTrue();
// updates the count to 5 if the current value is 50
assertThat(bookStore.setCount("Potter", 50, 5)).isFalse();

If we want to use the setCount method in concurrent code, we should use the above version to guarantee consistency. A multi-threaded client could perform a retry if changing the count failed.

6. Conclusion

In this short tutorial, we discussed when and how to use a Multiset, compared it with a standard Map and looked at how best to use it in a concurrent application.

As always, the source code for the examples can be found over on GitHub.

Spring Data JPA and Null Parameters

$
0
0

1. Overview

In this article, we’ll show the ways of handling null parameters in Spring Data JPA.

In some cases, when we search for records by parameters we want to find rows with null as the field value. Other times, we may want to ignore a null and skip that field in our query.

Below we’ll show how to implement each of these.

2. Quick Example

Let’s say we have a Customer entity:

@Entity
public class Customer {

    @Id
    @GeneratedValue
    private long id;
    private String name;
    private String email;

    public Customer(String name, String email) {
        this.name = name;
        this.email = email;
    }

    // getters/setters

}

Also, we have a JPA repository:

public interface CustomerRepository extends JpaRepository<Customer, Long> { 

   // method1
   // method2
}

We want to search for customers by name and email.

For this purpose, we’ll write two methods that handle null parameters differently.

3. Ways to Handle Null Parameters

Firstly, we’ll create a method that interprets null values of the parameters as IS NULL, and then we’ll create a method that ignores null parameters and excludes them from the WHERE clause.

3.1. IS NULL Query

The first method is very simple to create because null parameters in the query methods are interpreted as IS NULL by default.

Let’s create the method:

List<Customer> findByNameAndEmail(String name, String email);

Now if we pass a null email, the generated JPQL will include the IS NULL condition:

customer0_.email is null

To demonstrate this let’s create a test.

First, we’ll add some customers to the repository:

@Before
public void before() {
    entityManager.persist(new Customer("A", "A@example.com"));
    entityManager.persist(new Customer("D", null));
    entityManager.persist(new Customer("D", "D@example.com"));
}

Now let’s pass “D” as the value of the name parameter and null as the value of the email parameter to our query method. We can see that exactly one customer will be found:

List<Customer> customers = repository.findByNameAndEmail("D", null);

assertEquals(1, customers.size());

Customer actual = customers.get(0);

assertEquals(null, actual.getEmail());
assertEquals("D", actual.getName());

3.2. Avoid null Parameter with Alternative Methods

Sometimes we want to ignore some parameters and not include their corresponding fields in the WHERE clause.

We can add more query methods to our repository. For example, to ignore email we can add a method that only accepts name:

 List<Customer> findByName(String name);

But such a way of ignoring one of our columns scaled poorly as the number increases, as we would have to add many methods to achieve all the combinations.

3.3. Ignoring null Parameters Using the @Query Annotation

We can avoid creating additional methods by using the @Query annotation and adding a small complication to the JPQL statement:

@Query("SELECT c FROM Customer c WHERE (:name is null or c.name = :name) and (:email is null or c.email = :email)")
List<Customer> findCustomerByNameAndEmail(@Param("name") String name, @Param("email") String email);

Notice that if the: email parameter is null:

:email is null or s.email = :email

Then the clause is always true and so doesn’t influence the whole WHERE clause.

Let’s make sure that this works:

List<Customer> customers = repository.findCustomerByNameAndEmail("D", null);

assertEquals(2, customers.size());

We found two customers whose name is “D” ignoring their emails.

The generated JPQL WHERE clause looks like this:

where (? is null or customer0_.name=?) and (? is null or customer0_.email=?)

With this method, we are putting trust in the database server to recognize the clause regarding our query parameter being null and optimize the execution plan of the query so that it doesn’t have a significant performance overhead. For some queries or database servers, especially involving a huge table scan, there could be a performance overhead.

4. Conclusion

We’ve demonstrated how Spring Data JPA interprets null parameters in query methods and shown how to change the default behavior.

Perhaps in the future, we’ll be able to specify how to interpret null parameters using the @NullMeans annotation.  Notice that it’s a proposed feature at this time and is still under consideration.

To sum up, there are two main ways to interpret null parameters, and they would both be provided by the proposed @NullMeans annotation:

  • IS (is null) – the default option demonstrated in section 3.1.
  • IGNORED (exclude a null parameter from the WHERE clause) – achieved either by extra query methods (section 3.2.) or by using a workaround (section 3.3.)

As usual, the complete source code is available over on GitHub.

Setting the Log Level in Spring Boot when Testing

$
0
0

1. Overview

In this tutorial, we’ll show how to set the log level when running tests for a Spring Boot application.

Although we can mostly ignore the logs while our tests are passing, choosing the right log level can be critical if there is a need to diagnose failed tests.

2. The Importance of the Log Level

Configuring the log level correctly can save us a lot of time.

For example, if tests are failing on a CI server but passing on our development machine, we won’t be able to diagnose the failing tests unless we have enough log output. On the other side, if we log too much detail, it might be more difficult to find useful information.

To achieve the right amount of detail, we can fine-tune the logging levels of our application’s packages. If we find that a Java package is more critical for our tests, we can give it a lower level, like DEBUG. Similarly, to avoid having too much noise in our logs we can configure a higher level, say INFO or ERROR, for packages that are less important.

Let’s explore various ways of setting the logging level.

3. Logging Settings in application.properties

If we want to modify the log level in our tests, there is a property we can set in src/test/resources/application.properties:

logging.level.com.baeldung.testloglevel=DEBUG

This property will set the log level specifically for the com.baeldung.testloglevel package.

Similarly, we can change the logging level for all packages by setting the root log level:

logging.level.root=INFO

Now, let’s try out our logging settings by adding a REST endpoint that writes some logs:

@RestController
public class TestLogLevelController {

    private static final Logger LOG = LoggerFactory.getLogger(TestLogLevelController.class);

    @Autowired
    private OtherComponent otherComponent;

    @GetMapping("/testLogLevel")
    public String testLogLevel() {
        LOG.trace("This is a TRACE log");
        LOG.debug("This is a DEBUG log");
        LOG.info("This is an INFO log");
        LOG.error("This is an ERROR log");

        otherComponent.processData();

        return "Added some log output to console...";
    }

}

As expected, if we call this endpoint in our testswe’ll be able to see the DEBUG logs from TestLogLevelController:

2019-04-01 14:08:27.545 DEBUG 56585 --- [nio-8080-exec-1] c.b.testloglevel.TestLogLevelController  : This is a DEBUG log
2019-04-01 14:08:27.545  INFO 56585 --- [nio-8080-exec-1] c.b.testloglevel.TestLogLevelController  : This is an INFO log
2019-04-01 14:08:27.546 ERROR 56585 --- [nio-8080-exec-1] c.b.testloglevel.TestLogLevelController  : This is an ERROR log
2019-04-01 14:08:27.546  INFO 56585 --- [nio-8080-exec-1] c.b.component.OtherComponent  : This is an INFO log from another package
2019-04-01 14:08:27.546 ERROR 56585 --- [nio-8080-exec-1] c.b.component.OtherComponent  : This is an ERROR log from another package

Setting the log level like this is quite easy, and we should definitely do it this way if our tests are annotated with @SpringBootTest. However, if we don’t use that annotation, we’ll have to configure the log level in a different way.

3.1. Profile-based Logging Settings

Although putting the settings into src/test/application.properties would work it in most situations, there might be cases where we would like to have different settings for one test or a group of tests.

In that case, we can add a Spring profile to our test by using the ActiveProfiles annotation:

@RunWith(SpringRunner.class)
@SpringBootTest(webEnvironment = WebEnvironment.RANDOM_PORT, classes = TestLogLevelApplication.class)
@EnableAutoConfiguration(exclude = SecurityAutoConfiguration.class)
@ActiveProfiles("logging-test")
public class TestLogLevelWithProfileIntegrationTest {

    // ...

}

Our logging settings will then be in a special application-testloglevel.properties file within src/test/resources:

logging.level.com.baeldung.testloglevel=TRACE
logging.level.root=ERROR

If we call TestLogLevelController from our tests with the described settings, we will now see the TRACE logs from our controller, and there will be no more INFO logs from other packages:

2019-04-01 14:08:27.545 DEBUG 56585 --- [nio-8080-exec-1] c.b.testloglevel.TestLogLevelController  : This is a DEBUG log
2019-04-01 14:08:27.545  INFO 56585 --- [nio-8080-exec-1] c.b.testloglevel.TestLogLevelController  : This is an INFO log
2019-04-01 14:08:27.546 ERROR 56585 --- [nio-8080-exec-1] c.b.testloglevel.TestLogLevelController  : This is an ERROR log
2019-04-01 14:08:27.546 ERROR 56585 --- [nio-8080-exec-1] c.b.component.OtherComponent  : This is an ERROR log from another package

4. Configuring Logback

If we use Logback, which is used by default in Spring Boot, we can set the log level in the logback-test.xml file within src/test/resources:

<configuration>
    <include resource="/org/springframework/boot/logging/logback/base.xml"/>
    <appender name="STDOUT" class="ch.qos.logback.core.ConsoleAppender">
        <encoder>
            <pattern>%d{HH:mm:ss.SSS} [%thread] %-5level %logger{36} - %msg%n
            </pattern>
        </encoder>
    </appender>
    <root level="error">
        <appender-ref ref="STDOUT"/>
    </root>
    <logger name="com.baeldung.testloglevel" level="debug"/>
</configuration>

The above example shows how to set the log level in our Logback configuration for tests.  The root log level is set to INFO and the log level for our com.baeldung.testloglevel package is set to DEBUG.

Again, let’s check the output after applying the settings from above:

2019-04-01 14:08:27.545 DEBUG 56585 --- [nio-8080-exec-1] c.b.testloglevel.TestLogLevelController  : This is a DEBUG log
2019-04-01 14:08:27.545  INFO 56585 --- [nio-8080-exec-1] c.b.testloglevel.TestLogLevelController  : This is an INFO log
2019-04-01 14:08:27.546 ERROR 56585 --- [nio-8080-exec-1] c.b.testloglevel.TestLogLevelController  : This is an ERROR log
2019-04-01 14:08:27.546  INFO 56585 --- [nio-8080-exec-1] c.b.component.OtherComponent  : This is an INFO log from another package
2019-04-01 14:08:27.546 ERROR 56585 --- [nio-8080-exec-1] c.b.component.OtherComponent  : This is an ERROR log from another package

4.1. Profile-based Logback Configuration

Another way to set up a profile-specific configuration for our tests is to set the logging.config property in application.properties for our profile:

logging.config=classpath:logback-testloglevel.xml

Or, yet another, say if we want to have a single Logback configuration on our classpath, is to use the springProfile element in logback.xml:

<configuration>
    <include resource="/org/springframework/boot/logging/logback/base.xml"/>
    <appender name="STDOUT" class="ch.qos.logback.core.ConsoleAppender">
        <encoder>
            <pattern>%d{HH:mm:ss.SSS} [%thread] %-5level %logger{36} - %msg%n
            </pattern>
        </encoder>
    </appender>
    <root level="error">
        <appender-ref ref="STDOUT"/>
    </root>
    <springProfile name="logback-test1">
        <logger name="com.baeldung.testloglevel" level="info"/>
    </springProfile>
    <springProfile name="logback-test2">
        <logger name="com.baeldung.testloglevel" level="trace"/>
    </springProfile>
</configuration>

Now, if we call the TestLogLevelController in our tests with the profile logback-test1, we will get the following output:

2019-04-01 14:08:27.545  INFO 56585 --- [nio-8080-exec-1] c.b.testloglevel.TestLogLevelController  : This is an INFO log
2019-04-01 14:08:27.546 ERROR 56585 --- [nio-8080-exec-1] c.b.testloglevel.TestLogLevelController  : This is an ERROR log
2019-04-01 14:08:27.546  INFO 56585 --- [nio-8080-exec-1] c.b.component.OtherComponent  : This is an INFO log from another package
2019-04-01 14:08:27.546 ERROR 56585 --- [nio-8080-exec-1] c.b.component.OtherComponent  : This is an ERROR log from another package

On the other hand, If we change the profile to logback-test2, the output will be:

2019-04-01 14:08:27.545 DEBUG 56585 --- [nio-8080-exec-1] c.b.testloglevel.TestLogLevelController  : This is a DEBUG log
2019-04-01 14:08:27.545  INFO 56585 --- [nio-8080-exec-1] c.b.testloglevel.TestLogLevelController  : This is an INFO log
2019-04-01 14:08:27.546 ERROR 56585 --- [nio-8080-exec-1] c.b.testloglevel.TestLogLevelController  : This is an ERROR log
2019-04-01 14:08:27.546  INFO 56585 --- [nio-8080-exec-1] c.b.component.OtherComponent  : This is an INFO log from another package
2019-04-01 14:08:27.546 ERROR 56585 --- [nio-8080-exec-1] c.b.component.OtherComponent  : This is an ERROR log from another package

5. A Log4J Alternative

Alternatively, if we use Log4J2, we can set the log level in the log4j2-spring.xml file within src/test/resources:

<Configuration>
    <Appenders>
        <Console name="Console" target="SYSTEM_OUT">
            <PatternLayout
                    pattern="%d{HH:mm:ss.SSS} [%thread] %-5level %logger{36} - %msg%n" />
        </Console>
    </Appenders>

    <Loggers>
        <Logger name="com.baeldung.testloglevel" level="debug" />

        <Root level="info">
            <AppenderRef ref="Console" />
        </Root>
    </Loggers>
</Configuration>

We can set the path of our Log4J configuration by setting the logging.config property in application.properties:

logging.config=classpath:log4j-testloglevel.xml

Finally, let’s check the output after applying the above settings:

2019-04-01 14:08:27.545 DEBUG 56585 --- [nio-8080-exec-1] c.b.testloglevel.TestLogLevelController  : This is a DEBUG log
2019-04-01 14:08:27.545  INFO 56585 --- [nio-8080-exec-1] c.b.testloglevel.TestLogLevelController  : This is an INFO log
2019-04-01 14:08:27.546 ERROR 56585 --- [nio-8080-exec-1] c.b.testloglevel.TestLogLevelController  : This is an ERROR log
2019-04-01 14:08:27.546  INFO 56585 --- [nio-8080-exec-1] c.b.component.OtherComponent  : This is an INFO log from another package
2019-04-01 14:08:27.546 ERROR 56585 --- [nio-8080-exec-1] c.b.component.OtherComponent  : This is an ERROR log from another package

6. Conclusion

In this article, we’ve learned how to set the log level when testing a Spring Boot application. We explored a number of different ways of configuring it.

Setting the log level in Spring Boot’s application.properties showed itself as the easiest, especially when we are using the @SpringBootTest annotation.

As always, the source code for these examples is over on GitHub.

Spring Boot With H2 Database

$
0
0

1. Overview

In this tutorial, we’ll explore using H2 with Spring Boot. Just like other databases, there’s full intrinsic support for it in the Spring Boot ecosystem.

2. Dependencies

So, let’s begin with the h2 and spring-boot-starter-data-jpa dependencies:

<dependency>
    <groupId>org.springframework.boot</groupId>
    <artifactId>spring-boot-starter-data-jpa</artifactId>
    <version>2.1.4.RELEASE</version>
</dependency>
<dependency>
    <groupId>com.h2database</groupId>
    <artifactId>h2</artifactId>
    <scope>runtime</scope>
    <version>1.4.199</version>
</dependency>

Of course, Spring Boot manages these versions for us, so normally, we’ll just leave off the version element.

3. Database Configuration

By default, Spring Boot configures the application to connect to an in-memory store with the username sa and an empty password. However, we can change those parameters by adding the following properties to the application.properties file:

spring.datasource.url=jdbc:h2:mem:testdb
spring.datasource.driverClassName=org.h2.Driver
spring.datasource.username=sa
spring.datasource.password=password
spring.jpa.database-platform=org.hibernate.dialect.H2Dialect

By design, the in-memory database is volatile and data will be lost when we restart the application.

We can change that behavior by using file-based storage. To do this we need to update the spring.datasource.url:

spring.datasource.url=jdbc:h2:file:/data/demo

The path, like /data/demo here, has to be absolute. The database can also operate in other modes.

4. Database Operations

Carrying out CRUD operations with H2 within Spring Boot is the same as with other SQL databases and our tutorials in the Spring Persistence series does a good job of covering this.

In the meantime, let’s add a data.sql file in src/main/resources:

DROP TABLE IF EXISTS billionaires;

CREATE TABLE billionaires (
  id INT AUTO_INCREMENT  PRIMARY KEY,
  first_name VARCHAR(250) NOT NULL,
  last_name VARCHAR(250) NOT NULL,
  career VARCHAR(250) DEFAULT NULL
);

INSERT INTO billionaires (first_name, last_name, career) VALUES
  ('Aliko', 'Dangote', 'Billionaire Industrialist'),
  ('Bill', 'Gates', 'Billionaire Tech Entrepreneur'),
  ('Folrunsho', 'Alakija', 'Billionaire Oil Magnate');

Spring Boot will automatically pick up the data.sql and run it against our configured H2 database during application startup. This is a good way to seed the database for testing or other purposes.

5. Accessing the H2 Console

H2 database has an embedded GUI console for browsing the contents of a database and running SQL queries. By default, the H2 console is not enabled in Spring. So to enable it, we need to add the following property to application.properties:

spring.h2.console.enabled=true

Then, after starting the application, we can navigate to http://localhost:8080/h2-console which will present us with a login page. On the login page, we’ll supply the same credentials as we used in the application.properties:

Once we connect, we’ll see a comprehensive webpage that lists all the tables on the left side of the page and a textbox for running SQL queries:

The web console has an auto-complete feature that suggests SQL keywords. The fact that the console is lightweight makes it handy for visually inspecting the database or executing raw SQL directly.

Moreover, we can further configure the console by specifying the following properties in the project’s application.properties with our desired values:

spring.h2.console.path=/h2-console
spring.h2.console.settings.trace=false
spring.h2.console.settings.web-allow-others=false

In the snippet above, we set the console path to be /h2-console which is relative to the address and port of our running application. Therefore if our app is running at http://localhost:9001 then the console will be available at http://localhost:9001/h2-console.

Furthermore, we set spring.h2.console.settings.trace to false to prevent trace output and we can also disable remote access by setting spring.h2.console.settings.web-allow-others to false.

6. Conclusion

The H2 database is fully compatible with Spring Boot. We’ve seen how to configure it and how to use the H2 console for managing our running database.

The complete source code is available over on Github.

How to Configure Spring Boot Tomcat

$
0
0

1. Overview

Spring Boot web applications include a pre-configured, embedded web server by default. In some situations though, we’d like to modify the default configuration to meet custom requirements.

In this tutorial, we’ll look at a few common use cases for configuring the Tomcat embedded server through the application.properties file.

2. Common Embedded Tomcat Configurations

2.1. Server Address And Port

The most common configuration we may wish to change is the port number:

server.port=80

If we don’t provide the server.port parameter it’s set to 8080 by default.

In some cases, we may wish to set a network address to which the server should bind. In other words, we define an IP address where our server will listen:

server.address=my_custom_ip

By default, the value is set to 0.0.0.0 which allows connection via all IPv4 addresses. Setting another value, for example, localhost – 127.0.0.1 – will make the server more selective.

2.2. Error Handling

By default, Spring Boot provides a standard error web page. This page is called the Whitelabel. It’s enabled by default but if we don’t want to display any error information we can  disable it:

server.error.whitelabel.enabled=false

The default path to a Whitelabel is /error. We can customize it by setting the server.error.path parameter:

server.error.path=/user-error

We can also set properties that will determine which information about the error is presented. For example, we can include the error message and the stack trace:

server.error.include-exception=true
server.error.include-stacktrace=always

Our tutorials Exception Message Handling for REST and Customize Whitelabel Error Page explain more about handling errors in Spring Boot.

2.3. Server Connections

When running on a low resource container we might like to decrease the CPU and memory load. One way of doing that is to limit the number of simultaneous requests that can be handled by our application. Conversely, we can increase this value to use more available resources to get better performance.

In Spring Boot, we can define the maximum amount of Tomcat worker threads:

server.tomcat.max-threads=200

When configuring a web server, it also might be useful to set the server connection timeout. This represents the maximum amount of time the server will wait for the client to make their request after connecting before the connection is closed:

server.connection-timeout=5s

We can also define the maximum size of a request header:

server.max-http-header-size=8KB

The maximum size of a request body:

server.tomcat.max-swallow-size=2MB

Or a maximum size of the whole post request:

server.tomcat.max-http-post-size=2MB

2.4. SSL

To enable SSL support in our Spring Boot application we need to set the server.ssl.enabled property to true and define an SSL protocol:

server.ssl.enabled=true
server.ssl.protocol=TLS

We should also configure the password, type, and path to the key store that holds the certificate:

server.ssl.key-store-password=my_password
server.ssl.key-store-type=keystore_type
server.ssl.key-store=keystore-path

And we must also define the alias that identifies our key in the key store:

server.ssl.key-alias=tomcat

For more information about SSL configuration, visit our HTTPS using self-signed certificate in Spring Boot article.

2.5. Tomcat Server Access Logs

Tomcat access logs are very useful when trying to measure page hit counts, user session activity, and so on.

To enable access logs, simply set:

server.tomcat.accesslog.enabled=true

We should also configure other parameters such as directory name, prefix, suffix, and date format appended to log files:

server.tomcat.accesslog.directory=logs
server.tomcat.accesslog.file-date-format=yyyy-MM-dd
server.tomcat.accesslog.prefix=access_log
server.tomcat.accesslog.suffix=.log

3. Conclusion

In this tutorial, we’ve learned a few common Tomcat embedded server configurations. To view more possible configurations, please visit the official Spring Boot application properties docs page.

As always, the source code for these examples is available over on GitHub.


Spring Data Web Support

$
0
0

1. Overview

Spring MVC and Spring Data each do a great job simplifying application development in their own right. But, what if we put them together?

In this tutorial, we’ll take a look at Spring Data’s web support and how its resolvers can reduce boilerplate and make our controllers more expressive.

Along the way, we’ll peek at Querydsl and what its integration with Spring Data looks like.

2. A Bit of Background

Spring Data’s web support is a set of web-related features implemented on top of the standard Spring MVC platform, aimed at adding extra functionality to the controller layer.

Spring Data web support’s functionality is built around several resolver classes. Resolvers streamline the implementation of controller methods that interoperate with Spring Data repositories and also enrich them with additional features.

These features include fetching domain objects from the repository layer, without having to explicitly call the repository implementations, and constructing controller responses that can be sent to clients as segments of data that support pagination and sorting.

Also, requests to controller methods that take one or more request parameters can be internally resolved to Querydsl queries.

3. A Demo Spring Boot Project

To understand how we can use Spring Data web support to improve our controllers’ functionality, let’s create a basic Spring Boot project.

Our demo project’s Maven dependencies are fairly standard, with a few exceptions that we’ll discuss later on:

<dependency>
    <groupId>org.springframework.boot</groupId>
    <artifactId>spring-boot-starter-data-jpa</artifactId>
</dependency>
<dependency>
    <groupId>org.springframework.boot</groupId>
    <artifactId>spring-boot-starter-web</artifactId>
</dependency>
<dependency>
    <groupId>com.h2database</groupId>
    <artifactId>h2</artifactId>
    <scope>runtime</scope>
</dependency>
<dependency>
    <groupId>org.springframework.boot</groupId>
    <artifactId>spring-boot-starter-test</artifactId>
    <scope>test</scope>
</dependency>

In this case, we included spring-boot-starter-web, as we’ll use it for creating a RESTful controller, spring-boot-starter-jpa for implementing the persistence layer, and spring-boot-starter-test for testing the controller API.

Since we’ll use H2 as the underlying database, we included com.h2database as well.

Let’s keep in mind that spring-boot-starter-web enables Spring Data web support by default. Hence, we don’t need to create any additional @Configuration classes to get it working within our application.

Conversely, for non-Spring Boot projects, we’d need to define a @Configuration class and annotate it with the @EnableWebMvc and @EnableSpringDataWebSupport annotations.

3.1. The Domain Class

Now, let’s add a simple User JPA entity class to the project, so we can have a working domain model to play with:

@Entity
@Table(name = "users")
public class User {

    @Id
    @GeneratedValue(strategy = GenerationType.AUTO)
    private long id;
    private final String name;
   
    // standard constructor / getters / toString

}

3.2. The Repository Layer

To keep the code simple, the functionality of our demo Spring Boot application will be narrowed to just fetching some User entities from an H2 in-memory database.

Spring Boot makes it easy to create repository implementations that provide minimal CRUD functionality out-of-the-box. Therefore, let’s define a simple repository interface that works with the User JPA entities:

@Repository
public interface UserRepository extends PagingAndSortingRepository<User, Long> {}

There’s nothing inherently complex in the definition of the UserRepository interface, except that it extends PagingAndSortingRepository.

This signals Spring MVC to enable automatic paging and sorting capabilities on database records.

3.3. The Controller Layer

Now, we need to implement at least a basic RESTful controller that acts as the middle tier between the client and the repository layer.

Therefore, let’s create a controller class, which takes a UserRepository instance in its constructor and adds a single method for finding User entities by id:

@RestController
public class UserController {

    @GetMapping("/users/{id}")
    public User findUserById(@PathVariable("id") User user) {
        return user;
    }
}

3.4.  Running the Application

Finally, let’s define the application’s main class and populate the H2 database with a few User entities:

@SpringBootApplication
public class Application {

    public static void main(String[] args) {
        SpringApplication.run(Application.class, args);
    }

    @Bean
    CommandLineRunner initialize(UserRepository userRepository) {
        return args -> {
            Stream.of("John", "Robert", "Nataly", "Helen", "Mary").forEach(name -> {
                User user = new User(name);
                userRepository.save(user);
            });
            userRepository.findAll().forEach(System.out::println);
        };
    }
}

Now, let’s run the application. As expected, we see the list of persisted User entities printed out to the console on startup:

User{id=1, name=John}
User{id=2, name=Robert}
User{id=3, name=Nataly}
User{id=4, name=Helen}
User{id=5, name=Mary}

4. The DomainClassConverter Class

For now, the UserController class only implements the findUserById() method.

At first sight, the method implementation looks fairly simple. But it actually encapsulates a lot of Spring Data web support functionality behind the scenes.

Since the method takes a User instance as an argument, we might end up thinking that we need to explicitly pass the domain object in the request. But, we don’t.

Spring MVC uses the DomainClassConverter class to convert the id path variable into the domain class’s id type and uses it for fetching the matching domain object from the repository layer. No further lookup is necessary.

For instance, a GET HTTP request to the http://localhost:8080/users/1 endpoint will return the following result:

{
  "id":1,
  "name":"John"
}

Hence, we can create an integration test and check the behavior of the findUserById() method:

@Test
public void whenGetRequestToUsersEndPointWithIdPathVariable_thenCorrectResponse() throws Exception {
    mockMvc.perform(MockMvcRequestBuilders.get("/users/{id}", "1")
      .contentType(MediaType.APPLICATION_JSON_UTF8))
      .andExpect(MockMvcResultMatchers.status().isOk())
      .andExpect(MockMvcResultMatchers.jsonPath("$.id").value("1"));
    }
}

Alternatively, we can use a REST API test tool, such as Postman, to test the method.

The nice thing about DomainClassConverter is that we don’t need to explicitly call the repository implementation in the controller method.

By simply specifying the id path variable, along with a resolvable domain class instance, we’ve automatically triggered the domain object’s lookup.

5. The PageableHandlerMethodArgumentResolver Class

Spring MVC supports the use of Pageable types in controllers and repositories.

Simply put, a Pageable instance is an object that holds paging information. Therefore, when we pass a Pageable argument to a controller method, Spring MVC uses the PageableHandlerMethodArgumentResolver class to resolve the Pageable instance into a PageRequest object, which is a simple Pageable implementation.

5.1. Using Pageable as a Controller Method Parameter

To understand how the PageableHandlerMethodArgumentResolver class works, let’s add a new method to the UserController class:

@GetMapping("/users")
public Page<User> findAllUsers(Pageable pageable) {
    return userRepository.findAll(pageable);
}

In contrast to the findUserById() method, here we need to call the repository implementation to fetch all the User JPA entities persisted in the database.

Since the method takes a Pageable instance, it returns a subset of the entire set of entities, stored in a Page<User> object.

A Page object is a sublist of a list of objects that exposes several methods we can use for retrieving information about the paged results, including the total number of result pages, and the number of the page that we’re retrieving.

By default, Spring MVC uses the PageableHandlerMethodArgumentResolver class to construct a PageRequest object, with the following request parameters:

  • page: the index of page that we want to retrieve – the parameter is zero-indexed and its default value is 0
  • size: the number of pages that we want to retrieve – the default value is 20
  • sort: one or more properties that we can use for sorting the results, using the following format: property1,property2(,asc|desc) – for instance, ?sort=name&sort=email,asc

For example, a GET request to the http://localhost:8080/users endpoint will return the following output:

{
  "content":[
    {
      "id":1,
      "name":"John"
    },
    {
      "id":2,
      "name":"Robert"
    },
    {
      "id":3,
      "name":"Nataly"
    },
    {
      "id":4,
      "name":"Helen"
    },
    {
      "id":5,
      "name":"Mary"
    }],
  "pageable":{
    "sort":{
      "sorted":false,
      "unsorted":true,
      "empty":true
    },
    "pageSize":5,
    "pageNumber":0,
    "offset":0,
    "unpaged":false,
    "paged":true
  },
  "last":true,
  "totalElements":5,
  "totalPages":1,
  "numberOfElements":5,
  "first":true,
  "size":5,
  "number":0,
  "sort":{
    "sorted":false,
    "unsorted":true,
    "empty":true
  },
  "empty":false
}

As we can see, the response includes the first, pageSize, totalElements, and totalPages JSON elements. This is really useful since a front-end can use these elements for easily creating a paging mechanism.

In addition, we can use an integration test to check the findAllUsers() method:

@Test
public void whenGetRequestToUsersEndPoint_thenCorrectResponse() throws Exception {
    mockMvc.perform(MockMvcRequestBuilders.get("/users")
      .contentType(MediaType.APPLICATION_JSON_UTF8))
      .andExpect(MockMvcResultMatchers.status().isOk())
      .andExpect(MockMvcResultMatchers.jsonPath("$['pageable']['paged']").value("true"));
}

5.2. Customizing the Paging Parameters

In many cases, we’ll want to customize the paging parameters. The simplest way to accomplish this is by using the @PageableDefault annotation:

@GetMapping("/users")
public Page<User> findAllUsers(@PageableDefault(value = 2, page = 0) Pageable pageable) {
    return userRepository.findAll(pageable);
}

Alternatively, we can use PageRequest‘s of() static factory method to create a custom PageRequest object and pass it to the repository method:

@GetMapping("/users")
public Page<User> findAllUsers() {
    Pageable pageable = PageRequest.of(0, 5);
    return userRepository.findAll(pageable);
}

The first parameter is the zero-based page index, while the second one is the size of the page that we want to retrieve.

In the example above, we created a PageRequest object of User entities, starting with the first page (0), with the page having 5 entries.

Additionally, we can build a PageRequest object using the page and size request parameters:

@GetMapping("/users")
public Page<User> findAllUsers(@RequestParam("page") int page, 
  @RequestParam("size") int size, Pageable pageable) {
    return userRepository.findAll(pageable);
}

Using this implementation, a GET request to the http://localhost:8080/users?page=0&size=2 endpoint will return the first page of User objects, and the size of the result page will be 2:

{
  "content": [
    {
      "id": 1,
      "name": "John"
    },
    {
      "id": 2,
      "name": "Robert"
    }
  ],
   
  // continues with pageable metadata
  
}

6. The SortHandlerMethodArgumentResolver Class

Paging is the de-facto approach for efficiently managing large numbers of database records. But, on its own, it’s pretty useless if we can’t sort the records in some specific way.

To this end, Spring MVC provides the SortHandlerMethodArgumentResolver class. The resolver automatically creates Sort instances from request parameters or from @SortDefault annotations.

6.1. Using the sort Controller Method Parameter

To get a clear idea of how the SortHandlerMethodArgumentResolver class works, let’s add the findAllUsersSortedByName() method to the controller class:

@GetMapping("/sortedusers")
public Page<User> findAllUsersSortedByName(@RequestParam("sort") String sort, Pageable pageable) {
    return userRepository.findAll(pageable);
}

In this case, the SortHandlerMethodArgumentResolver class will create a Sort object by using the sort request parameter.

As a result, a GET request to the http://localhost:8080/sortedusers?sort=name endpoint will return a JSON array, with the list of User objects sorted by the name property:

{
  "content": [
    {
      "id": 4,
      "name": "Helen"
    },
    {
      "id": 1,
      "name": "John"
    },
    {
      "id": 5,
      "name": "Mary"
    },
    {
      "id": 3,
      "name": "Nataly"
    },
    {
      "id": 2,
      "name": "Robert"
    }
  ],
  
  // continues with pageable metadata
  
}

6.2. Using the Sort.by() Static Factory Method

Alternatively, we can create a Sort object by using the Sort.by() static factory method, which takes a non-null, non-empty array of String properties to be sorted.

In this case, we’ll sort the records only by the name property:

@GetMapping("/sortedusers")
public Page<User> findAllUsersSortedByName() {
    Pageable pageable = PageRequest.of(0, 5, Sort.by("name"));
    return userRepository.findAll(pageable);
}

Of course, we could use multiple properties, as long as they’re declared in the domain class.

6.3. Using the @SortDefault Annotation

Likewise, we can use the @SortDefault annotation and get the same results:

@GetMapping("/sortedusers")
public Page<User> findAllUsersSortedByName(@SortDefault(sort = "name", 
  direction = Sort.Direction.ASC) Pageable pageable) {
    return userRepository.findAll(pageable);
}

Finally, let’s create an integration test to check the method’s behavior:

@Test
public void whenGetRequestToSorteredUsersEndPoint_thenCorrectResponse() throws Exception {
    mockMvc.perform(MockMvcRequestBuilders.get("/sortedusers")
      .contentType(MediaType.APPLICATION_JSON_UTF8))
      .andExpect(MockMvcResultMatchers.status().isOk())
      .andExpect(MockMvcResultMatchers.jsonPath("$['sort']['sorted']").value("true"));
}

7. Querydsl Web Support

As we mentioned in the introduction, Spring Data web support allows us to use request parameters in controller methods to build Querydsl‘s Predicate types and to construct Querydsl queries.

To keep things simple, we’ll just see how Spring MVC converts a request parameter into a Querydsl BooleanExpression, which in turn is passed to a QuerydslPredicateExecutor.

To accomplish this, first we need to add the querydsl-apt and querydsl-jpa Maven dependencies to the pom.xml file:

<dependency>
    <groupId>com.querydsl</groupId>
    <artifactId>querydsl-apt</artifactId>
</dependency>
<dependency>
    <groupId>com.querydsl</groupId>
    <artifactId>querydsl-jpa</artifactId>
</dependency>

Next, we need to refactor our UserRepository interface, which must also extend the QuerydslPredicateExecutor interface:

@Repository
public interface UserRepository extends PagingAndSortingRepository<User, Long>,
  QuerydslPredicateExecutor<User> {
}

Finally, let’s add the following method to the UserController class:

@GetMapping("/filteredusers")
public Iterable<User> getUsersByQuerydslPredicate(@QuerydslPredicate(root = User.class) 
  Predicate predicate) {
    return userRepository.findAll(predicate);
}

Although the method implementation looks fairly simple, it actually exposes a lot of functionality beneath the surface.

Let’s say that we want to fetch from the database all the User entities that match a given name. We can achieve this by just calling the method and specifying a name request parameter in the URL:

http://localhost:8080/filteredusers?name=John

As expected, the request will return the following result:

[
  {
    "id": 1,
    "name": "John"
  }
]

As we did before, we can use an integration test to check the getUsersByQuerydslPredicate() method:

@Test
public void whenGetRequestToFilteredUsersEndPoint_thenCorrectResponse() throws Exception {
    mockMvc.perform(MockMvcRequestBuilders.get("/filteredusers")
      .param("name", "John")
      .contentType(MediaType.APPLICATION_JSON_UTF8))
      .andExpect(MockMvcResultMatchers.status().isOk())
      .andExpect(MockMvcResultMatchers.jsonPath("$[0].name").value("John"));
}

This is just a basic example of how Querydsl web support works. But it actually doesn’t reveal all of its power.

Now, let’s say that we want to fetch a User entity that matches a given id. In such a case, we just need to pass an id request parameter in the URL:

http://localhost:8080/filteredusers?id=2

In this case, we’ll get this result:

[
  {
    "id": 2,
    "name": "Robert"
  }
]

It’s clear to see that Querydsl web support is a very powerful feature that we can use to fetch database records matching a given condition.

In all the cases, the whole process boils down to just calling a single controller method with different request parameters.

8. Conclusion

In this tutorial, we took an in-depth look at Spring web support’s key components and learned how to use it within a demo Spring Boot project.

As usual, all the examples shown in this tutorial are available over on GitHub.

Anonymous Classes in Java

$
0
0

1. Introduction

In this tutorial, we’ll consider anonymous classes in Java.

We’ll describe how we can declare and create instances of them. We’ll also briefly discuss their properties and limitations.

2. Anonymous Class Declaration

Anonymous classes are inner classes with no name. Since they have no name, we can’t use them in order to create instances of anonymous classes. As a result, we have to declare and instantiate anonymous classes in a single expression at the point of use.

We may either extend an existing class or implement an interface.

2.1. Extend a Class

When we instantiate an anonymous class from an existent one, we use the following syntax:

In the parentheses, we specify the parameters that are required by the constructor of the class that we are extending:

new Book("Design Patterns") {
    @Override
    public String description() {
        return "Famous GoF book.";
    }
}

Naturally, if the parent class constructor accepts no arguments, we should leave the parentheses empty.

2.2. Implement an Interface

We may instantiate an anonymous class from an interface as well:

Obviously, Java’s interfaces have no constructors, so the parentheses always remain empty. This is the only way we should do it to implement the interface’s methods:

new Runnable() {
    @Override
    public void run() {
        ...
    }
}

Once we have instantiated an anonymous class, we can assign that instance to a variable in order to be able to reference it somewhere later.

We can do this using the standard syntax for Java expressions:

Runnable action = new Runnable() {
    @Override
    public void run() {
        ...
    }
};

As we already mentioned, an anonymous class declaration is an expression, hence it must be a part of a statement. This explains why we have put a semicolon at the end of the statement.

Obviously, we can avoid assigning the instance to a variable if we create that instance inline:

List<Runnable> actions = new ArrayList<Runnable>();
actions.add(new Runnable() {
    @Override
    public void run() {
        ...
    }
});

We should use this syntax with great care as it might easily suffer the code readability especially when the implementation of the run() method takes a lot of space.

3. Anonymous Class Properties

There are certain particularities in using anonymous classes with respect to usual top-level classes. Here we briefly touch the most practical issues. For the most precise and updated information, we may always look at the Java Language Specification.

3.1. Constructor

The syntax of anonymous classes does not allow us to make them implement multiple interfaces. During construction, there might exist exactly one instance of an anonymous class. Therefore, they can never be abstract. Since they have no name, we can’t extend them. For the same reason, anonymous classes cannot have explicitly declared constructors.

In fact, the absence of a constructor doesn’t represent any problem for us for the following reasons:

  1. we create anonymous class instances at the same moment as we declare them
  2. from anonymous class instances, we can access local variables and enclosing class’s members

3.2. Static Members

Anonymous classes cannot have any static members except for those that are constant.

For example, this won’t compile:

new Runnable() {
    static final int x = 0;
    static int y = 0; // compilation error!

    @Override
    public void run() {...}
};

Instead, we’ll get the following error:

The field y cannot be declared static in a non-static inner type, unless initialized with a constant expression

3.3. Scope of Variables

Anonymous classes capture local variables that are in the scope of the block in which we have declared the class:

int count = 1;
Runnable action = new Runnable() {
    @Override
    public void run() {
        System.out.println("Runnable with captured variables: " + count);
    }           
};

As we see, the local variables count and action are defined in the same block. For this reason, we can access count from within the class declaration.

Note that in order to be able to use local variables, they must be effectively final. Since JDK 8, it is not required anymore that we declare variables with the keyword final. Nevertheless, those variables must be final. Otherwise, we get a compilation error:

[ERROR] local variables referenced from an inner class must be final or effectively final

In order the compiler decides that a variable is, in fact, immutable, in the code, there should be only one place in which we assign a value to it. We might find more information about effectively final variables in our article “Why Do Local Variables Used in Lambdas Have to Be Final or Effectively Final?

Let us just mention that as every inner class, an anonymous class can access all members of its enclosing class.

4. Anonymous Class Use Cases

There might be a big variety of applications of anonymous classes. Let’s explore some possible use cases.

4.1. Class Hierarchy and Encapsulation

We should use inner classes in general use cases and anonymous ones in very specific ones in order to achieve a cleaner hierarchy of classes in our application. When using inner classes, we may achieve a finer encapsulation of the enclosing class’s data. If we define the inner class functionality in a top-level class, then the enclosing class should have public or package visibility of some of its members. Naturally, there are situations when it is not very appreciated or even accepted.

4.2. Cleaner Project Structure

We usually use anonymous classes when we have to modify on the fly the implementation of methods of some classes. In this case, we can avoid adding new *.java files to the project in order to define top-level classes. This is especially true if that top-level class would be used just one time.

4.3. UI Event Listeners

In applications with a graphical interface, the most common use case of anonymous classes is to create various event listeners. For example, in the following snippet:

button.addActionListener(new ActionListener() {
    public void actionPerformed(ActionEvent e) {
        ...
    }
}

we create an instance of an anonymous class that implements interface ActionListener. Its actionPerformed method gets triggered when a user clicks the button.

Since Java 8, lambda expressions seem to be a more preferred way though.

5. General Picture

Anonymous classes that we considered above are just a particular case of nested classes. Generally, a nested class is a class that is declared inside another class or interface:

Looking at the diagram, we see that anonymous classes along with local and nonstatic member ones form the so-called inner classes. Together with static member classes, they form the nested classes.

6. Conclusion

In this article, we’ve considered various aspects of Java anonymous classes. We’ve described as well a general hierarchy of nested classes.

As always, the complete code is available over in our GitHub repository.

Persisting Maps with Hibernate

$
0
0

1. Introduction

In Hibernate, we can represent one-to-many relationships in our Java beans by having one of our fields be a List.

In this quick tutorial, we’ll explore various ways of doing this with a Map instead.

2. Maps Are Different from Lists

Using a Map to represent a one-to-many relationship is different from a List because we have a key.

This key turns our entity relationship into a ternary association, where each key refers to a simple value or an embeddable object or an entity. Because of this, to use a Map, we’ll always need a join table to store the foreign key that references the parent entity – the key, and the value.

But this join table will be a bit different from other join tables in that the primary key won’t necessarily be foreign keys to the parent and the target. Instead, we’ll have the primary key be a composite of a foreign key to the parent and a column that is the key to our Map.

The key-value pair in the Map may be of two types: Value Type and Entity Type. In the following sections, we’ll look at the ways to represent these associations in Hibernate.

3. Using @MapKeyColumn

Let’s say we have an Order entity and we want to keep track of name and price of all the items in an order. So, we want to introduce a Map<String, Double> to Order which will map the item’s name to its price:

@Entity
@Table(name = "orders")
public class Order {
    @Id
    @GeneratedValue
    @Column(name = "id")
    private int id;

    @ElementCollection
    @CollectionTable(name = "order_item_mapping", 
      joinColumns = {@JoinColumn(name = "order_id", referencedColumnName = "id")})
    @MapKeyColumn(name = "item_name")
    @Column(name = "price")
    private Map<String, Double> itemPriceMap;

    // standard getters and setters
}

We need to indicate to Hibernate where to get the key and the value. For the key, we’ve used @MapKeyColumn, indicating that the Map‘s key is the item_name column of our join table, order_item_mapping. Similarly, @Column specifies that the Map’s value corresponds to the price column of the join table.

Also, itemPriceMap object is a value type map, thus we must use the @ElementCollection annotation.

In addition to basic value type objects, @Embeddable objects can also be used as the Map‘s values in a similar fashion.

4. Using @MapKey

As we all know, requirements changes over time — so, now, let’s say we need to store some more attributes of Item along with itemName and itemPrice:

@Entity
@Table(name = "item")
public class Item {
    @Id
    @GeneratedValue
    @Column(name = "id")
    private int id;

    @Column(name = "name")
    private String itemName;

    @Column(name = "price")
    private double itemPrice;

    @Column(name = "item_type")
    @Enumerated(EnumType.STRING)
    private ItemType itemType;

    @Temporal(TemporalType.TIMESTAMP)
    @Column(name = "created_on")
    private Date createdOn;
   
    // standard getters and setters
}

Accordingly, let’s change Map<String, Double> to Map<String, Item> in the Order entity class:

@Entity
@Table(name = "orders")
public class Order {
    @Id
    @GeneratedValue
    @Column(name = "id")
    private int id;

    @OneToMany(cascade = CascadeType.ALL)
    @JoinTable(name = "order_item_mapping", 
      joinColumns = {@JoinColumn(name = "order_id", referencedColumnName = "id")},
      inverseJoinColumns = {@JoinColumn(name = "item_id", referencedColumnName = "id")})
    @MapKey(name = "itemName")
    private Map<String, Item> itemMap;

}

Note that this time, we’ll use the @MapKey annotation so that Hibernate will use Item#itemName as the map key column instead of introducing an additional column in the join table. So, in this case, the join table order_item_mapping doesn’t have a key column — instead, it refers to the Item‘s name.

This is in contrast to @MapKeyColumn. When we use @MapKeyColumn, the map key resides in the join table. This is the reason why we can’t define our entity mapping using both the annotations in conjunction.

Also, itemMap is an entity type map, therefore we have to annotate the relationship using @OneToMany or @ManyToMany.

5. Using @MapKeyEnumerated and @MapKeyTemporal

Whenever we specify an enum as the Map key, we use @MapKeyEnumerated. Similarly, for temporal values, @MapKeyTemporal is used. The behavior is quite similar to the standard @Enumerated and @Temporal annotations respectively.

By default, these are similar to @MapKeyColumn in that a key column will be created in the join table. If we want to reuse the value already stored in the persisted entity, we should additionally mark the field with @MapKey.

6. Using @MapKeyJoinColumn

Next, let’s say we also need to keep track of the seller of each item. One way we might do this is to add a Seller entity and tie that to our Item entity:

@Entity
@Table(name = "seller")
public class Seller {

    @Id
    @GeneratedValue
    @Column(name = "id")
    private int id;

    @Column(name = "name")
    private String sellerName;
   
    // standard getters and setters

}
@Entity
@Table(name = "item")
public class Item {
    @Id
    @GeneratedValue
    @Column(name = "id")
    private int id;

    @Column(name = "name")
    private String itemName;

    @Column(name = "price")
    private double itemPrice;

    @Column(name = "item_type")
    @Enumerated(EnumType.STRING)
    private ItemType itemType;

    @Temporal(TemporalType.TIMESTAMP)
    @Column(name = "created_on")
    private Date createdOn;

    @ManyToOne(cascade = CascadeType.ALL)
    @JoinColumn(name = "seller_id")
    private Seller seller;
 
    // standard getters and setters
}

In this case, let’s assume our use-case is to group all Order‘s Items by Seller. Hence, let’s change Map<String, Item> to Map<Seller, Item>:

@Entity
@Table(name = "orders")
public class Order {
    @Id
    @GeneratedValue
    @Column(name = "id")
    private int id;

    @OneToMany(cascade = CascadeType.ALL)
    @JoinTable(name = "order_item_mapping", 
      joinColumns = {@JoinColumn(name = "order_id", referencedColumnName = "id")},
      inverseJoinColumns = {@JoinColumn(name = "item_id", referencedColumnName = "id")})
    @MapKeyJoinColumn(name = "seller_id")
    private Map<Seller, Item> sellerItemMap;

    // standard getters and setters

}

We need to add @MapKeyJoinColumn to achieve this since that annotation allows Hibernate to keep the seller_id column (the map key) in the join table order_item_mapping along with the item_id column. So then, at the time of reading the data from the database, we can perform a GROUP BY operation easily.

7. Conclusion

In this article, we learned about the several ways of persisting Map in Hibernate depending upon the required mapping.

As always, the source code of this tutorial can be found over Github.

Types of SQL Joins

$
0
0

1. Introduction

In this tutorial, we’ll show different types of SQL joins and how they can be easily implemented in Java.

2. Defining the Model

Let’s start by creating two simple tables:

CREATE TABLE AUTHOR
(
  ID int NOT NULL PRIMARY KEY,
  FIRST_NAME varchar(255),
  LAST_NAME varchar(255)
);

CREATE TABLE ARTICLE
(
  ID int NOT NULL PRIMARY KEY,
  TITLE varchar(255) NOT NULL,
  AUTHOR_ID int,
  FOREIGN KEY(AUTHOR_ID) REFERENCES AUTHOR(ID)
);

And fill them with some test data:

INSERT INTO AUTHOR VALUES 
(1, 'Siena', 'Kerr'),
(2, 'Daniele', 'Ferguson'),
(3, 'Luciano', 'Wise'),
(4, 'Jonas', 'Lugo');

INSERT INTO ARTICLE VALUES
(1, 'First steps in Java', 1),
(2, 'SpringBoot tutorial', 1),
(3, 'Java 12 insights', null),
(4, 'SQL JOINS', 2),
(5, 'Introduction to Spring Security', 3);

Note that in our sample data set, not all authors have articles, and vice-versa. This will play a big part in our examples, which we’ll see later.

Let’s also define a POJO that we’ll use for storing the results of JOIN operations throughout our tutorial:

class ArticleWithAuthor {

    private String title;
    private String authorFirstName;
    private String authorLastName;

    // standard constructor, setters and getters
}

In our examples, we’ll extract a title from the ARTICLE table and authors data from the AUTHOR table.

3. Configuration

For our examples, we’ll use an external PostgreSQL database running on port 5432. Apart from the FULL JOIN, which is not supported in either MySQL or H2, all provided snippets should work with any SQL provider.

For our Java implementation, we’ll need a PostgreSQL driver:

<dependency>
    <groupId>org.postgresql</groupId>
    <artifactId>postgresql</artifactId>
    <version>42.2.5</version>
    <scope>test</scope>
</dependency>

Let’s first configure a java.sql.Connection to work with our database:

Class.forName("org.postgresql.Driver");
Connection connection = DriverManager.
  getConnection("jdbc:postgresql://localhost:5432/myDb", "user", "pass");

Next, let’s create a DAO class and some utility methods:

class ArticleWithAuthorDAO {

    private final Connection connection;

    // constructor

    private List<ArticleWithAuthor> executeQuery(String query) {
        try (Statement statement = connection.createStatement()) {
            ResultSet resultSet = statement.executeQuery(query);
            return mapToList(resultSet);
        } catch (SQLException e) {
            e.printStackTrace();
        }
            return new ArrayList<>();
    }

    private List<ArticleWithAuthor> mapToList(ResultSet resultSet) throws SQLException {
        List<ArticleWithAuthor> list = new ArrayList<>();
        while (resultSet.next()) {
            ArticleWithAuthor articleWithAuthor = new ArticleWithAuthor(
              resultSet.getString("TITLE"),
              resultSet.getString("FIRST_NAME"),
              resultSet.getString("LAST_NAME")
            );
            list.add(articleWithAuthor);
        }
        return list;
    }
}

In this article, we’ll not dive into details about using ResultSet, Statement, and Connection. These topics are covered in our JDBC related articles.

Let’s start exploring SQL joins in sections below.

4. Inner Join

Let’s start with possibly the simplest type of join. The INNER JOIN is an operation that selects rows matching a provided condition from both tables. The query consists of at least three parts: select columns, join tables and join condition.

Bearing that in mind, the syntax itself becomes pretty straightforward:

SELECT ARTICLE.TITLE, AUTHOR.LAST_NAME, AUTHOR.FIRST_NAME
  FROM ARTICLE INNER JOIN AUTHOR 
  ON AUTHOR.ID=ARTICLE.AUTHOR_ID

We can also illustrate the result of INNER JOIN as a common part of intersecting sets:

Let’s now implement the method for the INNER JOIN in the ArticleWithAuthorDAO class:

List<ArticleWithAuthor> articleInnerJoinAuthor() {
    String query = "SELECT ARTICLE.TITLE, AUTHOR.LAST_NAME, AUTHOR.FIRST_NAME "
      + "FROM ARTICLE INNER JOIN AUTHOR ON AUTHOR.ID=ARTICLE.AUTHOR_ID";
    return executeQuery(query);
}

And test it:

@Test
public void whenQueryWithInnerJoin_thenShouldReturnProperRows() {
    List<ArticleWithAuthor> articleWithAuthorList = articleWithAuthorDAO.articleInnerJoinAuthor();

    assertThat(articleWithAuthorList).hasSize(4);
    assertThat(articleWithAuthorList)
      .noneMatch(row -> row.getAuthorFirstName() == null || row.getTitle() == null);
}

As we mentioned before, the INNER JOIN selects only common rows by a provided condition. Looking at our inserts, we see that we have one article without an author and one author without an article. These rows are skipped because they don’t fulfill the provided condition. As a result, we retrieve four joined results, and none of them has empty authors data nor empty title.

5. Left Join

Next, let’s focus on the LEFT JOIN. This kind of join selects all rows from the first table and matches corresponding rows from the second table. For when there is no match, columns are filled with null values.

Before we dive into Java implementation, let’s have a look at a graphical representation of the LEFT JOIN:

In this case, the result of the LEFT JOIN includes every record from the set representing the first table with intersecting values from the second table.

Now, let’s move to the Java implementation:

List<ArticleWithAuthor> articleLeftJoinAuthor() {
    String query = "SELECT ARTICLE.TITLE, AUTHOR.LAST_NAME, AUTHOR.FIRST_NAME "
      + "FROM ARTICLE LEFT JOIN AUTHOR ON AUTHOR.ID=ARTICLE.AUTHOR_ID";
    return executeQuery(query);
}

The only difference to the previous example is that we used the LEFT keyword instead of the INNER keyword.

Before we test our LEFT JOIN method, let’s again take a look at our inserts. In this case, we’ll receive all the records from the ARTICLE table and their matching rows from the AUTHOR table. As we mentioned before, not every article has an author yet, so we expect to have null values in place of author data:

@Test
public void whenQueryWithLeftJoin_thenShouldReturnProperRows() {
    List<ArticleWithAuthor> articleWithAuthorList = articleWithAuthorDAO.articleLeftJoinAuthor();

    assertThat(articleWithAuthorList).hasSize(5);
    assertThat(articleWithAuthorList).anyMatch(row -> row.getAuthorFirstName() == null);
}

6. Right Join

The RIGHT JOIN is much like the LEFT JOIN, but it returns all rows from the second table and matches rows from the first table. Like in case of the LEFT JOIN, empty matches are replaced by null values.

The graphical representation of this kind of join is a mirror reflection of the one we’ve illustrated for the LEFT JOIN:

Let’s implement the RIGHT JOIN in Java:

List<ArticleWithAuthor> articleRightJoinAuthor() {
    String query = "SELECT ARTICLE.TITLE, AUTHOR.LAST_NAME, AUTHOR.FIRST_NAME "
      + "FROM ARTICLE RIGHT JOIN AUTHOR ON AUTHOR.ID=ARTICLE.AUTHOR_ID";
    return executeQuery(query);
}

Again, let’s look at our test data. Since this join operation retrieves all records from the second table we expect to retrieve five rows, and because not every author has already written an article, we expect some null values in the TITLE column:

@Test
public void whenQueryWithRightJoin_thenShouldReturnProperRows() {
    List<ArticleWithAuthor> articleWithAuthorList = articleWithAuthorDAO.articleRightJoinAuthor();

    assertThat(articleWithAuthorList).hasSize(5);
    assertThat(articleWithAuthorList).anyMatch(row -> row.getTitle() == null);
}

7. Full Outer Join

This join operation is probably the most tricky one. The FULL JOIN selects all rows from both the first and the second table regardless of whether the condition is met or not.

We can also represent the same idea as all values from each of the intersecting sets:

Let’s have a look at the Java implementation:

List<ArticleWithAuthor> articleOuterJoinAuthor() {
    String query = "SELECT ARTICLE.TITLE, AUTHOR.LAST_NAME, AUTHOR.FIRST_NAME "
      + "FROM ARTICLE FULL JOIN AUTHOR ON AUTHOR.ID=ARTICLE.AUTHOR_ID";
    return executeQuery(query);
}

Now, we can test our method:

@Test
public void whenQueryWithFullJoin_thenShouldReturnProperRows() {
    List<ArticleWithAuthor> articleWithAuthorList = articleWithAuthorDAO.articleOuterJoinAuthor();

    assertThat(articleWithAuthorList).hasSize(6);
    assertThat(articleWithAuthorList).anyMatch(row -> row.getTitle() == null);
    assertThat(articleWithAuthorList).anyMatch(row -> row.getAuthorFirstName() == null);
}

Once more, let’s look at the test data. We have five different articles, one of which has no author, and four authors, one of which has no assigned article. As a result of the FULL JOIN, we expect to retrieve six rows. Four of them are matched against each other, and the remaining two are not. For that reason, we also assume that there will be at least one row with null values in both AUTHOR data columns and one with a null value in the TITLE column.

8. Conclusion

In this article, we explored the basic types of SQL joins. We looked at examples of four types of joins and how they can be implemented in Java.

As always, the complete code used in this article is available over on GitHub.

Spring Data JPA Repository Populators

$
0
0

1. Introduction

In this quick article, we’ll explore Spring JPA Repository Populators with a quick example. The Spring Data JPA repository populator is a great alternative for data.sql script.

Spring Data JPA repository populator supports JSON and XML file formats. In the following sections, we’ll see how to use Spring Data JPA repository populator.

2. Sample Application

First of all, let’s say we have a Fruit entity class and an inventory of fruits to populate our database:

@Entity
public class Fruit {
    @Id
    private long id;
    private String name;
    private String color;
    
    // getters and setters
}

We’ll extend JpaRepository to read Fruit data from the database:

@Repository
public interface FruitRepository extends JpaRepository<Fruit, Long> {
    // ...
}

In the following section, we’ll use the JSON format to store and populate the initial fruit data.

3. JSON Repository Populators

Let’s create a JSON file with Fruit data. We’ll create this file in src/main/resources and call it fruit-data.json:

[
    {
        "_class": "com.baeldung.entity.Fruit",
        "name": "apple",
        "color": "red",
        "id": 1
    },
    {
        "_class": "com.baeldung.entity.Fruit",
        "name": "guava",
        "color": "green",
        "id": 2
    }
]

The entity class name should be given in the _class field of each JSON object. The remaining keys map to columns of our Fruit entity.

Now, we’ll add the jackson-databind dependency in the pom.xml:

<dependency>
    <groupId>com.fasterxml.jackson.core</groupId>
    <artifactId>jackson-databind</artifactId>
    <version>2.9.8</version>
</dependency>

Finally, we’ll have to add a repository populator bean. This repository populator bean will read the data from the fruit-data.json file and populate it into the database when the application starts:

@Bean
public Jackson2RepositoryPopulatorFactoryBean getRespositoryPopulator() {
    Jackson2RepositoryPopulatorFactoryBean factory = new Jackson2RepositoryPopulatorFactoryBean();
    factory.setResources(new Resource[]{new ClassPathResource("fruit-data.json")});
    return factory;
}

We’re all set to unit test our configuration:

@Test
public void givenFruitJsonPopulatorThenShouldInsertRecordOnStart() {
    List<Fruit> fruits = fruitRepository.findAll();
    assertEquals("record count is not matching", 2, fruits.size());

    fruits.forEach(fruit -> {
        if (1 == fruit.getId()) {
            assertEquals("apple", fruit.getName());
            assertEquals("red", fruit.getColor());
        } else if (2 == fruit.getId()) {
            assertEquals("guava", fruit.getName());
            assertEquals("green", fruit.getColor());
        }
    });
}

4. XML Repository Populators

In this section, we’ll see how to use XML files with repository populators. Firstly, we’ll create an XML file with the required Fruit details.

Here, an XML file represents a single fruit’s data.

apple-fruit-data.xml:

<fruit>
    <id>1</id>
    <name>apple</name>
    <color>red</color>
</fruit>

guava-fruit-data.xml:

<fruit>
    <id>2</id>
    <name>guava</name>
    <color>green</color>
</fruit>

Again, we’re storing these XML files in src/main/resources.

Also, we’ll add the spring-oxm maven dependency in the pom.xml:

<dependency>
    <groupId>org.springframework</groupId>
    <artifactId>spring-oxm</artifactId>
    <version>5.1.5.RELEASE</version>
</dependency>

In addition, we need to add @XmlRootElement annotation to our entity class:

@XmlRootElement
@Entity
public class Fruit {
    // ...
}

Finally, we’ll define a repository populator bean. This bean will read the XML file and populate the data:

@Bean
public UnmarshallerRepositoryPopulatorFactoryBean repositoryPopulator() {
    Jaxb2Marshaller unmarshaller = new Jaxb2Marshaller();
    unmarshaller.setClassesToBeBound(Fruit.class);

    UnmarshallerRepositoryPopulatorFactoryBean factory = new UnmarshallerRepositoryPopulatorFactoryBean();
    factory.setUnmarshaller(unmarshaller);
    factory.setResources(new Resource[] { new ClassPathResource("apple-fruit-data.xml"), 
      new ClassPathResource("guava-fruit-data.xml") });
    return factory;
}

We can unit test the XML repository populator just like we can with the JSON populator.

4. Conclusion

In this tutorial, we learned how to use Spring Data JPA repository populator. The complete source code used for this tutorial is available over on GitHub.

Viewing all 4752 articles
Browse latest View live