Quantcast
Channel: Baeldung
Viewing all 4831 articles
Browse latest View live

Groovy def Keyword

$
0
0

1. Overview

In this quick tutorial, we’ll explore the concept of the def keyword in Groovy. It provides an optional typing feature to this dynamic JVM language.

2. Meaning of the def Keyword

The def keyword is used to define an untyped variable or a function in Groovy, as it is an optionally-typed language.

When we’re unsure of the type of a variable or field, we can leverage def to let Groovy decide types at runtime based on the assigned values:

def firstName = "Samwell"  
def listOfCountries = ['USA', 'UK', 'FRANCE', 'INDIA']

Here, firstName will be a String, and listOfCountries will be an ArrayList.

We can also use the def keyword to define the return type of a method:

def multiply(x, y) {
    return x*y
}

Here, multiply can return any type of object, depending on the parameters we pass to it.

3. def Variables

Let’s understand how def works for variables.

When we use def to declare a variable, Groovy declares it as a NullObject and assign a null value to it:

def list
assert list.getClass() == org.codehaus.groovy.runtime.NullObject
assert list.is(null)

The moment we assign a value to the list, Groovy defines its type based on the assigned value:

list = [1,2,4]
assert list instanceof ArrayList

Let’s say that we want to have our variable type behaving dynamically and change as per assignment:

int rate = 20
rate = [12] // GroovyCastException
rate = "nill" // GroovyCastException

We cannot assign List or String to an int typed variable, as this will throw a runtime exception.

So, to overcome this problem and invoke the dynamic nature of Groovy, we’ll use the def keyword:

def rate
assert rate == null
assert rate.getClass() == org.codehaus.groovy.runtime.NullObject

rate = 12
assert rate instanceof Integer
        
rate = "Not Available"
assert rate instanceof String
        
rate = [1, 4]
assert rate instanceof List

4. def Methods

The def keyword is further used to define the dynamic return type of a method. This is handy when we can have different types of return values for a method:

def divide(int x, int y) {
    if (y == 0) {
        return "Should not divide by 0"
    } else {
        return x/y
    }
}

assert divide(12, 3) instanceof BigDecimal
assert divide(1, 0) instanceof String

We can also use def to define a method with no explicit returns:

def greetMsg() {
    println "Hello! I am Groovy"
}

5. def vs. Type

Let’s discuss some of the best practices surrounding the use of def.

Although we may use both def and type together while declaring a variable:

def int count
assert count instanceof Integer

The def keyword will be redundant there, so we should use either def or a type.

Additionally, we should avoid using def for untyped parameters in a method.

Therefore, instead of:

void multiply(def x, def y)

We should prefer:

void multiply(x, y)

Furthermore, we should avoid using def when defining constructors.

6. Groovy def vs. Java Object

As we’ve seen most of the features of the def keyword and its uses through examples, we might wonder if it’s similar to declaring something using the Object class in Java. Yes, def can be considered similar to Object:

def fullName = "Norman Lewis"

Similarly, we can use Object in Java:

Object fullName = "Norman Lewis";

7. def vs. @TypeChecked

As many of us would be from the world of strictly-typed languages, we may wonder how to force compile-time type checking in Groovy. We can easily achieve this using the @TypeChecked annotation.

For example, we can use @TypeChecked over a class to enable type checking for all of its methods and properties:

@TypeChecked
class DefUnitTest extends GroovyTestCase {

    def multiply(x, y) {
        return x * y
    }
    
    int divide(int x, int y) {
        return x / y
    }
}

Here, the DefUnitTest class will be type checked, and compilation will fail due to the multiply method being untyped. The Groovy compiler will display an error:

[Static type checking] - Cannot find matching method java.lang.Object#multiply(java.lang.Object).
Please check if the declared type is correct and if the method exists.

So, to ignore a method, we can use TypeCheckingMode.SKIP:

@TypeChecked(TypeCheckingMode.SKIP)
def multiply(x, y)

8. Conclusion

In this quick tutorial, we’ve seen how to use the def keyword to invoke the dynamic feature of the Groovy language and have it determine the types of variables and methods at runtime.

This keyword can be handy in writing dynamic and robust code as per our need.

As usual, the code implementations of this tutorial are available on the GitHub project.


Generic Constructors in Java

$
0
0

1. Overview

We previously discussed the basics of Java Generics. In this tutorial, we’ll have a look at Generic Constructors in Java.

A generic constructor is a constructor that has at least one parameter of a generic type.

We’ll see that generic constructors don’t have to be in a generic class, and not all constructors in a generic class have to be generic.

2. Non-Generic Class

First, we have a simple class Entry, which is not a generic class:

public class Entry {
    private String data;
    private int rank;
}

In this class, we’ll add two constructors: a basic constructor with two parameters, and a generic constructor.

2.1. Basic Constructor

The first Entry constructor is a simple constructor with two parameters:

public Entry(String data, int rank) {
    this.data = data;
    this.rank = rank;
}

Now, let’s use this basic constructor to create an Entry object:

@Test
public void givenNonGenericConstructor_whenCreateNonGenericEntry_thenOK() {
    Entry entry = new Entry("sample", 1);
    
    assertEquals("sample", entry.getData());
    assertEquals(1, entry.getRank());
}

2.2. Generic Constructor

Next, our second constructor is a generic constructor:

public <E extends Rankable & Serializable> Entry(E element) {
    this.data = element.toString();
    this.rank = element.getRank();
}

Although the Entry class isn’t generic, it has a generic constructor, as it has a parameter element of type E.

The generic type E is bounded and should implement both Rankable and Serializable interfaces.

Now, let’s have a look at the Rankable interface, which has one method:

public interface Rankable {
    public int getRank();
}

And, suppose we have a class Product that implements the Rankable interface:

public class Product implements Rankable, Serializable {
    private String name;
    private double price;
    private int sales;

    public Product(String name, double price) {
        this.name = name;
        this.price = price;
    }

    @Override
    public int getRank() {
        return sales;
    }
}

We can then use the generic constructor to create Entry objects using a Product:

@Test
public void givenGenericConstructor_whenCreateNonGenericEntry_thenOK() {
    Product product = new Product("milk", 2.5);
    product.setSales(30);
 
    Entry entry = new Entry(product);
    
    assertEquals(product.toString(), entry.getData());
    assertEquals(30, entry.getRank());
}

3. Generic Class

Next, we’ll have a look at a generic class called GenericEntry:

public class GenericEntry<T> {
    private T data;
    private int rank;
}

We’ll add the same two types of constructors as the previous section in this class as well.

3.1. Basic Constructor

First, let’s write a simple, non-generic constructor for our GenericEntry class:

public GenericEntry(int rank) {
    this.rank = rank;
}

Even though GenericEntry is a generic class, this is a simple constructor that doesn’t have a parameter of a generic type.

Now, we can use this constructor to create a GenericEntry<String>:

@Test
public void givenNonGenericConstructor_whenCreateGenericEntry_thenOK() {
    GenericEntry<String> entry = new GenericEntry<String>(1);
    
    assertNull(entry.getData());
    assertEquals(1, entry.getRank());
}

3.2. Generic Constructor

Next, let’s add the second constructor to our class:

public GenericEntry(T data, int rank) {
    this.data = data;
    this.rank = rank;
}

This is a generic constructor, as it has a data parameter of the generic type T. Note that we don’t need to add <T> in the constructor declaration, as it’s implicitly there.

Now, let’s test our generic constructor:

@Test
public void givenGenericConstructor_whenCreateGenericEntry_thenOK() {
    GenericEntry<String> entry = new GenericEntry<String>("sample", 1);
    
    assertEquals("sample", entry.getData());
    assertEquals(1, entry.getRank());        
}

4. Generic Constructor with Different Type

In our generic class, we can also have a constructor with a generic type that’s different from the class’ generic type:

public <E extends Rankable & Serializable> GenericEntry(E element) {
    this.data = (T) element;
    this.rank = element.getRank();
}

This GenericEntry constructor has a parameter element with type E, which is different from the T type. Let’s see it in action:

@Test
public void givenGenericConstructorWithDifferentType_whenCreateGenericEntry_thenOK() {
    Product product = new Product("milk", 2.5);
    product.setSales(30);
 
    GenericEntry<Serializable> entry = new GenericEntry<Serializable>(product);

    assertEquals(product, entry.getData());
    assertEquals(30, entry.getRank());
}

Note that:

  • In our example, we used Product (E) to create a GenericEntry of type Serializable (T)
  • We can only use this constructor when the parameter of type E can be cast to T

5. Multiple Generic Types

Next, we have the generic class MapEntry with two generic types:

public class MapEntry<K, V> {
    private K key;
    private V value;

    public MapEntry(K key, V value) {
        this.key = key;
        this.value = value;
    }
}

MapEntry has one generic constructor with two parameters, each of a different type. Let’s use it in a simple unit test:

@Test
public void givenGenericConstructor_whenCreateGenericEntryWithTwoTypes_thenOK() {
    MapEntry<String,Integer> entry = new MapEntry<String,Integer>("sample", 1);
    
    assertEquals("sample", entry.getKey());
    assertEquals(1, entry.getValue().intValue());        
}

6. Wildcards

Finally, we can use wildcards in a generic constructor:

public GenericEntry(Optional<? extends Rankable> optional) {
    if (optional.isPresent()) {
        this.data = (T) optional.get();
        this.rank = optional.get().getRank();
    }
}

Here, we used wildcards in this GenericEntry constructor to bound the Optional type:

@Test
public void givenGenericConstructorWithWildCard_whenCreateGenericEntry_thenOK() {
    Product product = new Product("milk", 2.5);
    product.setSales(30);
    Optional<Product> optional = Optional.of(product);
 
    GenericEntry<Serializable> entry = new GenericEntry<Serializable>(optional);
    
    assertEquals(product, entry.getData());
    assertEquals(30, entry.getRank());
}

Note that we should be able to cast the optional parameter type (in our case, Product) to the GenericEntry type (in our case, Serializable).

7. Conclusion

In this article, we learned how to define and use generic constructors in both generic and non-generic classes.

The full source code can be found over on GitHub.

Spring Data JPA Delete and Relationships

$
0
0

1. Overview

In this tutorial, we’ll have a look at how deleting is done in Spring Data JPA.

2. Sample Entity

As we know from the Spring Data JPA reference documentation, repository interfaces provide us some basic support for entities.

If we have an entity, like a Book:

@Entity
public class Book {

    @Id
    @GeneratedValue
    private Long id;
    private String title;

    // standard constructors

    // standard getters and setters
}

Then, we can extend Spring Data JPA’s CrudRepository to give us access to CRUD operations on Book:

@Repository
public interface BookRepository extends CrudRepository<Book, Long> {}

3. Delete from Repository

Among others, CrudRepository contains two methods: deleteById and deleteAll.

Let’s test these methods directly from our BookRepository:

@RunWith(SpringRunner.class)
@SpringBootTest(classes = {Application.class})
public class DeleteFromRepositoryUnitTest {

    @Autowired
    private BookRepository repository;

    Book book1;
    Book book2;
    List<Book> books;

    // data initialization

    @Test
    public void whenDeleteByIdFromRepository_thenDeletingShouldBeSuccessful() {
        repository.deleteById(book1.getId());
        assertThat(repository.count()).isEqualTo(1);
    }

    @Test
    public void whenDeleteAllFromRepository_thenRepositoryShouldBeEmpty() {
        repository.deleteAll();
        assertThat(repository.count()).isEqualTo(0);
    }
}

And even though we are using CrudRepository, note that these same methods exist for other Spring Data JPA interfaces like JpaRepository or PagingAndSortingRepository.

4. Derived Delete Query

We can also derive query methods for deleting entities. There is a set of rules for writing them, but let’s just focus on the simplest example.

A derived delete query must start with deleteBy, followed by the name of the selection criteria. These criteria must be provided in the method call.

Let’s say that we want to delete Books by title. Using the naming convention, we’d start with deleteBy and list title as our criteria:

@Repository
public interface BookRepository extends CrudRepository<Book, Long> {
    long deleteByTitle(String title);
}

The return value, of type long, indicates how many records the method deleted.

Let’s write a test and make sure that is correct:

@Test
@Transactional
public void whenDeleteFromDerivedQuery_thenDeletingShouldBeSuccessful() {
    long deletedRecords = repository.deleteByTitle("The Hobbit");
    assertThat(deletedRecords).isEqualTo(1);
}

Persisting and deleting objects in JPA requires a transaction, that’s why we should use a @Transactional annotation when using these derived delete queries, to make sure a transaction is running. This is explained in detail in the ORM with Spring documentation.

5. Custom Delete Query

The method names for derived queries can get quite long, and they are limited to just a single table.

When we need something more complex, we can write a custom query using @Query and @Modifying together.

Let’s check the equivalent code for our derived method from earlier:

@Modifying
@Query("delete from Book b where b.title=:title")
void deleteBooks(@Param("title") String title);

Again, we can verify it works with a simple test:

@Test
@Transactional
public void whenDeleteFromCustomQuery_thenDeletingShouldBeSuccessful() {
    repository.deleteBooks("The Hobbit");
    assertThat(repository.count()).isEqualTo(1);
}

Both solutions presented above are similar and achieve the same result. However, they take a slightly different approach.

The @Query method creates a single JPQL query against the database. By comparison, the deleteBy methods execute a read query, then delete each of the items one by one.

6. Delete in Relationships

Let’s see now what happens when we have relationships with other entities.

Assume we have a Category entity, that has a OneToMany association with the Book entity:

@Entity
public class Category {

    @Id
    @GeneratedValue
    private Long id;
    private String name;

    @OneToMany(mappedBy = "category", cascade = CascadeType.ALL, orphanRemoval = true)
    private List<Book> books;

    // standard constructors

    // standard getters and setters
}

The CategoryRepository can just be an empty interface that extends CrudRepository:

@Repository
public interface CategoryRepository extends CrudRepository<Category, Long> {}

We should also modify the Book entity to reflect this association:

@ManyToOne
private Category category;

Let’s now add two categories and associate them with the books we currently have. Now, if we try to delete the categories, the books will also be deleted:

@Test
public void whenDeletingCategories_thenBooksShouldAlsoBeDeleted() {
    categoryRepository.deleteAll();
    assertThat(bookRepository.count()).isEqualTo(0);
    assertThat(categoryRepository.count()).isEqualTo(0);
}

This is not bi-directional, though. That means that if we delete the books, the categories are still there:

@Test
public void whenDeletingBooks_thenCategoriesShouldAlsoBeDeleted() {
    bookRepository.deleteAll();
    assertThat(bookRepository.count()).isEqualTo(0);
    assertThat(categoryRepository.count()).isEqualTo(2);
}

We can change this behavior by changing the properties of the relationship, such as the CascadeType.

7. Conclusion

In this article, we looked at different ways to delete entities in Spring Data JPA. We looked at the provided delete methods from CrudRepository, as well as our derived queries or custom ones using @Query annotation.

We also had a look at how deleting is done in relationships. As always, all of the code snippets mentioned in this article can be found on our GitHub repository.

Guide to Google Tink

$
0
0

1. Introduction

Nowadays, many developers use cryptographic techniques to protect user data.

In cryptography, small implementation errors can have serious consequences, and understanding how to implement cryptography correctly is a complex and time-consuming task.

In this tutorial, we’re going to describe Tink – a multi-language, cross-platform cryptographic library that can help us to implement secure, cryptographic code.

2. Dependencies

We can use Maven or Gradle to import Tink.

For our tutorial, we’ll just add Tink’s Maven dependency:

<dependency>
    <groupId>com.google.crypto.tink</groupId>
    <artifactId>tink</artifactId>
    <version>1.2.2</version>
</dependency>

Though we could have used Gradle instead:

dependencies {
  compile 'com.google.crypto.tink:tink:latest'
}

3. Initialization

Before using any of Tink APIs we need to initialize them.

If we need to use all implementations of all primitives in Tink, we can use the TinkConfig.register() method:

TinkConfig.register();

While, for example, if we only need AEAD primitive, we can use AeadConfig.register() method:

AeadConfig.register();

A customizable initialization is provided for each implementation, too.

4. Tink Primitives

The main objects the library uses are called primitives which, depending on the type, contains different cryptographic functionality.

A primitive can have multiple implementations:

Primitive Implementations
AEAD AES-EAX, AES-GCM, AES-CTR-HMAC, KMS Envelope, CHACHA20-POLY1305
Streaming AEAD AES-GCM-HKDF-STREAMING, AES-CTR-HMAC-STREAMING
Deterministic AEAD AEAD: AES-SIV
MAC HMAC-SHA2
Digital Signature ECDSA over NIST curves, ED25519
Hybrid Encryption ECIES with AEAD and HKDF, (NaCl CryptoBox)

We can obtain a primitive by calling the method getPrimitive() of the corresponding factory class passing it a KeysetHandle:

Aead aead = AeadFactory.getPrimitive(keysetHandle);

4.1. KeysetHandle

In order to provide cryptographic functionality, each primitive needs a key structure that contains all the key material and parameters.

Tink provides an object – KeysetHandle – which wraps a keyset with some additional parameters and metadata.

So, before instantiating a primitive, we need to create a KeysetHandle object:

KeysetHandle keysetHandle = KeysetHandle.generateNew(AeadKeyTemplates.AES256_GCM);

And after generating a key, we might want to persist it:

String keysetFilename = "keyset.json";
CleartextKeysetHandle.write(keysetHandle, JsonKeysetWriter.withFile(new File(keysetFilename)));

Then, we can subsequently load it:

String keysetFilename = "keyset.json";
KeysetHandle keysetHandle = CleartextKeysetHandle.read(JsonKeysetReader.withFile(new File(keysetFilename)));

5. Encryption

Tink provides multiple ways of applying the AEAD algorithm. Let’s take a look.

5.1. AEAD

AEAD provides Authenticated Encryption with Associated Data which means that we can encrypt plaintext and, optionally, provide associated data that should be authenticated but not encrypted.

Note that this algorithm ensures the authenticity and integrity of the associated data but not its secrecy.

To encrypt data with one of the AEAD implementations, as we previously saw, we need to initialize the library and create a keysetHandle:

AeadConfig.register();
KeysetHandle keysetHandle = KeysetHandle.generateNew(
  AeadKeyTemplates.AES256_GCM);

Once we’ve done that, we can get the primitive and encrypt the desired data:

String plaintext = "baeldung";
String associatedData = "Tink";

Aead aead = AeadFactory.getPrimitive(keysetHandle); 
byte[] ciphertext = aead.encrypt(plaintext.getBytes(), associatedData.getBytes());

Next, we can decrypt the ciphertext using the decrypt() method:

String decrypted = new String(aead.decrypt(ciphertext, associatedData.getBytes()));

5.2. Streaming AEAD

Similarly, when the data to be encrypted is too large to be processed in a single step, we can use the streaming AEAD primitive:

AeadConfig.register();
KeysetHandle keysetHandle = KeysetHandle.generateNew(
  StreamingAeadKeyTemplates.AES128_CTR_HMAC_SHA256_4KB);
StreamingAead streamingAead = StreamingAeadFactory.getPrimitive(keysetHandle);

FileChannel cipherTextDestination = new FileOutputStream("cipherTextFile").getChannel();
WritableByteChannel encryptingChannel =
  streamingAead.newEncryptingChannel(cipherTextDestination, associatedData.getBytes());

ByteBuffer buffer = ByteBuffer.allocate(CHUNK_SIZE);
InputStream in = new FileInputStream("plainTextFile");

while (in.available() > 0) {
    in.read(buffer.array());
    encryptingChannel.write(buffer);
}

encryptingChannel.close();
in.close();

Basically, we needed WriteableByteChannel to achieve this.

So, to decrypt the cipherTextFile, we’d want to use a ReadableByteChannel:

FileChannel cipherTextSource = new FileInputStream("cipherTextFile").getChannel();
ReadableByteChannel decryptingChannel =
  streamingAead.newDecryptingChannel(cipherTextSource, associatedData.getBytes());

OutputStream out = new FileOutputStream("plainTextFile");
int cnt = 1;
do {
    buffer.clear();
    cnt = decryptingChannel.read(buffer);
    out.write(buffer.array());
} while (cnt>0);

decryptingChannel.close();
out.close();

6. Hybrid Encryption

In addition to symmetric encryption, Tink implements a couple of primitives for hybrid encryption.

With Hybrid Encryption we can get the efficiency of symmetric keys and the convenience of asymmetric keys.

Simply put, we’ll use a symmetric key to encrypt the plaintext and a public key to encrypt the symmetric key only.

Notice that it provides secrecy only, not identity authenticity of the sender.

So, let’s see how to use HybridEncrypt and HybridDecrypt:

TinkConfig.register();

KeysetHandle privateKeysetHandle = KeysetHandle.generateNew(
  HybridKeyTemplates.ECIES_P256_HKDF_HMAC_SHA256_AES128_CTR_HMAC_SHA256);
KeysetHandle publicKeysetHandle = privateKeysetHandle.getPublicKeysetHandle();

String plaintext = "baeldung";
String contextInfo = "Tink";

HybridEncrypt hybridEncrypt = HybridEncryptFactory.getPrimitive(publicKeysetHandle);
HybridDecrypt hybridDecrypt = HybridDecryptFactory.getPrimitive(privateKeysetHandle);

byte[] ciphertext = hybridEncrypt.encrypt(plaintext.getBytes(), contextInfo.getBytes());
byte[] plaintextDecrypted = hybridDecrypt.decrypt(ciphertext, contextInfo.getBytes());

The contextInfo is implicit public data from the context that can be null or empty or used as “associated data” input for the AEAD encryption or as “CtxInfo” input for HKDF.

The ciphertext allows for checking the integrity of contextInfo but not its secrecy or authenticity.

7. Message Authentication Code

Tink also supports Message Authentication Codes, or MACs.

A MAC is a block of a few bytes that we can use to authenticate a message.

Let’s see how we can create a MAC and then verify its authenticity:

TinkConfig.register();

KeysetHandle keysetHandle = KeysetHandle.generateNew(
  MacKeyTemplates.HMAC_SHA256_128BITTAG);

String data = "baeldung";

Mac mac = MacFactory.getPrimitive(keysetHandle);

byte[] tag = mac.computeMac(data.getBytes());
mac.verifyMac(tag, data.getBytes());

In the event that the data isn’t authentic, the method verifyMac() throws a GeneralSecurityException.

8. Digital Signature

As well as encryption APIs, Tink supports digital signatures.

To implement digital signature, the library uses the PublicKeySign primitive for the signing of data, and PublickeyVerify for verification:

TinkConfig.register();

KeysetHandle privateKeysetHandle = KeysetHandle.generateNew(SignatureKeyTemplates.ECDSA_P256);
KeysetHandle publicKeysetHandle = privateKeysetHandle.getPublicKeysetHandle();

String data = "baeldung";

PublicKeySign signer = PublicKeySignFactory.getPrimitive(privateKeysetHandle);
PublicKeyVerify verifier = PublicKeyVerifyFactory.getPrimitive(publicKeysetHandle);

byte[] signature = signer.sign(data.getBytes()); 
verifier.verify(signature, data.getBytes());

Similar to the previous encryption method, when the signature is invalid, we’ll get a GeneralSecurityException.

9. Conclusion

In this article, we introduced the Google Tink library using its Java implementation.

We’ve seen how to use to encrypt and decrypt data and how to protect its integrity and authenticity. Moreover, we’ve seen how to sign data using digital signature APIs.

As always, the sample code is available over on GitHub.

Set Operations in Java

$
0
0

1. Introduction

A set is a handy way to represent a unique collection of items.

In this tutorial, we’ll learn more about what that means and how we can use one in Java.

2. A Bit of Set Theory

2.1. What Is a Set?

A set is simply a group of unique things. So, a significant characteristic of any set is that it does not contain duplicates.

We can put anything we like into a set. However, we typically use sets to group together things which have a common trait. For example, we could have a set of vehicles or a set of animals.

Let’s use two sets of integers as a simple example:

setA : {1, 2, 3, 4}

setB : {2, 4, 6, 8}

We can show sets as a diagram by simply putting the values into circles:
A Venn Diagram of Two Sets

Diagrams like these are known as Venn diagrams and give us a useful way to show interactions between sets as we’ll see later.

2.2. The Intersection of Sets

The term intersection means the common values of different sets.

We can see that the integers 2 and 4 exist in both sets. So the intersection of setA and setB is 2 and 4 because these are the values which are common to both of our sets.

setA intersection setB = {2, 4}

In order to show the intersection in a diagram, we merge our two sets and highlight the area that is common to both of our sets:
A Venn Diagram of Interception

2.3. The Union of Sets

The term union means combining the values of different sets.

So let’s create a new set which is the union of our example sets. We already know that we can’t have duplicate values in a set. However, our sets have some duplicate values (2 and 4). So when we combine the contents of both sets, we need to ensure we remove duplicates. So we end up with 1, 2, 3, 4, 6 and 8.

setA union setB = {1, 2, 3, 4, 6, 8}

Again we can show the union in a diagram. So let’s merge our two sets and highlight the area that represents the union:
A Venn Diagram of Union

2.4. The Relative Complement of Sets

The term relative complement means the values from one set that are not in another. It is also referred to as the set difference.

Now let’s create new sets which are the relative complements of setA and setB.

relative complement of setA in setB = {6, 8}

relative complement of setB in setA = {1, 3}

And now, let’s highlight the area in setA that is not part of setB. This gives us the relative complement of setB in setA:
A Venn Diagram of Relative Complement

2.5. The Subset and Superset

A subset is simply part of a larger set, and the larger set is called a superset. When we have a subset and superset, the union of the two is equal to the superset, and the intersection is equal to the subset.

3. Implementing Set Operations with java.util.Set

In order to see how we perform set operations in Java, we’ll take the example sets and implement the intersection, union and relative complement. So let’s start by creating our sample sets of integers:

private Set<Integer> setA = setOf(1,2,3,4);
private Set<Integer> setB = setOf(2,4,6,8);
    
private static Set<Integer> setOf(Integer... values) {
    return new HashSet<Integer>(Arrays.asList(values));
}

3.1. Intersection

First, we’re going to use the retainAll method to create the intersection of our sample sets. Because retainAll modifies the set directly, we’ll make a copy of setA called intersectSet. Then we’ll use the retainAll method to keep the values that are also in setB:

Set<Integer> intersectSet = new HashSet<>(setA);
intersectSet.retainAll(setB);
assertEquals(setOf(2,4), intersectSet);

3.2. Union

Now let’s use the addAll method to create the union of our sample sets. The addAll method adds all the members of the supplied set to the other. Again as addAll updates the set directly, we’ll make a copy of setA called unionSet, and then add setB to it:

Set<Integer> unionSet = new HashSet<>(setA);
unionSet.addAll(setB);
assertEquals(setOf(1,2,3,4,6,8), unionSet);

3.3. Relative Complement

Finally, we’ll use the removeAll method to create the relative complement of setB in setA. We know that we want the values that are in setA that don’t exist in setB. So we just need to removeAll elements from setA that are also in setB:

Set<Integer> differenceSet = new HashSet<>(setA);
differenceSet.removeAll(setB);
assertEquals(setOf(1,3), differenceSet);

4. Implementing Set Operations with Streams

4.1. Intersection

Let’s create the intersection of our sets using Streams.

First, we’ll get the values from setA into a stream. Then we’ll filter the stream to keep all values that are also in setB. And lastly, we’ll collect the results into a new Set:

Set<Integer> intersectSet = setA.stream()
    .filter(setB::contains)
    .collect(Collectors.toSet());
assertEquals(setOf(2,4), intersectSet);

4.2. Union

Now let’s use the static method Streams.concat to add the values of our sets into a single stream.

In order to get the union from the concatenation of our sets, we need to remove any duplicates. We’ll do this by simply collecting the results into a Set:

Set<Integer> unionSet = Stream.concat(setA.stream(), setB.stream())
    .collect(Collectors.toSet());
assertEquals(setOf(1,2,3,4,6,8), unionSet);

4.3. Relative Complement

Finally, we’ll create the relative complement of setB in setA.

As we did with the intersection example we’ll first get the values from setA into a stream. This time we’ll filter the stream to remove any values that are also in setB. Then, we’ll collect the results into a new Set:

Set<Integer> differenceSet = setA.stream()
    .filter(val -> !setB.contains(val))
    .collect(Collectors.toSet());
assertEquals(setOf(1,3), differenceSet);

5. Utility Libraries for Set Operations

Now that we’ve seen how to perform basic set operations with pure Java, let’s use a couple of utility libraries to perform the same operations. One nice thing about using these libraries is that the method names clearly tell us what operation is being performed.

5.1. Dependencies

In order to use the Guava Sets and Apache Commons Collections SetUtils we need to add their dependencies:

<dependency>
    <groupId>com.google.guava</groupId>
    <artifactId>guava</artifactId>
    <version>27.1-jre</version>
</dependency>
<dependency>
    <groupId>org.apache.commons</groupId>
    <artifactId>commons-collections4</artifactId>
    <version>4.3</version>
</dependency>

5.2. Guava Sets

Let’s use the Guava Sets class to perform intersection and union on our example sets. In order to do this we can simply use the static methods union and intersection of the Sets class:

Set<Integer> intersectSet = Sets.intersection(setA, setB);
assertEquals(setOf(2,4), intersectSet);

Set<Integer> unionSet = Sets.union(setA, setB);
assertEquals(setOf(1,2,3,4,6,8), unionSet);

Take a look at our Guava Sets article to find out more.

5.3. Apache Commons Collections

Now let’s use the intersection and union static methods of the SetUtils class from the Apache Commons Collections:

Set<Integer> intersectSet = SetUtils.intersection(setA, setB);
assertEquals(setOf(2,4), intersectSet);

Set<Integer> unionSet = SetUtils.union(setA, setB);
assertEquals(setOf(1,2,3,4,6,8), unionSet);

Take a look at our Apache Commons Collections SetUtils tutorial to find out more.

6. Conclusion

We’ve seen an overview of how to perform some basic operations on sets, as well as details of how to implement these operations in a number of different ways.

All of the code examples can be found over on GitHub.

REST Assured Authentication

$
0
0

1. Overview

In this tutorial, we’ll analyze how we can authenticate with REST Assured to test and validate a secured API properly.

The tool provides support for several authentication schemes:

  • Basic Authentication
  • Digest Authentication
  • Form Authentication
  • OAuth 1 and OAuth 2

And we’ll see examples for each one.

2. Using Basic Authentication

The basic authentication scheme requires the consumer to send user id and a password encoded in Base64.

REST Assured provides an easy way to configure the credentials that the request requires:

given().auth()
  .basic("user1", "user1Pass")
  .when()
  .get("http://localhost:8080/spring-security-rest-basic-auth/api/foos/1")
  .then()
  .assertThat()
  .statusCode(HttpStatus.OK.value());

2.1. Preemptive Authentication

As we’ve seen on a previous post on Spring Security authentication, a server might use a challenge-response mechanism to indicate explicitly when the consumer needs authenticate to access the resource.

By default, REST Assured waits for the server to challenge before sending the credentials.

This can be troublesome in some cases, for example, where the server is configured to retrieve a login form instead of the challenge response.

For this reason, the library provides the preemptive directive that we can use:

given().auth()
  .preemptive()
  .basic("user1", "user1Pass")
  .when()
  // ...

With this in place, REST Assured will send the credentials without waiting for an Unauthorized response.

We hardly ever are interested in testing the server’s ability to challenge. Therefore, we can normally add this command to avoid complications and the overhead of making an additional request.

3. Using Digest Authentication

Even though this is also considered a “weak” authentication method, using Digest Authentication represents an advantage over the basic protocol.

This is due to the fact that this scheme avoids sending the password in cleartext.

Despite this difference, implementing this form of authentication with REST Assured is very similar to the one we followed in the previous section:

given().auth()
  .digest("user1", "user1Pass")
  .when()
  // ...

Note that, currently, the library supports only challenged authentication for this scheme, so we can’t use preemptive() as we did earlier.

4. Using Form Authentication

Many services provide an HTML form for the user to authenticate by filling in the fields with their credentials.

When the user submits the form, the browser executes a POST request with the information.

Normally, the form indicates the endpoint that it’ll call with its action attribute, and each input field corresponds with a form parameter sent in the request.

If the login form is simple enough and follows these rules, then we can rely on REST Assured to figure out these values for us:

given().auth()
  .form("user1", "user1Pass")
  .when()
  // ...

This is not an optimal approach, anyway, since REST Assured needs to perform an additional request and parse the HTML response to find the fields.

We also have to keep in mind that the process can still fail, for example, if the webpage is complex, or if the service is configured with a context path that is not included in the action attribute.

Therefore, a better solution is to provide the configuration ourselves, indicating explicitly the three required fields:

given().auth()
  .form(
    "user1",
    "user1Pass",
    new FormAuthConfig("/perform_login", "username", "password"))
  // ...

Apart from these basic configurations, REST Assured ships with functionality to:

  • detect or indicate a CSRF token field in the webpage
  • use additional form fields in the request
  • log information about the authentication process

5. OAuth Support

OAuth is technically an authorization framework, and it doesn’t define any mechanism for authenticating a user.

Still, it can be used as the basis for building an authentication and identity protocol, as is the case of OpenID Connect.

5.1. OAuth 2.0

REST Assured allows configuring the OAuth 2.0 access token to request a secured resource:

given().auth()
  .oauth2(accessToken)
  .when()
  .// ...

The library doesn’t provide any help in obtaining the access token, so we’ll have to figure out how to do this ourselves.

For the Client Credential and Password flows this is a simple task, since the Token is obtained by just presenting the corresponding credentials.

On the other hand, automating the Authorization Code flow might not be that easy, and we’ll probably need the help of other tools as well.

To understand correctly this flow and what it takes to obtain an Access Token, we can have a look at this great post on the subject.

5.2. OAuth 1.0a

In the case of OAuth 1.0a, REST Assured supplies a method that receives a Consumer Key, Secret, Access Token and Token Secret to access a secured resource:

given().accept(ContentType.JSON)
  .auth()
  .oauth(consumerKey, consumerSecret, accessToken, tokenSecret)
  // ...

This protocol requires user input, therefore obtaining the last two fields won’t be a trivial task.

Note that we’ll need to add the scribejava-apis dependency in our project if we’re using OAuth 2.0 features with a version prior to 2.5.0, or if we’re making use of the OAuth 1.0a functionality.

6. Conclusion

In this tutorial, we’ve learned how we can authenticate to access secured APIs using REST Assured.

The library simplifies the process of authentication for practically any scheme that we implemented.

As always, we can find working examples with instructions on our Github repo.

Introduction to SPNEGO/Kerberos Authentication in Spring

$
0
0

1. Overview

In this tutorial, we’ll understand the basics of the Kerberos authentication protocol. We’ll also cover the need for SPNEGO in connection with Kerberos.

Finally, we’ll see how to make use of the Spring Security Kerberos extension to create applications enabled for Kerberos with SPNEGO.

Before we proceed, it’s worthwhile to note that this tutorial will introduce many new terms for those uninitiated in this area. Hence, we’ll spend some time up front to cover the grounds.

2. Understanding Kerberos

Kerberos is a Network Authentication Protocol developed at Massachusetts Institute of Technology (MIT) in the early eighties. As you may realize, this is relatively old and has stood the test of time. Windows Server widely supports Kerberos as an authentication mechanism and has even made it the default authentication option.

Technically, Kerberos is a ticket-based authentication protocol that allows nodes in a computer network to identify themselves to each other.

2.1. Simple Use Case for Kerberos

Let’s draw up a hypothetical situation to demonstrate this.

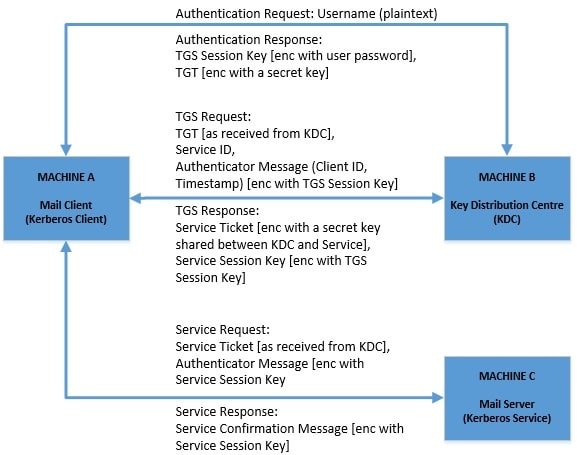
Suppose that a user, through his mail client on his machine, needs to pull his emails from a mail server on another machine on the same network. There is an obvious need for authentication here. The mail client and mail server must be able to identify and trust each other for them to communicate securely.

How can Kerberos help us here? Kerberos introduces a third party called Key Distribution Centre (KDC), which has a mutual trust with each node in the network. Let’s see how this can work in our case:

2.2. Key Aspects of Kerberos Protocol

While this may sound esoteric, this is quite simple and creative in securing communication over an unsecured network. Some of the problems presented here are quite taken for granted in the era of TLS everywhere!

While a detailed discussion of the Kerberos Protocol is not possible here, let’s go through some salient aspects:

  • Trust between nodes (client and server) and KDC is assumed to exist here over the same realm
  • Password is never exchanged over the network
  • Trust between the client and server is implied based on the fact that they can decrypt messages with a key shared only with the KDC
  • Trust between the client and the server is mutual
  • The client can cache tickets for repeated use until the expiry, providing a single sign-on experience
  • Authenticator Messages are based on the timestamp and thus are good only for one-time use
  • All three parties here must have a relatively synchronized time

While this just scratches the surface of this beautiful authentication protocol, it is sufficient to get us going with our tutorial.

3. Understanding SPNEGO

SPNEGO stands for Simple and Protected GSS-API Negotiation Mechanism. Quite a name! Let’s first see what GSS-API stands for. The Generic Security Service Application Program Interface (GSS-API) is nothing but an IETF standard for client and server to communicate in a secure and vendor-agnostic manner.

SPNEGO is a part of the GSS-API for client and server to negotiate the choice of security mechanism to use, for instance, Kerberos or NTLM.

4. Why do we need SPNEGO with Kerberos?

As we saw in the previous section, Kerberos is a pure Network Authentication Protocol operating primarily in the transport layer (TCP/UDP). While this is good for many use cases, this falls short of requirements for the modern web. If we have an application that operates on a higher abstraction, like HTTP, it is not possible to use Kerberos directly.

This is where SPNEGO comes to our help. In the case of a web application, communication primarily happens between a web browser like Chrome and a web server like Tomcat hosting the web application over HTTP. If enabled, they can negotiate Kerberos as a security mechanism through SPNEGO and exchange tickets as SPNEGO tokens over HTTP.

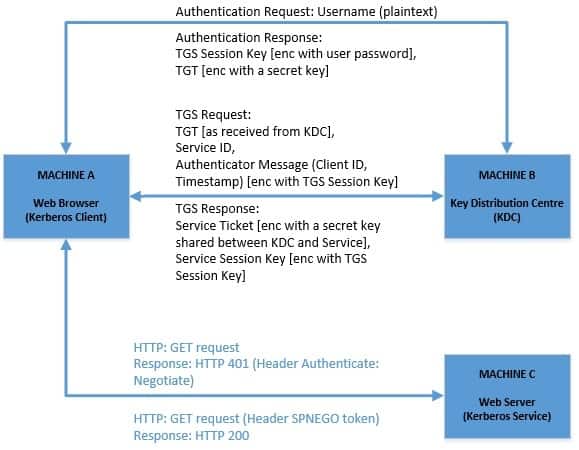
So how does this change our scenario mentioned earlier? Let’s replace our simple mail client with a web browser and mail server with a web application:

So, not much has changed in this compared to our previous diagram except that the communication between client and server happens explicitly over HTTP now. Let’s understand this better:

  • The client machine authenticates against the KDC and caches the TGT
  • Web browser on the client machine is configured to use SPNEGO and Kerberos
  • The web application is also configured to support SPNEGO and Kerberos
  • Web application throws a “Negotiate” challenge to web browser trying to access a protected resource
  • Service Ticket is wrapped as SPNEGO token and exchanged as an HTTP header

5. Requirements

Before we can proceed to develop a web application that supports Kerberos authentication mode, we must gather some basic setup. Let’s go through these tasks quickly.

5.1. Setting up KDC

Setting up a Kerberos environment for production use is beyond the scope of this tutorial. This is unfortunately not a trivial task and fragile as well. There are several options available to get an implementation of Kerberos, both open source and commercial versions:

The actual set-up of KDC and related infrastructure is dependent on the provider and should be followed from their respective documentation. However, Apache Kerby can be run inside a Docker container, which makes it platform-neutral.

5.2. Setting up Users in KDC

We need to set up two users — or, as they call it, principals — in KDC. We can use the “kadmin” command-line tool for this purpose. Let’s suppose we’ve created a realm called “baeldung.com” in the KDC database and logged in to “kadmin” with a user having admin privileges.

We’ll create our first user, whom we wish to authenticate from a web browser, with:

$ kadmin: addprinc -randkey kchandrakant -pw password
Principal "kchandrakant@baeldung.com" created.

We’ll also need to register our web application with the KDC:

$ kadmin: addprinc -randkey HTTP/demo.kerberos.baeldung.com@baeldung.com -pw password
Principal "HTTP/demo.kerberos.baeldung.com@baeldung.com" created.

Note the convention for naming the principal here, as this must match the domain on which the application is accessible from the web browser. The web browser automatically tries to create a Service Principal Name (SPN) with this convention when presented with a “Negotiate” challenge.

We also need to export this as a keytab file to make it available to the web application:

$ kadmin: ktadd -k baeldung.keytab HTTP/demo.kerberos.baeldung.com@baeldung.com

This should give us a file named “baeldung.keytab”.

5.3. Browser Configuration

We need to enable the web browser that we use to access a protected resource on the web application for the “Negotiate” authentication scheme. Fortunately, most of the modern web browsers like Chrome support “Negotiate” as an authentication scheme by default.

Additionally, we can configure the browser to provide “Integrated Authentication”. In this mode, when presented with the “Negotiate” challenge, the browser tries to make use of the cached credentials in the host machine, which has already been logged into a KDC principal. However, we’ll not use this mode in here to keep things explicit.

5.4. Domain Configuration

It is understandable that we may not have actual domains to test our web application. But sadly, we can’t use localhost or 127.0.0.1 or any other IP address with Kerberos authentication. There is, however, an easy solution to this, which involves setting up entries in the “hosts” file like:

demo.kerberos.bealdung.com 127.0.0.1

6. Spring to Our Rescue!

Finally, as we’ve got the basics clear, it is time to test the theory. But, won’t it be cumbersome to create a web application supporting SPNEGO and Kerberos? Not if we use Spring. Spring has a Kerberos Extension as part of Spring Security that supports SPNEGO with Kerberos seamlessly.

Almost all we have to do is just configurations in Spring Security to enable SPNEGO with Kerberos. We’ll use Java-style configurations here, but an XML configuration can be set up as easily. We can extend the WebSecurityConfigurerAdapter class to configure all we need.

6.1. Maven Dependencies

The first thing we have to set up are the dependencies:

<dependency>
    <groupId>org.springframework.security.kerberos</groupId>
    <artifactId>spring-security-kerberos-web</artifactId>
    <version>${kerberos.extension.version}</version>
</dependency>
<dependency>
    <groupId>org.springframework.security.kerberos</groupId>
    <artifactId>spring-security-kerberos-client</artifactId>
    <version>${kerberos.extension.version}</version>
</dependency>

These dependencies are available for download from Maven Central.

6.2. SPNEGO Configurations

Firstly, SPNEGO is integrated into Spring Security as a Filter in HTTPSecurity:

@Override
protected void configure(HttpSecurity http) throws Exception {
    http.authorizeRequests()
      .anyRequest()
      .authenticated()
    .and()
      .addFilterBefore(
        spnegoAuthenticationProcessingFilter(authenticationManagerBean()),
        BasicAuthenticationFilter.class);
}

This only shows the part required to configure SPNEGO Filter and is not a complete HTTPSecurity configuration, which should be configured as per application security requirements.

Next, we need to provide the SPNEGO Filter as Bean:

@Bean
public SpnegoAuthenticationProcessingFilter spnegoAuthenticationProcessingFilter(
  AuthenticationManager authenticationManager) {
    SpnegoAuthenticationProcessingFilter filter = new SpnegoAuthenticationProcessingFilter();
    filter.setAuthenticationManager(authenticationManager);
    return filter;
}

6.3. Kerberos Configurations

In addition, We can configure Kerberos by adding AuthenticationProvider to AuthenticationManagerBuilder in Spring Security:

@Override
protected void configure(AuthenticationManagerBuilder auth) throws Exception {
    auth
      .authenticationProvider(kerberosAuthenticationProvider())
      .authenticationProvider(kerberosServiceAuthenticationProvider());
}

The first thing we have to provide is a KerberosAuthenticationProvider as a Bean. This is an implementation of AuthenticationProvider, and this is where we set SunJaasKerberosClient as a KerberosClient:

@Bean
public KerberosAuthenticationProvider kerberosAuthenticationProvider() {
    KerberosAuthenticationProvider provider = new KerberosAuthenticationProvider();
    SunJaasKerberosClient client = new SunJaasKerberosClient();
    provider.setKerberosClient(client);
    provider.setUserDetailsService(userDetailsService());
    return provider;
}

Next, we also have to provide a KerberosServiceAuthenticationProvider as a Bean. This is the class that validates Kerberos Service Tickets or SPNEGO Tokens:

@Bean
public KerberosServiceAuthenticationProvider kerberosServiceAuthenticationProvider() {
    KerberosServiceAuthenticationProvider provider = new KerberosServiceAuthenticationProvider();
    provider.setTicketValidator(sunJaasKerberosTicketValidator());
    provider.setUserDetailsService(userDetailsService());
    return provider;
}

Lastly, we need to provide a SunJaasKerberosTicketValidator as a Bean. This is an implementation of KerberosTicketValidator and uses SUN JAAS Login Module:

@Bean
public SunJaasKerberosTicketValidator sunJaasKerberosTicketValidator() {
    SunJaasKerberosTicketValidator ticketValidator = new SunJaasKerberosTicketValidator();
    ticketValidator.setServicePrincipal("HTTP/demo.kerberos.bealdung.com@baeldung.com");
    ticketValidator.setKeyTabLocation(new FileSystemResource("baeldung.keytab"));
    return ticketValidator;
}

6.4. User Details

We’ve seen references to a UserDetailsService in our AuthenticationProvider earlier, so why do we need it? Well, as we’ve come to know Kerberos, it is purely an authentication mechanism that is ticket-based.

So, while it’s able to identify the user, it doesn’t provide other details related to the user, like their authorizations. We need a valid UserDetailsService provided to our AuthenticationProvider to fill this gap.

6.5. Running the Application

This is pretty much what we need to set up a web application with Spring Security enabled for SPNEGO with Kerberos. When we boot up the web application and access any page therein, the web browser should prompt for username and password, prepare a SPNEGO token with Service Ticket, and send it to the application.

The application should be able to process it using the credentials in the keytab file and respond with successful authentication.

However, as we saw earlier, setting up a working Kerberos environment is complicated and quite brittle. If things don’t work as expected, it’s worthwhile to check all the steps again. A simple mistake like mismatch in the domain name can lead to failure with error messages that aren’t particularly helpful.

7. Practical Use of SPNEGO and Kerberos

Now that we’ve seen how Kerberos authentication works and how we can use SPNEGO with Kerberos in web applications, we may question the need for it. While this makes complete sense to use it as an SSO mechanism within an enterprise network, why should we use this in web applications?

Well, for one, even after so many years, Kerberos is still very actively used within enterprise applications, especially Windows-based applications. If an organization has several internal and external web applications, it does make sense to extend the same SSO infrastructure to cover them all. This makes it much easier for administrators and users of an organization to have a seamless experience through disparate applications.

8. Conclusion

To sum up, in this tutorial, we understood the basics of Kerberos authentication protocol. We also discussed SPNEGO as part of GSS-API and how we can use it to facilitate Kerberos-based authentication in a web application over HTTP. Furthermore, we tried to build a small web application leveraging Spring Security’s built-in support for SPNEGO with Kerberos.

This tutorial just provides a quick sneak peek of a powerful and time tested authentication mechanism. There is quite a wealth of information available for us to learn more and possibly appreciate even more!

As always, the code can be found over on GitHub.

Java Weekly, Issue 278

$
0
0

Here we go…

1. Spring and Java

>> Microservices with Spring Boot and Spring Cloud. From config server to OAuth2 server (without inMemory things — Part 2 [itnext.io]

This week’s installment shows how to build a custom auth service, with a user repository and token store backed by MongoDB.

>> Comparing JVM alternatives to JavaScript [renato.athaydes.com]

If you’re writing a front-end app and JavaScript just isn’t your cup of tea, you may ask, can we do this in Java? It’s not always a good idea but we are definitely able to!

>> Reporting Code Coverage using Maven and JaCoCo plugin [tech.asimio.net]

And a quick intro to the JaCoCo plugin, which can tell you what percentage of your code is exercised by your test suites.

Also worth reading:

Webinars and presentations:

Time to upgrade:

2. Technical and Musings

>> A beginner’s guide to database table relationships [vladmihalcea.com]

A run-down of the three basic types of entity relationships in a relational database.

>> To Multicluster, or Not to Multicluster: Inter-Cluster Communication Using a Service Mesh [infoq.com]

A close look at coordinating communication across multiple Kubernetes clusters.

>> The Rise of Hybrid Cloud: 7 Reasons Why It Might be a Better Choice [blog.overops.com]

And finally, a compelling argument for using a combination of on-premise private cloud resources and public cloud services.

Also worth reading:

3. Comics

And my favorite Dilberts of the week:

>> Be More Like Alice [dilbert.com]

>> Wally and the Management Track [dilbert.com]

>> Using Git [dilbert.com]

4. Pick of the Week

>> 5 Skills to Help You Develop Emotional Intelligence [markmanson.net]


Rendering Exceptions in JSON with Spring

$
0
0

1. Introduction

Happy-path REST is pretty well-understood, and Spring makes this easy to do in Java.

But what about when things go wrong?

In this tutorial, we’ll go over passing a Java exception as part of a JSON response using Spring.

For a broader look, check out our posts on error handling for REST with Spring and creating a Java global exception handler.

2. An Annotated Solution

We’re going to use three basic Spring MVC annotations to solve this:

  • @ControllerAdvice to register the surrounding class as something each @Controller should be aware of
  • @ExceptionHandler to tell Spring which of our methods should be invoked for a given exception
  • @ResponseBody to tell Spring to render that method’s response as JSON

Together, these create a Spring bean that handles any exceptions we configure it for. Here are more details about using @ControllerAdvice and @ExceptionHandler in conjunction.

3. Example

Firstly, let’s create an arbitrary custom exception to return to the client.

public class CustomException extends RuntimeException {
    // constructors
}

Secondly, let’s define a class to handle the exception and pass it to the client as JSON.

@ControllerAdvice
@ResponseBody
public class ErrorHandler {

    @ExceptionHandler(CustomException.class)
    @ResponseStatus(HttpStatus.INTERNAL_SERVER_ERROR)
    public CustomException handleCustomException(CustomException ce) {
        return ce;
    }

}

Note that we added the @ResponseStatus annotation. This will specify the status code to send to the client, in our case an Internal Server Error. Also, the @ResponseBody will ensure that the object is sent back to the client serialized in JSON. Finally, below is a dummy controller that shows an example of how the exception can be thrown.

@Controller
public class MainController {

    @GetMapping("/")
    public void index() throws CustomException {
        throw new CustomException();
    }

}

4. Conclusion

In this post, we showed how to handle exceptions in Spring. Moreover, we showed how to send them back to the client serialized in JSON.

The full implementation of this article can be found over on Github. This is a Maven-based project so it should be easy to import and run as it is.

How to Process YAML with Jackson

$
0
0

1. Introduction

In this short tutorial, we’re going to learn how to use Jackson to read and write YAML files.

After we go over our example structure, we’ll use the ObjectMapper to read a YAML file into a Java object and also write an object out to a file.

2. Dependencies

Let’s add the dependency for Jackson YAML data format:

<dependency>
    <groupId>com.fasterxml.jackson.dataformat</groupId>
    <artifactId>jackson-dataformat-yaml</artifactId>
    <version>2.9.8</version>
</dependency>

We can always find the most recent version of this dependency at Maven Central.

Our Java object uses a LocalDate, so let’s also add a dependency for the JSR-310 datatype:

<dependency>
    <groupId>com.fasterxml.jackson.datatype</groupId>
    <artifactId>jackson-datatype-jsr310</artifactId>
    <version>2.9.8</version>
</dependency>

Again, we can look up its most recent version on Maven Central.

3. Data and Object Structure

With our dependencies squared away, we’ll now turn to our input file and the Java classes we’ll be using.

Let’s first look at the file we’ll be reading in:

orderNo: A001
date: 2019-04-17
customerName: Customer, Joe
orderLines:
    - item: No. 9 Sprockets
      quantity: 12
      unitPrice: 1.23
    - item: Widget (10mm)
      quantity: 4
      unitPrice: 3.45

Then, let’s define the Order class:

public class Order {
    private String orderNo;
    private LocalDate date;
    private String customerName;
    private List<OrderLine> orderLines;

    // Constructors, Getters, Setters and toString
}

Finally, let’s create our OrderLine class:

public class OrderLine {
    private String item;
    private int quantity;
    private BigDecimal unitPrice;

    // Constructors, Getters, Setters and toString
}

4. Reading YAML

We’re going to use Jackson’s ObjectMapper to read our YAML file into an Order object, so let’s set that up now:

mapper = new ObjectMapper(new YAMLFactory());

We need to use the findAndRegisterModules method so that Jackson will handle our Date properly:

mapper.findAndRegisterModules();

Once we have our ObjectMapper configured, we simply use readValue:

Order order = mapper.readValue(new File("src/main/resources/orderInput.yaml"), Order.class);

We’ll find that our Order object is populated from the file, including the list of OrderLine.

5. Writing YAML

We’re also going to use ObjectMapper to write an Order out to a file. But first, let’s add some configuration to it:

mapper.disable(SerializationFeature.WRITE_DATES_AS_TIMESTAMPS);

Adding that line tells Jackson to just write our date as a String instead of individual numeric parts.

By default, our file will start with three dashes. That’s perfectly valid for the YAML format, but we can turn it off by disabling the feature on the YAMLFactory:

mapper = new ObjectMapper(new YAMLFactory().disable(Feature.WRITE_DOC_START_MARKER));

With that additional set up out of the way, let’s create an Order:

List<OrderLine> lines = new ArrayList<>();
lines.add(new OrderLine("Copper Wire (200ft)", 1, new BigDecimal(50.67).setScale(2, RoundingMode.HALF_UP)));
lines.add(new OrderLine("Washers (1/4\")", 24, new BigDecimal(.15).setScale(2, RoundingMode.HALF_UP)));
Order order = new Order(
  "B-9910", 
  LocalDate.parse("2019-04-18", DateTimeFormatter.ISO_DATE),
  "Customer, Jane", 
  lines);

Let’s write our order using writeValue:

mapper.writeValue(new File("src/main/resources/orderOutput.yaml"), order);

When we look into the orderOutput.yaml, it should look like similar to:

orderNo: "B-9910"
date: "2019-04-18"
customerName: "Customer, Jane"
orderLines:
- item: "Copper Wire (200ft)"
  quantity: 1
  unitPrice: 50.67
- item: "Washers (1/4\")"
  quantity: 24
  unitPrice: 0.15

6. Conclusion

In this quick tutorial, we learned how to read and write YAML to and from files using the Jackson library. We also looked at a few configuration items that will help us get our data looking the way we want.

The full example code is over on GitHub.

Pattern Matching in Strings in Groovy

$
0
0

1. Overview

In this article, we’ll look at the Groovy language features for pattern matching in Strings.

We’ll see how Groovy’s batteries-included approach provides us with a powerful and ergonomic syntax for our basic pattern matching needs.

2. Pattern Operator

The Groovy language introduces the so-called pattern operator ~. This operator can be considered a syntactic sugar shortcut to Java’s java.util.regex.Pattern.compile(string) method.

Let’s check it out in practice as a part of a Spock test:

def "pattern operator example"() {
    given: "a pattern"
    def p = ~'foo'

    expect:
    p instanceof Pattern

    and: "you can use slashy strings to avoid escaping of blackslash"
    def digitPattern = ~/\d*/
    digitPattern.matcher('4711').matches()
}

This is also pretty convenient, but we’ll see that this operator is merely the baseline for some other, even more useful operators.

3. Match Operator

Most of the time, and especially when writing tests, we’re not really interested in creating Pattern objects, but instead, want to check if a String matches a certain regular expression (or Pattern). Groovy, therefore, also contains the match operator ==~.

It returns a boolean and performs a strict match against the specified regular expression. Basically, it’s a syntactic shortcut over calling Pattern.matches(regex, string).

Again, we’ll look into it in practice as part of a Spock test:

def "match operator example"() {
    expect:
    'foobar' ==~ /.*oba.*/

    and: "matching is strict"
    !('foobar' ==~ /foo/)
}

4. Find Operator

The last Groovy operator in the context of pattern matching is the find operator ~=. In this case, the operator will directly create and return a java.util.regex.Matcher instance.

We can act upon this Matcher instance, of course, by accessing its known Java API methods. But in addition, we’re also able to access matched groups using a multi-dimensional array.

And that’s not all — the Matcher instance will automatically coerce to a boolean type by calling its find() method if used as a predicate. Quoting the official Groovy docs, this means “the =~ operator is consistent with the simple use of Perl’s =~ operator”.

Here, we see the operator in action:

def "find operator example"() {
    when: "using the find operator"
    def matcher = 'foo and bar, baz and buz' =~ /(\w+) and (\w+)/

    then: "will find groups"
    matcher.size() == 2

    and: "can access groups using array"
    matcher[0][0] == 'foo and bar'
    matcher[1][2] == 'buz'

    and: "you can use it as a predicate"
    'foobarbaz' =~ /bar/
}

5. Conclusion

We’ve seen how the Groovy language gives us access to the built-in Java features regarding regular expressions in a very convenient manner.

The official Groovy documentation also contains some concise examples regarding this topic. It’s especially cool if you consider that the code examples in the docs are executed as part of the documentation build.

As always, code examples can be found on GitHub.

Console I/O in Kotlin

$
0
0

1. Introduction

When we learn a new programing language, it’s common to start with console I/O. In this tutorial, we’ll explore some alternatives for handling console I/O with Kotlin.

2. Using the Kotlin Standard Library

The Kotlin standard library provides us extensions for handling I/O based on the JDK’s built-in support.

To print to the console, we can use the print function. If we run the following snippet:

print("Hello from Kotlin")

We’ll see the following message displayed on our terminal:

Hello from Kotlin

Behind the scenes, this function uses Java’s System.out.print method. Also, the library offers us the println alternative function, which adds the line separator at the end of the message.

In order to read from the console, we can use the readLine function:

val inputText = readLine()

Interestingly, this isn’t a synonym for Scanner.readLine like print is for System.out.print. Let’s see now where Scanner does come in, though.

3. Using the Java Standard Library

Kotlin has great interoperability with Java. Thus, we can use the standard I/O classes from the JDK in our programs in case we need them.

Let’s explore some of them here.

3.1. Using the Scanner Class

Using the Scanner class is very straightforward; we only need to create an instance and use the nextLine method:

val scanner = Scanner(System.`in`)
val readText = scanner.nextLine()

Note that we’re escaping the in property with backticks because it’s a keyword in Kotlin.

3.2. Using the BufferedReader Class

To use the BufferedReader class to read from the standard input stream, we first need to instantiate it with System.in:

val reader = BufferedReader(InputStreamReader(System.`in`))

And then we can use its methods — for example, readLine():

val readText = reader.readLine()

3.3. Using the Console Class

Unlike the two previous classes, the Console class has additional methods for handling console I/O, like readPassword and printf.

In order to use the Console class, we need to get an instance from the System class:

val console = System.console()

Now, we can use its readLine() method, among others:

val readText = console.readLine()

4. Conclusion

In this tutorial, we saw an introduction to handling I/O with Kotlin and how to use the equivalent classes from the JDK. For more details about these JDK classes, be sure to check out our tutorial on Scanner, BufferedReader, and Console.

Also, thanks to Kotlin’s interoperability with Java, we can use additional Java libraries for handling I/O.

As usual, all the code samples shown in this article are available over on GitHub.

Maps in Groovy

$
0
0

1. Overview

Groovy extends the Map API in Java to provide methods for operations such as filtering, searching and sorting. It also provides a variety of shorthand ways of creating and manipulating maps.

In this article, we’ll look at the Groovy way of working with maps.

2. Creating Groovy Maps

We can use the map literal syntax [k:v] for creating maps. Basically, it allows us to instantiate a map and define entries in one line.

An empty map can be created using:

def emptyMap = [:]

Similarly, a map with values can be instantiated using:

def map = [name: "Jerry", age: 42, city: "New York"]

Notice that the keys aren’t surrounded by quotes.

And by default Groovy creates an instance of java.util.LinkedHashMap. We can override this default behavior by using the as operator.

3. Adding Items

Let’s start by defining a map:

def map = [name:"Jerry"]

We can add a key to the map:

map["age"] = 42

But another more Javascript-like way is using property notation (the dot operator):

map.city = "New York"

In other words, Groovy supports accessing of key-value pairs in a bean like fashion.

We can also use variables instead of literals as keys while adding new items to the map:

def hobbyLiteral = "hobby"
def hobbyMap = [(hobbyLiteral): "Singing"]
map.putAll(hobbyMap)
assertTrue(hobbyMap.hobby == "Singing")
assertTrue(hobbyMap[hobbyLiteral] == "Singing")

First, we have to create a new variable which stores the key hobby. Then we use this variable enclosed in parenthesis with the map literal syntax to create another map.

4. Retrieving Items

The literal syntax or the property notation can be used to get items from a map.

For a map defined as:

def map = [name:"Jerry", age: 42, city: "New York", hobby:"Singing"]

We can get the value corresponding to the key name:

assertTrue(map["name"] == "Jerry")

or

assertTrue(map.name == "Jerry")

5. Removing Items

We can remove any entry from a map based on a key using the remove() method. But, sometimes we may need to remove multiple entries from a map. This can be done using the minus() method.

The minus() method accepts a Map. And returns a new Map after removing all the entries of the given map from the underlying map:

def map = [1:20, a:30, 2:42, 4:34, ba:67, 6:39, 7:49]

def minusMap = map.minus([2:42, 4:34]);
assertTrue(minusMap == [1:20, a:30, ba:67, 6:39, 7:49])

Next, we can also remove entries based on a condition. This can be achieved using the removeAll() method:

minusMap.removeAll{it -> it.key instanceof String}
assertTrue(minusMap == [1:20, 6:39, 7:49])

Inversely, to retain all entries which satisfy a condition, we can use the retainAll() method:

minusMap.retainAll{it -> it.value % 2 == 0}
assertTrue(minusMap == [1:20])

6. Iterating Through Entries

We can iterate through entries using the each() and eachWithIndex() methods.

The each() method provides implicit parameters like entry, key, and value which correspond to the current Entry.

The eachWithIndex() method also provides an index in addition to Entry. Both the methods accept a Closure as an argument.

In the next example, we iterate through each Entry. The Closure passed to the each() method gets the key-value pair from the implicit parameter entry and prints it:

map.each{entry -> println "$entry.key: $entry.value"}

Next, we use the eachWithIndex() method to print the current index along with other values:

map.eachWithIndex{entry, i -> println "$i $entry.key: $entry.value"}

It’s also possible to ask the key, value, and index be supplied separately:

map.eachWithIndex{key, value, i -> println "$i $key: $value"}

7. Filtering

We can use the find(), findAll() and grep() methods to filter and search for map entries based on keys and values.

Let’s start by defining a map to execute these methods on:

def map = [name:"Jerry", age: 42, city: "New York", hobby:"Singing"]

First, we look at the find() method which accepts a Closure and returns the first Entry that matches the Closure condition:

assertTrue(map.find{it.value == "New York"}.key == "city")

Similarly, findAll also accepts a Closure but returns a Map with all the key-value pairs that satisfy the condition in the Closure:

assertTrue(map.findAll{it.value == "New York"} == [city : "New York"])

If we’d prefer to use a List, though, we can use grep instead of findAll:

map.grep{it.value == "New York"}.each{it -> assertTrue(it.key == "city" && it.value == "New York")}

We first used grep to find entries which have the value as New York. Then, to demonstrate the return type is List, we iterate through the result of grep(). And for each Entry in the list which is available in the implicit parameter, we check if its the expected result.

Next, to find out if all the items in a map satisfy a condition we can use every which returns a boolean.

Let’s check if all values in the map are of type String:

assertTrue(map.every{it -> it.value instanceof String} == false)

Similarly, we can use any to determine if any items in the map match a condition:

assertTrue(map.any{it -> it.value instanceof String} == true)

8. Transforming and Collecting

At times we may want to transform the entries in a map into new values. Using the collect() and collectEntries() methods it’s possible to transform and collect entries into a Collection or Map respectively.

Let’s look at some examples.

Given a map of employee ids and employees:

def map = [
  1: [name:"Jerry", age: 42, city: "New York"],
  2: [name:"Long", age: 25, city: "New York"],
  3: [name:"Dustin", age: 29, city: "New York"],
  4: [name:"Dustin", age: 34, city: "New York"]]

We can collect the names of all employees into a list using collect():

def names = map.collect{entry -> entry.value.name}
assertTrue(names == ["Jerry", "Long", "Dustin", "Dustin"])

Next, if we’re interested in a unique set of names, we can specify the collection by passing a Collection object:

def uniqueNames = map.collect([] as HashSet){entry -> entry.value.name}
assertTrue(uniqueNames == ["Jerry", "Long", "Dustin"] as Set)

If we want to change the employee names in the map from lowercase to uppercase, we can use collectEntries. This method returns a map of transformed values:

def idNames = map.collectEntries{key, value -> [key, value.name]}
assertTrue(idNames == [1:"Jerry", 2:"Long", 3:"Dustin", 4:"Dustin"])

Lastly, it’s also possible to use collect methods in conjunction with the find and findAll methods to transform the filtered results:

def below30Names = map.findAll{it.value.age < 30}.collect{key, value -> value.name}
assertTrue(below30Names == ["Long", "Dustin"])

Here, we first find all employees between ages 20-30 and collect them into a map.

9. Grouping

Sometimes we may want to group some items of a map into submaps based on a condition.

The groupBy() method returns a map of maps. And each map contains key-value pairs which evaluate to the same result for the given condition:

def map = [1:20, 2: 40, 3: 11, 4: 93]
     
def subMap = map.groupBy{it.value % 2}
assertTrue(subMap == [0:[1:20, 2:40], 1:[3:11, 4:93]])

Another way of creating submaps is by using subMap(). It is different in groupBy() in the sense that it only allows for grouping based on the keys:

def keySubMap = map.subMap([1,2])
assertTrue(keySubMap == [1:20, 2:40])

In this case, the entries for keys 1 and 2 are returned in the new map, and all the other entries are discarded.

10. Sorting

Usually, when sorting, we may want to sort the entries in a map based on key or value or both. Groovy provides a sort() method which can be used for this purpose.

Given a map:

def map = [ab:20, a: 40, cb: 11, ba: 93]

If sorting needs to be done on key, use the no-args sort() method which is based on natural ordering:

def naturallyOrderedMap = map.sort()
assertTrue([a:40, ab:20, ba:93, cb:11] == naturallyOrderedMap)

Or use the sort(Comparator) method to provide comparison logic:

def compSortedMap = map.sort({k1, k2 -> k1 <=> k2} as Comparator)
assertTrue([a:40, ab:20, ba:93, cb:11] == compSortedMap)

Next, to sort on either key or values or both, we can supply a Closure condition to sort():

def cloSortedMap = map.sort({it1, it2 -> it1.value <=> it1.value})
assertTrue([cb:11, ab:20, a:40, ba:93] == cloSortedMap)

11. Conclusion

We started by looking at how we can create Maps in Groovy. Next, we looked at different ways in which items can be added, retrieved and removed from a map.

Later, we covered the methods to perform common operations which are provided out of the box in Groovy. They included filtering, searching, transforming and sorting.

As always the examples covered in the article can be found on GitHub.

MongoDB BSON Guide

$
0
0

1. Introduction

In this tutorial, we’ll be looking at BSON and how we can use it to interact with MongoDB.

Now, an in-depth description of MongoDB and all of its capabilities is beyond the scope of this article. However, it’ll be useful to understand a few key concepts.

MongoDB is a distributed, NoSQL document storage engine. Documents are stored as BSON data and grouped together into collections. Documents in a collection are analogous to rows in a relational database table.

For a more in-depth look, have a look at the introductory MongoDB article.

2. What is BSON?

BSON stands for Binary JSON. It’s a protocol for binary serialization of JSON-like data.

JSON is a data exchange format that is popular in modern web services. It provides a flexible way to represent complex data structures.

BSON provides several advantages over using regular JSON:

  • Compact: In most cases, storing a BSON structure requires less space than its JSON equivalent
  • Data Types: BSON provides additional data types not found in regular JSON, such as Date and BinData

One of the main benefits of using BSON is that it’s easy to traverse. BSON documents contain additional metadata that allow for easy manipulation of the fields of a document, without having to read the entire document itself.

3. The MongoDB Driver

Now that we have a basic understanding of BSON and MongoDB, let’s look at how to use them together. We’ll focus on the main actions from the CRUD acronym (Create, Read, Update, Delete).

MongoDB provides software drivers for most modern programming languages. The drivers are built on top of the BSON library, which means we’ll be working directly with the BSON API when building queries. For more information, see our guide to the MongoDB query language.

In this section, we’ll look at using the driver to connect to a cluster, and using the BSON API to perform different types of queries. Note that the MongoDB driver provides a Filters class that can help us write more compact code. For this tutorial, however, we’ll focus solely on using the core BSON API.

As an alternative to using the MongoDB driver and BSON directly, take a look at our Spring Data MongoDB guide.

3.1. Connecting

To get started, we first add the MongoDB driver as a dependency into our application:

<dependency>
    <groupId>org.mongodb</groupId>
    <artifactId>mongodb-driver-sync</artifactId>
    <version>3.10.1</version>
</dependency>

Then we create a connection to a MongoDB database and collection:

MongoClient mongoClient = MongoClients.create();
MongoDatabase database = mongoClient.getDatabase("myDB");
MongoCollection<Document> collection = database.getCollection("employees");

The remaining sections will look at creating queries using the collection reference.

3.2. Insert

Let’s say we have the following JSON that we want to insert as a new document into an employees collection:

{
  "first_name" : "Joe",
  "last_name" : "Smith",
  "title" : "Java Developer",
  "years_of_service" : 3,
  "skills" : ["java","spring","mongodb"],
  "manager" : {
     "first_name" : "Sally",
     "last_name" : "Johanson"
  }
}

This example JSON shows the most common data types we would encounter with MongoDB documents: text, numeric, arrays, and embedded documents.

To insert this using BSON, we’d use MongoDB’s Document API:

Document employee = new Document()
    .append("first_name", "Joe")
    .append("last_name", "Smith")
    .append("title", "Java Developer")
    .append("years_of_service", 3)
    .append("skills", Arrays.asList("java", "spring", "mongodb"))
    .append("manager", new Document()
                           .append("first_name", "Sally")
                           .append("last_name", "Johanson"));
collection.insertOne(employee);

The Document class is the primary API used in BSON. It extends the Java Map interface and contains several overloaded methods. This makes it easy to work with native types as well as common objects such as object IDs, dates, and lists.

3.3. Find

To find a document in MongoDB, we provide a search document that specifies which fields to query on. For example, to find all documents that have a last name of “Smith” we would use the following JSON document:

{  
  "last_name": "Smith"
}

Written in BSON this would be:

Document query = new Document("last_name", "Smith");
List results = new ArrayList<>();
collection.find(query).into(results);

“Find” queries can accept multiple fields and the default behavior is to use the logical and operator to combine them. This means only documents that match all fields will be returned.

To get around this, MongoDB provides the or query operator:

{
  "$or": [
    { "first_name": "Joe" },
    { "last_name":"Smith" }
  ]
}

This will find all documents that have either first name “Joe” or last name “Smith”. To write this as BSON, we would use a nested Document just like the insert query above:

Document query = 
  new Document("$or", Arrays.asList(
      new Document("last_name", "Smith"),
      new Document("first_name", "Joe")));
List results = new ArrayList<>();
collection.find(query).into(results);

3.4. Update

Update queries are a little different in MongoDB because they require two documents:

  1. The filter criteria to find one or more documents
  2. An update document specifying which fields to modify

For example, let’s say we want to add a “security” skill to every employee that already has a “spring” skill. The first document will find all employees with “spring” skills, and the second one will add a new “security” entry to their skills array.

In JSON, these two queries would look like:

{
  "skills": { 
    $elemMatch:  { 
      "$eq": "spring"
    }
  }
}

{
  "$push": { 
    "skills": "security"
  }
}

And in BSON, they would be:

Document query = new Document(
  "skills",
  new Document(
    "$elemMatch",
    new Document("$eq", "spring")));
Document update = new Document(
  "$push",
  new Document("skills", "security"));
collection.updateMany(query, update);

3.5. Delete

Delete queries in MongoDB use the same syntax as find queries. We simply provide a document that specifies one or more criteria to match.

For example, let’s say we found a bug in our employee database and accidentally created employees a with a negative value for years of service. To find them all, we would use the following JSON:

{
  "years_of_service" : { 
    "$lt" : 0
  }
}

The equivalent BSON document would be:

Document query = new Document(
  "years_of_service", 
  new Document("$lt", 0));
collection.deleteMany(query);

4. Conclusion

In this tutorial, we’ve seen a basic introduction to building MongoDB queries using the BSON library. Using only the BSON API, we implemented basic CRUD operations for a MongoDB collection.

What we have not covered are more advanced topics such as projections, aggregations, geospatial queries, bulk operations, and more. All of these are possible using just the BSON library. The examples we’ve seen here form the building blocks we would use to implement these more advanced operations.

As always, you can find the code examples above in our GitHub repo.

Java 9 Migration Issues and Resolutions

$
0
0

1. Overview

The Java platform used to have a monolithic architecture, bundling all packages as a single unit.

In Java 9, this was streamlined with the introduction of the Java Platform Module System (JPMS), or Modules for short. Related packages were grouped under modules, and modules replaced packages to become the basic unit of reuse.

In this quick tutorial, we’ll go through some of the issues related to modules that we may face when migrating an existing application to Java 9.

2. Simple Example

Let’s take a look at a simple Java 8 application that contains four methods, which are valid under Java 8 but challenging in future versions. We’ll use these methods to understand the impact of migration to Java 9.

The first method fetches the name of the JCE provider referenced within the application:

private static void getCrytpographyProviderName() {
    LOGGER.info("1. JCE Provider Name: {}\n", new SunJCE().getName());
}

The second method lists the names of the classes in a stack trace:

private static void getCallStackClassNames() {
    StringBuffer sbStack = new StringBuffer();
    int i = 0;
    Class<?> caller = Reflection.getCallerClass(i++);
    do {
        sbStack.append(i + ".").append(caller.getName())
            .append("\n");
        caller = Reflection.getCallerClass(i++);
    } while (caller != null);
    LOGGER.info("2. Call Stack:\n{}", sbStack);
}

The third method converts a Java object into XML:

private static void getXmlFromObject(Book book) throws JAXBException {
    Marshaller marshallerObj = JAXBContext.newInstance(Book.class).createMarshaller();
    marshallerObj.setProperty(Marshaller.JAXB_FORMATTED_OUTPUT, true);

    StringWriter sw = new StringWriter();
    marshallerObj.marshal(book, sw);
    LOGGER.info("3. Xml for Book object:\n{}", sw);
}

And the final method encodes a string to Base 64 using sun.misc.BASE64Encoder, from the JDK internal libraries:

private static void getBase64EncodedString(String inputString) {
    String encodedString = new BASE64Encoder().encode(inputString.getBytes());
    LOGGER.info("4. Base Encoded String: {}", encodedString);
}

Let’s invoke all the methods from the main method:

public static void main(String[] args) throws Exception {
    getCrytpographyProviderName();
    getCallStackClassNames();
    getXmlFromObject(new Book(100, "Java Modules Architecture"));
    getBase64EncodedString("Java");
}

When we run this application in Java 8 we get the following:

> java -jar target\pre-jpms.jar
[INFO] 1. JCE Provider Name: SunJCE

[INFO] 2. Call Stack:
1.sun.reflect.Reflection
2.com.baeldung.prejpms.App
3.com.baeldung.prejpms.App

[INFO] 3. Xml for Book object:
<?xml version="1.0" encoding="UTF-8" standalone="yes"?>
<book id="100">
    <title>Java Modules Architecture</title>
</book>

[INFO] 4. Base Encoded String: SmF2YQ==

Normally, Java versions guarantee backward compatibility, but the JPMS changes some of this.

3. Execution in Java 9

Now, let’s run this application in Java 9:

>java -jar target\pre-jpms.jar
[INFO] 1. JCE Provider Name: SunJCE

[INFO] 2. Call Stack:
1.sun.reflect.Reflection
2.com.baeldung.prejpms.App
3.com.baeldung.prejpms.App

[ERROR] java.lang.NoClassDefFoundError: javax/xml/bind/JAXBContext
[ERROR] java.lang.NoClassDefFoundError: sun/misc/BASE64Encoder

We can see that the first two methods run fine, while the last two failed. Let’s investigate the cause of failure by analyzing the dependencies of our application. We’ll use the jdeps tool that shipped with Java 9:

>jdeps target\pre-jpms.jar
   com.baeldung.prejpms            -> com.sun.crypto.provider               JDK internal API (java.base)
   com.baeldung.prejpms            -> java.io                               java.base
   com.baeldung.prejpms            -> java.lang                             java.base
   com.baeldung.prejpms            -> javax.xml.bind                        java.xml.bind
   com.baeldung.prejpms            -> javax.xml.bind.annotation             java.xml.bind
   com.baeldung.prejpms            -> org.slf4j                             not found
   com.baeldung.prejpms            -> sun.misc                              JDK internal API (JDK removed internal API)
   com.baeldung.prejpms            -> sun.reflect                           JDK internal API (jdk.unsupported)

The output from the command gives:

  • the list of all packages inside our application in the first column
  • the list of all dependencies within our application in the second column
  • the location of the dependencies in the Java 9 platform – this can be a module name, or an internal JDK API, or none for third-party libraries

4. Deprecated Modules

Let’s now try to solve the first error java.lang.NoClassDefFoundError: javax/xml/bind/JAXBContext.

As per the dependencies list, we know that java.xml.bind package belongs to java.xml.bind module which seems to be a valid module. So, let’s take a look at the official documentation for this module.

The official documentation says that java.xml.bind module is deprecated for removal in a future release. Consequently, this module is not loaded by default into the classpath.

However, Java provides a method to load modules on demand by using the –add-modules option. So, let’s go ahead and try it:

>java --add-modules java.xml.bind -jar target\pre-jpms.jar
...
INFO 3. Xml for Book object:
<?xml version="1.0" encoding="UTF-8" standalone="yes"?>
<book id="100">
    <title>Java Modules Architecture</title>
</book>
...

We can see that the execution was successful. This solution is quick and easy but not the best solution.

As long term solution, we should add the dependency as a third party library using Maven:

<dependency>
    <groupId>javax.xml.bind</groupId>
    <artifactId>jaxb-api</artifactId>
    <version>2.3.1</version>
</dependency>

5. JDK Internal APIs

Let’s now look into the second error java.lang.NoClassDefFoundError: sun/misc/BASE64Encoder.

From the dependencies list, we can see that sun.misc package is a JDK internal API.

Internal APIs, as the name suggests, are private code, used internally in the JDK.

In our example, the internal API appears to have been removed from the JDK. Let’s check what the alternative API for this is by using the –jdk-internals option:

>jdeps --jdk-internals target\pre-jpms.jar
...
JDK Internal API                         Suggested Replacement
----------------                         ---------------------
com.sun.crypto.provider.SunJCE           Use java.security.Security.getProvider(provider-name) @since 1.3
sun.misc.BASE64Encoder                   Use java.util.Base64 @since 1.8
sun.reflect.Reflection                   Use java.lang.StackWalker @since 9

We can see that Java 9 recommends using java.util.Base64 instead of sun.misc.Base64Encoder. Consequently, a code change is mandatory for our application to run in Java 9.

Notice that there are two other internal APIs we’re using in our application for which Java platform has suggested replacements, but we didn’t get any error for these:

  • Some internal APIs like sun.reflect.Reflection were considered critical to the platform and so were added to a JDK-specific jdk.unsupported module. This module is available by default on the classpath in Java 9.
  • Internal APIs like com.sun.crypto.provider.SunJCE are provided only on certain Java implementations. As long as code using them is run on the same implementation, it will not throw any errors.

In all the cases in this example, we’re using internal APIs, which is not a recommended practice. Therefore, the long term solution is to replace them with suitable public APIs provided by the platform.

6. Conclusion

In this article, we saw how the module system introduced in Java 9 can cause migration problems for some older applications using deprecated or internal APIs.

We also saw how to apply short term and long term fixes for these errors.

As always, the examples from this article are available over on GitHub.


Difference Between @Size, @Length, and @Column(length=value)

$
0
0

1. Overview

In this quick tutorial, we’ll take a look at JSR-330‘s @Size, Hibernate‘s @Length and JPA @Column‘s length attribute.

At first blush, these may seem the same, but they perform different functions. Let’s see how.

2. Origins

Simply put, all of these annotations are meant to communicate the size of a field.

@Size and @Length are similar. We can use either to validate the size of a field. The first is a Java-standard annotation and the second is specific to Hibernate.

@Column, though, is a JPA annotation that we use to control DDL statements.

Now, let’s go through each of them in detail.

3. @Size

For validations, we’ll use @Size, a bean validation annotation. Let’s use the property middleName annotated with @Size to validate its value between the attributes min and max:

public class User {

    // ...

    @Size(min = 3, max = 15)
    private String middleName;

    // ...

}

Most importantly, @Size makes the bean independent of JPA and its vendors such as Hibernate. As a result, this is more portable than @Length.

4. @Length

And as we just stated, @Length is the Hibernate-specific version of @Size. Let’s enforce the range for lastName using @Length:

@Entity
public class User {

    // ...
      
    @Length(min = 3, max = 15)
    private String lastName;

    // ...

}

5. @Column(length=value)

@Column, though, is quite different.

We’ll use @Column to indicate specific characteristics of the physical database column. Let’s use the length attribute of the @Column annotation to specify the string-valued column length:

@Entity
public class User {

    @Column(length = 3)
    private String firstName;

    // ...

}

Consequently, the resulting column would be generated as a VARCHAR(3) and trying to insert a longer string would result in an SQL error.

Note that we’ll use @Column only to specify table column properties as it doesn’t provide validations.

Of course, we can use @Column together with @Size to specify database column property with bean validation.

@Entity
public class User {

    // ... 
    
    @Column(length = 5)
    @Size(min = 3, max = 5)
    private String city;

    // ...

}

6. Conclusion

In this write-up, we learned about the differences between the @Size annotation, @Length annotation and @Column‘s length attribute. We examined each separately within the areas of their use.

As always, the full source code of the examples is available over on GitHub.

Check If a String Contains a Substring

$
0
0

1. Overview

In this tutorial, we’ll review several ways of checking if a String contains a substring, and we’ll compare the performance of each.

2. String.indexOf

Let’s first try using the String.indexOf method. indexOf gives us the first position where the substring is found, or -1 if it isn’t found at all.

When we search for “Rhap”, it will return 9:

Assert.assertEquals(9, "Bohemian Rhapsodyan".indexOf("Rhap"));

When we search for “rhap”, it’ll return -1 because it’s case sensitive.

Assert.assertEquals(-1, "Bohemian Rhapsodyan".indexOf("rhap"));
Assert.assertEquals(9, "Bohemian Rhapsodyan".toLowerCase().indexOf("rhap"));

It’s also important to note, that if we search the substring “an”, it’ll return 6 because it returns the first occurrence:

Assert.assertEquals(6, "Bohemian Rhapsodyan".indexOf("an"));

3. String.contains

Next, let’s try String.contains. contains will search a substring throughout the entire String and will return true if it’s found and false otherwise.

In this example, contains returns true because “Hey” is found.

Assert.assertTrue("Hey Ho, let's go".contains("Hey"));

If the string is not found, contains returns false:

Assert.assertFalse("Hey Ho, let's go".contains("jey"));

In the last example, “hey” is not found because String.contains is case-sensitive.

Assert.assertFalse("Hey Ho, let's go".contains("hey"));
Assert.assertTrue("Hey Ho, let's go".toLowerCase().contains("hey"));

An interesting point is that contains internally calls indexOf to know if a substring is contained, or not.

4. StringUtils.containsIgnoreCase

Our third approach will be using StringUtils#containsIgnoreCase from the Apache Commons Lang library:

Assert.assertTrue(StringUtils.containsIgnoreCase("Runaway train", "train"));
Assert.assertTrue(StringUtils.containsIgnoreCase("Runaway train", "Train"));

We can see that it will check if a substring is contained in a String, ignoring the case. That’s why containsIgnoreCase returns true when we search for “Trai” and also “trai” inside of “Runaway Train”.

This approach won’t be as efficient as the previous approaches as it takes additional time to ignore the case. containsIgnoreCase internally converts every letter to upper-case and compares the converted letters instead of the original ones.

5. Using Pattern

Our last approach will be using a Pattern with a regular expression:

Pattern pattern = Pattern.compile("(?<!\\S)" + "road" + "(?!\\S)");

We can observe that we need to build the Pattern first, then we need to create the Matcher, and finally, we can check with the find method if there’s an occurrence of the substring or not:

Matcher matcher = pattern.matcher("Hit the road Jack");
Assert.assertTrue(matcher.find());

For example, the first time that find is executed, it returns true because the word “road” is contained inside of the string “Hit the road Jack”, but when we try to find the same word in the string “and don’t you come back no more” it returns false:

Matcher matcher = pattern.matcher("and don't you come back no more");
Assert.assertFalse(matcher.find());

6. Performance Comparison

We’ll use an open-source micro-benchmark framework called Java Microbenchmark Harness (JMH) in order to decide which method is the most efficient in terms of execution time.

6.1. Benchmark Setup

As in every JMH benchmark, we have the ability to write a setup method, in order to have certain things in place before our benchmarks are run:

@Setup
public void setup() {
    message = "Lorem ipsum dolor sit amet, consectetur adipiscing elit, " + 
      "sed do eiusmod tempor incididunt ut labore et dolore magna aliqua. " + 
      "Ut enim ad minim veniam, quis nostrud exercitation ullamco laboris " + 
      "nisi ut aliquip ex ea commodo consequat. Duis aute irure dolor in " + 
      "reprehenderit in voluptate velit esse cillum dolore eu fugiat nulla pariatur. " + 
      "Excepteur sint occaecat cupidatat non proident, sunt in culpa qui officia deserunt " + 
      "mollit anim id est laborum";
    pattern = Pattern.compile("(?<!\\S)" + "eiusmod" + "(?!\\S)");
}

In the setup method, we’re initializing the message field. We’ll use this as the source text for our various searching implementations.

We also are initializing pattern in order to use it later in one of our benchmarks.

6.2. The String.indexOf Benchmark

Our first benchmark will use indexOf:

@Benchmark
public int indexOf() {
    return message.indexOf("eiusmod");
}

We’ll search in which position “eiusmod” is present in the message variable.

6.3. The String.contains Benchmark

Our second benchmark will use contains:

@Benchmark
public boolean contains() {
    return message.contains("eiusmod");
}

We’ll try to find if the message value contains “eiusmod”, the same substring used in the previous benchmark.

6.4. The StringUtils.containsIgnoreCase Benchmark

Our third benchmark will use StringUtils#containsIgnoreCase:

@Benchmark
public boolean containsStringUtilsIgnoreCase() {
    return StringUtils.containsIgnoreCase(message, "eiusmod");
}

As with the previous benchmarks, we’ll search the substring in the message value.

6.5. The Pattern Benchmark

And our last benchmark will use Pattern:

@Benchmark
public boolean searchWithPattern() {
    return pattern.matcher(message).find();
}

We’ll use the pattern initialized in the setup method to create a Matcher and be able to call the find method, using the same substring as before.

6.6. Analysis of Benchmarks Results

It’s important to note that we’re evaluating the benchmark results in nanoseconds.

After running our JMH test, we can see the average time each took:

  • contains: 14.736 ns
  • indexOf: 14.200 ns
  • containsStringUtilsIgnoreCase: 385.632 ns
  • searchWithPattern: 1014.633 ns

indexOf method is the most efficient one, closely followed by contains. It makes sense that contains took longer because is using indexOf internally.

containsStringUtilsIgnoreCase took extra time compared with the previous ones because it’s case insensitive.

searchWithPattern, took an even higher average time the last one, proving that using Patterns is the worst alternative for this task.

7. Conclusion

In this article, we’ve explored various ways to search for a substring in a String. We’ve also benchmarked the performance of the different solutions.

As always, the code is available over on GitHub.

WebClient Requests with Parameters

$
0
0

1. Overview

A lot of frameworks and projects are introducing reactive programming and asynchronous request handling. Consequently, Spring 5 introduced a reactive WebClient implementation as a part of the WebFlux framework.

In this tutorial, we’ll see how to reactively consume REST API endpoints with WebClient.

2. REST API Endpoints

To start with, let’s define a sample REST API with the following GET endpoints:

  • /products – get all products
  • /products/{id} – get product by ID
  • /products/{id}/attributes/{attributeId} – get product attribute by id
  • /products/?name={name}&deliveryDate={deliveryDate}&color={color} – find products
  • /products/?tag[]={tag1}&tag[]={tag2} – get products by tags
  • /products/?category={category1}&category={category2} – get products by categories

So, we’ve just defined a few different URIs. In just a moment, we’ll figure out how to build and send each type of URI with WebClient.

Please note the URIs for gettings products by tags and by categories contain arrays as query parameters. However, the syntax differs. Since there is no strict definition of how arrays should be represented in URIs. Primarily, this depends on the server-side implementation. Accordingly, we’ll cover both cases.

3. WebClient Setup

At first, we need to create an instance of WebClient. For this article, we’ll be using a mocked object as far as we need just to verify that a valid URI is requested.

Let’s define the client and related mock objects:

this.exchangeFunction = mock(ExchangeFunction.class);
ClientResponse mockResponse = mock(ClientResponse.class);
when(this.exchangeFunction.exchange(this.argumentCaptor.capture())).thenReturn(Mono.just(mockResponse));
this.webClient = WebClient
  .builder()
  .baseUrl("https://example.com/api")
  .exchangeFunction(exchangeFunction)
  .build();

In addition, we’ve passed a base URL that will be prepended to all requests made by the client.

Lastly, to verify that a particular URI has been passed to the underlying ExchangeFunction instance, let’s use the following helper method:

private void verifyCalledUrl(String relativeUrl) {
    ClientRequest request = this.argumentCaptor.getValue();
    Assert.assertEquals(String.format("%s%s", BASE_URL, relativeUrl), request.url().toString());
    Mockito.verify(this.exchangeFunction).exchange(request);
    verifyNoMoreInteractions(this.exchangeFunction);
}

The WebClientBuilder class has the uri() method that provides the UriBuilder instance as an argument. Generally, an API call is usually made in the following manner:

this.webClient.get()
  .uri(uriBuilder -> uriBuilder
    //... building a URI
    .build())
  .retrieve();

We’ll use UriBuilder extensively in this guide to construct URIs. It’s worth noting that we can build a URI using any other way and then just pass the generated URI as String.

4. URI Path Component

A path component consists of a sequence of path segments separated by a slash ( / ). First, let’s start with a simple case when a URI doesn’t have any variable segments /products:

this.webClient.get()
  .uri("/products")
  .retrieve();
verifyCalledUrl("/products");

For that case, we can just pass a String as an argument.

Next, let’s take the /products/{id} endpoint and build the corresponding URI:

this.webClient.get()
  .uri(uriBuilder - > uriBuilder
    .path("/products/{id}")
    .build(2))
  .retrieve();
verifyCalledUrl("/products/2");

From the code above, we can see that actual segment values are passed to the build() method.
Now, in a similar way we can create a URI with multiple path segments for the /products/{id}/attributes/{attributeId} endpoint:

this.webClient.get()
  .uri(uriBuilder - > uriBuilder
    .path("/products/{id}/attributes/{attributeId}")
    .build(2, 13))
  .retrieve();
verifyCalledUrl("/products/2/attributes/13");

A URI can have as many path segments as required. Of course, if the final URI length is not exceeding limitations. Lastly, remember to keep the right order of actual segment values passed to the build() method.

5. URI Query Parameters

Usually, a query parameter is a simple key-value pair like title=Baeldung. Let’s see how to build such URIs.

5.1. Single Value Parameters

Let’s start with single value parameters and take the /products/?name={name}&deliveryDate={deliveryDate}&color={color} endpoint. To set a query parameter we call the queryParam() method of the UriBuilder interface:

this.webClient.get()
  .uri(uriBuilder - > uriBuilder
    .path("/products/")
    .queryParam("name", "AndroidPhone")
    .queryParam("color", "black")
    .queryParam("deliveryDate", "13/04/2019")
    .build())
  .retrieve();
verifyCalledUrl("/products/?name=AndroidPhone&color=black&deliveryDate=13/04/2019");

Here we’ve added three query parameters and assigned actual values immediately. Additionally, it’s also possible to leave placeholders instead of exact values:

this.webClient.get()
  .uri(uriBuilder - > uriBuilder
    .path("/products/")
    .queryParam("name", "{title}")
    .queryParam("color", "{authorId}")
    .queryParam("deliveryDate", "{date}")
    .build("AndroidPhone", "black", "13/04/2019"))
  .retrieve();
verifyCalledUrl("/products/?name=AndroidPhone&color=black&deliveryDate=13%2F04%2F2019");

Especially, this might be helpful when passing a builder object further in a chain. Please note one important difference between the two code snippets above.

With attention to the expected URIs, we can see that they were encoded differently. Particularly, the slash character ( / ) was escaped in the last example. Generally speaking, RFC3986 doesn’t require encoding of slashes in the query.

However, some server-side applications might require such conversion. Therefore, we’ll see how to change this behavior later in this guide.

5.2. Array Parameters

Likewise, we may need to pass an array of values. Still, there are no strict rules for passing arrays in a query string. Therefore, an array representation in a query string differs from project to project and usually depends on underlying frameworks. We’ll cover the most widely used formats.

Let’s start with the /products/?tag[]={tag1}&tag[]={tag2} endpoint:

this.webClient.get()
  .uri(uriBuilder - > uriBuilder
    .path("/products/")
    .queryParam("tag[]", "Snapdragon", "NFC")
    .build())
  .retrieve();
verifyCalledUrl("/products/?tag%5B%5D=Snapdragon&tag%5B%5D=NFC");

As we can see, the final URI contains multiple tag parameters followed by encoded square brackets. The queryParam() method accepts variable arguments as values, so there is no need to call the method several times.

Alternatively, we can omit square brackets and just pass multiple query parameters with the same key, but different values – /products/?category={category1}&category={category2}:

this.webClient.get()
  .uri(uriBuilder - > uriBuilder
    .path("/products/")
    .queryParam("category", "Phones", "Tablets")
    .build())
  .retrieve();
verifyCalledUrl("/products/?category=Phones&category=Tablets");

To conclude, there is one more extensively-used method to encode an array is to pass comma-separated values. Let’s transform our previous example into comma-separated values:

this.webClient.get()
  .uri(uriBuilder - > uriBuilder
    .path("/products/")
    .queryParam("category", String.join(",", "Phones", "Tablets"))
    .build())
  .retrieve();
verifyCalledUrl("/products/?category=Phones,Tablets");

Thus, we are just using the join() method of the String class to create a comma-separated string.  Sure, we can use any other delimiter that is expected by the application.

6. Encoding Mode

Remember how we mentioned URL encoding earlier.

If the default behavior doesn’t fit our requirements, we can change it. We need to provide a UriBuilderFactory implementation while building a WebClient instance. In this case, we’ll use the DefaultUriBuilderFactory class. To set encoding call the setEncodingMode() method. The following modes are available:

  • TEMPLATE_AND_VALUES: Pre-encode the URI template and strictly encode URI variables when expanded
  • VALUES_ONLY: Do not encode the URI template, but strictly encode URI variables after expanding them into the template
  • URI_COMPONENTS: Encode URI component value after expending URI variables
  • NONE: No encoding will be applied

The default value is TEMPLATE_AND_VALUES. Let’s set the mode to URI_COMPONENTS:

DefaultUriBuilderFactory factory = new DefaultUriBuilderFactory(BASE_URL);
factory.setEncodingMode(DefaultUriBuilderFactory.EncodingMode.URI_COMPONENT);
this.webClient = WebClient
  .builder()
  .uriBuilderFactory(factory)
  .baseUrl(BASE_URL)
  .exchangeFunction(exchangeFunction)
  .build();

As a result, the following assertion will succeed:

this.webClient.get()
  .uri(uriBuilder - > uriBuilder
    .path("/products/")
    .queryParam("name", "AndroidPhone")
    .queryParam("color", "black")
    .queryParam("deliveryDate", "13/04/2019")
    .build())
  .retrieve();
verifyCalledUrl("/products/?name=AndroidPhone&color=black&deliveryDate=13/04/2019");

And, of course, we can provide a completely custom UriBuilderFactory implementation to handle URI creation manually.

7. Conclusion

In this tutorial, we’ve seen how to build different types of URIs using WebClient and DefaultUriBuilder.

Along the way, we’ve covered various types and formats of query parameters. And we wrapped up with changing the default encoding mode of the URL builder.

All of the code snippets from the article, as always, are available over on GitHub repository.

Jackson Support for Kotlin

$
0
0

1. Overview

In this tutorial, we’ll discuss the Jackson support for Kotlin.

We’ll explore how to serialize and deserialize both Objects and Collections. We’ll also make use of @JsonProperty and @JsonInclude annotations.

2. Maven Configuration

First, we need to add the jackson-module-kotlin dependency to our pom.xml:

<dependency>
    <groupId>com.fasterxml.jackson.module</groupId>
    <artifactId>jackson-module-kotlin</artifactId>
    <version>2.9.8</version>
</dependency>

The latest version of jackson-module-kotlin can be found on Maven Central.

3. Object Serialization

Let’s start with object serialization.

Here we have a simple data Movie class that we’ll use in our examples:

data class Movie(
  var name: String, 
  var studio: String, 
  var rating: Float? = 1f)

In order to serialize and deserialize objects, we’ll need to have an instance of ObjectMapper for Kotlin.

We can create one using jacksonObjectMapper():

import com.fasterxml.jackson.module.kotlin.jacksonObjectMapper

val mapper = jacksonObjectMapper()

Or we can create an ObjectMapper and then register KotlinModule:

import com.fasterxml.jackson.databind.ObjectMapper
import com.fasterxml.jackson.module.kotlin.KotlinModule

val mapper = ObjectMapper().registerModule(KotlinModule())

Now that we have our mapper, let’s use it to serialize a simple Movie object.

We can serialize an object to a JSON string using the method writeValueAsString():

@Test
fun whenSerializeMovie_thenSuccess() {               
    val movie = Movie("Endgame", "Marvel", 9.2f)
    val serialized = mapper.writeValueAsString(movie)
    
    val json = """
      {
        "name":"Endgame",
        "studio":"Marvel",
        "rating":9.2
      }"""
    assertEquals(serialized, json)      
}

4. Object Deserialization

Next, we’ll use our mapper to deserialize a JSON String to a Movie instance.

We’ll use the method readValue():

@Test
fun whenDeserializeMovie_thenSuccess() {               
    val json = """{"name":"Endgame","studio":"Marvel","rating":9.2}"""
    val movie: Movie = mapper.readValue(json)
    
    assertEquals(movie.name, "Endgame")   
    assertEquals(movie.studio, "Marvel")   
    assertEquals(movie.rating, 9.2f)   
}

Note that we don’t need to provide TypeReference to readValue() method; we only need to specify the variable type.

We can also specify the class type in a different way:

val movie = mapper.readValue<Movie>(json)

While deserializing, if a field is missing from JSON String, the mapper will use the default value declared in our class for that field.

Here our JSON String is missing rating field, so the default value 1 was used:

@Test
fun whenDeserializeMovieWithMissingValue_thenUseDefaultValue() {               
    val json = """{"name":"Endgame","studio":"Marvel"}"""
    val movie: Movie = mapper.readValue(json)
    
    assertEquals(movie.name, "Endgame")   
    assertEquals(movie.studio, "Marvel")   
    assertEquals(movie.rating, 1f)   
}

5. Working with Maps

Next, we’ll see how to serialize and deserialize Maps using Jackson.

Here we’ll serialize a simple Map<Int, String>:

@Test
fun whenSerializeMap_thenSuccess() {               
    val map =  mapOf(1 to "one", 2 to "two")
    val serialized = mapper.writeValueAsString(map)
    
    val json = """
      {
        "1":"one",
        "2":"two"
      }"""
    assertEquals(serialized, json)      
}

Next, when we deserialize the map, we need to make sure to specify the key and value types:

@Test
fun whenDeserializeMap_thenSuccess() {               
    val json = """{"1":"one","2":"two"}"""
    val aMap: Map<Int,String> = mapper.readValue(json)
    
    assertEquals(aMap[1], "one")   
    assertEquals(aMap[2], "two")   
}

6. Working with Collections

Now, we’ll see how to serialize collections in Kotlin.

Here we have a List of movies that we want to serialize to a JSON String:

@Test
fun whenSerializeList_thenSuccess() {
    val movie1 =  Movie("Endgame", "Marvel", 9.2f)
    val movie2 =  Movie("Shazam", "Warner Bros", 7.6f)
    val movieList = listOf(movie1, movie2)
    val serialized = mapper.writeValueAsString(movieList)
    
    val json = """
      [
        {
          "name":"Endgame",
          "studio":"Marvel",
          "rating":9.2
        },
        {
          "name":"Shazam",
          "studio":"Warner Bros",
          "rating":7.6
        }
      ]"""
    assertEquals(serialized, json)        
}

Now when we deserialize a List, we need to provide the object type Movie – just like we did with the Map:

@Test
fun whenDeserializeList_thenSuccess() {
    val json = """[{"name":"Endgame","studio":"Marvel","rating":9.2}, 
      {"name":"Shazam","studio":"Warner Bros","rating":7.6}]"""
    val movieList: List<Movie> = mapper.readValue(json)
        
    val movie1 =  Movie("Endgame", "Marvel", 9.2f)
    val movie2 =  Movie("Shazam", "Warner Bros", 7.6f)
    assertTrue(movieList.contains(movie1))                    
    assertTrue(movieList.contains(movie2))                    
}

7. Changing a Field Name

Next, we can change a field name during serialization and deserialization using @JsonProperty annotation.

In this example, we’ll rename the authorName field to author for a Book data class:

data class Book(
  var title: String, 
  @JsonProperty("author") var authorName: String)

Now when we serialize a Book object, author is used instead of authorName:

@Test
fun whenSerializeBook_thenSuccess() {               
    val book =  Book("Oliver Twist", "Charles Dickens")
    val serialized = mapper.writeValueAsString(book)
    
    val json = """
      {
        "title":"Oliver Twist",
        "author":"Charles Dickens"
      }"""
    assertEquals(serialized, json)      
}

The same goes for deserialization as well:

@Test
fun whenDeserializeBook_thenSuccess() {               
    val json = """{"title":"Oliver Twist", "author":"Charles Dickens"}"""
    val book: Book = mapper.readValue(json)
    
    assertEquals(book.title, "Oliver Twist")   
    assertEquals(book.authorName, "Charles Dickens")   
}

8. Excluding Empty Fields

Finally, we’ll discuss how to exclude empty fields from serialization.

Let’s add a new field called genres to the Book class. This field is initialized as emptyList() by default:

data class Book(
  var title: String, 
  @JsonProperty("author") var authorName: String) {
    var genres: List<String>? = emptyList()
}

All fields are included by default in serialization – even if they are null or empty:

@Test
fun whenSerializeBook_thenSuccess() {               
    val book =  Book("Oliver Twist", "Charles Dickens")
    val serialized = mapper.writeValueAsString(book)
    
    val json = """
      {
        "title":"Oliver Twist",
        "author":"Charles Dickens",
        "genres":[]
      }"""
    assertEquals(serialized, json)      
}

We can exclude empty fields from JSON using @JsonInclude annotation:

@JsonInclude(JsonInclude.Include.NON_EMPTY)
data class Book(
  var title: String, 
  @JsonProperty("author") var authorName: String) {
    var genres: List<String>? = emptyList()
}

That will exclude fields that are null, an empty Collection, an empty Maps, an array with zero length, and so on:

@Test
fun givenJsonInclude_whenSerializeBook_thenEmptyFieldExcluded() {               
    val book =  Book("Oliver Twist", "Charles Dickens")
    val serialized = mapper.writeValueAsString(book)
    
    val json = """
      {
        "title":"Oliver Twist",
        "author":"Charles Dickens"
      }"""
    assertEquals(serialized, json)      
}

9. Conclusion

In this article, we learned how to use Jackson to serialize and deserialize objects in Kotlin.

We also learned how to use @JsonProperty and @JsonInclude annotations.

The full source code can be found on GitHub.

Spring Data JPA and Named Entity Graphs

$
0
0

1. Overview

Simply put, Entity Graphs are another way to describe a query in JPA 2.1. We can use them to formulate better-performing queries.

In this tutorial, we’re going to learn how to implement Entity Graphs with Spring Data JPA through a simple example.

2. The Entities

First, let’s create a model called Item which has multiple characteristics:

@Entity
public class Item {

    @Id
    private Long id;
    private String name;
    
    @OneToMany(mappedBy = "item")
    private List<Characteristic> characteristics = new ArrayList<>();

    // getters and setters
}

Now let’s define the Characteristic entity:

@Entity
public class Characteristic {

    @Id
    private Long id;
    private String type;
    
    @ManyToOne(fetch = FetchType.LAZY)
    @JoinColumn
    private Item item;

    //Getters and Setters
}

As we can see in the code, both the characteristics field in the Item entity and the item field in the Characteristic entity are loaded lazily using the fetch parameter. So, our goal here is to load them eagerly at runtime.

3. The Entity Graphs

In Spring Data JPA, we can define an entity graph using a combination of @NamedEntityGraph and @EntityGraph annotations. Or, we can also define ad-hoc entity graphs with just the attributePaths argument of the @EntityGraph annotation.

Let’s see how it can be done.

3.1. With @NamedEntityGraph

First, we can use JPA’s @NamedEntityGraph annotation directly on our Item entity:

@Entity
@NamedEntityGraph(name = "Item.characteristics",
    attributeNodes = @NamedAttributeNode("characteristics")
)
public class Item {
	//...
}

And then, we can attach the @EntityGraph annotation to one of our repository methods:

public interface ItemRepository extends JpaRepository<Item, Long> {

    @EntityGraph(value = "Item.characteristics")
    Item findByName(String name);
}

As the code shows, we’ve passed the name of the entity graph, which we’ve created earlier on the Item entity, to the @EntityGraph annotation. When we call the method, that’s the query Spring Data will use.

The default value of the type argument of the @EntityGraph annotation is EntityGraphType.FETCH. When we use this, the Spring Data module will apply the FetchType.EAGER strategy on the specified attribute nodes. And for others, the FetchType.LAZY strategy will be applied.

So in our case, the characteristics property will be loaded eagerly, even though the default fetch strategy of the @OneToMany annotation is lazy.

One catch here is that if the defined fetch strategy is EAGER, then we cannot change its behavior to LAZY. This is by design since the subsequent operations may need the eagerly fetched data at a later point during the execution.

3.2. Without @NamedEntityGraph

Or, we can define an ad-hoc entity graph, too, with attributePaths.

Let’s add an ad-hoc entity graph to our CharacteristicsRepository that eagerly loads its Item parent:

public interface CharacteristicsRepository 
  extends JpaRepository<Characteristic, Long> {
    
    @EntityGraph(attributePaths = {"item"})
    Characteristic findByType(String type);    
}

This will load the item property of the Characteristic entity eagerly, even though our entity declares a lazy-loading strategy for this property.

This is handy since we can define the entity graph inline instead of referring to an existing named entity graph.

4. Test Case

Now that we’ve defined our entity graphs let’s create a test case to verify it:

@DataJpaTest
@RunWith(SpringRunner.class)
@Sql(scripts = "/entitygraph-data.sql")
public class EntityGraphIntegrationTest {
   
    @Autowired
    private ItemRepository itemRepo;
    
    @Autowired
    private CharacteristicsRepository characteristicsRepo;
    
    @Test
    public void givenEntityGraph_whenCalled_shouldRetrunDefinedFields() {
        Item item = itemRepo.findByName("Table");
        assertThat(item.getId()).isEqualTo(1L);
    }
    
    @Test
    public void givenAdhocEntityGraph_whenCalled_shouldRetrunDefinedFields() {
        Characteristic characteristic = characteristicsRepo.findByType("Rigid");
        assertThat(characteristic.getId()).isEqualTo(1L);
    }
}

The first test will use the entity graph defined using the @NamedEntityGraph annotation.

Let’s see the SQL generated by Hibernate:

select 
    item0_.id as id1_10_0_,
    characteri1_.id as id1_4_1_,
    item0_.name as name2_10_0_,
    characteri1_.item_id as item_id3_4_1_,
    characteri1_.type as type2_4_1_,
    characteri1_.item_id as item_id3_4_0__,
    characteri1_.id as id1_4_0__
from 
    item item0_ 
left outer join 
    characteristic characteri1_ 
on 
    item0_.id=characteri1_.item_id 
where 
    item0_.name=?

For comparison, let’s remove the @EntityGraph annotation from the repository and inspect the query:

select 
    item0_.id as id1_10_,
    item0_.name as name2_10_ 
from 
    item item0_ 
where 
    item0_.name=?

From these queries, we can clearly observe that the query generated without @EntityGraph annotation is not loading any properties of Characteristic entity. As a result, it loads only the Item entity.

Lastly, let’s compare the Hibernate queries of the second test with the @EntityGraph annotation:

select 
    characteri0_.id as id1_4_0_,
    item1_.id as id1_10_1_,
    characteri0_.item_id as item_id3_4_0_,
    characteri0_.type as type2_4_0_,
    item1_.name as name2_10_1_ 
from 
    characteristic characteri0_ 
left outer join 
    item item1_ 
on 
    characteri0_.item_id=item1_.id 
where 
    characteri0_.type=?

And the query without the @EntityGraph annotation:

select 
    characteri0_.id as id1_4_,
    characteri0_.item_id as item_id3_4_,
    characteri0_.type as type2_4_ 
from 
    characteristic characteri0_ 
where 
    characteri0_.type=?

5. Conclusion

In this tutorial, we’ve learned how to use JPA Entity Graphs in Spring Data. With Spring Data, we can create multiple repository methods that are linked to different entity graphs.

The examples for this article are available over on GitHub.

Viewing all 4831 articles
Browse latest View live


<script src="https://jsc.adskeeper.com/r/s/rssing.com.1596347.js" async> </script>