In most typical web applications, we often need to restrict a request parameter to a set of predefined values. Enums are a great way to do this.
In this quick tutorial, we'll show how to use enums as web request parameters in Spring MVC.
2. Use Enums as Request Parameters
Let's first define an enum for our examples:
public enum Modes {
ALPHA, BETA;
}
We can then use this enum as a RequestParameter in a Spring controller:
@GetMapping("/mode2str")
public String getStringToMode(@RequestParam("mode") Modes mode) {
// ...
}
Or we can use it as a PathVariable:
@GetMapping("/findbymode/{mode}")
public String findByEnum(@PathVariable("mode") Modes mode) {
// ...
}
When we make a web request, such as /mode2str?mode=ALPHA, the request parameter is a String object. Spring can try to convert this String object to an Enum object by using its StringToEnumConverterFactory class.
The back-end conversion uses the Enum.valueOfmethod. Therefore, the input name string must exactly match one of the declared enum values.
When we make a web request with a string value that doesn't match one of our enum values, for example, /mode2str?mode=unknown, Spring will fail to convert it to the specified enum type. In this case, we'll get a ConversionFailedException.
3. Custom Converter
In Java, it's considered good practice to define enum values with uppercase letters, as they are constants. However, we may want to support lowercase letters in the request URL.
In this case, we need to create a custom converter:
public class StringToEnumConverter implements Converter<String, Modes> {
@Override
public Modes convert(String source) {
return Modes.valueOf(source.toUpperCase());
}
}
To use our custom converter, we need to register it in the Spring configuration:
@Configuration
public class WebConfig implements WebMvcConfigurer {
@Override
public void addFormatters(FormatterRegistry registry) {
registry.addConverter(new StringToEnumConverter());
}
}
4. Exception Handling
The Enum.valueOf method in the StringToEnumConverter will throw an IllegalArgumentException if our Modes enum has no matched constant. We can handle this exception in our custom converter in different ways, depending on requirements.
For example, we can simply have our converter return null for non-matching Strings:
public class StringToEnumConverter implements Converter<String, Modes> {
@Override
public Modes convert(String source) {
try {
return Modes.valueOf(source.toUpperCase());
} catch (IllegalArgumentException e) {
return null;
}
}
}
However, if we don't handle the exception locally in the custom converter, Spring will throw a ConversionFailedException exception to the calling controller method. There are several ways to handle this exception.
For example, we can use a global exception handler class:
@ControllerAdvice
public class GlobalControllerExceptionHandler {
@ExceptionHandler(ConversionFailedException.class)
public ResponseEntity<String> handleConflict(RuntimeException ex) {
return new ResponseEntity<>(ex.getMessage(), HttpStatus.BAD_REQUEST);
}
}
5. Conclusion
In this article, we showed how to use enums as request parameters in Spring with some code examples.
We also provided a custom converter example that can map the input string to an enum constant.
Finally, we discussed how to handle the exception thrown by Spring when it encounters an unknown input string.
As always, the source code for the tutorial is available over on GitHub.
In this quick tutorial, we'll learn about the @DirtiesContext annotation. We'll also show a standard way to use the annotation for testing.
2. @DirtiesContext
@DirtiesContext is a Spring testing annotation. It indicates the associated test or class modifies the ApplicationContext. It tells the testing framework to close and recreate the context for later tests.
We can annotate a test method or an entire class. By setting the MethodMode or ClassMode, we can control when Spring marks the context for closure.
If we place @DirtiesContext on a class, the annotation applies to every method in the class with the given ClassMode.
3. Testing Without Clearing the Spring Context
Let's say we have a User:
public class User {
String firstName;
String lastName;
}
We also have a very simple UserCache:
@Component
public class UserCache {
@Getter
private Set<String> userList = new HashSet<>();
public boolean addUser(String user) {
return userList.add(user);
}
public void printUserList(String message) {
System.out.println(message + ": " + userList);
}
}
We create an integration test to load up and test the full application:
Let's say a later test was relying on an empty cache for some assertions. The previously inserted names may cause undesired behavior.
4. Using @DirtiesContext
Now we'll show @DirtiesContext with the default MethodMode, AFTER_METHOD. This means Spring will mark the context for closure after the corresponding test method completes.
To isolate changes to a test, we add @DirtiesContext. Let's see how it works.
The addJohnDoeAndPrintCache test method adds a user to the cache. We have also added the @DirtiesContext annotation, which says the context should shut down at the end of the test method:
Running the full test class, we see the Spring context reload in between addJohnDoeAndPrintCache and printCacheAgain. So the cache reinitializes, and the output is empty:
printCacheAgain: []
5. Other Supported Test Phases
The example above shows the after current test method phase. Let's do a quick summary of the phases:
5.1. Class Level
The ClassMode options for a test class define when the context is reset:
BEFORE_CLASS: Before current test class
BEFORE_EACH_TEST_METHOD: Before each test method in the current test class
AFTER_EACH_TEST_METHOD: After each test method in the current test class
AFTER_CLASS: After the current test class
5.2. Method Level
The MethodMode options for an individual method define when the context is reset:
BEFORE_METHOD: Before the current test method
AFTER_METHOD: After the current test method
6. Conclusion
In this article, we presented the @DirtiesContext testing annotation.
As always, the example code is available over on GitHub.
The problem with this approach, however, is that the files are downloaded sequentially. We might speed things up by downloading files in parallel.
3. Parallelizing Downloads with wget
There are different ways in which we can make wget download files in parallel.
3.1. The Bash Approach
A simple and somewhat naive approach would be to send the wget process to the background using the &-operator:
#!/bin/bash
while read file; do
wget ${file} &
done < files.txt
Each call to wget is forked to the background and runs asynchronously in its own separate sub-shell.
Although we now download the files in parallel, this approach is not without its drawbacks. For example, there is no feedback of completed or failed downloads. Also, we can't control how many processes will be executed at once.
3.2. Let wget Fork Itself
We can do a little better and let wget fork itself to the background by passing -b as a parameter:
#!/bin/bash
while read file; do
wget ${file} -b
done < files.txt
Just as with the &-operator, each call is forked to the background and run asynchronously. What is different though, is that the -b parameter additionally makes for us a log file for each download. We can grep these log files to check that no errors occurred.
3.3. Using xargs
The most sophisticated and clean solution to our problem is using xargs. The xargs command takes a list of arguments and passes these to a utility of choice with the possibility to run multiple processes in parallel.
Above all, it gives us control over the maximum number of processes that will run at once at any given time.
For example, we can call wget for each line in files.txt with a maximum of two processes in parallel:
We also set wget to be quiet (-q). Without that, xargs would redirect the output of all processes to stdout, which would have cluttered our terminal in no time. Instead, we can rely on xargs‘s return code. It'll exit with a value of 0 if no error has occurred and with a value of 1 otherwise.
4. Conclusion
As we have seen, there are different ways in which we can download multiple files in parallel using wget. The xargs command provides the cleanest solution to this problem. It's very useful in scripts because it offers the right amount of control and has a clean exit code.
Let's first look at what it means that HashMap is a map. A map is a key-value mapping, which means that every key is mapped to exactly one value and that we can use the key to retrieve the corresponding value from a map.
One might ask why not simply add the value to a list. Why do we need a HashMap? The simple reason is performance. If we want to find a specific element in a list, the time complexity is O(n) and if the list is sorted, it will be O(log n) using, for example, a binary search.
The advantage of a HashMap is that the time complexity to insert and retrieve a value is O(1) on average. We'll look at how that can be achieved later. Let's first look at how to use HashMap.
2.1. Setup
Let's create a simple class that we'll use throughout the article:
public class Product {
private String name;
private String description;
private List<String> tags;
// standard getters/setters/constructors
public Product addTagsOfOtherProdcut(Product product) {
this.tags.addAll(product.getTags());
return this;
}
}
2.2. Put
We can now create a HashMap with the key of type String and elements of type Product:
Map<String, Product> productsByName = new HashMap<>();
And add products to our HashMap:
Product eBike = new Product("E-Bike", "A bike with a battery");
Product roadBike = new Product("Road bike", "A bike for competition");
productsByName.put(eBike.getName(), eBike);
productsByName.put(roadBike.getName(), roadBike);
2.3. Get
We can retrieve a value from the map by its key:
Product nextPurchase = productsByName.get("E-Bike");
assertEquals("A bike with a battery", nextPurchase.getDescription());
If we try to find a value for a key that doesn't exist in the map, we'll get a null value:
And if we insert a second value with the same key, we'll only get the last inserted value for that key:
Product newEBike = new Product("E-Bike", "A bike with a better battery");
productsByName.put(newEBike.getName(), newEBike);
assertEquals("A bike with a better battery", productsByName.get("E-Bike"));
2.4. Null as the Key
HashMap also allows us to have null as a key:
Product defaultProduct = new Product("Chocolate", "At least buy chocolate");
productsByName.put(null, defaultProduct);
Product nextPurchase = productsByName.get(null);
assertEquals("At least buy chocolate", nextPurchase.getDescription());
2.5. Values with the Same Key
Furthermore, we can insert the same object twice with a different key:
To check if a key is present in the map, we can use the containsKey() method:
productsByName.containsKey("E-Bike");
Or, to check if a value is present in the map, we can use the containsValue() method:
productsByName.containsValue(eBike);
Both method calls will return true in our example. Though they look very similar, there is an important difference in performance between these two method calls. The complexity to check if a key exists is O(1), while the complexity to check for an element is O(n), as it's necessary to loop over all the elements in the map.
2.8. Iterating over a HashMap
There are three basic ways to iterate over all key-value pairs in a HashMap.
for(Map.Entry<String, Product> entry : productsByName.entrySet()) {
Product product = entry.getValue();
String key = entry.getKey();
//do something with the key and value
}
Fiinally, we can iterate over all values:
List<Product> products = new ArrayList<>(productsByName.values());
3. The Key
We can use any class as the key in our HashMap. However, for the map to work properly, we need to provide an implementation for equals() and hashCode().Let's say we want to have a map with the product as the key and the price as the value:
HashMap<Product, Integer> priceByProduct = new HashMap<>();
priceByProduct.put(eBike, 900);
Let's implement the equals() and hashCode() methods:
@Override
public boolean equals(Object o) {
if (this == o) {
return true;
}
if (o == null || getClass() != o.getClass()) {
return false;
}
Product product = (Product) o;
return Objects.equals(name, product.name) &&
Objects.equals(description, product.description);
}
@Override
public int hashCode() {
return Objects.hash(name, description);
}
Note that hashCode() and equals() need to be overridden only for classes that we want to use as map keys, not for classes that are only used as values in a map. We'll see why this is necessary in section 5 of this article.
4. Additional Methods as of Java 8
Java 8 added several functional-style methods to HashMap. In this section, we'll look at some of these methods.
For each method, we'll look at two examples. The first example shows how to use the new method, and the second example shows how to achieve the same in earlier versions of Java.
As these methods are quite straightforward, we won't look at more detailed examples.
4.1. forEach()
The forEach method is the functional-style way to iterate over all elements in the map:
productsByName.forEach( (key, product) -> {
System.out.println("Key: " + key + " Product:" + product.getDescription());
//do something with the key and value
});
Prior to Java 8:
for(Map.Entry<String, Product> entry : productsByName.entrySet()) {
Product product = entry.getValue();
String key = entry.getKey();
//do something with the key and value
}
And with merge(), we can modify the value for a given key if a mapping exists, or add a new value otherwise:
Product eBike2 = new Product("E-Bike", "A bike with a battery");
eBike2.getTags().add("sport");
productsByName.merge("E-Bike", eBike2, Product::addTagsOfOtherProdcut);
It's worth noting that the methods merge() and compute() are quite similar. The compute() method accepts two arguments: the key and a BiFunction for the remapping. And merge() accepts three parameters: the key, a default value to add to the map if the key doesn't exist yet, and a BiFunction for the remapping.
5. HashMap Internals
In this section, we'll look at how HashMap works internally and what are the benefits of using HashMap instead of a simple list, for example.
As we've seen, we can retrieve an element from a HashMap by its key. One approach would be to use a list, iterate over all elements, and return when we find an element for which the key matches. Both the time and space complexity of this approach would be O(n).
With HashMap, we can achieve an average time complexity of O(1) for the put and get operations and space complexity of O(n). Let's see how that works.
5.1. The Hash Code and Equals
Instead of iterating over all its elements, HashMap attempts to calculate the position of a value based on its key.
The naive approach would be to have a list that can contain as many elements as there are keys possible. As an example, let's say our key is a lower-case character. Then it's sufficient to have a list of size 26, and if we want to access the element with key ‘c', we'd know that it's the one at position 3, and we can retrieve it directly.
However, this approach would not be very effective if we have a much bigger keyspace. For example, let's say our key was an integer. In this case, the size of the list would have to be 2,147,483,647. In most cases, we would also have far fewer elements, so a big part of the allocated memory would remain unused.
HashMap stores elements in so-called buckets and the number of buckets is called capacity. When we want to put a value in the map, HashMap calculates the bucket based on the key and stores the value in that bucket. To retrieve the value, HashMap calculates the bucket in exactly the same way.
5.2. Collisions
For this to work correctly, equal keys must have the same hash, however, different keys can have the same hash. If two different keys have the same hash, the two values belonging to them will be stored in the same bucket. Inside a bucket, values are stored in a list and retrieved by looping over all elements. The cost of this is O(n).
As of Java 8 (see JEP 180), the data structure in which the values inside one bucket are stored is changed from a list to a balanced tree if a bucket contains 8 or more values, and it's changed back to a list if, at some point, only 6 values are left in the bucket. This improves the performance to be O(log n).
5.3. Capacity and Load Factor
To avoid having many buckets with multiple values, the capacity is doubled if 75% (the load factor) of the buckets become non-empty. The default value for the load factor is 75%, and the default initial capacity is 16. Both can be set in the constructor.
5.4. Summary of put and get Operations
Let's summarize how the put and get operations work.
When we add an element to the map,HashMap calculates the bucket. If the bucket already contains a value, the value is added to the list (or tree) belonging to that bucket. If the load factor becomes bigger than the maximum load factor of the map, the capacity is doubled.
When we want to get a value from the map,HashMap calculates the bucket and gets the value with the same key from the list (or tree).
6. Conclusion
In this article, we saw how to use a HashMap and how it works internally. Along with ArrayList, HashMap is one of the most frequently used data structures in Java, so it's very handy to have good knowledge of how to use it and how it works under the hood. Our article The Java HashMap Under the Hood covers the internals of HashMap in more detail.
As usual, the complete source code is available over on Github.
In this tutorial, we'll have a look into Java's built-in security infrastructure, which is disabled by default. Specifically, we'll examine its main components, extension points, and configurations.
2. SecurityManager in Action
It might be a surprise, but default SecurityManager settings disallowmany standard operations:
System.setSecurityManager(new SecurityManager());
new URL("http://www.google.com").openConnection().connect();
Here, we programmatically enable security supervision with default settings and attempt to connect to google.com.
There are numerous other use-cases in the standard library — for example, reading system properties, reading environment variables, opening a file, reflection, and changing the locale, to name a few.
3. Use-Case
This security infrastructure has been available since Java 1.0. This was a time where applets – Java applications embedded into the browser – were pretty common. Naturally, it was necessary to constrain their access to system resources.
Nowadays, applets are obsolete. However, security enforcement is still an actual concept when there is a situation in which third-party code executes in a protected environment.
For example, consider that we have a Tomcat instance where third-party clients may host their web applications. We don't want to allow them to execute operations like System.exit() because that would affect other applications and possibly the whole environment.
4. Design
4.1. SecurityManager
One of the main components in the built-in security infrastructure is java.lang SecurityManager. It has several checkXxx methods like checkConnect, which was authorizing our attempt to connect to Google in the test above. All of them delegate to the checkPermission(java.security.Permission) method.
4.2. Permission
java.security.Permission instances stand for authorization requests. Standard JDK classes create them for all potentially dangerous operations (like reading/writing a file, opening a socket, etc.) and give them over to SecurityManager for proper authorization.
4.3. Configuration
We define permissions in a special policy format. These permissions take the form of grant entries:
grant codeBase "file:${{java.ext.dirs}}/*" {
permission java.security.AllPermission;
};
The codeBase rule above is optional. We can specify no field at all there or use signedBy (integrated with corresponding certificates in the keystore) or principal (java.security.Principal attached to the current thread via javax.security.auth.Subject). We can use any combination of those rules.
By default, the JVM loads the common system policy file located at <java.home>/lib/security/java.policy. If we've defined any user-local policy in <user.home>/.java.policy, the JVM appends it to the system policy.
It's also possible to specify policy file via command line: –Djava.security.policy=/my/policy-file. That way we can append policies to the previously loaded system and user policies.
There is a special syntax for replacing all system and user policies (if any) – double equals sign: –Djava.security.policy==/my/policy-file
5. Example
Let's define a custom permission:
public class CustomPermission extends BasicPermission {
public CustomPermission(String name) {
super(name);
}
public CustomPermission(String name, String actions) {
super(name, actions);
}
}
and a shared service that should be protected:
public class Service {
public static final String OPERATION = "my-operation";
public void operation() {
SecurityManager securityManager = System.getSecurityManager();
if (securityManager != null) {
securityManager.checkPermission(new CustomPermission(OPERATION));
}
System.out.println("Operation is executed");
}
}
If we try to run it with a security manager enabled, an exception is thrown:
java.security.AccessControlException: access denied
("com.baeldung.security.manager.CustomPermission" "my-operation")
at java.security.AccessControlContext.checkPermission(AccessControlContext.java:472)
at java.security.AccessController.checkPermission(AccessController.java:884)
at java.lang.SecurityManager.checkPermission(SecurityManager.java:549)
at com.baeldung.security.manager.Service.operation(Service.java:10)
We can create our <user.home>/.java.policy file with the following content and try re-running the application:
grant codeBase "file:<our-code-source>" {
permission com.baeldung.security.manager.CustomPermission "my-operation";
};
It works just fine now.
6. Conclusion
In this article, we checked how the built-in JDK security system is organized and how we can extend it. Even though the target use-case is relatively rare, it's good to be aware of it.
As usual, the complete source code for this article is available over on GitHub.
In this tutorial, we'll give an overview of the File class, which is part of the java.io API. The File class gives us the ability to work with files and directories on the file system.
2. Creating a File Object
The File class has 4 public constructors. Depending on the developer's needs, different types of instances of the File class can be created.
File(String pathname) – Creates an instance representing the given pathname
File(String parent, String child) – Creates an instance that represents the path formed by joining the parent and the child paths
File(File parent, String child) – Creates an instance with the path formed by joining the parent path represented by another File instance and the child path
File(URI uri) – Creates an instance that represents the given Uniform Resource Identifier
3. Working with the File Class
The File class has a number of methods that allow us to work with and manipulate files on the file system. We will highlight some of them here. It is important to note that the File class cannot modify or access the contents of the file it represents.
3.1. Creating and Deleting Directories and Files
The File class has instance methods to create and delete directories and files. Directories and files are created using the mkdir and createNewFile methods, respectively.
Directories and files are deleted using the delete method. All these methods return a boolean value that is true when the operation succeeds, and false otherwise:
@Test
public void givenDirectoryCreated_whenMkdirIsInvoked_thenDirectoryIsDeleted() {
File directory = new File("testDirectory");
if (!directory.isDirectory() || !directory.exists()) {
directory.mkdir();
}
assertTrue(directory.delete());
}
@Test
public void givenFileCreated_whenCreateNewFileIsInvoked_thenFileIsDeleted() throws IOException {
File file = new File("testFile.txt");
if (!file.isFile() || !file.exists()) {
file.createNewFile();
}
assertTrue(file.delete());
}
In the above snippet, we also see other helpful methods.
The isDirectory method can be used to test if the file denoted by the provided name is a directory, while the isFile method can be used to test if the file denoted by the provided name is a file. And, we can use the exists method to test whether a directory or file already exists on the system.
3.2. Getting Metadata About File Instances
The File class has a number of methods that return metadata about File instances. Let's see how to use the getName, getParentFile, and getPath methods:
Here, we've illustrated validating the metadata about the file that was created inside the directory. We've also shown how to find the parent of the file and the relative path to that file.
3.3. Setting File and Directory Permissions
The File class has methods that allow you to set permissions on a file or a directory. Here, we'll look at the setWritable and setReadablemethods:
In the code above, we attempt to write to a file after we explicitly set permissions on it that blocks any writes. We do this with the setWritable method. Attempting to write to a file when writing to the file is not permitted results in a FileNotFoundException being thrown.
Next, we attempt to read from a file after setting permissions on it that blocks any reads. Reads are blocked using the setReadable method:
Again, the JVM will throw a FileNotFoundException for attempts to read a file where reads are not permitted.
3.4. Listing Files Inside a Directory
The File class has methods that allow us to list files contained in a directory. Similarly, directories can also be listed. Here we'll look at the list and list(FilenameFilter) methods:
We created a directory and added two files to it — one with a csv extension and the other with a txt extension. When listing all files in the directory, we get two files as expected. When we filter the listing by filtering around files with a csv extension, we get only one file returned.
3.5. Renaming Files and Directories
The File class has the functionality of renaming files and directories using the renameTo method:
In the example above, we create two directories — the source and the destination directories. We then rename the source directory to the destination directory using the renameTo method. The same can be used to rename files instead of directories.
3.6. Getting Disk Space Information
The File class also allows us to get disk space information. Let's see a demonstration of the getFreeSpace method:
@Test
public void givenDataIsWrittenToFile_whenWriteIsInvoked_thenFreeSpaceOnSystemDecreases() throws IOException {
String name = System.getProperty("user.home") + System.getProperty("file.separator") + "test";
File testDir = makeDirectory(name);
File sample = new File(testDir, "sample.txt");
long freeSpaceBeforeWrite = testDir.getFreeSpace();
writeSampleDataToFile(sample);
long freeSpaceAfterWrite = testDir.getFreeSpace();
assertTrue(freeSpaceAfterWrite < freeSpaceBeforeWrite);
removeDirectory(testDir);
}
In this example, we created a directory inside the user's home directory and then created a file in it. We then checked if the free space on the home directory partition had changed after populating this file with some text. Other methods that give information about disk space are getTotalSpace and getUsableSpace.
4. Conclusion
In this tutorial, we've shown some of the functionality the File class provides for working with files and directories on the file system. .
As always, the full source code of the example is available over on Github.
Using an Object Relational Mapping tool, like Hibernate, makes it easy to read our data into objects, but can make forming our queries difficult with complex data models.
The many-to-many relationship is always challenging, but it can be more challenging when we wish to acquire related entities based on some property of the relation itself.
In this tutorial, we are going to look at how to solve this problem using Hibernate's @WhereJoinTable annotation.
2. Basic @ManyToMany Relation
Let's start with a simple @ManyToMany relationship. We'll need domain model entities, a relation entity, and some sample test data.
2.1. Domain Model
Let's imagine we have two simple entities, User and Group, which are associated as @ManyToMany:
@Entity
public class User {
@Id
@GeneratedValue
private Long id;
private String name;
@ManyToMany
private List<Group> groups = new ArrayList<>();
// standard getters and setters
}
@Entity
public class Group {
@Id
@GeneratedValue
private Long id;
private String name;
@ManyToMany(mappedBy = "groups")
private List<User> users = new ArrayList<>();
// standard getters and setters
}
As we can see, our User entity can be a member of more than one Group entity. Similarly, a Group entity can contain more than one User entity.
2.2. Relation Entity
For @ManyToMany associations, we need a separate database table called a relation table. The relation table needs to contain at least two columns: The primary keys of the related User and Group entities.
Finally, to configure it properly, we need to add the @JoinTable annotation on User‘s groups collection. Here we'll specify the join table name using r_user_group, the entity name of UserGroupRelation:
@ManyToMany
@JoinTable(
name = "r_user_group",
joinColumns = @JoinColumn(name = "user_id"),
inverseJoinColumns = @JoinColumn(name = "group_id")
)
private List<Group> groups = new ArrayList<>();
2.3. Sample Data
For our integration tests, let's define some sample data:
public void setUp() {
session = sessionFactory.openSession();
session.beginTransaction();
user1 = new User("user1");
user2 = new User("user2");
user3 = new User("user3");
group1 = new Group("group1");
group2 = new Group("group2");
session.save(group1);
session.save(group2);
session.save(user1);
session.save(user2);
session.save(user3);
saveRelation(user1, group1, UserGroupRole.MODERATOR);
saveRelation(user2, group1, UserGroupRole.MODERATOR);
saveRelation(user3, group1, UserGroupRole.MEMBER);
saveRelation(user1, group2, UserGroupRole.MEMBER);
saveRelation(user2, group2, UserGroupRole.MODERATOR);
}
private void saveRelation(User user, Group group, UserGroupRole role) {
UserGroupRelation relation = new UserGroupRelation(user.getId(), group.getId(), role);
session.save(relation);
session.flush();
session.refresh(user);
session.refresh(group);
}
As we can see, user1 and user2 are in two groups. Also, we should notice that while user1 is MODERATOR on group1, at the same time it has a MEMBER role on group2.
3. Fetching @ManyToMany Relations
Now we've properly configured our entities, let's fetch the groups of the User entity.
3.1. Simple Fetch
In order to fetch groups, we can simply invoke the getGroups() method of User inside an active Hibernate session:
List<Group> groups = user1.getGroups();
Our output for groups will be:
[Group [name=group1], Group [name=group2]]
But how can we get the groups of a user whose group role is only MODERATOR?
3.2. Custom Filters on a Relation Entity
We can use the @WhereJoinTable annotation to directly acquire only filtered groups.
Let's define a new property as moderatorGroups and put the @WhereJoinTable annotation on it. When we access the related entities via this property, it will only contain groups of which our user is MODERATOR.
We'll need to add a SQL where clause to filter the groups by the MODERATOR role:
Thus, we can easily get the groups with the specified SQL where clause applied:
List<Group> groups = user1.getModeratorGroups();
Our output will be the groups on which the user has only the role of MODERATOR:
[Group [name=group1]]
4. Conclusion
In this tutorial, we learned how to filter @ManyToMany collections based on a property of the relation table using Hibernate's @WhereJoinTable annotation.
As always, all the code samples given in this tutorial are available over on GitHub.
I've been running the yearly 2019 “State of Java” survey for the last couple of weeks.
In its 6th year, we had 6707 developers taking the time to go through and answer; if that was you – thank you!
Time the for results Image may be NSFW. Clik here to view.
1. Java Adoption
Even today, Java 8 is still
Not surprisingly, Java 8 is still predominantly used in production:
Clearly, Java 8 is here to stay – with a drop from last year at 84.7% to this year at 79.8%.
2. Framework Adoption
Next, let's see what the framework story looks this year:
As opposed to Java, this is an entirely different story. Spring 4 was over 50% last year and it's now hitting 30%, and Spring 5 went up from 24% to 58.4% today.
The Java EE / Jakarta EE numbers are also interesting – going from 9.5% last year to now 14%. The current more stable and well-understood path is clearly helping.
3. Spring Boot Adoption
On to Spring Boot – again, the adoption and the speed with which the community is moving to the latest version is impressive and speaks volumes about the maturity of the ecosystem.
Boot 2 went up from around the 30% mark last year all the way to 60.5% now:
And, the 1.4 or older is starting to drop off the chart here, which is also cool.
4. Build Tools Adoption
The build tools story is probably the most stable of all of the data here. Maven is exactly where it was last year – dominating the landscape:
5. IDE Adoption
IDEs, on the other hand, are a different story. IntelliJ is clearly winning the race here, with 61.3% (up from 55.4% last year):
Eclipse is about half of that – with 32.8% this year, down from 38% last year. Not a surprising pattern here.
6. Web/Application Server Adoption
This is the second year where I decided to ask this question – so it's great to finally have these numbers but also the data from last year to compare to.
Tomcat is clearly still the winner here, with a cool 73% of the market (up from 62.5% – which is crazy growth).
7. Other JVM Languages
On to other languages on the JVM.
First, what's somewhat surprising and interesting here is that 62.6% of developers are only using Java, exactly like last year (62.8%). I was definitely expecting this number to go down, given the strong adoption of Kotlin, but it looks like it hasn't, yet:
That being said, Kotlin did still grow from 13% last year to 16.5% today.
Groovy fell from 19.3% to 17.4% today, most of that attention likely now going to Kotlin.
Scala also fell about 1.1%, now to 8.6%.
So, the trend is clear – Kotlin is chipping away at the other JVM languages, and quite successfully.
8. DBs
And, finally – DBs – with MySQL stable and PostgreSQL growing a full 5% since last year:
9. Conclusion
There we have it – a very interesting look at the Java ecosystem now, in 2019.
Some really unexpected bits of data, and definitely some not-so-unexpected ones.
All in all, a very cool look at the Java community, and again – big thanks to everyone who voted.
We may wish to send HTTP requests without using a web browser or other interactive app. For this, Linux provides us with two commands: curl and wget.
Both commands are quite helpful as they provide a mechanism for non-interactive download and upload of data. We can use them for web crawling, automating scripts, testing of APIs, etc.
In this tutorial, we will be looking at the differences between these two utilities.
2. Protocols
2.1. Using the HTTP Protocol
Both curl and wget support HTTP, HTTPS, and FTP protocols. So if we want to get a page from a website, say baeldung.com, then we can run them with the web address as the parameter:
The main difference between them is that curl will show the output in the console. On the other hand, wget will download it into a file.
We can save the data in a file with curl by using the -o parameter:
curl https://www.baeldung.com/ -o baeldung.txt
% Total % Received % Xferd Average Speed Time Time Time Current
Dload Upload Total Spent Left Speed
100 122k 0 122k 0 0 99k 0 --:--:-- 0:00:01 --:--:-- 99k
2.2. Download and Upload using FTP
We can also use curl and wget to download files using the FTP protocol:
We can also upload files to an FTP server with curl. For this, we can use the -Tparameter:
curl -T "img.png" ftp://ftp.example.com/upload/
We should note that when uploading to a directory, we must use provide the trailing /, otherwise curl will think that the path represents a file.
2.3. Differences
The difference between the two is that curl supports a plethora of other protocols. This includes DICT, FILE, FTPS, GOPHER, IMAP, IMAPS, LDAP, LDAPS, POP3, POP3S, RTMP, RTSP, SCP, SFTP, SMB, SMBS, SMTP, SMTPS, TELNET, and TFTP.
We can treat curl as a general-purpose tool for transferring data to or from a server.
On the other hand, wget is basically a network downloader.
3. Recursive Download
When we wish to make a local copy of a website, wget is the tool to use. curl does not provide recursive download, as it cannot be provided for all its supported protocols.
We can download a website with wget in a single command:
wget --recursive https://www.baeldung.com
This will download the homepage and any resources linked from it. As we can see, www.baeldung.com links to various other resources like:
Start here
REST with Spring course
Learn Spring Security course
Learn Spring course
wget will follow each of these resources and download them individually:
--2019-10-02 22:09:17-- https://www.baeldung.com/start-here
...
Saving to: ‘www.baeldung.com/start-here’
www.baeldung.com/start-here [ <=> ] 134.85K 321KB/s in 0.4s
2019-10-02 22:09:18 (321 KB/s) - ‘www.baeldung.com/start-here’ saved [138087]
--2019-10-02 22:09:18-- https://www.baeldung.com/rest-with-spring-course
...
Saving to: ‘www.baeldung.com/rest-with-spring-course’
www.baeldung.com/rest-with-spring-cou [ <=> ] 244.77K 395KB/s in 0.6s
2019-10-02 22:09:19 (395 KB/s) - ‘www.baeldung.com/rest-with-spring-course’ saved [250646]
... more output omitted
3.1. Recursive Download with HTTP
The recursive download is one of the most powerful features of wget. This means that wget can follow links in HTML, XHTML, and CSS pages, to create local versions of remote web sites, fully recreating the directory structure of the original site.
Recursive downloading in wget is breadth-first. In other words, it first downloads the requested document, then the documents linked from that document, then the documents linked by those documents, and so on. The default maximum depth is set to five, but it can be overridden using the -l parameter:
In the case of HTTP or HTTPS URLs, wget scans and parses the HTML or CSS. Then, it retrieves the files the document refers to, through markups like href or src.
By default, wget will exclude paths under robots.txt (Robot Exclusion Standard). To switch this off, we can use the -e parameter:
wget -e robots=off http://example.com
3.2. Recursive Download with FTP
Unlike HTTP recursion, FTP recursion is performed depth-first. This means that wget will retrieve data of the first directory up to the specified depth level, and then move to the next directory in the directory tree.
4. Conclusion
In this article, we saw how both curl and wget can download files from internet servers.
wget is a simpler solution and only supports a small number of protocols. It is very good for downloading files and can download directory structures recursively.
We also saw how curl supports a much larger range of protocols, making it a more general-purpose tool.
In this tutorial, we'll look into different ways to search for a String in an ArrayList. Our intent is to check if a specific non-empty sequence of characters is present in any of the elements in the ArrayList and to return a list with all the matching elements.
2. Basic Looping
First, let's use a basic loop to search the sequence of characters in the given search string using the contains method of Java's String class:
public List<String> findUsingLoop(String search, List<String> list) {
List<String> matches = new ArrayList<String>();
for(String str: list) {
if (str.contains(search)) {
matches.add(str);
}
}
return matches;
}
3. Streams
The Java 8 Streams API provides us with a more compact solution by using functional operations.
First, we'll use the filter() method to search our input list for the search string, and then, we'll use the collect method to create and populate a list containing the matching elements:
Commons Collections provides us with a method IterableUtils.filteredIterable() that matches the given Iterable against a Predicate.
Let's call IterableUtils.filteredIterable(), defining the predicate to select only those elements containing the search string. Then, we'll use IteratorUtils.toList() to convert the Iterable to a List:
public List<String> findUsingCommonsCollection(String search, List<String> list) {
Iterable<String> result = IterableUtils.filteredIterable(list, new Predicate<String>() {
public boolean evaluate(String listElement) {
return listElement.contains(search);
}
});
return IteratorUtils.toList(result.iterator());
}
4.2. Google Guava
Google Guava offers a similar solution to Apache's filteredIterable() with the Iterables.filter() method. Let's use it to filter the list and return only the elements matching our search string:
public List<String> findUsingGuava(String search, List<String> list) {
Iterable<String> result = Iterables.filter(list, Predicates.containsPattern(search));
return Lists.newArrayList(result.iterator());
}
5. Conclusion
In this tutorial, we’ve learned different ways of searching for a String in an ArrayList. We first started with a simple for loop and then proceeded with an approach using the Stream API. Finally, we saw some examples using two third-party libraries — Google Guava and Commons Collections.
By default, any errors encountered during a Spring Batch job processing will make a corresponding step fail. However, there are many situations where we'd rather like to skip the currently processed item for certain exceptions.
In this tutorial, we'll explore two approaches to configure skip logic in the Spring Batch framework.
As we can see, the last three rows contain some invalid data – rows 5 and 7 are missing the username field, and the transaction amount in row 6 is negative.
In the later sections, we'll configure our batch job to skip these corrupted records.
3. Configuring Skip Limit and Skippable Exceptions
3.1. Using skip and skipLimit
Let's now discuss the first of two ways to configure our job to skip items in case of a failure — the skip and skipLimit methods:
First of all, to enable skip functionality, we need to include a call to faultTolerant() during the step-building process.
Within skip() and skipLimit(), we define the exceptions we want to skip and the maximum number of skipped items.
In the above example, if either a MissingUsernameException or NegativeAmountException is thrown during read, process, or write phase, then the currently processed item will be omitted and counted against the total limit of two.
Consequently, if any exception is thrown a third time, then the whole step will fail.
3.1. Using noSkip
In the previous example, any other exception besides MissingUsernameException and NegativeAmountException makes our step fail.
In some situations, however, it may be more appropriate to identify exceptions that should make our step fail and skip on any other.
Let's see how we can configure this using skip, skipLimit, and noSkip:
With the above configuration, we instruct Spring Batch framework to skip on any Exception (within a configured limit) except SAXException. This means SAXException always causes a step failure.
The order of the skip() and noSkip() calls doesn't matter.
4. Using Custom SkipPolicy
Sometimes we may need a more sophisticated skip-checking mechanism. For that purpose, Spring Batch framework provides the SkipPolicy interface.
We can then provide our own implementation of skip logic and plug it into our step definition.
Keeping the preceding example in mind, imagine we still want to define a skip limit of two items and make only MissingUsernameException and NegativeAmountException skippable.
However, an additional constraint is that we can skip NegativeAmountException, but only if the amount doesn't exceed a defined limit.
Let's implement our custom SkipPolicy:
public class CustomSkipPolicy implements SkipPolicy {
private static final int MAX_SKIP_COUNT = 2;
private static final int INVALID_TX_AMOUNT_LIMIT = -1000;
@Override
public boolean shouldSkip(Throwable throwable, int skipCount)
throws SkipLimitExceededException {
if (throwable instanceof MissingUsernameException && skipCount < MAX_SKIP_COUNT) {
return true;
}
if (throwable instanceof NegativeAmountException && skipCount < MAX_SKIP_COUNT ) {
NegativeAmountException ex = (NegativeAmountException) throwable;
if(ex.getAmount() < INVALID_TX_AMOUNT_LIMIT) {
return false;
} else {
return true;
}
}
return false;
}
}
Now, we can use our custom policy in a step definition:
And, similarly to our previous example, we still need to use faultTolerant() to enable skip functionality.
This time, however, we do not call skip() or noSkip(). Instead, we use the skipPolicy() method to provide our own implementation of the SkipPolicy interface.
As we can see, this approach gives us more flexibility, so it can be a good choice in certain use cases.
5. Conclusion
In this tutorial, we presented two ways to make a Spring Batch job fault-tolerant.
Even though using a skipLimit() together with skip() and noSkip() methods seems to be more popular, we may find implementing a custom SkipPolicy to be more convenient in some situations.
As usual, all the code examples are available over on GitHub.
In this tutorial, we're going to learn how to use the Reactive HTTP client from Jetty. We'll be demonstrating its usage with different Reactive libraries by creating small test cases.
2. What is Reactive HttpClient?
Jetty's HttpClient allows us to perform blocking HTTP requests. When we're dealing with a Reactive API however, we can't use the standard HTTP client. To fill this gap, Jetty has created a wrapper around the HttpClient APIs so that it also supports the ReactiveStreams API.
The Reactive HttpClient is used to either consume or produce a stream of data over HTTP calls.
The example we're going to demonstrate here will have a Reactive HTTP client, which will communicate with a Jetty server using different Reactive libraries. We'll also talk about the request and response events provided by Reactive HttpClient.
We recommend reading our articles on Project Reactor, RxJava, and Spring WebFlux to get a better understanding of Reactive programming concepts and its terminologies.
So here, the ReactiveRequest wrapper provided by the Jetty made our blocking HTTP Client reactive. Let's proceed and see its usage with different reactive libraries.
5. ReactiveStreams Usage
Jetty's HttpClient natively supports Reactive Streams, so let's begin there.
Now, Reactive Streams is just a set of interfaces, so, for our testing, let's implement a simple blocking subscriber:
public class BlockingSubscriber implements Subscriber<ReactiveResponse> {
BlockingQueue<ReactiveResponse> sink = new LinkedBlockingQueue<>(1);
@Override
public void onSubscribe(Subscription subscription) {
subscription.request(1);
}
@Override
public void onNext(ReactiveResponse response) {
sink.offer(response);
}
@Override
public void onError(Throwable failure) { }
@Override
public void onComplete() { }
public ReactiveResponse block() throws InterruptedException {
return sink.poll(5, TimeUnit.SECONDS);
}
}
Note that we needed to call Subscription#requestas per the JavaDoc which states that “No events will be sent by a Publisher until demand is signaled via this method.”
Also, note that we've added a safety mechanism so that our test can bail out if it hasn't seen the value in 5 seconds.
Let’s now see how we can use the Reactive HttpClient with the Project Reactor. The publisher creation is pretty much the same as in the previous section.
After the publisher creation, let's use the Mono class from Project Reactor to get a reactive response:
The conversion of the blocking HTTP Client into a reactive one is easy when used with Spring WebFlux. The Spring WebFlux ships with a reactive client, WebClient, that can be used with various HTTP Client libraries. We can use this as an alternative to using straight Project Reactor code.
So first, let's wrap the Jetty's HTTP Client using JettyClientHttpConnector to bond it with the WebClient:
ClientHttpConnector clientConnector = new JettyClientHttpConnector(httpClient);
And then pass this connector to the WebClient to perform the non-blocking HTTP requests:
The code ReactiveResponse.Content.asString() converts the response body to a string. It is also possible to discard the response using the ReactiveResponse.Content.discard() method if we're only interested in the status of the request.
Now, we can see that getting a response using RxJava2 is actually quite similar to Project Reactor. Basically, we just use Single instead of Mono:
The Reactive HTTP client emits a number of events during the execution. They are categorized as request events and response events. These events are helpful to peek into the lifecycle of a Reactive HTTP client.
This time, let's make our reactive request slightly differently by using the HTTP Client instead of the request:
Now, let's use RxJava once again. This time, we'll create a list, that holds the event types, and populate it by subscribing to the request events as they happen:
Then, since we're in a test, we can block our response and verify:
int actualStatus = response.blockingGet().getStatus();
Assert.assertEquals(6, requestEventTypes.size());
Assert.assertEquals(HttpStatus.OK_200, actualStatus);
Similarly, we can subscribe to the response events as well. Since they are similar to the request event subscription, we've added only the latter here. The complete implementation with both request and response events can be found in the GitHub repository, linked at the end of this article.
9. Conclusion
In this tutorial, we've learned about the ReactiveStreams HttpClient provided by Jetty, its usage with the various Reactive libraries and the lifecycle events associated with a Reactive request.
All of the code snippets, mentioned in the article, can be found in our GitHub repository.
Searching text is a very common operation in Linux. For example, we want to find the files that contain specific text, or we want to find the lines within a file that contain specific text.
In this tutorial, we'll go through some examples together and learn how to perform some common text searching in Linux using the grepcommand-line utility.
2. The grep Command
The grep command searches one or more input files for lines containing a match to a specified pattern.
Its name comes from the ed command g/re/p (globally search a regular expression and print).
By default, grep outputs the matching lines. The grep command has different variants and is available on almost every distribution of the Unix-like system by default. In this tutorial, we'll focus on the most widely used GNU grep.
3. Common Usage of grep
Now let's see some practical examples of how grep helps us to do text searches. In this section, all examples are done with GNU grep version 3.3.
Let's create a text file named input.txt to help us explore the grep command's results:
Linux is a great system.
Learning linux is very interesting.
This Linux system has 17 users.
The uptime of this linux system: 77 hours.
File report
There are 100 directories under */*.
There are 250 files under */opt*.
There are 300 files under */home/root*.
There are 20 mountpoints.
3.1. Basic String Search
To see how simple it is to perform a basic text search using grep, let's search our file for lines containing the string “linux“:
$ grep 'linux' input.txt
Learning linux is very interesting.
The uptime of this linux system: 77 hours.
Quoting the search string is a good practice. Whether to use a single or double quote depends on if we want the shell to expand the expression before executing the grep process.
3.2. Case-Insensitive Search
The basic string search with grep is pretty simple. What if we want to search lines containing “linux” or “Linux” — that is, do a case-insensitive search? grep‘s -i option can help us with that:
$ grep -i 'linux' input.txt
Linux is a great system.
Learning linux is very interesting.
This Linux system has 17 users.
The uptime of this linux system: 77 hours.
We can see that all lines containing linux or Linux are listed.
3.3. Whole-Word Search
We can use the -w option to tell grep to treat the pattern as a whole word.
For example, let's find lines in our input file that contain “is” as a whole word:
$ grep -w 'is' input.txt
Linux is a great system.
Learning linux is very interesting.
Note that the lines containing the word “this” – but not the word “is” – were not included in the result.
4. Advanced grep Usage
4.1. Regular Expressions
If we've understood the meaning of grep‘s name, it's not hard to imagine that regular expressions (regex) and grep are good friends. GNU grep understands three different versions of regular expression syntax:
BRE (Basic Regular Expressions)
ERE (Extended Regular Expressions)
PCRE (Perl Compatible Regular Expressions)
In GNU grep, there is no difference in functionality between the basic and extended syntaxes. However, PCRE gives additional functionality and is more powerful than both BRE and ERE.
By default, grep will use BRE. In BRE, the meta-characters ?, +, {, |, (, and ) lose their special meanings. We can use the backslash-escaped versions \?, \+, \{, \|, \(, and \) to make them have special meanings.
With the -E option, grep will work with ERE syntax. In ERE, the meta-characters we mentioned above have special meanings. If we backslash-escape them, they lose their special meanings.
Finally, the -P option will tell grep to do pattern matching with PCRE syntax.
4.2. Fixed String Search
We've learned that grep will do a BRE search by default. So the pattern “linux” or “is” that we gave in the previous examples are regex as well. They don't have any characters with special meaning. Therefore, they match the literal text “linux” and “is“.
If the text we want to search contains any characters with special meaning in regex (for example, “.” or “*“), we have to either escape those characters or use the -F option, to tell grep to do a fixed-string search.
For example, we may want to search for lines containing “*/opt*“:
$ grep -F '*/opt*' input.txt
There are 250 files under */opt*.
Let's do the same without using the -F option:
$ grep '\*/opt\*' input.txt
There are 250 files under */opt*.
4.3. Inverting the Search
We can use grep to search lines that don't contain a certain pattern. Let's see an example that finds all lines that don't contain numbers:
$ grep -v '[0-9]' input.txt
Linux is a great system.
Learning linux is very interesting.
File report
[0-9] in the above example is a regex that matches on a single numerical digit.
If we switch to PCRE with the -P option, we can use \d to match a numerical digit and get the same result:
$ grep -vP '\d' input.txt
Linux is a great system.
Learning linux is very interesting.
File report
In the outputs of the above two commands, we see that empty lines are also matched because blank lines don't have numerical digits either.
4.4. Print Only the Matched Parts
As we can see, grep prints each line that matches a pattern. However, sometimes only the matched parts are interesting for us. We can make use of the -o option to tell grep to print only matched parts of a matching line.
For example, we may want to find all strings that look like directories:
$ grep -o '/[^/*]*' input.txt
/
/opt
/home
/root
5. Other grep Tricks
5.1. Print Additional Context Lines Before or After Match
Sometimes we want to see lines before or after our matching lines in the result. grep has three options to handle additional context lines: -B (before a match), -A (after a match), and -C (before and after a match).
Now, let's search for the text “report” and print the three lines after the matching line:
$ grep -A3 'report' input.txt
File report
There are 100 directories under */*.
There are 250 files under */opt*.
There are 300 files under */home/root*.
The context line control options can be handy when we want to check several continuous lines but only know one line among them matching some pattern.
For example, YAML is widely used in applications for configuration files. Instead of viewing the entire configuration file, we might only need to see part of it. For example, to see the datasource configuration in a YAML file, we can make use of grep‘s -A option:
The -c option in grep allows us to suppress the standard output, and instead print only the count of matching lines. For example, we want to know how many lines contain “*”:
$ grep -Fc '*' input.txt
3
grep is a line-based search utility. The-c option will output the count of matched lines instead of the count of pattern occurrences. That's why the above command outputs three instead of six.
5.3. Recursively Search a Directory
In addition to files, grep accepts a directory as input as well. A common problem is to search in a directory recursively and find all files that contain some pattern.
Let's search in the /var/log directory recursively to find all files that contain “boot”. Here, we'll use the -l option to skip the matching information and let grep print only the file names of matched files:
In this article, we’ve learned how to use the grep command to do simple text searches and how to control the output. grep finds text efficiently and quickly and is a great tool to have in our arsenal of Linux commands.
Notice that our prefix name will be followed by the following letters. Adding -d to the command will use numeric suffixes starting from 0 instead of alphabetic ones.
The –bytes argument accepts integer values or a unit (example: 10K is 10*1024). Units are K, M, G, T, P, E, Z, Y for powers of 1024 or KB, MB, and so on for powers of 1000
We can also split a file into a given number of chunks with equal size.
split --number=2 data.txt dataPartPrefix
This will create two files with 5MB size each:
dataPartPrefixa
dataPartPrefixb
If we are splitting a text file and want to split it by lines we can do:
split -l 500 data.txt dataPartPrefix
This will result in a number of files depending on origin file content length.
Typically when making HTTP requests in our applications, we execute these calls sequentially. However, there are occasions when we might want to perform these requests simultaneously.
For example, we may want to do this when retrieving data from multiple sources or when we simply want to try giving our application a performance boost.
In this quick tutorial, we’ll take a look at several approaches to see how we can accomplish this bymaking parallel service calls using the Spring reactive WebClient.
2. Recap on Reactive Programming
To quickly recap WebClient was introduced in Spring 5 and is included as part of the Spring Web Reactive module. It provides a reactive, non-blocking interface for sending HTTP requests.
For an in-depth guide to reactive programming with WebFlux, check out our excellent Guide to Spring 5 WebFlux.
3. A Simple User Service
We're going to be using a simple User API in our examples. This API has a GET method that exposes one method getUser for retrieving a user using the id as a parameter.
Let's take a look at how to make a single call to retrieve a user for a given id:
In the next section, we'll learn how we can call this method concurrently.
4. Making Simultaneous WebClient Calls
In this section, we're going see several examples for calling our getUser method concurrently. We'll also take a look at both publisher implementations Fluxand Monoin the examples as well.
4.1. Multiple Calls to the Same Service
Let's now imagine that we want to fetch data about five users simultaneously and return the result as a list of users:
The main difference in this example is that we've used the static method merge instead of the fromIterable method. Using the merge method, we can combine two or more Fluxes into one result.
4.3. Multiple Calls to Different Services Different Types
The probability of having two services returning the same thing is rather low. More typically we'll have another service providing a different response type and our goal is to merge two (or more) responses.
The Mono class provides the static zip method which lets us combine two or more results:
public Mono fetchUserAndItem(int userId, int itemId) {
Mono<User> user = getUser(userId).subscribeOn(Schedulers.elastic());
Mono<Item> item = getItem(itemId).subscribeOn(Schedulers.elastic());
return Mono.zip(user, item, UserWithItem::new);
}
Another important point to note is we need to call subscribeOn before passing the results to the zip method.
However, the subscribeOn method does not subscribe to the Mono.
It specifies what kind of Scheduler to use when the subscribe call happens. Again we're using the elastic scheduler in this example which ensures each subscription happens on a dedicated single thread.
The last step is to call the zip method which combines the given user and itemMonos into a new Mono with the type UserWithItem. This is a simple POJO object which wraps a user and item.
5. Testing
In this section, we're going to see how we can test the code we've already seen and, in particular, verify that service calls are happening in parallel.
For this, we're going to use Wiremock to create a mock server and we'll test the fetchUsers method:
@Test
public void givenClient_whenFetchingUsers_thenExecutionTimeIsLessThanDouble() {
int requestsNumber = 5;
int singleRequestTime = 1000;
for (int i = 1; i <= requestsNumber; i++) {
stubFor(get(urlEqualTo("/user/" + i)).willReturn(aResponse().withFixedDelay(singleRequestTime)
.withStatus(200)
.withHeader("Content-Type", "application/json")
.withBody(String.format("{ \"id\": %d }", i))));
}
List<Integer> userIds = IntStream.rangeClosed(1, requestsNumber)
.boxed()
.collect(Collectors.toList());
Client client = new Client("http://localhost:8089");
long start = System.currentTimeMillis();
List<User> users = client.fetchUsers(userIds);
long end = System.currentTimeMillis();
long totalExecutionTime = end - start;
assertEquals("Unexpected number of users", requestsNumber, users.size());
assertTrue("Execution time is too big", 2 * singleRequestTime > totalExecutionTime);
}
In this example, the approach we've taken is to mock the user service and make it respond to any request in one second. Now if we make five calls using our WebClient we can assume that it shouldn't take more than two seconds as the calls happen concurrently.
If we take a closer look at the logs when we run our test. We can see that each request is happening on a different a thread:
[elastic-6] INFO c.b.r.webclient.simultaneous.Client - Calling getUser(5)
[elastic-3] INFO c.b.r.webclient.simultaneous.Client - Calling getUser(2)
[elastic-5] INFO c.b.r.webclient.simultaneous.Client - Calling getUser(4)
[elastic-2] INFO c.b.r.webclient.simultaneous.Client - Calling getUser(1)
[elastic-4] INFO c.b.r.webclient.simultaneous.Client - Calling getUser(3)
In this tutorial, we’ve explored a few ways we can make HTTP service calls simultaneously using the Spring 5 Reactive WebClient.
First, we showed how to make calls in parallel to the same service. Later, we saw an example of how to call two services returning different types. Then, we showed how we can test this code using a mock server.
As always, the source code for this article is available over on GitHub.
In this tutorial, we're going to learn about the Digital Signature mechanism and how we can implement it using the Java Cryptography Architecture (JCA). We'll explore the KeyPair, MessageDigest, Cipher, KeyStore, Certificate, and Signature JCA APIs.
We'll start by understanding what is Digital Signature, how to generate a key pair, and how to certify the public key from a certificate authority (CA). After that, we'll see how to implement Digital Signature using the low-level and high-level JCA APIs.
2. What Is Digital Signature?
2.1. Digital Signature Definition
Digital Signature is a technique for ensuring:
Integrity: the message hasn't been altered in transit
Authenticity: the author of the message is really who they claim to be
Non-repudiation: the author of the message can't later deny that they were the source
2.2. Sending a Message with a Digital Signature
Technically speaking, digital signature is the encrypted hash (digest, checksum) of a message. That means we generate a hash from a message and encrypt it with a private key according to a chosen algorithm.
The message, the encrypted hash, the corresponding public key, and the algorithm are all then sent. This is classified as a message with its digital signature.
2.3. Receiving and Checking a Digital Signature
To check the digital signature, the message receiver generates a new hash from the received message, decrypts the received encrypted hash using the public key, and compares them. If they match, the Digital Signature is said to be verified.
We should note that we only encrypt the message hash, and not the message itself. In other words, Digital Signature doesn't try to keep the message secret. Our digital signature only proves that the message was not altered in transit.
When the signature is verified, we're sure that only the owner of the private key could be the author of the message.
3. Digital Certificate and Public Key Identity
A certificate is a document that associates an identity to a given public key. Certificates are signed by a third-party entity called a Certificate Authority (CA).
We know that if the hash we decrypt with the published public key matches the actual hash, then the message is signed. However, how do we know that the public key really came from the right entity? This is solved by the use of digital certificates.
A Digital Certificate contains a public key and is itself signed by another entity. The signature of that entity can itself be verified by another entity and so on. We end up having what we call a certificate chain. Each top entity certifies the public key of the next entity. The most top-level entity is self-signed, which means that his public key is signed by his own private key.
The X.509 is the most used certificate format, and it is shipped either as binary format (DER) or text format (PEM). JCA already provides an implementation for this via the X509Certificate class.
4. KeyPair Management
Since Digital Signature uses a private and public key, we'll use the JCA classes PrivateKey and PublicKey for signing and checking a message, respectively.
4.1. Getting a KeyPair
To create a key pair of a private and public key, we'll use the Java keytool.
Let's generate a key pair using the genkeypair command:
This creates a private key and its corresponding public key for us. The public key is wrapped into an X.509 self-signed certificate which is wrapped in turn into a single-element certificate chain. We store the certificate chain and the private key in the Keystore file sender_keystore.p12, which we can process using the KeyStore API.
Here, we've used the PKCS12 key store format, as it is the standard and recommended over the Java-proprietary JKS format. Also, we should remember the password and alias, as we'll use them in the next subsection when loading the Keystore file.
4.2. Loading the Private Key for Signing
In order to sign a message, we need an instance of the PrivateKey.
Using the KeyStore API, and the previous Keystore file, sender_keystore.p12, we can get a PrivateKey object:
Otherwise, if we're going to work with a CA-signed certificate, then we need to create a certificate signing request (CSR). We do this with the certreq command:
The CSR file, sender_certificate.csr, is then sent to a Certificate Authority for the purpose of signing. When this is done, we'll receive a signed public key wrapped in an X.509 certificate, either in binary (DER) or text (PEM) format. Here, we've used the rfc option for a PEM format.
The public key we received from the CA, sender_certificate.cer, has now been signed by a CA and can be made available for clients.
4.4. Loading a Public Key for Verification
Having access to the public key, a receiver can load it into their Keystore using the importcert command:
Now that we have a PrivateKey instance on the sender side, and an instance of the PublicKey on the receiver side, we can start the process of signing and verification.
5. Digital Signature with MessageDigest and Cipher Classes
As we have seen, the digital signature is based on hashing and encryption.
Usually, we use the MessageDigest class with SHA or MD5 for hashing and the Cipher class for encryption.
Now, let's start implementing the digital signature mechanisms.
5.1. Generating a Message Hash
A message can be a string, a file, or any other data. So let's take the content of a simple file:
At this point, the message, the digital signature, the public key, and the algorithm are all sent, and the receiver can use these pieces of information to verify the integrity of the message.
5.3. Verifying Signature
When we receive a message, we must verify its signature. To do so, we decrypt the received encrypted hash and compare it with a hash we make of the received message.
In this example, we've used the text file message.txt to simulate a message we want to send, or the location of the body of a message we've received. Normally, we'd expect to receive our message alongside the signature.
6. Digital Signature Using the Signature Class
So far, we've used the low-level APIs to build our own digital signature verification process. This helps us understand how it works and allows us to customize it.
However, JCA already offers a dedicated API in the form of the Signature class.
6.1. Signing a Message
To start the process of signing, we first create an instance of the Signature class. To do that, we need a signing algorithm. We then initialize the Signature with our private key:
The signing algorithm we chose, SHA256withRSA in this example, is a combination of a hashing algorithm and an encryption algorithm. Other alternatives include SHA1withRSA, SHA1withDSA, and MD5withRSA, among others.
Next, we proceed to sign the byte array of the message:
In this article, we first looked at how digital signature works and how to establish trust for a digital certificate. Then we implemented digital signature using the MessageDigest,Cipher, and Signature classes from the Java Cryptography Architecture.
We saw in detail how to sign data using the private key and how to verify the signature using a public key.
As always, the code from this article is available over on GitHub.
In this tutorial, we're going to learn about the Breadth-First Search algorithm, which allows us to search for a node in a tree or a graph by travelling through their nodes breadth-first rather than depth-first.
First, we'll go through a bit of theory about this algorithm for trees and graphs. After that, we'll dive into implementations of the algorithms in Java. Finally, we'll cover their time complexity.
2. Breadth-First Search Algorithm
The basic approach of the Breadth-First Search (BFS) algorithm is to search for a node into a tree or graph structure by exploring neighbors before children.
First, we'll see how this algorithm works for trees. After that, we'll adapt it to graphs, which have the specific constraint of sometimes containing cycles. Finally, we'll discuss the performance of this algorithm.
2.1. Trees
The idea behind the BFS algorithm for trees is to maintain a queue of nodes that will ensure the order of traversal. At the beginning of the algorithm, the queue contains only the root node. We'll repeat these steps as long as the queue still contains one or more nodes:
Pop the first node from the queue
If that node is the one we're searching for, then the search is over
Otherwise, add this node's children to the end of the queue and repeat the steps
Execution termination is ensured by the absence of cycles. We'll see how to manage cycles in the next section.
2.2. Graphs
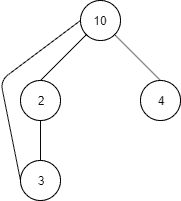
In the case of graphs, we must think of possible cycles in the structure. If we simply apply the previous algorithm on a graph with a cycle, it'll loop forever. Therefore, we'll need to keep a collection of the visited nodes and ensure we don't visit them twice:
Pop the first node from the queue
Check if the node has already been visited, if so skip it
If that node is the one we're searching for, then the search is over
Otherwise, add it to the visited nodes
Add this node's children to the queue and repeat these steps
3. Implementation in Java
Now that the theory has been covered, let's get our hands into the code and implement these algorithms in Java!
3.1. Trees
First, we'll implement the tree algorithm. Let's design our Tree class, which consists of a value and children represented by a list of other Trees:
public class Tree<T> {
private T value;
private List<Tree<T>> children;
private Tree(T value) {
this.value = value;
this.children = new ArrayList<>();
}
public static <T> Tree<T> of(T value) {
return new Tree<>(value);
}
public Tree<T> addChild(T value) {
Tree<T> newChild = new Tree<>(value);
children.add(newChild);
return newChild;
}
}
To avoid creating cycles, children are created by the class itself, based on a given value.
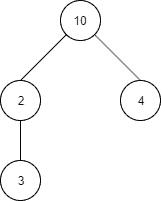
Then, if searching for the value 4, we expect the algorithm to traverse nodes with values 10, 2 and 4, in that order:
BreadthFirstSearchAlgorithm.search(4, root)
We can verify that with logging the value of the visited nodes:
[main] INFO c.b.a.b.BreadthFirstSearchAlgorithm - Visited node with value: 10
[main] INFO c.b.a.b.BreadthFirstSearchAlgorithm - Visited node with value: 2
[main] INFO c.b.a.b.BreadthFirstSearchAlgorithm - Visited node with value: 4
3.2. Graphs
That concludes the case of trees. Let's now see how to deal with graphs. Contrarily to trees, graphs can contain cycles. That means, as we've seen in the previous section, we have to remember the nodes we visited to avoid an infinite loop. We'll see in a moment how to update the algorithm to consider this problem, but first, let's define our graph structure:
public class Node<T> {
private T value;
private Set<Node<T>> neighbors;
public Node(T value) {
this.value = value;
this.neighbors = new HashSet<>();
}
public void connect(Node<T> node) {
if (this == node) throw new IllegalArgumentException("Can't connect node to itself");
this.neighbors.add(node);
node.neighbors.add(this);
}
}
Now, we can see that, in opposition to trees, we can freely connect a node with another one, giving us the possibility to create cycles. The only exception is that a node can't connect to itself.
It's also worth noting that with this representation, there is no root node. This is not a problem, as we also made the connections between nodes bidirectional. That means we'll be able to search through the graph starting at any node.
First of all, let's reuse the algorithm from above, adapted to the new structure:
public static <T> Optional<Node<T>> search(T value, Node<T> start) {
Queue<Node<T>> queue = new ArrayDeque<>();
queue.add(start);
Node<T> currentNode;
while (!queue.isEmpty()) {
currentNode = queue.remove();
if (currentNode.getValue().equals(value)) {
return Optional.of(currentNode);
} else {
queue.addAll(currentNode.getNeighbors());
}
}
return Optional.empty();
}
We can't run the algorithm like this, or any cycle will make it run forever. So, we must add instructions to take care of the already visited nodes:
while (!queue.isEmpty()) {
currentNode = queue.remove();
LOGGER.info("Visited node with value: {}", currentNode.getValue());
if (currentNode.getValue().equals(value)) {
return Optional.of(currentNode);
} else {
alreadyVisited.add(currentNode);
queue.addAll(currentNode.getNeighbors());
queue.removeAll(alreadyVisited);
}
}
return Optional.empty();
As we can see, we first initialize a Set that'll contain the visited nodes.
Set<Node<T>> alreadyVisited = new HashSet<>();
Then, when the comparison of values fails, we add the node to the visited ones:
alreadyVisited.add(currentNode);
Finally, after adding the node's neighbors to the queue, we remove from it the already visited nodes (which is an alternative way of checking the current node's presence in that set):
queue.removeAll(alreadyVisited);
By doing this, we make sure that the algorithm won't fall into an infinite loop.
Let's see how it works through an example. First of all, we'll define a graph, with a cycle:
Node<Integer> start = new Node<>(10);
Node<Integer> firstNeighbor = new Node<>(2);
start.connect(firstNeighbor);
Node<Integer> firstNeighborNeighbor = new Node<>(3);
firstNeighbor.connect(firstNeighborNeighbor);
firstNeighborNeighbor.connect(start);
Node<Integer> secondNeighbor = new Node<>(4);
start.connect(secondNeighbor);
Let's again say we want to search for the value 4. As there is no root node, we can begin the search with any node we want, and we'll choose firstNeighborNeighbor:
Again, we'll add a log to see which nodes are visited, and we expect them to be 3, 2, 10 and 4, only once each in that order:
[main] INFO c.b.a.b.BreadthFirstSearchAlgorithm - Visited node with value: 3
[main] INFO c.b.a.b.BreadthFirstSearchAlgorithm - Visited node with value: 2
[main] INFO c.b.a.b.BreadthFirstSearchAlgorithm - Visited node with value: 10
[main] INFO c.b.a.b.BreadthFirstSearchAlgorithm - Visited node with value: 4
3.3. Complexity
Now that we've covered both algorithms in Java, let's talk about their time complexity. We'll use the Big-O notation to express them.
Let's start with the tree algorithm. It adds a node to the queue at most once, therefore visiting it at most once also. Thus, if n is the number of nodes in the tree, the time complexity of the algorithm will be O(n).
Now, for the graph algorithm, things are a little bit more complicated. We'll go through each node at most once, but to do so we'll make use of operations having linear complexity such as addAll() and removeAll().
Let's consider n the number of nodes and c the number of connections of the graph. Then, in the worst case (being no node found), we might use addAll() and removeAll() methods to add and remove nodes up to the number of connections, giving us O(c) complexity for these operations. So, provided that c > n, the complexity of the overall algorithm will be O(c). Otherwise, it'll be O(n). This is generally noted O(n + c), which can be interpreted as a complexity depending on the greatest number between n and c.
Why didn't we have this problem for the tree search? Because the number of connections in a tree is bounded by the number of nodes. The number of connections in a tree of n nodes is n – 1.
4. Conclusion
In this article, we learned about the Breadth-First Search algorithm and how to implement it in Java. After going through a bit of theory, we saw Java implementations of the algorithm and discussed its complexity. As usual, the code is available over on GitHub.
In this next tutorial, we'll focus on buildingvalidations for enums using custom annotations.
2. Validating Enums
Unfortunately, most standard annotations can not be applied to enums.
For example, when applying the @Pattern annotation to an enum we receive an error like this one with Hibernate Validator:
javax.validation.UnexpectedTypeException: HV000030: No validator could be found for constraint
'javax.validation.constraints.Pattern' validating type 'org.baeldung.javaxval.enums.demo.CustomerType'.
Check configuration for 'customerTypeMatchesPattern'
Actually, the only standard annotations which can be applied to enum's are @NotNull and @Null.
3. Validating the Pattern of an Enum
Let's start by defining an annotation to validate the pattern of an enum:
As we can see, the annotation does not actually contain the validation logic. Therefore, we need to provide a ConstraintValidator:
public class EnumNamePatternValidator implements ConstraintValidator<EnumNamePattern, Enum<?>> {
private Pattern pattern;
@Override
public void initialize(EnumNamePattern annotation) {
try {
pattern = Pattern.compile(annotation.regexp());
} catch (PatternSyntaxException e) {
throw new IllegalArgumentException("Given regex is invalid", e);
}
}
@Override
public boolean isValid(Enum<?> value, ConstraintValidatorContext context) {
if (value == null) {
return true;
}
Matcher m = pattern.matcher(value.name());
return m.matches();
}
}
In this example, the implementation is very similar to the standard @Pattern validator. However, this time, we match the name of the enum.
4. Validating a Subset of an Enum
Matching an enum with a regular expression is not type-safe. Instead, it makes more sense to compare with the actual values of an enum.
However, because of the limitations of annotations, such an annotation cannot be made generic. This is because arguments for annotations can only be concrete values of a specific enum, not instances of the enum parent class.
Let's see how to create a specific subset validation annotation for our CustomerType enum:
@Target({METHOD, FIELD, ANNOTATION_TYPE, CONSTRUCTOR, PARAMETER, TYPE_USE})
@Retention(RUNTIME)
@Documented
@Constraint(validatedBy = CustomerTypeSubSetValidator.class)
public @interface CustomerTypeSubset {
CustomerType[] anyOf();
String message() default "must be any of {anyOf}";
Class<?>[] groups() default {};
Class<? extends Payload>[] payload() default {};
}
This annotation can then be applied to enums of the type CustomerType:
Next, we need to define the CustomerTypeSubSetValidator to check whether the list of given enum values contains the current one:
public class CustomerTypeSubSetValidator implements ConstraintValidator<CustomerTypeSubset, CustomerType> {
private CustomerType[] subset;
@Override
public void initialize(CustomerTypeSubset constraint) {
this.subset = constraint.anyOf();
}
@Override
public boolean isValid(CustomerType value, ConstraintValidatorContext context) {
return value == null || Arrays.asList(subset).contains(value);
}
}
While the annotation has to be specific for a certain enum, we can of course share code between different validators.
5. Validating that a String Matches a Value of an Enum
Instead of validating an enum to match a String, we could also do the opposite. For this, we can create an annotation that checks if the String is valid for a specific enum.
@Target({METHOD, FIELD, ANNOTATION_TYPE, CONSTRUCTOR, PARAMETER, TYPE_USE})
@Retention(RUNTIME)
@Documented
@Constraint(validatedBy = ValueOfEnumValidator.class)
public @interface ValueOfEnum {
Class<? extends Enum<?>> enumClass();
String message() default "must be any of enum {enumClass}";
Class<?>[] groups() default {};
Class<? extends Payload>[] payload() default {};
}
This annotation can be added to a String field and we can pass any enum class.
Let's define the ValueOfEnumValidator to check whether the String (or any CharSequence) is contained in the enum:
public class ValueOfEnumValidator implements ConstraintValidator<ValueOfEnum, CharSequence> {
private List<String> acceptedValues;
@Override
public void initialize(ValueOfEnum annotation) {
acceptedValues = Stream.of(annotation.enumClass().getEnumConstants())
.map(Enum::name)
.collect(Collectors.toList());
}
@Override
public boolean isValid(CharSequence value, ConstraintValidatorContext context) {
if (value == null) {
return true;
}
return acceptedValues.contains(value.toString());
}
}
This validation can especially be useful when working with JSON objects. Because the following exception appears, when mapping an incorrect value from a JSON object to an enum:
Cannot deserialize value of type CustomerType from String value 'UNDEFINED': value not one
of declared Enum instance names: [...]
We can, of course, handle this exception. However, this does not allow us to report all violations at once.
Instead of mapping the value to an enum, we can map it to a String. We'd then use our validator to check whether it matches any of the enum values.
6. Bringing it all Together
We can now validate beans using any of our new validations. Most importantly, all of our validations accept null values. Consequently, we can also combine it with the annotation @NotNull:
public class Customer {
@ValueOfEnum(enumClass = CustomerType.class)
private String customerTypeString;
@NotNull
@CustomerTypeSubset(anyOf = {CustomerType.NEW, CustomerType.OLD})
private CustomerType customerTypeOfSubset;
@EnumNamePattern(regexp = "NEW|DEFAULT")
private CustomerType customerTypeMatchesPattern;
// constructor, getters etc.
}
In the next section, we’ll see how we can test our new annotations.
7. Testing Our Javax Validations for Enums
In order to test our validators, we'll set up a validator, which supports our newly defined annotations. We'll the Customer bean for all our tests.
First, we want to make sure that a valid Customer instance does not cause any violations:
@Test
public void whenAllAcceptable_thenShouldNotGiveConstraintViolations() {
Customer customer = new Customer();
customer.setCustomerTypeOfSubset(CustomerType.NEW);
Set violations = validator.validate(customer);
assertThat(violations).isEmpty();
}
Second, we want our new annotations to support and accept null values. We only expect a single violation. This should be reported on customerTypeOfSubset by the @NotNull annotation:
@Test
public void whenAllNull_thenOnlyNotNullShouldGiveConstraintViolations() {
Customer customer = new Customer();
Set<ConstraintViolation> violations = validator.validate(customer);
assertThat(violations.size()).isEqualTo(1);
assertThat(violations)
.anyMatch(havingPropertyPath("customerTypeOfSubset")
.and(havingMessage("must not be null")));
}
Finally, we validate our validators to report violations, when the input is not valid:
@Test
public void whenAllInvalid_thenViolationsShouldBeReported() {
Customer customer = new Customer();
customer.setCustomerTypeString("invalid");
customer.setCustomerTypeOfSubset(CustomerType.DEFAULT);
customer.setCustomerTypeMatchesPattern(CustomerType.OLD);
Set<ConstraintViolation> violations = validator.validate(customer);
assertThat(violations.size()).isEqualTo(3);
assertThat(violations)
.anyMatch(havingPropertyPath("customerTypeString")
.and(havingMessage("must be any of enum class org.baeldung.javaxval.enums.demo.CustomerType")));
assertThat(violations)
.anyMatch(havingPropertyPath("customerTypeOfSubset")
.and(havingMessage("must be any of [NEW, OLD]")));
assertThat(violations)
.anyMatch(havingPropertyPath("customerTypeMatchesPattern")
.and(havingMessage("must match \"NEW|DEFAULT\"")));
}
8. Conclusion
In this tutorial, we covered three options to validate enums using custom annotations and validators.
First, we learned how to validate the name of an enum using a regular expression.
Second, we discussed a validation for a subset of values of a specific enum. We also explained why we cannot build a generic annotation to do this.
Finally, we also looked at how to build a validator for strings. In order to check whether a String conforms to a particular value of a given enum.
As always, the full source code of the article is available over on Github.