Quantcast
Channel: Baeldung
Viewing all 4700 articles
Browse latest View live

How to Set Up a WildFly Server

$
0
0

1. Introduction

In this tutorial, we explore the different server modes and configurations of the JBoss WildFly application server. WildFly is a lightweight application server with a CLI and an admin console.

Before we get started, though, we need to make sure we have a JAVA_HOME variable set to a JDK. Anything after version 8 will work for WildFly 17.

2. Server Modes

WildFly comes with standalone and domain modes by default. Let's take a look at standalone first.

2.1. Standalone

After downloading and extracting WildFly to a local directory, we need to execute the user script.

For Linux, we'd do:

~/bin/add-user.sh

Or for Windows:

~\bin\add-user.bat

The admin user will already exist; however, we'll want to update the password to something different. Updating the default admin password is always best practice even when planning to use another account for server management.

The UI will prompt us to update the password in option (a):

Enter the details of the new user to add.
Using realm 'ManagementRealm' as discovered from the existing property files.
Username : admin
User 'admin' already exists and is enabled, would you like to...
 a) Update the existing user password and roles
 b) Disable the existing user
 c) Type a new username
(a):

After changing the password, we need to run the OS-appropriate startup script:

~\bin\standalone.bat

After the server output stops, we see that the server is running.

We can now access the administration console at http://127.0.0.1:9990 as prompted in the output. If we access the server URL, http://127.0.0.1:8080/, we should be prompted with a message telling us that the server is running:

Server is up and running!

This quick and easy setup is great for a lone instance running on a single server, but let's check out domain mode for multiple instances.

2.2. Domain

As mentioned above, the domain mode has multiple server instances being managed by a single host controller. The default number is two servers.

Similarly to the standalone instance, we add a user via the add-user script. However, the startup script is appropriately called domain rather than standalone.

After running through the same steps for the startup process, we now hit the individual server instances.

For example, we can visit the same single instance URL for the first server at http://127.0.0.1:8080/

Server is up and running!

Likewise, we can visit server two at http://127.0.0.1:8230

Server is up and running!

We'll take a look at that odd port configuration for server two a bit later.

3. Deployment

To deploy our first application, we need a good example application.

Let's use Spring Boot Hello World. With a slight modification, it'll work on WildFly.

First, let's update the pom.xml to build a WAR. We'll change the packaging element and add the maven-war-plugin:

<packaging>war</packaging>
...
<build>
  <plugins>
	<plugin>
	  <groupId>org.apache.maven.plugins</groupId>
	  <artifactId>maven-war-plugin</artifactId>
	  <configuration>
		<archive>
		  <manifestEntries>
			<Dependencies>jdk.unsupported</Dependencies>
		  </manifestEntries>
		</archive>
	  </configuration>
	</plugin>
  </plugins>
</build>

Next, we need to alter the Application class to extend SpringBootServletInitializer:

public class Application extends SpringBootServletInitializer

And override the configure method:

    @Override
    protected SpringApplicationBuilder configure(SpringApplicationBuilder application) {
        return application.sources(Application.class);
    }

Finally, let's build the project:

./mvnw package

Now, we can deploy it.

3.1. Deploy an Application

Let's look at how easy it is to deploy our new WildFly application through the console.

Firstly, we log in to the console using the admin user and password set earlier.

Click Add -> Upload Deployment -> Choose a file…

Secondly, we browse to the target directory for the Spring Boot application and upload the WAR file. Click Next to continue, and edit the name of the new application.

Lastly, we access the application by the same URL – http://127.0.0.1:8080/. We now see the application output as:

Greetings from Spring Boot!

As a result of the successful application deployment, let's review some of the common configuration properties.

4. Server Configuration

For these common properties, viewing them in the administration console is the most convenient.

4.1. Common Configuration Properties

First of all, let's take a look at the Subsystems — each one has a statistics-enabled value that can be set to true for runtime statistics:

Under the Paths section, we see a couple of the important file paths being used by the server:

As an example, using specific values for the configuration directory and log directory is helpful:

jboss.server.config.dir
jboss.server.log.dirw

In addition, the Datasources and Drivers section provides for managing external data sources and different drivers for data persistence layers:

In the Logging subsystem, we update the log level from INFO to DEBUG to see more application logs:

4.2. Server Configuration Files

Remember the server two URL in domain mode, http://127.0.0.1:8230? The odd port 8230 is due to a default offset value of 150 in the host-slave.xml configuration file:

<server name="server-one" group="main-server-group"/>
<server name="server-two" group="main-server-group" auto-start="true">
  <jvm name="default"/>
  <socket-bindings port-offset="150"/>
</server>

However, we can make a simple update to the port-offset value:

<socket-bindings port-offset="10"/>

Consequently, we now access server two at URL http://127.0.0.1:8090.

Another great feature of using and configuring the application in a convenient admin console is that those settings can be exported as an XML file. Using a consistent configuration through XML files simplifies managing multiple environments.

5. Monitoring

The command-line interface for WildFly allows for viewing and updating configuration values the same as the administration console.

To use the CLI, we simply execute:

~\bin\jboss-cli.bat

After that we type:

[disconnected /] connect
[domain@localhost:9990 /]

As a result, we can follow the prompts to connect to our server instance. After connecting, we can access the configuration real-time.

For example, to view all current configuration as XML when connected to the server instance, we can run the read-config-as-xml command:

[domain@localhost:9990 /] :read-config-as-xml

The CLI can also be used for runtime statistics on any of the server subsystems. Most importantly, CLI is great for identifying different issues through server metrics.

6. Conclusion

In this tutorial, we walked through setting up and deploying a first application in WildFly as well as some of the configuration options for the server.

The Spring Boot sample project and export of the XML configuration can be viewed on GitHub.


Unable to Find @SpringBootConfiguration with @DataJpaTest

$
0
0

1. Introduction

In our tutorial on testing in Spring Boot, we saw how we can use the @DataJpaTest annotation.

In this next tutorial, we'll see how to resolve the error “Unable to find a @SpringBootConfiguration.

2. Causes

The @DataJpaTest annotation helps us to set up a JPA test. For this, it initializes the application, ignoring irrelevant parts. For instance, it'll ignore MVC controllers.

However, to initialize the application it needs configuration.

For this, it searches in the current package and goes up in the package hierarchy until a configuration is found.

For example, let's add a @DataJpaTest in the com.baeldung.data.jpa package. Then, it'll search for a configuration class in:

  • com.baeldung.data.jpa
  • com.baeldung.data
  • and so on

However, when no configuration is found, the application will report an error:

Unable to find a @SpringBootConfiguration, you need to use @ContextConfiguration or @SpringBootTest(classes=...)
  with your test java.lang.IllegalStateException

This could, for example, happen because the configuration class is located in a more specific package, like com.baeldung.data.jpa.application.

Let's move the configuration class to com.baeldung.data.jpa. As a result, Spring will now be able to find it.

On the other hand, we can have a module that doesn't have any @SpringBootConfiguration. In the next section, we'll look into this scenario.

3. Missing @SpringBootConfiguration

What if our module doesn't contain any @SpringBootConfiguration? There can be multiple reasons for that. Let's assume, for this tutorial, that we have a module containing only model classes.

So, the solution is straightforward. Let's add a @SpringBootApplication to our test code:

@SpringBootApplication
public class TestApplication {}

Now that we have an annotated class, Spring is able to bootstrap our tests.

To validate our setup, let's inject a TestEntityManager and validate that it is set:

@RunWith(SpringRunner.class)
@DataJpaTest
public class DataJpaUnitTest {

    @Autowired
    TestEntityManager entityManager;

    @Test
    public void givenACorrectSetup_thenAnEntityManagerWillBeAvailable() {
        assertNotNull(entityManager);
    }
}

This test succeeds when Spring can find the @SpringBootConfiguration in its own package or one of its parent packages.

4. Conclusion

In this short tutorial, we looked into two different causes for the error: “Unable to find a @SpringBootConfiguration“.

First, we looked at a case where the configuration class could not found. This was because of its location. We solved it by moving the configuration class to another location.

Second, we looked at a scenario where no configuration class was available. We resolved this by adding a @SpringBootApplication to our test codebase.

As always, the full source code of the article is available over on GitHub.

Linux Commands – Find Broken Symlinks

$
0
0

1. Overview

In this tutorial, we'll see how to find broken symlinks using the find command in different forms.

2. Symlinks

Symlinks, symbolic links, or even soft links are files that point to other links, files, directories, and resources. They are similar to shortcuts in Windows.

Since they are links, once the target is not available anymore, they become useless.

Our examples will run in the following directory structure:

To reproduce the above environment, we can run these commands in an empty directory:

mkdir -p baeldung/dir-1/dir-2/dir-3/
touch baeldung/file.txt
touch baeldung/dir-1/file-1.txt
touch baeldung/dir-1/dir-2/file-2.txt
touch baeldung/dir-1/dir-2/dir-3/file-3.txt
ln -s dir-2/dir-3/ baeldung/dir-1/dir-3
ln -s ../../file-1.txt baeldung/dir-1/dir-2/dir-3/file-1.txt
ln -s baeldung/nonexistent-directory baeldung/dir-1/dir-2/link-to-nonexistent-directory
ln -s dir-4/file-4.txt baeldung/dir-1/dir-2/dir-3/file-4.txt
ln -s dir-2/file-2.txt baeldung/dir-1/file-2.txt
ln -s ../filex.txt baeldung/dir-1/filex.txt
ln -s ../cyclic-link baeldung/dir-1/cyclic-link
ln -s dir-1/cyclic-link baeldung/cyclic-link
ln -s . baeldung/infinite-loop

3. Finding Broken Symlinks

The find command has the following structure:

find [-H] [-L] [-P] [-D debugopts] [-Olevel] [starting-point...] [expression]

The -H, -L and -P options control how symbolic links are treated, and when omitted, use -P as the default.

When -P is used and find examines or prints information from a symbolic link, the details are taken from the properties of the symbolic link itself.

We're going to assume a Bash shell for our commands.

3.1. The Simple Way

The simplest way to detect broken symlinks is by using the following command:

find baeldung -xtype l

Executing the above command in our environment will produce the following output:

find: ‘baeldung/cyclic-link’: Too many levels of symbolic links
find: ‘baeldung/dir-1/cyclic-link’: Too many levels of symbolic links
baeldung/dir-1/filex.txt
baeldung/dir-1/dir-2/link-to-nonexistent-directory
baeldung/dir-1/dir-2/dir-3/file-4.txt

In the first two lines, we can see that not only we're detecting broken symlinks, but we're also reporting cyclic links. After the cyclic links, we see our broken links.

We used the -xtype l argument, which is true only for broken symbolic links.

We could have achieved the same thing by including the -P flag:

find baeldung -P -xtype l

As we might guess, this means that -P is the default.

3.2. The Portable Way

For POSIX-compliant shells, we can use the solution below since -xtype may not be available on all systems:

find baeldung -type l ! -exec test -e {} \; -print

As expected, the output will be the same as the last sample:

baeldung/cyclic-link
baeldung/dir-1/cyclic-link
baeldung/dir-1/filex.txt
baeldung/dir-1/dir-2/link-to-nonexistent-directory
baeldung/dir-1/dir-2/dir-3/file-4.txt

Let's break in parts what is happening here:

  • The find command is looking for files of type link the same way we did in the last samples
  • ! is negating the result of the –exec expression that is testing for files existence – negating that will show only files that don't exist
  • The exec expression action is used to execute commands for each found file. In this case, we're executing test -e for each file. test is a Linux command used to check file types and compare values. Using the -e argument, we're checking if the file exists
  • {} will be replaced by the current filename
  • \ is used to protect the command from expansion by the shell – the command can be quoted to avoid the use of “\
  • ; represents the end of the command
  • -print prints the result to the standard output

3.3. The Portable and In-Depth Way

Or, we can find this standard solution on many websites:

find -L baeldung -type l

In fact, it works even better than other solutions above. This is because it also reports “file system loops” as we can see on the second line:

find: ‘baeldung/cyclic-link’: Too many levels of symbolic links
find: File system loop detected; ‘baeldung/infinite-loop’ is part of the same file system loop as ‘baeldung’
find: ‘baeldung/dir-1/cyclic-link’: Too many levels of symbolic links
baeldung/dir-1/dir-3/file-4.txt
baeldung/dir-1/filex.txt
baeldung/dir-1/dir-2/link-to-nonexistent-directory
baeldung/dir-1/dir-2/dir-3/file-4.txt

The side effect that many people don't know is that this approach does an in-depth search if a link points to a directory.

For example, imagine that we have a link that points to /usr/share. Using the -L option will make find traverse the entire /usr/share structure.

This approach can take too much time and resources to complete. In most cases, it is not what we're trying to do. It's essential to know when to use each approach and have in mind its benefits and consequences.

So, if we want to search for broken links inside directories when we have links that point to directories, we can use the -L option.

But if we want to stay inside our specific directory structure and don't want to follow links, we don't need to use -L.

To see this difference, we can enable the debug to show each file and folder visited:

find -D search baeldung -xtype l
find -D search -L baeldung -type l

3.4. The Hacky Way

We can use a different approach that uses the user permission level to read files.

It's a bit of a hack since we'll see broken links as well as files we don't have permission to read. In other words, this option only really is applicable for root users.

That said, we can use the below command to find broken links:

find baeldung -type l ! -readable

That will produce an output similar to the last sample:

baeldung/cyclic-link
baeldung/dir-1/cyclic-link
baeldung/dir-1/filex.txt
baeldung/dir-1/dir-2/link-to-nonexistent-directory
baeldung/dir-1/dir-2/dir-3/file-4.txt

In this case, we used -type l that looks for files of type symlinks.

Then we negate the -readable argument with !. This will then show files that we can't read.

Since we can't read broken links, these are returned as part of the result.

3.5. Limiting the Scope and Depth

We can limit the scope of our search using some useful test expressions:

  • lname pattern: We can provide link name patterns
  • ilname pattern: The same as lname, but is case-insensitive
  • maxdepth: Search until this directory depth
  • mindepth: Search from this directory depth

As an example, we can execute:

find baeldung -mindepth 3 -ilname "*.TXT" -xtype l

Which will produce the output:

baeldung/dir-1/dir-2/dir-3/file-4.txt

3.6. Customizing the Output

We can customize the output to provide more useful information.

With the expression action -ls, we can have detailed information about the link and to where it points to:

find baeldung -xtype l -ls

And the output will be:

find: ‘baeldung/cyclic-link’: Too many levels of symbolic links
find: ‘baeldung/dir-1/cyclic-link’: Too many levels of symbolic links
 21109100      0 lrwxrwxrwx   1  fabio    fabio          12 Sep 17 23:26 baeldung/dir-1/filex.txt -> ../filex.txt
 21109086      0 lrwxrwxrwx   1  fabio    fabio          30 Sep 17 23:21 baeldung/dir-1/dir-2/link-to-nonexistent-directory -> baeldung/nonexistent-directory
 21109087      0 lrwxrwxrwx   1  fabio    fabio          16 Sep 17 23:21 baeldung/dir-1/dir-2/dir-3/file-4.txt -> dir-4/file-4.txt

This approach doesn't work well when filenames are unusual, because they can contain any character except \0 and /, even line breaks.

Unusual characters in a file name can do unexpected and often undesirable things to our terminal. For example, certain characters can change the settings of our function keys on some terminals.

4. Conclusion

In this quick article, we saw how to find broken links using simple and more elaborate approaches, how to limit the scope of the search, and customize the output.

The find utility is a real swiss army knife! To learn more, please take a look at the find man page.

Java Application Remote Debugging

$
0
0

1. Overview

Debugging a remote Java Application can be handy in more than one case.

In this tutorial, we'll discover how to do that using JDK's tooling.

2. The Application

Let's start by writing an application. We'll run it on a remote location and debug it locally through this article:

public class OurApplication {
    private static String staticString = "Static String";
    private String instanceString;

    public static void main(String[] args) {
        for (int i = 0; i < 1_000_000_000; i++) {
            OurApplication app = new OurApplication(i);
            System.out.println(app.instanceString);
        }
    }

    public OurApplication(int index) {
        this.instanceString = buildInstanceString(index);
    }

    public String buildInstanceString(int number) {
        return number + ". Instance String !";
    }
}

3. JDWP: The Java Debug Wire Protocol

The Java Debug Wire Protocol is a protocol used in Java for the communication between a debuggee and a debugger. The debuggee is the application being debugged while the debugger is an application or a process connecting to the application being debugged.

Both applications either run on the same machine or on different machines. We'll focus on the latter.

3.1. JDWP's Options

We'll use JDWP in the JVM command-line arguments when launching the debuggee application.

Its invocation requires a list of options:

  • transport is the only fully required option. It defines which transport mechanism to use. dt_shmem only works on Windows and if both processes run on the same machine while dt_socket is compatible with all platforms and allows the processes to run on different machines
  • server is not a mandatory option. This flag, when on, defines the way it attaches to the debugger. It either exposes the process through the address defined in the address option. Otherwise, JDWP exposes a default one
  • suspend defines whether the JVM should suspend and wait for a debugger to attach or not
  • address is the option containing the address, generally a port, exposed by the debuggee. It can also represent an address translated as a string of characters (like javadebug if we use server=y without providing an address on Windows)

3.2. Launch Command

Let's start by launching the remote application. We'll provide all the options listed earlier:

java -agentlib:jdwp=transport=dt_socket,server=y,suspend=n,address=8000 OurApplication

Until Java 5, the JVM argument runjdwp had to be used together with the other option debug:

java -Xdebug -Xrunjdwp:transport=dt_socket,server=y,suspend=n,address=8000

This way of using JDWP is still supported but will be dropped in future releases. We'll prefer the usage of the newer notation when possible.

3.3. Since Java 9

Finally, one of the options of JDWP has changed with the release of version 9 of Java. This is quite a minor change since it only concerns one option but will make a difference if we're trying to debug a remote application.

This change impacts the way address behaves for remote applications. The older notation address=8000 only applies to localhost. To achieve the old behavior, we'll use an asterisk with a colon as a prefix for the address (e.g address=*:8000).

According to the documentation, this is not secure and it's recommended to specify the debugger's IP address whenever possible:

java -agentlib:jdwp=transport=dt_socket,server=y,suspend=n,address=127.0.0.1:8000

4. JDB: The Java Debugger

JDB, the Java Debugger, is a tool included in the JDK conceived to provide a convenient debugger client from the command-line.

To launch JDB, we'll use the attach mode. This mode attaches JDB to a running JVM. Other running modes exist, such as listen or run but are mostly convenient when debugging a locally running application:

jdb -attach 127.0.0.1:8000
> Initializing jdb ...

4.1. Breakpoints

Let's continue by putting some breakpoints in the application presented in section 1.

We'll set a breakpoint on the constructor:

> stop in OurApplication.<init>

We'll set another one in the static method main, using the fully-qualified name of the String class:

> stop in OurApplication.main(java.lang.String[])

Finally, we'll set the last one on the instance method buildInstanceString:

> stop in OurApplication.buildInstanceString(int)

We should now notice the server application stopping and the following being printed in our debugger console:

> Breakpoint hit: "thread=main", OurApplication.<init>(), line=11 bci=0

Let's now add a breakpoint on a specific line, the one where the variable app.instanceString is being printed:

> stop at OurApplication:7

We notice that at is used after stop instead of in when the breakpoint is defined on a specific line.

4.2. Navigate and Evaluate

Now that we've set our breakpoints, let's use cont to continue the execution of our thread until we reach the breakpoint on line 7.

We should see the following printed in the console:

> Breakpoint hit: "thread=main", OurApplication.main(), line=7 bci=17

As a reminder, we've stopped on the line containing the following piece of code:

System.out.println(app.instanceString);

Stopping on this line could have also been done by stopping on the main method and typing step twice. step executes the current line of code and stops the debugger directly on the next line.

Now that we've stopped, the debugee is evaluating our staticString, the app‘s instanceString, the local variable i and finally taking a look at how to evaluate other expressions.

Let's print staticField to the console:

> eval OurApplication.staticString
OurApplication.staticString = "Static String"

We explicitly put the name of the class before the static field.

Let's now print the instance field of app:

> eval app.instanceString
app.instanceString = "68741. Instance String !"

Next, let's see the variable i:

> print i
i = 68741

Unlike the other variables, local variables don't require to specify a class or an instance. We can also see that print has exactly the same behavior as eval: they both evaluate an expression or a variable.

We'll evaluate a new instance of OurApplication for which we've passed an integer as a constructor parameter:

> print new OurApplication(10).instanceString
new OurApplication(10).instanceString = "10. Instance String !"

Now that we've evaluated all the variables we needed to, we'll want to delete the breakpoints set earlier and let the thread continue its processing. To achieve this, we'll use the command clear followed by the breakpoint's identifier.

The identifier is exactly the same as the one used earlier with the command stop:

> clear OurApplication:7
Removed: breakpoint OurApplication:7

To verify whether the breakpoint has correctly been removed, we'll use clear without arguments. This will display the list of existing breakpoints without the one we just deleted:

> clear
Breakpoints set:
        breakpoint OurApplication.<init>
        breakpoint OurApplication.buildInstanceString(int)
        breakpoint OurApplication.main(java.lang.String[])

5. Conclusion

We've discovered how to use JDWP together with JDB, both JDK tools. More information on the tooling can be found in their respective documentation: JDWP's and JDB's.

Spring Path Variables with Thymeleaf

$
0
0

1. Introduction

In this short tutorial, we're going to learn how to use Thymeleaf to create URLs using Spring path variables.

We use path variables when we want to pass a value as part of the URL. In a Spring controller, we access these values using the @PathVariable annotation.

2. Using Path Variables

First, let's set up our example by creating a simple Item class:

public class Item {
    private int id;
    private String name;

    // Constructor and standard getters and setters
}

Now, let's take create our controller:

@Controller
public class PathVariablesController {

    @GetMapping("/pathvars")
    public String start(Model model) {
        List<Item> items = new ArrayList<Item>();
        items.add(new Item(1, "First Item"));
        items.add(new Item(2, "Second Item"));
        model.addAttribute("items", items);
        return "pathvariables/index";
    }
    
    @GetMapping("/pathvars/single/{id}")
    public String singlePathVariable(@PathVariable("id") int id, Model model) {
        if (id == 1) {
            model.addAttribute("item", new Item(1, "First Item"));
        } else {
            model.addAttribute("item", new Item(2, "Second Item"));
        }
        
        return "pathvariables/view";
    }
}

In our index.html template, let's loop through our items and create links calling the singlePathVariable method:

<div th:each="item : ${items}">
    <a th:href="@{/pathvars/single/{id}(id = ${item.id})}">
        <span th:text="${item.name}"></span>
    </a>
</div>

The code we just created makes URLs like this:

http://localhost:8080/pathvars/single/1

This is standard Thymeleaf syntax for using expressions in URLs.

We can also use concatenation to achieve the same result:

<div th:each="item : ${items}">
    <a th:href="@{'/pathvars/single/' + ${item.id}}">
        <span th:text="${item.name}"></span>
    </a>
</div>

3. Using Multiple Path Variables

Now that we've covered the basics of creating a path variable URL in Thymeleaf, let's quickly cover using multiple.

First, we'll create a Detail class and modify our Item class to have a list of them:

public class Detail {
    private int id;
    private String description;

    // constructor and standard getters and setters
}

Next, let's add a list of Detail to Item:

private List<Detail> details;

Now, let's update our controller to add a method using multiple @PathVariable annotations:

@GetMapping("/pathvars/item/{itemId}/detail/{dtlId}")
public String multiplePathVariable(@PathVariable("itemId") int itemId, 
  @PathVariable("dtlId") int dtlId, Model model) {
    for (Item item : items) {
        if (item.getId() == itemId) {
            model.addAttribute("item", item);
            for (Detail detail : item.getDetails()) {
                if (detail.getId() == dtlId) {
                    model.addAttribute("detail", detail);
                }
            }
        }
    }
    return "pathvariables/view";
}

Finally, let's modify our index.html template to create URLs for each detail record:

<ul>
    <li th:each="detail : ${item.details}">
        <a th:href="@{/pathvars/item/{itemId}/detail/{dtlId}(itemId = ${item.id}, dtlId = ${dtl.id})}">
            <span th:text="${detail.description}"></span>
        </a>
    </li>
</ul>

4. Conclusion

In this quick tutorial, we learned how to use Thymeleaf to create URLs with path variables. We started by creating a simple URL with only one. Later, we expanded on our example to use multiple path variables.

The example code is available over on GitHub.

Java Weekly, Issue 303

$
0
0

1. Spring and Java

>> Simple Event Driven Microservices with Spring Cloud Stream [spring.io]

A good set of abstractions to help you eliminate boilerplate from your messaging code.

>> How to map SQL Server JSON columns using JPA and Hibernate [vladmihalcea.com]

A quick look at the JsonStringType class available in the hibernate-types project.

>> Migrating the ServiceLoader to the Java 9 module system [blog.frankel.ch]

And a nice example of how to decouple an API from implementation using the JPMS.

Also worth reading:

Time to upgrade:

Webinars and presentations:

2. Technical and Musings

>> Delta: A Data Synchronization and Enrichment Platform [medium.com]

A cool new platform from Netflix for multi-datastore synchronization.

>> DDDs. v Anemic Domain Models (Martin Fowler) [blog.codecentric.de]

Now that ORM tools have improved considerably, maybe it's time to revisit whether there's a place for the anemic domain model.

Also worth reading:

3. Comics

And my favorite Dilberts of the week:

>> Lack of Strategy [dilbert.com]

>> Dogbert Designed the Simulation [dilbert.com]

>> Slippery Slope [dilbert.com]

4. Pick of the Week

This makes more sense as the pick of this week 🙂 – Boot 2.2 is out:

>> Spring Boot 2.2.0 [spring.io]

Transaction Support in Spring Integration

$
0
0

1. Overview

In this tutorial, we'll take a look at transaction support in the Spring Integration framework.

2. Transactions in Message Flows

Spring provides support for synchronizing resources with transactions since the earliest versions. We often use it to synchronize transactions managed by multiple transaction managers.

For example, we can synchronize a JMS commit with a JDBC commit.

On the other hand, we also have more complex use cases in the message flows. They include synchronization of nontransactional resources as well as various types of transactional resources.

Typically, messaging flows can be initiated by two different types of mechanisms.

2.1. Message Flows Initiated by a User Process

Some message flows depend on the initiation of third party processes, like triggering of a message on some message channel or invocation of a message gateway method.

We configure transaction support for these flows through Spring’s standard transaction support. The flows don't have to be configured explicitly by Spring Integration to support transactions. The Spring Integration message flow naturally honors the transactional semantics of the Spring components.

For example, we can annotate a ServiceActivator or its method with @Transactional:

@Transactional
public class TxServiceActivator {

    @Autowired
    private JdbcTemplate jdbcTemplate;

    public void storeTestResult(String testResult) {
        this.jdbcTemplate.update("insert into STUDENT values(?)", testResult);
        log.info("Test result is stored: {}", testResult);
    }
}

We can run the storeTestResult method from any component, and the transactional context will apply as usual. With this approach, we have full control over the transaction configuration.

2.2. Message Flows Initiated by a Daemon Process

We often use this type of message flow for automation. For example, a Poller polling a message queue to initiate a new message flow with the polled message, or a scheduler scheduling the process by creating a new message and initiating a message flow at a predefined time.

In essence, these are trigger-based flows initiated by a trigger process (a daemon process). For these flows, we have to provide some transaction configuration to create a transaction context whenever a new message flow begins.

Through the configuration, we delegate the flows to Spring's existing transaction support.

We'll focus on transaction support for this type of message flow through the rest of the article.

3. Poller Transaction Support

Poller is a common component in integration flows. It periodically retrieves the data from various sources and passes it on through the integration chain.

Spring Integration provides transactional support for pollers out of the box. Any time we configure a Poller component, we can provide transactional configuration:

@Bean
@InboundChannelAdapter(value = "someChannel", poller = @Poller(value = "pollerMetadata"))
public MessageSource<File> someMessageSource() {
    ...
}

@Bean
public PollerMetadata pollerMetadata() {
    return Pollers.fixedDelay(5000)
      .advice(transactionInterceptor())
      .transactionSynchronizationFactory(transactionSynchronizationFactory)
      .get();
}

private TransactionInterceptor transactionInterceptor() {
    return new TransactionInterceptorBuilder()
      .transactionManager(txManager)
      .build();
}

We have to provide a reference to a TransactionManager and a custom TransactionSynchronizationFactory, or we can rely on the defaults. Internally, Spring’s native transaction wraps the process. As a result, all message flows initiated by this poller are transactional.

4. Transaction Boundaries

When a transaction is started, the transaction context is always bound to the current thread. Regardless of how many endpoints and channels we might have in our message flow, our transaction context will always be preserved as long as the flow lives in the same thread.

If we break it by initiating a new thread in some service, we'll break the Transactional boundary as well. Essentially, the transaction will end at that point.

If a successful handoff has transpired between the threads, the flow will be considered a success. That will commit the transaction at that point, but the flow will continue, and it still might result in an Exception somewhere downstream.

Consequently, that Exception can get back to the initiator of the flow so that the transaction can end up in a rollback. That is why we have to use transactional channels at any point where a thread boundary can be broken.

For example, we should use JMS, JDBC, or some other transactional channel.

5. Transaction Synchronization

In some use cases, it is beneficial to synchronize certain operations with a transaction that encompasses the entire flow.

For example, we'll demonstrate how to use a Poller that reads an incoming file and, based on its contents, performs a database update. When the database operation completes, it also renames the file depending on the success of the operation.

Before we move to the example, it is crucial to understand that this approach synchronizes the operations on the filesystem with a transaction. It does not make the filesystem, which is not inherently transactional, actually become transactional.

The transaction starts before the poll and either commits or rolls back when the flow completes, followed by the synchronized operation on the filesystem.

First, we define an InboundChannelAdapter with a simple Poller:

@Bean
@InboundChannelAdapter(value = "inputChannel", poller = @Poller(value = "pollerMetadata"))
public MessageSource<File> fileReadingMessageSource() {
    FileReadingMessageSource sourceReader = new FileReadingMessageSource();
    sourceReader.setDirectory(new File(INPUT_DIR));
    sourceReader.setFilter(new SimplePatternFileListFilter(FILE_PATTERN));
    return sourceReader;
}

@Bean
public PollerMetadata pollerMetadata() {
    return Pollers.fixedDelay(5000)
      .advice(transactionInterceptor())
      .transactionSynchronizationFactory(transactionSynchronizationFactory)
      .get();
}

Poller contains a reference to the TransactionManager, as explained earlier. Additionally, it also contains a reference to the TransactionSynchronizationFactory. This component provides the mechanism for synchronization of the filesystem operations with the transaction:

@Bean
public TransactionSynchronizationFactory transactionSynchronizationFactory() {
    ExpressionEvaluatingTransactionSynchronizationProcessor processor =
      new ExpressionEvaluatingTransactionSynchronizationProcessor();

    SpelExpressionParser spelParser = new SpelExpressionParser();
 
    processor.setAfterCommitExpression(
      spelParser.parseExpression(
        "payload.renameTo(new java.io.File(payload.absolutePath + '.PASSED'))"));
 
    processor.setAfterRollbackExpression(
      spelParser.parseExpression(
        "payload.renameTo(new java.io.File(payload.absolutePath + '.FAILED'))"));

    return new DefaultTransactionSynchronizationFactory(processor);
}

If the transaction commits, TransactionSynchronizationFactory will rename the file by appending “.PASSED” to the filename. However, if it rolls back, it will append “.FAILED”.

The InputChannel transforms the payload using the FileToStringTransformer and delegates it to the toServiceChannel. This channel is bound to the ServiceActivator:

@Bean
public MessageChannel inputChannel() {
    return new DirectChannel();
}
    
@Bean
@Transformer(inputChannel = "inputChannel", outputChannel = "toServiceChannel")
public FileToStringTransformer fileToStringTransformer() {
    return new FileToStringTransformer();
}

ServiceActivator reads the incoming file, which contains the student's exam results. It writes the result in the database. If a result contains the string “fail”, it throws the Exception, which causes the database to rollback:

@ServiceActivator(inputChannel = "toServiceChannel")
public void serviceActivator(String payload) {

    jdbcTemplate.update("insert into STUDENT values(?)", payload);

    if (payload.toLowerCase().startsWith("fail")) {
        log.error("Service failure. Test result: {} ", payload);
        throw new RuntimeException("Service failure.");
    }

    log.info("Service success. Test result: {}", payload);
}

After the database operation successfully commits or rolls back, the TransactionSynchronizationFactory synchronizes the filesystem operation with its outcome.

6. Conclusion

In this article, we explained the transaction support in the Spring Integration framework. Additionally, we demonstrated how to synchronize the transaction with operations on a nontransactional resource like the filesystem.

The complete source code for the example is available over on GitHub.

Spring @ComponentScan – Filter Types

$
0
0

1. Overview

In an earlier tutorial, we learned about the basics of Spring component scans.

In this write-up, we'll see the different types of filter options available with the @ComponentScan annotation.

2. @ComponentScan Filter

By default, classes annotated with @Component, @Repository, @Service, @Controller are registered as Spring beans. The same goes for classes annotated with a custom annotation that is annotated with @Component. We can extend this behavior by using includeFilters and excludeFilters parameters of the @ComponentScan annotation.

There are five types of filters available for ComponentScan.Filter :

  • ANNOTATION
  • ASSIGNABLE_TYPE
  • ASPECTJ
  • REGEX
  • CUSTOM

We'll see these in detail in the next sections.

We should note that all these filters can include or exclude classes from scanning. For simplicity in our examples, we'll only include classes.

3. FilterType.ANNOTATION

The ANNOTATION filter type includes or excludes classes in the component scans which are marked with given annotations.

Let's say, for example, that we have an @Animal annotation:

@Retention(RetentionPolicy.RUNTIME)
@Target(ElementType.TYPE)
public @interface Animal { }

Now, let's define an Elephant class which uses @Animal:

@Animal
public class Elephant { }

Finally, let's use the FilterType.ANNOTATION to tell Spring to scan for @Animal-annotated classes:

@Configuration
@ComponentScan(includeFilters = @ComponentScan.Filter(type = FilterType.ANNOTATION,
        classes = Animal.class))
public class ComponentScanAnnotationFilterApp { }

As we can see, the scanner picks up our Elephant just fine:

@Test
public void whenAnnotationFilterIsUsed_thenComponentScanShouldRegisterBeanAnnotatedWithAnimalAnootation() {
    ApplicationContext applicationContext =
            new AnnotationConfigApplicationContext(ComponentScanAnnotationFilterApp.class);
    List<String> beans = Arrays.stream(applicationContext.getBeanDefinitionNames())
            .filter(bean -> !bean.contains("org.springframework")
                    && !bean.contains("componentScanAnnotationFilterApp"))
            .collect(Collectors.toList());
    assertThat(beans.size(), equalTo(1));
    assertThat(beans.get(0), equalTo("elephant"));
}

4. FilterType.ASSIGNABLE_TYPE

The ASSIGNABLE_TYPE filters all classes during the component scan that either extend the class or implement the interface of the specified type.

First, let's declare the Animal interface:

public interface Animal { }

And again, let's declare our Elephant class, this time implementing Animal interface:

public class Elephant implements Animal { }

Let's declare our Cat class that also implementing Animal:

public class Cat implements Animal { }

Now, let's use ASSIGNABLE_TYPE to guide Spring to scan for Animal-implementing classes:

@Configuration
@ComponentScan(includeFilters = @ComponentScan.Filter(type = FilterType.ASSIGNABLE_TYPE,
        classes = Animal.class))
public class ComponentScanAssignableTypeFilterApp { }

And we'll see that both Cat and Elephant get scanned:

@Test
public void whenAssignableTypeFilterIsUsed_thenComponentScanShouldRegisterBean() {
    ApplicationContext applicationContext =
      new AnnotationConfigApplicationContext(ComponentScanAssignableTypeFilterApp.class);
    List<String> beans = Arrays.stream(applicationContext.getBeanDefinitionNames())
      .filter(bean -> !bean.contains("org.springframework")
        && !bean.contains("componentScanAssignableTypeFilterApp"))
      .collect(Collectors.toList());
    assertThat(beans.size(), equalTo(2));
    assertThat(beans.contains("cat"), equalTo(true));
    assertThat(beans.contains("elephant"), equalTo(true));
}

5. FilterType.REGEX

The REGEX filter checks if the class name matching a given regex pattern. FilterType.REGEX checks both simple and fully-qualified class names.

Once again, let's declare our Elephant class. This time not implementing any interface or annotated with any annotation:

public class Elephant { }

Let's declare one more class Cat:

public class Cat { }

Now, let's declare Loin class:

public class Loin { }

Let's use FilterType.REGEX which instructs Spring to scan classes which match regex .*[nt]. Our regex expression evaluates everything containing nt:

@Configuration
@ComponentScan(includeFilters = @ComponentScan.Filter(type = FilterType.REGEX,
        pattern = ".*[nt]"))
public class ComponentScanRegexFilterApp { }

This time in our test, we'll see that Spring scans the Elephant, but not the Lion:

@Test
public void whenRegexFilterIsUsed_thenComponentScanShouldRegisterBeanMatchingRegex() {
    ApplicationContext applicationContext =
      new AnnotationConfigApplicationContext(ComponentScanRegexFilterApp.class);
    List<String> beans = Arrays.stream(applicationContext.getBeanDefinitionNames())
      .filter(bean -> !bean.contains("org.springframework")
        && !bean.contains("componentScanRegexFilterApp"))
      .collect(Collectors.toList());
    assertThat(beans.size(), equalTo(1));
    assertThat(beans.contains("elephant"), equalTo(true));
}

6. FilterType.ASPECTJ

When we want to use expressions to pick out a complex subset of classes, we need to use the FilterType ASPECTJ.

For this use case, we can reuse the same three classes as in the previous section.

Let's use FilterType.ASPECTJ to direct Spring to scan classes that match our AspectJ expression:

@Configuration
@ComponentScan(includeFilters = @ComponentScan.Filter(type = FilterType.ASPECTJ,
  pattern = "com.baeldung.componentscan.filter.aspectj.* "
  + "&& !(com.baeldung.componentscan.filter.aspectj.L* "
  + "|| com.baeldung.componentscan.filter.aspectj.C*)"))
public class ComponentScanAspectJFilterApp { }

While a bit complex, our logic here wants beans that start with neither “L” nor “C” in their class name, so that leaves us with Elephants again:

@Test
public void whenAspectJFilterIsUsed_thenComponentScanShouldRegisterBeanMatchingAspectJCreteria() {
    ApplicationContext applicationContext =
      new AnnotationConfigApplicationContext(ComponentScanAspectJFilterApp.class);
    List<String> beans = Arrays.stream(applicationContext.getBeanDefinitionNames())
      .filter(bean -> !bean.contains("org.springframework")
        && !bean.contains("componentScanAspectJFilterApp"))
      .collect(Collectors.toList());
    assertThat(beans.size(), equalTo(1));
    assertThat(beans.get(0), equalTo("elephant"));
}

7. FilterType.CUSTOM

If none of the above filter types meet our requirement then we can also create a custom filter type. For example, let's say we only want to scan classes whose name is five characters or shorter.

To create a custom filter, we need to implement the org.springframework.core.type.filter.TypeFilter:

public class ComponentScanCustomFilter implements TypeFilter {

    @Override
    public boolean match(MetadataReader metadataReader,
      MetadataReaderFactory metadataReaderFactory) throws IOException {
        ClassMetadata classMetadata = metadataReader.getClassMetadata();
        String fullyQualifiedName = classMetadata.getClassName();
        String className = fullyQualifiedName.substring(fullyQualifiedName.lastIndexOf(".") + 1);
        return className.length() > 5 ? true : false;
    }
}

Let's use FilterType.CUSTOM which conveys Spring to scan classes using our custom filter ComponentScanCustomFilter:

@Configuration
@ComponentScan(includeFilters = @ComponentScan.Filter(type = FilterType.CUSTOM,
  classes = ComponentScanCustomFilter.class))
public class ComponentScanCustomFilterApp { }

Now it's time to see test case of our custom filter ComponentScanCustomFilter:

@Test
public void whenCustomFilterIsUsed_thenComponentScanShouldRegisterBeanMatchingCustomFilter() {
    ApplicationContext applicationContext =
      new AnnotationConfigApplicationContext(ComponentScanCustomFilterApp.class);
    List<String> beans = Arrays.stream(applicationContext.getBeanDefinitionNames())
      .filter(bean -> !bean.contains("org.springframework")
        && !bean.contains("componentScanCustomFilterApp")
        && !bean.contains("componentScanCustomFilter"))
      .collect(Collectors.toList());
    assertThat(beans.size(), equalTo(1));
    assertThat(beans.get(0), equalTo("elephant"));
}

8. Summary

In this tutorial, we introduced filters associated with @ComponentScan.

As usual, the complete code is available over on GitHub.


The Spring TestExecutionListener

$
0
0

 1. Overview

Typically, we use the JUnit annotations like @BeforeEach, @AfterEach, @BeforeAll, and @AfterAll, to orchestrate tests' lifecycle, but sometimes that's not enough — especially when we're working with the Spring framework.

This is where Spring TestExecutionListener comes in handy.

In this tutorial, we'll see what the TestExecutionListener offers, the default listeners provided by Spring, and how to implement a custom TestExecutionListener.

2. The TestExecutionListener Interface

First, let's visit the TestExecutionListener interface:

public interface TestExecutionListener {
    default void beforeTestClass(TestContext testContext) throws Exception {};
    default void prepareTestInstance(TestContext testContext) throws Exception {};
    default void beforeTestMethod(TestContext testContext) throws Exception {};
    default void afterTestMethod(TestContext testContext) throws Exception {};
    default void afterTestClass(TestContext testContext) throws Exception {};
}

The implementations of this interface can receive events during different test execution stages. Consequently, each of the methods in the interface is passed a TestContext object.

This TestContext object contains information of the Spring context and of the target test class and methods. This information can be used to alter the behavior of the tests or to extend their functionality.

Now, let's take a quick look at each of these methods:

  • afterTestClass – post-processes a test class after execution of all tests within the class
  • afterTestExecution – post-processes a test immediately after execution of the test method in the supplied test context
  • afterTestMethod – post-processes a test after execution of after-lifecycle callbacks of the underlying test framework
  • beforeTestClass – pre-processes a test class before execution of all tests within the class
  • beforeTestExecution – pre-processes a test immediately before execution of the test method in the supplied test context
  • beforeTestMethod – pre-processes a test before execution of before-lifecycle callbacks of the underlying test framework
  • prepareTestInstance – prepares the test instance of the supplied test context

It's worth noting that this interface provides empty default implementations for all the methods. Consequently, concrete implementations can choose to override only those methods that are suitable for the task at hand.

3. Spring's Default TestExecutionListeners

By default, Spring provides some TestExecutionListener implementations out-of-the-box.

Let's quickly look at each of these:

  • ServletTestExecutionListener – configures Servlet API mocks for a WebApplicationContext
  • DirtiesContextBeforeModesTestExecutionListener – handles the @DirtiesContext annotation for “before” modes
  • DependencyInjectionTestExecutionListener – provides dependency injection for the test instance
  • DirtiesContextTestExecutionListener – handles the @DirtiesContext annotation for “after” modes
  • TransactionalTestExecutionListener – provides transactional test execution with default rollback semantics
  • SqlScriptsTestExecutionListener – runs SQL scripts configured using the @Sql annotation

These listeners are pre-registered exactly in the order listed. We'll see more about the order when we create a custom TestExecutionListener.

4. Using a Custom TestExecutionListener

Now, let's define a custom TestExecutionListener:

public class CustomTestExecutionListener implements TestExecutionListener, Ordered {
    private static final Logger logger = LoggerFactory.getLogger(CustomTestExecutionListener.class);
    
    public void beforeTestClass(TestContext testContext) throws Exception {
        logger.info("beforeTestClass : {}", testContext.getTestClass());
    }; 
    
    public void prepareTestInstance(TestContext testContext) throws Exception {
        logger.info("prepareTestInstance : {}", testContext.getTestClass());
    }; 
    
    public void beforeTestMethod(TestContext testContext) throws Exception {
        logger.info("beforeTestMethod : {}", testContext.getTestMethod());
    }; 
    
    public void afterTestMethod(TestContext testContext) throws Exception {
        logger.info("afterTestMethod : {}", testContext.getTestMethod());
    }; 
    
    public void afterTestClass(TestContext testContext) throws Exception {
        logger.info("afterTestClass : {}", testContext.getTestClass());
    }

    @Override
    public int getOrder() {
        return Integer.MAX_VALUE;
    };
}

For simplicity, all this class does is log some of the TestContext information.

4.1. Registering the Custom Listener Using @TestExecutionListeners

Now, let's use this listener in our test class. To do this, we'll register it by using the @TestExecutionListeners annotation:

@RunWith(SpringRunner.class)
@TestExecutionListeners(value = {
  CustomTestExecutionListener.class,
  DependencyInjectionTestExecutionListener.class
})
@ContextConfiguration(classes = AdditionService.class)
public class AdditionServiceUnitTest {
    // ...
}

It's important to note that using the annotation will de-register all default listeners. Hence, we've added DependencyInjectionTestExecutionListener explicitly so that we can use autowiring in our test class.

If we need any of the other default listeners, we'll have to specify each of them. But, we can also use the mergeMode property of the annotation:

@TestExecutionListeners(
  value = { CustomTestExecutionListener.class }, 
  mergeMode = MergeMode.MERGE_WITH_DEFAULTS)

Here, MERGE_WITH_DEFAULTS indicates that the locally declared listeners should be merged with the default listeners.

Now, when we run the above test, the listener will log each event it receives:

[main] INFO  o.s.t.c.s.DefaultTestContextBootstrapper - Using TestExecutionListeners: 
[com.baeldung.testexecutionlisteners.CustomTestExecutionListener@38364841, 
org.springframework.test.context.support.DependencyInjectionTestExecutionListener@28c4711c]
[main] INFO  c.b.t.CustomTestExecutionListener - beforeTestClass : 
class com.baeldung.testexecutionlisteners.TestExecutionListenersWithoutMergeModeUnitTest
[main] INFO  c.b.t.CustomTestExecutionListener - prepareTestInstance : 
class com.baeldung.testexecutionlisteners.TestExecutionListenersWithoutMergeModeUnitTest
[main] INFO  o.s.c.s.GenericApplicationContext - 
Refreshing org.springframework.context.support.GenericApplicationContext@7d68ef40: startup date [XXX]; 
root of context hierarchy
[main] INFO  c.b.t.CustomTestExecutionListener - beforeTestMethod : 
public void com.baeldung.testexecutionlisteners.TestExecutionListenersWithoutMergeModeUnitTest
.whenValidNumbersPassed_thenReturnSum()
[main] INFO  c.b.t.CustomTestExecutionListener - afterTestMethod : 
public void com.baeldung.testexecutionlisteners.TestExecutionListenersWithoutMergeModeUnitTest
.whenValidNumbersPassed_thenReturnSum()
[main] INFO  c.b.t.CustomTestExecutionListener - afterTestClass : 
class com.baeldung.testexecutionlisteners.TestExecutionListenersWithoutMergeModeUnitTest

4.2. Automatic Discovery of Default TestExecutionListener Implementations

Using @TestExecutionListener to register listeners is suitable if it's used in a limited number of test classes. But, it can become cumbersome to add it to an entire test suite.

We can address this problem by taking advantage of the support provided by the SpringFactoriesLoader mechanism for the automatic discovery of TestExecutionListener implementations.

The spring-test module declares all core default listeners under the org.springframework.test.context.TestExecutionListener key in its META-INF/spring.factories properties file. Similarly, we can register our custom listener by using the above key in our own META-INF/spring.factories properties file:

org.springframework.test.context.TestExecutionListener=\
com.baeldung.testexecutionlisteners.CustomTestExecutionListener

4.3. Ordering Default TestExecutionListener Implementations

When Spring discovers default TestExecutionListener implementations through the SpringFactoriesLoader mechanism, it'll sort them by using Spring’s AnnotationAwareOrderComparator. This honors Spring’s Ordered interface and @Order annotation for ordering.

Note that all default TestExecutionListener implementations provided by Spring implement Ordered with appropriate values. Therefore, we have to make sure that our custom TestExecutionListener implementation is registered with the proper order. Consequently, we've implemented Ordered in our custom listener:

public class CustomTestExecutionListener implements TestExecutionListener, Ordered {
    // ...
    @Override
    public int getOrder() {
        return Integer.MAX_VALUE;
    };
}

But, we can use the @Order annotation instead.

5. Conclusion

In this article, we saw how to implement a custom TestExecutionListener. We also looked at the default listeners provided by the Spring framework.

And, of course, the code accompanying this article is available over on GitHub.

Adding an Element to a Java Array vs an ArrayList

$
0
0

1. Overview

In this tutorial, we'll briefly look at the similarities and dissimilarities in memory allocation between Java arrays and ArrayList. Furthermore, we'll see how to append and insert elements in an array and ArrayList.

2. Java Arrays and ArrayList

A Java array is a basic data structure provided by the language. In contrast, ArrayList is an implementation of the List interface backed by an array and is provided in the Java Collections Framework.

2.1. Accessing and Modifying Elements

We can access and modify array elements using the square brackets notation:

System.out.println(anArray[1]);
anArray[1] = 4;

On the other hand, ArrayList has a set of methods to access and modify elements:

int n = anArrayList.get(1);
anArrayList.set(1, 4);

2.2. Fixed vs Dynamic Size

An array and the ArrayList both allocate heap memory in a similar manner, but what differs is that an array is fixed-sized, while the size of an ArrayList increases dynamically.

Since a Java array is fixed-sized, we need to provide the size while instantiating it. It is not possible to increase the size of the array once it has been instantiated. Instead, we need to create a new array with the adjusted size and copy all the elements from the previous array.

ArrayList is a resizable array implementation of the List interface — that is, ArrayList grows dynamically as elements are added to it. When the number of current elements (including the new element to be added to the ArrayList) is greater than the maximum size of its underlying array, then the ArrayList increases the size of the underlying array.

The growth strategy for the underlying array depends on the implementation of the ArrayList. However, since the size of the underlying array cannot be increased dynamically, a new array is created and the old array elements are copied into the new array.

The add operation has a constant amortized time cost. In other words, adding n elements to an ArrayList requires O(n) time.

2.3. Element Types

An array can contain primitive as well as non-primitive data types, depending on the definition of the array. However, an ArrayList can only contain non-primitive data types.

When we insert elements with primitive data types into an ArrayList, the Java compiler automatically converts the primitive data type into its corresponding object wrapper class.

Let's now look at how to append and insert elements in Java arrays and the ArrayList.

3. Appending an Element

As we've already seen, arrays are of fixed size.

So, to append an element, first, we need to declare a new array that is larger than the old array and copy the elements from the old array to the newly created array. After that, we can append the new element to this newly created array.

Let's look at its implementation in Java without using any utility classes:

public Integer[] addElementUsingPureJava(Integer[] srcArray, int elementToAdd) {
    Integer[] destArray = new Integer[srcArray.length+1];

    for(int i = 0; i < srcArray.length; i++) {
        destArray[i] = srcArray[i];
    }

    destArray[destArray.length - 1] = elementToAdd;
    return destArray;
}

Alternately, the Arrays class provides a utility method copyOf(), which assists in creating a new array of larger size and copying all the elements from the old array:

int[] destArray = Arrays.copyOf(srcArray, srcArray.length + 1);

Once we have created a new array, we can easily append the new element to the array:

destArray[destArray.length - 1] = elementToAdd;

On the other hand, appending an element in ArrayList is quite easy:

anArrayList.add(newElement);

4. Inserting an Element at Index

Inserting an element at a given index without losing the previously added elements is not a simple task in arrays.

First of all, if the array already contains the number of elements equal to its size, then we first need to create a new array with a larger size and copy the elements over to the new array.

Furthermore, we need to shift all elements that come after the specified index by one position to the right:

public static int[] insertAnElementAtAGivenIndex(final int[] srcArray, int index, int newElement) {
    int[] destArray = new int[srcArray.length+1];
    int j = 0;
    for(int i = 0; i < destArray.length-1; i++) {

        if(i == index) {
            destArray[i] = newElement;
        } else {
            destArray[i] = srcArray[j];
            j++;
        }
    }
    return destArray;
}

However, the ArrayUtils class gives us a simpler solution to insert items into an array:

int[] destArray = ArrayUtils.insert(2, srcArray, 77);

We have to specify the index at which we want to insert the value, the source array, and the value to insert.

The insert() method returns a new array containing a larger number of elements, with the new element at the specified index and all remaining elements shifted one position to the right.

Note that the last argument of the insert() method is a variable argument, so we can insert any number of items into an array.

Let's use it to insert three elements in srcArray starting at index two:

int[] destArray = ArrayUtils.insert(2, srcArray, 77, 88, 99);

And the remaining elements will be shifted three places to the right.

Furthermore, this can be achieved trivially for the ArrayList:

anArrayList.add(index, newElement);

ArrayList shifts the elements and inserts the element at the required location.

5. Conclusion

In this article, we looked at Java array and ArrayList. Furthermore, we looked at the similarities and differences between the two. Finally, we saw how to append and insert elements in an array and ArrayList.

As always, the full source code of the working examples is available over on GitHub.

Java ‘protected’ Access Modifier

$
0
0

1. Overview

In the Java programming language, fields, constructors, methods, and classes can be marked with access modifiers. In this tutorial, we'll look at protected access.

2. The protected Keyword

While elements declared as private can be accessed only by the class in which they're declared, the protected keyword allows access from sub-classes and members of the same package.

By using the protected keyword, we make decisions about which methods and fields should be considered internals of a package or class hierarchy, and which are exposed to outside code.

3. Declaring protected Fields, Methods, and Constructors

First, let's create a class named FirstClass containing a protected field, method, and constructor:

public class FirstClass {

    protected String name;

    protected FirstClass(String name) {
        this.name = name;
    }

    protected String getName() {
        return name;
    }
}

With this example, by using the protected keyword, we've granted access to these fields to classes in the same package as FirstClass and to sub-classes of FirstClass.

4. Accessing protected Fields, Methods, and Constructors

4.1 From the Same Package

Now, let's see how we can access protected fields by creating a new GenericClass declared in the same package as FirstClass:

public class GenericClass {

    public static void main(String[] args) {
        FirstClass first = new FirstClass("random name");
        System.out.println("FirstClass name is " + first.getName());
        first.name = "new name";
    }
}

As this calling class is in the same package as FirstClass, it's allowed to see and interact with all the protected fields, methods, and constructors.

4.2. From a Different Package

Let's now try to interact with these fields from a class declared in a different package from FirstClass:

public class SecondGenericClass {

    public static void main(String[] args) {
        FirstClass first = new FirstClass("random name");
        System.out.println("FirstClass name is "+ first.getName());
        first.name = "new name";
    }
}

As we can see, we get compilation errors:

The constructor FirstClass(String) is not visible
The method getName() from the type FirstClass is not visible
The field FirstClass.name is not visible

That's exactly what we were expecting by using the protected keyword.  This is because SecondGenericClass is not in the same package as FirstClass and does not subclass it.

4.3 From a Sub-Class

Let's now see what happens when we declare a class extending FirstClass but declared in a different package:

public class SecondClass extends FirstClass {
    
    public SecondClass(String name) {
        super(name);
        System.out.println("SecondClass name is " + this.getName());
        this.name = "new name";
    } 
}

As expected, we can access all the protected fields, methods, and constructors. This is because SecondClass is a sub-class of FirstClass.

5. protected Inner Class

In the previous examples, we saw protected fields, methods, and constructors in action. There is one more particular case — a protected inner class.

Let's create this empty inner class inside our FirstClass:

package com.baeldung.core.modifiers;

public class FirstClass {

    // ...

    protected static class InnerClass {

    }
}

As we can see, this is a static inner class, and so can be constructed from outside of an instance of FirstClass. However, as it is protected, we can only instantiate it from code in the same package as FirstClass.

5.1 From the Same Package

To test this, let's edit our GenericClass:

public class GenericClass {

    public static void main(String[] args) {
        // ...
        FirstClass.InnerClass innerClass = new FirstClass.InnerClass();
    }
}

As we can see, we can instantiate the InnerClass without any problem because GenericClass is in the same package as FirstClass.

5.2. From a Different Package

Let's try to instantiate an InnerClass from our SecondGenericClass which, as we remember, is outside FirstClass' package:

public class SecondGenericClass {

    public static void main(String[] args) {
        // ...

        FirstClass.InnerClass innerClass = new FirstClass.InnerClass();
    }
}

As expected, we get a compilation error:

The type FirstClass.InnerClass is not visible

5.3. From a Sub-Class

Let's try to do the same from our SecondClass:

public class SecondClass extends FirstClass {
    
    public SecondClass(String name) {
        // ...
 
        FirstClass.InnerClass innerClass = new FirstClass.InnerClass();
    }     
}

We were expecting to instantiate our InnerClass with ease. However, we are getting a compilation error here too:

The constructor FirstClass.InnerClass() is not visible

Let's take a look at our InnerClass declaration:

protected static class InnerClass {
}

The main reason we are getting this error is because the default constructor of a protected class is implicitly protected. In addition, SecondClass is a sub-class of FirstClass but is not a sub-class of InnerClass.  Finally, we also declared SecondClass outside FirstClass' package.

For all these reasons, SecondClass can't access the protected InnerClass constructor.

If we wanted to solve this issue, and allow our SecondClass to instantiate an InnerClass object, we could explicitly declare a public constructor:

protected static class InnerClass {
    public InnerClass() {
    }
}

By doing this, we no longer get a compilation error, and we can now instantiate an InnerClass from SecondClass.

6. Conclusion

In this quick tutorial, we discussed the protected access modifier in Java. With it, we can ensure exposing only the required data and methods to sub-classes and classes in the same package.

As always, the example code is available over on GitHub.

Fallback for Zuul Route

$
0
0

1. Overview

Zuul is an edge service (or API gateway) from Netflix that provides dynamic routing, monitoring, resiliency, and security.

In this tutorial, we'll look at how to configure Zuul routes with fallbacks.

2. Initial Setup

To begin with, we'll first set up two Spring Boot applications. In the first application, we'll create a simple REST service. Whereas, in the second application, we'll use the Zuul proxy to create a route for the REST service of the first application.

2.1. A Simple REST Service

Let's say our application needs to display today's weather information to the user. So, we'll create a Spring Boot-based weather service application using the spring-boot-starter-web starter:

<dependency>
    <groupId>org.springframework.boot</groupId>
    <artifactId>spring-boot-starter-web</artifactId>
</dependency>

Now, we'll create a controller for our weather service:

@RestController
@RequestMapping("/weather")
public class WeatherController {

    @GetMapping("/today")
    public String getMessage() {
        return "It's a bright sunny day today!";
    }

}

Now, let's run the weather service and check the weather service API:

$ curl -s localhost:8080/weather/today
It's a bright sunny day today!

2.2. The API Gateway Application

Let's now create our second Spring Boot application, the API Gateway. In this application, we'll create a Zuul route for our weather service.

And since both our weather service and Zuul will want to use 8080 by default, we'll configure it to run on a different port, 7070.

So, let's first add the spring-cloud-starter-netflix-zuul in pom.xml:

<dependency>
    <groupId>org.springframework.cloud</groupId>
    <artifactId>spring-cloud-starter-netflix-zuul</artifactId>
</dependency>

Next, we'll add the @EnableZuulProxy annotation to our API Gateway application class:

@SpringBootApplication
@EnableZuulProxy
public class ApiGatewayApplication {

    public static void main(String[] args) {
        SpringApplication.run(ApiGatewayApplication.class, args);
    }

}

Finally, we'll configure the Zuul route, using Ribbon, for our weather service API in application.yml:

spring:
   application:
      name: api-gateway
server:
   port: 7070
  
zuul:
   igoredServices: '*'
   routes:
      weather-service:
         path: /weather/**
         serviceId: weather-service
         strip-prefix: false

ribbon:
   eureka:
      enabled: false

weather-service:
   ribbon:
      listOfServers: localhost:8080

2.3. Testing the Zuul Route

At this point, both Spring Boot applications are set up to expose the weather service API using Zuul proxy.

So, let's run both the applications and check the weather service API via Zuul:

$ curl -s localhost:7070/weather/today
It's a bright sunny day today!

2.4. Testing the Zuul Route Failure Without Fallback

Now, let's stop the weather service application and check the weather service via Zuul again. As a result, we'll see an error message in the response:

$ curl -s localhost:7070/weather/today
{"timestamp":"2019-10-08T12:42:09.479+0000","status":500,
"error":"Internal Server Error","message":"GENERAL"}

Obviously, this is not the response the user would like to see. So, one of the ways we can take care of this is to create a fallback for the weather service Zuul route.

3. Zuul Fallback for a Route

The Zuul proxy uses Ribbon for load balancing and the requests execute in the Hystrix command. As a result, failures in the Zuul route appear in a Hystrix matrix.

Therefore, to create a custom fallback for a Zuul route, we'll create a bean of type FallbackProvider.

3.1. The WeatherServiceFallback Class

In this example, we want to return a message from the fallback response instead of the default error message that we saw earlier. So, let's create a simple implementation of FallbackProvider for the weather service route:

@Component
class WeatherServiceFallback implements FallbackProvider {

    private static final String DEFAULT_MESSAGE = "Weather information is not available.";

    @Override
    public String getRoute() {
        return "weather-service";
    }

    @Override
    public ClientHttpResponse fallbackResponse(String route, Throwable cause) {
        if (cause instanceof HystrixTimeoutException) {
            return new GatewayClientResponse(HttpStatus.GATEWAY_TIMEOUT, DEFAULT_MESSAGE);
        } else {
            return new GatewayClientResponse(HttpStatus.INTERNAL_SERVER_ERROR, DEFAULT_MESSAGE);
        }
    }

}

As we can see, we've overridden the methods getRoute and fallbackResponse. The getRoute method returns the Id of the route for which we have to create the fallback. Whereas, the fallbackResponse method returns the custom fallback response, an object of type GatewayClientResponse in our case. The GatewayClientResponse is a simple implementation of ClientHttpResponse.

3.2. Testing the Zuul Fallback

Let's now test the fallback we've created for weather service. Therefore, we'll run the API Gateway application and make sure that the weather service application is stopped.

Now, let's access the weather service API via the Zuul route and see the fallback response in action:

$ curl -s localhost:7070/weather/today
Weather information is not available.

4. Fallback for All Routes

So far, we've seen how to create a fallback for a Zuul route using its route Id. However, let's suppose, we also want to create a generic fallback for all other routes in our application. We can do so by creating one more implementation of FallbackProvider and returning * or null from the getRoute method, instead of the route Id:

@Override
public String getRoute() {
    return "*"; // or return null;
}

5. Conclusion

In this tutorial, we've seen an example of creating a fallback for a Zuul route. We've also seen how we can create a generic fallback for all Zuul routes.

As usual, the implementation of all these examples and code snippets can be found over on GitHub.

Prototype Pattern in Java

$
0
0

1. Introduction

In this tutorial, we're going to learn about one of the Creational Design Patterns – the Prototype pattern. At first, we'll explain this pattern and then proceed to implement it in Java.

We'll also discuss some of its advantages and disadvantages.

2. Prototype Pattern

The Prototype pattern is generally used when we don't want to keep creating new instances of a class. This is quite helpful in places where the cost of creating an object is high. In such cases, we want to minimize the use of resources such as memory.

Let's use an analogy to better understand this pattern.

In some games, we want trees or buildings in the background. We may realize that we don't have to create new trees or buildings and render them on the screen every time the character moves.

So, we create an instance of the tree first. Then we can create as many trees as we want from this instance (prototype) and update their positions. We may also choose to change the color of the trees for a new level in the game.

The Prototype pattern is quite similar. Instead of creating new objects, we just have to clone the prototypical instance.

3. UML Diagram

Prototype Pattern

In the diagram, we see that the client is telling the prototype to clone itself and create an object. Prototype is an interface and declares a method for cloning itself. ConcretePrototype1 and ConcretePrototype2 implement the operation to clone themselves.

4. Implementation

One of the ways we can implement this pattern in Java is by using the clone() method. To do this, we'd implement the Cloneable interface.

When we're trying to clone, we should decide between making a shallow or a deep copy. Eventually, it boils down to the requirements.

For example, if the class contains only primitive and immutable fields, we may use a shallow copy.

If it contains references to mutable fields, we should go for a deep copy. We might do that with copy constructors or serialization and deserialization.

Let's take the example we mentioned earlier and imagine that creating new instances of Tree is expensive.

Now, let's proceed to see how to apply the Prototype pattern by using the Cloneable interface:

public class Tree implements Cloneable {
    
    // ...
    @Override
    public Tree clone() {
        Tree tree = null;
        try {
            tree = (Tree) super.clone();
        } catch (CloneNotSupportedException e) {
            // ...
        }
        return tree;
    }

    // ...
}

5. Testing

Now let's test it:

public class TreePrototypesUnitTest {

    @Test
    public void givenATreePrototypeWhenClonedThenCreateA_Clone() {
        // ...

        Tree tree = new Tree(mass, height);
        tree.setPosition(position);
        Tree anotherTree = tree.clone();
        anotherTree.setPosition(otherPosition);

        assertEquals(position, tree.getPosition());
        assertEquals(otherPosition, anotherTree.getPosition());
    }
}

We see that the tree has been cloned from the prototype and we have two different instances of Tree. We've just updated the position in the clone and retained the other values.

6. Advantages & Disadvantages

This pattern is appropriate when object creation is expensive. Also, it's handy when our new object is only slightly different from our existing one. Doing so can also help improve the performance of the application.

Prototype pattern, just like every other design pattern, should be used only when it's appropriate. Since we are cloning the objects, the process could get complex when there are many classes, thereby resulting in a mess. Additionally, it's difficult to clone classes that have circular references.

7. Conclusion

In this tutorial, we learned the key concepts of the Prototype pattern and saw how to implement it in Java. We also discussed some of its pros and cons.

As usual, the source code for this article is available over on Github.

Transaction Propagation and Isolation in Spring @Transactional

$
0
0

1. Introduction

In this tutorial, we'll cover the @Transactional annotation and its isolation and propagation settings.

2. What Is @Transactional?

We can use @Transactional to wrap a method in a database transaction.

It allows us to set propagation, isolation, timeout, read-only, and rollback conditions for our transaction. Also, we can specify the transaction manager.

2.1. @Transactional Implementation Details

Spring creates a proxy or manipulates the class byte-code to manage the creation, commit, and rollback of the transaction. In the case of a proxy, Spring ignores @Transactional in internal method calls.

Simply put, if we have a method like callMethod and we mark it as @Transactional, Spring would wrap some transaction management code around the invocation:@Transactional method called:

createTransactionIfNecessary();
try {
    callMethod();
    commitTransactionAfterReturning();
} catch (exception) {
    completeTransactionAfterThrowing();
    throw exception;
}

2.2. How to Use @Transactional

We can put the annotation on definitions of interfaces, classes, or directly on methods.  They override each other according to the priority order; from lowest to highest we have: Interface, superclass, class, interface method, superclass method, and class method.

Spring applies the class-level annotation to all public methods of this class that we did not annotate with @Transactional.

However, if we put the annotation on a private or protected method, Spring will ignore it without an error.

Let's start with an interface sample:

@Transactional
public interface TransferService {
    void transfer(String user1, String user2, double val);
}

Usually, it is not recommended to set the @Transactional on the interface. However, it is acceptable for cases like @Repository with Spring Data.
We can put the annotation on a class definition to override the transaction setting of the interface/superclass:

@Service
@Transactional
public class TransferServiceImpl implements TransferService {
    @Override
    public void transfer(String user1, String user2, double val) {
        // ...
    }
}

Now let's override it by setting the annotation directly on the method:

@Transactional
public void transfer(String user1, String user2, double val) {
    // ...
}

3. Transaction Propagation

Propagation defines our business logic ‘s transaction boundary. Spring manages to start and pause a transaction according to our propagation setting.

Spring calls TransactionManager::getTransaction to get or create a transaction according to the propagation. It supports some of the propagations for all types of TransactionManager, but there are a few of them that only supported by specific implementations of TransactionManager.

Now let's go through the different propagations and how they work.

3.1. REQUIRED Propagation

REQUIRED is the default propagation. Spring checks if there is an active transaction, then it creates a new one if nothing existed. Otherwise, the business logic appends to the currently active transaction:

@Transactional(propagation = Propagation.REQUIRED)
public void requiredExample(String user) { 
    // ... 
}

Also as REQUIRED is the default propagation, we can simplify the code by dropping it:

@Transactional
public void requiredExample(String user) { 
    // ... 
}

Let's see the pseudo-code of how transaction creation works for REQUIRED propagation:

if (isExistingTransaction()) {
    if (isValidateExistingTransaction()) {
        validateExisitingAndThrowExceptionIfNotValid();
    }
    return existing;
}
return createNewTransaction();

3.2. SUPPORTS Propagation

For SUPPORTS, Spring first checks if an active transaction exists. If a transaction exists, then the existing transaction will be used. If there isn't a transaction, it is executed non-transactional:

@Transactional(propagation = Propagation.SUPPORTS)
public void supportsExample(String user) { 
    // ... 
}

Let's see the transaction creation's pseudo-code for SUPPORTS:

if (isExistingTransaction()) {
    if (isValidateExistingTransaction()) {
        validateExisitingAndThrowExceptionIfNotValid();
    }
    return existing;
}
return emptyTransaction;

3.3. MANDATORY Propagation

When the propagation is MANDATORY, if there is an active transaction, then it will be used. If there isn't an active transaction, then Spring throws an exception:

@Transactional(propagation = Propagation.MANDATORY)
public void mandatoryExample(String user) { 
    // ... 
}

And let's again see the pseudo-code:

if (isExistingTransaction()) {
    if (isValidateExistingTransaction()) {
        validateExisitingAndThrowExceptionIfNotValid();
    }
    return existing;
}
throw IllegalTransactionStateException;

3.4. NEVER Propagation

For transactional logic with NEVER propagation, Spring throws an exception if there's an active transaction:

@Transactional(propagation = Propagation.NEVER)
public void neverExample(String user) { 
    // ... 
}

Let's see the pseudo-code of how transaction creation works for NEVER propagation:

if (isExistingTransaction()) {
    throw IllegalTransactionStateException;
}
return emptyTransaction;

3.5. NOT_SUPPORTED Propagation

Spring at first suspends the current transaction if it exists, then the business logic is executed without a transaction.

@Transactional(propagation = Propagation.NOT_SUPPORTED)
public void notSupportedExample(String user) { 
    // ... 
}

The JTATransactionManager supports real transaction suspension out-of-the-box. Others simulate the suspension by holding a reference to the existing one and then clearing it from the thread context

3.6. REQUIRES_NEW Propagation

When the propagation is REQUIRES_NEW, Spring suspends the current transaction if it exists and then creates a new one:

@Transactional(propagation = Propagation.REQUIRES_NEW)
public void requiresNewExample(String user) { 
    // ... 
}

Similar to NOT_SUPPORTED, we need the JTATransactionManager for actual transaction suspension.

And the pseudo-code looks like so:

if (isExistingTransaction()) {
    suspend(existing);
    try {
        return createNewTransaction();
    } catch (exception) {
        resumeAfterBeginException();
        throw exception;
    }
}
return createNewTransaction();

3.7. NESTED Propagation

For NESTED propagation, Spring checks if a transaction exists, then if yes, it marks a savepoint. This means if our business logic execution throws an exception, then transaction rollbacks to this savepoint. If there's no active transaction, it works like REQUIRED.

DataSourceTransactionManager supports this propagation out-of-the-box. Also, some implementations of JTATransactionManager may support this.

JpaTransactionManager supports NESTED only for JDBC connections. However, if we set nestedTransactionAllowed flag to true, it also works for JDBC access code in JPA transactions if our JDBC driver supports savepoints.

Finally, let's set the propagation to NESTED:

@Transactional(propagation = Propagation.NESTED)
public void nestedExample(String user) { 
    // ... 
}

4. Transaction Isolation

Isolation is one of the common ACID properties: Atomicity, Consistency, Isolation, and Durability. Isolation describes how changes applied by concurrent transactions are visible to each other.

Each isolation level prevents zero or more concurrency side effects on a transaction:

  • Dirty read: read the uncommitted change of a concurrent transaction
  • Nonrepeatable read: get different value on re-read of a row if a concurrent transaction updates the same row and commits
  • Phantom read: get different rows after re-execution of a range query if another transaction adds or removes some rows in the range and commits

We can set the isolation level of a transaction by @Transactional::isolation. It has these five enumerations in Spring: DEFAULT, READ_UNCOMMITTED, READ_COMMITTED, REPEATABLE_READ, SERIALIZABLE.

4.1. Isolation Management in Spring

The default isolation level is DEFAULT. So when Spring creates a new transaction, the isolation level will be the default isolation of our RDBMS. Therefore, we should be careful if we change the database.

We should also consider cases when we call a chain of methods with different isolation. In the normal flow, the isolation only applies when a new transaction created. Thus if for any reason we don't want to allow a method to execute in different isolation, we have to set TransactionManager::setValidateExistingTransaction to true. Then the pseudo-code of transaction validation will be:

if (isolationLevel != ISOLATION_DEFAULT) {
    if (currentTransactionIsolationLevel() != isolationLevel) {
        throw IllegalTransactionStateException
    }
}

Now let's get deep in different isolation levels and their effects.

4.2. READ_UNCOMMITTED Isolation

READ_UNCOMMITTED is the lowest isolation level and allows for most concurrent access.

As a result, it suffers from all three mentioned concurrency side effects. So a transaction with this isolation reads uncommitted data of other concurrent transactions. Also, both non-repeatable and phantom reads can happen. Thus we can get a different result on re-read of a row or re-execution of a range query.

We can set the isolation level for a method or class:

@Transactional(isolation = Isolation.READ_UNCOMMITTED)
public void log(String message) {
    // ...
}

Postgres does not support READ_UNCOMMITTED isolation and falls back to READ_COMMITED instead. Also, Oracle does not support and allow READ_UNCOMMITTED.

4.3. READ_COMMITTED Isolation

The second level of isolation, READ_COMMITTED, prevents dirty reads.

The rest of the concurrency side effects still could happen. So uncommitted changes in concurrent transactions have no impact on us, but if a transaction commits its changes, our result could change by re-querying.

Here, we set the isolation level:

@Transactional(isolation = Isolation.READ_COMMITTED)
public void log(String message){
    // ...
}

READ_COMMITTED is the default level with Postgres, SQL Server, and Oracle.

4.4. REPEATABLE_READ Isolation

The third level of isolation, REPEATABLE_READ, prevents dirty, and non-repeatable reads. So we are not affected by uncommitted changes in concurrent transactions.

Also, when we re-query for a row, we don't get a different result. But in the re-execution of range-queries, we may get newly added or removed rows.

Moreover, it is the lowest required level to prevent the lost update. The lost update occurs when two or more concurrent transactions read and update the same row. REPEATABLE_READ does not allow simultaneous access to a row at all. Hence the lost update can't happen.

Here is how to set the isolation level for a method:

@Transactional(isolation = Isolation.REPEATABLE_READ) 
public void log(String message){
    // ...
}

REPEATABLE_READ is the default level in Mysql. Oracle does not support REPEATABLE_READ.

4.5. SERIALIZABLE Isolation

SERIALIZABLE is the highest level of isolation. It prevents all mentioned concurrency side effects but can lead to the lowest concurrent access rate because it executes concurrent calls sequentially.

In other words, concurrent execution of a group of serializable transactions has the same result as executing them in serial.

Now let's see how to set SERIALIZABLE as the isolation level:

@Transactional(isolation = Isolation.SERIALIZABLE)
public void log(String message){
    // ...
}

5. Conclusion

In this tutorial, we explored the propagation property of @Transaction in detail. Afterward, we learned about concurrency side effects and isolation levels.

As always, you can find the complete code over on GitHub.

Guide to Tomcat Manager Application

$
0
0

1. Introduction

In this tutorial, we're going to take an in-depth look at the Tomcat Manager Application. In a nutshell, the Tomcat Manager App is a web application that is packaged with the Tomcat server and provides us with the basic functionality we need to manage our deployed web applications.

As we're going to see, the application has many features and services. Besides allowing us to manage deployed applications, we can also see the status and configuration of the server and its applications.

2. Installing Tomcat

Before we delve into the Tomcat Manager App, we first need to install a Tomcat server.

Fortunately, installing Tomcat is an easy process. Please refer to our Introduction to Apache Tomcat guide for help installing Tomcat. In this tutorial, we'll be using the latest Tomcat 9 version.

3. Accessing the Tomcat Manager App

Now, let's take a look at how to use the Tomcat Manager App. We have two options here — we can choose to use the web-based (HTML) application or the text-based web service.

The text-based service is ideal for scripting, whereas the HTML application is designed for humans.

The web-based application is available at:

  • http[s]://<server>:<port>/manager/html/

While the corresponding text service is available at:

  • http[s]://<server>:<port>/manager/text/

However, before we can access these services, we need to configure Tomcat. By default, it can only be accessed by users with the correct permissions.

Let's go ahead and add such users by editing the conf/tomcat-users file:

<tomcat-users>
  <role rolename="manager-gui"/>
  <role rolename="manager-script"/>
  <user username="tomcatgui" password="s3cret" roles="manager-gui"/>
  <user username="tomcattext" password="baeldung" roles="manager-script"/>
</tomcat-users>

As we can see, we added two new users:

  • tomcatgui – has the manager-gui role and can use the web-based application
  • tomcattext – has the manager-script role and can use the text-based web service

In the next section, we'll see how we can use these two users to demonstrate the capabilities of the Tomcat Manager App.

4. Listing Currently Deployed Applications

In this section, we'll learn how to see a list of the currently deployed applications.

4.1. Using the Web

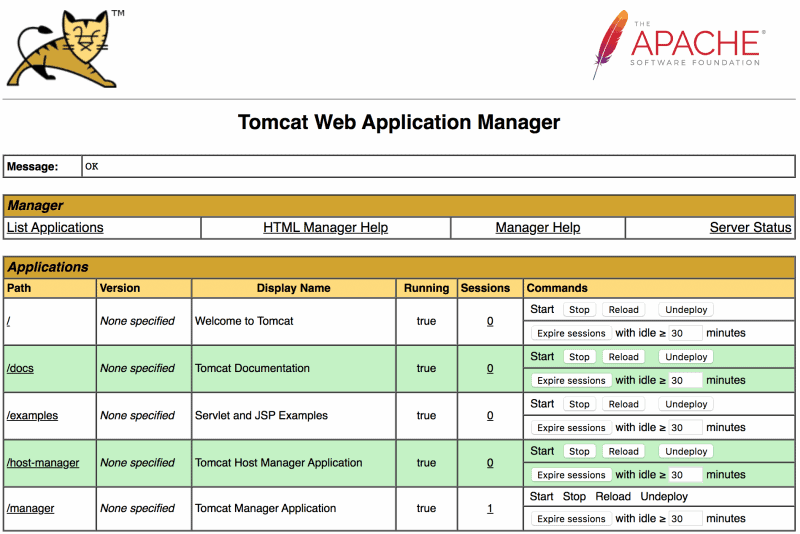
Let's open http://localhost:8080/manager/html/ to view the Tomcat Manager App webpage. We need to authenticate as the tomcatgui user to do so.

Once logged in, the web page lists all the deployed applications at the top of the page. For each application, we can see if it is running or not, the context path, and the number of active sessions. There are also several buttons we can use to manage the applications:

Tomcat Manager app list applications

4.2. Using the Text Service

Alternatively, we can list all the deployed applications using the text web service. This time we make a curl request using the tomcattext user to authenticate:

curl -u tomcattext:baeldung http://localhost:8080/manager/text/list

Just like the web page, the response shows all the deployed applications with their current state and number of active sessions. For example, we can see the manager application is running and has one active session:

OK - Listed applications for virtual host [localhost]
/:running:0:ROOT
/examples:running:0:examples
/host-manager:running:0:host-manager
/manager:running:1:manager
/docs:running:0:docs

5. Managing Applications

One of the key pieces of functionality that the Tomcat Manager App allows us to do is stop, start, and reload applications.

5.1. Using the Web

In the case of the web application, stopping and starting the applications is just a matter of clicking the buttons on the web page. The outcome and any problems are reported in the message field at the top of the page.

5.2. Using the Text Service

Likewise, we can stop and start applications using the text service. Let's stop and then start the examples application using a curl request:

curl -u tomcattext:baeldung http://localhost:8080/manager/text/stop?path=/examples
OK - Stopped application at context path [/examples]
curl -u tomcattext:baeldung http://localhost:8080/manager/text/start?path=/examples
OK - Started application at context path [/examples]

The path query parameter indicates which application to manage and must match the context path of the application.

We can also reload applications to pick up changes to classes or resources. However, this only works for applications that are unpacked into a directory and not deployed as WAR files.

Here is an example of how we can reload the docs application using the text service:

curl -u tomcattext:baeldung http://localhost:8080/manager/text/reload?path=/docs
OK - Reloaded application at context path [/docs]

Remember, though, we only need to click the reload button to achieve the same in the web application.

6. Expiring Sessions

In addition to managing applications, we can manage user sessions. The Tomcat Manager App shows details on current user sessions and allows us to expire sessions manually.

6.1. Via the Web Interface

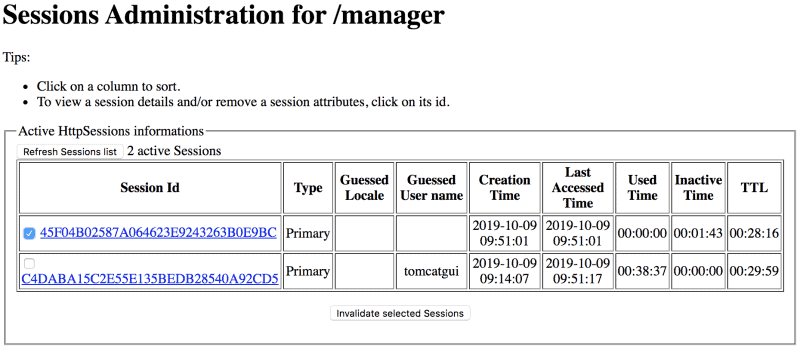
We can view current user sessions by following the link in the Sessions column for all listed applications.

In the example below, we can see there are two user sessions for the manager application. It shows the duration of the session, how long it has been inactive, and how long until it expires (30 minutes by default).

We can also manually destroy sessions by selecting them and choosing Invalidate selected sessions:

Tomcat Manager app user sessions

On the home page, there is a button to Expire sessions. This also destroys sessions that have been idle for the specified period of minutes.

6.2. Via the Text Web Service

Again, the text service equivalents are straightforward.

To view details on current user sessions, we call the session endpoint with the context path of the application we are interested in. In this example, we can see there are currently two sessions for the manager application:

curl -u tomcattext:baeldung "http://localhost:8080/manager/text/sessions?path=/manager"
OK - Session information for application at context path [/manager]
Default maximum session inactive interval is [30] minutes
Inactive for [2 - <3] minutes: [1] sessions
Inactive for [13 - <14] minutes: [1] sessions

If we want to destroy inactive user sessions, then we use the expire endpoint. In this example, we expire sessions that have been inactive for more than 10 minutes for the manager application:

curl -u tomcattext:baeldung "http://localhost:8080/manager/text/expire?path=/manager&idle=10"
OK - Session information for application at context path [/manager]
Default maximum session inactive interval is [30] minutes
Inactive for [5 - <6] minutes: [1] sessions
Inactive for [15 - <16] minutes: [1] sessions
Inactive for [>10] minutes: [1] sessions were expired

7. Deploying Applications

Now that we have seen how we can manage our applications, let's see how we can deploy new applications.

To get started, download the Tomcat sample WAR so we have a new application to deploy.

7.1. Using the Web

Now, we have a few options to deploy our new sample WAR using the web page. The easiest method is to upload the sample WAR file and deploy it:

Tomcat Manager app war deploy

The WAR is deployed with a context path matching the name of the WAR. If successful, the sample application is deployed, started, and displayed in the list of applications. If we follow the /sample link in the context path, we can view our running sample application:

Tomcat Manager app sample application

So that we can deploy the same application again, let's click on the Undeploy button. As the name suggests, this will undeploy the application. Note that this also deletes all files and directories for the deployed application.

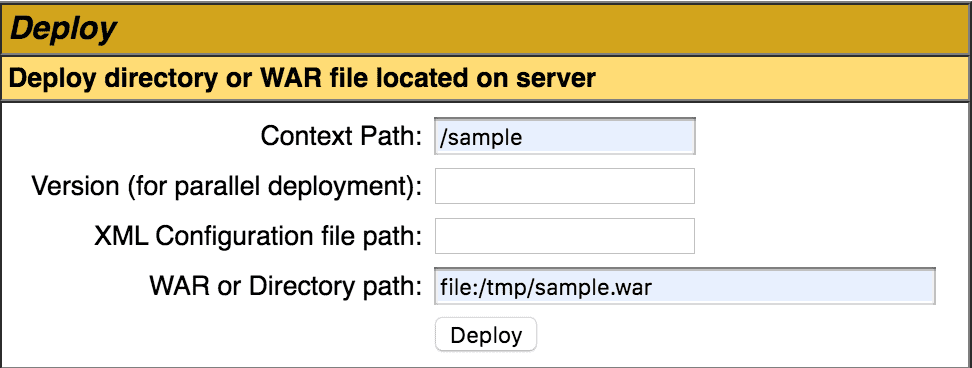
Next, we can deploy the sample WAR file by specifying the file path. We specify the file path URI to the WAR file or the unpacked directory plus the context path. In our case, the sample WAR is in the /tmp directory, and we are setting the context path to /sample:

Tomcat Manager app path to war

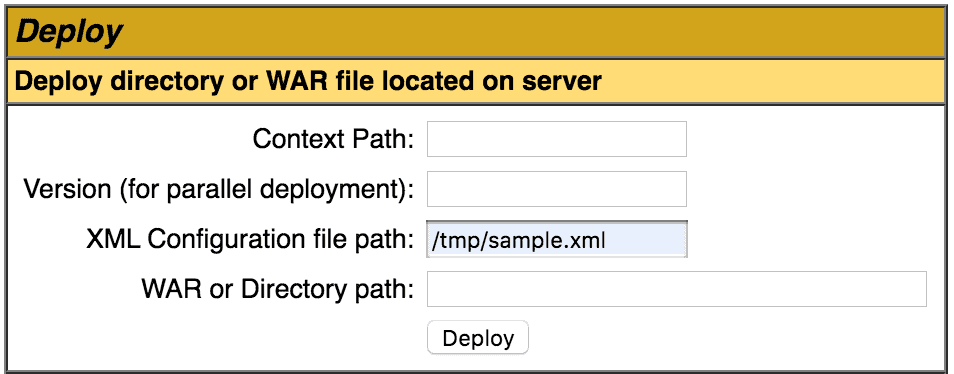
Alternatively, we can specify the file path to an XML deployment descriptor. This approach allows us to specify additional attributes affecting how the application is deployed and run. In the example below, we are deploying the sample WAR application and making it reloadable.

Note that any path specified in the deployment descriptor is ignored. The context path is taken from the file name of the deployment descriptor. Take a look at the Common Attributes to understand why, as well as a description of all the other possible attributes:

<Context docBase="/tmp/sample.war" reloadable="true" />
Tomcat Manager app xml deployment descriptor

7.2. Using the Text Service

Now let's have a look at deploying applications using the text service.

Firstly, let's undeploy our sample application:

curl -u tomcattext:baeldung "http://localhost:8080/manager/text/undeploy?path=/sample"
OK - Undeployed application at context path [/sample]

To deploy it again, we specify the context path and the location URI of the sample WAR file:

curl -u tomcattext:baeldung "http://localhost:8080/manager/text/deploy?path=/sample&war=file:/tmp/sample.war"
OK - Deployed application at context path [/sample]

Furthermore, we can also deploy an application using the XML deployment descriptor:

curl -u tomcattext:baeldung "http://localhost:8080/manager/text/deploy?config=file:/tmp/sample.xml"
OK - Deployed application at context path [/sample]

8. Viewing SSL Configuration

We need to enable SSL in Tomcat before we can see any SSL configuration. First, let's create a new certificate keystore with a self-signed certificate in our Tomcat's conf directory:

keytool -genkey -alias tomcat -keyalg RSA -keystore conf/localhost-rsa.jks

Next, we change the conf/tomcat-server.xml file to enable the SSL connector in Tomcat:

<Connector port="8443" protocol="org.apache.coyote.http11.Http11NioProtocol"
           maxThreads="150" SSLEnabled="true">
    <SSLHostConfig>
        <Certificate certificateKeystoreFile="conf/localhost-rsa.jks" type="RSA" />
    </SSLHostConfig>
</Connector>

Once we restart Tomcat, we find it runs securely on port 8443!

8.1. Using the Web

Let's open https://localhost:8443/manager/html to see the Tomcat Manager App again. It should look exactly the same.

We can now view our SSL configuration using the buttons under Diagnostics:

Tomcat Manager app TLS buttons
  • The Ciphers button shows all the SSL ciphers understood by Tomcat
  • Next, the Certificates button shows details of our self-signed certificate
  • Finally, the Trusted Certificates button shows trusted CA certificate details; in our example, it does not display anything of interest as we have not added any trusted CA certificates

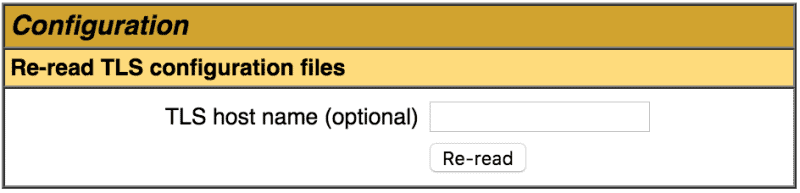
Also, the SSL configuration files can be dynamically re-loaded at any time. We can re-load per virtual host by entering the hostname. Otherwise, all configuration is re-read:

Tomcat manager app re-load SSL

8.2. Using the Text Service

Likewise, we can get the same information using the text service. We can view all:

  • SSL ciphers using the sslConnectorCiphers resource:
curl -ku tomcattext:baeldung "https://localhost:8443/manager/text/sslConnectorCiphers"
  • Certificates using the sslConnectorCerts resource:
curl -ku tomcattext:baeldung "https://localhost:8443/manager/text/sslConnectorCerts"
  • Trusted certificates using the sslConnectorTrustedCerts resource:
curl -ku tomcattext:baeldung "https://localhost:8443/manager/text/sslConnectorTrustedCerts"

The SSL configuration can be re-loaded using:

curl -ku tomcattext:baeldung "https://localhost:8443/manager/text/sslReload"
OK - Reloaded TLS configuration for all TLS virtual hosts

Note the -k option in the curl command as we are using a self-signed certificate.

9. Viewing the Server Status

The Tomcat Manager App also shows us the status of the server and the deployed applications. These pages are particularly handy when we want to view overall usage statistics.

If we follow the Server Status link, displayed in the top right, we see details on the server. The Complete Server Status link shows additional details on the applications:

Tomcat Manager app server status

There is no corresponding text service. However, we can modify the Server Status link to view the server status in XML. Unfortunately, doing the same for the Complete Server Status link may or may not work, depending on which Tomcat version we are using.

10. Saving Configuration

The text service allows us to save the current configuration to the Tomcat conf/server.xml. This is very useful if we have changed the configuration and want to save it for later use.

Thankfully, this also backs up the previous conf/server.xml, although any previous comments may be removed in the new conf/server.xml configuration file.

However, before we can do this, we need to add a new listener. Edit the conf/server.xml and add the following to the end of the list of the existing listeners:

<Listener className="org.apache.catalina.storeconfig.StoreConfigLifecycleListener" />

Once we've restarted Tomcat, we can save our configuration using:

curl -u tomcattext:baeldung "http://localhost:8080/manager/text/save"
OK - Server configuration saved

11. Diagnostics

Lastly, let's look at additional diagnostic features provided by the Tomcat Manager App.

11.1. Thread Dump

We can use the text service to get a thread dump of the running Tomcat server:

curl -u tomcattext:baeldung "http://localhost:8080/manager/text/threaddump"
OK - JVM thread dump
2019-10-06 23:19:10.066
Full thread dump Java HotSpot(TM) 64-Bit Server VM (11.0.3+12-LTS mixed mode):
...

This is particularly useful when we need to analyze or find threads that are causing performance issues, such as long-running or deadlocked threads.

11.2. Finding Memory Leaks

Tomcat generally does a good job of preventing memory leaks. But when we do suspect a memory leak, the Tomcat Manager App has a memory leak detection service to help us. It performs a full garbage collection and detects any classes still resident in memory since the last time the application was reloaded.

We only need to run the Find Leaks button on the web page to detect leaks.

Similarly, the text service can run memory leak detection:

curl -u  tomcattext:baeldung "http://localhost:8080/manager/text/findleaks?statusLine=true"
OK - No memory leaks found

11.3. Displaying Available Resources

The text service provides a list of available resources. In this example, we see we have one in-memory database available:

curl -u tomcattext:baeldung "http://localhost:8080/manager/text/resources"
OK - Listed global resources of all types
UserDatabase:org.apache.catalina.users.MemoryUserDatabase

12. Conclusion

In this article, we’ve taken a detailed look at the Tomcat Manager App. We started by installing the application and seeing how to give access by configuring permissions for two distinct users.

Then we explored several examples using the web-based application and text-based web service. We saw how we could view, manage, and deploy applications using a variety of methods. Then we took a look at how to view the server's configuration and status.

To learn more about The Tomcat Manager App, check out the online documentation.


Knapsack Problem Implementation in Java

$
0
0

1. Introduction

The knapsack problem is a combinatorial optimization problem that has many applications. In this tutorial, we'll solve this problem in Java.

2. The Knapsack Problem

In the knapsack problem, we have a set of items. Each item has a weight and a worth value:

We want to put these items into a knapsack. However, it has a weight limit:

Therefore, we need to choose the items whose total weight does not exceed the weight limit, and their total value is as high as possible. For example, the best solution for the above example is to choose the 5kg item and 6kg item, which gives a maximum value of $40 within the weight limit.

The knapsack problem has several variations. In this tutorial, we will focus on the 0-1 knapsack problem. In the 0-1 knapsack problem, each item must either be chosen or left behind. We cannot take a partial amount of an item. Also, we cannot take an item multiple times.

3. Mathematical Definition

Let's now formalize the 0-1 knapsack problem in mathematical notation. Given a set of n items and the weight limit W, we can define the optimization problem as:

This problem is NP-hard. Therefore, there is no polynomial-time algorithm to solve it currently. However, there is a pseudo-polynomial time algorithm using dynamic programming for this problem.

4. Recursive Solution

We can use a recursion formula to solve this problem:

In this formula, M(n,w) is the optimal solution for n items with a weight limit w. It is the maximum of the following two values:

  • The optimal solution from (n-1) items with the weight limit w (excluding the n-th item)
  • Value of the n-th item plus the optimal solution from (n-1) items and w minus weight of the n-th item (including the n-th item)

If the weight of the n-th item is more than the current weight limit, we don't include it. Therefore, it is in the first category of the above two cases.

We can implement this recursion formula in Java:

int knapsackRec(int[] w, int[] v, int n, int W) {
    if (n <= 0) { 
        return 0; 
    } else if (w[n - 1] > W) {
        return knapsackRec(w, v, n - 1, W);
    } else {
        return Math.max(knapsackRec(w, v, n - 1, W), v[n - 1] 
          + knapsackRec(w, v, n - 1, W - w[n - 1]));
    }
}

In each recursion step, we need to evaluate two sub-optimal solutions. Therefore, the running time of this recursive solution is O(2n).

5. Dynamic Programming Solution

Dynamic programming is a strategy for linearizing otherwise exponentially-difficult programming problems. The idea is to store the results of subproblems so that we do not have to re-compute them later.

We can also solve the 0-1 knapsack problem with dynamic programming. To use dynamic programming, we first create a 2-dimensional table with dimensions from 0 to n and 0 to W. Then, we use a bottom-up approach to calculate the optimal solution with this table:

int knapsackDP(int[] w, int[] v, int n, int W) {
    if (n <= 0 || W <= 0) {
        return 0;
    }

    int[][] m = new int[n + 1][W + 1];
    for (int j = 0; j <= W; j++) {
        m[0][j] = 0;
    }

    for (int i = 1; i <= n; i++) {
        for (int j = 1; j <= W; j++) { 
            if (w[i - 1] > j) {
                m[i][j] = m[i - 1][j];
            } else {
                m[i][j] = Math.max(
                  m[i - 1][j], 
                  m[i - 1][j - w[i - 1]] + v[i - 1]);
            }
        }
    }
    return m[n][W];
}

In this solution, we have a nested loop over the item number n and the weight limit W. Therefore, it's running time is O(nW).

6. Conclusion

In this tutorial, we showed a math definition of the 0-1 knapsack problem. Then we provided a recursive solution to this problem with Java implementation. Finally, we used dynamic programming to solve this problem.

As always, the source code for the article is available over on GitHub.

JPA Annotation for the PostgreSQL TEXT Type

$
0
0

1. Introduction

In this quick tutorial, we'll explain how to manage the PostgreSQL TEXT type using the annotations defined by the JPA specification.

2. The TEXT Type in PostgreSQL

When working with PostgresSQL we may, periodically, need to store a string with an arbitrary length.

For this, PostgreSQL provides three character types:

  • CHAR(n)
  • VARCHAR(n)
  • TEXT

Unfortunately, the TEXT type is not part of the types that are managed by the SQL standard. This means that if we want to use JPA annotations in our persistence entities, we may have a problem.

This is because the JPA specification makes use of the SQL standard. Consequently, it doesn't define a simple way to handle this type of object using, for example, a @Text annotation.

Luckily, we have a couple of possibilities for managing the TEXT data type for a PostgreSQL database:

  • We can use the @Lob annotation
  • Alternatively, we can also use the @Column annotation, combined with the columnDefinition attribute

Let's now take a look at the two solutions beginning with the @Lob annotation.

3. @Lob

As the name suggests, a lob is a large object. In database terms, lob columns are used to store very long texts or binary files.

We can choose from two kinds of lobs:

  • CLOB – a character lob used to store texts
  • BLOB – a binary lob that can be used to store binary data

We can use the JPA @Lob annotation to map large fields to large database object types.

When we use the @Lob record on a String type attribute, the JPA specification says that the persistence provider should use a large character type object to store the value of the attribute. Consequently, PostgreSQL can translate a character lob into a TEXT type.

Let's suppose we have a simple Exam entity object, with a description field, which could have an arbitrary length:

@Entity
public class Exam {

    @Id
    @GeneratedValue(strategy=GenerationType.AUTO)
    private Long id;

    @Lob
    private String description;
}

Using the @Lob annotation on the description field, we instruct Hibernate to manage this field using the PostgreSQL TEXT type.

4. @Column

Another option for managing the TEXT type is to use the @Column annotation, together with the columnDefinition property.

Let's use the same Exam entity object again but this time we'll add a TEXT field, which could be of an arbitrary length:

@Entity
public class Exam {

    @Id
    @GeneratedValue(strategy=GenerationType.AUTO)
    private Long id;
    
    @Lob
    private String description;
    
    @Column(columnDefinition="TEXT")
    private String text;

}

In this example, we use the annotation @Column(columnDefinition=”TEXT”). Using the columnDefinition attribute allows us to specify the SQL fragment which will be used when constructing the data column for this type.

5. Bringing It All Together

In this section, we'll write a simple unit test to verify our solution is working:

@Test
public void givenExam_whenSaveExam_thenReturnExpectedExam() {
    Exam exam = new Exam();
    exam.setDescription("This is a description. Sometimes the description can be very very long! ");
    exam.setText("This is a text. Sometimes the text can be very very long!");

    exam = examRepository.save(exam);

    assertEquals(examRepository.find(exam.getId()), exam);
}

In this example, we begin by creating a new Exam object and persisting it to our database.  We then retrieve the Exam object from the database and compare the result with the original exam we created.

To demonstrate the point, if we quickly modify the description field on our Exam entity:

@Column(length = 20)
private String description;

When we run our test again we'll see an error:

ERROR o.h.e.jdbc.spi.SqlExceptionHelper - Value too long for column "TEXT VARCHAR(20)"

6. Conclusion

In this tutorial, we covered two approaches for using JPA annotations with the PostgreSQL TEXT type.

We began by explaining what the TEXT type is used for and then we saw how we can use the JPA annotations @Lob and @Column to save String objects using the TEXT type defined by PostgreSQL.

As always, the full source code of the article is available over on GitHub.

Java Weekly, Issue 304

$
0
0

1. Spring and Java

>> A First Look at Java Inline Classes [infoq.com]

A deep dive into the LW2 prototype for inline classes from Project Valhalla.

>> Spring Cloud Stream – functional and reactive [spring.io]

A nice summary of the core features combining Spring Cloud Function with Project Reactor's stream abstractions.

>> How to Simulate a Liquibase Migration using H2 [blog.jooq.org]

And a good write-up on jOOQ's upcoming embrace of Liquibase, starting with jOOQ 3.13.

Also worth reading:

Webinars and presentations:

Time to upgrade:

2. Technical and Musings

>> Sustainable software development [blog.codecentric.de]

A theory for modeling sustainable software design and control that takes many complexities of the development process into account.

>> Open Sourcing Mantis: A Platform For Building Cost-Effective, Realtime, Operations-Focused Applications [medium.com]

And a Netflix platform designed to help minimize or avoid downtime in distributed systems.

Also worth reading:

3. Comics

And my favorite Dilberts of the week:

>> Wally Has Skills [dilbert.com]

>> Bad News I Can't Tell You [dilbert.com]

>> Project Update [dilbert.com]

4. Pick of the Week

>> How to break a Monolith into Microservices [martinfowler.com]

Programmatic Transaction Management in Spring

$
0
0

1. Overview

Spring's @Transactional annotation provides a nice declarative API to mark transactional boundaries.

Behind the scenes, an aspect takes care of creating and maintaining transactions as they are defined in each occurrence of the @Transactional annotation. This approach makes it easy to decouple our core business logic from cross-cutting concerns like transaction management.

In this tutorial, we'll see that this isn't always the best approach. We'll explore what programmatic alternatives Spring provides, like TransactionTemplate, and our reasons for using them.

2. Trouble in Paradise

Let's suppose we're mixing two different types of I/O in a simple service:

@Transactional
public void initialPayment(PaymentRequest request) {
    savePaymentRequest(request); // DB
    callThePaymentProviderApi(request); // API
    updatePaymentState(request); // DB
    saveHistoryForAuditing(request); // DB
}

Here, we have a few database calls alongside a possibly expensive REST API call. At first glance, it might make sense to make the whole method transactional, since we may want to use one EntityManager to perform the whole operation atomically.

However, if that external API takes longer than usual to respond, for whatever reason, we may soon run out of database connections!

2.1. The Harsh Nature of Reality

Here's what happens when we call the initialPayment method:

  1. The transactional aspect creates a new EntityManager and starts a new transaction – so, it borrows one Connection from the connection pool
  2. After the first database call, it calls the external API while keeping the borrowed Connection
  3. Finally, it uses that Connection to perform the remaining database calls

If the API call responds very slowly for a while, this method would hog the borrowed Connection while waiting for the response.

Imagine that during this period, we get a burst of calls to the initialPayment method. Then, all Connections may wait for a response from the API call. That's why we may run out of database connections — because of a slow back-end service!

Mixing the database I/O with other types of I/O in a transactional context is a bad smell. So, the first solution for these sorts of problems is to separate these types of I/O altogether. If for whatever reason we can't separate them, we can still use Spring APIs to manage transactions manually.

3. Using TransactionTemplate

TransactionTemplate provides a set of callback-based APIs to manage transactions manually. In order to use it, first, we should initialize it with a PlatformTransactionManager. 

For example, we can set up this template using dependency injection:

// test annotations
class ManualTransactionIntegrationTest {

    @Autowired
    private PlatformTransactionManager transactionManager;

    private TransactionTemplate transactionTemplate;

    @BeforeEach
    void setUp() {
        transactionTemplate = new TransactionTemplate(transactionManager);
    }

    // omitted
}

The PlatformTransactionManager helps the template to create, commit, or rollback transactions.

When using Spring Boot, an appropriate bean of type PlatformTransactionManager will be automatically registered, so we just need to simply inject it. Otherwise, we should manually register a PlatformTransactionManager bean.

3.1. Sample Domain Model

From now on, for the sake of demonstration, we're going to use a simplified payment domain model. In this simple domain, we have a Payment entity to encapsulate each payment's details:

@Entity
public class Payment {

    @Id
    @GeneratedValue
    private Long id;

    private Long amount;

    @Column(unique = true)
    private String referenceNumber;

    @Enumerated(EnumType.STRING)
    private State state;

    // getters and setters

    public enum State {
        STARTED, FAILED, SUCCESSFUL
    }
}

Also, we'll run all tests inside a test class, using the Testcontainers library to run a PostgreSQL instance before each test case:

@DataJpaTest
@Testcontainers
@ActiveProfiles("test")
@AutoConfigureTestDatabase(replace = NONE)
@Transactional(propagation = NOT_SUPPORTED) // we're going to handle transactions manually
public class ManualTransactionIntegrationTest {

    @Autowired 
    private PlatformTransactionManager transactionManager;

    @Autowired 
    private EntityManager entityManager;

    @Container
    private static PostgreSQLContainer<?> pg = initPostgres();

    private TransactionTemplate transactionTemplate;

    @BeforeEach
    public void setUp() {
        transactionTemplate = new TransactionTemplate(transactionManager);
    }

    // tests

    private static PostgreSQLContainer<?> initPostgres() {
        PostgreSQLContainer<?> pg = new PostgreSQLContainer<>("postgres:11.1")
                .withDatabaseName("baeldung")
                .withUsername("test")
                .withPassword("test");
        pg.setPortBindings(singletonList("54320:5432"));

        return pg;
    }
}

3.2. Transactions with Results

The TransactionTemplate offers a method called execute, which can run any given block of code inside a transaction and then return some result:

@Test
void givenAPayment_WhenNotDuplicate_ThenShouldCommit() {
    Long id = transactionTemplate.execute(status -> {
        Payment payment = new Payment();
        payment.setAmount(1000L);
        payment.setReferenceNumber("Ref-1");
        payment.setState(Payment.State.SUCCESSFUL);

        entityManager.persist(payment);

        return payment.getId();
    });

    Payment payment = entityManager.find(Payment.class, id);
    assertThat(payment).isNotNull();
}

Here, we're persisting a new Payment instance into the database and then returning its auto-generated id.

Similar to the declarative approach, the template can guarantee atomicity for us. That is, if one of the operations inside a transaction fails to complete, it rolls back all of them:

@Test
void givenTwoPayments_WhenRefIsDuplicate_ThenShouldRollback() {
    try {
        transactionTemplate.execute(status -> {
            Payment first = new Payment();
            first.setAmount(1000L);
            first.setReferenceNumber("Ref-1");
            first.setState(Payment.State.SUCCESSFUL);

            Payment second = new Payment();
            second.setAmount(2000L);
            second.setReferenceNumber("Ref-1"); // same reference number
            second.setState(Payment.State.SUCCESSFUL);

            entityManager.persist(first); // ok
            entityManager.persist(second); // fails

            return "Ref-1";
        });
    } catch (Exception ignored) {}

    assertThat(entityManager.createQuery("select p from Payment p").getResultList()).isEmpty();
}

Since the second referenceNumber is a duplicate, the database rejects the second persist operation, causing the whole transaction to rollback. Therefore, the database does not contain any payments after the transaction. It's also possible to manually trigger a rollback by calling the setRollbackOnly() on TransactionStatus:

@Test
void givenAPayment_WhenMarkAsRollback_ThenShouldRollback() {
    transactionTemplate.execute(status -> {
        Payment payment = new Payment();
        payment.setAmount(1000L);
        payment.setReferenceNumber("Ref-1");
        payment.setState(Payment.State.SUCCESSFUL);

        entityManager.persist(payment);
        status.setRollbackOnly();

        return payment.getId();
    });

    assertThat(entityManager.createQuery("select p from Payment p").getResultList()).isEmpty();
}

3.3. Transactions without Results

If we don't intend to return anything from the transaction, we can use the TransactionCallbackWithoutResult callback class:

@Test
void givenAPayment_WhenNotExpectingAnyResult_ThenShouldCommit() {
    transactionTemplate.execute(new TransactionCallbackWithoutResult() {
        @Override
        protected void doInTransactionWithoutResult(TransactionStatus status) {
            Payment payment = new Payment();
            payment.setReferenceNumber("Ref-1");
            payment.setState(Payment.State.SUCCESSFUL);

            entityManager.persist(payment);
        }
    });

    assertThat(entityManager.createQuery("select p from Payment p").getResultList()).hasSize(1);
}

3.4. Custom Transaction Configurations

Up until now, we used the TransactionTemplate with its default configuration. Although this default is more than enough most of the time, it's still possible to change configuration settings.

For example, we can set the transaction isolation level:

transactionTemplate = new TransactionTemplate(transactionManager);
transactionTemplate.setIsolationLevel(TransactionDefinition.ISOLATION_REPEATABLE_READ);

Similarly, we can change the transaction propagation behavior:

transactionTemplate.setPropagationBehavior(TransactionDefinition.PROPAGATION_REQUIRES_NEW);

Or we can set a timeout, in seconds, for the transaction:

transactionTemplate.setTimeout(1000);

It's even possible to benefit from optimizations for read-only transactions:

transactionTemplate.setReadOnly(true);

Anyway, once we create a TransactionTemplate with a configuration, all transactions will use that configuration to execute. So, if we need multiple configurations, we should create multiple template instances.

4. Using PlatformTransactionManager

In addition to the TransactionTemplate, we can use an even lower-level API like PlatformTransactionManager to manage transactions manually. Quite interestingly, both @Transactional and TransactionTemplate use this API to manage their transactions internally.

4.1. Configuring Transactions

Before using this API, we should define how our transaction is going to look. For example, we can set a three-second timeout with the repeatable read transaction isolation level:

DefaultTransactionDefinition definition = new DefaultTransactionDefinition();
definition.setIsolationLevel(TransactionDefinition.ISOLATION_REPEATABLE_READ);
definition.setTimeout(3);

Transaction definitions are similar to TransactionTemplate configurations. Howeverwe can use multiple definitions with just one PlatformTransactionManager.

4.2. Maintaining Transactions

After configuring our transaction, we can programmatically manage transactions:

@Test
void givenAPayment_WhenUsingTxManager_ThenShouldCommit() {
 
    // transaction definition

    TransactionStatus status = transactionManager.getTransaction(definition);
    try {
        Payment payment = new Payment();
        payment.setReferenceNumber("Ref-1");
        payment.setState(Payment.State.SUCCESSFUL);

        entityManager.persist(payment);
        transactionManager.commit(status);
    } catch (Exception ex) {
        transactionManager.rollback(status);
    }

    assertThat(entityManager.createQuery("select p from Payment p").getResultList()).hasSize(1);
}

5. Conclusion

In this tutorial, first, we saw when one should choose programmatic transaction management over the declarative approach. Then, by introducing two different APIs, we learned how to manually create, commit, or rollback any given transaction.

As usual, the sample code is available over on GitHub.

Manipulating Strings in Linux with tr

$
0
0

1. Overview

In this tutorial, we'll see how to manipulate strings using the tr in Linux.

Note that we've tested these commands using Bash, but should work on any POSIX-compliant terminal.

2. Lower Case to Upper Case

First of all, let's see the synopsis of the command and how to use a predefined SET of the tool.

tr [OPTION]... SET1 [SET2]

Where SET1 and SET2 each represent a SET of characters and a parameter inside [] means it's optional. The tr command is normally combined with pipes in order to manipulate standard input and get a processed standard output.

In this case, let's transform a string from lower case to upper case:

echo "Baeldung is in the top 10" | tr [a-z] [A-Z]

The output of the command will be:

BAELDUNG IS IN THE TOP 10

3. Translate Whitespaces to Tabs

Another option that we can try with tr is translating all whitespace occurrences to tabs, continuing with the same example but a little bit tuned for this purpose:

echo "Baeldung is in the top 10" | tr [:space:] '\t'

And we'll get the translated string:

Baeldung    is    in    the    top    10

4. Delete Characters

Suppose that we are using the Linux terminal, we have the string “Baeldung is in the top 10”, and we want to delete all the occurrences of the character “e”. We can easily do this by specifying the -d parameter and the character that we want to delete from the phrase:

echo "Baeldung is in the top 10" | tr -d 'e'

And our result is:

Baldung is in th top 10

In addition, we can delete multiple characters by putting them all in a single set. Let's say that we want to remove all the vowels:

echo "Baeldung is in the top 10" | tr -d 'aeiou'

Let's check the output:

Bldng s n th tp 10

Now, imagine we want to delete all the digits that appear in the phrase. We can do this by using the same -d parameter plus the references to the digits set:

echo "Baeldung is in the top 10" | tr -d [:digit:]

Once again, we can see the output of the command:

Baeldung is in the top

5. Complementing Sets

We can also complement any of the sets that tr gives us.

Let's continue with the previous example of deleting the vowels. If, instead of deleting the vowels, we want to do the opposite – that is, the complementary operation – we just need to add the -c parameter and this will do the magic:

echo "Baeldung is in the top 10" | tr -cd 'aeiou'

Now the output will be the deletion of all characters except the vowels:

aeuiieo

6. Conclusion

In this tutorial, we've looked at how easy it is to manipulate strings using tr in a Bash shell.

For more info, check out the tr man page online or by typing man tr in the terminal.

Viewing all 4700 articles
Browse latest View live


<script src="https://jsc.adskeeper.com/r/s/rssing.com.1596347.js" async> </script>