Quantcast
Channel: Baeldung
Viewing all 4703 articles
Browse latest View live

Guide to Stream Redirections in Linux

$
0
0

1. Introduction

Whenever we work on the Linux command line, we often have to pass data from one command to another, like feeding a list of find results into a grep. This is where streams come into play.

In this tutorial, we'll take a look at what streams are and how we work with them.

2. What are Streams

We can think of a stream in its simplest form as a pipe that carries data – especially character data – from one point to another.

Some examples of input streams are the keyboard, text data stored in files and input from I/O devices. We can deliver output to files, commands, windows, and other I/O devices.

3. Sample Data

Let's create some sample files to use in the subsequent sections:

$ echo -e "tables\nladders\nchairs" > streamdata1
$ echo -e "planes\ntrains\nautomobiles" > streamdata2

We've created the streamdata1 and streamdata2 files and populated them with some data:

$ cat streamdata1
tables
ladders
chairs

$ cat streamdata2 
planes
trains
automobiles

4. Redirecting Input

The first stream that we're going to look at is STDIN.

STDIN refers to the standard input stream; usually, input from the keyboard. STDIN has a filehandle of 0 (zero).

The < operator is used to pass input from a file or I/O device data to a command.

Let's say that we want to count the number of lines in a file without passing the file name through as a parameter to the wc command. We can do it by redirecting STDIN:

$ wc -l < streamdata1

5. Redirecting Output

Next, let's take a look at STDOUT, the standard output stream. All output from this stream is typically sent to our terminal window. The filehandle for STDOUT is 1.

The > operator is used to direct output from a command to a source; usually a file. By default, a single > will:

  • Create a new file if it doesn't already exist
  • Overwrite any pre-existing data in the file if the file already exists

Let's see how we can use the cat command to emit the contents of streamdata1 and send the output to a new file:

$ cat streamdata1 > combinedstreamdata

When we print the contents of the combinestreamdata file it should look exactly like streamdata1:

$ cat combinedstreamdata
tables
ladders
chairs

6. Appending to an Existing File

While > overwrites data, the >> operator preserves data by appending to an existing file.

Let's see how we can add the contents of streamdata2 to the combinedstreamdata file:

$ cat streamdata2 >> combinedstreamdata

The combinedstreamdata file now contains the contents of both our streamdata1 and streamdata2 files:

$ cat combinedstreamdata
tables
ladders
chairs
planes
trains
automobiles

7. Piping Output to Input

Chaining together multiple tasks is a common use case when working with Linux commands.

With the | (pipe) operator, we can chain many commands together by passing the output from one through as input to the next.

Let's try using the | operator to stream the output from the cat command to the input stream of the wc command:

$ cat streamdata2 | wc -l

8. Redirecting Error

Now that we've got the basics of stream redirection down, let's look at how we can work with multiple output files.

Let's attempt to execute a script that does not exist and pipe its imaginary output to a log file:

$ exec doesnotexist.sh > out.log

We get this error message:

exec: doesnotexist.sh: not found

Let's take a look and see what our command wrote to out.log:

$ cat out.log

Hmm, our log file is empty. But, we did see an error message – we might want to log that, too.

Let's see how we can redirect STDOUT and STDERR to capture the output and error output:

$ exec doesnotexist.sh >out.log 2>err.log

In the above statement, we direct standard output to out.log and standard error to err.log.

More specifically, we referenced the standard error stream using its filehandle – 2>err.log. We didn't have to specify the filehandle for standard output because its filehandle is the default.

Let's check to see what the command wrote to err.log:

$ cat err.log
exec: doesnotexist.sh: not found

Our error message was successfully redirected to our error log file.

In this example, we handled both output streams (STDOUT, STDERR) and directed each to its own log file.

9. Merging Output and Error

Although we can direct STDOUT and STDERR to their own log files, we often prefer the simplicity of having a single log file to deal with.

The >& operator is a special operator that is used for directing output from one stream to anotherWe can use it to pipe the output of STDERR to STDOUT: 

Let's see how we can leverage file handles and >& to give us a single log file that contains the output of STDOUT and STDERR:

$ cat streamdata1 streamdata2 streamdata3 2>&1>out.log
$ cat out.log
tables
ladders
chairs
planes
trains
automobiles
cat: streamdata3: No such file or directory

As expected, the contents of streamdata1 and streamdata2 are found in out.log along with the anticipated error message since streamdata3 does, in fact, not exist.

10. Conclusion

In this tutorial, we looked at what Linux streams are and saw how to use them. We worked through a few scenarios that demonstrated the different capabilities of stream redirection.


How to Count Duplicate Elements in Arraylist

$
0
0

1. Overview

In this short tutorial, we'll look at some different ways to count the duplicated elements in an ArrayList.

2. Loop with Map.put()

Our expected result would be a Map object, which contains all elements from the input list as keys and the count of each element as value.

The most straightforward solution to achieve this would be to loop through the input list and for each element:

  • if the resultMap contains the element, we increment a counter by 1
  • otherwise, we put a new map entry (element, 1) to the map
public <T> Map<T, Long> countByClassicalLoop(List<T> inputList) {
    Map<T, Long> resultMap = new HashMap<>();
    for (T element : inputList) {
        if (resultMap.containsKey(element)) {
            resultMap.put(element, resultMap.get(element) + 1L);
        } else {
            resultMap.put(element, 1L);
        }
    }
    return resultMap;
}

This implementation has the best compatibility, as it works for all modern Java versions.

Next, let's create an input list to test the method:

private List<String> INPUT_LIST = Lists.list(
  "expect1",
  "expect2", "expect2",
  "expect3", "expect3", "expect3",
  "expect4", "expect4", "expect4", "expect4");

And now let's verify it:

private void verifyResult(Map<String, Long> resultMap) {
    assertThat(resultMap)
      .isNotEmpty().hasSize(4)
      .containsExactly(
        entry("expect1", 1L),
        entry("expect2", 2L),
        entry("expect3", 3L),
        entry("expect4", 4L));
}

We'll reuse this test harness for the rest of our approaches.

3. Loop with Map.compute()

The solution in the previous section has the best compatibility, however, it looks a little bit lengthy.

Since JDK 8, the handy compute() method was introduced to the Map interface. We can make use of this method to simplify the containsKey() check:

public <T> Map<T, Long> countByClassicalLoopWithMapCompute(List<T> inputList) {
    Map<T, Long> resultMap = new HashMap<>();
    for (T element : inputList) {
        resultMap.compute(element, (k, v) -> v == null ? 1 : v + 1);
    }
    return resultMap;
}

4. Stream API Collectors.toMap()

Since we've already talked about JDK 8, we won't forget the powerful Stream API. Thanks to the Stream API, we can solve the problem in a very compact way.

The toMap() collector helps us to convert the input list into a Map:

public <T> Map<T, Long> countByStreamToMap(List<T> inputList) {
    return inputList.stream().collect(Collectors.toMap(Function.identity(), v -> 1L, Long::sum));
}

The toMap() is a convenient collector, which can help us to transform the stream into different Map implementations.

5. Stream API Collectors.groupingBy() and Collectors.counting()

Except for the toMap(), our problem can be solved by two other collectors, groupingBy() and counting():

public <T> Map<T, Long> countByStreamGroupBy(List<T> inputList) {
    return inputList.stream().collect(Collectors.groupingBy(k -> k, Collectors.counting()));
}

The proper usage of Java 8 Collectors makes our codes compact and easy to read.

6. Conclusion

In this quick article, we illustrated various ways to calculate the count of duplicate elements in a list. As always, the complete source code is available over on GitHub.

Best Practices for REST API Error Handling

$
0
0

1. Introduction

REST is a stateless architecture in which clients can access and manipulate resources on a server. Generally, REST services utilize HTTP to advertise a set of resources that they manage and provide an API that allows clients to obtain or alter the state of these resources.

In this tutorial, we'll learn about some of the best practices for handling REST API errors, including useful approaches for providing users with relevant information, examples from large-scale websites, and a concrete implementation using an example Spring REST application.

2. HTTP Status Codes

When a client makes a request to an HTTP server — and the server successfully receives the request — the server must notify the client if the request was successfully handled or not. HTTP accomplishes this with five categories of status codes:

  • 100-level (Informational) — Server acknowledges a request
  • 200-level (Success) — Server completed the request as expected
  • 300-level (Redirection) — Client needs to perform further actions to complete the request
  • 400-level (Client error) — Client sent an invalid request
  • 500-level (Server error) — Server failed to fulfill a valid request due to an error with server

Based on the response code, a client can surmise the result of a particular request.

3. Handling Errors

The first step in handling errors is to provide a client with a proper status code. Additionally, we may need to provide more information in the response body.

3.1. Basic Responses

The simplest way we handle errors is to respond with an appropriate status code.

Some common response codes include:

  • 400 Bad Request — Client sent an invalid request — such as lacking required request body or parameter
  • 401 Unauthorized — Client failed to authenticate with the server
  • 403 Forbidden — Client authenticated but does not have permission to access the requested resource
  • 404 Not Found — The requested resource does not exist
  • 412 Precondition Failed — One or more conditions in the request header fields evaluated to false
  • 500 Internal Server Error — A generic error occurred on the server
  • 503 Service Unavailable — The requested service is not available

Generally, we should not expose 500 errors to clients. 500 errors signal that some issue occurred on the server, such as an unexpected exception in our REST service while handling a request. Therefore, this internal error is not our client's business.

Instead, we should diligently attempt to handle or catch internal errors and respond with some 400 level response. For example, if an exception occurs because a requested resource doesn't exist, we should expose this as a 404 error, not a 500 error.

While basic, these codes allow a client to understand the broad nature of the error that occurred. For example, we know if we receive a 403 error that we lack permissions to access the resource we requested.

In many cases, though, we need to provide supplemental details in our responses.

3.2. Default Spring Error Responses

These principles are so ubiquitous that Spring has codified them in its default error handling mechanism.

To demonstrate, suppose we have a simple Spring REST application that manages books, with an endpoint to retrieve a book by its ID:

curl -X GET -H "Accept: application/json" http://localhost:8080/api/book/1

If there is no book with an ID of 1, we expect that our controller will throw a BookNotFoundException. Performing a GET on this endpoint, we see that this exception was thrown and the response body is:

{
    "timestamp":"2019-09-16T22:14:45.624+0000",
    "status":500,
    "error":"Internal Server Error",
    "message":"No message available",
    "path":"/api/book/1"
}

Note that this default error handler includes a timestamp of when the error occurred, the HTTP status code, a title (the error field), a message (which is blank by default), and the URL path where the error occurred.

These fields provide a client or developer with information to help troubleshoot the problem and also constitute a few of the fields that make up standard error handling mechanisms.

Additionally, note that Spring automatically returns an HTTP status code of 500 when our BookNotFoundException is thrown. Although some APIs will return a 500 status code — or 400 status code, as we will see with the Facebook and Twitter APIs — for all errors for the sake of simplicity, it is best to use the most specific error code when possible.

3.3. More Detailed Responses

As seen in the above Spring example, sometimes a status code is not enough to show the specifics of the error. When needed, we can use the body of the response to provide the client with additional information. When providing detailed responses, we should include:

  • Error — A unique identifier for the error
  • Message — A brief human-readable message
  • Detail — A lengthier explanation of the error

For example, if a client sends a request with incorrect credentials, we can send a 403 response with a body of:

{
    "error": "auth-0001",
    "message": "Incorrect username and password",
    "detail": "Ensure that the username and password included in the request are correct"
}

The error field should not match the response code. Instead, it should be an error code unique to our application. Generally, there is no convention for the error field, expect that it be unique.

Usually, this field contains only alphanumerics and connecting characters, such as dashes or underscores. For example, 0001auth-0001, and incorrect-user-pass are canonical examples of error codes.

The message portion of the body is usually considered presentable on user interfaces. Therefore we should translate this title if we support internationalization. So, if a client sends a request with an Accept-Language header corresponding to French, the title value should be translated to French.

The detail portion is intended for use by developers of clients and not the end-user, so translation is not necessary.

Additionally, we could also provide a URL — such as the help field — that clients can follow to discover more information:

{
    "error": "auth-0001",
    "message": "Incorrect username and password",
    "detail": "Ensure that the username and password included in the request are correct",
    "help": "https://example.com/help/error/auth-0001"
}

Sometimes, we may want to report more than one error for a request. In this case, we should return the errors in a list:

{
    "errors": [
        {
            "error": "auth-0001",
            "message": "Incorrect username and password",
            "detail": "Ensure that the username and password included in the request are correct",
            "help": "https://example.com/help/error/auth-0001"
        },
        ...
    ]
}

And when a single error occurs, we respond with a list containing one element. Note that responding with multiple errors may be too complicated for simple applications. In many cases, responding with the first or most significant error is sufficient.

3.4. Standardized Response Bodies

While most REST APIs follow similar conventions, specifics usually vary, including the names of fields and the information included in the response body. These differences make it difficult for libraries and frameworks to handle errors uniformly.

In an effort to standardize REST API error handling, the IETF devised RFC 7807, which creates a generalized error-handling schema.

This schema is composed of five parts:

  1. type — A URI identifier that categorizes the error
  2. title — A brief, human-readable message about the error
  3. status — The HTTP response code (optional)
  4. detail — A human-readable explanation of the error
  5. instance — A URI that identifies the specific occurrence of the error

Instead of using our custom error response body, we can convert our body to:

{
    "type": "/errors/incorrect-user-pass",
    "title": "Incorrect username or password.",
    "status": 403,
    "detail": "Authentication failed due to incorrect username or password.",
    "instance": "/login/log/abc123"
}

Note that the type field categorizes the type of error, while instance identifies a specific occurrence of the error in a similar fashion to classes and objects, respectively.

By using URIs, clients can follow these paths to find more information about the error in the same way that HATEOAS links can be used to navigate a REST API.

Adhering to RFC 7807 is optional, but it is advantageous if uniformity is desired.

4. Examples

The above practices are common throughout some of the most popular REST APIs. While the specific names of fields or formats may vary between sites, the general patterns are nearly universal.

4.1. Twitter

For example, let's send a GET request without supplying the required authentication data:

curl -X GET https://api.twitter.com/1.1/statuses/update.json?include_entities=true

The Twitter API responds with a 400 error with the following body:

{
    "errors": [
        {
            "code":215,
            "message":"Bad Authentication data."
        }
    ]
}

This response includes a list containing a single error, with its error code and message. In Twitter's case, no detailed message is present and a general 400 error — rather than a more specific 401 error — is used to denote that authentication failed.

Sometimes a more general status code is easier to implement, as we'll see in our Spring example below. It allows developers to catch groups of exceptions and not differentiate the status code that should be returned. When possible, though, the most specific status code should be used.

4.2. Facebook

Similar to Twitter, Facebook's Graph REST API also includes detailed information in its responses.

For example, let's perform a POST request to authenticate with the Facebook Graph API:

curl -X GET https://graph.facebook.com/oauth/access_token?client_id=foo&client_secret=bar&grant_type=baz

We receive the following error:

{
    "error": {
        "message": "Missing redirect_uri parameter.",
        "type": "OAuthException",
        "code": 191,
        "fbtrace_id": "AWswcVwbcqfgrSgjG80MtqJ"
    }
}

Like Twitter, Facebook also uses a generic 400 error — rather than a more specific 400-level error — to denote a failure. In addition to a message and numeric code, Facebook also includes a type field that categorizes the error and a trace ID (fbtrace_id) that acts as an internal support identifier.

5. Conclusion

In this article, we examined some of the best practices of REST API error handling, including:

  • Providing specific status codes
  • Including additional information in response bodies
  • Handling exceptions in a uniform manner

While the details of error handling will vary by application, these general principles apply to nearly all REST APIs and should be adhered to when possible.

Not only does this allow clients to handle errors in a consistent manner, but it also simplifies the code we create when implementing a REST API.

The code referenced in this article is available over on GitHub.

Intro to Spring Data Geode

$
0
0

1. Overview

Apache Geode provides data management solutions through a distributed cloud architecture. It would be ideal to utilize the Spring Data APIs for the data access through the Apache Geode server.

In this tutorial, we'll explore Spring Data Geode for the configuration and development of an Apache Geode Java client application.

2. Spring Data Geode

The Spring Data Geode library empowers a Java application to configure an Apache Geode server through XML and annotations. At the same time, the library is also handy for creating an Apache Geode cache client-server application.

The Spring Data Geode library is similar to Spring Data Gemfire. Apart from subtle differences, the latter provides integration with Pivotal Gemfire, which is a commercial version of Apache Geode.

Along the way, we'll explore a few Spring Data Geode annotations to configure a Java application into an Apache Geode's cache client.

3. Maven Dependency

Let's add the latest spring-geode-starter dependency to our pom.xml:

<dependency>
    <groupId>org.springframework.geode</groupId>
    <artifactId>spring-geode-starter</artifactId>
    <version>1.1.1.RELEASE</version>
</dependency>

4. Apache Geode's @ClientCacheApplication with Spring Boot

First, let's create a Spring Boot ClientCacheApp by using @SpringBootApplication:

@SpringBootApplication 
public class ClientCacheApp {
    public static void main(String[] args) {
        SpringApplication.run(ClientCacheApp.class, args); 
    } 
}

Then, to transform the ClientCacheApp class into the Apache Geode cache client, we'll add the Spring Data Geode provided @ClientCacheApplication:

@ClientCacheApplication
// existing annotations
public class ClientCacheApp {
    // ...
}

That's it! The cache client app is ready to run.

However, before starting our app, we'll need to start the Apache Geode server.

5. Start an Apache Geode Server

Assuming that Apache Geode and gfsh command-line interface are already set up, we can start a locator named basicLocator and then a server named basicServer.

To do so, let's run the following commands in the gfsh CLI:

gfsh>start locator --name="basicLocator"
gfsh>start server --name="basicServer"

Once the server starts running, we can list all the members:

gfsh>list members

The gfsh CLI output should list the locator and the server:

    Name     | Id
------------ | ------------------------------------------------------------------
basicLocator | 10.25.3.192(basicLocator:25461:locator)<ec><v0>:1024 [Coordinator]
basicServer  | 10.25.3.192(basicServer:25546)<v1>:1025

Voila! We're all set to run our cache client app using the Maven command:

mvn spring-boot:run

6. Configuration

Let's configure our cache client app to access data through the Apache Geode server.

6.1. Region

First, we'll create an entity named Author and then define it as an Apache Geode Region. A Region is similar to a table in the RDBMS:

@Region("Authors")
public class Author {
    @Id
    private Long id;
    
    private String firstName;
    private String lastName;
    private int age;
}

Let's review the Spring Data Geode annotations declared in the Author entity.

To begin with, @Region will create the Authors region in the Apache Geode server to persist the Author object.

Then, @Id will mark the property as a primary key.

6.2. Entity

We can enable the Author entity by adding @EnableEntityDefinedRegions.

Also, we'll add @EnableClusterConfiguration to let the application create the regions in the Apache Geode server:

@EnableEntityDefinedRegions(basePackageClasses = Author.class)
@EnableClusterConfiguration
// existing annotations
public class ClientCacheApp {
    // ...
}

Therefore, restarting the app will create the regions automatically:

gfsh>list regions

List of regions
---------------
Authors

6.3. Repository

Next, we'll add CRUD operations on the Author entity.

To do so, let's create a repository named AuthorRepository, which extends Spring Data's CrudRepository:

public interface AuthorRepository extends CrudRepository<Author, Long> {
}

Then, we'll enable the AuthorRepository by adding @EnableGemfireRepositories:

@EnableGemfireRepositories(basePackageClasses = AuthorRepository.class)
// existing annotations
public class ClientCacheApp {
    // ...
}

Now, we're all set to perform CRUD operations on the Author entity using methods like save and findById provided by CrudRepository.

6.4. Indexes

Spring Data Geode provides an easy way to create and enable the indexes in the Apache Geode server.

First, we'll add @EnableIndexing to the ClientCacheApp class:

@EnableIndexing
// existing annotations
public class ClientCacheApp {
    // ...
}

Then, let's add @Indexed to a property in the Author class:

public class Author {
    @Id
    private Long id;

    @Indexed
    private int age;

    // existing data members
}

Here, Spring Data Geode will automatically implement the indexes based on the annotations defined in the Author entity.

Hence, @Id will implement the primary key index for the id. Similarly, @Indexed will implement the hash index for the age.

Now, let's restart the application and confirm the indexes created in the Apache Geode server:

gfsh> list indexes

Member Name | Region Path |       Name        | Type  | Indexed Expression | From Clause | Valid Index
----------- | ----------- | ----------------- | ----- | ------------------ | ----------- | -----------
basicServer | /Authors    | AuthorsAgeKeyIdx  | RANGE | age                | /Authors    | true
basicServer | /Authors    | AuthorsIdHashIdx  | RANGE | id                 | /Authors    | true

Likewise, we can use @LuceneIndexed to create an Apache Geode Lucene index for the String typed properties.

6.5. Continuous Query

The continuous query enables the application to receive automatic notifications when data gets changed in the server. It matches the query and relies on the subscription model.

To add the capability, we'll create the AuthorService and add @ContinuousQuery with the matching query:

@Service
public class AuthorService {
    @ContinuousQuery(query = "SELECT * FROM /Authors a WHERE a.id = 1")
    public void process(CqEvent event) {
        System.out.println("Author #" + event.getKey() + " updated to " + event.getNewValue());
    }
}

To use the continuous queries, we'll enable server-to-client subscriptions:

@ClientCacheApplication(subscriptionEnabled = true)
// existing annotations
public class ClientCacheApp {
    // ...
}

Hence, our app will receive automatic notification at the process method, whenever we modify an Author object with an id equal to 1.

7. Additional Annotations

Let's explore a few handy annotations additionally available in the Spring Data Geode library.

7.1. @PeerCacheApplication

So far, we've examined a Spring Boot application as an Apache Geode cache client. At times, we may require our application to be an Apache Geode peer cache application.

Then, we should annotate the main class with @PeerCacheApplication in place of @CacheClientApplication.

Also, @PeerCacheApplication will automatically create an embedded peer cache instance to connect with.

7.2. @CacheServerApplication

Similarly, to have our Spring Boot application as both a peer member and a server, we can annotate the main class with @CacheServerApplication.

7.3. @EnableHttpService

We can enable Apache Geode's embedded HTTP server for both of @PeerCacheApplication and @CacheServerApplication.

To do so, we need to annotate the main class with @EnableHttpService. By default, the HTTP service starts on port 7070.

7.4. @EnableLogging

We can enable the logging by simply adding @EnableLogging to the main class. At the same time, we can use the logLevel and logFile attributes to set the corresponding properties.

7.5. @EnablePdx

Also, we can enable Apache Geode's PDX serialization technique for all our domains, by merely adding @EnablePdx to the main class.

7.6. @EnableSsl and @EnableSecurity

We can use @EnableSsl to switch on Apache Geode's TCP/IP Socket SSL. Similarly, @EnableSecurity can be used to enable Apache Geode's security for authentication and authorization.

8. Conclusion

In this tutorial, we've explored Spring Data for Apache Geode.

To begin with, we've created a Spring Boot application to serve as the Apache Geode cache client application.

At the same time, we've examined a few handy annotations provided by Spring Data Geode to configure and enable Apache Geode features.

Last, we've explored a few additional annotations like @PeerCacheApplication and @CacheServerApplication to change the application to a peer or server in the cluster configuration.

As usual, all the code implementations are available over on GitHub.

Concatenating Files in Linux

$
0
0

1. Introduction

Sometimes, we need to do some operations that require using multiple files at the same time. This can be something as common as searching for some text in multiple files or merging multiple files into a new one.

In this quick tutorial, we'll show some useful operations that can make our life easier when concatenating files in Linux.

2. The cat Command

The most frequently used command to concatenate files in Linux is probably cat, whose name comes from concatenate.

The command syntax follows the form:

cat [options] [files]

In the next sections, we'll dig deeper into the command and the options we can use.

3. Displaying a File

Let's first go quickly over the basics of the cat command. The most straightforward operation we can do is to display a file:

cat myfile

This displays myfile in the standard output:

This is a text file.

4. Creating a File

We can also use cat to create new files without a text editor.

It's as easy as using the redirection operator:

cat > newfile

After that, we can start typing what we want to add to the file:

creating a new file.

When we want to save the file, we have to press CTRL+D. Notice that if the file exists, it will be overwritten.

5. Concatenating Files

One of the most common functions of the cat command is to concatenate files, as its name suggests.

The most simple concatenation is to display multiple files in the standard output:

cat file1 file2

The command above displays the files sequentially:

My file 1 
My file 2

We can also use wildcards to display all the files that match a common pattern:

cat file*

So far, we've been displaying the files in the standard output, but we can write the output into a new file:

cat file1 file2 > file3

Also, we can append a file to an existing file:

cat file1 >> file2

Another useful option is to read from the standard input, which we represent by using ‘-‘ :

cat - file1 > file2

Then, we can type the text we want to concatenate before file1:

text from standard input

Now, if we type cat file2 to display the file, we can see the text we've introduced concatenated with file1:

text from standard input
My file 1

Also, we could append the standard input after the file instead of before:

cat file1 - > file2

If we go a bit further, we can also concatenate the output of any other command to cat:

ls -la | cat > file1

Finally, we can pipe cat output to other utilities to create more powerful commands:

cat file1 file2 file3 | sort > file4

In this case, we've concatenated three files, sorted the result of the concatenation, and written the sorted output to a new file called file4.

6. Other Options

In the help of the cat command, we can find some other useful options that we can add to our commands:

cat --help
Usage: cat [OPTION]... [FILE]...
Concatenate FILE(s) to standard output.

With no FILE, or when FILE is -, read standard input.

  -A, --show-all           equivalent to -vET
  -b, --number-nonblank    number nonempty output lines, overrides -n
  -e                       equivalent to -vE
  -E, --show-ends          display $ at end of each line
  -n, --number             number all output lines
  -s, --squeeze-blank      suppress repeated empty output lines
  -t                       equivalent to -vT
  -T, --show-tabs          display TAB characters as ^I
  -u                       (ignored)
  -v, --show-nonprinting   use ^ and M- notation, except for LFD and TAB
      --help     display this help and exit
      --version  output version information and exit

For instance, we can use the -n option:

cat -n myfile

That displays the number of each line:

1 This is a test file. 
2 It contains multiple lines.

Alternatively, we can use -e:

cat -e myfile

In this case, it shows a at the end of each line:

This is a test file.$ 
It contains multiple lines.$

These are just some quick examples that show how to use these options.

7. Conclusion

In this quick tutorial, we've shown some examples of how to use the cat command in Linux. We covered the basics pretty quickly to focus later on the file concatenation. We've also seen that cat can be handy when combined with other commands and can be used in many different situations.

File System Mocking with Jimfs

$
0
0

1. Overview

Typically, when testing components that make heavy use of I/O operations, our tests can suffer from several issues such as poor performance, platform dependency, and unexpected state.

In this tutorial, we'll take a look at how we can alleviate these problems using the in-memory file system Jimfs.

2. Introduction to Jimfs

and supports almost every feature of it. This is particularly useful, as it means we can emulate a virtual in-memory filesystem and interact with it using our existing java.nio layer.

As we're going to see, it may be beneficial to use a mocked file system instead of a real one in order to:

  • avoid being dependent on the file system that is currently running the test
  • ensure the filesystem gets assembled with the expected state on each test run
  • help speed up our tests

As file systems vary considerably, using Jimfs also facilitates easily testing with file systems from different operating systems.

3. Maven Dependencies

First of all, let’s add the project dependencies we'll need for our examples:

<dependency>
    <groupId>com.google.jimfs</groupId>
    <artifactId>jimfs</artifactId>
    <version>1.1</version>
</dependency>

The jimfs dependency contains everything that we need in order to use our mocked file system. Additionally, we'll be writing tests using JUnit5.

4. A Simple File Repository

We'll start by defining a simple FileRepository class that implements some standard CRUD operations:

public class FileRepository {

    void create(Path path, String fileName) {
        Path filePath = path.resolve(fileName);
        try {
            Files.createFile(filePath);
        } catch (IOException ex) {
            throw new UncheckedIOException(ex);
        }
    }

    String read(Path path) {
        try {
            return new String(Files.readAllBytes(path));
        } catch (IOException ex) {
            throw new UncheckedIOException(ex);
        }
    }

    String update(Path path, String newContent) {
        try {
            Files.write(path, newContent.getBytes());
            return newContent;
        } catch (IOException ex) {
            throw new UncheckedIOException(ex);
        }
    }

    void delete(Path path) {
        try {
            Files.deleteIfExists(path);
        } catch (IOException ex) {
            throw new UncheckedIOException(ex);
        }
    }
}

As we can see, each method is making use of standard java.nio classes.

4.1. Creating a File

In this section, we'll write a test that tests the create method from our repository:

@Test
@DisplayName("Should create a file on a file system")
void givenUnixSystem_whenCreatingFile_thenCreatedInPath() {
    FileSystem fileSystem = Jimfs.newFileSystem(Configuration.unix());
    String fileName = "newFile.txt";
    Path pathToStore = fileSystem.getPath("");

    fileRepository.create(pathToStore, fileName);

    assertTrue(Files.exists(pathToStore.resolve(fileName)));
}

In this example, we've used the static method Jimfs.newFileSystem() to create a new in-memory file system. We pass a configuration object Configuration.unix(), which creates an immutable configuration for a Unix file system. This includes important OS-specific information such as path separators and information about symbolic links.

Now that we've created a file, we're able to check if the file was created successfully on the Unix-based system.

4.2. Reading a File

Next, we'll test the method that reads the content of the file:

@Test
@DisplayName("Should read the content of the file")
void givenOSXSystem_whenReadingFile_thenContentIsReturned() throws Exception {
    FileSystem fileSystem = Jimfs.newFileSystem(Configuration.osX());
    Path resourceFilePath = fileSystem.getPath(RESOURCE_FILE_NAME);
    Files.copy(getResourceFilePath(), resourceFilePath);

    String content = fileRepository.read(resourceFilePath);

    assertEquals(FILE_CONTENT, content);
}

This time around, we've checked if it's possible to read the content of the file on a macOS (formerly OSX) system by simply using a different type of configuration — Jimfs.newFileSystem(Configuration.osX()).

4.3. Updating a File

We can also use Jimfs to test the method that updates the content of the file:

@Test
@DisplayName("Should update the content of the file")
void givenWindowsSystem_whenUpdatingFile_thenContentHasChanged() throws Exception {
    FileSystem fileSystem = Jimfs.newFileSystem(Configuration.windows());
    Path resourceFilePath = fileSystem.getPath(RESOURCE_FILE_NAME);
    Files.copy(getResourceFilePath(), resourceFilePath);
    String newContent = "I'm updating you.";

    String content = fileRepository.update(resourceFilePath, newContent);

    assertEquals(newContent, content);
    assertEquals(newContent, fileRepository.read(resourceFilePath));
}

Likewise, this time we've checked how the method behaves on a Windows-based system by using Jimfs.newFileSystem(Configuration.windows()).

4.4. Deleting a File

To conclude testing our CRUD operations, let's test the method that deletes the file:

@Test
@DisplayName("Should delete file")
void givenCurrentSystem_whenDeletingFile_thenFileHasBeenDeleted() throws Exception {
    FileSystem fileSystem = Jimfs.newFileSystem();
    Path resourceFilePath = fileSystem.getPath(RESOURCE_FILE_NAME);
    Files.copy(getResourceFilePath(), resourceFilePath);

    fileRepository.delete(resourceFilePath);

    assertFalse(Files.exists(resourceFilePath));
}

Unlike previous examples, we've used Jimfs.newFileSystem() without specifying a file system configuration. In this case, Jimfs will create a new in-memory file system with a default configuration appropriate to the current operating system.

5. Moving a File

In this section, we'll learn how to test a method that moves a file from one directory to another.

Firstly, let's implement the move method using the standard java.nio.file.File class:

void move(Path origin, Path destination) {
    try {
        Files.createDirectories(destination);
        Files.move(origin, destination, StandardCopyOption.REPLACE_EXISTING);
    } catch (IOException ex) {
        throw new UncheckedIOException(ex);
    }
}

We're going to use a parameterized test to ensure that this method works on several different file systems:

private static Stream<Arguments> provideFileSystem() {
    return Stream.of(
            Arguments.of(Jimfs.newFileSystem(Configuration.unix())),
            Arguments.of(Jimfs.newFileSystem(Configuration.windows())),
            Arguments.of(Jimfs.newFileSystem(Configuration.osX())));
}

@ParameterizedTest
@DisplayName("Should move file to new destination")
@MethodSource("provideFileSystem")
void givenEachSystem_whenMovingFile_thenMovedToNewPath(FileSystem fileSystem) throws Exception {
    Path origin = fileSystem.getPath(RESOURCE_FILE_NAME);
    Files.copy(getResourceFilePath(), origin);
    Path destination = fileSystem.getPath("newDirectory", RESOURCE_FILE_NAME);

    fileManipulation.move(origin, destination);

    assertFalse(Files.exists(origin));
    assertTrue(Files.exists(destination));
}

As we can see, we've also been able to use Jimfs to test that we can move files on a variety of different file systems from a single unit test.

6. Operating System Dependent Tests

To demonstrate another benefit of using Jimfs, let's create a FilePathReader class. The class is responsible for returning the real system path, which is, of course, OS-dependent:

class FilePathReader {

    String getSystemPath(Path path) {
        try {
            return path
              .toRealPath()
              .toString();
        } catch (IOException ex) {
            throw new UncheckedIOException(ex);
        }
    }
}

Now, let's add a test for this class:

class FilePathReaderUnitTest {

    private static String DIRECTORY_NAME = "baeldung";

    private FilePathReader filePathReader = new FilePathReader();

    @Test
    @DisplayName("Should get path on windows")
    void givenWindowsSystem_shouldGetPath_thenReturnWindowsPath() throws Exception {
        FileSystem fileSystem = Jimfs.newFileSystem(Configuration.windows());
        Path path = getPathToFile(fileSystem);

        String stringPath = filePathReader.getSystemPath(path);

        assertEquals("C:\\work\\" + DIRECTORY_NAME, stringPath);
    }

    @Test
    @DisplayName("Should get path on unix")
    void givenUnixSystem_shouldGetPath_thenReturnUnixPath() throws Exception {
        FileSystem fileSystem = Jimfs.newFileSystem(Configuration.unix());
        Path path = getPathToFile(fileSystem);

        String stringPath = filePathReader.getSystemPath(path);

        assertEquals("/work/" + DIRECTORY_NAME, stringPath);
    }

    private Path getPathToFile(FileSystem fileSystem) throws Exception {
        Path path = fileSystem.getPath(DIRECTORY_NAME);
        Files.createDirectory(path);

        return path;
    }
}

As we can see, the output for Windows differs from the one of Unix, as we'd expect. Moreover, we didn't have to run these tests using two different file systems — Jimfs mocked it for us automatically.

It's worth mentioning that Jimfs doesn't support the toFile() method that returns a java.io.File. It's the only method from the Path class that isn't supported. Therefore, it might be better to operate on an InputStream rather than a File.

7. Conclusion

In this article, we've learned how to use use the in-memory file system Jimfs to mock file system interactions from our unit tests.

First, we started by defining a simple file repository with several CRUD operations. Then we saw examples of how to test each of the methods using a different file system type. Finally, we saw an example of how we can use Jimfs to test OS-dependent file system handling.

As always, the code for these examples is available over on Github.

Testing a Spring Batch Job

$
0
0

1. Introduction

Unlike other Spring-based applications, testing batch jobs comes with some specific challenges, mostly due to the asynchronous nature of how jobs are executed.

In this tutorial, we're going to explore the various alternatives for testing a Spring Batch job.

2. Required Dependencies

We're using spring-boot-starter-batch, so first let's set up the required dependencies in our pom.xml:

<dependency>
    <groupId>org.springframework.boot</groupId>
    <artifactId>spring-boot-starter-batch</artifactId>
    <version>2.1.9.RELEASE</version>
</dependency>
<dependency>
    <groupId>org.springframework.boot</groupId>
    <artifactId>spring-boot-starter-test</artifactId>
    <version>2.1.9.RELEASE</version>
    <scope>test</scope>
</dependency>
<dependency>
    <groupId>org.springframework.batch</groupId>
    <artifactId>spring-batch-test</artifactId>
    <version>4.2.0.RELEASE</version>
    <scope>test</scope>
</dependency>

We included the spring-boot-starter-test and spring-batch-test which bring in some necessary helper methods, listeners and runners for testing Spring Batch applications.

3. Defining the Spring Batch Job

Let's create a simple application to show how Spring Batch solves some of the testing challenges.

Our application uses a two-step Job that reads a CSV input file with structured book information and outputs books and book details.

3.1. Defining the Job Steps

The two subsequent Steps extract specific information from BookRecords and then map these to Books (step1) and BookDetails (step2):

@Bean
public Step step1(
  ItemReader<BookRecord> csvItemReader, ItemWriter<Book> jsonItemWriter) throws IOException {
    return stepBuilderFactory
      .get("step1")
      .<BookRecord, Book> chunk(3)
      .reader(csvItemReader)
      .processor(bookItemProcessor())
      .writer(jsonItemWriter)
      .build();
}

@Bean
public Step step2(
  ItemReader<BookRecord> csvItemReader, ItemWriter<BookDetails> listItemWriter) {
    return stepBuilderFactory
      .get("step2")
      .<BookRecord, BookDetails> chunk(3)
      .reader(csvItemReader)
      .processor(bookDetailsItemProcessor())
      .writer(listItemWriter)
      .build();
}

3.2. Defining the Input Reader and Output Writer

Let's now configure the CSV file input reader using a FlatFileItemReader to de-serialize the structured book information into BookRecord objects:

private static final String[] TOKENS = { 
  "bookname", "bookauthor", "bookformat", "isbn", "publishyear" };

@Bean
@StepScope
public FlatFileItemReader<BookRecord> csvItemReader(
  @Value("#{jobParameters['file.input']}") String input) {
    FlatFileItemReaderBuilder<BookRecord> builder = new FlatFileItemReaderBuilder<>();
    FieldSetMapper<BookRecord> bookRecordFieldSetMapper = new BookRecordFieldSetMapper();
    return builder
      .name("bookRecordItemReader")
      .resource(new FileSystemResource(input))
      .delimited()
      .names(TOKENS)
      .fieldSetMapper(bookRecordFieldSetMapper)
      .build();
}

There are a couple of important things in this definition, which will have implications on the way we test.

First of all, we annotated the FlatItemReader bean with @StepScope, and as a result, this object will share its lifetime with StepExecution.

This also allows us to inject dynamic values at runtime so that we can pass our input file from the JobParameters in line 4. In contrast, the tokens used for the BookRecordFieldSetMapper are configured at compile-time.

We then similarly define the JsonFileItemWriter output writer:

@Bean
@StepScope
public JsonFileItemWriter<Book> jsonItemWriter(
  @Value("#{jobParameters['file.output']}") String output) throws IOException {
    JsonFileItemWriterBuilder<Book> builder = new JsonFileItemWriterBuilder<>();
    JacksonJsonObjectMarshaller<Book> marshaller = new JacksonJsonObjectMarshaller<>();
    return builder
      .name("bookItemWriter")
      .jsonObjectMarshaller(marshaller)
      .resource(new FileSystemResource(output))
      .build();
}

For the second Step, we use a Spring Batch-provided ListItemWriter that just dumps stuff to an in-memory list.

3.3. Defining the Custom JobLauncher

Next, let's disable the default Job launching configuration of Spring Boot Batch by setting spring.batch.job.enabled=false in our application.properties.

We configure our own JobLauncher to pass a custom JobParameters instance when launching the Job:

@SpringBootApplication
public class SpringBatchApplication implements CommandLineRunner {

    // autowired jobLauncher and transformBooksRecordsJob

    @Value("${file.input}")
    private String input;

    @Value("${file.output}")
    private String output;

    @Override
    public void run(String... args) throws Exception {
        JobParametersBuilder paramsBuilder = new JobParametersBuilder();
        paramsBuilder.addString("file.input", input);
        paramsBuilder.addString("file.output", output);
        jobLauncher.run(transformBooksRecordsJob, paramsBuilder.toJobParameters());
   }

   // other methods (main etc.)
}

4. Testing the Spring Batch Job

The spring-batch-test dependency provides a set of useful helper methods and listeners that can be used to configure the Spring Batch context during testing.

Let's create a basic structure for our test:

@RunWith(SpringRunner.class)
@SpringBatchTest
@EnableAutoConfiguration
@ContextConfiguration(classes = { SpringBatchConfiguration.class })
@TestExecutionListeners({ DependencyInjectionTestExecutionListener.class, 
  DirtiesContextTestExecutionListener.class})
@DirtiesContext(classMode = ClassMode.AFTER_CLASS)
public class SpringBatchIntegrationTest {

    // other test constants
 
    @Autowired
    private JobLauncherTestUtils jobLauncherTestUtils;
  
    @Autowired
    private JobRepositoryTestUtils jobRepositoryTestUtils;
  
    @After
    public void cleanUp() {
        jobRepositoryTestUtils.removeJobExecutions();
    }

    private JobParameters defaultJobParameters() {
        JobParametersBuilder paramsBuilder = new JobParametersBuilder();
        paramsBuilder.addString("file.input", TEST_INPUT);
        paramsBuilder.addString("file.output", TEST_OUTPUT);
        return paramsBuilder.toJobParameters();
   }

The @SpringBatchTest annotation provides the JobLauncherTestUtils and JobRepositoryTestUtils helper classes. We use them to trigger the Job and Steps in our tests.

Our application uses Spring Boot auto-configuration, which enables a default in-memory JobRepository. As a result, running multiple tests in the same class requires a cleanup step after each test run.

Finally, if we want to run multiple tests from several test classes, we need to mark our context as dirty. This is required to avoid the clashing of several JobRepository instances using the same data source.

4.1. Testing the End-To-End Job

The first thing we'll test is a complete end-to-end Job with a small data-set input.

We can then compare the results with an expected test output:

@Test
public void givenReferenceOutput_whenJobExecuted_thenSuccess() throws Exception {
    // given
    FileSystemResource expectedResult = new FileSystemResource(EXPECTED_OUTPUT);
    FileSystemResource actualResult = new FileSystemResource(TEST_OUTPUT);

    // when
    JobExecution jobExecution = jobLauncherTestUtils.launchJob(defaultJobParameters());
    JobInstance actualJobInstance = jobExecution.getJobInstance();
    ExitStatus actualJobExitStatus = jobExecution.getExitStatus();
  
    // then
    assertThat(actualJobInstance.getJobName(), is("transformBooksRecords"));
    assertThat(actualJobExitStatus.getExitCode(), is("COMPLETED"));
    AssertFile.assertFileEquals(expectedResult, actualResult);
}

Spring Batch Test provides a useful file comparison method for verifying outputs using the AssertFile class.

4.2. Testing Individual Steps

Sometimes it's quite expensive to test the complete Job end-to-end and so it makes sense to test individual Steps instead:

@Test
public void givenReferenceOutput_whenStep1Executed_thenSuccess() throws Exception {
    // given
    FileSystemResource expectedResult = new FileSystemResource(EXPECTED_OUTPUT);
    FileSystemResource actualResult = new FileSystemResource(TEST_OUTPUT);

    // when
    JobExecution jobExecution = jobLauncherTestUtils.launchStep(
      "step1", defaultJobParameters()); 
    Collection actualStepExecutions = jobExecution.getStepExecutions();
    ExitStatus actualJobExitStatus = jobExecution.getExitStatus();

    // then
    assertThat(actualStepExecutions.size(), is(1));
    assertThat(actualJobExitStatus.getExitCode(), is("COMPLETED"));
    AssertFile.assertFileEquals(expectedResult, actualResult);
}

@Test
public void whenStep2Executed_thenSuccess() {
    // when
    JobExecution jobExecution = jobLauncherTestUtils.launchStep(
      "step2", defaultJobParameters());
    Collection actualStepExecutions = jobExecution.getStepExecutions();
    ExitStatus actualExitStatus = jobExecution.getExitStatus();

    // then
    assertThat(actualStepExecutions.size(), is(1));
    assertThat(actualExitStatus.getExitCode(), is("COMPLETED"));
    actualStepExecutions.forEach(stepExecution -> {
        assertThat(stepExecution.getWriteCount(), is(8));
    });
}

Notice that we use the launchStep method to trigger specific steps.

Remember that we also designed our ItemReader and ItemWriter to use dynamic values at runtime, which means we can pass our I/O parameters to the JobExecution (lines 9 and 23).

For the first Step test, we compare the actual output with an expected output.

On the other hand, in the second test, we verify the StepExecution for the expected written items.

4.3. Testing Step-scoped Components

Let's now test the FlatFileItemReader. Recall that we exposed it as @StepScope bean, so we'll want to use Spring Batch's dedicated support for this:

// previously autowired itemReader

@Test
public void givenMockedStep_whenReaderCalled_thenSuccess() throws Exception {
    // given
    StepExecution stepExecution = MetaDataInstanceFactory
      .createStepExecution(defaultJobParameters());

    // when
    StepScopeTestUtils.doInStepScope(stepExecution, () -> {
        BookRecord bookRecord;
        itemReader.open(stepExecution.getExecutionContext());
        while ((bookRecord = itemReader.read()) != null) {

            // then
            assertThat(bookRecord.getBookName(), is("Foundation"));
            assertThat(bookRecord.getBookAuthor(), is("Asimov I."));
            assertThat(bookRecord.getBookISBN(), is("ISBN 12839"));
            assertThat(bookRecord.getBookFormat(), is("hardcover"));
            assertThat(bookRecord.getPublishingYear(), is("2018"));
        }
        itemReader.close();
        return null;
    });
}

The MetadataInstanceFactory creates a custom StepExecution that is needed to inject our Step-scoped ItemReader.

Because of this, we can check the behavior of the reader with the help of the doInTestScope method.

Next, let's test the JsonFileItemWriter and verify its output:

@Test
public void givenMockedStep_whenWriterCalled_thenSuccess() throws Exception {
    // given
    FileSystemResource expectedResult = new FileSystemResource(EXPECTED_OUTPUT_ONE);
    FileSystemResource actualResult = new FileSystemResource(TEST_OUTPUT);
    Book demoBook = new Book();
    demoBook.setAuthor("Grisham J.");
    demoBook.setName("The Firm");
    StepExecution stepExecution = MetaDataInstanceFactory
      .createStepExecution(defaultJobParameters());

    // when
    StepScopeTestUtils.doInStepScope(stepExecution, () -> {
        jsonItemWriter.open(stepExecution.getExecutionContext());
        jsonItemWriter.write(Arrays.asList(demoBook));
        jsonItemWriter.close();
        return null;
    });

    // then
    AssertFile.assertFileEquals(expectedResult, actualResult);
}

Unlike the previous tests, we are now in full control of our test objects. As a result, we're responsible for opening and closing the I/O streams.

5. Conclusion

In this tutorial, we've explored the various approaches of testing a Spring Batch job.

End-to-end testing verifies the complete execution of the job. Testing individual steps may help in complex scenarios.

Finally, when it comes to Step-scoped components, we can use a bunch of helper methods provided by spring-batch-test. They will assist us in stubbing and mocking Spring Batch domain objects.

As usual, we can explore the complete codebase over on GitHub.

Mapping a Single Entity to Multiple Tables in JPA

$
0
0

1. Introduction

JPA makes dealing with relational database models from our Java applications less painful. Things are simple when we map every table to a single entity class. But, sometimes we have reasons to model our entities and tables differently:

In this short tutorial, we'll see how to tackle this last scenario.

2. Data Model

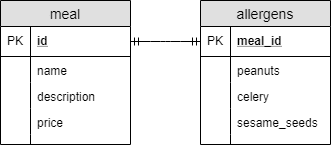
Let's say we run a restaurant, and we want to store data about every meal we serve:

  • name
  • description
  • price
  • what kind of allergens it contains

Since there are many possible allergens, we're going to group this dataset together. Furthermore, we'll also model this using the following table definitions:

Now let's see how can we map these tables to entities using standard JPA annotations.

3. Creating Multiple Entities

The most obvious solution is to create an entity for both classes.

Let's start by defining the Meal entity:

@Entity
@Table(name = "meal")
class Meal {

    @Id
    @GeneratedValue(strategy = GenerationType.IDENTITY)
    @Column(name = "id")
    Long id;

    @Column(name = "name")
    String name;

    @Column(name = "description")
    String description;

    @Column(name = "price")
    BigDecimal price;

    @OneToOne(mappedBy = "meal")
    Allergens allergens;

    // standard getters and setters
}

Next, we'll add the Allergens entity:

@Entity
@Table(name = "allergens")
class Allergens {

    @Id
    @GeneratedValue(strategy = GenerationType.IDENTITY)
    @Column(name = "meal_id")
    Long mealId;

    @OneToOne
    @PrimaryKeyJoinColumn(name = "meal_id")
    Meal meal;

    @Column(name = "peanuts")
    boolean peanuts;

    @Column(name = "celery")
    boolean celery;

    @Column(name = "sesame_seeds")
    boolean sesameSeeds;

    // standard getters and setters
}

In the above example, we can see that meal_id is both the primary key and also the foreign key. That means we need to define the one-to-one relationship column using @PrimaryKeyJoinColumn.

However, this solution has two problems:

  • We always want to store allergens for a meal, and this solution doesn't enforce this rule
  • The meal and allergen data belong together logically – therefore we might want to store this information in the same Java class even though we created multiple tables for them

One possible resolution to the first problem is to add the @NotNull annotation to the allergens field on our Meal entity. JPA won't let us persist the Meal if we have a null Allergens.

However, this is not an ideal solution; we want a more restrictive one, where we don't even have the opportunity to try to persist a Meal without Allergens.

4. Creating a Single Entity with @SecondaryTable

We can create a single entity specifying that we have columns in different tables using the @SecondaryTable annotation:

@Entity
@Table(name = "meal")
@SecondaryTable(name = "allergens", pkJoinColumns = @PrimaryKeyJoinColumn(name = "meal_id"))
class Meal {

    @Id
    @GeneratedValue(strategy = GenerationType.IDENTITY)
    @Column(name = "id")
    Long id;

    @Column(name = "name")
    String name;

    @Column(name = "description")
    String description;

    @Column(name = "price")
    BigDecimal price;

    @Column(name = "peanuts", table = "allergens")
    boolean peanuts;

    @Column(name = "celery", table = "allergens")
    boolean celery;

    @Column(name = "sesame_seeds", table = "allergens")
    boolean sesameSeeds;

    // standard getters and setters

}

Behind the scenes, JPA joins the primary table with the secondary table and populates the fields. This solution is similar to the @OneToOne relationship, but this way, we can have all of the properties in the same class.

It's important to note that if we have a column that is in a secondary table, we have to specify it with the table argument of the @Column annotation. If a column is in the primary table, we can omit the table argument as JPA looks for columns in the primary table by default.

Also, note that we can have multiple secondary tables if we embed them in @SecondaryTables. Alternatively, from Java 8, we can mark the entity with multiple @SecondaryTable annotations since it's a repeatable annotation.

5. Combining @SecondaryTable With @Embedded

As we've seen, @SecondaryTable maps multiple tables to the same entity. We also know that @Embedded and @Embeddable to do the opposite and map a single table to multiple classes.

Let's see what we get when we combine @SecondaryTable with @Embedded and @Embeddable:

@Entity
@Table(name = "meal")
@SecondaryTable(name = "allergens", pkJoinColumns = @PrimaryKeyJoinColumn(name = "meal_id"))
class Meal {

    @Id
    @GeneratedValue(strategy = GenerationType.IDENTITY)
    @Column(name = "id")
    Long id;

    @Column(name = "name")
    String name;

    @Column(name = "description")
    String description;

    @Column(name = "price")
    BigDecimal price;

    @Embedded
    Allergens allergens;

    // standard getters and setters

}

@Embeddable
class Allergens {

    @Column(name = "peanuts", table = "allergens")
    boolean peanuts;

    @Column(name = "celery", table = "allergens")
    boolean celery;

    @Column(name = "sesame_seeds", table = "allergens")
    boolean sesameSeeds;

    // standard getters and setters

}

It's a similar approach to what we saw using @OneToOne. However, it has a couple of advantages:

  • JPA manages the two tables together for us, so we can be sure that there will be a row for each meal in both tables
  • Also, the code is a bit simpler, since we need less configuration

Nevertheless, this one-to-one like solution works only when the two tables have matching ids.

It's worth mentioning that if we want to reuse the Allergens class, it would be better if we defined the columns of the secondary table in the Meal class with @AttributeOverride.

6. Conclusion

In this short tutorial, we've seen how we can map multiple tables to the same entity using the @SecondaryTable JPA annotation.

We also saw the advantages of combining @SecondaryTable with @Embedded and @Embeddable to get a relationship similar to one-to-one.

As usual, the examples are available over on GitHub.


Converting Java Date to OffsetDateTime

$
0
0

1. Introduction

In this tutorial, we learn about the difference between Date and OffsetDateTime. We also learn how to convert from one to the other.

2. Difference between Date and OffsetDateTime

OffsetDateTime was introduced in JDK 8 as a modern alternative to java.util.Date.

OffsetDateTime is a thread-safe class that stores date and time to a precision of nanoseconds. Date, on the other hand, is not thread-safe and stores time to millisecond precision.

OffsetDateTime is a value-based class, which means that we need to use equals when comparing references instead of the typical ==.

The output of OffsetDateTime‘s toString method is in ISO-8601 format, while Date‘s toString is in a custom non-standard format.

Let's call toString on of both classes to see the difference:

Date: Sat Oct 19 17:12:30 2019
OffsetDateTime: 2019-10-19T17:12:30.174Z

Date can't store timezones and corresponding offsets. The only thing that a Date object contains is the number of milliseconds since 1 January 1970, 00:00:00 UTC, so if our time isn't in UTC we should store the timezone in a helper class. On the contrary, OffsetDateTime stores the ZoneOffset internally.

3. Converting Date to OffsetDateTime

Converting Date to OffsetDateTime is pretty simple. If our Date is in UTC, we can convert it with a single expression:

Date date = new Date();
OffsetDateTime offsetDateTime = date.toInstant()
  .atOffset(ZoneOffset.UTC);

If the original Date isn't in UTC, we can provide the offset (stored in a helper object, because as mentioned earlier Date class can't store timezones).

Let's say our original Date is +3:30 (Tehran time):

int hour = 3;
int minute = 30;
offsetDateTime = date.toInstant()
  .atOffset(ZoneOffset.ofHoursMinutes(hour, minute));

OffsetDateTime provides many useful methods that can be used afterward. For example, we can simply getDayOfWeek(), getDayOfMonth(), and getDayOfYear(). It's also very easy to compare two OffsetDateTime objects with isAfter and isBefore methods.

Above all, it's a good practice to avoid the deprecated Date class entirely.

4. Conclusion

In this tutorial, we learned how simple it is to convert from Date to OffsetDateTime. The code is available over on Github.

Java Scanner hasNext() vs. hasNextLine()

$
0
0

1. Overview

The Scanner class is a handy tool that can parse primitive types and strings using regular expressions and was introduced into the java.util package in Java 5.

In this short tutorial, we'll talk about its hasNext() and hasNextLine() methods. Even though these two methods may look pretty similar at first, they're actually doing quite different checks.

2. hasNext()

2.1. Basic Usage

The hasNext() method checks if the Scanner has another token in its input. A Scanner breaks its input into tokens using a delimiter pattern, which matches whitespace by default. That is, hasNext() checks the input and returns true if it has another non-whitespace character.

We should also note a few details about the default delimiter:

  • Whitespace includes not only the space character, but also tab space (\t), line feed (\n), and even more characters
  • Continuous whitespace characters are treated as a single delimiter
  • The blank lines at the end of the input are not printed — that is, hasNext() returns false for blank lines

Let's take a look at an example of how hasNext() works with the default delimiter. First, we'll prepare an input string to help us explore Scanner‘s parsing result:

String INPUT = new StringBuilder()
    .append("magic\tproject\n")
    .append("     database: oracle\n")
    .append("dependencies:\n")
    .append("spring:foo:bar\n")
    .append("\n")  // Note that the input ends with a blank line
    .toString();

Next, let's parse the input and print the result:

Scanner scanner = new Scanner(INPUT);
while (scanner.hasNext()) {
    log.info(scanner.next());
}
log.info("--------OUTPUT--END---------")

If we run the above code, we'll see the console output:

[DEMO]magic
[DEMO]project
[DEMO]database:
[DEMO]oracle
[DEMO]dependencies:
[DEMO]spring:foo:bar
[DEMO]--------OUTPUT--END---------

2.2. With Custom Delimiter

So far, we've looked at hasNext() with the default delimiter. The Scanner class provides a useDelimiter(String pattern) method that allows us to change the delimiter. Once the delimiter is changed, the hasNext() method will do the check with the new delimiter instead of the default one.

Let's see another example of how hasNext() and next() work with a custom delimiter. We'll reuse the input from the last example.

After the scanner parses a token matching the string “dependencies:“, we'll change the delimiter to a colon ( : ) so that we can parse and extract each value of the dependencies:

while (scanner.hasNext()) {
    String token = scanner.next();
    if ("dependencies:".equals(token)) {
        scanner.useDelimiter(":");
    }
    log.info(token);
}
log.info("--------OUTPUT--END---------");

Let's see the resulting output:

[DEMO]magic
[DEMO]project
[DEMO]database:
[DEMO]oracle
[DEMO]dependencies:
[DEMO]
spring
[DEMO]foo
[DEMO]bar


[DEMO]--------OUTPUT--END---------

Great! We've successfully extracted the values in “dependencies“, however, there are some unexpected line-break problems. We'll see how to avoid those in the next section.

2.3. With regex as Delimiter

Let's review the output in the last section. First, we noticed that there's a line break (\n) before “spring“. We've changed the delimiter to “:” after the “dependencies:” token was fetched. The line break after the “dependencies:” now becomes the part of the next token. Therefore, hasNext() returned true and the line break was printed out.

For the same reason, the line feed after “hibernate” and the last blank line become the part of the last token, so two blank lines are printed out together with “hibernate“.

If we can make both colon and whitespace as the delimiter, then the “dependencies” values will be correctly parsed and our problem will be solved. To achieve that, let's change the useDelimiter(“:”) call:

scanner.useDelimiter(":|\\s+");

The “:|\\s+” here is a regular expression matching a single “:” or one or more whitespace characters. With this fix, the output turns into:

[DEMO]magic
[DEMO]project
[DEMO]database:
[DEMO]oracle
[DEMO]dependencies:
[DEMO]spring
[DEMO]foo
[DEMO]bar
[DEMO]--------OUTPUT--END---------

3. hasNextLine()

The hasNextLine() method checks to see if there's another line in the input of the Scanner object, no matter if the line is blank or not.

Let's take the same input again. This time, we'll add line numbers in front of each line in the input using hasNextLine() and nextLine() methods:

int i = 0;
while (scanner.hasNextLine()) {
    log.info(String.format("%d|%s", ++i, scanner.nextLine()));
}
log.info("--------OUTPUT--END---------");

Now, let's take a look at our output:

[DEMO]1|magic	project
[DEMO]2|     database: oracle
[DEMO]3|dependencies:
[DEMO]4|spring:foo:bar
[DEMO]5|
[DEMO]--------OUTPUT--END---------

As we expected, the line numbers are printed, and the last blank line is there, too.

4. Conclusion

In this article, we've learned that Scanner‘s hasNextLine() method checks if there is another line in the input, no matter if the line is blank or not, while hasNext() uses a delimiter to check for another token.

As always, the complete source code for the examples is available over on GitHub.

Defensive Copies for Collections Using AutoValue

$
0
0

1. Overview

Creating immutable value objects introduces a bit of unwanted boilerplate. Also, Java's standard collections types have the potential to introduce mutability to value objects where this trait is undesirable.

In this tutorial, we'll demonstrate how to create defensive copies of collections when using AutoValue, a useful tool to reduce the boilerplate code for defining immutable value objects.

2. Value Objects and Defensive Copies

The Java community generally considers value objects to be a classification of types that represent immutable data records. Of course, such types may contain references to standard Java collections types like java.util.List.

For example, consider a Person value object:

class Person {
    private final String name;
    private final List<String> favoriteMovies;

    // accessors, constructor, toString, equals, hashcode omitted
}

Because Java's standard collection types may be mutable, the immutable Person type must protect itself from callers who would modify the favoriteMovies list after creating a new Person:

var favoriteMovies = new ArrayList<String>();
favoriteMovies.add("Clerks"); // fine
var person = new Person("Katy", favoriteMovies);
favoriteMovies.add("Dogma"); // oh, no!

The Person class must make a defensive copy of the favoriteMovies collection. By doing so, the Person class captures the state of the favoriteMovies list as it existed when the Person was created.

The Person class constructor may make a defensive copy of the favoriteMovies list using the List.copyOf static factory method:

public Person(String name, List<String> favoriteMovies) {
    this.name = name;
    this.favoriteMovies = List.copyOf(favoriteMovies);
}

Java 10 introduced defensive copy static factory methods such as List.copyOf. Applications using older versions of Java may create a defensive copy using a copy constructor and one of the “unmodifiable” static factory methods on the Collections class:

public Person(String name, List<String> favoriteMovies) {
    this.name = name;
    this.favoriteMovies = Collections.unmodifiableList(new ArrayList<>(favoriteMovies));
}

Note that there's no need to make a defensive copy of the String name parameter since String instances are immutable.

3. AutoValue and Defensive Copies

AutoValue is an annotation processing tool for generating the boilerplate code for defining value object types. However, AutoValue does not make defensive copies when constructing a value object.

The @AutoValue annotation instructs AutoValue to generate a class AutoValue_Person, which extends Person and includes the accessors, constructor, toString, equals, and hashCode methods we previously omitted from the Person class.

Lastly, we add a static factory method to the Person class and invoke the generated AutoValue_Person constructor:

@AutoValue
public abstract class Person {

    public static Person of(String name, List<String> favoriteMovies) {
        return new AutoValue_Person(name, favoriteMovies);
    }

    public abstract String name();
    public abstract List<String> favoriteMovies();
}

The constructor AutoValue generates will not automatically create any defensive copies, including one for the favoriteMovies collection.

Therefore, we need to create a defensive copy of the favoriteMovies collection in the static factory method we defined:

public abstract class Person {

    public static Person of(String name, List<String> favoriteMovies) {
        // create defensive copy before calling constructor
        var favoriteMoviesCopy = List.copyOf(favoriteMovies);
        return new AutoValue_Person(name, favoriteMoviesCopy);
    }

    public abstract String name();
    public abstract List<String> favoriteMovies();
}

4. AutoValue Builders and Defensive Copies

When desired, we can use the @AutoValue.Builder annotation, which instructs AutoValue to generate a Builder class:

@AutoValue
public abstract class Person {

    public abstract String name();
    public abstract List<String> favoriteMovies();

    public static Builder builder() {
        return new AutoValue_Person.Builder();
    }

    @AutoValue.Builder
    public static class Builder {
        public abstract Builder name(String value);
        public abstract Builder favoriteMovies(List<String> value);
        public abstract Person build();
    }
}

Because AutoValue generates the implementations of all the abstract methods, it's not clear how to create a defensive copy of the List. We need to use a mixture of AutoValue-generated code and custom code to make defensive copies of collections just before the builder constructs the new Person instance.

First, we'll complement our builder with two new package-private abstract methods: favoriteMovies() and autoBuild(). These methods are package-private because we want to use them in our custom implementation of the build() method, but we don't want consumers of this API to use them.

@AutoValue.Builder
public static abstract class Builder {

    public abstract Builder name(String value);
    public abstract Builder favoriteMovies(List<String> value);

    abstract List<String> favoriteMovies();
    abstract Person autoBuild();

    public Person build() {
        // implementation omitted
    }
}

Finally, we'll provide a custom implementation of the build() method that creates the defensive copy of the list before constructing the Person. We'll use the favoriteMovies() method to retrieve the List that the user set. Next, we'll replace the list with a new copy before calling autoBuild() to construct the Person:

public Person build() {
    List<String> favoriteMovies = favoriteMovies();
    List<String> copy = Collections.unmodifiableList(new ArrayList<>(favoriteMovies));
    favoriteMovies(copy);
    return autoBuild();
}

5. Conclusion

In this tutorial, we learned that AutoValue does not automatically create defensive copies, which is often of importance for Java Collections.

We demonstrated how to create defensive copies in static factory methods before constructing instances of AutoValue generated classes. Next, we showed how to combine custom and generated code to create defensive copies when using AutoValue's Builder classes.

As always, the code snippets used in this tutorial are available over on GitHub.

Setting Permissions with chown and chmod

$
0
0

1. Overview

The Linux operating system is a multi-user operating system. It has a security system in place that controls which users and groups have access to the files and directories in the system.

In this short tutorial, we're going to have a look at two tools for enabling users to access files: chown and chmod.

The commands used in this tutorial were tested in bash, but should work in other POSIX-compliant shells as well.

2. Security Concepts

In Linux, users can belong to one or more groups. Also, both users and groups can be the owners of files and directories. As well as details of ownership, each file has metadata about its access permissions.

chown and chmod are the tools we use to manipulate ownership and access permissions of files and directories.

3. Ownership and Access Rights

As mentioned earlier, the file metadata contains information about the user and group that owns the file. Also, it contains information about who is allowed to read, write and execute it.

We can list this information by using ls:

$ ls -l
total 20
-rw-rw-r--. 1 bob bob 16433 Oct  7 18:06 document.docx

There are two parts of information that are of particular interest to us:

bob bob

From left to right, this means that the file document.docx is owned by user bob and its owning group is also called bob. This is possible because, by default, Linux creates a private group for each user with the user's name.

Next there's:

-rw-rw-r--

These are the access permissions. The first character describes the file type. The remaining characters come in three groups of three characters, respectively describing the access rights of the owner, the owning group and then everyone else.

In each group, the first character is for read access (r), followed by write access (w) and the right to execute (x). A dash means that the permission is turned off.

Therefore, full permissions for everyone on the system would look like:

-rwxrwxrwx

In Linux, files and directories are treated similarly. The main difference between access rights for files and directories is that the x permission on a file grants permission to execute it, where on a directory, it grants permission to enter it.

4. Transferring Ownership with chown

Files can be transferred between users with chown. The name chown is an abbreviation for “change owner”.

We can change the owner of document.docx by calling:

chown alice document.docx

The document is now owned by Alice:

$ ls -l
total 20
-rw-rw-r--. 1 alice bob 16433 Oct 7 18:06 document.docx

The owning group of the document is still bob. We only told chown to change the owner, not the group. As a result, by means of group membership, both Alice and Bob now have read and write access to this document.

To change the group to alice, we could do one of three things.

We can change owner and group to alice:

chown alice:alice document.docx

Because we want to change the owning group to the default group of the user, we could omit the group:

chown alice: document.docx

Or alternatively, as we only want to change the owning group, we could call:

chown :alice document.docx

And then, the result will be:

$ ls -l 
total 20 
-rw-rw-r--. 1 alice alice 16433 Oct 7 18:06 document.docx

In Linux, as a regular user, it's not possible to give away the ownership of our files to someone else. We either have to be running as root, or have privileges to run chown through sudo:

sudo chown alice:alice document.docx

5. Changing Access Permissions with chmod

File access permissions can be modified via the chmod command. The name chmod is short for “change mode”.

We can use two ways of calling chmod, symbolic or octal notation.

5.1. Symbolic Notation

In symbolic notation, we provide chmod with a comma-separated string using references for user (u), group (g) and others (o).

Let's remember the access permissions of document.docx: -rw-rw-r–

We can set these same permissions with symbolic notation:

chmod u=rw,g=rw,o=r document.docx

It's also possible to add permissions incrementally. For example, we can add write permissions for others:

chmod o+w document.docx

Or similarly, we can take away write access for the group by calling:

chmod g-w document.docx

We should note that incremental changes only operate on the group and flag specified, leaving the other access permissions as they were.

We can combine references to set permissions all at once. To make the document read-only for group and others, we can use:

chmod go=r document.docx

There even is a shorthand notation – a – to set permissions for all references. For example, we can make our document read-only for every user and group with:

chmod a=r document.docx

5.2. Octal Notation

A widely used, often shorter, form of calling chmod is by use of the octal notation. This is a combination of three numbers by which we can represent all combinations of access rights.

The following table shows the equivalent octal and symbolic notations:

r/w/x | binary | octal
 ---  |  000   |   0
 --x  |  001   |   1
 -w-  |  010   |   2
 -wx  |  011   |   3
 r--  |  100   |   4
 r-x  |  101   |   5
 rw-  |  110   |   6
 rwx  |  111   |   7

Each possible combination of access permissions can be written as a binary number, with 1 and 0 meaning the permission is turned on or off. These binary numbers represent digits 0 to 7, the 8 digits that make up the octal numeral system.

Going back to the example of the previous section, the equivalent of:

chmod u=rwx,g=rx,o= document.docx

in octal notation is:

chmod 750 document.docx

We should also note that in octal notation, it is not possible to add permissions incrementally.

6. Common Examples

Finally, let's look at some common examples and what they do.

6.1. Recursively Change Ownership of a Directory

chown -R alice:alice /path/to/directory

In this example, the -R switch makes chown recursive.

6.2. Share a Directory with Others

chmod u=rwx,go=rx /path/to/directory

or

chmod 755 /path/to/directory

6.3. Protect a SSH Private Key

chmod u=rw,og= ~/.ssh/id_rsa

or

chmod 600 ~/.ssh/id_rsa

We should note that many Linux security configurations will prevent keys in the .ssh folder from being used to allow SSH access if they do not have the correct permissions applied.

6.4. Make a Script Executable

chmod +x script.sh

7. Conclusion

In this article, we looked at how to leverage chown and chmod to manage access to our files and folders.

We saw how the permission model works, connecting owning users and groups with the access control flags on each file and directory.

We should note that it is good practice to be as restrictive about access permissions as possible. Incorrectly configured groups and permissions are a security risk to our private information.


Customizing the Result of JPA Queries with Aggregation Functions

$
0
0

1. Overview

While Spring Data JPA can abstract the creation of queries to retrieve entities from the database in specific situations, we sometimes need to customize our queries, such as when we add aggregation functions.

In this tutorial, we'll focus on how to convert the results of those queries into an object. We'll explore two different solutions — one involving the JPA specification and a POJO, and another using Spring Data Projection.

2. JPA Queries and the Aggregation Problem

JPA queries typically produce their results as instances of a mapped entity. However, queries with aggregation functions normally return the result as Object[].

To understand the problem, let's define a domain model based on the relationship between posts and comments:

@Entity
public class Post {
    @Id
    private Integer id;
    private String title;
    private String content;
    @OneToMany(mappedBy = "post")
    private List comments;

    // additional properties
    // standard constructors, getters, and setters
}

@Entity
public class Comment {
    @Id
    private Integer id;
    private Integer year;
    private boolean approved;
    private String content;
    @ManyToOne
    private Post post;

    // additional properties
    // standard constructors, getters, and setters
}

Our model defines that a post can have many comments, and each comment belongs to one post. Let's use a Spring Data Repository with this model:

@Repository
public interface CommentRepository extends JpaRepository<Comment, Integer> {
    // query methods
}

Now, let's count the comments grouped by year:

@Query("SELECT c.year, COUNT(c.year) FROM Comment AS c GROUP BY c.year ORDER BY c.year DESC")
List<Object[]> countTotalCommentsByYear();

The result of the previous JPA query cannot be loaded into an instance of Comment, because the result is a different shape. The year and COUNT specified in the query do not match our entity object.

While we can still access the results in the general-purpose Object[] returned in the list, doing so will result in messy, error-prone code.

3. Customizing the Result with Class Constructors

The JPA specification allows us to customize results in an object-oriented fashion. Therefore, we can use a JPQL constructor expression to set the result:

@Query("SELECT new com.baeldung.aggregation.model.custom.CommentCount(c.year, COUNT(c.year)) "
  + "FROM Comment AS c GROUP BY c.year ORDER BY c.year DESC")
List<CommentCount> countTotalCommentsByYearClass();

This binds the output of the SELECT statement to a POJO. The class specified needs to have a constructor that matches the projected attributes exactly, but it's not required to be annotated with @Entity.

We can also see that the constructor declared in the JPQL must have a fully qualified name:

package com.baeldung.aggregation.model.custom;

public class CommentCount {
    private Integer year;
    private Long total;

    public CommentCount(Integer year, Long total) {
        this.year = year;
        this.total = total;
    }
    // getters and setters
}

4. Customizing the Result with Spring Data Projection

Another possible solution is to customize the result of JPA queries with Spring Data Projection. This functionality allows us to project query results with considerably less code.

4.1. Customizing the Result of JPA Queries

To use interface-based projection, we must define a Java interface composed of getter methods that match the projected attribute names. Let's define an interface for our query result:

public interface ICommentCount {
    Integer getYearComment();
    Long getTotalComment();
}

Now, let's express our query with the result returned as List<ICommentCount>:

@Query("SELECT c.year AS yearComment, COUNT(c.year) AS totalComment "
  + "FROM Comment AS c GROUP BY c.year ORDER BY c.year DESC")
List<ICommentCount> countTotalCommentsByYearInterface();

To allow Spring to bind the projected values to our interface, we need to give aliases to each projected attribute with the property name found in the interface.

Spring Data will then construct the result on-the-fly and return a proxy instance for each row of the result.

4.2. Customizing the Result of Native Queries

We can face situations where JPA queries are not as fast as native SQL or cannot use some specific features of our database engine. To solve this, we use native queries.

One advantage of interface-based projection is that we can use it for native queries. Let's use ICommentCount again and bind it to a SQL query:

@Query(value = "SELECT c.year AS yearComment, COUNT(c.*) AS totalComment "
  + "FROM comment AS c GROUP BY c.year ORDER BY c.year DESC", nativeQuery = true)
List<ICommentCount> countTotalCommentsByYearNative();

This works identically to JPQL queries.

5. Conclusion

In this article, we evaluated two different solutions to address mapping the results of JPA Queries with aggregation functions. First, we used the JPA standard, involving a POJO class, and in the second solution, we used the lightweight Spring Data projections with an interface.

Spring Data projections allow us to write less code, both in Java and in JPQL.

As always, the example code for this tutorial is available over on GitHub.

Guide to the Linux find Command

$
0
0

1. Introduction

The Linux find command can be used to find files and directories on a disk. It provides several command-line options that make it a powerful tool. In this tutorial, we'll look at how to use the find command.

2. Syntax

Let's quickly take a look at the basic syntax of the find command:

find [path...] [expression]

Both path and expression are optional.

The path argument specifies one or more directories to search. The default is the current working directory.

The expression argument is what determines which files and directories to include in the output, as well as what action to take on them. The default is to print all non-hidden files and directories.

We'll take a closer look at expressions in the next section.

Note that different Linux distributions and versions may use slightly different syntax or offer different options.

3. Expressions

The expression argument is made up of options, tests, and actions. A single expression can combine any number of these using traditional boolean operators such as and and or.

Let's take a look at each of these in more detail.

3.1. Options

Options affect the overall operation of find, rather than the processing of a specific file during the search.

Some of the most important options are:

  • -d, -depth: performs a depth-first traversal by processing subdirectories before files in the directory itself
  • -daystart: measure time from the beginning of the day instead of 24 hours ago
  • -help: prints a simple command-line usage and then exits
  • -mindepth, -maxdepth: controls how many directory levels to search before stopping (default mindepth is 0, and maxdepth defaults to unlimited)

3.2. Tests

Tests are the core of the find command. Applied to each file that is found, tests return true or false depending on whether that particular file passes or not.

We can use tests to look at various file attributes such as modified times, pattern matches, permissions, size, and more. Let's look at some of the more popular tests we can perform.

First, there are tests for matching files by name or type:

  • -name: tests if the file name matches a pattern (uses a simple pattern match and only looks at the file name)
  • -regex: tests if the file name matches a pattern (uses standard Emacs regular expressions and looks at full file path)
  • -type: tests if the file is a specific type (regular file, directory, symbolic link, etc.)

Let's use find with the -name test to find all XML files in the current directory:

> find . -name "*.xml"
src/main/resources/applicationContext.xml
src/test/resources/applicationContext-test.xml

Notice the default output is simply the full path of each file.

Now, let's find only directories in the /tmp directory:

find /tmp -type d

There are also several tests that can match files using time comparisons:

  • -amin, -anewer, -atime: tests the last access time of the file against a relative time or another file
  • -cmin, -cnewer, -ctime: tests the created time of the file against a relative time or another file
  • -mmin, -mnewer, -mtime: tests the modified time of the file against a relative time or another file
  • -newer: tests if the file is newer than another file

Here's an example find command that uses –ctime to find all JAR files created in the past year in a directory named lib:

find lib -name "*.jar" -ctime -365

Or we can find all files in the current directory that are newer than a file named testfile:

find . -newer testfile

A few other handy tests can match based on other file properties like permissions or size:

  • -perm: tests if the file permissions match a given permissions mode
  • -size: tests the size of the file

Here, we'll use -perm to find all files in the current directory that match the permission mode 700:

find . -perm 700

And let's use -size to find all files larger than 1 kilobyte in a directory named properties:

find properties -size 1k

3.3. Actions

Actions are executed on files that match all tests. The default action is to simply print the file name and path.

There are a few other actions we can use to print more details about the matching files:

  • -ls: perform a standard directory listing of the file
  • -print, -print0, -printf: print the details of the to stdout
  • -fprint, -fprint0, -fprintf: print details of the file to a file

To demonstrate, let's use the -ls action to perform a directory listing of all .jar files in the target directory:

> find target -name "*.jar" -ls
4316430646    88112 -rw-r--r--    1 mike staff 45110374 Oct 14 15:01 target/app.jar

And we can use -printf with a format string to print only the file size and name on each line:

> find lib -name "*.jar" -printf '%s %p\n'
12345 file1.jar
24543 file2.jar

Some of the more advanced actions we can use with the find command are:

  • -delete: remove the file from disk
  • -exec: execute any arbitrary command

Suppose we want to delete all .tmp files from the /tmp directory:

find /tmp -name "*.tmp" -delete

Or to find all .java files containing the word “interface”:

find src -name "*.java" -type f -exec grep -l interface {} \;

Notice the “;” on the end. This causes the grep command to be executed for each file one at a time (the “\” is required because semi-colons will be interpreted by the shell). We could also use a “+” instead, which would cause multiple files to be passed into grep at the same time.

3.4. Operators

All of the expression types above can be combined using traditional boolean operators.

Here's a quick list of the supported operators, in order of precedence:

  • (expr): parenthesis force the execution of the expression inside before any other expression; be careful to avoid shell interpolation by using quotes
  • !, -not: negates an expression; be careful to avoid shell interpolation by using quotes
  • -a, -and: performs a boolean and operation on two expressions, returning true only if both expressions are true
  • -o, -or: performs a boolean or operation on two expressions, returning true if either expression is true

For example, we can find any file that is not a directory in the src directory:

find src ! -type d

Or we can find all files with either a .xml or .yaml extension in the properties directory:

find properties -name "*yaml" -o -name "*.xml"

4. Advanced Options

In addition to the path and expressions, most versions of find offer more advanced options:

find [-H] [-L] [-P] [-Olevel] [-D help|tree|search|stat|rates|opt|exec] [path] [expressions]

First, the -H, -L, and -P options specify how the find command handles symbolic links. The default is to use -P, which means file information of the link itself will be used by tests.

The -O option is used to specify a query optimization level. This parameter changes how find re-orders expressions to help speed up the command without changing the output. We can specify any value between 0 and 3 inclusive. The default value is 1, which is sufficient for most use cases.

Finally, the -D option specifies a debug level — it prints diagnostic information that can help us diagnose why the find command is not working as expected.

5. Conclusion

In this tutorial, we've seen how to use the Linux find command.

By using a combination of expressions and boolean logic, the find command can help us locate files and directories efficiently. The find command is powerful enough on its own, but when combined with other Linux commands, it is one of the most useful command-line tools available.

Linux Commands – top

$
0
0

1. Overview

It's quite common to find ourselves in a situation where we need to know the resource usage of each process and thread in our system. For example, we might want to know which process is slowing down our system.

In this tutorial, we'll look at how to can get this kind of insight using the top command.

2. A Default Interface

We can use top by simply typing top in the command line, after which we'll get an interactive interface:

top

top - 04:05:27 up 3 days, 12:02,  1 user,  load average: 0.55, 1.06, 1.27
Tasks: 362 total,   2 running, 290 sleeping,   0 stopped,   0 zombie
%Cpu(s): 35.8 us, 10.7 sy,  0.0 ni, 52.4 id,  0.3 wa,  0.0 hi,  0.7 si,  0.0 st
KiB Mem :  8060436 total,   150704 free,  4438276 used,  3471456 buff/cache
KiB Swap:  2097148 total,  1656152 free,   440996 used.  2557604 avail Mem 

  PID USER      PR  NI    VIRT    RES    SHR S  %CPU %MEM     TIME+ COMMAND                                                                           
32081 abhishe+  20   0  879676 198164 106096 S 152.6  2.5   0:10.16 chrome                                                                            
  582 abhishe+  20   0   51448   4088   3372 R  15.8  0.1   0:00.04 top                                                                               
  503 root     -51   0       0      0      0 S   5.3  0.0  11:05.61 irq/130-iwlwifi                                                                   
  875 message+  20   0   53120   5900   3204 S   5.3  0.1  10:10.14 dbus-daemon                                                                       
 6855 abhishe+  20   0 1564544 170444  22924 S   5.3  2.1  75:21.88 deluge-gtk                                                                        
    1 root      20   0  225840   7200   4720 S   0.0  0.1   4:51.28 systemd                                                                           
    2 root      20   0       0      0      0 S   0.0  0.0   0:00.20 kthreadd                                                                          
    4 root       0 -20       0      0      0 I   0.0  0.0   0:00.00 kworker/0:0H                                                                      
    6 root       0 -20       0      0      0 I   0.0  0.0   0:00.00 mm_percpu_wq

This interactive screen is divided into four sections:

  1. Summary
  2. Fields/Columns Header
  3. Input/Message Line
  4. Tasks

2.1. Summary

The first line consists of five things:

  • name of the window
  • current time
  • length of time since last boot
  • total number of users, and
  • system load averaged over the last 1, 5 and 15 minutes
top - 04:05:27 up 3 days, 12:02, 1 user, load average: 0.55, 1.06, 1.27

We can see that the second line gives the count of various processes and threads, divided into four categories: running, sleeping, stopped, and zombie.

And the next line tells us about the CPU state percentage, that is, time taken by user and kernel processes:

Tasks: 362 total, 2 running, 290 sleeping, 0 stopped, 0 zombie
%Cpu(s): 35.8 us, 10.7 sy, 0.0 ni, 52.4 id, 0.3 wa, 0.0 hi, 0.7 si, 0.0 st

The meaning of various symbols in the above example is the time taken by the CPU in running various processes:

  • us – user processes (that are defined without any user-defined priority – un-niced user processes)
  • sy – kernel processes
  • ni – niced user processes
  • id – kernel idle handler
  • wa – I/O completion
  • hi – hardware interrupts
  • si – software interrupts
  • st – time stolen from this VM by the hypervisor

We can notice that line 4 describes the state of physical memory; while line 5 describes the virtual memory:

KiB Mem : 8060436 total, 150704 free, 4438276 used, 3471456 buff/cache
KiB Swap: 2097148 total, 1656152 free, 440996 used. 2557604 avail Mem

3. The top Headers

As we can see in the example given above there are various fields describing the status of various processes and threads.

Let's learn about the meaning of these headers one-by-one:

  • PID (Process ID): The unique id of the task that is defined by task_struct – it's used by the kernel to identify any process
  • USER (User Name): The effective username of the task's owner
  • PR (Priority): The scheduling priority of the task. The rt values under this field mean that the task is running under real-time scheduling prioritization
  • NI (Nice Value): Also depicts the priority of the task. The difference between PR and NI is that PR is the real priority of a process as seen by the kernel, while NI is just a priority hint for the kernel. A negative nice value means higher priority, whereas a positive nice value means lower priority
  • TIME+ (CPU Time): Depicts the total CPU time the task has used since it started, having the granularity of hundredths of a second
  • COMMAND (Command Name): Displays the command line used to start a task or the name of the associated program

3.1. Memory Headers

The headers that are used to summarize various parameters related to memory are described below:

  • VIRT (Virtual Memory Size in KiB): Depicts the total amount of virtual memory used by the task. Virtual memory includes all code, data, and shared libraries. It also includes pages that have been swapped out and pages that have been mapped but not used
  • RES (Resident Memory Size in KiB): Stands for a subset of the virtual memory space (VIRT) representing the non-swapped physical memory a task is currently using
  • SHR (Shared Memory Size in KiB): Stands for a subset of resident memory (RES) that may be used by other processes
  • %CPU (CPU Usage): Stands for the task's share of the elapsed CPU time since the last screen update, expressed as a percentage of total CPU time. A value greater than 100% can be reported for a multi-threaded process when top is not running in Threads Mode
  • %MEM (Memory Usage -RES): The task's current share of available physical memory

4. Interactive Commands

We can interact with the top interface using various commands:

  • The simplest one being seeing the help menu by pressing the h button.
  • We can use the d or s button to change the refresh rate of top. The default refresh rate is 3.0 seconds.
  • To quit from the top interface, we can press the q button.

We can kill a task by pressing the k button, after that the “Input Line” will be active and we'll need to enter the PID of the task.

We can also change the renice value of a task by pressing the r button. After that, we'll enter the PID and then the renice value of that task. Ordinary users can only increase the nice value and are prevented from lowering it.

We can change the unit used for showing memory in the Summary Area from KiB by pressing E:

MiB Mem : 7871.520 total,  995.176 free, 4501.594 used, 2374.750 buff/cache
MiB Swap: 2047.996 total, 1607.332 free,  440.664 used. 2275.230 avail Mem

To change the memory unit used in the Task Area, we can press e:

22011 abhishe+  20   0 4049.7m 266.1m 138.3m S  13.2  3.4  18:08.67 gnome-shell                                                                       
  920 cyberea+  20   0 2545.5m 110.4m   8.6m S   7.9  1.4  92:37.54 cybereason-sens                                                                   
 1554 abhishe+  20   0  489.2m  69.9m  53.0m S   6.6  0.9  97:43.26 Xorg                                                                              
 6855 abhishe+  20   0 1536.8m 174.6m  21.6m S   6.6  2.2  85:00.29 deluge-gtk                                                                        
23393 abhishe+  20   0 1689.2m 197.4m  63.4m S   6.0  2.5   3:09.83 _Postman

Both of these will lead to the cycling of memory units starting from KiB and going all the way up to EiB (exbibytes).

4.1. Global Modes

There are different modes that are useful in various cases, one of those being Threads Mode.

By default, top displays a summation of all threads in each process. We can change this by pressing the H button. After this top will display individual threads of each process:

  PID USER      PR  NI    VIRT    RES    SHR S %CPU %MEM     TIME+ COMMAND                                                                            
 6855 abhishe+  20   0 1573660 178760  22124 S  2.6  2.2  45:11.77 deluge-gtk                                                                         
 6899 abhishe+  20   0 1573660 178760  22124 S  2.3  2.2  37:41.68 deluge-gtk

As we can notice in the previous example, the application named deluge was mentioned only once as the underlying threads were not shown, while in this example we can see two different threads that are used by this application.

The other mode is Solaris Mode, which can be toggled off by pressing the I button. When operating under this mode, a task's CPU usage will be divided by the total number of CPUs.

4.2. Interaction With the Task Window

We can change the fields that are displayed and their order by pressing the f button. The field menu will open up and then we can select the fields to be shown, their order, sort by fields, etc.

One of the most useful views that is presented by top is Forest View Mode. In this mode, the tasks will be ordered like a tree and all child tasks will be aligned under their respective parents:

  PID USER      PR  NI    VIRT    RES    SHR S  %CPU %MEM     TIME+ COMMAND                                                                           
    1 root      20   0  225840   7196   4716 S   0.0  0.1   5:46.79 systemd                                                                           
  283 root      19  -1  148972  37300  36300 S   0.0  0.5   0:23.01  `- systemd-journal                                                               
  336 root      20   0   47060   4000   2528 S   0.0  0.0   0:01.10  `- systemd-udevd                                                                 
  862 systemd+  20   0  146112   1276   1208 S   0.0  0.0   0:00.35  `- systemd-timesyn                                                               
  864 systemd+  20   0   71072   4556   3916 S   0.0  0.1   0:12.47  `- systemd-resolve                                                               
  867 root      20   0   70728   3732   3448 S   0.0  0.0   0:03.05  `- systemd-logind                                                                
  871 root      20   0   38428   2748   2652 S   0.0  0.0   0:00.27  `- cron

We can use the x key to highlight the sorted field. We can use the > and < to change the sorted field to the right or left respectively. Some fields have direct key bindings for their sorting, M for %MEMN for PIDP for %CPUT for TIME+.

5. Command-Line Options

We can use top in batch mode by passing the -b flag. When in batch mode top doesn't receive any input and will run till the program is killed. This is quite useful for passing the output of top command to some other program or file.

To fix the number of iterations, we can use -n flag:

top -b -n10

To change the refresh rate, we can use the -d flag. We can use fractional seconds with this flag:

top -d2.5

To see all the output fields supported by top, we can use the -O flag:

top -O
PID
PPID
UID
USER
... more output omitted

We can use these field names to define the sorting order by passing it after the -o flag. So, if we want to sort the output of top by virtual memory, we can use:

top -o VIRT

  PID USER      PR  NI    VIRT    RES    SHR S  %CPU %MEM     TIME+ COMMAND                                                                           
23584 abhishe+  20   0 14.593g 554600  58412 S   2.3  6.9  10:25.55 _Postman                                                                          
22011 abhishe+  20   0 4142400 277884 141424 S   0.7  3.4  22:00.86 gnome-shell                                                                       
 1183 gdm       20   0 3664328 114104  72160 S   0.0  1.4   6:33.79 gnome-shell                                                                       
 2008 abhishe+  20   0 2782760  22520  15096 S   0.0  0.3   0:35.15 copyq

Next, we can use various filters for monitoring tasks on the basis of PIDs, users, etc. To filter task on the basis of PIDs, we can pass up to 20 PIDs with the -p flag:

top -p23584,22011

PID USER PR NI VIRT RES SHR S %CPU %MEM TIME+ COMMAND
22011 abhishe+ 20 0 4144624 276900 141368 S 6.2 3.4 22:16.92 gnome-shell
23584 abhishe+ 20 0 14.593g 554600 58412 S 0.0 6.9 10:29.91 _Postman

Finally, to filter on the basis of users, we can use the -u flag:

top -u root

PID USER      PR  NI    VIRT    RES    SHR S  %CPU %MEM     TIME+ COMMAND                                                                           
503 root     -51   0       0      0      0 S   6.2  0.0  12:55.09 irq/130-iwlwifi
  1 root      20   0  225840   7196   4716 S   0.0  0.1   5:43.72 systemd

6. Conclusion

In this tutorial, we saw how top is useful in knowing the memory usage of various processes and threads and monitor them.

We saw its interactive screen and explored the meaning and use of various fields.

We also saw various handy command-line options.


Causes & Avoidance of java.lang.VerifyError

$
0
0

1. Introduction

In this tutorial, we'll look at the cause of java.lang.VerifyError errors and multiple ways to avoid it.

2. Cause

The Java Virtual Machine (JVM) distrusts all loaded bytecode as a core tenet of the Java Security Model. During runtime, the JVM will load .class files and attempt to link them together to form an executable — but the validity of these loaded .class files is unknown.

To ensure that the loaded .class files do not pose a threat to the final executable, the JVM performs verification on the .class files. Additionally, the JVM ensures that binaries are well-formed. For example, the JVM will verify classes do not subtype final classes.

In many cases, verification fails on valid, non-malicious bytecode because a newer version of Java has a stricter verification process than older versions. For example, JDK 13 may have added a verification step that was not enforced in JDK 7. Thus, if we run an application with JVM 13 and include dependencies compiled with an older version of the Java Compiler (javac), the JVM may consider the outdated dependencies to be invalid.

Thus, when linking older .class files with a newer JVM, the JVM may throw a java.lang.VerifyError similar to the following:

java.lang.VerifyError: Expecting a stackmap frame at branch target X
Exception Details:
  Location:
    
com/example/baeldung.Foo(Lcom/example/baeldung/Bar:Baz;)Lcom/example/baeldung/Foo; @1: infonull
  Reason:
    Expected stackmap frame at this location.
  Bytecode:
    0000000: 0001 0002 0003 0004 0005 0006 0007 0008
    0000010: 0001 0002 0003 0004 0005 0006 0007 0008
    ...

There are two ways to solve this problem:

  • Update dependencies to versions compiled with an updated javac
  • Disable Java verification

3. Production Solution

The most common cause of a verification error is linking binaries using a newer JVM version compiled with an older version of javac. This is more common when dependencies have bytecode generated by tools such as Javassist, which may have generated outdated bytecode if the tool is outdated.

To resolve this issue, update dependencies to a version built using a JDK version that matches the JDK version used to build the application. For example, if we build an application using JDK 13, the dependencies should be built using JDK 13.

To find a compatible version, inspect the Build-Jdk in the JAR Manifest file of the dependency to ensure it matches the JDK version used to build the application.

4. Debugging & Development Solution

When debugging or developing an application, we can disable verification as a quick-fix.

Do not use this solution for production code.

By disabling verification, the JVM can link malicious or faulty code to our applications, resulting in security compromises or crashes when executed.

Also note that as of JDK 13, this solution has been deprecated, and we should not expect this solution to work in future Java releases. Disabling verification will result in the following warning:

Java HotSpot(TM) 64-Bit Server VM warning: Options -Xverify:none and -noverify were deprecated
  in JDK 13 and will likely be removed in a future release.

The mechanism for disabling bytecode verification varies based on how we run our code.

4.1. Command Line

To disable verification on the command line, pass the noverify flag to the java command:

java -noverify Foo.class

Note that -noverify is a shortcut for-Xverify:none and both can be used interchangeably.

4.2. Maven

To disable verification in a Maven build, pass the noverify flag to any desired plugin:

<plugin>
    <groupId>com.example.baeldung</groupId>
    <artifactId>example-plugin</artifactId>
    <!-- ... -->
    <configuration>
        <argLine>-noverify</argLine>
        <!-- ... -->
    </configuration>
</plugin>

4.3. Gradle

To disable verification in a Gradle build, pass the noverify flag to any desired task:

someTask {
    // ...
    jvmArgs = jvmArgs << "-noverify"
}

5. Conclusion

In this quick tutorial, we learned why the JVM performs bytecode verification and what causes the java.lang.VerifyError error. We also explored two solutions: A production one and a non-production one.

When possible, use the latest versions of dependencies rather than disabling verification.

Pipes and Redirection in Linux

$
0
0

1. Introduction

Most shells offer the ability to alter the way that application input and output flows. This can direct output away from the terminal and into files or other applications, or otherwise reading input from files instead of the terminal.

2. Standard Input and Output

Before we understand how redirection works in shells, we first need to understand the standard input and output process.

All applications have three unique streams that connect them to the outside world. These are referred to as Standard Input, or stdin; Standard Output, or stdout; and Standard Error, or stderr.

Standard input is the default mechanism for getting input into an interactive program. This is typically a direct link to the keyboard when running directly in a terminal, and isn't connected to anything otherwise.

Standard output is the default mechanism for writing output from a program. This is typically a link to the output terminal but is often buffered for performance reasons. This can be especially important when the program is running over a slow network link.

The standard error is an alternative mechanism for writing output from a program. This is typically a different link to the same output terminal but is unbuffered so that we can write errors immediately while normal output can be written one line at a time.

3. Redirecting Into Files

One common need when we run applications is to direct the output into a file instead of the terminal. Specifically, what we're doing here is replacing the standard output stream with one that goes where we want: In this case, a file.

This is typically done with the > operator between the application to run and the file to write the output into. For example, we can send the output of the ls command into a file called files as follows:

$ ls > files
We can do this after any command, including any needed arguments:
$ ls -1 *.txt > text-files

3.1. Appending To Files

When we use >, then we are writing the output to the file, replacing all of the contents. If needed, we can also append to the file using >> instead:

$ ls -1 *.txt > files
$ ls -1 *.text >> files
$ ls -1 *.log >> files

We can use this to build up files using all manner of output if we need to, including just using echo to exact output lines:

$ echo Text Files > files
$ ls -1 *.txt >> files
$ echo Log Files >> files
$ ls -1 *.log >> files

3.2. Redirecting Standard Error

On occasion, we need to redirect standard error instead of standard output. This works in the same way, but we need to specify the exact stream.

All three of the standard streams have ID values, as defined in the POSIX specification and used in the C language. Standard input is 0, standard output is 1, and standard error is 2.

When we use the redirect operators, by default, this applies to standard output. We can explicitly specify the stream to redirect, though, by prefixing it with the stream ID.

For example, to redirect standard error, from the cat command we would use 2>:

$ cat does-not-exist 2> log

We can be consistent and use 1> to redirect standard output if we wish, though this is identical to what we saw earlier.

We can also use &> to redirect both standard output and standard error at the same time:

$ ls -1 &> log

This sends all output from the command, regardless of which stream it is on, into the same file. This only works in certain shells, though – for example, we can use this in bash or zsh, but not in sh.

3.3. Redirecting into Streams

Sometimes we want to redirect into a stream instead of a file. We can achieve this by using the stream ID, prefixed by &, in place of the filename. For example, we can redirect into standard error by using >&2:
$ echo Standard Output >&1
$ echo Standard Error >&2

We can combine this with the above to combine streams, by redirecting from one stream into another. A common construct is to combine standard error into standard output, so that both can be used together. We achieve this using 2>&1 – literally redirecting stream 2 into stream 1:

# ls -1 2>&1

We can sometimes use this to create new streams, simply by using new IDs. This stream must already have been used elsewhere first though, otherwise, it is an error. Most often this is used as a stream source first.

For example, we can swap standard output and standard error by going via a third stream, using 3>&2 2>&1 1>&3:

$ ls -1 3>&2 2>&1 1>&3

This construct doesn't work correctly in all shells. In bash, the end result is that standard output and standard error is directly swapped. In zsh the result is that both standard output and standard error have ended up on standard output instead.

3.4. Redirecting Multiple Streams

We can easily combine the above to redirect standard output and standard error at the same time. This mostly works exactly as we would expect – we simply combine the two different redirects on the same command:

$ ls -1 > stdout.log 2> stderr.log
This won't work as desired if we try to redirect both streams into the same file. What happens here is that both streams are redirected individually, and whichever comes second wins, rather than combining both into the same file.

If we want to redirect both into the same file, then we can use &> as we saw above, or else we can use stream combination operators. If we wish to use the stream combination operators, then we must do this after we have redirected into the file, or else only the standard output gets redirected:

$ ls -1 > log 2>&1

4. Reading From Files

Sometimes we also want to achieve the opposite – redirecting a file into an application. We do this using the < operator, and the contents of the file will replace the standard input for the application:

$ wc < /usr/share/dict/words
  235886  235886 2493109

When we do this, the only input that the application can receive comes from this source, and it will all happen immediately. It's effectively the same as when the user types out the entire contents of the file at the very start of the application.

However, the end of the file is signaled to the application as well, which many applications can use to stop processing.

5. Piping Between Applications

The final action that we can perform is to direct the output of one application into another one. This is commonly referred to as piping, and uses the | operator instead:

$ ls | wc
      11      11     138

This directly connects the standard output of our first application into the standard input of the second one and then lets the data directly flow between them.

5.1. Handling Standard Error

Standard error isn't connected by default, so we'll still get anything written to that stream appearing in the console. This is by design since standard error is designed for error reporting and not for normal application output.

If we want to redirect standard error as well then we can use the technique from above to first redirect it into standard output and then pipe into the next application:

$ ls i-dont-exist | wc
ls: i-dont-exist: No such file or directory
       0       0       0

$ ls i-dont-exist 2>&1 | wc
       1       7      44

If we want only to pipe standard error then we need to swap the standard output and standard error streams around, as we saw earlier.

$ ls 3>&2 2>&1 1>&3 | wc -l
some-file
       0

$ ls i-dont-exist 3>&2 2>&1 1>&3 | wc -l
       1

5.2. Combining Pipes

When piping between applications, we can also build arbitrary chains where we are piping between many applications to achieve a result:

$ docker images | cut -d' ' -f1 | tail -n +2 | sort -u | wc -l
      17
This command looks scary, but we can break this down to the individual parts:
  • docker images – Get a list of all Docker images
  • cut -d' ‘ -f1 – Cut this output to only return the first column, where columns are space-separated
  • tail -n +2 – Limit this to start from line 2
  • sort -u – Sort this list, only returning unique entries
  • wc -l – Count the number of lines

So we have a command here to get the number of unique docker images, ignoring the version of the image.

Many console applications are designed for exactly this use, which is why they can often consume input from standard input and write to standard output.

Certain applications also have special modes that allow for this – git, for example, has what is termed porcelain and plumbing commands, where the plumbing commands are specially designed to be combined in this manner while the porcelain commands are designed for human consumption.

6. Summary

Here, we ‘ve seen several techniques for redirecting the input and output of applications either between files or other applications. These are compelling techniques that can give rise to complicated results from simple inputs.

Why not see what else we can do with these?

Generating Random Dates in Java

$
0
0

1. Overview

In this tutorial, we're going to see how to generate random dates and times in bounded and unbounded fashions.

We'll be looking at how to generate these values using the legacy java.util.Date API and also the new date-time library from Java 8.

2. Random Date and Time

Dates and times are nothing more than 32-bit integers compared to an epoch time, so we can generate random temporal values by following this simple algorithm:

  1. Generate a random 32-bit number, an int
  2. Pass the generated random value to an appropriate date and time constructor or builder

2.1. Bounded Instant

java.time.Instant is one of the new date and time additions in Java 8. They represent instantaneous points on the time-line.

In order to generate a random Instant between two other ones, we can:

  1. Generate a random number between the epoch seconds of the given Instants
  2. Create the random Instant by passing that random number to the ofEpochSecond() method
public static Instant between(Instant startInclusive, Instant endExclusive) {
    long startSeconds = startInclusive.getEpochSecond();
    long endSeconds = endExclusive.getEpochSecond();
    long random = ThreadLocalRandom
      .current()
      .nextLong(startSeconds, endSeconds);

    return Instant.ofEpochSecond(random);
}

In order to achieve more throughput in multi-threaded environments, we're using the ThreadLocalRandom to generate our random numbers.

We can verify that the generated Instant is always greater than or equal to the first Instant and is less than the second Instant:

Instant hundredYearsAgo = Instant.now().minus(Duration.ofDays(100 * 365));
Instant tenDaysAgo = Instant.now().minus(Duration.ofDays(10));
Instant random = RandomDateTimes.between(hundredYearsAgo, tenDaysAgo);
assertThat(random).isBetween(hundredYearsAgo, tenDaysAgo);

Remember, of course, that testing randomness is inherently non-deterministic and is generally not recommended in a real application.

Similarly, it's also possible to generate a random Instant after or before another one:

public static Instant after(Instant startInclusive) {
    return between(startInclusive, Instant.MAX);
}

public static Instant before(Instant upperExclusive) {
    return between(Instant.MIN, upperExclusive);
}

2.2. Bounded Date

One of the java.util.Date constructors takes the number of milliseconds after the epoch. So, we can use the same algorithm to generate a random Date between two others:

public static Date between(Date startInclusive, Date endExclusive) {
    long startMillis = startInclusive.getTime();
    long endMillis = endExclusive.getTime();
    long randomMillisSinceEpoch = ThreadLocalRandom
      .current()
      .nextLong(startMillis, endMillis);

    return new Date(randomMillisSinceEpoch);
}

Similarly, we should be able to verify this behavior:

long aDay = TimeUnit.DAYS.toMillis(1);
long now = new Date().getTime();
Date hundredYearsAgo = new Date(now - aDay * 365 * 100);
Date tenDaysAgo = new Date(now - aDay * 10);
Date random = LegacyRandomDateTimes.between(hundredYearsAgo, tenDaysAgo);
assertThat(random).isBetween(hundredYearsAgo, tenDaysAgo);

2.3. Unbounded Instant

In order to generate a totally random Instant, we can simply generate a random integer and pass it to the ofEpochSecond() method:

public static Instant timestamp() {
    return Instant.ofEpochSecond(ThreadLocalRandom.current().nextInt());
}

Using 32-bit seconds since the epoch time generates more reasonable random times, hence we're using the nextInt() method here.

Also, this value should be still between the minimum and maximum possible Instant values that Java can handle:

Instant random = RandomDateTimes.timestamp();
assertThat(random).isBetween(Instant.MIN, Instant.MAX);

2.4. Unbounded Date

Similar to the bounded example, we can pass a random value to Date's constructor to generate a random Date:

public static Date timestamp() {
    return new Date(ThreadLocalRandom.current().nextInt() * 1000L);
}

Since the constructor's time unit is milliseconds, we're converting the 32-bit epoch seconds to milliseconds by multiplying it by 1000.

Certainly, this value is still between the minimum and maximum possible Date values:

Date MIN_DATE = new Date(Long.MIN_VALUE);
Date MAX_DATE = new Date(Long.MAX_VALUE);
Date random = LegacyRandomDateTimes.timestamp();
assertThat(random).isBetween(MIN_DATE, MAX_DATE);

3. Random Date

Up until now, we generated random temporals containing both date and time components. Similarly, we can use the concept of epoch days to generate random temporals with just date components.

An epoch day is equal to the number of days since the 1 January 1970. So in order to generate a random date, we just have to generate a random number and use that number as the epoch day.

3.1. Bounded

We need a temporal abstraction containing only date components, so java.time.LocalDate seems a good candidate:

public static LocalDate between(LocalDate startInclusive, LocalDate endExclusive) {
    long startEpochDay = startInclusive.toEpochDay();
    long endEpochDay = endExclusive.toEpochDay();
    long randomDay = ThreadLocalRandom
      .current()
      .nextLong(startEpochDay, endEpochDay);

    return LocalDate.ofEpochDay(randomDay);
}

Here we're using the toEpochDay() method to convert each LocalDate to its corresponding epoch day. Similarly, we can verify that this approach is correct:

LocalDate start = LocalDate.of(1989, Month.OCTOBER, 14);
LocalDate end = LocalDate.now();
LocalDate random = RandomDates.between(start, end);
assertThat(random).isBetween(start, end);

3.2. Unbounded

In order to generate random dates regardless of any range, we can simply generate a random epoch day:

public static LocalDate date() {
    int hundredYears = 100 * 365;
    return LocalDate.ofEpochDay(ThreadLocalRandom
      .current().nextInt(-hundredYears, hundredYears));
}

Our random date generator chooses a random day from 100 years before and after the epoch. Again, the rationale behind this is to generate reasonable date values:

LocalDate randomDay = RandomDates.date();
assertThat(randomDay).isBetween(LocalDate.MIN, LocalDate.MAX);

4. Random Time

Similar to what we did with dates, we can generate random temporals with just time components. In order to do that, we can use the second of the day concept. That is, a random time is equal to a random number representing the seconds since the beginning of the day.

4.1. Bounded

The java.time.LocalTime class is a temporal abstraction that encapsulates nothing but time components:

public static LocalTime between(LocalTime startTime, LocalTime endTime) {
    int startSeconds = startTime.toSecondOfDay();
    int endSeconds = endTime.toSecondOfDay();
    int randomTime = ThreadLocalRandom
      .current()
      .nextInt(startSeconds, endSeconds);

    return LocalTime.ofSecondOfDay(randomTime);
}

In order to generate a random time between two others, we can:

  1. Generate a random number between the second of the day of the given times
  2. Create a random time using that random number

We can easily verify the behavior of this random time generation algorithm:

LocalTime morning = LocalTime.of(8, 30);
LocalTime randomTime = RandomTimes.between(LocalTime.MIDNIGHT, morning);
assertThat(randomTime)
  .isBetween(LocalTime.MIDNIGHT, morning)
  .isBetween(LocalTime.MIN, LocalTime.MAX);

4.2. Unbounded

Even unbounded time values should be in 00:00:00 until 23:59:59 range, so we can simply implement this logic by delegation:

public static LocalTime time() {
    return between(LocalTime.MIN, LocalTime.MAX);
}

5. Conclusion

In this tutorial, we reduced the definition of random dates and times to random numbers. Then, we saw how this reduction helped us to generate random temporal values behaving like timestamps, dates or times.

As usual, the sample code is available over on GitHub.

Java Weekly, Issue 305

$
0
0

1. Spring and Java

>> Spring Cloud Stream – and Spring Integration. [spring.io]

Find out how to combine these two to implement function-based streams.

>> JVM numeric types – Integer types [blog.scottlogic.com]

Everything you always wanted to know about Integer types but were afraid to ask.

>> GraphQL server in Java: Part II: Understanding Resolvers [nurkiewicz.com]

And a good write-up on the GraphQLResolver interface — the key to lazy loading in GraphQL.


Also worth reading:


Webinars and presentations:


Time to upgrade:

2. Technical and Musings

>> A beginner’s guide to database deadlock [vladmihalcea.com]

A look at deadlocks and how a few major database systems recover from them differently.

>> Encryption in the cloud [advancedweb.hu]

And while data encryption is important, we still have to control access to both the data itself and the encryption keys.


Also worth reading:

3. Comics

And my favorite Dilberts of the week:

>> Self Reliant [dilbert.com]

>> We Already Have a Carl [dilbert.com]

>> Best Employees [dilbert.com]

4. Pick of the Week

>> How to be Patient in an Impatient World [markmanson.net]


Practical Application of Test Pyramid in Spring-based Microservice

$
0
0

1. Overview

In this tutorial, we'll understand the popular software-testing model called the test pyramid.

We'll see how it's relevant in the world of microservices. In the process, we'll develop a sample application and relevant tests to conform to this model. In addition, we'll try to understand the benefits and boundaries of using a model.

2. Let's Take a Step Back

Before we start to understand any particular model like the test pyramid, it's imperative to understand why we even need one.

The need to test software is inherent and perhaps as old as the history of software development itself. Software testing has come a long way from manual to automation and further. The objective, however, remains the same — to deliver software conforming to specifications.

2.1. Types of Tests

There are several different types of tests in practice, which focus on specific objectives. Sadly, there is quite a variation in vocabulary and even understanding of these tests.

Let's review some of the popular and possibly unambiguous ones:

  • Unit Tests: Unit tests are the tests that target small units of code, preferably in isolation. The objective here is to validate the behavior of the smallest testable piece of code without worrying about the rest of the codebase. This automatically implies that any dependency needs to be replaced with either a mock or a stub or such similar construct.
  • Integration Tests: While unit tests focus on the internals of a piece of code, the fact remains that a lot of complexity lies outside of it. Units of code need to work together and often with external services like databases, message brokers, or web services. Integration tests are the tests that target the behavior of an application while integrating with external dependencies.
  • UI Tests: A software we develop is often consumed through an interface, which consumers can interact with. Quite often, an application has a web interface. However, API interfaces are becoming increasingly popular. UI tests target the behavior of these interfaces, which often are highly interactive in nature. Now, these tests can be conducted in an end-to-end manner, or user interfaces can also be tested in isolation.

2.2. Manual vs. Automated Tests

Software testing has been done manually since the beginning of testing, and it's widely in practice even today. However, it's not difficult to understand that manual testing has restrictions. For the tests to be useful, they have to be comprehensive and run often.

This is even more important in agile development methodologies and cloud-native microservice architecture. However, the need for test automation was realized much earlier.

If we recall the different types of tests we discussed earlier, their complexity and scope increase as we move from unit tests to integration and UI tests. For the same reason, automation of unit tests is easier and bears most of the benefits as well. As we go further, it becomes increasingly difficult to automate the tests with arguably lesser benefits.

Barring certain aspects, it's possible to automate testing of most software behavior as of today. However, this must be weighed rationally with the benefits compared to the effort needed to automate.

3. What Is a Test Pyramid?

Now that we've gathered enough context around test types and tools, it's time to understand what exactly a test pyramid is. We've seen that there are different types of tests that we should write.

However, how should we decide how many tests should we write for each type? What are the benefits or pitfalls to look out for? These are some of the problems addressed by a test automation model like the test pyramid.

Mike Cohn came up with a construct called Test Pyramid in his book “Succeeding with Agile”. This presents a visual representation of the number of tests that we should write at different levels of granularity.

The idea is that it should be highest at the most granular level and should start decreasing as we broaden our scope of the test. This gives the typical shape of a pyramid, hence the name:

While the concept is pretty simple and elegant, it's often a challenge to adopt this effectively. It's important to understand that we must not get fixated with the shape of the model and types of tests it mentions. The key takeaway should be that:

  • We must write tests with different levels of granularity
  • We must write fewer tests as we get coarser with their scope

4. Test Automation Tools

There are several tools available in all mainstream programming languages for writing different types of tests. We'll cover some of the popular choices in the Java world.

4.1. Unit Tests

  • Test Framework: The most popular choice here in Java is JUnit, which has a next-generation release known as JUnit5. Other popular choices in this area include TestNG, which offers some differentiated features compared to JUnit5. However, for most applications, both of these are suitable choices.
  • Mocking: As we saw earlier, we definitely want to deduct most of the dependencies, if not all, while executing a unit test. For this, we need a mechanism to replace dependencies with a test double like a mock or stub. Mockito is an excellent framework to provision mocks for real objects in Java.

4.2. Integration Tests

  • Test Framework: The scope of an integration test is wider than a unit test, but the entry point is often the same code at a higher abstraction. For this reason, the same test frameworks that work for unit testing are suitable for integration testing as well.
  • Mocking: The objective of an integration test is to test an application behavior with real integrations. However, we may not want to hit an actual database or message broker for tests. Many databases and similar services offer an embeddable version to write integration tests with.

4.3. UI Tests

  • Test Framework: The complexity of UI tests varies depending on the client handling the UI elements of the software. For instance, the behavior of a web page may differ depending upon device, browser, and even operating system. Selenium is a popular choice to emulate browser behavior with a web application. For REST APIs, however, frameworks like REST-assured are the better choices.
  • Mocking: User interfaces are becoming more interactive and client-side rendered with JavaScript frameworks like Angular and React. It's more reasonable to test such UI elements in isolation using a test framework like Jasmine and Mocha. Obviously, we should do this in combination with end-to-end tests.

5. Adopting Principles in Practice

Let's develop a small application to demonstrate the principles we've discussed so far. We'll develop a small microservice and understand how to write tests conforming to a test pyramid.

Microservice architecture helps structure an application as a collection of loosely coupled services drawn around domain boundaries. Spring Boot offers an excellent platform to bootstrap a microservice with a user interface and dependencies like databases in almost no time.

We'll leverage these to demonstrate the practical application of the test pyramid.

5.1. Application Architecture

We'll develop an elementary application that allows us to store and query movies that we've watched:

As we can see, it has a simple REST Controller exposing three endpoints:

@RestController
public class MovieController {
 
    @Autowired
    private MovieService movieService;
 
    @GetMapping("/movies")
    public List<Movie> retrieveAllMovies() {
        return movieService.retrieveAllMovies();
    }
 
    @GetMapping("/movies/{id}")
    public Movie retrieveMovies(@PathVariable Long id) {
        return movieService.retrieveMovies(id);
    }
 
    @PostMapping("/movies")
    public Long createMovie(@RequestBody Movie movie) {
        return movieService.createMovie(movie);
    }
}

The controller merely routes to appropriate services, apart from handling data marshaling and unmarshaling:

@Service
public class MovieService {
 
    @Autowired
    private MovieRepository movieRepository;

    public List<Movie> retrieveAllMovies() {
        return movieRepository.findAll();
    }
 
    public Movie retrieveMovies(@PathVariable Long id) {
        Movie movie = movieRepository.findById(id)
          .get();
        Movie response = new Movie();
        response.setTitle(movie.getTitle()
          .toLowerCase());
        return response;
    }
 
    public Long createMovie(@RequestBody Movie movie) {
        return movieRepository.save(movie)
          .getId();
    }
}

Furthermore, we have a JPA Repository that maps to our persistence layer:

@Repository
public interface MovieRepository extends JpaRepository<Movie, Long> {
}

Finally, our simple domain entity to hold and pass movie data:

@Entity
public class Movie {
    @Id
    private Long id;
    private String title;
    private String year;
    private String rating;

    // Standard setters and getters
}

With this simple application, we're now ready to explore tests with different granularity and quantity.

5.2. Unit Testing

First, we'll understand how to write a simple unit test for our application. As evident from this application, most of the logic tends to accumulate in the service layer. This mandates that we test this extensively and more often — quite a good fit for unit tests:

public class MovieServiceUnitTests {
 
    @InjectMocks
    private MovieService movieService;
 
    @Mock
    private MovieRepository movieRepository;
 
    @Before
    public void setUp() throws Exception {
        MockitoAnnotations.initMocks(this);
    }
 
    @Test
    public void givenMovieServiceWhenQueriedWithAnIdThenGetExpectedMovie() {
        Movie movie = new Movie(100L, "Hello World!");
        Mockito.when(movieRepository.findById(100L))
          .thenReturn(Optional.ofNullable(movie));
 
        Movie result = movieService.retrieveMovies(100L);
 
        Assert.assertEquals(movie.getTitle().toLowerCase(), result.getTitle());
    }
}

Here, we're using JUnit as our test framework and Mockito to mock dependencies. Our service, for some weird requirement, was expected to return movie titles in lower case, and that is what we intend to test here. There can be several such behaviors that we should cover extensively with such unit tests.

5.3. Integration Testing

In our unit tests, we mocked the repository, which was our dependency on the persistence layer. While we've thoroughly tested the behavior of the service layer, we still may have issues when it connects to the database. This is where integration tests come into the picture:

@RunWith(SpringRunner.class)
@SpringBootTest
public class MovieControllerIntegrationTests {
 
    @Autowired
    private MovieController movieController;
 
    @Test
    public void givenMovieControllerWhenQueriedWithAnIdThenGetExpectedMovie() {
        Movie movie = new Movie(100L, "Hello World!");
        movieController.createMovie(movie);
 
        Movie result = movieController.retrieveMovies(100L);
 
        Assert.assertEquals(movie.getTitle().toLowerCase(), result.getTitle());
    }
}

Note a few interesting differences here. Now, we're not mocking any dependencies. However, we may still need to mock a few dependencies depending upon the situation. Moreover, we're running these tests with SpringRunner.

That essentially means that we'll have a Spring application context and live database to run this test with. No wonder, this will run slower! Hence, we much choose fewer scenarios to tests here.

5.4. UI Testing

Finally, our application has REST endpoints to consume, which may have their own nuances to test. Since this is the user interface for our application, we'll focus to cover it in our UI testing. Let's now use REST-assured to test the application:

@RunWith(SpringRunner.class)
@SpringBootTest(webEnvironment = SpringBootTest.WebEnvironment.RANDOM_PORT)
public class MovieApplicationE2eTests {
 
    @Autowired
    private MovieController movieController;
 
    @LocalServerPort
    private int port;
 
    @Test
    public void givenMovieApplicationWhenQueriedWithAnIdThenGetExpectedMovie() {
        Movie movie = new Movie(100L, "Hello World!");
        movieController.createMovie(movie);
 
        when().get(String.format("http://localhost:%s/movies/100", port))
          .then()
          .statusCode(is(200))
          .body(containsString("Hello World!".toLowerCase()));
    }
}

As we can see, these tests are run with a running application and access it through the available endpoints. We focus on testing typical scenarios associated with HTTP, like the response code. These will be the slowest tests to run for obvious reasons.

Hence, we must be very particular to choose scenarios to test here. We should only focus on complexities that we've not been able to cover in previous, more granular tests.

6. Test Pyramid for Microservices

Now we've seen how to write tests with different granularity and structure them appropriately. However, the key objective is to capture most of the application complexity with more granular and faster tests.

While addressing this in a monolithic application gives us the desired pyramid structure, this may not be necessary for other architectures.

As we know, microservice architecture takes an application and gives us a set of loosely coupled applications. In doing so, it externalizes some of the complexities that were inherent to the application.

Now, these complexities manifest in the communication between services. It's not always possible to capture them through unit tests, and we have to write more integration tests.

While this may mean that we deviate from the classical pyramid model, it does not mean we deviate from principle as well. Remember, we're still capturing most of the complexities with as granular tests as possible. As long as we're clear on that, a model that may not match a perfect pyramid will still be valuable.

The important thing to understand here is that a model is only useful if it delivers value. Often, the value is subject to context, which in this case is the architecture we choose for our application. Therefore, while it's helpful to use a model as a guideline, we should focus on the underlying principles and finally choose what makes sense in our architecture context.

7. Integration with CI

The power and benefit of automated tests are largely realized when we integrate them into the continuous integration pipeline. Jenkins is a popular choice to define build and deployment pipelines declaratively.

We can integrate any tests which we've automated in the Jenkins pipeline. However, we must understand that this increases the time for the pipeline to execute. One of the primary objectives of continuous integration is fast feedback. This may conflict if we start adding tests that make it slower.

The key takeaway should be to add tests that are fast, like unit tests, to the pipeline that is expected to run more frequently. For instance, we may not benefit from adding UI tests into the pipeline that triggers on every commit. But, this is just a guideline and, finally, it depends on the type and complexity of the application we're dealing with.

8. Conclusion

In this article, we went through the basics of software testing. We understood different test types and the importance of automating them using one of the available tools.

Furthermore, we understood what a test pyramid means. We implemented this using a microservice built using Spring Boot.

Finally, we went through the relevance of the test pyramid, especially in the context of architecture like microservices.

Viewing all 4703 articles
Browse latest View live


<script src="https://jsc.adskeeper.com/r/s/rssing.com.1596347.js" async> </script>