Quantcast
Channel: Baeldung
Viewing all 4699 articles
Browse latest View live

Single Responsibility Principle in Java

$
0
0

1. Overview

In this tutorial, we'll be discussing the Single Responsibility Principle, as one of the SOLID principles of object-oriented programming.

Overall, we'll go in-depth on what this principle is and how to implement it when designing our software. Furthermore, we'll explain when this principle can be misleading.

*SRP = Single Responsibility Principle

2. Single Responsibility Principle

As the name suggests, this principle states that each class should have one responsibility, one single purpose. This means that a class will do only one job, which leads us to conclude it should have only one reason to change.

We don’t want objects that know too much and have unrelated behavior. These classes are harder to maintain. For example, if we have a class that we change a lot, and for different reasons, then this class should be broken down into more classes, each handling a single concern. Surely, if an error occurs, it will be easier to find.

Let’s consider a class that contains code that changes the text in some way. The only job of this class should be manipulating text.

public class TextManipulator {
    private String text;

    public TextManipulator(String text) {
        this.text = text;
    }

    public String getText() {
        return text;
    }

    public void appendText(String newText) {
        text = text.concat(newText);
    }
    
    public String findWordAndReplace(String word, String replacementWord) {
        if (text.contains(word)) {
            text = text.replace(word, replacementWord);
        }
        return text;
    }
    
    public String findWordAndDelete(String word) {
        if (text.contains(word)) {
            text = text.replace(word, "");
        }
        return text;
    }

    public void printText() {
        System.out.println(textManipulator.getText());
    }
}

Although this may seem fine, it is not a good example of the SRP. Here we have two responsibilities: manipulating and printing the text.

Having a method that prints out text in this class violate the Single Responsibility Principle. For this purpose, we should create another class, which will only handle printing text:

public class TextPrinter {
    TextManipulator textManipulator;

    public TextPrinter(TextManipulator textManipulator) {
        this.textManipulator = textManipulator;
    }

    public void printText() {
        System.out.println(textManipulator.getText());
    }

    public void printOutEachWordOfText() {
        System.out.println(Arrays.toString(textManipulator.getText().split(" ")));
    }

    public void printRangeOfCharacters(int startingIndex, int endIndex) {
        System.out.println(textManipulator.getText().substring(startingIndex, endIndex));
    }
}

Now, in this class, we can create methods for as many variations of printing text as we want, because that's its job.

3. How Can This Principle Be Misleading?

The trick of implementing SRP in our software is knowing the responsibility of each class.

However, every developer has their vision of the class purpose, which makes things tricky. Since we don’t have strict instructions on how to implement this principle, we are left with our interpretations of what the responsibility will be.

What this means is that sometimes only we, as designers of our application, can decide if something is in the scope of a class or not.

When writing a class according to the SRP principle, we have to think about the problem domain, business needs, and application architecture. It is very subjective, which makes implementing this principle harder then it seems. It will not be as simple as the example we have in this tutorial.

This leads us to the next point.

4. Cohesion

Following the SRP principle, our classes will adhere to one functionality. Their methods and data will be concerned with one clear purpose. This means high cohesion, as well as robustness, which together reduce errors.

When designing software based on the SRP principle, cohesion is essential, since it helps us to find single responsibilities for our classes. This concept also helps us find classes that have more than one responsibility.

Let’s go back to our TextManipulator class methods:

...

public void appendText(String newText) {
    text = text.concat(newText);
}

public String findWordAndReplace(String word, String replacementWord) {
    if (text.contains(word)) {
        text = text.replace(word, replacementWord);
    }
    return text;
}

public String findWordAndDelete(String word) {
    if (text.contains(word)) {
        text = text.replace(word, "");
    }
    return text;
}

...

Here, we have a clear representation of what this class does: Text manipulation.

But, if we don’t think about cohesion and we don’t have a clear definition of what this class’s responsibility is, we could say that writing and updating the text are two different and separate jobs. Lead by this thought, we can conclude than these should be two separate classes: WriteText and UpdateText.

In reality, we'd get two classes that are tightly coupled and loosely cohesive, which should almost always be used together. These three methods may perform different operations, but they essentially serve one single purpose: Text manipulation. The key is not to overthink.

One of the tools that can help achieve high cohesion in methods is LCOM. Essentially, LCOM measures the connection between class components and their relation to one another.

Martin Hitz and Behzad Montazeri introduced LCOM4, which Sonarqube metered for a time, but has since deprecated.

5. Conclusion

Even though the name of the principle is self-explanatory, we can see how easy it is to implement incorrectly. Make sure to distinguish the responsibility of every class when developing a project and pay extra attention to cohesion.

As always, the code is available on GitHub.


Building a Java Application With Gradle

$
0
0

1. Overview

This tutorial provides a practical guide on how to build a Java-based project using Gradle.

We'll explain the steps of manually creating a project structure, performing the initial configuration, and adding the Java plug-in and JUnit dependency. Then, we'll build and run the application.

Finally, in the last section, we'll give an example of how to do this with the Gradle Build Init Plugin. Some basic introduction can be also found in the article Introduction to Gradle.

2. Java Project Structure

Before we manually create a Java project and prepare it for build, we need to install Gradle.

Let's start creating a project folder using the PowerShell console with name gradle-employee-app:

> mkdir gradle-employee-app

After that, let's navigate to the project folder and create sub-folders:

> mkdir src/main/java/employee

The resulting output is shown:

Directory: D:\gradle-employee-app\src\main\java

Mode                LastWriteTime         Length Name
----                -------------         ------ ----
d-----        4/10/2020  12:14 PM                employee

Within the project structure above, let's create two classes. One is a simple Employee class with data such as name, email address, and year of birth:

public class Employee {
    String name;
    String emailAddress;
    int yearOfBirth;
}

The second is the main Employee App class that prints Employee data:

public class EmployeeApp {

    public static void main(String[] args){
        Employee employee = new Employee();

        employee.name = "John";
        employee.emailAddress = "john@baeldung.com";
        employee.yearOfBirth = 1978;

        System.out.println("Name: " + employee.name);
        System.out.println("Email Address: " + employee.emailAddress);
        System.out.println("Year Of Birth:" + employee.yearOfBirth);
    }
}

3. Build a Java Project

Next, to build our Java project, we create a build.gradle configuration file in project root folder.

The following is in the PowerShell command-line:

Echo > build.gradle

We skip the next step related to the input parameters:

cmdlet Write-Output at command pipeline position 1
Supply values for the following parameters:
InputObject[0]:

For a build to be successful, we need to add a Java Library and Application Plugin:

plugins {
    id 'java-library'
    id 'application'
}

To use these plug-ins we apply an application plugin and add a fully-qualified name of the main class:

apply plugin: 'application'
mainClassName = 'employee.EmployeeApp'

Each project consists of tasks. A task represents a piece of work that a build performs such as compiling the source code.

For instance, we can add a task to the configuration file that prints a message about the completed project configuration:

println 'This is executed during configuration phase'
task configured {
    println 'The project is configured'
}

Usually, gradle build is the primary task and the one most used. This task compiles, tests, and assembles the code into a JAR file. The build is started by typing:

> gradle build

Execute the command above to output:

> Configure project :
This is executed during configuration phase
The project is configured
BUILD SUCCESSFUL in 1s
2 actionable tasks: 2 up-to-date

To see the build results, let's look at the build folder which contains sub-folders: classes, distributions, libs, and reports. Typing the Tree / F gives the structure of the build folder:

├───build
│   ├───classes
│   │   └───java
│   │       ├───main
│   │       │   └───employee
│   │       │           Employee.class
│   │       │           EmployeeApp.class
│   │       │
│   │       └───test
│   │           └───employee
│   │                   EmployeeAppTest.class
│   │
│   ├───distributions
│   │       gradle-employee-app.tar
│   │       gradle-employee-app.zip
       
│   ├───libs
│   │       gradle-employee-app.jar
│   │
│   ├───reports
│   │   └───tests
│   │       └───test
│   │           │   index.html
│   │           │
│   │           ├───classes
│   │           │       employee.EmployeeAppTest.html

As you can see, the classes sub-folder contains two compiled .class files we previously created. The distributions sub-folder contains an archived version of the application jar package. And libs keeps the jar file of our application.

Usually, in reports, there are files that are generated when running JUnit tests. 

Now everything is ready to run the Java project by typing gradle run.The result of executing the application on exit:

> Configure project :
This is executed during configuration phase
The project is configured

> Task :run
Name: John
Email Address: john@baeldung.com
Year Of Birth:1978

BUILD SUCCESSFUL in 1s
2 actionable tasks: 1 executed, 1 up-to-date

3.1. Build Using Gradle Wrapper

The Gradle Wrapper is a script that invokes a declared version of Gradle.

First, let's define a wrapper task in the build.gradle file:

task wrapper(type: Wrapper){
    gradleVersion = '5.3.1'
}

Let's run this task using gradle wrapper from Power Shell:

> Configure project :
This is executed during configuration phase
The project is configured

BUILD SUCCESSFUL in 1s
1 actionable task: 1 executed

Several files will be created under the project folder, including the files under /gradle/wrapper location:

│   gradlew
│   gradlew.bat
│   
├───gradle
│   └───wrapper
│           gradle-wrapper.jar
│           gradle-wrapper.properties
  • gradlew: the shell script used to create Gradle tasks on Linux
  • gradlew.bat: a .bat script that Windows users to create Gradle tasks
  • gradle-wrapper.jar: a wrapper-executable jar of our application
  • gradle-wrapper.properties: properties file for configuring the wrapper

4. Add Java Dependencies and Run a Simple Test

First, in our configuration file, we need to set a remote repository from where we download dependency jars. Most often, these repositories are either mavenCentral() or jcenter(). Let's choose the second one:

repositories {
    jcenter()
}

With our repositories created, we can then specify which dependencies to download. In this example, we are adding Apache Commons and JUnit library. To implement, add testImplementation and testRuntime parts in the dependencies configuration.

It builds on an additional test block:

dependencies {
    compile group: 'org.apache.commons', name: 'commons-lang3', version: '3.10'
    testImplementation('junit:junit:4.13')
    testRuntime('junit:junit:4.13')
}
test {
    useJUnit()
}

When that's done, let's try the work of JUnit on a simple test. Navigate to the src folder and make the sub-folders for the test:

src> mkdir test/java/employee

Within the last sub-folder, let's create EmployeeAppTest.java:

public class EmployeeAppTest {

    @Test
    public void testData() {

        Employee testEmp = this.getEmployeeTest();
        assertEquals(testEmp.name, "John");
        assertEquals(testEmp.emailAddress, "john@baeldung.com");
        assertEquals(testEmp.yearOfBirth, 1978);
    }

    private Employee getEmployeeTest() {

        Employee employee = new Employee();
        employee.name = "John";
        employee.emailAddress = "john@baeldung.com";
        employee.yearOfBirth = 1978;

        return employee;
    }
}

Similar to before, let's run a gradle clean test from the command line and the test should pass without issue.

5. Java Project Initialization Using Gradle

In this section, we'll explain the steps for creating and building a Java application that we have gone through so far. The difference is that, this time, we work with the help of the Gradle Build Init Plugin.

Create a new project folder and name it gradle-java-example. Then, switch to that empty project folder and run the init script:

> gradle init

Gradle will ask us with few questions and offer options for creating a project. The first question is what type of project we want to generate:

Select type of project to generate:
  1: basic
  2: cpp-application
  3: cpp-library
  4: groovy-application
  5: groovy-library
  6: java-application
  7: java-library
  8: kotlin-application
  9: kotlin-library
  10: scala-library
Select build script DSL:
  1: groovy
  2: kotlin
Enter selection [1..10] 6

Select option 6 for the type of project and then first option (groovy) for the build script.

Next, a list of questions appears:

Select test framework:
  1: junit
  2: testng
  3: spock
Enter selection (default: junit) [1..3] 1

Project name (default: gradle-java-example):
Source package (default: gradle.java.example): employee

BUILD SUCCESSFUL in 57m 45s
2 actionable tasks: 2 executed

Here, we select the first option, junit, for the test framework. Select the default name for our project and type “employee” as the name of the source package.

To see the complete directory structure within /src project folders, let's type Tree /F in Power Shell:

├───main
│   ├───java
│   │   └───employee
│   │           App.java
│   │
│   └───resources
└───test
    ├───java
    │   └───employee
    │           AppTest.java
    │
    └───resources

Finally, if we build the project with gradle run, we get “Hello World” on exit:

> Task :run
Hello world.

BUILD SUCCESSFUL in 1s
2 actionable tasks: 1 executed, 1 up-to-date

6. Conclusion

In this article, we've presented two ways to create and build a Java application using Gradle. The fact is, we did the manual work and it took time to start compiling and building applications from the command line. In this case, we should pay attention to the import of some required packages and classes if the application uses multiple libraries.

On the other side, the Gradle init script has features that generate a light skeleton of our project, as well as some of the configuration files associated with Gradle.

The source code for this article is available over on GitHub.

Asserting Log Messages With JUnit

$
0
0

1. Introduction

In this tutorial, we'll look at how we can cover generated logs in JUnit testing.

We'll use the slf4j-api and the logback implementation and create a custom appender that we can use for log assertion.

2. Maven Dependencies

Before we begin, let's add the logback dependency. As it natively implements the slf4j-api, it is automatically downloaded and injected into the project by Maven transitivity:

<dependency>
    <groupId>ch.qos.logback</groupId>
    <artifactId>logback-classic</artifactId>. 
    <version>1.2.3</version>
</dependency>

AssertJ offers very useful functions when testing, so let's add its dependency to the project as well:

<dependency>
    <groupId>org.assertj</groupId>
    <artifactId>assertj-core</artifactId>
    <version>3.15.0</version>
    <scope>test</scope>
</dependency>

3. A Basic Business Function

Now, let's create an object that will generate logs we can base our tests on.

Our BusinessWorker object will only expose one method. This method will generate a log with the same content for each log level. Although this method isn't that useful in the real world, it'll serve well for our testing purposes:

public class BusinessWorker {
    private static Logger LOGGER = LoggerFactory.getLogger(BusinessWorker.class);

    public void generateLogs(String msg) {
        LOGGER.trace(msg);
        LOGGER.debug(msg);
        LOGGER.info(msg);
        LOGGER.warn(msg);
        LOGGER.error(msg);
    }
}

4. Testing the Logs

We want to generate logs, so let's create a logback.xml file in the src/test/resources folder. Let's keep it as simple as possible and redirect all logs to a CONSOLE appender:

<?xml version="1.0" encoding="UTF-8"?>
<configuration>
    <appender name="CONSOLE" class="ch.qos.logback.core.ConsoleAppender">
        <layout class="ch.qos.logback.classic.PatternLayout">
            <Pattern>
                %d{HH:mm:ss.SSS} [%t] %-5level %logger{36} - %msg%n
            </Pattern>
        </layout>
    </appender>

    <root level="error">
        <appender-ref ref="CONSOLE"/>
    </root>
</configuration>

4.1. MemoryAppender

Now, let's create a custom appender that keeps logs in memory. We'll extend the ListAppender<ILoggingEvent> that logback offers, and we'll enrich it with a few useful methods:

public class MemoryAppender extends ListAppender<ILoggingEvent> {
    public void reset() {
        this.list.clear();
    }

    public boolean contains(String string, Level level) {
        return this.list.stream()
          .anyMatch(event -> event.getMessage().toString().contains(string)
            && event.getLevel().equals(level));
    }

    public int countEventsForLogger(String loggerName) {
        return (int) this.list.stream()
          .filter(event -> event.getLoggerName().contains(loggerName))
          .count();
    }

    public List<ILoggingEvent> search(String string) {
        return this.list.stream()
          .filter(event -> event.getMessage().toString().contains(string))
          .collect(Collectors.toList());
    }

    public List<ILoggingEvent> search(String string, Level level) {
        return this.list.stream()
          .filter(event -> event.getMessage().toString().contains(string)
            && event.getLevel().equals(level))
          .collect(Collectors.toList());
    }

    public int getSize() {
        return this.list.size();
    }

    public List<ILoggingEvent> getLoggedEvents() {
        return Collections.unmodifiableList(this.list);
    }
}

The MemoryAppender class handles a List that is automatically populated by the logging system.

It exposes a variety of methods in order to cover a wide range of test purposes:

  • reset() – clears the list
  • contains(msg, level) – returns true only if the list contains an ILoggingEvent matching the specified content and severity level
  • countEventForLoggers(loggerName) – returns the number of ILoggingEvent generated by named logger
  • search(msg) – returns a List of ILoggingEvent matching the specific content
  • search(msg, level) – returns a List of ILoggingEvent matching the specified content and severity level
  • getSize() – returns the number of ILoggingEvents
  • getLoggedEvents() – returns an unmodifiable view of the ILoggingEvent elements

4.2. Unit Test

Next, let's create a JUnit test for our business worker.

We'll declare our MemoryAppender as a field and programmatically inject it into the log system. Then, we'll start the appender.

For our tests, we'll set the level to DEBUG:

@Before
public void setup() {
    Logger logger = (Logger) LoggerFactory.getLogger(LOGGER_NAME);
    memoryAppender = new MemoryAppender();
    memoryAppender.setContext((LoggerContext) LoggerFactory.getILoggerFactory());
    logger.setLevel(Level.DEBUG);
    logger.addAppender(memoryAppender);
    memoryAppender.start();
}

Now we can create a simple test where we instantiate our BusinessWorker class and call the generateLogs method. We can then make assertions on the logs that it generates:

@Test
public void test() {
    BusinessWorker worker = new BusinessWorker();
    worker.generateLogs(MSG);
        
    assertThat(memoryAppender.countEventsForLogger(LOGGER_NAME)).isEqualTo(4);
    assertThat(memoryAppender.search(MSG, Level.INFO).size()).isEqualTo(1);
    assertThat(memoryAppender.contains(MSG, Level.TRACE)).isFalse();
}

This test uses three features of the MemoryAppender:

  • Four logs have been generated — one entry per severity should be present, with the trace level filtered
  • Only one log entry with content message with the level severity of INFO
  • No log entry is present with content message and severity TRACE

If we plan to use the same instance of this class inside the same test class when generating a lot of logs, the memory usage will creep up. We can invoke the MemoryAppender.clear() method before each test to free memory and avoid OutOfMemoryException.

In this example, we've reduced the scope of the retained logs to the LOGGER_NAME package, which we defined as “com.baeldung.junit.log“. We could potentially retain all logs with LoggerFactory.getLogger(Logger.ROOT_LOGGER_NAME), but we should avoid this whenever possible as it can consume a lot of memory.

5. Conclusion

With this tutorial, we've demonstrated how to cover log generation in our unit tests.

As always, the code can be found over on GitHub.

How to add proxy support to Jsoup?

$
0
0

1. Overview

In this tutorial, we'll take a look at how to add proxy support to Jsoup.

2. Common Reasons To Use a Proxy

There are two main reasons we might want to use a proxy with Jsoup.

2.1. Usage Behind an Organization Proxy

It's common for organizations to have proxies controlling Internet access.  If we try to access Jsoup through a proxied local network, we'll get an exception:

java.net.SocketTimeoutException: connect timed out

When we see this error, we need to set a proxy for Jsoup before trying to access any URL outside of the network.

2.2. Preventing IP Blocking

Another common reason to use a proxy with Jsoup is to prevent websites from blocking IP addresses.

In other words, using a proxy (or multiple rotating proxies) allows us to parse HTML more reliably, reducing the chance that our code stops working due to a block or ban of our IP address.

3. Setup

When using Maven, we need to add the Jsoup dependency to our pom.xml:

<dependency>
    <groupId>org.jsoup</groupId>
    <artifactId>jsoup</artifactId>
    <version>1.13.1</version>
</dependency>

In Gradle, we have to declare our dependency in build.gradle:

compile 'org.jsoup:jsoup:1.13.1'

4. Adding Proxy Support Through Host and Port Properties

Adding proxy support to Jsoup is pretty simple. All we need to do is to call the proxy(String, int) method when building the Connection object:

Jsoup.connect("https://spring.io/blog")
  .proxy("127.0.0.1", 1080)
  .get();

Here we set the HTTP proxy to use for this request, with the first argument representing the proxy hostname and the second the proxy port.

5. Adding Proxy Support Through Proxy Object

Or, to add the proxy to Jsoup using the Proxy class, we call the proxy(java.net.Proxy) method of the Connection object:

Proxy proxy = new Proxy(Proxy.Type.HTTP, 
  new InetSocketAddress("127.0.0.1", 1080));

Jsoup.connect("https://spring.io/blog")
  .proxy(proxy)
  .get();

This method takes a Proxy object consisting of a proxy type, typically the HTTP type, and an InetSocketAddress – a class that wraps the proxy's hostname and port, respectively.

6. Conclusion

In this tutorial, we've explored two different ways of adding proxy support to Jsoup.

First, we learned how to do it with the Jsoup method that takes the host and port properties. Second, we learned how to achieve the same result using a Proxy object as a parameter.

As always, the code samples are available over on GitHub.

Spring JPA @Embedded and @EmbeddedId

$
0
0

1. Overview

In this tutorial, we're going to cover the use of the @EmbeddedId annotation and “findBy” method for querying a composite key based JPA entity. Hence we'll be using @EmbeddeId and @Embeddable annotations to represent composite keys in JPA entities. We also need to use Spring JpaRepository to achieve our goal. We'll concentrate on querying objects by partial primary key.

2. Need for @Embeddable and @EmbeddedId

In software, we come across many use cases when we need to have a composite primary key to define an entry in a table. Composite primary keys are keys that use more than one column to identify a row in the table uniquely.

We represent a composite primary key in Spring Data by using the @Embeddable annotation on a class. This key is then embedded in the table's corresponding entity class as the composite primary key by using the @EmbeddedId annotation on a field of the @Embeddable type.

3. Example

Consider a book table, where a book record has a composite primary key consisting of author and name. Sometimes, we might want to find books by a part of the primary key. For example, a user might want to search for books only by a particular author. We'll learn how to do this with JPA.

Our primary application will consist of an @Embeddable BookId and @Entity Book with @EmbeddedId BookId.

3.1. @Embeddable

Let's define our BookId class in this section. The author and name will specify a unique BookId — the class is Serializable and implements both equals and hashCode methods:

@Embeddable
public class BookId implements Serializable {

    private String author;
    private String name;

    //standard getters and setters
}

3.2. @Entity and @EmbeddedId

Our Book entity has @EmbeddedId BookId and other fields related to a book. BookId tells JPA that the Book entity has a composite key:

@Entity
public class Book {

    @EmbeddedId
    private BookId id;
    private String genre;
    private Integer price;

    //standard getters and setters
}

3.3. JPA Repository and Method Naming

Let us quickly define our JPA repository interface by extending the JpaRepository with entity Book as well as BookId:

@Repository
public interface BookRepository extends JpaRepository<Book, BookId> {

    List<Book> findByIdName(String name);

    List<Book> findByIdAuthor(String author);
}

We use a part of the id variable's field names to derive our Spring Data query methods. Hence, JPA interprets the partial primary key query as:

findByIdName -> directive "findBy" field "id.name"
findByIdAuthor -> directive "findBy" field "id.author"

4. Conclusion

JPA can be used to efficiently map composite keys and query them via derived queries. In this article, we saw a small example of running a partial id field search. We looked at the @Embeddable annotation to represent the composite primary key and the @EmbeddedId annotation to insert a composite key in an entity. Finally, we saw how to use the JpaRepository findBy derived methods to search with partial id fields.

As always, the example code for this tutorial is available over on GitHub.

Copying Files To And From Docker Containers

$
0
0

1. Introduction

As more of our applications are deployed to cloud environments, working with Docker is becoming a necessary skill for developers. Often when debugging applications, it is useful to copy files into or out of our Docker containers.

In this tutorial, we'll look at some different ways we can copy files to and from Docker containers.

2. Docker cp Command

The quickest way to copy files to and from a Docker container is to use the docker cp command. This command closely mimics the Unix cp command and has the following syntax:

docker cp <SRC> <DEST>

Before we look at some examples of this command, let's assume we have the following Docker containers running:

CONTAINER ID        IMAGE               COMMAND                  CREATED             STATUS              PORTS                    NAMES
1477326feb62        grafana/grafana     "/run.sh"                2 months ago        Up 3 days           0.0.0.0:3000->3000/tcp   grafana
8c45029d15e8        prom/prometheus     "/bin/prometheus --c…"   2 months ago        Up 3 days           0.0.0.0:9090->9090/tcp   prometheus

The first example copies a file from the /tmp directory on the host machine into the Grafana install directory in the grafana container:

docker cp /tmp/config.ini grafana:/usr/share/grafana/conf/

We can also use container IDs instead of their names:

docker cp /tmp/config.ini 1477326feb62:/usr/share/grafana/conf/

To copy files from the grafana container to the /tmp directory on the host machine, we just switch the order of the parameters:

docker cp grafana:/usr/share/grafana/conf/defaults.ini /tmp

We can also copy an entire directory instead of single files. This example copies the entire conf directory from the grafana container to the /tmp directory on the host machine:

docker cp grafana:/usr/share/grafana/conf /tmp

The docker cp command does have some limitations. First, we cannot use it to copy between two containers. It can only be used to copy files between the host system and a single container.

Second, while it does have the same syntax as the Unix cp command, it does not support the same flags. In fact, it only supports two:

-a: Archive mode, which preserves all uid/gid information of the files being copied
-L: Always follow symbolic links in SRC

3. Volume Mounts

Another way to copy files to and from Docker containers is to use a volume mount. This means we make a directory from the host system available inside the container.

To use volume mounts, we have to run our container with the -v flag:

docker run -d --name=grafana -p 3000:3000 grafana/grafana -v /tmp:/transfer

The command above runs a grafana container and mounts the /tmp directory from the host machine as a new directory inside the container named /transfer. If we wanted to, we could provide multiple -v flags to create multiple volume mounts inside the container.

There are several advantages to this approach. First, we can use the Unix cp command, which has many more flags and options over the docker cp command.

The second advantage is that we can create a single shared directory for all Docker containers. This means we can copy directly between containers as long as they all have the same volume mount.

Keep in mind this approach has the disadvantage that all files have to go through the volume mount. This means we cannot copy files in a single command. Instead, we first copy files into the mounted directory, and then into their final desired location.

Another drawback to this approach is we may have issues with file ownership. Docker containers typically only have a root user, which means files created inside the container will have root ownership by default. We can use the Unix chown command to restore file ownership if needed on the host machine.

4. Dockerfile

Dockerfiles are used to build Docker images, which are then instantiated into Docker containers. Dockerfiles can contain several different instructions, one of which is COPY.

The COPY instruction lets us copy a file (or files) from the host system into the image. This means the files become a part of every container that is created from that image.

The syntax for the COPY instruction is similar to other copy commands we saw above:

COPY <SRC> <DEST>

Just like the other copy commands, SRC can be either a single file or a directory on the host machine. It can also include wildcard characters to match multiple files.

Let's look at some examples.

This will copy a single from the current Docker build context into the image:

COPY properties.ini /config/

And this will copy all XML files into the Docker image:

COPY *.xml /config/

The main downside of this approach is that we cannot use it for running Docker containers. Docker images are not Docker containers, so this approach only makes sense to use when the set of files needed inside the image is known ahead of time.

5. Conclusion

In this tutorial, we've seen how to copy files to and from a Docker container. Each has some pros and cons, so we must pick the approach that best suits our needs.

Generate Database Schema with Spring Data JPA

$
0
0

1. Overview

When creating a persistence layer, we need to match our SQL database schema with the object model that we have created in our code. This can be a lot of work to do manually.

In this tutorial, we're going to see how to generate and export our database schema based on the entity models from our code.

First, we'll cover the JPA configuration properties for schema generation. Then, we'll explore how to use these properties in Spring Data JPA.

Finally, we'll explore an alternative for DDL generation using Hibernate's native API.

2. JPA Schema Generation

JPA 2.1 introduced a standard for database schema generation. Therefore, starting with this release we can control how to generate and export our database schema through a set of predefined configuration properties.

2.1. The Script action

First, to control which DDL commands we'll generate, JPA introduces the script action configuration option:

javax.persistence.schema-generation.scripts.action

We can choose from four different options:

  • none – does not generate any DDL commands
  • create – generates only database create commands
  • drop – generates only database drop commands
  • drop-and-create – generates database drop commands followed by create commands

2.2. The Script target

Secondly, for each specified script action, we'll need to define the corresponding target configuration:

javax.persistence.schema-generation.scripts.create-target
javax.persistence.schema-generation.scripts.drop-target

In essence, the script target defines the location of the file that contains the schema create or drop commands. So, for instance, if we choose drop-and-create as script action we'll need to specify both targets.

2.3. The Schema Source

Finally, to generate the schema DDL commands from our entity models we should include the schema source configurations with the metadata option selected:

javax.persistence.schema-generation.create-source=metadata
javax.persistence.schema-generation.drop-source=metadata

In the next section, we'll show how we can use Spring Data JPA to automatically generate our database schema with the standard JPA properties.

3. Schema Generation with Spring Data JPA

3.1. The Models

Let's imagine we're implementing a user-account system with an entity called Account:

@Entity
@Table(name = "accounts")
public class Account {
    
    @Id
    @GeneratedValue
    private Long id;

    @Column(nullable = false, length = 100)
    private String name;

    @Column(name = "email_address")
    private String emailAddress;

    @OneToMany(mappedBy = "account", cascade = CascadeType.ALL)
    private List<AccountSettings> accountSettings = new ArrayList<>();

    // getters and setters
}

Each account can have multiple account settings, so here we'll have a one-to-many mapping:

@Entity
@Table(name = "account_settings")
public class AccountSetting {

    @Id
    @GeneratedValue
    private Long id;

    @Column(name = "name", nullable = false)
    private String settingName;

    @Column(name = "value", nullable = false)
    private String settingValue;

    @ManyToOne
    @JoinColumn(name ="account_id", nullable = false)
    private Account account;

    // getters and setters
}

3.2. Spring Data JPA Configuration

Now to generate the database schema we'll need to pass the schema generation properties to the persistence provider in use. To do this, we'll set the native JPA properties in our configuration file under the spring.jpa.properties prefix:

spring.jpa.properties.javax.persistence.schema-generation.scripts.action=create
spring.jpa.properties.javax.persistence.schema-generation.scripts.create-target=create.sql
spring.jpa.properties.javax.persistence.schema-generation.scripts.create-source=metadata

Consequently, Spring Data JPA passes these properties to the persistence provider, when it creates the EntityManagerFactory bean.

3.3. The create.sql File

As a result, on the application startup, the above configuration will generate the database creation commands based on the entity mapping metadata. Furthermore, the DDL commands are exported into the create.sql file, which is created in our main project folder:

create table account_settings (
    id bigint not null,
    name varchar(255) not null,
    value varchar(255) not null,
    account_id bigint not null,
    primary key (id)
)

create table accounts (
    id bigint not null,
    email_address varchar(255),
    name varchar(100) not null,
    primary key (id)
)

alter table account_settings
   add constraint FK54uo82jnot7ye32pyc8dcj2eh
   foreign key (account_id)
   references accounts (id)

4. Schema Generation with the Hibernate API

If we're using Hibernate, we can use directly its native API, SchemaExport, to generate our schema DDL commands. Likewise, the Hibernate API uses our application entity models to generate and export the database schema.

With Hibernate's SchemaExport we can use the drop, createOnly, and create methods explicitly:

MetadataSources metadataSources = new MetadataSources(serviceRegistry);
metadataSources.addAnnotatedClass(Account.class);
metadataSources.addAnnotatedClass(AccountSettings.class);
Metadata metadata = metadataSources.buildMetadata();

SchemaExport schemaExport = new SchemaExport();
schemaExport.setFormat(true);
schemaExport.setOutputFile("create.sql");
schemaExport.createOnly(EnumSet.of(TargetType.SCRIPT), metadata);

When we run this code, our database creation commands are exported into the create.sql file in our main project folder.

The SchemaExport is part of the Hibernate Bootstrapping API.

5. Schema Generation Options

Even though schema generation can save us time during development, we should use it only for basic scenarios.

For instance, we could use it to quickly spin up development or testing databases.

In contrast, for more complex scenarios, like database migration, we should use more refined tooling like Liquibase or Flyway.

6. Conclusion

In this tutorial, we saw how to generate and export our database schema with the help of the JPA schema-generation properties. Subsequently, we saw how to achieve the same result using Hibernate's native API, SchemaExport.

As always, we can find the example code over on GitHub.

Manual Logout With Spring Security

$
0
0

1. Introduction

Spring Security is the standard for securing Spring-based applications. It has several features to manage user's authentication, including login and logout. 

In this tutorial, we'll focus on manual logout with Spring Security.

We'll assume that readers already understand the standard Spring Security logout process.

2. Basic Logout

When a user attempts a logout, it has several consequences on its current session state. We need to destroy the session with two steps:

  1. Invalidate HTTP session information.
  2. Clear SecurityContext as it contains authentication information.

Those two actions are performed by the SecurityContextLogoutHandler. Let's see that in action:

@Configuration
public class DefaultLogoutConfiguration extends WebSecurityConfigurerAdapter {

    @Override
    protected void configure(HttpSecurity http) throws Exception {
        http
          .logout(logout -> logout
            .logoutUrl("/basic/basiclogout")
            .addLogoutHandler(new SecurityContextLogoutHandler())
          );
    }
}

Note that SecurityContextLogoutHandler is added by Spring Security by default – we just show it here for clarity.

3. Cookie Clearing Logout

Often, a logout also requires us to clear some or all of a user's cookies. We can create our own LogoutHandler that loops through all cookies and expires them on logout:

@Configuration
public class AllCookieClearingLogoutConfiguration extends WebSecurityConfigurerAdapter {
    @Override
    protected void configure(HttpSecurity http) throws Exception {
        http
          .logout(logout -> logout
            .logoutUrl("/cookies/cookielogout")
            .addLogoutHandler((request, response, auth) -> {
                for (Cookie cookie : request.getCookies()) {
                    String cookieName = cookie.getName();
                    Cookie cookieToDelete = new Cookie(cookieName, null);
                    cookieToDelete.setMaxAge(0);
                    response.addCookie(cookieToDelete);
                }
            })
          );
    }
}

On the other hand, Spring Security provides CookieClearingLogoutHandler which is a ready-to-use logout handler for cookie removal.

4. Clear-Site-Data Header Logout

Alternatively, we can use a special HTTP response header to achieve the same thing; this is where the Clear-Site-Data header comes into play. The Clear-Data-Site header clears browsing data (cookies, storage, cache) associated with the requesting website.

@Configuration
public class ClearSiteDataHeaderLogoutConfiguration extends WebSecurityConfigurerAdapter {

    private static final ClearSiteDataHeaderWriter.Directive[] SOURCE = 
      {CACHE, COOKIES, STORAGE, EXECUTION_CONTEXTS};

    @Override
    protected void configure(HttpSecurity http) throws Exception {
        http
          .logout(logout -> logout
            .logoutUrl("/csd/csdlogout")
            .addLogoutHandler(new HeaderWriterLogoutHandler(new ClearSiteDataHeaderWriter(SOURCE)))
          );
    }
}

Note that storage cleansing might corrupt the application state when we clear only one type of storage. Therefore, due to Incomplete Clearing, the header is only applied if the request is secure.

5. Conclusion

Spring Security has many built-in features to handle authentication scenarios. It always comes in handy to master how to use those features programmatically.

As always, the code for these examples is available over on GitHub.


Find Unused Maven Dependencies

$
0
0

1. Overview

When using Maven to manage our project dependencies, we can lose track of what dependencies are used in our application.

In this short tutorial, we'll cover how to use the Maven dependency plugin, a plugin that helps us find unused dependencies in our project.

2. Project Setup

Let's begin by adding a couple of dependencies, slf4j-api (the one we will be using) and common-collections (the one we won't use):

<dependencies>
    <dependency>
        <groupId>commons-collections</groupId>
        <artifactId>commons-collections</artifactId>
        <version>3.2.2</version>
    </dependency>
    <dependency>
        <groupId>org.slf4j</groupId>
        <artifactId>slf4j-api</artifactId>
        <version>1.7.25</version>
    </dependency>
</dependencies>

We can access the Maven dependency plugin without specifying it in our pom. In any case, we can use the pom.xml definition to specify the version and also some properties if needed:

<build>
    <plugins>
        <plugin>
            <artifactId>maven-dependency-plugin</artifactId>
            <version>3.1.2</version>
        </plugin>
    </plugins>
</build>

3. Code Sample

Now that we have our project set up, let's write a line of code where we use one of the dependencies we defined before:

public Logger getLogger() {
    return LoggerFactory.getLogger(UnusedDependenciesExample.class);
}

The LoggerFactory from the Slf4J library is returned in a method, but there's no use of the common-collections library, making it a candidate for removal.

4. Find Unused Dependencies

Using the Maven dependency plugin, we can find the dependencies that are not in use in our project. For that, we invoke the analyze goal of the plugin:

$ mvn dependency:analyze

[INFO] --- maven-dependency-plugin:3.1.1:analyze (default-cli) @ maven-unused-dependencies ---
[WARNING] Unused declared dependencies found:
[WARNING]    commons-collections:commons-collections:jar:3.2.2:compile
[INFO] ------------------------------------------------------------------------
[INFO] BUILD SUCCESS
[INFO] ------------------------------------------------------------------------
[INFO] Total time: 1.225 s
[INFO] Finished at: 2020-04-01T16:10:25-04:00
[INFO] ------------------------------------------------------------------------

For every dependency that is not in use in our project, Maven issues a warning in the analysis report.

5. Specify Dependencies as Used

Depending on the nature of the project, sometimes we might need to load classes at runtime, like for example in a plugin oriented project.

Since the dependencies are not used at compile-time, the maven-dependency-plugin would issue a warning stating that a dependency is not being used, when in fact it is. For that, we can enforce and instruct the plugin that a library is being used.

We do this by listing the dependencies inside the usedDependencies property:

<plugin>
    <groupId>org.apache.maven.plugins</groupId>
    <artifactId>maven-dependency-plugin</artifactId>
    <configuration>
        <usedDependencies>
            <dependency>commons-collections:commons-collections</dependency>
        </usedDependencies>
    </configuration>
</plugin>

Running the analyze goal again, we see that the unused dependency is no longer considered in the report.

6. Conclusion

In this short tutorial, we learned how to find unused maven dependencies. It's a good practice to check for unused dependencies regularly since it improves maintainability and reduces the library size of our project.

As always, the full source code with all examples is available over on GitHub.

How to Set Environment Variables in Jenkins?

$
0
0

1. Introduction

In this tutorial, we'll show the different ways to set and use environment variables in Jenkins.

To learn more about Jenkins and Pipelines, refer to our intro to Jenkins.

2. Global Properties

We can set global properties by navigating to “Manage Jenkins -> Configure System -> Global properties option”.

Let's first check the “Environment variables” checkbox and then add the variables and their respective values inside the “List of Variables” section:

This is one of the easiest and least intrusive ways to set environment variables.

3. Jenkinsfile

We can set environment variables globally by declaring them in the environment directive of our Jenkinsfile.

Let's see how to set two variables, DISABLE_AUTH and DB_ENGINE:

Jenkinsfile (Declarative Pipeline)
pipeline {
    //Setting the environment variables DISABLE_AUTH and DB_ENGINE
    environment {
        DISABLE_AUTH = 'true'
        DB_ENGINE    = 'mysql'
    }

}

This approach of defining the variables in the Jenkins file is useful for instructing the scripts; for example, a Make file.

4. EnvInject

We can install and use the EnvInject plugin to inject environment variables during the build startup.

In the build configuration window, we select the “Inject environment variables” option in the “Add build step” combo box.

We can then add the required environment variables in the properties content text box.

For example, we can specify the user profile:

5. Usage

Now, we can use any of our environment variables by surrounding the name in ${}:

echo "Database engine is ${DB_ENGINE}"

6. Conclusion

In this article, we saw how to set and use environment variables in Jenkins.

Spring Data Redis’s Property-Based Configuration

$
0
0

1. Overview

One of the main attractions of Spring Boot is how it often reduces third-party configuration to just a few properties.

In this tutorial, we're going to see how Spring Boot simplifies working with Redis.

2. Why Redis?

Redis is one of the most popular in-memory data structure stores. For this reason, it can be used as a database, cache, and message broker.

In terms of performance, it is well known because of its fast response time. As a result, it can serve hundreds of thousands of operations per second and is easily scalable.

And, it pairs well with Spring Boot applications. For example, we can use it as a cache in our microservices architecture. We can also use it as a NoSQL database.

3. Running Redis

To get started, let's create a Redis instance using their official Docker image.

$ docker run -p 16379:6379 -d redis:6.0 redis-server --requirepass "mypass"

Above, we've just started an instance of Redis on port 16379 with a password of mypass.

4. Starter

Spring gives us great support for connecting our Spring Boot applications with Redis using Spring Data Redis.

So, next, let's make sure we've got the spring-boot-starter-data-redis dependency in our pom.xml:

<dependency>
    <groupId>org.springframework.boot</groupId>
    <artifactId>spring-boot-starter-data-redis</artifactId>
    <version>2.2.6.RELEASE</version>    
</dependency>

5. Lettuce

Next, let's configure the client.

The Java Redis client we'll use is Lettuce since Spring Boot uses it by default. However, we could have also used Jedis.

Either way, the result is an instance of RedisTemplate:

@Bean
public RedisTemplate<Long, Book> redisTemplate(RedisConnectionFactory connectionFactory) {
    RedisTemplate<Long, Book> template = new RedisTemplate<>();
    template.setConnectionFactory(connectionFactory);
    // Add some specific configuration here. Key serializers, etc.
    return template;
}

6. Properties

When we use Lettuce, we don't need to configure the RedisConnectionFactory. Spring Boot does it for us.

All we have left, then, is to specify a few properties in our application.properties file:

spring.redis.database=0
spring.redis.host=localhost
spring.redis.port=16379
spring.redis.password=mypass
spring.redis.timeout=60000

Respectively:

  • database sets the database index used by the connection factory
  • host is where the server host is located
  • port indicates the port where the server is listening
  • password is the login password for the server, and
  • timeout establishes the connection timeout

Of course, there are a lot of other properties we can configure. The complete list of configuration properties is available in the Spring Boot documentation.

7. Demo

Finally, let's try using it in our application. If we imagine a Book class and a BookRepository, we can create and retrieve Books, using our RedisTemplate to interact with Redis as our backend:

@Autowired
private RedisTemplate<Long, Book> redisTemplate;

public void save(Book book) {
    redisTemplate.opsForValue().set(book.getId(), book);
}

public Book findById(Long id) {
    return redisTemplate.opsForValue().get(id);
}

By default, Lettuce will manage serialization and deserialization for us, so there's nothing more to do at this point. However, it's good to know that this also can be configured.

Another important feature is since RedisTemplate is thread-safe, so it'll work properly in multi-threaded environments.

8. Conclusion

In this article, we configured Spring Boot to talk to Redis via Lettuce. And, we achieved it with a starter, a single @Bean configuration, and a handful of properties.

To wrap up, we used the RedisTemplate to have Redis act as a simple backend.

The full example can be found over on GitHub.

Java Weekly, Issue 332

$
0
0

1. Spring and Java

>> Updates to Spring Versions [spring.io]

The Spring team is adopting Semantic Versioning for project modules, and Calendar Versioning for release trains.

>> Java Feature Spotlight: Text Blocks [infoq.com]

A comprehensive look at text blocks, scheduled to become a permanent language feature in Java SE 15.

>> What is JDBC? [marcobehler.com]

And a great primer on JDBC, covering drivers, connections, queries, and connection pooling.

Also worth reading:

Webinars and presentations:

Time to upgrade:

2. Technical

>> Continuous Integration [martinfowler.com] and >> Integration Frequency [martinfowler.com] and >> Comparing Feature Branching and Continuous Integration [martinfowler.com] and >> Reviewed Commits [martinfowler.com]

The popular series continues with a focus on integration patterns.

Also worth reading:

3. Musings

>> You Don't Hate Mocks; You Hate Side-Effects [blog.thecodewhisperer.com]

And when tests rely more on side-effects and less on expectations, maybe it's time to refactor.

Also worth reading:

4. Comics

And my favorite Dilberts of the week:

>> Dogbert Designs Headphones [dilbert.com]

>> CEO Has Pandemic Plan [dilbert.com]

>> Decisions Without Data [dilbert.com]

5. Pick of the Week

>> Web Architecture 101 [videoblocks.com]

Spring Cloud Gateway WebFilter Factories

$
0
0

1. Introduction

Spring Cloud Gateway is an intelligent proxy service often used in microservices. It transparently centralizes requests in a single entry point and routes them to the proper service. One of its most interesting features is the concept of filters (WebFilter or GatewayFilter).

WebFilter, together with Predicate factories, incorporate the complete routing mechanism. Spring Cloud Gateway provides many built-in WebFilter factories that allow interacting with the HTTP requests before reaching the proxied service and the HTTP responses before delivering the result to the client. It is also possible to implement custom filters.

In this tutorial, we'll focus on the built-in WebFilter factories included in the project and how to use them in advanced use cases.

2. WebFilter Factories

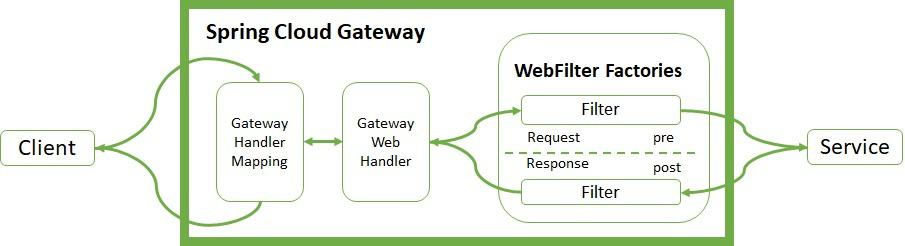
WebFilter (or GatewayFilter) factories allow modifying the inbound HTTP requests and outbound HTTP responses. In this sense, it offers a set of interesting functionalities to apply before and after interacting with the downstream services.

Spring Cloud Gateway WebFilter Factories Architecture

The Handler Mapping manages the client's request. It checks whether it matches some configured route. Then, it sends the request to the Web Handler to execute the specific filter chain for this route. The dotted line splits the logic between pre- and post-filter logic. The income filters run before the proxy request. The output filters enter into action when they receive the proxy response. Filters provide mechanisms to modify the process in between.

3. Implementing WebFilter Factories

Let's review the most important WebFilter factories incorporated in the Spring Cloud Gateway project. There are two ways to implement them, using YAML or Java DSL. We'll show examples of how to implement both.

3.1. HTTP Request

The built-in WebFilter factories allow interacting with the headers and parameters of the HTTP request. We can add (AddRequestHeader), map (MapRequestHeader), set or replace (SetRequestHeader), and remove (RemoveRequestHeader) header values and send them to the proxied service. The original host header can also be kept (PreserveHostHeader).

In the same way, we can add (AddRequestParameter) and remove (RemoveRequestParameter) parameters to be processed by the downstream service. Let's see how to do it:

- id: add_request_header_route
  uri: https://httpbin.org
  predicates:
  - Path=/get/**
  filters:
  - AddRequestHeader=My-Header-Good,Good
  - AddRequestHeader=My-Header-Remove,Remove
  - AddRequestParameter=var, good
  - AddRequestParameter=var2, remove
  - MapRequestHeader=My-Header-Good, My-Header-Bad
  - MapRequestHeader=My-Header-Set, My-Header-Bad
  - SetRequestHeader=My-Header-Set, Set 
  - RemoveRequestHeader=My-Header-Remove
  - RemoveRequestParameter=var2

Let's check if everything works as expected. For that, we'll use curl and the publicly available httpbin.org:

$ curl http://localhost:8080/get
{
  "args": {
    "var": "good"
  },
  "headers": {
    "Host": "localhost",
    "My-Header-Bad": "Good",
    "My-Header-Good": "Good",
    "My-Header-Set": "Set",
  },
  "origin": "127.0.0.1, 90.171.125.86",
  "url": "https://localhost:8080/get?var=good"
}

We can see the curl response as a consequence of the request filters configured. They add My-Header-Good with value Good and map its content to My-Header-Bad. They remove My-Header-Remove and set a new value to My-Header-Set. In the args and url sections, we can see a new parameter var added. Furthermore, the last filter removes the var2 parameter.

In addition, we can modify the request body before reaching the proxied service. This filter can only be configured using the Java DSL notation. The snippet below just uppercases the content of the response body:

@Bean
public RouteLocator routes(RouteLocatorBuilder builder) {
     return builder.routes()
       .route("modify_request_body", r -> r.path("/post/**")
         .filters(f -> f.modifyRequestBody(
           String.class, Hello.class, MediaType.APPLICATION_JSON_VALUE, 
           (exchange, s) -> Mono.just(new Hello(s.toUpperCase()))))
         .uri("https://httpbin.org"))
       .build();
}

To test the snippet, let's execute curl with the -d option to include the body “Content”:

$ curl -X POST "http://localhost:8080/post" -i -d "Content"
"data": "{\"message\":\"CONTENT\"}",
"json": {
    "message": "CONTENT"
}

We can see that the content of the body is now uppercased to CONTENT as a result of the filter.

3.2. HTTP Response

Likewise, we can modify response headers by using add (AddResponseHeader), set or replace (SetResponseHeader), remove (RemoveResponseHeader) and rewrite (RewriteResponseHeader). Another functionality over the response is to dedupe (DedupeResponseHeader) to overwrite strategies and avoid duplication on them. We can get rid of backend-specific details regarding version, location, and host by using another built-in factory (RemoveLocationResponseHeader).

Let's see a complete example:

- id: response_header_route
  uri: https://httpbin.org
  predicates:
  - Path=/header/post/**
  filters:
  - AddResponseHeader=My-Header-Good,Good
  - AddResponseHeader=My-Header-Set,Good
  - AddResponseHeader=My-Header-Rewrite, password=12345678
  - DedupeResponseHeader=Access-Control-Allow-Credentials Access-Control-Allow-Origin
  - AddResponseHeader=My-Header-Remove,Remove
  - SetResponseHeader=My-Header-Set, Set
  - RemoveResponseHeader=My-Header-Remove
  - RewriteResponseHeader=My-Header-Rewrite, password=[^&]+, password=***
  - RewriteLocationResponseHeader=AS_IN_REQUEST, Location, ,

Let's use curl to display the response headers:

$ curl -X POST "http://localhost:8080/header/post" -s -o /dev/null -D -
HTTP/1.1 200 OK
My-Header-Good: Good
Access-Control-Allow-Origin: *
Access-Control-Allow-Credentials: true
My-Header-Rewrite: password=***
My-Header-Set: Set

Similarly to the HTTP request, we can modify the response body. For this example, we overwrite the body of the PUT response:

@Bean
public RouteLocator responseRoutes(RouteLocatorBuilder builder) {
    return builder.routes()
      .route("modify_response_body", r -> r.path("/put/**")
        .filters(f -> f.modifyResponseBody(
          String.class, Hello.class, MediaType.APPLICATION_JSON_VALUE, 
          (exchange, s) -> Mono.just(new Hello("New Body"))))
        .uri("https://httpbin.org"))
      .build();
}

Let's use the PUT endpoint to test the functionality:

$ curl -X PUT "http://localhost:8080/put" -i -d "CONTENT"
{"message":"New Body"}

3.3. Path

One of the features provided with the built-in WebFilter factories is the interaction with the paths configured by the client. It is possible to set a different path (SetPath), rewrite (RewritePath), add a prefix (PrefixPath), and strip (StripPrefix) to extract only parts of it. Remember that the filters are executed in order based on their positions in the YAML file. Let's see how to configure the routes:

- id: path_route
  uri: https://httpbin.org
  predicates:
  - Path=/new/post/**
  filters:
  - RewritePath=/new(?<segment>/?.*), $\{segment}
  - SetPath=/post

Both filters remove the subpath /new before reaching the proxied service. Let's execute curl:

$ curl -X POST "http://localhost:8080/new/post" -i
"X-Forwarded-Prefix": "/new"
"url": "https://localhost:8080/post"

We could also use the StripPrefix factory. With StripPrefix=1, we can get rid of the first subpath when contacting the downstream service.

3.4. Related to HTTP Status

RedirectTo takes two parameters: status and URL. The status must be a series of 300 redirection HTTP code and the URL a valid one. SetStatus takes one parameter status that can be an HTTP code or its string representation. Let's have a look at a couple of examples:

- id: redirect_route
  uri: https://httpbin.org
  predicates:
  - Path=/fake/post/**
  filters:
  - RedirectTo=302, https://httpbin.org
- id: status_route
  uri: https://httpbin.org
  predicates:
  - Path=/delete/**
  filters:
  - SetStatus=401

The first filter acts over the /fake/post path, and the client is redirected to https://httpbin.org with an HTTP status 302:

$ curl -X POST "http://localhost:8080/fake/post" -i
HTTP/1.1 302 Found
Location: https://httpbin.org

The second filter detects the /delete path, and an HTTP status 401 is set:

$ curl -X DELETE "http://localhost:8080/delete" -i
HTTP/1.1 401 Unauthorized

3.5. Request Size Limit

Finally, we can restrict the size limit of the request (RequestSize). If the request size is beyond the limit, the gateway rejects access to the service:

- id: size_route
  uri: https://httpbin.org
  predicates:
  - Path=/anything
  filters:
  - name: RequestSize
    args:
       maxSize: 5000000

4. Advanced Use Cases

Spring Cloud Gateway offers other advanced WebFilter factories to support baseline functionalities for the microservices pattern.

4.1. Circuit Breaker

Spring Cloud Gateway has a built-in WebFilter factory for Circuit Breaker capability. The factory permits different fallback strategies and Java DSL route configuration. Let's see a simple example:

- id: circuitbreaker_route
  uri: https://httpbin.org
  predicates:
  - Path=/status/504
  filters:
  - name: CircuitBreaker
  args:
     name: myCircuitBreaker
     fallbackUri: forward:/anything
  - RewritePath=/status/504, /anything

For the configuration of the Circuit Breaker, we used Resilience4J by adding the spring-cloud-starter-circuitbreaker-reactor-resilience4j dependency:

<dependency>
    <groupId>org.springframework.cloud</groupId>
    <artifactId>spring-cloud-starter-circuitbreaker-reactor-resilience4j</artifactId>
</dependency>

Again, we can test the functionality using curl:

$ curl http://localhost:8080/status/504 
"url": "https://localhost:8080/anything"

4.2. Retry

Another advanced feature allows the client to retry access when something happens with proxied services. It takes several parameters, such as the number of retries, the HTTP status codes (statuses) and methods that should be retried, series, exceptions, and backoff intervals to wait after each retry. Let's look at the YAML configuration:

- id: retry_test
  uri: https://httpbin.org
  predicates:
  - Path=/status/502
  filters:
  - name: Retry
    args:
       retries: 3
       statuses: BAD_GATEWAY
       methods: GET,POST
       backoff:
          firstBackoff: 10ms
          maxBackoff: 50ms
          factor: 2
          basedOnPreviousValue: false

When the client reaches /status/502 (Bad Gateway), the filter retries three times, waiting for the backoff intervals configured after each execution. Let's see how it works:

$ curl http://localhost:8080/status/502

At the same time, we need to check the Gateway logs in the server:

Mapping [Exchange: GET http://localhost:8080/status/502] to Route{id='retry_test', ...}
Handler is being applied: {uri=https://httpbin.org/status/502, method=GET}
Received last HTTP packet
Handler is being applied: {uri=https://httpbin.org/status/502, method=GET}
Received last HTTP packet
Handler is being applied: {uri=https://httpbin.org/status/502, method=GET}
Received last HTTP packet

The filter retries three times with this backoff for methods GET and POST when the gateway receives status 502.

4.3. Save Session and Secure Headers

The SecureHeader factory adds HTTP security headers to the response. Similarly, SaveSession is of particular importance when used with Spring Session and Spring Security:

filters: 
- SaveSession

This filter stores the session state before making the forwarded call.

4.4. Request Rate Limiter

Last but not least, the RequestRateLimiter factory determines if the request can proceed.  If not, it returns an HTTP code status 429 – Too Many Requests. It uses different parameters and resolvers to specify the rate limiter.

The RedisRateLimiter uses the well-known Redis database to check the number of tokens the bucket can keep. It requires the following dependency:

<dependency>
    <groupId>org.springframework.boot</groupId>
    <artifactId>spring-boot-starter-data-redis-reactive</artifactId>
 </dependency>

Consequently, it also needs the configuration of Spring Redis:

spring:
  redis:
    host: localhost
    port: 6379

The filter has several properties. The first argument, replenishRate, is the number of requests per second allowed. The second argument, burstCapacity, is the maximum number of requests in a single second. The third parameter, requestedTokens, is how many tokens the request costs. Let's see an example implementation:

- id: request_rate_limiter
  uri: https://httpbin.org
  predicates:
  - Path=/redis/get/**
  filters:
  - StripPrefix=1
  - name: RequestRateLimiter
    args:
       redis-rate-limiter.replenishRate: 10
       redis-rate-limiter.burstCapacity: 5

Let's use curl to test the filter. Beforehand, remember to start a Redis instance, for example using Docker:

$ curl "http://localhost:8080/redis/get" -i
HTTP/1.1 200 OK
X-RateLimit-Remaining: 4
X-RateLimit-Requested-Tokens: 1
X-RateLimit-Burst-Capacity: 5
X-RateLimit-Replenish-Rate: 10

Once the remaining rate limit reaches zero, the gateway raises HTTP code 429. For testing the behavior, we can use the unit tests. We start an Embedded Redis Server and run RepeatedTests in parallel. Once the bucket reaches the limit, the error begins to display:

00:57:48.263 [main] INFO  c.b.s.w.RedisWebFilterFactoriesLiveTest - Received: status->200, reason->OK, remaining->[4]
00:57:48.394 [main] INFO  c.b.s.w.RedisWebFilterFactoriesLiveTest - Received: status->200, reason->OK, remaining->[3]
00:57:48.530 [main] INFO  c.b.s.w.RedisWebFilterFactoriesLiveTest - Received: status->200, reason->OK, remaining->[2]
00:57:48.667 [main] INFO  c.b.s.w.RedisWebFilterFactoriesLiveTest - Received: status->200, reason->OK, remaining->[1]
00:57:48.826 [main] INFO  c.b.s.w.RedisWebFilterFactoriesLiveTest - Received: status->200, reason->OK, remaining->[0]
00:57:48.851 [main] INFO  c.b.s.w.RedisWebFilterFactoriesLiveTest - Received: status->429, reason->Too Many Requests, remaining->[0]
00:57:48.894 [main] INFO  c.b.s.w.RedisWebFilterFactoriesLiveTest - Received: status->429, reason->Too Many Requests, remaining->[0]
00:57:49.135 [main] INFO  c.b.s.w.RedisWebFilterFactoriesLiveTest - Received: status->200, reason->OK, remaining->[4]

5. Conclusion

In this tutorial, we covered Spring Cloud Gateway's WebFilter factories. We showed how to interact with the requests and responses from the client before and after executing the proxied service.

As always, the code is available over on GitHub.

How to dynamically Autowire a Bean in Spring

$
0
0

1. Introduction

In this short tutorial, we'll show how to dynamically autowire a bean in Spring.

We'll start by presenting a real-world use case where dynamic autowiring might be helpful. In addition to this, we'll show how to solve it in Spring in two different ways.

2. Dynamic Autowiring Use Cases

Dynamic autowiring is helpful in places where we need to dynamically change the Spring's bean execution logic. It's practical especially in places where what code to execute is chosen based on some runtime variables.

To demonstrate a real-world use case, let's create an application that controls servers in different regions of the world. For this reason, we've created an interface with two simple methods:

public interface RegionService {
    boolean isServerActive(int serverId);

    String getISOCountryCode();
}

and two implementations:

@Service("GBregionService")
public class GBRegionService implements RegionService {
    @Override
    public boolean isServerActive(int serverId) {
        return false;
    }

    @Override
    public String getISOCountryCode() {
        return "GB";
    }
}
@Service("USregionService")
public class USRegionService implements RegionService {
    @Override
    public boolean isServerActive(int serverId) {
        return true;
    }

    @Override
    public String getISOCountryCode() {
        return "US";
    }
}

Let's say we have a website where a user has an option to check whether the server is active in the selected region. Consequently, we'd like to have a service class that dynamically changes the RegionService interface implementation given the input of the user. Undoubtedly, this is the use case where dynamic bean autowiring comes into play.

3. Using BeanFactory

BeanFactory is a root interface for accessing a Spring bean container. In particular, it contains useful methods to obtain specific beans. Since BeanFactory is also a Spring bean, we can autowire and use it directly in our class:

@Service
public class BeanFactoryDynamicAutowireService {
    private static final String SERVICE_NAME_SUFFIX = "regionService";
    private final BeanFactory beanFactory;

    @Autowired
    public BeanFactoryDynamicAutowireService(BeanFactory beanFactory) {
        this.beanFactory = beanFactory;
    }

    public boolean isServerActive(String isoCountryCode, int serverId) {
        RegionService service = beanFactory.getBean(getRegionServiceBeanName(isoCountryCode), 
          RegionService.class);

        return service.isServerActive(serverId);
    }

    private String getRegionServiceBeanName(String isoCountryCode) {
        return isoCountryCode + SERVICE_NAME_SUFFIX;
    }
}

We've used an overloaded version of the getBean() method to get the bean with the given name and desired type.

And while this works, we'd really rather rely on something more idiomatic; that is, something that uses dependency injection.

4. Using Interfaces

To solve this with dependency injection, we'll rely on one of Spring's lesser-known features.

Besides standard single-field autowiring, Spring gives us an ability to collect all beans that are implementations of the specific interface into a Map:

@Service
public class CustomMapFromListDynamicAutowireService {
    private final Map<String, RegionService> servicesByCountryCode;

    @Autowired
    public CustomMapFromListDynamicAutowireService(List<RegionService> regionServices) {
        servicesByCountryCode = regionServices.stream()
                .collect(Collectors.toMap(RegionService::getISOCountryCode, Function.identity()));
    }

    public boolean isServerActive(String isoCountryCode, int serverId) {
        RegionService service = servicesByCountryCode.get(isoCountryCode);

        return service.isServerActive(serverId);
    }
}

We've created a map in a constructor that holds implementations by their country code. Furthermore, we can use it later in a method to get a particular implementation to check whether a given server is active in a specific region.

5. Conclusion

In this quick tutorial, we've seen how to dynamically autowire a bean in Spring using two different approaches.

As always, the code shown in this article is available over on GitHub.

Spring Security With Okta

$
0
0

1. Overview

Okta provides features like authentication, authorization, and social login for web, mobile, or API services. Additionally, it has robust support for the Spring Framework to make integrations quite straightforward.

Now that Stormpath has joined forces with Okta to provide better Identity APIs for developers, it's now a popular way to enable authentication in a web application.

In this tutorial, we'll explore Spring Security with Okta along with a minimalistic setup of the Okta developer account.

2. Setting Up Okta

2.1. Developer Account Sign Up

First, we'll sign up for a free Okta developer account that provides access for up to 1k monthly active users. However, we can skip this section if we already have one:

2.2. Dashboard

Once logged in to the Okta developer account, we'll land at the dashboard screen that briefs us about the number of users, authentications, and failed logins.

Additionally, it also shows detailed log entries of the system:


Further, we'll note the Org URL at the upper-right corner of the Dashboard, required for Okta setup in our Spring Boot App that we'll create later.

2.3. Create a New Application

Then, let's create a new application using the Applications menu to create OpenID Connect (OIDC) app for Spring Boot.

Further, we'll choose the Web platform out of available options like Native, Single-Page App, and Service:

2.4. Application Settings

Next, let's configure a few application settings like Base URIs and Login redirect URIs pointing to our application:

Also, make sure to mark Authorization code for the Grant type allowed, required to enable OAuth2 authentication for a web application.

2.5. Client Credentials

Then, we'll get values for the Client ID and Client secret associated with our app:

Please keep these credentials handy because they are required for Okta setup.

3. Spring Boot App Setup

Now that our Okta developer account is ready with essential configurations, we're prepared to integrate Okta security support in a Spring Boot App.

3.1. Maven

First, let's add the latest okta-spring-boot-starter Maven dependency to our pom.xml:

<dependency>
    <groupId>com.okta.spring</groupId>
    <artifactId>okta-spring-boot-starter</artifactId>
    <version>1.4.0</version>
</dependency>

3.2. Gradle

Similarly, when using Gradle, we can add the okta-spring-boot-starter dependency in the build.gradle:

compile 'com.okta.spring:okta-spring-boot-starter:1.4.0'

3.3. application.properties

Then, we'll configure Okta oauth2 properties in the application.properties:

okta.oauth2.issuer=https://dev-example123/oauth2/default
okta.oauth2.client-id=1230oaa4yncmaxaQ90ccJwl4x6
okta.oauth2.client-secret=hjiyblEzgT0ItY91Ywcdzwa78oNhtrYqNklQ5vLzvruT123
okta.oauth2.redirect-uri=/authorization-code/callback

Here, we can use the default authorization server (if none available) for the issuer URL that points to the {orgURL}/oauth2/default.

Also, we can create a new Authorization server in the Okta developer account by using the API menu:

Then, we'll add the Client Id and Client secret of our Okta app that was generated in the previous section.

Last, we've configured the same redirect-uri that is being set in the Application Settings.

4. HomeController

After that, let's create the HomeController class:

@RestController
public class HomeController {
    @GetMapping("/")
    public String home(@AuthenticationPrincipal OidcUser user) {
        return "Welcome, "+ user.getFullName() + "!";
    }
}

Here, we've added the home method with Base Uri (/) mapping, configured in the Application Settings.

Also, the argument of the home method is an instance of the OidcUser class provided by Spring Security for accessing the user information.

That's it! Our Spring Boot App is ready with Okta security support. Let's run our app using the Maven command:

mvn spring-boot:run

When accessing the application at localhost:8080, we'll see a default sign-in page provided by Okta:

Once logged in using the registered user's credentials, a welcome message with the user's full name will be shown:

Also, we'll find a “Sign up” link at the bottom of the default sign-in screen for self-registration.

5. Sign Up

5.1. Self-Registration

For the first time, we can create an Okta account by using the “Sign up” link, and then providing information like email, first name, and last name:

5.2. Create a User

Or, we can create a new user from the Users menu in the Okta developer account:

5.3. Self-Service Registration Settings

Additionally, sign-up and registration settings can be configured from the Users menu in the Okta developer account:

6. Okta Spring SDK

Now that we've seen Okta security integration in the Spring Boot App, let's interact with the Okta management API in the same app.

First, we should create a Token by using the API menu in the Okta developer account:

Make sure to note down the Token as it is shown only once after generation. Then, it'll be stored as a hash for our protection.

6.1. Setup

Then, let's add the latest okta-spring-sdk Maven dependency to our pom.xml:

<dependency>
    <groupId>com.okta.spring</groupId>
    <artifactId>okta-spring-sdk</artifactId>
    <version>1.4.0</version>
</dependency>

6.2. application.properties

Next, we'll add a few essential Okta client properties:

okta.client.orgUrl=https://dev-example123.okta.com
okta.client.token=00TVXDNx1e2FgvxP4jLlONbPMzrBDLwESSf9hZSvMI123

Here, we've added the token noted in the previous section.

6.3. AdminController

Last, let's create the AdminController, injected with the Client instance:

@RestController
public class AdminController {
    @Autowired
    public Client client;
}

That's it! We're ready to call methods on the Client instance to make requests to the Okta API.

6.4. List Users

Let's create the getUsers method to fetch a list of all users in our organization, using the listUsers method that returns a UserList object:

public class AdminController {
    // ...

    @GetMapping("/users") 
    public UserList getUsers() { 
        return client.listUsers(); 
    }
}

After that, we can access localhost:8080/users to receive a JSON response containing all users:

{
    "dirty":false,
    "propertyDescriptors":{
        "items":{
            "name":"items",
            "type":"com.okta.sdk.resource.user.User"
        }
    },
    "resourceHref":"/api/v1/users",
    "currentPage":{
        "items":[
            {
                "id":"00uanxiv7naevaEL14x6",
                "profile":{
                    "firstName":"Anshul",
                    "lastName":"Bansal",
                    "email":"anshul@bansal.com",
                    // ...
                },
                // ...
            },
            { 
                "id":"00uag6vugXMeBmXky4x6", 
                "profile":{ 
                    "firstName":"Ansh", 
                    "lastName":"Bans", 
                    "email":"ansh@bans.com",
                    // ... 
                }, 
                // ... 
            }
        ]
    },
    "empty":false,
    // ...
}

6.5. Search User

Similarly, we can filter users using the firstName, lastName, or email as query parameters:

@GetMapping("/user")
public UserList searchUserByEmail(@RequestParam String query) {
    return client.listUsers(query, null, null, null, null);
}

Let's search for a user by email using localhost:8080/user?query=ansh@bans.com:

{
    "dirty":false,
    "propertyDescriptors":{
        "items":{
            "name":"items",
            "type":"com.okta.sdk.resource.user.User"
        }
    },
    "resourceHref":"/api/v1/users?q=ansh%40bans.com",
    "currentPage":{
        "items":[
            {
                "id":"00uag6vugXMeBmXky4x6",
                "profile":{
                    "firstName":"Ansh",
                    "lastName":"Bans",
                    "email":"ansh@bans.com",
                    // ...
                },
                // ...
            }
        ]
    },
    // ...
}

6.6. Create User

Also, we can create a new user by using the instance method of the UserBuilder interface:

@GetMapping("/createUser")
public User createUser() {
    char[] tempPassword = {'P','a','$','$','w','0','r','d'};
    User user = UserBuilder.instance()
        .setEmail("normal.lewis@email.com")
        .setFirstName("Norman")
        .setLastName("Lewis")
        .setPassword(tempPassword)
        .setActive(true)
        .buildAndCreate(client);
    return user;
}

So, let's access localhost:8080/createUser and verify new user's details:

{
    "id": "00uauveccPIYxQKUf4x6",   
    "profile": {
        "firstName": "Norman",
        "lastName": "Lewis",
        "email": "norman.lewis@email.com"
    },
    "credentials": {
        "password": {},
        "emails": [
            {
                "value": "norman.lewis@email.com",
                "status": "VERIFIED",
                "type": "PRIMARY"
            }
        ],
        // ...
    },
    "_links": {
        "resetPassword": {
            "href": "https://dev-example123.okta.com/api/v1/users/00uauveccPIYxQKUf4x6/lifecycle/reset_password",
            "method": "POST"
        },
        // ...
    }
}

Similarly, we can perform a range of operations like listing all applications, creating an application, listing all groups, and creating a group.

7. Conclusion

In this quick tutorial, we explored Spring Security with Okta.

First, we set up the Okta developer account with essential configurations. Then, we created a Spring Boot App and configured the application.properties for Spring Security integration with Okta.

Next, we integrated the Okta Spring SDK to manage Okta API. Last, we looked into features like listing all users, searching a user, and creating a user.

As usual, all the code implementations are available over on GitHub.


Logout in an OAuth Secured Application (using the Spring Security OAuth legacy stack)

$
0
0

1. Overview

In this quick tutorial, we're going to show how we can add logout functionality to an OAuth Spring Security application.

We will, of course, use the OAuth application described in a previous article – Creating a REST API with OAuth2.

Note: this article is using the Spring OAuth legacy project. For the version of this article using the new Spring Security 5 stack, have a look at our article Logout in an OAuth Secured Application.

2. Remove the Access Token

Simply put, logging out in an OAuth-secured environment involves rendering the user's Access Token invalid – so it can no longer be used.

In a JdbcTokenStore-based implementation, this means removing the token from the TokenStore.

Let's implement a delete operation for the token. We're going to use the parimary /oauth/token URL structure here and simply introduce a new DELETE operation for it.

Now, because we're actually using the /oauth/token URI here – we need to handle it carefully. We won't be able to simply add this to any controller – because the framework already has operations mapped to that URI – with POST and GET.

Instead what we need to do is to define this is a @FrameworkEndpoint – so that it gets picked up and resolved by the FrameworkEndpointHandlerMapping instead of the standard RequestMappingHandlerMapping. That way we won't run into any partial matches and we won't have any conflicts:

@FrameworkEndpoint
public class RevokeTokenEndpoint {

    @Resource(name = "tokenServices")
    ConsumerTokenServices tokenServices;

    @RequestMapping(method = RequestMethod.DELETE, value = "/oauth/token")
    @ResponseBody
    public void revokeToken(HttpServletRequest request) {
        String authorization = request.getHeader("Authorization");
        if (authorization != null && authorization.contains("Bearer")){
            String tokenId = authorization.substring("Bearer".length()+1);
            tokenServices.revokeToken(tokenId);
        }
    }
}

Notice how we're extracting the token out of the request, simply using the standard Authorization header.

3. Remove the Refresh Token

In a previous article on Handling the Refresh Token, we have set up our application to be able to refresh the Access Token, using a Refresh Token. This implementation makes use of a Zuul proxy – with a CustomPostZuulFilter to add the refresh_token value received from the Authorization Server to a refreshToken cookie.

When revoking the Access Token, as shown in the previous section, the Refresh Token associated with it is also invalidated. However, the httpOnly cookie will remain set on the client, given that we can't remove it via JavaScript – so we need to remove it from the server side.

Let's enhance the CustomPostZuulFilter implementation that intercepts the /oauth/token/revoke URL so that it will remove the refreshToken cookie when encountering this URL:

@Component
public class CustomPostZuulFilter extends ZuulFilter {
    //...
    @Override
    public Object run() {
        //...
        String requestMethod = ctx.getRequest().getMethod();
        if (requestURI.contains("oauth/token") && requestMethod.equals("DELETE")) {
            Cookie cookie = new Cookie("refreshToken", "");
            cookie.setMaxAge(0);
            cookie.setPath(ctx.getRequest().getContextPath() + "/oauth/token");
            ctx.getResponse().addCookie(cookie);
        }
        //...
    }
}

4. Remove the Access Token from the AngularJS Client

Besides revoking the access token from the token store, the access_token cookie will also need to be removed from the client side.

Let's add a method to our AngularJS controller that clears the access_token cookie and calls the /oauth/token/revoke DELETE mapping:

$scope.logout = function() {
    logout($scope.loginData);
}
function logout(params) {
    var req = {
        method: 'DELETE',
        url: "oauth/token"
    }
    $http(req).then(
        function(data){
            $cookies.remove("access_token");
            window.location.href="login";
        },function(){
            console.log("error");
        }
    );
}

This function will be called when clicking on the Logout link:

<a class="btn btn-info" href="#" ng-click="logout()">Logout</a>

5. Conclusion

In this quick but in-depth tutorial, we've shown how we can logout a user from an OAuth secured application and invalidate the tokens of that user.

The full source code of the examples can be found over on GitHub.

Validate Phone Numbers With Java Regex

$
0
0

1. Overview

Sometimes, we need to validate text to ensure that its content complies with some format. In this quick tutorial, we'll see how to validate different formats of phone numbers using regular expressions.

2. Regular Expressions to Validate Phone Numbers

2.1. Ten-Digit Number

Let's start with a simple expression that will check if the number has ten digits and nothing else:

@Test
public void whenMatchesTenDigitsNumber_thenCorrect() {
    Pattern pattern = Pattern.compile("^\\d{10}$");
    Matcher matcher = pattern.matcher("2055550125");
    assertTrue(matcher.matches());
}

This expression will allow numbers like 2055550125.

2.2. Number With Whitespaces, Dots or Hyphens

In the second example, let's see how we can allow optional whitespace, dots, or hyphens (-) between the numbers:

@Test
public void whenMatchesTenDigitsNumberWhitespacesDotHyphen_thenCorrect() {
    Pattern pattern = Pattern.compile("^(\\d{3}[- .]?){2}\\d{4}$");
    Matcher matcher = pattern.matcher("202 555 0125");
    assertTrue(matcher.matches());
}

To achieve this extra goal (optional whitespace or hyphen), we've simply added the characters:

  • [- .]?

This pattern will allow numbers like 2055550125, 202 555 0125, 202.555.0125, and 202-555-0125.

2.3. Number With Parentheses

Next, let's add the possibility to have the first part of our phone between parentheses:

@Test
public void whenMatchesTenDigitsNumberParenthesis_thenCorrect() {
    Pattern pattern = Pattern.compile"^((\\(\\d{3}\\))|\\d{3})[- .]?\\d{3}[- .]?\\d{4}$");
    Matcher matcher = pattern.matcher("(202) 555-0125");
    assertTrue(matcher.matches());
}

To allow the optional parenthesis in the number, we've added the following characters to our regular expression:

  • (\\(\\d{3}\\))|\\d{3})

This expression will allow numbers like (202)5550125, (202) 555-0125 or (202)-555-0125. Additionally, this expression will also allow the phone numbers covered in the previous example.

2.4. Number With International Prefix

Finally, let's see how to allow an international prefix at the start of a phone number:

@Test
public void whenMatchesTenDigitsNumberPrefix_thenCorrect() {
  Pattern pattern = Pattern.compile("^(\\+\\d{1,3}( )?)?((\\(\\d{3}\\))|\\d{3})[- .]?\\d{3}[- .]?\\d{4}$");
  Matcher matcher = pattern.matcher("+111 (202) 555-0125");
  
  assertTrue(matcher.matches());
}

To permit the prefix in our number, we have added to the beginning of our pattern the characters:

  • (\\+\\d{1,3}( )?)?

This expression will enable phone numbers to include international prefixes, taking into account that international prefixes are normally numbers with a maximum of three digits.

3. Applying Multiple Regular Expressions

As we've seen, a valid phone number can take on several different formats. Therefore, we may want to check if our String complies with any one of these formats.

In the last section, we started with a simple expression and added more complexity to achieve the goal of covering more than one format. However, sometimes it's not possible to use just one expression. In this section, we'll see how to join multiple regular expressions into a single one.

If we are unable to create a common regular expression that can validate all the possible cases that we want to cover, we can define different expressions for each of the cases and then use them all together by concatenating them with a pipe symbol (|).

Let's see an example where we use the following expressions:

  • The expression used in the last section:
    • ^(\\+\\d{1,3}( )?)?((\\(\\d{3}\\))|\\d{3})[- .]?\\d{3}[- .]?\\d{4}$
  • Regular expression to allow numbers like +111 123 456 789:
    • ^(\\+\\d{1,3}( )?)?(\\d{3}[ ]?){2}\\d{3}$
  • Pattern to allow numbers like +111 123 45 67 89:
    • ^(\\+\\d{1,3}( )?)?(\\d{3}[ ]?)(\\d{2}[ ]?){2}\\d{2}$
@Test
public void whenMatchesPhoneNumber_thenCorrect() {
    String patterns 
      = "^(\\+\\d{1,3}( )?)?((\\(\\d{3}\\))|\\d{3})[- .]?\\d{3}[- .]?\\d{4}$" 
      + "|^(\\+\\d{1,3}( )?)?(\\d{3}[ ]?){2}\\d{3}$" 
      + "|^(\\+\\d{1,3}( )?)?(\\d{3}[ ]?)(\\d{2}[ ]?){2}\\d{2}$";

    String[] validPhoneNumbers 
      = {"2055550125","202 555 0125", "(202) 555-0125", "+111 (202) 555-0125", "636 856 789", "+111 636 856 789", "636 85 67 89", "+111 636 85 67 89"};

    Pattern pattern = Pattern.compile(patterns);
    for(String phoneNumber : validPhoneNumbers) {
        Matcher matcher = pattern.matcher(phoneNumber);
        assertTrue(matcher.matches());
    }
}

As we can see in the above example, by using the pipe symbol, we can use the three expressions in one go, thus allowing us to cover more cases than with just one regular expression.

4. Conclusion

In this article, we've seen how to check whether a String contains a valid phone number using different regular expressions. We've also learned how to use multiple regular expressions at the same time.

As always, the full source code of the article is available over on GitHub.

Foreign Memory Access API in Java 14

$
0
0

1. Overview

Java objects reside on the heap. However, this can occasionally lead to problems such as inefficient memory usage, low performance, and garbage collection issues. Native memory can be more efficient in these cases, but using it has been traditionally very difficult and error-prone.

Java 14 introduces the foreign memory access API to access native memory more securely and efficiently.

In this tutorial, we'll look at this API.

2. Motivation

Efficient use of memory has always been a challenging task. This is mainly due to the factors such as inadequate understanding of the memory, its organization, and complex memory addressing techniques.

For instance, an improperly implemented memory cache could cause frequent garbage collection. This would degrade application performance drastically.

Before the introduction of the foreign memory access API in Java, there were two main ways to access native memory in Java. These are java.nio.ByteBuffer and sun.misc.Unsafe classes.

Let's have a quick look at the advantages and disadvantages of these APIs.

2.1. ByteBuffer API

The ByteBuffer API allows the creation of direct, off-heap byte buffers. These buffers can be directly accessed from a Java program. However, there are some limitations:

  • The buffer size can't be more than two gigabytes
  • The garbage collector is responsible for memory deallocation

Furthermore, incorrect use of a ByteBuffer can cause a memory leak and OutOfMemory errors. This is because an unused memory reference can prevent the garbage collector from deallocating the memory.

2.2. Unsafe API

The Unsafe API is extremely efficient due to its addressing model. However, as the name suggests, this API is unsafe and has several drawbacks:

  • It often allows the Java programs to crash the JVM due to illegal memory usage
  • It's a non-standard Java API

2.3. The Need for a New API

In summary, accessing a foreign memory poses a dilemma for us. Should we use a safe but limited path (ByteBuffer)? Or should we risk using the unsupported and dangerous Unsafe API?

The new foreign memory access API aims to resolve these issues.

3. Foreign Memory API

The foreign memory access API provides a supported, safe, and efficient API to access both heap and native memory. It's built upon three main abstractions:

  • MemorySegment – models a contiguous region of memory
  • MemoryAddress – a location in a memory segment
  • MemoryLayout – a way to define the layout of a memory segment in a language-neutral fashion

Let's discuss these in detail.

3.1. MemorySegment

A memory segment is a contiguous region of memory. This can be either heap or off-heap memory. And, there are several ways to obtain a memory segment.

A memory segment backed by native memory is known as a native memory segment. It's created using one of the overloaded allocateNative methods.

Let's create a native memory segment of 200 bytes:

MemorySegment memorySegment = MemorySegment.allocateNative(200);

A memory segment can also be backed by an existing heap-allocated Java array. For example, we can  create an array memory segment from an array of long:

MemorySegment memorySegment = MemorySegment.ofArray(new long[100]);

Additionally, a memory segment can be backed by an existing Java ByteBuffer. This is known as a buffer memory segment:

MemorySegment memorySegment = MemorySegment.ofByteBuffer(ByteBuffer.allocateDirect(200));

Alternatively, we can use a memory-mapped file. This is known as a mapped memory segment. Let's define a 200-byte memory segment using a file path with read-write access:

MemorySegment memorySegment = MemorySegment.mapFromPath(
  Path.of("/tmp/memory.txt"), 200, FileChannel.MapMode.READ_WRITE);

A memory segment is attached to a specific thread. So, if any other thread requires access to the memory segment, it must gain access using the acquire method.

Also, a memory segment has spatial and temporal boundaries in terms of memory access:

  • Spatial boundary — the memory segment has lower and upper limits
  • Temporal boundary — governs creating, using, and closing a memory segment

Together, spatial and temporal checks ensure the safety of the JVM.

3.2. MemoryAddress

A MemoryAddress is an offset within a memory segment. It's commonly obtained using the baseAddress method:

MemoryAddress address = MemorySegment.allocateNative(100).baseAddress();

A memory address is used to perform operations such as retrieving data from memory on the underlying memory segment.

3.3. MemoryLayout

The MemoryLayout class lets us describe the contents of a memory segment. Specifically, it lets us define how the memory is broken up into elements, where the size of each element is provided.

This is a bit like describing the memory layout as a concrete type, but without providing a Java class. It's similar to how languages like C++ map their structures to memory.

Let's take an example of a cartesian coordinate point defined with the coordinates x and y:

int numberOfPoints = 10;
MemoryLayout pointLayout = MemoryLayout.ofStruct(
  MemoryLayout.ofValueBits(32, ByteOrder.BIG_ENDIAN).withName("x"),
  MemoryLayout.ofValueBits(32, ByteOrder.BIG_ENDIAN).withName("y")
);
SequenceLayout pointsLayout = 
  MemoryLayout.ofSequence(numberOfPoints, pointLayout);

Here, we've defined a layout made of two 32-bit values named x and y. This layout can be used with a SequenceLayout to make something similar to an array, in this case with 10 indices.

4. Using Native Memory

4.1. MemoryHandles

The MemoryHandles class lets us construct VarHandles. A VarHandle allows access to a memory segment.

Let's try this out:

long value = 10;
MemoryAddress memoryAddress = MemorySegment.allocateNative(8).baseAddress();
VarHandle varHandle = MemoryHandles.varHandle(long.class, ByteOrder.nativeOrder());
varHandle.set(memoryAddress, value);
 
assertThat(varHandle.get(memoryAddress), is(value));

In the above example, we create a MemorySegment of eight bytes. We need eight bytes to represent a long number in memory. Then, we use a VarHandle to store and retrieve it.

4.2. Using MemoryHandles with Offset

We can also use an offset in conjunction with a MemoryAddress to access a memory segment. This is similar to using an index to get an item from an array:

VarHandle varHandle = MemoryHandles.varHandle(int.class, ByteOrder.nativeOrder());
try (MemorySegment memorySegment = MemorySegment.allocateNative(100)) {
    MemoryAddress base = memorySegment.baseAddress();
    for(int i=0; i<25; i++) {
        varHandle.set(base.addOffset((i*4)), i);
    }
    for(int i=0; i<25; i++) {
        assertThat(varHandle.get(base.addOffset((i*4))), is(i));
    }
}

In the above example, we are storing the integers 0 to 24 in a memory segment.

At first, we create a MemorySegment of 100 bytes. This is because, in Java, each integer consumes 4 bytes. Therefore, to store 25 integer values, we need 100 bytes (4*25).

To access each index, we set the varHandle to point to the right offset using addOffset on the base address.

4.3. MemoryLayouts

The MemoryLayouts class defines various useful layout constants.

For instance, in an earlier example, we created a SequenceLayout:

SequenceLayout sequenceLayout = MemoryLayout.ofSequence(25, 
  MemoryLayout.ofValueBits(64, ByteOrder.nativeOrder()));

This can be expressed more simply using the JAVA_LONG constant:

SequenceLayout sequenceLayout = MemoryLayout.ofSequence(25, MemoryLayouts.JAVA_LONG);

4.4. ValueLayout

A ValueLayout models a memory layout for basic data types such as integer and floating types. Each value layout has a size and a byte order. We can create a ValueLayout using the ofValueBits method:

ValueLayout valueLayout = MemoryLayout.ofValueBits(32, ByteOrder.nativeOrder());

4.5. SequenceLayout

A SequenceLayout denotes the repetition of a given layout. In other words, this can be thought of as a sequence of elements similar to an array with the defined element layout.

For example, we can create a sequence layout for 25 elements of 64 bits each:

SequenceLayout sequenceLayout = MemoryLayout.ofSequence(25, 
  MemoryLayout.ofValueBits(64, ByteOrder.nativeOrder()));

4.6. GroupLayout

A GroupLayout can combine multiple member layouts. The member layouts can be either similar types or a combination of different types.

There are two possible ways to define a group layout. For instance, when the member layouts are organized one after another, it is defined as a struct. On the other hand, if the member layouts are laid out from the same starting offset, then it is called a union.

Let's create a GroupLayout of struct type with an integer and a long:

GroupLayout groupLayout = MemoryLayout.ofStruct(MemoryLayouts.JAVA_INT, MemoryLayouts.JAVA_LONG);

We can also create a GroupLayout of union type using ofUnion method:

GroupLayout groupLayout = MemoryLayout.ofUnion(MemoryLayouts.JAVA_INT, MemoryLayouts.JAVA_LONG);

The first of these is a structure which contains one of each type. And, the second is a structure that can contain one type or the other.

A group layout allows us to create a complex memory layout consisting of multiple elements. For example:

MemoryLayout memoryLayout1 = MemoryLayout.ofValueBits(32, ByteOrder.nativeOrder());
MemoryLayout memoryLayout2 = MemoryLayout.ofStruct(MemoryLayouts.JAVA_LONG, MemoryLayouts.PAD_64);
MemoryLayout.ofStruct(memoryLayout1, memoryLayout2);

5. Slicing a Memory Segment

We can slice a memory segment into multiple smaller blocks. This avoids our having to allocate multiple blocks if we want to store values with different layouts.

Let's try using asSlice:

MemoryAddress memoryAddress = MemorySegment.allocateNative(12).baseAddress();
MemoryAddress memoryAddress1 = memoryAddress.segment().asSlice(0,4).baseAddress();
MemoryAddress memoryAddress2 = memoryAddress.segment().asSlice(4,4).baseAddress();
MemoryAddress memoryAddress3 = memoryAddress.segment().asSlice(8,4).baseAddress();

VarHandle intHandle = MemoryHandles.varHandle(int.class, ByteOrder.nativeOrder());
intHandle.set(memoryAddress1, Integer.MIN_VALUE);
intHandle.set(memoryAddress2, 0);
intHandle.set(memoryAddress3, Integer.MAX_VALUE);

assertThat(intHandle.get(memoryAddress1), is(Integer.MIN_VALUE));
assertThat(intHandle.get(memoryAddress2), is(0));
assertThat(intHandle.get(memoryAddress3), is(Integer.MAX_VALUE));

6. Conclusion

In this article, we learned about the new foreign memory access API in Java 14.

First, we looked at the need for foreign memory access and the limitations of the pre-Java 14 APIs. Then, we saw how the foreign memory access API is a safe abstraction for accessing both heap and non-heap memory.

Finally, we explored the use of the API to read and write data both on and off the heap.

As always, the source code of the examples is available over on GitHub.

Log4j 2 Plugins

$
0
0

1. Overview

Log4j 2 uses plugins like Appenders and Layouts to format and output logs. These are known as core plugins, and Log4j 2 provides a lot of options for us to choose from.

However, in some cases, we may also need to extend the existing plugin or even write custom ones.

In this tutorial, we'll use the Log4j 2 extension mechanism to implement custom plugins.

2. Extending Log4j 2 Plugins

Plugins in Log4j 2 are broadly divided into five categories:

  1. Core Plugins
  2. Convertors
  3. Key Providers
  4. Lookups
  5. Type Converters

Log4j 2 allows us to implement custom plugins in all the above categories using a common mechanism. Moreover, it also allows us to extend existing plugins with the same approach.

In Log4j 1.x, the only way to extend an existing plugin is to override its implementation class. On the other hand, Log4j 2 makes it easier to extend existing plugins by annotating a class with @Plugin.

In the following sections, we'll implement a custom plugin in a few of these categories.

3. Core Plugin

3.1. Implementing a Custom Core Plugin

Key elements like Appenders, Layouts, and Filters are known as core plugins in Log4j 2. Although there is a diverse list of such plugins, in some cases, we may need to implement a custom core plugin. For example, consider a ListAppender that only writes log records into an in-memory List:

@Plugin(name = "ListAppender", 
  category = Core.CATEGORY_NAME, 
  elementType = Appender.ELEMENT_TYPE)
public class ListAppender extends AbstractAppender {

    private List<LogEvent> logList;

    protected ListAppender(String name, Filter filter) {
        super(name, filter, null);
        logList = Collections.synchronizedList(new ArrayList<>());
    }

    @PluginFactory
    public static ListAppender createAppender(
      @PluginAttribute("name") String name, @PluginElement("Filter") final Filter filter) {
        return new ListAppender(name, filter);
    }

    @Override
    public void append(LogEvent event) {
        if (event.getLevel().isLessSpecificThan(Level.WARN)) {
            error("Unable to log less than WARN level.");
            return;
        }
        logList.add(event);
    }
}

We have annotated the class with @Plugin that allows us to name our plugin. Also, the parameters are annotated with @PluginAttribute. The nested elements like filter or layout are passed as @PluginElement. Now we can refer this plugin in the configuration using the same name:

<?xml version="1.0" encoding="UTF-8"?>
<Configuration xmlns:xi="http://www.w3.org/2001/XInclude"
    packages="com.baeldung" status="WARN">
    <Appenders>
        <ListAppender name="ListAppender">
            <BurstFilter level="INFO" rate="16" maxBurst="100"/>
        </MapAppender>
    </Appenders>
    <Loggers
        <Root level="DEBUG">
            <AppenderRef ref="ConsoleAppender" />
            <AppenderRef ref="ListAppender" />
        </Root>
    </Loggers>
</Configuration>

3.2. Plugin Builders

The example in the last section is rather simple and only accepts a single parameter name. Generally speaking, core plugins like appenders are much more complex and usually accepts several configurable parameters.

For example, consider an appender that writes logs into Kafka:

<Kafka2 name="KafkaLogger" ip ="127.0.0.1" port="9010" topic="log" partition="p-1">
    <PatternLayout pattern="%pid%style{%message}{red}%n" />
</Kafka2>

To implement such appenders, Log4j 2 provides a plugin builder implementation based on the Builder pattern:

@Plugin(name = "Kafka2", category = Core.CATEGORY_NAME)
public class KafkaAppender extends AbstractAppender {

    public static class Builder implements org.apache.logging.log4j.core.util.Builder<KafkaAppender> {

        @PluginBuilderAttribute("name")
        @Required
        private String name;

        @PluginBuilderAttribute("ip")
        private String ipAddress;

        // ... additional properties

        // ... getters and setters

        @Override
        public KafkaAppender build() {
            return new KafkaAppender(
              getName(), getFilter(), getLayout(), true, new KafkaBroker(ipAddress, port, topic, partition));
        }
    }

    private KafkaBroker broker;

    private KafkaAppender(String name, Filter filter, Layout<? extends Serializable> layout, 
      boolean ignoreExceptions, KafkaBroker broker) {
        super(name, filter, layout, ignoreExceptions);
        this.broker = broker;
    }

    @Override
    public void append(LogEvent event) {
        connectAndSendToKafka(broker, event);
    }
}

In short, we introduced a Builder class and annotated the parameters with @PluginBuilderAttribute. Because of this, KafkaAppender accepts the Kafka connection parameters from the config shown above.

3.3. Extending an Existing Plugin

We can also extend an existing core plugin in Log4j 2. We can achieve this by giving our plugin the same name as an existing plugin. For example, if we're extending the RollingFileAppender:

@Plugin(name = "RollingFile", category = Core.CATEGORY_NAME, elementType = Appender.ELEMENT_TYPE)
public class RollingFileAppender extends AbstractAppender {

    public RollingFileAppender(String name, Filter filter, Layout<? extends Serializable> layout) {
        super(name, filter, layout);
    }
    @Override
    public void append(LogEvent event) {
    }
}

Notably, we now have two appenders with the same name. In such a scenario, Log4j 2 will use the appender that is discovered first. We'll see more on plugin discovery in a later section.

Please note that Log4j 2 discourages multiple plugins with the same name. It's better to implement a custom plugin instead and use that in the logging configuration.

4. Converter Plugin

The layout is a powerful plugin in Log4j 2It allows us to define the output structure for our logs. For instance, we can use JsonLayout for writing the logs in JSON format.

Another such plugin is the PatternLayoutIn some cases, an application wants to publish information like thread id, thread name, or timestamp with each log statement. PatternLayout plugin allows us to embed such details through a conversion pattern string in the configuration:

<Configuration status="debug" name="baeldung" packages="">
    <Appenders>
        <Console name="stdout" target="SYSTEM_OUT">
            <PatternLayout pattern="%d{yyyy-MM-dd HH:mm:ss} %p %m%n"/>
        </Console>
    </Appenders>
</Configuration>

Here, %d is the conversion pattern. Log4j 2 converts this %d pattern through a DatePatternConverter that understands the conversion pattern and replaces it with the formatted date or timestamp.

Now suppose an application running inside a Docker container wants to print the container name with every log statement. To do this, we'll implement a DockerPatterConverter and change the above config to include the conversion string:

@Plugin(name = "DockerPatternConverter", category = PatternConverter.CATEGORY)
@ConverterKeys({"docker", "container"})
public class DockerPatternConverter extends LogEventPatternConverter {

    private DockerPatternConverter(String[] options) {
        super("Docker", "docker");
    }

    public static DockerPatternConverter newInstance(String[] options) {
        return new DockerPatternConverter(options);
    }

    @Override
    public void format(LogEvent event, StringBuilder toAppendTo) {
        toAppendTo.append(dockerContainer());
    }

    private String dockerContainer() {
        return "container-1";
    }
}

So we implemented a custom DockerPatternConverter similar to the date pattern. It will replace the conversion pattern with the name of the Docker container.

This plugin is similar to the core plugin we implemented earlier. Notably, there is just one annotation that is different from the last plugin. @ConverterKeys annotation accepts the conversion pattern for this plugin.

As a result, this plugin will convert %docker or %container pattern string into the container name in which the application is running:

<?xml version="1.0" encoding="UTF-8"?>
<Configuration xmlns:xi="http://www.w3.org/2001/XInclude" packages="com.baeldung" status="WARN">
    <Appenders>
        <xi:include href="log4j2-includes/console-appender_pattern-layout_colored.xml" />
        <Console name="DockerConsoleLogger" target="SYSTEM_OUT">
            <PatternLayout pattern="%pid %docker %container" />
        </Console>
    </Appenders>
    <Loggers>
        <Logger name="com.baeldung.logging.log4j2.plugins" level="INFO">
            <AppenderRef ref="DockerConsoleLogger" />
        </Logger>
    </Loggers>
</Configuration>

5. Lookup Plugin

Lookup plugins are used to add dynamic values in the Log4j 2 configuration file. They allow applications to embed runtime values to some properties in the configuration file. The value is added through a key-based lookup in various sources like a file system, database, etc.

One such plugin is the DateLookupPlugin that allows replacing a date pattern with the current system date of the application:

<RollingFile name="Rolling-File" fileName="${filename}" 
  filePattern="target/rolling1/test1-$${date:MM-dd-yyyy}.%i.log.gz">
    <PatternLayout>
        <pattern>%d %p %c{1.} [%t] %m%n</pattern>
    </PatternLayout>
    <SizeBasedTriggeringPolicy size="500" />
</RollingFile>

In this sample configuration file, RollingFileAppender uses a date lookup where the output will be in MM-dd-yyyy format. As a result, Log4j 2 writes logs to an output file with a date suffix.

Similar to other plugins, Log4j 2 provides a lot of sources for lookups. Moreover, it makes it easy to implement custom lookups if a new source is required:

@Plugin(name = "kafka", category = StrLookup.CATEGORY)
public class KafkaLookup implements StrLookup {

    @Override
    public String lookup(String key) {
        return getFromKafka(key);
    }

    @Override
    public String lookup(LogEvent event, String key) {
        return getFromKafka(key);
    }

    private String getFromKafka(String topicName) {
        return "topic1-p1";
    }
}

So KafkaLookup will resolve the value by querying a Kafka topic. We'll now pass the topic name from the configuration:

<RollingFile name="Rolling-File" fileName="${filename}" 
  filePattern="target/rolling1/test1-$${kafka:topic-1}.%i.log.gz">
    <PatternLayout>
        <pattern>%d %p %c{1.} [%t] %m%n</pattern>
    </PatternLayout>
    <SizeBasedTriggeringPolicy size="500" />
</RollingFile>

We replaced the date lookup in our earlier example with Kafka lookup that will query topic-1.

Since Log4j 2 only calls the default constructor of a lookup plugin, we didn't implement the @PluginFactory as we did in earlier plugins.

6. Plugin Discovery

Finally, let's understand how Log4j 2 discovers the plugins in an application. As we saw in the examples above, we gave each plugin a unique name. This name acts as a key, which Log4j 2 resolves to a plugin class.

There's a specific order in which Log4j 2 performs a lookup to resolve a plugin class:

  1. Serialized plugin listing file in the log4j2-core library. Specifically, a Log4j2Plugins.dat is packaged inside this jar to list the default Log4j 2 plugins
  2. Similar Log4j2Plugins.dat file from the OSGi bundles
  3. A comma-separated package list in the log4j.plugin.packages system property
  4. In programmatic Log4j 2 configuration, we can call PluginManager.addPackages() method to add a list of package names
  5. A comma-separated list of packages can be added in the Log4j 2 configuration file

As a prerequisite, annotation processing must be enabled to allow Log4j 2 to resolve plugin by the name given in the @Plugin annotation.

Since Log4j 2 uses names to look up the plugin, the above order becomes important. For example, if we have two plugins with the same name, Log4j 2 will discover the plugin that is resolved first. Therefore, if we need to extend an existing plugin in Log4j 2we must package the plugin in a separate jar and place it before the log4j2-core.jar.

7. Conclusion

In this article, we looked at the broad categories of plugins in Log4j 2. We discussed that even though there is an exhaustive list of existing plugins, we may need to implement custom plugins for some use cases.

Later, we looked at the custom implementation of some useful plugins. Furthermore, we saw how Log4j 2 allows us to name these plugins and subsequently use this plugin name in the configuration file. Finally, we discussed how Log4j 2 resolves plugins based on this name.

As always, all examples are available over on GitHub.

Transactional Annotations: Spring vs. JTA

$
0
0

1. Overview

In this tutorial, we'll discuss the differences between org.springframework.transaction.annotation.Transactional and javax.transaction.Transactional annotations.

We'll start with an overview of their configuration properties. Then, we'll discuss what types of components each can be applied to, and in which circumstances we can use one or the other.

2. Configuration Differences

Spring's Transactional annotation comes with additional configuration compared to its JTA counterpart:

  • Isolation – Spring offers transaction-scoped isolation through the isolation property; however, in JTA, this feature is available only at a connection level
  • Propagation – available in both libraries, through the propagation property in Spring, and the value property in Java EE; Spring offers Nested as an additional propagation type
  • Read-Only – available only in Spring through the readOnly property
  • Timeout – available only in Spring through the timeout property
  • Rollback – both annotations offer rollback management; JTA provides the rollbackOn and dontRollbackOn properties, while Spring has rollbackFor and noRollbackFor, plus two additional properties: rollbackForClassName and noRollbackForClassName

2.1. Spring Transactional Annotation Configuration

As an example, let's use and configure the Spring Transactional annotation on a simple car service:

import org.springframework.transaction.annotation.Transactional;

@Service
@Transactional(
  isolation = Isolation.READ_COMMITTED, 
  propagation = Propagation.SUPPORTS, 
  readOnly = false, 
  timeout = 30)
public class CarService {

    @Autowired
    private CarRepository carRepository;

    @Transactional(
      rollbackFor = IllegalArgumentException.class, 
      noRollbackFor = EntityExistsException.class,
      rollbackForClassName = "IllegalArgumentException", 
      noRollbackForClassName = "EntityExistsException")
    public Car save(Car car) {
        return carRepository.save(car);
    }
}

2.3. JTA Transactional Annotation Configuration

Let's do the same for a simple rental service using the JTA Transactional annotation:

import javax.transaction.Transactional;

@Service
@Transactional(Transactional.TxType.SUPPORTS)
public class RentalService {

    @Autowired
    private CarRepository carRepository;

    @Transactional(
      rollbackOn = IllegalArgumentException.class, 
      dontRollbackOn = EntityExistsException.class)
    public Car rent(Car car) {
        return carRepository.save(car);
    }
}

3. Applicability and Interchangeability

JTA Transactional annotation applies to CDI-managed beans and classes defined as managed beans by the Java EE specification, whereas Spring's Transactional annotation applies only to Spring beans.

It's also worth noting that support for JTA 1.2 was introduced in Spring Framework 4.0. Thus, we can use the JTA Transactional annotation in Spring applications. However, the other way around is not possible since we can't use Spring annotations outside the Spring context.

4. Conclusion

In this tutorial, we discussed the differences between Transactional annotations from Spring and JTA, and when we can use one or another.

As always, the code from this tutorial is available over on GitHub.

Viewing all 4699 articles
Browse latest View live


<script src="https://jsc.adskeeper.com/r/s/rssing.com.1596347.js" async> </script>