Quantcast
Channel: Baeldung
Viewing all 4702 articles
Browse latest View live

AWS AppSync With Spring Boot

$
0
0

1. Introduction

In this article, we'll explore AWS AppSync with Spring Boot. AWS AppSync is a fully-managed, enterprise-level GraphQL service with real-time data synchronization and offline programming features.

2. Setup AWS AppSync

First, we need to have an active AWS account. Once that is taken care of, we can search for AppSync from the AWS console. Then we'll click the Getting Started with AppSync link.

2.1. Create AppSync API

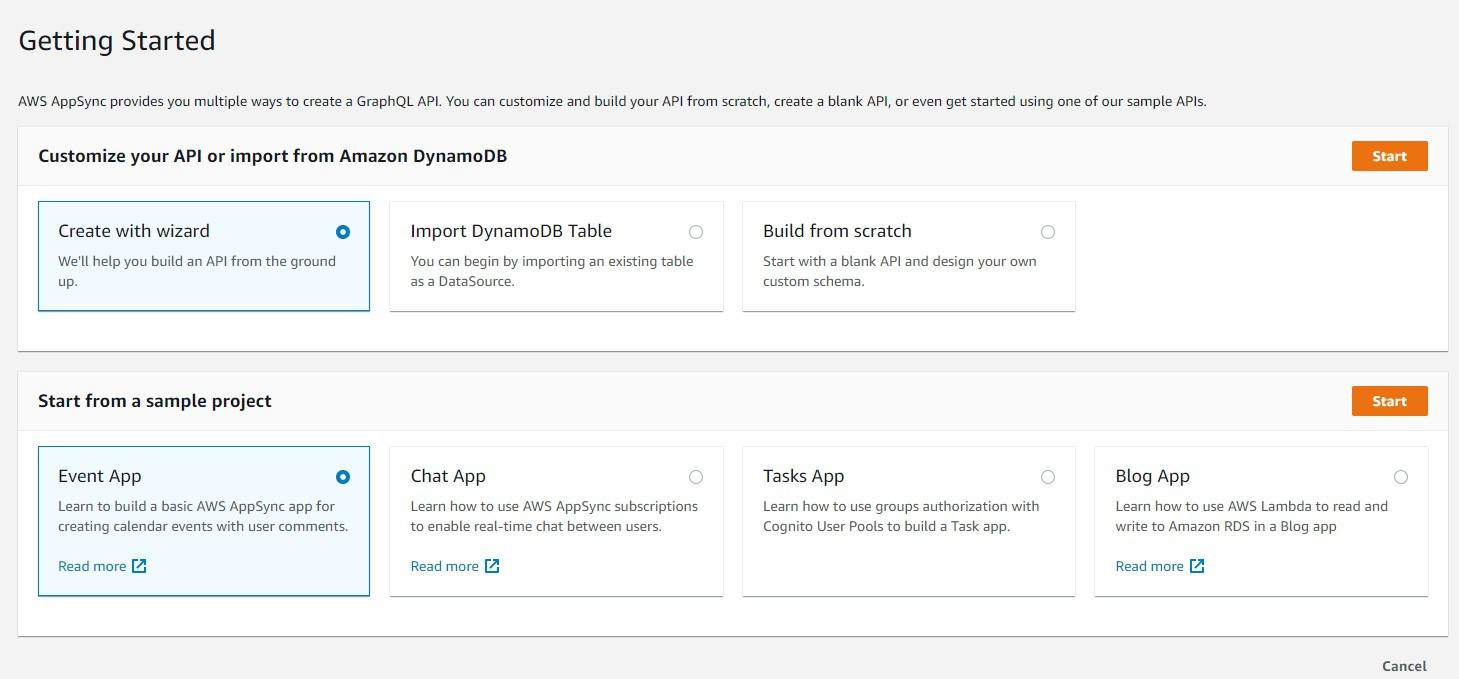
Following the quick start instructions to create our API, we'll use the Event App sample project. Then click Start to name and create the app:

This will bring us to our AppSync app console. Now let's take a look at our GraphQL model.

2.2. GraphQL Event Model

GraphQL uses a schema to define what data is available to clients and how to interact with the GraphQL server. The schema contains queries, mutations, and a variety of declared types.

For simplicity, let's take a look at part of the default AWS AppSync GraphQL schema, our Event model:

type Event {
  id: ID!
  name: String
  where: String
  when: String
  description: String
  # Paginate through all comments belonging to an individual post.
  comments(limit: Int, nextToken: String): CommentConnection
}

Event is a declared type with some String fields and a CommentConnection type. Notice the exclamation point on the ID field. This means it is a required/non-null field.

This should be enough to understand the basics of our schema. However, for more information, head over to the GraphQL site.

3. Spring Boot

Now that we've set up everything on the AWS side, let's look at our Spring Boot client application.

3.1. Maven Dependencies

To access our API, we will be using the Spring Boot Starter WebFlux library for access to WebClient, Spring's new alternative to RestTemplate:

    <dependency> 
      <groupId>org.springframework.boot</groupId> 
      <artifactId>spring-boot-starter-webflux</artifactId> 
    </dependency>

Check out our article on WebClient for more information.

3.2. GraphQL Client

To make a request to our API, we'll start by creating our RequestBodySpec using the WebClient builder, providing the AWS AppSync API URL and API key:

WebClient.RequestBodySpec requestBodySpec = WebClient
    .builder()
    .baseUrl(apiUrl)
    .defaultHeader("x-api-key", apiKey)
    .build()
    .method(HttpMethod.POST)
    .uri("/graphql");

Don't forget the API key header, x-api-key. The API key authenticates to our AppSync app.

4. Working With GraphQL Types

4.1. Queries

Setting up our query involves adding it to a query element in the message body:

Map<String, Object> requestBody = new HashMap<>();
requestBody.put("query", "query ListEvents {" 
  + " listEvents {"
  + "   items {"
  + "     id"
  + "     name"
  + "     where"
  + "     when"
  + "     description"
  + "   }"
  + " }"
  + "}");

Using our requestBody, let's invoke our WebClient to retrieve the response body:

WebClient.ResponseSpec response = requestBodySpec
    .body(BodyInserters.fromValue(requestBody))
    .accept(MediaType.APPLICATION_JSON, MediaType.APPLICATION_XML)
    .acceptCharset(StandardCharsets.UTF_8)
    .retrieve();

Finally, we can get the body as a String:

String bodyString = response.bodyToMono(String.class).block();
assertNotNull(bodyString);
assertTrue(bodyString.contains("My First Event"));

4.2. Mutations

GraphQL allows for updating and deleting data through the use of mutations. Mutations modify the server-side data as needed and follow a similar syntax to queries.

Let's add a new event with an add mutation query:

String queryString = "mutation add {"
  + "    createEvent("
  + "        name:\"My added GraphQL event\""
  + "        where:\"Day 2\""
  + "        when:\"Saturday night\""
  + "        description:\"Studying GraphQL\""
  + "    ){"
  + "        id"
  + "        name"
  + "        description"
  + "    }"
  + "}";
 
requestBody.put("query", queryString);

One of the greatest advantages of AppSync, and of GraphQL in general, is that one endpoint URL provides all CRUD functionality across the entire schema.

We can reuse the same WebClient to add, update, and delete data.  We will simply get a new response based on the callback in the query or mutation.

assertNotNull(bodyString);
assertTrue(bodyString.contains("My added GraphQL event"));
assertFalse(bodyString.contains("where"));

5. Conclusion

In this article, we looked at how quickly we can set up a GraphQL app with AWS AppSync and access it with a Spring Boot client. AppSync provides developers with a powerful GraphQL API through a single endpoint. For more information, visit our tutorial on creating a GraphQL Spring Boot server. As always, the code is over on GitHub.


Generating PDF Files Using Thymeleaf

$
0
0

1. Overview

In this tutorial, we'll learn how to generate PDFs using Thymeleaf as a template engine through a quick and practical example.

2. Maven Dependencies

First, let's add our Thymeleaf dependency:

<dependency>
    <groupId>org.thymeleaf</groupId>
    <artifactId>thymeleaf</artifactId>
    <version>3.0.11.RELEASE</version>
</dependency>

Thymeleaf by itself is just a template engine, and it can't generate PDFs on its own. For this purpose, we're going to add flying-saucer-pdf to our pom.xml:

<dependency>
    <groupId>org.xhtmlrenderer</groupId>
    <artifactId>flying-saucer-pdf</artifactId>
    <version>9.1.20</version>
</dependency>

3. Generating PDFs

Next, let's create a simple Thymeleaf HTML template – thymeleaf_template.html:

<html xmlns:th="http://www.thymeleaf.org">
  <body>
    <h3 style="text-align: center; color: green">
      <span th:text="'Welcome to ' + ${to} + '!'"></span>
    </h3>
  </body>
</html>

And then, we'll create a simple function – parseThymeleafTemplate – that'll parse our template and return an HTML String:

private String parseThymeleafTemplate() {
    ClassLoaderTemplateResolver templateResolver = new ClassLoaderTemplateResolver();
    templateResolver.setSuffix(".html");
    templateResolver.setTemplateMode(TemplateMode.HTML);

    TemplateEngine templateEngine = new TemplateEngine();
    templateEngine.setTemplateResolver(templateResolver);

    Context context = new Context();
    context.setVariable("to", "Baeldung");

    return templateEngine.process("thymeleaf_template", context);
}

Finally, let's implement a simple function that receives the previously generated HTML as input and write a PDF to our home folder:

public void generatePdfFromHtml(String html) {
    String outputFolder = System.getProperty("user.home") + File.separator + "thymeleaf.pdf";
    OutputStream outputStream = new FileOutputStream(outputFolder);

    ITextRenderer renderer = new ITextRenderer();
    renderer.setDocumentFromString(html);
    renderer.layout();
    renderer.createPDF(outputStream);

    outputStream.close();
}

After running our code, we'll notice a file named thymeleaf.pdf, in our user's home directory, that looks like this:

As we can see, the text is green and aligned to the center as defined in our inline CSS. This is an extremely powerful tool for customizing our PDFs.

We should keep in mind that Thymeleaf is completely decoupled from Flying Saucer, meaning that we can use any other template engine for creating PDFs like Apache FreeMarker.

4. Conclusion

In this quick tutorial, we've learned how to easily generate PDFs using Thymeleaf as a template engine.

As always, the code is available over on GitHub.

Introduction to Lock-Free Data Structures

$
0
0

1. Introduction

In this tutorial, we'll learn what non-blocking data structures are and why they are an important alternative to lock-based concurrent data structures.

First, we'll go over some terms like obstruction-free, lock-free, and wait-free.

Second, we'll look at the basic building blocks of non-blocking algorithms like CAS (compare-and-swap).

Third, we'll look at the implementation of a lock-free queue in Java, and finally, we'll outline an approach on how to achieve wait-freedom.

2. Lock Versus Starvation

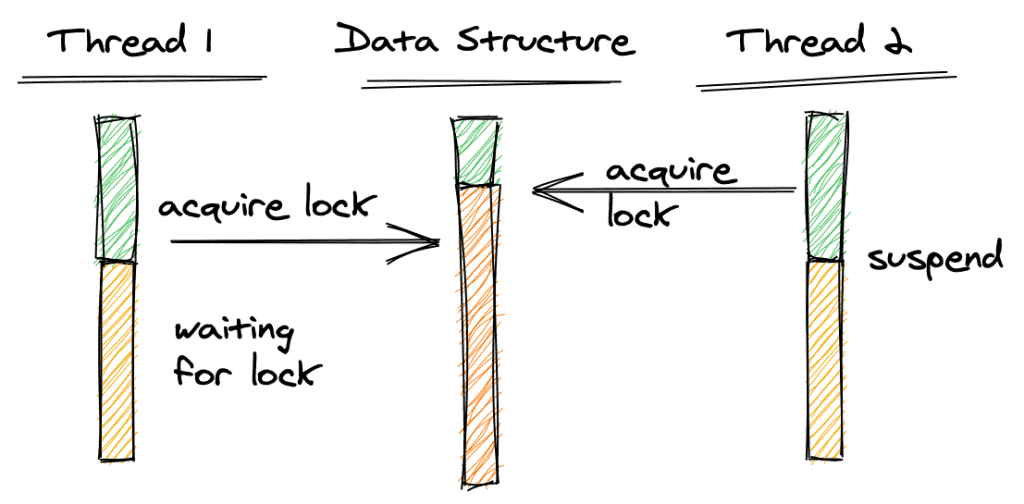
First, let's look at the difference between a blocked and a starving thread.

In the above picture, Thread 2 acquires a lock on the data structure. When Thread 1 attempts to acquire a lock as well, it needs to wait until Thread 2 releases the lock; it won't proceed before it can get the lock. If we suspend Thread 2 while it holds the lock, Thread 1 will have to wait forever.

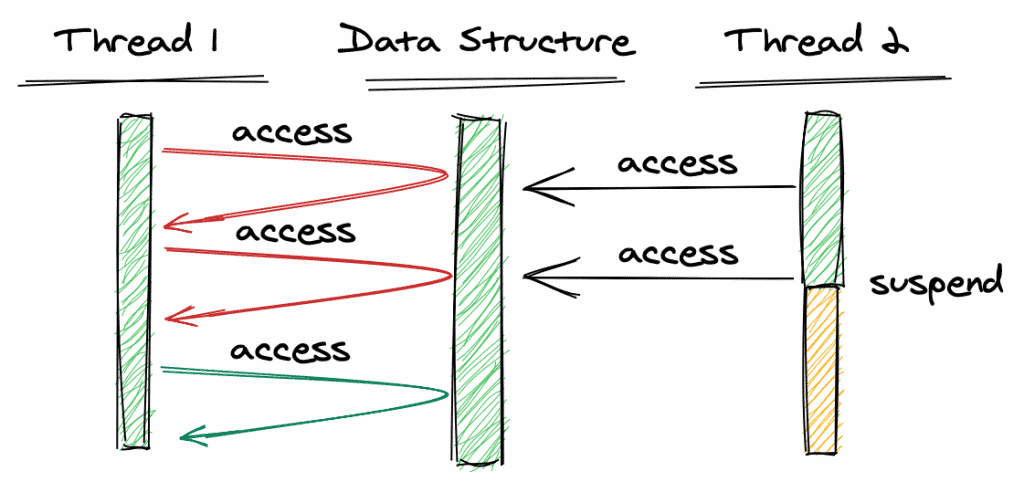
The next picture illustrates thread starvation:

Here, Thread 2 accesses the data structure but does not acquire a lock. Thread 1 attempts to access the data structure at the same time, detects the concurrent access, and returns immediately, informing the thread that it could not complete (red) the operation. Thread 1 will then try again until it succeeds to complete the operation (green).

The advantage of this approach is that we don't need a lock. However, what can happen is that if Thread 2 (or other threads) access the data structure with high frequency, then Thread 1 needs a large number of attempts until it finally succeeds. We call this starvation.

Later on we'll see how the compare-and-swap operation achieves non-blocking access.

3. Types of Non-Blocking Data Structures

We can distinguish between three levels of non-blocking data structures.

3.1. Obstruction-Free

Obstruction-freedom is the weakest form of a non-blocking data structure. Here, we only require that a thread is guaranteed to proceed if all other threads are suspended.

More precisely, a thread won't continue to starve if all other threads are suspended. This is different from using locks in that sense, that if the thread was waiting for a lock and a thread that holds the lock is suspended, the waiting thread would wait forever.

3.2. Lock-Free

A data structure provides lock-freedom if, at any time, at least one thread can proceed. All other threads may be starving. The difference to obstruction-freedom is that there is at least one non-starving thread even if no threads are suspended.

3.3. Wait-Free

A data structure is wait-free if it's lock-free and every thread is guaranteed to proceed after a finite number of steps, that is, threads will not starve for an “unreasonably large” number of steps.

3.4. Summary

Let's summarize these definitions in graphical representation:

The first part of the image shows obstruction-freedom as Thread 1 (top thread) can proceed (green arrow) as soon we suspend the other threads (at the bottom in yellow).

The middle part shows lock-freedom. At least Thread 1 can progress while others may be starving (red arrow).

The last part shows wait-freedom. Here, we guarantee that Thread 1 can continue (green arrow) after a certain period of starvation (red arrows).

4. Non-Blocking Primitives

In this section, we'll look at three basic operations that help us to build lock-free operations on data structures.

4.1. Compare and Swap

One of the basic operations used to avoid locking is the compare-and-swap (CAS) operation.

The idea of compare-and-swap is, that a variable is only updated if it still has the same value as at the time we had fetched the value of the variable from the main memory. CAS is an atomic operation, which means that fetch and update together are one single operation:

Here, both threads fetch the value 3 from the main memory. Thread 2 succeeds (green) and updates the variable to 8. As the first CAS by thread 1 expects the value to be still 3, the CAS fails (red). Therefore, Thread 1 fetches the value again, and the second CAS succeeds.

The important thing here is that CAS does not acquire a lock on the data structure but returns true if the update was successful, otherwise it returns false.

The following code snippet outlines how CAS works:

volatile int value;

boolean cas(int expectedValue, int newValue) {
    if(value == expectedValue) {
        value = newValue;
        return true;
    }
    return false;
}

We only update the value with the new value if it still has the expected value, otherwise, it returns false. The following code snippet shows how CAS can be called:

void testCas() {
    int v = value;
    int x = v + 1;

    while(!cas(v, x)) {
        v = value;
        x = v + 1;
    }
}

We attempt to update our value until the CAS operation succeeds, that is, returns true.

However, it's possible that a thread gets stuck in starvation. That can happen if other threads perform a CAS on the same variable at the same time, so the operation will never succeed for a particular thread (or will take an unreasonable amount of time to succeed). Still, if the compare-and-swap fails, we know that another thread has succeeded, thus we also ensure global progress, as required for lock-freedom.

It's important to note that the hardware should support compare-and-swap, to make it a truly atomic operation without the use of locking.

Java provides an implementation of compare-and-swap in the class sun.misc.Unsafe. However, in most cases, we should not use this class directly, but Atomic variables instead.

Furthermore, compare-and-swap does not prevent the A-B-A problem. We'll look at that in the following section.

4.2. Load-Link/Store-Conditional

An alternative to compare-and-swap is load-link/store-conditional. Let's first revisit compare-and-swap. As we've seen before, CAS only updates the value if the value in the main memory is still the value we expect it to be.

However, CAS also succeeds if the value had changed, and, in the meantime, has changed back to its previous value.

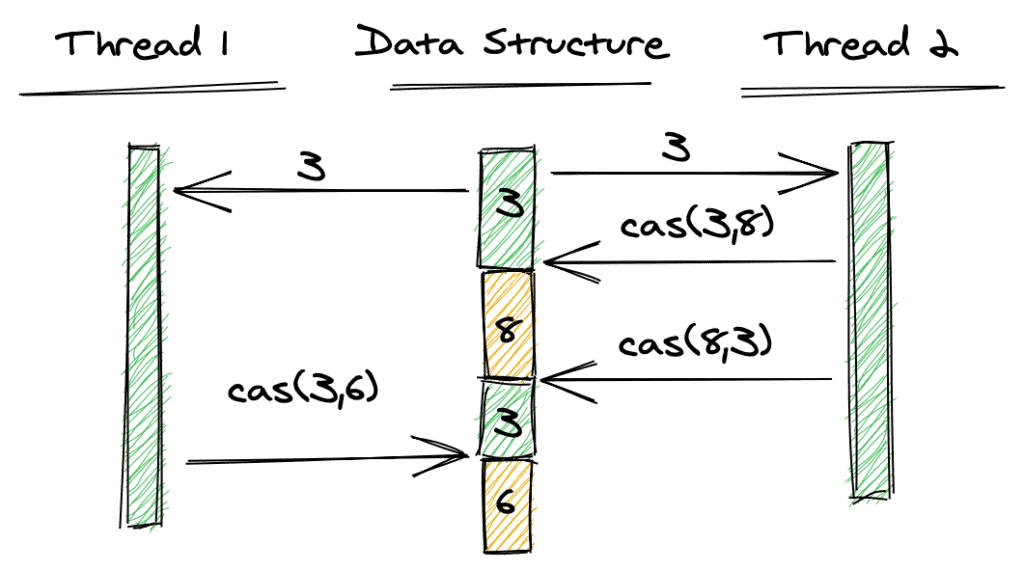
The below image illustrates this situation:

Both, thread 1 and Thread 2 read the value of the variable, which is 3. Then Thread 2 performs a CAS, which succeeds in setting the variable to 8. Then again, Thread 2 performs a CAS to set the variable back to 3, which succeeds as well. Finally, Thread 1 performs a CAS, expecting the value 3, and succeeds as well, even though the value of our variable was modified twice in between.

This is called the A-B-A problem. This behavior might not be a problem depending on the use-case, of course. However, it might not be desired for others. Java provides an implementation of load-link/store-conditional with the AtomicStampedReference class.

4.3. Fetch and Add

Another alternative is fetch-and-add. This operation increments the variable in the main memory by a given value. Again, the important point is that the operation happens atomically, which means no other thread can interfere.

Java provides an implementation of fetch-and-add in its atomic classes. Examples are AtomicInteger.incrementAndGet(), which increments the value and returns the new value; and AtomicInteger.getAndIncrement(), which returns the old value and then increments the value.

5. Accessing a Linked Queue from Multiple Threads

To better understand the problem of two (or more) threads accessing a queue simultaneously, let's look at a linked queue and two threads trying to add an element concurrently.

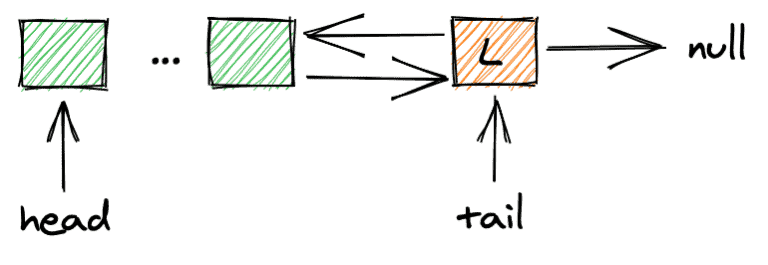
The queue we'll look at is a doubly-linked FIFO queue where we add new elements after the last element (L) and the variable tail points to that last element:

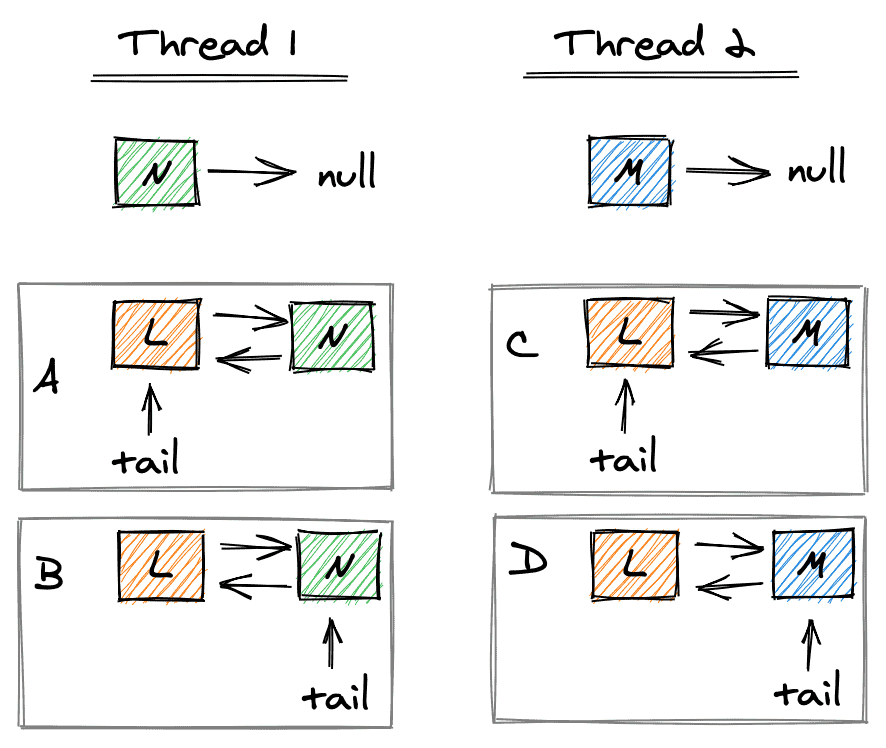
To add a new element, the threads need to perform three steps: 1) create the new elements (N and M), with the pointer to the next element set to null; 2) have the reference to the previous element point to L and the reference to the next element of L point to N (M, respectively). 3) Have tail point to N (M, respectively):

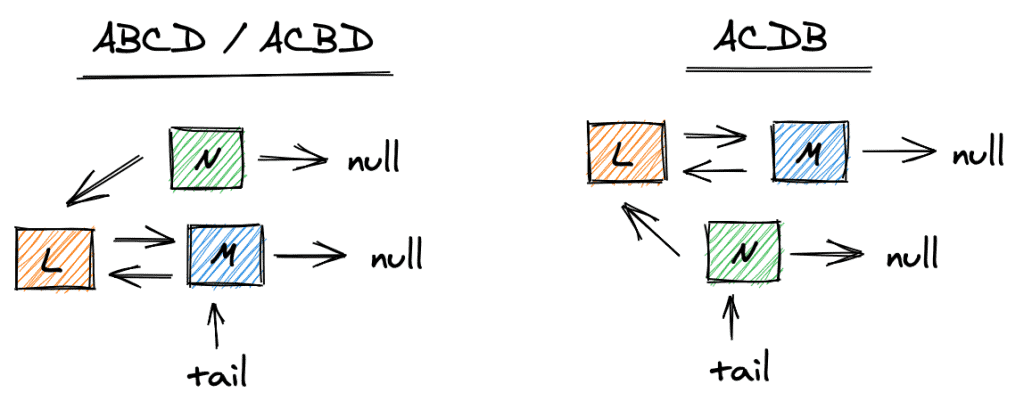
What can go wrong if the two threads perform these steps simultaneously? If the steps in the above picture execute in the order ABCD or ACBD, L, as well as tail, will point to M. N will remain disconnected from the queue.

If the steps execute in the order ACDB, tail will point to N, while L will point to M, which will cause an inconsistency in the queue:

Of course, one way to solve this problem is to have one thread acquire a lock on the queue. The solution we'll look at in the following chapter will solve the problem with the help of a lock-free operation by using the CAS operation we've seen earlier.

6. A Non-Blocking Queue in Java

Let's look at a basic lock-free queue in Java. First, let's look at the class members and the constructor:

public class NonBlockingQueue<T> {

    private final AtomicReference<Node<T>> head, tail;
    private final AtomicInteger size;

    public NonBlockingQueue() {
        head = new AtomicReference<>(null);
        tail = new AtomicReference<>(null);
        size = new AtomicInteger();
        size.set(0);
    }
}

The important part is the declaration of the head and tail references as AtomicReferences, which ensures that any update on these references is an atomic operation. This data type in Java implements the necessary compare-and-swap operation.

Next, let's look at the implementation of the Node class:

private class Node<T> {
    private volatile T value;
    private volatile Node<T> next;
    private volatile Node<T> previous;

    public Node(T value) {
        this.value = value;
        this.next = null;
    }

    // getters and setters 
}

Here, the important part is to declare the references to the previous and next node as volatile. This ensures that we update these references always in the main memory (thus are directly visible to all threads). The same for the actual node value.

6.1. Lock-Free add

Our lock-free add operation will make sure that we add the new element at the tail and won't be disconnected from the queue, even if multiple threads want to add a new element concurrently:

public void add(T element) {
    if (element == null) {
        throw new NullPointerException();
    }

    Node<T> node = new Node<>(element);
    Node<T> currentTail;
    do {
        currentTail = tail.get();
        node.setPrevious(currentTail);
    } while(!tail.compareAndSet(currentTail, node));

    if(node.previous != null) {
        node.previous.next = node;
    }

    head.compareAndSet(null, node); // for inserting the first element
    size.incrementAndGet();
}

The essential part to pay attention to is the highlighted line. We attempt to add the new node to the queue until the CAS operation succeeds to update the tail, which must still be the same tail to which we appended the new node.

6.2. Lock-Free get

Similar to the add-operation, the lock-free get-operation will make sure that we return the last element and move the tail to the current position:

public T get() {
    if(head.get() == null) {
        throw new NoSuchElementException();
    }

    Node<T> currentHead;
    Node<T> nextNode;
    do {
        currentHead = head.get();
        nextNode = currentHead.getNext();
    } while(!head.compareAndSet(currentHead, nextNode));

    size.decrementAndGet();
    return currentHead.getValue();
}

Again, the essential part to pay attention to is the highlighted line. The CAS operation ensures that we move the current head only if no other node has been removed in the meantime.

Java already provides an implementation of a non-blocking queue, the ConcurrentLinkedQueue. It's an implementation of the lock-free queue from M. Michael and L. Scott described in this paper. An interesting side-note here is that the Java documentation states that it's a wait-free queue, where it's actually lock-free. The Java 8 documentation correctly calls the implementation lock-free.

7. Wait-Free Queues

As we've seen, the above implementation is lock-free, however, not wait-free. The while loops in both the add and get method can potentially loop for a long time (or, though unlikely, forever) if there are many threads accessing our queue.

How can we achieve wait-freedom? The implementation of wait-free algorithms, in general, is quite tricky. We refer the interested reader to this paper, which describes a wait-free queue in detail. In this article, let's look at the basic idea of how we can approach a wait-free implementation of a queue.

A wait-free queue requires that every thread makes guaranteed progress (after a finite number of steps). In other words, the while loops in our add and get methods must succeed after a certain number of steps.

In order to achieve that, we assign a helper thread to every thread. If that helper thread succeeds to add an element to the queue, it will help the other thread to insert its element before inserting another element.

As the helper thread has a helper itself, and, down the whole list of threads, every thread has a helper, we can guarantee that a thread succeeds the insertion latest after every thread has done one insertion. The following figure illustrates the idea:

Of course, things become more complicated when we can add or remove threads dynamically.

8. Conclusion

In this article, we saw the fundamentals of non-blocking data structures. We explained the different levels and basic operations like compare-and-swap.

Then, we looked at a basic implementation of a lock-free queue in Java. Finally, we outlined the idea of how to achieve wait-freedom.

The full source code for all examples in this article is available over on GitHub.

Introduction to Finagle

$
0
0

1. Overview

In this tutorial, we'll take a quick look at Finagle, Twitter's RPC library.

We'll use it to build a simple client and server.

2. Building Blocks

Before we dig into the implementation, we need to get to know the basic concepts we'll use to build our application. They are widely known but can have a slightly different meaning in Finagle's world.

2.1. Services

Services are functions represented by classes that take requests and return a Future containing the eventual result of the operation or information about the failure.

2.2. Filters

Filters are also functions. They take a request and a service, do some operations on the request, pass it to the service, do some operations on the resulting Future, and finally return the final Future. We can think of them as aspects as they can implement logic that happens around the execution of a function and alter its input and output.

2.3. Futures

Futures represent the eventual results of the asynchronous operations. They may be in one of the three states: pending, succeeded, or failed.

3. Service

First, we'll implement a simple HTTP greeting service. It'll take the name parameter from the request and respond and add the customary “Hello” message.

To do so, we need to create a class that will extend the abstract Service class from the Finagle library, implementing its apply method.

What we're doing looks similar to implementing a functional interface. Interestingly, though, we can't actually use that specific feature because Finagle is written in Scala and we are taking advantage of the Java-Scala interoperability:

public class GreetingService extends Service<Request, Response> {
    @Override
    public Future<Response> apply(Request request) {
        String greeting = "Hello " + request.getParam("name");
        Reader<Buf> reader = Reader.fromBuf(new Buf.ByteArray(greeting.getBytes(), 0, greeting.length()));
        return Future.value(Response.apply(request.version(), Status.Ok(), reader));
    }
}

4. Filter

Next, we'll write a filter that will log some data about the request to the console. Similar to Service, we will need to implement Filter‘s apply method that'll take request and return a Future response, but this time it'll also take the service as the second parameter.

The basic Filter class has four type-parameters but very often we don't need to change the types of requests and responses inside the filter.

For that, we will use the SimpleFilter that merges the four type-parameters into two. We'll print some information from the request and then simply invoke the apply method from the provided service:

public class LogFilter extends SimpleFilter<Request, Response> {
    @Override
    public Future apply(Request request, Service<Request, Response> service) {
        logger.info("Request host:" + request.host().getOrElse(() -> ""));
        logger.info("Request params:");
        request.getParams().forEach(entry -> logger.info("\t" + entry.getKey() + " : " + entry.getValue()));
        return service.apply(request);
    }
}

5. Server

Now we can use the service and the filter to build a server that will actually listen for requests and process them.

We'll provision this server with a service that contains both our filter and service chained together with the andThen method:

Service serverService = new LogFilter().andThen(new GreetingService()); 
Http.serve(":8080", serverService);

6. Client

Finally, we need a client to send a request to our server.

For that, we'll create an HTTP service using the convenient newService method from Finagle's Http class. It'll be directly responsible for sending the request.

Additionally, we'll use the same logging filter we implemented before and chain it with the HTTP service. Then, we'll just need to invoke the apply method.

That last operation is asynchronous and its eventual results are stored in the Future instance. We could wait for this Future to succeed or fail but that would be a blocking operation and we may want to avoid it. Instead, we can implement a callback to be triggered when the Future succeeds:

Service<Request, Response> clientService = new LogFilter().andThen(Http.newService(":8080"));
Request request = Request.apply(Method.Get(), "/?name=John");
request.host("localhost");
Future<Response> response = clientService.apply(request);

Await.result(response
        .onSuccess(r -> {
            assertEquals("Hello John", r.getContentString());
            return BoxedUnit.UNIT;
        })
        .onFailure(r -> {
            throw new RuntimeException(r);
        })
);

Note that we return BoxedUnit.UNIT. Returning Unit is the Scala's way of coping with void methods, so we do it here to maintain interoperability.

7. Summary

In this tutorial, we learned how to build a simple HTTP server and a client using Finagle as well as how to establish communication between them and exchange messages.

As always, the source code with all the examples can be found over on GitHub.


Finding an Object’s Class in Java

$
0
0

1. Overview

In this article, we'll explore the different ways of finding an object's class in Java.

2. Using the getClass() Method

The first method that we'll check is the getClass() method.

First, let's take a look at our code. We'll write a User class:

public class User {
    
    // implementation details

}

Now, let's create a Lender class that extends User:

public class Lender extends User {
    
    // implementation details

}

Likewise, we'll create a Borrower class that extends User as well:

public class Borrower extends User {
    
    // implementation details

}

The getClass() method simply returns the runtime class of the object we are evaluating, hence, we don't consider inheritance.

As we can see, getClass() shows that our lender object's class is of type Lender but not of type User:

@Test
public void givenLender_whenGetClass_thenEqualsLenderType() {
    User lender = new Lender();
    assertEquals(Lender.class, lender.getClass());
    assertNotEquals(User.class, lender.getClass());
}

3. Using the isInstance() Method

When using the isInstance() method, we're checking if an object is of a particular type, and by type, we are either talking about a class or an interface.

This method will return true if our object sent as the method's argument passes the IS-A test for the class or interface type.

We can use the isInstance() method to check the class of an object at runtime. Furthermore, isInstance() handles autoboxing as well.

If we check the following code, we'll find that the code doesn't compile:

@Ignore
@Test
public void givenBorrower_whenDoubleOrNotString_thenRequestLoan() {
    Borrower borrower = new Borrower();
    double amount = 100.0;
        
    if(amount instanceof Double) { // Compilation error, no autoboxing
        borrower.requestLoan(amount);
    }
        
    if(!(amount instanceof String)) { // Compilation error, incompatible operands
        borrower.requestLoan(amount);
    }
        
}

Let's check the autoboxing in action using the isInstance() method:

@Test
public void givenBorrower_whenLoanAmountIsDouble_thenRequestLoan() {
    Borrower borrower = new Borrower();
    double amount = 100.0;
        
    if(Double.class.isInstance(amount)) { // No compilation error
        borrower.requestLoan(amount);
    }
    assertEquals(100, borrower.getTotalLoanAmount());
}

Now, let's try to evaluate our object at run time:

@Test
public void givenBorrower_whenLoanAmountIsNotString_thenRequestLoan() {
    Borrower borrower = new Borrower();
    Double amount = 100.0;
        
    if(!String.class.isInstance(amount)) { // No compilation error
        borrower.requestLoan(amount);
    }
    assertEquals(100, borrower.getTotalLoanAmount());
}

We can also use isInstance() to verify whether an object can be cast to another class before casting it:

@Test
public void givenUser_whenIsInstanceOfLender_thenDowncast() {
    User user = new Lender();
    Lender lender = null;
        
    if(Lender.class.isInstance(user)) {
        lender = (Lender) user;
    }
        
    assertNotNull(lender);
}

When we make use of the isInstance() method, we protect our program from attempting illegal downcasts, although, using the instanceof operator will be smoother in this case. Let's check it next.

4. Using the instanceof Operator

Similarly to the isInstance() method, the instanceof operator returns true if the object being evaluated belongs to the given type — in other words, if our object referred to on the left side of the operator passes the IS-A test for the class or interface type on the right side.

We can evaluate if a Lender object is type Lender and type User:

@Test
public void givenLender_whenInstanceOf_thenReturnTrue() {
    User lender = new Lender();
    assertTrue(lender instanceof Lender);
    assertTrue(lender instanceof User);
}

To get an in-depth look at how the instanceof operator works, we can find more information in our Java instanceOf Operator article.

5. Conclusion

In this article, we reviewed three different ways of finding an object's class in Java: the getClass() method, the isInstance() method, and the instanceof operator.

As usual, the complete code samples are available over on GitHub.

Java Weekly, Issue 333

$
0
0

1. Spring and Java

>> Getting Started With RSocket: Servers Calling Clients [spring.io]

A nice example of server-client communication using RSocket's request-stream interaction mode.

>> Running Spring Boot apps as GraalVM Native Images [blog.codecentric.de]

A sneak preview of what to expect this Fall, with full support coming in Spring 5.3.

>> Understanding Classic Java Garbage Collection [infoq.com]

And a great intro to the fundamentals of GC as implemented in the JVM.

Also worth reading:

Webinars and presentations:

Time to upgrade:

2. Technical

>> Integration Friction [martinfowler.com] and >> Release Branch [martinfowler.com] and >> Maturity Branch [martinfowler.com] and >> Environment Branch [martinfowler.com]

The series continues with yet another collection of useful source code branching patterns.

Also worth reading:

3. Musings

>> Learning yet another Programming Language [blog.code-cop.org]

And a step-by-step approach, aimed at experienced developers, for learning a new programming language.

Also worth reading:

4. Comics

And my favorite Dilberts of the week:

>> Noble Bad Data [dilbert.com]

>> Dogbert Teaches Asok Tech Support [dilbert.com]

>> Sciencesplainer New [dilbert.com]

5. Pick of the Week

An oldie but a goodie:

>> Introducing Deliberate Discovery [dannorth.net]

Java 14 Record Keyword

$
0
0

1. Introduction

Passing immutable data between objects is one of the most common, but mundane tasks in many Java applications.

Prior to Java 14, this required the creation of a class with boilerplate fields and methods, which were susceptible to trivial mistakes and muddled intentions.

With the release of Java 14, we can now use records to remedy these problems.

In this tutorial, we'll look at the fundamentals of records, including their purpose, generated methods, and customization techniques.

2. Purpose

Commonly, we write classes to simply hold data, such as database results, query results, or information from a service.

In many cases, this data is immutable, since immutability ensures the validity of the data without synchronization.

To accomplish this, we create data classes with the following:

  1. private, final field for each piece of data
  2. getter for each field
  3. public constructor with a corresponding argument for each field
  4. equals method that returns true for objects of the same class when all fields match
  5. hashCode method that returns the same value when all fields match
  6. toString method that includes the name of the class and the name of each field and its corresponding value

For example, we can create a simple Person data class, with a name and an address:

public class Person {

    private final String name;
    private final String address;

    public Person(String name, String address) {
        this.name = name;
        this.address = address;
    }

    @Override
    public int hashCode() {
        return Objects.hash(name, address);
    }

    @Override
    public boolean equals(Object obj) {
        if (this == obj) {
            return true;
        } else if (!(obj instanceof Person)) {
            return false;
        } else {
            Person other = (Person) obj;
            return Objects.equals(name, other.name)
              && Objects.equals(address, other.address);
        }
    }

    @Override
    public String toString() {
        return "Person [name=" + name + ", address=" + address + "]";
    }

    // standard getters
}

While this accomplishes our goal, there are two problems with it:

  1. There is a lot of boilerplate code
  2. We obscure the purpose of our class – to represent a person with a name and address

In the first case, we have to repeat the same tedious process for each data class, monotonously creating a new field for each piece of data, creating equalshashCode, and toString methods, and creating a constructor that accepts each field.

While IDEs can automatically generate many of these classes, they fail to automatically update our classes when we add a new field. For example, if we add a new field, we have to update our equals method to incorporate this field.

In the second case, the extra code obscures that our class is simply a data class that has two String fields: name and address.

A better approach would be to explicitly declare that our class is a data class.

3. The Basics

As of JDK 14, we can replace our repetitious data classes with records. Records are immutable data classes that require only the type and name of fields.

The equalshashCode, and toString methods, as well as the private, final fields, and public constructor, are generated by the Java compiler.

To create a Person record, we use the record keyword:

public record Person (String name, String address) {}

3.1. Constructor

Using records, a public constructor – with an argument for each field – is generated for us.

In the case of our Person record, the equivalent constructor is:

public Person(String name, String address) {
    this.name = name;
    this.address = address;
}

This constructor can be used in the same way as a class to instantiate objects from the record:

Person person = new Person("John Doe", "100 Linda Ln.");

3.2. Getters

We also receive public getters methods – whose names match the name of our field – for free.

In our Person record, this means a name() and address() getter:

@Test
public void givenValidNameAndAddress_whenGetNameAndAddress_thenExpectedValuesReturned() {
    String name = "John Doe";
    String address = "100 Linda Ln.";

    Person person = new Person(name, address);

    assertEquals(name, person.name());
    assertEquals(address, person.address());
}

3.3. equals

Additionally, an equals method is generated for us.

This method returns true if the supplied object is of the same type and the values of all of its fields match:

@Test
public void givenSameNameAndAddress_whenEquals_thenPersonsEqual() {
    String name = "John Doe";
    String address = "100 Linda Ln.";

    Person person1 = new Person(name, address);
    Person person2 = new Person(name, address);

    assertTrue(person1.equals(person2));
}

If any of the fields differ between two Person instances, the equals method will return false.

3.4. hashCode

Similar to our equals method, a corresponding hashCode method is also generated for us.

Our hashCode method returns the same value for two Person objects if all of the field values for both object match (barring collisions due to the birthday paradox):

@Test
public void givenSameNameAndAddress_whenHashCode_thenPersonsEqual() {
    String name = "John Doe";
    String address = "100 Linda Ln.";

    Person person1 = new Person(name, address);
    Person person2 = new Person(name, address);

    assertEquals(person1.hashCode(), person2.hashCode());
}

The hashCode value will differ if any of the field values differ.

3.5. toString

Lastly, we also receive a toString method that results in a string containing the name of the record, followed by the name of each field and its corresponding value in square brackets.

Therefore, instantiating a Person with a name of “John Doe” and an address of “100 Linda Ln.” results in the following toString result:

Person[name=John Doe, address=100 Linda Ln.]

4. Constructors

While a public constructor is generated for us, we can still customize our constructor implementation.

This customization is intended to be used for validation and should be kept as simple as possible.

For example, we can ensure that the name and address provided to our Person record are not null using the following constructor implementation:

public record Person(String name, String address) {
    public Person {
        Objects.requireNonNull(name);
        Objects.requireNonNull(address);
    }
}

We can also create new constructors with different arguments by supplying a different argument list:

public record Person(String name, String address) {
    public Person(String name) {
        this(name, "Unknown");
    }
}

As with class constructors, the fields can be referenced using the this keyword (for example, this.name and this.address) and the arguments match the name of the fields (that is, name and address).

Note that creating a constructor with the same arguments as the generated public constructor is valid, but this requires that each field be manually initialized:

public record Person(String name, String address) {
    public Person(String name, String address) {
        this.name = name;
        this.address = address;
    }
}

Additionally, declaring a no-argument constructor and one with an argument list matching the generated constructor results in a compilation error.

Therefore, the following will not compile:

public record Person(String name, String address) {
    public Person {
        Objects.requireNonNull(name);
        Objects.requireNonNull(address);
    }
    
    public Person(String name, String address) {
        this.name = name;
        this.address = address;
    }
}

5. Static Variables & Methods

As with regular Java classes, we can also include static variables and methods in our records.

We declare static variables using the same syntax as a class:

public record Person(String name, String address) {
    public static String UNKNOWN_ADDRESS = "Unknown";
}

Likewise, we declare static methods using the same syntax as a class:

public record Person(String name, String address) {
    public static Person unnamed(String address) {
        return new Person("Unnamed", address);
    }
}

We can then reference both static variables and static methods using the name of the record:

Person.UNKNOWN_ADDRESS
Person.unnamed("100 Linda Ln.");

6. Conclusion

In this article, we looked at the record keyword introduced in Java 14, including their fundamental concepts and intricacies.

Using records – with their compiler-generated methods – we can reduce boilerplate code and improve the reliability of our immutable classes.

The code and examples for this tutorial can be found over on GitHub.

Formatting Currencies in Spring Using Thymeleaf

$
0
0

1. Introduction

In this tutorial, we'll learn how to format currencies by locale using Thymeleaf.

2. Maven Dependencies

Let's begin by importing the Spring Boot Thymeleaf dependency:

<dependency>
    <groupId>org.springframework.boot</groupId> 
    <artifactId>spring-boot-starter-thymeleaf</artifactId> 
    <version>2.2.7.RELEASE</version>
</dependency>

3. Project Setup

Our project will be a simple Spring web application that displays currencies based on the user's locale. Let's create our Thymeleaf template, currencies.html, in resources/templates/currencies:

<!DOCTYPE html>
<html xmlns="http://www.w3.org/1999/xhtml"
  xmlns:th="http://www.thymeleaf.org">
    <head>
        <meta charset="UTF-8">
        <title>Currency table</title>
    </head>
</html>

We can also create a controller class that will handle our requests:

@Controller
public class CurrenciesController {
    @GetMapping(value = "/currency")
    public String exchange(
      @RequestParam(value = "amount") String amount, Locale locale) {
        return "currencies/currencies";
    }
}

4. Formatting

When it comes to currencies, we need to format them based on the requester's locale.

In this case, we'll send the Accept-Language header with each request to represent our user's locale.

4.1. Currency

The Numbers class, provided by Thymeleaf, has support for formatting currencies. So, let's update our view with a call to the formatCurrency method

<p th:text="${#numbers.formatCurrency(param.amount)}"></p>

When we run our example, we'll see the currency properly formatted:

@Test
public void whenCallCurrencyWithUSALocale_ThenReturnProperCurrency() throws Exception {
    mockMvc.perform(MockMvcRequestBuilders.get("/currency")
      .header("Accept-Language", "en-US")
      .param("amount", "10032.5"))
      .andExpect(status().isOk())
      .andExpect(content().string(containsString("$10,032.50")));
}

Since we set the Accept-Language header to the United States, the currency is formatted with a decimal point and a dollar sign.

4.2. Currency Arrays

We can also use the Numbers class to format arrays. As a result, we'll add another request parameter to our controller:

@GetMapping(value = "/currency")
public String exchange(
  @RequestParam(value = "amount") String amount,
  @RequestParam(value = "amountList") List amountList, Locale locale) {
    return "currencies/currencies";
}

Next, we can update our view to include a call to the listFormatCurrency method:

<p th:text="${#numbers.listFormatCurrency(param.amountList)}"></p>

Now let's see what the result looks like:

@Test
public void whenCallCurrencyWithRomanianLocaleWithArrays_ThenReturnLocaleCurrencies() throws Exception {
    mockMvc.perform(MockMvcRequestBuilders.get("/currency")
      .header("Accept-Language", "ro-RO")
      .param("amountList", "10", "20", "30"))
      .andExpect(status().isOk())
      .andExpect(content().string(containsString("10,00 RON, 20,00 RON, 30,00 RON")));
}

The result shows the currency list with the proper Romanian formatting added.

4.3. Trailing Zeros

Using Strings#replace, we can remove the trailing zeros.

<p th:text="${#strings.replace(#numbers.formatCurrency(param.amount), '.00', '')}"></p>

Now we can see the full amount without trailing double zeros:

@Test
public void whenCallCurrencyWithUSALocaleWithoutDecimal_ThenReturnCurrencyWithoutTrailingZeros()
  throws Exception {
    mockMvc.perform(MockMvcRequestBuilders.get("/currency")
      .header("Accept-Language", "en-US")
      .param("amount", "10032"))
      .andExpect(status().isOk())
      .andExpect(content().string(containsString("$10,032")));
}

4.4. Decimals

Depending on the locale, decimals may be formatted differently. Therefore, if we want to replace a decimal point with a comma, we can use the formatDecimal method provided by the Numbers class:

<p th:text="${#numbers.formatDecimal(param.amount, 1, 2, 'COMMA')}"></p>

Let's see the outcome in a test:

@Test
public void whenCallCurrencyWithUSALocale_ThenReturnReplacedDecimalPoint() throws Exception {
    mockMvc.perform(MockMvcRequestBuilders.get("/currency")
      .header("Accept-Language", "en-US")
      .param("amount", "1.5"))
      .andExpect(status().isOk())
      .andExpect(content().string(containsString("1,5")));
}

The value will be formatted as “1,5”.

5. Conclusion

In this short tutorial, we showed how Thymeleaf can be used with Spring Web to handle currencies using the user's Locale.

As always, the code is available over on GitHub.


Applying CI/CD With Spring Boot

$
0
0

1. Overview

In this tutorial, we'll take a look at the Continuous Integration/Continuous Deployment (CI/CD) process and implement its essential parts.

We'll create a simple Spring Boot application and then push it to the shared Git repository. After that, we'll build it with a building integration service, create a Docker image, and push it to a Docker repository.

In the end, we'll automatically deploy our application to a PaaS service (Heroku).

2. Version Control

The crucial part of CI/CD is the version control system to manage our code. In addition, we need a repository hosting service that our build and deploy steps will tie into.

Let's choose Git as the VCS and GitHub as our repository provider as they are the most popular at the moment and free to use.

First, we'll have to create an account on GitHub.

Additionally, we should create a Git repository. Let's name it baeldung-ci-cd-process. Also, let's pick a public repository since it will allow us to access other services for free. Lastly, let's initialize our repository with a README.md.

Now that our repository has been created, we should clone our project locally. To do so, let's execute this command on our local computer:

git clone https://github.com/$USERNAME/baeldung-ci-cd-process.git

This will initialize our project in the directory where we executed the command. At the moment, it should only contain the README.md file.

3. Creating the Application

In this section, we'll create a simple Spring Boot application that will take part in the process. We'll also use Maven as our build tool.

First, let's initialize our project in the directory where we have cloned the version control repository.

For instance, we can do that with Spring Initializer, adding the web and actuator modules.

3.1. Creating the Application Manually

Or, we can add the spring-boot-starter-web and spring-boot-starter-actuator dependencies manually:

<dependency>
    <groupId>org.springframework.boot</groupId>
    <artifactId>spring-boot-starter-web</artifactId>
</dependency>

<dependency>
    <groupId>org.springframework.boot</groupId>
    <artifactId>spring-boot-starter-actuator</artifactId>
</dependency>

The first is to introduce a REST endpoint and the second, a health check endpoint.

In addition, let's add the plugin that'll allow us to run our application:

<plugin>
    <groupId>org.springframework.boot</groupId>
    <artifactId>spring-boot-maven-plugin</artifactId>
</plugin>

And finally, let's add a Spring Boot main class:

@SpringBootApplication
public class CiCdApplication {

    public static void main(String[] args) {
        SpringApplication.run(CiCdApplication.class, args);
    }
}

3.2. Pushing

Whether using Spring Initializr or manually creating the project, we're now ready to commit and push our changes to our repository.

Let's do that with the following commands:

git add .
git commit -m 'Initialize application'
git push

We can now check if our changes exist in the repository.

4. Build Automation

Another part of the CI/CD process is a service that will build and test our pushed code.

We'll use Travis CI here, but any building service will work as well.

4.1. Maven Wrapper

Let's begin by adding a Maven Wrapper to our application. If we've used the Spring Initializr, we can skip this part since it's included by default.

In the application directory, let's do:

mvn -N io.takari:maven:0.7.7:wrapper

This will add Maven wrapper files, including the mvnw and the mvnw.cmd files that can be used instead of Maven.

While Travis CI has its own Maven, other building services might not. This Maven Wrapper will help us to be prepared for either situation. Also, developers won't have to install Maven on their machines.

4.2. Building Service

After that, let's create an account on Travis CI by signing in with our GitHub account. Going forward, we should allow access to our project in GitHub.

Next, we should create a .travis.yml file which will describe the building process in Travis CI. Most of the building services allow us to create such a file, which is located at our repository's root.

In our case, let's tell Travis to use Java 11 and the Maven Wrapper to build our application:

language: java
jdk:
  - openjdk11
script:
  - ./mvnw clean install

The language property indicates we want to use Java.

The jdk property says which Docker image to download from DockerHub, openjdk11 in this case.

The script property says what command to run – we want to use our Maven wrapper.

Lastly, we should push our changes to the repository. The Travis CI should automatically trigger the build.

5. Dockerizing

In this section, we'll build a Docker image with our application and host it on DockerHub as a part of the CD process. It'll allow us to run it on any machine with ease.

5.1. Repository for Docker images

First, we should create a Docker repository for our images.

Let's create an account on DockerHub. Also, let's create the repository for our project by filling out the appropriate fields:

  • name: baeldung-ci-cd-process
  • visibility: Public
  • Build setting: GitHub

5.2. Docker Image

Now, we're ready to create a Docker image and push it to DockerHub.

First, let's add the jib-maven-plugin that will create and push our image with the application to the Docker repository (replace DockerHubUsername with the correct username):

<profile>
    <id>deploy-docker</id>
    <properties>
        <maven.deploy.skip>true</maven.deploy.skip>
    </properties>
    <build>
        <plugins>
            <plugin>
                <groupId>com.google.cloud.tools</groupId>
                <artifactId>jib-maven-plugin</artifactId>
                <version>2.2.0</version>
                <configuration>
                    <to>
                        <image>${DockerHubUsername}/baeldung-ci-cd-process</image>
                        <tags>
                            <tag>${project.version}</tag>
                            <tag>latest</tag>
                        </tags>
                    </to>
                </configuration>
            </plugin>
        </plugins>
    </build>
</profile>

We have added it as part of a Maven profile in order to not trigger it with the default build.

Additionally, we have specified two tags for the image. To learn more about the plugin, visit our article about Jib.

Going forward, let's adjust our build file (.travis.yml):

before_install:
  - echo "$DOCKER_PASSWORD" | docker login -u "$DOCKER_USERNAME" --password-stdin
  - docker pull openjdk:11-jre-slim-sid

script:
  - ./mvnw clean install
  - ./mvnw deploy jib:build -P deploy-docker

With these changes, the build service will log in to DockerHub before building the application. Additionally, it'll execute the deploy phase with our profile. During that phase, our application will be pushed as an image to the Docker repository.

Lastly, we should define DOCKER_PASSWORD and DOCKER_USERNAME variables in our build service. In Travis CI, these variables can be defined as part of the build settings.

Now, let's push our changes to the VCS. The build service should automatically trigger the build with our changes.

We can check if the Docker image has been pushed to the repository by running locally:

docker run -p 8080:8080 -t $DOCKER_USERNAME/baeldung-ci-cd-process

Now, we should be able to access our health check by accessing http://localhost:8080/actuator/health.

6. Code Analysis

The next thing we'll include in our CI/CD process is static code analysis. The main goal of such a process is to ensure the highest code quality. For instance, it could detect that we don't have enough test cases or that we have some security issues.

Let's integrate with CodeCov, which will inform us about our test coverage.

Firstly, we should log in to CodeCov with our GitHub profile to establish integration.

Secondly, we should make changes to our code. Let's begin by adding the jacoco plugin:

<plugin>
    <groupId>org.jacoco</groupId>
    <artifactId>jacoco-maven-plugin</artifactId>
    <version>0.8.5</version>
    <executions>
        <execution>
            <id>default-prepare-agent</id>
            <goals>
                <goal>prepare-agent</goal>
            </goals>
        </execution>
        <execution>
            <id>report</id>
            <phase>test</phase>
            <goals>
                <goal>report</goal>
            </goals>
        </execution>
    </executions>
</plugin>

The plugin is responsible for generating test reports that will be used by CodeCov.

Next, we should adjust the script section in our build service file (.travis.yml):

script:
  - ./mvnw clean org.jacoco:jacoco-maven-plugin:prepare-agent install
  - ./mvnw deploy jib:build -P deploy-docker

after_success:
  - bash <(curl -s https://codecov.io/bash)

We instructed the jacoco plugin to trigger during the clean install phase. Additionally, we've included the after_success section, which will send the report to CodeCov after the build is successful.

Going forward, we should add a test class to our application. For instance, it could be a test for the main class:

@SpringBootTest
class CiCdApplicationIntegrationTest {

    @Test
    public void contextLoads() {

    }
}

Lastly, we should push our changes. The build should be triggered and the report should be generated in our CodeCov profile related to the repository.

7. Deploying the Application

As the last part of our process, we'll deploy our application. With a Docker image available for use, we can deploy it on any service. For instance, we could deploy it on cloud-based PaaS or IaaS.

Let's deploy our application to Heroku, which is a PaaS that requires minimal setup.

First, we should create an account and then log in.

Next, let's create the application space in Heroku and name it baeldung-ci-cd-processThe name of the application must be unique, so we might need to use another one.

We'll deploy it by integrating Heroku with GitHub, as it's the simplest solution. However, we could also have written the pipeline that would use our Docker image.

Going forward, we should include the heroku plugin in our pom:

<profile>
    <id>deploy-heroku</id>
    <properties>
        <maven.deploy.skip>true</maven.deploy.skip>
    </properties>
    <build>
        <plugins>
            <plugin>
                <groupId>com.heroku.sdk</groupId>
                <artifactId>heroku-maven-plugin</artifactId>
                <version>3.0.2</version>
                <configuration>
                    <appName>spring-boot-ci-cd</appName>
                    <processTypes>
                        <web>java $JAVA_OPTS -jar -Dserver.port=$PORT target/${project.build.finalName}.jar</web>
                    </processTypes>
                </configuration>
            </plugin>
        </plugins>
    </build>
</profile>

Like with Docker, we've added it as part of the Maven profile. Additionally, we've included a startup command in the web section.

Next, we should adjust our build service file (.travis.yml) to deploy the application to Heroku as well:

script:
  - ./mvnw clean install
  - ./mvnw heroku:deploy jib:build -P deploy-heroku,deploy-docker

Additionally, let's add the Heroku API-KEY in a HEROKU_API_KEY variable in our building service.

Lastly, let's commit our changes. The application should be deployed to Heroku after the build has finished.

We can check it by accessing https://baeldung-ci-cd-process.herokuapp.com/actuator/health

8. Conclusion

In this article, we've learned what the essential parts of the CI/CD process are and how to prepare them.

First, we prepared a Git repository in GitHub and pushed our application there. Then, we used Travis CI as a build tool to build our application from that repository.

After that, we created a Docker image and pushed it to DockerHub.

Next, we added a service that's responsible for static code analysis.

Lastly, we deployed our application to PaaS and accessed it.

As always, the code for these examples is available over on GitHub.

Open/Closed Principle in Java

$
0
0

1. Overview

In this tutorial, we'll discuss the Open/Closed Principle (OCP) as one of the SOLID principles of object-oriented programming.

Overall, we'll go into detail on what this principle is and how to implement it when designing our software.

2. Open/Closed Principle

As the name suggests, this principle states that software entities should be open for extension, but closed for modification. As a result, when the business requirements change then the entity can be extended, but not modified.

For the illustration below, we'll focus on how interfaces are one way to follow OCP.

2.1. Non-Compliant

Let's consider we're building a calculator app that might have several operations, such as addition and subtraction.

First of all, we'll define a top-level interface – CalculatorOperation:

public interface CalculatorOperation {}

Let's define an Addition class, which would add two numbers and implement the CalculatorOperation:

public class Addition implements CalculatorOperation {
    private double left;
    private double right;
    private double result = 0.0;

    public Addition(double left, double right) {
        this.left = left;
        this.right = right;
    }

    // getters and setters

}

As of now, we only have one class Addition, so we need to define another class named Subtraction:

public class Subtraction implements CalculatorOperation {
    private double left;
    private double right;
    private double result = 0.0;

    public Subtraction(double left, double right) {
        this.left = left;
        this.right = right;
    }

    // getters and setters
}

Let's now define our main class, which will perform our calculator operations: 

public class Calculator {

    public void calculate(CalculatorOperation operation) {
        if (operation == null) {
            throw new InvalidParameterException("Can not perform operation");
        }

        if (operation instanceof Addition) {
            Addition addition = (Addition) operation;
            addition.setResult(addition.getLeft() + addition.getRight());
        } else if (operation instanceof Subtraction) {
            Subtraction subtraction = (Subtraction) operation;
            subtraction.setResult(subtraction.getLeft() - subtraction.getRight());
        }
    }
}

Although this may seem fine, it's not a good example of the OCP. When a new requirement of adding multiplication or divide functionality comes in, we've no way besides changing the calculate method of the Calculator class.

Hence, we can say this code is not OCP compliant.

2.2. OCP Compliant

As we've seen our calculator app is not yet OCP compliant. The code in the calculate method will change with every incoming new operation support request. So, we need to extract this code and put it in an abstraction layer.

One solution is to delegate each operation into their respective class:

public interface CalculatorOperation {
    void perform();
}

As a result, the Addition class could implement the logic of adding two numbers:

public class Addition implements CalculatorOperation {
    private double left;
    private double right;
    private double result;

    // constructor, getters and setters

    @Override
    public void perform() {
        result = left + right;
    }
}

Likewise, an updated Subtraction class would have similar logic. And similarly to Addition and Subtraction, as a new change request, we could implement the division logic:

public class Division implements CalculatorOperation {
    private double left;
    private double right;
    private double result;

    // constructor, getters and setters
    @Override
    public void perform() {
        if (right != 0) {
            result = left / right;
        }
    }
}

And finally, our Calculator class doesn't need to implement new logic as we introduce new operators:

public class Calculator {

    public void calculate(CalculatorOperation operation) {
        if (operation == null) {
            throw new InvalidParameterException("Cannot perform operation");
        }
        operation.perform();
    }
}

That way the class is closed for modification but open for an extension.

3. Conclusion

In this tutorial, we've learned what is OCP by definition, then elaborated on that definition. We then saw an example of a simple calculator application that was flawed in its design. Lastly, we made the design good by making it adhere to the OCP.

As always, the code is available over on GitHub.

How to Call Python From Java

$
0
0

1. Overview

Python is an increasingly popular programming language, particularly in the scientific community due to its rich variety of numerical and statistical packages. Therefore, it's not an uncommon requirement to able to invoke Python code from our Java applications.

In this tutorial, we'll take a look at some of the most common ways of calling Python code from Java.

2. A Simple Python Script

Throughout this tutorial, we'll use a very simple Python script which we'll define in a dedicated file called hello.py:

print("Hello Baeldung Readers!!")

Assuming we have a working Python installation, when we run our script we should see the message printed:

$ python hello.py 
Hello Baeldung Readers!!

3. Core Java

In this section, we'll take a look at two different options we can use to invoke our Python script using core Java.

3.1. Using ProcessBuilder

Let's first take a look at how we can use the ProcessBuilder API to create a native operating system process to launch python and execute our simple script:

@Test
public void givenPythonScript_whenPythonProcessInvoked_thenSuccess() throws Exception {
    ProcessBuilder processBuilder = new ProcessBuilder("python", resolvePythonScriptPath("hello.py"));
    processBuilder.redirectErrorStream(true);

    Process process = processBuilder.start();
    List<String> results = readProcessOutput(process.getInputStream());

    assertThat("Results should not be empty", results, is(not(empty())));
    assertThat("Results should contain output of script: ", results, hasItem(
      containsString("Hello Baeldung Readers!!")));

    int exitCode = process.waitFor();
    assertEquals("No errors should be detected", 0, exitCode);
}

In this first example, we're running the python command with one argument which is the absolute path to our hello.py script. We can find it in our test/resources folder.

To summarize, we create our ProcessBuilder object passing the command and argument values to the constructor. It's also important to mention the call to redirectErrorStream(true). In case of any errors, the error output will be merged with the standard output. 

This is useful as it means we can read any error messages from the corresponding output when we call the getInputStream() method on the Process object. If we don't set this property to true, then we'll need to read output from two separate streams, using the getInputStream() and the getErrorStream() methods.

Now, we start the process using the start() method to get a Process object. Then we read the process output and verify the contents is what we expect.

As previously mentioned, we've made the assumption that the python command is available via the PATH variable.

3.2. Working With the JSR-223 Scripting Engine

JSR-223, which was first introduced in Java 6, defines a set of scripting APIs that provide basic scripting functionality. These methods provide mechanisms for executing scripts and for sharing values between Java and a scripting language. The main objective of this standard was to try to bring some uniformity to interoperating with different scripting languages from Java.

We can use the pluggable script engine architecture for any dynamic language provided it has a JVM implementation, of course. Jython is the Java platform implementation of Python which runs on the JVM.

Assuming that we have Jython on the CLASSPATH, the framework should automatically discover that we have the possibility of using this scripting engine and enable us to ask for the Python script engine directly.

Since Jython is available from Maven Central, we can just include it in our pom.xml:

<dependency>
    <groupId>org.python</groupId>
    <artifactId>jython</artifactId>
    <version>2.7.2</version>
</dependency>

Likewise, it can also be downloaded and installed directly.

Let's list out all the scripting engines that we have available to us:

ScriptEngineManagerUtils.listEngines();

If we have the possibility of using Jython, we should see the appropriate scripting engine displayed:

...
Engine name: jython
Version: 2.7.2
Language: python
Short Names:
python
jython

Now that we know we can use the Jython scripting engine, let's go ahead and see how to call our hello.py script:

@Test
public void givenPythonScriptEngineIsAvailable_whenScriptInvoked_thenOutputDisplayed() throws Exception {
    StringWriter writer = new StringWriter();
    ScriptContext context = new SimpleScriptContext();
    context.setWriter(writer);

    ScriptEngineManager manager = new ScriptEngineManager();
    ScriptEngine engine = manager.getEngineByName("python");
    engine.eval(new FileReader(resolvePythonScriptPath("hello.py")), context);
    assertEquals("Should contain script output: ", "Hello Baeldung Readers!!", writer.toString().trim());
}

As we can see, it is pretty simple to work with this API. First, we begin by setting up a ScriptContext which contains a StringWriter. This will be used to store the output from the script we want to invoke.

We then use the getEngineByName method of the ScriptEngineManager class to look up and create a ScriptEngine for a given short name. In our case, we can pass python or jython which are the two short names associated with this engine.

As before, the final step is to get the output from our script and check it matches what we were expecting.

4. Jython

Continuing with Jython, we also have the possibility of embedding Python code directly into our Java code. We can do this using the PythonInterpretor class:

@Test
public void givenPythonInterpreter_whenPrintExecuted_thenOutputDisplayed() {
    try (PythonInterpreter pyInterp = new PythonInterpreter()) {
        StringWriter output = new StringWriter();
        pyInterp.setOut(output);

        pyInterp.exec("print('Hello Baeldung Readers!!')");
        assertEquals("Should contain script output: ", "Hello Baeldung Readers!!", output.toString()
          .trim());
    }
}

Using the PythonInterpreter class allows us to execute a string of Python source code via the exec method. As before we use a StringWriter to capture the output from this execution.

Now let's see an example where we add two numbers together:

@Test
public void givenPythonInterpreter_whenNumbersAdded_thenOutputDisplayed() {
    try (PythonInterpreter pyInterp = new PythonInterpreter()) {
        pyInterp.exec("x = 10+10");
        PyObject x = pyInterp.get("x");
        assertEquals("x: ", 20, x.asInt());
    }
}

In this example we see how we can use the get method, to access the value of a variable.

In our final Jython example, we'll see what happens when an error occurs:

try (PythonInterpreter pyInterp = new PythonInterpreter()) {
    pyInterp.exec("import syds");
}

When we run this code a PyException is thrown and we'll see the same error as if we were working with native Python:

Traceback (most recent call last):
  File "<string>", line 1, in <module>
ImportError: No module named syds

A few points we should note:

  • As PythonIntepreter implements AutoCloseable, it's good practice to use try-with-resources when working with this class
  • The PythonInterpreter class name does not imply that our Python code is interpreted. Python programs in Jython are run by the JVM and therefore compiled to Java bytecode before execution
  • Although Jython is the Python implementation for Java, it may not contain all the same sub-packages as native Python

5. Apache Commons Exec

Another third-party library that we could consider using is Apache Common Exec which attempts to overcome some of the shortcomings of the Java Process API.

The commons-exec artifact is available from Maven Central:

<dependency>
    <groupId>org.apache.commons</groupId>
    <artifactId>commons-exec</artifactId>
    <version>1.3</version>
</dependency>

Now let's how we can use this library:

@Test
public void givenPythonScript_whenPythonProcessExecuted_thenSuccess() 
  throws ExecuteException, IOException {
    String line = "python " + resolvePythonScriptPath("hello.py");
    CommandLine cmdLine = CommandLine.parse(line);
        
    ByteArrayOutputStream outputStream = new ByteArrayOutputStream();
    PumpStreamHandler streamHandler = new PumpStreamHandler(outputStream);
        
    DefaultExecutor executor = new DefaultExecutor();
    executor.setStreamHandler(streamHandler);

    int exitCode = executor.execute(cmdLine);
    assertEquals("No errors should be detected", 0, exitCode);
    assertEquals("Should contain script output: ", "Hello Baeldung Readers!!", outputStream.toString()
      .trim());
}

This example is not too dissimilar to our first example using ProcessBuilder. We create a CommandLine object for our given command. Next, we set up a stream handler to use for capturing the output from our process before executing our command.

To summarize, the main philosophy behind this library is to offer a process execution package aimed at supporting a wide range of operating systems through a consistent API.

6. Utilizing HTTP for Interoperability

Let's take a step back for a moment and instead of trying to invoke Python directly consider using a well-established protocol like HTTP as an abstraction layer between the two different languages.

In actual fact Python ships with a simple built-in HTTP server which we can use for sharing content or files over HTTP:

python -m http.server 9000

If we now go to http://localhost:9000, we'll see the contents listed for the directory where we launched the previous command.

Some other popular frameworks we could consider using for creating more robust Python-based web services or applications are Flask and Django.

Once we have an endpoint we can access, we can use any one of several Java HTTP libraries to invoke our Python web service/application implementation.

7. Conclusion

In this tutorial, we've learned about some of the most popular technologies for calling Python code from Java.

As always, the full source code of the article is available over on GitHub.

Clicking Elements in Selenium using JavaScript

$
0
0

1. Introduction

In this short tutorial, we're going to take a look at a simple example of how to click and element in Selenium WebDriver using JavaScript.

For our demo, we'll use JUnit and Selenium to open https://baeldung.com and search for “Selenium” articles.

2. Dependencies

First, we add the selenium-java and junit dependencies to our project in the pom.xml:

<dependency>
    <groupId>org.seleniumhq.selenium</groupId>
    <artifactId>selenium-java</artifactId>
    <version>3.141.59</version>
</dependency>
<dependency>
    <groupId>junit</groupId>
    <artifactId>junit</artifactId>
    <version>4.13</version>
    <scope>test</scope>
</dependency>

3. Configuration

Next, we need to configure WebDriver. In this example, we'll use its Chrome implementation:

@Before
public void setUp() {
    System.setProperty("webdriver.chrome.driver","path to chromedriver.exe");
    driver = new ChromeDriver();
}

We're using a method annotated with @Before to do the initial setup before each test. Inside we're setting the webdriver.chrome.driver property defining the chrome driver location. After that, we're instantiating the WebDriver object.

When the test finishes we should close the browser window. We can do it by placing the driver.close() statement in a method annotated with @After. This makes sure it'll be executed even if the test fails:

@After
public void cleanUp() {
    driver.close();
}

4. Opening the Browser

Now, we can create a test case that will do our first step – open the website:

@Test
public void whenSearchForSeleniumArticles_thenReturnNotEmptyResults() {
    driver.get("https://baeldung.com");
    String title = driver.getTitle();
    assertEquals("Baeldung | Java, Spring and Web Development tutorials", title);
}

Here, we use the driver.get() method to load the webpage. Next, we verify its title to make sure we're in the right place.

5. Clicking an Element Using JavaScript

Selenium comes with a handy WebElement#click method that invokes a click event on a given element. But in some cases click action is not possible.

One example is if we want to click a disabled element. In that case, WebElement#click throws an IllegalStateException. Instead, we can use Selenium's JavaScript support.

To do this, the first thing that we'll need is the JavascriptExecutor. Since we are using the ChromeDriver implementation, we can simply cast it to what we need:

JavascriptExecutor executor = (JavascriptExecutor) driver;

After getting the JavascriptExecutor, we can use its executeScript method. The arguments are the script itself and an array of script parameters. In our case, we invoke the click method on the first argument:

executor.executeScript("arguments[0].click();", element);

Now, lets put it together into a single method that we'll call clickElement:

private void clickElement(WebElement element) {
    JavascriptExecutor executor = (JavascriptExecutor) driver;
    executor.executeScript("arguments[0].click();", element);
}

And finally, we can add this to our test:

@Test
public void whenSearchForSeleniumArticles_thenReturnNotEmptyResults() {
    // ... load https://baeldung.com
    WebElement searchButton = driver.findElement(By.className("menu-search"));
    clickElement(searchButton);

    WebElement searchInput = driver.findElement(By.id("search"));
    searchInput.sendKeys("Selenium");

    WebElement seeSearchResultsButton = driver.findElement(By.className("btn-search"));
    clickElement(seeSearchResultsButton);
}

6. Non-Clickable Elements

One of the most common problems occurring while clicking an element using JavaScript is executing the click script before the element is clickable. In this situation, the click action won't happen but the code will continue to execute.

To overcome this issue, we have to hold back the execution until the clicking is available. We can use WebDriverWait#until to wait until the button is rendered.

First, WebDriverWait object requires two parameters; the driver and a timeout:

WebDriverWait wait = new WebDriverWait(driver, 5000);

Then, we call until, giving the expected elementToBeClickable condition:

wait.until(ExpectedConditions.elementToBeClickable(By.className("menu-search")));

And once that returns successfully, we know we can proceed:

WebElement searchButton = driver.findElement(By.className("menu-search"));
clickElement(searchButton);

For more available condition methods refer to the official documentation.

7. Conclusion

In this tutorial, we've learned how to click an element in Selenium using JavaScript. As always, the source for the article is available over on GitHub.

@PropertySource with YAML Files in Spring Boot

$
0
0

1. Overview

In this quick tutorial, we'll show how to read a YAML properties file using the @PropertySource annotation in Spring Boot.

2. @PropertySource and YAML format

Spring Boot has great support for externalized configuration. Also, it's possible to use different ways and formats to read the properties in the Spring Boot application out-of-the-box.

However, by default, @PropertySource doesn't load YAML files. This fact is explicitly mentioned in the official documentation.

So, if we want to use the @PropertySource annotation in our application, we need to stick with the standard properties files. Or we can implement the missing puzzle piece ourselves!

3. Custom PropertySourceFactory

As of Spring 4.3, @PropertySource comes with the factory attribute. We can make use of it to provide our custom implementation of the PropertySourceFactory, which will handle the YAML file processing.

This is easier than it sounds! Let's see how to do this:

public class YamlPropertySourceFactory implements PropertySourceFactory {

    @Override
    public PropertySource<?> createPropertySource(String name, EncodedResource encodedResource) 
      throws IOException {
        YamlPropertiesFactoryBean factory = new YamlPropertiesFactoryBean();
        factory.setResources(encodedResource.getResource());

        Properties properties = factory.getObject();

        return new PropertiesPropertySource(encodedResource.getResource().getFilename(), properties);
    }
}

As we can see, it's enough to implement a single createPropertySource method.

In our custom implementation, first, we used the YamlPropertiesFactoryBean to convert the resources in YAML format to the java.util.Properties object.

Then, we simply returned a new instance of the PropertiesPropertySource, which is a wrapper that allows Spring to read the parsed properties.

4. @PropertySource and YAML in action

Let's now put all the pieces together and see how to use them in practice.

First, let's create a simple YAML file – foo.yml:

yaml:
  name: foo
  aliases:
    - abc
    - xyz

Next, let's create a properties class with @ConfigurationProperties and use our custom YamlPropertySourceFactory:

@Configuration
@ConfigurationProperties(prefix = "yaml")
@PropertySource(value = "classpath:foo.yml", factory = YamlPropertySourceFactory.class)
public class YamlFooProperties {

    private String name;

    private List<String> aliases;

    // standard getter and setters
}

And finally, let's verify that the properties are properly injected:

@RunWith(SpringRunner.class)
@SpringBootTest
public class YamlFooPropertiesIntegrationTest {

    @Autowired
    private YamlFooProperties yamlFooProperties;

    @Test
    public void whenFactoryProvidedThenYamlPropertiesInjected() {
        assertThat(yamlFooProperties.getName()).isEqualTo("foo");
        assertThat(yamlFooProperties.getAliases()).containsExactly("abc", "xyz");
    }
}

5. Conclusion

To sum up, in this quick tutorial, we first showed how easy it is to create a custom PropertySourceFactory. After that, we presented how to pass this custom implementation to the @PropertySource using its factory attribute.

Consequently, we were able to successfully load the YAML properties file into our Spring Boot application.

As usual, all the code examples are available over on GitHub.

CQRS and Event Sourcing in Java

$
0
0

1. Introduction

In this tutorial, we'll explore the basic concepts of Command Query Responsibility Segregation (CQRS) and Event Sourcing design patterns.

While often cited as complementary patterns, we'll try to understand them separately and finally see how they complement each other. There are several tools and frameworks to help adopt these patterns, but we'll create a simple application in Java to understand the basics.

2. Basic Concepts

We'll first understand these patterns theoretically before we attempt to implement them. Also, as they stand as individual patterns quite well, we'll try to understand without mixing them.

Please note that these patterns are often used together in an enterprise application. In this regard, they also benefit from several other enterprise architecture patterns. We'll discuss some of them as we go along.

2.1. Event Sourcing

Event Sourcing gives us a new way of persisting application state as an ordered sequence of events. We can selectively query these events and reconstruct the state of the application at any point in time. Of course, to make this work, we need to reimage every change to the state of the application as events:

These events here are facts that have happened and can not be altered — in other words, they must be immutable. Recreating the application state is just a matter of replaying all the events.

Note that this also opens up the possibility to replay events selectively, replay some events in reverse, and much more. As a consequence, we can treat the application state itself as a secondary citizen, with the event log as our primary source of truth.

2.2. CQRS

Put simply, CQRS is about segregating the command and query side of the application architecture. CQRS is based on the Command Query Separation (CQS) principle which was suggested by Bertrand Meyer. CQS suggests that we divide the operations on domain objects into two distinct categories: Queries and Commands:

Queries return a result and do not change the observable state of a system. Commands change the state of the system but do not necessarily return a value.

We achieve this by cleanly separating the Command and Query sides of the domain model. We can take a step further, splitting the write and read side of the data store as well, of course, by introducing a mechanism to keep them in sync.

3. A Simple Application

We'll begin by describing a simple application in Java that builds a domain model.

The application will offer CRUD operations on the domain model and will also feature a persistence for the domain objects. CRUD stands for Create, Read, Update, and Delete, which are basic operations that we can perform on a domain object.

We'll use the same application to introduce Event Sourcing and CQRS in later sections.

In the process, we'll leverage some of the concepts from Domain-Driven Design (DDD) in our example.

DDD addresses the analysis and design of software that relies on complex domain-specific knowledge. It builds upon the idea that software systems need to be based on a well-developed model of a domain. DDD was first prescribed by Eric Evans as a catalog of patterns. We'll be using some of these patterns to build our example.

3.1. Application Overview

Creating a user profile and managing it is a typical requirement in many applications. We'll define a simple domain model capturing the user profile along with a persistence:

As we can see, our domain model is normalized and exposes several CRUD operations. These operations are just for demonstration and can be simple or complex depending upon the requirements. Moreover, the persistence repository here can be in-memory or use a database instead.

3.2. Application Implementation

First, we'll have to create Java classes representing our domain model. This is a fairly simple domain model and may not even require the complexities of design patterns like Event Sourcing and CQRS. However, we'll keep this simple to focus on understanding the basics:

public class User {
private String userid;
    private String firstName;
    private String lastName;
    private Set<Contact> contacts;
    private Set<Address> addresses;
    // getters and setters
}

public class Contact {
    private String type;
    private String detail;
    // getters and setters
}

public class Address {
    private String city;
    private String state;
    private String postcode;
    // getters and setters
}

Also, we'll define a simple in-memory repository for the persistence of our application state. Of course, this does not add any value but suffices for our demonstration later:

public class UserRepository {
    private Map<String, User> store = new HashMap<>();
}

Now, we'll define a service to expose typical CRUD operations on our domain model:

public class UserService {
    private UserRepository repository;
    public UserService(UserRepository repository) {
        this.repository = repository;
    }

    public void createUser(String userId, String firstName, String lastName) {
        User user = new User(userId, firstName, lastName);
        repository.addUser(userId, user);
    }

    public void updateUser(String userId, Set<Contact> contacts, Set<Address> addresses) {
        User user = repository.getUser(userId);
        user.setContacts(contacts);
        user.setAddresses(addresses);
        repository.addUser(userId, user);
    }

    public Set<Contact> getContactByType(String userId, String contactType) {
        User user = repository.getUser(userId);
        Set<Contact> contacts = user.getContacts();
        return contacts.stream()
          .filter(c -> c.getType().equals(contactType))
          .collect(Collectors.toSet());
    }

    public Set<Address> getAddressByRegion(String userId, String state) {
        User user = repository.getUser(userId);
        Set<Address> addresses = user.getAddresses();
        return addresses.stream()
          .filter(a -> a.getState().equals(state))
          .collect(Collectors.toSet());
    }
}

That's pretty much what we have to do to set up our simple application. This is far from being production-ready code, but it exposes some of the important points that we're going to deliberate on later in this tutorial.

3.3. Problems in This Application

Before we proceed any further in our discussion with Event Sourcing and CQRS, it's worthwhile to discuss the problems with the current solution. After all, we'll be addressing the same problems by applying these patterns!

Out of many problems that we may notice here, we'll just like to focus on two of them:

  • Domain Model: The read and write operations are happening over the same domain model. While this is not a problem for a simple domain model like this, it may worsen as the domain model gets complex. We may need to optimize our domain model and the underlying storage for them to suit the individual needs of the read and write operations.
  • Persistence: The persistence we have for our domain objects stores only the latest state of the domain model. While this is sufficient for most situations, it makes some tasks challenging. For instance, if we have to perform a historical audit of how the domain object has changed state, it's not possible here. We have to supplement our solution with some audit logs to achieve this.

4. Introducing CQRS

We'll begin addressing the first problem we discussed in the last section by introducing the CQRS pattern in our application. As part of this, we'll separate the domain model and its persistence to handle write and read operations. Let's see how CQRS pattern restructures our application:

The diagram here explains how we intend to cleanly separate our application architecture to write and read sides. However, we have introduced quite a few new components here that we must understand better. Please note that these are not strictly related to CQRS, but CQRS greatly benefits from them:

  • Aggregate/Aggregator:

Aggregate is a pattern described in Domain-Driven Design (DDD) that logically groups different entities by binding entities to an aggregate root. The aggregate pattern provides transactional consistency between the entities.

CQRS naturally benefits from the aggregate pattern, which groups the write domain model, providing transactional guarantees. Aggregates normally hold a cached state for better performance but can work perfectly without it.

  • Projection/Projector:

Projection is another important pattern which greatly benefits CQRS. Projection essentially means representing domain objects in different shapes and structures.

These projections of original data are read-only and highly optimized to provide an enhanced read experience. We may again decide to cache projections for better performance, but that's not a necessity.

4.1. Implementing Write Side of Application

Let's first implement the write side of the application.

We'll begin by defining the required commands. A command is an intent to mutate the state of the domain model. Whether it succeeds or not depends on the business rules that we configure.

Let's see our commands:

public class CreateUserCommand {
    private String userId;
    private String firstName;
    private String lastName;
}

public class UpdateUserCommand {
    private String userId;
    private Set<Address> addresses;
    private Set<Contact> contacts;
}

These are pretty simple classes that hold the data we intend to mutate.

Next, we define an aggregate that's responsible for taking commands and handling them. Aggregates may accept or reject a command:

public class UserAggregate {
    private UserWriteRepository writeRepository;
    public UserAggregate(UserWriteRepository repository) {
        this.writeRepository = repository;
    }

    public User handleCreateUserCommand(CreateUserCommand command) {
        User user = new User(command.getUserId(), command.getFirstName(), command.getLastName());
        writeRepository.addUser(user.getUserid(), user);
        return user;
    }

    public User handleUpdateUserCommand(UpdateUserCommand command) {
        User user = writeRepository.getUser(command.getUserId());
        user.setAddresses(command.getAddresses());
        user.setContacts(command.getContacts());
        writeRepository.addUser(user.getUserid(), user);
        return user;
    }
}

The aggregate uses a repository to retrieve the current state and persist any changes to it. Moreover, it may store the current state locally to avoid the round-trip cost to a repository while processing every command.

Finally, we need a repository to hold the state of the domain model. This will typically be a database or other durable store, but here we'll simply replace them with an in-memory data structure:

public class UserWriteRepository {
    private Map<String, User> store = new HashMap<>();
    // accessors and mutators
}

This concludes the write side of our application.

4.2. Implementing Read Side of Application

Let's switch over to the read side of the application now. We'll begin by defining the read side of the domain model:

public class UserAddress {
    private Map<String, Set<Address>> addressByRegion = new HashMap<>();
}

public class UserContact {
    private Map<String, Set<Contact>> contactByType = new HashMap<>();
}

If we recall our read operations, it's not difficult to see that these classes map perfectly well to handle them. That is the beauty of creating a domain model centered around queries we have.

Next, we'll define the read repository. Again, we'll just use an in-memory data structure, even though this will be a more durable data store in real applications:

public class UserReadRepository {
    private Map<String, UserAddress> userAddress = new HashMap<>();
    private Map<String, UserContact> userContact = new HashMap<>();
    // accessors and mutators
}

Now, we'll define the required queries we have to support. A query is an intent to get data — it may not necessarily result in data.

Let's see our queries:

public class ContactByTypeQuery {
    private String userId;
    private String contactType;
}

public class AddressByRegionQuery {
    private String userId;
    private String state;
}

Again, these are simple Java classes holding the data to define a query.

What we need now is a projection that can handle these queries:

public class UserProjection {
    private UserReadRepository readRepository;
    public UserProjection(UserReadRepository readRepository) {
        this.readRepository = readRepository;
    }

    public Set<Contact> handle(ContactByTypeQuery query) {
        UserContact userContact = readRepository.getUserContact(query.getUserId());
        return userContact.getContactByType()
          .get(query.getContactType());
    }

    public Set<Address> handle(AddressByRegionQuery query) {
        UserAddress userAddress = readRepository.getUserAddress(query.getUserId());
        return userAddress.getAddressByRegion()
          .get(query.getState());
    }
}

The projection here uses the read repository we defined earlier to address the queries we have. This pretty much concludes the read side of our application as well.

4.3. Synchronizing Read and Write Data

One piece of this puzzle is still unsolved: there's nothing to synchronize our write and read repositories.

This is where we'll need something known as a projector. A projector has the logic to project the write domain model into the read domain model.

There are much more sophisticated ways to handle this, but we'll keep it relatively simple:

public class UserProjector {
    UserReadRepository readRepository = new UserReadRepository();
    public UserProjector(UserReadRepository readRepository) {
        this.readRepository = readRepository;
    }

    public void project(User user) {
        UserContact userContact = Optional.ofNullable(
          readRepository.getUserContact(user.getUserid()))
            .orElse(new UserContact());
        Map<String, Set<Contact>> contactByType = new HashMap<>();
        for (Contact contact : user.getContacts()) {
            Set<Contact> contacts = Optional.ofNullable(
              contactByType.get(contact.getType()))
                .orElse(new HashSet<>());
            contacts.add(contact);
            contactByType.put(contact.getType(), contacts);
        }
        userContact.setContactByType(contactByType);
        readRepository.addUserContact(user.getUserid(), userContact);

        UserAddress userAddress = Optional.ofNullable(
          readRepository.getUserAddress(user.getUserid()))
            .orElse(new UserAddress());
        Map<String, Set<Address>> addressByRegion = new HashMap<>();
        for (Address address : user.getAddresses()) {
            Set<Address> addresses = Optional.ofNullable(
              addressByRegion.get(address.getState()))
                .orElse(new HashSet<>());
            addresses.add(address);
            addressByRegion.put(address.getState(), addresses);
        }
        userAddress.setAddressByRegion(addressByRegion);
        readRepository.addUserAddress(user.getUserid(), userAddress);
    }
}

This is rather a very crude way of doing this but gives us enough insight into what is needed for CQRS to work. Moreover, it's not necessary to have the read and write repositories sitting in different physical stores. A distributed system has its own share of problems!

Please note that it's not convenient to project the current state of the write domain into different read domain models. The example we have taken here is fairly simple, hence, we do not see the problem.

However, as the write and read models get more complex, it'll get increasingly difficult to project. We can address this through event-based projection instead of state-based projection with Event Sourcing. We'll see how to achieve this later in the tutorial.

4.4. Benefits and Drawbacks of CQRS

We discussed the CQRS pattern and learned how to introduce it in a typical application. We've categorically tried to address the issue related to the rigidity of the domain model in handling both read and write.

Let's now discuss some of the other benefits that CQRS brings to an application architecture:

  • CQRS provides us a convenient way to select separate domain models appropriate for write and read operations; we don't have to create a complex domain model supporting both
  • It helps us to select repositories that are individually suited for handling the complexities of the read and write operations, like high throughput for writing and low latency for reading
  • It naturally complements event-based programming models in a distributed architecture by providing a separation of concerns as well as simpler domain models

However, this does not come for free. As is evident from this simple example, CQRS adds considerable complexity to the architecture. It may not be suitable or worth the pain in many scenarios:

  • Only a complex domain model can benefit from the added complexity of this pattern; a simple domain model can be managed without all this
  • Naturally leads to code duplication to some extent, which is an acceptable evil compared to the gain it leads us to; however, individual judgment is advised
  • Separate repositories lead to problems of consistency, and it's difficult to keep the write and read repositories in perfect sync always; we often have to settle for eventual consistency

5. Introducing Event Sourcing

Next, we'll address the second problem we discussed in our simple application. If we recall, it was related to our persistence repository.

We'll introduce Event Sourcing to address this problem. Event Sourcing dramatically changes the way we think of the application state storage.

Let's see how it changes our repository:

Here, we've structured our repository to store an ordered list of domain events. Every change to the domain object is considered an event. How coarse- or fine-grained an event should be is a matter of domain design. The important things to consider here are that events have a temporal order and are immutable.

5.1. Implementing Events and Event Store

The fundamental objects in event-driven applications are events, and event sourcing is no different. As we've seen earlier, events represent a specific change in the state of the domain model at a specific point of time. So, we'll begin by defining the base event for our simple application:

public abstract class Event {
    public final UUID id = UUID.randomUUID();
    public final Date created = new Date();
}

This just ensures that every event we generate in our application gets a unique identification and the timestamp of creation. These are necessary to process them further.

Of course, there can be several other attributes that may interest us, like an attribute to establish the provenance of an event.

Next, let's create some domain-specific events inheriting from this base event:

public class UserCreatedEvent extends Event {
    private String userId;
    private String firstName;
    private String lastName;
}

public class UserContactAddedEvent extends Event {
    private String contactType;
    private String contactDetails;
}

public class UserContactRemovedEvent extends Event {
    private String contactType;
    private String contactDetails;
}

public class UserAddressAddedEvent extends Event {
    private String city;
    private String state;
    private String postCode;
}

public class UserAddressRemovedEvent extends Event {
    private String city;
    private String state;
    private String postCode;
}

These are simple POJOs in Java containing the details of the domain event. However, the important thing to note here is the granularity of events.

We could've created a single event for user updates, but instead, we decided to create separate events for addition and removal of address and contact. The choice is mapped to what makes it more efficient to work with the domain model.

Now, naturally, we need a repository to hold our domain events:

public class EventStore {
    private Map<String, List<Event>> store = new HashMap<>();
}

This is a simple in-memory data structure to hold our domain events. In reality, there are several solutions specially created to handle event data like Apache Druid. There are many general-purpose distributed data stores capable of handling event sourcing including Kafka and Cassandra.

5.2. Generating and Consuming Events

So, now our service that handled all CRUD operations will change. Now, instead of updating a moving domain state, it will append domain events. It will also use the same domain events to respond to queries.

Let's see how we can achieve this:

public class UserService {
    private EventStore repository;
    public UserService(EventStore repository) {
        this.repository = repository;
    }

    public void createUser(String userId, String firstName, String lastName) {
        repository.addEvent(userId, new UserCreatedEvent(userId, firstName, lastName));
    }

    public void updateUser(String userId, Set<Contact> contacts, Set<Address> addresses) {
        User user = UserUtility.recreateUserState(repository, userId);
        user.getContacts().stream()
          .filter(c -> !contacts.contains(c))
          .forEach(c -> repository.addEvent(
            userId, new UserContactRemovedEvent(c.getType(), c.getDetail())));
        contacts.stream()
          .filter(c -> !user.getContacts().contains(c))
          .forEach(c -> repository.addEvent(
            userId, new UserContactAddedEvent(c.getType(), c.getDetail())));
        user.getAddresses().stream()
          .filter(a -> !addresses.contains(a))
          .forEach(a -> repository.addEvent(
            userId, new UserAddressRemovedEvent(a.getCity(), a.getState(), a.getPostcode())));
        addresses.stream()
          .filter(a -> !user.getAddresses().contains(a))
          .forEach(a -> repository.addEvent(
            userId, new UserAddressAddedEvent(a.getCity(), a.getState(), a.getPostcode())));
    }

    public Set<Contact> getContactByType(String userId, String contactType) {
        User user = UserUtility.recreateUserState(repository, userId);
        return user.getContacts().stream()
          .filter(c -> c.getType().equals(contactType))
          .collect(Collectors.toSet());
    }

    public Set<Address> getAddressByRegion(String userId, String state) throws Exception {
        User user = UserUtility.recreateUserState(repository, userId);
        return user.getAddresses().stream()
          .filter(a -> a.getState().equals(state))
          .collect(Collectors.toSet());
    }
}

Please note that we're generating several events as part of handling the update user operation here. Also, it's interesting to note how we are generating the current state of the domain model by replaying all the domain events generated so far.

Of course, in a real application, this is not a feasible strategy, and we'll have to maintain a local cache to avoid generating the state every time. There are other strategies like snapshots and roll-up in the event repository that can speed up the process.

This concludes our effort to introduce event sourcing in our simple application.

5.3. Benefits and Drawbacks of Event Sourcing

Now we've successfully adopted an alternate way of storing domain objects using event sourcing. Event sourcing is a powerful pattern and brings a lot of benefits to an application architecture if used appropriately:

  • Makes write operations much faster as there is no read, update, and write required; write is merely appending an event to a log
  • Removes the object-relational impedance and, hence, the need for complex mapping tools; of course, we still need to recreate the objects back
  • Happens to provide an audit log as a by-product, which is completely reliable; we can debug exactly how the state of a domain model has changed
  • It makes it possible to support temporal queries and achieve time-travel (the domain state at a point in the past)!
  • It's a natural fit for designing loosely coupled components in a microservices architecture that communicate asynchronously by exchanging messages

However, as always, even event sourcing is not a silver bullet. It does force us to adopt a dramatically different way to store data. This may not prove to be useful in several cases:

  • There's a learning curve associated and a shift in mindset required to adopt event sourcing; it's not intuitive, to begin with
  • It makes it rather difficult to handle typical queries as we need to recreate the state unless we keep the state in the local cache
  • Although it can be applied to any domain model, it's more appropriate for the event-based model in an event-driven architecture

6. CQRS with Event Sourcing

Now that we have seen how to individually introduce Event Sourcing and CQRS to our simple application, it's time to bring them together. It should be fairly intuitive now that these patterns can greatly benefit from each other. However, we'll make it more explicit in this section.

Let's first see how the application architecture brings them together:

This should not be any surprise by now. We've replaced the write side of the repository to be an event store, while the read side of the repository continues to be the same.

Please note that this is not the only way to use Event Sourcing and CQRS in the application architecture. We can be quite innovative and use these patterns together with other patterns and come up with several architecture options.

What's important here is to ensure that we use them to manage the complexity, not to simply increase the complexities further!

6.1. Bringing CQRS and Event Sourcing Together

Having implemented Event Sourcing and CQRS individually, it should not be that difficult to understand how we can bring them together.

We'll begin with the application where we introduced CQRS and just make relevant changes to bring event sourcing into the fold. We'll also leverage the same events and event store that we defined in our application where we introduced event sourcing.

There are just a few changes. We'll begin by changing the aggregate to generate events instead of updating state:

public class UserAggregate {
    private EventStore writeRepository;
    public UserAggregate(EventStore repository) {
        this.writeRepository = repository;
    }

    public List<Event> handleCreateUserCommand(CreateUserCommand command) {
        UserCreatedEvent event = new UserCreatedEvent(command.getUserId(), 
          command.getFirstName(), command.getLastName());
        writeRepository.addEvent(command.getUserId(), event);
        return Arrays.asList(event);
    }

    public List<Event> handleUpdateUserCommand(UpdateUserCommand command) {
        User user = UserUtility.recreateUserState(writeRepository, command.getUserId());
        List<Event> events = new ArrayList<>();

        List<Contact> contactsToRemove = user.getContacts().stream()
          .filter(c -> !command.getContacts().contains(c))
          .collect(Collectors.toList());
        for (Contact contact : contactsToRemove) {
            UserContactRemovedEvent contactRemovedEvent = new UserContactRemovedEvent(contact.getType(), 
              contact.getDetail());
            events.add(contactRemovedEvent);
            writeRepository.addEvent(command.getUserId(), contactRemovedEvent);
        }
        List<Contact> contactsToAdd = command.getContacts().stream()
          .filter(c -> !user.getContacts().contains(c))
          .collect(Collectors.toList());
        for (Contact contact : contactsToAdd) {
            UserContactAddedEvent contactAddedEvent = new UserContactAddedEvent(contact.getType(), 
              contact.getDetail());
            events.add(contactAddedEvent);
            writeRepository.addEvent(command.getUserId(), contactAddedEvent);
        }

        // similarly process addressesToRemove
        // similarly process addressesToAdd

        return events;
    }
}

The only other change required is in the projector, which now needs to process events instead of domain object states:

public class UserProjector {
    UserReadRepository readRepository = new UserReadRepository();
    public UserProjector(UserReadRepository readRepository) {
        this.readRepository = readRepository;
    }

    public void project(String userId, List<Event> events) {
        for (Event event : events) {
            if (event instanceof UserAddressAddedEvent)
                apply(userId, (UserAddressAddedEvent) event);
            if (event instanceof UserAddressRemovedEvent)
                apply(userId, (UserAddressRemovedEvent) event);
            if (event instanceof UserContactAddedEvent)
                apply(userId, (UserContactAddedEvent) event);
            if (event instanceof UserContactRemovedEvent)
                apply(userId, (UserContactRemovedEvent) event);
        }
    }

    public void apply(String userId, UserAddressAddedEvent event) {
        Address address = new Address(
          event.getCity(), event.getState(), event.getPostCode());
        UserAddress userAddress = Optional.ofNullable(
          readRepository.getUserAddress(userId))
            .orElse(new UserAddress());
        Set<Address> addresses = Optional.ofNullable(userAddress.getAddressByRegion()
          .get(address.getState()))
          .orElse(new HashSet<>());
        addresses.add(address);
        userAddress.getAddressByRegion()
          .put(address.getState(), addresses);
        readRepository.addUserAddress(userId, userAddress);
    }

    public void apply(String userId, UserAddressRemovedEvent event) {
        Address address = new Address(
          event.getCity(), event.getState(), event.getPostCode());
        UserAddress userAddress = readRepository.getUserAddress(userId);
        if (userAddress != null) {
            Set<Address> addresses = userAddress.getAddressByRegion()
              .get(address.getState());
            if (addresses != null)
                addresses.remove(address);
            readRepository.addUserAddress(userId, userAddress);
        }
    }

    public void apply(String userId, UserContactAddedEvent event) {
        // Similarly handle UserContactAddedEvent event
    }

    public void apply(String userId, UserContactRemovedEvent event) {
        // Similarly handle UserContactRemovedEvent event
    }
}

If we recall the problems we discussed while handling state-based projection, this is a potential solution to that.

The event-based projection is rather convenient and easier to implement. All we have to do is process all occurring domain events and apply them to all read domain models. Typically, in an event-based application, the projector would listen to domain events it's interested in and would not rely on someone calling it directly.

This is pretty much all we have to do to bring Event Sourcing and CQRS together in our simple application.

7. Conclusion

In this tutorial, we discussed the basics of Event Sourcing and CQRS design patterns. We developed a simple application and applied these patterns individually to it.

In the process, we understood the advantages they bring and the drawbacks they present. Finally, we understood why and how to incorporate both of these patterns together in our application.

The simple application we've discussed in this tutorial does not even come close to justifying the need for CQRS and Event Sourcing. Our focus was to understand the basic concepts, hence, the example was trivial. But as mentioned before, the benefit of these patterns can only be realized in applications that have a reasonably complex domain model.

As usual, the source code for this article can be found over on GitHub.

Introduction to Exchanger in Java

$
0
0

1. Overview

In this tutorial, we'll look into java.util.concurrent.Exchanger<T>. This works as a common point for two threads in Java to exchange objects between them.

2. Introduction to Exchanger

The Exchanger class in Java can be used to share objects between two threads of type T. The class provides only a single overloaded method exchange(T t).

When invoked exchange waits for the other thread in the pair to call it as well. At this point, the second thread finds the first thread is waiting with its object. The thread exchanges the objects they are holding and signals the exchange, and now they can return.

Let's look into an example to understand message exchange between two threads with Exchanger:

@Test
public void givenThreads_whenMessageExchanged_thenCorrect() {
    Exchanger<String> exchanger = new Exchanger<>();

    Runnable taskA = () -> {
        try {
            String message = exchanger.exchange("from A");
            assertEquals("from B", message);
        } catch (InterruptedException e) {
            Thread.currentThread.interupt();
            throw new RuntimeException(e);
        }
    };

    Runnable taskB = () -> {
        try {
            String message = exchanger.exchange("from B");
            assertEquals("from A", message);
        } catch (InterruptedException e) {
            Thread.currentThread.interupt();
            throw new RuntimeException(e);
        }
    };
    CompletableFuture.allOf(
      runAsync(taskA), runAsync(taskB)).join();
}

Here, we have the two threads exchanging messages between each other using the common exchanger. Let's see an example where we exchange an object from the main thread with a new thread:

@Test
public void givenThread_WhenExchangedMessage_thenCorrect() throws InterruptedException {
    Exchanger<String> exchanger = new Exchanger<>();

    Runnable runner = () -> {
        try {
            String message = exchanger.exchange("from runner");
            assertEquals("to runner", message);
        } catch (InterruptedException e) {
            Thread.currentThread.interupt();
            throw new RuntimeException(e);
        }
    };
    CompletableFuture<Void> result 
      = CompletableFuture.runAsync(runner);
    String msg = exchanger.exchange("to runner");
    assertEquals("from runner", msg);
    result.join();
}

Note that, we need to start the runner thread first and later call exchange() in the main thread.

Also, note that the first thread's call may timeout if the second thread does not reach the exchange point in time. How long the first thread should wait can be controlled using the overloaded exchange(T t, long timeout, TimeUnit timeUnit).

3. No GC Data Exchange

Exchanger could be used to create pipeline kind of patterns with passing data from one thread to the other. In this section, we'll create a simple stack of threads continuously pass data between each other as a pipeline.

@Test
public void givenData_whenPassedThrough_thenCorrect() throws InterruptedException {

    Exchanger<Queue<String>> readerExchanger = new Exchanger<>();
    Exchanger<Queue<String>> writerExchanger = new Exchanger<>();

    Runnable reader = () -> {
        Queue<String> readerBuffer = new ConcurrentLinkedQueue<>();
        while (true) {
            readerBuffer.add(UUID.randomUUID().toString());
            if (readerBuffer.size() >= BUFFER_SIZE) {
                readerBuffer = readerExchanger.exchange(readerBuffer);
            }
        }
    };

    Runnable processor = () -> {
        Queue<String> processorBuffer = new ConcurrentLinkedQueue<>();
        Queue<String> writerBuffer = new ConcurrentLinkedQueue<>();
        processorBuffer = readerExchanger.exchange(processorBuffer);
        while (true) {
            writerBuffer.add(processorBuffer.poll());
            if (processorBuffer.isEmpty()) {
                processorBuffer = readerExchanger.exchange(processorBuffer);
                writerBuffer = writerExchanger.exchange(writerBuffer);
            }
        }
    };

    Runnable writer = () -> {
        Queue<String> writerBuffer = new ConcurrentLinkedQueue<>();
        writerBuffer = writerExchanger.exchange(writerBuffer);
        while (true) {
            System.out.println(writerBuffer.poll());
            if (writerBuffer.isEmpty()) {
                writerBuffer = writerExchanger.exchange(writerBuffer);
            }
        }
    };
    CompletableFuture.allOf(
      runAsync(reader), 
      runAsync(processor),
      runAsync(writer)).join();
}

Here, we have three threads: reader, processor, and writer. Together, they work as a single pipeline exchanging data between them.

The readerExchanger is shared between the reader and the processor thread, while the writerExchanger is shared between the processor and the writer thread.

Note that the example here is only for demonstration. We must be careful while creating infinite loops with while(true). Also to keep the code readable, we've omitted some exceptions handling.

This pattern of exchanging data while reusing the buffer allows having less garbage collection. The exchange method returns the same queue instances and thus there would be no GC for these objects. Unlike any blocking queue, the exchanger does not create any nodes or objects to hold and share data.

Creating such a pipeline is similar to the Disrupter pattern, with a key difference, the Disrupter pattern supports multiple producers and consumers, while an exchanger could be used between a pair of consumers and producers.

4.Conclusion

So, we have learned what Exchanger<T> is in Java, how it works, and we have seen how to use the Exchanger class. Also, we created a pipeline and demonstrated GC-less data exchange between threads.

As always, the code is available over on GitHub.


LinkedBlockingQueue vs ConcurrentLinkedQueue

$
0
0

1. Introduction

LinkedBlockingQueue and ConcurrentLinkedQueue are the two most frequently used concurrent queues in Java. Although both queues are often used as a concurrent data structure, there are subtle characteristics and behavioural differences between them.

In this short tutorial, we'll discuss both of these queues and explain their similarities and differences.

2. LinkedBlockingQueue

The LinkedBlockingQueue is an optionally-bounded blocking queue implementation, meaning that the queue size can be specified if needed.

Let's create a LinkedBlockingQueue which can contain up to 100 elements:

BlockingQueue<Integer> boundedQueue = new LinkedBlockingQueue<>(100);

We can also create an unbounded LinkedBlockingQueue just by not specifying the size:

BlockingQueue<Integer> unboundedQueue = new LinkedBlockingQueue<>();

An unbounded queue implies that the size of the queue is not specified while creating. Therefore, the queue can grow dynamically as elements are added to it. However, if there is no memory left, then the queue throws a java.lang.OutOfMemoryError.

We can create a LinkedBlockingQueue from an existing collection as well:

Collection<Integer> listOfNumbers = Arrays.asList(1,2,3,4,5);
BlockingQueue<Integer> queue = new LinkedBlockingQueue<>(listOfNumbers);

The LinkedBlockingQueue class implements the BlockingQueue interface, which provides the blocking nature to it.

A blocking queue indicates that the queue blocks the accessing thread if it is full (when the queue is bounded) or becomes empty. If the queue is full, then adding a new element will block the accessing thread unless there is space available for the new element. Similarly, if the queue is empty, then accessing an element blocks the calling thread:

ExecutorService executorService = Executors.newFixedThreadPool(1);
LinkedBlockingQueue<Integer> queue = new LinkedBlockingQueue<>();
executorService.submit(() -> {
  try {
    queue.take();
  } 
  catch (InterruptedException e) {
    // exception handling
  }
});

In the above code snippet, we are accessing an empty queue. Therefore, the take method blocks the calling thread.

The blocking feature of the LinkedBlockingQueue is associated with some cost. This cost is because every put or the take operation is lock contended between the producer or the consumer threads. Therefore, in scenarios with many producers and consumers, put and take actions could be slower.

3. ConcurrentLinkedQueue

A ConcurrentLinkedQueue is an unbounded, thread-safe, and non-blocking queue.

Let's create an empty ConcurrentLinkedQueue:

ConcurrentLinkedQueue queue = new ConcurrentLinkedQueue();

We can create a ConcurrentLinkedQueue from an existing collection as well:

Collection<Integer> listOfNumbers = Arrays.asList(1,2,3,4,5);
ConcurrentLinkedQueue<Integer> queue = new ConcurrentLinkedQueue<>(listOfNumbers);

Unlike a LinkedBlockingQueue, a ConcurrentLinkedQueue is a non-blocking queue. Thus, it does not block a thread once the queue is empty. Instead, it returns null. Since its unbounded, it'll throw a java.lang.OutOfMemoryError if there's no extra memory to add new elements.

Apart from being non-blocking, a ConcurrentLinkedQueue has additional functionality.

In any producer-consumer scenario, consumers will not content with producers; however, multiple producers will contend with one another:

int element = 1;
ExecutorService executorService = Executors.newFixedThreadPool(2);
ConcurrentLinkedQueue<Integer> queue = new ConcurrentLinkedQueue<>();

Runnable offerTask = () -> queue.offer(element);

Callable<Integer> pollTask = () -> {
  while (queue.peek() != null) {
    return queue.poll().intValue();
  }
  return null;
};

executorService.submit(offerTask);
Future<Integer> returnedElement = executorService.submit(pollTask);
assertThat(returnedElement.get().intValue(), is(equalTo(element)));

The first task, offerTask, adds an element to the queue, and the second task, pollTask, retrieve an element from the queue. The poll task additionally checks the queue for an element first as ConcurrentLinkedQueue is non-blocking and can return a null value.

4. Similarities

Both LinkedBlockingQueue and the ConcurrentLinkedQueue are queue implementations and share some common characteristics. Let's discuss the similarities of these two queues:

  1. Both implements the Queue Interface
  2. They both use linked nodes to store their elements
  3. Both are suitable for concurrent access scenarios

5. Differences

Although both of these queues have certain similarities, there are substantial characteristics differences, too:

Feature LinkedBlockingQueue ConcurrentLinkedQueue
Blocking Nature It is a blocking queue and implements the BlockingQueue interface It is a non-blocking queue and does not implement the BlockingQueue interface
Queue Size It is an optionally bounded queue, which means there are provisions to define the queue size during creation It is an unbounded queue, and there is no provision to specify the queue size during creation
Locking Nature It is a lock-based queue It is a lock-free queue
Algorithm It implements its locking based on two-lock queue algorithm It relies on the Michael & Scott algorithm for non-blocking, lock-free queues
Implementation In the two-lock queue algorithm mechanism, LinkedBlockingQueue uses two different locks – the putLock and the takeLock. The put/take operations uses the first lock type, and the take/poll operations use the other lock type It uses CAS (Compare-And-Swap) for its operations
Blocking Behavior It is a blocking queue. So, it blocks the accessing threads when the queue is empty It does not block the accessing thread when the queue is empty and returns null

6. Conclusion

In this article, we learned about LinkedBlockingQueue and ConcurrentLinkedQueue.

First, we individually discussed these two queue implementations and some of their characteristics. Then, we saw the similarities between these two queue implementations. Finally, we explored the differences between these two queue implementations.

As always, the source code of the examples is available over on GitHub.

Spring REST Docs vs OpenAPI

$
0
0

1. Overview

Spring REST Docs and OpenAPI 3.0 are two ways to create API documentation for a REST API.

In this tutorial, we'll examine their relative advantages and disadvantages.

2. A Brief Summary of Origins

Spring REST Docs is a framework developed by the Spring community in order to create accurate documentation for RESTful APIs. It takes a test-driven approach, wherein the documentation is written either as Spring MVC tests, Spring Webflux's WebTestClient, or REST-Assured.

The output of running the tests is created as AsciiDoc files which can be put together using Asciidoctor to generate an HTML page describing our APIs. Since it follows the TDD method, Spring REST Docs automatically brings in all its advantages such as less error-prone code, reduced rework, and faster feedback cycles, to name a few.

OpenAPI, on the other hand, is a specification born out of Swagger 2.0. Its latest version as of writing this is 3.0 and has many known implementations.

As any other specification would, OpenAPI lays out certain ground rules for its implementations to follow. Simply put, all OpenAPI implementations are supposed to produce the documentation as a JSON object, either in JSON or YAML format.

There also exist many tools that take this JSON/YAML in and spit out a UI to visualize and navigate the API. This comes in handy during acceptance testing, for example. In our code samples here, we'll be using springdoc – a library for OpenAPI 3 with Spring Boot.

Before looking at the two in detail, let's quickly set up an API to be documented.

3. The REST API

Let's put together a basic CRUD API using Spring Boot.

3.1. The Repository

Here, the repository that we'll be using is a bare-bones PagingAndSortingRepository interface, with the model Foo:

@Repository
public interface FooRepository extends PagingAndSortingRepository<Foo, Long>{}

@Entity
public class Foo {
    @Id
    @GeneratedValue(strategy = GenerationType.IDENTITY)
    private long id;
    
    @Column(nullable = false)
    private String title;
  
    @Column()
    private String body;

    // constructor, getters and setters
}

We'll also load the repository using a schema.sql and a data.sql.

3.2. The Controller

Next, let's look at the controller, skipping its implementation details for brevity:

@RestController
@RequestMapping("/foo")
public class FooController {

    @Autowired
    FooRepository repository;

    @GetMapping
    public ResponseEntity<List<Foo>> getAllFoos() {
        // implementation
    }

    @GetMapping(value = "{id}")
    public ResponseEntity<Foo> getFooById(@PathVariable("id") Long id) {
        // implementation
    }

    @PostMapping
    public ResponseEntity<Foo> addFoo(@RequestBody @Valid Foo foo) {
        // implementation
    }

    @DeleteMapping("/{id}")
    public ResponseEntity<Void> deleteFoo(@PathVariable("id") long id) {
        // implementation
    }

    @PutMapping("/{id}")
    public ResponseEntity<Foo> updateFoo(@PathVariable("id") long id, @RequestBody Foo foo) {
        // implementation
    }
}

3.3. The Application

And finally, the Boot App:

@SpringBootApplication()
public class Application {
    public static void main(String[] args) {
        SpringApplication.run(Application.class, args);
    }
}

4. OpenAPI / Springdoc

Now let's see how springdoc can add documentation to our Foo REST API.

Recall that it'll generate a JSON object and a UI visualization of the API based on that object.

4.1. Basic UI

To begin with, we'll just add a couple of Maven dependencies – springdoc-openapi-data-rest for generating the JSON, and springdoc-openapi-ui for rendering the UI.

The tool will introspect the code for our API, and read the controller methods' annotations. On that basis, it'll generate the API JSON which will be live at http://localhost:8080/api-docs/. It'll also serve a basic UI at http://localhost:8080/swagger-ui-custom.html:

As we can see, without adding any code at all, we obtained a beautiful visualization of our API, right down to the Foo schema. Using the Try it out button, we can even execute the operations and view the results.

Now, what if we wanted to add some real documentation to the API? In terms of what the API is all about, what all its operations mean, what should be input, and what responses to expect?

We'll look at this in the next section.

4.2. Detailed UI

Let's first see how to add a general description to the API.

For that, we'll add an OpenAPI bean to our Boot App:

@Bean
public OpenAPI customOpenAPI(@Value("${springdoc.version}") String appVersion) {
    return new OpenAPI().info(new Info()
      .title("Foobar API")
      .version(appVersion)
      .description("This is a sample Foobar server created using springdocs - " + 
        "a library for OpenAPI 3 with spring boot.")
      .termsOfService("http://swagger.io/terms/")
      .license(new License().name("Apache 2.0")
      .url("http://springdoc.org")));
}

Next, to add some information to our API operations, we'll decorate our mappings with a few OpenAPI-specific annotations.

Let's see how we can describe getFooById. We'll do this inside another controller, FooBarController, which is similar to our FooController:

@RestController
@RequestMapping("/foobar")
@Tag(name = "foobar", description = "the foobar API with documentation annotations")
public class FooBarController {
    @Autowired
    FooRepository repository;

    @Operation(summary = "Get a foo by foo id")
    @ApiResponses(value = {
      @ApiResponse(responseCode = "200", description = "found the foo", content = { 
        @Content(mediaType = "application/json", schema = @Schema(implementation = Foo.class))}),
      @ApiResponse(responseCode = "400", description = "Invalid id supplied", content = @Content), 
      @ApiResponse(responseCode = "404", description = "Foo not found", content = @Content) })
    @GetMapping(value = "{id}")
    public ResponseEntity getFooById(@Parameter(description = "id of foo to be searched") 
      @PathVariable("id") String id) {
        // implementation omitted for brevity
    }
    // other mappings, similarly annotated with @Operation and @ApiResponses
}

Now let's see the effect on the UI:

So with these minimal configurations, the user of our API can now see what it's about, how to use it, and what results to expect. All we had to do was compile the code and run the Boot App.

5. Spring REST Docs

REST docs is a totally different take on API documentation. As described earlier, the process is test-driven, and the output is in the form of a static HTML page.

In our example here, we'll be using Spring MVC Tests to create documentation snippets.

At the outset, we'll need to add the spring-restdocs-mockmvc dependency and the asciidoc Maven plugin to our pom.

5.1. The JUnit5 Test

Now let's have a look at the JUnit5 test which includes our documentation:

@ExtendWith({ RestDocumentationExtension.class, SpringExtension.class })
@SpringBootTest(classes = Application.class)
public class SpringRestDocsIntegrationTest {
    private MockMvc mockMvc;
    
    @Autowired
    private ObjectMapper objectMapper;

    @BeforeEach
    public void setup(WebApplicationContext webApplicationContext, 
      RestDocumentationContextProvider restDocumentation) {
        this.mockMvc = MockMvcBuilders.webAppContextSetup(webApplicationContext)
          .apply(documentationConfiguration(restDocumentation))
          .build();
    }

    @Test
    public void whenGetFooById_thenSuccessful() throws Exception {
        ConstraintDescriptions desc = new ConstraintDescriptions(Foo.class);
        this.mockMvc.perform(get("/foo/{id}", 1))
          .andExpect(status().isOk())
          .andDo(document("getAFoo", preprocessRequest(prettyPrint()), 
            preprocessResponse(prettyPrint()), 
            pathParameters(parameterWithName("id").description("id of foo to be searched")),
            responseFields(fieldWithPath("id")
              .description("The id of the foo" + 
                collectionToDelimitedString(desc.descriptionsForProperty("id"), ". ")),
              fieldWithPath("title").description("The title of the foo"), 
              fieldWithPath("body").description("The body of the foo"))));
    }

    // more test methods to cover other mappings

}

After running this test, we get several files in our targets/generated-snippets directory with information about the given API operation. Particularly, whenGetFooById_thenSuccessful will give us eight adocs in a getAFoo folder in the directory.

Here's a sample http-response.adoc, of course containing the response body:

[source,http,options="nowrap"]
----
HTTP/1.1 200 OK
Content-Type: application/json
Content-Length: 60

{
  "id" : 1,
  "title" : "Foo 1",
  "body" : "Foo body 1"
}
----

5.2. fooapi.adoc

Now we need a master file that will weave all these snippets together to form a well-structured HTML.

Let's call it fooapi.adoc and see a small portion of it:

=== Accessing the foo GET
A `GET` request is used to access the foo read.

==== Request structure
include::{snippets}/getAFoo/http-request.adoc[]

==== Path Parameters
include::{snippets}/getAFoo/path-parameters.adoc[]

==== Example response
include::{snippets}/getAFoo/http-response.adoc[]

==== CURL request
include::{snippets}/getAFoo/curl-request.adoc[]

After executing the asciidoctor-maven-plugin, we get the final HTML file fooapi.html in the target/generated-docs folder.

And this is how it'll look when opened in a browser:

6. Key Takeaways

Now that we've looked at both the implementations, let's summarize the advantages and disadvantages.

With springdoc, the annotations we had to use cluttered our rest controller's code and reduced its readability. Also, the documentation was tightly coupled to the code and would make its way into production.

Needless to say, maintaining the documentation is another challenge here – if something in the API changed, would the programmer always remember to update the corresponding OpenAPI annotation?

On the other hand, REST Docs neither looks as catchy as the other UI did nor can it be used for acceptance testing. But it has its advantages.

Notably, the successful completion of the Spring MVC test not only gives us the snippets but also verifies our API as any other unit test would. This forces us to make documentation changes corresponding to API modifications if any. Also, the documentation code is completely separate from the implementation.

But again, on the flip side, we had to write more code to generate the documentation. First, the test itself which is arguably as verbose as the OpenAPI annotations, and second, the master adoc.

It also needs more steps to generate the final HTML – running the test first and then the plugin.  Springdoc only required us to run the Boot App.

7. Conclusion

In this tutorial, we looked at the differences between the OpenAPI based springdoc and Spring REST Docs. We also saw how to implement the two to generate documentation for a basic CRUD API.

In summary, both have their pros and cons, and the decision of using one over the other is subject to our specific requirements.

As always, source code is available over on GitHub.

Univocity Parsers

$
0
0

1. Introduction

In this tutorial, we'll take a quick look at Univocity Parsers, a library for parsing CSV, TSV, and fixed-width files in Java.

We'll start with the basics of reading and writing files before moving on to reading and writing files to and from Java beans. Then, we'll take a quick look at the configuration options before wrapping up.

2. Setup

To use the parsers, we need to add the latest Maven dependency to our project pom.xml file:

<dependency>
    <groupId>com.univocity</groupId>
    <artifactId>univocity-parsers</artifactId>
    <version>2.8.4</version>
</dependency>

3. Basic Usage

3.1. Reading

In Univocity, we can quickly parse an entire file into a collection of String arrays that represent each line in the file.

First, let's parse a CSV file by providing a Reader to our CSV file into a CsvParser with default settings:

try (Reader inputReader = new InputStreamReader(new FileInputStream(
  new File("src/test/resources/productList.csv")), "UTF-8")) {
    CsvParser parser = new CsvParser(new CsvParserSettings());
    List<String[]> parsedRows = parser.parseAll(inputReader);
    return parsedRows;
} catch (IOException e) {
    // handle exception
}

We can easily switch this logic to parse a TSV file by switching to TsvParser and providing it with a TSV file.

It's only slightly more complicated to process a fixed-width file. The primary difference is that we need to provide our field widths in the parser settings.

Let's read a fixed-width file by providing a FixedWidthFields object to our FixedWidthParserSettings:

try (Reader inputReader = new InputStreamReader(new FileInputStream(
  new File("src/test/resources/productList.txt")), "UTF-8")) {
    FixedWidthFields fieldLengths = new FixedWidthFields(8, 30, 10);
    FixedWidthParserSettings settings = new FixedWidthParserSettings(fieldLengths);

    FixedWidthParser parser = new FixedWidthParser(settings);
    List<String[]> parsedRows = parser.parseAll(inputReader);
    return parsedRows;
} catch (IOException e) {
    // handle exception
}

3.2. Writing

Now that we've covered reading files with the parsers, let's learn how to write them.

Writing files is very similar to reading them in that we provide a Writer along with our desired settings to the parser that matches our file type.

Let's create a method to write files in all three possible formats:

public boolean writeData(List<Object[]> products, OutputType outputType, String outputPath) {
    try (Writer outputWriter = new OutputStreamWriter(new FileOutputStream(new File(outputPath)),"UTF-8")){
        switch(outputType) {
            case CSV:
                CsvWriter writer = new CsvWriter(outputWriter, new CsvWriterSettings());
                writer.writeRowsAndClose(products);
                break;
            case TSV:
                TsvWriter writer = new TsvWriter(outputWriter, new TsvWriterSettings());
                writer.writeRowsAndClose(products);
                break;
            case FIXED_WIDTH:
                FixedWidthFields fieldLengths = new FixedWidthFields(8, 30, 10);
                FixedWidthWriterSettings settings = new FixedWidthWriterSettings(fieldLengths);
                FixedWidthWriter writer = new FixedWidthWriter(outputWriter, settings);
                writer.writeRowsAndClose(products);
                break;
            default:
                logger.warn("Invalid OutputType: " + outputType);
                return false;
        }
        return true;
    } catch (IOException e) {
        // handle exception
    }
}

As with reading files, writing CSV files and TSV files are nearly identical. For fixed-width files, we have to provide the field width to our settings.

3.3. Using Row Processors

Univocity provides a number of row processors we can use and also provides the ability for us to create our own.

To get a feel for using row processors, let's use the BatchedColumnProcessor to process a larger CSV file in batches of five rows:

try (Reader inputReader = new InputStreamReader(new FileInputStream(new File(relativePath)), "UTF-8")) {
    CsvParserSettings settings = new CsvParserSettings();
    settings.setProcessor(new BatchedColumnProcessor(5) {
        @Override
        public void batchProcessed(int rowsInThisBatch) {}
    });
    CsvParser parser = new CsvParser(settings);
    List<String[]> parsedRows = parser.parseAll(inputReader);
    return parsedRows;
} catch (IOException e) {
    // handle exception
}

To use this row processor, we define it in our CsvParserSettings and then all we have to do is call parseAll.

3.4. Reading and Writing into Java Beans

The list of String arrays is alright, but we're often working with data in Java beans. Univocity also allows for reading and writing into specially annotated Java beans.

Let's define a Product bean with the Univocity annotations:

public class Product {

    @Parsed(field = "product_no")
    private String productNumber;
    
    @Parsed
    private String description;
    
    @Parsed(field = "unit_price")
    private float unitPrice;

    // getters and setters
}

The main annotation is the @Parsed annotation.

If our column heading matches the field name, we can use @Parsed without any values specified. If our column heading differs from the field name we can specify the column heading using the field property.

Now that we've defined our Product bean, let's read our CSV file into it:

try (Reader inputReader = new InputStreamReader(new FileInputStream(
  new File("src/test/resources/productList.csv")), "UTF-8")) {
    BeanListProcessor<Product> rowProcessor = new BeanListProcessor<Product>(Product.class);
    CsvParserSettings settings = new CsvParserSettings();
    settings.setHeaderExtractionEnabled(true);
    settings.setProcessor(rowProcessor);
    CsvParser parser = new CsvParser(settings);
    parser.parse(inputReader);
    return rowProcessor.getBeans();
} catch (IOException e) {
    // handle exception
}

We first constructed a special row processor, BeanListProcessor, with our annotated class. Then, we provided that to the CsvParserSettings and used it to read in a list of Products.

Next, let's write our list of Products out to a fixed-width file:

try (Writer outputWriter = new OutputStreamWriter(new FileOutputStream(new File(outputPath)), "UTF-8")) {
    BeanWriterProcessor<Product> rowProcessor = new BeanWriterProcessor<Product>(Product.class);
    FixedWidthFields fieldLengths = new FixedWidthFields(8, 30, 10);
    FixedWidthWriterSettings settings = new FixedWidthWriterSettings(fieldLengths);
    settings.setHeaders("product_no", "description", "unit_price");
    settings.setRowWriterProcessor(rowProcessor);
    FixedWidthWriter writer = new FixedWidthWriter(outputWriter, settings);
    writer.writeHeaders();
    for (Product product : products) {
        writer.processRecord(product);
    }
    writer.close();
    return true;
} catch (IOException e) {
    // handle exception
}

The notable difference is that we're specifying our column headers in our settings.

4. Settings

Univocity has a number of settings we can apply to the parsers. As we saw earlier, we can use settings to apply a row processor to the parsers.

There are many other settings that can be changed to suit our needs. Although many of the configurations are common across the three file types, each parser also has format-specific settings.

Let's adjust our CSV parser settings to put some limits on the data we're reading:

CsvParserSettings settings = new CsvParserSettings();
settings.setMaxCharsPerColumn(100);
settings.setMaxColumns(50);
CsvParser parser = new CsvParser(new CsvParserSettings());

5. Conclusion

In this quick tutorial, we learned the basics of parsing files using the Univocity library.

We learned how to read and write files both into lists of string arrays and Java beans. Before, we got into Java beans, we took a quick look at using different row processors. Finally, we briefly touched on how to customize the settings.

As always, the source code is available over on GitHub.

An Introduction to Invoke Dynamic in the JVM

$
0
0

1. Overview

Invoke Dynamic (Also known as Indy) was part of JSR 292 intended to enhance the JVM support for dynamically typed languages. After its first release in Java 7, the invokedynamic opcode is used quite extensively by dynamic JVM-based languages like JRuby and even statically typed languages like Java.

In this tutorial, we're going to demystify invokedynamic and see how it can help library and language designers to implement many forms of dynamicity.

2. Meet Invoke Dynamic

Let's start with a simple chain of Stream API calls:

public class Main { 

    public static void main(String[] args) {
        long lengthyColors = List.of("Red", "Green", "Blue")
          .stream().filter(c -> c.length() > 3).count();
    }
}

At first, we might think that Java creates an anonymous inner class deriving from Predicate and then passes that instance to the filter method. But, we'd be wrong.

2.1. The Bytecode

To check this assumption, we can take a peek at the generated bytecode:

javap -c -p Main
// truncated
// class names are simplified for the sake of brevity 
// for instance, Stream is actually java/util/stream/Stream
0: ldc               #7             // String Red
2: ldc               #9             // String Green
4: ldc               #11            // String Blue
6: invokestatic      #13            // InterfaceMethod List.of:(LObject;LObject;)LList;
9: invokeinterface   #19,  1        // InterfaceMethod List.stream:()LStream;
14: invokedynamic    #23,  0        // InvokeDynamic #0:test:()LPredicate;
19: invokeinterface  #27,  2        // InterfaceMethod Stream.filter:(LPredicate;)LStream;
24: invokeinterface  #33,  1        // InterfaceMethod Stream.count:()J
29: lstore_1
30: return

Despite what we thought, there's no anonymous inner class and certainly, nobody is passing an instance of such a class to the filter method

Surprisingly, the invokedynamic instruction is somehow responsible for creating the Predicate instance.

2.2. Lambda Specific Methods

Additionally, the Java compiler also generated the following funny-looking static method:

private static boolean lambda$main$0(java.lang.String);
    Code:
       0: aload_0
       1: invokevirtual #37                 // Method java/lang/String.length:()I
       4: iconst_3
       5: if_icmple     12
       8: iconst_1
       9: goto          13
      12: iconst_0
      13: ireturn

This method takes a String as the input and then performs the following steps:

  • Computing the input length (invokevirtual on length)
  • Comparing the length with the constant 3 (if_icmple and iconst_3)
  • Returning false if the length is less than or equal to 3

Interestingly, this is actually equivalent of the lambda we passed to the filter method:

c -> c.length() > 3

So instead of an anonymous inner class, Java creates a special static method and somehow invokes that method via invokedynamic. 

Over the course of this article, we're going to see how this invocation works internally. But, first, let's define the problem that invokedynamic is trying to solve.

2.3. The Problem

Before Java 7, the JVM only had four method invocation types: invokevirtual to call normal class methods, invokestatic to call static methods, invokeinterface to call interface methods, and invokespecial to call constructors or private methods.

Despite their differences, all these invocations share one simple trait: They have a few predefined steps to complete each method call, and we can't enrich these steps with our custom behaviors.

There are two main workarounds for this limitation: One at compile-time and the other at runtime. The former is usually used by languages like Scala or Koltin and the latter is the solution of choice for JVM-based dynamic languages like JRuby.

The runtime approach is usually reflection-based and consequently, inefficient.

On the other hand, the compile-time solution is usually relying on code-generation at compile-time. This approach is more efficient at runtime. However, it's somewhat brittle and also may cause a slower startup time as there's more bytecode to process.

Now that we've got a better understanding of the problem, let's see how the solution works internally.

3. Under the Hood

invokedynamic lets us bootstrap the method invocation process in any way we want. That is, when the JVM sees an invokedynamic opcode for the first time, it calls a special method known as the bootstrap method to initialize the invocation process:

The bootstrap method is a normal piece of Java code that we've written to set up the invocation process. Therefore, it can contain any logic.

Once the bootstrap method completes normally, it should return an instance of CallSiteThis CallSite encapsulates the following pieces of information:

  • A pointer to the actual logic that JVM should execute. This should be represented as a MethodHandle
  • A condition representing the validity of the returned CallSite.

From now on, every time JVM sees this particular opcode again, it will skip the slow path and directly calls the underlying executable. Moreover, the JVM will continue to skip the slow path until the condition in the CallSite changes.

As opposed to the Reflection API, the JVM can completely see through MethodHandles and will try to optimize them, hence the better performance.

3.1. Bootstrap Method Table

Let's take another look at the generated invokedynamic bytecode:

14: invokedynamic #23,  0  // InvokeDynamic #0:test:()Ljava/util/function/Predicate;

This means that this particular instruction should call the first bootstrap method (#0 part) from the bootstrap method table. Also, it mentions some of the arguments to pass to the bootstrap method:

  • The test is the only abstract method in the Predicate
  • The ()Ljava/util/function/Predicate represents a method signature in the JVM – the method takes nothing as input and returns an instance of the Predicate interface

In order to see the bootstrap method table for the lambda example, we should pass -v option to javap:

javap -c -p -v Main
// truncated
// added new lines for brevity
BootstrapMethods:
  0: #55 REF_invokeStatic java/lang/invoke/LambdaMetafactory.metafactory:
    (Ljava/lang/invoke/MethodHandles$Lookup;
     Ljava/lang/String;
     Ljava/lang/invoke/MethodType;
     Ljava/lang/invoke/MethodType;
     Ljava/lang/invoke/MethodHandle;
     Ljava/lang/invoke/MethodType;)Ljava/lang/invoke/CallSite;
    Method arguments:
      #62 (Ljava/lang/Object;)Z
      #64 REF_invokeStatic Main.lambda$main$0:(Ljava/lang/String;)Z
      #67 (Ljava/lang/String;)Z

The bootstrap method for all lambdas is the metafactory static method in the LambdaMetafactory class.

Similar to all other bootstrap methods, this one takes at least three arguments as follows:

  • The Ljava/lang/invoke/MethodHandles$Lookup argument represents the lookup context for the invokedynamic
  • The Ljava/lang/String represents the method name in the call site – in this example, the method name is test
  • The Ljava/lang/invoke/MethodType is the dynamic method signature of the call site – in this case, it's ()Ljava/util/function/Predicate

In addition to these three arguments, bootstrap methods also can optionally accept one or more extra parameters. In this example, these are the extra ones:

  • The (Ljava/lang/Object;)Z is an erased method signature accepting an instance of Object and returning a boolean.
  • The REF_invokeStatic Main.lambda$main$0:(Ljava/lang/String;)Z is the MethodHandle pointing to the actual lambda logic.
  • The (Ljava/lang/String;)Z is a non-erased method signature accepting one String and returning a boolean.

Put simply, the JVM will pass all the required information to the bootstrap method. Bootstrap method will, in turn, use that information to create an appropriate instance of Predicate. Then, the JVM will pass that instance to the filter method.

3.2. Different Types of CallSites

Once the JVM sees invokedynamic in this example for the first time, it calls the bootstrap method. As of writing this article, the lambda bootstrap method will use the InnerClassLambdaMetafactory to generate an inner class for the lambda at runtime.

Then the bootstrap method encapsulates the generated inner class inside a special type of CallSite known as ConstantCallSiteThis type of CallSite would never change after setup. Therefore, after the first setup for each lambda, the JVM will always use the fast path to directly call the lambda logic.

Although this is the most efficient type of invokedynamic, it's certainly not the only available option. As a matter of fact, Java provides MutableCallSite and VolatileCallSite to accommodate for more dynamic requirements.

3.3. Advantages

So, in order to implement lambda expressions, instead of creating anonymous inner classes at compile-time, Java creates them at runtime via invokedynamic.

One might argue against deferring inner class generation until runtime. However, the invokedynamic approach has a few advantages over the simple compile-time solution.

First, the JVM does not generate the inner class until the first use of lambda. Hence, we won't pay for the extra footprint associated with the inner class before the first lambda execution.

Additionally, much of the linkage logic is moved out from the bytecode to the bootstrap method. Therefore, the invokedynamic bytecode is usually much smaller than alternative solutions. The smaller bytecode can boost startup speed.

Suppose a newer version of Java comes with a more efficient bootstrap method implementation. Then our invokedynamic bytecode can take advantage of this improvement without recompiling. This way we can achieve some sort of forward binary compatibility. Basically, we can switch between different strategies without recompilation.

Finally, writing the bootstrap and linkage logic in Java is usually easier than traversing an AST to generate a complex piece of bytecode. So, invokedynamic can be (subjectively) less brittle.

4. More Examples

Lambda expressions are not the only feature, and Java is not certainly the only language using invokedynamic. In this section, we're going to get familiar with a few other examples of dynamic invocation.

4.1. Java 14: Records

Records are a new preview feature in Java 14 providing a nice concise syntax to declare classes that are supposed to be dumb data holders.

Here's a simple record example:

public record Color(String name, int code) {}

Given this simple one-liner, Java compiler generates appropriate implementations for accessor methods, toString, equals, and hashcode. 

In order to implement toString, equals, or hashcode, Java is using invokedynamicFor instance, the bytecode for equals is as follows:

public final boolean equals(java.lang.Object);
    Code:
       0: aload_0
       1: aload_1
       2: invokedynamic #27,  0  // InvokeDynamic #0:equals:(LColor;Ljava/lang/Object;)Z
       7: ireturn

The alternative solution is to find all record fields and generate the equals logic based on those fields at compile-time. The more we have fields, the lengthier the bytecode.

On the contrary, Java calls a bootstrap method to link the appropriate implementation at runtime. Therefore, the bytecode length would remain constant regardless of the number of fields.

Looking more closely at the bytecode shows that the bootstrap method is ObjectMethods#bootstrap:

BootstrapMethods:
  0: #42 REF_invokeStatic java/lang/runtime/ObjectMethods.bootstrap:
    (Ljava/lang/invoke/MethodHandles$Lookup;
     Ljava/lang/String;
     Ljava/lang/invoke/TypeDescriptor;
     Ljava/lang/Class;
     Ljava/lang/String;
     [Ljava/lang/invoke/MethodHandle;)Ljava/lang/Object;
    Method arguments:
      #8 Color
      #49 name;code
      #51 REF_getField Color.name:Ljava/lang/String;
      #52 REF_getField Color.code:I

4.2. Java 9: String Concatenation

Prior to Java 9, non-trivial string concatenations were implemented using StringBuilder. As part of JEP 280, string concatenation is now using invokedynamic. For instance, let's concatenate a constant string with a random variable:

"random-" + ThreadLocalRandom.current().nextInt();

Here's how the bytecode looks like for this example:

0: invokestatic  #7          // Method ThreadLocalRandom.current:()LThreadLocalRandom;
3: invokevirtual #13         // Method ThreadLocalRandom.nextInt:()I
6: invokedynamic #17,  0     // InvokeDynamic #0:makeConcatWithConstants:(I)LString;

Moreover, the bootstrap methods for string concatenations are residing in the StringConcatFactory class:

BootstrapMethods:
  0: #30 REF_invokeStatic java/lang/invoke/StringConcatFactory.makeConcatWithConstants:
    (Ljava/lang/invoke/MethodHandles$Lookup;
     Ljava/lang/String;
     Ljava/lang/invoke/MethodType;
     Ljava/lang/String;
     [Ljava/lang/Object;)Ljava/lang/invoke/CallSite;
    Method arguments:
      #36 random-\u0001

5. Conclusion

In this article, first, we got familiar with the problems the indy is trying to solve.

Then, by walking through a simple lambda expression example, we saw how invokedynamic works internally.

Finally, we enumerated a few other examples of indy in recent versions of Java.

Java Weekly, Issue 334

$
0
0

1. Spring and Java

>> Switch as an expression in Java with Lambda-like syntax [blog.codeleak.pl]

A quick guide that shows how to return a value from a Java 14 switch expression.

>> Introduction to Azure Spring Cloud with IntelliJ IDEA [spring.io]

A few tools available in IntelliJ to accelerate Spring Cloud microservice development and deployment to Azure.

>> Looking at Java Records [mscharhag.com]

And a few cool use cases for the Record type, including composite map keys, and how to write a compact constructor.

Also worth reading:

Webinars and presentations:

Time to upgrade:

2. Technical

>> Kick-start your microservice project with JHipster [blog.codecentric.de]

A solid overview of JHipster, a full-fledged application scaffolding and development platform that now covers both web applications and microservice architectures.

Also worth reading:

3. Musings

>> Breaking Through Your Refactoring Rut [blog.thecodewhisperer.com]

The key involves repetitive deliberate practice and applying cognitive psychology's chunking strategy.

Also worth reading:

4. Comics

And my favorite Dilberts of the week:

>> No Interruptions At Home [dilbert.com]

>> Asok Meditates [dilbert.com]

>> No Lunch With You [dilbert.com]

5. Pick of the Week

An oldie but a goodie: 

>> Introducing Deliberate Discovery [dannorth.net]

Viewing all 4702 articles
Browse latest View live


<script src="https://jsc.adskeeper.com/r/s/rssing.com.1596347.js" async> </script>