This will work with Hibernate versions 5.4, 5.3, and 5.2.
In the event that the version of Hibernate is older, the artifactId value above will be different. For versions 5.1 and 5.0, we can use hibernate-types-51. Similarly, version 4.3 requires hibernate-types-43, and versions 4.2, and 4.1 require hibernate-types-4.
The examples in this tutorial require a database. Using Docker we've provided a database container. Therefore, we'll need a working copy of Docker.
So, to run and create our database we only need to execute:
$ ./create-database.sh
3. Supported Databases
We can use our types with Oracle, SQL Server, PostgreSQL, and MySQL databases. Therefore, the mapping of types in Java to database column types will vary depending on the database we use. In our case, we will use MySQL and map the JsonBinaryType to a JSON column type.
The data model for this tutorial will allow us to store information about albums and songs. An album has cover art and one or more songs. A song has an artist and length. The cover art has two image URLs and a UPC code. Finally, an artist has a name, a country, and a musical genre.
In the past, we'd have created tables to represent all the data in our model. But, now that we have types available to us we can very easily store some of the data as JSON instead.
For this tutorial, we'll only create tables for the albums and the songs:
public class Album extends BaseEntity {
@Type(type = "json")
@Column(columnDefinition = "json")
private CoverArt coverArt;
@OneToMany(fetch = FetchType.EAGER)
private List<Song> songs;
// other class members
}
public class Song extends BaseEntity {
private Long length = 0L;
@Type(type = "json")
@Column(columnDefinition = "json")
private Artist artist;
// other class members
}
Using the JsonStringType we'll represent the cover art and artists as JSON columns in those tables:
public class Artist implements Serializable {
private String name;
private String country;
private String genre;
// other class members
}
public class CoverArt implements Serializable {
private String frontCoverArtUrl;
private String backCoverArtUrl;
private String upcCode;
// other class members
}
It's important to note that the Artist and CoverArt classes are POJOs and not entities. Furthermore, they are members of our database entity classes, defined with the @Type(type = “json”) annotation.
4.1. Storing JSON Types
We defined our album and songs models to contain members the database will store as JSON. This is due to using the provided json type. In order to have that type available for us to use we must define it using a type definition:
@TypeDefs({
@TypeDef(name = "json", typeClass = JsonStringType.class),
@TypeDef(name = "jsonb", typeClass = JsonBinaryType.class)
})
public class BaseEntity {
// class members
}
The @Type for JsonStringType and JsonBinaryType makes the types json and jsonb available.
The latest MySQL versions support JSON as a column type. Consequently, JDBC processes any JSON read from or any object saved to a column with either of these types as a String. This means that to map to the column correctly we must use JsonStringType in our type definition.
4.2. Hibernate
Ultimately, our types will automatically translate to SQL using JDBC and Hibernate. So, now we can create a few song objects, an album object and persist them to the database. Subsequently, Hibernate generates the following SQL statements:
insert into song (name, artist, length, id) values ('A Happy Song', '{"name":"Superstar","country":"England","genre":"Pop"}', 240, 3);
insert into song (name, artist, length, id) values ('A Sad Song', '{"name":"Superstar","country":"England","genre":"Pop"}', 120, 4);
insert into song (name, artist, length, id) values ('A New Song', '{"name":"Newcomer","country":"Jamaica","genre":"Reggae"}', 300, 6)
insert into album (name, cover_art, id) values ('Album 0', '{"frontCoverArtUrl":"http://fakeurl-0","backCoverArtUrl":"http://fakeurl-1","upcCode":"b2b9b193-ee04-4cdc-be8f-3a276769ab5b"}', 7)
As expected, our json type Java objects are all translated by Hibernate and stored as well-formed JSON in our database.
5. Storing Generic Types
Besides supporting JSON based columns, the library also adds a few generics types: YearMonth, Year, and Month from the java.time package.
Now, we can map these types that are not natively supported by Hibernate or JPA. Also, we now have the ability to store them as an Integer, String, or Date column.
For example, let's say we want to add the recorded date of a song to our song model and store it as an Integer in our database. We can use the YearMonthIntegerType in our Song entity class definition:
@TypeDef(
typeClass = YearMonthIntegerType.class,
defaultForType = YearMonth.class
)
public class Song extends BaseEntity {
@Column(
name = "recorded_on",
columnDefinition = "mediumint"
)
private YearMonth recordedOn = YearMonth.now();
// other class members
}
Our recordedOn property value is translated to the typeClass we provided. As a result, a pre-defined converter will persist the value in our database as an Integer.
6. Other Utility Classes
Hibernate Types has a few helper classes that further improve the developer experience when using Hibernate.
The CamelCaseToSnakeCaseNamingStrategy maps camel-cased properties in our Java classes to snake-cased columns in our database.
The ClassImportIntegrator allows simple Java DTO class name values in JPA constructor parameters.
There are also the ListResultTransformer and the MapResultTransformer classes providing cleaner implementations of the result objects used by JPA. In addition, they support the use of lambdas and provide backward compatibility with older JPA versions.
7. Conclusion
In this tutorial, we introduced the Hibernate Types Java library and the new types it adds to Hibernate and JPA. We also looked at some of the utilities and generic types provided by the library.
The implementation of the examples and code snippets are available over on GitHub.
Comparing objects is an essential feature of object-oriented programming languages.
In this tutorial, we're going look at some of the features of the Java language that allow us to compare objects. Additionally, we'll look at such features in external libraries.
2. == and != Operators
Let's begin with the == and != operators that can tell if two Java objects are the same or not, respectively.
2.1. Primitives
For primitive types, being the same means having equal values:
assertThat(1 == 1).isTrue();
Thanks to auto-unboxing, this also works when comparing a primitive value with its wrapper type counterpart:
Integer a = new Integer(1);
assertThat(1 == a).isTrue();
If two integers have different values, the == operator would return false, while the != operator would return true.
2.2. Objects
Let's say we want to compare two Integer wrapper types with the same value:
Integer a = new Integer(1);
Integer b = new Integer(1);
assertThat(a == b).isFalse();
By comparing two objects, the value of those objects is not 1. Rather it is their memory addresses in the stack that are different since both objects were created using the new operator. If we had assigned a to b, then we would've had a different result:
Integer a = new Integer(1);
Integer b = a;
assertThat(a == b).isTrue();
Now, let's see what happens when we're using the Integer#valueOf factory method:
Integer a = Integer.valueOf(1);
Integer b = Integer.valueOf(1);
assertThat(a == b).isTrue();
In this case, they are considered the same. This is because the valueOf() method stores the Integer in a cache two avoid creating too many wrapper objects with the same value. Therefore, the method returns the same Integer instance for both calls.
Java also does this for String:
assertThat("Hello!" == "Hello!").isTrue();
However, if they were created using the new operator, then they would not be the same.
Finally, two null references are considered to be the same, while any non-null object will be considered different from null:
Of course, the behavior of the equality operators can be limiting. What if we want to compare two objects mapped to different addresses and yet having them considered equal based on their internal states? We'll see how in the next sections.
3. Object#equals Method
Now, let's talk about a broader concept of equality with the equals() method.
This method is defined in the Object class so that every Java object inherits it. By default, its implementation compares object memory addresses, so it works the same as the == operator. However, we can override this method in order to define what equality means for our objects.
First, let's see how it behaves for existing objects like Integer:
Integer a = new Integer(1);
Integer b = new Integer(1);
assertThat(a.equals(b)).isTrue();
The method still returns true when both objects are the same.
We should note that we can pass a null object as the argument of the method, but of course, not as the object we call the method upon.
We can use the equals() method with an object of our own. Let's say we have a Person class:
public class Person {
private String firstName;
private String lastName;
public Person(String firstName, String lastName) {
this.firstName = firstName;
this.lastName = lastName;
}
}
We can override the equals() method for this class so that we can compare two Persons based on their internal details:
@Override
public boolean equals(Object o) {
if (this == o) return true;
if (o == null || getClass() != o.getClass()) return false;
Person that = (Person) o;
return firstName.equals(that.firstName) &&
lastName.equals(that.lastName);
}
Let's now look at the Objects#equals static method. We mentioned earlier that we can't use null as the value of the first object otherwise a NullPointerException would be thrown.
The equals() method of the Objects helper class solves that problems. It takes two arguments and compares them, also handling null values.
Let's compare Person objects again with:
Person joe = new Person("Joe", "Portman");
Person joeAgain = new Person("Joe", "Portman");
Person natalie = new Person("Natalie", "Portman");
assertThat(Objects.equals(joe, joeAgain)).isTrue();
assertThat(Objects.equals(joe, natalie)).isFalse();
As we said, the method handles null values. Therefore, if both arguments are null it will return true, and if only one of them is null, it will return false.
This can be really handy. Let's say we want to add an optional birth date to our Person class:
However, if we add many nullable fields to our class, it can become really messy. Using the Objects#equals method in our equals() implementation is much cleaner, and improves readability:
Objects.equals(birthDate, that.birthDate);
5. Comparable Interface
Comparison logic can also be used to place objects in a specific order. The Comparable interface allows us to define an ordering between objects, by determining if an object is greater, equal, or lesser than another.
The Comparable interface is generic and has only one method, compareTo(), which takes an argument of the generic type and returns an int. The returned value is negative if this is lower than the argument, 0 if they are equal, and positive otherwise.
Let's say, in our Person class, we want to compare Person objects by their last name:
public class Person implements Comparable<Person> {
//...
@Override
public int compareTo(Person o) {
return this.lastName.compareTo(o.lastName);
}
}
The compareTo() method will return a negative int if called with a Person having a greater last name than this, zero if the same last name, and positive otherwise.
The Comparator interface is generic and has a compare method that takes two arguments of that generic type and returns an integer. We already saw that pattern earlier with the Comparable interface.
Comparator is similar; however, it's separated from the definition of the class. Therefore, we can define as many Comparators we want for a class, where we can only provide one Comparable implementation.
Let's imagine we have a web page displaying people in a table view, and we want to offer the user the possibility to sort them by first names rather than last names. It isn't possible with Comparable if we also want to keep our current implementation, but we could implement our own Comparators.
Let's create a PersonComparator that will compare them only by their first names:
Let's now sort a List of people using that Comparator:
Person joe = new Person("Joe", "Portman");
Person allan = new Person("Allan", "Dale");
List<Person> people = new ArrayList<>();
people.add(joe);
people.add(allan);
people.sort(compareByFirstNames);
assertThat(people).containsExactly(allan, joe);
There are other methods on the Comparator interface we can use in our compareTo() implementation:
@Override
public int compareTo(Person o) {
return Comparator.comparing(Person::lastName)
.thenComparing(Person::firstName)
.thenComparing(Person::birthDate, Comparator.nullsLast(Comparator.naturalOrder()))
.compare(this, o);
}
In this case, we are first comparing last names, then first names. Then, we compare birth dates but as they are nullable we must say how to handle that so we give a second argument telling they should be compared according to their natural order but with null values going last.
First, let's talk about the ObjectUtils#notEqual method. It takes two Object arguments, to determine if they are not equal, according to their own equals() method implementation. It also handles null values.
Let's reuse our String examples:
String a = new String("Hello!");
String b = new String("Hello World!");
assertThat(ObjectUtils.notEqual(a, b)).isTrue();
It should be noted that ObjectUtils has an equals() method. However, that's deprecated since Java 7, when Objects#equals appeared
7.2. ObjectUtils#compare Method
Now, let's compare object order with the ObjectUtils#compare method. It's a generic method that takes two Comparable arguments of that generic type and returns an Integer.
Let's see that using Strings again:
String first = new String("Hello!");
String second = new String("How are you?");
assertThat(ObjectUtils.compare(first, second)).isNegative();
By default, the method handles null values by considering them as greater. It offers an overloaded version that offers to invert that behavior and consider them lesser, taking a boolean argument.
Similar to the Apache Commons library, Google provides us with a method to determine if two objects are equal, Objects#equal. Though they have different implementations, they return the same results:
String a = new String("Hello!");
String b = new String("Hello!");
assertThat(Objects.equal(a, b)).isTrue();
Though it's not marked as deprecated, the JavaDoc of this method says that it should be considered as deprecated since Java 7 provides the Objects#equals method.
8.2. Comparison Methods
Now, the Guava library doesn't offer a method to compare two objects (we'll see in the next section what we can do to achieve that though), but it does provide us with methods to compare primitive values. Let's take the Ints helper class and see how its compare() method works:
assertThat(Ints.compare(1, 2)).isNegative();
As usual, it returns an integer that may be negative, zero, or positive if the first argument is lesser, equal, or greater than the second, respectively. Similar methods exist for all the primitive types, except for bytes.
8.3. ComparisonChain Class
Finally, the Guava library offers the ComparisonChain class that allows us to compare two objects through a chain of comparisons. We can easily compare two Person objects by the first and last names:
Person natalie = new Person("Natalie", "Portman");
Person joe = new Person("Joe", "Portman");
int comparisonResult = ComparisonChain.start()
.compare(natalie.lastName(), joe.lastName())
.compare(natalie.firstName(), joe.firstName())
.result();
assertThat(comparisonResult).isPositive();
The underlying comparison is achieved using the compareTo() method, so the arguments passed to the compare() methods must either be primitives or Comparables.
9. Conclusion
In this article, we looked at the different ways to compare objects in Java. We examined the difference between sameness, equality, and ordering. We also had a look at the corresponding features in the Apache Commons and Guava libraries.
As usual, the full code for this article can be found over on GitHub.
In this tutorial, we're going to get familiar with super type tokens and see how they can help us to preserve generic type information at runtime.
2. The Erasure
Sometimes we need to convey particular type information to a method. For example, here we expect from Jackson to convert the JSON byte array to a String:
byte[] data = // fetch json from somewhere
String json = objectMapper.readValue(data, String.class);
We're communicating this expectation via a literal class token, in this case, the String.class.
However, we can't set the same expectation for generic types as easily:
Java erases generic type information during compilation. Therefore, generic type parameters are merely an artifact of the source code and will be absent at runtime.
2.1. Reification
Technically speaking, the generic types are not reified in Java. In programming language's terminology, when a type is present at runtime, we say that type is reified.
The reified types in Java are as follows:
Simple primitive types such as long
Non-generic abstractions such as String or Runnable
Raw types such as List or HashMap
Generic types in which all types are unbounded wildcards such as List<?> or HashMap<?, ?>
Arrays of other reified types such as String[], int[], List[], or Map<?, ?>[]
Consequently, we can't use something like Map<String, String>.class because the Map<String, String> is not a reified type.
3. Super Type Token
As it turns out, we can take advantage of the power of anonymous inner classes in Java to preserve the type information during compile time:
public abstract class TypeReference<T> {
private final Type type;
public TypeReference() {
Type superclass = getClass().getGenericSuperclass();
type = ((ParameterizedType) superclass).getActualTypeArguments()[0];
}
public Type getType() {
return type;
}
}
This class is abstract, so we only can derive subclasses from it.
For example, we can create an anonymous inner:
TypeReference<Map<String, Integer>> token = new TypeReference<Map<String, String>>() {};
The constructor does the following steps to preserve the type information:
First, it gets the generic superclass metadata for this particular instance – in this case, the generic superclass is TypeReference<Map<String, Integer>>
Then, it gets and stores the actual type parameter for the generic superclass – in this case, it would be Map<String, Integer>
This approach for preserving the generic type information is usually known as super type token:
TypeReference<Map<String, Integer>> token = new TypeReference<Map<String, Integer>>() {};
Type type = token.getType();
assertEquals("java.util.Map<java.lang.String, java.lang.Integer>", type.getTypeName());
Type[] typeArguments = ((ParameterizedType) type).getActualTypeArguments();
assertEquals("java.lang.String", typeArguments[0].getTypeName());
assertEquals("java.lang.Integer", typeArguments[1].getTypeName());
Using super type tokens, we know that the container type is Map, and also, its type parameters are String and Integer.
This pattern is so famous that libraries like Jackson and frameworks like Spring have their own implementations of it. Parsing a JSON object into a Map<String, String> can be accomplished by defining that type with a super type token:
In this tutorial, we'll explore the MockConsumer, one of Kafka‘s Consumer implementations.
First, we'll discuss what are the main things to be considered when testing a Kafka Consumer. Then, we'll see how we can use MockConsumer to implement tests.
2. Testing a Kafka Consumer
Consuming data from Kafka consists of two main steps. Firstly, we have to subscribe to topics or assign topic partitions manually. Secondly, we poll batches of records using the poll method.
The polling is usually done in an infinite loop. That's because we typically want to consume data continuously.
For example, let's consider the simple consuming logic consisting of just the subscription and the polling loop:
Looking at the code above, we can see that there are a few things we can test:
the subscription
the polling loop
the exception handling
if the Consumer was closed correctly
We have multiple options to test the consuming logic.
We can use an in-memory Kafka instance. But, this approach has some disadvantages. In general, an in-memory Kafka instance makes tests very heavy and slow. Moreover, setting it up is not a simple task and can lead to unstable tests.
Alternatively, we can use a mocking framework to mock the Consumer. Although using this approach makes tests lightweight, setting it up can be somewhat tricky.
The final option, and perhaps the best, is to use the MockConsumer, which is a Consumer implementation meant for testing. Not only does it help us to build lightweight tests, but it's also easy to set up.
Let's have a look at the features it provides.
3. Using MockConsumer
MockConsumer implements the Consumer interface that the kafka-clients library provides. Therefore, it mocks the entire behavior of a real Consumer without us needing to write a lot of code.
Let's look at some usage examples of the MockConsumer. In particular, we'll take a few common scenarios that we may come across while testing a consumer application, and implement them using the MockConsumer.
For our example, let's consider an application that consumes country population updates from a Kafka topic. The updates contain only the name of the country and its current population:
class CountryPopulation {
private String country;
private Integer population;
// standard constructor, getters and setters
}
Our consumer just polls for updates using a Kafka Consumer instance, processes them, and at the end, commits the offset using the commitSync method:
Next, let's see how we can create an instance of MockConsumer:
@BeforeEach
void setUp() {
consumer = new MockConsumer<>(OffsetResetStrategy.EARLIEST);
updates = new ArrayList<>();
countryPopulationConsumer = new CountryPopulationConsumer(consumer,
ex -> this.pollException = ex, updates::add);
}
Basically, all we need to provide is the offset reset strategy.
Note that we use updates to collect the records countryPopulationConsumer will receive. This will help us to assert the expected results.
In the same way, we use pollException to collect and assert the exceptions.
For all the test cases, we'll use the above set up method. Now, let's look at a few test cases for the consumer application.
3.2. Assigning Topic Partitions
To begin, let's create a test for the startByAssigning method:
@Test
void whenStartingByAssigningTopicPartition_thenExpectUpdatesAreConsumedCorrectly() {
// GIVEN
consumer.schedulePollTask(() -> consumer.addRecord(record(TOPIC, PARTITION, "Romania", 19_410_000)));
consumer.schedulePollTask(() -> countryPopulationConsumer.stop());
HashMap<TopicPartition, Long> startOffsets = new HashMap<>();
TopicPartition tp = new TopicPartition(TOPIC, PARTITION);
startOffsets.put(tp, 0L);
consumer.updateBeginningOffsets(startOffsets);
// WHEN
countryPopulationConsumer.startByAssigning(TOPIC, PARTITION);
// THEN
assertThat(updates).hasSize(1);
assertThat(consumer.closed()).isTrue();
}
At first, we set up the MockConsumer. We start by adding a record to the consumer using the addRecord method.
The first thing to remember is that we cannot add records before assigning or subscribing to a topic. That is why we schedule a poll task using the schedulePollTask method. The task we schedule will run on the first poll before the records are fetched. Thus, the addition of the record will happen after the assignment takes place.
Equally important is that we cannot add to the MockConsumer records that do not belong to the topic and partition assigned to it.
Then, to make sure the consumer does not run indefinitely, we configure it to shut down at the second poll.
Additionally, we must set the beginning offsets. We do this using the updateBeginningOffsets method.
In the end, we check if we consumed the update correctly, and the consumer is closed.
3.3. Subscribing to Topics
Now, let's create a test for our startBySubscribing method:
@Test
void whenStartingBySubscribingToTopic_thenExpectUpdatesAreConsumedCorrectly() {
// GIVEN
consumer.schedulePollTask(() -> {
consumer.rebalance(Collections.singletonList(new TopicPartition(TOPIC, 0)));
consumer.addRecord(record("Romania", 1000, TOPIC, 0));
});
consumer.schedulePollTask(() -> countryPopulationConsumer.stop());
HashMap<TopicPartition, Long> startOffsets = new HashMap<>();
TopicPartition tp = new TopicPartition(TOPIC, 0);
startOffsets.put(tp, 0L);
consumer.updateBeginningOffsets(startOffsets);
// WHEN
countryPopulationConsumer.startBySubscribing(TOPIC);
// THEN
assertThat(updates).hasSize(1);
assertThat(consumer.closed()).isTrue();
}
In this case, the first thing to do before adding a record is a rebalance. We do this by calling the rebalance method, which simulates a rebalance.
The rest is the same as the startByAssigning test case.
3.4. Controlling the Polling Loop
We can control the polling loop in multiple ways.
The first option is to schedule a poll task as we did in the tests above. We do this via schedulePollTask, which takes a Runnable as a parameter. Each task we schedule will run when we call the poll method.
The second option we have is to call the wakeup method. Usually, this is how we interrupt a long poll call. Actually, this is how we implemented the stop method in CountryPopulationConsumer.
Lastly, we can set an exception to be thrown using the setPollException method:
@Test
void whenStartingBySubscribingToTopicAndExceptionOccurs_thenExpectExceptionIsHandledCorrectly() {
// GIVEN
consumer.schedulePollTask(() -> consumer.setPollException(new KafkaException("poll exception")));
consumer.schedulePollTask(() -> countryPopulationConsumer.stop());
HashMap<TopicPartition, Long> startOffsets = new HashMap<>();
TopicPartition tp = new TopicPartition(TOPIC, 0);
startOffsets.put(tp, 0L);
consumer.updateBeginningOffsets(startOffsets);
// WHEN
countryPopulationConsumer.startBySubscribing(TOPIC);
// THEN
assertThat(pollException).isInstanceOf(KafkaException.class).hasMessage("poll exception");
assertThat(consumer.closed()).isTrue();
}
3.5. Mocking End Offsets and Partitions Info
If our consuming logic is based on end offsets or partition information, we can also mock these using MockConsumer.
When we want to mock the end offset, we can use the addEndOffsets and updateEndOffsets methods.
And, in case we want to mock partition information, we can use the updatePartitions method.
4. Conclusion
In this article, we've explored how to use MockConsumer to test a Kafka consumer application.
First, we've looked at an example of consumer logic and which are the essential parts to test. Then, we tested a simple Kafka consumer application using the MockConsumer.
Along the way, we looked at the features of the MockConsumer and how to use it.
As always, all these code samples are available over on GitHub.
Auth0 provides authentication and authorization services for various types of applications like Native, Single Page Applications, and Web. Additionally, it allows for implementing various features like Single Sign-on, Social login, and Multi-Factor Authentication.
In this tutorial, we'll explore Spring Security with Auth0 through a step-by-step guide, along with key configurations of the Auth0 account.
2. Setting Up Auth0
2.1. Auth0 Sign-Up
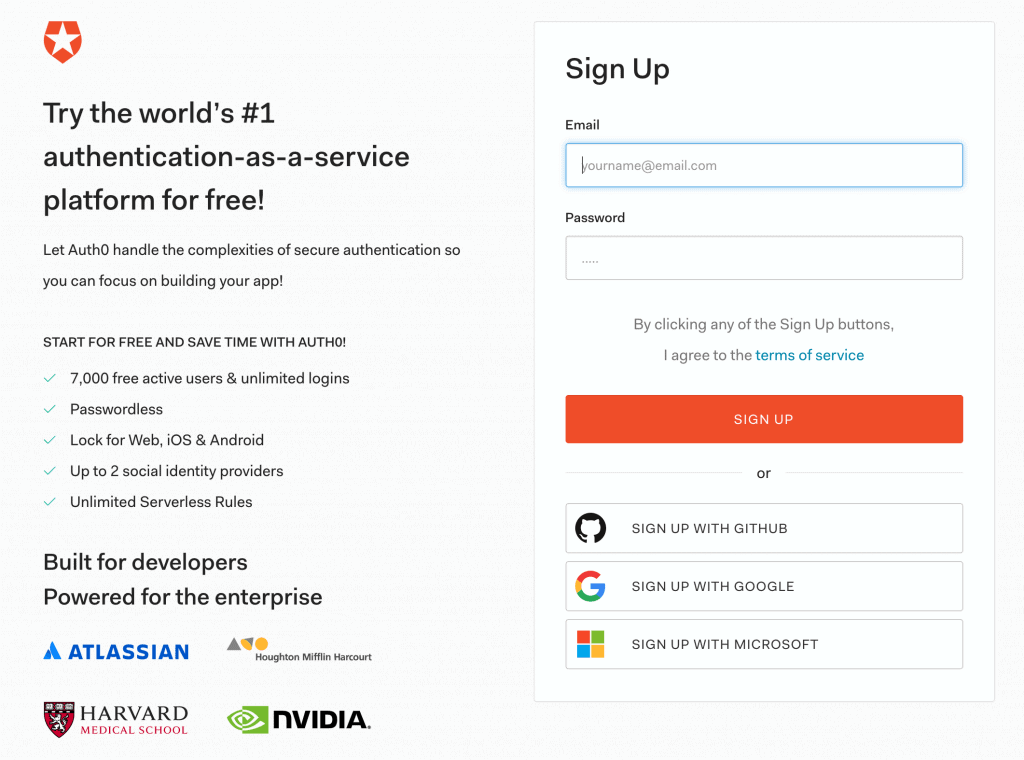
First, we'll sign up for a free Auth0 plan that provides access for up to 7k active users with unlimited logins. However, we can skip this section if we already have one:
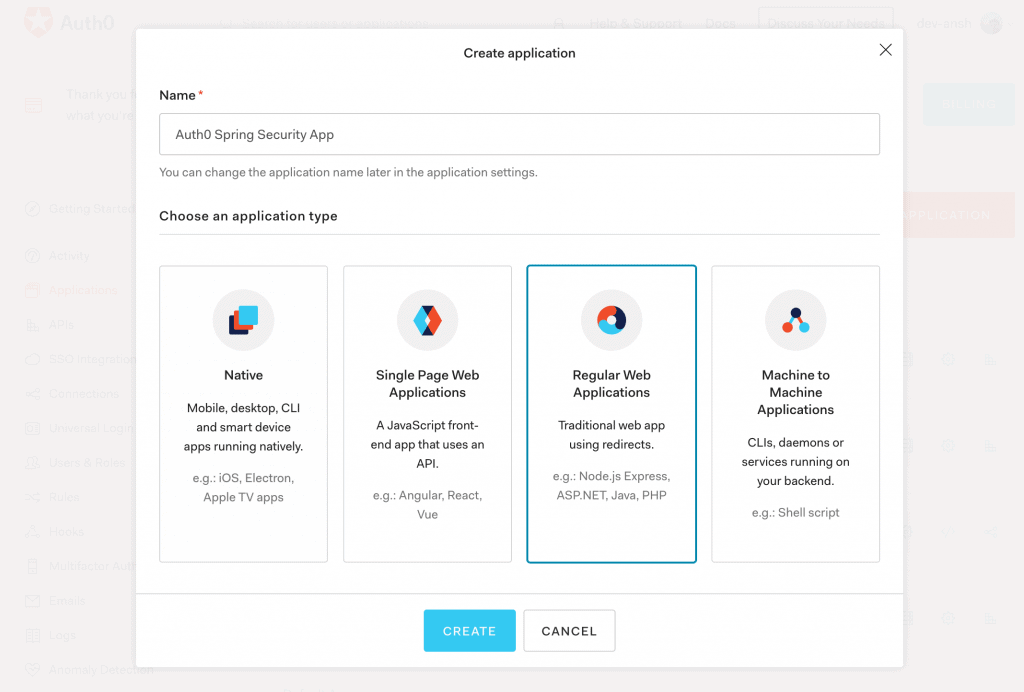
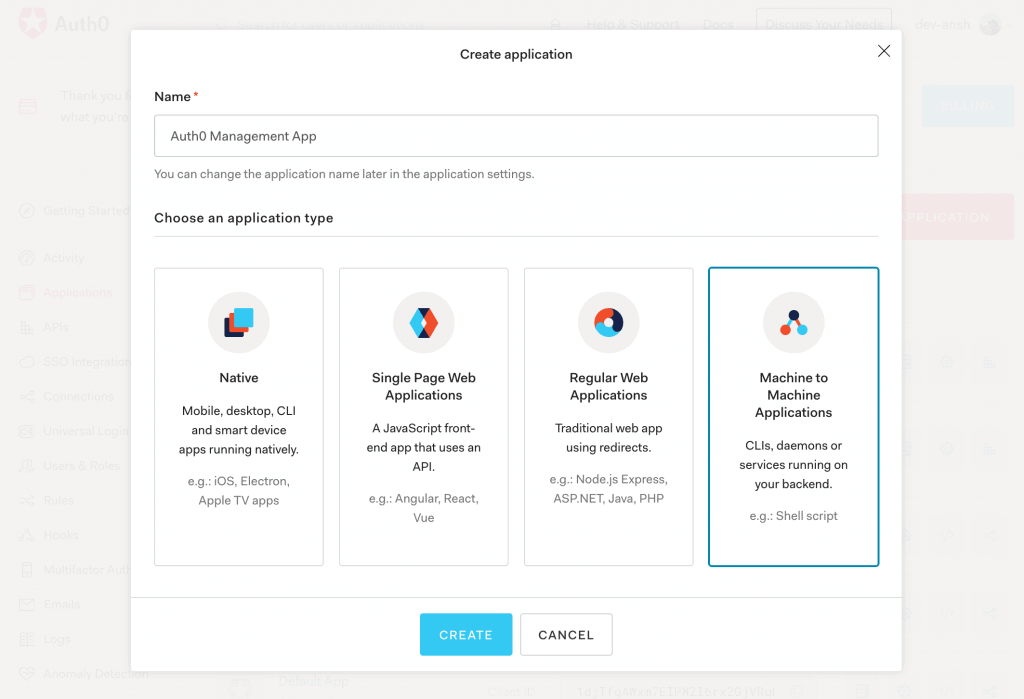
Further, we'll choose Regular Web Applications as application type out of available options like Native, Single-Page Apps, and Machine to Machine Apps:
Similarly, when using Gradle, we can add the mvc-auth-commons dependency in the build.gradle file:
compile 'com.auth0:mvc-auth-commons:1.2.0'
3.3. application.properties
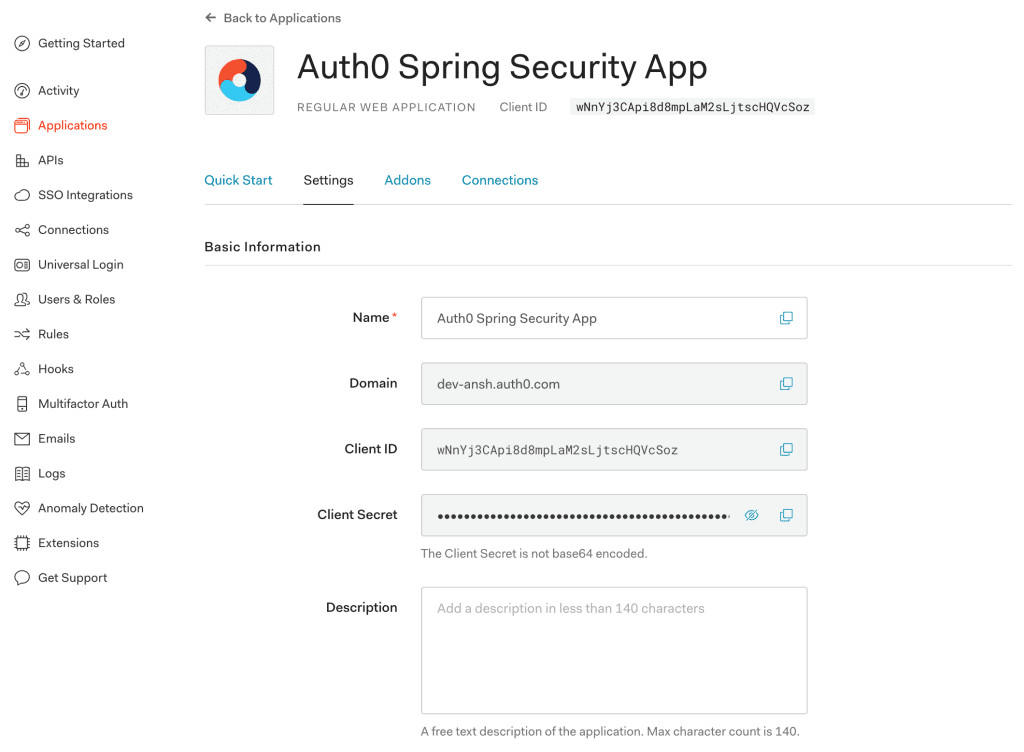
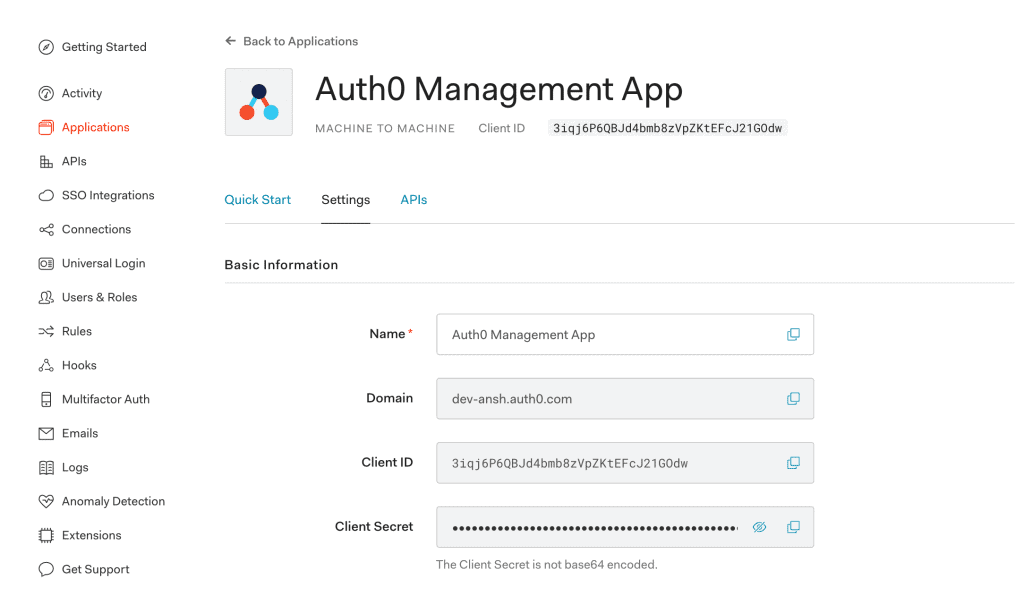
Our Spring Boot App requires information like Client Id and Client Secret to enable authentication of an Auth0 account. So, we'll add them to the application.properties file:
Last, we'll add a bean reference for the AuthenticationController class to the already discussed AuthConfig class:
@Bean
public AuthenticationController authenticationController() throws UnsupportedEncodingException {
JwkProvider jwkProvider = new JwkProviderBuilder(domain).build();
return AuthenticationController.newBuilder(domain, clientId, clientSecret)
.withJwkProvider(jwkProvider)
.build();
}
Here, we've used the JwkProviderBuilder class while building an instance of the AuthenticationController class. We'll use this to fetch the public key to verify the token's signature (by default, the token is signed using the RS256 asymmetric signing algorithm).
Further, the authenticationController bean provides an authorization URL for login and handles the callback request.
4. AuthController
Next, we'll create the AuthController class for login and callback features:
@Controller
public class AuthController {
@Autowired
private AuthConfig config;
@Autowired
private AuthenticationController authenticationController;
}
Here, we've injected the dependencies of the AuthConfig and AuthenticationController classes discussed in the previous section.
4.1. Login
Let's create the login method that allows our Spring Boot App to authenticate a user:
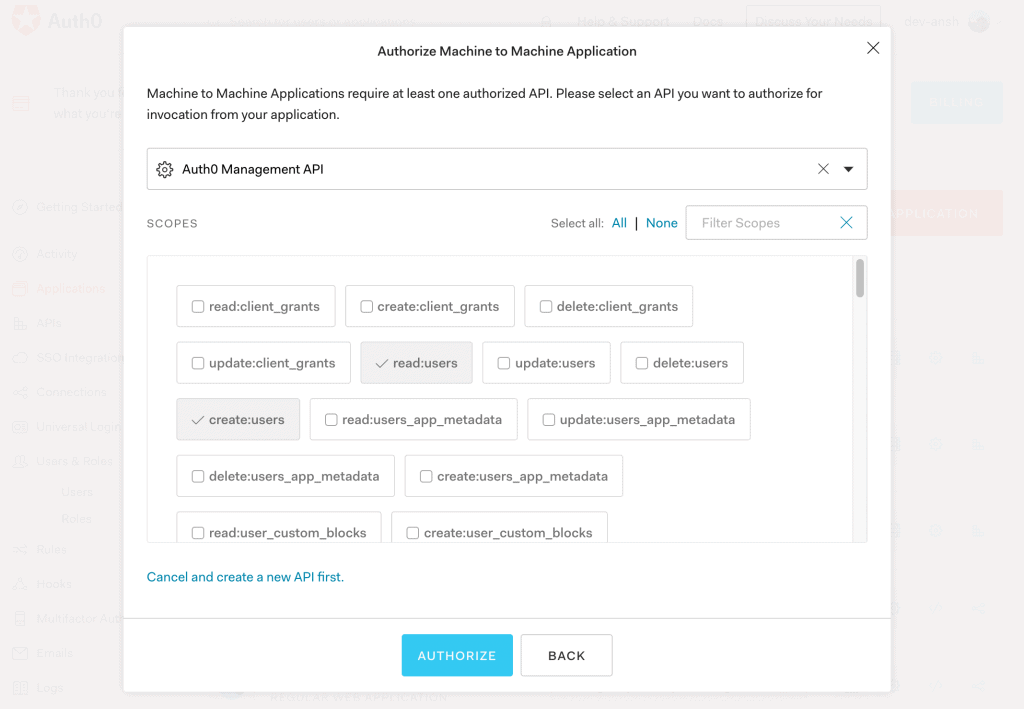
Let's generate an access token for the Auth0 Management App using client credentials received in the previous section:
public String getManagementApiToken() {
HttpHeaders headers = new HttpHeaders();
headers.setContentType(MediaType.APPLICATION_JSON);
JSONObject requestBody = new JSONObject();
requestBody.put("client_id", "auth0ManagementAppClientId");
requestBody.put("client_secret", "auth0ManagementAppClientSecret");
requestBody.put("audience", "https://dev-example.auth0.com/api/v2/");
requestBody.put("grant_type", "client_credentials");
HttpEntity<String> request = new HttpEntity<String>(requestBody.toString(), headers);
RestTemplate restTemplate = new RestTemplate();
HashMap<String, String> result = restTemplate
.postForObject("https://dev-example.auth0.com/oauth/token", request, HashMap.class);
return result.get("access_token");
}
Here, we've made a REST request to the /oauth/token Auth0 Token URL to get the access and refresh tokens.
Also, we can store these client credentials in the application.properties file and read it using the AuthConfig class.
8.5. UserController
After that, let's create the UserController class with the users method:
@Controller
public class UserController {
@GetMapping(value="/users")
@ResponseBody
public ResponseEntity<String> users(HttpServletRequest request, HttpServletResponse response) {
HttpHeaders headers = new HttpHeaders();
headers.setContentType(MediaType.APPLICATION_JSON);
headers.set("Authorization", "Bearer " + getManagementApiToken());
HttpEntity<String> entity = new HttpEntity<String>(headers);
RestTemplate restTemplate = new RestTemplate();
ResponseEntity<String> result = restTemplate
.exchange("https://dev-example.auth0.com/api/v2/users", HttpMethod.GET, entity, String.class);
return result;
}
}
The users method fetches a list of all users by making a GET request to the /api/v2/users Auth0 API with the access token generated in the previous section.
So, let's access localhost:8080/users to receive a JSON response containing all users:
Similarly, we can perform various operations like listing all connections, creating a connection, listing all clients, and creating a client using Auth0 APIs, depending on our permissions.
9. Conclusion
In this tutorial, we explored Spring Security with Auth0.
First, we set up the Auth0 account with essential configurations. Then, we created a Spring Boot App and configured the application.properties for Spring Security integration with Auth0.
Next, we looked into creating an API token for the Auth0 Management API. Last, we looked into features like fetching all users and creating a user.
As usual, all the code implementations are available over on GitHub.
In this tutorial, we'll learn how to use Bucket4j to rate limit a Spring REST API. We'll explore API rate limiting, learn about Bucket4j and work through a few ways of rate limiting REST APIs in a Spring application.
2. API Rate Limiting
Rate limiting is a strategy to limit access to APIs. It restricts the number of API calls that a client can make within a certain timeframe. This helps defend the API against overuse, both unintentional and malicious.
Rate limits are often applied to an API by tracking the IP address, or in a more business-specific way such as API keys or access tokens. As API developers, we can choose to respond in several different ways when a client reaches the limit:
Queueing the request until the remaining time period has elapsed
Allowing the request immediately but charging extra for this request
Or, most commonly, rejecting the request (HTTP 429 Too Many Requests)
3. Bucket4j Rate Limiting Library
3.1. What Is Bucket4j?
Bucket4j is a Java rate-limiting library based on the token-bucket algorithm. Bucket4j is a thread-safe library that can be used in either a standalone JVM application or a clustered environment. It also supports in-memory or distributed caching via the JCache (JSR107) specification.
3.2. Token-bucket Algorithm
Let's look at the algorithm intuitively, in the context of API rate limiting.
Say that we have a bucket whose capacity is defined as the number of tokens that it can hold. Whenever a consumer wants to access an API endpoint, it must get a token from the bucket. We remove a token from the bucket if it's available and accept the request. On the other hand, we reject a request if the bucket doesn't have any tokens.
As requests are consuming tokens, we are also replenishing them at some fixed rate, such that we never exceed the capacity of the bucket.
Let's consider an API that has a rate limit of 100 requests per minute. We can create a bucket with a capacity of 100, and a refill rate of 100 tokens per minute.
If we receive 70 requests, which is fewer than the available tokens in a given minute, we would add only 30 more tokens at the start of the next minute to bring the bucket up to capacity. On the other hand, if we exhaust all the tokens in 40 seconds, we would wait for 20 seconds to refill the bucket.
4. Getting Started with Bucket4j
4.1. Maven Configuration
Let's begin by adding the bucket4jdependency to our pom.xml:
Before we look at how we can use Bucket4j, let's briefly discuss some of the core classes, and how they represent the different elements in the formal model of the token-bucket algorithm.
The Bucket interface represents the token bucket with a maximum capacity. It provides methods such as tryConsume and tryConsumeAndReturnRemaining for consuming tokens. These methods return the result of consumption as true if the request conforms with the limits, and the token was consumed.
The Bandwidth class is the key building block of a bucket – it defines the limits of the bucket. We use Bandwidth to configure the capacity of the bucket and the rate of refill.
The Refill class is used to define the fixed rate at which tokens are added to the bucket. We can configure the rate as the number of tokens that would be added in a given time period. For example, 10 buckets per second or 200 tokens per 5 minutes, and so on.
The tryConsumeAndReturnRemaining method in Bucket returns ConsumptionProbe. ConsumptionProbe contains, along with the result of consumption, the status of the bucket such as the tokens remaining, or the time remaining until the requested tokens are available in the bucket again.
4.3. Basic Usage
Let's test some basic rate limit patterns.
For a rate limit of 10 requests per minute, we'll create a bucket with capacity 10 and a refill rate of 10 tokens per minute:
Refill refill = Refill.intervally(10, Duration.ofMinutes(1));
Bandwidth limit = Bandwidth.classic(10, refill);
Bucket bucket = Bucket4j.builder()
.addLimit(limit)
.build();
for (int i = 1; i <= 10; i++) {
assertTrue(bucket.tryConsume(1));
}
assertFalse(bucket.tryConsume(1));
Refill.intervally refills the bucket at the beginning of the time window – in this case, 10 tokens at the start of the minute.
Next, let's see refill in action.
We'll set a refill rate of 1 token per 2 seconds, and throttle our requests to honor the rate limit:
Bandwidth limit = Bandwidth.classic(1, Refill.intervally(1, Duration.ofSeconds(2)));
Bucket bucket = Bucket4j.builder()
.addLimit(limit)
.build();
assertTrue(bucket.tryConsume(1)); // first request
Executors.newScheduledThreadPool(1) // schedule another request for 2 seconds later
.schedule(() -> assertTrue(bucket.tryConsume(1)), 2, TimeUnit.SECONDS);
Suppose, we have a rate limit of 10 requests per minute. At the same time, we may wish to avoid spikes that would exhaust all the tokens in the first 5 seconds. Bucket4j allows us to set multiple limits (Bandwidth) on the same bucket. Let's add another limit that allows only 5 requests in a 20-second time window:
Bucket bucket = Bucket4j.builder()
.addLimit(Bandwidth.classic(10, Refill.intervally(10, Duration.ofMinutes(1))))
.addLimit(Bandwidth.classic(5, Refill.intervally(5, Duration.ofSeconds(20))))
.build();
for (int i = 1; i <= 5; i++) {
assertTrue(bucket.tryConsume(1));
}
assertFalse(bucket.tryConsume(1));
5. Rate Limiting a Spring API Using Bucket4j
Let's use Bucket4j to apply a rate limit in a Spring REST API.
5.1. Area Calculator API
We're going to implement a simple, but extremely popular, area calculator REST API. Currently, it calculates and returns the area of a rectangle given its dimensions:
Now, we'll introduce a naive rate limit – the API allows 20 requests per minute. In other words, the API rejects a request if it has already received 20 requests, in a time window of 1 minute.
Let's modify our Controller to create a Bucket and add the limit (Bandwidth):
@RestController
class AreaCalculationController {
private final Bucket bucket;
public AreaCalculationController() {
Bandwidth limit = Bandwidth.classic(20, Refill.greedy(20, Duration.ofMinutes(1)));
this.bucket = Bucket4j.builder()
.addLimit(limit)
.build();
}
//..
}
In this API, we can check whether the request is allowed by consuming a token from the bucket, using the method tryConsume. If we have reached the limit, we can reject the request by responding with an HTTP 429 Too Many Requests status:
public ResponseEntity<AreaV1> rectangle(@RequestBody RectangleDimensionsV1 dimensions) {
if (bucket.tryConsume(1)) {
return ResponseEntity.ok(new AreaV1("rectangle", dimensions.getLength() * dimensions.getWidth()));
}
return ResponseEntity.status(HttpStatus.TOO_MANY_REQUESTS).build();
}
Now that we have a naive rate limit that can throttle the API requests. Next, let's introduce pricing plans for more business-centred rate limits.
Pricing plans help us monetize our API. Let's assume that we have the following plans for our API clients:
Free: 20 requests per hour per API client
Basic: 40 requests per hour per API client
Professional: 100 requests per hour per API client
Each API client gets a unique API key that they must send along with each request. This would help us identify the pricing plan linked with the API client.
Let's define the rate limit (Bandwidth) for each pricing plan:
Let's walk through the changes. The API client sends the API key with the X-api-key request header. We use the PricingPlanService to get the bucket for this API key and check whether the request is allowed by consuming a token from the bucket.
In order to enhance the client experience of the API, we'll use the following additional response headers to send information about the rate limit:
X-Rate-Limit-Remaining: number of tokens remaining in the current time window
X-Rate-Limit-Retry-After-Seconds: remaining time, in seconds, until the bucket is refilled
We can call ConsumptionProbe methods getRemainingTokens and getNanosToWaitForRefill, to get the count of the remaining tokens in the bucket and the time remaining until the next refill, respectively. The getNanosToWaitForRefill method returns 0 if we are able to consume the token successfully.
As it turns out, we need to rate-limit our new endpoint as well. We can simply copy and paste the rate limit code from our previous endpoint. Or, we can use Spring MVC's HandlerInterceptor to decouple the rate limit code from the business code.
Let's create a RateLimitInterceptor and implement the rate limit code in the preHandle method:
public class RateLimitInterceptor implements HandlerInterceptor {
private PricingPlanService pricingPlanService;
@Override
public boolean preHandle(HttpServletRequest request, HttpServletResponse response, Object handler)
throws Exception {
String apiKey = request.getHeader("X-api-key");
if (apiKey == null || apiKey.isEmpty()) {
response.sendError(HttpStatus.BAD_REQUEST.value(), "Missing Header: X-api-key");
return false;
}
Bucket tokenBucket = pricingPlanService.resolveBucket(apiKey);
ConsumptionProbe probe = tokenBucket.tryConsumeAndReturnRemaining(1);
if (probe.isConsumed()) {
response.addHeader("X-Rate-Limit-Remaining", String.valueOf(probe.getRemainingTokens()));
return true;
} else {
long waitForRefill = probe.getNanosToWaitForRefill() / 1_000_000_000;
response.addHeader("X-Rate-Limit-Retry-After-Seconds", String.valueOf(waitForRefill));
response.sendError(HttpStatus.TOO_MANY_REQUESTS.value(),
"You have exhausted your API Request Quota");
return false;
}
}
}
Finally, we must add the interceptor to the InterceptorRegistry:
public class AppConfig implements WebMvcConfigurer {
private RateLimitInterceptor interceptor;
@Override
public void addInterceptors(InterceptorRegistry registry) {
registry.addInterceptor(interceptor)
.addPathPatterns("/api/v1/area/**");
}
}
The RateLimitInterceptor intercepts each request to our area calculation API endpoints.
It looks like we're done! We can keep adding endpoints and the interceptor would apply the rate limit for each request.
6. Bucket4j Spring Boot Starter
Let's look at another way of using Bucket4j in a Spring application. The Bucket4j Spring Boot Starter provides auto-configuration for Bucket4j that helps us achieve API rate limiting via Spring Boot application properties or configuration.
Once we integrate the Bucket4j starter into our application, we'll have a completely declarative API rate limiting implementation, without any application code.
6.1. Rate Limit Filters
In our example, we've used the value of the request header X-api-key as the key for identifying and applying the rate limits.
The Bucket4j Spring Boot Starter provides several predefined configurations for defining our rate limit key:
a naive rate limit filter, which is the default
filter by IP Address
expression-based filters
Expression-based filters use the Spring Expression Language (SpEL). SpEL provides access to root objects such as HttpServletRequest that can be used to build filter expressions on the IP Address (getRemoteAddr()), request headers (getHeader(‘X-api-key')), and so on.
The library also supports custom classes in the filter expressions, which is discussed in the documentation.
We had used an in-memory Map to store the Bucket per API key (consumer) in our earlier implementation. Here, we can use Spring's caching abstraction to configure an in-memory store such as Caffeine or Guava.
Note: We have added the jcachedependencies as well, to conform with Bucket4j's caching support.
6.3. Application Configuration
Let's configure our application to use the Bucket4j starter library. First, we'll configure Caffeine caching to store the API key and Bucket in-memory:
In this tutorial, we've looked at several different approaches using Bucket4j for rate-limiting Spring APIs. Be sure to check out the official documentation to learn more.
As usual, the source code for all the examples is available over on GitHub.
Jenkins is an excellent tool for automating software builds and deliveries, especially when using git for software configuration management. However, a common problem when using Jenkins is how to handle sensitive data such as passwords or tokens.
In this tutorial, we'll look at how to securely inject git secrets into Jenkins pipelines and jobs.
2. Git Secrets
To get started, we'll first look at generating git secrets.
2.1. Create GPG Keys
Because git secrets use GPG keys, we must first ensure we have a valid key to use:
$ gpg --gen-key
This will prompt us for a full name and email, as well as a secret passphrase. Remember this passphrase, as we will need it later when we configure Jenkins.
This will create a public and private key pair in our home directory, which is sufficient to start creating secrets. Later, we'll see how to export the key for use with Jenkins.
2.2. Initialize Secrets
The git-secret utility is an add-on to git that can store sensitive data inside a git repository. Not only is it a secure way to store credentials, but we also get the benefits of versioning and access control that is native to git.
To get started, we must first install the git-secret utility. Note that this is not a part of most git distributions and must be installed separately.
Once installed, we can initialize secrets inside any git repository:
$ git secret init
This is similar to the git init command. It creates a new .gitsecret directory inside the repository.
As a best practice, we should add all files in the .gitignore directory to source control, except for the random_seed file. The init command above should ensure our .gitignore handles this for us, but it's worth double-checking.
Next, we need to add a user to the git secret repo keyring:
$ git secret tell mike@aol.com
We are now ready to store secrets in our repo.
2.3. Storing and Retrieving Secrets
The git secret command works by encrypting specific files in the repo. The files are given a .secret extension, and the original filename is added to .gitignore to prevent it from being committed to the repository.
As an example, let's say we want to store a password for our database inside a file named dbpassword.txt. We first create the file:
$ echo "Password123" > dbpassword.txt
Now we encrypt the file:
$ git secret add dbpassword.txt
Finally, we must commit the secret using the hide command:
$ git secret hide
At this point, we should commit our changes to ensure the file is securely stored inside our repo. This is done using standard git commands:
PASSPHRASE is the GPG passphrase we used when generating our GPG key.
3. Using Git Secrets With Jenkins
We have now seen the steps required for storing and retrieving credentials using git secret. Next, we'll see how to use encrypted secrets with Jenkins.
3.1. Create Credentials
To get started, we must first export the GPG private key we generated earlier:
It's important to keep this private key safe. Never share it or save it to a publicly accessible location.
Next, we need to store this private key inside Jenkins. We'll do this by creating multiple Jenkins credentials to store the GPG private key and trust store we just exported.
First, navigate to Credentials > System > Global Credentials and click Add Credentials. We need to set the following fields:
Now that we have the GPG key available as credentials, we can create or modify a Jenkins pipeline to use the key. Keep in mind that we must have the git-secret tool installed on the Jenkins agent before this will work.
To access the encrypted data inside our pipeline, we have to add a few pieces to the pipeline script.
In this tutorial, we have seen how to use git secrets with both Jenkins pipelines and traditional jobs. This is an easy and secure way to provide access to sensitive data to your CI/CD pipelines.
Spring Cloud Feign Client is a handy declarative REST client, that we use to implement communication between microservices.
In this short tutorial we'll show how to set a custom Feign Client connection timeout, both globally and per-client.
2. Defaults
Feign Client is pretty configurable.
In terms of a timeout, it allows us to configure both read and connection timeouts. Connection timeout is the time needed for the TCP handshake, while the read timeout needed to read data from the socket.
Connection and read timeouts are by default 10 and 60 seconds, respectively.
3. Globally
We can set the connection and read timeouts that apply to every Feign Client in the application via the feign.client.config.default property set in our application.yml file:
And, we could, of course, list a global setting and also per-client overrides together without a problem.
5. Conclusion
In this tutorial, we explained how to tweak Feign Client's timeouts and how to set custom values through the application.yml file. Feel free to try these out by following our main Feign introduction.
With analysts predicting 20% annual growth in the low-code industry, it's still prudent to involve IT when choosing RAD tooling and solutions to ensure compliance, mitigate security concerns, and avoid vendor lock-in.
In this tutorial, we'll look briefly at the different ways of casting an int to an enum value in Java. Although there's no direct way of casting, there are a couple of ways to approximate it.
2. Using Enum#values
Firstly, let's look at how we can solve this problem by using the Enum‘s values method.
Let's start by creating an enum PizzaStatus that defines the status of an order for a pizza:
public enum PizzaStatus {
ORDERED(5),
READY(2),
DELIVERED(0);
private int timeToDelivery;
PizzaStatus (int timeToDelivery) {
this.timeToDelivery = timeToDelivery;
}
// Method that gets the timeToDelivery variable.
}
We associate each constant enum value with timeToDelivery field. When defining the constant enums, we pass the timeToDelivery field to the constructor.
The static values method returns an array containing all of the values of the enum in the order of their declaration. Therefore, we can use the timeToDelivery integer value to get the corresponding enum value:
First, we use the values method to get an array containing enum values.
Second, we iterate over the pizzaStatuses array and match timeToDelivery corresponding to it. If the timeToDelivery matches the timeToDeliveryForOrderedPizzaStatus value, then we return the corresponding PizzaStatus enum value.
In this approach, we call the values method every time we want to fetch the corresponding enum value using the time to deliver integer value. The values method returns an array of all the values of enum each time a call to values method is made.
Moreover, we iterate over the pizzaStatuses array fetched from the call to the values method each time to fetch the corresponding enum value; it's quite inefficient.
3. Using Map
Next, let's use Java's Map data structure along with the values method to fetch the enum value corresponding to the time to deliver integer value.
In this approach, the values method is called only once while initializing the map. Furthermore, since we're using a map, we don't need to iterate over the values each time we need to fetch the enum value corresponding to the time to deliver.
We use a static map timeToDeliveryToEnumValuesMapping internally, which handles the mapping of time to deliver to its corresponding enum value.
Furthermore, the values method of the Enum class provides all the enum values. In the static block, we iterate over the array of enum values and add them to the map along with the corresponding time to deliver integer value as key:
Finally, we create a static method that takes the timeToDelivery integer as a parameter. This method returns the corresponding enum value using the static map timeToDeliveryToEnumValuesMapping:
public static PizzaStatus castIntToEnum(int timeToDelivery) {
return timeToDeliveryToEnumValuesMapping.get(timeToDelivery);
}
By using a static map and static method, we fetch the enum value corresponding to the time to deliver integer value.
4. Conclusion
In conclusion, we looked at a couple of workarounds to fetch enum values corresponding to the integer value.
As always, all these code samples are available over on GitHub.
The latest version of the org.json library comes with a JSONTokener constructor. It directly accepts a Reader as a parameter.
So, let's convert a BufferedReader to a JSONObject using that:
@Test
public void givenValidJson_whenUsingBufferedReader_thenJSONTokenerConverts() {
byte[] b = "{ \"name\" : \"John\", \"age\" : 18 }".getBytes(StandardCharsets.UTF_8);
InputStream is = new ByteArrayInputStream(b);
BufferedReader bufferedReader = new BufferedReader(new InputStreamReader(is));
JSONTokener tokener = new JSONTokener(bufferedReader);
JSONObject json = new JSONObject(tokener);
assertNotNull(json);
assertEquals("John", json.get("name"));
assertEquals(18, json.get("age"));
}
4. First Convert to String
Now, let's look at another approach to obtain the JSONObject by first converting a BufferedReader to a String.
This approach can be used when working in an older version of org.json:
@Test
public void givenValidJson_whenUsingString_thenJSONObjectConverts()
throws IOException {
// ... retrieve BufferedReader<br />
StringBuilder sb = new StringBuilder();
String line;
while ((line = bufferedReader.readLine()) != null) {
sb.append(line);
}
JSONObject json = new JSONObject(sb.toString());
// ... same checks as before
}
Here, we're converting a BufferedReader to a String and then we're using the JSONObject constructor to convert a String to a JSONObject.
5. Conclusion
In this article, we've seen two different ways of converting a BufferedReader to a JSONObject with simple examples. Undoubtedly, the latest version of org.json provides a neat and clean way of converting a BufferedReader to a JSONObject with fewer lines of code.
As always, the full source code of the example is available over on GitHub.
So, in a number of other tutorials, we've talked about BeanPostProcessor. In this tutorial, we'll put them to use in a real-world example using Guava's EventBus.
Spring's BeanPostProcessor gives us hooks into the Spring bean lifecycle to modify its configuration.
BeanPostProcessor allows for direct modification of the beans themselves.
In this tutorial, we're going to look at a concrete example of these classes integrating Guava's EventBus.
2. Setup
First, we need to set up our environment. Let's add the Spring Context, Spring Expression, and Guava dependencies to our pom.xml:
For our first goal, we want to utilize Guava's EventBus to pass messages across various aspects of the system asynchronously.
Next, we want to register and unregister objects for events automatically on bean creation/destruction instead of using the manual method provided by EventBus.
So, we're now ready to start coding!
Our implementation will consist of a wrapper class for Guava's EventBus, a custom marker annotation, a BeanPostProcessor, a model object, and a bean to receive stock trade events from the EventBus. In addition, we'll create a test case to verify the desired functionality.
3.1. EventBus Wrapper
To being with, we'll define an EventBus wrapper to provide some static methods to easily register and unregister beans for events which will be used by the BeanPostProcessor:
public final class GlobalEventBus {
public static final String GLOBAL_EVENT_BUS_EXPRESSION
= "T(com.baeldung.postprocessor.GlobalEventBus).getEventBus()";
private static final String IDENTIFIER = "global-event-bus";
private static final GlobalEventBus GLOBAL_EVENT_BUS = new GlobalEventBus();
private final EventBus eventBus = new AsyncEventBus(IDENTIFIER, Executors.newCachedThreadPool());
private GlobalEventBus() {}
public static GlobalEventBus getInstance() {
return GlobalEventBus.GLOBAL_EVENT_BUS;
}
public static EventBus getEventBus() {
return GlobalEventBus.GLOBAL_EVENT_BUS.eventBus;
}
public static void subscribe(Object obj) {
getEventBus().register(obj);
}
public static void unsubscribe(Object obj) {
getEventBus().unregister(obj);
}
public static void post(Object event) {
getEventBus().post(event);
}
}
This code provides static methods for accessing the GlobalEventBus and underlying EventBus as well as registering and unregistering for events and posting events. It also has a SpEL expression used as the default expression in our custom annotation to define which EventBus we want to utilize.
3.2. Custom Marker Annotation
Next, let's define a custom marker annotation which will be used by the BeanPostProcessor to identify beans to automatically register/unregister for events:
Now, we'll define the BeanPostProcessor which will check each bean for the Subscriber annotation. This class is also a DestructionAwareBeanPostProcessor, which is a Spring interface adding a before-destruction callback to BeanPostProcessor. If the annotation is present, we'll register it with the EventBus identified by the annotation's SpEL expression on bean initialization and unregister it on bean destruction:
The code above takes every bean and runs it through the process method, defined below. It processes it after the bean has been initialized and before it is destroyed. The requiresDestruction method returns true by default and we keep that behavior here as we check for the existence of the @Subscriber annotation in the postProcessBeforeDestruction callback.
Let's now look at the process method:
private void process(Object bean, BiConsumer<EventBus, Object> consumer, String action) {
Object proxy = this.getTargetObject(bean);
Subscriber annotation = AnnotationUtils.getAnnotation(proxy.getClass(), Subscriber.class);
if (annotation == null)
return;
this.logger.info("{}: processing bean of type {} during {}",
this.getClass().getSimpleName(), proxy.getClass().getName(), action);
String annotationValue = annotation.value();
try {
Expression expression = this.expressionParser.parseExpression(annotationValue);
Object value = expression.getValue();
if (!(value instanceof EventBus)) {
this.logger.error("{}: expression {} did not evaluate to an instance of EventBus for bean of type {}",
this.getClass().getSimpleName(), annotationValue, proxy.getClass().getSimpleName());
return;
}
EventBus eventBus = (EventBus)value;
consumer.accept(eventBus, proxy);
} catch (ExpressionException ex) {
this.logger.error("{}: unable to parse/evaluate expression {} for bean of type {}",
this.getClass().getSimpleName(), annotationValue, proxy.getClass().getName());
}
}
This code checks for the existence of our custom marker annotation named Subscriber and, if present, reads the SpEL expression from its value property. Then, the expression is evaluated into an object. If it's an instance of EventBus, we apply the BiConsumer function parameter to the bean. The BiConsumer is used to register and unregister the bean from the EventBus.
The implementation of the method getTargetObject is as follows:
public class StockTrade {
private String symbol;
private int quantity;
private double price;
private Date tradeDate;
// constructor
}
3.5. StockTradePublisher Event Receiver
Then, let's define a listener class to notify us a trade was received so that we can write our test:
@FunctionalInterface
public interface StockTradeListener {
void stockTradePublished(StockTrade trade);
}
Finally, we'll define a receiver for new StockTrade events:
@Subscriber
public class StockTradePublisher {
Set<StockTradeListener> stockTradeListeners = new HashSet<>();
public void addStockTradeListener(StockTradeListener listener) {
synchronized (this.stockTradeListeners) {
this.stockTradeListeners.add(listener);
}
}
public void removeStockTradeListener(StockTradeListener listener) {
synchronized (this.stockTradeListeners) {
this.stockTradeListeners.remove(listener);
}
}
@Subscribe
@AllowConcurrentEvents
void handleNewStockTradeEvent(StockTrade trade) {
// publish to DB, send to PubNub, ...
Set<StockTradeListener> listeners;
synchronized (this.stockTradeListeners) {
listeners = new HashSet<>(this.stockTradeListeners);
}
listeners.forEach(li -> li.stockTradePublished(trade));
}
}
The code above marks this class as a Subscriber of Guava EventBus events and Guava's @Subscribe annotation marks the method handleNewStockTradeEvent as a receiver of events. The type of events it'll receive is based on the class of the single parameter to the method; in this case, we'll receive events of type StockTrade.
The @AllowConcurrentEvents annotation allows the concurrent invocation of this method. Once we receive a trade we do any processing we wish then notify any listeners.
3.6. Testing
Now let's wrap up our coding with an integration test to verify the BeanPostProcessor works correctly. Firstly, we'll need a Spring context:
@Configuration
public class PostProcessorConfiguration {
@Bean
public GlobalEventBus eventBus() {
return GlobalEventBus.getInstance();
}
@Bean
public GuavaEventBusBeanPostProcessor eventBusBeanPostProcessor() {
return new GuavaEventBusBeanPostProcessor();
}
@Bean
public StockTradePublisher stockTradePublisher() {
return new StockTradePublisher();
}
}
The test code above generates a stock trade and posts it to the GlobalEventBus. We wait at most two seconds for the action to complete and to be notified the trade was received by the stockTradePublisher. Furthermore, we validate the received trade was not modified in transit.
4. Conclusion
In conclusion, Spring's BeanPostProcessor allows us to customize the beans themselves, providing us with a means to automate bean actions we would otherwise have to do manually.
One of the new features that Java 9 brings us is the capability to build Multi-Release JARs (MRJAR). As the JDK Enhancement Proposal says, this allows us to have different Java release-specific versions of a class in the same JAR.
In this tutorial, we explore how to configure an MRJAR file using Maven.
2. Maven
Maven is one of the most used build tools in the Java ecosystem; one of its capabilities is packaging a project into a JAR.
In the following sections, we'll explore how to use it to build an MRJAR instead.
3. Sample Project
Let's start with a basic example.
First, we'll define a class that prints the Java version currently used; before Java 9, one of the approaches that we could use was the System.getProperty method:
public class DefaultVersion {
public String version() {
return System.getProperty("java.version");
}
}
Now, from Java 9 and onward, we can use the new version method from the Runtime class:
public class DefaultVersion {
public String version() {
return Runtime.version().toString();
}
}
public class App {
private static final Logger logger = LoggerFactory.getLogger(App.class);
public static void main(String[] args) {
logger.info(String.format("Running on %s", new DefaultVersion().version()));
}
}
Finally, let's place each version of DefaultVersion into its own src/main directory structure:
We'll use the first execution compile-java-8 to compile our Java 8 class and the compile-java-9 execution to compile our Java 9 class.
We can see that it's necessary to configure the compileSourceRoot and outputDirectory tags with the respective folders for the Java 9 version.
4.2. Maven JAR Plugin
We use the JAR plugin to set the Multi-Release entry to true in our MANIFEST file. With this configuration, the Java runtime will look inside the META-INF/versions folder of our JAR file for version-specific classes; otherwise, only the base classes are used.
When we execute with Java 8, we'll see the following output:
[main] INFO com.baeldung.multireleaseapp.App - Running on 1.8.0_252
But if we execute with Java 14, we'll see:
[main] INFO com.baeldung.multireleaseapp.App - Running on 14.0.1+7
As we can see, now it's using the new output format. Note that although our MRJAR was built with Java 9, it's compatible with multiple major Java platform versions.
6. Conclusion
In this brief tutorial, we saw how to configure the Maven build tool to generate a simple MRJAR.
As always, the full code presented in this tutorial is available over on GitHub.
Spring Data's CrudRespository#save is undoubtedly simple, but one feature could be a drawback: It updates every column in the table. Such are the semantics of the U in CRUD, but what if we want to do a PATCH instead?
In this tutorial, we're going to cover techniques and approaches to performing a partial instead of a full update.
2. Problem
As stated before, save() will overwrite any matched entity with the data provided, meaning that we can not supply partial data. That can become inconvenient, especially for larger objects with a lot of fields.
If we'd look at an ORM, some patches exist, like:
Hibernate's @DynamicUpdate annotation, which dynamically re-writes the update query
JPA's @Column annotation, as we can disallow updates on specific columns using the updatable parameter
But in the following, we're going to approach this problem with specific intent: Our purpose is to prepare our entities for the save method without relying on an ORM.
3. Our Case
First, let's build a Customer entity:
@Entity
public class Customer {
@Id
@GeneratedValue(strategy = GenerationType.AUTO)
public long id;
public String name;
public String phone;
}
@Service
public class CustomerService {
@Autowired
CustomerRepository repo;
public void addCustomer(String name) {
Customer c = new Customer();
c.name = name;
repo.save(c);
}
}
4. Load and Save Approach
Let's first look at an approach that is probably familiar: loading our entities from the database and then updating only the fields we need.
Though this is simple and obvious, it's of the simplest approaches we can use.
Let's add a method in our service to update the contact data of our customers.
Now, suppose we have more than a hundred phone fields in our object. Writing a method that pours the data from DTO to our entity, as we did before, could be bothersome, and pretty unmaintainable.
Nevertheless, we can get over this issue using a mapping strategy, and specifically with the MapStruct implementation.
Let's create a CustomerDto:
public class CustomerDto {
private long id;
public String name;
public String phone;
//...
private String phone99;
}
The @MappingTarget annotation lets us update an existing object, saving us from the pain of writing a lot of code.
MapStruct has a @BeanMapping method decorator, that lets us define a rule to skip null values during the mapping process. Let's add it to our updateCustomerFromDto method interface:
The drawback of this approach is that we can't pass null values to the database during an update.
4.2. Simpler Entities
At last, keep in mind that we can approach this problem from the design phase of an application.
It's essential to define our entities to be as small as possible.
Let's take a look at our Customer entity. What if we structure it a little bit, and extract all the phone fields to ContactPhone entities and be under a one-to-many relationship?
@Entity public class CustomerStructured {
@Id
@GeneratedValue(strategy = GenerationType.AUTO)
public Long id;
public String name;
@OneToMany(fetch = FetchType.EAGER, targetEntity=ContactPhone.class, mappedBy="customerId")
private List<ContactPhone> contactPhones;
}
The code is clean and, more importantly, we achieved something. Now, we can update our entities without having to retrieve and fill all the phone data.
Handling small and bounded entities allows us to update only the necessary fields.
The only inconvenience of this approach is that we should design our entities with awareness, without falling into the trap of overengineering.
5. Custom Query
Another approach we can implement is to define a custom query for partial updates.
In fact, JPA defines two annotations, @Modifying and @Query, which allow us to write our update statement explicitly.
We can now tell our application how to behave during an update, without leaving the burden on the ORM.
Let's add our custom update method in the repository:
@Modifying
@Query("update Customer u set u.phone = :phone where u.id = :id")
void updatePhone(@Param(value = "id") long id, @Param(value = "phone") String phone);
Now, we can rewrite our update method:
public void updateCustomerContacts(long id, String phone) {
repo.updatePhone(id, phone);
}
Now we are able to perform a partial update: with just a few lines of code and without altering our entities we've achieved our goal.
The disadvantage of this technique is that we'll have to define a method for each possible partial update of our object.
6. Conclusion
The partial data update is quite a fundamental operation; while we can have our ORM to handle it, sometimes it could be profitable to get full control over it.
As we've seen, we can preload our data and then update it or define our custom statements, but remember to be aware of the drawbacks that these approaches imply and how to overcome them.
As usual, the source code for this article is available over on GitHub.
In this tutorial, we'll discuss the cause and possible remedies of the java.lang.OutOfMemoryError: unable to create new native thread error.
2. Understanding the Problem
2.1. Cause of the Problem
Most Java applications are multithreaded in nature, consisting of multiple components, performing specific tasks, and executed in different threads. However, the underlying operating system (OS) imposes a cap on the maximum number of threads that a Java application can create.
The JVM throws an unable to create new native thread error when the JVM asks the underlying OS for a new thread, and the OS is incapable of creating new kernel threads also known as OS or system threads. The sequence of events is as follows:
An application running inside the Java Virtual Machine (JVM) requests for a new thread
The JVM native code sends a request to the OS to create a new kernel thread
The OS attempts to create a new kernel thread which requires memory allocation
The OS refuses native memory allocation because either
The requesting Java process has exhausted its memory address space
The OS has depleted its virtual memory
The Java process then returns the java.lang.OutOfMemoryError: unable to create new native thread error
2.2. Thread Allocation Model
An OS typically has two types of threads – user threads (threads created by a Java application) and kernel threads. User threads are supported above the kernel threads and the kernel threads are managed by the OS.
Between them, there are three common relationships:
Many-To-One – Many user threads map to a single kernel thread
One-To-One – One user thread map to one kernel thread
Many-To-Many – Many user threads multiplex to a smaller or equal number of kernel threads
3. Reproducing the Error
We can easily recreate this issue by creating threads in a continuous loop and then make the threads wait:
while (true) {
new Thread(() -> {
try {
TimeUnit.HOURS.sleep(1);
} catch (InterruptedException e) {
e.printStackTrace();
}
}).start();
}
Since we are holding on to each thread for an hour, while continuously creating new ones, we will quickly reach the max number of threads from the OS.
4. Solutions
One way to address this error is to increase the thread limit configuration at the OS level.
However, this is not an ideal solution because the OutOfMemoryError likely indicates a programming error. Let's look at some other ways to solve this problem.
4.1. Leveraging Executor Service Framework
Leveraging Java's executor service framework for thread administration can address this issue to a certain extent. The default executor service framework, or a custom executor configuration, can control thread creation.
We can use the Executors#newFixedThreadPool method to set the maximum number of threads that can be used at a time:
In the above example, we first create a fixed-thread pool with five threads and a runnable task which makes the threads wait for one hour. We then submit ten such tasks to the thread pool and asserts that five tasks are waiting in the executor service queue.
Since the thread pool has five threads, it can handle a maximum of five tasks at any time.
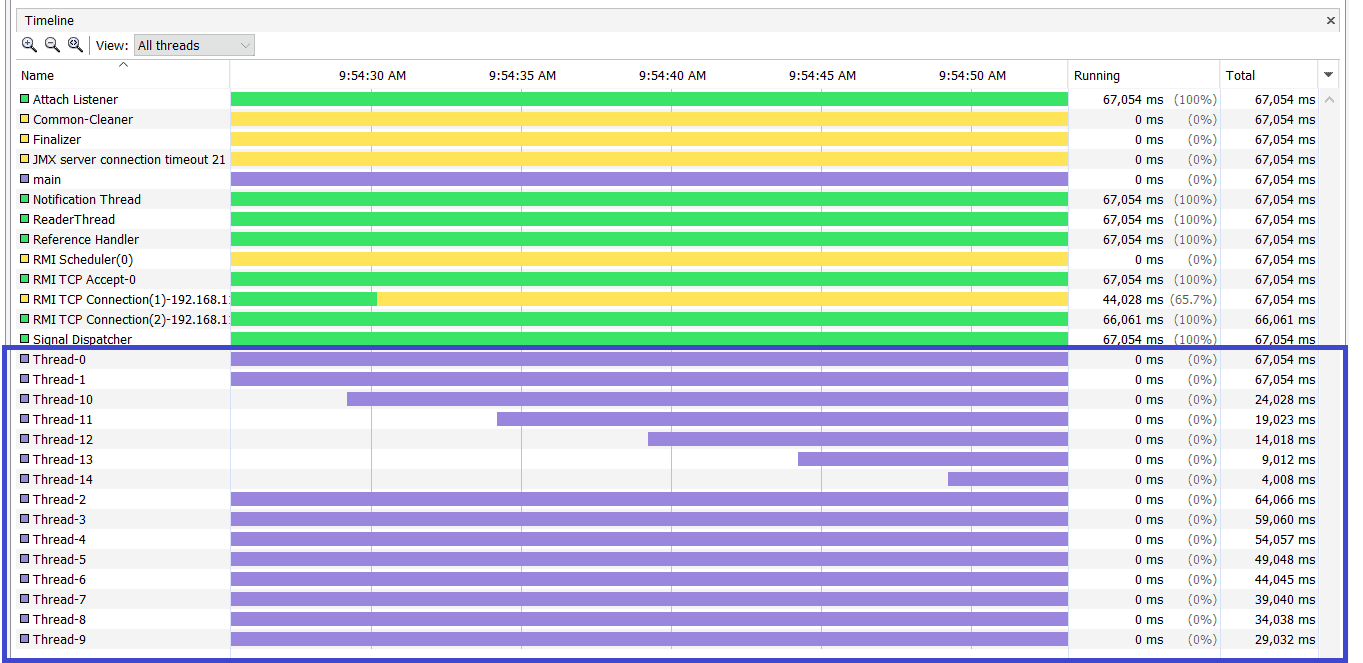
The above thread snapshot is from Java VisualVM for the example presented earlier. This snapshot clearly demonstrates the continuous thread creation.
Once we identify that there's continuous thread creation, we can capture the thread dump of the application to identify the source code creating the threads:
In the above snapshot, we can identify the code responsible for the thread creation. This provides useful insight to take appropriate measures.
5. Conclusion
In this article, we learned about the java.lang.OutOfMemoryError: unable to create new native thread error, and we saw that it's caused by excessive thread creation in a Java application.
We explored some solutions to address and analyze the error by looking at the ExecutorService framework and thread dump analysis as two useful measures to tackle this issue.
As always, the source code for the article is available over on GitHub.
Compilers and runtimes tend to optimize everything, even the smallest and seemingly less critical parts. When it comes to these sorts of optimizations, JVM and Java have a lot to offer.
In this article, we're going to evaluate one of these relatively new optimizations: string concatenation with invokedynamic.
2. Before Java 9
Before Java 9, non-trivial string concatenations were implemented using StringBuilder. For instance, let's join a few strings the wrong way:
String numbers = "Numbers: ";
for (int i = 0; i < 100; i++) {
numbers += i;
}
The bytecode for this simple code is as follows (with javap -c):
Here, the Java 8 compiler is using StringBuilder to concatenate the strings, even though we didn't use StringBuilder in our code.
To be fair, concatenating strings using StringBuilder is pretty efficient and well-engineered.
Let's see how Java 9 changes this implementation and what are the motivations for such a change.
3. Invoke Dynamic
As of Java 9 and as part of JEP 280, the string concatenation is now using invokedynamic.
The primary motivation behind the change is to have a more dynamic implementation. That is, it's possible to change the concatenation strategy without changing the bytecode. This way, clients can benefit from a new optimized strategy even without recompilation.
There are other advantages, too. For example, the bytecode for invokedynamic is more elegant, less brittle, and smaller.
3.1. Big Picture
Before diving into details of how this new approach works, let's see it from a broader point of view.
As an example, suppose we're going to create a new String by joining another String with an int. We can think of this as a function that accepts a String and an int and then returns the concatenated String.
Here's how the new approach works for this example:
Preparing the function signature describing the concatenation. For instance, (String, int) -> String
Preparing the actual arguments for the concatenation. For instance, if we're going to join “The answer is “ and 42, then these values will be the arguments
Calling the bootstrap method and passing the function signature, the arguments, and a few other parameters to it
Generating the actual implementation for that function signature and encapsulating it inside a MethodHandle
Calling the generated function to create the final joined string
Put simply, the bytecode defines a specification at compile-time. Then the bootstrap method links an implementation to that specification at runtime. This, in turn, will make it possible to change the implementation without touching the bytecode.
Throughout this article, we'll uncover the details associated with each of these steps.
First, let's see how the linkage to the bootstrap method works.
4. The Linkage
Let's see how the Java 9+ compiler generates the bytecode for the same loop:
11: aload_1 // The String Numbers:
12: iload_2 // The i
13: invokedynamic #9, 0 // InvokeDynamic #0:makeConcatWithConstants:(LString;I)LString;
18: astore_1
As opposed to the naive StringBuilder approach, this one is using a significantly smaller number of instructions.
In this bytecode, the (LString;I)LString signature is quite interesting. It takes a String and an int (the I represents int) and returns the concatenated string. This is because we're joining the current String value with the loop index in each iteration:
numbers += i;
Similar to other invoke dynamic implementations, much of the logic is moved out from compile-time to runtime.
To see that runtime logic, let's inspect the bootstrap method table (with javap -c -v):
In this case, when the JVM sees the invokedynamic instruction for the first time, it calls the makeConcatWithConstants bootstrap method. The bootstrap method will, in turn, return a ConstantCallSite, which points to the concatenation logic.
Among the arguments passed to the bootstrap method, two stand out:
Ljava/lang/invoke/MethodType represents the string concatenation signature. In this case, it's (LString;I)LString since we're combining an integer with a String
\u0001\u0001 is the recipe for constructing the string (more on this later)
5. Recipes
To better understand the role of recipes, let's consider a simple data class:
public class Person {
private String firstName;
private String lastName;
// constructor
@Override
public String toString() {
return "Person{" +
"firstName='" + firstName + '\'' +
", lastName='" + lastName + '\'' +
'}';
}
}
To generate a String representation, the JVM passes firstName and lastName fields to the invokedynamic instruction as the arguments:
As shown above, the recipe represents the basic structure of the concatenated String. For instance, the preceding recipe consists of:
Constant strings such as “Person“. These literal values will be present in the concatenated string as-is
Two \u0001 tags to represent ordinary arguments. They will be replaced by the actual arguments such as firstName
We can think of the recipe as a templated String containing both static parts and variable placeholders.
Using recipes can dramatically reduce the number of arguments passed to the bootstrap method, as we only need to pass all dynamic arguments plus one recipe.
6. Bytecode Flavors
There are two bytecode flavors for the new concatenation approach. So far, we're familiar with the one flavor: calling the makeConcatWithConstants bootstrap method and passing a recipe. This flavor, known as indy with constants, is the default one as of Java 9.
Instead of using a recipe, the second flavor passes everything as arguments. That is, it doesn't differentiate between constant and dynamic parts and passes all of them as arguments.
To use the second flavor, we should pass the -XDstringConcat=indy option to the Java compiler. For instance, if we compile the same Person class with this flag, then the compiler generates the following bytecode:
This time around, the bootstrap method is makeConcat. Moreover, the concatenation signature takes seven arguments. Each argument represents one part from toString:
The first argument represents the part before the firstName variable — the“Person{firstName=\'” literal
The second argument is the value of the firstName field
The third argument is a single quotation character
The fourth argument is the part before the next variable — “, lastName=\'”
The fifth argument is the lastName field
The sixth argument is a single quotation character
The last argument is the closing curly bracket
This way, the bootstrap method has enough information to link an appropriate concatenation logic.
Quite interestingly, it's also possible to travel back to the pre-Java 9 world and use StringBuilder with the -XDstringConcat=inline compiler option.
7. Strategies
The bootstrap method eventually provides a MethodHandle that points to the actual concatenation logic. As of this writing, there are six different strategies to generate this logic:
BC_SB or “bytecode StringBuilder” strategy generates the same StringBuilder bytecode at runtime. Then it loads the generated bytecode via the Unsafe.defineAnonymousClass method
BC_SB_SIZED strategy will try to guess the necessary capacity for StringBuilder. Other than that, it's identical to the previous approach. Guessing the capacity can potentially help the StringBuilder to perform the concatenation without resizing the underlying byte[]
BC_SB_SIZED_EXACT is a bytecode generator based on StringBuilder that computes the required storage exactly. To calculate the exact size, first, it converts all arguments to String
MH_SB_SIZED is based on MethodHandles and eventually calls the StringBuilder API for concatenation. This strategy also makes an educated guess about the required capacity
MH_SB_SIZED_EXACT is similar to the previous one except it calculates the necessary capacity with complete accuracy
MH_INLINE_SIZE_EXACT calculates the required storage upfront and directly maintains its byte[] to store the concatenation result. This strategy is inline because it replicates what StringBuilder does internally
The default strategy is MH_INLINE_SIZE_EXACT. However, we can change this strategy using the -Djava.lang.invoke.stringConcat=<strategyName> system property.
8. Conclusion
In this detailed article, we looked at how the new String concatenation is implemented and the advantages of using such an approach.
First, we'll dive into the specification of the Open Service Broker API. Then, we'll learn how to use Spring Cloud Open Service Broker to build applications that implement the API specs.
Finally, we'll explore what security mechanisms we can use to protect our service broker endpoints.
2. Open Service Broker API
The Open Service Broker API project allows us to quickly provide backing services to our applications running on cloud-native platforms such as Cloud Foundry and Kubernetes. In essence, the API specification describes a set of REST endpoints through which we can provision and connect to these services.
In particular, we can use service brokers within a cloud-native platform to:
Advertise a catalog of backing services
Provision service instances
Create and delete bindings between a backing service and a client application
Deprovision service instances
Spring Cloud Open Service Broker creates the base for an Open Service Broker API compliant implementation by providing the required web controllers, domain objects, and configuration. Additionally, we'll need to come up with our business logic by implementing the appropriate service broker interfaces.
3. Auto Configuration
In order to use Spring Cloud Open Service Broker in our application, we need to add the associated starter artifact. We can use Maven Central to search for the latest version of the open-service-broker starter.
Besides the cloud starter, we'll also need to include a Spring Boot web starter, and either Spring WebFlux or Spring MVC, to activate the auto-configuration:
The auto-configuration mechanism configures default implementations for most of the components that we need for a service broker. If we want, we can override the default behavior by providing our own implementation of the open-service-broker Spring-related beans.
3.1. Service Broker Endpoints Path Configuration
By default, the context path under which the service broker endpoints are registered is “/”.
If that's not ideal and we want to change it, the most straightforward way is to set the property spring.cloud.openservicebroker.base-path in our application properties or YAML file:
In this case, to query the service broker endpoints, we'll first need to prefix our requests with the /broker/ base-path.
4. A Service Broker Example
Let's create a service broker application using the Spring Cloud Open Service Broker library and explore how the API works.
Through our example, we'll use the service broker to provision and connect to a backing mail system. For simplicity, we'll use a dummy mail API provided within our code examples.
4.1. Service Catalog
First, to control which services our service broker offers, we'll need to define a service catalog. To quickly initialize the service catalog, in our example we'll provide a Spring bean of type Catalog:
As shown above, the service catalog contains metadata describing all available services that our service broker can offer. Moreover, the definition of a service is intentionally broad as it could refer to a database, a messaging queue, or, in our case, a mail service.
Another key point is that each service is built up from plans, which is another general term. In essence, each plan can offer different features and cost different amounts.
In the end, the service catalog is made available to the cloud-native platforms through the service broker /v2/catalog endpoint:
Consequently, cloud-native platforms will query the service broker catalog endpoint from all service brokers to present an aggregated view of the service catalogs.
4.2. Service Provisioning
Once we start advertising services, we also need to provide the mechanisms in our broker to provision and manage the lifecycle of them within the cloud platform.
Furthermore, what provisioning represents varies from broker to broker. In some cases, provisioning may involve spinning up empty databases, creating a message broker, or simply providing an account to access external APIs.
In terms of terminology, the services created by a service broker will be referred to as service instances.
With Spring Cloud Open Service Broker, we can manage the service lifecycle by implementing the ServiceInstanceService interface. For example, to manage the service provisioning requests in our service broker we must provide an implementation for the createServiceInstance method:
Here, we allocate a new mail service in our internal mappings, if one with the same service instance id doesn't exist, and provide a dashboard URL. We can consider the dashboard as a web management interface for our service instance.
Service provisioning is made available to the cloud-native platforms through the /v2/service_instances/{instance_id} endpoint:
In short, when we provision a new service, we need to pass the service_id and the plan_id advertised in the service catalog. Additionally, we need to provide a unique instance_id, which our service broker will use in future binding and de-provisioning requests.
4.3. Service Binding
After we provision a service, we'll want our client application to start communicating with it. From a service broker's perspective, this is called service binding.
Similar to service instances and plans, we should consider a binding as another flexible abstraction that we can use within our service broker. In general, we'll provide service bindings to expose credentials used to access a service instance.
In our example, if the advertised service has the bindable field set to true, our service broker must provide an implementation of the ServiceInstanceBindingService interface. Otherwise, the cloud platforms won't call the service binding methods from our service broker.
Let's handle the service binding creation requests by providing an implementation to the createServiceInstanceBinding method:
The above code generates a unique set of credentials – username, password, and a URI – through which we can connect and authenticate to our new mail service instance.
Spring Cloud Open Service Broker framework exposes service binding operations through the /v2/service_instances/{instance_id}/service_bindings/{binding_id} endpoint:
Just like service instance provisioning, we are using the service_id and the plan_id advertised in the service catalog within our binding request. Furthermore, we also pass a unique binding_id, which the broker uses as a username for our credentials set.
5. Service Broker API Security
Usually, when service brokers and cloud-native platforms communicate with each other, an authentication mechanism is required.
Unfortunately, the Open Service Broker API specification doesn't currently cover the authentication part for the service broker endpoints. Because of this, also the Spring Cloud Open Service Broker library doesn't implement any security configuration.
Luckily, if we need to protect our service broker endpoints, we could quickly use Spring Security to put in place Basic authentication or an OAuth 2.0 mechanism. In this case, we should authenticate all service broker requests using our chosen authentication mechanism and return a 401 Unauthorized response when the authentication fails.
6. Conclusion
In this article, we explored the Spring Cloud Open Service Broker project.
First, we learned what the Open Service Broker API is, and how it allows us to provision and connect to backing services. Subsequently, we saw how to quickly build a Service Broker API compliant project using the Spring Cloud Open Service Broker library.
Finally, we discussed how we can secure our service broker endpoints with Spring Security.
As always, the source code for this tutorial is available over on GitHub.
Targeting Elasticsearch 7.6.2, this release deprecates the ElasticsearchTemplate, built on the now-deprecated TransportClient, and offers a handful of new and improved features.
GET http://localhost:8080/api/tickets?params[type]=foo¶ms[color]=green
And, actually, it can still look like:
GET http://localhost:8080/api/tickets?params={"type":"foo","color":"green"}
The first option allows us to use parameter validations, which will let us know if something is wrong before the request is made.
With the second option, we trade that for greater control on the backend as well as OpenAPI 2 compatibility.
4. URL Encoding
It's important to note that, in making this decision to transport request parameters as a JSON object, we'll want to URL-encode the parameter to ensure safe transport.
So, to send the following URL:
GET /tickets?params={"type":"foo","color":"green"}
We'd actually do:
GET /tickets?params=%7B%22type%22%3A%22foo%22%2C%22color%22%3A%22green%22%7D
5. Limitations
Also, let's keep in mind the limitations of passing a JSON object as a set of query parameters:
reduced security
limited length of the parameters
For example, the more data we place in a query parameter, the more appears in server logs, and the higher the potential for sensitive data exposure.
Also, a single query parameter can be no longer than 2048 characters. Certainly, we can all imagine scenarios where our JSON objects are larger than that. Practically speaking, a URL encoding of our JSON string will actually limit us to about 1000 characters for our payload.
One workaround is to send larger JSON Objects in the body. In this way, we fix both the security issue and the JSON length limitation.
Actually, GET or POST both support this. One reason to send a body over GET is to maintain the RESTful semantics of our API.
Of course, it's a bit unusual and not universally supported. For instance, some JavaScript HTTP libraries don’t allow GET requests to have a request body.
In short, this choice is a trade-off between semantics and universal compatibility.
6. Conclusion
To sum up, in this article we learned how to specify JSON objects as query parameters using OpenAPI. Then, we observed some of the implications on the backend.
The complete OpenAPI definitions for these examples are available over on GitHub.
Sending a request to a proxy using RestTemplate is pretty simple. All we need to do is to call the setProxy(java.net.Proxy) from SimpleClientHttpRequestFactory before building the RestTemplate object.
First, we start by configuring the SimpleClientHttpRequestFactory:
Proxy proxy = new Proxy(Type.HTTP, new InetSocketAddress(PROXY_SERVER_HOST, PROXY_SERVER_PORT));
SimpleClientHttpRequestFactory requestFactory = new SimpleClientHttpRequestFactory();
requestFactory.setProxy(proxy);
Then, we move forward to passing the request factory instance to the RestTemplate constructor:
RestTemplate restTemplate = new RestTemplate(requestFactory);
Finally, once we have built the RestTemplate, we can use it to make proxied requests:
In this short tutorial, we've explored two different ways to send a request to a proxy using RestTemplate.
First, we learned how to send the request through a RestTemplate built using a SimpleClientHttpRequestFactory. Then we learned how to do the same using a RestTemplateCustomizer, this one being the recommended approach according to the documentation.
As always, the code samples are available over on GitHub.