Quantcast
Channel: Baeldung
Viewing all 4699 articles
Browse latest View live

Skipping Tests With Gradle

$
0
0

1. Introduction

Although skipping tests is usually a bad idea, there are some situations where it might be useful, and it will save us some time. For instance, consider we are developing a new feature, and we want to see a result within the intermediate builds. In this case, we might skip the tests temporarily to reduce the overhead of compiling and running them. Undoubtedly, ignoring the tests can cause many serious issues.

In this short tutorial, we'll see how to skip tests when using the Gradle build tool.

2. Using Command Line Flags

First, let's create a simple test that we want to skip:

@Test
void skippableTest() {
    Assertions.assertTrue(true);
}

When we run the build command:

gradle build

We'll see running tasks:

> ...
> Task :compileTestJava
> Task :processTestResources NO-SOURCE
> Task :testClasses
> Task :test
> ...

To skip any task from the Gradle build, we can use the -x or –exclude-task option. In this case, we'll use “-x test” to skip tests from the build.

To see it in action, let's run the build command with -x option:

gradle build -x test

We'll see running tasks:

> Task :compileJava NO-SOURCE 
> Task :processResources NO-SOURCE 
> Task :classes UP-TO-DATE 
> Task :jar 
> Task :assemble 
> Task :check 
> Task :build

As a result, the test sources are not compiled and, therefore, are not executed.

3. Using the Gradle Build Script

We have more options to skip tests using the Gradle build script. For example, we can skip tests based on some condition or only in a particular environment using the onlyIf() method. Tests will be skipped if this method returns false.

Let's skip tests based on checking a project property:

test.onlyIf { !project.hasProperty('someProperty') }

Now, we'll run the build command and pass someProperty to Gradle:

gradle build -PsomeProperty

Therefore, Gradle skips running the tests:

> ...
> Task :compileTestJava 
> Task :processTestResources NO-SOURCE 
> Task :testClasses 
> Task :test SKIPPED 
> Task :check UP-TO-DATE 
> ...

Moreover, we can exclude tests based on their package or class name using the exclude property in our build.gradle file:

test {
    exclude 'org/boo/**'
    exclude '**/Bar.class'
}

We can also skip tests based on a regex pattern. For instance, we can skip all tests whose class name ends with the word “Integration“:

test {
    exclude '**/**Integration'
}

4. Conclusion

In this tutorial, we've learned how to skip tests when using the Gradle build tool. We also went through all the relevant options that we can use on the command-line, as well as those we can use in Gradle build scripts.


Removing Docker Images

$
0
0

1. Introduction

In a previous article, we explained the difference between Docker images and Docker containers. In short: An image is like a Java class, and containers are like Java objects.

In this tutorial, we'll look at the various ways of removing Docker images.

2. Why Remove Docker Images?

The Docker Engine stores images and runs containers. For that purpose, the Docker Engine reserves a certain amount of disk space as a “storage pool” for images, containers, and everything else (such as global Docker volumes or networks).

Once that storage pool is full, the Docker Engine stops working: We can't create or download new images anymore, and our containers fail to run.

Docker images take up the majority of the Docker Engine storage pool. So we remove Docker images to keep Docker running.

We also remove images to keep our Docker Engine organized and clean. For instance, we can easily create dozens of images during development that we soon don't need anymore. Or, we download some software images for testing that we can dispose of later.

We can easily remove a Docker image that we pulled from a Docker repository: If we ever need it again, we'll just pull it from the repository once more.

But we have to be careful with Docker Images we created ourselves: Once removed, our own images are gone unless we saved them! We can save Docker images by pushing them to a repository or exporting them to a TAR file.

3. Downloading PostgreSQL 13 Beta Images

PostgreSQL is an open-source relational database. We'll use the first two PostgreSQL 13 beta Docker images as examples. These two images are relatively small, so we can download them quickly. And because they are beta software, we don't have them in our Docker Engine already.

We'll use the beta 2 image to create a container. We won't use the beta 1 image directly.

But before we download these two images, let's check first how much space Docker images take up in the storage pool:

docker system df --format 'table {{.Type}}\t{{.TotalCount}}\t{{.Size}}'

Here's the output from a test machine. The first line shows that our 71 Docker images use 7.8 GB:

TYPE                TOTAL               SIZE
Images              71                  7.813GB
Containers          1                   359.1MB
Local Volumes       203                 14.54GB
Build Cache         770                 31.54GB

Now we download the two PostgreSQL images and recheck the Docker storage pool:

docker pull postgres:13-beta1-alpine
docker pull postgres:13-beta2-alpine
docker system df --format 'table {{.Type}}\t{{.TotalCount}}\t{{.Size}}'

As expected, the number of images increased from 71 to 73. And the overall image size went from 7.8 GB to 8.1 GB.

We'll just show the first line for brevity:

TYPE                TOTAL               SIZE
Images              73                  8.119GB

4. Removing a Single Image

Let's start a container with the PostgreSQL 13 beta 2 image. We set secr3t as the password for the database root user because the PostgreSQL container won't start without one:

docker run -d -e POSTGRES_PASSWORD=secr3t postgres:13-beta2-alpine
docker ps --format 'table {{.ID}}\t{{.Image}}\t{{.Status}}'

Here is the running container on the test machine:

CONTAINER ID        IMAGE                      STATUS
527bfd4cfb89        postgres:13-beta2-alpine   Up Less than a second

Now let's remove the PostgreSQL 13 beta 2 image. We use docker image rm to remove a Docker image. That command removes one or more images:

docker image rm postgres:13-beta2-alpine

This command fails because a running container still uses that image:

Error response from daemon: conflict: unable to remove repository reference "postgres:13-beta2-alpine" (must force) - container 527bfd4cfb89 is using its referenced image cac2ee40fa5a

So let's stop that running container by using its ID, which we obtained from docker ps:

docker container stop 527bfd4cfb89

We now try to remove the image again – and get the same error message: We can't remove an image used by a container, running or not.

So let's remove the container. Then we can finally remove the image:

docker container rm 527bfd4cfb89
docker image rm postgres:13-beta2-alpine

The Docker Engine prints details of the image removal:

Untagged: postgres:13-beta2-alpine
Untagged: postgres@sha256:b3a4ebdb37b892696a7bd7e05763b938345f29a7327fc17049c7148c03ff6a92
removed: sha256:cac2ee40fa5a40f0abe53e0138033fe7a9bcee28e7fb6c9eaac4d3a2076b1a86
removed: sha256:6a14bab707274a8007da33fe08ea56a921f356263d8fd5e599273c7ee4880170
removed: sha256:5e6ef40b9f6f8802452dbca622e498caa460736d890ca20011e7c79de02adf28
removed: sha256:dbd38ed4b347c7f3c81328742a1ddeb1872ad52ac3b1db034e41aa71c0d55a75
removed: sha256:23639f6bd6ab4b786e23d9d7c02a66db6d55035ab3ad8f7ecdb9b1ad6efeec74
removed: sha256:8294c0a7818c9a435b8908a3bcccbc2171c5cefa7f4f378ad23f40e28ad2f843

The docker system df confirms the removal: The number of images decreased from 73 to 72. And the overall image size went from 8.1 GB to 8.0 GB:

TYPE                TOTAL               SIZE
Images              72                  7.966GB

5. Removing Multiple Images by Name

Let's download the PostgreSQL 13 beta 2 image again that we just removed in the previous section:

docker pull postgres:13-beta2-alpine

Now we want to remove both the beta 1 image and the beta 2 image by name. We've only used the beta 2 image so far. As mentioned earlier, we're not using the beta 1 image directly, so we can just remove it now.

Unfortunately, docker image rm doesn't offer a filter option for removing by name. Instead, we'll chain Linux commands to remove multiple images by name.

We'll reference images by repository and tag, like in a docker pull command: The repository is postgres, the labels are 13-beta1-alpine and 13-beta2-alpine.

So, to remove multiple images by name, we need to:

  • List all images by repository and tag, such as postgres:13-beta2-alpine
  • Then, filter those output lines through a regular expression with the grep command: ^postgres:13-beta
  • And finally, feed those lines to the docker image rm command

Let's start putting these together. To test for correctness, let's run just the first two of these pieces:

docker image ls --format '{{.Repository}}:{{.Tag}}' | grep '^postgres:13-beta'

And on our test machine we get:

postgres:13-beta2-alpine
postgres:13-beta1-alpine

Now given that, we can add it to our docker image rm command:

docker image rm $(docker image ls --format '{{.Repository}}:{{.Tag}}' | grep '^postgres:13-beta')

As before, we can only remove images if no container, running or stopped, uses them. We then see the same image removal details as in the previous section. And docker system df shows that we're back to 71 images at 7.8 GB on the test machine:

TYPE                TOTAL               SIZE
Images              71                  7.813GB

This image removal command works in a terminal on Linux and Mac. On Windows, it requires the “Docker Quickstart Terminal” of the Docker Toolbox. In the future, the more recent Docker Desktop for Windows may work with this Linux command on Windows 10, too.

6. Removing Images by Size

An excellent way to save disk space is to remove the largest Docker images first.

Now docker image ls can't sort by size, either. So, we list all images and sort that output with the sort command to view images by size:

docker image ls | sort -k7 -h -r

which on our test machine outputs:

collabora/code   4.2.5.3         8ae6850294e5   3 weeks ago  1.28GB
nextcloud        19.0.1-apache   25b6e2f7e916   6 days ago   752MB
nextcloud        latest          6375cff75f7b   5 weeks ago  750MB
nextcloud        19.0.0-apache   5c44e8445287   7 days ago   750MB

Next, we manually review to find what we want to remove. The ID, column three, is easier to copy and paste than the repository and tag, columns one and two. Docker allows removing multiple images in one go.

Let's say we want to remove nextcloud:latest and nextcloud:19.0.0-apache. Simply put, we can look at their corresponding IDs in our table and list them in our docker image rm command:

docker image rm 6375cff75f7b 5c44e8445287

As before, we can only remove images not used by any container and see the usual image removal details. Now we're down to 69 images at 7.1 GB on our test machine:

TYPE                TOTAL               SIZE
Images              69                  7.128GB

7. Removing Images by Creation Date

Docker can remove images by their creation date. We'll use the new docker image prune command for that. Unlike docker image rm, it is designed to remove multiple images or even all images.

Now, let's remove all images created before July 7, 2020:

docker image prune -a --force --filter "until=2020-07-07T00:00:00"

We still can only remove images not used by any container, and we still see the usual image removal details. This command removed two images on the test machine, so we're at 67 images and 5.7 GB on the test machine:

TYPE                TOTAL               SIZE
Images              67                  5.686GB

Another way to remove images by their creation date is to specify a time span instead of a cut-off date. Let's say we wanted to remove all images older than a week:

docker image prune -a --force --filter "until=168h"

Note that the Docker filter option requires us to convert that time span into hours.

8. Pruning Containers and Images

docker image prune bulk-removes unused images. It goes hand-in-hand with docker container prune, which bulk-removes stopped containers. Let's start with that last command:

docker container prune

This prints a warning message. We have to enter y and press Enter to proceed:

WARNING! This will remove all stopped containers.
Are you sure you want to continue? [y/N] y
removed Containers:
1c3be3eba8837323820ecac5b82e84ab65ad6d24a259374d354fd561254fd12f

Total reclaimed space: 359.1MB

So on the test machine, this removed one stopped container.

Now we need need to discuss image relationships briefly. Our Docker images extend other images to gain their functionality, just as Java classes extend other Java classes.

Let's look at the top of the Dockerfile for the PostgreSQL beta 2 image to see what image it's extending:

FROM alpine:3.12

So the beta 2 image uses alpine:3.12. That's why Docker implicitly downloaded alpine:3.12 when we pulled the beta 2 image at first. We don't see these implicitly downloaded images with docker image ls.

Now let's say we removed the PostgreSQL 13 beta 2 image. If no other Docker image extended alpine:3.12, then Docker would consider alpine:3.12 a so-called “dangling image”: A once implicitly downloaded image that's now not needed anymore. docker image prune removes these dangling images:

docker image prune

This command also requires us to enter y and press Enter to proceed:

WARNING! This will remove all dangling images.
Are you sure you want to continue? [y/N] y
Total reclaimed space: 0B

On the test machine, this didn't remove any images.

docker image prune -a removes all images not used by containers. So if we don't have any containers (running or not), then this will remove all Docker images! That is a dangerous command indeed:

docker image prune -a

On the test machine, this removed all images. docker system df confirms that neither containers nor images are left:

TYPE                TOTAL               SIZE
Images              0                   0B
Containers          0                   0B

9. Conclusion

In this article, we first saw how we could remove a single Docker image. Next, we learned how to remove images by name, size, or creation date. Finally, we learned how to remove all unused containers and images.

Check If a File or Directory Exists in Java

$
0
0

1. Overview

In this quick tutorial, we're going to get familiar with different ways to check the existence of a file or directory.

First, we'll start with the modern NIO APIs and then will cover the legacy IO approaches.

2. Using java.nio.file.Files

To check if a file or directory exists, we can leverage the Files.exists(Path) method. As it's clear from the method signature, we should first obtain a Path to the intended file or directory. Then we can pass that Path to the Files.exists(Path) method:

Path path = Paths.get("does-not-exist.txt");
assertFalse(Files.exists(path));

Since the file doesn't exist, it returns false. It's also worth mentioning that if the Files.exists(Path) method encounters an IOException, it'll return false, too.

On the other hand, when the given file exists, it'll return true as expected:

Path tempFile = Files.createTempFile("baeldung", "exist-article");
assertTrue(Files.exists(tempFile));

Here we're creating a temporary file and then calling the Files.exists(Path) method.

This even works for directories:

Path tempDirectory = Files.createTempDirectory("baeldung-exists");
assertTrue(Files.exists(tempDirectory));

If we specifically want to know if a file or directory exists, we can also use Files.isDirectory(Path) or Files.isRegularFile(Path) methods:

assertTrue(Files.isDirectory(tempDirectory));
assertFalse(Files.isDirectory(tempFile));
assertTrue(Files.isRegularFile(tempFile));

There is also a notExists(Path) method that returns true if the given Path doesn't exist:

assertFalse(Files.notExists(tempDirectory));

Sometimes the Files.exists(Path) returns false because we don't possess the required file permissions. In such scenarios, we can use the Files.isReadable(Path) method to make sure the file is actually readable by the current user:

assertTrue(Files.isReadable(tempFile));
assertFalse(Files.isReadable(Paths.get("/root/.bashrc")));

2.1. Symbolic Links

By default, the Files.exists(Path) method follows the symbolic links. If file has a symbolic link to file B, then the Files.exists(A) method returns true if and only if the file exists already:

Path target = Files.createTempFile("baeldung", "target");
Path symbol = Paths.get("test-link-" + ThreadLocalRandom.current().nextInt());
Path symbolicLink = Files.createSymbolicLink(symbol, target);
assertTrue(Files.exists(symbolicLink));

Now if we delete the target of the link, the Files.exists(Path) will return false:

Files.deleteIfExists(target);
assertFalse(Files.exists(symbolicLink));

Since the link target doesn't exist any more, following the link won't lead to anything, and Files.exists(Path) will return false.

It's even possible to not follow the symbolic links by passing an appropriate LinkOption as the second argument:

assertTrue(Files.exists(symbolicLink, LinkOption.NOFOLLOW_LINKS));

Because the link itself exists, the Files.exists(Path) method returns true. Also, we can check if a Path is a symbolic link using the Files.isSymbolicLink(Path) method:

assertTrue(Files.isSymbolicLink(symbolicLink));
assertFalse(Files.isSymbolicLink(target));

3. Using java.io.File

If we're using Java 7 or a newer version of Java, it's highly recommended to use the modern Java NIO APIs for these sorts of requirements.

However, to make sure if a file or directory exists in Java legacy IO world, we can call the exists() method on File instances:

assertFalse(new File("invalid").exists());

If the file or directory does exist already, it'll return true:

Path tempFilePath = Files.createTempFile("baeldung", "exist-io");
Path tempDirectoryPath = Files.createTempDirectory("baeldung-exists-io");

File tempFile = new File(tempFilePath.toString());
File tempDirectory = new File(tempDirectoryPath.toString());

assertTrue(tempFile.exists());
assertTrue(tempDirectory.exists());

As shown above, the exists() method doesn't care if it's a file or directory. Therefore, as long as it does exist, it'll return true

The isFile() method, however, returns true if the given path is an existing file:

assertTrue(tempFile.isFile());
assertFalse(tempDirectory.isFile());

Similarly, the isDirectory() method returns true if the given path is an existing directory:

assertTrue(tempDirectory.isDirectory());
assertFalse(tempFile.isDirectory());

Finally, the canRead() method returns true if the file is readable:

assertTrue(tempFile.canRead());
assertFalse(new File("/root/.bashrc").canRead());

When it returns false, the file either doesn't exist or the current user doesn't possess the read permission on the file.

4. Conclusion

In this short tutorial, we saw how to make sure a file or directory exists in Java. Along the way, we talked about modern NIO and the legacy IO APIs. Also, we saw how the NIO API handles symbolic links.

As usual, all the examples are available over on GitHub.

XML Defined Beans in Spring Boot

$
0
0

1. Introduction

Before Spring 3.0, XML was the only way to define and configure beans. Spring 3.0 introduced JavaConfig, allowing us to configure beans using Java classes. However, XML configuration files are still used today.

In this tutorial, we'll discuss how to integrate XML configurations into Spring Boot.

2. The @ImportResource Annotation

The @ImportResource annotation allows us to import one or more resources containing bean definitions.

Let's say we have a beans.xml file with the definition of a bean:

<?xml version="1.0" encoding="UTF-8"?>
<beans xmlns="http://www.springframework.org/schema/beans"
    xmlns:xsi="http://www.w3.org/2001/XMLSchema-instance"
    xmlns:context="http://www.springframework.org/schema/context"
    xsi:schemaLocation="http://www.springframework.org/schema/beans http://www.springframework.org/schema/beans/spring-beans.xsd
    http://www.springframework.org/schema/context http://www.springframework.org/schema/context/spring-context.xsd">
    
    <bean class="com.baeldung.springbootxml.Pojo">
        <property name="field" value="sample-value"></property>
    </bean>
</beans>

To use it in a Spring Boot application, we can use the @ImportResource annotation, telling it where to find the configuration file:

@Configuration
@ImportResource("classpath:beans.xml")
public class SpringBootXmlApplication implements CommandLineRunner {

    @Autowired 
    private Pojo pojo;

    public static void main(String[] args) {
        SpringApplication.run(SpringBootXmlApplication.class, args);
    }
}

In this case, the Pojo instance will be injected with the bean defined in beans.xml.

3. Accessing Properties in XML Configurations

What about using properties in XML configuration files? Let's say we want to use a property declared in our application.properties file:

sample=string loaded from properties!

Let's update the Pojo definition, in beans.xml, to include the sample property:

<bean class="com.baeldung.springbootxml.Pojo">
    <property name="field" value="${sample}"></property>
</bean>

Next, let's verify if the property is properly included:

@RunWith(SpringRunner.class)
@SpringBootTest(classes = SpringBootXmlApplication.class)
public class SpringBootXmlApplicationIntegrationTest {

    @Autowired 
    private Pojo pojo;
    @Value("${sample}") 
    private String sample;

    @Test
    public void whenCallingGetter_thenPrintingProperty() {
        assertThat(pojo.getField())
                .isNotBlank()
                .isEqualTo(sample);
    }
}

Unfortunately, this test will fail because, by default, the XML configuration file can't resolve placeholders. However, we can solve this by including the @EnableAutoConfiguration annotation:

@Configuration
@EnableAutoConfiguration
@ImportResource("classpath:beans.xml")
public class SpringBootXmlApplication implements CommandLineRunner {
    // ...
}

This annotation enables auto-configuration and attempts to configure beans.

4. Recommended Approach

We can continue using XML configuration files. But we can also consider moving all configuration to JavaConfig for a couple of reasons. First, configuring the beans in Java is type-safe, so we'll catch type errors at compile time. Also, XML configuration can grow quite large, making it difficult to maintain.

5. Conclusion

In this article, we saw how to use XML configuration files to define our beans in a Spring Boot application. As always, the source code of the example we used is available over on GitHub.

Introduction to Transactions in Java and Spring

$
0
0

1. Introduction

In this tutorial, we'll understand what is meant by transactions in Java. Thereby we'll understand how to perform resource local transactions and global transactions. This will also allow us to explore different ways to manage transactions in Java and Spring.

2. What is a Transaction?

Transactions in Java, as in general refer to a series of actions that must all complete successfully. Hence, if one or more action fails, all other actions must back out leaving the state of the application unchanged. This is necessary to ensure that the integrity of the application state is never compromised.

Also, these transactions may involve one or more resources like database, message queue, giving rise to different ways to perform actions under a transaction. These include performing resource local transactions with individual resources. Alternatively, multiple resources can participate in a global transaction.

3. Resource Local Transactions

We'll first explore how can we use transactions in Java while working with individual resources. Here, we may have multiple individual actions that we perform with a resource like a database. But, we may want them to happen as a unified whole, as in an indivisible unit of work. In other words, we want these actions to happen under a single transaction.

In Java, we have several ways to access and operate on a resource like a database. Hence, the way we deal with transactions is also not the same. In this section, we'll find how we can use transactions with some of these libraries in Java which are quite often used.

3.1. JDBC

Java Database Connectivity (JDBC) is the API in Java that defines how to access databases in Java. Different database vendors provide JDBC drivers for connecting to the database in a vendor-agnostic manner. So, we retrieve a Connection from a driver to perform different operations on the database:

JDBC provides us the options to execute statements under a transaction. The default behavior of a Connection is auto-commit. To clarify, what this means is that every single statement is treated as a transaction and is automatically committed right after execution.

However, if we wish to bundle multiple statements in a single transaction, this is possible to achieve as well:

Connection connection = DriverManager.getConnection(CONNECTION_URL, USER, PASSWORD);
try {
    connection.setAutoCommit(false);
    PreparedStatement firstStatement = connection .prepareStatement("firstQuery");
    firstStatement.executeUpdate();
    PreparedStatement secondStatement = connection .prepareStatement("secondQuery");
    secondStatement.executeUpdate();
    connection.commit();
} catch (Exception e) {
    connection.rollback();
}

Here, we have disabled the auto-commit mode of Connection. Hence, we can manually define the transaction boundary and perform a commit or rollback. JDBC also allows us to set a Savepoint that provides us more control over how much to rollback.

3.2. JPA

Java Persistence API (JPA) is a specification in Java that can be used to bridge the gap between object-oriented domain models and relational database systems. So, there are several implementations of JPA available from third parties like Hibernate, EclipseLink, and iBatis.

In JPA, we can define regular classes as an Entity that provides them persistent identity. The EntityManager class provides the necessary interface to work with multiple entities within a persistence context. The persistence context can be thought of as a first-level cache where entities are managed:

The persistence context here can be of two types, transaction-scoped or extended-scoped. A transaction-scoped persistence context is bound to a single transaction. While the extended-scoped persistence context can span across multiple transactions. The default scope of a persistence context is transaction-scope.

Let's see how can we create an EntityManager and define a transaction boundary manually:

EntityManagerFactory entityManagerFactory = Persistence.createEntityManagerFactory("jpa-example");
EntityManager entityManager = entityManagerFactory.createEntityManager();
try {
    entityManager.getTransaction().begin();
    entityManager.persist(firstEntity);
    entityManager.persist(secondEntity);
    entityManager.getTransaction().commit();
} catch (Exceotion e) {
    entityManager.getTransaction().rollback();
}

Here, we're creating an EntityManager from EntityManagerFactory within the context of a transaction-scoped persistence context. Then we're defining the transaction boundary with begin, commit, and rollback methods.

3.3. JMS

Java Messaging Service (JMS) is a specification in Java that allows applications to communicate asynchronously using messages. The API allows us to create, send, receive, and read messages from a queue or topic. There are several messaging services that conform to JMS specifications including OpenMQ, and ActiveMQ.

The JMS API supports bundling multiple send or receives operations in a single transaction. However, by the nature of message-based integration architecture, production and consumption of a message cannot be part of the same transaction. The scope of the transaction remains between the client and the JMS provider:


JMS allows us to create a Session from a Connection that we obtain from a vendor-specific ConnectionFactory. We have an option to create a Session that is transacted or not. For non-transaction Sessions, we can further define an appropriate acknowledge mode as well.

Let's see how we can create a transacted Session to send multiple messages under a transaction:

ActiveMQConnectionFactory connectionFactory = new ActiveMQConnectionFactory(CONNECTION_URL);
Connection connection = = connectionFactory.createConnection();
connection.start();
try {
    Session session = connection.createSession(true, 0);
    Destination = destination = session.createTopic("TEST.FOO");
    MessageProducer producer = session.createProducer(destination);
    producer.send(firstMessage);
    producer.send(secondMessage);
    session.commit();
} catch (Exception e) {
    session.rollback();
}

Here, we're creating a MessageProducer for the Destination of the type of topic. We get the Destination from the Session we created earlier. We further use Session to define transaction boundaries using the methods commit and rollback.

4. Global Transactions

As we saw resource local transactions allow us to perform multiple operations within a single resource as a unified whole. But, quite often we deal with operations that span across multiple resources. For instance, operation in two different databases or a database and a message queue. Here, local transaction support within resources will not be sufficient for us.

What we need in these scenarios is a global mechanism to demarcate transactions spanning multiple participating resources. This is often known as distributed transactions and there are specifications that have been proposed to deal with them effectively.

The XA Specification is one such specification which defines a transaction manager to control transaction across multiple resources. Java has quite mature support for distributed transactions conforming to the XA Specification through the components JTA and JTS.

4.1. JTA

Java Transaction API (JTA) is a Java Enterprise Edition API developed under the Java Community Process. It enables Java applications and application servers to perform distributed transactions across XA resources. JTA is modeled around XA architecture, leveraging two-phase commit.

JTA specifies standard Java interfaces between a transaction manager and the other parties in a distributed transaction:

Let's understand some of the key interfaces highlighted above:

  • TransactionManager: An interface which allows an application server to demarcate and control transactions
  • UserTransaction: This interface allows an application program to demarcate and control transactions explicitly
  • XAResource: The purpose of this interface is to allow a transaction manager to work with resource managers for XA-compliant resources

4.2. JTS

Java Transaction Service (JTS) is a specification for building the transaction manager that maps to the OMG OTS specification. JTS uses the standard CORBA ORB/TS interfaces and Internet Inter-ORB Protocol (IIOP) for transaction context propagation between JTS transaction managers.

At a high level, it supports the Java Transaction API (JTA). A JTS transaction manager provides transaction services to the parties involved in a distributed transaction:

Services that JTS provides to an application are largely transparent and hence we may not even notice them in the application architecture. JTS is architected around an application server which abstracts all transaction semantics from the application programs.

5. JTA Transaction Management

Now it's time to understand how we can manage a distributed transaction using JTA. Distributed transactions are not trivial solutions and hence have cost implications as well. Moreover, there are multiple options that we can choose from to include JTA in our application. Hence, our choice must be in the view of overall application architecture and aspirations.

5.1. JTA in Application Server

As we have seen earlier, JTA architecture relies on the application server to facilitate a number of transaction-related operations. One of the key services it relies on the server to provide is a naming service through JNDI. This is where XA resources like data sources are bound to and retrieved from.

Apart from this, we have a choice in terms of how we want to manage the transaction boundary in our application. This gives rise to two types of transactions within the Java application server:

  • Container-managed Transaction: As the name suggests, here the transaction boundary is set by the application server. This simplifies the development of Enterprise Java Beans (EJB) as it does not include statements related to transaction demarcation and relies solely on the container to do so. However, this does not provide enough flexibility for the application.
  • Bean-managed Transaction: Contrary to the container-managed transaction, in a bean-managed transaction EJBs contain the explicit statements to define the transaction demarcation. This provides precise control to the application in marking the boundaries of the transaction, albeit at the cost of more complexity.

One of the main drawbacks of performing transactions in the context of an application server is that the application becomes tightly coupled with the server. This has implications with respect to testability, manageability, and portability of the application. This is more profound in microservice architecture where the emphasis is more on developing server-neutral applications.

5.2. JTA Standalone

The problems we discussed in the last section have provided a huge momentum towards creating solutions for distributed transactions that does not rely on an application server. There are several options available to us in this regard, like using transaction support with Spring or use a transaction manager like Atomikos.

Let's see how we can use a transaction manager like Atomikos to facilitate a distributed transaction with a database and a message queue. One of the key aspects of a distributed transaction is enlisting and delisting the participating resources with the transaction monitor. Atomikos takes care of this for us. All we have to do is use Atomikos-provided abstractions:

AtomikosDataSourceBean atomikosDataSourceBean = new AtomikosDataSourceBean();
atomikosDataSourceBean.setXaDataSourceClassName("com.mysql.cj.jdbc.MysqlXADataSource");
DataSource dataSource = atomikosDataSourceBean;

Here, we are creating an instance of AtomikosDataSourceBean and registering the vendor-specific XADataSource. From here on, we can continue using this like any other DataSource and get the benefits of distributed transactions.

Similarly, we have an abstraction for message queue which takes care of registering the vendor-specific XA resource with the transaction monitor automatically:

AtomikosConnectionFactoryBean atomikosConnectionFactoryBean = new AtomikosConnectionFactoryBean();
atomikosConnectionFactoryBean.setXaConnectionFactory(new ActiveMQXAConnectionFactory());
ConnectionFactory connectionFactory = atomikosConnectionFactoryBean;

Here, we are creating an instance of AtomikosConnectionFactoryBean and registering the XAConnectionFactory from an XA-enabled JMS vendor. After this, we can continue to use this as a regular ConnectionFactory.

Now, Atomikos provides us the last piece of the puzzle to bring everything together, an instance of UserTransaction:

UserTransaction userTransaction = new UserTransactionImp();

Now, we are ready to create an application with distributed transaction spanning across our database and the message queue:

try {
    userTransaction.begin();

    java.sql.Connection dbConnection = dataSource.getConnection();
    PreparedStatement preparedStatement = dbConnection.prepareStatement(SQL_INSERT);
    preparedStatement.executeUpdate();

    javax.jms.Connection mbConnection = connectionFactory.createConnection();
    Session session = mbConnection.createSession(true, 0);
    Destination destination = session.createTopic("TEST.FOO");
    MessageProducer producer = session.createProducer(destination);
    producer.send(MESSAGE);

    userTransaction.commit();
} catch (Exception e) {
    userTransaction.rollback();
}

Here, we are using the methods begin and commit in the class UserTransaction to demarcate the transaction boundary. This includes saving a record in the database as well as publishing a message to the message queue.

6. Transactions Support in Spring

We have seen that handling transactions are rather an involved task which includes a lot of boilerplate coding and configurations. Moreover, each resource has its own way of handling local transactions. In Java, JTA abstracts us from these variations but further brings provider-specific details and the complexity of the application server.

Spring platform provides us a much cleaner way of handling transactions, both resource local and global transactions in Java. This together with the other benefits of Spring creates a compelling case for using Spring to handle transactions. Moreover, it's quite easy to configure and switch a transaction manager with Spring, which can be server provided or standalone.

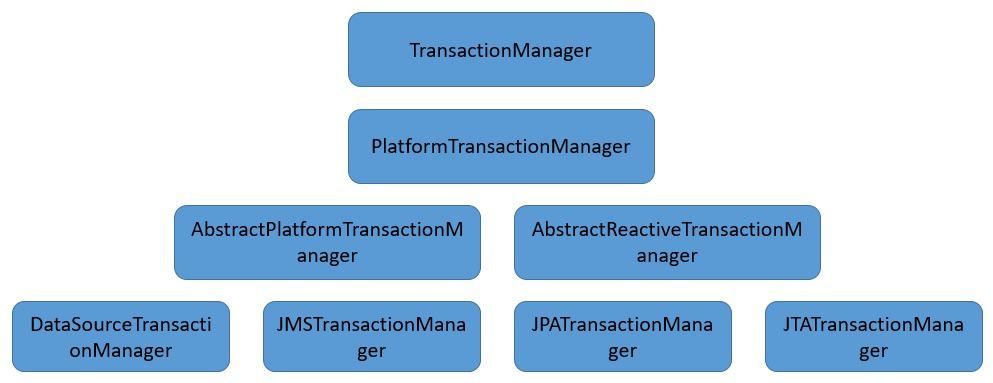
Spring provides us this seamless abstraction by creating a proxy for the methods with transactional code. The proxy manages the transaction state on behalf of the code with the help of TransactionManager:

The central interface here is PlatformTransactionManager which has a number of different implementations available. It provides abstractions over JDBC (DataSource), JMS, JPA, JTA, and many other resources.

6.1. Configurations

Let's see how we can configure Spring to use Atomikos as a transaction manager and provide transactional support for JPA and JMS. We'll begin by defining a PlatformTransactionManager of the type JTA:

@Bean
public PlatformTransactionManager platformTransactionManager() throws Throwable {
    return new JtaTransactionManager(
                userTransaction(), transactionManager());
}

Here, we are providing instances of UserTransaction and TransactionManager to JTATransactionManager. These instances are provided by a transaction manager library like Atomikos:

@Bean
public UserTransaction userTransaction() {
    return new UserTransactionImp();
}

@Bean(initMethod = "init", destroyMethod = "close")
public TransactionManager transactionManager() {
    return new UserTransactionManager();
}

The classes UserTransactionImp and UserTransactionManager are provided by Atomikos here.

Further, we need to define the JmsTemplete which the core class allowing synchronous JMS access in Spring:

@Bean
public JmsTemplate jmsTemplate() throws Throwable {
    return new JmsTemplate(connectionFactory());
}

Here, ConnectionFactory is provided by Atomikos where it enables distributed transaction for Connection provided by it:

@Bean(initMethod = "init", destroyMethod = "close")
public ConnectionFactory connectionFactory() {
    ActiveMQXAConnectionFactory activeMQXAConnectionFactory = new 
ActiveMQXAConnectionFactory();
    activeMQXAConnectionFactory.setBrokerURL("tcp://localhost:61616");
    AtomikosConnectionFactoryBean atomikosConnectionFactoryBean = new AtomikosConnectionFactoryBean();
    atomikosConnectionFactoryBean.setUniqueResourceName("xamq");
    atomikosConnectionFactoryBean.setLocalTransactionMode(false);
atomikosConnectionFactoryBean.setXaConnectionFactory(activeMQXAConnectionFactory);
    return atomikosConnectionFactoryBean;
}

So, as we can see, here we are wrapping a JMS provider-specific XAConnectionFactory with AtomikosConnectionFactoryBean.

Next, we need to define an AbstractEntityManagerFactoryBean that is responsible for creating JPA EntityManagerFactory bean in Spring:

@Bean
public LocalContainerEntityManagerFactoryBean entityManager() throws SQLException {
    LocalContainerEntityManagerFactoryBean entityManager = new LocalContainerEntityManagerFactoryBean();
    entityManager.setDataSource(dataSource());
    Properties properties = new Properties();
    properties.setProperty( "javax.persistence.transactionType", "jta");
    entityManager.setJpaProperties(properties);
    return entityManager;
}

As before, the DataSource that we set in the LocalContainerEntityManagerFactoryBean here is provided by Atomikos with distributed transactions enabled:

@Bean(initMethod = "init", destroyMethod = "close")
public DataSource dataSource() throws SQLException {
    MysqlXADataSource mysqlXaDataSource = new MysqlXADataSource();
    mysqlXaDataSource.setUrl("jdbc:mysql://127.0.0.1:3306/test");
    AtomikosDataSourceBean xaDataSource = new AtomikosDataSourceBean();
    xaDataSource.setXaDataSource(mysqlXaDataSource);
    xaDataSource.setUniqueResourceName("xads");
    return xaDataSource;
}

Here again, we are wrapping the provider-specific XADataSource in AtomikosDataSourceBean.

6.2. Transaction Management

Having gone through all the configurations in the last section, we must feel quite overwhelmed! We may even question the benefits of using Spring after all. But do remember that all this configuration has enabled us abstraction from most of the provider-specific boilerplate and our actual application code does not need to be aware of that at all.

So, now we are ready to explore how to use transactions in Spring where we intend to update the database and publish messages. Spring provides us two ways to achieve this with their own benefits to choose from. Let's understand how we can make use of them:

  • Declarative Support

The easiest way to use transactions in Spring is with declarative support. Here, we have a convenience annotation available to be applied at the method or even at the class. This simply enables global transaction for our code:

@PersistenceContext
EntityManager entityManager;

@Autowired
JmsTemplate jmsTemplate;

@Transactional(propagation = Propagation.REQUIRED)
public void process(ENTITY, MESSAGE) {
   entityManager.persist(ENTITY);
   jmsTemplate.convertAndSend(DESTINATION, MESSAGE);
}

The simple code above is sufficient to allow a save-operation in the database and a publish-operation in message queue within a JTA transaction.

  • Programmatic Support

While the declarative support is quite elegant and simple, it does not offer us the benefit of controlling the transaction boundary more precisely. Hence, if we do have a certain need to achieve that, Spring offers programmatic support to demarcate transaction boundary:

@Autowired
private PlatformTransactionManager transactionManager;

public void process(ENTITY, MESSAGE) {
    TransactionTemplate transactionTemplate = new TransactionTemplate(transactionManager);
    transactionTemplate.executeWithoutResult(status -> {
        entityManager.persist(ENTITY);
        jmsTemplate.convertAndSend(DESTINATION, MESSAGE);
    });
}

So, as we can see, we have to create a TransactionTemplate with the available PlatformTransactionManager. Then we can use the TransactionTemplete to process a bunch of statements within a global transaction.

7. Afterthoughts

As we have seen that handling transactions, particularly those that span across multiple resources are complex. Moreover, transactions are inherently blocking which is detrimental to latency and throughput of an application. Further, testing and maintaining code with distributed transactions is not easy, especially if the transaction depends on the underlying application server. So, all in all, it's best to avoid transactions at all if we can!

But that is far from reality. In short, in real-world applications, we do often have a legitimate need for transactions. Although it's possible to rethink the application architecture without transactions, it may not always be possible. Hence, we must adopt certain best practices when working with transactions in Java to make our applications better:

  • One of the fundamental shifts we should adopt is to use standalone transaction managers instead of those provided by an application server. This alone can simplify our application greatly. Moreover, it's much suited for cloud-native microservice architecture.
  • Further, an abstraction layer like Spring can help us contain the direct impact of providers like JPA or JTA providers. So, this can enable us to switch between providers without much impact on our business logic. Moreover, it takes away the low-level responsibilities of managing the transaction state from us.
  • Lastly, we should be careful in picking the transaction boundary in our code. Since transactions are blocking, it's always better to keep the transaction boundary as restricted as possible. If necessary we should prefer programmatic over declarative control for transactions.

8. Conclusion

To sum up, in this tutorial we discussed transactions in the context of Java. We went through support for individual resource local transactions in Java for different resources. We also went through the ways to achieve global transactions in Java.

Further, we went through different ways to manage global transactions in Java. Also, we understood how Spring makes using transactions in Java easier for us.

Finally, we went through some of the best practices when working with transactions in Java.

Difference in Used, Committed, and Max Heap Memory

$
0
0

1. Overview

In this short article, we're going to see the difference between various memory size metrics in the JVM.

First, we'll talk about how adaptive sizing works, and then we'll evaluate the difference between max, used, and committed sizes.

2. Max Size and Adaptive Sizing

Two values control the size of the JVM heap: one initial value specified via the -Xms flag and another maximum value controlled by the -Xmx tuning flag.

If we don't specify these flags, then the JVM will choose default values for them. These default values depend on the underlying OS, amount of available RAM, and, of course, the JVM implementation itself:Intial Size


Regardless of the actual size and default values, the heap size starts with an initial size. As we allocate more objects, the heap size may grow to accommodate for that. The heap size, however, can't go beyond the maximum heap size.

Put simply, the max heap size is the size specified via the -Xmx flag. Also, when we don't explicitly specify the -Xmx, the JVM calculates a default max size.

3. Used Size

Now, let's suppose we allocated a few objects since the program started. The heap size may grow a bit to accommodate for new objects:

Used Space

The used space is the amount of memory that is currently occupied by Java objects. It's always less than or equal to the max size.

4. Committed Size

The committed size is the amount of memory guaranteed to be available for use by the Java virtual machine. The committed memory size is always greater than or equal to the used size.

5. Conclusion

In this short article, we saw the difference between max, used, and committed heap size.

A Guide to async-profiler

$
0
0

1. Overview

Java Sampling Profilers are usually designed using the JVM Tool Interface (JVMTI) and collect stack traces at a safepoint. Therefore, these sampling profilers can suffer from the safepoint bias problem.

For a holistic view of the application, we need a sampling profiler that doesn't require threads to be at safepoints and can collect the stack traces at any time to avoid the safepoint bias problem.

In this tutorial, we'll explore async-profiler along with various profiling techniques it offers.

2. async-profiler

async-profiler is a sampling profiler for any JDK based on the HotSpot JVM. It has low overhead and doesn't rely on JVMTI.

It avoids the safepoint bias problem by using the AsyncGetCallTrace API provided by HotSpot JVM to profile the Java code paths, and Linux's perf_events to profile the native code paths.

In other words, the profiler matches call stacks of both Java code and native code paths to produce accurate results.

3. Setup

3.1. Installation

First, we'll download the latest release of async-profiler based on our platform. Currently, it supports Linux and macOS platforms only.

Once downloaded, we can check if it's working on our platform:

$ ./profiler.sh --version
Async-profiler 1.7.1 built on May 14 2020
Copyright 2016-2020 Andrei Pangin

It's always a good idea to check all the options available with async-profiler beforehand:

$ ./profiler.sh
Usage: ./profiler.sh [action] [options] 
Actions:
  start             start profiling and return immediately
  resume            resume profiling without resetting collected data
  stop              stop profiling
  check             check if the specified profiling event is available
  status            print profiling status
  list              list profiling events supported by the target JVM
  collect           collect profile for the specified period of time
                    and then stop (default action)
Options:
  -e event          profiling event: cpu|alloc|lock|cache-misses etc.
  -d duration       run profiling for  seconds
  -f filename       dump output to 
  -i interval       sampling interval in nanoseconds
  -j jstackdepth    maximum Java stack depth
  -b bufsize        frame buffer size
  -t                profile different threads separately
  -s                simple class names instead of FQN
  -g                print method signatures
  -a                annotate Java method names
  -o fmt            output format: summary|traces|flat|collapsed|svg|tree|jfr
  -I include        output only stack traces containing the specified pattern
  -X exclude        exclude stack traces with the specified pattern
  -v, --version     display version string

  --title string    SVG title
  --width px        SVG width
  --height px       SVG frame height
  --minwidth px     skip frames smaller than px
  --reverse         generate stack-reversed FlameGraph / Call tree

  --all-kernel      only include kernel-mode events
  --all-user        only include user-mode events
  --cstack mode     how to traverse C stack: fp|lbr|no

 is a numeric process ID of the target JVM
      or 'jps' keyword to find running JVM automatically

Many of the shown options will come handy in the later sections.

3.2. Kernel Configuration

When using async-profiler on the Linux platform, we should make sure to configure our kernel to capture call stacks using the perf_events by all users:

First, we'll set the perf_event_paranoid to 1, which will allow the profiler to collect performance information:

$ sudo sh -c 'echo 1 >/proc/sys/kernel/perf_event_paranoid'

Then, we'll set the kptr_restrict to 0 to remove the restrictions on exposing kernel addresses:

$ sudo sh -c 'echo 0 >/proc/sys/kernel/kptr_restrict'

However, the async-profiler will work by itself on the macOS platform.

Now that our platform is ready, we can build our profiling application and run it using the Java command:

$ java -XX:+UnlockDiagnosticVMOptions -XX:+DebugNonSafepoints -jar path-to-jar-file

Here, we've started our profiling app using the -XX:+UnlockDiagnosticVMOptions -XX:+DebugNonSafepoints JVM flags that are highly recommended for accurate results.

Now that we're ready to profile our application, let's explore various types of profiling supported by the async-profiler.

4. CPU Profiling

Async-profiler collects sample stack traces of Java methods, including JVM code, native class, and kernel functions, when profiling CPU.

Let's profile our application using its PID:

$ ./profiler.sh -e cpu -d 30 -o summary 66959
Started [cpu] profiling
--- Execution profile --- 
Total samples       : 28

Frame buffer usage  : 0.069%

Here, we've defined the cpu profiling event by using the -e option. Then, we used the -d <duration> option to collect the sample for 30 seconds.

Last, the -o option is useful to define the output format like summary, HTML, traces, SVG, and tree.

Let's create the HTML output while CPU profiling our application:

$ ./profiler.sh -e cpu -d 30 -f cpu_profile.html 66959

Here, we can see the HTML output allows us to expand, collapse, and search the samples.

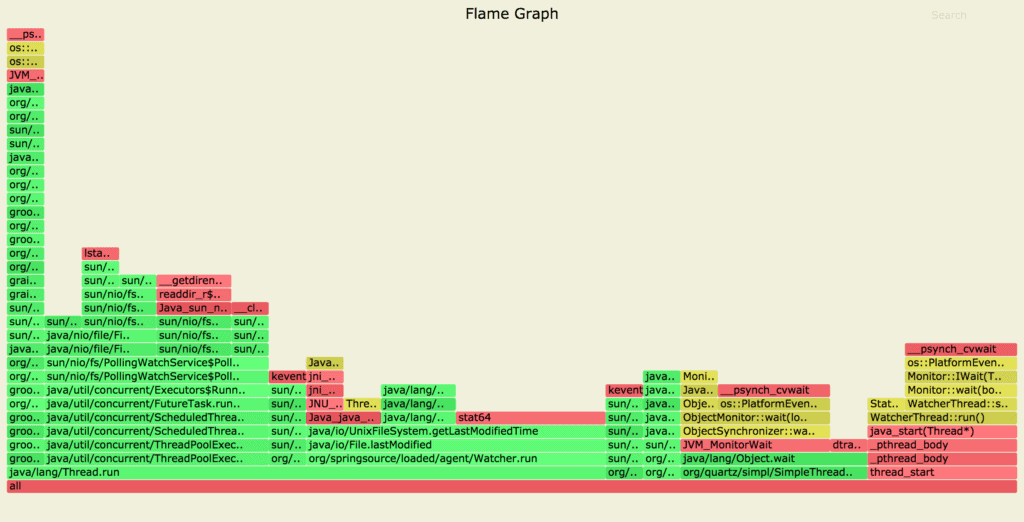
Additionally, async-profiler supports flame graphs out-of-the-box.

Let's generate a flame graph by using the .svg file extension for the CPU profile of our application:

$ ./profiler.sh -e cpu -d 30 -f cpu_profile.svg 66959

Here, the resulting flame graph shows Java code paths in green, C++ in yellow, and system code paths in red.

5. Allocation Profiling

Similarly, we can collect samples of memory allocation without using an intrusive technique like bytecode instrumentation.

async-profiler uses the TLAB (Thread Local Allocation Buffer) based sampling technique to collect the samples of the heap allocation above the average size of TLAB.

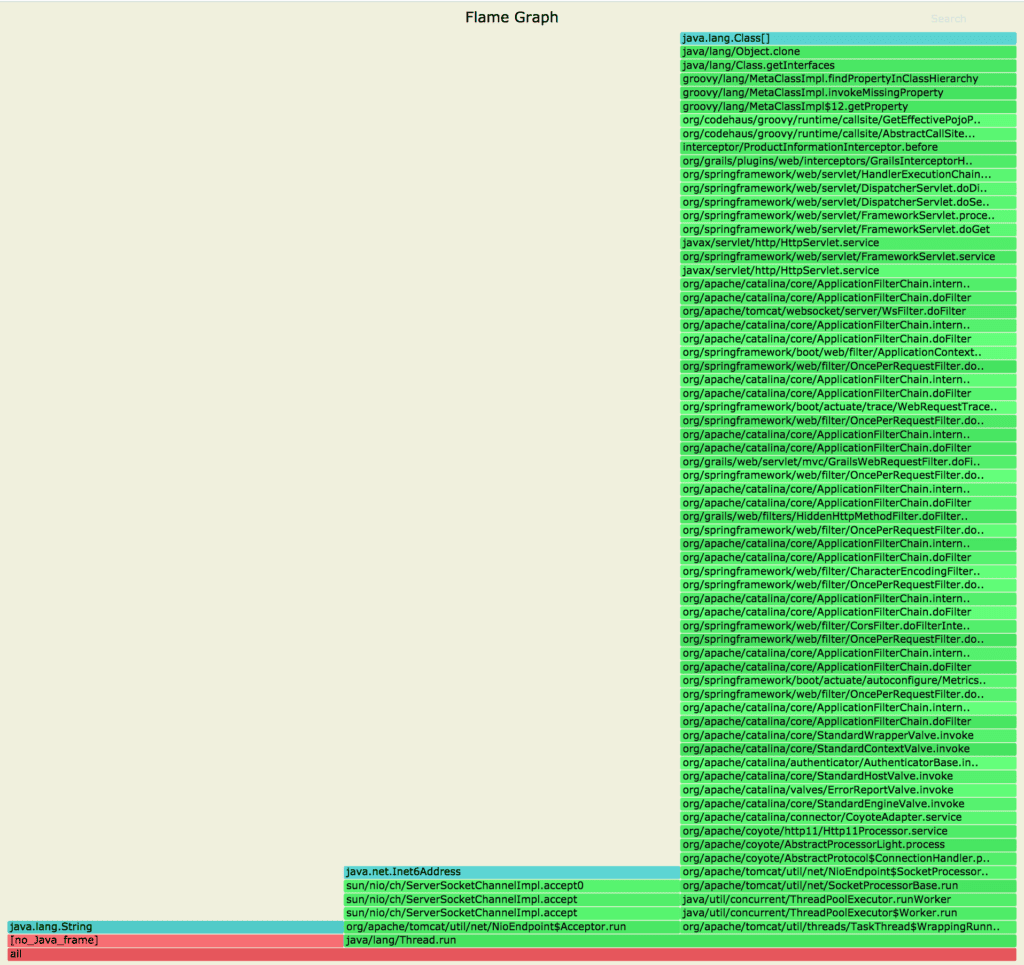
By using the alloc event, we can enable the profiler to collect heap allocations of our profiling application:

$ ./profiler.sh -e alloc -d 30 -f alloc_profile.svg 66255

Here, we can see the object cloning has allocated a large part of memory, which is otherwise hard to perceive when looking at the code.

6. Wall-Clock Profiling

Also, async-profiler can sample all threads irrespective of their status – like running, sleeping, or blocked – by using the wall-clock profile.

This can prove handy when troubleshooting issues in the application start-up time.

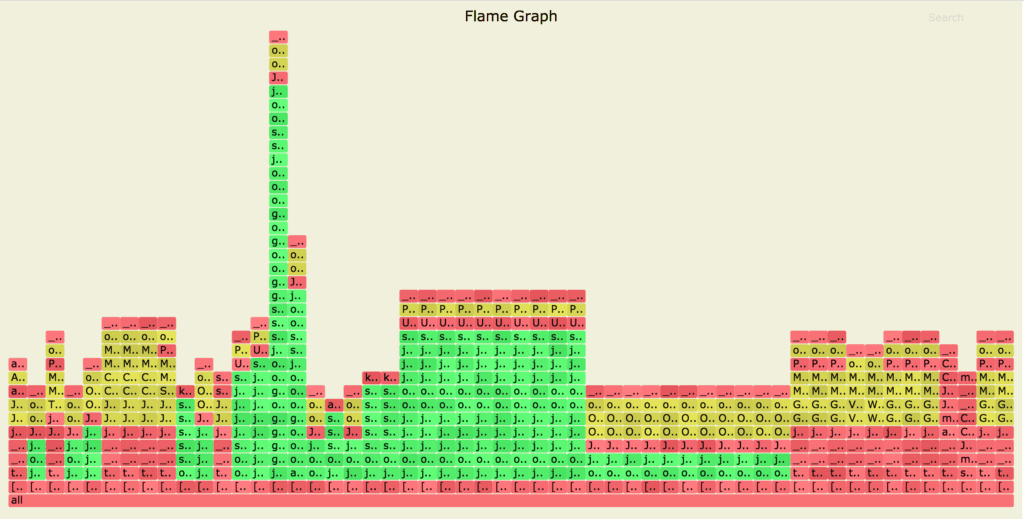
By defining the wall event, we can configure the profiler to collect samples of all threads:

$ ./profiler.sh -e wall -t -d 30 -f wall_clock_profile.svg 66959

Here, we've used the wall-clock profiler in per-thread mode by using the -t option, which is highly recommended when profiling all threads.

Additionally, we can check all profiling events supported by our JVM by using the list option:

$ ./profiler.sh list 66959
Basic events:
  cpu
  alloc
  lock
  wall
  itimer
Java method calls:
  ClassName.methodName

7. async-profiler With IntelliJ IDEA

IntelliJ IDEA features integration with async-profiler as a profiling tool for Java.

7.1. Profiler Configurations

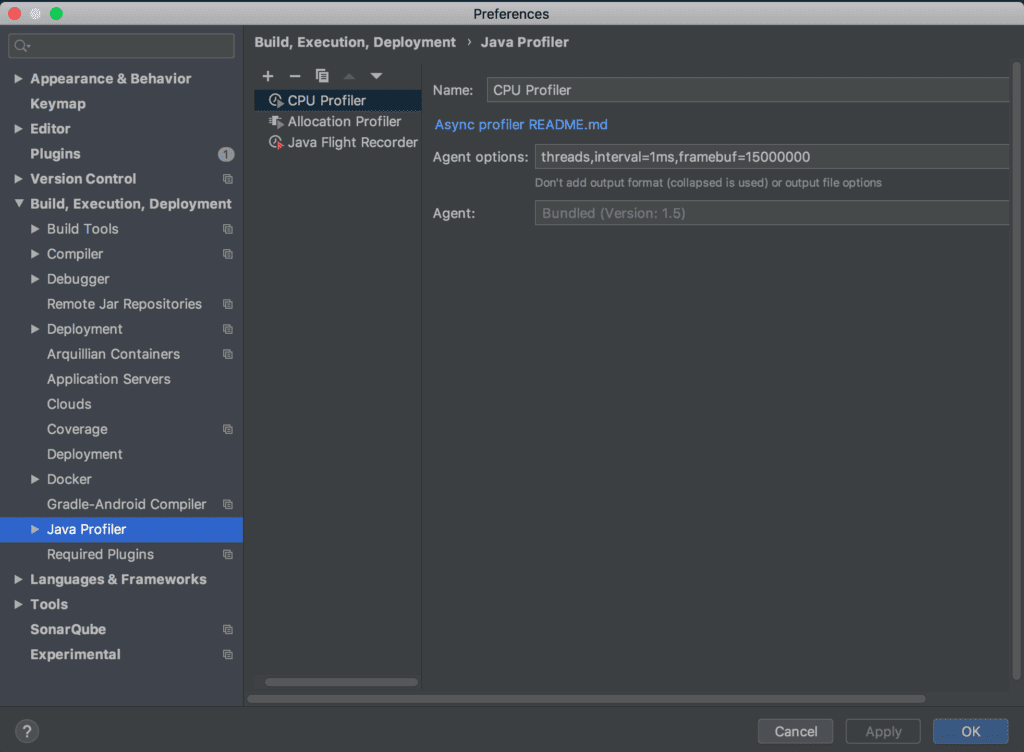
We can configure async-profiler in IntelliJ IDEA by selecting the Java Profiler menu option at Settings/Preferences > Build, Execution, Deployment:

Also, for quick usage, we can choose any pre-defined configuration, like the CPU Profiler and the Allocation Profiler that IntelliJ IDEA offers.

Similarly, we can copy a profiler template and edit the Agent options for specific use cases.

7.2. Profile Application Using IntelliJ IDEA

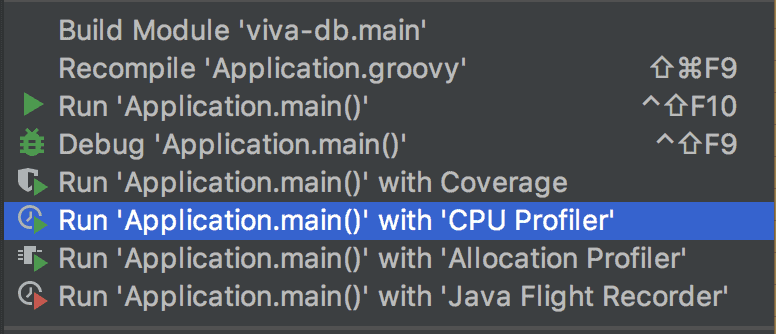
There are a few ways to analyze our application with a profiler.

For instance, we can select the application and choose Run <application name> with <profiler configuration name> option:

Or, we can click on the toolbar and choose the Run <application name> with <profiler configuration name> option:

Or, by choosing the Run with Profiler option under the Run menu, then selecting the <profiler configuration name>:

Additionally, we can see the option to Attach Profiler to Process under the Run menu. It opens a dialog that lets us choose the process to attach:

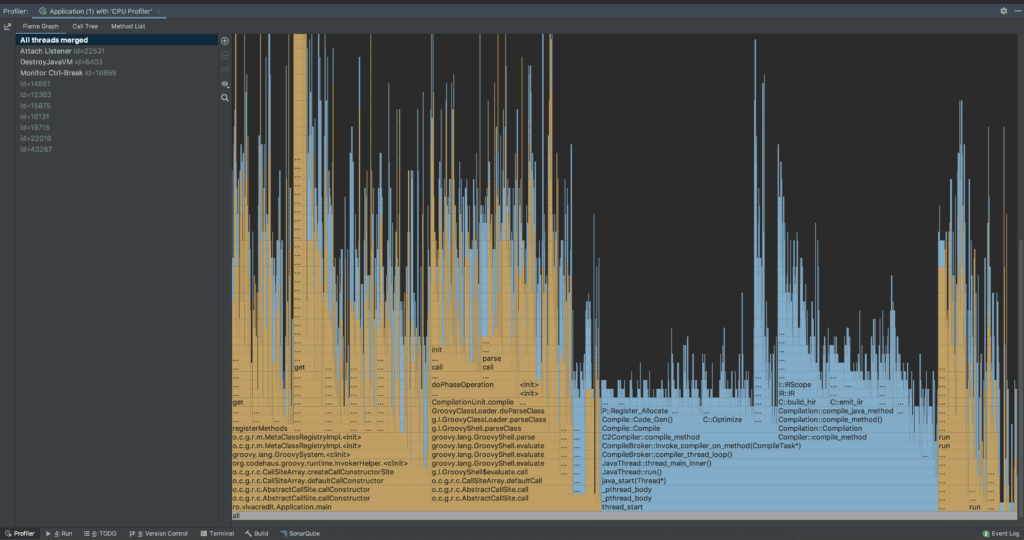
Once our application is profiled, we can analyze the profiling result using the Profiler tool window bar at the bottom of the IDE.

The profiling result of our application will look like:

It shows the thread wise results in different output formats like flame graphs, call trees, and method list.

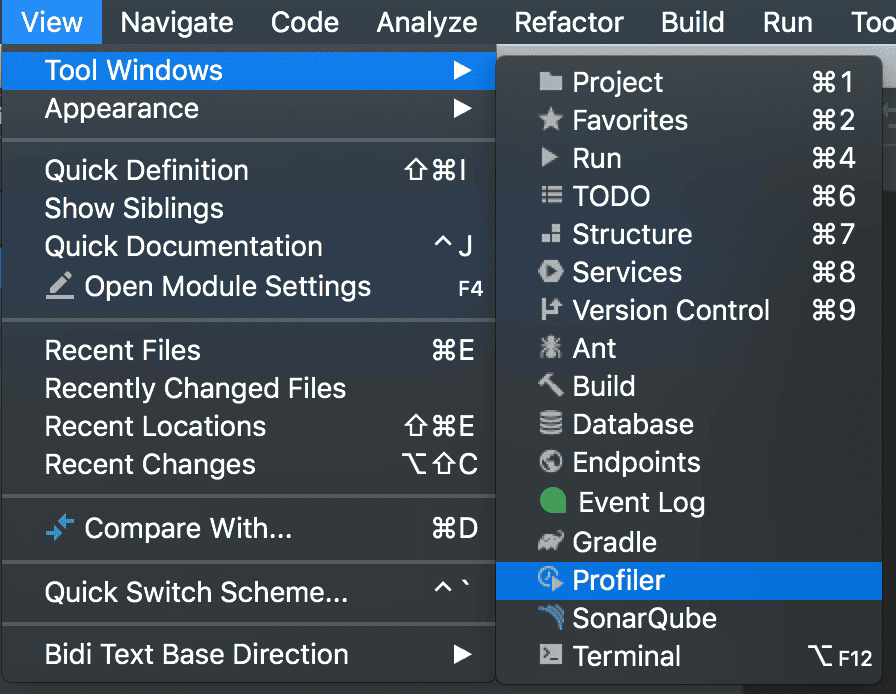
Alternatively, we can choose the Profiler option under the View > Tool Windows menu to see the results:

8. Conclusion

In this article, we explored the async-profiler, along with a few profiling techniques.

First, we've seen how to configure the kernel when using the Linux platform, and a few recommended JVM flags to start profiling our application with to obtain accurate results.

Then, we examined various types of profiling techniques like CPU, allocation, and wall-clock.

Last, we profiled an application with async-profiler using IntelliJ IDEA.

Performance Comparison of boolean[] vs BitSet

$
0
0

1. Overview

In this article, we're going to compare BitSets and boolean[] in terms of performance in different scenarios.

We usually use the term performance very loosely with different meanings in mind. Therefore, we'll start by looking at various definitions of the term “performance”.

Then, we're going to use two different performance metrics for benchmarks: memory footprint and throughput. To benchmark the throughput, we'll compare a few common operations on bit-vectors.

2. Definition of Performance

Performance is a very general term to refer to a wide range of “performance” related concepts!

Sometimes we use this term to talk about the startup speed of a particular application; that is, the amount of time the application takes before being able to respond to its first request.

In addition to startup speed, we may think about memory usage when we talk about performance. So the memory footprint is another aspect of this term.

It's possible to interpret the “performance” as how “fast” our code works. So the latency is yet another performance aspect.

For some applications, it's very critical to know the system capacity in terms of operations per second. So the throughput can be another aspect of performance.

Some applications only after responding to a few requests and getting “warmed up” technically speaking, can operate on their peak performance level. Therefore, time to peak performance is another aspect.

The list of possible definitions goes on and on! Throughout this article, however, we're going to focus on only two performance metrics: memory footprint and throughput.

3. Memory Footprint

Although we might expect booleans to consume just one bit, each boolean in a boolean[] consumes one byte of memory. This is mainly to avoid word tearing and accessibility issues. Therefore, if we need a vector of bits, boolean[] will have a pretty significant memory footprint.

To make matters more concrete, we can use Java Object Layout (JOL) to inspect the memory layout of a boolean[] with, say, 10,000 elements:

boolean[] ba = new boolean[10_000];
System.out.println(ClassLayout.parseInstance(ba).toPrintable());

This will print the memory layout:

[Z object internals:
 OFFSET  SIZE      TYPE DESCRIPTION               VALUE
      0     4           (object header)           01 00 00 00 (1)
      4     4           (object header)           00 00 00 00 (0)
      8     4           (object header)           05 00 00 f8 (-134217723)
     12     4           (object header)           10 27 00 00 (10000)
     16 10000   boolean [Z.                       N/A
Instance size: 10016 bytes

As shown above, this boolean[] consumes around 10 KB of memory.

On the other hand, BitSet is using a combination of primitive data types (specifically long) and bitwise operations to achieve the one bit per flag footprint. So a BitSet with 10,000 bits will consume much less memory compared to a boolean[] with the same size:

BitSet bitSet = new BitSet(10_000);
System.out.println(GraphLayout.parseInstance(bitSet).toPrintable());

Similarly, this will print the memory layout of the BitSet:

java.util.BitSet@5679c6c6d object externals:
          ADDRESS       SIZE TYPE             PATH      
        76beb8190         24 java.util.BitSet           
        76beb81a8       1272 [J               .words   

As expected, the BitSet with the same number of bits consumes around 1 KB, which is far less than the boolean[].

We can also compare the memory footprint for the different number of bits:

Path path = Paths.get("footprint.csv");
try (BufferedWriter stream = Files.newBufferedWriter(path, StandardOpenOption.CREATE)) {
    stream.write("bits,bool,bitset\n");

    for (int i = 0; i <= 10_000_000; i += 500) {
        System.out.println("Number of bits => " + i);

        boolean[] ba = new boolean[i];
        BitSet bitSet = new BitSet(i);

        long baSize = ClassLayout.parseInstance(ba).instanceSize();
        long bitSetSize = GraphLayout.parseInstance(bitSet).totalSize();

        stream.write((i + "," + baSize + "," + bitSetSize + "\n"));

        if (i % 10_000 == 0) {
            stream.flush();
        }
    }
}

The above code will compute the object size for both types of bit-vectors with different lengths. Then it writes and flushes the size comparisons to a CSV file.

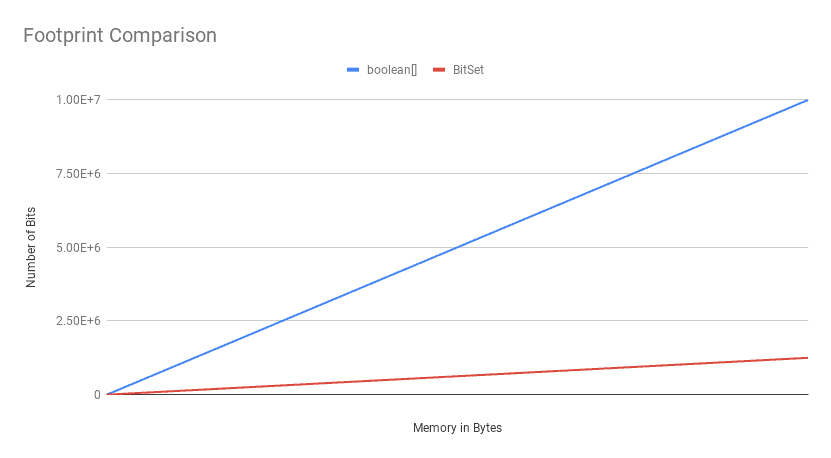
Now if we plot this CSV file, we'll see that the absolute difference in memory footprint grows with the number of bits:

Footprint Comparison

The key takeaway here is, the BitSet beats the boolean[] in terms of the memory footprint, except for a minimal number of bits.

4. Throughput

To compare the throughput of BitSet and boolean[] with each other, we'll conduct three benchmarks based on three different and yet everyday operations on bit-vectors:

  • Getting the value of a particular bit
  • Setting or clearing the value of a specific bit
  • Counting the number of set bits

This is the common setup we're going to use for the throughput comparison of bit-vectors with different lengths:

@State(Scope.Benchmark)
@BenchmarkMode(Mode.Throughput)
public class VectorOfBitsBenchmark {

    private boolean[] array;
    private BitSet bitSet;

    @Param({"100", "1000", "5000", "50000", "100000", "1000000", "2000000", "3000000",
      "5000000", "7000000", "10000000", "20000000", "30000000", "50000000", "70000000", "1000000000"})
    public int size;

    @Setup(Level.Trial)
    public void setUp() {
        array = new boolean[size];
        for (int i = 0; i < array.length; i++) {
            array[i] = ThreadLocalRandom.current().nextBoolean();
        }

        bitSet = new BitSet(size);
        for (int i = 0; i < size; i++) {
            bitSet.set(i, ThreadLocalRandom.current().nextBoolean());
        }
    }

    // omitted benchmarks
}

As shown above, we're creating boolean[]s and BitSets with lengths in the 100-1,000,000,000 range. Also, after setting a few bits in the setup process, we'll perform different operations on both the boolean[] and BitSets.

4.1. Getting a Bit

At first glance, the direct memory access in boolean[] seems to be more efficient than performing two bitwise operations per get in BitSets (left-shift plus an and operation). On the other hand, memory compactness of BitSets may allow them to fit more values inside a cache line.

Let's see which one wins! Here are the benchmarks that JMH will run with a different value of the size state each time:

@Benchmark
public boolean getBoolArray() {
    return array[ThreadLocalRandom.current().nextInt(size)];
}

@Benchmark
public boolean getBitSet() {
    return bitSet.get(ThreadLocalRandom.current().nextInt(size));
}

4.2. Getting a Bit: Throughput

We're going to run the benchmarks using the following command:

$ java -jar jmh-1.0-SNAPSHOT.jar -f2 -t4 -prof perfnorm -rff get.csv getBitSet getBoolArray

This will run the get-related benchmarks using four threads and two forks, profile their execution stats using the perf tool on Linux, and outputs the result into the bench-get.csv file. The “-prof perfnorm” will profile the benchmark using the perf tool on Linux and normalizes the performance counters based on the number of operations.

Since the command result is so verbose, we're going only to plot them here. Before that, let's see the basic structure of each benchmark result:

"Benchmark","Mode","Threads","Samples","Score","Score Error (99.9%)","Unit","Param: size"
"getBitSet","thrpt",4,40,184790139.562014,2667066.521846,"ops/s",100
"getBitSet:L1-dcache-load-misses","thrpt",4,2,0.002467,NaN,"#/op",100
"getBitSet:L1-dcache-loads","thrpt",4,2,19.050243,NaN,"#/op",100
"getBitSet:L1-dcache-stores","thrpt",4,2,6.042285,NaN,"#/op",100
"getBitSet:L1-icache-load-misses","thrpt",4,2,0.002206,NaN,"#/op",100
"getBitSet:branch-misses","thrpt",4,2,0.000451,NaN,"#/op",100
"getBitSet:branches","thrpt",4,2,12.985709,NaN,"#/op",100
"getBitSet:dTLB-load-misses","thrpt",4,2,0.000194,NaN,"#/op",100
"getBitSet:dTLB-loads","thrpt",4,2,19.132320,NaN,"#/op",100
"getBitSet:dTLB-store-misses","thrpt",4,2,0.000034,NaN,"#/op",100
"getBitSet:dTLB-stores","thrpt",4,2,6.035930,NaN,"#/op",100
"getBitSet:iTLB-load-misses","thrpt",4,2,0.000246,NaN,"#/op",100
"getBitSet:iTLB-loads","thrpt",4,2,0.000417,NaN,"#/op",100
"getBitSet:instructions","thrpt",4,2,90.781944,NaN,"#/op",100

As shown above, the result is a comma-separated list of fields each representing a metric. For instance, “thrpt” represents the throughput, “L1-dcache-load-misses” is the number of cache misses for the level 1 data cache, “L1-icache-load-misses” is the number of cache misses for the level 1 instruction cache, and “instructions” represents the number of CPU instructions for each benchmark. Also, the last field represents the number of bits, and the first one represents the benchmark method name.

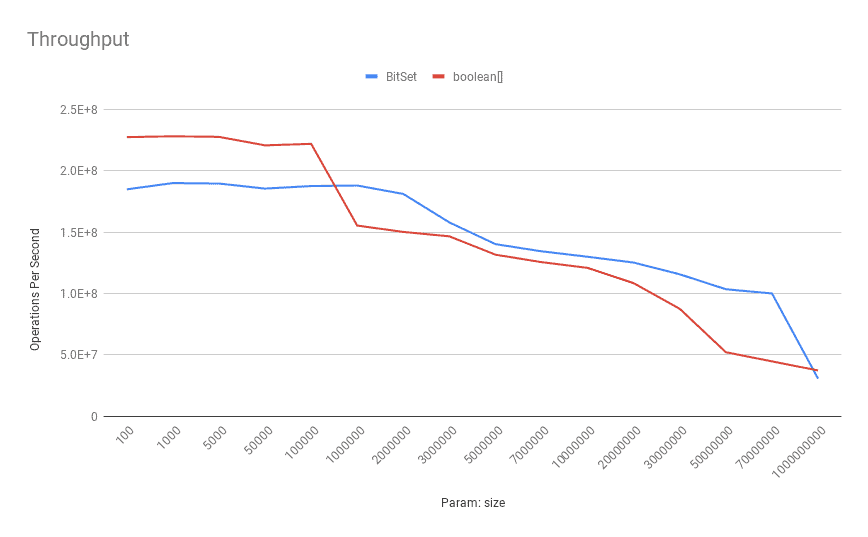
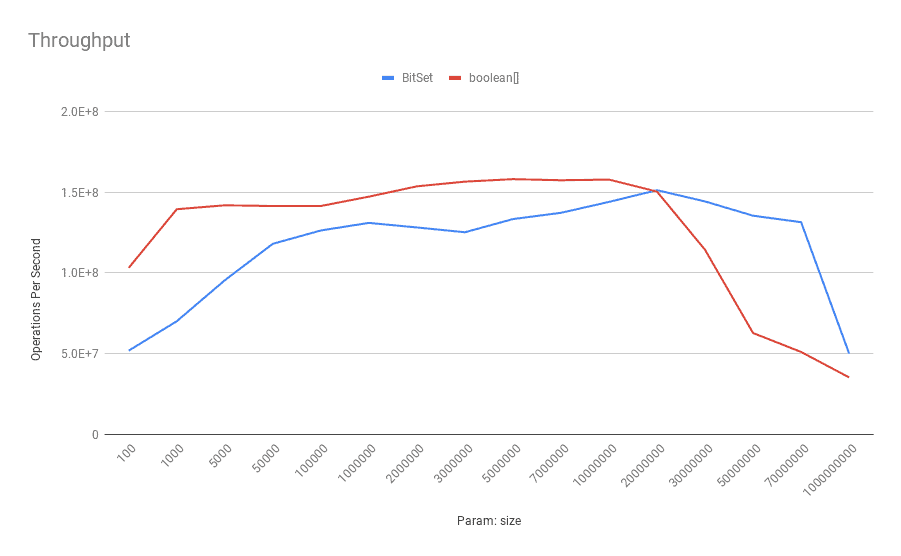
This is how the benchmark results look like for throughput on a typical Digitial Ocean droplet with a 4-core Intel(R) Xeon(R) CPU 2.20GHz:

Throughput-Get

As shown above, the boolean[] has a better throughput on smaller sizes. When the number of bits increases, the BitSet outperforms the boolean[] in terms of throughput. To be more specific, after 100,000 bits, the BitSet shows superior performance.

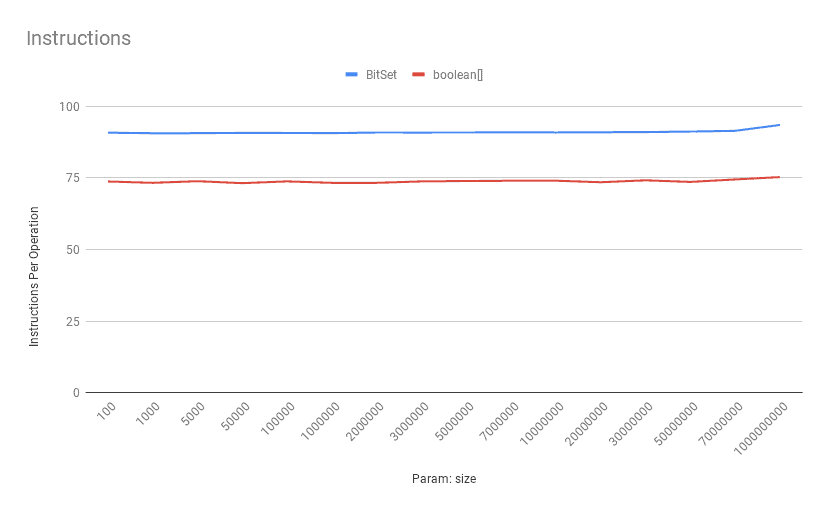
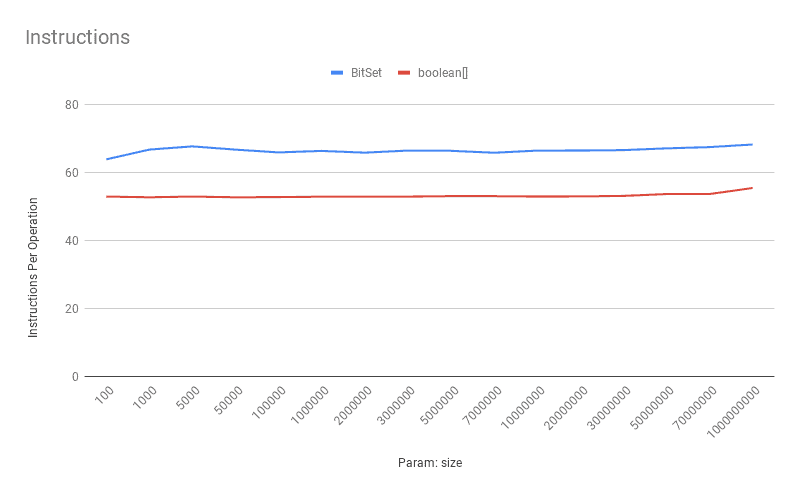
4.3. Getting a Bit: Instructions Per Operation

As we expected, the get operation on a boolean[] has fewer instructions per operation:

Instructions-Get

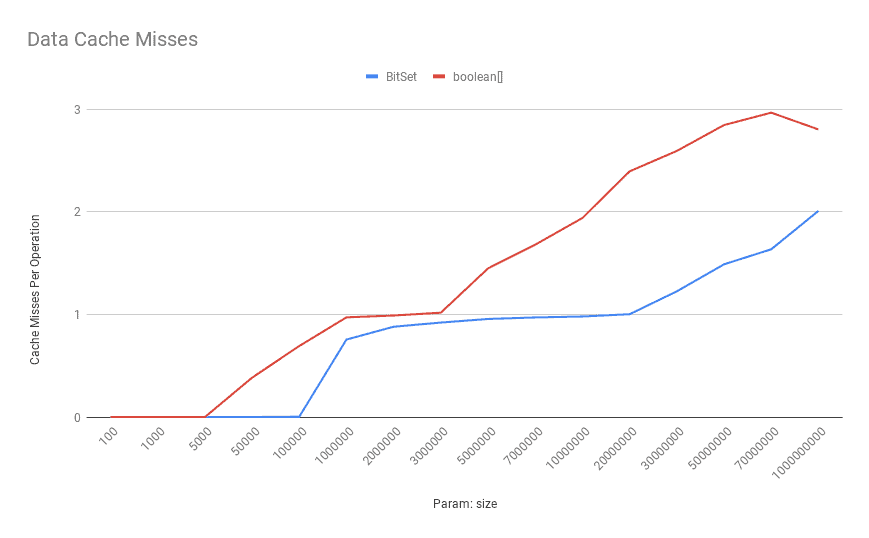
4.4. Getting a Bit: Data Cache Misses

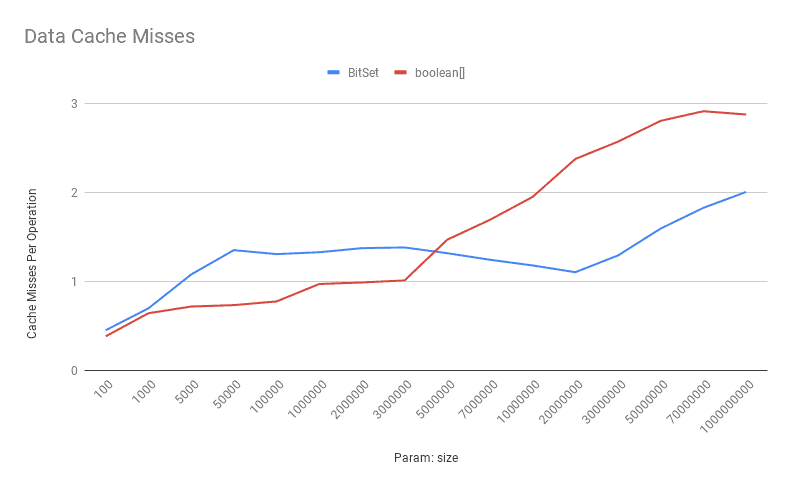
Now, let's see how data cache misses are looking for these bit-vectors:

Data Cache Misses GET

As shown above, the number of data cache misses for the boolean[] increases as the number of bits goes up.

So cache misses are much more expensive than executing more instructions here. Therefore, the BitSet API outperforms the boolean[] in this scenario most of the time.

4.5. Setting a Bit

To compare the throughput of set operations, we're going to use these benchmarks:

@Benchmark
public void setBoolArray() {
    int index = ThreadLocalRandom.current().nextInt(size);
    array[index] = true;
}

@Benchmark
public void setBitSet() {
    int index = ThreadLocalRandom.current().nextInt(size);
    bitSet.set(index);
}

Basically, we're picking a random bit index and set it to true. Similarly, we can run these benchmarks using the following command:

$ java -jar jmh-1.0-SNAPSHOT.jar -f2 -t4 -prof perfnorm -rff set.csv setBitSet setBoolArray

Let's see how the benchmark results look like for these operations in terms of throughput:

Throughput-Set

This time the boolean[] outperforms the BitSet most of the time except for the very large sizes. Since we can have more BitSet bits inside a cache line, the effect of cache misses and false sharing can be more significant in BitSet instances.

Here is the data cache miss comparison:

Data Cache Misses-Set

As shown above, the data cache misses for boolean[] is pretty low for low to a moderate number of bits. Again, when the number of bits increases, the boolean[] encounters more cache misses.

Similarly, the instructions per operation for boolean[] is reasonably less than the BitSet:

Instructions-Set

4.6. Cardinality

One of the other common operations in such bit-vectors is to count the number of set-bits. This time we're going to run these benchmarks:

@Benchmark
public int cardinalityBoolArray() {
    int sum = 0;
    for (boolean b : array) {
        if (b) sum++;
    }

    return sum;
}

@Benchmark
public int cardinalityBitSet() {
    return bitSet.cardinality();
}

Again we can run these benchmarks with the following command:

$ java -jar jmh-1.0-SNAPSHOT.jar -f2 -t4 -prof perfnorm -rff cardinal.csv cardinalityBitSet cardinalityBoolArray

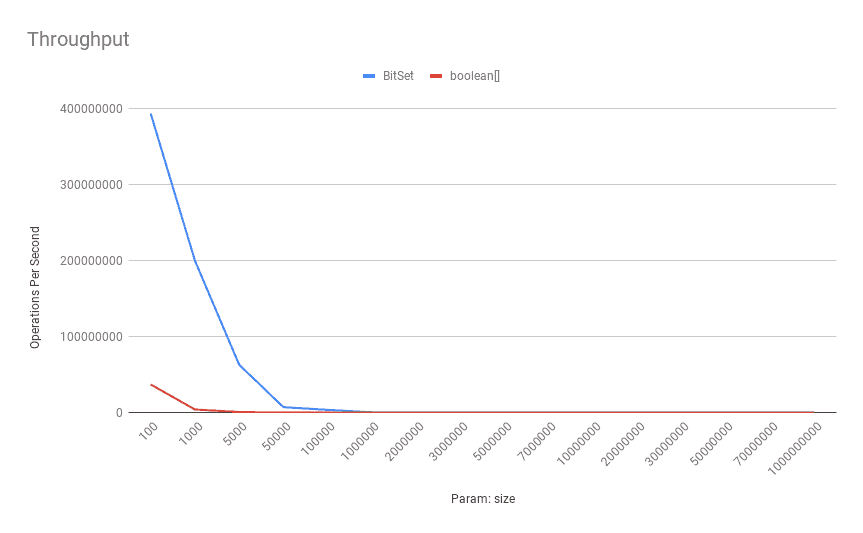
Here's what the throughput looks like for these benchmarks:

Throughput-Cardinal

In terms of cardinality throughput, the BitSet API outperforms the boolean[] almost all the time because it has much fewer iterations. To be more specific, the BitSet only has to iterate its internal long[] which has much less number of elements compared to the corresponding boolean[].

Also, because of this line and random distribution of set-bits in our bit-vectors:

if (b) {
    sum++;
}

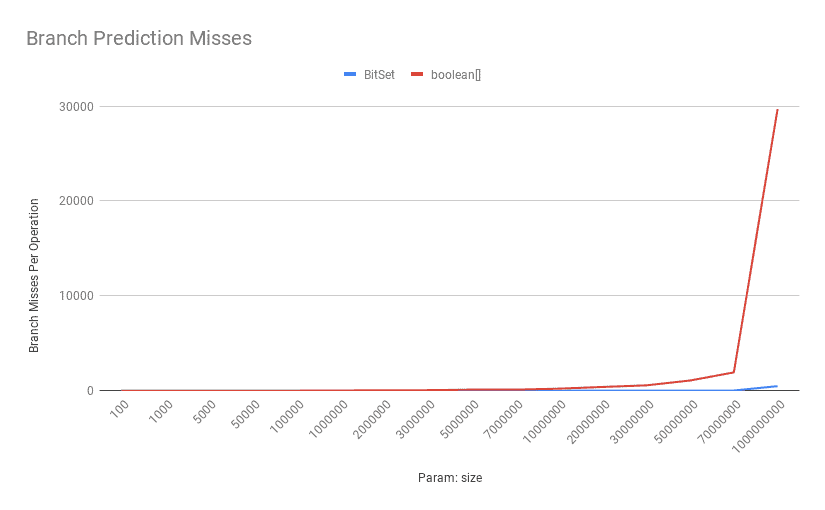
The cost of branch misprediction can be decisive, too:

Branch Prediction Misses

As shown above, as the number of bits increases, the number of mispredictions for the boolean[] goes up significantly.

5. Conclusion

In this article, we compared the throughput of BitSet and boolean[] in terms of three common operations: getting a bit, setting a bit, and calculating cardinality. In addition to throughput, we saw that the BitSet uses much less memory compared to a boolean[] with the same size.

To recap, in single-bit read-heavy scenarios, the boolean[] outperforms the BitSet in smaller sizes. However, when the number of bits increases, the BitSet has superior throughput.

Moreover, in single-bit write-heavy scenarios, the boolean[] exhibits a superior throughput almost all the time except for a very large number of bits. Also, in the batch read scenarios, the BitSet API completely dominates the boolean[] approach.

We used the JMH-perf integration to capture low-level CPU metrics such as L1 Data Cache Misses or Missed Branch Predictions. As of Linux 2.6.31, perf is the standard Linux profiler capable of exposing useful Performance Monitoring Counters or PMCs. It's also possible to use this tool separately. To see some examples of this standalone usage, it's highly recommended to read Branden Greg‘s blog.

As usual, all the examples are available over on GitHub. Moreover, the CSV results of all conducted benchmarks are also accessible on GitHub.


Flyway Repair With Spring Boot

$
0
0

1. Overview

Flyway migrations don't always go according to plan. In this tutorial, we'll explore the options we have for recovering from a failed migration.

2. Setup

Let's start with a basic Flyway configured Spring Boot project. It has the flyway-core, spring-boot-starter-jdbc, and flyway-maven-plugin dependencies.

For more configuration details please refer to our article that introduces Flyway.

2.1. Configuration

First, let's add two different profiles. This will enable us to easily run migrations against different database engines:

<profile>
    <id>h2</id>
    <activation>
        <activeByDefault>true</activeByDefault>
    </activation>
    <dependencies>
        <dependency>
            <groupId>com.h2database</groupId>
	    <artifactId>h2</artifactId>
        </dependency>
    </dependencies>
</profile>
<profile>
    <id>postgre</id>
    <dependencies>
        <dependency>
            <groupId>org.postgresql</groupId>
            <artifactId>postgresql</artifactId>
        </dependency>
    </dependencies>
</profile>

Let's also add the Flyway database configuration files for each of these profiles.

First, we create the application-h2.properties:

flyway.url=jdbc:h2:file:./testdb;DB_CLOSE_ON_EXIT=FALSE;AUTO_RECONNECT=TRUE;MODE=MySQL;DATABASE_TO_UPPER=false;
flyway.user=testuser
flyway.password=password

And after that, let's create the PostgreSQL application-postgre.properties:

flyway.url=jdbc:postgresql://127.0.0.1:5431/testdb
flyway.user=testuser
flyway.password=password

Note: We can either adjust the PostgreSQL configuration to match an alreay existing database, or we can use the docker-compose file in the code sample.

2.2. Migrations

Let's add our first migration file, V1_0__add_table.sql:

create table table_one (
  id numeric primary key
);

Now let's add a second migration file that contains an error, V1_1__add_table.sql:

create table table_one (
  id numeric primary key
);

We've made a mistake on purpose by using the same table name. This should lead to a Flyway migration error.

3. Run the Migrations

Now, let's run the application and try to apply the migrations.

First for the default h2 profile:

mvn spring-boot:run

Then for the postgre profile:

mvn spring-boot:run -Ppostgre

As expected, the first migration was successful, while the second failed:

Migration V1_1__add_table.sql failed
...
Message    : Table "TABLE_ONE" already exists; SQL statement:

3.1. Checking the State

Before moving on to repair the database, let's inspect the Flyway migration state by running:

mvn flyway:info -Ph2

This returns, as expected:

+-----------+---------+-------------+------+---------------------+---------+
| Category  | Version | Description | Type | Installed On        | State   |
+-----------+---------+-------------+------+---------------------+---------+
| Versioned | 1.0     | add table   | SQL  | 2020-07-17 12:57:35 | Success |
| Versioned | 1.1     | add table   | SQL  | 2020-07-17 12:57:35 | Failed  |
+-----------+---------+-------------+------+---------------------+---------+

But when we check the state for PostgreSQL with:

mvn flyway:info -Ppostgre

We notice the state of the second migration is Pending and not Failed:

+-----------+---------+-------------+------+---------------------+---------+
| Category  | Version | Description | Type | Installed On        | State   |
+-----------+---------+-------------+------+---------------------+---------+
| Versioned | 1.0     | add table   | SQL  | 2020-07-17 12:57:48 | Success |
| Versioned | 1.1     | add table   | SQL  |                     | Pending |
+-----------+---------+-------------+------+---------------------+---------+

The difference comes from the fact that PostgreSQL supports DDL transactions while others like H2 or MySQL don't. As a result, PostgreSQL was able to rollback the transaction for the failed migration. Let's see how this difference affects things when we try to repair the database.

3.2. Correct the Mistake and Re-Run the Migration

Let's fix the migration file V1_1__add_table.sql by correcting the table name from table_one to table_two.

Now, let's try and run the application again:

mvn spring-boot:run -Ph2

We now notice that the H2 migration fails with:

Validate failed: 
Detected failed migration to version 1.1 (add table)

Flyway will not re-run the version 1.1 migration as long as an already failed migration exists for this version.

On the other hand, the postgre profile ran successfully. As mentioned earlier, due to the rollback, the state was clean and ready to apply the corrected migration.

Indeed, by running mvn flyway:info -Ppostgre we can see both migrations applied with Success. So, in conclusion, for PostgreSQL, all we had to do was correct our migration script and re-trigger the migration.

4. Manually Repair the Database State

The first approach to repair the database state is to manually remove the Flyway entry from flyway_schema_history table.

Let's simply run this SQL statement against the database:

delete from flyway_schema_history where version = '1.1';

Now, when we run mvn spring-boot:run again, we see the migration successfully applied.

However, directly manipulating the database might not be ideal. So, let's see what other options we have.

5. Flyway Repair

5.1. Repair a Failed Migration

Let's move forward by adding another broken migration V1_2__add_table.sql file, running the application and getting back to a state where we have a failed migration.

Another way to repair the database state is by using the flyway:repair tool. After correcting the SQL file, instead of manually touching the flyway_schema_history table, we can instead run:

mvn flyway:repair

which will result in:

Successfully repaired schema history table "PUBLIC"."flyway_schema_history"

Behind the scenes, Flyway simply removes the failed migration entry from the flyway_schema_history table.

Now, we can run flyway:info again and see the state of the last migration changed from Failed to Pending.

Let's run the application again. As we can see, the corrected migration is now successfully applied.

5.2. Realign Checksums

It's generally recommended never to change successfully applied migrations. But there might be cases where there is no way around it.

So, in such a scenario, let's alter migration V1_1__add_table.sql by adding a comment at the beginning of the file.

Running the application now, we see a failure message like:

Migration checksum mismatch for migration version 1.1
-> Applied to database : 314944264
-> Resolved locally    : 1304013179

This happens because we altered an already applied migration and Flyway detects an inconsistency.

In order to realign the checksums, we can use the same flyway:repair command. However, this time no migration will be executed. Only the checksum of the version 1.1 entry in the flyway_schema_history table will be updated to reflect the updated migration file.

By running the application again, after the repair, we notice the application now starts successfully.

Note that, in this case, we've used flyway:repair via Maven. Another way is to install the Flyway command-line tool and run flyway repair. The effect is the same: flyway repair will remove failed migrations from the flyway_schema_history table and realign checksums of already applied migrations.

6. Flyway Callbacks

If we don't want to manually intervene, we could consider an approach to automatically clean the failed entries from the flyway_schema_history after a failed migration. For this purpose, we can use the afterMigrateError Flyway callback.

We first create the SQL callback file db/callback/afterMigrateError__repair.sql:

DELETE FROM flyway_schema_history WHERE success=false;

This will automatically remove any failed entry from the Flyway state history, whenever a migration error occurs.

Let's create an application-callbacks.properties profile configuration that will include the db/callback folder in the Flyway locations list:

spring.flyway.locations=classpath:db/migration,classpath:db/callback

And now, after adding yet another broken migration V1_3__add_table.sql, we run the application including the callbacks profile:

mvn spring-boot:run -Dspring-boot.run.profiles=h2,callbacks
...
Migrating schema "PUBLIC" to version 1.3 - add table
Migration of schema "PUBLIC" to version 1.3 - add table failed!
...
Executing SQL callback: afterMigrateError - repair

As expected, the migration failed but the afterMigrateError callback ran and cleaned up the flyway_schema_history.

Simply correcting the V1_3__add_table.sql migration file and running the application again will be enough to apply to corrected migration.

7. Summary

In this article, we looked at different ways of recovering from a failed Flyway migration.

We saw how a database like PostgreSQL – that is, one that supports DDL transactions – requires no additional effort to repair the Flyway database state.

On the other hand, for databases like H2 without this support, we saw how Flyway repair can be used to clean the Flyway history and eventually apply a corrected migration.

As always the complete code is available over on GitHub.

Java Weekly, Issue 345

$
0
0

1. Spring and Java

>> OpenJDK Comes to Windows 10 on ARM [infoq.com]

More contributions to the Java ecosystem from Microsoft: A distribution of OpenJDK for Windows on ARM CPU architectures.

>> Finalizing instanceof Pattern Matching and Records in JDK 16 [marxsoftware.blogspot.com]

After a few rounds of previews, Java 16 will ship with the final version of pattern matching for instanceof and records. A version to be excited about!

>> Request/Reply Pattern with Spring AMQP [reflectoring.io]

It's not always about pub-sub or fire-and-forget messaging: A practical guide on how to implement a request/reply communication style with Spring AMQP.

Also worth reading:

Webinars and presentations:

Time to upgrade:

2. Technical and Musings

>> Patterns of Distributed Systems [martinfowler.com]

An insightful take on how to cope with a few common challenges in distributed systems including network delays, process crashes, process pauses, and last but certainly not least, unsynchronized clocks.

>> More Uninterrupted Time At Work for You and Your Organization [phauer.com]

Lessons learned from working from home: A collection of cultural and organizational approaches to work effectively, both remote and on-site.

Also worth reading:

3. Comics

And my favorite Dilberts of the week:

>> Asok Analysis [dilbert.com]

>> Sarcasm Works Better [dilbert.com]

4. Pick of the Week

I'll pick DataDog again this week – with a strong focus on their solid logging support – as that's the main aspect of the platform I'm using right now:

>> Explore an easy-to-use, cost-effective log management solution from Datadog

Simply put – a really solid and mature end-to-end way to monitor your application, with full support for pretty much anything Java.

You can use their trial here.

Copy a Directory in Java

$
0
0

1. Introduction

In this short tutorial, we'll see how to copy a directory in Java, including all its files and subdirectories. This can be achieved by using core Java features or third-party libraries.

2. Using the java.nio API

Java NIO has been available since Java 1.4. Java 7 introduced NIO 2 that brought a lot of useful features like better support for handling symbolic links, file attributes access. It also provided us with classes such as Path, Paths, and Files that made file system manipulation much easier.

Let's demonstrate this approach:

public static void copyDirectory(String sourceDirectoryLocation, String destinationDirectoryLocation) 
  throws IOException {
    Files.walk(Paths.get(sourceDirectoryLocation))
      .forEach(source -> {
          Path destination = Paths.get(destinationDirectoryLocation, source.toString()
            .substring(sourceDirectoryLocation.length()));
          try {
              Files.copy(source, destination);
          } catch (IOException e) {
              e.printStackTrace();
          }
      });
}

In this example, we walked the file tree rooted at the given source directory using Files.walk() and invoked Files.copy() for each file or directory we found in the source directory.

3. Using the java.io API

Java 7 was a turning point from the file system management perspective since it introduced a lot of new handy features.

However, if we want to stay compatible with older Java versions, we can copy a directory using recursion and java.io.File features:

private static void copyDirectory(File sourceDirectory, File destinationDirectory) throws IOException {
    if (!destinationDirectory.exists()) {
        destinationDirectory.mkdir();
    }
    for (String f : sourceDirectory.list()) {
        copyDirectoryCompatibityMode(new File(sourceDirectory, f), new File(destinationDirectory, f));
    }
}

In this case, we'll create a directory in the destination directory for every directory in the source directory tree. Then we'll invoke the copyDirectoryCompatibityMode() method:

public static void copyDirectoryCompatibityMode(File source, File destination) throws IOException {
    if (source.isDirectory()) {
        copyDirectory(source, destination);
    } else {
        copyFile(source, destination);
    }
}

Also, let's see how to copy a file using FileInputStream and FileOutputStream:

private static void copyFile(File sourceFile, File destinationFile) 
  throws IOException {
    try (InputStream in = new FileInputStream(sourceFile); 
      OutputStream out = new FileOutputStream(destinationFile)) {
        byte[] buf = new byte[1024];
        int length;
        while ((length = in.read(buf)) > 0) {
            out.write(buf, 0, length);
        }
    }
}

4. Using Apache Commons IO

Apache Commons IO has a lot of useful features like utility classes, file filters, and file comparators. Here we'll be using FileUtils that provide methods for easy file and directory manipulation, i.e., reading, moving, copying.

Let's add commons-io to our pom.xml file:

<dependency>
    <groupId>commons-io</groupId>
    <artifactId>commons-io</artifactId>
    <version>2.7</version>
</dependency>

Finally, let's copy a directory using this approach:

public static void copyDirectory(String sourceDirectoryLocation, String destinationDirectoryLocation) throws IOException {
    File sourceDirectory = new File(sourceDirectoryLocation);
    File destinationDirectory = new File(destinationDirectoryLocation);
    FileUtils.copyDirectory(sourceDirectory, destinationDirectory);
}

As shown in the previous example, Apache Commons IO makes it all much easier, since we only need to call FileUtils.copyDirectory() method.

5. Conclusion

This article illustrated how to copy a directory in Java. Complete code samples are available over on GitHub.

Determine if an Object is of Primitive Type

$
0
0

1. Overview

Sometimes we need to determine if an object is of primitive type, especially for wrapper primitive types. However, there are no built-in methods in the standard JDK to achieve this.

In this quick tutorial, we'll see how to implement a solution using core Java. Then we'll take a look at how we can achieve this using a couple of commonly used libraries.

2. Primitives and Wrapper Classes

There are nine predefined objects to represent eight primitives and a void type in Java. Each primitive type has a corresponding Wrapper Class.

To learn more about Primitives and Objects, please see this article.

The java.lang.Class.isPrimitive() method can determine if the specified object represents a primitive type. However,  it does not work on the wrappers for primitives.

For example, the following statement returns false:

Integer.class.isPrimitive();

Now let's take a look at different ways we can achieve this.

3. Using Core Java

First, let's define a HashMap variable which stores the wrapper and the primitive type classes:

private static final Map<Class<?>, Class<?>> WRAPPER_TYPE_MAP;
static {
    WRAPPER_TYPE_MAP = new HashMap<Class<?>, Class<?>>(16);
    WRAPPER_TYPE_MAP.put(Integer.class, int.class);
    WRAPPER_TYPE_MAP.put(Byte.class, byte.class);
    WRAPPER_TYPE_MAP.put(Character.class, char.class);
    WRAPPER_TYPE_MAP.put(Boolean.class, boolean.class);
    WRAPPER_TYPE_MAP.put(Double.class, double.class);
    WRAPPER_TYPE_MAP.put(Float.class, float.class);
    WRAPPER_TYPE_MAP.put(Long.class, long.class);
    WRAPPER_TYPE_MAP.put(Short.class, short.class);
    WRAPPER_TYPE_MAP.put(Void.class, void.class);
}

If the object is a primitive wrapper class, we can look it up from the predefined HashMap variable with java.utils.Map.ContainsKey() method.

Now we can create a simple utility method to determine if the object source is of a primitive type:

public static boolean isPrimitiveType(Object source) {
    return WRAPPER_TYPE_MAP.containsKey(source.getClass());
}

Let's validate that this works as expected:

assertTrue(PrimitiveTypeUtil.isPrimitiveType(false));
assertTrue(PrimitiveTypeUtil.isPrimitiveType(1L));
assertFalse(PrimitiveTypeUtil.isPrimitiveType(StringUtils.EMPTY));

4. Using Apache Commons – ClassUtils.isPrimitiveOrWrapper()

Apache Commons Lang has a ClassUtils.isPrimitiveOrWrapper method that can be used to determine if a class is a primitive or a wrapper of primitive.

First, let's add the commons-lang3 dependency from Maven Central to our pom.xml:

<dependency>
    <groupId>org.apache.commons<groupId>
    <artifactId>commons-lang3<artifactId>
    <version>3.5<version>
<dependency>

Then let's test it:

assertTrue(ClassUtils.isPrimitiveOrWrapper(Boolean.False.getClass()));
assertTrue(ClassUtils.isPrimitiveOrWrapper(boolean.class));
assertFalse(ClassUtils.isPrimitiveOrWrapper(StringUtils.EMPTY.getClass()));

5. Using Guava – Primitives.isWrapperType()

Guava provides a similar implementation via the Primitives.isWrapperType method.

Again, let's add the dependency from Maven Central first:

<dependency>
    <groupId>com.google.guava<groupId>
    <artifactId>guava<artifactId>
    <version>29.0-jre<version>
<dependency>

Likewise, we can test it using:

assertTrue(Primitives.isWrapperType(Boolean.FALSE.getClass()));
assertFalse(Primitives.isWrapperType(StringUtils.EMPTY.getClass()));

However, the Primitives.isWrapperType method won't work on the primitive class, the following code will returns false:

assertFalse(Primitives.isWrapperType(boolean.class));

6. Conclusion

In this tutorial, we illustrated how to determine if an object can represent a primitive data type using our own implementation using Java. Then we took a look at a couple of popular libraries that provide utility methods for achieving this.

The complete code can be found over on Github.

Hypermedia Serialization With JSON-LD

$
0
0

1. Overview

JSON-LD is a JSON-based RDF format for representing Linked Data. It enables extending existing JSON objects with hypermedia capabilities; in other words, the capability to contain links in a machine-readable way.

In this tutorial, we'll look at a couple of Jackson-based options to serialize and deserialize the JSON-LD format directly into POJOs. We'll also cover the basic concepts of JSON-LD that will enable us to understand the examples.

2. Basic Concepts

The first time we see a JSON-LD document, we notice that some member names start with the @ character. These are JSON-LD keywords, and their values help us to understand the rest of the document.

To navigate the world of JSON-LD and to understand this tutorial, we need to be aware of four keywords:

  • @context is the description of the JSON object that contains a key-value map of everything needed for the interpretation of the document
  • @vocab is a possible key in @context that introduces a default vocabulary to make the @context object much shorter
  • @id is the keyword to identify links either as a resource property to represent the direct link to the resource itself or as a @type value to mark any field as a link
  • @type is the keyword to identify resource types either on the resource level or in the @context; for example, to define the type of embedded resources

3. Serialization in Java

Before we continue, we should take a look at our previous tutorials to refresh our memory on the Jackson ObjectMapper, Jackson Annotations, and custom Jackson Serializers.

Being already familiar with Jackson, we might realize that we could easily serialize two custom fields in any POJO as @id and @type using the @JsonProperty annotation. However, writing the @context by hand could be a lot of work and also prone to error.

Therefore, to avoid this error-prone approach, let's take a closer look at two libraries that we could use for @context generation. Unfortunately, neither one of them is capable of generating all features of JSON-LD, but we'll take a look at their shortcomings later as well.

4. Serialization With Jackson-Jsonld

Jackson-Jsonld is a Jackson module that enables the annotation of POJOs in a convenient way to generate JSON-LD documents.

4.1. Maven Dependencies

First, let's add jackson-jsonld as a dependency to the pom.xml:

<dependency>
    <groupId>com.io-informatics.oss</groupId>
    <artifactId>jackson-jsonld</artifactId>
    <version>0.1.1</version>
</dependency>

4.2. Example

Then, let's create our example POJO and annotate it for @context generation:

@JsonldResource
@JsonldNamespace(name = "s", uri = "http://schema.org/")
@JsonldType("s:Person")
@JsonldLink(rel = "s:knows", name = "knows", href = "http://example.com/person/2345")
public class Person {
    @JsonldId
    private String id;
    @JsonldProperty("s:name")
    private String name;

    // constructor, getters, setters
}

Let’s deconstruct the steps to understand what we've done:

  • With @JsonldResource we marked the POJO for processing as a JSON-LD resource
  • In the @JsonldNamespace we defined a shorthand for the vocabulary we want to use
  • The parameter we specified in @JsonldType will become the @type of the resource
  • We used the @JsonldLink annotation to add links to the resource. When processed, the name parameter will be used as a field name and also added as a key to the @context. href will be the field value and rel will be the mapped value in the @context
  • The field we marked with @JsonldId will become the @id of the resource
  • The parameter we specified in @JsonldProperty will become the value mapped to the field's name in the @context

Next, let's generate the JSON-LD document.

First, we should register the JsonldModule in the ObjectMapper. This module contains a custom Serializer that Jackson will use for POJOs marked with the @JsonldResource annotation.

Then, we'll continue and use the ObjectMapper to generate the JSON-LD document:

ObjectMapper objectMapper = new ObjectMapper();
objectMapper.registerModule(new JsonldModule());

Person person = new Person("http://example.com/person/1234", "Example Name");
String personJsonLd = objectMapper.writeValueAsString(person);

As a result, the personJsonLd variable should now contain:

{
  "@type": "s:Person",
  "@context": {
    "s": "http://schema.org/",
    "name": "s:name",
    "knows": {
      "@id": "s:knows",
      "@type": "@id"
    }
  },
  "name": "Example Name",
  "@id": "http://example.com/person/1234",
  "knows": "http://example.com/person/2345"
}

4.3. Considerations

Before we choose this library for a project, we should consider the following:

  • Using the @vocab keyword is not possible, so we'll have to either use the @JsonldNamespace to provide a shorthand for resolving field names or write out the full Internationalized Resource Identifier (IRI) every time
  • We can only define links at compile-time, so in order to add a link runtime, we would need to use reflection to change that parameter in the annotation

5. Serialization With Hydra-Jsonld

Hydra-Jsonld is a module of the Hydra-Java library, which is primarily built to enable convenient JSON-LD response creation for Spring applications. It uses the Hydra Vocabulary to make the JSON-LD documents more expressive.

However, the Hydra-Jsonld module contains a Jackson Serializer and some annotations that we can use to generate JSON-LD documents outside of the Spring Framework.

5.1. Maven Dependencies

First, let's add the dependency for hydra-jsonld to the pom.xml:

<dependency>
    <groupId>de.escalon.hypermedia</groupId>
    <artifactId>hydra-jsonld</artifactId>
    <version>0.4.2</version>
</dependency>

5.2. Example

Secondly, let's annotate our POJO for @context generation.

Hydra-Jsonld automatically generates a default @context without the need for annotations. If we're satisfied with the defaults, we only need to add the @id to get a valid JSON-LD document.

The default vocabulary will be the schema.org vocabulary, the @type the Java class name, and the public properties of the POJO will all be included in the resulting JSON-LD document.

In this example, let's override these defaults with custom values:

@Vocab("http://example.com/vocab/")
@Expose("person")
public class Person {
    private String id;
    private String name;

    // constructor

    @JsonProperty("@id")
    public String getId() {
        return id;
    }

    @Expose("fullName")
    public String getName() {
        return name;
    }
}

Again, let’s take a closer look at the steps involved:

  • Compared to the Jackson-Jsonld example, we left out the knows field from our POJO because of the limitations of Hydra-Jsonld outside of the Spring Framework
  • We set our preferred vocabulary with the @Vocab annotation
  • By using the @Expose annotation on the class, we set a different resource @type
  • We used the same @Expose annotation on a property to set its mapping to a custom value in the @context
  • For generating the @id from a property, we used the @JsonProperty annotation from Jackson

Next, let's configure an instance of a Jackson Module that we can register in the ObjectMapper. We'll add the JacksonHydraSerializer as a BeanSerializerModifier so it can be applied to all POJOs that are being serialized:

SimpleModule getJacksonHydraSerializerModule() {
    return new SimpleModule() {
        @Override
        public void setupModule(SetupContext context) {
            super.setupModule(context);

            context.addBeanSerializerModifier(new BeanSerializerModifier() {
                @Override
                public JsonSerializer<?> modifySerializer(
                  SerializationConfig config, 
                  BeanDescription beanDesc, 
                  JsonSerializer<?> serializer) {
                    if (serializer instanceof BeanSerializerBase) {
                        return new JacksonHydraSerializer((BeanSerializerBase) serializer);
                    } else {
                        return serializer;
                    }
                }
            });
        }
    };
}

Then let's register the Module in ObjectMapper and use it. We should also set the ObjectMapper to only include non-null values to produce a valid JSON-LD document:

ObjectMapper objectMapper = new ObjectMapper();
objectMapper.registerModule(getJacksonHydraSerializerModule());
objectMapper.setSerializationInclusion(JsonInclude.Include.NON_NULL);

Person person = new Person("http://example.com/person/1234", "Example Name");

String personJsonLd = objectMapper.writeValueAsString(person);

Now, the personJsonLd variable should contain:

{
  "@context": {
    "@vocab": "http://example.com/vocab/",
    "name": "fullName"
  },
  "@type": "person",
  "name": "Example Name",
  "@id": "http://example.com/person/1234"
}

5.3. Considerations

Although it's technically possible to use Hydra-Jsonld outside of the Spring Framework, it was originally designed for usage with Spring-HATEOAS. As a result, there's no way to generate links with annotations as we saw in Jackson-Jsonld. On the other hand, they are generated for some Spring-specific classes automatically.

Before we choose this library for a project, we should consider the following:

  • Using it with the Spring Framework will enable additional features
  • There's no easy way to generate links if we're not using the Spring Framework
  • We cannot disable the usage of @vocab, we can only override it

6. Deserialization With Jsonld-Java and Jackson

Jsonld-Java is the Java implementation of the JSON-LD 1.0 specification and API, which is unfortunately not the latest version. At the time of writing this tutorial, the implementation of the 1.1 version, Titanium JSON-LD, is not yet ready.

To deserialize a JSON-LD document, let's transform it with a JSON-LD API feature, called compaction, to a format that we can map to a POJO with ObjectMapper.

6.1. Maven Dependencies

First, let's add the dependency for jsonld-java:

<dependency>
    <groupId>com.github.jsonld-java</groupId>
    <artifactId>jsonld-java</artifactId>
    <version>0.13.0</version>
</dependency>

6.2. Example

Let's work with this JSON-LD document as our input:

{
  "@context": {
    "@vocab": "http://schema.org/",
    "knows": {
      "@type": "@id"
    }
  },
  "@type": "Person",
  "@id": "http://example.com/person/1234",
  "name": "Example Name",
  "knows": "http://example.com/person/2345"
}

For the sake of simplicity, let's assume we have the content of the document in a String variable called inputJsonLd.

First, let's compact it and convert it back to a String:

Object jsonObject = JsonUtils.fromString(inputJsonLd);
Object compact = JsonLdProcessor.compact(jsonObject, new HashMap<>(), new JsonLdOptions());
String compactContent = JsonUtils.toString(compact);
  • We can parse and write the JSON-LD object with methods from the JsonUtils, which is part of the Jsonld-Java library
  • When using the compact method, as a second parameter we can use an empty Map. This way, the compaction algorithm will produce a simple JSON object where the keys are resolved to their IRI forms

The compactContent variable should contain:

{
  "@id": "http://example.com/person/1234",
  "@type": "http://schema.org/Person",
  "http://schema.org/knows": {
    "@id": "http://example.com/person/2345"
  },
  "http://schema.org/name": "Example Name"
}

Secondly, let's tailor our POJO with Jackson annotations to fit such a document structure:

@JsonIgnoreProperties(ignoreUnknown = true)
public class Person {
    @JsonProperty("@id")
    private String id;
    @JsonProperty("http://schema.org/name")
    private String name;
    @JsonProperty("http://schema.org/knows")
    private Link knows;

    // constructors, getters, setters

    public static class Link {
        @JsonProperty("@id")
        private String id;

        // constructors, getters, setters
    }
}

And finally, let's map the JSON-LD to the POJO:

ObjectMapper objectMapper = new ObjectMapper();
Person person = objectMapper.readValue(compactContent, Person.class);

7. Conclusion

In this article, we looked at two Jackson-based libraries for serializing a POJO into a JSON-LD document, and one way to deserialize a JSON-LD into a POJO.

As we've highlighted, both serialization libraries have shortcomings that we should consider before using them. If we need to use more features of JSON-LD than these libraries can offer, we could approach creating our document via an RDF library with JSON-LD output format.

As usual, the source code can be found over on GitHub.

Spring @Pathvariable Annotation

$
0
0

1. Overview

In this quick tutorial, we'll explore Spring's @PathVariable annotation.

Simply put, the @PathVariable annotation can be used to handle template variables in the request URI mapping,  and use them as method parameters.

Let's see how to use @PathVariable and its various attributes.

2. A Simple Mapping

A simple use case of the @PathVariable annotation would be an endpoint that identifies an entity with a primary key:

@GetMapping("/api/employees/{id}")
@ResponseBody
public String getEmployeesById(@PathVariable String id) {
    return "ID: " + id;
}

In this example, we use @PathVariable annotation to extract the templated part of the URI represented by the variable {id}.

A simple GET request to /api/employees/{id} will invoke getEmployeesById with the extracted id value:

http://localhost:8080/api/employees/111 
---- 
ID: 111

Now, let's further explore this annotation and have a look at its attributes.

3. Specifying the Path Variable Name

In the previous example, we skipped defining the name of the template path variable since the names for the method parameter and the path variable were the same.

However, if the path variable name is different, we can specify it in the argument of the @PathVariable annotation:

@GetMapping("/api/employeeswithvariable/{id}")
@ResponseBody
public String getEmployeesByIdWithVariableName(@PathVariable("id") String employeeId) {
    return "ID: " + employeeId;
}
http://localhost:8080/api/employeeswithvariable/1 
---- 
ID: 1

We can also define the path variable name as @PathVariable(value=”id”) instead of PathVariable(“id”) for clarity.

4. Multiple Path Variables in a Single Request

Depending on the use case, we can have more than one path variable in our request URI for a controller method, which also has multiple method parameters:

@GetMapping("/api/employees/{id}/{name}")
@ResponseBody
public String getEmployeesByIdAndName(@PathVariable String id, @PathVariable String name) {
    return "ID: " + id + ", name: " + name;
}
http://localhost:8080/api/employees/1/bar 
---- 
ID: 1, name: bar

We can also handle more than one @PathVariable parameters using a method parameter of type java.util.Map<String, String>:

@GetMapping("/api/employeeswithmapvariable/{id}/{name}")
@ResponseBody
public String getEmployeesByIdAndNameWithMapVariable(@PathVariable Map<String, String> pathVarsMap) {
    String id = pathVarsMap.get("id");
    String name = pathVarsMap.get("name");
    if (id != null && name != null) {
        return "ID: " + id + ", name: " + name;
    } else {
        return "Missing Parameters";
    }
}
http://localhost:8080/api/employees/1/bar 
---- 
ID: 1, name: bar

There is, however, a small catch while handling multiple @PathVariable parameters when the path variable string contains a dot(.) character. We've discussed those corner cases in detail here.

5. Optional Path Variables

In Spring, method parameters annotated with @PathVariable are required by default:

@GetMapping(value = { "/api/employeeswithrequired", "/api/employeeswithrequired/{id}" })
@ResponseBody
public String getEmployeesByIdWithRequired(@PathVariable String id) {
    return "ID: " + id;
}

By how it looks, the above controller should handle both /api/employeeswithrequired and /api/employeeswithrequired/1 request paths. But, since method parameters annotated by @PathVariables are mandatory by default, it doesn't handle the requests sent to /api/employeeswithrequired path:

http://localhost:8080/api/employeeswithrequired 
---- 
{"timestamp":"2020-07-08T02:20:07.349+00:00","status":404,"error":"Not Found","message":"","path":"/api/employeeswithrequired"} 

http://localhost:8080/api/employeeswithrequired/1 
---- 
ID: 111

We can handle this in two ways.

5.1. Setting @PathVariable as Not Required

We can set the required property of @PathVariable to false to make it optional. Hence, modifying our previous example, we can now handle the URI versions with and without the path variable:

@GetMapping(value = { "/api/employeeswithrequiredfalse", "/api/employeeswithrequiredfalse/{id}" })
@ResponseBody
public String getEmployeesByIdWithRequiredFalse(@PathVariable(required = false) String id) {
    if (id != null) {
        return "ID: " + id;
    } else {
        return "ID missing";
    }
}
http://localhost:8080/api/employeeswithrequiredfalse 
---- 
ID missing

5.2. Using java.util.Optional

Since Spring 4.1, we can also use java.util.Optional<T> (available in Java 8+) to handle a non-mandatory path variable:

@GetMapping(value = { "/api/employeeswithoptional", "/api/employeeswithoptional/{id}" })
@ResponseBody
public String getEmployeesByIdWithOptional(@PathVariable Optional<String> id) {
    if (id.isPresent()) {
        return "ID: " + id.get();
    } else {
        return "ID missing";
    }
}

Now, if we don't specify the path variable id in the request, we get the default response:

http://localhost:8080/api/employeeswithoptional 
----
ID missing 

5.3. Using a Method Parameter of Type Map<String, String>

As shown earlier, we can use a single method parameter of type java.util.Map to handle all the path variables in the request URI. We can also use this strategy to handle the optional path variables case:

@GetMapping(value = { "/api/employeeswithmap/{id}", "/api/employeeswithmap" })
@ResponseBody
public String getEmployeesByIdWithMap(@PathVariable Map<String, String> pathVarsMap) {
    String id = pathVarsMap.get("id");
    if (id != null) {
        return "ID: " + id;
    } else {
        return "ID missing";
    }
}

6. Default Value for @PathVariable

Out of the box, there isn't a provision to define a default value for method parameters annotated with @PathVariable. However, we can use the same strategies discussed above to satisfy the default value case for @PathVariable. We just need to check for null on the path variable.

For instance, using java.util.Optional<String, String>, we can identify if the path variable is null or not. If it is null then we can just respond to the request with a default value:

@GetMapping(value = { "/api/defaultemployeeswithoptional", "/api/defaultemployeeswithoptional/{id}" })
@ResponseBody
public String getDefaultEmployeesByIdWithOptional(@PathVariable Optional<String> id) {
    if (id.isPresent()) {
        return "ID: " + id.get();
    } else {
        return "ID: Default Employee";
    }
}

7. Conclusion

In this article, we discussed how to use Spring's @PathVariable annotation. We also identified the various ways to effectively use the @PathVariable annotation to suit different use cases such as optional parameters and dealing with default values.

The code example shown in this article is also available over on Github.

Difference Between request.getSession() and request.getSession(true)

$
0
0

1. Overview

In this quick tutorial, we'll see the difference between calling HttpServletRequest#getSession() and HttpServletRequest#getSession(boolean).

2. What's the Difference?

The methods getSession() and getSession(boolean) are very similar. There's a small difference, though. The difference is whether the session should be created if it doesn't exist already.

Calling getSession() and getSession(true) are functionally the same: retrieve the current session, and if one doesn't exist yet, create it.

Calling getSession(false), though, retrieves the current session, and if one doesn't exist yet, returns null. Among other things, this is handy when we want to ask if the session exists.

3. Example

In this example, we are considering this scenario:

  • the user enters the user id and logs in to the application
  • the user then enters the user name and age and wants to update these details for the logged-in user

We'll store the user values in the session to understand the usage of HttpServletRequest#getSession() and HttpServletRequest#getSession(boolean).

First, let's create a servlet where we're using HttpServletRequest#getSession() in its doGet() method:

protected void doGet(HttpServletRequest request, HttpServletResponse response) throws ServletException, IOException {
    HttpSession session = request.getSession();
    session.setAttribute("userId", request.getParameter("userId"));
}

At this point, the servlet will retrieve the existing session or create a new one for the logged-in user, if it doesn't exist.

Next, we'll set the userName attribute in the session.

As we want to update the details of the user for the respective user id, we want the same session and do not want to create a new session to store the user name.

So now, we will use HttpServletRequest#getSession(boolean) with false value:

protected void doGet(HttpServletRequest request, HttpServletResponse response) throws ServletException, IOException {
    HttpSession session = request.getSession(false);
    session.setAttribute("userName", request.getParameter("userName"));
}

This will result in setting the userName attribute on the same session that the userId was previously set.

4. Conclusion

In this tutorial, we've explained the difference between HttpServletRequest#getSession() and HttpServletRequest#getSession(boolean) methods.

The complete example is available over on GitHub.


Set Field Value With Reflection

$
0
0

1. Overview

In our previous article, we discussed how we could read the values of private fields from a different class in Java. However, there can be scenarios when we need to set the values of fields, such as in some libraries where we don't have access to the fields.

In this quick tutorial, we'll discuss how can we set the values of fields from a different class in Java by using the Reflection API.

Note that we'll be using the same Person class for the examples here as we used in our previous article.

2. Setting Primitive Fields

We can set the fields that are primitives by using the Field#setXxx methods.

2.1. Setting Integer Fields

We can use the setByte, setShort, setInt, and setLong methods to set the byte, short, int, and long fields, respectively:

@Test
public void whenSetIntegerFields_thenSuccess() 
  throws Exception {
    Person person = new Person();

    Field ageField = person.getClass()
        .getDeclaredField("age");
    ageField.setAccessible(true);

    byte age = 26;
    ageField.setByte(person, age);
    Assertions.assertEquals(age, person.getAge());

    Field uidNumberField = person.getClass()
        .getDeclaredField("uidNumber");
    uidNumberField.setAccessible(true);

    short uidNumber = 5555;
    uidNumberField.setShort(person, uidNumber);
    Assertions.assertEquals(uidNumber, person.getUidNumber());

    Field pinCodeField = person.getClass()
        .getDeclaredField("pinCode");
    pinCodeField.setAccessible(true);

    int pinCode = 411057;
    pinCodeField.setInt(person, pinCode);
    Assertions.assertEquals(pinCode, person.getPinCode());

    Field contactNumberField = person.getClass()
        .getDeclaredField("contactNumber");
    contactNumberField.setAccessible(true);

    long contactNumber = 123456789L;
    contactNumberField.setLong(person, contactNumber);
    Assertions.assertEquals(contactNumber, person.getContactNumber());

}

It's also possible to perform unboxing with primitive types:

@Test
public void whenDoUnboxing_thenSuccess() 
  throws Exception {
    Person person = new Person();

    Field pinCodeField = person.getClass()
        .getDeclaredField("pinCode");
    pinCodeField.setAccessible(true);

    Integer pinCode = 411057;
    pinCodeField.setInt(person, pinCode);
    Assertions.assertEquals(pinCode, person.getPinCode());
}

The setXxx methods for primitive data types also support narrowing:

@Test
public void whenDoNarrowing_thenSuccess() 
  throws Exception {
    Person person = new Person();

    Field pinCodeField = person.getClass()
        .getDeclaredField("pinCode");
    pinCodeField.setAccessible(true);

    short pinCode = 4110;
    pinCodeField.setInt(person, pinCode);
    Assertions.assertEquals(pinCode, person.getPinCode());
}

2.2. Setting Floating Type Fields

To set float and double fields, we need to use the setFloat and setDouble methods, respectively:

@Test
public void whenSetFloatingTypeFields_thenSuccess() 
  throws Exception {
    Person person = new Person();

    Field heightField = person.getClass()
        .getDeclaredField("height");
    heightField.setAccessible(true);

    float height = 6.1242f;
    heightField.setFloat(person, height);
    Assertions.assertEquals(height, person.getHeight());

    Field weightField = person.getClass()
        .getDeclaredField("weight");
    weightField.setAccessible(true);

    double weight = 75.2564;
    weightField.setDouble(person, weight);
    Assertions.assertEquals(weight, person.getWeight());
}

2.3. Setting Character Fields

To set the char fields, we can use the setChar method:

@Test
public void whenSetCharacterFields_thenSuccess() 
  throws Exception {
    Person person = new Person();

    Field genderField = person.getClass()
        .getDeclaredField("gender");
    genderField.setAccessible(true);

    char gender = 'M';
    genderField.setChar(person, gender);
    Assertions.assertEquals(gender, person.getGender());
}

2.4. Setting Boolean Fields

Similarly, we can use the setBoolean method to set the boolean field:

@Test
public void whenSetBooleanFields_thenSuccess() 
  throws Exception {
    Person person = new Person();

    Field activeField = person.getClass()
        .getDeclaredField("active");
    activeField.setAccessible(true);

    activeField.setBoolean(person, true);
    Assertions.assertTrue(person.isActive());
}

3. Setting Fields That Are Objects

We can set the fields that are objects by using the Field#set method:

@Test
public void whenSetObjectFields_thenSuccess() 
  throws Exception {
    Person person = new Person();

    Field nameField = person.getClass()
        .getDeclaredField("name");
    nameField.setAccessible(true);

    String name = "Umang Budhwar";
    nameField.set(person, name);
    Assertions.assertEquals(name, person.getName());
}

4. Exceptions

Now, let's discuss the exceptions that the JVM can throw while setting the fields.

4.1. IllegalArgumentException

The JVM will throw IllegalArgumentException if we use a setXxx mutator that is incompatible with the target field's type. In our example, if we write nameField.setInt(person, 26), the JVM throws this exception since the field is of type String and not int or Integer:

@Test
public void givenInt_whenSetStringField_thenIllegalArgumentException() 
  throws Exception {
    Person person = new Person();
    Field nameField = person.getClass()
        .getDeclaredField("name");
    nameField.setAccessible(true);

    Assertions.assertThrows(IllegalArgumentException.class, () -> nameField.setInt(person, 26));
}

As we've already seen, the setXxx methods support narrowing for the primitive types. It's important to note that we need to provide the correct target for narrowing to be successful. Otherwise, the JVM throws an IllegalArgumentException:

@Test
public void givenInt_whenSetLongField_thenIllegalArgumentException() 
  throws Exception {
    Person person = new Person();

    Field pinCodeField = person.getClass()
        .getDeclaredField("pinCode");
    pinCodeField.setAccessible(true);

    long pinCode = 411057L;

    Assertions.assertThrows(IllegalArgumentException.class, () -> pinCodeField.setLong(person, pinCode));
}

4.2. IllegalAccessException

If we're trying to set a private field that doesn't have access rights, then the JVM will throw an IllegalAccessException. In the above example, if we don't write the statement nameField.setAccessible(true), then the JVM throws the exception:

@Test
public void whenFieldNotSetAccessible_thenIllegalAccessException() 
  throws Exception {
    Person person = new Person();
    Field nameField = person.getClass()
        .getDeclaredField("name");

    Assertions.assertThrows(IllegalAccessException.class, () -> nameField.set(person, "Umang Budhwar"));
}

5. Conclusion

In this tutorial, we've seen how we can modify or set the values of private fields of a class from another class in Java. We've also seen the exceptions that the JVM can throw and what causes them.

As always, the complete code for this example is available over on GitHub.

Introduction to Spring Data JDBC

$
0
0

1. Overview

Spring Data JDBC is a persistence framework that is not as complex as Spring Data JPA. It doesn't provide cache, lazy loading, write-behind, or many other features of JPA. Nevertheless, it has it's own ORM and provides most of the features we're used with Spring Data JPA like mapped entities, repositories, query annotations, and JdbcTemplate.

An important thing to keep in mind is that Spring Data JDBC doesn't offer schema generation. As a result, we are responsible for explicitly creating the schema.

2. Adding Spring Data JDBC to the Project

Spring Data JDBC is available to Spring Boot applications with the JDBC dependency starter. This dependency starter does not bring the database driver, though. That decision must be taken by the developer. Let's add the dependency starter for Spring Data JPA:

<dependency> 
    <groupId>org.springframework.boot</groupId> 
    <artifactId>spring-boot-starter-data-jdbc</artifactId>
</dependency> 

In this example, we're using the H2 database. As we mentioned early, Spring Data JDBC doesn't offer schema generation. In such a case, we can create a custom schema.sql file that will have the SQL DDL commands for creating the schema objects. Automatically, Spring Boot will pick this file and use it for creating database objects.

3. Adding Entities

As with the other Spring Data projects, we use annotations to map POJOs with database tables. In Spring Data JDBC, the entity is required to have an @Id. Spring Data JDBC uses the @Id annotation to identify entities.

Similar to Spring Data JPA, Spring Data JDBC uses, by default, a naming strategy that maps Java entities to relational database tables, and attributes to column names. By default, the Camel Case names of entities and attributes are mapped to snake case names of tables and columns, respectively. For example, a Java entity named AddressBook is mapped to a database table named address_book.

Also, we can map entities and attributes with tables and columns explicitly by using the @Table and @Column annotations. For example, below we have defined the entity that we're going to use in this example:

public class Person {
    @Id
    private long id;
    private String firstName;
    private String lastName;
    // constructors, getters, setters
}

We don't need to use the annotation @Table or @Column in the Person class. The default naming strategy of Spring Data JDBC does all the mappings implicitly between the entity and the table.

4. Declaring JDBC Repositories

Spring Data JDBC uses a syntax that is similar to Spring Data JPA. We can create a Spring Data JDBC repository by extending the Repository, CrudRepository, or PagingAndSortingRepository interface. By implementing CrudRepository, we receive the implementation of the most commonly used methods like save, delete, and findById, among others.

Let's create a JDBC repository that we're going to use in our example:

@Repository 
public interface PersonRepository extends CrudRepository<Person, Long> {
}

If we need to have pagination and sorting features, the best choice would be to extend the PagingAndSortingRepository interface.

5. Customizing JDBC Repositories

Despite CrudRepository built-in methods, we need to create our methods for specific cases. One important thing to note is that Spring Data JDBC does not support derived queries. This means that we can't just write the method name and expect that Spring Data JDBC generates the query.

Every time we write a custom method, we need to decorate it with the @Query annotation. Inside the @Query annotation, we add our SQL command. In Spring Data JDBC, we write queries in plain SQL. We don't use any higher-level query language like JPQL. As a result, the application becomes tightly coupled with the database vendor.

For this reason, it also becomes more difficult to change to a different database.

Another important difference is that Spring Data JDBC does not support the referencing of parameters with index numbers. In this version of Spring Data JDBC, we're able only to reference parameters by name.

With the @Modifying annotation, we can annotate query methods that modify the entity.

Now let's customize our PersonRepository with a non-modifying query and a modifying query:

@Repository
public interface PersonRepository extends CrudRepository<Person, Long> {

    @Query("select * from person where first_name=:firstName")
    List<Person> findByFirstName(@Param("firstName") String firstName);

    @Modifying
    @Query("UPDATE person SET first_name = :name WHERE id = :id")
    boolean updateByFirstName(@Param("id") Long id, @Param("name") String name);
}

6. Populating the Database

Finally, we need to populate the database with data that will serve for testing the Spring Data JDBC repository we created above. So, we're going to create a database seeder that will insert dummy data. Let's add the implementation of database seeder for this example:

@Component
public class DatabaseSeeder {

    @Autowired
    private JdbcTemplate jdbcTemplate;
    public void insertData() {
        jdbcTemplate.execute("INSERT INTO Person(first_name,last_name) VALUES('Victor', 'Hugo')");
        jdbcTemplate.execute("INSERT INTO Person(first_name,last_name) VALUES('Dante', 'Alighieri')");
        jdbcTemplate.execute("INSERT INTO Person(first_name,last_name) VALUES('Stefan', 'Zweig')");
        jdbcTemplate.execute("INSERT INTO Person(first_name,last_name) VALUES('Oscar', 'Wilde')");
    }
}

As seen above, we're using Spring JDBC for executing the INSERT statements. In particular, Spring JDBC handles the connection with the database and lets us execute SQL commands using JdbcTemplates. This solution is very flexible because we have complete control over the executed queries.

7. Conclusion

To summarize, Spring Data JDBC offers a solution that is as simple as using Spring JDBC — there is no magic behind it. Nonetheless, it also offers a majority of features that we're accustomed to using Spring Data JPA.

One of the biggest advantages of Spring Data JDBC is the improved performance when accessing the database as compared to Spring Data JPA. This is due to Spring Data JDBC communicating directly to the database. Spring Data JDBC doesn't contain most of the Spring Data magic when querying the database.

One of the biggest disadvantages when using Spring Data JDBC is the dependency on the database vendor. If we decide to change the database from MySQL to Oracle, we might have to deal with problems that arise from databases having different dialects.

The implementation of this Spring Data JDBC tutorial can be found over on GitHub.

Java Files Open Options

$
0
0

1. Overview

In this tutorial, we're going to focus on the standard open options available for files in Java.

We'll explore the StandardOpenOption enum that implements the OpenOption interface and that defines these standard open options.

2. The OpenOption Parameter

In Java, we can work with files using the NIO2 API, which contains several utility methods. Some of these methods use an optional OpenOption parameter that configures how to open or create a file. In addition, this parameter will have a default value if not set, which can be different for each of these methods.

The StandardOpenOption enum type defines the standard options and implements the OpenOption interface.

Here's the list of supported options we can use with the StandardOpenOptions enum:

  • WRITE: opens the file for write access
  • APPEND: appends some data to the file
  • TRUNCATE_EXISTING: truncates the file
  • CREATE_NEW: creates a new file and throws an exception if the file already exists
  • CREATE: opens the file if it exists or creates a new file if it does not
  • DELETE_ON_CLOSE: deletes the file after closing the stream
  • SPARSE: the newly created file will be sparse
  • SYNC: preserves the content and the metadata of the file synchronized
  • DSYNC: preserves only the content of the file synchronized

In the next sections, we'll see examples of how to use each of these options.

To avoid any confusion on the file path, let's get a handle on the home directory of the user, which will be valid across all operating systems:

private static String HOME = System.getProperty("user.home");

3. Opening a File for Reading and Writing

First, if we want to create a new file if it does not exist we can use the option CREATE:

@Test
public void givenExistingPath_whenCreateNewFile_thenCorrect() throws IOException {
    assertFalse(Files.exists(Paths.get(HOME, "newfile.txt")));
    Files.write(path, DUMMY_TEXT.getBytes(), StandardOpenOption.CREATE);
    assertTrue(Files.exists(path));
}

We can also use the option CREATE_NEW, which will create a new file if it does not exist. However, it will throw an exception if the file already exists.

Secondly, if we want to open the file for reading we can use the newInputStream(Path, OpenOption...) method. This method opens the file for reading and returns an input stream:

@Test
public void givenExistingPath_whenReadExistingFile_thenCorrect() throws IOException {
    Path path = Paths.get(HOME, DUMMY_FILE_NAME);

    try (InputStream in = Files.newInputStream(path); BufferedReader reader = new BufferedReader(new InputStreamReader(in))) {
        String line;
        while ((line = reader.readLine()) != null) {
            assertThat(line, CoreMatchers.containsString(DUMMY_TEXT));
        }
    }
}

Notice how we didn't use the option READ because it's used by default by the method newInputStream.

Third, we can create a file, append to a file, or write to a file by using the newOutputStream(Path, OpenOption...) method. This method opens or creates a file for writing and returns an OutputStream.

The API will create a new file if we don't specify the open options, and the file does not exist. However, if the file exists, it will be truncated. This option is similar to calling the method with the CREATE and TRUNCATE_EXISTING options.

Let's open an existing file and append some data:

@Test
public void givenExistingPath_whenWriteToExistingFile_thenCorrect() throws IOException {
    Path path = Paths.get(HOME, DUMMY_FILE_NAME);

    try (OutputStream out = Files.newOutputStream(path, StandardOpenOption.APPEND, StandardOpenOption.WRITE)) {
        out.write(ANOTHER_DUMMY_TEXT.getBytes());
    }
}

4. Creating a SPARSE File

We can tell the file system that the newly created file should be sparse (files containing empty spaces that will not be written to disk).

For this, we should use the option SPARSE with the CREATE_NEW option. However, this option will be ignored if the file system does not support sparse files.

Let's create a sparse file:

@Test
public void givenExistingPath_whenCreateSparseFile_thenCorrect() throws IOException {
    Path path = Paths.get(HOME, "sparse.txt");
    Files.write(path, DUMMY_TEXT.getBytes(), StandardOpenOption.CREATE_NEW, StandardOpenOption.SPARSE);
}

5. Keeping the File Synchronized

The StandardOpenOptions enum has SYNC and DSYNC options. These options require that data is written to the file synchronously in the storage. In other words, these will guarantee that the data is not lost in the event of a system crash.

Let's append some data to our file and use the option SYNC:

@Test
public void givenExistingPath_whenWriteAndSync_thenCorrect() throws IOException {
    Path path = Paths.get(HOME, DUMMY_FILE_NAME);
    Files.write(path, ANOTHER_DUMMY_TEXT.getBytes(), StandardOpenOption.APPEND, StandardOpenOption.WRITE, StandardOpenOption.SYNC);
}

The difference between SYNC and DSYNC is that SYNC stores the content and the metadata of the file synchronously in the storage, while DSYNC stores only the contents of the file synchronously in the storage.

6. Deleting the File After Closing the Stream

The StandardOpenOptions enum also offers a useful option that gives us the ability to destroy the file after closing the stream. This useful if we want to create a temporary file.

Let's append some data to our file, and use the option DELETE_ON_CLOSE:

@Test
public void givenExistingPath_whenDeleteOnClose_thenCorrect() throws IOException {
    Path path = Paths.get(HOME, EXISTING_FILE_NAME);
    assertTrue(Files.exists(path)); // file was already created and exists

    try (OutputStream out = Files.newOutputStream(path, StandardOpenOption.APPEND, 
      StandardOpenOption.WRITE, StandardOpenOption.DELETE_ON_CLOSE)) {
        out.write(ANOTHER_DUMMY_TEXT.getBytes());
    }

    assertFalse(Files.exists(path)); // file is deleted
}

7. Conclusion

In this tutorial, we covered the available options to open files in Java using the new file system API (NIO2) that was shipped as a part of Java 7.

As usual, the source code with all the examples in the tutorial can be found over on Github.

Getting Docker Container From Docker Engine API

$
0
0

1. Overview

In this tutorial, we're going to see how to access Docker container information from inside the container using the Docker Engine API.

2. Setup

We can connect to the Docker engine in multiple ways. We'll cover the most useful ones under Linux, but they also work on other operating systems.

However, we should be very careful, because enabling remote access represents a security risk. When a container can access the engine, it breaks the isolation from the host operating system.

For the setup part, we will consider that we have full control of the host.

2.1. Forwarding the Default Unix Socket

By default, the Docker engine uses a Unix socket mounted under /var/run/docker.sock on the host OS:

$ ss -xan | grep var

u_str LISTEN 0      4096              /var/run/docker/libnetwork/dd677ae5f81a.sock 56352            * 0           
u_dgr UNCONN 0      0                                 /var/run/chrony/chronyd.sock 24398            * 0           
u_str LISTEN 0      4096                                      /var/run/nscd/socket 23131            * 0           
u_str LISTEN 0      4096                              /var/run/docker/metrics.sock 42876            * 0           
u_str LISTEN 0      4096                                      /var/run/docker.sock 53704            * 0    
...       

With this approach, we can strictly control which container gets access to the API. This is how the Docker CLI works behind the scenes.

Let's start the alpine Docker container and mount this path using the -v flag:

$ docker run -it -v /var/run/docker.sock:/var/run/docker.sock alpine

(alpine) $

Next, let's install some utilities in the container:

(alpine) $ apk add curl && apk add jq

fetch http://dl-cdn.alpinelinux.org/alpine/v3.11/community/x86_64/APKINDEX.tar.gz
(1/4) Installing ca-certificates (20191127-r2)
(2/4) Installing nghttp2-libs (1.40.0-r1)
...

Now let's use curl with the –unix-socket flag and Jq to fetch and filter some container data:

(alpine) $ curl -s --unix-socket /var/run/docker.sock http://dummy/containers/json | jq '.'

[
  {
    "Id": "483c5d4aa0280ca35f0dbca59b5d2381ad1aa455ebe0cf0ca604900b47210490",
    "Names": [
      "/wizardly_chatelet"
    ],
    "Image": "alpine",
    "ImageID": "sha256:e7d92cdc71feacf90708cb59182d0df1b911f8ae022d29e8e95d75ca6a99776a",
    "Command": "/bin/sh",
    "Created": 1595882408,
    "Ports": [],
...

Here, we issue a GET on the /containers/json endpoint and get the currently running containers. We then prettify the output using jq.

We'll cover the details of the engine API a bit later.

2.2. Enabling TCP Remote Access

We can also enable remote access using a TCP socket.

For Linux distributions that come with systemd we need to customize the Docker service unit. For other Linux distros, we need to customize the daemon.json usually located /etc/docker.

We'll cover just the first kind of setup since most of the steps are similar.

The default Docker setup includes a bridge network. This is where all containers are connected unless specified otherwise.

Since we want to allow just the containers to access the engine API let's first identify their network:

$ docker network ls

a3b64ea758e1        bridge              bridge              local
dfad5fbfc671        host                host                local
1ee855939a2a        none                null                local

Let's see its details:

$ docker network inspect a3b64ea758e1

[
    {
        "Name": "bridge",
        "Id": "a3b64ea758e1f02f4692fd5105d638c05c75d573301fd4c025f38d075ed2a158",
...
        "IPAM": {
            "Driver": "default",
            "Options": null,
            "Config": [
                {
                    "Subnet": "172.17.0.0/16",
                    "Gateway": "172.17.0.1"
                }
            ]
        },
        "Internal": false,
        "Attachable": false,
...

Next, let's see where the Docker service unit is located:

$ systemctl status docker.service

docker.service - Docker Application Container Engine
     Loaded: loaded (/usr/lib/systemd/system/docker.service; disabled; vendor preset: disabled)
...
     CGroup: /system.slice/docker.service
             ├─6425 /usr/bin/dockerd --add-runtime oci=/usr/sbin/docker-runc
             └─6452 docker-containerd --config /var/run/docker/containerd/containerd.toml --log-level warn

Now let's take a look at the service unit definition:

$ cat /usr/lib/systemd/system/docker.service

[Unit]
Description=Docker Application Container Engine
Documentation=http://docs.docker.com
After=network.target lvm2-monitor.service SuSEfirewall2.service

[Service]
EnvironmentFile=/etc/sysconfig/docker
...
Type=notify
ExecStart=/usr/bin/dockerd --add-runtime oci=/usr/sbin/docker-runc $DOCKER_NETWORK_OPTIONS $DOCKER_OPTS
ExecReload=/bin/kill -s HUP $MAINPID
...

The ExecStart property defines what command is run by systemd (the dockerd executable). We pass the -H flag to it and specify the corresponding network and port to listen on.

We could modify this service unit directly (not recommended), but let's use the $DOCKER_OPTS variable (defined in the EnvironmentFile=/etc/sysconfig/docker):

$ cat /etc/sysconfig/docker 

## Path           : System/Management
## Description    : Extra cli switches for docker daemon
## Type           : string
## Default        : ""
## ServiceRestart : docker
#
DOCKER_OPTS="-H unix:///var/run/docker.sock -H tcp://172.17.0.1:2375"

Here, we use the gateway address of the bridge network as a bind address. This corresponds to the docker0 interface on the host:

$ ip address show dev docker0

3: docker0: <BROADCAST,MULTICAST,UP,LOWER_UP> mtu 1500 qdisc noqueue state UP group default 
    link/ether 02:42:6c:7d:9c:8d brd ff:ff:ff:ff:ff:ff
    inet 172.17.0.1/16 brd 172.17.255.255 scope global docker0
       valid_lft forever preferred_lft forever
    inet6 fe80::42:6cff:fe7d:9c8d/64 scope link 
       valid_lft forever preferred_lft forever

We also enable the local Unix socket so that the Docker CLI still works on the host.

There's one more step we need to do. Let's allow our container packets to reach the host:

$ iptables -I INPUT -i docker0 -j ACCEPT

Here, we set the Linux firewall to accept all packages that come through the docker0 interface.

Now, let's restart the Docker service:

$ systemctl restart docker.service
$ systemctl status docker.service
 docker.service - Docker Application Container Engine
     Loaded: loaded (/usr/lib/systemd/system/docker.service; disabled; vendor preset: disabled)
...
     CGroup: /system.slice/docker.service
             ├─8110 /usr/bin/dockerd --add-runtime oci=/usr/sbin/docker-runc -H unix:///var/run/docker.sock -H tcp://172.17.0.1:2375
             └─8137 docker-containerd --config /var/run/docker/containerd/containerd.toml --log-level wa

Let's run our alpine container again:

(alpine) $ curl -s http://172.17.0.1:2375/containers/json | jq '.'

[
  {
    "Id": "45f13902b710f7a5f324a7d4ec7f9b934057da4887650dc8fb4391c1d98f051c",
    "Names": [
      "/unruffled_cray"
    ],
    "Image": "alpine",
    "ImageID": "sha256:a24bb4013296f61e89ba57005a7b3e52274d8edd3ae2077d04395f806b63d83e",
    "Command": "/bin/sh",
    "Created": 1596046207,
    "Ports": [],
...

We should be aware that all containers connected to the bridge network can access the daemon API.

Furthermore, our TCP connection is not encrypted.

3. Docker Engine API

Now that we've set up our remote access let's take a look at the API.

We'll explore just a few interesting options but we can always check the complete documentation for more.

Let's get some info about our container:

(alpine) $ curl -s http://172.17.0.1:2375/containers/"$(hostname)"/json | jq '.'

{
  "Id": "45f13902b710f7a5f324a7d4ec7f9b934057da4887650dc8fb4391c1d98f051c",
  "Created": "2020-07-29T18:10:07.261589135Z",
  "Path": "/bin/sh",
  "Args": [],
  "State": {
    "Status": "running",
...

Here we use the /containers/{container-id}/json URL to obtain details about our container.

In this case, we run the hostname command to get the container-id.

Next, let's listen to events on the Docker daemon:

(alpine) $ curl -s http://172.17.0.1:2375/events | jq '.'

Now in a different terminal let's start the hello-world container:

$ docker run hello-world

Hello from Docker!
This message shows that your installation appears to be working correctly.
...

Back in our alpine container, we get a bunch of events:

{
  "status": "create",
  "id": "abf881cbecfc0b022a3c1a6908559bb27406d0338a917fc91a77200d52a2553c",
  "from": "hello-world",
  "Type": "container",
  "Action": "create",
...
}
{
  "status": "attach",
  "id": "abf881cbecfc0b022a3c1a6908559bb27406d0338a917fc91a77200d52a2553c",
  "from": "hello-world",
  "Type": "container",
  "Action": "attach",
...

So far, we've been doing non-intrusive things. Time to shake things a little.

Let's create and start a container. First, we define its manifest:

(alpine) $ cat > create.json << EOF
{
  "Image": "hello-world",
  "Cmd": ["/hello"]
}
EOF

Now let's call the /containers/create endpoint using the manifest:

(alpine) $ curl -X POST -H "Content-Type: application/json" -d @create.json http://172.17.0.1:2375/containers/create

{"Id":"f96a6360ad8e36271cc75a3cff05348761569cf2f089bbb30d826bd1e2d52f59","Warnings":[]}

Then, we use the id to start the container:

(alpine) $ curl -X POST http://172.17.0.1:2375/containers/f96a6360ad8e36271cc75a3cff05348761569cf2f089bbb30d826bd1e2d52f59/start

Finally, we can explore the logs:

(alpine) $ curl http://172.17.0.1:2375/containers/f96a6360ad8e36271cc75a3cff05348761569cf2f089bbb30d826bd1e2d52f59/logs?stdout=true --output -

Hello from Docker!
KThis message shows that your installation appears to be working correctly.

;To generate this message, Docker took the following steps:
3 1. The Docker client contacted the Docker daemon.
...

Notice we get some strange characters at the beginning of each line. This happens because the stream over which the logs are transmitted is multiplexed to distinguish between stderr and stdout.

As a result, the output needs further processing.

We can avoid this by simply enabling the TTY option when we create the container:

(alpine) $ cat create.json

{
  "Tty":true,	
  "Image": "hello-world",
  "Cmd": ["/hello"]
}

4. Conclusion

In this tutorial, we learned how to use the Docker Engine Remote API.

We started by setting up the remote access either from the UNIX socket or TCP and moved further showing how we can use the remote API.

Java Reporting Tools: a Comparison

$
0
0

1. Overview

When we talk about Reporting tools, a lot of software covers this area. However, most of them are full-fledged Business Intelligence platforms or Cloud services.

But, what happens if we just want to add some reporting features to our application as a library? We will review here some Java reporting tools well suited for this purpose.

We will mainly focus on these open-source tools:

In addition, we will briefly analyze the following commercial tools:

2. Designing Reports

Through this section, we'll review how we can visually design reports and play with our data. Note we'll be referring only to open-source tools in this part.

2.1. Visual Editors

All the three tools include a WYSIWIG editor with report previewing capabilities.

BIRT Report Designer and Jaspersoft Studio are tools built on Eclipse RCP. This is a good point for most of us Java developers, as we might be familiar with the Eclipse environment. Unlike those, Pentaho Report Designer has aged visually poorly.

Also, there is an additional interesting feature about Jaspersoft Studio: we can publish our reports directly on their Jasper Reports Server (the report management system).

2.2. Datasets

As with all reporting tools, we can retrieve datasets by querying a datasource (see below). Then, we can transform them into report fields, create computed fields, or use aggregation formulas.

Besides this, it's interesting to compare how we can manage multiple datasets as we may need several of them if our data comes from different queries or even different datasources:

  • BIRT offers the easiest solution as we can have multiple datasets in the same report
  • With Jasper Reports and Pentaho, we need to create a separated subreport each time, which can be quite tricky

2.3. Charts And Visual Elements

All the tools provide simple elements like shapes and images, and also every chart flavor: lines, areas, pies, radar, ring, etc. All of them support cross-tabs too.

However, Jasper Reports provides the richest visual elements collection. It adds to the above list maps, sparklines, pyramids, and Gantt diagrams.

2.4. Styling Reports

Now, let's compare the positioning and sizing of elements in the page:

  • All of the tools provide pixel-positioning
  • BIRT and Pentaho also provides HTML-like positioning (table, block, inline)
  • None of them supports CSS-like flexbox or grid system to control elements size

Also, when we have to manage multiple reports, we may want to share the same visual theme:

  • Jasper Reports provides theme files with XML-CSS syntax
  • BIRT can import CSS stylesheets into the design system
  • With Pentaho, we can only add CSS stylesheets in the page header. So it's difficult to mix them with the internal design system

3. Rendering Reports

Now, that we've seen how to design reports, let's compare how we can render them programmatically.

3.1. Installation

First, let's note that all the tools have been designed to be easily embedded within a Java project.

To get started, you can have a look at our dedicated articles about BIRT and Jasper Reports. For Pentaho, there's a help page and free code samples.

Next, for each of these tools, we will connect the report engine to our application data.

3.2. Datasource

The first question we should ask is: how can we connect the report engine to our project datasource?

  • Jasper Reports: we simply add it as a parameter of the fillReport method
  • BIRT solution for this is a bit more complex: we should modify our report to set the datasource attributes as parameters
  • Pentaho has a big drawback here: unless we buy their PDI commercial software, we have to use a JNDI datasource, which is more difficult to set up

Speaking of datasources, which types are supported?

  • All three tools support the most common types: JDBC, JNDI, POJOs, CSV, XML and MongoDB
  • REST API is a requirement for modern projects, however, none of them support it natively
    • with BIRT, we should code a Groovy script
    • Jasper Reports requires an extra free plugin
    • with Pentaho, we should code a Groovy script or acquire the PDI commercial software
  • JSON files are supported natively by Jasper Reports and Pentaho, but BIRT will require an external Java parser library
  • We can find the complete comparison list in this matrix

3.3. Parameters And Runtime Customization

As we have connected our report to our datasource, let's render some data!

The important thing now is how to retrieve our end-user data. To do this, we can pass parameters to the rendering method. These parameters should have been defined when we designed the report, not at runtime. But what can we do if, for example, our dataset is based on different queries depending on the end-user context?

With Pentaho and Jasper Reports, it is simply not possible to do that, as the report file is binary and there is no Java SDK to modify them. By comparison, BIRT reports are plain-XML files. Moreover, we can use a Java API to modify them, so it's very easy to customize everything at runtime.

3.4. Output Formats And Javascript Clients

Thankfully, most of the common formats are supported by all the tools: HTML, PDF, Excel, CSV, plain text, and RTF. Nowadays, we may also ask how we can integrate the report result directly into our web pages. We will not mention the rough inclusion of a PDF visualizer though.

  • The best solution is to use Javascript clients to render reports directly into an HTML element. For BIRT, the Javascript client is Actuate JSAPI and for Jasper Reports, we should use JRIO.js
  • Pentaho does not provide anything but iFrame integration. This solution works but may have serious drawbacks

3.5. Standalone Rendering Tools

Besides integrating our report into a web page, we may also be interested in having an out-of-the-box rendering server. Each tool provides its own solution:

  • BIRT Viewer is a lightweight web application sample to execute BIRT reports on-demand. It's open-source but does not include report management features
  • for Pentaho and Jasper Report, there are only commercial software packages

4. Projects Status And Activity

First, a word about licenses. BIRT is under EPL, Jasper Reports under LGPLv3, and Pentaho under LGPLv2.1. Thus, we can embed all of these libraries into our own products, even if they are commercial.

Then, we can ask ourselves how these open source projects are maintained, and if the community is still active:

  • Jasper Reports has a well-maintained repository, with a stable medium activity by its editor TIBCO Software
  • BIRT repository remains maintained, but its activity is very low since 2015 when OpenText acquired its editor Actuate
  • Similarly, Pentaho repository activity is very low since Hitachi-Vantara acquisition in 2015

We can confirm this using Stackoverflow trends. The lowest popularity is for BIRT and Pentaho, but is moderate for Jasper Reports.

All three Java reporting tools have decreased in popularity in the past 5 years although remain stable for now. We can explain this by the emergence of the Cloud and Javascript offers.

5. Commercial Java Reporting Tools

Besides the open-source solutions, there are also some commercial options available that are worth mentioning.

5.1. Fine Report

Fine Report has been initially designed to be executed as a standalone server. Fortunately, we're able to include it as part of our project if we want to use it. We have to manually copy all JARs and resources into our WAR, as described in their procedure.

After doing this, we can see the Decision-making Platform tool available as a URL in our project. From this URL, we can execute reports directly in the provided web view, an iFrame, or using their Javascript client. However, we can't generate reports programmatically.

Another huge limitation is the target runtime. Version 10 only supports Java 8 and Tomcat 8.x.

5.2. Logi Report (formerly JReport)

Like Fine Report, Logi Report has been designed to be executed as a standalone server, but we can integrate it as part of our existing WAR project. Thus, we will face the same limitation as with Fine Report: we can't generate reports programmatically.

Unlike Fine Report. however, Logi Report supports almost all servlet containers and  Java 8 to 13.

5.3. ReportMill Reporting

Finally, ReportMill is worth mentioning because we can embed it smoothly into every Java application. Also, like BIRT, it's very flexible: we can customize reports at runtime as they are plain XML files.

However, we can see right away that ReportMill has aged, and also has a poor set of features comparing to the other solutions.

6. Conclusion

In this article, we went through some of the most well known Java reporting tools and compared their features.

As a conclusion, we can pick one of these Java Reporting Tools depending on our requirements:

We'll choose BIRT:

  • For a simple library to replace an existing home-made solution
  • For its greatest flexibility and high customization potential

We'll choose Jasper Reports:

  • If we need a reporting library compatible with a full-fledged report management system
  • If we want to bet on the best long-term evolution and support


Viewing all 4699 articles
Browse latest View live


<script src="https://jsc.adskeeper.com/r/s/rssing.com.1596347.js" async> </script>