In this short tutorial, we're going to take a close look at how to disable logout redirects in Spring Security.
We'll first start with a brief background on how the logout flow works in Spring Security. Then, we'll illustrate, through a practical example, how to avoid user redirection after a successful logout.
2. Logout in Spring Security
In short, Spring Security provides out-of-box support for the logout mechanism through the logout() DSL method. Basically, Spring Security triggers log out when a user hits the default logout URL which is /logout.
It's worth mentioning that the default value of the logout URL was /j_spring_security_logout before Spring Security 4.
Spring Security offers the possibility to redirect users to a particular URL after logging out. However, there are some occasions when we want to avoid this behavior.
So, without further ado, let's see how to implement the logic of disabling logout redirects in Spring Security.
3. Disable Spring Security Logout Redirect
By default, Spring Security redirects users to /login?logout after a successful logout. So, in this section, we're going to focus on how to prevent user redirection to the login page after logging out.
The main point here is to show how to avoid redirection when the /logout URL is being called from a REST client.
As a matter of fact, the LogoutSuccessHandler interface offers a flexible way to execute custom logic when the logout process is performed successfully.
So here, we'll use a custom LogoutSuccessHandler to return only a clean 200 status code. That way, it won't redirect us to any page.
Now, let's implement the necessary Spring Security configuration required to disable logout redirects:
The important part to note from the above configuration is the logoutSuccessHandler() method. As we can see, we use a lambda expression to define our custom logout success handler.
This brief tutorial will describe Maven's <optional> tag and how we can use it to reduce the size and scope of a Maven project's artifact, such as a WAR, EAR, or JAR.
Sometimes we'll create a Maven project to be a dependency for other Maven projects. When working on such a project, it may be required to include one or more dependencies that are only useful to a subset of that project's features.
If an end-user doesn't use that feature subset, the project still transitively pulls in those dependencies. This bloats the user's project size unnecessarily, and might even introduce conflicting dependency versions with other project dependencies.
Ideally, we should split the project's feature subset into its own module and therefore not pollute the rest of the project. However, this is not always practical.
In order to exclude these special dependencies from the main project, we can apply Maven's <optional> tag to them. This forces any user who wants to use those dependencies to declare them explicitly. However, it does not force those dependencies into a project that doesn't need them.
3. How to Use <optional>
As we're going to see we can include the <optional> element with a value of true to make any Maven dependency optional.
In this example, although optional-project is labeled as optional, it remains as a usable dependency of project-with-optionals as if the <optional> tag was never there.
In order to see the effect of the <optional> tag, we need to create a new project that depends on project-with-optionals:
Now if we try to reference optional-project from within main-project, we see that optional-project doesn't exist. This is because the <optional> tag prevents it from being transitively included.
If we find that we need optional-project in our main-project, we simply need to declare it as a dependency.
4. Conclusion
In this article, we looked at Maven's <optional> tag. The main benefits of using the tag are that it can reduce a project's size and help prevent version conflicts. We also saw that the tag doesn't affect the project that uses it.
The source code in this article is available over on Github.
In this tutorial, we'll look at a few examples of how we can implement probability with Java.
2. Simulating Basic Probability
To simulate probability in Java, the first thing we need to do is to generate random numbers. Fortunately, Java provides us with plenty of random numbers generators.
In this case, we'll use the SplittableRandom class because it provides high-quality randomness and is relatively fast:
SplittableRandom random = new SplittableRandom();
Then we need to generate a number in a range and compare it to another number chosen from that range. Every number in the range has an equal chance of being drawn. As we know the range, we know the probability of drawing our chosen number. That way we're controlling probability:
boolean probablyFalse = random.nextInt(10) == 0
In this example, we drew numbers from 0 to 9. Therefore, the probability of drawing 0 is equal to 10%. Now, let's get a random number and test if the chosen number is lower than the drawn one:
boolean whoKnows = random.nextInt(1, 101) <= 50
Here, we drew numbers from 1 to 100. The chance for our random number to be lesser or equal to 50 is exactly 50%.
3. Uniform Distribution
Values generated up to this point fall into the uniform distribution. This means that every event, for example rolling some number on a dice, has an equal chance of happening.
3.1. Invoking a Function With a Given Probability
Now, let's say we want to perform a task from time to time and control its probability. For example, we operate an e-commerce site and we want to give a discount to 10% of our users.
To do so, let's implement a method that will take three parameters: a supplier to invoke in some percentage of cases, a second supplier to invoke in the rest of the cases, and the probability.
First, we declare our SplittableRandom as Lazyusing Vavr. This way we'll instantiate it only once, on a first request:
private final Lazy<SplittableRandom> random = Lazy.of(SplittableRandom::new);
Then, we'll implement the probability-managing function:
public <T> withProbability(Supplier<T> positiveCase, Supplier<T> negativeCase, int probability) {
    SplittableRandom random = this.random.get();
    if (random.nextInt(1, 101) <= probability) {
        return positiveCase.get();
    } else {
        return negativeCase.get();
    }
}
3.2. Sampling Probability With the Monte Carlo Method
Let's reverse the process we saw in the previous section. To do so, we'll measure the probability using the Monte Carlo method. It generates a high volume of random events and counts how many of them satisfy the provided condition. It's useful when the probability is hard or impossible to compute analytically.
For example, if we look at six-sided dice we know that the probability of rolling a certain number is 1/6. But, if we have a mysterious dice with an unknown number of sides, it'd be hard to tell what the probability would be. Instead of analyzing the dice we could just roll it numerous times and count how many times certain events are occurring.
Let's see how we can implement this approach. First, we'll try to generate the number 1 with the probability of 10% for a million times and count them:
int numberOfSamples = 1_000_000;
int probability = 10;
int howManyTimesInvoked =
  Stream.generate(() -> randomInvoker.withProbability(() -> 1, () -> 0, probability))
    .limit(numberOfSamples)
    .mapToInt(e -> e)
    .sum();
Then, the sum of generated numbers divided by the number of samples will be an approximation of the probability of the event:
int monteCarloProbability = (howManyTimesInvoked * 100) / numberOfSamples;
Mind that, the computed probability is approximated. The higher the number of samples, the better the approximation will be.
4. Other Distributions
The uniform distribution works well for modeling things like games. For the game to be fair, all the events often need to have the same probability of happening.
However, in real life, distributions are usually more complicated. The chances are not equal for different things to happen.
For example, there are very few extremely short people and very few extremely tall. Most people are of average height, which means that height of people follows the normal distribution. If we need to generate random human heights, then it won't suffice to generate a random number of feet.
Fortunately, we don't need to implement the underlying mathematical model ourselves. We need to know which distribution to use and how to configure it, for example, using statistical data.
The Apache Commons library provides us with implementations for several distributions. Let's implement the normal distribution with it:
private static final double MEAN_HEIGHT = 176.02;
private static final double STANDARD_DEVIATION = 7.11;
private static NormalDistribution distribution =  new NormalDistribution(MEAN_HEIGHT, STANDARD_DEVIATION);
Using this API is very straightforward – the sample method draws a random number from the distribution:
public static double generateNormalHeight() {
    return distribution.sample();
}
As a result, we'll get the probability of a person having a height between two bounds. In this case, the lower and the upper heights.
5. Conclusion
In this article, we learned how to generate random events and how to compute the probability of them happening. We used uniform and normal distributions to model different situations.
Finding differences between collections of objects of the same data type is a common programming task. As an example, imagine we have a list of students who applied for an exam and another list of students who passed it. The difference between those two lists would give us the students who didn't pass the exam.
In Java, there's no explicit way for finding differences between two lists in the List API, though there are some helper methods that come close.
In this quick tutorial, we'll look at how to find the differences between two lists. We'll try a few different approaches, including plain Java (with and without Streams) and using third-party libraries such as Guava and the Apache Commons Collections.
2. Test Setup
Let's start by defining two lists, which we'll use to test out our examples:
public class FindDifferencesBetweenListsUnitTest {

    private static final List listOne = Arrays.asList("Jack", "Tom", "Sam", "John", "James", "Jack");
    private static final List listTwo = Arrays.asList("Jack", "Daniel", "Sam", "Alan", "James", "George");

}
3. Using the Java List API
We can create a copy of one list and then remove all the elements common with the other, using the List method removeAll():
List<String> differences = new ArrayList<>(listOne);
differences.removeAll(listTwo);
assertEquals(2, differences.size());
assertThat(differences).containsExactly("Tom", "John");
Let's reverse this to find the differences the other way around:
In this article, we explored a few ways to find differences between lists.
In the examples, we covered a basic Java solution, a solution using the Streams API, and with third-party libraries like Google Guava and Apache Commons Collections.
We also saw how to handle duplicate values.
As always, the complete source code is available over on GitHub.
In this tutorial, we'll learn how to set up an OAuth 2.0 resource server using Spring Security 5.
We'll do this using JWT as well as opaque tokens, the two kinds of bearer tokens supported by Spring Security.
Before jumping on to the implementation and code samples, we'll establish some background.
2. A Little Background
2.1. What are JWTs and Opaque Tokens?
JWT, or JSON Web Token is a way to transfer sensitive information securely in the widely-accepted JSON format. The contained information could be about the user, or about the token itself, such as its expiry and issuer.
On the other hand, an opaque token, as the name suggests, is opaque in terms of the information it carries. The token is just an identifier that points to the information stored at the authorization server – it gets validated via introspection at the server's end.
2.2. What is a Resource Server?
In the context of OAuth 2.0, a resource server is an application that protects resources via OAuth tokens. These tokens are issued by an authorization server, typically to a client application. The job of the resource server is to validate the token before serving a resource to the client.
A token's validity is determined by several things:
Did this token come from the configured authorization server?
Is it unexpired?
Is this resource server its intended audience?
Does the token have the required authority to access the requested resource?
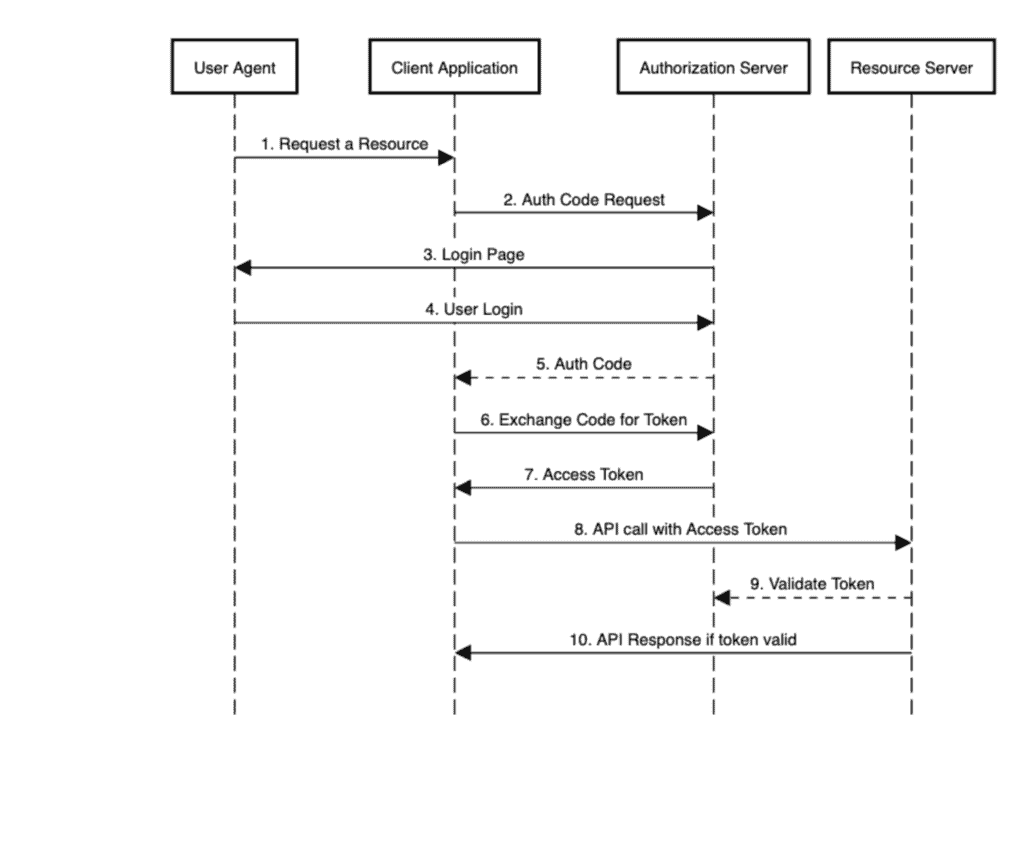
To visualize, let's look at a sequence diagram for the authorization code flow and see all the actors in action:
As we can see in step 8, when the client application calls the resource server's API to access a protected resource, it first goes to the authorization server to validate the token contained in the request's Authorization: Bearer header, and then responds to the client.
Step 9 is what we're focusing on in this tutorial.
All right, now let's jump into the code part. We'll set up an authorization server using Keycloak, a resource server validating JWT tokens, another resource server validating opaque tokens, and a couple of JUnit tests to simulate client apps and verify responses.
3. Authorization Server
First, we'll set up an authorization server, or the thing that issues tokens.
For that, we'll be using Keycloak embedded in a Spring Boot Application. Keycloak is an open-source identity and access management solution. Since we're focusing on the resource server in this tutorial, we'll not delve any deeper into it.
Our embedded Keycloak Server has two clients defined – fooClient and barClient – corresponding to our two resource server applications.
4. Resource Server – Using JWTs
Our resource server will have four main components:
Model – the resource to protect
API – a REST controller to expose the resource
Security Configuration – a class to define access control for the protected resource that the API exposes
application.yml – a config file to declare properties, including information about the authorization server
Let's see them one by one for our resource server handling JWT tokens, after taking a peek at the dependencies.
4.1. Maven Dependencies
Mainly, we'll need the spring-boot-starter-oauth2-resource-server, Spring Boot's starter for resource server support. This starter includes Spring Security by default, so we don't need to add it explicitly:
For our demonstration purposes, we'll generate resources randomly instead of getting them from a database, with some help from Apache's commons-lang3 library.
4.2. Model
Keeping it simple, we'll use Foo, a POJO, as our protected resource:
public class Foo {
    private long id;
    private String name;

    // constructor, getters and setters
}
4.3. API
Here's our rest controller, to make Foo available for manipulation:
@RestController
@RequestMapping(value = "/foos")
public class FooController {

    @GetMapping(value = "/{id}")
    public Foo findOne(@PathVariable Long id) {
        return new Foo(Long.parseLong(randomNumeric(2)), randomAlphabetic(4));
    }

    @GetMapping
    public List findAll() {
        List fooList = new ArrayList();
        fooList.add(new Foo(Long.parseLong(randomNumeric(2)), randomAlphabetic(4)));
        fooList.add(new Foo(Long.parseLong(randomNumeric(2)), randomAlphabetic(4)));
        fooList.add(new Foo(Long.parseLong(randomNumeric(2)), randomAlphabetic(4)));
        return fooList;
    }

    @ResponseStatus(HttpStatus.CREATED)
    @PostMapping
    public void create(@RequestBody Foo newFoo) {
        logger.info("Foo created");
    }
}
As is evident, we have the provision to GET all Foos, GET a Foo by id, and POST a Foo.
4.4. Security Configuration
In this configuration class, we define access levels for our resource:
Anyone with an access token having the read scope can get Foos. In order to POST a new Foo, their token should have a write scope.
Additionally, we added a call to jwt() using the oauth2ResourceServer()DSL to indicate the type of tokens supported by our server here.
4.5. application.yml
In the application properties, in addition to the usual port number and context-path, we need to define the path to our authorization server's issuer URI so that the resource server can discover its provider configuration:
The resource server uses this information to validate the JWT tokens coming in from the client application, as per Step 9 of our sequence diagram.
For this validation to work using the issuer-uri property, the authorization server must be up and running. Otherwise, the resource server wouldn't start.
If we need to start it independently, then we can supply the jwk-set-uri property instead to point to the authorization server's endpoint exposing public keys:
In the above code, at Line #3 we obtain an access token with read scope from the authorization server, covering Steps from 1 through 7 of our sequence diagram.
Step 8 is performed by RestAssured‘s get() call. Step 9 is performed by the resource server with the configurations we saw and is transparent to us as users.
5. Resource Server – Using Opaque Tokens
Next, let's see the same components for our resource server handling opaque tokens.
5.1. Maven Dependencies
To support opaque tokens, we'll additionally need the oauth2-oidc-sdkdependency:
public class Bar {
    private long id;
    private String name;

    // constructor, getters and setters
}
We'll also have a BarController with endpoints similar to our FooController before, to dish out Bars.
5.3. application.yml
In the application.yml here, we'll need to add an introspection-uri corresponding to our authorization server's introspection endpoint. As mentioned before, this is how an opaque token gets validated:
Keeping access levels similar to that of Foo for the Bar resource as well, this configuration class also makes a call to opaqueToken() using the oauth2ResourceServer() DSL to indicate the use of the opaque token type:
Here we're also specifying the client credentials corresponding to the authorization server's client we'll be using. We defined these earlier in our application.yml.
5.5. Testing
We'll setup a JUnit for our opaque token based resource server, similar to how we did it for the JWT one.
In this case, let's check if a write scoped access token can POST a Bar to resource-server-opaque:
If we get a status of CREATED back, it means the resource server successfully validated the opaque token and created the Bar for us.
6. Conclusion
In this tutorial, we saw how to configure a Spring Security based resource server application for validating JWT as well as opaque tokens.
As we saw, with minimal setup, Spring made it possible to seamlessly validate the tokens with an issuer and send resources to the requesting party – in our case, a JUnit test.
Processing 40 million events per second while keeping the 99.99% of latencies under 12ms: squeezing out the last ounce of performance using concurrent GCs and green threads on JVM.
A quick overview of new features in Micronaut 2.0: functions and serverless integration, upgraded Maven and Gradle support, and of course, finalized support for GraalVM native images.
In this tutorial, we'll take a look at handling equality with JPA Entity objects.
2. Considerations
In general, equality simply means that two objects are the same. However, in Java, we can change the definition of equality by overriding the Object.equals() and the Object.hashCode() methods. Ultimately, Java allows us to define what it means to be equal. But first, there are a few things we need to consider.
2.1. Collections
Java collections group objects together. The grouping logic uses a special value known as a hash code to determine the group for an object.
If the value returned by the hashCode() method is the same for all entities, this could result in undesired behavior. Let's say our entity object has a primary key defined as id, but we define our hashCode() method as:
@Override
public int hashCode() {
    return 12345;
}
Collections will not be able to distinguish between different objects when comparing them because they will all share the same hash code. Luckily, resolving this is as easy as using a unique key when generating a hash code. For example, we can define the hashCode() method using our id:
@Override
public int hashCode() {
    return id * 12345;
}
In this case, we used the id of our entity to define the hash code. Now, collections can compare, sort, and store our entities.
2.2. Transient Entities
Newly created JPA entity objects that have no association with a persistence context are considered to be in the transient state. These objects usually do not have their @Id members populated. Therefore, if equals() or hashCode() use the id in their calculations, this means all transient objects will be equal because their ids will all be null. There are not many cases where this is desirable.
2.3. Subclasses
Subclasses are also a concern when defining equality. It's common to compare classes in the equals() method. Therefore, including the getClass() method will help to filter out subclasses when comparing objects for equality.
Let's define an equals() method that will only work if the objects are of the same class and have the same id:
@Override
public boolean equals(Object o) {
    if (o == null || this.getClass() != o.getClass()) {
        return false;
    }
    return o.id.equals(this.id);
}
3. Defining Equality
Given these considerations, we have a few choices when handling equality. Accordingly, the approach we take depends on the specifics of how we plan to use our objects. Let's look at our options.
3.1. No Overrides
By default, Java provides the equals() and hashCode() methods by virtue of all objects descending from the Object class. Therefore, the easiest thing we can do is nothing. Unfortunately, this means that when comparing objects, in order to be considered equal, they have to be the same instances and not two separate instances representing the same object.
3.2. Using a Database Key
In most cases, we're dealing with JPA entities that are stored in a database. Normally, these entities have a primary key that is a unique value. Therefore, any instances of this entity that have the same primary key value are equal. So, we can override equals() as we did above for subclasses and also override hashCode() using only the primary key in both.
3.3. Using a Business Key
Alternatively, we can use a business key to compare JPA entities. In this case, the object's key is comprised of members of the entity other than the primary key. This key should make the JPA entity unique. Using a business key gives us the same desired outcome when comparing entities without the need for primary or database-generated keys.
Let's say we know that an email address is always going to be unique, even if it isn't the @Id field. We can include the email field in hashCode() and equals() methods:
public class EqualByBusinessKey {

    private String email;

    @Override
    public int hashCode() {
        return java.util.Objects.hashCode(email);
    }

    @Override
    public boolean equals(Object obj) {
        if (this == obj) {
            return true;
        }
        if (obj == null) {
            return false;
        }
        if (obj instanceof EqualByBusinessKey) {
            if (((EqualByBusinessKey) obj).getEmail() == getEmail()) {
                return true;
            }
        }

        return false;
    }
}
4. Conclusion
In this tutorial, we discussed various ways that we can handle equality when writing JPA entity objects. We also described the considerations we should take when choosing an approach. As always, the full source code can be found over on GitHub.
JDBC provides a Java API to read the actual data stored in database tables. Besides this, the same API can also be used to read metadata about the database. Metadata means data about the data such as table names, column names, and column types.
In this tutorial, we'll learn how to extract different types of metadata using the DatabaseMetaData interface.
2. DatabaseMetaData Interface
DatabaseMetaData is an interface that provides a variety of methods to obtain comprehensive information about the database. This information is useful for creating database tools that allow users to explore the structure of different databases. It's also helpful when we want to check whether the underlying database supports some features or not.
We'll need an instance of DatabaseMetaData to get this information. So, let's see in code how we can obtain this from a Connection object:
Here, the connection is an instance of JdbcConnection. Therefore, getMetaData() method returns an object of JdbcDatabaseMetaData, which implements the DatabaseMetaData interface.
In the next few sections, we'll use this object to fetch different types of metadata. Afterward, we'll also learn how to check if the database supports a particular feature.
3. Tables Metadata
Sometimes, we want to know the names of all the user-defined tables, system tables, or views. Also, we may like to know some explanatory comments on the tables. All of this can be done by using the getTables() method of the DatabaseMetaData object.
First, let's see how we can extract the names of all the existing user-defined tables:
Here, the first two parameters are catalog and schema. The third parameter takes a pattern of table names. For instance, if we provide “CUST%”, this will include all the tables whose name starts with “CUST”. The last parameter takes a String array containing the types of tables. Use TABLE for user-defined tables.
Next, if we want to look for system-defined tables, all we have to do is to replace the table type with “SYSTEM TABLE“:
Here, the getColumns() call returns a ResultSet that we can iterate to find the description of each column. Each description contains many useful columns such as COLUMN_NAME, COLUMN_SIZE, and DATA_TYPE.
Besides regular columns, we can also find out the primary key columns of a particular table:
Similarly, we can retrieve the description of foreign key columns along with the primary key columns referenced by the given table. Let's see an example:
Here, the CUSTOMER_ADDRESS table has a foreign key column CUST_ID that references the ID column of the CUSTOMER table. The above code snippet will produce “CUSTOMER” as the primary table and “CUSTOMER_ADDRESS” as a foreign table.
In the next section, we'll see how to fetch the information about the username and available schema names.
5. Username and Schemas Metadata
We can also get the name of the user whose credentials have been used while fetching the database connection:
String userName = databaseMetaData.getUserName();
Similarly, we can use the method getSchemas() to retrieve the names of the available schemas in the database:
In the next section, we'll see how to fetch some other useful information about the database.
6. Database-Level Metadata
Now, let's see how the database-level information can be obtained using the same DatabaseMetaData object.
For instance, we can fetch the name and version of the database product, name of the JDBC driver, the version number of the JDBC driver, and so on. Let's now look at the code snippet:
Knowing this information can sometimes be useful, especially when an application is running against multiple database products and versions. For instance, a certain version or product may lack a particular feature or contain a bug where the application needs to implement some kind of workaround.
Next, we'll see how we can come to know if the database lacks or supports a particular feature.
7. Supported Database Features Metadata
Different databases support different features. For instance, H2 doesn't support full outer joins, while MySQL does.
So, how can we find out if the database we are using supports a certain feature or not? Let's see some examples:
Keycloak is an open-source identity and access management or IAM solution, that can be used as a third-party authorization server to manage our web or mobile applications' authentication and authorization requirements.
In this tutorial, we'll focus on how we can customize the theme for our Keycloak server so that we can have a different look and feel for our end-user facing web pages.
First, we'll establish a background from the perspective of a standalone Keycloak server. In later sections, we'll look at similar examples in the context of an embedded one.
A couple of themes are pre-built in Keycloak and come bundled with the distribution.
For a standalone server, these can be found as different folders in the keycloak-<version>/themes directory:
base: a skeletal theme that contains HTML templates and message bundles; all themes, including custom ones, generally inherit from it
keycloak: contains images and stylesheets for beautifying pages; if we don't provide a custom theme, this is the one used by default
It is not recommended to modify the existing themes. Instead, we should create a new theme that extends one of the above two.
To create a new customized theme, we'll need to add a new folder, let's call it custom, to the themes directory. In case we want a complete overhaul, copying contents from the base folder is the best way to kick-start.
For our demo, we're not planning on replacing everything, so it’s pragmatic to get the contents from the keycloak directory.
As we'll see in the next section, custom will only need the contents of the theme type that we want to override, and not the entire keycloak folder.
2.2. Types of Themes
Keycloak supports six types of themes:
Common: for common items such as fonts; is imported by other theme types
Welcome: for the landing page
Login: for login, OTP, grant, registration, and forgot password pages
Account: for user account management pages
Admin Console: for admin console
Email: for emails that are sent by the server
The last four themes from the above list can be set via the Admin Console for a standalone server. When we create a new folder in the themes directory, it's available for selection after a server restart.
Let's login to the admin console with the credentials initial1/zaq1!QAZ and go to the Themes tab for our realm:
Notably, the themes are set realm-wise so that we can have different ones for different realms. Here we're setting our custom theme for user account management for our SpringBootKeycloak realm.
2.3. Structure of a Theme Type
Apart from the HTML templates, message bundles, images, and stylesheets as outlined in our Default Themes section, a theme in Keycloak consists of a couple more elements – theme properties and scripts.
Each theme type contains a theme.properties file. As an example, let's have a look at this file from the account type:
As we can see, this theme extends from the base theme to get all its HTML and message bundles and also imports the common theme to include a few styles from it. Apart from that, it also defines its own style, css/account.css.
Scripts are an optional feature. If we need to include tailored JavaScript files for our templates for a given theme type, we can create a resources/js directory and keep them there. Next, we need to include them in our theme.properties:
scripts=js/script1.js js/script2.js
2.4. Adding Customizations
Now on to the fun part!
Let's take the example of our Account Management page and see how to change its appearance. To be precise, we'll be changing the logo appearing on the page.
Let's try to change the logo to our own. For that, we need to add a new folder, account inside the themes/custom directory. We'll rather copy it from the themes/keycloak directory so that we have all the required elements.
Now, it's just a matter of adding our new logo file, say baeldung.png to resources/img in our custom directory and modifying resources/css/account.css:
Importantly, during the development phase we'll like to see the effect of our changes immediately, without a server restart. To enable that, we need to make a few changes to Keycloak's standalone.xml:
Similar to how we customized the account theme here, to change the look and feel of the other theme types, we need to add new folders called admin, email or login, and follow the same process.
2.5. Customizing the Welcome Page
To customize the Welcome page, first, we need to add a line to the standalone.xml:
Second, we have to create a folder welcome under themes/custom. Again, it's prudent to copy index.ftl and theme.properties along with existing resources from the default keycloak theme directory.
Now let's try to change the background of this page.
To change the background image, keep the new image, say geo.png, inside themes/custom/welcome/resources, then simply edit resources/css/welcome.css:
body {
    background: #fff url(../geo.png);
    background-size: cover;
}
Here's the effect:
3. Customizing an Embedded Keycloak Server
An embedded Keycloak server by definition means that we do not have the IAM provider installed on our machine. Consequently, we need to keep all required artifacts, such as themes.properties and CSS files, in our source code.
A good place to keep them in the src/main/resources/themes folder of our Spring Boot project.
Of course, since the files of the theme structure are the same, the way we customize them also remains the same as the standalone server.
However, we need to configure a few things to instruct the Keycloak server to pick stuff up from our custom theme.
3.1. Changes to Realm Definition File
First, let's see how to specify a custom theme for a given theme type.
Recall that in case of our standalone server, on the Themes page of our admin console, we'd added the custom theme from the dropdown for Account Theme.
To achieve the same effect here, we need to add a line to our realm definition file, baeldung-realm.json:
"accountTheme": "custom",
And that's all we need; all other types such as Login and Email will still follow the standard theme.
3.2. Redirecting to the Custom Theme Directory
Next, let's see how we can tell the server where the said custom theme is located.
We can do this in a couple of ways.
At the time of starting up the Boot App for our embedded server, we can specify the theme directory as a VM argument:
In this article, we'll see how to find the kth-smallest element in the union of two sorted arrays.
First, we'll define the exact problem. Second, we'll see two inefficient but straightforward solutions. Third, we'll look at an efficient solution based on a binary search on the two arrays. Finally, we'll look at some tests to verify that our algorithm works.
We'll also see Java code snippets for all parts of the algorithm. For simplicity, our implementation will only operate on integers. However, the described algorithm works with all data types that are comparable and could even be implemented using Generics.
2. What Is the Kth Smallest Element in the Union of Two Sorted Arrays?
2.1. The Kth Smallest Element
To find the kth-smallest element, also called the kth-order statistic, in an array, we typically use a selection algorithm. However, these algorithms operate on a single, unsorted array, whereas in this article, we want to find the kth smallest element in two sorted arrays.
Before we see several solutions to the problem, let's exactly define what we want to achieve. For that, let's jump right into an example.
We are given two sorted arrays (a and b), which do not necessarily need to have an equal number of elements:
In these two arrays, we want to find the kth smallest element. More specifically, we want to find the kth smallest element in the combined and sorted array:
The combined and sorted array for our example is shown in (c). The 1st smallest element is 3, and the 4th smallest element is 20.
2.2. Duplicate Values
We'll also need to define how to handle duplicate values. An element could occur more than once in one of the arrays (element 3 in array a) and also occur again in the second array (b).
If we count duplicates only once, we'll count as shown in (c). If we count all occurrences of an element, we'll count as shown in (d).
In the remaining part of this article, we'll count duplicates as shown in (d), thus counting them as if they were distinct elements.
3. Two Simple but Less Efficient Approaches
3.1. Join and Then Sort the Two Arrays
The simplest way to find the kth smallest element is to join the arrays, sort them, and return the kth element of the resulting array:
int getKthElementSorted(int[] list1, int[] list2, int k) {

    int length1 = list1.length, length2 = list2.length;
    int[] combinedArray = new int[length1 + length2];
    System.arraycopy(list1, 0, combinedArray, 0, list1.length);
    System.arraycopy(list2, 0, combinedArray, list1.length, list2.length);
    Arrays.sort(combinedArray);

    return combinedArray[k-1];
}
With n being the length of the first array and m the length of the second array, we get the combined length c = n + m.
Since the complexity for the sort is O(c log c), the overall complexity of this approach is O(n log n).
A disadvantage of this approach is that we need to create a copy of the array, which results in more space needed.
3.2. Merge the Two Arrays
Similar to one single step of the Merge Sort sorting algorithm, we can merge the two arrays and then directly retrieve the kth element.
The basic idea of the merge algorithm is to start with two pointers, which point to the first elements of the first and second arrays (a).
We then compare the two elements (3 and 4) at the pointers, add the smaller one (3) to the result, and move that pointer one position forward (b). Again, we compare the elements at the pointers and add the smaller one (4) to the result.
We continue in the same way until all elements are added to the resulting array. If one of the input arrays does not have more elements, we simply copy all of the remaining elements of the other input array to the result array.
We can improve the performance if we don't copy the full arrays, but stop when the resulting array has k elements. We don't even need to create an additional array for the combined array but can operate on the original arrays only.
It's straightforward to understand the time-complexity of this algorithm is O(k). An advantage of this algorithm is that it can be easily adapted to consider duplicate elements only once.
4. A Binary Search Over Both Arrays
Can we do better than O(k)? The answer is that we can. The basic idea is to do a binary search algorithm over the two arrays.
For this to work, we need a data structure that provides constant-time read access to all its elements. In Java, that could be an array or an ArrayList.
Let's define the skeleton for the method we are going to implement:
int findKthElement(int k, int[] list1, int[] list2)
    throws NoSuchElementException, IllegalArgumentException {

    // check input (see below)

    // handle special cases (see below)

    // binary search (see below)
}
Here, we pass k and the two arrays as arguments. First, we'll validate the input; second, we handle some special cases and then do the binary search. In the next three sections, we'll look at these three steps in reverse order, so first, we'll see the binary search, second, the special cases, and finally, the parameter validation.
4.1. The Binary Search
The standard binary search, where we are looking for a specific element, has two possible outcomes: either we find the element we're looking for and the search is successful, or we don't find it and the search is unsuccessful. This is different in our case, where we want to find the kth smallest element. Here, we always have a result.
Let's look at how to implement that.
4.1.1. Finding the Correct Number of Elements From Both Arrays
We start our search with a certain number of elements from the first array. Let's call that number nElementsList1. As we need k elements in total, the number nElementsList1 is:
int nElementsList2 = k - nElementsList1;
As an example, let's say k = 8. We start with four elements from the first array and four elements from the second array (a).
If the 4th element in the first array is bigger than the 4th element in the second array, we know that we took too many elements from the first array and can decrease nElementsList1 (b). Otherwise, we know that we took too few elements and can increase nElementsList1 (b').
We continue until we have reached the stopping criteria. Before we look at what that is, let's look at the code for what we've described so far:
int right = k;
int left = = 0;
do {
    nElementsList1 = ((left + right) / 2) + 1;
    nElementsList2 = k - nElementsList1;

    if(nElementsList2 > 0) {
        if (list1[nElementsList1 - 1] > list2[nElementsList2 - 1]) {
            right = nElementsList1 - 2;
        } else {
            left = nElementsList1;
        }
    }
} while(!kthSmallesElementFound(list1, list2, nElementsList1, nElementsList2));
4.1.2. Stopping Criteria
We can stop in two cases. First, we can stop if the maximum element we take from the first array is equal to the maximum element we take from the second (c). In this case, we can simply return that element.
Second, we can stop if the following two conditions are met (d):
The largest element to take from the first array is smaller than the smallest element we do not take from the second array (11 < 100).
The largest element to take from the second array is smaller than the smallest element we do not take from the first array (21 < 27).
It's easy to visualize (d') why that condition works: all elements we take from the two arrays are surely smaller than any other element in the two arrays.
Here's the code for the stopping criteria:
private static boolean foundCorrectNumberOfElementsInBothLists(int[] list1, int[] list2, int nElementsList1, int nElementsList2) {

    // we do not take any element from the second list
    if(nElementsList2 < 1) {
        return true;
    }

    if(list1[nElementsList1-1] == list2[nElementsList2-1]) {
        return true;
    }

    if(nElementsList1 == list1.length) {
        return list1[nElementsList1-1] <= list2[nElementsList2];
    }

    if(nElementsList2 == list2.length) {
        return list2[nElementsList2-1] <= list1[nElementsList1];
    }

    return list1[nElementsList1-1] <= list2[nElementsList2] && list2[nElementsList2-1] <= list1[nElementsList1];
}
4.1.3. The Return Value
Finally, we need to return the correct value. Here, we have three possible cases:
We take no elements from the second array, thus the target value is in the first array (e)
Note that we do not need to handle the case where we don't take any element from the first array — we'll exclude that case in the handling of special cases later.
4.2. Initial Values for the Left and Right Borders
Until now, we initialized the right and left border for the first array with k and 0:
int right = k;
int left = 0;
However, depending on the value of k, we need to adapt these borders.
First, if k exceeds the length of the first array, we need to take the last element as the right border. The reason for this is quite straightforward, as we cannot take more elements from the array than there are.
Second, if k is bigger than the number of elements in the second array, we know for sure that we need to take at least (k – length(list2)) from the first array. As an example, let's say k = 7. As the second array only has four elements, we know that we need to take at least 3 elements from the first array, so we can set L to 2:
Here's the code for the adapted left and right borders:
// correct left boundary if k is bigger than the size of list2
int left = k < list2.length ? 0 : k - list2.length - 1;

// the inital right boundary cannot exceed the list1
int right = min(k-1, list1.length - 1);
4.3. Handling of Special Cases
Before we do the actual binary search, we can handle a few special cases to make the algorithm slightly less complicated and avoid exceptions. Here's the code with explanations in the comments:
// we are looking for the minimum value
if(k == 1) {
    return min(list1[0], list2[0]);
}

// we are looking for the maximum value
if(list1.length + list2.length == k) {
    return max(list1[list1.length-1], list2[list2.length-1]);
}

// swap lists if needed to make sure we take at least one element from list1
if(k <= list2.length && list2[k-1] < list1[0]) {
    int[] list1_ = list1;
    list1 = list2;
    list2 = list1_;
}
4.4. Input Validation
Let's look at the input validation first. To prevent the algorithm from failing and throwing, for example, a NullPointerException or ArrayIndexOutOfBoundsException, we want to make sure that the three parameters meet the following conditions:
Both arrays must not be null and have at least one element
k must be >= 0 and cannot be bigger than the length of the two arrays together
Here's the full code of the algorithm we've just described:
public static int findKthElement(int k, int[] list1, int[] list2) throws NoSuchElementException, IllegalArgumentException {

    checkInput(k, list1, list2);

    // we are looking for the minimum value
    if(k == 1) {
        return min(list1[0], list2[0]);
    }

    // we are looking for the maximum value
    if(list1.length + list2.length == k) {
        return max(list1[list1.length-1], list2[list2.length-1]);
    }

    // swap lists if needed to make sure we take at least one element from list1
    if(k <= list2.length && list2[k-1] < list1[0]) {
        int[] list1_ = list1;
        list1 = list2;
        list2 = list1_;
    }

    // correct left boundary if k is bigger than the size of list2
    int left = k < list2.length ? 0 : k - list2.length - 1;

    // the inital right boundary cannot exceed the list1
    int right = min(k-1, list1.length - 1);

    int nElementsList1, nElementsList2;

    // binary search
    do {
        nElementsList1 = ((left + right) / 2) + 1;
        nElementsList2 = k - nElementsList1;

        if(nElementsList2 > 0) {
            if (list1[nElementsList1 - 1] > list2[nElementsList2 - 1]) {
                right = nElementsList1 - 2;
            } else {
                left = nElementsList1;
            }
        }
    } while(!kthSmallesElementFound(list1, list2, nElementsList1, nElementsList2));

    return nElementsList2 == 0 ? list1[nElementsList1-1] : max(list1[nElementsList1-1], list2[nElementsList2-1]);
}

private static boolean foundCorrectNumberOfElementsInBothLists(int[] list1, int[] list2, int nElementsList1, int nElementsList2) {

    // we do not take any element from the second list
    if(nElementsList2 < 1) {
        return true;
    }

    if(list1[nElementsList1-1] == list2[nElementsList2-1]) {
        return true;
    }

    if(nElementsList1 == list1.length) {
        return list1[nElementsList1-1] <= list2[nElementsList2];
    }

    if(nElementsList2 == list2.length) {
        return list2[nElementsList2-1] <= list1[nElementsList1];
    }

    return list1[nElementsList1-1] <= list2[nElementsList2] && list2[nElementsList2-1] <= list1[nElementsList1];
}
5. Testing the Algorithm
In our GitHub repository, there are many test cases that cover a lot of possible input arrays and also many corner cases.
Here, we only point out one of the tests, which tests not against static input arrays but compares the result of our double binary search algorithm to the result of the simple join-and-sort algorithm. The input consists of two randomized arrays:
In this article, we saw several ways of how to find the kth smallest element in the union of two sorted arrays. First, we saw a simple and straightforward O(n log n) algorithm, then a version with complexity O(n), and last, an algorithm that runs in O(log n).
The last algorithm we saw is a nice theoretical exercise; however, for most practical purposes, we should consider using one of the first two algorithms, which are much simpler than the binary search over two arrays. Of course, if performance is an issue, a binary search could be a solution.
In this tutorial, we'll walk through some of the main implementations of concurrent queues in Java. For a general introduction to queues, refer to our Guide to the Java Queue Interface article.
2. Queues
In multithreaded applications, queues need to handle multiple concurrent producers-consumers scenarios. The correct choice of a concurrent queue could be crucial in achieving good performance in our algorithms.
Firstly, we'll see some important differences between a blocking queue and a non-blocking one. Then, we'll take a look at some implementations and best practices.
2. Blocking vs Non-Blocking Queue
BlockingQueue offers a simple thread-safe mechanism. In this queue, threads need to wait for the queue's availability. The producers will wait for available capacity before adding elements, while consumers will wait until the queue is empty. In those cases, the non-blocking queue will either throw an exception or return a special value, like null or false.
To achieve this blocking mechanism, the BlockingQueue interface exposes two functions on top of the normal Queue functions: put and take. Those functions are the equivalent of add and remove in a standard Queue.
3. Concurrent Queue Implementations
3.1. ArrayBlockingQueue
As its name suggests, this queue uses an array internally. As a consequence, it's a bounded queue, meaning it has a fixed size.
A simple work queue is an example use case. This scenario is often a low producer-to-consumer ratio, where we split time-consuming tasks among multiple workers. Since this queue can't grow indefinitely, the size limit acts as a safety threshold if memory is an issue.
Speaking of memory, it's important to note that the queue pre-allocates the array. While this may improve throughput, it may also consume more memory than necessary. For instance, a large-capacity queue may stay empty for long periods of time.
Also, the ArrayBlockingQueue uses a single lock for both put and take operations. This ensures no overwrite of entries, at the cost of a performance hit.
3.2. LinkedBlockingQueue
The LinkedBlockingQueue uses a LinkedList variant, where each queue item is a new node. While this makes the queue unbounded in principle, it still has a hard limit of Integer.MAX_VALUE.
On the other hand, we can set the queue size by using the constructor LinkedBlockingQueue(int capacity).
This queue uses distinct locks for put and take operations. As a consequence, both operations can be done in parallel and improve throughput.
Since the LinkedBlockingQueue can be either bounded or unbounded, why would we use the ArrayBlockingQueue over this one? LinkedBlockingQueue needs to allocate and deallocate nodes every time an item is added or removed from the queue. For this reason, an ArrayBlockingQueue can be a better alternative if the queue grows fast and shrinks fast.
The performance of LinkedBlockingQueue is said to be unpredictable. In other words, we always need to profile our scenarios to ensure we use the right data structure.
3.3. PriorityBlockingQueue
The PriorityBlockingQueue is our go-to solution when we need to consume items in a specific order. To achieve this, the PriorityBlockingQueue uses an array-based binary heap.
While internally it uses a single lock mechanism, the take operation can occur simultaneously with the put operation. The use of a simple spinlock makes this possible.
A typical use case is consuming tasks with different priorities. We don't want a low priority task to take the place of a high priority one.
3.4. DelayQueue
We use a DelayQueuewhen a consumer can only take an expired item. Interestingly, it uses a PriorityQueue internally to order the items by their expiration.
Since this is not a general-purpose queue, it doesn't cover as many scenarios as the ArrayBlockingQueue or the LinkedBlockingQueue. For example, we can use this queue to implement a simple event loop similar to what is found in NodeJS. We place asynchronous tasks in the queue for later processing when they expire.
3.5. LinkedTransferQueue
The LinkedTransferQueue introduces a transfer method. While other queues typically block when producing or consuming items, the LinkedTransferQueueallows a producer to wait for the consumption of an item.
We use a LinkedTransferQueue when we need a guarantee that a particular item we put in the queue has been taken by someone. Also, we can implement a simple backpressure algorithm using this queue. Indeed, by blocking producers until consumption, consumers can drive the flow of messages produced.
3.6. SynchronousQueue
While queues typically contain many items, the SynchronousQueue will always have, at most, a single item. In other words, we need to see the SynchronousQueue as a simple way to exchange some data between two threads.
When we have two threads that need access to a shared state, we often synchronize these with CountDownLatch or other synchronization mechanisms. By using a SynchronousQueue, we can avoid this manual synchronization of threads.
3.7. ConcurrentLinkedQueue
The ConcurrentLinkedQueue is the only non-blocking queue of this guide. Consequently, it provides a “wait-free” algorithm where add and poll are guaranteed to be thread-safe and return immediately. Instead of locks, this queue uses CAS (Compare-And-Swap).
It's a perfect candidate for modern reactive systems, where using blocking data structures is often forbidden.
On the other hand, if our consumer ends up waiting in a loop, we should probably choose a blocking queue as a better alternative.
4. Conclusion
In this guide, we walked through different concurrent queue implementations, discussing their strengths and weaknesses. With this in mind, we're better equipped to develop efficient, durable, and available systems.
In this tutorial, we'll analyze the technique to list all the classes loaded by a specific class loader in Java, using the Java Instrumentation API. We'll also see how to create and load a Java agent to acquire an Instrumentation instance and invoke the required methods to accomplish our task.
2. Class Loaders in Java
The class loaders are an integral part of the JRE (Java Runtime Environment). Their job is to dynamically load classes into the Java Virtual Machine. In other words, they load classes into memory on-demand when required by the application. The article on Java class loaders talks about their different types and provides a detailed understanding of how they work.
3. Using the Instrumentation API
The Instrumentation interface provides the getInitiatedClasses(Classloader loader) method that can be invoked toreturn an array comprising all the classes loaded by the particular loader. Let's see how this works.
First, we need to create and load an agent to acquire an instance of the Instrumentation interface. A Java agent is a tool to instrument programs running on the JVM (Java Virtual Machine).
In other words, it can add or modify the bytecode of methods for the purpose of gathering data. We'll require an agent to get a handle on the Instrumentation instance and invoke the required method.
There are multiple ways to create and load an agent. In this tutorial, we'll use the static loading approach using the premain method and the -javaagent option.
3.1. Creating a Java Agent
To create a Java agent, we need to define the premain method to which the Instrumentation instance will be passedon agent load. Let's now create the ListLoadedClassesAgent class:
public class ListLoadedClassesAgent {

    private static Instrumentation instrumentation;

    public static void premain(String agentArgs, Instrumentation instrumentation) {
        ListLoadedClassesAgent.instrumentation = instrumentation;
    }
}
3.2. Defining the listLoadedClasses Methods
In addition to defining the agent, we'll define and expose a static method to return an array of loaded classes for a given class loader.
Note that if we pass a class loader with a null value to the getInitiatedClasses method, it returns the classes loaded by the bootstrap class loader.
Note that if we're using Java 9 or above, we can use the getPlatformClassLoader method. This will list the classes loaded by the Platform class loader. In that case, the switch case will also contain:
case "PLATFORM":
    classLoader = ClassLoader.getPlatformClassLoader();
    break;
3.3. Creating the Agent Manifest File
Now, let's create a manifest file, MANIFEST.MF, with appropriate attributes for our agent to run, including:
The complete list of manifest attributes for an agent JAR file is available on the official documentation of the java.lang.instrument package.
3.4. Loading the Agent And Running the Application
Let's now load the agent and run the application. First, we need the agent JAR file with a manifest file containing the Premain-Class information. Additionally, we need the application JAR file with a manifest file containing the Main-Class information. The Launcher class containing the main method will start our application. Then we'll be able to print the classes loaded by different types of class loaders:
In this tutorial, we learned about the technique to list all the classes loaded in a specific class loader.
First, we created the Java Agent. After that, we defined the method to list the loaded classes using the Java Instrumentation API. Finally, we created the agent manifest files, loaded the agent, and ran our application.
As always, the complete source code of the example can be found over on GitHub.
A runtime system provides an environment to translate the code written in a high-level language like Java to machine code and understandable by the Central Process Unit (CPU).
We can distinguish these types of translators:
Assemblers: They directly translate assembly codes to machine code so it is fast
Compilers: They translate the code into assembly code, then it uses assemblers to translate the resulting code into binary. Using this technique is slow but the execution is fast. Also, the resulting machine code is platform dependent
Interpreters: They translate the code while executing it. Since the translation happens at runtime, the execution may be slow
3. Java Virtual Machine
The JVM is a virtual machine to run Java desktop, server, and web applications. Another important thing about Java is it was developed with portability in mind. Thus, the JVM has been shaped also to support multiple host architectures and run everywhere. But, it is too heavy for embedded devices.
Java has an active community and will continue to be widely used in the future. Moreover, HotSpot is the JVM reference implementation. As well, there are also more than five other implementations maintained by the Open Source Community.
With the new cadence-based release, Java and the JVM are receiving new updates every six months. For example, we can list some proposals of the next releases such as Foreign-Memory Access and Packaging Tool.
4. Dalvik Virtual Machine
The DVM is a virtual machine to run Android applications. The DVM executes Dalvik bytecode, which is compiled from programs written in the Java language. Note that the DVM is not a JVM.
One of the key design principles of the DVM is that it should run on low memory mobile devices and loads quicker compared to any JVM. Also, this VM is more efficient when it runs multiple instances on the same device.
In 2014, Google released Android Runtime (ART) for Android 5 which replaced Dalvik for improved application performance battery usage. The last version was 1.6.0 on Android 4.4.
5. Difference Between JVM and DVM
5.1. Architecture
The JVM is a stack-based VM where all the arithmetic and logic operations are carried out via push and pop operands and results are stored on the stack. The stack is also the data structure to store methods.
Contrastingly the DVM is a register-based VM. These registers located in the CPU carry out all the arithmetic and logic operations. The register is the data structure to store operands.
5.2. Compilation
Java code is compiled inside the JVM to an intermediary format called Java bytecode (.class files). Then, the JVM parses the resulting Java bytecode and translates it to machine code.
On an Android device, the DVM compiles the Java code to an intermediate format called Java bytecode (.class file) like the JVM. Then, with the help of a tool called Dalvik eXchange or dx, it transforms Java bytecode to Dalvik bytecode. Finally, the DVM translates the Dalvik bytecode to binary machine code.
Both VMs use the Just-In-Time (JIT) Compiler. The JIT Compiler is a type of compiler that performs the compilation during the runtime.
5.3. Performance
As seen previously, JVM is a Stack-based VM and DVM is a Register-based VM. Stack-based VM bytecode is very compact because the location of operands is implicitly on the operand stack. Register-based VM bytecode requires all the implicit operands to be part of an instruction. That indicates that the Register-based code size will usually be much larger than Stack-based bytecode.
On the other hand, register-based VM's can express computations using fewer VM instructions than a corresponding stack-based VM. Dispatching a VM instruction is costly, so the reduction in executedVM instructions is likely to significantly improve the speed of the register-based VM.
5.4. Execution
Although it is possible to set up an instance of the JVM per running application, typically we'll only configure one single instance of a JVM with shared processes and memory space to run all the applications we have deployed.
However, Android was designed to run multiple DVM instances. So to run an application or a service, the Android OS creates a new DVM instance with a separate process in shared memory space and deploys the code to run the application.
6. Conclusion
In this tutorial, we presented the main differences between the JVM and DVM. Both VM's run applications written in Java, but they use different techniques and processes to compile and run code.
In this tutorial, we'll learn about Azure Cosmos DB and how we can interact with it using Spring Data.
2. Azure Cosmos DB
Azure Cosmos DB is Microsoft's globally distributed database service.
It's a NoSQL database, which provides comprehensive service level agreements for throughput, latency, availability, and consistency guarantees. Also, it assures 99.999% availability for both reads and writes.
Azure Cosmos DB does not give only two consistency choices i.e. either consistent or not consistent. Instead, we get five consistency choices: strong, bounded staleness, session, consistent prefix, and eventual.
We can elastically scale both the throughput and storage of Azure Cosmos DB.
Additionally, it's available in all Azure regions and offers turnkey global distribution as we can replicate our data in any Azure regions just by clicking a button. This helps us in having our data closer to our users so that we can serve their requests faster.
It's schema-agnosticas it has no schema. Furthermore, we don't need to do any index management for Azure Cosmos Db. It automatically does indexing of data for us.
We can work with Azure CosmosDb using different standard APIs such as SQL, MongoDB, Cassandra, etc.
3. Spring Data Azure Cosmos DB
Microsoft also provides a module that allows us to work with Cosmos DB using Spring Data. In the next section, we'll see how we can use Azure Cosmos DB in a Spring Boot application.
In our example, we'll create a Spring web application that stores a product entity in an Azure Cosmos database and performs basic CRUD operations on it. First, we need to configure an account and database in the Azure portal, following the instructions in the documentation.
If we don't want to create an account on the Azure portal, Azure also provides the Azure Cosmos Emulator. Even though this doesn't contain all the functionalities of Azure Cosmos Service and there are some differences, we can use it for local development and testing.
We can use the Emulator in our local environment in two ways: either by downloading the Azure Cosmos Emulator on our machine or running the Emulator on Docker for Windows.
We'll choose the option to run it on Docker for Windows. Let's pull the Docker image by running the following command:
docker pull microsoft/azure-cosmosdb-emulator
Then we can run the Docker image and start the container by running the following commands:
set containerName=azure-cosmosdb-emulator
set hostDirectory=%LOCALAPPDATA%\azure-cosmosdb-emulator.hostd
md %hostDirectory% 2>nul
docker run --name %containerName% --memory 2GB --mount "type=bind,source=%hostDirectory%,destination=C:\CosmosDB.Emulator\bind-mount" -P --interactive --tty microsoft/azure-cosmosdb-emulator
Once we've configured the Azure Cosmos DB account and database in the Azure portal or in Docker, we can continue to configure it in our Spring Boot application.
4. Using Azure Cosmos DB in Spring
4.1. Configuring Spring Data Azure Cosmos DB with Spring
To access Azure Cosmos DB from our Spring application we'll need the URI of our database, it's access keys and database name. Then we'all add the connection properties in our application.properties:
We can find the values of the above properties from the Azure portal. The URI, primary key, and the secondary key will be available in the keys section of our Azure Cosmos DB in the Azure portal.
To connect to Azure Cosmos DB from our application we need to create a client. For that, we need to extend AbstractCosmosConfiguration class in our configuration class and add the @EnableCosmosRepositories annotation.
This annotation will scan for interfaces that extend Spring Data's repository interfaces in the specified package.
We also need to configure a bean of type CosmosDBConfig:
In order to interact with Azure Cosmos DB, we make use of entities. So, let's create an entity that we will store in Azure Cosmos DB. To make our Product class an entity, we'll use the @Document annotation:
In this example, we've used the collection attribute with the value products, to indicate this will be the name of our container in the database. If we don't provide any value for the collection parameter, then the class name will be used as the container name in the database.
We've also defined an id for our document. We can either create a field with the name id in our class or we can annotate a field with the @Id annotation. Here we have used the productid field as the document id.
We can logically partition our data in our container by using a partition key by annotating a field with @PartitionKey. In our class, we've used the productCategory field as the partition key.
By default, the indexing policy is defined by Azure, but we can also customize it by using @DocumentIndexingPolicy annotation on our entity Class.
We can also enable Optimistic locking for our entity container by creating a field named _etag and annotating it with @Version.
4.3. Defining the Repository
Now let's create a ProductRepository interface that extends CosmosRepository. Using this interface, we can perform CRUD operations on our Azure Cosmos DB:
@Repository
public interface ProductRepository extends CosmosRepository<Product, String> {
    List findByProductName(String productName);

}
As we can see, this is defined in a similar way to other Spring Data modules.
4.4. Testing the Connection
Now we can create a Junit Test to save a Product entity in Azure Cosmos DB using our ProductRepository:
@SpringBootTest
public class AzureCosmosDbApplicationManualTest {

    @Autowired
    ProductRepository productRepository;

    @Test
    public void givenProductIsCreated_whenCallFindById_thenProductIsFound() {
        Product product = new Product();
        product.setProductid("1001");
        product.setProductCategory("Shirt");
        product.setPrice(110.0);
        product.setProductName("Blue Shirt");

        productRepository.save(product);
        Product retrievedProduct = productRepository.findById("1001", new PartitionKey("Shirt"))
            .orElse(null);
        Assert.notNull(retrievedProduct, "Retrieved Product is Null");
    }

}
By running this Junit test we can test our connection with Azure Cosmos DB from our Spring application.
5. Conclusion
In this tutorial, we learned about Azure Cosmos DB. Further, we learned how to access Azure Cosmos DB from a Spring Boot application, how to create entities and configure a Repository by extending CosmosRepository to interact with it.
The code for the above example is available over on GitHub.
In this tutorial, we'll explain the Hi/Lo Algorithm. It is used mostly as a database identifier generation strategy.
We'll start with the algorithm overview. Then, we'll show a practical example based on the Hibernate framework. Finally, we'll discuss the algorithm's use cases, its benefits, and its drawbacks.
2. Hi/Lo Algorithm Overview
2.1 Definition
The main purpose of the Hi/Lo algorithm is to create a range of numbers that can be safely used as database identifiers. In order to do that, it uses three number variables commonly called high, low, and incrementSize.
The incrementSize variable holds the maximum number of identifiers that can be generated in one batch. It should be treated as a constant value defined at the beginning of the algorithm. Any runtime modification might cause serious problems in environments where multiple clients use the same Hi/Lo configuration to persist entries.
The high variable is usually assigned from a database sequence. In that case, we're sure that no one will get the same number twice.
The low variable holds the currently assigned number in the range [0, incrementSize).
Given these points, the Hi/Lo algorithm generates values in range [(hi – 1) * incrementSize + 1, (hi * incrementSize)).
2.2 Pseudocode
Let’s take a look at the steps for generating a new value using the Hi/Lo algorithm:
if low is greater than or equal to incrementSize, assign a new value to high and reset low to 0
generate a new value with the formula: (high – 1) * incrementSize + low
increment low by 1
return the generated value
3. Practical Example
Let's see the Hi/Lo algorithm in action. To do that, we'll use the Hibernate framework and its Hi/Lo implementation.
First, let's define a database entity to work with:
@Entity
public class RestaurantOrder {
    @Id
    @GeneratedValue(strategy = GenerationType.SEQUENCE, generator = "hilo_sequence_generator")
    @GenericGenerator(
      name = "hilo_sequence_generator",
      strategy = "sequence",
      parameters = {
        @Parameter(name = "sequence_name", value = "hilo_seqeunce"),
        @Parameter(name = "initial_value", value = "1"),
        @Parameter(name = "increment_size", value = "3"),
        @Parameter(name = "optimizer", value = "hilo")
      }
    )
    private Long id;
}
It's a simple restaurant order with one id field. To correctly define the Hi/Lo algorithm in Hibernate, in the definition of the id field, we must choose a sequence strategy – hilo optimizer – and specify the increment_size parameter.
To show the Hi/Lo algorithm in action, we'll persist nine restaurant orders in a loop:
public void persist() {
    Transaction transaction = session.beginTransaction();

    for (int i = 0; i < 9; i++) {
        session.persist(new RestaurantOrder());
        session.flush();
    }

    transaction.commit();
}
According to the specified increment size in the entity, we should have only three calls to the database for the next high value. Assuming the database sequence starts from 1, the first batch of generated identifiers will be in the range [1,3].
When the Hi/Lo algorithm returns 3 and Hibernate asks for the next identifier's value, the value of the low variable is equal to the incrementSize constant. In that case, the next call to the database for the new high value must be made. Having 2 as the new high value, the algorithm generates values in the range [4,6].
Finally, the last call to the database for the next high value is made, and values in the range [7, 9] are assigned to the entities.
Hibernate logs captured during the execution of the persist() method confirm those values:
Hibernate: call next value for hilo_seqeunce
org.hibernate.id.enhanced.SequenceStructure  - Sequence value obtained: 1
org.hibernate.event.internal.AbstractSaveEventListener  - Generated identifier: 1, using strategy: org.hibernate.id.enhanced.SequenceStyleGenerator
org.hibernate.event.internal.AbstractSaveEventListener  - Generated identifier: 2, using strategy: org.hibernate.id.enhanced.SequenceStyleGenerator
org.hibernate.event.internal.AbstractSaveEventListener  - Generated identifier: 3, using strategy: org.hibernate.id.enhanced.SequenceStyleGenerator
Hibernate: call next value for hilo_seqeunce
org.hibernate.id.enhanced.SequenceStructure  - Sequence value obtained: 2
org.hibernate.event.internal.AbstractSaveEventListener  - Generated identifier: 4, using strategy: org.hibernate.id.enhanced.SequenceStyleGenerator
org.hibernate.event.internal.AbstractSaveEventListener  - Generated identifier: 5, using strategy: org.hibernate.id.enhanced.SequenceStyleGenerator
org.hibernate.event.internal.AbstractSaveEventListener  - Generated identifier: 6, using strategy: org.hibernate.id.enhanced.SequenceStyleGenerator
Hibernate: call next value for hilo_seqeunce
org.hibernate.id.enhanced.SequenceStructure  - Sequence value obtained: 3
org.hibernate.event.internal.AbstractSaveEventListener  - Generated identifier: 7, using strategy: org.hibernate.id.enhanced.SequenceStyleGenerator
org.hibernate.event.internal.AbstractSaveEventListener  - Generated identifier: 8, using strategy: org.hibernate.id.enhanced.SequenceStyleGenerator
org.hibernate.event.internal.AbstractSaveEventListener  - Generated identifier: 9, using strategy: org.hibernate.id.enhanced.SequenceStyleGenerator
4. Algorithm Benefits and Drawbacks
The main advantage of the Hi/Lo algorithm is the reduced number of database calls for the next sequence values. Increasing the value of incrementSize decreases the number of round-trips to the database. Obviously, that means a performance gain in our application. In addition to that, the Hi/Lo algorithm is a preferred choice in environments with a weak Internet connection.
On the other hand, the Hi/Lo algorithm isn't the best choice in environments where multiple different clients persist data to the same table in a database. Third-party applications might be unaware of the Hi/Lo strategy we're using to generate identifiers. As a result, they might use entity ids from the generated range of numbers used currently in our application. In that case, when persisting data, we may encounter errors that are difficult to fix.
5. Conclusion
In this tutorial, we discussed the Hi/Lo algorithm.
First, we explained how it works and discussed its pseudocode implementation. Then, we showed a practical example using Hibernate's algorithm implementation. Finally, we listed Hi/Lo benefits and drawbacks.
As always, the code shown in this article is available over on GitHub.
In this tutorial, we'll explore concurrency in reactive programs written with Spring WebFlux.
We'll begin by discussing concurrency in relation to reactive programming. After that, we'll explore how Spring WebFlux offers concurrency abstractions over different reactive server libraries.
2. The Motivation for Reactive Programming
A typical web application comprises of several complex, interacting parts. Many of these interactions are blocking in nature like, for example, those involving a database call to fetch or update data. Several others, however, are independent and can be performed concurrently, possibly in parallel.
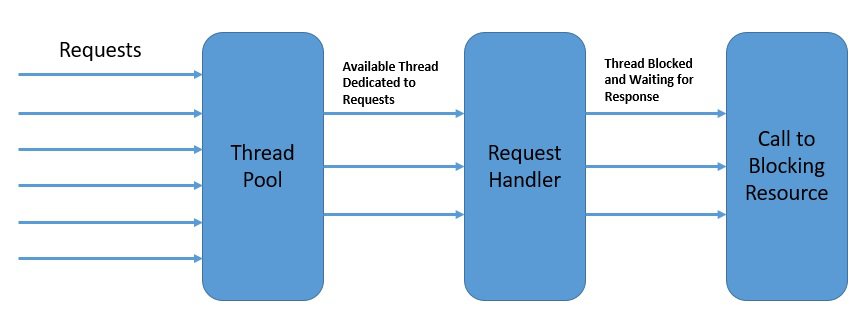
For instance, two user requests to a web server can be handled by different threads. On a multi-core platform, this has an obvious benefit in terms of the overall response time. Hence, this model of concurrency is known as the thread-per-request model:
In the diagram above, each thread handles a single request at a time.
While thread-based concurrency solves a part of the problem for us, it does nothing to address the fact that most of our interactions within a single thread are still blocking. Moreover, the native threads we use to achieve concurrency in Java come at a significant cost in terms of context switches.
Meanwhile, as web applications face more and more requests, the thread-per-request model starts to fall short of expectations.
Consequently, what we need is a concurrency model which can help us handle increasingly more requests with relatively less number of threads. This is one of the primary motivations for adopting reactive programing.
3. Concurrency in Reactive Programming
Reactive programming helps us structure the program in terms of data flows and the propagation of change through them. Hence, in a completely non-blocking environment, this can enable us to achieve higher concurrency with better resource utilization.
However, is reactive programming a complete departure from thread-based concurrency? While this is a strong statement to make, reactive programming certainly has a very different approach to the usage of threads to achieve concurrency. So, the fundamental difference that reactive programming brings on is asynchronicity.
In other words, the program flow transforms from a sequence of synchronous operations, into an asynchronous stream of events.
For instance, under the reactive model, a read call to the database does not block the calling thread while data is fetched. The call immediately returns a publisher that others can subscribe to. The subscriber can process the event after it occurs and may even further generate events itself:
Above all, reactive programming does not emphasize on which thread events should be generated and consumed. Emphasis is, rather, on structuring the program as an asynchronous event stream.
The publisher and subscriber here do not need to be part of the same thread. This helps us in getting better utilization of available threads and hence higher overall concurrency.
4. Event Loop
There are several programming models that describe a reactive approach to concurrency.
In this section, we'll examine a few of them to understand how reactive programming achieves higher concurrency with fewer threads.
One of such reactive asynchronous programming model for servers is the event loopmodel:
Above, is an abstract design of an event loop that presents the ideas of reactive asynchronous programming:
The event loop runs continuously in a single thread, although we can have as many event loops as the number of available cores
The event loop process the events from an event queue sequentially and returns immediately after registering the callback with the platform
The platform can trigger the completion of an operation like a database call or an external service invocation
The event loop can trigger the callback on the operation completion notification and send back the result to the original caller
The event loopmodel is implemented in a number of platforms including Node.js, Netty, and Ngnix. They offer much better scalability than traditional platforms like Apache HTTP Server, Tomcat, or JBoss.
5. Reactive Programming with Spring WebFlux
Now, we have enough insights into reactive programming and its concurrency model, to explore the subject in Spring WebFlux.
WebFlux isthe Spring‘sreactive-stack web framework, which was added in version 5.0.
Let's explore the server-side stack of Spring WebFlux to understand how it complements the traditional web stack in Spring:
As we can see, Spring WebFlux sits parallel to the traditional web framework in Spring and does not necessarily replace it.
There are a few important points to note here:
Spring WebFlux extends the traditional annotation-based programming model with functional routing
Moreover, it adapts the underlying HTTP runtimes to the Reactive Streams API making the runtimes interoperable
Hence, it's able to support a wide variety of reactive runtimes including Servlet 3.1+ containers like Tomcat, Reactor, Netty, or Undertow
Lastly, it includes WebClient, a reactive and non-blocking client for HTTP requests offering functional and fluent APIs
6. Threading Model in Supported Runtimes
As we have discussed earlier, reactive programs tend to work with just a few threads and make the most of them. However, the number and nature of threads depend upon the actual Reactive Stream API runtime that we choose.
To clarify, Spring WebFlux can adapt to different runtimes through a common API provided by HttpHandler. This API is a simple contract with just one method that provides an abstraction over different server APIs like Reactor Netty, Servlet 3.1 API, or Undertow APIs.
Let's now understand the threading model implemented in a few of them.
While Netty is the default server in a WebFlux application, it's just a matter of declaring the right dependency to switch to any other supported server:
While it's possible to observe the threads created in a Java Virtual Machine in a number of ways, it's quite easy just to pull them from the Thread class itself:
As we said, Reactor Netty is the default embedded server in the Spring Boot WebFlux starter. Let's try to see the threads that Netty creates by default. Hence, in the beginning, we'll not add any other dependencies or use WebClient. So, if we start a Spring WebFlux application created using its SpringBoot starter, we can expect to see some default threads it creates:
Note that, apart from a normal thread for the server, Netty spawns a bunch of worker threads for request processing. These typically are not more than available CPU cores. This is the output on a quad-core machine. We'd also see a bunch of housekeeping threads typical to a JVM environment, but they are not important here.
Netty uses the event loop model to provide highly scalable concurrency in a reactive asynchronous manner. Let's see how Netty implements event loop levering Java NIO to provide this scalability:
Here, EventLoopGroup manages one or more EventLoop which must be continuously running. Hence, it's not recommended to create more EventLoops than the number of available cores.
The EventLoopGroup further assigns an EventLoop to each newly created Channel. Thus, for the lifetime of a Channel, all operations are executed by the same thread.
6.2. Apache Tomcat
Spring WebFlux is also supported on a traditional Servlet Container like Apache Tomcat.
WebFlux relies on the Servlet 3.1 API with non-blocking I/O. While it uses Servlet API behind a low-level adapter, Servlet API is not available for direct usage.
Let's see what kind of threads we expect in a WebFlux application running on Tomcat:
The number and type of threads which we can see here are quite different from what we observed earlier.
To begin with, Tomcat starts with more worker threads, which defaults to ten. Of course, we'll also see some housekeeping threads typical to the JVM, and the Catalina container, which we can ignore for this discussion.
Let's understand the architecture of Tomcat with Java NIO to correlate it with the threads we see above.
Tomcat 5 onward supports NIO in its Connector component, which is primarily responsible for receiving the requests.
The other Tomcat component is the Container component, which is responsible for the container management functions.
The point of interest for us here is the threading model that the Connector component implements to support NIO. It is comprised of Acceptor, Poller, and Worker as part of the NioEndpoint module:
Tomcat spawns one or more threads for Acceptor, Poller, and Worker with typically a thread pool dedicated to Worker.
While a detailed discussion on Tomcat architecture is beyond the scope of this tutorial, we should now have enough insights to understand the threads we saw earlier.
7. Threading Model in WebClient
WebClientis the reactive HTTP client that is part of Spring WebFlux. We can use it anytime we require REST-based communication and enables us to create applications that are end-to-endreactive.
As we have seen before, reactive applications work with just a few threads, and so, there is no margin for any part of the application to block a thread. Hence, WebClient plays a vital role in helping us realize the potential of WebFlux.
7.1. Using WebClient
Using WebClient is quite simple as well. We do not need to include any specific dependencies as it's part of Spring WebFlux.
Let's create a simple REST endpoint which returns a Mono:
@GetMapping("/index")
public Mono<String> getIndex() {
    return Mono.just("Hello World!");
}
Then, we'll use WebClient to call this REST endpoint and consume the data reactively:
Here, we're also printing the threads that are created using the method we discussed earlier.
7.2. Understanding the Threading Model
So, how does the threading model work in the case of WebClient?
Well, not surprisingly, WebClient also implements concurrency using the event loop model. Of course, it relies on the underlying runtime to provide the necessary infrastructure.
If we're running WebClient on the Reactor Netty, it shares the event loop that Netty uses for the server. Hence, in this case, we may not notice much difference in the threads that are created.
However, WebClient is also supported on a Servlet 3.1+ container like Jetty, but the way it works there is different.
If we compare the threads that are created on a WebFlux application running Jetty with and without WebClient, we'll notice a few additional threads.
Here, WebClient has to create its event loop. So, we can see a fixed number of processing threads that this event loop creates:
In some cases,having a separate thread pool for client and server can provide better performance. While it's not the default behavior with Netty, it's always possible to declare a dedicated thread pool for WebClient if needed.
We'll see how this is possible in a later section.
8. Threading Model in Data Access Libraries
As we have seen earlier, even a simple application usually consists of several parts that need to be connected.
Typical examples of these parts include databases and message brokers. The existing libraries to connect with many of them are still blocking, but that is changing fast.
There are several databases now that offer reactive libraries for connectivity. Many of these libraries are available within Spring Data, while we can use others directly as well.
The threading model these libraries use is of particular interest to us.
8.1. Spring Data MongoDB
Spring Data MongoDB provides reactive repository support for MongoDB built on top of the MongoDB Reactive Streams driver. Most notably, this driver fully implements the Reactive Streams API to provide asynchronous stream processing with non-blocking back-pressure.
Setting up support for the reactive repository for MongoDB in a Spring Boot application is as simple as adding a dependency:
This will allow us to create a repository, and use it to perform some basic operations on MongoDB in a non-blocking manner:
public interface PersonRepository extends ReactiveMongoRepository<Person, ObjectId> {
}
.....
personRepository.findAll().doOnComplete(this::printThreads);
So, what kind of threads can we expect to see when we run this application on the Netty server?
Well, not surprisingly, we'll not see much difference as aSpring Data reactive repository makes use of the same event loop that is available for the server.
8.2. Reactor Kafka
Spring is still in the process of building full-fledged support for reactive Kafka. However, we do have options available outside Spring.
Reactor Kafka is a reactive API for Kafka based on Reactor. Reactor Kafka enables messages to be published and consumed using functional APIs, also with non-blocking back-pressure.
First, we need to add the required dependency in our application to start using Reactor Kafka:
We're subscribing to a topic reactive-test in Kafka and getting a Flux of messages.
The interesting thing for us is the threads that get created:
We can see a few threads that are not typical to the Netty server.
This indicates that Reactor Kafka manages its own thread pool, with a few worker threads, that participate in Kafka message processing exclusively. Of course, we'll see a bunch of other threads related to Netty and the JVM that we can ignore.
Kafka producers use a separate network thread for sending requests to the broker. Further, they deliver responses to the application on a single-threaded pooled scheduler.
Kafka consumer, on the other hand, has one thread per consumer group – that blocks to listen for incoming messages. The incoming messages are then scheduled for processing on a different thread pool.
9. Scheduling Options in WebFlux
We have seen so far that reactive programming really shines in a completely non-blocking environment with just a few threads. But, this also means that, if there is indeed a part that is blocking, it will result in far worse performance. This is because a blocking operation can freeze the event loop entirely.
So, how do we handle long-running processes or blocking operations in reactive programming?
Honestly, the best option would be just to avoid them. However, this may not be always possible, and we may need a dedicated scheduling strategy for those parts of our application.
Spring WebFlux offers a mechanism to switch processing to a different thread pool in between a data flow chain. This can provide us precise control over the scheduling strategy that we want for certain tasks. Of course, WebFlux is able to offer this based on the thread pool abstractions, known as schedulers, available in the underlying reactive libraries.
9.1. Reactor
In Reactor, the Scheduler class defines the execution model as well as where the execution takes place.
The Schedulers class provides a number of execution contexts like immediate, single, elastic, and parallel.
These provide different types of thread pools which can be useful for different jobs. Moreover, we can always create our own Scheduler with a preexisting ExecutorService.
While Schedulers gives us several execution contexts, Reactor also provides us different ways to switch the execution context. They are the methods publishOn and subscribeOn.
We can use publishOn with a Scheduler anywhere in the chain, with that Scheduler affecting all the subsequent operators.
While we can also use subscribeOn with a Scheduler anywhere in the chain, it will only affect the context of the source of emission.
If we recall, WebClient on Netty shares the same event loop created for the server as a default behavior. However, we may have valid reasons to create a dedicated thread pool for WebClient.
Let's see how we can achieve this in Reactor which is the default reactive library in WebFlux:
Earlier, we did not observe any difference in the threads created on Netty with or without WebClient. However, if we now run the code above, we'll observe a few new threads being created:
Here, we can see the threads created as part of our bounded elastic thread pool. It is where responses from the WebClient are published once subscribed.
This leaves the main thread pool for handling the server requests.
9.2. RxJava
The default behavior in RxJava is not very different than that of Reactor.
The Observable, and the chain of operators we apply on it, do their work – and notify the observers – on the same thread where the subscription was invoked. Also, RxJava, like Reactor, offers ways to introduce prefixed or custom scheduling strategies into the chain.
RxJava also features a class Schedulers, which offers a number of execution models for the Observable chain. These include new thread, immediate, trampoline, io, computation, and test. Of course, it also allows us to define a Schedulerfrom a Java Executor.
Moreover, RxJava also offers two extension methods to achieve this, subscribeOn and observeOn.
The subscribeOn method changes the default behavior by specifying a different Scheduler on which Observable should operate.
The observeOn method, on the other hand, specifies a different Scheduler that the Observable can use to send notifications to the observers.
As we have discussed before Spring WebFlux uses Reactor as its reactive library by default. But, since it's fully compatible with Reactive Streams API, it's possible to switch to another Reactive Streams implementation like RxJava (for RxJava 1.x with its Reactive Streams adapter).
As a result, if we run this application, apart from the regular Netty and JVM related threads we should see a few threads related to our RxJava Scheduler:
10. Conclusion
In this article, we explored the premise of reactive programming from the context of concurrency.
We observed the difference in the concurrency model in traditional and reactive programming. This allowed us to examine the concurrency model in Spring WebFlux, and its take on the threading model to achieve it.
Further, we explored the threading model in WebFlux in combination with different HTTP runtime and reactive libraries.
We also discussed how the threading model differs when we use WebClient or a data access library.
Lastly, we touched upon the options for controlling the scheduling strategy in our reactive program within WebFlux.
As always, the source code for this article can be found over on GitHub.
In this tutorial, we'll walk through how we can use properties defined in a YAML file to configure values for a Map in our POJO classes.
2. POJO and YAML
POJO classes are Plain Old Java Objects. YAML is a human-readable structured data format that uses indentation to indicate nesting.
2.1. Simple Map Example
Let's imagine that we are running an online store, and we are creating a service that translates clothing sizes. At first, we are only selling clothes in the UK. We want to know what UK size the label “S”, “M”, “L” and so on refers to. We create our POJO configuration class:
@ConfigurationProperties(prefix = "t-shirt-size")
public class TshirtSizeConfig {

    private Map<String, Integer> simpleMapping;

    public TshirtSizeConfig(Map<String, Integer> simpleMapping) {
        this.simpleMapping = simpleMapping;
    }

    //getters and setters..
}
Notice the @ConfigurationProperties with the prefix value. We'll define our mapping under that same root value in our YAML file, as we can see in the next section.
We also need to remember to enable configuration properties with the following annotation on our Application.class:
@EnableConfigurationProperties(TshirtSizeConfig.class)
public class DemoApplication {
    public static void main(String[] args) {
        SpringApplication.run(DemoApplication.class, args);
    }
}
2.2. YAML Configuration
Now we add t-shirt-size to our YAML configuration.
We can use the following structure in our application.yml file:
Notice the indentation and the spaces. YAML uses indentation to indicate nesting. The recommended syntax is two spaces for each nested level.
Notice how we're using simple-mapping with the dash, but our property name in our class is called simpleMapping. YAML properties with dashes will automatically translate to the camel-case equivalent in code.
2.3. More Complex Map Example
After our successful UK shops, we now need to consider translating sizes to other countries' measurements. For example, we now want to know what size is the label “S” in France and the US. We need to add another layer of data to our configuration.
We can alter our application.yml with a more complex mapping:
In this tutorial, we'll look at the java.lang.NoSuchMethodError and some ways to handle it.
2. NoSuchMethodError
As the name suggests, the NoSuchMethodError occurs when a particular method is not found. This method can either be an instance method or a static method.
In most cases,we're able to catch this error at compile-time. Hence, it's not a big issue. However, sometimes it could be thrown at runtime, then finding it becomes a bit difficult. According to the Oracle documentation, this error may occur at runtime if a class has been incompatibly changed.
Hence, we may encounter this error in the following cases. Firstly, if we do just a partial recompilation of our code. Secondly, if there is version incompatibility with the dependencies in our application, such as the external jars.
Note that the NoSuchMethodError inheritance tree includes IncompatibleClassChangeError and LinkageError. These errors are associated with an incompatible class change after compilation.
3. Example of NoSuchMethodError
Let’s see this error in action with an example. For this, we'll create two classes. First is SpecialToday which will list the specials for the day in a restaurant:
public class SpecialToday {
    private static String desert = "Chocolate Cake";

    public static String getDesert() {
        return desert;
    }
}
The second class MainMenu calls methods from SpecialsToday:
public class MainMenu {
    public static void main(String[] args) {
        System.out.println("Today's Specials: " + getSpecials());
    }

    public static String getSpecials() {
        return SpecialToday.getDesert();
    }
}
Here the output will be:
Today's Specials: Chocolate Cake
Next, we’ll delete the method getDesert() in SpecialToday and recompile only this updated class. This time when we run our MainMenu, we notice the following runtime error:
Exception in thread "main" java.lang.NoSuchMethodError: SpecialToday.getDesert()Ljava/lang/String;
4. How to Handle NoSuchMethodError
Now let's see how we can handle this. For the above code, let’s do a full clean-compile, including both the classes. We'll notice that the error will be caught while we're compiling. If we use an IDE like Eclipse, it will be detected even earlier, as soon as we update SpecialsToday.
Hence if we run into this error with our applications, as a first step, we'll do a full clean compile. With maven, we'll run the mvn clean install command.
Sometimes the issue is with the external dependencies of our application. In this case, we'll first check the order of the jars in the build path pulled by the classpath loader. And we'll trace and update the inconsistent jar.
However, if we still encounter this error at runtime, we'll have to dig deeper. We'll have to ensure that the Compile-time and the Runtime classes and jars have the same versions. For this, we can run the application with -verbose: class option to check the loaded classes. We can run the command as follows:
Using this information about all the classes being loaded in the individual jars, during runtime, we can trace the incompatible dependency.
We should also make sure that there are no duplicate classes in two or more jars. In most cases, maven will help control conflicting dependencies directly. Furthermore, we can run the mvn dependency: tree command to get the dependency tree of our project as follows:
We can check the libraries and their versions in the list generated by this command. Moreover, we can also manage dependencies using maven tags. Using the <exclusions> tag, we can exclude the problematic dependency. Using the <optional> tag, we can prevent unwanted dependencies from being bundled in the jar or war.
5. Conclusion
In this article, we addressed NoSuchMethodError. We discussed the cause of this error and also ways to handle it. For more details on how to handle errors properly, please refer to our article on catching Java errors.
As always, the code presented in this article is available over on GitHub.
Working effectively with Kotlin and Testcontainers: overcoming the recursive generic type definition and of course, the new @DynamicPropertySource annotation.
Meet the Write-Ahead Log (WAL) Pattern: overcoming failures in flushing storage data structures in distributed systems, or any other data-intensive system.
In this tutorial, we'll see how Leadership Election with Consul helps to ensure data stability. We'll provide a practical example of how to manage distributed locking in concurrent applications.
2. What Is Consul?
Consul is an open-source tool that provides service registry and discovery based on health checking. Furthermore, it includes a Web Graphical User Interface (GUI) to view and easily interact with Consul. It also covers extra capabilities of session management and Key-Value (KV) store.
In the next sections, we'll focus on how we can use Consul's session management and KV store to select the leader in applications with multiple instances.
3. Consul Fundamentals
The Consul agent is the most important component running on each node of a Consul cluster. It's in charge of health checking; registering, discovering, and resolving services; storing configuration data; and much more.
Consul agent can run in two different modes — Server and Agent.
The main responsibilities of the Consul Server are to respond to the queries coming from the agents and to elect the leader. The leadership is selected using the consensus protocol to provide Consistency (as defined by CAP) based on the Raft algorithm.
It's not in the scope of this article to go into detail on how the consensus works. Nevertheless, it's worth mentioning that the nodes can be in one of three states: leader, candidate, or follower. It also stores the data and responds to queries coming from the agents.
Agent is more lightweight than the Consul server. It's responsible for running the health checking of the registered services and forwarding queries to the server. Let's see a simple diagram of a Consul cluster:
Consul can also help in other ways — for instance, in concurrent applications in which one instance must be the leader.
Let's see in the coming sections how Consul, through session management and KV store, can provide this important capability.
4. Leadership Election With Consul
In distributed deployments, the service holding the lock is the leader. Therefore, for highly available systems, it is critical to managing locks and leaders.
Consul provides an easy-to-use KV store and session management. Those functionalities serve to build leader election, so let's learn the principles behind them.
4.1. Leadership Contention
The first thing all the instances belonging to the distributed system do is compete for the leadership. The contention for being a leader includes a series of steps:
All the instances must agree on a common key to contend.
Next, the instance creates a session using the agreed key through Consul session management and KV capabilities.
Third, they should acquire the session. If the return value is true, the lock belongs to the instance, and if false, the instance is a follower.
The instances need to continually watch for the session to acquire the leadership again in case of failure or release.
Finally, the leader can release the session, and the process begins again.
Once the leader is elected, the rest of the instances use Consul KV and session management to discover the leader by:
Retrieving the agreed key
Getting session information to know the leader
4.2. A Practical Example
We need to create the key and the value together with the session in Consul with multiple instances running. To help with this, we'll use the Kinguin Digital Limited Leadership Consul open-source Java implementation.
We excluded the consul-api dependency to avoid collisions on the different versions in Java.
For the common key, we'll use:
services/%s/leader
Let's test all of the process with a simple snippet:
new SimpleConsulClusterFactory()
    .mode(SimpleConsulClusterFactory.MODE_MULTI)
    .debug(true)
    .build()
    .asObservable()
    .subscribe(i -> System.out.println(i));
Then we create a cluster with multiple instances with asObservable() to access to events by subscribers. The leader creates a session in Consul, and all the instances verify the session to confirm leadership.
Finally, we customize the consul configuration and session management, and the agreed key between the instances to elect the leader:
There are several options to install Consul and run an agent.
One of the possibilities to deploy Consul is through containers. We'll use the Consul Docker image available in Docker Hub, the world's largest repository for container images.
We'll deploy Consul using Docker by running the command:
docker run -d --name consul -p 8500:8500 -e CONSUL_BIND_INTERFACE=eth0 consul
Consul is now running, and it should be available at localhost:8500.
Let's execute the snippet and check the steps done:
The leader creates a session in Consul.
Then it is elected (elected.first).
The rest of the instances watch until the session is released:
INFO: multi mode active
INFO: Session created e11b6ace-9dc7-4e51-b673-033f8134a7d4
INFO: Session refresh scheduled on 7 seconds frequency
INFO: Vote frequency setup on 10 seconds frequency
ElectionMessage(status=elected, vote=Vote{sessionId='e11b6ace-9dc7-4e51-b673-033f8134a7d4', serviceName='cluster-app', serviceId='node-1'}, error=null)
ElectionMessage(status=elected.first, vote=Vote{sessionId='e11b6ace-9dc7-4e51-b673-033f8134a7d4', serviceName='cluster-app', serviceId='node-1'}, error=null)
ElectionMessage(status=elected, vote=Vote{sessionId='e11b6ace-9dc7-4e51-b673-033f8134a7d4', serviceName='cluster-app', serviceId='node-1'}, error=null)
Consul also provides a Web GUI available at http://localhost:8500/ui.
Let's open a browser and click the key-value section to confirm that the session is created:
Therefore, one of the concurrent instances created a session using the agreed key for the application. Only when the session is released can the process start over, and a new instance can become a leader.
5. Conclusion
In this article, we showed the Leadership Election fundamentals in high-performance applications with multiple instances. We demonstrated how session management and KV store capabilities of Consul can help acquire the lock and select the leader.