Quantcast
Channel: Baeldung
Viewing all 4460 articles
Browse latest View live

Spring Boot With Spring Batch

$
0
0

1. Overview

Spring Batch is a powerful framework for developing robust batch applications. In our previous tutorial, we introduced Spring Batch.

In this tutorial, we'll build on the previous one and learn how to set up and create a basic batch-driven application using Spring Boot.

2. Maven Dependencies

First, let’s add the spring-boot-starter-batch to our pom.xml:

<dependency>
    <groupId>org.springframework.boot</groupId>
    <artifactId>spring-boot-starter-batch</artifactId>
    <version>2.4.0.RELEASE</version>
</dependency>

We'll also add the org.hsqldb dependency, which is available from Maven Central as well:

<dependency>
    <groupId>org.hsqldb</groupId>
    <artifactId>hsqldb</artifactId>
    <version>2.5.1</version>
    <scope>runtime</scope>
</dependency>

3. Defining a Simple Spring Batch Job

We're going to build a job that imports a coffee list from a CSV file, transforms it using a custom processor, and stores the final results in an in-memory database.

3.1. Getting Started

Let's start by defining our application entry point:

@SpringBootApplication
public class SpringBootBatchProcessingApplication {
    public static void main(String[] args) {
        SpringApplication.run(SpringBootBatchProcessingApplication.class, args);
    }
}

As we can see, this is a standard Spring Boot application. As we want to use default configuration values where possible, we're going to use a very light set of application configuration properties.

We'll define these properties in our src/main/resources/application.properties file:

file.input=coffee-list.csv

This property contains the location of our input coffee list. Each line contains the brand, origin, and some characteristics of our coffee:

Blue Mountain,Jamaica,Fruity
Lavazza,Colombia,Strong
Folgers,America,Smokey

As we're going to see, this is a flat CSV file, which means Spring can handle it without any special customization.

Next, we'll add a SQL script schema-all.sql to create our coffee table to store the data:

DROP TABLE coffee IF EXISTS;
CREATE TABLE coffee  (
    coffee_id BIGINT IDENTITY NOT NULL PRIMARY KEY,
    brand VARCHAR(20),
    origin VARCHAR(20),
    characteristics VARCHAR(30)
);

Conveniently Spring Boot will run this script automatically during startup.

3.2. Coffee Domain Class

Subsequently, we'll need a simple domain class to hold our coffee items:

public class Coffee {
    private String brand;
    private String origin;
    private String characteristics;
    public Coffee(String brand, String origin, String characteristics) {
        this.brand = brand;
        this.origin = origin;
        this.characteristics = characteristics;
    }
    // getters and setters
}

As previously mentioned, our Coffee object contains three properties:

  • A brand
  • An origin
  • Some additional characteristics

4. Job Configuration

Now, on to the key component, our job configuration. We'll go step by step, building up our configuration and explaining each part along the way:

@Configuration
@EnableBatchProcessing
public class BatchConfiguration {
    @Autowired
    public JobBuilderFactory jobBuilderFactory;
    @Autowired
    public StepBuilderFactory stepBuilderFactory;
    
    @Value("${file.input}")
    private String fileInput;
    
    // ...
}

Firstly, we start with a standard Spring @Configuration class. Next, we add a @EnableBatchProcessing annotation to our class. Notably, this gives us access to many useful beans that support jobs and will save us a lot of leg work.

Furthermore, using this annotation also provides us with access to two useful factories that we'll use later when building our job configuration and jobs steps.

For the last part of our initial configuration, we include a reference to the file.input property we declared previously.

4.1. A Reader and Writer for Our Job

Now, we can go ahead and define a reader bean in our configuration:

@Bean
public FlatFileItemReader reader() {
    return new FlatFileItemReaderBuilder().name("coffeeItemReader")
      .resource(new ClassPathResource(fileInput))
      .delimited()
      .names(new String[] { "brand", "origin", "characteristics" })
      .fieldSetMapper(new BeanWrapperFieldSetMapper() {{
          setTargetType(Coffee.class);
      }})
      .build();
}

In short, our reader bean defined above looks for a file called coffee-list.csv and parses each line item into a Coffee object.

Likewise, we define a writer bean:

@Bean
public JdbcBatchItemWriter writer(DataSource dataSource) {
    return new JdbcBatchItemWriterBuilder()
      .itemSqlParameterSourceProvider(new BeanPropertyItemSqlParameterSourceProvider<>())
      .sql("INSERT INTO coffee (brand, origin, characteristics) VALUES (:brand, :origin, :characteristics)")
      .dataSource(dataSource)
      .build();
}

This time around, we include the SQL statement needed to insert a single coffee item into our database, driven by the Java bean properties of our Coffee object. Handily the dataSource is automatically created by @EnableBatchProcessing annotation.

4.2. Putting Our Job Together

Lastly, we need to add the actual job steps and configuration:

@Bean
public Job importUserJob(JobCompletionNotificationListener listener, Step step1) {
    return jobBuilderFactory.get("importUserJob")
      .incrementer(new RunIdIncrementer())
      .listener(listener)
      .flow(step1)
      .end()
      .build();
}
@Bean
public Step step1(JdbcBatchItemWriter writer) {
    return stepBuilderFactory.get("step1")
      .<Coffee, Coffee> chunk(10)
      .reader(reader())
      .processor(processor())
      .writer(writer)
      .build();
}
@Bean
public CoffeeItemProcessor processor() {
    return new CoffeeItemProcessor();
}

As we can see, our job is relatively simple and consists of one step defined in the step1 method.

Let's take a look at what this step is doing:

  • First, we configure our step so that it will write up to ten records at a time using the chunk(10) declaration
  • Then, we read in the coffee data using our reader bean, which we set using the reader method
  • Next, we pass each of our coffee items to a custom processor where we apply some custom business logic
  • Finally, we write each coffee item to the database using the writer we saw previously

On the other hand, our importUserJob contains our job definition, which contains an id using the build-in RunIdIncrementer class. We also set a JobCompletionNotificationListener, which we use to get notified when the job completes.

To complete our job configuration, we list each step (though this job has only one step). We now have a perfectly configured job!

5. A Custom Coffee Processor

Let's take a look in detail at the custom processor we defined previously in our job configuration:

public class CoffeeItemProcessor implements ItemProcessor<Coffee, Coffee> {
    private static final Logger LOGGER = LoggerFactory.getLogger(CoffeeItemProcessor.class);
    @Override
    public Coffee process(final Coffee coffee) throws Exception {
        String brand = coffee.getBrand().toUpperCase();
        String origin = coffee.getOrigin().toUpperCase();
        String chracteristics = coffee.getCharacteristics().toUpperCase();
        Coffee transformedCoffee = new Coffee(brand, origin, chracteristics);
        LOGGER.info("Converting ( {} ) into ( {} )", coffee, transformedCoffee);
        return transformedCoffee;
    }
}

Of particular interest, the ItemProcessor interface provides us with a mechanism to apply some specific business logic during our job execution.

To keep things simple, we define our CoffeeItemProcessor, which takes an input Coffee object and transforms each of the properties to uppercase.

6. Job Completion

Additionally, we're also going to write a JobCompletionNotificationListener to provide some feedback when our job finishes:

@Override
public void afterJob(JobExecution jobExecution) {
    if (jobExecution.getStatus() == BatchStatus.COMPLETED) {
        LOGGER.info("!!! JOB FINISHED! Time to verify the results");
        String query = "SELECT brand, origin, characteristics FROM coffee";
        jdbcTemplate.query(query, (rs, row) -> new Coffee(rs.getString(1), rs.getString(2), rs.getString(3)))
          .forEach(coffee -> LOGGER.info("Found < {} > in the database.", coffee));
    }
}

In the above example, we override the afterJob method and check the job completed successfully. Moreover, we run a trivial query to check that each coffee item was stored in the database successfully.

7. Running Our Job

Now that we have everything in place to run our job, here comes the fun part. Let's go ahead and run our job:

...
17:41:16.336 [main] INFO  c.b.b.JobCompletionNotificationListener -
  !!! JOB FINISHED! Time to verify the results
17:41:16.336 [main] INFO  c.b.b.JobCompletionNotificationListener -
  Found < Coffee [brand=BLUE MOUNTAIN, origin=JAMAICA, characteristics=FRUITY] > in the database.
17:41:16.337 [main] INFO  c.b.b.JobCompletionNotificationListener -
  Found < Coffee [brand=LAVAZZA, origin=COLOMBIA, characteristics=STRONG] > in the database.
17:41:16.337 [main] INFO  c.b.b.JobCompletionNotificationListener -
  Found < Coffee [brand=FOLGERS, origin=AMERICA, characteristics=SMOKEY] > in the database.
...

As we can see, our job ran successfully, and each coffee item was stored in the database as expected.

8. Conclusion

In this article, we've learned how to create a simple Spring Batch job using Spring Boot. First, we started by defining some basic configuration.

Then, we saw how to add a file reader and database writer. Finally, we took a look at how to apply some custom processing and check our job was executed successfully.

As always, the full source code of the article is available over on GitHub.

The post Spring Boot With Spring Batch first appeared on Baeldung.


A Guide to MultipleBagFetchException in Hibernate

$
0
0

1. Overview

In this tutorial, we'll talk about the MultipleBagFetchException. We'll begin with the necessary terms to understand, and then we'll explore some workarounds until we reach the ideal solution.

We'll create a simple music app's domain to demonstrate each of the solutions.

2. What is a Bag in Hibernate?

A Bag, similar to a List, is a collection that can contain duplicate elements. However, it is not in order. Moreover, a Bag is a Hibernate term and isn't part of the Java Collections Framework.

Given the earlier definition, it's worth highlighting that both List and Bag uses java.util.List. Although in Hibernate, both are treated differently. To differentiate a Bag from a List, let's look at it in actual code.

A Bag:

// @ any collection mapping annotation
private List<T> collection;

A List:

// @ any collection mapping annotation
@OrderColumn(name = "position")
private List<T> collection;

3. Cause of MultipleBagFetchException

Fetching two or more Bags at the same time on an Entity could form a Cartesian Product. Since a Bag doesn't have an order, Hibernate would not be able to map the right columns to the right entities. Hence, in this case, it throws a MultipleBagFetchException.

Let's have some concrete examples that lead to MultipleBagFetchException.

For the first example, let's try to create a simple entity that has 2 bags and both with eager fetch type. An Artist might be a good example. It can have a collection of songs and offers.

Given that, let's create the Artist entity:

@Entity
class Artist {
    @Id
    @GeneratedValue(strategy = GenerationType.AUTO)
    private Long id;
    private String name;
    @OneToMany(mappedBy = "artist", fetch = FetchType.EAGER)
    private List<Song> songs;
    @OneToMany(mappedBy = "artist", fetch = FetchType.EAGER)
    private List<Offer> offers;
    // constructor, equals, hashCode
}

If we try to run a test, we'll encounter a MultipleBagFetchException immediately, and it won't be able to build Hibernate SessionFactory. Having that said, let's not do this.

Instead, let's convert one or both of the collections' fetch type to lazy:

@OneToMany(mappedBy = "artist")
private List<Song> songs;
@OneToMany(mappedBy = "artist")
private List<Offer> offers;

Now, we'll be able to create and run a test. Although, if we try to fetch both of these bag collections at the same time, it would still lead to MultipleBagFetchException.

4. Simulate a MultipleBagFetchException

In the previous section, we've seen the causes of MultipleBagFetchException. Here, let's verify those claims by creating an integration test.

For simplicity, let's use the Artist entity that we've previously created.

Now, let's create the integration test, and let's try to fetch both songs and offers at the same time using JPQL:

@Test
public void whenFetchingMoreThanOneBag_thenThrowAnException() {
    IllegalArgumentException exception =
      assertThrows(IllegalArgumentException.class, () -> {
        String jpql = "SELECT artist FROM Artist artist "
          + "JOIN FETCH artist.songs "
          + "JOIN FETCH artist.offers ";
        entityManager.createQuery(jpql);
    });
    final String expectedMessagePart = "MultipleBagFetchException";
    final String actualMessage = exception.getMessage();
    assertTrue(actualMessage.contains(expectedMessagePart));
}

From the assertion, we have encountered an IllegalArgumentException, which has a root cause of MultipleBagFetchException.

5. Domain Model

Before proceeding to possible solutions, let's look at the necessary domain models, which we'll use as a reference later on.

Suppose we're dealing with a music app's domain. Given that, let's narrow our focus toward certain entities: Album, Artist, and User. 

We've already seen the Artist entity, so let's proceed with the other two entities instead.

First, let's look at the Album entity:

@Entity
class Album {
    @Id
    @GeneratedValue(strategy = GenerationType.AUTO)
    private Long id;
    private String name;
    @OneToMany(mappedBy = "album")
    private List<Song> songs;
    @ManyToMany(mappedBy = "followingAlbums")
    private Set<Follower> followers;
    // constructor, equals, hashCode
}

An Album has a collection of songs, and at the same time, could have a set of followers. 

Next, here's the User entity:

@Entity
class User {
    @Id
    @GeneratedValue(strategy = GenerationType.AUTO)
    private Long id;
    private String name;
    @OneToMany(mappedBy = "createdBy", cascade = CascadeType.PERSIST)
    private List<Playlist> playlists;
    @OneToMany(mappedBy = "user", cascade = CascadeType.PERSIST)
    @OrderColumn(name = "arrangement_index")
    private List<FavoriteSong> favoriteSongs;
    
    // constructor, equals, hashCode
}

A User can create many playlists. Additionally, a User has a separate List for favoriteSongs wherein its order is based on the arrangement index.

6. Workaround: Using a Set in a single JPQL query

Before anything else, let's emphasize that this approach would generate a cartesian product, which makes this a mere workaround. It's because we'll be fetching two collections simultaneously in a single JPQL query. In contrast, there's nothing wrong with using a Set. It is the appropriate choice if we don't need our collection to have an order or any duplicated elements.

To demonstrate this approach, let's reference the Album entity from our domain model. 

An Album entity has two collections: songs and followers. The collection of songs is of type bag. However, for the followers, we're using a Set. Having that said, we won't encounter a MultipleBagFetchException even if we try to fetch both collections at the same time.

Using an integration test, let's try to retrieve an Album by its id while fetching both of its collections in a single JPQL query:

@Test
public void whenFetchingOneBagAndSet_thenRetrieveSuccess() {
    String jpql = "SELECT DISTINCT album FROM Album album "
      + "LEFT JOIN FETCH album.songs "
      + "LEFT JOIN FETCH album.followers "
      + "WHERE album.id = 1";
    Query query = entityManager.createQuery(jpql)
      .setHint(QueryHints.HINT_PASS_DISTINCT_THROUGH, false);
    assertEquals(1, query.getResultList().size());
}

As we can see, we have successfully retrieved an Album. It's because only the list of songs is a Bag. On the other hand, the collection of followers is a Set.

On a side note, it's worth highlighting that we're making use of QueryHints.HINT_PASS_DISTINCT_THROUGH. Since we're using an entity JPQL query, it prevents the DISTINCT keyword from being included in the actual SQL query. Thus, we'll use this query hint for the remaining approaches as well. 

7. Workaround: Using a List in a single JPQL query

Similar to the previous section, this would also generate a cartesian product, which could lead to performance issues. Again, there's nothing wrong with using a List, Set, or Bag for the data type. The purpose of this section is to demonstrate further that Hibernate can fetch collections simultaneously given there's no more than one of type Bag.

For this approach, let's use the User entity from our domain model.

As mentioned earlier, a User has two collections: playlists and favoriteSongs. The playlists have no defined order, making it a bag collection. However, for the List of favoriteSongs, its order depends on how the User arranges it. If we look closely at the FavoriteSong entity, the arrangementIndex property made it possible to do so.

Again, using a single JPQL query, let's try to verify if we'll be able to retrieve all the users while fetching both collections of playlists and favoriteSongs at the same time.

To demonstrate, let's create an integration test:

@Test
public void whenFetchingOneBagAndOneList_thenRetrieveSuccess() {
    String jpql = "SELECT DISTINCT user FROM User user "
      + "LEFT JOIN FETCH user.playlists "
      + "LEFT JOIN FETCH user.favoriteSongs ";
    List<User> users = entityManager.createQuery(jpql, User.class)
      .setHint(QueryHints.HINT_PASS_DISTINCT_THROUGH, false)
      .getResultList();
    assertEquals(3, users.size());
}

From the assertion, we can see that we have successfully retrieved all users. Moreover, we didn't encounter a MultipleBagFetchException. It's because even though we're fetching two collections at the same time, only the playlists is a bag collection.

8. Ideal Solution: Using Multiple Queries

We've seen from the previous workarounds the use of a single JPQL query for the simultaneous retrieval of collections. Unfortunately, it generates a cartesian product. We know that it's not ideal. So here, let's solve the MultipleBagFetchException without having to sacrifice performance.

Suppose we're dealing with an entity that has more than one bag collection. In our case, it is the Artist entity. It has two bag collections: songs and offers.

Given this situation, we won't even be able to fetch both collections at the same time using a single JPQL query. Doing so will lead to a MultipleBagFetchException. Instead, let's split it into two JPQL queries.

With this approach, we're expecting to fetch both bag collections successfully, one at a time.

Again, for the last time, let's quickly create an integration test for the retrieval of all artists:

@Test
public void whenUsingMultipleQueries_thenRetrieveSuccess() {
    String jpql = "SELECT DISTINCT artist FROM Artist artist "
      + "LEFT JOIN FETCH artist.songs ";
    List<Artist> artists = entityManager.createQuery(jpql, Artist.class)
      .setHint(QueryHints.HINT_PASS_DISTINCT_THROUGH, false)
      .getResultList();
    jpql = "SELECT DISTINCT artist FROM Artist artist "
      + "LEFT JOIN FETCH artist.offers "
      + "WHERE artist IN :artists ";
    artists = entityManager.createQuery(jpql, Artist.class)
      .setParameter("artists", artists)
      .setHint(QueryHints.HINT_PASS_DISTINCT_THROUGH, false)
      .getResultList();
    assertEquals(2, artists.size());
}

From the test, we first retrieved all artists while fetching its collection of songs.

Then, we created another query to fetch the artists' offers.

Using this approach, we avoided the MultipleBagFetchException as well as the formation of a cartesian product.

9. Conclusion

In this article, we've explored MultipleBagFetchException in detail. We discussed the necessary vocabulary and the causes of this exception. We then simulated it. After that, we talked about a simple music app's domain to have different scenarios for each of our workarounds and ideal solution. Lastly, we set up several integration tests to verify each of the approaches.

As always, the full source code of the article is available over on GitHub.

The post A Guide to MultipleBagFetchException in Hibernate first appeared on Baeldung.


Get a Filename Without the Extension in Java

$
0
0

1. Overview

When we work with files in Java, we often need to handle filenames. For example, sometimes we want to get the name without the extension from a given filename. In other words, we want to remove the extension of a filename.

In this tutorial, we'll discuss the generic way to remove the extension from a filename.

2. Scenarios of Removing the Extension From a Filename

When we take a first look at it, we may think that removing the extension from a filename is a pretty easy problem.

However, if we take a closer look at the problem, it could be more complicated than we thought.

First of all, let's have a look at the types a filename can be:

  • Without any extension, for example, “baeldung”
  • With a single extension, this is the most usual case, for example, “baeldung.txt
  • With multiple extensions, like “baeldung.tar.gz
  • Dotfile without an extension, such as “.baeldung
  • Dotfile with a single extension, for instance, “.baeldung.conf
  • Dotfile with multiple extensions, for example, “.baeldung.conf.bak

Next, we'll list expecting results of the examples above after removing the extension(s):

  • baeldung“: The filename doesn't have an extension. Therefore, the filename should not be changed, and we should get “baeldung
  • baeldung.txt“: This is a straightforward case. The correct result is “baeldung
  • baeldung.tar.gz“: This filename contains two extensions. If we want to remove only one extension, “baeldung.tar” should be the result. But if we want to remove all extensions from the filename, “baeldung” is the correct result
  • .baeldung“: Since this filename doesn't have any extension either, the filename shouldn't be changed either. Thus, we're expecting to see “.baeldung” in the result
  • .baeldung.conf“: The result should be “.baeldung
  • .baeldung.conf.bak“: The result should be “.baeldung.conf” if we only want to remove one extension. Otherwise, “.baeldung” is the expected output if we'll remove all extensions

In this tutorial, we'll test if the utility methods provided by Guava and Apache Commons IO can handle all the cases listed above.

Further, we'll also discuss a generic way to solve the problem of removing the extension (or extensions) from a given filename.

3. Testing the Guava Library

Since version 14.0, Guava has introduced the Files.getNameWithoutExtension() method. It allows us to remove the extension from the given filename easily.

To use the utility method, we need to add the Guava library into our classpath. For example, if we use Maven as the build tool, we can add the Guava dependency to our pom.xml file:

<dependency>
    <groupId>com.google.guava</groupId>
    <artifactId>guava</artifactId>
    <version>30.0-jre</version>
</dependency>

First, let's have a look at the implementation of this method:

public static String getNameWithoutExtension(String file) {
   ...
   int dotIndex = fileName.lastIndexOf('.');
   return (dotIndex == -1) ? fileName : fileName.substring(0, dotIndex);
 }

The implementation is pretty straightforward. If the filename contains dots, the method cuts from the last dot to the end of the filename. Otherwise, if the filename doesn't contain a dot, the original filename will be returned without any change.

Therefore, Guava's getNameWithoutExtension() method won't work for dotfiles without an extension. Let's write a test to prove that:

@Test
public void givenDotFileWithoutExt_whenCallGuavaMethod_thenCannotGetDesiredResult() {
    //negative assertion
    assertNotEquals(".baeldung", Files.getNameWithoutExtension(".baeldung"));
}

When we handle a filename with multiple extensions, this method doesn't provide an option to remove all extensions from the filename:

@Test
public void givenFileWithoutMultipleExt_whenCallGuavaMethod_thenCannotRemoveAllExtensions() {
    //negative assertion
    assertNotEquals("baeldung", Files.getNameWithoutExtension("baeldung.tar.gz"));
}

4. Testing the Apache Commons IO Library

Like the Guava library, the popular Apache Commons IO library provides a removeExtension() method in the FilenameUtils class to quickly remove the filename's extension.

Before we have a look at this method, let's add the Apache Commons IO dependency into our pom.xml:

<dependency>
    <groupId>commons-io</groupId>
    <artifactId>commons-io</artifactId>
    <version>2.8.0</version>
</dependency>

The implementation is similar to Guava's getNameWithoutExtension() method:

public static String removeExtension(final String filename) {
    ...
    final int index = indexOfExtension(filename); //used the String.lastIndexOf() method
    if (index == NOT_FOUND) {
  	return filename;
    } else {
	return filename.substring(0, index);
    }
}

Therefore, the Apache Commons IO's method won't work with dotfiles either:

@Test
public void givenDotFileWithoutExt_whenCallApacheCommonsMethod_thenCannotGetDesiredResult() {
    //negative assertion
    assertNotEquals(".baeldung", FilenameUtils.removeExtension(".baeldung"));
}

If a filename has multiple extensions, the removeExtension() method cannot remove all extensions:

@Test
public void givenFileWithoutMultipleExt_whenCallApacheCommonsMethod_thenCannotRemoveAllExtensions() {
    //negative assertion
    assertNotEquals("baeldung", FilenameUtils.removeExtension("baeldung.tar.gz"));
}

5. Removing the Extension(s) From a Filename

So far, we've seen utility methods for removing the extension from a filename in two widely used libraries. Both methods are pretty handy and work for the most common cases.

However, on the other hand, they have some shortcomings:

  • They won't work for dotfiles, for example, “.baeldung
  • When a filename has multiple extensions, they don't provide an option to remove the last extension only or all extensions

Next, let's build a method to cover all cases:

public static String removeFileExtension(String filename, boolean removeAllExtensions) {
    if (filename == null || filename.isEmpty()) {
        return filename;
    }
    String extPattern = "(?<!^)[.]" + (removeAllExtensions ? ".*" : "[^.]*$");
    return filename.replaceAll(extPattern, "");
}

We added a boolean parameter removeAllExtensions to provide the option to remove all extensions or only the last extension from a filename.

The core part of this method is the regex pattern. So let's understand what does this regex pattern do:

  • “(?<!^)[.]” – We use a negative-lookbehind in this regex. It matches a dot “.” that is not at the beginning of the filename
  • (?<!^)[.].*” – If the removeAllExtensions option is set, this will match the first matched dot until the end of the filename
  • (?<!^)[.][^.]*$” – This pattern matches only the last extension

Finally, let's write some test methods to verify if our method works for all different cases:

@Test
public void givenFilenameNoExt_whenCallFilenameUtilMethod_thenGetExpectedFilename() {
    assertEquals("baeldung", MyFilenameUtil.removeFileExtension("baeldung", true));
    assertEquals("baeldung", MyFilenameUtil.removeFileExtension("baeldung", false));
}
@Test
public void givenSingleExt_whenCallFilenameUtilMethod_thenGetExpectedFilename() {
    assertEquals("baeldung", MyFilenameUtil.removeFileExtension("baeldung.txt", true));
    assertEquals("baeldung", MyFilenameUtil.removeFileExtension("baeldung.txt", false));
}
@Test
public void givenDotFile_whenCallFilenameUtilMethod_thenGetExpectedFilename() {
    assertEquals(".baeldung", MyFilenameUtil.removeFileExtension(".baeldung", true));
    assertEquals(".baeldung", MyFilenameUtil.removeFileExtension(".baeldung", false));
}
@Test
public void givenDotFileWithExt_whenCallFilenameUtilMethod_thenGetExpectedFilename() {
    assertEquals(".baeldung", MyFilenameUtil.removeFileExtension(".baeldung.conf", true));
    assertEquals(".baeldung", MyFilenameUtil.removeFileExtension(".baeldung.conf", false));
}
@Test
public void givenDoubleExt_whenCallFilenameUtilMethod_thenGetExpectedFilename() {
    assertEquals("baeldung", MyFilenameUtil.removeFileExtension("baeldung.tar.gz", true));
    assertEquals("baeldung.tar", MyFilenameUtil.removeFileExtension("baeldung.tar.gz", false));
}
@Test
public void givenDotFileWithDoubleExt_whenCallFilenameUtilMethod_thenGetExpectedFilename() {
    assertEquals(".baeldung", MyFilenameUtil.removeFileExtension(".baeldung.conf.bak", true));
    assertEquals(".baeldung.conf", MyFilenameUtil.removeFileExtension(".baeldung.conf.bak", false));
}

6. Conclusion

In this article, we've talked about how to remove extensions from a given filename.

First, we discussed the different scenarios of removing extensions.

Next, we've introduced the methods provided by two widely used libraries: Guava and Apache Commons IO. They are pretty handy and work for common cases but cannot work for dotfiles. Also, they don't provide an option to remove a single extension or all extensions.

Finally, we built a method to cover all requirements.

As always, the full source code of the article is available over on GitHub.

The post Get a Filename Without the Extension in Java first appeared on Baeldung.


Comparing Doubles in Java

$
0
0

1. Overview

In this tutorial, we'll talk about the different ways of comparing double values in Java. In particular, it isn't as easy as comparing other primitive types. As a matter of fact, it's problematic in many other languages, not only Java.

First, we'll explain why using the simple == operator is inaccurate and might cause difficult to trace bugs in the runtime. Then, we'll show how to compare doubles in plain Java and common third-party libraries correctly.

2. Using the == Operator

Inaccuracy with comparisons using the == operator is caused by the way double values are stored in a computer's memory. We need to remember that there is an infinite number of values that must fit in limited memory space, usually 64 bits. As a result, we can't have an exact representation of most double values in our computers. They must be rounded to be saved.

Because of the rounding inaccuracy, interesting errors might occur:

double d1 = 0;
for (int i = 1; i <= 8; i++) {
    d1 += 0.1;
 }
double d2 = 0.1 * 8;
System.out.println(d1);
System.out.println(d2);

Both variables, d1 and d2, should equal 0.8. However, when we run the code above, we'll see the following results:

0.7999999999999999
0.8

In that case, comparing both values with the == operator would produce a wrong result. For this reason, we must use a more complex comparison algorithm.

If we want to have the best precision and control over the rounding mechanism, we can use java.math.BigDecimal class.

3. Comparing Doubles in Plain Java

The recommended algorithm to compare double values in plain Java is a threshold comparison method. In this case, we need to check whether the difference between both numbers is within the specified tolerance, commonly called epsilon:

double epsilon = 0.000001d;
assertThat(Math.abs(d1 - d2) < epsilon).isTrue();

The smaller the epsilon's value, the greater the comparison accuracy. However, if we specify the tolerance value too small, we'll get the same false result as in the simple == comparison. In general, epsilon's value with 5 and 6 decimals is usually a good place to start.

Unfortunately, there is no utility from the standard JDK that we could use to compare double values in the recommended and precise way. Luckily, we don't need to write it by ourselves. We can use a variety of dedicated methods provided by free and widely known third-party libraries.

4. Using Apache Commons Math

Apache Commons Math is one of the biggest open-source library dedicated to mathematics and statistics components. From the variety of different classes and methods, we'll focus on org.apache.commons.math3.util.Precision class in particular. It contains 2 helpful equals() methods to compare double values correctly:

double epsilon = 0.000001d;
assertThat(Precision.equals(d1, d2, epsilon)).isTrue();
assertThat(Precision.equals(d1, d2)).isTrue();

The epsilon variable used here has the same meaning as in the previous example. It is an amount of allowed absolute error. However, it's not the only similarity to the threshold algorithm. In particular, both equals methods use the same approach under the hood.

The two-argument function version is just a shortcut for the equals(d1, d2, 1) method call. The epsilon's value in that version is quite high. Therefore we shouldn't use it and always specify the tolerance value by ourselves.

5. Using Guava

Google's Guava is a big set of core Java libraries that extend the standard JDK capabilities. It contains a big number of useful math utils in the com.google.common.math package. To compare double values correctly in Guava, let's implement the fuzzyEquals() method from the DoubleMath class:

double epsilon = 0.000001d;
assertThat(DoubleMath.fuzzyEquals(d1, d2, epsilon)).isTrue();

The method name is different than in the Apache Commons Math, but it works practically identically under the hood. The only difference is that there is no overloaded method with the epsilon's default value.

6. Using JUnit

JUnit is one of the most widely used unit testing frameworks for Java. In general, every unit test usually ends with analyzing the difference between expected and actual values. Therefore, the testing framework must have correct and precise comparison algorithms. In fact, JUnit provides a set of comparing methods for common objects, collections, and primitive types, including dedicated methods to check double values equality:

double epsilon = 0.000001d;
assertEquals(d1, d2, epsilon);

As a matter of fact, it works the same as Guava's and Apache Commons's methods previously described.

It's important to point out that there is also a deprecated, two-argument version without the epsilon argument. However, if we want to be sure our results are always correct, we should stick with the three-argument version.

7. Conclusion

In this article, we've explored different ways of comparing double values in Java.

We've explained why simple comparison might cause difficult to trace bugs in the runtime. Then, we've shown how to compare values in plain Java and common libraries correctly.

As always, the source code for the examples can be found over on GitHub.

The post Comparing Doubles in Java first appeared on Baeldung.


Adding Parameters to HttpClient Requests

$
0
0

1. Introduction

HttpClient is part of the Apache HttpComponents project that provides a toolset of low-level Java components focused on HTTP and associated protocols. The most essential function of HttpClient is to execute HTTP methods.

In this short tutorial, we'll discuss adding parameters to HttpClient requests. We'll learn how to use UriBuilder with String name-value pairs and also NameValuePairs. Similarly, we'll see how to pass parameters using UrlEncodedFormEntity.

2. Add Parameters to HttpClient Requests Using UriBuilder

UriBuilder helps us to easily create URIs and add parameters via builder pattern. We can add parameters using String name-value pairs, or utilize NameValuePairs class for that purpose.

In this example, a final URL should look like this:

https://example.com?param1=value1&param2=value2

Let's see how to use String name-value pairs:

public CloseableHttpResponse sendHttpRequest() {
    HttpGet httpGet = new HttpGet("https://example.com");
    URI uri = new URIBuilder(httpGet.getURI())
      .addParameter("param1", "value1")
      .addParameter("param2", "value2")
      .build();
   ((HttpRequestBase) httpGet).setURI(uri);
    CloseableHttpResponse response = client.execute(httpGet);
    client.close();
}

Also, we can go with the NameValuePair list for HttpClient request:

public CloseableHttpResponse sendHttpRequest() {
    List nameValuePairs = new ArrayList();
    nameValuePairs.add(new BasicNameValuePair("param1", "value1"));
    nameValuePairs.add(new BasicNameValuePair("param2", "value2"));
    HttpGet httpGet = new HttpGet("https://example.com");
    URI uri = new URIBuilder(httpGet.getURI())
      .addParameters(nameValuePairs)
      .build();
   ((HttpRequestBase) httpGet).setURI(uri);
    CloseableHttpResponse response = client.execute(httpGet);
    client.close();
}

Similarly, UriBuilder can be used to add parameters to other HttpClient request methods.

3. Add Parameters to HttpClient Request Using UrlEncodedFormEntity

Another approach would be to utilize UrlEncodedFormEntity:

public CloseableHttpResponse sendHttpRequest() {
    List nameValuePairs = new ArrayList();
    nameValuePairs.add(new BasicNameValuePair("param1", "value1"));
    nameValuePairs.add(new BasicNameValuePair("param2", "value2"));
    HttpPost httpPost = new HttpPost("https://example.com");
    httpPost.setEntity(new UrlEncodedFormEntity(nameValuePairs, StandardCharsets.UTF_8));
    CloseableHttpResponse response = client.execute(httpPost);
    client.close();
}

Notice that UrlEncodedFormEntity couldn't be used for GET requests, since GET request does not have a body that could contain an entity.

4. Conclusion

In this example, we showed how to add parameters to HttpClient requests. Also, the implementation of all these examples and code snippets are available over on GitHub.

The post Adding Parameters to HttpClient Requests first appeared on Baeldung.


Java Weekly, Issue 363

$
0
0

1. Spring and Java

>> Incubator Support for HTTP/3 in Netty [netty.io]

Say hello to HTTP/3 and QUIC – the first incubator support of QUIC in Netty based on Cloudflare's quiche implementation!

>> Towards OpenJDK 17 [cl4es.github.io]

Faster startup times and static images: using the JVM as the basis for Project Leyden!

>> Introducing Hibernate Reactive [in.relation.to]

Meet the new Reactive API for the Hibernate ORM: communicating with the relational databases using the non-blocking IO.

Also worth reading:

Webinars and presentations:

Time to upgrade:

2. Technical

>> Don't Panic: Kubernetes and Docker [kubernetes.io]

Kubernetes deprecates Docker as its container runtime: towards more lightweight and CRI compatible container runtimes.

Also worth reading:

3. Musings

>> Team Manager's Toolkit for 1-on-1s [phauer.com]

In praise of 1-on-1 sessions: a recipe for maintaining growth, development, and becoming and staying happy!

Also worth reading:

4. Comics

And my favorite Dilberts of the week:

>> 5 G Is 4 G [dilbert.com]

>> Married Zoomers [dilbert.com]

>> Thought Leader [dilbert.com]

5. Pick of the Week

>> If Self-Discipline Feels Difficult, Then You’re Doing It Wrong [markmanson.net]

The post Java Weekly, Issue 363 first appeared on Baeldung.


ArrayList vs. LinkedList vs. HashMap in Java

$
0
0

1. Overview

Collections in Java are based on a couple of core interfaces and more than a dozen implementation classes. The wide selection of different implementations can sometimes lead to confusion.

Deciding on which collection type to use for a particular use case is not a trivial task. That decision can have a great impact on our code readability and performance.

Instead of explaining all types of collections in a single article, we'll explain three of the most common ones: ArrayList, LinkedList, and HashMap. In this tutorial, we'll look at how they store data, their performance, and recommend when to use them.

2. Collections

A collection is simply a Java object that groups other objects together. The Java Collections Framework contains a set of data structures and algorithms for representing and manipulating collections. If applied correctly, the provided data structures help reduce programming effort and increase performance.

2.1. Interfaces

The Java Collections Framework contains four basic interfaces: List, Set, Map, and Queue. It is important to understand the intended usage of these interfaces before looking at the implementation classes.

Let's have a quick look at three of the four core interfaces that we'll use in this article:

  • The List interface is dedicated to storing ordered collections of objects. It allows us to positionally access and insert new elements, as well as save duplicate values
  • The Map interface supports a key-value pair mapping of the data. To access a certain value, we need to know its unique key
  • The Queue interface enables the storage of data based on the first-in-first-out order. Similar to a real-world queue line

HashMap implements the Map interface. The List interface is implemented by both ArrayList and LinkedList. LinkedList additionally implements the Queue interface.

2.2. List vs. Map

A common antipattern we sometimes encounter is trying to maintain order using a map. Thus, not making use of other collection types more suitable for the job.

Just because we can solve many problems with a single collection type doesn't mean we should.

Let's look at a bad example, where we use a map to save data based on the positional key:

Map<Integer, String> map = new HashMap<>();
map.put(1, "Daniel");
map.put(2, "Marko");
for (String name : map.values()) {
    assertThat(name).isIn(map.values());
}
assertThat(map.values()).containsExactlyInAnyOrder("Daniel", "Marko");

When we iterate through the map values, we're not guaranteed to retrieve them in the same order we put them in. That is simply because a map wasn't designed for maintaining the order of elements.

We can rewrite this example in a much more readable way using a list. Lists are ordered by definition, so we can iterate through the items in the same order that we inserted them:

List<String> list = new ArrayList<>();
list.add("Daniel");
list.add("Marko");
for (String name : list) {
    assertThat(name).isIn(list);
}
assertThat(list).containsExactly("Daniel", "Marko");

Maps are designed for quick access and search based on unique keys. When we want to maintain order or work with position-based indexes, lists are a natural choice.

3. ArrayList

ArrayList is the most commonly used implementation of the List interface in Java. It is based on built-in arrays but can dynamically grow and shrink as we add or remove elements.

We use indexes that start from zero to access list elements. We can insert a new element either at the end, or the specific position of the list:

List<String> list = new ArrayList<>();
list.add("Daniel");
list.add(0, "Marko");
assertThat(list).hasSize(2);
assertThat(list.get(0)).isEqualTo("Marko");

To remove an element from the list, we need to provide the object reference or its index:

List<String> list = new ArrayList<>(Arrays.asList("Daniel", "Marko"));
list.remove(1);
assertThat(list).hasSize(1);
assertThat(list).doesNotContain("Marko");

3.1. Performance

ArrayList provides us with dynamic arrays in Java. Although slower than the built-in arrays, ArrayList helps us save some programming effort and improve code readability.

When we talk about time complexity, we make use of the Big-O notation. The notation describes how the time to perform the algorithm grows with the size of the input.

ArrayList allows random access since arrays are based on indexes. That means that accessing any element always takes a constant time O(1).

Adding new elements also takes O(1) time, except when adding an element on a specific position/index, then it takes O(n). Checking if a specific element exists in the given list runs in linear O(n) time.

The same is true for the removal of elements. We need to iterate the entire array to find the element selected for removal.

3.2. Usage

Whenever we're unsure what collection type to use, it's probably a good idea to start with an ArrayList. Keep in mind that accessing items based on indexes will be very fast. However, searching for items based on their value or adding/removing items at a specific position will be expensive.

Using ArrayList makes sense when it is important to maintain the same order of items, and quick access time based on the position/index is an important criterion.

Avoid using ArrayList when the order of items is not important. Also, try to avoid it when items often need to be added at a specific position. Likewise, bear in mind that ArrayList may not be the best option when searching for specific item values is an important requirement, especially if the list is large.

4. LinkedList

LinkedList is a doubly-linked list implementation. Implementing both the List and Deque (an extension of Queue) interfaces. Unlike ArrayList, when we store data in a LinkedList, every element maintains a link to the previous one.

Besides standard List insertion methods, LinkedList supports additional methods which can add an element at the beginning or the end of the list:

LinkedList<String> list = new LinkedList<>();
list.addLast("Daniel");
list.addFirst("Marko");
assertThat(list).hasSize(2);
assertThat(list.getLast()).isEqualTo("Daniel");

This list implementation also offers methods for removing elements from the beginning or at the end of the list:

LinkedList<String> list = new LinkedList<>(Arrays.asList("Daniel", "Marko", "David"));
list.removeFirst();
list.removeLast();
assertThat(list).hasSize(1);
assertThat(list).containsExactly("Marko");

The implemented Deque interface provides queue-like methods for retrieving, adding, and deleting elements:

LinkedList<String> list = new LinkedList<>();
list.push("Daniel");
list.push("Marko");
assertThat(list.poll()).isEqualTo("Marko");
assertThat(list).hasSize(1);

4.1. Performance

LinkedList consumes a bit more memory than an ArrayList since every node stores two references to the previous and next element.

The insertion, addition, and removal operations are faster in a LinkedList because there is no resizing of an array done in the background. When a new item is added somewhere in the middle of the list, only references in surrounding elements need to change.

LinkedList supports O(1) constant-time insertion at any position in the collection. However, it is less efficient at accessing items in a specific position, taking O(n) time.

Removing an element also takes O(1) constant-time, since we just need to modify a few pointers. Checking if a specific element exists in the given list takes O(n) linear time, same as for an ArrayList.

4.2. Usage

Most of the time we can use ArrayList as the default List implementation. However, in certain use-cases, we should make use of LinkedList. Those include when we prefer constant insertion and deletion time, over constant access time, and effective memory usage.

Using LinkedList makes sense when maintaining the same order of items and quick insertion time (adding and removing items at any position) is an important criterion.

Like an ArrayList, we should avoid using LinkedList when the order of items is not important. LinkedList is not the best option when fast access time or searching for items is an important requirement.

5. HashMap

Unlike ArrayList and LinkedList, HashMap implements the Map interface. That means that every key is mapped to exactly one value. We always need to know the key to retrieve the corresponding value from the collection:

Map<String, String> map = new HashMap<>();
map.put("123456", "Daniel");
map.put("654321", "Marko");
assertThat(map.get("654321")).isEqualTo("Marko");

Similarly, we can only delete a value from the collection using its key:

Map<String, String> map = new HashMap<>();
map.put("123456", "Daniel");
map.put("654321", "Marko");
map.remove("654321");
assertThat(map).hasSize(1);

5.1. Performance

One might ask, why not simply use a List and get rid of the keys all together? Especially since HashMap consumes more memory for saving keys and its entries are not ordered. The answer lies in the performance benefits for searching elements.

HashMap is very efficient at checking if a key exists or retrieving a value based on a key. Those operations take O(1) on average.

Adding and removing elements from a HashMap based on a key takes O(1) constant-time. Checking for an element without knowing the key takes linear time O(n), as it's necessary to loop over all the elements.

5.2. Usage

Along with ArrayListHashMap is one of the most frequently used data structures in Java. Unlike different list implementations, HashMap makes use of indexing to perform a jump to a specific value, making the search time constant, even for large collections.

Using HashMap makes sense only when unique keys are available for the data we want to store. We should use it when searching for items based on a key and quick access time is an important requirement.

We should avoid using HashMap when it is important to maintain the same order of items in a collection.

6. Conclusion

In this article, we explored three common collection types in Java: ArrayList, LinkedList, and HashMap. We looked at their performance for adding, removing, and searching for items. Based on that, we provided recommendations on when to apply each of them in our Java applications.

In the examples, we covered only basic methods for adding and removing items. For a more detailed look at each implementation API, please visit our dedicated ArrayList, ArrayList, and HashMap articles.

As always, the complete source code is available over on GitHub.

The post ArrayList vs. LinkedList vs. HashMap in Java first appeared on Baeldung.


JDBC URL Format For Different Databases

$
0
0

1. Overview

When we work with a database in Java, usually we connect to the database with JDBC.

The JDBC URL is an important parameter to establish the connection between our Java application and the database. However, the JDBC URL format can be different for different database systems.

In this tutorial, we'll take a closer look at the JDBC URL formats of several widely used databases: Oracle, MySQL, Microsoft SQL Server, and PostgreSQL.

2. JDBC URL Formats for Oracle

Oracle database systems are widely used in enterprise Java applications. Before we can take a look at the format of the JDBC URL to connect Oracle databases, we should first make sure the Oracle Thin database driver is in our classpath.

For example, if our project is managed by Maven, we need to add the ojdbc14 dependency in our pom.xml:

<dependency>
    <groupId>com.oracle</groupId>
    <artifactId>ojdbc14</artifactId>
    <version>10.2.0.4.0</version>
</dependency>

Due to some license issues, the Maven Central repository only points to the POM file of this artifact. Therefore, we need to download the jar and manually install it in our Maven repository.

The Thin driver offers several kinds of JDBC URL formats:

Next, we'll go through each of these formats.

2.1. Connect to Oracle Database SID

In some older versions of the Oracle database, the database is defined as a SID. Let's see the JDBC URL format for connecting to a SID:

jdbc:oracle:thin:[<user>/<password>]@<host>[:<port>]:<SID>

For example, assuming we have an Oracle database server host “myoracle.db.server:1521“, and the name of the SID is “my_sid“, we can follow the format above to build the connection URL and connect to the database:

@Test
public void givenOracleSID_thenCreateConnectionObject() {
    String oracleJdbcUrl = "jdbc:oracle:thin:@myoracle.db.server:1521:my_sid";
    String username = "dbUser";
    String password = "1234567";
    try (Connection conn = DriverManager.getConnection(oracleJdbcUrl, username, password)) {
        assertNotNull(conn);
    } catch (SQLException e) {
        System.err.format("SQL State: %s\n%s", e.getSQLState(), e.getMessage());
    }
}

2.2. Connect to Oracle Database Service Name

The format of the JDBC URL to connect Oracle databases via service name is pretty similar to the one we used to connect via SID:

jdbc:oracle:thin:[<user>/<password>]@//<host>[:<port>]/<service>

We can connect to the service “my_servicename” on the Oracle database server “myoracle.db.server:1521“:

@Test
public void givenOracleServiceName_thenCreateConnectionObject() {
    String oracleJdbcUrl = "jdbc:oracle:thin:@//myoracle.db.server:1521/my_servicename";
    ...
    try (Connection conn = DriverManager.getConnection(oracleJdbcUrl, username, password)) {
        assertNotNull(conn);
        ...
    }
    ...
}

2.3. Connect to Oracle Database With tnsnames.ora Entries

We can also include tnsnames.ora entries in the JDBC URL to connect to Oracle databases:

jdbc:oracle:thin:@(DESCRIPTION=(ADDRESS=(PROTOCOL=TCP)(HOST=<host>)(PORT=<port>))(CONNECT_DATA=(SERVICE_NAME=<service>)))

Let's see how to connect to our “my_servicename” service using entries from the tnsnames.ora file:

@Test
public void givenOracleTnsnames_thenCreateConnectionObject() {
    String oracleJdbcUrl = "jdbc:oracle:thin:@" +
      "(DESCRIPTION=(ADDRESS=(PROTOCOL=TCP)" +
      "(HOST=myoracle.db.server)(PORT=1521))" +
      "(CONNECT_DATA=(SERVICE_NAME=my_servicename)))";
    ...
    try (Connection conn = DriverManager.getConnection(oracleJdbcUrl, username, password)) {
        assertNotNull(conn);
        ...
    }
    ...
}

3. JDBC URL Formats for MySQL

In this section, let's discuss how to write the JDBC URL to connect to MySQL databases.

To connect to a MySQL database from our Java application, let's first add the JDBC driver mysql-connector-java dependency in our pom.xml:

<dependency>
    <groupId>mysql</groupId>
    <artifactId>mysql-connector-java</artifactId>
    <version>8.0.22</version>
</dependency>

Next, let's take a look at the generic format of the connection URL supported by the MySQL JDBC driver:

protocol//[hosts][/database][?properties]

Let's see an example of connecting to the MySQL database “my_database” on the host “mysql.db.server“:

@Test
public void givenMysqlDb_thenCreateConnectionObject() {
    String jdbcUrl = "jdbc:mysql://mysql.db.server:3306/my_database?useSSL=false&serverTimezone=UTC";    
    String username = "dbUser";
    String password = "1234567";
    try (Connection conn = DriverManager.getConnection(jdbcUrl, username, password)) {
        assertNotNull(conn);
    } catch (SQLException e) {
        System.err.format("SQL State: %s\n%s", e.getSQLState(), e.getMessage());
    }
}

The JDBC URL in the example above looks straightforward. It has four building blocks:

  • protocoljdbc:mysql:
  • host mysql.db.server:3306
  • databasemy_database
  • propertiesuseSSL=false&serverTimezone=UTC

However, sometimes, we may face more complex situations, such as different types of connections or multiple MySQL hosts, and so on.

Next, we'll take a closer look at each building block.

3.1. Protocol

Except for the ordinary “jdbc:mysql:” protocol, the connector-java JDBC driver still supports protocols for some special connections:

When we talk about the load-balancing and JDBC replication, we may realize that there should be multiple MySQL hosts.

Next, let's check out the details of another part of the connection URL — hosts.

3.2. Hosts

We've seen the JDBC URL example of defining a single host in a previous section — for example, mysql.db.server:3306.

However, if we need to handle multiple hosts, we can list hosts in a comma-separated list: host1, host2,…,hostN.

We can also enclose the comma-separated host list by square brackets: [host1, host2,…,hostN].

Let's see several JDBC URL examples of connecting to multiple MySQL servers:

  • jdbc:mysql://myhost1:3306,myhost2:3307/db_name
  • jdbc:mysql://[myhost1:3306,myhost2:3307]/db_name
  • jdbc:mysql:loadbalance://myhost1:3306,myhost2:3307/db_name?user=dbUser&password=1234567&loadBalanceConnectionGroup=group_name&ha.enableJMX=true

If we look at the last example above closely, we'll see that after the database name, there are some definitions of properties and user credentials. We'll look at these next.

3.3. Properties and User Credentials

Valid global properties will be applied to all hosts. Properties are preceded by a question mark “?” and written as key=value pairs separated by the “& symbol:

jdbc:mysql://myhost1:3306/db_name?prop1=value1&prop2=value2

We can put user credentials in the properties list as well:

jdbc:mysql://myhost1:3306/db_name?user=root&password=mypass

Also, we can prefix each host with the user credentials in the format “user:password@host:

jdbc:mysql://root:mypass@myhost1:3306/db_name

Further, if our JDBC URL contains a list of hosts and all hosts use the same user credentials, we can prefix the host list:

jdbc:mysql://root:mypass[myhost1:3306,myhost2:3307]/db_name

After all, it is also possible to provide the user credentials outside the JDBC URL.

We can pass the username and password to the DriverManager.getConnection(String url, String user, String password) method when we call the method to obtain a connection.

4. JDBC URL Format for Microsoft SQL Server

Microsoft SQL Server is another popular database system. To connect an MS SQL Server database from a Java application, we need to add the mssql-jdbc dependency into our pom.xml:

<dependency>
    <groupId>com.microsoft.sqlserver</groupId>
    <artifactId>mssql-jdbc</artifactId>
    <version>8.4.1.jre11</version>
</dependency>

Next, let's look at how to build the JDBC URL to obtain a connection to MS SQL Server.

The general format of the JDBC URL for connection to the MS SQL Server database is:

jdbc:sqlserver://[serverName[\instanceName][:portNumber]][;property=value[;property=value]]

Let's have a closer look at each part of the format.

  • serverName – the address of the server we'll connect to; this could be a domain name or IP address pointing to the server
  • instanceName – the instance to connect to on serverName; it's an optional field, and the default instance will be chosen if the field isn't specified
  • portNumber – this is the port to connect to on serverName (default port is 1433)
  • properties – can contain one or more optional connection properties, which must be delimited by the semicolon, and duplicate property names are not allowed

Now, let's say we have an MS SQL Server database running on host “mssql.db.server“, the instanceName on the server is “mssql_instance“, and the name of the database we want to connect is “my_database“.

Let's try to obtain the connection to this database:

@Test
public void givenMssqlDb_thenCreateConnectionObject() {
    String jdbcUrl = "jdbc:sqlserver://mssql.db.server\\mssql_instance;databaseName=my_database";
    String username = "dbUser";
    String password = "1234567";
    try (Connection conn = DriverManager.getConnection(jdbcUrl, username, password)) {
        assertNotNull(conn);
    } catch (SQLException e) {
        System.err.format("SQL State: %s\n%s", e.getSQLState(), e.getMessage());
    }
}

5. JDBC URL Format for PostgreSQL

PostgreSQL is a popular, open-source database system. To work with PostgreSQL, the JDBC driver postgresql should be added as a dependency in our pom.xml:

<dependency>
    <groupId>org.postgresql</groupId>
    <artifactId>postgresql</artifactId>
    <version>42.2.18</version>
</dependency>

The general form of the JDBC URL to connect to PostgreSQL is:

jdbc:postgresql://host:port/database?properties

Now, let's look into each part in the above JDBC URL format.

The host parameter is the domain name or IP address of the database server.

If we want to specify an IPv6 address, the host parameter must be enclosed by square brackets, for example, jdbc:postgresql://[::1]:5740/my_database.mysql

The port parameter specifies the port number PostgreSQL is listening on. The port parameter is optional, and the default port number is 5432.

As its name implies, the database parameter defines the name of the database we want to connect to.

The properties parameter can contain a group of key=value pairs separated by the “&” symbol.

After understanding the parameters in the JDBC URL format, let's see an example of how to obtain the connection to a PostgreSQL database:

@Test
public void givenPostgreSqlDb_thenCreateConnectionObject() {
    String jdbcUrl = "jdbc:postgresql://postgresql.db.server:5430/my_database?ssl=true&loglevel=2";
    String username = "dbUser";
    String password = "1234567";
    try (Connection conn = DriverManager.getConnection(jdbcUrl, username, password)) {
        assertNotNull(conn);
    } catch (SQLException e) {
        System.err.format("SQL State: %s\n%s", e.getSQLState(), e.getMessage());
    }
}

In the example above, we connect to a PostgreSQL database with:

  • host:port – postgresql.db.server:5430
  • databasemy_database
  • properties – ssl=true&loglevel=2

6. Conclusion

This article discussed the JDBC URL formats of four widely used database systems: Oracle, MySQL, Microsoft SQL Server, and PostgreSQL.

We've also seen different examples of building the JDBC URL string to obtain connections to those databases.

As always, the full source code of the article is available over on GitHub.

The post JDBC URL Format For Different Databases first appeared on Baeldung.


InvalidAlgorithmParameterException: Wrong IV Length

$
0
0

1. Overview

The Advanced Encryption Standard (AES) is a widely used symmetric block cipher algorithm. Initialization Vector (IV) plays an important role in the AES algorithm.

In this tutorial, we'll explain how to generate IV in Java. Also, we'll describe how to avoid InvalidAlgorithmParameterException when we generate the IV and use it in a cipher algorithm.

2. Initialization Vector

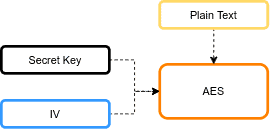
The AES algorithm has usually three inputs: plaintext, secret key, and IV. It supports secret keys of 128, 192, and 256 bits to encrypt and decrypt data in blocks of 128 bits. The below figure shows the AES inputs:

The goal of IV is to augment the encryption process. The IV is used in conjunction with the secret key in some AES modes of operation. For example, the Cipher Block Chaining (CBC) mode uses the IV in its algorithm.

In general, the IV is a pseudo-random value chosen by the sender. The IV for the encryption must be the same when decrypting information.

It has the same size as the block that is encrypted. Therefore, the size of the IV is 16 bytes or 128 bits.

3. Generating the IV

It's recommended to use java.security.SecureRandom class instead of java.util.Random to generate a random IV. In addition, it's a best practice that the IV be unpredictable. Also, we should not hard-code the IV in the source code.

To use the IV in a cipher, we use the IvParameterSpec class. Let’s create a method for generating the IV:

public static IvParameterSpec generateIv() {
    byte[] iv = new byte[16];
    new SecureRandom().nextBytes(iv);
    return new IvParameterSpec(iv);
}

4. Exception

The AES algorithm requires that the IV size must be 16 bytes (128 bits). So, if we provide an IV whose size is not equal to 16 bytes, an InvalidAlgorithmParameterException will be thrown.

To solve this issue, we'll have to use the IV with a size of 16 bytes. Sample snippet code regarding the use of IV in AES CBC mode can be found in this article.

5. Conclusion

In summary, we've learned how to generate an Initialization Vector (IV) in Java. Also, we've described the exception relevant to the IV generation. The source code used in this tutorial is available over on GitHub.


The post InvalidAlgorithmParameterException: Wrong IV Length first appeared on Baeldung.


Writing byte[] to a File in Java

$
0
0

1. Overview

In this quick tutorial, we're going to learn several different ways to write a Java byte array to a file. We'll start at the beginning, using the Java IO package. Next, we'll look at an example using Java NIO. After that, we'll use Google Guava and Apache Commons IO.

2. Java IO

Java's IO package has been around since JDK 1.0 and provides a collection of classes and interfaces for reading and writing data.

Let's use a FileOutputStream to write the image to a file:

File outputFile = tempFolder.newFile("outputFile.jpg");
try (FileOutputStream outputStream = new FileOutputStream(outputFile)) {
    outputStream.write(dataForWriting);
}

We open an output stream to our destination file, and then we can simply pass our byte[] dataForWriting to the write method. Note that we're using a try-with-resources block here to ensure that we close the OutputStream in case an IOException is thrown.

3. Java NIO

The Java NIO package was introduced in Java 1.4, and the file system API for NIO was introduced as an extension in Java 7. Java NIO is uses buffering and is non-blocking, whereas Java IO uses blocking streams. The syntax for creating file resources is more succinct in the java.nio.file package.

We can write our byte[] in one line using the Files class:

Files.write(outputFile.toPath(), dataForWriting);

Our example either creates a file or truncates an existing file and opens it for write. We can also use Paths.get(“path/to/file”) or Paths.get(“path”, “to”, “file”) to construct the Path that describes where our file will be stored. Path is the Java NIO native way of expressing paths.

If we need to override the file opening behavior, we can also provide OpenOption to the write method.

4. Google Guava

Guava is a library by Google that provides a variety of types for performing common operations in Java, including IO.

Let's import Guava into our pom.xml file:

<dependency>
    <groupId>com.google.guava</groupId>
    <artifactId>guava</artifactId>
    <version>30.0-jre</version>
</dependency>

4.1. Guava Files

As with the Java NIO package, we can write our byte[] in one line:

Files.write(dataForWriting, outputFile);

Guava's Files.write method also takes an optional OptionOptions and uses the same defaults as java.nio.Files.write.

There's a catch here though: The Guava Files.write method is marked with the @Beta annotation. According to the documentation, that means it can change at any time and so is not recommended for use in libraries.

So, if we're writing a library project, we should consider using a ByteSink.

4.2. ByteSink

We can also create a ByteSink to write our byte[]:

ByteSink byteSink = Files.asByteSink(outputFile);
byteSink.write(dataForWriting);

The ByteSink is a destination to which we can write bytes. It supplies an OutputStream to the destination.

If we need to use a java.nio.files.Path or to supply a special OpenOption, we can get our ByteSink using the MoreFiles class:

ByteSink byteSink = MoreFiles.asByteSink(outputFile.toPath(), 
    StandardOpenOption.CREATE, 
    StandardOpenOption.WRITE);
byteSink.write(dataForWriting);

5. Apache Commons IO

Apache Commons IO provides some common file tasks.

Let's import the latest version of commons-io:

<dependency>
    <groupId>commons-io</groupId>
    <artifactId>commons-io</artifactId>
    <version>1.3.2</version>
</dependency>

Now, let's write our byte[] using the FileUtils class:

FileUtils.writeByteArrayToFile(outputFile, dataForWriting);

The FileUtils.writeByteArrayToFile method is similar to the other methods that we've used in that we give it a File representing our desired destination and the binary data we're writing. If our destination file or any of the parent directories don't exist, they'll be created.

6. Conclusion

In this short tutorial, we learned how to write binary data from a byte[] to a file using plain Java and two popular Java utility libraries: Google Guava and Apache Commons IO.

As always, the example code is available over on GitHub.

The post Writing byte[] to a File in Java first appeared on Baeldung.


Configuring a Project to Exclude Certain Sonar Violations

$
0
0

1. Overview

During our builds, we can use various tools to report on the quality of our source code. One such tool is SonarQube, which performs static code analysis.

Sometimes we may disagree with the results returned. We may, therefore, wish to exclude some code that has been incorrectly flagged by SonarQube.

In this short tutorial, we'll look at how to disable Sonar checks. While it's possible to change the ruleset on the SonarQube's server, we'll focus only on how to control individual checks within the source code and configuration of our project.

2. Violation Example

Let's look at an example:

public void printStringToConsoleWithDate(String str) {
    System.out.println(LocalDateTime.now().toString() + " " + str);
}

By default, SonarQube reports this code as a Code Smell due to the java:S106 rule violation:

However, let's imagine that for this particular class, we've decided that logging with System.out is valid. Maybe this is a lightweight utility that will run in a container and does not need a whole logging library just to log to stdout.

We should note that it's also possible to mark a violation as a false-positive within the SonarQube user interface. However, if the code is analyzed on multiple servers, or if the line moves to another class after refactoring, then the violation will re-appear.

Sometimes we want to make our exclusions within the source code repository so that they persist.

So, let's see how we can exclude this code from the SonarQube report by configuring the project.

3. Using //NOSONAR

We can disable a single line of code by putting a //NOSONAR at the end:

System.out.println(
  LocalDateTime.now()
    .toString() + " " + str); //NOSONAR lightweight logging

The //NOSONAR tag at the end of the line suppresses all issues that might be raised on it. This approach works for most languages supported by SonarQube.

We're also allowed to put some additional comments after NOSONAR explaining why we have disabled the check.

Let's move forward and take a look at a Java-specific way to disable checks.

4. Using @SuppressWarnings

4.1. Annotating the Code

In Java, we can exclude Sonar checks using the built-in @SuppressWarnings annotation.

We can annotate the function:

@SuppressWarnings("java:S106")
public void printStringToConsoleWithDate(String str) {
    System.out.println(LocalDateTime.now().toString() + " " + str);
}

This works exactly the same way as suppressing compiler warnings. All we have to do is specify the rule identifier, in this case java:S106.

4.2. How to Get the Identifier

We can get the rule identifier using the SonarQube user interface. When we're looking at the violation, we can click Why is this an issue?:

It shows us the definition. From this we can find the rule identifier in the top right corner:

5. Using sonar-project.properties

We can also define exclusion rules in the sonar-project.properties file using analysis properties.

Let's define and add the sonar-project.properties file to our resource dir:

sonar.issue.ignore.multicriteria=e1
sonar.issue.ignore.multicriteria.e1.ruleKey=java:S106
sonar.issue.ignore.multicriteria.e1.resourceKey=**/SonarExclude.java

We've just declared our very first multicriteria, named e1. We excluded the java:S106 rule for the SonarExclude class. Our definition can mix exclusions using rule identifiers and file matching patterns together, respectively in ruleKey and resourceKey properties preceded by the e1 name tag.

Using this approach, we can build a complex configuration that excludes particular rules across multiple files:

sonar.issue.ignore.multicriteria=e1,e2
# Console usage - ignore a single class
sonar.issue.ignore.multicriteria.e1.ruleKey=java:S106
sonar.issue.ignore.multicriteria.e1.resourceKey=**/SonarExclude.java
# Too many parameters - ignore the whole package
sonar.issue.ignore.multicriteria.e2.ruleKey=java:S107
sonar.issue.ignore.multicriteria.e2.resourceKey=com/baeldung/sonar/*.java

We've just defined a subset of multicriteria. We extended our configuration by adding a second definition and named it e2. Then we combined both rules in a single subset, separating the names with a comma.

6. Disable Using Maven

All analysis properties can be also applied using Maven properties. A similar mechanism is also available in Gradle.

6.1. Multicriteria in Maven

Returning to the example, let's modify our pom.xml:

<properties>
    <sonar.issue.ignore.multicriteria>e1</sonar.issue.ignore.multicriteria>
    <sonar.issue.ignore.multicriteria.e1.ruleKey>java:S106</sonar.issue.ignore.multicriteria.e1.ruleKey>
    <sonar.issue.ignore.multicriteria.e1.resourceKey>
      **/SonarExclude.java
    </sonar.issue.ignore.multicriteria.e1.resourceKey>
</properties>

This configuration works exactly the same as if it were used in a sonar-project.properties file.

6.2. Narrowing the Focus

Sometimes, an analyzed project may contain some generated code that we want to exclude and narrow the focus of SonarQube checks.

Let's exclude our class by defining sonar.exclusions in our pom.xml:

<properties>
    <sonar.exclusions>**/SonarExclude.java</sonar.exclusions>
</properties>

In that case, we've excluded a single file by its name. Checks will be performed for all files except that one.

We can also use file matching patterns. Let's exclude the whole package by defining:

<properties>
    <sonar.exclusions>com/baeldung/sonar/*.java</sonar.exclusions>
</properties>

On the other hand, by using the sonar.inclusions property, we can ask SonarQube only to analyse a particular subset of the project's files:

<properties>
    <sonar.inclusions>com/baeldung/sonar/*.java</sonar.inclusions>
</properties>

This snippet defines analysis only for java files from the com.baeldung.sonar package.

Finally, we can also define the sonar.skip value:

<properties>
    <sonar.skip>true</sonar.skip>
</properties>

This excludes the whole Maven module from SonarQube checks.

7. Conclusion

In this article, we discussed different ways to suppress certain SonarQube analysis on our code.

We started by excluding checks on individual lines. Then, we talked about built-in @SuppressWarnings annotation and exclusion by a specific rule. This requires us to find the rule's identifier.

We also looked at configuring the analysis properties. We tried multicriteria and the sonar-project.properties file.

Finally, we moved our properties to the pom.xml and reviewed other ways to narrow the focus.

The post Configuring a Project to Exclude Certain Sonar Violations first appeared on Baeldung.
        

Difference Between COPY and ADD in a Dockerfile

$
0
0

1. Introduction

When creating Dockerfiles, it's often necessary to transfer files from the host system into the Docker image. These could be property files, native libraries, or other static content that our applications will require at runtime.

The Dockerfile specification provides two ways to copy files from the source system into an image: the COPY and ADD directives.

In this article, we'll look at the differences between them and when it makes sense to use each one.

2. Difference Between COPY and ADD

At first glance, the COPY and ADD directives look the same. They have the same syntax:

COPY <source> <destination>
ADD <source> <destination>

And both copy files from the host system to the Docker image.

So what's the difference? In short, the ADD directive is more capable than COPY.

While functionally similar, the ADD directive is more powerful in two ways:

  • It can handle remote URLs
  • It can auto-extract tar files

Let's look at these more closely.

First, the ADD directive can accept a remote URL for its source argument. The COPY directive, on the other hand, can only accept local files.

Note that using ADD to fetch remote files and copying is not typically ideal. This is because the file will increase the overall Docker image size. Instead, we should use curl or wget to fetch remote files and remove them when no longer needed.

Second, the ADD directive will automatically expand tar files into the image file system. While this can reduce the number of Dockerfile steps required to build an image, it may not be desired in all cases.

Note that the auto-expansion only occurs when the source file is local to the host system.

3. When to Use ADD or COPY

According to the Dockerfile best practices guide, we should always prefer COPY over ADD unless we specifically need one of the two additional features of ADD.

As noted above, using ADD to copy remote files into a Docker image creates an extra layer and increases the file size. If we use wget or curl instead, we can remove the files afterward, and they don't remain a permanent part of the Docker image.

Additionally, since the ADD command automatically expands tar files and certain compressed formats, it can lead to unexpected files being written to the file system in our images.

4. Conclusion

In this quick tutorial, we've seen the two primary ways to copy files into a Docker image: ADD and COPY. While functionally similar, the COPY directive is preferred for most cases. This is because the ADD directive provides additional functionality that should be used with caution and only when needed.

The post Difference Between COPY and ADD in a Dockerfile first appeared on Baeldung.
Viewing Contents of a JAR File

$
0
0

1. Overview

We've learned about getting class names from a JAR file. Further, in that tutorial, we've discussed how to get the classes' names in a JAR file in a Java application.

In this tutorial, we'll learn another way to list a JAR file's content from the command-line.

We'll also see several GUI tools for viewing more detailed contents of a JAR file — for example, the Java source code.

2. Example JAR File

In this tutorial, we'll still take the stripe-0.0.1-SNAPSHOT.jar file as an example to address how to view the content in a JAR file:

3. Reviewing the jar Command

We've learned that we can use the jar command shipped with the JDK to check the content of a JAR file:

$ jar tf stripe-0.0.1-SNAPSHOT.jar 
META-INF/
META-INF/MANIFEST.MF
...
templates/result.html
templates/checkout.html
application.properties
com/baeldung/stripe/StripeApplication.class
com/baeldung/stripe/ChargeRequest.class
com/baeldung/stripe/StripeService.class
com/baeldung/stripe/ChargeRequest$Currency.class

If we want to filter the output to get only the information we want, for example, class names or properties files, we can pipe the output to filter tools such as grep.

The jar command is pretty convenient to use if our system has a JDK installed.

However, sometimes, we want to examine a JAR file's content on a system without a JDK installed. In this case, the jar command is not available.

We'll take a look at this next.

4. Using the unzip Command

JAR files are packaged in the ZIP file format. In other words, if a utility can read a ZIP file, we can use it to view a JAR file as well.

The unzip command is a commonly used utility for working with ZIP files from the Linux command-line.

Therefore, we can use the -l option of the unzip command to list the content of a JAR file without extracting it:

$ unzip -l stripe-0.0.1-SNAPSHOT.jar
Archive:  stripe-0.0.1-SNAPSHOT.jar
  Length      Date    Time    Name
---------  ---------- -----   ----
        0  2020-10-16 20:53   META-INF/
...
      137  2020-10-16 20:53   static/index.html
      677  2020-10-16 20:53   templates/result.html
     1323  2020-10-16 20:53   templates/checkout.html
       37  2020-10-16 20:53   application.properties
      715  2020-10-16 20:53   com/baeldung/stripe/StripeApplication.class
     3375  2020-10-16 20:53   com/baeldung/stripe/ChargeRequest.class
     2033  2020-10-16 20:53   com/baeldung/stripe/StripeService.class
     1146  2020-10-16 20:53   com/baeldung/stripe/ChargeRequest$Currency.class
     2510  2020-10-16 20:53   com/baeldung/stripe/ChargeController.class
     1304  2020-10-16 20:53   com/baeldung/stripe/CheckoutController.class
...
---------                     -------
    15394                     23 files

Thanks to the unzip command, we can view the content of a JAR file without the JDK.

The output above is pretty clear. It lists the files in the JAR file in a tabular format.

5. Exploring JAR Files Using GUI Utilities

Both the jar and the unzip commands are handy, but they only list the filenames in a JAR file.

Sometimes, we would like to know more information about files in the JAR file, for example, examining the Java source code of a class.

In this section, we'll introduce several platform-independent GUI tools to help us to look at files inside a JAR file.

5.1. Using JD-GUI

First, let's have a look at JD-GUI.

The JD-GUI is a nice open-source GUI utility to explore Java source code decompiled by the Java decompiler JD-Core.

JD-GUI ships a JAR file. We can start the utility by using the java command with the -jar option, for instance:

$ java -jar jd-gui-1.6.6.jar

When we see the main window of JD-GUI, we can either open our JAR file by navigating the menu “File -> Open File…” or just drag-and-drop the JAR file in the window.

Once we open a JAR file, all the classes in the JAR file will be decompiled.

Then we can select the files we're interested in on the left side to examine their source code:

As we can see in the above demo, in the outline on the left side, the classes and the members of each class such as methods and fields are listed, too, just like we usually see in an IDE.

It's pretty handy to locate methods or fields, particularly when we need to check some classes with many lines of code.

When we click through different classes on the left side, each class will be opened in a tab on the right side.

The tab feature is helpful if we need to switch among several classes.

5.2. Using Jar Explorer

Jar Explorer is another open-source GUI tool for viewing the contents of JAR files. It ships a jar file and a start script “Jar Explorer.sh“. It also supports the drag-and-drop feature, making opening a JAR file pretty easy.

Another nice feature provided by Jar Explorer is that it supports three different Java decompilers: JD-Core, Procyon, and Fernflower.

We can switch among the decompilers when we examine source code:

Jar Explorer is pretty easy to use. The decompiler switching feature is nice, too. However, the outline on the left side stops at the class level.

Also, since Jar Explorer doesn't provide the tab feature, we can only open a single file at a time.

Moreover, every time we select a class on the left side, the class will be decompiled by the currently selected decompiler.

5.3. Using Luyten

Luyten is a nice open-source GUI utility for Java decompiler Procyon that provides downloads for different platforms, for example, the .exe format and the JAR format.

Once we've downloaded the JAR file, we can start Luyten using the java -jar command:

$ java -jar luyten-0.5.4.jar 

We can drag and drop our JAR file into Luyten and explore the contents in the JAR file:

Using Luyten, we cannot choose different Java decompilers. But, as the demo above shows, Luyten provides various options for decompiling. Also, we can open multiple files in tabs.

Apart from that, Luyten supports a nice theme system, and we can choose a comfortable theme while examining the source codes.

However, Luyten lists the structure of the JAR file only to the file level.

6. Conclusion

In this article, we've learned how to list files in a JAR file from the command-line. Later, we've seen three GUI utilities to view more detailed contents of a JAR file.

If we want to decompile the classes and examine the JAR file's source code, picking a GUI tool may be the most straightforward approach.

The post Viewing Contents of a JAR File first appeared on Baeldung.
        

Scheduled WebSocket Push with Spring Boot

$
0
0

1. Overview

In this tutorial, we'll see how to send scheduled messages from a server to the browser using WebSockets. An alternative would be using Server sent events (SSE), but we won't be covering that in this article.

Spring provides a variety of scheduling options. First, we'll be covering the @Scheduled annotation. Then, we'll see an example with Flux::interval method provided by Project Reactor. This library is available out-of-the-box for Webflux applications, and it can be used as a standalone library in any Java project.

Also, more advanced mechanisms exist, like the Quartz scheduler, but we won't be covering them.

2. A Simple Chat Application

In a previous article, we used WebSockets to build a chat application. Let's extend it with a new feature: chatbots. Those bots are the server-side components that push scheduled messages to the browser.

2.1. Maven Dependencies

Let's start by setting the necessary dependencies in Maven. To build this project, our pom.xml should have:

<dependency>
    <groupId>org.springframework.boot</groupId>
    <artifactId>spring-boot-starter-websocket</artifactId>
</dependency>
<dependency>
    <groupId>io.projectreactor</groupId>
    <artifactId>reactor-core</artifactId>
</dependency>
<dependency>
    <groupId>com.github.javafaker</groupId>
    <artifactId>javafaker</artifactId>
    <version>1.0.2</version>
</dependency>
<dependency>
    <groupId>com.google.code.gson</groupId>
    <artifactId>gson</artifactId>
</dependency>

2.2. JavaFaker Dependency

We'll be using the JavaFaker library to generate our bots' messages. This library is often used to generate test data. Here, we'll add a guest named “Chuck Norris” to our chat room.

Let's see the code:

Faker faker = new Faker();
ChuckNorris chuckNorris = faker.chuckNorris();
String messageFromChuck = chuckNorris.fact();

The Faker will provide factory methods for various data generators. We'll be using the ChuckNorris generator. A call to chuckNorris.fact() will display a random sentence from a list of predefined messages.

2.3. Data Model

The chat application uses a simple POJO as the message wrapper:

public class OutputMessage {
    private String from;
    private String text;
    private String time;
   // standard constructors, getters/setters, equals and hashcode
}

Putting it all together, here's an example of how we create a chat message:

OutputMessage message = new OutputMessage(
  "Chatbot 1", "Hello there!", new SimpleDateFormat("HH:mm").format(new Date())));

2.4. Client-Side

Our chat client is a simple HTML page. It uses a SockJS client and the STOMP message protocol.

Let's see how the client subscribes to a topic:

<html>
<head>
    <script src="./js/sockjs-0.3.4.js"></script>
    <script src="./js/stomp.js"></script>
    <script type="text/javascript">
        // ...
        stompClient = Stomp.over(socket);
	
        stompClient.connect({}, function(frame) {
            // ...
            stompClient.subscribe('/topic/pushmessages', function(messageOutput) {
                showMessageOutput(JSON.parse(messageOutput.body));
            });
        });
        // ...
    </script>
</head>
<!-- ... -->
</html>

First, we created a Stomp client over the SockJS protocol. Then, the topic subscription serves as the communication channel between the server and the connected clients.

In our repository, this code is in webapp/bots.html. We access it when running locally at http://localhost:8080/bots.html. Of course, we need to adjust the host and port depending on how we deploy the application.

2.5. Server-Side

We've seen how to configure WebSockets in Spring in a previous article. Let's modify that configuration a little bit:

@Configuration
@EnableWebSocketMessageBroker
public class WebSocketConfig implements WebSocketMessageBrokerConfigurer {
    @Override
    public void configureMessageBroker(MessageBrokerRegistry config) {
        config.enableSimpleBroker("/topic");
        config.setApplicationDestinationPrefixes("/app");
    }
    @Override
    public void registerStompEndpoints(StompEndpointRegistry registry) {
        // ...
        registry.addEndpoint("/chatwithbots");
        registry.addEndpoint("/chatwithbots").withSockJS();
    }
}

To push our messages, we use the utility class SimpMessagingTemplate. By default, it's made available as a @Bean in the Spring Context. We can see how it's declared through autoconfiguration when the AbstractMessageBrokerConfiguration is in the classpath. Therefore, we can inject it in any Spring component.

Following that, we use it to publish messages to the topic /topic/pushmessages. We assume our class has that bean injected in a variable named simpMessagingTemplate:

simpMessagingTemplate.convertAndSend("/topic/pushmessages", 
  new OutputMessage("Chuck Norris", faker.chuckNorris().fact(), time));

As shown previously in our client-side example, the client subscribes to that topic to process messages as they arrive.

3. Scheduling Push Messages

In the Spring ecosystem, we can choose from a variety of scheduling methods. If we use Spring MVC, the @Scheduled annotation comes as a natural choice for its simplicity. If we use Spring Webflux, we can also use Project Reactor's Flux::interval method. We'll see one example of each.

3.1. Configuration

Our chatbots will use the JavaFaker's Chuck Norris generator. We'll configure it as a bean so we can inject it where we need it.

@Configuration
class AppConfig {
    @Bean
    public ChuckNorris chuckNorris() {
        return (new Faker()).chuckNorris();
    }
}

3.2. Using @Scheduled

Our example bots are scheduled methods. When they run, they send our OutputMessage POJOs through a WebSocket using SimpMessagingTemplate.

As its name implies, the @Scheduled annotation allows the repeated execution of methods. With it, we can use simple rate-based scheduling or more complex “cron” expressions.

Let's code our first chatbot:

@Service
public class ScheduledPushMessages {
    @Scheduled(fixedRate = 5000)
    public void sendMessage(SimpMessagingTemplate simpMessagingTemplate, ChuckNorris chuckNorris) {
        String time = new SimpleDateFormat("HH:mm").format(new Date());
        simpMessagingTemplate.convertAndSend("/topic/pushmessages", 
          new OutputMessage("Chuck Norris (@Scheduled)", chuckNorris().fact(), time));
    }
    
}

We annotate the sendMessage method with @Scheduled(fixedRate = 5000). This makes sendMessage run every five seconds. Then, we use the simpMessagingTemplate instance to send an OutputMessage to the topic. The simpMessagingTemplate and chuckNorris instances are injected from the Spring context as method parameters.

3.3. Using Flux::interval()

If we use WebFlux, we can use the Flux::interval operator. It will publish an infinite stream of Long items separated by a chosen Duration.

Now, let's use Flux with our previous example. The goal will be to send a quote from Chuck Norris every five seconds. First, we need to implement the InitializingBean interface to subscribe to the Flux at application startup:

@Service
public class ReactiveScheduledPushMessages implements InitializingBean {
    private SimpMessagingTemplate simpMessagingTemplate;
    private ChuckNorris chuckNorris;
    @Autowired
    public ReactiveScheduledPushMessages(SimpMessagingTemplate simpMessagingTemplate, ChuckNorris chuckNorris) {
        this.simpMessagingTemplate = simpMessagingTemplate;
        this.chuckNorris = chuckNorris;
    }
    @Override
    public void afterPropertiesSet() throws Exception {
        Flux.interval(Duration.ofSeconds(5L))
            // discard the incoming Long, replace it by an OutputMessage
            .map((n) -> new OutputMessage("Chuck Norris (Flux::interval)", 
                              chuckNorris.fact(), 
                              new SimpleDateFormat("HH:mm").format(new Date()))) 
            .subscribe(message -> simpMessagingTemplate.convertAndSend("/topic/pushmessages", message));
    }
}

Here, we use constructor injection to set the simpMessagingTemplate and chuckNorris instances. This time, the scheduling logic is in afterPropertiesSet(), which we override when implementing InitializingBean. The method will run as soon as the service starts up.

The interval operator emits a Long every five seconds. Then, the map operator discards that value and replaces it with our message. Finally, we subscribe to the Flux to trigger our logic for each message.

4. Conclusion

In this tutorial, we've seen that the utility class SimpMessagingTemplate makes it easy to push server messages through a WebSocket. In addition, we've seen two ways of scheduling the execution of a piece of code.

As always, the source code for the examples is available over on GitHub.

The post Scheduled WebSocket Push with Spring Boot first appeared on Baeldung.
        

Java Weekly, Issue 364

$
0
0

1. Spring and Java

>> HotSpot Intrinsics [alidg.me]

What you see isn't what you get: an introduction to how compiler intrinsics works on the HotSpot JVM!

>> Smaller, Faster-starting Container Images With jlink and AppCDS [morling.dev]

Application Class Data Sharing or AppCDS meets jlink: faster startup times with AppCDS in custom runtime images!

>> Announcing gRPC Kotlin 1.0 for Android and Cloud [developers.googleblog.com]

Better asynchrony with gRPC and coroutines: high-performance RPC framework with Kotlin, gRPC, and of course, CSP style concurrency.

Also worth reading:

Webinars and presentations:

Time to upgrade:

2. Technical

>> How Netflix Scales its API with GraphQL Federation [netflixtechblog.com]

Flexible and complex schema, observability, and security: GraphQL federation at Netflix scale!

Also worth reading:

3. Musings

>> Apple's M1 Chip Benchmarks focused on the real-world programming [tech.ssut.me]

ARM vs x86: Apple's M1 chip shines on some famous benchmarks suits for Java, Javascript, Python, and Go!

Also worth reading:

4. Comics

And my favorite Dilberts of the week:

>> Pick Midpoint [dilbert.com]

>> Assigning Dilbert To Project [dilbert.com]

>> Ted Reimagined More [dilbert.com]

5. Pick of the Week

And a view from the “other side”:

>> How to hire a programmer to make your ideas happen [sive.rs]

The post Java Weekly, Issue 364 first appeared on Baeldung.


Get list of JSON objects with Spring RestTemplate

$
0
0

1. Overview

Our services often have to communicate with other REST services in order to fetch information.

In Spring, we can use RestTemplate to perform synchronous HTTP requests. The data is usually returned as JSON, and RestTemplate can convert it for us.

In this tutorial we are going to explore how we can convert a JSON Array into three different object structures in Java: Array of ObjectArray of POJO and a List of POJO.

2. JSON, POJO and Service

Let's imagine that we have an endpoint http://localhost:8080/users returning a list of users as the following JSON:

[{
  "id": 1,
  "name": "user1",
}, {
  "id": 2,
  "name": "user2"
}]

We'll require the corresponding User class to process data:

public class User {
    private int id;
    private String name;
    // getters and setters..
}

For our interface implementation we write a UserConsumerServiceImpl with RestTemplate as its dependency:

public class UserConsumerServiceImpl implements UserConsumerService {
    private final RestTemplate restTemplate;
    public UserConsumerServiceImpl(RestTemplate restTemplate) {
        this.restTemplate = restTemplate;
    }
...
}

3. Mapping a List of JSON objects

When the response to a REST request is a JSON array, there are a few ways we can convert it to a Java collection. Let's look at the options and see how easily they allow us to process the data that is returned. We'll look at extracting the usernames of some user objects returned by a REST service.

3.1. RestTemplate with Object Array

First, let's make the call with RestTemplate.getForEntity and use a ResponseEntity of type Object[] to collect the response:

ResponseEntity<Object[]> responseEntity =
   restTemplate.getForEntity(BASE_URL, Object[].class);

Next, we can extract the body into our array of Object:

Object[] objects = responseEntity.getBody();

The actual Object here is just some arbitrary structure that contains our data, but doesn't use our User type. Let's convert it into our User objects.

For this, we'll need an ObjectMapper:

ObjectMapper mapper = new ObjectMapper();

We can declare it inline, though this is usually done as a private static final member of the class.

Lastly we are ready to extract the usernames:

return Arrays.stream(objects)
  .map(object -> mapper.convertValue(object, User.class))
  .map(User::getName)
  .collect(Collectors.toList());

With this method, we can essentially read an array of anything into an Object array in Java. This can be handy if we only wanted to count the results, for instance. However, it doesn't lend itself well to further processing. We had to put extra effort into converting it to a type we could work with.

The Jackson Deserializer actually deserialises JSON into a series of LinkedHashMap objects when we ask it to produce Object as the target type. Post-processing with convertValue is an inefficient overhead.

We can avoid it if we provide our desired type to Jackson in the first place.

3.2. RestTemplate with User Array

We can provide User[]  to RestTemplate, instead of Object[]:

  ResponseEntity<User[]> responseEntity = 
    restTemplate.getForEntity(BASE_URL, User[].class); 
  User[] userArray = responseEntity.getBody();
  return Arrays.stream(userArray) 
    .map(User::getName) 
    .collect(Collectors.toList());

We can see that we no longer need the ObjectMapper.convertValue. The ResponseEntity has User objects inside it. However we still need to do some extra conversions to use the Java Stream API and for our code to work with a List.

3.3. RestTemplate with User List and ParameterizedTypeReference

If we need the convenience of Jackson producing a List of Users instead of an Array we need to describe the List we want to create. To do this we have to use RestTemplate.exchange. This method takes a ParameterizedTypeReference produced by an anonymous inner class:

ResponseEntity<List<User>> responseEntity = 
  restTemplate.exchange(
    BASE_URL,
    HttpMethod.GET,
    null,
    new ParameterizedTypeReference<List<User>>() {}
  );
List<User> users = responseEntity.getBody();
return users.stream()
  .map(User::getName)
  .collect(Collectors.toList());

This produces the List that we want to use.

Let's have a closer look into why we need to use the ParameterisedTypeReference.

In the first two examples Spring can easily deserialise the JSON into a User.class type token where the type information is fully available at runtime.

With generics, however, type erasure occurs if we try to use List<User>.class. So, Jackson would not be able to determine the type inside the <>.

We can overcome this by using a super type token called ParameterizedTypeReference. Instantiating it as an anonymous inner class – new ParameterizedTypeReference<List<User>>() {} – exploits the fact that subclasses of generic classes contain compile-time type information that is not subject to type erasure and can be consumed through reflection.

4. Summary

In this article we saw three different ways of processing JSON objects using RestTemplate. We saw how to specify the types of arrays of Object and our own custom classes.

Then we learnt how we provide the type information to produce a List by using the ParameterizedTypeReference.

As always, the code for this article is available over on GitHub.

The post Get list of JSON objects with Spring RestTemplate first appeared on Baeldung.


Unmarshalling a JSON Array Using camel-jackson

$
0
0

1. Overview

Apache Camel is a powerful open-source integration framework implementing a number of the known Enterprise Integration Patterns.

Typically when working with message routing using Camel, we'll want to use one of the many supported pluggable data formats. Given that JSON is popular in most modern APIs and data services, it becomes an obvious choice.

In this tutorial, we'll take a look at a couple of ways we can unmarshal a JSON Array into a list of Java objects using the camel-jackson component.

2. Dependencies

First, let’s add the camel-jackson dependency to our pom.xml:

<dependency>
    <groupId>org.apache.camel</groupId>
    <artifactId>camel-jackson</artifactId>
    <version>3.6.0</version>
</dependency>

Then, we'll also add the camel-test dependency specifically for our unit tests, which is available from Maven Central as well:

<dependency>
    <groupId>org.apache.camel</groupId>
    <artifactId>camel-test</artifactId>
    <version>3.6.0</version>
</dependency>

3. Fruit Domain Classes

Throughout this tutorial, we'll use a couple of light POJO objects to model our fruit domain.

Let's go ahead and define a class with an id and a name to represent a fruit:

public class Fruit {
    private String name;
    private int id;
    // standard getter and setters
}

Next, we'll define a container to hold a list of Fruit objects:

public class FruitList {
    private List<Fruit> fruits;
    public List<Fruit> getFruits() {
        return fruits;
    }
    public void setFruits(List<Fruit> fruits) {
        this.fruits = fruits;
    }
}

In the next couple of sections, we'll see how to unmarshal a JSON string representing a list of fruits into these domain classes. Ultimately what we are looking for is a variable of type List<Fruit> that we can work with.

4. Unmarshalling a JSON FruitList

In this first example, we're going to represent a simple list of fruit using JSON format:

{
    "fruits": [
        {
            "id": 100,
            "name": "Banana"
        },
        {
            "id": 101,
            "name": "Apple"
        }
    ]
}

Above all, we should emphasize that this JSON represents an object which contains a property called fruits, which contains our array.

Now let's set up our Apache Camel route to perform the deserialization:

@Override
protected RouteBuilder createRouteBuilder() throws Exception {
    return new RouteBuilder() {
        @Override
        public void configure() throws Exception {
            from("direct:jsonInput")
              .unmarshal(new JacksonDataFormat(FruitList.class))
              .to("mock:marshalledObject");
        }
    };
}

In this example, we use direct endpoint with the name jsonInput. Next, we call the unmarshal method, which unmarshals the message body on our Camel exchange using the specified data format.

We're using the JacksonDataFormat class with a custom unmarshal type of FruitList. This is essentially a simple wrapper around the Jackon ObjectMapper and lets us marshal to and from JSON.

Finally, we send the result of the unmarshal method to a mock endpoint called marshalledObject. As we're going to see, this is how we'll test our route to see if it is working correctly.

With that in mind, let's go ahead and write our first unit test:

public class FruitListJacksonUnmarshalUnitTest extends CamelTestSupport {
    @Test
    public void givenJsonFruitList_whenUnmarshalled_thenSuccess() throws Exception {
        MockEndpoint mock = getMockEndpoint("mock:marshalledObject");
        mock.expectedMessageCount(1);
        mock.message(0).body().isInstanceOf(FruitList.class);
        String json = readJsonFromFile("/json/fruit-list.json");
        template.sendBody("direct:jsonInput", json);
        assertMockEndpointsSatisfied();
        FruitList fruitList = mock.getReceivedExchanges().get(0).getIn().getBody(FruitList.class);
        assertNotNull("Fruit lists should not be null", fruitList);
        List<Fruit> fruits = fruitList.getFruits();
        assertEquals("There should be two fruits", 2, fruits.size());
        Fruit fruit = fruits.get(0);
        assertEquals("Fruit name", "Banana", fruit.getName());
        assertEquals("Fruit id", 100, fruit.getId());
        fruit = fruits.get(1);
        assertEquals("Fruit name", "Apple", fruit.getName());
        assertEquals("Fruit id", 101, fruit.getId());
    }
}

Let's walk through the key parts of our test to understand what is going on:

  • First things first, we start by extending the CamelTestSupport class –  a useful testing utility base class
  • Then we set up our test expectations. Our mock variable should have one message, and the message type should be a FruitList
  • Now we're ready to send out the JSON input file as a String to the direct endpoint we defined earlier
  • After we check our mock expectations have been satisfied, we are free to retrieve the FruitList and check the contents is as expected

This test confirms that our route is working properly and our JSON is being unmarshalled as expected. Awesome!

5. Unmarshalling a JSON Fruit Array

On the other hand, we want to avoid using a container object to hold our Fruit objects. We can modify our JSON to hold a fruit array directly:

[
    {
        "id": 100,
        "name": "Banana"
    },
    {
        "id": 101,
        "name": "Apple"
    }
]

This time around, our route is almost identical, but we set it up to work specifically with a JSON array:

@Override
protected RouteBuilder createRouteBuilder() throws Exception {
    return new RouteBuilder() {
        @Override
        public void configure() throws Exception {
            from("direct:jsonInput")
              .unmarshal(new ListJacksonDataFormat(Fruit.class))
              .to("mock:marshalledObject");
        }
    };
}

As we can see, the only difference to our previous example is that we're using the ListJacksonDataFormat class with a custom unmarshal type of Fruit. This is a Jackson data format type prepared directly to work with lists.

Likewise, our unit test is very similar:

@Test
public void givenJsonFruitArray_whenUnmarshalled_thenSuccess() throws Exception {
    MockEndpoint mock = getMockEndpoint("mock:marshalledObject");
    mock.expectedMessageCount(1);
    mock.message(0).body().isInstanceOf(List.class);
    String json = readJsonFromFile("/json/fruit-array.json");
    template.sendBody("direct:jsonInput", json);
    assertMockEndpointsSatisfied();
    @SuppressWarnings("unchecked")
    List<Fruit> fruitList = mock.getReceivedExchanges().get(0).getIn().getBody(List.class);
    assertNotNull("Fruit lists should not be null", fruitList);
    // more standard assertions
}

However, there are two subtle differences with respect to the test we saw in the previous section:

  • We're first setting up our mock expectation to contain a body with a List.class directly
  • When we retrieve the message body as a List.class, we'll get a standard warning about type safety – hence the use of @SuppressWarnings(“unchecked”)

6. Conclusion

In this short article, we've seen two simple approaches for unmarshalling JSON arrays using camel message routing and the camel-jackson component.

As always, the full source code of the article is available over on GitHub.

The post Unmarshalling a JSON Array Using camel-jackson first appeared on Baeldung.


Redis vs MongoDB

$
0
0

1. Overview

Often, we find it challenging to decide on a non-relational database as a primary data store for our applications.

In this article, we'll explore two popular non-relational databases, Redis and MongoDB.

First, we'll take a quick look at the features offered by Redis and MongoDB. Then, we'll discuss when to use Redis or MongoDB by comparing them against each other.

2. Redis

Redis is an in-memory data structure store that offers a rich set of features. It's useful as a cache, message broker, and queue.

2.1. Features

2.2. Installation

We can download the latest Redis server from the official website and install it:

$ wget http://download.redis.io/releases/redis-6.0.9.tar.gz
$ tar xzf redis-6.0.9.tar.gz
$ cd redis-6.0.9
$ make

3. MongoDB

MongoDB is a NoSQL document database that stores information in a JSON-like document structure. It's useful as a schemaless data store for rapidly changing applications, prototyping, and startups in a design and implementation phase.

3.1. Features

  • Offers an interactive command-line interface MongoDB Shell (mongosh) to perform administrative operations and query/update data
  • JSON based query structure with the support of joins
  • Supports various types of searches like geo-based search, graph search, and text search
  • Supports multi-document ACID transactions
  • Spring Data support
  • Available in community, enterprise, and cloud (MongoDB Atlas) editions
  • Various drivers for major technologies like C++, Java, Go, Python, Rust, and Scala
  • Provides GUI to explore and manipulate data through MongoDB Compass
  • Offers a visual representation of data using MongoDB Charts
  • MongoDB BI Connector provides connections to BI and analytics platforms

3.2. Installation

We can download the latest MongoDB server or, if using macOS, we can install the community edition directly using Homebrew:

brew tap mongodb/brew
brew install mongodb-community@4.4

4. When to Use Redis?

4.1. Caching

Redis provides best-in-class caching performance by providing sub-millisecond response time on frequently requested items.

Furthermore, it allows setting expiration time on keys using commands like EXPIRE, EXPIREAT, and PEXPIRE.

At the same time, we can use the PERSIST command to remove the timeout and persist the key-value pair, making it ideal for caching.

4.2. Flexible Data Storage

Redis provides various data structures like string, list, set, and hash to decide how to store and organize our data. Hence, Redis gives us full freedom over the implementation of the database structures.

However, it may also require a long time to think through the DB design. Similarly, it can be challenging to build and maintain the inner structure of the schema using Redis.

4.3. Complex Data Storage

Similarly, with the combination of the list, set, and hash, we can implement complex data structures like queues, arrays, sorted sets, and graphs for our storage.

4.4. Chat, Queue, and Message Broker

Redis can publish and subscribe to messages using pub/sub message queues with pattern matching. Thus, Redis can support real-time chat and social-media feed applications.

Similarly, we can implement a lightweight queue using the list data structure. Furthermore, Redis's list supports atomic operations and offer blocking capabilities, making it suitable to implement a message broker.

4.5. Session Store

Redis provides an in-memory data store with persistence capabilities, making it a good candidate to store and manage sessions for web/mobile applications.

4.6. IoT and Embedded Systems

As per Redis's official documentation, newer versions starting from 4 and 5 support the ARM processor and the Raspberry Pi.

Also, it runs on Andriod, and efforts are in place to include Android as an officially supported platform.

So, Redis looks ideal for IoT and embedded systems, benefitted by its small memory footprint and low CPU requirements.

4.7. Real-Time Processing

Being a blazing fast in-memory data structure, we can use it for real-time processing applications.

For instance, Redis can efficiently serve applications that offer features like stock price alerts, leaderboards, and real-time analytics.

4.8. Geospatial Apps

Redis offers a purpose-built in-memory data structure Geo Set – built on sorted set – for managing geospatial indices. Also, it provides specific geo commands like GEOADD, GEOPOS, and GEORADIUS to add, read, and analyze geospatial data.

Therefore, we can build real-time geospatial applications with location-based features like drive time and drive distance using Redis.

5. When to Use MongoDB?

5.1. Dynamic Queries

MongoDB offers a powerful set of query tools. Also, it provides a wide range of flexible query schemes like geo-based search, graph search, and text search for efficient data retrieval.

At the same time, with the support of JSON-structured queries, MongoDB looks to be a better choice for scenarios where data search and analytics are daily activities.

5.2. Rapidly Changing Schema

MongoDB can be helpful in the design and early implementation phases, where we require quick changes to our schema. At the same time, it doesn't make assumptions on the underlying data, and it optimizes itself without needing a schema.

5.3. Prototyping and Hackathons

By following the JSON-like document structure, MongoDB allows for rapid prototyping, quick integrations with front-end channels, and hackathons.

At the same time, it can be useful for junior teams that don't want to deal with the complexities of an RDBMS.

5.4. Catalogs

By providing a dynamic schema that is self-describing, MongoDB makes it easier to add products, features, and recommendations for catalogs like e-commerce, asset management, and inventory.

We can also use expressive queries in MongoDB for features like advanced search and analytics by indexing a field or set of fields of the JSON-structured document.

5.5. Mobile Apps

MongoDB’s JSON document structure allows storing different types of data from various devices along with geospatial indexes.

Besides, horizontal scalability with native sharding allows easy scaling of a mobile app. Therefore, MongoDB can serve tons of users, process petabytes of data, and support hundreds of thousands of operations per second, making it a worthy choice for backing mobile apps.

5.6. Content-Rich Apps

It's not easy to incorporate various content in RDBMS for modern content-rich apps. On the other hand, MongoDB allows storing and serving rich content like text, audio, and video.

Also, we can easily store files larger than 16MB efficiently using MongoDB GridFS. It allows accessing a portion of large files without loading the entire file into memory.

Additionally, it automatically syncs our files and metadata across all servers. As a result, MongoDB looks to be a more suitable choice for supporting content-rich apps.

5.7. Gaming Apps

Similar to mobile and content-rich apps, gaming also requires massive scaling and dynamic data structures. Thus, MongoDB can be a promising choice for gaming apps.

5.8. Global Cloud Database Service

MongoDB Atlas is available across multiple cloud services like AWS, Google Cloud, and Azure. In addition, with built-in replication and failover mechanism, it offers a highly available distributed system. Therefore, we can quickly deploy and manage the database and use it as a global cloud database service.

6. Conclusion

In this article, we explored Redis and MongoDB as choices for a non-relational database.

First, we looked at the features offered by both databases. Then, we explored scenarios where one of them is better than the other.

We can certainly conclude Redis looks promising as a better solution for caching, message broker, and queue. At the same time, it can prove worthy in real-time processing, geospatial apps, and embedded systems.

On the other hand, MongoDB is a solid choice for storing JSON-like objects. As a result, MongoDB can be best suited for schema-less architecture for prototyping, modern-day content-rich, mobile, and gaming applications.

The post Redis vs MongoDB first appeared on Baeldung.


Java 14 – New Features

$
0
0

1. Overview

Java 14 released on March 17, 2020, exactly six months after its previous version as per Java's new release cadence.

In this tutorial, we'll look at a summary of new and deprecated features of version 14 of the language.

We also have more detailed articles on Java 14 that offer an in-depth view of the new features.

2. Features Carried Over From Earlier Versions

A few features have been carried over in Java 14 from the previous version. Let's look at them one by one.

2.1. Switch Expressions (JEP 361)

These were first introduced as a preview feature in JDK 12, and even in Java 13, they continued as preview features only. But now, switch expressions have been standardized so that they are part and parcel of the development kit.

What this effectively means is that this feature can now be used in production code, and not just in the preview mode to be experimented with by developers.

As a simple example, let's consider a scenario where we'd designate days of the week as either weekday or weekend.

Prior to this enhancement, we'd have written it as:

boolean isTodayHoliday;
switch (day) {
    case "MONDAY":
    case "TUESDAY":
    case "WEDNESDAY":
    case "THURSDAY":
    case "FRIDAY":
        isTodayHoliday = false;
        break;
    case "SATURDAY":
    case "SUNDAY":
        isTodayHoliday = true;
        break;
    default:
        throw new IllegalArgumentException("What's a " + day);
}

With switch expressions, we can write the same thing more succinctly:

boolean isTodayHoliday = switch (day) {
    case "MONDAY", "TUESDAY", "WEDNESDAY", "THURSDAY", "FRIDAY" -> false;
    case "SATURDAY", "SUNDAY" -> true;
    default -> throw new IllegalArgumentException("What's a " + day);
};

2.2. Text Blocks (JEP 368)

Text blocks continue their journey to getting a mainstream upgrade and are still available as preview features.

In addition to the capabilities from JDK 13 to make multiline strings easier to use, in their second preview, text blocks now have two new escape sequences:

  • \: to indicate the end of the line, so that a new line character is not introduced
  • \s: to indicate a single space

For example:

String multiline = "A quick brown fox jumps over a lazy dog; the lazy dog howls loudly.";

can now be written as:

String multiline = """
    A quick brown fox jumps over a lazy dog; \
    the lazy dog howls loudly.""";

This improves the readability of the sentence for a human eye but does not add a new line after dog;.

3. New Preview Features

3.1. Pattern Matching for instanceof (JEP 305)

JDK 14 has introduced pattern matching for instanceof with the aim of eliminating boilerplate code and make the developer's life a little bit easy.

To understand this, let's consider a simple example.

Before this feature, we wrote:

if (obj instanceof String) {
    String str = (String) obj;
    int len = str.length();
    // ...
}

Now, we don't need as much code to start using obj as String:

if (obj instanceof String str) {
    int len = str.length();
    // ...
}

In future releases, Java is going to come up with pattern matching for other constructs such as a switch.

3.2. Records (JEP 359)

Records were introduced to reduce repetitive boilerplate code in data model POJOs. They simplify day to day development, improve efficiency and greatly minimize the risk of human error.

For example, a data model for a User with an id and password can be simply defined as:

public record User(int id, String password) { };

As we can see, we are making use of a new keyword, record, here. This simple declaration will automatically add a constructor, getters, equals, hashCode and toString methods for us.

Let's see this in action with a JUnit:

private User user1 = new User(0, "UserOne");
@Test
public void givenRecord_whenObjInitialized_thenValuesCanBeFetchedWithGetters() {
    assertEquals(0, user1.id());
    assertEquals("UserOne", user1.password());
}
@Test
public void whenRecord_thenEqualsImplemented() {
    User user2 = user1;
    assertTrue(user1, user2);
}
@Test
public void whenRecord_thenToStringImplemented() {
    assertTrue(user1.toString().contains("UserOne"));
}

4. New Production Features

Along with the two new preview features, Java 14 has also shipped a concrete production-ready one.

4.1. Helpful NullPointerExceptions (JEP 358)

Previously, the stack trace for a NullPointerException didn't have much of a story to tell except that some value was null at a given line in a given file.

Though useful, this information only suggested a line to debug instead of painting the whole picture for a developer to understand, just by looking at the log.

Now Java has made this easier by adding the capability to point out what exactly was null in a given line of code.

For example, consider this simple snippet:

int[] arr = null;
arr[0] = 1;

Earlier, on running this code, the log would say:

Exception in thread "main" java.lang.NullPointerException
at com.baeldung.MyClass.main(MyClass.java:27)

But now, given the same scenario, the log might say:

java.lang.NullPointerException: Cannot store to int array because "a" is null

As we can see, now we know precisely which variable caused the exception.

5. Incubating Features

These are the non-final APIs and tools that the Java team comes up with, and provides us for experimentation. They are different from preview features and are provided as separate modules in the package jdk.incubator.

5.1. Foreign Memory Access API (JEP 370)

This is a new API to allow Java programs to access foreign memory, such as native memory, outside the heap in a safe and efficient manner.

Many Java libraries such as mapDB and memcached do access foreign memory and it was high time the Java API itself offered a cleaner solution. With this intention, the team came up with this JEP as an alternative to its already existing ways to access non-heap memory – ByteBuffer API and sun.misc.Unsafe API.

Built upon three main abstractions of MemorySegment, MemoryAddress and MemoryLayout, this API is a safe way to access both heap and non-heap memory.

5.2. Packaging Tool (JEP 343)

Traditionally, to deliver Java code, an application developer would simply send out a JAR file that the user was supposed to run inside their own JVM.

However, users rather expected an installer that they'd double click to install the package on their native platforms, such as Windows or macOS.

This JEP aims to do precisely that. Developers can use jlink to condense the JDK down to the minimum required modules, and then use this packaging tool to create a lightweight image that can be installed as an exe on Windows or a dmg on a macOS.

6. JVM/HotSpot Features

6.1. ZGC on Windows (JEP 365) and macOS (JEP 364) – Experimental

The Z Garbage Collector, a scalable, low-latency garbage collector, was first introduced in Java 11 as an experimental feature. But initially, the only supported platform was Linux/x64.

After receiving positive feedback on ZGC for Linux, Java 14 has ported its support to Windows and macOS as well. Though still an experimental feature, it's all set to become production-ready in the next JDK release.

6.2. NUMA-Aware Memory Allocation for G1 (JEP 345)

Non-uniform memory access (NUMA) was not implemented so far for the G1 garbage collector, unlike the Parallel collector.

Looking at the performance improvement that it offers to run a single JVM across multiple sockets, this JEP was introduced to make the G1 collector NUMA-aware as well.

At this point, there's no plan to replicate the same to other HotSpot collectors.

6.3. JFR Event Streaming (JEP 349)

With this enhancement, JDK's flight recorder data is now exposed so that it can be continuously monitored. This involves modifications to the package jdk.jfr.consumer so that users can now read or stream the recording data directly.

7. Deprecated or Removed Features

Java 14 has deprecated a couple of features:

  • Solaris and SPARC Ports (JEP 362) – because this Unix operating system and RISC processor are not in active development since the past few years
  • ParallelScavenge + SerialOld GC Combination (JEP 366) – since this is a rarely used combination of GC algorithms, and requires significant maintenance effort

There are a couple of removals as well:

  • Concurrent Mark Sweep (CMS) Garbage Collector (JEP 363) – deprecated by Java 9, this GC has been succeeded by G1 as the default GC. Also, there are other more performant alternatives to use now, such as ZGC and Shenandoah, hence the removal
  • Pack200 Tools and API (JEP 367) – these were deprecated for removal in Java 11, and now removed

8. Conclusion

In this tutorial, we looked at the various JEPs of Java 14.

In all, there are 16 major features in this release of the language, including preview features, incubators, deprecations and removals. We looked at all of them one by one, and the language features with examples.

As always, the source code is available over on GitHub.

The post Java 14 - New Features first appeared on Baeldung.


Behavioral Patterns in Core Java

$
0
0

1. Introduction

Recently we looked at Creational Design Patterns and where to find them within the JVM and other core libraries. Now we're going to look at Behavioral Design Patterns. These focus on how our objects interact with each other or how we interact with them.

2. Chain of Responsibility

The Chain of Responsibility pattern allows for objects to implement a common interface and for each implementation to delegate on to the next one if appropriate. This then allows us to build a chain of implementations, where each one performs some actions before or after the call to the next element in the chain:

interface ChainOfResponsibility {
    void perform();
}
class LoggingChain {
    private ChainOfResponsibility delegate;
    public void perform() {
        System.out.println("Starting chain");
        delegate.perform();
        System.out.println("Ending chain");
    }
}

Here we can see an example where our implementation prints out before and after the delegate call.

We aren't required to call on to the delegate. We could decide that we shouldn't do so and instead terminate the chain early. For example, if there were some input parameters, we could have validated them and terminated early if they were invalid.

2.1. Examples in the JVM

Servlet Filters are an example from the JEE ecosystem that works in this way. A single instance receives the servlet request and response, and a FilterChain instance represents the entire chain of filters. Each one should then perform its work and then either terminate the chain or else call chain.doFilter() to pass control on to the next filter:

public class AuthenticatingFilter implements Filter {
    public void doFilter(ServletRequest request, ServletResponse response, FilterChain chain) 
      throws IOException, ServletException {
        HttpServletRequest httpRequest = (HttpServletRequest) request;
        if (!"MyAuthToken".equals(httpRequest.getHeader("X-Auth-Token")) {
             return;
        }
        chain.doFilter(request, response);
    }
}

3. Command

The Command pattern allows us to encapsulate some concrete behaviors – or commands – behind a common interface, such that they can be correctly triggered at runtime.

Typically we'll have a Command interface, a Receiver instance that receives the command instance, and an Invoker that is responsible for calling the correct command instance. We can then define different instances of our Command interface to perform different actions on the receiver:

interface DoorCommand {
    perform(Door door);
}
class OpenDoorCommand implements DoorCommand {
    public void perform(Door door) {
        door.setState("open");
    }
}

Here, we have a command implementation that will take a Door as the receiver and will cause the door to become “open”. Our invoker can then call this command when it wishes to open a given door, and the command encapsulates how to do this.

In the future, we might need to change our OpenDoorCommand to check that the door isn't locked first. This change will be entirely within the command, and the receiver and invoker classes don't need to have any changes.

3.1. Examples in the JVM

A very common example of this pattern is the Action class within Swing:

Action saveAction = new SaveAction();
button = new JButton(saveAction)

Here, SaveAction is the command, the Swing JButton component that uses this class is the invoker, and the Action implementation is called with an ActionEvent as the receiver.

4. Iterator

The Iterator pattern allows us to work across the elements in a collection and interact with each in turn. We use this to write functions taking an arbitrary iterator over some elements without regard to where they are coming from. The source could be an ordered list, an unordered set, or an infinite stream:

void printAll<T>(Iterator<T> iter) {
    while (iter.hasNext()) {
        System.out.println(iter.next());
    }
}

4.1. Examples in the JVM

All of the JVM standard collections implement the Iterator pattern by exposing an iterator() method that returns an Iterator<T> over the elements in the collection. Streams also implement the same method, except in this case, it might be an infinite stream, so the iterator might never terminate.

5. Memento

The Memento pattern allows us to write objects that are able to change state, and then revert back to their previous state. Essentially an “undo” function for object state.

This can be implemented relatively easily by storing the previous state any time a setter is called:

class Undoable {
    private String value;
    private String previous;
    public void setValue(String newValue) {
        this.previous = this.value;
        this.value = newValue;
    }
    public void restoreState() {
        if (this.previous != null) {
            this.value = this.previous;
            this.previous = null;
        }
    }
}

This gives the ability to undo the last change that was made to the object.

This is often implemented by wrapping the entire object state in a single object, known as the Memento. This allows the entire state to be saved and restored in a single action, instead of having to save every field individually.

5.1. Examples in the JVM

JavaServer Faces provides an interface called StateHolder that allows implementers to save and restore their state. There are several standard components that implement this, consisting of individual components – for example, HtmlInputFile, HtmlInputText, or HtmlSelectManyCheckbox – as well as composite components such as HtmlForm.

6. Observer

The Observer pattern allows for an object to indicate to others that changes have happened. Typically we'll have a Subject – the object emitting events, and a series of Observers – the objects receiving these events. The observers will register with the subject that they want to be informed about changes. Once this has happened, any changes that happen in the subject will cause the observers to be informed:

class Observable {
    private String state;
    private Set<Consumer<String>> listeners = new HashSet<>;
    public void addListener(Consumer<String> listener) {
        this.listeners.add(listener);
    }
    public void setState(String newState) {
        this.state = state;
        for (Consumer<String> listener : listeners) {
            listener.accept(newState);
        }
    }
}

This takes a set of event listeners and calls each one every time the state changes with the new state value.

6.1. Examples in the JVM

Java has a standard pair of classes that allow us to do exactly this – java.beans.PropertyChangeSupport and java.beans.PropertyChangeListener.

PropertyChangeSupport acts as a class that can have observers added and removed from it and can notify them all of any state changes. PropertyChangeListener is then an interface that our code can implement to receive any changes that have happened:

PropertyChangeSupport observable = new PropertyChangeSupport();
// Add some observers to be notified when the value changes
observable.addPropertyChangeListener(evt -> System.out.println("Value changed: " + evt));
// Indicate that the value has changed and notify observers of the new value
observable.firePropertyChange("field", "old value", "new value");

Note that there are another pair of classes that seem a better fit – java.util.Observer and java.util.Observable. These are deprecated in Java 9 though, due to being inflexible and unreliable.

7. Strategy

The Strategy pattern allows us to write generic code and then plug specific strategies into it to give us the specific behavior needed for our exact cases.

This will typically be implemented by having an interface representing the strategy. The client code is then able to write concrete classes implementing this interface as needed for the exact cases. For example, we might have a system where we need to notify end-users and implement the notification mechanisms as pluggable strategies:

interface NotificationStrategy {
    void notify(User user, Message message);
}
class EmailNotificationStrategy implements NotificationStrategy {
    ....
}
class SMSNotificationStrategy implements NotificationStrategy {
    ....
}

We can then decide at runtime exactly which of these strategies to actually use to send this message to this user. We can also write new strategies to use with minimal impact on the rest of the system.

7.1. Examples in the JVM

The standard Java libraries use this pattern extensively, often in ways that may not seem obvious at first. For example, the Streams API introduced in Java 8 makes extensive use of this pattern. The lambdas provided to map(), filter(), and other methods are all pluggable strategies that are provided to the generic method.

Examples go back even further, though. The Comparator interface introduced in Java 1.2 is a strategy that can be provided to sort elements within a collection as required. We can provide different instances of the Comparator to sort the same list in different ways as desired:

// Sort by name
Collections.sort(users, new UsersNameComparator());
// Sort by ID
Collections.sort(users, new UsersIdComparator());

8. Template Method

The Template Method pattern is used when we want to orchestrate several different methods working together. We'll define a base class with the template method and a set of one or more abstract methods – either unimplemented or else implemented with some default behavior. The template method then calls these abstract methods in a fixed pattern. Our code then implements a subclass of this class and implements these abstract methods as needed:

class Component {
    public void render() {
        doRender();
        addEventListeners();
        syncData();
    }
    protected abstract void doRender();
    protected void addEventListeners() {}
    protected void syncData() {}
}

Here, we have some arbitrary UI component. Our subclasses will implement the doRender() method to actually render the component. We can also optionally implement the addEventListeners() and syncData() methods. When our UI framework renders this component it will guarantee that all three get called in the correct order.

8.1. Examples in the JVM

The AbstractList, AbstractSet, and AbstractMap used by Java Collections have many examples of this pattern. For example, the indexOf() and lastIndexOf() methods both work in terms of the listIterator() method, which has a default implementation but which gets overridden in some subclasses. Equally, the add(T) and addAll(int, T) methods both work in terms of the add(int, T) method which doesn't have a default implementation and needs to be implemented by the subclass.

Java IO also makes use of this pattern within InputStream, OutputStream, Reader, and Writer. For example, the InputStream class has several methods that work in terms of read(byte[], int, int), which needs the subclass to implement.

9. Visitor

The Visitor pattern allows our code to handle various subclasses in a typesafe way, without needing to resort to instanceof checks. We'll have a visitor interface with one method for each concrete subclass that we need to support. Our base class will then have an accept(Visitor) method. The subclasses will each call the appropriate method on this visitor, passing itself in. This then allows us to implement concrete behaviour in each of these methods, each knowing that it will be working with the concrete type:

interface UserVisitor<T> {
    T visitStandardUser(StandardUser user);
    T visitAdminUser(AdminUser user);
    T visitSuperuser(Superuser user);
}
class StandardUser {
    public <T> T accept(UserVisitor<T> visitor) {
        return visitor.visitStandardUser(this);
    }
}

Here we have our UserVisitor interface with three different visitor methods on it. Our example StandardUser calls the appropriate method, and the same will be done in AdminUser and Superuser. We can then write our visitors to work with these as needed:

class AuthenticatingVisitor {
    public Boolean visitStandardUser(StandardUser user) {
        return false;
    }
    public Boolean visitAdminUser(AdminUser user) {
        return user.hasPermission("write");
    }
    public Boolean visitSuperuser(Superuser user) {
        return true;
    }
}

Our StandardUser never has permission, our Superuser always has permission, and our AdminUser might have permission but this needs to be looked up in the user itself.

9.1. Examples in the JVM

The Java NIO2 framework uses this pattern with Files.walkFileTree(). This takes an implementation of FileVisitor that has methods to handle various different aspects of walking the file tree. Our code can then use this for searching files, printing out matching files, processing many files in a directory, or lots of other things that need to work within a directory:

Files.walkFileTree(startingDir, new SimpleFileVisitor() {
    public FileVisitResult visitFile(Path file, BasicFileAttributes attr) {
        System.out.println("Found file: " + file);
    }
    public FileVisitResult preVisitDirectory(Path dir, BasicFileAttributes attrs) {
        System.out.println("Found directory: " + dir);
    }
});

10. Conclusion

In this article, we've had a look at various design patterns used for the behaviour of objects. We've also looked at examples of these patterns as used within the core JVM as well, so we can see them in use in a way that many applications already benefit from.

The post Behavioral Patterns in Core Java first appeared on Baeldung.

        
Viewing all 4460 articles
Browse latest View live


<script src="https://jsc.adskeeper.com/r/s/rssing.com.1596347.js" async> </script>