Quantcast
Channel: Baeldung
Viewing all 4464 articles
Browse latest View live

Secret Key and String Conversion in Java

$
0
0

1. Overview

In a real-life scenario, we come across several situations where we need encryption and decryption for security purposes. We can achieve this easily using a secret key. So for encrypting and decrypting a secret key, we have to know the way of converting the secret keys to string and vice-versa. In this tutorial, we’ll see the secret key and String conversion in Java. Also, we'll go through different ways of creating Secret Key in Java with examples.

2. Secret Key

A secret key is the piece of information or parameter that is used to encrypt and decrypt messages.  In Java, we have SecretKey an interface that defines it as a secret (symmetric) key. The purpose of this interface is to group (and provide type safety for) all secret key interfaces.

There are two ways for generating a secret key in Java: generating from a random number or deriving from a given password.

In the first approach, the secret key is generated from a Cryptographically Secure (Pseudo-)Random Number Generator like the SecureRandom class.

For generating a secret key, we can use the KeyGenerator class. Let’s define a method for generating a SecretKey — the parameter n specifies the length (128, 192, or 256) of the key in bits:

public static SecretKey generateKey(int n) throws NoSuchAlgorithmException {
    KeyGenerator keyGenerator = KeyGenerator.getInstance("AES");
    keyGenerator.init(n);
    SecretKey originalKey = keyGenerator.generateKey();
    return originalKey;
}

In the second approach, the secret key is derived from a given password using a password-based key derivation function like PBKDF2. We also need a salt value for turning a password into a secret key. The salt is also a random value.

We can use the SecretKeyFactory class with the PBKDF2WithHmacSHA256 algorithm for generating a key from a given password.

Let’s define a method for generating the SecretKey from a given password with 65,536 iterations and a key length of 256 bits:

public static SecretKey getKeyFromPassword(String password, String salt)
  throws NoSuchAlgorithmException, InvalidKeySpecException {
    SecretKeyFactory factory = SecretKeyFactory.getInstance("PBKDF2WithHmacSHA256");
    KeySpec spec = new PBEKeySpec(password.toCharArray(), salt.getBytes(), 65536, 256);
    SecretKey originalKey = new SecretKeySpec(factory.generateSecret(spec).getEncoded(), "AES");
    return originalKey;
}

3. SecretKey and String Conversion

3.1. SecretKey to String

We'll convert the SecretKey into a byte array. Then, we'll convert the byte array into String using Base64 encoding:

public static String convertSecretKeyToString(SecretKey secretKey) throws NoSuchAlgorithmException {
    byte[] rawData = secretKey.getEncoded();
    String encodedKey = Base64.getEncoder().encodeToString(rawData);
    return encodedKey;
}

3.2. String to SecretKey

We'll convert the encoded String key into a byte array using Base64 decoding. Then, using SecretKeySpecs, we'll convert the byte array into the SecretKey:

public static SecretKey convertStringToSecretKeyto(String encodedKey) {
    byte[] decodedKey = Base64.getDecoder().decode(encodedKey);
    SecretKey originalKey = new SecretKeySpec(decodedKey, 0, decodedKey.length, "AES");
    return originalKey;
}

Let's verify the conversion quickly:

SecretKey encodedKey = ConversionClassUtil.getKeyFromPassword("Baeldung@2021", "@$#baelDunG@#^$*");
String encodedString = ConversionClassUtil.convertSecretKeyToString(encodedKey);
SecretKey decodeKey = ConversionClassUtil.convertStringToSecretKeyto(encodedString);
Assertions.assertEquals(encodedKey, decodeKey);

4. Conclusion

In summary, we've learned how to convert a SecretKey into String and vice versa in Java. Additionally, we've discussed various ways of creating SecretKey in Java.

As always, the full source code of the article is available over on GitHub.

The post Secret Key and String Conversion in Java first appeared on Baeldung.
       

How to Return Multiple Entities In JPA Query

$
0
0

1. Overview

In this short tutorial, we'll see how to return multiple different entities in JPA Query. 

First, we'll create a simple code example containing a few different entities. Then, we'll explain how to create a JPA Query that returns multiple different entities. Finally, we'll show a working example in Hibernate's JPA implementation.

2. Example Configuration

Before we explain how to return multiple entities in a single Query, let's build an example that we'll work on.

We'll create an app that allows its users to buy subscriptions for specific TV channels. It consists of 3 tables: Channel, Subscription, and User.

First, let's look at the Channel entity:

@Entity
public class Channel {
    @Id
    @GeneratedValue(strategy = GenerationType.AUTO)
    private Long id;
    private String code;
    private Long subscriptionId;
   // getters, setters, etc.
}

It consists of 3 fields that are mapped to corresponding columns. The first and the most important one is the id, which is also the primary key. In the code field, we'll store Channel‘s code.

Last but not least, there is also a subscriptionId column. It'll be used to create a relation between a channel and a subscription it belongs to. One channel can belong to different subscriptions.

Now, let's see the Subscription entity:

@Entity
public class Subscription {
    @Id
    @GeneratedValue(strategy = GenerationType.AUTO)
    private Long id;
    private String code;
   // getters, setters, etc.
}

It's even simpler than the first one. It consists of the id field, which is the primary key, and the subscription's code field.

Let's also look at the User entity:

@Entity
public class User {
    @Id
    @GeneratedValue(strategy = GenerationType.AUTO)
    private Long id;
    private String email;
    private Long subscriptionId;
    // getters, setters, etc.
}

Besides the primary key id field, it consists of email and subscriptionId fields. The latter is used to create a relation between a user and a subscription that they have chosen.

3. Returning Multiple Entities In Query

3.1. Creating the Query

In order to create a query returning multiple different entities, we need to do 2 things.

Firstly, we need to list entities that we want to return in the SELECT part of the SQL Query, separated by a comma.

Secondly,  we need to connect them with each other by their primary and corresponding foreign keys.

Let's look at our example. Imagine that we want to fetch all Channels assigned to Subscriptions that were bought by the user with the given email. The JPA Query does look like this:

SELECT c, s, u
  FROM Channel c, Subscription s, User u
  WHERE c.subscriptionId = s.id AND s.id = u.subscriptionId AND u.email=:email

3.2. Extracting Results

A JPA Query that selects multiple different entities returns them in an array of Objects. What's worth pointing out is that the array keeps the order of entities. It's crucial information because we need to manually cast returned Objects to specific entity classes.

Let's see that in action. We created a dedicated repository class that creates a query and fetches results:

public class ReportRepository {
    private final EntityManagerFactory emf;
    public ReportRepository() {
        // create an instance of entity manager factory
    }
    public List<Object[]> find(String email) {
        EntityManager entityManager = emf.createEntityManager();
        Query query = entityManager
          .createQuery("SELECT c, s, u FROM  Channel c, Subscription s, User u" 
          + " WHERE c.subscriptionId = s.id AND s.id = u.subscriptionId AND u.email=:email");
        query.setParameter("email", eamil);
        return query.getResultList();
    }
}

We're using an exact query from the previous section. Then, we set an email parameter to narrow down the results. Finally, we fetch the result list.

Let's see how we can extract individual entities from the fetched list:

List<Object[]> reportDetails = reportRepository.find("user1@gmail.com");
for (Object[] reportDetail : reportDetails) {
    Channel channel = (Channel) reportDetail[0];
    Subscription subscription = (Subscription) reportDetail[1];
    User user = (User) reportDetail[2];
    
    // do something with entities
}

We iterate over the fetched list and extract entities from the given object array. Having in mind our JPA Query and the order of entities in its SELECT section, we get a Channel entity as a first element, a Subscription entity as a second, and a User entity as the last element of the array.

4. Conclusion

In this article, w discussed how to return multiple entities in the JPA query. Firstly, we created an example that we worked on later in the article. Then, we explained how to write a JPA query to return multiple different entities. Finally, we showed how to extract them from the result list.

As always, the full source code of the article is available over on GitHub.

The post How to Return Multiple Entities In JPA Query first appeared on Baeldung.
       

Finding All Classes in a Java Package

$
0
0

1. Overview

Sometimes, we want to get information about the runtime behavior of our application, such as finding all classes available at runtime.

In this tutorial, we'll explore several examples of how to find all classes in a Java package at runtime.

2. Class Loaders

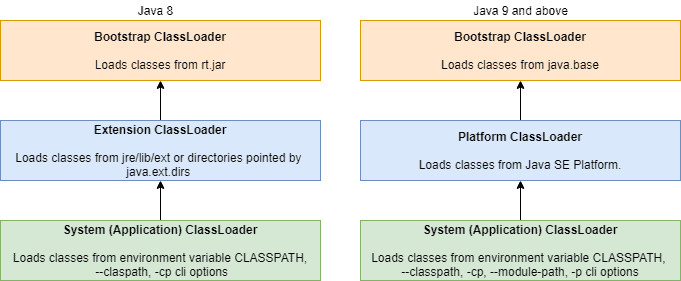
First, we'll start our discussion with the Java class loaders. The Java class loader is part of the Java Runtime Environment (JRE) that dynamically loads Java classes into the Java Virtual Machine (JVM). The Java class loader decouples the JRE from knowing about files and file systems. Not all classes are loaded by a single class loader.

Let's understand the available class loaders in Java through pictorial representation:

Java 9 introduced some major changes to the class loaders. With the introduction of modules, we have the option to provide the module path alongside the classpath. The system class loader loads the classes that are present on the module path.

Class loaders are dynamic. They are not required to tell the JVM which classes it can provide at runtime. Hence, finding classes in a package is essentially a file system operation rather than one done by using Java Reflection.

However, we can write our own class loaders or examine the classpath to find classes inside a package.

3. Finding Classes in a Java Package

For our illustration, let's create a package com.baeldung.reflection.access.packages.search.

Now, let's define an example class:

public class ClassExample {
    class NestedClass {
    }
}

Next, let's define an interface:

public interface InterfaceExample {
}

In the next section, we'll look at how to find classes using the system class loader and some third-party libraries.

3.1. System Class Loader

First, we'll use the built-in system class loader. The system class loader loads all the classes found in the classpath. This happens during the early initialization of the JVM:

public class AccessingAllClassesInPackage {
    public Set<Class> findAllClassesUsingClassLoader(String packageName) {
        InputStream stream = ClassLoader.getSystemClassLoader()
          .getResourceAsStream(packageName.replaceAll("[.]", "/"));
        BufferedReader reader = new BufferedReader(new InputStreamReader(stream));
        return reader.lines()
          .filter(line -> line.endsWith(".class"))
          .map(line -> getClass(line, packageName))
          .collect(Collectors.toSet());
    }
 
    private Class getClass(String className, String packageName) {
        try {
            return Class.forName(packageName + "."
              + className.substring(0, className.lastIndexOf('.')));
        } catch (ClassNotFoundException e) {
            // handle the exception
        }
        return null;
    }
}

In our example above, we're loading the system class loader using the static getSystemClassLoader() method.

Next, we'll find the resources in the given package. We'll read the resources as a stream of URLs using the getResourceAsStream method. To fetch the resources under a package, we need to convert the package name to a URL string. So, we have to replace all the dots (.) with a path separator (“/”).

After that, we're going to input our stream to a BufferedReader and filter all the URLs with the .class extension. After getting the required resources, we'll construct the class and collect all the results into a Set. Since Java doesn't allow lambda to throw an exception, we have to handle it in the getClass method.

Let's now test this method:

@Test
public void when_findAllClassesUsingClassLoader_thenSuccess() {
    AccessingAllClassesInPackage instance = new AccessingAllClassesInPackage();
 
    Set<Class> classes = instance.findAllClassesUsingClassLoader(
      "com.baeldung.reflection.access.packages.search");
 
    Assertions.assertEquals(3, classes.size());
}

There are just two Java files in the package. However, we have three classes declared — including the nested class, NestedExample. As a result, our test resulted in three classes.

Note that the search package is different from the current working package.

3.2. Reflections Library

Reflections is a popular library that scans the current classpath and allows us to query it at runtime.

Let's start by adding the reflections dependency to our Maven project:

<dependency>
    <groupId>org.reflections</groupId>
    <artifactId>reflections</artifactId> 
    <version>0.9.12</version>
</dependency>

Now, let's dive into the code sample:

public Set<Class> findAllClassesUsingReflectionsLibrary(String packageName) {
    Reflections reflections = new Reflections(packageName, new SubTypesScanner(false));
    return reflections.getSubTypesOf(Object.class)
      .stream()
      .collect(Collectors.toSet());
}

In this method, we're initiating the SubTypesScanner class and fetching all subtypes of the Object class. Through this approach, we get more granularity when fetching the classes.

Again, let's test it out:

@Test
public void when_findAllClassesUsingReflectionsLibrary_thenSuccess() {
    AccessingAllClassesInPackage instance = new AccessingAllClassesInPackage();
 
    Set<Class> classes = instance.findAllClassesUsingReflectionsLibrary(
      "com.baeldung.reflection.access.packages.search");
 
    Assertions.assertEquals(3, classes.size());
}

Similar to our previous test, this test finds the classes declared in the given package.

Now, let's move on to our next example.

3.3. Google Guava Library

In this section, we'll see how to find classes using the Google Guava library. Google Guava provides a ClassPath utility class that scans the source of the class loader and finds all loadable classes and resources.

First, let's add the guava dependency to our project:

<dependency>
      <groupId>com.google.guava</groupId>
      <artifactId>guava</artifactId>
      <version>30.1.1-jre</version>
</dependency>

Let's dive into the code:

public Set<Class> findAllClassesUsingGoogleGuice(String packageName) throws IOException {
    return ClassPath.from(ClassLoader.getSystemClassLoader())
      .getAllClasses()
      .stream()
      .filter(clazz -> clazz.getPackageName()
        .equalsIgnoreCase(packageName))
      .map(clazz -> clazz.load())
      .collect(Collectors.toSet());
}

In the above method, we're providing the system class loader as input to the ClassPath#from method. All the classes scanned by ClassPath are filtered based on the package name. The filtered classes are then loaded (but not linked or initialized) and collected into a Set.

Let's now test this method:

@Test
public void when_findAllClassesUsingGoogleGuice_thenSuccess() throws IOException {
    AccessingAllClassesInPackage instance = new AccessingAllClassesInPackage();
 
    Set<Class> classes = instance.findAllClassesUsingGoogleGuice(
      "com.baeldung.reflection.access.packages.search");
 
    Assertions.assertEquals(3, classes.size());
}

In addition, the Google Guava library provides getTopLevelClasses() and getTopLevelClassesRecursive() methods.

It's important to note that in all the above examples, package-info is included in the list of available classes if present under the package and annotated with one or more package-level annotations.

The next section will discuss how to find classes in a Modular Application.

4. Finding Classes in a Modular Application

The Java Platform Module System (JPMS) introduced us to a new level of access control through modules. Each package has to be explicitly exported to be accessed outside the module.

In a modular application, each module can be one of named, unnamed, or automatic modules.

For the named and automatic modules, the built-in system class loader will have no classpath. The system class loader will search for classes and resources using the application module path.

For an unnamed module, it will set the classpath to the current working directory.

4.1. Within a Module

All packages in a module have visibility to other packages in the module. The code inside the module enjoys reflective access to all types and all their members.

4.2. Outside a Module

Since Java enforces the most restrictive access, we have to explicitly declare packages using the export or open module declaration to get reflective access to the classes inside the module.

For a normal module, the reflective access for exported packages (but not open ones) only provides access to public and protected types and all their members of the declared package.

We can construct a module that exports the package that needs to be searched:

module my.module {
    exports com.baeldung.reflection.access.packages.search;
}

For a normal module, the reflective access for open packages provides access to all types and their members of the declared package:

module my.module {
    opens com.baeldung.reflection.access.packages.search;
}

Likewise, an open module grants reflective access to all types and their members as if all packages had been opened. Let's now open our entire module for reflective access:

open module my.module{
}

Finally, after ensuring that the proper modular descriptions for accessing packages are provided for the module, any of the methods from the previous section can be used to find all available classes inside a package.

5. Conclusion

In conclusion, we learned about class loaders and the different ways to find all classes in a package. Also, we discussed accessing packages in a modular application.

As usual, all the code is available over on GitHub.

The post Finding All Classes in a Java Package first appeared on Baeldung.
       

Writing an Enterprise-Grade AWS Lambda in Java

$
0
0

1. Overview

It doesn't require much code to put together a basic AWS Lambda in Java. To keep things small, we usually create our serverless applications with no framework support.

However, if we need to deploy and monitor our software at enterprise quality, we need to solve many of the problems that are solved out-of-the-box with frameworks like Spring.

In this tutorial, we'll look at how to include configuration and logging capabilities in an AWS Lambda, as well as libraries that reduce boilerplate code, while still keeping things lightweight.

2. Building an Example

2.1. Framework Options

Frameworks like Spring Boot cannot be used to create AWS Lambdas. The Lambda has a different lifecycle from a server application, and it interfaces with the AWS runtime without directly using HTTP.

Spring offers Spring Cloud Function, which can help us create an AWS Lambda, but we often need something smaller and simpler.

We'll take inspiration from DropWizard, which has a smaller feature set than Spring but still supports common standards, including configurability, logging, and dependency injection.

While we may not need every one of these features from one Lambda to the next, we'll build an example that solves all of these problems, so we can choose which techniques to use in future development.

2.2. Example Problem

Let's create an app that runs every few minutes. It'll look at a “to-do list”, find the oldest job that's not marked as done, and then create a blog post as an alert. It will also produce helpful logs to allow CloudWatch alarms to alert on errors.

We'll use the APIs on JsonPlaceholder as our back-end, and we'll make the application configurable for both the base URLs of the APIs and the credentials we'll use in that environment.

2.3. Basic Setup

We'll use the AWS SAM CLI to create a basic Hello World Example.

Then we'll change the default App class, which has an example API handler in it, into a simple RequestStreamHandler that logs on startup:

public class App implements RequestStreamHandler {
    @Override
    public void handleRequest(
      InputStream inputStream, 
      OutputStream outputStream, 
      Context context) throws IOException {
        context.getLogger().log("App starting\n");
    }
}

As our example is not an API handler, we won't need to read any input or produce any output. Right now, we're using the LambdaLogger inside the Context passed to our function to do logging, though later on, we'll look at how to use Log4j and Slf4j.

Let's quickly test this:

$ sam build
$ sam local invoke
Mounting todo-reminder/.aws-sam/build/ToDoFunction as /var/task:ro,delegated inside runtime container
App starting
END RequestId: 2aaf6041-cf57-4414-816d-76a63c7109fd
REPORT RequestId: 2aaf6041-cf57-4414-816d-76a63c7109fd  Init Duration: 0.12 ms  Duration: 121.70 ms
  Billed Duration: 200 ms Memory Size: 512 MB     Max Memory Used: 512 MB 

Our stub application has started up and logged “App starting” to the logs.

3. Configuration

As we may deploy our application to multiple environments, or wish to keep things like credentials separate from our code, we need to be able to pass in configuration values at deployment or runtime. This is most commonly achieved by setting environment variables.

3.1. Adding Environment Variables to the Template

The template.yaml file contains the settings for the lambda. We can add environment variables to our function using the Environment section under AWS::Serverless::Function section:

Environment: 
  Variables:
    PARAM1: VALUE

The generated example template has a hard-coded environment variable PARAM1, but we need to set our environment variables at deployment time.

Let's imagine that we want our application to know the name of its environment in a variable ENV_NAME.

First, let's add a parameter to the very top of the template.yaml file with a default environment name:

AWSTemplateFormatVersion: '2010-09-09'
Transform: AWS::Serverless-2016-10-31
Description: todo-reminder application
Parameters:
  EnvironmentName:
    Type: String
    Default: dev

Next, let's connect that parameter to an environment variable in the AWS::Serverless::Function section:

Environment: 
  Variables: 
    ENV_NAME: !Ref EnvironmentName

Now, we're ready to read the environment variable at runtime.

3.2. Read an Environment Variable

Let's read the environment variable ENV_NAME upon the construction of our App object:

private String environmentName = System.getenv("ENV_NAME");

We can also log the environment when handleRequest is called:

context.getLogger().log("Environment: " + environmentName + "\n");

The log message must end in “\n” to separate logging lines. We can see the output:

$ sam build
$ sam local invoke
START RequestId: 12fb0c05-f222-4352-a26d-28c7b6e55ac6 Version: $LATEST
App starting
Environment: dev

Here, we see that the environment has been set from the default in template.yaml.

3.3. Changing Parameter Values

We can use parameter overrides to supply a different value at runtime or deploy time:

$ sam local invoke --parameter-overrides "ParameterKey=EnvironmentName,ParameterValue=test"
START RequestId: 18460a04-4f8b-46cb-9aca-e15ce959f6fa Version: $LATEST
App starting
Environment: test

3.4. Unit Testing with Environment Variables

As an environment variable is global to the application, we might be tempted to initialize it in a private static final constant. However, this makes it very difficult to unit test.

As the handler class is initialized by the AWS Lambda runtime as a singleton for the entire life of the application, it's better to use instance variables of the handler to store runtime state.

We can use System Stubs to set an environment variable, and Mockito deep stubs to make our LambdaLogger testable inside the Context. First, we have to add the MockitoJUnitRunner to the test:

@RunWith(MockitoJUnitRunner.class)
public class AppTest {
    @Mock(answer = Answers.RETURNS_DEEP_STUBS)
    private Context mockContext;
    // ...
}

Next, we can use an EnvironmentVariablesRule to enable us to control the environment variable before the App object is created:

@Rule
public EnvironmentVariablesRule environmentVariablesRule = 
  new EnvironmentVariablesRule();

Now, we can write the test:

environmentVariablesRule.set("ENV_NAME", "unitTest");
new App().handleRequest(fakeInputStream, fakeOutputStream, mockContext);
verify(mockContext.getLogger()).log("Environment: unitTest\n");

As our lambdas get more complicated, it's very useful to be able to unit test the handler class, including the way it loads its configuration.

4. Handling Complex Configurations

For our example, we'll need the endpoint addresses for our API, as well as the name of the environment. The endpoint might vary at test time, but it has a default value.

We can use System.getenv several times over, and even use Optional and orElse to drop to a default:

String setting = Optional.ofNullable(System.getenv("SETTING"))
  .orElse("default");

However, this can require a lot of repetitive code and coordination of lots of individual Strings.

4.1. Represent the Configuration as a POJO

If we build a Java class to contain our configuration, we can share that with the services that need it:

public class Config {
    private String toDoEndpoint;
    private String postEndpoint;
    private String environmentName;
    // getters and setters
}

Now we can construct our runtime components with the current configuration:

public class ToDoReaderService {
    public ToDoReaderService(Config configuration) {
        // ...
    }
}

The service can take any configuration values it needs from the Config object. We can even model the configuration as a hierarchy of objects, which may be useful if we have repeated structures like credentials:

private Credentials toDoCredentials;
private Credentials postCredentials;

So far, this is just a design pattern. Let's look at how to load these values in practice.

4.2. Configuration Loader

We can use lightweight-config to load our configuration from a .yml file in our resources.

Let's add the dependency to our pom.xml:

<dependency>
    <groupId>uk.org.webcompere</groupId>
    <artifactId>lightweight-config</artifactId>
    <version>1.1.0</version>
</dependency>

And then, let's add a configuration.yml file to our src/main/resources directory. This file mirrors the structure of our configuration POJO and contains hardcoded values, placeholders to fill in from environment variables, and defaults:

toDoEndpoint: https://jsonplaceholder.typicode.com/todos
postEndpoint: https://jsonplaceholder.typicode.com/posts
environmentName: ${ENV_NAME}
toDoCredentials:
  username: baeldung
  password: ${TODO_PASSWORD:-password}
postCredentials:
  username: baeldung
  password: ${POST_PASSWORD:-password}

We can load these settings into our POJO using the ConfigLoader:

Config config = ConfigLoader.loadYmlConfigFromResource("configuration.yml", Config.class);

This fills in the placeholder expressions from the environment variables, applying defaults after the :- expressions. It's quite similar to the configuration loader built into DropWizard.

4.3. Holding the Context Somewhere

If we have several components – including the configuration – to load when the lambda first starts, it can be useful to keep these in a central place.

Let's create a class called ExecutionContext that the App can use for object creation:

public class ExecutionContext {
    private Config config;
    private ToDoReaderService toDoReaderService;
    
    public ExecutionContext() {
        this.config = 
          ConfigLoader.loadYmlConfigFromResource("configuration.yml", Config.class);
        this.toDoReaderService = new ToDoReaderService(config);
    }
}

The App can create one of these in its initializer list:

private ExecutionContext executionContext = new ExecutionContext();

Now, when the App needs a “bean”, it can get it from this object.

5. Better Logging

So far, our use of the LambdaLogger has been very basic. If we bring in libraries that perform logging, the chances are that they'll expect Log4j or Slf4j to be present. Ideally, our log lines will have timestamps and other useful context information.

Most importantly, when we encounter errors, we ought to log them with plenty of useful information, and Logger.error usually does a better job at this task than homemade code.

5.1. Add the AWS Log4j Library

We can enable the AWS lambda Log4j runtime by adding dependencies to our pom.xml:

<dependency>
    <groupId>com.amazonaws</groupId>
    <artifactId>aws-lambda-java-log4j2</artifactId>
    <version>1.2.0</version>
</dependency>

We also need a log4j2.xml file in src/main/resources configured to use this logger:

<?xml version="1.0" encoding="UTF-8"?>
<Configuration packages="com.amazonaws.services.lambda.runtime.log4j2">
    <Appenders>
        <Lambda name="Lambda">
            <PatternLayout>
                <pattern>%d{yyyy-MM-dd HH:mm:ss} %X{AWSRequestId} %-5p %c{1} - %m%n</pattern>
            </PatternLayout>
        </Lambda>
    </Appenders>
    <Loggers>
        <Root level="info">
            <AppenderRef ref="Lambda" />
        </Root>
    </Loggers>
</Configuration>

5.2. Writing a Logging Statement

Now, we add the standard Log4j Logger boilerplate to our classes:

public class ToDoReaderService {
    private static final Logger LOGGER = LogManager.getLogger(ToDoReaderService.class);
    public ToDoReaderService(Config configuration) {
        LOGGER.info("ToDo Endpoint on: {}", configuration.getToDoEndpoint());
        // ...
    }
    // ...
}

Then we can test it from the command line:

$ sam build
$ sam local invoke
START RequestId: acb34989-980c-42e5-b8e4-965d9f497d93 Version: $LATEST
2021-05-23 20:57:15  INFO  ToDoReaderService - ToDo Endpoint on: https://jsonplaceholder.typicode.com/todos

5.3. Unit Testing Log Output

In cases where testing log output is important, we can do that using System Stubs. Our configuration, optimized for AWS Lambda, directs the log output to System.out, which we can tap:

@Rule
public SystemOutRule systemOutRule = new SystemOutRule();
@Test
public void whenTheServiceStarts_thenItOutputsEndpoint() {
    Config config = new Config();
    config.setToDoEndpoint("https://todo-endpoint.com");
    ToDoReaderService service = new ToDoReaderService(config);
    assertThat(systemOutRule.getLinesNormalized())
      .contains("ToDo Endpoint on: https://todo-endpoint.com");
}

5.4. Adding Slf4j Support

We can add Slf4j by adding the dependency:

<dependency>
    <groupId>org.apache.logging.log4j</groupId>
    <artifactId>log4j-slf4j-impl</artifactId>
    <version>2.13.2</version>
</dependency>

This allows us to see log messages from Slf4j enabled libraries. We can also use it directly:

public class ExecutionContext {
    private static final Logger LOGGER =
      LoggerFactory.getLogger(ExecutionContext.class);
    public ExecutionContext() {
        LOGGER.info("Loading configuration");
        // ...
    }
    // ...
}

Slf4j logging is routed through the AWS Log4j runtime:

$ sam local invoke
START RequestId: 60b2efad-bc77-475b-93f6-6fa7ddfc9f88 Version: $LATEST
2021-05-23 21:13:19  INFO  ExecutionContext - Loading configuration

6. Consuming a REST API with Feign

If our Lambda consumes a REST service, we can use the Java HTTP libraries directly. However, there are benefits to using a lightweight framework.

OpenFeign is a great option for this. It allows us to plug in our choice of components for HTTP client, logging, JSON parsing, and much more.

6.1. Adding Feign

We'll use the Feign default client for this example, though the Java 11 client is also a very good option and works with the Lambda java11 runtime, based on Amazon Corretto.

Additionally, we'll use Slf4j logging and Gson as our JSON library:

<dependency>
    <groupId>io.github.openfeign</groupId>
    <artifactId>feign-core</artifactId>
    <version>11.2</version>
</dependency>
<dependency>
    <groupId>io.github.openfeign</groupId>
    <artifactId>feign-slf4j</artifactId>
    <version>11.2</version>
</dependency>
<dependency>
    <groupId>io.github.openfeign</groupId>
    <artifactId>feign-gson</artifactId>
    <version>11.2</version>
</dependency>

We're using Gson as our JSON library here because Gson is much smaller than Jackson. We could use Jackson, but this would make the start-up time slower. There's also the option of using Jackson-jr, though this is still experimental.

6.2. Defining a Feign Interface

First, we describe the API we're going to call with an interface:

public interface ToDoApi {
    @RequestLine("GET /todos")
    List<ToDoItem> getAllTodos();
}

This describes the path within the API and any objects that are to be produced from the JSON response. Let's create the ToDoItem to model the response from our API:

public class ToDoItem {
    private int userId;
    private int id;
    private String title;
    private boolean completed;
    // getters and setters
}

6.3. Defining a Client from the Interface

Next, we use the Feign.Builder to convert the interface into a client:

ToDoApi toDoApi = Feign.builder()
  .decoder(new GsonDecoder())
  .logger(new Slf4jLogger())
  .target(ToDoApi.class, config.getToDoEndpoint());

In our example, we're also using credentials. Let's say these are supplied via basic authentication, which would require us to add a BasicAuthRequestInterceptor before the target call:

.requestInterceptor(
   new BasicAuthRequestInterceptor(
     config.getToDoCredentials().getUsername(),
     config.getToDoCredentials().getPassword()))

7. Wiring the Objects Together

Up to this point, we've created the configurations and beans for our application, but we haven't wired them together yet. We have two options for this. Either we wire the objects together using plain Java, or we use some sort of dependency injection solution.

7.1. Constructor Injection

As everything is a plain Java object, and as we've built the ExecutionContext class to coordinate construction, we can do all the work in its constructor.

We might expect to extend the constructor to build all the beans in order:

this.config = ... // load config
this.toDoApi = ... // build api
this.postApi = ... // build post API
this.toDoReaderService = new ToDoReaderService(toDoApi);
this.postService = new PostService(postApi);

This is the simplest solution. It encourages well-defined components that are both testable and easy to compose at runtime.

However, above a certain number of components, this starts to become long-winded and harder to manage.

7.2. Bring in a Dependency Injection Framework

DropWizard uses Guice for dependency injection. This library is relatively small and can help manage the components in an AWS Lambda.

Let's add its dependency:

<dependency>
    <groupId>com.google.inject</groupId>
    <artifactId>guice</artifactId>
    <version>5.0.1</version>
</dependency>

7.3. Use Injection Where It's Easy

We can annotate beans constructed from other beans with the @Inject annotation to make them automatically injectable:

public class PostService {
    private PostApi postApi;
    @Inject
    public PostService(PostApi postApi) {
        this.postApi = postApi;
    }
    // other functions
}

7.4. Creating a Custom Injection Module

For any beans where we have to use custom load or construction code, we can use a Module as a factory:

public class Services extends AbstractModule {
    @Override
    protected void configure() {
        Config config = 
          ConfigLoader.loadYmlConfigFromResource("configuration.yml", Config.class);
        ToDoApi toDoApi = Feign.builder()
          .decoder(new GsonDecoder())
          .logger(new Slf4jLogger())
          .logLevel(FULL)
          .requestInterceptor(... // omitted
          .target(ToDoApi.class, config.getToDoEndpoint());
        PostApi postApi = Feign.builder()
          .encoder(new GsonEncoder())
          .logger(new Slf4jLogger())
          .logLevel(FULL)
          .requestInterceptor(... // omitted
          .target(PostApi.class, config.getPostEndpoint());
        bind(Config.class).toInstance(config);
        bind(ToDoApi.class).toInstance(toDoApi);
        bind(PostApi.class).toInstance(postApi);
    }
}

Then we use this module inside our ExecutionContext via an Injector:

public ExecutionContext() {
    LOGGER.info("Loading configuration");
    try {
        Injector injector = Guice.createInjector(new Services());
        this.toDoReaderService = injector.getInstance(ToDoReaderService.class);
        this.postService = injector.getInstance(PostService.class);
    } catch (Exception e) {
        LOGGER.error("Could not start", e);
    }
}

This approach scales well, as it localizes bean dependencies to the classes closest to each bean. With a central configuration class building every bean, any change in dependency always requires changes there, too.

We should also note that it's important to log errors that occur during start-up — if this fails, the Lambda cannot run.

7.5. Using the Objects Together

Now that we have an ExecutionContext with services that have the APIs inside them, configured by the Config, let's complete our handler:

@Override
public void handleRequest(InputStream inputStream, 
  OutputStream outputStream, Context context) throws IOException {
    PostService postService = executionContext.getPostService();
    executionContext.getToDoReaderService()
      .getOldestToDo()
      .ifPresent(postService::makePost);
}

Let's test this:

$ sam build
$ sam local invoke
Mounting /Users/ashleyfrieze/dev/tutorials/aws-lambda/todo-reminder/.aws-sam/build/ToDoFunction as /var/task:ro,delegated inside runtime container
2021-05-23 22:29:43  INFO  ExecutionContext - Loading configuration
2021-05-23 22:29:44  INFO  ToDoReaderService - ToDo Endpoint on: https://jsonplaceholder.typicode.com
App starting
Environment: dev
2021-05-23 22:29:44 73264c34-ca48-4c3e-a2b4-5e7e74e13960 INFO  PostService - Posting about: ToDoItem{userId=1, id=1, title='delectus aut autem', completed=false}
2021-05-23 22:29:44 73264c34-ca48-4c3e-a2b4-5e7e74e13960 INFO  PostService - Post: PostItem{title='To Do is Out Of Date: 1', body='Not done: delectus aut autem', userId=1}
END RequestId: 73264c34-ca48-4c3e-a2b4-5e7e74e13960

8. Conclusion

In this article, we looked at the importance of features like configuration and logging when using Java to build an enterprise-grade AWS Lambda. We saw how frameworks like Spring and DropWizard provide these tools by default.

We explored how to use environment variables to control configuration and how to structure our code to make unit testing possible.

Then, we looked at libraries for loading configuration, building a REST client, marshaling JSON data, and wiring our objects together, with a focus on choosing smaller libraries to make our Lambda start as quickly as possible.

As always, the example code can be found over on GitHub.

The post Writing an Enterprise-Grade AWS Lambda in Java first appeared on Baeldung.
       

Find All Numbers in a String in Java

$
0
0

1. Overview

Sometimes we need to find numeric digits or full numbers in strings. We can do this with both regular expressions or certain library functions.

In this article, we'll use regular expressions to find and extract numbers in strings. We'll also cover some ways to count digits.

2. Counting Numeric Digits

Let's start by counting the digits found within a string.

2.1. Using Regular Expressions

We can use Java Regular Expressions to count the number of matches for a digit.

In regular expressions, \d matches “any single digit”. Let's use this expression to count digits in a string:

int countDigits(String stringToSearch) {
    Pattern digitRegex = Pattern.compile("\\d");
    Matcher countEmailMatcher = digitRegex.matcher(stringToSearch);
    int count = 0;
    while (countEmailMatcher.find()) {
        count++;
    }
    return count;
}

Once we have defined a Matcher for the regex, we can use it in a loop to find and count all the matches. Let's test it:

int count = countDigits("64x6xxxxx453xxxxx9xx038x68xxxxxx95786xxx7986");
assertThat(count, equalTo(21));

2.2. Using the Google Guava CharMatcher

To use Guava, we first need to add the Maven dependency:

<dependency>
    <groupId>com.google.guava</groupId>
    <artifactId>guava</artifactId>
    <version>30.1.1</version>
</dependency>

Guava provides the CharMatcher.inRange​ method for counting digits:

int count = CharMatcher.inRange('0', '9')
  .countIn("64x6xxxxx453xxxxx9xx038x68xxxxxx95786xxx7986");
assertThat(count, equalTo(21));

3. Finding Numbers

Counting numbers requires patterns that capture all the digits of a valid numeric expression.

3.1. Finding Integers

To construct an expression to recognize integers, we must consider that they can be positive or negative and consist of a sequence of one or more digits. We also note that negative integers are preceded by a minus sign.

Thus, we can find integers by extending our regex to “-?\d+“. This pattern means “an optional minus sign, followed by one or more digits”.

Let's create an example method that uses this regex to find integers in a string:

List<String> findIntegers(String stringToSearch) {
    Pattern integerPattern = Pattern.compile("-?\\d+");
    Matcher matcher = integerPattern.matcher(stringToSearch);
    List<String> integerList = new ArrayList<>();
    while (matcher.find()) {
        integerList.add(matcher.group());
    }
    return integerList;
}

Once we have created a Matcher on the regex, we use it in a loop to find all the integers in a string. We call group on each match to get all the integers.

Let's test findIntegers:

List<String> integersFound = 
  findIntegers("646xxxx4-53xxx34xxxxxxxxx-35x45x9xx3868xxxxxx-95786xxx79-86");
assertThat(integersFound)
  .containsExactly("646", "4", "-53", "34", "-35", "45", "9", "3868", "-95786", "79", "-86");

3.2. Finding Decimal Numbers

To create a regex that finds decimal numbers, we need to consider the pattern of characters used when writing them.

If a decimal number is negative, it starts with a minus sign. This is followed by one or more digits and an optional fractional part. This fractional part starts with a decimal point, with another sequence of one or more digits after that.

We can define this using the regular expression “-?\d+(\.\d+)?“:

List<String> findDecimalNums(String stringToSearch) {
    Pattern decimalNumPattern = Pattern.compile("-?\\d+(\\.\\d+)?");
    Matcher matcher = decimalNumPattern.matcher(stringToSearch);
    List<String> decimalNumList = new ArrayList<>();
    while (matcher.find()) {
        decimalNumList.add(matcher.group());
    }
    return decimalNumList;
}

Now we'll test findDecimalNums:

List<String> decimalNumsFound = 
  findDecimalNums("x7854.455xxxxxxxxxxxx-3x-553.00x53xxxxxxxxxxxxx3456xxxxxxxx3567.4xxxxx");
assertThat(decimalNumsFound)
  .containsExactly("7854.455", "-3", "-553.00", "53", "3456", "3567.4");

4. Converting the Strings Found into Numeric Values

We may also wish to convert the found numbers into their Java types.

Let's convert our integer numbers into Long using Stream mapping:

LongStream integerValuesFound = findIntegers("x7854x455xxxxxxxxxxxx-3xxxxxx34x56")
  .stream()
  .mapToLong(Long::valueOf);
        
assertThat(integerValuesFound)
  .containsExactly(7854L, 455L, -3L, 34L, 56L);

Next, we'll convert decimal numbers to Double in the same way:

DoubleStream decimalNumValuesFound = findDecimalNums("x7854.455xxxxxxxxxxxx-3xxxxxx34.56")
  .stream()
  .mapToDouble(Double::valueOf);
assertThat(decimalNumValuesFound)
  .containsExactly(7854.455, -3.0, 34.56);

5. Finding Other Types of Numbers

Numbers can be expressed in other formats, which we can detect by adjusting our regular expression.

5.1. Scientific Notation

Let's find some numbers formatted using scientific notation:

String strToSearch = "xx1.25E-3xxx2e109xxx-70.96E+105xxxx-8.7312E-102xx919.3822e+31xxx";
Matcher matcher = Pattern.compile("-?\\d+(\\.\\d+)?[eE][+-]?\\d+")
  .matcher(strToSearch);
// loop over the matcher
assertThat(sciNotationNums)
  .containsExactly("1.25E-3", "2e109", "-70.96E+105", "-8.7312E-102", "919.3822e+31");

5.2. Hexadecimal

Now we'll find hexadecimal numbers in a string:

String strToSearch = "xaF851Bxxx-3f6Cxx-2Ad9eExx70ae19xxx";
Matcher matcher = Pattern.compile("-?[0-9a-fA-F]+")
  .matcher(strToSearch);
// loop over the matcher
assertThat(hexNums)
  .containsExactly("aF851B", "-3f6C", "-2Ad9eE", "70ae19");

6. Conclusion

In this article, we first discussed how to count digits in a string using regular expressions and the CharMatcher class from Google Guava.

Then, we explored using regular expressions to find integers and decimal numbers.

Finally, we covered finding numbers in other formats such as scientific notation and hexadecimal.

As always, the source code for this tutorial can be found over on GitHub.

The post Find All Numbers in a String in Java first appeared on Baeldung.
       

Attach and Detach From a Docker Container

$
0
0

1. Overview

While working with a docker container, we often need to run it in an interactive mode. This is where we attach the standard input, output, or error streams of our terminal to the container.

Often we prefer to run our container in the background. However, we may wish to connect to it later to check its output or errors or disconnect the session.

In this short article, we'll learn some useful commands to achieve these. We'll also see different ways to detach from a session without stopping the container.

2. Run a Container in Attached/Detached Mode

Let's see how to run a container in attached or detached mode.

2.1. Default Mode

By default, Docker runs a container in the foreground:

$ docker run --name test_redis -p 6379:6379 redis

This means we can't return to our shell prompt until the process finishes.

The above command links the standard output (stdout), and the standard error (stderr) streams with our terminal. So, we can see the console output of the container in our terminal.

The –name option gives the container a name. We can later use the same name to refer to this container in other commands. Alternatively, we can refer to it by the container id which we get executing the docker ps command.

We may also use the -a option to choose specific streams from stdin, stdout, and stderr to connect with:

$ docker run --name test_redis -a STDERR -p 6379:6379 redis

The above command means we see only the error messages from the container.

2.2. Interactive Mode

We initiate a container in the interactive mode with -i and -t options together:

$ docker run -it ubuntu /bin/bash

Here, the -i option attaches the standard input stream (stdin) of the bash shell in the container and the -t option allocates a pseudo-terminal to the process. This lets us interact with the container from our terminal.

2.3. Detached Mode

We run a container in detached mode with the -d option:

$ docker run -d --name test_redis -p 6379:6379 redis

This command starts the container, prints its id, and then returns to the shell prompt. Thus, we can continue with other tasks while the container continues to run in the background.

We can connect to this container later using either its name or container id.

3. Interact With a Running Container

3.1. Execute a Command

The execute command lets us execute commands inside a container that is already running:

$ docker exec -it test_redis redis-cli

This command opens a redis-cli session in the Redis container named test_redis which is already running. We can also use the container id instead of the name. The option -it, as explained in section 2.2, enables the interactive mode.

However, we may only want to get the value against a key:

$ docker exec test_redis redis-cli get mykey

This executes the get command in the redis-cli, returns the value for the key mykey, and closes the session.

It is also possible to execute a command in the background:

$ docker exec -d test_redis redis-cli set anotherkey 100

Here, we use -d for this purpose. It sets the value 100 against the key anotherKey, but doesn't display the output of the command.

3.2. Attaching a Session

The attach command connects our terminal to a running container:

$ docker attach test_redis

By default, the command binds the standard input, output, or error streams with the host shell.

To see only the output and error messages, we may omit stdin using the –no-stdin option:

$ docker attach --no-stdin test_redis

4. Detach From a Container

The way to detach from a docker container depends on its running mode.

4.1. Default Mode

Pressing CTRL-c is the usual way of ending a session. But, if we've launched our container without the -d or -it option, the CTRL-c command stops the container instead of disconnecting from it. The session propagates the CTRL-c i.e., SIGINT signal to the container and kills its main process.

Let's override the behavior passing –sig-proxy=false:

$ docker run --name test_redis --sig-proxy=false -p 6379:6379 redis

Now, we can press CTRL-c to detach only the current session while the container keeps running in the background.

4.2. Interactive Mode

In this mode, CTRL-c acts as a command to the interactive session and so it doesn't work as a detach key. Here, we should use CTRL-p CTRL-q to end the session.

4.3. Background Mode

In this case, we need to override the –sig-proxy value while attaching the session:

$ docker attach --sig-proxy=false test_redis

We may also define a separate key by –detach-keys option:

$ docker attach --detach-keys="ctrl-x" test_redis

This detaches the container and returns the prompt when we press CTRL-x.

5. Conclusion

In this article, we saw how to launch a docker container in both attached and detached mode.

Then, we looked at some commands to start or end a session with an active container.

The post Attach and Detach From a Docker Container first appeared on Baeldung.

Defining Unique Constraints in JPA

$
0
0

1. Introduction

In this tutorial, we'll discuss defining unique constraints using JPA and Hibernate.

First, we'll discuss unique constraints and how they differ from primary key constraints.

Next, we'll take a look at JPA's important annotations – @Column(unique=true) and @UniqueConstraint. We'll implement them to define the unique constraints on a single column and multiple columns.

Finally, we'll see how to define unique constraints on referenced table columns.

2. Unique Constraints

Let's start with a quick recap. A unique key is a set of single or multiple columns of a table that uniquely identify a record in a database table.

Both the unique and primary key constraints provide a guarantee for uniqueness for a column or set of columns.

2.1. How It's Different From Primary Key Constraints?

Unique constraints ensure that the data in a column or combination of columns is unique for each row. A table's primary key, for example, functions as an implicit unique constraint. Hence, the primary key constraint automatically has a unique constraint.

Furthermore, we can have only one primary key constraint per table. However, there can be multiple unique constraints per table.
Simply put, the unique constraints apply in addition to any constraint entailed by primary key mapping.

The unique constraints we define are used during table creation to generate the proper database constraints and may also be used at runtime to order insert, update, or delete statements.

2.2. What Are Single-Column and Multiple-Column Constraints?

A unique constraint can be either a column constraint or a table constraint. At the table level, we can define unique constraints across multiple columns.

JPA allows us to define unique constraints in our code using @Column(unique=true) and @UniqueConstraint. These annotations are interpreted by the schema generation process, creating constraints automatically.

Before anything else, let's emphasize that column-level constraints apply to a single column, and table-level constraints apply to the whole table.

We'll discuss those in detail in the next sections through examples.

3. Set Up an Entity

An entity in JPA represents a table stored in a database. Every instance of an entity represents a row in the table.

Let's start by creating a domain entity and mapping it to a database table. For this example, we'll create a Person entity:

@Entity
@Table
public class Person implements Serializable {
    @Id
    @GeneratedValue
    private Long id;  
    private String name;
    private String password;
    private String email;
    private Long personNumber;
    private Boolean isActive;
    private String securityNumber;
    private String departmentCode;
    @JoinColumn(name = "addressId", referencedColumnName = "id")
    private Address address;
   //getters and setters
 }

An address field is a referenced field from the Address entity:

@Entity
@Table
public class Address implements Serializable {
    @Id
    @GeneratedValue
    private Long id;
    private String streetAddress;
    //getters and setters
}

Throughout this tutorial, we'll use this Person entity to demonstrate our examples.

4. Column Constraints

When we have our model ready, we can implement our first unique constraint.

Let's consider our Person entity that holds the person's information. We have a primary key for the id column. This entity also holds the PersonNumber that does not contain any duplicate value. Also, we can't define the primary key because our table already has it.

In this case, we can use column unique constraints to make sure that no duplicate values are entered in a PersonNumber field. JPA allows us to achieve that using the @Column annotation with the unique attribute.

In this section, we will first take a look at the @Column annotation and then learn how to implement it.

4.1. @Column(unique=true)

The annotation type Column is used to specify the mapped column for a persistent property or field.

Let's take a look at the definition:

@Target(value={METHOD,FIELD})
@Retention(value=RUNTIME)
public @interface Column {
    boolean unique;
   //other elements
 }

The unique attribute specifies whether the column is a unique key. This is a shortcut for the UniqueConstraint annotation and is useful when the unique key constraint corresponds to only a single column.

We'll see how to define it in the next section.

4.2. Defining the Column Constraints

Whenever the unique constraint is based only on one field, we can use @Column(unique=true) on that column.

Let's define a unique constraint on the personNumber field:

@Column(unique=true)
private Long personNumber;

When we execute the schema creation process, we can validate it from the logs:

[main] DEBUG org.hibernate.SQL -
    alter table Person add constraint UK_d44q5lfa9xx370jv2k7tsgsqt unique (personNumber)

Similarly, if we want to restrict a Person to register with a unique email, we can add a unique constraint on the email field:

@Column(unique=true)
private String email;

Let's execute the schema creation process and check the constraints:

[main] DEBUG org.hibernate.SQL -
    alter table Person add constraint UK_585qcyc8qh7bg1fwgm1pj4fus unique (email)

Although this is useful when we want to put a unique constraint on a single column, sometimes we may want to add unique constraints on a composite key — some combination of columns. To define a composite unique key, we can use table constraints. We'll discuss that in the next section.

5. Table Constraints

A composite unique key is a unique key made up of a combination of columns. To define a composite unique key, we can add constraints on the table instead of a column. JPA helps us to achieve it using @UniqueConstraint annotation.

5.1. @UniqueConstraint Annotation

Annotation type UniqueConstraint specifies that a unique constraint is to be included in the generated DDL (Data Definition Language) for a table.

Let's take a look at the definition:

@Target(value={})
@Retention(value=RUNTIME)
public @interface UniqueConstraint {
    String name() default "";
    String[] columnNames();
}

As we see, the name and columnNames of type String and String[], respectively, are the annotation elements that may be specified for the UniqueConstraint annotation.

We'll take a better look at each of the parameters in the next section, going through examples.

5.2. Defining Unique Constraints

Let's consider our Person entity. A Person should not have any duplicate record for the active status. In other words, there won't be any duplicate values for the key comprising personNumber and isActive. Here, we need to add unique constraints that span across multiple columns.

JPA helps us to achieve that with the @UniqueConstraint annotation. We do that in the @Table annotation under the uniqueConstraints attribute. Let's remember to specify the names of the columns:

@Table(uniqueConstraints = { @UniqueConstraint(columnNames = { "personNumber", "isActive" }) })

We can validate it once the schema is generated:

[main] DEBUG org.hibernate.SQL -
    alter table Person add constraint UK5e0bv5arhh7jjhsls27bmqp4a unique (personNumber, isActive)

One point to note here is that if we don't specify a name, it's a provider-generated value. Since JPA 2.0, we can provide a name for our unique constraint:

@Table(uniqueConstraints = { @UniqueConstraint(name = "UniqueNumberAndStatus", columnNames = { "personNumber", "isActive" }) })

And we can validate the same:

[main] DEBUG org.hibernate.SQL -
    alter table Person add constraint UniqueNumberAndStatus unique (personNumber, isActive)

Here, we have added unique constraints on a set of columns. We can also add multiple unique constraints — unique constraints on multiple sets of columns. We'll do just that in the next section.

5.3. Multiple Unique Constraints on a Single Entity

A table can have multiple unique constraints. In the last section, we defined unique constraints on a composite key: personNumber and isActive status. In this section, we'll add constraints on the combination of securityNumber and departmentCode.

Let's collect our unique indexes and specify them at once. We do that by repeating @UniqueConstraint annotation in braces and separated by a comma:

@Table(uniqueConstraints = {
   @UniqueConstraint(name = "UniqueNumberAndStatus", columnNames = {"personNumber", "isActive"}),
   @UniqueConstraint(name = "UniqueSecurityAndDepartment", columnNames = {"securityNumber", "departmentCode"})})

Now, let's see the logs and check the constraints:

[main] DEBUG org.hibernate.SQL -
    alter table Person add constraint UniqueNumberAndStatus unique (personNumber, isActive)
[main] DEBUG org.hibernate.SQL -
   alter table Person add constraint UniqueSecurityAndDepartment unique (securityNumber, departmentCode)

Up until now, we defined unique constraints on the fields in the same entity. However, in some cases, we may have referenced fields from other entities and need to ensure the uniqueness of those fields. We'll discuss that in the next section.

6. Unique Constraints on a Referenced Table Column

When we create two or more tables that are related to each other, they are often related by a column in one table referencing the primary key of the other table. That column is called the “foreign key”. For example, Person and Address entities are connected through the addressId field. Hence, addressId acts as a referenced table column.

We can define unique constraints on the referenced columns. We'll first implement it on a single column and then on multiple columns.

6.1. Single-Column Constraints

In our Person entity, we have an address field that refers to the Address entity. A person should have a unique address.

So, let's define a unique constraint on the address field of the Person:

@Column(unique = true)
private Address address;

Now, let's quickly check this constraint:

[main] DEBUG org.hibernate.SQL -
   alter table Person add constraint UK_7xo3hsusabfaw1373oox9uqoe unique (address)

We can also define multiple column constraints on the referenced table column, as we'll see in the next section.

6.2. Multiple-Column Constraints

We can specify unique constraints on a combination of columns. As stated earlier, we can use table constraints to do so.

Let's define unique constraints on the personNumber and address and add it to the uniqueConstraints array:

@Entity
@Table(uniqueConstraints = 
  //other constraints
  @UniqueConstraint(name = "UniqueNumberAndAddress", columnNames = { "personNumber", "address" })})

Finally, let's see the unique constraints:

[main] DEBUG org.hibernate.SQL -
    alter table Person add constraint UniqueNumberAndAddress unique (personNumber, address)

7. Conclusion

The unique constraints prevent two records from having identical values in a column or set of columns.

In this tutorial, we saw how we could define unique constraints in JPA. First, we did a little recap of the unique constraints. Further, we discussed @Column(unique=true) and @UniqueConstraint annotations to define unique constraints on a single column and multiple columns, respectively.

As always, the examples from the article are available over on GitHub.

The post Defining Unique Constraints in JPA first appeared on Baeldung.
       

Project Reactor: map() vs flatMap()

$
0
0

1. Overview

This tutorial introduces the map and flatMap operators in Project Reactor. They're defined in the Mono and Flux classes to transform items when processing a stream.

In the following sections, we'll focus on the map and flatMap methods in the Flux class. Those of the same name in the Mono class work just the same way.

2. Maven Dependencies

To write some code examples, we need the Reactor core dependency:

<dependency>
    <groupId>io.projectreactor</groupId>
    <artifactId>reactor-core</artifactId>
    <version>3.3.9.RELEASE</version>
</dependency>

3. The map Operator

Now, let's see how we can use the map operator.

The Flux#map method expects a single Function parameter, which can be as simple as:

Function<String, String> mapper = String::toUpperCase;

This mapper converts a string to its uppercase version. We can apply it on a Flux stream:

Flux<String> inFlux = Flux.just("baeldung", ".", "com");
Flux<String> outFlux = inFlux.map(mapper);

The given mapper converts each item in the input stream to a new item in the output, preserving the order.

Let's prove that:

StepVerifier.create(outFlux)
  .expectNext("BAELDUNG", ".", "COM")
  .expectComplete()
  .verify();

Notice the mapper function isn't executed when the map method is called. Instead, it runs at the time we subscribe to the stream.

4. The flatMap Operator

It's time to move on to the flatMap operator.

4.1. Code Example

Similar to map, the flatMap operator has a single parameter of type Function. However, unlike the function that works with map, the flatMap mapper function transforms an input item into a Publisher rather than an ordinary object.

Here's an example:

Function<String, Publisher<String>> mapper = s -> Flux.just(s.toUpperCase().split(""));

In this case, the mapper function converts a string to its uppercase version, then splits it up into separate characters. Finally, the function builds a new stream from those characters.

We can now pass the given mapper to a flatMap method:

Flux<String> inFlux = Flux.just("baeldung", ".", "com");
Flux<String> outFlux = inFlux.flatMap(mapper);

The flat-mapping operation we've seen creates three new streams out of an upstream with three string items. After that, elements from these three streams are split and intertwined to form another new stream. This final stream contains characters from all three input strings.

We can then subscribe to this newly formed stream to trigger the pipeline and verify the output:

List<String> output = new ArrayList<>();
outFlux.subscribe(output::add);
assertThat(output).containsExactlyInAnyOrder("B", "A", "E", "L", "D", "U", "N", "G", ".", "C", "O", "M");

Note that due to the interleaving of items from different sources, their order in the output may differ from what we see in the input.

4.2. Explanation of the Pipeline Operations

We've just gone through defining a mapper, passing it to a flatMap operator, and invoking this operator on a stream. It's time to dive deep into the details and see why items in the output may be out of order.

First, let's be clear that no operations occur until the stream is subscribed. When that happens, the pipeline executes and invokes the mapper function passed to the flatMap method.

At this point, the mapper performs the necessary transformation on elements in the input stream. Each of these elements may be transformed into multiple items, which are then used to create a new stream. In our code example, the value of the expression Flux.just(s.toUpperCase().split("")) indicates such a stream.

Once a new stream – represented by a Publisher instance – is ready, flatMap eagerly subscribes. The operator doesn't wait for the publisher to finish before moving on to the next stream, meaning the subscription is non-blocking.

Since the pipeline handles all the derived streams simultaneously, their items may come in at any moment. As a result, the original order is lost. If the order of items is important, consider using the flatMapSequential operator instead.

5. Differences Between map and flatMap

So far, we've covered the map and flatMap operators. Let's wrap up with major differences between them.

5.1. One-to-One vs. One-to-Many

The map operator applies a one-to-one transformation to stream elements, while flatMap does one-to-many. This distinction is clear when looking at the method signature:

  • <V> Flux<V> map(Function<? super T, ? extends V> mapper) – the mapper converts a single value of type T to a single value of type V
  • Flux<R> flatMap(Function<? super T, ? extends Publisher<? extends R>> mapper) – the mapper converts a single value of type T to a Publisher of elements of type R

We can see that in terms of functionality, the difference between map and flatMap in Project Reactor is similar to the difference between map and flatMap in the Java Stream API.

5.2. Synchronous vs. Asynchronous

Here are two extracts from the API specification for the Reactor Core library:

  • map: Transform the items emitted by this Flux by applying a synchronous function to each item
  • flatMap: Transform the elements emitted by this Flux asynchronously into Publishers

It's easy to see map is a synchronous operator – it's simply a method that converts one value to another. This method executes in the same thread as the caller.

The other statement – flatMap is asynchronous – is not that clear. In fact, the transformation of elements into Publishers can be either synchronous or asynchronous.

In our sample code, that operation is synchronous since we emit elements with the Flux#just method. However, when dealing with a source that introduces high latency, such as a remote server, asynchronous processing is a better option.

The important point is that the pipeline doesn't care which threads the elements come from – it just pays attention to the publishers themselves.

6. Conclusion

In this article, we've walked through the map and flatMap operators in Project Reactor. We discussed a couple of examples and clarified the process.

As usual, the source code for our application is available over on GitHub.

The post Project Reactor: map() vs flatMap() first appeared on Baeldung.
       

Kafka Streams vs. Kafka Consumer

$
0
0

1. Introduction

Apache Kafka is the most popular open-source distributed and fault-tolerant stream processing system. Kafka Consumer provides the basic functionalities to handle messages. Kafka Streams also provides real-time stream processing on top of the Kafka Consumer client.

In this tutorial, we'll explain the features of Kafka Streams to make the stream processing experience simple and easy.

2. Difference Between Streams and Consumer APIs

2.1. Kafka Consumer API

In a nutshell, Kafka Consumer API allows applications to process messages from topics. It provides the basic components to interact with them, including the following capabilities:

  • Separation of responsibility between consumers and producers
  • Single processing
  • Batch processing support
  • Only stateless support. The client does not keep the previous state and evaluates each record in the stream individually
  • Write an application requires a lot of code
  • No use of threading or parallelism
  • It is possible to write in several Kafka clusters

2.2. Kafka Streams API

Kafka Streams greatly simplifies the stream processing from topics. Built on top of Kafka client libraries, it provides data parallelism, distributed coordination, fault tolerance, and scalability. It deals with messages as an unbounded, continuous, and real-time flow of records, with the following characteristics:

  • Single Kafka Stream to consume and produce
  • Perform complex processing
  • Do not support batch processing
  • Support stateless and stateful operations
  • Write an application requires few lines of code
  • Threading and parallelism
  • Interact only with a single Kafka Cluster
  • Stream partitions and tasks as logical units for storing and transporting messages

Kafka Streams uses the concepts of partitions and tasks as logical units strongly linked to the topic partitions. Besides, it uses threads to parallelize processing within an application instance. Another important capability supported is the state stores, used by Kafka Streams to store and query data coming from the topics. Finally, Kafka Streams API interacts with the cluster, but it does not run directly on top of it.

In the coming sections, we'll focus on four aspects that make the difference with respect to the basic Kafka clients: Stream-table duality, Kafka Streams Domain Specific Language (DSL), Exactly-Once processing Semantics (EOS), and Interactive queries.

2.3. Dependencies

To implement the examples, we'll simply add the Kafka Consumer API and Kafka Streams API dependencies to our pom.xml:

<dependency>
    <groupId>org.apache.kafka</groupId>
    <artifactId>kafka-clients</artifactId>
    <version>2.8.0</version>
</dependency>
<dependency>
    <groupId>org.apache.kafka</groupId>
    <artifactId>kafka-streams</artifactId>
    <version>2.8.0</version>
 </dependency>

3. Stream-Table Duality

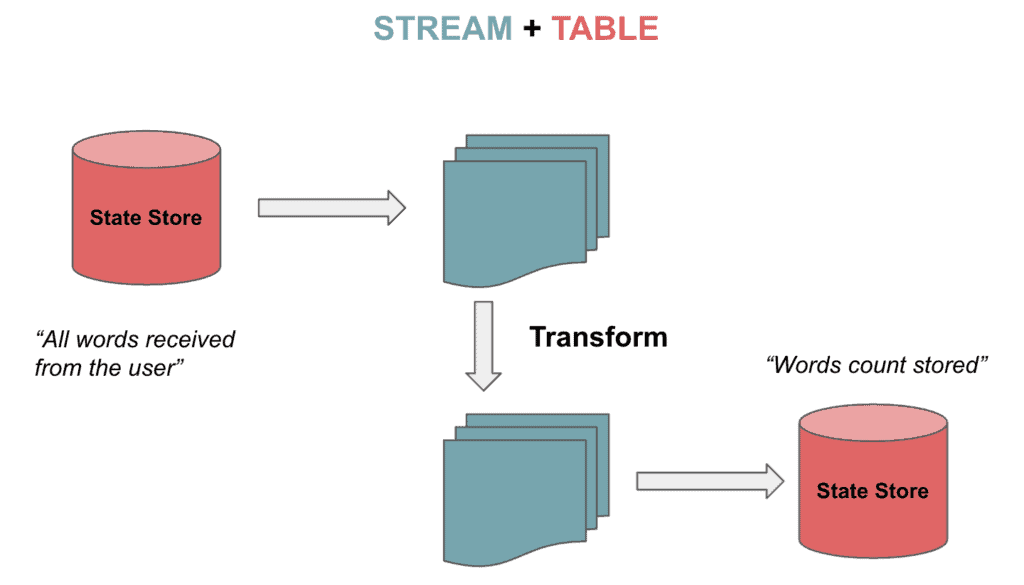
Kafka Streams support streams but also tables that can be bidirectionally transformed.  It is the so-called stream-table duality. Tables are a set of evolving facts. Each new event overwrites the old one, whereas streams are a collection of immutable facts.

Streams handle the complete flow of data from the topic. Tables store the state by aggregating information from the streams. Let's imagine playing a chess game as described in Kafka Data Modelling. The stream of continuous moves are aggregated to a table, and we can transition from one state to another:

3.1. KStream, KTable and GlobalKTable

Kafka Streams provides two abstractions for Streams and Tables. KStream handles the stream of records. On the other hand, KTable manages the changelog stream with the latest state of a given key. Each data record represents an update.

There is another abstraction for not partitioned tables. We can use GlobalKTables to broadcast information to all tasks or to do joins without re-partitioned the input data.

We can read and deserialize a topic as a stream:

StreamsBuilder builder = new StreamsBuilder();
KStream<String, String> textLines = 
  builder.stream(inputTopic, Consumed.with(Serdes.String(), Serdes.String()));

It is also possible to read a topic to track the latest words received as a table:

KTable<String, String> textLinesTable = 
  builder.table(inputTopic, Consumed.with(Serdes.String(), Serdes.String()));

Finally, we are able to read a topic using a global table:

GlobalKTable<String, String> textLinesGlobalTable = 
  builder.globalTable(inputTopic, Consumed.with(Serdes.String(), Serdes.String()));

4. Kafka Streams DSL

Kafka Streams DSL is a declarative and functional programming style. It is built on top of the Streams Processor API. The language provides the built-in abstractions for streams and tables mentioned in the previous section.

Furthermore, it also supports stateless (map, filter, etc.) and stateful transformations (aggregations, joins, and windowing). Thus, it is possible to implement stream processing operations with just a few lines of code.

4.1. Stateless Transformations

Stateless transformations don't require a state for processing. In the same way, a state store is not needed in the stream processor. Example operations include are filter, map, flatMap, or groupBy.

Let's now see how to map the values as UpperCase, filter them from the topic and store them as a stream:

KStream<String, String> textLinesUpperCase =
  textLines
    .map((key, value) -> KeyValue.pair(value, value.toUpperCase()))
    .filter((key, value) -> value.contains("FILTER"));

4.2. Stateful Transformations

Stateful transformations depend on the state to fulfil the processing operations. The processing of a message depends on the processing of other messages (state store). In other words, any table or state store can be restored using the changelog topic.

An example of stateful transformation is the word count algorithm:

KTable<String, Long> wordCounts = textLines
  .flatMapValues(value -> Arrays.asList(value
    .toLowerCase(Locale.getDefault()).split("\\W+")))
  .groupBy((key, word) -> word)
    .count(Materialized.<String, Long, KeyValueStore<Bytes, byte[]>> as("counts-store"));

We'll send those two strings to the topic:

String TEXT_EXAMPLE_1 = "test test and test";
String TEXT_EXAMPLE_2 = "test filter filter this sentence";

The result is:

Word: and -> 1
Word: test -> 4
Word: filter -> 2
Word: this -> 1
Word: sentence -> 1

DSL covers several transformation features. We can join, or merge two input streams/tables with the same key to produce a new stream/table. We are also able to aggregate, or combe multiple records from streams/tables into one single record in a new table. Finally, it is possible to apply windowing, to group records with the same key in join or aggregation functions.

An example of joining with 5s windowing will merge records grouped by key from two streams into one stream:

KStream<String, String> leftRightSource = leftSource.outerJoin(rightSource,
  (leftValue, rightValue) -> "left=" + leftValue + ", right=" + rightValue,
    JoinWindows.of(Duration.ofSeconds(5))).groupByKey()
      .reduce(((key, lastValue) -> lastValue))
  .toStream();

So we'll put in the left stream value=left with key=1 and the right stream value=right and key=2. The result is the following:

(key= 1) -> (left=left, right=null)
(key= 2) -> (left=null, right=right)

For the aggregation example, we'll compute the word count algorithm but using as key the first two letters of each word:

KTable<String, Long> aggregated = input
  .groupBy((key, value) -> (value != null && value.length() > 0)
    ? value.substring(0, 2).toLowerCase() : "",
    Grouped.with(Serdes.String(), Serdes.String()))
  .aggregate(() -> 0L, (aggKey, newValue, aggValue) -> aggValue + newValue.length(),
    Materialized.with(Serdes.String(), Serdes.Long()));

With the following entries:

"one", "two", "three", "four", "five"

The output is:

Word: on -> 3
Word: tw -> 3
Word: th -> 5
Word: fo -> 4
Word: fi -> 4

5. Exactly-Once Processing Semantics (EOS)

There are occasions in which we need to ensure that the consumer reads the message just exactly once. Kafka introduced the capability of including the messages into transactions to implement EOS with the Transactional API. The same feature is covered by Kafka Streams from version 0.11.0.

To configure EOS in Kafka Streams, we'll include the following property:

streamsConfiguration.put(StreamsConfig.PROCESSING_GUARANTEE_CONFIG,
  StreamsConfig.EXACTLY_ONCE);

6. Interactive Queries

Interactive queries allow consulting the state of the application in distributed environments. This means the capability of extract information from the local stores, but also from the remote stores on multiple instances. Basically, we'll gather all the stores and group them together to get the complete state of the application.

Let's see an example using interactive queries. Firstly, we'll define the processing topology, in our case, the word count algorithm:

KStream<String, String> textLines = 
  builder.stream(TEXT_LINES_TOPIC, Consumed.with(Serdes.String(), Serdes.String()));
final KGroupedStream<String, String> groupedByWord = textLines
  .flatMapValues(value -> Arrays.asList(value.toLowerCase().split("\\W+")))
  .groupBy((key, word) -> word, Grouped.with(stringSerde, stringSerde));

Next, we'll create a state store (key-value) for all the computed word counts:

groupedByWord
  .count(Materialized.<String, Long, KeyValueStore<Bytes, byte[]>>as("WordCountsStore")
  .withValueSerde(Serdes.Long()));

Then, we can query the key-value store:

ReadOnlyKeyValueStore<String, Long> keyValueStore =
  streams.store(StoreQueryParameters.fromNameAndType(
    "WordCountsStore", QueryableStoreTypes.keyValueStore()));
KeyValueIterator<String, Long> range = keyValueStore.all();
while (range.hasNext()) {
    KeyValue<String, Long> next = range.next();
    System.out.println("count for " + next.key + ": " + next.value);
}

The output of the example is the following:

Count for and: 1
Count for filter: 2
Count for sentence: 1
Count for test: 4
Count for this: 1

7. Conclusion

In this tutorial, we showed how Kafka Streams simplify the processing operations when retrieving messages from Kafka topics. It strongly eases the implementation when dealing with streams in Kafka. Not only for stateless processing but also for stateful transformations.

Of course, it is possible to perfectly build a consumer application without using Kafka Streams. But we would need to manually implement the bunch of extra features given for free.

As always, the code is available over on GitHub.

The post Kafka Streams vs. Kafka Consumer first appeared on Baeldung.
       

Java Weekly, Issue 388

$
0
0

1. Spring and Java

>> Taming Resource Scopes [inside.java]

Exploring different approaches to make the Foreign Memory Access/Linker API safer – an interesting glimpse on the future of natives in Java!

>> Spring Microservices Security Best Practices [piotrminkowski.com]

Recipes for building secure Microservices with Spring Boot and Spring Security – concise and yet practical!

>> The Road to Quarkus 2.0: Continuous Testing [infoq.com]

A cool interview with Stuart Douglas on continuous testing in Quarkus 2.0: the motivation, benefits, limitations, and many more!

Also worth reading:

Webinars and presentations:

Time to upgrade:

2. Technical & Musings

>> Amazon Timestream – Time series is the new black [allthingsdistributed.com]

An interesting story of how AWS Timestream came to be – from the complex workaround architectures to implementation, data lifecycle, and query language!

>> On the Diverse And Fantastical Shapes of Testing [martinfowler.com]

On different interpretations of various testing levels: unit, integration, and end-to-end – insightful read!

Also worth reading:

3. Comics

And my favorite Dilberts of the week:

>> Pandemic Sales [dilbert.com]

>> Frequent Victims Club [dilbert.com]

>> Banning Political Discussions [dilbert.com]

4. Pick of the Week

>> “Stealth mode” and other f’ing brilliant strategies [asmartbear.com]

The post Java Weekly, Issue 388 first appeared on Baeldung.
       

Exclusions from Jacoco Report

$
0
0

1. Introduction

In this article, we'll see how to exclude certain classes and packages from JaCoCo test coverage reports.

Generally, the candidates for exclusion can be configuration classes, POJOs, DTOs as well as generated byte code. These carry no specific business logic and it could be useful to exclude them from the reports in order to provide a better view of test coverage.

We'll explore various ways of exclusion in both Maven and a Gradle project.

2. Example

Let's start with a sample project where we have all the required code already covered by tests.

Next, we'll generate the coverage report by running mvn clean package or mvn jacoco:report:

Here, this report shows that we already have the required coverage, and missed instructions should be excluded from JaCoCo report metrics.

3. Excluding Using Plugin Configuration

Classes and packages can be excluded using standard * and ? wildcard syntax in the plugin configuration:

  • * matches zero or more characters
  • ** matches zero or more directories
  • ? matches a single character

3.1. Maven Configuration

Let's update the Maven plugin to add several excluded patterns:

<plugin> 
    <groupId>org.jacoco</groupId>
    <artifactId>jacoco-maven-plugin</artifactId>
    <configuration>
        <excludes>
            <exclude>com/baeldung/**/ExcludedPOJO.class</exclude>
            <exclude>com/baeldung/**/*DTO.*</exclude>
            <exclude>**/config/*</exclude>
        </excludes>
     </configuration>
     ...
</plugin>

Here, we've specified the following exclusions:

  • ExcludedPOJO class in any sub-package under com.baeldung package
  • all classes with names ending in DTO in any sub-package under com.baeldung package
  • the config package declared anywhere in the root or sub-packages

3.2. Gradle Configuration

We can also apply the same exclusions in a Gradle project.

First, let's update the JaCoCo configuration in build.gradle and specify a list of exclusion, using the same patterns, as earlier:

jacocoTestReport {
    dependsOn test // tests are required to run before generating the report
    
    afterEvaluate {
        classDirectories.setFrom(files(classDirectories.files.collect {
            fileTree(dir: it, exclude: [
                "com/baeldung/**/ExcludedPOJO.class",
                "com/baeldung/**/*DTO.*",
                "**/config/*"
            ])
        }))
    }
}

Above, we use a closure to traverse the class directories and eliminate files that match a list of specified patterns. As a result, generating the report using ./gradlew jacocoTestReport or ./gradlew clean test will exclude all the specified classes and packages, as expected.

It's worth noting that the JaCoCo plugin is bound to the test phase here which runs all the tests prior to generating the reports.

4. Excluding With Custom Annotation

Starting from JaCoCo 0.8.2, we can exclude classes and methods by annotating them with a custom annotation with the following properties:

  • The name of the annotation should include Generated.
  • The retention policy of annotation should be runtime or class.

First, let's create our annotation:

@Documented
@Retention(RUNTIME)
@Target({TYPE, METHOD})
public @interface Generated {
}

Now we can annotate class(es) or method(s) that should be excluded from the coverage report.

Let's use this annotation at the class level first:

@Generated
public class Customer {
    // everything in this class will be excluded from jacoco report because of @Generated
}

Similarly, we can also apply this custom annotation to a specific method in a class:

public class CustomerService {
    @Generated
    public String getCustomerId() {
        // method excluded form coverage report
    }
    
    public String getCustomerName() {
        // method included in test coverage report
    }
}

5. Excluding Lombok Generated Code

Project Lombok is a popular library for greatly reducing boilerplate and repetitive code in Java projects.

Lastly, let's see how to exclude all Lombok-generated bytecode by adding a property to lombok.config file in our project's root directory:

lombok.addLombokGeneratedAnnotation = true

Basically, this property adds the lombok.@Generated annotation to the relevant methods, classes, and fields of all classes annotated with Lombok annotations e.g. the Product class. As a result, JaCoCo then ignores all the constructs annotated with this annotation and they're not shown in the reports.

Finally, we can see the report after applying all the exclusion techniques shown above:

6. Conclusion

In this article, we looked at various ways of specifying exclusions from the JaCoCo test report.

Initially, we excluded several files and packages using naming patterns in the plugin configuration. Then, we saw how to use @Generated to exclude certain classes as well as methods. Finally, we looked at how to exclude all the Lombok-generated code from the test coverage report using a config file.

As always, the Maven source code and Gradle source code are available over on Github.

The post Exclusions from Jacoco Report first appeared on Baeldung.
       

Spring Boot Error ApplicationContextException

$
0
0

1. Overview

In this quick tutorial, we're going to take a close look at the Spring Boot error “ApplicationContextException: Unable to start ServletWebServerApplicationContext due to missing ServletWebServerFactory bean“.

First of all, we're going to shed light on the main causes behind this error. Then, we'll dive into how to reproduce it using a practical example and finally how to solve it.

2. Possible Causes

First, let's try to understand what the error message means. “Unable to start ServletWebServerApplicationContext due to missing ServletWebServerFactory bean” says it all. It simply tells us that there is no configured ServletWebServerFactory bean in the ApplicationContext.

The error comes up mainly when Spring Boot fails to start the ServletWebServerApplicationContext. Why? Because the ServletWebServerApplicationContext uses a contained ServletWebServerFactory bean to bootstrap itself.

In general, Spring Boot provides the SpringApplication.run method to bootstrap Spring applications.

The SpringApplication class will attempt to create the right ApplicationContext for us, depending on whether we are developing a web application or not.

For example, the algorithm used to determine if a web application comes from some dependencies like spring-boot-starter-web. With that being said, the absence of these dependencies can be one of the reasons behind our error.

Another cause would be missing the @SpringBootApplication annotation in the Spring Boot entry point class.

3. Reproducing the Error

Now, let's see an example where we can produce the Spring Boot error. The simplest way to achieve this is to create a main class without the @SpringBootApplication annotation.

First, let's create an entry point class and deliberately forget to annotate it with @SpringBootApplication:

public class MainEntryPoint {
    public static void main(String[] args) {
        SpringApplication.run(MainEntryPoint.class, args);
    }
}

Now, let's run our sample Spring Boot application and see what happens:

22:20:39.134 [main] ERROR o.s.boot.SpringApplication - Application run failed
org.springframework.context.ApplicationContextException: Unable to start web server; nested exception is org.springframework.context.ApplicationContextException: Unable to start ServletWebServerApplicationContext due to missing ServletWebServerFactory bean.
	...
	at com.baeldung.applicationcontextexception.MainEntryPoint.main(MainEntryPoint.java:10)
Caused by: org.springframework.context.ApplicationContextException: Unable to start ServletWebServerApplicationContext due to missing ServletWebServerFactory bean.
	at org.springframework.boot.web.servlet.context.ServletWebServerApplicationContext.getWebServerFactory(ServletWebServerApplicationContext.java:209)
	at org.springframework.boot.web.servlet.context.ServletWebServerApplicationContext.createWebServer(ServletWebServerApplicationContext.java:179)
	... 

As shown above, we get “ApplicationContextException: Unable to start ServletWebServerApplicationContext due to missing ServletWebServerFactory bean” error.

4. Fixing the Error

The simple solution to fix our error would be to annotate our MainEntryPoint class with the @SpringBootApplication annotation.

By using this annotation, we tell Spring Boot to auto-configure the necessary beans and register them in the context.

Similarly, we can avoid the error for non-web applications by disabling the web environment. To do so, we can use the spring.main.web-application-type property.

In application.properties:

spring.main.web-application-type=none

Likewise, in our application.yml:

spring: 
    main: 
        web-application-type: none

none means that the application should not run as a web application. It's used to disable the webserver.

Bear in mind that starting from Spring Boot 2.0, we can also use SpringApplicationBuilder to explicitly define a specific type of web application:

@SpringBootApplication
public class MainClass {
    public static void main(String[] args) {
        new SpringApplicationBuilder(MainClass.class)
          .web(WebApplicationType.NONE)
          .run(args);
    }
}

For a WebFlux project, we can use WebApplicationType.REACTIVE. Another solution could be to exclude the spring-webmvc dependency.

The presence of this dependency in the classpath tells Spring Boot to treat the project as a servlet application and not as a reactive web application. As a result, Spring Boot fails to start the ServletWebServerApplicationContext.

5. Conclusion

In this short article, we discussed in detail what causes Spring Boot to fail at startup with this error: “ApplicationContextException: Unable to start ServletWebServerApplicationContext due to missing ServletWebServerFactory bean“.

Along the way, we explained, through a practical example, how to produce the error and how to fix it.

As always, the full source code of the examples is available over on GitHub.

The post Spring Boot Error ApplicationContextException first appeared on Baeldung.
       

Log4j Warning: “No Appenders Could Be Found for Logger”

$
0
0

1. Overview

In this tutorial, we'll show how to fix the warning, “log4j: WARN No appenders could be found for logger”. We'll explain what an appender is and how to define it. Furthermore, we will show how to solve the warning in different ways.

2. Appender Definition

Let's first explain what an appender is. Log4j allows us to put logs into multiple destinations. Each destination where it prints output is called an appender. We have appenders for the console, files, JMS, GUI components, and others.

There's no default appender defined in log4j. Additionally, a logger can have multiple appenders, in which case the logger prints output into all of them.

3. Warning Message Explained

Now that we know what an appender is, let's understand the issue at hand. The warning message says that no appender could be found for a logger.

Let's create a NoAppenderExample class to reproduce the warning:

public class NoAppenderExample {
    private final static Logger logger = Logger.getLogger(NoAppenderExample.class);
    public static void main(String[] args) {
        logger.info("Info log message");
    }
}

We run our class without any log4j configuration. After this, we can see the warning together with more details in the console output:

log4j:WARN No appenders could be found for logger (com.baeldung.log4j.NoAppenderExample).
log4j:WARN Please initialize the log4j system properly.
log4j:WARN See http://logging.apache.org/log4j/1.2/faq.html#noconfig for more info.

4. Solving the Issue With Configuration

Log4j looks by default into the application's resources for a configuration file, which can be either in XML or Java properties format. Let's now define the log4j.xml file under the resources directory:

<log4j:configuration debug="false">
    <!--Console appender -->
    <appender name="stdout" class="org.apache.log4j.ConsoleAppender">
        <layout class="org.apache.log4j.PatternLayout">
            <param name="ConversionPattern" value="%d{yyyy-MM-dd HH:mm:ss} %p %m%n"/>
        </layout>
    </appender>
    <root>
        <level value="DEBUG"/>
        <appender-ref ref="stdout"/>
    </root>
</log4j:configuration>

We defined the root logger, which exists on the top of the logger's hierarchy. All application loggers are children of it and override its configuration. We defined the root logger with one appender, which puts logs into the console.

Let's run the NoAppenderExample class again and check the console output. As a result, the log contains our statement:

2021-05-23 12:59:10 INFO Info log message

4.1. Appender Additivity

An appender doesn't have to be defined for each logger. The logging request for a given logger sends logs to the appenders defined for it and all appenders specified for loggers higher in the hierarchy. Let's show it in an example.

If logger A has defined a console appender and logger B is a child of A, logger B prints its logs to the console, too. A logger inherits appenders from its ancestor only when additivity flags in the intermediate ancestors are set to true. In case the additivity flag is set to false, appenders from loggers higher in the hierarchy are not inherited.

To prove that a logger inherits appenders from ancestors, let's add a logger for NoAppenderExample in our log4j.xml file:

<!DOCTYPE log4j:configuration SYSTEM "log4j.dtd" >
<log4j:configuration debug="false">
    ...
    <logger name="com.baeldung.log4j.NoAppenderExample" />
    ...
</log4j:configuration>

Let's run the NoAppenderExample class again. This time, the log statement appears in the console. Though the NoAppenderExample logger has no appender explicitly defined, it inherits the appender from the root logger.

5. Configuration File Not on the Classpath

Let's now consider the case where we want to define the configuration file outside an application classpath. We have two options:

  • Specify a path to the file with the java command line option: -Dlog4j.configuration=<path to log4j configuration file>
  • Define path in code: PropertyConfigurator.configure(“<path to log4j properties file>”);

In the next section, we'll see how to achieve this in our Java code.

6. Solving the Issue in Code

Let's say we don't want the configuration file. Let's remove the log4.xml file and modify the main method:

public class NoAppenderExample {
    private final static Logger logger = Logger.getLogger(NoAppenderExample.class);
    public static void main(String[] args) {
        BasicConfigurator.configure();
        logger.info("Info log message");
    }
}

We call the static configure method from the BasicConfigurator class. It adds the ConsoleAppender to the root logger. Let's look at the source code of the configure method:

public static void configure() {
    Logger root = Logger.getRootLogger();
    root.addAppender(new ConsoleAppender(new PatternLayout("%r [%t] %p %c %x - %m%n")));
}

Because the root logger in log4j always exists, we can programmatically add the console appender to it.

7. Conclusion

That concludes this short tutorial on how to solve the log4j warning about a missing appender. We explained what an appender is and how to solve the warning issue with a configuration file. Then, we explained how appender additivity works. Finally, we showed how to solve the warning in code.

As always, the source code of the example is available over on GitHub.

The post Log4j Warning: “No Appenders Could Be Found for Logger” first appeared on Baeldung.
       

Creating, Updating and Deleting Resources with the Java Kubernetes API

$
0
0

1. Introduction

In this tutorial, we'll cover CRUD operations on Kubernetes resources using its official Java API.

We've already covered the basics of this API usage in previous articles, including basic project setup and various ways in which we can use it to get information about a running cluster.

In general, Kubernetes deployments are mostly static. We create some artifacts (e.g. YAML files) describing what we want to create and submit them to a DevOps pipeline. The pieces of our system then remain the same until we add a new component or upgrade an existing one.

However, there are cases where we need to add resources on the fly. A common one is running Jobs in response to a user-initiated request. In response, the application would launch a background job to process the report and make it available for later retrieval.

The key point here is that, by using those APIs, we can make better use of the available infrastructure, as we can consume resources only when they're needed, releasing them afterward.

2. Creating a New Resource

In this example, we'll create a Job resource in a Kubernetes cluster. A Job is a kind of Kubernetes workload that, differently from other kinds, runs to completion. That is, once the programs running in its pod terminate, the job itself terminates. Its YAML representation is not unlike other resources:

apiVersion: batch/v1
kind: Job
metadata:
  namespace: jobs
  name: report-job
  labels:
    app: reports
spec:
  template:
    metadata:
      name: payroll-report
    spec:
      containers:
      - name: main
        image: report-runner
        command:
        - payroll
        args:
        - --date
        - 2021-05-01
      restartPolicy: Never

The Kubernetes API offers two ways to create the equivalent Java object:

  • Creating POJOS with new and populating all required properties via setters
  • Using a fluent API to build the Java resource representation

Which approach to use is mostly a personal preference. Here, we'll use the fluent approach to create the V1Job object, as the building process looks very similar to its YAML counterpart:

ApiClient client  = Config.defaultClient();
BatchV1Api api = new BatchV1Api(client);
V1Job body = new V1JobBuilder()
  .withNewMetadata()
    .withNamespace("report-jobs")
    .withName("payroll-report-job")
    .endMetadata()
  .withNewSpec()
    .withNewTemplate()
      .withNewMetadata()
        .addToLabels("name", "payroll-report")
        .endMetadata()
      .editOrNewSpec()
        .addNewContainer()
          .withName("main")
          .withImage("report-runner")
          .addNewCommand("payroll")
          .addNewArg("--date")
          .addNewArg("2021-05-01")
          .endContainer()
        .withRestartPolicy("Never")
        .endSpec()
      .endTemplate()
    .endSpec()
  .build(); 
V1Job createdJob = api.createNamespacedJob("report-jobs", body, null, null, null);

We start by creating the ApiClient and then API stub instance. Job resources are part of the Batch API, so we create a BatchV1Api instance, which we'll use to invoke the cluster's API server.

Next, we instantiate a V1JobBuilder instance, which kind of leads us through the process of filling all the properties.  Notice the use of nested builders: to “close” a nested builder, we must call its endXXX() method, which brings us back to its parent builder.

Alternatively, it's also possible to use a withXXX method to inject a nested object directly. This is useful when we want to reuse a common set of properties, such as metadata, labels, and annotations.

The final step is just a call to the API stub. This will serialize our resource object and POST the request to the server. As expected, there are synchronous (used above) and asynchronous versions of the API.

The returned object will contain metadata and status fields related to the created job. In the case of a Job, we can use its status field to check when it is finished. We can also one of the techniques presented in our article about monitoring resources to receive this notification.

3. Updating an Existing Resource

Updating an existing resource consists of sending a PATCH request to the Kubernetes API server, containing which fields we want to modify. As of Kubernetes version 1.16, there are four ways to specify those fields:

  • JSON Patch (RFC 6092)
  • JSON Merge Patch (RFC 7396)
  • Strategic Merge Patch
  • Apply YAML

Of those, the last one is the easiest one to use as it leaves all merging and conflict resolution to the server: all we have to do is send a YAML document with the fields we want to modify.

Unfortunately, the Java API offers no easy way to build this partial YAML document. Instead, we must resort to the PatchUtil helper class to send a raw YAML or JSON  string. However, we can use the built-in JSON serializer available through the ApiClient object to get it:

V1Job patchedJob = new V1JobBuilder(createdJob)
  .withNewMetadata()
    .withName(createdJob.getMetadata().getName())
    .withNamespace(createdJob.getMetadata().getNamespace())
    .endMetadata()
  .editSpec()
    .withParallelism(2)
  .endSpec()
  .build();
String patchedJobJSON = client.getJSON().serialize(patchedJob);
PatchUtils.patch(
  V1Job.class, 
  () -> api.patchNamespacedJobCall(
    createdJob.getMetadata().getName(), 
    createdJob.getMetadata().getNamespace(), 
    new V1Patch(patchedJobJSON), 
    null, 
    null, 
    "baeldung", 
    true, 
    null),
  V1Patch.PATCH_FORMAT_APPLY_YAML,
  api.getApiClient());

Here, we use the object returned from createNamespacedJob() as a template from which we'll construct the patched version. In this case, we're just increasing the parallelism value from one to two, leaving all other fields unchanged. An important point here is that as we build the modified resource, we must use the withNewMetadata().  This ensures that we don't build an object containing managed fields, which are present in the returned object we got after creating the resource. For a full description of managed fields and how they're used in Kubernetes, please refer to the documentation.

Once we've built an object with the modified fields, we then convert it to its JSON representation using the serialize method. We then use this serialized version to construct a V1Patch object used as the payload for the PATCH call. The patch method also takes an additional argument where we inform the kind of data present in the request. In our case, this is PATCH_FORMAT_APPLY_YAML, which the library uses as the Content-Type header included in the HTTP request.

The “baeldung” value passed to the fieldManager parameter defines the actor name who is manipulating the resource's fields. Kubernetes uses this value internally to resolve an eventual conflict when two or more clients try to modify the same resource. We also pass true in the force parameter, meaning that we'll take ownership of any modified field.

4. Deleting a Resource

Compared to the previous operations, deleting a resource is quite straightforward:

V1Status response = api.deleteNamespacedJob(
  createdJob.getMetadata().getName(), 
  createdJob.getMetadata().getNamespace(), 
  null, 
  null, 
  null, 
  null, 
  null, 
  null ) ;

Here, we're just using the deleteNamespacedJob method to remove the job using default options for this specific kind of resource. If required, we can use the last parameter to control the details of the deletion process. This takes the form of a V1DeleteOptions  object, which we can use to specify a grace period and cascading behavior for any dependent resources.

5. Conclusion

In this article, we've covered how to manipulate Kubernetes resources using the Java Kubernetes API library. As usual, the full source code of the examples can be found over on GitHub.

The post Creating, Updating and Deleting Resources with the Java Kubernetes API first appeared on Baeldung.
       

Feign Logging Configuration

$
0
0

1. Overview

In this tutorial, we'll describe how we can enable Feign client logging in our Spring Boot application. Also, we'll take a look at different types of configurations for it. For a refresher on Feign client, check out our comprehensive guide.

2. Feign Client

Feign is a declarative web service client that works by processing annotations into a templatized request. Using a Feign client, we get rid of boilerplate code to make the HTTP API requests. We just need to put in an annotated interface. Thus, the actual implementation will be created at runtime.

3. Logging Configuration

Feign client logging helps us to have a better view of the requests that have been made. To enable logging, we need to set the Spring Boot logging level to DEBUG for the class or package that contains our feign client in the application.properties file

Let's set the logging level property for a class:

logging.level.<packageName>.<className> = DEBUG

Or if we have a package where we put all our feign clients, we can add it for the whole package:

logging.level.<packageName> = DEBUG

Next, we need to set the logging level for the feign client. Notice that the previous step was just to enable the logging.

There are four logging levels to choose from:

  • NONE: no logging (DEFAULT)
  • BASIC: logs the request method and URL and the response status code and execution time
  • HEADERS: logs the basic information along with the request and response headers
  • FULL: logs the headers, body, and metadata for both requests and responses

We can configure them via java configuration or in our properties file.

3.1. Java Configuration

We need to declare a config class, let's call it FeignConfig:

public class FeignConfig {
 
    @Bean
    Logger.Level feignLoggerLevel() {
        return Logger.Level.FULL;
    }
}

After that, we'll bind the configuration class into our feign client class FooClient:

@FeignClient(name = "foo-client", configuration = FeignConfig.class)
public interface FooClient {
 
    // methods for different requests
}

3.2. Using Properties

The second way is setting it in our application.properties. Let's reference here the name of our feign client, in our case foo-client:

feign.client.config.foo-client.loggerLevel = full

Or, we can override the default config level for all feign clients:

feign.client.config.default.loggerLevel = full

4. Example

For this example, we have configured a client to read from the JSONPlaceHolder APIs. We'll retrieve all the users with the help of the feign client.

Below, we'll  declare the UserClient class:

@FeignClient(name = "user-client", url="https://jsonplaceholder.typicode.com", configuration = FeignConfig.class)
public interface UserClient {
    @RequestMapping(value = "/users", method = RequestMethod.GET)
    String getUsers();
}

We'll be using the same FeignConfig we created in the Configuration section.  Notice that the logging level continues to be Logger.Level.FULL.

Let's take a look at how the logging is looking when we call /users:

2021-05-31 17:21:54 DEBUG 2992 - [thread-1] com.baeldung.UserClient : [UserClient#getUsers] ---> GET https://jsonplaceholder.typicode.com/users HTTP/1.1
2021-05-31 17:21:54 DEBUG 2992 - [thread-1] com.baeldung.UserClient : [UserClient#getUsers] ---> END HTTP (0-byte body)
2021-05-31 17:21:55 DEBUG 2992 - [thread-1] com.baeldung.UserClient : [UserClient#getUsers] <--- HTTP/1.1 200 OK (902ms)
2021-05-31 17:21:55 DEBUG 2992 - [thread-1] com.baeldung.UserClient : [UserClient#getUsers] access-control-allow-credentials: true
2021-05-31 17:21:55 DEBUG 2992 - [thread-1] com.baeldung.UserClient : [UserClient#getUsers] cache-control: max-age=43200
2021-05-31 17:21:55 DEBUG 2992 - [thread-1] com.baeldung.UserClient : [UserClient#getUsers] content-type: application/json; charset=utf-8
2021-05-31 17:21:55 DEBUG 2992 - [thread-1] com.baeldung.UserClient : [UserClient#getUsers] date: Mon, 31 May 2021 14:21:54 GMT
                                                                                            // more headers
2021-05-31 17:21:55 DEBUG 2992 - [thread-1] com.baeldung.UserClient : [UserClient#getUsers] [
  {
    "id": 1,
    "name": "Leanne Graham",
    "username": "Bret",
    "email": "Sincere@april.biz",
    // more user details
  },
  // more users objects
]
2021-05-31 17:21:55 DEBUG 2992 - [thread-1] com.baeldung.UserClient : [UserClient#getPosts] <--- END HTTP (5645-byte body)

In the first part of the log, we can see the request logged; The URL endpoint with his HTTP GET method. In this case, as it is a GET request, we don't have a request body.

The second part contains the response. It shows the headers and the body of the response.

5. Conclusion

In this short tutorial, we have looked at the Feign client logging mechanism and how we can enable it. We saw that there are multiple ways to configure it based on our needs.

As always, the example shown in this tutorial is available over on GitHub.

The post Feign Logging Configuration first appeared on Baeldung.
       

Spring Validation in the Service Layer

$
0
0

1. Overview

In this tutorial, we’ll discuss Spring validation in the service layer of a Java application. Although Spring Boot supports seamless integration with custom validators, the de-facto standard for performing validation is Hibernate Validator.

Here, we'll learn how to move our validation logic out of our controllers and into a separate service layer. Additionally, we will implement validation in the service layer in a Spring application.

2. Application Layering

Depending on the requirements, Java business applications can take several different shapes and types. For instance, we must determine which layers our application requires based on these criteria. Unless there is a specific need, many applications would not benefit from the added complexity and maintenance costs of service or repository layers.

We can fulfill all these concerns by using multiple layers. These layers are:

The Consumer layer or Web layer is the topmost layer of a web application. It's in charge of interpreting the user's inputs and providing the appropriate response. The exceptions thrown by the other layers must also be handled by the web layer. Since the web layer is our application's entry point, it's responsible for authentication and serves as the first line of protection against unauthorized users.

Under the web layer is the Service layer. It serves as a transactional barrier and houses both application and infrastructure services. Furthermore, the public API of the service layer is provided by the application services. They often serve as a transaction boundary and are in charge of authorizing transactions. Infrastructure services provide the “plumbing code” that connects to external tools including file systems, databases, and email servers. These approaches are often used by several application services.

A web application's lowest layer is the persistence layer. In other words, it's in charge of interacting with the user's data storage.

3. Validation in the Service Layer

A service layer is a layer in an application that facilitates communication between the controller and the persistence layer. Additionally, business logic is stored in the service layer. It includes validation logic in particular. The model state is used to communicate between the controller and service layers.

There are advantages and disadvantages to treating validation as business logic, and Spring's validation (and data binding) architecture does not preclude either. Validation, in particular, should not be bound to the web tier, should be simple to localize, and should allow for the use of any validator available.

Also, client input data does not always pass through the REST controller process, and if we don't validate in the Service layer as well, unacceptable data can pass through, causing several issues. In this case, we'll use the standard Java JSR-303 validation scheme.

4. Example

Let's consider a simple user account registration form developed using Spring Boot.

4.1. Simple Domain Class

To begin with, we'll have only the name, age, phone, and password attributes:

public class UserAccount {
    @NotNull(message = "Password must be between 4 to 15 characters")
    @Size(min = 4, max = 15)
    private String password;
    @NotBlank(message = "Name must not be blank")
    private String name;
    @Min(value = 18, message = "Age should not be less than 18")
    private int age;
    @NotBlank(message = "Phone must not be blank")
    private String phone;
    
    // standard constructors / setters / getters / toString
}

Here in the above class, we've used four annotations – @NotNull, @Size, @NotBlank, and @Min – to make sure that the input attributes are neither null nor blank and adhere to the size requirements.

4.2. Implementing Validation in Service Layer

There are many validation solutions available, with Spring or Hibernate handling the actual validation. On the other hand, manual validation is a viable alternative. When it comes to integrating validation into the right part of our app, this gives us a lot of flexibility.

Next, let's implement our validation in the service class:

@Service
public class UserAccountService {
    @Autowired
    private Validator validator;
    
    @Autowired
    private UserAccountDao dao;
    
    public String addUserAccount(UserAccount useraccount) {
        
        Set<ConstraintViolation<UserAccount>> violations = validator.validate(useraccount);
        if (!violations.isEmpty()) {
            StringBuilder sb = new StringBuilder();
            for (ConstraintViolation<UserAccount> constraintViolation : violations) {
                sb.append(constraintViolation.getMessage());
            }
            dao.addUserAccount(useraccount);
            throw new ConstraintViolationException("Error occurred: " + sb.toString(), violations);
        }         
        return "Account for " + useraccount.getName() + " Added!";
    }
}

Validator is part of the Bean Validation API and responsible for validating Java objects. Furthermore, Spring automatically provides a Validator instance, which we can inject into our UserAccountService. The Validator is used to validate a passed object within the validate(..) function. The result is a Set of ConstraintViolation.

If no validation constraints are violated (the object is valid), the Set is empty. Otherwise, we throw a ConstraintViolationException.

4.3. Implementing a REST Controller

After this, let's build the Spring REST Controller class to display the service to the client or end-user and evaluate input validation for the application:

@RestController
public class UserAccountController {
    @Autowired
    private UserAccountService service;
    @PostMapping("/addUserAccount")
    public Object addUserAccount(@RequestBody UserAccount userAccount) {
        return service.addUserAccount(userAccount);
    }
}

We haven't used the @Valid annotation in the above REST controller form to prevent any validation.

4.4. Testing the REST Controller

Now, let's test this method by running the Spring Boot application. After that, using Postman or any other API testing tool, we'll post the JSON input to the localhost:8080/addUserAccount URL:

{
   "name":"Baeldung",
   "age":25,
   "phone":"1234567890",
   "password":"test",
   "useraddress":{
      "countryCode":"UK"
   }
}
After confirming that the test runs successfully, let's now check if the validation is working as per the expectation. The next logical step is to test the application with few invalid inputs. Hence, we'll update our input JSON with invalid values:
{
   "name":"",
   "age":25,
   "phone":"1234567890",
   "password":"",
   "useraddress":{
      "countryCode":"UK"
   }
}
The console now shows the error message, Hence, we can see how the usage of Validator is essential for validation:
Error occurred: Password must be between 4 to 15 characters, Name must not be blank

5. Pros and Cons

In the service/business layer, this is often a successful approach for validation. It isn't restricted to method parameters and can be applied to a variety of objects. We may, for example, load an object from a database, change it, and then validate it before proceeding.

We can also use this method for unit tests so we can actually mock the Service class. In order to facilitate real validation in unit tests, we can manually generate the necessary Validator instance.

Neither case requires bootstrapping a Spring application context in our tests.

6. Conclusion

In this quick tutorial, we explored different layers of Java business applications. We learned how to move our validation logic out of our controllers and into a separate service layer. Furthermore, we implemented one approach to performing validation in the service layer of a Spring application.

The post Spring Validation in the Service Layer first appeared on Baeldung.
       

Understanding the Pattern.quote Method

$
0
0

1. Overview

When using regular expressions in Java, sometimes we need to match regex patterns in their literal formwithout processing any metacharacters present in those sequences.

In this quick tutorial, let's see how we can escape metacharacters inside regular expressions both manually and using the Pattern.quote() method provided by Java.

2. Without Escaping Metacharacters

Let's consider a string holding a list of dollar amounts:

String dollarAmounts = "$100.25, $100.50, $150.50, $100.50, $100.75";

Now, let's imagine we need to search for occurrences of a specific amount of dollars inside it. Let's initialize a regular expression pattern string accordingly:

String patternStr = "$100.50";

First off, let's find out what happens if we execute our regex search without escaping any metacharacters:

public void whenMetacharactersNotEscaped_thenNoMatchesFound() {
    Pattern pattern = Pattern.compile(patternStr);
    Matcher matcher = pattern.matcher(dollarAmounts);
    int matches = 0;
    while (matcher.find()) {
        matches++;
    }
    assertEquals(0, matches);
}

As we can see, matcher fails to find even a single occurrence of $150.50 within our dollarAmounts string. This is simply due to patternStr starting with a dollar sign which happens to be a regular expression metacharacter specifying an end of a line.

As you probably should have guessed, we'd face the same issue over all the regex metacharacters. We won't be able to search for mathematical statements that include carets (^) for exponents like “5^3“, or text that use backslashes (\) such as “users\bob“.

3. Manually Ignore Metacharacters

So secondly, let's escape the metacharacters within our regular expression before we perform our search:

public void whenMetacharactersManuallyEscaped_thenMatchingSuccessful() {
    String metaEscapedPatternStr = "\\Q" + patternStr + "\\E";
    Pattern pattern = Pattern.compile(metaEscapedPatternStr);
    Matcher matcher = pattern.matcher(dollarAmounts);
    int matches = 0;
    while (matcher.find()) {
        matches++;
    }
    assertEquals(2, matches);
}

This time, we have successfully performed our search; But this can't be the ideal solution due to a couple of reasons:

  • String concatenation carried out when escaping the metacharacters that make the code more difficult to follow.
  • Less clean code due to the addition of hard-coded values.

4. Use Pattern.quote()

Finally, let's see the easiest and cleanest way to ignore metacharacters in our regular expressions.

Java provides a quote() method inside their Pattern class to retrieve a literal pattern of a string:

public void whenMetacharactersEscapedUsingPatternQuote_thenMatchingSuccessful() {
    String literalPatternStr = Pattern.quote(patternStr);
    Pattern pattern = Pattern.compile(literalPatternStr);
    Matcher matcher = pattern.matcher(dollarAmounts);
    int matches = 0;
    while (matcher.find()) {
        matches++;
    }
    assertEquals(2, matches);
}

5. Conclusion

In this article, we looked at how we can process regular expression patterns in their literal forms.

We saw how not escaping regex metacharacters failed to provide the expected results and how escaping metacharacters inside regex patterns can be performed manually and using the Pattern.quote() method.

The full source code for all the code samples used here can be found over on GitHub.

The post Understanding the Pattern.quote Method first appeared on Baeldung.
       

Inserting Null Into an Integer Column Using JDBC

$
0
0

1. Introduction

In this article, we'll examine how we can store null values in our database using plain JDBC. We'll start by describing the reasons for using null values, followed by several code examples.

2. Using null Values

null is a keyword that transcends all programming languages. It represents a special value. It's a common perception that null has no value or that it represents nothing. Having a null stored in a database column means that space is reserved on the hard disk. If an appropriate value becomes available, we can store it in that space.

Another perception is that null is equal to zero or a blank string. Zero or a blank string in a specific context can have meaning, for example, zero items in the warehouse. Also, we can execute operations like sum or concat on these two values. But those operations have no meaning when dealing with null.

Using null values to represent special cases in our data has many advantages. One of those advantages is that most database engines exclude null values from internal functions such as sum or avg. On the other hand, when null is in our code, we can program special actions to mitigate the missing values.

Bringing null to the table also brings a couple of disadvantages. When writing code that deals with data containing null values, we have to handle that data differently. This can lead to bad-looking code, clutter, and bugs. Also, null values can have a variable length in the database. null stored in Integer and Byte columns will have different lengths.

3. Implementation

For our example, we'll use a simple Maven module with an H2 in-memory database. No other dependencies are required.

First, let's create our POJO class named Person. This class will have four fields. Id used as the primary key for our database, name, and lastName, which are strings and age represented as Integer. Age is not a required field and can be null:

public class Person {
    private Integer id;
    private String name;
    private String lastName;
    private Integer age;
    //getters and setters
}

To create a database table that reflects this Java class, we'll use the following SQL query:

CREATE TABLE Person (id INTEGER not null, name VARCHAR(50), lastName VARCHAR(50), age INTEGER, PRIMARY KEY (id));

With all that out of the way, now we can focus on our main goal. To set a null value into the Integer column, there are two defined ways in the PreparedStatement interface.

3.1. Using the setNull Method

With the setNull method, we're always sure that our field value is null before executing the SQL query. This allows us for more flexibility in the code.

With the column index, we must also supply the PreparedStatement instance with information about the underlying column type. In our case, this is java.sql.Types.INTEGER.

This method is reserved only for null values. For any other, we must use the appropriate method of PreparedStatement instance:

@Test
public void givenNewPerson_whenSetNullIsUsed_thenNewRecordIsCreated() throws SQLException {
    Person person = new Person(1, "John", "Doe", null);
    try (PreparedStatement preparedStatement = DBConfig.getConnection().prepareStatement(SQL)) {
        preparedStatement.setInt(1, person.getId());
        preparedStatement.setString(2, person.getName());
        preparedStatement.setString(3, person.getLastName());
        if (person.getAge() == null) {
            preparedStatement.setNull(4, Types.INTEGER);
        }
        else {
            preparedStatement.setInt(4, person.getAge());
        }
        int noOfRows = preparedStatement.executeUpdate();
        assertThat(noOfRows, equalTo(1));
    }
}

In the case that we don't check whether or not the getAge method returns null and call the setInt method with a null value, we'll get a NullPointerException.

3.2. Using the setObject Method

The setObject method gives us less flexibility to deal with missing data in our code. We can pass the data we have, and the underlying structure will map Java Object types to SQL types.

Note that not all databases will allow passing null without specifying a SQL type. For example, the JDBC driver cannot infer SQL types from null.

To be on the safe side with this method, it's best to pass a SQL type to the setObject method:

@Test
public void givenNewPerson_whenSetObjectIsUsed_thenNewRecordIsCreated() throws SQLException {
    Person person = new Person(2, "John", "Doe", null);
    try (PreparedStatement preparedStatement = DBConfig.getConnection().prepareStatement(SQL)) {
        preparedStatement.setInt(1, person.getId());
        preparedStatement.setString(2, person.getName());
        preparedStatement.setString(3, person.getLastName());
        preparedStatement.setObject(4, person.getAge(), Types.INTEGER);
        int noOfRows = preparedStatement.executeUpdate();
        assertThat(noOfRows, equalTo(1));
    }
}

4. Conclusion

In this tutorial, we explained some basic usages of null values in databases. Then we provided examples of how to store null values inside Integer columns with plain JDBC.

As always, all code can be found over on GitHub.

The post Inserting Null Into an Integer Column Using JDBC first appeared on Baeldung.
       

Interface With Default Methods vs Abstract Class

$
0
0

1. Introduction

After the introduction of default methods in Java interfaces, it seemed that there was no longer any difference between an interface and an abstract class. But, that's not the case — there are some fundamental differences between them.

In this tutorial, we'll take a closer look at both the interface and abstract class to see how they differ.

2. Why Use a default Method?

The purpose of the default method is to provide external functionality without breaking the existing implementations. The original motivation behind introducing the default method was to provide backward compatibility to the Collection Framework with the new lambda functions.

3. Interface With default Method vs Abstract Class

Let's take a look at the main fundamental differences.

3.1. State

The abstract class can have a state, and its methods can access the implementation's state. Although default methods are allowed in an interface, they can't access the implementation's state.

Any logic we write in the default method should be with respect to other methods of the interface — those methods will be independent of the object's state.

Let's say that we've created an abstract class, CircleClass, which contains a String, color, to represent the state of the CircleClass object:

public abstract class CircleClass {
    private String color;
    private List<String> allowedColors = Arrays.asList("RED", "GREEN", "BLUE");
    public boolean isValid() {
        if (allowedColors.contains(getColor())) {
            return true;
        } else {
            return false;
        }
    }
    //standard getters and setters
}

In the above abstract class, we have a non-abstract method called isValid() to validate a CircleClass object based on its state. The isValid() method can access the state of a CircleClass object and validate the instance of CircleClass based on the allowed colors. Due to this behavior, we can write any logic in the abstract class method based on the object's state.

Let's create a simple implementation class of CircleClass:

public class ChildCircleClass extends CircleClass {
}

Now, let's create an instance and validate the color:

CircleClass redCircle = new ChildCircleClass();
redCircle.setColor("RED");
assertTrue(redCircle.isValid());

Here, we can see that when we put a valid color in the CircleClass object and call the isValid() method, internally, the isValid() method can access the state of the CircleClass object and check if the instance contains a valid color or not.

Let's try to do something similar using an interface with a default method:

public interface CircleInterface {
    List<String> allowedColors = Arrays.asList("RED", "GREEN", "BLUE");
    String getColor();
    
    public default boolean isValid() {
        if (allowedColors.contains(getColor())) {
            return true;
        } else {
            return false;
        }
    }
}

As we know, an interface can't have a state, and therefore, the default method can't access the state.

Here, we've defined the getColor() method to provide the state information. The child class will override the getColor() method to provide the state of the instance at runtime:

public class ChidlCircleInterfaceImpl implements CircleInterface {
    private String color;
    @Override
    public String getColor() {
        return color;
    }
    public void setColor(String color) {
        this.color = color;
    }
}

Let's create an instance and validate the color:

ChidlCircleInterfaceImpl redCircleWithoutState = new ChidlCircleInterfaceImpl();
redCircleWithoutState.setColor("RED");
assertTrue(redCircleWithoutState.isValid());

As we can see here, we're overriding the getColor() method in the child class so that the default method validates the state at runtime.

3.2. Constructors

Abstract classes can have constructors, allowing us to initialize the state upon creation. Interfaces, of course, do not have constructors.

3.3. Syntactical Differences

Additionally, there are few differences regarding syntax. An abstract class can override Object class methods, but an interface can't.

An abstract class can declare instance variables, with all possible access modifiers, and they can be accessed in child classes. An interface can only have public, static, and final variables and can't have any instance variables.

Additionally, an abstract class can declare instances and static blocks, whereas an interface can't have either of these.

Finally, an abstract class can't refer to a lambda expression, while the interface can have a single abstract method that can refer to a lambda expression.

4. Conclusion

This article shows the difference between an abstract class and an interface with a default method. We've also seen which one is best suited based on our scenario.

Whenever possible, we should always choose an interface with the default method because it allows us to extend a class and also implement an interface.

As usual, all the code samples shown in this article are available over on GitHub.

The post Interface With Default Methods vs Abstract Class first appeared on Baeldung.
       

Max-HTTP-Header-Size in Spring Boot 2

$
0
0

1. Overview

Spring Boot web applications include a pre-configured, embedded web server by default. In some situations, though, we'd like to modify the default configuration to meet custom requirements.

In this tutorial, we’ll see how to set and use the max-http-header-size property for request headers in the application.properties file in a Spring Boot 2.x application.

2. Max-HTTP-Header-Size

Spring Boot supports Tomcat, Undertow, and Jetty as embedded servers. In general, we write the server configurations inside the application.properties file or application.yaml file in a Spring Boot application.

Most web servers have their own set of size limits for HTTP request headers. The HTTP header values are restricted by server implementations. In a Spring Boot application, the max HTTP header size is configured using server.max-http-header-size.

The actual default value for Tomcat and Jetty is 8kB, and the default value for Undertow is 1MB.

To modify the max HTTP header size, we'll add the property to our application.properties file:

server.max-http-header-size=20000

Likewise for the application.yaml format:

server:
    max-http-header-size: 20000

From Spring Boot 2.1, we'll now use a DataSize parsable value:

server.max-http-header-size=10KB

3. Request Header Is Too Large

Suppose a request is sent where the total HTTP header size is larger than the max-http-header-size value. The server rejects the request with a “400 Bad request” error. We'll see this error in our log file in the next example.

Let's create a controller which has a header property called token:

@RestController
@RequestMapping(value = "/request-header-test")
public class MaxHttpHeaderSizeController {
    @GetMapping
    public boolean testMaxHTTPHeaderSize(@RequestHeader(value = "token") String token) {
	return true;
    }
}

Next, let's add some properties to our application.properties file:

## Server connections configuration
server.tomcat.threads.max=200
server.connection-timeout=5s
server.max-http-header-size=8KB
server.tomcat.max-swallow-size=2MB
server.tomcat.max-http-post-size=2MB

When we pass a String value that has a size greater than 8kb in the token, we'll get the 400 error as below:

400 for max-http-header-size

And in the log, we see the below error:

19:41:50.757 [http-nio-8080-exec-7] INFO  o.a.coyote.http11.Http11Processor - Error parsing HTTP request header
 Note: further occurrences of HTTP request parsing errors will be logged at DEBUG level.
java.lang.IllegalArgumentException: Request header is too large
...

4. Solution

We can increase the value of the max-http-header-size property in our application.properties file as per our requirements.

In the above program, we can upgrade its value from the default 8kb to 40KB, which will resolve the problem.

server.max-http-header-size=40KB

Now, the server will process the request and send back a 200 response as below:

Max-HTTP-Header-Size

Hence, whenever the header size exceeds the default values listed by the server, we'll see the server returns a 400-Bad Request with an error “request header is too large”. We have to override the max-http-header-size value in the application configuration file to match the request header length, as we see in the above example.

In general, a request header might become too large when for example, the token used is very long due to encryption.

5. Conclusion

In this tutorial, we've learned how to use the max-http-header-size property in the application configuration files of our Spring Boot application.

Then, we saw what happens when we pass a request header exceeding this size and how to increase the size of max-http-header-size in our application.properties.

As always, the source code for these examples is available over on GitHub.

The post Max-HTTP-Header-Size in Spring Boot 2 first appeared on Baeldung.
       
Viewing all 4464 articles
Browse latest View live


<script src="https://jsc.adskeeper.com/r/s/rssing.com.1596347.js" async> </script>