Quantcast
Channel: Baeldung
Viewing all 4464 articles
Browse latest View live

Wire Tap Enterprise Integration Pattern

$
0
0

1. Overview

In this tutorial, we'll cover the Wire Tap Enterprise Integration Pattern (EIP), which helps us monitor messages flowing through the system.

This pattern allows us to intercept the messages without permanently consuming them off the channel.

2. Wire Tap Pattern

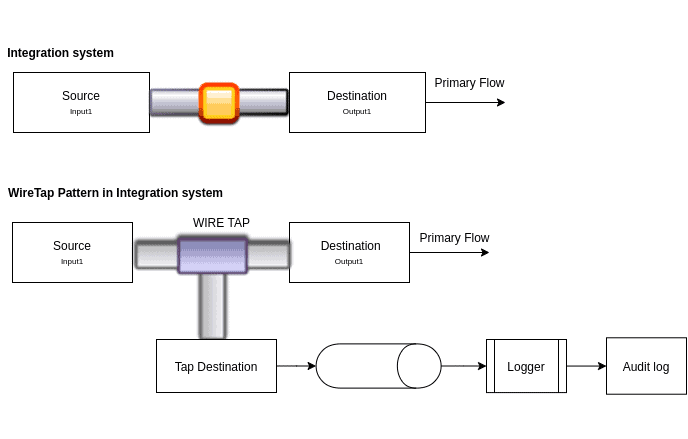
The Wire Tap inspects messages that travel on a Point-to-Point Channel. It receives the message, makes a copy, and sends it to the Tap Destination:

To understand this better, let's create a Spring Boot application with ActiveMQ and Camel.

3. Maven Dependencies

Let's add camel-spring-boot-dependencies:

<dependencyManagement>
    <dependencies>
        <dependency>
            <groupId>org.apache.camel.springboot</groupId>
            <artifactId>camel-spring-boot-dependencies</artifactId>
            <version>${camel.version}</version>
            <type>pom</type>
            <scope>import</scope>
        </dependency>
    </dependencies>
</dependencyManagement>

Now, we'll add camel-spring-boot-starter:

<dependency>
    <groupId>org.apache.camel.springboot</groupId>
    <artifactId>camel-spring-boot-starter</artifactId>
</dependency>

To view the messages flowing through a route, we'll also need to include ActiveMQ:

<dependency>
    <groupId>org.apache.camel.springboot</groupId>
    <artifactId>camel-activemq-starter</artifactId>
</dependency>

4. Messaging Exchange

Let's create a message object:

public class MyPayload implements Serializable {
    private String value;
    ...
}

We will send this message to the direct:source to initiate the route:

try (CamelContext context = new DefaultCamelContext()) {
    ActiveMQConnectionFactory connectionFactory = new ActiveMQConnectionFactory("vm://localhost?broker.persistent=false");
    connectionFactory.setTrustAllPackages(true);
    context.addComponent("direct", JmsComponent.jmsComponentAutoAcknowledge(connectionFactory));
    addRoute(context);
    try (ProducerTemplate template = context.createProducerTemplate()) {
        context.start();
        MyPayload payload = new MyPayload("One");
        template.sendBody("direct:source", payload);
        Thread.sleep(10000);
    } finally {
        context.stop();
    }
}

Next, we'll add a route and tap destination.

5. Tapping an Exchange

We will use the wireTap method to set the endpoint URI of the Tap Destination. Camel doesn't wait for a response from wireTap because it sets the Message Exchange Pattern to InOnly. The Wire Tap processor processes it on a separate thread:

wireTap("direct:tap").delay(1000)

Camel's Wire Tap node supports two flavors when tapping an exchange:

5.1. Traditional Wire Tap

Let's add a traditional Wire Tap route:

RoutesBuilder traditionalWireTapRoute() {
    return new RouteBuilder() {
        public void configure() {
            from("direct:source").wireTap("direct:tap")
                .delay(1000)
                .bean(MyBean.class, "addTwo")
                .to("direct:destination");
            from("direct:tap").log("Tap Wire route: received");
            from("direct:destination").log("Output at destination: '${body}'");
        }
    };
}

Here, Camel will only copy the Exchange – it won't do a deep cloneAll copies could share objects from the original exchange.

While processing multiple messages concurrently, there's a possibility of corrupting the final payload. We can create a deep clone of the payload before passing it to the Tap Destination to prevent this.

5.2. Sending a New Exchange

The Wire Tap EIP supports an Expression or Processor, pre-populated with a copy of the exchange. An Expression can only be used to set the message body.

The Processor variation gives full power over how the exchange is populated (setting properties, headers, etc).

Let's implement deep cloning in the payload:

public class MyPayload implements Serializable {
    private String value;
    ...
    public MyPayload deepClone() {
        MyPayload myPayload = new MyPayload(value);
        return myPayload;
   }
}

Now, let's implement the Processor class with a copy of the original exchange as input:

public class MyPayloadClonePrepare implements Processor {
    public void process(Exchange exchange) throws Exception {
        MyPayload myPayload = exchange.getIn().getBody(MyPayload.class);
        exchange.getIn().setBody(myPayload.deepClone());
        exchange.getIn().setHeader("date", new Date());
    }
}

We'll call it using onPrepare right after wireTap:

RoutesBuilder newExchangeRoute() throws Exception {
    return new RouteBuilder() {
        public void configure() throws Exception {
        from("direct:source").wireTap("direct:tap")
            .onPrepare(new MyPayloadClonePrepare())
            .end()
            .delay(1000);
        from("direct:tap").bean(MyBean.class, "addThree");
        }
     };
}

6. Conclusion

In this article, we implemented a Wire Tap pattern to monitor messages passing through certain message endpoints. Using Apache Camel's wireTap, we copy the message and send it to a different endpoint without altering the existing flow.

Camel supports two ways to tap an exchange. In the traditional Wire Tap, the original exchange is copied. In the second, we can create a new exchange. We can populate this new exchange with new values of message body using an Expression, or we can set headers – and optionally, the body – using a Processor.

The code sample is available over on GitHub.

The post Wire Tap Enterprise Integration Pattern first appeared on Baeldung.
       

Download a Binary File Using OkHttp

$
0
0

1. Overview

This tutorial will give a practical example of how to download a binary file using the OkHttp library.

2. Maven Dependencies

We'll start by adding the base library okhttp dependency:

<dependency>
    <groupId>com.squareup.okhttp3</groupId>
    <artifactId>okhttp</artifactId>
    <version>4.9.1</version>
</dependency>

Then, if we want to write an integration test for the module implemented with the OkHttp library, we can use the mockwebserver library. This library has the tools to mock a server and its responses:

<dependency>
    <groupId>com.squareup.okhttp3</groupId>
    <artifactId>mockwebserver</artifactId>
    <version>4.9.1</version>
    <scope>test</scope>
</dependency>

3. Requesting a Binary File

We'll first implement a class that receives as a parameter a URL from where to download the file and creates and executes an HTTP request for that URL.

To make the class testable, we'll inject the OkHttpClient and the writer in the constructor:

public class BinaryFileDownloader implements AutoCloseable {
    private final OkHttpClient client;
    private final BinaryFileWriter writer;
    public BinaryFileDownloader(OkHttpClient client, BinaryFileWriter writer) {
        this.client = client;
        this.writer = writer;
    }
}

Next, we'll implement the method that downloads the file from the URL:

public long download(String url) throws IOException {
    Request request = new Request.Builder().url(url).build();
    Response response = client.newCall(request).execute();
    ResponseBody responseBody = response.body();
    if (responseBody == null) {
        throw new IllegalStateException("Response doesn't contain a file");
    }
    double length = Double.parseDouble(Objects.requireNonNull(response.header(CONTENT_LENGTH, "1")));
    return writer.write(responseBody.byteStream(), length);
}

The process of downloading the file has four steps. Create the request using the URL. Execute the request and receive a response. Get the body of the response, or fail if it's null. Write the bytes of the body of the response to a file.

4. Writing the Response to a Local File

To write the received bytes from the response to a local file, we'll implement a BinaryFileWriter class which takes as an input an InputStream and an OutputStream and copies the contents from the InputStream to the OutputStream.

The OutputStream will be injected into the constructor so that the class can be testable:

public class BinaryFileWriter implements AutoCloseable {
    private final OutputStream outputStream;
    public BinaryFileWriter(OutputStream outputStream) {
        this.outputStream = outputStream;
    }
}

We'll now implement the method that copies the contents from the InputStream to the OutputStream. The method first wraps the InputStream with a BufferedInputStream so that we can read more bytes at once. Then we prepare a data buffer in which we temporarily store the bytes from the InputStream.

Finally, we'll write the buffered data to the OutputStream. We do this as long as the InputStream has data to be read:

public long write(InputStream inputStream) throws IOException {
    try (BufferedInputStream input = new BufferedInputStream(inputStream)) {
        byte[] dataBuffer = new byte[CHUNK_SIZE];
        int readBytes;
        long totalBytes = 0;
        while ((readBytes = input.read(dataBuffer)) != -1) {
            totalBytes += readBytes;
            outputStream.write(dataBuffer, 0, readBytes);
        }
        return totalBytes;
    }
}

5. Getting the File Download Progress

In some cases, we might want to tell the user the progress of a file download.

We'll first need to create a functional interface:

public interface ProgressCallback {
    void onProgress(double progress);
}

Then, we'll use it in the BinaryFileWriter class. This will give us at every step the total bytes that the downloader wrote so far.

First, we'll add the ProgressCallback as a field to the writer class. Then, we'll update the write method to receive as a parameter the length of the response. This will help us calculate the progress.

Then, we'll call the onProgress method with the calculated progress from the totalBytes written so far and the length:

public class BinaryFileWriter implements AutoCloseable {
    private final ProgressCallback progressCallback;
    public long write(InputStream inputStream, double length) {
        //...
        progressCallback.onProgress(totalBytes / length * 100.0);
    }
}

Finally, we'll update the BinaryFileDownloader class to call the write method with the total response length. We'll get the response length from the Content-Length header, then pass it to the write method:

public class BinaryFileDownloader {
    public long download(String url) {
        double length = getResponseLength(response);
        return write(responseBody, length);
    }
    private double getResponseLength(Response response) {
        return Double.parseDouble(Objects.requireNonNull(response.header(CONTENT_LENGTH, "1")));
    }
}

6. Conclusion

In this article, we implemented a simple yet practical example of downloading a binary file from a URL using the OkHttp library.

For a full implementation of the file download application, along with the unit tests, check out the project over on GitHub.

The post Download a Binary File Using OkHttp first appeared on Baeldung.
       

Java Weekly, Issue 390

$
0
0

1. Spring and Java

>> CopyOnWriteArrayList and Collection#toArray() [javaspecialists.eu]

Deep into safe usage of the CopyOnWriteArrayList. If you haven't been working on concurrency lately, this is a solid read.

>> What's New in Java 16 [infoq.com]

I assume you're not yet using Java 16 in production. A half-hour very well spent.

Also worth reading:

Webinars and presentations:

Time to upgrade:

2. Technical and Musings

>> Making POST and PATCH requests idempotent [mscharhag.com]

Easy to not get this right, and definitely important to – yes, idempotency is the correct way to implement these operations but also makes things so much easier long term.

>> Software Mistakes and Tradeoffs [manning.com]

Looks like a very interesting read when it's fully out, and Tomasz shared a 35% off code with me to include in this week's Java Weekly: nlbaeldung21. Enjoy

Also worth reading:

3. Pick of the Week

This is our third and hopefully last COVID launch ever:

>> All Courses on Baeldung are 30% off – starting yesterday

The post Java Weekly, Issue 390 first appeared on Baeldung.
       

Capturing Image From Webcam In Java

$
0
0

1. Overview

Usually, Java doesn't provide easy access to the computer hardware. That's why we might find it tough to access the webcam using Java.

In this tutorial, we’ll explore a few Java libraries that allow us to capture images by accessing the webcam.

2. JavaCV

First, we'll examine the javacv library. This is Bytedeco‘s Java implementation of the OpenCV computer vision library.

Let's add the latest javacv-platform Maven dependency to our pom.xml:

<dependency>
    <groupId>org.bytedeco</groupId>
    <artifactId>javacv-platform</artifactId>
    <version>1.5.5</version>
</dependency>

Similarly, when using Gradle, we can add the javacv-platform dependency in the build.gradle file:

compile group: 'org.bytedeco', name: 'javacv-platform', version: '1.5.5'

Now that we're ready with the setup, let's use the OpenCVFrameGrabber class to access the webcam and capture a frame:

FrameGrabber grabber = new OpenCVFrameGrabber(0);
grabber.start();
Frame frame = grabber.grab();

Here, we've passed the device number as 0, pointing to the default webcam of the system. However, if we have more than one camera available, then the second camera is accessible at 1, the third one at 2, and so on.

Then, we can use the OpenCVFrameConverter to convert the captured frame into an image. Also, we'll save the image using the cvSaveImage method of the opencv_imgcodecs class:

OpenCVFrameConverter.ToIplImage converter = new OpenCVFrameConverter.ToIplImage();
IplImage img = converter.convert(frame);
opencv_imgcodecs.cvSaveImage("selfie.jpg", img);

Last, we can use the CanvasFrame class to display the captured frame:

CanvasFrame canvas = new CanvasFrame("Web Cam");
canvas.showImage(frame);

Let's examine a full solution that accesses the webcam, captures an image, displays the image in a frame, and closes the frame automatically after two seconds:

CanvasFrame canvas = new CanvasFrame("Web Cam");
canvas.setDefaultCloseOperation(JFrame.EXIT_ON_CLOSE);
FrameGrabber grabber = new OpenCVFrameGrabber(0);
OpenCVFrameConverter.ToIplImage converter = new OpenCVFrameConverter.ToIplImage();
grabber.start();
Frame frame = grabber.grab();
IplImage img = converter.convert(frame);
cvSaveImage("selfie.jpg", img);
canvas.showImage(frame);
Thread.sleep(2000);
canvas.dispatchEvent(new WindowEvent(canvas, WindowEvent.WINDOW_CLOSING));

3. webcam-capture

Next, we'll examine the webcam-capture library that allows using the webcam by supporting multiple capturing frameworks.

First, let's add the latest webcam-capture Maven dependency to our pom.xml:

<dependency>
    <groupId>com.github.sarxos</groupId>
    <artifactId>webcam-capture</artifactId>
    <version>0.3.12</version>
</dependency>

Or, we can add the webcam-capture in the build.gradle for a Gradle project:

compile group: 'com.github.sarxos', name: 'webcam-capture', version: '0.3.12'

Then, let's write a simple example to capture an image using the Webcam class:

Webcam webcam = Webcam.getDefault();
webcam.open();
BufferedImage image = webcam.getImage();
ImageIO.write(image, ImageUtils.FORMAT_JPG, new File("selfie.jpg"));

Here, we accessed the default webcam to capture the image, and then we saved the image to a file.

Alternatively, we can use the WebcamUtils class to capture an image:

WebcamUtils.capture(webcam, "selfie.jpg");

Also, we can use the WebcamPanel class to display a captured image in a frame:

Webcam webcam = Webcam.getDefault();
webcam.setViewSize(WebcamResolution.VGA.getSize());
WebcamPanel panel = new WebcamPanel(webcam);
panel.setImageSizeDisplayed(true);
JFrame window = new JFrame("Webcam");
window.add(panel);
window.setResizable(true);
window.setDefaultCloseOperation(JFrame.EXIT_ON_CLOSE);
window.pack();
window.setVisible(true);

Here, we set VGA as the view size of the webcam, created the JFrame object, and added the WebcamPanel component to the frame.

4. Marvin Framework

At last, we'll explore the Marvin framework to access the webcam and capturing an image.

As usual, we'll add the latest marvin dependency to our pom.xml:

<dependency>
    <groupId>com.github.downgoon</groupId>
    <artifactId>marvin</artifactId>
    <version>1.5.5</version>
</dependency>

Or, for a Gradle project, we'll add the marvin dependency in the build.gradle file:

compile group: 'com.github.downgoon', name: 'marvin', version: '1.5.5'

Now that setup is ready, let's use the MarvinJavaCVAdapter class to connect to the default webcam by providing 0 for the device number:

MarvinVideoInterface videoAdapter = new MarvinJavaCVAdapter();
videoAdapter.connect(0);

Next, we can use the getFrame method to capture the frame, and then we'll save the image using the saveImage method of the MarvinImageIO class:

MarvinImage image = videoAdapter.getFrame();
MarvinImageIO.saveImage(image, "selfie.jpg");

Also, we can use the MarvinImagePanel class to display an image in a frame:

MarvinImagePanel imagePanel = new MarvinImagePanel();
imagePanel.setImage(image);
imagePanel.setSize(800, 600);
imagePanel.setVisible(true);

5. Conclusion

In this short article, we examined a few Java libraries that provide easy access to the webcam.

First, we explored the javacv-platform library that provides a Java implementation of the OpenCV project. Then, we saw the example implementation of the webcam-capture library to capture images using a webcam. Last, we took a look at the simple examples to capture the images using the Marvin framework.

As usual, all the code implementations are available over on GitHub.

The post Capturing Image From Webcam In Java first appeared on Baeldung.
       

Command Line Arguments as Maven Properties

$
0
0

1. Overview

In this short tutorial, we'll look at how we can pass arguments to Maven using the command line.

2. Maven Properties 

Maven properties are value placeholders. First, we need to define them under the properties tag in our pom.xml file:

<properties>
    <maven.compiler.source>1.7</maven.compiler.source>
    <maven.compiler.target>1.7</maven.compiler.target>
    <project.build.sourceEncoding>UTF-8</project.build.sourceEncoding>
    <project.reporting.outputEncoding>UTF-8</project.reporting.outputEncoding>
    <start-class>com.example.Application</start-class>
    <commons.version>2.5</commons.version>
</properties>

Then, we can use them inside other tags. For example, in this case, we'll use the “commons.version” value in our commons-io dependency:

<dependency>
    <groupId>commons-io</groupId>
    <artifactId>commons-io</artifactId>
    <version>{commons.version}</version>
</dependency>

In fact, we can use these properties anywhere in the pom.xml, such as in the build, package, or plugin sections.

3. Define Placeholders for Properties

Sometimes, we don't know a property value at development time. In this case, we can leave a placeholder instead of a value using the syntax ${some_property}, and Maven will override the placeholder value at runtime. Let's set a placeholder for COMMON_VERSION_CMD:

<properties>
    <maven.compiler.source>1.7</maven.compiler.source>
    <commons.version>2.5</commons.version>
    <version>${COMMON_VERSION_CMD}</version>
</properties>

4. Passing an Argument to Maven

Now, let's run Maven from our terminal as we usually do, with the package command, for example. But in this case, let's also add the notation -D followed by a property name:

mvn package -DCOMMON_VERSION_CMD=2.5

Maven will use the value (2.5) passed as an argument to replace the COMMON_VERSION_CMD property set in our pom.xml. This is not limited to the package command — we can pass arguments together with any Maven command, such as install, test, or build.

5. Conclusion

In this article, we looked at how to pass parameters to Maven from the command line. By using this approach, instead of modifying the pom.xml or any static configuration, we can provide properties dynamically.

The post Command Line Arguments as Maven Properties first appeared on Baeldung.
       

Guide to the ModelAssert Library for JSON

$
0
0

1. Overview

When writing automated tests for software that uses JSON, we often need to compare JSON data with some expected value.

In some cases, we can treat the actual and expected JSON as strings and perform string comparison, but this has many limitations.

In this tutorial, we'll look at how to write assertions and comparisons between JSON values using ModelAssert. We'll see how to construct assertions on individual values within a JSON document and how to compare documents. We'll also cover how to handle fields whose exact values cannot be predicted, such as dates or GUIDs.

2. Getting Started

ModelAssert is a data assertion library with a syntax similar to AssertJ and features comparable to JSONAssert. It's based on Jackson for JSON parsing and uses JSON Pointer expressions to describe paths to fields in the document.

Let's start by writing some simple assertions for this JSON:

{
   "name": "Baeldung",
   "isOnline": true,
   "topics": [ "Java", "Spring", "Kotlin", "Scala", "Linux" ]
}

2.1. Dependency

To start, let's add ModelAssert to our pom.xml:

<dependency>
    <groupId>uk.org.webcompere</groupId>
    <artifactId>model-assert</artifactId>
    <version>1.0.0</version>
    <scope>test</scope>
</dependency>

2.2. Assert a Field in a JSON Object

Let's imagine that the example JSON has been returned to us as a String, and we want to check that the name field is equal to Baeldung:

assertJson(jsonString)
  .at("/name").isText("Baeldung");

The assertJson method will read JSON from various sources, including StringFilePath, and Jackson's JsonNode. The object returned is an assertion, upon which we can use the fluent DSL (domain-specific language) to add conditions.

The at method describes a place within the document where we wish to make a field assertion. Then, isText specifies that we expect a text node with the value Baeldung.

We can assert a path within the topics array by using a slightly longer JSON Pointer expression:

assertJson(jsonString)
  .at("/topics/1").isText("Spring");

While we can write field assertions one by one, we can also combine them into a single assertion:

assertJson(jsonString)
  .at("/name").isText("Baeldung")
  .at("/topics/1").isText("Spring");

2.3. Why String Comparison Doesn't Work

Often we want to compare a whole JSON document with another. String comparison, though possible in some cases, often gets caught out by irrelevant JSON formatting issues:

String expected = loadFile(EXPECTED_JSON_PATH);
assertThat(jsonString)
  .isEqualTo(expected);

A failure message like this is common:

org.opentest4j.AssertionFailedError: 
expected: "{
    "name": "Baeldung",
    "isOnline": true,
    "topics": [ "Java", "Spring", "Kotlin", "Scala", "Linux" ]
}"
but was : "{"name": "Baeldung","isOnline": true,"topics": [ "Java", "Spring", "Kotlin", "Scala", "Linux" ]}"

2.4. Comparing Trees Semantically

To make a whole document comparison, we can use isEqualTo:

assertJson(jsonString)
  .isEqualTo(EXPECTED_JSON_PATH);

In this instance, the string of the actual JSON is loaded by assertJson, and the expected JSON document – a file described by a Path – is loaded inside the isEqualTo. The comparison is made based on the data.

2.5. Different Formats

ModelAssert also supports Java objects that can be converted to JsonNode by Jackson, as well as the yaml format.

Map<String, String> map = new HashMap<>();
map.put("name", "baeldung");
assertJson(map)
  .isEqualToYaml("name: baeldung");

For yaml handling, the isEqualToYaml method is used to indicate the format of the string or file. This requires assertYaml if the source is yaml:

assertYaml("name: baeldung")
  .isEqualTo(map);

3. Field Assertions

So far, we've seen some basic assertions. Let's look at more of the DSL.

3.1. Asserting at Any Node

The DSL for ModelAssert allows nearly every possible condition to be added against any node in the tree. This is because JSON trees may contain nodes of any type at any level.

Let's look at some assertions we might add to the root node of our example JSON:

assertJson(jsonString)
  .isNotNull()
  .isNotNumber()
  .isObject()
  .containsKey("name");

As the assertion object has these methods available on its interface, our IDE will suggest the various assertions we can add the moment we press the “.” key.

In this example, we have added lots of unnecessary conditions since the last condition already implies a non-null object.

Most often, we use JSON Pointer expressions from the root node in order to perform assertions on nodes lower down the tree:

assertJson(jsonString)
  .at("/topics").hasSize(5);

This assertion uses hasSize to check that the array in the topic field has five elements. The hasSize method operates on objects, arrays, and strings. An object's size is its number of keys, a string's size is its number of characters, and an array's size is its number of elements.

Most assertions we need to make on fields depend on the exact type of the field. We can use the methods numberarraytextbooleanNode, and object to move into a more specific subset of the assertions when we're trying to write assertions on a particular type. This is optional but can be more expressive:

assertJson(jsonString)
  .at("/isOnline").booleanNode().isTrue();

When we press the “.” key in our IDE after booleanNode, we only see autocomplete options for boolean nodes.

3.2. Text Node

When we're asserting text nodes, we can use isText to compare using an exact value. Alternatively, we can use textContains to assert a substring:

assertJson(jsonString)
  .at("/name").textContains("ael");

We can also use regular expressions via matches:

assertJson(jsonString)
  .at("/name").matches("[A-Z].+");

This example asserts that the name starts with a capital letter.

3.3. Number Node

For number nodes, the DSL provides some useful numeric comparisons:

assertJson("{count: 12}")
  .at("/count").isBetween(1, 25);

We can also specify the Java numeric type we're expecting:

assertJson("{height: 6.3}")
  .at("/height").isGreaterThanDouble(6.0);

The isEqualTo method is reserved for whole tree matching, so for comparing numeric equality, we use isNumberEqualTo:

assertJson("{height: 6.3}")
  .at("/height").isNumberEqualTo(6.3);

3.4. Array Node

We can test the contents of an array with isArrayContaining:

assertJson(jsonString)
  .at("/topics").isArrayContaining("Scala", "Spring");

This tests for the presence of the given values and allows the actual array to contain additional items. If we wish to assert a more exact match, we can use isArrayContainingExactlyInAnyOrder:

assertJson(jsonString)
   .at("/topics")
   .isArrayContainingExactlyInAnyOrder("Scala", "Spring", "Java", "Linux", "Kotlin");

We can also make this require the exact order:

assertJson(ACTUAL_JSON)
  .at("/topics")
  .isArrayContainingExactly("Java", "Spring", "Kotlin", "Scala", "Linux");

This is a good technique for asserting the contents of arrays that contain primitive values. Where an array contains objects, we may wish to use isEqualTo instead.

4. Whole Tree Matching

While we can construct assertions with multiple field-specific conditions to check out what's in the JSON document, we often need to compare a whole document against another.

The isEqualTo method (or isNotEqualTo) is used to compare the whole tree. This can be combined with at to move to a subtree of the actual before making the comparison:

assertJson(jsonString)
  .at("/topics")
  .isEqualTo("[ \"Java\", \"Spring\", \"Kotlin\", \"Scala\", \"Linux\" ]");

Whole tree comparison can hit problems when the JSON contains data that is either:

  • the same, but in a different order
  • comprised of some values that cannot be predicted

The where a method is used to customize the next isEqualTo operation to get around these.

4.1. Add Key Order Constraint

Let's look at two JSON documents that seem the same:

String actualJson = "{a:{d:3, c:2, b:1}}";
String expectedJson = "{a:{b:1, c:2, d:3}}";

We should note that this isn't strictly JSON format. ModelAssert allows us to use the JavaScript notation for JSON, as well as the wire format that usually quotes the field names.

These two documents have exactly the same keys underneath “a”, but they're in a different order. An assertion of these would fail, as ModelAssert defaults to strict key order.

We can relax the key order rule by adding a where configuration:

assertJson(actualJson)
  .where().keysInAnyOrder()
  .isEqualTo(expectedJson);

This allows any object in the tree to have a different order of keys from the expected document and still match.

We can localize this rule to a specific path:

assertJson(actualJson)
  .where()
    .at("/a").keysInAnyOrder()
  .isEqualTo(expectedJson);

This limits the keysInAnyOrder to just the “a” field in the root object.

The ability to customize the comparison rules allows us to handle many scenarios where the exact document produced cannot be fully controlled or predicted.

4.2. Relaxing Array Constraints

If we have arrays where the order of values can vary, then we can relax the array ordering constraint for the whole comparison:

String actualJson = "{a:[1, 2, 3, 4, 5]}";
String expectedJson = "{a:[5, 4, 3, 2, 1]}";
assertJson(actualJson)
  .where().arrayInAnyOrder()
  .isEqualTo(expectedJson);

Or we can limit that constraint to a path, as we did with keysInAnyOrder.

4.3. Ignoring Paths

Maybe our actual document contains some fields that are either uninteresting or unpredictable. We can add a rule to ignore that path:

String actualJson = "{user:{name: \"Baeldung\", url:\"http://www.baeldung.com\"}}";
String expectedJson = "{user:{name: \"Baeldung\"}}";
assertJson(actualJson)
  .where()
    .at("/user/url").isIgnored()
  .isEqualTo(expectedJson);

We should note that the path we're expressing is always in terms of the JSON Pointer within the actual.

The extra field “url” in the actual is now ignored.

4.4. Ignore Any GUID

So far, we've only added rules using at in order to customize comparison at specific locations in the document.

The path syntax allows us to describe where our rules apply using wildcards. When we add an at or path condition to the where of our comparison, we can also provide any of the field assertions from above to use in place of a side-by-side comparison with the expected document.

Let's say we had an id field that appeared in multiple places in our document and was a GUID that we couldn't predict.

We could ignore this field with a path rule:

String actualJson = "{user:{credentials:[" +
  "{id:\"a7dc2567-3340-4a3b-b1ab-9ce1778f265d\",role:\"Admin\"}," +
  "{id:\"09da84ba-19c2-4674-974f-fd5afff3a0e5\",role:\"Sales\"}]}}";
String expectedJson = "{user:{credentials:" +
  "[{id:\"???\",role:\"Admin\"}," +
  "{id:\"???\",role:\"Sales\"}]}}";
assertJson(actualJson)
  .where()
    .path("user","credentials", ANY, "id").isIgnored()
  .isEqualTo(expectedJson);

Here, our expected value could have anything for the id field because we've simply ignored any field whose JSON Pointer starts “/user/credentials” then has a single node (the array index) and ends in “/id”.

4.5. Match Any GUID

Ignoring fields we can't predict is one option. It's better instead to match those nodes by type, and maybe also by some other condition they must meet. Let's switch to forcing those GUIDs to match the pattern of a GUID, and let's allow the id node to appear at any leaf node of the tree:

assertJson(actualJson)
  .where()
    .path(ANY_SUBTREE, "id").matches(GUID_PATTERN)
  .isEqualTo(expectedJson);

The ANY_SUBTREE wildcard matches any number of nodes between parts of the path expression. The GUID_PATTERN comes from the ModelAssert Patterns class, which contains some common regular expressions to match things like numbers and date stamps.

4.6. Customizing isEqualTo

The combination of where with either path or at expressions allows us to override comparisons anywhere in the tree. We either add the built-in rules for an object or array matching or specify specific alternative assertions to use for individual or classes of paths within the comparison.

Where we have a common configuration, reused across various comparisons, we can extract it into a method:

private static <T> WhereDsl<T> idsAreGuids(WhereDsl<T> where) {
    return where.path(ANY_SUBTREE, "id").matches(GUID_PATTERN);
}

Then, we can add that configuration to a particular assertion with configuredBy:

assertJson(actualJson)
  .where()
    .configuredBy(where -> idsAreGuids(where))
  .isEqualTo(expectedJson);

5. Compatibility with Other Libraries

ModelAssert was built for interoperability. So far, we've seen the AssertJ style assertions. These can have multiple conditions, and they will fail on the first condition that's not met.

However, sometimes we need to produce a matcher object for use with other types of tests.

5.1. Hamcrest Matcher

Hamcrest is a major assertion helper library supported by many tools. We can use the DSL of ModelAssert to produce a Hamcrest matcher:

Matcher<String> matcher = json()
  .at("/name").hasValue("Baeldung");

The json method is used to describe a matcher that will accept a String with JSON data in it. We could also use jsonFile to produce a Matcher that expects to assert the contents of a File. The JsonAssertions class in ModelAssert contains multiple builder methods like this to start building a Hamcrest matcher.

The DSL for expressing the comparison is identical to assertJson, but the comparison isn't executed until something uses the matcher.

We can, therefore, use ModelAssert with Hamcrest's MatcherAssert:

MatcherAssert.assertThat(jsonString, json()
  .at("/name").hasValue("Baeldung")
  .at("/topics/1").isText("Spring"));

5.2. Using With Spring Mock MVC

While using response body verification in Spring Mock MVC, we can use Spring's built-in jsonPath assertions. However, Spring also allows us to use Hamcrest matchers to assert the string returned as response content. This means we can perform sophisticated content assertions using ModelAssert.

5.3. Use With Mockito

Mockito is already interoperable with Hamcrest. However, ModelAssert also provides a native ArgumentMatcher. This can be used both to set up the behavior of stubs and to verify calls to them:

public interface DataService {
    boolean isUserLoggedIn(String userDetails);
}
@Mock
private DataService mockDataService;
@Test
void givenUserIsOnline_thenIsLoggedIn() {
    given(mockDataService.isUserLoggedIn(argThat(json()
      .at("/isOnline").isTrue()
      .toArgumentMatcher())))
      .willReturn(true);
    assertThat(mockDataService.isUserLoggedIn(jsonString))
      .isTrue();
    verify(mockDataService)
      .isUserLoggedIn(argThat(json()
        .at("/name").isText("Baeldung")
        .toArgumentMatcher()));
}

In this example, the Mockito argThat is used in both the setup of a mock and the verify. Inside that, we use the Hamcrest style builder for the matcher – json. Then we add conditions to it, converting to Mockito's ArgumentMatcher at the end with toArgumentMatcher.

6. Conclusion

In this article, we looked at the need to compare JSON semantically in our tests.

We saw how ModelAssert can be used to build an assertion on individual nodes within a JSON document as well as whole trees. Then we saw how to customize tree comparison to allow for unpredictable or irrelevant differences.

Finally, we saw how to use ModelAssert with Hamcrest and other libraries.

As always, the example code from this tutorial is available over on GitHub.

The post Guide to the ModelAssert Library for JSON first appeared on Baeldung.
       

Connection Timeout vs. Read Timeout for Java Sockets

$
0
0

1. Introduction

In this tutorial, we'll focus on the timeout exceptions of Java socket programming. Our goal is to understand why these exceptions occur and how to handle them.

2. Java Sockets and Timeouts

A socket is one end-point of a logical link between two computer applications. In other words, it's a logical interface applications use to send and receive data over the network.

In general, a socket is a combination of an IP address and a port number. Each socket is assigned with a specific port number that is used to identify the service.

Connection-based services use TCP-based stream sockets. For this reason, Java provides the java.net.Socket class for client-side programming. On the other hand, server-side TCP/IP programming makes use of the java.net.ServerSocket class.

Another type of socket is the UDP-based datagram socket which is used for connectionless services. Java provides java.net.DatagramSocket for UDP operations. However, in this tutorial, we'll focus on TCP/IP sockets.

3. Connection Timed Out

3.1. What Is “Connection Timed Out”?

For establishing a connection to the server from the client-side, the socket constructor is invoked, which instantiates a socket object. The constructor takes the remote host address and the port number as input arguments. After that, it attempts to establish a connection to the remote host based on the given parameters.

The operation blocks all other processes until a successful connection is made. However, if the connection isn't successful after a certain time, the program throws a ConnectionException with a “Connection timed out” message:

java.net.ConnectException: Connection timed out: connect

From the server-side, the ServerSocket class continuously listens to incoming connection requests. When ServerSocket receives a connection request, it invokes the accept() method to instantiate a new socket object. Similarly, this method also blocks until it establishes a successful connection with the remote client.

In case the TCP handshakes are not complete, the connection remains unsuccessful. Consequently, the program throws an IOException indicating an error occurred while establishing a new connection.

3.2. Why It Occurs?

There can be several reasons for a connection timeout error:

  • No service is listening to the given port on the remote host
  • The remote host is not accepting any connection
  • The remote host is not available
  • Slow internet connection
  • No forwarding path to the remote host

3.3. How to Handle It?

Blocking times are not bounded, and a programmer can pre-set the timeout option for both client and server operations. For the client-side, we'll first create an empty socket. After that, we'll use the connect(SocketAddress endpoint, int timeout) method and set the timeout parameter:

Socket socket = new Socket(); 
SocketAddress socketAddress = new InetSocketAddress(host, port); 
socket.connect(socketAddress, 30000);

The timeout unit is in milliseconds and should be greater than 0. However, if the timeout expires before the method call returns, it will throw a SocketTimeoutException:

Exception in thread "main" java.net.SocketTimeoutException: Connect timed out

For the server-side, we'll use the setSoTimeout(int timeout) method to set a timeout value. The timeout value defines how long the ServerSocket.accept() method will block:

ServerSocket serverSocket = new new ServerSocket(port);
serverSocket.setSoTimeout(40000);

Similarly, the timeout unit should be in milliseconds and should be greater than 0. If the timeout elapses before the method returns, it will throw a SocketTimeoutException.

Sometimes, firewalls block certain ports due to security reasons. As a result, a “connection timed out” error can occur when a client is trying to establish a connection to a server. Therefore, we should check the firewall settings to see if it's blocking a port before binding it to a service.

4. Read Timed Out

4.1. What Is “Read Timed Out”?

The read() method call in the InputStream blocks until it finishes reading data bytes from the socket. The operation waits until it reads at least one data byte from the socket. However, if the method doesn't return anything after an unspecified time, it throws an InterrupedIOException with a “Read timed out” error message:

java.net.SocketTimeoutException: Read timed out

4.2. Why It Occurs?

From the client side, the “read timed out” error happens if the server is taking longer to respond and send information. This could be due to a slow internet connection, or the host could be offline.

From the server side, it happens when the server takes a long time to read data compared to the preset timeout.

4.3. How to Handle It?

For both TCP client and server, we can specify the amount of time the socketInputStream.read() method blocks with the setSoTimeout(int timeout) method:

Socket socket = new Socket(host, port);
socket.setSoTimeout(30000);

However, if the timeout elapses before the method returns, the program will throw a SocketTimeoutException.

5. Conclusion

In this article, we went through the timeout exceptions in Java socket programming and learned how to handle them.

As always, the code is available over on GitHub.

The post Connection Timeout vs. Read Timeout for Java Sockets first appeared on Baeldung.
       

What Does Mono.defer() Do?

$
0
0

1. Overview

In Reactive Programming, there are many ways we can create a publisher of type Mono or Flux. Here, we'll look at the use of the defer method to delay the execution of a Mono publisher.

2. What Is The Mono.defer Method?

We can create a cold publisher which can produce at most one value using defer method of the Mono. Let's look at the method signature:

public static <T> Mono<T> defer(Supplier<? extends Mono<? extends T>> supplier)

Here, defer takes in a Supplier of Mono publisher and returns that Mono lazily when subscribed downstream.

However, the question is, what is a cold publisher or a lazy publisher? Let's look into that.

Executing thread evaluates cold publishers only when consumers subscribe to them. While the hot publisher evaluated eagerly before any subscription. We have the method Mono.just() that gives a hot publisher of type Mono.

3. How Does It Work?

Let's explore a sample use case having Supplier of type Mono:

private Mono<String> sampleMsg(String str) {
    log.debug("Call to Retrieve Sample Message!! --> {} at: {}", str, System.currentTimeMillis());
    return Mono.just(str);
}

Here, this method returns a hot Mono publisher. Let's subscribe to this eagerly:

public void whenUsingMonoJust_thenEagerEvaluation() throws InterruptedException {
    Mono<String> msg = sampleMsg("Eager Publisher");
    log.debug("Intermediate Test Message....");
    StepVerifier.create(msg)
      .expectNext("Eager Publisher")
      .verifyComplete();
    Thread.sleep(5000);
    StepVerifier.create(msg)
      .expectNext("Eager Publisher")
      .verifyComplete();
}

On execution, we can see the following in logs:

20:44:30.250 [main] DEBUG com.baeldung.mono.MonoUnitTest - Call to Retrieve Sample Message!! --> Eager Publisher at: 1622819670247
20:44:30.365 [main] DEBUG reactor.util.Loggers$LoggerFactory - Using Slf4j logging framework
20:44:30.365 [main] DEBUG com.baeldung.mono.MonoUnitTest - Intermediate Test Message....

Here, we can notice that:

  • According to the instructions sequence, the main thread eagerly executes the method sampleMsg.
  • On both subscriptions using StepVerifier, the main thread uses the same output of sampleMsg. Therefore, no new evaluation.

Let's see how Mono.defer() converts it to a cold (lazy) publisher:

public void whenUsingMonoDefer_thenLazyEvaluation() throws InterruptedException {
    Mono<String> deferMsg = Mono.defer(() -> sampleMsg("Lazy Publisher"));
    log.debug("Intermediate Test Message....");
    StepVerifier.create(deferMsg)
      .expectNext("Lazy Publisher")
      .verifyComplete();
    Thread.sleep(5000);
    StepVerifier.create(deferMsg)
      .expectNext("Lazy Publisher")
      .verifyComplete();
}

On executing this method, we can see the following logs in the console:

20:01:05.149 [main] DEBUG com.baeldung.mono.MonoUnitTest - Intermediate Test Message....
20:01:05.187 [main] DEBUG com.baeldung.mono.MonoUnitTest - Call to Retrieve Sample Message!! --> Lazy Publisher at: 1622817065187
20:01:10.197 [main] DEBUG com.baeldung.mono.MonoUnitTest - Call to Retrieve Sample Message!! --> Lazy Publisher at: 1622817070197

Here, we can notice few points from the log sequence:

  • StepVerifier executes the method sampleMsg on each subscription, instead of when we defined it.
  • After a delay of 5 seconds, the second consumer subscribing to the method sampleMsg executes it again.

This is how the defer method turns hot into a cold publisher.

4. Use Cases for Mono.defer?

Let's look at the possible use cases where we can use Mono.defer() method:

  • When we have to conditionally subscribe to a publisher
  • When each subscribed execution could produce a different result
  • deferContextual can be used for the current context-based evaluation of publisher

4.1. Sample Usage

Let's go through one sample that is using the conditional Mono.defer() method:

public void whenEmptyList_thenMonoDeferExecuted() {
    Mono<List<String>> emptyList = Mono.defer(() -> monoOfEmptyList());
    //Empty list, hence Mono publisher in switchIfEmpty executed after condition evaluation
    Flux<String> emptyListElements = emptyList.flatMapIterable(l -> l)
      .switchIfEmpty(Mono.defer(() -> sampleMsg("EmptyList")))
      .log();
    StepVerifier.create(emptyListElements)
      .expectNext("EmptyList")
      .verifyComplete();
}

Here, the supplier of Mono publisher sampleMsg is placed in switchIfEmpty method for conditional execution. Hence, sampleMsg executed only when it is subscribed lazily.

Now, let's look at the same code for the non-empty list:

public void whenNonEmptyList_thenMonoDeferNotExecuted() {
    Mono<List<String>> nonEmptyist = Mono.defer(() -> monoOfList());
    //Non empty list, hence Mono publisher in switchIfEmpty won't evaluated.
    Flux<String> listElements = nonEmptyist.flatMapIterable(l -> l)
      .switchIfEmpty(Mono.defer(() -> sampleMsg("NonEmptyList")))
      .log();
    StepVerifier.create(listElements)
      .expectNext("one", "two", "three", "four")
      .verifyComplete();
}

Here, the sampleMsg isn't executed because it isn't subscribed.

5. Conclusion

In this article, we discussed Mono.defer() method and hot/cold publishers. In addition, how we can convert a hot publisher to a cold publisher. Finally, we also discussed its working with sample use cases.

As always, the code example is available over on GitHub.

The post What Does Mono.defer() Do? first appeared on Baeldung.
       

Java DocLint

$
0
0

1. Overview

There are so many reasons why using Javadoc is a good idea. For example, we can generate HTML from our Java code, traverse through their definitions, and discover various properties related to them.

Moreover, it facilitates communication among developers and improves maintainability. Java DocLint is a tool to analyze our Javadoc. It throws warnings and errors whenever it finds bad syntax.

In this tutorial, we focus on how we can use it. Later, we'll look at the problems it can create in certain situations, along with some guidelines on how we can avoid them.

2. How to Use DocLint

Suppose we have a class file named Sample.java:

/**
 * This sample file creates a class that
 * just displays sample string on standard output.
 *
 * @autho  Baeldung
 * @version 0.9
 * @since   2020-06-13 
 */
public class Sample {
    public static void main(String[] args) {
        // Prints Sample! on standard output.
        System.out.println("Sample!");
    }
}

Purposefully, There is a mistype here, the @author parameter is written @autho. Let's see what happens if we try to make Javadoc without DocLint:

As we can see from the console output, the Javadoc engine couldn't figure out the mistake in our documentation and did not return any errors or warnings.

To make Java DocLint return this type of warning, we have to execute the javadoc command with the –Xdoclint option. (we'll explain this in detail later):

As we can see in the output, it directly mentions the error in line 5 of our Java file:

Sample.java:5: error: unknown tag: autho
 * @autho  Baeldung
   ^

3. -Xdoclint

The -Xdoclint parameter has three options for different purposes. We'll take a quick look at each one.

3.1. none

The none option disables the -Xdoclint option:

javadoc -Xdoclint:none Sample.java

3.2. group

This option is useful when we want to apply certain checks related to certain groups, for example:

javadoc -Xdoclint:syntax Sample.java

There are several types of group variables:

  • accessibility – checks for the issues to be detected by an accessibility checker (for example, no caption or summary attributes specified in a table tag)
  • html – detects high-level HTML issues, like putting block elements inside inline elements or not closing elements that require an end tag
  • missing – checks for missing Javadoc comments or tags (for example, a missing comment or class, or a missing @return tag or similar tag on a method)
  • reference – checks for issues relating to the references to Java API elements from Javadoc tags (for example, item not found in @see, or a bad name after @param)
  • syntax – checks for low-level issues like unescaped angle brackets (< and >) and ampersands (&) and invalid Javadoc tags

It's possible to apply multiple groups at once:

javadoc -Xdoclint:html,syntax,accessibility Sample.java

3.3. all

This option enables all groups at once, but what if we want to exclude some of them?

We could use the -group syntax:

javadoc -Xdoclint:all,-missing

4. How to Disable DocLint

Since Java DocLint didn't exist before Java 8, this can create unwanted headaches, especially in old third-party libraries.

We've already seen the none option with the javadoc command in a previous section In addition, there's an option to disable DocLint from build systems like Maven, Gradle, Ant. We'll see these in the next few subsections.

4.1. Maven

With maven-javadoc-plugin, starting with version 3.0.0, a new doclint configuration has been added. Let's see how to configure it to disable DocLint:

<plugins>
    <plugin>
        <groupId>org.apache.maven.plugins</groupId>
        <artifactId>maven-javadoc-plugin</artifactId>
        <version>3.1.1</version>
        <configuration>
            <doclint>none</doclint> <!-- Turn off all checks -->
        </configuration>
        <executions>
            <execution>
                <id>attach-javadocs</id>
                <goals>
                    <goal>jar</goal>
                </goals>
            </execution>
        </executions>
    </plugin>
</plugins>

But generally, it's not recommended to use the none option because it skips all types of checks. We should use <doclint>all,-missing</doclint> instead.

When using earlier versions (before v3.0.0), we need to use a different setting:

<plugins>
  <plugin>
    <groupId>org.apache.maven.plugins</groupId>
    <artifactId>maven-javadoc-plugin</artifactId>
    <configuration>
      <additionalparam>-Xdoclint:none</additionalparam>
    </configuration>
  </plugin>
</plugins>

4.2. Gradle

We can deactivate DocLint in Gradle projects with a simple script:

if (JavaVersion.current().isJava8Compatible()) {
    allprojects {
        tasks.withType(Javadoc) {
            options.addStringOption('Xdoclint:none', '-quiet')
        }
    }
}

Unfortunately, Gradle doesn't support additionalparam as Maven does in the example above, so we need to do it manually.

4.3. Ant

Ant uses additionalparam as Maven does, so we can set -Xdoclint:none as demonstrated above.

5. Conclusion

In this article, we looked at various ways of using Java DocLint. It can help us when we want to have a clean, error-prone Javadoc.

For additional in-depth information, it's a good idea to have a look at the official documentation.

The post Java DocLint first appeared on Baeldung.
       

A Comparison Between JPA and JDBC

$
0
0

1. Overview

In this tutorial, we're going to look at the differences between the Java Database Connectivity (JDBC) API and the Java Persistence API (JPA).

2. What Is JDBC

JDBC is a programming-level interface for Java applications that communicate with a database. An application uses this API to communicate with a JDBC manager. It's the common API that our application code uses to communicate with the database. Beyond the API is the vendor-supplied, JDBC-compliant driver for the database we're using.

3. What Is JPA

JPA is a Java standard that allows us to bind Java objects to records in a relational database. It's one possible approach to Object Relationship Mapping(ORM), allowing the developer to retrieve, store, update, and delete data in a relational database using Java objects. Several implementations are available for the JPA specification.

4. JPA vs JDBC

When it comes to deciding how to communicate with back-end database systems, software architects face a significant technological challenge. The debate between JPA and JDBC is often the deciding factor, as the two database technologies take very different approaches to work with persistent data. Let’s analyze the key differences between them.

4.1. Database Interactions

JDBC allows us to write SQL commands to read data from and update data to a relational database. JPA, unlike JDBC, allows developers to construct database-driven Java programs utilizing object-oriented semantics. The JPA annotations describe how a given Java class and its variables map to a given table and its columns in a database.

Let's see how we can map an Employee class to an employee database table:

@Entity
@Table(name = "employee")
public class Employee implements Serializable {
    @Column(name = "employee_name")
    private String employeeName;
}

The JPA framework then handles all the time-consuming, error-prone coding required to convert between object-oriented Java code and the back-end database

4.2. Managing Associations

When associating database tables in a query with JDBC, we need to write out the full SQL query, while with JPA, we simply use annotations to create one-to-one, one-to-many, many-to-one, and many-to-many associations.

Let's say our employee table has a one-to-many relationship with the communication table:

@Entity
@Table(name = "employee")
public class Employee implements Serializable {
 
    @OneToMany(mappedBy = "employee", fetch = FetchType.EAGER)
    @OrderBy("firstName asc")
    private Set communications;
}

The owner of this relationship is Communication, so we're using the mappedBy attribute in Employee to make it a bi-directional relationship.

4.3. Database Dependency

JDBC is database-dependent, which means that different scripts must be written for different databases. On the other side, JPA is database-agnostic, meaning that the same code can be used in a variety of databases with few (or no) modifications.

4.4. Exception Handling

Because JDBC throws checked exceptions, such as SQLException, we must write it in a try-catch block. On the other hand, the JPA framework uses only unchecked exceptions, like Hibernate. Hence, we don't need to catch or declare them at every place we're using them.

4.5. Performance

The difference between JPA and JDBC is essentially who does the coding: the JPA framework or a local developer. Either way, we'll have to deal with the object-relation impedance mismatch.

To be fair, when we write SQL queries incorrectly, JDBC performance can be abysmally sluggish. When deciding between the two technologies, performance shouldn't be a point of dispute. Professional developers are more than capable of producing Java applications that run equally well regardless of the technology utilized.

4.6. JDBC Dependency

JPA-based applications still use JDBC under the hood. Therefore, when we utilize JPA, our code is actually using the JDBC APIs for all database interactions. In other words, JPA serves as a layer of abstraction that hides the low-level JDBC calls from the developer, making database programming considerably easier.

4.7. Transaction Management

In JDBC, transaction management is handled explicitly by using commit and rollback. On the other hand, transaction management is implicitly provided in JPA.

5. Pros and Cons

The most obvious benefit of JDBC over JPA is that it's simpler to understand. On the other side, if a developer doesn't grasp the internal workings of the JPA framework or database design, they will be unable to write good code.

Also, JPA is thought to be better suited for more sophisticated applications by many developers. But, JDBC is considered the preferable alternative if an application will use a simple database and we don't plan to migrate it to a different database vendor.

The main advantage of JPA over JDBC for developers is that they can code their Java applications using object-oriented principles and best practices without having to worry about database semantics. As a result, development can be completed more quickly, especially when software developers lack a solid understanding of SQL and relational databases.

Also, because a well-tested and robust framework is handling the interaction between the database and the Java application, we should see a decrease in errors from the database mapping layer when using JPA.

6. Conclusion

In this quick tutorial, we explored the key differences between JPA and JDBC.

While JPA brings many advantages, we have many other high-quality alternatives to use if JPA doesn’t work best for our current application requirements.

The post A Comparison Between JPA and JDBC first appeared on Baeldung.
       

How to Implement Min-Max Heap In Java

$
0
0

1. Overview

In this tutorial, we'll look at how to implement a min-max heap in Java.

2. Min-Max Heap

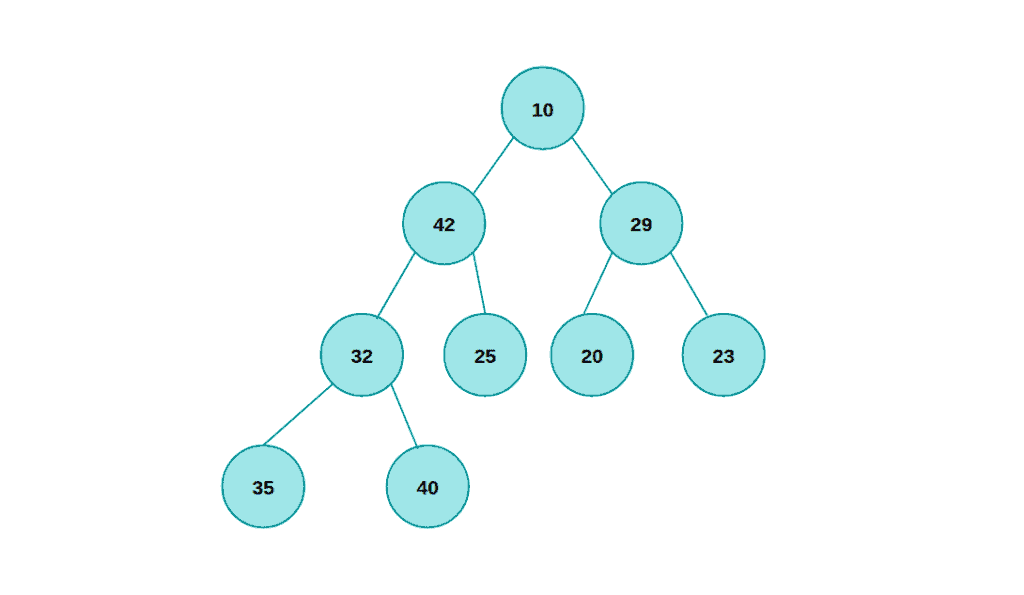
First of all, let's look at heap's definition and characteristics. The min-max heap is a complete binary tree with both traits of min heap and max heap:

As we can see above, each node at an even level in the tree is less than all of its descendants, while each node at an odd level in the tree is greater than all of its descendants, where the root is at level zero.

Each node in the min-max heap has a data member that is usually called a key. The root has the smallest key in the min-max heap, and one of the two nodes in the second level is the greatest key. For each node like X in a min-max heap:

  • If X is on a min (or even) level, then X.key is the minimum key among all keys in the subtree with root X
  • If X is on a max (or odd) level, then X.key is the maximum key among all keys in the subtree with root X

Like min-heap or max-heap, insertion and deletion can occur in the time complexity of O(logN).

3. Implementation In Java

Let's start with a simple class that represents our min-max heap:

public class MinMaxHeap<T extends Comparable<T>> {
    private List<T> array;
    private int capacity;
    private int indicator;
}

As we can see above, we use an indicator to figure out the last item index added to the array. But before we continue, we need to remember that the array index starts from zero, but we assume the index starts from one in a heap.

We can find the index of left and right children using the following methods:

private int getLeftChildIndex(int i) {
   return 2 * i;
}
private int getRightChildIndex(int i) {
    return ((2 * i) + 1);
}

Likewise, we can find the index of parent and grandparent of the item in the array by the following code:

private int getParentIndex(int i) {
   return i / 2;
}
private int getGrandparentIndex(int i) {
   return i / 4;
}

Now, let's continue with complete our simple min-max heap class:

public class MinMaxHeap<T extends Comparable<T>> {
    private List<T> array;
    private int capacity;
    private int indicator;
    MinMaxHeap(int capacity) {
        array = new ArrayList<>();
        this.capacity = capacity;
        indicator = 1;
    }
    MinMaxHeap(List<T> array) {
        this.array = array;
        this.capacity = array.size();
        this.indicator = array.size() + 1;
    }
}

We can create an instance of the min-max heap in two ways here. First, we initiate an array with an ArrayList and specific capacity, and second, we make a min-max heap from the existing array.

Now, let's discuss operations on our heap.

3.1. Create

Let's first look at building a min-max heap from an existing array. Here we use Floyd's algorithm with some adaption like the Heapify algorithm:

public List<T> create() {
    for (int i = Math.floorDiv(array.size(), 2); i >= 1; i--) {
        pushDown(array, i);
    }
    return array;
}

Let's see what exactly happened in the above code by take a look closer to pushDown in the following code:

private void pushDown(List<T> array, int i) {
    if (isEvenLevel(i)) {
        pushDownMin(array, i);
    } else {
        pushDownMax(array, i);
    }
}

As we can see, for all even levels, we check array items with pushDownMin. This algorithm is like heapify-down that we'll use for removeMin and removeMax:

private void pushDownMin(List<T> h, int i) {
    while (getLeftChildIndex(i) < indicator) {
       int indexOfSmallest = getIndexOfSmallestChildOrGrandChild(h, i);
          //...
          i = indexOfSmallest;
    }
 }

First, we find the index of the smallest child or grandchild of the ‘i' element. Then we proceed according to the following conditions.

If the smallest child or grandchild is not less than the current element, we break. In other words, the current arranges of elements are like min-heap:

if (h.get(indexOfSmallest - 1).compareTo(h.get(i - 1)) < 0) {
    //...
} else {
    break;
}

If the smallest child or grandchild is smaller than the current element, we swap it with its parent or grandparent:

if (getParentIndex(getParentIndex(indexOfSmallest)) == i) {
       if (h.get(indexOfSmallest - 1).compareTo(h.get(i - 1)) < 0) {
          swap(indexOfSmallest - 1, i - 1, h);
          if (h.get(indexOfSmallest - 1)
            .compareTo(h.get(getParentIndex(indexOfSmallest) - 1)) > 0) {
             swap(indexOfSmallest - 1, getParentIndex(indexOfSmallest) - 1, h);
           }
        }
  } else if (h.get(indexOfSmallest - 1).compareTo(h.get(i - 1)) < 0) {
      swap(indexOfSmallest - 1, i - 1, h);
 }

We'll continue the above operations until found a child for the element ‘i'.

Now, Let's see how getIndexOfSmallestChildOrGrandChild works. It's pretty easy! First, we assume the left child has the smallest value then compare it with others:

private int getIndexOfSmallestChildOrGrandChild(List<T> h, int i) {
    int minIndex = getLeftChildIndex(i);
    T minValue = h.get(minIndex - 1);
    // rest of the implementation
}

In each step, if the index is greater than the indicator, the last minimum value found is the answer.

For example, let's compare min-value with the right child:

if (getRightChildIndex(i) < indicator) {
    if (h.get(getRightChildIndex(i) - 1).compareTo(minValue) < 0) {
        minValue = h.get(getRightChildIndex(i));
        minIndex = getRightChildIndex(i);
    }
} else {
     return minIndex;
}

Now, let's create a test to verify that make a min-max heap from an unordered array works fine:

@Test
public void givenUnOrderedArray_WhenCreateMinMaxHeap_ThenIsEqualWithMinMaxHeapOrdered() {
    List<Integer> list = Arrays.asList(34, 12, 28, 9, 30, 19, 1, 40);
    MinMaxHeap<Integer> minMaxHeap = new MinMaxHeap<>(list);
    minMaxHeap.create();
    Assert.assertEquals(List.of(1, 40, 34, 9, 30, 19, 28, 12), list);
}

The algorithm for pushDownMax is identical to that for pushDownMin, but with all of the comparison, operators reversed.

3.2. Insert

Let's see how to add an element to a min-max Heap:

public void insert(T item) {
    if (isEmpty()) {
        array.add(item);
        indicator++;
    } else if (!isFull()) {
        array.add(item);
        pushUp(array, indicator);
        indicator++;
    } else {
        throw new RuntimeException("invalid operation !!!");
    }
 }

First, we check the heap is empty or not. If the heap is empty, we append the new element and increase the indicator. Otherwise, the new element that added may change the order of the min-max heap, So we need to adjust the heap with pushUp:

private void pushUp(List<T>h,int i) {
    if (i != 1) {
        if (isEvenLevel(i)) {
            if (h.get(i - 1).compareTo(h.get(getParentIndex(i) - 1)) < 0) {
                pushUpMin(h, i);
            } else {
                swap(i - 1, getParentIndex(i) - 1, h);
                i = getParentIndex(i);
                pushUpMax(h, i);
            }
        } else if (h.get(i - 1).compareTo(h.get(getParentIndex(i) - 1)) > 0) {
            pushUpMax(h, i);
        } else {
            swap(i - 1, getParentIndex(i) - 1, h);
            i = getParentIndex(i);
            pushUpMin(h, i);
        }
    }
}

As we can see above, the new element compares its parent, then:

  • If it's found to be less (greater) than the parent, then it's definitely less (greater) than all other elements on max (min) levels that are on the path to the root of the heap
  • The path from the new element to the root (considering only min/max levels) should be in a descending (ascending) order as it was before the insertion. So, we need to make a binary insertion of the new element into this sequence

Now, Let's take a look at the pushUpMin as is following:

private void pushUpMin(List<T> h , int i) {
    while(hasGrandparent(i) && h.get(i - 1)
      .compareTo(h.get(getGrandparentIndex(i) - 1)) < 0) {
        swap(i - 1, getGrandparentIndex(i) - 1, h);
        i = getGrandparentIndex(i);
    }
}

Technically, it's simpler to swap the new element with its parent while the parent is greater. Also, pushUpMax identical to pushUpMin, but with all of the comparison, operators reversed.

Now, Let's create a test to verify that insert a new element into a min-max Heap works fine:

@Test
public void givenNewElement_WhenInserted_ThenIsEqualWithMinMaxHeapOrdered() {
    MinMaxHeap<Integer> minMaxHeap = new MinMaxHeap(8);
    minMaxHeap.insert(34);
    minMaxHeap.insert(12);
    minMaxHeap.insert(28);
    minMaxHeap.insert(9);
    minMaxHeap.insert(30);
    minMaxHeap.insert(19);
    minMaxHeap.insert(1);
    minMaxHeap.insert(40);
    Assert.assertEquals(List.of(1, 40, 28, 12, 30, 19, 9, 34),
      minMaxHeap.getMinMaxHeap());
}

3.3. Find Min

The min element in a min-max heap is always located at the root, so we can find it in time complexity O(1):

public T min() {
    if (!isEmpty()) {
        return array.get(0);
    }
    return null;
}

3.4. Find Max

The max element in a min-max heap it's always located first odd level, so we can find it in time complexity O(1) with a simple comparison:

public T max() {
    if (!isEmpty()) {
        if (indicator == 2) {
            return array.get(0);
        }
        if (indicator == 3) {
            return array.get(1);
        }
        return array.get(1).compareTo(array.get(2)) < 0 ? array.get(2) : array.get(1);
    }
    return null;
}

3.5. Remove Min

In this case, we'll find the min element, then replace it with the last element of the array:

public T removeMin() {
    T min = min();
    if (min != null) {
       if (indicator == 2) {
         array.remove(indicator--);
         return min;
       }
       array.set(0, array.get(--indicator - 1));
       array.remove(indicator - 1);
       pushDown(array, 1);
    }
    return min;
}

3.6. Remove Max

Removing the max element is the same as remove min, with the only change that we find the index of the max element then call pushDown:

public T removeMax() {
    T max = max();
    if (max != null) {
        int maxIndex;
        if (indicator == 2) {
            maxIndex = 0;
            array.remove(--indicator - 1);
            return max;
        } else if (indicator == 3) {
            maxIndex = 1;
            array.remove(--indicator - 1);
            return max;
        } else {
            maxIndex = array.get(1).compareTo(array.get(2)) < 0 ? 2 : 1;
        }
        array.set(maxIndex, array.get(--indicator - 1));
        array.remove(indicator - 1);
        pushDown(array, maxIndex + 1);
    }
    return max;
}

4. Conclusion

In this tutorial, we've seen implementing a min-max heap in Java and exploring some of the most common operations.

First, we learned what exactly a min-max heap is, including some of the most common features. Then, we saw how to create, insert, find-min, find-max, remove-min, and remove-max items in our min-max heap implementation.

As usual, all the examples used in this article are available over on GitHub.

The post How to Implement Min-Max Heap In Java first appeared on Baeldung.
       

Exchanges, Queues, and Bindings in RabbitMQ

$
0
0

1. Overview

To better understand how RabbitMQ works, we need to dive into its core components.

In this article, we’ll take a look into exchanges, queues, and bindings, and how we can declare them programmatically within a Java application.

2. Setup

As usual, we’ll use the Java client and the official client for the RabbitMQ server.

First, let's add the Maven dependency for the RabbitMQ client:

<dependency>
    <groupId>com.rabbitmq</groupId>
    <artifactId>amqp-client</artifactId>
    <version>5.12.0</version>
</dependency>

Next, let's declare the connection to the RabbitMQ server and open a communication channel:

ConnectionFactory factory = new ConnectionFactory();
factory.setHost("localhost");
Connection connection = factory.newConnection();
Channel channel = connection.createChannel();

Also, a more detailed example of the setup can be found in our Introduction to RabbitMQ.

3. Exchanges

In RabbitMQ, a producer never sends a message directly to a queue. Instead, it uses an exchange as a routing mediator.

Therefore, the exchange decides if the message goes to one queue, to multiple queues, or is simply discarded.

For instance, depending on the routing strategy, we have four exchange types to choose from:

  • Direct – the exchange forwards the message to a queue based on a routing key
  • Fanout – the exchange ignores the routing key and forwards the message to all bounded queues
  • Topic – the exchange routes the message to bounded queues using the match between a pattern defined on the exchange and the routing keys attached to the queues
  • Headers – in this case, the message header attributes are used, instead of the routing key, to bind an exchange to one or more queues

Moreover, we also need to declare properties of the exchange:

  • Name – the name of the exchange
  • Durability – if enabled, the broker will not remove the exchange in case of a restart
  • Auto-Delete – when this option is enabled, the broker deletes the exchange if it is not bound to a queue
  • Optional arguments

All things considered, let’s declare the optional arguments for the exchange:

Map<String, Object> exchangeArguments = new HashMap<>();
exchangeArguments.put("alternate-exchange", "orders-alternate-exchange");

When passing the alternate-exchange argument, the exchange redirects unrouted messages to an alternative exchange, as we might guess from the argument name.

Next, let's declare a direct exchange with durability enabled and auto-delete disabled:

channel.exchangeDeclare("orders-direct-exchange", BuiltinExchangeType.DIRECT, true, false, exchangeArguments);

4. Queues

Similar to other messaging brokers, the RabbitMQ queues deliver messages to consumers based on a FIFO model.

In addition, when creating a queue, we can define several properties of the queue:

  • Name – the name of the queue. If not defined, the broker will generate one
  • Durability – if enabled, the broker will not remove the queue in case of a restart
  • Exclusive – if enabled, the queue will only be used by one connection and will be removed when the connection is closed
  • Auto-delete – if enabled, the broker deletes the queue when the last consumer unsubscribes
  • Optional arguments

Further, we'll declare the optional arguments for the queue.

Let's add two arguments, the message TTL and the maximum number of priorities:

Map<String, Object> queueArguments = new HashMap<>();
queueArguments.put("x-message-ttl", 60000);
queueArguments.put("x-max-priority", 10);

Now, let's declare a durable queue with the exclusive and auto-delete properties disabled:

channel.queueDeclare("orders-queue", true, false, false, queueArguments);

5. Bindings

Exchanges use bindings to route messages to specific queues.

Sometimes, they have a routing key attached to them, used by some types of exchanges to filter specific messages and route them to the bounded queue.

Finally, let's bind the queue that we created to the exchange using a routing key:

channel.queueBind("orders-queue", "orders-direct-exchange", "orders-routing-key");

6. Conclusion

In this article, we covered the core components of RabbitMQ – exchanges, topics, and bindings. We also learned about their role in message delivery and how we can manage them from a Java application.

As always, the complete source code for this tutorial is available over on GitHub.

The post Exchanges, Queues, and Bindings in RabbitMQ first appeared on Baeldung.
       

The settings.xml File in Maven

$
0
0

1. Overview

While using Maven, we keep most of the project specific configuration in the pom.xml.

Maven provides a settings file – settings.xml. This allows us to specify which local and remote repositories it will use. We can also use it store settings that we don't want in our source code, such as credentials.

In this tutorial, we'll look at how to use the settings.xml. We'll look at proxies, mirroring, and profiles. We'll also look at how to determine the current settings that apply to our project.

2. Configurations

The settings.xml file configures a Maven installation. It's similar to a pom.xml file but is defined globally or per user.

Let's explore the elements we can configure in the settings.xml file. The main, settings element of the settings.xml file, can contain nine possible predefined child elements:

<settings xmlns="http://maven.apache.org/SETTINGS/1.0.0" xmlns:xsi="http://www.w3.org/2001/XMLSchema-instance"
      xsi:schemaLocation="http://maven.apache.org/SETTINGS/1.0.0 https://maven.apache.org/xsd/settings-1.0.0.xsd">
    <localRepository/>
    <interactiveMode/>
    <offline/>
    <pluginGroups/>
    <servers/>
    <mirrors/>
    <proxies/>
    <profiles/>
    <activeProfiles/>
</settings>

2.1. Simple Values

Some of the top-level configuration elements contain simple values:

<settings xmlns="http://maven.apache.org/SETTINGS/1.0.0" xmlns:xsi="http://www.w3.org/2001/XMLSchema-instance"
  xsi:schemaLocation="http://maven.apache.org/SETTINGS/1.0.0 https://maven.apache.org/xsd/settings-1.0.0.xsd">
    <localRepository>${user.home}/.m2/repository</localRepository>
    <interactiveMode>true</interactiveMode>
    <offline>false</offline>
</settings>

The localRepository element points to the path of the system’s local repository. The local repository is where all the dependencies from our projects get cached. The default is to use the user's home directory. However, we could change it to allow all logged-in users to build from a common local repository.

The interactiveMode flag defines if we allow Maven to interact with the user asking for input. This flag defaults to true.

The offline flag determines if the build system may operate in offline mode. This defaults to false. However, we can switch it to true in cases where the build servers cannot connect to a remote repository.

2.2. Plugin Groups

The pluginGroups element contains a list of child elements that specify a groupId. A groupId is the unique identifier of the organization that created a specific Maven artifact:

<settings xmlns="http://maven.apache.org/SETTINGS/1.0.0" xmlns:xsi="http://www.w3.org/2001/XMLSchema-instance"
  xsi:schemaLocation="http://maven.apache.org/SETTINGS/1.0.0 https://maven.apache.org/xsd/settings-1.0.0.xsd">
    <pluginGroups>
        <pluginGroup>org.apache.tomcat.maven</pluginGroup>
    </pluginGroups>
</settings>

Maven searches the list of plugin groups when a plugin is used without a groupId provided at the command line. The list contains the groups org.apache.maven.plugins and org.codehaus.mojo by default.

The settings.xml file defined above allows us to execute truncated Tomcat plugin commands:

mvn tomcat7:help
mvn tomcat7:deploy
mvn tomcat7:run

2.3. Proxies

We can configure a proxy for some or all of Maven's HTTP requests. The proxies element allows a list of child proxy elements, but only one proxy can be active at a time:

<settings xmlns="http://maven.apache.org/SETTINGS/1.0.0" xmlns:xsi="http://www.w3.org/2001/XMLSchema-instance"
  xsi:schemaLocation="http://maven.apache.org/SETTINGS/1.0.0 https://maven.apache.org/xsd/settings-1.0.0.xsd">
    <proxies>
        <proxy>
            <id>baeldung-proxy</id>
            <active>true</active>
            <protocol>http</protocol>
            <host>baeldung.proxy.com</host>
            <port>8080</port>
            <username>demo-user</username>
            <password>dummy-password</password>
            <nonProxyHosts>*.baeldung.com|*.apache.org</nonProxyHosts>
        </proxy>
    </proxies>
</settings>

We define the currently active proxy via the active flag. Then, with the nonProxyHosts element, we specify which hosts are not proxied. The delimiter used depends on the specific proxy server. The most common delimiters are pipe and comma.

2.4. Mirrors

Repositories can be declared inside a project pom.xml. This means that the developers sharing the project code get the right repository settings out of the box.

We can use mirrors in cases when we want to define an alternative mirror for a particular repository. This overrides what's in the pom.xml.

For example, we can force Maven to use a single repository by mirroring all repository requests:

<settings xmlns="http://maven.apache.org/SETTINGS/1.0.0" xmlns:xsi="http://www.w3.org/2001/XMLSchema-instance" 
  xsi:schemaLocation="http://maven.apache.org/SETTINGS/1.0.0 https://maven.apache.org/xsd/settings-1.0.0.xsd">
    <mirrors>
        <mirror>
            <id>internal-baeldung-repository</id>
            <name>Baeldung Internal Repo</name>
            <url>https://baeldung.com/repo/maven2/</url>
            <mirrorOf>*</mirrorOf>
        </mirror>
    </mirrors>
</settings>

We may define only one mirror for a given repository and Maven will pick the first match. Normally, we should use the official repository distributed worldwide via CDN.

2.5. Servers

Defining repositories in the project pom.xml is a good practice. However, we shouldn't put security settings, such as credentials, into our source code repository with the pom.xml. Instead, we define this secure information in the settings.xml file:

<settings xmlns="http://maven.apache.org/SETTINGS/1.0.0" xmlns:xsi="http://www.w3.org/2001/XMLSchema-instance"
  xsi:schemaLocation="http://maven.apache.org/SETTINGS/1.0.0 https://maven.apache.org/xsd/settings-1.0.0.xsd">
    <servers>
        <server>
            <id>internal-baeldung-repository</id>
            <username>demo-user</username>
            <password>dummy-password</password>
            <privateKey>${user.home}/.ssh/bael_key</privateKey>
            <passphrase>dummy-passphrase</passphrase>
            <filePermissions>664</filePermissions>
            <directoryPermissions>775</directoryPermissions>
            <configuration></configuration>
        </server>
    </servers>
</settings>

We should note that the ID of the server in the settings.xml needs to match the ID element of the repository mentioned in the pom.xml. The XML also allows us to use placeholders to pick up credentials from environment variables.

3. Profiles

The profiles element enables us to create multiple profile child elements differentiated by their ID child element. The profile element in the settings.xml is a truncated version of the same element available in the pom.xml.

It can contain only four child elements: activationrepositoriespluginRepositories, and properties. These elements configure the build system as a whole, instead of any particular project.

It's important to note that values from an active profile in settings.xml will override any equivalent profile values in a pom.xml or profiles.xml file. Profiles are matched by ID.

3.1. Activation

We can use profiles to modify certain values only under given circumstances. We can specify those circumstances using the activation element. Consequently, profile activation occurs when all specified criteria are met:

<settings xmlns="http://maven.apache.org/SETTINGS/1.0.0" xmlns:xsi="http://www.w3.org/2001/XMLSchema-instance"
  xsi:schemaLocation="http://maven.apache.org/SETTINGS/1.0.0 https://maven.apache.org/xsd/settings-1.0.0.xsd">
    <profiles>
        <profile>
            <id>baeldung-test</id>
            <activation>
                <activeByDefault>false</activeByDefault>
                <jdk>1.8</jdk>
                <os>
                    <name>Windows 10</name>
                    <family>Windows</family>
                    <arch>amd64</arch>
                    <version>10.0</version>
                </os>
                <property>
                    <name>mavenVersion</name>
                    <value>3.0.7</value>
                </property>
                <file>
                    <exists>${basedir}/activation-file.properties</exists>
                    <missing>${basedir}/deactivation-file.properties</missing>
                </file>
            </activation>
        </profile>
    </profiles>
</settings>

There are four possible activators and not all of them need to be specified:

  • jdk: activates based on the JDK version specified (ranges are supported)
  • os: activates based on operating system properties
  • property: activates the profile if Maven detects a specific property value
  • file: activates the profile if a given filename exists or is missing

In order to check which profile will activate a certain build, we can use the Maven help plugin:

mvn help:active-profiles

The output will display currently active profiles for a given project:

[INFO] --- maven-help-plugin:3.2.0:active-profiles (default-cli) @ core-java-streams-3 ---
[INFO]
Active Profiles for Project 'com.baeldung.core-java-modules:core-java-streams-3:jar:0.1.0-SNAPSHOT':
The following profiles are active:
 - baeldung-test (source: com.baeldung.core-java-modules:core-java-streams-3:0.1.0-SNAPSHOT)

3.2. Properties

Maven properties can be thought of as named placeholders for a certain value. The values are accessible within a pom.xml file using the ${property_name} notation:

<settings xmlns="http://maven.apache.org/SETTINGS/1.0.0" xmlns:xsi="http://www.w3.org/2001/XMLSchema-instance"
  xsi:schemaLocation="http://maven.apache.org/SETTINGS/1.0.0 https://maven.apache.org/xsd/settings-1.0.0.xsd">
    <profiles>
        <profile>
            <id>baeldung-test</id>
            <properties>
                <user.project.folder>${user.home}/baeldung-tutorials</user.project.folder>
            </properties>
        </profile>
    </profiles>
</settings>

Four different types of properties are available in pom.xml files:

  • Properties using the env prefix return an environment variable value, for example, ${env.PATH}
  • Properties using the project prefix return a property value set in the project element of the pom.xml, for example, ${project.version}
  • Properties using the settings prefix return the corresponding element’s value from the settings.xml, for example, ${settings.localRepository}
  • We may reference all properties available via System.getProperties method in Java directly, for example, ${java.home}
  • We may use properties set within a properties element without a prefix, for example, ${junit.version}

3.3. Repositories

Remote repositories contain collections of artifacts that Maven uses to populate our local repository. Different remote repositories may be needed for particular artifacts. Maven searches the repositories enabled under the active profile:

<settings xmlns="http://maven.apache.org/SETTINGS/1.0.0" xmlns:xsi="http://www.w3.org/2001/XMLSchema-instance"
  xsi:schemaLocation="http://maven.apache.org/SETTINGS/1.0.0 https://maven.apache.org/xsd/settings-1.0.0.xsd">
    <profiles>
        <profile>
            <id>adobe-public</id>
            <repositories>
	        <repository>
	            <id>adobe-public-releases</id>
	            <name>Adobe Public Repository</name>
	            <url>https://repo.adobe.com/nexus/content/groups/public</url>
	            <releases>
	                <enabled>true</enabled>
	                <updatePolicy>never</updatePolicy>
	            </releases>
	            <snapshots>
	                <enabled>false</enabled>
	            </snapshots>
	        </repository>
	    </repositories>
        </profile>
    </profiles>
</settings>

We can use the repository element to enable only release or snapshots versions of artifacts from a specific repository.

3.4. Plugin Repositories

There are two standard types of Maven artifacts – dependencies and plugins. As Maven plugins are a special type of artifact, we may separate plugin repositories from the others:

<settings xmlns="http://maven.apache.org/SETTINGS/1.0.0" xmlns:xsi="http://www.w3.org/2001/XMLSchema-instance"
  xsi:schemaLocation="http://maven.apache.org/SETTINGS/1.0.0 https://maven.apache.org/xsd/settings-1.0.0.xsd">
    <profiles>
        <profile>
            <id>adobe-public</id>
            <pluginRepositories>
               <pluginRepository>
                  <id>adobe-public-releases</id>
                  <name>Adobe Public Repository</name>
                  <url>https://repo.adobe.com/nexus/content/groups/public</url>
                  <releases>
                      <enabled>true</enabled>
                      <updatePolicy>never</updatePolicy>
                  </releases>
                  <snapshots>
                      <enabled>false</enabled>
                  </snapshots>
	        </pluginRepository>
	    </pluginRepositories>
        </profile>
    </profiles>
</settings>

Notably, the structure of the pluginRepositories element is very similar to the repositories element.

3.5. Active Profiles

The activeProfiles element contains child elements that refer to a specific profile ID. Maven automatically activates any profile referenced here:

<settings xmlns="http://maven.apache.org/SETTINGS/1.0.0" xmlns:xsi="http://www.w3.org/2001/XMLSchema-instance"
  xsi:schemaLocation="http://maven.apache.org/SETTINGS/1.0.0 https://maven.apache.org/xsd/settings-1.0.0.xsd">
    <activeProfiles>
        <activeProfile>baeldung-test</activeProfile>
        <activeProfile>adobe-public</activeProfile>
    </activeProfiles>
</settings>

In this example, every invocation of mvn is run as though we've added -P baeldung-test,adobe-public to the command line.

4. Settings Level

A settings.xml file is usually found in a couple of places:

  • Global settings in Mavens home directory: ${maven.home}/conf/settings.xml
  • User settings in the user’s home: ${user.home}/.m2/settings.xml

If both files exist, their contents are merged. Configurations from the user settings take precedence.

4.1. Determine File Location

In order to determine the location of global and user settings, we can run Maven using the debug flag and search for “settings” in the output:

$ mvn -X clean | grep "settings"

[DEBUG] Reading global settings from C:\Program Files (x86)\Apache\apache-maven-3.6.3\bin\..\conf\settings.xml
[DEBUG] Reading user settings from C:\Users\Daniel Strmecki\.m2\settings.xml

4.2. Determine Effective Settings

We can use the Maven help plugin to find out the contents of the combined global and user settings:

mvn help:effective-settings

This describes the settings in XML format:

<settings xmlns="http://maven.apache.org/SETTINGS/1.0.0" xmlns:xsi="http://www.w3.org/2001/XMLSchema-instance"
  xsi:schemaLocation="http://maven.apache.org/SETTINGS/1.0.0 https://maven.apache.org/xsd/settings-1.0.0.xsd">
    <localRepository>C:\Users\Daniel Strmecki\.m2\repository</localRepository>
    <pluginGroups>
        <pluginGroup>org.apache.tomcat.maven</pluginGroup>
        <pluginGroup>org.apache.maven.plugins</pluginGroup>
        <pluginGroup>org.codehaus.mojo</pluginGroup>
    </pluginGroups>
</settings>

4.3. Override the Default Location

Maven also allows us to override the location of the global and user settings via the command line:

$ mvn clean --settings c:\user\user-settings.xml --global-settings c:\user\global-settings.xml

We can also use the shorter –s version of the same command:

$ mvn clean --s c:\user\user-settings.xml --gs c:\user\global-settings.xml

5. Conclusion

In this article, we explored the configurations available in Maven's settings.xml file.

We saw how to configure proxies, repositories and profiles.

Next, we looked at the difference between global and user settings files and how to determine which are in use.

Finally, we looked at determining the effective settings used, and overriding default file locations.

The post The settings.xml File in Maven first appeared on Baeldung.
       

Build a Dashboard With Cassandra, Astra, REST & GraphQL – Recording Status Updates

$
0
0

1. Introduction

In our previous article, we looked at building a dashboard for viewing the current status of the Avengers using DataStax Astra, a DBaaS powered by Apache Cassandra using Stargate to offer additional APIs for working with it.

In this article, we will be extending this to store discrete events instead of the rolled-up summary. This will allow us to view these events in the UI. We will allow the user to click on a single card and get a table of the events that have led us to this point. Unlike with the summary, these events will each represent one Avenger and one discrete point in time. Every time a new event is received then it will be appended to the table, along with all the others.

We are using Cassandra for this because it allows a very efficient way to store time-series data, where we are writing much more often than we are reading. The goal here is a system that can be updated frequently – for example, every 30 seconds – and can then allow users to easily see the most recent events that have been recorded.

2. Building out the Database Schema

Unlike with the Document API that we used in the previous article, this will be built using the REST and GraphQL APIs. These work on top of a Cassandra table, and these APIs can completely cooperate with each other and the CQL API.

In order to work with these, we need to have already defined a schema for the table we are storing our data into. The table we are using is designed to work with a specific schema – find events for a given Avenger in order of when they happened.

This schema will look as follows:

CREATE TABLE events (
    avenger text,
    timestamp timestamp,
    latitude decimal,
    longitude decimal,
    status decimal,
    PRIMARY KEY (avenger, timestamp)
) WITH CLUSTERING ORDER BY (timestamp DESC);

With data that looks similar to this:

avenger timestamp latitude longitude status
 falcon  2021-05-16 09:00:30.000000+0000  40.715255  -73.975353  0.999954
 hawkeye  2021-05-16 09:00:30.000000+0000  40.714602  -73.975238  0.99986
 hawkeye  2021-05-16 09:01:00.000000+0000  40.713572  -73.975289  0.999804

This defines our table to have multi-row partitions, with a partition key of “avenger”, and a clustering key of “timestamp”. The partition key is used by Cassandra to determine which node the data is stored on. The clustering key is used to determine the order that the data is stored within the partition.

By indicating that the “avenger” is our partition key it will ensure that all data for the same Avenger is kept together. By indicating that the “timestamp” is our clustering key, it will store the data within this partition in the most efficient order for us to retrieve. Given that our core query for this data is selecting every event for a single Avenger – our partition key – ordered by the timestamp of the event – our clustering key – Cassandra can allow us to access this very efficiently.

In addition, the way the application is designed to be used means that we are writing event data on a near-continuous basis. For example, we might get a new event from every Avenger every 30 seconds. Structuring our table in this way makes it very efficient to insert the new events into the correct position in the correct partition.

For convenience sake, our script for pre-populating our database will also create and populate this schema.

3. Building The Client Layer Using Astra, REST, & GraphQL APIs

We are going to interact with Astra using both the REST and GraphQL APIs, for different purposes. The REST API will be used for inserting new events into the table. The GraphQL API will be used for retrieving them again.

In order to best do this, we will need a client layer that can perform the interactions with Astra. These are the equivalent of the DocumentClient class that we built in the previous article, for these other two APIs.

3.1. REST Client

Firstly, our REST Client. We will be using this to insert new, whole records and so only needs a single method that takes the data to insert:

@Repository
public class RestClient {
  @Value("https://${ASTRA_DB_ID}-${ASTRA_DB_REGION}.apps.astra.datastax.com/api/rest/v2/keyspaces/${ASTRA_DB_KEYSPACE}")
  private String baseUrl;
  @Value("${ASTRA_DB_APPLICATION_TOKEN}")
  private String token;
  private RestTemplate restTemplate;
  public RestClient() {
    this.restTemplate = new RestTemplate();
    this.restTemplate.setRequestFactory(new HttpComponentsClientHttpRequestFactory());
  }
  public <T> void createRecord(String table, T record) {
    var uri = UriComponentsBuilder.fromHttpUrl(baseUrl)
      .pathSegment(table)
      .build()
      .toUri();
    var request = RequestEntity.post(uri)
      .header("X-Cassandra-Token", token)
      .body(record);
    restTemplate.exchange(request, Map.class);
  }
}

3.2. GraphQL Client

Then, our GraphQL Client. This time we are taking a full GraphQL query and returning the data that it fetches:

@Repository
public class GraphqlClient {
  @Value("https://${ASTRA_DB_ID}-${ASTRA_DB_REGION}.apps.astra.datastax.com/api/graphql/${ASTRA_DB_KEYSPACE}")
  private String baseUrl;
  @Value("${ASTRA_DB_APPLICATION_TOKEN}")
  private String token;
  private RestTemplate restTemplate;
  public GraphqlClient() {
    this.restTemplate = new RestTemplate();
    this.restTemplate.setRequestFactory(new HttpComponentsClientHttpRequestFactory());
  }
  public <T> T query(String query, Class<T> cls) {
    var request = RequestEntity.post(baseUrl)
      .header("X-Cassandra-Token", token)
      .body(Map.of("query", query));
    var response = restTemplate.exchange(request, cls);
  
    return response.getBody();
  }
}

As before, our baseUrl and token fields are configured from our properties defining how to talk to Astra. These client classes each know how to build the complete URLs needed to interact with the database. We can use them to make the correct HTTP requests to perform the desired actions.

That's all that's needed to interact with the Astra since these APIs work by simply exchanging JSON documents over HTTP.

4. Recording Individual Events

In order to display events, we need to be able to record them. This will build on top of the functionality we had before to update the statuses table, and will additionally insert new records into the events table.

4.1. Inserting Events

The first thing we need is a representation of the data in this table. This will be represented as a Java Record:

public record Event(String avenger, 
  String timestamp,
  Double latitude,
  Double longitude,
  Double status) {}

This directly correlates to the schema we defined earlier. Jackson will convert this into the correct JSON for the REST API when we actually make the API calls.

Next, we need our service layer to actually record these. This will take the appropriate details from outside, augment them with the timestamp and call our REST client to create the new record:

@Service
public class EventsService {
  @Autowired
  private RestClient restClient;
  public void createEvent(String avenger, Double latitude, Double longitude, Double status) {
    var event = new Event(avenger, Instant.now().toString(), latitude, longitude, status);
    restClient.createRecord("events", event);
  }
}

4.2. Update API

Finally, we need a controller to receive the events. This is extending the UpdateController that we wrote in the previous article to wire in the new EventsService and to then call it from our update method.

@RestController
public class UpdateController {
  ......
  @Autowired
  private EventsService eventsService;
  @PostMapping("/update/{avenger}")
  public void update(@PathVariable String avenger, @RequestBody UpdateBody body) throws Exception {
    eventsService.createEvent(avenger, body.lat(), body.lng(), body.status());
    statusesService.updateStatus(avenger, lookupLocation(body.lat(), body.lng()), getStatus(body.status()));
  }
  ......
}

At this point, calls to our API to record the status of an Avenger will both update the statuses document and insert a new record into the events table. This will allow us to record every update event that happens.

This means that every single time we receive a call to update the status of an Avenger we will be adding a new record to this table. In reality, we will need to support the scale of data being stored either by pruning or by adding additional partitioning, but that is out of scope for this article.

5. Making Events Available to Users via the GraphQL API

Once we have events in our table, the next step is to make them available to users. We will achieve this using the GraphQL API, retrieving a page of events at a time for a given Avenger, always ordered so that the most recent ones come first.

Using GraphQL we also have the ability to only retrieve the subset of fields that we are actually interested in, rather than all of them. If we are fetching a large number of records then this can help keep the payload size down and thus improve performance.

5.1. Retrieving Events

The first thing we need is a representation of the data we are retrieving. This is a subset of the actual data stored in the table. As such, we will want a different class to represent it:

public record EventSummary(String timestamp,
  Double latitude,
  Double longitude,
  Double status) {}

We also need a class that represents the GraphQL response for a list of these. This will include a list of event summaries and the page state to use for a cursor to the next page:

public record Events(List<EventSummary> values, String pageState) {}

We can now create a new method within our Events Service to actually perform the search.

public class EventsService {
  ......
  @Autowired
  private GraphqlClient graphqlClient;
  public Events getEvents(String avenger, String offset) {
    var query = "query {" + 
      "  events(filter:{avenger:{eq:\"%s\"}}, orderBy:[timestamp_DESC], options:{pageSize:5, pageState:%s}) {" +
      "    pageState " +
      "    values {" +
      "     timestamp " +
      "     latitude " +
      "     longitude " +
      "     status" +
      "   }" +
      "  }" +
      "}";
    var fullQuery = String.format(query, avenger, offset == null ? "null" : "\"" + offset + "\"");
    return graphqlClient.query(fullQuery, EventsGraphqlResponse.class).data().events();
  }
  private static record EventsResponse(Events events) {}
  private static record EventsGraphqlResponse(EventsResponse data) {}
}

Here we have a couple of inner classes that exist purely to represent the JSON structure returned by the GraphQL API down to the part that is interesting to us – these are entirely an artefact of the GraphQL API.

We then have a method that constructs a GraphQL query for the details that we want, filtering by the avenger field and sorting by the timestamp field in descending order. Into this we substitute the actual Avenger ID and the page state to use before passing it on to our GraphQL client to get the actual data.

5.2. Displaying Events in the UI

Now that we can fetch the events from the database, we can then wire this up to our UI.

Firstly we will update the StatusesController that we wrote in the previous article to support the UI endpoint for fetching the events:

public class StatusesController {
  ......
  @Autowired
  private EventsService eventsService;
  @GetMapping("/avenger/{avenger}")
  public Object getAvengerStatus(@PathVariable String avenger, @RequestParam(required = false) String page) {
    var result = new ModelAndView("dashboard");
    result.addObject("avenger", avenger);
    result.addObject("statuses", statusesService.getStatuses());
    result.addObject("events", eventsService.getEvents(avenger, page));
    return result;
  }
}

Then we need to update our templates to render the events table. We'll add a new table to the dashboard.html file that is only rendered if the events object is present in the model received from the controller:

......
    <div th:if="${events}">
      <div class="row">
        <table class="table">
          <thead>
            <tr>
              <th scope="col">Timestamp</th>
              <th scope="col">Latitude</th>
              <th scope="col">Longitude</th>
              <th scope="col">Status</th>
            </tr>
          </thead>
          <tbody>
            <tr th:each="data, iterstat: ${events.values}">
              <th scope="row" th:text="${data.timestamp}">
                </td>
              <td th:text="${data.latitude}"></td>
              <td th:text="${data.longitude}"></td>
              <td th:text="${(data.status * 100) + '%'}"></td>
            </tr>
          </tbody>
        </table>
      </div>
      <div class="row" th:if="${events.pageState}">
        <div class="col position-relative">
          <a th:href="@{/avenger/{id}(id = ${avenger}, page = ${events.pageState})}"
            class="position-absolute top-50 start-50 translate-middle">Next
            Page</a>
        </div>
      </div>
    </div>
  </div>
......

This includes a link at the bottom to go to the next page, which passes through the page state from our events data and the ID of the avenger that we are looking at.

And finally, we need to update the status cards to allow us to link through to the events table for this entry. This is simply a hyperlink around the header in each card, rendered in status.html:

......
  <a th:href="@{/avenger/{id}(id = ${data.avenger})}">
    <h5 class="card-title" th:text="${data.name}"></h5>
  </a>
......

We can now start up the application, and click through from the cards to see the most recent events that lead up to this status:

6. Summary

Here we have seen how the Astra REST and GraphQL APIs can be used to work with row-based data, and how they can work together. We're also starting to see how well Cassandra, and these APIs, can be used for massive data sets.

All of the code from this article can be found on GitHub.

The post Build a Dashboard With Cassandra, Astra, REST & GraphQL – Recording Status Updates first appeared on Baeldung.
       

Java Weekly, Issue 391

$
0
0

1. Spring and Java

>> BlockHound: how it works [blog.frankel.ch]

Going from imperative to the reactive paradigm – is no small feat, where it makes sense. This is a cool library that will definitely help.

>> Getting Started with Apache Camel and Spring Boot [reflectoring.io]

Exactly what it says on the tin – a clear, to-the-point guide to get started.

Also worth reading:

Webinars and presentations:

Time to upgrade:

2. Technical and Musings

>> How the Next Layer of the Internet is Going to be Standardised [mnot.net]

Maybe a bit dry but certainly an interesting read about standards and the future of the internet.

Also worth reading:

3. Pick of the Week

As I mentioned last week, my courses are all 30% off until next Friday.

If you're looking to quickly level up your Spring coding and understanding, and you've been holding off, this is a good time to go through:

>> All Courses on Baeldung

>> The Bulk Courses Page

Hope that helps.

Cheers,

Eugen.

The post Java Weekly, Issue 391 first appeared on Baeldung.
       

How to Get the Number of Threads in a Java Process

$
0
0

1. Overview

Thread is the basic unit of concurrency in Java. In most cases, the throughput of an application increases when multiple threads are created to do tasks in parallel.

However, there's always a saturation point. After all, the throughput of an application depends on CPU and memory resources. After a certain limit, increasing the number of threads can result in high memory, thread context switching, etc. 

So a good starting point in troubleshooting a high memory issue in a Java application is to monitor the number of threads. In this tutorial, we'll look at some ways we can check the number of threads created by a Java process.

2. Graphical Java Monitoring Tools

The simplest way to see the number of threads in Java is to use a graphical tool like Java VisualVM. Apart from the application threads, Java VisualVM also lists the GC or any other threads used by the application like JMX threads.

Furthermore, it also shows stats like thread states along with their duration:

Java VisualVM

Monitoring the number of threads is the most basic feature in Java VisualVM. Generally speaking, graphical tools are more advanced and allow live monitoring of an application. For example, Java VisualVM allows us to sample our CPU stack traces and thus find a class or a method that may cause CPU bottleneck.

Java VisualVM is distributed with the JDK installation on Windows machines.  For applications deployed on Linux, we need to connect to the application remotely. This requires JMX VM arguments.

Therefore, such tools won't work if an application is already running without these parameters. In a later section, we'll see how we can get the number of threads using command-line tools.

3. Java APIs

In some use cases, we may want to find the number of threads within the application itself. For example, to display on monitoring dashboards or exposing it in logs.

In such cases, we rely on Java APIs to get the thread count. Thankfully, there's an activeCount() API in the Thread class:

public class FindNumberofThreads {
    public static void main(String[] args) {
        System.out.println("Number of threads " + Thread.activeCount());
    }
}

And the output will be:

Number of threads 2

Notably, if we see the number of threads in Java VisualVM, we'll see more threads for the same application. This is because activeCount() only returns the number of threads in the same ThreadGroupJava divides all the threads into groups for easier management.

In this example, we have just the parent ThreadGroup, i.e., main:

public static void main(String[] args) {
    System.out.println("Current Thread Group - " + Thread.currentThread().getThreadGroup().getName());
}
Current Thread Group - main

If there are many thread groups in a Java application, activeCount() won't give a correct output. For example, it won't return the number of GC threads.

In such scenarios, we can use the JMX API:

public static void main(String[] args) {
    System.out.println("Total Number of threads " + ManagementFactory.getThreadMXBean().getThreadCount());
}

This API returns the total number of threads from all thread groups, GC, JMX, etc.:

Total Number of threads 6

As a matter of fact, the JMX graphical tools like Java VisualVM use the same API for their data.

4. Command-Line Tools

Previously, we discussed Java VisualVM, a graphical tool for analyzing live threads in an application. Although it's a great tool for live visualization of threads, it has a minor impact on application performance. And hence it's not recommended for production environments.

Moreover, as we discussed, Java VisualVM requires remote connectivity in Linux. And in fact, in some cases, it requires additional configuration. For example, an application running inside a Docker or Kubernetes would require additional service and port configuration.

In such cases, we have to rely on command-line tools in the host environment to get the thread count.

Luckily, Java provides few commands to take a thread dump. We can analyze a thread dump either as a text file or use a thread dump analyzer tool to check the number of threads along with their state.

Alibaba Arthas is another great command-line tool that doesn't require remote connectivity or any special configuration.

Additionally, we can get information about threads from a few Linux commands as well. For example, we can use the top command to display all the threads of any Java application:

top -H -p 1

Here, -H is a command-line option to display every thread in a Java process. Without this flag, the top command will display combined stats for all threads in the process. The -p option filters the output by process id of the target application:

top - 15:59:44 up 7 days, 19:23,  0 users,  load average: 0.52, 0.41, 0.36
Threads:  37 total,   0 running,  37 sleeping,   0 stopped,   0 zombie
%Cpu(s):  3.2 us,  2.2 sy,  0.0 ni, 93.4 id,  0.8 wa,  0.0 hi,  0.3 si,  0.0 st
MiB Mem :   1989.2 total,    110.2 free,   1183.1 used,    695.8 buff/cache
MiB Swap:   1024.0 total,    993.0 free,     31.0 used.    838.8 avail Mem
  PID USER      PR  NI    VIRT    RES    SHR S  %CPU  %MEM     TIME+ COMMAND
   1 flink     20   0 2612160 304084  29784 S   0.0  14.9   0:00.07 java
  275 flink     20   0 2612160 304084  29784 S   0.0  14.9   0:02.87 java
  276 flink     20   0 2612160 304084  29784 S   0.0  14.9   0:00.37 VM Thread
  277 flink     20   0 2612160 304084  29784 S   0.0  14.9   0:00.00 Reference Handl
  278 flink     20   0 2612160 304084  29784 S   0.0  14.9   0:00.00 Finalizer
  279 flink     20   0 2612160 304084  29784 S   0.0  14.9   0:00.00 Signal Dispatch

As seen above, it shows the thread id, i.e., PID and per-thread CPU and memory utilization. Similar to Java VisualVM, the top command will list all the threads, including GC, JMX, or any other sub-process.

To find the process ID we used as an argument in the above command, we can use the ps command:

ps -ef | grep java

As a matter of fact, we can use the ps command to list the threads as well:

ps -e -T | grep 1

The -T option tells the ps command to list all the threads started by the application:

1     1 ?        00:00:00 java
1   275 ?        00:00:02 java
1   276 ?        00:00:00 VM Thread
1   277 ?        00:00:00 Reference Handl
1   278 ?        00:00:00 Finalizer
1   279 ?        00:00:00 Signal Dispatch
1   280 ?        00:00:03 C2 CompilerThre
1   281 ?        00:00:01 C1 CompilerThre

Here, the first column is the PID, and the second column shows the Linux thread ID for each thread.

5. Conclusion

In this article, we saw that there are various ways we can find the number of threads in a Java application. In most cases, using the command-line options like the top or ps command should be the go-to way.

However, in some situations, we may also need graphical tools like the Java VisualVM. All code samples are available over on GitHub.

The post How to Get the Number of Threads in a Java Process first appeared on Baeldung.
       

Logical vs Bitwise OR Operator

$
0
0

1. Introduction

In computer programming, the use case of OR is that it is either a logical construct for boolean logic or a bitwise mathematical operation for manipulating data at the bit level.

The logical operator is used for making decisions based on certain conditions, while the bitwise operator is used for fast binary computation, including IP address masking.

In this tutorial, we'll learn about the logical and bitwise OR operators, represented by || and | respectively.

2. Use of Logical OR

2.1. How It Works

The logical OR operator works on boolean operands. It returns true when at least one of the operands is trueotherwise, it returns false:

  • true || true = true
  • true || false = true
  • false || true = true
  • false || false = false

2.2. Example

Let's understand with the help of some boolean variables:

boolean condition1 = true; 
boolean condition2 = true; 
boolean condition3 = false; 
boolean condition4 = false;

When we apply logical OR on two true operands, the result will be true:

boolean result = condition1 || condition2;
assertTrue(result);

When we apply logical OR on one true and one false operand, the result will be true:

boolean result = condition1 || condition3; 
assertTrue(result);

And when we apply logical OR on two false operands, the result will be false:

boolean result = condition3 || condition4; 
assertFalse(result);

When there are multiple operands, the evaluation is effectively performed from left to right. So, the expression condition1 || condition2 || condition3 || condition4 will result in the same logic as:

boolean result1 = condition1 || condition2; 
boolean result2 = result1 || condition3;
boolean finalResult = result2 || condition4;
assertTrue(finalResult);

In practice, though, Java can take a shortcut on the above expression.

3. Short-Circuit

The logical OR operator has a short-circuit behaviour. This means it returns true as soon as one of the operands is evaluated as true, without evaluating the remaining operands.

Let's consider the following example:

boolean returnAndLog(boolean value) { 
    System.out.println("Returning " + value); 
    return value; 
} 
if (returnAndLog(true) || returnAndLog(false)) { 
} 
Output:
Returning true
if (returnAndLog(false) || returnAndLog(true)) { 
}
Output:
Returning false
Returning true

Here we see that the second logical condition isn't evaluated if an earlier condition is true.

We should note that this can lead to unexpected results if any of the methods called have a side effect. We get a different result if we rewrite the first example to capture the boolean values before the if statement:

boolean result1 = returnAndLog(true);
boolean result2 = returnAndLog(false);
if (result1 || result2) {
}
Output:
Returning true
Returning false

4. Use of Bitwise OR

4.1. How It Works

The bitwise OR is a binary operator and it evaluates OR of each corresponding bit of two integer operands. It returns 1 if at least one of the bits is 1, otherwise, it returns 0. Also, this operator always evaluates both the operands:

  • 1 | 1 = 1
  • 1 | 0 = 1
  • 0 | 1 = 1
  • 0 | 0 = 0

So, when we apply the bitwise OR on two integers, the result will be a new integer.

4.2. Example

Let's consider an example:

int four = 4; //0100 = 4
int three = 3; //0011 = 3
int fourORthree = four | three;
assertEquals(7, fourORthree); // 0111 = 7

Now, we'll look at how the above operation works.

First, each integer is converted to its binary representation:

  • The binary representation of 4 is 0100
  • The binary representation of 3 is 0100

And then, the bitwise OR of the respective bits are evaluated to arrive at the binary representation that represents the final result:

0100
0011
----
0111

Now, 0111, when converted back to its decimal representation, will give us the final result: the integer 7.

When there are multiple operands, the evaluation is done from left to right. So, the expression 1 | 2 | 3 | 4 will be evaluated as:

int result1 = 1 | 2; 
int result2 = result1 | 3;
int finalResult = result2 | 4;
assertEquals(finalResult,7);

5. Compatible Types

In this section, we'll look at the data types that these operators are compatible with.

5.1. Logical OR

The logical OR operator can only be used with boolean operands. And, using it with integer operands results in a compilation error:

boolean result = 1 || 2;

Compilation error: Operator '||' cannot be applied to 'int', 'int

5.2. Bitwise OR

Along with integer operands, the bitwise OR can also be used with boolean operands. It returns true if at least one of the operands is true, otherwise, it returns false.

Let's understand with the help of some boolean variables in an example:

boolean condition1 = true;
boolean condition2 = true;
boolean condition3 = false;
boolean condition4 = false;
 
boolean condition1_OR_condition2 = condition1 | condition2;
assertTrue(condition1_OR_condition2);
boolean condition1_OR_condition3 = condition1 | condition3;
assertTrue(condition1_OR_condition3);
boolean condition3_OR_condition4 = condition3 | condition4;
assertFalse(condition3_OR_condition4);

6. Precedence

Let's review the precedence of logical and bitwise OR operator, among other operators:

  • Operators with higher precedence: ++ –– * + – / >> << > < == !=
  • Bitwise AND: &
  • Bitwise OR: |
  • Logical AND: &&
  • Logical OR: ||
  • Operators with lower precedence: ? : = += -= *= /= >>= <<=

A quick example will help us understand this better:

boolean result = 2 + 4 == 5 || 3 < 5;
assertTrue(result);

Considering the low precedence of the logical OR operator, the expression above will evaluate to:

  • ((2+4) == 5) || (3 < 5)
  • And then, (6 == 5) || (3 < 5)
  • And then, false || true

This makes the result true.

Now, consider another example with a bitwise OR operator:

int result = 1 + 2 | 5 - 1;
assertEquals(7, result);

The expression above will evaluate to:

  • (1+2) | (5-1)
  • And then, 3 | 4

Hence, the result will be 7.

7. Conclusion

In this article, we learned about using logical and bitwise OR operators on boolean and integer operands.

We also looked at the major difference between the two operators and their precedence among other operators.

As always, the example code is available over on GitHub.

The post Logical vs Bitwise OR Operator first appeared on Baeldung.
       

Cluster, Datacenters, Racks and Nodes in Cassandra

$
0
0

1. Introduction

In this tutorial, we'll have a close look at Cassandra's architecture. We'll find out about data storing in a distributed architecture, and we'll discuss basic architecture components.

2. Cassandra Overview

Apache Cassandra is a NoSQL, distributed database management system. The main advantage of Cassandra is that it can handle a high volume of structured data across commodity servers. Moreover, it provides high availability and provides no single point of failure. Cassandra achieves this by using a ring-type architecture, where the smallest logical unit is a node. It uses the partitioning of data for optimizing queries.

Every piece of data has a partition key. The partition key for every row is hashed. As a result, we'll get a unique token for every piece of data. For each node, there is an assigned range of tokens. Consequently, data with the same token is stored on the same node. The ring architecture of nodes is shown below:

3. Cassandra Components

3.1. Node

A Node is the basic infrastructure component of Cassandra. It's a fully functional machine that connects with other nodes in the cluster through the high internal network.

The name of this network is Gossip Protocol. To clarify, the machine can be a physical server or an EC2 instance, or a virtual machine. All nodes are organized with ring network topology. Importantly, every node is independent and has the same role in the ring. Cassandra arranges nodes in a peer-to-peer structure. The node contains the actual data.

Each node in a cluster can accept read and write requests. Therefore, it doesn't matter where the data is actually located in the cluster. We'll always get the newest version of data.

3.2. Virtual Node

Newer versions of Cassandra use virtual nodes or vnodes for short. A virtual node is the data storage layer within a server.

There are 256 virtual nodes per server by default. As we discussed in the previous paragraph, each node has a range of tokens assigned. Every virtual node uses a sub-range of tokens from the node they belong to.

These virtual nodes provide greater flexibility in the system. Consequently, it's easier for Cassandra to add new nodes to the cluster when we need them. When our data has unequally distributed tokens between nodes, we can easily extend the storage capacity by extending virtual nodes to the more loaded node.

3.4. Server

When we use the term server, we'll mean a machine with the Cassandra software installed. Every node has a single instance of Cassandra, which is technically a server. As we said earlier, each instance of Cassandra has evolved to contain 256 virtual nodes. The Cassandra server runs core processes. For example, processes like spreading replicas around nodes or routing requests.

3.5. Rack

A Cassandra rack is a logical grouping of nodes within the ring. In other words, a rack is a collection of servers. The database uses racks so that it can ensure replicas are distributed among different logical groupings. As a result, it can send operations not only to just one node. Multiple nodes, each on a separate rack, can provide greater fault tolerance and availability.

3.6. Datacenters

A datacenter is a logical set of racks. The datacenter should contain at least one rack.  We can say that the Cassandra Datacenter is a group of nodes related and configured within a cluster for replication purposes. So, it helps to reduce latency, prevent transactions from impact by other workloads and related effects. Whatsmore, the replication factor can also be set up to write to multiple datacenters. As a result, Cassandra can provide additional flexibility in architectural design and organization.

3.7. Cluster

A cluster is a component that contains one or more datacenters. It's the most outer storage container in the database. One database contains one or more clusters. The hierarchy of elements in the Cassandra cluster is:

First, we have clusters that consist of datacenters. Inside of datacenters, we have nodes that contain by default 256 virtual nodes.

4. Data Replication

Now, when we know the basic components of Cassandra. Let's talk about how Cassandra manages data around its structure. Some systems can not allow for data loss or interruption in data delivery. The solution is to provide a backup when the problem has occurred. For example, it can be hardware problems, or links can be down at any time during the data process. Cassandra stores data replicas on multiple nodes to ensure reliability and fault tolerance.

5.1. Replication Factor

We can determine the number of replicas and their location by the replication factor and replication strategy. The replication factor is the total number of replicas across the cluster. When we set this factor to one, it means that only one copy of each row exists in a cluster and so on. We can set this factor on the datacenter level and on rack level.

5.1. Replication Strategy

The replication strategy controls how the replicas are chosen. The importance of replicas is the same. Cassandra has two strategies for determining which nodes contain replicated data. The first one is called the SimpleStrategy, and it is unaware of the logical division of nodes for datacenters and racks. The second one is NetworkTopologyStrategy is more complicated and is both racks aware and datacenter aware. We can define how many replicas would be placed in different datacenters by using The NetworkTopologyStrategy. Additionally, it tries to avoid situations when two replicas are placed on the same rack.

5. Conclusion

This tutorial introduces the basic components of Cassandra's architecture. We covered the key concepts of this database that ensure its high availability and partitioning tolerance. We also talked about data partitioning and data replication.

The post Cluster, Datacenters, Racks and Nodes in Cassandra first appeared on Baeldung.
       

Running Selenium Scripts with JMeter

$
0
0

1. Overview

In this tutorial, we'll discuss the steps to run Selenium scripts with JMeter.

2. Selenium Scripts with JMeter

JMeter provides an open-source solution for performance and load testing. It can also be used for functional testing. But with the advancement of technologies like CSS, JS, and HTML5, we push more and more logic and behavior down the client. Thus many more things add to the browser execution time. These things include:

  • Client-side Javascript execution – AJAX, JS templates, etc.
  • CSS transforms – 3D matrix transforms, animations, etc.
  • 3rd party plugins – Facebook likes Double click ads, etc.

In turn, this might affect the overall performance of a website or web application. But JMeter does not have such a matrix to measure these perceived performances. JMeter also cannot measure the user experience at client renderings like load time or page rendition as JMeter is not a real browser.

Web drivers like Selenium can automate the execution and collection of performance metrics discussed above on the client-side (browser in this case). Thus while the JMeter Load Test will put enough load on the system, the JMeter WebDriver plan will get the response times and other behavior from the user experience point of view.

Thus apart from measuring performance, we can also measure other behaviors when we use a WebDriver set with JMeter. So let's discuss this further.

3. Prerequisites

Following prerequisites should be fulfilled before running a Selenium script with JMeter:

Now we can move ahead and create a sample JMeter project to run the Selenium script.

4. JMeter Project

At this point, we have the environment installed to run the Selenium script in JMeter. Now, let's create a JMeter Project to configure and test it out. We'll create a Thread Group that will have a Selenium Web Driver Sampler instance. We'll include a Selenium script in this sampler and then execute it.

A detailed description is given below:

First, we launch our JMeter GUI:

Then we can add a simple “Thread Group” by clicking “Edit-> Add” and select the Thread Group:

Then, we need to add the Chrome driver config. Now, we click on the Chrome driver config in the left pane and specify the “Path to chrome driver”:

Please note that the version of Chrome browser should match with the “Chromedrive.exe” version for the script to run successfully.

Next, we need to add the web driver sampler to the thread group:

We can add the script  given below to the thread group:

WDS.sampleResult.sampleStart()
WDS.browser.get('http://baeldung.com')
WDS.sampleResult.sampleEnd()
WDS.log.info("successfully navigated to http://baeldung.com/");

Finally, let's add a ‘View Results in Table’  and/or “View Results Tree” listener so that we can view the results of the script execution.

The thread group we created above looks as shown in the following image:

5. Running the Selenium Script

Now we have created the thread group with the Selenium script we want to execute. Next, we “Run the Thread Group”.

The instance of Selenium Web Driver is created, and a new Chrome driver window opens up that opens the homepage of Baeldung:

As we can see from the JMeter Results table above, we have successfully executed the Thread Group that contained a simple Selenium script that opened a new Chrome Browser window and then opened the specified webpage. This way we can execute any Selenium script by adding a WebDriver Sample in the Thread Group and then executing it.


6. Conclusion

In this tutorial, we have illustrated running a Selenium script using JMeter. We executed a Selenium script in JMeter by creating a Thread Group containing the Selenium Web Driver instance.

The full code for the implementation is available over on GitHub.

The post Running Selenium Scripts with JMeter first appeared on Baeldung.
       

Monitor the Consumer Lag in Apache Kafka

$
0
0

1. Overview

Kafka consumer group lag is a key performance indicator of any Kafka-based event-driven system.

In this tutorial, we'll build an analyzer application to monitor Kafka consumer lag.

2. Consumer Lag

Consumer lag is simply the delta between the consumer's last committed offset and the producer's end offset in the log. In other words, the consumer lag measures the delay between producing and consuming messages in any producer-consumer system.

In this section, let's understand how we can determine the offset values.

2.1. Kafka AdminClient

To inspect the offset values of a consumer group, we'll need the administrative Kafka client. So, let's write a method in the LagAnalyzerService class to create an instance of the AdminClient class:

private AdminClient getAdminClient(String bootstrapServerConfig) {
    Properties config = new Properties();
    config.put(AdminClientConfig.BOOTSTRAP_SERVERS_CONFIG, bootstrapServerConfig);
    return AdminClient.create(config);
}

We must note the use of @Value annotation to retrieve the bootstrap server list from the property file. In the same way, we'll use this annotation to get other values such as groupId and topicName.

2.2. Consumer Group Offset

First, we can use the listConsumerGroupOffsets() method of the AdminClient class to fetch the offset information of a specific consumer group id.

Next, our focus is mainly on the offset values, so we can invoke the partitionsToOffsetAndMetadata() method to get a map of TopicPartition vs. OffsetAndMetadata values:

private Map<TopicPartition, Long> getConsumerGrpOffsets(String groupId) 
  throws ExecutionException, InterruptedException {
    ListConsumerGroupOffsetsResult info = adminClient.listConsumerGroupOffsets(groupId);
    Map<TopicPartition, OffsetAndMetadata> topicPartitionOffsetAndMetadataMap = info.partitionsToOffsetAndMetadata().get();
    Map<TopicPartition, Long> groupOffset = new HashMap<>();
    for (Map.Entry<TopicPartition, OffsetAndMetadata> entry : topicPartitionOffsetAndMetadataMap.entrySet()) {
        TopicPartition key = entry.getKey();
        OffsetAndMetadata metadata = entry.getValue();
        groupOffset.putIfAbsent(new TopicPartition(key.topic(), key.partition()), metadata.offset());
    }
    return groupOffset;
}

Lastly, we can notice the iteration over the topicPartitionOffsetAndMetadataMap to limit our fetched results to the offset values per each topic and partition.

2.3. Producer Offset

The only thing left for finding the consumer group lag is a way of getting the end offset values. For this, we can use the endOffsets() method of the KafkaConsumer class.

Let's start by creating an instance of the KafkaConsumer class in the LagAnalyzerService class:

private KafkaConsumer<String, String> getKafkaConsumer(String bootstrapServerConfig) {
    Properties properties = new Properties();
    properties.setProperty(ConsumerConfig.BOOTSTRAP_SERVERS_CONFIG, bootstrapServerConfig);
    properties.setProperty(ConsumerConfig.KEY_DESERIALIZER_CLASS_CONFIG, StringDeserializer.class.getName());
    properties.setProperty(ConsumerConfig.VALUE_DESERIALIZER_CLASS_CONFIG, StringDeserializer.class.getName());
    return new KafkaConsumer<>(properties);
}

Next, let's aggregate all the relevant TopicPartition values from the consumer group offsets for which we need to compute the lag so that we provide it as an argument to the endOffsets() method:

private Map<TopicPartition, Long> getProducerOffsets(Map<TopicPartition, Long> consumerGrpOffset) {
    List<TopicPartition> topicPartitions = new LinkedList<>();
    for (Map.Entry<TopicPartition, Long> entry : consumerGrpOffset.entrySet()) {
        TopicPartition key = entry.getKey();
        topicPartitions.add(new TopicPartition(key.topic(), key.partition()));
    }
    return kafkaConsumer.endOffsets(topicPartitions);
}

Finally, let's write a method that uses consumer offsets and producer's endoffsets to generate the lag for each TopicPartition:

private Map<TopicPartition, Long> computeLags(
  Map<TopicPartition, Long> consumerGrpOffsets,
  Map<TopicPartition, Long> producerOffsets) {
    Map<TopicPartition, Long> lags = new HashMap<>();
    for (Map.Entry<TopicPartition, Long> entry : consumerGrpOffsets.entrySet()) {
        Long producerOffset = producerOffsets.get(entry.getKey());
        Long consumerOffset = consumerGrpOffsets.get(entry.getKey());
        long lag = Math.abs(producerOffset - consumerOffset);
        lags.putIfAbsent(entry.getKey(), lag);
    }
    return lags;
}

3. Lag Analyzer

Now, let's orchestrate the lag analysis by writing the analyzeLag() method in the LagAnalyzerService class:

public void analyzeLag(String groupId) throws ExecutionException, InterruptedException {
    Map<TopicPartition, Long> consumerGrpOffsets = getConsumerGrpOffsets(groupId);
    Map<TopicPartition, Long> producerOffsets = getProducerOffsets(consumerGrpOffsets);
    Map<TopicPartition, Long> lags = computeLags(consumerGrpOffsets, producerOffsets);
    for (Map.Entry<TopicPartition, Long> lagEntry : lags.entrySet()) {
        String topic = lagEntry.getKey().topic();
        int partition = lagEntry.getKey().partition();
        Long lag = lagEntry.getValue();
        System.out.printf("Time=%s | Lag for topic = %s, partition = %s is %d\n",
          MonitoringUtil.time(),
          topic,
          partition,
          lag);
    }
}

However, when it comes to monitoring the lag metric, we'd need an almost real-time value of the lag so that we can take any administrative action for recovering system performance.

One straightforward way of achieving this is by polling the lag value at a regular interval of time. So, let's create a LiveLagAnalyzerService service that will invoke the analyzeLag() method of the LagAnalyzerService:

@Scheduled(fixedDelay = 5000L)
public void liveLagAnalysis() throws ExecutionException, InterruptedException {
    lagAnalyzerService.analyzeLag(groupId);
}

For our purpose, we have set the poll frequency as 5 seconds using the @Scheduled annotation. However, for real-time monitoring, we'd probably need to make this accessible via JMX.

4. Simulation

In this section, we'll simulate Kafka producer and consumer for a local Kafka setup so that we can see LagAnalyzer in action without depending on an external Kafka producer and consumer.

4.1. Simulation Mode

Since simulation mode is required only for demonstration purposes, we should have a mechanism to turn it off when we want to run the Lag Analyzer application for a real scenario.

We can keep this as a configurable property in the application.properties resource file:

monitor.producer.simulate=true
monitor.consumer.simulate=true

We'll plug these properties into the Kafka producer and consumer and control their behavior.

Additionally, let's define producer startTime, endTime, and a helper method time() to get the current time during the monitoring:

public static final Date startTime = new Date();
public static final Date endTime = new Date(startTime.getTime() + 30 * 1000);
public static String time() {
    DateTimeFormatter dtf = DateTimeFormatter.ofPattern("yyyy/MM/dd HH:mm:ss");
    LocalDateTime now = LocalDateTime.now();
    String date = dtf.format(now);
    return date;
}

4.2. Producer-Consumer Configurations

We'll need to define few core configuration values for instantiating the instances for our Kafka consumer and producer simulators.

First, let's define the configuration for the consumer simulator in the KafkaConsumerConfig class:

public ConsumerFactory<String, String> consumerFactory(String groupId) {
    Map<String, Object> props = new HashMap<>();
    props.put(ConsumerConfig.BOOTSTRAP_SERVERS_CONFIG, bootstrapAddress);
    if (enabled) {
        props.put(ConsumerConfig.GROUP_ID_CONFIG, groupId);
    } else {
        props.put(ConsumerConfig.GROUP_ID_CONFIG, simulateGroupId);
    }
    props.put(ConsumerConfig.KEY_DESERIALIZER_CLASS_CONFIG, StringDeserializer.class);
    props.put(ConsumerConfig.VALUE_DESERIALIZER_CLASS_CONFIG, StringDeserializer.class);
    props.put(ConsumerConfig.AUTO_COMMIT_INTERVAL_MS_CONFIG, 0);
    return new DefaultKafkaConsumerFactory<>(props);
}
@Bean
public ConcurrentKafkaListenerContainerFactory<String, String> kafkaListenerContainerFactory() {
    ConcurrentKafkaListenerContainerFactory<String, String> factory = new ConcurrentKafkaListenerContainerFactory<>();
    if (enabled) {
        factory.setConsumerFactory(consumerFactory(groupId));
    } else {
        factory.setConsumerFactory(consumerFactory(simulateGroupId));
    }
    return factory;
}

Next, we can define the configuration for the producer simulator in the KafkaProducerConfig class:

@Bean
public ProducerFactory<String, String> producerFactory() {
    Map<String, Object> configProps = new HashMap<>();
    configProps.put(ProducerConfig.BOOTSTRAP_SERVERS_CONFIG, bootstrapAddress);
    configProps.put(ProducerConfig.KEY_SERIALIZER_CLASS_CONFIG, StringSerializer.class);
    configProps.put(ProducerConfig.VALUE_SERIALIZER_CLASS_CONFIG, StringSerializer.class);
    return new DefaultKafkaProducerFactory<>(configProps);
}
@Bean
public KafkaTemplate<String, String> kafkaTemplate() {
    return new KafkaTemplate<>(producerFactory());
}

Further, let's use the @KafkaListener annotation to specify the target listener, which is, of course, enabled only when monitor.consumer.simulate is set to true:

@KafkaListener(
  topics = "${monitor.topic.name}",
  containerFactory = "kafkaListenerContainerFactory",
  autoStartup = "${monitor.consumer.simulate}")
public void listen(String message) throws InterruptedException {
    Thread.sleep(10L);
}

As such, we added a sleeping time of 10 milliseconds to create an artificial consumer lag.

Finally, let's write a sendMessage() method to simulate the producer:

@Scheduled(fixedDelay = 1L, initialDelay = 5L)
public void sendMessage() throws ExecutionException, InterruptedException {
    if (enabled) {
        if (endTime.after(new Date())) {
            String message = "msg-" + time();
            SendResult<String, String> result = kafkaTemplate.send(topicName, message).get();
        }
    }
}

We can notice that the producer will generate messages at the rate of 1 message/ms. Moreover, it'll stop producing messages after the endTime of 30 seconds after startTime of the simulation.

4.3. Live Monitoring

Now, let's run the main method in our LagAnalyzerApplication:

public static void main(String[] args) {
    SpringApplication.run(LagAnalyzerApplication.class, args);
    while (true) ;
}

We'll see the current lag on each partition of the topic after every 30 seconds:

Time=2021/06/06 11:07:24 | Lag for topic = baeldungTopic, partition = 0 is 93
Time=2021/06/06 11:07:29 | Lag for topic = baeldungTopic, partition = 0 is 290
Time=2021/06/06 11:07:34 | Lag for topic = baeldungTopic, partition = 0 is 776
Time=2021/06/06 11:07:39 | Lag for topic = baeldungTopic, partition = 0 is 1159
Time=2021/06/06 11:07:44 | Lag for topic = baeldungTopic, partition = 0 is 1559
Time=2021/06/06 11:07:49 | Lag for topic = baeldungTopic, partition = 0 is 2015
Time=2021/06/06 11:07:54 | Lag for topic = baeldungTopic, partition = 0 is 1231
Time=2021/06/06 11:07:59 | Lag for topic = baeldungTopic, partition = 0 is 731
Time=2021/06/06 11:08:04 | Lag for topic = baeldungTopic, partition = 0 is 231
Time=2021/06/06 11:08:09 | Lag for topic = baeldungTopic, partition = 0 is 0

As such, the rate at which the producer is producing messages is 1 message/ms, which is higher than the rate at which the consumer is consuming the message. So, lag will start building for the first 30 seconds, after which the producer stops producing, so lag will gradually decline to 0.

5. Conclusion

In this tutorial, we developed an understanding of how to find the consumer lag on a Kafka topic. Additionally, we used that knowledge to create a LagAnalyzer application in spring that shows the lag in almost real-time.

As always, the complete source code for the tutorial is available over on GitHub.

The post Monitor the Consumer Lag in Apache Kafka first appeared on Baeldung.
       
Viewing all 4464 articles
Browse latest View live


<script src="https://jsc.adskeeper.com/r/s/rssing.com.1596347.js" async> </script>