Quantcast
Channel: Baeldung
Viewing all 4464 articles
Browse latest View live

Private Constructors in Java

$
0
0

1. Introduction

Private constructors allow us to restrict the instantiation of a class. Simply put, they prevent the creation of class instances in any place other than the class itself.

Public and private constructors, used together, allow control over how we wish to instantiate our classes – this is known as constructor delegation.

2. Typical Usage

There are several patterns and benefits to restricting explicit class instantiation, and we'll go through the most common ones in this tutorial:

Let's see how to define a private constructor:

public class PrivateConstructorClass {
    
    private PrivateConstructorClass() {
        // in the private constructor
    }
}

We define private constructors similarly to public constructors; we’ve simply changed the public keyword to private.

3. Using Private Constructors in the Singleton Pattern

The singleton pattern is one of the most common places we'll encounter the use of a private constructor. The private constructor allows us to restrict class instantiation to a single object instance:

public final class SingletonClass {
    
    private static SingletonClass INSTANCE;
    private String info = "Initial info class";
    private SingletonClass() {
    }
    public static SingletonClass getInstance() {
        if (INSTANCE == null) {
            INSTANCE = new SingletonClass();
        }
        return INSTANCE;
    }
    // getters and setters
}

We can create an instance by calling SingletonClass.getInstance() – this either returns an existing instance or creates one if this is the first instantiation. We can only instantiate this class by using the getInstance() static method.

4. Using Private Constructors to Delegate Constructors

Another common use case for private constructors is to provide a means of constructor delegation. Constructor delegation allows us to pass parameters through several different constructors while restricting initialization to specific places.

In this example, ValueTypeClass allows initialization with a value and type – but we only want to allow it for a subset of types. The general constructor must be private to ensure that only permitted types are used:

public class ValueTypeClass {
    
    private final String value;
    private final String type;
    public ValueTypeClass(int x) {
        this(Integer.toString(x), "int");
    }
    public ValueTypeClass(boolean x) {
        this(Boolean.toString(x), "boolean");
    }
    private ValueTypeClass(String value, String type) {
        this.value = value;
        this.type = type;
    }
    // getters and setters
}

We can initialize ValueTypeClass via two different public constructors: one accepts an int, and the other a boolean. Each of these constructors then calls a common private constructor to complete the object initialization.

5. Using Private Constructors to Create Uninstantiable Classes

Uninstantiable classes are classes that we cannot instantiate. In this example, we'll create a class that simply contains a collection of static methods:

public class StringUtils {
    
    private StringUtils() {
        // this class cannot be instantiated
    }
    public static String toUpperCase(String s) {
        return s.toUpperCase();
    }
    public static String toLowerCase(String s) {
        return s.toLowerCase();
    }
}

The StringUtils class contains a couple of static utility methods and can't be instantiated due to the private constructor.

Really, there's no need to allow object instantiation since static methods don't require an object instance to be used.

6. Using Private Constructors in the Builder Pattern

The builder pattern allows us to construct complex objects step by step, rather than having several constructors providing different ways to create the object. A private constructor restricts initialization, allowing the builder to manage object creation instead.

In this example, we've created an Employee class that holds the name, age, and department of an employee:

public class Employee {
    private final String name;
    private final int age;
    private final String department;
    private Employee(String name, int age, String department) {
        this.name = name;
        this.age = age;
        this.department = department;
    }
}

As we can see, we've made the Employee constructor private – therefore, we cannot instantiate the class explicitly.

We'll now add an inner Builder class to the Employee class:

public static class Builder {
    private String name;
    private int age;
    private String department;
    public Builder setName(String name) {
        this.name = name;
        return this;
    }
    public Builder setAge(int age) {
        this.age = age;
        return this;
    }
    public Builder setDepartment(String department) {
        this.department = department;
        return this;
    }
    public Employee build() {
        return new Employee(name, age, department);
    }
}

The builder can now create different employees with a name, age, or department – there's no constraint on how many fields we must provide:

Employee.Builder emplBuilder = new Employee.Builder();
Employee employee = emplBuilder
  .setName("baeldung")
  .setDepartment("Builder Pattern")
  .build();

We've created an Employee with a name of “baeldung” and a department of “Builder Pattern“. Age is not provided, so the default primitive int value of 0 will be used.

7. Using Private Constructors to Prevent Subclassing

Another possible use for private constructors is to prevent subclassing of a class. If we tried to create such as subclass, it would be unable to call the super constructor. However, it's important to note that we'd normally make a class final to prevent subclassing rather than using a private constructor.

8. Conclusion

The primary use of private constructors is to restrict the instantiation of classes. Private constructors are especially useful when we want to restrict the external creation of a class.

Singletons, factories, and static method objects are examples of how restricting object instantiation can be useful to enforce a certain pattern.

Constants classes and static method classes also dictate that a class should not be instantiable. It's important to remember that we can also combine private constructors with public constructors to allow code sharing inside different public constructor definitions.

The code for these examples can be found over on GitHub.

The post Private Constructors in Java first appeared on Baeldung.
       

3DES in Java

$
0
0

1. Introduction

3DES or Triple Data Encryption Algorithm is a symmetric-key block cipher that applies the DES cipher algorithm three times to each data block.

In this tutorial, we'll learn how to create 3DES keys and use them for encrypting and decrypting Strings and files in Java.

2. Generating Secret Key

Generating a 3DES secret key requires a couple of steps. First, we'll need to generate a secret key that will be used for the encryption-decryption process. In our case, we'll use a 24-byte key constructed from random numbers and letters:

byte[] secretKey = "9mng65v8jf4lxn93nabf981m".getBytes();

Note that a secret key shouldn't be shared publicly.

Now, we'll wrap our key in the SecretKeySpec combining it with a chosen algorithm:

SecretKeySpec secretKeySpec = new SecretKeySpec(secretKey, "TripleDES");

In our case, we're using TripleDES, which is one of the Java Security Standard Algorithms.

Another item we should generate in advance is the Initialization Vector for our key. We'll use an 8-byte array of random numbers and letters:

byte[] iv = "a76nb5h9".getBytes();

And then, we'll wrap it in the IvParameterSpec class:

IvParameterSpec ivSpec = new IvParameterSpec(iv);

3. Encrypting Strings

We're now ready to encrypt simple String values. Let's first define a String that we'll work with:

String secretMessage = "Baeldung secret message";

Next, we'll need a Cipher object initialized with the encryption mode, secret key, and the initialization vector that we generated previously:

Cipher encryptCipher = Cipher.getInstance("TripleDES/CBC/PKCS5Padding");
encryptCipher.init(Cipher.ENCRYPT_MODE, secretKeySpec, ivSpec);

Note that we're using the TripleDES algorithm with a CBC and a PKCS#5 padding scheme.

With the Cipher, we can run the doFinal method to encrypt our message. Note that it only works with a byte array, so we need to transform our String first:

byte[] secretMessagesBytes = secretMessage.getBytes(StandardCharsets.UTF_8);
byte[] encryptedMessageBytes = encryptCipher.doFinal(secretMessagesBytes);

Now, our message is successfully encrypted. If we'd like to store it in a database or send it via a REST API, it would be more convenient to encode it with the Base64 alphabet:

String encodedMessage = Base64.getEncoder().encodeToString(encryptedMessageBytes);

Base64 encoding makes the message more readable and easier to work with.

4. Decrypting Strings

Now, let's see how we can reverse the encryption process and decrypt the message to its original form. For this, we'll need a new Cipher instance, but this time, we'll initialize it in decryption mode:

Cipher decryptCipher = Cipher.getInstance("TripleDES/CBC/PKCS5Padding");
decryptCipher.init(Cipher.DECRYPT_MODE, secretKeySpec, ivSpec);

Next, we'll run the doFinal method:

byte[] decryptedMessageBytes = decryptCipher.doFinal(encryptedMessageBytes);

Now, we'll decode the result to a String variable:

String decryptedMessage = new String(decryptedMessageBytes, StandardCharsets.UTF_8);

Finally, we can verify the results to make sure the decryption process performed correctly by comparing it to the initial value:

Assertions.assertEquals(secretMessage, decryptedMessage);

5. Working with Files

We can encrypt whole files as well. As an example, let's create a temp file with some text content:

String originalContent = "Secret Baeldung message";
Path tempFile = Files.createTempFile("temp", "txt");
writeString(tempFile, originalContent);

Next, let's transform its content into a single byte array:

byte[] fileBytes = Files.readAllBytes(tempFile);

Now, we can use the encryption cipher the same way we did with a String:

Cipher encryptCipher = Cipher.getInstance("TripleDES/CBC/PKCS5Padding");
encryptCipher.init(Cipher.ENCRYPT_MODE, secretKeySpec, ivSpec);
byte[] encryptedFileBytes = encryptCipher.doFinal(fileBytes);

Finally, let's overwrite the file content with new, encrypted data:

try (FileOutputStream stream = new FileOutputStream(tempFile.toFile())) {
    stream.write(encryptedFileBytes);
}

The decryption process looks very similar. The only difference is a cipher initialized in decryption mode:

encryptedFileBytes = Files.readAllBytes(tempFile);
Cipher decryptCipher = Cipher.getInstance("TripleDES/CBC/PKCS5Padding");
decryptCipher.init(Cipher.DECRYPT_MODE, secretKeySpec, ivSpec);
byte[] decryptedFileBytes = decryptCipher.doFinal(encryptedFileBytes);

Once again, let's overwrite the file content – this time, with the decrypted data:

try (FileOutputStream stream = new FileOutputStream(tempFile.toFile())) {
    stream.write(decryptedFileBytes);
}

As the last step, we can verify if the file content matches the original value:

String fileContent = readString(tempFile);
Assertions.assertEquals(originalContent, fileContent);

6. Summary

In this article, we've learned how to create a 3DES key in Java and how to use it to encrypt and decrypt Strings and files.

As always, all source code is available over on GitHub.

The post 3DES in Java first appeared on Baeldung.
       

Introduction to Spring Native

$
0
0

1. Overview

Native images provide various advantages like an instant startup and reduced memory consumption. Therefore, at times, we might want to build a native image of our Java application.

In this tutorial, we'll explore Spring Native to compile and build native images using Buildpacks and GraalVM's native build tools.

2. Basic Setup

As a prerequisite, we'll make sure to install Docker, required later to run native images.

Then, we'll create a simple Spring Boot project named baeldung-spring-native and use it throughout the tutorial to build a native image.

Next, let's add a link to the Spring repo to download dependencies and plugins required in later sections:

<repositories>
    <repository>
        <id>spring-release</id>
        <name>Spring release</name>
        <url>https://repo.spring.io/release</url>
    </repository>
</repositories>
<pluginRepositories>
    <pluginRepository>
        <id>spring-release</id>
        <name>Spring release</name>
        <url>https://repo.spring.io/release</url>
    </pluginRepository>
</pluginRepositories>

Then, we'll add the latest spring-native Maven dependency:

<dependency>
    <groupId>org.springframework.experimental</groupId>
    <artifactId>spring-native</artifactId>
    <version>0.10.0</version>
</dependency>

However, for a Gradle project, Spring Native is automatically added by the Spring AOT plugin.

We should note that each Spring Native version only supports a specific Spring Boot version – for example, Spring Native 0.10.0 supports Spring Boot 2.5.1. So, we should make sure to use the compatible Spring Boot Maven dependencies in our pom.xml.

Next, we'll add a few properties to use Java 8 for compilation:

<properties>
    <java.version>1.8</java.version>
    <maven.compiler.target>1.8</maven.compiler.target>
    <maven.compiler.source>1.8</maven.compiler.source>
</properties>

Last, we'll create the SpringNativeApp class:

public class SpringNativeApp {
    public static void main(String[] args) {
        System.out.println("Hello, World! This is a Baledung Spring Native Application");
    }
}

3. Buildpacks

Now that our Spring Boot project, baeldung-spring-native, is ready with the basic setup, let's integrate buildpacks in our Spring Boot project to build native images.

3.1. Spring Boot Maven Plugin

First, we'll require the spring-boot-maven-plugin with native image configuration using the Paketo Java buildpacks:

<build>
    <plugins>
        <plugin>
            <groupId>org.springframework.boot</groupId>
            <artifactId>spring-boot-maven-plugin</artifactId>
            <configuration>
                <image>
                    <builder>paketobuildpacks/builder:tiny</builder>
                    <env>
                        <BP_NATIVE_IMAGE>true</BP_NATIVE_IMAGE>
                    </env>
                </image>
            </configuration>
        </plugin>
    </plugins>
</build>

Here, we'll use the tiny builder out of the various available builders like base and full to build a native image. Also, we enabled the buildpack by providing the true value to the BP_NATIVE_IMAGE environment variable.

Similarly, when using Gradle, we can add the tiny builder along with the BP_NATIVE_IMAGE environment variable to the build.gradle file:

bootBuildImage {
    builder = "paketobuildpacks/builder:tiny"
    environment = [
        "BP_NATIVE_IMAGE" : "true"
    ]
}

3.2. Spring AOT Plugin

Next, we'll need to add the Spring AOT plugin that performs ahead-of-time transformations helpful in improving the footprint and compatibility of the native image.

So, let's add the latest spring-aot-maven-plugin Maven dependency to our pom.xml:

<plugin>
    <groupId>org.springframework.experimental</groupId>
    <artifactId>spring-aot-maven-plugin</artifactId>
    <version>0.10.0</version>
</plugin>

Similarly, for a Gradle project, we can add the latest org.springframework.experimental.aot dependency in the build.gradle file:

plugins {
    id 'org.springframework.experimental.aot' version '0.10.0'
}

Also, as we noted earlier, this will add the Spring Native dependency to the Gradle project automatically.

The Spring AOT plugin provides several options to determine the source generation. For example, options like removeYamlSupport and removeJmxSupport remove the Spring Boot Yaml and Spring Boot JMX support, respectively.

3.3. Build and Run Image

That's it! we're ready to build a native image of our Spring Boot project by using the Maven command:

$ mvn spring-boot:build-image

The Maven command should create a native image of our Spring Boot App with the name baeldung-spring-native:0.0.1-SNAPSHOT.

Note: building native images consumes a lot of resources. So, we must increase the memory and CPU allocated to Docker when we encounter issues while building the native images.

Last, we can run the image of our app on Docker using the docker run command:

$ docker run --rm -p 8080:8080 baeldung-spring-native:0.0.1-SNAPSHOT

So, our app should start almost instantaneously and provide output like:

Hello, World! This is a Baledung Spring Native Application

4. GraalVM Native Build Tools

As an alternative to the Paketo buildpacks, we can use GraalVM‘s native build tools to compile and build native images using GraalVM's native-image compiler.

4.1. Native Image Compiler Installation

As a prerequisite, we must install SDKMAN to smooth the process of setup. Then, we can use the SDKMAN to install GraalVM for Java 8:

$ sdk install java 21.0.0.2.r8

Next, we'll set up JAVA_HOME pointing to GraalVM's 21.0.0.2.r8 distribution.

Last, let's install the native-image compiler provided by the installed GraalVM's 21.0.0.2.r8 distribution:

$ gu install native-image

4.2. Spring AOT

Along with the spring-native dependency, we'll add the latest spring-aot Maven dependency, required for native build tools, in our pom.xml:

<dependency>
    <groupId>org.springframework.experimental</groupId>
    <artifactId>spring-aot</artifactId>
    <version>0.10.0</version>
</dependency>

4.3. Spring Boot Maven Plugin

Similar to the Paketo buildpacks, GraalVM's native build tools also require spring-boot-maven-plugin:

<plugin>
    <groupId>org.springframework.boot</groupId>
    <artifactId>spring-boot-maven-plugin</artifactId>
</plugin>

4.4. Spring AOT Maven Plugin

Also, we'll add the spring-aot-maven-plugin to our pom.xml with the generate goal:

<plugin>
    <groupId>org.springframework.experimental</groupId>
    <artifactId>spring-aot-maven-plugin</artifactId>
    <version>0.10.0</version>
    <executions>
        <execution>
            <id>generate</id>
            <goals>
                <goal>generate</goal>
            </goals>
        </execution>
    </executions>
</plugin>

4.5. Native Profile

Next, we'll add a profile named native with build support of a few plugins like native-maven-plugin and spring-boot-maven-plugin:

<profiles>
    <profile>
        <id>native</id>
        <build>
            <plugins>
                <plugin>
                    <groupId>org.graalvm.buildtools</groupId>
                    <artifactId>native-maven-plugin</artifactId>
                    <version>0.9.0</version>
                    <executions>
                        <execution>
                            <id>build-native</id>
                            <goals>
                                <goal>build</goal>
                            </goals>
                            <phase>package</phase>
                        </execution>
                    </executions>
                </plugin>
                <plugin>
                    <groupId>org.springframework.boot</groupId>
                    <artifactId>spring-boot-maven-plugin</artifactId>
                    <configuration>
                        <classifier>exec</classifier>
                    </configuration>
                </plugin>
            </plugins>
        </build>
    </profile>
</profiles>

This profile will invoke the native-image compiler from the build during the package phase.

However, when using Gradle, we'll add the latest org.graalvm.buildtools.native plugin to the build.gradle file:

plugins {
    id 'org.graalvm.buildtools.native' version '0.9.0'
}

4.6. Build and Run

That's it! We're ready to build our native image by providing the native profile in the Maven package command:

$ mvn -Pnative -DskipTests package

The Maven command will create the baeldung-spring-native executor file in the target folder. So, we can run our app by simply accessing the executor file:

$ target/baeldung-spring-native
Hello World!, This is Baledung Spring Native Application

5. Conclusion

In this tutorial, we explored Spring Native along with buildpacks and GraalVM's native build tools.

First, we created a simple Spring Boot project and built a native image using Paketo buildpacks. Then, we examined GraalVM's native build tools to build and run native images by utilizing GraalVM's native-image compiler.

As usual, all the code implementations are available over on GitHub.

The post Introduction to Spring Native first appeared on Baeldung.
       

Collection.toArray(new T[0]) or .toArray(new T[size])

$
0
0

1. Overview

The Java programming language provides arrays and collections to group objects together. Mostly, a collection is backed by an array and modeled with a set of methods to process the elements it contains.

While developing software, it's quite common to use both of these data structures. Hence, programmers need a bridging mechanism to convert these elements from one form to another. The asList method from the Arrays class and the Collection interface's toArray method form this bridge.

In this tutorial, we'll do an in-depth analysis of an interesting argument: which toArray method to use and why? We'll also use JMH-assisted benchmarking to support these arguments.

2. The toArray Rabbit Hole

Before aimlessly invoking the toArray method, let's understand what's inside the box. The Collection interface offers two methods to transform a collection into an array:

Object[] toArray()
<T> T[] toArray(T[] a)

Both methods return an array containing all elements of the collection. To demonstrate this, let's create a list of natural numbers:

List<Integer> naturalNumbers = IntStream
    .range(1, 10000)
    .boxed()
    .collect(Collectors.toList());

2.1. Collection.toArray()

The toArray() method allocates a new in-memory array with a length equal to the size of the collection. Internally, it invokes the Arrays.copyOf on the underlying array backing the collection. Therefore, the returned array has no references to it and is safe to use:

Object[] naturalNumbersArray = naturalNumbers.toArray();

However, we cannot merely cast the result into an Integer[]. Doing so will result in a ClassCastException.

2.2. <T> T[] Collection.toArray(T[] a)

Unlike the non-parameterized method, this one accepts a pre-allocated array as an argument. Additionally, the use of Generics in the method's definition mandates having the same type for the input and the returned array. This also solves the previously observed problem of iterating over an Object[].

This variant works distinctively based on the size of the input array:

  • If the length of the pre-allocated array is less than the collection's size, a new array of the required length and the same type is allocated:
Integer[] naturalNumbersArray = naturalNumbers.toArray(new Integer[0]);
  • If the input array is large enough to contain the collection's elements, it's returned with those elements inside:
Integer[] naturalNumbersArray = naturalNumbers.toArray(new Integer[naturalNumbers.size]);

Now, let's switch back to the original question of selecting the faster and better-performing candidate.

3. Performance Trials

Let's begin with a simple experiment that compares the zero-sized (toArray(new T[0]) and the pre-sized (toArray(new T[size]) variants. We'll use the popular ArrayList and the AbstractCollection backed TreeSet for the trials. Also, we'll include differently sized (small, medium, and large) collections to have a broad spectrum of sample data.

3.1. The JMH Benchmark

Next, let's put together a JMH (Java Microbenchmark Harness) benchmark for our trials. We'll configure the size and type parameters of the collection for the benchmark:

@Param({ "10", "10000", "10000000" })
private int size;
@Param({ "array-list", "tree-set" })
private String type;

Additionally, we'll define benchmark methods for the zero-sized and the pre-sized toArray variants:

@Benchmark
public String[] zero_sized() {
    return collection.toArray(new String[0]);
}
@Benchmark
public String[] pre_sized() {
    return collection.toArray(new String[collection.size()]);
}

3.2. Benchmark Results

Running the above benchmark on an 8 vCPU, 32 GB RAM, Linux x86_64 Virtual Machine with JMH (v1.28) and JDK (1.8.0_292) furnishes the results shown below. The Score reveals the average execution time, in nanoseconds per operation, for each of the benchmarked methods.

The lower the value, the better the performance:

Benchmark                   (size)      (type)  Mode  Cnt          Score          Error  Units
<<<<<<<<<<<<<<<<<<<<<<<<<<<<<<<<<<<<<<<<<<<>>>>>>>>>>>>>>>>>>>>>>>>>>>>>>>>>>>>>>>>>>>>>>>>>>>
TestBenchmark.zero_sized        10  array-list  avgt   15         24.939 ±        1.202  ns/op
TestBenchmark.pre_sized         10  array-list  avgt   15         38.196 ±        3.767  ns/op
----------------------------------------------------------------------------------------------
TestBenchmark.zero_sized     10000  array-list  avgt   15      15244.367 ±      238.676  ns/op
TestBenchmark.pre_sized      10000  array-list  avgt   15      21263.225 ±      802.684  ns/op
----------------------------------------------------------------------------------------------
TestBenchmark.zero_sized  10000000  array-list  avgt   15   82710389.163 ±  6616266.065  ns/op
TestBenchmark.pre_sized   10000000  array-list  avgt   15  100426920.878 ± 10381964.911  ns/op
<<<<<<<<<<<<<<<<<<<<<<<<<<<<<<<<<<<<<<<<<<<>>>>>>>>>>>>>>>>>>>>>>>>>>>>>>>>>>>>>>>>>>>>>>>>>>>
TestBenchmark.zero_sized        10    tree-set  avgt   15         66.802 ±        5.667  ns/op
TestBenchmark.pre_sized         10    tree-set  avgt   15         66.009 ±        4.504  ns/op
----------------------------------------------------------------------------------------------
TestBenchmark.zero_sized     10000    tree-set  avgt   15      85141.622 ±     2323.420  ns/op
TestBenchmark.pre_sized      10000    tree-set  avgt   15      89090.155 ±     4895.966  ns/op
----------------------------------------------------------------------------------------------
TestBenchmark.zero_sized  10000000    tree-set  avgt   15  211896860.317 ± 21019102.769  ns/op
TestBenchmark.pre_sized   10000000    tree-set  avgt   15  212882486.630 ± 20921740.965  ns/op

After careful observation of the above results, it's quite evident that the zero-sized method calls win it all, for all sizes and collection types in this trial.

For now, these numbers are just data. To have a detailed understanding, let's dig deep and analyze them.

3.3. The Allocation Rate

Hypothetically, it can be assumed that the zero-sized toArray method calls perform better than the pre-sized ones due to optimized memory allocations per operation. Let's clarify this by executing another benchmark and quantifying the average allocation rates – the memory in bytes allocated per operation – for the benchmarked methods.

The JMH provides a GC profiler (-prof gc) that internally uses ThreadMXBean#getThreadAllocatedBytes to calculate the allocation rate per @Benchmark:

Benchmark                                                    (size)      (type)  Mode  Cnt          Score           Error   Units
<<<<<<<<<<<<<<<<<<<<<<<<<<<<<<<<<<<<<<<<<<<<<<<<<<<<<<<<<<<<<<<<<<<<<>>>>>>>>>>>>>>>>>>>>>>>>>>>>>>>>>>>>>>>>>>>>>>>>>>>>>>>>>>>>
TestBenchmark.zero_sized:·gc.alloc.rate.norm                     10  array-list  avgt   15         72.000 ±         0.001    B/op
TestBenchmark.pre_sized:·gc.alloc.rate.norm                      10  array-list  avgt   15         56.000 ±         0.001    B/op
---------------------------------------------------------------------------------------------------------------------------------
TestBenchmark.zero_sized:·gc.alloc.rate.norm                  10000  array-list  avgt   15      40032.007 ±         0.001    B/op
TestBenchmark.pre_sized:·gc.alloc.rate.norm                   10000  array-list  avgt   15      40016.010 ±         0.001    B/op
---------------------------------------------------------------------------------------------------------------------------------
TestBenchmark.zero_sized:·gc.alloc.rate.norm               10000000  array-list  avgt   15   40000075.796 ±         8.882    B/op
TestBenchmark.pre_sized:·gc.alloc.rate.norm                10000000  array-list  avgt   15   40000062.213 ±         4.739    B/op
<<<<<<<<<<<<<<<<<<<<<<<<<<<<<<<<<<<<<<<<<<<<<<<<<<<<<<<<<<<<<<<<<<<<<>>>>>>>>>>>>>>>>>>>>>>>>>>>>>>>>>>>>>>>>>>>>>>>>>>>>>>>>>>>>
TestBenchmark.zero_sized:·gc.alloc.rate.norm                     10    tree-set  avgt   15         56.000 ±         0.001    B/op
TestBenchmark.pre_sized:·gc.alloc.rate.norm                      10    tree-set  avgt   15         56.000 ±         0.001    B/op
---------------------------------------------------------------------------------------------------------------------------------
TestBenchmark.zero_sized:·gc.alloc.rate.norm                  10000    tree-set  avgt   15      40055.818 ±        16.723    B/op
TestBenchmark.pre_sized:·gc.alloc.rate.norm                   10000    tree-set  avgt   15      41069.423 ±      1644.717    B/op
---------------------------------------------------------------------------------------------------------------------------------
TestBenchmark.zero_sized:·gc.alloc.rate.norm               10000000    tree-set  avgt   15   40000155.947 ±         9.416    B/op
TestBenchmark.pre_sized:·gc.alloc.rate.norm                10000000    tree-set  avgt   15   40000138.987 ±         7.987    B/op

Clearly, the above numbers prove that the allocation rate is more or less the same for identical sizes, irrespective of the collection type or the toArray variant. Therefore, it negates any speculative assumptions that the pre-sized and zero-sized toArray variants perform differently due to the irregularities in their memory allocation rates.

3.4. The toArray(T[] a) Internals

To further root out the cause of the problem, let's delve into the ArrayList internals:

if (a.length < size)
    return (T[]) Arrays.copyOf(elementData, size, a.getClass());
System.arraycopy(elementData, 0, a, 0, size);
if (a.length > size)
    a[size] = null;
return a;

Basically, depending on the length of the pre-allocated array, it's either an Arrays.copyOf or the native System.arraycopy method call that copies the underlying elements of the collection into an array.

Further, gazing at the copyOf method, it's evident that first a copy array of length equal to the size of the collection is created and then followed by the System.arraycopy invocation:

T[] copy = ((Object)newType == (Object)Object[].class)
    ? (T[]) new Object[newLength]
    : (T[]) Array.newInstance(newType.getComponentType(), newLength);
System.arraycopy(original, 0, copy, 0,
    Math.min(original.length, newLength));

When both the zero-sized and the pre-sized methods eventually invoke the native System.arraycopy method, how is the zero-sized method call faster?

The mystery lies in the direct costs of the CPU time spent in performing Zero Initializations for the externally pre-allocated arrays that make the toArray(new T[size]) method much slower.

4. Zero Initializations

The Java language specification directs that newly instantiated arrays and objects should have the default field values and not the irregular leftovers from memory. Hence, the runtime must zero-out the pre-allocated storage. Benchmarking experiments have proved that the zero-sized array method calls managed to avoid zeroing, but the pre-sized case could not.

Let's consider a couple of benchmarks:

@Benchmark
public Foo[] arraycopy_srcLength() {
    Object[] src= this.src;
    Foo[] dst = new Foo[size];
    System.arraycopy(src, 0, dst, 0, src.length);
    return dst;
}
@Benchmark
public Foo[] arraycopy_dstLength() {
    Object[] src= this.src;
    Foo[] dst = new Foo[size];
    System.arraycopy(src, 0, dst, 0, dst.length);
    return dst;
}

Experimental observations show that the System.arraycopy immediately following the array allocation in the arraycopy_srcLength benchmark is able to avoid the pre-zeroing of the dst array. However, the arraycopy_dstLength execution could not avoid pre-zeroing.

Coincidently, the latter arraycopy_dstLength case is similar to the pre-sized array method collection.toArray(new String[collection.size()]) where zeroing cannot be eliminated, hence its slowness.

5. Benchmarks on Newer JDKs

Finally, let's execute the original benchmark on the recently released JDKs, and also configure the JVM to use the newer and much improved G1 garbage collector:

# VM version: JDK 11.0.2, OpenJDK 64-Bit Server VM, 11.0.2+9
-----------------------------------------------------------------------------------
Benchmark                    (size)      (type)  Mode  Cnt    Score    Error  Units
-----------------------------------------------------------------------------------
ToArrayBenchmark.zero_sized     100  array-list  avgt   15  199.920 ± 11.309  ns/op
ToArrayBenchmark.pre_sized      100  array-list  avgt   15  237.342 ± 14.166  ns/op
-----------------------------------------------------------------------------------
ToArrayBenchmark.zero_sized     100    tree-set  avgt   15  819.306 ± 85.916  ns/op
ToArrayBenchmark.pre_sized      100    tree-set  avgt   15  972.771 ± 69.743  ns/op
###################################################################################
# VM version: JDK 14.0.2, OpenJDK 64-Bit Server VM, 14.0.2+12-46
------------------------------------------------------------------------------------
Benchmark                    (size)      (type)  Mode  Cnt    Score    Error   Units
------------------------------------------------------------------------------------
ToArrayBenchmark.zero_sized     100  array-list  avgt   15  158.344 ±   3.862  ns/op
ToArrayBenchmark.pre_sized      100  array-list  avgt   15  214.340 ±   5.877  ns/op
------------------------------------------------------------------------------------
ToArrayBenchmark.zero_sized     100    tree-set  avgt   15  877.289 ± 132.673  ns/op
ToArrayBenchmark.pre_sized      100    tree-set  avgt   15  934.550 ± 148.660  ns/op
####################################################################################
# VM version: JDK 15.0.2, OpenJDK 64-Bit Server VM, 15.0.2+7-27
------------------------------------------------------------------------------------
Benchmark                    (size)      (type)  Mode  Cnt    Score     Error  Units
------------------------------------------------------------------------------------
ToArrayBenchmark.zero_sized     100  array-list  avgt   15  147.925 ±   3.968  ns/op
ToArrayBenchmark.pre_sized      100  array-list  avgt   15  213.525 ±   6.378  ns/op
------------------------------------------------------------------------------------
ToArrayBenchmark.zero_sized     100    tree-set  avgt   15  820.853 ± 105.491  ns/op
ToArrayBenchmark.pre_sized      100    tree-set  avgt   15  947.433 ± 123.782  ns/op
####################################################################################
# VM version: JDK 16, OpenJDK 64-Bit Server VM, 16+36-2231
------------------------------------------------------------------------------------
Benchmark                    (size)      (type)  Mode  Cnt    Score     Error  Units
------------------------------------------------------------------------------------
ToArrayBenchmark.zero_sized     100  array-list  avgt   15  146.431 ±   2.639  ns/op
ToArrayBenchmark.pre_sized      100  array-list  avgt   15  214.117 ±   3.679  ns/op
------------------------------------------------------------------------------------
ToArrayBenchmark.zero_sized     100    tree-set  avgt   15  818.370 ± 104.643  ns/op
ToArrayBenchmark.pre_sized      100    tree-set  avgt   15  964.072 ± 142.008  ns/op
####################################################################################

Interestingly, the toArray(new T[0]) method has been consistently faster than toArray(new T[size]). Also, its performance has constantly improved with every new release of the JDK.

5.1. Java 11 Collection.toArray(IntFunction<T[]>) 

In Java 11, the Collection interface introduced a new default toArray method that accepts an IntFunction<T[]> generator as an argument (one that will generate a new array of the desired type and the provided length).

This method guarantees new T[0] array initialization by invoking the generator function with a value of zero, thereby ensuring that the faster and better performing zero-sized toArray(T[]) method will always be executed.

6. Conclusion

In this article, we probed into the different toArray overloaded methods of the Collection interface. We also ran performance trials leveraging the JMH micro-benchmarking tool across different JDKs.

We understood the necessity and the impact of zeroing and observed how the internally allocated array eliminates the zeroing, thus winning the performance race. Lastly, we can firmly conclude that the toArray(new T[0]) variant is faster than the toArray(new T[size]) and, therefore, should always be the preferred option when we have to convert a collection to an array.

As always, the code used in this article can be found over on GitHub.

The post Collection.toArray(new T[0]) or .toArray(new T[size]) first appeared on Baeldung.
       

Generating Alphanumeric UUID String in Java

$
0
0

1. Overview

UUID (Universally Unique Identifier), also known as GUID (Globally Unique Identifier), is a 128-bit value that is unique for all practical purposes. Their uniqueness doesn't depend on a central registration authority or coordination between the parties generating them, unlike most other numbering schemes.

In this tutorial, we'll see two different implementation approaches to generate UUID identifiers in Java.

2. Structure

Let's have a look at an example UUID, followed by the canonical representation of a UUID:

123e4567-e89b-42d3-a456-556642440000
xxxxxxxx-xxxx-Bxxx-Axxx-xxxxxxxxxxxx

The standard representation is composed of 32 hexadecimal (base-16) digits, displayed in five groups separated by hyphens, in the form 8-4-4-4-12, for a total of 36 characters (32 hexadecimal characters and 4 hyphens).

The Nil UUID is a special form of UUID in which all bits are zero.

2.1. Variants

In the standard representation above, A indicates the UUID variant, which determines the layout of the UUID. All other bits in the UUID depend on the setting of the bits in the variant field.

The variant is determined by the three most significant bits of A:

  MSB1    MSB2    MSB3
   0       X       X     reserved (0)
   1       0       X     current variant (2)
   1       1       0     reserved for Microsoft (6)
   1       1       1     reserved for future (7)

The value of A in the mentioned UUID is “a”. The binary equivalent of “a” (=10xx) shows the variant as 2.

2.1. Versions

Looking again at the standard representation, B represents the version. The version field holds a value that describes the type of the given UUID. The version (value of B) in the example UUID above is 4.

There are five different basic types of UUIDs:

  1. Version 1 (Time-Based): based on the current timestamp, measured in units of 100 nanoseconds from October 15, 1582, concatenated with the MAC address of the device where the UUID is created.
  2. Version 2 (DCE – Distributed Computing Environment): uses the current time, along with the MAC address (or node) for a network interface on the local machine. Additionally, a version 2 UUID replaces the low part of the time field with a local identifier such as the user ID or group ID of the local account that created the UUID.
  3. Version 3 (Name-based): The UUIDs are generated using the hash of namespace and name. The namespace identifiers are UUIDs like Domain Name System (DNS), Object Identifiers (OIDs), and URLs.
  4. Version 4 (Randomly generated): In this version, UUID identifiers are randomly generated and do not contain any information about the time they are created or the machine that generated them.
  5. Version 5 (Name-based using SHA-1): Generated using the same approach as version 3, with the difference of the hashing algorithm. This version uses SHA-1 (160 bits) hashing of a namespace identifier and name.

3. The UUID Class

Java has a built-in implementation to manage UUID identifiers, whether we want to randomly generate UUIDs or create them using a constructor.

The UUID class has a single constructor:

UUID uuid = new UUID(long mostSignificant64Bits, long leastSignificant64Bits);

If we want to use this constructor, we need to provide two long values. However, it requires us to construct the bit pattern for the UUID ourselves.

For convenience, there are three static methods to create a UUID.

The first method creates a version 3 UUID from the given byte array:

UUID uuid = UUID.nameUUIDFromBytes(byte[] bytes);

Second, the randomUUID() method creates a version 4 UUID. This is the most convenient way of creating a UUID instance:

UUID uuid = UUID.randomUUID();

The third static method returns a UUID object given the string representation of a given UUID:

UUID uuid = UUID.fromString(String uuidHexDigitString);

Let's now look at some implementations for generating UUIDs without using the built-in UUID class.

4. Implementations

We're going to separate the implementations into two categories depending on the requirement. The first category will be for identifiers that only need to be unique, and for that purpose, UUIDv1 and UUIDv4 are the best options. In the second category, if we need to always generate the same UUID from a given name, we would need a UUIDv3 or UUIDv5.

Since RFC 4122 does not specify the exact generation details, we won't look at an implementation of UUIDv2 in this article.

Let's now see the implementation for the categories we mentioned.

4.1. Versions 1 and 4

First of all, if privacy is a concern, UUIDv1 can alternatively be generated with a random 48-bit number instead of the MAC address. In this article, we'll look at this alternative.

First, we'll generate the 64 least and most significant bits as long values:

private static long get64LeastSignificantBitsForVersion1() {
    Random random = new Random();
    long random63BitLong = random.nextLong() & 0x3FFFFFFFFFFFFFFFL;
    long variant3BitFlag = 0x8000000000000000L;
    return random63BitLong + variant3BitFlag;
}
private static long get64MostSignificantBitsForVersion1() {
    LocalDateTime start = LocalDateTime.of(1582, 10, 15, 0, 0, 0);
    Duration duration = Duration.between(start, LocalDateTime.now());
    long seconds = duration.getSeconds();
    long nanos = duration.getNano();
    long timeForUuidIn100Nanos = seconds * 10000000 + nanos * 100;
    long least12SignificatBitOfTime = (timeForUuidIn100Nanos & 0x000000000000FFFFL) >> 4;
    long version = 1 << 12;
    return 
      (timeForUuidIn100Nanos & 0xFFFFFFFFFFFF0000L) + version + least12SignificatBitOfTime;
}

We can then pass these two values to the constructor of the UUID:

public static UUID generateType1UUID() {
    long most64SigBits = get64MostSignificantBitsForVersion1();
    long least64SigBits = get64LeastSignificantBitsForVersion1();
    return new UUID(most64SigBits, least64SigBits);
}

We'll now see how to generate UUIDv4. The implementation uses random numbers as the source. The Java implementation is SecureRandom, which uses an unpredictable value as the seed to generate random numbers in order to reduce the chance of collisions.

Let’s generate a version 4 UUID:

UUID uuid = UUID.randomUUID();

And then, let's generate a unique key using “SHA-256” and a random UUID:

MessageDigest salt = MessageDigest.getInstance("SHA-256");
salt.update(UUID.randomUUID().toString().getBytes("UTF-8"));
String digest = bytesToHex(salt.digest());

4.2. Versions 3 and 5

The UUIDs are generated using the hash of namespace and name. The namespace identifiers are UUIDs like Domain Name System (DNS), Object Identifiers (OIDs), and URLs. Let's look at the pseudocode of the algorithm:

UUID = hash(NAMESPACE_IDENTIFIER + NAME)

The only difference between UUIDv3 and UUIDv5 is the hashing algorithm — v3 uses MD5 (128 bits), while v5 uses SHA-1 (160 bits).

For UUIDv3 we'll use the method nameUUIDFromBytes() from the UUID class, which takes an array of bytes and apply the MD5 hash.

So let's first extract the bytes representation from the namespace and the specific name, and join them into a single array to send it to the UUID api:

byte[] nameSpaceBytes = bytesFromUUID(namespace);
byte[] nameBytes = name.getBytes("UTF-8");
byte[] result = joinBytes(nameSpaceBytes, nameBytes);

The final step will be to pass the result we got from the previous process to the nameUUIDFromBytes() method. This method will also set the variant and version fields:

UUID uuid = UUID.nameUUIDFromBytes(result);

Let's now see the implementation for UUIDv5. It is important to notice that Java doesn't provide a built-in implementation to generate version 5.

Let's check the code to generate the least and most significant bits, againg as long values:

public static long getLeastAndMostSignificantBitsVersion5(final byte[] src, final int offset, final ByteOrder order) {
    long ans = 0;
    if (order == ByteOrder.BIG_ENDIAN) {
        for (int i = offset; i < offset + 8; i += 1) {
            ans <<= 8;
            ans |= src[i] & 0xffL;
        }
    } else {
        for (int i = offset + 7; i >= offset; i -= 1) {
            ans <<= 8;
            ans |= src[i] & 0xffL;
        }
    }
    return ans;
}

Now, we need to define the method that will take a name to generate the UUID. This method will use the default constructor defined in UUID class:

private static UUID generateType5UUID(String name) { 
    byte[] bytes = name.getBytes(StandardCharsets.UTF_8);
    MessageDigest md = MessageDigest.getInstance("SHA-1");
    byte[] hash = md.digest(bytes);
    long msb = getLeastAndMostSignificantBitsVersion5(hash, 0, ByteOrder.BIG_ENDIAN);
    long lsb = getLeastAndMostSignificantBitsVersion5(hash, 8, ByteOrder.BIG_ENDIAN);
    msb &= ~(0xfL << 12);
    msb |= ((long) 5) << 12;
    lsb &= ~(0x3L << 62);
    lsb |= 2L << 62;
    return new UUID(msb, lsb);
}

5. Conclusion

In this article, we saw the main concepts about UUID identifiers and how to generate them using a built-in class. We then saw some efficient implementations for different versions of UUIDs and their application scopes.

As always, the complete code for this article is available over on GitHub.

The post Generating Alphanumeric UUID String in Java first appeared on Baeldung.
       

Enabling Logging for Apache HttpClient

$
0
0

1. Overview

In this tutorial, we'll show how to enable logging in Apache's HttpClient. Additionally, we'll explain how logging is implemented inside the library. Afterward, we'll show how to enable different levels of logging.

2. Logging Implementation

The HttpClient library provides efficient, up-to-date, and feature-rich implementation client site of the HTTP protocol.

Indeed as a library, HttpClient doesn't force logging implementation. With this intention, version 4.5, provides logs with Commons Logging. Similarly, the latest version, 5.1, uses a logging facade provided by SLF4J. Both versions use a hierarchy schema to match loggers with their configurations.

Thanks to that, it is possible to set up loggers for single classes or for all classes related to the same functionality.

3. Log Types

Let's have a look at log levels defined by the library. We can distinguish 3 types of logs:

  • context logging – logs information about all internal operations of HttpClient. It contains wire and header logs as well.
  • wire logging – logs only data transmitted to and from the server
  • header logging – logs HTTP headers only

In version 4.5 the corresponding packages are org.apache.http.impl.client and org.apache.http.wire, org.apache.http.headers.

Acordingly in version 5.1 the are packages org.apache.hc.client5.http, org.apache.hc.client5.http.wire and org.apache.hc.client5.http.headers.

4. Log4j Configuration

Let's have a look at how to enable logging in both versions.  Our aim is to achieve the same flexibility in both versions. In version 4.1, we'll redirect logs to SLF4j. Thanks to that, different logging frameworks can be used.

4.1. Version 4.5 Configuration

Let's add the httpclient dependency:

<dependency>
    <groupId>org.apache.httpcomponents</groupId>
    <artifactId>httpclient</artifactId>
    <version>4.5.8</version>
    <exclusions>
        <exclusion>
            <artifactId>commons-logging</artifactId>
            <groupId>commons-logging</groupId>
        </exclusion>
    </exclusions>
</dependency>

We'll use jul-to-slf4j to redirect logs to SLF4J. Therefore we excluded commons-logging. Let's then add a dependency to the bridge between JUL and SLF4J:

<dependency>
    <groupId>org.slf4j</groupId>
    <artifactId>jul-to-slf4j</artifactId>
    <version>1.7.26</version>
</dependency>

Because SLF4J is just a facade, we need a binding. In our example, we'll use logback:

<dependency>
    <groupId>ch.qos.logback</groupId>
    <artifactId>logback-classic</artifactId>
    <version>1.2.3</version>
</dependency>

Let's now create the ApacheHttpClientUnitTest class:

public class ApacheHttpClientUnitTest {
    private final Logger logger = LoggerFactory.getLogger(this.getClass());
    public static final String DUMMY_URL = "https://postman-echo.com/get";
    @Test
    public void whenUseApacheHttpClient_thenCorrect() throws IOException {
        HttpGet request = new HttpGet(DUMMY_URL);
        try (CloseableHttpClient client = HttpClients.createDefault(); CloseableHttpResponse response = client.execute(request)) {
            HttpEntity entity = response.getEntity();
            logger.debug("Response -> {}",  EntityUtils.toString(entity));
        }
    }
}

The test fetches a dummy web page and prints the contents to the log.

Let's now define a logger configuration with our logback.xml file:

<configuration debug="false">
    <appender name="stdout" class="ch.qos.logback.core.ConsoleAppender">
        <encoder>
            <pattern>%date [%level] %logger - %msg %n</pattern>
        </encoder>
    </appender>
    <logger name="com.baeldung.httpclient.readresponsebodystring" level="debug"/>
    <logger name="org.apache.http" level="debug"/>
    <root level="WARN">
        <appender-ref ref="stdout"/>
    </root>
</configuration>

After running our test, all HttpClient's logs can be found in the console:

...
2021-06-19 22:24:45,378 [DEBUG] org.apache.http.impl.execchain.MainClientExec - Executing request GET /get HTTP/1.1 
2021-06-19 22:24:45,378 [DEBUG] org.apache.http.impl.execchain.MainClientExec - Target auth state: UNCHALLENGED 
2021-06-19 22:24:45,379 [DEBUG] org.apache.http.impl.execchain.MainClientExec - Proxy auth state: UNCHALLENGED 
2021-06-19 22:24:45,382 [DEBUG] org.apache.http.headers - http-outgoing-0 >> GET /get HTTP/1.1 
...

4.2. Version 5.1 Configuration

Let's have a look now at the higher version. It contains redesigned logging. Therefore, instead of Commons Logging, it utilizes SLF4J. As a result, a binding for the logger facade is the only additional dependency. Therefore we'll use logback-classic as in the first example.

Let's add the httpclient5 dependency:

<dependency>
    <groupId>org.apache.httpcomponents.client5</groupId>
    <artifactId>httpclient5</artifactId>
    <version>5.1</version>
</dependency>

Let's add a similar test as in the previous example:

public class ApacheHttpClient5UnitTest {
    private final Logger logger = LoggerFactory.getLogger(this.getClass());
    public static final String DUMMY_URL = "https://postman-echo.com/get";
    @Test
    public void whenUseApacheHttpClient_thenCorrect() throws IOException, ParseException {
        HttpGet request = new HttpGet(DUMMY_URL);
        try (CloseableHttpClient client = HttpClients.createDefault(); CloseableHttpResponse response = client.execute(request)) {
            HttpEntity entity = response.getEntity();
            logger.debug("Response -> {}", EntityUtils.toString(entity));
        }
    }
}

Next, we need to add a logger to the logback.xml file:

<configuration debug="false">
...
    <logger name="org.apache.hc.client5.http" level="debug"/>
...
</configuration>

Let's run the test class ApacheHttpClient5UnitTest and check the output. It is similar to the old version:

...
2021-06-19 22:27:16,944 [DEBUG] org.apache.hc.client5.http.impl.classic.InternalHttpClient - ep-0000000000 endpoint connected 
2021-06-19 22:27:16,944 [DEBUG] org.apache.hc.client5.http.impl.classic.MainClientExec - ex-0000000001 executing GET /get HTTP/1.1 
2021-06-19 22:27:16,944 [DEBUG] org.apache.hc.client5.http.impl.classic.InternalHttpClient - ep-0000000000 start execution ex-0000000001 
2021-06-19 22:27:16,944 [DEBUG] org.apache.hc.client5.http.impl.io.PoolingHttpClientConnectionManager - ep-0000000000 executing exchange ex-0000000001 over http-outgoing-0 
2021-06-19 22:27:16,960 [DEBUG] org.apache.hc.client5.http.headers - http-outgoing-0 >> GET /get HTTP/1.1 
...

5. Conclusion

That concludes this short tutorial on how to configure logging for Apache's HttpClient. Firstly, we explained how logging is implemented in the library. Secondly, we configured logging in two versions and executed simple test cases to show the output.

As always, the source code of the example is available over on GitHub.

The post Enabling Logging for Apache HttpClient first appeared on Baeldung.
       

Common Shortcuts in Eclipse

$
0
0

1. Overview

Many developers rely heavily on keyboard shortcuts to work efficiently in their IDE of choice.

In this tutorial, we're going to learn about some of the common shortcuts in the popular Eclipse IDE.

We'll break the shortcuts down into four general categories:

  • Search and navigation
  • Editing our code
  • Refactoring code
  • Running and debugging

Because there are some differences in key labeling between the Mac and Windows operating systems, we'll list the Mac command first, followed by the Windows command throughout this article. We should also note that on some keyboard configurations, we may need to use the function (fn) key to activate function keys.

2. Search and Navigation

In this section, we'll cover both how to find and open resources within our codebase and how to find and jump to specific items within a single file.

2.1. Quick Access Search

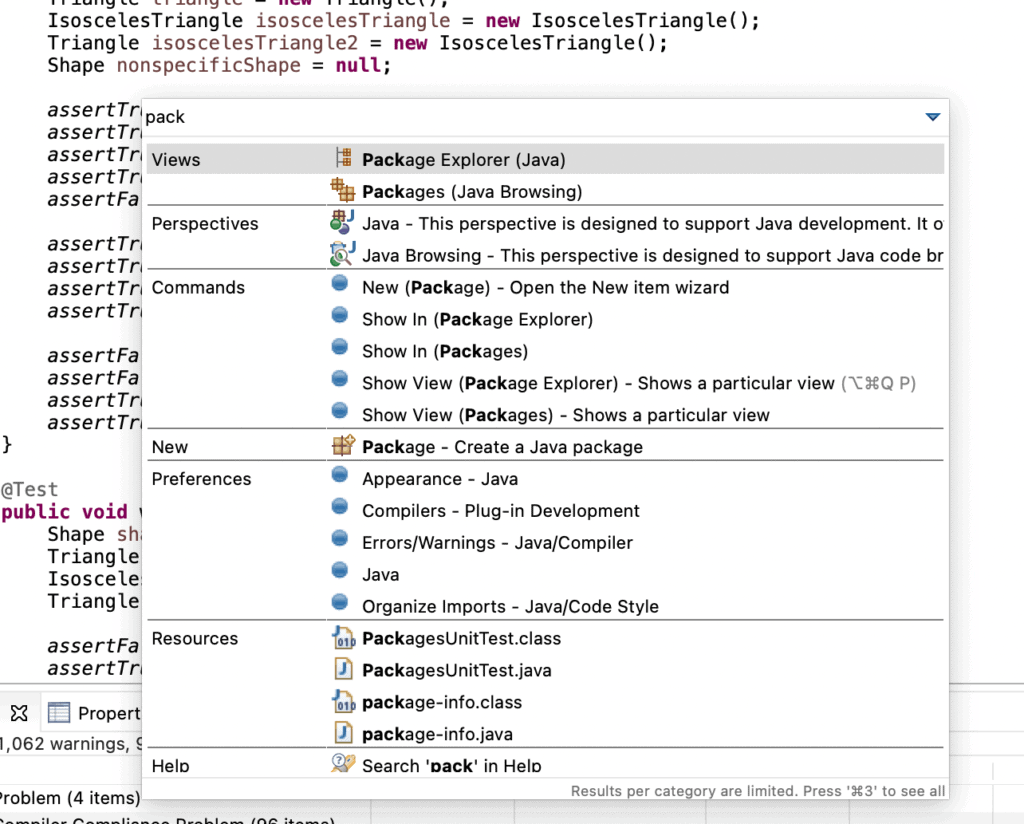
To open up a general search window that we can use to quickly search and open what we need, let's use + 3 or Ctrl + 3 to open the Quick Access Search window:

2.2. Overall Search

To open the Overall Search window, let's use Ctrl + H. From this window, we can find specific values throughout a project or the whole workspace depending on the options we choose:

2.3. Open Resource

If we know the name of the file we'd like to open, we can use + Shift + R or Ctrl + Shift + R to bring up the Open Resource window. From there, we can start typing the name of any resource within the workspace:

2.4. Open Type

Similar to the Open Resource window, we can get the Open Type window using + Shift + T or Ctrl + Shift + T. In that window, we can start typing the name of any class or interface in our workspace:

2.5. Find All References to a Type

Sometimes we need to find everywhere in our project that a class or interface is used. Once we've highlighted our type name, we can use + Shift + G or Ctrl + Shift + G to find all references to that type:

2.6. Search/Search and Replace

We've learned how to search across our workspace, but we'll often want to find and replace text within the file we're currently editing. We can use + F or Cmd + F to open the Find/Replace window:

2.7. Go to Line

When debugging our Java code, we might have a line number from a stack trace or some other source that we want to jump to. We can easily do that by using + L or Ctrl L to open the Go to Line window. In that window, we can just type our line number and go to it:

3. Editing

Now that we can find our code, let's look at the shortcuts we can use to edit more efficiently.

3.1. Moving Code Up or Down

To move a line of code, we just need to have our cursor on that line. Then we can use Opt + the up or down arrow key or Alt + up or down to move that line of up or down.

First, let's select line 24:

Then, we can use Opt + down arrow to move the entire line down one line:

3.2. Content Assist

Sometimes we'd like to have a little help remembering variable or class names. In Eclipse, we can use Ctrl + Space to get suggestions or even have our variable names auto-completed:

3.3. Suggestions for Fixing Problems

Similarly to Content Assist, we can also ask Eclipse to make suggestions for fixing a problem. We can ask for these suggestions using + 1 or Ctrl + 1:

3.4. Comments

In Java, we can comment individual lines of code using // and blocks of code using /* */. In Eclipse, we have shortcuts at our disposal for both kinds of comments.

We can comment and uncomment individual lines of code using + / or Ctrl + /:

To create comment blocks of code, let's use + Opt + / or Ctrl + Alt + /. We can undo block comments with + Opt + \ or Ctrl + Alt + \:

3.5. Advanced Editing Options

Next, let's open the advanced editing options window using Opt + + S or Alt + Shift + S:

4. Refactoring

Next, let's look at some of the shortcuts we can use to refactor our code more easily.

4.1. Renaming Variables

Let's highlight our variable and use Opt + + R or Ctrl + Shift + R to rename it. It's sufficient for us to just type a new name and hit enter, but we can also choose to open a more advanced refactoring window:

4.2. Refactoring Options

If we want refactoring options, we can highlight a variable, type, or even a package and use  Opt + + T or Ctrl + Shift + T to open a list of refactoring options. The options displayed will vary depending on what we've highlighted:

5. Running and Debugging

One major advantage we gain from using an IDE is running an application in debug mode. With that in mind, let's finish up by looking at the commands we can use to run and debug our applications.

5.1. Running/Debugging an Application

Let's use + F11 or F11 to run our application in debug mode:

If we don't need the debugger, we'll use ⌘ + Shift + F11 or Ctrl + Shift + F11 to run the last application we ran.

5.2. Debugging

Once we've hit a breakpoint in our code, we need to decide how to move through the code from there. There are simple shortcuts for common actions.

Let's start by using F6 to step over a line of code.

Let's imagine that we've hit our breakpoint here:

After we've used F6 to step over:

Now, if we need to step into a method, we use F5 to step into the method.

Let's use F5 to step into the method from the previous example:

Let's say we get into the setup() method and decide that's not where we need to be. We'll use the F7 shortcut to Step to the method return.

When we're ready to let our application run to completion, let's use F8 to let our application continue execution.

6. Conclusion

In this article, we've learned about some of the common keyboard shortcuts available in the Eclipse IDE. We covered common shortcuts in four general areas: searching/finding, editing, refactoring, and running/debugging.

The post Common Shortcuts in Eclipse first appeared on Baeldung.
       

Expose More Than One Port With Docker

$
0
0

1. Overview

When we dockerize our applications, we usually need to expose one port. The application uses that port to interact with other containers or the outside world. Sometimes, one port is not sufficient. One or more additional ports may be required to serve other purposes. For example, in a Spring Boot application, we need a separate port to publish management endpoints to monitor the application using the actuator.

In this article, we'll see how to declare more than one port to expose and how to bind the exposed ports with the ports of the host computer in order to achieve the above.

2. Declaring Ports

First, we need to declare the ports to be exposed. We can do that while building the docker image. It's also possible to declare ports while running a container based on the image. Let's see how we do that.

We'll start with an example of a sample Spring Boot application – my-app. Throughout the article, we will use the same example to understand the concepts. Our application has only one GET endpoint, which returns “Hello buddy“. It also has the Spring actuator enabled. The application runs on port 8080, and the management endpoints run on port 8081. So, when the application is running on the local computer, these commands work:

$ curl http://localhost:8080
Hello buddy
$ curl http://localhost:8081/actuator/health
{"status":"UP"}

2.1. Declaration in Dockerfile

As our application my-app publishes its endpoints in two ports, 8080 and 8081, we need to expose both ports in our Dockerfile. The EXPOSE verb in the Dockerfile exposes ports:

FROM openjdk:8-jdk-alpine
EXPOSE 8080
EXPOSE 8081
ARG JAR_FILE=target/my-app-0.1.jar
ADD ${JAR_FILE} my-app.jar
ENTRYPOINT ["java","-jar","/my-app.jar"]

However, when we build the image using this Dockerfile:

$ docker build -t my-app:latest .

This doesn't actually open the ports because the author of the Dockerfile has no control over the network the container will be running on. Rather, the EXPOSE command acts as documentation. With this, the person who runs a container understands which ports of the container need to be published in the host computer to communicate with the application.

We can also specify the protocol – TCP or UDP – for communicating on this port:

EXPOSE 8080/tcp
EXPOSE 8081/udp

If we don't specify anything, it takes TCP as default.

The command also supports port declaration in a range:

EXPOSE 8000-8009

The above command tells that the application needs to open 10 ports starting from 8000 to 8009 for communication.

2.2. Declaration in docker run Command

Let's assume we already have a docker image for my-app that exposes only one port 8080 using the EXPOSE command in its Dockerfile. Now, if we want to expose the other port, 8081, we should use the –expose parameter along with the run command:

$ docker run --name myapp -d --expose=8081 my-app:latest

The above command runs a container named myapp from the image my-app and exposes 8081 along with port 8080. We can check this using:

$ docker ps
CONTAINER ID   IMAGE           COMMAND                  CREATED             STATUS              PORTS              NAMES
2debb3c5345b   my-app:latest   "java -jar /my-app.j…"   5 seconds ago       Up 3 seconds        8080-8081/tcp      myapp

It is important to understand that this parameter only exposes – but does not publish – the ports in the host computer. To understand it more clearly, let's execute:

$ docker port myapp

This doesn't print anything because no ports have been opened and mapped in the host computer. Therefore, we're not able to access the application even though it's running inside the container:

$ curl http://localhost:8080
curl: (7) Failed to connect to localhost port 8080: Connection refused

We may also opt to expose a range of ports in the same way:

$ docker run --name myapp -d --expose=8000-8009 my-app:latest

3. Publishing Ports

We've already learned to expose ports for a dockerized application. Now it's time to publish them.

3.1. Publishing in Run Command

Let's reuse the example of the my-app image from the previous section. It has two ports exposed in its Dockerfile8080 and 8081. While running the container based on this image, we can publish all the exposed ports at once using the -P argument:

$ docker run --name myapp -d -P myApp:latest

The above command opens two random ports in the host computer and maps them with ports 8080 and 8081 of the Docker container. It behaves the same way if we expose a range of ports.

To check the mapped ports, we use:

$ docker port myapp
8080/tcp -> 0.0.0.0:32773
8081/tcp -> 0.0.0.0:32772

Now, the application is accessible using port 32773, and the management endpoints are accessible through 32772:

$ curl http://localhost:32773
Hello buddy
$ curl http://localhost:32772/actuator/health
{"status":"UP"}

Instead of allocating random ports, we may choose specific ports in the host computer by using the -p parameter:

$ docker run --name myapp -d -p 80:8080 my-app:latest

The above command publishes only port 8080 and maps with port 80 in the host server. It doesn't make the actuator endpoints accessible from outside the container:

$ curl http://localhost:80
Hello buddy
$ curl http://localhost:8081/actuator/health
curl: (7) Failed to connect to localhost port 8081: Connection refused

To publish multiple port mappings, we use the -p parameter multiple times:

$ docker run --name myapp -d -p 80:8080 -p 81:8081 my-app:latest

This way, we also keep control of which ports of the container opens up to the outside.

3.2. Publishing in docker-compose

If we use our application in docker-compose, we can provide a list of ports that needs to be published in the docker-compose.yml file:

version: "3.7"
services:
  myapp:
    image: my-app:latest
    ports:
      - 8080
      - 8081

If we launch this setup, it assigns random ports of the host server with the given ports:

$ docker-compose up -d
Starting my-app_myapp_1 ... done
$ docker port  my-app_myapp_1
8080/tcp -> 0.0.0.0:32785
8081/tcp -> 0.0.0.0:32784

However, it's possible to provide the specific choice of ports:

version: "3.7"
services:
  myapp:
    image: my-app:latest
    ports:
      - 80:8080
      - 81:8081

Here, 80 and 81 are the ports of the host machine, whereas 8080 and 8081 are the container ports.

4. Conclusion

In this article, we have discussed different ways of exposing and publishing more than one port in a Docker container. We have seen what exposing actually means and also how to gain full control over the publishing of the ports between the container and the host computer.

The post Expose More Than One Port With Docker first appeared on Baeldung.

Lookahead and Lookbehind in Java Regex

$
0
0

1. Overview

Sometimes we might face difficulty matching a string with a regular expression. For example, we might not know what we want to match exactly, but we can be aware of its surroundings, like what comes directly before it or what is missing from after it. In these cases, we can use the lookaround assertions. These expressions are called assertions because they only indicate if something is a match or not but are not included in the result.

In this tutorial, we'll take a look at how we can use the four types of regex lookaround assertions.

2. Positive Lookahead

Let's say we'd like to analyze the imports of java files. First, let's look for import statements that are static by checking that the static keyword follows the import keyword.

Let's use a positive lookahead assertion with the (?=criteria) syntax in our expression to match the group of characters static after our main expression import:

Pattern pattern = Pattern.compile("import (?=static).+");
Matcher matcher = pattern
  .matcher("import static org.junit.jupiter.api.Assertions.assertEquals;");
assertTrue(matcher.find());
assertEquals("import static org.junit.jupiter.api.Assertions.assertEquals;", matcher.group());
assertFalse(pattern.matcher("import java.util.regex.Matcher;").find());

3. Negative Lookahead

Next, let's do the direct opposite of the previous example and look for import statements that are not static. Let's do this by checking that the static keyword does not follow the import keyword.

Let's use a negative lookahead assertion with the (?!criteria) syntax in our expression to ensure that the group of characters static cannot match after our main expression import:

Pattern pattern = Pattern.compile("import (?!static).+");
Matcher matcher = pattern.matcher("import java.util.regex.Matcher;");
assertTrue(matcher.find());
assertEquals("import java.util.regex.Matcher;", matcher.group());
assertFalse(pattern
  .matcher("import static org.junit.jupiter.api.Assertions.assertEquals;").find());

4. Limitations of Lookbehind in Java

Up until Java 8, we might run into the limitation that unbound quantifiers, like + and *, are not allowed within a lookbehind assertion. That is to say, for example, the following assertions will throw PatternSyntaxException up until Java 8:

  • (?<!fo+)bar, where we don't want to match bar if fo with one or more o characters come before it
  • (?<!fo*)bar, where we don't want to match bar if it is preceded by an f character followed by zero or more o characters
  • (?<!fo{2,})bar, where we don't want to match bar if foo with two or more o characters come before it

As a workaround, we might use a curly braces quantifier with a specified upper limit, for example (?<!fo{2,4})bar, where we maximize the number of o characters following the f character to 4.

Since Java 9, we can use unbound quantifiers in lookbehinds. However, because of the memory consumption of the regex implementation, it is still recommended to only use quantifiers in lookbehinds with a sensible upper limit, for example (?<!fo{2,20})bar instead of (?<!fo{2,2000})bar.

5. Positive Lookbehind

Let's say we'd like to differentiate between JUnit 4 and JUnit 5 imports in our analysis. First, let's check if an import statement for the assertEquals method is from the jupiter package.

Let's use a positive lookbehind assertion with the (?<=criteria) syntax in our expression to match the character group jupiter before our main expression .*assertEquals:

Pattern pattern = Pattern.compile(".*(?<=jupiter).*assertEquals;");
Matcher matcher = pattern
  .matcher("import static org.junit.jupiter.api.Assertions.assertEquals;");
assertTrue(matcher.find());
assertEquals("import static org.junit.jupiter.api.Assertions.assertEquals;", matcher.group());
assertFalse(pattern.matcher("import static org.junit.Assert.assertEquals;").find());

6. Negative Lookbehind

Next, let's do the direct opposite of the previous example and look for import statements that are not from the jupiter package.

To do this, let's use a negative lookbehind assertion with the (?<!criteria) syntax in our expression to ensure that the group of characters jupiter.{0,30} cannot match before our main expression assertEquals:

Pattern pattern = Pattern.compile(".*(?<!jupiter.{0,30})assertEquals;");
Matcher matcher = pattern.matcher("import static org.junit.Assert.assertEquals;");
assertTrue(matcher.find());
assertEquals("import static org.junit.Assert.assertEquals;", matcher.group());
assertFalse(pattern
  .matcher("import static org.junit.jupiter.api.Assertions.assertEquals;").find());

7. Conclusion

In this article, we've seen how to use the four types of regex lookaround to solve some difficult cases of matching strings with regex.

As always, the source code for this article is available over on GitHub.

The post Lookahead and Lookbehind in Java Regex first appeared on Baeldung.
       

Java Weekly, Issue 392

$
0
0

1. Spring and Java

>> Internal JDK Elements Strongly Encapsulated in JDK 17 [infoq.com]

Illegal access to internal APIs is no longer an option as of Java 17 – must know if we're planning to use Java 17!

>> Hibernate Physical Naming Strategy [vladmihalcea.com]

Let's see how Hibernate 5 maps entity attributes to database identifiers – it's always a good idea to know how things work under the hood!

Also worth reading:

Webinars and presentations:

Time to upgrade:

2. Technical

>> Time and Distributed Systems: Version Vector, Hybrid Clock, and Lamport Clock [martinfowler.com]

The illusion of in-synch clocks in distributed systems – a few patterns to maintain historical revisions or causal relationships in distributed systems.

>> Implementing Microservicilites with Istio [infoq.com]

Handling most cross-cutting concerns in Microservices via Istio – circuit breaker, tracing, monitoring, and several more. An interesting read.

Also worth reading:

3. Musings

>> Start Clean! [reflectoring.io]

Wanna have a good night's sleep? Act responsibly for the things you can control in your codebase – documenting decisions, explaining the architecture, modularization, and more!

Also worth reading:

4. Comics

And my favorite Dilberts of the week:

>> Based on Facts! [dilbert.com]

>> Loser Detector [dilbert.com]

>> Firing Remotely! [dilbert.com]

5. Pick of the Week

>> How to Work Hard [paulgraham.com]

The post Java Weekly, Issue 392 first appeared on Baeldung.
       

Difference Between Maven Surefire and Failsafe Plugins

$
0
0

1. Overview

In typical Test Driven Development, we aim to write lots of low-level unit tests that are fast to run and set up in isolation. Additionally, there are also few high-level integration tests that are dependent on external systems, for example, setting up a server or databases. Unsurprisingly, these are typically both resource and time-consuming.

Hence, these tests mostly require some pre-integration setup and post-integration cleanup for the graceful termination. Therefore, it's desirable to distinguish between the two types of tests and be able to run them separately during the build process.

In this tutorial, we'll compare the Surefire and Failsafe plugins most commonly used for running various types of tests in a typical Apache Maven build.

2. Surefire Plugin

The Surefire Plugin belongs to a set of Maven core plugins and runs the unit tests of the application.

The project POM includes this plugin by default, but we can also configure it explicitly:

<build>
    <pluginManagement>
        <plugins>
            <plugin>
                <groupId>org.apache.maven.plugins</groupId>
                <artifactId>maven-surefire-plugin</artifactId>
                <version>3.0.0-M5</version>
                ....
            </plugin>
         </plugins>
    </pluginManagement>
</build>

The plugin binds to the test phase of the default lifecycle. Therefore, let's execute it with the command:

mvn clean test

This runs all the unit tests in our project. Since the Surefire plugin binds with the test phase, in case of any test failures, the build fails, and no further phases execute during the build process.

Alternatively, we can modify the plugin configuration to run integration tests, as well as the unit tests. However, this may not be desirable behavior for integration tests which could require some environment setup before, as well as some clean-up after test execution.

Maven provides another plugin precisely for this purpose.

3. Failsafe Plugin

The Failsafe Plugin is designed to run the integration tests in the project.

3.1. Configuration

First, let's configure this in the project POM:

<plugin>
    <artifactId>maven-failsafe-plugin</artifactId>
    <version>3.0.0-M5</version>
    <executions>
        <execution>
            <goals>
                <goal>integration-test</goal>
                <goal>verify</goal>
            </goals>
            ....
        </execution>
    </executions>
</plugin>

Here, the plugin's goals bind to the integration-test and verify phases of the build cycle in order to execute the integration tests.

Now, let's execute the verify phase from the command line:

mvn clean verify

This runs all the integration tests, but if any tests fail during the integration-test phase, the plugin does not fail the build immediately.

Instead, Maven still executes the post-integration-test phase. Therefore we can still perform any cleanup and environment tear-down as part of the post-integration-test phase. The subsequent verify phase of the build process reports any test failures.

3.2. Example

In our example, we'll configure a Jetty server to start prior to running the integration tests and stop after the test execution.

First, let's add the Jetty Plugin to our POM:

<plugin>
    <groupId>org.eclipse.jetty</groupId>
    <artifactId>jetty-maven-plugin</artifactId>
    <version>9.4.11.v20180605</version>
    ....
    <executions>
        <execution>
            <id>start-jetty</id>
            <phase>pre-integration-test</phase>
            <goals>
                <goal>start</goal>
            </goals>
        </execution>
        <execution>
            <id>stop-jetty</id>
            <phase>post-integration-test</phase>
            <goals>
                <goal>stop</goal>
            </goals>
        </execution>
    </executions>
</plugin>

Here we've added the configuration to start and stop the Jetty server during the pre-integration-test and post-integration-test phases respectively.

Now, let's execute our integration tests once again and see the console output:

....
[INFO] <<< jetty-maven-plugin:9.4.11.v20180605:start (start-jetty) 
  < validate @ maven-integration-test <<<
[INFO] --- jetty-maven-plugin:9.4.11.v20180605:start (start-jetty)
  @ maven-integration-test ---
[INFO] Started ServerConnector@4b9dc62f{HTTP/1.1,[http/1.1]}{0.0.0.0:8999}
[INFO] Started @6794ms
[INFO] Started Jetty Server
[INFO]
[INFO] --- maven-failsafe-plugin:3.0.0-M5:integration-test (default)
  @ maven-integration-test ---
[INFO]
[INFO] -------------------------------------------------------
[INFO]  T E S T S
[INFO] -------------------------------------------------------
[INFO] Running com.baeldung.maven.it.FailsafeBuildPhaseIntegrationTest
[ERROR] Tests run: 1, Failures: 1, Errors: 0, Skipped: 0, Time elapsed: 0.024 s
  <<< FAILURE! - in com.baeldung.maven.it.FailsafeBuildPhaseIntegrationTest
[ERROR] com.baeldung.maven.it.FailsafeBuildPhaseIntegrationTest.whenTestExecutes_thenPreAndPostIntegrationBuildPhasesAreExecuted
  Time elapsed: 0.012 s  <<< FAILURE!
org.opentest4j.AssertionFailedError: expected: <true> but was: <false>
	at com.baeldung.maven.it.FailsafeBuildPhaseIntegrationTest
          .whenTestExecutes_thenPreAndPostIntegrationBuildPhasesAreExecuted(FailsafeBuildPhaseIntegrationTest.java:11)
[INFO]
[INFO] Results:
[INFO]
[ERROR] Failures:
[ERROR]   FailsafeBuildPhaseIntegrationTest.whenTestExecutes_thenPreAndPostIntegrationBuildPhasesAreExecuted:11
  expected: <true> but was: <false>
[INFO]
[ERROR] Tests run: 1, Failures: 1, Errors: 0, Skipped: 0
[INFO]
[INFO] --- jetty-maven-plugin:9.4.11.v20180605:stop (stop-jetty)
  @ maven-integration-test ---
[INFO]
[INFO] --- maven-failsafe-plugin:3.0.0-M5:verify (default)
  @ maven-integration-test ---
[INFO] Stopped ServerConnector@4b9dc62f{HTTP/1.1,[http/1.1]}{0.0.0.0:8999}
[INFO] node0 Stopped scavenging
[INFO] ------------------------------------------------------------------------
[INFO] BUILD FAILURE
[INFO] ------------------------------------------------------------------------
....

Here, as per our configuration, the Jetty server starts prior to the integration test execution. For demonstration, we have a failing integration test, but this does not fail the build immediately. The post-integration-test phase executes after the test execution, and the server stops before build failure.

In contrast, if we use Surefire Plugin to run these integration tests, the build would have stopped at the integration-test phase without performing any required cleanup.

An additional benefit of using different plugins for different types of tests is the separation between the various configurations. This improves the maintainability of the project build.

4. Conclusion

In this article, we compared Surefire and Failsafe plugins for separating and running different types of tests. We also looked at an example and saw how Failsafe Plugin provides additional functionality for running tests that require further setup and cleanup.

As always, the code is available over on GitHub.

The post Difference Between Maven Surefire and Failsafe Plugins first appeared on Baeldung.
       

Kubernetes Deployment vs. StatefulSets

$
0
0

1. Overview

Kubernetes (K8s) is an open-source container orchestration system. It allows us to automate deployments, scale, and manage containerized applications.

In this tutorial, we'll discuss two different ways to deploy our application(pods) on Kubernetes using different Kubernetes resources. Below are two different resources that Kubernetes provides for deploying pods:

Let's start by looking at the difference between a stateful and stateless application.

2. Stateful and Stateless Applications

The key difference between stateful and stateless applications is that stateless applications don’t “store” data. On the other hand, stateful applications require backing storage. For example, applications like the Cassandra, MongoDB, and MySQL databases require some type of persistent storage to survive service restarts.

Keeping a state is critical for running a stateful application. But for a stateless service, any data flow is typically transitory. Also, the state is stored only in a separate back-end service like a database. Any associated storage is typically ephemeral. For instance, if the container restarts, anything stored is lost. As organizations adopt containers, they tend to begin with stateless containers as they are easier to adopt.

Kubernetes is well-known for managing stateless services. The deployment workload is more suited to work with stateless applications. As far as deployment is concerned, pods are interchangeable. While a StatefulSet keeps a unique identity for each pod it manages. It uses the same identity whenever it needs to reschedule those pods. In this article, we'll discuss this further.

3. Deployment

3.1. Understanding Deployment: The Basics

A Kubernetes Deployment provides means for managing a set of pods. These could be one or more running containers or a group of duplicate pods, known as ReplicaSets. Deployment allows us to easily keep a group of identical pods running with a common configuration.

First, we define our Kubernetes Deployment and then deploy it. Kubernetes will then work to make sure all pods managed by the deployment meet whatever requirements we have set. Deployment is a supervisor for pods. It gives us fine-grained control over how and when a new pod version is rolled out. It also provides control when we have to rollback to a previous version.

In Kubernetes Deployment with a replica of 1, the controller will verify whether the current state is equal to the desired state of ReplicaSet, i.e., 1. If the current state is 0, it will create a ReplicaSet. The ReplicaSet will further create the pods. When we create a Kubernetes Deployment with the name web-app, it will create a ReplicaSet with the name web-app-<replica-set-id>. This replica will further create a pod with name web-app-<replica-set->-<pod-id>.

Kubernetes Deployment is usually used for stateless applications. However, we can save the state of Deployment by attaching a Persistent Volume to it and make it stateful. The deployed pods will share the same Volume, and the data will be the same across all of them.

3.2. Deployment Components in Kubernetes

The following are the major components of a Kubernetes Deployment :

  • Deployment Template
  • PersistentVolume
  • Service

First, let's make our deployment template and save it as ‘deployment.yaml'. In the template below, we're also attaching a persistent volume:

apiVersion: apps/v1
kind: Deployment
metadata:
  name: web-app-deployment
spec:
  strategy:
    type: RollingUpdate
    rollingUpdate:
      maxSurge: 2
      maxUnavailable: 1
  selector:
    matchLabels:
      app: web-app
  replicas: 3
  template:
    metadata:
      labels:
        app: web-app
    spec:
      containers:
        - name: web-app
          image: hello-world:nanoserver-1809
          volumeMounts:
          - name: counter
            mountPath: /app/
      volumes:
       - name: counter
         persistentVolumeClaim:
          claimName: counter

In the template below, we have our PersistentVolumeClaim:

apiVersion: v1
kind: PersistentVolumeClaim
metadata:
  name: counter
spec:
  accessModes:
  - ReadWriteMany
  resources:
    requests:
      storage: 50Mi
  storageClassName: default

3.3. Executing a Deployment in Kubernetes

Before we execute our Deployment, we need a service to access the above Deployment. Let's create a service of type NodePort and save it as ‘service.yaml' :

apiVersion: v1
kind: Service
metadata:
  name: web-app-service
spec:
  ports:
    - name: http
      port: 80
      nodePort: 30080
  selector:
    name: web-app
  type: NodePort

First, we run the service template with the below kubectl apply command:

kubectl apply -f service.yaml

Then we run the same command for the deployment template:

kubectl apply -f deployment.yaml

In addition, to get a detailed description of the deployment, let's run the kubectl describe command:

kubectl describe deployment web-app-deployment

The output will be similar to this:

Name:                web-app-deployment
 Namespace:          default
 CreationTimestamp:  Tue, 30 Aug 2016 18:11:37 -0700
 Labels:             app=web-app
 Annotations:        deployment.kubernetes.io/revision=1
 Selector:           app=web-app
 Replicas:           3 desired | 3 updated | 3 total | 3 available | 0 unavailable
 StrategyType:       RollingUpdate
 MinReadySeconds:    0
 RollingUpdateStrategy:  1 max unavailable, 2 max surge
 Pod Template:
   Labels:               app=web-app
   Containers:
    web-app:
     Image:              spring-boot-docker-project:1
     Port:               80/TCP
     Environment:        <none>
     Mounts:             <none>
   Volumes:              <none>
 Conditions:
   Type          Status  Reason
   ----          ------  ------
   Available     True    MinimumReplicasAvailable
   Progressing   True    NewReplicaSetAvailable
 OldReplicaSets:   <none>
 NewReplicaSet:    web-app-deployment-1771418926 (3/3 replicas created)
 No events.

In the above section, we observe that Deployment internally creates a ReplicaSet. Then, it internally creates Pods inside that ReplicaSet. In the future, when we update the current deployment, it will create a new ReplicaSet. Then, it'll gradually move the Pods from the old ReplicaSet to the new one at a controlled rate.

If an error occurs while updating, the new ReplicaSet will never be in Ready state. The old ReplicaSet will not terminate again, ensuring 100% uptime in case of a failed update. In Kubernetes Deployment, we can also manually rollback to a previous ReplicaSet in case our new feature is not working as expected.

4. StatefulSets

4.1. Understanding StatefulSets: The Basics

In Kubernetes Deployment, we treat our pods like cattle, not like pets. If one of the cattle members gets sick or dies, we can easily replace it by purchasing a new head. Such an action is not noticeable. Similarly, if one pod goes down in deployment, it brings up another one. In StatefulSets, pods are given names and are treated like pets. If one of your pets got sick, it’s immediately noticeable. The same is in the case of StatefulSets, as it interacts with pods by their name.

StatefulSets provides to each pod in it two stable unique identities. First, the Network Identity enables us to assign the same DNS name to the pod regardless of the number of restarts. The IP addresses might still be different, so consumers should depend on the DNS name (or watch for changes and update the internal cache).

Secondly, the Storage Identity remains the same. The Network Identity always receives the same instance of Storage, regardless of which node it’s rescheduled on.

StatefulSet is also a Controller, but unlike Kubernetes Deployment, it doesn’t create ReplicaSet rather, it creates the pod with a unique naming convention. Each pod receives DNS name according to the pattern: <statefulset name>-<ordinal index>. For example, for StatefulSet with the name mysql, it will be mysql-0.

Every replica of a stateful set will have its own state, and each of the pods will be creating its own PVC(Persistent Volume Claim). So a StatefulSet with 3 replicas will create 3 pods, each having its own Volume, so total 3 PVCs. As StatefulSets works with data, we should be careful while stopping pod instances by allowing the required time to persist data from memory to disk. There still might be valid reasons to perform force deletion, for example, when Kubernetes Node fails.

4.2. Headless Service

A stateful application requires pods with a unique identity (hostname). One pod should be able to reach other pods with well-defined names. A StatefulSet needs a Headless Service to work. A headless service is a service with a service IP. Thus, it directly returns the IPs of our associated pods. This allows us to interact directly with the pods instead of a proxy. It's as simple as specifying None for .spec.clusterIP.

A Headless Service does not have an IP address. Internally, it creates the necessary endpoints to expose pods with DNS names. The StatefulSet definition includes a reference to the Headless Service, but we have to create it separately.

4.3. StatefulSets Components in Kubernetes

The following are the major components of StatefulSets :

  • StatefulSet
  • PersistentVolume
  • Headless Service

First, we create a StatefulSet template:

apiVersion: apps/v1
kind: StatefulSet
metadata:
  name: web
spec:
  selector:
    matchLabels:
      app: nginx
  serviceName: "nginx"
  replicas: 3
  template:
    metadata:
      labels:
        app: nginx
    spec:
      containers:
      - name: nginx
        image: nginx
        ports:
        - containerPort: 80
          name: web
        volumeMounts:
        - name: www
          mountPath: /usr/share/nginx/html
      volumes:
      - name: www
        persistentVolumeClaim:
          claimName: myclaim

Secondly, we create a PersistentVolume mentioned in the StatefulSet template:

apiVersion: v1
kind: PersistentVolumeClaim
metadata:
  name: myclaim
spec:
  accessModes:
    - ReadWriteMany
  resources:
    requests:
      storage: 5Gi

Lastly, we now create a Headless Service for the above StatefulSet:

apiVersion: v1
kind: Service
metadata:
  name: nginx
  labels:
    app: nginx
spec:
  ports:
  - port: 80
    name: web
  clusterIP: None
  selector:
    app: nginx

4.4. Executing StatefulSets in Kubernetes

We have templates ready for all three components. Now, let's run the create kubectl command to create the StatefulSet:

kubectl create -f statefulset.yaml

It will create three pods named web-0,web-1,web-2. We can verify the correct creation with get pods:

kubectl get pods
NAME      READY     STATUS    RESTARTS   AGE
web-0     1/1       Running   0          1m
web-1     1/1       Running   0          46s
web-2     1/1       Running   0          18s

We can also verify the running service:

kubectl get svc nginx
NAME      TYPE        CLUSTER-IP   EXTERNAL-IP   PORT(S)   AGE
nginx     ClusterIP   None         < none >      80/TCP    2m

StatefulSets don’t create ReplicaSet, so we can't rollback a StatefulSet to a previous version. We can only delete or scale up/down the Statefulset. If we update a StatefulSet, it also performs RollingUpdate, i.e., one replica pod will go down, and the updated pod will come up. Similarly, then the next replica pod will go down in the same manner.

For instance, we change the image of the above StatefulSet. The web-2 will terminate, and once it terminates completely, then web-2 will be recreated, and web-1 will be terminated at the same time. The same happens for the next replica, i.e., web-0. If an error occurs while updating, so only web-2 will be down, web-1 & web-0 will still be up, running on the previous stable version. Unlike Deployment, we cannot rollback to any previous version of a StatefulSet.

Deleting and/or scaling a StatefulSet down will not delete the volumes associated with the StatefulSet. This ensures data safety, which is generally more valuable than an automatic purge of all related StatefulSet resources. After deleting StatefulSets there are no guarantees on the termination of pods. To achieve ordered and graceful termination of the pods in the StatefulSet, it is possible to scale the StatefulSet down to 0 before deletion.

4.5. StatefulSets Usage

StatefulSets enable us to deploy stateful applications and clustered applications. They save data to persistent storage, such as Compute Engine persistent disks. They are suitable for deploying Kafka, MySQL, Redis, ZooKeeper, and other applications (needing unique, persistent identities and stable hostnames).

For instance, a Solr database cluster is managed by several Zookeeper instances. For such an application to function correctly, each Solr instance must be aware of the Zookeeper instances that are controlling it. Similarly, the Zookeeper instances themselves establish connections between each other to elect a master node. Due to such a design, Solr clusters are an example of stateful applications. Other examples of stateful applications include MySQL clusters, Redis, Kafka, MongoDB, and others. In such scenarios, StatefulSets are used.

5. Deployment vs. StatefulSets

Let's see the main differences between Deployment vs. StatefulSet:

Deployment StatefulSet
Deployment is used to deploy stateless applications StatefulSets is used to deploy stateful applications
Pods are interchangeable Pods are not interchangeable. Each pod has a persistent identifier that it maintains across any rescheduling
Pod names are unique Pod names are in sequential order
Service is required to interact with pods in a deployment A Headless Service is responsible for the network identity of the pods
The specified PersistentVolumeClaim is shared by all pod replicas. In other words, shared volume The specified volumeClaimTemplates so that each replica pod gets a unique PersistentVolumeClaim associated with it. In other words, no shared volume


A Kubernetes Deployment is a resource object in Kubernetes that provides declarative updates to applications. A deployment allows us to describe an application’s life cycle. Such as, which images to use for the app, the number of pods there should be, and how they should be updated.

A StatefulSets are more suited for stateful apps. A stateful application requires pods with a unique identity (for instance, hostname). A pod will be able to reach other pods with well-defined names. It needs a Headless Service to connect with the pods. A Headless Service does not have an IP address. Internally, it creates the necessary endpoints to expose pods with DNS names.

The StatefulSet definition includes a reference to the Headless Service, but we have to create it separately. StatefulSet needs persistent storage so that the hosted application saves its state and data across restarts. Once the StatefulSet and the Headless Service are created, a pod can access another one by name prefixed with the service name.

6. Conclusion

In this tutorial, we've looked at the two ways to make deployments in Kubernetes:  Statefulset and Deployment. We've seen their main characteristics and components and finally compared them.

The post Kubernetes Deployment vs. StatefulSets first appeared on Baeldung.

Swagger @Api Description Is Deprecated

$
0
0

1. Overview

Describing a RESTful API plays an important role in the documentation. One common tool used to document REST APIs is Swagger 2. However, one useful attribute used for adding a description has been deprecated. In this tutorial, we'll find a solution for deprecated description attribute using Swagger 2 and OpenAPI 3, and we'll show how these can be used to describe a Spring Boot REST API application.

2. API Description

By default, Swagger generates an empty description for the REST API class name. Therefore, we need to specify a suitable annotation for describing a REST API. We can either use Swagger 2, with the @Api annotation, or we can use the @Tag annotation in OpenAPI 3.

3. Swagger 2

To use Swagger 2 for the Spring Boot REST API, we can use the Springfox library. We'll need to add springfox-boot-starter dependency in the pom.xml file:

<dependency>
    <groupId>io.springfox</groupId>
    <artifactId>springfox-boot-starter</artifactId>
    <version>3.0.0</version>
</dependency>

The Springfox library provides @Api annotation to configure a class as a Swagger resource. Previously, the @Api annotation provided a description attribute to customize the API documentation:

@Api(value = "", description = "")

However, as mentioned earlier, the description attribute is deprecated. Luckily, there's an alternative. We can use the tags attribute:

@Api(value = "", tags = {"tag_name"})

In Swagger 1.5, we would use the @SwaggerDefinition annotation for defining the tag. However, it's no longer supported in Swagger 2. Therefore, in Swagger 2, we define the tags and descriptions in the Docket bean:

@Configuration
public class SwaggerConfiguration {
    public static final String BOOK_TAG = "book service";
    @Bean
    public Docket api() {
        return new Docket(DocumentationType.SWAGGER_2)
          .select()
          .apis(RequestHandlerSelectors.any())
          .paths(PathSelectors.any())
          .build()
          .tags(new Tag(BOOK_TAG, "the book API with description api tag"));
    }
}

Here, we're using the Tag class in our Docket bean for creating our tag. With that, we can reference the tag in our controller:

@RestController
@RequestMapping("/api/book")
@Api(tags = {SwaggerConfiguration.BOOK_TAG})
public class BookController {
    @GetMapping("/")
    public List<String> getBooks() {
        return Arrays.asList("book1", "book2");
    }
}

4. OpenAPI 3

OpenAPI 3 is the latest version of the OpenAPI Specification. It is the successor to OpenAPI 2 (Swagger 2). For describing an API using OpenAPI 3, we can use the @Tag annotation. Moreover, the @Tag annotation provides a description and also external links. Let's define the BookController class:

@RestController
@RequestMapping("/api/book")
@Tag(name = "book service", description = "the book API with description tag annotation")
public class BookController {
    @GetMapping("/")
    public List<String> getBooks() {
        return Arrays.asList("book1", "book2");
    }
}

5. Conclusion

In this brief article, we described how to add a description into a REST API in a Spring Boot application. We looked at how this can be accomplished using Swagger 2 and OpenAPI 3. For the Swagger section, the code is available over on GitHub. To see the OpenAPI 3 sample code, check out its module over on GitHub.

The post Swagger @Api Description Is Deprecated first appeared on Baeldung.
       

JPA Entities and the Serializable Interface

$
0
0

1. Introduction

In this tutorial, we'll discuss how JPA entities and the Java Serializable interface blend. First, we'll take a look at the java.io.Serializable interface and why we need it. After that, we'll take a look at the JPA specification and Hibernate as its most popular implementation.

2. What is the Serializable Interface?

Serializable is one of the few marker interfaces found in core Java. Marker interfaces are special case interfaces with no methods or constants.

Object serialization is the process of converting Java objects into byte streams. We can then transfer these byte streams over the wire or store them in persistent memory. Deserialization is the reverse process, where we take byte streams and convert them back into Java objects. To allow object serialization (or deserialization), a class must implement the Serializable interface. Otherwise, we'll run into java.io.NotSerializableException. Serialization is widely used in technologies such as RMI, JPA, and EJB.

3. JPA and Serializable

Let's see what the JPA specification says about Serializable and how it pertains to Hibernate.

3.1. JPA Specification

One of the core parts of JPA is an entity class. We mark such classes as entities (either with the @Entity annotation or an XML descriptor). There are several requirements that our entity class must fulfill, and the one we're most concerned with, according to the JPA specification, is:

If an entity instance is to be passed by value as a detached object (e.g., through a remote interface), the entity class must implement the Serializable interface.

In practice, if our object is to leave the domain of the JVM, it'll require serialization.

Each entity class consists of persistent fields and properties. The specification requires that fields of an entity may be Java primitives, Java serializable types, or user-defined serializable types.

An entity class must also have a primary key. Primary keys can be primitive (single persistent field) or composite. Multiple rules apply to a composite key, one of which is that a composite key is required to be serializable.

Let's create a simple example using Hibernate, H2 in-memory database, and a User domain object with UserId as a composite key:

@Entity
public class User {
    @EmbeddedId UserId userId;
    String email;
    
    // constructors, getters and setters
}
@Embeddable
public class UserId implements Serializable{
    private String name;
    private String lastName;
    
    // getters and setters
}

We can test our domain definition using the integration test:

@Test
public void givenUser_whenPersisted_thenOperationSuccessful() {
    UserId userId = new UserId();
    userId.setName("John");
    userId.setLastName("Doe");
    User user = new User(userId, "johndoe@gmail.com");
    entityManager.persist(user);
    User userDb = entityManager.find(User.class, userId);
    assertEquals(userDb.email, "johndoe@gmail.com");
}

If our UserId class does not implement the Serializable interface, we'll get a MappingException with a concrete message that our composite key must implement the interface.

3.2. Hibernate @JoinColumn Annotation

Hibernate official documentation, when describing mapping in Hibernate, notes that the referenced field must be serializable when we use referencedColumnName from the @JoinColumn annotation. Usually, this field is a primary key in another entity. In rare cases of complex entity classes, our reference must be serializable.

Let's extend the previous User class where the email field is no longer a String but an independent entity. Also, we'll add an Account class that will reference a user and has a field type. Each User can have multiple accounts of different types. We'll map Account by email since it's more natural to search by email address:

@Entity
public class User {
    @EmbeddedId private UserId userId;
    private Email email;
}
@Entity
public class Email implements Serializable {
    @Id
    private long id;
    private String name;
    private String domain;
}
@Entity
public class Account {
    @Id
    private long id;
    private String type;
    @ManyToOne
    @JoinColumn(referencedColumnName = "email")
    private User user;
}

To test our model, we'll write a test where we create two accounts for a user and query by an email object:

@Test
public void givenAssociation_whenPersisted_thenMultipleAccountsWillBeFoundByEmail() {
    // object creation 
    entityManager.persist(user);
    entityManager.persist(account);
    entityManager.persist(account2);
    List userAccounts = entityManager.createQuery("select a from Account a join fetch a.user where a.user.email = :email")
      .setParameter("email", email)
      .getResultList();
    
    assertEquals(userAccounts.size(), 2);
}

If the Email class does not implement the Serializable interface, we'll get MappingException again, but this time with a somewhat cryptic message: “Could not determine type”.

3.3. Exposing Entities to the Presentation Layer

When sending objects over the wire using HTTP, we usually create specific DTOs (data transfer objects) for this purpose. By creating DTOs, we decouple internal domain objects from external services. If we want to expose our entities directly to the presentation layer without DTOs, then entities must be serializable.

We use the HttpSession object to store relevant data that help us identify users across multiple page visits to our website. The web server can store session data on a disk when shutting down gracefully or transfer session data to another web server in clustered environments. If an entity is part of this process, then it must be serializable. Otherwise, we'll run into NotSerializableException.

4. Conclusion

In this article, we covered the basics of Java serialization and saw how it comes into play in JPA. First, we went over the JPA specification's requirements regarding Serializable. After that, we looked into Hibernate as the most popular implementation of JPA. In the end, we covered how JPA entities work with web servers.

As usual, all code presented in this article can be found over on GitHub.

The post JPA Entities and the Serializable Interface first appeared on Baeldung.
       

Different Serialization Approaches for Java

$
0
0

1. Overview

Serialization is the process of converting an object into a stream of bytes. That object can then be saved to a database or transferred over a network. The opposite operation, extracting an object from a series of bytes, is deserialization. Their main purpose is to save the state of an object so that we can recreate it when needed.

In this tutorial, we'll explore different serialization approaches for Java objects.

First, we'll discuss Java's Native APIs for serialization. Next, we'll explore libraries that support JSON and YAML formats to do the same. Finally, we'll take a look at some cross-language protocols.

2. Sample Entity Class

Let's start by introducing a simple entity that we're going to use throughout this tutorial:

public class User {
    private int id;
    private String name;
    
    //getters and setters
}

In the next sections, we'll go through the most widely used serialization protocols. Through examples, we'll learn the basic usage of each of them.

3. Java's Native Serialization

Serialization in Java helps to achieve effective and prompt communication between multiple systems. Java specifies a default way to serialize objects. A Java class can override this default serialization and define its own way of serializing objects.

The advantages of Java native serialization are:

  • It's a simple yet extensible mechanism
  • It maintains the object type and safety properties in the serialized form
  • Extensible to support marshaling and unmarshaling as needed for remote objects
  • This is a native Java solution, so it doesn't require any external libraries

3.1. The Default Mechanism

As per the Java Object Serialization Specification, we can use the writeObject() method from ObjectOutputStream class to serialize the object. On the other hand, we can use the readObject() method, which belongs to the ObjectInputStream class, to perform the deserialization.

We'll illustrate the basic process with our User class.

First, our class needs to implement the Serializable interface:

public class User implements Serializable {
    //fields and methods
}

Next, we need to add the serialVersionUID attribute:

private static final long serialVersionUID = 1L;

Now, let's create a User object:

User user = new User();
user.setId(1);
user.setName("Mark");

We need to provide a file path to save our data:

String filePath = "src/test/resources/protocols/user.txt";

Now, it's time to serialize our User object to a file:

FileOutputStream fileOutputStream = new FileOutputStream(filePath);
ObjectOutputStream objectOutputStream = new ObjectOutputStream(fileOutputStream);
objectOutputStream.writeObject(user);

Here, we used ObjectOutputStream for saving the state of the User object to a “user.txt” file.

On the other hand, we can read the User object from the same file and deserialize it:

FileInputStream fileInputStream = new FileInputStream(filePath);
ObjectInputStream objectInputStream = new ObjectInputStream(fileInputStream);
User deserializedUser = (User) objectInputStream.readObject();

Finally, we can test the state of the loaded object:

assertEquals(1, deserializedUser.getId());
assertEquals("Mark", deserializedUser.getName());

This is the default way to serialize Java objects. In the next section, we'll see the custom way to do the same.

3.2. Custom Serialization Using the Externalizable Interface

Custom serialization can be particularly useful when trying to serialize an object that has some unserializable attributes. This can be done by implementing the Externalizable interface, which has two methods:

public void writeExternal(ObjectOutput out) throws IOException;
public void readExternal(ObjectInput in) throws IOException, ClassNotFoundException;

We can implement these two methods inside the class that we want to serialize. A detailed example can be found in our article on the Externalizable Interface.

3.3. Java Serialization Caveats

There are some caveats that concern native serialization in Java:

  • Only objects marked Serializable can be persisted. The Object class does not implement Serializable, and hence, not all the objects in Java can be persisted automatically
  • When a class implements the Serializable interface, all its sub-classes are serializable as well. However, when an object has a reference to another object, these objects must implement the Serializable interface separately, or else a NotSerializableException will be thrown
  • If we want to control the versioning, we need to provide the serialVersionUID attribute. This attribute is used to verify that the saved and loaded objects are compatible. Therefore, we need to ensure it is always the same, or else InvalidClassException will be thrown
  • Java serialization heavily uses I/O streams. We need to close a stream immediately after a read or write operation because if we forget to close the stream, we'll end up with a resource leak. To prevent such resource leaks, we can use the try-with-resources idiom

4. Gson Library

Google's Gson is a Java library that is used to serialize and deserialize Java objects to and from JSON representation.

Gson is an open-source project hosted in GitHub. In general, it provides toJson() and fromJson() methods to convert Java objects to JSON and vice versa.

4.1. Maven Dependency

Let's add the dependency for the Gson library:

<dependency>
    <groupId>com.google.code.gson</groupId>
    <artifactId>gson</artifactId>
    <version>2.8.7</version>
</dependency>

4.2. Gson Serialization

First, let's create a User object:

User user = new User();
user.setId(1);
user.setName("Mark");

Next, we need to provide a file path to save our JSON data:

String filePath = "src/test/resources/protocols/gson_user.json";

Now, let's use the toJson() method from the Gson class to serialize the User object into the “gson_user.json” file:

Writer writer = new FileWriter(filePath);
Gson gson = new GsonBuilder().setPrettyPrinting().create();
gson.toJson(user, writer);

4.3. Gson Deserialization

We can use the fromJson() method from the Gson class to deserialize the JSON data.

Let's read the JSON file and deserialize the data into a User object:

Gson gson = new GsonBuilder().setPrettyPrinting().create();
User deserializedUser = gson.fromJson(new FileReader(filePath), User.class);

Finally, we can test the deserialized data:

assertEquals(1, deserializedUser.getId());
assertEquals("Mark", deserializedUser.getName());

4.4. Gson Features

Gson has many important features, including:

  • It can handle collections, generic types, and nested classes
  • With Gson, we can also write a custom serializer and/or deserializer so that we can control the whole process
  • Most importantly, it allows deserializing instances of classes for which the source code is not accessible
  • In addition, we can use a versioning feature in case our class file has been modified in different versions. We can use the @Since annotation on newly added fields, and then we can use the setVersion() method from GsonBuilder

For more examples, please check our cookbooks for Gson Serialization and Gson Deserialization.

In this section, we serialized data in the JSON format using Gson API. In the next section, we'll use the Jackson API to do the same.

5. Jackson API

Jackson is also known as “the Java JSON library” or “the best JSON parser for Java”. It provides multiple approaches to work with JSON data.

To understand the Jackson library in general, our Jackson Tutorial is a good place to start.

5.1. Maven Dependency

Let's add the dependency for the Jackson libraries:

<dependency>
    <groupId>com.fasterxml.jackson.core</groupId>
    <artifactId>jackson-core</artifactId>
    <version>2.12.3</version>
</dependency>
<dependency>
    <groupId>com.fasterxml.jackson.core</groupId>
    <artifactId>jackson-annotations</artifactId>
    <version>2.12.3</version>
</dependency>
<dependency>
    <groupId>com.fasterxml.jackson.core</groupId>
    <artifactId>jackson-databind</artifactId>
     <version>2.12.3</version>
</dependency>

5.2. Java Object to JSON

We can use the writeValue() method, which belongs to the ObjectMapper class, to serialize any Java object as JSON output.

Let's start by creating a User object:

User user = new User();
user.setId(1);
user.setName("Mark Jonson");

After that, let's provide a file path to store our JSON data:

String filePath = "src/test/resources/protocols/jackson_user.json";

Now, we can store a User object into a JSON file using the ObjectMapper class:

File file = new File(filePath);
ObjectMapper mapper = new ObjectMapper();
mapper.writeValue(file, user);

This code will write our data to the “jackson_user.json” file.

5.3. JSON to Java Object

The simple readValue() method of the ObjectMapper is a good entry point. We can use it to deserialize JSON content into a Java object.

Let's read the User object from the JSON file:

User deserializedUser = mapper.readValue(new File(filePath), User.class);

We can always test the loaded data:

assertEquals(1, deserializedUser.getId());
assertEquals("Mark Jonson", deserializedUser.getName());

5.4. Jackson Features

  • Jackson is a solid and mature JSON serialization library for Java
  • The ObjectMapper class is the entry point of the serialization process and provides a straightforward way to parse and generate JSON objects with a lot of flexibility
  • One of the greatest strengths of the Jackson library is the highly customizable serialization and deserialization process

Until now, we saw data serialization in the JSON format. In the next section, we'll explore serialization using YAML.

6. YAML

YAML stands for “YAML Ain't Markup Language”. It is a human-readable data serialization language. We can use YAML for configuration files, as well as in the applications where we want to store or transmit data.

In the previous section, we saw the Jackson API process JSON files. We can also use Jackson APIs to process YAML files. A detailed example can be found in our article on parsing YAML with Jackson.

Now, let's take a look at other libraries.

6.1. YAML Beans

YAML Beans makes it easy to serialize and deserialize Java object graphs to and from YAML.

The YamlWriter class is used to serialize Java objects to YAML. The write() method automatically handles this by recognizing public fields and the bean's getter methods.

Conversely, we can use the YamlReader class to deserialize YAML to Java objects. The read() method reads the YAML document and deserializes it into the required object.

First of all, let's add the dependency for YAML Beans:

<dependency>
    <groupId>com.esotericsoftware.yamlbeans</groupId>
    <artifactId>yamlbeans</artifactId>
    <version>1.15</version>
</dependency>

Now. let's create a map of User objects:

private Map<String, User> populateUserMap() {
    User user1 = new User();
    user1.setId(1);
    user1.setName("Mark Jonson");
    //.. more user objects
    
    Map<String, User> users = new LinkedHashMap<>();
    users.put("User1", user1);
    // add more user objects to map
    
    return users;
}

After that, we need to provide a file path to store our data:

String filePath = "src/test/resources/protocols/yamlbeans_users.yaml";

Now, we can use the YamlWriter class to serialize the map into a YAML file:

YamlWriter writer = new YamlWriter(new FileWriter(filePath));
writer.write(populateUserMap());
writer.close();

On the opposite side, we can use the YamlReader class to deserialize the map:

YamlReader reader = new YamlReader(new FileReader(filePath));
Object object = reader.read();
assertTrue(object instanceof Map); 

Finally, we can test the loaded map:

Map<String, User> deserializedUsers = (Map<String, User>) object;
assertEquals(4, deserializedUsers.size());
assertEquals("Mark Jonson", (deserializedUsers.get("User1").getName()));
assertEquals(1, (deserializedUsers.get("User1").getId()));

6.2. SnakeYAML

SnakeYAML provides a high-level API to serialize Java objects to YAML documents and vice versa. The latest version, 1.2, can be used with JDK 1.8 or higher Java versions. It can parse Java structures such as String, List, and Map.

The entry point for SnakeYAML is the Yaml class, which contains several methods that help in serialization and deserialization.

To deserialize YAML input into Java objects, we can load a single document with the load() method and multiple documents with the loadAll() method. These methods accept an InputStream, as well as String objects.

Going the other direction, we can use the dump() method to serialize Java objects into YAML documents.

A detailed example can be found in our article on parsing YAML with SnakeYAML.

Naturally, SnakeYAML works well with Java Maps, however, it can work with custom Java objects as well.

In this section, we saw different libraries to serialize data into YAML format. In the next sections, we'll discuss cross-platform protocols.

7. Apache Thrift

Apache Thrift was originally developed by Facebook and is currently maintained by Apache.

The best benefit of using Thrift is that it supports cross-language serialization with lower overhead. Also, many serialization frameworks support only one serialization format, however, Apache Thrift allows us to choose from several.

7.1. Thrift Features

Thrift provides pluggable serializers that are known as protocols. These protocols provide flexibility to use any one of several serialization formats for data exchange. Some examples of supported protocols include:

  • TBinaryProtocol uses a binary format and hence faster to process than the text protocol
  • TCompactProtocol is a more compact binary format and, therefore, more efficient to process as well
  • TJSONProtocol uses JSON for encoding data

Thrift also supports the serialization of container types – lists, sets, and maps.

7.2. Maven Dependency

To use the Apache Thrift framework in our application, let's add the Thrift libraries:

<dependency>
    <groupId>org.apache.thrift</groupId>
    <artifactId>libthrift</artifactId>
    <version>0.14.2</version>
</dependency>

7.3. Thrift Data Serialization

Apache Thrift protocols and transports are designed to work together as a layered stack. The protocols serialize data into a byte stream, and the transports read and write the bytes.

As stated earlier, Thrift provides a number of protocols. We'll illustrate thrift serialization using a binary protocol.

First of all, we need a User object:

User user = new User();
user.setId(2);
user.setName("Greg");

The next step is to create a binary protocol:

TMemoryBuffer trans = new TMemoryBuffer(4096);
TProtocol proto = new TBinaryProtocol(trans);

Now, let's serialize our data. We can do so using the write APIs:

proto.writeI32(user.getId());
proto.writeString(user.getName());

7.4. Thrift Data Deserialization

Let's use the read APIs to deserialize the data:

int userId = proto.readI32();
String userName = proto.readString();

Finally, we can test the loaded data:

assertEquals(2, userId);
assertEquals("Greg", userName);

More examples can be found in our article on Apache Thrift.

8. Google Protocol Buffers

The last approach that we'll cover in this tutorial is Google Protocol Buffers (protobuf). It is a well-known binary data format.

8.1. Benefits of Protocol Buffers

Protocol buffers provide several benefits, including:

  • It's language and platform-neutral
  • It's a binary transfer format, meaning the data is transmitted as binary. This improves the speed of transmission because it takes less space and bandwidth
  • Supports both backward and forward compatibility so that new versions can read old data and vice versa

8.2. Maven Dependency

Let's start by adding the dependency for the Google protocol buffer libraries:

<dependency>
    <groupId>com.google.protobuf</groupId>
    <artifactId>protobuf-java</artifactId>
    <version>3.17.3</version>
</dependency>

8.3. Defining a Protocol

With our dependencies squared away, we can now define a message format:

syntax = "proto3";
package protobuf;
option java_package = "com.baeldung.serialization.protocols";
option java_outer_classname = "UserProtos";
message User {
    int32 id = 1;
    string name = 2;
}

This is a protocol of a simple message of User type that has two fields – id and name, of type integer and string, respectively. Note that we're saving it as the “user.proto” file.

8.4. Generating a Java Code From Protobuf File

Once we have a protobuf file, we can use the protoc compiler to generate code from it:

protoc -I=. --java_out=. user.proto

As a result, this command will generate a UserProtos.java file.

After that, we can create an instance of the UserProtos class:

UserProtos.User user = UserProtos.User.newBuilder().setId(1234).setName("John Doe").build();

8.5. Serializing and Deserializing Protobuf

First, we need to provide a file path to store our data:

String filePath = "src/test/resources/protocols/usersproto";

Now, let's save the data into a file. We can use the writeTo() method from the UserProtos class – a class we had generated from a protobuf file:

FileOutputStream fos = new FileOutputStream(filePath);
user.writeTo(fos);

After executing this code, our object will be serialized to binary format and saved to the “usersproto” file.

Oppositely, we can use the mergeFrom() method to load that data from a file and deserialize it back to a User object:

UserProtos.User deserializedUser = UserProtos.User.newBuilder().mergeFrom(new FileInputStream(filePath)).build();

Finally, we can test the loaded data:

assertEquals(1234, deserializedUser.getId());
assertEquals("John Doe", deserializedUser.getName());

9. Summary

In this tutorial, we explored some widely used protocols for the serialization of Java objects. The choice of data serialization format for an application depends on various factors such as data complexity, need for human readability, and speed.

Java supports built-in serialization that is easy to use.

JSON is preferable due to readability and being schema-less. Hence, both Gson and Jackson are good options for serializing JSON data. They are simple to use and well documented. For editing data, YAML is a good fit.

On the other hand, binary formats are faster than textual formats. When speed is important for our application, Apache Thrift and Google Protocol Buffers are great candidates for serializing data. Both are more compact and quicker than XML or JSON formats.

To sum up, there is often a trade-off between convenience and performance, and serialization proves no different. There are, of course, many other formats available for data serialization.

As always, the full example code is over on GitHub.

The post Different Serialization Approaches for Java first appeared on Baeldung.
       

“Code too large” Compilation Error in Java

$
0
0

1. Overview 

When a Java method exceeds 65535 bytes, we get the compilation error, “code too large”. In this article, we'll discuss why this error occurs and how to fix it.

2. JVM Constraints

The Code_attribute is a table of variable length in the method_info structure of JVM specifications. This structure contains the JVM instructions for a method, which can be a regular method or an initialization method for an instance, class, or interface:

Code_attribute {
    u2 attribute_name_index;
    u4 attribute_length;
    u2 max_stack;
    u2 max_locals;
    u4 code_length;
    u1 code[code_length];
    u2 exception_table_length;
    {   
        u2 start_pc;
        u2 end_pc;
        u2 handler_pc;
        u2 catch_type;
    }
    exception_table[exception_table_length];
    u2 attributes_count;
    attribute_info attributes[attributes_count];
}

The attribute code_length specifies the length of the code in a method:

code_length
The value of the code_length item gives the number of bytes in the code array for this method.
The value of code_length must be greater than zero (as the code array must not be empty) and less than 65536.

As can be seen above, JVM specifications state that the code length of a method has to be less than 65536 bytes, so this implies that the size of a method can't exceed 65535 bytes.

3. Why the Problem Occurs

Now that we know the size limit for methods, let's looks at the situations that can result in such large methods:

  • Code Generators: Most large methods are a result of using some code generator like ANTLR parser
  • Initialization methods: GUI initializations can add lots of details like layouts, event listeners, and many more, all in one method
  • JSP Pages: Contains all the code in one single method of the class
  • Code Instrumentation: Adds bytecode to compiled classes at runtime
  • Array Initializers: Methods initializing very large arrays as shown below:
String[][] largeStringArray = new String[][] {
    { "java", "code", "exceeded", "65355", "bytes" },
    { "alpha", "beta", "gamma", "delta", "epsilon" },
    { "one", "two", "three", "four", "five" }, 
    { "uno", "dos", "tres", "cuatro", "cinco" }, 
        
    //More values
};

4. How to Fix the Error

As we've noted, the root cause of the error is a method exceeding the threshold of 65535 bytes. So, refactoring the erring method into several smaller methods will fix the problem for us.

In the case of array initializations, we can either split the arrays or load from a file. We can also use static initializers. Even when we're using code generators, we can still refactor the code. And in the case of a large JSP file, we can use the jsp:include directive and break it into smaller units.

The above issues are relatively easy to handle, but things get complicated when we get a “code too large” error after adding instrumentation to the code. In case we own the code, we can still refactor the method. But when we get this error from a third-party library, we are in a fix. By reducing the instrumentation level, we might be able to fix the problem.

5. Conclusion

In this article, we've discussed the causes and potential solutions to the “code too large” error. We can always refer to the Code_Attributes section of the JVM Specifications to find more details about this constraint.

The post “Code too large” Compilation Error in Java first appeared on Baeldung.
       

Converting Camel Case and Title Case to Words in Java

$
0
0

1. Overview

Strings commonly contain a mixture of words and other delimiters. Sometimes, these strings may delimit words by a change in case without whitespace. For example, camel case capitalizes each word after the first, and title case (or Pascal case) capitalizes every word.

We may wish to parse these strings back into words in order to process them.

In this short tutorial, we'll look at how to find the words in mixed case strings using regular expressions, and how to convert them into sentences or titles.

2. Use Cases for Parsing Capitalized Strings

A common use case for processing camel case strings might be the field names in a document. Let's say a document has a field “firstName” – we may wish to display that on-screen as “First name” or “First Name”.

Similarly, if we were to scan the types or functions in our application via reflection, in order to produce reports using their names, we would commonly find camel case or title case identifiers that we may wish to convert.

An extra problem we need to solve when parsing these expressions is that single-letter words cause consecutive capital letters.

For clarity:

  • thisIsAnExampleOfCamelCase
  • ThisIsTitleCase
  • thisHasASingleLetterWord

Now that we know the sorts of identifiers we need to parse, let's use a regular expression to find the words.

3. Find Words Using Regular Expressions

3.1. Defining a Regular Expression to Find Words

Let's define a regular expression to locate words that are either made of lowercase letters only, a single uppercase letter followed by lowercase letters, or a single uppercase letter on its own:

Pattern WORD_FINDER = Pattern.compile("(([A-Z]?[a-z]+)|([A-Z]))");

This expression provides the regular expression engine with two options. The first uses “[A-Z]?” to mean “an optional first capital letter” and then “[a-z]+” to mean “one or more lowercase letters”. After that, there's the “|” character to provide or logic, followed by the expression “[A-Z]”, which means “a single capital letter”.

Now that we have the regular expression, let's parse our strings.

3.2. Finding Words in a String

We'll define a method to use this regular expression:

public List<String> findWordsInMixedCase(String text) {
    Matcher matcher = WORD_FINDER.matcher(text);
    List<String> words = new ArrayList<>();
    while (matcher.find()) {
        words.add(matcher.group(0));
    }
    return words;
}

This uses the Matcher created by the regular expression's Pattern to help us find the words. We iterate over the matcher while it still has matches, adding them to our list.

This should extract anything that meets our word definition. Let's test it.

3.3. Testing the Word Finder

Our word finder should be able to find words that are separated by any non-word characters, as well as by changes in case. Let's start with a simple example:

assertThat(findWordsInMixedCase("some words"))
  .containsExactly("some", "words");

This test passes and shows us that our algorithm is working. Next, we'll try camel case:

assertThat(findWordsInMixedCase("thisIsCamelCaseText"))
  .containsExactly("this", "Is", "Camel", "Case", "Text");

Here we see that the words are extracted from a camel case String and come out with their capitalization unchanged. For example, “Is” started with a capital letter in the original text, and is capitalized when extracted.

We can also try this with title case:

assertThat(findWordsInMixedCase("ThisIsTitleCaseText"))
  .containsExactly("This", "Is", "Title", "Case", "Text");

Plus, we can check that single letter words are extracted as we intended:

assertThat(findWordsInMixedCase("thisHasASingleLetterWord"))
  .containsExactly("this", "Has", "A", "Single", "Letter", "Word");

So far, we've built a word extractor, but these words are capitalized in a way that may not be ideal for output.

4. Convert Word List to Human Readable Format

After extracting a list of words, we probably want to use methods like toUpperCase or toLowerCase to normalize them. Then we can use String.join to join them back into a single string with a delimiter. Let's look at a couple of ways to achieve real-world use cases with these.

4.1. Convert to Sentence

Sentences start with a capital letter and end in a period“.”. We're going to need to be able to make a word start with a capital letter:

private String capitalizeFirst(String word) {
    return word.substring(0, 1).toUpperCase()
      + word.substring(1).toLowerCase();
}

Then we can loop through the words, capitalizing the first, and making the others lowercase:

public String sentenceCase(List<String> words) {
    List<String> capitalized = new ArrayList<>();
    for (int i = 0; i < words.size(); i++) {
        String currentWord = words.get(i);
        if (i == 0) {
            capitalized.add(capitalizeFirst(currentWord));
        } else {
            capitalized.add(currentWord.toLowerCase());
        }
    }
    return String.join(" ", capitalized) + ".";
}

The logic here is that the first word has its first character capitalized, and the rest are in lowercase. We join them with a space as the delimiter and add a period at the end.

Let's test this out:

assertThat(sentenceCase(Arrays.asList("these", "Words", "Form", "A", "Sentence")))
  .isEqualTo("These words form a sentence.");

4.2. Convert to Title Case

Title case has slightly more complex rules than a sentence. Each word must have a capital letter, unless it's a special stop word that isn't normally capitalized. However, the whole title must start with a capital letter.

We can achieve this by defining our stop words:

Set<String> STOP_WORDS = Stream.of("a", "an", "the", "and", 
  "but", "for", "at", "by", "to", "or")
  .collect(Collectors.toSet());

After this, we can modify the if statement in our loop to capitalize any word that's not a stop word, as well as the first:

if (i == 0 || 
  !STOP_WORDS.contains(currentWord.toLowerCase())) {
    capitalized.add(capitalizeFirst(currentWord));
 }

The algorithm to combine the words is the same, though we don't add the period at the end.

Let's test it out:

assertThat(capitalizeMyTitle(Arrays.asList("title", "words", "capitalize")))
  .isEqualTo("Title Words Capitalize");
assertThat(capitalizeMyTitle(Arrays.asList("a", "stop", "word", "first")))
  .isEqualTo("A Stop Word First");

5. Conclusion

In this short article, we looked at how to find the words in a String using a regular expression. We saw how to define this regular expression to find different words using capitalization as a word boundary.

We also looked at some simple algorithms for taking a list of words and converting them into the correct capitalization for a sentence or a title.

As always, the example code can be found over on GitHub.

The post Converting Camel Case and Title Case to Words in Java first appeared on Baeldung.
       

Start Two Threads at the Exact Same Time in Java

$
0
0

1. Overview

Multi-thread programming allows us to run threads concurrently, and each thread can handle different tasks. Thus, it makes optimal use of the resources, particularly when our computer has a multiple multi-core CPU or multiple CPUs.

Sometimes, we'd like to control multiple threads to start at the same time.

In this tutorial, we'll first understand the requirement, especially the meaning of “the exact same time”. Moreover, we'll address how to start two threads simultaneously in Java.

2. Understanding the Requirement

Our requirement is: “starting two threads at the exact same time.”

This requirement looks easy to understand. However, if we think about it carefully, is it even possible to start two threads at the EXACT same time?

First of all, each thread will consume CPU time to work. Therefore, if our application is running on a computer with a single-core CPU, it's impossible to start two threads at exact same time.

If our computer has a multi-core CPU or multiple CPUs, two threads can possibly start at the exact same time. However, we cannot control it on the Java side.

This is because when we work with threads in Java, the Java thread scheduling depends on the thread scheduling of the operating system. So, different operating systems may handle it differently.

Moreover, if we discuss “the exact same time” in a more strict way, according to Einstein's special theory of relativity:

It is impossible to say in an absolute sense that two distinct events occur at the same time if those events are separated in space.

No matter how close our CPUs sit on the motherboard or the cores located in a CPU, there are spaces. Therefore, we cannot ensure two threads start at the EXACT same time.

So, does it mean the requirement is invalid?

No. It's a valid requirement. Even if we cannot make two threads start at the EXACT same time, we can get pretty close through some synchronization techniques.

These techniques may help us in most practical cases when we need two threads to start at “the same time.”

In this tutorial, we'll explore two approaches to solve this problem:

Both approaches follow the same idea: We won't really start two threads at the same time. Instead, we block the threads immediately after the threads start and try to resume their execution simultaneously.

Since our tests would be related to thread scheduling, it's worth mentioning the environment to run the tests in this tutorial:

  • CPU: Intel(R) Core(TM) i7-8850H CPU. The processor clocks are at between 2.6 and 4.3 GHz (4.1 with 4 cores, 4 GHz with 6 cores)
  • Operating System: 64-bit Linux with Kernel version 5.12.12
  • Java: Java 11

Now, let's see CountDonwLatch and CyclicBarrier in action.

3. Using the CountDownLatch Class

CountDownLatch is a synchronizer introduced in Java 5 as a part of the java.util.concurrent package. Usually, we use a CountDownLatch to block threads until other threads have completed their tasks.

Simply put, we set a count in a latch object and associate the latch object to some threads. When we start these threads, they will be blocked until the latch's count becomes zero.

On the other side, in other threads, we can control under which condition we reduce the count and let the blocked threads resume, for example, when some tasks in the main thread are done.

3.1. The Worker Thread

Now, let's have a look at how to solve our problem using the CountDownLatch class.

First, we'll create our Thread class. Let's call it WorkerWithCountDownLatch:

public class WorkerWithCountDownLatch extends Thread {
    private CountDownLatch latch;
    public WorkerWithCountDownLatch(String name, CountDownLatch latch) {
        this.latch = latch;
        setName(name);
    }
    @Override public void run() {
        try {
            System.out.printf("[ %s ] created, blocked by the latch...\n", getName());
            latch.await();
            System.out.printf("[ %s ] starts at: %s\n", getName(), Instant.now());
            // do actual work here...
        } catch (InterruptedException e) {
            // handle exception
        }
    }

We've added a latch object to our WorkerWithCountDownLatch class. First, let's understand the function of the latch object.

In the run() method, we call the method latch.await(). This means, if we started the worker thread, it would check the latch's count. The thread would be blocked until the count is zero.

In this way, we can create a CountDownLatch(1) latch with count=1 in the main thread and associate the latch object to two worker threads we want to start at the same time.

When we want the two threads to resume doing their actual jobs, we release the latch by invoking latch.countDown() in the main thread.

Next, let's take a look at how the main thread controls the two worker threads.

3.2. The Main Thread

We'll implement the main thread in the usingCountDownLatch() method:

private static void usingCountDownLatch() throws InterruptedException {
    System.out.println("===============================================");
    System.out.println("        >>> Using CountDownLatch <<<<");
    System.out.println("===============================================");
    CountDownLatch latch = new CountDownLatch(1);
    WorkerWithCountDownLatch worker1 = new WorkerWithCountDownLatch("Worker with latch 1", latch);
    WorkerWithCountDownLatch worker2 = new WorkerWithCountDownLatch("Worker with latch 2", latch);
    worker1.start();
    worker2.start();
    Thread.sleep(10);//simulation of some actual work
    System.out.println("-----------------------------------------------");
    System.out.println(" Now release the latch:");
    System.out.println("-----------------------------------------------");
    latch.countDown();
}

Now, let's call the usingCountDownLatch() method above from our main() method. When we run the main() method, we'll see the output:

===============================================
        >>> Using CountDownLatch <<<<
===============================================
[ Worker with latch 1 ] created, blocked by the latch
[ Worker with latch 2 ] created, blocked by the latch
-----------------------------------------------
 Now release the latch:
-----------------------------------------------
[ Worker with latch 2 ] starts at: 2021-06-27T16:00:52.268532035Z
[ Worker with latch 1 ] starts at: 2021-06-27T16:00:52.268533787Z

As the output above shows, the two worker threads started almost at the same time. The difference between the two start times is less than two microseconds.

4. Using the CyclicBarrier Class

The CyclicBarrier class is another synchronizer introduced in Java 5. Essentially, CyclicBarrier allows a fixed number of threads to wait for each other to reach a common point before continuing execution.

Next, let's see how we solve our problem using the CyclicBarrier class.

4.1. The Worker Thread

Let's first take a look at the implementation of our worker thread:

public class WorkerWithCyclicBarrier extends Thread {
    private CyclicBarrier barrier;
    public WorkerWithCyclicBarrier(String name, CyclicBarrier barrier) {
        this.barrier = barrier;
        this.setName(name);
    }
    @Override public void run() {
        try {
            System.out.printf("[ %s ] created, blocked by the barrier\n", getName());
            barrier.await();
            System.out.printf("[ %s ] starts at: %s\n", getName(), Instant.now());
            // do actual work here...
        } catch (InterruptedException | BrokenBarrierException e) {
            // handle exception
        }
    }
}

The implementation is pretty straightforward. We associate a barrier object with the worker threads. When the thread starts, we call the barrier.await() method immediately.

In this way, the worker thread will be blocked and waiting for all parties to invoke barrier.await() to resume.

4.2. The Main Thread

Next, let's look at how to control two worker threads resuming in the main thread:

private static void usingCyclicBarrier() throws BrokenBarrierException, InterruptedException {
    System.out.println("\n===============================================");
    System.out.println("        >>> Using CyclicBarrier <<<<");
    System.out.println("===============================================");
    CyclicBarrier barrier = new CyclicBarrier(3);
    WorkerWithCyclicBarrier worker1 = new WorkerWithCyclicBarrier("Worker with barrier 1", barrier);
    WorkerWithCyclicBarrier worker2 = new WorkerWithCyclicBarrier("Worker with barrier 2", barrier);
    worker1.start();
    worker2.start();
    Thread.sleep(10);//simulation of some actual work
    System.out.println("-----------------------------------------------");
    System.out.println(" Now open the barrier:");
    System.out.println("-----------------------------------------------");
    barrier.await();
}

Our goal is to let two worker threads resume at the same time. So, together with the main thread, we have three threads in total.

As the method above shows, we create a barrier object with three parties in the main thread. Next, we create and start two worker threads.

As we discussed earlier, the two worker threads are blocked and waiting for the barrier's open to resume.

In the main thread, we can do some actual work. When we decide to open the barrier, we call the method barrier.await() to let two workers continue execution.

If we call usingCyclicBarrier() in the main() method, we'll get the output:

===============================================
        >>> Using CyclicBarrier <<<<
===============================================
[ Worker with barrier 1 ] created, blocked by the barrier
[ Worker with barrier 2 ] created, blocked by the barrier
-----------------------------------------------
 Now open the barrier:
-----------------------------------------------
[ Worker with barrier 1 ] starts at: 2021-06-27T16:00:52.311346392Z
[ Worker with barrier 2 ] starts at: 2021-06-27T16:00:52.311348874Z

We can compare the two start times of the workers. Even if the two workers didn't start at the exact same time, we're pretty close to our goal: the difference between the two start times is less than three microseconds.

5. Conclusion

In this article, we've first discussed the requirement: “start two threads at the exact same time.”

Next, we've addressed two approaches to start two threads simultaneously: using CountDownLatch and CyclicBarrier.

Their ideas are similar, blocking two threads and trying to let them resume execution simultaneously.

Even though these approaches cannot guarantee two threads starting at the exact same time, the result is pretty close and sufficient for most cases in the real world.

As always, the code for the article can be found over on GitHub.

The post Start Two Threads at the Exact Same Time in Java first appeared on Baeldung.
       

Send Large Messages With Kafka

$
0
0

1. Overview

Apache Kafka is a powerful, open-source, distributed, fault-tolerant event streaming platform. However, when we use Kafka to send messages larger than the configured size limit, it gives an error.

We showed how to work with Spring and Kafka in a previous tutorial. In this tutorial, we'll look at the way to send large messages with Kafka.

2. Problem Statement

Kafka configuration limits the size of messages that it's allowed to send. By default, this limit is 1MB. However, if there's a requirement to send large messages, we need to tweak these configurations as per our requirements.

For this tutorial, we're using Kafka v2.5. Let's first look into our Kafka setup before jumping to configuration.

3. Setup

Here, we're going to use the basic Kafka setup with a single broker. Also, the producer application can send messages over a defined topic to Kafka Broker by using Kafka Client. Additionally, we're using a single partition topic:

We can observe multiple interaction points here like Kafka Producer, Kafka Broker, Topic, and Kafka Consumer. Therefore, all of these need configuration updates to be able to send a large message from one end to another.

Let's look into these configs in detail to send a large message of 20MB.

3. Kafka Producer Configuration

This is the first place where our message originates. And we're using Spring Kafka to send messages from our application to the Kafka server.

Hence, the property “max.request.size” needs to be updated first. Additional details about this producer config are available in Kafka Documentation.  This is available as constant ProducerConfig.MAX_REQUEST_SIZE_CONFIG in the Kafka Client library, which is available as part of Spring Kafka dependency.

Let's configure this value to 20971520 bytes:

public ProducerFactory<String, String> producerFactory() {
    Map<String, Object> configProps = new HashMap<>();
    configProps.put(ProducerConfig.BOOTSTRAP_SERVERS_CONFIG, bootstrapAddress);
    configProps.put(ProducerConfig.KEY_SERIALIZER_CLASS_CONFIG, StringSerializer.class);
    configProps.put(ProducerConfig.VALUE_SERIALIZER_CLASS_CONFIG, StringSerializer.class);
    configProps.put(ProducerConfig.MAX_REQUEST_SIZE_CONFIG, "20971520");
    return new DefaultKafkaProducerFactory<>(configProps);
}

4. Kafka Topic Configuration

Our message-producing application sends messages to Kafka Broker on a defined Topic. Hence, the next requirement is to configure the used Kafka Topic. This means we need to update the “max.message.bytes” property having a default value of 1MB.

This holds the value of Kafka's largest record batch size after compression (if compression is enabled). Additional details are available in Kafka Documentation.

Let's configure this property manually at the time of topic creation using the CLI command:

./kafka-topics.sh --bootstrap-server localhost:9092 --create --topic longMessage --partitions 1 \
--replication-factor 1 --config max.message.bytes=20971520 

Alternatively, we can configure this property through Kafka Client:

public NewTopic topic() {
    NewTopic newTopic = new NewTopic(longMsgTopicName, 1, (short) 1);
    Map<String, String> configs = new HashMap<>();
    configs.put("max.message.bytes", "20971520");
    newTopic.configs(configs);
    return newTopic;
}

At a minimum, we need to configure these two properties.

5. Kafka Broker Configuration

An optional configuration property, “message.max.bytes“, can be used to allow all topics on a Broker to accept messages of greater than 1MB in size.

And this holds the value of the largest record batch size allowed by Kafka after compression (if compression is enabled). Additional details are available in Kafka Documentation.

Let's add this property in Kafka Broker's “server.properties” config file:

message.max.bytes=20971520

Moreover, the maximum value among “message.max.bytes” and “max.message.bytes” will be the effective value used.

6. Consumer Configuration

Let's look into the configuration settings available for a Kafka consumer. Although these changes aren't mandatory for consuming large messages, avoiding them can have a performance impact on the consumer application. Hence, it's good to have these configs in place, too:

  • max.partition.fetch.bytes: This property limits the number of bytes a consumer can fetch from a Topic's partition. Additional details are available in Kafka Documentation. This is available as a constant named ConsumerConfig.MAX_PARTITION_FETCH_BYTES_CONFIG in the Kafka Client library
  • fetch.max.bytes: This property limits the number of bytes a consumer can fetch from the Kafka server itself. A Kafka consumer can listen on multiple partitions as well. Additional details are available in Kafka Documentation. This is available as constant ConsumerConfig.FETCH_MAX_BYTES_CONFIG in the Kafka Client library

Therefore, to configure our consumers, we need to create a KafkaConsumerFactory. Remember we always need to use a higher value compared to Topic/Broker config:

public ConsumerFactory<String, String> consumerFactory(String groupId) {
    Map<String, Object> props = new HashMap<>();
    props.put(ConsumerConfig.BOOTSTRAP_SERVERS_CONFIG, bootstrapAddress);
    props.put(ConsumerConfig.GROUP_ID_CONFIG, groupId);
    props.put(ConsumerConfig.KEY_DESERIALIZER_CLASS_CONFIG, StringDeserializer.class);
    props.put(ConsumerConfig.VALUE_DESERIALIZER_CLASS_CONFIG, StringDeserializer.class);
    props.put(ConsumerConfig.MAX_PARTITION_FETCH_BYTES_CONFIG, "20971520");
    props.put(ConsumerConfig.FETCH_MAX_BYTES_CONFIG, "20971520");
    return new DefaultKafkaConsumerFactory<>(props);
}

Here we used the same config value of 20971520 Bytes for both properties because we are using a single partition Topic. However, the value of FETCH_MAX_BYTES_CONFIG should be higher than MAX_PARTITION_FETCH_BYTES_CONFIG. When we have consumer listening on multiple partitions, FETCH_MAX_BYTES_CONFIG represents the message size that can be fetched from multiple partitions. On the other hand, config MAX_PARTITION_FETCH_BYTES_CONFIG represents message fetch size from a single partition.

7. Alternatives

We saw how different configs in Kafka producer, Topic, Broker, and Kafka consumer could be updated to send large messages. However, we should generally avoid sending large messages using Kafka. The processing of large messages consumes more CPU and memory of our producer and consumer. Hence ultimately somewhat limits their processing capabilities for other tasks. Also, this can cause visibly high latency to the end-user.

Let's look into other possible options:

  1. Kafka producer provides a feature to compress messages. Additionally, it supports different compression types that we can configure using the compression.type property.
  2. We can store the large messages in a file at the shared storage location and send the location through Kafka message. This can be a faster option and has minimum processing overhead.
  3. Another option could be to split the large message into small messages of size 1KB each at the producer end. After that, we can send all these messages to a single partition using the partition key to ensure the correct order. Therefore, later, at the consumer end, we can reconstruct the large message from smaller messages.

If none of the above options suits our requirements, we can go for the earlier discussed configurations.

8. Conclusion

In this article, we covered different Kafka configurations required to send large messages greater than 1MB in size.

We covered configs needs at the Producer, Topic, on Broker, and Consumer end. However, some of these are mandatory configs, while some are optional. Additionally, consumer configs are optional but good to have to avoid negative performance impacts.

In the end, we also covered alternate possible options for sending large messages.

As always, the code example is available over on GitHub.

The post Send Large Messages With Kafka first appeared on Baeldung.
       

The java.lang.NoClassDefFoundError in JUnit

$
0
0

1. Overview

In this article, we'll understand why the java.lang.NoClassDefFoundError occurs in JUnit and how to fix it. This issue is mainly related to IDE's configurations. Therefore, we'll be focusing on the most popular IDEs: Visual Studio Code, Eclipse, and IntelliJ to reproduce and resolve this error.

2. What is java.lang.NoClassDefFoundError?

When the Java Runtime runs a Java program, it does not load all the classes and dependencies at once. Instead, it calls upon the Java Classloader to load classes in memory as-and-when-required. While loading a class, if the Classloader cannot find the class's definition, it throws the  NoClassDefFoundError.

There are a couple of reasons for which Java cannot find the class's definition, which are:

  • Missing a few dependent jars which is the most common reason.
  • All jars are added as dependencies but in the wrong path.
  • Version mismatches in the dependencies.

3. VS Code

For writing Junit4 test cases, we require the Junit4 jar. However, the Junit4 has an internal dependency on the hamcrest-core jar.

If we miss adding the hamcrest-core jar as a dependency in our classpath, Java throws the NoClassDefFoundError. The classpath is as follows:

One other scenario is when we added both the jars, but the versions don't match. For example, if we have added JUnit jar version 4.13.2 and the hamcrest-core jar version 2.2, the NoClassDefFoundError is thrown:


In both cases, the same stack trace is printed:

java.lang.NoClassDefFoundError: org/hamcrest/SelfDescribing
	at java.base/java.lang.ClassLoader.defineClass1(Native Method)
	at java.base/java.lang.ClassLoader.defineClass(ClassLoader.java:1010)
	at java.base/java.security.SecureClassLoader.defineClass(SecureClassLoader.java:150)
	at java.base/jdk.internal.loader.BuiltinClassLoader.defineClass(BuiltinClassLoader.java:855)
	at java.base/jdk.internal.loader.BuiltinClassLoader.findClassOnClassPathOrNull(BuiltinClassLoader.java:753)
	at java.base/jdk.internal.loader.BuiltinClassLoader.loadClassOrNull(BuiltinClassLoader.java:676) ...

To resolve the error in both the scenarios (missing dependencies and version mismatch), we need to add the correct dependencies. The correct dependencies in the case of Junit4 are junit-4.13.2.jar and hamcrest-core-1.3.jar. Adding these two jars in the dependencies (Referenced Libraries) resolves the error. The instructions to add and remove external jars in VS Code are present here. Our referenced library section should be set up as:

4. Eclipse

In Eclipse IDE that supports Java 9 and above, we have a classpath and a module path. To resolve module dependency, we use the module path. However, adding external jars in the module path does not make them available for the class loader. Hence the class loader considers them as missing dependencies and throws the NoClassDefFoundError.

Hence if our dependency looks like the below image, running a Junit test case results in a NoClassDefFoundError:

The stack trace generated on running the JUnit test is:

java.lang.NoClassDefFoundError: org/junit/runner/manipulation/Filter
	at java.base/java.lang.Class.forName0(Native Method)
	at java.base/java.lang.Class.forName(Class.java:377)
	at org.eclipse.jdt.internal.junit.runner.RemoteTestRunner.loadTestLoaderClass(RemoteTestRunner.java:381)

In Eclipse, we need to add the jars under the classpath and not in the module path. So, to add external jars correctly, follow the path:

right-click on the Project -> Build Path -> Configure Build Path

In the window that opens, remove the jars from under the module path and add them under the classpath. This resolves the NoClassDefFoundError. The correct classpath for running JUnit should be similar to:

5. IntelliJ

Running JUnit 5 test cases requires both the Jupiter engine and Jupiter API. The Jupiter engine is internally dependent on the Jupiter API, and hence most of the time,  it is sufficient to add just the Jupiter engine dependency in the pom.xml. However, Adding only the Jupiter API dependency in our pom.xml and missing the Jupiter engine dependency results in the NoClassDefFoundError.

The incorrect setup in the pom.xml would be like this:

<dependencies>
    <dependency>
        <groupId>org.junit.jupiter</groupId>
        <artifactId>junit-jupiter-api</artifactId>
        <version>5.4.2</version>
        <scope>test</scope>
    </dependency>
</dependencies>

Running a simple test case with this setup results in the following stack trace:

Exception in thread "main" java.lang.NoClassDefFoundError: org/junit/platform/engine/TestDescriptor
	at java.base/java.lang.Class.forName0(Native Method)
	at java.base/java.lang.Class.forName(Class.java:375)
	at com.intellij.rt.junit.JUnitStarter.getAgentClass(JUnitStarter.java:230)
....

In IntelliJ, to correct the dependencies, we need to correct the pom.xml. The corrected pom.xml looks like this:

<dependencies>
    <dependency>
        <groupId>org.junit.jupiter</groupId>
        <artifactId>junit-jupiter-api</artifactId>
        <version>5.4.2</version>
        <scope>test</scope>
    </dependency>
    <dependency>
        <groupId>org.junit.jupiter</groupId>
        <artifactId>junit-jupiter-engine</artifactId>
        <version>5.4.2</version>
        <scope>test</scope>
    </dependency>
</dependencies>

Alternatively, we can add junit-jupiter-engine since adding it automatically adds the junit-jupiter-api jar to the classpath and resolves the error.

6. Summary

In this article, we saw different reasons for the java.lang.NoClassDefFoundError to occur in JUnit. We also saw how we resolve the error in different IDEs. The entire code for this tutorial is available over on GitHub.

The post The java.lang.NoClassDefFoundError in JUnit first appeared on Baeldung.
       
Viewing all 4464 articles
Browse latest View live


<script src="https://jsc.adskeeper.com/r/s/rssing.com.1596347.js" async> </script>