Quantcast
Channel: Baeldung
Viewing all 4464 articles
Browse latest View live

Count Occurrences Using Java groupingBy Collector

$
0
0

1. Overview

In this short tutorial, we'll see how we can group equal objects and count their occurrences in Java. We'll use the groupingBy() collector in Java.

2. Count Occurrences using Collectors.groupingBy()

Collectors.groupingBy() provides functionality similar to the GROUP BY clause in SQL. We can use this to group objects by any attribute and store results in a Map.

For instance, let's consider a scenario where we need to group equal Strings in a stream and count their occurrences:

List<String> list = new ArrayList<>(Arrays.asList("Foo", "Bar", "Bar", "Bar", "Foo"));

We can group equal Strings, which in this case would be “Foo” and “Bar”. The result Map will store these Strings as keys. The values for these keys will be the count of occurrences. The value for “Foo” will be 2 and “Bar” will be 3:

Map<String, Long> result = list.stream()
  .collect(Collectors.groupingBy(Function.identity(), Collectors.counting()));
Assert.assertEquals(new Long(2), result.get("Foo"));
Assert.assertEquals(new Long(3), result.get("Bar"));

Let's decode the above code snippet:

  • Map<String, Long> result – this is the output result Map that will store the grouped elements as keys and count their occurrences as values
  • list.stream() – we convert the list elements into Java stream to process the collection in a declarative way
  • Collectors.groupingBy() – this is the method of Collectors class to group objects by some property and store results in a Map instance
  • Function.identity() – it is a functional interface in Java; the identity method returns a Function that always returns its input arguments
  • Collectors.counting() – this Collectors class method counts the number of elements passed in the stream as a parameter

We could use Collectors.groupingByConcurrent() instead of Collectors.groupingBy(). It also performs group by operation on input stream elements. The method collects the results in ConcurrentMap, thus improving efficiency.

For example, for the input list:

List<String> list = new ArrayList<>(Arrays.asList("Adam", "Bill", "Jack", "Joe", "Ian"));

We can group equal length Strings using Collectors.groupingByConcurrent():

Map<Integer, Long> result = list.stream()
  .collect(Collectors.groupingByConcurrent(String::length, Collectors.counting()));
Assert.assertEquals(new Long(2), result.get(3));
Assert.assertEquals(new Long(3), result.get(4));

3. Conclusion

In this article, we covered the usage of Collector.groupingBy() to group the equal objects.

And to wrap up, you'll find the source code to this article over on GitHub.

The post Count Occurrences Using Java groupingBy Collector first appeared on Baeldung.
       

Java Weekly, Issue 393

$
0
0

1. Spring and Java

>> Quarkus 2.0.0.Final released [quarkus.io]

Lots of new and exciting features in Quarkus 2.0 – continuous testing, brand new CLI, more Kotlin friendly, more extensions, and so on!

>> Hello, Spring GraphQL [spring.io] and >> Introducing Spring GraphQL [spring.io]

Definitely a big step – the first milestone release of Spring GraphQL – Spring integrates with GraphQL Java, on its 6th birthday. Good stuff.

>> Hibernate’s Read-Only Query Hint For Faster Read Operations [thorben-janssen.com]

Improved performance and reduced memory footprint by taking advantage of read-only query hints – short but very practical article!

Also worth reading:

Webinars and presentations:

Time to upgrade:

2. Technical

>> GitHub Copilot Experiences – a glimpse of an AI-assisted future [blog.scottlogic.com]

Meet the AI pair programmer – the first take on GitHub's Copilot which suggests entire function implementations!

Also worth reading:

3. Musings

>> Uncovering Better Ways [benjiweber.co.uk]

In pursuit of better ways from the whole WFH experience – how about more experiments by trying to removing some processes, constraining them, doing the opposite, or going to the far extreme?

Also worth reading:

4. Comics

And my favourite Dilberts of the week:

>> Is it blockchain? [dilbert.com]

>> Remotely casual! [dilbert.com]

>> Everyone is a designer! [dilbert.com]

5. Pick of the Week

Solid, wide-reaching surveys are few and far between in the Java ecosystem.

The 2021 report that Snyk has published reached over 2000 Java developers and has some super interesting insights.

Insights like – Java 11 has finally surpassed Java 8 in production! Yes, it finally happened in 2021 🙂

Kotlin adoption, IntelliJ usage and a number of others, in a very quick read:

>> The JVM Ecosystem Report 2021 [snyk.io]

The post Java Weekly, Issue 393 first appeared on Baeldung.
       

Find the GC Algorithm Used by a JVM Instance

$
0
0

1. Overview

In addition to typical development utilities such as compiler and runtime, each JDK release is shipped with a myriad of other tools. Some of these tools can help us to gain valuable insights into our running applications.

In this article, we're going to see how we can use such tools to find out more about the GC algorithm used by a particular JVM instance.

2. Sample Application

Throughout this article, we're going to use a very simple application:

public class App {
    public static void main(String[] args) throws IOException {
        System.out.println("Waiting for stdin");
        int read = System.in.read();
        System.out.println("I'm done: " + read);
    }
}

Obviously, this app waits and keeps running until it receives something from the standard input. This suspension helps us to mimic the behavior of long-running JVM applications.

In order to use this app, we have to compile the App.java file with javac and then run it using the java tool.

3. Finding the JVM Process

To find the GC used by a JVM process, first, we should identify the process id of that particular JVM instance. Let's say that we ran our app with the following command:

>> java App
Waiting for stdin

If we have JDK installed, the best way to find the process id of JVM instances is to use the jps tool. For instance:

>> jps -l
69569 
48347 App
48351 jdk.jcmd/sun.tools.jps.Jps

As shown above, there are three JVM instances running on the system. Obviously, the description of the second JVM instance (“App”) matches our application name. Therefore, the process id we're looking for is 48347.

In addition to jps, we can always use other general utilities to filter out running processes. For instance, the famous ps tool from the procps package will work as well:

>> ps -ef | grep java
502 48347 36213   0  1:28AM ttys037    0:00.28 java App

However, the jps is way simpler to use and requires less filtering.

4. Used GC

Now that we know how to find the process id, let's find the GC algorithm used by JVM applications that are already running.

4.1. Java 8 and Earlier

If we're on Java 8, we can use the jmap utility to print the heap summary, heap histogram, or even generate a heap dump. In order to find the GC algorithm, we can use the -heap option as:

>> jmap -heap <pid>

So in our particular case, we're using the CMS GC:

>> jmap -heap 48347 | grep GC
Concurrent Mark-Sweep GC

For other GC algorithms, the output is almost the same:

>> jmap -heap 48347 | grep GC
Parallel GC with 8 thread(s)

4.2. Java 9+: jhsdb jmap

As of Java 9, we can use the jhsdb jmap combination to print some information about the JVM heap. More specifically, this particular command would be equivalent to the previous one:

>> jhsdb jmap --heap --pid <pid>

For instance, our app is running with G1GC now:

>> jhsdb jmap --heap --pid 48347 | grep GC
Garbage-First (G1) GC with 8 thread(s)

4.3. Java 9+: jcmd

In modern JVMs, the jcmd command is pretty versatile. For instance, we can use it to get some general info about the heap:

>> jcmd <pid> VM.info

So if we pass our app's process id, we can see that this JVM instance is using Serial GC:

>> jcmd 48347 VM.info | grep gc
# Java VM: OpenJDK 64-Bit Server VM (15+36-1562, mixed mode, sharing, tiered, compressed oops, serial gc, bsd-amd64)
// omitted

The output is similar for G1 or ZGC:

// ZGC
# Java VM: OpenJDK 64-Bit Server VM (15+36-1562, mixed mode, sharing, tiered, z gc, bsd-amd64)
// G1GC
# Java VM: OpenJDK 64-Bit Server VM (15+36-1562, mixed mode, sharing, tiered, compressed oops, g1 gc, bsd-amd64)

With a little bit of grep magic, we can also remove all those noises and just get the GC name:

>> jcmd 48347 VM.info | grep -ohE "[^\s^,]+\sgc"
g1 gc

4.4. Command Line Arguments

Sometimes, we (or someone else) explicitly specify the GC algorithm while launching the JVM application. For instance, we're opting to use ZGC here:

>> java -XX:+UseZGC App

In such cases, there are much simpler ways to find the used GC. Basically, all we have to do is to somehow find the command that the application has been executed with.

For example, on UNIX-based platforms, we can use the ps command again:

>> ps -p 48347 -o command=
java -XX:+UseZGC App

From the above output, it's obvious that the JVM is using ZGC. Similarly, the jcmd command also can print the command line arguments:

>> jcmd 48347 VM.flags
84020:
-XX:CICompilerCount=4 -XX:-UseCompressedOops -XX:-UseNUMA -XX:-UseNUMAInterleaving -XX:+UseZGC // omitted

Surprisingly, as shown above, this command will print both implicit and explicit arguments and tunables. So even if we don't specify the GC algorithm explicitly, it'll show the selected and default one:

>> jcmd 48347 VM.flags | grep -ohE '\S*GC\s'
-XX:+UseG1GC

And even more surprising, this will work on Java 8 as well:

>> jcmd 48347 VM.flags | grep -ohE '\S*GC\s'
-XX:+UseParallelGC

5. Conclusion

In this article, we saw different approaches to find the GC algorithm used by a particular JVM instance. Some of the mentioned approaches were tied to specific Java versions, and some were portable.

Moreover, we saw a couple of ways to find the process id, which is always needed.

The post Find the GC Algorithm Used by a JVM Instance first appeared on Baeldung.
       

List Active Brokers in a Kafka Cluster Using Shell Commands

$
0
0

1. Overview

Monitoring an event-driven system that uses the Apache Kafka cluster would often require us to get the list of active brokers. In this tutorial, we'll explore few shell commands to get the list of active brokers in a running cluster.

2. Setup

For the purpose of this article, let's use the below docker-compose.yml file to set up a two-node Kafka cluster:

$ cat docker-compose.yml
---
version: '2'
services:
  zookeeper-1:
    image: confluentinc/cp-zookeeper:latest
    environment:
      ZOOKEEPER_CLIENT_PORT: 2181
      ZOOKEEPER_TICK_TIME: 2000
    ports:
      - 2181:2181
  
  kafka-1:
    image: confluentinc/cp-kafka:latest
    depends_on:
      - zookeeper-1
    ports:
      - 29092:29092
    environment:
      KAFKA_BROKER_ID: 1
      KAFKA_ZOOKEEPER_CONNECT: zookeeper-1:2181
      KAFKA_ADVERTISED_LISTENERS: PLAINTEXT://kafka-1:9092,PLAINTEXT_HOST://localhost:29092
      KAFKA_LISTENER_SECURITY_PROTOCOL_MAP: PLAINTEXT:PLAINTEXT,PLAINTEXT_HOST:PLAINTEXT
      KAFKA_INTER_BROKER_LISTENER_NAME: PLAINTEXT
      KAFKA_OFFSETS_TOPIC_REPLICATION_FACTOR: 1
  kafka-2:
    image: confluentinc/cp-kafka:latest
    depends_on:
      - zookeeper-1
    ports:
      - 39092:39092
    environment:
      KAFKA_BROKER_ID: 2
      KAFKA_ZOOKEEPER_CONNECT: zookeeper-1:2181
      KAFKA_ADVERTISED_LISTENERS: PLAINTEXT://kafka-2:9092,PLAINTEXT_HOST://localhost:39092
      KAFKA_LISTENER_SECURITY_PROTOCOL_MAP: PLAINTEXT:PLAINTEXT,PLAINTEXT_HOST:PLAINTEXT
      KAFKA_INTER_BROKER_LISTENER_NAME: PLAINTEXT
      KAFKA_OFFSETS_TOPIC_REPLICATION_FACTOR: 1

Now, let's spin-up the Kafka cluster using the docker-compose command:

$ docker-compose up -d

We can verify that the Zookeeper server is listening on port 2181, while the Kafka brokers are listening on ports 29092 and 39092, respectively:

$ ports=(2181 29092 39092)
$ for port in $ports
do
nc -z localhost $port
done
Connection to localhost port 2181 [tcp/eforward] succeeded!
Connection to localhost port 29092 [tcp/*] succeeded!
Connection to localhost port 39092 [tcp/*] succeeded!

3. Using Zookeeper APIs

In a Kafka cluster, the Zookeeper server stores metadata related to the Kafka broker servers. So, let's use the filesystem APIs exposed by Zookeeper to get the broker details.

3.1. zookeeper-shell Command

Most Kafka distributions are shipped with either zookeeper-shell or zookeeper-shell.sh binary. So, it's a de facto standard to use this binary to interact with the Zookeeper server.

First, let's connect to the Zookeeper server running at localhost:2181:

$ /usr/local/bin/zookeeper-shell localhost:2181
Connecting to localhost:2181
Welcome to ZooKeeper!

Once we're connected to the Zookeeper server, we can execute typical filesystem commands such as ls to get metadata information stored in the server. Let's find the ids of the brokers that are currently alive:

ls /brokers/ids
[1, 2]

We can see that there are currently two active brokers, with ids 1 and 2. Using the get command, we can fetch more details for a specific broker with a given id:

get /brokers/ids/1
{"features":{},"listener_security_protocol_map":{"PLAINTEXT":"PLAINTEXT","PLAINTEXT_HOST":"PLAINTEXT"},"endpoints":["PLAINTEXT://kafka-1:9092","PLAINTEXT_HOST://localhost:29092"],"jmx_port":-1,"port":9092,"host":"kafka-1","version":5,"timestamp":"1625336133848"}
get /brokers/ids/2
{"features":{},"listener_security_protocol_map":{"PLAINTEXT":"PLAINTEXT","PLAINTEXT_HOST":"PLAINTEXT"},"endpoints":["PLAINTEXT://kafka-2:9092","PLAINTEXT_HOST://localhost:39092"],"jmx_port":-1,"port":9092,"host":"kafka-2","version":5,"timestamp":"1625336133967"}

Note that the broker with id=1 is listening on port 29092, while the second broker with id=2 is listening on port 39092.

Finally, to exit the Zookeeper shell, we can use the quit command:

quit

3.2. zkCli Command

Just like Kafka distributions are shipped with the zookeeper-shell binary, Zookeeper distributions are shipped with zkCli or zkCli.sh binary.

As such, interacting with zkCli is exactly like interacting with zookeeper-shell, so let's go ahead and confirm that we're able to get the required details for the broker with id=1:

$ zkCli -server localhost:2181 get /brokers/ids/1
Connecting to localhost:2181
WATCHER::
WatchedEvent state:SyncConnected type:None path:null
{"features":{},"listener_security_protocol_map":{"PLAINTEXT":"PLAINTEXT","PLAINTEXT_HOST":"PLAINTEXT"},"endpoints":["PLAINTEXT://kafka-1:9092","PLAINTEXT_HOST://localhost:29092"],"jmx_port":-1,"port":9092,"host":"kafka-1","version":5,"timestamp":"1625336133848"}

As expected, we can see that broker details fetched using zookeeper-shell match those obtained using zkCli.

4. Using the Broker Version API

At times, we might have an incomplete list of active brokers, and we want to get all the available brokers in the cluster. In such a scenario, we can use the kafka-broker-api-versions command shipped with the Kafka distributions.

Let's assume that we know about a broker running at localhost:29092, so let's try to find out all active brokers participating in the Kafka cluster:

$ kafka-broker-api-versions --bootstrap-server localhost:29092 | awk '/id/{print $1}'
localhost:39092
localhost:29092

It's worth noting that we used the awk command to filter the output and show only the broker address. Further, the result correctly shows that there are two active brokers in the cluster.

Although this approach looks simpler than the Zookeeper CLI approach, the kafka-broker-api-versions binary is only a recent addition to Kafka distribution.

5. Shell Script

In any practical scenario, executing the zkCli or zookeeper-shell commands manually for each broker would be taxing. So, let's write a Shell script that takes the Zookeeper server address as an input, and in return, gives us the list of all active brokers.

5.1. Helper Functions

Let's write all the helper functions in the functions.sh script:

$ cat functions.sh
#!/bin/bash
ZOOKEEPER_SERVER="${1:-localhost:2181}"
# Helper Functions Below

First, let's write the get_broker_ids function to get the set of active broker ids that will call the zkCli command internally:

function get_broker_ids {
broker_ids_out=$(zkCli -server $ZOOKEEPER_SERVER <<EOF
ls /brokers/ids
quit
EOF
)
broker_ids_csv="$(echo "${broker_ids_out}" | grep '^\[.*\]$')"
echo "$broker_ids_csv" | sed 's/\[//;s/]//;s/,/ /'
}

Next, let's write the get_broker_details function to get the verbose broker details using the broker_id:

function get_broker_details {
broker_id="$1"
echo "$(zkCli -server $ZOOKEEPER_SERVER <<EOF
get /brokers/ids/$broker_id
quit
EOF
)"
}

Now that we have the verbose broker details, let's write the parse_broker_endpoint function to get the broker's endpoint detail:

function parse_endpoint_detail {
broker_detail="$1"
json="$(echo "$broker_detail"  | grep '^{.*}$')"
json_endpoints="$(echo $json | jq .endpoints)"
echo "$(echo $json_endpoints |jq . |  grep HOST | tr -d " ")"
}

Internally, we used the jq command for the JSON parsing.

5.2. Main Script

Now, let's write the main script get_all_active_brokers.sh that uses the helper functions defined in functions.sh:

$ cat get_all_active_brokers.sh
#!/bin/bash
. functions.sh "$1"
function get_all_active_brokers {
broker_ids=$(get_broker_ids)
for broker_id in $broker_ids
do
    broker_details="$(get_broker_details $broker_id)"
    broker_endpoint=$(parse_endpoint_detail "$broker_details")
    echo "broker_id="$broker_id,"endpoint="$broker_endpoint
done
}
get_all_active_brokers

We can notice that we've iterated over all the broker_ids in the get_all_active_brokers function to aggregate the endpoints for all the active brokers.

Finally, let's execute the get_all_active_brokers.sh script so that we can see the list of active brokers for our two-node Kafka cluster:

$ ./get_all_active_brokers.sh localhost:2181
broker_id=1,endpoint="PLAINTEXT_HOST://localhost:29092"
broker_id=2,endpoint="PLAINTEXT_HOST://localhost:39092"

We can see that the results are accurate. It looks like we nailed it!

6. Conclusion

In this tutorial, we learned about shell commands such as zookeeper-shell, zkCli, and kafka-broker-api-versions to get the list of active brokers in a Kafka cluster. Additionally, we wrote a shell script to automate the process of finding broker details in real-world scenarios.

The post List Active Brokers in a Kafka Cluster Using Shell Commands first appeared on Baeldung.

Converting String to BigInteger in Java

$
0
0

1. Overview

In this tutorial, we'll demonstrate how we can convert a String to a BigInteger. The BigInteger is commonly used for working with very large numerical values, which are usually the result of arbitrary arithmetic calculations.

2. Converting Decimal (Base 10) Integer Strings

To convert a decimal String to BigInteger, we'll use the BigInteger(String value) constructor:

String inputString = "878";
BigInteger result = new BigInteger(inputString);
assertEquals("878", result.toString());

3. Converting Non-Decimal Integer Strings

When using the default BigInteger(String value) constructor to convert a non-decimal String, like a hexadecimal number, we may get a NumberFormatException:

String inputString = "290f98";
new BigInteger(inputString);

This exception can be handled in two ways.

One way is to use the BigInteger(String value, int radix) constructor:

String inputString = "290f98";
BigInteger result = new BigInteger(inputString, 16);
assertEquals("2690968", result.toString());

In this case, we're specifying the radix, or base, as 16 for converting hexadecimal to decimal.

The other way is to first convert the non-decimal String into a byte array, and then use the BigIntenger(byte [] bytes) constructor:

byte[] inputStringBytes = inputString.getBytes();
BigInteger result = new BigInteger(inputStringBytes);
assertEquals("290f98", new String(result.toByteArray()));

This gives us the correct result because the BigIntenger(byte [] bytes) constructor turns a byte array containing the two's-complement binary representation into a BigInteger.

4. Conclusion

In this article, we looked at a few ways to convert a String to BigIntger in Java.

As usual, all code samples used in this tutorial are available over on GitHub.

The post Converting String to BigInteger in Java first appeared on Baeldung.
       

Tiered Compilation in JVM

$
0
0

1. Overview

The JVM interprets and executes bytecode at runtime. In addition, it makes use of the just-in-time (JIT) compilation to boost performance.

In earlier versions of Java, we had to manually choose between the two types of JIT compilers available in the Hotspot JVM. One is optimized for faster application start-up, while the other achieves better overall performance. Java 7 introduced tiered compilation in order to achieve the best of both worlds.

In this tutorial, we'll look at the client and server JIT compilers. We'll review tiered compilation and its five compilation levels. Finally, we'll see how method compilation works by tracking the compilation logs.

2. JIT Compilers

A JIT compiler compiles bytecode to native code for frequently executed sections. These sections are called hotspots, hence the name Hotspot JVM. As a result, Java can run with similar performance to a fully compiled language. Let's look at the two types of JIT compilers available in the JVM.

2.1. C1 – Client Complier

The client compiler, also called C1, is a type of a JIT compiler optimized for faster start-up time. It tries to optimize and compile the code as soon as possible.

Historically, we used C1 for short-lived applications and applications where start-up time was an important non-functional requirement. Prior to Java 8, we had to specify the -client flag to use the C1 compiler. However, if we use Java 8 or higher, this flag will have no effect.

2.2. C2 – Server Complier

The server compiler, also called C2, is a type of a JIT compiler optimized for better overall performance. C2 observes and analyzes the code over a longer period of time compared to C1. This allows C2 to make better optimizations in the compiled code.

Historically, we used C2 for long-running server-side applications. Prior to Java 8, we had to specify the -server flag to use the C2 compiler. However, this flag will have no effect in Java 8 or higher.

We should note that the Graal JIT compiler is also available since Java 10, as an alternative to C2. Unlike C2, Graal can run in both just-in-time and ahead-of-time compilation modes to produce native code.

3. Tiered Compilation

The C2 compiler often takes more time and consumes more memory to compile the same methods. However, it generates better-optimized native code than that produced by C1.

The tiered compilation concept was first introduced in Java 7. Its goal was to use a mix of C1 and C2 compilers in order to achieve both fast startup and good long-term performance.

3.1. Best of Both Worlds

On application startup, the JVM initially interprets all bytecode and collects profiling information about it. The JIT compiler then makes use of the collected profiling information to find hotspots.

First, the JIT compiler compiles the frequently executed sections of code with C1 to quickly reach native code performance. Later, C2 kicks in when more profiling information is available. C2 recompiles the code with more aggressive and time-consuming optimizations to boost performance:

In summary, C1 improves performance faster, while C2 makes better performance improvements based on more information about hotspots.

3.2. Accurate Profiling

An additional benefit of tiered compilation is more accurate profiling information. Before tiered compilation, the JVM collected profiling information only during interpretation.

With tiered compilation enabled, the JVM also collects profiling information on the C1 compiled code. Since the compiled code achieves better performance, it allows the JVM to collect more profiling samples.

3.3. Code Cache

Code cache is a memory area where the JVM stores all bytecode compiled into native code. Tiered compilation increased the amount of code that needs to be cached up to four times.

Since Java 9, the JVM segments the code cache into three areas:

  • The non-method segment – JVM internal related code (around 5 MB, configurable via -XX:NonNMethodCodeHeapSize)
  • The profiled-code segment – C1 compiled code with potentially short lifetimes (around 122 MB by default, configurable via -XX:ProfiledCodeHeapSize)
  • The non-profiled segment – C2 compiled code with potentially long lifetimes (similarly 122 MB by default, configurable via -XX:NonProfiledCodeHeapSize)

Segmented code cache helps to improve code locality and reduces memory fragmentation. Thus, it improves overall performance.

3.4. Deoptimization

Even though C2 compiled code is highly optimized and long-lived, it can be deoptimized. As a result, the JVM would temporarily roll back to interpretation.

Deoptimization happens when the compiler’s optimistic assumptions are proven wrong — for example, when profile information does not match method behavior:

In our example, once the hot path changes, the JVM deoptimizes the compiled and inlined code.

4. Compilation Levels

Even though the JVM works with only one interpreter and two JIT compilers, there are five possible levels of compilation. The reason behind this is that the C1 compiler can operate on three different levels. The difference between those three levels is in the amount of profiling done.

4.1. Level 0 – Interpreted Code

Initially, JVM interprets all Java code. During this initial phase, the performance is usually not as good compared to compiled languages.

However, the JIT compiler kicks in after the warmup phase and compiles the hot code at runtime. The JIT compiler makes use of the profiling information collected on this level to perform optimizations.

4.2. Level 1 – Simple C1 Compiled Code

On this level, the JVM compiles the code using the C1 compiler, but without collecting any profiling information. The JVM uses level 1 for methods that are considered trivial.

Due to low method complexity, the C2 compilation wouldn't make it faster. Thus, the JVM concludes that there is no point in collecting profiling information for code that cannot be optimized further.

4.3. Level 2 – Limited C1 Compiled Code

On level 2, the JVM compiles the code using the C1 compiler with light profiling. The JVM uses this level when the C2 queue is full. The goal is to compile the code as soon as possible to improve performance.

Later, the JVM recompiles the code on level 3, using full profiling. Finally, once the C2 queue is less busy, the JVM recompiles it on level 4.

4.4. Level 3 – Full C1 Compiled Code

On level 3, the JVM compiles the code using the C1 compiler with full profiling. Level 3 is part of the default compilation path. Thus, the JVM uses it in all cases except for trivial methods or when compiler queues are full.

The most common scenario in JIT compilation is that the interpreted code jumps directly from level 0 to level 3.

4.5. Level 4 – C2 Compiled Code

On this level, the JVM compiles the code using the C2 compiler for maximum long-term performance. Level 4 is also a part of the default compilation path. The JVM uses this level to compile all methods except trivial ones.

Given that level 4 code is considered fully optimized, the JVM stops collecting profiling information. However, it may decide to deoptimize the code and send it back to level 0.

5. Compilation Parameters

Tiered compilation is enabled by default since Java 8. It's highly recommended to use it unless there's a strong reason to disable it.

5.1. Disabling Tiered Compilation

We may disable tiered compilation by setting the –XX:-TieredCompilation flag. When we set this flag, the JVM will not transition between compilation levels. As a result, we'll need to select which JIT compiler to use: C1 or C2.

Unless explicitly specified, the JVM decides which JIT compiler to use based on our CPU. For multi-core processors or 64-bit VMs, the JVM will select C2. In order to disable C2 and only use C1 with no profiling overhead, we can apply the -XX:TieredStopAtLevel=1 parameter.

To completely disable both JIT compilers and run everything using the interpreter, we can apply the -Xint flag. However, we should note that disabling JIT compilers will have a negative impact on performance.

5.2. Setting Thresholds for Levels

A compile threshold is the number of method invocations before the code gets compiled. In the case of tiered compilation, we can set these thresholds for compilation levels 2-4. For example, we can set a parameter -XX:Tier4CompileThreshold=10000.

In order to check the default thresholds used on a specific Java version, we can run Java using the -XX:+PrintFlagsFinal flag:

java -XX:+PrintFlagsFinal -version | grep CompileThreshold
intx CompileThreshold = 10000
intx Tier2CompileThreshold = 0
intx Tier3CompileThreshold = 2000
intx Tier4CompileThreshold = 15000

We should note that the JVM doesn't use the generic CompileThreshold parameter when tiered compilation is enabled.

6. Method Compilation

Let's now take a look at a method compilation life-cycle:

In summary, the JVM initially interprets a method until its invocations reach the Tier3CompileThreshold. Then, it compiles the method using the C1 compiler while profiling information continues to be collected. Finally, the JVM compiles the method using the C2 compiler when its invocations reach the Tier4CompileThreshold. Eventually, the JVM may decide to deoptimize the C2 compiled code. That means that the complete process will repeat.

6.1. Compilation Logs

By default, JIT compilation logs are disabled. To enable them, we can set the -XX:+PrintCompilation flag. The compilation logs are formatted as:

  • Timestamp – In milliseconds since application start-up
  • Compile ID – Incremental ID for each compiled method
  • Attributes – The state of the compilation with five possible values:
    • % – On-stack replacement occurred
    • s – The method is synchronized
    • ! – The method contains an exception handler
    • b – Compilation occurred in blocking mode
    • n – Compilation transformed a wrapper to a native method
  • Compilation level – Between 0 and 4
  • Method name
  • Bytecode size
  • Deoptimisation indicator – With two possible values:
    • Made not entrant – Standard C1 deoptimization or the compiler’s optimistic assumptions proven wrong
    • Made zombie – A cleanup mechanism for the garbage collector to free space from the code cache

6.2. An Example

Let's demonstrate the method compilation life-cycle on a simple example. First, we'll create a class that implements a JSON formatter:

public class JsonFormatter implements Formatter {
    private static final JsonMapper mapper = new JsonMapper();
    @Override
    public <T> String format(T object) throws JsonProcessingException {
        return mapper.writeValueAsString(object);
    }
}

Next, we'll create a class that implements the same interface, but implements an XML formatter:

public class XmlFormatter implements Formatter {
    private static final XmlMapper mapper = new XmlMapper();
    @Override
    public <T> String format(T object) throws JsonProcessingException {
        return mapper.writeValueAsString(object);
    }
}

Now, we'll write a method that uses the two different formatter implementations. In the first half of the loop, we'll use the JSON implementation and then switch to the XML one for the rest:

public class TieredCompilation {
    public static void main(String[] args) throws Exception {
        for (int i = 0; i < 1_000_000; i++) {
            Formatter formatter;
            if (i < 500_000) {
                formatter = new JsonFormatter();
            } else {
                formatter = new XmlFormatter();
            }
            formatter.format(new Article("Tiered Compilation in JVM", "Baeldung"));
        }
    }
}

Finally, we'll set the -XX:+PrintCompilation flag, run the main method, and observe the compilation logs.

6.3. Review Logs

Let's focus on log output for our three custom classes and their methods.

The first two log entries show that the JVM compiled the main method and the JSON implementation of the format method on level 3. Therefore, both methods were compiled by the C1 compiler. The C1 compiled code replaced the initially interpreted version:

567  714       3       com.baeldung.tieredcompilation.JsonFormatter::format (8 bytes)
687  832 %     3       com.baeldung.tieredcompilation.TieredCompilation::main @ 2 (58 bytes)
A few hundred milliseconds later, the JVM compiled both methods on level 4. Hence, the C2 compiled versions replaced the previous versions compiled with C1:
659  800       4       com.baeldung.tieredcompilation.JsonFormatter::format (8 bytes)
807  834 %     4       com.baeldung.tieredcompilation.TieredCompilation::main @ 2 (58 bytes)

Just a few milliseconds later, we see our first example of deoptimization. Here, the JVM marked obsolete (not entrant) the C1 compiled versions:

812  714       3       com.baeldung.tieredcompilation.JsonFormatter::format (8 bytes)   made not entrant
838 832 % 3 com.baeldung.tieredcompilation.TieredCompilation::main @ 2 (58 bytes) made not entrant

After a while, we'll notice another example of deoptimization. This log entry is interesting as the JVM marked obsolete (not entrant) the fully optimized C2 compiled versions. That means the JVM rolled back the fully optimized code when it detected that it wasn't valid anymore:

1015  834 %     4       com.baeldung.tieredcompilation.TieredCompilation::main @ 2 (58 bytes)   made not entrant
1018  800       4       com.baeldung.tieredcompilation.JsonFormatter::format (8 bytes)   made not entrant

Next, we'll see the XML implementation of the format method for the first time. The JVM compiled it on level 3, together with the main method:

1160 1073       3       com.baeldung.tieredcompilation.XmlFormatter::format (8 bytes)
1202 1141 %     3       com.baeldung.tieredcompilation.TieredCompilation::main @ 2 (58 bytes)

A few hundred milliseconds later, the JVM compiled both methods on level 4. However, this time, it's the XML implementation that was used by the main method:

1341 1171       4       com.baeldung.tieredcompilation.XmlFormatter::format (8 bytes)
1505 1213 %     4       com.baeldung.tieredcompilation.TieredCompilation::main @ 2 (58 bytes

Same as before, a few milliseconds later, the JVM marked obsolete (not entrant) the C1 compiled versions:

1492 1073       3       com.baeldung.tieredcompilation.XmlFormatter::format (8 bytes)   made not entrant
1508 1141 %     3       com.baeldung.tieredcompilation.TieredCompilation::main @ 2 (58 bytes)   made not entrant

The JVM continued to use the level 4 compiled methods until the end of our program.

7. Conclusion

In this article, we explored the tiered compilation concept in the JVM. We reviewed the two types of JIT compilers and how tiered compilation uses both of them to achieve the best results. We saw five levels of compilation and learned how to control them using JVM parameters.

In the examples, we explored the complete method compilation life-cycle by observing the compilation logs.

As always, the source code is available over on GitHub.

The post Tiered Compilation in JVM first appeared on Baeldung.
       

Additional Source Directories in Maven

$
0
0

1. Overview

In this tutorial, we'll explain how we can add multiple source directories in the Maven-based Java project.

2. Extra Source Directory

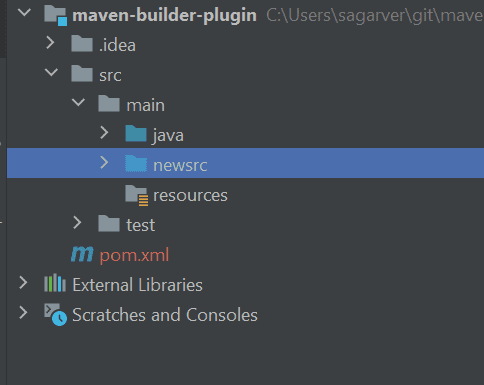
Let's assume we need to add a /newsrc source directory inside src/main:

First, let's create a simple Java class file DataConnection.java inside the src/main/newsrc/ folder:

public class DataConnection {
    public static String temp() {
        return "secondary source directory";
    }
}

After that, let's create another class file in the src/main/java directory that is using our DataConnection class created in the other folder:

public class MainApp {
    public static void main(String args[]){
        System.out.println(DataConnection.temp());
    }
}

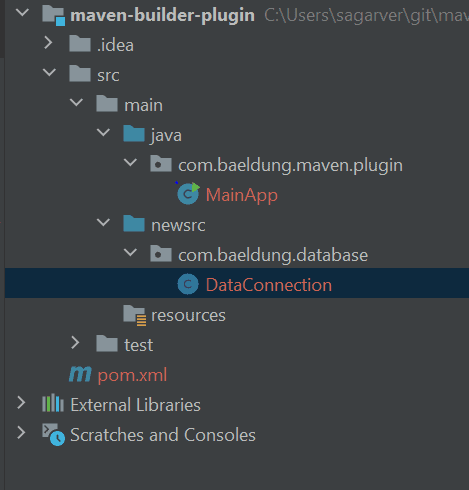
Before we try to compile our Maven project, let's have a quick look at the project's structure:

Now, if we try to compile it, we'll get a compilation error:

[ERROR] BuilderHelper/src/main/java/com/baeldung/maven/plugin/MainApp.java:[3,29] package com.baeldung.database does not exist
[ERROR] BuilderHelper/src/main/java/com/baeldung/database/MainApp.java:[9,28] cannot find symbol
[ERROR] symbol: variable DataConnection
[ERROR] location: class com.baeldung.MainApp

We can understand the root cause of the error message – we've defined the DataConnection class outside of the general project directory configuration.

Maven supports only one source folder by default. To configure more than one source directory, we'll need to use a Maven plugin called build-helper-maven-plugin.

3. Add Source Directory with build-helper-maven-plugin

We'll use build-helper-maven-plugin to add a source directory in order to resolve the above error. This plugin helps us to achieve our goal with a minimum amount of configuration.

Since we have a sibling directory next to the src/main folder, we'll now add a second source directory:

  <build>
        <plugins>
            <plugin>
                <groupId>org.codehaus.mojo</groupId>
                <artifactId>build-helper-maven-plugin</artifactId>
                <version>3.2.0</version>
                <executions>
                    <execution>
                        <id>add-source</id>
                        <phase>generate-sources</phase>
                        <goals>
                            <goal>add-source</goal>
                        </goals>
                        <configuration>
                            <sources>
                                <source>src/main/newsrc/</source>
                            </sources>
                        </configuration>
                    </execution>
                </executions>
            </plugin>
        </plugins>
    </build>

Here, we're running the add-source goal in the generate-sources phase. Also, we specified the source directory in a configuration.sources.source tag.

As we know, Maven's default lifecycle contains several phases prior to compilation: validate, initialize, generate-sources, process-sources, generate-resources, process-resources, and compile. So, here, we're adding a new source directory before Maven compiles the source code.

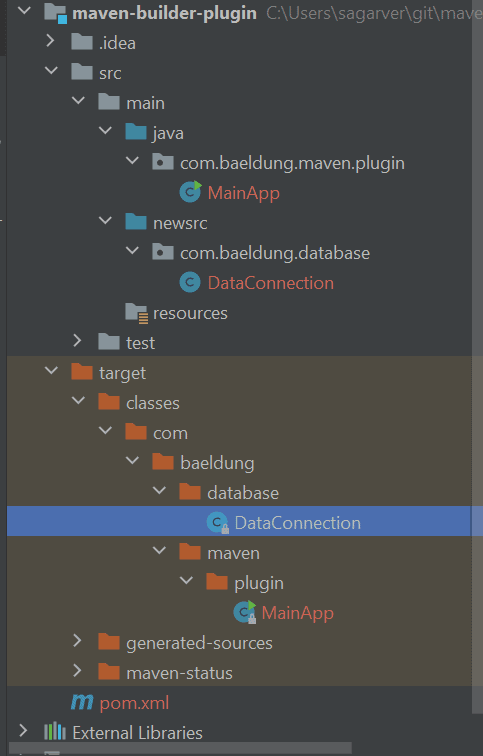
Now, we'll compile the project, and then the build succeeds. After this, when we check the target folder, we'll see that the plugin generates classes from both source directories:

We can find the latest version of this plugin on Maven Central. We've only added one source directory in our example, but the plugin allows us to add as many as we want.

4. Conclusion

In this tutorial, we've learned how we can add multiple source directories using build-helper-maven-plugin.

As always, the full source code of the examples is available over on GitHub.

The post Additional Source Directories in Maven first appeared on Baeldung.
       

Static Classes Versus the Singleton Pattern in Java

$
0
0

1. Introduction

In this quick tutorial, we'll discuss some eminent differences between programming to the Singleton design pattern and using static classes in Java. We'll review both the coding methodologies and compare them with respect to different aspects of programming.

By the end of this article, we'll be able to make the right decision when picking between the two options.

2. The Basics

Let's hit ground zero. Singleton is a design pattern that assures a single instance of a Class for the lifetime of an application.
It also provides a global point of access to that instance.

static – a reserved keyword – is a modifier that makes instance variables as class variables. Hence, these variables get associated with the class (with any object). When used with methods, it makes them accessible just with the class name. Lastly, we can also create static nested inner classes.

In this context, a static class contains static methods and static variables.

3. Singleton Versus Static Utility Classes

Now, let's go down the rabbit hole and understand some prominent differences between the two giants. We begin our quest with some Object-Oriented concepts.

3.1. Runtime Polymorphism

Static methods in Java are resolved at compile-time and can't be overridden at runtime. Hence, a static class can't truly benefit from runtime polymorphism:

public class SuperUtility {
    public static String echoIt(String data) {
        return "SUPER";
    }
}
public class SubUtility extends SuperUtility {
    public static String echoIt(String data) {
        return data;
    }
}
@Test
public void whenStaticUtilClassInheritance_thenOverridingFails() {
    SuperUtility superUtility = new SubUtility();
    Assert.assertNotEquals("ECHO", superUtility.echoIt("ECHO"));
    Assert.assertEquals("SUPER", superUtility.echoIt("ECHO"));
}

Contrastingly, singletons can leverage the runtime polymorphism just like any other class by deriving from a base class:

public class MyLock {
    protected String takeLock(int locks) {
        return "Taken Specific Lock";
    }
}
public class SingletonLock extends MyLock {
    // private constructor and getInstance method 
    @Override
    public String takeLock(int locks) {
        return "Taken Singleton Lock";
    }
}
@Test
public void whenSingletonDerivesBaseClass_thenRuntimePolymorphism() {
    MyLock myLock = new MyLock();
    Assert.assertEquals("Taken Specific Lock", myLock.takeLock(10));
    myLock = SingletonLock.getInstance();
    Assert.assertEquals("Taken Singleton Lock", myLock.takeLock(10));
}

Moreover, singletons can also implement interfaces, giving them an edge over static classes:

public class FileSystemSingleton implements SingletonInterface {
    // private constructor and getInstance method
    @Override
    public String describeMe() {
        return "File System Responsibilities";
    }
}
public class CachingSingleton implements SingletonInterface {
    // private constructor and getInstance method
    @Override
    public String describeMe() {
        return "Caching Responsibilities";
    }
}
@Test
public void whenSingletonImplementsInterface_thenRuntimePolymorphism() {
    SingletonInterface singleton = FileSystemSingleton.getInstance();
    Assert.assertEquals("File System Responsibilities", singleton.describeMe());
    singleton = CachingSingleton.getInstance();
    Assert.assertEquals("Caching Responsibilities", singleton.describeMe());
}

Singleton-scoped Spring Beans implementing an interface are perfect examples of this paradigm.

3.2. Method Parameters

As it's essentially an object, we can easily pass around a singleton to other methods as an argument:

@Test
public void whenSingleton_thenPassAsArguments() {
    SingletonInterface singleton = FileSystemSingleton.getInstance();
    Assert.assertEquals("Taken Singleton Lock", singleton.passOnLocks(SingletonLock.getInstance()));
}

However, creating a static utility class object and passing it around in methods is worthless and a bad idea.

3.3. Object State, Serialization, and Cloneability

A singleton can have instance variables, and just like any other object, it can maintain a state of those variables:

@Test
public void whenSingleton_thenAllowState() {
    SingletonInterface singleton = FileSystemSingleton.getInstance();
    IntStream.range(0, 5)
        .forEach(i -> singleton.increment());
    Assert.assertEquals(5, ((FileSystemSingleton) singleton).getFilesWritten());
}

Furthermore, a singleton can be serialized to preserve its state or to be transferred over a medium, such as a network:

new ObjectOutputStream(baos).writeObject(singleton);
SerializableSingleton singletonNew = (SerializableSingleton) new ObjectInputStream
   (new ByteArrayInputStream(baos.toByteArray())).readObject();

Finally, the existence of an instance also sets up the potential to clone it using the Object's clone method:

@Test
public void whenSingleton_thenAllowCloneable() {
    Assert.assertEquals(2, ((SerializableCloneableSingleton) singleton.cloneObject()).getState());
}

Contrarily, static classes only have class variables and static methods, and therefore, they carry no object-specific state. Since static members belong to the class, we can't serialize them. Also, cloning is meaningless for static classes due to the lack of an object to be cloned. 

3.4. Loading Mechanism and Memory Allocation

The singleton, like any other instance of a class, lives on the heap. To its advantage, a huge singleton object can be lazily loaded whenever required by the application.

On the other hand, a static class encompasses static methods and statically bound variables at compile time and is allocated on the stack.
Therefore, static classes are always eagerly loaded at the time of class loading in the JVM.

3.5. Efficiency and Performance

As iterated earlier, static classes don't require object initialization. This removes the overhead of the time required to create the object.

Additionally, by static binding at compile-time, they're more efficient than singletons and tend to be faster.

We must choose singletons for design reasons only and not as a single instance solution for efficiency or a performance gain.

3.6. Other Minor Differences

Programming to a singleton rather than a static class can also benefit the amount of refactoring required.

Unquestionably, a singleton is an object of a class. Therefore, we can easily move away from it to a multi-instance world of a class.

Since static methods are invoked without an object but with the class name, migrating to a multi-instance environment could be a relatively larger refactor.

Secondly, in static methods, as the logic is coupled to the class definition and not to the objects, a static method call from the object being unit-tested becomes harder to be mocked or even overwritten by a dummy or stub implementation.

4. Making the Right Choice

Go for a singleton if we:

  • Require a complete object-oriented solution for the application
  • Need only one instance of a class at all given times and to maintain a state
  • Want a lazily loaded solution for a class so that it's loaded only when required

Use static classes when we:

  • Just need to store many static utility methods that only operate on input parameters and do not modify any internal state
  • Don't need runtime polymorphism or an object-oriented solution

5. Conclusion

In this article, we reviewed some of the essential differences between static classes and the Singleton pattern in Java. We also inferred when to use either of the two approaches in developing software.

As always, we can find the complete code over on GitHub.

The post Static Classes Versus the Singleton Pattern in Java first appeared on Baeldung.
       

Configuring the Server Port on Quarkus Applications

$
0
0

1. Overview

In this quick tutorial, we're going to learn how to configure the server port on Quarkus applications.

2. Configuring Port

By default, similar to many other Java server applications, Quarkus listens to port 8080. In order to change the default server port, we can use the quarkus.http.port property.

Quarkus reads its configuration properties from various sources. Therefore, we can change the quarkus.http.port property from different sources, as well. For instance, we can make Quarkus listen to port 9000 by adding this to our application.properties:

quarkus.http.port=9000

Now, if we send a request to localhost:9000, the server would return some sort of an HTTP response:

>> curl localhost:9000/hello
Hello RESTEasy

It's also possible to configure the port through Java system properties and -D arguments:

>> mvn compile quarkus:dev -Dquarkus.http.port=9000
// omitted
Listening on: http://localhost:9000

As shown above, the system property is overriding the default port here. In addition to these, we can use environment variables, too:

>> QUARKUS_HTTP_PORT=9000 
>> mvn compile quarkus:dev

Here, we're converting all characters in quarkus.http.port to uppercase and replacing dots with underscores to form the environment variable name.

3. Conclusion

In this short tutorial, we saw a couple of ways to configure the application port in Quarkus.

The post Configuring the Server Port on Quarkus Applications first appeared on Baeldung.
       

Guide to Java BigInteger

$
0
0

1. Introduction

Java provides some primitives, such as int or long, to perform integer operations. But sometimes, we need to store numbers, which overflow the available limits for those data types.

In this tutorial, we'll look deeper into the BigInteger class. We'll check its structure by looking into the source code and answer the question – how is it possible to store large numbers outside the limit of available primitive data types?

2. BigInteger Class

As we know, the BigInteger class is used for mathematical operations which involve very big integer calculations larger than the primitive long type. It represents immutable arbitrary-precision integers.

Before going further, let's remember that in Java all bytes are represented in the two's-complement system using the big-endian notation. It stores the most significant byte of a word at the smallest memory address (the lowest index). Moreover, the first bit of the byte is also a sign bit. Let's inspect example byte values:

  • 1000 0000 represents -128
  • 0111 1111 represents 127
  • 1111 1111 represents -1

So now, let's check the source code and explain how it stores given numbers exceeding available primitives limits.

2.1. int signum

The signum property determines the sign of the BigInteger. Three integer values represent the value's sign: -1 for negative, 0 for zero, for positive numbers:

assertEquals(1, BigInteger.TEN.signum());
assertEquals(-1, BigInteger.TEN.negate().signum());
assertEquals(0, BigInteger.ZERO.signum());

Let's be aware that BigInteger.ZERO must have the signum of 0 due to the magnitude array. This value ensures that there is exactly one representation for each BigInteger value.

2.2. int[] mag

All the magic of the BigInteger class starts with the mag property. It stores the given value in an array using the binary representation, which allows omitting primitive data types limits.

Moreover, the BigInteger groups them in 32-bit portions – a set of four bytes. Due to this, the magnitude inside the class definition is declared as the int array:

int[] mag;

This array holds the magnitude of the given value in big-endian notation. The zeroth element of this array is the most significant int of the magnitude. Let's check it using BigInteger(byte[] bytes):

assertEquals(new BigInteger("1"), new BigInteger(new byte[]{0b1}))
assertEquals(new BigInteger("2"), new BigInteger(new byte[]{0b10}))
assertEquals(new BigInteger("4"), new BigInteger(new byte[]{0b100}))

This constructor translates a given byte array containing the two's-complement binary representation into the value.

Since there's a sign-magnitude variable (signum), we don't use the first bit as a sign bit of the value. Let's quickly check it:

byte[] bytes = { -128 }; // 1000 0000
assertEquals(new BigInteger("128"), new BigInteger(1, bytes));
assertEquals(new BigInteger("-128"), new BigInteger(-1, bytes));

We created two different values using the BigInteger(int signum, byte[] magnitude) constructor. It translates the sign-magnitude representation into the BigInteger. We reused the same bytes array, changing only a sign value.

We can also print the magnitude using the toString(int radix) method:

assertEquals("10000000", new BigInteger(1, bytes));
assertEquals("-10000000", new BigInteger(-1, bytes));

Notice that for the negative values, the minus sign is added.

Finally, the magnitude's most significant int must be non-zero. This implies that the BigInteger.ZERO has a zero-length mag array:

assertEquals(0, BigInteger.ZERO.bitCount()); 
assertEquals(BigInteger.ZERO, new BigInteger(0, new byte[]{}));

For now, we'll skip inspecting other properties. They are marked as deprecated due to redundancy, used only as internal cache.

Let's now go straight to the more complex examples and check how the BigInteger stores numbers over the primitive data types.

3. BigInteger Larger Than Long.MAX_VALUE.

As we already know, the long data type is a 64-bit two's complement integer. The signed long has a minimum value of -263 (1000 0000 … 0000) and a maximum value of 263-1 (0111 1111 … 1111). To create a number over those limits, we need to use the BigInteger class.

Let's now create a value larger by one than Long.MAX_VALUE, equal to 263. According to the information in the previous chapter, it needs to have:

  • a signum property set to 1,
  • a mag array, with 64 bits total, where only the most significant bit set (1000 0000 … 0000).

Firstly, let's create a BigInteger using the setBit(int n) function:

BigInteger bi1 = BigInteger.ZERO.setBit(63);
String str = bi1.toString(2);
assertEquals(64, bi1.bitLength());
assertEquals(1, bi1.signum());
assertEquals("9223372036854775808", bi1.toString());
assertEquals(BigInteger.ONE, bi1.substract(BigInteger.valueOf(Long.MAX_VALUE)));
assertEquals(64, str.length());
assertTrue(str.matches("^10{63}$")); // 1000 0000 ... 0000

Remember that in the binary representation system, bits are ordered from right to left, starting from 0. While the BigInteger.ZERO has an empty magnitude array, setting the 63rd bit makes it at the same time the most significant – the zeroth element of the 64 length array. The signum is automatically set to one.

On the other hand, the same bit sequence is represented by the Long.MIN_VALUE. Let's transform this constant into byte[] array and create construct the BigInteger:

byte[] bytes = ByteBuffer.allocate(Long.BYTES).putLong(Long.MIN_VALUE).array();
BigInteger bi2 = new BigInteger(1, bytes);
assertEquals(bi1, bi2);
...

As we see, both values are equal, so the same pack of assertions applies.

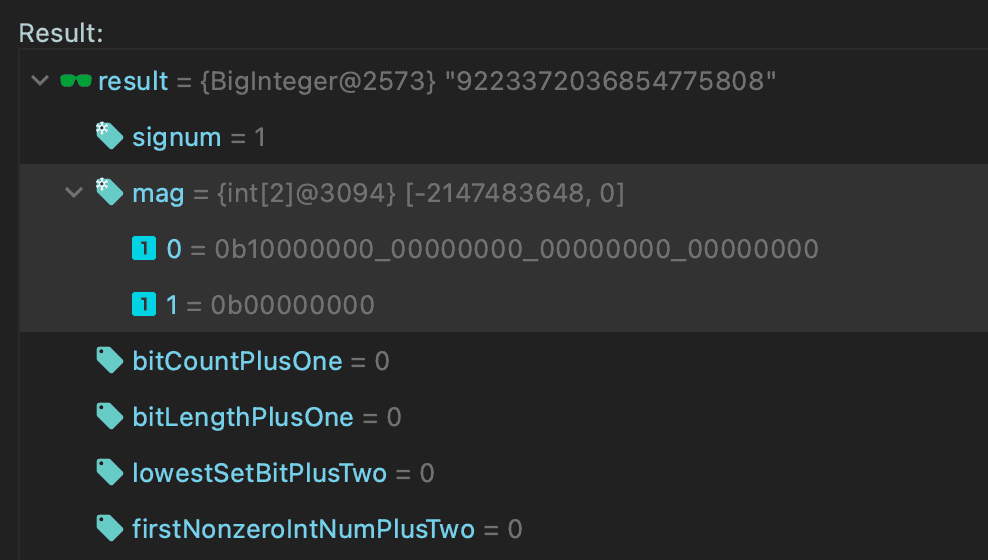
Finally, we can inspect the internal int[] mag variable. Currently, Java doesn't provide API to get this value, but we can do it by evaluation tool in our debugger:

We store our value in the array using two integers, two packs of 32-bits. The zeroth element is equal to Integer.MIN_VALUE and the other is zero.

4. Conclusion

In this quick tutorial, we focused on the implementation details of the BigInteger class. We started by reminding some information about numbers, primitives, and the binary representation rules.

Then we inspected the source code of the BigInteger. We checked signum and mag properties. We also learned how the BigInteger stores the given value, allowing us to provide larger numbers than available primitive data types.

As always, we can find all code snippets and tests over on GitHub.

The post Guide to Java BigInteger first appeared on Baeldung.
       

Force Repository Update with Maven

$
0
0

1. Overview

In this tutorial, we'll learn how to force-update a local Maven repository when it becomes corrupted. To accomplish this, we'll use a straightforward example to understand why a repository can become corrupted and how to fix it.

2. Prerequisites

To learn and run the commands in this tutorial, we need to use a Spring Initializr project and have a JDK and Maven installed.

3. Maven Repository Structure

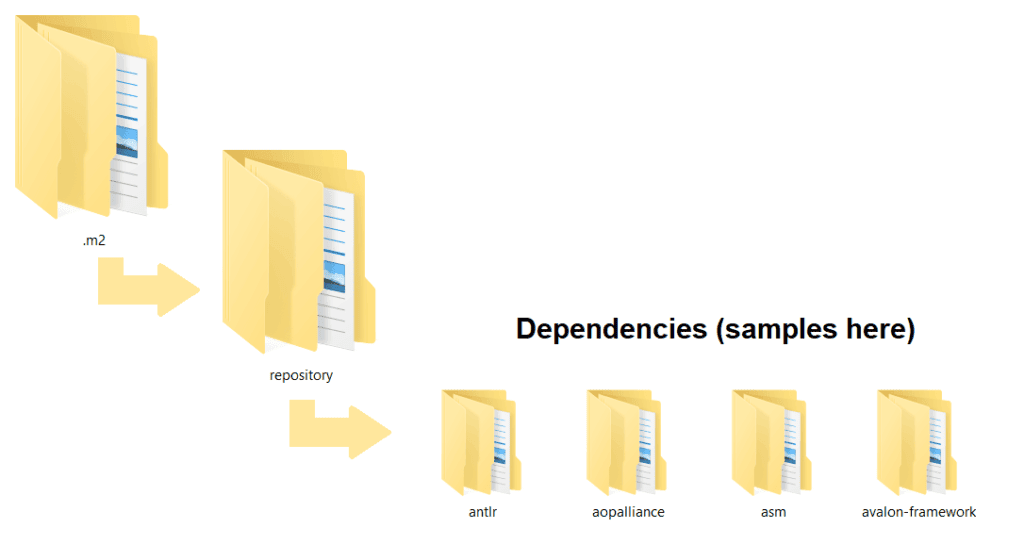
Maven saves all the dependencies of projects in the .m2 folder. For example, in the following image, we can observe the structure of Maven repositories:

As we can see, Maven downloads all dependencies under the repository folder. Therefore, the download into our local repository is necessary to access all needed code at runtime.

4. Downloading Dependencies

We know that Maven works based on the pom.xml file configurations. When Maven executes this pom.xml file, the dependencies will be downloaded from a central Maven repository and put into your local Maven repository. If we already have the dependencies in our local repository, Maven will not download them.

The download happens when we execute the following commands:

mvn package
mvn install

Both of the above include executing the following command:

mvn dependency:resolve 

Therefore, we can solely resolve the dependencies without using a package or install by just running the dependency:resolve command.

5. Corrupted Dependencies

While downloading the dependencies, a network glitch can happen, resulting in corrupted dependencies. The interrupted dependency download is the leading cause of corruption. Maven will display a message accordingly:

Could not resolve dependencies for project ...

Let's see next how we can solve this issue.

6. Automatically Fixing the Corrupted Dependencies

Maven usually displays the corrupted dependency when it notifies that the build failed:

Could not transfer artifact [artifact-name-here] ...

To fix this, we can have automatic or manual approaches. Additionally, we should run any repository update in debug mode, adding the -X option after -U to have a better picture of what happens during the update.

6.1. Force Update All SNAPSHOT Dependencies

As we know already, Maven will not download existing dependencies again. Therefore, to force Maven to update all corrupted SNAPSHOT dependencies, we should add in our command the  -U/–update-snapshots option:

mvn package -U
mvn install -U

Still, we have to remember that the option does not re-download a SNAPSHOT dependency if Maven already downloaded it and if the checksum is the same.

This will also package or install our project next. Finally, we'll learn how to update the repository without including the current working project.

6.2. Dependency Resolve Goal

We can tell Maven to resolve our dependencies and update snapshots without any package or install command. For this purpose, we'll use the dependency:resolve goal, by including the -U option:

mvn dependency:resolve -U

6.3. Purge Local Repository Goal

We know that -U  just re-downloads the corrupted SNAPSHOT dependencies. As a result, in the case of corrupted local release dependencies, we might need deeper commands. For this purpose, we should use:

mvn dependency:purge-local-repository

The purpose of the dependency:purge-local-repository is to purge (delete and optionally re-resolve) artefacts from the local Maven repository. By default, artefacts will be re-resolved.

6.4. Purge Local Repository Options

The purge local repository can be configured to run for only a certain group of dependencies by specifying the groupId, using the resolutionFuzziness option:

mvn dependency:purge-local-repository -DresolutionFuzziness=com.yyy.projectA:projectA

To add details, we might want to use the options includes/excludes to include or exclude artefacts for deletion or refresh:

mvn dependency:purge-local-repository -Dinclude=com.yyy.projectA:projectB -Dexclude=com.yyy.projectA:projectC

7. Manually Deleting the Repository

Whereas the -U option and purge-local-repository might resolve the corrupted dependencies without refreshing all of them, the manual delete of the .m2 local repository will cause a forced re-download of all dependencies.

This can be useful when having old and maybe corrupted dependencies. Then a simple re-package or re-install should do the job. Moreover, we can use the dependency:resolve option to solve the dependencies of our project solely.

8. Conclusion

In this tutorial, we discussed the options and goals of Maven that forcibly updates our local repository.

The samples used are simple Maven commands that can be used on any project with a proper pom.xml configured.

The post Force Repository Update with Maven first appeared on Baeldung.
       

Writing Log Data to Syslog Using Log4j2

$
0
0

1. Overview

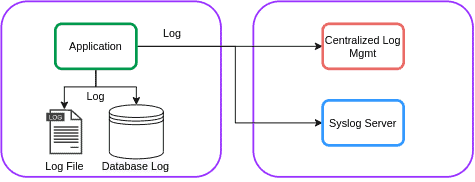
Logging is a vital component in every application. When we use a logging mechanism in our application, we can store our logs in a file or a database. Additionally, we can send the logging data to a centralized logging management application like Graylog or Syslog:

In this tutorial, we'll describe how to send logging information to a Syslog server using Log4j2 in a Spring Boot application.

2. Log4j2

Log4j2 is the latest version of Log4j. It is a common choice for high-performance logging and is used in many production applications.

2.1. Maven Dependency

Let's start by adding the spring-boot-starter-log4j2 dependency to our pom.xml:

<dependency>
    <groupId>org.springframework.boot</groupId>
    <artifactId>spring-boot-starter-log4j2</artifactId>
    <version>2.5.2</version>
</dependency>

For configuring Log4j2 in a Spring Boot application, we'll need to exclude the default Logback logging framework from any starter library in pom.xml. In our project, there's only the spring-boot-starter-web starter dependency. Let's exclude the default logging from it:

<dependency>
    <groupId>org.springframework.boot</groupId>
    <artifactId>spring-boot-starter-web</artifactId>
    <exclusions>
        <exclusion>
            <groupId>org.springframework.boot</groupId>
            <artifactId>spring-boot-starter-logging</artifactId>
        </exclusion>
    </exclusions>
</dependency>

2.2. Log4j2 Configuration

Now, we'll create the Log4j2 configuration file. The Spring Boot project searches for either the log4j2-spring.xml or log4j2.xml files in the classpath. Let's configure a simple log4j2-spring.xml in the resource directory:

<?xml version="1.0" encoding="UTF-8"?>
<Configuration>
    <Appenders>
        <Console name="ConsoleAppender" target="SYSTEM_OUT">
            <PatternLayout
                pattern="%style{%date{DEFAULT}}{yellow} %highlight{%-5level}{FATAL=bg_red, ERROR=red, WARN=yellow, INFO=green} %message"/>
        </Console>
    </Appenders>
    <Loggers>
        <Root level="info">
            <AppenderRef ref="ConsoleAppender"/>
        </Root>
    </Loggers>
</Configuration>

The configuration has a Console appender for displaying logging data to the console.

2.3. Syslog Appender

Appenders are the main component in logging frameworks that deliver logging data to a destination. Log4j2 supports many appenders, such as the Syslog appender. Let's update our log4j2-spring.xml file to add the Syslog appender for sending the logging data to the Syslog server:

<Syslog name="Syslog" format="RFC5424" host="localhost" port="514"
    protocol="UDP" appName="baeldung" facility="LOCAL0" />

The Syslog appender has many attributes:

  • name: the name of the appender
  • format: it can be either set to BSD or RFC5424
  • host: the address of the Syslog server
  • port: the port of the Syslog server
  • protocol: whether to use TCP or UPD
  • appName: the name of the application that is logging
  • facility: the category of the message

3. Syslog Server

Now, let's set up the Syslog server. In many Linux distributions, rsyslog is the main logging mechanism. It's included in most Linux distributions, such as Ubuntu and CentOS.

3.1. Syslog Configuration

Our rsyslog configuration should match the Log4j2 setting. The rsyslog configuration is defined in the /etc/rsyslog.conf file. We're using UDP and port 514 for protocol and port in Log4j2 configuration, respectively. Therefore, we'll add, or uncomment, the following lines to rsyslog.conf file:

# provides UDP syslog reception
module(load="imudp")
input(type="imudp" port="514")

In this case, we're setting module(load=”imudp”) to load imudp module to receive Syslog messages via UDP. Then, we set the port to 514 using input configuration. The input assigns the port to the module. After that, we should restart the rsyslog server:

sudo service rsyslog restart

Now the configuration is ready.

3.2. Testing

Let's create a simple Spring Boot application that logs a few messages:

@SpringBootApplication
public class SpringBootSyslogApplication {
    private static final Logger logger = LogManager.getLogger(SpringBootSyslogApplication.class);
    public static void main(String[] args) {
        SpringApplication.run(SpringBootSyslogApplication.class, args);
        logger.debug("Debug log message");
        logger.info("Info log message");
        logger.error("Error log message");
        logger.warn("Warn log message");
        logger.fatal("Fatal log message");
        logger.trace("Trace log message");
    }
}

The logging information is stored in the /var/log/ directory. Let's check the syslog file:

tail -f /var/log/syslog

When we run our Spring Boot application, we'll see our log messages:

Jun 30 19:49:35 baeldung[16841] Info log message
Jun 30 19:49:35 baeldung[16841] Error log message
Jun 30 19:49:35 baeldung[16841] Warn log message
Jun 30 19:49:35 baeldung[16841] Fatal log message

4. Conclusion

In this tutorial, we described the Syslog configuration in Log4j2 in a Spring Boot application. Also, we configured the rsyslog server as the Syslog server. As usual, the full source code can be found over on GitHub.

The post Writing Log Data to Syslog Using Log4j2 first appeared on Baeldung.
       

Java Weekly, Issue 394

$
0
0

1. Spring and Java

>> Quarkus & Hibernate – Getting Started [thorben-janssen.com]

Developing k8s-native Java apps – a practical guide on using Quarkus and Hibernate together.

>> Kotlin’s “internal” Visibility Modifier and Java Interoperability [4comprehension.com]

Kotlin and messing with method names to implement the internal visibility. Short but insightful.

Also worth reading:

Webinars and presentations:

Time to upgrade:

2. Technical & Musings

>> Kubernetes API and Feature Removals In 1.22: Here’s What You Need To Know [kubernetes.io]

K8S 1.22 is around the corner – prepare by knowing the API removals, changes, and additions.

>> Elasticsearch Indexing Strategy in Asset Management Platform (AMP) [netflixtechblog.medium.com]

How Netflix is using Elasticsearch to indexing and searching the metadata for video and image assets – project Amsterdam!

Also worth reading:

3. Comics

And my favorite Dilberts of the week:

>> A slight decrease [dilbert.com]

>> Need more data [dilbert.com]

>> Never heard of BOTOX! [dilbert.com]

4. Pick of the Week

>> Software Development Is Misunderstood [itnext.io]

The post Java Weekly, Issue 394 first appeared on Baeldung.
       

Plugin Management in Maven

$
0
0

1. Overview

Apache Maven is a powerful tool that uses plugins to automate and perform all the build and reporting tasks in a Java project.

However, there are likely to be several of these plugins used in the build along with different versions and configurations, especially in a multi-module project. This can lead to problems of complex POM files with redundant or duplicate plugin artifacts as well as configurations scattered across various child projects.

In this article, we'll see how to use Maven's dependency management mechanism to handle such issues and effectively maintain plugins across the whole project.

2. Plugin Configuration

Maven has two types of plugin:

  • Build – executed during the build process. Examples include Clean, Install, and Surefire plugins. These should be configured in the build section of the POM.
  • Reporting – executed during site generation to produce various project reports. Examples include Javadoc and Checkstyle plugins. These are configured in the reporting section of the project POM.

Maven plugins provide all the useful functionalities required to execute and manage the project build.

For example, we can declare the Jar plugin in the POM:

<build>
    ....
    <plugins>
        <plugin>
            <groupId>org.apache.maven.plugins</groupId>
            <artifactId>maven-jar-plugin</artifactId>
            <version>3.2.0</version>
            ....
        </plugin>
    ....
    </plugins>
</build>

Here, we've included the plugin in the build section to add the capability to compile our project into a jar.

3. Plugin Management

In addition to the plugins, we can also declare plugins in the pluginManagement section of the POM. This contains the plugin elements in much the same way as we saw previously. However, by adding the plugin in the pluginManagement section, it becomes available to this POM, and all inheriting child POMs.

This means that any child POMs will inherit the plugin executions simply by referencing the plugin in their plugin section. All we need to do is add the relevant groupId and artifactId, without having to duplicate the configuration or manage the version.

Similar to the dependency management mechanism, this is particularly useful in multi-module projects as it provides a central location to manage plugin versions and any related configuration.

4. Example

Let's start by creating a simple multi-module project with two submodules. We'll include the Build Helper Plugin in the parent POM which contains several small goals to assist with the build lifecycle. In our example, we'll use it to copy some additional resources to the project output for a child project.

4.1. Parent POM Configuration

First, we'll add the plugin to the pluginManagement section of the parent POM:

<pluginManagement>
    <plugins>
        <plugin>
            <groupId>org.codehaus.mojo</groupId>
            <artifactId>build-helper-maven-plugin</artifactId>
            <version>3.2.0</version>
            <executions>
                <execution>
                    <id>add-resource</id>
                    <phase>generate-resources</phase>
                    <goals>
                        <goal>add-resource</goal>
                    </goals>
                    <configuration>
                        <resources>
                            <resource>
                                <directory>src/resources</directory>
                                <targetPath>json</targetPath>
                            </resource>
                        </resources>
                    </configuration>
                </execution>
            </executions>
        </plugin>
   </plugins>
</pluginManagement>

This binds the plugin's add-resource goal to the generate-resources phase in the default POM lifecycle. We've also specified the src/resources directory containing the additional resources. The plugin execution will copy these resources to the target location in the project output, as required.

Next, let's run the maven command to ensure that the configuration is valid and the build is successful:

$ mvn clean test

After running this, the target location does not contain the expected resources yet.

4.2. Child POM Configuration

Now, let's reference this plugin from the child POM:

<build>
    <plugins>
        <plugin>
            <groupId>org.codehaus.mojo</groupId>
            <artifactId>build-helper-maven-plugin</artifactId>
        </plugin>
    </plugins>
</build>

Similar to dependency management, we don't declare the version or any plugin configuration. Instead, child projects inherit these values from the declaration in the parent POM.

Finally, let's run the build again and see the output:

....
[INFO] --- build-helper-maven-plugin:3.2.0:add-resource (add-resource) @ submodule-1 ---
[INFO]
[INFO] --- maven-resources-plugin:2.6:resources (default-resources) @ submodule-1 ---
[INFO] Using 'UTF-8' encoding to copy filtered resources.
[INFO] Copying 1 resource to json
....

Here, the plugin executes during the build but only in the child project with the corresponding declaration. As a result, the project output now contains the additional resources from the specified project location, as expected.

We should note that only the parent POM contains the plugin declaration and configuration whilst the child projects just reference this, as needed.

The child projects are free to modify the inherited configuration, if required.

5. Core Plugins

There are some Maven core plugins that are used as part of the build lifecycle, by default. For example, the clean and compiler plugins don't need to be declared explicitly.

We can, however, explicitly declare and configure these in the pluginManagement element in the POM. The main difference is that the core plugin configuration takes effect automatically without any reference in the child projects.

Let's try this out by adding the compiler plugin to the familiar pluginManagement section:

<pluginManagement>
    ....
    <plugin>
        <groupId>org.apache.maven.plugins</groupId>
        <artifactId>maven-compiler-plugin</artifactId>
        <version>3.8.1</version>
        <configuration>
            <source>1.8</source>
            <target>1.8</target>
        </configuration>
    </plugin>
    ....
</pluginManagement>

Here, we've locked down the plugin version and configured it to use Java 8 to build the project. However, there is no additional plugin declaration required in any child projects. The build framework activates this configuration by default. Therefore, this configuration means that the build must use Java 8 to compile this project across all modules.

Overall, it can be good practice to explicitly declare the configuration and lockdown the versions for any plugins required in a multi-module project. Consequently, different child projects can inherit only the required plugin configurations from the parent POM and apply them as needed.

This eliminates duplicate declarations, simplifies the POM files, and improves build reproducibility.

6. Conclusion

In this article, we've seen how to centralize and manage the Maven plugins required for building a project.

First, we looked at plugins and their usage in the project POM. Then we took a more detailed look at the Maven plugin management mechanism and how this helps to reduce duplication and improve the maintainability of the build configuration.

As always, the example code is available over on GitHub.

The post Plugin Management in Maven first appeared on Baeldung.
       

Creating a Self-Signed Certificate With OpenSSL

$
0
0

1. Overview

OpenSSL is an open-source command-line tool that allows users to perform various SSL-related tasks.

In this article, we'll learn how to create a self-signed certificate with OpenSSL.

2. Creating a Private Key

First, we'll create a private key. A private key helps to enable encryption and is the most important component of our certificate.

Let's create a password-protected, 2048-bit RSA private key (domain.key) with the openssl command:

openssl genrsa -des3 -out domain.key 2048

Enter a password when prompted. The output will look like:

Generating RSA private key, 2048 bit long modulus (2 primes)
.....................+++++
.........+++++
e is 65537 (0x010001)
Enter pass phrase for domain.key:
Verifying - Enter pass phrase for domain.key:

If we want our private key unencrypted, we can simply remove the -des3 option from the command.

3. Creating a Certificate Signing Request

If we want our certificate signed, we need a certificate signing request (CSR). The CSR includes the public key and some additional information (such as organization and country).

Let's create a CSR (domain.csr) from our existing private key:

openssl req -key domain.key -new -out domain.csr

We'll enter our private key password and some CSR information to complete the process. The output will look like:

Enter pass phrase for domain.key:
You are about to be asked to enter information that will be incorporated
into your certificate request.
What you are about to enter is what is called a Distinguished Name or a DN.
There are quite a few fields but you can leave some blank
For some fields there will be a default value,
If you enter '.', the field will be left blank.
-----
Country Name (2 letter code) [AU]:AU
State or Province Name (full name) [Some-State]:stateA                        
Locality Name (eg, city) []:cityA
Organization Name (eg, company) [Internet Widgits Pty Ltd]:companyA
Organizational Unit Name (eg, section) []:sectionA
Common Name (e.g. server FQDN or YOUR name) []:domain
Email Address []:email@email.com
Please enter the following 'extra' attributes
to be sent with your certificate request
A challenge password []:
An optional company name []:

An important field is “Common Name”, which should be the exact Fully Qualified Domain Name (FQDN) of our domain.

A challenge password” and “An optional company name” can be left empty.

We can also create both the private key and CSR with a single command:

openssl req -newkey rsa:2048 -keyout domain.key -out domain.csr

If we want our private key unencrypted, we can add the -nodes option:

openssl req -newkey rsa:2048 -nodes -keyout domain.key -out domain.csr

4. Creating a Self-Signed Certificate

A self-signed certificate is a certificate that is signed with its own private key. It can be used to encrypt data just as well as CA-signed certificates, but our users will be shown a warning that says the certificate is not trusted.

Let's create a self-signed certificate (domain.crt) with our existing private key and CSR:

openssl x509 -signkey domain.key -in domain.csr -req -days 365 -out domain.crt

The -days option specifies the number of days that the certificate will be valid.

We can create a self-signed certificate with just a private key:

openssl req -key domain.key -new -x509 -days 365 -out domain.crt

This command will create a temporary CSR. We still have the CSR information prompt, of course.

We can even create a private key and a self-signed certificate with just a single command:

openssl req -newkey rsa:2048 -keyout domain.key -x509 -days 365 -out domain.crt

5. Creating a CA-Signed Certificate With Our Own CA

We can be our own certificate authority (CA) by creating a self-signed root CA certificate, then install it as a trusted certificate in the local browser.

5.1. Create a Self-Signed Root CA

Let's create a private key (rootCA.key) and a self-signed root CA certificate (rootCA.crt) from the command line:

openssl req -x509 -sha256 -days 1825 -newkey rsa:2048 -keyout rootCA.key -out rootCA.crt

5.2. Sign Our CSR With Root CA

First, we'll create a configuration text-file (domain.ext) with the following content:

authorityKeyIdentifier=keyid,issuer
basicConstraints=CA:FALSE
subjectAltName = @alt_names
[alt_names]
DNS.1 = domain

The “DNS.1” field should be the domain of our website.

Then, we can sign our CSR (domain.csr) with the root CA certificate and its private key:

openssl x509 -req -CA rootCA.crt -CAkey rootCA.key -in domain.csr -out domain.crt -days 365 -CAcreateserial -extfile domain.ext

As a result, the CA-signed certificate will be in the domain.crt file.

6. View Certificates

We can use the openssl command to view the contents of our certificate in plain text:

openssl x509 -text -noout -in domain.crt

The output will look like:

Certificate:
    Data:
        Version: 1 (0x0)
        Serial Number:
            64:1a:ad:0f:83:0f:21:33:ff:ac:9e:e6:a5:ec:28:95:b6:e8:8a:f4
        Signature Algorithm: sha256WithRSAEncryption
        Issuer: C = AU, ST = stateA, L = cityA, O = companyA, OU = sectionA, CN = domain, emailAddress = email@email.com
        Validity
            Not Before: Jul 12 07:18:18 2021 GMT
            Not After : Jul 12 07:18:18 2022 GMT
        Subject: C = AU, ST = stateA, L = cityA, O = companyA, OU = sectionA, CN = domain, emailAddress = email@email.com
        Subject Public Key Info:
            Public Key Algorithm: rsaEncryption
                RSA Public-Key: (2048 bit)
                Modulus:
                    00:a2:6a:2e:a2:17:68:bd:83:a1:17:87:d8:9c:56:
                    ab:ac:1f:1e:d3:32:b2:91:4d:8e:fe:4f:9c:bf:54:
                    aa:a2:02:8a:bc:14:7c:3d:02:15:a9:df:d5:1b:78:
                    17:ff:82:6b:af:f2:21:36:a5:ad:1b:6d:67:6a:16:
                    26:f2:a9:2f:a8:b0:9a:44:f9:72:de:7a:a0:0a:1f:
                    dc:67:b0:4d:a7:f4:ea:bd:0e:83:7e:d2:ea:15:21:
                    6d:8d:18:65:ed:f8:cc:6a:7f:83:98:e2:a4:f4:d6:
                    00:b6:ed:69:95:4e:0d:59:ee:e8:3f:e7:5a:63:24:
                    98:d1:4b:a5:c9:14:a5:7d:ef:06:78:2e:08:25:3c:
                    fd:05:0c:67:ce:70:5d:34:9b:c4:12:e6:e3:b1:04:
                    6a:db:db:e9:47:31:77:80:4f:09:5e:25:73:75:e4:
                    57:36:34:f8:c3:ed:a2:21:57:0e:e3:c1:5c:fc:d9:
                    f2:a3:b1:d9:d9:4f:e2:3e:ad:21:77:20:98:ed:15:
                    39:99:1b:7e:29:60:14:eb:76:8b:8b:72:16:b1:68:
                    5c:10:51:27:fa:41:49:c5:b7:c4:79:69:5e:28:a2:
                    c3:55:ac:e8:05:0f:4b:4a:bd:4b:2c:8b:7d:92:b0:
                    2d:b3:1a:de:9f:1a:5b:46:65:c6:33:b2:2e:7a:0c:
                    b0:2f
                Exponent: 65537 (0x10001)
    Signature Algorithm: sha256WithRSAEncryption
         58:c0:cd:df:4f:c1:0b:5c:50:09:1b:a5:1f:6a:b9:9a:7d:07:
         51:ca:43:ec:ba:ab:67:69:c1:eb:cd:63:09:33:42:8f:16:fe:
         6f:05:ee:2c:61:15:80:85:0e:7a:e8:b2:62:ec:b7:15:10:3c:
         7d:fa:60:7f:ee:ee:f8:dc:70:6c:6d:b9:fe:ab:79:5d:1f:73:
         7a:6a:e1:1f:6e:c9:a0:ae:30:b2:a8:ee:c8:94:81:8e:9b:71:
         db:c7:8f:40:d6:2d:4d:f7:b4:d3:cf:32:04:e5:69:d7:31:9c:
         ea:a0:0a:56:79:fa:f9:a3:fe:c9:3e:ff:54:1c:ec:96:1c:88:
         e5:02:d3:d0:da:27:f6:8f:b4:97:09:10:33:32:87:a8:1f:08:
         dc:bc:4c:be:6b:cc:b9:0e:cf:18:12:55:17:44:47:2e:9c:99:
         99:3c:96:60:12:c6:fe:b0:ee:01:97:54:20:b0:13:51:4f:ee:
         1d:c0:3d:1a:30:aa:79:30:12:e2:4f:af:13:85:f8:c8:1e:f5:
         28:7c:55:66:66:10:f4:0a:69:c0:55:8a:9a:c7:eb:ec:15:f0:
         ef:bd:c1:d2:47:43:34:72:71:d2:c3:ff:f0:a3:c1:2c:63:56:
         f2:f5:cf:91:ec:a1:c0:1f:5d:af:c0:8e:7a:02:fe:08:ba:21:
         68:f2:dd:bd

7. Convert Certificate Formats

Our certificate (domain.crt) is an X.509 certificate that is ASCII PEM-encoded. We can use OpenSSL to convert it to other formats for multi-purpose use.

7.1. Convert PEM to DER

The DER format is usually used with Java. Let's convert our PEM-encoded certificate to a DER-encoded certificate:

openssl x509 -in domain.crt -outform der -out domain.der

7.2. Convert PEM to PKCS12

PKCS12 files, also known as PFX files, are usually used for importing and exporting certificate chains in Microsoft IIS.

Use the following command to take our private key and certificate, then combine them into a PKCS12 file:

openssl pkcs12 -inkey domain.key -in domain.crt -export -out domain.pfx

8. Conclusion

In summary, we've learned how to create a self-signed certificate with OpenSSL from scratch, view this certificate, and convert it to other formats. I hope these things help with your work.

The post Creating a Self-Signed Certificate With OpenSSL first appeared on Baeldung.
       

Guava’s Futures and ListenableFuture

$
0
0

1. Introduction

Guava provides us with ListenableFuture with an enriched API over the default Java Future. Let's see how we can use this to our advantage.

2. Future, ListenableFuture and Futures

Let's have a brief look at what these different classes are and how they are related to each other.

2.1. Future

Since Java 5, we can use java.util.concurrent.Future to represent asynchronous tasks.

A Future allows us access to the result of a task that has already been completed or might complete in the future, along with support for canceling them.

2.2. ListenableFuture

One lacking feature when using java.util.concurrent.Future is the ability to add listeners to run on completion, which is a common feature provided by most popular asynchronous frameworks.

Guava solves this problem by allowing us to attach listeners to its com.google.common.util.concurrent.ListenableFuture.

2.3. Futures

Guava provides us with the convenience class com.google.common.util.concurrent.Futures to make it easier to work with their ListenableFuture.

This class provides various ways of interacting with ListenableFuture, among which is the support for adding success/failure callbacks and allowing us to coordinate multiple futures with aggregations or transformations.

3. Simple Usage

Let's now see how we can use ListenableFuture in its simplest ways; creating and adding callbacks.

3.1. Creating ListenableFuture

The simplest way we can obtain a ListenableFuture is by submitting a task to a ListeningExecutorService (much like how we would use a normal ExecutorService to obtain a normal Future):

ExecutorService execService = Executors.newSingleThreadExecutor();
ListeningExecutorService lExecService = MoreExecutors.listeningDecorator(execService);
ListenableFuture<Integer> asyncTask = lExecService.submit(() -> {
    TimeUnit.MILLISECONDS.sleep(500); // long running task
    return 5;
});

Notice how we use the MoreExecutors class to decorate our ExecutorService as a ListeningExecutorService. We can refer to Thread Pool's Implementation in Guava to learn more about MoreExecutors.

If we already have an API that returns a Future and we need to convert it to ListenableFuture, this is easily done by initializing its concrete implementation ListenableFutureTask:

// old api
public FutureTask<String> fetchConfigTask(String configKey) {
    return new FutureTask<>(() -> {
        TimeUnit.MILLISECONDS.sleep(500);
        return String.format("%s.%d", configKey, new Random().nextInt(Integer.MAX_VALUE));
    });
}
// new api
public ListenableFutureTask<String> fetchConfigListenableTask(String configKey) {
    return ListenableFutureTask.create(() -> {
        TimeUnit.MILLISECONDS.sleep(500);
        return String.format("%s.%d", configKey, new Random().nextInt(Integer.MAX_VALUE));
    });
}

We need to be aware that these tasks won't run unless we submit them to an Executor. Interacting directly with ListenableFutureTask is not common usage and is done only in rare scenarios (ex: implementing our own ExecutorService). Refer to Guava's AbstractListeningExecutorService for practical usage.

We can also use com.google.common.util.concurrent.SettableFuture if our asynchronous task can't use the ListeningExecutorService or the provided Futures utility methods, and we need to set the future value manually. For more complex usage, we can also consider com.google.common.util.concurrent.AbstractFuture.

3.2. Adding Listeners/Callbacks

One way we can add a listener to a ListenableFuture is by registering a callback with Futures.addCallback(), providing us access to the result or exception when success or failure occurs:

Executor listeningExecutor = Executors.newSingleThreadExecutor();
ListenableFuture<Integer> asyncTask = new ListenableFutureService().succeedingTask()
Futures.addCallback(asyncTask, new FutureCallback<Integer>() {
    @Override
    public void onSuccess(Integer result) {
        // do on success
    }
    @Override
    public void onFailure(Throwable t) {
        // do on failure
    }
}, listeningExecutor);

We can also add a listener by adding it directly to the ListenableFuture. Note that this listener will run when the future completes either successfully or exceptionally. Also, note that we don't have access to the result of the asynchronous task:

Executor listeningExecutor = Executors.newSingleThreadExecutor();
int nextTask = 1;
Set<Integer> runningTasks = ConcurrentHashMap.newKeySet();
runningTasks.add(nextTask);
ListenableFuture<Integer> asyncTask = new ListenableFutureService().succeedingTask()
asyncTask.addListener(() -> runningTasks.remove(nextTask), listeningExecutor);

4. Complex Usage

Let's now see how we can use these futures in more complex scenarios.

4.1. Fan-In

We may sometimes need to invoke multiple asynchronous tasks and collect their results, usually called a fan-in operation.

Guava provides us with two ways of doing this. However, we should be careful in selecting the correct method depending on our requirements. Let's assume we need to coordinate the following asynchronous tasks:

ListenableFuture<String> task1 = service.fetchConfig("config.0");
ListenableFuture<String> task2 = service.fetchConfig("config.1");
ListenableFuture<String> task3 = service.fetchConfig("config.2");

One way of fanning-in multiple futures is by the use of Futures.allAsList() method. This allows us to collect results of all futures if all of them succeed, in the order of the provided futures. If either one of these futures fails, then the whole result is a failed future:

ListenableFuture<List<String>> configsTask = Futures.allAsList(task1, task2, task3);
Futures.addCallback(configsTask, new FutureCallback<List<String>>() {
    @Override
    public void onSuccess(@Nullable List<String> configResults) {
        // do on all futures success
    }
    @Override
    public void onFailure(Throwable t) {
        // handle on at least one failure
    }
}, someExecutor);

If we need to collect results of all asynchronous tasks, regardless of whether they failed or not, we can use Futures.successfulAsList(). This will return a list whose results will have the same order as the tasks passed into the argument, and the failed tasks will have null assigned to their respective positions in the list:

ListenableFuture<List<String>> configsTask = Futures.successfulAsList(task1, task2, task3);
Futures.addCallback(configsTask, new FutureCallback<List<String>>() {
    @Override
    public void onSuccess(@Nullable List<String> configResults) {
        // handle results. If task2 failed, then configResults.get(1) == null
    }
    @Override
    public void onFailure(Throwable t) {
        // handle failure
    }
}, listeningExecutor);

We should be careful in the above usage that if the future task normally returns null on success, it will be indistinguishable from a failed task (which also sets the result as null).

4.2. Fan-In with Combiners

If we have a requirement to coordinate multiple futures that return different results, the above solution may not suffice. In this case, we can use the combiner variants of the fan-in operations to coordinate this mix of futures.

Similar to the simple fan-in operations, Guava provides us with two variants; one that succeeds when all tasks complete successfully and one that succeeds even if some tasks fail using the Futures.whenAllSucceed() and Futures.whenAllComplete() methods, respectively.

Let's see how we can use Futures.whenAllSucceed() to combine different results types from multiple futures:

ListenableFuture<Integer> cartIdTask = service.getCartId();
ListenableFuture<String> customerNameTask = service.getCustomerName();
ListenableFuture<List<String>> cartItemsTask = service.getCartItems();
ListenableFuture<CartInfo> cartInfoTask = Futures.whenAllSucceed(cartIdTask, customerNameTask, cartItemsTask)
    .call(() -> {
        int cartId = Futures.getDone(cartIdTask);
        String customerName = Futures.getDone(customerNameTask);
        List<String> cartItems = Futures.getDone(cartItemsTask);
        return new CartInfo(cartId, customerName, cartItems);
    }, someExecutor);
Futures.addCallback(cartInfoTask, new FutureCallback<CartInfo>() {
    @Override
    public void onSuccess(@Nullable CartInfo result) {
        //handle on all success and combination success
    }
    @Override
    public void onFailure(Throwable t) {
        //handle on either task fail or combination failed
    }
}, listeningExecService);

If we need to allow some tasks to fail, we can use Futures.whenAllComplete(). While the semantics are mostly similar to the above, we should be aware that the failed futures will throw an ExecutionException when Futures.getDone() is called on them.

4.3. Transformations

Sometimes we need to convert the result of a future once successful. Guava provides us with two ways to do so with Futures.transform() and Futures.lazyTransform().

Let's see how we can use Futures.transform() to transform the result of a future. This can be used as long as the transformation computation is not heavy:

ListenableFuture<List<String>> cartItemsTask = service.getCartItems();
Function<List<String>, Integer> itemCountFunc = cartItems -> {
    assertNotNull(cartItems);
    return cartItems.size();
};
ListenableFuture<Integer> itemCountTask = Futures.transform(cartItemsTask, itemCountFunc, listenExecService);

We can also use Futures.lazyTransform() to apply a transformation function to a java.util.concurrent.Future. We need to keep in mind that this option doesn't return a ListenableFuture but a normal java.util.concurrent.Future and that the transformation function applies every time get() is invoked on the resulting future.

4.4. Chaining Futures

We may come across situations where our futures need to call other futures. In such cases, Guava provides us with async() variants to safely chain these futures to execute one after the other.

Let's see how we can use Futures.submitAsync() to call a future from inside the Callable that is submitted:

AsyncCallable<String> asyncConfigTask = () -> {
    ListenableFuture<String> configTask = service.fetchConfig("config.a");
    TimeUnit.MILLISECONDS.sleep(500); //some long running task
    return configTask;
};
ListenableFuture<String> configTask = Futures.submitAsync(asyncConfigTask, executor);

In case we want true chaining, where the result of one future is fed into the computation of another future, we can use Futures.transformAsync():

ListenableFuture<String> usernameTask = service.generateUsername("john");
AsyncFunction<String, String> passwordFunc = username -> {
    ListenableFuture<String> generatePasswordTask = service.generatePassword(username);
    TimeUnit.MILLISECONDS.sleep(500); // some long running task
    return generatePasswordTask;
};
ListenableFuture<String> passwordTask = Futures.transformAsync(usernameTask, passwordFunc, executor);

Guava also provides us with Futures.scheduleAsync() and Futures.catchingAsync() to submit a scheduled task and to provide fallback tasks on error recovery, respectively. While they cater to different scenarios, we won't discuss them since they are similar to the other async() calls.

5. Usage Dos and Don'ts

Let's now investigate some common pitfalls we may encounter when working with futures and how to avoid them.

5.1. Working vs. Listening Executors

It is important to understand the difference between the working executor and the listening executor when using Guava futures. For example, let's say we have an asynchronous task to fetch configs:

public ListenableFuture<String> fetchConfig(String configKey) {
    return lExecService.submit(() -> {
        TimeUnit.MILLISECONDS.sleep(500);
        return String.format("%s.%d", configKey, new Random().nextInt(Integer.MAX_VALUE));
    });
}

Let's also say that we want to attach a listener to the above future:

ListenableFuture<String> configsTask = service.fetchConfig("config.0");
Futures.addCallback(configsTask, someListener, listeningExecutor);

Notice that the lExecService here is the executor that is running our asynchronous task, while the listeningExecutor is the executor on which our listener is invoked.

As seen above, we should always consider separating these two executors to avoid scenarios where our listeners and workers are competing for the same thread pool resources. Sharing the same executor may cause our heavy-duty tasks to starve the listener executions. Or a badly written heavyweight listener ends up blocking our important heavy-duty tasks.

5.2. Be Careful With directExecutor()

While we can use MoreExecutors.directExecutor() and MoreExecutors.newDirectExecutorService() in unit testing to make it easier to handle asynchronous executions, we should be careful using them in production code.

When we obtain executors from the above methods, any tasks that we submit to it, be it heavyweight or listeners, will be executed on the current thread. This can be dangerous if the current execution context is one that requires high throughput.

For example, using a directExecutor and submitting a heavyweight task to it in the UI thread will automatically block our UI thread.

We could also face a scenario where our listener ends up slowing down all our other listeners (even the ones that aren't involved with directExecutor). This is because Guava executes all listeners in a while loop in their respective Executors, but the directExecutor will cause the listener to run in the same thread as the while loop.

5.3. Nesting Futures is Bad

When working with chained futures, we should be careful not to call one from inside another future in such a way that it creates nested futures:

public ListenableFuture<String> generatePassword(String username) {
    return lExecService.submit(() -> {
        TimeUnit.MILLISECONDS.sleep(500);
        return username + "123";
    });
}
String firstName = "john";
ListenableFuture<ListenableFuture<String>> badTask = lExecService.submit(() -> {
    final String username = firstName.replaceAll("[^a-zA-Z]+", "")
        .concat("@service.com");
    return generatePassword(username);
});

If we ever see code that has ListenableFuture<ListenableFuture<V>>, then we should know that this is a badly written future because there is a chance that cancellation and completion of the outer future may race, and the cancellation may not propagate to the inner future.

If we see the above scenario, we should always use the Futures.async() variants to safely unwrap these chained futures in a connected fashion.

5.4. Be Careful With JdkFutureAdapters.listenInPoolThread()

Guava recommends that the best way we can leverage its ListenableFuture is by converting all our code that uses Future to ListenableFuture. 

If this conversion is not feasible in some scenarios, Guava provides us with adapters to do this using the  JdkFutureAdapters.listenInPoolThread() overrides. While this may seem helpful, Guava warns us that these are heavyweight adapters and should be avoided where possible.

6. Conclusion

In this article, we have seen how we can use Guava's ListenableFuture to enrich our usage of futures and how to use the Futures API to make it easier to work with these futures.

We have also seen some common errors that we may make when working with these futures and the provided executors.

As always, the full source code with our examples is available over on GitHub.

The post Guava’s Futures and ListenableFuture first appeared on Baeldung.
       

Convert a String to Camel Case

$
0
0

1. Overview

Camel case and title case are commonly used as identifiers for fields and types. We may wish to convert text into this format.

This can be achieved either by writing custom code or by making use of third-party libraries.

In this tutorial, we'll look at how to write some custom string conversions to camel case, and we'll explore some third-party library features that can help us with that task.

2. Java Solutions

Camel case allows us to join multiple words by removing whitespace and using capital letters to show word boundaries. 

There are two types:

  • Lower camel case, where the first character of the first word is in lowercase
  • Upper camel case, also known as title case, where the first character of the first word is in uppercase:
thisIsLowerCamelCase
ThisIsLowerCamelCase

In this tutorial, we'll focus on conversion to lower camel case, though these techniques are easily adapted to suit either.

2.1. Regular Expression (Regex)

We can use regular expressions to split our string containing words into an array:

String[] words = text.split("[\\W_]+");

This splits the given string at any character that's not part of a word. The underscore is normally considered a word character in regular expressions. Camel case does not include underscore, so we've added that to the delimiter expression.

When we have the separate words, we can modify their capitalization and reassemble them as camel case:

StringBuilder builder = new StringBuilder();
for (int i = 0; i < words.length; i++) {
    String word = words[i];
    if (i == 0) {
        word = word.isEmpty() ? word : word.toLowerCase();
    } else {
        word = word.isEmpty() ? word : Character.toUpperCase(word.charAt(0)) + word.substring(1).toLowerCase();      
    }
    builder.append(word);
}
return builder.toString();

Here, we convert the first string/word in the array to lowercase. For every other word in the array, we convert the first character to uppercase and the rest to lowercase.

Let's test this method using white space as the non-word characters:

assertThat(toCamelCaseByRegex("THIS STRING SHOULD BE IN CAMEL CASE"))
  .isEqualTo("thisStringShouldBeInCamelCase");

This solution is straightforward, but it requires a few copies of the original text in order to calculate the answer. First, it creates a list of the words, then creates copies of those words in various capitalized or lowercase formats to compose the final string. This may consume a lot of memory with very large input.

2.2. Iterating Through the String

We could replace the above algorithm with a loop that works out the correct case of each character as it passes through the original string. This skips any delimiters and writes one character at a time to the StringBuilder.

First, we need to track the state of the conversion:

boolean shouldConvertNextCharToLower = true;

Then we iterate through the source text, skipping or appropriately capitalizing each character:

for (int i = 0; i < text.length(); i++) {
    char currentChar = text.charAt(i);
    if (currentChar == delimiter) {
        shouldConvertNextCharToLower = false;
    } else if (shouldConvertNextCharToLower) {
        builder.append(Character.toLowerCase(currentChar));
    } else {
        builder.append(Character.toUpperCase(currentChar));
        shouldConvertNextCharToLower = true;
    }
}
return builder.toString();

The delimiter character here is a char that represents the expected non-word character.

Let's try this solution using space as the delimiter:

assertThat(toCamelCaseByIteration("THIS STRING SHOULD BE IN CAMEL CASE", ' '))
  .isEqualTo("thisStringShouldBeInCamelCase");

We can also try it with an underscore delimiter:

assertThat(toCamelCaseByIteration("THIS_STRING_SHOULD_BE_IN_CAMEL_CASE", '_'))
  .isEqualTo("thisStringShouldBeInCamelCase");

3. Using Third-Party Libraries

We may prefer to use third-party library string functions, rather than write our own.

3.1. Apache Commons Text

To use Apache Commons Text, we need to add it to our project:

<dependency>
    <groupId>org.apache.commons</groupId>
    <artifactId>commons-text</artifactId>
    <version>1.9</version>
</dependency>

This library provides a toCamelCase method in CaseUtils:

String camelCase = CaseUtils.toCamelCase(text, false, delimiter);

Let's try it out:

assertThat(CaseUtils.toCamelCase("THIS STRING SHOULD BE IN CAMEL CASE", false, ' '))
  .isEqualTo("thisStringShouldBeInCamelCase");

In order to turn the string to title case or upper camel case, we need to pass true into the toCamelCase method:

String camelCase = CaseUtils.toCamelCase(text, true, delimiter);

Let's try it out:

assertThat(CaseUtils.toCamelCase("THIS STRING SHOULD BE IN CAMEL CASE", true, ' '))
  .isEqualTo("ThisStringShouldBeInCamelCase");

3.2. Guava

With a little pre-processing, we can convert a string to camel via Guava.

To use Guava, let's add its dependency to our project:

<dependency>
      <groupId>com.google.guava</groupId>
      <artifactId>guava</artifactId>
      <version>28.1-jre</version>
</dependency>

Guava has a utility class, CaseFormat, for format conversion:

String camelCase = CaseFormat.UPPER_UNDERSCORE.to(CaseFormat.LOWER_CAMEL, "THIS_STRING_SHOULD_BE_IN_CAMEL_CASE");

This converts a given uppercase string separated by underscores to lower camel case. Let's see it:

assertThat(CaseFormat.UPPER_UNDERSCORE.to(CaseFormat.LOWER_CAMEL, "THIS_STRING_SHOULD_BE_IN_CAMEL_CASE"))
  .isEqualTo("thisStringShouldBeInCamelCase");

This is fine if our string is already in this format. However, if we wish to use a different delimiter and handle mixed cases, we'll need to pre-process our input:

String toUpperUnderscore = "This string should Be in camel Case"
  .toUpperCase()
  .replaceAll(' ', "_");

First, we convert the given string to uppercase. Then, we replace all the separators with underscores. The resulting format is the equivalent of Guava's CaseFormat.UPPER_UNDERSCORE. Now we can use Guava to produce the camel case version:

assertThat(toCamelCaseUsingGuava("THIS STRING SHOULD BE IN CAMEL CASE", " "))
  .isEqualTo("thisStringShouldBeInCamelCase");

4. Conclusion

In this tutorial, we've learned how to convert a string to camel case.

First, we built an algorithm to split the string into words. Then we built an algorithm that iterated over each character.

Finally, we looked at how to use some third-party libraries to achieve the result. Apache Commons Text was a close match, and Guava could help us after some pre-processing.

As usual, the complete source code is available over on GitHub.

The post Convert a String to Camel Case first appeared on Baeldung.
       

Why Missing Annotations Don’t Cause ClassNotFoundException

$
0
0

1. Overview

In this tutorial, we're going to get familiar with a seemingly bizarre feature in the Java Programming language: Missing annotations won't cause any exceptions at runtime.

Then, we'll dig deeper to see what reasons and rules govern this behavior and what are the exceptions for such rules.

2. A Quick Refresher

Let's start with a familiar Java example. There is class A, and then there's class B, which depends on A:

public class A {
}
public class B {
    public static void main(String[] args) {
        System.out.println(new A());
    }
}

Now, if we compile these classes and run the compiled B, it'll print a message on the console for us:

>> javac A.java
>> javac B.java
>> java B
A@d716361

However, if we remove the compiled A.class file and re-run class B, we will see a NoClassDefFoundError caused by a ClassNotFoundException:

>> rm A.class
>> java B
Exception in thread "main" java.lang.NoClassDefFoundError: A
        at B.main(B.java:3)
Caused by: java.lang.ClassNotFoundException: A
        at java.base/jdk.internal.loader.BuiltinClassLoader.loadClass(BuiltinClassLoader.java:606)
        at java.base/jdk.internal.loader.ClassLoaders$AppClassLoader.loadClass(ClassLoaders.java:168)
        at java.base/java.lang.ClassLoader.loadClass(ClassLoader.java:522)
        ... 1 more

This happens because the classloader couldn't find the class file at runtime, even though it was there during compilation. That's the normal behavior many Java developers expect.

3. Missing Annotations

Now, let's see what happens with annotations under the same circumstances. In order to do that, we're going to change the A class to be an annotation:

@Retention(RetentionPolicy.RUNTIME)
public @interface A {
}

As shown above, Java will retain the annotation information at runtime. After that, it's time to annotate the class B with A:

@A
public class B {
    public static void main(String[] args) {
        System.out.println("It worked!");
    }
}

Next, let's compile and run these classes:

>> javac A.java
>> javac B.java
>> java B
It worked!

So, we see that B successfully prints its message on the console, which makes sense, as everything is compiled and wired together so nicely.

Now, let's delete the class file for A:

>> rm A.class
>> java B
It worked!

As shown above, even though the annotation class file is missing, the annotated class runs without any exceptions.

3.1. Annotation with Class Tokens

To make it even more interesting, let's introduce another annotation that has a Class<?> attribute:

@Retention(RetentionPolicy.RUNTIME)
public @interface C {
    Class<?> value();
}

As shown above, this annotation has an attribute named value with the return type of Class<?>. As an argument for that attribute, let's add another empty class named D:

public class D {
}

Now, we're going to annotate the B class with this new annotation:

@A
@C(D.class)
public class B {
    public static void main(String[] args) {
        System.out.println("It worked!");
    }
}

When all class files are present, everything should work fine. However, what happens when we delete only the D class file and don't touch the others? Let's find out:

>> rm D.class
>> java B
It worked!

As shown above, despite the absence of D at runtime, everything is still working! Therefore, in addition to annotations, the referenced class tokens from attributes are not required to be present at runtime either.

3.2. The Java Language Specification

So, we saw that some annotations with runtime retention were missing at runtime but the annotated class was running perfectly. As unexpected as it might sound, this behavior is actually completely fine according to the Java Language Specification, §9.6.4.2:

Annotations may be present only in source code, or they may be present in the binary form of a class or interface. An annotation that is present in the binary form may or may not be available at run time via the reflection libraries of the Java SE Platform.

Moreover, the JLS §13.5.7 entry also states:

Adding or removing annotations has no effect on the correct linkage of the binary representations of programs in the Java programming language.

The bottom line is, the runtime does not throw exceptions for missing annotations, because the JLS allows it.

3.3. Accessing the Missing Annotation

Let's change the B class in a way that it retrieves the A information reflectively:

@A
public class B {
    public static void main(String[] args) {
        System.out.println(A.class.getSimpleName());
    }
}

If we compile and run them, everything would fine:

>> javac A.java
>> javac B.java
>> java B
A

Now, if we remove the A class file and run B, we'll see the same NoClassDefFoundError caused by a ClassNotFoundException:

Exception in thread "main" java.lang.NoClassDefFoundError: A
        at B.main(B.java:5)
Caused by: java.lang.ClassNotFoundException: A
        at java.base/jdk.internal.loader.BuiltinClassLoader.loadClass(BuiltinClassLoader.java:606)
        at java.base/jdk.internal.loader.ClassLoaders$AppClassLoader.loadClass(ClassLoaders.java:168)
        at java.base/java.lang.ClassLoader.loadClass(ClassLoader.java:522)
        ... 1 more

According to JLS, the annotation does not have to be available at runtime. However, when some other code reads that annotation and does something about it (like what we did), the annotation must be present at runtime. Otherwise, we would see a ClassNotFoundException.

4. Conclusion

In this article, we saw how some annotations can be absent at runtime, even though they're part of the binary representation of a class.

As usual, all the examples are available over on GitHub.

The post Why Missing Annotations Don’t Cause ClassNotFoundException first appeared on Baeldung.
       

Valid @SuppressWarnings Warning Names

$
0
0

1. Overview

In this tutorial, we'll take a look at the different warning names that work with the @SuppressWarnings Java annotation, which allows us to suppress compiler warnings. These warning names allow us to suppress particular warnings. The warning names available will depend on our IDE or Java compiler. The Eclipse IDE is our reference for this article.

2. Warning Names

Below is a list of valid warning names available in the @SuppressWarnings annotation:

  • all: this is sort of a wildcard that suppresses all warnings
  • boxing: suppresses warnings related to boxing/unboxing operations
  • unused: suppresses warnings of unused code
  • cast: suppresses warnings related to object cast operations
  • deprecation: suppresses warnings related to deprecation, such as a deprecated class or method
  • restriction: suppresses warnings related to the usage of discouraged or forbidden references
  • dep-ann: suppresses warnings relative to deprecated annotations
  • fallthrough: suppresses warnings related to missing break statements in switch statements
  • finally: suppresses warnings related to finally blocks that don't return
  • hiding: suppresses warnings relative to locals that hide variables
  • incomplete-switch: suppresses warnings relative to missing entries in a switch statement (enum case)
  • nls: suppresses warnings related to non-nls string literals
  • null: suppresses warnings related to null analysis
  • serial: suppresses warnings related to the missing serialVersionUID field, which is typically found in a Serializable class
  • static-access: suppresses warnings related to incorrect static variable access
  • synthetic-access: suppresses warnings related to unoptimized access from inner classes
  • unchecked: suppresses warnings related to unchecked operations
  • unqualified-field-access: suppresses warnings related to unqualified field access
  • javadoc: suppresses warnings related to Javadoc
  • rawtypes: suppresses warnings related to the usage of raw types
  • resource: suppresses warnings related to the usage of resources of type Closeable
  • super: suppresses warnings related to overriding a method without super invocations
  • sync-override: suppresses warnings due to missing synchronize when overriding a synchronized method

3. Using Warning Names

This section will show examples of the use of different warning names.

3.1. @SuppressWarnings(“unused”)

In the example below, the warning name suppresses the warning of the unusedVal in the method:

@SuppressWarnings("unused")
void suppressUnusedWarning() {
    int usedVal = 5;
    int unusedVal = 10;  // no warning here
    List<Integer> list = new ArrayList<>();
    list.add(usedVal);
}

3.2. @SuppressWarnings(“deprecated”)

In the example below, the warning name suppresses the warning of the usage of the @deprecated method:

@SuppressWarnings("deprecated")
void suppressDeprecatedWarning() {
    ClassWithSuppressWarningsNames cls = new ClassWithSuppressWarningsNames();
    cls.deprecatedMethod(); // no warning here
}
@Deprecated
String deprecatedMethod() {
    return "deprecated method";
}

3.3. @SuppressWarnings(“fallthrough”)

In the example below, the warning name suppresses the warning of the missing break statements — we've included them here, commented out, to show where we would otherwise get the warning:

@SuppressWarnings("fallthrough")
String suppressFallthroughWarning() {
    int day = 5;
    switch (day) {
        case 5:
            return "This is day 5";
//          break; // no warning here
        case 10:
            return "This is day 10";
//          break; // no warning here   
        default:
            return "This default day";
    }
}

3.4. @SuppressWarnings(“serial”)

This warning name is placed at the class level. In the example below, the warning name suppresses the warning of the missing serialVersionUID (which we've commented out) in a Serializable class:

@SuppressWarnings("serial")
public class ClassWithSuppressWarningsNames implements Serializable {
//    private static final long serialVersionUID = -1166032307853492833L; // no warning even though this is commented

4. Combining Multiple Warning Names

The @SuppressWarnings annotation expects an array of Strings, so we can combine multiple warning names:

@SuppressWarnings({"serial", "unchecked"})

5. Conclusion

This article provides a list of valid @SuppressWarnings warning names. As usual, all code samples shown in this tutorial are available over on GitHub.

The post Valid @SuppressWarnings Warning Names first appeared on Baeldung.
       

Significance of Getters and Setters in Java

$
0
0

1. Introduction

Getters and Setters play an important role in retrieving and updating the value of a variable outside the encapsulating class. A setter updates the value of a variable, while a getter reads the value of a variable.

In this tutorial, we'll discuss the problems of not using getters/setters, their significance, and common mistakes to avoid while implementing them in Java.

2. Life Without Getters and Setters in Java

Think about a situation when we want to change the state of an object based on some condition. How could we achieve that without a setter method?

  • Marking the variable as public, protected, or default
  • Changing the value using a dot (.) operator

Let's look at the consequences of doing this.

3. Accessing Variables Without Getters and Setters

First, for accessing the variables outside a class without getters/setters, we have to mark those as public, protected, or default. Thus, we're losing control over the data and compromising the fundamental OOP principle – encapsulation.

Second, since anyone can change the non-private fields from outside the class directly, we cannot achieve immutability.

Third, we cannot provide any conditional logic to the change of the variable. Let's consider we have a class Employee with a field retirementAge:

public class Employee {
    public String name;
    public int retirementAge;
// Constructor, but no getter/setter
}

Note that, here we've set the fields as public to enable access from outside the class Employee. Now, we need to change the retirementAge of an employee:

public class RetirementAgeModifier {
    private Employee employee = new Employee("John", 58);
    private void modifyRetirementAge(){
        employee.retirementAge=18;
    }
}

Here, any client of the Employee class can easily do what they want with the retirementAge field. There's no way to validate the change.

Fourth, how could we achieve read-only or write-only access to the fields from outside the class?

There come getters and setters to your rescue.

4. Significance of Getters and Setters in Java

Out of many, let's cover some of the most important benefits of using getters and setters:

  • It helps us achieve encapsulation which is used to hide the state of a structured data object inside a class, preventing unauthorized direct access to them
  • Achieve immutability by declaring the fields as private and using only getters
  • Getters and setters also allow additional functionalities like validation, error handling that could be added more easily in the future. Thus we can add conditional logic and provide behavior according to the needs
  • We can provide different access levels to the fields; for example, the get (read-access) may be public, while the set (write-access) could be protected
  • Control over setting the value of the property correctly
  • With getters and setters, we achieve one more key principle of OOP, i.e., abstraction, which is hiding implementation details so that no one can use the fields directly in other classes or modules

5. Avoiding Mistakes

Below are the most common mistakes to avoid while implementing getters and setters.

5.1. Using Getters and Setters With Public Variables

Public variables can be accessed outside the class using a dot (.) operator. So, there is no sense in using getters and setters for public variables:

public class Employee {
    public String name;
    public int retirementAge;
    public void setName(String name) {
        this.name = name;
    }
    public String getName() {
        return this.name;
    } 
    // getter/setter for retirementAge
}

As a rule of thumb, we need to always use the most restricted access modifiers based on the need to achieve encapsulation.

5.2. Assigning Object References Directly in the Setter Methods

When we assign object reference directly in the setter methods, both these references point to a single object in memory, so changes made using any of the reference variables are actually made on the same object:

public void setEmployee(Employee employee) {
    this.employee = employee;
}

However, we can copy all the elements from one object to another object using a deep copy. Due to this, the state of this object becomes independent of the existing (passed) employee object:

public void setEmployee(Employee employee) {
    this.employee.setName(employee.getName());
    this.employee.setRetirementAge(employee.getRetirementAge());
}

5.3. Returning Object References Directly From the Getter Methods

Similarly, if the getter method returns the reference of the object directly, anyone can use this reference from the outside code to change the state of the object:

public Employee getEmployee() {
    return this.employee;
}

Let's use this getEmployee() method and change the retirementAge:

private void modifyAge() {
    Employee employeeTwo = getEmployee();
    employeeTwo.setRetirementAge(65);
}

This leads to the unrecoverable loss of the original object.

So, instead of returning the reference from the getter method, we should return a copy of the object. One such way is as below:

public Employee getEmployee() {
    return new Employee(this.employee.getName(), this.employee.getRetirementAge());
}

6. Conclusion

In this tutorial, we discussed the pros and cons of using getters and setters in Java. We also discussed some common mistakes to be avoided while implementing getters and setters, and how to use those appropriately

The post Significance of Getters and Setters in Java first appeared on Baeldung.
       
Viewing all 4464 articles
Browse latest View live


<script src="https://jsc.adskeeper.com/r/s/rssing.com.1596347.js" async> </script>