Quantcast
Channel: Baeldung
Viewing all 4464 articles
Browse latest View live

Pub-Sub vs. Message Queues

$
0
0

1. Overview

In this tutorial, we'll look at the use of message queues and publishers/subscribers. These are common patterns used in distributed systems for two or more services to communicate with one another.

For this tutorial, all examples will be shown using the RabbitMQ message broker so first follow RabbitMQ's tutorial to get up and running locally. For a deeper dive on RabbitMQ check out our other tutorial.

Note: there are many alternatives to RabbitMQ that can be used for the same examples in this tutorial such as Kafka, Google Cloud Pub-Sub, and Amazon SQS to name but a few.

2. What are Message Queues?

Let's start by looking at message queues. Message queues consist of a publishing service and multiple consumer services that communicate via a queue. This communication is typically one way where the publisher will issue commands to the consumers. The publishing service will typically put a message on a queue or exchange and a single consumer service will consume this message and perform an action based on this.

Consider the following exchange:


From this, we can see a Publisher service that is putting a message ‘m n+1' onto the queue. In addition, we can also see multiple messages already in existence on the queue waiting to be consumed. On the right-hand side, we have 2 consuming services ‘A' and ‘B' that are listening to the queue for messages.

Let's now consider the same exchange after some time:


First, we can see that the Publisher's message has been pushed to the tail of the queue. Next, the important part to consider is the right-hand side of the image. We can see that consumer ‘A' has read the message ‘m 1' and, as such, it is no longer available in the queue for the other service ‘B' to consume.

2.1. Where to Use Message Queues

Message queues are often used where we want to delegate work from a service. In doing so, we want to ensure that the work is only executed one time.

Using message queues is popular in micro-service architectures and while developing cloud-based or serverless applications as it allows us to horizontally scale our app based on load.

For example, if there are many messages on the queue waiting to be processed, we can spin up multiple consumer services which listen to the same message queue and handle the influx in messages. Once the messages have been handled, the services can then be turned off when traffic is minimal to save on running costs.

2.2. Example Using RabbitMQ

Let's go through an example for clarity. Our example will take the form of a pizza restaurant. Imagine people are able to order pizzas via an app and chefs at the pizzeria will pick up orders as they come in. In this example, the customer is our publisher and the chef(s) are our consumers.

First, let's define our queue:

private static final String MESSAGE_QUEUE = "pizza-message-queue";
@Bean
public Queue queue() {
    return new Queue(MESSAGE_QUEUE);
}

Using Spring AMQP, we have created a queue named “pizza-message-queue”. Next, let's define our publisher that will post messages to our newly defined queue:

public class Publisher {
    private RabbitTemplate rabbitTemplate;
    private String queue;
    public Publisher(RabbitTemplate rabbitTemplate, String queue) {
        this.rabbitTemplate = rabbitTemplate;
        this.queue = queue;
    }
    @PostConstruct
    public void postMessages() {
        rabbitTemplate.convertAndSend(queue, "1 Pepperoni");
        rabbitTemplate.convertAndSend(queue, "3 Margarita");
        rabbitTemplate.convertAndSend(queue, "1 Ham and Pineapple (yuck)");
    }
}

Spring AMQP will create a RabbitTemplate bean for us that has a connection to our RabbitMQ exchange to reduce configuration overhead. Our Publisher makes use of this by sending 3 messages to our queue.

Now that our pizza orders are in we need a separate consumer application. This will act as our chef in the example and read messages:

public class Consumer {
    public void receiveOrder(String message) {
        System.out.printf("Order received: %s%n", message);
    }
}

Let's now create a MessageListenerAdapter for our queue that will call our Consumer's receiveOrder method using reflection:

@Bean
public SimpleMessageListenerContainer container(ConnectionFactory connectionFactory, MessageListenerAdapter listenerAdapter) {
    SimpleMessageListenerContainer container = new SimpleMessageListenerContainer();
    container.setConnectionFactory(connectionFactory);
    container.setQueueNames(MESSAGE_QUEUE);
    container.setMessageListener(listenerAdapter);
    return container;
}
@Bean
public MessageListenerAdapter listenerAdapter(Consumer consumer) {
    return new MessageListenerAdapter(consumer, "receiveOrder");
}

Messages read from the queue will now be routed to the receiveOrder method of the Consumer class. To run this application, we can create as many Consumer applications as we wish to fulfill the incoming orders. For example, if 400 pizza orders were put on the queue then we may need more than 1 consumer ‘chef', or orders will be slow. In this case, we might spin up 10 consumer instances to fulfill the orders in a timely manner.

3. What is the Pub-Sub?

Now that we have covered message queues, let's look into pub-sub. Conversely to message queues, in a pub-sub architecture we want all our consuming (subscribing) applications to get at least 1 copy of the message that our publisher posts to an exchange.

Consider the following exchange:


On the left we have a publisher sending a message “m n+1” to a Topic. This Topic will broadcast this message to its subscriptions. These subscriptions are bound to queues. Each queue has a listening subscriber service awaiting messages.

Let's now consider the same exchange after some time has passed:


Both the subscribing services are consuming “m 1” as both received a copy of this message. In addition, the Topic is distributing the new message “m n+1” to all of its subscribers.

Pub sub should be used where we need a guarantee that each subscriber gets a copy of the message.

3.1. Example Using RabbitMQ

Imagine we have a clothing website. This website is able to send push notifications to users to notify them of deals. Our system can send notifications via email or text alerts. In this scenario, the website is our publisher and the text and email alerting services are our subscribers.

First, let's define our topic exchange and bind 2 queues to it:

private static final String PUB_SUB_TOPIC = "notification-topic";
private static final String PUB_SUB_EMAIL_QUEUE = "email-queue";
private static final String PUB_SUB_TEXT_QUEUE = "text-queue";
@Bean
public Queue emailQueue() {
    return new Queue(PUB_SUB_EMAIL_QUEUE);
}
@Bean
public Queue textQueue() {
    return new Queue(PUB_SUB_TEXT_QUEUE);
}
@Bean
public TopicExchange exchange() {
    return new TopicExchange(PUB_SUB_TOPIC);
}
@Bean
public Binding emailBinding(Queue emailQueue, TopicExchange exchange) {
    return BindingBuilder.bind(emailQueue).to(exchange).with("notification");
}
@Bean
public Binding textBinding(Queue textQueue, TopicExchange exchange) {
    return BindingBuilder.bind(textQueue).to(exchange).with("notification");
}

We have now bound 2 queues using the routing key “notification” meaning any messages posted on the topic with this routing key will go to both queues. Updating the Publisher class that we created earlier, we can send some messages to our exchange:

rabbitTemplate.convertAndSend(topic, "notification", "New Deal on T-Shirts: 95% off!");
rabbitTemplate.convertAndSend(topic, "notification", "2 for 1 on all Jeans!");

4. Comparison

Now that we've touched on both areas, let's briefly compare both types of exchange.

As previously mentioned, both message queues and pub-sub architecture patterns are a great way to break up an application to make it more horizontally scalable.

Another benefit of using either pub-sub or message queues is that the communication is more durable than traditional synchronous modes of communication. For example, if app A communicates to app B via a synchronous HTTP call then if either of the applications goes down the data is lost and the request must be retried.

Using message queues if a consumer application instance goes down then another consumer will be able to handle the message instead. Using pub-sub, if a subscriber is down then once it has recovered the messages it has missed will be available for consumption in its subscribing queue.

Finally, context is key. Choosing whether to use pub-sub or message queue architecture comes down to defining exactly how you want the consuming service to behave. The most important factor to keep in mind is asking “Does it matter if every consumer gets every message?

5. Conclusion

In this tutorial we've looked at pub-sub and message queues and some of the characteristics of each. All the code mentioned in this tutorial can be found over on GitHub.

The post Pub-Sub vs. Message Queues first appeared on Baeldung.
       

Is java.sql.Connection Thread-Safe?

$
0
0

1. Overview

When we work on multi-threading projects, we know that if multiple threads share objects that are not implemented with thread safety in mind, the threads may behave unexpectedly.

Many of us may have suffered from thread-safe problems. So, the question, “Is this class thread-safe?” often comes to mind.

It's pretty common for a Java application to access relational databases via JDBC and also make use of multi-threading. In this quick tutorial, we're going to discuss if java.sql.Connection is thread-safe.

2. The java.sql.Connection Interface

When we access databases via JDBC from our applications, we'll directly or indirectly use java.sql.Connection objects. We rely on these connection objects to execute database operations. Therefore, java.sql.Connection is a pretty important type in JDBC.

It's also a common scenario that multiple threads will need to talk to a database concurrently. As a result, we often hear the question, “Is java.sql.Connection thread-safe?”

In the next few sections, we'll take a closer look at this question. Further, we'll discuss a proper approach to use java.sql.Connection objects among multiple threads so that multiple threads can access the database simultaneously.

3. Thread Safty and java.sql.Connection

First of all, let's talk about thread safety quickly. Thread safety is a programming method. That is, it's an implementation-related concept. Therefore, we can use different techniques to make an implementation thread-safe — for instance, stateless implementations, immutable implementations, and more.

Now, let's take a look at java.sql.Connection. First of all, it's an interface — it doesn't contain any implementation. Therefore, it doesn't make much sense if we ask in general: “Is java.sql.Connection thread-safe?” We have to check the classes that implement this interface to decide if an implementation is thread-safe or not.

Well, a couple of questions come to mind right away: Which classes implement this interface? Are they thread-safe?

Usually, we don't implement the java.sql.Connection interface in our application code. JDBC drivers will implement this interface so that we can get the connection to a specific database, such as SQL Server or Oracle.

Therefore, the thread-safety of the Connection implementation is fully dependent on the JDBC drivers.

Next, we'll explore a couple of database JDBC drivers as examples.

4. java.sql.Connection Implementation Examples

Microsoft SQL Server and Oracle Database are two widely used relational database products.

In this section, we'll look at the JDBC drivers of these two databases and discuss if their implementations of the java.sql.Connection interface is thread-safe.

4.1. Microsoft SQLServer

The Microsoft SQL Server driver class, SQLServerConnection, implements the java.sql.Connection interface and is not thread-safe, according to its Javadoc:

SQLServerConnection is not thread-safe, however multiple statements created from a single connection can be processing simultaneously in concurrent threads.

So, this means we shouldn't share an SQLServerConnection object among threads, but we can share the statements created from the same SQLServerConnection object.

Next, let's take a look at another well-known database product, Oracle Database.

4.2. Oracle Database

The official Oracle JDBC driver implements the java.sql.Connection interface in a thread-safe way.

Oracle states the thread safety of its Connection implementation in its official document:

The Oracle JDBC drivers provide full support for, and are highly optimized for, applications that use Java multithreading …

However, Oracle strongly discourages sharing a database connection among multiple threads. Avoid allowing multiple threads to access a connection simultaneously …

Well, based on the description above, we can say Oracle's connection implementation is thread-safe. However, sharing a connection object among multiple threads is “strongly discouraged”.

So, from the SQL Server and Oracle examples, we know that we cannot assume that a java.sql.Connection implementation is thread-safe. Then, we may ask, what is the proper approach if we want multiple threads to access a database concurrently? Let's figure it out in the next section.

5. Using a Connection Pool

When we access a database from our application, we need first to establish the connection to the database. This is considered an expensive operation. To improve the performance, usually, we'll use a connection pool.

Let's quickly understand how a connection pool works in a multi-threading scenario.

A connection pool holds multiple connection objects. We can configure the size of a pool.

When multiple threads need to access a database concurrently, they request connection objects from the connection pool.

If there are still free connections in the pool, a thread will get a connection object and start its database operations. After the thread finishes its work, it'll return the connection to the pool.

In case there is no free connection in the pool, the thread will wait for a connection object to be returned to the pool by another thread.

Therefore, a connection pool allows multiple threads to access the database concurrently using different connection objects instead of sharing the same one.

Further, in this way, we don't have to care about whether the implementation of the Connection interface is thread-safe.

6. Conclusion

In this article, we've discussed the frequently asked question: Is java.sql.Connection thread-safe?

As java.sql.Connection is an interface, it's not easy to predict if the implementations are thread-safe.

Moreover, we've addressed that a connection pool is a proper way to handle connections if multiple threads need to access the database concurrently.

The post Is java.sql.Connection Thread-Safe? first appeared on Baeldung.
       

Java Weekly, Issue 395

$
0
0

1. Spring and Java

>> Rust and the JVM [blog.frankel.ch]

Tunneling to Rust from Java – exploring different ways to call Rust functions from Java.

>> What's New in JPA Buddy — July 2021 [jpa-buddy.com]

Visual tools for SQL, Flyway callbacks, more structured Liquibase, and other improvements in a new JPA Buddy release.

Also worth reading:

Webinars and presentations:

Time to upgrade:

2. Technical

>> RabbitMQ Streams Overview [blog.rabbitmq.com]

Streams – a cool feature in RabbitMQ 3.9 – a persisted and replicated append-only logs, just what we're used to seeing in Apache Kafka!

>> Kubernetes Release Cadence Change: Here’s What You Need To Know [kubernetes.io]

A change in K8S release cycles – we're going to have three releases each year, instead of the current once in a quarter release.

Also worth reading:

3. Musings

>> Failure on demand – Scenes from an agile transformation [blog.codecentric.de]

Exploring various situations and scenarios when agile transformation may still fail after all these years.

Also worth reading:

4. Comics

And my favorite Dilberts of the week:

>> Alients And Pronouns [dilbert.com]

>> Dropping In To Zoom Meetings [dilbert.com]

>> Boss Trades Cryptocurrency [dilbert.com]

5. Pick of the Week

>> Open-plan office noise increases stress and worsens mood: we've measured the effects [abc.net.au]

The post Java Weekly, Issue 395 first appeared on Baeldung.
       

Creating a Kubertes Admission Controller in Java

$
0
0

1. Introduction

After working for a while with Kubernetes, we'll soon realize that there's a lot of boilerplate code involved. Even for a simple service, we need to provide all required details, usually taking the form of a quite verbose YAML document.

Also, when dealing with several services deployed in a given environment, those YAML documents tend to contain a lot of repeated elements. For instance, we might want to add a given ConfigMap or some sidecar containers to all deployments.

In this article, we'll explore how we can stick to the DRY principle and avoid all this repeated code using Kubernetes admission controllers.

2. What's an Admission Controller?

Admission controllers are a mechanism used by Kubernetes to pre-process API requests after they've been authenticated but before they're executed.

The API server process (kube-apiserver) already comes with several built-in controllers, each in charge of a given aspect of API processing.

AllwaysPullImage is a good example: This admission controller modifies pod creation requests, so the image pull policy becomes “always”, regardless of the informed value. The Kubernetes documentation contains the full list of the standard admission controllers.

Besides those built-in controllers, which actually run as part of the kubeapi-server process, Kubernetes also supports external admission controllers. In this case, the admission controller is just an HTTP service that processes requests coming from the API server.

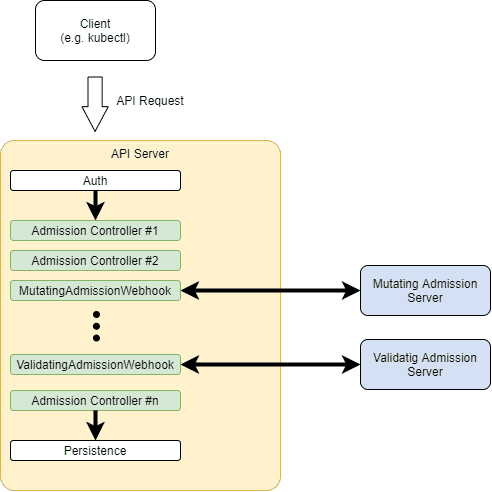
In addition, those external admission controllers can be dynamically added and removed, hence the name dynamic admission controllers. This results in a processing pipeline that looks like this:

Here, we can see that the incoming API request, once authenticated, goes through each of the built-in admission controllers until it reaches the persistence layer.

3. Admission Controller Types

Currently, there are two types of admission controllers:

  • Mutating admission controllers
  • Validation admission controllers

As their names suggest, the main difference is the type of processing each does with an incoming request. Mutating controllers may modify a request before passing them downstream, whereas validation ones can only validate them.

An important point about those types is the order in which the API server executes them: mutating controllers come first, then validation controllers. This makes sense, as validation will only occur once we have the final request, possibly changed by any of the mutating controllers.

3.1. Admission Review Requests

The built-in admission controllers (mutating and validating) communicate with external admission controllers using a simple HTTP Request/Response pattern:

  • Request: an AdmissionReview JSON object containing the API call to process in its request property
  • Response: an AdmissionReview JSON object containing the result in its response property

Here's an example of a request:

{
  "kind": "AdmissionReview",
  "apiVersion": "admission.k8s.io/v1",
  "request": {
    "uid": "c46a6607-129d-425b-af2f-c6f87a0756da",
    "kind": {
      "group": "apps",
      "version": "v1",
      "kind": "Deployment"
    },
    "resource": {
      "group": "apps",
      "version": "v1",
      "resource": "deployments"
    },
    "requestKind": {
      "group": "apps",
      "version": "v1",
      "kind": "Deployment"
    },
    "requestResource": {
      "group": "apps",
      "version": "v1",
      "resource": "deployments"
    },
    "name": "test-deployment",
    "namespace": "test-namespace",
    "operation": "CREATE",
    "object": {
      "kind": "Deployment",
      ... deployment fields omitted
    },
    "oldObject": null,
    "dryRun": false,
    "options": {
      "kind": "CreateOptions",
      "apiVersion": "meta.k8s.io/v1"
    }
  }
}

Among the available fields, some are particularly important:

  • operation: This tells whether this request will create, modify or delete a resource
  • object: The resource's specification details being processed.
  • oldObject: When modifying or deleting a resource, this field contains the existing resource

The expected response is also an AdmissionReview JSON object, with a response field instead response:

{
  "apiVersion": "admission.k8s.io/v1",
  "kind": "AdmissionReview",
  "response": {
    "uid": "c46a6607-129d-425b-af2f-c6f87a0756da",
    "allowed": true,
    "patchType": "JSONPatch",
    "patch": "W3sib3A ... Base64 patch data omitted"
  }
}

Let's dissect the response object's fields:

  • uid: the value of this field must match the corresponding field present in the incoming request field
  • allowed: The outcome of the review action. true means that the API call processing may proceed to the next step
  • patchType: Valid only for mutating admission controllers. Indicates the patch type returned by the AdmissionReview request
  • patch: Patches to apply in the incoming object. Details on next section

3.2. Patch Data

The patch field present in the response from a mutating admission controller tells the API server what needs to be changed before the request can proceed. Its value is a Base64-encoded JSONPatch object containing an array of instructions that the API server uses to modify the incoming API call's body:

[
  {
    "op": "add",
    "path": "/spec/template/spec/volumes/-",
    "value":{
      "name": "migration-data",
      "emptyDir": {}
    }
  }
]

In this example, we have a single instruction that appends a volume to the volumes array of the deployment specification. A common issue when dealing with patches is the fact that there's no way to add an element to an existing array unless it already exists in the original object. This is particularly annoying when dealing with Kubernetes API objects, as the most common ones (e.g., deployments) include optional arrays.

For instance, the previous example is valid only when the incoming deployment already has at least one volume. If this was not the case, we'd have to use a slightly different instruction:

[
  {
    "op": "add",
    "path": "/spec/template/spec/volumes",
    "value": [{
      "name": "migration-data",
      "emptyDir": {}
    }]
  }
]

Here, we've defined a new volumes field whose value is an array containing the volume definition. Previously, the value was an object since this is what we were appending to the existing array.

4. Sample Use Case: Wait-For-It

Now that we have a basic understanding of the expected behavior of an admission controller, let's write a simple example. A common issue in Kubernetes when is managing runtime dependencies, especially when using a microservices architecture. For instance, if a particular microservice requires access to a database, there's no point in starting if the former is offline.

To address issues like this, we can use an initContainer with our pods to do this check before starting the main container. An easy way to do that is using the popular wait-for-it shell script, also available as a docker image.

The script takes a hostname and port parameters and tries to connect to it. If the test succeeds, the container exits with a successful status code and the pod initialization proceeds. Otherwise, it will fail, and the associated controller will keep on retrying according to the defined policy. The cool thing about externalizing this pre-flight check is that any associated Kubernetes service will notice that the failure. Consequently, no requests will be sent to it, potentially improving overall resiliency.

4.1. The Case for Admission Controller

This is what a typical deployment with the wait-for-it init container added to it:

apiVersion: apps/v1
kind: Deployment
metadata:
  name: frontend
  labels:
    app: nginx
spec:
  replicas: 1
  selector:
    matchLabels:
      app: nginx
  template:
    metadata:
      labels:
        app: nginx
    spec:
      initContainers:
      - name: wait-backend
        image: willwill/wait-for-it
        args:
        -www.google.com:80
      containers: 
      - name: nginx 
        image: nginx:1.14.2 
        ports: 
        - containerPort: 80

While not that complicated (at least in this simple example), adding the relevant code to every deployment has some drawbacks. In particular, we're imposing on deployment authors the burden to specify exactly how a dependency check should be done. Instead, a better experience would require only defining what should be tested.

Enter our admission controller. To address this use case, we'll write a mutating admission controller that looks for the presence of a particular annotation in a resource and adds the initContainer to it if present. This is what an annotated deployment spec would look like:

apiVersion: apps/v1 
kind: Deployment 
metadata: 
  name: frontend 
  labels: 
    app: nginx 
  annotations:
    com.baeldung/wait-for-it: "www.google.com:80"
spec: 
  replicas: 1 
  selector: 
    matchLabels: 
      app: nginx 
  template: 
    metadata: 
      labels: 
        app: nginx 
    spec: 
      containers:
      - name: nginx
        image: nginx:1.14.2
        ports:
          - containerPort: 80

Here, we're using the annotation com.baeldung/wait-for-it to indicate the host and port we must test. What's important, though, is nothing is telling us how the test should be done. In theory, we could change the test in any way while keeping the deployment spec unchanged.

Now, let's move on to the implementation.

4.2. Project Structure

As discussed before, the external admission controller is just a simple HTTP service. As such, we'll create a Spring Boot project as our basic structure. For this example, this is all we need is the Spring Web Reactive starter but, for a real-world application, it might also be useful to add features like the Actuator and/or some Cloud Config dependencies.

4.3. Handling Requests

The entry point for admission request is a simple Spring REST controller that delegates the processing of the incoming payload to a service:

@RestController
@RequiredArgsConstructor
public class AdmissionReviewController {
    private final AdmissionService admissionService;
    @PostMapping(path = "/mutate")
    public Mono<AdmissionReviewResponse> processAdmissionReviewRequest(@RequestBody Mono<ObjectNode> request) {
        return request.map((body) -> admissionService.processAdmission(body));
    }
}

Here, we're using an ObjectNode as the input parameter. This means that we'll try to process any well-formed JSON sent by the API Server. The reason for this lax approach is, as of this writing, there's still no official schema published for this payload. Using a non-structured type, in this case, implies some extra work, but ensures our implementation deals a bit better with any extra fields that a particular Kubernetes implementation or version decides to throw at us.

Also, given that the request object can be any of the available resources in the Kubernetes API, adding too much structure here would not be that helpful.

4.4. Modifying Admission Requests

The meat of the processing happens in the AdmissionService class. This is a @Component class injected into the controller with a single public method: processAdmission. This method processes the incoming review request and returns the appropriate response.

The full code is available online and basically consists of a long sequence of JSON manipulations. Most of them are trivial, but some excerpts deserve some explanation:

if (admissionControllerProperties.isDisabled()) {
    data = createSimpleAllowedReview(body);
} else if (annotations.isMissingNode()) {
    data = createSimpleAllowedReview(body);
} else {
    data = processAnnotations(body, annotations);
}

First, why add a “disabled” property? Well, it turns out that, in some highly controlled environments, it might be much easier to change a configuration parameter of an existing deployment than removing and/or updating it. Since we're using the @ConfigurationProperties mechanism to populate this property, its actual value can come from a variety of sources.

Next, we test for missing annotations, which we'll treat as a sign that we should leave the deployment unchanged. This approach ensures the “opt-in” behavior that we want in this case.

Another interesting snippet comes from the JSONPatch generation logic in the injectInitContainer() method:

JsonNode maybeInitContainers = originalSpec.path("initContainers");
ArrayNode initContainers = 
maybeInitContainers.isMissingNode() ?
  om.createArrayNode() : (ArrayNode) maybeInitContainers;
ArrayNode patchArray = om.createArrayNode();
ObjectNode addNode = patchArray.addObject();
addNode.put("op", "add");
addNode.put("path", "/spec/template/spec/initContainers");
ArrayNode values = addNode.putArray("values");
values.addAll(initContainers);

As there's no guarantee that the incoming specification contains the initContainers field, we must handle two cases: it may be either missing or present. If it is missing, we use an ObjectMapper instance (om in the snippet above) to create a new ArrayNode. Otherwise, we just use the incoming array.

In doing so, we can use a single “add” patch instruction. Despite its name, its behavior is such that the field either will be created or replace an existing field with the same name. The value field is always an array, which includes the (possibly empty) original initContainers array. The last step adds the actual wait-for-it container:

ObjectNode wfi = values.addObject();
wfi.put("name", "wait-for-it-" + UUID.randomUUID())
// ... additional container fields added (omitted)

As container names must be unique within a pod, we just add a random UUID to a fixed prefix. This avoids any name clash with existing containers.

4.5. Deployment

The final step to start using our admission controller is to deploy it to a target Kubernetes cluster. As expected, this requires writing some YAML or using a tool like Terraform. Either way, those are the resources we need to create:

  • A Deployment to run our admission controller. It's a good idea to spin more than one replica of this service, as failures may block any new deployments to happen
  • Service to route requests from the API Server to an available pod running the admission controller
  • MutatingWebhookConfiguration resource that describes which API calls should be routed to our Service

For instance, let's say that we'd like Kubernetes to use our admission controller every time a deployment is created or updated. In the MutatingWebhookConfiguration documents we'll see a rule definition like this:

apiVersion: admissionregistration.k8s.io/v1
kind: MutatingWebhookConfiguration
metadata:
  name: "wait-for-it.baeldung.com"
webhooks:
- name: "wait-for-it.baeldung.com"
  rules:
  - apiGroups:   ["*"]
    apiVersions: ["*"]
    operations:  ["CREATE","UPDATE"]
    resources:   ["deployments"]
  ... other fields omitted

An important point about our server: Kubernetes requires HTTPS to communicate with external admission controllers. This means we need to provide our SpringBoot server with a proper certificate and private key. Please check the Terraform script used to deploy the sample admission controller to see one way to do this.

Also, a quick tip: Although not mentioned anywhere in the documentation, some Kubernetes implementations (e.g. GCP) require the usage of port 443, so we need to change the SpringBoot HTTPS port from its default value (8443).

4.6. Testing

Once we have the deployment artifacts ready, it's finally time to test our admission controller in an existing cluster. In our case, we're using Terraform to perform the deployment so all we have to do is an apply:

$ terraform apply -auto-approve

Once completed, we can check the deployment and admission controller status using kubectl:

$ kubectl get mutatingwebhookconfigurations
NAME                               WEBHOOKS   AGE
wait-for-it-admission-controller   1          58s
$ kubectl get deployments wait-for-it-admission-controller         
NAME                               READY   UP-TO-DATE   AVAILABLE   AGE
wait-for-it-admission-controller   1/1     1            1           10m

Now, let's create a simple nginx deployment including our annotation:

$ kubectl apply -f nginx.yaml
deployment.apps/frontend created

We can check the associated logs to see that the wait-for-it init container was indeed injected:

 $ kubectl logs --since=1h --all-containers deployment/frontend
wait-for-it.sh: waiting 15 seconds for www.google.com:80
wait-for-it.sh: www.google.com:80 is available after 0 seconds

Just to be sure, let's check the deployment's YAML:

$ kubectl get deployment/frontend -o yaml
apiVersion: apps/v1
kind: Deployment
metadata:
  annotations:
    com.baeldung/wait-for-it: www.google.com:80
    deployment.kubernetes.io/revision: "1"
		... fields omitted
spec:
  ... fields omitted
  template:
	  ... metadata omitted
    spec:
      containers:
      - image: nginx:1.14.2
        name: nginx
				... some fields omitted
      initContainers:
      - args:
        - www.google.com:80
        image: willwill/wait-for-it
        imagePullPolicy: Always
        name: wait-for-it-b86c1ced-71cf-4607-b22b-acb33a548bb2
	... fields omitted
      ... fields omitted
status:
  ... status fields omitted

This output shows the initContainer that our admission controller added to the deployment.

5. Conclusion

In this article, we've covered how to create a Kubernetes admission controller in Java and deploy it to an existing cluster.

As usual, the full source code of the examples can be found over on GitHub.

The post Creating a Kubertes Admission Controller in Java first appeared on Baeldung.
       

Kubernetes with kind

$
0
0

1. Overview

When working with Kubernetes, we lack a tool that helps in local development — a tool that can run local Kubernetes clusters using Docker containers as nodes.

In this tutorial, we'll explore Kubernetes with kind. Primarily a testing tool for Kubernetes, kind is also handy for local development and CI.

2. Setup

As a prerequisite, we should make sure Docker is installed in our system. An easy way to install Docker is using the Docker Desktop appropriate for our operating system (and processor, in the case of macOS).

2.1. Install Kubernetes Command-Line

First, let's install the Kubernetes command-line, kubectl.On macOS, we can install it using Homebrew:

$ brew install kubectl

We can verify the successful installation by using the command:

$ kubectl version --client
Client Version: version.Info{Major:"1", Minor:"21", GitVersion:"v1.21.3", 
GitCommit:"ca643a4d1f7bfe34773c74f79527be4afd95bf39", GitTreeState:"clean", 
BuildDate:"2021-07-15T21:04:39Z", GoVersion:"go1.16.6", Compiler:"gc", Platform:"darwin/amd64"}

Similarly, we can use curl to download on Windows:

curl -LO https://dl.k8s.io/v1.21.0/bin/windows/amd64/kubectl.exe.sha256

Then, we should add the kubectl command's binary location to our PATH variable.

2.2. Install kind

Next, we'll install kind using Homebrew on macOS:

$ brew install kind

To verify the successful installation, we can try the command:

$ kind version
kind v0.11.1 go1.15.6 darwin/amd64

However, if the kind version command doesn't work, please add its location to the PATH variable.

Similarly, for the Windows operating system, we can download kind using curl:

curl -Lo kind-windows-amd64.exe https://kind.sigs.k8s.io/dl/v0.11.1/kind-windows-amd64
Move-Item .\kind-windows-amd64.exe c:\kind\kind.exe

3. Kubernetes Cluster

Now, we're all set to use kind to prepare the local development environment for Kubernetes.

3.1. Create Cluster

First, let's create a local Kubernetes cluster with the default configuration:

$ kind create cluster

By default, a cluster named kind will be created. However, we can provide a name to the cluster using the –name parameter:

$ kind create cluster --name baeldung-kind
Creating cluster "baeldung-kind" ...
 ✓ Ensuring node image (kindest/node:v1.21.1) 🖼 
 ✓ Preparing nodes 📦  
 ✓ Writing configuration 📜 
 ✓ Starting control-plane 🕹 
 ✓ Installing CNI 🔌 
 ✓ Installing StorageClass 💾 
Set kubectl context to "kind-baeldung-kind"
You can now use your cluster with:
kubectl cluster-info --context kind-baeldung-kind
Thanks for using kind! 😊

Also, we can use a YAML config file to configure the cluster. For instance, let's write a simplistic configuration in the baeldungConfig.yaml file:

kind: Cluster
apiVersion: kind.x-k8s.io/v1
name: baeldung-kind

Then, let's create the cluster using the configuration file:

$ kind create cluster --config baeldungConfig.yaml

Additionally, we can also provide a specific version of the Kubernetes image while creating a cluster:

$ kind create cluster --image kindest/node:v1.20.7

3.2. Get Cluster

Let's check the created cluster by using the get command:

$ kind get clusters
baeldung-kind

Also, we can confirm the corresponding docker container:

$ docker ps
CONTAINER ID  IMAGE                 COMMAND                 CREATED    STATUS        PORTS                      NAMES
612a98989e99  kindest/node:v1.21.1  "/usr/local/bin/entr…"  1 min ago  Up 2 minutes  127.0.0.1:59489->6443/tcp  baeldung-kind-control-plane

Or, we can confirm the nodes via kubectl:

$ kubectl get nodes
NAME                          STATUS   ROLES                  AGE   VERSION
baeldung-kind-control-plane   Ready    control-plane,master   41s   v1.21.1

3.3. Cluster Details

Once a cluster is ready, we can check the details using the cluster-info command on kubectl:

$ kubectl cluster-info --context kind-baeldung-kind
Kubernetes master is running at https://127.0.0.1:59489
CoreDNS is running at https://127.0.0.1:59489/api/v1/namespaces/kube-system/services/kube-dns:dns/proxy

Also, we can use the dump parameter along with the cluster-info command to extract the detailed information about a cluster:

$ kubectl cluster-info dump --context kind-baeldung-kind

3.4. Delete Cluster

Similar to the get command, we can use the delete command to remove a specific cluster:

$ kind delete cluster --name baeldung-kind

4. Ingress Controller

4.1. Configure

We'll require an ingress controller to establish a connection between our local environment and the Kubernetes cluster.

Therefore, we can use kind‘s config options like extraPortMappings and node-labels:

kind: Cluster
apiVersion: kind.x-k8s.io/v1alpha4
name: baeldung-kind
nodes:
- role: control-plane
  kubeadmConfigPatches:
  - |
    kind: InitConfiguration
    nodeRegistration:
      kubeletExtraArgs:
        node-labels: "ingress-ready=true"    
  extraPortMappings:
  - containerPort: 80
    hostPort: 80
    protocol: TCP
  - containerPort: 443
    hostPort: 443
    protocol: TCP

Here, we've updated our baeldungConfig.yaml file to set the configurations for the ingress controller, mapping the container port to the host port. Also, we enabled the node for the ingress by defining ingress-ready=true.

Then, we must recreate our cluster with the modified configuration:

kind create cluster --config baeldungConfig.yaml

4.2. Deploy

Then, we'll deploy the Kubernetes supported ingress NGINX controller to work as a reverse proxy and load balancer:

kubectl apply -f https://raw.githubusercontent.com/kubernetes/ingress-nginx/main/deploy/static/provider/kind/deploy.yaml

Additionally, we can also use AWS and GCE load balancer controllers.

5. Deploying a Service Locally

Finally, we're all set to deploy our service. For this tutorial, we can use a simple http-echo web server available as a docker image.

5.1. Configure

So, let's create a configuration file that defines the service and use ingress to host it locally:

kind: Pod
apiVersion: v1
metadata:
  name: baeldung-app
  labels:
    app: baeldung-app
spec:
  containers:
  - name: baeldung-app
    image: hashicorp/http-echo:0.2.3
    args:
    - "-text=Hello World! This is a Baeldung Kubernetes with kind App"
---
kind: Service
apiVersion: v1
metadata:
  name: baeldung-service
spec:
  selector:
    app: baeldung-app
  ports:
  # Default port used by the image
  - port: 5678
---
apiVersion: networking.k8s.io/v1
kind: Ingress
metadata:
  name: baeldung-ingress
spec:
  rules:
  - http:
      paths:
      - pathType: Prefix
        path: "/baeldung"
        backend:
          service:
            name: baeldung-service
            port:
              number: 5678
---

Here, we've created a pod named baeldung-app with the text argument and a service called baeldung-service.

Then, we set up ingress networking to the baeldung-service on the 5678 port and through the /baeldung URI.

5.2. Deploy

Now that we're ready with all the configuration and our cluster integrates with the ingress NGINX controller, let's deploy our service:

$ kubectl apply -f baeldung-service.yaml

We can check the status of the services on kubectl:

$ kubectl get services
NAME               TYPE        CLUSTER-IP      EXTERNAL-IP   PORT(S)    AGE
baeldung-service   ClusterIP   10.96.172.116   <none>        5678/TCP   5m38s
kubernetes         ClusterIP   10.96.0.1       <none>        443/TCP    7m5s

That's it! Our service is deployed and should be available at localhost/baeldung:

$ curl localhost/baeldung
Hello World! This is a Baeldung Kubernetes with kind App

Note: if we encounter any error related to the validate.nginx.ingress.kubernetes.io webhook, we should delete the ValidationWebhookConfiguration:

$ kubectl delete -A ValidatingWebhookConfiguration ingress-nginx-admission
validatingwebhookconfiguration.admissionregistration.k8s.io "ingress-nginx-admission" deleted

Then, deploy the service again.

6. Conclusion

In this article, we explored Kubernetes with kind.

First, we did a setup that includes installing Kubernetes command-line kubectl and kind. Then, we went through a few features of kind to create/update a Kubernetes local cluster.

Last, we integrated the ingress controller and deployed a privately accessible service on the Kubernetes cluster.

The post Kubernetes with kind first appeared on Baeldung.

How to Implement LRU Cache in Java

$
0
0

1. Overview

In this tutorial, we're going to learn about the LRU cache and take a look at an implementation in Java.

2. LRU Cache

The Least Recently Used (LRU) cache is a cache eviction algorithm that organizes elements in order of use. In LRU, as the name suggests, the element that hasn't been used for the longest time will be evicted from the cache.

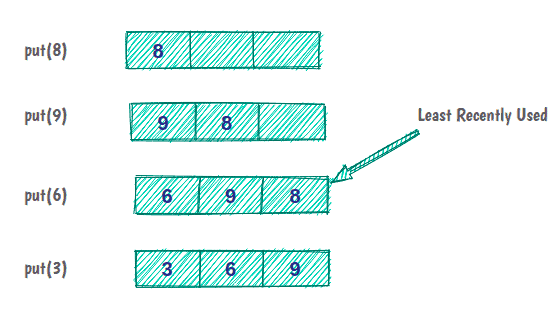
For example, if we have a cache with a capacity of three items:

Initially, the cache is empty, and we put element 8 in the cache. Elements 9 and 6 are cached as before. But now, the cache capacity is full, and to put the next element, we have to evict the least recently used element in the cache.

Before we implement the LRU cache in Java, it's good to know some aspects of the cache:

  • All operations should run in order of O(1)
  • The cache has a limited size
  • It's mandatory that all cache operations support concurrency
  • If the cache is full, adding a new item must invoke the LRU strategy

2.1. Structure of an LRU Cache

Now, let's think about a question that will help us in designing the cache.

How can we design a data structure that could do operations like reading, sorting (temporal sorting), and deleting elements in constant time?

It seems that to find the answer to this question, we need to think deeply about what has been said about LRU cache and its features:

  • In practice, LRU cache is a kind of Queue if an element is reaccessed, it goes to the end of the eviction order
  • This queue will have a specific capacity as the cache has a limited size. Whenever a new element is brought in, it is added at the head of the queue. When eviction happens, it happens from the tail of the queue.
  • Hitting data in the cache must be done in constant time, which isn't possible in Queue! But, it is possible with Java's HashMap data structure
  • Removal of the least recently used element must be done in constant time, which means for the implementation of Queue, we'll use DoublyLinkedList instead of SingleLinkedList or an array

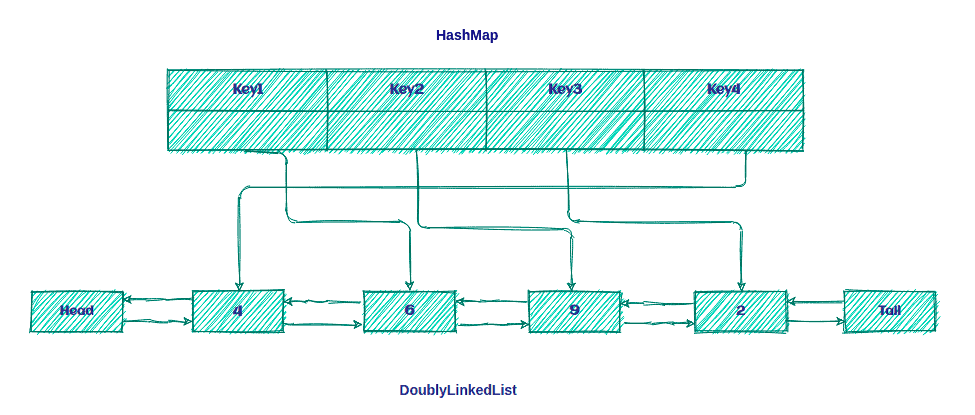
So, the LRU cache is nothing but a combination of the DoublyLinkedList and the HashMap as shown below:

The idea is to keep the keys on the Map for quick access to data within the Queue.

2.2. LRU Algorithm

The LRU algorithm is pretty easy! If the key is present in HashMap, it's a cache hit; else, it's a cache miss.

We'll follow two steps after a cache miss occurs:

  1. Add a new element in front of the list.
  2. Add a new entry in HashMap and refer to the head of the list.

And, we'll do two steps after a cache hit:

  1. Remove the hit element and add it in front of the list.
  2. Update HashMap with a new reference to the front of the list.

Now, it's time to see how we can implement LRU cache in Java!

3. Implementation in Java

First, we'll define our Cache interface:

public interface Cache<K, V> {
    boolean set(K key, V value);
    Optional<V> get(K key);
    int size();
    boolean isEmpty();
    void clear();
}

Now, we'll define the LRUCache class that represents our cache:

public class LRUCache<K, V> implements Cache<K, V> {
    private int size;
    private Map<K, LinkedListNode<CacheElement<K,V>>> linkedListNodeMap;
    private DoublyLinkedList<CacheElement<K,V>> doublyLinkedList;
    public LRUCache(int size) {
        this.size = size;
        this.linkedListNodeMap = new HashMap<>(maxSize);
        this.doublyLinkedList = new DoublyLinkedList<>();
    }
   // rest of the implementation
}

We can create an instance of the LRUCache with a specific size. In this implementation, we use HashMap collection for storing all references to LinkedListNode.

Now, let's discuss operations on our LRUCache.

3.1. Put Operation

The first one is the put method:

public boolean put(K key, V value) {
    CacheElement<K, V> item = new CacheElement<K, V>(key, value);
    LinkedListNode<CacheElement<K, V>> newNode;
    if (this.linkedListNodeMap.containsKey(key)) {
        LinkedListNode<CacheElement<K, V>> node = this.linkedListNodeMap.get(key);
        newNode = doublyLinkedList.updateAndMoveToFront(node, item);
    } else {
        if (this.size() >= this.size) {
            this.evictElement();
        }
        newNode = this.doublyLinkedList.add(item);
    }
    if(newNode.isEmpty()) {
        return false;
    }
    this.linkedListNodeMap.put(key, newNode);
    return true;
 }

First, we find the key in the linkedListNodeMap that stores all keys/references. If the key exists, a cache hit happened, and it's ready to retrieve CacheElement from the DoublyLinkedList and move it to the front.

After that, we update the linkedListNodeMap with a new reference and move it to the front of the list:

public LinkedListNode<T> updateAndMoveToFront(LinkedListNode<T> node, T newValue) {
    if (node.isEmpty() || (this != (node.getListReference()))) {
        return dummyNode;
    }
    detach(node);
    add(newValue);
    return head;
}

First, we check that the node is not empty. Also, the reference of the node must be the same as the list. After that, we detach the node from the list and add newValue to the list.

But if the key doesn't exist, a cache miss happened, and we have to put a new key into the linkedListNodeMap. Before we can do that, we check the list size. If the list is full, we have to evict the least recently used element from the list.

3.2. Get Operation

Let's take a look at our get operation:

public Optional<V> get(K key) {
   LinkedListNode<CacheElement<K, V>> linkedListNode = this.linkedListNodeMap.get(key);
   if(linkedListNode != null && !linkedListNode.isEmpty()) {
       linkedListNodeMap.put(key, this.doublyLinkedList.moveToFront(linkedListNode));
       return Optional.of(linkedListNode.getElement().getValue());
   }
   return Optional.empty();
 }

As we can see above, this operation is straightforward. First, we get the node from the linkedListNodeMap and, after that, check that it's not null or empty.

The rest of the operation is the same as before, with just one difference on the moveToFront method:

public LinkedListNode<T> moveToFront(LinkedListNode<T> node) {
    return node.isEmpty() ? dummyNode : updateAndMoveToFront(node, node.getElement());
}

Now, let's create some tests to verify that our cache works fine:

@Test
public void addSomeDataToCache_WhenGetData_ThenIsEqualWithCacheElement(){
    LRUCache<String,String> lruCache = new LRUCache<>(3);
    lruCache.put("1","test1");
    lruCache.put("2","test2");
    lruCache.put("3","test3");
    assertEquals("test1",lruCache.get("1").get());
    assertEquals("test2",lruCache.get("2").get());
    assertEquals("test3",lruCache.get("3").get());
}

Now, let's test the eviction policy:

@Test
public void addDataToCacheToTheNumberOfSize_WhenAddOneMoreData_ThenLeastRecentlyDataWillEvict(){
    LRUCache<String,String> lruCache = new LRUCache<>(3);
    lruCache.put("1","test1");
    lruCache.put("2","test2");
    lruCache.put("3","test3");
    lruCache.put("4","test4");
    assertFalse(lruCache.get("1").isPresent());
 }

4. Dealing With Concurrency

So far, we assumed that our cache was just used in a single-threaded environment.

To make this container thread-safe, we need to synchronize all public methods. Let's add a ReentrantReadWriteLock and ConcurrentHashMap into the previous implementation:

public class LRUCache<K, V> implements Cache<K, V> {
    private int size;
    private final Map<K, LinkedListNode<CacheElement<K,V>>> linkedListNodeMap;
    private final DoublyLinkedList<CacheElement<K,V>> doublyLinkedList;
    private final ReentrantReadWriteLock lock = new ReentrantReadWriteLock();
    public LRUCache(int size) {
        this.size = size;
        this.linkedListNodeMap = new ConcurrentHashMap<>(size);
        this.doublyLinkedList = new DoublyLinkedList<>();
    }
// ...
}

We prefer to use a reentrant read/write lock rather than declaring methods as synchronized because it gives us more flexibility in deciding when to use a lock on reading and writing.

4.1. writeLock

Now, let's add a call to writeLock in our put method:

public boolean put(K key, V value) {
  this.lock.writeLock().lock();
   try {
       //..
   } finally {
       this.lock.writeLock().unlock();
   }
}

When we use writeLock on the resource, only the thread holding the lock can write to or read from the resource. So, all other threads that are either trying to read or write on the resource will have to wait until the current lock holder releases it.

This is very important to prevent a deadlock. If any of the operations inside the try block fails, we still release the lock before exiting the function with a finally block at the end of the method.

One of the other operations that needs writeLock is evictElement, which we used in the put method:

private boolean evictElement() {
    this.lock.writeLock().lock();
    try {
        //...
    } finally {
        this.lock.writeLock().unlock();
    }
}

4.2. readLock

And now it's time to add a readLock call to the get method:

public Optional<V> get(K key) {
    this.lock.readLock().lock();
    try {
        //...
    } finally {
        this.lock.readLock().unlock();
    }
}

It seems exactly what we have done with the put method. The only difference is that we use a readLock instead of writeLock. So, this distinction between the read and write locks allows us to read the cache in parallel while it's being updated.

Now, let's test our cache in a concurrent environment:

@Test
public void runMultiThreadTask_WhenPutDataInConcurrentToCache_ThenNoDataLost() throws Exception {
    final int size = 50;
    final ExecutorService executorService = Executors.newFixedThreadPool(5);
    Cache<Integer, String> cache = new LRUCache<>(size);
    CountDownLatch countDownLatch = new CountDownLatch(size);
    try {
        IntStream.range(0, size).<Runnable>mapToObj(key -> () -> {
            cache.put(key, "value" + key);
            countDownLatch.countDown();
       }).forEach(executorService::submit);
       countDownLatch.await();
    } finally {
        executorService.shutdown();
    }
    assertEquals(cache.size(), size);
    IntStream.range(0, size).forEach(i -> assertEquals("value" + i,cache.get(i).get()));
}

5. Conclusion

In this tutorial, we learned what exactly an LRU cache is, including some of its most common features.  Then, we saw one way to implement an LRU cache in Java and explored some of the most common operations.

Finally, we covered concurrency in action using the lock mechanism.

As usual, all the examples used in this article are available over on GitHub.

The post How to Implement LRU Cache in Java first appeared on Baeldung.
       

Find Whether an IP Address Is in the Specified Range or Not in Java

$
0
0

1. Overview

In this tutorial, we'll discuss how to find whether an IP address is in a given range or not using Java. For this problem, we'll consider all the given IP addresses are valid IPv4 (Internet Protocol Version 4) and IPv6 (Internet Protocol Version 6) addresses throughout the article.

2. Introduction to the Problem

Given an input IP address along with the two other IP addresses as the range (from and to). We should be able to determine whether the input IP address is in the given range or not.

For Example:

  • Input = 192.220.3.0, Range between 192.210.0.0 and 192.255.0.0
    Output = true
  • Input = 192.200.0.0, Range between 192.210.0.0 and 192.255.0.0
    Output = false

Now, let's look at the different ways to check the given IP address is in range or not, using various Java libraries.

3. IPAddress Library

The IPAddress library, written by Sean C Foley, supports handling both IPv4 and IPv6 addresses for a wide range of use cases. It is important to note that this library requires at least Java 8 to work.

Setting up this library is straightforward. We need to add the ipaddress dependency to our pom.xml:

<dependency>
    <groupId>com.github.seancfoley</groupId>
    <artifactId>ipaddress</artifactId>
    <version>5.3.3</version>
</dependency>

It provides the following Java classes needed to solve our problem:

  • IPAddress, to hold the IP address as a Java instance
  • IPAddressString, to construct the IPAddress instance from the given IP as a string
  • IPAddressSeqRange, to represent an arbitrary range of IP addresses

Now, let's look at the code for finding whether an IP address is in the given range by using the above classes:

public static boolean checkIPIsInGivenRange (String inputIP, String rangeStartIP, String rangeEndIP) 
  throws AddressStringException {
    IPAddress startIPAddress = new IPAddressString(rangeStartIP).getAddress();
    IPAddress endIPAddress = new IPAddressString(rangeEndIP).getAddress();
    IPAddressSeqRange ipRange = startIPAddress.toSequentialRange(endIPAddress);
    IPAddress inputIPAddress = new IPAddressString(inputIP).toAddress();
    return ipRange.contains(inputIPAddress);
}

The above code works for both IPv4 and IPv6 addresses. IPAddressString parameterized constructor takes an IP as a string to construct IPAddress instance. IPAddressString instance can be converted to IPAddress by using any of the following two methods:

  • toAddress()
  • getAddress()

The getAddress() method assumes the given IP is valid, but the toAddress() method validates the input once and throws AddressStringException if it is invalid. IPAddress class provides a toSequentialRange method that constructs IPAddressSeqRange instance using the beginning and ending IP range.

Let's consider few unit cases which calls checkIPIsInGivenRange with IPv4 and IPv6 addresses:

@Test
void givenIPv4Addresses_whenIsInRange_thenReturnsTrue() throws Exception {
    assertTrue(IPWithGivenRangeCheck.checkIPIsInGivenRange("192.220.3.0", "192.210.0.0", "192.255.0.0"));
}
@Test
void givenIPv4Addresses_whenIsNotInRange_thenReturnsFalse() throws Exception {
    assertFalse(IPWithGivenRangeCheck.checkIPIsInGivenRange("192.200.0.0", "192.210.0.0", "192.255.0.0"));
}
@Test
void givenIPv6Addresses_whenIsInRange_thenReturnsTrue() throws Exception {
    assertTrue(IPWithGivenRangeCheck.checkIPIsInGivenRange(
      "2001:db8:85a3::8a03:a:b", "2001:db8:85a3::8a00:ff:ffff", "2001:db8:85a3::8a2e:370:7334"));
}
@Test
void givenIPv6Addresses_whenIsNotInRange_thenReturnsFalse() throws Exception {
    assertFalse(IPWithGivenRangeCheck.checkIPIsInGivenRange(
      "2002:db8:85a3::8a03:a:b", "2001:db8:85a3::8a00:ff:ffff", "2001:db8:85a3::8a2e:370:7334"));
}

4. Commons IP Math

Commons IP Math library provides classes for representing IPv4 and IPv6 addresses and ranges. It provides APIs for dealing with the most common operations, and in addition, it gives comparators and other utilities for working with IP ranges.

We need to add the commons-ip-math dependency to our pom.xml:

<dependency>
    <groupId>com.github.jgonian</groupId>
    <artifactId>commons-ip-math</artifactId>
    <version>1.32</version>
</dependency>

4.1. For IPv4

The library provides Ipv4 and Ipv4Range classes for holding a single IP address and a range of addresses as instances, respectively. Now, let's glance at the code sample which makes use of the aforementioned classes:

public static boolean checkIPv4IsInRange (String inputIP, String rangeStartIP, String rangeEndIP) {
    Ipv4 startIPAddress = Ipv4.of(rangeStartIP);
    Ipv4 endIPAddress = Ipv4.of(rangeEndIP);
    Ipv4Range ipRange = Ipv4Range.from(startIPAddress).to(endIPAddress);
    Ipv4 inputIPAddress = Ipv4.of(inputIP);
    return ipRange.contains(inputIPAddress);
}

Ipv4 class provides a static method of() that takes the IP string to construct an Ipv4 instance. Ipv4Range class uses the builder design pattern to create its instance by using from() and to() methods to specify the range. Further, it provides the contains() function to check for an IP address present in the specified range or not.

Now let's run some tests against our function:

@Test
void givenIPv4Addresses_whenIsInRange_thenReturnsTrue() throws Exception {
    assertTrue(IPWithGivenRangeCheck.checkIPv4IsInRange("192.220.3.0", "192.210.0.0", "192.255.0.0"));
}
@Test
void givenIPv4Addresses_whenIsNotInRange_thenReturnsFalse() throws Exception {
    assertFalse(IPWithGivenRangeCheck.checkIPv4IsInRange("192.200.0.0", "192.210.0.0", "192.255.0.0"));
}

4.2. For IPv6

For IP version 6, the library provides the same classes and functions with a change in the version number from 4 → 6. The classes for version 6 are Ipv6 and Ipv6Range. 

Let's peek at the code example for IP version 6 by utilizing the aforementioned classes:

public static boolean checkIPv6IsInRange (String inputIP, String rangeStartIP, String rangeEndIP) {
    Ipv6 startIPAddress = Ipv6.of(rangeStartIP);
    Ipv6 endIPAddress = Ipv6.of(rangeEndIP);
    Ipv6Range ipRange = Ipv6Range.from(startIPAddress).to(endIPAddress);
    Ipv6 inputIPAddress = Ipv6.of(inputIP);
    return ipRange.contains(inputIPAddress);
}

Now let's run the unit tests to check our code:

@Test
void givenIPv6Addresses_whenIsInRange_thenReturnsTrue() throws Exception {
    assertTrue(IPWithGivenRangeCheck.checkIPv6IsInRange(
      "2001:db8:85a3::8a03:a:b", "2001:db8:85a3::8a00:ff:ffff", "2001:db8:85a3::8a2e:370:7334"));
}
@Test
void givenIPv6Addresses_whenIsNotInRange_thenReturnsFalse() throws Exception {
    assertFalse(IPWithGivenRangeCheck.checkIPv6IsInRange(
      "2002:db8:85a3::8a03:a:b", "2001:db8:85a3::8a00:ff:ffff", "2001:db8:85a3::8a2e:370:7334"));
}

5. Using Java's InetAddress Class for IPv4

IPv4 address is a sequence of four 1-byte values. Hence, it can be converted to a 32-bit integer. We can check if it falls under the given range.

Java's InetAddress class represents an IP address and provides methods to get the IP for any given hostnames. An instance of InetAddress represents the IP address with its corresponding hostname.

Here's the Java code to convert an IPv4 address into a long integer:

long ipToLongInt (InetAddress ipAddress) {
    long resultIP = 0;
    byte[] ipAddressOctets = ipAddress.getAddress();
    for (byte octet : ipAddressOctets) {
        resultIP <<= 8;
        resultIP |= octet & 0xFF;
    }
    return resultIP;
}

By using the above method, let's check for IP is in the range:

public static boolean checkIPv4IsInRangeByConvertingToInt (String inputIP, String rangeStartIP, String rangeEndIP) 
  throws UnknownHostException {
    long startIPAddress = ipToLongInt(InetAddress.getByName(rangeStartIP));
    long endIPAddress = ipToLongInt(InetAddress.getByName(rangeEndIP));
    long inputIPAddress = ipToLongInt(InetAddress.getByName(inputIP));
    return (inputIPAddress >= startIPAddress && inputIPAddress <= endIPAddress);
}

The getByName() method in InetAddress class takes either domain name or IP address as input and throws UnknownHostException if it's invalid. Let's check our code by running unit tests:

@Test
void givenIPv4Addresses_whenIsInRange_thenReturnsTrue() throws Exception {
    assertTrue(IPWithGivenRangeCheck.checkIPv4IsInRangeByConvertingToInt("192.220.3.0", "192.210.0.0", "192.255.0.0"));
}
@Test
void givenIPv4Addresses_whenIsNotInRange_thenReturnsFalse() throws Exception {
    assertFalse(IPWithGivenRangeCheck.checkIPv4IsInRangeByConvertingToInt("192.200.0.0", "192.210.0.0", "192.255.0.0"));
}

The above logic of converting an IP address to an integer also applies to IPv6, but it's a 128-bit integer. Java language supports a maximum of 64-bit (long integer) in primitive data types. If we have to apply the above logic for version 6, we need to use either two long integers or BigInteger class for computations. But it would be a tedious process and also involves complex calculations.

6. Java IPv6 Library

Java IPv6 library is written especially for IPv6 support in Java and to perform related operations on it. This library internally uses two long integers to store the IPv6 address. And it requires at least Java 6 to work.

We need the java-ipv6 dependency to be added to our pom.xml:

<dependency>
    <groupId>com.googlecode.java-ipv6</groupId>
    <artifactId>java-ipv6</artifactId>
    <version>0.17</version>
</dependency>

The library provides various classes to operate with IPv6 addresses. Here are the two of them which help us to solve our problem:

  • IPv6Address, for expressing IPv6 as a Java instance
  • IPv6AddressRange, for representing a continuous range of consecutive IPv6 addresses

Let's look at the code snippet that uses the above classes to check IP is in the given range:

public static boolean checkIPv6IsInRangeByIPv6library (String inputIP, String rangeStartIP, String rangeEndIP) {
    IPv6Address startIPAddress = IPv6Address.fromString(rangeStartIP);
    IPv6Address endIPAddress = IPv6Address.fromString(rangeEndIP);
    IPv6AddressRange ipRange = IPv6AddressRange.fromFirstAndLast(startIPAddress, endIPAddress);
    IPv6Address inputIPAddress = IPv6Address.fromString(inputIP);
    return ipRange.contains(inputIPAddress);
}

IPv6Address class gives us various static functions to construct its instance:

  • fromString
  • fromInetAddress
  • fromBigInteger
  • fromByteArray
  • fromLongs

All the above methods are self-explanatory, which helps us to create an IPv6Address instance. IPv6AddressRange has a method named fromFirstAndLast() that takes two IP addresses as input. In addition, it provides a contains() method that takes an IPv6Address as a parameter and determines if it is present in the specified range or not.

By calling the above method we defined, let's pass few sample inputs in our tests:

@Test
void givenIPv6Addresses_whenIsInRange_thenReturnsTrue() throws Exception {
    assertTrue(IPWithGivenRangeCheck.checkIPv6IsInRangeByIPv6library(
      "fe80::226:2dff:fefa:dcba",
      "fe80::226:2dff:fefa:cd1f",
      "fe80::226:2dff:fefa:ffff"
    ));
}
@Test
void givenIPv6Addresses_whenIsNotInRange_thenReturnsFalse() throws Exception {
    assertFalse(IPWithGivenRangeCheck.checkIPv6IsInRangeByIPv6library(
      "2002:db8:85a3::8a03:a:b",
      "2001:db8:85a3::8a00:ff:ffff",
      "2001:db8:85a3::8a2e:370:7334"
    ));
}

7. Conclusion

In this article, we examined how we can determine whether the given IP address (both v4 and v6) is in the specified range or not. With the help of various libraries, we analyzed checking the IP address presence without any complex logic and computations.

As always, the code snippets of this article can be found over on GitHub.

The post Find Whether an IP Address Is in the Specified Range or Not in Java first appeared on Baeldung.
       

CQL Data Types

$
0
0

1. Overview

In this tutorial, we'll show some of the different data types of the Apache Cassandra database. Apache Cassandra supports a rich set of data types, including collection types, native types, tuple types, and user-defined types.

The Cassandra Query Language (CQL) is a simple alternative to Structured Query Language (SQL). It is a declarative language developed to provide communication with its database. Similar to SQL, CQL also stores data in tables and organizes data into rows and columns.

2. Cassandra Database Configuration

Let's create a database using a docker image and connect it to the database using cqlsh. Next, we should create a keyspace:

CREATE KEYSPACE baeldung WITH replication = {'class':'SimpleStrategy', 'replication_factor' : 1};

For the purposes of this tutorial, we created a keyspace with only one copy of the data. Now, let's connect the client session to a keyspace:

USE <code class="language-shell">baeldung;

3. Built-in Data Types

CQL supports a rich set of native data types. These data types come pre-defined, and we can directly refer to any of them.

3.1. Numeric Types

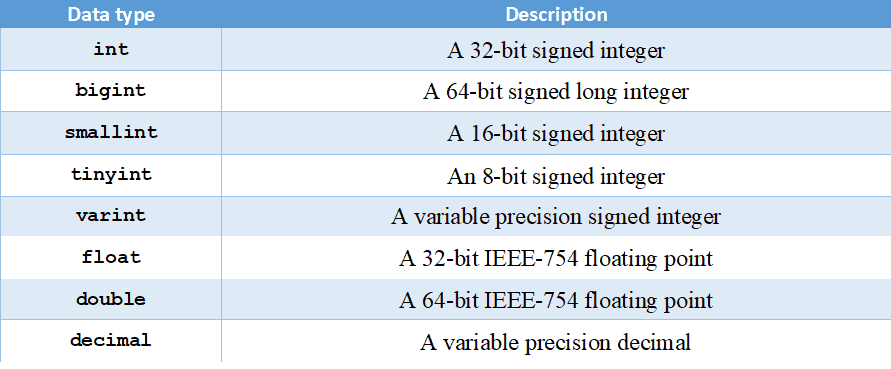
Numeric types are similar to standard types in Java and other languages such as integers or floating-point numbers with different ranges:

Let's create a table with all these data types:

CREATE TABLE numeric_types
(
    type1 int PRIMARY KEY,
    type2 bigint,
    type3 smallint,
    type4 tinyint,
    type5 varint,
    type6 float,
    type7 double,
    type8 decimal
);

3.2. Text Types

CQL provides two data types for representing text. We can use text or varchar to create a UTF-8 character string. UTF-8 is the more recent and widely used text standard and supports internationalization.

There is also the ascii type to create an ASCII character string. The ascii type is most useful if we are dealing with legacy data that is in ASCII format. The size of the text values ​​is limited by the maximum size of the column. The single-column value size is 2 GB, but recommended is only 1 MB.

Let's create a table with all these data types:

CREATE TABLE text_types
(
    primaryKey int PRIMARY KEY,
    type2      text,
    type3      varchar,
    type4      ascii
);

3.3. Date Types

Now, let's talk about date types. Cassandra provides several types which prove quite useful in defining unique partition keys or define ordinary columns:


timeuuid is represented by UUID version 1. We can input integer or string to CQL timestamp, time, and date. Values of the duration type are encoded as 3 signed integers.

The first integer represents the number of months, the second the number of days, and the third the number of nanoseconds.

Let's see an example of create table command:

CREATE TABLE date_types
(
    primaryKey int PRIMARY KEY,
    type1      timestamp,
    type2      time,
    type3      date,
    type4      timeuuid,
    type5      duration
);

3.4. Counter Type

The counter type is used to define counter columns. A counter column is a column whose value is a 64-bit signed integer. We can only perform two operations on the counter column – incrementing and decrementing.

Therefore, we can't set the value to the counter. We can use counters for tracking statistics such as numbers of page views, tweets, log messages, and so on. We can't mix the counter type with other types.

Let's see an example:

CREATE TABLE counter_type
(
    primaryKey uuid PRIMARY KEY,
    type1      counter
);

3.5. Other Data Types

  • boolean is a simple true/false value
  • uuid is a Type 4 UUID, which is based entirely on random numbers. We can input UUIDs by using dash-separated sequences of hex digits
  • A binary large object (blob) is a colloquial computing term for an arbitrary array of bytes. The CQL blob type stores media or other binary file types. The maximum blob size is 2 GB, but less than 1 MB is recommended.
  • inet is the type that represents IPv4 or IPv6 Internet addresses

Again, let's create a table with these types:

CREATE TABLE other_types
(
    primaryKey int PRIMARY KEY,
    type1      boolean,
    type2      uuid,
    type3      blob,
    type4      inet
);

4. Collection Data Types

Sometimes we want to store data of the same type without generating new columns. Collections can store multiple values. CQL provides three collection types to help us such as lists, sets, and maps.

For instance, we can create a table having a list of textual elements, a list of integers, or a list of some other element types.

4.1. Set

We can store multiple unique values using the set data type. Likewise, in Java, the elements are not stored in order.

Let's create a set:

CREATE TABLE collection_types
(
    primaryKey int PRIMARY KEY,
    email      set<text>
);

4.2. List

In this data type, the values are stored in the form of a list. We can't change the order of the elements. After storing the values in the list, the elements get a particular index. We can retrieve data by using these indexes.

Unlike sets, lists can store duplicate values. Let's add a list to our table:

ALTER TABLE collection_types
    ADD scores list<text>;

4.3. Map

Using Cassandra, we can store data in sets of key-value pairs using the map data type. Keys are unique. Because of that, we can sort maps by their keys.

Let's add another column to our table:

ALTER TABLE collection_types
    ADD address map<uuid, text>;

5. Tuples

Tuples are a set of different types of elements. These sets have a fixed length:

CREATE TABLE tuple_type
(
    primaryKey int PRIMARY KEY,
    type1 tuple<int, text, float>
);

6. User-Defined Data Types

Cassandra provides the possibility for creating our own data types. We can create, modify and remove these data types. Firstly, let's create our own type:

CREATE TYPE user_defined_type (
    type1 timestamp,
    type2 text,
    type3 text,
    type4 text);

So, now we can create a table with our type:

CREATE TABLE user_type
(
    primaryKey int PRIMARY KEY,
    our_type   user_defined_type
);

7. Conclusion

In this quick tutorial, we explored the basic CQL data types. In addition, we created tables with these data types. After that, we talked about what kind of data they can store.

As always, the full source code of the article is available over on GitHub.

The post CQL Data Types first appeared on Baeldung.
       

Architecture of a Geospatial Application with Java

$
0
0

1. Introduction

In this article, we'll understand the core architecture and important elements of a geospatial application. We'll begin by understanding what a geospatial application is and typical challenges in building one.

One of the important aspects of a geospatial application is representing useful data on intuitive maps. Although, in this article, we'll mostly focus on handling geospatial data at the backend and the options available to us in the industry today.

2. What Are Geospatial Applications?

Let's begin by understanding what we mean by a geospatial application. These are basically applications that make use of geospatial data to deliver their core features.

In simple terms, geospatial data are any data that represent places, locations, maps, navigation, and so on. Even without any fancy definition, we're quite surrounded by these applications. For instance, our favorite ride-sharing applications, food-delivery applications, and movie-booking applications are all geospatial applications.

Geospatial data is basically information that describes objects, events, or other features with a location on or near the earth's surface. For instance, think of an application that can suggest to us the nearest theaters playing our favorite Shakespeare plays in the evening today. It can do so by combining the location information of theaters with the attribute information of the plays and the temporal information of the events.

There are several other useful applications of geospatial data that deliver day-to-day value to us — for example, when we try to locate a cab nearby at any hour of the day that is willing to take us to our destination. Or when we can't wait for that important shipment to arrive and, thankfully, can locate where exactly it is in transit.

In fact, this has become a fundamental requirement of several applications that we use quite often these days.

3. Geospatial Technologies

Before we understand the nuances of building a geospatial application, let's go through some of the core technologies that empower such applications. These are the underlying technologies that help us generate, process, and present geospatial data in a useful form.

Remote Sensing (RS) is the process of detecting and monitoring the physical characteristics of an area by measuring its reflected and emitted radiation at a distance. Typically this is done using remote sensing satellites. It has significant usage in the fields of surveying, intelligence, and also commercial applications.

Global Positioning Systems (GPS) refers to a satellite-based navigation system based on a network of 24 satellites flying in the Medium Earth Orbit (MEO). It can provide geolocation and time information to a suitable receiver anywhere on the Earth where it has an unobstructed line-of-sight to four or more GPS satellites.

Geographic Information Systems (GIS) is a system that creates, manages, analyzes, and maps all types of data. For instance, it helps us to integrate location data with more descriptive information like what is present in that location. It helps improve communication and decision-making in several industries.

4. Challenges in Building a Geospatial Application

To understand what design choices we should make when building a geospatial application, it's important to know the challenges involved. Typically, geospatial applications require real-time analysis of a large volume of geospatial data. For instance, finding the quickest alternate route to a recent hit place with a natural disaster is crucial for first responders.

So basically, one of the underpinning requirements of a geospatial application is storing tons of geospatial data and facilitating arbitrary queries with very low latency. Now, it's also important to understand the nature of spatial data and why it requires special handling. Basically, spatial data represents objects defined in geometric space.

Let's imagine that we have several locations of interest around a city. A location is typically described by its latitude, longitude, and (possibly) elevation:

Now, what we're really interested in is to find the nearby locations to a given location. So, we need to compute the distance from this location to all the possible locations. Such queries are quite atypical of regular database queries we're familiar with. These are known as spatial queries. They involve geometric data types and consider the spatial relationship between these geometries.

We already know that no production database would probably survive without efficient indices. That's also true for spatial data. However, due to its nature, regular indices would not be very efficient for spatial data and the types of spatial queries we want to perform. Hence, we need specialized indices known as spatial indices that can help us perform spatial operations more efficiently.

5. Spatial Data Types and Queries

Now that we understand the challenges in dealing with spatial data, it's important to note several types of spatial data. Moreover, we can perform several interesting queries on them to serve unique requirements. We'll cover some of these data types and the operations we can perform on them.

We normally talk about spatial data with respect to a spatial reference system. This is composed of a coordinate system and a datum. There are several coordinate systems like affine, cylindrical, cartesian, ellipsoidal, linear, polar, spherical, and vertical. A datum is a set of parameters that define the position of the origin, the scale, and the orientation of a coordinate system.

Broadly speaking, many databases supporting spatial data divide them into two categories, geometry and geography:

Geometry stores spatial data on a flat coordinate system. This helps us represent shapes like points, lines, and regions with their coordinates in cartesian space. Geography stores spatial data based on a round-earth coordinate system. This is useful in representing the same shapes on the surface of the Earth with latitude and longitude coordinates.

There are two fundamental types of inquiry we can make with spatial data. These are basically to find nearest neighbors or to send different types of range queries. We've already seen examples of queries to find the nearest neighbors earlier. The general idea is to identify a certain number of items nearest to a query point.

The other important type of query is the range query. Here, we're interested to know all the items that fall within a query range. The query range can be a rectangle or a circle with a certain radius from a query point. For instance, we can use this kind of query to identify all Italian restaurants within a two-mile radius from where we're standing.

6. Data Structures for Spatial Data

Now, we'll understand some of the data structures that are more appropriate for building spatial indices. This will help us understand how they are different from regular indices and why they're more efficient in handling spatial operations. Invariably, almost all these data structures are variations of the tree data structure.

6.1. Regular Database Index

A database index is basically a data structure that improves the speed of data retrieval operations. Without an index, we would have to go through all the rows to search for the row we're interested in. But, for a table of significant size, even going through the index can take a significant amount of time.

However, it's important to reduce the number of steps to fetch a key and reduce the number of disk operations to do so. A B-tree or a balanced tree is a self-balancing tree data structure that stores several sorted key-value pairs in every node. This helps pull a larger set of keys in the processor cache in a single read operation from the disk.

While a B-tree works pretty well, generally, we use a B+tree for building a database index. A B+tree is very similar to a B-tree except for the fact that it stores values or data only at the leaf nodes:

Here, all the leaf nodes are also linked and, hence, provide ordered access to the key-value pairs. The benefit here is that the leaf nodes provide the first level of the index, while the internal nodes provide a multilevel index.

A regular database index focuses on ordering its keys on a single dimension. For instance, we can create an index on one of the attributes like zip code in our database table. This will help us to query all locations with a certain zip code or within a range of zip codes.

6.2. Spatial Database Index

In geospatial applications, we're often interested in nearest neighbor or range queries. For instance, we may want to find all locations within 10 miles of a particular point. A regular database index does not prove to be very useful here. In fact, there are other more suitable data structures to build spatial indices.

One of the most commonly used data structures is the R-tree. The R-tree was first proposed by Antonin Guttman in 1984 and is suitable for storing spatial objects like locations. The fundamental idea behind R-tree is to group nearby objects and represent them with their minimum bounding rectangle in the next higher level of the tree:

For most operations, an R-tree is not very different from a B-tree. The key difference is in using the bounding rectangles to decide whether to search inside a subtree or not. For better performance, we should ensure that rectangles don't cover too much empty space and that they don't overlap too much. Most interestingly, an R-tree can extend to cover three or even more dimensions!

Another data structure for building a spatial index is the Kd-tree, which is a slight variation of the R-tree. The Kd-tree splits the data space into two instead of partitioning it into multiple rectangles. Hence, the tree nodes in a Kd-tree represent separating planes and not bounding boxes. While Kd-tree proves to be easier to implement and is faster, it's not suitable for data that is always changing.

The key idea behind these data structures is basically partitioning data into axis-aligned regions and storing them in tree nodes. In fact, there are quite a few other such data structures that we can use, like BSP-tree and R*-tree.

7. Databases with Native Support

We've already seen how spatial data differ from regular data and why they need special treatment. Hence, what we require to build a geospatial application is a database that can natively support storing spatial data types and that can perform spatial queries efficiently. We refer to such a database management system as a spatial database management system.

Almost all mainstream databases have started to provide some level of support for spatial data. This includes some popular database management systems like MySQL, Microsoft SQL Server, PostgreSQL, Redis, MongoDB, Elasticsearch, and Neo4J. However, there are some purpose-built spatial databases available as well, such as GeoMesa, PostGIS, and Oracle Spatial.

7.1. Redis

Redis is an in-memory data structure store that we can use as a database, a cache, or a message broker. It can minimize the network overhead and latency as it performs operations efficiently in memory. Redis supports various data structures like Hash, Set, Sorted Set, List, and String. Of particular interest for us are Sorted Sets that add an ordered view to members, sorted by scores.

Geospatial indexing is implemented in Redis using Sorted Sets as the underlying data structure. Redis actually encodes the latitude and longitude into the score of the Sorted Set using the geohash algorithm. Geo Set is the key data structure implemented with a Sorted Set and supports geospatial data in Redis at a more abstract level.

Redis provides simple commands to work with the geospatial index and perform common operations like creating new sets and adding or updating members in the set. For instance, to create a new set and add members to it from the command line, we can use the GEOADD command:

GEOADD locations 20.99 65.44 Vehicle-1 23.99 55.45 Vehicle-2

Here, we're adding the location of a few vehicles to a Geo Set called “locations”.

Redis also provides several ways to read the index, like ZRANGE, ZSCAN, and GEOPOS. Further, we can use the command GEODIST to compute the distance between the members in a set. But the most interesting commands are those that allow us to search the index by location. For instance, we can use the command GEORADIUSYMEMBER to search members that are within a radius range of a particular member:

GEORADIUSBYMEMBER locations Vehicle-3 1000 m

Here, we're interested in finding all other vehicles within a one-kilometer radius of the third vehicle.

Redis is quite powerful and simple in providing support for storing a large volume of geospatial data and performing low latency geospatial queries.

7.2. MongoDB

MongoDB is a document-oriented database management system that uses JSON-like documents with an optional schema to store data. It provides several ways to search documents, like field queries, range queries, and regular expressions. We can even index the documents to primary and secondary indices. Moreover, MongoDB with sharding and replication provides high availability and horizontal scalability.

We can store spatial data in MongoDB either as GeoJSON objects or as legacy coordinate pairs. GeoJSON objects are useful for storing location data over an Earth-like surface, whereas legacy coordinate pairs are useful for storing data that we can represent in a Euclidean plane.

To specify the GeoJSON data, we can use an embedded document with a field named type to indicate GeoJSON object type and another field named coordinates to indicate the object's coordinates:

db.vehicles.insert( {
    name: "Vehicle-1",
    location: { type: "Point", coordinates: [ 83.97, 70.77 ] }
} )

Here, we're adding a document in the collection named vehicles. The embedded document is a GeoJSON object of the type Point with its longitude and latitude coordinates.

Further, MongoDB provides multiple geospatial index types like 2dsphere and 2d to support geospatial queries. A 2dsphere supports queries that calculate geometries on an Earth-like sphere:

db.vehicles.createIndex( { location : "2dsphere" } )

Here, we're creating a 2dsphere index on the location field of our collection.

Lastly, MongoDB offers several geospatial query operators to facilitate searching through the geospatial data. Some of the operators are geoIntersects, geoWithin, near, and nearSphere. These operators can interpret geometry on a flat surface or a sphere.

For instance, let's see how we can use the near operator:

db.places.find(
   {
     location:
       { $near:
          {
            $geometry: { type: "Point", coordinates: [ 93.96, 30.78 ] },
            $minDistance: 500,
            $maxDistance: 1000
          }
       }
   }
)

Here, we're searching for documents that are at least 500 meters and at most 1,000 meters from the mentioned GeoJSON Point.

The power of representing JSON-like data with flexible schema, scale efficiency, and inherent support for geospatial data makes MongoDB quite suitable for geospatial applications.

7.3. PostGIS

PostgreSQL is a relational database management system that provides SQL compliance and features ACID transactions. It's quite versatile in supporting a wide variety of workloads. PostgreSQL includes built-in support for synchronous replication and built-in support for regular B-tree and hash table indices. PostGIS is a spatial database extender for PostgreSQL.

Basically, PostGIS adds support for storing geospatial data in PostgreSQL and executing location queries in SQL. It adds geometry types for Points, LineStrings, Polygons, and more. Further, it provides spatial indices using R-tree-over-GiST (Generalized Search Tree). Lastly, it also adds spatial operators for geospatial measurements and set operations.

We can create a database in PostgreSQL as always and enable the PostGIS extension to start using it. Fundamentally, data is stored in rows and columns, but PostGIS introduces a geometry column with data in a specific coordinate system defined by a Spatial Reference Identifier (SRID). PostGIS also adds many options for loading different GIS data formats.

PostGIS supports both geometry and geography data types. We can use regular SQL queries to create a table and insert a geography data type:

CREATE TABLE vehicles (name VARCHAR, geom GEOGRAPHY(Point));
INSERT INTO vehicles VALUES ('Vehicle-1', 'POINT(44.34 82.96)');

Here, we've created a new table “vehicles” and have added the location of a particular vehicle using the Point geometry.

PostGIS adds quite a few spatial functions to perform spatial operations on the data. For instance, we can use spatial function ST_AsText to read geometry data as text:

SELECT name, ST_AsText(geom) FROM vehicles;

Of course, for us, a more useful query is to look for all vehicles in the near vicinity of a given point:

SELECT geom FROM vehicles 
  WHERE ST_Distance( geom, 'SRID=4326;POINT(43.32 68.35)' ) < 1000

Here, we're searching for all vehicles within a one-kilometer radius of the provided point.

PostGIS adds the spatial capabilities to PostgreSQL, allowing us to leverage well-known SQL semantics for spatial data. Moreover, we can benefit from all the advantages of using PostgreSQL.

8. Industry Standards and Specifications

While we've seen that the support for spatial data is growing in the database layer, what about the application layer? For building geospatial applications, we need to write code that is capable of handling spatial data efficiently.

Moreover, we need standards and specifications to represent and transfer spatial data between different components. Further, language bindings can support us in building a geospatial application in a language like Java.

In this section, we'll cover some of the standardization that has taken place in the field of geospatial applications, the standards they have produced, and the libraries that are available for us to use.

8.1. Standardization Efforts

There has been a lot of development in this area, and through the collaborative efforts of multiple organizations, several standards, and best practices have been established. Let's first go through some of the organizations contributing to the advancement and standardization of geospatial applications across different industries.

Environmental Systems Research Institute (ESRI) is perhaps one of the oldest and largest international suppliers of Geographic Information System (GIS) software and geodatabase management applications. They develop a suite of GIS software under the name ArcGIS targeted for multiple platforms like desktop, server, and mobile. It has also established and promotes data formats for both vector and raster data types — for instance, Shapefile, File Geodatabase, Esri Grid, and Mosaic.

Open Geospatial Consortium (OGC) is an international industry consortium of more than 300 companies, government agencies, and universities participating in a consensus process to develop publicly available interface specifications. These specifications enable complex spatial information and services accessible and useful to all kinds of applications. Currently, the OGC standard comprises more than 30 standards, including Spatial Reference System Identifier (SRID), Geography Markup Language (GML), and Simple Features – SQL (SFS).

Open Source Geospatial Foundation (OSGeo) is a non-profit, non-government organization that supports and promotes the collaborative development of open geospatial technologies and data. It promotes geospatial specifications like Tile Map Service (TMS). Moreover, it also helps in the development of several geospatial libraries like GeoTools and PostGIS. It also works on applications like QGIS, a desktop GIS for data viewing, editing, and analysis. These are just a  few of the projects that OSGeo promotes under its umbrella.

8.2. Geospatial Standards: OGC GeoAPI

The GeoAPI Implementation Standard defines, through the GeoAPI library, a Java language API including a set of types and methods that we can use to manipulate geographic information. The underlying structure of the geographic information should follow the specification adopted by the Technical Committee 211 of the International Organization for Standardization (ISO) and by the OGC.

GeoAPI provides Java interfaces that are implementation neutral. Before we can actually use GeoAPI, we have to pick from a list of third-party implementations. We can perform several geospatial operations using the GeoAPI. For instance, we can get a Coordinate Reference System (CRS) from an EPSG code. Then, we can perform a coordinate operation like map projection between a pair of CRSs:

CoordinateReferenceSystem sourceCRS = 
  crsFactory.createCoordinateReferenceSystem("EPSG:4326");  // WGS 84
CoordinateReferenceSystem targetCRS = 
  crsFactory.createCoordinateReferenceSystem("EPSG:3395");  // WGS 84 / World Mercator
CoordinateOperation operation = opFactory.createOperation(sourceCRS, targetCRS);
double[] sourcePt = new double[] {
  27 + (59 + 17.0 / 60) / 60,         // 27°59'17"N
  86 + (55 + 31.0 / 60) / 60          // 86°55'31"E
};
double[] targetPt = new double[2];
operation.getMathTransform().transform(sourcePt, 0, targetPt, 0, 1);

Here, we're using the GeoAPI to perform a map projection to transform a single CRS point.

There are several third-party implementations of GeoAPI available as wrappers around existing libraries — for instance, NetCDF Wrapper, Proj.6 Wrapper, and GDAL Wrapper.

8.3. Geospatial Libraries: OSGeo GeoTools

GeoTools is an OSGeo project that provides an open-source Java library for working with geospatial data. The GeoTools data structure is basically based on the OGC specifications. It defines interfaces for key spatial concepts and data structures. It also comes with a data access API supporting feature access, a stateless low memory rendered, and a parsing technology using XML schema to bind to GML content.

To create geospatial data in GeoTools, we need to define a feature type. The simplest way is to use the class SimpleFeatureType:

SimpleFeatureTypeBuilder builder = new SimpleFeatureTypeBuilder();
builder.setName("Location");
builder.setCRS(DefaultGeographicCRS.WGS84);
builder
  .add("Location", Point.class);
  .length(15)
  .add("Name", String.class);
SimpleFeatureType VEHICLE = builder.buildFeatureType();

Once we have our feature type ready, we can use this to create the feature with SimpleFeatureBuilder:

SimpleFeatureBuilder featureBuilder = new SimpleFeatureBuilder(VEHICLE);
DefaultFeatureCollection collection = new DefaultFeatureCollection();
GeometryFactory geometryFactory = JTSFactoryFinder.getGeometryFactory(null);

We're also instantiating the collection to store our features and the GeoTools factory class to create a Point for the location. Now, we can add specific locations as features to our collection:

Point point = geometryFactory.createPoint(new Coordinate(13.46, 42.97));
featureBuilder.add(point);
featureBuilder.add("Vehicle-1");
collection.add(featureBuilder.buildFeature(null))

This is just scratching the surface of what we can do with the GeoTools library. GeoTools provides support for working with both vector and raster data types. It also allows us to work with data in a standard format like shapefile.

9. Conclusion

In this tutorial, we went through the basics of building a geospatial application. We discussed the nature of and challenges in building such an application. This helped us understand the different types of spatial data and data structures we can make use of.

Further, we went through some of the open-source databases with native support for storing spatial data, building spatial indices, and performing spatial operations. Lastly, we also covered some of the industry collaborations driving the standardization efforts in geospatial applications.

The post Architecture of a Geospatial Application with Java first appeared on Baeldung.
       

Linking to an External URL in Javadoc

$
0
0

1. Introduction

While writing our code, we might refer to articles on the internet like wiki pages, guides, or official documentation of a library. It could be a good idea to add the links to such reference articles in the Javadoc.

In this tutorial, we'll learn how to reference an external URL in Javadoc.

2. Creating an In-Line Link

Java does not offer any special tools for external links, but we can just use standard HTML. The following syntax is used to create an in-line link:

/**
 * Some text <a href="URL#value">label</a> 
 */

Here, the URL#value can be a relative or absolute URL.

Let's consider an example:

/** 
 * Refer to <a href="http://www.baeldung.com">Baeldung</a> 
 */

This will render as:

Refer to Baeldung

3. Creating an In-line Link With a Heading

Another way is to create a heading containing the link. The @see tag is used as follows to achieve this:

/**
 * @see <a href="URL#value">label</a>
 */

Consider the following example:

/**
 * @see <a href="http://www.baeldung.com">Baeldung</a> 
 */

This will create a ‘See Also' heading containing the link:
See Also:
Baeldung

4. Creating a Link to Javadoc of Another Class

The @link tag is specifically used to link to the Javadoc of other classes and methods. This is an inline tag that converts to an HTML hyperlink pointing to the documentation of the given class or method reference:

{@link <class or method reference>}

Suppose we have a class DemoOne containing a method demo:

/** 
 * Javadoc
 */
class DemoOne {
  
  /**
   * Javadoc
  */
  void demo() {
    //some code
  }
}

Now, we can link to the Javadoc of the above class and method from another class, in the following ways:

/** 
 * See also {@link org.demo.DemoOne}
 */
/**
 * See also {@link org.demo.DemoOne#demo()}
 */

This tag can be used anywhere that a comment can be written, while @see creates its own section.

To summarize, @link is preferred when we use a class or method name in the description. On the other hand, @see is used when a relevant reference is not mentioned in the description or as a replacement for multiple links to the same reference.

5. Conclusion

In this article, we learned about the ways to create an external link in Javadoc. We also looked at the difference between the @see and @link tags.

The post Linking to an External URL in Javadoc first appeared on Baeldung.
       

Java Weekly, Issue 396

$
0
0

1. Spring and Java

>> Is Java 17 a Glass Half Full? [infoq.com]

Java's 6-month cadence dilemma – should we be pessimistic about these, sometimes, modest releases, or is this yet another “glass half full” aspect of the release cycle?

>> Introduction to Panache [thorben-janssen.com]

Meet Panache – a Quarkus-specific library to implement the repository and active record patterns pretty easily in Java.

>> Implementing Retry with Resilience4j and Spring Boot [reflectoring.io]

How to retry failed operations in a variety of ways with the help of Resilience4j – short and yet practical!

Also worth reading:

Webinars and presentations:

Time to upgrade:

2. Technical & Musings

>> Apache Cassandra 4.0 is Here [cassandra.apache.org]

A major Cassandra release after six years: Java 11 support, virtual tables, auditing, full query logging, transient replication, and many more improvements.

Also worth reading:

3. Comics

And my favorite Dilberts of the week:

>> Ted's Long Email [dilbert.com]

>> Wally Will Be In Charge [dilbert.com]

>> One On One Meetings [dilbert.com]

4. Pick of the Week

>> Modern-Day Architecture Design Patterns for Software Professionals [betterprogramming.pub]

The post Java Weekly, Issue 396 first appeared on Baeldung.
       

Comments in a Jenkinsfile

$
0
0

1. Overview

In this tutorial, we'll see how we can use comments in Jenkinsfile. We will cover different types of comments and their syntax.

2. Comments in a Jenkinsfile

The syntax of Jenkinsfile is based on Groovy, so it's possible to use Groovy syntax for comments. Let's take a simple example of Pipeline Linter and try to comment it out.

2.1. Single-Line Comments

Single-line comments in Jenkinsfile are the same as we see in popular languages like Java, C++, and C#.

They start with two forward slashes (//). Any text between // and the end of the line is commented and ignored in Jenkinsfile.

Let's use single-line comments to comment out a basic pipeline definition:

//pipeline {
//    agent any
//    stages {
//        stage('Initialize') {
//            steps {
//                echo 'Hello World'
//            }
//        }
//    }
//}

2.2. Block Comments

Block comments in Jenkinsfile are used to comment out a block of code. Again, the pattern is similar to Java and C++.

A block comment starts with a forward-slash followed by an asterisk (/*) and ends with an asterisk followed by a forward-slash (*/). The beginning (/*) and ending (*/) characters will be added to the appropriate places to mark the selected block as a comment.

In this example, we'll use block comments to comment out the pipeline definition:

/*
pipeline {
    agent any
    stages {
        stage('Initialize') {
            steps {
                echo 'Placeholder.'
            }
        }
    }
}
*/

2.3. Comments in Shell Script

While inside of a shell (sh) section, we'll be using the shell comment character, hash (#), for commenting:

pipeline {
    agent any
    stages {
        stage('Initialize') {
            steps {
                sh '''
                cd myFolder
                # This is a comment in sh & I am changing the directory to myFolder
                '''
            }
        }
    }
}

3. Conclusion

In this short article, we covered different types of comments in a Jenkinsfile. First, we looked at single-line comments. Next, we saw how to use block comments. Finally, we showed how to add comments within a shell section of a Jenkinsfile.

The post Comments in a Jenkinsfile first appeared on Baeldung.

Calling a SOAP Web Service from the Command Line

$
0
0

1. Overview

In this tutorial, we're going to show how we can use different command-line interface (CLI) processes to consume a SOAP web service.

2. SOAP Web Service

To run the examples in this post, we'll use the SOAP web service developed in a previous article. In a nutshell, this service has an endpoint that clients can access, providing a country name in the request. The service replies with the name of the country's capital, population, and currency.

3. cURL

Let's start with cURL because it's probably the most widely used command-line tool for transferring data via network protocols. To test a SOAP web service, we just need to make HTTP requests with a SOAP envelope in the request body.

For our web service, a simple HTTP POST request is:

curl -v --request POST --header "Content-Type: text/xml;charset=UTF-8" \
--data \
'<soapenv:Envelope xmlns:soapenv="http://schemas.xmlsoap.org/soap/envelope/" xmlns:gs="http://www.baeldung.com/springsoap/gen"> \
<soapenv:Header/> \ 
<soapenv:Body> \ 
<gs:getCountryRequest> <gs:name>Poland</gs:name> </gs:getCountryRequest> \ 
</soapenv:Body> \ 
</soapenv:Envelope>' \
http://localhost:8080/ws

We don't need to specify that we're using HTTP because it's the default protocol in cURL. Since we're testing the request, we use the verbose mode via the -v option.

Inside the SOAP envelope, we specify the country (Poland) and finish the command with the SOAP server URL. We have installed the server locally on our computer, using the example from our earlier article.

Since we're using the -v option, we get a detailed response:

* Connected to localhost (::1) port 8080 (#0)
> POST /ws HTTP/1.1
> Host: localhost:8080
> User-Agent: curl/7.55.1
> Accept: */*
> Content-Type: text/xml;charset=UTF-8
> Content-Length: 282
>
* upload completely sent off: 282 out of 282 bytes
< HTTP/1.1 200
< Accept: text/xml, text/html, image/gif, image/jpeg, *; q=.2, */*; q=.2
< SOAPAction: ""
< Content-Type: text/xml;charset=utf-8
< Content-Length: 407
< Date: Sun, 18 Jul 2021 23:46:38 GMT
<
<SOAP-ENV:Envelope xmlns:SOAP-ENV="http://schemas.xmlsoap.org/soap/envelope/"><SOAP-ENV:Header/><SOAP-ENV:Body><ns2:getCountryResponse xmlns:ns
2="http://www.baeldung.com/springsoap/gen"><ns2:country><ns2:name>Poland</ns2:name><ns2:population>38186860</ns2:population><ns2:capital>Warsaw
</ns2:capital><ns2:currency>PLN</ns2:currency></ns2:country></ns2:getCountryResponse></SOAP-ENV:Body></SOAP-ENV:Envelope>* Connection #0 to hos
t localhost left intact

The request and response messages for SOAP web services can be long, so it's more convenient to store them in files. If we save the request body in request.xml and redirect the output of the response to the file response.xml, the command, in this case, is very simple:

curl --header "Content-Type: text/xml;charset=UTF-8" -d @request.xml -o response.xml http://localhost:8080/ws

In general, it's not necessary to specify POST in the command as we did before because it's inferred by cURL.

If we need to read the response in the terminal, it's best to pipe the command with xmllint to get the XML response properly formatted:

curl --request POST --header "Content-Type: text/xml;charset=UTF-8" -d @request.xml http://localhost:8080/ws | xmllint --format -
  % Total    % Received % Xferd  Average Speed   Time    Time     Time  Current
                                 Dload  Upload   Total   Spent    Left  Speed
100   725  100   407  100   318    407    318  0:00:01 --:--:--  0:00:01 15425<?xml version="1.0"?>
<SOAP-ENV:Envelope xmlns:SOAP-ENV="http://schemas.xmlsoap.org/soap/envelope/">
  <SOAP-ENV:Header/>
  <SOAP-ENV:Body>
    <ns2:getCountryResponse xmlns:ns2="http://www.baeldung.com/springsoap/gen">
      <ns2:country>
        <ns2:name>Poland</ns2:name>
        <ns2:population>38186860</ns2:population>
        <ns2:capital>Warsaw</ns2:capital>
        <ns2:currency>PLN</ns2:currency>
      </ns2:country>
    </ns2:getCountryResponse>
  </SOAP-ENV:Body>
</SOAP-ENV:Envelope>

4. Wget

Let's make the same request using Wget:

wget --post-file=request.xml --header="Content-Type: text/xml" http://localhost:8080/ws -O response.xml

The response is:

Resolving localhost (localhost)... ::1, 127.0.0.1
Connecting to localhost (localhost)|::1|:8080... connected.
HTTP request sent, awaiting response... 200
Length: 407 [text/xml]
Saving to: ‘response.xml’

The syntax is similar to cURL, and we can have the request and response bodies stored in files as before.

5. HTTPie

Wget and cURL are very useful commands to quickly test a SOAP server. They're available with all major OS distributions. They can also be easily integrated with shell scripts.

The advantage of HTTPie is that it provides a very intuitive way to interact with Web Services. As stated in the documentation: “HTTPie is designed for testing, debugging, and generally interacting with APIs & HTTP servers. They use simple and natural syntax and provide formatted and colorized output.”

Let's issue the simple request we did before, this time using HTTPie:

echo '<soapenv:Envelope xmlns:soapenv="http://schemas.xmlsoap.org/soap/envelope/" xmlns:gs="http://www.baeldung.com/springsoap/gen"> \
<soapenv:Header/> \ 
<soapenv:Body> \ 
<gs:getCountryRequest> <gs:name>Poland</gs:name> </gs:getCountryRequest> \ 
</soapenv:Body> \ 
</soapenv:Envelope>' | \
http -b POST http://localhost:8080/ws 'Content-Type:text/xml'

If we want to extract the request body from a file:

http -b POST http://localhost:8080/ws 'Content-Type:text/xml' < request.xml

It's as simple as using file input redirection.

For more details on how to use HTTPie, refer to the documentation.

6. Summary

We've seen simple examples of how to quickly call a SOAP Web Service from the command line using cURL, Wget, and HTTPie. We also have done a brief comparison of the three tools and when to use them.

The post Calling a SOAP Web Service from the Command Line first appeared on Baeldung.
       

Default Values for Maven Properties

$
0
0

1. Overview

Apache Maven is a powerful build automation tool used primarily for Java projects. Maven uses a Project Object Model or POM which contains information about the project and configuration details to build the project. Inside the POM, we are able to define properties that can be used in the POM itself or any child POM in a multi-module configured project.

Maven properties allow us to define values in one place and use them in several different locations within our project definition.

In this short article, we'll go through how to configure default values, and then how to use them.

2. Default Values in the POM

Most commonly, we define default values for Maven properties in the POM – to demonstrate this, we'll create a property that holds a default value for a library dependency. Let's start by defining the property and its default value in the POM:

<properties>
    <junit.version>4.13</junit.version>
</properties>

In this example, we've created a property called junit.version and assigned a default value of 4.13.

3. Default Values in settings.xml

We can also define Maven properties in a user's settings.xml. This is useful if users need to set their own default values for a property. We define properties and their values in settings.xml in the same way we define them in the POM.

We find settings.xml in the .m2 directory within a user's home directory.

4. Default Values on the Command Line

We can define default values for properties on the command line when executing a Maven command. In this example, we're changing the default value of 4.13 to 4.12:

mvn install -Djunit.version=4.12

5. Using Properties in the POM

We can reference our default property values elsewhere in the POM, so let's go ahead and define the junit dependency and use our property to retrieve the version number:

<dependencies>
    <dependency>
        <groupId>junit</groupId>
        <artifactId>junit</artifactId>
        <version>${junit.version}</version>
    </dependency>
</dependencies>

We're referencing the value junit.version through use of the ${junit.version} syntax.

6. Conclusion

In this short article, we've seen how to define default values for Maven properties in three different ways, and as we can see, they are useful in allowing us to re-use the same value in various places whilst only needing to manage it in a single place.

As always, the example code can be found over on GitHub.

The post Default Values for Maven Properties first appeared on Baeldung.
       

Setting Up a Jenkins Slave Node

$
0
0

1. Overview

In this tutorial, we'll go over the concept of distributed builds in Jenkins Architecture. Furthermore, we'll learn how we can configure Jenkins master-slave architecture. Additionally, we'll build a pipeline on Jenkins master to run build jobs on the slave nodes.

2. Distributed Builds

Ideally, the machine where we install standard Jenkins will be our Jenkins master. On the slave node machine, we will install a runtime program called Agent. Installing Agent will not be a standard Jenkins install, but this Agent will run on the JVM. It is capable enough to run the subtask or main task of Jenkins in a dedicated executor:

Distributed Build

We can have any number of Agent nodes or slave nodes. Further, we can configure the master node to decide which task or job should run on which agent and how many executor agents we can have. The communication between master and Jenkins slave nodes is bi-directional and takes place over TCP/IP.

3. Configuring Jenkins Master and Slave Nodes

The standard Jenkins installation includes Jenkins master, and in this setup, the master will be managing all our build system's tasks. If we're working on a number of projects, we can run numerous jobs on each one. Some projects require the use of specific nodes, which necessitates the use of slave nodes.

The Jenkins master is in charge of scheduling jobs, assigning slave nodes, and sending builds to slave nodes for execution. It will also keep track of the slave node state (offline or online), retrieve build results from slave nodes, and display them on the terminal output. In most installations, multiple slave nodes will be assigned to the task of building jobs.

Before we get started, let's double-check that we have all of the prerequisites in place for adding a slave node:

  • Jenkins Server is up and running and ready to use
  • Another server for a slave node configuration
  • The Jenkins server and the slave server are both connected to the same network

To configure the Master server, we'll log in to the Jenkins server and follow the steps below.

First, we'll go to “Manage Jenkins -> Manage Nodes -> New Node” to create a new node:Manage nodes

On the next screen, we enter the “Node Name” (slaveNode1), select “Permanent Agent”, then click “OK”:

New Slave Node

After clicking “OK”, we'll be taken to a screen with a new form where we need to fill out the slave node's information. We're considering the slave node to be running on Linux operating systems, hence the launch method is set to “Launch agents via ssh”.

In the same way, we'll add relevant details, such as the name, description, and number of executors.

We'll save our work by pressing the “Save” button. The “Labels” with the name “slaveNode1” will help us to set up jobs on this slave node:

Slave Node Details

4. Building the Project on Slave Nodes

Now that our master and slave nodes are ready, we'll discuss the steps for building the project on the slave node.

For this, we start by clicking “New Item” in the top left corner of the dashboard.

Next, we need to enter the name of our project in the “Enter an item name” field and select the “Pipeline project”, and then click the “OK” button.

On the next screen, we'll enter a “Description” (optional) and navigate to the “Pipeline” section. Make sure the “Definition” field has the Pipeline script option selected.

After this, we copy and paste the following declarative Pipeline script into a “script” field:

node('slaveNode1'){
    stage('Build') {
        sh '''echo build steps'''
    }
    stage('Test') {
        sh '''echo test steps'''
    }
}

Next, we click on the “Save” button. This will redirect to the Pipeline view page.

On the left pane, we click the “Build Now” button to execute our Pipeline. After Pipeline execution is completed, we'll see the Pipeline view:

Console Output

We can verify the history of the executed build under the Build History by clicking the build number. As shown above, when we click on the build number and select “Console Output”, we can see that the pipeline ran on our slaveNode1 machine.

5. Conclusion

In this tutorial, we've covered what a Distributed Build is in Jenkins, and we saw how the Jenkins master node invokes the slave nodes. Additionally, we learned how to set up a Jenkins master-slave configuration. Finally, we've put the slave node configuration to the test.

The post Setting Up a Jenkins Slave Node first appeared on Baeldung.

Trusting a Self-Signed Certificate in OkHttp

$
0
0

1. Overview

In this article, we'll see how to initialize and configure an OkHttpClient to trust self-signed certificates. For this purpose, we'll set up a minimal HTTPS-enabled Spring Boot application secured by a self-signed certificate.

Refer to our collection of articles on OkHttp for more specifics on the library.

2. The Fundamentals

Before we dive into the code responsible for making this work, let's hit the bottom line. The essence of SSL is that it establishes a secure connection between any two parties, commonly a client and a server. Also, it helps in safeguarding the privacy and integrity of data transferred over a network.

The JSSE API, a security component of the Java SE, provides complete API support for the SSL/TLS protocol.

SSL certificates, a.k.a digital certificates, play a vital role in establishing a TLS handshake, facilitating encryption and trust between the communicating parties. Self-signed SSL certificates are the ones that aren't issued by a well-known and trusted certificate authority (CA). They can be easily generated and signed by a developer to enable HTTPS for their software.

As the self-signed certificates aren't trustworthy, neither browsers nor standard HTTPS clients like OkHttp and Apache HTTP Client trust them by default.

Lastly, we can conveniently fetch the server certificate using a web browser or the OpenSSL command-line utility.

3. Setting Up the Test Environment

To demonstrate an application accepting and trusting a self-signed certificate using OkHttp, let's quickly configure and spin up a simple Spring Boot application with HTTPS enabled (secured by a self-signed certificate).

The default configuration will start a Tomcat server listening on port 8443 and expose a secured REST API accessible at “https://localhost:8443/welcome”.

Now, let's use an OkHttp client to make an HTTPS request to this server and consume the “/welcome” API.

4. OkHttpClient and SSL

This section will initialize an OkHttpClient and use it to connect to the test environment we just set up. Additionally, we'll examine the errors encountered in our path, and step by step, reach our final goal of trusting a self-signed certificate using OkHttp.

First, let create a builder for the OkHttpClient:

OkHttpClient.Builder builder = new OkHttpClient.Builder();

Also, let's declare the HTTPS URL that we'll use throughout this tutorial:

int SSL_APPLICATION_PORT = 8443;
String HTTPS_WELCOME_URL = "https://localhost:" + SSL_APPLICATION_PORT + "/welcome";

4.1. The SSLHandshakeException

Without configuring the OkHttpClient for SSL, if we attempt to consume an HTTPS URL, we get a security exception:

@Test(expected = SSLHandshakeException.class)
public void whenHTTPSSelfSignedCertGET_thenException() {
    builder.build()
    .newCall(new Request.Builder()
    .url(HTTPS_WELCOME_URL).build())
    .execute();
}

The stack trace is:

javax.net.ssl.SSLHandshakeException: PKIX path building failed: 
    sun.security.provider.certpath.SunCertPathBuilderException:
    unable to find valid certification path to requested target
    ...

The above error precisely means that the server uses a self-signed certificate that is not signed by a Certificate Authority (CA).

Therefore, the client could not verify the chain of trust up to the root certificate, so it threw an SSLHandshakeException.

4.2. The SSLPeerUnverifiedException

Now, let's configure the OkHttpClient that trusts a certificate regardless of its nature – CA-signed or self-signed.

First, we need to create our own TrustManager that nullifies the default certificate validations and overrides those with our custom implementation:

TrustManager TRUST_ALL_CERTS = new X509TrustManager() {
    @Override
    public void checkClientTrusted(java.security.cert.X509Certificate[] chain, String authType) {
    }
    @Override 
    public void checkServerTrusted(java.security.cert.X509Certificate[] chain, String authType) {
    }
    @Override
    public java.security.cert.X509Certificate[] getAcceptedIssuers() {
        return new java.security.cert.X509Certificate[] {};
    }
};

Next, we'll use the above TrustManager to initialize an SSLContext, and also set the OkHttpClient builder's SSLSocketFactory:

SSLContext sslContext = SSLContext.getInstance("SSL");
sslContext.init(null, new TrustManager[] { TRUST_ALL_CERTS }, new java.security.SecureRandom());
builder.sslSocketFactory(sslContext.getSocketFactory(), (X509TrustManager) TRUST_ALL_CERTS);

Again, let's run the test. It won't be hard to believe that even after the above tweaks, consuming the HTTPS URL throws an error:

@Test(expected = SSLPeerUnverifiedException.class)
public void givenTrustAllCerts_whenHTTPSSelfSignedCertGET_thenException() {
    // initializing the SSLContext and set the sslSocketFactory
    builder.build()
        .newCall(new Request.Builder()
        .url(HTTPS_WELCOME_URL).build())
        .execute();
}

The exact error is:

javax.net.ssl.SSLPeerUnverifiedException: Hostname localhost not verified:
    certificate: sha256/bzdWeeiDwIVjErFX98l+ogWy9OFfBJsTRWZLB/bBxbw=
    DN: CN=localhost, OU=localhost, O=localhost, L=localhost, ST=localhost, C=IN
    subjectAltNames: []

This is due to a well-known problem – the hostname verification failure. Most of the HTTP libraries perform hostname verification against the certificate's SubjectAlternativeName's DNS Name field, which is unavailable in the server's self-signed certificate, as seen in the detailed stack trace above.

4.3. Overriding the HostnameVerifier

The last step towards configuring the OkHttpClient correctly is to disable the default HostnameVerifier and replace it with another one that bypasses the hostname verification.

Let's put in this last chunk of customization:

builder.hostnameVerifier(new HostnameVerifier() {
    @Override
    public boolean verify(String hostname, SSLSession session) {
        return true;
    }
});

Now, let's run our test one last time:

@Test
public void givenTrustAllCertsSkipHostnameVerification_whenHTTPSSelfSignedCertGET_then200OK() {
    // initializing the SSLContext and set the sslSocketFactory
    // set the custom hostnameVerifier
    Response response = builder.build()
        .newCall(new Request.Builder()
        .url(HTTPS_WELCOME_URL).build())
        .execute();
    assertEquals(200, response.code());
    assertNotNull(response.body());
    assertEquals("<h1>Welcome to Secured Site</h1>", response.body()
        .string());
}

Finally, the OkHttpClient is successfully able to consume the HTTPS URL secured by a self-signed certificate.

5. Conclusion

In this tutorial, we learned about configuring SSL for an OkHttpClient such that it's able to trust a self-signed certificate and consume any HTTPS URL.

However, an important point to consider is that, although this design entirely omits certificate validation and hostname verification, all communications between the client and the server are still encrypted. The trust between the two parties is lost, but the SSL handshake and the encryption aren't compromised.

As always, we can find the complete source code over on GitHub.

The post Trusting a Self-Signed Certificate in OkHttp first appeared on Baeldung.
       

Converting a PEM File to Java KeyStore Format

$
0
0

1. Overview

In a previous tutorial, we showed how to convert a Java KeyStore (JKS) into PEM format. In this tutorial, we're going to convert the PEM format to the standard Java KeyStore (JKS) format. A Java KeyStore is a container that stores certificates with their matching private keys.

We'll use a combination of keytool and openssl commands to convert from PEM to JKS. The keytool command comes with the JDK (Java Development Kit) and is used to convert from PEM to PKCS12. The second command, openssl, needs to be downloaded, and its role is to convert from PKCS12 to JKS.

2. File Formats

JKS is a Java-specific file format that was the default format for KeyStores until Java 8. Starting from Java 9, PKCS#12 is the default KeyStore format. Despite JKS, PKCS#12 is a standardized and language-neutral format for storing encrypted data. The PKCS#12 format is also known as PKCS12 or PFX.

PEM (Privacy Enhanced Mail) is also a certificate container format. The PEM files are encoded in Base64. This ensures that data remains intact during translation between different systems.

Further, a PEM file can contain one or more instances, each of them being separated by a plain-text header and footer:

-----BEGIN CERTIFICATE-----
// base64 encoded
-----END CERTIFICATE-----

3. Converting PEM to JKS Format

We'll now go through the steps to convert all certificates and private keys from PEM to JKS format.

For the purpose of example, we're going to create a self-signed certificate.

3.1. Creating the PEM File

We'll start by generating two files, key.pem and cert.pem, using openssl:

openssl req -newkey rsa:2048 -x509 -keyout key.pem -out cert.pem -days 365 

The tool will prompt us to enter a PEM passphrase and other information.

Once we've answered all the prompts, the openssl tool outputs two files:

  • key.pem (the private key)
  • cert.pem (a public certificate)

We'll use these files to generate our self-signed certificate.

3.2. Generating the PKCS12 Certificate

In most cases, the certificate is in Public Key Cryptography Standards #12 (PKCS12) format. Less frequently, we use a Java KeyStore (JKS) format.

Let's convert PEM into a PKCS12 format:

openssl pkcs12 -export -in cert.pem -inkey key.pem -out certificate.p12 -name "certificate"

While the command runs, we'll be prompted to enter the passphrase that we created previously for key.pem:

Enter pass phrase for key.pem:

And then we'll see the prompt asking for a new password for certificate.p12:

Enter Export Password:

After that, we'll have a certificate.p12 KeyStore stored in PCKS12 format.

3.3. PKCS#12 to JKS

The last step is to convert from PKCS12 to JKS format:

keytool -importkeystore -srckeystore certificate.p12 -srcstoretype pkcs12 -destkeystore cert.jks

As the command executes, it'll prompt for a new password for the cert.jks file:

Enter destination keystore password:

And it'll prompt us for the certificate.p12 password we created earlier:

Enter source keystore password:

Then, we should see the final output:

Entry for alias certificate successfully imported.
Import command completed: 1 entries successfully imported, 0 entries failed or cancelled

The result is a cert.jks KeyStore stored in JKS format.

4. Conclusion

In this article, we described the steps for converting a PEM file to JKS format, with the help of the intermediate PKCS12 format.

As helping tools, we used the keytool and openssl commands.

The post Converting a PEM File to Java KeyStore Format first appeared on Baeldung.
       

EntityNotFoundException in Hibernate

$
0
0

1. Introduction

In this tutorial, we'll talk about the EntityNotFoundException from the javax.persistence package. We'll cover the cases when this exception can occur, and after that, we'll write tests for those cases.

2. When is the EntityNotFoundException Thrown?

Oracle documentation for this exception defines three situations in which the persistence provider can throw the EntityNotFoundException:

  • EntityManager.getReference on an entity that does not exist
  • EntityManager.refresh on an object that does not exist in the database
  • EntityManager.lock with pessimistic locking on an entity that does not exist in the database

Apart from these three use cases, there is one more case that is a bit more ambiguous. This exception can also occur when working with @ManyToOne relationships and lazy loading.

When we use @ManyToOne annotation, then the referenced entity must exist. This is usually ensured with database integrity using foreign keys. If we don't use foreign keys in our relational model or our database is inconsistent, we can see EntityNotFoundException when fetching entities. We'll illustrate this in the following section with an example.

3. EntityNotFoundException in Practice

First, let's cover one simpler use case. In the previous section, we mentioned the getReference method. We use this method to fetch a proxy of a specific entity. This proxy only has the primary key field initialized. When we call a getter on this proxy entity persistence provider initializes the rest of the fields. If the entity doesn't exist in the database, then we get EntityNotFoundException:

@Test(expected = EntityNotFoundException.class)
public void givenNonExistingUserId_whenGetReferenceIsUsed_thenExceptionIsThrown() {
    User user = entityManager.getReference(User.class, 1L);
    user.getName();
}

User entity is elementary. It only has two fields and no relationships. We create a proxy entity with the primary key value 1L on the first line in the test. After that, we call getter on that proxy entity. The persistence provider tries to fetch entity by primary key, and since the record doesn't exist, an EntityNotFoundException is thrown.

For the next example, we'll use different domain entities. We'll create Item and Category entities with a bi-directional relationship between them:

@Entity
public class Item implements Serializable {
    @Id
    @Column(unique = true, nullable = false)
    private long id;
    private String name;
    @ManyToOne(fetch = FetchType.LAZY)
    @JoinColumn(name = "category_id", foreignKey = @ForeignKey(ConstraintMode.NO_CONSTRAINT))
    private Category category;
    // getters and setters
}
@Entity
public class Category implements Serializable {
    @Id
    @Column(unique = true, nullable = false)
    private long id;
    private String name;
    @OneToMany
    @JoinColumn(name = "category_id", foreignKey = @ForeignKey(ConstraintMode.NO_CONSTRAINT))
    private List<Item> items = new ArrayList<>();
    // getters and setters
}

Note that we are using lazy fetch on @ManyToOne annotation. Also, we use @ForeignKey to remove the constraint from the database:

@Test(expected = EntityNotFoundException.class)
public void givenItem_whenManyToOneEntityIsMissing_thenExceptionIsThrown() {
    entityManager.createNativeQuery("Insert into Item (category_id, name, id) values (1, 'test', 1)").executeUpdate();
    entityManager.flush();
    Item item = entityManager.find(Item.class, 1L);
    item.getCategory().getName();
}

In this test, we fetch the Item entity by id. Method find will return an Item object without Category fully initialized since we use FetchType.LAZY (only the id is set, similar to the previous example). When we call getter on Category object persistence provider will try to fetch the object from the database, and we'll get an exception since the record doesn't exist.

@ManyToOne relationship assumes that referenced entity exists. Foreign keys and database integrity ensure that these entities exist. If this is not the case, there is a workaround to ignore the missing entity.

Combining @NotFound(action = NotFoundAction.IGNORE) with @ManyToOne annotation will stop the persistence provider from throwing the EntityNotFoundException, but we'll have to handle missing entity by hand to avoid NullPointerException.

4. Conclusion

In this article, we covered in which situations can EntityNotFoundException occur and how we can handle it. First, we went over official documentation and covered usual use cases. After that, we cover more complex cases and how to fix this issue.

As usual, we can find the code from this article over on GitHub.

The post EntityNotFoundException in Hibernate first appeared on Baeldung.
       

How to Create Password-Protected Zip Files and Unzip Them in Java

$
0
0

1. Overview

In a previous tutorial, we show how to zip and unzip in Java with the help of the java.util.zip package. But we don’t have any standard Java library to create password-protected zip files.

In this tutorial, we'll learn how to create password-protected zip files and unzip them with the Zip4j library. It's the most comprehensive Java library for zip files.

2. Dependencies

Let's start by adding the zip4j dependency to our pom.xml file:

<dependency>
    <groupId>net.lingala.zip4j</groupId>
    <artifactId>zip4j</artifactId>
    <version>2.9.0</version>
</dependency>

3. Zip a File

First, we'll use the zipFile method to zip a file named aFile.txt into a password-protected archive named compressed.zip:

ZipParameters zipParameters = new ZipParameters();
zipParameters.setEncryptFiles(true);
zipParameters.setCompressionLevel(CompressionLevel.HIGHER);
zipParameters.setEncryptionMethod(EncryptionMethod.AES);
ZipFile zipFile = new ZipFile("compressed.zip", "password".toCharArray());
zipFile.addFile(new File("aFile.txt"));

The setCompressionLevel line is optional. We can choose from level FASTEST to ULTRA (the default is NORMAL).

In this example, we've used AES encryption. If we want to use Zip standard encryption, we just replace AES with ZIP_STANDARD.

4. Zip Multiple Files

Let's modify the code a bit so that we can compress multiple files at once:

ZipParameters zipParameters = new ZipParameters();
zipParameters.setEncryptFiles(true);
zipParameters.setEncryptionMethod(EncryptionMethod.AES);
List<File> filesToAdd = Arrays.asList(
  new File("aFile.txt"),
  new File("bFile.txt")
);
ZipFile zipFile = new ZipFile("compressed.zip", "password".toCharArray());
zipFile.addFiles(filesToAdd, zipParameters);

Instead of using the addFile method, we use addFiles and pass in a List of files.

5. Zip a Directory

We can zip a folder simply by replacing the addFile method with addFolder:

ZipFile zipFile = new ZipFile("compressed.zip", "password".toCharArray());
zipFile.addFolder(new File("/users/folder_to_add"), zipParameters);

6. Creating a Split Zip File

We can split the zip file over several files when the size exceeds a particular limit by using createSplitZipFile and createSplitZipFileFromFolder methods:

ZipFile zipFile = new ZipFile("compressed.zip", "password".toCharArray());
int splitLength = 1024 * 1024 * 10; //10MB
zipFile.createSplitZipFile(Arrays.asList(new File("aFile.txt")), zipParameters, true, splitLength);
zipFile.createSplitZipFileFromFolder(new File("/users/folder_to_add"), zipParameters, true, splitLength);

The unit of splitLength is bytes.

7. Extracting All Files

Extracting files is just as simple. We can extract all files from our compressed.zip with the extractAll method:

ZipFile zipFile = new ZipFile("compressed.zip", "password".toCharArray());
zipFile.extractAll("/destination_directory");

8. Extracting a Single File

And if we just want to extract a single file from compressed.zip, we can use the extractFile method:

ZipFile zipFile = new ZipFile("compressed.zip", "password".toCharArray());
zipFile.extractFile("aFile.txt", "/destination_directory");

9. Conclusion

In summary, we've learned how to create password-protected zip files and unzip them in Java with the Zip4j library.

The implementation of these examples can be found over on GitHub.

The post How to Create Password-Protected Zip Files and Unzip Them in Java first appeared on Baeldung.
       

Difference Between MVC and MVP Patterns

$
0
0

1. Overview

In this tutorial, we'll learn about the Model View Controller and Model View Presenter patterns. We'll also discuss the differences between them.

2. Design Pattern and Architectural Pattern

2.1. Architectural Pattern

Architectural patterns are general, reusable solutions to commonly occurring problems in software architecture. These have an extensive impact on the codebase.

For example, these impact the software either horizontally or vertically. By horizontally, we mean how to structure the code inside a layer. Conversely, vertically means how a request is processed from outer layers to inner layers and back.

Some of the more common architectural patterns are MVC, MVP, and MVVM.

2.2. Design Pattern

Design patterns are usually associated with code-level commonalities. They provide various schemes for refining and building smaller subsystems.

Additionally, design patterns are medium-scale tactics that flesh out some of the structure and behavior of entities and their relationships. Some commonly used design patterns are the singleton, factory, and builder patterns.

Design Patterns differ from Architectural Patterns in their scope. They're more localized and have less impact on the codebase. Instead, they impact only a specific section of the codebase. In the next section, we'll talk about why we use these patterns.

3. Why MVC and MVP Patterns

The main idea behind the use of these patterns is the separation of concerns between the business and UI layers. These patterns provide us with features like ease of testing. They also hide data access.

We can say they're more adaptable to change by isolating the major components. However, the biggest drawbacks are adding complexity and the learning curve.

4. MVC Pattern

In the MVC pattern, features are divided into three components based on three separate concerns. Firstly, the view is responsible for rendering UI elements. Secondly, the controller responds to UI actions. And the model handles business behaviors and state management.

In most implementations, all three components can directly interact with each other. However, in some implementations, the controller is responsible for determining which view to display.

The diagram below shows the MVC flow of control:

The model represents the whole business logic layer. The view represents the data fetched from the model. In addition, it handles presentation logic. Lastly, the controller handles control flow logic and updates the model.

MVC doesn't specify how the view and the model should be structured internally. Usually, the view layer is implemented in a single class.

However, in that case, a couple of problems can arise:

  • The view and the model are tightly coupled. As a result, feature requirements of the view can easily drip down to the model and pollute the business logic layer
  • The view is monolithic and usually couples tightly with the UI framework. Thus, unit testing the view becomes difficult

5. MVP Pattern

The MVP pattern is a UI presentation pattern based on the concepts of the MVC pattern. However, it doesn't specify how to structure the whole system. It only dictates how to structure the view.

This pattern separates responsibilities across four components in general. Firstly the view is responsible for rendering UI elements. Secondly, the view interface is used to loosely couple the presenter from its view.

Finally, the presenter interacts with the view and model, and the model is responsible for business behaviors and state management.

In some implementations, the presenter interacts with a service (controller) layer to retrieve/persist the model. The view interface and service layer are commonly used to make writing unit tests for the presenter and the model easier.

The diagram below shows the MVP flow of control:

mvp_pattern

The model is the same as in MVC and contains the business logic. The view is a passive interface that displays data. It sends user actions to the presenter.

The presenter sits between the model and view. It triggers business logic and enables the view to update. It receives data from the model and shows the same in the view. This makes testing the presenter much easier.

Still, there are some problems with MVP:

  • The controller is often omitted. Because of the lack of a controller, control flow has also to be handled by the presenter. This makes the presenter responsible for two concerns: updating the model and presenting the model
  • We can't utilize data binding. If binding is possible with the UI framework, we should utilize it to simplify the presenter

6. MVC and MVP Implementation

We'll understand the patterns with a simple example. We've got a product that we need to show and update. These actions are handled differently in MVC and MVP.

6.1. The View Class

We have a simple view class that outputs the product details. The view class for both MVP and MVC are similar:

public class ProductView {
    public void printProductDetails(String name, String description, Double price) {
        log.info("Product details:");
        log.info("product Name: " + name);
        log.info("product Description: " + description);
        log.info("product price: " + price);
    }
}

6.2. MVP Model and Presenter Classes

Let's now define a Product class for MVP that is responsible for the business logic only:

public class Product {
    private String name;
    private String description;
    private Double price;
    
   //getters & setters
}

The presenter class in MVP fetches the data from the model and passes it to the view:

public class ProductPresenter {
    private final Product product;
    private final ProductView view;
    
     //getters,setters & constructor
    
    public void showProduct() {
        productView.printProductDetails(product.getName(), product.getDescription(), product.getPrice());
    }
}

6.3. MVC Model Class

For MVC, the difference is that the view will get the data from the model class instead of the presenter class in MVP.

We can define a model class for MVC:

public class Product {
    private String name;
    private String description;
    private Double price;
    private ProductView view;
    
    //getters,setters
    
    public void showProduct() {
        view.printProductDetails(name, description, price);
    }
}

Notice the showProduct() method. This method handles the data passing from model to view. In MVP, this is done in the presenter class, and in MVC, it's done in the model class.

7. Comparison Between MVC and MVP

There aren't a whole lot of differences between MVC and MVP. Both patterns focus on separating responsibility across multiple components, hence, promoting loose coupling of the UI (View) from the business layer (Model).

The major differences are how the patterns are implemented and in some advanced scenarios. Let's look at some of the key differences:

  • Coupling: The view and the model are tightly coupled in MVC but loosely coupled in MVP
  • Communication: In MVP, communication between the View-Presenter and Presenter-Model happens via an interface. However, the controller and view layer falls in the same activity/fragment in MVC
  • User Input: In MVC, user inputs are handled by the Controller that instructs the model for further operations. But in MVP, user inputs are handled by the view that instructs the presenter to call appropriate functions
  • Type of Relation: A many-to-one relationship exists between the controller and view. One Controller can select different views based upon required operations in MVC. On the other hand, the presenter and view have a one-to-one relationship in MVP, where one presenter class manages one view at a time
  • Main Component: In MVC, the controller is in charge. It creates the appropriate view and interacts with the model according to the user’s request. On the contrary, in MVP, the view is in charge. The view call methods on the presenter, which further directs the model
  • Unit Testing: Due to tight coupling, MVC has limited support for unit testing. On the other hand, unit Testing is well supported in MVP

8. Why MVP Has an Edge over MVC

MVP has the slight upper hand over MVC in that it can break down our application into modules. Thus, we can avoid having to create views constantly. In other words, MVP can help to make our views reusable.

9. Conclusion

In this tutorial, we've seen the MVC and MVP architectural patterns and a comparison between them.

The example code is available over on GitHub.

The post Difference Between MVC and MVP Patterns first appeared on Baeldung.
       
Viewing all 4464 articles
Browse latest View live


<script src="https://jsc.adskeeper.com/r/s/rssing.com.1596347.js" async> </script>