Quantcast
Channel: Baeldung
Viewing all 4464 articles
Browse latest View live

Understanding Detached HEAD in Git

$
0
0

1. Overview

It is not very uncommon to come across a mysterious state while working on git. However, one day it is most likely to see “detached HEAD”.

In this tutorial, we'll discuss what is a detached HEAD is and how does it work. We’ll walk through how to navigate into and out of a detached HEAD in Git.

2. What is HEAD in Git

Git stores a record of the state of all the files in the repository when we create a commit. HEAD is another important type of reference. The purpose of HEAD is to keep track of the current point in a Git repo. In other words, HEAD answers the question, “Where am I right now?”:

$git log --oneline
a795255 (HEAD -> master) create 2nd file
5282c7c appending more info
b0e1887 creating first file

For instance, when we use the log command, how does Git know which commit it should start displaying results from? HEAD provides the answer. When we create a new commit, its parent is indicated by where HEAD currently points to.

Because Git has such advanced version tracking features, we can go back to any point in time in our repository to view its contents.

Being able to review past commits also lets us see how a repository or a particular file or set of files has evolved over time. When we check out a commit that is not a branch, we’ll enter “detached HEAD state”. This refers to when we are viewing a commit that is not the most recent commit in a repository.

3. Example of Detached HEAD

For most of the time, HEAD points to a branch name. When we add a new commit, our branch reference is updated to point to it, but HEAD remains the same. When we change branches, HEAD is updated to point to the branch we've switched to. All of that means, in the above scenarios, HEAD is synonymous with “the last commit in the current branch.” This is the normal state in which HEAD is attached to a branch:
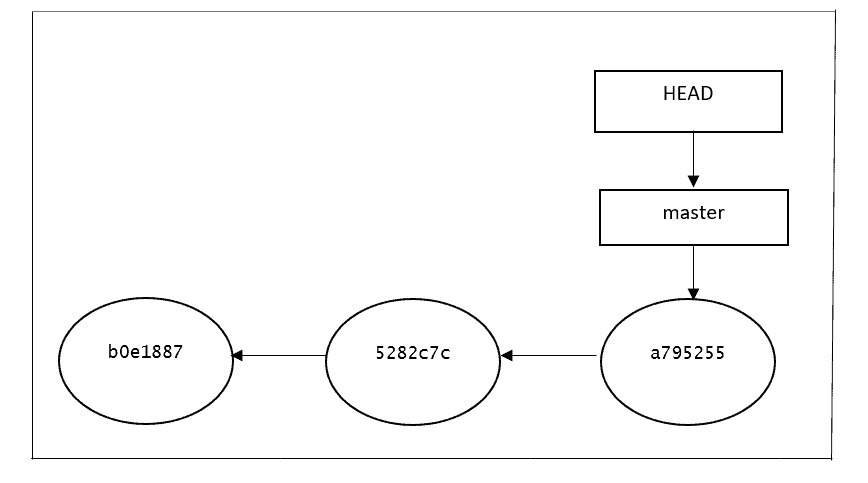
As we can see, HEAD points to the master branch, which points to the last commit. Everything looks perfect. However, after running the below command the repo is in a detached HEAD:

$ git checkout 5282c7c
Note: switching to '5282c7c'.
You are in 'detached HEAD' state. You can look around, make experimental
changes and commit them, and you can discard any commits you make in this
state without impacting any branches by switching back to a branch.
If you want to create a new branch to retain commits you create, you may
do so (now or later) by using -c with the switch command. Example:
  git switch -c <new-branch-name>
Or undo this operation with:
  git switch -
HEAD is now at 5282c7c appending more info
users@ubuntu01: MINGW64 ~/git/detached-head-demo ((5282c7c...))

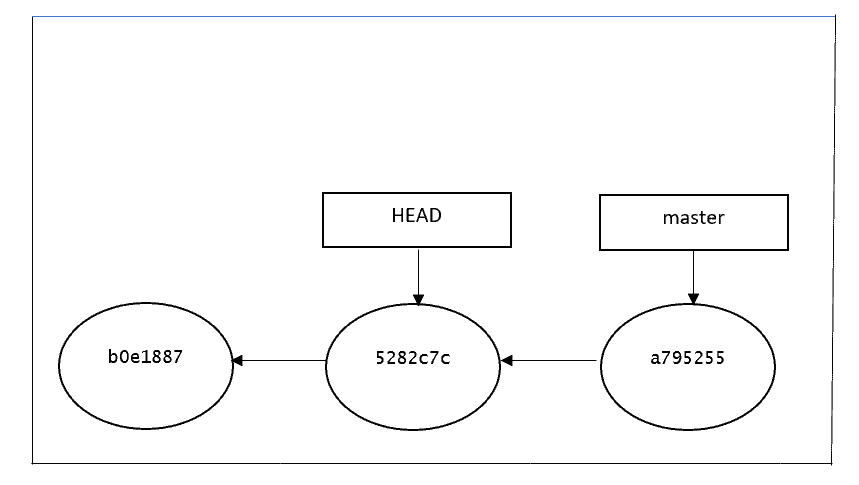
Below is the graphical representation of the current git HEAD. Since we've checkout to a previous commit, now the HEAD is pointing to 5282c7c commit, and the master branch is still referring to the same:
4. Benefits of a Git Detached HEAD

After detaching the HEAD by checking out a particular(5282c7c) commit, it is allowing us to go to the previous point in the project’s history.

Let’s say we want to check if a given bug already existed last Tuesday. We can use the log command, filtering by date, to start the relevant commit hash. Then we can check out the commit and test the application, either by hand or by running our automated test suite.

What if we could take not only a look at the past but also change it? That’s what a detached HEAD allows us to do. Let’s review how to do it using the below commands:

echo "understanding git detached head scenarios" > sample-file.txt
git add .
git commit -m "Create new sample file"
echo "Another line" >> sample-file.txt
git commit -a -m "Add a new line to the file"

We now have two additional commits that descend from our second commit. Let’s run git log –oneline and see the result:

$ git log --oneline
7a367ef (HEAD) Add a new line to the file
d423c8c create new sample file
5282c7c appending more info
b0e1887 creating first file

Before HEAD was pointing to the 5282c7c commit, then we added two more commits, d423c8c and 7a367ef. Below is the graphical representation of the commits done on top of HEAD. It shows that now HEAD is pointing to the latest commit 7a367ef:

What should we do if we want to keep these changes or go back to the previous one? We'll see in the next point.

5. Scenarios

5.1. By Accident

If we’ve reached the detached HEAD state by accident – that is to say, we didn’t mean to check out a commit – going back is easy. Just check out the branch we were in before using one the below command:

git switch <branch-name>   
git checkout <branch-name>

5.2. Made Experimental Changes but Need to Discard Them

In some scenarios, if we made changes after detaching HEAD to test some functionality or identify the bugs but we don't want to merge these changes to the original branch, then we can simply discard it using the same commands as the previous scenario and go to back our original branch.

5.3. Made Experimental Changes but Need to Keep Them

If we want to keep changes made with a detached HEAD, we just create a new branch and switch to it. We can create it right after arriving at a detached HEAD or after creating one or more commits. The result is the same. The only restriction is that we should do it before returning to our normal branch. Let’s do it in our demo repo using the below commands after creating one or more commits:

git branch experimental
git checkout experimental

We can notice how the result of git log –oneline is exactly the same as before, with the only difference being the name of the branch indicated in the last commit:

$ git log --oneline
7a367ef (HEAD -> experimental) Add a new line to the file
d423c8c create new sample file
5282c7c appending more info
b0e1887 creating first file

6. Conclusion

As we’ve seen in this article, a detached HEAD doesn’t mean something is wrong with our repo. Detached HEAD is just a less usual state our repository can be in. Aside from not being an error, it can actually be quite useful, allowing us to run experiments that we can then choose to keep or discard.


Find the IP Address of a Client Connected to a Server

$
0
0

1. Introduction

In this quick tutorial, we're going to learn how to find the IP address of a client computer connected to a server.

We'll create a simple client-server scenario to allow us to explore the java.net APIs available for TCP/IP communication.

2. Background

Java applications use sockets for communicating and sending data over the internet. Java provides the java.net.Socket class for client applications.

The java.net.ServerSocket class is used for TCP/IP-based server-side socket implementation. However, let's focus only on TCP/IP applications.

3. Sample Use-Case

Let's assume that we have an application server running on our system. This server sends greetings messages to the clients. In this case, the server uses a TCP socket for communication.

The application server is bound to a specific TCP port. Its socket address is the combination of that port and the IP address of the local network interface. For this reason, the client should use this particular socket address for connecting to the server.

4. Sample Application

Now that we've defined our use-case, let's start by building the server.

4.1. The Application Server

First, we need to instantiate a ServerSocket for listening to incoming connection requests. The constructor of the ServerSocket class requires a port number as an argument:

public class ApplicationServer {
    private ServerSocket serverSocket;
    private Socket connectedSocket;
  
    public void startServer(int port) throws IOException {
        serverSocket = new ServerSocket(port);
        connectedSocket = serverSocket.accept();
        //...

4.2. Obtaining the Client IP Address

Now that we've established our Socket for the incoming client, let's see how to obtain the client's IP address. The Socket instance contains the socket address of the remote client. We can use the getRemoteSocketAddress method to inspect this.

ThegetRemoteSocketAddress method returns an object of type SocketAddress. This is an abstract Java class. In this instance, we know it's a TCP/IP connection, so we can cast it to InetSocketAddress:

InetSocketAddress socketAddress = (InetSocketAddress) connectedSocket.getRemoteSocketAddress();

As we've already seen, a socket address is a combination of an IP address and port number. We can use getAddress to get the IP address. This returns an InetAddress object. However, we can also use getHostAddress to get a string representation of the IP address:

String clientIpAddress = socketAddress.getAddress()
    .getHostAddress();

4.3. Sending Greeting Message to the Client

Now, the server and client can exchange greeting messages:

String msg = in.readLine();
System.out.println("Message received from the client :: " + msg);
PrintWriter out = new PrintWriter(connectedSocket.getOutputStream(), true);
out.println("Hello Client !!");

5. Test the Application

Let's now build a client application to test our code. This client will run on a separate computer and connect to our server.

5.1. Build a Client Application

First, we need to establish a Socket connection to the service using the IP address and the port number:

public class ApplicationClient {
    public void connect(String ip, int port) throws IOException {
        clientSocket = new Socket(ip, port);
    }
}

Similar to the server application, we'll use the BufferedReader and PrintWriter to read from and write to the socket. For sending messages to the server, let's create a method to write to the connected socket:

public void sendGreetings(String msg) throws IOException {
    out.println(msg);
    String reply = in.readLine();
    System.out.println("Reply received from the server :: " + reply);
}

5.2. Run the Application

Next, let's run the client application, choosing a free port for it.

After that, we need to start the client application from another PC. For this example, let's say the IP address of the server machine is 192.168.0.100 and port 5000 is free:

java -cp com.baeldung.clientaddress.ApplicationClient 192.168.0.100 5000 Hello

Here, we're assuming that the client and server are on the same network. After the client establishes a successful connection to the server, the IP address of the client will be printed on the server console.

If the client IP address, for example, is 192.168.0.102, we should be able to see it in the console:

IP address of the connected client :: 192.168.0.102

5.3. What Happened in the Background?

In general, when the application server is started, the ServerSocket instantiates a socket object using the given port number and a wildcard IP address. After that, it changes its status to “Listening” for incoming connection requests. Then, when the client sends a connection request, ServerSocket instantiates a new socket by invoking the accept method.

The newly created socket instance contains the IP address and port of the server as well as the remote client. For server IP address, the ServerSocket class uses the IP address of the local network interface through which it received the incoming request. Then, to obtain the remote client IP address, it decodes the IP header of the received TCP packet and uses the source address.

6. Conclusion

In this article, we defined a sample client-server use-case and used Java socket programming to find the IP address of a client connected to a server.

As always, the code of this application is available over on GitHub.


Connecting to a Specific Schema in JDBC

$
0
0

1. Introduction

In this article, we'll cover the basics of database schemas, why we need them, and how they are useful. After that, we'll focus on practical examples of setting schema in JDBC with PostgreSQL as a database.

2. What is a Database Schema

In general, a database schema is a set of rules that regulate a database. It is an additional layer of abstraction around a database. There are two kinds of schemas:

  1. Logical database schema defines rules that apply to the data stored in a database.
  2. Physical database schema defines rules on how data is physically stored on a storage system.

In PostgreSQL, schema refers to the first kind. Schema is a logical namespace that contains database objects such as tables, views, indexes, etc. Each schema belongs to one database, and each database has at least one schema. If not specified otherwise, the default schema in PostgreSQL is public. Every database object we create, without specifying the schema, belongs to the public schema.

A schema in PostgreSQL allows us to organize tables and views into groups and make them more manageable. This way, we can set up privileges on our database objects on a more granular level. Also, schemas allow us to have multiple users using the same databases simultaneously without interfering.

3. How to Use Schema With PostgreSQL

To access an object of a database schema, we must specify the schema's name before the name of a given database object that we want to use. For example, to query table product within schema store, we need to use the qualified name of the table:

SELECT * FROM store.product;

The recommendation is to avoid hardcoding schema names to prevent coupling concrete schema to our application. This means that we use database object names directly and let the database system determine which schema to use. PostgreSQL determines where to search for a given table by following a search path.

3.1. PostgreSQL search_path

The search path is an ordered list of schemas that define the database system's search for a given database object. If the object is present in any (or multiple) schemas we get the first found occurrence. Otherwise, we get an error. The first schema in the search path is also called the current schema. To preview which schemas are on the search path, we can use the query:

SHOW search_path;

Default PostgreSQL configuration will return $user and public schemas. The public schema we already mentioned, the $user schema, is a schema named after the current user, and it might not exist. In that case, the database ignores that schema.

To add store schema to the search path, we can execute the query:

SET search_path TO store,public;

After this, we can query the product table without specifying the schema. Also, we could remove the public schema from the search path.

Setting the search path as we described above is a configuration on the ROLE level. We can change the search path on the whole database by changing the postgresql.conf file and reloading database instance.

3.2. JDBC URL

We can use JDBC URL to specify all kinds of parameters during connection setup. The usual parameters are database type, address, port, database name, etc. Since Postgres version 9.4. there is added support for specifying the current schema using URL.

Before we bring this concept to practice, let's set up a testing environment. For this, we'll use the testcontainers library and create the following test setup:

@ClassRule
public static PostgresqlTestContainer container = PostgresqlTestContainer.getInstance();
@BeforeClass
public static void setup() throws Exception {
    Properties properties = new Properties();
    properties.setProperty("user", container.getUsername());
    properties.setProperty("password", container.getPassword());
    Connection connection = DriverManager.getConnection(container.getJdbcUrl(), properties);
    connection.createStatement().execute("CREATE SCHEMA store");
    connection.createStatement().execute("CREATE TABLE store.product(id SERIAL PRIMARY KEY, name VARCHAR(20))");
    connection.createStatement().execute("INSERT INTO store.product VALUES(1, 'test product')");
}

With @ClassRule, we create an instance of PostgreSQL database container. Next, in the setup method, create a connection to that database and create the required objects.

Now when the database is set, let's connect to the store schema using JDBC URL:

@Test
public void settingUpSchemaUsingJdbcURL() throws Exception {
    Properties properties = new Properties();
    properties.setProperty("user", container.getUsername());
    properties.setProperty("password", container.getPassword());
    Connection connection = DriverManager.getConnection(container.getJdbcUrl().concat("&currentSchema=store"), properties);
    ResultSet resultSet = connection.createStatement().executeQuery("SELECT * FROM product");
    resultSet.next();
    assertThat(resultSet.getInt(1), equalTo(1));
    assertThat(resultSet.getString(2), equalTo("test product"));
}

To change the default schema, we need to specify the currentSchema parameter. If we enter a non-existing schema, PSQLException is thrown during a select query, saying the database object is missing.

3.3. PGSimpleDataSource

To connect to a database, we can use javax.sql.DataSource implementation from PostgreSQL driver library named PGSimpleDataSource. This concrete implementation has support for setting up a schema:

@Test
public void settingUpSchemaUsingPGSimpleDataSource() throws Exception {
    int port = //extracting port from container.getJdbcUrl()
    PGSimpleDataSource ds = new PGSimpleDataSource();
    ds.setServerNames(new String[]{container.getHost()});
    ds.setPortNumbers(new int[]{port});
    ds.setUser(container.getUsername());
    ds.setPassword(container.getPassword());
    ds.setDatabaseName("test");
    ds.setCurrentSchema("store");
    ResultSet resultSet = ds.getConnection().createStatement().executeQuery("SELECT * FROM product");
    resultSet.next();
    assertThat(resultSet.getInt(1), equalTo(1));
    assertThat(resultSet.getString(2), equalTo("test product"));
}

While using PGSimpleDataSource, the driver uses public schema as a default if we don't set schema.

3.4. @Table annotation from javax.persistence package

If we use JPA in our project, we can specify schema on entity level using @Table annotation. This annotation can hold value for schema or defaults to empty a String. Let's map our product table to the Product entity:

@Entity
@Table(name = "product", schema = "store")
public class Product {
    @Id
    private int id;
    private String name;
    
    // getters and setters
}

To verify this behavior, we set up the EntityManager instance to query the product table:

@Test
public void settingUpSchemaUsingTableAnnotation(){
    Map<String,String> props = new HashMap<>();
    props.put("hibernate.connection.url", container.getJdbcUrl());
    props.put("hibernate.connection.user", container.getUsername());
    props.put("hibernate.connection.password", container.getPassword());
    EntityManagerFactory emf = Persistence.createEntityManagerFactory("postgresql_schema_unit", props);
    EntityManager entityManager = emf.createEntityManager();
    Product product = entityManager.find(Product.class, 1);
    assertThat(product.getName(), equalTo("test product"));
}

As we previously mentioned in section 3, it's best to avoid coupling schema to the code for various reasons. Because of that, this feature is often overlooked, but it can be advantageous when accessing multiple schemas.

4. Conclusion

In this tutorial, first, we covered basic theory about database schemas. After that, we described multiple ways of setting database schema using different approaches and technologies. As usual, all the code samples are available over on GitHub.


Understanding Maven’s “relativePath” Tag for a Parent POM

$
0
0

1. Overview

In this tutorial, we'll learn about the Parent POM resolution of Maven. First, we'll discover the default behavior. Then, we'll discuss the possibilities to customize it.

2. Default Parent POM Resolution

If we want to specify a parent POM, we can do this by naming groupId, artifactId, and version, the so-called GAV coordinate. Maven doesn't resolve the parent POM by searching in repositories first. We can find the details in the Maven Model Documentation and sum up the behavior:

  1. If there is a pom.xml file in the parent folder, and if this file has the matching GAV coordinate, it is classified as the project's Parent POM
  2. If not, Maven reverts to the repositories

Placing a Maven project into another one is the best practice when managing Multi-Module Projects. For example, we have an aggregator project with the following GAV coordinate:

<groupId>com.baeldung.maven-parent-pom-resolution</groupId>
<artifactId>aggregator</artifactId>
<version>1.0.0-SNAPSHOT</version>

We could then place the module into the subfolder and refer to the aggregator as a parent:

So, the module1 POM could include this section:

<artifactId>module1</artifactId>
<parent>
    <groupId>com.baeldung.maven-parent-pom-resolution</groupId>
    <artifactId>aggregator</artifactId>
    <version>1.0.0-SNAPSHOT</version>
</parent>

There is no need to install the aggregator POM into a repository. And there is even no need to declare module1 in the aggregator POM. But we must be aware that this is only applicable for local checkouts of a project (e.g. when building the project). If the project is resolved as a dependency from a Maven repository, the parent POM should be available in a repository too.

And we have to ensure, that the aggregator POM has the matching GAV coordinate. Otherwise, we'll get a build error:

[ERROR]     Non-resolvable parent POM for com.baeldung.maven-parent-pom-resolution:module1:1.0.0-SNAPSHOT:
  Could not find artifact com.baeldung.maven-parent-pom-resolution:aggregator:pom:1.0-SNAPSHOT
  and 'parent.relativePath' points at wrong local POM @ line 7, column 13

3. Customizing The Location Of The Parent POM

If the parent POM is not located in the parent folder, we need to use the relativePath tag to refer to the location. For example, if we have a second module that should inherit the settings from module1, not from the aggregator, we must name the sibling folder:

<artifactId>module2</artifactId>
<parent>
    <groupId>com.baeldung.maven-parent-pom-resolution</groupId>
    <artifactId>module1</artifactId>
    <version>1.0.0-SNAPSHOT</version>
    <relativePath>../module1/pom.xml</relativePath>
</parent>

Of course, we should only use relative paths that are available in every environment (mostly to a path within the same Git repository) to ensure the portability of our build.

4. Disable Local File Resolution

To skip the local file search and directly search the parent POM in Maven repositories, we need to explicitly set the relativePath to an empty value:

<parent>
    <groupId>com.baeldung</groupId>
    <artifactId>external-project</artifactId>
    <version>1.0.0-SNAPSHOT</version>
    <relativePath/>
</parent>

This should be a best practice whenever we inherit from external projects like Spring Boot.

5. IDEs

Interestingly, IntelliJ IDEA (current version: 2021.1.3) comes with a Maven plugin that differs from external Maven runtimes concerning the Parent POM resolution. Deviating from Maven's POM Schema, it explains the relativePath tag this way:

[…] Maven looks for the parent pom first in the reactor of currently building projects […]

That means, for IDE-internal resolution, the position of the parent POM doesn't matter as long as the parent project is registered as an IntelliJ Maven Project. This might be helpful to simply develop projects without explicitly building them (if they are not in the scope of the same Git repository). But if we try to build the project with an external Maven runtime, it will fail.

6. Conclusion

In this article, we learned that Maven does not resolve parent POMs by searching Maven repositories firstly. It rather searches for it locally, and we explicitly have to deactivate this behavior when inheriting from external projects. Furthermore, IDEs might additionally resolve to projects in the workspace, which may result in errors when we use external Maven runtimes.

As always, the example code is available over on GitHub.


Enabling Unlimited Strength Cryptography in Java

$
0
0

1. Overview

In this tutorial, we'll learn why the Java Cryptography Extension (JCE) unlimited strength policy files are not always enabled by default. Additionally, we'll explain how to check the cryptographic strength. Afterward, we'll show how to enable unlimited cryptography in different versions of Java.

2. JCE Unlimited Strength Policy Files

Let's understand what cryptographic strength means. It is defined by the difficulty of discovering the key, which depends on the used cipher and length of the key. In general, a longer key provides stronger encryption. The limited cryptographic strength uses a maximum 128-bit key. On the other hand, the unlimited one uses a key of maximum length 2147483647 bits.

As we know, the JRE contains encryption functionality itself. The JCE uses jurisdiction policy files to control the cryptographic strength. Policy files consist of two jars: local_policy.jar and US_export_policy.jar. Thanks to that, the Java platform has built-in control of cryptographic strength.

3. Why Aren't the JCE Unlimited Strength Policy Files Included by Default

Firstly, only the older versions of the JRE do not include the unlimited strength policy files. The JRE versions 8u151 and earlier bundle only limited policy files. In contrast, starting from Java version 8u151 unlimited and limited policy files are provided with the JRE. The reason is straightforward, some countries require restricted cryptographic strengths. In case the law of a country allows unlimited cryptographic strength, it is possible to bundle or enable it depending on the Java version.

4. How to Check the Cryptographic Strength

Let's have a look at how to check cryptographic strength. We can do it by checking the maximum allowed key length:

int maxKeySize = javax.crypto.Cipher.getMaxAllowedKeyLength("AES");

It returns 128, in case of limited policy files. On the other hand, in case it returns 2147483647 then the JCE uses unlimited policy files.

5. Where are the Policy Files Located

Java versions 8u151 and earlier contain the policy files in JAVA_HOME/jre/lib/security directory.

Starting from version 8u151, the JRE provides different sets of policy files.  As a result, in the JRE directory JAVA_HOME/jre/lib/security/policy there are 2 subdirectories: limited and unlimited. The first one contains limited strength policy files. The second one contains unlimited ones.

6. How to Enable Unlimited Strength Cryptography

Let's now have a look at how we can enable maximum cryptographic strength. There are different ways how to do it depending on the version of Java we are using.

6.1. Handling Before Java Version 8u151

Before version 8u151 the JRE contains only limited strength policy files. We have to replace it with an unlimited version from the Oracle site.

First, we download files for Java 8, which are available here. Next, we unpack the downloaded package, which contains local_policy.jar and US_export_policy.jar.

Finally, we copy these files to JAVA_HOME/jre/lib/security.

6.2. Handling after Java Version 8u151

In Java versions 8u151 and higher, the JCE framework uses the unlimited strength policy files by default. Furthermore, in case we want to define which version to use, there is a security property crypto.policy:

Security.setProperty("crypto.policy", "unlimited");

We must set the property before the JCE framework initialization. It defines a directory under JAVA_HOME/jre/lib/security/policy for policy files.

Firstly, when the security property is unset, the framework checks the legacy location JAVA_HOME/jre/lib/security for policy files. Although, by default in new versions of Java, there are no policy files in the legacy location. The JCE checks it as the first one to be compatible with old versions.

Secondly, if the jar files are not present in the legacy location and the property is not defined, then the JRE by default uses the unlimited policy files.

7. Conclusion

In this short article, we learned about the JCE unlimited strength policy files. Firstly, we looked at why unlimited cryptographic strength is not enabled by default in older versions of Java. Next, we learned how to determine cryptographic strength by checking the maximum key length. Finally, we saw how to enable it in different versions of Java.

As always, the source code of the example is available over on GitHub.


Java Weekly, Issue 402

$
0
0

1. Spring and Java

>> A Java 17 and Jakarta EE 9 baseline for Spring Framework 6 [spring.io]

Moving the Java ecosystem forward – Spring is planning to use Java 17 as the minimum version for Spring Framework 6 and Spring Boot 3!

>> Why and How to Upgrade to Java 16 or 17 [infoq.com]

Upgrading to Java 16 or 17 is easier than you think – step by step guide on how (and also why!) to migrate from older Java versions to 16 or 17. Good stuff.

Also worth reading:

Webinars and presentations:

Time to upgrade:

2. Technical

>> Practical API Design at Netflix, Part 1: Using Protobuf FieldMask [netflixtechblog.com]

Even more efficient gRPC: a great article on avoiding unnecessary backend computations and heavy response payloads by using Protobuf's FieldMask.

Also worth reading:

3. Musings

>> Make it Easy [reflectoring.io]

A few tips on how to transform seemingly hard problems into easy and enjoyable pieces – hard isn't always superior to easy!

Also worth reading:

4. Comics

And my favorite Dilberts of the week:

>> Useful Assignments [dilbert.com]

>> App For Fake Graphs [dilbert.com]

>> Wally's Vacation Day Correlation [dilbert.com]

5. Pick of the Week

>> 5 Skills to Help You Develop Emotional Intelligence [markmanson.net]


Generate a Java Class From JSON

$
0
0

1. Overview

In some situations, we need to create Java classes, also called POJOs, using JSON files. This is possible without writing the whole class from scratch using a handy jsonschema2pojo library.

In this tutorial, we'll see how to create a Java class from a JSON object using this library.

2. Setup

We can convert a JSON object into a Java class using the jsonschema2pojo-core dependency:

<dependency>
    <groupId>org.jsonschema2pojo</groupId>
    <artifactId>jsonschema2pojo-core</artifactId>
    <version>1.1.1</version>
</dependency>

3. JSON to Java Class Conversion

Let's see how to write a program using the jsonschema2pojo library, which will convert a JSON file into a Java class.

First, we'll create a method convertJsonToJavaClass that converts a JSON file to a POJO class and accepts four parameters:

  • an inputJson file URL
  • an outputJavaClassDirectory where the POJO would get generated
  • packageName to which the POJO class would belong and
  • an output POJO className.

Then, we'll define the steps in this method:

  • We'll start with creating an object of JCodeModel class, which will generate the Java class
  • Then, we'll define the configuration for jsonschema2pojo, which lets the program identify that the input source file is JSON (the getSourceType method)
  • Furthermore, we'll pass this configuration to a RuleFactory, which will be used to create type generation rules for this mapping
  • We'll create a SchemaMapper using this factory along with the SchemaGenerator object, which generates the Java type from the provided JSON
  • Finally, we'll call the build method of the JCodeModel to create the output class

Let's see the implementation:

public void convertJsonToJavaClass(URL inputJsonUrl, File outputJavaClassDirectory, String packageName, String javaClassName) 
  throws IOException {
    JCodeModel jcodeModel = new JCodeModel();
    GenerationConfig config = new DefaultGenerationConfig() {
        @Override
        public boolean isGenerateBuilders() {
            return true;
        }
        @Override
        public SourceType getSourceType() {
            return SourceType.JSON;
        }
    };
    SchemaMapper mapper = new SchemaMapper(new RuleFactory(config, new Jackson2Annotator(config), new SchemaStore()), new SchemaGenerator());
    mapper.generate(jcodeModel, javaClassName, packageName, inputJsonUrl);
    jcodeModel.build(outputJavaClassDirectory);
}

4. Input and Output

Let's use this sample JSON for the program execution:

{
  "name": "Baeldung",
  "area": "tech blogs",
  "author": "Eugen",
  "id": 32134,
  "topics": [
    "java",
    "kotlin",
    "cs",
    "linux"
  ],
  "address": {
    "city": "Bucharest",
    "country": "Romania"
  }
}

Once we execute our program, it creates the following Java class in the given directory:

@JsonInclude(JsonInclude.Include.NON_NULL)
@JsonPropertyOrder({"name", "area", "author", "id", "topics", "address"})
@Generated("jsonschema2pojo")
public class Input {
    @JsonProperty("name")
    private String name;
    @JsonProperty("area")
    private String area;
    @JsonProperty("author")
    private String author;
    @JsonProperty("id")
    private Integer id;
    @JsonProperty("topics")
    private List<String> topics = new ArrayList<String>();
    @JsonProperty("address")
    private Address address;
    @JsonIgnore
    private Map<String, Object> additionalProperties = new HashMap<String, Object>();
    // getters & setters
    // hashCode & equals
    // toString
}

Note that it has consequently created a new Address class for the nested JSON object as well:

@JsonInclude(JsonInclude.Include.NON_NULL)
@JsonPropertyOrder({"city", "country"})
@Generated("jsonschema2pojo")
public class Address {
    @JsonProperty("city")
    private String city;
    @JsonProperty("country")
    private String country;
    @JsonIgnore
    private Map<String, Object> additionalProperties = new HashMap<String, Object>();
    // getters & setters
    // hashCode & equals
    // toString
}

We can also achieve all of this by simply visiting jsonschema2pojo.org. The jsonschema2pojo tool takes a JSON (or YAML) schema document and generates DTO-style Java classes. It provides many options that you can choose to include in the Java class, including constructors as well as hashCode, equals, and toString methods.

5. Conclusion

In this tutorial, we covered how to create a Java class from JSON with examples using the jsonschema2pojo library.

As usual, code snippets are available over on GitHub.


Guide to mapMulti in Stream API

$
0
0

1. Overview

In this tutorial, we'll review the method Stream::mapMulti introduced in Java 16. We'll write simple examples to illustrate how to use it. In particular, we'll see that this method is similar to Stream::flatMap. We'll cover under what circumstances we prefer to use mapMulti over flatMap.

Be sure to check out our articles on Java Streams for a deeper dive into the Stream API.

2. Method Signature

Omitting the wildcards, the mapMulti method can be written more succinctly:

<R> Stream<R> mapMulti​(BiConsumer<T, Consumer<R>> mapper)

It's a Stream intermediate operation. It requires as a parameter the implementation of a BiConsumer functional interface. The implementation of the BiConsumer takes a Stream element T, if necessary, transforms it into type R, and invokes the mapper's Consumer::accept.

Inside Java's mapMulti method implementation, the mapper is a buffer that implements the Consumer functional interface.

Each time we invoke Consumer::accept, it accumulates the elements in the buffer and passes them to the stream pipeline.

3. Simple Implementation Example

Let's consider a list of integers to do the following operation:

List<Integer> integers = Arrays.asList(1, 2, 3, 4, 5);
double percentage = .01;
List<Double> evenDoubles = integers.stream()
  .<Double>mapMulti((integer, consumer) -> {
    if (integer % 2 == 0) {
        consumer.accept((double) integer * ( 1 + percentage));
    }
  })
  .collect(toList());

In our lambda implementation of BiConsumer<T, Consumer<R>> mapper, we first select only even integers, then we add to them the amount specified in percentage, cast the result into a double, and finish invoking consumer.accept.

As we saw before, the consumer is just a buffer that passes the return elements to the stream pipeline. (As a side note, notice that we have to use a type witness <Double>mapMulti for the return value because otherwise, the compiler cannot infer the right type of R in the method's signature.)

This is either a one-to-zero or one-to-one transformation depending on whether the element is odd or even.

Notice that the if statement in the previous code sample plays the role of a Stream::filter, and casting the integer into a double, the role of a Stream::map. Hence, we could use Stream's filter and map to achieve the same result:

List<Integer> integers = Arrays.asList(1, 2, 3, 4, 5);
double percentage = .01;
List<Double> evenDoubles = integers.stream()
  .filter(integer -> integer % 2 == 0)
  .<Double>map(integer -> ((double) integer * ( 1 + percentage)))
  .collect(toList());

However, the mapMulti implementation is more direct since we don't need to invoke so many stream intermediate operations.

Another advantage is that the mapMulti implementation is imperative, giving us more freedom to do element transformations.

To support int, long, and double primitive types, we have mapMultiToDouble, mapMultiToInt, and mapMultiToLong variations of mapMulti.

For example, we can use mapMultiToDouble to find the sum of the previous List of doubles:

List<Integer> integers = Arrays.asList(1, 2, 3, 4, 5);
double percentage = .01;
double sum = integers.stream()
  .mapMultiToDouble((integer, consumer) -> {
    if (integer % 2 == 0) {
        consumer.accept(integer * (1 + percentage));
    }
  })
  .sum();

4. More Realistic Example

Let's consider a collection of Albums:

public class Album {
    private String albumName;
    private int albumCost;
    private List<Artist> artists;
    Album(String albumName, int albumCost, List<Artist> artists) {
        this.albumName = albumName;
        this.albumCost = albumCost;
        this.artists = artists;
    }
    // ...
}

Each Album has a list of Artists:

public class Artist {
    private final String name;
    private boolean associatedMajorLabels;
    private List<String> majorLabels;
    Artist(String name, boolean associatedMajorLabels, List<String> majorLabels) {
        this.name = name;
        this.associatedMajorLabels = associatedMajorLabels;
        this.majorLabels = majorLabels;
    }
    // ...
}

If we want to collect a list of artist-album name pairs, we can implement it using mapMulti:

List<Pair<String, String>> artistAlbum = albums.stream()
  .<Pair<String, String>> mapMulti((album, consumer) -> {
      for (Artist artist : album.getArtists()) {
          consumer.accept(new ImmutablePair<String, String>(artist.getName(), album.getAlbumName()));
      }
  })

For each album in the stream, we iterate over the artists, create an Apache Commons ImmutablePair of artist-album names, and invoke Consumer::accept. The implementation of mapMulti accumulates the elements accepted by the consumer and passes them to the stream pipeline.

This has the effect of a one-to-many transformation where the results are accumulated in the consumer but ultimately are flattened into a new stream. This is essentially what Stream::flatMap does so that we can achieve the same result with the following implementation:

List<Pair<String, String>> artistAlbum = albums.stream()
  .flatMap(album -> album.getArtists()
      .stream()
      .map(artist -> new ImmutablePair<String, String>(artist.getName(), album.getAlbumName())))
  .collect(toList());

We see that both methods give identical results. We'll cover next in which cases it is more advantageous to use mapMulti.

5. When to Use mapMulti Instead of flatMap

5.1. Replacing Stream Elements with a Small Number of Elements

As stated in the Java documentation: “when replacing each stream element with a small (possibly zero) number of elements. Using this method avoids the overhead of creating a new Stream instance for every group of result elements, as required by flatMap”.

Let's write a simple example that illustrates this scenario:

int upperCost = 9;
List<Pair<String, String>> artistAlbum = albums.stream()
  .<Pair<String, String>> mapMulti((album, consumer) -> {
    if (album.getAlbumCost() < upperCost) {
        for (Artist artist : album.getArtists()) {
            consumer.accept(new ImmutablePair<String, String>(artist.getName(), album.getAlbumName()));
      }
    }
  })

For each album, we iterate over the artists and accumulate zero or few artist-album pairs, depending on the album's price compared with the variable upperCost.

To accomplish the same results using flatMap:

int upperCost = 9;
List<Pair<String, String>> artistAlbum = albums.stream()
  .flatMap(album -> album.getArtists()
    .stream()
    .filter(artist -> upperCost > album.getAlbumCost())
    .map(artist -> new ImmutablePair<String, String>(artist.getName(), album.getAlbumName())))
  .collect(toList());

We see that the imperative implementation of mapMulti is more performant — we don't have to create intermediate streams with each processed element as we do with the declarative approach of flatMap.

5.2. When It's Easier to Generate Result Elements

Let's write in the Album class a method that passes all the artist-album pairs with their associated major labels to a consumer:

public class Album {
    //...
    public void artistAlbumPairsToMajorLabels(Consumer<Pair<String, String>> consumer) {
        for (Artist artist : artists) {
            if (artist.isAssociatedMajorLabels()) {
                String concatLabels = artist.getMajorLabels().stream().collect(Collectors.joining(","));
                consumer.accept(new ImmutablePair<>(artist.getName()+ ":" + albumName, concatLabels));
            }
        }
    }
    // ...
}

If the artist has an association with major labels, the implementation joins the labels into a comma-separated string. It then creates a pair of artist-album names with the labels and invokes Consumer::accept.

If we want to get a list of all the pairs, it's as simple as using mapMulti with the method reference Album::artistAlbumPairsToMajorLabels:

List<Pair<String, String>> copyrightedArtistAlbum = albums.stream()
  .<Pair<String, String>> mapMulti(Album::artistAlbumPairsToMajorLabels)
  .collect(toList());

We see that, in more complex cases, we could have very sophisticated implementations of the method reference. For instance, the Java documentation gives an example using recursion.

In general, replicating the same results using flatMap will be very difficult. Therefore, we should use mapMulti in cases where generating result elements is much easier than returning them in the form of a Stream as required in flatMap.

6. Conclusion

In this tutorial, we've covered how to implement mapMulti with different examples. We've seen how it compares with flatMap and when it's more advantageous to use.

In particular, it's recommended to use mapMulti when a few stream elements need to be replaced or when it's easier to use an imperative approach to generate the elements of the stream pipeline.

The source code can be found over on GitHub.


Performance of System.arraycopy() vs. Arrays.copyOf()

$
0
0

1. Introduction

In this tutorial, we will look at the performance of two Java methods: System.arraycopy() and Arrays.copyOf(). First, we'll analyze their implementations. Second, we'll run some benchmarks to compare their average execution times.

2. Performance of System.arraycopy()

System.arraycopy() copies the array contents from the source array, beginning at the specified position, to the designated position in the destination array. Additionally, before copying, the JVM checks that both source and destination types are the same.

When estimating the performance of System.arraycopy(), we need to keep in mind that it is a native method. Native methods are implemented in platform-dependent code (typically C) and accessed through JNI calls.

Because native methods are already compiled for a specific architecture, we can't precisely estimate the runtime complexity. Moreover, their complexities can differ between platforms. We can be sure that the worst-case scenario is O(N). However, the processor can copy contiguous blocks of memory one block at a time (memcpy() in C), so actual results can be better.

We can view only the signature of System.arraycopy():

public static native void arraycopy(Object src, int srcPos, Object dest, int destPos, int length);

3. Performance of Arrays.copyOf()

Arrays.copyOf() offers additional functionality on top of what System.arraycopy() implements. While System.arraycopy() simply copies values from the source array to the destination, Arrays.copyOf() also creates new array. If necessary, it will truncate or pad the content.

The second difference is that the new array can be of a different type than the source array. If that's the case, the JVM will use reflection, which adds performance overhead.

When called with an Object array, copyOf() will invoke the reflective Array.newInstance() method:

public static <T,U> T[] copyOf(U[] original, int newLength, Class<? extends T[]> newType) {
    @SuppressWarnings("unchecked")
    T[] copy = ((Object)newType == (Object)Object[].class) 
      ? (T[]) new Object[newLength]
      : (T[]) Array.newInstance(newType.getComponentType(), newLength);
    System.arraycopy(original, 0, copy, 0, Math.min(original.length, newLength));
    return copy;
}

However, when invoked with primitives as parameters, it doesn't need reflection to create a destination array:

public static int[] copyOf(int[] original, int newLength) {
    int[] copy = new int[newLength];
    System.arraycopy(original, 0, copy, 0, Math.min(original.length, newLength));
    return copy;
}

We can clearly see that currently, the implementation of Arrays.copyOf() calls System.arraycopy(). As a result, runtime execution should be similar. To confirm our suspicion, we will benchmark the above methods with both primitives and objects as parameters.

4. Code Benchmark

Let's check which copy method is faster with the real test. To do that, we'll use JMH (Java Microbenchmark Harness). We'll create a simple test in which we will copy values from one array to the other using both System.arraycopy() and Arrays.copyOf().

We'll create two test classes. In one test class, we will test primitives, and in the second, we'll test objects. The benchmark configuration will be the same in both cases.

4.1. Benchmark Configuration

First, let's define our benchmark parameters:

@BenchmarkMode(Mode.AverageTime)
@State(Scope.Thread)
@OutputTimeUnit(TimeUnit.NANOSECONDS)
@Warmup(iterations = 10)
@Fork(1)
@Measurement(iterations = 100)

Here, we specify that we want to run our benchmark only once, with 10 warmup iterations and 100 measurement iterations.  Moreover, we would like to calculate the average execution time and collect the results in nanoseconds. To obtain exact results, it is important to perform at least five warmup iterations.

4.2. Parameters Setup

We need to be sure that we measure only the time spent on method execution and not on array creation. To do that, we'll initialize the source array in the benchmark setup phase. It's a good idea to run the benchmark with both big and small numbers.

In the setup method, we simply initialize an array with random parameters. First, we define the benchmark setup for primitives:

public class PrimitivesCopyBenchmark {
    @Param({ "10", "1000000" })
    public int SIZE;
    int[] src;
    @Setup
    public void setup() {
        Random r = new Random();
        src= new int[SIZE];
        for (int i = 0; i < SIZE; i++) {
            src[i] = r.nextInt();
        }
    }
}

The same setup follows for the objects benchmark:

public class ObjectsCopyBenchmark {
    @Param({ "10", "1000000" })
    public int SIZE;
    Integer[] src;
    @Setup
    public void setup() {
        Random r = new Random();
        src= new Integer[SIZE];
        for (int i = 0; i < SIZE; i++) {
            src[i] = r.nextInt();
        }
    }
}

4.3. Tests

We define two benchmarks that will execute copy operations. First, we'll call System.arraycopy():

@Benchmark
public Integer[] systemArrayCopyBenchmark() {
    Integer[] target = new Integer[SIZE];
    System.arraycopy(src, 0, target, 0, SIZE);
    return target;
}

To make both tests equivalent, we've included target array creation in the benchmark.

Second, we'll measure the performance of Arrays.copyOf():

@Benchmark
public Integer[] arraysCopyOfBenchmark() {
    return Arrays.copyOf(src, SIZE);
}

4.4. Results

After running our test, let's look at the results:

Benchmark                                          (SIZE)  Mode  Cnt        Score       Error  Units
ObjectsCopyBenchmark.arraysCopyOfBenchmark             10  avgt  100        8.535 ±     0.006  ns/op
ObjectsCopyBenchmark.arraysCopyOfBenchmark        1000000  avgt  100  2831316.981 ± 15956.082  ns/op
ObjectsCopyBenchmark.systemArrayCopyBenchmark          10  avgt  100        9.278 ±     0.005  ns/op
ObjectsCopyBenchmark.systemArrayCopyBenchmark     1000000  avgt  100  2826917.513 ± 15585.400  ns/op
PrimitivesCopyBenchmark.arraysCopyOfBenchmark          10  avgt  100        9.172 ±     0.008  ns/op
PrimitivesCopyBenchmark.arraysCopyOfBenchmark     1000000  avgt  100   476395.127 ±   310.189  ns/op
PrimitivesCopyBenchmark.systemArrayCopyBenchmark       10  avgt  100        8.952 ±     0.004  ns/op
PrimitivesCopyBenchmark.systemArrayCopyBenchmark  1000000  avgt  100   475088.291 ±   726.416  ns/op

As we can see, the performance of System.arraycopy() and Arrays.copyOf() differs on the range of measurement error for both primitives and Integer objects. It isn't surprising, considering the fact that Arrays.copyOf() uses System.arraycopy() under the hood. Since we used two primitive int arrays, no reflective calls were made.

We need to remember that JMH gives just a rough estimation of execution times, and the results can differ between machines and JVMs.

5. Intrinsic Candidates

It's worth noting that in HotSpot JVM 16, both Arrays.copyOf() and System.arraycopy() are marked as @IntrinsicCandidate. This annotation means that the annotated method can be replaced with faster low-level code by the HotSpot VM.

The JIT compiler can (for some or all architectures) substitute intrinsic methods with machine-dependent, greatly optimized instructions. Since native methods are a black box to the compiler, with significant call overhead, the performance of both methods can be better. Again, such performance gains aren't guaranteed.

6. Conclusion

In this example, we've looked into the performance of System.arraycopy() and Arrays.copyOf(). First, we analyzed the source code of both methods. Second, we set up an example benchmark to measure their average execution times.

As a result, we have confirmed our theory that because Arrays.copyOf() uses System.arraycopy(), the performance of both methods is very similar.

As usual, the examples used in this article are available over on GitHub.


Upload a File with WebClient

$
0
0

1. Overview

Our applications often have to handle file uploads via an HTTP request. Since Spring 5, we can now make these requests reactive.
The added support for Reactive Programming allows us to work in a non-blocking way, using a small number of threads and Backpressure.

In this article, we'll use WebClient – a non-blocking, reactive HTTP client – to illustrate how to upload a file. WebClient is part of the reactive programming library called Project Reactor. We'll cover two different approaches to uploading a file using a BodyInserter.

2. Uploading a File with WebClient

In order to use WebClient, we'll need to add the spring-boot-starter-webflux dependency to our project:

<dependency>
    <groupId>org.springframework.boot</groupId>. 
    <artifactId>spring-boot-starter-webflux</artifactId>
</dependency>

2.1. Uploading a File from a Resource

To start with, we want to declare our URL:

URI url = UriComponentsBuilder.fromHttpUrl(EXTERNAL_UPLOAD_URL).build().toUri();

Let's say in this example we want to upload a PDF. We'll use MediaType.APPLICATION_PDF as our ContentType.
Our upload endpoint returns an HttpStatus. Since we're expecting only one result, we'll wrap it in a Mono:

Mono<HttpStatus> httpStatusMono = webClient.post()
    .uri(url)
    .contentType(MediaType.APPLICATION_PDF)
    .body(BodyInserters.fromResource(resource))
    .exchangeToMono(response -> {
        if (response.statusCode().equals(HttpStatus.OK)) {
            return response.bodyToMono(HttpStatus.class).thenReturn(response.statusCode());
        } else {
            throw new ServiceException("Error uploading file");
        }
     });

The method consuming this method can also return a Mono, and we can continue until we actually need to access the result. Once we're ready, we can call the block() method on the Mono object.

The fromResource() method uses the InputStream of the passed resource to write to the output message.

2.2. Uploading a File from Multipart Resource

If our external upload endpoint takes a Multipart form data, we can use the MultiPartBodyBuilder to take care of the parts:

MultipartBodyBuilder builder = new MultipartBodyBuilder();
builder.part("file", multipartFile.getResource());

Here, we could be adding various parts according to our requirements. The value in the map can be an Object or an HttpEntity.

When we call WebClient, we use BodyInsterter.fromMultipartData and build the object:

.body(BodyInserters.fromMultipartData(builder.build()))

We update the content type to MediaType.MULTIPART_FORM_DATA to reflect the changes.

Let's look at the entire call:

Mono<HttpStatus> httpStatusMono = webClient.post()
    .uri(url)
    .contentType(MediaType.MULTIPART_FORM_DATA)
    .body(BodyInserters.fromMultipartData(builder.build()))
    .exchangeToMono(response -> {
        if (response.statusCode().equals(HttpStatus.OK)) {
            return response.bodyToMono(HttpStatus.class).thenReturn(response.statusCode());
        } else {
            throw new ServiceException("Error uploading file");
        }
      });

3. Conclusion

In this tutorial, we've shown two ways to upload a file with WebClient using BodyInserters. As always, the code is available over on GitHub.


Priority of a Thread in Java

$
0
0

1. Introduction

In this tutorial, we'll discuss how the Java thread scheduler executes threads on a priority basis. Additionally, we'll cover the types of thread priorities in Java.

2. Types of Priority

In Java, a thread's priority is an integer in the range 1 to 10. The larger the integer, the higher the priority. The thread scheduler uses this integer from each thread to determine which one should be allowed to execute. The Thread class defines three types of priorities:

  • Minimum priority
  • Normal priority
  • Maximum priority

The Thread class defines these priority types as constants MIN_PRIORITY, NORM_PRIORITY, and MAX_PRIORITY, with values 1, 5, and 10, respectively. NORM_PRIORITY is the default priority for a new Thread.

3. Overview of Thread Execution

The JVM supports a scheduling algorithm called fixed-priority pre-emptive scheduling. All Java threads have a priority, and the JVM serves the one with the highest priority first.

When we create a Thread, it inherits its default priority. When multiple threads are ready to execute, the JVM selects and executes the Runnable thread that has the highest priority. If this thread stops or becomes not runnable, the lower-priority threads will execute. In case two threads have the same priority, the JVM will execute them in FIFO order.

There are two scenarios that can cause a different thread to run:

  • A thread with higher priority than the current thread becomes runnable
  • The current thread exits the runnable state or yields (temporarily pause and allow other threads)

In general, at any time, the highest priority thread is running. But sometimes, the thread scheduler might choose low-priority threads for execution to avoid starvation.

4. Knowing and Changing a Thread’s Priority

Java's Thread class provides methods for checking the thread’s priority and for modifying it. The getPriority() instance method returns the integer that represents its priority. The setPriority() instance method takes an integer between 1 and 10 for changing the thread's priority. If we pass a value outside the 1-10 range, the method will throw an error.

5. Conclusion

In this short article, we looked at how multiple threads are executed in Java on a priority basis using the pre-emptive scheduling algorithm. We further examined the priority range and the default thread priority. Also, we analyzed Java methods for checking a thread's priority and manipulating it if necessary.


Joinpoint vs. ProceedingJoinPoint in AspectJ

$
0
0

1. Introduction

In this short tutorial, we'll learn about the differences between JoinPoint and ProceedingJoinPoint interfaces in AspectJ.

We'll cover it with a brief explanation and code examples.

2. JoinPoint

JoinPoint is an AspectJ interface that provides reflective access to the state available at a given join point, like method parameters, return value, or thrown exception. It also provides all static information about the method itself.

We can use it with the @Before, @After, @AfterThrowing, and @AfterReturning advice. These pointcuts will launch respectively before the method execution, after execution, after returning a value, or only after throwing an exception, or only after the method returns a value.

For better understanding, let's take a look at a basic example. First, we'll need to declare a pointcut. We'll define as every execution of getArticleList() from ArticleService class:

@Pointcut("execution(* com.baeldung.ArticleService.getArticleList(..))")
public void articleListPointcut(){ }

Next, we can define the advice. In our example, we'll use the @Before:

@Before("articleListPointcut()")
public void beforeAdvice(JoinPoint joinPoint) {
    log.info(
      "Method {} executed with {} arguments",
      joinPoint.getStaticPart().getSignature(),
      joinPoint.getArgs()
    );
}

In the above example, we use the @Before advice to log method execution with its parameters. A similar use case would be to log exceptions that occur in our code:

@AfterThrowing(
  pointcut = "articleListPointcut()",
  throwing = "e"
)
public void logExceptions(JoinPoint jp, Exception e) {
    log.error(e.getMessage(), e);
}

By using the @AfterThrowing advice, we make sure the logging happens only when the exception occurs.

3. ProceedingJoinPoint

ProceedingJoinPoint is an extension of the JoinPoint that exposes the additional proceed() method. When invoked, the code execution jumps to the next advice or to the target method. It gives us the power to control the code flow and decide whether to proceed or not with further invocations.

It can be just with the @Around advice, which surrounds the whole method invocation:

@Around("articleListPointcut()")
public Object aroundAdvice(ProceedingJoinPoint pjp) {
    Object articles = cache.get(pjp.getArgs());
    if (articles == null) {
        articles = pjp.proceed(pjp.getArgs());
    }
    return articles;
}

In the above example, we illustrate one of the most popular usages of @Around advice. The actual method gets invoked only if the cache doesn't return a result. It's the exact way the Spring Cache Annotations work.

We could also use the ProceedingJoinPoint and @Around advice to retry the operation in case of any exception:

@Around("articleListPointcut()")
public Object aroundAdvice(ProceedingJoinPoint pjp) {
    try {
        return pjp.proceed(pjp.getArgs());
    } catch (Throwable) {
        log.error(e.getMessage(), e);
        log.info("Retrying operation");
        return pjp.proceed(pjp.getArgs());
    }
}

This solution can be used, for example, to retry HTTP calls in cases of network interruptions.

4. Conclusion

In this article, we've learned about the differences between Joinpoint and ProceedingJoinPoint in AspectJ. As always, all the source code is available over on GitHub.


Java Weekly, Issue 403

$
0
0

1. Spring and Java

>> The Arrival of Java 17 [inside.java]

Java 17, a new LTS version, is now available – sealed classes, pattern matching, enhanced random numbers, vectorization, foreign memory access, and more!

>> Moving Java Forward Even Faster [mreinhold.org]

Ship an LTS release every two years – Mark Reinhold, Java chief architect proposes to have more LTS versions of Java to increase the adoption rate.

>> JPA Bulk Update and Delete with Blaze Persistence [vladmihalcea.com]

Increasing the throughput and reducing network round-trips by using bulk updates and deletes in the Blaze persistence framework.

Also worth reading:

Webinars and presentations:

Time to upgrade:

2. Technical and Musings

>> The Show Must Go On: Securing Netflix Studios At Scale [netflixtechblog.com]

Staying secure while delivering more and more features: how Netflix leverages the API Gateway to be secure and productive.

>> Exploring 120 years of timezones [blog.scottlogic.com]

Timezones can be more exotic than what we might think: analyzing different patterns in a constant state of flux of timezone rules.

Also worth reading:

4. Comics

And my favorite Dilberts of the week:

>> Know Why We Are Here [dilbert.com]

>> What Carol Likes Most [dilbert.com]

>> Rotting In A Meeting [dilbert.com]

5. Pick of the Week

>> Subtract [sive.rs]


Different Log4j2 Configurations per Spring Profile

$
0
0

1. Overview

In our previous tutorials, Spring Profiles and Logging in Spring Boot, we showed how to activate different profiles and use Log4j2 in Spring.

In this short tutorial, we'll learn how to use different Log4j2 configurations per Spring profile.

2. Use Different Properties Files

For example, suppose we have two files, log4j2.xml and log4j2-dev.xml, one for the default profile and the other for the “dev” profile.

Let's create our application.properties file and tell it where to find the logging config file:

logging.config=/path/to/log4j2.xml

Next, let's create a new properties file for our “dev” profile named application-dev.properties and add a similar line:

logging.config=/path/to/log4j2-dev.xml

If we have other profiles – for example, “prod” – we only need to create a similarly named properties file – application-prod.properties for our “prod” profile. Profile-specific properties always override the default ones.

3. Programmatic Configuration

We can programmatically choose which Log4j2 configuration file to use by changing our Spring Boot Application class:

@SpringBootApplication
public class Application implements CommandLineRunner {
    @Autowired
    private Environment env;
    public static void main(String[] args) {
        SpringApplication.run(Application.class, args);
    }
    @Override
    public void run(String... param) {
        if (Arrays.asList(env.getActiveProfiles()).contains("dev")) {
            Configurator.initialize(null, "/path/to/log4j2-dev.xml");
        } else {
            Configurator.initialize(null, "/path/to/log4j2.xml");
        }
    }
}

Configurator is a class of the Log4j2 library. It provides several ways to construct a LoggerContext using the location of the configuration file and various optional parameters.

This solution has one drawback: The application boot process won't be logged using Log4j2.

4. Conclusion

In summary, we've seen two approaches to using different Log4j2 configurations per Spring profile. First, we saw that we could provide a different properties file for each profile. Then, we saw an approach for configuring Log4j2 programmatically at application startup based on the active profile.


Get All Running JVM Threads

$
0
0

1. Overview

In this short tutorial, we'll learn how to get all running threads in the current JVM, including the threads not started by our class.

2. Use the Thread Class

The getAllStackTrace() method of the Thread class gives a stack trace of all the running threads. It returns a Map whose keys are the Thread objects, so we can get the key set and simply loop over its elements to get information about the threads.

Let's use the printf() method to make the output more readable:

Set<Thread> threads = Thread.getAllStackTraces().keySet();
System.out.printf("%-15s \t %-15s \t %-15s \t %s\n", "Name", "State", "Priority", "isDaemon");
for (Thread t : threads) {
    System.out.printf("%-15s \t %-15s \t %-15d \t %s\n", t.getName(), t.getState(), t.getPriority(), t.isDaemon());
}

The output will look like:

Name            	 State           	 Priority        	 isDaemon
main            	 RUNNABLE        	 5               	 false
Signal Dispatcher 	 RUNNABLE        	 9               	 true
Finalizer       	 WAITING         	 8               	 true
Reference Handler 	 WAITING         	 10              	 true

As we see, besides thread main, which runs the main program, we have three other threads. This result may vary with different Java versions.

Let's learn a bit more about these other threads:

  • Signal Dispatcher: this thread handles signals sent by the operating system to the JVM.
  • Finalizer: this thread performs finalizations for objects that no longer need to release system resources.
  • Reference Handler: this thread puts objects that are no longer needed into the queue to be processed by the Finalizer thread.

All these threads will be terminated if the main program exits.

3. Use the ThreadUtils Class from Apache Commons

We can also use the ThreadUtils class from Apache Commons Lang library to achieve the same goal:

Let's add a dependency to our pom.xml file:

<dependency>
    <groupId>org.apache.commons</groupId>
    <artifactId>commons-lang3</artifactId>
    <version>3.10</version>
</dependency>

And simply use the getAllThreads() method to get all running threads:

System.out.printf("%-15s \t %-15s \t %-15s \t %s\n", "Name", "State", "Priority", "isDaemon");
for (Thread t : ThreadUtils.getAllThreads()) {
    System.out.printf("%-15s \t %-15s \t %-15d \t %s\n", t.getName(), t.getState(), t.getPriority(), t.isDaemon());
}

The output is the same as above.

4. Conclusion

In summary, we've learned two methods to get all running threads in the current JVM.


Collecting Stream Elements into a List in Java

$
0
0

1. Overview

In this tutorial, we'll look at different methods to get a List from a Stream. We'll also discuss the differences among them and when to use which method.

2. Collecting Stream Elements into a List

Getting a List from a Stream is the most used terminal operation of the Stream pipeline. Before Java 16, we used to invoke the Stream.collect() method and pass it to a Collector as an argument to gather the elements into. The Collector itself was created by calling the Collectors.toList() method.

However, there have been change requests for a method to get a List directly from a Stream instance. After the Java 16 release, we can now invoke toList(), a new method directly on the Stream, to get the List. Libraries like StreamEx also provide a convenient way to get a List directly from a Stream.

We can accumulate Stream elements into a List by using:

We'll work with the methods in the chronological order of their release.

3. Analyzing the Lists

Let's first create the lists from the methods described in the previous section. After that, let's analyze their properties.

We'll use the following Stream of country codes for all the examples:

Stream.of(Locale.getISOCountries());

3.1. Creating Lists

Now, we'll create a List from the given Stream of country codes using the different methods:

First, let's create a List using Collectors:toList():

List<String> result = Stream.of(Locale.getISOCountries()).collect(Collectors.toList());

After that, let's collect it using Collectors.toUnmodifiableList():

List<String> result = Stream.of(Locale.getISOCountries()).collect(Collectors.toUnmodifiableList());

Here, in these methods, we accumulate the Stream into a List through the Collector interface. This results in extra allocation and copying as we don't work directly with the Stream.

Then, let's repeat the collection with Stream.toList():

List<String> result = Stream.of(Locale.getISOCountries()).toList();

Here, we get the List directly from the Stream, thus preventing extra allocation and copying.

So, using toList() directly on the Stream is more concise, neat, convenient, and optimum when compared to the other two invocations.

3.2. Examining the Accumulated Lists

Let's begin with examining the type of List we created.

Collectors.toList(), collects the Stream elements into an ArrayList:

java.util.ArrayList

Collectors.toUnmodifiableList(), collects the Stream elements into an unmodifiable List.

java.util.ImmutableCollections.ListN

Stream.toList(), collects the elements into an unmodifiable List.

java.util.ImmutableCollections.ListN

Though the current implementation of the Collectors.toList() creates a mutable List, the method's specification itself makes no guarantee on the type, mutability, serializability, or thread-safety of the List.

On the other hand, both Collectors.toUnmodifiableList() and Stream.toList(), produce unmodifiable lists.

This implies that we can do operations like add and sort on the elements of Collectors.toList(), but not on the elements of Collectors.toUnmodifiableList() and Stream.toList()

3.3. Allowing Null Elements in the Lists

Although Stream.toList() produces an unmodifiable List, it is still not the same as Collectors.toUnmodifiableList(). This is because Stream.toList() allows the null elements and Collectors.toUnmodifiableList() doesn't allow the null elements. However, Collectors.toList() allows the null elements.

Collectors.toList() doesn't throw an Exception when a Stream containing null elements is collected:

Assertions.assertDoesNotThrow(() -> {
    Stream.of(null,null).collect(Collectors.toList());
});

Collectors.toUnmodifiableList() throws a NulPointerException when we collect a Stream containing null elements:

Assertions.assertThrows(NullPointerException.class, () -> {
    Stream.of(null,null).collect(Collectors.toUnmodifiableList());
});

Similarly, Stream.toList() also throws a NulPointerException when we try to collect a Stream containing null elements:

Assertions.assertDoesNotThrow(() -> {
    Stream.of(null,null).toList();
});

Therefore, this is something to watch out for when migrating our code from Java 8 to Java 10 or Java 16. We can't blindly use Stream.toList() in place of Collectors.toList() or Collectors.toUnmodifiableList().

3.4. Summary of Analysis

The following table summarizes the differences and similarities of the lists from our analysis:

4. When to Use Different toList() Methods

The main objective of adding Stream.toList() is to reduce the verboseness of the Collector API.

As shown previously, using the Collectors methods for getting Lists is very verbose. On the other hand, using the Stream.toList() method makes code neat and concise.

Nevertheless, as seen in earlier sections, Stream.toList() can't be used as a shortcut to Collectors.toList() or Collectors.toUnmodifiableList().

Secondly, the Stream.toList() uses less memory because its implementation is independent of the Collector interface. It accumulates the Stream elements directly into the List. So, in case we know the size of the stream in advance, it will be optimum to use Stream.toList().

Thirdly, we know that the Stream API provides the implementation only for the toList() method. It doesn't contain similar methods for getting a map or a set. So, in case we want a uniform approach to get any converters like list, map, or set, we'll continue to use the Collector API. This will also maintain consistency and avoid confusion.

Lastly, if we're using versions lower than Java 16, we have to continue to use Collectors methods.

The following table summarizes the optimum usage of the given methods:

5. Conclusion

In this article, we analyzed the three most popular ways of getting a List from a Stream. Then, we looked at the main differences and similarities. And, we also discussed how and when to use these methods.

As always, the source code for the examples used in this article is available over on GitHub.


Connect to Apache Kafka running in Docker

$
0
0

1. Overview

Apache Kafka is a very popular event streaming platform that is used with Docker frequently. Often, people experience connection establishment problems with Kafka, especially when the client is not running on the same Docker network or the same host. This is primarily due to the misconfiguration of Kafka's advertised listeners.

In this tutorial, we will learn how to configure the listeners so that clients can connect to a Kafka broker running within Docker.

2. Setup Kafka

Before we try to establish the connection, we need to run a Kafka broker using Docker. Here's a snippet of our docker-compose.yaml file:

version: '2'
services:
  zookeeper:
    container_name: zookeeper
    networks: 
      - kafka_network
    ...
  
  kafka:
    container_name: kafka
    networks: 
      - kafka_network
    ports:
      - 29092:29092
    environment:
      KAFKA_LISTENERS: EXTERNAL_SAME_HOST://:29092,INTERNAL://:9092
      KAFKA_ADVERTISED_LISTENERS: INTERNAL://kafka:9092,EXTERNAL_SAME_HOST://localhost:29092
      KAFKA_LISTENER_SECURITY_PROTOCOL_MAP: INTERNAL:PLAINTEXT,EXTERNAL_SAME_HOST:PLAINTEXT
      KAFKA_INTER_BROKER_LISTENER_NAME: INTERNAL
     ... 
networks:
  kafka_network:
    name: kafka_docker_example_net

Here, we defined two must-have services – Kafka and Zookeeper. We also defined a custom network – kafka_docker_example_net, which our services will use.

We will look at the KAFKA_LISTENERS, KAFKA_ADVERTISED_LISTENERS, and KAFKA_LISTENER_SECURITY_PROTOCOL_MAP properties in more detail later.

With the above docker-compose.yaml file, we start the services:

docker-compose up -d
Creating network "kafka_docker_example_net" with the default driver
Creating zookeeper ... done
Creating kafka ... done

Also, we will be using the Kafka console producer utility as a sample client to test the connection to the Kafka broker. To use the kafka-console-producer script without Docker, we need to have Kafka downloaded.

3. Listeners

Listeners, advertised listeners, and listener protocols play a considerable role when connecting with Kafka broker.

We manage listeners with the KAFKA_LISTENERS property, where we declare a comma-separated list of URIs, which specify the sockets that the broker should listen on for incoming TCP connections.

Each URI comprises a protocol name, followed by an interface address and a port:

EXTERNAL_SAME_HOST://0.0.0.0:29092,INTERNAL://0.0.0.0:9092

Here, we specified a 0.0.0.0 meta address to bind the socket to all interfaces. Further, EXTERNAL_SAME_HOST and INTERNAL are our custom listener names that we need to specify when defining listeners in the URI format.

3.2. Bootstrapping

For initial connections, Kafka clients need a bootstrap server list where we specify the addresses of the brokers. The list should contain at least one valid address to a random broker in the cluster.

The client will use that address to connect to the broker. If the connection is successful, the broker will return the metadata about the cluster, including the advertised listener lists for all the brokers in the cluster. For subsequent connections, the clients will use that list to reach the brokers.

3.3. Advertised Listeners

Just declaring listeners is not enough because it's just a socket configuration for the broker. We need a way to tell the clients (consumers and producers) how to connect to Kafka.

This is where advertised listeners come into the picture with the help of the KAFKA_ADVERTISED_LISTENERS property. It has a similar format as the listener's property:

<listener protocol>://<advertised host name>:<advertised port>

The clients use the addresses specified as advertised listeners after the initial bootstrapping process.

3.4. Listener Security Protocol Map

Apart from listeners and advertised listeners, we need to tell the clients about the security protocols to use when connecting to Kafka. In the KAFKA_LISTENER_SECURITY_PROTOCOL_MAP, we map our custom protocol names to valid security protocols.

In the configuration in the previous section, we declared two custom protocol names – INTERNAL and EXTERNAL_SAME_HOST. We can name them as we want, but we need to map them to valid security protocols.

One of the security protocols we specified is PLAINTEXT, which means that the clients don't need to authenticate with the Kafka broker. Also, the data exchanged is not encrypted.

4. Client Connecting from the Same Docker Network

Let's start the Kafka console producer from another container and try to produce messages to the broker:

docker run -it --rm --network kafka_docker_example_net confluentinc/cp-kafka /bin/kafka-console-producer --bootstrap-server kafka:9092 --topic test_topic
>hello
>world

Here, we are attaching this container to the existing kafka_docker_example_net network to communicate to our broker freely. We also specify the broker's address –  kafka:9092 and the name of the topic, which will be created automatically.

We were able to produce the messages to the topic, which means that the connection to the broker was successful.

5. Client Connecting from the Same Host

Let's connect to the broker from the host machine when the client is not containerized. For external connection, we advertised EXTERNAL_SAME_HOST listener, which we can use to establish the connection from the host. From the advertised listener property, we know that we have to use the localhost:29092 address to reach Kafka broker.

To test connectivity from the same host, we will use a non-Dockerized Kafka console producer:

kafka-console-producer --bootstrap-server localhost:29092 --topic test_topic_2
>hi
>there

Since we managed to produce in the topic, it means that both the initial bootstrapping and the subsequent connection (where advertised listeners are used by the client) to the broker were successful.

The port number 29092 that we configured in docker-compose.yaml earlier made the Kafka broker reachable outside Docker.

6. Client Connecting from a Different Host

How would we connect to a Kafka broker if it's running on a different host machine? Unfortunately, we can't re-use existing listeners because they are only for the same Docker network or host connection. So instead, we need to define a new listener and advertise it:

KAFKA_LISTENERS: EXTERNAL_SAME_HOST://:29092,EXTERNAL_DIFFERENT_HOST://:29093,INTERNAL://:9092
KAFKA_ADVERTISED_LISTENERS: INTERNAL://kafka:9092,EXTERNAL_SAME_HOST://localhost:29092,EXTERNAL_DIFFERENT_HOST://157.245.80.232:29093
KAFKA_LISTENER_SECURITY_PROTOCOL_MAP: INTERNAL:PLAINTEXT,EXTERNAL_SAME_HOST:PLAINTEXT,EXTERNAL_DIFFERENT_HOST:PLAINTEXT

We created a new listener called EXTERNAL_DIFFERENT_HOST with security protocol PLAINTEXT and port 29093 associated. In KAFKA_ADVERTISED_LISTENERS, we also added the IP address of the cloud machine Kafka is running on.

We have to keep in mind that we can't use localhost because we are connecting from a different machine (local workstation in this case). Also, port 29093 is published under the ports section so that it's reachable outside Docker.

Let's try producing a few messages:

kafka-console-producer --bootstrap-server 157.245.80.232:29093 --topic test_topic_3
>hello
>REMOTE SERVER

We can see that we were able to connect to the Kafka broker and produce messages successfully.

7. Conclusion

In this article, we learned how to configure the listeners so that clients can connect to a Kafka broker running within Docker. We looked at different scenarios where the client was running on the same Docker network, same host, different host, etc. We saw that the configurations for listeners, advertised listeners, and security protocol maps determines the connectivity.


HTML to PDF Using OpenPDF

$
0
0

1. Overview

In this quick tutorial, we'll look at using OpenPDF in Java to convert HTML files to PDF formats programmatically.

2. OpenPDF

OpenPDF is a free Java library for creating and editing PDF files under the LGPL and MPL licenses. It's a fork of the iText program. In fact, before version 5, the code for generating PDF using OpenPDF was nearly identical to the iText API. It is a well-maintained solution for producing PDFs in Java.

3. Converting Using Flying Saucer

Flying Saucer is a Java library that allows us to render well-formed XML (or XHTML) with CSS 2.1 for style and formatting, generating output to PDF, pictures, and swing panels.

3.1. Maven Dependencies

We'll start with Maven dependencies:

<dependency>
    <groupId>org.jsoup</groupId>
    <artifactId>jsoup</artifactId>
    <version>1.13.1</version>
</dependency>
<dependency>
    <groupId>org.xhtmlrenderer</groupId>
    <artifactId>flying-saucer-pdf-openpdf</artifactId>
    <version>9.1.20</version>
</dependency>

We'll use the library jsoup for parsing HTML files, input streams, URLs, and even strings. It offers DOM (Document Object Model) traversal capabilities, CSS, and jQuery-like selectors to extract data from HTML.

The flying-saucer-pdf-openpdf library accepts an XML representation of HTML files as input, applies CSS formatting and styling, and outputs PDF.

3.2. HTML to PDF

In this tutorial, we'll try to cover simple instances that you might encounter in HTML to PDF conversions, such as images in HTML and styling, using Flying Saucer and OpenPDF. We'll also discuss how we can customize the code to accept external styles, images, and fonts.

Let's take a look at our sample HTML code:

<html>
    <head>
        <style>
            .center_div {
                border: 1px solid gray;
                margin-left: auto;
                margin-right: auto;
                width: 90%;
                background-color: #d0f0f6;
                text-align: left;
                padding: 8px;
            }
        </style>
        <link href="style.css" rel="stylesheet">
    </head>
    <body>
        <div class="center_div">
            <h1>Hello Baeldung!</h1>
            <img src="Java_logo.png">
            <div class="myclass">
                <p>This is the tutorial to convert html to pdf.</p>
            </div>
        </div>
    </body>
</html>

To convert HTML to PDF, we'll first read the HTML file from the defined location:

File inputHTML = new File(HTML);

As the next step, we'll use jsoup to convert the above HTML file to a jsoup Document to render XHTML.

Given below is the XHTML output:

Document document = Jsoup.parse(inputHTML, "UTF-8");
document.outputSettings().syntax(Document.OutputSettings.Syntax.xml);
return document;

Now, as the last step, let's create a PDF from the XHTML document we generated in the previous step. The ITextRenderer will take this XHTML document and create an output PDF file. Note that we're wrapping our code in a try-with-resources block to ensure the output stream is closed:

try (OutputStream outputStream = new FileOutputStream(outputPdf)) {
    ITextRenderer renderer = new ITextRenderer();
    SharedContext sharedContext = renderer.getSharedContext();
    sharedContext.setPrint(true);
    sharedContext.setInteractive(false);
    renderer.setDocumentFromString(xhtml.html());
    renderer.layout();
    renderer.createPDF(outputStream);
}

3.3. Customizing for External Styling

We can register additional fonts used in the HTML input document to ITextRenderer so that it can include them while generating the PDF:

renderer.getFontResolver().addFont(getClass().getClassLoader().getResource("fonts/PRISTINA.ttf").toString(), true);

ITextRenderer may be required to register relative URLs to access the external styles:

String baseUrl = FileSystems.getDefault()
  .getPath("src/main/resources/")
  .toUri().toURL().toString();
renderer.setDocumentFromString(xhtml, baseUrl);

We can customize image-related attributes by implementing ReplacedElementFactory:

public ReplacedElement createReplacedElement(LayoutContext lc, BlockBox box, UserAgentCallback uac, int cssWidth, int cssHeight) {
    Element e = box.getElement();
    String nodeName = e.getNodeName();
    if (nodeName.equals("img")) {
        String imagePath = e.getAttribute("src");
        try {
            InputStream input = new FileInputStream("src/main/resources/"+imagePath);
            byte[] bytes = IOUtils.toByteArray(input);
            Image image = Image.getInstance(bytes);
            FSImage fsImage = new ITextFSImage(image);
            if (cssWidth != -1 || cssHeight != -1) {
                fsImage.scale(cssWidth, cssHeight);
            } else {
                fsImage.scale(2000, 1000);
            }
            return new ITextImageElement(fsImage);
        } catch (Exception e1) {
            e1.printStackTrace();
        }
    }
    return null;
}

Note: The above code prefixes the base path to the image path and sets the default image size in case it isn't provided.

Then, we can add the custom ReplacedElementFactory to the SharedContext:

sharedContext.setReplacedElementFactory(new CustomElementFactoryImpl());

4. Converting Using Open HTML

Open HTML to PDF is a Java library that outputs well-formed XML/XHTML (and even some HTML5) to PDF or pictures using CSS 2.1 (and later standards) for layout and formatting.

4.1. Maven Dependencies

In addition to the jsoup library shown above, we'll need to add a couple of Open HTML to PDF libraries to our pom.xml file:

<dependency>
    <groupId>com.openhtmltopdf</groupId>
    <artifactId>openhtmltopdf-core</artifactId>
    <version>1.0.6</version>
</dependency>
<dependency>
    <groupId>com.openhtmltopdf</groupId>
    <artifactId>openhtmltopdf-pdfbox</artifactId>
    <version>1.0.6</version>
</dependency>

Library openhtmltopdf-core renders well-formed XML/XHTML, and openhtmltopdf-pdfbox generates a PDF document from the rendered representation of the XHTML.

4.2. HTML to PDF

In this program, to convert HTML to PDF using Open HTML, we'll use the same HTML mentioned in section 3.2. We'll first convert the HTML file to a jsoup Document as we showed in a previous example.

In the last step, to create a PDF from the XHTML document, PdfRendererBuilder will take this XHTML document and create a PDF as the output file. Again, we're using try-with-resources to wrap our logic:

try (OutputStream os = new FileOutputStream(outputPdf)) {
    PdfRendererBuilder builder = new PdfRendererBuilder();
    builder.withUri(outputPdf);
    builder.toStream(os);
    builder.withW3cDocument(new W3CDom().fromJsoup(doc), "/");
    builder.run();
}

4.3. Customizing for External Styling

We can register additional fonts used in the HTML input document to PdfRendererBuilder so that it can include them with the PDF:

builder.useFont(new File(getClass().getClassLoader().getResource("fonts/PRISTINA.ttf").getFile()), "PRISTINA");

PdfRendererBuilder library may also be required to register relative URLs to access the external styles, similar to our earlier example:

String baseUrl = FileSystems.getDefault()
  .getPath("src/main/resources/")
  .toUri().toURL().toString();
builder.withW3cDocument(new W3CDom().fromJsoup(doc), baseUrl);

5. Conclusion

In this article, we have learned how to convert HTML into PDF using Flying Saucer and Open HTML. We've also discussed how we can register external fonts, styles, and customizations.

As is the custom, all the code samples used in this tutorial are available over on GitHub.


Fixing the “Declared package does not match the expected package” Error

$
0
0

1. Overview

In this article, we'll investigate the “Declared package does not match the expected package” error in a java project.

We normally expect to put our java files in folders that match the package structure. The most common cause of the error is when our IDE encounters a mismatch between the package declaration and the physical location of the java file.

In this short tutorial, we'll look at an example of this error, how it shows up in IDEs and Maven, and how to resolve it. We'll also look at a few other tips and tricks.

2. Example of Error

Let's imagine we have the following class in the src/main/java/com/baeldung/bookstore directory:

package com.baeldung;
public class Book {
    // fields and methods
}

We would expect this to cause an error in IDE as the package name implies the path src/main/java/com/baeldung.

3. Solving the Problem

It's usually fairly straightforward to solve this problem.

3.1. Correcting Package Declaration

First, let's make sure that the package declaration and relative source file path match. If that's already the case, we can try to close and reopen the project again. Sometimes the IDE may be out of sync with the project on disk and needs to reimport the files, resolve dependencies and successfully recompile.

Otherwise, we can correct the package declaration in the following reverse DNS format:

package com.baeldung.bookstore;

3.2. Correcting the Source Code's Physical Location

It might be the case that the package is declared correctly, and the java file got mistakenly placed into the wrong directory.

Then, we'll move the Book class into the following correct directory location:

<source-path>/com/baeldung/bookstore

4. Symptoms of the Problem

Depending on our IDE of choice, the error message may appear differently. Similarly, we may see the error in maven.

4.1. Error in Eclipse

In Eclipse, we'll see an error like this:


4.2. Error in IntelliJ

In IntelliJ, we'll get a similar error message:

4.3. Error in Maven

Similarly, we'll get the below error while running the maven build:

[ERROR] COMPILATION ERROR : 
[INFO] -------------------------------------------------------------
[ERROR] /Users/saichakr2/baeldung-projects/tutorials/core-java-modules/core-java-lang-4/src/main/java/com/baeldung/bookstore/Book.java:[3,8] duplicate class: com.baeldung.Book
[ERROR] /Users/saichakr2/baeldung-projects/tutorials/core-java-modules/core-java-lang-4/src/main/java/com/baeldung/bookstore/LibraryAdmin.java:[7,12] cannot access com.baeldung.bookstore.Book
  bad source file: /Users/saichakr2/baeldung-projects/tutorials/core-java-modules/core-java-lang-4/src/main/java/com/baeldung/bookstore/Book.java
    file does not contain class com.baeldung.bookstore.Book
    Please remove or make sure it appears in the correct subdirectory of the sourcepath

We should note, however, the Book class will compile fine using the standalone javac command. This is because the java compiler does not require the package declaration path and relative source path to match.

5. Error in Dependent code

We may not spot the problem in the affected class file itself. It may show up in a class with a peer dependency:

As expected, the above class could not resolve the Book class because the Book class failed to compile in the expected package.

6. Additional Tips and Tricks

While it's an easy fix when the file is in the wrong path, we may still encounter difficulties with a source file that appears to be in the right place in the source tree.

6.1. Verify Build Path

We'll need to verify that the build path in IDE has no errors. The default source path is mentioned as <project-name>/src/main/java and <project-name>/src/test/java. The build path should have the correct dependencies and library.

6.2. Additional Source Path

Sometimes, it's required to add a source folder to let maven compile those class files. Although, not recommended to do so as predefined source folders will suffice most of the time.

Nevertheless, we can add additional sources when required using build-helper-maven-plugin:

<plugin>
    <groupId>org.codehaus.mojo</groupId>
    <artifactId>build-helper-maven-plugin</artifactId>
    <version>3.0.0</version>
    <executions>
        <execution>
            <phase>generate-sources</phase>
            <goals>
                <goal>add-source</goal>
            </goals>
            <configuration>
                <sources>
                    <source>src/main/<another-src></source>
                </sources>
            </configuration>
        </execution>
    </executions>
</plugin>

7. Conclusion

In this article, we've learned how a mismatch between the package declaration and the corresponding directory of the java file cause error in IDEs. We also explored a couple of ways to resolve this.

As always, the complete source code of the examples is available over on GitHub.


Maven dependencyManagement vs. dependencies Tags

$
0
0

1. Overview

In this tutorial, we will review two important Maven tags — dependencyManagement and dependencies.

These features are especially useful for multi-module projects.

We'll review the similarities and differences of the two tags, and we'll also look at some common mistakes that developers make when using them that can cause confusion.

2. Usage

In general, we use the dependencyManagement tag to avoid repeating the version and scope tags when we define our dependencies in the dependencies tag. In this way, the required dependency is declared in a central POM file.

2.1. dependencyManagement

This tag consists of a dependencies tag which itself might contain multiple dependency tags. Each dependency is supposed to have at least three main tags: groupId, artifactId, and version. Let's see an example:

<dependencyManagement>
    <dependencies>
        <dependency>
            <groupId>org.apache.commons</groupId>
            <artifactId>commons-lang3</artifactId>
            <version>3.12.0</version>
        </dependency>
    </dependencies>
</dependencyManagement>

The above code just declares the new artifact commons-lang3, but it doesn't really add it to the project dependency resource list.

2.2. dependencies

This tag contains a list of dependency tags. Each dependency is supposed to have at least two main tags, which are groupId and artifactId.

Let's see a quick example:

<dependencies>
    <dependency>
        <groupId>org.apache.commons</groupId>
        <artifactId>commons-lang3</artifactId>
        <version>3.12.0</version>
    </dependency>
</dependencies>

The version and scope tags can be inherited implicitly if we have used the dependencyManagement tag before in the POM file:

<dependencies>
    <dependency>
        <groupId>org.apache.commons</groupId>
        <artifactId>commons-lang3</artifactId>
    </dependency>
</dependencies>

3. Similarities

Both of these tags aim to declare some third-party or sub-module dependency. They complement each other.

In fact, we usually define the dependencyManagement tag once, preceding the dependencies tag. This is used in order to declare the dependencies in the POM file. This declaration is just an announcement, and it doesn't really add the dependency to the project.

Let's see a sample for adding the JUnit library dependency:

<dependencyManagement>
    <dependencies>
        <dependency>
            <groupId>junit</groupId>
            <artifactId>junit</artifactId>
            <version>4.13.2</version>
            <scope>test</scope>
        </dependency>
    </dependencies>
</dependencyManagement>

As we can see in the above code, there is a dependencyManagement tag that itself contains another dependencies tag.

Now, let's see the other side of the code, which adds the actual dependency to the project:

<dependencies>
    <dependency>
        <groupId>junit</groupId>
        <artifactId>junit</artifactId>
    </dependency>
</dependencies>

So, the current tag is very similar to the previous one. Both of them would define a list of dependencies. Of course, there are small differences which we will cover soon.

The same groupId and artifactId tags are repeated in both code snippets, and there is a meaningful correlation between them: Both of them refer to the same artifact.

As we can see, there is not any version tag present in our later dependency tag. Surprisingly, it's valid syntax, and it can be parsed and compiled without any problem. The reason can be guessed easily: It will use the version declared by dependencyManagement.

4. Differences

4.1. Structural Difference

As we covered earlier, the main structural difference between these two tags is the logic of inheritance. We define the version in the dependencyManagement tag, and then we can use the mentioned version without specifying it in the next dependencies tag.

4.2. Behavioral Difference

dependencyManagement is just a declaration, and it does not really add a dependency. The declared dependencies in this section must be later used by the dependencies tag. It is just the dependencies tag that causes real dependency to happen. In the above sample, the dependencyManagement tag will not add the junit library into any scope. It is just a declaration for the future dependencies tag.

5. Real-World Example

Nearly all Maven-based open-source projects use this mechanism.

Let's see an example from the Maven project itself. We see the hamcrest-core dependency, which exists in the Maven project. It's declared first in the dependencyManagement tag, and then it is imported by the main dependencies tag:

<dependencyManagement>
    <dependencies>
        <dependency>
            <groupId>org.hamcrest</groupId>
            <artifactId>hamcrest-core</artifactId>
            <version>2.2</version>
            <scope>test</scope>
        </dependency>
    </dependencies>
</dependencyManagement>
<dependencies>
    <dependency>
        <groupId>org.hamcrest</groupId>
        <artifactId>hamcrest-core</artifactId>
        <scope>test</scope>
    </dependency>
</dependencies>

6. Common Use Cases

A very common use case for this feature is a multi-module project.

Imagine we have a big project which consists of different modules. Each module has its own dependencies, and each developer might use a different version for the used dependencies. Then it could lead to a mesh of different artifact versions, which can also cause difficult and hard-to-resolve conflicts.

The easy solution for this problem is definitely using the dependencyManagement tag in the root POM file (usually called the “parent”) and then using the dependencies in the child's POM files (sub-modules) and even the parent module itself (if applicable).

If we have a single module, does it make sense to use this feature or not? Although this is very useful in multi-module environments, it can also be a rule of thumb to obey it as a best practice even in a single-module project. This helps the project readability and also makes it ready to extend to a multi-module project.

7. Common Mistakes

One common mistake is defining a dependency just in the dependencyManagement section and not including it in the dependencies tag. In this case, we will encounter compile or runtime errors, depending on the mentioned scope.

Let's see an example:

<dependencyManagement>
    <dependencies>
        <dependency>
            <groupId>org.apache.commons</groupId>
            <artifactId>commons-lang3</artifactId>
            <version>3.12.0</version>
        </dependency>
        ...
    </dependencies>
</dependencyManagement>

Imagine the above POM code snippet. Then suppose we're going to use this library in a sub-module source file:

import org.apache.commons.lang3.StringUtils;
public class Main {
    public static void main(String[] args) {
        StringUtils.isBlank(" ");
    }
}

This code will not compile because of the missing library. The compiler complains with an error:

[ERROR] Failed to execute goal compile (default-compile) on project sample-module: Compilation failure
[ERROR] ~/sample-module/src/main/java/com/baeldung/Main.java:[3,32] package org.apache.commons.lang3 does not exist

To avoid this error, it's enough to add the below dependencies tag to the sub-module POM file:

<dependencies>
    <dependency>
        <groupId>org.apache.commons</groupId>
        <artifactId>commons-lang3</artifactId>
    </dependency>
</dependencies>

8. Conclusion

In this tutorial, we compared Maven's dependencyManagement and dependencies tags. Then, we reviewed their similarities and differences and saw how they work together.

As usual, the code for these examples is available over on GitHub.

       
Viewing all 4464 articles
Browse latest View live


<script src="https://jsc.adskeeper.com/r/s/rssing.com.1596347.js" async> </script>