Quantcast
Channel: Baeldung
Viewing all 4464 articles
Browse latest View live

Running a Single Test or Method With Maven

$
0
0

1. Overview

Usually, we execute tests during a Maven build using the Maven surefire plugin.

This tutorial will explore how to use this plugin to run a single test class or test method.

2. Introduction to the Problem

The Maven surefire plugin is easy to use. It has only one goal: test.

Therefore, with the default configuration, we can execute all tests in the project by the command: mvn test.

Sometimes, we may want to execute one single test class or even one single test method.

In this tutorial, we'll take JUnit 5 as the testing provider example to address how to achieve it.

3. The Example Project

To show the test results in a more straightforward way, let's create a couple of simple test classes:

class TheFirstUnitTest {
    // declaring logger ... 
    @Test
    void whenTestCase_thenPass() {
        logger.info("Running a dummyTest");
    }
}
class TheSecondUnitTest {
    // declaring logger ... 
    @Test
    void whenTestCase1_thenPrintTest1_1() {
        logger.info("Running When Case1: test1_1");
    }
    @Test
    void whenTestCase1_thenPrintTest1_2() {
        logger.info("Running When Case1: test1_2");
    }
    @Test
    void whenTestCase1_thenPrintTest1_3() {
        logger.info("Running When Case1: test1_3");
    }
    @Test
    void whenTestCase2_thenPrintTest2_1() {
        logger.info("Running When Case2: test2_1");
    }
}

In the TheFirstUnitTest class, we have only one test method. However, TheSecondUnitTest contains four test methods. All our method names are following the “when…then…” pattern.

To make it simple, we've made each test method output a line indicating the method is being called.

Now, if we run mvn test, all tests will be executed:

$ mvn test
...
[INFO] Scanning for projects...
...
[INFO] -------------------------------------------------------
[INFO]  T E S T S
[INFO] -------------------------------------------------------
[INFO] Running com.baeldung.runasingletest.TheSecondUnitTest
16:58:16.444 [main] INFO ...TheSecondUnitTest - Running When Case2: test2_1
16:58:16.448 [main] INFO ...TheSecondUnitTest - Running When Case1: test1_1
16:58:16.449 [main] INFO ...TheSecondUnitTest - Running When Case1: test1_2
16:58:16.450 [main] INFO ...TheSecondUnitTest - Running When Case1: test1_3
[INFO] Tests run: 4, Failures: 0, Errors: 0, Skipped: 0, Time elapsed: 0.065 s - in com.baeldung.runasingletest.TheSecondUnitTest
[INFO] Running com.baeldung.runasingletest.TheFirstUnitTest
16:58:16.453 [main] INFO ...TheFirstUnitTest - Running a dummyTest
[INFO] Tests run: 1, Failures: 0, Errors: 0, Skipped: 0, Time elapsed: 0 s - in com.baeldung.runasingletest.TheFirstUnitTest
[INFO] 
[INFO] Results:
[INFO] 
[INFO] Tests run: 5, Failures: 0, Errors: 0, Skipped: 0
[INFO] 
 ...

So next, let's tell Maven to execute only specified tests.

4. Execute a Single Test Class

The Maven surefire plugin provides a “test” parameter that we can use to specify test classes or methods we want to execute.

If we want to execute a single test class, we can execute the command: mvn test -Dtest=”TestClassName”.

For instance, we can pass -Dtest=”TheFirstUnitTest” to the mvn command to execute the TheFirstUnitTest class only:

$ mvn test -Dtest="TheFirstUnitTest"
...
[INFO] Scanning for projects...
...
[INFO] -------------------------------------------------------
[INFO]  T E S T S
[INFO] -------------------------------------------------------
[INFO] Running com.baeldung.runasingletest.TheFirstUnitTest
17:10:35.351 [main] INFO com.baeldung.runasingletest.TheFirstUnitTest - Running a dummyTest
[INFO] Tests run: 1, Failures: 0, Errors: 0, Skipped: 0, Time elapsed: 0.053 s - in com.baeldung.runasingletest.TheFirstUnitTest
[INFO] 
[INFO] Results:
[INFO] 
[INFO] Tests run: 1, Failures: 0, Errors: 0, Skipped: 0
[INFO] 
[INFO] ------------------------------------------------------------------------
[INFO] BUILD SUCCESS
 ...

As the output shows, only the test class we've passed to the “test” parameter is executed.

5. Execute a Single Test Method

Additionally, we can ask the Maven surefire plugin to execute a single test method by passing -Dtest=”TestClassName#TestMethodName” to the mvn command.

Now, let's execute the whenTestCase2_thenPrintTest2_1() method in the TheSecondUnitTest class:

$ mvn test -Dtest="TheSecondUnitTest#whenTestCase2_thenPrintTest2_1"    
...
[INFO] Scanning for projects...
...
[INFO] -------------------------------------------------------
[INFO]  T E S T S
[INFO] -------------------------------------------------------
[INFO] Running com.baeldung.runasingletest.TheSecondUnitTest
17:22:07.063 [main] INFO ...TheSecondUnitTest - Running When Case2: test2_1
[INFO] Tests run: 1, Failures: 0, Errors: 0, Skipped: 0, Time elapsed: 0.057 s - in com.baeldung.runasingletest.TheSecondUnitTest
[INFO] 
[INFO] Results:
[INFO] 
[INFO] Tests run: 1, Failures: 0, Errors: 0, Skipped: 0
[INFO] 
[INFO] ------------------------------------------------------------------------
[INFO] BUILD SUCCESS
...

As we can see, this time, we've executed only the specified test method.

6. More About the test Parameter

So far, we've shown how to execute a single test class or test method by providing the test parameter value accordingly.

Actually, the Maven surefire plugin allows us to set the value of the test parameter in different formats to execute tests flexibly.

Next, we'll show some commonly used formats:

  • Execute multiple test classes by name: -Dtest=”TestClassName1, TestClassName2, TestClassName3…”
  • Execute multiple test classes by name pattern: -Dtest=”*ServiceUnitTest” or -Dtest=”The*UnitTest, Controller*Test”
  • Specify multiple test methods by name: -Dtest=”ClassName#method1+method2″
  • Specify multiple method names by name pattern: -Dtest=”ClassName#whenSomethingHappens_*”

Finally, let's see one more example.

Let's say we only want to execute all “whenTestCase1…” methods in the TheSecondUnitTest class.

So, following the pattern we've talked about above, we hope that -Dtest=”TheSecondUnitTest#whenTestCase1*” will do the job:

$ mvn test -Dtest="TheSecondUnitTest#whenTestCase1*"
...
[INFO] Scanning for projects...
...
[INFO] -------------------------------------------------------
[INFO]  T E S T S
[INFO] -------------------------------------------------------
[INFO] Running com.baeldung.runasingletest.TheSecondUnitTest
17:51:04.973 [main] INFO ...TheSecondUnitTest - Running When Case1: test1_1
17:51:04.979 [main] INFO ...TheSecondUnitTest - Running When Case1: test1_2
17:51:04.980 [main] INFO ...TheSecondUnitTest - Running When Case1: test1_3
[INFO] Tests run: 3, Failures: 0, Errors: 0, Skipped: 0, Time elapsed: 0.055 s - in com.baeldung.runasingletest.TheSecondUnitTest
[INFO] 
[INFO] Results:
[INFO] 
[INFO] Tests run: 3, Failures: 0, Errors: 0, Skipped: 0
[INFO] 
[INFO] ------------------------------------------------------------------------
[INFO] BUILD SUCCESS
...

Yes, as we expected, only the three test methods matching the specified name pattern have been executed.

7. Conclusion

The Maven surefire plugin provides a test parameter. It allows us a lot of flexibility in choosing which tests we want to execute.

In this article, we've discussed some commonly used value formats of the test parameter.

Also, we've addressed through examples how to run only specified test classes or test methods with Maven.

As always, the code for the article can be found over on GitHub.


Change the Default Location of the Log4j2 Configuration File in Spring Boot

$
0
0

1. Overview

In our previous tutorial on Logging in Spring Boot, we showed how to use Log4j2 in Spring Boot.

In this short tutorial, we'll learn how to change the default location of the Log4j2 configuration file.

2. Use Properties File

By default, we'll leave the Log4j2 configuration file (log4j2.xml/log4j2-spring.xml) in the project classpath or resources folder.

We can change the location of this file by adding/modifying the following line in our application.properties file:

logging.config=/path/to/log4j2.xml

3. Use VM Options

We can also add the following VM option when running our program to achieve the same goal:

-Dlogging.config=/path/to/log4j2.xml

4. Programmatic Configuration

Finally, we can programmatically configure the location of this file by changing our Spring Boot Application class like this:

@SpringBootApplication
public class Application implements CommandLineRunner {
    public static void main(String[] args) {
        SpringApplication.run(Application.class, args);
    }
    @Override
    public void run(String... param) {
        Configurator.initialize(null, "/path/to/log4j2.xml");
    }
}

This solution has one drawback: the application boot process won't be logged using Log4j2.

5. Conclusion

In summary, we've learned different ways to change the default location of the Log4j2 configuration file in Spring Boot. I hope these things help with your work.


Context Path vs. Servlet Path in Spring

$
0
0

1. Introduction

DispatcherServlet plays a significant role in Spring applications and provides a single entry point for the application. Whereas the context path defines the URL that the end-user will access the application.

In this tutorial, we're going to learn about the differences between context path and servlet path.

2. Context Path

Simply put, the context path is a name with which a web application is accessed. It is the root of the application. By default, Spring Boot serves the content on the root context path (“/”).

So, any Boot application with default configuration can be accessed as:

http://localhost:8080/

However, in some cases, we may wish to change the context of our application. There are multiple ways to configure the context path, and application.properties is one of them. This file resides under the src/main/resources folder.

Let's configure it using the application.properties file:

server.servlet.context-path=/demo

As a result, the application main page will be:

http://localhost:8080/demo

When we deploy this application to an external server, this modification helps us to avoid accessibility issues.

3. Servlet Path

The servlet path represents the path of the main DispatcherServlet. The DispatcherServlet is an actual Servlet, and it inherits from HttpSerlvet base class. The default value is similar to the context path, i.e. (“/”):

spring.mvc.servlet.path=/

In the earlier versions of Boot, the property was in the ServerProperties class and known as server.servlet-path=/.

From 2.1.x, this property is moved to the WebMvcProperties class and renamed as spring.mvc.servlet.path=/.

Let's modify the servlet path:

spring.mvc.servlet.path=/baeldung

When we update the servlet path, it also affects the context of the application. So, after these modifications, the application context path will become http://localhost:8080/baeldung/demo.

In other words, if a style sheet was being served as http://localhost:8080/demo/style.css, now will serve as http://localhost:8080/baeldung/demo/style.css.

Usually, we don't configure the DispatcherServlet by ourselves. But, if we really need to do it, we have to provide the path of our custom DispatcherServlet.

4. Conclusion

In this quick article, we looked at the semantics of context path and servlet path. We also saw what these terms represent and how they work together in a Spring application.


Deploying a Java War in a Docker Container

$
0
0

1. Overview

In this tutorial, we'll learn to deploy a Java WAR file inside a Docker container.

We'll deploy the WAR file on Apache Tomcat, a free and open-source web server that is widely used in the Java community.

2. Deploy a WAR File to Tomcat

WAR (Web Application ARchive) is a zipped archive file that packages all the web application-related files and their directory structure.

To make things simple, deploying a WAR file on Tomcat is nothing but copying that WAR file into the deployment directory of the Tomcat server. The deployment directory in Linux is $CATALINA_HOME/webapps. $CATALINA_HOME denotes the installation directory of the Tomcat server.

After this, we need to restart the Tomcat server, which will extract the WAR file inside the deployment directory.

3. Deploy WAR in Docker Container

Let's assume that we have a WAR file for our application, ROOT.war, which we need to deploy to the Tomcat server.

To achieve our goal, we need to first create a Dockerfile. This Dockerfile will include all the dependencies necessary to run our application.

Further, we'll create a Docker image using this Dockerfile followed by the step to launch the Docker container.

Let's now dive deep into these steps one by one.

3.1. Create Dockerfile

We'll use the latest Docker image of Tomcat as the base image for our Dockerfile. The advantage of using this image is that all the necessary dependencies/packages are pre-installed. For instance, if we use the latest Ubuntu/CentOS Docker images, then we need to install Java, Tomcat, and other required packages manually.

Since all the required packages are already installed, all we need to do is copy the WAR file, ROOT.war, to the deployment directory of the Tomcat server. That's it!

Let's have a closer look:

$ ls
Dockerfile  ROOT.war
$ cat Dockerfile 
FROM tomcat
COPY ROOT.war /usr/local/tomcat/webapps/

$CATALINA_HOME/webapps denotes the deployment directory for Tomcat. Here, CATALINA_HOME for the official Docker image of Tomcat is /usr/local/tomcat. As a result, the complete deployment directory would turn out to be /usr/local/tomcat/webapps.

The application that we used here is very simple and does not require any other dependencies.

3.2. Build the Docker Image

Let's now create the Docker image using the Dockerfile that we just created:

$ pwd
/baeldung
$ ls
Dockerfile  ROOT.war
$ docker build -t myapp .
Sending build context to Docker daemon  19.97kB
Step 1/2 : FROM tomcat
 ---> 710ec5c56683
Step 2/2 : COPY ROOT.war /usr/local/tomcat/webapps/
 ---> Using cache
 ---> 8b132ab37a0e
Successfully built 8b132ab37a0e
Successfully tagged myapp:latest

The docker build command will create a Docker image with a tag myapp. 

Make sure to build the Docker image from inside the directory where the Dockerfile is located. In our example above, we're inside the /baeldung directory when we build the Docker image.

3.3. Run Docker Container

So far, we've created a Dockerfile and built a Docker image out of it. Let's now run the Docker container:

$ docker run -itd -p 8080:8080 --name my_application_container myapp
e90c61fdb4ac85b198903e4d744f7b0f3c18c9499ed6e2bbe2f39da0211d42c0
$ docker ps 
CONTAINER ID        IMAGE               COMMAND             CREATED             STATUS              PORTS                    NAMES
e90c61fdb4ac        myapp               "catalina.sh run"   6 seconds ago       Up 5 seconds        0.0.0.0:8080->8080/tcp   my_application_container

This command will launch a Docker container with the name my_application_container using the Docker image myapp. 

The default port for the Tomcat server is 8080. Therefore, while starting the Docker container, make sure to always bind the container port 8080 with any available host port. We've used host port 8080 for simplicity here.

3.4. Verify the Setup

Let's now verify everything that we've done so far. We'll access the URL http://<IP>:<PORT> in the browser to view the application.

Here, the IP denotes the public IP (or private IP in some cases) of the Docker host machine. The PORT is the container port that we have exposed while running the Docker container (8080, in our case).

We can also verify the setup using the curl utility in Linux:

$ curl http://localhost:8080
Hi from Baeldung!!!

In the command above, we're executing the command from the Docker host machine. So, we are able to connect to the application using localhost. In response, the curl utility prints the raw HTML of the application webpage.

4. Conclusion

In this article, we've learned to deploy a Java WAR file in a Docker container. We started by creating the Dockerfile using the official Tomcat Docker image. Then, we built the Docker image and ran the application container.

At last, we verified the setup by accessing the application URL.


Display Custom Items in JavaFX ListView

$
0
0

1. Introduction

JavaFX is a powerful tool designed to build application UI for different platforms. It provides not only UI components but different useful tools, such as properties and observable collections.

ListView component is handy to manage collections. Namely, we didn't need to define DataModel or update ListView elements explicitly. Once a change happens in the ObjervableList, it reflects in the ListView widget.

However, such an approach requires a way to display our custom items in JavaFX ListView. This tutorial describes a way to set up how the domain objects look in the ListView.

2. Cell Factory

2.1. Default Behavior

By default ListView in JavaFX uses the toString() method to display an object.

So the obvious approach is to override it:

public class Person {
    String firstName;
    String lastName;
    @Override
    public String toString() {
        return firstName + " " + lastName;
    }
}

This approach is ok for the learning and conceptual examples. However, it's not the best way.

First, our domain class takes on display implementation. Thus, this approach contradicts to single responsibility principle.

Second, other subsystems may use toString(). For instance, we use the toString() method to log our object's state. Logs may require more fields than an item of ListView. So, in this case, a single toString() implementation can't fulfill every module need.

2.2. Cell Factory to Display Custom Objects in ListView

Let's consider a better way to display our custom objects in JavaFX ListView.

Each item in ListView is displayed with an instance of ListCell class. ListCell has a property called text. A cell displays its text value.

So to customize the text in the ListCell instance, we should update its text property. Where can we do it? ListCell has a method named updateItem. When the cell for the item appears, it calls the updateItem. The updateItem method also runs when the cell changes. So we should inherit our own implementation from the default ListCell class. In this implementation, we need to override updateItem.

But how can we make ListView use our custom implementation instead of the default one?

ListView may have a cell factory. Cell factory is null by default. We should set it up to customize the way ListView displays objects.

Let's illustrate cell factory on an example:

public class PersonCellFactory implements Callback<ListView<Person>, ListCell<Person>> {
    @Override
    public ListCell<Person> call(ListView<Person> param) {
        return new ListCell<>(){
            @Override
            public void updateItem(Person person, boolean empty) {
                super.updateItem(person, empty);
                if (empty || person == null) {
                    setText(null);
                } else {
                    setText(person.getFirstName() + " " + person.getLastName());
                }
            }
        };
    }
}

CellFactory should implement a JavaFX callback. The Callback interface in JavaFX is similar to the standard Java Function interface. However, JavaFX uses a Callback interface due to historical reasons.

We should call default implementation of the updateItem method. This implementation triggers default actions, such as connecting the cell to the object and showing a row for an empty list.

The default implementation of the method updateItem calls setText, too. It then sets up the text that will be displayed in the cell.

2.3. Display Custom Items in JavaFX ListView With Custom Widgets

ListCell provides us with an opportunity to set up a custom widget as content. All we should do to display our domain objects in custom widgets is to use setGraphics() instead of setCell().

Supposing, we have to display each row as a CheckBox. Let's take a look at the appropriate cell factory:

public class CheckboxCellFactory implements Callback<ListView<Person>, ListCell<Person>> {
    @Override
    public ListCell<Person> call(ListView<Person> param) {
        return new ListCell<>(){
            @Override
            public void updateItem(Person person, boolean empty) {
                super.updateItem(person, empty);
                if (empty) {
                    setText(null);
                    setGraphic(null);
                } else if (person != null) {
                    setText(null);
                    setGraphic(new CheckBox(person.getFirstName() + " " + person.getLastName()));
                } else {
                    setText("null");
                    setGraphic(null);
                }
            }
        };
    }
}

In this example, we set the text property to null. If both text and graphic properties exist, the text will show beside the widget.

Of course, we can set up the CheckBox callback logic and other properties based on our custom element data. It requires some coding, the same way as setting up the widget text.

3. Conclusion

In this article, we considered a way to show custom items in JavaFX ListView. We saw that the ListView allows quite a flexible way to set it up. We can even display custom widgets in our ListView cells.

As always, the code for the examples is available over on GitHub.


Run JUnit Test Cases From the Command Line

$
0
0

1. Overview

In this tutorial, we'll understand how to run JUnit 5 tests directly from the command line.

2. Test Scenarios

Previously, we've covered how to run a JUnit test programmatically. For our examples, we're going to use the same JUnit tests:

public class FirstUnitTest {
    @Test
    public void whenThis_thenThat() {
        assertTrue(true);
    }
    @Test
    public void whenSomething_thenSomething() {
        assertTrue(true);
    }
    @Test
    public void whenSomethingElse_thenSomethingElse() {
        assertTrue(true);
    }
}
public class SecondUnitTest {
    @Test
    public void whenSomething_thenSomething() {
        assertTrue(true);
    }
    @Test
    public void whensomethingElse_thenSomethingElse() {
        assertTrue(true);
    }
}

3. Running a JUnit 5 Test 

We can run a JUnit 5 test case using JUnit's console launcher. The executable for this jar can be downloaded from Maven Central, under the junit-platform-console-standalone directory.

Also, we'll need a directory that will contain all our compiled classes:

$ mkdir target

Let's see how we can run different test cases using the console launcher.

3.1. Run a Single Test Class

Before we run the test class, let's compile it:

$ javac -d target -cp target:junit-platform-console-standalone-1.7.2.jar src/test/java/com/baeldung/commandline/FirstUnitTest.java

Now, we'll run the compiled test class using the Junit console launcher:

$ java -jar junit-platform-console-standalone-1.7.2.jar --class-path target --select-class com.baeldung.commandline.FirstUnitTest

This will give us test run results:

Test run finished after 60 ms
[         3 containers found      ]
[         0 containers skipped    ]
[         3 containers started    ]
[         0 containers aborted    ]
[         3 containers successful ]
[         0 containers failed     ]
[         3 tests found           ]
[         0 tests skipped         ]
[         3 tests started         ]
[         0 tests aborted         ]
[         3 tests successful      ]
[         0 tests failed          ]

3.2. Run Multiple Test Classes

Again, let's compile the test classes we want to run:

$ javac -d target -cp target:junit-platform-console-standalone-1.7.2.jar src/test/java/com/baeldung/commandline/FirstUnitTest.java src/test/java/com/baeldung/commandline/SecondUnitTest.java 

We'll now run the compiled test classes using the console launcher:

$ java -jar junit-platform-console-standalone-1.7.2.jar --class-path target --select-class com.baeldung.commandline.FirstUnitTest --select-class com.baeldung.commandline.SecondUnitTest

Our results now show that all five test methods were successful:

Test run finished after 68 ms
...
[         5 tests found           ]
...
[         5 tests successful      ]
[         0 tests failed          ]

3.3. Run All Test Classes in a Package

To run all the test classes in a package, let's compile all the test classes present in our package:

$ javac -d target -cp target:junit-platform-console-standalone-1.7.2.jar src/test/java/com/baeldung/commandline/*.java

Again, we'll run the compiled test classes of our package:

$ java -jar junit-platform-console-standalone-1.7.2.jar --class-path target --select-package com.baeldung.commandline
...
Test run finished after 68 ms
...
[         5 tests found           ]
...
[         5 tests successful      ]
[         0 tests failed          ]

3.4. Run All the Test Classes

Let's run all the test cases:

$ java -jar junit-platform-console-standalone-1.7.2.jar --class-path target  --scan-class-path
...
Test run finished after 68 ms
...
[         5 tests found           ]
...
[         5 tests successful      ]
[         0 tests failed          ]

4. Running JUnit Using Maven

If we're using Maven as our build tool, we can execute test cases directly from the command line.

4.1. Running a Single Test Case

To run a single test case on the console, let's execute the following command by specifying the test class name:

$ mvn test -Dtest=SecondUnitTest 

This will give us test run results:

[INFO] Tests run: 2, Failures: 0, Errors: 0, Skipped: 0, Time elapsed: 0.069 s - in com.baeldung.commandline.SecondUnitTest 
[INFO] 
[INFO] Results:
[INFO]
[INFO] Tests run: 2, Failures: 0, Errors: 0, Skipped: 0
[INFO]
[INFO] ------------------------------------------------------------------------ 
[INFO] BUILD SUCCESS 
[INFO] ------------------------------------------------------------------------ 
[INFO] Total time: 7.211 s [INFO] Finished at: 2021-08-02T23:13:41+05:30
[INFO] ------------------------------------------------------------------------

4.2. Run Multiple Test Cases

To run multiple test cases on the console, let's execute the command, specifying the names of all the test classes we want to execute:

$ mvn test -Dtest=FirstUnitTest,SecondUnitTest
...
[INFO] Tests run: 2, Failures: 0, Errors: 0, Skipped: 0, Time elapsed: 0.069 s - in com.baeldung.commandline.SecondUnitTest
[INFO] Tests run: 3, Failures: 0, Errors: 0, Skipped: 0, Time elapsed: 0.069 s - in com.baeldung.commandline.FirstUnitTest
[INFO] 
[INFO] Results:
[INFO] 
[INFO] Tests run: 5, Failures: 0, Errors: 0, Skipped: 0
[INFO] 
[INFO] ------------------------------------------------------------------------
[INFO] BUILD SUCCESS
[INFO] ------------------------------------------------------------------------
[INFO] Total time:  7.211 s
[INFO] Finished at: 2021-08-02T23:13:41+05:30
[INFO] ------------------------------------------------------------------------

4.3. Run All Test Cases in a Package

To run all the test cases within a package, on the console, we need to specify the package name as part of the command:

$ mvn test -Dtest="com.baeldung.commandline.**"
...
[INFO] Tests run: 2, Failures: 0, Errors: 0, Skipped: 0, Time elapsed: 0.069 s - in com.baeldung.commandline.SecondUnitTest
[INFO] Tests run: 3, Failures: 0, Errors: 0, Skipped: 0, Time elapsed: 0.069 s - in com.baeldung.commandline.FirstUnitTest
[INFO] 
[INFO] Results:
[INFO] 
[INFO] Tests run: 5, Failures: 0, Errors: 0, Skipped: 0
[INFO] 
[INFO] ------------------------------------------------------------------------
[INFO] BUILD SUCCESS
[INFO] ------------------------------------------------------------------------
[INFO] Total time:  7.211 s
[INFO] Finished at: 2021-08-02T23:13:41+05:30
[INFO] ------------------------------------------------------------------------

4.4. Run All Test Cases

Finally, to run all the test cases using Maven on the console, we simply execute mvn clean test:

$ mvn clean test
...
[INFO] Tests run: 2, Failures: 0, Errors: 0, Skipped: 0, Time elapsed: 0.069 s - in com.baeldung.commandline.SecondUnitTest
[INFO] Tests run: 3, Failures: 0, Errors: 0, Skipped: 0, Time elapsed: 0.069 s - in com.baeldung.commandline.FirstUnitTest
[INFO] 
[INFO] Results:
[INFO] 
[INFO] Tests run: 5, Failures: 0, Errors: 0, Skipped: 0
[INFO] 
[INFO] ------------------------------------------------------------------------
[INFO] BUILD SUCCESS
[INFO] ------------------------------------------------------------------------
[INFO] Total time:  7.211 s
[INFO] Finished at: 2021-08-02T23:13:41+05:30
[INFO] ------------------------------------------------------------------------

5. Conclusion

In this article, we've learned how to run JUnit tests directly from the command line, covering JUnit 5 both with and without Maven.

Implementation of the examples shown here is available over on GitHub.


Cassandra Partition Key, Composite Key, and Clustering Key

$
0
0

1. Overview

Data distribution and data modeling in the Cassandra NoSQL database are different from those in a traditional relational database.

In this article, we'll learn how a partition key, composite key, and clustering key form a primary key. We'll also see how they differ. As a result, we'll touch upon the data distribution architecture and data modeling topics in Cassandra.

2. Apache Cassandra Architecture

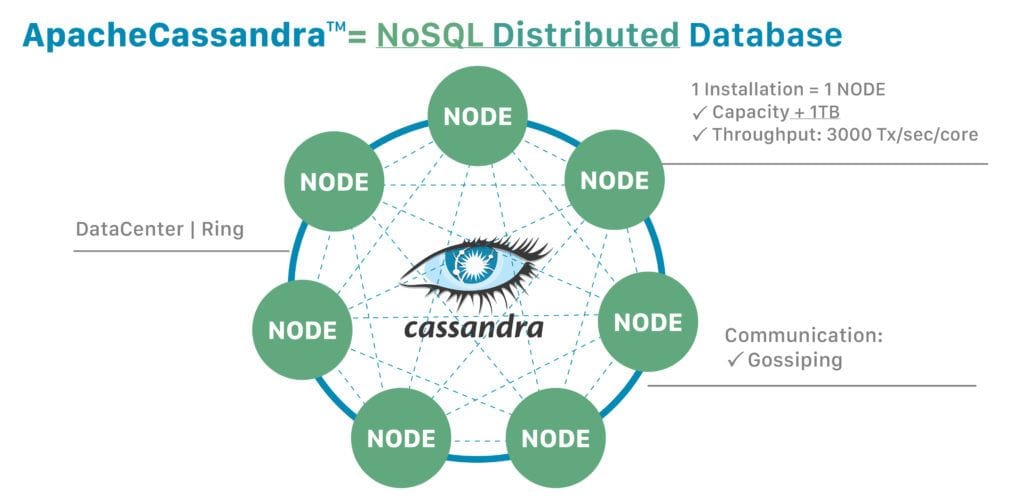
Apache Cassandra is an open-source NoSQL distributed database built for high availability and linear scalability without compromising performance.

Here is the high-level Cassandra architecture diagram:

Cassandra Architecture

In Cassandra, the data is distributed across a cluster. Additionally, a cluster may consist of a ring of nodes arranged in racks installed in data centers across geographical regions.

At a more granular level, virtual nodes known as vnodes assign the data ownership to a physical machine. Vnodes make it possible to allow each node to own multiple small partition ranges by using a technique called consistent hashing to distribute the data.

A partitioner is a function that hashes the partition key to generate a token. This token value represents a row and is used to identify the partition range it belongs to in a node.

However, a Cassandra client sees the cluster as a unified whole database and communicates with it using a Cassandra driver library.

3. Cassandra Data Modeling

Generally, data modeling is a process of analyzing the application requirements, identifying the entities and their relationships, organizing the data, and so on. In relational data modeling, the queries are often an afterthought in the whole data modeling process.

However, in Cassandra, the data access queries drive the data modeling. The queries are, in turn, driven by the application workflows.

Additionally, there are no table-joins in the Cassandra data models, which implies that all desired data in a query must come from a single table. As a result, the data in a table is in a denormalized format.

Next, in the logical data modeling step, we specify the actual database schema by defining keyspaces, tables, and even table columns. Then, in the physical data modeling step, we use the Cassandra Query Language (CQL) to create physical keyspaces — tables with all data types in a cluster.

4. Primary Key

The way primary keys work in Cassandra is an important concept to grasp.

A primary key in Cassandra consists of one or more partition keys and zero or more clustering key components. The order of these components always puts the partition key first and then the clustering key.

Apart from making data unique, the partition key component of a primary key plays an additional significant role in the placement of the data. As a result, it improves the performance of reads and writes of data spread across multiple nodes in a cluster.

Now, let's look at each of these components of a primary key.

4.1. Partition Key

The primary goal of a partition key is to distribute the data evenly across a cluster and query the data efficiently.

A partition key is for data placement apart from uniquely identifying the data and is always the first value in the primary key definition.

Let's try to understand using an example — a simple table containing application logs with one primary key:

CREATE TABLE application_logs (
  id                    INT,
  app_name              VARCHAR,
  hostname              VARCHAR,
  log_datetime          TIMESTAMP,
  env                   VARCHAR,
  log_level             VARCHAR,
  log_message           TEXT,
  PRIMARY KEY (app_name)
);

Here are some sample data in the above table:

PartitionKeyTableData

As we learned earlier, Cassandra uses a consistent hashing technique to generate the hash value of the partition key (app_name) and assign the row data to a partition range inside a node.

Let's look at possible data storage:

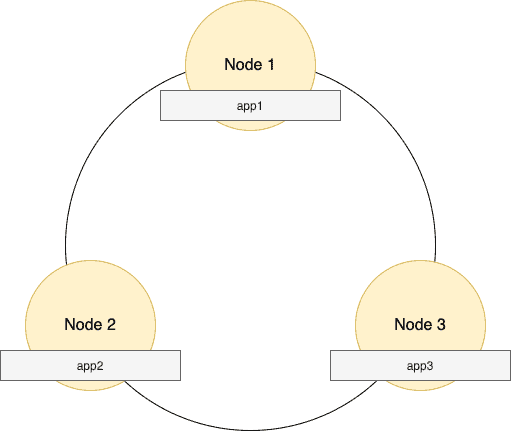
Data Nodes

The above diagram is a possible scenario where the hash values of app1, app2, and app3 resulted in each row being stored in three different nodes — Node1, Node2, and Node3, respectively.

All app1 logs go to Node1, app2 logs go to Node2, and app3 logs go to Node3.

A data fetch query without a partition key in the where clause results in an inefficient full cluster scan.

On the other hand, with a partition key in where clause, Cassandra uses the consistent hashing technique to identify the exact node and the exact partition range within a node in the cluster. As a result, the fetch data query is fast and efficient:

select * application_logs where app_name = 'app1';

4.2. Composite Partition Key

If we need to combine more than one column value to form a single partition key, we use a composite partition key.

Here again, the goal of the composite partition key is for the data placement, in addition to uniquely identifying the data. As a result, the storage and retrieval of data become efficient.

Here's an example of the table definition that combines the app_name and env columns to form a composite partition key:

CREATE TABLE application_logs (
  id                    INT,
  app_name              VARCHAR,
  hostname              VARCHAR,
  log_datetime          TIMESTAMP,
  env                   VARCHAR,
  log_level             VARCHAR,
  log_message           TEXT,
  PRIMARY KEY ((app_name, env))
);

The important thing to note in the above definition is the inner parenthesis around app_name and env primary key definition. This inner parenthesis specifies that app_name and env are part of a partition key and are not clustering keys.

If we drop the inner parenthesis and have only a single parenthesis, then the app_name becomes the partition key, and env becomes the clustering key component.

Here's the sample data for the above table:

CompositePartitionKeyTableData

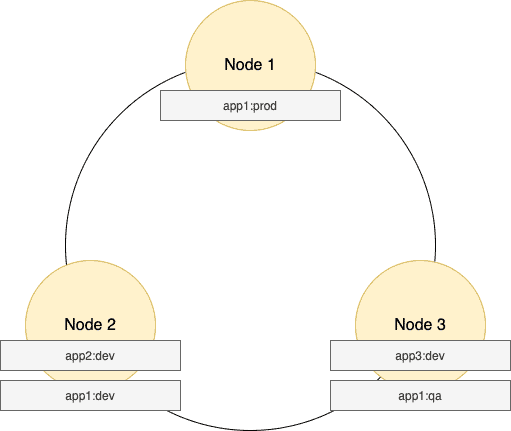
Let's look at the possible data distribution of the above sample data. Please note: Cassandra generates the hash value for the app_name and env column combination:

CompositeDataDistributionNodes

As we can see above, the possible scenario where the hash value of app1:prod, app1:dev, app1:qa resulted in these three rows being stored in three separate nodes — Node1, Node2, and Node3, respectively.

All app1 logs from the prod environment go to Node1, while app1 logs from the dev environment go to Node2, and app1 logs from the qa environment go to Node3.

Most importantly, to efficiently retrieve data, the where clause in fetch query must contain all the composite partition keys in the same order as specified in the primary key definition:

select * application_logs where app_name = 'app1' and env = 'prod';

4.3. Clustering Key

As we've mentioned above, partitioning is the process of identifying the partition range within a node the data is placed into. In contrast, clustering is a storage engine process of sorting the data within a partition and is based on the columns defined as the clustering keys.

Moreover, identification of the clustering key columns needs to be done upfront — that's because our selection of clustering key columns depends on how we want to use the data in our application.

All the data within a partition is stored in continuous storage, sorted by clustering key columns. As a result, the retrieval of the desired sorted data is very efficient.

Let's look at an example table definition that has the clustering keys along with the composite partition keys:

CREATE TABLE application_logs (
  id                    INT,
  app_name              VARCHAR,
  hostname              VARCHAR,
  log_datetime          TIMESTAMP,
  env                   VARCHAR,
  log_level             VARCHAR,
  log_message           TEXT,
  PRIMARY KEY ((app_name, env), hostname, log_datetime)
);

And let's see some sample data:

CompositePartitionKeyTableData

As we can see in the above table definition, we've included the hostname and the log_datetime as clustering key columns. Assuming all the logs from app1 and prod environment are stored in Node1, the Cassandra storage engine lexically sorts those logs by the hostname and the log_datetime within the partition.

By default, the Cassandra storage engine sorts the data in ascending order of clustering key columns, but we can control the clustering columns' sort order by using WITH CLUSTERING ORDER BY clause in the table definition:

CREATE TABLE application_logs (
  id                    INT,
  app_name              VARCHAR,
  hostname              VARCHAR,
  log_datetime          TIMESTAMP,
  env                   VARCHAR,
  log_level             VARCHAR,
  log_message           TEXT,
  PRIMARY KEY ((app_name,env), hostname, log_datetime)
) 
WITH CLUSTERING ORDER BY (hostname ASC, log_datetime DESC);

Per the above definition, within a partition, the Cassandra storage engine will store all logs in the lexical ascending order of hostname, but in descending order of log_datetime within each hostname group.

Now, let's look at an example of the data fetch query with clustering columns in the where clause:

select * application_logs 
where 
app_name = 'app1' and env = 'prod' 
and hostname = 'host1' and log_datetime > '2021-08-13T00:00:00';

What's important to note here is that the where clause should contain the columns in the same order as defined in the primary key clause.

5. Conclusion

In this article, we learned that Cassandra uses a partition key or a composite partition key to determine the placement of the data in a cluster. The clustering key provides the sort order of the data stored within a partition. All of these keys also uniquely identify the data.

We also touched upon the Cassandra architecture and data modeling topics.

For more information on Cassandra, visit the DataStax and Apache Cassandra documentation.


How to Check Field Existence in MongoDB?

$
0
0

1. Overview

In this short tutorial, we'll see how to check field existence in MongoDB. 

First, we'll create a simple Mongo database and sample collection. Then, we'll put dummy data in it to use later in our examples. After that, we'll show how to check whether the field exists or not in a native Mongo query as well as in Java.

2. Example Configuration

Before we start checking field existence, we need an existing database, collection, and dummy data for later use. We'll be using Mongo shell for that.

Firstly, let's switch Mongo shell context to an existence database:

use existence

It's worth pointing out that MongoDB only creates the database when you first store data in that database. We'll insert a single user into the users collection:

db.users.insert({name: "Ben", surname: "Big" })

Now we have everything we need to check, whether the field exists or not.

3. Checking Field Existence in Mongo Shell

Sometimes we need to check for specific field existence by using a basic query, e.g., in Mongo Shell or any other database console. Luckily for us, Mongo provides a special query operator, $exists, for that purpose:

db.users.find({ 'name' : { '$exists' : true }})

We use a standard find Mongo method in which we specify the field we are looking for and use the $exists query operator. If the name field exists in the users collection, all rows containing that field will be returned:

[
  {
    "_id": {"$oid": "6115ad91c4999031f8e6f582"},
    "name": "Ben",
    "surname": "Big"
  }
]

If the field is missing, we'll get an empty result.

4. Checking Field Existence in Java

Before we go through possible ways to check field existence in Java, let's add the necessary Mongo dependency to our project. Here's the Maven dependency:

<dependency>
    <groupId>org.mongodb</groupId>
    <artifactId>mongo-java-driver</artifactId>
    <version>3.12.10</version>
</dependency>

And here's the Gradle version:

implementation group: 'org.mongodb', name: 'mongo-java-driver', version: '3.12.10'

Finally, let's connect to the existence database and the users collection:

MongoClient mongoClient = new MongoClient();
MongoDatabase db = mongoClient.getDatabase("existence");
MongoCollection<Document> collection = db.getCollection("users");

4.1. Using Filters

The com.mongodb.client.model.Filters is a util class from the Mongo dependency that contains a lot of useful methods. We're going to use the exists() method in our example:

Document nameDoc = collection.find(Filters.exists("name")).first();
assertNotNull(nameDoc);
assertFalse(nameDoc.isEmpty());

First, we try to find elements from the users collection and get the first found element. If the specified field exists, we get a nameDoc Document as a response. It's not null and not empty.

Now, let's see what happens when we try to find a non-existing field:

Document nameDoc = collection.find(Filters.exists("non_existing")).first();
assertNull(nameDoc);

If no element is found, we get a null Document as a response.

4.2. Using a Document Query

The com.mongodb.client.model.Filters class isn't the only way to check field existence. We can use an instance of com.mongodb.BasicDBObject:

Document query = new Document("name", new BasicDBObject("$exists", true));
Document doc = collection.find(query).first();
assertNotNull(doc);
assertFalse(doc.isEmpty());

The behavior is the same as in the previous example. If the element is found, we receive a not null Document, which is empty.

The code behaves the same also in a situation when we try to find a non-existing field:

Document query = new Document("non_existing", new BasicDBObject("$exists", true));
Document doc = collection.find(query).first();
assertNull(doc);

If no element is found, we get a null Document as a response.

5. Conclusion

In this article, we discussed how to check field existence in MongoDB. Firstly, we showed how to create a Mongo database, collection, and how to insert dummy data. Then, we explained how to check whether a field exists or not in Mongo shell using a basic query. Finally, we explained how to check field existence using the com.mongodb.client.model.Filters and a Document query approach.

As always, the full source code of the article is available over on GitHub.


Custom Serializers in Apache Kafka

$
0
0

1. Introduction

During the transmission of messages in Apache Kafka, the client and server agree on the use of a common syntactic format. Apache Kafka brings default converters (such as String and Long) but also supports custom serializers for specific use cases. In this tutorial, we'll see how to implement them.

2. Serializers in Apache Kafka

Serialization is the process of converting objects into bytes. Deserialization is the inverse process — converting a stream of bytes into an object. In a nutshell, it transforms the content into readable and interpretable information.

As we mentioned, Apache Kafka provides default serializers for several basic types, and it allows us to implement custom serializers:


The figure above shows the process of sending messages to a Kafka topic through the network. In this process, the custom serializer converts the object into bytes before the producer sends the message to the topic. Similarly, it also shows how the deserializer transforms back the bytes into the object for the consumer to properly process it.

2.1. Custom Serializers

Apache Kafka provides a pre-built serializer and deserializer for several basic types:

But it also offers the capability to implement custom (de)serializers. In order to serialize our own objects, we'll implement the Serializer interface. Similarly, to create a custom deserializer, we'll implement the Deserializer interface.

There are there methods available to override for both interfaces:

  • configure: used to implement configuration details
  • serialize/deserialize: These methods include the actual implementation of our custom serialization and deserialization.
  • close: use this method to close the Kafka session

3. Implementing Custom Serializers in Apache Kafka

Apache Kafka provides the capability of customizing the serializers. It's possible to implement specific converters not only for the message value but also for the key.

3.1. Dependencies

To implement the examples, we'll simply add the Kafka Consumer API dependency to our pom.xml:

<dependency>
    <groupId>org.apache.kafka</groupId>
    <artifactId>kafka-clients</artifactId>
    <version>2.8.0</version>
</dependency>

3.2. Custom Serializer

First, we'll use Lombok to specify the custom object to send through Kafka:

@Data
@AllArgsConstructor
@NoArgsConstructor
@Builder
public class MessageDto {
    private String message;
    private String version;
}

Next, we'll implement the Serializer interface provided by Kafka for the producer to send the messages:

@Slf4j
public class CustomSerializer implements Serializer {
    private final ObjectMapper objectMapper = new ObjectMapper();
    @Override
    public void configure(Map<String, ?> configs, boolean isKey) {
    }
    @Override
    public byte[] serialize(String topic, MessageDto data) {
        try {
            if (data == null){
                System.out.println("Null received at serializing");
                return null;
            }
            System.out.println("Serializing...");
            return objectMapper.writeValueAsBytes(data);
        } catch (Exception e) {
            throw new SerializationException("Error when serializing MessageDto to byte[]");
        }
    }
    @Override
    public void close() {
    }
}

We'll override the serialize method of the interface. Therefore, in our implementation, we'll transform the custom object using a Jackson ObjectMapper. Then we'll return the stream of bytes to properly send the message to the network.

3.3. Custom Deserializer

In the same way, we'll implement the Deserializer interface for the consumer:

@Slf4j
public class CustomDeserializer implements Deserializer<MessageDto> {
    private ObjectMapper objectMapper = new ObjectMapper();
    @Override
    public void configure(Map<String, ?> configs, boolean isKey) {
    }
    @Override
    public MessageDto deserialize(String topic, byte[] data) {
        try {
            if (data == null){
                System.out.println("Null received at deserializing");
                return null;
            }
            System.out.println("Deserializing...");
            return objectMapper.readValue(new String(data, "UTF-8"), MessageDto.class);
        } catch (Exception e) {
            throw new SerializationException("Error when deserializing byte[] to MessageDto");
        }
    }
    @Override
    public void close() {
    }
}

As in the previous section, we'll override the deserialize method of the interface. Consequently, we'll convert the stream of bytes into the custom object using the same Jackson ObjectMapper.

3.4. Consuming an Example Message

Let's see a working example sending and receiving an example message with the custom serializer and deserializer.

Firstly, we'll create and configure the Kafka Producer:

private static KafkaProducer<String, MessageDto> createKafkaProducer() {
    Properties props = new Properties();
    props.put(ProducerConfig.BOOTSTRAP_SERVERS_CONFIG, kafka.getBootstrapServers());
    props.put(ProducerConfig.CLIENT_ID_CONFIG, CONSUMER_APP_ID);
    props.put(ProducerConfig.KEY_SERIALIZER_CLASS_CONFIG, "org.apache.kafka.common.serialization.StringSerializer");
    props.put(ProducerConfig.VALUE_SERIALIZER_CLASS_CONFIG, "com.baeldung.kafka.serdes.CustomSerializer");
    return new KafkaProducer(props);
}

We'll configure the value serializer property with our custom class and the key serializer with the default StringSerializer.

Secondly, we'll create the Kafka Consumer:

private static KafkaConsumer<String, MessageDto> createKafkaConsumer() {
    Properties props = new Properties();
    props.put(ConsumerConfig.BOOTSTRAP_SERVERS_CONFIG, kafka.getBootstrapServers());
    props.put(ConsumerConfig.CLIENT_ID_CONFIG, CONSUMER_APP_ID);
    props.put(ConsumerConfig.GROUP_ID_CONFIG, CONSUMER_GROUP_ID);
    props.put(ConsumerConfig.AUTO_OFFSET_RESET_CONFIG, "earliest");
    props.put(ConsumerConfig.KEY_DESERIALIZER_CLASS_CONFIG, "org.apache.kafka.common.serialization.StringDeserializer");
    props.put(ConsumerConfig.VALUE_DESERIALIZER_CLASS_CONFIG, "com.baeldung.kafka.serdes.CustomDeserializer");
    return new KafkaConsumer<>(props);
}

Besides the key and value deserializers with our custom class, it is mandatory to include the group id. Apart from that, we put the auto offset reset config to earliest in order to make sure the producer sent all messages before the consumer starts.

Once we've created the producer and consumer clients, it's time to send an example message:

MessageDto msgProd = MessageDto.builder().message("test").version("1.0").build();
KafkaProducer<String, MessageDto> producer = createKafkaProducer();
producer.send(new ProducerRecord<String, MessageDto>(TOPIC, "1", msgProd));
System.out.println("Message sent " + msgProd);
producer.close();

And we can receive the message with the consumer by subscribing to the topic:

AtomicReference<MessageDto> msgCons = new AtomicReference<>();
KafkaConsumer<String, MessageDto> consumer = createKafkaConsumer();
consumer.subscribe(Arrays.asList(TOPIC));
ConsumerRecords<String, MessageDto> records = consumer.poll(Duration.ofSeconds(1));
records.forEach(record -> {
    msgCons.set(record.value());
    System.out.println("Message received " + record.value());
});
consumer.close();

The result in the console is:

Serializing...
Message sent MessageDto(message=test, version=1.0)
Deserializing...
Message received MessageDto(message=test, version=1.0)

4. Conclusion

In this tutorial, we showed how producers use serializers in Apache Kafka to send the messages through the network. In the same way, we also showed how consumers use deserializers to interpret the message received.

Furthermore, we learned the default serializers available and, most importantly, the capability of implementing custom serializers and deserializers.

As always, the code is available over on GitHub.


Gradle Offline Mode

$
0
0

1. Overview

Gradle is the build tool of choice for millions of developers around the globe and is the official build tool for Android applications.

We usually use Gradle to download dependencies from the network, but sometimes we can't access the network. In these situations, Gradle's offline mode will be useful.

In this short tutorial, we'll talk about how to achieve offline mode in Gradle.

2. Prepare

Before going for the offline mode, we need to install Gradle first. And then we need to build our applications to download all their dependencies, otherwise, we will fail when we try using the offline mode.

3. Offline Mode

We usually use Gradle in command-line tools or IDEs (like JetBrains IntelliJ IDEA and Eclipse), so we mainly learn how to use offline mode in these tools.

3.1. Command-Line

Once we've installed Gradle in our system, we can download dependencies and build our applications:

gradle build

And now, we can achieve the offline mode by adding the –offline option:

gradle --offline build

3.2. JetBrains IntelliJ IDEA

When we use IntelliJ, we can integrate and configure Gradle with it, and then we'll see the Gradle window.

If we need to use the offline mode, just go to the Gradle window and click the Toggle Offline Mode button:

After we click the button to enable offline mode, we can reload all dependencies and find that offline mode works.

3.3. Eclipse

Finally, let's see how to achieve the offline mode in Eclipse. We can find the Gradle configuration in Eclipse by navigating to the Preferences -> Gradle section. We can see the Offline Mode config and toggle it off:

As a result, we'll find that the offline mode works in Eclipse.

4. Conclusion

In this quick tutorial, we talked about the offline mode in Gradle. We learned how to enable offline mode from the command line, as well as from two popular IDEs: Eclipse and IntelliJ.


Java Weekly, Issue 400

$
0
0

We're hitting issue 400 – a really cool milestone along the way.

Hope the Java Weekly has been an interesting read over the years 🙂

Let's jump right in.

1. Spring and Java

>> Micronaut Framework 3 Released! [micronaut.io]

Project Reactor, injecting generic types, supporting lifecycle annotations, GraalVM enhancements, and a lot more – in a new Micronaut release.

>> Structuring Spring Boot Applications [spring.io]

A good read on how Spring's IoC container enables us to wire different components together in a variety of ways.

>> JEP 413: Code Snippets in Java API Documentation [openjdk.java.net]

Time to say goodbye to pre tags in Javadocs – introducing validatable source code snippets in Javadocs via a new @snippet tag in Java 18!

Also worth reading:

Webinars and presentations:

Time to upgrade:

2. Technical

>> How to integrate with Elastic Stack via Logstash [advancedweb.hu]

A deep dive into what's now a classic, hugely powerful stack. Good stuff.

Also worth reading:

3. Musings

>> Out of Time [lizkeogh.com]

We're out of time to stop some of the irreversible effects of climate change – the climate change is real and we still have a lot to save!

Also worth reading:

4. Comics

And my favorite Dilberts of the week:

>> Asok Becomes Senior Engineer [dilbert.com]

>> Tiny Bit of Help [dilbert.com]

>> Rocket For The Ceo [dilbert.com]

5. Pick of the Week

>> How To Be More Productive by Working Less [markmanson.net]


The DTO Pattern (Data Transfer Object)

$
0
0

1. Overview

In this tutorial, we'll discuss the DTO pattern, what it is, how, and when to use them. At the end of it, let's hope we'll know how to use it properly.

2. The Pattern

DTOs or Data Transfer Objects are objects that carry data between processes in order to reduce the number of methods calls. The pattern was first introduced by Martin Fowler in his book EAA. He explained that the pattern's main purpose is to reduce roundtrips to the server by batching up multiple parameters in a single call. Therefore reducing the network overhead in such remote operations. Another benefit of this practice is the encapsulation of the serialization's logic (the mechanism that translates the object structure and data to a specific format that can be stored and transferred). It provides a single point of change in the serialization nuances. It also decouples the domain models from the presentation layer, allowing both to change independently.

3. How to Use It?

DTOs normally are created as POJOs. They are flat data structures that contain no business logic, only storage, accessors, and eventually methods related to serialization or parsing. The data is mapped from the domain models to the DTOs, normally through a mapper component in the presentation or facade layer. The image below illustrates the interaction between the components:

4. When to Use It?

As mentioned in its definition, DTOs come in handy in systems with remote calls, as they help to reduce the number of them. They also help when the domain model is composed of many different objects, and the presentation model needs all their data at once or even reduces roundtrip between client and server. With DTOs, we can build different views from our domain models, allowing us to create other representations of the same domain but optimizing them to the clients' needs without affecting our domain design. Such flexibility is a powerful tool to solve complex problems.

5. Use Case

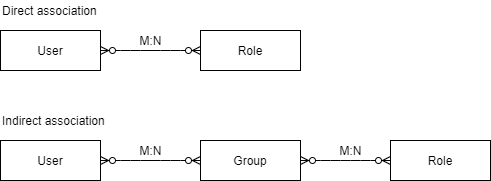
To demonstrate the implementation of the pattern, we'll use a simple application with two main domain models. In this case, User and Role, to focus on the pattern, let's look at 2 examples of functionality, user retrieval, and creation of new ones.

5.1. DTO vs. Domain

Below is the definition of both models:

public class User {
    private String id;
    private String name;
    private String password;
    private List<Role> roles;
    public User(String name, String password, List<Role> roles) {
        this.name = Objects.requireNonNull(name);
        this.password = this.encrypt(password);
        this.roles = Objects.requireNonNull(roles);
    }
    // Getters and Setters
   String encrypt(String password) {
       // encryption logic
   }
}
public class Role {
    private String id;
    private String name;
    // Constructors, getters and setters
}

Now let's look at the DTOs so that we can compare them with the Domain models. At this moment is important to notice that the DTO represents the model sent from or to the API client. Therefore, the small differences are either to pack together the request sent to the server or optimize the response of the client:

public class UserDTO {
    private String name;
    private List<String> roles;
    
    // standard getters and setters
}

The DTO above provides only the relevant information to the client, hiding the password, for example, for security reasons. The next one groups all the data necessary to create a user and sends it to the server in a single request. And mentioned before, this optimizes the interactions with the API. See the code below:

public class UserCreationDTO {
    private String name;
    private String password;
    private List<String> roles;
    // standard getters and setters
}

5.2. Connecting Both Sides

Next, the layer that ties both classes uses a mapper component to pass the data from one side to the other and vice-versa. This normally happens in the presentation layer, as shown below:

@RestController
@RequestMapping("/users")
class UserController {
    private UserService userService;
    private RoleService roleService;
    private Mapper mapper;
    // Constructor
    @GetMapping
    @ResponseBody
    public List<UserDTO> getUsers() {
        return userService.getAll()
          .stream()
          .map(mapper::toDto)
          .collect(toList());
    }
    @PostMapping
    @ResponseBody
    public UserIdDTO create(@RequestBody UserCreationDTO userDTO) {
        User user = mapper.toUser(userDTO);
        userDTO.getRoles()
          .stream()
          .map(role -> roleService.getOrCreate(role))
          .forEach(user::addRole);
        userService.save(user);
        return new UserIdDTO(user.getId());
    }
}

Last, we have the Mapper component that transfers the data making sure that both DTO and domain model doesn't need to know about each other:

@Component
class Mapper {
    public UserDTO toDto(User user) {
        String name = user.getName();
        List<String> roles = user
          .getRoles()
          .stream()
          .map(Role::getName)
          .collect(toList());
        return new UserDTO(name, roles);
    }
    public User toUser(UserCreationDTO userDTO) {
        return new User(userDTO.getName(), userDTO.getPassword(), new ArrayList<>());
    }
}

6. Common Mistakes

Although the DTO pattern is quite a simple design pattern, few mistakes are frequently found in applications implementing this technique. The first one is to create different DTOs for every occasion. That will increase the number of classes and mappers we need to maintain. Try to keep them concise and evaluate the trade-offs of adding one or reusing an existing one. The opposite is also valid. Avoid trying to use a single class for many scenarios. This practice may lead to big contracts where many attributes are frequently not used. Another common mistake is to add business logic to those classes. That should not happen. The purpose of the pattern is to optimize the data transfer and the structure of the contracts. Therefore, all business logic should live in the domain layer. Last but not least, we have the so-called LocalDTOs, where DTOs pass data across domains. The problem once again is the cost of maintenance of all the mapping. One of the most commons arguments in favor of this approach is the encapsulation of the domain model. But actually, the problem here is to have our domain model coupled with the persistence model. By decoupling them, the risk to expose the domain model almost disappears. However, other patterns reach a similar outcome, but they usually are used in more complex scenarios, such as CQRS, Data Mappers, CommandQuerySeparation, etc.

7. Conclusion

In this article, we saw the definition of the DTO Pattern and its reason for existing, and how to implement it. We also saw some of the commons mistakes related to its implementation and way to avoid them. As usual, the source code of the example is available over on GitHub.


Handling Exceptions in Project Reactor

$
0
0

1. Overview

In this tutorial, we'll look at several ways to handle exceptions in Project Reactor. Operators introduced in the code examples are defined in both the Mono and Flux classes. However, we'll only focus on methods in the Flux class.

2. Maven Dependencies

Let's start by adding the Reactor core dependency:

<dependency>
    <groupId>io.projectreactor</groupId>
    <artifactId>reactor-core</artifactId
    <version>3.4.9</version>
</dependency>

3. Throwing Exceptions Directly in a Pipeline Operator

The simplest way to handle an Exception is by throwing it. If something abnormal happens during the processing of a stream element, we can throw an Exception with the throw keyword as if it were a normal method execution.

Let's assume we need to parse a stream of Strings to Integers. If an element isn't a numeric String, we'll need to throw an Exception.

It's a common practice to use the map operator for such a conversion:

Function<String, Integer> mapper = input -> {
    if (input.matches("\\D")) {
        throw new NumberFormatException();
    } else {
        return Integer.parseInt(input);
    }
};
Flux<String> inFlux = Flux.just("1", "1.5", "2");
Flux<Integer> outFlux = inFlux.map(mapper);

As we can see, the operator throws an Exception if an input element is invalid. When we throw the Exception this way, Reactor catches it and signals an error downstream:

StepVerifier.create(outFlux)
    .expectNext(1)
    .expectError(NumberFormatException.class)
    .verify();

This solution works, but it's not elegant. As specified in the Reactive Streams specification, rule 2.13, an operator must return normally. Reactor helped us by converting the Exception to an error signal. However, we could do better.

Essentially, reactive streams rely on the onError method to indicate a failure condition. In most cases, this condition must be triggered by an invocation of the error method on the Publisher. Using an Exception for this use case brings us back to traditional programming.

4. Handling Exceptions in the handle Operator

Similar to the map operator, we can use the handle operator to process items in a stream one by one. The difference is that Reactor provides the handle operator with an output sink, allowing us to apply more complicated transformations.

Let's update our example from the previous section to use the handle operator:

BiConsumer<String, SynchronousSink<Integer>> handler = (input, sink) -> {
    if (input.matches("\\D")) {
        sink.error(new NumberFormatException());
    } else {
        sink.next(Integer.parseInt(input));
    }
};
Flux<String> inFlux = Flux.just("1", "1.5", "2");
Flux<Integer> outFlux = inFlux.handle(handler);

Unlike the map operator, the handle operator receives a functional consumer, called once for each element. This consumer has two parameters: an element coming from upstream and a SynchronousSink that builds an output to be sent downstream.

If the input element is a numeric String, we call the next method on the sink, providing it with the Integer converted from the input. If it isn't a numeric String, we'll indicate the situation by calling the error method with an Exception object.

Notice that an invocation of the error method will cancel the subscription to the upstream and invoke the onError method on the downstream. Such collaboration of error and onError is the standard way to handle Exceptions in reactive streams.

Let's verify the output stream:

StepVerifier.create(outFlux)
    .expectNext(1)
    .expectError(NumberFormatException.class)
    .verify();

5. Handling Exceptions in the flatMap Operator

Another commonly used operator that supports error handling is flatMap. This operator transforms input elements into Publishers, then flattens the Publishers into a new stream. We can take advantage of these Publishers to signify an erroneous state.

Let's try the same example using flatMap:

Function<String, Publisher<Integer>> mapper = input -> {
    if (input.matches("\\D")) {
        return Mono.error(new NumberFormatException());
    } else {
        return Mono.just(Integer.parseInt(input));
    }
};
Flux<String> inFlux = Flux.just("1", "1.5", "2");
Flux<Integer> outFlux = inFlux.flatMap(mapper);
StepVerifier.create(outFlux)
    .expectNext(1)
    .expectError(NumberFormatException.class)
    .verify();

Unsurprisingly, the result is the same as before.

Notice the only difference between handle and flatMap regarding error handling is that the handle operator calls the error method on a sink, while flatMap calls it on a Publisher.

If we're dealing with a stream represented by a Flux object, we can also use concatMap to handle errors. This method behaves in much the same way as flatMap, but it doesn't support asynchronous processing.

6. Avoiding NullPointerException

This section covers the handling of null references, which often cause NullPointerExceptions, a commonly encountered Exception in Java. To avoid this exception, we usually compare a variable with null and direct the execution to a different way if that variable is actually null. It's tempting to do the same in reactive streams:

Function<String, Integer> mapper = input -> {
    if (input == null) {
        return 0;
    } else {
        return Integer.parseInt(input);
    }
};

We may think that a NullPointerException won't occur because we already handled the case when the input value is null. However, the reality tells a different story:

Flux<String> inFlux = Flux.just("1", null, "2");
Flux<Integer> outFlux = inFlux.map(mapper);
StepVerifier.create(outFlux)
    .expectNext(1)
    .expectError(NullPointerException.class)
    .verify();

Apparently, a NullPointerException triggered an error downstream, meaning our null check didn't work.

To understand why that happened, we need to go back to the Reactive Streams specification. Rule 2.13 of the specification says that “calling onSubscribe, onNext, onError or onComplete MUST return normally except when any provided parameter is null in which case it MUST throw a java.lang.NullPointerException to the caller”.

As required by the specification, Reactor throws a NullPointerException when a null value reaches the map function.

Therefore, there's nothing we can do about a null value when it reaches a certain stream. We can't handle it or convert it to a non-null value before passing it downstream. Therefore, the only way to avoid a NullPointerException is to make sure that null values won't make it to the pipeline.

7. Conclusion

In this article, we've walked through Exception handling in Project Reactor. We discussed a couple of examples and clarified the process. We also covered a special case of exception that can happen when processing a reactive stream — NullPointerException.

As usual, the source code for our application is available over on GitHub.


Configuring Kafka SSL Using Spring Boot

$
0
0

1. Introduction

In this tutorial, we'll cover the basic setup for connecting a Spring Boot client to an Apache Kafka broker using SSL authentication.

Secure Sockets Layer (SSL) has actually been deprecated and replaced with Transport Layer Security (TLS) since 2015. However, for historic reasons, Kafka (and Java) still refer to “SSL” and we'll be following this convention in this article as well.

2. SSL Overview

By default, Apache Kafka sends all data as clear text and without any authentication.

First of all, we can configure SSL for encryption between the broker and the client. This, by default, requires one-way authentication using public key encryption where the client authenticates the server certificate.

In addition, the server can also authenticate the client using a separate mechanism (such as SSL or SASL), thus enabling two-way authentication or mutual TLS (mTLS). Basically, two-way SSL authentication ensures that the client and the server both use SSL certificates to verify each other's identities and trust each other in both directions.

In this article, the broker will be using SSL to authenticate the client, and keystore and truststore will be used for holding the certificates and keys.

Each broker requires its own keystore which contains the private key and the public certificate. The client uses its truststore to authenticate this certificate and trust the server. Similarly, each client also requires its own keystore which contains its private key and the public certificate. The server uses its truststore to authenticate and trust the client's certificate and establish a secure connection.

The truststore can contain a Certificate Authority (CA) which can sign certificates. In this case, the broker or the client trusts any certificate signed by the CA that is present in the truststore. This simplifies the certificate authentication as adding new clients or brokers does not require a change to the truststore.

3. Dependencies and Setup

Our example application will be a simple Spring Boot application.

In order to connect to Kafka, let's add the spring-kafka dependency in our POM file:

<dependency>
    <groupId>org.springframework.kafka</groupId>
    <artifactId>spring-kafka</artifactId>
    <version>2.7.2</version>
</dependency>

We'll also be using a Docker Compose file to configure and test the Kafka server setup. Initially, let's do this without any SSL configuration:

---
version: '2'
services:
  zookeeper:
    image: confluentinc/cp-zookeeper:6.2.0
    environment:
      ZOOKEEPER_CLIENT_PORT: 2181
      ZOOKEEPER_TICK_TIME: 2000
  kafka:
    image: confluentinc/cp-kafka:6.2.0
    depends_on:
      - zookeeper
    ports:
      - 9092:9092
    environment:
      KAFKA_BROKER_ID: 1
      KAFKA_ZOOKEEPER_CONNECT: zookeeper:2181
      KAFKA_ADVERTISED_LISTENERS: PLAINTEXT://localhost:9092
      KAFKA_AUTO_CREATE_TOPICS_ENABLE: 'true'
      KAFKA_OFFSETS_TOPIC_REPLICATION_FACTOR: 1

Now, let's start the container:

docker-compose up

This should bring up the broker with the default configuration.

4. Broker Configuration

Let's start by looking at the minimum configuration required for the broker in order to establish secure connections.

4.1. Standalone Broker

Although we're not using a standalone instance of the broker in this example, it's useful to know the configuration changes required in order to enable SSL authentication.

First, we need to configure the broker to listen for SSL connections on port 9093, in the server.properties:

listeners=PLAINTEXT://kafka1:9092,SSL://kafka1:9093
advertised.listeners=PLAINTEXT://localhost:9092,SSL://localhost:9093

Next, the keystore and truststore related properties need to be configured with the certificate locations and credentials:

ssl.keystore.location=/certs/kafka.server.keystore.jks
ssl.keystore.password=password
ssl.truststore.location=/certs/kafka.server.truststore.jks
ssl.truststore.password=password
ssl.key.password=password

Finally, the broker must be configured to authenticate clients in order to achieve two-way authentication:

ssl.client.auth=required

4.2. Docker Compose

As we're using Compose to manage our broker environment, let's add all of the above properties to our docker-compose.yml file:

kafka:
  image: confluentinc/cp-kafka:6.2.0
  depends_on:
    - zookeeper
  ports:
    - 9092:9092
    - 9093:9093
  environment:
    ...
    KAFKA_ADVERTISED_LISTENERS: PLAINTEXT://localhost:9092,SSL://localhost:9093
    KAFKA_SSL_CLIENT_AUTH: 'required'
    KAFKA_SSL_KEYSTORE_FILENAME: '/certs/kafka.server.keystore.jks'
    KAFKA_SSL_KEYSTORE_CREDENTIALS: '/certs/kafka_keystore_credentials'
    KAFKA_SSL_KEY_CREDENTIALS: '/certs/kafka_sslkey_credentials'
    KAFKA_SSL_TRUSTSTORE_FILENAME: '/certs/kafka.server.truststore.jks'
    KAFKA_SSL_TRUSTSTORE_CREDENTIALS: '/certs/kafka_truststore_credentials'
  volumes:
    - ./certs/:/etc/kafka/secrets/certs

Here, we've exposed the SSL port (9093) in the ports section of the configuration. Additionally, we've mounted the certs project folder in the volumes section of the config. This contains the required certs and the associated credentials.

Now, restarting the stack using Compose shows the relevant SSL details in the broker log:

...
kafka_1      | uid=1000(appuser) gid=1000(appuser) groups=1000(appuser)
kafka_1      | ===> Configuring ...
<strong>kafka_1      | SSL is enabled.</strong>
....
kafka_1      | [2021-08-20 22:45:10,772] INFO KafkaConfig values:
<strong>kafka_1      |  advertised.listeners = PLAINTEXT://localhost:9092,SSL://localhost:9093
kafka_1      |  ssl.client.auth = required</strong>
<strong>kafka_1      |  ssl.enabled.protocols = [TLSv1.2, TLSv1.3]</strong>
kafka_1      |  ssl.endpoint.identification.algorithm = https
kafka_1      |  ssl.key.password = [hidden]
kafka_1      |  ssl.keymanager.algorithm = SunX509
<strong>kafka_1      |  ssl.keystore.location = /etc/kafka/secrets/certs/kafka.server.keystore.jks</strong>
kafka_1      |  ssl.keystore.password = [hidden]
kafka_1      |  ssl.keystore.type = JKS
kafka_1      |  ssl.principal.mapping.rules = DEFAULT
<strong>kafka_1      |  ssl.protocol = TLSv1.3</strong>
kafka_1      |  ssl.trustmanager.algorithm = PKIX
kafka_1      |  ssl.truststore.certificates = null
<strong>kafka_1      |  ssl.truststore.location = /etc/kafka/secrets/certs/kafka.server.truststore.jks</strong>
kafka_1      |  ssl.truststore.password = [hidden]
kafka_1      |  ssl.truststore.type = JKS
....

5. Spring Boot Client

Now that the server setup is complete, we'll create the required Spring Boot components. These will interact with our broker which now requires SSL for two-way authentication.

5.1. Producer

First, let's send a message to the specified topic using KafkaTemplate:

public class KafkaProducer {
    private final KafkaTemplate<String, String> kafkaTemplate;
    public void sendMessage(String message, String topic) {
        log.info("Producing message: {}", message);
        kafkaTemplate.send(topic, "key", message)
          .addCallback(
            result -> log.info("Message sent to topic: {}", message),
            ex -> log.error("Failed to send message", ex)
          );
    }
}

The send method is an async operation. Therefore, we've attached a simple callback that just logs some information once the broker receives the message.

5.2. Consumer

Next, let's create a simple consumer using @KafkaListener.  This connects to the broker and consumes messages from the same topic as that used by the producer:

public class KafkaConsumer {
    public static final String TOPIC = "test-topic";
    public final List<String> messages = new ArrayList<>();
    @KafkaListener(topics = TOPIC)
    public void receive(ConsumerRecord<String, String> consumerRecord) {
        log.info("Received payload: '{}'", consumerRecord.toString());
        messages.add(consumerRecord.value());
    }
}

In our demo application, we've kept things simple and the consumer simply stores the messages in a List. In an actual real-world system, the consumer receives the messages and processes them according to the application's business logic.

5.3. Configuration

Finally, let's add the necessary configuration to our application.yml:

spring:
  kafka:
    security:
      protocol: "SSL"
    bootstrap-servers: localhost:9093
    ssl:
      trust-store-location: classpath:/client-certs/kafka.client.truststore.jks
      trust-store-password: <password>
      key-store-location:  classpath:/client-certs/kafka.client.keystore.jks
      key-store-password: <password>
    
    # additional config for producer/consumer 

Here, we've set the required properties provided by Spring Boot to configure the producer and consumer. As both of these components are connecting to the same broker, we can declare all the essential properties under spring.kafka section. However, if the producer and consumer were connecting to different brokers, we would specify these under spring.kafka.producer and spring.kafka.consumer sections, respectively.

In the ssl section of the configuration, we point to the JKS truststore in order to authenticate the Kafka broker. This contains the certificate of the CA which has also signed the broker certificate. In addition, we've also provided the path for the Spring client keystore which contains the certificate signed by the CA that should be present in the truststore on the broker side.

5.4. Testing

As we're using a Compose file, let's use the Testcontainers framework to create an end-to-end test with our Producer and Consumer:

@ActiveProfiles("ssl")
@Testcontainers
@SpringBootTest(classes = KafkaSslApplication.class)
class KafkaSslApplicationLiveTest {
    private static final String KAFKA_SERVICE = "kafka";
    private static final int SSL_PORT = 9093;  
    @Container
    public DockerComposeContainer<?> container =
      new DockerComposeContainer<>(KAFKA_COMPOSE_FILE)
        .withExposedService(KAFKA_SERVICE, SSL_PORT, Wait.forListeningPort());
    @Autowired
    private KafkaProducer kafkaProducer;
    @Autowired
    private KafkaConsumer kafkaConsumer;
    @Test
    void givenSslIsConfigured_whenProducerSendsMessageOverSsl_thenConsumerReceivesOverSsl() {
        String message = generateSampleMessage();
        kafkaProducer.sendMessage(message, TOPIC);
        await().atMost(Duration.ofMinutes(2))
          .untilAsserted(() -> assertThat(kafkaConsumer.messages).containsExactly(message));
    }
    private static String generateSampleMessage() {
        return UUID.randomUUID().toString();
    }
}

When we run the test, Testcontainers starts the Kafka broker using our Compose file, including the SSL configuration. The application also starts with its SSL configuration and connects to the broker over an encrypted and authenticated connection. As this is an asynchronous sequence of events, we've used Awaitlity to poll for the expected message in the consumer message store. This verifies all the configuration and the successful two-way authentication between the broker and the client.

6. Conclusion

In this article, we've covered the basics of the SSL authentication setup required between the Kafka broker and a Spring Boot client.

Initially, we looked at the broker setup required to enable two-way authentication. Then, we looked at the configuration required on the client-side in order to connect to the broker over an encrypted and authenticated connection. Finally, we used an integration test to verify the secure connection between the broker and the client.

As always, the full source code is available over on GitHub.


Squash the Last X Commits Using Git

$
0
0

1. Overview

We may often hear the word “squash” when we talk about Git workflows.

In this tutorial, we'll shortly introduce what Git squashing is. Then, we'll talk about when we need to squash commits.

Finally, we'll take a closer look at how to squash commits.

2.What's Git Squashing?

When we say “squash” in Git, it means to combine multiple continuous commits into one. An example can explain it quickly:


          ┌───┐      ┌───┐     ┌───┐      ┌───┐
    ...   │ A │◄─────┤ B │◄────┤ C │◄─────┤ D │
          └───┘      └───┘     └───┘      └───┘
 After Squashing commits B, C, and D:
          ┌───┐      ┌───┐
    ...   │ A │◄─────┤ E │
          └───┘      └───┘
          ( The commit E includes the changes in B, C, and D.)

In this example, we've squashed the commits B, C, and D into E.

After understanding what the Git squashing operation is, we may want to know when we should squash commits. So next, let's talk about it.

3. When to Squash Commits?

Simply put, we use squashing to keep the branch graph clean.

Let's imagine how we implement a new feature. Usually, we'll commit multiple times before we reach a satisfactory result, such as some fixes and tests.

However, when we've implemented the feature, those intermediate commits look redundant. So, in this case, we may want to squash our commits into one.

Another common scenario in which we want to squash commits is when we merge branches.

Very likely, when we start working on a new feature, we'll start a feature branch. Let's say we've done our work with 20 commits in our feature branch.

So, when we merge the feature branch to the master branch, we want to do a squashing to combine the 20 commits into one. In this way, we keep the master branch clean.

4. How to Squash Commits?

Today, some modern IDEs, such as IntelliJ and Eclipse, have integrated support for common Git operations. This allows us to squash commits from a GUI.

For example, in IntelliJ, we can select the commits we want to squash and choose “Squash Commits” in the right-click context menu:

However, in this tutorial, we'll focus on squashing with Git commands.

We should note that squash is not a Git command, even if it's a common Git operation. That is, “git squash … ” is an invalid Git command.

We'll address two different approaches to squashing commits:

Next, let's see them in action.

4. Squashing by Interactive Rebase

Before we start, let's created a Git alias slog (stands for short log) to show Git commit logs in a compact view:

git config --global alias.slog = log --graph --all --topo-order --pretty='format:%h %ai %s%d (%an)'

We've prepared a Git repository as an example:

$ git slog
* ac7dd5f 2021-08-23 23:29:15 +0200 Commit D (HEAD -> master) (Kai Yuan)
* 5de0b6f 2021-08-23 23:29:08 +0200 Commit C (Kai Yuan)
* 54a204d 2021-08-23 23:29:02 +0200 Commit B (Kai Yuan)
* c407062 2021-08-23 23:28:56 +0200 Commit A (Kai Yuan)
* 29976c5 2021-08-23 23:28:33 +0200 BugFix #1 (Kai Yuan)
* 34fbfeb 2021-08-23 23:28:19 +0200 Feature1 implemented (Kai Yuan)
* cbd350d 2021-08-23 23:26:19 +0200 Init commit (Kai Yuan)

Git's interactive rebase will list all relevant commits in the default editor. In this case, those are the commits we want to squash.

Then, we can control each commit and commit message as we want and save the change in the editor.

Next, let's squash the last four commits.

It's worth mentioning that when we say “the last X commits”, we're talking about the last X commits from the HEAD. So, in this case, the last four commits are:

* ac7dd5f ... Commit D (HEAD -> master)
* 5de0b6f ... Commit C 
* 54a204d ... Commit B 
* c407062 ... Commit A

Moreover, if we've squashed already pushed commits, and we would like to publish the squashed result, we have to do a force push (git push -f).

4.1. Squash the Last X Commits

The syntax to squash the last X commits using interactive rebase is:

git rebase -i HEAD~[X]

So, in this example, we should run:

git rebase -i HEAD~4

After we execute the command, Git will start the system default editor (the Vim editor in this example) with the commits we want to squash and the interactive rebase help information:

As we can see in the screenshot above, all four commits we want to squash are listed in the editor with the “pick” command.

There's a detailed guideline on how to control each commit and commit message in the commented lines that follow.

For example, we can change the “pick” command of commits into “s” or “squash” to squash them:

If we save the change and exit the editor, Git will do the rebase following our instructions:

$ git rebase -i HEAD~4
[detached HEAD f9a9cd5] Commit A
 Date: Mon Aug 23 23:28:56 2021 +0200
 1 file changed, 1 insertion(+), 1 deletion(-)
Successfully rebased and updated refs/heads/master.

Now, if we check the Git commit log once again:

$ git slog
* f9a9cd5 2021-08-23 23:28:56 +0200 Commit A (HEAD -> master) (Kai Yuan)
* 29976c5 2021-08-23 23:28:33 +0200 BugFix #1 (Kai Yuan)
* 34fbfeb 2021-08-23 23:28:19 +0200 Feature1 implemented (Kai Yuan)
* cbd350d 2021-08-23 23:26:19 +0200 Init commit (Kai Yuan)

As the slog output shows, we've squashed the last four commits into one new commit, “f9a9cd5​“.

Now, if we have a look at the complete log of the commit, we can see that the messages of all squashed commits are combined:

$ git log -1
commit f9a9cd50a0d11b6312ba4e6308698bea46e10cf1 (HEAD -> master)
Author: Kai Yuan
Date:   2021-08-23 23:28:56 +0200
    Commit A
    
    Commit B
    
    Commit C
    
    Commit D

4.2. When X is Relatively Large

We've learned that the command git rebase -i HEAD~X is pretty straightforward to squash the last X commits.

However, counting a larger X number can be a pain when we have quite a lot of commits in our branch. Moreover, it's error-prone.

When the X is not easy to count, we can find the commit hash we want to rebase “onto” and execute the command git rebase -i hash_onto.

Let's see how it works by an example:

$ git slog
e7cb693 2021-08-24 15:00:56 +0200 Commit F (HEAD -> master) (Kai Yuan)
2c1aa63 2021-08-24 15:00:45 +0200 Commit E (Kai Yuan)
ac7dd5f 2021-08-23 23:29:15 +0200 Commit D (Kai Yuan)
5de0b6f 2021-08-23 23:29:08 +0200 Commit C (Kai Yuan)
54a204d 2021-08-23 23:29:02 +0200 Commit B (Kai Yuan)
c407062 2021-08-23 23:28:56 +0200 Commit A (Kai Yuan)
29976c5 2021-08-23 23:28:33 +0200 BugFix #1 (Kai Yuan)
34fbfeb 2021-08-23 23:28:19 +0200 Feature1 implemented (Kai Yuan)
cbd350d 2021-08-23 23:26:19 +0200 Init commit (Kai Yuan)

As the git slog shows, in this branch, we have some commits.

Now, let's say we would like to squash all commits and rebase onto the commit 29976c5 with the message: “BugFix #1“.

So, we don't have to count how many commits we need to squash. Instead, we can just execute the command git rebase -i 29976c5.

We've learned that we need to change the “pick” commands into “squash” in the editor, and then Git will do the squashing as we expected:

$ git rebase -i 29976c5
[detached HEAD aabf37e] Commit A
 Date: Mon Aug 23 23:28:56 2021 +0200
 1 file changed, 1 insertion(+), 1 deletion(-)
Successfully rebased and updated refs/heads/master.
$ git slog
* aabf37e 2021-08-23 23:28:56 +0200 Commit A (HEAD -> master) (Kai Yuan)
* 29976c5 2021-08-23 23:28:33 +0200 BugFix #1 (Kai Yuan)
* 34fbfeb 2021-08-23 23:28:19 +0200 Feature1 implemented (Kai Yuan)
* cbd350d 2021-08-23 23:26:19 +0200 Init commit (Kai Yuan)

5. Squashing by Merging With the –squash Option

We've seen how to use Git interactive rebase to squash commits. This can effectively clean the commit graph in a branch.

However, sometimes, we've made many commits in our feature branch when we were working on it. After we've developed the feature, usually, we would like to merge the feature branch to the main branch, say “master”.

We want to keep the master branch graph clean, for example, one feature, one commit. But we don't care about how many commits are in our feature branch.

In this case, we can use the commit git merge –squash command to achieve that. As usual, let's understand it through an example:

$ git slog
* 0ff435a 2021-08-24 15:28:07 +0200 finally, it works. phew! (HEAD -> feature) (Kai Yuan)
* cb5fc72 2021-08-24 15:27:47 +0200 fix a typo (Kai Yuan)
* 251f01c 2021-08-24 15:27:38 +0200 fix a bug (Kai Yuan)
* e8e53d7 2021-08-24 15:27:13 +0200 implement Feature2 (Kai Yuan)
| * 204b03f 2021-08-24 15:30:29 +0200 Urgent HotFix2 (master) (Kai Yuan)
| * 8a58dd4 2021-08-24 15:30:15 +0200 Urgent HotFix1 (Kai Yuan)
|/  
* 172d2ed 2021-08-23 23:28:56 +0200 BugFix #2 (Kai Yuan)
* 29976c5 2021-08-23 23:28:33 +0200 BugFix #1 (Kai Yuan)
* 34fbfeb 2021-08-23 23:28:19 +0200 Feature1 implemented (Kai Yuan)
* cbd350d 2021-08-23 23:26:19 +0200 Init commit (Kai Yuan)

As the output above shows, in this Git repository, we've implemented “Feature2” in the feature branch.

In our feature branch, we've made four commits.

Now, we would like to merge the result back to the master branch with one single commit to keep the master branch clean:

$ git checkout master
Switched to branch 'master'
$ git merge --squash feature
Squash commit -- not updating HEAD
Automatic merge went well; stopped before committing as requested

Unlike a regular merge, when we execute the command git merge with the –squash option, Git won't automatically create a merge commit. Instead, it turns all changes from the source branch, which is the feature branch in this scenario, into local changes in the working copy:

$ git status
On branch master
Changes to be committed:
  (use "git restore --staged <file>..." to unstage)
	modified:   readme.md

In this example, all changes of the “Feature2” are about the readme.md file.

We need to commit the changes to complete the merge:

$ git commit -am'Squashed and merged the Feature2 branch'
[master 565b254] Squashed and merged the Feature2 branch
 1 file changed, 4 insertions(+)

Now, if we check the branch graph:

$ git slog
* 565b254 2021-08-24 15:53:05 +0200 Squashed and merged the Feature2 branch (HEAD -> master) (Kai Yuan)
* 204b03f 2021-08-24 15:30:29 +0200 Urgent HotFix2 (Kai Yuan)
* 8a58dd4 2021-08-24 15:30:15 +0200 Urgent HotFix1 (Kai Yuan)
| * 0ff435a 2021-08-24 15:28:07 +0200 finally, it works. phew! (feature) (Kai Yuan)
| * cb5fc72 2021-08-24 15:27:47 +0200 fix a typo (Kai Yuan)
| * 251f01c 2021-08-24 15:27:38 +0200 fix a bug (Kai Yuan)
| * e8e53d7 2021-08-24 15:27:13 +0200 implement Feature2 (Kai Yuan)
|/  
* 172d2ed 2021-08-23 23:28:56 +0200 BugFix #2 (Kai Yuan)
* 29976c5 2021-08-23 23:28:33 +0200 BugFix #1 (Kai Yuan)
* 34fbfeb 2021-08-23 23:28:19 +0200 Feature1 implemented (Kai Yuan)
* cbd350d 2021-08-23 23:26:19 +0200 Init commit (Kai Yuan)

We can see that we've merged all the changes in the feature branch into the master branch, and we have one single commit, 565b254, in the master branch.

On the other hand, in the feature branch, we still have four commits.

6. Conclusion

In this tutorial, we've talked about what Git squashing is and when we should consider using it.

Also, we've learned how to squash commits in Git.


Format a Milliseconds Duration to HH:MM:SS

$
0
0

1. Overview

Duration is an amount of time expressed in terms of hours, minutes, seconds, milliseconds, and so on. We may wish to format a duration into some particular time pattern.

We can achieve this either by writing custom code with the help of some JDK libraries or by making use of third-party libraries.

In this quick tutorial, we'll look at how to write simple code to format a given duration to HH:MM:SS format.

2. Java Solutions

There are multiple ways a duration can be expressed — for example, in minutes, seconds, and milliseconds, or as a Java Duration, which has its own specific format.

This section and subsequent sections will focus on formatting intervals (elapsed time), specified in milliseconds, to HH:MM:SS using some JDK libraries. For the sake of our examples, we'll be formatting 38114000ms as 10:35:14 (HH:MM:SS).

2.1. Duration

As of Java 8, the Duration class was introduced to handle intervals of time in various units. The Duration class comes with a lot of helper methods to get the hours, minutes, and seconds from a duration.

To format an interval to HH:MM:SS using the Duration class, we need to initialize the Duration object from our interval using the factory method ofMillis found in the Duration class. This converts the interval to a Duration object that we can work with:

Duration duration = Duration.ofMillis(38114000);

For ease of calculation from seconds to our desired units, we need to get the total number seconds in our duration or interval:

long seconds = duration.getSeconds();

Then, once we have the number of seconds, we generate the corresponding hours, minutes, and seconds for our desired format:

long HH = seconds / 3600;
long MM = (seconds % 3600) / 60;
long SS = seconds % 60;

Finally, we format our generated values:

String timeInHHMMSS = String.format("%02d:%02d:%02d", HH, MM, SS);

Let's try this solution out:

assertThat(timeInHHMMSS).isEqualTo("10:35:14");

If we're using Java 9 or later, we can use some helper methods to get the units directly without having to perform any calculations:

long HH = duration.toHours();
long MM = duration.toMinutesPart();
long SS = duration.toSecondsPart();
String timeInHHMMSS = String.format("%02d:%02d:%02d", HH, MM, SS);

The above snippet will give us the same result as tested above:

assertThat(timeInHHMMSS).isEqualTo("10:35:14");

2.2. TimeUnit

Just like the Duration class discussed in the previous section, TimeUnit represents a time at a given granularity. It provides some helper methods to convert across units – which in our case would be hours, minutes, and seconds – and to perform timing and delay operations in these units.

To format a duration in milliseconds to the format HH:MM:SS, all we need to do is to use the corresponding helper methods in TimeUnit:

long HH = TimeUnit.MILLISECONDS.toHours(38114000);
long MM = TimeUnit.MILLISECONDS.toMinutes(38114000) % 60;
long SS = TimeUnit.MILLISECONDS.toSeconds(38114000) % 60;

Then, format the duration based on generated units above:

String timeInHHMMSS = String.format("%02d:%02d:%02d", HH, MM, SS);
assertThat(timeInHHMMSS).isEqualTo("10:35:14");

3. Using Third-Party Libraries

We may choose to try a different route by using third-party library methods rather than writing our own.

3.1. Apache Commons

To use Apache Commons, we need to add commons-lang3 to our project:

<dependency>
    <groupId>org.apache.commons</groupId>
    <artifactId>commons-lang3</artifactId>
    <version>3.12.0</version>
</dependency>

As expected, this library has formatDuration as well as other unit formatting methods in its DurationFormatUtils class:

String timeInHHMMSS = DurationFormatUtils.formatDuration(38114000, "HH:MM:SS", true);
assertThat(timeInHHMMSS).isEqualTo("10:35:14");

3.2. Joda Time

The Joda Time library comes in handy when we're using a Java version prior to Java 8 because of its handy helper methods to represent and format units of time. To use Joda Time, let's add the joda-time dependency to our project:

<dependency>
    <groupId>joda-time</groupId>
    <artifactId>joda-time</artifactId>
    <version>2.10.10</version>
</dependency>

Joda Time has a Duration class to represent time. First, we convert the interval in milliseconds to an instance of the Joda Time Duration object:

Duration duration = new Duration(38114000);

Then, we get the period from the duration above using the toPeriod method in Duration, which converts or initializes it to an instance of the Period class in Joda Time:

Period period = duration.toPeriod();

We get the units (hours, minutes, and seconds) from Period using its corresponding helper methods:

long HH = period.getHours();
long MM = period.getMinutes();
long SS = period.getSeconds();

Finally, we can format the duration and test the result:

String timeInHHMMSS = String.format("%02d:%02d:%02d", HH, MM, SS);
assertThat(timeInHHMMSS).isEqualTo("10:35:14");

4. Conclusion

In this tutorial, we've learned how to format a duration to a specific format (HH:MM:SS, in our case).

First, we used Duration and TimeUnit classes that come with Java to get the required units and format them with the help of Formatter.

Finally, we looked at how to use some third-party libraries to achieve the result.

As usual, the complete source code is available over on GitHub.


Access Control Models

$
0
0

1. Introduction

In this article, we’ll explore different access control models how to implement them in practice.

2. What’s an Access Control Model?

A common requirement for applications, especially web-based ones, is that some action can only be performed if a given set of conditions, also referred to as a policy, are satisfied. Ok, this is a very generic requirement, so let’s put forward some examples:

  • Internet Forum: only members can post new messages or reply to existing ones
  • E-commerce site: a regular user can only see his/her own orders
  • Banking back-office: an account manager can manage the portfolio of his/her own clients. In addition to those portfolios, he/she can also manage the portfolio of another account manager’s client when he/she is temporarily unavailable (e.g., vacation) and the former acts as its peer.
  • Digital wallet: payments are limited to $500 from 20:00 to 08:00 in the user’s time zone

The Access Control Model we’ll adopt for a given application will be responsible for evaluating an incoming request and come up with a decision: either the request can proceed or not. In the latter case, the result will usually be an error message that is sent back to the user.

Clearly, each of those examples requires a different approach when authorizing a given request.

3. Access Control Model Types

From the previous examples, we can see that to make an allow/deny decision, we need to take into account different aspects related to the request:

  • An identity associated with the request. Notice that even anonymous accesses have a form of identity here
  • The objects/resources that are targeted by the request
  • The action performed on those objects/resources
  • Contextual information about the request. Time of day, time zone, and authentication method used are examples of this kind of contextual information

We can categorize Access Control Model into three types:

  • Role-based Access Control (RBAC)
  • Access Control Lists (ACL)
  • Attribute-based Access Control (ABAC)

Regardless of its type, we can usually identify the following entities in a model:

  • PEP, or Policy Enforcement Point: Intercepts the request and let it proceed or not based on the result returned by the PDP
  • PDP, or Policy Decision Point: Evaluates requests using a policy to produce an access decision
  • PIP, or Policy Information Point: Stores and/or mediates access to information used by the PDP to make access decisions.
  • PAP, or Policy Administration Point: Manages policies and other operational aspects associated with access decision making.

The following diagram shows how those entities logically relate to each other:

It is important to note that, although depicted as autonomous entities, in practice, we’ll find that some or even all model elements are embedded in the application itself.

Also, this model does not address how to establish a user's identity. Nevertheless, this aspect may be considered when deciding whether to allow a request to proceed.

Now, let’s see how we can apply this generic architecture to each of the models above.

4. Role-Based Access Control

In this model, the PDP decision process consists of two steps:

  • First, it recovers the roles associated with the identity of the incoming request.
  • Next, it tries to match those roles with the request policy

A concrete implementation of this model is present in the Java EE specification, in the form of the @HttpConstraint annotation and its XML equivalent. This is a typical use of the annotation when applied to a servlet:

@WebServlet(name="rbac", urlPatterns = {"/protected"})
@DeclareRoles("USER")
@ServletSecurity(
  @HttpConstraint(rolesAllowed = "USER")
)
public class RBACController  extends HttpServlet {
    protected void doGet(HttpServletRequest req, HttpServletResponse resp) throws ServletException, IOException {
        resp.getWriter().println("Hello, USER");
    }
}

For the Tomcat server, we can identify the access control model entities described before as follows:

  • PEP: The security Valve that checks for the presence of this annotation in the target servlet and calls the associated Realm to recover the identity associated with the current request
  • PDP: The Realm implementation that decides which restrictions to apply for a given request
  • PIP: Any backend used by a specific Realm implementation that stores security-related information. For the RBAC model, the key information is the user's role set, usually retrieved from an LDAP repository.
  • Policy Store: In this case, the annotation is the store itself
  • PAP: Tomcat does not support dynamic policy changes, so there’s no real need for one. However, with some imagination, we can identify it with any tool used to add the annotations and/or edit the application’s WEB-INF/web.xml file.

Other security frameworks (e.g., Spring Security) work in a similar fashion. The key point here is that even if a particular framework does not adhere exactly to our generic model, its entities are still there, even if somewhat disguised.

4.1. Role Definitions

What exactly constitutes a role? In practice, a role is just a named set of related actions a user can perform in a particular application. They can be coarsely or finely defined as required, depending on the application’s requirements.

Regardless of their granularity level, it is a good practice to define them, so each one maps to a disjoint set of functionalities. This way, we can easily manage user profiles by adding/removing roles without fearing side effects.

As for the association between users and roles, we can use a direct or indirect approach. In the former, we assign roles directly to users. In the latter, there’s an intermediate entity, usually a user group, to which we assign roles:

The benefit of using groups as an intermediary entity in this association is that we can easily reassign roles to many users at once. This aspect is quite relevant in the context of larger organizations, where people are constantly moving from one area to another.

Similarly, the indirect model also allows us to easily change existing role definitions, usually after refactoring an application.

5. Access Control Lists

ACL-based security control allows us to define access restrictions on individual domain objects. This contrasts with RBAC, where restrictions usually apply to whole categories of objects. In the forum example above, we can use an RBAC-only approach to define can read and create new posts.

However, if we decide to create a new functionality where a user can edit his own posts, RBAC alone will not be enough. The decision engine, in this case, needs to consider not only who but also which post is the target for the editing action.

For this simple example, we can just add a single author column to the database and use it to allow or deny access to the edit action. But what if we wanted to support collaborative editing? In this case, we need to store a list of all people that can edit a post – an ACL.

Dealing with ACLs poses a few practical issues:

  • Where do we store the ACLs?
  • How to efficiently apply ACL restrictions when retrieving large object collections?

The Spring Security ACL library is a good example of an ACL library. It uses a dedicated database schema and caches to implement ACLs and is tightly integrated with Spring Security. This is a short example adapted from our article on this library showing how to implement access controls at the object level:

@PreAuthorize("hasPermission(#postMessage, 'WRITE')")
PostMessage save(@Param("noticeMessage")PostMessage postMessage);

Another good example of ACLs is the permission system used by Windows to secure objects. Every Securable Object (e.g., files, directories, processes, to name a few) has a Security Descriptor attached to it which contains a list of individual users/groups and the associated permissions:

Windows ACLs are quite powerful (or complicated, depending on who we ask), allowing administrators to assign permissions to individual users and/or groups. Furthermore, individual entries define allow/deny permissions for each possible action.

6. Attribute-Based Access Control

Attribute-based control models allow access decisions based not only on the identity, action, and target object but also on contextual information related to a request.

The XACML standard is perhaps the most well-known example of this model, which uses XML documents to describe access policies. This is how we can use this standard to describe the digital wallet withdrawal rule:

<Policy xmlns="urn:oasis:names:tc:xacml:3.0:core:schema:wd-17" 
  PolicyId="urn:baeldung:atm:WithdrawalPolicy"
  Version="1.0" 
  RuleCombiningAlgId="urn:oasis:names:tc:xacml:1.0:rule-combining-algorithm:deny-overrides">
    <Target/>
    <Rule RuleId="urn:oasis:names:tc:baeldung:WithDrawalPolicy:Rule1" Effect="Deny">
        <Target>
            <AnyOf>
                <AllOf>
... match rule for the withdrawal action omitted
                </AllOf>
            </AnyOf>
        </Target>
        <Condition>
... time-of-day and amount conditions definitions omitted
        </Condition>
    </Rule>
</Policy>

The full rule definition is available online.

Despite its verbosity, it’s not hard to figure out its general structure. A policy contains one or more rules that, when evaluated, results in an Effect: Permit or Deny.

Each rule contains targets, which define a logical expression using attributes of the request. Optionally, a rule can also contain one or more Condition elements that define its applicability.

At runtime, an XACML-based access control PEP creates a RequestContext instance and submits it to the PDP for evaluation. The engine then evaluates all applicable rules and returns the access decision.

The kind of information present in this RequestContext is the main aspect that differentiates this model from the preceding ones. Let’s take, for example, an XML representation of a request context built to authorize a withdrawal in our digital wallet application:

<Request 
    xmlns="urn:oasis:names:tc:xacml:3.0:core:schema:wd-17"
    CombinedDecision="true"
    ReturnPolicyIdList="false">
    
    <Attributes Category="urn:oasis:names:tc:xacml:3.0:attribute-category:action">
... action attributes omitted
    </Attributes>
    <Attributes Category="urn:oasis:names:tc:xacml:3.0:attribute-category:environment">
... environment attributes (e.g., current time) omitted
    </Attributes>
    <Attributes Category="urn:baeldung:atm:withdrawal">
... withdrawal attributes omitted 
    </Attributes>
</Request>

When we submit this request to the XAML rule evaluation engine at 21:00, the expected result will be the refusal of this withdrawal, as it exceeds the maximum allowed amount for nightly transactions.

The key advantage of the ABAC model is its flexibility. We can define and, more importantly, modify complex rules simply by changing the policy. Depending on the implementation, we can even do it in real-time.

6.1. XACML4J

XACML4J is an open-source implementation of the XACML 3.0 standard for Java. It provides an evaluation engine and related entities' implementations required by the ABAC model. Its core API is the PolicyDecisionPoint interface, which, not surprisingly, implements the PDP logic.

Once we've built the PDP, using it requires two steps. First, we create and populate a RequestContext with information about the request we want to evaluate:

... attribute categories creation omitted
RequestContext request = RequestContext.builder()
  .attributes(actionCategory,environmentCategory,atmTxCategory)
  .build();

Here, each xxxCategory parameter contains a set of attributes for the associated Category. The full code uses the available builders to create a test request for a withdrawal of $1,200.00 happening at 21:00. Alternatively, we can also create a RequestContext object directly from any JAXB-compatible source.

Next, we pass this object to the decide() method of the PolicyDecisionPoint service for its evaluation:

ResponseContext response = pdp.decide(request);
assertTrue(response.getDecision() == Decision.DENY); 

The returned ResponseContext contains a Decision object with the policy evaluation result. Additionally, it may also return diagnostic information and additional obligations and/or advice to the PEP. Obligations and advice are a topic on themselves, so we won't cover them here. This tutorial from Axiomatic shows how we can use this feature to implement regulatory controls in a typical system of records application.

6.2. ABAC Without XACML

The complexity of XACML usually makes it overkill for most applications. However, we can still use the underlying model in our applications. After all, we can always implement a simpler version tailored to a specific use-case, maybe externalizing just a few parameters, right?

Well, any seasoned developer knows how this ends…

A tricky aspect of any ABAC implementation is how to extract attributes from the request's payload. Standard methods to insert custom logic before processing a request, such as servlet filters or JAX-RS interceptors have only access to raw payload data.

Since modern applications tend to use JSON or similar representations, the PEP must decode it before it can extract any payload attribute. This means a potential hit on CPU and memory usage, especially for large payloads.

In this case, a better approach is to use AOP to implement the PEP. In this case, the aspect handler code has access to the decoded version of the payload.

7. Conclusion

In this article, we’ve described different access control models and how applications use them to enforce access rules.

As usual, the full source code of the examples can be found over on GitHub.


Java Weekly, Issue 401

$
0
0

1. Spring and Java

>> Saving Time with Structured Logging [reflectoring.io]

Optimizing our logs for being queried – a practical guide on how to add structure to our log events.

>> Soft Deletion in Hibernate: Things You May Miss [jpa-buddy.com]

How soft-deletion in Hibernate works with different fetch types and also, one to one and many to one associations – definitely a good read!

Also worth reading:

Webinars and presentations:

Time to upgrade:

2. Technical

>> Netflix Builds a Reliable, Scalable Platform with Event Sourcing, MQTT, and Alpakka-Kafka [infoq.com]

Let's see how Netflix uses Apache Kafka, Alpakka-Kafka, and CockroachDB to build an MQTT-based event sourcing tool!

Also worth reading:

3. Musings

>> My Ultimate PowerShell prompt with Oh My Posh and the Windows Terminal [hanselman.com]

Windows shells don't have to be ugly! Here Scott Hanselman shows us how to beautify the Powershell with Oh My Posh.

Also worth reading:

4. Comics

And my favorite Dilberts of the week:

>> Tina's Self Esteem [dilbert.com]

>> Generic Feedback [dilbert.com]

>> Access To Contracts [dilbert.com]

5. Pick of the Week

>> The Refragmentation [paulgraham.com]


Test WebSocket APIs With Postman

$
0
0

1. Overview

In this article, we'll create an application with WebSocket and test it using Postman.

2. Java WebSockets

WebSocket is a bi-directional, full-duplex, persistent connection between a web browser and a server. Once a WebSocket connection is established, the connection stays open until the client or server decides to close this connection.

The WebSocket protocol is one of the ways to make our application handle real-time messages. The most common alternatives are long polling and server-sent events. Each of these solutions has its advantages and drawbacks.

One way of using WebSockets in Spring is using the STOMP subprotocol. However, in this article, we'll be using raw WebSockets because, as of today, STOMP support is not available in Postman.

3. Postman Setup

Postman is an API platform for building and using APIs. When using Postman, we don't need to write an HTTP client infrastructure code just for the sake of testing. Instead, we create test suites called collections and let Postman interact with our API.

4. Application Using WebSocket

We'll build a simple application. The workflow of our application will be:

  • The server sends a one-time message to the client
  • It sends periodic messages to the client
  • Upon receiving messages from a client, it logs them and sends them back to the client
  • The client sends aperiodic messages to the server
  • The client receives messages from a server and logs them

The workflow diagram is as follows:


5. Spring WebSocket

Our server consists of two parts. Spring WebSocket events handler and Spring WebSocket configuration. We'll discuss them separately below:

5.1. Spring WebSocket Config

We can enable WebSocket support in the Spring server by adding the @EnableWebSocket annotation.

In the same configuration, we'll also register the implemented WebSocket handler for the WebSocket endpoint:

@Configuration
@EnableWebSocket
public class ServerWebSocketConfig implements WebSocketConfigurer {
    
    @Override
    public void registerWebSocketHandlers(WebSocketHandlerRegistry registry) {
        registry.addHandler(webSocketHandler(), "/websocket");
    }
    
    @Bean
    public WebSocketHandler webSocketHandler() {
        return new ServerWebSocketHandler();
    }
}

5.2. Spring WebSocket Handler

The WebSocket handler class extends TextWebSocketHandler. This handler uses the handleTextMessage callback method to receive messages from a client. The sendMessage method sends messages back to the client:

@Override
public void handleTextMessage(WebSocketSession session, TextMessage message) throws Exception {
    String request = message.getPayload();
    logger.info("Server received: {}", request);
        
    String response = String.format("response from server to '%s'", HtmlUtils.htmlEscape(request));
    logger.info("Server sends: {}", response);
    session.sendMessage(new TextMessage(response));
}

The @Scheduled method broadcasts periodic messages to active clients with the same sendMessage method:

@Scheduled(fixedRate = 10000)
void sendPeriodicMessages() throws IOException {
    for (WebSocketSession session : sessions) {
        if (session.isOpen()) {
            String broadcast = "server periodic message " + LocalTime.now();
            logger.info("Server sends: {}", broadcast);
            session.sendMessage(new TextMessage(broadcast));
        }
    }
}

Our endpoint for testing will be:

ws://localhost:8080/websocket

6. Testing with Postman

Now that our endpoint is ready, we can test it with Postman. To test WebSocket, we must have v8.5.0 or higher.

Before starting the process with Postman, we'll run our server. Now let's proceed.

Firstly, start the Postman application. Once it started we can proceed.

After it has loaded from the UI  choose new:

A new pop-up will be opened. From there choose WebSocket Request:

We'll be testing a raw WebSocket request. The screen should look like this:

Now let's add our URL. Press the connect button and test the connection:

So, the connection is working fine. As we can see from the console we are getting responses from the server. Let's try sending messages now and the server will respond back:

After our test is done, we can disconnect simply by clicking the Disconnect button.

7. Conclusion

In this article, we've created a simple application to test a connection with WebSocket and tested it using Postman.

Finally, the related code is available over on GitHub.
       

Javadoc: @version and @since

$
0
0

1. Overview

Javadoc is a way to generate documentation in HTML format from Java source code.

In this tutorial, we'll focus on the @version and @since tags in doc comments.

2. Usage Of @version And @since

In this section, we'll talk about how to use the @version and @since tags properly.

2.1. @version

The format of the @version tag is straightforward:

@version  version-text

For example, we can use it to indicate JDK 1.7:

/**
 * @version JDK 1.7
 */

When we use the @version tag, it has two different usage scenarios:

  • Record the version of a single file
  • Mark the version of the whole software

Obviously, we can see that there is a discrepancy between these two scenarios. That's because the version of a single file may not be compatible with the version of the software. Besides, different files may have different file versions. So, how should we use the @version tag?

In the past, Sun used the @version tag to record the version of a single file. And it recommended that the @version tag used the SCCS string “%I%, %G%“. Then, the SCCS would replace “%I%” with the current version of the file and “%G%” with the date “mm/dd/yy” when we check the file out. For example, it would look like “1.39, 02/28/97” (mm/dd/yy).  Furthermore, %I% gets incremented each time we edit and delget(delta + get) a file.

The SCCS is also known as Source Code Control System. If we want to know more about SCCS Command, we can refer to it here. In addition, SCCS is an old-fashioned source-code version control system.

At present, we tend to use the @version tag to indicate the version of the whole software. In light of this, it makes the @version tag placed in a single file unnecessarily.

Does it mean that the version of a single file is no longer important? That's not actually true. Now, we have modernized version control software, such as Git, SVN, CVS, and so on. Each version control software has its unique way of recording the version of every single file and doesn't need to rely on the @version tag.

Let's take Oracle JDK 8 as an example. If we look at the source code in the src.zip file, we may find only the java.awt.Color class has a @version tag:

/**
 * @version     10 Feb 1997
 */

So, we may infer that using the @version tag to indicate the version of a single file is fading. Thus, the Oracle doc suggests that we use the @version tag to record the current version number of the software.

2.2. @since

The format of the @since tag is quite simple:

@since  since-text

For example, we can use it to mark a feature introduced in JDK 1.7:

/**
 * @since JDK 1.7
 */

In short, we use the @since tag to describe when a change or feature has first existed. Similarly, it uses the release version of the whole software, not the version of a single file. The Oracle doc gives us some detailed instructions on how to use the @since tag:

  • When introducing a new package, we should specify an @since tag in the package description and each of its classes.
  • When adding a new class or interface, we should specify one @since tag in the class description, not in the description of class members.
  • If we add new members to an existing class, we should only specify @since tags to members newly added, not in the class description.
  • If we change a class member from protected to public in a later release, we shouldn't change the @since tag.

Sometimes, the @since tag is rather important because it provides a vital hint that software users should only expect a specific feature after some certain release version.

If we look at the src.zip file again, we may find many @since tag usages. Let's take the java.lang.FunctionalInterface class as an example:

/**
 * @since 1.8
 */
@Documented
@Retention(RetentionPolicy.RUNTIME)
@Target(ElementType.TYPE)
public @interface FunctionalInterface {}

From this code snippet, we can learn that the FunctionalInterface class is only available in JDK 8 and above.

3. Similarities Between @version And @since

In this section, let's look at the similarities between the @version and @since tags.

3.1. Both Belong To Block Tags

Firstly, both @version and @since belong to block tags.

In doc comments, tags can be categorized into two types:

  • Block tags
  • Inline tags

A block tag has a form of @tag. And it should appear at the beginning of a line, ignoring leading asterisks, white space, and separator (/**). For example, we can use @version and @since in the tag section:

/**
 * Some description here.
 * 
 * @version 1.2
 * @since 1.1
 */

However, an inline tag has the form of {@tag}. And it can exist anywhere in descriptions or comments. For example, if we have a {@link} tag, we can use it in the description:

/**
 * We can use a {@link java.lang.StringBuilder} class here.
 */

3.2. Both Can Be Used Multiple Times

Secondly, both @version and @since can be used multiple times. At first, we may be shocked by this usage. Then, we may wonder how can the @version tag appear multiple times in a single class. But it is true, and it is documented here. And it explains that we can use the same program element in more than one API. So, we can attach various versions with the same program element.

For example, if we use the same class or interface in different versions of ADK and JDK, we can provide different @version and @since messages:

/**
 * Some description here.
 *
 * @version ADK 1.6
 * @version JDK 1.7
 * @since ADK 1.3
 * @since JDK 1.4
 */

In the generated HTML pages, the Javadoc tool will insert a comma (,) and space between names. Thus, the version text looks like this:

ADK 1.6, JDK 1.7

And, the since text looks like:

ADK 1.3, JDK 1.4

4. Differences Between @version And @since

In this section, let's look at the differences between the @version and @since tags.

4.1. Whether Their Content Change

The @version text is constantly changing, and the @since text is stable. As time goes by, the software is constantly evolving. New features will join, so its version will continue to change. However, the @since tag only identifies a time point in the past at which new changes or features came into existence.

4.2. Where They Can Be Used

These two tags have slightly different usages:

  • @version: overview, package, class, interface
  • @since: overview, package, class, interface, field, constructor, method

The @since tag has a wider range of usages, and it is valid in any doc comment. In contrast, the @version tag has a narrower range of usages, and we can't use it in fields, constructors, or methods.

4.3. Whether They Appear By Default

These two tags have different behaviors in the generated HTML pages by default:

  • The @version text doesn't show by default
  • The @since text does appear by default

If we want to include “version text” in generated docs, we can use -version option:

javadoc -version -d docs/ src/*.java

Likewise, if we want to omit “since text” in generated docs, we can use -nosince option:

javadoc -nosince -d docs/ src/*.java

5. Conclusion

In this tutorial, we first talked about how to use the @version and @since tags correctly. Then we described the similarities and differences between them. In short, the @version tag holds the current version number of the software, and the @since tag describes when a change or feature has first existed.

       
Viewing all 4464 articles
Browse latest View live


<script src="https://jsc.adskeeper.com/r/s/rssing.com.1596347.js" async> </script>