Quantcast
Channel: Baeldung
Viewing all 4561 articles
Browse latest View live

Checking if an Element is the Last Element While Iterating Over an Array

$
0
0

1. Overview

When working with arrays in Java, there are situations where we need to identify whether the current element in an iteration is the last one.

In this tutorial, let’s explore a few common ways to achieve this, each with its advantages depending on the context of our application.

2. Introduction to the Problem

As usual, let’s understand the problem through examples. For example, let’s say we have an array:

String[] simpleArray = { "aa", "bb", "cc" };

Some might think the last element determination while iteration is a simple problem since we can always compare the current element to the last element (array[array.length – 1]). Yes, this approach works for arrays like simpleArray.

However, once the array contains duplicate elements, this approach won’t work anymore, for instance:

static final String[] MY_ARRAY = { "aa", "bb", "cc", "aa", "bb", "cc"};

Now, the last element is “cc”. But we have two “cc” elements in the array. Therefore, checking if the current element equals the last element can result in the wrong result.

So, we need a stable solution to check whether the current element is the last one while iterating an array.

In this tutorial, we’ll address solutions for different iteration scenarios. Also, to demonstrate each approach easily, let’s take MY_ARRAY as the input and use iteration to build this result String:

static final String EXPECTED_RESULT = "aa->bb->cc->aa->bb->cc[END]";

Of course, various ways exist to join array elements into a String with separators. However, our focus is to showcase how to determine if we’ve reached the last iteration. 

Additionally, we shouldn’t forget Java has object arrays and primitive arrays. We’ll also cover primitive array scenarios.

3. Checking the Indexes in Loops

A straightforward method to check if an element is the last in an array is to use a traditional index-based for loop. This approach gives us direct access to each element’s index, which can be compared to the last element’s index in the array to determine if we’re at the last element:

int lastIndex = MY_ARRAY.length - 1;
StringBuilder sb = new StringBuilder();
for (int i = 0; i < MY_ARRAY.length; i++) {
    sb.append(MY_ARRAY[i]);
    if (i == lastIndex) {
        sb.append("[END]");
    } else {
        sb.append("->");
    }
}
assertEquals(EXPECTED_RESULT, sb.toString());

In this example, we first get the last element’s index (lastIndex) in the array. We compare the loop variable i to lastIndex on each iteration to determine if we’ve reached the last element. Then, we can choose the corresponding separator.

Since this approach checks array indexes, it works for object and primitive arrays.

4. Using For-Each Loop with an External Counter

Sometimes, we prefer using a for-each loop, for its simplicity and readability. However, it doesn’t provide direct access to the index. But we can create an external counter to keep track of our position in the array:

int counter = 0;
StringBuilder sb = new StringBuilder();
for (String element : MY_ARRAY) {
    sb.append(element);
    if (++counter == MY_ARRAY.length) {
        sb.append("[END]");
    } else {
        sb.append("->");
    }
}
assertEquals(EXPECTED_RESULT, sb.toString());

In this example, we manually maintain a counter variable that starts at 0 and increments with each iteration. We also check if the counter has reached the given array’s length on each iteration.

The external counter approach works similarly to the index-based for loop. Therefore, it also works for primitive arrays.

5. Converting the Array to an Iterable

Java’s Iterator allows us to iterate data collections conveniently. Furthermore, it provides the hasNext() method, which is ideal to check if the current element is the last one in the collection.

However, arrays don’t implement the Iterable interface in Java. We know Iterator is available in Iterable or Stream instances. Therefore, we can convert the array to an Iterable or Stream to obtain an Iterator.

5.1. Object Arrays

List implements the Iterable interface. So, let’s can convert an object array to a List and get its Iterator:

Iterator<String> it = Arrays.asList(MY_ARRAY).iterator();
StringBuilder sb = new StringBuilder();
while (it.hasNext()) {
    sb.append(it.next());
    if (it.hasNext()) {
        sb.append("[END]");
    } else {
        sb.append("->");
    }
}
assertEquals(EXPECTED_RESULT, sb.toString());

In this example, we use Arrays.asList() to convert our String array to a List<String>.

Alternatively, we can leverage the Stream API to convert an object array to a Stream and obtain an Iterator:

Iterator<String> it = Arrays.stream(MY_ARRAY).iterator();
StringBuilder sb = new StringBuilder();
while (it.hasNext()) {
    sb.append(it.next());
    if (it.hasNext()) {
        sb.append("[END]");
    } else {
        sb.append("->");
    }
}
assertEquals(EXPECTED_RESULT, sb.toString());

As the code above shows, we use Arrays.stream() to get a Stream<String> from the input String array.

5.2. Primitive Arrays

Let’s first create an int[] array as an example and the expected String result:

static final int[] INT_ARRAY = { 1, 2, 3, 1, 2, 3 };
static final String EXPECTED_INT_ARRAY_RESULT = "1->2->3->1->2->3[END]";

Stream API offers three commonly used primitive types of streams: IntStream, LongStream, and DoubleStream. So, if we want to use an Iterator to iterate an int[], long[], or double[], we can easily convert the primitive array to a Stream, for example:

Iterator<Integer> it = IntStream.of(INT_ARRAY).iterator();
StringBuilder sb = new StringBuilder();
while (it.hasNext()) {
    sb.append(it.next());
    if (it.hasNext()) {
        sb.append("[END]");
    } else {
        sb.append("->");
    }
}
assertEquals(EXPECTED_INT_ARRAY_RESULT, sb.toString());

Alternatively, we can still use Arrays.stream() to get a primitive type Stream from an int[], long[], or double[]:

public static IntStream stream(int[] array)
public static LongStream stream(long[] array)
public static DoubleStream stream(double[] array)

If our primitive array isn’t one of int[], long[], or double[], we can convert it to a List of its wrapper type, for example, converting a char[] to a List<Character>. Then, we can use an Iterator to iterate the List.

However, when we perform the primitive array to List conversion, we must walk through the array. Thus, we iterate the array to obtain the List and then iterate the List again for the actual work. Therefore, it’s not an optimal approach to convert a primitive array to a List just for using an Iterator to iterate it. 

Next, let’s see how we can use an Iterator to iterate primitive arrays other than int[], long[], or double[].

6. Creating a Custom Iterator

We’ve seen that it’s handy to iterate an array and determine the last iteration using an Iterator. Also, we’ve discussed that obtaining an Iterator of a primitive array by converting the array to List isn’t an optimal approach. Instead, we can implement a custom Iterator for primitive arrays to gain Iterator‘s benefits without creating intermediate List or Stream objects.

First, let’s prepare a char[] array as our input and the expected String result:

static final char[] CHAR_ARRAY = { 'a', 'b', 'c', 'a', 'b', 'c' };
static final String EXPECTED_CHAR_ARRAY_RESULT = "a->b->c->a->b->c[END]";

Next, let’s create a custom Iterator for char[] arrays:

class CharArrayIterator implements Iterator<Character> {
    private final char[] theArray;
    private int currentIndex = 0;
    public static CharArrayIterator of(char[] array) {
        return new CharArrayIterator(array);
    }
    private CharArrayIterator(char[] array) {
        theArray = array;
    }
    @Override
    public boolean hasNext() {
        return currentIndex < theArray.length;
    }
    @Override
    public Character next() {
        return theArray[currentIndex++];
    }
}

As the code shows, the CharArrayIterator class implements the Iterator interface. It holds the char[] array as an internal variable. Next to the array variable, we define currentIndex to track the current index position. It’s worth mentioning that autoboxing (char -> Character) happens in the next() method.

Next, let’s see how to use our CharArrayIterator:

Iterator<Character> it = CharArrayIterator.of(CHAR_ARRAY);
StringBuilder sb = new StringBuilder();
while (it.hasNext()) {
    sb.append(it.next());
    if (it.hasNext()) {
        sb.append("->");
    } else {
        sb.append("[END]");
    }
}
assertEquals(EXPECTED_CHAR_ARRAY_RESULT, sb.toString());

If we need custom Iterators for other primitive arrays, we must create similar classes.

7. Conclusion

In this article, we’ve explored how to determine if an element is the last one while iterating over an array in different iteration scenarios. We’ve also discussed the solutions for both object and primitive array cases.

As always, the complete source code for the examples is available over on GitHub.


Stored Procedures With Spring JdbcTemplate

$
0
0

1. Overview

In this tutorial, we’ll discuss the Spring JDBC framework’s JdbcTemplate class’s ability to execute a database stored procedure. Database stored procedures are similar to functions. While functions support input parameters and have a return type, procedures support both input and output parameters.

2. Prerequisite

Let’s consider a simple stored procedure in the PostgreSQL database:

CREATE OR REPLACE PROCEDURE sum_two_numbers(
    IN num1 INTEGER,
    IN num2 INTEGER,
    OUT result INTEGER
)
LANGUAGE plpgsql
AS '
BEGIN
    sum_result := num1 + num2;
END;
';

The stored procedure sum_two_numbers takes two input numbers and returns their sum in the output parameter sum_result. Generally, stored procedures can support multiple input and output parameters. However, for this example, we’ve considered a single output parameter.

3. Using the JdbcTemplate#call() Method

Let’s see how to invoke the database stored procedure by using the JdbcTemplate#call() method:

void givenStoredProc_whenCallableStatement_thenExecProcUsingJdbcTemplateCallMethod() {
    List<SqlParameter> procedureParams = List.of(new SqlParameter("num1", Types.INTEGER),
      new SqlParameter("num2", Types.NUMERIC),
      new SqlOutParameter("result", Types.NUMERIC)
    );
    Map<String, Object> resultMap = jdbcTemplate.call(new CallableStatementCreator() {
        @Override
        public CallableStatement createCallableStatement(Connection con) throws SQLException {
            CallableStatement callableStatement = con.prepareCall("call sum_two_numbers(?, ?, ?)");
            callableStatement.registerOutParameter(3, Types.NUMERIC);
            callableStatement.setInt(1, 4);
            callableStatement.setInt(2, 5);
            return callableStatement;
        }
    }, procedureParams);
    assertEquals(new BigDecimal(9), resultMap.get("result"));
}

First, we define the IN parameters num1 and num2 of the stored procedure sum_two_numbers() with the help of the SqlParameter class. Then, we define the OUT parameter result with the SqlOutParameter.

Later, we pass the CallableStatementCreater object and the List<SqlParameter> in procedureParams to the JdbcTemplate#call() method.

In the CallableStatementCreator#createCallableStatement() method, we create the CallableStatement object by calling the Connection#prepareCall() method. Similar to PreparedStatement, we set the IN parameters in the CallableStatment object.

However, we must register the OUT parameter using the registerOutParameter() method.

Finally, we retrieve the result from the Map object in resultMap.

4. Using JdbcTemplate#execute() Method

There could be scenarios where we would need more control over the CallableStatement. Hence, the Spring framework provides the CallableStatementCallback interface similar to PreparedStatementCallback. Let’s see how to use it in the JdbcTemplate#execute() method:

void givenStoredProc_whenCallableStatement_thenExecProcUsingJdbcTemplateExecuteMethod() {
    String command = jdbcTemplate.execute(new CallableStatementCreator() {
        @Override
        public CallableStatement createCallableStatement(Connection con) throws SQLException {
            CallableStatement callableStatement = con.prepareCall("call sum_two_numbers(?, ?, ?)");
            return callableStatement;
        }
    }, new CallableStatementCallback<String>() {
        @Override
        public String doInCallableStatement(CallableStatement cs) throws SQLException, DataAccessException {
            cs.setInt(1, 4);
            cs.setInt(2, 5);
            cs.registerOutParameter(3, Types.NUMERIC);
            cs.execute();
            BigDecimal result = cs.getBigDecimal(3);
            assertEquals(new BigDecimal(9), result);
            String command = "4 + 5 = " + cs.getBigDecimal(3);
            return command;
        }
    });
    assertEquals("4 + 5 = 9", command);
}

The CallableStatementCreator object parameter creates the CallableStatement object. Later, it’s available in the CallableStatementCallback#doInCallableStatement() method.

In this method, we set the IN and OUT parameters in the CallableStatement object, and later, we call CallableStatement#execute(). Finally, we fetch the result and form the command  4 + 5 = 9.

We can reuse the CallableStatement object in doInCallableStatement() method multiple times to execute the stored procedure with different parameters.

5. Using SimpleJdbcCall

The SimpleJdbcCall class internally uses JdbcTemplate to execute stored procedures and functions. It also supports fluent-style method chaining, making it simpler to understand and use.

Additionally, SimpleJdbcCall is designed to work in multi-threaded scenarios. Hence, it allows for safe, concurrent access by multiple threads without requiring any external synchronization.

Let’s see how we can call the stored procedure sum_two_numbers with the help of this class:

void givenStoredProc_whenJdbcTemplate_thenCreateSimpleJdbcCallAndExecProc() {
    SimpleJdbcCall simpleJdbcCall = new SimpleJdbcCall(jdbcTemplate).withProcedureName("sum_two_numbers");
    Map<String, Integer> inParams = new HashMap<>();
    inParams.put("num1", 4);
    inParams.put("num2", 5);
    Map<String, Object> resultMap = simpleJdbcCall.execute(inParams);
    assertEquals(new BigDecimal(9), resultMap.get("result"));
}

First, we instantiate the SimpleJdbcCall class by passing the JdbcTemplate object to its constructor. Under the hood, this JdbcTemplate object executes the stored procedure. Then, we pass the procedure name to SimpleJdbcCall#withProcedureName() method.

Finally, we get the results in a Map object by passing the input parameters in a Map to the SimpleJdbcCall#execute() method. The results are stored against the keys with the name of the OUT parameter.

Interestingly, there’s no need to define the metadata of the stored procedure parameters because the SimpleJdbcCall class can read the database metadata. This support is limited to a few databases such as Derby, MySQL, Microsoft SQL Server, Oracle, DB2, Sybase, and PostgreSQL.

Hence, for others, we need to define the parameters explicitly in the SimpleJdbcCall#declareParameters() method:

@Test
void givenStoredProc_whenJdbcTemplateAndDisableMetadata_thenCreateSimpleJdbcCallAndExecProc() {
    SimpleJdbcCall simpleJdbcCall = new SimpleJdbcCall(jdbcTemplate)
      .withProcedureName("sum_two_numbers")
      .withoutProcedureColumnMetaDataAccess();
    simpleJdbcCall.declareParameters(new SqlParameter("num1", Types.NUMERIC),
      new SqlParameter("num2", Types.NUMERIC),
      new SqlOutParameter("result", Types.NUMERIC));
    Map<String, Integer> inParams = new HashMap<>();
    inParams.put("num1", 4);
    inParams.put("num2", 5);
    Map<String, Object> resultMap = simpleJdbcCall.execute(inParams);
    assertEquals(new BigDecimal(9), resultMap.get("result"));
}

We disabled the database metadata processing by calling the SimpleJdbcCall#withoutProcedureColumnMetaDataAccess() method. The rest of the steps remain the same as before.

6. Using StoredProcedure

StoredProcedure is an abstract class, and we can override its execute() method for additional processing:

public class StoredProcedureImpl extends StoredProcedure {
    public StoredProcedureImpl(JdbcTemplate jdbcTemplate, String procName) {
        super(jdbcTemplate, procName);
    }
    private String doSomeProcess(Object procName) {
        //do some processing
        return null;
    }
    @Override
    public Map<String, Object> execute(Map<String, ?> inParams) throws DataAccessException {
        doSomeProcess(inParams);
        return super.execute(inParams);
    }
}

Let’s see how to use this class:

@Test
void givenStoredProc_whenJdbcTemplate_thenCreateStoredProcedureAndExecProc() {
    StoredProcedure storedProcedure = new StoredProcedureImpl(jdbcTemplate, "sum_two_numbers");
    storedProcedure.declareParameter(new SqlParameter("num1", Types.NUMERIC));
    storedProcedure.declareParameter(new SqlParameter("num2", Types.NUMERIC));
    storedProcedure.declareParameter(new SqlOutParameter("result", Types.NUMERIC));
    Map<String, Integer> inParams = new HashMap<>();
    inParams.put("num1", 4);
    inParams.put("num2", 5);
    Map<String, Object> resultMap = storedProcedure.execute(inParams);
    assertEquals(new BigDecimal(9), resultMap.get("result"));
}

Like SimpleJdbcCall, we first instantiate the subclass of StoredProcedure by passing in the JdbcTemplate and stored procedure name. Then we set the parameters, execute the stored procedure, and get the results in a Map.

Additionally, we must remember to declare the SqlParameter objects in the same order in which the parameters are passed to the stored procedure.

7. Conclusion

In this article, we discussed the JdbcTemplate‘s capability to execute stored procedures. JdbcTemplate has been the core class for handling data operations in databases. It can be used directly or implicitly with the help of wrapper classes like SimpleJdbcCall and StoredProcedure.

As usual, the code used in this article can be found over on GitHub.


Integrating Firebase Authentication With Spring Security

$
0
0

1. Overview

In modern web applications, user authentication and authorization are critical components. Building our authentication layer from scratch is a challenging and complex task. However, with the rise of cloud-based authentication services, this process has become much simpler.

One such example is Firebase Authentication, a fully managed authentication service offered by Firebase and Google.

In this tutorial, we’ll explore how to integrate Firebase Authentication with Spring Security to create and authenticate our users. We’ll walk through the necessary configuration, implement user registration and login functionality, and create a custom authentication filter to validate user tokens for private API endpoints.

2. Setting up the Project

Before we dive into the implementation, we’ll need to include an SDK dependency and configure our application correctly.

2.1. Dependencies

Let’s start by adding the Firebase admin dependency to our project’s pom.xml file:

<dependency>
    <groupId>com.google.firebase</groupId>
    <artifactId>firebase-admin</artifactId>
    <version>9.3.0</version>
</dependency>

This dependency provides us with the necessary classes to interact with the Firebase Authentication service from our application.

2.2. Defining Firebase Configuration Beans

Now, to interact with Firebase Authentication, we need to configure our private key to authenticate API requests.

For our demonstration, we’ll create the private-key.json file in our src/main/resources directory. However, in production, the private key should be loaded from an environment variable or fetched from a secret management system to enhance security.

We’ll load our private key using the @Value annotation and use it to define our beans:

@Value("classpath:/private-key.json")
private Resource privateKey;
@Bean
public FirebaseApp firebaseApp() {
    InputStream credentials = new ByteArrayInputStream(privateKey.getContentAsByteArray());
    FirebaseOptions firebaseOptions = FirebaseOptions.builder()
      .setCredentials(GoogleCredentials.fromStream(credentials))
      .build();
    return FirebaseApp.initializeApp(firebaseOptions);
}
@Bean
public FirebaseAuth firebaseAuth(FirebaseApp firebaseApp) {
    return FirebaseAuth.getInstance(firebaseApp);
}

We first define our FirebaseApp bean, which we then use to create our FirebaseAuth bean. This allows us to reuse the FirebaseApp bean when working with multiple Firebase services, such as Cloud Firestore Database, Firebase Messaging, etc.

The FirebaseAuth class is the main entry point for interacting with the Firebase Authentication service.

3. Creating Users in Firebase Authentication

Now that we’ve defined our FirebaseAuth bean, let’s create a UserService class and reference it to create new users in Firebase Authentication:

private static final String DUPLICATE_ACCOUNT_ERROR = "EMAIL_EXISTS";
public void create(String emailId, String password) {
    CreateRequest request = new CreateRequest();
    request.setEmail(emailId);
    request.setPassword(password);
    request.setEmailVerified(Boolean.TRUE);
    try {
        firebaseAuth.createUser(request);
    } catch (FirebaseAuthException exception) {
        if (exception.getMessage().contains(DUPLICATE_ACCOUNT_ERROR)) {
            throw new AccountAlreadyExistsException("Account with given email-id already exists");
        }
        throw exception;
    }
}

In our create() method, we initialize a new CreateRequest object with the user’s email and password. We also set the emailVerified value to true for simplicity, however, we might want to implement an email verification process before we do that in a production application.

Additionally, we handle the case where an account with the given emailId already exists, throwing a custom AccountAlreadyExistsException.

4. Implementing User Login Functionality

Now that we can create users, we’ll naturally have to allow them to authenticate themselves before they access our private API endpoints. We’ll implement the user login functionality that returns an ID token in the form of a JWT and a refresh token on successful authentication.

The Firebase admin SDK does not support token exchange with email/password credentials as this functionality is typically handled by the client applications. However, for our demonstration, we’ll call the sign-in REST API directly from our backend application.

First, we’ll declare a couple of records to represent the request and response payloads:

record FirebaseSignInRequest(String email, String password, boolean returnSecureToken) {}
record FirebaseSignInResponse(String idToken, String refreshToken) {}

To invoke the Firebase Authentication REST API, we’ll need the web API key of our Firebase project. We’ll store it in our application.yaml file and inject it into our new FirebaseAuthClient class using the @Value annotation:

private static final String API_KEY_PARAM = "key";
private static final String INVALID_CREDENTIALS_ERROR = "INVALID_LOGIN_CREDENTIALS";
private static final String SIGN_IN_BASE_URL = "https://identitytoolkit.googleapis.com/v1/accounts:signInWithPassword";
@Value("${com.baeldung.firebase.web-api-key}")
private String webApiKey;
public FirebaseSignInResponse login(String emailId, String password) {
    FirebaseSignInRequest requestBody = new FirebaseSignInRequest(emailId, password, true);
    return sendSignInRequest(requestBody);
}
private FirebaseSignInResponse sendSignInRequest(FirebaseSignInRequest firebaseSignInRequest) {
    try {
        return RestClient.create(SIGN_IN_BASE_URL)
          .post()
          .uri(uriBuilder -> uriBuilder
            .queryParam(API_KEY_PARAM, webApiKey)
            .build())
          .body(firebaseSignInRequest)
          .contentType(MediaType.APPLICATION_JSON)
          .retrieve()
          .body(FirebaseSignInResponse.class);
    } catch (HttpClientErrorException exception) {
        if (exception.getResponseBodyAsString().contains(INVALID_CREDENTIALS_ERROR)) {
            throw new InvalidLoginCredentialsException("Invalid login credentials provided");
        }
        throw exception;
    }
}

In our login() method, we create a FirebaseSignInRequest with the user’s email, password, and set returnSecureToken to true. We then pass this request to our private sendSignInRequest() method, which sends a POST request to the Firebase Authentication REST API using RestClient.

If the request is successful, we return the response containing the user’s idToken and refreshToken to the caller. If the login credentials are invalid, we throw a custom InvalidLoginCredentialsException.

It’s important to note that the validity of the idToken we receive from Firebase is one hour, and we can’t change it. In the next section, we’ll explore how we can allow our client applications to use the returned refreshToken to obtain new ID tokens.

5. Exchanging Refresh Tokens for New ID Tokens

Now that we’ve got our login functionality in place, let’s see how we can use the refreshToken to get a new idToken when the current one expires. This allows our client application to keep our users logged-in for an extended period without requiring them to re-enter their credentials.

We’ll start by defining the records to represent the request and response payloads:

record RefreshTokenRequest(String grant_type, String refresh_token) {}
record RefreshTokenResponse(String id_token) {}

Next, in our FirebaseAuthClient class, let’s invoke the refresh token exchange REST API:

private static final String REFRESH_TOKEN_GRANT_TYPE = "refresh_token";
private static final String INVALID_REFRESH_TOKEN_ERROR = "INVALID_REFRESH_TOKEN";
private static final String REFRESH_TOKEN_BASE_URL = "https://securetoken.googleapis.com/v1/token";
public RefreshTokenResponse exchangeRefreshToken(String refreshToken) {
    RefreshTokenRequest requestBody = new RefreshTokenRequest(REFRESH_TOKEN_GRANT_TYPE, refreshToken);
    return sendRefreshTokenRequest(requestBody);
}
private RefreshTokenResponse sendRefreshTokenRequest(RefreshTokenRequest refreshTokenRequest) {
    try {
        return RestClient.create(REFRESH_TOKEN_BASE_URL)
          .post()
          .uri(uriBuilder -> uriBuilder
            .queryParam(API_KEY_PARAM, webApiKey)
            .build())
          .body(refreshTokenRequest)
          .contentType(MediaType.APPLICATION_JSON)
          .retrieve()
          .body(RefreshTokenResponse.class);
    } catch (HttpClientErrorException exception) {
        if (exception.getResponseBodyAsString().contains(INVALID_REFRESH_TOKEN_ERROR)) {
            throw new InvalidRefreshTokenException("Invalid refresh token provided");
        }
        throw exception;
    }
}

In our exchangeRefreshToken() method, we create a RefreshTokenRequest with the refresh_token grant type and the provided refreshToken. We then pass this request to our private sendRefreshTokenRequest() method, which sends a POST request to the desired API endpoint.

If the request is successful, we return the response containing the new idToken. And if the provided refreshToken is invalid, we throw a custom InvalidRefreshTokenException.

Additionally, if we need to force our users to re-authenticate, we can revoke their refresh tokens:

firebaseAuth.revokeRefreshTokens(userId);

We call the revokeRefreshTokens() method provided by the FirebaseAuth class. This not only invalidates all the refreshTokens issued to the user but also the user’s active idToken, effectively logging them out of our application.

6. Integrating With Spring Security

With our user creation and login functionality in place, let’s integrate Firebase Authentication with Spring Security to secure our private API endpoints.

6.1. Creating Custom Authentication Filter

First, we’ll create our custom authentication filter extending the OncePerRequestFilter class:

@Component
class TokenAuthenticationFilter extends OncePerRequestFilter {
    private static final String BEARER_PREFIX = "Bearer ";
    private static final String USER_ID_CLAIM = "user_id";
    private static final String AUTHORIZATION_HEADER = "Authorization";
    private final FirebaseAuth firebaseAuth;
    private final ObjectMapper objectMapper;
    // standard constructor
    @Override
    protected void doFilterInternal(HttpServletRequest request, HttpServletResponse response,
      FilterChain filterChain) {
        String authorizationHeader = request.getHeader(AUTHORIZATION_HEADER);
        if (authorizationHeader != null && authorizationHeader.startsWith(BEARER_PREFIX)) {
            String token = authorizationHeader.replace(BEARER_PREFIX, "");
            Optional<String> userId = extractUserIdFromToken(token);
            if (userId.isPresent()) {
                var authentication = new UsernamePasswordAuthenticationToken(userId.get(), null, null);
                authentication.setDetails(new WebAuthenticationDetailsSource().buildDetails(request));
                SecurityContextHolder.getContext().setAuthentication(authentication);   
            } else {
                setAuthErrorDetails(response);
                return;
            }
        }
        filterChain.doFilter(request, response);
    }
    private Optional<String> extractUserIdFromToken(String token) {
        try {
            FirebaseToken firebaseToken = firebaseAuth.verifyIdToken(token, true);
            String userId = String.valueOf(firebaseToken.getClaims().get(USER_ID_CLAIM));
            return Optional.of(userId);
        } catch (FirebaseAuthException exception) {
            return Optional.empty();
        }
    }
    private void setAuthErrorDetails(HttpServletResponse response) {
        HttpStatus unauthorized = HttpStatus.UNAUTHORIZED;
        response.setStatus(unauthorized.value());
        response.setContentType(MediaType.APPLICATION_JSON_VALUE);
        ProblemDetail problemDetail = ProblemDetail.forStatusAndDetail(unauthorized,
          "Authentication failure: Token missing, invalid or expired");
        response.getWriter().write(objectMapper.writeValueAsString(problemDetail));
    }
}

In our doFilterInternal() method, we extract the Authorization header from the incoming HTTP request and remove the Bearer prefix to get the JWT token.

Then, using our private extractUserIdFromToken() method, we verify the authenticity of the token and retrieve its user_id claim.

If the token verification fails, we create a ProblemDetail error response, convert it to JSON using ObjectMapper, and write it to the HttpServletResponse.

If the token is valid, we create a new instance of UsernamePasswordAuthenticationToken with the userId as the Principal and then set it in the SecurityContext.

After successful authentication, we can retrieve the authenticated user’s userId from the SecurityContext in our service layer:

String userId = Optional.ofNullable(SecurityContextHolder.getContext().getAuthentication())
  .map(Authentication::getPrincipal)
  .filter(String.class::isInstance)
  .map(String.class::cast)
  .orElseThrow(IllegalStateException::new);

To follow the Single Responsibility Principle, we can have our above logic in a separate AuthenticatedUserIdProvider class. This helps the service layer maintain a relationship between the currently authenticated user and the operations they perform.

6.2. Configuring SecurityFilterChain

Finally, let’s configure our SecurityFilterChain to use our custom authentication filter:

private static final String[] WHITELISTED_API_ENDPOINTS = { "/user", "/user/login", "/user/refresh-token" };
private final TokenAuthenticationFilter tokenAuthenticationFilter;
// standard constructor
@Bean
public SecurityFilterChain configure(HttpSecurity http) {
    http
      .authorizeHttpRequests(authManager -> {
        authManager.requestMatchers(HttpMethod.POST, WHITELISTED_API_ENDPOINTS)
          .permitAll()
          .anyRequest()
          .authenticated();
      })
      .addFilterBefore(tokenAuthenticationFilter, UsernamePasswordAuthenticationFilter.class);
    return http.build();
}

We allow unauthenticated access to the /user, /user/login, and /user/refresh-token endpoints, which correspond to our user registration, login and refresh token exchange functionality.

Finally, we add our custom TokenAuthenticationFilter before the UsernamePasswordAuthenticationFilter in the filter chain.

This setup ensures that our private API endpoints are protected, and only requests with a valid JWT token are allowed to access them.

7. Conclusion

In this article, we explored how to integrate Firebase Authentication with Spring Security.

We walked through the necessary configurations, implemented user registration, login, and refresh token exchange functionality, and created a custom Spring Security filter to secure our private API endpoints.

By using Firebase Authentication, we can offload the complexity of managing user credentials and access, allowing us to focus on building our core functionality.

As always, all the code examples used in this article are available over on GitHub.


How to Print the Content of an Array in Java

$
0
0

1. Overview

In Java, an array is a static data structure that stores elements of the same type in contiguous memory locations. This arrangement ensures that elements are stored sequentially in memory and can be accessed directly using their index.

However, in Java, if we try to print an array object directly, it doesn’t print the array’s content but instead prints a string that contains the array type and its memory reference. Therefore, to display the elements of an array, we can use methods like Arrays.toString(), Stream.forEach(), Arrays.deepToString(), or iterate through the arrays using loops.

In this tutorial, we’ll discuss several methods to print the content of a single or multi-dimensional array in Java.

2. Printing the Content of an Array in Java

Java offers several methods to display the elements of a single-dimensional array. These methods include loops, Arrays.toString(), stream.forEach(), and Arrays.asList().

2.1. Using for Loop

Loops are the most convenient way of traversing an iterable like an array. We can use the print() method within the for loop to iterate through an array and print its elements on the console:

String[] empArray = {"Anees", "Peter", "Asghar", "Joseph", "Alex"};
for (int i = 0; i < empArray.length; i++) {
    System.out.print(empArray[i] + " ");
}

In this example, we define a string-type array empArray, and initialize it with five employee names. Moreover, we use the for loop to iterate over the entire array and print its content using the print() method:

Anees Peter Asghar Joseph Alex

Overall, this is the simplest way of printing array elements that don’t require any extra libraries or functionalities.

2.2. Using for-each Loop

In Java, we can use a for-each or the enhanced for loop to iterate directly over each array element. Inside this loop, we can use the print() or println() method to print the array’s elements:

String[] empArray = {"Anees", "Peter", "Asghar", "Joseph", "Alex"};
for (String arr : empArray) {
    System.out.println(arr);
}

The output shows that the for-each loop processes each element of the array one by one and then prints each element on the new line using the println() method:

Anees
Peter
Asghar
Joseph
Alex

This method offers a simple, readable way to iterate over arrays and collections while reducing errors and ensuring type safety.

2.3. Using Arrays.toString()

The Java Arrays class provides a static method named toString() that can be used to print the array content. We can pass an array of a primitive type to this method and get the string representation of array elements. Furthermore, this string representation can easily be printed using methods like print() or println():

int[] empIDs = {10, 12, 13, 15, 17};
String strIDs = Arrays.toString(empIDs);
System.out.println(strIDs);

Here, we convert the empIDs array into a string using the Arrays.toString() method, and then print it using the println() method:

[10, 12, 13, 15, 17]

This method provides a concise approach with minimal code, making it ideal for quick debugging or when a compact output format is needed.

2.4. Using Stream.forEach()

In Java 8 and later versions, we can use the Arrays.stream() method to convert the given array into a stream, and then use the Stream API’s forEach() method to traverse and print the contents of an array:

String[] empArray = {"Anees", "Peter", "Asghar", "Joseph", "Alex"};
Arrays.stream(empArray).forEach(System.out::println);

We convert the empArray array into a stream and print each array element to the console using System.out.println() method:

Anees
Peter
Asghar
Joseph
Alex

All in all, this method provides concise and readable code with functional programming benefits.

2.5. Using Arrays.asList()

Java’s Arrays class provides a static method named Arrays.asList() that converts any array into a fixed-size list backed by a given array. However, if we change the converted list, it affects the array and vice versa, but we can’t resize the list. The converted list can easily be printed using the print() or println() method:

String[] empArray = {"Anees", "Peter", "Asghar", "Joseph", "Alex"};
System.out.println(Arrays.asList(empArray));

This time, we wrap the Arrays.asList() method within the println() method to print the array’s content on the console:

[Anees, Peter, Asghar, Joseph, Alex]

This method has minimal performance overhead as it doesn’t create a new collection.

2.6. Using String.join()

Java’s String class offers a join() method that returns a string combined with a specific delimiter. We can also use this method to print the array content as a string, separating each element with the given delimiter:

String[] empArray = {"Anees", "Peter", "Asghar", "Joseph", "Alex"};
String outputString = String.join(", ", empArray);
System.out.println(outputString);

Here, we use the join() method to combine the elements of the empArray as a string, with each element separated by a comma followed by a space. Finally, we use the println() method to print the returned string on the console:

Anees, Peter, Asghar, Joseph, Alex

The String.join() method is efficient for printing array elements. It creates a single string with a specified delimiter. Thus, it avoids the need for loops or extra data structures.

3. Printing Content of Multi-Dimensional Array in Java

A multidimensional array is an array of arrays in which each element is itself an array. We can print a multi-dimensional array in Java using several methods, such as Nested Loops, Arrays.deepToString(), Java 8 Streams, or Arrays.toString().

4. Conclusion

Java supports several methods to print the content of a single or multi-dimensional array. In this article, we discussed multiple approaches like Arrays.toString(), Stream.forEach(), Arrays.deepToString(), loops, etc., to print the array’s content. However, the choice of method depends on the user’s needs, as loops offer a good balance between simplicity and efficiency, while other methods offer more concise solutions. As usual, the complete example code is available over on GitHub.


Java Weekly, Issue 559

$
0
0

1. Spring and Java

>> Java 23: What’s New? [foojay.io]

A quick overview of the main features to expect in Java 23. Lots of good stuff coming.

>> Reuse Testcontainers initialization and configuration code with JUnit 5 Extension Callbacks in your Spring Boot Integration Tests [tech.asimio]

Take advantage of JUnit lifecycle callbacks to reduce test execution times—a very useful trick for optimizing integration test execution times.

>> Embeddable Inheritance with JPA and Hibernate [vladmihalcea.com]

And a practical guide on how to map embeddable inheritance when using JPA and Hibernate.

Also worth reading:

Webinars and presentations:

Time to upgrade:

2. Technical & Musings

>> How I Review GitHub PRs [bitquabit.com]

A few tips and tricks on how to review PRs effectively, especially the ones touching a lot of files. Good stuff.

Also worth reading:

3. Pick of the Week

>> Just use Postgres [mccue.dev]


Programmatic Usage of NetBeans Profiler

$
0
0

1. Overview

Profiling an application provides deep insight into its behavior during the runtime. There are various popular profilers in the Java ecosystems such as NetBeans Profiler, JProfiler, and VisualVM for general-purpose profiling. NetBeans Profiler offers great functionality for free.

In this tutorial, we’ll dive into how to use the NetBeans profiler API programmatically by creating a sample project, taking a heap dump, and analyzing it using the NetBeans Profiler API.

2. NetBeans Profiler

The NetBeans IDE offers a free profiler to analyze Java applications. It provides functionality to assess the CPU performance and memory usage through an intuitive embedded UI in the IDE.

However, NetBeans Profiler also makes its profiling API accessible for programmatic use. This could be advantageous for automating heap dump analysis without much reliance on GUI tools.

The heap dump is the memory snapshot of an application at a period in time. It’s a good indicator to gain insight into memory usage because it includes live objects in the memory, their classes and fields, and references between objects.

3. Example Setup

To use the NetBeans Profiler API, let’s add its dependency to the pom.xml:

<dependency>
    <groupId>org.netbeans.modules</groupId>
    <artifactId>org-netbeans-lib-profiler</artifactId>
    <version>RELEASE220</version>
</dependency>

This dependency provides various classes such as JavaClasses and Instances to help us analyze classes, the number of instances created, and the memory used.

Next, let’s create a simple project and analyze it’s heap dump:

class SolarSystem {
    private static final Logger LOGGER = Logger.getLogger(SolarSystem.class.getName());
    private int id;
    private String name;
    private List<String> planet = new ArrayList<>();
    // constructors
    public void logSolarSystem() {
        LOGGER.info(name);
        LOGGER.info(String.valueOf(id));
        LOGGER.info(planet.toString());
    }
}

In the code above, we define a class named SolarSystem and log the name, id, and planets in the solar system to the console.

While an application is running, we can take the heap dump for further analysis using jmap. Also, we can take the heap dump programmatically:

static void dumpHeap(String filePath, boolean live) throws IOException {
    MBeanServer server = ManagementFactory.getPlatformMBeanServer();
    HotSpotDiagnosticMXBean mxBean = ManagementFactory.newPlatformMXBeanProxy(
      server, "com.sun.management:type=HotSpotDiagnostic", HotSpotDiagnosticMXBean.class);
    mxBean.dumpHeap(filePath, live);
}

In the code above, we create MBeabServer and HotSpotDiagnosticMXBean objects to take the heap dump.

Next, let’s create a class named SolApp and add a method to instantiate the SolarSystem:

class SolApp {
    static void solarSystem() throws IOException {
        List<String> planet = new ArrayList<>();
        planet.add("Mercury");
        planet.add("Mars");
        planet.add("Earth");
        planet.add("Venus");
        SolarSystem solarSystem = new SolarSystem(1, "Sol System", planet);
        solarSystem.logSolarSystem();
        HeapDump.dumpHeap("solarSystem.hprof", true);
    }
}

Here, we instantiate the SolarSystem class with some planets and programmatically take the heap dump for profiling. The solarSystem.hprof file is dumped into the project root directory after execution.

Furthermore, let’s create a Heap object to load the heap dump:

Heap heap = HeapFactory.createHeap(new File("solarSystem.hprof"));

In the code above, we prepare the dump file for profiling. We can now invoke various methods on the Heap object for further analysis.

With a heap dump in hand, we can perform several analyses, such as understanding the memory usage of classes, detecting potential data leaks, and optimizing code performance based on the findings.

4. Heap Summary

Let’s start by getting a brief overview of the heap:

static void heapDumpSummary() {
    HeapSummary summary = heap.getSummary();
    LOGGER.info("Total instances: " + summary.getTotalLiveInstances());
    LOGGER.info("Total bytes: " + summary.getTotalLiveBytes());
    LOGGER.info("Time: " + summary.getTime());
    LOGGER.info("GC Roots: " + heap.getGCRoots().size());
    LOGGER.info("Total classes: " + heap.getAllClasses().size());
}

In the code above, we create a HeapSummary object and invoke various methods on it to examine the dump file.

Here’s the log output:

INFO com.baeldung.netbeanprofiler.SolApp -- Total instances: 79893
INFO com.baeldung.netbeanprofiler.SolApp -- Total bytes: 6235526
INFO com.baeldung.netbeanprofiler.SolApp -- Time: 1724568603079
INFO com.baeldung.netbeanprofiler.SolApp -- GC Roots: 2612
INFO com.baeldung.netbeanprofiler.SolApp -- Total classes: 3207

The result shows that 79893 live objects were active when the heap dump was collected. These live instances occupy approximately 6 MiB, with a total of 3207 classes whose instances account for the 79893 live objects.

The GC roots count is 2612 at the time of the dump.

5. Class Histogram

After getting an overview of our heap dump, let’s examine the classes and the number of instances used in the application.

First, let’s create an object to get all classes in the sample application:

List<JavaClass> unmodifiableClasses = heap.getAllClasses();

Next, let’s create a List object to store the classes for sorting:

List<JavaClass> classes = new ArrayList<>(unmodifiableClasses);
classes.sort((c1, c2) -> Long.compare(c2.getInstancesCount(), c1.getInstancesCount()));

Then, let’s loop through the JavaClass object:

for (int i = 0; i < Math.min(5, classes.size()); i++) {
    JavaClass javaClass = classes.get(i);
    LOGGER.info("  " + javaClass.getName());
    LOGGER.info("    Instances: " + javaClass.getInstancesCount());
    LOGGER.info("    Total size: " + javaClass.getAllInstancesSize() + " bytes");
}

In the code above, we invoke the getName()getInstancesCount(), and getAllInstancesSize() methods on javaClass to get the class name, the total number of instances created, and the total size of the instances respectively.

Here’s the console output:

INFO com.baeldung.netbeanprofiler.SolApp --   byte[]
INFO com.baeldung.netbeanprofiler.SolApp --     Instances: 18996
INFO com.baeldung.netbeanprofiler.SolApp --     Total size: 2714375 bytes
INFO com.baeldung.netbeanprofiler.SolApp --   java.lang.String
INFO com.baeldung.netbeanprofiler.SolApp --     Instances: 18014
INFO com.baeldung.netbeanprofiler.SolApp --     Total size: 540420 bytes
INFO com.baeldung.netbeanprofiler.SolApp --   java.util.concurrent.ConcurrentHashMap$Node
INFO com.baeldung.netbeanprofiler.SolApp --     Instances: 5522
INFO com.baeldung.netbeanprofiler.SolApp --     Total size: 242968 bytes

The result above shows the byte[] and String classes have the highest number of instances, with 18996 and 18014 instances respectively. This is expected because our SolarSystem class relies on String object underhood.

6. Profiling SolarSystem Object

Furthermore, let’s examine the SolarSystem class and investigate the size and count of its instances.

6.1. Total Size and Instances Count

First, let’s find the size and total instance count of the SolarSystem class:

static void solarSystemSummary() {
    JavaClass solarSystemClass = heap.getJavaClassByName("com.baeldung.netbeanprofiler.galaxy.SolarSystem");
    List<Instance> instances = solarSystemClass.getInstances();
    long totalSize = 0;
    long instancesNumber = solarSystemClass.getInstancesCount();
    for (Instance instance : instances) {
        totalSize += instance.getSize();
    }
    LOGGER.info("Total SolarSystem instances: " + instancesNumber);
    LOGGER.info("Total memory used by SolarSystem instances: " + totalSize);
}

Here, we create a JavaClass object and invoke the getJavaClassByName() method on the heap instance. Next, we get the instances of the class and log the number of instances and their size to the console:

INFO com.baeldung.netbeanprofiler.SolApp - Total SolarSystem instances: 1
INFO com.baeldung.netbeanprofiler.SolApp - Total memory used by SolarSystem instances: 36

From the console output, the SolarSystem instance was created once using 36 bytes. This matches the number of instances created in the example code, indicating the SolarSystem object is instantiated as expected.

6.2. Field Details

Furthermore, we can dig deep into a selected class to investigate its fields:

static void logFieldDetails() {
    JavaClass solarSystemClass = heap.getJavaClassByName("com.baeldung.netbeanprofiler.galaxy.SolarSystem");
    List<Field> fields = solarSystemClass.getFields();
    for (Field field : fields) {
        LOGGER.info("Field: " + field.getName());
        LOGGER.info("Type: " + field.getType().getName());
    }
}

In the code above, we select the SolarSystem class and get all its instances. Then we create a collection Field object and iterate through the collection. Finally, we log the name and type of the field to the console.

7. Exploring GC Roots

The GC roots provide a clear picture of the garbage collector’s behavior. Any objects being referenced directly or indirectly by GC roots won’t be garbage collected. It shows the object is still alive and not ready to be cleaned.

Let’s invoke the getGCRoots() method on the heap object to collect all the GC roots:

Collection<GCRoot> gcRoots = heap.getGCRoots();

In the code above, we invoke the getGCRoots() method on the heap instance to get a collection of GC roots.

Next, let’s create a variable to store the count of different GC roots:

int threadObj = 0, jniGlobal = 0, jniLocal = 0, javaFrame = 0, other = 0;

Then, let’s loop through the GC roots and count the number of Thread objects, Java Native Interface (JNI) Global and Local objects, and Java Frame:

for (GCRoot gcRoot : gcRoots) {
    Instance instance = gcRoot.getInstance();
    String kind = gcRoot.getKind();
    switch (kind) {
        case THREAD_OBJECT:
            threadObj++;
            break;
        case JNI_GLOBAL:
            jniGlobal++;
            break;
        case JNI_LOCAL:
            jniLocal++;
            break;
        case JAVA_FRAME:
            javaFrame++;
            break;
        default:
            other++;
    }
}

Here, we iterate over the GC roots and count the number of Thread objects, Java Frames, JNI Global References, JNI Local References, and others.

Thread objects are active threads at the time the heap dump was taken. Objects referenced by it are considered live and won’t be garbage collected. Java Frames represent object references in the JVM stack frame. It holds the local variables and method invocation details.

Also, the JNI allows Java code to interact with native code such as C or C++. Local references are valid within the scope of the native method that created them while global references retain a reference to a Java object beyond the scope of a single native method call.

Finally, let’s log the details to the console:

LOGGER.info("\nGC Root Summary:");
LOGGER.info("  Thread Objects: " + threadObj);
LOGGER.info("  JNI Global References: " + jniGlobal);
LOGGER.info("  JNI Local References: " + jniLocal);
LOGGER.info("  Java Frames: " + javaFrame);
LOGGER.info("  Other: " + other);

Here’s the result:

INFO com.baeldung.netbeanprofiler.SolApp --   Thread Objects: 8
INFO com.baeldung.netbeanprofiler.SolApp --   JNI Global References: 122
INFO com.baeldung.netbeanprofiler.SolApp --   JNI Local References: 1
INFO com.baeldung.netbeanprofiler.SolApp --   Java Frames: 481
INFO com.baeldung.netbeanprofiler.SolApp --   Other: 2000

From the result above, 8 Thread objects are still alive and the Java Frame count is 481 count.

8. Conclusion

In this article, we learned the basic profiling feature of NetBeans Profiler API by taking a heap dump programmatically and further analyzing it. Additionally, we saw how to get the heap summary and single out a class for profiling.

As always, the source code for the examples is available over on GitHub.


Introduction to Traefik

$
0
0

1. Introduction

Traefik is a modern reverse proxy and load balancer designed to streamline and optimize the deployment and management of microservices. In this tutorial, we’ll explore what Traefik is, its key features, and how it can be integrated into an application infrastructure.

2. What Is Traefik

Traefik is an open-source, dynamic reverse proxy and load balancer developed by Containous. It’s specifically designed to integrate seamlessly with modern container orchestration platforms such as Kubernetes, Docker Swarm, and Mesos.

Traefik’s primary goal is to simplify the configuration and management of reverse proxying and load-balancing tasks, making it an ideal choice for microservice architectures.

3. Key Features

  • Auto-discovery: Traefik automatically discovers services and routes by integrating with service registries, container orchestrators, and cloud providers.
  • Dynamic Configuration: It dynamically adapts its configuration as the environment changes, without requiring a restart.
  • Middleware: Supports various middleware to manipulate requests and responses, such as authentication, rate limiting, and retries.
  • Load Balancing: Provides sophisticated load-balancing algorithms to distribute traffic across services.
  • SSL Termination: Traefik can automatically manage SSL certificates, making it easier to secure our applications with HTTPS.
  • Dashboard: Offers a built-in web UI to monitor and visualize the state of our services and routers.

4. How Traefik Works

Traefik operates by listening to the APIs of our orchestration platform or service discovery tool. It then uses this information to route traffic to the appropriate service automatically. For example, in a Kubernetes environment, we can configure Traefik as an ingress controller to manage incoming HTTP and HTTPS traffic to services within the cluster.

Let’s understand a simple flow of how Traefik works:

  1. Service Discovery: Traefik continuously monitors the environment for new or updated services.
  2. Routing: Traefik dynamically creates or updates routes based on the discovered services.
  3. Load Balancing: Traefik distributes incoming requests across the available service instances.
  4. TLS Termination: If configured, Traefik handles HTTPS traffic, managing SSL certificates automatically.
  5. Middleware: We can modify requests and responses before they reach the service or the client.
Introduction to Traefik

The above image is part of the official documentation for Traefik.

5. Working With Traefik

Traefik offers multiple installation methods. For this guide, we’ll focus on installing it using Docker. We’ll use the below docker-compose.yml to run Traefik as a container. We can find the latest image for Traefik in the Docker repository:

version: '3'
services:
  reverse-proxy:
    # The official v3 Traefik docker image
    image: traefik:v3.1
    # Enables the web UI and tells Traefik to listen to docker
    command: --api.insecure=true --providers.docker
    ports:
      # The HTTP port
      - "80:80"
      # The Web UI (enabled by --api.insecure=true)
      - "8080:8080"
    volumes:
      # So that Traefik can listen to the Docker events
      - /var/run/docker.sock:/var/run/docker.sock

The below command will run a Traefik container in the background. In this example, Traefik is configured to listen to Docker events, automatically updating its routing configuration based on the running services:

docker-compose up -d reverse-proxy

Let’s open the browser and navigate to http://localhost:8080/api/rawdata to view Traefik’s API raw data:

We can now deploy new services. Let’s add a new service called whoami in the docker-compose.yml. This service will output the information about the machine on which the service is deployed:

version: '3'
services:
  whoami:
    image: traefik/whoami
    labels:
      - "traefik.http.routers.whoami.rule=Host(`whoami.docker.localhost`)"

Let’s now run the command to start the service:

docker-compose up -d whoami

Traefik automatically detects the new service and updates the configuration:

When Traefik detects new services, it creates the corresponding routes, allowing us to access them. Let’s give it a try using curl:

curl -H Host:whoami.docker.localhost http://127.0.0.1

Running the above command will result in output containing details like the client’s IP address, the service’s internal IP and hostname, and headers, including the original host and protocol:

Hostname: 008455958d71
IP: 127.0.0.1
IP: 172.21.0.3
RemoteAddr: 172.21.0.2:43852
GET / HTTP/1.1
Host: whoami.docker.localhost
User-Agent: curl/8.7.1
Accept: /
Accept-Encoding: gzip
X-Forwarded-For: 172.21.0.1
X-Forwarded-Host: whoami.docker.localhost
X-Forwarded-Port: 80
X-Forwarded-Proto: http
X-Forwarded-Server: 0c1bf06a7c23
X-Real-Ip: 172.21.0.1

6. Conclusion

In this article, we explored what Traefik is, what its core features are, and how to get it up and running using Docker. Traefik is a powerful and flexible tool for managing traffic in modern web architectures. Its auto-discovery, dynamic configuration and extensive middleware support make it ideal for microservices and containerized environments.


Migrate HttpStatus to HttpStatusCode in Spring Boot 3

$
0
0
start here featured

1. Overview

In this article, we’ll look at how to use HttpStatusCode in Spring Boot applications, focusing on the most recent enhancements introduced in version 3.3.3. With these enhancements, HttpStatusCode has been incorporated into the HttpStatus implementation, simplifying how we work with HTTP status codes.

The main purpose of these improvements is to provide a more flexible and reliable method for handling both standard and custom HTTP status codes, giving us higher flexibility and extensibility when working with HTTP responses while maintaining backward compatibility.

2. HttpStatus Enumerator

Prior to Spring 3.3.3, HTTP status codes were represented as enums in HttpStatus. This limited the use of custom or non-standard HTTP status codes as enums are a fixed set of predefined values.

Even though the HttpStatus class hasn’t been deprecated, some enums and methods that return raw integer status codes, such as getRawStatusCode() and rawStatusCode(), are now deprecated. Still, using the @ResponseStatus annotation to improve code readability remains the recommended approach.

We may also use HttpStatus in conjunction with HttpStatusCode for more flexible HTTP response management:

@GetMapping("/exception")
public ResponseEntity<String> resourceNotFound() {
    HttpStatus statusCode = HttpStatus.NOT_FOUND;
    if (statusCode.is4xxClientError()) {
        return new ResponseEntity<>("Resource not found", HttpStatusCode.valueOf(404));
    }
    return new ResponseEntity<>("Resource found", HttpStatusCode.valueOf(200));
}

3. HttpStatusCode Interface

The HttpStatusCode interface is designed to support custom status codes beyond the predefined ones in HttpStatus. It has 8 instance methods:

  • is1xxInformational()
  • is2xxSuccessful()
  • is3xxRedirection()
  • is4xxClientError()
  • is5xxServerError()
  • isError()
  • isSameCodeAs(HttpStatusCode other)
  • value()

These methods not only increase the flexibility of dealing with different HTTP statuses but also streamline the process of checking response categories, which improves the clarity and efficiency of status code management.

Let’s look at an example of how we may use them in practice:

@GetMapping("/resource")
public ResponseEntity successStatusCode() {
    HttpStatusCode statusCode = HttpStatusCode.valueOf(200);
    if (statusCode.is2xxSuccessful()) {
        return new ResponseEntity("Success", statusCode);
    }
    return new ResponseEntity("Moved Permanently", HttpStatusCode.valueOf(301));
}

3.1. Static Method valueOf(int)

This method returns an HttpStatusCode object for the given int value. The input parameter must be a 3-digit positive number, or else we get an IllegalArgumentException.

valueOf() maps a status code to a corresponding enum value within HttpStatus. If no existing entry matches the provided status code, the method defaults to returning an instance of DefaultHttpStatusCode.

The DefaultHttpStatusCode class implements the HttpStatusCode and offers a straightforward implementation of the value() method, which returns the original integer value used to initialize it. This approach ensures that all HTTP status codes, whether custom or non-standard, remain easy to work with:

@GetMapping("/custom-exception")
public ResponseEntity<String> goneStatusCode() {
    throw new ResourceGoneException("Resource Gone", HttpStatusCode.valueOf(410));
}

4. Using HttpStatusCode in Custom Exceptions

Next, let’s look at how to use a custom exception with HttpStatusCode within an ExceptionHandler. We’ll use the @ControllerAdvice annotation to handle exceptions globally across all controllers, and the @ExceptionHandler annotation to manage instances of the custom exception.

This approach centralizes error handling in Spring MVC applications, making the code cleaner and more maintainable.

4.1. @ControllerAdvice and @ExceptionHandler

@ControllerAdvice handles exceptions globally, while @ExceptionHandler manages custom exception instances to return consistent HTTP responses with the exception message and status code.

Let’s look at how we can use both annotations in practice:

@ControllerAdvice
public class GlobalExceptionHandler {
    @ExceptionHandler(CustomException.class)
    public ResponseEntity<String> handleGoneException(CustomException e) {
        return new ResponseEntity<>(e.getMessage(), e.getStatusCode());
    }
}

4.2. Custom Exceptions

Next, let’s define a CustomException class that extends RuntimeException and includes an HttpStatusCode field, enabling custom messages and HTTP status codes for more precise error handling:

public class CustomException extends RuntimeException {
    private final HttpStatusCode statusCode;
    public CustomException(String message, HttpStatusCode statusCode) {
        super(message);
        this.statusCode = statusCode;
    }
    public HttpStatusCode getStatusCode() {
        return statusCode;
    }
}

5. Conclusion

The HttpStatus enum contains a limited set of standard HTTP status codes, which in older versions of Spring worked well for most use cases. However, they lacked flexibility in defining custom status codes.

Spring Boot 3.3.3 introduces HttpStatusCode, addressing this limitation by allowing us to define custom status codes. This provides a more flexible way to handle HTTP status codes, with instance methods for commonly used status codes such as is2xxSuccessful() and is3xxRedirection(), ultimately allowing for more granular control over response handling.

As usual, the complete code with all the examples presented in this article are available over on GitHub.


Retries With Kafka Producer

$
0
0

1. Overview

In this short article, we’ll explore KafkaProducer’s retry mechanism and how to tailor its settings to fit specific use cases.

We’ll discuss the key properties and their default values, and then customize them for our example.

2. The Default Configuration

The default behavior of KafkaProducer is to retry the publish when the messages aren’t acknowledged by the broker. To demonstrate this, we can cause the producer to fail by deliberately misconfiguring the topic settings.

Firstly, let’s add the kafka-clients dependency to our pom.xml:

<dependency>
    <groupId>org.apache.kafka</groupId>
    <artifactId>kafka-clients</artifactId>
    <version>3.8.0</version>
</dependency>

Now, we need to simulate the use case when the Kafka broker refuses the message sent by the producer. For example, we can use the “min.insync.replicas” topic configuration, which verifies if a minimum number of replicas are in sync before a write is deemed successful.

Let’s create a topic and set this property to 2, even though our test environment only includes a single Kafka broker. Consequently, new messages are always rejected, allowing us to test the producer’s retry mechanism:

@Test
void givenDefaultConfig_whenMessageCannotBeSent_thenKafkaProducerRetries() throws Exception {
    NewTopic newTopic = new NewTopic("test-topic-1", 1, (short) 1)
      .configs(Map.of("min.insync.replicas", "2"));
    adminClient.createTopics(singleton(newTopic)).all().get();
  // publish message and verify exception
}

Then, we create a KafkaProducer, send a message to this topic, and verify it retries multiple times and eventually times out after two minutes:

@Test
void givenDefaultConfig_whenMessageCannotBeSent_thenKafkaProducerRetries() throws Exception {
    // set topic config
    Properties props = new Properties();
    props.put(BOOTSTRAP_SERVERS_CONFIG, KAFKA_CONTAINER.getBootstrapServers());
    props.put(KEY_SERIALIZER_CLASS_CONFIG, StringSerializer.class.getName());
    props.put(VALUE_SERIALIZER_CLASS_CONFIG, StringSerializer.class.getName());
    KafkaProducer<String, String> producer = new KafkaProducer<>(props);
	
    ProducerRecord<String, String> record = new ProducerRecord<>("test-topic-1", "test-value");
    assertThatThrownBy(() -> producer.send(record).get())
      .isInstanceOf(ExecutionException.class)
      .hasCauseInstanceOf(org.apache.kafka.common.errors.TimeoutException.class)     
      .hasMessageContaining("Expiring 1 record(s) for test-topic-1-0");
}

As we can observe from the exception and logs, the producer attempted to send the message multiple times and ultimately timed out after two minutes. This behavior is consistent with the default settings of KafkaProducer:

  • retries (defaults to Integer.MAX_VALUE): the maximum number of attempts to publish the message
  • delivery.timeout.ms (defaults to 120,000): the maximum time to wait for a message to be acknowledged before considering it failed
  • retry.backoff.ms (defaults to 100): the time to wait before retrying
  • retry.backoff.max.ms (defaults to 1,000): the maximum delay between consecutive retries

3. Custom Retry Configuration

Needless to say, we can adjust the KafkaProducer configuration for retries to better fit our needs.

For instance, we can set the maximum delivery time to five seconds, use a 500 millisecond delay between retries, and lower the maximum number of retries to 20:

@Test
void givenCustomConfig_whenMessageCannotBeSent_thenKafkaProducerRetries() throws Exception {
    // set topic config
    Properties props = new Properties();
    // other properties
    props.put(RETRIES_CONFIG, 20);
    props.put(RETRY_BACKOFF_MS_CONFIG, "500");
    props.put(DELIVERY_TIMEOUT_MS_CONFIG, "5000");
    KafkaProducer<String, String> producer = new KafkaProducer<>(props);
    ProducerRecord<String, String> record = new ProducerRecord<>("test-topic-2", "test-value");
    assertThatThrownBy(() -> producer.send(record).get())
      .isInstanceOf(ExecutionException.class)
      .hasCauseInstanceOf(org.apache.kafka.common.errors.TimeoutException.class)
      .hasMessageContaining("Expiring 1 record(s) for test-topic-2-0");
}

As expected, the producer stops retrying after the custom timeout of five seconds. The logs show a 500 millisecond delay between retries and confirm that the retry count starts at twenty and decreases with each attempt:

12:57:19.599 [kafka-producer-network-thread | producer-1] WARN  o.a.k.c.producer.internals.Sender - [Producer clientId=producer-1] Got error produce response with correlation id 5 on topic-partition test-topic-2-0, retrying (19 attempts left). Error: NOT_ENOUGH_REPLICAS
12:57:20.107 [kafka-producer-network-thread | producer-1] WARN  o.a.k.c.producer.internals.Sender - [Producer clientId=producer-1] Got error produce response with correlation id 6 on topic-partition test-topic-2-0, retrying (18 attempts left). Error: NOT_ENOUGH_REPLICAS
12:57:20.612 [kafka-producer-network-thread | producer-1] WARN  o.a.k.c.producer.internals.Sender - [Producer clientId=producer-1] Got error produce response with correlation id 7 on topic-partition test-topic-2-0, retrying (17 attempts left). Error: NOT_ENOUGH_REPLICAS
[...]

4. Conclusion

In this short tutorial, we explored KafkaProducer‘s retry configuration. We learned how to set the maximum delivery time, specify the number of retries, and configure the delay between failed attempts.

As always, the code is available over on GitHub.


How to Stop or Limit Indexing in Intellij IDEA

$
0
0

1. Overview

IntelliJ IDEA relies heavily on indexing to deliver its intelligent features. Every time files are modified or opened, IntelliJ scans the project files to build an internal index. This allows the IDE to provide faster code lookups and accurate code analysis. While useful, frequent indexing can consume a significant amount of resources and hinder productivity, especially in large codebases.

Fortunately, there are several ways to stop, limit, or optimize the indexing process in IntelliJ IDEA. In this article, we’ll explore practical tips and techniques to manage IntelliJ IDEA’s indexing more efficiently.

2. Understand the Role of Indexing in IntelliJ IDEA

Indexing is a fundamental process in IntelliJ IDEA that involves scanning and analyzing the project’s source code to create an internal database. This database stores detailed information about code elements such as classes, methods, and variables.

The indexing process in IntelliJ IDEA works as follows:

  • Code Scanning: IntelliJ scans the project’s files and extracts information about symbols and code structures.
  • Database Creation: The extracted data is stored in an internal index, which the IDE uses to provide features like code completion, navigation, and search.
  • Updates and Re-Indexing: The index is updated whenever there are changes to the codebase, such as modifications or additions. This ensures that the IDE’s features reflect the project’s current state.

While indexing is essential for enabling IntelliJ’s advanced features, it can consume significant system resources and time, especially in large projects. By understanding how indexing works, we can implement strategies to manage its impact, balancing performance with the IDE’s powerful capabilities.

3. Disable Synchronization on Frame or Tab Activation

IntelliJ IDEA automatically synchronizes and re-indexes files whenever we switch back to the IDE from another application or move between editor tabs. This can result in frequent and often unnecessary re-indexing that may disrupt our workflow.

Here are the steps to prevent this automatic behavior:

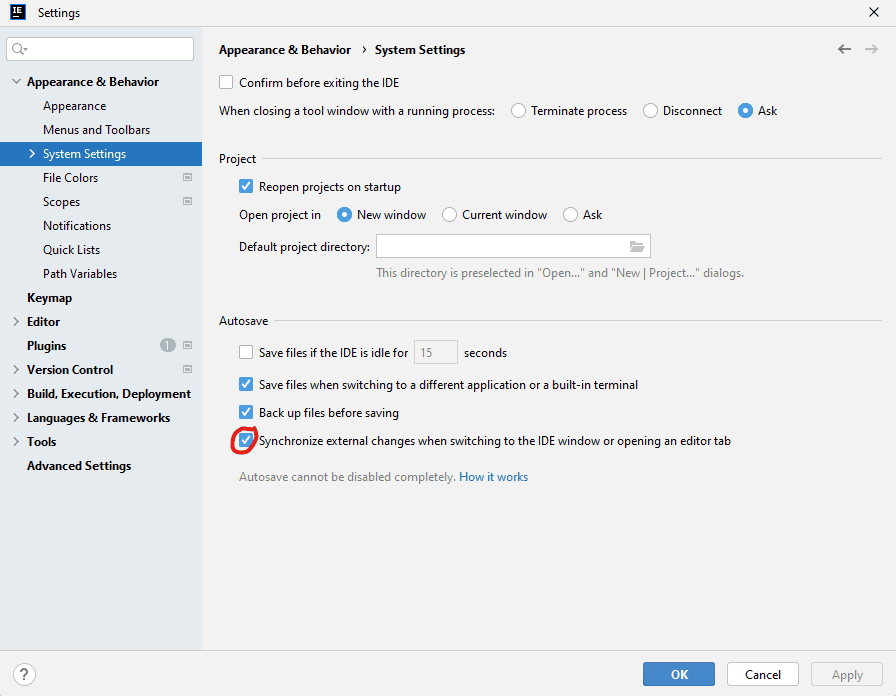
  • Navigate to “File > Settings > Appearance & Behavior > System Settings”.
  • Uncheck the “Synchronize external changes when switching to the IDE window or opening an editor tab” option.
Disable synchronization on Frame or Tab activation

Disabling this setting stops IntelliJ from triggering an index update when we return to the IDE or change tabs. This allows us to control when to refresh and re-index the project manually, helping to minimize interruptions and improve overall efficiency.

4. Exclude Unnecessary Folders From Indexing

One of the most effective ways to limit indexing is by excluding folders that don’t need to be part of the index. Large folders such as build or logs don’t typically require indexing for IntelliJ to function correctly.

To exclude folders from indexing:

  • Right-click on the folder in the project view.
  • Select “Mark Directory as > Excluded”.
Exclude unnecessary files from Indexing

Excluding a folder from the indexing process reduces the number of files IntelliJ needs to scan, which speeds up indexing and minimizes its impact on performance.

5. Adjust Project Reload Settings

In large projects, particularly those using external build tools like Maven or Gradle, IntelliJ IDEA can automatically reload and re-index files whenever it detects changes in the build script. This mechanism can disrupt our workflow and affect performance. By adjusting this setting, we can gain more control over when the IDE updates and re-indexes the project.

To configure automatic project reload:

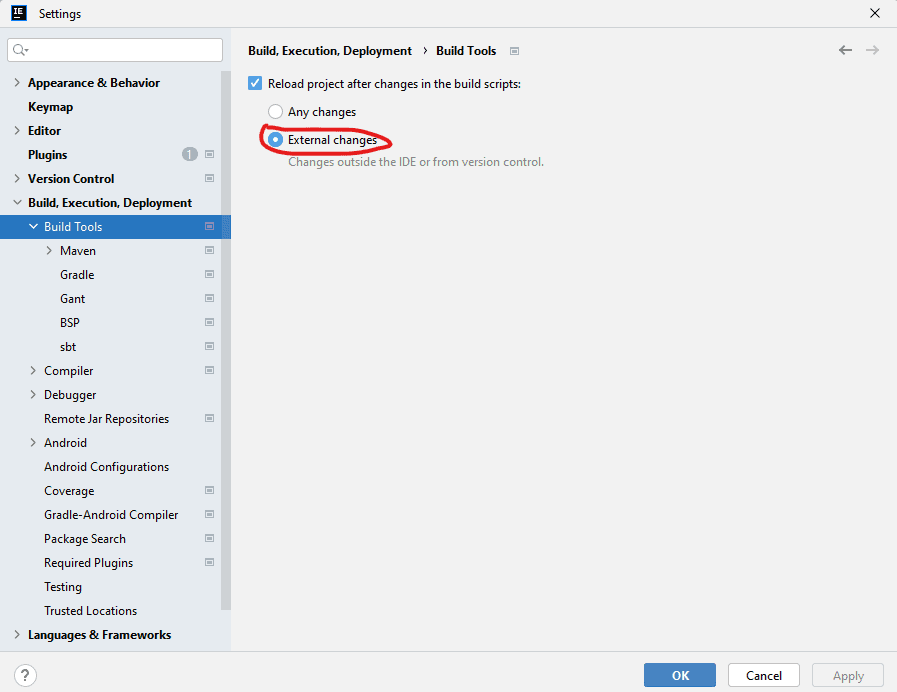
  • Go to “File > Settings > Build, Execution, Deployment > Build Tools”.
  • Locate the “Reload project after changes in the build scripts” option”.
  • Choose the appropriate setting:
    • Any changes: Automatically reloads the project after every change in the build script files.
    • External changes (default): Reloads the project only when changes are detected from external sources, such as updates from version control. This prevents reloading after every minor change and allows us to control when to refresh the project.
Adjust roject reload settings

Selecting the “External changes” option ensures that the project isn’t reloaded unnecessarily, reducing the indexing frequency and allowing us to manage updates more effectively.

6. Invalidate Cache Only When Necessary

Occasionally, IntelliJ IDEA may experience issues with repeated indexing due to corrupted or outdated caches. In such cases, invalidating the cache can help resolve problems caused by stale or erroneous data, although it triggers a complete re-index.

To invalidate the cache:

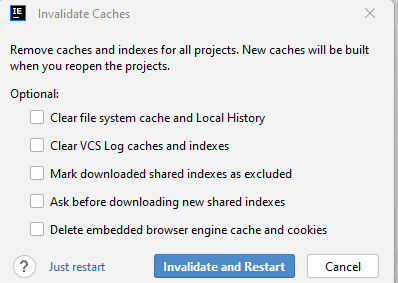
  • Go to “File > Invalidate Caches / Restart”.
  • Choose “Invalidate and Restart”.
Invalidate cache only when necessary

This action forces IntelliJ to rebuild its index from scratch, which can address issues with persistent or excessive indexing. However, since this process can be time-consuming and disrupt our workflow, it should be used sparingly and only when other methods haven’t resolved the problem.

7. Conclusion

Indexing is crucial for IntelliJ IDEA’s advanced features but can be disruptive if overly frequent. By disabling automatic synchronization, excluding unnecessary folders, adjusting project reload settings, and using cache invalidation sparingly, we can effectively manage IntelliJ IDEA’s indexing cycle.

These steps help balance the IDE’s powerful capabilities with a smoother development experience.


Read and Write to IBM MQ Queue Using Java JMS

$
0
0

1. Introduction

In this tutorial, we’ll learn how to use Java JMS (Java Message Service) to read and write messages from IBM MQ queues.

2. Setting up the Environment

To avoid the complexities of manual installation and configuration, we can run IBM MQ inside a Docker container. We can use the following command to run the container with a basic configuration:

docker run -d --name my-mq -e LICENSE=accept -e MQ_QMGR_NAME=QM1 MQ_QUEUE_NAME=QUEUE1 -p 1414:1414 -p 9443:9443 ibmcom/mq

Next, we need to add the IBM MQ client in our pom.xml file:

<dependency>
    <groupId>com.ibm.mq</groupId>
    <artifactId>com.ibm.mq.allclient</artifactId>
    <version>9.4.0.0</version>
</dependency>

3. Configuring JMS Connection

First, we need to set up a JMS connection with a QueueConnectionFactory, which is used to create connections to the queue manager:

public class JMSSetup {
    public QueueConnectionFactory createConnectionFactory() throws JMSException {
        MQQueueConnectionFactory factory = new MQQueueConnectionFactory();
        factory.setHostName("localhost");
        factory.setPort(1414);
        factory.setQueueManager("QM1");
        factory.setChannel("SYSTEM.DEF.SVRCONN"); 
        
        return factory;
    }
}

We start by creating an instance of MQQueueConnectionFactory, which is used to configure and create connections to the IBM MQ server. We set the hostname to localhost because the MQ server is running locally inside the Docker container. The port 1414 is mapped from the Docker container to the host machine.

Then we use the default channel SYSTEM.DEF.SVRCONN. This is a common channel for client connections to IBM MQ.

4. Writing Messages to IBM MQ Queue

In this section, we’ll go through the process of sending messages to an IBM MQ queue.

4.1. Establish a JMS Connection

To begin, we first create the MessageSender class. This class is responsible for setting up the connection to the IBM MQ server, managing the session, and handling message sending operations. We declare instance variables for QueueConnectionFactory, QueueConnection, QueueSession, and QueueSender, which will be used to interact with the IBM MQ server.

Below is an example implementation of the IBM MQ connection setup, session creation, and message sending:

public class MessageSender {
    private QueueConnectionFactory factory;
    private QueueConnection connection;
    private QueueSession session;
    private QueueSender sender;
    public MessageSender() throws JMSException {
        factory = new JMSSetup().createConnectionFactory();
        connection = factory.createQueueConnection();
        session = connection.createQueueSession(false, Session.AUTO_ACKNOWLEDGE);
        Queue queue = session.createQueue("QUEUE1");
        sender = session.createSender(queue);
        connection.start();
    }
    // ...
}

Next, in the constructor of the MessageSender, we initialize the QueueConnectionFactory using the JMSSetup class. This factory is then used to create a QueueConnection. This connection allows us to interact with the IBM MQ server.

Once the connection is established, we create a QueueSession using the createQueueSession(). This session allows us to communicate with the queue. Here we pass false to indicate the session is non-transactional and Session.AUTO_ACKNOWLEDGE to automatically acknowledge messages when they’re received.

After that, we define the specific queue “QUEUE1” and create a QueueSender to handle sending messages. Finally, we start the connection to ensure that the session is active and ready to transmit messages.

4.2. Writing a Text Message

Now that we have established a connection, created a session, defined the queue, and created a message producer, we’re ready to send a text message to the queue:

public void sendMessage(String messageText) {
    try {
        TextMessage message = session.createTextMessage();
        message.setText(messageText);
        sender.send(message);
    } catch (JMSException e) {
        // handle exception
    } finally {
        // close resources
    }
}

First, we create a sendMessage() method that takes a messageText parameter. The sendMessage() method is responsible for sending a text message to the queue. It creates a TextMessage object and sets the message content using the setText() method.

Next, we send the message to the defined queue using the send() method of the QueueSender object. This design allows for efficient message transmission, as the connection and session remain open for as long as the MessageSender object exists.

4.3. Message Types

In addition to TextMessage, IBM MQ supports a variety of other message types that cater to different use cases. For instance, we can send the following:

  • BytesMessage: A message holds raw binary data in the form of bytes.
  • ObjectMessage: A message carries a serialized Java object.
  • MapMessage: A message containing key-value pairs.
  • StreamMessage: A message contains a stream of primitive data types.

5. Reading Messages From the IBM MQ Queue

Now that we’ve sent a message to the queue, let’s explore how to read messages from the queue.

5.1. Establish a JMS Connection and Create a Session

To begin, we need to establish a connection and create a session, similar to what we did when sending messages. We start by creating a MessageReceiver class. This class handles the connection to the IBM MQ server and sets up the components required for message consumption:

public class MessageReceiver {
    private QueueConnectionFactory factory;
    private QueueConnection connection;
    private QueueSession session;
    private QueueReceiver receiver;
    public MessageReceiver() throws JMSException {
        factory = new JMSSetup().createConnectionFactory();
        connection = factory.createQueueConnection();
        session = connection.createQueueSession(false, Session.AUTO_ACKNOWLEDGE);
        Queue queue = session.createQueue("QUEUE1");
        receiver = session.createReceiver(queue);
        connection.start();
    }
    // ...
}

In this class, we first create a QueueConnectionFactory to set up a connection to the IBM MQ server. We then use this connection to create a QueueSession, which allows us to interact with the queue.

Finally, we define the specific queue”QUEUE1” and create a QueueReceiver to handle incoming messages from the queue.

5.2. Reading a Text Message

Once the connection, session, and receiver are set up, we can start receiving messages from the queue. We use the receive() method of the QueueReceiver to pull messages from the specified queue:

public void receiveMessage() {
    try {
        Message message = receiver.receive(1000);
        if (message instanceof TextMessage) {
            TextMessage textMessage = (TextMessage) message;
        } else {
            // ...
        }
    } catch (JMSException e) {
        // handle exception
    } finally {
        // close resources
    }
}

In the receiveMessage() method, we use the receive() function to wait for a message from the queue, with a timeout of 1000 milliseconds. Once a message is received, we check if it’s of type TextMessage.

If it is, we can retrieve the actual message content using the getText() method, which returns the text content as a string.

6. Message Properties and Headers

In this section, we’ll discuss some commonly used message properties and headers that we can use when sending or receiving messages.

6.1. Message Properties

Message properties can be used to store and retrieve additional information beyond the message body. This is particularly useful for filtering messages or adding contextual data to the message. Here is how we can set the custom property when sending a message:

TextMessage message = session.createTextMessage();
message.setText(messageText);
message.setStringProperty("OrderID", "12345");

Next, we can retrieve the property when receiving a message:

Message message = receiver.receive(1000);
if (message instanceof TextMessage) {
    TextMessage textMessage = (TextMessage) message;
    String orderID = message.getStringProperty("OrderID");
} 

6.2. Message Headers

Message headers provide predefined fields that include metadata about the message. Some commonly used message headers include:

  • JMSMessageID: A unique identifier assigned by the JMS provider to each message. We can use this ID to track and log messages.
  • JMSExpiration: Define the message expiration time (ms). If a message is not delivered within this time, it’ll be discarded.
  • JMSTimestamp: The time the message was sent.
  • JMSPriority: The priority of the message.

Let’s see how we can retrieve the message headers when receiving the message:

Message message = receiver.receive(1000);
if (message instanceof TextMessage) {
    TextMessage textMessage = (TextMessage) message;
    String messageId = message.getJMSMessageID();
    long timestamp = message.getJMSTimestamp();
    long expiration = message.getJMSExpiration();
    int priority = message.getJMSPriority();
}

7. Mock Test With Mockito

In this section, we’ll use Mockito to mock dependencies and verify interactions for the MessageSender and MessageReceiver classes. We start by using the @Mock annotation to create mock instances of the dependencies.

Next, we verify the sendMessage() method correctly interacts with the mocked QueueSender. We mock the send() method of QueueSender, and verify the TextMessage is properly created:

String messageText = "Hello Baeldung! Nice to meet you!";
doNothing().when(sender).send(any(TextMessage.class));
messageSender.sendMessage(messageText);
verify(sender).send(any(TextMessage.class));
verify(textMessage).setText(messageText);

Lastly, we verify the receiveMessage() method correctly interacts with the mocked QueueReceiver. We mock the receive() method to return a pre-defined TextMessage and the message text is retrieved as we expected:

when(receiver.receive(anyLong())).thenReturn(textMessage);
when(textMessage.getText()).thenReturn("Hello Baeldung! Nice to meet you!");
messageReceiver.receiveMessage();
verify(textMessage).getText();

8. Conclusion

In this article, we explored the process of setting up JMS connections, sessions, and message producers/receivers for interacting with IBM MQ queues. We also introduced several message types supported by IBM MQ. Additionally, we highlighted how custom properties and headers can enhance message processing.

As always, the code discussed here is available over on GitHub.


How to Check if a Number Is a Palindrome in Java

$
0
0

1. Overview

As we know, a number is a palindrome if it remains the same when its digits are reversed.

In this tutorial, we’ll explore different ways to check if a number is a palindrome, including iterative methods, recursive methods, and a few optimized ways to achieve our goal.

2. Problem Statement

Given a positive integer N, we want to find whether it’s a palindrome.

Input: N = 12321
Output: Yes
Explanation: 12321 is a palindrome number because after reversing its digits, it becomes 12321, the same as the original number.

Input: N = 123
Output: No
Explanation: 123 isn’t a palindrome number because after reversing its digits, the number becomes 321 which is different from the original number.

Now, let’s move into the approaches that help us find if a number is a palindrome.

3. Using Iterative Approach

The most straightforward way to check if a number is a palindrome is by reversing the digits and comparing the reversed number with the original one:

public static boolean isPalindromeIterative(int number) {
    int originalNumber = number;
    int reversedNumber = 0;
    while (number > 0) {
        int digit = number % 10;
	reversedNumber = reversedNumber * 10 + digit;
	number /= 10;
    }
    return originalNumber == reversedNumber;
}

So, we start by keeping a copy of the original number. This is important because we’ll need to compare it later. Next, we reverse the number by extracting its digits one by one. We do this by taking the number’s last digit and adding it to a new number we’re building, which starts at 0. Pulling each digit off the original number, we shrink it by dividing it by 10.

Let’s see the test case for the iterative approach:

@Test
void givenNumber_whenUsingIterativeApproach_thenCheckPalindrome() {     
    assertTrue(PalindromeNumber.isPalindromeIterative(12321));
    assertFalse(PalindromeNumber.isPalindromeIterative(123));
}

Once we’ve processed all the digits, we have a reversed version of the original number. The final step is to compare this reversed number with the original one we saved earlier. If they match, it means the number is a palindrome.

Let’s understand this logic:

  • Step 1: Set originalNumber = 12321 and reversedNumber = 0.
  • Step 2: Reverse the number
    • First digit: Extract 1, update the reversed number to 1, and reduce the number to 1232.
    • Second digit: Extract 2, update the reversedNumber to 12, and reduce the number to 123.
    • Third digit: Extract 3, update the reversedNumber to 123, and reduce the number to 12.
    • Fourth digit: Extract 2, update reversedNumber to 1232, and reduce the number to 1.
    • Fifth digit: Extract 1, update the reversedNumber to 12321, and reduce the number to 0.
  • Step 3: Since, reversedNumber (12321) matches the originalNumber (12321), so the number is a palindrome.

The loop runs once for each digit in the number. If the number has n digits, the time complexity is O(n). Each operation inside the loop (modulus, division, and multiplication) takes constant time O(1). So, the overall time complexity is O(n). And, we have used a constant amount of extra space for variables like originalNumber, reversedNumber, and digit, so the space complexity is O(1).

4. Using String Conversion

Another approach is to convert the number to a string, reverse it, and compare it with the original string:

public static boolean isPalindromeString(int number) {
    String original = String.valueOf(number);
    String reversed = new StringBuilder(original).reverse().toString();
    return original.equals(reversed);
}

In this approach, we first convert the number into a string. Then, we use a handy tool called StringBuilder to reverse that string. Once we have the reversed version, we compare it to the original string. If they match, the number is a palindrome.

Let’s see the test case for the string approach:

@Test
void givenNumber_whenUsingStringApproach_thenCheckPalindrome() {
    assertTrue(PalindromeNumber.isPalindromeString(12321));
    assertFalse(PalindromeNumber.isPalindromeString(123));
}

Let’s have a dry run of this code:

  • Step 1: Convert the number to String: original = “12321”.
  • Step 2: Reverse the string using the built-in method: reversed = “12321”.
  • Final step: Compare using original.equals(reversed). Since it returns true, it indicates that the number is a palindrome.

The loop in this approach iterates once for each digit in the number, leading to a time complexity of O(n), where n is the number of digits. Each operation within the loop, such as modulus, division, and multiplication, is performed in constant time, O(1). As for space complexity, only a constant amount of extra space is required for variables like originalNumber, reversedNumber, and digit, resulting in a space complexity of O(1).

5. Using Recursive Approach

We can also check for a palindrome using recursion, though it’s more complex and not as commonly used:

public static boolean isPalindromeRecursive(int number) {
    return isPalindromeHelper(number, 0) == number;
}
private static int isPalindromeHelper(int number, int reversedNumber) {
    if (number == 0) {
        return reversedNumber;
    }
    reversedNumber = reversedNumber * 10 + number % 10;
    return isPalindromeHelper(number / 10, reversedNumber);
}

In the recursive approach, we keep a copy of the original number. This is important because we’ll need to compare it later. Next, we reverse the number by extracting its digits one by one. We do this by taking the number’s last digit and adding it to a new number we’re building, which starts at zero. Pulling each digit off the original number, we shrink it by dividing it by 10.

Below is the test case for the recursive approach:

@Test
void givenNumber_whenUsingRecursiveApproach_thenCheckPalindrome() {
    assertTrue(PalindromeNumber.isPalindromeRecursive(12321));
    assertFalse(PalindromeNumber.isPalindromeRecursive(123));
}

Once we’ve processed all the digits, we have a reversed version of the original number. The final step is to compare this reversed number with the original one we saved earlier. If they match, it means the number is a palindrome.

Let’s dry-run this code to check if 12321 is a palindrome.

  • Step 1: Call isPalindromeHelper(12321, 0).
  • Step 2: Build reversed number recursively
    • First call: Reverse the last digit 1, update reversedNumber to 1, and call isPalindromeHelper(1232, 1).
    • Second call: Reverse 2, update reversedNumber to 12, and call isPalindromeHelper(123, 12)
    • Third call: Reverse 3, update reversedNumber to 123, and call isPalindromeHelper(12, 123).
    • Fourth call: Reverse 2, update reversedNumber to 1232, and call isPalindromeHelper(1, 1232).
    • Fifth call: Reverse 1, update reversedNumber to 12321, and call isPalindromeHelper(0, 12321).
  • Base case: Return reversedNumber (12321) and compare it with the originalNumber (12321). Since they match, it confirms that the number is a palindrome.

The recursive function is called once for each digit in the number, so the time complexity is O(n). Each recursive call involves a constant-time operation O(1). The recursion depth is equal to the number of digits in the number, so the space complexity is O(n) due to the call stack.

6. Half-Reversal Approach

This approach is more space-efficient than the full reversal method because it only reverses half of the number. The idea is to reverse the digits of the second half of the number and compare it with the first half.

Let’s understand this approach step by step along with its implementation and an example:

public static boolean isPalindromeHalfReversal(int number) {
    if (number < 0 || (number % 10 == 0 && number != 0)) {
        return false;
    }
    int reversedNumber = 0;
    while (number > reversedNumber) {
        reversedNumber = reversedNumber * 10 + number % 10;
        number /= 10;
    }
    return number == reversedNumber || number == reversedNumber / 10;
}

Here is the test case for the half-reversal approach:

@Test
void givenNumber_whenUsingHalfReversalApproach_thenCheckPalindrome() {
    assertTrue(PalindromeNumber.isPalindromeHalfReversal(12321));
    assertFalse(PalindromeNumber.isPalindromeHalfReversal(123));
}

Let’s dry-run this code to check if 12321 is a palindrome:

  • Initially, number = 12321 and reversedNumber = 0.
  • First iteration: number = 1232, reversedNumber = 1.
  • Second iteration: number = 123, reversedNumber = 12.
  • Third iteration: number = 12, reversedNumber = 123.
  • The loop stops because the number (12) is no longer greater than reversedNumber (123).
  • Since number == reversedNumber / 10, the function returns true.

Since we only process half of the digits, the time complexity is O(n), where n is the number of digits and we only use a few integer variables, so the space complexity is O(1).

7. Digit-by-Digit Comparison

This approach avoids reversing the number altogether by comparing digits from the start and end of the number moving toward the center.

Let’s understand this approach step by step along with its implementation and an example:

public static boolean isPalindromeDigitByDigit(int number) {
    if (number < 0) {
        return false;
    }
    int divisor = 1;
    while (number / divisor >= 10) {
        divisor *= 10;
    }
    while (number != 0) {
        int leading = number / divisor;
        int trailing = number % 10;
        if (leading != trailing) {
            return false;
        }
        number = (number % divisor) / 10;
        divisor /= 100;
    }
    return true;
}

Here’s the test case for this approach:

@Test
void givenNumber_whenUsingDigitByDigitApproach_thenCheckPalindrome() {
    assertTrue(PalindromeNumber.isPalindromeDigitByDigit(12321));
    assertFalse(PalindromeNumber.isPalindromeDigitByDigit(123));
}

Let’s run this code for 12321:

  • For 12321, initially, divisor = 10000, which is 10^(number of digits – 1).
  • Compare the first digit (1) with the last digit (1).
  • Remove both digits, adjust the divisor, and continue comparing.
  • If all digit pairs match, return true.

Since we compare digits from both ends moving towards the center, the time complexity is O(n), where n is the number of digits and we only use a few integer variables, so space complexity remains O(1).

8. Conclusion

In this article, we came across several approaches to check whether a number is palindrome. Choosing the right approach depends on our specific needs. If we’re looking for simplicity and can afford a bit more memory usage, the string conversion method might be our go-to. The half-reversal or digit-by-digit comparison methods offer excellent performance with minimal space overhead for a more efficient solution, especially with large numbers.

Each method has its charm, and understanding these different strategies can help us choose the most appropriate one for our situation, whether we prioritize readability, memory usage, or computational efficiency.

As always, the source code of all these examples is available over on GitHub.


Intro to MongoDB Atlas

$
0
0

1. Introduction

MongoDB is a popular NoSQL database that offers scalability, performance, high availability, and support for real-time data processing.

In this introductory article, we’ll discuss about MongoDB Atlas, a fully managed Database as a Service provided by MongoDB with multi-cloud support (AWS, GCP, and Azure).

2. What Is MongoDB Atlas?

MongoDB Atlas is a cloud-based service that manages the deployment, monitoring, security, and scaling of MongoDB databases.

The database service provided by MongoDB efficiently hides the complexity of managing the database infrastructure and allows integration with modern web/mobile applications through various ways like MongoDB Shell, language-specific MongoDB drivers, and MongoDB Atlas API.

3. MongoDB Atlas UI

Let’s use the MongoDB Atlas website‘s intuitive UI to setup our first cluster.

3.1. Create an Account

First, let’s sign up and create an account:

MongoDB Signup Prompt

After signing in, we can view the dashboard to access deployment, services, and security settings.

3.2. Create a Cluster

Next, we can create a cluster using the Create button on the dashboard:

Create Cluster

When creating a new cluster, the MongoDB Atlas UI lets us choose the type of server, like M10, M5, and M0, based on various needs.

Also, it provides the choices for the cloud provider, region, and security settings to deploy a cluster:

Deploy Cluster

Once the BaeldungCluster named cluster is created and deployed, we can check its details and choose to either add data, migrate, or load the sample data (which creates the sample_mflix database):

Cluster Overview

Also, we can notice the toolbar section on the right that features a few handy samples for the developer’s interests.

Once sample data is loaded, we can check out our BaeldungCluster on the dashboard with a few handy statistics like read and write operations, logical size, and connections over the last six hours:

Cluster Dashboard

Also, we can visualize the sample data through the set of collections:

Cluster Collections

Here, we can check out that the sample_mflix database includes collections such as comments, movies, and theatres. Also, the UI allows us to find, insert, and aggregate the document.

3.3. Connect to Cluster

Let’s create a new database user to connect to our BaeldungCluster, through either  the MongoDB Shell or the MongoDB driver in our application:

Add new database user

Once the user is ready, we’ll see the configuration details on the Database Access screen:

Database access details

Next, on the dashboard, clicking the Connect button shows options to connect to the BaeldungCluster using drivers, Compass, or the Shell:

Connect BaeldungCluster

Then, let’s review the steps to connect to the BaeldungCluster using MongoDB Shell:

Connect BaeldungCluster using MongoDB Shell

Similarly, we can also get the connection string for our Java application by selecting the Java driver to connect to the BaeldungCluster:

Connect BaeldungCluster using Java

Likewise, if required, we can explore other ways like Compass and Atlas SQL to connect to our cluster.

3.4. Query Data

MongoDB Atlas UI lets us query data through Atlas search by providing various options like Atlas Vector Search, Autocomplete, and Rich Query DSL:

BaeldungCluster search

First, let’s create a search index for our BaeldungCluster and choose the Visual Editor option:

Create search index on BaeldungCluster

Next, we can name the index – baeldungindex and select the sample_mflix database, which is the sample data loaded on our BaeldungCluster:

Add IndexName and Datasource

Also, the UI lets us refine the default index configuration in the next step:

Index configuration

Once the baeldungindex named search index is ready, we can use it to search the data:

Search tester for BaeldungCluster

Here, the Search Tester dialog allows us to enter any text as the wildcard search.

4. Basic Operations Using MongoDB Shell

Let’s use the MongoDB Shell to connect the cluster and run a few commands to see them in action.

4.1. Connect Cluster

First, let’s follow the instructions shown above to install the MongoDB Shell.

Once installed, we can use MongoDB Shell to connect our BaeldungCluster:

mongosh "mongodb+srv://baeldungcluster.oyixi.mongodb.net/" --apiVersion 1 --username baeldungadmin

When creating a connection, the mongosh command asks for the password for the username baeldungadmin.

Then, the MongoDB Shell establishes the connection and logs the details:

Enter password: ********************
Current Mongosh Log ID:	66cb11d7d082639cbff99270
Connecting to:		mongodb+srv://<credentials>@baeldungcluster.oyixi.mongodb.net/?appName=mongosh+2.2.15
Using MongoDB:		7.0.12 (API Version 1)
Using Mongosh:		2.2.15
mongosh 2.3.0 is available for download: https://www.mongodb.com/try/download/shell
For mongosh info see: https://docs.mongodb.com/mongodb-shell/
Atlas atlas-2e83ir-shard-0 [primary] test> 

Here, we can also see the cluster name and its node type, which is primary.

4.2. Find Document

First, let’s follow the use command to select the sample_mflix database:

use sample_mflix;

Next, we can use the following command to show all the collections:

show collections;

Last, we can use the find command to check all the documents in the comments collection:

db.comments.find();

We’ll see the following results in the command line:

[{
    _id: ObjectId('5a9427648b0beebeb69581b9'),
    name: 'Sandor Clegane',
    email: 'rory_mccann@gameofthron.es',
    movie_id: ObjectId('573a1392f29313caabcdbceb'),
    text: 'Totam facilis ad amet a sunt aut quia.',
    date: ISODate('2010-01-11T08:07:56.000Z')
  },
  {
    _id: ObjectId('5a9427648b0beebeb69581cf'),
    name: 'Catelyn Stark',
    email: 'michelle_fairley@gameofthron.es',
    movie_id: ObjectId('573a1392f29313caabcdbd59'),
    text: 'Explicabo voluptatum soluta sed optio ea.',
    date: ISODate('1983-12-23T05:39:52.000Z')
  },
...
]

Also, we can observe that the results are already presented in the readable JSON format.

4.3. Add Document

Next, let’s use the insertOne command to add a document to the comments collection:

db.comments.insertOne({
  "name": "Anshul Bansal",
  "movie": "Matrix",
  "text": "nice sci-fi movie"
})

Then, the following acknowledgment would be returned:

{
  acknowledged: true,
  insertedId: ObjectId('66cb372ad082639cbff99271')
}

Note the automatically generated ObjectId for a new document.

4.4. Use Search Index

Similarly, we can use the aggregate command to search the collection using the previously created baeldungindex:

db.comments.aggregate([
  {
    $search: {
      index: "baeldungindex",
      text: {
        query: "Anshul Bansal",
        path: {
          wildcard: "*"
        }
      }
    }
  }
])

Here’s the output of the above command:

[
  {
    _id: ObjectId('66cb372ad082639cbff99271'),
    name: 'Anshul Bansal',
    movie: 'Matrix',
    text: 'nice sci-fi movie'
  }
]

We can confirm that the ObjectId of the returned document exactly matches the one created in the previous step.

5. MongoDB Atlas CLI

MongoDB Atlas also offers a dedicated command-line interface for interaction with the database service through its intuitive commands.

Let’s check out the setup and a few handy commands.

5.1. Setup

First, similar to the MongoDB Shell, we’ll be required to install the MongoDB Atlas CLI:

brew install mongodb-atlas

After installation, we can use the Atlas CLI by starting commands with the atlas keyword:

atlas --version

Here, the command returns the installed version 1.26.0 of the Atlas CLI.

5.2. Login

Then, we can log in using the Atlas CLI:

atlas auth login

This opens the browser window to let us sign in using the username and password.

And, it also logs the one-time verification code that is required to enter into the activation screen:

To verify your account, copy your one-time verification code:
7QGP-TQXH
Paste the code in the browser when prompted to activate your Atlas CLI. Your code will expire after 10 minutes.
To continue, go to https://account.mongodb.com/account/connect

Once authorized, we can run a few commands to confirm the access.

5.3. List Projects, Users, and Clusters

For example, let’s check the list of projects:

atlas projects list
ID                         NAME
66b9bcede5fc6d307bbc8e48   Baeldung

Similarly, we can check the list of database users:

atlas dbusers list
USERNAME DATABASE
baeldungadmin admin

Note that the command returns the database user baeldungadmin we created in the previous step.

Likewise, let’s check out the clusters through the MongoDB Atlas CLI command:

atlas clusters list
ID NAME MDB VER STATE
66ca41392ed10b3dd115e87f BaeldungCluster 7.0.12 IDLE

Here, we can see the ID, Version, and State of the BaeldungCluster named cluster.

5.4. Create Cluster

Next, let’s use the Atlas CLI to create a cluster:

atlas clusters create baeldungatlascluster --provider AWS --region EU_CENTRAL_1

Here, we’ve provided the name of the cluster, the cloud provider, and the region.

6. MongoDB Atlas APIs

MongoDB Atlas offers programmatic access to manage deployments, clusters, and data through its set of well-designed APIs.

Let’s familiarize ourselves with the setup and a few handy APIs.

6.1. Create API Key

First, we’ll be required to create an API key with the required permissions for the programmatic access through MongoDB Atlas API:

Create API key

After we create an API key, the UI will show us the private key only once. We should store it safely, as it’s needed for API access.

We can also find the public key on the Organization Access Manager screen.

Organization access manager

6.2. List Groups

Let’s use the MongoDB Atlas API to get a list of all groups on our MongoDB Atlas account:

curl --user "<publickey>:<privatekey>" --digest \
  --header "Content-Type: application/json" \
  --header "Accept: application/vnd.atlas.2023-02-01+json" \
  --request GET "https://cloud.mongodb.com/api/atlas/v2/groups?pretty=true"

Here, we should fill in the values of the publicKey and privateKey we stored in the previous step.

The JSON response of the above command would look like the following:

{
  "links": [
    {
      "href": "https://cloud.mongodb.com/api/atlas/v2/groups?pageNum=1&itemsPerPage=100",
      "rel": "self"
    }
  ],
  "results": [
    {
      "clusterCount": 1,
      "created": "2024-08-12T07:42:46Z",
      "id": "66b9bcede5fc6d307bbc8e48",
      "links": [
        {
          "href": "https://cloud.mongodb.com/api/atlas/v2/groups/66b9bcede5fc6d307bbc8e48",
          "rel": "self"
        }
      ],
      "name": "Baeldung",
      "orgId": "66b9bcede5fc6d307bbc8dc5",
      "tags": []
    }
  ],
  "totalCount": 1
}

Here, we should copy the ID of the group/project to list all clusters under the Baeldung group.

6.3. List Clusters

So, let’s use the following cURL command to get a list of all clusters on our MongoDB Atlas account:

curl --user "<publickey>:<privatekey>" --digest \
  --header "Content-Type: application/json" \
  --header "Accept: application/vnd.atlas.2023-02-01+json" \
  --request GET "https://cloud.mongodb.com/api/atlas/v2/groups/66b9bcede5fc6d307bbc8e48/clusters?pretty=true"

Then, we can check  out the elaborated response of the above command:

{
  "links": [
    {
      "href": "https://cloud.mongodb.com/api/atlas/v2/groups/66b9bcede5fc6d307bbc8e48/clusters?pageNum=1&itemsPerPage=100",
      "rel": "self"
    }
  ],
  "results": [
    {
      "backupEnabled": false,
      "biConnector": {
        "enabled": false,
        "readPreference": "secondary"
      },
      "clusterType": "REPLICASET",
      "connectionStrings": {
        "standard": "mongodb://baeldungcluster-shard-00-00.oyixi.mongodb.net:27017,baeldungcluster-shard-00-01.oyixi.mongodb.net:27017,baeldungcluster-shard-00-02.oyixi.mongodb.net:27017/?ssl=true&authSource=admin&replicaSet=atlas-2e83ir-shard-0",
        "standardSrv": "mongodb+srv://baeldungcluster.oyixi.mongodb.net"
      },
      "createDate": "2024-08-24T20:23:21Z",
      "diskSizeGB": 0.5,
      "diskWarmingMode": "FULLY_WARMED",
      "encryptionAtRestProvider": "NONE",
      "globalClusterSelfManagedSharding": false,
      "groupId": "66b9bcede5fc6d307bbc8e48",
      "id": "66ca41392ed10b3dd115e87f",
      "labels": [],
      "mongoDBMajorVersion": "7.0",
      "mongoDBVersion": "7.0.12",
      "name": "BaeldungCluster",
      "paused": false,
      "pitEnabled": false,
      "replicationSpecs": [
        {
          "id": "66ca41392ed10b3dd115e83d",
          "numShards": 1,
          "regionConfigs": [
            {
              "electableSpecs": {
                "instanceSize": "M0"
              },
              "backingProviderName": "AWS",
              "priority": 7,
              "providerName": "TENANT",
              "regionName": "EU_CENTRAL_1"
            }
          ],
          "zoneId": "66ca41392ed10b3dd115e84f",
          "zoneName": "Zone 1"
        }
      ],
      "rootCertType": "ISRGROOTX1",
      "stateName": "IDLE",
      "tags": [],
      "terminationProtectionEnabled": false,
      "versionReleaseSystem": "LTS"
    }
  ],
  "totalCount": 1
}

We can notice various details of the cluster like connectionStrings, id, and replicationSpecs.

6.4. List Indexes

Similarly, we can access the list of all indexes available on the BaeldungCluster:

curl --user "<publickey>:<privatekey>" --digest \
  --header "Content-Type: application/vnd.atlas.2024-05-30+json" \
  --header "Accept: application/vnd.atlas.2024-05-30+json" \
  --request GET "https://cloud.mongodb.com/api/atlas/v2/groups/66b9bcede5fc6d307bbc8e48/clusters/BaeldungCluster/search/indexes?pretty=true"

So, the JSON response would mention the baeldungindex created in the previous steps:

[ {
  "collectionName" : "comments",
  "database" : "sample_mflix",
  "indexID" : "66cb362f60a4c668404a1372",
  "latestDefinition" : {
    "mappings" : {
      "dynamic" : true
    }
  },
  "latestDefinitionVersion" : {
    "createdAt" : "2024-08-25T13:48:31Z",
    "version" : 0
  },
  "name" : "baeldungindex",
  "queryable" : true,
  "status" : "READY",
  "statusDetail" : [ {
    "hostname" : "atlas-2e83ir-shard-00-00",
    "mainIndex" : {
      "definition" : {
        "mappings" : {
          "dynamic" : true,
          "fields" : { }
        }
      },
      "definitionVersion" : {
        "createdAt" : "2024-08-25T13:48:31Z",
        "version" : 0
      },
      "queryable" : true,
      "status" : "READY"
    },
    "queryable" : true,
    "status" : "READY"
  }, {
    "hostname" : "atlas-2e83ir-shard-00-02",
    "mainIndex" : {
      "definition" : {
        "mappings" : {
          "dynamic" : true,
          "fields" : { }
        }
      },
      "definitionVersion" : {
        "createdAt" : "2024-08-25T13:48:31Z",
        "version" : 0
      },
      "queryable" : true,
      "status" : "READY"
    },
    "queryable" : true,
    "status" : "READY"
  }, {
    "hostname" : "atlas-2e83ir-shard-00-01",
    "mainIndex" : {
      "definition" : {
        "mappings" : {
          "dynamic" : true,
          "fields" : { }
        }
      },
      "definitionVersion" : {
        "createdAt" : "2024-08-25T13:48:31Z",
        "version" : 0
      },
      "queryable" : true,
      "status" : "READY"
    },
    "queryable" : true,
    "status" : "READY"
  } ]
} ]

Also, among other details, we can observe the status of the index on various hosts.

7. Conclusion

In this tutorial, we discussed MongoDB Atlas, a cloud-hosted MongoDB service.

We started by outlining the steps to create, deploy, and access a cluster using the UI. Next, we explored basic operations with MongoDB Shell.

Finally, we examined the MongoDB Atlas CLI and API for interacting with database services.


Using MockMvc With SpringBootTest vs. Using WebMvcTest

$
0
0

1. Overview

Let’s dive into the world of Spring Boot testing! In this tutorial, we’ll take a deep dive into the @SpringBootTest and @WebMvcTest annotations. We’ll explore when and why to use each one and how they work together to test our Spring Boot applications. Plus, we’ll uncover the inner workings of MockMvc and how it interacts with both annotations in integration tests.

2. What are @WebMvcTest and @SpringBootTest

The @WebMvcTest annotation is used to create MVC (or more specifically controller) related tests. It can also be configured to test for a specific controller. It mainly loads and makes testing of the web layer easy.

The @SpringBootTest annotation is used to create a test environment by loading a full application context (like classes annotated with @Component and @Service, DB connections, etc). It looks for the main class (which has the @SpringBootApplication annotation) and uses it to start the application context.

Both of these annotations were introduced in Spring Boot 1.4.

3. Project Setup

For this tutorial, we’ll create two classes namely SortingController and SortingService. SortingController receives a request with a list of integers and uses a helper class SortingService which has the business logic to sort the list.

We’ll be using constructor injection to get SortingService dependency as shown below:

@RestController
public class SortingController {
    private final SortingService sortingService;
    public SortingController(SortingService sortingService){
        this.sortingService=sortingService;
    }


// ... }

Let’s declare a GET method to check our server running and this will also help us explore the working of annotations during testing:

@GetMapping
public ResponseEntity<String> helloWorld(){
    return ResponseEntity.ok("Hello, World!");
}

Next, we’ll also have a post method that takes an array as a JSON body and returns a sorted array in response. Testing this type of method will help us to understand the use of MockMvc:

@PostMapping
public ResponseEntity<List<Integer>> sort(@RequestBody List<Integer> arr){
    return ResponseEntity.ok(sortingService.sortArray(arr));
}

4. Comparing @SpringBootTest and @WebMvcTest 

The @WebMvcTest annotation is located in the org.springframework.boot.test.autoconfigure.web.servlet package, whereas @SpringBootTest is located in org.springframework.boot.test.context. Spring Boot, by default, adds the necessary dependencies to our project assuming that we plan to test our application. At the class level, we can use either one of them at a time.

4.1. Using MockMvc

In a @SpringBootTest context, MockMvc will automatically call the actual service implementation from the controller. The service layer beans will be available in the application context. To use MockMvc within our tests, we’ll need to add the @AutoConfigureMockMvc annotation. This annotation creates an instance of MockMvc, injects it into the mockMvc variable, and makes it ready for testing without requiring manual configuration:

@AutoConfigureMockMvc
@SpringBootTest
class SortingControllerIntegrationTest {
    @Autowired
    private MockMvc mockMvc;
}

In @WebMvcTest, MockMvc will be accompanied by @MockBean of the service layer to mock service layer responses without calling the real service. Also, service layer beans are not included in the application context. It provides @AutoConfigureMockMvc by default:

@WebMvcTest
class SortingControllerUnitTest {
    @Autowired
    private MockMvc mockMvc;
    @MockBean
    private SortingService sortingService;
}

Note: When using @SpringBootTest with webEnvironment=RANDOM_PORT, be cautious about using MockMvc because MockMvc tries to make sure that whatever is needed for handling web requests is in place and no servlet container (handles incoming HTTP requests and generates responses) is started while webEnvironment=RANDOM_PORT tries to bring up the servlet container. They both contradict each other if used in conjunction.

4.2. What Is Autoconfigured?

In @WebMvcTest, Spring Boot automatically configures the MockMvc instance, DispatcherServlet, HandlerMapping, HandlerAdapter, and ViewResolvers. It also scans for @Controller, @ControllerAdvice, @JsonComponent, Converter, GenericConverter, Filter, WebMvcConfigurer, and HandlerMethodArgumentResolver components.  In general, it autoconfigures web layer-related components.

@SpringBootTest loads everything that @SpringBootApplication (SpringBootConfiguration+ EnableAutoConfiguration + ComponentScan) does i.e. a fully-fledged application context. It even loads the application.properties file and the profile-related info. It also enables beans to inject like using @Autowired.

4.3. Lightweight or Heavyweight

We can say that @SpringBootTest is heavyweight as it is mostly configured for integration testing by default unless we want to use any mocks. It also has all the beans in the application context. This also is the reason for it being slower as compared to others.

On the other hand, @WebMvcTest is more isolated and only concerned about the MVC layer. It is ideal for unit testing. We can be specific to one or more controllers also. It has a limited number of beans in the application context. Also, while running we can observe the same time difference (i.e. less running time with @WebMvcTest) for test cases to complete.

4.4. Web Environment During Testing

When we start a real application, we usually hit “http://localhost:8080” to access our application. To imitate the same scenario during testing we use webEnvironment. And using this we define a port for our test cases (similar to 8080 in URL). @SpringBootTest can step in both the simulated webEnvironment (WebEnvironment.MOCK) or real webEnvironment (WebEnvironment.RANDOM_PORT) while @WebMvcTest provides only the simulated test environment.

Following is the code example for it @SpringBootTest with WebEnvironment:

@SpringBootTest(webEnvironment = SpringBootTest.WebEnvironment.RANDOM_PORT)
class SortingControllerWithWebEnvironmentIntegrationTest {
    @LocalServerPort
    private int port;
    @Autowired
    private TestRestTemplate restTemplate;
    @Autowired
    private ObjectMapper objectMapper;
}

Now let’s use them in action for writing test cases. Following is the test case for the GET method: 

@Test
void whenHelloWorldMethodIsCalled_thenReturnSuccessString() {
    ResponseEntity<String> response = restTemplate.getForEntity("http://localhost:" + port + "/", String.class);
    Assertions.assertEquals(HttpStatus.OK, response.getStatusCode());
    Assertions.assertEquals("Hello, World!", response.getBody());
}

Following is the test case to check the correctness of the POST method:

@Test
void whenSortMethodIsCalled_thenReturnSortedArray() throws Exception {
    List<Integer> input = Arrays.asList(5, 3, 8, 1, 9, 2);
    List<Integer> sorted = Arrays.asList(1, 2, 3, 5, 8, 9);
    HttpHeaders headers = new HttpHeaders();
    headers.setContentType(MediaType.APPLICATION_JSON);
    ResponseEntity<List> response = restTemplate.postForEntity("http://localhost:" + port + "/",
      new HttpEntity<>(objectMapper.writeValueAsString(input), headers),
      List.class);
    Assertions.assertEquals(HttpStatus.OK, response.getStatusCode());
    Assertions.assertEquals(sorted, response.getBody());
}

4.5. Dependencies

@WebMvcTest does not detect dependencies needed for the controller automatically, so we’ve to Mock them. While @SpringBootTest does it automatically.

Here we can see we’ve used @MockBean because we’re calling a service from inside a controller:

@WebMvcTest
class SortingControllerUnitTest {
    @Autowired
    private MockMvc mockMvc;
    @MockBean
    private SortingService sortingService;
}

Now let’s see a test example of using MockMvc with a mocked bean:

@Test
void whenSortMethodIsCalled_thenReturnSortedArray() throws Exception {
    List<Integer> input = Arrays.asList(5, 3, 8, 1, 9, 2);
    List<Integer> sorted = Arrays.asList(1, 2, 3, 5, 8, 9);
    when(sortingService.sortArray(input)).thenReturn(sorted);
    mockMvc.perform(post("/").contentType(MediaType.APPLICATION_JSON)
      .content(objectMapper.writeValueAsString(input)))
      .andExpect(status().isOk())
      .andExpect(content().json(objectMapper.writeValueAsString(sorted)));
}

Here we’ve used when().thenReturn() to mock the sortArray() function in our service class. Not doing that will cause a NullPointerException.

4.6. Customization

@SpringBootTest is mostly not a good choice for customization but @WebMvcTest can be customized to work with only limited controller classes. In the following example, I have mentioned the SortingController class specifically. So only one controller with its dependencies is registered with the application:

@WebMvcTest(SortingController.class)
class SortingControllerUnitTest {
    @Autowired
    private MockMvc mockMvc;
    @MockBean
    private SortingService sortingService;
    @Autowired
    private ObjectMapper objectMapper;
}

5. Conclusion

@SpringBootTest and @WebMvcTest, each serve distinct purposes. @WebMvcTest is designed for MVC-related tests, focusing on the web layer and providing easy testing for specific controllers. On the other hand, @SpringBootTest creates a test environment by loading a full application context, including @Components, DB connections, and @Service, making it suitable for integration and system testing, similar to the production environment.

When it comes to using MockMvc, @SpringBootTest internally calls actual service implementation from the controller, while @WebMvcTest is accompanied by @MockBean for mocking service layer responses without calling the real service.

As usual, the code for this tutorial is available over on GitHub.


How to Sort a List of Pair

$
0
0

1. Overview

In Java, we often have to work with data in pairs, and the Apache Commons Lang3 library provides a convenient Pair class for this purpose. When we have a list of Pair<String, Integer>, there are many cases where we need to sort it by the integer value.

In this tutorial, we’ll explore various ways to sort a List of Apache Commons Lang3’s Pair<String, Integer> by the integer part.

2. Introduction to the Problem

The Pair class in Apache Commons Lang3 provides a simple structure for holding two values. As it’s one of the commonly used Pair types in Java, we’ll use it as an example in this tutorial.

As usual, let’s understand the problem through examples. Let’s first create a method to build up a List of Apache Commons Lang3’s Pair<String, Integer> objects:

private List<Pair<String, Integer>> getUnsortedInput() {
    return Arrays.asList(
      Pair.of("False", 5),
      Pair.of("Yes", 3),
      Pair.of("True", 4),
      Pair.of("No", 2),
      Pair.of("X", 1)
    );
}

As the code above shows, the getUnsortedInput() method produces an unsorted List<Pair<String, Integer>>. Each Pair element holds two values: a String and the Integer count of letters it contains.

We aim to sort the List by each Pair element’s integer value. Therefore, the expected result is:

static final List<Pair<String, Integer>> EXPECTED = List.of(
  Pair.of("X", 1),
  Pair.of("No", 2),
  Pair.of("Yes", 3),
  Pair.of("True", 4),
  Pair.of("False", 5)
);

Next, we’ll explore different approaches to solving this interesting sorting problem.

3. Using an Anonymous Comparator Class

We know that we need to compare elements to sort a collection of data. Apache Commons Lang3’s Pair class doesn’t implement the Comparable interface. Therefore, we cannot directly compare two Pair objects.

However, we can create an anonymous class that implements the Comparator interface to compare two Pairs’ integer values and pass the Comparator to List.sort():

List<Pair<String, Integer>> myList = getUnsortedInput();
myList.sort(new Comparator<Pair<String, Integer>>() {
    @Override
    public int compare(Pair<String, Integer> o1, Pair<String, Integer> o2) {
        return o1.getRight()
          .compareTo(o2.getRight());
    }
});
 
assertEquals(EXPECTED, myList);

As the code above shows, the anonymous Comparator class implements the compare() method. Since Integer implements Comparable, we compare the integer values of the two Pair elements using Integer.compareTo().

It’s worth mentioning that Apache Commons Lang3’s Pair class provides getRight() and getValue() methods to return the second value in a Pair object. There is no difference between these two methods. Actually, getValue() invokes the getRight() method:

public abstract R getRight();
 
public R getValue() {
    return this.getRight();
}

When we run the test, it passes. Therefore, this approach solves the problem.

4. Using a Lambda Expression

The anonymous Comparator class approach solves our sorting problem. However, the anonymous class code isn’t easy to read. As of Java 8, the List.sort() method provides a functional possibility: lambda expression as Comparator support.

Next, let’s refactor the anonymous Comparator class solution to a comparison with lambda expression:

List<Pair<String, Integer>> myList = getUnsortedInput();
myList.sort((p1, p2) -> p1.getRight()
  .compareTo(p2.getRight()));
 
assertEquals(EXPECTED, myList);

As we can see, the lambda expression approach provides a concise way of implementing the Comparator interface. It makes the code more readable and easier to maintain.

5. Using Comparator.comparing()

Since Java 8, the Comparator interface offers a new comparing() method. This method accepts a Function keyExtractor and returns a Comparator that compares by that sort key.

Next, let’s employ the Comparator.comparing() method to solve our sorting problem:

List<Pair<String, Integer>> myList = getUnsortedInput();
myList.sort(Comparator.comparing(Pair::getRight));
 
assertEquals(EXPECTED, myList);

In this example, we pass the method reference Pair::getRight to the comparing() method as the functional parameter. It creates a Comparator object that sorts Pair elements in the given List<Pair<String, Integer>> by the integer value.

6. A New List for the Sorted Result

We’ve seen three solutions to the sorting problem. It’s important to note that all three approaches perform an in-place sort, which changes the element order in the original input List.

However, sometimes we cannot modify the input list — for instance, if our input is an immutable List:

List<Pair<String, Integer>> immutableUnsortedList = List.copyOf(getUnsortedInput());
assertThrows(UnsupportedOperationException.class, 
  () -> immutableUnsortedList.sort(Comparator.comparing(Pair::getRight)));

In this example, we use List.copyOf() to create an immutable List, and an exception is thrown when we sort it using a previous solution.

Therefore, we’ll have to obtain the sorted result as a new List object.

A straightforward idea to achieve that is first to make a copy of the original List and then sort the copied List in place.

Alternatively, we can use Stream‘s sorted() method to perform sorting and then collect the sorted elements into a new List object. Let’s see this in action:

List<Pair<String, Integer>> immutableUnsortedList = List.copyOf(getUnsortedInput());
 
List<Pair<String, Integer>> sorted = immutableUnsortedList.stream()
  .sorted(Comparator.comparing(Pair::getRight))
  .toList();
 
assertEquals(EXPECTED, sorted);

As we can see, the stream().sorted().toList() pipeline is easy to read and solves the problem fluently.

7. Conclusion

In this article, we’ve explored various approaches to sort a List of Pair<String, Integer> elements by each Pair‘s integer value. Also, we discussed how to obtain a new List object for the sorted result and keep the original List unmodified.

As always, the complete source code for the examples is available over on GitHub.


Change Field Value Before Update and Insert in Hibernate

$
0
0

1. Overview

It’s common to have a scenario where we need to change a field value before persisting the entity to the database when working with Hibernate. Such scenarios could arise from user requirements to perform necessary field transformations.

In this tutorial, let’s take a simple example use case, which converts a field value to uppercase in nature before performing an update and insert. We’ll also see the different approaches to achieve this.

2. Entity Lifecycle Callbacks

First of all, let’s define a simple entity class Student for our illustration:

@Entity
@Table(name = "student")
public class Student {
    @Id
    @GeneratedValue(strategy = GenerationType.IDENTITY)
    private Integer id;
    @Column
    private String name;
    // getters and setters
}

The first approach we’re going to review is JPA entity lifecycle callbacks. JPA provides a set of annotations that allow us to execute a method at different JPA lifecycle events such as:

  • @PrePresist — Execute before an insert event
  • @PreUpdate — Execute before an update event

In our example, we’ll add a changeNameToUpperCase() method to the Student entity class. The method changes the name field to uppercase. It is annotated by @PrePersist and @PreUpdate so that JPA will invoke this method before persisting and before updating:

@Entity
@Table(name = "student")
public class Student {
    @PrePersist
    @PreUpdate
    private void changeNameToUpperCase() {
        name = StringUtils.upperCase(name);
    }
    // The same definitions in our base class
}

Now, let us run the following code to persist a new Student entity and see how it works:

Student student = new Student();
student.setName("David Morgan");
entityManager.persist(student);

As we can see in the console log, the name parameter has been converted to uppercase before being included in the SQL query:

[main] DEBUG org.hibernate.SQL - insert into student (name,id) values (?,default)
Hibernate: insert into student (name,id) values (?,default)
[main] TRACE org.hibernate.orm.jdbc.bind - binding parameter (1:VARCHAR) <- [DAVID MORGAN]

3. JPA Entity Listeners

We defined the callback methods inside the entity class to handle JPA lifecycle events. This tends to be repetitive if we have more than one entity class that should implement the same logic. For example, we need to implement audit and logging features that are common for all entity classes, but it’s considered code duplication to define the same callback methods inside every entity class.

JPA provides an option to define an entity listener with those callback methods. An event listener decouples the JPA lifecycle callback methods from the entity class to alleviate code duplication.

Now let’s take a look at the same uppercase conversion scenario and apply the logic across different entity classes, but we will implement it this time using an event listener.

Let’s start by defining an interface Person as an extension to our solution for applying the same logic on multiple classes of entities:

public interface Person {
    String getName();
    void setName(String name);
}

This interface allows the implementation of a generic entity listener class that would apply to every Person implementation. Within the event listener, the method changeNameToUpperCase() has the @PrePersist and @PreUpdate annotations that convert the person’s name to uppercase before the persistence of the entity:

public class PersonEventListener<T extends Person> {
    @PrePersist
    @PreUpdate
    private void changeNameToUpperCase(T person) {
        person.setName(StringUtils.upperCase(person.getName()));
    }
}

Now, to complete our configuration, we need to configure Hibernate to register our provider in the application. We are using Spring Boot in our example. Let’s add the integrator_provider property to the application.yaml:

@Entity
@Table(name = "student")
@EntityListeners(PersonEventListener.class)
public class Student implements Person {
    // The same definitions in our base class 
}

It does the exact same thing as the above example, but in a more reusable way: It moves the logic of converting uppercase out of the entity class itself and puts it into its entity listener class. Thus, we can apply this logic to any entity class implementing Person without any boilerplate code.

4. Hibernate Entity Listeners

Hibernate provides another mechanism for handling the entity lifecycle events via its dedicated event system. It allows us to define our event listeners and integrate them with Hibernate.

Our next example demonstrates a custom Hibernate event listener that listens for pre-insert and pre-update events by implementing the PreInsertEventListener and PreUpdateEventListener interfaces:

public class HibernateEventListener implements PreInsertEventListener, PreUpdateEventListener {
    @Override
    public boolean onPreInsert(PreInsertEvent event) {
        upperCaseStudentName(event.getEntity());
        return false;
    }
    @Override
    public boolean onPreUpdate(PreUpdateEvent event) {
        upperCaseStudentName(event.getEntity());
        return false;
    }
    private void upperCaseStudentName(Object entity) {
        if (entity instanceof Student) {
            Student student = (Student) entity;
            student.setName(StringUtils.upperCase(student.getName()));
        }
    }
}

Each one of these interfaces requires us to implement one event-handling method. In both methods, we’ll invoke the upperCaseStudentName() method. This custom event listener will attempt to intercept the name field and make it uppercase just before Hibernate inserts or updates.

After the definition of our event listener class, let’s define an Integrator class to register our custom event listener via Hibernate’s EventListenerRegistry:

public class HibernateEventListenerIntegrator implements Integrator {
    @Override
    public void integrate(Metadata metadata, BootstrapContext bootstrapContext, 
      SessionFactoryImplementor sessionFactoryImplementor) {
        ServiceRegistryImplementor serviceRegistry = sessionFactoryImplementor.getServiceRegistry();
        EventListenerRegistry eventListenerRegistry = serviceRegistry.getService(EventListenerRegistry.class);
        HibernateEventListener listener = new HibernateEventListener();
        eventListenerRegistry.appendListeners(EventType.PRE_INSERT, listener);
        eventListenerRegistry.appendListeners(EventType.PRE_UPDATE, listener);
    }
    @Override
    public void disintegrate(SessionFactoryImplementor sessionFactory, 
      SessionFactoryServiceRegistry serviceRegistry) {
    }
}

In addition, we create a custom IntegratorProvider class that contains our integrator. This provider will be referenced in our Hibernate configuration to ensure our custom integrator is registered during the application startup:

public class HibernateEventListenerIntegratorProvider implements IntegratorProvider {
    @Override
    public List<Integrator> getIntegrators() {
        return Collections.singletonList(new HibernateEventListenerIntegrator());
    }
}

To complete our setup, we must configure Hibernate to register our provider in the application. We’re adopting Spring Boot in our example. Let’s add the property integrator_provider to the application.yaml:

spring:
  jpa:
    properties:
      hibernate:
        integrator_provider: com.baeldung.changevalue.entity.event.StudentIntegratorProvider

5. Hibernate Column Transformers

The last approach we’ll examine is the Hibernate @ColumnTransformer annotation. This annotation allows us to define an SQL expression that will apply to the target column.

In the code below, we annotate the name field by the @ColumnTransform applying the UPPER SQL function when Hibernate generates the SQL query that writes to the column:

@Entity
@Table(name = "student")
public class Student {
    @Id
    @GeneratedValue(strategy = GenerationType.IDENTITY)
    private Integer id;
    @Column
    @ColumnTransformer(write = "UPPER(?)")
    private String name;
    // getters and setters
}

This approach looks straightforward but has a major flaw. The transformation takes place at the database level only. If we insert a row into the table, we’ll see the following SQL with the UPPER function included in the console log:

[main] DEBUG org.hibernate.SQL - insert into student (name,id) values (UPPER(?),default)
Hibernate: insert into student (name,id) values (UPPER(?),default)
[main] TRACE org.hibernate.orm.jdbc.bind - binding parameter (1:VARCHAR) <- [David Morgan]

However, if we assert the name cases from the persisted entity, we can see the name in the entity is not in uppercase:

@Test
void whenPersistStudentWithColumnTranformer_thenNameIsNotInUpperCase() {
    Student student = new Student();
    student.setName("David Morgan");
    entityManager.persist(student);
    assertThat(student.getName()).isNotEqualTo("DAVID MORGAN");
}

It’s because the entity has already been cached in the EntityManager. Thus, it will return the same entity to us even if we retrieve it again. To get the updated entity with the transformation result, we need to first clear the cached entities by calling the clear() method on our EntityManager:

entityManager.clear();

Nonetheless, this will lead to an undesirable outcome because we are clearing all other stored cached entities.

6. Conclusion

In this article, we’ve explored various approaches to change a field value before persisting it in the database in Hibernate. These approaches include JPA lifecycle callbacks, JPA entity listeners, Hibernate event listeners, and Hibernate column transformers.

As usual, the complete source code is available over on GitHub.


Finding the Closest Number to a Given Value From a List of Integers in Java

$
0
0

1. Overview

When we work with integer Lists in Java, one common problem we may encounter is finding the number in a List that is closest to a given value.

In this tutorial, we’ll explore different ways to solve this problem using Java.

2. Introduction to the Problem

Let’s first look at the definition of the problem:

Given a List of integers and a target value, we need to find the number from the List that is closest to the target. We pick the one with the lowest index if multiple numbers are equally close.

Next, let’s quickly understand the “distance” between a number and a given target.

2.1. The Distance Between Two Numbers

In this context, the distance between numbers a and b is the absolute value of a – b: Distance = abs(a – b)

For instance, given target = 42, the following are the distances (D) between target and different numbers (n):

  • n = 42 → D = abs(42 – 42) = 0
  • n = 100 → D = abs(42 – 100) = 58
  • n = 44 → D = abs(42 – 44) = 2
  • n = 40 → D = abs(42 – 40) = 2

As we can see, given target = 42, numbers 44 and 40 are the same distance from the target.

2.2. Understanding the Problem

So, the closest number to the target in a List has the smallest distance to the target among all elements. For example, in the List:

[ 8, 100, 6, 89, -23, 77 ]

Given target = 70, the closest integer in the List to it is 77. But if target = 7, then both 8 (index: 0) and 6 (index: 2) have an equal distance (1) to it. In this case, we choose the number with the lowest index. Thus, 8 is the expected result.

For simplicity, we assume the given List isn’t null or empty. We’ll explore various approaches to solving this problem. We’ll also take this integer List as an example and leverage unit test assertions to verify each solution’s result.

Additionally, to solve the problem efficiently, we’ll choose different algorithms to solve the problem depending on whether the input List is sorted.

Next, let’s design some test cases to cover all scenarios:

  • When target (-100) is less than the Min. integer (-23) in the List: result = -23
  • When target (500) is greater than the Max. integer (100) in the List: result = 100
  • When target (89) exists in the List: result = 89
  • When target (70) doesn’t exist in the List: result = 77
  • If multiple integers (8 and 6) in the List have the same distance (1) to target (7): result = 8

Now, let’s dive into the code.

3. When We Don’t Know if the List Is Sorted

Commonly, we don’t know if the given List is sorted. So, let’s create a List variable to hold our numbers:

static final List<Integer> UNSORTED_LIST = List.of(8, 100, 6, 89, -23, 77);

Clearly, this isn’t a sorted List.

Next, we’ll solve the problem using two different approaches.

3.1. Using a Loop

The first idea to solve the problem is walking through the List and checking the distance between each number and target:

static int findClosestByLoop(List<Integer> numbers, int target) {
    int closest = numbers.get(0);
    int minDistance = Math.abs(target - closest);
    for (int num : numbers) {
        int distance = Math.abs(target - num);
        if (distance < minDistance) {
            closest = num;
            minDistance = distance;
        }
    }
    return closest;
}

As the code shows, we start with the first number in the List as closest, and save the distance between target and it in another variable minDistance, which keeps track of the smallest distance.

Then, we loop through the List. For each number in the List, we calculate its distance to target and compare it to minDistance. If it’s smaller than minDistance, we update closest and minDistance.

After iterating through the entire List, closest holds the final result.

Next, let’s create a test to check if this approach works as expected:

assertEquals(-23, findClosestByLoop(UNSORTED_LIST, -100));
assertEquals(100, findClosestByLoop(UNSORTED_LIST, 500));
assertEquals(89, findClosestByLoop(UNSORTED_LIST, 89));
assertEquals(77, findClosestByLoop(UNSORTED_LIST, 70));
assertEquals(8, findClosestByLoop(UNSORTED_LIST, 7));

As we can see, this loop-based solution passes all our test cases.

3.2. Using the Stream API

Java Stream API allows us to handle collections conveniently and concisely. Next, let’s solve this problem using the Stream API:

static int findClosestByStream(List<Integer> numbers, int target) {
    return numbers.stream()
      .min(Comparator.comparingInt(o -> Math.abs(o - target)))
      .get();
}

This code looks more compact than the loop-based solution. Let’s walk through it quickly to understand how it works.

First, numbers.stream() converts List<Integer> to a Stream<Integer>.

Then, min() finds the minimum element in the Stream based on a custom ComparatorHere, we use Comparator.comparingInt() and a lambda expression to create the custom Comparator that compares integers based on the value produced by the lambda. The lambda o -> Math.abs(o – target) effectively measures the distance between target and each number in the List.

The min() operation returns an Optional. The Optional is always present since we assume the List is not empty. Therefore, we call get() directly to extract the closest number from the Optional object.

Next, let’s check if the stream-based approach works correctly:

assertEquals(-23, findClosestByStream(UNSORTED_LIST, -100));
assertEquals(100, findClosestByStream(UNSORTED_LIST, 500));
assertEquals(89, findClosestByStream(UNSORTED_LIST, 89));
assertEquals(77, findClosestByStream(UNSORTED_LIST, 70));
assertEquals(8, findClosestByStream(UNSORTED_LIST, 7));

If we run the test, it passes. So, this solution does the job concisely and effectively.

3.3. Performance

Whether applying the straightforward loop-based or the compact stream-based approach, we must iterate through the entire List once to get the result. Therefore, both solutions have the same time complexity: O(n).

Since neither solution considers the List order, they work regardless of whether the given List is sorted. 

However, if we know the input List is sorted, we can apply a different algorithm for better performance. Next, let’s figure out how to do it.

4. When the List Is Sorted

If the List is sorted, we can use binary search with O(log n) complexity to improve performance. 

First, let’s create a sorted List containing the same numbers in previous examples:

static final List<Integer> SORTED_LIST = List.of(-23, 6, 8, 77, 89, 100);

Then, we can implement a binary-search-based method to solve the problem:

public static int findClosestByBiSearch(List<Integer> sortedNumbers, int target) {
    int first = sortedNumbers.get(0);
    if (target <= first) {
        return first;
    }
 
    int last = sortedNumbers.get(sortedNumbers.size() - 1);
    if (target >= last) {
        return last;
    }
 
    int pos = Collections.binarySearch(sortedNumbers, target);
    if (pos > 0) {
        return sortedNumbers.get(pos);
    }
    int insertPos = -(pos + 1);
    int pre = sortedNumbers.get(insertPos - 1);
    int after = sortedNumbers.get(insertPos);
 
    return Math.abs(pre - target) <= Math.abs(after - target) ? pre : after;
}

Now, let’s understand how the code works.

First, we handle two special cases:

  • target <= the smallest number in the List, which is the first element – Return the first element
  • target >= the largest number in the List, which is the last element – Return the last element

Then, we call Collections.binarySearch() to find the position (pos) of target in the sorted List. binarySearch() returns:

  • pos > 0 – Exact match, which means target is found in the List
  • pos < 0target is not found. The negative pos is the negated insertion point (where target would be inserted to maintain the sorted order) minus 1: pos = (- insertPos – 1)

If an exact match is found, we take the match directly, as it’s the closest number (distance = 0) to target.

Otherwise, we need to determine the closest number from two numbers before and after the insertion point (insertionPos = – (pos – 1)). Of course, the number with smaller distance wins.

This method passes the same test cases:

assertEquals(-23, findClosestByBiSearch(SORTED_LIST, -100));
assertEquals(100, findClosestByBiSearch(SORTED_LIST, 500));
assertEquals(89, findClosestByBiSearch(SORTED_LIST, 89));
assertEquals(77, findClosestByBiSearch(SORTED_LIST, 70));
assertEquals(6, findClosestByBiSearch(SORTED_LIST, 7));

It’s worth noting that given target = 7, the expected number in the last assertion is 6 instead of 8. This is because 6’s index (1) is smaller than 8’s index (2) in the sorted List.

5. Conclusion

In this article, we’ve explored two approaches to finding the number closest to a given value from a List of integers. Also, if the List is sorted, we can use binary search to find the closest number efficiently with a time complexity of O(log n).

As always, the complete source code for the examples is available over on GitHub.


Asserting REST JSON Responses With REST-assured

$
0
0

1. Overview

When we’re testing HTTP endpoints that return JSON we want to be able to check the contents of the response body. Often we want to capture examples of this JSON and store it in formatted example files to compare against responses.

However, we may encounter problems if some fields in the JSON returned are in a different order than our example, or if some fields contain values that change from one response to the next.

We can use REST-assured to write our test assertions, but it doesn’t solve all of the above problems by default. In this tutorial, we’ll look at how to assert JSON bodies with REST-assured, and how to use JSONAssert, JsonUnit, and ModelAssert to make it easier to handle fields that vary, or expected JSON that’s formatted differently to the precise response from the server.

2. Example Project Setup

We can use REST-assured to test any type of HTTP server. It’s commonly used with Spring Boot and Micronaut tests.

For our example, let’s use WireMock to simulate the server we’re testing.

2.1. Set up WireMock

Let’s add the dependency for WireMock to our pom.xml:

<dependency>
    <groupId>org.wiremock</groupId>
    <artifactId>wiremock-standalone</artifactId>
    <version>3.9.1</version>
    <scope>test</scope>
</dependency>

Now we can build our test to use the WireMockTest JUnit 5 extension:

@WireMockTest
class WireMockTest {
    @BeforeEach
    void beforeEach(WireMockRuntimeInfo wmRuntimeInfo) {
        // set up wiremock
    }
}

2.2. Add Example Endpoints

Inside our beforeEach() method we tell WireMock to simulate one endpoint that returns consistent static data on every request to /static:

stubFor(get("/static").willReturn(
  aResponse()
    .withStatus(200)
    .withHeader("content-type", "application/json")
    .withBody("{\"name\":\"baeldung\",\"type\":\"website\",\"text\":{\"language\":\"english\",\"code\":\"java\"}}")));

Then we add a /build endpoint which also adds some runtime data that changes on every request:

stubFor(get("/build").willReturn(
  aResponse()
    .withStatus(200)
    .withHeader("content-type", "application/json")
    .withBody("{\"build\":\"" + 
      UUID.randomUUID() + 
      "\",\"timestamp\":\"" + 
      LocalDateTime.now() + 
      "\",\"name\":\"baeldung\",\"type\":\"website\",\"text\":{\"language\":\"english\",\"code\":\"java\"}}")));

Here our build and timestamp fields are a UUID and a date stamp, respectively.

2.3. Capture JSON Bodies

It’s common at this point to capture the actual output of our endpoints and put them in a JSON file to use as an expected response.

Here are our static endpoint outputs:

{
  "name": "baeldung",
  "type": "website",
  "text": {
    "language": "english",
    "code": "java"
  }
}

And here’s the output of the /build endpoint:

{
  "build": "360dac90-38bc-4430-bbc3-a46091aea135",
  "timestamp": "2024-09-09T22:33:46.691667",
  "name": "baeldung",
  "type": "website",
  "text": {
    "language": "english",
    "code": "java"
  }
}

2.4. Setup REST-assured

Let’s add REST-assured to our pom.xml:

<dependency>
    <groupId>io.rest-assured</groupId>
    <artifactId>rest-assured</artifactId>
    <version>5.5.0</version>
    <scope>test</scope>
</dependency>

We can configure the REST-assured client to use the port exposed by WireMock within the beforeAll() of our test class:

@BeforeEach
void beforeEach(WireMockRuntimeInfo wmRuntimeInfo) {
    RestAssured.port = wmRuntimeInfo.getHttpPort();
}

Now we’re ready to write some assertions.

3. Using REST-assured Out of the Box

REST-assured provides a given()/then() structure for setting up and asserting HTTP requests. This includes the ability to assert expected values in the response headers, status code, or body. It also lets us extract the body for deeper assertions.

Let’s start by seeing how to check JSON responses, using built-in features of REST-assured.

3.1. Asserting Individual Fields With REST-assured

By convention, we can use the REST-assured body() method to assert the value of an individual field in our response:

given()
  .get("/static")
  .then()
  .body("name", equalTo("baeldung"));

This uses a JSON path expression as the first parameter of body(), followed by a Hamcrest matcher to indicate the expected value.

While this is very precise for testing individual fields, it becomes long-winded when there’s a whole JSON object to assert:

given()
  .get("/static")
  .then()
  .body("name", equalTo("baeldung"))
  .body("type", equalTo("website"))
  .body("text.code", equalTo("java"))
  .body("text.language", equalTo("english"));

3.2. Asserting a Whole JSON Body as a String

REST-assured allows us to extract the whole body and assert it after REST-assured has finished its checks:

String body = given()
  .get("/static")
  .then()
  .extract()
  .body()
  .asString();
assertThat(body)
  .isEqualTo("{\"name\":\"baeldung\",\"type\":\"website\",\"text\":{\"language\":\"english\",\"code\":\"java\"}}");

Here we’ve used an assertThat() assertion from AssertJ to check the result. We should note that the body() function can use a Hamcrest matcher as its sole argument to assert the whole body. We’ll be looking into that option later.

The problem with asserting the whole body as a String is that it is easily affected by the order of fields, or by format.

3.3. Asserting the Whole Response Using a POJO

If the domain object returned by the service is already modeled in our codebase, we may find it easier to test using those domain classes. In our example, maybe we have a WebsitePojo class:

public class WebsitePojo {
    public static class WebsiteText {
        private String language;
        private String code;
        // getters, setters, equals, hashcode and constructors
    }
    private String name;
    private String type;
    private WebsiteText text;
    // getters, setters, equals, hashcode and constructors
}

With these classes, we can write a test that uses REST-assured’s extract() method to convert to a POJO for us:

WebsitePojo body = given()
  .get("/static")
  .then()
  .extract()
  .body()
  .as(WebsitePojo.class);
assertThat(body)
  .isEqualTo(new WebsitePojo("baeldung", "website", new WebsiteText("english", "java")));

Here the extract() method takes the body, parses it, and uses as() to convert it to our WebsitePojo type. We can construct an object with the expected values to compare, using AssertJ.

4. Asserting With JSONAssert

JSONAssert is one of the longest-standing JSON comparison tools. It allows for customization, allowing us to handle small differences between formats, along with handling unpredictable values.

4.1. Comparing Response Body With a String

Let’s use JSON Assert’s assertEquals() to compare the response body with an expected String:

String body = given()
  .get("/static")
  .then()
  .extract()
  .body()
  .asString();
JSONAssert.assertEquals("{\"name\":\"baeldung\",\"type\":\"website\",\"text\":{\"language\":\"english\",\"code\":\"java\"}}", body, JSONCompareMode.STRICT);

We can use STRICT mode here since the /static endpoint returns entirely predictable results.

We should note that JSON Assert’s methods throw JSONException on error, so our test method needs a throws on it:

@Test
void whenGetBody_thenCanCompareByJsonAssertAgainstFile() throws Exception {
}

4.2. Comparing Response Body With a File

If we have a convenient way of loading a file, we can use our example JSON file with the assertion:

JSONAssert.assertEquals(Files.contentOf(new File("src/test/resources/expected-website.json"), "UTF-8"), body, JSONCompareMode.STRICT);

As we have AssertJ, we can use the contentOf() function to load our test data file as a String. The fact that our JSON file is formatted is ignored by JSONAssert, which checks for semantic equivalence, rather than character-by-character.

4.3. Comparing a Response With Extra Fields

One solution to the unpredictable fields is to ignore them. We could compare the response from /build to the subset of values found in /static:

JSONAssert.assertEquals(Files.contentOf(new File("src/test/resources/expected-website.json"), "UTF-8"), body, JSONCompareMode.LENIENT)

While this prevents the test from going wrong, it would be better if we could assert the unpredictable fields in some way.

4.4. Using a Custom Comparator

As well as STRICT and LENIENT modes, JSONAssert provides customization options. While they have limitations, they work well in this situation:

String body = given()
  .get("/build")
  .then()
  .extract()
  .body()
  .asString();
JSONAssert.assertEquals(Files.contentOf(new File("src/test/resources/expected-build.json"), "UTF-8"), body,
  new CustomComparator(JSONCompareMode.STRICT,
    new Customization("build",
      new RegularExpressionValueMatcher<>("[0-9a-f-]+")),
    new Customization("timestamp",
      new RegularExpressionValueMatcher<>(".+"))));

Here we’ve added a Customization on the build field to match a regular expression with only UUID characters in it, followed by a customization for timestamp to match any non-blank string.

5. Comparison Using JsonUnit

JsonUnit is a younger JSON assertion library, influenced by AssertJ, designed for fluent assertions.

5.1. Adding JsonUnit

For fluent assertions, we add the JsonUnit AssertJ dependency:

<dependency>
    <groupId>net.javacrumbs.json-unit</groupId>
    <artifactId>json-unit-assertj</artifactId>
    <version>3.4.1</version>
    <scope>test</scope>
</dependency>

5.2. Comparing Response Body With a File

We use assertThatJson() to start a JSON assertion:

assertThatJson(body)
  .isEqualTo(Files.contentOf(new File("src/test/resources/expected-website.json"), "UTF-8"));

This can handle responses in different formats with the fields in any order.

5.3. Using Regular Expressions on Unpredictable Field Values

We can provide expected output for JsonUnit with special placeholders in it that indicate to match against a regular expression:

String body = given()
  .get("/build")
  .then()
  .extract()
  .body()
  .asString();
assertThatJson(body)
  .isEqualTo("{\"build\":\"${json-unit.regex}[0-9a-f-]+\",\"timestamp\":\"${json-unit.any-string}\",\"type\":\"website\",\"name\":\"baeldung\",\"text\":{\"language\":\"english\",\"code\":\"java\"}}");

Here the placeholder ${json-unit-regex} prefixes our UUID pattern. The ${json-unit.any-string} placeholder matches successfully against any string value.

The disadvantage of these placeholders is that they pollute the expected values with control commands to the assertion.

6. Comparison With Model Assert

ModelAssert has a similar set of features to both JSON Assert and JsonUnit. By default, it’s sensitive to the order of keys in the response.

6.1. Adding Model Assert

To use ModelAssert we add it to the pom.xml:

<dependency>
    <groupId>uk.org.webcompere</groupId>
    <artifactId>model-assert</artifactId>
    <version>1.0.3</version>
    <scope>test</scope>
</dependency>

6.2. Comparing the JSON Response Body With a File

We use assertJson() to compare a string with an expected value, which can be a File:

String body = given()
  .get("/static")
  .then()
  .extract()
  .body()
  .asString();
assertJson(body)
  .where()
  .keysInAnyOrder()
  .isEqualTo(new File("src/test/resources/expected-website-different-field-order.json"));

We don’t need to use a file reading utility as ModelAssert can read files. In this example, the expected JSON is deliberately in a different order, so where().keysInAnyOrder() has been added to the assertion before isEqualTo() is called.

6.3. Ignoring Extra Fields

Model Assert can also compare a subset of fields to a larger object:

assertJson(body)
  .where()
  .objectContains()
  .isEqualTo("{\"type\":\"website\",\"name\":\"baeldung\",\"text\":{\"language\":\"english\",\"code\":\"java\"}}");

The objectContains() rule makes ModelAssert ignore any fields not present in the expected, but present in the actual.

6.4. Adding Rules for Unpredictable Fields

However, it’s better to customize ModelAssert to assert the fields that are present, even if we can’t predict their exact values:

String body = given()
  .get("/build")
  .then()
  .extract()
  .body()
  .asString();
assertJson(body)
  .where()
  .keysInAnyOrder()
  .path("build").matches("[0-9a-f-]+")
  .path("timestamp").matches("[0-9:T.-]+")
  .isEqualTo(new File("src/test/resources/expected-build.json"));

Here the two path() rules add a regular expression match for the build and timestamp fields.

7. Tighter Integration

As we saw earlier, REST-assured is an assertion library supporting Hamcrest matchers in its body() method. To use it with the other JSON assertion libraries, we’ve had to extract the response body. Each of the libraries can be used as a Hamcrest matcher. Depending on our use case, this may make our test code easier to read.

7.1. JSON Assert Hamcrest

For this we need an extra dependency produced by a different contributor:

<dependency>
    <groupId>uk.co.datumedge</groupId>
    <artifactId>hamcrest-json</artifactId>
    <version>0.2</version>
</dependency>

This handles simple use cases well:

given()
  .get("/build")
  .then()
  .body(sameJSONAs(Files.contentOf(new File("src/test/resources/expected-website.json"), "UTF-8")).allowingExtraUnexpectedFields());

The sameJSONAs builds a Hamcrest matcher using JSON Assert as the engine. However, it only has limited customization options. In this case, we can only use allowExtraUnexpectedFields().

7.2. JsonUnit Hamcrest

We need to add an extra dependency from the JsonUnit project to use the Hamcrest matcher:

<dependency>
    <groupId>net.javacrumbs.json-unit</groupId>
    <artifactId>json-unit</artifactId>
    <version>3.4.1</version>
    <scope>test</scope>
</dependency>

Then we can write an asserting matcher inside the body() function of REST-assured:

given()
  .get("/build")
  .then()
  .body(jsonEquals(Files.contentOf(new File("src/test/resources/expected-website.json"), "UTF-8")).when(Option.IGNORING_EXTRA_FIELDS));

Here the jsonEquals defines the matcher, customized by the when() function.

7.3. ModelAssert Hamcrest

ModelAssert was built to be both a standalone assertion and a Hamcrest matcher. We use the json() method to create a Hamcrest matcher:

given()
  .get("/build")
  .then()
  .body(json().where()
    .keysInAnyOrder()
    .path("build").matches("[0-9a-f-]+")
    .path("timestamp").matches("[0-9:T.-]+")
    .isEqualTo(new File("src/test/resources/expected-build.json")));

All the customization options from earlier are available in the same way.

8. Comparison of Libraries

JSONAssert is the most well-established library, but its complex customization along with its use of checked exceptions makes it a little fiddly to use.

JsonUnit is a growing library with a lot of users and a lot of customization options.

ModelAssert has more explicit support for programmatic customization and comparison against expected results in files. It’s a less well-known and less mature library.

9. Conclusion

In this article, we looked at how to compare JSON bodies returned from testing REST endpoints with expected JSON data that we might wish to store in files.

We looked at the challenges of field values that cannot be predicted and looked at how we could perform assertions natively with REST-assured as well as three sophisticated JSON comparison assertion libraries.

Finally, we looked at how to bring the assertions into the REST-assured syntax via the use of hamcrest matchers.

As always, the example code can be found over on GitHub.


Combine Date and Time from Separate Variables in Java

$
0
0

1. Introduction

In Java, it’s common to handle dates and times separately, especially when these components come from different sources. However, there are situations where we need to combine a LocalDate (date) with a LocalTime (time) into a single LocalDateTime object for further processing.

In this tutorial, we’ll explore various ways to combine date and time from separate variables in Java. Moreover, we’ll use the Java 8+ java.time package, which provides an intuitive API for working with date and time values.

2. Understanding Date and Time in Java

Java 8 introduced three key classes for handling date and time: LocalDate, LocalTime, and LocalDateTime. Each class serves a distinct purpose:

  • LocalDate represents a date without a time component, such as 2023-09-12. It’s ideal for scenarios where only the date is relevant.
  • LocalTime represents a time without a date component, such as 14:30. This class is useful when only the time is needed.
  • LocalDateTime combines date and time into a single object, like 2023-09-12T14:30. This class is used when both date and time need to be handled together.

To combine LocalDate and LocalTime, we need to merge these objects into a single LocalDateTime. Let’s examine different approaches for achieving this.

3. Using LocalDateTime.of() Method

The simplest way to combine a LocalDate and LocalTime is to use the LocalDateTime.of() method. This method accepts a LocalDate and LocalTime as parameters and returns a LocalDateTime object.

Let’s first set up the LocalDate, LocalTime, and expected LocalDateTime that we’ll use across our examples:

LocalDate date = LocalDate.of(2023, 9, 12);
LocalTime time = LocalTime.of(14, 30);
LocalDateTime expectedDateTime = LocalDateTime.parse("2023-09-12T14:30");

We initialize a specific date and time and then parse the expected LocalDateTime result that we will use for assertions.

Now, we can reuse these values in our first test. Let’s combine the date and time using LocalDateTime.of():

@Test
public void givenDateAndTime_whenUsingLocalDateTimeOf_thenCombined() {
    LocalDateTime combinedDateTime = LocalDateTime.of(date, time);
    assertEquals(expectedDateTime, combinedDateTime);
}

In this example, we use the LocalDateTime.of() method to combine the LocalDate and LocalTime into a LocalDateTime object.

The LocalDateTime.of() method effectively merges these components into a single object to represent date and time.

4. Using LocalDate.atTime() Method

Another approach is to call the atTime() method directly on a LocalDate instance. This method allows us to append a LocalTime to the LocalDate and receive a LocalDateTime:

@Test
public void givenDateAndTime_whenUsingAtTime_thenCombined() {
    LocalDateTime combinedDateTime = date.atTime(time);
    assertEquals(expectedDateTime, combinedDateTime);
}

In this case, we call date.atTime() to create a LocalDateTime instance from the LocalDate and LocalTime. This method provides a convenient way to merge date and time when we already have a LocalDate object.

5. Using TemporalAdjuster for Flexible Manipulation

Occasionally, we might need to manipulate the time before combining it with the date. For example, we can truncate the time down to the whole hour using a TemporalAdjuster:

@Test
public void givenDateAndTime_whenAdjustingTime_thenCombined() {
    LocalDate date = LocalDate.of(2024, 9, 18);
    LocalTime originalTime = LocalTime.of(14, 45);
    LocalTime adjustedTime = originalTime.with(ChronoField.MINUTE_OF_HOUR, 0);
    LocalDateTime expectedAdjustedDateTime = LocalDateTime.of(date, adjustedTime);
    LocalDateTime actualDateTime = date.atTime(adjustedTime);
    assertEquals(expectedAdjustedDateTime, actualDateTime);
}

In this example, we explicitly define the LocalDate as 2024-09-18 and the LocalTime as 14:45 (2:45 PM). We then use a TemporalAdjuster to set the minutes of the LocalTime to zero, truncating the time to the whole hour, resulting in 14:00 (2:00 PM).

After adjusting the time, we combine it with the date using LocalDateTime.of() to create an expected LocalDateTime. This is then compared to the result of date.atTime(), which should match the expected value, ensuring that the time manipulation and combination were successful.

6. Conclusion

Combining date and time in Java is straightforward using methods like LocalDateTime.of() and LocalDate.atTime(). These approaches allow us to merge separate LocalDate and LocalTime values into a unified LocalDateTime object for easier processing.

Additionally, we can use TemporalAdjusters to manipulate time before combining if more flexibility is required.

As always, the complete code samples for this article can be found over on GitHub.


Deep Dive Into JVM Tools: Dynamic Attach and Serviceability Agent

$
0
0

1. Introduction

Java Virtual Machine (JVM) serviceability tools, such as Dynamic Attach and the Serviceability Agent, are invaluable for managing Java applications in complex production environments. While both provide insight into the JVM behavior, they work differently and are suited for distinct scenarios.

In this tutorial, we’ll investigate key differences and similarities between them. We’ll get a thorough understanding of how each one works, along with its advantages, and limitations.

We’ll likewise look at a use case showing how to benefit from each. By the end of the article, we’ll be well-positioned to choose the most suitable solution for our needs. We’ll focus on one of the Latest Long-Term Support (LTS) releases of the JVM, JDK 21, which features the Generational ZGC.

2. Dynamic Attach: Definition and Features

Dynamic Attach is a feature of the JVM that allows tools and agents to attach to a running Java process at runtime. This capability doesn’t require the application to restart or pre-configure.

This mechanism uses the Attach API to connect to the target JVM, enabling the dynamic loading of Java agents and the execution of diagnostic commands. Dynamic Attach provides some features that we’ll consider in the following sub-sections.

2.1. Real-Time Diagnostics and Monitoring

Through Dynamic Attach, we can establish a live connection to a JVM process and monitor its health in real-time. Using resources such as jcmd, JConsole, or VisualVM, we can delve into various metrics pertaining to the JVM. These include memory consumption, garbage collection behavior patterns, thread states, and CPU utilization.

This feature can diagnose performance issues or detect bottlenecks without interrupting operations. Additionally, it allows the identification of problematic areas such as threads consuming high CPU resources or frequent GC pauses.

2.2. Loading Agents Dynamically

Dynamic Attach’s strength lies in its capability to load Java agents dynamically into a running JVM process. These agents can instrument bytecode at runtime, thus allowing them to monitor or modify an application’s behavior.

Dynamic loading of agents is allowed in JDK 21, although with a warning from the JVM. Starting with JDK 21, future releases will disable it by default. Developers must use the command XX:+EnableDynamicAgentLoading to enable this feature when launching their applications.

2.3. Minimal Performance Overhead

The Attach API and tools like jstack use Dynamic Attach to interact with running applications.

They enable actions like collecting thread dumps, retrieving garbage collection logs, and attaching monitoring agents. These tools are designed to minimize performance overhead.

3. Some Limitations of Dynamic Attach

Complex applications with many interactions may slow down diagnostic tools or consume significant resources.

Furthermore, compatibility issues might arise due to limited support for Attach API in some JVM variants.

Although collecting diagnostics such as thread dumps and garbage collection logs can be advantageous, their excessive usage could compromise application performance. Consequently, careful monitoring is needed to prevent the system from being overwhelmed by excessive data.

Lastly, strict access controls in some environments might restrict permission to attach to certain processes.

4. Serviceability Agent

The Java Virtual Machine offers the Serviceability Agent, which is a diagnostic tool for the thorough exploration and evaluation of internal data structures.

4.1. Access to Internal JVM Structures

The Serviceability Agent provides a powerful interface for examining JVM internals. These include object memory layouts, symbol tables, class loaders, thread states, garbage collector information, and more.

Such a feature proves useful when dealing with complex issues that can’t be identified through high-level JVM metrics alone.

4.2. Post-Mortem Debugging

When a JVM experiences a crash, it typically produces a comprehensive snapshot of its state, known as a core dump.

The Serviceability Agent can attach to this core dump and examine its contents to determine the underlying cause of the crash. Thus, SA is valuable for performing post-mortem analysis of such events.

4.3. Heap Dump and Object Analysis

Through the SA, users can perform in-depth analysis of heap dumps to gain insight into the JVM’s heap and the objects it contains.

This tool enables the inspection of memory usage patterns, objects, and references.

4.4. Thread and Lock Analysis

The Serviceability Agent provides detailed insights into thread states, locks, and synchronization issues. It can identify threads that are deadlocked, blocked, or waiting, helping diagnose performance problems caused by thread contention or locking issues.

Administrators can use the SA to detect bottlenecks and optimize thread management, ensuring smoother application performance.

5. Some Limitations of the Serviceability Agent

The agent could cause a decrease in performance, especially when collecting extensive diagnostic details. This can impact the application’s responsiveness under high-load scenarios.

In addition, in environments with strict access controls, the agents may face restrictions. Security limitations could hinder their ability to attach to specific processes. This constraint may limit its usefulness in production environments.

6. Practical Use Case: Diagnosing and Resolving a Memory Leak

Let’s consider a scenario where a memory leak is causing gradual performance degradation in production for a large-scale Java application. We’ll see how we can apply Dynamic Attach and the Serviceability Agent.

6.1. Initial Investigation With Dynamic Attach

We adopt a three-part strategy, using Dynamic Attach for initial diagnosis.

The first step involves generating a heap dump through the jcmd command. This is followed by memory and garbage collection monitoring via JConsole.

Finally, profiling agent deployment is performed through VisualVM. These steps yield comprehensive and non-disruptive insights into application performance metrics and memory allocation data. This information can be used for further analysis if necessary.

6.2. Detailed Analysis With the Serviceability Agent

During the detailed analysis phase, we use the Serviceability Agent to delve deeper into memory issues. The process involves three steps: Dump analysis, crash investigation, and custom tool development.

Firstly, we analyze previously generated heap dumps to identify potential leak sources and object retention patterns.

Secondly, if an out-of-memory crash occurs, core dumps are analyzed to gain insights into the JVM’s final state.

Lastly, we develop a custom Serviceability Agent tool. This tool traverses through the heap and identifies specific object types or patterns contributing to memory leaks.

This methodology provides detailed insights into complex issues inside JVMs.

6.3. Resolution and Verification

After identifying and resolving the source of a memory leak, we implement a structured strategy to prevent future occurrences. This encompassed agent deployment, custom metrics exposure using JMX pertaining to previously leaking resources, and continuous monitoring.

Through this strategy, we can watch over potential recurrences or new memory-related issues.

7. Summary

To  illustrate the differences between Dynamic Attach and the Serviceability Agent, let’s examine a comparison table:

Feature Dynamic Attach Serviceability Agent
Real-time Monitoring Yes No
Dynamic Agent Loading Yes No
Performance Overhead Designed to minimize performance impact Performance degradation when collecting extensive data.
Scope of Operations Focused on live applications and ongoing monitoring Includes live and post-mortem analysis
Use Cases Monitoring, profiling, immediate diagnostics Deep analysis, troubleshooting, post-mortem debugging
Data Accessibility Limited to real-time data collection and analysis Comprehensive JVM internals

This table shows how Dynamic Attach and the Serviceability Agent complement each other. The former is ideal for real-time monitoring while the latter excels in JVM analysis, especially in post-mortem scenarios.

8. Conclusion

In this article, we delved into the functions of Dynamic Attach and the Serviceability Agent in monitoring and resolving issues in the JVM.

The Serviceability Agent offers in-depth inspection of JVM internals for thorough analysis and post-mortem debugging. On the other hand, Dynamic Attach performs well in instantaneous diagnostics and low-impact monitoring.

Despite their limitations, both tools can enhance the performance and reliability of the JVM.

       
Viewing all 4561 articles
Browse latest View live


<script src="https://jsc.adskeeper.com/r/s/rssing.com.1596347.js" async> </script>