Quantcast
Channel: Baeldung
Viewing all 4561 articles
Browse latest View live

Guide to Hibernate’s @TimeZoneStorage Annotation

$
0
0

1. Overview

When building our persistence layer with Hibernate and working with timestamp fields, we often need to handle timezone details as well. Since Java 8, the most common approach to represent timestamps with timezone is by using the OffsetDateTime and ZonedDateTime classes. However, storing them in our database is a challenge since they’re not valid attribute types according to the JPA specification.

Hibernate 6 introduces the @TimeZoneStorage annotation to address the above challenge. This annotation provides flexible options for configuring how timezone information is stored and retrieved in our database.

In this tutorial, we’ll explore Hibernate’s @TimeZoneStorage annotation and its various storage strategies. We’ll walk through practical examples and look at the behavior of each strategy, enabling us to choose the best one for our specific needs.

2. Application Setup

Before we explore the @TimeZoneStorage annotation in Hibernate, let’s set up a simple application that we’ll use throughout this tutorial.

2.1. Dependencies

Let’s start by adding the Hibernate dependency to our project’s pom.xml file:

<dependency>
    <groupId>org.hibernate.orm</groupId>
    <artifactId>hibernate-core</artifactId>
    <version>6.6.0.Final</version>
</dependency>

This dependency provides us with the core Hibernate ORM functionality, including the @TimeZoneStorage annotation we’re discussing in this tutorial.

2.2. Defining the Entity Class and Repository Layer

Now, let’s define our entity class:

@Entity
@Table(name = "astronomical_observations")
class AstronomicalObservation {
    @Id
    private UUID id;
    private String celestialObjectName;
    private ZonedDateTime observationStartTime;
    private OffsetDateTime peakVisibilityTime;
    private ZonedDateTime nextExpectedAppearance;
    private OffsetDateTime lastRecordedSighting;
    // standard setters and getters
}

For our demonstration, we’ll wear our astronomy geek hats. The AstronomicalObservation class is the central entity in our example, and we’ll be using it to learn how the @TimeZoneStorage annotation works in the upcoming sections.

With our entity class defined, let’s create its corresponding repository interface:

@Repository
interface AstronomicalObservationRepository extends JpaRepository<AstronomicalObservation, UUID> {
}

Our AstronomicalObservationRepository interface extends JpaRepository and will allow us to interact with our database.

2.3. Enabling SQL Logging

To better understand how @TimeZoneStorage works under the hood, let’s enable SQL logging in our application by adding the corresponding configuration to our application.yml file:

logging:
  level:
    org:
      hibernate:
        SQL: DEBUG
        orm:
          results: DEBUG
          jdbc:
            bind: TRACE
        type:
          descriptor:
            sql:
              BasicBinder: TRACE

With this setup, we’ll be able to see the exact SQL that Hibernate generates for our AstronomicalObservation entity.

It’s important to note that the above configuration is for our practical demonstration and isn’t intended for production use.

3. @TimeZoneStorage Strategies

Now that we’ve set up our application, let’s take a look at the different storage strategies available when using the @TimeZoneStorage annotation.

3.1. NATIVE

Before we look at the NATIVE strategy, let’s talk about the TIMESTAMP WITH TIME ZONE data type. It’s a SQL standard data type that has the ability to store both the timestamp and the timezone information. However, not all database vendors support it. PostgreSQL and Oracle are popular databases that do support it.

Let’s annotate our observationStartTime field with @TimeZoneStorage and use the NATIVE strategy:

@TimeZoneStorage(TimeZoneStorageType.NATIVE)
private ZonedDateTime observationStartTime;

When we use the NATIVE strategy, Hibernate stores our ZonedDateTime or OffsetDateTime value directly in a column of type TIMESTAMP WITH TIME ZONE. Let’s see this in action:

AstronomicalObservation observation = new AstronomicalObservation();
observation.setId(UUID.randomUUID());
observation.setCelestialObjectName("test-planet");
observation.setObservationStartTime(ZonedDateTime.now());
astronomicalObservationRepository.save(observation);

Let’s take a look at the generated logs when we execute the above code to save a new AstronomicalObservation object:

org.hibernate.SQL : insert into astronomical_observations (id, celestial_object_name, observation_start_time) values (?, ?, ?)
org.hibernate.orm.jdbc.bind : binding parameter (1:UUID) <- [ffc2f72d-bcfe-38bc-80af-288d9fcb9bb0]
org.hibernate.orm.jdbc.bind : binding parameter (2:VARCHAR) <- [test-planet]
org.hibernate.orm.jdbc.bind : binding parameter (3:TIMESTAMP_WITH_TIMEZONE) <- [2024-09-18T17:52:46.759673+05:30[Asia/Kolkata]]

As is evident from the logs, our ZonedDateTime value is mapped directly to the TIMESTAMP_WITH_TIMEZONE column, preserving the timezone information.

If our database supports this data type, then the NATIVE strategy is recommended for storing timestamps with timezone.

3.2. COLUMN

The COLUMN strategy stores the timestamp and the timezone offset in separate table columns. The timezone offset is stored in a column with type INTEGER.

Let’s use this strategy on the peakVisibilityTime attribute of our AstronomicalObservation entity class:

@TimeZoneStorage(TimeZoneStorageType.COLUMN)
@TimeZoneColumn(name = "peak_visibility_time_offset")
private OffsetDateTime peakVisibilityTime;
@Column(name = "peak_visibility_time_offset", insertable = false, updatable = false)
private Integer peakVisibilityTimeOffset;

We also declare a new peakVisibilityTimeOffset attribute and use the @TimeZoneColumn annotation to tell Hibernate to use it for storing the timezone offset. Then, we set the insertable and updatable attributes to false, which is necessary here to prevent a mapping conflict as Hibernate manages it through the @TimeZoneColumn annotation.

If we don’t use the @TimeZoneColumn annotation, Hibernate assumes the timezone offset column name is suffixed by _tz. In our example, it would be peak_visibility_time_tz.

Now, let’s see what happens when we save our AstronomicalObservation entity with the COLUMN strategy:

AstronomicalObservation observation = new AstronomicalObservation();
observation.setId(UUID.randomUUID());
observation.setCelestialObjectName("test-planet");
observation.setPeakVisibilityTime(OffsetDateTime.now());
astronomicalObservationRepository.save(observation);

Let’s analyse the logs that are generated when we execute the above:

org.hibernate.SQL : insert into astronomical_observations (id, celestial_object_name, peak_visibility_time, peak_visibility_time_offset) values (?, ?, ?, ?)
org.hibernate.orm.jdbc.bind : binding parameter (1:UUID) <- [82d0a618-dd11-4354-8c99-ef2d2603cacf]
org.hibernate.orm.jdbc.bind : binding parameter (2:VARCHAR) <- [test-planet]
org.hibernate.orm.jdbc.bind : binding parameter (3:TIMESTAMP_UTC) <- [2024-09-18T12:37:43.441296Z]
org.hibernate.orm.jdbc.bind : binding parameter (4:INTEGER) <- [+05:30]

We can see that Hibernate stores the timestamp without timezone in our peak_visibility_time column and the timezone offset in our peak_visibility_time_offset column.

If our database doesn’t support the TIMESTAMP WITH TIME ZONE data type, the COLUMN strategy is recommended to be used. Also, we need to ensure that the column for storing the timezone offset is present in our table schema.

3.3. NORMALIZE

Next, we’ll take a look at the NORMALIZE strategy. When we use this strategy, Hibernate normalizes the timestamp to our application’s local timezone and stores the timestamp value without the timezone information. When we fetch the record from the database, Hibernate adds our local timezone to the timestamp value.

Let’s take a closer look at this behavior. First, let’s annotate our nextExpectedAppearance attribute with @TimeZoneStorage and specify the NORMALIZE strategy:

@TimeZoneStorage(TimeZoneStorageType.NORMALIZE)
private ZonedDateTime nextExpectedAppearance;

Now, let’s save an AstronomicalObservation entity and analyze the SQL logs to understand what’s happening:

TimeZone.setDefault(TimeZone.getTimeZone("Asia/Kolkata")); // UTC+05:30
AstronomicalObservation observation = new AstronomicalObservation();
observation.setId(UUID.randomUUID());
observation.setCelestialObjectName("test-planet");
observation.setNextExpectedAppearance(ZonedDateTime.of(1999, 12, 25, 18, 0, 0, 0, ZoneId.of("UTC+8")));
astronomicalObservationRepository.save(observation);

We first set our application’s default timezone to Asia/Kolkata (UTC+05:30). Then, we create a new AstronomicalObservation entity and set its nextExpectedAppearance to a ZonedDateTime that has a timezone of UTC+8. Finally, we save the entity in our database.

Before we execute our above code and analyse the logs, we’ll need to add some extra logging for Hibernate’s ResourceRegistryStandardImpl class to our application.yaml file:

logging:
  level:
    org:
      hibernate:
        resource:
          jdbc:
            internal:
              ResourceRegistryStandardImpl: TRACE

Once we’ve added the above configuration, we’ll execute our code and see the following logs:

org.hibernate.SQL : insert into astronomical_observations (id, celestial_object_name, next_expected_appearance) values (?, ?, ?)
org.hibernate.orm.jdbc.bind : binding parameter (1:UUID) <- [938bafb9-20a7-42f0-b865-dfaca7c088f5]
org.hibernate.orm.jdbc.bind : binding parameter (2:VARCHAR) <- [test-planet]
org.hibernate.orm.jdbc.bind : binding parameter (3:TIMESTAMP) <- [1999-12-25T18:00+08:00[UTC+08:00]]
o.h.r.j.i.ResourceRegistryStandardImpl : Releasing statement [HikariProxyPreparedStatement@971578330 wrapping prep1: insert into astronomical_observations (id, celestial_object_name, next_expected_appearance) values (?, ?, ?) {1: UUID '938bafb9-20a7-42f0-b865-dfaca7c088f5', 2: 'test-planet', 3: TIMESTAMP '1999-12-25 15:30:00'}]

We can see that our timestamp 1999-12-25T18:00+08:00 got normalized to our application’s local timezone of Asia/Kolkata and stored as 1999-12-25 15:30:00. Hibernate removed the timezone information from the timestamp by subtracting 2.5 hours, which is the difference between the original timezone (UTC+8) and the application’s local timezone (UTC+5:30), resulting in the stored time of 15:30.

Now, let’s fetch our saved entity from the database:

astronomicalObservationRepository.findById(observation.getId()).orElseThrow();

We’ll see the following logs when we execute the above fetch operation:

org.hibernate.SQL : select ao1_0.id, ao1_0.celestial_object_name, ao1_0.next_expected_appearance from astronomical_observations ao1_0 where ao1_0.id=?
org.hibernate.orm.jdbc.bind : binding parameter (1:UUID) <- [938bafb9-20a7-42f0-b865-dfaca7c088f5]
org.hibernate.orm.results : Extracted JDBC value [1] - [test-planet]
org.hibernate.orm.results : Extracted JDBC value [2] - [1999-12-25T15:30+05:30[Asia/Kolkata]]

Hibernate reconstructs the ZonedDateTime value and adds our application’s local timezone of +05:30. As we can see, this value is not in the UTC+8 timezone that we’d stored.

We need to be careful of using this strategy when our application runs in multiple timezones. For example, when running multiple instances of our application behind a load balancer, we need to ensure that our instances have the same default timezone to avoid inconsistencies.

3.4. NORMALIZE_UTC

The NORMALIZE_UTC strategy is similar to the NORMALIZE strategy we explored in the previous section. The only difference is that instead of using our application’s local timezone, it always normalizes the timestamps to UTC.

Let’s see how this strategy works. We’ll specify it on the lastRecordingSighting attribute of our AstronomicalObservation class:

@TimeZoneStorage(TimeZoneStorageType.NORMALIZE_UTC)
private OffsetDateTime lastRecordedSighting;

Now, let’s save an AstronomicalObservation entity with its lastRecordedSighting attribute set to an OffsetDateTime with a UTC+8 offset:

AstronomicalObservation observation = new AstronomicalObservation();
observation.setId(UUID.randomUUID());
observation.setCelestialObjectName("test-planet");
observation.setLastRecordedSighting(OffsetDateTime.of(1999, 12, 25, 18, 0, 0, 0, ZoneOffset.ofHours(8)));
astronomicalObservationRepository.save(observation);

Upon executing our code, let’s look at the generated logs:

org.hibernate.SQL : insert into astronomical_observations (id,celestial_object_name,last_recorded_sighting) values (?,?,?)
org.hibernate.orm.jdbc.bind : binding parameter (1:UUID) <- [c843a9db-45c7-44c7-a2de-f5f0c8947449]
org.hibernate.orm.jdbc.bind : binding parameter (2:VARCHAR) <- [test-planet]
org.hibernate.orm.jdbc.bind : binding parameter (3:TIMESTAMP_UTC) <- [1999-12-25T18:00+08:00]
o.h.r.j.i.ResourceRegistryStandardImpl : Releasing statement [HikariProxyPreparedStatement@1938138927 wrapping prep1: insert into astronomical_observations (id,celestial_object_name,last_recorded_sighting) values (?,?,?) {1: UUID 'c843a9db-45c7-44c7-a2de-f5f0c8947449', 2: 'test-planet', 3: TIMESTAMP WITH TIME ZONE '1999-12-25 10:00:00+00'}]

From the logs, we can see that Hibernate normalized our OffsetDateTime of 1999-12-25T18:00+08:00 to 1999-12-25 10:00:00+00 in UTC by subtracting eight hours before storing it in the database.

To ensure that the local timezone offset is not added to the timestamp value when we retrieve it from the database, let’s look at the logs generated when we fetch our earlier saved object:

org.hibernate.SQL : select ao1_0.id,ao1_0.celestial_object_name,ao1_0.last_recorded_sighting from astronomical_observations ao1_0 where ao1_0.id=?
org.hibernate.orm.jdbc.bind : binding parameter (1:UUID) <- [9fd6cc61-ab7e-490b-aeca-954505f52603]
org.hibernate.orm.results : Extracted JDBC value [1] - [test-planet]
org.hibernate.orm.results : Extracted JDBC value [2] - [1999-12-25T10:00Z]

While we lose the original timezone information of UTC+8, the OffsetDateTime still represents the same instant in time.

3.5. AUTO

The AUTO strategy lets Hibernate choose the appropriate strategy based on our database.

If our database supports the TIMESTAMP WITH TIME ZONE data type, Hibernate will use the NATIVE strategy. Otherwise, it’ll use the COLUMN strategy.

In most cases, we’d be aware of the database we’re using, so it’s generally a good idea to explicitly use the appropriate strategy instead of relying on the AUTO strategy.

3.6. DEFAULT

The DEFAULT strategy is a lot like the AUTO strategy. It lets Hibernate choose the appropriate strategy based on the database we’re using.

If our database supports the TIMESTAMP WITH TIME ZONE data type, Hibernate will use the NATIVE strategy. Otherwise, it’ll use the NORMALIZE_UTC strategy.

Again, it’s usually a good idea to explicitly use the appropriate strategy when we know what database we’re using.

4. Conclusion

In this article, we’ve explored using Hibernate’s @TimeZoneStorage annotation to persist timestamps with timezone details in our database.

We looked at the various storage strategies available when using @TimeZoneStorage annotation on our OffsetDateTime and ZonedDateTime fields. We saw the behavior of each strategy by analyzing the SQL log statements it generates.

As always, all the code examples used in this article are available over on GitHub.


Writing JDBC ResultSet to an Excel File Using Apache POI

$
0
0

1. Overview

Data handling is one of the critical tasks in software development. A common use case is retrieving data from a database and exporting it into a format for further analysis such as Excel files.

This tutorial will show how to export data from a JDBC ResultSet to an Excel file using the Apache POI library.

2. Maven Dependency

In our example, we’ll read some data from a database table and write it into an Excel file. Let’s define the Apache POI and POI OOXML schema dependencies in the pom.xml:

<dependency> 
    <groupId>org.apache.poi</groupId>
    <artifactId>poi</artifactId> 
    <version>5.3.0</version> 
</dependency> 
<dependency> 
    <groupId>org.apache.poi</groupId> 
    <artifactId>poi-ooxml</artifactId> 
    <version>5.3.0</version> 
</dependency>

We’ll adopt the H2 database for our demonstration. Let’s include its dependency as well:

<dependency>
    <groupId>com.h2database</groupId>
    <artifactId>h2</artifactId>
    <version>2.3.232</version>
</dependency>

3. Data Preparation

Next, let’s prepare some data for our demonstration by creating a products table in the H2 database and inserting rows into it:

CREATE TABLE products (
    id INT AUTO_INCREMENT PRIMARY KEY, 
    name VARCHAR(255) NOT NULL, 
    category VARCHAR(255), 
    price DECIMAL(10, 2) 
);
INSERT INTO products(name, category, price) VALUES ('Chocolate', 'Confectionery', 2.99);
INSERT INTO products(name, category, price) VALUES ('Fruit Jellies', 'Confectionery', 1.5);
INSERT INTO products(name, category, price) VALUES ('Crisps', 'Snacks', 1.69);
INSERT INTO products(name, category, price) VALUES ('Walnuts', 'Snacks', 5.95);
INSERT INTO products(name, category, price) VALUES ('Orange Juice', 'Juices', 2.19);

With the table created and data inserted, we can use JDBC to fetch all data stored within the products table:

try (Connection connection = getConnection();
    Statement statement = connection.createStatement();
    ResultSet resultSet = statement.executeQuery(dataPreparer.getSelectSql());) {
    // The logic of export data to Excel file.
}

We have neglected the implementation details of getConnection(). We normally get a JDBC connection either by raw JDBC connection, via a connection pool, or from a DataSource.

4. Create a Workbook

An Excel file consists of a workbook and can contain multiple sheets. In our demonstration, we’ll create a Workbook and a single Sheet that we’ll write the data into later. First of all, let’s create a Workbook:

Workbook workbook = new XSSFWorkbook();

There are a few Workbook variants that we can choose from Apache POI:

  • HSSFWorkbook – the older Excel format (97-2003) generator with extension .xls
  • XSSFWorkbook – used to create the newer, XML-based Excel 2007 format with the .xlsx extension
  • SXSSFWorkbook – also creates the files with the .xlsx extension but by streaming, hence keeping memory usage to a minimum

For this example, we’ll use XSSFWorkbook. However, if we anticipate exporting many rows, say more than 10,000 rows, then we’d be better off with SXSSFWorkbook over XSSFWorkbook for more efficient memory utilization.

Next, let’s create a Sheet named “data” within the Workbook:

Sheet sheet = workbook.createSheet("data");

5. Create the Header Row

Typically, a header would contain the title of each column in our dataset. Since we’re dealing here with the ResultSet object returned from JDBC, we could use the ResultSetMetaData interface that provides metadata regarding ResultSet columns.

Let’s see how to get the column names using ResultSetMetaData and create a header row of an Excel sheet using Apache POI:

Row row = sheet.createRow(sheet.getLastRowNum() + 1);
for (int n = 0; n < numOfColumns; n++) {
    String label = resultSetMetaData.getColumnLabel(n + 1);
    Cell cell = row.createCell(n);
    cell.setCellValue(label);
}

In this example, we obtain the column names dynamically from ResultSetMetaData and use them as header cells of our Excel sheet. This way, we’ll avoid the hard-coding of column names.

6. Create Data Rows

After adding the header row, let’s load the table data to the Excel file:

while (resultSet.next()) {
    Row row = sheet.createRow(sheet.getLastRowNum() + 1);
    for (int n = 0; n < numOfColumns; n++) {
        Cell cell = row.createCell(n);
        cell.setCellValue(resultSet.getString(n + 1));
    }
}

We iterate on ResultSet and, for each iteration, we create a new row in the sheet. Based on the column numbers obtained earlier in the header row via the sheet.getLastRowNum(), we do an iteration on every column to get the data from the current row and write to the corresponding Excel cells.

7. Write the Workbook

Now that our Workbook is fully populated, we can write it into an Excel file. Since we used an instance of XSSFWorkbook as our implementation, the exporting file will be saved in the Excel 2007 file format with the .xslx extension:

File excelFile = // our file
try (OutputStream outputStream = new BufferedOutputStream(new FileOutputStream(excelFile))) {
    workbook.write(outputStream);
    workbook.close();
}

It’s good practice to close the Workbook explicitly after writing by calling the close() method on the instance of the Workbook. This will ensure that resources get released and data gets flushed to the file.

Now, let’s see the exported results, which are according to our table definition and also maintain the insertion order of the data:

8. Conclusion

In this article, we went through how to export data from a JDBC ResultSet into an Excel file with Apache POI. We created a Workbook, dynamically populated header rows from ResultSetMetaData, and filled the sheet with data rows by iterating the ResultSet.

As always, the code is available over on GitHub.


Format Output in a Table Format Using System.out

$
0
0

1. Overview

In Java applications, it’s often necessary to display data in a table-like format. System.out offers several ways to do this, from simple string concatenation to advanced formatting techniques.

In this tutorial, we’ll explore various methods to format output in a table-like structure using System.out.

2. Using String Concatenation

The simplest way to format output in a table is by using string concatenation. While this method is straightforward, it requires manual adjustment of spaces and alignment:

void usingStringConcatenation() {
    String[] headers = {"ID", "Name", "Age"};
    String[][] data = {
        {"1", "James", "24"},
        {"2", "Sarah", "27"},
        {"3", "Keith", "31"}
    };
    System.out.println(headers[0] + "   " + headers[1] + "   " + headers[2]);
    for (String[] row : data) {
        System.out.println(row[0] + "   " + row[1] + "   " + row[2]);
    }
}

The expected output is:

ID   Name   Age
1   James   24
2   Sarah   27
3   Keith   31

While this approach works, it becomes cumbersome when dealing with dynamic data, as it requires manual adjustment to maintain alignment.

3. Using printf()

The System.out.printf() method provides a more flexible way to format strings. We can specify the width of each column and ensure proper alignment:

void usingPrintf() {
    String[] headers = {"ID", "Name", "Age"};
    String[][] data = {
        {"1", "James", "24"},
        {"2", "Sarah", "27"},
        {"3", "Keith", "31"}
    };
    System.out.printf("%-5s %-10s %-5s%n", headers[0], headers[1], headers[2]);
    for (String[] row : data) {
        System.out.printf("%-5s %-10s %-5s%n", row[0], row[1], row[2]);
    }
}

The expected output will be as follows:

ID    Name       Age  
1     James      24   
2     Sarah      27   
3     Keith      31  

In the printf method, %-5s specifies a left-aligned string with a width of 5 characters. While %-10s specifies a left-aligned string with a width of 10 characters.

This approach is much cleaner and ensures that the columns are aligned regardless of the data’s length.

4. Using String.format()

If we need to store the formatted output in a string instead of printing it directly, we can use String.format(). This method uses the same formatting syntax as printf().

void usingStringFormat() {
    String[] headers = {"ID", "Name", "Age"};
    String[][] data = { 
        {"1", "James", "24"}, 
        {"2", "Sarah", "27"}, 
        {"3", "Keith", "31"} 
    };
    String header = String.format("%-5s %-10s %-5s", headers[0], headers[1], headers[2]);
    System.out.println(header);
    for (String[] row : data) {
        String formattedRow = String.format("%-5s %-10s %-5s", row[0], row[1], row[2]);
        System.out.println(formattedRow);
    }
}

The output is identical to the printf() example. The difference is that String.format() returns a formatted string, which we can use for further processing or logging:

ID    Name       Age  
1     James      24   
2     Sarah      27   
3     Keith      31   

5. Using StringBuilder

When dealing with dynamic or large amounts of data, constructing the table with a StringBuilder can be more efficient. This approach allows us to build the entire output as a single string and print it once:

void usingStringBuilder() {
    String[] headers = {"ID", "Name", "Age"};
    String[][] data = { 
        {"1", "James", "24"}, 
        {"2", "Sarah", "27"}, 
        {"3", "Keith", "31"} 
    };
    StringBuilder table = new StringBuilder();
    table.append(String.format("%-5s %-10s %-5s%n", headers[0], headers[1], headers[2]));
    for (String[] row : data) {
        table.append(String.format("%-5s %-10s %-5s%n", row[0], row[1], row[2]));
    }
    System.out.print(table.toString());
}

Expected Output:

ID    Name       Age  
1     James      24   
2     Sarah      27   
3     Keith      31   

This method is particularly useful when we need to create complex outputs or when performance is a concern, as StringBuilder reduces the overhead of multiple-string concatenation.

6. Using ASCII Table

We can use external libraries like ASCII Table. It is a third-party library that makes it easy to create a nice-looking ASCII table.

To use ASCII Table methods, we need to include its dependency in our project:

<dependency>
    <groupId>de.vandermeer</groupId>
    <artifactId>asciitable</artifactId>
    <version>0.3.2</version>
<dependency>

We can then use its methods to create a table-like structure. Here’s an example using ASCII Table:

void usingAsciiTable() {
    AsciiTable table = new AsciiTable();
    table.addRule();
    table.addRow("ID", "Name", "Age");
    table.addRule();
    table.addRow("1", "James", "24");
    table.addRow("2", "Sarah", "27");
    table.addRow("3", "Keith", "31");
    table.addRule();

String renderedTable = table.render(); System.out.println(renderedTable); }

The expected output will be:

┌──────────────────────────┬─────────────────────────┬─────────────────────────┐
│ID                        │Name                     │Age                      │
├──────────────────────────┼─────────────────────────┼─────────────────────────┤
│1                         │James                    │24                       │
│2                         │Sarah                    │27                       │
│3                         │Keith                    │31                       │
└──────────────────────────┴─────────────────────────┴─────────────────────────┘

7. Conclusion

In this tutorial, we explored various ways to format output in a table-like structure using System.out. For straightforward tasks, basic string concatenation or printf works well. However, for more dynamic or complex outputs, using StringBuilder can be more efficient. The ASCII table helps produce clean and well-formatted output. By selecting the right method for our requirements, we can generate neat, readable, and well-structured console output.

As always, the full source code is available over on GitHub.


How to Make a Field Optional in JPA Entity?

$
0
0

1. Overview

When working with databases and Spring Data, it’s common to encounter scenarios where not all fields in an entity are necessary for every operation. Therefore, we might want to make some field optional in our result set.

In this tutorial, we’ll explore different techniques for fetching only the columns we need from a database query using Spring Data and native queries.

2. Why Optional Fields?

The need to make fields optional in result sets arises from the necessity to balance data integrity and performance. In many applications, especially those with complex data models, fetching entire entities can lead to unnecessary overhead, mainly when certain fields are irrelevant to a specific context or operation. By excluding non-essential fields from the result set, we can minimize the amount of data processed and transferred, leading to faster query execution and lower memory usage.

We can see this at the SQL level. For example, we want data from a book table:

select * from book where id = 1;

Imagine the book table has ten columns. If some of those columns aren’t required, we can extract a subset:

select id, title, author from book where id = 1;

3. Example Setup

To demonstrate, let’s create a Spring Boot application. Let’s say we have a list of books we want to get from a database. We can define a Book entity:

@Entity
@Table
public class Book {
    @Id
    @GeneratedValue(strategy = GenerationType.IDENTITY)
    @Column
    private Integer id;
    @Column
    private String title;
    @Column
    private String author;
    @Column
    private String synopsis;
    @Column
    private String language;
    // other fields, getters and setters
}

We can use an H2 in-memory database. Let’s create the application-h2.properties file to set the database properties:

spring.datasource.url=jdbc:h2:mem:testdb
spring.datasource.driverClassName=org.h2.Driver
spring.datasource.username=sa
spring.datasource.password=password
spring.jpa.database-platform=org.hibernate.dialect.H2Dialect
spring.jpa.hibernate.ddl-auto=update

We’ll start a Spring Boot application, and we also want a specific profile loading the properties file:

@Profile("h2")
@SpringBootApplication
public class OptionalFieldsApplication {
    public static void main(String[] args) {
        SpringApplication.run(OptionalFieldsApplication.class);
    }
}

We’ll create a @Repository for every solution to access the data. However, we can already set up a test class with an active h2 profile:

@ActiveProfiles("h2")
@SpringBootTest(classes = OptionalFieldsApplication.class)
@Transactional
public class OptionalFieldsUnitTest {
    // @Autowired of repositories and tests
}

Notably, we’ll use the @Transactional annotation, and every test will roll back to have a clean start for every test instance.

Let’s look at examples of making some fields optional for a Book. For example, we don’t need all the details; we’re fine with retrieving only the id, title, and author.

4. Use a Projection

In SQL, projection refers to selecting specific columns or fields from a table or query rather than retrieving all the data, thus allowing us to limit the data we fetch.

We can define our projection as a class or an interface:

public interface BookProjection {
    Integer getId();
    String getTitle();
    String getAuthor();
}

Let’s define our repository to extract the projection:

@Repository
public interface BookProjectionRepository extends JpaRepository<Book, Integer> {
    @Query(value = "SELECT b.id as id, b.title, b.author FROM Book b", nativeQuery = true)
    List<BookProjection> fetchBooks();
}

We can then create a simple test for the BookProjectionRepository:

@Test
public void whenUseProjection_thenFetchOnlyProjectionAttributes() {
    String title = "Title Projection";
    String author = "Author Projection";
    Book book = new Book();
    book.setTitle(title);
    book.setAuthor(author);
    bookProjectionRepository.save(book);
    List<BookProjection> result = bookProjectionRepository.fetchBooks();
    assertEquals(1, result.size());
    assertEquals(title, result.get(0).getTitle());
    assertEquals(author, result.get(0).getAuthor());
}

Once we fetch the BookProjection objects, we can assert that the title and author are the ones we persisted.

5. Use a DTO

A DTO (Data Transfer Object) is a simple object used to transfer data between different layers or components of an application, typically between the database layer and the business logic or service layer.

In this case, we’ll use it to create a dataset object with the fields we need. Therefore, we’ll only populate the DTO’s fields when fetching from the database. Let’s define our BookDto:

public record BookDto(Integer id, String title, String author) {}

Let’s define our repository to extract the DTO objects:

@Repository
public interface BookDtoRepository extends JpaRepository<Book, Integer> {
    @Query(value = "SELECT new com.baeldung.spring.data.jpa.optionalfields.BookDto(b.id, b.title, b.author) FROM Book b")
    List<BookDto> fetchBooks();
}

In this case, we use a JPQL syntax to create an instance of BookDto for every book record.

Finally, we can add a test to verify:

@Test
public void whenUseDto_thenFetchOnlyDtoAttributes() {
    String title = "Title Dto";
    String author = "Author Dto";
    Book book = new Book();
    book.setTitle(title);
    book.setAuthor(author);
    bookDtoRepository.save(book);
    List<BookDto> result = bookDtoRepository.fetchBooks();
    assertEquals(1, result.size());
    assertEquals(title, result.get(0).title());
    assertEquals(author, result.get(0).author());
}

6. Use @SqlResultSetMapping

We can look at the @SqlResultSetMapping annotation as an alternative to DTO or projection. To use it, we need to apply the annotation to the entity’s class:

@Entity
@Table
@SqlResultSetMapping(name = "BookMappingResultSet", 
  classes = @ConstructorResult(targetClass = BookDto.class, columns = {
      @ColumnResult(name = "id", type = Integer.class), 
      @ColumnResult(name = "title", type = String.class),
      @ColumnResult(name = "author", type = String.class) }))
public class Book {
    // same as intial setup
} 

To identify the result set, we need @ConstructorResult and @ColumnResult. Notably, the result set in these examples has the same class definition. Therefore, we can reuse the BookDto class for convenience, as it matches the same constructor.

We can’t use the @SqlResultSetMapping with @Query. Therefore, our repository needs extra work because it will use the EntityManager. First, we need to create a custom repository:

public interface BookCustomRepository {
    List<BookDto> fetchBooks();
}

This interface includes the signature for the method we want and extends the actual @Repository:

@Repository
public interface BookSqlMappingRepository extends JpaRepository<Book, Integer>, BookCustomRepository {}

Finally, we can create the implementation:

@Repository
public class BookSqlMappingRepositoryImpl implements BookCustomRepository {
    @PersistenceContext
    private EntityManager entityManager;
    @Override
    public List<BookDto> fetchBooks() {
        return entityManager.createNativeQuery("SELECT b.id, b.title, b.author FROM Book b", "BookMappingResultSet")
          .getResultList();
    }
}

In the fetchBooks() method, we create a native query using the EntityManager and the createNativeQuery() method.

Let’s also add a test for the repository:

@Test
public void whenUseSqlMapping_thenFetchOnlyColumnResults() {
    String title = "Title Sql Mapping";
    String author = "Author Sql Mapping";
    Book book = new Book();
    book.setTitle(title);
    book.setAuthor(author);
    bookSqlMappingRepository.save(book);
    List<BookDto> result = bookSqlMappingRepository.fetchBooks();
    assertEquals(1, result.size());
    assertEquals(title, result.get(0).title());
    assertEquals(author, result.get(0).author());
}

@SqlResultSetMapping is a more complex solution. Nonetheless, if we have a repository with multiple queries using the EntityManager and native or named queries, it could be worth using.

7. Use Object or Tuple

We can do native queries and restrict fields using Object or Tuple. Although these methods are less readable as we don’t directly access the class properties, they’re still valid options.

7.1. Object

We don’t need to add any transfer object as we’ll use directly the Object class:

@Repository
public interface BookObjectsRepository extends JpaRepository<Book, Integer> {
    @Query("SELECT b.id, b.title, b.author FROM Book b")
    List<Object[]> fetchBooks();
}

Let’s look at how we can access the object values in a test:

@Test
public void whenUseObjectArray_thenFetchOnlyQueryFields() {
    String title = "Title Object";
    String author = "Author Object";
    Book book = new Book();
    book.setTitle(title);
    book.setAuthor(author);
    bookObjectsRepository.save(book);
    List<Object[]> result = bookObjectsRepository.fetchBooks();
    assertEquals(1, result.size());
    assertEquals(3, result.get(0).length);
    assertEquals(title, result.get(0)[1].toString());
    assertEquals(author, result.get(0)[2].toString());
}

As we can see, this isn’t a dynamic solution because we must know the columns’ position in the array.

7.2. Tuple

We can also use the Tuple class. It’s a wrapper to an array of Object, and it’s helpful because we can iterate over a list and access the property by the alias instead of positionally, as we have seen in the previous example. Let’s create a BookTupleRepository:

@Repository
public interface BookTupleRepository extends JpaRepository<Book, Integer> {
    @Query(value = "SELECT b.id, b.title, b.author FROM Book b", nativeQuery = true)
    List<Tuple> fetchBooks();
}

Let’s look at how we can access the Tuple values in a test:

@Test
public void whenUseTuple_thenFetchOnlyQueryFields() {
    String title = "Title Tuple";
    String author = "Author Tuple";
    Book book = new Book();
    book.setTitle(title);
    book.setAuthor(author);
    bookTupleRepository.save(book);
    List<Tuple> result = bookTupleRepository.fetchBooks();
    assertEquals(1, result.size());
    assertEquals(3, result.get(0).toArray().length);
    assertEquals(title, result.get(0).get("title"));
    assertEquals(author, result.get(0).get("author"));
}

Still, this isn’t a dynamic solution either. However, we can access the column values using the alias or the column name.

8. Conclusion

In this article, we saw how to delimit the number of columns of a database result set using Spring Data. We saw how to use projections, DTOs, and @SqlResultSetMapping and got similar results. We also saw how to use Object or Tuple and access the generic result sets as array positionally.

As always, all source code is available over on GitHub.


Assert Collection of JSON Objects Ignoring Order

$
0
0

1. Introduction

Asserting that collections of JSON objects are equal can be challenging, especially when the order of elements within the collection isn’t guaranteed. While libraries like Jackson and AssertJ can be used, more specialized tools like JSONassert and hamcrest-json are designed to handle this use case more reliably.

In this tutorial, we’ll explore how to compare collections of JSON objects, focusing on ignoring the order of elements using JSONassert and hamcrest-json.

2. Problem Statement

When we work with collections of JSON objects, the order of elements within a list can vary based on the data source.

Consider the following JSON arrays:

[
  {"id": 1, "name": "Alice", "address": {"city": "NY", "street": "5th Ave"}},
  {"id": 2, "name": "Bob", "address": {"city": "LA", "street": "Sunset Blvd"}}
]
[
  {"id": 2, "name": "Bob", "address": {"city": "LA", "street": "Sunset Blvd"}},
  {"id": 1, "name": "Alice", "address": {"city": "NY", "street": "5th Ave"}}
]

Although these arrays have the same elements, the order differs. A direct string comparison of these arrays will fail due to the order difference, despite their identical data.

Let’s define these JSON arrays as Java variables, then explore how to compare them for equality while ignoring order:

String jsonArray1 = "["
        + "{\"id\": 1, \"name\": \"Alice\", \"address\": {\"city\": \"NY\", \"street\": \"5th Ave\"}}, "
        + "{\"id\": 2, \"name\": \"Bob\", \"address\": {\"city\": \"LA\", \"street\": \"Sunset Blvd\"}}"
        + "]";
String jsonArray2 = "["
        + "{\"id\": 2, \"name\": \"Bob\", \"address\": {\"city\": \"LA\", \"street\": \"Sunset Blvd\"}}, "
        + "{\"id\": 1, \"name\": \"Alice\", \"address\": {\"city\": \"NY\", \"street\": \"5th Ave\"}}"
        + "]";

3. Using JSONassert for JSON Comparison

JSONassert provides a flexible way to compare JSON data, allowing us to compare JSON objects or arrays as JSON, instead of direct string comparison. Specifically, it can compare arrays while ignoring the order of elements.

With LENIENT mode, JSONAssert focuses purely on content, ignoring the order:

@Test
public void givenJsonArrays_whenUsingJSONAssertIgnoringOrder_thenEqual() throws JSONException {
    JSONAssert.assertEquals(jsonArray1, jsonArray2, JSONCompareMode.LENIENT);
}

In this test, the JSONCompareMode.LENIENT mode allows us to assert equality while ignoring the order of elements. This makes JSONassert ideal for cases where we expect the same data, but the order of elements may vary.

3.1. Ignoring Extra Fields with JSONassert

JSONassert also allows extra fields in JSON objects to be ignored with the same LENIENT mode. This is useful when comparing JSON data where some fields, like metadata or timestamps, aren’t relevant to the test:

@Test
public void givenJsonWithExtraFields_whenIgnoringExtraFields_thenEqual() throws JSONException {
    String jsonWithExtraFields = "["
            + "{\"id\": 1, \"name\": \"Alice\", \"address\": {\"city\": \"NY\", \"street\": \"5th Ave\"}, \"age\": 30}, "
            + "{\"id\": 2, \"name\": \"Bob\", \"address\": {\"city\": \"LA\", \"street\": \"Sunset Blvd\"}, \"age\": 25}"
            + "]";
    JSONAssert.assertEquals(jsonArray1, jsonWithExtraFields, JSONCompareMode.LENIENT);
}

In this example, the test validates that jsonArray1 is equivalent to jsonWithExtraFields, allowing for extra fields like age in the comparison.

4. Using hamcrest-json for JSON Matching

In addition to JSONassert, we can leverage hamcrest-json, a plugin for Hamcrest specifically designed for JSON assertions. This plugin builds on Hamcrest’s matcher functionality and allows us to write expressive and readable assertions when working with JSON in JUnit.

One of the most useful features in hamcrest-json is the allowingAnyArrayOrdering() method. This enables us to compare JSON arrays while ignoring their order:

@Test
public void givenJsonCollection_whenIgnoringOrder_thenEqual() {
    assertThat(jsonArray1, sameJSONAs(jsonArray2).allowingAnyArrayOrdering());
}

This approach ensures that the JSON equality check ignores the order of elements in the array using the sameJSONAs() matcher.

4.1. Ignoring Extra Fields with hamcrest-json

In addition to ignoring array ordering, hamcrest-json provides the allowingExtraUnexpectedFields() utility for handling extra fields. This method enables us to ignore fields present in one JSON object but not the other:

@Test
public void givenJsonWithUnexpectedFields_whenIgnoringUnexpectedFields_thenEqual() {
    String jsonWithUnexpectedFields = "["
            + "{\"id\": 1, \"name\": \"Alice\", \"address\": {\"city\": \"NY\", \"street\": \"5th Ave\"}, \"extraField\": \"ignoreMe\"}, "
            + "{\"id\": 2, \"name\": \"Bob\", \"address\": {\"city\": \"LA\", \"street\": \"Sunset Blvd\"}}"
            + "]";
    assertThat(jsonWithUnexpectedFields, sameJSONAs(jsonArray1).allowingExtraUnexpectedFields());
}

In this example, we validate that jsonWithUnexpectedFields equals jsonArray1, even though it contains an extra field. By combining allowingExtraUnexpectedFields() with allowingAnyArrayOrdering(), we ensure a robust comparison that focuses on matching the data between our JSON arrays.

5. Conclusion

In this article, we’ve demonstrated the ability to compare collections of JSON objects while ignoring the order of elements by using purpose-built libraries like JSONassert and hamcrest-json. These libraries offer a more direct approach over manually parsing JSON into Java objects, providing greater reliability and ease of use.

As always, the complete code samples for this article can be found over on GitHub.


Efficient Way to Insert a Number Into a Sorted Array of Numbers in Java

$
0
0

1. Overview

The usage of arrays is very common in programming languages. Inserting and removing elements from an array of numbers is a basic operation we often need. Inserting an element into a sorted array of numbers is a special case of an array insertion.

Let’s see how to insert a number into a sorted array of numbers efficiently.

2. Introduction to Problem

To make inserting a number into a sorted array efficient, we need to minimize the number of position shifts and comparisons. We can achieve this by searching for the insertion index using binary search. Then, shift the elements to the right to make space for the new element.

For example, given that sortedArray is a sorted integer array:

int[] sortedArray = new int[] { 4, 55, 85, 100, 125 };

We want to add a new element 90 to the array. The algorithm should insert the number after 85 and before 100 in an efficient manner:

int[] expcetedArray = new int[] { 4, 55, 85, 90, 100, 125 };

3. Solution

The solution involves two steps. The first is to find the insertion index for the new number. The most efficient way of doing that is with a binary search. Once the index is found, we increase the size of the array by 1, shift the elements from the index up to the end to the right, and insert the new element at the calculated index:

public static int[] insertInSortedArray(int[] arr, int numToInsert) {
    int index = Arrays.binarySearch(arr, numToInsert);
    if (index < 0) {
        index = -(index + 1);
    }
    int[] newArray = new int[arr.length + 1];
    System.arraycopy(arr, 0, newArray, 0, index);
    newArray[index] = numToInsert;
    System.arraycopy(arr, index, newArray, index + 1, arr.length - index);
    return newArray;
}

Arrays.binarySearch(arr, element) returns the element insert index using binary search. The binarySearch() method returns a positive element insert index if the element is found in the array arr. If the element is not found in the array arr, it returns negation of insert index plus one. Hence, if the returned index value is less than 0, we add 1 and negate it to get the insertion index.

We create a new array of size 1 more than that of the original array and insert the value at the calculated index in the new array. Then, to replicate the shifting of elements from the insert index to the end of the array, we copy values from the original array to the new array.

System.arraycopy() is used to efficiently copy the array before and after the insert index.

Let’s validate our code with a test case:

@Test
void givenSortedArray_whenElementInserted_thenArrayRemainsSorted() {
    int[] sortedArray = new int[] { 4, 55, 85, 100, 125 };
    int[] expcetedArray = new int[] { 4, 55, 85, 90, 100, 125 };
    int valueToInsert = 90;
    int[] resultArray = insertInSortedArray(sortedArray, valueToInsert);
    assertThat(expcetedArray).isEqualTo(resultArray);
}

The test case inserts new element 90 in the array sortedArray. Our insertion method insertInSortedArray() returns the result in the array resultArray. The test case matches the expected output array expectedArray with the result array resultArray. Since the test case passes successfully, it validates our array insertion logic.

Similarly, we can implement the solution for an array of numeric wrapper classes like Integer[], Double[], etc. The only change would be in array type, as both binarySearch() and arrayCopy() methods work with the wrapper class arrays.

4. Time Complexity

As discussed earlier, there are two steps in the solution. The binary search for calculating the insertion index has a time complexity of O(log n), and shifting of the elements has a complexity of O(n). Hence, the overall complexity of the solution is O(n).

5. Conclusion

In this article, we learned that a number can be inserted in a sorted array efficiently in Java by having two steps, i.e., binary search for figuring out the element insert index and right shifting of elements from the element insert index.

As always, the complete code used in this article is available over on GitHub.


How to Handle Alerts and Popups in Selenium

$
0
0

1. Overview

In this tutorial, we’ll explore how to handle alerts and popups in Selenium. Alerts and popups are common elements that can interrupt the flow of automated scripts, so managing them effectively is essential for ensuring smooth test execution.

First, we need to understand that alerts and popups come in various forms and require different handling techniques.

Simple alerts are basic notifications that need acknowledgment, typically through an “OK” button (part of the HTML browser standard). Confirmation alerts prompt users to accept or dismiss an action, while prompt alerts request user input. Additionally, popups can appear as separate browser windows or modal dialogs.

Throughout this tutorial, we’ll examine the types of alerts and popups we might encounter during web testing. We’ll demonstrate how to interact with each of these elements using Selenium to ensure our tests proceed without interruption.

2. Setup and Configuration

To handle alerts and popups, we first need to set up our environment with the two required dependencies: the Selenium Java library, which provides the core functionality for automating browsers, and WebDriverManager, which is essential for managing browser drivers by automatically downloading and configuring the correct versions.

To begin, let’s include the required dependencies in our project’s pom.xml file:

<dependency>
    <groupId>org.seleniumhq.selenium</groupId>
    <artifactId>selenium-java</artifactId>
    <version>4.23.1</version>
</dependency>
<dependency>
    <groupId>io.github.bonigarcia</groupId>
    <artifactId>webdrivermanager</artifactId>
    <version>5.8.0</version>
</dependency>

Once the dependencies are set up, we initialize a new instance of ChromeDriver to automate Google Chrome, but this configuration can be easily modified to accommodate other browsers:

private WebDriver driver;
@BeforeEach
public void setup() {
    driver = new ChromeDriver();
}
@AfterEach
public void tearDown() {
    driver.quit();
}

3. Handling Simple Alerts

In this section, we’ll focus on practical steps needed to handle simple alerts using Selenium. Simple alerts are basic alert windows with text and an “OK” button:

simple alert window

We’ll navigate to a sample webpage that demonstrates simple alerts and write a JUnit test to trigger and manage the alert. The Test Page for Javascript Alerts provides examples of various types of alerts, including the simple alert we aim to handle:

@Test
public void whenSimpleAlertIsTriggered_thenHandleIt() {
    driver.get("https://testpages.herokuapp.com/styled/alerts/alert-test.html");
    driver.findElement(By.id("alertexamples")).click();
    Alert alert = driver.switchTo().alert();
    String alertText = alert.getText();
    alert.accept();
    assertEquals("I am an alert box!", alertText);
}

In this test, we initialize the WebDriver and navigate to the test page. The simple alert is triggered by clicking the “Show alert box” button. Once we trigger the alert, we use Selenium’s switchTo().alert() method to switch the control from the main browser window to the alert window.

Once we’re on the alert window, we can now interact with it using the methods provided by Alert Interface. In the case of a simple alert box, we handle it by clicking on the “OK” button on the alert box using the method alert.accept(). Apart from just accepting or dismissing the alert, we can also make use of other useful methods such as alert.getText() to extract the text from the alert window:

String alertText = alert.getText();

Handling alerts in this way is crucial because if we don’t, the automated script will run into an exception. Let’s test this behavior by triggering an alert, deliberately not handling it, and trying to click on another element:

@Test
public void whenAlertIsNotHandled_thenThrowException() {
    driver.get("https://testpages.herokuapp.com/styled/alerts/alert-test.html");
    driver.findElement(By.id("alertexamples")).click();
    assertThrows(UnhandledAlertException.class, () -> {
        driver.findElement(By.xpath("/html/body/div/div[1]/div[2]/a[2]")).click();
    });
}

The result of the test case confirms that an UnhandledAlertException is thrown when an alert is not handled before attempting to interact with other elements on the page.

4. Handling Confirmation Alerts

Confirmation alerts are slightly different from simple alerts. They typically appear when a user action requires confirmation, such as deleting a record or submitting sensitive information. Unlike simple alerts, which only present an “OK” button, confirmation alerts offer two choices: “OK” to confirm the action or “Cancel” to dismiss it.

confirmation alert

To demonstrate how to handle confirmation alerts, we’ll continue using the Test Page for Javascript Alerts. Our goal is to trigger a confirmation alert and interact with it by accepting and dismissing it and then verifying the outcomes.

Let’s see how we can handle confirmation alerts in Selenium:

@Test
public void whenConfirmationAlertIsTriggered_thenHandleIt() {
    driver.get("https://testpages.herokuapp.com/styled/alerts/alert-test.html");
    driver.findElement(By.id("confirmexample")).click();
    Alert alert = driver.switchTo().alert();
    String alertText = alert.getText();
    alert.accept();
    assertEquals("true", driver.findElement(By.id("confirmreturn")).getText());
    driver.findElement(By.id("confirmexample")).click();
    alert = driver.switchTo().alert();
    alert.dismiss();
    assertEquals("false", driver.findElement(By.id("confirmreturn")).getText());
}

In this test, we first navigate the page and trigger the confirmation alert by clicking the “Show confirm box” button. Using switchTo().alert(), we switch the control to focus on the alert and capture the text for verification. The alert is then accepted using the accept() method, and we check the result displayed on the page to confirm that the action was successfully completed.

To further demonstrate the handling of the confirmation alerts, the test triggers the alert again, but this time, we use the dismiss() method to cancel the action. After dismissing the action, we verify that the corresponding action was correctly aborted.

5. Handling Prompt Alerts

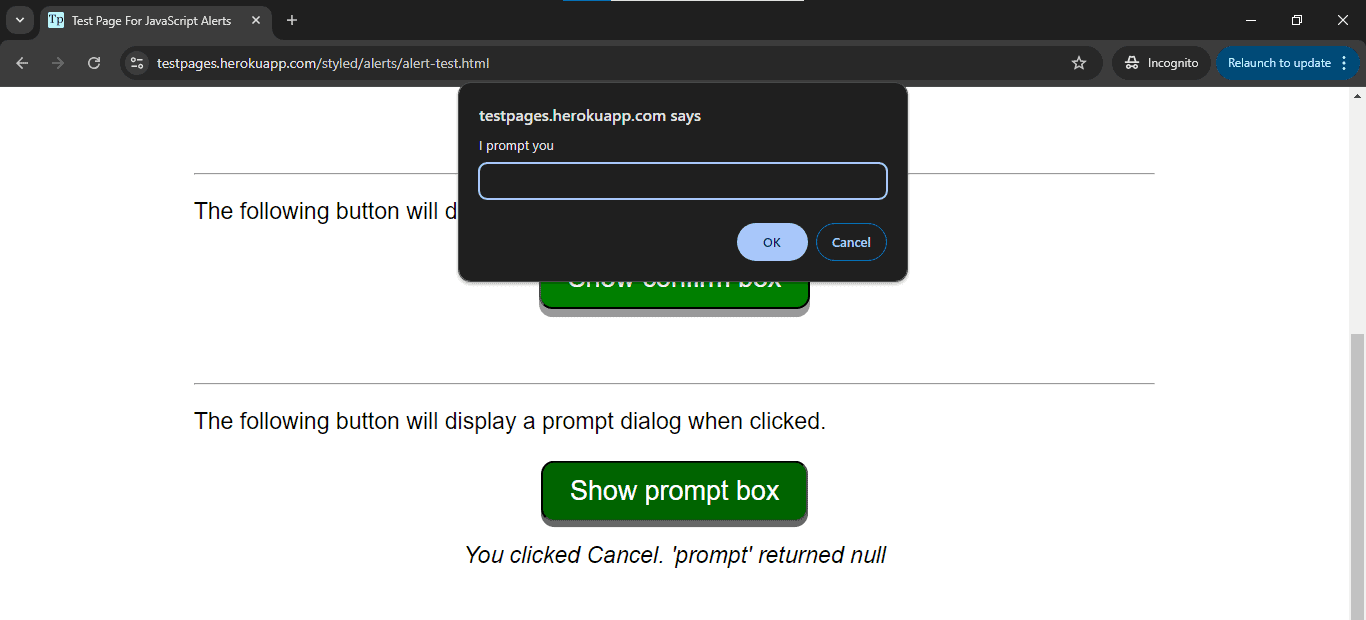
Prompt alerts are a more interactive form of browser alerts compared to simple and confirmation alerts. Unlike simple and confirmation alerts which only present a message to the user, prompt alerts present a message and text input field where the user can enter a response:

prompt-alert image

Prompt alerts typically appear when an action on the webpage requires user input. Handling these alerts in Selenium involves sending the desired input text to the alert and then managing the response by either accepting the input or dismissing the alert.

To demonstrate how to handle prompt alerts, we’ll use the same test page to trigger a prompt alert. Our goal is to trigger the alert, interact with it by submitting the input, and verify that the correct input was processed.

Let’s look at an example showing how we can handle a prompt alert in Selenium:

@Test
public void whenPromptAlertIsTriggered_thenHandleIt() {
    driver.get("https://testpages.herokuapp.com/styled/alerts/alert-test.html");
    driver.findElement(By.id("promptexample")).click();
    Alert alert = driver.switchTo().alert();
    String inputText = "Selenium Test";
    alert.sendKeys(inputText);
    alert.accept();
    assertEquals(inputText, driver.findElement(By.id("promptreturn")).getText());
}

This test navigates to the test page and triggers the prompt alert. The critical step when handling a prompt alert is sending the input text to the alert. We use sendKeys() to enter text into the input field of the prompt window. In this case, we send the string “Selenium Test” as the input. After sending the input, we use the accept() method to submit the input and close the alert.

Finally, we verify that the correct input was submitted by checking the text displayed on the page after the alert is processed. This step helps us ensure that the application correctly handles the input provided by our test script to the prompt alert.

6. Additional Concepts for Handling Alerts in Selenium

In addition to methods we’ve previously covered, two other important concepts in Selenium for managing alerts are alertIsPresent() with WebDriverWait and handling NoAlertPresentException. 

6.1. Using alertIsPresent() with WebDriverWait

The alertIsPresent() condition is part of Selenium’s ExpectedConditions class. It’s used in conjunction with WebDriver’s wait functionality to pause the execution of the script until an alert is present on the page before interacting with it. It’s useful in scenarios where the appearance of an alert is not immediate or predictable.

Let’s see how to use alertIsPresent() with WebDriverWait:

WebDriverWait wait = new WebDriverWait(driver, Duration.ofSeconds(10));
Alert alert = wait.until(ExpectedConditions.alertIsPresent());
alert.accept();

In this implementation, instead of switching to the alert immediately, we use WebDriverWait with ExpectedConditions.alertIsPresent() to pause the script until the alert is detected. This approach ensures that our script only proceeds once the alert is available for interaction.

6.2. Handling NoAlertPresentException

Sometimes, alerts might not appear when we expect them to, and if we attempt to interact with an alert that is not present, our test will fail with a NoAlertPresentExceptionTo handle such cases, we can use a try-catch block to catch the exception and proceed with alternative logic if the alert is not present:

@Test
public void whenNoAlertIsPresent_thenHandleGracefully() {
    driver.get("https://testpages.herokuapp.com/styled/alerts/alert-test.html");
    boolean noAlertExceptionThrown = false;
    try {
        Alert alert = driver.switchTo().alert();
        alert.accept();
    } catch (NoAlertPresentException e) {
        noAlertExceptionThrown = true;
    }
    assertTrue(noAlertExceptionThrown, "NoAlertPresentException should be thrown");
    assertTrue(driver.getTitle().contains("Alerts"), "Page title should contain 'Alerts'");
}

7. Handling Popups

In this section, we’ll explore how to handle popups in Selenium and discuss some of the challenges associated with handling them. Popups are a common feature in many websites and can generally be divided into two broad categories: browser-level and website application popups. Each category requires a different approach in Selenium, and strategies to handle them vary based on their behavior and implementation.

7.1. Browser-Level Popups

Browser-level popups are generated by the browser itself, independent of the web page’s HTML content. These popups often include system dialogs such as basic authentication windows. Browser-level popups are not part of the DOM and, therefore, cannot be interacted with directly using Selenium’s standard findElement() methods.

Common examples of browser-level popups include:

  • Basic Authentication Popups: require users to enter a username and password before accessing a page
  • File Upload/Download Dialogs: appear when the user is required to upload or download files
  • Print Dialogs: triggered by the browser when a webpage or element is printed

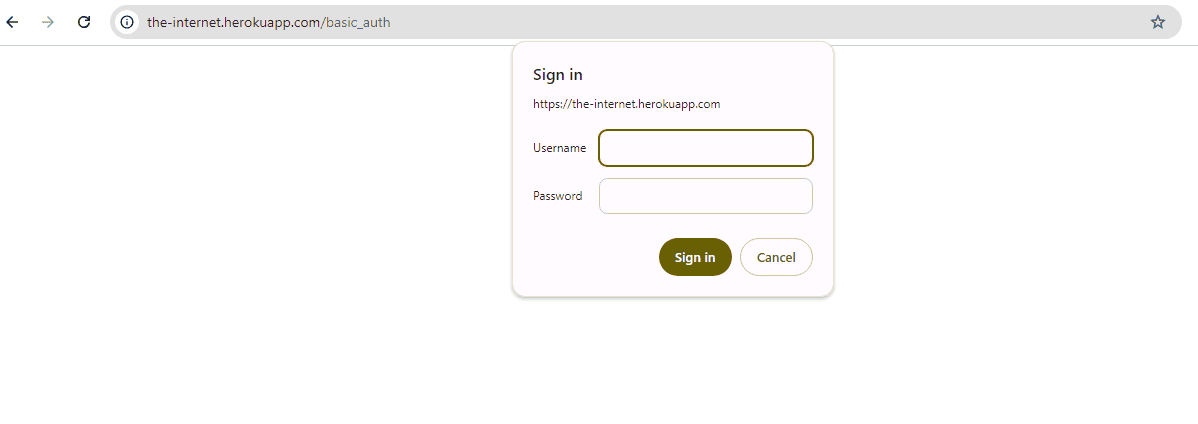
For this tutorial, we’ll focus on demonstrating how to handle a basic authentication popup. Basic authentication popups require credentials (username and password) before granting access to a webpage. We’ll use the demo page Basic Auth to trigger and handle the popup:

Browser-level popups like this are not accessible through standard web element inspection techniques. As a result, we can’t use the sendKeys() method to input credentials. Instead, we need to handle these popups at the browser level. Our approach is to bypass the popup entirely by embedding the necessary credentials directly into the URL.

Let’s see how to handle a basic authentication popup in Selenium:

@Test
public void whenBasicAuthPopupAppears_thenBypassWithCredentials() {
    String username = "admin";
    String password = "admin";
    String url = "https://" + username + ":" + password + "@the-internet.herokuapp.com/basic_auth";
    driver.get(url);
    String bodyText = driver.findElement(By.tagName("body")).getText();
    assertTrue(bodyText.contains("Congratulations! You must have the proper credentials."));
}

In this example, we bypass the basic authentication popup by embedding the username and password into the URL. This technique works for basic HTTP authentication popups. We then navigate to the designated URL, and the browser sends the request to the server with the embedded credentials in the URL. The server recognizes these credentials and authenticates the request without triggering the browser-level popup.

7.2. Web Application Popups

Web application popups are elements embedded directly within the webpage’s HTML and are part of the application’s front end. These popups are created using JavaScript or CSS and can include elements such as modal dialogs, banners, or custom alerts. Unlike browser-level popups, web application popups can be interacted with using standard Selenium commands, as they exist within the DOM.

Some common examples of web application popups include:

  • Modal Dialogs: overlays and prevent user interaction with the rest of the page until closed
  • Javascript Popups: triggered by user actions, such as confirming a deletion or submitting a form
  • Custom Alerts and Toasts: notifications or messages that appear to inform users about an action

For this tutorial, we’ll focus on handling modal dialogs for many web applications.

Modal dialogs display important information or prompt the user for input without navigating away from the page. In this section, we’ll focus on how to interact with modal dialogs using Selenium — particularly, how to close them:

Typically, we inspect the HTML structure of the modal to find the close button or other interactive elements. Once identified, we can use Selenium’s click() method to close the modal.

Here’s an example of how to handle a modal dialog using the standard Selenium click() method:

@Test
public void whenModalDialogAppears_thenCloseIt() {
    driver.get("https://the-internet.herokuapp.com/entry_ad");
    WebDriverWait wait = new WebDriverWait(driver, Duration.ofSeconds(10), Duration.ofMillis(500));
    WebElement modal = wait.until(ExpectedConditions.visibilityOfElementLocated(By.id("modal")));
    WebElement closeElement = driver.findElement(By.xpath("//div[@class='modal-footer']/p"));
    closeElement.click();
    WebDriverWait modalWait = new WebDriverWait(driver, Duration.ofSeconds(10));
    boolean modalIsClosed = modalWait.until(ExpectedConditions.invisibilityOf(modal));
    assertTrue(modalIsClosed, "The modal should be closed after clicking the close button");
}

In this test, the WebDriverWait ensures that the modal is fully visible before interacting with it. Once the modal appears, we locate the close button (which, in this case, is a <p> element inside the modal footer) and call the click() method to close it.

After the click, we verify that the modal is no longer visible using ExpectedConditions.invisibilityOf. Our test passed, indicating that a modal was discovered and closed successfully.

8. Conclusion

In this article, we’ve learned to use switchTo().alert() for JavaScript alerts, employ accept(), dismiss(), and sendKeys() methods, how to utilize WebDriverWait with alertIsPresent() for better synchronization, and how to bypass browser-level authentication popups.

The key takeaway is that we need to remember that specific approaches may vary depending on the application’s implementation, so we need to adapt our strategies accordingly. The complete source code for this tutorial is available over on GitHub.


Masking a String Except the Last N Characters

$
0
0

1. Overview

In Java, we often need to mask a String, for example to hide sensitive information printed in log files or displayed to the user.

In this tutorial, we’ll explore how to accomplish this using a few simple Java techniques.

2. Introduction to the Problem

We might need to mask sensitive information in many situations, such as credit card numbers, social security numbers, or even email addresses. A common way to do this is to hide all but the last few characters of the String.

As usual, examples help understand a problem quickly. Let’s say we have three sensitive String values:

static final String INPUT_1 = "a b c d 1234";
static final String INPUT_2 = "a b c d     ";
static final String INPUT_3 = "a b";

Now, we want to mask all characters in these String values except the last N. For simplicity, let’s take N=4 and mask each character using an asterisk (*) in this tutorial. Therefore, the expected results are:

static final String EXPECTED_1 = "********1234";
static final String EXPECTED_2 = "********    ";
static final String EXPECTED_3 = "a b";

As we can see, if an input String‘s length is less than or equal to N (4), we skip masking it. Further, we treat whitespace characters the same as regular characters.

Next, we’ll take these String inputs as examples and use different approaches to mask them to get the expected result. As usual, we’ll leverage unit test assertions to verify if each solution works correctly.

3. Using char Array

We know that a String is composed of a sequence of chars. Therefore, we can convert the String input to a char array and then apply the masking logic to the char array:

String maskByCharArray(String input) {
    if (input.length() <= 4) {
        return input;
    }
    char[] chars = input.toCharArray();
    Arrays.fill(chars, 0, chars.length - 4, '*');
    return new String(chars);
}

Next, let’s walk through the implementation and understand how it works.

First, we check if the input’s length is less than or equal to 4. If so, no masking is applied, and we return the input String as is.

Then, we convert the input String to a char[] using the toCharArray() method. Next, we leverage Arrays.fill() to mask the characters. Arrays.fill() allows us to define which part of the input char[] needs to be filled by a specific character. In this case, we only want to fill() (mask) chars.length – 4 characters from the beginning of the array.

Finally, after masking the required portion of the char array, we convert it back into a String using new String(chars) and return the result.

Next, let’s test if this solution works as expected:

assertEquals(EXPECTED_1, maskByCharArray(INPUT_1));
assertEquals(EXPECTED_2, maskByCharArray(INPUT_2));
assertEquals(EXPECTED_3, maskByCharArray(INPUT_3));

As the test shows, it masks our three inputs correctly.

4. Two Substrings

Our requirement is to mask all characters in the given String except the last four. In other words, we can divide the input String into two substrings: a substring to be masked (toMask), and a substring for the last four characters to keep plain (keepPlain).

Then, we can simply replace all of the characters in the toMask substring with ‘*’ and join the two substrings together to form the final result:

String maskBySubstring(String input) {
    if (input.length() <= 4) {
        return input;
    }
    String toMask = input.substring(0, input.length() - 4);
    String keepPlain = input.substring(input.length() - 4);
    return toMask.replaceAll(".", "*") + keepPlain;
}

As the code shows, similar to the char array approach, we first handle the case when the input’s length() <= 4.

Then we use the substring() method to extract two substrings: toMask and keepPlain.

We ask replaceAll() to mask toMask by replacing any character “.” with “*”. It’s important to note that the “.” parameter here is a regular expression (regex) to match any character rather than a literal period character.

Finally, we concatenate the masked portion with the unmasked portion (keepPlain) and return the result.

This method passes our tests, too:

assertEquals(EXPECTED_1, maskBySubstring(INPUT_1));
assertEquals(EXPECTED_2, maskBySubstring(INPUT_2));
assertEquals(EXPECTED_3, maskBySubstring(INPUT_3));

As we can see, this approach is a neat and concise solution to this problem.

5. Using Regex

In the two-substrings solution, we used replaceAll(). We also mentioned that this method supports regex. In fact, by using replaceAll() and a clever regex, we can efficiently solve this masking problem in a single step.

Next, let’s see how this is done:

String maskByRegex(String input) {
    if (input.length() <= 4) {
        return input;
    }
    return input.replaceAll(".(?=.{4})", "*");
}

In this example, apart from the input.length() <=4 case handling, we apply the masking logic only by one single replaceAll() call. Next, let’s understand the magic, the regex “.(?=.{4})

This is a lookahead assertion. It ensures that only characters that are followed by exactly four more characters remain unmasked.

Simply put, the regex looks for any character (.) that is followed by four characters (.{4}) and replaces it with “*”. This ensures that only the characters before the last four are masked.

If we test it with our inputs, we get the expected result:

assertEquals(EXPECTED_1, maskByRegex(INPUT_1));
assertEquals(EXPECTED_2, maskByRegex(INPUT_2));
assertEquals(EXPECTED_3, maskByRegex(INPUT_3));

The regex approach efficiently handles the masking in a single pass, making it ideal for concise code.

6. Using the repeat() Method

Since Java 11, the repeat() method has joined the String family. It allows us to create a String value by repeating a certain character several times. If we work with Java 11 or later, we can use repeat() to solve the masking problem:

String maskByRepeat(String input) {
    if (input.length() <= 4) {
        return input;
    }
    int maskLen = input.length() - 4;
    return "*".repeat(maskLen) + input.substring(maskLen);
}

In this method, we first calculate the mask length (maskLen): input.length() -4. Then, we directly repeat the masking character for the required length and concatenate it with the unmasked substring, forming the final result.

As usual, let’s test this approach using our input Strings:

assertEquals(EXPECTED_1, maskByRepeat(INPUT_1));
assertEquals(EXPECTED_2, maskByRepeat(INPUT_2));
assertEquals(EXPECTED_3, maskByRepeat(INPUT_3));

As the test shows, the repeat() approach does the job.

7. Conclusion

In this article, we’ve explored different ways to mask a String while keeping the last four characters visible.

It’s worth noting that although we picked the ‘*’ character to mask sensitive information and kept the last four (N = 4) characters visible in this tutorial, these methods can be easily adjusted to suit different requirements, for example, a different mask character or N value.

As always, the complete source code for the examples is available over on GitHub.


How to Clone a JPA Entity

$
0
0

1. Introduction

Cloning a JPA entity means creating a copy of an existing entity. This allows us to make changes to a new entity without affecting the original object. In this tutorial, we’ll explore various approaches to clone a JPA entity.

2. Why Clone a JPA entity?

Sometimes, we want to copy data without modifying the original entity. For example, we may want to create a new record that is almost identical to an existing one, or we may need to safely edit an entity in memory without saving it to the database right away.

Cloning helps in these cases by allowing us to duplicate the entity and work on the copy.

3. Approaches to Clone

There are multiple strategies for cloning JPA entities, each affecting how thoroughly the original object and its associated entities are copied. Let’s explore each of them.

3.1. Using Manual Copying

The simplest approach to clone an entity is to manually copy its fields. We can either use a constructor or a method that explicitly sets each field value.  This gives us full control over what is copied and how relationships are handled.

Let’s create the Product entity and Category entity classes:

@Entity
public class Category {
    private Long id; 
    private String name;
    // set and get 
}
@Entity
public class Product {
    private Long id;
    private String name;
    private double price;
    private Category category;
   
    // set and get 
}

Here’s an example where we manually copy the fields of a Product entity using a method:

Product manualClone(Product original) {
    Product clone = new Product();
    clone.setName(original.getName());
    clone.setCategory(original.getCategory());
    clone.setPrice(original.getPrice());
    return clone;
}

In the manualClone() method, we start by creating a new instance of the Product entity. Then, we explicitly copy each field from the original product to the new clone object. 

However, when working with JPA, certain fields shouldn’t be copied during the cloning process. For instance, JPA typically auto-generates IDs, so copying the ID field could lead to issues when persisting the cloned entity.

Similarly, audit fields such as createdBy, createdDate, lastModifiedBy, and lastModifiedDate, which are used for tracking the creation and modification of entities, shouldn’t be copied. These fields should be reset to reflect the new clone’s lifecycle.

To verify the behaviour of our cloning method, we can write a simple test case:

@Test
void whenUsingManualClone_thenReturnsNewEntityWithReferenceToRelatedEntities() {
    // ...
    Product clone = service.manualClone(original);
    assertNotSame(original, clone);
    assertSame(original.getCategory(), clone.getCategory());
}

In this test, we see that the Category still refers to the same entity, indicating a shallow copy. If we want a deep copy of the Category, we need to clone it as well.

Here’s an example of how to deep clone the Category when cloning a Product:

Product manualDeepClone(Product original) {
    Product clone = new Product();
    clone.setName(original.getName());
    // ... other fields
    if (original.getCategory() != null) {
        Category categoryClone = new Category();
        categoryClone.setName(original.getCategory().getName());
        // ... other fields
        clone.setCategory(categoryClone);
    }
    return clone;
}

In this case, we create a new Category instance and manually copy its fields to achieve a deep clone.

Since we explicitly copy each field, we can determine exactly which fields should be duplicated and how they should be copied. However, it can become easy to overlook fields as the entity grows more complex.

3.2. Using Cloneable Interface

Another approach to cloning a JPA entity is by implementing the Cloneable interface and overriding the clone() method.

First, we need to ensure that our entity implements Cloneable:

@Entity
public class Product implements Cloneable {
    // ... other fields
}

Then we override the clone() method in our Product entity:

@Override
public Product clone() throws CloneNotSupportedException {
    Product clone = (Product) super.clone();
    clone.setId(null);
    return clone;
}

When we invoke the super.clone(), this method performs a shallow copy of the Product object.

3.3. Using Serialization

Another way to clone a JPA entity is to serialize it to a byte stream and then deserialize it back into a new object. This technique works well for deep cloning since it copies all fields and can even handle complex relationships.

To begin with, we need to ensure that our entity such as implements the Serializable interface:

@Entity
public class Product implements Serializable {
    // ... other fields
}

Once our entity is serializable, we can proceed to clone it using the serialization method:

Product cloneUsingSerialization(Product original) throws IOException, ClassNotFoundException {
    ByteArrayOutputStream byteOut = new ByteArrayOutputStream();
    ObjectOutputStream out = new ObjectOutputStream(byteOut);
    out.writeObject(original);
    ByteArrayInputStream byteIn = new ByteArrayInputStream(byteOut.toByteArray());
    ObjectInputStream in = new ObjectInputStream(byteIn);
    Product clone = (Product) in.readObject();
    in.close();
    clone.setId(null);
    return clone;
}

In this method, we first create a ByteArrayOutputStream to hold the serialized data. The writeObject() method converts the Product instance into a byte sequence and writes it to the ByteArrayOutputStream.

Next, an ObjectInputStream is then used to read the byte sequence and deserialize it back into a new Product object. Since JPA entities require unique identifiers, we explicitly set the ID to null to ensure that when we persist the cloned entity.

To verify this cloning method, we can write a test:

@Test
void whenUsingSerializationClone_thenReturnsNewEntityWithNewNestedEntities() {
    // ...
    Product clone = service.cloneUsingSerialization(original);
    assertNotSame(original, clone);
    assertNotSame(original.getCategory(), clone.getCategory());
}

In this test, the cloned Product is a distinct object from the original, including any nested entities like Category. It’s important to note that, nested entities like Category must also implement the Serializable interface.

Serialization is useful for deep cloning, as it copies all fields provided that all nested objects and relationships are also serializable.

However, serialization can be slower due to the overhead of converting objects to and from byte streams. Additionally, we must explicitly set the ID to null to avoid conflicts when persisting the cloned entity, as JPA expects a new ID for newly persisted entities.

3.4. Using BeanUtils

Additionally, we can also use the Spring Framework’s BeanUtils.copyProperties() method to clone an entity. This method copies the property values from one object to another. This approach is useful for shallow cloning where we need to quickly duplicate the properties of an entity without manually setting each one.

Before we can use this approach, we need to add the commons-beanutils dependency to our pom.xml:

<dependency>
    <groupId>commons-beanutils</groupId>
    <artifactId>commons-beanutils</artifactId>
    <version>1.9.4</version>
</dependency>

Once the dependency is added, we can use BeanUtils.copyProperties() to implement the JPA entity cloning:

Product cloneUsingBeanUtils(Product original) throws InvocationTargetException, IllegalAccessException {
    Product clone = new Product();
    BeanUtils.copyProperties(original, clone);
    clone.setId(null);
    return clone;
}

BeanUtils is useful when we want a quick, shallow copy of an entity, though it doesn’t handle deep copying well. Therefore the category field won’t be copied.

Let’s verify this behaviour with a test case:

@Test
void whenUsingBeanUtilsClone_thenReturnsNewEntityWithNullNestedEntities() throws InvocationTargetException, IllegalAccessException {
    // ...
    Product clone = service.cloneUsingBeanUtils(original);
    assertNotSame(original, clone);
    assertNull(clone.getCategory());
}

In this example, it creates a new Product instance but doesn’t copy over the nested Category entity, leaving the Category as null.

Again, with this solution, we’re only performing a shallow copy. Fields such as ID and audit-related properties are intentionally excluded or reset, as this approach is designed to address quick entity duplication in a JPA-specific context.

3.5. Using ModelMapper

ModelMapper is another utility that can map one object to another. Unlike BeanUtils, which performs shallow copying, ModelMapper is designed to handle deep copying of complex, nested objects with minimal configuration. It’s highly effective when dealing with large entities that contain multiple fields or nested objects.

First, add the ModelMapper dependency to our pom.xml:

<dependency>
    <groupId>org.modelmapper</groupId>
    <artifactId>modelmapper</artifactId>
    <version>3.2.1</version>
</dependency>

Here’s how we can use ModelMapper to clone a Product entity:

Product cloneUsingModelMapper(Product original) {
    ModelMapper modelMapper = new ModelMapper();
    modelMapper.getConfiguration().setDeepCopyEnabled(true);
    Product clone = modelMapper.map(original, Product.class);
    clone.setId(null);
    return clone;
}

In this example, we use the modelMapper.map() method to clone the Product entity. This method maps the fields of the original Product object to a new Product instance.

Moreover, it recursively traverses through the object and its nested fields, performing a deep copy:

@Test
void whenUsingModelMapperClone_thenReturnsNewEntityWithNewNestedEntities() {
    // ...
    Product clone = service.cloneUsingModelMapper(original);
    assertNotSame(original, clone);
    assertNotSame(original.getCategory(), clone.getCategory());
}

In this test, we observe that the cloneUsingModelMapper() method creates a new Product instance and also a new Category instance for the cloned product.

3.6. Using JPA’s detach() Method

JPA provides a detach() method to detach an entity from the persistence context. After detaching the entity, we can modify it and save it as a new entity. This approach is useful when we want to make minimal changes to an entity and treat it as a new record in the database:

Product original = em.find(Product.class, 1L);
// Modify original product's name
original.setName("Smartphone");
em.merge(original);
original = em.find(Product.class, 1L);
em.detach(original); 
original.setId(2L);
original.setName("Laptop");
Product clone = em.merge(original); 
original = em.find(Product.class, 1L);
assertSame("Laptop", clone.getName());
assertSame("Smartphone", original.getName());

From the test case, we detach the original product instance from the persistence context. Once detached, any further modifications, such as updating the name, won’t be tracked automatically by JPA.

4. Conclusion

In this article, we’ve explored various approaches to cloning JPA entities. Manual copying is the most straightforward approach, providing full control over which fields to clone.

However, for more complex scenarios or when dealing with relationships, custom cloning methods or libraries like ModelMapper and BeanUtils can be beneficial.

As always, the code discussed here is available over on GitHub.


How to Check if Multiplying Two Numbers in Java Will Cause an Overflow

$
0
0

1. Overview

In Java, multiplying two numbers can lead to overflow if the result exceeds the limits of the data type (int or long). Java 8 introduced Math.multiplyExact(), automatically detecting overflow and throwing an ArithmeticException. However, before Java 8, manual methods were required to check for overflow.

This article discusses the modern approach using Math.multiplyExact() and a primitive method to detect overflow when multiplying two numbers.

2. Using Math.multiplyExact() for Overflow Detection

Java 8 introduced the Math.multiplyExact() method, which checks for overflow during multiplication. If overflow occurs, it throws an ArithmeticException. This method supports both int and long types.

Here’s how we can check for overflow using Math.multiplyExact() for both int and long values:

public class OverflowCheck {
    public static boolean checkMultiplication(int a, int b) {
        try {
            Math.multiplyExact(a, b);
            return true; // No overflow
        } catch (ArithmeticException e) {
            return false; // Overflow occurred
        }
    }
    public static boolean checkMultiplication(long a, long b) {
        try {
            Math.multiplyExact(a, b);
            return true; // No overflow
        } catch (ArithmeticException e) {
            return false; // Overflow occurred
        }
    }
}

In the above example, we created two methods: checkMultiplication(int a, int b) and checkMultiplication(long a, long b). The first method checks for overflow when multiplying two integers, and the second checks for overflow with long values.

Both methods catch the ArithmeticException and return a boolean, where true indicates successful multiplication (no overflow), and false otherwise.

Let’s examine a unit test that includes various multiplication scenarios for both int and long, addressing cases with and without overflow:

@Test
public void givenVariousInputs_whenCheckingForOverflow_thenOverflowIsDetectedCorrectly() {
    // Int tests
    assertTrue(OverflowCheck.checkMultiplication(2, 3)); // No overflow
    assertFalse(OverflowCheck.checkMultiplication(Integer.MAX_VALUE, 3_000)); // Overflow
    assertTrue(OverflowCheck.checkMultiplication(100, -200)); // No overflow (positive * negative)
    assertFalse(OverflowCheck.checkMultiplication(Integer.MIN_VALUE, -2)); // Overflow (negative * negative)
    assertTrue(OverflowCheck.checkMultiplication(-100, -200)); // No overflow (small negative values)
    assertTrue(OverflowCheck.checkMultiplication(0, 1000)); // No overflow (multiplying with zero)
    // Long tests
    assertTrue(OverflowCheck.checkMultiplication(1_000_000_000L, 10_000_000L)); // No overflow
    assertFalse(OverflowCheck.checkMultiplication(Long.MAX_VALUE, 2L)); // Overflow
    assertTrue(OverflowCheck.checkMultiplication(1_000_000_000L, -10_000L)); // No overflow (positive * negative)
    assertFalse(OverflowCheck.checkMultiplication(Long.MIN_VALUE, -2L)); // Overflow (negative * negative)
    assertTrue(OverflowCheck.checkMultiplication(-1_000_000L, -10_000L)); // No overflow (small negative values)
    assertTrue(OverflowCheck.checkMultiplication(0L, 1000L)); // No overflow (multiplying with zero)
}

In the above unit test, we first verify that multiplying small positive integers (2 * 3) and large values (1 billion * 10 million) stay within the int and long bounds, respectively, without causing overflow.

Multiplying Integer.MAX_VALUE by 3.000 and Long.MAX_VALUE by 2 correctly triggers overflow, as both exceed their type limits.

Mixed-sign multiplications, such as 100 * -200 and 1 billion * -10,000, do not cause overflow. For negative values, multiplying Integer.MIN_VALUE by -2 and Long.MIN_VALUE by -2 results in overflow, while smaller negative values like -100 * -200 and -1,000,000 * -10,000 do not.

Finally, multiplying any value by 0 always avoids overflow.

These cases collectively validate that the checkMultiplication() method accurately detects safe and overflow-prone multiplications for both int and long types.

3. Primitive Method for Overflow Detection

Before Java 8, we needed to manually detect overflow during multiplication because there was no built-in method like Math.multiplyExact(). The general idea is to verify whether multiplying two numbers would exceed the bounds of the data type by rearranging the multiplication logic. We do this by comparing the operands against the data type’s maximum and minimum possible values.

Here’s how we can check for overflow using primitive methods for both int and long values:

public class PrimitiveOverflowCheck {
    public static boolean willOverflow(int a, int b) {
        if (a == 0 || b == 0) return false;
        if (a > 0 && b > 0 && a > Integer.MAX_VALUE / b) return true;
        if (a > 0 && b < 0 && b < Integer.MIN_VALUE / a) return true;
        if (a < 0 && b > 0 && a < Integer.MIN_VALUE / b) return true;
        return a < 0 && b < 0 && a < Integer.MAX_VALUE / b;
    }
    public static boolean willOverflow(long a, long b) {
        if (a == 0 || b == 0) return false;
        if (a > 0 && b > 0 && a > Long.MAX_VALUE / b) return true;
        if (a > 0 && b < 0 && b < Long.MIN_VALUE / a) return true;
        if (a < 0 && b > 0 && a < Long.MIN_VALUE / b) return true;
        return a < 0 && b < 0 && a < Long.MAX_VALUE / b;
    }
}

The willOverflow(int a, int b) method checks if multiplying two int values will exceed the maximum or minimum values of the int type. It considers cases where the operands are positive or negative and whether their product would exceed the range.

Similarly, for long values, the willOverflow(long a, long b) method performs a check to ensure that their multiplication doesn’t surpass the bounds of the long type.

A key component of this method is the final check, which specifically addresses the situation where both values are negative. This check is crucial because, without it, we might overlook cases where the multiplication of two negative numbers produces a positive result that exceeds the allowed maximum for the data type. This can occur because, in the case of integer overflow, two large negative numbers can produce a positive result that lies outside the permissible range of int values.

Both methods use a similar approach to detect overflow by comparing the operands against their respective types’ maximum and minimum values, ensuring that multiplication results remain within the safe range.

Here is a simple unit test that covers many possible cases of overflow:

@Test
public void givenVariousInputs_whenCheckingForOverflow_thenOverflowIsDetectedCorrectly() {
    // Int tests
    assertFalse(PrimitiveOverflowCheck.willOverflow(2, 3)); // No overflow
    assertTrue(PrimitiveOverflowCheck.willOverflow(Integer.MAX_VALUE, 3_000)); // Overflow
    assertFalse(PrimitiveOverflowCheck.willOverflow(100, -200)); // No overflow (positive * negative)
    assertTrue(PrimitiveOverflowCheck.willOverflow(Integer.MIN_VALUE, -2)); // Overflow (negative * negative)
    assertFalse(PrimitiveOverflowCheck.willOverflow(-100, -200)); // No overflow (small negative values)
    assertFalse(PrimitiveOverflowCheck.willOverflow(0, 1000)); // No overflow (multiplying with zero)
    // Long tests
    assertFalse(PrimitiveOverflowCheck.willOverflow(1_000_000_000L, 10_000_000L)); // No overflow
    assertTrue(PrimitiveOverflowCheck.willOverflow(Long.MAX_VALUE, 2L)); // Overflow
    assertFalse(PrimitiveOverflowCheck.willOverflow(1_000_000_000L, -10_000L)); // No overflow (positive * negative)
    assertTrue(PrimitiveOverflowCheck.willOverflow(Long.MIN_VALUE, -2L)); // Overflow (negative * negative)
    assertFalse(PrimitiveOverflowCheck.willOverflow(-1_000_000L, -10_000L)); // No overflow (small negative values)
    assertFalse(PrimitiveOverflowCheck.willOverflow(0L, 1000L)); // No overflow (multiplying with zero)
}

This test is similar to the one from earlier, confirming that willOverflow() correctly identifies overflow conditions for both int and long types. It ensures that the method accurately detects when multiplication operations will overflow, aligning with the behavior of Math.multiplyExact().

4. Conclusion

Detecting overflow during multiplication is crucial for avoiding unexpected results. Java 8’s Math.multiplyExact() provides a simple, built-in way to check for overflow by throwing an ArithmeticException. However, in earlier versions of Java or for specific use cases, manual (primitive) methods can also be used to detect overflow. Both approaches can safely handle arithmetic operations without producing invalid results.

As always, the source code is available over on GitHub.


How to Replace Deprecated JWT parser().setSigningKey()

$
0
0

1. Overview

The Java JWT (JSON Web Token) library is a tool for creating, parsing, and validating JWT tokens. These tokens secure APIs and web applications and are a common solution for authentication and authorization.

In this tutorial, we’ll learn how to replace the deprecated parser().setSigningKey() method from this library with the more modern parserBuilder.setSigningKey(). Before diving into the implementation, we’ll discuss the reason for this change and the advantages of using JWT Parser-builder for parsing and validating JSON Web Tokens.

2. What Is the Signing Key?

The signing key is a crucial element of a JWT token. JWT tokens consist of three parts: a header, a payload, and a signature. The signature is created by signing the header and payload using a secret key or a public/private key pair. When a token is sent to the server, the signing key is used to validate the signature, ensuring that the token has not been tampered with.

In the Java JWT library, the signing key is provided to the parser during token validation. This ensures the token’s integrity and allows the server to trust its contents.

3. What Is the Jwts Class?

The Jwts class is a core utility class in the Java JWT library. It serves as the entry point for working with JWTs. This class provides us with various methods for creating, parsing, and validating JWTs. For instance, when we want to parse a JWT, we start by calling the Jwts.parserBuilder() method, which provides us with a builder for constructing a parser with the necessary configuration options, such as setting the signing key.

3.1 Deprecated Method Overview

Now that we have some context, let’s look at the deprecated parser().setSigningKey() method that we want to replace:

JwtParser parser = Jwts.parser().setSigningKey(key);

In this context, we use setSigningKey() to set the key for parsing and validating the JWT. This method was straightforward but had limitations, particularly regarding immutability and thread safety, which led to its eventual deprecation.

Specifically, this way of configuring the signing key was deprecated in version 0.11.0

4. Refactored Code With parserBuilder.setSigningKey()

To replace the deprecated method, we’ll use the JwtParserBuilder class instead. Furthermore, this was introduced in version 0.11.0 and provides us with a more secure and flexible API for handling JWT tokens. The new way to create our JwtParser with a signing key looks like this:

JwtParser parser = Jwts.parserBuilder()
  .setSigningKey(key)
  .build();

In this example, parserBuilder() allows us to build a parser with a signing key while offering additional configuration options. Finally, the build() method creates an immutable parser instance, ensuring that it’s thread-safe and allows reuse across different parts of our application.

5. Why the Change?

The deprecation of parser().setSigningKey() is part of a broader move toward enhancing security and flexibility in JWT handling. Let’s look at some of the key reasons for this change:

  • Immutability and Thread Safety: The new parserBuilder.setSigningKey() method produces a JWT Parser instance that is immutable and thread-safe. This also means we can reuse the same parser across multiple threads without worrying about state capture and unexpected behavior.
  • Enhanced Security: With parserBuilder.setSigningKey(), we can flexibly configure specific required claims and also set custom validation rules. This helps us enforce stricter security rules and easily customize our JWT validation process.
  • Improved Readability: We can also improve the readability of our code by making configurations explicit and easier to understand with parserBuilder.setSigningKey().

6. Conclusion

In this article, we learned how to replace the deprecated parser().setSigningKey() method with the parserBuilder.setSigningKey(). We also explored the reasons behind the deprecation and discussed the benefits of using the updated API for creating JWT parsers.

As always, the code used in this tutorial is available over on GitHub.


How to Append a Newline to a StringBuilder

$
0
0

1. Overview

In this tutorial, we’re going to explore how to append newlines to a StringBuilder.

First, we’ll discuss why hard-coding newlines isn’t reliable across operating systems. Then, we’ll dive into platform-independent methods for handling newlines in Java.

2. The Challenge of Platform-Dependent Newlines

In Java, when working with Strings and StringBuilders, adding a new line can become tricky because different operating systems handle newlines differently. Thus, if we build an application that runs across multiple platforms, simply adding \n might not always work as expected.

2.1 Newline Representation Conventions

  • Unix/Linux/macOS represent newline using Line Feed(LF) denoted by “\n”.
  • Windows uses a combination of Carriage Return and  Line Feed(CRLF) denoted as “\r\n”.

To learn more about line break types and their implications, check out the Difference Between CR LF, LF, and CR Line Break Types.

The following code used “\n” to add a new line in StringBuilder:

StringBuilder sb = new StringBuilder();
sb.append("Line 1");
sb.append("\n");
sb.append("Line 2");

If we hard-code a newline with “\n”,  it may display as expected on the Unix operating system but not on Windows, which expects CRLF (“\r\n”).

3. Platform Independent Methods to Append Newlines

To ensure that our code works consistently across different platforms, it is important to use platform-independent methods. Let’s look at a few options:

3.1 Using System.lineSeparator()

Java provides System.lineSeparator(), which returns the appropriate newline character based on the underlying operating system.

Therefore, this is the recommended way to handle newlines in cross-platform applications:

StringBuilder sb = new StringBuilder();
sb.append("First Line");
sb.append(System.lineSeparator());
sb.append("Second Line");

Here, System.lineSeparator() dynamically returns “\n” for Linux/macOS and “\r\n” for Windows.

3.2 Using System.getProperty(“line.separator”)

An alternative approach is to use System.getProperty(“line.separator”), which returns the newline character specific to the system we’re running on:

StringBuilder sb = new StringBuilder();
sb.append("First Line");
sb.append(System.getProperty("line.separator"));
sb.append("Second Line");

Although System.getProperty(“line.separator”)  works the same way as System.lineSeparator(),  it’s less commonly used because System.lineSeparator() was introduced as a cleaner solution in Java 7.

3.3 Using String.format(“%n”)

Another option is using String.format() with the %n format specifier, which is replaced by the platform-specific newline character:

StringBuilder sb = new StringBuilder();
sb.append("First Line");
sb.append(String.format("%n"));
sb.append("Second Line");

This method also ensures platform independence and is useful when working with formatted strings.

4. Helper Class/Function

To simplify newline handling further, we can encapsulate the logic in a helper function or class.

For example, we can create a helper class that wraps StringBuilder and provides custom methods for appending a newline. This helps avoid code duplication and makes it easier to maintain and update:

public class StringBuilderHelper {
    private StringBuilder sb;
    public StringBuilderHelper() {
        sb = new StringBuilder();
    }
    public StringBuilderHelper append(Object obj) {
        sb.append(obj != null ? obj.toString() : "");
    }
    public StringBuilderHelper appendLineSeparator() {
        sb.append(System.lineSeparator());
    }
    @Override
    public String toString() {
        return sb.toString();
    }
}

Here’s how you can use the StringBuilderHelper class:

@Test
public void whenAppendingString_thenCorrectStringIsBuilt() {
    StringBuilderHelper gsBuilder = new StringBuilderHelper();
    gsBuilder.append("Hello")
      .appendLineSeparator()
      .append("World");
    assertEquals("Hello" + System.lineSeparator() + "World", gsBuilder.toString());
}

This helper class encapsulates StringBuilder and adds an appendNewLine() method that appends a platform-independent newline using System.lineSeparator(). It also returns this(object reference) to allow method chaining, just like StringBuilder.

5. Conclusion

In this article, we explored various ways to add newlines to a StringBuilder. First, we saw that hardcoding platform-specific newlines can lead to issues on different operating systems. Then we discussed platform-independent methods like System.lineSeparator() and String.format(“%n”), which work perfectly with cross-platform applications. Finally, we covered how to create a helper class to simplify adding newlines simplifying newline management by encapsulating the logic and supporting method chaining for a cleaner and more maintainable approach.

As usual, the full source code and examples can be found over on GitHub.


Handling Kafka Producer TimeOutException with Java

$
0
0

1. Overview

In this tutorial, we’ll learn how to handle TimeOutException in Kafka Producer.

Firstly, let’s go through possible scenarios when TimeOutException occurs, and then see how to tackle the same.

2. TimeOutException in Kafka Producer

We start producing messages to Kafka by creating a ProducerRecord, which must include the topic we want to send the record to and a value. Optionally, we can also specify a key, a partition, a timestamp, and/or a collection of headers.

Then the partitioner chooses a partition for us, usually based on the ProducerRecord key. Once the partitioner selects a partition, the producer identifies the topic and partition for the record. The producer then adds the record to a batch of records that it also sends to the same topic and partition, which we consider a buffer. A separate thread is responsible for sending those batches of records to the appropriate Kafka brokers.

Kafka uses the buffering concept while sending messages from producer to broker. Once we call the send() method from KafkaProducer to send the ProducerRecord, the system places the message in the buffer and sends it to the buffer in a separate thread.

Request timeout or large batch size causes the TimeOutException in KafkaProducer, i.e., exceeding the buffer limit or experiencing a network bottleneck. Let’s understand it one by one.

3. Request Timeout

Once we add a record to a batch, we need to send that batch within a specified duration to ensure we send it on time. The configuration parameter request.timeout.ms controls the time limit which defaults to thirty seconds:

producerProperties.put(ProducerConfig.REQUEST_TIMEOUT_MS_CONFIG, 60000);

We change the request timeout to allow more time for sending each batch. Once the batch queued longer than 60 seconds then we get the TimeOutException.

4. Large Batch Size

The kafka producer waits to send the data in the buffer to the broker until the batch size is met. If the producer doesn’t meet the batch size, the request times out. So we can decrease the batch-size and reduce the possibility of request time out:

producerProperties.put(ProducerConfig.BATCH_SIZE_CONFIG, 100000);

By decreasing the batch size we’ve batches sent to the broker more frequently with less number of messages. This might avoid the TimeOutException.

5. Network Bottleneck

If we send the messages to the broker with a higher rate than the processing capability of sender threads then it can cause a network bottleneck causing TimeOutException. We can handle this using configuration linger.ms:

producerProperties.put(ProducerConfig.LINGER_MS_CONFIG, 10);

linger.ms property controls the amount of time to wait for additional messages before sending the current batch. KafkaProducer sends a batch of messages either when it fills the current batch or when it reaches the linger.ms limit.

By default, the producer sends messages as soon as there is a sender thread available to send them, even if there’s just one message in the batch. By setting linger.ms higher than 0, we instruct the producer to wait a few milliseconds to add additional messages to the batch before sending it to the brokers.

This increases latency a little and significantly increases throughput—the overhead per message is much lower, and compression, if enabled, is much better.

6. Replication Factor

Kafka offers configuration for replication strategies. Both the topic-level configuration and the broker-level configuration refer to min.insync.replicas.

If replication factor is less than min.insync.replicas, then A write doesn’t get enough acknowledgments and therefore times out. Recreating the topic with replication factor > min.insync.replicas fixes it.

While configuring the cluster for data durability, we can ensure that the producer has at least two replicas that are caught up and “in sync” by setting min.insync.replicas to 2. We should use this setting alongside configuring the producer to acknowledge “all” requests. This ensures that at least two replicas (leader and one other) acknowledge a write for it to be successful.

This can prevent data loss in scenarios where the leader acks a write, then suffers a failure, and leadership is transferred to a replica that doesn’t have a successful write. Without these durable settings, the producer would think it was successfully produced, and the messages would be dropped on the floor and lost.

However, configuring for higher durability results in reduced efficiency due to the extra overhead involved, so kafka doesn’t recommend clusters with high throughput that can tolerate occasional message loss to change this setting from the default of 1.

7. Bootstrap Server Address

Some network-related issues can cause the TimeOutException as well.

A firewall might block the Kafka port, either on the producer side, on the broker side, or somewhere in the middle. Try nc -z broker-ip <port_number> from the server running the producer:

$ nc -z  192.168.123.132 9092

We find out that if a firewall blocks the port.

If the DNS resolution is broken, even though the port is open, the producer cannot find an IP address. Hence, if the rest of the things are fine, we can check this too.

8. Conclusion

In this article, we’ve learned that a TimeOutException in the KafkaProducer class can be caused by either request timeout, batch size, or network bottlenecks. We’ve also gone through other possibilities, like an erroneous replication factor or server address configuration.

As always, the complete code used in this article is available over on GitHub.


How to Count Lines of Java Code Using IntelliJ IDEA?

$
0
0

1. Overview

IntelliJ IDEA is a popular integrated development environment (IDE) for Java programming. It’s best known for its powerful features and user-friendly interface. To count lines of Java code in IntelliJ IDEA, we can use built-in tools or third-party plugins.

In this tutorial, we’ll explore several ways of counting lines of Java code using IntelliJ IDEA. For a profound understanding, we’ll look at each method with screenshots.

2. Counting Lines of Java Code Using Statistic Plugin

Statistic is a third-party plugin for IntelliJ IDEA. It’s important to note that it isn’t pre-installed in the IntelliJ idea by default. However, we can install it from the plugin marketplace to use its code analysis and line-counting features.

For this purpose, first, let’s open the IntelliJ IDEA settings by pressing CTRL+ALT+S or by navigating to the File tab and clicking on the Settings option:


Now we go to the Plugin tab, type statistic in the Search bar, and finally click on the Install button under the Statistic plugin to install the selected plugin:


After installing the Statistic plugin, we restart the IDE to ensure it works correctly. The plugin icon appears at the bottom left side of the IntelliJ Idea. To demonstrate how it works, let’s click on it to open the Overview:


The Statistic plugin shows there are a total of 15 lines in our code. Apart from the line count, it also shows the file size, minimum size, maximum size, etc. Moreover, we can navigate to the java tab for more precise results:


The java tab shows the total lines, source code lines, commented lines, etc.

In IntelliJ IDEA, Search is a built-in feature that enables us to search for specific text within a file, project, or across multiple files. More specifically, to count lines of Java code using the Search feature, we need to use regular expressions like \n or \n+.

For instance, we can use keyboard shortcut keys CTRL+F to search within the current file and CTRL+SHIFT+F to search across the entire project or multiple files:

Let’s click on the .* icon in the search box to switch to Regex mode:


Now we can use \n to count the total lines of Java code, including empty as well as non-empty lines:


The output shows that we’re currently on line 4 out of a total of 14 lines. Similarly, we can use the regex \n+ to count only non-empty lines:


The output shows that there are a total of 13 non-empty lines in this Java file.

The Statistic plugin is suited for users who prefer automated checks and work with larger codebases. On the other hand, Regex in Search is ideal for users who don’t want to install additional plugins and are comfortable with manual input, particularly in smaller codebases.

To illustrate this in detail, let’s compare the Statistic plugin with regex in the search feature:

Feature Statistic Plugin Regex in Search
Installation We need to install it from the plugin marketplace. Pre-installed in IntelliJ IDEA.
Ease of Use Provides a simple interface for code analysis after installation. It requires a basic understanding of regular expressions.
Line Counting Options Counts total lines, source lines, comment lines, blank lines, etc. Counts total lines or non-empty lines based on the regex used.
Output Detailed breakdown of line types and file statistics. Displays the current line number and the total lines in a file or a project.
Customization Designed specifically for code statistics with file size info. More manual but flexible for custom searches using regex.
Use Case Best for detailed code analysis, especially when needing precision. Suitable for quick, simple line counting without installing additional plugins.
Performance Efficient for larger projects, providing a comprehensive view. May be slower or tedious for large projects due to manual input.
Advanced Metrics Provides additional metrics like file size, and minimum or maximum size. Lacks additional metrics beyond basic line counting.

Overall, the Statistic plugin provides detailed, user-friendly analysis, while Regex in the Search feature offers a quick, flexible method for basic line counting.

5. Conclusion

In this article, we explored two methods for counting lines of Java code in IntelliJ IDEA: the third-party Statistic plugin and the built-in Search feature with regex. Specifically, the Statistic plugin offers detailed and user-friendly analysis, making it ideal for comprehensive code metrics and larger projects.

In contrast, using regex in the Search feature provides a quick, flexible alternative for basic line counting without requiring additional installations. Finally, choosing between these methods depends on our need for detailed analysis or a simple, immediate count.


ChatClient Fluent API in Spring AI

$
0
0

1. Overview

In this tutorial, we’ll explore the fluent API of ChatClient, a feature of the Spring AI module version 1.0.0 M1.

The ChatClient interface from the Spring AI module enables communication with AI models, allowing users to send prompts and receive structured responses. It follows the builder pattern, offering an API similar to WebClient, RestClient, and JdbcClient.

2. Executing Prompts via ChatClient

We can use the client in Spring Boot as an auto-configured bean, or create an instance programmatically.

First, let’s add the spring-ai-openai-spring-boot-starter dependency to our pom.xml:

<dependency>
    <groupId>org.springframework.ai</groupId>
    <artifactId>spring-ai-openai-spring-boot-starter</artifactId>
</dependency>

With this, we can inject the ChatClient.Builder instance into our Spring-managed components:

@RestController
@RequestMapping("api/articles")
class BlogsController {
    private final ChatClient chatClient;
  
    public BlogsController(ChatClient.Builder chatClientBuilder) {
        this.chatClient = chatClientBuilder.build();
    }
    // ...
}

Now, let’s create a simple endpoint that accepts a question as a query parameter and forwards the prompt to the AI:

@GetMapping("v1")
String askQuestion(@RequestParam(name = "question") String question) {
    return chatClient.prompt()
      .user(question)
      .call()
      .chatResponse()
      .getResult()
      .getOutput()
      .getContent();
}

As we can see, the fluent ChatClient allows us to easily create a prompt request from the user’s input String, call the API, and retrieve the response content as text.

Moreover, if we’re only interested in the response body as a String and don’t need metadata like status codes or headers, we can simplify our code by using the content() method to group the last four steps. Let’s refactor the code and add this improvement:

@GetMapping("v1")
String askQuestion(@RequestParam(name = "question") String question) {
    return chatClient.prompt()
      .user(question)
      .call()
      .content();
}

If we send a GET request now, we’ll receive a response without a defined structure, similar to the default output from ChatGPT when accessed through a browser:

3. Mapping Response to a Specific Format

As we can see, the ChatClient interface simplifies the process of forwarding user queries to a chat model and sending the response back. However, in most cases, we’ll want the model’s output in a structured format, which can then be serialized to JSON.

The API exposes an entity() method, which allows us to define a specific data structure for the model’s output. Let’s revise our code to ensure it returns a list of Article objects, each containing a title and a set of tags:

record Article(String title, Set<String> tags) {
}
@GetMapping("v2")
List<Article> askQuestionAndRetrieveArticles(@RequestParam(name = "question") String question) {
    return chatClient.prompt()
      .user(question)
      .call()
      .entity(new ParameterizedTypeReference<List<Article>>() {});
}

If we execute the request now, we’ll expect the endpoint to return the Article recommendation in a valid JSON list:

4. Provide Additional Context

We’ve learned how to use the Spring AI module to create prompts, send them to an AI model, and receive structured responses. However, the article recommendations returned by our REST API are fictional and may not exist in reality, on our website.

To address this, the ChatClient leverages the Retrieval Augmented Generation (RAG) pattern, combining data retrieval from a source with a generative model to provide more accurate responses. We’ll use a vector store to take advantage of RAG and load it with documents relevant to our use case.

First, we’ll create a VectorStore and load it with the augmented data from a local file, during the class initialization:

@RestController
@RequestMapping("api/articles")
public class BlogsController {
    private final ChatClient chatClient;
    private final VectorStore vectorStore;
    public BlogsController(ChatClient.Builder chatClientBuilder, EmbeddingModel embeddingModel) throws IOException {
        this.chatClient = chatClientBuilder.build();
        this.vectorStore = new SimpleVectorStore(embeddingModel);
        initContext();
    }
    void initContext() throws IOException {
        List<Document> documents = Files.readAllLines(Path.of("src/main/resources/articles.txt"))
          .stream()
          .map(Document::new)
          .toList();
        vectorStore.add(documents);
    }
  
    // ...
}

As we can see, we read all the entries from articles.txt and created a new Document for each line of this file. Needless to say, we don’t have to rely on a file –  we can use any data source if needed.

After that, we’ll provide the augmented data to the model by wrapping the VectorStore in a QuestionAnswerAdvisor:

@GetMapping("v3")
List<Article> askQuestionWithContext(@RequestParam(name = "question") String question) {
    return chatClient.prompt()
      .advisors(new QuestionAnswerAdvisor(vectorStore, SearchRequest.defaults()))
      .user(question)
      .call()
      .entity(new ParameterizedTypeReference<List<Article>>() {});
}

As a result, our application now returns data exclusively from the augmented context:

5. Conclusion

In this article, we explored Spring AI’s ChatClient. We began by sending simple user queries to the model and reading its responses as plain text. Then, we enhanced our solution by retrieving the model’s response in a specific, structured format.

Finally, we learned how to load the model’s context with a collection of documents to provide accurate responses based on our own data. We achieved this using a VectorStore and a QuestionAnswerAdvisor.

The complete examples are available over on GitHub.


Introduction to Apache Hadoop

$
0
0

1. Introduction

Humanity produces staggering amounts of data daily with the world more connected than ever through social media platforms, messaging apps, and audio/video streaming services.

Therefore, statistics show that an astounding 90% of all the data created has been generated in the past two to three years.

Since the role of data in the modern world has become more strategic and the majority of the data is in the unstructured format, we needed a framework capable of processing such vast data sets – at the scale of petabytes, zettabytes, or more, commonly referred to as Big Data.

In this tutorial, we’ll explore Apache Hadoop, a widely recognized technology for handling big data that offers reliability, scalability, and efficient distributed computing.

2. What Is Apache Hadoop?

Apache Hadoop is an open-source framework designed to scale up from a single server to numerous machines, offering local computing and storage from each, facilitating the storage and processing of large-scale datasets in a distributed computing environment.

The framework leverages the power of cluster computing – processing data in small chunks across multiple servers in a cluster.

Also, the flexibility of Hadoop in working with many other tools makes it the foundation of modern big data platforms – providing a reliable and scalable way for businesses to gain insights from their growing data.

3. Core Components of Hadoop

Hadoop’s four core components form the foundation of its system, enabling distributed data storage and processing.

3.1. Hadoop Common

It’s a set of essential Java libraries commonly available to all Hadoop modules to function better.

3.2. Hadoop Distributed File System (HDFS)

HDFS is a distributed file system with native support for large datasets that provides data throughput with high availability and fault tolerance.

Simply, it’s the storage component of Hadoop, storing large amounts of data across multiple machines and capable of running on standard hardware, making it cost-effective.

3.3. Hadoop YARN

YARN, an acronym for Yet Another Resource Negotiator, provides a framework for scheduling jobs, and manages system resources for distributed systems.

In a nutshell, it’s the resource management component of Hadoop, which manages the resources utilized for processing the data stored in HDFS.

3.4. Hadoop MapReduce

A simple programming model that processes data in parallel by turning unstructured data into key-value pairs (mapping), then splits it across nodes and combines the results into the final output (reducing).

So, in layman’s terms, it’s the brain of Hadoop, providing primary processing engine capabilities in two phases – mapping and reducing.

4. Setup

The GNU/Linux platform supports Hadoop. So, let’s set up our Hadoop cluster on the Linux OS.

4.1. Prerequisites

First, we require Java 8/11 installed for the latest Apache Hadoop. Also, we can follow the recommendations for the Java version here.

Next, we need to install SSH and ensure that the sshd service is running to use Hadoop scripts.

4.2. Download and Install Hadoop

We can follow the detailed guide to install and configure Hadoop in Linux.

Once setup is complete, let’s run the following command to verify the version of the installed Hadoop:

hadoop version

Here’s the output of the above command:

Hadoop 3.4.0 Source code repository git@github.com:apache/hadoop.git -r bd8b77f398f626bb7791783192ee7a5dfaeec760 
Compiled by root on 2024-03-04T06:29Z 
Compiled on platform linux-aarch_64 
Compiled with protoc 3.21.12 
From source with checksum f7fe694a3613358b38812ae9c31114e 
This command was run using /usr/local/hadoop/common/hadoop-common-3.4.0.jar

Notably, we can run it in any of the three supported operation modes – standalone, pseudo-distributed, and fully-distributed. However, by default, Hadoop is configured to run in the standalone (local non-distributed) mode, essentially running a single Java process.

5. Basic Operations

Once our Hadoop cluster is up and running, we can perform many operations.

5.1. HDFS Operations

Let’s check out a few handy operations for managing files and directories using the HDFS’s command line interface.

For instance, we can upload a file to HDFS:

hdfs dfs -put /local_file_path /hdfs_path

Similarly, we can download the file:

hdfs dfs -get /hdfs_file_path /local_path

Let’s list all the files in the HDFS directory:

hdfs dfs -ls /hdfs_directory_path

And, here’s how we can read the content of a file at the HDFS location:

hdfs dfs -cat /hdfs_file_path

Also, this command checks the HDFS disk usage:

hdfs dfs -du -h /hdfs_path

Furthermore, there are other useful commands like -mkdir to create a directory, –rm to delete a file or directory, and -mv to move to rename a file available through HDFS.

5.2. Running MapReduce Job

Hadoop distribution includes a few simple and introductory examples to explore MapReduce under the hadoop-mapreduce-examples-3.4.0 jar file.

For instance, let’s look at WordCount, a simple app that scans the given input files and extracts the number of occurrences of each word as output.

First, we’ll create a few text files – textfile1.txt and textfile2.txt in the input directory with some content:

echo "Introduction to Apache Hadoop" > textfile01.txt
echo "Running MapReduce Job" > textfile01.txt

Then, let’s run the MapReduce job and create output files:

hadoop jar $HADOOP_HOME/share/hadoop/mapreduce/hadoop-mapreduce-examples-3.4.0.jar wordcount input output

The output log shows the mapping and reducing operations among other tasks:

2024-09-22 12:54:39,592 INFO impl.MetricsSystemImpl: Scheduled Metric snapshot period at 10 second(s).
2024-09-22 12:54:39,592 INFO impl.MetricsSystemImpl: JobTracker metrics system started
2024-09-22 12:54:39,722 INFO input.FileInputFormat: Total input files to process : 2
2024-09-22 12:54:39,752 INFO mapreduce.JobSubmitter: number of splits:2
2024-09-22 12:54:39,835 INFO mapreduce.JobSubmitter: Submitting tokens for job: job_local1009338515_0001
2024-09-22 12:54:39,835 INFO mapreduce.JobSubmitter: Executing with tokens: []
2024-09-22 12:54:39,917 INFO mapreduce.Job: The url to track the job: http://localhost:8080/
2024-09-22 12:54:39,918 INFO mapreduce.Job: Running job: job_local1009338515_0001
2024-09-22 12:54:39,959 INFO mapred.MapTask: Processing split: file:/Users/anshulbansal/work/github_examples/hadoop/textfile01.txt:0+30
2024-09-22 12:54:39,984 INFO mapred.MapTask: (EQUATOR) 0 kvi 26214396(104857584)
2024-09-22 12:54:39,984 INFO mapred.MapTask: mapreduce.task.io.sort.mb: 100
2024-09-22 12:54:39,984 INFO mapred.MapTask: soft limit at 83886080
2024-09-22 12:54:39,984 INFO mapred.MapTask: bufstart = 0; bufvoid = 104857600
2024-09-22 12:54:39,984 INFO mapred.MapTask: kvstart = 26214396; length = 6553600
2024-09-22 12:54:39,985 INFO mapred.MapTask: Map output collector class = org.apache.hadoop.mapred.MapTask$MapOutputBuffer
2024-09-22 12:54:39,998 INFO mapred.LocalJobRunner: 
2024-09-22 12:54:39,999 INFO mapred.MapTask: Starting flush of map output
2024-09-22 12:54:39,999 INFO mapred.MapTask: Spilling map output
2024-09-22 12:54:39,999 INFO mapred.MapTask: bufstart = 0; bufend = 46; bufvoid = 104857600
2024-09-22 12:54:39,999 INFO mapred.MapTask: kvstart = 26214396(104857584); kvend = 26214384(104857536); length = 13/6553600
2024-09-22 12:54:40,112 INFO mapred.LocalJobRunner: Finishing task: attempt_local1009338515_0001_r_000000_0
2024-09-22 12:54:40,112 INFO mapred.LocalJobRunner: reduce task executor complete.
2024-09-22 12:54:40,926 INFO mapreduce.Job: Job job_local1009338515_0001 running in uber mode : false
2024-09-22 12:54:40,928 INFO mapreduce.Job:  map 100% reduce 100%
2024-09-22 12:54:40,929 INFO mapreduce.Job: Job job_local1009338515_0001 completed successfully
2024-09-22 12:54:40,936 INFO mapreduce.Job: Counters: 30
	File System Counters
		FILE: Number of bytes read=846793
		FILE: Number of bytes written=3029614
		FILE: Number of read operations=0
		FILE: Number of large read operations=0
		FILE: Number of write operations=0
	Map-Reduce Framework
		Map input records=2
		Map output records=7
		Map output bytes=80
		Map output materialized bytes=106
		Input split bytes=264
		Combine input records=7
		Combine output records=7
		Reduce input groups=7
		Reduce shuffle bytes=106
		Reduce input records=7
		Reduce output records=7
		Spilled Records=14
		Shuffled Maps =2
		Failed Shuffles=0
		Merged Map outputs=2
		GC time elapsed (ms)=4
		Total committed heap usage (bytes)=663748608
	Shuffle Errors
		BAD_ID=0
		CONNECTION=0
		IO_ERROR=0
		WRONG_LENGTH=0
		WRONG_MAP=0
		WRONG_REDUCE=0
	File Input Format Counters 
		Bytes Read=52
	File Output Format Counters 
		Bytes Written=78

Once the MapReduce job is over, the part-r-00000 text file will be created in the output directory, containing the words and their count of occurrences:

hadoop dfs -cat /output/part-r-00000

Here’s the content of the file:

Apache	1
Hadoop	1
Introduction	1
Job	1
MapReduce	1
Running	1
to	1

Similarly, we can check out other examples like TerraSort to perform large-scale sorting of data, RandomTextWriter to generate random text data useful for benchmarking and testing, and Grep to search for matching strings in the input file available in the hadoop-mapreduce-examples-3.4.0 jar file.

5.3. Manage Services on YARN

Now, let’s see a few operations to manage services on Hadoop. For instance, here’s the command to check the node status:

yarn node -list

Similarly, we can list all running applications:

yarn application -list

Here’s how we can deploy a service:

yarn deploy service service_definition.json

Likewise, we can launch an already registered service:

yarn app -launch service_name

Then, we can start, stop, and destroy the service respectively:

yarn app -start service_name
yarn app -stop service_name
yarn app -destroy service_name

Also, there are useful YARN administrative commands like daemonlog to check the daemon log, nodemanager to start a node manager, proxyserver to start the web proxy server, and timelineserver to start the timeline server.

6. Hadoop Ecosystem

Hadoop stores and processes large datasets, and needs supporting tools for tasks like ingestion, analysis, and data extraction. Let’s list down some important tools within the Hadoop ecosystem:

  • Apache Ambari: a web-based cluster management tool that simplifies deployment, management, and monitoring of Hadoop clusters
  • Apache HBase: a distributed, column-oriented database for real-time applications
  • Apache Hive: a data warehouse infrastructure that allows SQL-like queries to manage and analyze large datasets
  • Apache Pig: a high-level scripting language for easy implementation of data analysis tasks
  • Apache Spark: a cluster computing framework for batch processing, streaming, and machine learning
  • Apache ZooKeeper: a service that provides reliable, high-performance, and distributed coordination services for large-scale distributed systems

7. Conclusion

In this article, we explored Apache Hadoop, a framework offering scalable and efficient solutions for managing and processing Big Data – essential in today’s data-driven world.

We began by discussing its core components, including HDFS, YARN, and MapReduce, followed by the steps to set up a Hadoop cluster.

Lastly, we familiarized ourselves with basic operations within the framework, providing a solid foundation for further exploration.


Java Weekly, Issue 562

$
0
0

1. Spring and Java

>> AI Meets Spring Petclinic: Implementing an AI Assistant with Spring AI (Part I) [spring.io]

Incorporating an AI assistant that allows users to interact with the application using natural language.

>> Exploring New Features in JDK 23: Factory Pattern with Flexible Constructor Bodies with JEP-482 [foojay.io]

And a look at the newest preview feature, JEP-482, from the latest JDK release 23, and how this newest addition brings a functional coding style.

Also worth reading:

Webinars and presentations:

Time to upgrade:

2. Technical & Musings

>> Augmenting the client with Alpine.js [frankel.ch]

A different way to implement asynchronous requests on the client using Alpine.js.

Also worth reading:

3. Pick of the Week

>> I will f(l)ail at your tech interviews, here’s why you should care [fraklopez.com]


Understanding Ramp-up in JMeter

$
0
0

1. Overview

JMeter is a very popular solution for testing the performance of JVM applications. One problem we often face in JMeter is how to control the amount of requests we make in a given time. This is especially critical at the warm-up phase when the application has just started up and spun up threads.

JMeter test plans have a property, called ramp-up period, that offers a way to configure the frequency of users making requests to the system under test. Furthermore, we can use this property to tune the number of requests per second.

In this tutorial, we’ll briefly examine some main concepts of JMeter and we’ll focus on understanding the use of ramp-up in JMeter. Then, we’ll try to get a clear understanding of it and learn how to properly compute/configure it.

2. Concepts of JMeter

JMeter is an open-source software, written in Java, used for performance testing JVM applications. Originally, it was created to test the performance of web applications, but nowadays it supports other types, such as FTP, JDBC, Java Objects, and more.

Some of the key features of JMeter include:

Running a load test with JMeter involves three main phases. First, we need to create a test plan, which has the configuration of the scenario we want to simulate. For example, the test execution period, operations per second, concurrent operations, etc. Then, we execute the test plan and last, we analyze the results.

2.1. Thread Group of a Test Plan

In order to understand ramp-up in JMeter, we need to first understand the thread groups of a test plan. A thread group controls the number of threads of a test plan and its main elements are:

  • number of threads which is the number of different users we want to execute the current test plan
  • ramp-up period, in seconds, is the time JMeter will take to get all users up and running
  • the loop count is the number of repetitions. In other words, it sets the number of times a user (thread) is executing the current test plan
pic-elements-of-thread-groups

3. Ramp-up in JMeter

As mentioned earlier, ramp-up in JMeter is the property that configures the period JMeter needs to spin up all threads. This also implies what the delay between starting each thread is. For example, if we have two threads and a ramp-up period of one second, then JMeter needs one second to start all users, and each user starts with a delay of approximately half a second (1 second / 2 threads = 0.5 seconds).

If we set the value to zero seconds, then JMeter immediately starts all of our users together.

One thing to note is that by number of threads, we mean users. So, using ramp-up in JMeter we tune the users per second, which is different from the operations per second. The latter is a key concept in performance testing, one we target when setting up a performance testing scenario. The ramp-up period, in combination with some other properties, also helps us to set the operations per second value.

3.1. Using Ramp-up in JMeter to Configure Users Per Second

In the following examples, we’ll be executing the tests against a Spring Boot application. The endpoint we’re testing is a UUID generator. It just creates a UUID and returns the response:

@RestController
public class RetrieveUuidController {
    @GetMapping("/api/uuid")
    public Response uuid() {
        return new Response(format("Test message... %s.", UUID.randomUUID()));
    }
}

Now, let’s say we want to test our service with 30 users per second. We can achieve this easily, by setting the number of threads to 30 and the ramp-up period to 1. But this isn’t giving much value as a performance test so let’s say we want 30 users per second, for one minute:

test-plan-1-thread-group

We set the total number of threads to 1800, which gives us 30 users per second over a minute (30 users per second * 60 seconds = 1800 users). Because each user is executing the test plan once (loop count is set to 1), the throughput, or operations per second, is also 30 operations per second, as shown in the summary report:

test-plan1-summary-report

Further, we can see from the JMeter graphs, that the test was indeed executed for 1 minute (~21:58:42 to 21:59:42):

test-plan1-time-graph

3.2. Using Ramp-up in JMeter to Configure Requests Per Second

In the following examples, we’ll be using the same endpoint of the Spring Boot application we presented in the previous paragraph.

In performance testing, we care more about the system throughput, than the number of users during some period. This is because the same user can make multiple requests in a given time, such as clicking the ‘Add to cart’ button many times while shopping. Ramp-up in JMeter can be used, in combination with loop count, to configure the throughput we want to achieve, independently of the number of users.

Let’s consider a scenario where we want to test our service with 60 operations per second, for one minute. We can achieve this in two ways:

  1. We can set the total number of threads to the targeted ops * total seconds of the execution and the loop count to 1. This is the same approach as earlier and this way we have a different user for each operation.
  2. We set the total number of threads to targeted ops * total seconds of execution / loop count and set some loop count so that each user does more than one operation.

Let’s put some numbers to it. In the first case, similar to the previous examples, we set the total number of threads to 3600, which gives us 60 users per second over a minute (60 operations per second * 60 seconds = 3600 users):

test-plan2-thread-group

This gives us a throughput of ~60 operations per second, as shown in the summary report:

test-plan2-summary-report

From this graph, we also see the total samples (requests to our endpoint) that are the number we expected, 3600. The total execution time (~21:58:42 to 21:59:42) and response delay can be seen in the response time graph:

test-plan2-time-graph

In the second case, we target 60 operations per second for one minute, but we want each user to be doing two operations on the system. So, we set the total number of threads to 1800, ramp-up to 60 seconds, and loop count to 2, (60 operations per second * 60 seconds / 2 loop count = 1800 users):

test-plan3-thread-group

We can see from the summary result that the total samples are again 3600, as expected. The throughput is also the expected one of about 60 per second:

test-plan3-summary-report

Last, we verify that the execution time was one minute (~21:58:45 to 21:59:45), in the response time graph:

test-plan3-time-graph

4. Conclusion

In this article, we looked at the property of ramp-up in JMeter. We learned what ramp-up period does and how to use it to tune two main aspects of performance testing, users per second and requests per second. Finally, we used a REST service to demonstrate how to use ramp-up in JMeter and presented the results of some test executions.

As always, all the source code is available over on GitHub.


Monitor Java Application Logs With Loggly

$
0
0

1. Overview

In this tutorial, we’ll walk through the steps to configure SolarWinds Loggly, a cloud-based log management tool, for Java applications using various logging libraries. We’ll also learn how logs are consolidated in Loggly for streamlined monitoring and analysis.

 2. Brief Introduction to Loggly

Let’s consider a business service running multiple distributed, highly available critical applications. It’s common to have applications consisting of clusters of microservices spread across private and public clouds.

With such a challenging setup centralizing the logs generated from all these systems is essential. Moreover, fetching logs from multiple sources and running analytics after consolidating them, can provide valuable actionable insights to developers and support. Furthermore, it comes with rich, easy-to-use, and customizable visualization dashboards. As a result, it would help them efficiently troubleshoot and fix issues and meet the SLAs.

Loggly is a cloud-based SaaS log management tool from Solarwinds that offers many features:


3. Prerequisite

Let’s begin by first creating a free 30-day trial Loggly account. After creating the account, we get access to a Loggly SaaS instance with the URL https://www.<<account name>>.loggly.com.

For example, for this tutorial, we created a free https://www.baeldung.loggly.com account:

The portal is user-friendly and seamlessly guides through the setup process for different log sources:

Additionally, there’s a wizard available to guide setting up log sources for different environments:

Let’s move on to the setup process following the steps in the wizard.

The Log4j 2 and Logback libraries support sending the log events over HTTPS. However, for Log4j, in a few cases, we might need a utility running on our system to forward the logs to Loggly. In Linux, the rsyslog utility can play this role. Hence, let’s first configure the syslog daemon:

First, we run the curl command to download the configure-linux.sh script file, and then we run it by copying the command from the Loggly console:

Later, we uncomment a few configurations in the /etc/rsyslog.conf file to enable log transport over UDP on port 514:

Then, we restart rsyslog to apply the configuration changes:

Lastly, the easiest and most generic way to send application logs to Loggly is by setting up file watch monitoring jobs on the hosting servers. On Linux servers, the Syslog daemon can help achieve this. Whereas on Windows servers, we can do this by setting up Nxlog.

Furthermore, we can verify the setup by pushing a test event to Loggly by running the logger utility:

Finally, we search for the event by logging into the Loggly console:

Normally, the log events appear instantly on Loggly. However, there can be delays depending on the network bandwidth and load on the Loggly server.

4. Loggly for Application Using Log4j Library

Before starting on this topic, we must note that Log4j 1 has been reported to have critical vulnerabilities, hence it’s best to avoid it.

First, we’ll begin by entering the Maven dependency for adding the Loggly syslog appender to the Log4j Java application:

<dependency>
    <groupId>com.github.loggly.log4jSyslogWriter64k</groupId>
    <artifactId>log4jSyslogWriter64k</artifactId>
    <version>2.0.0</version>
</dependency>

Next, we’ll use the SyslogAppender64k in the log4j.properties file:

log4j.rootLogger=INFO, SYSLOG
log4j.appender.SYSLOG=com.github.loggly.log4j.SyslogAppender64k
log4j.appender.SYSLOG.SyslogHost=localhost
log4j.appender.SYSLOG.Facility=Local3
log4j.appender.SYSLOG.Header=true
log4j.appender.SYSLOG.layout=org.apache.log4j.EnhancedPatternLayout
log4j.appender.SYSLOG.layout.ConversionPattern=baeldung-java-app %d{ISO8601}{GMT} %p %t %c %M - %m%n

In the log4j.properties file, we may replace baeldung-java-app with any other custom app name corresponding to the conversion pattern property key. It helps identify the logs on the Loggly log explorer. This syslog appender writes these messages to the syslog daemon which runs on the local host.

After completing the prerequisite setups, we can write a few logger statements with different log levels in the application:

public class LogglyLog4jLiveTest {
    private static final Logger logger = Logger.getLogger(LogglyLog4jUnitTest.class);
    @Test
    void givenLoggly_whenLogEvent_thenPushEventToLoggly() {
        logger.info("This is a test info message");
        logger.debug("This is a test debug message");
        logger.error("This is a test error message");
    }
}

Eventually, when the application runs, the logs are pushed into Loggly and visible on its log explorer screen:

5. Loggly for Application Using Log4j 2 Library

As usual, let’s start with the Maven dependencies for the Log4j 2 Java application:

<dependency>
    <groupId>org.apache.logging.log4j</groupId>
    <artifactId>log4j-core</artifactId>
    <version>2.23.1</version>
</dependency>
<dependency>
    <groupId>org.apache.logging.log4j</groupId>
    <artifactId>log4j-api</artifactId>
    <version>2.23.1</version>
</dependency>

Next, we’ll define the log4j2.xml file:

<?xml version="1.0" encoding="UTF-8"?>
<Configuration>
    <Appenders>
        <Socket name="Loggly" host="localhost" port="514" protocol="UDP">
            <PatternLayout>
                <pattern>${hostName} baeldung-java-app %d{yyyy-MM-dd HH:mm:ss,SSS}{GMT} %p %t %c.%M - %m%n</pattern>
            </PatternLayout>
        </Socket>
    </Appenders>
    <Loggers>
        <Root level="DEBUG">
            <AppenderRef ref="Loggly"/>
        </Root>
    </Loggers>
</Configuration>

The Loggly Socket appender in the log4j2.xml file writes the logs to the rsyslog utility over UDP.

Moving on, let’s go through the Java program with the logger statements:

public class LogglyLog4j2LiveTest {
    private static final Logger logger = LogManager.getLogger(LogglyLog4j2UnitTest.class);
    @Test
    void givenLoggly_thenLogEvent_thenPushErrorEventToLoggly() {
        logger.info("This is a log4j2 test info message");
        logger.debug("This is a log4j2 test debug message");
        logger.error("This is a log4j2 test error message");
    }
}

Eventually, when the app runs, the log events appear on the Loggly log explorer screen:

Apart from the socket appender, we can also use the HTTP appender in the log4j2.xml file to push the logs to Loggly:

<?xml version="1.0" encoding="UTF-8"?>
<Configuration>
    <Appenders>
        <Http name="Loggly" url="https://logs-01.loggly.com/inputs/TOKEN/tag/java">
            <PatternLayout>
                <pattern>${hostName} %d{yyyy-MM-dd HH:mm:ss,SSS}{GMT} %p %t %c.%M - %m%n</pattern>
            </PatternLayout>
        </Http>
    </Appenders>
    <Loggers>
        <Root level="DEBUG">
            <AppenderRef ref="Loggly"/>
        </Root>
    </Loggers>
</Configuration>

Moreover, the authentication token used in the URL can be copied from the Loggly portal:

As usual, when the program runs, it publishes the logs to Loggly over HTTP:

6. Loggly for Application Using Logback Library

In the applications that use the Logback library for logging, we must add the Maven dependency for the Loggly extension:

<dependency>
    <groupId>org.logback-extensions</groupId>
    <artifactId>logback-ext-loggly</artifactId>
    <version>0.1.5</version>
</dependency>

Next, we’ll define the logback.xml file:

<configuration debug="true">
    <appender name="loggly" class="ch.qos.logback.ext.loggly.LogglyAppender">
        <endpointUrl>https://logs-01.loggly.com/inputs/a3a21667-e23a-4378-b0b4-f2260ecfc25b/tag/logback</endpointUrl>
        <pattern>%d{"ISO8601", UTC} %p %t %c{0}.%M - %m%n</pattern>
    </appender>
    <root level="debug">
        <appender-ref ref="loggly"/>
    </root>
</configuration>

The logback.xml file uses the custom LogglyAppender from the logback loggly extension library. There could be scenarios where the frequency of log event creation might be high. Therefore in such cases, we can send multi-line log events in batches with the help of ch.qos.logback.ext.loggly.LogglyBatchAppender to the Loggly bulk endpoint https://logs-01.loggly.com/bulk/TOKEN/tag/bulk/.

Similar to the basic LogglyAppender, we have to specify the batch appender and bulk endpoint URL in the logback.xml file:

<configuration debug="true">
    <appender name="loggly" class="ch.qos.logback.ext.loggly.LogglyBatchAppender">
        <endpointUrl>https://logs-01.loggly.com/bulk/a3a21667-e23a-4378-b0b4-f2260ecfc25b/tag/bulk</endpointUrl>
        <pattern>%d{"ISO8601", UTC} %p %t %c %M - %m%n</pattern>
    </appender>
    <root level="info">
        <appender-ref ref="loggly" />
    </root>
</configuration>

However, this appender can send a maximum of 5 MB per batch and up to 1 MB per event. As mentioned in the previous section, we can download the TOKEN from the Customer Tokens page.

After completing the prerequisites, let’s go through the Java program with the logger statements:

public class LogglyLogbackLiveTest {
    Logger logger = LoggerFactory.getLogger(LogglyLogbackUnitTest.class);
    @Test
    void givenLoggly_whenLogEvent_thenPushEventToLoggly() {
        logger.info("This is a logback test info message");
        logger.debug("This is a logback test debug message");
        logger.error("This is a logback test error message");
    }
}

The program uses the Logback implementation of the SLF4J framework. Now, let’s run the test program and check the Loggly log explorer:

As expected, the log events register on the log explorer.

7. Conclusion

In this article, we discussed setting up Java applications to send their logs to the Solarwinds Loggly.

Impressively, the Loggly portal has documented the setup process quite elaborately and has a wizard that expedites it further. Additionally, the troubleshooting processes are covered in the online guide.

As usual, the code used in this article is available over on GitHub.


Mocking an Enum Using Mockito

$
0
0

1. Overview

An enum is a special type of class that extends the Enum class. It consists of a group of static final values, which makes them unchangeable. Furthermore, we use enums to define a set of expected values one variable could hold. This way, we make our code more readable and less error-prone.

However, when it comes to testing, we’d like to mock enum values in some scenarios. In this tutorial, we’ll learn how to mock an enum using the Mockito library and discuss the situations where this might be useful.

2. Dependency Setup

Before we dive in, let’s add the mockito-core dependency to our project:

<dependency>
    <groupId>org.mockito</groupId>
    <artifactId>mockito-core</artifactId>
    <version>5.13.0</version>
    <scope>test</scope>
</dependency>

It’s important to note that we need to use dependency version 5.0.0 or higher to be able to mock the static methods.

For older Mockito versions, we’d need to add the additional mockito-inline dependency in our pom.xml:

<dependency>
    <groupId>org.mockito</groupId>
    <artifactId>mockito-inline</artifactId>
    <version>5.2.0</version>
    <scope>test</scope>
</dependency>

We don’t need to add the mockito-inline for higher versions since it’s incorporated in the mockito-core.

3. Example Setup

Next, let’s create a simple Direction enum we’ll use throughout this tutorial:

public enum Direction {
    NORTH,
    EAST,
    SOUTH,
    WEST;
}

In addition, let’s define a utility method that uses a previously created enum and returns a description based on the passed value:

public static String getDescription(Direction direction) {
    return switch (direction) {
        case NORTH -> "You're headed north.";
        case EAST -> "You're headed east.";
        case SOUTH -> "You're headed south.";
        case WEST -> "You're headed west.";
        default -> throw new IllegalArgumentException();
    };
}

4. Solution With Mocking an Enum

To examine the application’s behavior, we could use already defined enum values in test cases. However, in some scenarios, we’d like to mock an enum and use a value that doesn’t exist. Let’s address a few.

One of the examples we’d need such a mock would be ensuring the values we might add to the enum in the future wouldn’t result in unexpected behavior. Another example would be aiming for a high percentage of code coverage.

Now, let’s create a test and mock an enum:

@Test
void givenMockedDirection_whenGetDescription_thenThrowException() {
    try (MockedStatic<Direction> directionMock = Mockito.mockStatic(Direction.class)) {
        Direction unsupported = Mockito.mock(Direction.class);
        Mockito.doReturn(4).when(unsupported).ordinal();
        directionMock.when(Direction::values)
          .thenReturn(new Direction[] { Direction.NORTH, Direction.EAST, Direction.SOUTH,
            Direction.WEST, unsupported });
        assertThrows(IllegalArgumentException.class, () -> DirectionUtils.getDescription(unsupported));
    }
}

Here, we used the mockStatic() method to mock invocations to static method calls. This method returns a MockedStatic object for the Direction type. Next, we defined a new mocked enum value and specified what should happen when we call the ordinal() method. Lastly, we included the mocked value in the result the values() method returns.

As a result, the getDescription() method throws the IllegalArgumentException for the unsupported value.

5. Solution Without Mocking an Enum

Moving forward, let’s examine how to achieve the same behavior, but this time without mocking an enum.

First, let’s define the Direction enum in the test directory and add the new UNKNOWN value:

public enum Direction {
    NORTH,
    EAST,
    SOUTH,
    WEST,
    UNKNOWN;
}

The newly created Direction enum should have the same path as the enum we previously defined in the source directory.

Furthermore, since we defined the enum with the same fully qualified name as the one from the source directory when test cases execute, they’ll use the one provided in the test sources directory.

Also, since we defined the enum with the same fully qualified name as the one from the source directory, the Direction enum under the sources directory will be overloaded with the one provided in the test directory. Therefore, the test engine uses the one provided in the test directory.

Let’s test the behavior of the getDescription() method when the UNKNOWN value is passed:

@Test
void givenUnknownDirection_whenGetDescription_thenThrowException() {
    assertThrows(IllegalArgumentException.class, () -> DirectionUtils.getDescription(Direction.UNKNOWN));
}

As expected, the call on the getDescription() method throws the IllegalArgumentException exception.

One of the possible drawbacks of using this approach is that now we have the enum that isn’t part of our source code, and, additionally, it affects all tests in our test suite.

6. Conclusion

In this article, we learned how to mock an enum using the Mockito library. We also examined a few scenarios where this might be useful.

To sum up, mocking an enum can be helpful when we want to test whether our code would behave expectedly if we introduce a new value. We also learned how to do the same by overloading the existing enum instead of mocking its values.

As always, the entire code used in this article can be found over on GitHub.

       
Viewing all 4561 articles
Browse latest View live


<script src="https://jsc.adskeeper.com/r/s/rssing.com.1596347.js" async> </script>