Quantcast
Channel: Baeldung
Viewing all 4561 articles
Browse latest View live

How to Execute a Scheduled Task Only Once for a Spring Boot Application

$
0
0

1. Introduction

In this tutorial, we’ll learn how to schedule tasks to run only once. Scheduled tasks are common for automating processes like reports or sending notifications. Typically, we set these to run periodically. Still, there are scenarios where we might want to schedule a task to execute only once at a future time, such as initializing resources or performing data migration.

We’ll explore several ways to schedule tasks to run only once in a Spring Boot application. From using the @Scheduled annotation with an initial delay to more flexible approaches like TaskScheduler and custom triggers, we’ll learn how to ensure that our tasks are executed just once, with no unintended repetitions.

2. TaskScheduler With Start-Time Only

While the @Scheduled annotation provides a straightforward way to schedule tasks, it’s limited in terms of flexibility. When we need more control over task planning (especially for one-time executions), Spring’s TaskScheduler interface offers a more versatile alternative. Using TaskScheduler, we can programmatically schedule tasks with a specified start time, providing greater flexibility for dynamic scheduling scenarios.

The simplest method within TaskScheduler allows us to define a Runnable task and an Instant, representing the exact time we want it to execute. This approach enables us to schedule tasks dynamically without relying on fixed annotations. Let’s write a method for scheduling a task to run at a specific point in the future:

private TaskScheduler scheduler = new SimpleAsyncTaskScheduler();
public void schedule(Runnable task, Instant when) {
    scheduler.schedule(task, when);
}

All the other methods in TaskScheduler are for periodic executions, so this method is helpful for one-off tasks. Most importantly, we’re using a SimpleAsyncTaskScheduler for demonstration purposes, but we can switch to any other implementation appropriate to the tasks we need to run.

Scheduled tasks are challenging to test, but we can use a CountDownLatch to wait for the execution time we choose and ensure it only executes once. Let’s call countdown() our latch as the task and schedule it for a second in the future:

@Test
void whenScheduleAtInstant_thenExecutesOnce() throws InterruptedException {
    CountDownLatch latch = new CountDownLatch(1);
    scheduler.schedule(latch::countDown, 
      Instant.now().plus(Duration.ofSeconds(1)));
    boolean executed = latch.await(5, TimeUnit.SECONDS);
    assertTrue(executed);
}

We’re using the version of latch.await() that accepts a timeout, so we never end up waiting indefinitely. If it returns true, we assert that the task finished successfully and that our latch had only one countDown() call.

3. Using @Scheduled With Initial Delay Only

One of the simplest ways to schedule a one-time task in Spring is by using the @Scheduled annotation with an initial delay and leaving out the fixedDelay or fixedRate attributes. Typically, we use @Scheduled to run tasks at regular intervals, but when we specify only an initialDelay, the task will execute once after the specified delay and not repeat:

@Scheduled(initialDelay = 5000)
public void doTaskWithInitialDelayOnly() {
    // ...
}

In this case, our method will run 5 seconds (5000 milliseconds) after the component containing this method initializes. Since we didn’t specify any rate attributes, the method won’t repeat after this initial execution. This approach is interesting when we need to run a task just once after the application starts or when we want to delay the execution of a task for some reason.

For example, this is handy for running CPU-intensive tasks a few seconds after the application has started, allowing other services and components to initialize properly before consuming resources. However, one limitation of this approach is that the scheduling is static. We can’t dynamically adjust the delay or execution time at runtime. It’s also worth noting that the @Scheduled annotation requires the method to be part of a Spring-managed component or service.

3.1. Before Spring 6

Before Spring 6, it wasn’t possible to leave out the delay or rate attributes, so our only option was to specify a theoretically unreachable delay:

@Scheduled(initialDelay = 5000, fixedDelay = Long.MAX_VALUE)
public void doTaskWithIndefiniteDelay() {
    // ...
}

In this example, the task will execute after the initial 5-second delay, and the subsequent execution won’t happen before millions of years, effectively making it a one-time task. While this approach works, it’s not ideal if we need flexibility or cleaner code.

4. Creating a PeriodicTrigger Without a Next Execution

Our final option is to implement a PeriodicTrigger. Using it over TaskScheduler benefits us in cases where we need more reusable, complex scheduling logic. We can override nextExecution() to only return the next execution time if we haven’t triggered it yet.

Let’s start by defining a period and initial delay:

public class OneOffTrigger extends PeriodicTrigger {
    public OneOffTrigger(Instant when) {
        super(Duration.ofSeconds(0));
        Duration difference = Duration.between(Instant.now(), when);
        setInitialDelay(difference);
    }
    // ...
}

Since we want this to execute only once, we can set anything as a period. And since we must pass a value, we’ll pass a zero. Ultimately, we calculate the difference between the desired moment we want our task to execute and the current time since we need to pass a Duration to our initial delay.

Then, to override nextExecution(), we check the last completion time in our context:

@Override
public Instant nextExecution(TriggerContext context) {
    if (context.lastCompletion() == null) {
        return super.nextExecution(context);
    }
    return null;
}

A null completion means it hasn’t fired yet, so we let it call the default implementation. Otherwise, we return null, which makes this a trigger that only executes once. Finally, let’s create a method to use it:

public void schedule(Runnable task, PeriodicTrigger trigger) {
    scheduler.schedule(task, trigger);
}

4.1. Testing the PeriodicTrigger

Finally, we can write a simple test to ensure our trigger behaves as expected. In this test, we use a CountDownLatch to track whether the task executes. We schedule the task with our OneOffTrigger and verify that it runs exactly once:

@Test
void whenScheduleWithRunOnceTrigger_thenExecutesOnce() throws InterruptedException {
    CountDownLatch latch = new CountDownLatch(1);
    scheduler.schedule(latch::countDown, new OneOffTrigger(
      Instant.now().plus(Duration.ofSeconds(1))));
    boolean executed = latch.await(5, TimeUnit.SECONDS);
    assertTrue(executed);
}

5. Conclusion

In this article, we explored solutions for scheduling a task to run only once in a Spring Boot application. We started with the most straightforward option, using the @Scheduled annotation without a fixed rate. We then moved on to more flexible solutions, like using the TaskScheduler for dynamic scheduling and creating custom triggers that ensure tasks only execute once.

Each approach provides different levels of control, so we choose the method that best fits our use case. As always, the source code is available over on GitHub.


multiply vs parallelMultiply Methods of BigInteger

$
0
0

1. Overview

Sometimes, when programming in Java, we may need to work with integer values that exceed the limits of primitive types like the long type. The BigInteger class in allows us to do exactly that. For example, we need to use the BigInteger class to calculate the factorial of 100.

The BigInteger class provides two public multiplication methods, multiply and parallelMultiply. Although their usage is similar and they return the same mathematical result, one may be preferable to the other for certain cases.

In this tutorial, we’ll compare the multiply and parallelMultiply methods of the BigInteger class.

2. The multiply Method

The multiply method of the BigInteger class multiplies two BigInteger instances. Let’s look at an example that shows how to use this method:

BigInteger bigInteger1 = new BigInteger("131224324234234234234313");
BigInteger bigInteger2 = new BigInteger("13345663456346435648234313");
BigInteger result = bigInteger1.multiply(bigInteger2);

After creating two BigInteger instances, bigInteger1 and bigInteger2, we multiply them using the multiply() method. We assign the result of multiplication to the result variable, which is also of type BigInteger.

3. The parallelMultiply Method

The parallelMultiply method of the BigInteger class is another option for multiplying two BigInteger instances. Its usage is similar to the usage of the multiply method:

BigInteger bigInteger1 = new BigInteger("131224324234234234234313");
BigInteger bigInteger2 = new BigInteger("13345663456346435648234313");
BigInteger result = bigInteger1.parallelMultiply(bigInteger2);

This method has been available since Java 19.

4. Comparing the Implementations

Let’s start by comparing the implementation of the two methods. The public multiply method in BigInteger.java calls a private multiply method:

public BigInteger multiply(BigInteger val) {
    return multiply(val, false, false, 0);
}

The parallelMultiply method also calls the same private multiply method:

public BigInteger parallelMultiply(BigInteger val) {
    return multiply(val, false, true, 0);
}

The difference between them is the value of the third argument of multiply. It’s false in the first one while it’s true in the second one. Let’s check the signature of the private multiply method together with its return type:

private BigInteger multiply(BigInteger val, boolean isRecursion, boolean parallel, int depth)

The name of the third parameter is parallel. This parameter specifies whether the multiplication operation is done in parallel.

Indeed, the multiply method speeds up the multiplication process by using different algorithms depending on the values of the multiplier and multiplicand. It uses the Karatsuba Algorithm for large numbers and the three-way Toom-Cook Algorithm for huge numbers consisting of several thousands of bits.

The three-way Toom Cook Algorithm can split two large integers into smaller integers and parallelize the multiplication of smaller integers. Therefore, it reduces the computational time complexity, leading to a faster calculation. So, we may prefer to use the parallelMultiply method while multiplying huge numbers. However, the parallelMultiply method might use more CPU and memory to compute the multiplication faster.

According to the reported test results, the calculation of the 100000000th Fibonacci number using parallelMultiply might be 2.75 times faster than using multiply.

5. Conclusion

In this article, we compared the multiply and parallelMultiply methods of the BigInteger class. First, we saw the usage of both methods. Their usage is the same.

Then, we briefly discussed their implementation details. We saw that they used the same private multiply method under the hood. However, the parallelMultiply method uses a parallel implementation of the three-way Toom-Cook method for huge integers. Therefore, it’s faster than the multiply method for integers consisting of several thousands of bits.


How to Determine the Delimiter in CSV File

$
0
0

1. Introduction

In CSV (Comma-Separated Values) files, delimiters separate data fields, and they can vary across different files. Common delimiters include commas, semicolons, or tabs. Identifying the correct delimiter is crucial when processing CSV files, as it ensures accurate parsing and prevents data corruption.

In this tutorial, we’ll explore how to determine the delimiter in a CSV file.

2. Understanding Delimiters in CSV Files

A delimiter in a CSV file separates individual fields in a record. The most common delimiters are:

  • Commas (,): Standard in most CSV files
  • Semicolon (;): Often used in locales where commas serve as a decimal separator
  • Tab (\t): Typically seen in tab-separated value files
  • Pipes (|): Occasionally used to avoid conflicts with more traditional delimiters

When working with CSV files, we must use the correct delimiter to parse the data correctly.

For example, let’s say we have a CSV file with the following contents:

Location,Latitude,Longitude,Elevation(m)
New York,40.7128,-74.0060,10
Los Angeles,34.0522,-118.2437,71

We can see that the comma (,) is used to separate the fields.

3. Simple Line Sampling

One approach to determining the delimiter is to sample a few lines from the file and count the occurrences of common delimiter characters.

First, let’s define the possible delimiters that we’ll test across multiple lines:

private static final char[] POSSIBLE_DELIMITERS = {',', ';', '\t', '|'};

We can assume that the character appearing most frequently across lines is likely the delimiter:

@Test
public void givenCSVLines_whenDetectingDelimiterUsingFrequencyCount_thenCorrectDelimiterFound() {
    char[] POSSIBLE_DELIMITERS = {',', ';', '\t', '|'};
    Map<Character, Integer> delimiterCounts = new HashMap<>();
    for (char delimiter : POSSIBLE_DELIMITERS) {
        int count = 0;
        for (String line : lines) {
            count += line.length() - line.replace(String.valueOf(delimiter), "").length();
        }
        delimiterCounts.put(delimiter, count);
    }
    char detectedDelimiter = delimiterCounts.entrySet().stream()
      .max(Map.Entry.comparingByValue())
      .map(Map.Entry::getKey)
      .orElse(',');
    assertEquals(',', detectedDelimiter);
}

In this method, we use replace() to remove the delimiter from the line, and the difference in length() counts how many times each delimiter appears. We then store the counts in a HashMap. Finally, we use stream().max() to find the delimiter with the highest count and return it. If the method doesn’t find a delimiter, it defaults to a comma using the orElse() method.

4. Dynamic Delimiter Detection Using Sampling

A more robust way of detecting a delimiter is to take the set of all characters in the first row and then sample additional lines to test which character consistently results in the same number of columns:

@Test
public void givenCSVLines_whenDetectingDelimiter_thenCorrectDelimiterFound() {
    String[] lines = {
            "Location,Latitude,Longitude,Elevation(m)",
            "New York,40.7128,-74.0060,10",
            "Los Angeles,34.0522,-118.2437,71",
            "Chicago,41.8781,-87.6298,181"
    };
    char detectedDelimiter = ',';
    for (char delimiter : lines[0].toCharArray()) {
        boolean allRowsHaveEqualColumnCounts = Arrays.stream(lines)
          .map(line -> line.split(Pattern.quote(String.valueOf(delimiter))))
          .map(columns -> columns.length)
          .distinct()
          .count() == 1;
        if (allRowsHaveEqualColumnCounts) {
            detectedDelimiter = delimiter;
            break;
        }
    }
    assertEquals(',', detectedDelimiter);
}

In this approach, we iterate over each character in the first line, considering each a potential delimiter. Then we check if this character produces a consistent number of columns across all rows. The method splits each line using split(), with Pattern.quote() to handle special characters such as | or \t.

For each potential delimiter, we then use it to split all rows and calculate the number of columns (fields) per row. Additionally, the key part of this algorithm is to verify that the number of columns remains consistent across all rows by using distinct() to check if the column counts are uniform.

Finally, if the delimiter under consideration yields a consistent column count for every row, we assume it’s the correct delimiter. If no consistent delimiter is found across the rows, we’ll also default to using a comma.

5. Conclusion

In this article, we explored two methods for detecting the delimiter in a CSV file. The first method uses simple line sampling and counts occurrences of potential delimiters. The second, more robust approach checks for consistent column counts across multiple rows to identify the correct delimiter. Either method can be applied based on the complexity of the CSV file.

As always, the complete code samples for this article can be found over on GitHub.


Mock @Value in Spring Boot Test

$
0
0

1. Overview

When writing unit tests in Spring Boot, it’s common to encounter scenarios where we must mock external configurations or properties loaded using the @Value annotation. These properties are often loaded from application.properties or application.yml files and injected into our Spring components. However, we typically don’t want to load the full Spring context with external files. Instead, we’d like to mock these values to keep our tests fast and isolated.

In this tutorial, we’ll learn why and how to mock @Value in Spring Boot tests to ensure smooth and effective testing without loading the entire application context.

2. How to Mock @Value in Spring Boot Tests

Let’s have a service class ValueAnnotationMock that gets us the value of an external API URL from the application.properties file using @Value:

@Service
public class ValueAnnotationMock {
    @Value("${external.api.url}")
    private String apiUrl;
    public String getApiUrl() {
        return apiUrl;
    }
    public String callExternalApi() {
        return String.format("Calling API at %s", apiUrl);
    }
}

Also, this is our application.properties file:

external.api.url=http://dynamic-url.com

So, how can we mock this property in our test class?

There are multiple ways to mock @Value annotation. Let’s see each one by one.

2.1. Using the @TestPropertySource Annotation

The simplest way to mock a @Value property in a Spring Boot test is by using the @TestPropertySource annotation. This allows us to define properties directly in our test class.

Let’s walk through an example to understand better:

@RunWith(SpringRunner.class)
@ContextConfiguration(classes = ValueAnnotationMock.class)
@SpringBootTest
@TestPropertySource(properties = {
    "external.api.url=http://mocked-url.com"
})
public class ValueAnnotationMockTestPropertySourceUnitTest {
    @Autowired
    private ValueAnnotationMock valueAnnotationMock;
    @Test
    public void givenValue_whenUsingTestPropertySource_thenMockValueAnnotation() {
        String apiUrl = valueAnnotationMock.getApiUrl();
        assertEquals("http://mocked-url.com", apiUrl);
    }
}

In this example, the @TestPropertySource provides a mock value for the external.api.url property, i.e., http://mocked-url.com. It’s then injected into the ValueAnnotationMock bean.

Let’s explore some key advantages of using @TestPropertySource to mock @Value:

  • This approach allows us to simulate the real behavior of the application by using Spring’s property injection mechanism, which means the code being tested is close to what will run in production.
  • We can specify test-specific property values directly in our test class, simplifying the mocking of complex properties.

Now, let’s switch and look into some drawbacks of this approach:

  • Tests using @TestPropertySource load the Spring context, which can be slower than unit tests that don’t require context loading.
  • This approach can add unnecessary complexity for simple unit tests since it brings in a lot of Spring’s machinery, making tests less isolated and slower.

2.2. Using ReflectionTestUtils

For cases where we want to directly inject mock values into private fields such as those annotated with @Value, we can use the ReflectionTestUtils class of Spring to set the value manually.

Let’s see the implementation:

public class ValueAnnotationMockReflectionUtilsUnitTest {
    @Autowired
    private ValueAnnotationMock valueAnnotationMock;
    @Test
    public void givenValue_whenUsingReflectionUtils_thenMockValueAnnotation() {
        valueAnnotationMock = new ValueAnnotationMock();
        ReflectionTestUtils.setField(valueAnnotationMock, "apiUrl", "http://mocked-url.com");
        String apiUrl = valueAnnotationMock.getApiUrl();
        assertEquals("http://mocked-url.com", apiUrl);
    }
}

This method bypasses the entire context of Spring, making it ideal for pure unit tests where we don’t want to involve Spring Boot’s dependency injection mechanism at all.

Let’s see some of the benefits of this approach:

  • We can directly manipulate private fields, even those annotated with @Value, without modifying the original class. This can be helpful for legacy code that cannot be easily refactored.
  • It avoids loading the Spring application context, making tests faster and isolated.
  • We can test the exact behaviors by changing the internal state of an object dynamically during testing.

There are some downsides to using ReflectionUtils:

  • Directly accessing or modifying private fields through reflection breaks encapsulation, which goes against best practices for object-oriented design.
  • While it doesn’t load Spring’s context, reflection is slower than standard access due to the overhead of inspecting and modifying class structures at runtime.

2.3. Using Constructor Injection

This approach uses constructor injection to handle @Value properties, providing a clean solution for Spring context injection and unit testing without needing reflection or Spring’s full environment.

We have a main class where properties like apiUrl and apiPassword are injected using the @Value annotation in the constructor:

public class ValueAnnotationConstructorMock {
    private final String apiUrl;
    private final String apiPassword;
    public ValueAnnotationConstructorMock(@Value("#{myProps['api.url']}") String apiUrl,
        @Value("#{myProps['api.password']}") String apiPassword) {
        this.apiUrl = apiUrl;
        this.apiPassword = apiPassword;
    }
    public String getApiUrl() {
        return apiUrl;
    }
    public String getApiPassword() {
        return apiPassword;
    }
}

Instead of injecting these values via field injection which might require reflection or additional setup in testing, they’re passed directly through the constructor. This allows the class to easily instantiate with specific values for testing purposes.

In the test class, we don’t need Spring’s context to inject these values. Instead, we can simply instantiate the class with arbitrary values:

public class ValueAnnotationMockConstructorUnitTest {
    private ValueAnnotationConstructorMock valueAnnotationConstructorMock;
    @BeforeEach
    public void setUp() {
        valueAnnotationConstructorMock = new ValueAnnotationConstructorMock("testUrl", "testPassword");
    }
    @Test
    public void testDefaultUrl() {
        assertEquals("testUrl", valueAnnotationConstructorMock.getApiUrl());
    }
    @Test
    public void testDefaultPassword() {
        assertEquals("testPassword", valueAnnotationConstructorMock.getApiPassword());
    }
}

This makes testing more straightforward because we’re not dependent on Spring’s initialization process. We can pass whatever values we need directly, such as anyUrl and anyPassword, to mock the @Value properties.

Now, moving on to some key advantages of using Constructor Injection:

  • This approach is ideal for unit tests since it allows us to bypass the need for Spring’s context. We can directly inject mock values in tests, making them faster and more isolated.
  • It simplifies class construction and ensures that all required dependencies are injected at construction time, making the class easier to reason about.
  • Using final fields with constructor injection ensures immutability, making the code safer and easier to debug.

Next, let’s review some of the disadvantages of using Constructor Injection:

  • We may need to modify our existing code to adopt constructor injection, which might not always be feasible, especially for legacy applications.
  • We need to explicitly manage all dependencies in tests, which could result in verbose test setups if the class has many dependencies.
  • If our tests need to handle dynamically changing values or a large number of properties, constructor injection can become cumbersome.

3. Conclusion

In this article, we saw that mocking @Value in Spring Boot tests is a common requirement to keep our unit tests focused, fast, and independent of external configuration files. By leveraging tools like @TestPropertySource and ReflectionTestUtils, we can efficiently mock configuration values and maintain clean, reliable tests.

With these strategies, we can confidently write unit tests that isolate the logic of our components without relying on external resources, ensuring better test performance and reliability.

As usual, all the examples are available over on GitHub.


Reduce Memory Footprint in Java

$
0
0

1. Overview

Application size is crucial for start-up time and memory usage, both of which impact performance. Even with today’s powerful hardware, we can significantly reduce an application’s memory footprint through careful coding practices and optimized technical decisions.

The choice of data types, data structures, and class design affects the size of an application. Selecting the most appropriate data types can reduce the cost of running an application in production.

In this tutorial, we’ll learn how to manually estimate the memory size of a Java application, explore various techniques to reduce the memory footprint, and use the Java Object Layout (JOL) library to verify our estimations. Finally, because JVMs can have different memory layouts for objects, we’ll use Hotspot JVM. It’s the default JVM in OpenJDK.

2. Maven Dependency

First, let’s add the JOL library to the pom.xml:

<dependency>
    <groupId>org.openjdk.jol</groupId>
    <artifactId>jol-core</artifactId>
    <version>0.17</version>
</dependency>

This library provides classes for analyzing and reporting the memory layout of Java objects. Notably, computing the memory footprint depends on the JVM architecture. Different JVMs may have different object memory layouts.

3. Size of Java Primitives and Objects

The RAM of a system is structured like a table with rows and columns. Each data type occupies a specific number of bits used to estimate memory usage. Java primitive types and objects have different memory representations.

3.1. Memory Word

The memory word represents the amount of data a processor can transfer in a single operation. Based on the system architecture, the memory word size is 4 bytes for a 32-bit system and 8 bytes for a 64-bit system.

When a data type can’t fill the minimal size, it’s rounded up to 4 bytes in a 32-bit system and 8 bytes in a 64-bit system, meaning objects are padded to fit these boundaries.

Understanding this gives us in-depth insight into our program memory usage.

3.2. The Size of an Object

An empty class in Java without any fields contains only metadata. This metadata includes:

  • Mark Word: 8 bytes on a 64-bit system
  • Class Pointer: 4 bytes with compressed oops on 64-bit systems

Thus, the minimum size of an object is 16 bytes with memory alignment on a 64-bit system.

3.3. The Size of Primitive Wrappers

Furthermore, primitive wrappers are objects that encapsulate the primitive types. They consist of an object header, a class pointer, and a primitive field.

Here’s an estimation of their size with the memory padding in a 64 bit-system:

Type Mark Word Class Pointer Primitive Value Memory Padding Total
Byte 8 4 1 3 16
Short 8 4 1 3 16
Characters 8 4 1 3 16
Integer 8 4 4 16
Float 8 4 4 16
Long 8 4 8 4 24
Double 8 4 8 4 24

In the table above, we define the memory size of wrappers by analyzing the components that contribute to their total size.

4. Example Setup

Now that we know how to estimate the memory size of different Java primitives and objects, let’s set up a simple project and estimate its initial size. First, let’s create a class named Dinosaur:

class Dinosaur {
    Integer id;
    Integer age;
    String feedingHabits;
    DinosaurType type;
    String habitat;
    Boolean isExtinct;
    Boolean isCarnivorous;
    Boolean isHerbivorous;
    Boolean isOmnivorous;
    // constructor
}

Next, let’s define a class that represents the Dinosaur taxonomy:

class DinosaurType {
    String kingdom;
    String phylum;
    String clazz;
    String order;
    String family;
    String genus;
    String species;
    // constructor
}

Here, we create a class named DinosaurType that is referenced in the Dinosaur class.

5. Estimating Initial Memory Size

Let’s compute the initial memory size of our application without any optimization yet. First, let’s instantiate the Dinosaur class:

DinosaurType dinosaurType 
  = new DinosaurType("Animalia", "Chordata", "Dinosauria", "Saurischia", "Eusaurischia", "Eoraptor", "E. lunensis");
Dinosaur dinosaur = new Dinosaur(1, 10, "Carnivorous", dinosaurType, "Land", true, false, false, true);

Then, let’s use the JOL library to estimate the size of a dinosaur object:

LOGGER.info(String.valueOf(GraphLayout.parseInstance(dinosaur).totalSize()));

Estimating the size without optimization gives us 624 bytes. Notably, this could vary based on JVM implementation.

6. Optimizing Initial Memory Size

Now that we have an understanding of the initial memory footprint, let’s explore how we can optimize it.

6.1. Using Primitive Types

Let’s revisit the Dinosaur class and replace primitive wrappers with primitive equivalents:

class Dinosaur {
    int id;
    int age;
    String feedingHabits;
    DinosaurType type;
    String habitat;
    boolean isExtinct;
    boolean isCarnivorous;
    boolean isHerbivorous;
    boolean isOmnivorous;
    // constructor
}

In the code above, we change the types of id, age, isExtinct, isCarnivorous, and other wrappers to use primitive types instead. This action saves us some bytes. Next, let’s estimate the memory size:

LOGGER.info(String.valueOf(GraphLayout.parseInstance(dinosaur).totalSize()));

Here’s the log output:

[main] INFO com.baeldung.reducememoryfootprint.DinosaurUnitTest -- 552

The new size is 552 bytes compared to the initial 624 bytes. Therefore, using primitive types instead of wrappers saves us 72 bytes.

Furthermore, we can use a short type for Dinosaur age. A short in Java can store up to 32767 whole numbers:

// ...
short age;
// ...

Next, let’s see the console output after using short type for age:

[main] INFO com.baeldung.reducememoryfootprint.DinosaurUnitTest -- 552

From the console output, the memory size is still 552 bytes — no difference in this case. However, we can always use the most narrow type possible for memory efficiency.

In the case of fields like feedingHabits, habitat, and taxonomy information, we retain the String type due to its flexibility. Alternatives like char[] lack the functionality that String provides, such as built-in methods for manipulating text.

To further reduce our memory footprint, we can merge the fields in related classes, consolidating them into a single class. Let’s merge the Dinosaur and DinosaurType classes into a single class:

class DinosaurNew {
    int id;
    short age;
    String feedingHabits;
    String habitat;
    boolean isExtinct;
    boolean isCarnivorous;
    boolean isHerbivorous;
    boolean isOmnivorous;
    String kingdom;
    String phylum;
    String clazz;
    String order;
    String family;
    String genus;
    String species;
    // constructor
}

Here, we create a new class by merging the two initial classes’ fields. This is beneficial since Dinosaur instances have unique taxonomy. Assuming Dinosaur instances share the same taxonomy, this won’t be an efficient approach. It’s crucial to analyze the use case before merging classes.

Next, let’s instantiate the new class:

DinosaurNew dinosaurNew
  = new DinosaurNew(1, (short) 10, "Carnivorous", "Land", true, false, false, true, "Animalia", "Chordata", "Dinosauria", "Saurischia", "Eusaurischia", "Eoraptor", "E. lunensis");

Then, let’s compute the memory size:

LOGGER.info(String.valueOf(GraphLayout.parseInstance(dinosaurNew).totalSize()));

Here’s the console output:

[main] INFO com.baeldung.reducememoryfootprint.DinosaurUnitTest -- 536

By merging the Dinosaur and DinosaurType classes, we save 16 bytes that would otherwise be used for the object’s mark word, class pointer, and memory padding.

6.3. Bit Packing for Boolean Fields

In a case where we have multiple boolean fields, we can pack them into a single short type. First, let’s define the bit positions:

static final short IS_EXTINCT = 0, IS_CARNIVOROUS = 1, IS_HERBIVOROUS = 2, IS_OMNIVOROUS = 3;

Next, let’s write a method to convert the booleans to short:

static short convertToShort(
  boolean isExtinct, boolean isCarnivorous, boolean isHerbivorous, boolean isOmnivorous) {
    short result = 0;
    result |= (short) (isExtinct ? 1 << IS_EXTINCT : 0);
    result |= (short) (isCarnivorous ? 1 << IS_CARNIVOROUS : 0);
    result |= (short) (isHerbivorous ? 1 << IS_HERBIVOROUS : 0);
    result |= (short) (isOmnivorous ? 1 << IS_OMNIVOROUS : 0);
    return result;
}

The method above takes four boolean parameters and converts them to a single short value where each bit represents a boolean. If the boolean value is true, it shifts 1 to the left by the position of that flag. If the boolean is false, it uses zero with no bits set. Finally, we use the bitwise OR operator to combine all these values.

Also, let’s write a method to convert back to boolean:

static boolean convertToBoolean(short value, short flagPosition) {
    return (value >> flagPosition & 1) == 1;
}

The method above extracts a single boolean value from the packed short.

Next, let’s remove the four boolean fields and replace them with a single short flag:

short flag;

Finally, let’s instantiate the Dinosaur object and compute the memory footprint:

short flags = DinousaurBitPacking.convertToShort(true, false, false, true);
DinousaurBitPacking dinosaur 
  = new DinousaurBitPacking(1, (short) 10, "Carnivorous", "Land", flags, "Animalia", "Chordata", "Dinosauria", "Saurischia", "Eusaurischia", "Eoraptor", "E. lunensis");
 
LOGGER.info("{} {} {} {}", 
  DinousaurBitPacking.convertToBoolean(dinosaur.flag, DinousaurBitPacking.IS_EXTINCT),
  DinousaurBitPacking.convertToBoolean(dinosaur.flag, DinousaurBitPacking.IS_CARNIVOROUS),
  DinousaurBitPacking.convertToBoolean(dinosaur.flag, DinousaurBitPacking.IS_HERBIVOROUS), 
  DinousaurBitPacking.convertToBoolean(dinosaur.flag, DinousaurBitPacking.IS_OMNIVOROUS));
LOGGER.info(String.valueOf(GraphLayout.parseInstance(dinosaur).totalSize()));

Now, we have a single short value to represent the four boolean values. Here’s the JOL computation:

[main] INFO com.baeldung.reducememoryfootprint.DinosaurUnitTest -- true false false true
[main] INFO com.baeldung.reducememoryfootprint.DinosaurUnitTest -- 528

We’re now down to 528 bytes from 536 bytes.

7. Java Collections

Java Collections have complex internal structures, and computing this structure manually might be tedious. However, we can use the Eclipse Collection library for additional memory optimization.

7.1. Standard Java Collections

Let’s compute the memory footprint of an ArrayList of Dinosaur type:

List<DinosaurNew> dinosaurNew = new ArrayList<>();
dinosaurPrimitives.add(dinosaurNew);
LOGGER.info(String.valueOf(GraphLayout.parseInstance(dinosaurNew).totalSize()));

The code above outputs 616 bytes to the console.

7.2. Eclipse Collection

Now, let’s use the Eclipse Collection library to reduce the memory footprint:

MutableList<DinosaurNew> dinosaurPrimitivesList = FastList.newListWith(dinosaurNew);
LOGGER.info(String.valueOf(GraphLayout.parseInstance(dinosaurNew).totalSize()));

In the code above, we create a collection of MutableList of Dinosaur using the third-party collection library, which outputs 584 bytes to the console. This means that there’s a 32-byte difference between the standard and Eclipse collections libraries.

7.3. Primitive Collections

Also, the Eclipse Collection provides collections of primitive types. These primitive collections avoid the overhead cost of wrapper classes, leading to substantial memory savings.

Furthermore, libraries like Trove, Fastutil, and Colt provide primitive collections. Also, these third-party libraries are performance-efficient compared to the Java standard collections.

8. Conclusion

In this article, we learned how to estimate the memory size of Java primitives and objects. Also, we estimated the initial memory footprint of an application and then used approaches such as using primitives instead of the wrappers, combining classes for related objects, and using narrow types like short to reduce the memory footprint.

As always, the complete example code is available over on GitHub.


Convert Avro File to JSON File in Java

$
0
0

1. Overview

Apache Avro is a widely used data serialization system, especially popular in big data applications due to its efficiency and schema evolution capabilities. In this tutorial, we’ll walk through object conversion to JSON through Avro, and converting an entire Avro file to a JSON file. This can be particularly useful for data inspection and debugging.

In today’s data-driven world, the ability to work with different data formats is crucial. Apache Avro is often used in systems that require high performance and storage efficiency, such as Apache Hadoop.

2. Configuration

To get started, let’s add dependencies for Avro and JSON to our pom.xml file.

We’ve added version 1.11.1 of Apache Avro for this tutorial:

<dependency>
    <groupId>org.apache.avro</groupId>
    <artifactId>avro</artifactId>
    <version>1.11.1</version>
</dependency>

3. Converting Avro Object to JSON

Converting a Java object to JSON via Avro involves a number of steps which include:

  • Inferring/Building the Avro schema
  • Converting the Java object to an Avro GenericRecord and finally
  • Converting the object to JSON

We’ll utilize Avro’s Reflect API to dynamically infer the schema from Java objects, instead of manually defining the schema.

To demonstrate this, let’s create a Point class with two integral properties, x and y:

public class Point {
    private int x;
    private int y;
    public Point(int x, int y) {
        this.x = x;
        this.y = y;
    }
    // Getters and setters
}

Let’s proceed to infer the schema:

public Schema inferSchema(Point p) {
    return ReflectData.get().getSchema(p.getClass());
}

We defined a method inferSchema and used the getSchema method of the ReflectData class to infer the schema off the point object. The schema describes the fields x and y along with their data types.

Next, let’s create a GenericRecord object from a Point object and convert it to JSON:

public String convertObjectToJson(Point p, Schema schema) {
    try {
        ByteArrayOutputStream outputStream = new ByteArrayOutputStream();
        GenericDatumWriter<GenericRecord> datumWriter = new GenericDatumWriter<>(schema);
        GenericRecord genericRecord = new GenericData.Record(schema);
        genericRecord.put("x", p.getX());
        genericRecord.put("y", p.getY());
        Encoder encoder = EncoderFactory.get().jsonEncoder(schema, outputStream);
        datumWriter.write(genericRecord, encoder);
        encoder.flush();
        outputStream.close();
        return outputStream.toString();
    } catch (Exception e) {
        throw new RuntimeException(e);
    }
}

The method convertObjectToJson converts Point object into JSON string using the provided schema. Initially, created a GenericRecord object based on the provided schema, populated it with the Point object’s data, and afterward, used DatumWriter to write data to the ByteArrayOutputStream transitively via the JsonEncoder object, finally, the toString method was used on the OutputStream object to get the JSON string.

Let’s verify the content of the JSON produced:

private AvroFileToJsonFile avroFileToJsonFile;
private Point p;
private String expectedOutput;
@BeforeEach
public void setup() {
    avroFileToJsonFile = new AvroFileToJsonFile();
    p = new Point(2, 4);
    expectedOutput = "{\"x\":2,\"y\":4}";
}
@Test
public void whenConvertedToJson_ThenEquals() {
    String response = avroFileToJsonFile.convertObjectToJson(p, avroFileToJsonFile.inferSchema(p));
    assertEquals(expectedOutput, response);
}

4. Converting Avro File to JSON File

Converting an entire Avro file to a JSON file follows a similar process but involves reading from a file. This is common when we have data stored in Avro format on disk and need to convert it to a more accessible format, such as JSON.

Let’s begin by defining a method, writeAvroToFile, which will be used to write some Avro data to a file:

public void writeAvroToFile(Schema schema, List<Point> records, File writeLocation) {
    try {
        if (writeLocation.exists()) {
            if (!writeLocation.delete()) {
                System.err.println("Failed to delete existing file.");
                return;
            }
        }
        GenericDatumWriter<GenericRecord> datumWriter = new GenericDatumWriter<>(schema);
        DataFileWriter<GenericRecord> dataFileWriter = new DataFileWriter<>(datumWriter);
        dataFileWriter.create(schema, writeLocation);
        for (Point record: records) {
            GenericRecord genericRecord = new GenericData.Record(schema);
            genericRecord.put("x", record.getX());
            genericRecord.put("y", record.getY());
            dataFileWriter.append(genericRecord);
        }
        dataFileWriter.close();
    } catch (IOException e) {
        e.printStackTrace();
        System.out.println("Error writing Avro file.");
    }
}

The method converts Point objects into Avro format by structuring them as GenericRecord instances according to the provided Schema. The GenericDatumWrite serializes these records, which are then written to an Avro file using DataFileWriter.

Let’s verify the file is written to a file and exists:

private File dataLocation;
private File jsonDataLocation;
...
@BeforeEach
public void setup() {
    // Load files from the resources folder
    ClassLoader classLoader = getClass().getClassLoader();
    dataLocation = new File(classLoader.getResource("").getFile(), "data.avro");
    jsonDataLocation = new File(classLoader.getResource("").getFile(), "data.json");
    ...
}
...
@Test
public void whenAvroContentWrittenToFile_ThenExist(){
    Schema schema = avroFileToJsonFile.inferSchema(p);
    avroFileToJsonFile.writeAvroToFile(schema, List.of(p), dataLocation);
    assertTrue(dataLocation.exists());
}

Next, we’ll read the file from the stored location and write it back to another file in JSON format.

Let’s create a method called readAvroFromFileToJsonFile to handle that:

public void readAvroFromFileToJsonFile(File readLocation, File jsonFilePath) {
    DatumReader<GenericRecord> reader = new GenericDatumReader<>();
    try {
        DataFileReader<GenericRecord> dataFileReader = new DataFileReader<>(readLocation, reader);
        DatumWriter<GenericRecord> jsonWriter = new GenericDatumWriter<>(dataFileReader.getSchema());
        Schema schema = dataFileReader.getSchema();
        OutputStream fos = new FileOutputStream(jsonFilePath);
        JsonEncoder jsonEncoder = EncoderFactory.get().jsonEncoder(schema, fos);
        while (dataFileReader.hasNext()) {
            GenericRecord record = dataFileReader.next();
            System.out.println(record.toString());
            jsonWriter.write(record, jsonEncoder);
            jsonEncoder.flush();
        }
        dataFileReader.close();
    } catch (IOException e) {
        throw new RuntimeException(e);
    }
}

We read the Avro data from readLocation and write it as JSON to jsonFilePath. We use the DataFileReader to read GenericRecord instances from the Avro file, then serialize these records into JSON format using JsonEncoder and GenericDatumWriter.

Let’s proceed to confirm the content of the JSON content written to the file produced:

@Test
public void whenAvroFileWrittenToJsonFile_ThenJsonContentEquals() throws IOException {
    avroFileToJsonFile.readAvroFromFileToJsonFile(dataLocation, jsonDataLocation);
    String text = Files.readString(jsonDataLocation.toPath());
    assertEquals(expectedOutput, text);
}

5. Conclusion

In this article, we explored how to write Avro’s content to a file, read it, and store it in a JSON-formatted file, using examples to illustrate the process. Additionally, it is worth noting that schemas can also be stored in a separate file instead of being included with the data.

The implementation of the examples and code snippets can be found over on GitHub.


User Agent Parsing Using Yauaa

$
0
0

1. Overview

When building a web application, we often need information about the devices and browsers accessing our application so that we can deliver optimized user experiences.

A user agent is a string that identifies the client making requests to our server. It contains information about the client device, operating system, browser, and more. It’s sent to the server through the User-Agent request header.

However, parsing user agent strings can be challenging due to their complex structure and varied nature. The Yauaa (Yet Another UserAgent Analyzer) library helps simplify this process when working in the Java ecosystem.

In this tutorial, we’ll explore how to leverage Yauaa in a Spring Boot application to parse user agent strings and implement device-specific routing.

2. Setting up the Project

Before we dive into the implementation, we’ll need to include an SDK dependency and configure our application correctly.

2.1. Dependencies

Let’s start by adding the yauaa dependency to our project’s pom.xml file:

<dependency>
    <groupId>nl.basjes.parse.useragent</groupId>
    <artifactId>yauaa</artifactId>
    <version>7.28.1</version>
</dependency>

This dependency provides us with the necessary classes to parse and analyze the user agent request header from our application.

2.2. Defining UserAgentAnalyzer Configuration Bean

Now that we’ve added the correct dependency, let’s define our UserAgentAnalyzer bean:

private static final int CACHE_SIZE = 1000;
@Bean
public UserAgentAnalyzer userAgentAnalyzer() {
    return UserAgentAnalyzer
      .newBuilder()
      .withCache(CACHE_SIZE)
      // ... other settings
      .build();
}

The UserAgentAnalyzer class is the main entry point for parsing user agent strings.

The UserAgentAnalyzer, by default, uses an in-memory cache with a size of 10000, but we can update it as required using the withCache() method as we’ve done in our example. Caching helps us improve performance by avoiding repeated parsing of the same user agent strings.

3. Exploring UserAgent Fields

Once we’ve defined our UserAgentAnalyzer bean, we can use it to parse a user agent string and get information about the client.

For our demonstration, let’s take the user agent of the device that’s being used to write this tutorial:

Mozilla/5.0 (Macintosh; Intel Mac OS X 10_15_7) AppleWebKit/605.1.15 (KHTML, like Gecko) Version/17.6 Safari/605.1.15

Now, we’ll use our UserAgentAnalyzer bean to parse the above and extract all available fields:

UserAgent userAgent = userAgentAnalyzer.parse(USER_AGENT_STRING);
userAgent
  .getAvailableFieldNamesSorted()
  .forEach(fieldName -> {
      log.info("{}: {}", fieldName, userAgent.getValue(fieldName));
  });

Let’s take a look at the generated logs when we execute the above code:

com.baeldung.Application : DeviceClass: Desktop
com.baeldung.Application : DeviceName: Apple Macintosh
com.baeldung.Application : DeviceBrand: Apple
com.baeldung.Application : DeviceCpu: Intel
com.baeldung.Application : DeviceCpuBits: 64
com.baeldung.Application : OperatingSystemClass: Desktop
com.baeldung.Application : OperatingSystemName: Mac OS
com.baeldung.Application : OperatingSystemVersion: >=10.15.7
com.baeldung.Application : OperatingSystemVersionMajor: >=10.15
com.baeldung.Application : OperatingSystemNameVersion: Mac OS >=10.15.7
com.baeldung.Application : OperatingSystemNameVersionMajor: Mac OS >=10.15
com.baeldung.Application : LayoutEngineClass: Browser
com.baeldung.Application : LayoutEngineName: AppleWebKit
com.baeldung.Application : LayoutEngineVersion: 605.1.15
com.baeldung.Application : LayoutEngineVersionMajor: 605
com.baeldung.Application : LayoutEngineNameVersion: AppleWebKit 605.1.15
com.baeldung.Application : LayoutEngineNameVersionMajor: AppleWebKit 605
com.baeldung.Application : AgentClass: Browser
com.baeldung.Application : AgentName: Safari
com.baeldung.Application : AgentVersion: 17.6
com.baeldung.Application : AgentVersionMajor: 17
com.baeldung.Application : AgentNameVersion: Safari 17.6
com.baeldung.Application : AgentNameVersionMajor: Safari 17
com.baeldung.Application : AgentInformationEmail: Unknown
com.baeldung.Application : WebviewAppName: Unknown
com.baeldung.Application : WebviewAppVersion: ??
com.baeldung.Application : WebviewAppVersionMajor: ??
com.baeldung.Application : WebviewAppNameVersion: Unknown
com.baeldung.Application : WebviewAppNameVersionMajor: Unknown
com.baeldung.Application : NetworkType: Unknown

As we can see, the UserAgent class provides valuable information about the device, operating system, browser, and more. We can use these fields and make informed decisions as per our business requirements.

It’s also important to note that not all the fields are available for a given user agent string, which is evident by the Unknown and ?? values in the log statements. If we don’t want these unavailable values displayed, we can use the getCleanedAvailableFieldNamesSorted() method of the UserAgent class instead.

4. Implementing Device-Based Routing

Now that we’ve looked at the various fields available in the UserAgent class, let’s put this knowledge to use by implementing device-based routing in our application.

For our demonstration, we’ll assume a requirement to serve our application to mobile devices while restricting access to non-mobile devices. We can achieve this by inspecting the DeviceClass field of the user agent string.

First, let’s define a list of supported device classes that we’ll consider as mobile devices:

private static final List SUPPORTED_MOBILE_DEVICE_CLASSES = List.of("Mobile", "Tablet", "Phone");

Next, let’s create our controller method:

@GetMapping("/mobile/home")
public ModelAndView homePage(@RequestHeader(HttpHeaders.USER_AGENT) String userAgentString) {
    UserAgent userAgent = userAgentAnalyzer.parse(userAgentString);
    String deviceClass = userAgent.getValue(UserAgent.DEVICE_CLASS);
    boolean isMobileDevice = SUPPORTED_MOBILE_DEVICE_CLASSES.contains(deviceClass);
    if (isMobileDevice) {
        return new ModelAndView("/mobile-home");
    }
    return new ModelAndView("error/open-in-mobile", HttpStatus.FORBIDDEN);
}

In our method, we use the @RequestHeader to get the value of the user agent string, which we parse using our UserAgentAnalyzer bean. Then, we extract the DEVICE_CLASS field from the parsed UserAgent instance and check if it matches any of the supported mobile device classes.

If we identify that the incoming request has been made from a mobile device, we return the /mobile-home view. Otherwise, we return an error view with an HTTP status of Forbidden, indicating that the resource is only accessible from mobile devices.

5. Testing Device-Based Routing

Now that we’ve implemented device-based routing, let’s test it to ensure it works as expected using MockMvc:

private static final String SAFARI_MAC_OS_USER_AGENT = "Mozilla/5.0 (Macintosh; Intel Mac OS X 14_7) AppleWebKit/605.1.15 (KHTML, like Gecko) Version/18.0 Safari/605.1.15";
mockMvc.perform(get("/mobile/home")
  .header("User-Agent", SAFARI_MAC_OS_USER_AGENT))
  .andExpect(view().name("error/open-in-mobile"))
  .andExpect(status().isForbidden());

We simulate a request with a Safari user agent string for macOS and invoke our /home endpoint. We verified that our error view was returned to the client with an HTTP status of 403 forbidden.

Similarly, let’s now invoke our endpoint with a mobile user agent:

private static final String SAFARI_IOS_USER_AGENT = "Mozilla/5.0 (iPhone; CPU iPhone OS 17_0 like Mac OS X) AppleWebKit/605.1.15 (KHTML, like Gecko) Version/17.0 Mobile/15E148 Safari/604.1";
mockMvc.perform(get("/mobile/home")
  .header("User-Agent", SAFARI_IOS_USER_AGENT))
  .andExpect(view().name("/mobile-home"))
  .andExpect(status().isOk());

Here, we use a Safari user agent string for iOS and assert that the request is successfully completed with the correct view returned to the client.

6. Reducing Memory Footprint and Speeding up Execution

By default, Yauaa parses all available fields from the user agent string. However, if we only need a subset of fields in our application, we can specify them in our UserAgentAnalyzer bean:

UserAgentAnalyzer
  .newBuilder()
  .withField(UserAgent.DEVICE_CLASS)
  // ... other settings
  .build();

Here, we configure the UserAgentAnalyzer to only parse the DEVICE_CLASS field that we used in our device-based routing implementation.

We can chain multiple withField() methods together if we need to parse multiple fields. This approach is highly recommended as it helps reduce memory usage and improves performance.

7. Conclusion

In this article, we explored using Yauaa to parse and analyze user agent strings.

We walked through the necessary configuration, looked at the different fields we have access to, and implemented device-based routing in our application.

As always, all the code examples used in this article are available over on GitHub.


@MapsId Annotation in Hibernate

$
0
0

1. Overview

In this short tutorial, we’ll learn how to use the Hibernate annotation @MapsId to implement the shared primary key strategy.

First, we’ll start with some insight into what @MapsId is. Then, we’ll demonstrate how to use it in practice.

2. @MapsId Annotation

JPA/Hibernate provides several convenient annotations that we can use to do all the heavy lifting of object-relational mapping. Among these annotations, we find @MapsId.

In short, this annotation simplifies one-to-one relationships, allowing two entities to share the same primary key. It helps implement the shared primary key strategy by telling Hibernate to map the primary key of a child entity to the primary key of its associated parent entity.

Now that we know what @MapsId is, let’s go down the rabbit hole and see how to use it in practice.

3. Setting up the Application

To illustrate the usage of this annotation, we need to set up a basic example. Let’s consider a classic situation where we have two tables in the database, Person and Address. Here, we’ll assume that the two tables share a one-to-one relationship. Each person has one address and each address belongs to one person.

Now, we’ll create the corresponding JPA entities for the two tables. Let’s start with the Person entity class:

@Entity
public class Person {
    @Id
    private int id;
    private String firstName;
    private String lastName;
    @OneToOne(mappedBy = "person")
    private Address address;
    // standards getters and setters
}

In this example, we define a person by their identifier, first name, last name, and address.

Typically, we use the @Entity annotation to denote that the Person class is a JPA entity. Moreover, @Id marks the field that represents the primary key. Furthermore, @OneToOne, as the name implies, defines the one-to-one association with the Person entity as the non-owning side.

Next, let’s create the Address entity class:

@Entity
public class Address {
    @Id
    private int id;
    private String street;
    private String city;
    private int zipode;
    @OneToOne
    @JoinColumn(name = "id")
    @MapsId
    private Person person;
    // standards getters and setters
}

Similarly, we used the same annotations to map our table Address. The important part is the person attribute marked by the @MapsId annotation.

Here, we instruct Hibernate to use the primary key value of the Person entity as the primary key value of the Address entity. In other words, Person and Address tables will have the same primary key values.

4. Usage Example

As a basic and mostly evident example, we’ll try to insert a Person instance with a specific identifier. Then, we’ll insert an Address object without specifying an id and see what happens:

@Test
void givenPersonEntityWithIdentifier_whenAddingAddress_thenPersistWithSameIdentifier() {
    int personId = 3;
    Person person = new Person();
    person.setId(personId);
    person.setFirstName("Azhrioun");
    person.setLastName("Abderrahim");
    session.persist(person);
    Address address = new Address();
    address.setStreet("7 avenue berlin");
    address.setCity("Tamassint");
    address.setZipode(13000);
    address.setPerson(person);
    session.persist(address);
    Address persistedAddress = session.find(Address.class, personId);
    assertThat(persistedAddress.getId()).isEqualTo(personId);
}

As we can see, Hibernate inserts a new record into the Address table with the same identifier as the given person even though we don’t specify an id in the first place.

In a nutshell, the @MapsId helps to easily map a one-to-one relationship where the foreign key in the child entity acts also as a primary key allowing both entities to share the same primary key.

Another important caveat is that without @MapsId, we’d define two columns for the foreign and primary keys in the child entity. So, with @MapsId, we can avoid this duplication by providing a single mapping for both.

5. Conclusion

In this article, we learned how to use the @MapsId annotation to implement the shared primary key strategy when using one-to-one relationships.

As always, the full source code of the examples is available over on GitHub.


Reading a File Into a 2d Array in Java

$
0
0

1. Introduction

Reading data from files is a common task in many applications. When working with structured data such as CSV files, we can store the contents in a 2D array for easier access and manipulation.

In this tutorial, we’ll cover three approaches for reading a file into a 2D array in Java: a BufferedReader, the Java 8 Nonblocking IO (NIO) API, and the Apache Commons CSV library.

2. Problem Statement

A common way to represent data from external files, such as CSV files, is through a 2D array, where each row corresponds to a line in the file, and each column contains an individual data value.

For example, if the file contains the following content:

value1,value2,value3
value4,value5,value6
value7,value8,value9

We can load this data into a 2D array like:

String[][] expectedData = {
    {"value1", "value2", "value3"},
    {"value4", "value5", "value6"},
    {"value7", "value8", "value9"}
};

The challenge lies in choosing the right approach to efficiently read and process the file while ensuring flexibility for larger or more complex datasets.

3. Using BufferedReader

The most straightforward approach to reading a file into a 2D array is with a BufferedReader:

try (BufferedReader br = new BufferedReader(new FileReader(filePath))) {
    List<String[]> dataList = new ArrayList<>();
    String line;
    while ((line = br.readLine()) != null) {
        dataList.add(line.split(","));
    }
    return dataList.toArray(new String[0][]);
}

First, we create a BufferedReader with a FileReader, which allows us to read each line from the file efficiently. We’ll use an ArrayList to store the data dynamically.

Additionally, the try-with-resources statement ensures that the BufferedReader is automatically closed after reading the file, preventing resource leaks. The dynamically sized ArrayList, called dataList, stores each file row as a string array.

Inside the loop, br.readLine() reads each line from the file individually until all lines have been read, after which readLine() returns null. We then split() each line into an array of strings. Finally, we convert the ArrayList into a 2D array using the toArray() method.

Furthermore, let’s test this implementation by comparing the actual data read from the file with the expected 2D array:

@Test
public void givenFile_whenUsingBufferedReader_thenArrayIsCorrect() throws IOException {
    String[][] actualData = readFileTo2DArrayUsingBufferedReader("src/test/resources/test_file.txt");
    assertArrayEquals(expectedData, actualData);
}

4. Using java.nio.file.Files

In Java 8, we can leverage the java.nio.file.Files class for a more concise approach to reading a file into a 2D array. Instead of manually reading each line with a BufferedReader, we can use the readAllLines() method to read all lines from the file at once:

List<String> lines = Files.readAllLines(Paths.get(filePath));
return lines.stream()
        .map(line -> line.split(","))
        .toArray(String[][]::new);

Here, we read all lines from the file and store them in a List. Next, we convert the list of lines into a stream using the lines.stream() method. Subsequently, we use map() to transform each line in the stream, where line.split() creates an array of strings. Finally, we use toArray() to collect the result into a 2D array.

Let’s test this approach to ensure it also reads the file into the expected 2D array:

@Test
public void givenFile_whenUsingStreamAPI_thenArrayIsCorrect() throws IOException {
    String[][] actualData = readFileTo2DArrayUsingStreamAPI("src/test/resources/test_file.txt");
    assertArrayEquals(expectedData, actualData);
}

Note that this approach improves readability and reduces the amount of boilerplate code, making it a great option for modern Java applications.

5. Using Apache Commons CSV

For more complex CSV file formats, the Apache Commons CSV library provides a robust and flexible solution. To read the CSV file, we first create a CSVParser instance by reading the file using the CSVFormat class:

Reader reader = new FileReader(filePath);
CSVParser csvParser = new CSVParser(reader, CSVFormat.DEFAULT);

In this snippet, we also use a FileReader to read the contents of the specified file. The CSVParser is initialized with the reader and configured to use the default CSV format.

Next, we can iterate through the records in the CSV file and store them in a list:

List<String[]> dataList = new ArrayList<>();
for (CSVRecord record : csvParser) {
    String[] data = new String[record.size()];
    for (int i = 0; i < record.size(); i++) {
        data[i] = record.get(i);
    }
    dataList.add(data);
}
return dataList.toArray(new String[dataList.size()][]);

Each CSVRecord is a row, and the values within each record are the columns. By the end, we’ll have a fully populated 2D array with the file’s data.

Let’s test this method using Apache Commons CSV to confirm it works as expected:

@Test
public void givenFile_whenUsingApacheCommonsCSV_thenArrayIsCorrect() throws IOException {
    String[][] actualData = readFileTo2DArrayUsingApacheCommonsCSV("src/test/resources/test_file.csv");
    assertArrayEquals(expectedData, actualData);
}

The Apache Commons CSV library deals with many types of string sanitization, such as quoted fields, different delimiters, and escape characters, making it a great solution for large and complex CSV files.

6. Conclusion

Each method discussed in this tutorial offers a unique way to read a file into a 2D array in Java. The BufferedReader method gives us full control over the reading process, while the Java NIO API provides a more concise and functional solution. The Apache Commons CSV library is an excellent choice for more complex CSV data, offering greater flexibility and robustness.

As always, the complete code samples for this article can be found over on GitHub.


How to Publish Maven Artifacts to GitHub Packages

$
0
0

1. Overview

In this tutorial, we’ll learn how to create a Maven artifact and make it publicly available. We’ll discuss the project structure, building the JAR file with Maven, and publishing it to GitHub Packages.

After that, we’ll see how clients can install our package from the GitHub repository as a Maven dependency.

2. Creating the Maven Project

We’ll create a small library of utility functions for unit testing. We’ll start by setting up a Maven project and configuring the main properties in the pom.xml.

Since we’re publishing to GitHub Packages, we’ll use the io.github.<github_username> pattern for the groupId Apart from this, we’ll set default properties like the artifactId, version, project name, and description, packaging as jar, and the Java version:

<project>
    <modelVersion>4.0.0</modelVersion>
    <groupId>io.github.etrandafir93</groupId>
    <artifactId>utilitest</artifactId>
    <version>1.0.0-SNAPSHOT</version>
    <packaging>jar</packaging>
    <name>Utilitest</name>
    <description>A collection of test helpers for AssertJ, Mockito and Awaitility</description>
    <url>https://github.com/etrandafir93/utilitest</url>
    <properties>
        <java.version>11</java.version>
    </properties>
    <!-- license, distribution, dependenceis, build... etc. -->
</project>

3. Adding a License

A license for an open-source project is a legal agreement that defines how the project’s code can be used, modified, and distributed by others. We can add a license to our Maven project, by adding the <license> section in the pom.xml:

<licenses>
    <license>
        <name>MIT License</name>
        <url>http://www.opensource.org/licenses/mit-license.php</url>
    </license>
</licenses>

As we can see, we’ve chosen the MIT License, which allows anyone to use, modify, and distribute the software – as long as the original license and copyright notice are included. Alternatively, we could have chosen a license like Apache 2.0, GPL, or any other from opensource.org.

Additionally, we’ll add the LICENSE file at the root of our project:

utilitest
├── src
│   ├── main
│   └── test
├── LICENSE
└── pom.xml

4. Publishing to GitHub Packages

Next, we must configure Maven to build and publish our artifacts to GitHub. To do this, we’ll add a <distributionManagement> section to our pom.xml, which include three key properties:

  • “id” – set to “github
  • “name” – the name of the personal account or organization that owns the repository
  • “url” – the URL for publishing packages, typically in the format https://maven.pkg.github.com/{owner}/{repository}

Let’s add the <distributionManagement> section with our details:

<distributionManagement>
    <repository>
        <id>github</id>
        <name>etrandafir93</name>
        <url>https://maven.pkg.github.com/etrandafir93/utilitest</url>
    </repository>
</distributionManagement>

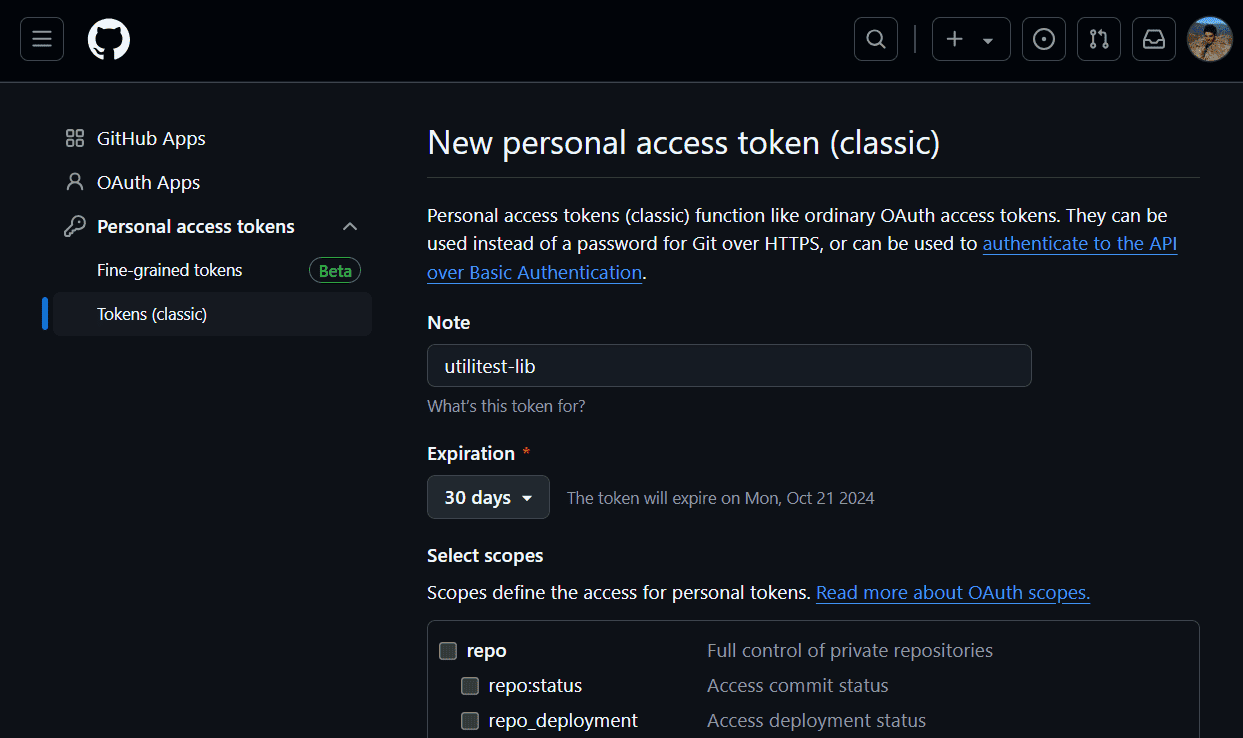
After that, we’ll need to generate a personal access token on GitHub, from the developer settings page:

We can configure the token’s scope and expiration date. After that, we’ll update our .m2/settings.xml adding the GitHub username and the newly generated access token in the <servers> section:

<servers>
    <server>
        <id>github</id>
	<username>etrandafir93</username>
	<password>{access_token}</password>
    </server>
</servers>

Moreover, we’ll add the repository URL within the <profile> section:

<profiles>
    <profile>
      <id>github</id>
      <repositories>
        <repository>
          <id>central</id>
          <url>https://repo1.maven.org/maven2</url>
        </repository>
        <repository>
          <id>github</id>
          <url>https://maven.pkg.github.com/etrandafir93/utilitest</url>
          <snapshots>
            <enabled>true</enabled>
          </snapshots>
        </repository>
      </repositories>
    </profile>
</profiles>

That’s it! With this setup, we can now deploy artifacts to GitHub Packages using the mvn deploy command:

> mvn deploy
[INFO] Scanning for projects...
[INFO] 
[INFO] ------------------< io.github.etrandafir93:utilitest >------------------
[INFO] Building Utilitest 1.0.0-SNAPOSHOT
[INFO]   from pom.xml
[INFO] --------------------------------[ jar ]---------------------------------
     
    [ .... ]
Uploaded to github: https://maven.pkg.github.com/etrandafir93/utilitest/io/github/etrandafir93/utilitest/ 1.0.0-SNAPOSHOT/utilitest-1.0.0-SNAPOSHOT.pom (3.7 kB at 1.1 kB/s)
Uploaded to github: https://maven.pkg.github.com/etrandafir93/utilitest/io/github/etrandafir93/utilitest/ 1.0.0-SNAPOSHOT/utilitest-1.0.0-SNAPOSHOT.jar (4.5 kB at 1.4 kB/s)
Uploaded to github: https://maven.pkg.github.com/etrandafir93/utilitest/io/github/etrandafir93/utilitest/ maven-metadata.xml (368 B at 343 B/s)
[INFO] ------------------------------------------------------------------------
[INFO] BUILD SUCCESS
[INFO] ------------------------------------------------------------------------
[INFO] Total time:  17.463 s
[INFO] Finished at: 2024-09-21T19:44:10+02:00
[INFO] ------------------------------------------------------------------------

As shown in the logs, the package was successfully uploaded to GitHub. Moreover, we should be able to see our uploaded package by checking the GitHub webpage:

5. Installing the Maven Dependency

By default, artifacts uploaded to GitHub Packages inherit the visibility of the parent repository. Since our repository is public, we can easily install the new library as a Maven dependency.

Even though the package is public, GitHub requires clients to authenticate with a personal access token. The process to generate and configure it is the same as before, but this time, the token’s scope can be limited to read-only access.

Additionally, we’ll need to specify the repository URL in our .m2/settings.xml or directly in the pom.xml:

<repository>
    <id>github</id>
    <name>etrandafir93</name>
    <url>https://maven.pkg.github.com/etrandafir93/*</url>
</repository>

Finally, we can add the Maven dependency and start using our new library:

<dependency>
    <groupId>io.github.etrandafir93</groupId>
    <artifactId>utilitest</artifactId>
    <version>1.0.0-SNAPOSHOT</version>
    <scope>test</scope>
</dependency>

6. Conclusion

In this article, we learned how to create Maven projects, build them as JARs, and publish them as GitHub packages.

We looked at the project structure, configuring the pom.xml file, and licensing. After that, we configured the GitHub repository and generated an access token for publishing the packages. Finally, we demonstrated how users can install the published artifacts as Maven dependencies.


Java JSch Library to Read Remote File Line by Line

$
0
0

1. Overview

The Java Secure Channel (JSch) library provides an API for connecting Java applications to remote servers, enabling various remote operations. One of its powerful features is the ability to read files directly from a remote server without downloading them to the local machine.

In this tutorial, we’ll learn how to use JSch to connect to a remote server and read a specific file line by line.

2. Maven Dependency

First, let’s add the JSch dependency to the pom.xml:

<dependency>
    <groupId>com.github.mwiede</groupId>
    <artifactId>jsch</artifactId>
    <version>0.2.20</version>
</dependency>

The dependency provides classes to establish a connection to a remote server and open an SSH File Transfer Protocol (SFTP) channel for file transfer.

3. Connecting to the Remote Server

Let’s create variables to store the connection details to the remote server:

private static final String HOST = "HOST_NAME";
private static final String USER = "USERNAME";
private static final String PRIVATE_KEY = "PRIVATE_KEY";
private static final int PORT = 22;

The HOST could be the domain name or IP address of the remote server. The USER is the username for the authentication to the remote server while the PRIVATE_KEY represents a path to the SSH private key authentication. SSH port is 22 by default.

Next, let’s create a session:

JSch jsch = new JSch();
jsch.addIdentity(PRIVATE_KEY);
Session session = jsch.getSession(USER, HOST, PORT);
session.setConfig("StrictHostKeyChecking", "no");
session.connect();

Here, we create an instance of JSch which is the entry point for the JSch functionality. Next, we load the key for authentication. Then, we create a new Session object with our connection details. For simplicity, we disable strict host key checking.

4. Read Remote Files With JSch

After establishing a session, let’s create a new channel for SFTP:

ChannelSftp channelSftp = (ChannelSftp) session.openChannel("sftp");
channelSftp.connect();

In the code above, we create an instance of ChannelSftp and establish a connection by invoking the connect() method on it.

Now that we’ve opened an SFTP channel, we can list the files in the remote directory to easily spot the files we want to read.

Let’s define a field to store the path of the remote file:

private static final String filePath = "REMOTE_DIR/examplefile.txt";

Next, let’s connect to the file remotely and read its content:

InputStream stream = channelSftp.get(filePath);
try (BufferedReader bufferedReader = new BufferedReader(new InputStreamReader(stream))) {
    String line;
    while ((line = bufferedReader.readLine()) != null) {
        LOGGER.info(line);
    }
}

Here, we create an Instance of BufferedReader which accepts the InputStream object as an argument for effective file reading. Since InputStream returns a byte stream, InputStreamReader helps decode it into characters.

Finally, we invoke the readLine() method on the BufferedReader object and use the while loop to iterate through all the lines.

We don’t need to explicitly close the BufferedReader object because it’s used within the try-with-resources block.

5. Closing the Connection

After successfully reading the file, we need to close the SSH session and the SFTP channel:

channelSftp.disconnect();
session.disconnect();

In the code above, we invoke the disconnect() method on the Session and ChannelSftp objects to close the connections and free resources.

6. Conclusion

In this article, we learn how to read a remote file line by line using the JSch library. We established a connection to the remote server and created an SFTP channel. Then, we use the BuffferedReader class to read each file line by line.

As always, the full source code for the example is available over on GitHub.


Determining All Years Starting on a Sunday Within a Given Year Range

$
0
0

1. Overview

Determining all years that start on a Sunday might seem like a simple requirement. However, it can be quite relevant in various real-world scenarios or business use cases. Specific dates and calendar structures often influence operations, events, or schedules. For instance, such a requirement might arise in a holiday or religious event scheduling, or payroll and work schedule planning.

In this tutorial, we’ll look at three approaches to find all the years that start on a Sunday within a given range. We’ll first look at a solution using Date and Calendar, and then see how to use the modern java.time API. Finally, we’ll include an optimized example using Spliterator<LocalDate>.

2. Legacy Solution

To start with, we’ll use the legacy Calendar class to check whether January 1st of each year, for a given range, falls on a Sunday: 

public class FindSundayStartYearsLegacy {
    public static List<Integer> getYearsStartingOnSunday(int startYear, int endYear) {
        List<Integer> years = new ArrayList<>();
        for (int year = startYear; year <= endYear; year++) {
            Calendar calendar = new GregorianCalendar(year, Calendar.JANUARY, 1);
            if (calendar.get(Calendar.DAY_OF_WEEK) == Calendar.SUNDAY) {
                years.add(year);
            }
        }
        return years;
    }
}

First, we create a Calendar object for each year with the date set to January 1st. We then use the calendar.get(Calendar.DAY_OF_WEEK) method, to check if the day is a Sunday. We’ll test our FindSundayStartYearsLegacy implementation using the year range from 2000 to 2025. We expect a result which includes the four years that start on a Sunday: 2006, 2012, 2017, and 2023:

@Test
public void givenYearRange_whenCheckingStartDayLegacy_thenReturnYearsStartingOnSunday() {
    List<Integer> expected = List.of(2006, 2012, 2017, 2023);
    List<Integer> result = FindSundayStartYearsLegacy.getYearsStartingOnSunday(2000, 2025);
    assertEquals(expected, result);
}

3. New API Solution

Let’s solve the same problem using the java.time package introduced in Java 8. We’ll use LocalDate to check if January 1st of each year starts on a Sunday:

public class FindSundayStartYearsTimeApi {
    public static List<Integer> getYearsStartingOnSunday(int startYear, int endYear) {
        List<Integer> years = new ArrayList<>();
        for (int year = startYear; year <= endYear; year++) {
            LocalDate firstDayOfYear = LocalDate.of(year, 1, 1);
            if (firstDayOfYear.getDayOfWeek() == DayOfWeek.SUNDAY) {
                years.add(year);
            }
        }
        return years;
    }
}

We use here LocalDate.of(year, 1, 1) to represent January 1st of each year. Then, we use the getDayOfWeek() method, to check if the day is a Sunday. Next, we validate the solution using the java.time API in the FindSundayStartYearsTimeApi class, with the same input and expected result as in the previous test:

@Test 
public void givenYearRange_whenCheckingStartDayTimeApi_thenReturnYearsStartingOnSunday() {
    List<Integer> expected = List.of(2006, 2012, 2017, 2023);
    List<Integer> result = FindSundayStartYearsTimeApi.getYearsStartingOnSunday(2000, 2025);
    assertEquals(expected, result);
}

4. Enhancements Using Streams

Let’s look at how we can use the Spliterator<LocalDate> to iterate through the years and filter out the ones that start on a Sunday. The Spliterator is useful for efficiently traversing large data ranges:

public class FindSundayStartYearsSpliterator {
    public static List<Integer> getYearsStartingOnSunday(int startYear, int endYear) {
        List<Integer> years = new ArrayList<>();
        Spliterator<LocalDate> spliterator = Spliterators.spliteratorUnknownSize(
          Stream.iterate(LocalDate.of(startYear, 1, 1), date -> date.plus(1, ChronoUnit.YEARS))
            .limit(endYear - startYear + 1)
            .iterator(), Spliterator.ORDERED);
        Stream<LocalDate> stream = StreamSupport.stream(spliterator, false);
        stream.filter(date -> date.getDayOfWeek() == DayOfWeek.SUNDAY)
          .forEach(date -> years.add(date.getYear()));
        return years;
    }
}

Here we create a Spliterator<LocalDate> using Stream.iterator() to iterate over the first day of each year in the given range. Next, the StreamSupport.stream() method converts the Spliterator into a Stream<LocalDate>. Additionally, we use filter() to check if the first day of each year is a Sunday. Finally, we populate the array with the valid entries, which we return at the end. Now we’ll test the Streams-based implementation in the FindSundayStartYearsSpliterator class:

@Test
public void givenYearRange_whenCheckingStartDaySpliterator_thenReturnYearsStartingOnSunday() {
    List<Integer> expected = List.of(2006, 2012, 2017, 2023);
    List<Integer> result = FindSundayStartYearsSpliterator.getYearsStartingOnSunday(2000, 2025);
    assertEquals(expected, result);
}

5. Conclusion

In this article, we looked at three options to find the years that start on Sunday, for a given range. Although Date and Calendar are usable, they come with issues such as mutability, clunky APIs, and deprecated methods. This legacy solution is straightforward but not the best practice for new development. In general, the java.time package provides a cleaner and more robust API for handling dates and times. It’s type-safe, immutable, and easier to work with than Date and Calendar. Consequently, using Spliterator in combination with Stream is a functional and efficient way to process large data ranges, allowing parallelization and lazy evaluation. The java.time approach is the recommended method for handling dates and times in Java. The Spliterator solution adds flexibility and performance benefits. The complete source code for this article can be found over on GitHub.


Automated Accessibility Testing With Selenium

$
0
0

1. Overview

Accessibility testing is crucial for ensuring that software applications are usable by everyone, including people with impairments. Performing accessibility tests manually can be time-consuming and error-prone. Therefore, automating accessibility testing with Selenium can streamline the process, making it easier to detect and fix accessibility issues early.

In this tutorial, we’ll explore how to automate accessibility testing with Selenium.

2. What Is Automated Accessibility Testing?

Automated accessibility testing is the process of using automated tools and scripts to evaluate how well a software application meets accessibility standards, such as WCAG (Web Content Accessibility Guidelines).

It helps identify accessibility barriers that could prevent people with disabilities from using the software effectively.

By automating these tests, teams can quickly detect issues related to screen reader compatibility, keyboard navigation, color contrast, and other accessibility aspects, ensuring that the application is more inclusive and compliant with legal requirements.

3. Why Selenium for Accessibility Automation?

Selenium WebDriver is a popular open-source test automation framework. It helps in automating popular browsers such as Chrome, Firefox, Edge, and Safari and offers greater flexibility and compatibility with different testing frameworks.

With the release of Selenium 4, it’s also fully W3C compliant. In many countries, legal requirements and industry standards, such as the Web Content Accessibility Guidelines, mandate that web applications must be accessible. By using Selenium for automated accessibility testing, organizations can efficiently evaluate their compliance with these regulations and standards.

4. How to Get Started With Selenium Accessibility Testing?

In this section, we’ll learn how to perform accessibility testing using Selenium on cloud grids offered by platforms such as LambdaTest.

LambdaTest is an AI-driven test execution platform that lets developers and testers perform accessibility automation using frameworks like Selenium and Cypress on over 3000+ real environments.

To perform Selenium accessibility testing on LambdaTest, we need to enable the Accessibility Automation plan.

4.1. Test Scenario

The following test scenario for accessibility testing will run on the LambdaTest eCommerce Playground website:

  1. Navigate to the LambdaTest eCommerce Playground website.
  2. Hover on the My account dropdown and click on Login.
  3. Enter a valid username and password.
  4. Perform assertion to check that the logout link is displayed on successful login.

4.2. Setting up the Project

Let’s add the following Selenium dependency in the pom.xml file:

<dependency>
    <groupId>org.seleniumhq.selenium</groupId>
    <artifactId>selenium-java</artifactId>
    <version>4.23.1</version>
</dependency>

For the latest version, we can check out the Maven Central Repository.

Now, we’ll need to create a new ECommercePlayGroundAccessibilityTests class:

public class ECommercePlayGroundAccessibilityTests {
    private RemoteWebDriver driver;
    //..
}

Let’s define a setup() method that helps in instantiating the RemoteWebDriver:

@BeforeTest
public void setup() {
    final String userName = System.getenv("LT_USERNAME") == null 
      ? "LT_USERNAME" : System.getenv("LT_USERNAME");
    final String accessKey = System.getenv("LT_ACCESS_KEY") == null 
      ? "LT_ACCESS_KEY" : System.getenv("LT_ACCESS_KEY");
    final String gridUrl = "@hub.lambdatest.com/wd/hub";
    try {
        this.driver = new RemoteWebDriver(new URL(
          "http://" + userName + ":" + accessKey + gridUrl), 
          getChromeOptions());
    } catch (final MalformedURLException e) {
        System.out.println(
          "Could not start the remote session on LambdaTest cloud grid");
    }
    this.driver.manage().timeouts().implicitlyWait(Duration.ofSeconds(30));
}

This method requires the LambdaTest Username and Access Key to run the tests on the LambdaTest cloud grid. We can find these credentials from the LambdaTest Account Settings > Password & Security.

While instantiating the RemoteWebDriver, we’ll need to pass the capabilities like BrowserVersion, PlatformName, and more for running the tests:

public ChromeOptions getChromeOptions() {
    final var browserOptions = new ChromeOptions();
    browserOptions.setPlatformName("Windows 10");
    browserOptions.setBrowserVersion("127.0");
    final HashMap<String, Object> ltOptions = new HashMap<String, Object>();
    ltOptions.put("project", 
      "Automated Accessibility Testing With Selenium");
    ltOptions.put("build", 
      "LambdaTest Selenium Playground");
    ltOptions.put("name", 
      "Accessibility test");
    ltOptions.put("w3c", true);
    ltOptions.put("plugin", 
      "java-testNG");
    ltOptions.put("accessibility", true);
    ltOptions.put("accessibility.wcagVersion", 
      "wcag21");
    ltOptions.put("accessibility.bestPractice", false);
    ltOptions.put("accessibility.needsReview", true);
    browserOptions.setCapability(
      "LT:Options", ltOptions);
    return browserOptions;
}

For accessibility testing on LambdaTest, we’ll need to add capabilities such as accessibility, accessibility.wcagVersion, accessibility.bestPractice, and accessibility.needsReview.

To generate the capabilities, we can refer to the LambdaTest Automation Capabilities Generator.

4.3. Test Implementation

We’ll use the two test methods, testNavigationToLoginPage() and testLoginFunction() to implement the test scenario.

Below is the code snippet for the testNavigationToLoginPage() method:

@Test(priority = 1)
public void testNavigationToLoginPage() {
    driver.get("https://ecommerce-playground.lambdatest.io/");
    WebElement myAccountLink = driver.findElement(By.cssSelector(
      "#widget-navbar-217834 > ul > li:nth-child(6) > a"));
    Actions actions = new Actions(driver);
    actions.moveToElement(myAccountLink).build().perform();
    WebElement loginLink = driver.findElement(By.linkText("Login"));
    loginLink.click();
    String pageHeaderText = driver.findElement(By.cssSelector(
      "#content > div > div:nth-child(2) > div h2")).getText();
    assertEquals(pageHeaderText, "Returning Customer");
}

This test implements the first two steps of the test scenario, i.e., navigating to the LambdaTest eCommerce Playground website and hovering over the My account link. This test method executes first as the priority is set to “1”.

The moveToElement() method of the Actions class of Selenium WebDriver hovers over the My account link.

Once the menu opens, the Login link is located using the linkText, and a click action is performed on it. Finally, an assertion is performed to check that the Login page loads successfully.

Now let’s look at the code snippet for the testLoginFunction() method:

@Test(priority = 2)
public void testLoginFunction() {
    WebElement emailAddressField = driver.findElement(By.id(
      "input-email"));
    emailAddressField.sendKeys("davidJacob@demo.com");
    WebElement passwordField = driver.findElement(By.id(
      "input-password"));
    passwordField.sendKeys("Password123");
    WebElement loginBtn = driver.findElement(By.cssSelector(
      "input.btn-primary"));
    loginBtn.click();
    WebElement myAccountLink = driver.findElement(By.cssSelector(
      "#widget-navbar-217834 > ul > li:nth-child(6) > a"));
    Actions actions = new Actions(driver);
    actions.moveToElement(myAccountLink).build().perform();
    WebElement logoutLink = driver.findElement(By.linkText("Logout"));
    assertTrue(logoutLink.isDisplayed());
}

This test covers the final steps of logging in with valid credentials and verifying the Logout link. After entering credentials in the E-Mail Address and Password fields, the login button is clicked. A mouse hover is performed on the My Account link using the moveToElement() method, and an assertion checks if the Logout link is visible.

4.4. Test Execution

The following screenshot from the LambdaTest Web Automation Dashboard shows both of the accessibility tests:

lambdatest accessibility test execution

5. Conclusion

Accessibility testing helps uncover the defects related to the usability of the website or web-based applications. It helps in making the website usable to all the users including the ones with disabilities.

It’s a must to follow the guidelines laid by WCAG to make the websites or the web applications accessible. Post that, it’s essential to perform accessibility testing of the websites to ensure the websites and web applications are usable for everyone.

The source code used in this article is available over on GitHub.
       

Understanding Kafka Consumer Offset

$
0
0
start here featured

1. Overview

A Kafka consumer offset is a unique, monotonically increasing integer that identifies the position of an event record in a partition. Each consumer in the group maintains a specific offset for each partition to track progress. On the other hand, a Kafka consumer group consists of consumers responsible for reading messages from a topic across multiple partitions through polling.

The group coordinator in Kafka manages the consumer groups and assigns partitions to consumers within the group. When a consumer starts, it locates its group’s coordinator and requests to join. The coordinator triggers a group rebalance, assigning the new member its share of the partitions.

In this tutorial, let’s explore where these offsets are saved and how consumers can use them to track and start or resume their progress.

2. Setup

Let’s begin by setting up a single-instance Kafka cluster in Kraft mode using a Docker Compose script:

broker:
  image: confluentinc/cp-kafka:7.7.0
  hostname: broker
  container_name: broker
  ports:
    - "9092:9092"
    - "9101:9101"
  expose:
    - '29092'
  environment:
    KAFKA_NODE_ID: 1
    KAFKA_LISTENER_SECURITY_PROTOCOL_MAP: 'CONTROLLER:PLAINTEXT,PLAINTEXT:PLAINTEXT,PLAINTEXT_HOST:PLAINTEXT'
    KAFKA_ADVERTISED_LISTENERS: 'PLAINTEXT://broker:29092,PLAINTEXT_HOST://localhost:9092'
    KAFKA_OFFSETS_TOPIC_REPLICATION_FACTOR: 1
    KAFKA_GROUP_INITIAL_REBALANCE_DELAY_MS: 0
    KAFKA_TRANSACTION_STATE_LOG_MIN_ISR: 1
    KAFKA_TRANSACTION_STATE_LOG_REPLICATION_FACTOR: 1
    KAFKA_JMX_PORT: 9101
    KAFKA_JMX_HOSTNAME: localhost
    KAFKA_PROCESS_ROLES: 'broker,controller'
    KAFKA_CONTROLLER_QUORUM_VOTERS: '1@broker:29093'
    KAFKA_LISTENERS: 'PLAINTEXT://broker:29092,CONTROLLER://broker:29093,PLAINTEXT_HOST://0.0.0.0:9092'
    KAFKA_INTER_BROKER_LISTENER_NAME: 'PLAINTEXT'
    KAFKA_CONTROLLER_LISTENER_NAMES: 'CONTROLLER'
    KAFKA_LOG_DIRS: '/tmp/kraft-combined-logs'
    CLUSTER_ID: 'MkU3OEVBNTcwNTJENDM2Qk'
    KAFKA_LOG_CLEANUP_POLICY: 'delete'

This should make the cluster to be available at http://localhost:9092/.

Next, let’s create a topic with two partitions:

init-kafka:
  image: confluentinc/cp-kafka:7.7.0
  depends_on:
    - broker
  entrypoint: [ '/bin/sh', '-c' ]
  command: |
    " # blocks until kafka is reachable
    kafka-topics --bootstrap-server broker:29092 --list
    echo -e 'Creating kafka topics'
    kafka-topics --bootstrap-server broker:29092 --create \
      --if-not-exists --topic user-data --partitions 2 "

As an optional step, let’s set up Kafka UI to easily view the messages, though in this article we’ll be checking the details using the CLI:

kafka-ui:
  image: provectuslabs/kafka-ui:latest
  ports:
    - "3030:8080"
  depends_on:
    - broker
    - init-kafka
  environment:
    KAFKA_CLUSTERS_0_NAME: broker
    KAFKA_CLUSTERS_0_BOOTSTRAPSERVERS: broker:29092

This makes the Kafka UI available at http://localhost:3030/:

3. Consumer Offset Reference From Configuration

When a consumer joins the group for the first time, it identifies the offset position to fetch records based on auto.offset.reset configuration, set to either earliest or latest.

Let’s push a few messages as a producer:

docker exec -i <CONTAINER-ID> kafka-console-producer \
  --broker-list localhost:9092 \
  --topic user-data <<< '{"id": 1, "first_name": "John", "last_name": "Doe"}
{"id": 2, "first_name": "Alice", "last_name": "Johnson"}'

Next, let’s consume these messages by registering a consumer to read these messages from the topic user-data with auto.offset.reset set to earliest in all partitions:

docker exec -it <CONTAINER_ID> kafka-console-consumer \
  --bootstrap-server localhost:9092 \
  --topic user-data \
  --consumer-property auto.offset.reset=earliest \
  --group consumer-user-data

This adds a new consumer to the consumer-user-data group. We can check the rebalance in the broker logs and Kafka UI. It should also list all messages based on the earliest reset policy.

We need to keep in mind that the consumer stays open in the terminal for ongoing message consumption. To check behavior after disruption, we terminate this session.

4. Consumer Offset Reference From Topic

When a consumer joins a group, the broker creates an internal topic __consumer_offsets,  to store customer offset states at the topic, and partition level. If Kafka auto-commit is enabled, the consumer regularly commits the last processed message offsets to this topic. This allows the state to be used when resuming consumption after disruptions.

When a consumer in a group fails due to a crash or disconnection, Kafka detects missing heartbeats and triggers a rebalance. It reassigns the failed consumer’s partitions to active consumers, ensuring message consumption continues. The persisted states from the internal topic are used to resume consumption.

Let’s start by verifying the committed offsets state in the internal topic:

docker exec -it <CONTAINER_ID> kafka-console-consumer \
  --bootstrap-server localhost:9092 \
  --topic __consumer_offsets \
  --formatter "kafka.coordinator.group.GroupMetadataManager\$OffsetsMessageFormatter" \
  --from-beginning

This script uses a specific format for better readability as the default format is in binary and this script logs records from the topic, showing the consumer group(consumer-user-data), topic(user-data), partition(0 and 1), and offset metadata(offset = 2):

[consumer-user-data,user-data,0]::OffsetAndMetadata(offset=2, leaderEpoch=Optional[0], metadata=, commitTimestamp=1726601656308, expireTimestamp=None)
[consumer-user-data,user-data,1]::OffsetAndMetadata(offset=0, leaderEpoch=Optional.empty, metadata=, commitTimestamp=1726601661314, expireTimestamp=None)

In this case, partition 0 has received all the messages, and the consumer committed the state for tracking progress/recovery.

Next, let’s verify the resumption behavior by pushing additional messages as a producer:

docker exec -i <CONTAINER-ID> kafka-console-producer \
  --broker-list localhost:9092 \
  --topic user-data <<< '{"id": 3, "first_name": "Alice", "last_name": "Johnson"} 
{"id": 4, "first_name": "Michael", "last_name": "Brown"}'

Then, let’s restart the previously terminated consumer to check if it resumes consuming records from the last known offset:

docker exec -it <CONTAINER_ID> kafka-console-consumer \
  --bootstrap-server localhost:9092 \
  --topic user-data \
  --consumer-property auto.offset.reset=earliest \
  --group consumer-user-data

This should log the records with user id 3 & user id 4, even though auto.offset.reset is set to earliest, as the offset state is stored in the internal topic. Finally, we can verify the state in the __consumer_offsets topic by running the same command again:

[consumer-user-data, user-data, 1] :: OffsetAndMetadata(offset=0, leaderEpoch=Optional.empty, metadata=, commitTimestamp=1726611172398, expireTimestamp=None)
[consumer-user-data, user-data, 0] :: OffsetAndMetadata(offset=4, leaderEpoch=Optional[0], metadata=, commitTimestamp=1726611172398, expireTimestamp=None)

We can see the __consumer_offsets topic updated with the committed offsets(with a value of 4) effectively resuming the consumption from the last committed offset as the state is retained in the topic.

5. Conclusion

In this article, we explored how Kafka manages consumer offsets and how the auto.offset.reset property works when a consumer joins a group for the first time.

We also learned how the state from the internal __consumer_offsets topic is used to resume consumption after a pause or disruption.


Query JPA Repository With Single Table Inheritance Subtypes

$
0
0

1. Overview

JPA is a useful tool when developing Java-based applications. We know about inheritance in Java, but when we have inheritance in JPA entities, JPA provides multiple strategies for handling inheritance. We can store the data either in a single table, in a join table, or in a table for each subclass entity.

In this tutorial, we’ll look at storing data of subtypes in a single table.

2. Single Table Inheritance SubTypes

In JPA, single table inheritance can be configured using the annotation @Inheritance(strategy = InheritanceType.SINGLE_TABLE). This means that a single table stores all entities in the inheritance hierarchy. The table has a discriminator column to distinguish between different entity types (subtypes). We can query specific subtypes using the JPA repository.

Let’s consider an inheritance hierarchy with Employee as a base class:

@Entity
@Inheritance(strategy = InheritanceType.SINGLE_TABLE)
@DiscriminatorColumn(name="type")
public abstract class Employee {
    
    @Id
    @GeneratedValue(strategy = GenerationType.IDENTITY)
    private Long id;
    
    private String name;
    // ...more fields, getter and setters
}

Next, let’s create subclasses PermanentEmployee and ContractEmployee that extend the Employee class:

@Entity
@DiscriminatorValue("PERM")
public class PermanentEmployee extends Employee {
    private int employeeId;
    
    // ...more fields, getter and setters
}
@Entity
@DiscriminatorValue("CNTR")
public class ContractEmployee extends Employee {
    private int contractPeriod;
    // ...more fields, getter and setters
}

The annotation @Inheritance defines inheritance in the base class Employee. The strategy attribute for the annotation is assigned to InheritanceType.SINGLE_TABLE. This assignment instructs Hibernate to store records for both PermanentEmployee and ContractEmployee subclasses in a single table.

Also, the annotation @DiscriminatorColumn defines a discriminator column for subclasses. The discriminator column is an identifier for the rows belonging to two different subclasses. The annotation @DiscriminatorColumn has an attribute name to set the discriminator column name.

In this example, we’ve set the discriminator column name to ‘type‘. As we use a single table to store records from multiple entity subclasses, this annotation helps us to identify to what subtype of main entity the record belongs.

In the given example, class Employee has a discriminator column named type.

The annotation @DiscrimnatorValue in subclasses or sub-types PermanentEmployee and ContractEmployee defines the value for the discriminator column for that particular subclass.

In the example, all records of the PermanentEmployee have value ‘PERM’ for the discriminator column type. For the ContractEmpoyee class, the value is ‘CNTR’.

3. Querying With JPA Respoistory

3.1. Repository Classes

Now, let’s create repository classes for the base class and the subclasses in the inheritance hierarchy. These classes enable us to query using the JPA Repository feature of Spring Data.

We simply need to extend the JpaRepository interface:

public interface EmployeeRepository extends JpaRepository<Employee, Long> {
}

Extending the JpaRepository interface gives us basic queries like save, findAll, findById, delete, and many more.

Similarly, let’s create repository interfaces for the subclasses PermanentEmployee and ContractEmployee:

public interface PermanentEmployeeRepository extends JpaRepository<PermanentEmployee, Long> {
}
public interface ContractEmployeeRepository extends JpaRepository<ContractEmployee, Long> {
}

3.2. Persistence Configuration

Now, we need to declare the EnityManagerFactory bean in the configuration class PersistenceConfig and add a JPA vendor adapter for the Hibernate library:

@Bean
public LocalContainerEntityManagerFactoryBean entityManagerFactory() {
    LocalContainerEntityManagerFactoryBean em = new LocalContainerEntityManagerFactoryBean();
    em.setDataSource(dataSource());
    em.setPackagesToScan("com.baeldung.jpa.subtypes.entity");
    HibernateJpaVendorAdapter vendorAdapter = new HibernateJpaVendorAdapter();
    em.setJpaVendorAdapter(vendorAdapter);
    em.setJpaProperties(additionalProperties());
}

The LocalContainerEntityManagerFactoryBean is a Spring class that provides the FactoryBean for JPA’s EntityManagerFactory. It allows us to configure JPA provider, datasources, entity packages, and more.

3.3. Querying with JPA Repositories

To query data for the base class and subclasses, we autowire repository classes in the service class:

@Autowired
EmployeeRepository empRepository;
@Autowired
PermanentEmployeeRepository permEmpRepository;
@Autowired
ContractEmployeeRepository contrEmpRepository;

Let’s add some sample data to the subtypes:

PermanentEmployee perm1 = new PermanentEmployee(10, "John", 48);
permEmpRepository.save(perm1);
ContractEmployee contr1 = new ContractEmployee(180, "Mitchell", 23);
contrEmpRepository.save(contr1);

Now, based on single table configuration, PermanentEmployeeRepository, and ContractEmployeeRepository, insert the records in a single table Employee. Let’s see some sample data for the table Employee:

 ID NAME AGE EMPLOYEEID CONTRACTPERIOD TYPE
1 John 48 10 NULL PERM
2 Mitchell 23 NULL 180 CNTR

As we can see from the sample data from our database, the record for PermanentEmployee type does not have a value for the attribute that is specific to ContractEmployee and vice versa. The discriminator column TYPE identifies the subclass type for the record.

All records in the employee table can be retrieved using EmployeeRepository:

List<Employee> empList = empRepository.findAll()

We use permEmpRepository to get only PermanentEmployee from the employee table:

List<PermanentEmployee> perEmpList = permEmpRepository.findAll();

Similarly, contrEmpRepository to get only ContractEmployee from the employee table:

List<ContractEmployee> contrList = contrEmpRepository.findAll();

3.4. Using Custom Queries

We can query subclass data using custom JPA queries. Creating a filter query based on the discriminator column gives us data for the respective subclass:

@Query("SELECT e FROM Employee e WHERE type(e) = 'PERM' AND e.employeeId < :idlimit " 
  + "AND e.name LIKE :prefix% ")
List<PermanentEmployee> filterPermanent(@Param("idlimit") int idlimit, @Param("prefix") String prefix);
@Query("SELECT e FROM Employee e WHERE type(e) = 'CNTR' AND e.contractPeriod < :period " 
  + "AND e.name LIKE :prefix%  ")
List<ContractEmployee> filterContract(@Param("period") int period, @Param("prefix") String prefix);

In our example, the base class Employee is configured with discriminating column type. The same column is used to query data for specific subclasses.

Here, in the method filterPermanent(), using a custom query, we filter PermanentEmployee records having column type values ‘PERM ‘, employeeId less than the parameter idlimit, and name starting with the parameter prefix.

Similarly, in the method filterContract(), we filter ContractEmployee records based on columns type, contractPeriod, and name.

The custom query used in the base repository, EmployeeRepository, enables us to work with a single repository, handling records of all subtypes in a single table.

4. Conclusion

In this article, we learned about handling inheritance in JPA using a single table configuration for subtypes and querying the data using Spring Data JPA repositories. A single table stores the records of all subclasses in the inheritance, and the discriminator column differentiates the records for the subclasses.

As always, the complete code used in this article is available over on GitHub.
       

Solving “java.lang.ClassNotFoundException: com.mysql.cj.jdbc.Driver”

$
0
0

1. Overview

The Java Database Connectivity (JDBC) Application Programming Interface (API) provides a set of classes and interfaces. We can use these to develop applications to connect to data sources such as relational databases and process data. Further, we need a database-specific JDBC Driver that implements this API to connect to the specific database.

When connecting to the MySQL database using JDBC we could encounter the exception message java.lang.ClassNotFoundException: com.mysql.cj.jdbc.Driver. When we use the previous, now deprecated class com.mysql.jdbc.Driver, we could get the message java.lang.ClassNotFoundException: com.mysql.jdbc.Driver.

In this tutorial, we’ll learn how to solve this exception. We don’t need any special setup other than the application development environment we may already use. We’ll discuss solving this exception using JUnit 5 integration tests with Apache Maven as the build tool.

2. Cause of the Exception

We get this exception when the driver manager service that manages and loads JDBC drivers can’t find a driver class needed to obtain a connection. This exception can only occur at run-time. We can request a specific MySQL JDBC driver class to be loaded with the Class.forName(“com.mysql.cj.jdbc.Driver”) call in the application; however, it’s unnecessary because the DriverManager locates and loads a suitable driver by itself at run-time.

However, when the DriverManger doesn’t find a suitable or requested driver class in the classpath, it throws this exception. The classpath is the directory path that the Java Runtime Environment (JRE) searches for classes. To fix this issue, we need to add the MySQL Connector/J binaries or the jar file containing the Connector/J classes to the runtime classpath.

3. Example

A standalone application doesn’t require an application/web server. We can fix this exception by adding the Maven dependency for MySQL Connector/J to the configuration file pom.xml:

<dependency>
    <groupId>com.mysql</groupId>
    <artifactId>mysql-connector-j</artifactId>
    <version>8.0.33</version>
</dependency>

Let’s use a test class to check if the error is solved. No exception is thrown because we added the driver class and it gets found and loaded:

public class MySQLLoadDriverUnitTest {
    @Test
    void givenADriverClass_whenDriverLoaded_thenEnsureNoExceptionThrown() {
        assertDoesNotThrow(() -> {
            Class.forName("com.mysql.cj.jdbc.Driver");
        });
    }
}

4. Conclusion

In this article, we learned how to fix the java.lang.ClassNotFoundException: com.mysql.cj.jdbc.Driver exception problem. We used a JUnit 5 unit test developed in a Maven project to demonstrate adding MySQL Connector/J to the runtime classpath to fix the exception.

As always, the sample scripts used in this article are available over on GitHub.


Caching Guide

A Guide to @Locked in Lombok

$
0
0

1. Overview

Project Lombok is a Java library that provides various annotations we can use to generate standard methods and functionalities, reducing the boilerplate code. For instance, we can use Lombok to generate getters and setters, constructors, or even introduce design patterns in our code, such as the Builder pattern.

In this tutorial, we’ll learn how to use the @Locked annotation introduced in Lombok version 1.18.32.

2. Why @Locked Annotation?

First, let’s understand the need for the @Locked annotation.

Java 21 introduced virtual threads to ease concurrent applications’ implementation, maintenance, and debugging. What differentiates them from the standard threads is that they’re managed by the JVM instead of the operating system. Thus, their allocation doesn’t require a system call, nor do they depend on the operating system’s context switch.

However, we should be aware of potential performance problems virtual threads can yield. For instance, when the blocking operation is executed inside the synchronized block or a method, it still blocks the operating system’s thread. This situation is known as pinning. On the other hand, if the blocking operation is outside the synchronized block or a method, it wouldn’t cause any problems.

Furthermore, pinning can negatively affect the performance of our application, especially if the blocking operation is frequently called and long-lived. Notably, infrequent and short-lived blocking operations wouldn’t cause such problems.

One way to fix the pinning issue is to replace synchronized with the ReentrantLock. This is where the new Lombok annotation comes into play.

3. Understanding @Locked Annotation

Simply put, the @Locked annotation is created as a variant of the ReentrantLock. It was primarily designed to provide better support for virtual threads.

In addition, we can use this annotation only on static or instance methods. It wraps the entire code provided in a method into a block that acquires a lock. Moreover, we can specify the field of the ReentrantLock type we want to use for locking. As a result, Lombok performs a lock on that specific field. After the method finishes with execution, it unlocks.

Now, let’s see the @Locked annotation in action.

4. Dependency Setup

Let’s add the lombok dependency in our pom.xml:

<dependency>
    <groupId>org.projectlombok</groupId>
    <artifactId>lombok</artifactId>
    <version>1.18.34</version>
    <scope>provided</scope>
</dependency>

It’s important to note we need version 1.18.32 or higher to use this annotation.

5. Usage

Let’s create the Counter class with the increment() and get() methods:

public class Counter {
    private int counter = 0;
    private ReentrantLock lock = new ReentrantLock();
    
    public void increment() {
        lock.lock();
        try {
            counter++;
        } finally {
            lock.unlock();
        }
    }
    public int get() {
        lock.lock();
        try {
            return counter;
        } finally {
            lock.unlock();
        }
    }
}

Since counter++ isn’t an atomic operation, we needed to include locking to ensure the atomic update of the shared object is visible by other threads in a multithreaded environment. Otherwise, we’ll get incorrect results.

Here, we used the ReentrantLock to lock the increment() and get() methods, ensuring only one thread can call the method at a time.

Let’s replace the lock in the increment() and get() methods and use the @Locked annotation instead:

@Locked
public void increment() {
    counter++;
}
@Locked
public int get() {
    return counter;
}

We reduced the number of lines to just one per method. Now, let’s understand what happens under the hood. Lombok creates a new field of ReentrantLock type named $LOCK or $lock, depending on whether we’re using locking on a static or instance method.

Then, it wraps the code provided in the method into a block that acquires ReentrantLock. Finally, when we exit the method, it releases the lock.

Furthermore, multiple methods annotated with the @Locked annotation will share the same lock. If we need different locks, we can create a ReentrantLock instance variable and pass its name as an argument to the @Locked annotation.

Let’s test the methods to ensure they work properly:

@Test
void givenCounter_whenIncrementCalledMultipleTimes_thenReturnCorrectResult() throws InterruptedException {
    Counter counter = new Counter();
    Thread.Builder builder = Thread.ofVirtual().name("worker-", 0);
    Runnable task = counter::increment;
    Thread t1 = builder.start(task);
    t1.join();
    Thread t2 = builder.start(task);
    t2.join();
    assertEquals(2, counter.get());
}

5.1. @Locked.Read and @Locked.Write Annotations

We can use the @Locked.Read and @Locked.Write annotations instead of ReentrantReadWriteLock.

As the name suggests, methods decorated with the @Locked.Read lock on the read lock, while the methods annotated with the @Locked.Write lock on the write lock.

Let’s modify the code provided in the increment() and get() method and use the @Locked.Write and @Locked.Read annotations:

@Locked.Write
public void increment() {
    counter++;
}
@Locked.Read
public int get() {
    return counter;
}

As a reminder, having separate locks for read and write operations can improve performance, especially when the operation is heavy.

Notably, the name of the ReentrantReadWriteLock field Lombok creates is the same as the one generated for the @Locked annotation. Thus, we’d need to specify a custom name for one of the locks if we want to use both annotations in the same class.

6. Difference Between @Locked and @Synchronized

Besides the @Locked annotation, Lombok provides a similar @Synchronized annotation. Both annotations serve the purpose of ensuring thread safety. Let’s find out the differences between them.

While the @Locked annotation is a substitution for the ReentrantLock, the @Synchonized annotation replaces the synchronized modifier. Just like the keyword, we can use it only on static or instance methods. However, while synchronized locks on this, the annotation locks on the specific field created by Lombok.

Additionally, the @Locked annotation is recommended when using virtual threads, while using @Synchronized in the same situation can cause performance issues.

7. Conclusion

In this article, we learned how to use Lombok’s @Locked annotation.

To sum up, Lombok introduced the annotation for better support of virtual threads. It represents a substitution for the ReentrantLock object. Alternatively, we saw how to use the @Lock.Read and @Lock.Write annotations to specify read and write locks instead of using the general one. Finally, we highlighted several differences between the @Locked and the @Synchronized annotations.

As always, the source code for the article is available over on GitHub.


Parse XML as a String in Java

$
0
0

1. Overview

Sometimes, we may come across a scenario that requires us to convert an XML (Extensible Markup Language) string to an actual XML document that we can process. It’s more common in tasks like web crawling or retrieving XML data stored in a database.

In this article, we’ll discuss how to convert an XML string to an XML document. We’ll cover two approaches to the problem.

2. Example String

We’ll use a simple XML document that contains data about the blog post(s):

<posts>
    <post postId="1">
        <title>Parsing XML as a String in Java</title>
        <author>John Doe</author>
    </post>
</posts>

posts is the root that contains post as a child(ren).

3. Parsing XML from a String

In this section, we’ll cover two methods to parse XML from our example string.

3.1. InputSource with StringReader

When we parse an XML document, we build an instance of the DocumentBuilder class. Then, we invoke the parse method on the instance, which expects an input source to parse the XML from.

In our case, the XML is a string. Therefore, if we pass the string directly to the parse method, it will throw an exception. That’s because the parse method expects the string to be a URI (Uniform Resource Identifier) that points to the XML resource.

Fortunately, we can create a custom input source for our XML string. We can use the StringReader class to create a stream of characters from the XML string. Then, we create a new input source out of that stream:

String xmlString = "<posts>...</posts>";
DocumentBuilderFactory factory = DocumentBuilderFactory.newInstance();
DocumentBuilder builder = factory.newDocumentBuilder();
InputSource inputSource = new InputSource(new StringReader(xmlString));
Document document = builder.parse(inputSource);

Let’s break this down:

  • xmlString is our example XML string
  • DocumentBuilder is a helper class that lets us parse and create XML documents
  • InputSource is a wrapper that can consume XML data from various sources such as files, strings, and streams
  • StringReader turns the XML string into a readable stream of characters

Essentially, the InputSource can take a Reader object to parse it as an XML:

public InputSource(Reader characterStream)

Similarly, the parse method takes an InputSource:

public Document parse(InputSource is)

Eventually, the parse method creates an XML document out of the string. We can test it out by passing it our example document as a string:

@Test
public void givenXmlString_whenConvertToDocument_thenSuccess() {
    ...
    assertNotNull(document);
    assertEquals("posts", document.getDocumentElement().getNodeName());
    Element rootElement = document.getDocumentElement();
    var childElements = rootElement.getElementsByTagName("post");
    assertNotNull(childElements);
    assertEquals(1, childElements.getLength());
}

We can expect the test to pass if the XML string is a valid markup.

3.2. InputStream of Byte Array

Using InputStream is another common approach to parsing XML. It’s useful when we need to parse XML from a stream such as a network stream or a file stream. In addition, it’s simpler to use than InputSource, which lets us fine-tune the parsing process.

First, we create an instance of ByteArrayInputStream from our XML string. Then, we feed it to the parse method:

InputStream inputStream = new ByteArrayInputStream(xmlString.getBytes(StandardCharsets.UTF_8));
Document document = builder.parse(inputStream);

In the code, we convert the string to an array of bytes. In addition, we also specify the character encoding, which is UTF-8 in this case.

4. Conclusion

In this article, we reviewed the two most common approaches to converting an XML string to an XML document in Java. Specifically, we converted an XML string to a character stream and parsed it as an input source. Similarly, we covered how to parse the string as an input byte array stream.
As always, all the code for these examples is available over on GitHub.

       

Handling the Blocking Method In Non-Blocking Context Warning

$
0
0

1. Overview

In this article, we’ll explore the warning: “Possibly blocking call in non-blocking context could lead to thread starvation”. First, we’ll recreate the warning with a simple example and explore how to suppress it if it’s not relevant to our case.

Then, we’ll discuss the risks of ignoring it and explore two ways to address the issue effectively.

2. Blocking Method in Non-Blocking Context

IntelliJ IDEA will prompt the “Possibly blocking call in non-blocking context could lead to thread starvation” warning if we try to use a blocking operation in a reactive context.

Let’s assume we’re developing a reactive web application using Spring WebFlux with a Netty server. We’ll encounter this warning if we introduce blocking operations while handling HTTP requests that should remain non-blocking:

This warning originates from IntelliJ IDEA’s static analysis. If we are confident it won’t impact our application, we can easily suppress the warning using the “BlockingMethodInNonBlockingContext” inspection name:

@SuppressWarnings("BlockingMethodInNonBlockingContext")
@GetMapping("/warning")
Mono<String> warning() { 
    // ...
 }

However, it’s crucial to understand the underlying issue and assess its impact. In some cases, this can lead to blocking the threads responsible for handling HTTP requests, causing serious implications.

3. Understanding the Warning

Let’s showcase a scenario where ignoring this warning can lead to thread starvation and block incoming HTTP traffic. For this example, we’ll add another endpoint and intentionally block the thread for two seconds using Thread.sleep(), despite being in a reactive context:

@GetMapping("/blocking")
Mono<String> getBlocking() {
    return Mono.fromCallable(() -> {
        try {
            Thread.sleep(2_000);
        } catch (InterruptedException e) {
            throw new RuntimeException(e);
        }
        return "foo";
    });
}

In this case, Netty’s event loop threads handling incoming HTTP requests can become quickly blocked, leading to unresponsiveness. For example, if we send two hundred concurrent requests, the application will take 32 seconds to respond to all of them, even though no computation is involved. Furthermore, this will affect other endpoints as well – even if they don’t require the blocking operation.

This delay occurs because the Netty HTTP thread pool has a size of twelve, so it can only handle twelve requests at a time. If we check the IntelliJ profiler, we can expect to see the threads being blocked most of the time and a very low CPU usage throughout the test:

4. Fixing the Issue

Ideally, we should switch to a reactive API to resolve this issue. However, when that’s not feasible, we should use a separate thread pool for such operations to avoid blocking the HTTP threads.

4.1. Using a Reactive Alternative

First, we should aim for a reactive approach whenever possible. This means finding reactive alternatives to blocking operations.

For example, we can try to use reactive database drivers with Spring Data Reactive Repositories or reactive HTTP clients like WebClient. In our simple case, we can use Mono’s API to delay the response by two seconds, instead of relying on the blocking Thread.sleep():

@GetMapping("/non-blocking")
Mono<String> getNonBlocking() {
    return Mono.just("bar")
      .delayElement(Duration.ofSeconds(2));
}

With this approach, the application can handle hundreds of concurrent requests and send all responses after the two-second delay we’ve introduced.

4.2. Using a Dedicated Scheduler for the Blocking Operations

On the other hand, there are situations where we don’t have the option to use a reactive API. A common scenario is when querying a database using a non-reactive driver, which will lead to blocking operations:

@GetMapping("/blocking-with-scheduler")
Mono<String> getBlockingWithDedicatedScheduler() {
    String data = fetchDataBlocking();
    return Mono.just("retrieved data: " + data);
}

In these cases, we can wrap the blocking operation in a Mono and use subscribeOn() to specify the scheduler for its execution. This gives us a Mono<String> that can later be mapped to our desired response format:

@GetMapping("/blocking-with-scheduler")
Mono<String> getBlockingWithDedicatedScheduler() {
    return Mono.fromCallable(this::fetchDataBlocking)
      .subscribeOn(Schedulers.boundedElastic())
      .map(data -> "retrieved data: " + data);
}

5. Conclusion

In this tutorial, we covered the “Possibly blocking call in non-blocking context could lead to thread starvation” warning generated by IntelliJ’s static analyzer. Through code examples, we demonstrated how ignoring this warning can block Netty’s thread pool for handling incoming HTTP requests making the application unresponsive.

After that, we saw how favoring reactive APIs wherever possible can help us solve this issue. Additionally, we learned that we should use a separate thread pool for the blocking operations whenever we have no reactive alternatives.

As always, the source code for this tutorial is available over on GitHub.

       
Viewing all 4561 articles
Browse latest View live


<script src="https://jsc.adskeeper.com/r/s/rssing.com.1596347.js" async> </script>