Quantcast
Channel: Baeldung
Viewing all 4561 articles
Browse latest View live

Conditional Statements in Spring WebFlux Reactive Flow

$
0
0

1. Overview

Using conditional statements in a Spring WebFlux reactive flow allows for dynamic decision-making while processing reactive streams. Unlike an imperative approach, conditional logic in a reactive approach is not limited to if-else statements. Instead, we can use a variety of operators, such as map(), filter(), swithIfEmpty(), and so on, to introduce conditional flow without blocking the stream.

In this article, we’ll explore different approaches to using conditional statements with Spring WebFluxUnless specified explicitly, each approach will apply to both Mono and Flux.

2. Using Conditional Constructs with map()

We can use the map() operator to transform individual elements of the stream. Further, we can use if-else statements within the mapper to modify elements conditionally.

Let’s define a Flux named oddEvenFlux and label each of its elements as “Even” or “Odd” using the map() operator:

Flux<String> oddEvenFlux = Flux.just(1, 2, 3, 4, 5, 6)
  .map(num -> {
    if (num % 2 == 0) {
      return "Even";
    } else {
      return "Odd";
    }
  });

We should note that map() is synchronous, and it applies the transformation function immediately after an item is emitted.

Next, let’s use the StepVerifier to test the behavior of our reactive stream and confirm the conditional labeling of each item:

StepVerifier.create(oddEvenFlux)
  .expectNext("Odd")
  .expectNext("Even")
  .expectNext("Odd")
  .expectNext("Even")
  .expectNext("Odd")
  .expectNext("Even")
  .verifyComplete();

As expected, each number is labeled according to its parity.

3. Using filter()

We can use the filter() operator to filter out data using a predicate, ensuring that the downstream operators receive only the relevant data.

Let’s create a new Flux named evenNumbersFlux from a stream of numbers:

Flux<Integer> evenNumbersFlux = Flux.just(1, 2, 3, 4, 5, 6)
  .filter(num -> num % 2 == 0);

Here, we’ve added a predicate for the filter() operator to determine if the number is even.

Now, let’s verify that evenNumbersFlux allows only even numbers to pass downstream:

StepVerifier.create(evenNumbersFlux)
  .expectNext(2)
  .expectNext(4)
  .expectNext(6)
  .verifyComplete();

Great! It works as expected.

4. Using switchIfEmpty() and defaultIfEmpty()

In this section, we’ll learn about two useful operators that enable conditional data flow when the underlying flux doesn’t emit any items.

4.1. With switchIfEmpty()

When an underlying flux doesn’t publish any items, we might want to switch to an alternative stream. In such a scenario, we can supply an alternative publisher via the switchIfEmpty() operator.

Let’s say we’ve got a flux of words chained with a filter() operator that only allows words that have a length of two or more characters:

Flux<String> flux = Flux.just("A", "B", "C", "D", "E")
  .filter(word -> word.length() >= 2);

Naturally, when none of the words meet the filter criteria, the flux won’t emit any items.

Now, let’s supply an alternative flux via the switchIfEmpty() operator:

flux = flux.switchIfEmpty(Flux.defer(() -> Flux.just("AA", "BB", "CC")));

We’ve used the Flux.defer() method to ensure that the alternative flux is created only when the upstream flux doesn’t produce any items.

Lastly, let’s verify that the resultant flux produces all items from the alternate source:

StepVerifier.create(flux)
  .expectNext("AA")
  .expectNext("BB")
  .expectNext("CC")
  .verifyComplete();

The result looks correct.

4.2. With defaultIfEmpty()

Alternatively, we can use the defaultIfEmpty() operator to supply a fallback value instead of an alternative publisher when the upstream flux doesn’t emit any item:

flux = flux.defaultIfEmpty("No words found!");

Another key difference between using the switchIfEmpty() and defaultIfEmpty() is that we’re limited to using a single default value with the latter.

Now, let’s verify the conditional flow of our reactive stream:

StepVerifier.create(flux)
  .expectNext("No words found!")
  .verifyComplete();

We’ve got this one right.

5. Using flatMap()

We can use the flatMap() operator to create multiple conditional branches in our reactive stream while maintaining a non-blocking, asynchronous flow.

Let’s take a look at a Flux created from words and changed with two flatMap() operators:

Flux<String> flux = Flux.just("A", "B", "C")
  .flatMap(word -> {
    if (word.startsWith("A")) {
      return Flux.just(word + "1", word + "2", word + "3");
    } else {
      return Flux.just(word);
    }
  })
  .flatMap(word -> {
    if (word.startsWith("B")) {
      return Flux.just(word + "1", word + "2");
    } else {
      return Flux.just(word);
    }
  });

We’ve created a dynamic branching by adding two stages of conditional transformation, thereby providing multiple logical paths to each item of the reactive stream.

Now, it’s time to verify the conditional flow of our reactive stream:

StepVerifier.create(flux)
  .expectNext("A1")
  .expectNext("A2")
  .expectNext("A3")
  .expectNext("B1")
  .expectNext("B2")
  .expectNext("C")
  .verifyComplete();

Fantastic! It looks like we nailed this one. Further, we can use flatMapMany() for Mono publishers for a similar use case.

6. Using Side-Effect Operators

In this section, we’ll explore how to perform condition-based synchronous actions while processing a reactive stream.

6.1. With doOnNext()

We can use the doOnNext() operator to execute a side-effect operation synchronously for each item of the reactive stream.

Let’s start by defining the evenCounter variable to track the count of even numbers in our reactive stream:

AtomicInteger evenCounter = new AtomicInteger(0);

Now, let’s create a flux of integers and chain it together with a doOnNext() operator to increment the count of even numbers:

Flux<Integer> flux = Flux.just(1, 2, 3, 4, 5, 6)
  .doOnNext(num -> {
  if (num % 2 == 0) {
    evenCounter.incrementAndGet();
  }
  });

We’ve added the action within an if-block, thereby enabling a conditional increment of the counter.

Next, we must verify the logic and state of evenCounter after each item from the reactive stream is processed:

StepVerifier.create(flux)
  .expectNextMatches(num -> num == 1 && evenCounter.get() == 0)
  .expectNextMatches(num -> num == 2 && evenCounter.get() == 1)
  .expectNextMatches(num -> num == 3 && evenCounter.get() == 1)
  .expectNextMatches(num -> num == 4 && evenCounter.get() == 2)
  .expectNextMatches(num -> num == 5 && evenCounter.get() == 2)
  .expectNextMatches(num -> num == 6 && evenCounter.get() == 3)
  .verifyComplete();

Great! We’ve got the expected results.

6.2. With doOnComplete()

Similarly, we can also associate actions based on the condition of receiving a signal from the reactive stream, such as the complete signal sent after it has published all its items.

Let’s start by initializing the done flag:

AtomicBoolean done = new AtomicBoolean(false);

Now, let’s define a flux of integers and add an action of setting the done flag to true using the doOnComplete() operator:

Flux<Integer> flux = Flux.just(1, 2, 3, 4, 5, 6)
  .doOnComplete(() -> done.set(true));

It’s important to note that the complete signal is sent only once, so the side-effect action will be triggered at most once.

Further, let’s verify the conditional execution of the side effect by validating the done flag at various steps:

StepVerifier.create(flux)
  .expectNextMatches(num -> num == 1 && !done.get())
  .expectNextMatches(num -> num == 2 && !done.get())
  .expectNextMatches(num -> num == 3 && !done.get())
  .expectNextMatches(num -> num == 4 && !done.get())
  .expectNextMatches(num -> num == 5 && !done.get())
  .expectNextMatches(num -> num == 6 && !done.get())
  .then(() -> Assertions.assertTrue(done.get()))
  .expectComplete()
  .verify();

Perfect! We can see that the done flag was set to true only after all the items were emitted successfully. However, it’s important to note that doOnComplete() applies only to Flux publishers, and we must use doOnSuccess() for Mono publishers.

7. Using firstOnValue()

Sometimes, we might have multiple sources to collect data, but each could have a different latency. From a performance point of view, it’s best to use the value from the source with the least latency. For such conditional data access, we can use the firstOnValue() operator.

First, let’s define two sources, namely, source1 and source2, with latency of 200 ms and 10 ms, respectively:

Mono<String[]> source1 = Mono.defer(() -> Mono.just(new String[] { "val", "source1" })
  .delayElement(Duration.ofMillis(200)));
Mono<String[]> source2 = Mono.defer(() -> Mono.just(new String[] { "val", "source2" })
  .delayElement(Duration.ofMillis(10)));

Next, let’s use the firstWithValue() operator with the two sources and rely on the framework’s conditional logic to handle data access:

Mono<String[]> mono = Mono.firstWithValue(source1, source2);

Finally, let’s verify the outcome by comparing the emitted item against the data from the source with lower latency:

StepVerifier.create(mono)
  .expectNextMatches(item -> "val".equals(item[0]) && "source2".equals(item[1]))
  .verifyComplete();

Excellent! We’ve got this one right. Further, it’s important to note that firstWithValue() is available only for Mono publishers.

8. Using zip() and zipWhen()

In this section, let’s learn how to leverage the conditional flow using the zip() and zipWhen() operators.

8.1. With zip()

We can use the zip() operator to combine emissions from multiple sources. Further, we can use its combinator function to add conditional logic for data processing. Let’s see how we can use this to determine if values in a cache and database are inconsistent

First, let’s define the dataFromDB and dataFromCache publishers to simulate sources with varying latencies and values:

Mono<String> dataFromDB = Mono.defer(() -> Mono.just("db_val")
  .delayElement(Duration.ofMillis(200)));
Mono<String> dataFromCache = Mono.defer(() -> Mono.just("cache_val")
  .delayElement(Duration.ofMillis(10)));

Now, let’s zip them and use its combinator function to add the condition for determining if the cache is consistent:

Mono<String[]> mono = Mono.zip(dataFromDB, dataFromCache, 
  (dbValue, cacheValue) -> 
  new String[] { dbValue, dbValue.equals(cacheValue) ? "VALID_CACHE" : "INVALID_CACHE" });

Finally, let’s verify this simulation and validate that the cache is inconsistent because db_val is different from cache_val:

StepVerifier.create(mono)
  .expectNextMatches(item -> "db_val".equals(item[0]) && "INVALID_CACHE".equals(item[1]))
  .verifyComplete();

The result looks correct.

8.2. With zipWhen()

The zipWhen() operator is more suitable when we want to collect the emission from the second source only in the presence of an emission from the first source. Further, we can use the combinator function to add conditional logic to process our reactive stream.

Let’s say that we want to compute the age category of a user:

int userId = 1;
Mono<String> userAgeCategory = Mono.defer(() -> Mono.just(userId))
  .zipWhen(id -> Mono.defer(() -> Mono.just(20)), (id, age) -> age >= 18 ? "ADULT" : "KID");

We’ve simulated the scenario for a user with a valid user ID. So, we’re guaranteed an emission from the second publisher. Subsequently, we’ll get the user’s age category.

Now, let’s verify this scenario and confirm that a user with the age of 20 is categorized as an “ADULT”:

StepVerifier.create(userDetail)
  .expectNext("ADULT")
  .verifyComplete();

Next, let’s use Mono.empty() to simulate the categorization for a scenario where a valid user is not found:

Mono<String> noUserDetail = Mono.empty()
  .zipWhen(id -> Mono.just(20), (id, age) -> age >= 18 ? "ADULT" : "KID");

Lastly, we can confirm that there are no emissions in this case:

StepVerifier.create(noUserDetail)
  .verifyComplete();

Perfect! We got the expected results for both scenarios. Further, we need to note that zipWhen() is available only for Mono publishers.

9. Conclusion

In this article, we learned how to include conditional statements in Spring WebFlux. Further, we explored how conditional flow is facilitated by different operators, such as map(), flatMap(), zip(), firstOnValue(), switchIfEmpty(), defaultIfEmpty(), and more.

As always, the code from this article is available over on GitHub.


Sum of First N Even Numbers Divisible By 3 in Java

$
0
0

1. Overview

In this tutorial, we’ll explore calculating the sum of the first N even numbers divisible by 3 using Java. This can be solved using different approaches.

We’ll examine two distinct methods to illustrate these approaches. The first method is the brute force method. This method involves a step-by-step approach where we discuss each even number and determine its divisibility by 3. While simple to understand, it may not be the most efficient for large values of N. The second method we’ll discuss is the optimized mathematical approach. This method leverages the inherent properties of even numbers divisible by 3 to derive a formula for direct calculation. This approach offers significant performance improvements, especially when dealing with large datasets of numbers.

2. Brute Force Method

The brute-force method involves iterating through numbers, identifying those that are even and divisible by 3, and adding them to a running total. This is a straightforward approach, but it may be inefficient because it checks every even number individually, rather than focusing directly on multiples of 6. Since any number divisible by 2 and 3 is also divisible by 6 (as 6 is the least common multiple of 2 and 3), focusing on multiples of 6 allows us to skip unnecessary checks for numbers that don’t meet both conditions.

2.1. Implementation with for Loop

For our code examples, we’ll define NUMBER as 7, which represents the first 7 even numbers, and EXPECTED_SUM as 18 (6 + 12), which is the expected result of this calculation:

static final int NUMBER = 7;
static final int EXPECTED_SUM = 18;

In the next example, we’ll use a for loop to achieve the result:

@Test
void givenN_whenUsingBruteForceForLoop_thenReturnsCorrectSum() {
    int sum = 0;
    for (int i = 2; i <= NUMBER * 2; i++) {
        if (i % 2 == 0 && i % 3 == 0) {
            sum += i;
        }
    }
    assertEquals(EXPECTED_SUM, sum);
}

Here, we check each even number starting from 2, and the loop continues until we’ve identified the first N numbers divisible by both 2 and 3. The time complexity is O(N) since we iterate until we find N numbers. In this case, we check many numbers that aren’t divisible by 2 and 3.

2.2. Functional Programming Approach

We can leverage Java’s functional programming features for a more modern approach. Using the Stream API, we can generate an infinite Stream of numbers,  then filter this Stream to include only even numbers, limit it to the first N even numbers, and finally filter those that are divisible by 3 before summing them. This functional style can be more concise and declarative:

@Test
void givenN_whenUsingFunctionalApproach_thenReturnsCorrectSum() {
    int sum = IntStream.iterate(2, i -> i + 1)
      .filter(i -> i % 2 == 0)
      .limit(NUMBER)
      .filter(i -> i % 3 == 0)
      .sum();
    assertEquals(EXPECTED_SUM, sum);
}

This implementation uses IntStream.iterate() to generate an infinite Stream of Integers starting from 2. This approach isn’t only concise but also inherently parallelizable if necessary.

2.3. Improved Brute Force Method

The brute-force method can be further improved by observing that even numbers divisible by 3 are also divisible by 6. This means that instead of checking every even number, we can directly check numbers that are multiples of 6. This optimization reduces the number of checks we need to perform, making the method more efficient:

@Test
void givenN_whenUsingImprovedBruteForce_thenReturnsCorrectSum() {
    int sum = IntStream.iterate(6, i -> i + 6)
      .limit(NUMBER / 3)
      .sum();
    assertEquals(EXPECTED_SUM, sum);
}

By directly iterating through multiples of 6, we improve the performance of the brute-force method, making it more efficient without changing its core structure. This optimization makes the algorithm faster in practice, but the overall time complexity remains linear because the number of iterations is directly proportional to N.

3. Optimized Mathematical Approach

In the brute-force methods, we iterated through numbers and checked whether each was divisible by 6 to find even numbers divisible by 3. While effective, these approaches can be further optimized by leveraging the mathematical insight that the numbers we’re summing are multiples of 6. Therefore, instead of iterating through numbers and checking divisibility conditions, we can directly calculate the first N/3 multiples of 6 and sum them. This is because, out of every three even numbers, only one will be divisible by 3, so the first N even numbers divisible by 3 are the first N/3 multiples of 6.

3.1. Mathematical Insight

  • Every even number divisible by 3 is a multiple of 6.
  • Instead of iterating through numbers, we can directly calculate the first N multiples of 6 and sum them.
  • The first N multiples of 6 are 6 * 1, 6 * 2, 6 * 3, …, 6 * N. Therefore, we can calculate the sum as follows:
    Sum = 6 * (1 + 2 + 3 + ⋯ + N)
  • The sum of the first N natural numbers is given by the formula:
    (N * (N + 1)) / 2
  • Using this formula, the sum of the first N/3 multiples of 6 can be computed as:
    Sum = 6 * (N / 3 * (N / 3 + 1)) / 2 = 3 * (N / 3) * (N / 3 + 1)

This approach avoids looping altogether, making it more efficient than brute-force methods, especially for large values of N.

3.2. Optimized Mathematical Code

We directly calculate the sum using the formula for the sum of the first N / 3 multiples of 6:

@Test
void givenN_whenUsingOptimizedMethod_thenReturnsCorrectSum() {
    int sum = 3 * (NUMBER / 3) * (NUMBER / 3 + 1);
    assertEquals(EXPECTED_SUM, sum);
}

This approach is much faster because it avoids looping altogether and reduces the problem to a simple arithmetic calculation. The time complexity of this approach is O(1), as it performs a constant number of operations, regardless of the value of N.

4. Comparing the Two Approaches

The brute-force methods and the optimized mathematical approach differ mainly in performance, simplicity, and flexibility.

In terms of time complexity, the brute-force methods have a complexity of O(N), as they require iterating over numbers. Even the improved brute-force method, while more efficient, still depends on looping. On the other hand, the optimized mathematical approach uses a direct formula, giving it a constant time complexity of O(1), making it significantly faster, especially for large N.

Regarding simplicity, the brute-force methods are straightforward but involve loops and conditions, making them slightly longer and more involved. The optimized method is much cleaner and more concise, as it directly applies a formula. However, it requires some familiarity with mathematical principles.

When it comes to flexibility, the brute-force methods are more adaptable. If the problem changes, like summing numbers divisible by a different number, these methods can easily be adjusted. The optimized approach, however, is specialized for multiples of 6 and would need a new formula for different conditions.

The following table provides a concise summary of the key differences:

Brute Force Improved Brute Force Optimized Mathematical
Time Complexity O(N) O(N) O(1)
Space Complexity O(1) O(1) O(1)
Simplicity Easy, loop-based More efficient loop Very concise, uses a formula
Flexibility Adaptable to different conditions Adaptable to different conditions Less adaptable, formula-specific

5. Conclusion

In this article, we explored two main approaches for calculating the sum of the first N even numbers divisible by 3: brute-force methods and an optimized mathematical approach. The brute-force approach, though adaptable, involves iterating through numbers with O(N) complexity. At the same time, the optimized method uses a direct formula with constant time, O(1), offering better efficiency but less flexibility.

As always, the source code is available over on GitHub.


Analyzing JMeter Results

$
0
0

1. Overview

An Apache JMeter test execution ends with some outcomes that we need to analyze if we want to improve our service performance. These outcomes can be on the service side, with logs and metrics, or on the test execution side, with JMeter results produced for response error code rate, throughput, and more.

JMeter offers many ways to read test results, each of which might come in handy in different cases. There are many built-in options, but if we want even more advanced reports, the JMeter community provides many free plugins for this.

In this tutorial, we’ll focus on analyzing JMeter Results. We’ll look at the most popular available options and then dive deeper into some more commonly used ones, using only JMeter-enhanced tools.

2. Analyzing JMeter Results

After we run a performance test, we want to be able to observe the results and understand them to make improvements.

The results of a performance test can be observed from two different sources. First is the service under test itself. From this source, we can collect metrics like the JVM memory usage, active threads, and execution time for a DB transaction or a downstream REST request.

Second is the point of the client making the request, which in this case is the tool we use to execute the performance test. From that point, we can collect metrics about the total response time, failed requests rate, amount of requests sent, throughput, etc.

JMeter offers all of this info needed in many different ways and through different tools. We can group them into three categories:

3. Analyzing JMeter Results With Hosted Services

JMeter ships with:

  • a GraphiteBackendListenerClient which allows us to send metrics to a Graphite Backend
  • an InfluxDBBackendListenerClient which allows us to send metrics to an InfluxDB Backend

These backend listener clients store results in an external DB in real-time. This allows us to keep the history of data and use history to compare multiple executions from different times, different versions of our service, and more.

We can use hosted result services such as BlazeMeter Sense, Grafana, or Taurus, to get reports and dashboards back from a test result and use them to understand results. Those hosted services can be either cloud or self-hosted.

3.1. Risks of Using Hosted Services

Using hosted services has benefits, like using some tools that are created for the specific reason of creating dashboards. Grafana, for example, has very rich dashboards, to visualize results.

On the other hand, this approach increases complexity, risks, and sometimes costs. If we use only open-source, free tools, we can’t guarantee that the service exists forever or that it’s always free.

For example, BlazeMeter Sense started as a free cloud service, but at some point, this stopped. Now, we have to set up our own local BlazeMeter Sense server in order to use it with JMeter results.

Moreover, self-hosted services increase complexity, because we need to know on a lower level how they’re being set up, and they also increase costs, for machines to host them.

Further, in most cases, like using Grafana or Taurus to visualize JMeter results, we need to self-host more than one service. This is because the data we produce need to be stored somewhere so that these services can retrieve them. For self-hosted Grafana, we’d have to:

  • self-host a database
  • set a Backend Listener in our JMeter test to connect to our database
  • setup Grafana server and connect it to the same database as the source
  • create the dashboards we want in Grafana UI, using the metrics exported from JMeter to our self-hosted database

4. Analyzing JMeter Results With JMeter Plugins

Apache JMeter is a very popular and open-source tool, which makes it also well backed by plugins created by the community, that cover actual engineers and testers’ needs. For JMeter results, the list of plugins goes on and on. Some of the more popular ones are:

  • JMeterPluginsCMD is a small command-line utility for generating graphs out of JTL files. It behaves just like the right-click context menu on all graphs.
  • Graphs Generator Listener generates the following graphs at the end of a test:
    Active Threads Over Time, Response Times Over Time, Transactions per Second, Server Hits per Second, Response Codes per Second Response, Latencies Over Time Bytes, Throughput Over Time, Response Times vs Threads Transaction, Throughput vs Threads, Response Times Distribution, Response Times Percentiles.
  • JWeter is another popular tool for analyzing and visualizing JMeter result files.
  • JMeter Result Analysis Plugin is a Maven plugin that parses JMeter result XML files and generates detailed reports with charts.
  • UbikLoadPack observability plugin allows us to monitor a non-GUI/ CLI performance test from our favorite browser.

5. Analyzing JMeter Results With JMeter Report Listeners

We can gather JMeter results by using the different kinds of reports listeners provided. These listeners collect data during the test plan execution and then present it in various formats, such as plain text, aggregated data, tables, graphs, and more.

We can set listeners for different scopes, such as different listeners for different samplers, listeners for a specific thread group, or even listeners for the whole test plan execution:

JMeter listeners scopes

In this scenario, we only have one sampler, so the sampler-specific listener does the same as the thread group one, but for more samplers that wouldn’t be the case. The test plan-wide listener collects data for all thread groups and all samplers.

For our demonstration, we’re going to use a Spring Boot application and we’ll be testing an endpoint that creates a UUID and returns it in the response body. The samplers of the different thread groups will all be pointing to this endpoint:

JMeter-sampler-for-uuid-creation-endpoint

In the picture, we see the sampler ‘uuid-generator-endpoint-test‘ that points to the Spring Boot server running on localhost, port 8080 and the path is /api/uuid.

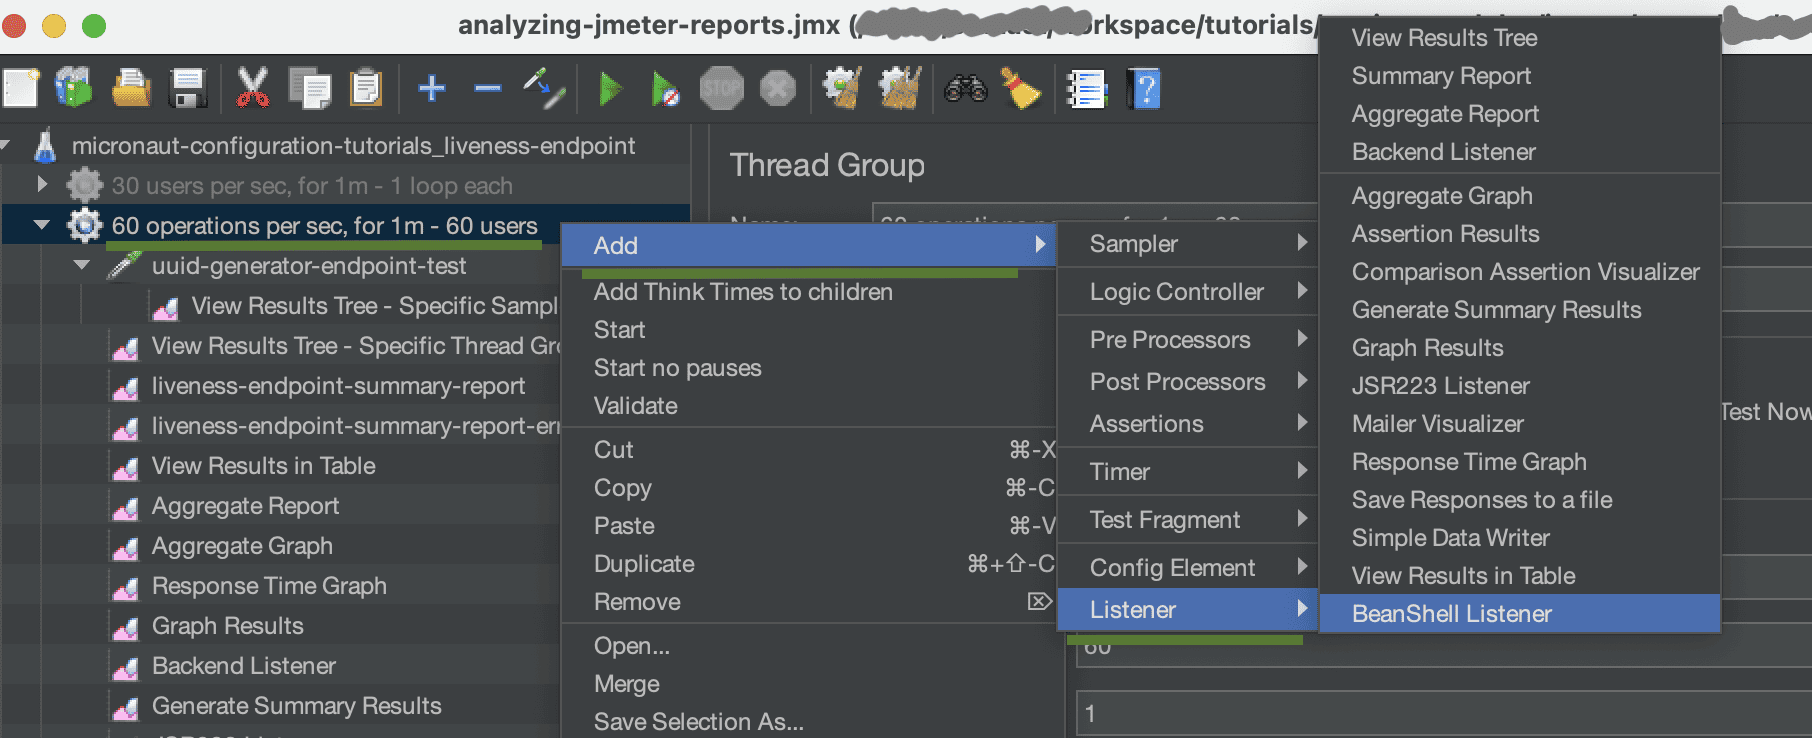
The way to add a listener, in our test plan, is by right-clicking on the item we want to add the listener to -> Add -> Listener:

jmeter-add-listeners

Here, we select to add to the ’60 operations per sec, for 1m – 60 users‘ sampler some listeners, following the steps described earlier. We have added a View Results Tree and a Table, a Response Time Graph, and more, which we’ll see later.

5.1. View Results Tree and Table Listeners

Using the View Results listeners, we can collect metrics about the requests and responses made by JMeter and also some info about the full transaction, like latency, sent bytes, time of execution, etc.

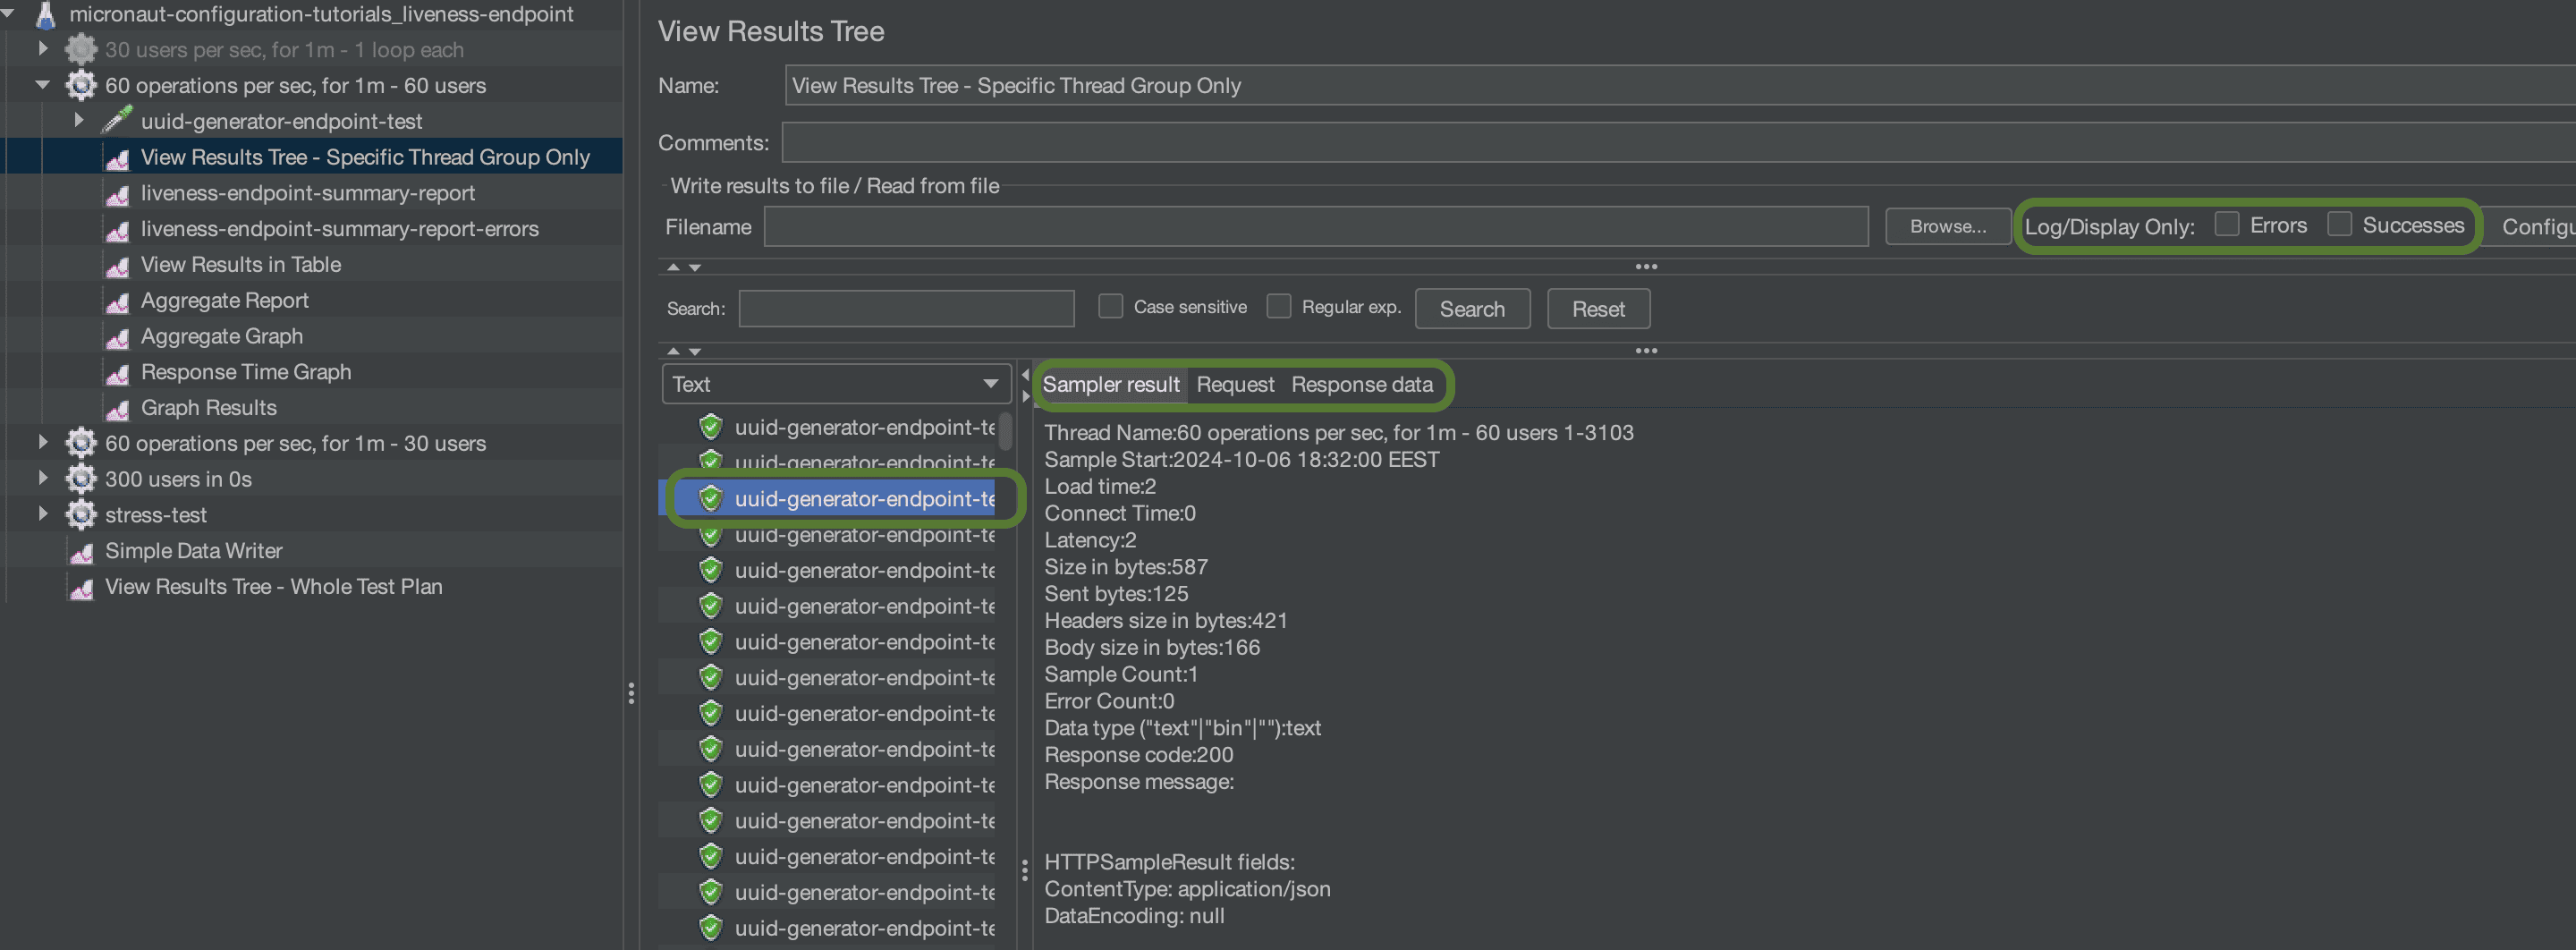
View Results Tree gives a list of all of the requests made:

jmeter-view-result-tree

In most JMeter results listeners, there is an option to filter requests by errors only or successes only, if we like. In our listeners, we collect all successes and errors. We also get the option to view results in a file, if we want to store the outcome for history or to view it later. We won’t be using it in our demonstration.

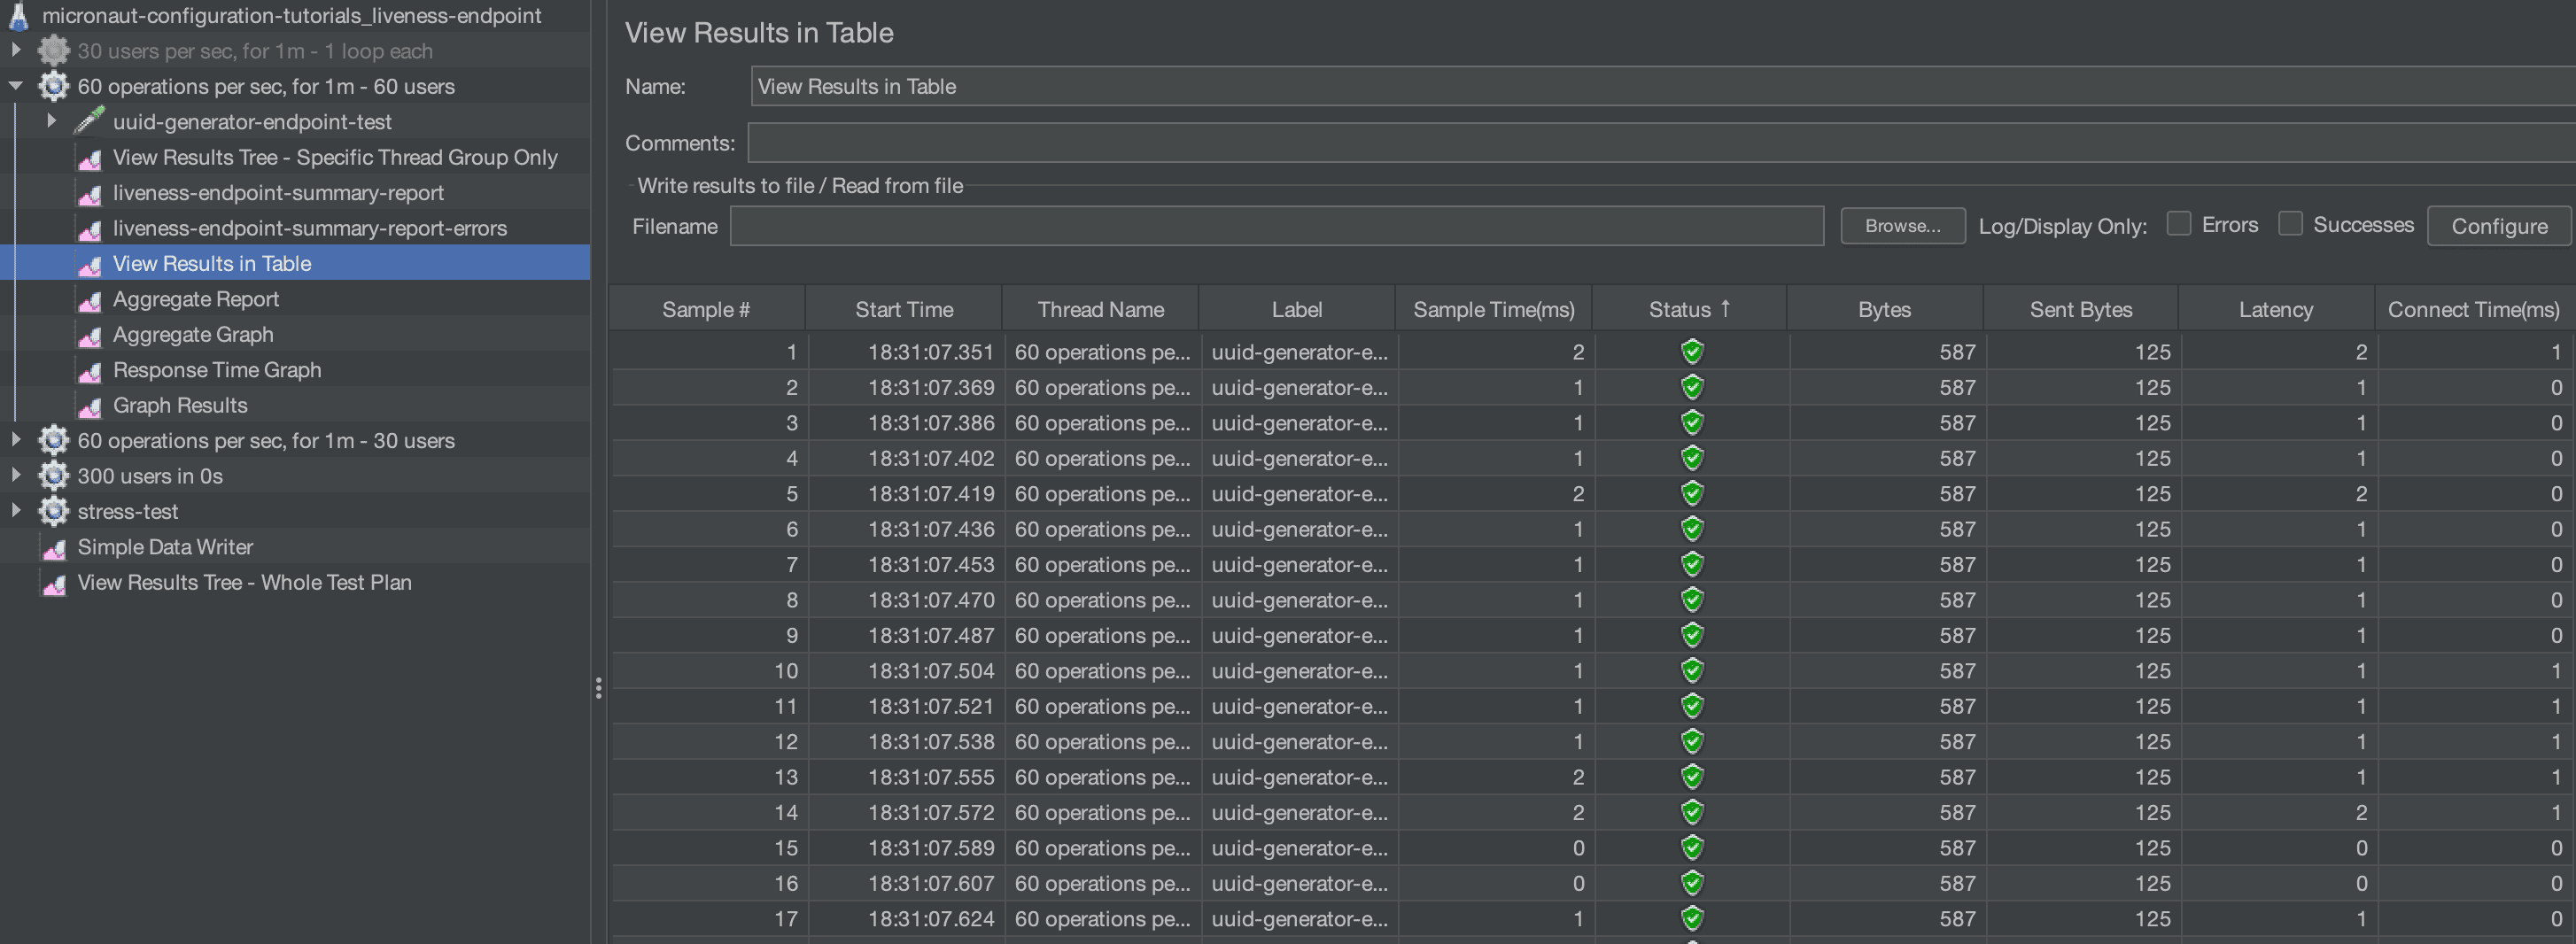
In a similar fashion, the View Results in Table offers the same info but in the form of a table:

jmeter-test-results-table

This way, we can do things like sort by column and we can easier browse our data.

5.2. Aggregate Report and Graph Listeners

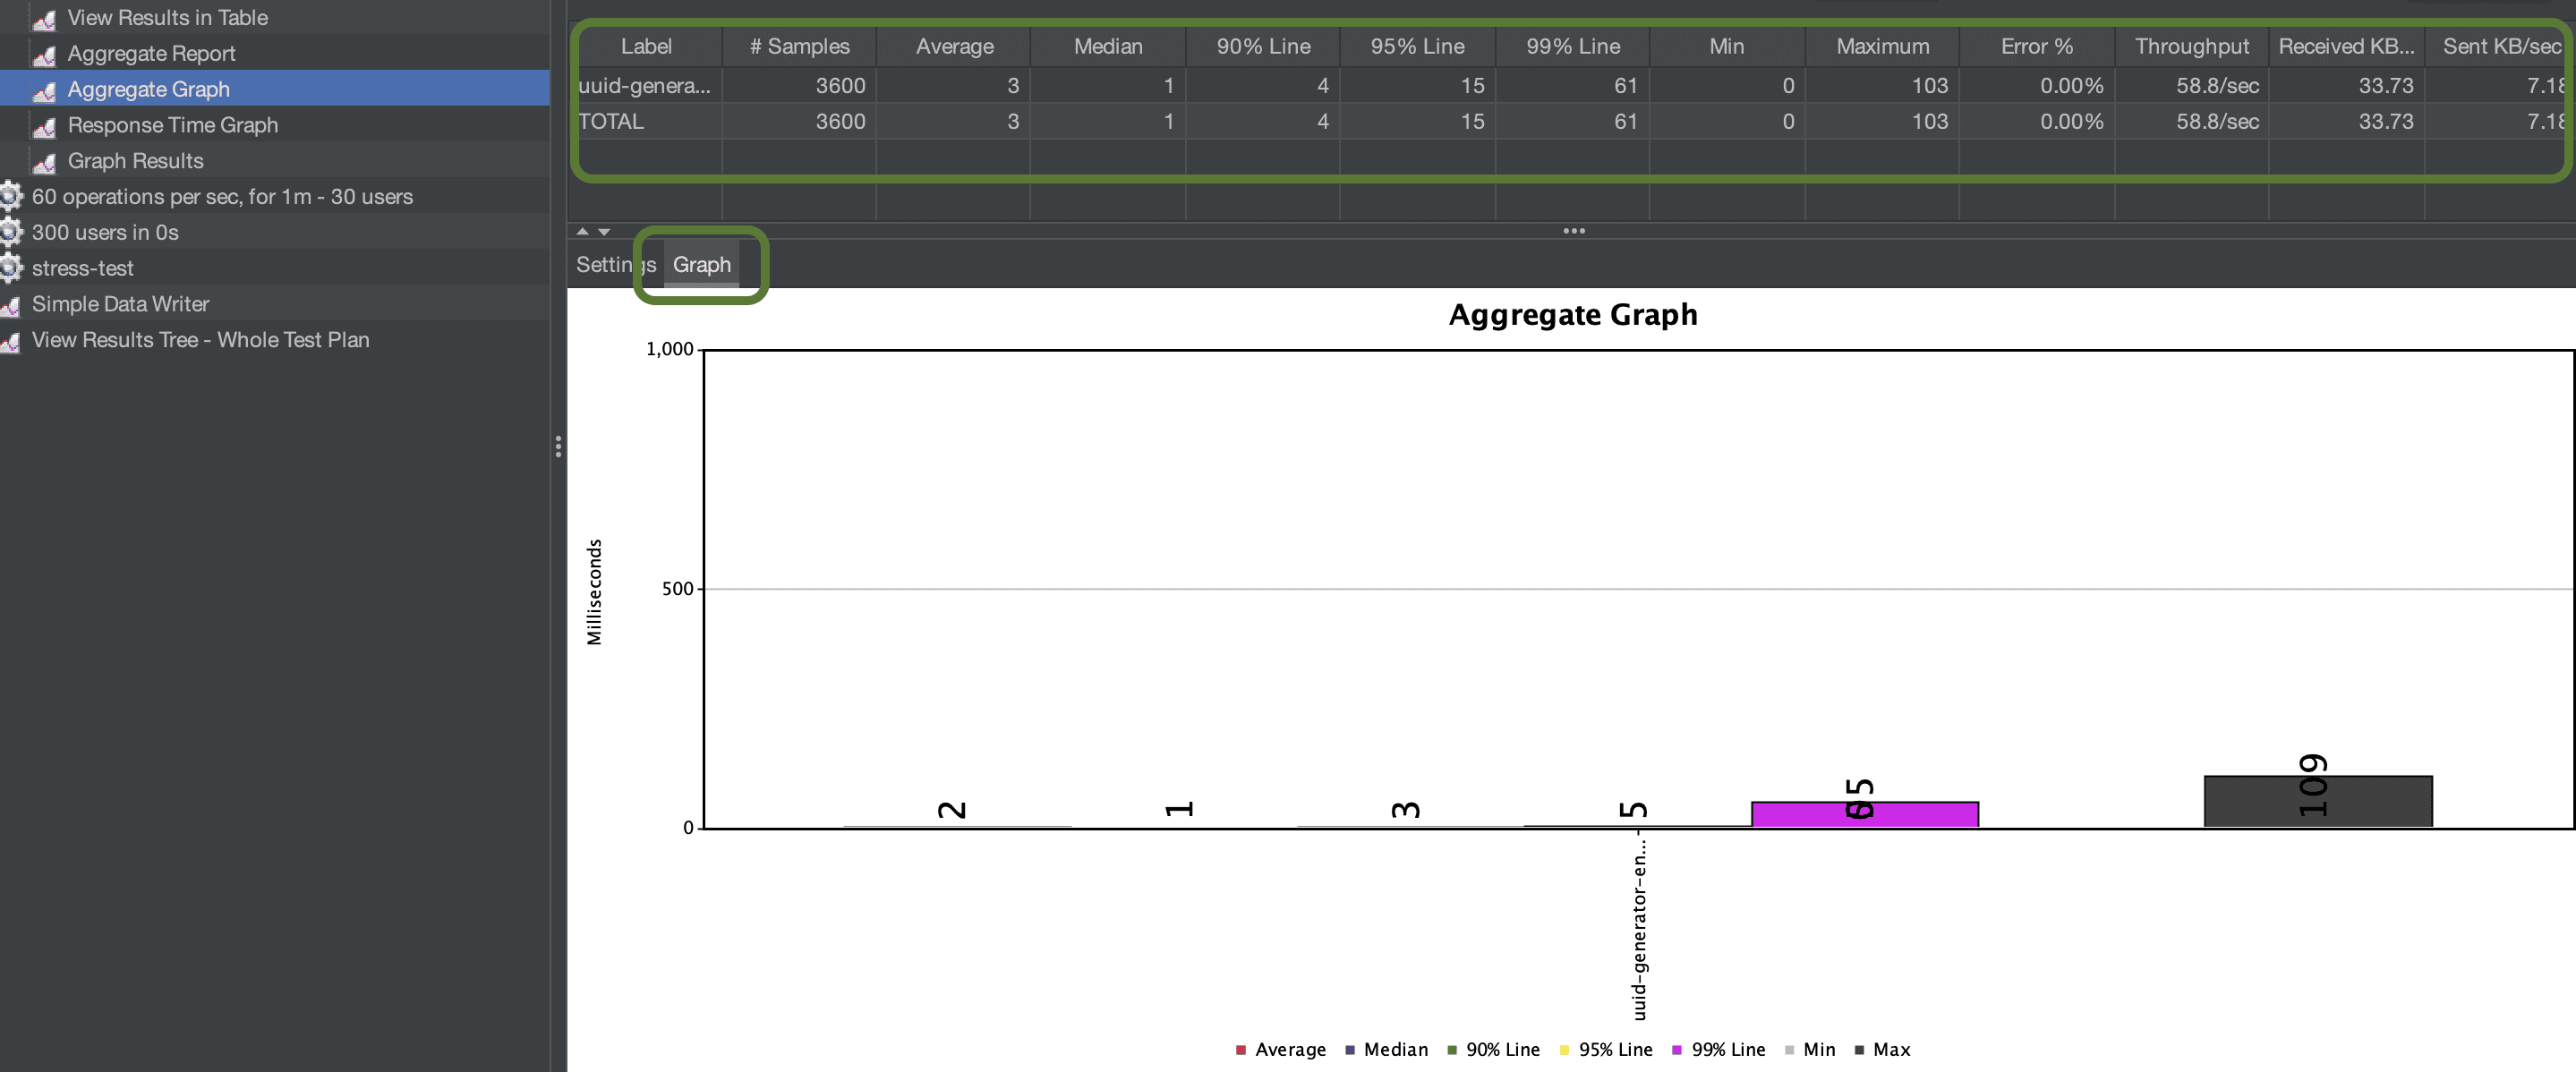
As the term says, Aggregate Report and Aggregate Graph listeners collect the same data as View Results listeners and then aggregate them. These listeners then offer the result in the form of statistical values, like Average, Median, 99% Percentile, Throughput, etc.

The Aggregate Report offers those values in the form of a table, where each line represents a sampler (in our example we only have one sampler):

jmeter-aggregate-report-listener

Aggregate Graph does the same things as the Aggregate Report, but on top, it offers a graph of some of the values, like Min, Max, 99% Line, and more:

jmeter-aggregate-report-listener

As we can see in this graph, the default JMeter graphs from listeners aren’t the best tools to visualize results and provide minimum configuration. This is why JMeter offers the dashboard report GUI, as we’ll see later on, and integration with more appropriate tools like Grafana.

5.3. Response Time Graph

Response Time Graph listener exports statistics about the timings of the samples taken. By this we mean, for example, in a REST application, what is the time taken for the response to be received by JMeter?

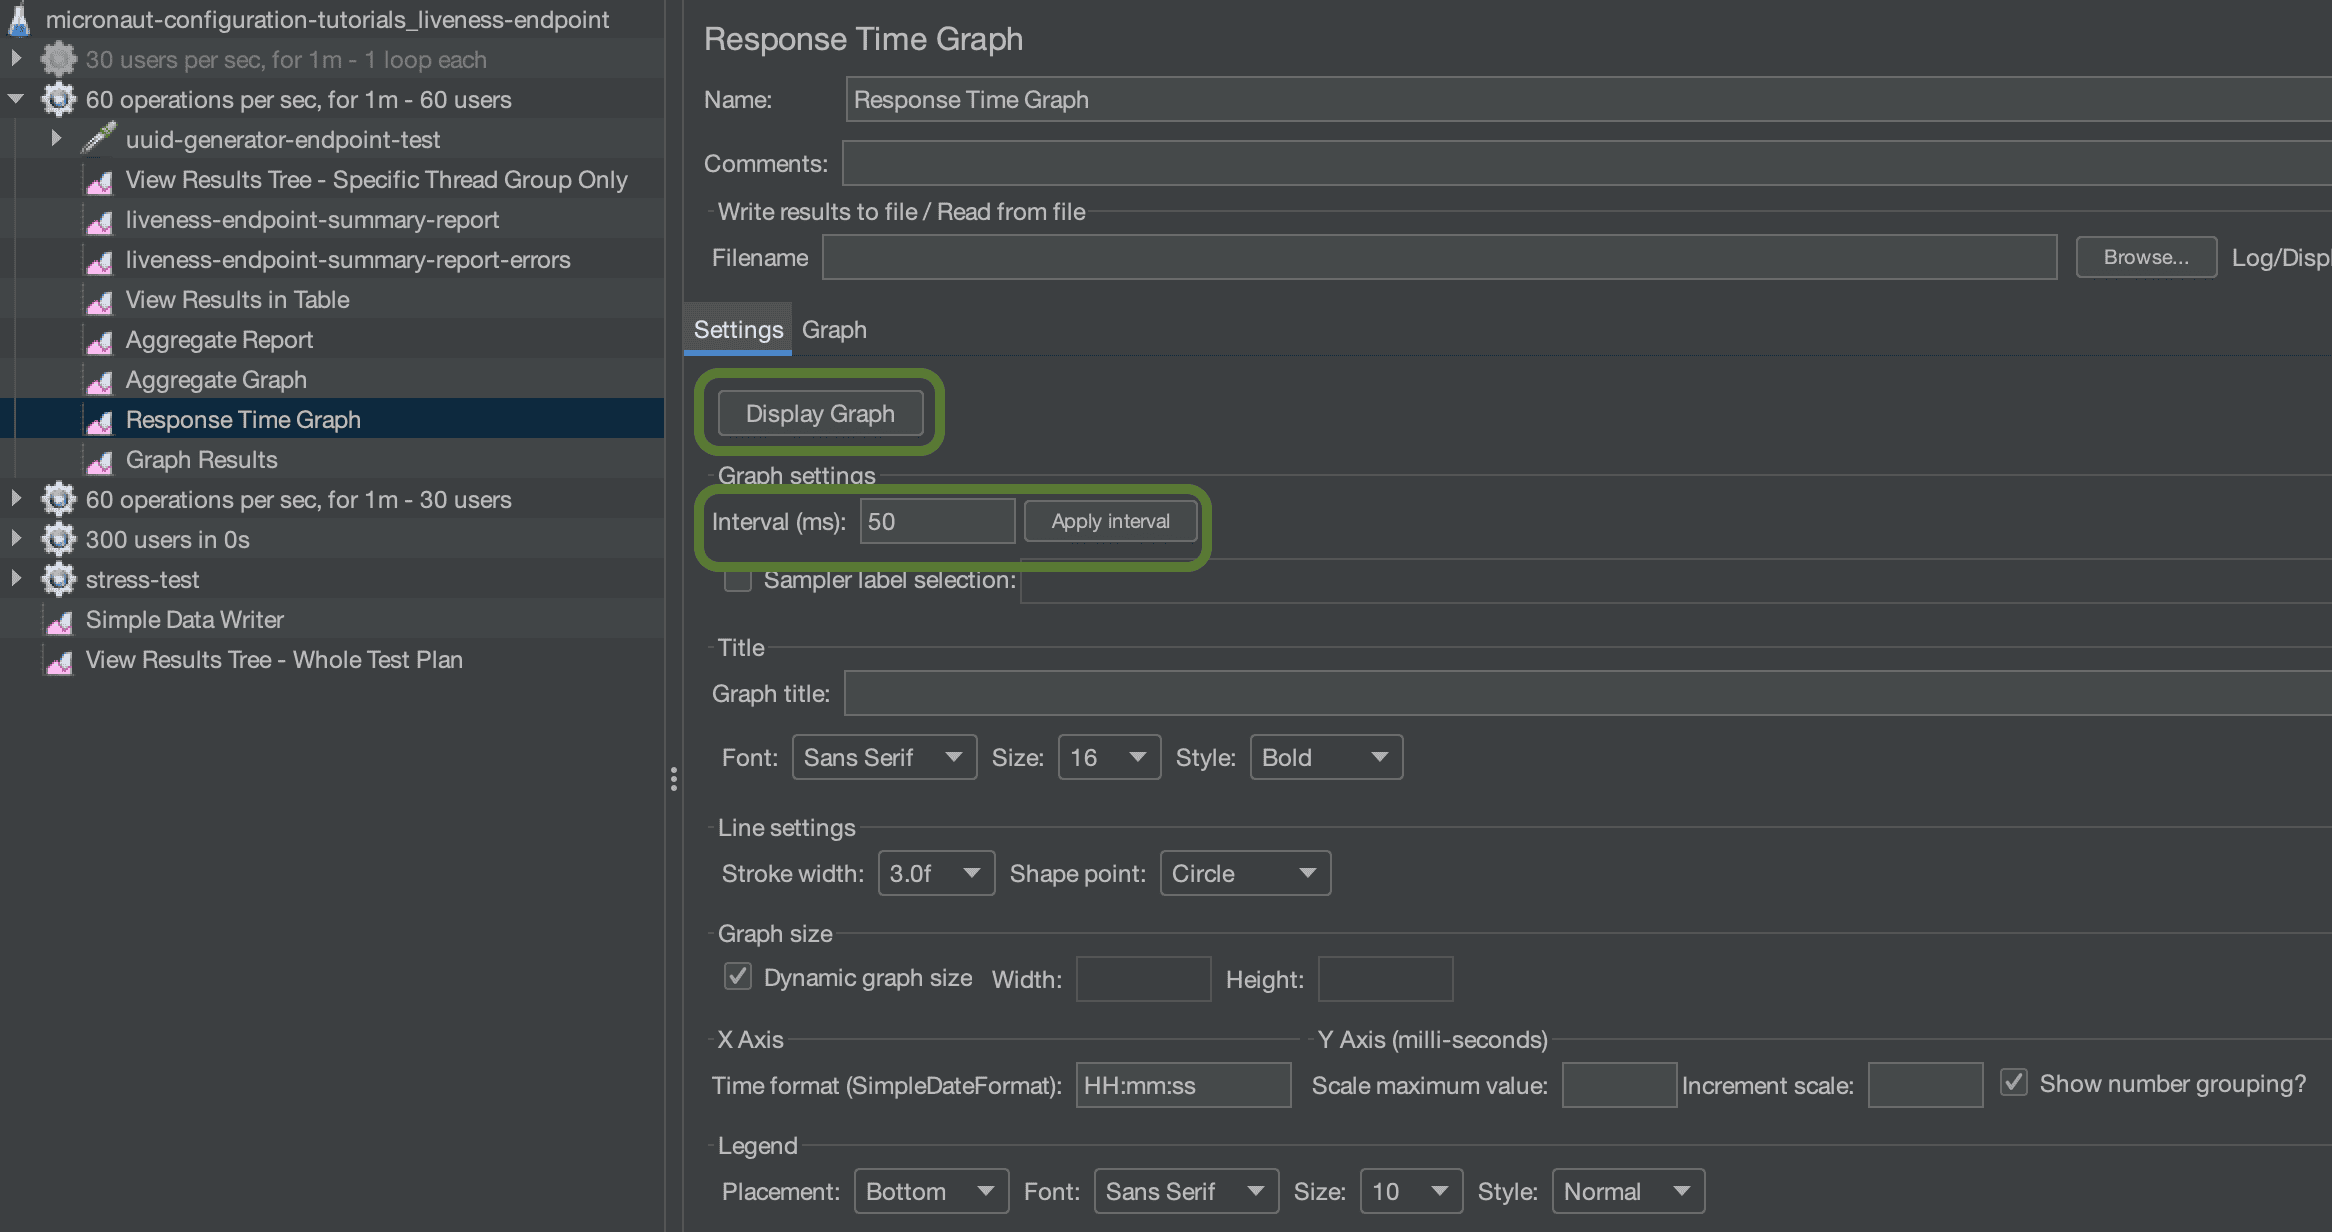
The Response Time Graph has two modes. First, we set it up in the Settings mode:

jmeter-response-time-graph-configuration

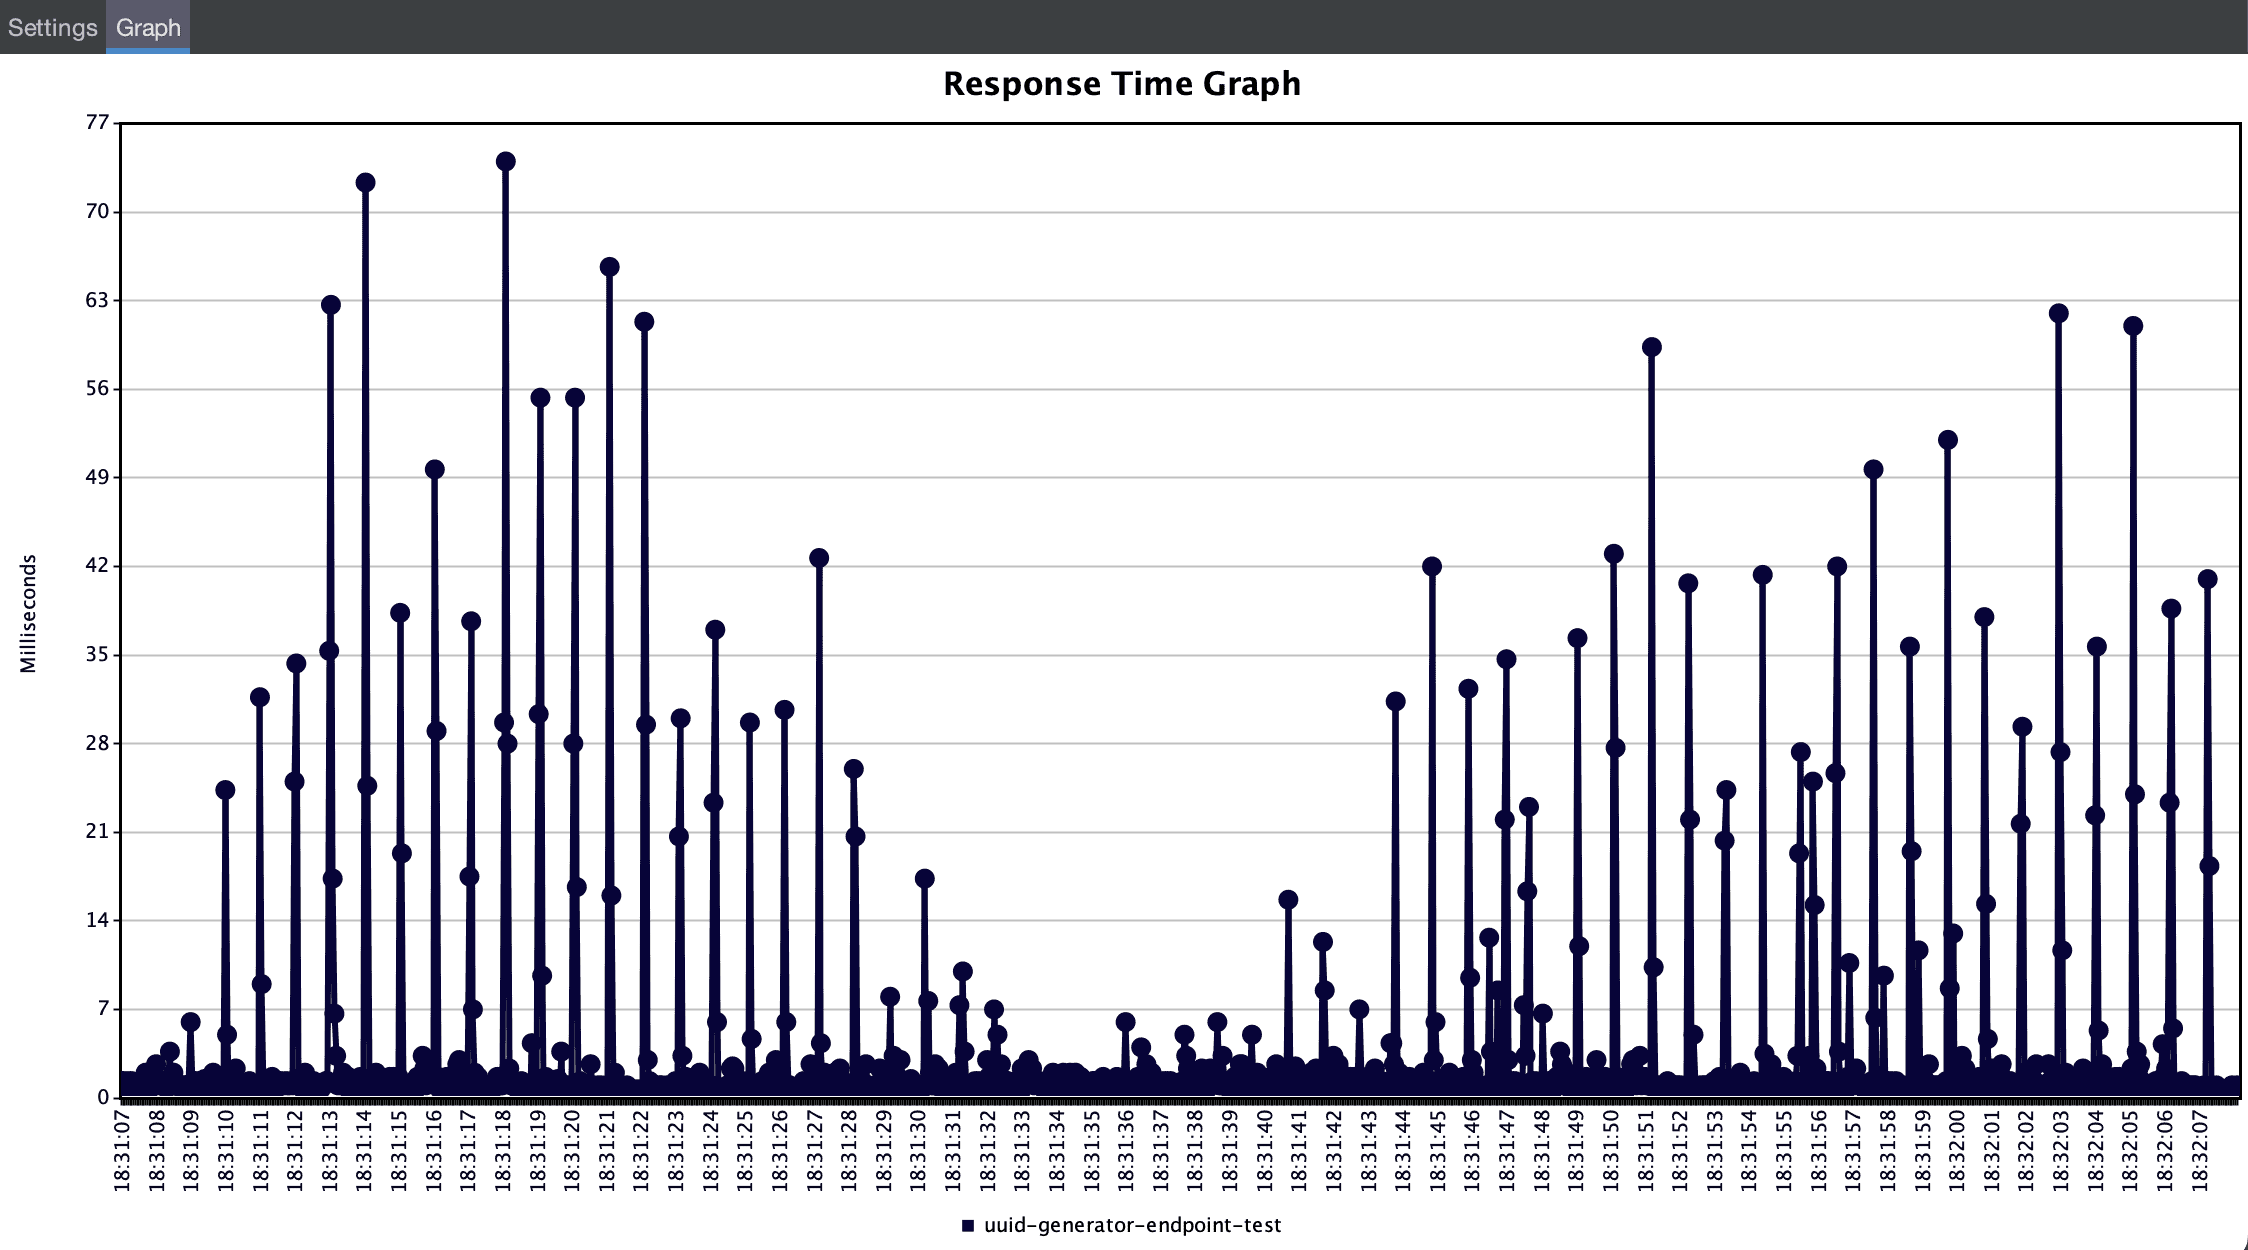
Here, we can see some things about fonts, axis, etc, but we also get one configuration that actually helps us make a graph more descriptive. This is the Interval. We can change this value to get a more or less detailed graph. If we set an interval of 50 milliseconds, then we get some more vertical lines in our graph. We should remember to ‘Apply Interval‘ and then ‘Display Graph‘:

jmeter-response-time-graph-dashboard

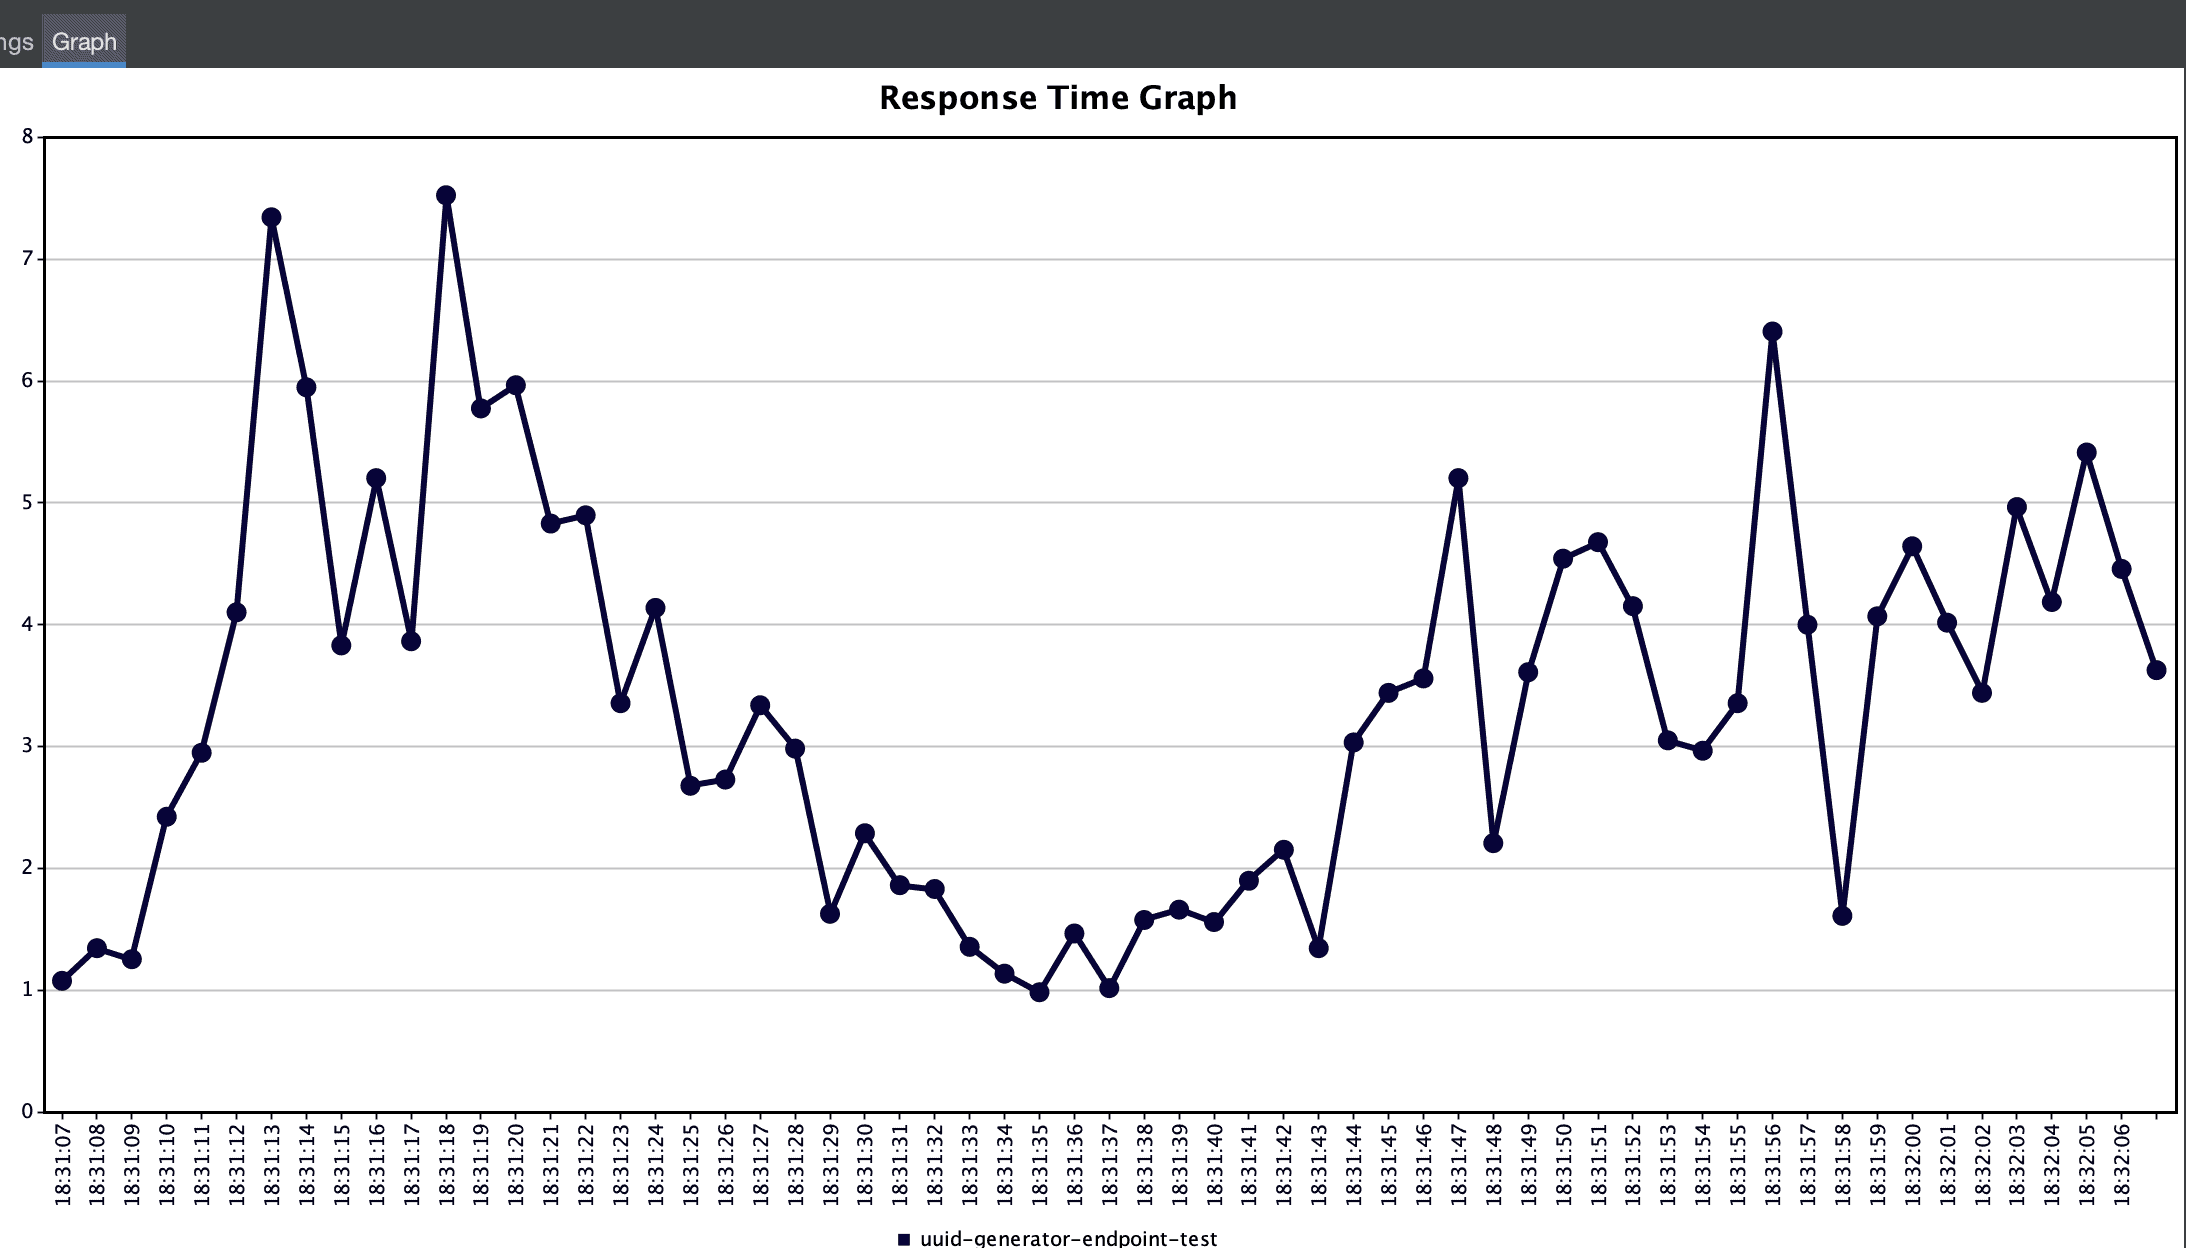
In this graph, we can see some average response times for 50 millisecond intervals. It contains some more information but the result isn’t that presentable. If we change it to one second, then we get a really nice visualization of the response times for this execution:

jmeter-response-time-graph-1-second-interval

5.4. Graph Results Listener

One final JMeter results listener that might come in handy is the Graph Results listener. Graph Results listener collects all data, aggregates them, and presents them in a graph, with the values over time. This is very similar to the Aggregate Report since the items are the same: Average, Median, Deviation, and Throughput. The difference here is that we can see all those over time:

jmeter-graph-results-listener

6. Analyzing JMeter Results With JMeter Dashboard Report GUI

As we’ve seen so far, JMeter results graphs aren’t the best in visualizing the metrics we want. This is why JMeter offers a GUI with dashboards of the reports created during a test execution. These dashboards aren’t created by default though. We need to follow a process to create them:

  1. Add a Simple Data Writer listener to the test plan, to write the results to a file:
    jmeter-simple-data-writer
  2. Create a properties file, to configure things like timestamp_format, threads, and more
  3. Use the ‘Generate HTML Report‘ from tools to create an output folder with the HTML reports:
    jmeter-generate-html-report-dashboards
  4. In the pop-up window set the JTL and properties files and a folder for the output:
    jmeter-html-dashboards-config-popup
  5. Open the index.html file from the output folder in a browser, to access the reports

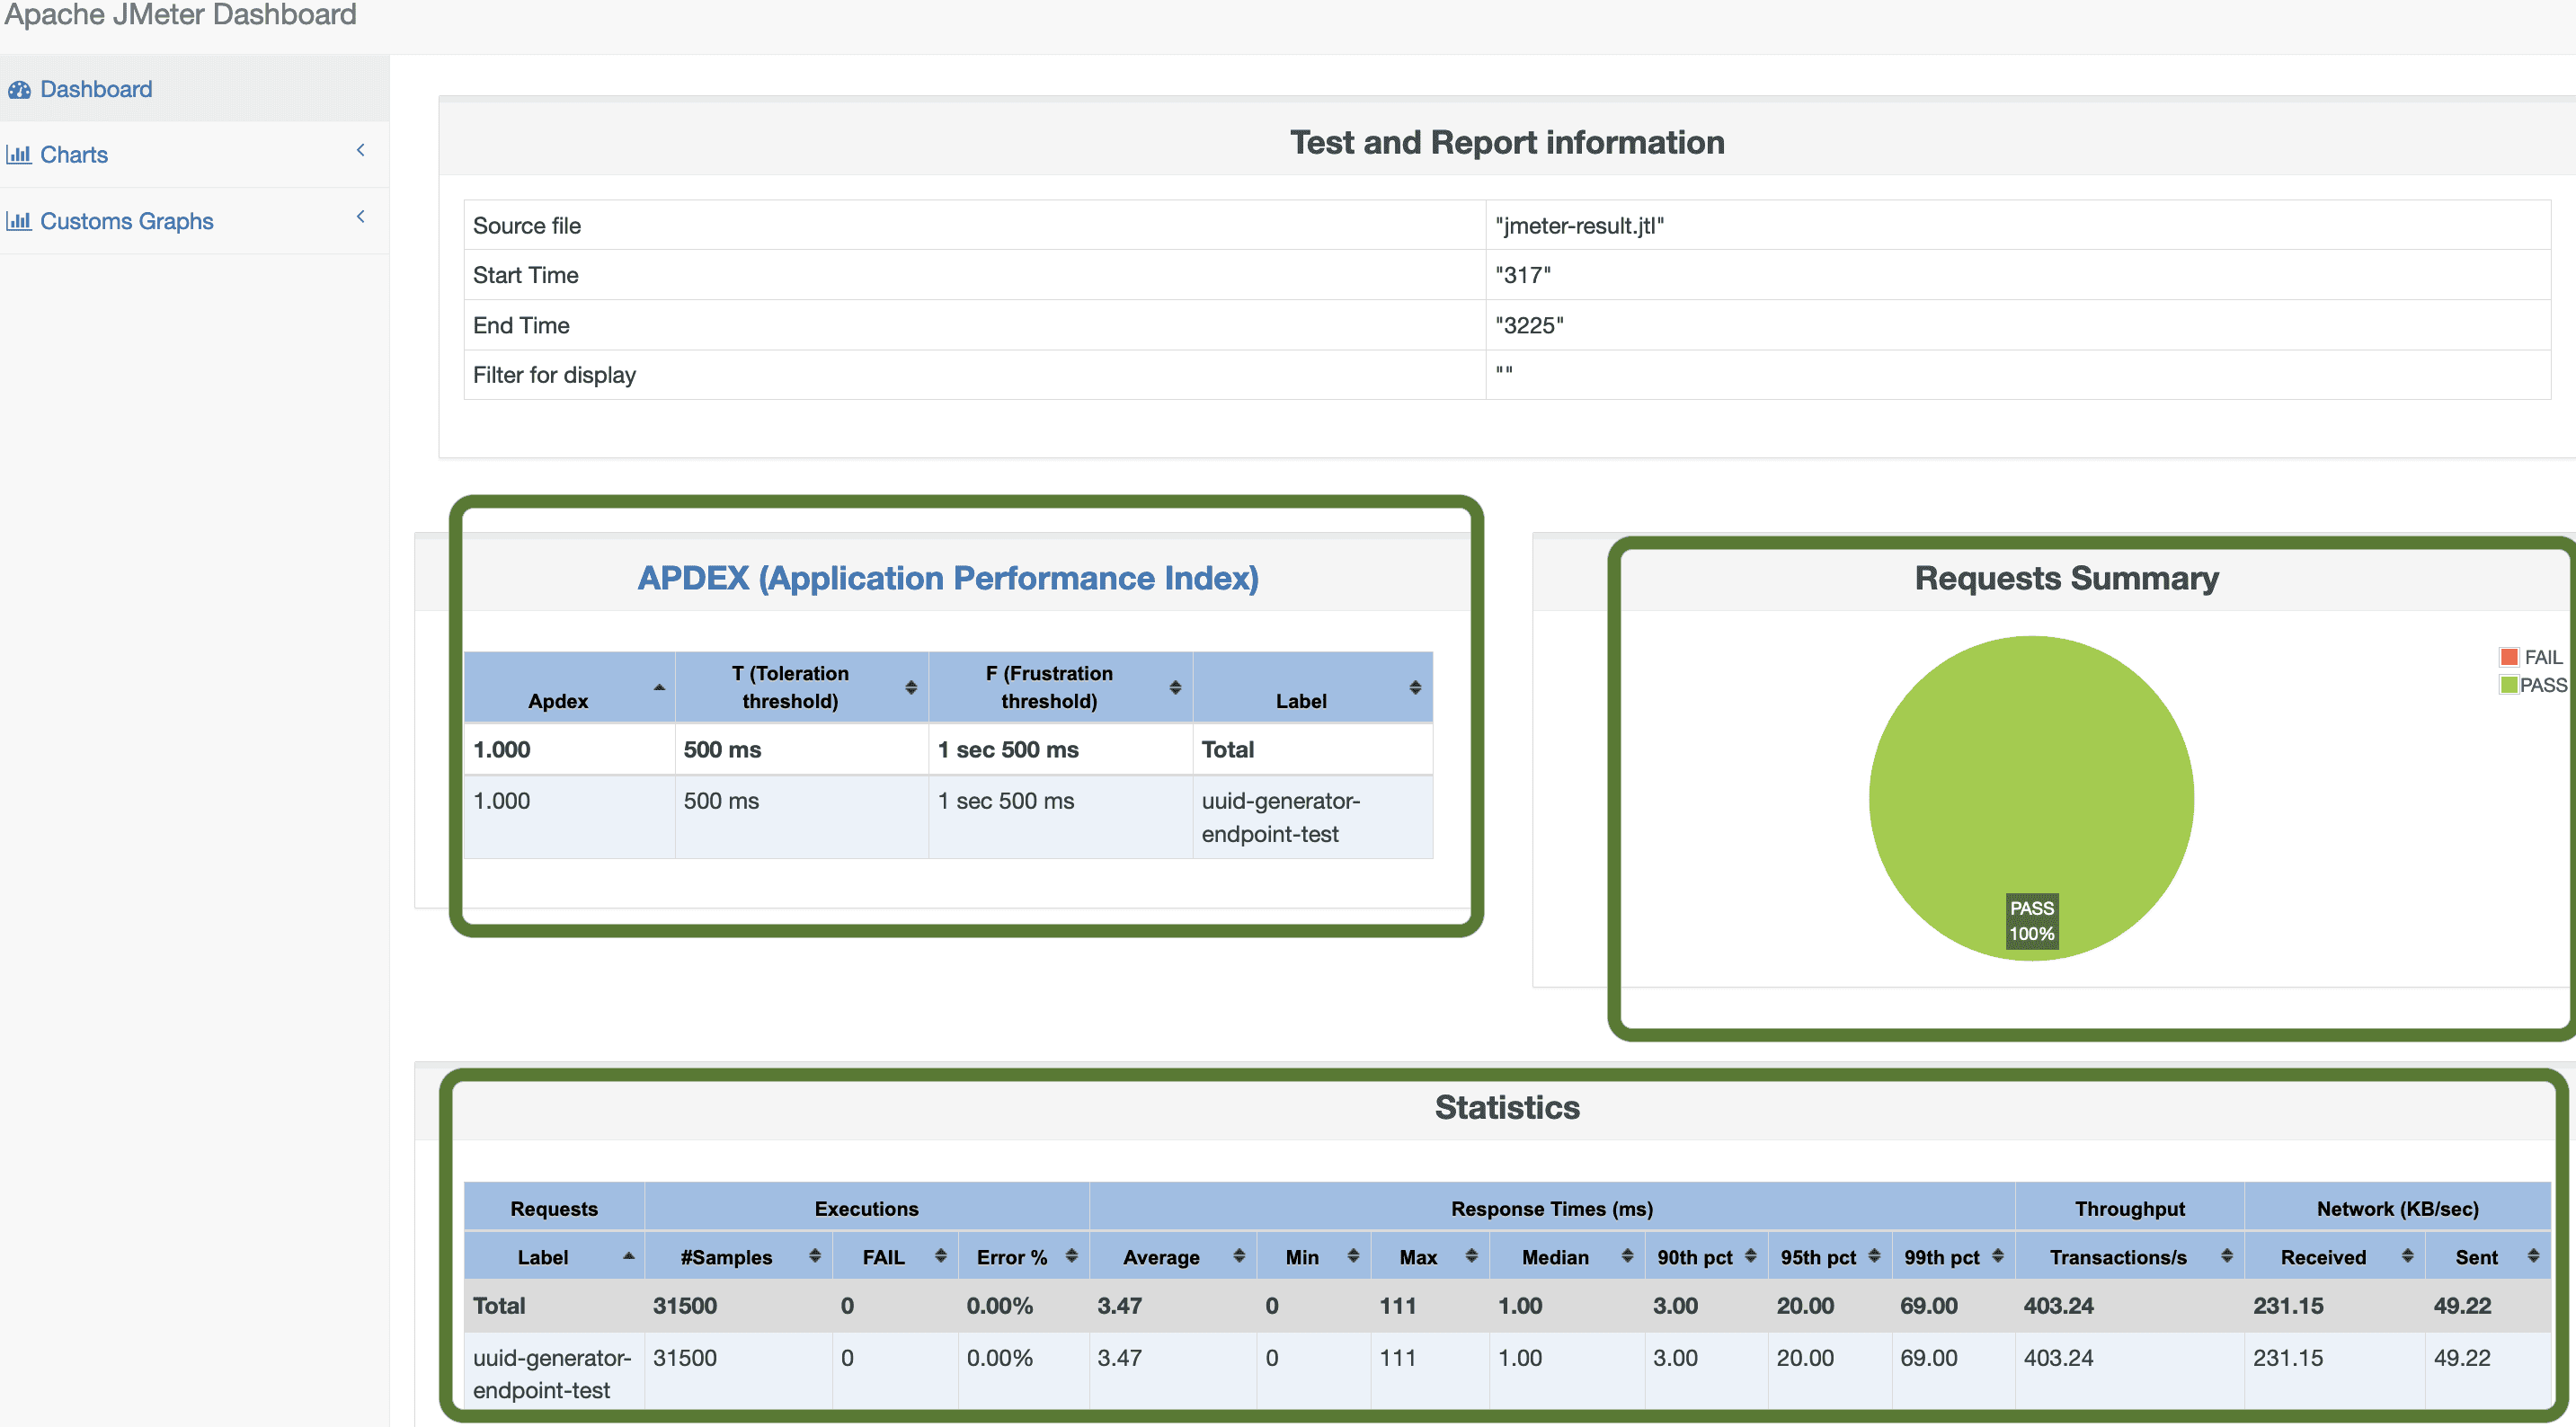
Then, we can take a look at the HTML pages we created, starting with the index.html which is a summary page:

jmeter-summary-html-page

This summary page contains a request summary pie chart and two tables, one of the Application Performance Index and one with other statistics.

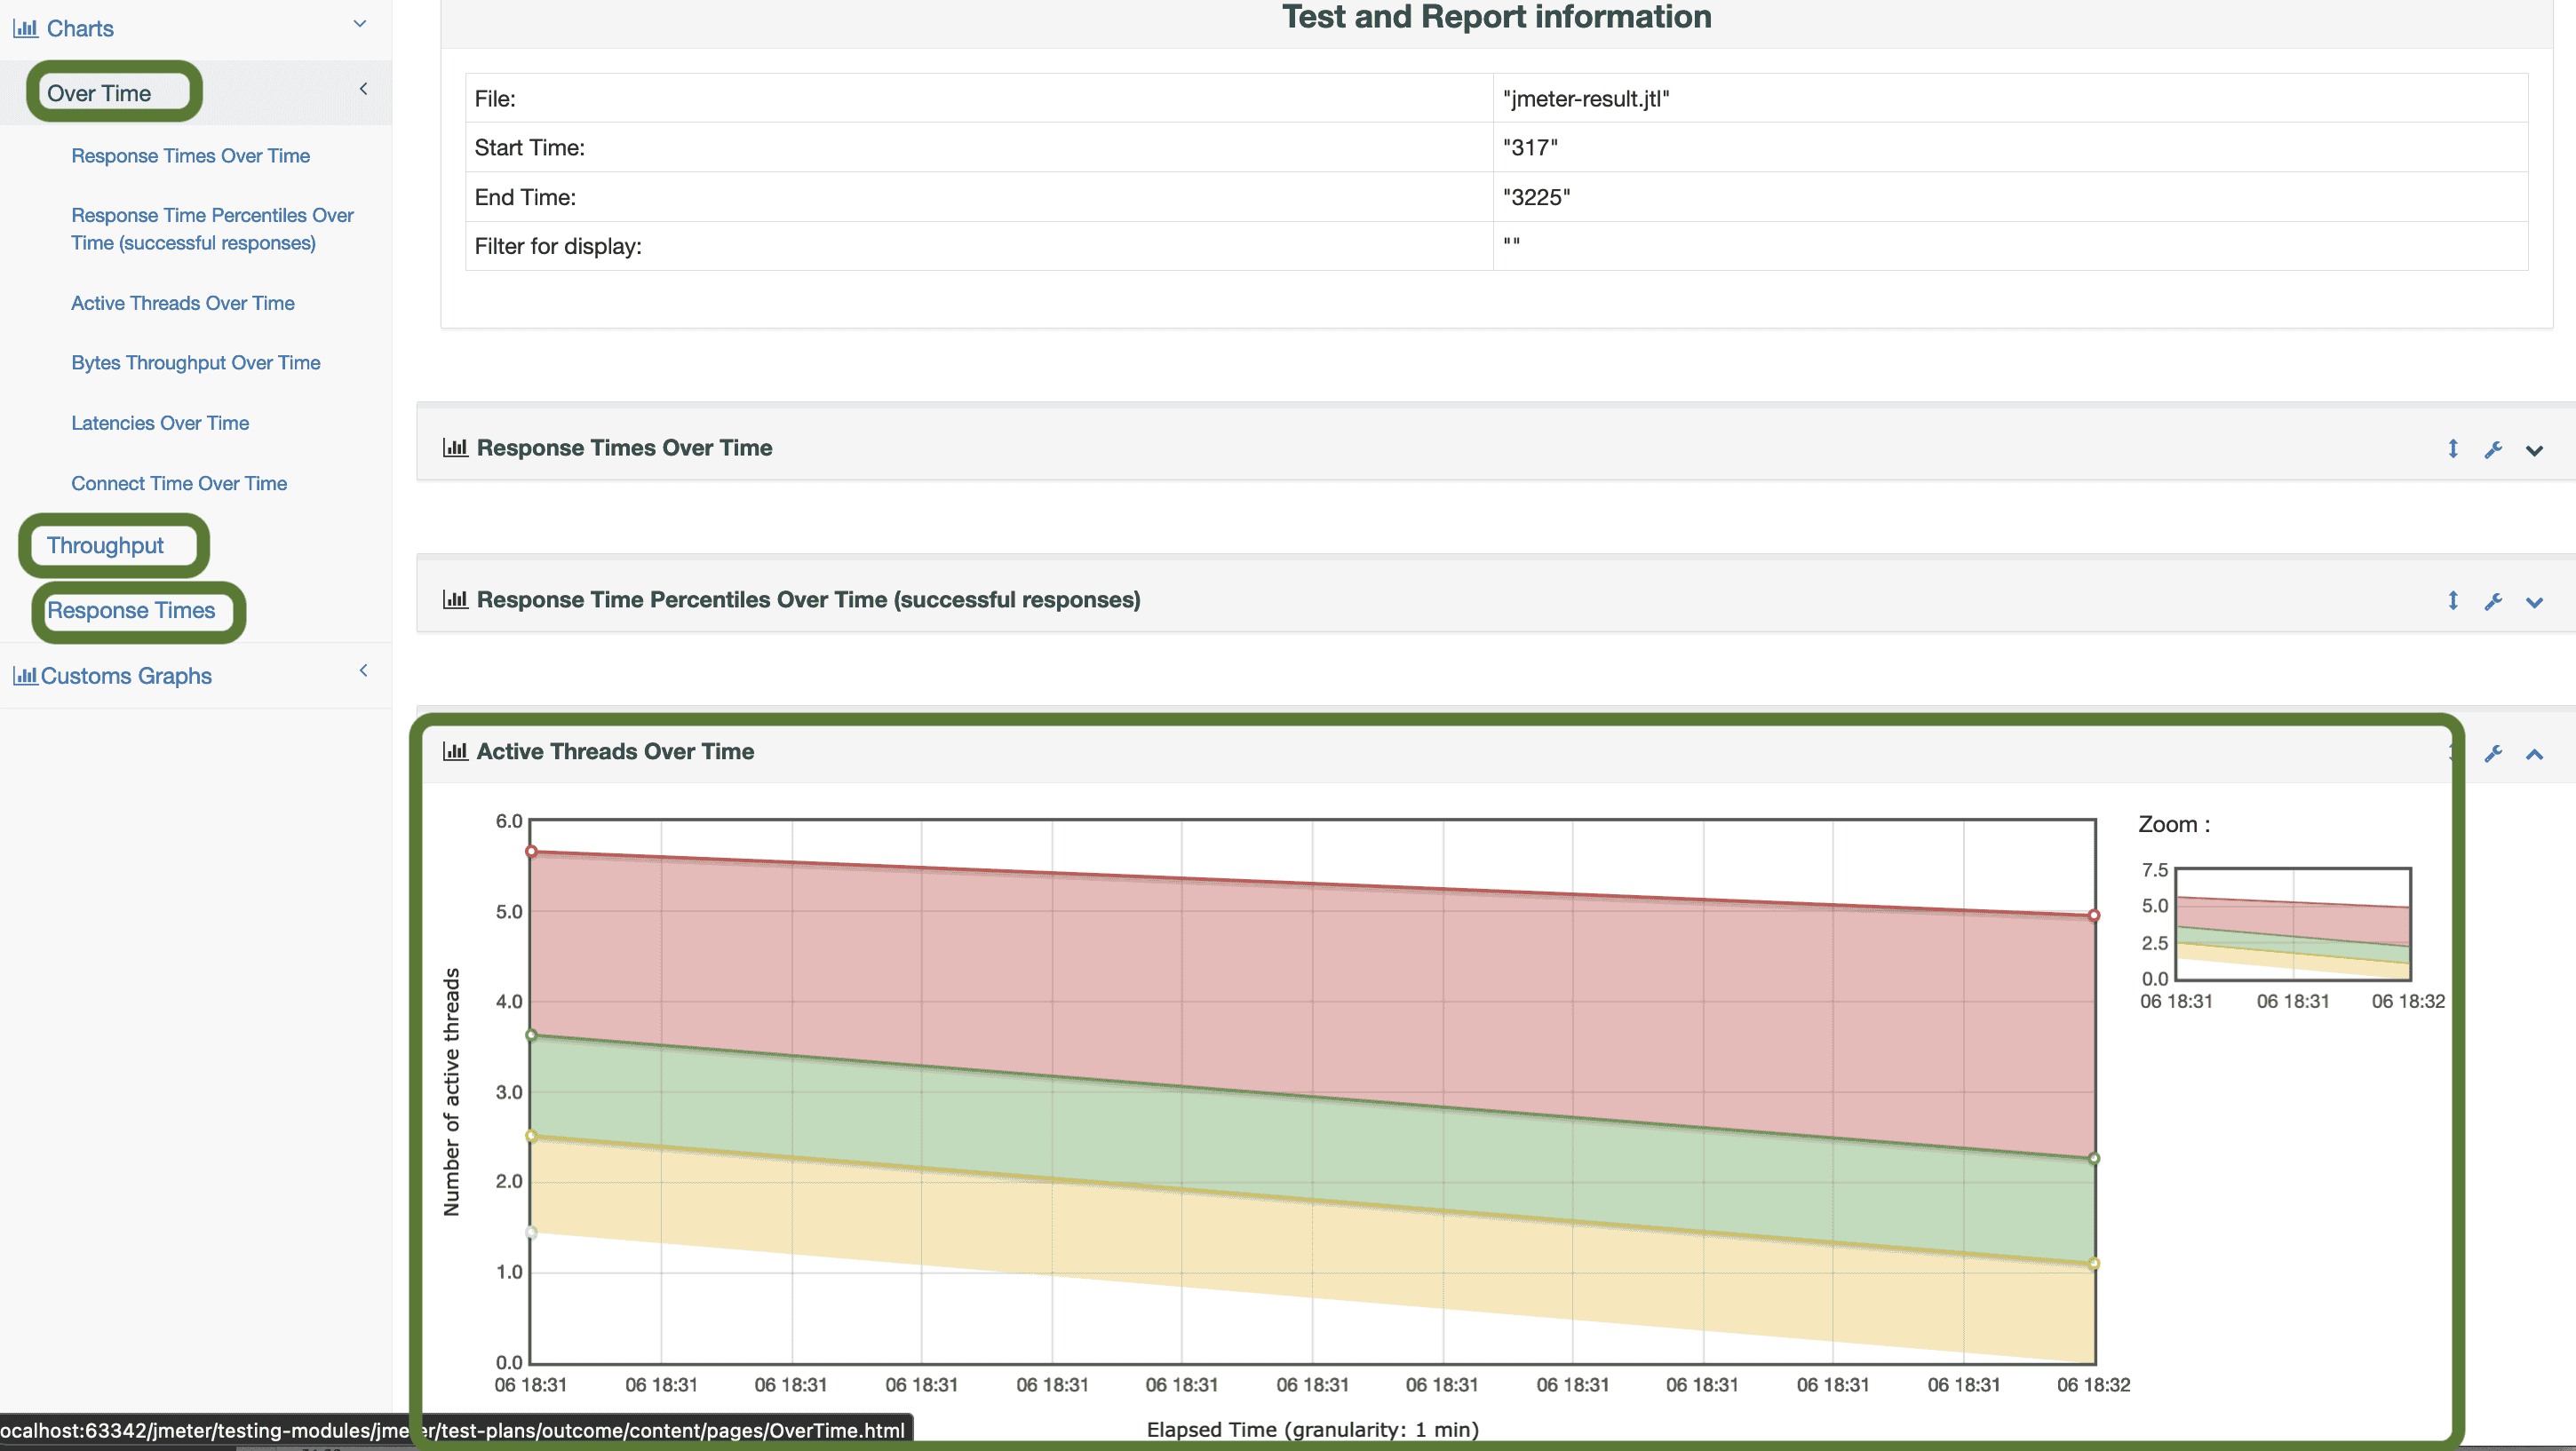
From the left side menu, we can navigate to some more charts:

jmeter-charts-html-pages

In this list, we can choose from ‘Over Time‘, ‘Throughput‘, or ‘Response Times‘ charts and display charts like ‘Active Threads Over Time‘, ‘Time Vs Threads‘, and many more.

7. Conclusion

In this article, we went through the options for analyzing Apache JMeter results. We examined the option of self-hosted tools and listed some of the more popular plugins. Finally, we had a deeper look into the JMeter-enhanced options. We demonstrated the usage of both JMeter’s different reports and the dashboard report GUI provided by the JMeter.

As always, all the source code used in the examples and the JMeter test execution (.jmx) and the JMeter results (.jtl) files can be found over on GitHub.


How to Serve a Zip File With Spring Boot @RequestMapping

$
0
0

1. Overview

Sometimes we may need to allow our REST API to download ZIP archives. This can be useful for reducing network load. However, we might encounter difficulties downloading the files with the default configuration on our endpoints.

In this article, we’ll see how to use the @RequestMapping annotation to produce ZIP files from our endpoints, and we’ll explore a few approaches to serve ZIP archives from them.

2. Zip Archive as Byte Array

The first way to serve a ZIP file is by creating it as a byte array and returning it in the HTTP response. Let’s create the REST controller with the endpoint that returns us archive bytes:

@RestController
public class ZipArchiveController {
    @GetMapping(value = "/zip-archive", produces = "application/zip")
    public ResponseEntity<byte[]> getZipBytes() throws IOException {
        ByteArrayOutputStream byteArrayOutputStream = new ByteArrayOutputStream();
        BufferedOutputStream bufferedOutputStream = new BufferedOutputStream(byteArrayOutputStream);
        ZipOutputStream zipOutputStream = new ZipOutputStream(bufferedOutputStream);
        addFilesToArchive(zipOutputStream);
        IOUtils.closeQuietly(bufferedOutputStream);
        IOUtils.closeQuietly(byteArrayOutputStream);
        return ResponseEntity
          .ok()
          .header("Content-Disposition", "attachment; filename=\"files.zip\"")
          .body(byteArrayOutputStream.toByteArray());
    }
}

We use @GetMapping as a shortcut for @RequestMapping annotation. In the produces property we choose application/zip which is a MIME type for ZIP archives. Then we wrap the ByteArrayOutputStream with the  ZipOutputStream and add all the needed files there. Finally, we set the Content-Disposition header with attachment value so we’ll be able to download our archive after the call.

Now, let’s implement the addFilesToArchive() method:

void addFilesToArchive(ZipOutputStream zipOutputStream) throws IOException {
    List<String> filesNames = new ArrayList<>();
    filesNames.add("first-file.txt");
    filesNames.add("second-file.txt");
    for (String fileName : filesNames) {
        File file = new File(ZipArchiveController.class.getClassLoader()
          .getResource(fileName).getFile());
        zipOutputStream.putNextEntry(new ZipEntry(file.getName()));
        FileInputStream fileInputStream = new FileInputStream(file);
        IOUtils.copy(fileInputStream, zipOutputStream);
        fileInputStream.close();
        zipOutputStream.closeEntry();
    }
    zipOutputStream.finish();
    zipOutputStream.flush();
    IOUtils.closeQuietly(zipOutputStream);
}

Here, we simply populate the archive with a few files from the resources folder.

Finally, let’s call our endpoint and check if all the files are returned:

@WebMvcTest(ZipArchiveController.class)
public class ZipArchiveControllerUnitTest {
    @Autowired
    MockMvc mockMvc;
    @Test
    void givenZipArchiveController_whenGetZipArchiveBytes_thenExpectedArchiveShouldContainExpectedFiles() throws Exception {
        MvcResult result = mockMvc.perform(get("/zip-archive"))
          .andReturn();
        MockHttpServletResponse response = result.getResponse();
        byte[] content = response.getContentAsByteArray();
        List<String> fileNames = fetchFileNamesFromArchive(content);
        assertThat(fileNames)
          .containsExactly("first-file.txt", "second-file.txt");
    }
    List<String> fetchFileNamesFromArchive(byte[] content) throws IOException {
        InputStream byteStream = new ByteArrayInputStream(content);
        ZipInputStream zipStream = new ZipInputStream(byteStream);
        List<String> fileNames = new ArrayList<>();
        ZipEntry entry;
        while ((entry = zipStream.getNextEntry()) != null) {
            fileNames.add(entry.getName());
            zipStream.closeEntry();
        }
        return fileNames;
    }
}

As expected in the response we obtained the ZIP archive from the endpoint. We’ve unarchived all the files from there and double-checked if all the expected files are in place.

We can use this approach for smaller files, but larger files may cause issues with heap consumption. This is because ByteArrayInputStream holds the entire ZIP file in memory.

3. Zip Archive as a Stream

For larger archives, we should avoid loading everything into memory. Instead, we can stream the ZIP file directly to the client as it’s being created. This reduces memory consumption and allows us to serve huge files efficiently.

Let’s create another one endpoint on our controller:

@GetMapping(value = "/zip-archive-stream", produces = "application/zip")
public ResponseEntity<StreamingResponseBody> getZipStream() {
    return ResponseEntity
      .ok()
      .header("Content-Disposition", "attachment; filename=\"files.zip\"")
      .body(out -> {
          ZipOutputStream zipOutputStream = new ZipOutputStream(out);
          addFilesToArchive(zipOutputStream);
      });
}

We’ve used a Servlet output stream here instead of ByteArrayInputStream, so all our files will be streamed to the client without being fully stored in memory.

Let’s call this endpoint and check if it returns our files:

@Test
void givenZipArchiveController_whenGetZipArchiveStream_thenExpectedArchiveShouldContainExpectedFiles() throws Exception {
    MvcResult result = mockMvc.perform(get("/zip-archive-stream"))
     .andReturn();
    MockHttpServletResponse response = result.getResponse();
    byte[] content = response.getContentAsByteArray();
    List<String> fileNames = fetchFileNamesFromArchive(content);
    assertThat(fileNames)
      .containsExactly("first-file.txt", "second-file.txt");
}

We successfully retrieved the archive and all the files were found there.

4. Control the Archive Compression

When we use ZipOutputStream, it already provides compression. We can adjust the compression level using the zipOutputStream.setLevel() method.

Let’s modify one of our endpoints code to set the compression level:

@GetMapping(value = "/zip-archive-stream", produces = "application/zip")
public ResponseEntity<StreamingResponseBody> getZipStream() {
    return ResponseEntity
      .ok()
      .header("Content-Disposition", "attachment; filename=\"files.zip\"")
      .body(out -> {
          ZipOutputStream zipOutputStream = new ZipOutputStream(out);
          zipOutputStream.setLevel(9);
          addFilesToArchive(zipOutputStream);
      });
}

We set the compression level to 9, giving us the maximum compression level. We can choose a value between 0 and 9. A lower compression level gives us faster processing, while a higher level produces a smaller output but slows the archiving.

5. Add Archive Password Protection

We’re also able to set up a password for our ZIP archives. To do this, let’s add the zip4j dependency:

<dependency>
    <groupId>net.lingala.zip4j</groupId>
    <artifactId>zip4j</artifactId>
    <version>${zip4j.version}</version>
</dependency>

Now we’ll add a new endpoint to our controller where we return password-encrypted archive streams:

import net.lingala.zip4j.io.outputstream.ZipOutputStream;
@GetMapping(value = "/zip-archive-stream-secured", produces = "application/zip")
public ResponseEntity<StreamingResponseBody> getZipSecuredStream() {
    return ResponseEntity
      .ok()
      .header("Content-Disposition", "attachment; filename=\"files.zip\"")
      .body(out -> {
          ZipOutputStream zipOutputStream = new ZipOutputStream(out, "password".toCharArray());
          addFilesToArchive(zipOutputStream);
      });
}

Here we’ve used ZipOutputStream from the zip4j library, which can handle passwords.

Now let’s implement the addFilesToArchive() method:

import net.lingala.zip4j.model.ZipParameters;
void addFilesToArchive(ZipOutputStream zipOutputStream) throws IOException {
    List<String> filesNames = new ArrayList<>();
    filesNames.add("first-file.txt");
    filesNames.add("second-file.txt");
    ZipParameters zipParameters = new ZipParameters();
    zipParameters.setCompressionMethod(CompressionMethod.DEFLATE);
    zipParameters.setEncryptionMethod(EncryptionMethod.ZIP_STANDARD);
    zipParameters.setEncryptFiles(true);
    for (String fileName : filesNames) {
        File file = new File(ZipArchiveController.class.getClassLoader()
          .getResource(fileName).getFile());
        zipParameters.setFileNameInZip(file.getName());
        zipOutputStream.putNextEntry(zipParameters);
        FileInputStream fileInputStream = new FileInputStream(file);
        IOUtils.copy(fileInputStream, zipOutputStream);
        fileInputStream.close();
        zipOutputStream.closeEntry();
    }
    zipOutputStream.flush();
    IOUtils.closeQuietly(zipOutputStream);
}

We’ve used the encryptionMethod and encryptFiles parameters of ZIP entry to encrypt the files.

Finally, let’s call our new endpoint and check the response:

@Test
void givenZipArchiveController_whenGetZipArchiveSecuredStream_thenExpectedArchiveShouldContainExpectedFilesSecuredByPassword() throws Exception {
    MvcResult result = mockMvc.perform(get("/zip-archive-stream-secured"))
      .andReturn();
    MockHttpServletResponse response = result.getResponse();
    byte[] content = response.getContentAsByteArray();
    List<String> fileNames = fetchFileNamesFromArchive(content);
    assertThat(fileNames)
      .containsExactly("first-file.txt", "second-file.txt");
}

In fetchFileNamesFromArchive(), we’ll implement the logic for retrieving data from our ZIP archive:

import net.lingala.zip4j.io.inputstream.ZipInputStream;
List<String> fetchFileNamesFromArchive(byte[] content) throws IOException {
    InputStream byteStream = new ByteArrayInputStream(content);
    ZipInputStream zipStream = new ZipInputStream(byteStream, "password".toCharArray());
    List<String> fileNames = new ArrayList<>();
    LocalFileHeader entry = zipStream.getNextEntry();
    while (entry != null) {
        fileNames.add(entry.getFileName());
        entry = zipStream.getNextEntry();
    }
    zipStream.close();
    return fileNames;
}

Here we use ZipInputStream from the zip4j library again and set the password we used during encryption. Otherwise, we’ll encounter a ZipException.

6. Conclusion

In this tutorial, we explored two approaches for serving ZIP files in a Spring Boot application. We can use byte arrays for small to medium-sized archives. For larger files, we should consider streaming the ZIP archive directly in the HTTP response to keep memory usage low. By adjusting the compression level, we can control the network load and the latency of our endpoints.

As always, the code is available over on GitHub.


Read Multiple Integers From One Line

$
0
0

1. Introduction

In this article, we’ll explore how to read multiple integers from one line written in a file. We’ll explore the standard Java packages, specifically BufferedReader, and Scanner to achieve our desired result.

2. Sample Data

 For all our examples, let’s define sample data and parameters. First, let’s start by manually creating a simple file named intinputs.txt in the resource folder, that we’ll use as an input source in our examples:

1 2 3 4 5

Furthermore, we’ll use the following sample values for the expected number of integers, and the file path:

private static final String FILE_PATH = "src/test/resources/intinputs.txt"; 
private static final int EXPECTED_NO_OF_INTEGERS = 5 ;

3. Using BufferedReader

Let’s explore the BufferedReader class which allows us to read input line by line. We can read the whole line into String and then based on the delimiter, we can split the input and parse them as Integers:

@Test
public void givenFile_whenUsingBufferedReader_thenExtractedIntegersCorrect() throws IOException {
    try (BufferedReader br = Files.newBufferedReader(Paths.get(FILE_PATH))) {
        String inputs = br.readLine();
        int[] requiredInputs = Arrays.stream(inputs.split(" "))
          .mapToInt(Integer::parseInt).toArray();
        assertEquals(EXPECTED_NO_OF_INTEGERS, requiredInputs.length);
    }
}

We created a stream on the split output using Arrays.stream() and then mapped them as Integer using the parseInt() method. As a result, we’ve read multiple Integers into an array from the input source.

4. Using Scanner

Using the Scanner class, we can achieve the same result with a similar approach. The Scanner class provides different methods to read data from the input source.

A token in a Scanner is defined by the delimiter pattern used by the Scanner to parse the input stream. By default, the delimiter pattern for a Scanner is any whitespace character (such as a space, tab, or newline).

We’ll specifically see nextInt() and nextLine() methods in detail.

4.1. Using the nextInt() Method

Scanner class provides the nextInt() method to read Integers from the input.

Let’s use the nextInt() method:

@Test
public void givenFile_whenUsingScannerNextInt_thenExtractedIntegersCorrect() throws IOException {
    try (Scanner scanner = new Scanner(new File(FILE_PATH))) {
        List<Integer> inputs = new ArrayList<>();
        while (scanner.hasNext()){
            inputs.add(scanner.nextInt());
        }
        assertEquals(EXPECTED_NO_OF_INTEGERS,inputs.size());
    }
}

We’ve added the output of nextInt() method to the list of Integers. As a result, we’ve read multiple Integers from the input source. When working with nextInt(), we need to be sure that we only give it Integer inputs, otherwise, it throws InputMismatchException.

4.2. Using the nextLine() Method

Similar to BufferedReader, Scanner also provides a method to read the whole line. The nextLine() method reads the whole line and we can split it using the required delimiter:

@Test
public void givenFile_whenUsingScannerNextLine_thenExtractedIntegersCorrect() throws IOException {
    try (Scanner scanner = new Scanner(new File(FILE_PATH))) {
        String inputs = scanner.nextLine();
        int[] requiredInputs = Arrays.stream(inputs.split(" "))
          .mapToInt(Integer::parseInt).toArray();
        assertEquals(EXPECTED_NO_OF_INTEGERS,requiredInputs.length);
    }
}

Similar to BufferedReader, we created a stream on the split output using Arrays.stream() and then mapped them as Integer using the parseInt() method.

5. Conclusion

In this tutorial, we’ve explored different ways to read integers from the input using BufferedReader and Scanner methods. While BufferedReader has only one method to read input, the Scanner class provides specific methods to read primitive types.

As always, all of the code examples in this article are available over on GitHub.


Rapid Spring Boot Prototyping with Bootify

$
0
0

1. Introduction

In today’s fast-paced development environment, accelerating the development process is crucial for delivering projects efficiently. Generating boilerplate code and configuration files can significantly streamline this process.

Bootify offers a powerful Spring Boot prototype solution for this purpose. By automating the creation of standard components and configurations, Bootify enables us to bypass repetitive and time-consuming setup tasks. This allows developers to dedicate their efforts to the more innovative and unique aspects of the application, such as refining business logic and adding custom features.

In this tutorial, we’ll explore the basics of the Bootify project, providing a comprehensive overview of its core features and capabilities. We’ll also walk through a practical example to demonstrate how Bootify can effectively be utilized in real-world scenarios.

2. What Is Bootify?

Bootify is a user-friendly application generator designed specifically for Spring Boot frameworks. It simplifies and accelerates the development process by automating the creation of boilerplate code and configuration files necessary for building Spring Boot applications.

With Bootify, developers can effortlessly set up entities, relationships, and various application components through an intuitive web-based interface. This tool streamlines the initial setup and ensures consistency and adherence to best practices in code structure.

By generating foundational code and configurations, Bootify allows developers to focus on crafting unique business logic and custom features, making it an invaluable asset for both rapid prototyping and full-scale application development.

3. Creating a Project

Creating a project with Bootify is straightforward and efficient, and it helps us quickly get our Spring Boot application up and running.

To simplify things, we’ll build a Spring Boot CRUD application with H2 as a database and no frontend.

3.1. Start New Project

First, we go to Bootify.io and click on the “Open Project” link. We’ll be greeted with options to start a new project or modify an existing one. We select the “Start new project” option to create a new project to begin the setup process:

bootify-first-page

Our new project can now be accessed via its unique URL.

3.2. Configure Project Settings

Now, we configure the basic details of our project, such as the project name, package structure, and any other general settings. Bootify provides a user-friendly interface to specify these parameters, ensuring that our project is set up according to our preferences.

We select Maven as the build tool and Java together with Lombok as the language. Also, we select H2 as a database. Bootify adds the necessary dependencies for our selected database.

bootify-general-1

Further down in the developer preferences, we also activate the OpenAPI for documenting REST APIs:

bootify-general-2

3.3. Define Our Domain Model

We can now create our database schema in the “Entities” tab. Bootify provides a graphical interface to define our application’s entities and their relationships. We can create entities, specify their attributes, and establish relationships between them, such as one-to-many or many-to-many associations.

bootify-entity-1

We will create a simple database schema to manage Post and PostComment. Let’s create the Post entity:

bootify-post

Also, we create the PostComment entity:

For each of the two entities, we activate the “CRUD Options“.

Now, we can create a relationship between two entities. There is a 1:N relation between a Post and a PostComment, so we create a one-to-many relation here:

bootify-relationship

The below figure shows the entities, their properties, and the relationships between them:

bootify-entities

3.4. Define Our Data Objects and Controllers

Next is “Data Objects” where we can define DTO’s and enums. Bootify adds a PostDTO and PostCommentDTO automatically.

The final section is for the “Controllers“. Bootify adds a PostResource and PostCommentResource automatically, which is just what we needed:

bootify-controller

3.5. Generate Code

Once we’ve completed the configuration, Bootify will generate the corresponding Spring Boot code for us. This includes the necessary entity classes, repositories, services, controllers, and other boilerplate components required for our application.

We can use “Explore” to view all the generated files:

bootify-preview

Also, we can download the generated project as a ZIP file.

4. Overview of Generated Code

After downloading the zip file, we can open it up in our favorite IDE (such as IntelliJ IDEA or Eclipse) to start working on it locally:

bootify-intellij

Here’s a breakdown of the key components and files included in the generated code.

The domain component includes the entity classes. These classes are annotated with JPA annotations such as @Entity, @Id, and @GeneratedValue to map them to the corresponding database tables. Each entity class contains fields representing the defined attributes and getter and setter methods.

The repos component represents the repository interfaces. Bootify generates interfaces that extend JpaRepository, which provides built-in methods for CRUD (Create, Read, Update, Delete) operations. These repository interfaces enable database interactions without custom implementation for common database operations.

The service component is responsible for providing the service layer. The generated code includes service classes that encapsulate the business logic. These classes are annotated with @Service and often include methods to handle business operations related to the entities. Services interact with repositories to perform data access operations and implement additional logic when required.

The rest of the components contain the REST controllers. Bootify generates REST controllers annotated with @RestController and @RequestMapping to manage HTTP requests. These controllers map incoming requests to the appropriate service methods and return the correct responses. They include endpoints for CRUD operations and use annotations like @GetMapping, @PostMapping, @PutMapping, and @DeleteMapping to define their operations.

The model component includes the DTO classes. Bootify generates these classes to facilitate data transfer between the client and server. DTOs are used to structure the data returned by the API or received from the client, effectively decoupling the internal data model from the external API representation.

The config component consists of configuration classes such as SwaggerConfig and JacksonConfig. These classes manage settings related to API documentation and object mapping.

Finally, the application properties are defined in the application.properties or application.yml files, which manage application configuration. These files handle settings like database connection details, server port configuration, and other environment-specific properties.

5. Conclusion

In this article, we explored the Bootify application generator. With Bootify handling the routine setup, we can focus on building and enhancing our application’s core functionality rather than spending time on repetitive setup tasks.


How to Convert float to int in Java

$
0
0

1. Overview

In Java programming, it’s common to face the need to convert a floating-point value to an integer. Since float allows decimal values, whereas int only holds whole numbers, converting between them can often lead to precision loss. It’s important to understand the different conversion techniques available to ensure our programs perform accurately.

In this article, we’ll look at various methods for converting a float to an int in Java, along with practical examples that demonstrate when each approach is appropriate.

2. float and int in Java

Let’s start by looking at the differences between float and int in Java:

  • The float is a 32-bit data type used for representing numbers that have fractions. It follows the IEEE 754 standard and is suitable when we need a wide range of values, especially those involving decimals.
  • On the other hand, int is also a 32-bit data type but only represents whole numbers. It’s perfect for tasks that require only integers, like counting items or representing positions in an array.

When converting a float to an int, we need to keep in mind that this conversion will remove the fractional part, leading to a potential loss of accuracy. The method we choose to convert a float to an int depends on how we want to handle that fractional portion.

3. Methods of float to int Conversion

There are several methods for converting a float to an int in Java. Each method handles the fractional component differently, and we need to pick the one that best suits our application’s requirements.

3.1. Explicit Type Casting

The most straightforward way to convert a float to an int is to use explicit type casting. By placing (int) in front of the float value, we forcefully convert it to an integer. This type of conversion simply removes the decimal part without rounding.

Let’s demonstrate this with a unit test:

@Test
public void givenFloatValues_whenExplicitCasting_thenValuesAreTruncated() {
    int intValue1 = (int) 7.9f;
    int intValue2 = (int) 5.4f;
    int intValue3 = (int) -5.1f;
    assertEquals(7, intValue1);
    assertEquals(5, intValue2);
    assertEquals(-5, intValue3);
}

In this example, we can see that the value 7.9 is converted to 7, the value 5.4 is converted to 5, and -5.1 is converted to -5. The decimal portion is truncated, which means this method is effective when we’re only interested in the integer part and don’t care about rounding.

3.2. Using Math.round()

If we need to convert a float to an int while rounding to the nearest whole number, we can use the Math.round() method. This method handles the decimal value appropriately and rounds up or down based on its value.

To demonstrate this with a unit test, we can use the following code:

@Test
public void givenFloatValues_whenRounding_thenValuesAreRoundedToNearestInteger() {
    int roundedValue1 = Math.round(7.9f);
    int roundedValue2 = Math.round(5.4f);
    int roundedValue3 = Math.round(-5.1f);
    // Then
    assertEquals(8, roundedValue1);
    assertEquals(5, roundedValue2);
    assertEquals(-5, roundedValue3);
}

In this example, the value 7.9 is rounded to 8, the value 5.4 is rounded to 5, and -5.1 is rounded to -5. This approach is useful when we want the closest integer representation, allowing for a more accurate conversion without always rounding down or up.

3.3. Using Math.floor() and Math.ceil()

In scenarios where we need greater control over the rounding behavior, Java’s Math class provides two useful methods:

  • The Math.floor() method consistently rounds a given float value down to the nearest whole number.
  • Conversely, Math.ceil() rounds a float value up to the nearest whole number.

To illustrate how these methods can be used in practice, we can look at a couple of unit tests:

@Test
public void givenFloatValues_whenFlooring_thenValuesAreRoundedDownToNearestWholeNumber() {
    int flooredValue1 = (int) Math.floor(7.9f);
    int flooredValue2 = (int) Math.floor(5.4f);
    int flooredValue3 = (int) Math.floor(-5.1f);
    assertEquals(7, flooredValue1);
    assertEquals(5, flooredValue2);
    assertEquals(-6, flooredValue3);
}
@Test
public void givenFloatValues_whenCeiling_thenValuesAreRoundedUpToNearestWholeNumber() {
    int ceiledValue1 = (int) Math.ceil(7.9f);
    int ceiledValue2 = (int) Math.ceil(5.4f);
    int ceiledValue3 = (int) Math.ceil(-5.1f);
    assertEquals(8, ceiledValue1);
    assertEquals(6, ceiledValue2);
    assertEquals(-5, ceiledValue3);
}

In these tests:

  • The Math.floor() method converts 7.9 to 7, 5.4 to 5, and -5.1 to -6.
  • The Math.ceil() method converts 7.9 to 8, 5.4 to 6, and -5.1 to -5.

Utilizing these approaches allows us to maintain consistency in how our conversions are rounded. This control is important when the rounding direction affects functionality, such as defining thresholds or handling aspects of the user interface.

4. Potential Issues with Conversion

When converting a float to an int, there are a few issues that we should be mindful of:

4.1. Loss of Precision

A key concern is the loss of precision. Since float values can include decimal parts, converting them into int results in the fractional portion being discarded. This truncation can lead to inaccuracies, especially in applications where the exact value is important.

4.2. Overflow Concerns

Another possible issue is overflow. Though both float and int are 32-bit types, they represent different value ranges. A float can store very large numbers, while int values are limited to just over two billion. If we attempt to convert a float that exceeds this range into an int, we may encounter overflow, leading to incorrect or unexpected outcomes.

4.3. Rounding Decisions

Each conversion method has its rounding behavior, and understanding these differences is crucial. For instance, using (int) simply truncates the value, whereas methods like Math.round(), Math.floor(), and Math.ceil() follow different rounding rules. Choosing the correct method is important to prevent bugs or inaccuracies, especially when rounding requirements are strict.

5. Conclusion

Converting float values to int in Java is a routine operation, but it necessitates careful consideration to maintain precision.

Whether we opt for explicit casting to truncate the value, utilize Math.round() for rounding to the nearest integer, or employ Math.floor() and Math.ceil() to consistently round either down or up, each method serves a distinct purpose and carries its implications.

By choosing the right approach according to our specific requirements, we can ensure that our programs manage numeric data effectively and accurately.

As always, the code can be found over on GitHub.


Spring Boot 3 – Configure Spring Security to Allow Swagger UI

$
0
0

1. Overview

In this tutorial, we’ll learn how to configure Spring Security to allow access to Swagger UI in a Spring Boot 3 application.

Swagger UI is a tool for documenting APIs. It provides a user-friendly interface to interact with the API and test endpoints. However, when we enable Spring Security in our application, the Swagger UI becomes inaccessible due to security restrictions.

We’ll explore how to set up Swagger in a Spring Boot 3 application and configure Spring Security to allow access to the Swagger UI.

2. Code Setup

Let’s start by setting up our application. We’ll add the necessary dependencies and create a simple controller. We’ll configure Swagger and test that the Swagger UI isn’t accessible. Then we’ll fix it by configuring Spring Security.

2.1. Add Swagger and Spring Security Dependencies

First, we’ll add the necessary dependencies to the pom.xml file:

<dependency>
    <groupId>org.springdoc</groupId>
    <artifactId>springdoc-openapi-starter-webmvc-ui</artifactId>
    <version>2.6.0</version>
</dependency>
<dependency>
    <groupId>org.springframework.boot</groupId>
    <artifactId>spring-boot-starter-security</artifactId>
</dependency>
<dependency>
    <groupId>org.springframework.boot</groupId>
    <artifactId>spring-boot-starter-web</artifactId>
</dependency>

The springdoc-openapi-starter-webmvc-ui is a Springdoc OpenAPI library that encapsulates Swagger. It contains the required dependencies and annotations to set up Swagger in the application.

The spring-boot-starter-security dependency provides Spring Security for the application. When we add this dependency, Spring Security is enabled by default and blocks access to all URLs.

The spring-boot-starter-web dependency is required to create APIs.

2.2. Controller

Next, let’s create a controller that has an endpoint:

@RestController
public class HelloController {
    @GetMapping("/hello")
    public String hello() {
        return "Hello, World!";
    }
}

When we call the hello endpoint, it returns the string “Hello, World!”.

3. Configure Swagger

Next, let’s configure Swagger. We’ll set up the configuration to enable Swagger and add annotations to the controller.

3.1. Configuration Class

To configure Swagger, we need to create a configuration class:

@Configuration
public class SwaggerConfig {
    @Bean
    public GroupedOpenApi publicApi() {
        return GroupedOpenApi.builder()
            .group("public")
            .pathsToMatch("/**")
            .build();
    }
}

Here, we’ve created a SwaggerConfig class and defined a publicApi() method that returns a GroupedOpenApi bean. This bean groups all the endpoints that match the specified path pattern.

We’ve defined a group public in the method and specified the path pattern as “/**”. This means that all the endpoints in the application will be included in this group.

3.2. Swagger Annotations

Next, let’s add Swagger annotations to the controller:

@Operation(summary = "Returns a Hello World message")
@GetMapping("/hello")
public String hello() {
    return "Hello, World!";
} 

We added the @Operation annotation to the hello() method to describe the endpoint. This description will be displayed in the Swagger UI.

3.3. Testing

Now, let’s run the application and test the Swagger UI. By default, the Swagger UI should be accessible at http://localhost:8080/swagger-ui/index.html:

Login page image


In the above image, we can see that the Swagger UI isn’t accessible. Instead, we’re prompted to enter the username and password. Spring Security wants to authenticate the user before allowing access to the URL.

4. Configure Spring Security to Allow Swagger UI

Now, let’s configure Spring Security to allow access to the Swagger UI. We’ll look at two ways to achieve this: using SecurityFilterChain and WebSecurityCustomizer.

4.1. Using WebSecurityCustomizer

An easy way to exclude paths from Spring Security is by using the WebSecurityCustomizer interface. We can disable Spring Security on specified URLs using this interface.

Let’s define a bean of type WebSecurityCustomizer in a configuration class:

@Configuration 
public class SecurityConfig {
   @Bean
    public WebSecurityCustomizer webSecurityCustomizer() {
        return (web) -> web.ignoring()
          .requestMatchers("/swagger-ui/**", "/v3/api-docs/**");
    }
}

The @Configuration annotation marks the class as a configuration class. Next, we define a bean of type WebSecurityCustomizer.

Here, we’ve used a lambda expression to define a WebSecurityCustomizer implementation. We’ve used the ignoring() method to exclude the Swagger UI URLs /swagger-ui/** and /v3/api-docs/** from the security configuration.

This is useful when we want to ignore all security rules on a URL. It’s only recommended if the URL is internal and not public exposed as no security rules will apply to it. 

4.2. Using SecurityFilterChain

Another way to override Spring Security’s default implementation is to define a SecurityFilterChain bean. Then we can allow Swagger URLs in the implementation we provide.

For this, we can define a SecurityFilterChain bean:

@Bean
public SecurityFilterChain filterChain(HttpSecurity http) throws Exception {
    http.authorizeHttpRequests(
      authorizeRequests -> authorizeRequests.requestMatchers("/swagger-ui/**")
        .permitAll()
        .requestMatchers("/v3/api-docs/**")
        .permitAll());
    return http.build();
}

This method configures the security filter chain to allow access to the Swagger UI URLs:

  • We’ve used the authorizeHttpRequests() method to define the authorization rules.
  • The requestMatchers() method is used to match the URLs. We’ve specified the Swagger UI URL patterns /swagger-ui/** and /v3/api-docs/**.
  • /swagger-ui/** is the URL pattern for the Swagger UI while /v3/api-docs/** is the URL pattern for the OpenAPI documentation that Swagger calls to fetch the API information.
  • We’ve used the permitAll() method to allow access to these URLs without authentication.
  • And finally, we’ve returned the http.build() method to build the security filter chain.

This is the recommended approach to allow unauthenticated requests to certain URL patterns. These URLs will have Spring Security headers in the response. However, they won’t need user authentication.

4.3. Testing

Now, let’s run the application and test the Swagger UI again. The Swagger UI should be accessible now.

Screenshot of the swagger UI homepageAs we can see the page is accessible and contains information about our controller endpoint.

5. Conclusion

In this article, we learned how to configure Spring Security to allow access to the Swagger UI in a Spring Boot 3 application. We explored how to exclude the Swagger UI URL from the Spring Security configuration using the SecurityFilterChain and WebSecurityCustomizer interfaces.

As always, the code for this tutorial is available over on GitHub.


Java Weekly, Issue 564

$
0
0

1. Spring and Java

>> Exploring New Features in JDK 23: Gatherers upgrades pipeline design pattern JEP-461 [foojay.io]

Let’s have a look at how the JEP-461’s stream gatherers can help handle complex data and improve functionality in JDK 23.

>> Nugget Friday – Jakarta JSON Binding: Simplifying JSON Serialization and Deserialization [payara.fish]

The Jakarta JSON Binding might just be the solution to simplify JSON handling in Java.

Also worth reading:

Webinars and presentations:

Time to upgrade:

2. Technical & Musings

>> Augmenting the client with Vue.js [foojay.io]

Some interesting points from someone trying out Vue.js for the first time to augment an SSR app.

>> Announcing Tools for Graal Development Kit for Micronaut 4.6.0 [oracle.com]

And a host of exciting new features to try out in the latest release here.

Also worth reading:

3. Pick of the Week

>> The Best Morning Routine (Backed by Science) [taylorpearson.me]


How To Add Header and Footer to PDF Using iText in Java

$
0
0

1. Introduction

Adding headers and footers to PDF documents enhances their readability and professionalism. This is useful in many PDF documents, such as reports, invoices, or presentations. For example, the header on each page could include the publish date, while the footer might contain the page number or the company name.

In this tutorial, we’ll explore how to add headers and footers to PDFs using iText in Java.

2. Problem Statement

When creating PDF documents, it is often necessary to enhance their readability and professionalism by including consistent headers and footers. However, adding these elements can be challenging, especially when dynamically rendering content based on the page number or other document-specific information.

iText is an open-source PDF library widely used for generating and manipulating PDF documents in Java. Moreover, it provides a robust solution for adding content to PDFs by offering an event-handling mechanism that allows developers to customize the appearance of PDF documents during the generation process.

To effectively implement headers and footers in our PDF document, we’ll create a handler class named HeaderFooterEventHandler class, which will implement the IEventHandler interface.

Specifically, this interface is crucial for defining how our headers and footers are rendered for each page creation event, with the core functionality implemented in the handleEvent() method.

3.1. Configuration

We’ll begin by setting up the HeaderFooterEventHandler class and implementing the handleEvent() method to access the necessary PDF document and page information:

public class HeaderFooterEventHandler implements IEventHandler {
    @Override
    public void handleEvent(Event event) {
        if (event instanceof PdfDocumentEvent docEvent) {
            PdfDocument pdfDoc = docEvent.getDocument();
            PdfPage page = docEvent.getPage();
            int pageNumber = pdfDoc.getPageNumber(page);
            //Additional implementation
        }
    }
}

In this snippet, we use the instanceof check to verify that the event is of type PdfDocumentEvent. This ensures that we only handle events relevant to PDF page generation. We then cast the event and retrieve the current page from the document to render the headers and footers with this data.

3.2. Drawing the Header

Next, we create a PdfCanvas object that we’ll use to draw text on the PDF page:

PdfCanvas canvas = new PdfCanvas(page.newContentStreamBefore(), page.getResources(), pdfDoc);

The PdfCanvas allows us to customize the rendering. Now, let’s move on to drawing the header. We begin by starting a new text block and setting the font style:

canvas.beginText();
try {
    canvas.setFontAndSize(PdfFontFactory.createFont(StandardFonts.HELVETICA), 12);
} catch (Exception e) {
    e.printStackTrace();
}

Here, we start the text block with beginText(), then set the font to Helvetica with a size of 12 points. If there’s an issue with the font creation (for example, the font might not be available or loaded correctly), we catch the exception and print the stack trace. In such cases, iText will typically fall back to the system’s default font and size.

After setting the font, we position the header text correctly and render it:

canvas.moveText(36, page.getPageSize().getTop() - 20);
canvas.showText("Header text - Page " + pageNumber);
canvas.endText();

Here, we position the header 36 pixels from the left edge and 20 pixels from the top of the page. Moreover, the showText() method prints the header to the page, which includes the current page number.

Now, we proceed to draw the footer using a similar approach:

canvas.beginText();
canvas.moveText(36, 20);
canvas.showText("Footer text - Page " + pageNumber);
canvas.endText();
canvas.release();

In this case, we position the footer text 36 pixels from the left and 20 pixels from the bottom of the page. Unlike the header, which explicitly uses the page’s top boundary, getTop(), we anchor the footer’s position near the bottom of the page.

iText uses a default coordinate system where the origin (0, 0) is at the bottom-left corner of the page. Therefore, positioning begins from the bottom upwards, allowing us to place the footer at the bottom of each page. Finally, we release the resources associated with the canvas.

Now, we’ll integrate our HeaderFooterEventHandler to create a PDF with custom headers and footers. We’ll also use PDFBox to validate the final output by extracting and verifying the text in the generated PDF.

4.1. Modifying the PDF with the Event Handler

To add a header and footer to the PDF, we create a new PDF document and register our event handler to ensure that the header and footer are added to each page on generation:

@Test
void givenHeaderAndFooter_whenCreatingPDF_thenHeaderFooterAreOnEachPage() throws IOException {
    String dest = "documentWithHeaderFooter.pdf";
    PdfWriter writer = new PdfWriter(dest);
    PdfDocument pdf = new PdfDocument(writer);
    Document document = new Document(pdf);
    HeaderFooterEventHandler handler = new HeaderFooterEventHandler();
    pdf.addEventHandler(PdfDocumentEvent.END_PAGE, handler);
    document.add(new Paragraph("This document contains a header and footer on every page."));
    document.close();
}

We create a new PDF file named “documentWithHeaderFooter.pdf” by initializing a PdfWriter and PdfDocument. We then instantiate our HeaderFooterEventHandler and register it using the addEventHandler() method, attaching it to the PdfDocumentEvent.END_PAGE event. This ensures that the handler executes whenever a page is finished, drawing the header and footer at the appropriate points.

Finally, we add some content to the document and close it to finalize the PDF.

4.2. Testing the PDF with PDFBox

Once the PDF is generated, we need to verify that the header and footer content are present on each page. For this, we’ll use PDFBox, which allows us to extract and inspect the text from the generated PDF:

@Test
void givenHeaderAndFooter_whenTestingPDF_thenHeaderFooterAreVerified() throws IOException {
    String dest = "documentWithHeaderFooter.pdf";
    PDDocument pdDocument = PDDocument.load(new File(dest));
    PDFTextStripper stripper = new PDFTextStripper();
    String text = stripper.getText(pdDocument);
    pdDocument.close();
    assertTrue(text.contains("Header text"));
    assertTrue(text.contains("Footer text"));
}

Here, we load the previously generated PDF using PDFBox’s PDDocument class and extract its text using PDFTextStripper. This method enables us to retrieve all the text from the document, allowing us to verify that the header and footer are present on every page.

The test assertions check for the specific header and footer content, ensuring that the PDF generation process successfully added these elements.

5. Conclusion

We’ve demonstrated how to add headers and footers to PDFs using iText’s IEventHandler. This event-driven approach ensures dynamic customization on every page.

We also introduced PDFBox to verify the generated PDF, extracting and checking the header and footer content. By combining iText for creation and PDFBox for validation, we ensure the accuracy and professionalism of our PDF documents.

As always, the complete code samples for this article can be found over on GitHub.


Troubleshooting Spring JPA Attribute Naming Issues

$
0
0

1. Introduction

One of the most powerful frameworks that Spring offers programmers for simplifying database interactions in Java applications is the Spring JPA (Java Persistence API). It provides a solid abstraction over JPA.

However, despite the ease of use, developers frequently encounter errors that can be challenging to diagnose and resolve. One such common issue is the “Unable to Locate Attribute with the Given Name” error.

In this tutorial, let’s examine the source of this issue before we investigate how to fix it.

2. Define Use Case

It always helps to have a practical use case to illustrate this article.

We create unique and eye-catching wearable gadgets. After a recent survey, our marketing team found that sorting products by sensor type, price, and popularity on our platform would help customers make better purchasing decisions by highlighting the most popular items.

3. Add Maven Dependencies

Let’s use an in-memory H2 database to create a Wearables table in our project into which we’ll populate sample data that we can use in our testing down the line.

To begin with, let’s add the following Maven dependencies:

<dependency> 
    <groupId>com.h2database</groupId> 
    <artifactId>h2</artifactId> 
    <version>2.2.224</version> 
</dependency>
<dependency>
    <groupId>org.springframework.boot</groupId>
    <artifactId>spring-boot-starter-data-jpa</artifactId>
    <version>2.7.11</version>
</dependency>

4. Add Application Resources

So that we can test this repository, let’s create a few application property entries that help us create and populate a table called WEARABLES into an H2 in-memory database.

In our application’s main/resources folder, let’s create an application-h2.properties with the following entries:

# H2 configuration
hibernate.dialect=org.hibernate.dialect.H2Dialect
hibernate.hbm2ddl.auto=create-drop
# Spring Datasource URL
spring.datasource.url=jdbc:h2:mem:testdb;DB_CLOSE_DELAY=-1

The below SQL that we will place in the main/resources folder called testdata.sql will help us create the wearables table in the H2 database with a bunch of pre-defined entries:

CREATE TABLE IF NOT EXISTS wearables (
    id BIGINT AUTO_INCREMENT PRIMARY KEY,
    name VARCHAR(255),
    price DECIMAL(10, 2),
    sensor_type VARCHAR(255),
    popularity_index INT
);
DELETE FROM wearables;
INSERT INTO wearables (id, name, price, sensor_type, popularity_index)
VALUES (1, 'SensaWatch', '500.00', 'Accelerometer', 5);
INSERT INTO wearables (id, name, price, sensor_type, popularity_index)
VALUES (2, 'SensaBelt', '300.00', 'Heart Rate', 3);
INSERT INTO wearables (id, name, price, sensor_type, popularity_index)
VALUES (3, 'SensaTag', '120.00', 'Proximity', 2);
INSERT INTO wearables (id, name, price, sensor_type, popularity_index)
VALUES (4, 'SensaShirt', '150.00', 'Human Activity Recognition', 2);

5. Define WearableEntity Model

Let’s define our entity model WearableEntity. This model is our entity that defines the characteristics of a Wearable device:

@Entity 
public class WearableEntity { 
    @Id @GeneratedValue 
    private Long Id; 
    
    @Column(name = "name") 
    private String Name; 
    @Column(name = "price") 
    private BigDecimal Price; 
    // e.g., "Heart Rate Monitor", "Neuro Feedback", etc. 
    @Column(name = "sensor_type") 
    private String SensorType; 
    
    @Column(name = "popularity_index") 
    private Integer PopularityIndex; 
}

6. Define Query For Entity Filtering

Having introduced the above entity in the platform, let’s add a query to our database that enables our customers to filter WearableEntity, as per the new filter criteria in our persistence layer using the Spring JPA framework.

public interface WearableRepository extends JpaRepository<WearableEntity, Long> {
    List<WearableEntity> findAllByOrderByPriceAscSensorTypeAscPopularityIndexDesc();
}

Let’s break down the above query to understand it better.

  1. findAllBy: Let’s use this method to retrieve all records that are or type WearableEntity
  2. OrderByPriceAsc:  Let’s sort the results by price in ascending order
  3. SensorTypeAsc: After sorting by price, let’s sort by sensorType in ascending order
  4. PopularityIndexDesc: Finally, let’s sort the results by popularityIndex in descending order (as higher popularity might be preferred)

7. Test Repository Via Integration Test

Let’s now check the behavior of the WearableRepository  by introducing an integration test in our project:

public class WearableRepositoryIntegrationTest { 
    @Autowired 
    private WearableRepository wearableRepository; 
    @Test 
    public void testFindByCriteria()  {
        assertThat(wearableRepository.findAllByOrderByPriceAscSensorTypeAscPopularityIndexDesc()) .hasSize(4);
    }
}

8. Running Integration Test

But upon running the integration test, we’ll immediately notice that it’s unable to load application context and fails with the following error:

Caused by: java.lang.IllegalArgumentException: Unable to locate Attribute  with the the given name [price] on this ManagedType [com.baeldung.spring.data.jpa.filtering.WearableEntity]

9. Understanding The Root Cause

Hibernate uses naming conventions to map fields to database columns. Suppose the field names in an entity class don’t align with the corresponding column names or expected conventions. In that case, Hibernate will fail to map them, causing exceptions during query execution or schema validation.

In this example:

  • Hibernate expects field names like name, price, or popularityIndex (in camelCase), but the entity incorrectly uses the field names Id, Name, SensorType, Price, and PopularityIndex (in PascalCase)
  • When executing a query like findAllByOrderByPriceAsc(), Hibernate will try to map the SQL price column to the entity field. Since the field is named Price (with an uppercase “P”), it fails to locate the attribute, resulting in an IllegalArgumentException

10. Resolving The Error By Fixing The Entity

Let us now change the naming of the fields in our WearableEntity class from PascalCase to camelCase:

@Entity
@Table(name = "wearables")
public class WearableValidEntity {
    @Id
    @GeneratedValue
    private Long id;
    @Column(name = "name")
    // use camelCase instead of PascalCase
    private String name;
    @Column(name = "price")
    // use camelCase instead of PascalCase
    private BigDecimal price;
    @Column(name = "sensor_type")
    // use camelCase instead of PascalCase
    private String sensorType;
    @Column(name = "popularity_index")
    // use camelCase instead of PascalCase
    private Integer popularityIndex;
}

Once we have made this change, let’s rerun the WearableRepositoryIntegrationTest. Voila! It instantly passes.

11. Conclusion

In this article, we’ve highlighted the importance of following JPA naming conventions to prevent runtime errors and ensure smooth data interactions. Adhering to best practices helps avoid field mapping issues and optimizes application performance.

As always, we can find the full code example over on GitHub.


Round Robin and AtomicInteger in Java

$
0
0
Contact Us Featured

1. Introduction

Multithreading has been a part of Java since its inception. However, managing concurrent tasks in multithreaded environments remains challenging, especially when multiple threads compete for shared resources. This competition often causes blocking, performance bottlenecks, and inefficient resource usage.

In this tutorial, we’ll build a Round Robin Load Balancer in Java using the powerful AtomicInteger class to ensure thread-safe, non-blocking operations. Along the way, we’ll explore key concepts like round-robin scheduling, context switching, and atomic operations—all crucial for efficient multithreading.

2. Round Robin and Context Switching

Understanding round-robin scheduling and context switching is important before we move forward to implement the same with the AtomicInteger class.

2.1. Round Robin Scheduling Mechanism

Before jumping into the implementation, let’s explore the core concept behind the load balancer: Round Robin Scheduling. This preemptive thread scheduling mechanism allows a single CPU architecture to manage multiple threads using a scheduler that executes each thread for a given time quantum. The time quantum defines the fixed amount of CPU time each thread receives before moving to the back of the queue.

For example, if we have five servers in the pool, the first request goes to server one, the second to server two, and so on. Once server five handles a request, the cycle starts over with server one. This simple mechanism ensures an even distribution of workload.

2.2. Context Switching

Context switching occurs when the system pauses a thread, saves its state, and loads another thread for execution. Although necessary for multitasking, frequent context switching can introduce overhead and reduce system efficiency. The process involves three steps:

  • Saving State: The system saves the thread’s state (program counter, registers, stack, and references) in the Process Control Block (PCB) or Thread Control Block (TCB).
  • Loading State: The scheduler retrieves the state of the next thread from the PCB or TCB.
  • Resuming Execution: The thread resumes execution from where it left off.

Using a non-blocking mechanism like AtomicInteger in our load balancer helps minimize context switching. This way, multiple threads can handle requests simultaneously without creating performance bottlenecks.

3. Concurrency

Concurrency refers to a program’s ability to manage and execute multiple tasks by interleaving their execution in a seemingly non-blocking way. Tasks in a concurrent system aren’t necessarily executed simultaneously, but they appear to be because their execution is structured to run independently and efficiently.

In a single CPU architecture, context switching allows multiple tasks to share CPU time through a time quantum. In a multi-core CPU architecture, threads are distributed across CPU cores and can run truly parallel as well as concurrently. Therefore, concurrency can be broadly defined as a way for a single CPU to execute multiple threads or tasks seemingly at the same time.

4. Introduction to Concurrent Utilities

Java’s concurrency model improved with the introduction of concurrent utilities in Java 5. These utilities provide high-level concurrency frameworks that simplify thread management, synchronization, and task execution.

With features like thread pools, locks, and atomic operations, they help developers manage shared resources more efficiently in multithreaded environments. Let’s explore why and how Java introduced concurrent utilities.

4.1. An Overview of Concurrent Utilities

Despite Java’s robust multithreading capabilities, managing tasks by breaking them into smaller atomic units that can be executed concurrently posed challenges. Subsequently, this gap led to the development of concurrent utilities in Java to better utilize system resources. Java introduced concurrent utilities in JDK 5, offering a range of synchronizers, thread pools, execution managers, locks, and concurrent collections. This API further expanded with the Fork/Join framework in JDK 7. These utilities are part of the following key packages:

Package Description
java.util.concurrent Provides classes and interfaces to replace built-in synchronization mechanisms.
java.util.concurrent.locks Offers an alternative to synchronized methods through the Lock interface.
java.util.concurrent.atomic Offers non-blocking operations for shared variables, replacing the volatile keyword.

4.2. Common Synchronizers & Thread Pools

The Java Concurrency API offers a set of common synchronizers like Semaphore, CyclicBarrier, Phaser, and many more as a replacement for the legacy way of implementing these synchronizers. Moreover, it provides thread pools inside of ExecutorService to manage a collection of worker threads. This has proved efficient for resource-intensive platforms.

The thread pool is a software design pattern that manages a collection of worker threads. It also provides thread reusability and can dynamically adjust the number of active threads to save resources. Using this design pattern at the base of ExecutorService, Java ensures that every task/thread can be queued when none of the threads are available and can execute the thread once a worker thread is freed.

5. What is AtomicInteger?

AtomicInteger allows atomic operations on an integer value, enabling multiple threads to update the integer safely without explicit synchronization.

5.1. AtomicInteger vs Synchronized Blocks

Using synchronized blocks locks the shared variable for explicit access, leading to context-switching overhead. In contrast, AtomicInteger provides a lock-free mechanism, boosting throughput in multithreaded applications.

5.2. Non-Blocking Operations and the Compare-And-Swap Algorithm

At the base of AtomicInteger lies a mechanism called Compare-And-Swap (CAS), which is why operations in AtomicInteger are non-blocking.

Unlike traditional synchronization, which uses locks to ensure thread safety, CAS leverages hardware-level atomic instructions to achieve the same goal without locking the entire resource.

5.3. The CAS Mechanism

The CAS algorithm is an atomic operation that checks whether a variable holds a specific value (the expected value). If it does, the value updates with a new one. This process happens atomically—without interruption by other threads. Here’s how it works:

  1. Comparison: The algorithm compares the current value in the variable to the expected value
  2. Swap: If the value matches, the current value is swapped with the new value
  3. Retry on Failure: If the value doesn’t match, the operation retries in a loop until successful

6. Implementing Round Robin Using AtomicInteger

It’s time to put the concepts into practice. Let’s build a Round Robin Load Balancer that assigns incoming requests to servers. To do this, we’ll use AtomicInteger to track the current server index, ensuring that requests are routed correctly even when multiple threads handle them concurrently:

private List<String> serverList; 
private AtomicInteger counter = new AtomicInteger(0);

We have a List of five servers and an AtomicInteger initialized to zero. Additionally, the counter will be responsible for allocating incoming requests to the appropriate server:

public AtomicLoadBalancer(List<String> serverList) {
   this.serverList = serverList;
}
public String getServer() {
    int index = counter.get() % serverList.size();
    counter.incrementAndGet();
    return serverList.get(index);
}

The getServer() method actively distributes incoming requests to servers in a round-robin manner while ensuring thread safety. First, it calculates the next server by using the current counter value and applying the modulus operation with the server list size to wrap around when reaching the end. Then, it increments the counter atomically using incrementAndGet(), ensuring efficient, non-blocking updates. The order of execution might vary as every thread runs parallelly.

Now, let’s also create an IncomingRequest class that extends the Thread class, directing the request to the correct server:

class IncomingRequest extends Thread {
    private final AtomicLoadBalancer balancer;
    private final int requestId;
    private Logger logger = Logger.getLogger(IncomingRequest.class.getName());
    public IncomingRequest(AtomicLoadBalancer balancer, int requestId) {
        this.balancer = balancer;
        this.requestId = requestId;
    }
    @Override
    public void run() {
        String assignedServer = balancer.getServer();
        logger.log(Level.INFO, String.format("Dispatched request %d to %s", requestId, assignedServer));
    }
}

Since the threads execute concurrently, the output order might vary.

7. Verifying the Implementation

Now we want to verify the AtomicLoadBalancer is distributing requests evenly across a list of servers. So, we start by creating a list of five servers and initialize the load balancer with it. Then, we simulate ten requests using IncomingRequest threads, which represent clients asking for a server:

@Test
public void givenBalancer_whenDispatchingRequests_thenServersAreSelectedExactlyTwice() throws InterruptedException {
    List<String> serverList = List.of("Server 1", "Server 2", "Server 3", "Server 4", "Server 5");
    AtomicLoadBalancer balancer = new AtomicLoadBalancer(serverList);
    int numberOfRequests = 10;
    Map<String, Integer> serverCounts = new HashMap<>();
    List<IncomingRequest> requestThreads = new ArrayList<>();
    
    for (int i = 1; i <= numberOfRequests; i++) {
       IncomingRequest request = new IncomingRequest(balancer, i);
       requestThreads.add(request);
       request.start();
    }
    for (IncomingRequest request : requestThreads) {
        request.join();
        String assignedServer = balancer.getServer();
        serverCounts.put(assignedServer, serverCounts.getOrDefault(assignedServer, 0) + 1);
    }
    for (String server : serverList) {
        assertEquals(2, serverCounts.get(server), server + " should be selected exactly twice.");
    }
}

Once the requests are processed, we collect how many times each server gets assigned. The goal is to ensure that the load balancer distributes the load evenly, so we expect each server to be assigned exactly twice. Finally, we verify this by checking the counts for each server. If the counts match, it confirms that the load balancer is working as expected and distributing requests evenly.

8. Conclusion

By using AtomicInteger and the Round Robin algorithm, we’ve built a thread-safe, non-blocking load balancer that efficiently distributes requests across multiple servers. AtomicInteger’s lock-free operations ensure that our load balancer avoids the pitfalls of context switching and thread contention, making it ideal for high-performance, multithreaded applications.

Through this implementation, we’ve seen how Java’s concurrent utilities can simplify the management of threads and improve overall system performance. Whether we’re building a load balancer, managing tasks in a web server, or developing any multithreaded system, the concepts explored here will help us design more efficient and scalable applications.

As always, the full implementation of these examples can be found over on GitHub.


Converting a JDBC ResultSet to CSV in Java

$
0
0

1. Introduction

When working with Java applications that interact with databases, we often need to export the query results into a format that can be easily consumed or shared. One common format for this purpose is CSV(Comma-Separated Values). To achieve this, we can convert a JDBC ResultSet (the data structure used to hold the results of a database query) into a CSV file.

In this article, we’ll explore two approaches to converting ResultSet into CSV format.

2. Setup

For testing purposes, we’ll use the Employees table which has the below schema:

CREATE TABLE EMPLOYEES (
    id SERIAL PRIMARY KEY ,
    first_name VARCHAR(50),
    last_name VARCHAR(50),
    salary DECIMAL(10, 2)
);

3. Using Custom Logic

In this approach, first, we’re querying the Employees table for the records:

Employee table records

As we can see above, the Employees table records include special characters. We’re then iterating over ResultSet and converting each record to CSV:

List<String> toCsv(Connection connection) throws SQLException {
    List<String> csvRecords = new ArrayList<>();
    PreparedStatement preparedStatement = connection.prepareStatement("SELECT * FROM employees");
    ResultSet resultSet = preparedStatement.executeQuery();
    while (resultSet.next()) {
        String eachRecord = formatForCsv(resultSet.getString("first_name")) + "," + 
          formatForCsv(resultSet.getString("last_name")) + "," + 
          "\"" + resultSet.getDouble("salary") + "\"";
        csvRecords.add(eachRecord);
    }
    return csvRecords;
}

For each record, we’re reading each column such as first_name, last_name, etc as a string. We created the formatForCSV() helper method which escapes newline (\n) with (\\n), carriage returns (\r) with (\\r), and double quotes() with (“”):

String formatForCsv(String value) {
    return "\"" + value
      .replace("\n", "\\n")
      .replace("\r", "\\r")
      .replace("\"", "\"\"")
      + "\"";
}

If we execute our logic, we’ll get the ResultSet converted CSV result:

CSV records of employee table

We can write unit tests to verify if our logic works as expected:

@Test
void givenEmployeeRecordsInEmployeeTable_whenResultSetToCSVInvoked_thenReturnsCSV() throws SQLException, IOException {
    insertRecords();
    ResultSetToCSV logic = new ResultSetToCSV();
    List<String> csvRecords = logic.toCsv(connection);
    Files.write(Paths.get("/Users/surajmishra/Documents/work-space/employee.csv"), csvRecords);
    assertThat(csvRecords.size()).isEqualTo(3);
    for (int i = 1; i <= 2; i++) {
        assertThat(csvRecords.get(i - 1))
          .isEqualTo("\"first" + i + "\"," + "\"last" + i + "\"," + "\"" + String.format("%.1f", 100.00 * i) + "\"");
    }
    assertThat(csvRecords.get(2))
      .isEqualTo("\"\"\"first\\nfirst1\\nfirst2!\"\"1\"," + "\"\"\"last!\\nlast1!\"\"1\"," + "\"100.0\"");
}

4. Using Third-Party Dependency

There are different open-source libraries available that can help us convert ResultSet to CSV. One of the popular libraries is OpenCSV.

We can add it in the pom.xml file:

<dependency>
    <groupId>com.opencsv</groupId>
    <artifactId>opencsv</artifactId>
    <version>5.9</version>
</dependency>

In the below logic, we’re reading all the Employees records from the database as ResultSet, and then using OpenCSV, converting them to CSV:

String toCsvWithOpenCsv(Connection connection) throws SQLException {
    PreparedStatement preparedStatement = connection.prepareStatement("SELECT * FROM employees");
    ResultSet resultSet = preparedStatement.executeQuery();
    StringWriter stringWriter = new StringWriter();
    CSVWriter csvWriter = new CSVWriter(stringWriter,
      CSVWriter.DEFAULT_SEPARATOR,
      CSVWriter.DEFAULT_QUOTE_CHARACTER,  // Default quote character is double quote
      CSVWriter.DEFAULT_ESCAPE_CHARACTER, // Default escape character is double quote
      CSVWriter.DEFAULT_LINE_END);
    ResultSetMetaData metaData = resultSet.getMetaData();
    int columnCount = metaData.getColumnCount();
    String[] row = new String[columnCount-1];
    while (resultSet.next()) {
        row[0] = resultSet.getString("first_name")
          .replace("\n", "\\n")
          .replace("\r", "\\r");
        row[1] = resultSet.getString("last_name")
          .replace("\n", "\\n")
          .replace("\r", "\\r");
        row[2] = String.valueOf(resultSet.getDouble("salary"));
        csvWriter.writeNext(row);
    }
    
    return stringWriter.toString();
}

In the above logic, we also escape each row for any special character such as newline, carriage returns, or double quotes in the column value. We use csvWriter to write a row array for the CSV. Then to get String, we convert stringWriter, which contains CSV data, to String using the toString() method.

We can write unit tests to verify if our logic works as expected:

@Test
void givenEmployeeRecordsInEmployeeTable_whenResultSetToCSVWithOpenCsvInvoked_thenReturnsCSV() throws SQLException {
    insertRecords();
    ResultSetToCSV logic = new ResultSetToCSV();
    String csvRecords = logic.toCsvWithOpenCsv(connection);
    String[] split = csvRecords.split("\n");
    assertThat(split.length).isEqualTo(3);
    for (int i = 1; i <= 2; i++) {
        assertThat(split[i - 1])
          .isEqualTo("\"first" + i + "\"," + "\"last" + i + "\"," + "\"" + String.format("%.1f", 100.00 * i) + "\"");
    }
    assertThat(split[2])
      .isEqualTo("\"\"\"first\\nfirst1\\nfirst2!\"\"1\"," + "\"\"\"last!\\nlast1!\"\"1\"," + "\"100.0\"");
}

5. Conclusion

In this tutorial, we learned two options using OpenCSV and custom logic to convert JDBC ResultSet to CSV. While we can always use third-party dependency such as OpenCSV to perform the conversion, writing our custom logic isn’t that bad.

As always, the example code is available over on GitHub.


Finding the Index of the First Duplicate Element in an Array

$
0
0

1. Overview

Finding the index of the first duplicate element in an array is a common coding problem that can be approached in various ways. While the brute-force method is straightforward, it can be inefficient, especially for large datasets.

In this tutorial, we’ll explore different approaches to solve this problem, ranging from a basic brute-force solution to more optimized techniques using data structures like HashSet and array indexing.

2. Problem Statement

Given an array of integers, we want to find the index of the first duplicate element in an array.

Inputarr = [2, 1, 3, 5, 3, 2]
Output4
Explanation: the first element that repeats is 3, and its second occurrence is at index 4. So the correct answer is 4.

Inputarr = [1, 2, 3, 4, 5]
Output: -1
Explanation: Since no elements repeat, the correct answer is -1.

3. Brute Force Approach

In this approach, we check each element of the array and compare it with all subsequent elements to find the first duplicate.

Let’s first look at the implementation and then understand it step by step:

int firstDuplicateBruteForce(int[] arr) {
    int minIndex = arr.length;
    for (int i = 0; i < arr.length - 1; i++) {
        for (int j = i + 1; j < arr.length; j++) {
            if (arr[i] == arr[j]) {
                minIndex = Math.min(minIndex, j);
                break;
            }
        }
    }
    return minIndex == arr.length ? -1 : minIndex;
}

Let’s review this code:

  • We loop over every element i, and for each element, we look for its duplicate at a later index j.
  • When we find a duplicate, we compare j (the index of the second occurrence) with minIndex, which tracks the earliest second occurrence of any duplicate.
  • The break ensures we only track the first-second occurrence of a duplicate for each element.
  • In the end, if minIndex hasn’t been updated, it means there were no duplicates, so we return -1.

Now, let’s discuss the time and space complexity. We use two nested loops, each iterating over the array, leading to a quadratic time complexity. So, the time complexity is O(n^2). Since the extra space we used is independent of the size of the input, the space complexity is O(1).

4. Using HashSet

We can use a HashSet to store the elements we’ve seen so far. As we iterate through the array, we check if an element has already been seen. If so, we return its index as the first duplicate.

Let’s first look at the implementation and then understand it step by step:

int firstDuplicateHashSet(int[] arr) {
    HashSet<Integer> firstDuplicateSet = new HashSet<>();
    for (int i = 0; i < arr.length; i++) {
        if (firstDuplicateSet.contains(arr[i])) {
            return i;
        }
        firstDuplicateSet.add(arr[i]);
    }
    return -1;
}

Let’s review this code:

  • Create an empty HashSet.
  • Loop through the array.
  • For each element, check if it exists in the HashSet.
    • If it does, return the index (first duplicate).
    • If it doesn’t, add the element to the set.
  • If no duplicate is found, return -1.

We’ll now consider the example we mentioned at the start and have a dry run:

First Duplicate Hashset

If we look at time and space complexity, we iterate through the array once, and checking/inserting elements in a HashSet is O(1) on average, so the time complexity is O(n). In the worst case, we may need to store all elements in the HashSet, so the space complexity is O(n).

5. Using Array Indexing

If the elements are positive and within a specific range, i.e., between 1 and n for an array of size n, we can avoid using extra space by modifying the array itself. This approach works under the assumption that all elements are positive and within the range [1, n].

Let’s first look at the implementation and then understand it step by step:

int firstDuplicateArrayIndexing(int[] arr) {
    for (int i = 0; i < arr.length; i++) {
        int val = Math.abs(arr[i]) - 1;
        if (arr[val] < 0) {
            return i;
        }
        arr[val] = -arr[val];
    }
    return -1;
}

Let’s review this code:

  • Iterate through the array.
  • For each element, treat the value as an index and mark the corresponding element negative.
  • If we encounter a negative value at the calculated index, it means the element has already been encountered, and we return the current index as the first duplicate.
  • If no duplicates are found, return -1.

We’ll now consider the example we mentioned at the start and have a dry run:

First Duplicate Array Indexing

Now, let’s discuss the time and space complexity. Since we iterate through the array once, the time complexity will be O(n), and as we used no extra space, the space complexity will be O(1).

6. Conclusion

In this article, we saw that identifying the first duplicate in an array can be done using different strategies, each with its time and space complexity trade-offs.

The brute-force approach, while simple, isn’t ideal for larger datasets due to its O(n^2) time complexity. Optimized approaches provide significant performance improvements, such as using a HashSet or modifying the array.

Choosing the right solution depends on the problem constraints, such as whether extra space is allowed or if the array can be modified. Understanding these techniques equips us with versatile tools for tackling similar problems efficiently.

As always, the code presented in this article is available over on GitHub.


HTTP DELETE With Request Body

$
0
0

1. Introduction

In this quick tutorial, we’ll implement a HTTP DELETE endpoint that accepts a body and then explore multiple ways to send a request to it. Consequently, we’ll use different popular REST client implementations.

2. The Problem

The HTTP specification is ambiguous about whether DELETE requests can include a body, stating that “content received in a DELETE request has no generally defined semantics.” This leaves the implementation to define the behavior. While it’s technically possible to include a body in DELETE requests, servers aren’t guaranteed to accept or process it.

We’ll examine how Spring’s RestController can accept and process a @RequestBody in a DELETE request. For simplicity, we’ll create a /delete endpoint that echoes the request body, allowing us to verify that the body is correctly handled:

@RestController
@RequestMapping("/delete")
public class DeleteController {
    @DeleteMapping
    public Body delete(@RequestBody Body body) {
        return body;
    }
}

Our body is a simple POJO:

public class Body {
    private String name;
    private Integer value;
    // standard getters and setters
}

During our tests, we’ll use a simple JSON String in our requests so we can easily match the content returned without additional parsing:

String json = "{\"name\":\"foo\",\"value\":1}"

We’re now ready to explore existing REST client implementations that allow us to send content in our request.

3. Using Spring’s RestTemplate

Our first option is using the popular RestTemplate from Spring. We’ll write a client class that receives a URL in its constructor:

public class SpringTemplateDeleteClient {
    private final String url;
    private RestTemplate client = new RestTemplate();
    public SpringTemplateDeleteClient(String url) {
        this.url = url;
    }
    // ...
}

Since RestTemplate doesn’t provide an overloaded delete() method that accepts a body, we use the more generic exchange() method with HttpMethod.DELETE. Let’s see what it looks like:

public String delete(String json) {
    HttpHeaders headers = new HttpHeaders();
    headers.set("Content-Type", "application/json");
    HttpEntity<String> body = new HttpEntity<>(json, headers);
    ResponseEntity<String> response = client.exchange(
      url, HttpMethod.DELETE, body, String.class);
    return response.getBody();
}

Since our controller returns the body precisely as received, we can assert that it correctly handles a body in a DELETE request:

@Test
void whenRestTemplate_thenDeleteWithBody() {
    SpringTemplateDeleteClient client = new SpringTemplateDeleteClient(url);
    assertEquals(json, client.delete(json));
}

4. Using Core Java Classes

The HttpClient in Java 11 lacks a dedicated delete() method that supports bodies, so we use the generic method(“DELETE”) in HttpRequest.newBuilder().

Let’s create a client with the same overall template, a class constructed with a URL containing a delete() method. We’ll receive a JSON String and construct a BodyPublisher using that method. Ultimately, we’ll return the response body as String:

public class PlainDeleteClient {
    private final String url;
    private HttpClient client = HttpClient.newHttpClient();
    // url constructor
    public String delete(String json) throws Exception {
        BodyPublisher body = HttpRequest.BodyPublishers.ofString(json);
        // ...
        
        HttpResponse<String> response = client.send(
          request, HttpResponse.BodyHandlers.ofString());
        return response.body();
    }
}

For the actual request, we’ll use HttpRequest.newBuilder(), which doesn’t contain a delete() helper that accepts a body. Instead, we’ll use the generic method(“DELETE”):

HttpRequest request = HttpRequest.newBuilder(URI.create(url))
  .header("Content-Type", "application/json")
  .method("DELETE", body)
.build();

Let’s test it:

@Test
void whenPlainHttpClient_thenDeleteWithBody() throws Exception {
    PlainDeleteClient client = new PlainDeleteClient(url);
    assertEquals(json, client.delete(json));
}

5. Using Apache HTTP 4

A popular option is using the Apache HTTP client. With this library, standard implementations like HttpPost extend HttpEntityEnclosingRequestBase, which includes a setEntity() method, allowing us to include a body in the request.

Unfortunately, HttpDelete only extends HttpRequestBase, which doesn’t include a way to define a request entity. So, let’s start by extending HttpEntityEnclosingRequestBase to create a custom HttpDeleteBody, which returns DELETE as the HTTP method. We’ll also include a constructor that accepts a String URL:

public class HttpDeleteBody extends HttpEntityEnclosingRequestBase {
    public HttpDeleteBody(final String uri) {
        super();
        setURI(URI.create(uri));
    }
    @Override
    public String getMethod() {
        return "DELETE";
    }
}

Then, we can instantiate it in our client and call setEntity() to pass our body. Finally, we use it with the client.execute() method:

public class ApacheDeleteClient {
    // url constructor
    public String delete(String json) throws IOException {
        try (CloseableHttpClient client = HttpClients.createDefault()) {
            StringEntity body = new StringEntity(json, ContentType.APPLICATION_JSON);
            HttpDeleteBody delete = new HttpDeleteBody(url);
            delete.setEntity(body);
            CloseableHttpResponse response = client.execute(delete);
            return EntityUtils.toString(response.getEntity());
        }
    }
}

As the name suggests, CloseableHttpClient implements Closeable, so we create it in a try-with-resources block. The framework also includes an EntityUtils class to help us convert the response entity to the desired type.

5.1. Using Apache HTTP 5

In version 5 of the library, the default HttpDelete implementation already contains everything we need to define a request body. Also, executing the request is now asynchronous, so we have to build a HttpClientResponseHandler. Let’s replace it in our previous example to see what it looks like:

HttpDelete delete = new HttpDelete(url);
delete.setEntity(body);
HttpClientResponseHandler handler = response -> {
    try (HttpEntity entity = response.getEntity()) {
        return EntityUtils.toString(entity);
    }
};
return client.execute(delete, handler);

Finally, HttpEntity now also implements Closeable, so we must declare it with try-with-resources.

6. Conclusion

In this article, we explored a few client implementations capable of sending DELETE HTTP requests with bodies. Each has strengths, and the choice depends on our specific requirements, such as dependency preferences.

As always, the source code is available over on GitHub.


Automatically Create a Database Schema With Spring Boot

$
0
0
start here featured

1. Introduction

Spring Boot works seamlessly with JPA making it easy to implement the data access layer in our applications. One of its powerful features is its ability to automatically create and manage database schemas based on our Java entity classes. With a few configurations, we can instruct Spring Boot to read our entity classes and automatically create or update the schema.

In this article, we’ll briefly talk about how we can leverage the power of Spring Boot and JPA to automatically create the database schema without having to write SQL statements. We’ll also see some common pitfalls to avoid during configuration.

2. Configuring for Auto Schema Creation

In this section, we’ll see the steps to configure Spring Boot for automatic database creation.

2.1. Adding the Required Dependencies

Before configuring our project for schema creation, we should ensure that our Spring Boot project includes the right dependencies.

First, we need Spring Data JPA for database interactions. It provides an abstraction layer over JPA:

<dependency>
    <groupId>org.springframework.boot</groupId>
    <artifactId>spring-boot-starter-data-jpa</artifactId>
</dependency>

Then, we need to add the database-specific dependency to our project.

For H2 Database, we need to add the following dependency:

<dependency>
    <groupId>com.h2database</groupId>
    <artifactId>h2</artifactId>
</dependency>

In the case of MySQL, the dependency would be as follows:

<dependency>
    <groupId>mysql</groupId>
    <artifactId>mysql-connector-java</artifactId>
</dependency>

and for PostgreSQL, we should add the following dependency:

<dependency>
    <groupId>org.postgresql</groupId>
    <artifactId>postgresql</artifactId>
</dependency>

2.2. Configuring application.properties

Spring Boot uses the application.properties file to define configuration settings. This is where we include database connection details and other configurations.

Let’s see the configuration for our H2 database:

spring.datasource.url=jdbc:h2:mem:testdb
spring.datasource.driverClassName=org.h2.Driver
spring.datasource.username=sa
spring.datasource.password=
spring.h2.console.enabled=true
# JPA Configuration
spring.jpa.database-platform=org.hibernate.dialect.H2Dialect
spring.jpa.hibernate.ddl-auto=update

For our MySQL, the configuration would be:

spring.datasource.url=jdbc:mysql://localhost:3306/mydatabase
spring.datasource.username=root
spring.datasource.password=password
spring.jpa.hibernate.ddl-auto=update
spring.jpa.database-platform=org.hibernate.dialect.MySQLDialect

For our PostgreSQL, let’s configure:

spring.datasource.url=jdbc:postgresql://localhost:5432/mydatabase
spring.datasource.username=postgres
spring.datasource.password=password
spring.jpa.hibernate.ddl-auto=update
spring.jpa.database-platform=org.hibernate.dialect.PostgreSQLDialect

2.3. Understanding spring.jpa.hibernate.ddl-auto Options

The key configuration option for automatic schema creation is spring.jpa.hibernate.ddl-auto. This setting controls how the database schema is managed when the application starts. Following, let’s understand the available options.

The none option means no schema generation or validation occurs. This is ideal when the database schema is already perfectly set up, and we don’t want Hibernate to make any changes to it.

The validate option checks if the existing database schema matches the entity classes. No changes will be made, but if there are discrepancies, such as a missing column, it will throw an error. This is useful for ensuring alignment without modification.

The update option modifies the database schema to match the entity classes. It adds new columns or tables but does not delete or alter existing structures. This is a safe choice when we need to evolve the schema without risking data loss.

The create option drops the entire database schema and recreates it every time the application starts. Use this option when we’re comfortable with losing and rebuilding the schema on each run.

We use the create-drop option to create the schema when the application starts and drops it when the application stops. This is handy for temporary environments or tests where persistence between runs is not required.

Finally, the drop option only drops the schema without recreating it. This is useful when we intentionally want to clean the entire database.

In production environments, developers often use the update option to ensure the schema evolves to match the application without risking the deletion of existing data.

2.4. Creating Entity Classes

Once the configuration is in place, we can create our entity classes. These classes represent the tables in our database and map directly to them.

Let’s see an example:

@Entity
public class Person {
    @Id
    @GeneratedValue(strategy = GenerationType.IDENTITY)
    private int id;
    private String firstName;
    private String lastName;
//Setters and getters
}

The @Entity annotation marks the Person class as a JPA entity. This means it will be mapped to a corresponding database table, typically named “Person” unless otherwise specified.

The @Id annotation designates id as the primary key column. While the @GeneratedValue(strategy = GenerationType.IDENTITY) indicates that the database will auto-generate the primary key (e.g., an auto-incremented value) for new rows.

Additionally, id, firstName, and lastName represent the columns in the database table.

3. Testing Our Changes

Let’s test the functionality of saving and retrieving a Person entity using Spring Data JPA:

void whenSavingPerson_thenPersonIsPersistedCorrectly() {
    long countBefore = personRepository.count();
    assertEquals(0, countBefore, "No persons should be present before the test");
    Person person = new Person();
    person.setFirstName("John");
    person.setLastName("Doe");
    Person savedPerson = personRepository.save(person);
    assertNotNull(savedPerson, "Saved person should not be null");
    assertTrue(savedPerson.getId() > 0, "ID should be greater than 0"); // Check if ID was generated
    assertEquals("John", savedPerson.getFirstName(), "First name should be 'John'");
    assertEquals("Doe", savedPerson.getLastName(), "Last name should be 'Doe'");
}

This test ensures that a Person entity is correctly persisted in the database. It initially starts by checking that no Person records exist before the test, and then creates a new Person object with specific values. Next, after saving the entity using the repository, the test subsequently verifies that the saved entity is not null. It also tests if it has a generated ID greater than 0 and retains the correct first and last names.

4. Troubleshooting Common Issues

Configuring automatic schema creation in Spring Boot is generally straightforward, but sometimes issues can arise, and the schema may not generate as expected.

One common issue is that the system might fail to create tables due to naming conventions or database dialect problems. To avoid this, we need to ensure that the spring.jpa.database-platform property is properly set in the application.properties file.

Another useful tip is to enable Hibernate logging by setting the spring.jpa.show-sql=true property. This will print the SQL statements generated by Hibernate, which can help in debugging issues with schema creation.

It’s also important to make sure that our entity classes are in the same package or a sub-package relative to the class annotated with @EnableAutoConfiguration (usually the main application class). If Spring Boot cannot locate our entities, it won’t create the corresponding tables in the database.

Additionally, verify that the application.properties file is located in the correct directory, typically under src/main/resources. This ensures that Spring Boot can load our configurations properly.

We also need to be cautious about misconfiguring our database connection. If the connection settings are incorrect, Spring Boot might default to using an in-memory database like H2 or HSQLDB. Checking the logs for unexpected database connections can help prevent this issue.

Finally, When we use the default spring.datasource.* properties in our application.properties (or application.yml) file, Spring Boot auto-configuration will automatically detect these properties and configure the data source without any additional configuration class or Bean.

However, when we use a custom prefix like h2.datasource.*, Spring Boot’s default auto-configuration won’t automatically pick these properties up because it’s specifically looking for the spring.datasource.* prefix.

In this case, we need to manually configure a data source bean and tell Spring Boot to bind the custom properties using @ConfigurationProperties:

@Configuration
public class DataSourceConfig {
    
    @Bean
    @ConfigurationProperties(prefix = "h2.datasource")
    public DataSource dataSource() {
        return DataSourceBuilder.create().build();
    }
}

5. Conclusion

In this tutorial, we’ve understood how to automatically create and update database schemas with Spring Boot. It’s a powerful feature that simplifies database management. With minimal configuration, we can keep our database schema in sync with our Java entities, ensuring that our application remains consistent and free from schema-related issues.

And, as always, the source code for the examples can be found over on GitHub.


Determining Empty Row in an Excel File With Java

$
0
0

1. Overview

One common task when working with Excel files in Java is identifying empty rows, especially when processing large datasets for analysis or reporting.

Empty rows in an Excel file can disrupt data processing, leading to inaccurate results or unnecessary complications in data analysis. Identifying these rows ensures that operations, such as data cleaning or transformation, run smoothly.

In this tutorial, we’ll examine three popular Java libraries — Apache POIJExcel, and fastexcel — and see how to use each to read and find empty rows in an Excel spreadsheet.

2. Using Apache POI

Apache POI is a comprehensive library for working with Excel files in Java, supporting both .xls and .xlsx formats. It’s widely used due to its flexibility and robustness.

2.1. Maven Dependencies

To start using Apache POI, we’ll add the dependency to our pom.xml file:

<dependency>
    <groupId>org.apache.poi</groupId>
    <artifactId>poi-ooxml</artifactId>
    <version>5.3.0</version>
</dependency>

2.2. Detecting the Empty Rows

First, we’ll create a helper class with a single method called isRowEmpty() to detect empty rows. This will iterate through each row, and check if all cells are either null or blank by comparing the cell type with CellType.BLANK:

public class PoiHelper {
    public static boolean isRowEmpty(Row row) {
        for (int cellNum = row.getFirstCellNum(); cellNum < row.getLastCellNum(); cellNum++) {
            Cell cell = row.getCell(cellNum);
            if (cell != null && cell.getCellType() != CellType.BLANK) {
                return false;
            }
        }
        return true;
    }
}

2.3. Testing the Method

We’ll start by creating our test class and method and opening the workbook in a try-with-resources block. We’re using a simple empty file called empty_excel_file.xlsx for testing:

public class PoiDetectEmptyRowUnitTest {
    
    private PoiHelper poiHelper = new PoiHelper();
    private static final String XLSX_EMPTY_FILE_PATH = "src/main/resources/empty_excel_file.xlsx";
    
    @Test
    public void givenXLSXFile_whenParsingExcelFile_thenDetectAllRowsEmpty() throws IOException {
        try (FileInputStream file = new FileInputStream(XLSX_EMPTY_FILE_PATH);
             Workbook workbook = new XSSFWorkbook(file)) {
            Sheet sheet = workbook.getSheetAt(0);
             for (int rowNum = 0; rowNum <= sheet.getLastRowNum(); rowNum++) {
                 Row row = sheet.getRow(rowNum);
                 assertTrue(poiHelper.isRowEmpty(row));
             }
        }
    }
}

Then, we obtain the first sheet in the workbook and iterate through all the rows in this sheet. For each row, we’ll apply the isRowEmpty() method previously created and assert that the row is empty.

3. Using JExcel

JExcel is another library that handles Excel files, particularly .xls files. It’s known for its simplicity and ease of use.

3.1. Maven Dependencies

To use JExcel, we’ll add the dependency to our pom.xml file:

<dependency>
    <groupId>net.sourceforge.jexcelapi</groupId>
    <artifactId>jxl</artifactId>
    <version>2.6.12</version>
</dependency>

3.2. Detecting the Empty Rows

Detecting empty rows with JExcel involves iterating through an array of Cell objects and checking that all of them are blank by using the getContents() method:

public class JExcelHelper {
    public boolean isRowEmpty(Cell[] row) {
        if (row == null) {
            return true;
        }
        for (Cell cell : row) {
            if (cell != null && !cell.getContents().trim().isEmpty()) {
                return false;
            }
        }
        return true;
    }
}

3.3. Testing the Method

Now, let’s see it in action:

public class JExcelDetectEmptyRowUnitTest {
    private JExcelHelper jexcelHelper = new JExcelHelper();
    private static final String EMPTY_FILE_PATH = "src/main/resources/empty_excel_file.xls";
    @Test
    public void givenXLSFile_whenParsingJExcelFile_thenDetectAllRowsEmpty()
      throws IOException, BiffException {
        Workbook workbook = Workbook.getWorkbook(new File(EMPTY_FILE_PATH));
        Sheet sheet = workbook.getSheet(0);
        for (int rowNum = 0; rowNum < sheet.getRows(); rowNum++) {
            Cell[] row = sheet.getRow(rowNum);
            assertTrue(jexcelHelper.isRowEmpty(row));
        }
    }
}

Here, we’ve opened the workbook and then retrieved the first sheet. After this, we’ll iterate through all the rows in the sheet and apply the helper method to each to assert that they are empty.

4. Using fastexcel

fastexcel is a lightweight library, optimized for reading and writing large Excel files quickly. It’s a good choice when performance is critical.

4.1. Maven Dependencies

We’ll add the fastexcel dependency to our project by including it in our pom.xml file:

<dependency>
    <groupId>org.dhatim</groupId>
    <artifactId>fastexcel</artifactId>
    <version>0.18.3</version>
</dependency>

4.2. Detecting the Empty Rows

To detect empty rows in fastexcel, we’ll stream through the cells in a Row object and check if each cell is empty using the getText() method:

public class FastexcelHelper {
    public boolean isRowEmpty(Row row) {
        if (row == null) {
            return true;
        }
        for (Cell cell : row) {
            if (cell != null && !cell.getText().trim().isEmpty()) {
                return false;
            }
        }
        return true;
    }
}

4.3. Testing the Method

Let’s see it in action to check if all the rows of a spreadsheet are empty:

public class FastexcelDetectEmptyRowUnitTest {
    private FastexcelHelper fastexcelHelper = new FastexcelHelper();
    private static final String EMPTY_FILE_PATH = "src/main/resources/empty_excel_file.xlsx";
    
    @Test
    public void givenXLSXFile_whenParsingEmptyFastExcelFile_thenDetectAllRowsAreEmpty()
      throws IOException {
        try (FileInputStream file = new FileInputStream(EMPTY_FILE_PATH);
             ReadableWorkbook wb = new ReadableWorkbook(file)) {
            Sheet sheet = wb.getFirstSheet();
            try (Stream<Row> rows = sheet.openStream()) {
                boolean isEmpty = rows.allMatch(fastexcelHelper::isRowEmpty);
                assertTrue(isEmpty);
            }
        }
    }
}

Like the previous tests, we’ll open the workbook and obtain the first sheet. Then, we’ll iterate through a Stream of rows to check that they’re empty.

fastexcel’s streaming API openStream() makes it efficient for processing large datasets, even when searching for empty rows.

5. Conclusion

In this tutorial, we saw that whether we use Apache POI, JExcel, or fastexcel, each library provides powerful tools to detect empty rows effectively. We also looked at the code examples using each library, which helped us understand multiple ways to detect empty rows in Excel files.

As always, the full code examples are available over on GitHub.


Get Classpath From ClassLoader in Java

$
0
0

1. Overview

In this article, we’ll explore how to obtain the classpath from a ClassLoader in recent OpenJDK distributions.

2. ClassLoaders and Classpath

The Java Virtual Machine uses ClassLoaders to resolve classes or other resources at runtime. Even though a ClassLoader implementation is free to choose a resolution mechanism, the classpath is the standard choice.

A classpath is an abstraction that Java programs use to locate classes and other resources using relative naming syntax. For example, if we start a Java program with:

java -classpath /tmp/program baeldung.Main

The Java Runtime will search for a file on the location /tmp/program/baeldung/Main.class, and, assuming it exists and is valid, the JVM will load the Class and execute the main method.

Once the program starts, any additional classloading will proceed by searching classes by their respective Internal Names, meaning, the fully qualified Class name with ‘.’ (dots) replaced by ‘/’ (slashes), as relative paths from the directory /tmp/program.

Furthermore, the classpath also supports:

  • Multiple locations, specified by the ‘:’ separator
  • Jar Files

Finally, we can specify any valid URL as classpath locations, not just file system paths. Therefore, objectively speaking a classpath is equivalent to a set of URLs.

3. Common Types of ClassLoaders

To be useful, a ClassLoader implementation must be capable of resolving instances of java.lang.Class objects by overriding the following method:

protected Class<?> findClass(String name) throws ClassNotFoundException {
    throw new ClassNotFoundException(name);
}

Implementing a bespoke ClassLoader can be tricky. ClassLoaders were designed like a LinkedList structure and each may have a parent ClassLoader which can be queried by the getParent() method to support the delegation model.

Lastly, there is no mandatory coupling between a classpath and a ClassLoader and we’ll restrict ourselves to well-known types that effectively employ the classpath mechanism for resource resolution.

3.1. java.net.URLClassLoader

The URLClassLoader exposes its classpath via the method getURLs() and it’s the usual choice when a program needs to handle dynamic classpaths. For instance, Tomcat extends URLClassLoader to segregate the classpath of web applications: the container gives each deployed app its isolated classpath, separate from the others.

In addition, a URLClassLoader is equipped with logic to handle not only local directories but also jar files hosted on disk or remotely accessible via HTTP or other protocols, such as FTP, as long as they support the URL::openConnection() method.

3.2. The Application ClassLoader

The ClassLoader responsible for launching a Java program, that is the ClassLoader that loads a class with a main method and executes it, is called the Application ClassLoader.

In older JDKs (<=9) the Application ClassLoader was a subclass of URLClassLoader. However, the hierarchy has changed since OpenJDK 10 and the Application ClassLoader inherits from the module-private jdk.internal.loader.BuiltinClassLoader, which is not a subclass of URLClassLoader.

By definition, the Application ClassLoader will have its classpath bound to the -classpath startup option. We can retrieve this information at runtime by querying the system property java.class.path, however, this can be inadvertently overwritten at any time and if we want to determine the actual runtime classpath we must query the ClassLoader itself.

4. Obtaining the Classpath From a ClassLoader

To obtain the classpath from a given ClassLoader, let’s start by defining a ClasspathResolver interface, which exposes the capability of querying the classpath of a single ClassLoader and also its whole hierarchy:

package com.baeldung.classloader.spi;
public interface ClasspathResolver {
    void collectClasspath(ClassLoader loader, Set<URL> result);
    default Set<URL> getClasspath(ClassLoader loader) {
        var result = new HashSet<URL>();
        collectClasspath(loader, result);
        return result;
    }
    default Set<URL> getFullClasspath(ClassLoader loader) {
        var result = new HashSet<URL>();
        collectClasspath(loader, result);
        loader = loader.getParent();
        while (loader != null) {
            collectClasspath(loader, result);
            loader = loader.getParent();
        }
        return result;
    }
}

As we mentioned before, Application ClassLoaders do not inherit from URLClassLoader anymore, thus we can’t simply obtain the associated classpath by calling the URLClassLoader::getURLs() method. However, there is still a common denominator to URLClassLoader and BuiltinClassLoader classes: both wrap an instance of jdk.internal.loader.URLClassPath, which is the actual class responsible for locating URL-based resources.

Therefore, an effective implementation of the ClasspathResolver interface will have to tinker with non-visible classes from the JDK, consequently requiring access to non-exported packages.

Since exposing JDK internals to a whole program is a bad practice, it would be better if we isolate this capability by placing the ClasspathResolver interface and its implementations in a modular jar, by also defining a module-info file:

module baeldung.classloader {
    exports com.baeldung.classloader.spi;
}

4.1. Basic Implementation

A basic implementation of ClasspathResolver will only handle URLClassLoaders and will always be available whether the program has access to JDK internals or not:

public class BasicClasspathResolver implements ClasspathResolver {
    @Override
    public void collectClasspath(ClassLoader loader, Set<URL> result) {
        if(loader instanceof URLClassLoader ucl) {
            var urls = Arrays.asList(ucl.getURLs());
            result.addAll(urls);
        }
    }
}

4.2. Extended Implementation

This implementation will demand non-exported OpenJDK classes and a few things can go wrong, namely:

  • Consumers of our library might not set proper runtime flags
  • The program is running in a different JDK, that may not have BuiltinClassLoaders
  • Future versions of OpenJDK may change or remove BuiltinClassLoader, rendering this implementation useless

When using internal JDK APIs we must program defensively, which means taking a few extra steps to compile and run our programs correctly.

First, we must export the jdk.internal.loader package to our module, by adding proper command line options to the compiler. Then, we must also open the package to support reflective access at runtime to test our implementation.

When using Maven as the build and test tool, the plugins have to be set up like this:

<build>
    <plugins>
        <plugin>
            <groupId>org.apache.maven.plugins</groupId>
            <artifactId>maven-compiler-plugin</artifactId>
            <configuration>
                <source>22</source>
                <target>22</target>
                <compilerArgs>
                    <arg>--add-exports</arg>
                    <arg>java.base/jdk.internal.loader=baeldung.classloader</arg>
                </compilerArgs>
            </configuration>
        </plugin>
        <plugin>
            <groupId>org.apache.maven.plugins</groupId>
            <artifactId>maven-surefire-plugin</artifactId>
            <configuration>
                <argLine>--add-opens java.base/jdk.internal.loader=baeldung.classloader</argLine>
            </configuration>
        </plugin>
    </plugins>
</build>

Note: If you prefer not to use modular projects, you can omit the module-info file. Instead, replace the baeldung.classloader module with ALL-UNNAMED in the exports and open clauses.

Some IDEs might require additional configuration as well. For example, in Eclipse, it is necessary to expose the package in Module Dependencies as shown in the picture below:

Export jdk.internal.loader

Now, we are ready to code our extended implementation. Essentially, the call chain we need is:

BuiltinClassLoader -> URLClassPath -> getURLs()

The URLClassPath instance is hoisted in the BuiltinClassLoader#ucp private field, therefore we must obtain it via reflection. This might fail at runtime and, in case it does what should we do?

We will opt to fall back to BasicClasspathResolver, and to do so we should code a support class that tells whether or not we can access BuiltinClassLoader#ucp:

public class InternalJdkSupport {
    static final Class<?> BUILT_IN_CLASSLOADER;
    static final VarHandle UCP;
    static {
        var log = LoggerFactory.getLogger(InternalJdkSupport.class);
        var version = System.getProperty("java.version");
        Class<?> clazz = null;
        VarHandle ucp = null;
        try {
            var ucpClazz = Class.forName("jdk.internal.loader.URLClassPath");
            clazz = Class.forName("jdk.internal.loader.BuiltinClassLoader");
            var lookup = MethodHandles.privateLookupIn(clazz, MethodHandles.lookup());
            ucp = lookup.findVarHandle(clazz, "ucp", ucpClazz);
        } catch (ClassNotFoundException e) {
            log.warn("JDK {} not supported => {} not available.", version, e.getMessage());
        } catch (NoSuchFieldException e) {
            log.warn("JDK {} not supported => BuiltinClassLoader.ucp not present", version);
        } catch (IllegalAccessException e) {
            log.warn("""
                BuiltinClassLoader.ucp requires \
                --add-opens java.base/jdk.internal.loader=baeldung.classloader
                """);
        }
        BUILT_IN_CLASSLOADER = clazz;
        UCP = ucp;
    }
    public static boolean available() {
        return UCP != null;
    }
    public static Object getURLClassPath(ClassLoader loader) {
        if (!isBuiltIn(loader)) {
            throw new UnsupportedOperationException("Loader not an instance of BuiltinClassLoader");
        }
        if (UCP == null) {
            throw new UnsupportedOperationException("""
                Program must be initialized with \
                --add-opens java.base/jdk.internal.loader=baeldung.classloader
                """);
        }
        try {
            return UCP.get(loader);
        } catch (Exception e) {
            throw new InternalError(e);
        }
    }
    static boolean isBuiltIn(ClassLoader loader) {
        return BUILT_IN_CLASSLOADER != null && BUILT_IN_CLASSLOADER.isInstance(loader);
    }
}

With InternalJdkSupport in place, our extended ClasspathResolver implementation, capable of extracting URLs from Application ClassLoaders becomes simply:

import jdk.internal.loader.BuiltinClassLoader;
import jdk.internal.loader.URLClassPath;

public final class InternalClasspathResolver implements ClasspathResolver { @Override public void collectClasspath(ClassLoader loader, Set<URL> result) { var urls = switch (loader) { case URLClassLoader ucl -> Arrays.asList(ucl.getURLs()); case BuiltinClassLoader bcl -> { URLClassPath ucp = (URLClassPath) InternalJdkSupport.getURLClassPath(loader); yield ucp == null ? Collections.<URL> emptyList() : Arrays.asList(ucp.getURLs()); } default -> { yield Collections.<URL> emptyList(); } }; result.addAll(urls); } }

4.3. Exposing the ClasspathResolver

Since our module exports only the com.baeldung.classloader.spi package, clients won’t be able to instantiate the implementations directly. Therefore, we should offer access to the implementations through a factory method:

public interface ClasspathResolver {
    static ClasspathResolver get() {
        if (InternalJdkSupport.available()) {
            return new InternalClasspathResolver();
        }
        return new BasicClasspathResolver();
    }
}

5. Conclusion

In this article, we’ve explored how to create a safe modular solution to obtain the classpath of common OpenJDK ClassLoaders.

The extended implementation was designed to work along OpenJDK, since it requires access to implementation-specific classes, however, it will work with other vendors such as Zulu, Graal, and Temurin.

Modularization limits the exposed JDK internals surface to a single, trusted module, preventing unwanted rogue access by third-party dependencies.

The complete source code for this article is available over on GitHub.


Consumer Seek in Kafka

$
0
0

1. Overview

Seeking in Kafka is similar to locating stored data on a disk before reading. Before reading data from a partition, we must first seek to the correct position. 

A Kafka consumer offset is a unique, steadily increasing number that marks the position of an event record in a partition. Each consumer in the group keeps its own offset for each partition to track progress.

Consumers may need to process messages at different positions in the partition for reasons such as replaying events or skipping to the latest message.

In this tutorial, let’s explore Spring Kafka API methods to retrieve messages at various positions within a partition.

2. Seek Using Java API

In most cases, a consumer reads messages from the beginning of a partition and continues to listen for new ones. However, there are situations where we might need to read from a specific position, time, or relative position.

Let’s explore an API that offers different endpoints to retrieve records from a partition by specifying an offset, or by reading from the beginning or the end.

2.1. Seek by Offset

Spring Kafka provides a seek() method to position the reader at the given offset within the partition.

Let’s first explore seeking by offset within a partition by taking the partition and offset value:

@GetMapping("partition/{partition}/offset/{offset}")
public ResponseEntity<Response> getOneByPartitionAndOffset(@PathVariable("partition") int partition,
  @PathVariable("offset") int offset) {
    try (KafkaConsumer<String, String> consumer = 
      (KafkaConsumer<String, String>) consumerFactory.createConsumer()) {
          TopicPartition topicPartition = new TopicPartition(TOPIC_NAME, partition);
          consumer.assign(Collections.singletonList(topicPartition));
          consumer.seek(topicPartition, offset);
          ConsumerRecords<String, String> records = consumer.poll(Duration.ofMillis(100));
          Iterator<ConsumerRecord<String, String>> recordIterator = records.iterator();
          if (recordIterator.hasNext()) {
              ConsumerRecord<String, String> consumerRecord = recordIterator.next();
              Response response = new Response(consumerRecord.partition(),
                consumerRecord.offset(), consumerRecord.value());
              return new ResponseEntity<>(response, HttpStatus.OK);
        }
    }
    return new ResponseEntity<>(HttpStatus.NOT_FOUND);
}

Here the API exposes an endpoint partition/{partition}/offset/{offset}, which passes the topic, partition, and offset to the seek() method, positioning the consumer to retrieve messages at the specified location. The response model includes the partition, offset, and the message content:

public record Response(int partition, long offset, String value) { }

For simplicity, the API retrieves only one record at the specified position. However, we can modify it to recover all messages starting from that offset. It also does not handle cases where the given offset is unavailable.

To test this, as a first step, let’s add a method that runs before all tests, producing 5 simple messages into the specified topic:

@BeforeAll
static void beforeAll() {
    // set producer config for the broker
    testKafkaProducer = new KafkaProducer<>(props);
    int partition = 0;
    IntStream.range(0, 5)
      .forEach(m -> {
        String key = String.valueOf(new Random().nextInt());
        String value = "Message no : %s".formatted(m);
        ProducerRecord<String, String> record = new ProducerRecord<>(TOPIC_NAME,
          partition,
          key,
          value
          );
        try {
          testKafkaProducer.send(record).get();
        } catch (InterruptedException | ExecutionException e) {
          throw new RuntimeException(e);
        }
        });
}

Here, the producer configuration is set, and 5 messages in the format “Message no : %s”.formatted(m) are sent to partition 0, where m represents an integer ranging from 0 to 4.

Next, let’s add a test which invokes the above endpoint by passing partition 0 and offset 2:

@Test
void givenKafkaBrokerExists_whenSeekByPartition_thenMessageShouldBeRetrieved() {
    this.webClient.get()
      .uri("/seek/api/v1/partition/0/offset/2")
      .exchange()
      .expectStatus()
      .isOk()
      .expectBody(String.class)
      .isEqualTo("{\"partition\":0,\"offset\":2,\"value\":\"Message no : 2\"}");
}

By invoking this API endpoint, we can see that the third message, located at offset 2, is received successfully.

2.2. Seek by Beginning

seekToBeginning() method positions the consumer at the start of the partition, allowing it to retrieve messages starting from the first one.

Next, Let’s add an endpoint that exposes the first message at the beginning of the partition:

@GetMapping("partition/{partition}/beginning")
public ResponseEntity<Response> getOneByPartitionToBeginningOffset(@PathVariable("partition") int partition) {
    try (KafkaConsumer<String, String> consumer = 
      (KafkaConsumer<String, String>) consumerFactory.createConsumer()) {
        TopicPartition topicPartition = new TopicPartition(TOPIC_NAME, partition);
        consumer.assign(Collections.singletonList(topicPartition));
        consumer.seekToBeginning(Collections.singleton(topicPartition));
        ConsumerRecords<String, String> records = consumer.poll(Duration.ofMillis(100));
        Iterator<ConsumerRecord<String, String>> recordIterator = records.iterator();
        if (recordIterator.hasNext()) {
            ConsumerRecord<String, String> consumerRecord = recordIterator.next();
            Response response = new Response(consumerRecord.partition(),
              consumerRecord.offset(), consumerRecord.value());
            return new ResponseEntity<>(response, HttpStatus.OK);
        }
    }
    return new ResponseEntity<>(HttpStatus.NOT_FOUND);
}

Here, the API provides the endpoint partition/{partition}/beginning, passing the topic and partition to the seekToBeginning() method. This positions the consumer to read messages from the start of the partition. The response includes the partition, offset, and message content.

Next, let’s add a test to retrieve the message at the beginning of partition 0. Note that the @BeforeAll section of the test ensures that the producer pushes five messages to the test topic:

@Test
void givenKafkaBrokerExists_whenSeekByBeginning_thenFirstMessageShouldBeRetrieved() {
    this.webClient.get()
      .uri("/seek/api/v1/partition/0/beginning")
      .exchange()
      .expectStatus()
      .isOk()
      .expectBody(String.class)
      .isEqualTo("{\"partition\":0,\"offset\":0,\"value\":\"Message no : 0\"}");
}

We can retrieve the first message stored at offset 0 by invoking this API endpoint.

2.3. Seek by End

The seekToEnd() method positions the consumer at the end of the partition, allowing it to retrieve any future messages that are appended.

Next, let’s create an endpoint that seeks the offset position at the end of the partition:

@GetMapping("partition/{partition}/end")
public ResponseEntity<Long> getOneByPartitionToEndOffset(@PathVariable("partition") int partition) {
    try (KafkaConsumer<String, String> consumer = 
      (KafkaConsumer<String, String>) consumerFactory.createConsumer()) {
        TopicPartition topicPartition = new TopicPartition(TOPIC_NAME, partition);
        consumer.assign(Collections.singletonList(topicPartition));
        consumer.seekToEnd(Collections.singleton(topicPartition));
        return new ResponseEntity<>(consumer.position(topicPartition), HttpStatus.OK);
    }
}

This API offers the endpoint partition/{partition}/end, passing the topic and partition to the seekToEnd() method. This positions the consumer to read messages from the end of the partition.

Since seeking the end means there are no new messages available, this API instead reveals the current offset position within the partition. Let’s add a test to verify this:

@Test
void givenKafkaBrokerExists_whenSeekByEnd_thenLastMessageShouldBeRetrieved() {
    this.webClient.get()
      .uri("/seek/api/v1/partition/0/end")
      .exchange()
      .expectStatus()
      .isOk()
      .expectBody(Long.class)
      .isEqualTo(5L);
}

Using seekToEnd() moves the consumer to the next offset where the following message would be written, placing it in one position beyond the last available message. When we invoke this API endpoint, the response returns the last offset position plus one.

2.4. Seek by Implementing ConsumerSeekAware Class

Besides reading messages at specific positions using consumer APIs, we can extend the AbstractConsumerSeekAware class in Spring Kafka. This class allows consumers to dynamically control the seeking in Kafka partitions. It offers methods for seeking specific offsets or timestamps during partition assignment, giving finer control over message consumption.

In addition to the above seek methods, AbstractConsumerSeekAware offers to seek from specific timestamp or relative position seeking.

Let’s explore the relative position seeking in this section:

void seekRelative​(java.lang.String topic, int partition, long offset, boolean toCurrent)

The seekRelative() method in Spring Kafka allows consumers to seek a position relative to the current or beginning offset within a partition. Each parameter has a specific role:

  • topic: The name of the Kafka topic from which to read messages
  • partition: The partition number within the topic where the seek will occur
  • offset: The number of positions to move relative to the current or start offset. This can be positive or negative
  • toCurrent: A boolean value. If true, the method seeks relative to the current offset. If false, it seeks relative to the beginning of the partition

Let’s add a custom listener which seeks to latest message within the partition by using seekRelative() API:

@Component
class ConsumerListener extends AbstractConsumerSeekAware {
    public static final Map<String, String> MESSAGES = new HashMap<>();
    @Override
    public void onPartitionsAssigned(Map<TopicPartition, 
      Long> assignments, ConsumerSeekCallback callback) {
        assignments.keySet()
          .forEach(tp -> callback.seekRelative(tp.topic(), tp.partition(), -1, false));
    }
    @KafkaListener(id = "test-seek", topics = "test-seek-topic")
    public void listen(ConsumerRecord<String, String> in) {
        MESSAGES.put(in.key(), in.value());
    }
}

The seekRelative() method is called in the onPartitionsAssigned method to manually adjust the consumer’s position when it receives a partition assignment.

The offset value of -1 tells the consumer to move one position backward from the reference point. In this case, since the toCurrent is set as false, it tells the consumer to seek relative to the end of the partition. This means the consumer moves one position back from the last available message.

An in-memory hash map tracks the read messages for testing, storing the received messages as strings.

Finally, let’s add a test to verify that the system retrieves the message at offset 4 successfully by checking the map:

@Test
void givenKafkaBrokerExists_whenMessagesAreSent_ThenLastMessageShouldBeRetrieved() {
    Map<String, String> messages = consumerListener.MESSAGES;
    Assertions.assertEquals(1, messages.size());
    Assertions.assertEquals("Message no : 4", messages.get("4"));
}

The @BeforeAll section of the test ensures that the producer pushes 5 messages to the test topic. The seeking configuration successfully retrieves the last message in the partition.

3. Conclusion

In this tutorial, we explored how Kafka consumers can seek specific positions in partitions using Spring Kafka.

We first examined seeking with consumer APIs, which is useful when precise control over the reading position in a partition is needed. This method works best for scenarios such as replaying events, skipping certain messages, or applying custom logic based on offsets.

Next, we looked at seeking while using a listener, which is more suitable for continuously consuming messages. This approach automatically commits offsets at regular intervals after processing, as the enable.auto.commit property is set to true by default.

As always, the source code for the examples is available over on GitHub.


Storing Basic Arrays and Collections using Array/JSON/XML Types in Hibernate

$
0
0

1. Overview

Mapping data collections in an SQL table field is a common approach when we want to store non-relational data within our entity. In Hibernate 6, there are changes to the default mapping mechanisms that make storing such data more efficient on the database side.

In this article, we’ll review those changes. Additionally, we’ll discuss possible approaches to migrating data persisted using Hibernate 5.

2. New Basic Array/Collection Mapping in Hibernate 6.x

Before Hibernate 6, we had unconditional mapping for collections where the type code SqlTypes.VARBINARY was used by default. Under the hood, we serialized the contents with Java serialization. Now, due to changes in the mapping, we can map collections as native array implementations, JSON, or XML.

Let’s review a few popular SQL dialects and see how they map collection-type fields. First, al of all, let’s add the latest Spring Data JPA dependency which already contains a Hibernate 6.x under the hood:

<dependency>
    <groupId>org.springframework.boot</groupId>
    <artifactId>spring-boot-starter-data-jpa</artifactId>
</dependency>

Also, let’s add the H2 database dependency since we’ll be able to switch dialects and modes and check different databases’ behavior using it:

<dependency>
    <groupId>com.h2database</groupId>
    <artifactId>h2</artifactId>
</dependency>

Now let’s create the entity we’ll use in all the cases:

public class User {
    @Id
    @GeneratedValue(strategy = GenerationType.SEQUENCE)
    Long id;
    List<String> tags;
    //getters and setters
}

We’ve created a User entity with the id and a list of user tags.

2.1. PostgreSQL Dialect

In the PostgreSQLDialect we have a supportsStandardArrays() method overridden and this driver supports a native array implementation for collections.

To review this behavior, let’s configure our database:

spring:
  datasource:
    url: jdbc:h2:mem:mydb;MODE=PostgreSQL
    username: sa
    password: password
    driverClassName: org.h2.Driver
  jpa:
    database-platform: org.hibernate.dialect.PostgreSQLDialect
    show-sql: true    

We’ve configured H2 in PostgreSQL mode.  Also, we’ve specified a PostgreSQLDialect class as a database platform. We’ve enabled SQL script logging to see the type definitions for the table columns.

Now let’s get a mapping for our User entity and check the SQL type of the tags field:

static int ARRAY_TYPE_CODE = 2003;
@PersistenceContext
EntityManager entityManager;
@Test
void givenPostgresDialect_whenGetUserEntityFieldsTypes_thenExpectedTypeShouldBePresent() {
    MappingMetamodelImpl mapping = (MappingMetamodelImpl) entityManager.getMetamodel();
    EntityMappingType entityMappingType = mapping
      .getEntityDescriptor(User.class.getName())
      .getEntityMappingType();
    entityMappingType.getAttributeMappings()
      .forEach(attributeMapping -> {
          if (attributeMapping.getAttributeName().equals("tags")) {
              JdbcType jdbcType = attributeMapping.getSingleJdbcMapping().getJdbcType();
              assertEquals(ARRAY_TYPE_CODE, jdbcType.getJdbcTypeCode());
          }
      });
}

We’ve got the JDBC mapping and checked that the tags field has an array JDBC type code. Besides that, if we check the logs we’ll see that for this column the varchar array was chosen as an SQL type:

Hibernate: 
    create table users (
        id bigint not null,
        tags varchar(255) array,
        primary key (id)
    )

2.2. Oracle Dialect

In OracleDialect, we don’t have a supportsStandardArrays() method overridden. Despite this, inside the getPreferredSqlTypeCodeForArray() we have unconditional support for the array type for collections.

Let’s configure our database to test Oracle behavior:

spring:
  datasource:
    url: jdbc:h2:mem:mydb;MODE=Oracle
    username: sa
    password: password
    driverClassName: org.h2.Driver
  jpa:
    database-platform: org.hibernate.dialect.OracleDialect
    show-sql: true

We switched our database to the Oracle mode and specified the OracleDialect. Now, let’s run the type checking for our User entity:

@Test
void givenOracleDialect_whenGetUserEntityFieldsTypes_thenExpectedTypeShouldBePresent() {
    MappingMetamodelImpl mapping = (MappingMetamodelImpl) entityManager.getMetamodel();
    EntityMappingType entityMappingType = mapping
      .getEntityDescriptor(User.class.getName())
      .getEntityMappingType();
    entityMappingType.getAttributeMappings()
      .forEach(attributeMapping -> {
          if (attributeMapping.getAttributeName().equals("tags")) {
              JdbcType jdbcType = attributeMapping.getSingleJdbcMapping().getJdbcType();
              assertEquals(ARRAY_TYPE_CODE, jdbcType.getJdbcTypeCode());
          }
      });
}

As expected, we have an array JDBC type code in the tags field. Let’s take a look at what is shown in the logs:

Hibernate: 
    create table users (
        id number(19,0) not null,
        tags StringArray,
        primary key (id)
    )

As we can see, the StringArray SQL type is used for the tags column.

2.3. Custom Dialect

By default, there are no dialects for mapping collections as JSON or XML. Let’s create a custom dialect that uses JSON as a default type for collections typed fields:

public class CustomDialect extends Dialect {
    @Override
    public int getPreferredSqlTypeCodeForArray() {
        return supportsStandardArrays() ? ARRAY : JSON;
    }
    @Override
    protected void registerColumnTypes(TypeContributions typeContributions, ServiceRegistry serviceRegistry) {
        super.registerColumnTypes( typeContributions, serviceRegistry );
        final DdlTypeRegistry ddlTypeRegistry = 
        typeContributions.getTypeConfiguration().getDdlTypeRegistry();
        ddlTypeRegistry.addDescriptor( new DdlTypeImpl( JSON, "jsonb", this ) );
    }
}

We’ve registered support for the JSON type and added it as a default type for collections mapping. Now let’s configure our database:

spring:
  datasource:
    url: jdbc:h2:mem:mydb;MODE=PostgreSQL
    username: sa
    password: password
    driverClassName: org.h2.Driver
  jpa:
    database-platform: com.baeldung.arrayscollections.dialects.CustomDialect

We’ve switched our database to the PostgreSQL mode since it supports a jsonb type. Also, we started using our CustomDialect class.

Now we’ll check the type mapping again:

static int JSON_TYPE_CODE = 3001;
@Test
void givenCustomDialect_whenGetUserEntityFieldsTypes_thenExpectedTypeShouldBePresent() {
    MappingMetamodelImpl mapping = (MappingMetamodelImpl) entityManager.getMetamodel();
    EntityMappingType entityMappingType = mapping
      .getEntityDescriptor(User.class.getName())
      .getEntityMappingType();
    entityMappingType.getAttributeMappings()
      .forEach(attributeMapping -> {
          if (attributeMapping.getAttributeName().equals("tags")) {
              JdbcType jdbcType = attributeMapping.getSingleJdbcMapping().getJdbcType();
              assertEquals(JSON_TYPE_CODE, jdbcType.getJdbcTypeCode());
          }
      });
}

We can see the tags field was mapped as a JSON type.  Let’s check the logs:

Hibernate: 
    create table users (
        id bigint not null,
        tags jsonb,
        primary key (id)
    )

As expected, the jsonb column type was used for tags.

3. Migration From Hibernate 5.x to Hibernate 6.x

Different default types are used for collection mappings in Hibernate 5.x and Hibernate 6.x. To migrate to native array or JSON/XML types, we have to read our existing data through the Java serialization mechanism. Then, we need to write it back through the respective JDBC method for the type.

To demonstrate it, let’s create the entity that is expected to be migrated:

@Entity
@Table(name = "migrating_users")
public class MigratingUser {
    @Id
    @GeneratedValue(strategy = GenerationType.SEQUENCE)
    private Long id;
    @JdbcTypeCode(SqlTypes.VARBINARY)
    private List<String> tags;
    private List<String> newTags;
   // getters, setters
}

We created a newTags field, which is mapped as an array type by default, and explicitly used SqlTypes.VARBINARY for the existing tags field, as it’s the default mapping type in Hibernate version 5.x.

Now, let’s create a repository for our entity:

public interface MigratingUserRepository extends JpaRepository<MigratingUser, Long> {
}

Finally, let’s execute the migration logic:

@Autowired
MigratingUserRepository migratingUserRepository;
@Test
void givenMigratingUserRepository_whenMigrateTheUsers_thenAllTheUsersShouldBeSavedInDatabase() {
    prepareData();
    migratingUserRepository
      .findAll()
      .stream()
      .peek(u -> u.setNewTags(u.getTags()))
      .forEach(u -> migratingUserRepository.save(u));
}

We’ve read all the items from the database, copied their values to the new field, and saved them back into the database.  To control the memory consumption we can consider pagination during the reading process. To improve the persistence speed we can use the batching mechanism. After the migration, we can remove the old column from the table.

4. Conclusion

In this tutorial, we reviewed the new collections mapping in Hibernate 6.x. We explored how to use internal array types and JSON fields to store serialized collections. Additionally, we implemented a migration mechanism to the new database schema. With the new mapping, we no longer need to implement it ourselves to support a more efficient data type for our collections.

As always, the code is available over on GitHub.
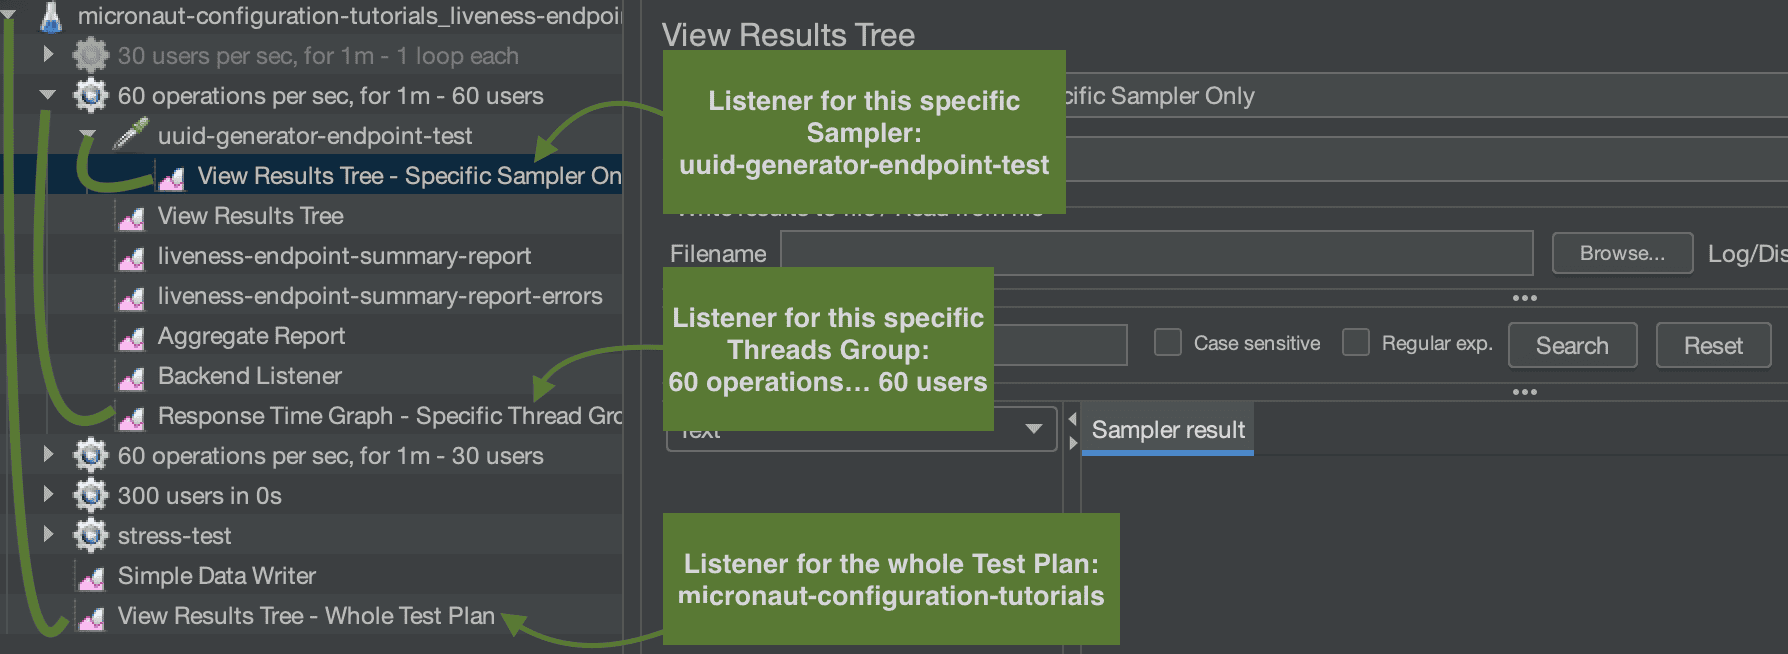
       
Viewing all 4561 articles
Browse latest View live


<script src="https://jsc.adskeeper.com/r/s/rssing.com.1596347.js" async> </script>