Quantcast
Channel: Baeldung
Viewing all 4848 articles
Browse latest View live

A Quick Guide to Spring Cloud Consul

$
0
0

1. Overview

The Spring Cloud Consul project provides easy integration with Consul for Spring Boot applications.

Consul is a tool that provides components for resolving some of the most common challenges in a micro-services architecture:

  • Service Discovery – to automatically register and unregister the network locations of service instances
  • Health Checking – to detect when a service instance is up and running
  • Distributed Configuration – to ensure all service instances use the same configuration

In this article, we’ll see how we can configure a Spring Boot application to use these features.

2. Prerequisites

To start with, it’s recommended to take a quick look at Consul and all its features.

In this article, we’re going to use a Consul agent running on localhost:8500. For more details about how to install Consul and run an agent, refer to this link.

First, we’ll need to add the spring-cloud-starter-consul-all dependency to our pom.xml:

<dependency>
    <groupId>org.springframework.cloud</groupId>
    <artifactId>spring-cloud-starter-consul-all</artifactId>
    <version>1.3.0.RELEASE</version>
</dependency>

3. Service Discovery

Let’s write our first Spring Boot application and wire up with the running Consul agent:

@SpringBootApplication
public class ServiceDiscoveryApplication {

    public static void main(String[] args) {
        new SpringApplicationBuilder(ServiceDiscoveryApplication.class)
          .web(true).run(args);
    }
}

By default, Spring Boot will try to connect to the Consul agent at localhost:8500. To use other settings, we need to update the application.yml file:

spring:
  cloud:
    consul:
      host: localhost
      port: 8500

Then, if we visit the Consul agent’s site in the browser at http://localhost:8500, we’ll see that our application was properly registered in Consul with the identifier from “${spring.application.name}:${profiles separated by comma}:${server.port}”.

To customize this identifier, we need to update the property spring.cloud.discovery.instanceId with another expression:

spring:
  application:
    name: myApp
  cloud:
    consul:
      discovery:
        instanceId: ${spring.application.name}:${random.value}

If we run the application again, we’ll see that it was registered using the identifier “MyApp” plus a random value. We need this for running multiple instances of our application on our local machine.

Finally, to disable Service Discovery, we need to set the property spring.cloud.consul.discovery.enabled to false.

3.1. Looking Up Services

We already have our application registered in Consul, but how can clients find the service endpoints? We need a discovery client service to get a running and available service from Consul.

Spring provides a DiscoveryClient API for this, which we can enable with the @EnableDiscoveryClient annotation:

@SpringBootApplication
@EnableDiscoveryClient
public class DiscoveryClientApplication {
    // ...
}

Then, we can inject the DiscoveryClient bean into our controller and access the instances:

@RestController
public class DiscoveryClientController {
 
    @Autowired
    private DiscoveryClient discoveryClient;

    public Optional<URI> serviceUrl() {
        return discoveryClient.getInstances("myApp")
          .stream()
          .map(si -> si.getUri());
          .findFirst()
    }
}

Finally, we’ll define our application endpoints:

@GetMapping("/discoveryClient")
public String discoveryPing() throws RestClientException, 
  ServiceUnavailableException {
    URI service = serviceUrl()
      .map(s -> s.resolve("/ping"))
      .orElseThrow(ServiceUnavailableException::new);
    return restTemplate.getForEntity(service, String.class)
      .getBody();
}

@GetMapping("/ping")
public String ping() {
    return "pong";
}

The “myApp/ping” path is the Spring application name with the service endpoint. Consul will provide all available applications named “myApp”.

4. Health Checking

Consul checks the health of the service endpoints periodically.

By default, Spring implements the health endpoint to return 200 OK if the app is up. If we want to customize the endpoint we have to update the application.yml:

spring:
  cloud:
    consul:
      discovery:
        healthCheckPath: /my-health-check
        healthCheckInterval: 20s

As a result, Consul will poll the “/my-health-check” endpoint every 20 seconds.

Let’s define our custom health check service to return a FORBIDDEN status:

@GetMapping("/my-health-check")
public ResponseEntity<String> myCustomCheck() {
    String message = "Testing my healh check function";
    return new ResponseEntity<>(message, HttpStatus.FORBIDDEN);
}

If we go to the Consul agent site, we’ll see that our application is failing. To fix this, the “/my-health-check” service should return the HTTP 200 OK status code.

5. Distributed Configuration

This feature allows synchronizing the configuration among all the services. Consul will watch for any configuration changes and then trigger the update of all the services.

First, we need to add the spring-cloud-starter-consul-config dependency to our pom.xml:

<dependency>
    <groupId>org.springframework.cloud</groupId>
    <artifactId>spring-cloud-starter-consul-config</artifactId>
    <version>1.3.0.RELEASE</version>
</dependency>

We also need to move the settings of Consul and Spring application name from the application.yml file to the bootstrap.yml file which Spring loads first.

Then, we need to enable Spring Cloud Consul Config:

spring:
  application:
    name: myApp
  cloud:
    consul:
      host: localhost
      port: 8500
      config:
        enabled: true

Spring Cloud Consul Config will look for the properties in Consul at “/config/myApp”. So if we have a property called “my.prop”, we would need to create this property in the Consul agent site.

We can create the property by going to the “KEY/VALUE” section, then entering “/config/myApp/my/prop” in the “Create Key” form and “Hello World” as value. Finally, click the “Create” button.

Bear in mind that if we are using Spring profiles, we need to append the profiles next to the Spring application name. For example, if we are using the dev profile, the final path in Consul will be “/config/myApp,dev”.

Now, let’s see what our controller with the injected properties looks like:

@RestController
public class DistributedPropertiesController {

    @Value("${my.prop}")
    String value;

    @Autowired
    private MyProperties properties;

    @GetMapping("/getConfigFromValue")
    public String getConfigFromValue() {
        return value;
    }

    @GetMapping("/getConfigFromProperty")
    public String getConfigFromProperty() {
        return properties.getProp();
    }
}

And the MyProperties class:

@RefreshScope
@Configuration
@ConfigurationProperties("my")
public class MyProperties {
    private String prop;

    // standard getter, setter
}

If we run the application, the field value and properties have the same “Hello World” value from Consul.

5.1. Updating the Configuration

What about updating the configuration without restarting the Spring Boot application?

If we go back to the Consul agent site and we update the property “/config/myApp/my/prop” with another value like “New Hello World”, then the field value will not change and the field properties will have been updated to “New Hello World” as expected.

This is because the field properties is a MyProperties class has the @RefreshScope annotation. All beans annotated with the @RefreshScope annotation will be refreshed after configuration changes.

In real life, we should not have the properties directly in Consul, but we should store them persistently somewhere. We can do this using a Config Server.

6. Conclusion

In this article, we’ve seen how to set up our Spring Boot applications to work with Consul for Service Discovery purposes, customize the health checking rules and share a distributed configuration.

We’ve also introduced a number of approaches for the clients to invoke these registered services.

As usual, sources can be found over on GitHub.


Introduction to Spring Security ACL

$
0
0

1. Introduction

Access Control List (ACL) is a list of permissions attached to an object. An ACL specifies which identities are granted which operations on a given object.

Spring Security Access Control List is Spring component which supports Domain Object Security. Simply put, Spring ACL helps in defining permissions for specific user/role on a single domain object – instead of across the board, at the typical per-operation level.

For example, a user with the role Admin can see (READ) and edit (WRITE) all messages on a Central Notice Box, but the normal user only can see messages, relate to them and cannot edit. Meanwhile, others user with the role Editor can see and edit some specific messages.

Hence, different user/role has different permission for each specific object. In this case, Spring ACL is capable of achieving the task. We’ll explore how to set up basic permission checking with Spring ACL in this article.

2. Configuration

2.1. ACL Database

To use Spring Security ACL, we need to create four mandatory tables in our database.

The first table is ACL_CLASS, which store class name of the domain object, columns include:

  • ID
  • CLASS: the class name of secured domain objects, for example: org.baeldung.acl.persistence.entity.NoticeMessage

Secondly, we need the ACL_SID table which allows us to universally identify any principle or authority in the system. The table needs:

  • ID
  • SID: which is the username or role name. SID stands for Security Identity
  • PRINCIPAL: 0 or 1, to indicate that the corresponding SID is a principal (user, such as mary, mike, jack…) or an authority (role, such as ROLE_ADMIN, ROLE_USER, ROLE_EDITOR…)

Next table is ACL_OBJECT_IDENTITY, which stores information for each unique domain object:

  • ID
  • OBJECT_ID_CLASS: define the domain object class, links to ACL_CLASS table
  • OBJECT_ID_IDENTITY: domain objects can be stored in many tables depending on the class. Hence, this field store the target object primary key
  • PARENT_OBJECT: specify parent of this Object Identity within this table
  • OWNER_SID: ID of the object owner, links to ACL_SID table
  • ENTRIES_INHERITTING: whether ACL Entries of this object inherits from the parent object (ACL Entries are defined in ACL_ENTRY table)

Finally, the ACL_ENTRY store individual permission assigns to each SID on an Object Identity:

  • ID
  • ACL_OBJECT_IDENTITY: specify the object identity, links to ACL_OBJECT_IDENTITY table
  • ACL_ORDER: the order of current entry in the ACL entries list of corresponding Object Identity
  • SID: the target SID which the permission is granted to or denied from, links to ACL_SID table
  • MASK: the integer bit mask that represents the actual permission being granted or denied
  • GRANTING: value 1 means granting, value 0 means denying
  • AUDIT_SUCCESS and AUDIT_FAILURE: for auditing purpose

2.2. Dependency

To be able to use Spring ACL in our project, let’s first define our dependencies:

<dependency>
    <groupId>org.springframework.security</groupId>
    <artifactId>spring-security-acl</artifactId>
</dependency>
<dependency>
    <groupId>org.springframework.security</groupId>
    <artifactId>spring-security-config</artifactId>
</dependency>
<dependency>
    <groupId>org.springframework</groupId>
    <artifactId>spring-context-support</artifactId>
</dependency>
<dependency>
    <groupId>net.sf.ehcache</groupId>
    <artifactId>ehcache-core</artifactId>
    <version>2.6.11</version>
</dependency>

Spring ACL requires a cache to store Object Identity and ACL entries, so we’ll make use of Ehcache here. And, to support Ehcache in Spring, we also need the spring-context-support.

When not working with Spring Boot, we need to add versions explicitly. Those can be checked on Maven Central: spring-security-acl, spring-security-config, spring-context-support, ehcache-core.

2.3. ACL-Related Configuration

We need to secure all methods which return secured domain objects, or make changes to the object, by enabling Global Method Security:

@Configuration
@EnableGlobalMethodSecurity(prePostEnabled = true, securedEnabled = true)
public class AclMethodSecurityConfiguration 
  extends GlobalMethodSecurityConfiguration {

    @Autowired
    MethodSecurityExpressionHandler 
      defaultMethodSecurityExpressionHandler;

    @Override
    protected MethodSecurityExpressionHandler createExpressionHandler() {
        return defaultMethodSecurityExpressionHandler;
    }
}

Let’s also enable Expression-Based Access Control by setting prePostEnabled to true to use Spring Expression Language (SpEL). Moreover, we need an expression handler with ACL support:

@Bean
public MethodSecurityExpressionHandler 
  defaultMethodSecurityExpressionHandler() {
    DefaultMethodSecurityExpressionHandler expressionHandler
      = new DefaultMethodSecurityExpressionHandler();
    AclPermissionEvaluator permissionEvaluator 
      = new AclPermissionEvaluator(aclService());
    expressionHandler.setPermissionEvaluator(permissionEvaluator);
    return expressionHandler;
}

Hencewe assign AclPermissionEvaluator to the DefaultMethodSecurityExpressionHandler. The evaluator needs a MutableAclService to load permission settings and domain object’s definitions from the database.

For simplicity, we use the provided JdbcMutableAclService:

@Bean 
public JdbcMutableAclService aclService() { 
    return new JdbcMutableAclService(
      dataSource, lookupStrategy(), aclCache()); 
}

As its name, the JdbcMutableAclService uses JDBCTemplate to simplify database access. It needs a DataSource (for JDBCTemplate), LookupStrategy (provides an optimized lookup when querying the database), and an AclCache (caching ACL Entries and Object Identity).

Again, for simplicity, we use provided BasicLookupStrategy and EhCacheBasedAclCache.

@Autowired
DataSource dataSource;

@Bean
public AclAuthorizationStrategy aclAuthorizationStrategy() {
    return new AclAuthorizationStrategyImpl(
      new SimpleGrantedAuthority("ROLE_ADMIN"));
}

@Bean
public PermissionGrantingStrategy permissionGrantingStrategy() {
    return new DefaultPermissionGrantingStrategy(
      new ConsoleAuditLogger());
}

@Bean
public EhCacheBasedAclCache aclCache() {
    return new EhCacheBasedAclCache(
      aclEhCacheFactoryBean().getObject(), 
      permissionGrantingStrategy(), 
      aclAuthorizationStrategy()
    );
}

@Bean
public EhCacheFactoryBean aclEhCacheFactoryBean() {
    EhCacheFactoryBean ehCacheFactoryBean = new EhCacheFactoryBean();
    ehCacheFactoryBean.setCacheManager(aclCacheManager().getObject());
    ehCacheFactoryBean.setCacheName("aclCache");
    return ehCacheFactoryBean;
}

@Bean
public EhCacheManagerFactoryBean aclCacheManager() {
    return new EhCacheManagerFactoryBean();
}

@Bean 
public LookupStrategy lookupStrategy() { 
    return new BasicLookupStrategy(
      dataSource, 
      aclCache(), 
      aclAuthorizationStrategy(), 
      new ConsoleAuditLogger()
    ); 
}

Here, the AclAuthorizationStrategy is in charge of concluding whether a current user possesses all required permissions on certain objects or not.

It needs the support of PermissionGrantingStrategy, which defines the logic for determining whether a permission is granted to a particular SID.

3. Method Security With Spring ACL

So far, we’ve done all necessary configurationNow we can put required checking rule on our secured methods.

By default, Spring ACL refers to BasePermission class for all available permissions. Basically, we have a READ, WRITE, CREATE, DELETE and ADMINISTRATION permission.

Let’s try to define some security rules:

@PostFilter("hasPermission(filterObject, 'READ')")
List<NoticeMessage> findAll();
    
@PostAuthorize("hasPermission(returnObject, 'READ')")
NoticeMessage findById(Integer id);
    
@PreAuthorize("hasPermission(#noticeMessage, 'WRITE')")
NoticeMessage save(@Param("noticeMessage")NoticeMessage noticeMessage);

After the execution of findAll() method, @PostFilter will be triggered. The required rule hasPermission(filterObject, ‘READ’), means returning only those NoticeMessage which current user has READ permission on.

Similarly, @PostAuthorize is triggered after the execution of findById() method, make sure only return the NoticeMessage object if the current user has READ permission on it. If not, the system will throw an AccessDeniedException.

On the other side, the system triggers the @PreAuthorize annotation before invoking the save() method. It will decide where the corresponding method is allowed to execute or not. If not, AccessDeniedException will be thrown.

4. In Action

Now we gonna test all those configurations using JUnit. We’ll use H2 database to keep configuration as simple as possible.

We’ll need to add:

<dependency>
  <groupId>com.h2database</groupId>
  <artifactId>h2</artifactId>
</dependency>

<dependency>
  <groupId>org.springframework</groupId>
  <artifactId>spring-test</artifactId>
  <scope>test</scope>
</dependency>

<dependency>
  <groupId>org.springframework.security</groupId>
  <artifactId>spring-security-test</artifactId>
  <scope>test</scope>
</dependency>

4.1. The Scenario

In this scenario, we’ll have two users (manager, hr) and a one user role (ROLE_EDITOR), so our acl_sid will be:

INSERT INTO acl_sid (id, principal, sid) VALUES
  (1, 1, 'manager'),
  (2, 1, 'hr'),
  (3, 0, 'ROLE_EDITOR');

Then, we need to declare NoticeMessage class in acl_class. And three instances of NoticeMessage class will be inserted in system_message. 

Moreover, corresponding records for those 3 instances must be declared in acl_object_identity:

INSERT INTO acl_class (id, class) VALUES
  (1, 'org.baeldung.acl.persistence.entity.NoticeMessage');

INSERT INTO system_message(id,content) VALUES 
  (1,'First Level Message'),
  (2,'Second Level Message'),
  (3,'Third Level Message');

INSERT INTO acl_object_identity 
  (id, object_id_class, object_id_identity, 
  parent_object, owner_sid, entries_inheriting) 
  VALUES
  (1, 1, 1, NULL, 3, 0),
  (2, 1, 2, NULL, 3, 0),
  (3, 1, 3, NULL, 3, 0);

Initially, we grant READ and WRITE permissions on the first object (id =1) to the user manager. Meanwhile, any user with ROLE_EDITOR will have READ permission on all three objects but only possess WRITE permission on the third object (id=3). Besides, user hr will have only READ permission on the second object.

Here, because we use default Spring ACL BasePermission class for permission checking, the mask value of the READ permission will be 1, and the mask value of WRITE permission will be 2. Our data in acl_entry will be:

INSERT INTO acl_entry 
  (id, acl_object_identity, ace_order, 
  sid, mask, granting, audit_success, audit_failure) 
  VALUES
  (1, 1, 1, 1, 1, 1, 1, 1),
  (2, 1, 2, 1, 2, 1, 1, 1),
  (3, 1, 3, 3, 1, 1, 1, 1),
  (4, 2, 1, 2, 1, 1, 1, 1),
  (5, 2, 2, 3, 1, 1, 1, 1),
  (6, 3, 1, 3, 1, 1, 1, 1),
  (7, 3, 2, 3, 2, 1, 1, 1);

4.2. Test Case

First of all, we try to call the findAll method.

As our configuration, the method returns only those NoticeMessage on which the user has READ permission.

Hence, we expect the result list contains only the first message:

@Test
@WithMockUser(username = "manager")
public void 
  givenUserManager_whenFindAllMessage_thenReturnFirstMessage(){
    List<NoticeMessage> details = repo.findAll();
 
    assertNotNull(details);
    assertEquals(1,details.size());
    assertEquals(FIRST_MESSAGE_ID,details.get(0).getId());
}

Then we try to call the same method with any user which has the role – ROLE_EDITOR. Note that, in this case, these users have the READ permission on all three objects.

Hence, we expect the result list will contain all three messages:

@Test
@WithMockUser(roles = {"EDITOR"})
public void 
  givenRoleEditor_whenFindAllMessage_thenReturn3Message(){
    List<NoticeMessage> details = repo.findAll();
    
    assertNotNull(details);
    assertEquals(3,details.size());
}

Next, using the manager user, we’ll try to get the first message by id and update its content – which should all work fine:

@Test
@WithMockUser(username = "manager")
public void 
  givenUserManager_whenFind1stMessageByIdAndUpdateItsContent_thenOK(){
    NoticeMessage firstMessage = repo.findById(FIRST_MESSAGE_ID);
    assertNotNull(firstMessage);
    assertEquals(FIRST_MESSAGE_ID,firstMessage.getId());
        
    firstMessage.setContent(EDITTED_CONTENT);
    repo.save(firstMessage);
        
    NoticeMessage editedFirstMessage = repo.findById(FIRST_MESSAGE_ID);
 
    assertNotNull(editedFirstMessage);
    assertEquals(FIRST_MESSAGE_ID,editedFirstMessage.getId());
    assertEquals(EDITTED_CONTENT,editedFirstMessage.getContent());
}

But if any user with the ROLE_EDITOR role updates the content of the first message – our system will throw an AccessDeniedException:

@Test(expected = AccessDeniedException.class)
@WithMockUser(roles = {"EDITOR"})
public void 
  givenRoleEditor_whenFind1stMessageByIdAndUpdateContent_thenFail(){
    NoticeMessage firstMessage = repo.findById(FIRST_MESSAGE_ID);
 
    assertNotNull(firstMessage);
    assertEquals(FIRST_MESSAGE_ID,firstMessage.getId());
 
    firstMessage.setContent(EDITTED_CONTENT);
    repo.save(firstMessage);
}

Similarly, the hr user can find the second message by id, but will fail to update it:

@Test
@WithMockUser(username = "hr")
public void givenUsernameHr_whenFindMessageById2_thenOK(){
    NoticeMessage secondMessage = repo.findById(SECOND_MESSAGE_ID);
    assertNotNull(secondMessage);
    assertEquals(SECOND_MESSAGE_ID,secondMessage.getId());
}

@Test(expected = AccessDeniedException.class)
@WithMockUser(username = "hr")
public void givenUsernameHr_whenUpdateMessageWithId2_thenFail(){
    NoticeMessage secondMessage = new NoticeMessage();
    secondMessage.setId(SECOND_MESSAGE_ID);
    secondMessage.setContent(EDITTED_CONTENT);
    repo.save(secondMessage);
}

5. Conclusion

We’ve gone through basic configuration and usage of Spring ACL in this article.

As we know, Spring ACL required specific tables for managing object, principle/authority, and permission setting. All interactions with those tables, especially updating action, must go through AclService. We’ll explore this service for basic CRUD actions in a future article.

By default, we are restricted to predefined permission in BasePermission class.

Finally, the implementation of this tutorial can be found over on Github.

Java Weekly, Issue 206

$
0
0

Here we go…

1. Spring and Java

>> Make your life easier with Kotlin stdlib [blog.frankel.ch]

Kotlin has some small germs in its standard library.

>> Collections.checkedCollection() [javaspecialists.eu]

checkedCollection() is an old and forgotten API, which still has some valid use-cases.

>> Servlet vs. Reactive: Choosing the Right Stack – Rossen Stoyanchev Presents at QCon SF 2017 [infoq.com]

If you’re not sure which stack to go with, this is a good place to start.

>> Calling JDK Tools Programmatically on Java 9 [in.relation.to]

The ToolProvider SPI provides a solid, uniform way of invoking all tools coming with the JDK.

Also worth reading:

Webinars and presentations:

Time to upgrade:

2. Technical

>> PMD Check and Report in the same build [blog.code-cop.org]

Having static analysis as a part of your Jenkins build is definitely a good idea.

Also worth reading:

3. Musings

>> Conference Speaking Isn’t Good for Your Career Until You Make it Good [daedtech.com]

The real costs and benefits of speaking at conferences – dissected 🙂

Also worth reading:

4. Comics

And my favorite Dilberts of the week:

>> Fake Email From The CEO [dilbert.com]

>> Forecast Are Guessing Plus Math [dilbert.com]

>> Traffic App [dilbert.com]

5. Pick of the Week

>> Move Slowly and Fix Things [m.signalvnoise.com]

Getting Started With Mule ESB

$
0
0

1. Overview

Mule ESB is a lightweight Java-based Enterprise Service Bus. It allows developers to connect multiple applications together by exchanging data in different formats. It carries data in a form of a message.

ESB offers powerful capabilities through providing a number of services, such as:

  • Service creation and hosting
  • Service mediation
  • Message routing
  • Data transformation

We’ll find ESB useful if we need to integrate multiple applications together, or if we have the notion of adding more application in future.

ESB is also used for dealing with more than one type of communication protocols, and when message routing capabilities are required.

Let’s create a sample project in Section 5 using AnyPoint Studio which is available for download here.

2. Mule Message Structure

Simply put, the primary purpose of ESB is to mediate between services and route messages to various endpoints. So it needs to deal with different types of content or payload.

The message structure is divided into two parts:

  • Message header – which contains message metadata
  • Message payload – which contains business-specific data

Message is embedded within a message object. We can retrieve the message object from the context. We can change its properties and payload using custom Java components and transformers inside a Mule flow.

Each application consists of one or more flows. 

In a flow, we can use components to access, filter or alter a message and its different properties.

For example, we can obtain an instance of a message using Java component. This component class implements a Callable interface from org.mule.api.lifecycle package:

public Object onCall(MuleEventContext eventContext) throws Exception {
    MuleMessage message = eventContext.getMessage();
    message.setPayload("Message payload is changed here.");
    return message;
}

3. Properties and Variables

Message metadata consists of properties. Variables represent data about a message. How properties and variables are applied across message’s life-cycle is defined by their scopes. Properties can be of two types, based on their scope: inbound and outbound.

Inbound properties contain metadata that prevents messages to become scrambled while traversing across flows. Inbound properties are immutable and cannot be altered by the user. They’re present only for the duration of the flow – once the message exits the flow, inbound properties are no longer there.

Outbound properties can be set automatically by Mule, or a user can set them through flow configuration. These properties are mutable.  They become inbound properties when a message enters another flow after crossing transport-barriers.

We can set and get outbound and inbound properties respectively by calling associated setter and getter methods in their respective scopes:

message.setProperty(
  "outboundKey", "outboundpropertyvalue", PropertyScope.OUTBOUND);
String inboundProp = (String) message.getInboundProperty("outboundKey");

There are two types of variables available to declare in applications.

One is flow variable which is local to a Mule flow and available across the flow, sub-flows and private flows.

Session variables once declared become available across the entire the application.

4. Transport Barriers and flow-ref

Transport barriers are HTTP-connectors, VMs, JMS or similar connectors that require paths or endpoints for messages to be routed. Flow variables aren’t available across transport barriers, but session variables are available across the project in all flows.

When we need to create sub-flow or private flow, we can refer to the flow from a parent or another flow using flow-ref component. Both flow variables and session variables are available in sub-flows and private flows referred using flow-ref.

5. Example Project

Let’s create an application in Anypoint Studio that contains multiple flows, which communicate between themselves through inbound and outbound connectors.

Let’s look at the first flow:


We can configure an HTTP listener as:

<http:listener-config name="HTTP_Listener_Configuration"
  host="localhost" port="8081" doc:name="HTTP Listener Configuration"/>

Flow components must be inside a <flow> tag. So, an example flow with multiple components is:

<flow name="Flow">
    <http:listener 
      config-ref="HTTP_Listener_Configuration" 
      path="/" doc:name="HTTP" 
      allowedMethods="POST"/>
    <logger message="Original 
      paylaod: #[payload]" 
      level="INFO" doc:name="Logger"/>
    <custom-transformer 
      class="com.baeldung.transformer.InitializationTransformer" 
      doc:name="Java"/>
    <logger message="Payload After Initialization: #[payload]" 
      level="INFO" doc:name="Logger"/>
    <set-variable variableName="f1" 
      value="#['Flow Variable 1']" doc:name="F1"/>
    <set-session-variable variableName="s1" 
      value="#['Session variable 1']" doc:name="S1"/>
    <vm:outbound-endpoint exchange-pattern="request-response" 
      path="test" doc:name="VM"/>
</flow>

Inside the flow, we’re providing a reference to a configured HTTP listener. Then we’re keeping a logger to log the payload that HTTP listener is receiving through POST method.

After that, a custom Java transformer class is placed, that transforms the payload after receiving the message:

public Object transformMessage(
  MuleMessage message, 
  String outputEncoding) throws TransformerException {
 
    message.setPayload("Payload is transferred here.");
    message.setProperty(
      "outboundKey", "outboundpropertyvalue", PropertyScope.OUTBOUND);
    return message;
}

The transformer class must extend AbstractMessageTransformerWe’re also setting an outbound property inside the class.

Now, we have already converted payload inside the message object, and have logged that in the console using logger. We’re setting a flow variable and a session variable.

Finally, we are sending our payload through outbound VM connector. The path in VM connector determines the receiving endpoint:

The message carried and transformed by initial flow reaches Flow1 through an inbound VM endpoints.

Java component retrieves outbound properties set by the first flow and returns the object which becomes the message payload. The transformMessage() method for this task:

public Object transformMessage(
  MuleMessage message, 
  String outputEncoding) throws TransformerException {

    return (String) message.getInboundProperty("outboundKey");
}

Then, flow and session variables are set to the second flow. After that, we’ve got a reference to Flow2 using flow-ref component.

In Flow2, we’ve transformed the message using Java component class and logged it in the console. We’ve also set a flow variable F3.

After calling Flow2 using flow-ref, Flow1 will wait for the message to be processed in Flow2

Any flow variable set in Flow1 and Flow2 will be available in both flows since these flows aren’t separated by any transport barriers.

Finally, the message is sent back to the HTTP requester through VMs. We configured all VMs as request-response.

We can invoke this application from any REST client by posting any JSON data in the body. The URL will be localhost:8081 as configured in HTTP listener.

6. Building Projects Using Maven in Command Line

In settings.xml file located in Maven’s conf directory, we need to include pluginGroup:

<pluginGroups>
    <pluginGroup>org.mule.tools</pluginGroup>
</pluginGroups>

We also need to tell Maven where to find Mule repositories and this needs to be included in profile tag:

<profile>
    <id>Mule Org</id>
    <activation>
        <activeByDefault>true</activeByDefault>
    </activation>
    <repositories>
        <repository>
            <id>mulesoft-releases</id>
            <name>MuleSoft Repository</name>
            <url>https://repository-master.mulesoft.org/releases/</url>
            <layout>default</layout>
        </repository>
        <repository>
            <id>mulesoft-snapshots</id>
            <name>MuleSoft Snapshot Repository</name>
            <url>https://repository-master.mulesoft.org/snapshots/</url>
            <layout>default</layout>
        </repository>
    </repositories>
</profile>

Now, we can easily initiate a Maven project using the command:

mvn mule-project-archetype:create -DartifactId=muleesb -DmuleVersion=3.8.1

After configuring our project, we can create a deployable archive using mvn package command. We can now deploy the archive in the apps folder of any standalone Mule server.

7. Conclusion

In this article, we’ve gone through different necessary concepts of building as ESB application in Mule. We’ve created a sample project illustrating all described concepts.

We can now start creating ESB application using Anypoint Studio to meet our various needs.

As usual, the complete project can be found over on GitHub.

Extension Methods in Kotlin

$
0
0

1. Introduction

Kotlin introduces the concept of Extension Methods – which are a handy way of extending existing classes with a new functionality without using inheritance or any forms of the Decorator pattern – after defining an extension. we can essentially use it – as it was the part of the original API.

This can be very useful in making our code easy to read and maintain, as we’re able to add methods that are specific to our needs and have them appear to be part of the original code, even when we don’t have access to the sources.

For example, we might need to perform XML escaping on a String. In standard Java code, we’d need to write a method that can perform this and call it:

String escaped = escapeStringForXml(input);

Whereas written in Kotlin, the snippet could be replaced with:

val escaped = input.escapeForXml()

Not only is this easier to read, but IDEs will be able to offer the method as an autocomplete option the same as if it was a standard method on the String class.

2. Standard Library Extension Methods

The Kotlin Standard Library comes with some extension methods out-of-the-box.

2.1. Context Adjusting Extension Methods

Some generic extensions exist and can be applied to all types in our application. These could be used to ensure that code is run in an appropriate context, and in some cases to ensure that a variable isn’t null.

It turns out that, most likely, we’re leveraging extensions without realizing this.

One of the most popular ones is possibly the let() method, which can be called on any type in Kotlin – let’s pass a function to it that will be executed on the initial value:

val name = "Baeldung"
val uppercase = name
  .let { n -> n.toUpperCase() }

It’s similar to the map() method from Optional or Stream classes – in this case, we pass a function representing an action that converts a given String into its upper-cased representation.

The variable name is known as the receiver of the call because it’s the variable that the extension method is acting upon.

This works great with the safe-call operator:

val name = maybeGetName()
val uppercase = name?.let { n -> n.toUpperCase() }

In this case, the block passed to let() is only evaluated if the variable name was non-null. This means that inside the block, the value n is guaranteed to be non-null. More on this here.

There are other alternatives to let() that can be useful as well though, depending on our needs.

The run() extension works the same as let(), but a receiver is provided as the this value inside the called block:

val name = "Baeldung"
val uppercase = name.run { toUpperCase() }

apply() works the same as run(), but it returns a receiver instead of returning the value from the provided block.

Let’s take advantage of apply() to chain related calls:

val languages = mutableListOf<String>()
languages.apply { 
    add("Java")
    add("Kotlin")
    add("Groovy")
    add("Python")
}.apply {
    remove("Python")
}

Notice how our code becomes more concise and expressive not having to explicitly use this or it.

The also() extension works just like let(), but it returns the receiver in the same way that apply() does:

val languages = mutableListOf<String>()
languages.also { list -> 
    list.add("Java")
    list.add("Kotlin") 
    list.add("Groovy") 
}

The takeIf() extension is provided with a predicate acting on the receiver, and if this predicate returns true then it returns the receiver or null otherwise – this works similarly to a combination of a common map() and filter() methods:

val language = getLanguageUsed()
val coolLanguage = language.takeIf { l -> l == "Kotlin" }

The takeUnless() extension is the same as takeIf() but with the reversed predicate logic.

val language = getLanguageUsed()
val oldLanguage = language.takeUnless { l -> l == "Kotlin" }

2.2. Extension Methods for Collections

Kotlin adds a large number of extension methods to the standard Java Collections which can make our code easier to work with.

These methods are located inside _Collections.kt, _Ranges.kt, and _Sequences.kt, as well as _Arrays.kt for equivalent methods to apply to Arrays instead. (Remember that, in Kotlin, Arrays can be treated the same as Collections)

There’re far too many of these extension methods to discuss here, so have a browse of these files to see what’s available.

In addition to Collections, Kotlin adds a significant number of extension methods to the String class – defined in _Strings.kt. These allow us to treat Strings as if they were collections of characters.

All of these extension methods work together to allow us to write significantly cleaner, easier to maintain code regardless of the kind of collection we’re working with.

3. Writing our Extension Methods

So, what if we need to extend a class with a new functionality – either from the Java or Kotlin Standard Library or from a dependent library that we’re using?

Extension methods are written as any other method, but the receiver class is provided as part of the function name, separated with the period.

For example:

fun String.escapeForXml() : String {
    ....
}

This will define a new function called escapeForXml as an extension to the String class, allowing us to call it as described above.

Inside this function, we can access the receiver using this, the same as if we had written this inside the String class itself:

fun String.escapeForXml() : String {
  return this
    .replace("&", "&amp;")
    .replace("<", "&lt;")
    .replace(">", "&gt;")
}

3.1. Writing Generic Extension Methods

What if we want to write an extension method that is meant to be applied to multiple types, generically? We could just extend the Any type, – which is the equivalent of the Object class in Java – but there is a better way.

Extension methods can be applied to a generic receiver as well as a concrete one:

fun <T> T.concatAsString(b: T) : String {
    return this.toString() + b.toString()
}

This could be applied to any type that meets the generic requirements, and inside the function this value is typesafe.

For example, using the above example:

5.concatAsString(10) // compiles
"5".concatAsString("10") // compiles
5.concatAsString("10") // doesn't compile

3.2. Writing Infix Extension Methods

Infix methods are useful for writing DSL-style code, as they allow for methods to be called without the period or brackets:

infix fun Number.toPowerOf(exponent: Number): Double {
    return Math.pow(this.toDouble(), exponent.toDouble())
}

We can now call this the same as any other infix method:

3 toPowerOf 2 // 9
9 toPowerOf 0.5 // 3

3.3. Writing Operator Extension Methods

We could also write an operator method as an extension.

Operator methods are ones that allow us to take advantage of the operator shorthand instead of the full method name – e.g., the plus operator method might be called using the + operator:

operator fun List<Int>.times(by: Int): List<Int> {
    return this.map { it * by }
}

Again, this works the same as any other operator method:

listOf(1, 2, 3) * 4 // [4 12]

4. Summary

Extension Methods are useful tools to extend types that already exist in the system – either because they don’t have the functionality we need or simply to make some specific area of code easier to manage.

We’ve seen here some extension methods that are ready to use in the system. Additionally, we explored various possibilities of extension methods. Some examples of this functionality can be found over on GitHub.

Spring Cloud Connectors and Heroku

$
0
0

1. Overview

In this article, we’re going to cover setting up a Spring Boot application on Heroku using Spring Cloud Connectors.

Heroku is a service that provides hosting for web services. Also, they provide a large selection of third-party services, called add-ons, that provide everything from system monitoring to database storage.

In addition to all of this, they have a custom CI/CD pipeline that integrates seamlessly into Git that expedites development into production.

Spring supports Heroku through it’s Spring Cloud Connectors library. We’ll be using this to configure a PostgreSQL data source in our application automatically.

Let’s jump into writing the app.

2. Spring Boot Book Service

First, let’s create a new simple Spring Boot service.

3. Heroku Sign Up

Now, we need to sign up for a Heroku account. Let’s go to heroku.com and click on the sign-up button in the top right corner of the page.

Now that we’ve got an account we need to get the CLI tool. We need to navigate to the heroku-cli installation page and install this software. This will give us the tools we need to complete this tutorial.

4. Create Heroku Application

Now that we have the Heroku CLI let’s go back to our app.

4.1. Initialize Git Repository

Heroku works best when using git as our source control.

Let’s begin by going to the root of our application, the same directory as our pom.xml file, and running the command git init to create a git repository. Then run git add . and git commit -m “first commit”.

Now we’ve got our application saved to our local git repository.

4.2. Provision Heroku Web App

Next, let’s use the Heroku CLI to provision a web server on our account.

First, we need to authenticate our Heroku account. From the command line run heroku login and follow the instructions for logging in and creating an SSH key.

Next, run heroku create. This will provision the web server and add a remote repository that we can push our code to for deployments. We’ll also see a domain printed in the console, copy this domain so that we can access it later.

4.3. Push Code To Heroku

Now we’ll use git to push our code to the new Heroku repository.

Run the command git push heroku master to send our code to Heroku.

In the console output we should see logs indicating the upload was successful then their system will, download any dependencies, build our application, run tests (if present), and deploy the app if everything goes smoothly.

That is it -we now have our application publicly deployed to a web server.

5. Test In-Memory On Heroku

Let’s make sure our app is working. Using the domain from our create step, let’s test our live application.

Let’s issue some HTTP requests:

POST https://{heroku-domain}/books HTTP
{"author":"baeldung","title":"Spring Boot on Heroku"}

We should get back:

{
    "title": "Spring Boot on Heroku",
    "author": "baeldung"
}

Now let’s try to read the object we just created:

GET https://{heroku-domain}/books/1 HTTP

This should return:

{
    "id": 1,
    "title": "Spring Boot on Heroku",
    "author": "baeldung"
}

That all looks good, but in production, we should be using a permanent data store.

Let’s walk through provisioning a PostgreSQL database and configuring our Spring app to use it.

6. Adding PostgreSQL

To add the PostgreSQL database, run this command heroku addons:create heroku-postgresql:hobby-dev

This will provision a database for our web server and add an environment variable that provides the connection information.

Spring Cloud Connector is configured to detect this variable and set up the data source automatically given that Spring can detect that we want to use PostgreSQL.

To let Spring Boot know that we’re using PostgreSQL, we need to make two changes.

First, we need to add a dependency to include the PostgreSQL drivers:

<dependency>
    <groupId>org.postgresql</groupId>
    <artifactId>postgresql</artifactId>
    <version>9.4-1201-jdbc4</version>
</dependency>

Next, let’s add properties so that Spring Data Connectors can configure the database according to its available resources.

In src/main/resources create an application.properties file and add the following properties:

spring.datasource.driverClassName=org.postgresql.Driver
spring.datasource.maxActive=10
spring.datasource.maxIdle=5
spring.datasource.minIdle=2
spring.datasource.initialSize=5
spring.datasource.removeAbandoned=true
spring.jpa.hibernate.ddl-auto=create

This will pool our database connections and limit our application’s connections. Heroku limits the number of active connections in a development tier database to 10 and so we set our max to 10. Additionally, we set the hibernate.ddl property to create so that our book table will be created automatically.

Finally, commit these changes and run git push heroku master. This will push these changes up to our Heroku app. After our app starts, try running tests from the previous section.

The last thing we need to do is change the ddl setting. Let’s update that value as well:

spring.jpa.hibernate.ddl-auto=update

This will instruct the application to update the schema when changes are made to the entity when the app is restarted. Commit and push this change like before to have the changes pushed to our Heroku app.

We didn’t need to write a custom data source integration for any of this. That’s because Spring Cloud Connectors detects that we’re running with Heroku and using PostgreSQL – and automatically wires up the Heroku data source.

5. Conclusion

We now have a running Spring Boot app in Heroku.

Most of all, the simplicity of going from a single idea to a running application makes Heroku a solid way to deploy.

To find out more about Heroku and all the tools, it offers we can read more on heroku.com.

As always, code snippets can be found over on GitHub.

A Guide to HashSet in Java

$
0
0

1. Overview

In this article, we’ll dive into HashSet. It’s one of the most popular Set implementations as well as an integral part of the Java Collections Framework.

2. Intro to HashSet

HashSet is one of the fundamental data structures in the Java Collections API.

Let’s recall the most important aspects of this implementation:

  • It stores unique elements and permits nulls
  • It’s backed by a HashMap
  • It doesn’t maintain insertion order
  • It’s not thread-safe

Note that this internal HashMap gets initialized when an instance of the HashSet is created:

public HashSet() {
    map = new HashMap<>();
}

If you want to go deeper into how the HashMap works, you can read the article focused on it here.

3. The API

In this section, we’re going to review most commonly used methods and have a look at some simple examples.

3.1. add()

The add() method can be used for adding elements to a set. The method contract states that an element will be added only when it isn’t already present in a set. If an element was added, the method returns true, otherwise – false.

We can add an element to a HashSet like:

@Test
public void whenAddingElement_shouldAddElement() {
    Set<String> hashset = new HashSet<>();
 
    assertTrue(hashset.add("String Added"));
}

From an implementation perspective, the add method is an extremely important one. Implementation details illustrate how the HashSet works internally and leverages the HashMap’s put method:

public boolean add(E e) {
    return map.put(e, PRESENT) == null;
}

The map variable is a reference to the internal, backing HashMap:

private transient HashMap<E, Object> map;

It’d be a good idea to get familiar with the hashcode first to get a detailed understanding of how the elements are organized in hash-based data structures.

Summarizing:

  • A HashMap is an array of buckets with a default capacity of 16 elements – each bucket corresponds to a different hashcode value
  • If various objects have the same hashcode value, they get stored in a single bucket
  • If the load factor is reached, a new array gets created twice the size of the previous one and all elements get rehashed and redistributed among new corresponding buckets
  • To retrieve a value, we hash a key, mod it, and then go to a corresponding bucket  and search through the potential linked list in case of there’s more than a one object

3.2. contains()

The purpose of the contains method is to check if an element is present in a given HashSetIt returns true if the element is found, otherwise false.

We can check for an element in the HashSet:

@Test
public void whenCheckingForElement_shouldSearchForElement() {
    Set<String> hashsetContains = new HashSet<>();
    hashsetContains.add("String Added");
 
    assertTrue(hashsetContains.contains("String Added"));
}

Whenever an object is passed to this method, the hash value gets calculated. Then, the corresponding bucket location gets resolved and traversed.

3.3. remove()

The method removes the specified element from the set if it’s present. This method returns true if a set contained the specified element.

Let’s see a working example:

@Test
public void whenRemovingElement_shouldRemoveElement() {
    Set<String> removeFromHashSet = new HashSet<>();
    removeFromHashSet.add("String Added");
 
    assertTrue(removeFromHashSet.remove("String Added"));
}

3.4. clear()

We use this method when we intend to remove all the items from a set. The underlying implementation simply clears all elements from the underlying HashMap.

Let’s see that in action:

@Test
public void whenClearingHashSet_shouldClearHashSet() {
    Set<String> clearHashSet = new HashSet<>();
    clearHashSet.add("String Added");
    clearHashSet.clear();
    
    assertTrue(clearHashSet.isEmpty());
}

3.5. size()

This is one of the fundamental methods in the API. It’s used heavily as it helps in identifying the number of elements present in the HashSet. The underlying implementation simply delegates the calculation to the HashMap’s size() method.

Let’s see that in action:

@Test
public void whenCheckingTheSizeOfHashSet_shouldReturnThesize() {
    Set<String> hashSetSize = new HashSet<>();
    hashSetSize.add("String Added");
    
    assertEquals(1, hashSetSize.size());
}

3.6. isEmpty()

We can use this method to figure if a given instance of a HashSet is empty or not. This method returns true if the set contains no elements:

@Test
public void whenCheckingForEmptyHashSet_shouldCheckForEmpty() {
    Set<String> emptyHashSet = new HashSet<>();
    
    assertTrue(emptyHashSet.isEmpty());
}

3.7. iterator()

The method returns an iterator over the elements in the Set. The elements are visited in no particular order and iterators are fail-fast.

We can observe the random iteration order here:

@Test
public void whenIteratingHashSet_shouldIterateHashSet() {
    Set<String> hashset = new HashSet<>();
    hashset.add("First");
    hashset.add("Second");
    hashset.add("Third");
    Iterator<String> itr = hashset.iterator();
    while(itr.hasNext()){
        System.out.println(itr.next());
    }
}

If the set is modified at any time after the iterator is created in any way except through the iterator’s own remove method, the Iterator throws a ConcurrentModificationException.

Let’s see that in action:

@Test(expected = ConcurrentModificationException.class)
public void whenModifyingHashSetWhileIterating_shouldThrowException() {
 
    Set<String> hashset = new HashSet<>();
    hashset.add("First");
    hashset.add("Second");
    hashset.add("Third");
    Iterator<String> itr = hashset.iterator();
    while (itr.hasNext()) {
        itr.next();
        hashset.remove("Second");
    }
}

Alternatively, had we used the iterator’s remove method, then we wouldn’t have encountered the exception:

@Test
public void whenRemovingElementUsingIterator_shouldRemoveElement() {
 
    Set<String> hashset = new HashSet<>();
    hashset.add("First");
    hashset.add("Second");
    hashset.add("Third");
    Iterator<String> itr = hashset.iterator();
    while (itr.hasNext()) {
        String element = itr.next();
        if (element.equals("Second"))
            itr.remove();
    }
 
    assertEquals(2, hashset.size());
}

The fail-fast behavior of an iterator cannot be guaranteed as it’s impossible to make any hard guarantees in the presence of unsynchronized concurrent modification.

Fail-fast iterators throw ConcurrentModificationException on a best-effort basis. Therefore, it’d be wrong to write a program that depended on this exception for its correctness.

4. How HashSet Maintains Uniqueness?

When we put an object into a HashSet, it uses the object’s hashcode value to determine if an element is not in the set already.

Each hash code value corresponds to a certain bucket location which can contain various elements, for which the calculated hash value is the same. But two objects with the same hashCode might not be equal.

So, objects within the same bucket will be compared using the equals() method.

5. Performance of HashSet

The performance of a HashSet is affected mainly by two parameters – its Initial Capacity and the Load Factor.

The expected time complexity of adding an element to a set is O(1) which can drop to O(n) in the worst case scenario (only one bucket present) – therefore, it’s essential to maintain the right HashSet’s capacity.

An important note: since JDK 8, the worst case time complexity is O(log*n).

The load factor describes what is the maximum fill level, above which, a set will need to be resized.

We can also create a HashSet with custom values for initial capacity and load factor:

Set<String> hashset = new HashSet<>();
Set<String> hashset = new HashSet<>(20);
Set<String> hashset = new HashSet<>(20, 0.5f);

In the first case, the default values are used – the initial capacity of 16 and the load factor of 0.75. In the second, we override the default capacity and in the third one, we override both.

A low initial capacity reduces space complexity but increases the frequency of rehashing which is an expensive process.

On the other hand, a high initial capacity increases the cost of iteration and the initial memory consumption.

As a rule of thumb:

  • A high initial capacity is good for a large number of entries coupled with little to no iteration
  • A low initial capacity is good for few entries with a lot of iteration

It’s, therefore, very important to strike the correct balance between the two. Usually, the default implementation is optimized and works just fine, should we feel the need to tune these parameters to suit the requirements, we need to do judiciously.

6. Conclusion

In this article, we outlined the utility of a HashSet, its purpose as well as its underlying working. We saw how efficient it is in terms of usability given its constant time performance and ability to avoid duplicates.

We studied some of the important methods from the API, how they can help us as a developer to use a HashSet to its potential.

As always, code snippets can be found over on GitHub.

Introduction to Hibernate Search

$
0
0

1. Overview

In this article, we’ll discuss the basics of Hibernate Search, how to configure it, and we’ll implement some simple queries.

2. Basics of Hibernate Search

Whenever we have to implement full-text search functionality, using tools we’re already well-versed with is always a plus.

In case we’re already using Hibernate and JPA for ORM, we’re only one step away from Hibernate Search.

Hibernate Search integrates Apache Lucene, a high-performance and extensible full-text search-engine library written in Java. This combines the power of Lucene with the simplicity of Hibernate and JPA.

Simply put, we just have to add some additional annotations to our domain classes, and the tool will take care of the things like database/index synchronization.

Hibernate Search also provides an Elasticsearch integration; however, as it’s still in an experimental stage, we’ll focus on Lucene here.

3. Configurations

3.1. Maven Dependencies

Before getting started, we first need to add the necessary dependencies to our pom.xml:

<dependency>
    <groupId>org.hibernate</groupId>
    <artifactId>hibernate-search-orm</artifactId>
    <version>5.8.2.Final</version>
</dependency>

For the sake of simplicity, we’ll use H2 as our database:

<dependency>
    <groupId>com.h2database</groupId> 
    <artifactId>h2</artifactId>
    <version>1.4.196</version>
</dependency>

3.2. Configurations

We also have to specify where Lucene should store the index.

This can be done via the property hibernate.search.default.directory_provider.

We’ll choose filesystem, which is the most straightforward option for our use case. More options are listed in the official documentationFilesystem-master/filesystem-slave and infinispan are noteworthy for clustered applications, where the index has to be synchronized between nodes.

We also have to define a default base directory where indexes will be stored:

hibernate.search.default.directory_provider = filesystem
hibernate.search.default.indexBase = /data/index/default

4. The Model Classes

After the configuration, we’re now ready to specify our model.

On top of the JPA annotations @Entity and @Table, we have to add an @Indexed annotation. It tells Hibernate Search that the entity Product shall be indexed.

After that, we have to define the required attributes as searchable by adding a @Field annotation:

@Entity
@Indexed
@Table(name = "product")
public class Product {

    @Id
    private int id;

    @Field(termVector = TermVector.YES)
    private String productName;

    @Field(termVector = TermVector.YES)
    private String description;

    @Field
    private int memory;

    // getters, setters, and constructors
}

The termVector = TermVector.YES attribute will be required for the “More Like This” query later.

5. Building the Lucene Index

Before starting the actual queries, we have to trigger Lucene to build the index initially:

FullTextEntityManager fullTextEntityManager 
  = Search.getFullTextEntityManager(entityManager);
fullTextEntityManager.createIndexer().startAndWait();

After this initial build, Hibernate Search will take care of keeping the index up to date. I. e. we can create, manipulate and delete entities via the EntityManager as usual.

Note: we have to make sure that entities are fully committed to the database before they can be discovered and indexed by Lucene (by the way, this also the reason why the initial test data import in our example code test cases comes in a dedicated JUnit test case, annotated with @Commit).

6. Building and Executing Queries

Now, we’re ready for creating our first query.

In the following section, we’ll show the general workflow for preparing and executing a query.

After that, we’ll create some example queries for the most important query types.

6.1. General Workflow for Creating and Executing a Query

Preparing and executing a query in general consists of four steps:

In step 1, we have to get a JPA FullTextEntityManager and from that a QueryBuilder:

FullTextEntityManager fullTextEntityManager 
  = Search.getFullTextEntityManager(entityManager);

QueryBuilder queryBuilder = fullTextEntityManager.getSearchFactory() 
  .buildQueryBuilder()
  .forEntity(Product.class)
  .get();

In step 2, we will create a Lucene query via the Hibernate query DSL:

org.apache.lucene.search.Query query = queryBuilder
  .keyword()
  .onField("productName")
  .matching("iphone")
  .createQuery();

In step 3, we’ll wrap the Lucene query into a Hibernate query:

org.hibernate.search.jpa.FullTextQuery jpaQuery
  = fullTextEntityManager.createFullTextQuery(query, Product.class);

Finally, in step 4 we’ll execute the query:

List<Product> results = jpaQuery.getResultList();

Note: by default, Lucene sorts the results by relevance.

Steps 1, 3 and 4 are the same for all query types.

In the following, we will focus on step 2, i. e. how to create different types of queries.

6.2. Keyword Queries

The most basic use-case is searching for a specific word.

This is what we actually did already in the previous section:

Query keywordQuery = queryBuilder
  .keyword()
  .onField("productName")
  .matching("iphone")
  .createQuery();

Here, keyword() specifies that we are looking for one specific word, onField() tells Lucene where to look and matching() what to look for.

6.3. Fuzzy Queries

Fuzzy queries are working like keyword queries, except that we can define a limit of “fuzziness”, above which Lucene shall accept the two terms as matching.

By withEditDistanceUpTo(), we can define how much a term may deviate from the other. It can be set to 0, 1, and 2, whereby the default value is 2 (note: this limitation is coming from the Lucene’s implementation).

By withPrefixLength(), we can define the length of the prefix which shall be ignored by the fuzziness:

Query fuzzyQuery = queryBuilder
  .keyword()
  .fuzzy()
  .withEditDistanceUpTo(2)
  .withPrefixLength(0)
  .onField("productName")
  .matching("iPhaen")
  .createQuery();

6.4. Wildcard Queries

Hibernate Search also enables us to execute wildcard queries, i. e. queries for which a part of a word is unknown.

For this, we can use “?” for a single character, and “*” for any character sequence:

Query wildcardQuery = queryBuilder
  .keyword()
  .wildcard()
  .onField("productName")
  .matching("Z*")
  .createQuery();

6.5. Phrase Queries

If we want to search for more than one word, we can use phrase queries. We can either look for exact or for approximate sentences, using phrase() and withSlop(), if necessary. The slop factor defines the number of other words permitted in the sentence:

Query phraseQuery = queryBuilder
  .phrase()
  .withSlop(1)
  .onField("with wireless charging")
  .sentence(text)
  .createQuery();

6.6. Simple Query String Queries

With the previous query types, we had to specify the query type explicitly.

If we want to give some more power to the user, we can use simple query string queries: by that, he can define his own queries at runtime.

The following query types are supported:

  • boolean (AND using “+”, OR using “|”, NOT using “-“)
  • prefix (prefix*)
  • phrase (“some phrase”)
  • precedence (using parentheses)
  • fuzzy (fuzy~2)
  • near operator for phrase queries (“some phrase”~3)

The following example would combine fuzzy, phrase and boolean queries:

Query simpleQueryStringQuery = queryBuilder
  .simpleQueryString()
  .onFields("productName", "description")
  .matching("Aple~2 + \"iPhone X\" + (256 | 128)")
  .createQuery();

6.7. Range Queries

Range queries search for a value in between given boundaries. This can be applied to numbers, dates, timestamps, and strings:

Query rangeQuery = queryBuilder
  .range()
  .onField("memory")
  .from(64).to(256)
  .createQuery();

6.8. More Like This Queries

Our last query type is the “More Like This” – query. For this, we provide an entity, and Hibernate Search returns a list with similar entities, each with a similarity score.

As mentioned before, the termVector = TermVector.YES attribute in our model class is required for this case: it tells Lucene to store the frequency for each term during indexing.

Based on this, the similarity will be calculated at query execution time:

Query moreLikeThisQuery = queryBuilder
  .moreLikeThis()
  .comparingField("productName").boostedTo(10f)
  .andField("description").boostedTo(1f)
  .toEntity(entity)
  .createQuery();
List<Object[]> results = (List<Object[]>) fullTextEntityManager
  .createFullTextQuery(moreLikeThisQuery, Product.class)
  .setProjection(ProjectionConstants.THIS, ProjectionConstants.SCORE)
  .getResultList();

6.9. Searching More Than One Field

Until now, we only created queries for searching one attribute, using onField().

Depending on the use case, we can also search two or more attributes:

Query luceneQuery = queryBuilder
  .keyword()
  .onFields("productName", "description")
  .matching(text)
  .createQuery();

Moreover, we can specify each attribute to be searched separately, e. g. if we want to define a boost for one attribute:

Query moreLikeThisQuery = queryBuilder
  .moreLikeThis()
  .comparingField("productName").boostedTo(10f)
  .andField("description").boostedTo(1f)
  .toEntity(entity)
  .createQuery();

6.10. Combining Queries

Finally, Hibernate Search also supports combining queries using various strategies:

  • SHOULD: the query should contain the matching elements of the subquery
  • MUST: the query must contain the matching elements of the subquery
  • MUST NOT: the query must not contain the matching elements of the subquery

The aggregations are similar to the boolean ones AND, OR and NOT. However, the names are different to emphasize that they also have an impact on the relevance.

For example, a SHOULD between two queries is similar to boolean OR: if one of the two queries has a match, this match will be returned.

However, if both queries match, the match will have a higher relevance compared to if only one query matches:

Query combinedQuery = queryBuilder
  .bool()
  .must(queryBuilder.keyword()
    .onField("productName").matching("apple")
    .createQuery())
  .must(queryBuilder.range()
    .onField("memory").from(64).to(256)
    .createQuery())
  .should(queryBuilder.phrase()
    .onField("description").sentence("face id")
    .createQuery())
  .must(queryBuilder.keyword()
    .onField("productName").matching("samsung")
    .createQuery())
  .not()
  .createQuery();

7. Conclusion

In this article, we discussed the basics of Hibernate Search and showed how to implement the most important query types. More advanced topics can be found it the official documentation.

As always, the full source code of the examples is available over on GitHub.


Send Operating System Data into Elastic Stack (ELK Stack)

$
0
0

1. Overview

In this quick tutorial, we’ll discuss how to send OS-level metrics into Elastic Stack. As a reference, we’re going to be using an Ubuntu server here.

We’ll use Metricbeat to collect data from the Operating System and send them periodically to Elasticsearch.

If you’re interested in sending other types of data into an ES instance, we discussed JMX data and Application Logs before.

2. Install Metricbeat

First, we need to download and install the standard Metricbeat agent – on our Ubuntu machine:

curl -L -O https://artifacts.elastic.co/downloads/beats/metricbeat/metricbeat-6.0.1-amd64.deb
sudo dpkg -i metricbeat-6.0.1-amd64.deb

After installation, we need to configure Metricbeat to send data to Elasticsearch by modifying metricbeat.yml found at “/etc/metricbeat/” (on Ubuntu):

output.elasticsearch:
  hosts: ["localhost:9200"]

Then, we can customize the metrics we want to track by modifying /etc/metricbeat/modules.d/system.yml:

- module: system
  period: 10s
  metricsets:
    - cpu
    - load
    - memory
    - network
    - process
    - process_summary

Finally, we’ll start our Metricbeat service:

sudo service metricbeat start

3. Quick Check

To make sure Metricbeat is sending data to Elasticsearch, do a quick check of the indices:

curl -X GET 'http://localhost:9200/_cat/indices'

Here’s what you should get:

yellow open metricbeat-6.0.1-2017.12.11 1 1  2185 0   1.7mb   1.7mb

Now, we’ll create new index from ‘Settings’ tab with pattern ‘metricbeat-*

4. Visualize OS Metrics

Now, we’ll visualize our memory usage over time.

First, we’ll create a new search – to separate our memory metrics – on our ‘metricbeat-*‘ index with the following query with the name ‘System Memory’:

metricset.name:memory

Finally, we can create a simple visualization of our memory data:

  • Navigate to ‘Visualize’ tab
  • Choose ‘Line Chart’
  • Choose ‘From Saved Search’
  • Choose ‘System Memory’ search we just created

For Y-axis, choose:

  • Aggregation: Average
  • Field: system.memory.used.pct

For X-axis, choose Aggregation: Date Histogram

5. Conclusion

In this quick and to-the-point article, we learned how to send OS-level data into an Elastic Stack instance, using Metricbeat.

Introduction to Hibernate Spatial

$
0
0

1. Introduction

In this article, we’ll have a look a the spatial extension of Hibernate, hibernate-spatial.

Starting with version 5, Hibernate Spatial provides a standard interface for working with geographic data.

2. Background on Hibernate Spatial

Geographic data includes representation of entities like a Point, Line, Polygon. Such data types aren’t a part of the JDBC specification, hence the JTS (JTS Topology Suite) has become a standard for representing spatial data types.

Apart from JTS, Hibernate spatial also supports Geolatte-geom – a recent library that has some features that aren’t available in JTS.

Both libraries are already included in the hibernate-spatial project. Using one library over other is simply a question of from which jar we’re importing data types.

Although Hibernate spatial supports different databases like Oracle, MySQL, PostgreSQLql/PostGIS, and a few others, the support for the database specific functions isn’t uniform.

It’s better to refer to the latest Hibernate documentation to check the list of functions for which hibernate provides support for a given database.

In this article, we’ll be using an in-memory Mariadb4j – which maintains the full functionality of MySQL.

The configuration for Mariadb4j and MySql are similar, even the mysql-connector library works for both of these databases.

3. Maven Dependencies

Let’s have a look at the Maven dependencies required for setting up a simple hibernate-spatial project:

<dependency>
    <groupId>org.hibernate</groupId>
    <artifactId>hibernate-entitymanager</artifactId>
    <version>5.2.12.Final</version>
</dependency>
<dependency>
    <groupId>org.hibernate</groupId>
    <artifactId>hibernate-spatial</artifactId>
    <version>5.2.12.Final</version>
</dependency>
<dependency>
    <groupId>mysql</groupId>
    <artifactId>mysql-connector-java</artifactId>
    <version>6.0.6</version>
</dependency>
<dependency>
    <groupId>ch.vorburger.mariaDB4j</groupId>
    <artifactId>mariaDB4j</artifactId>
    <version>2.2.3</version>
</dependency>

The hibernate-spatial dependency is the one that will provide the support for the spatial data types. The latest versions of hibernate-entitymanager, hibernate-spatial, mysql-connector-java, and mariaDB4j can be obtained from Maven Central.

4. Configuring Hibernate Spatial

The first step is to create a hibernate.properties in the resources directory:

hibernate.dialect=org.hibernate.spatial.dialect.mysql.MySQL56SpatialDialect
// ...

The only thing that is specific to hibernate-spatial is the MySQL56SpatialDialect dialect. This dialect extends the MySQL55Dialect dialect and provides additional functionality related to the spatial data types.

The code specific to loading the property file, creating a SessionFactory, and instantiating a Mariadb4j instance, is same as in a standard hibernate project.

5. Understanding the Geometry Type

Geometry is the base type for all the spatial types in JTS. This means that other types like Point, Polygon, and others extend from Geometry. The Geometry type in java corresponds to the GEOMETRY type in MySql as well.

By parsing a String representation of the type, we get an instance of Geometry. A utility class WKTReader provided by JTS can be used to convert any well-known text representation to a Geometry type:

public Geometry wktToGeometry(String wellKnownText) 
  throws ParseException {
 
    return new WKTReader().read(wellKnownText);
}

Now, let’s see this method in action:

@Test
public void shouldConvertWktToGeometry() {
    Geometry geometry = wktToGeometry("POINT (2 5)");
 
    assertEquals("Point", geometry.getGeometryType());
    assertTrue(geometry instanceof Point);
}

As we can see, even if the return type of the method is read() method is Geometry, the actual instance is that of a Point.

6. Storing a Point in DB

Now that we have a good idea of what a Geometry type is and how to get a Point out of a String, let’s have a look at the PointEntity:

@Entity
public class PointEntity {

    @Id
    @GeneratedValue
    private Long id;

    private Point point;

    // standard getters and setters
}

Note that the entity PointEntity contains a spatial type Point. As demonstrated earlier, a Point is represented by two coordinates:

public void insertPoint(String point) {
    PointEntity entity = new PointEntity();
    entity.setPoint((Point) wktToGeometry(point));
    session.persist(entity);
}

The method insertPoint() accepts a well-known text (WKT) representation of a Point, converts it to a Point instance, and saves in the DB.

As a reminder, the session isn’t specific to hibernate-spatial and is created in a way similar to another hibernate project.

We can notice here that once we have an instance of Point created, the process of storing PointEntity is similar to any regular entity.

Let’s look at some tests:

@Test
public void shouldInsertAndSelectPoints() {
    PointEntity entity = new PointEntity();
    entity.setPoint((Point) wktToGeometry("POINT (1 1)"));

    session.persist(entity);
    PointEntity fromDb = session
      .find(PointEntity.class, entity.getId());
 
    assertEquals("POINT (1 1)", fromDb.getPoint().toString());
    assertTrue(geometry instanceof Point);
}

Calling toString() on a Point returns the WKT representation of a Point. This is because the Geometry class overrides the toString() method and internally uses WKTWriter, a complimentary class to WKTReader that we saw earlier.

Once we run this test, hibernate will create PointEntity table for us.

Let’s have a look at that table:

desc PointEntity;
Field    Type          Null    Key
id       bigint(20)    NO      PRI
point    geometry      YES

As expected, the Type of Field Point is GEOMETRY. Because of this, while fetching the data using our SQL editor (like MySql workbench), we need to convert this GEOMETRY type to human-readable text:

select id, astext(point) from PointEntity;

id      astext(point)
1       POINT(2 4)

However, as hibernate already returns WKT representation when we call toString() method on Geometry or any of its subclasses, we don’t need to bother about this conversion.

7. Using Spatial Functions

7.1. ST_WITHIN() Example

We’ll now have a look at the usage of database functions that work with spatial data types.

One of such function in MySQL is ST_WITHIN() that tells whether one Geometry is within another. A good example here would be to find out all the points within a given radius.

Let’s start by looking at how to create a circle:

public Geometry createCircle(double x, double y, double radius) {
    GeometricShapeFactory shapeFactory = new GeometricShapeFactory();
    shapeFactory.setNumPoints(32);
    shapeFactory.setCentre(new Coordinate(x, y));
    shapeFactory.setSize(radius * 2);
    return shapeFactory.createCircle();
}

A circle is represented by a finite set of points specified by the setNumPoints() method. The radius is doubled before calling the setSize() method as we need to draw the circle around the center, in both the directions.

Let’s now move forward and see how to fetch the points within a given radius:

@Test
public void shouldSelectAllPointsWithinRadius() throws ParseException {
    insertPoint("POINT (1 1)");
    insertPoint("POINT (1 2)");
    insertPoint("POINT (3 4)");
    insertPoint("POINT (5 6)");

    Query query = session.createQuery("select p from PointEntity p where 
      within(p.point, :circle) = true", PointEntity.class);
    query.setParameter("circle", createCircle(0.0, 0.0, 5));

    assertThat(query.getResultList().stream()
      .map(p -> ((PointEntity) p).getPoint().toString()))
      .containsOnly("POINT (1 1)", "POINT (1 2)");
    }

Hibernate maps its within() function to the ST_WITHIN() function of MySql.

An interesting observation here is that the Point (3, 4) falls exactly on the circle. Still, the query doesn’t return this point. This is because the within() function returns true only if the given Geometry is completely within another Geometry.

7.2. ST_TOUCHES() Example

Here, we’ll present an example that inserts a set of Polygons in the database and select the Polygons that are adjacent to a given Polygon. Let’s have a quick look at the PolygonEntity class:

@Entity
public class PolygonEntity {

    @Id
    @GeneratedValue
    private Long id;

    private Polygon polygon;

    // standard getters and setters
}

The only thing different here from the previous PointEntity is that we’re using the type Polygon instead of the Point.

Let’s now move towards the test:

@Test
public void shouldSelectAdjacentPolygons() throws ParseException {
    insertPolygon("POLYGON ((0 0, 0 5, 5 5, 5 0, 0 0))");
    insertPolygon("POLYGON ((3 0, 3 5, 8 5, 8 0, 3 0))");
    insertPolygon("POLYGON ((2 2, 3 1, 2 5, 4 3, 3 3, 2 2))");

    Query query = session.createQuery("select p from PolygonEntity p 
      where touches(p.polygon, :polygon) = true", PolygonEntity.class);
    query.setParameter("polygon", wktToGeometry("POLYGON ((5 5, 5 10, 10 10, 10 5, 5 5))"));
    assertThat(query.getResultList().stream()
      .map(p -> ((PolygonEntity) p).getPolygon().toString())).containsOnly(
      "POLYGON ((0 0, 0 5, 5 5, 5 0, 0 0))", "POLYGON ((3 0, 3 5, 8 5, 8 0, 3 0))");
}

The insertPolygon() method is similar to the insertPoint() method that we saw earlier. The source contains the full implementation of this method.

We’re using the touches() function to find the Polygons adjacent to a given Polygon. Clearly, the third Polygon is not returned in the result as there is not edge touching the given Polygon.

8. Conclusion

In this article, we’ve seen that hibernate-spatial makes dealing with spatial datatypes a lot simpler as it takes care of the low-level details.

Even though this article uses Mariadb4j, we can replace it with MySql without modifying any configuration.

As always, the full source code for this article can be found over on GitHub.

Spring and Apache FileUpload

$
0
0

1. Overview

The Apache Commons File Upload Library helps us upload large files over the HTTP protocol using the multipart/form-data content type.

In this quick tutorial, we’re going to take a look at how to integrate it with Spring.

2. Maven Dependencies

To use the library, we’ll need the commons-fileupload artifact:

<dependency>
    <groupId>commons-fileupload</groupId>
    <artifactId>commons-fileupload</artifactId>
    <version>1.3.3</version>
</dependency>

The latest version can be found on Maven Central.

3. Transfering All at Once

For demonstration purposes, we’re going to create a Controller processing requests with a file payload:

@PostMapping("/upload")
public String handleUpload(HttpServletRequest request) throws Exception {
    boolean isMultipart = ServletFileUpload.isMultipartContent(request);

    DiskFileItemFactory factory = new DiskFileItemFactory();
    factory.setRepository(
      new File(System.getProperty("java.io.tmpdir")));
    factory.setSizeThreshold(
      DiskFileItemFactory.DEFAULT_SIZE_THRESHOLD);
    factory.setFileCleaningTracker(null);

    ServletFileUpload upload = new ServletFileUpload(factory);

    List items = upload.parseRequest(request);

    Iterator iter = items.iterator();
    while (iter.hasNext()) {
        FileItem item = iter.next();

        if (!item.isFormField()) {
            try (
              InputStream uploadedStream = item.getInputStream();
              OutputStream out = new FileOutputStream("file.mov");) {

                IOUtils.copy(uploadedStream, out);
            }
        }
    }    
    return "success!";
}

In the beginning, we need to check if the request contains a multipart content using the isMultipartContent method found in the ServletFileUpload class from the library.

By default, Spring features a MultipartResolver that we’ll need to disable to use this library. Otherwise, it’ll read the content of the request before it reaches our Controller.

We can achieve this by including this configuration in our application.properties file:

spring.http.multipart.enabled=false

Now, we can set the directory where our files are going to be saved, the threshold in which the library decides to write to disk and if files should be deleted after the request ends.

The library provides a DiskFileItemFactory class that takes the responsibility of the configuration for the file saving and cleaning. The setRepository method sets the target directory, with the default being shown in the example.

Next, the setSizeThreshold sets a maximum file size.

Then, we have the setFileCleaningTracker method that, when set to null, leaves the temporary files untouched. By default, it deletes them after the request has finished.

Now we can continue to the actual file handling.

First, we create our ServletFileUpload by including our previously created factory; then we proceed to parse the request and generate a list of FileItem which are the main abstraction of the library for the form fields.

Now if we know it isn’t a normal form field, then we proceed to extract the InputStream and to call the useful copy method from IOUtils (for more options you can have a look at this tutorial).

Now we have our file stored in the necessary folder. This is usually a more convenient way to handle this situation as it allows easy access to the files, but also time/memory efficiency isn’t optimal.

In the next section, we’re going to take a look at the streaming API.

4. Streaming API

The streaming API is easy to use, making it a great way to process large files simply by not copying to a temporary location:

ServletFileUpload upload = new ServletFileUpload();
FileItemIterator iterStream = upload.getItemIterator(request);
while (iterStream.hasNext()) {
    FileItemStream item = iterStream.next();
    String name = item.getFieldName();
    InputStream stream = item.openStream();
    if (!item.isFormField()) {
        // Process the InputStream
    } else {
        String formFieldValue = Streams.asString(stream);
    }
}

We can see in the previous code snippet that we no longer include a DiskFileItemFactory. This is because, when using the streaming API, we don’t need it.

Next, to process fields, the library provides a FileItemIterator, which doesn’t read anything until we extract them from the request with the next method.

Finally, we can see how to obtain the values of the other form fields.

5. Conclusion

In this article, we’ve reviewed how we can use the Apache Commons File Upload Library with Spring to upload and process large files.

As always the full source code can be found over at GitHub.

Java Weekly, Issue 207

$
0
0

Lots of interesting writeups on Java 9 this week.

Here we go…

1. Spring and Java

>> Exploring the jlink plug-in API in Java 9 [in.relation.to]

Jlink allows us to create fully self-contained runtime images containing your application. Pretty cool.

>> Automatic-Module-Name: Calling all Java Library Maintainers [branchandbound.net]

An open call to all OS libraries maintainers – let’s add default module names to make life with Java 9 easier!

Also worth reading:

Webinars and presentations:

Time to upgrade:

2. Technical and Musings

>> Pivotal Cloud Foundry vs Kubernetes: Choosing The Right Cloud-Native Application Deployment Platform [blog.takipi.com]

If you don’t know which one to choose, this is a good place to start.

>> Keep Dependency Injection Simple [blog.thecodewhisperer.com]

Dependency Injection goes well beyond Spring 🙂

>> “Unit” Tests? [facebook.com]

Kent Beck, returning to a foundational topic for any developer – the distinction between unit and integration tests.

Also worth reading:

Also worth reading:

3. Comics

And my favorite Dilberts of the week:

>> Fake Email From The CEO [dilbert.com]

>> Boss Counts Cards [dilbert.com]

>> Arguing On Twitter With Facts [dilbert.com]

4. Pick of the Week

>> Running in Circles [m.signalvnoise.com]

Interact with Google Sheets from Java

$
0
0

1. Overview

Google Sheets provides a convenient way to store and manipulate spreadsheets and collaborate with others on a document.

Sometimes, it can be useful to access these documents from an application, say to perform an automated operation. For this purpose, Google provides the Google Sheets API that developers can interact with.

In this article, we’re going to take a look at how we can connect to the API and perform operations on Google Sheets.

2. Maven Dependencies

To connect to the API and manipulate documents, we’ll need to add the google-api-client, google-oauth-client-jetty and google-api-services-sheets dependencies:

<dependency>
    <groupId>com.google.api-client</groupId>
    <artifactId>google-api-client</artifactId>
    <version>1.23.0</version>
</dependency>
<dependency>
    <groupId>com.google.oauth-client</groupId>
    <artifactId>google-oauth-client-jetty</artifactId>
    <version>1.23.0</version>
</dependency>
<dependency>
    <groupId>com.google.apis</groupId>
    <artifactId>google-api-services-sheets</artifactId>
    <version>v4-rev493-1.23.0</version>
</dependency>

3. Authorization

The Google Sheets API requires OAuth 2.0 authorization before we can access it through an application.

First, we need to obtain a set of OAuth credentials, then use this in our application to submit a request for authorization.

3.1. Obtaining OAuth 2.0 Credentials

To obtain the credentials, we’ll need to create a project in the Google Developers Console and then enable the Google Sheets API for the project. The first step in the Google Quickstart guide contains detailed information on how to do this.

Once we’ve downloaded the JSON file with the credential information, let’s copy the contents in a google-sheets-client-secret.json file in the src/main/resources directory of our application.

The contents of the file should be similar to this:

{
  "installed":
    {
      "client_id":"<your_client_id>",
      "project_id":"decisive-octane-187810",
      "auth_uri":"https://accounts.google.com/o/oauth2/auth",
      "token_uri":"https://accounts.google.com/o/oauth2/token",
      "auth_provider_x509_cert_url":"https://www.googleapis.com/oauth2/v1/certs",
      "client_secret":"<your_client_secret>",
      "redirect_uris":["urn:ietf:wg:oauth:2.0:oob","http://localhost"]
    }
}

3.2. Obtaining a Credential object

A successful authorization returns a Credential object we can use to interact with the Google Sheets API.

Let’s create a GoogleAuthorizeUtil class with a static authorize() method which reads the content of the JSON file above and builds a GoogleClientSecrets object.

Then, we’ll create a GoogleAuthorizationCodeFlow and send the authorization request:

public class GoogleAuthorizeUtil {
    public static Credential authorize() throws IOException, GeneralSecurityException {
        
        // build GoogleClientSecrets from JSON file

        List<String> scopes = Arrays.asList(SheetsScopes.SPREADSHEETS);

        // build Credential object

        return credential;
    }
}

In our example, we’re setting the SPREADSHEETS scope since we want to access Google Sheets and using an in-memory DataStoreFactory to store the credentials received. Another option is using a FileDataStoreFactory to store the credentials in a file.

For the full source code of the GoogleAuthorizeUtil class, check out the GitHub project.

4. Constructing the Sheets Service Instance

For interacting with Google Sheets, we’ll need a Sheets object which is the client for reading and writing through the API.

Let’s create a SheetsServiceUtil class that uses the Credential object above to obtain an instance of Sheets:

public class SheetsServiceUtil {
    private static final String APPLICATION_NAME = "Google Sheets Example";

    public static Sheets getSheetsService() throws IOException, GeneralSecurityException {
        Credential credential = GoogleAuthorizeUtil.authorize();
        return new Sheets.Builder(
          GoogleNetHttpTransport.newTrustedTransport(), 
          JacksonFactory.getDefaultInstance(), credential)
          .setApplicationName(APPLICATION_NAME)
          .build();
    }
}

Next, we’ll take a look at some of the most common operations we can perform using the API.

5. Writing Values on a Sheet

Interacting with an existing spreadsheet requires knowing that spreadsheet’s id, which we can find from its URL.

For our examples, we’re going to use a public spreadsheet called “Expenses”, located at:

https://docs.google.com/spreadsheets/d/1sILuxZUnyl_7-MlNThjt765oWshN3Xs-PPLfqYe4DhI/edit#gid=0

Based on this URL, we can identify this spreadsheet’s id as “1sILuxZUnyl_7-MlNThjt765oWshN3Xs-PPLfqYe4DhI”.

Also, to read and write values, we’re going to use spreadsheets.values collections. 

The values are represented as ValueRange objects, which are lists of lists of Java Objects, corresponding to rows or columns in a sheet.

Let’s create a test class where we initialize our Sheets service object and a SPREADSHEET_ID constant:

public class GoogleSheetsIntegrationTest {
    private static Sheets sheetsService;
    private static String SPREADSHEET_ID = // ...

    @BeforeClass
    public static void setup() throws GeneralSecurityException, IOException {
        sheetsService = SheetsServiceUtil.getSheetsService();
    }
}

Then, we can write values by:

  • writing to a single range
  • writing to multiple ranges
  • appending data after a table

5.1. Writing to a Single Range

To write values to a single range on a sheet, we’ll use the spreadsheets().values().update() method:

@Test
public void whenWriteSheet_thenReadSheetOk() throws IOException {
    ValueRange body = new ValueRange()
      .setValues(Arrays.asList(
        Arrays.asList("Expenses January"), 
        Arrays.asList("books", "30"), 
        Arrays.asList("pens", "10"),
        Arrays.asList("Expenses February"), 
        Arrays.asList("clothes", "20"),
        Arrays.asList("shoes", "5")));
    UpdateValuesResponse result = sheetsService.spreadsheets().values()
      .update(SPREADSHEET_ID, "A1", body)
      .setValueInputOption("RAW")
      .execute();
}

Here, we’re first creating a ValueRange object with multiple rows containing a list of expenses for two months.

Then, we’re using the update() method to build a request that writes the values to the spreadsheet with the given id, starting at the “A1” cell.

To send the request, we’re using the execute() method.

If we want our value sets to be considered as columns instead of rows, we can use the setMajorDimension(“COLUMNS”) method.

The “RAW” input option means the values are written exactly as they are, and not computed.

When executing this JUnit test, the application will open a browser window using the system’s default browser that asks the user to log in and give our application permission to interact with Google Sheets on the user’s behalf:

Note that this manual step can be bypassed if you have an OAuth Service Account.

A requirement for the application to be able to view or edit the spreadsheet is that the signed-in user has view or edit access to it. Otherwise, the request will result in a 403 error. The spreadsheet we use for our example is set to public edit access.

Now, if we check the spreadsheet, we’ll see the range “A1:B6” is updated with our value sets.

Let’s move on to writing to multiple disparate ranges in a single request.

5.2. Writing to Multiple Ranges

If we want to update multiple ranges on a sheet, we can use a BatchUpdateValuesRequest for better performance:

List<ValueRange> data = new ArrayList<>();
data.add(new ValueRange()
  .setRange("D1")
  .setValues(Arrays.asList(
    Arrays.asList("January Total", "=B2+B3"))));
data.add(new ValueRange()
  .setRange("D4")
  .setValues(Arrays.asList(
    Arrays.asList("February Total", "=B5+B6"))));

BatchUpdateValuesRequest batchBody = new BatchUpdateValuesRequest()
  .setValueInputOption("USER_ENTERED")
  .setData(data);

BatchUpdateValuesResponse batchResult = sheetsService.spreadsheets().values()
  .batchUpdate(SPREADSHEET_ID, batchBody)
  .execute();

In this example, we’re first building a list of ValueRanges, each made up of two cells that represent the name of the month and the total expenses.

Then, we’re creating a BatchUpdateValuesRequest with the input option “USER_ENTERED”, as opposed to “RAW”, meaning the cell values will be computed based on the formula of adding two other cells.

Finally, we’re creating and sending the batchUpdate request. As a result, the ranges “D1:E1” and “D4:E4” will be updated.

5.3. Appending Data After a Table

Another way of writing values in a sheet is by appending them at the end of a table.

For this, we can use the append() method:

ValueRange appendBody = new ValueRange()
  .setValues(Arrays.asList(
    Arrays.asList("Total", "=E1+E4")));
AppendValuesResponse appendResult = sheetsService.spreadsheets().values()
  .append(SPREADSHEET_ID, "A1", appendBody)
  .setValueInputOption("USER_ENTERED")
  .setInsertDataOption("INSERT_ROWS")
  .setIncludeValuesInResponse(true)
  .execute();
        
ValueRange total = appendResult.getUpdates().getUpdatedData();
assertThat(total.getValues().get(0).get(1)).isEqualTo("65");

First, we’re building the ValueRange object containing the cell values we want to add.

In our case, this contains a cell with the total expenses for both months that we find by adding the “E1” and “E2” cell values.

Then, we’re creating a request that will append the data after the table containing the “A1” cell.

The INSERT_ROWS option means that we want the data to be added to a new row, and not replace any existing data after the table. This means the example will write the range “A7:B7” in its first run.

On subsequent runs, the table that starts at the “A1” cell will now stretch to include the “A7:B7”  row, so a new row goes to the “A8:B8” row, and so on.

We also need to set the includeValuesInResponse property to true if we want to verify the response to a requestAs a result, the response object will contain the updated data.

6. Reading Values from a Sheet

Let’s verify that our values were written correctly by reading them from the sheet.

We can do this by using the spreadsheets().values().get() method to read a single range or the batchUpdate() method to read multiple ranges:

List<String> ranges = Arrays.asList("E1","E4");
BatchGetValuesResponse readResult = sheetsService.spreadsheets().values()
  .batchGet(SPREADSHEET_ID)
  .setRanges(ranges)
  .execute();
        
ValueRange januaryTotal = readResult.getValueRanges().get(0);
assertThat(januaryTotal.getValues().get(0).get(0))
  .isEqualTo("40");

ValueRange febTotal = readResult.getValueRanges().get(1);
assertThat(febTotal.getValues().get(0).get(0))
  .isEqualTo("25");

Here, we’re reading the ranges “E1” and “E4” and verifying that they contain the total for each month that we wrote before.

7. Creating New Spreadsheets

Besides reading and updating values, we can also manipulate sheets or entire spreadsheets by using spreadsheets() and spreadsheets().sheets() collections.

Let’s see an example of creating a new spreadsheet:

@Test
public void test() throws IOException {
    Spreadsheet spreadSheet = new Spreadsheet().setProperties(
      new SpreadsheetProperties().setTitle("My Spreadsheet"));
    Spreadsheet result = sheetsService
      .spreadsheets()
      .create(spreadSheet).execute();
        
    assertThat(result.getSpreadsheetId()).isNotNull();   
}

Here, we’re first creating a Spreadsheet object with the title “My Spreadsheet” then building and sending a request using the create() and execute() methods.

The new spreadsheet will be private and placed in the signed-in user’s Drive.

8. Other Updating Operations

Most other operations take the form of a Request object, which we then add to a list and use to build a BatchUpdateSpreadsheetRequest.

Let’s see how we can send two requests to change the title of a spreadsheet and copy-paste a set of cells from one sheet to another:

@Test
public void whenUpdateSpreadSheetTitle_thenOk() throws IOException {
    UpdateSpreadsheetPropertiesRequest updateSpreadSheetRequest 
      = new UpdateSpreadsheetPropertiesRequest().setFields("*")
      .setProperties(new SpreadsheetProperties().setTitle("Expenses"));
                
    CopyPasteRequest copyRequest = new CopyPasteRequest()
      .setSource(new GridRange().setSheetId(0)
        .setStartColumnIndex(0).setEndColumnIndex(2)
        .setStartRowIndex(0).setEndRowIndex(1))
      .setDestination(new GridRange().setSheetId(1)
        .setStartColumnIndex(0).setEndColumnIndex(2)
        .setStartRowIndex(0).setEndRowIndex(1))
      .setPasteType("PASTE_VALUES");
        
    List<Request> requests = new ArrayList<>();
    requests.add(new Request()
      .setCopyPaste(copyRequest));
    requests.add(new Request()
      .setUpdateSpreadsheetProperties(updateSpreadSheetRequest));
        
    BatchUpdateSpreadsheetRequest body 
      = new BatchUpdateSpreadsheetRequest().setRequests(requests);
        
    sheetsService.spreadsheets().batchUpdate(SPREADSHEET_ID, body).execute();
}

Here, we’re creating an UpdateSpreadSheetPropertiesRequest object which specifies the new title, a CopyPasteRequest object which contains the source and destination of the operation and then adding these objects to a List of Requests.

Then, we’re executing both requests as a batch update.

Many other types of requests are available to use in a similar manner. For example, we can create a new sheet in a spreadsheet with an AddSheetRequest or alter values with a FindReplaceRequest.

We can perform other operations such as changing borders, adding filters or merging cells. The full list of Request types is available here.

9. Conclusion

In this article, we’ve seen how we can connect to the Google Sheets API from a Java application and a few examples of manipulating documents stored in Google Sheets.

The full source code of the examples can be found over on GitHub.

A Guide to Transactions Across Microservices

$
0
0

1. Introduction

In this article, we’ll discuss options to implement a transaction across microservices.

We’ll also check out some alternatives to transactions in a distributed microservice scenario.

2. Avoiding Transactions Across Microservices

A distributed transaction is a very complex process with a lot of moving parts that can fail. Also, if these parts run on different machines or even in different data centers, the process of committing a transaction could become very long and unreliable.

This could seriously affect the user experience and overall system bandwidth. So one of the best ways to solve the problem of distributed transactions is to avoid them completely.

2.1. Example of Architecture Requiring Transactions

Usually, a microservice is designed in such way as to be independent and useful on its own. It should be able to solve some atomic business task.

If we could split our system in such microservices, there’s a good chance we wouldn’t need to implement transactions between them at all.

For example, let’s consider a system of broadcast messaging between users.

The user microservice would be concerned with the user profile (creating a new user, editing profile data etc.) with the following underlying domain class:

@Entity
public class User implements Serializable {

    @Id
    @GeneratedValue(strategy = GenerationType.AUTO)
    private long id;

    @Basic
    private String name;

    @Basic
    private String surname;

    @Basic
    private Instant lastMessageTime;
}

The message microservice would be concerned with broadcasting. It encapsulates the entity Message and everything around it:

@Entity
public class Message implements Serializable {

    @Id
    @GeneratedValue(strategy = GenerationType.AUTO)
    private long id;

    @Basic
    private long userId;

    @Basic
    private String contents;

    @Basic
    private Instant messageTimestamp;

}

Each microservice has its own database. Notice that we don’t refer to the entity User from the entity Message, as the user classes aren’t accessible from the message microservice. We refer to the user only by id.

Now the User entity contains the lastMessageTime field because we want to show the information about the last user activity time in her profile.

However, to add a new message to the user and update her lastMessageTime, we’d now have to implement a transaction across microservices.

2.2. Alternative Approach without Transactions

We can alter our microservice architecture and remove the field lastMessageTime from the User entity.

Then we could display this time in the user profile by issuing a separate request to the messages microservice and finding the maximum messageTimestamp value for all messages of this user.

Probably, if the message microservice is under high load or even down, we won’t be able to show the time of the last message of the user in her profile.

But that could be more acceptable than failing to commit a distributed transaction to save a message just because the user microservice didn’t respond in time.

There are of course more complex scenarios when we have to implement a business process across multiple microservices, and we don’t want to allow inconsistency between those microservices.

3. Two-Phase Commit Protocol

Two-phase commit protocol (or 2PC) is a mechanism for implementing a transaction across different software components (multiple databases, message queues etc.)

3.1. The Architecture of 2PC

One of the important participants in a distributed transaction is the transaction coordinator. The distributed transaction consists of two steps:

  • Prepare phase — during this phase, all participants of the transaction prepare for commit and notify the coordinator that they are ready to complete the transaction
  • Commit or Rollback phase — during this phase, either a commit or a rollback command is issued by the transaction coordinator to all participants

The problem with 2PC is that it is quite slow compared to the time for operation of a single microservice.

Coordinating the transaction between microservices, even if they are on the same network, can really slow the system down, so this approach isn’t usually used in a high load scenario.

3.2. XA Standard

The XA standard is a specification for conducting the 2PC distributed transactions across the supporting resources. Any JTA-compliant application server (JBoss, GlassFish etc.) supports it out-of-the-box.

The resources participating in a distributed transactions could be, for example, two databases of two different microservices.

However, to take advantage of this mechanism, the resources have to be deployed to a single JTA platform. This isn’t always feasible for a microservice architecture.

3.3. REST-AT Standard Draft

Another proposed standard is REST-AT which had undergone some development by RedHat but still didn’t get out of the draft stage. It’s however supported by the WildFly application server out-of-the-box.

This standard allows using the application server as a transaction coordinator with a specific REST API for creating and joining the distributed transactions.

The RESTful web services that wish to participate in the two-phase transaction also have to support a specific REST API.

Unfortunately, to bridge a distributed transaction to local resources of the microservice, we’d still have to either deploy these resources to a single JTA platform or solve a non-trivial task of writing this bridge ourselves.

4. Eventual Consistency and Compensation

By far, one of the most feasible models of handling consistency across microservices is eventual consistency.

This model doesn’t enforce distributed ACID transactions across microservices. Instead, it proposes to use some mechanisms of ensuring that the system would be eventually consistent at some point in the future.

4.1. A Case for Eventual Consistency

For example, suppose we need to solve the following task:

  • register a user profile
  • do some automated background check that the user can actually access the system

The second task is to ensure, for example, that this user wasn’t banned from our servers for some reason.

But it could take time, and we’d like to extract it to a separate microservice. It wouldn’t be reasonable to keep the user waiting for so long just to know that she was registered successfully.

One way to solve it would be with a message-driven approach including compensation. Let’s consider the following architecture:

  • the user microservice tasked with registering a user profile
  • the validation microservice tasked with doing a background check
  • the messaging platform that supports persistent queues

The messaging platform could ensure that the messages sent by the microservices are persisted. Then they would be delivered at a later time if the receiver weren’t currently available

4.2. Happy Scenario

In this architecture, a happy scenario would be:

  • the user microservice registers a user, saving information about her in its local database
  • the user microservice marks this user with a flag. It could signify that this user hasn’t yet been validated and doesn’t have access to full system functionality
  • a confirmation of registration is sent to the user with a warning that not all functionality of the system is accessible right away
  • the user microservice sends a message to the validation microservice to do the background check of a user
  • the validation microservice runs the background check and sends a message to the user microservice with the results of the check
    • if the results are positive, the user microservice unblocks the user
    • if the results are negative, the user microservice deletes the user account

After we’ve gone through all these steps, the system should be in a consistent state. However, for some period of time, the user entity appeared to be in an incomplete state.

The last step, when the user microservice removes the invalid account, is a compensation phase.

4.3. Failure Scenarios

Now let’s consider some failure scenarios:

  • if the validation microservice is not accessible, then the messaging platform with its persistent queue functionality ensures that the validation microservice would receive this message at some later time
  • suppose the messaging platform fails, then the user microservice tries to send the message again at some later time, for example, by scheduled batch-processing of all users that were not yet validated
  • if the validation microservice receives the message, validates the user but can’t send the answer back due to the messaging platform failure, the validation microservice also retries sending the message at some later time
  • if one of the messages got lost, or some other failure happened, the user microservice finds all non-validated users by scheduled batch-processing and sends requests for validation again

Even if some of the messages were issued multiple times, this wouldn’t affect the consistency of the data in the microservices’ databases.

By carefully considering all possible failure scenarios, we can ensure that our system would satisfy the conditions of eventual consistency. At the same time, we wouldn’t need to deal with the costly distributed transactions.

But we have to be aware that ensuring eventual consistency is a complex task. It doesn’t have a single solution for all cases.

5. Conclusion

In this article, we’ve discussed some of the mechanisms for implementing transactions across microservices.

And, we’ve also explored some alternatives to doing this style of transactions in the first place.

Introduction to Dubbo

$
0
0

1. Introduction

Dubbo is an open-source RPC and microservice framework from Alibaba.

Among other things, it helps enhance service governance and makes it possible for a traditional monolith applications to be refactored smoothly to a scalable distributed architecture.

In this article, we’ll give an introduction to Dubbo and its most important features.

2. Architecture

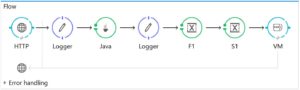
Dubbo distinguishes a few roles:

  1. Provider – where service is exposed; a provider will register its service to registry
  2. Container – where the service is initiated, loaded and run
  3. Consumer – who invokes remote services; a consumer will subscribe to the service needed in the registry
  4. Registry – where service will be registered and discovered
  5. Monitor – record statistics for services, for example, frequency of service invocation in a given time interval

(source: http://dubbo.io/images/dubbo-architecture.png)

Connections between a provider, a consumer and a registry are persistent, so whenever a service provider is down, the registry can detect the failure and notify the consumers.

The registry and monitor are optional. Consumers could connect directly to service providers, but the stability of the whole system would be affected.

3. Maven Dependency

Before we dive in, let’s add the following dependency to our pom.xml:

<dependency>
    <groupId>com.alibaba</groupId>
    <artifactId>dubbo</artifactId>
    <version>2.5.7</version>
</dependency>

The latest version can be found here.

4. Bootstrapping

Now let’s try out the basic features of Dubbo.

This is a minimally invasive framework, and lots of its features depend on external configurations or annotations.

It’s officially suggested that we should use XML configuration file because it depends on a Spring container (currently Spring 4.3.10).

We’ll demonstrate most of its features using XML configuration.

4.1. Multicast Registry – Service Provider

As a quick start, we’ll only need a service provider, a consumer and an “invisible” registry. The registry is invisible because we are using a multicast network.

In the following example, the provider only says “hi” to its consumers:

public interface GreetingsService {
    String sayHi(String name);
}

public class GreetingsServiceImpl implements GreetingsService {

    @Override
    public String sayHi(String name) {
        return "hi, " + name;
    }
}

To make a remote procedure call, the consumer must share a common interface with the service provider, thus the interface GreetingsService must be shared with the consumer.

4.2. Multicast Registry – Service Registration

Let’s now register GreetingsService to the registry. A very convenient way is to use a multicast registry if both providers and consumers are on the same local network:

<dubbo:application name="demo-provider" version="1.0"/>
<dubbo:registry address="multicast://224.1.1.1:9090"/>
<dubbo:protocol name="dubbo" port="20880"/>
<bean id="greetingsService" class="com.baeldung.dubbo.remote.GreetingsServiceImpl"/>
<dubbo:service interface="com.baeldung.dubbo.remote.GreetingsService"
  ref="greetingsService"/>

With the beans configuration above, we have just exposed our GreetingsService to an url under dubbo://127.0.0.1:20880 and registered the service to a multicast address specified in <dubbo:registry />.

In the provider’s configuration, we also declared our application metadata, the interface to publish and its implementation respectively by <dubbo:application />, <dubbo:service /> and <beans />.

The dubbo protocol is one of many protocols the framework supports. It is built on top of the Java NIO non-blocking feature and it’s the default protocol used.

We’ll discuss it in more detail later in this article.

4.3. Multicast Registry – Service Consumer

Generally, the consumer needs to specify the interface to invoke and the address of remote service, and that’s exactly what’s needed for a consumer:

<dubbo:application name="demo-consumer" version="1.0"/>
<dubbo:registry address="multicast://224.1.1.1:9090"/>
<dubbo:reference interface="com.baeldung.dubbo.remote.GreetingsService"
  id="greetingsService"/>

Now everything’s set up, let’s see how they work in action:

public class MulticastRegistryTest {

    @Before
    public void initRemote() {
        ClassPathXmlApplicationContext remoteContext
          = new ClassPathXmlApplicationContext("multicast/provider-app.xml");
        remoteContext.start();
    }

    @Test
    public void givenProvider_whenConsumerSaysHi_thenGotResponse(){
        ClassPathXmlApplicationContext localContext 
          = new ClassPathXmlApplicationContext("multicast/consumer-app.xml");
        localContext.start();
        GreetingsService greetingsService
          = (GreetingsService) localContext.getBean("greetingsService");
        String hiMessage = greetingsService.sayHi("baeldung");

        assertNotNull(hiMessage);
        assertEquals("hi, baeldung", hiMessage);
    }
}

When the provider’s remoteContext starts, Dubbo will automatically load GreetingsService and register it to a given registry. In this case, it’s a multicast registry.

The consumer subscribes to the multicast registry and creates a proxy of GreetingsService in the context. When our local client invokes the sayHi method, it’s transparently invoking a remote service.

We mentioned that the registry is optional, meaning that the consumer could connect directly to the provider, via the exposed port:

<dubbo:reference interface="com.baeldung.dubbo.remote.GreetingsService"
  id="greetingsService" url="dubbo://127.0.0.1:20880"/>

Basically, the procedure is similar to traditional web service, but Dubbo just makes it plain, simple and lightweight.

4.4. Simple Registry

Note that when using an “invisible” multicast registry, the registry service is not standalone. However, it’s only applicable to a restricted local network.

To explicitly set up a manageable registry, we can use a SimpleRegistryService.

After loading the following beans configuration into Spring context, a simple registry service is started:

<dubbo:application name="simple-registry" />
<dubbo:protocol port="9090" />
<dubbo:service interface="com.alibaba.dubbo.registry.RegistryService"
  ref="registryService" registry="N/A" ondisconnect="disconnect">
    <dubbo:method name="subscribe">
        <dubbo:argument index="1" callback="true" />
    </dubbo:method>
    <dubbo:method name="unsubscribe">
        <dubbo:argument index="1" callback="true" />
    </dubbo:method>
</dubbo:service>

<bean class="com.alibaba.dubbo.registry.simple.SimpleRegistryService"
  id="registryService" />

Note that the SimpleRegistryService class is not contained in the artifact, so we copied the source code directly from the Github repository.

Then we shall adjust the registry configuration of the provider and consumer:

<dubbo:registry address="127.0.0.1:9090"/>

SimpleRegistryService can be used as a standalone registry when testing, but it is not advised to be used in production environment.

4.5. Java Configuration

Configuration via Java API, property file, and annotations are also supported. However, property file and annotations are only applicable if our architecture isn’t very complex.

Let’s see how our previous XML configurations for multicast registry can be translated into API configuration. First, the provider is set up as follows:

ApplicationConfig application = new ApplicationConfig();
application.setName("demo-provider");
application.setVersion("1.0");

RegistryConfig registryConfig = new RegistryConfig();
registryConfig.setAddress("multicast://224.1.1.1:9090");

ServiceConfig<GreetingsService> service = new ServiceConfig<>();
service.setApplication(application);
service.setRegistry(registryConfig);
service.setInterface(GreetingsService.class);
service.setRef(new GreetingsServiceImpl());

service.export();

Now that the service is already exposed via the multicast registry, let’s consume it in a local client:

ApplicationConfig application = new ApplicationConfig();
application.setName("demo-consumer");
application.setVersion("1.0");

RegistryConfig registryConfig = new RegistryConfig();
registryConfig.setAddress("multicast://224.1.1.1:9090");

ReferenceConfig<GreetingsService> reference = new ReferenceConfig<>();
reference.setApplication(application);
reference.setRegistry(registryConfig);
reference.setInterface(GreetingsService.class);

GreetingsService greetingsService = reference.get();
String hiMessage = greetingsService.sayHi("baeldung");

Though the snippet above works like a charm as the previous XML configuration example, it is a little more trivial. For the time being, XML configuration should be the first choice if we intend to make full use of Dubbo.

5. Protocol Support

The framework supports multiple protocols, including dubbo, RMI, hessian, HTTP, web service, thrift, memcached and redis. Most of the protocols looks familiar, except for dubbo. Let’s see what’s new in this protocol.

The dubbo protocol keeps a persistent connection between providers and consumers. The long connection and NIO non-blocking network communication result in a fairly great performance while transmitting small-scale data packets (<100K).

There are several configurable properties, such as port, number of connections per consumer, maximum accepted connections, etc.

<dubbo:protocol name="dubbo" port="20880"
  connections="2" accepts="1000" />

Dubbo also supports exposing services via different protocols all at once:

<dubbo:protocol name="dubbo" port="20880" />
<dubbo:protocol name="rmi" port="1099" />

<dubbo:service interface="com.baeldung.dubbo.remote.GreetingsService"
  version="1.0.0" ref="greetingsService" protocol="dubbo" />
<dubbo:service interface="com.bealdung.dubbo.remote.AnotherService"
  version="1.0.0" ref="anotherService" protocol="rmi" />

And yes, we can expose different services using different protocols, as shown in the snippet above. The underlying transporters, serialization implementations and other common properties relating to networking are configurable as well.

6. Result Caching

Natively remote result caching is supported to speed up access to hot data. It’s as simple as adding a cache attribute to the bean reference:

<dubbo:reference interface="com.baeldung.dubbo.remote.GreetingsService"
  id="greetingsService" cache="lru" />

Here we configured a least-recently-used cache. To verify the caching behavior, we’ll change a bit in the previous standard implementation (let’s call it “special implementation”):

public class GreetingsServiceSpecialImpl implements GreetingsService {
    @Override
    public String sayHi(String name) {
        try {
            SECONDS.sleep(5);
        } catch (Exception ignored) { }
        return "hi, " + name;
    }
}

After starting up provider, we can verify on the consumer’s side, that the result is cached when invoking more than once:

@Test
public void givenProvider_whenConsumerSaysHi_thenGotResponse() {
    ClassPathXmlApplicationContext localContext
      = new ClassPathXmlApplicationContext("multicast/consumer-app.xml");
    localContext.start();
    GreetingsService greetingsService
      = (GreetingsService) localContext.getBean("greetingsService");

    long before = System.currentTimeMillis();
    String hiMessage = greetingsService.sayHi("baeldung");

    long timeElapsed = System.currentTimeMillis() - before;
    assertTrue(timeElapsed > 5000);
    assertNotNull(hiMessage);
    assertEquals("hi, baeldung", hiMessage);

    before = System.currentTimeMillis();
    hiMessage = greetingsService.sayHi("baeldung");
    timeElapsed = System.currentTimeMillis() - before;
 
    assertTrue(timeElapsed < 1000);
    assertNotNull(hiMessage);
    assertEquals("hi, baeldung", hiMessage);
}

Here the consumer is invoking the special service implementation, so it took more than 5 seconds for the invocation to complete the first time. When we invoke again, the sayHi method completes almost immediately, as the result is returned from the cache.

Note that thread-local cache and JCache are also supported.

7. Cluster Support

Dubbo helps us scale up our services freely with its ability of load balancing and several fault tolerance strategies. Here, let’s assume we have Zookeeper as our registry to manage services in a cluster. Providers can register their services in Zookeeper like this:

<dubbo:registry address="zookeeper://127.0.0.1:2181"/>

Note that we need these additional dependencies in the POM:

<dependency>
    <groupId>org.apache.zookeeper</groupId>
    <artifactId>zookeeper</artifactId>
    <version>3.4.11</version>
</dependency>
<dependency>
    <groupId>com.101tec</groupId>
    <artifactId>zkclient</artifactId>
    <version>0.10</version>
</dependency>

The latest versions of zookeeper dependency and zkclient can be found here and here.

7.1. Load Balancing

Currently, the framework supports a few load-balancing strategies:

  • random
  • round-robin
  • least-active
  • consistent-hash.

In the following example, we have two service implementations as providers in a cluster. The requests are routed using the round-robin approach.

First, let’s set up service providers:

@Before
public void initRemote() {
    ExecutorService executorService = Executors.newFixedThreadPool(2);
    executorService.submit(() -> {
        ClassPathXmlApplicationContext remoteContext 
          = new ClassPathXmlApplicationContext("cluster/provider-app-default.xml");
        remoteContext.start();
    });
    executorService.submit(() -> {
        ClassPathXmlApplicationContext backupRemoteContext
          = new ClassPathXmlApplicationContext("cluster/provider-app-special.xml");
        backupRemoteContext.start();
    });
}

Now we have a standard “fast provider” that responds immediately, and a special “slow provider” who sleeps for 5 seconds on every request.

After running 6 times with the round-robin strategy, we expect the average response time to be at least 2.5 seconds:

@Test
public void givenProviderCluster_whenConsumerSaysHi_thenResponseBalanced() {
    ClassPathXmlApplicationContext localContext
      = new ClassPathXmlApplicationContext("cluster/consumer-app-lb.xml");
    localContext.start();
    GreetingsService greetingsService
      = (GreetingsService) localContext.getBean("greetingsService");

    List<Long> elapseList = new ArrayList<>(6);
    for (int i = 0; i < 6; i++) {
        long current = System.currentTimeMillis();
        String hiMessage = greetingsService.sayHi("baeldung");
        assertNotNull(hiMessage);
        elapseList.add(System.currentTimeMillis() - current);
    }

    OptionalDouble avgElapse = elapseList
      .stream()
      .mapToLong(e -> e)
      .average();
    assertTrue(avgElapse.isPresent());
    assertTrue(avgElapse.getAsDouble() > 2500.0);
}

Moreover, dynamic load balancing is adopted. The next example demonstrates that, with round-robin strategy, the consumer automatically chooses the new service provider as a candidate when the new provider comes online.

The “slow provider” is registered 2 seconds later after the system starts:

@Before
public void initRemote() {
    ExecutorService executorService = Executors.newFixedThreadPool(2);
    executorService.submit(() -> {
        ClassPathXmlApplicationContext remoteContext
          = new ClassPathXmlApplicationContext("cluster/provider-app-default.xml");
        remoteContext.start();
    });
    executorService.submit(() -> {
        SECONDS.sleep(2);
        ClassPathXmlApplicationContext backupRemoteContext
          = new ClassPathXmlApplicationContext("cluster/provider-app-special.xml");
        backupRemoteContext.start();
        return null;
    });
}

The consumer invokes the remote service once per second. After running 6 times, we expect the average response time to be greater than 1.6 seconds:

@Test
public void givenProviderCluster_whenConsumerSaysHi_thenResponseBalanced()
  throws InterruptedException {
    ClassPathXmlApplicationContext localContext
      = new ClassPathXmlApplicationContext("cluster/consumer-app-lb.xml");
    localContext.start();
    GreetingsService greetingsService
      = (GreetingsService) localContext.getBean("greetingsService");
    List<Long> elapseList = new ArrayList<>(6);
    for (int i = 0; i < 6; i++) {
        long current = System.currentTimeMillis();
        String hiMessage = greetingsService.sayHi("baeldung");
        assertNotNull(hiMessage);
        elapseList.add(System.currentTimeMillis() - current);
        SECONDS.sleep(1);
    }

    OptionalDouble avgElapse = elapseList
      .stream()
      .mapToLong(e -> e)
      .average();
 
    assertTrue(avgElapse.isPresent());
    assertTrue(avgElapse.getAsDouble() > 1666.0);
}

Note that the load balancer can be configured both on the consumer’s side and on the provider’s side. Here’s an example of consumer-side configuration:

<dubbo:reference interface="com.baeldung.dubbo.remote.GreetingsService"
  id="greetingsService" loadbalance="roundrobin" />

7.2. Fault Tolerance

Several fault tolerance strategies are supported in Dubbo, including:

  • fail-over
  • fail-safe
  • fail-fast
  • fail-back
  • forking.

In the case of fail-over, when one provider fails, the consumer can try with some other service providers in the cluster.

The fault tolerance strategies are configured like the following for service providers:

<dubbo:service interface="com.baeldung.dubbo.remote.GreetingsService"
  ref="greetingsService" cluster="failover"/>

To demonstrate service fail-over in action, let’s create a fail-over implementation of GreetingsService:

public class GreetingsFailoverServiceImpl implements GreetingsService {

    @Override
    public String sayHi(String name) {
        return "hi, failover " + name;
    }
}

We can recall that our special service implementation GreetingsServiceSpecialImpl sleeps 5 seconds for each request.

When any response that takes more than 2 seconds is seen as a request failure for the consumer, we have a fail-over scenario:

<dubbo:reference interface="com.baeldung.dubbo.remote.GreetingsService"
  id="greetingsService" retries="2" timeout="2000" />

After starting two providers, we can verify the fail-over behavior with the following snippet:

@Test
public void whenConsumerSaysHi_thenGotFailoverResponse() {
    ClassPathXmlApplicationContext localContext
      = new ClassPathXmlApplicationContext(
      "cluster/consumer-app-failtest.xml");
    localContext.start();
    GreetingsService greetingsService
      = (GreetingsService) localContext.getBean("greetingsService");
    String hiMessage = greetingsService.sayHi("baeldung");

    assertNotNull(hiMessage);
    assertEquals("hi, failover baeldung", hiMessage);
}

8. Summary

In this tutorial, we took a small bite of Dubbo. Most users are attracted by its simplicity and rich and powerful features.

Aside from what we introduced in this article, the framework has a number of features yet to be explored, such as parameter validation, notification and callback, generalized implementation and reference, remote result grouping and merging, service upgrade and backward compatibility, to name just a few.

As always, the full implementation can be found over on Github.


A Guide to Inner Interfaces in Java

$
0
0

1. Introduction

In this short tutorial, we’ll be looking at inner interfaces in Java. They are mainly used for:

  • solving the namespacing issue when the interface has a common name
  • increasing encapsulation
  • increasing readability by grouping related interfaces in one place

A well-known example is the Entry interface which is declared inside the Map interface. Defined this way, the interface isn’t in global scope, and it’s referenced as Map.Entry differentiating it from other Entry interfaces and making its relation to Map obvious.

2. Inner Interfaces

By definition, declaration of an inner interface occurs in the body of another interface or class.

They are implicitly public and static as well as their fields when declared in another interface ( similar to field declarations in top-level interfaces), and they can be implemented anywhere:

public interface Customer {
    // ...
    interface List {
        // ...
    }
}

Inner interfaces declared within another class are also static, but they can have access specifiers which can constrain where they can be implemented:

public class Customer {
    public interface List {
        void add(Customer customer);
        String getCustomerNames();
    }
    // ...
}

In the example above, we have a List interface which will serve as declaring some operations on list of Customers such as adding new ones, getting a String representation and so on.

List is a prevalent name, and to work with other libraries defining this interface, we need to separate our declaration, i.e., namespace it.

This is where we make use of an inner interface if we don’t want to go with a new name like CustomerList.

We also kept two related interfaces together which improves encapsulation.

Finally, we can continue with an implementation of it:

public class CommaSeparatedCustomers implements Customer.List {
    // ...
}

3. Conclusion

We had a quick look at inner interfaces in Java.

As always, code samples can be found over on GitHub.

Creating a Custom Logback Appender

$
0
0

1. Introduction

In this article, we’ll explore creating a custom Logback appender. If you are looking for the introduction to logging in Java, please take a look at this article.

Logback ships with many built-in appenders that write to standard out, file system, or database. The beauty of this framework’s architecture is its modularity, which means we can easily customize it.

In this tutorial, we’ll focus on logback-classic, which requires the following Maven dependency:

<dependency>
    <groupId>ch.qos.logback</groupId>
    <artifactId>logback-classic</artifactId>
    <version>1.2.3</version>
</dependency>

The latest version of this dependency is available on Maven Central.

2. Base Logback Appenders

Logback provides base classes we can extend to create a custom appender.

Appender is the generic interface that all appenders must implement. The generic type is either ILoggingEvent or AccessEvent, depending on if we’re using logback-classic or logback-access, respectively.

Our custom appender should extend either AppenderBase or UnsynchronizedAppenderBase, which both implement Appender and handle functions such as filters and status messages.

AppenderBase is thread-safe; UnsynchronizedAppenderBase subclasses are responsible for managing their thread safety.

Just as the ConsoleAppender and the FileAppender both extend OutputStreamAppender and call the super method setOutputStream(), the custom appender should subclass OutputStreamAppender if it is writing to an OutputStream.

3. Custom Appender

For our custom example, we’ll create a toy appender named MapAppender. This appender will insert all logging events into a ConcurrentHashMap, with the timestamp for the key. To begin, we’ll subclass AppenderBase and use ILoggingEvent as the generic type:

public class MapAppender extends AppenderBase<ILoggingEvent> {

    private ConcurrentMap<String, ILoggingEvent> eventMap 
      = new ConcurrentHashMap<>();

    @Override
    protected void append(ILoggingEvent event) {
        eventMap.put(System.currentTimeMillis(), event);
    }
    
    public Map<String, ILoggingEvent> getEventMap() {
        return eventMap;
    }
}

Next, to enable the MapAppender to start receiving logging events, let’s add it as an appender in our configuration file logback.xml:

<configuration>
    <appender name="map" class="com.baeldung.logback.MapAppender"/>
    <root level="info">
        <appender-ref ref="map"/>
    </root>
</configuration>

4. Setting Properties

Logback uses JavaBeans introspection to analyze properties set on the appender. Our custom appender will need getter and setter methods to allow the introspector to find and set these properties.

Let’s add a property to MapAppender that gives the eventMap a prefix for its key:

public class MapAppender extends AppenderBase<ILoggingEvent> {

    //...

    private String prefix;

    @Override
    protected void append(ILoggingEvent event) {
        eventMap.put(prefix + System.currentTimeMillis(), event);
    }

    public String getPrefix() {
        return prefix;
    }

    public void setPrefix(String prefix) {
        this.prefix = prefix;
    }

    //...

}

Next, add a property to our configuration to set this prefix:

<configuration debug="true">

    <appender name="map" class="com.baeldung.logback.MapAppender">
        <prefix>test</prefix>
    </appender>

    //...

</configuration>

5. Error Handling

To handle errors during the creation and configuration of our custom appender, we can use methods inherited from AppenderBase.

For example, when the prefix property is a null or an empty string, the MapAppender can call addError() and return early:

public class MapAppender extends AppenderBase<ILoggingEvent> {

    //...

    @Override
    protected void append(final ILoggingEvent event) {
        if (prefix == null || "".equals(prefix)) {
            addError("Prefix is not set for MapAppender.");
            return;
        }

        eventMap.put(prefix + System.currentTimeMillis(), event);
    }

    //...

}

When the debug flag is turned on in our configuration, we’ll see an error in the console that alerts us that the prefix property has not been set:

<configuration debug="true">

    //...

</configuration>

6. Conclusion

In this quick tutorial, we focused on how to implement our custom appender for Logback.

As usual, the example can be found over on Github.

Introduction to Apache Lucene

$
0
0

1. Overview

Apache Lucene is a full-text search engine which can be used from various programming languages.

In this article, we’ll try to understand the core concepts of the library and create a simple application.

2. Maven Setup

To get started, let’s add necessary dependencies first:

<dependency>        
    <groupId>org.apache.lucene</groupId>          
    <artifactId>lucene-core</artifactId>
    <version>7.1.0</version>
</dependency>

The latest version can be found here.

Also, for parsing our search queries, we’ll need:

<dependency>
    <groupId>org.apache.lucene</groupId>
    <artifactId>lucene-queryparser</artifactId>
    <version>7.1.0</version>
</dependency>

Check for the latest version here.

3. Core Concepts

3.1. Indexing

Simply put, Lucene uses an “inverted indexing” of data – instead of mapping pages to keywords, it maps keywords to pages just like a glossary at the end of any book.

This allows for faster search responses, as it searches through an index, instead of searching through text directly.

3.2. Documents

Here, a document is a collection of fields, and each field has a value associated with it.

Indices are typically made up of one or more documents, and search results are sets of best-matching documents.

It isn’t always a plain text document, it could also be a database table or a collection.

3.3. Fields

Documents can have field data, where a field is typically a key holding a data value:

title: Goodness of Tea
body: Discussing goodness of drinking herbal tea...

Notice that here title and body are fields and could be searched for together or individually.

3.4. Analysis

An analysis is converting the given text into smaller and precise units for easy the sake of searching.

The text goes through various operations of extracting keywords, removing common words and punctuations, changing words to lower case, etc.

For this purpose, there are multiple built-in analyzers:

  1. StandardAnalyzer – analyses based on basic grammar, removes stop words like “a”, “an” etc. Also converts in lowercase
  2. SimpleAnalyzer – breaks the text based on no-letter character and converts in lowercase
  3. WhiteSpaceAnalyzer – breaks the text based on white spaces

There’re more analyzers available for us to use and customize as well.

3.5. Searching

Once an index is built, we can search that index using a Query and an IndexSearcher. The search result is typically a result set, containing the retrieved data.

Note that an IndexWritter is responsible for creating the index and an IndexSearcher for searching the index.

3.6. Query Syntax

Lucene provides a very dynamic and easy to write query syntax.

To search a free text, we’d just use a text String as the query.

To search a text in a particular field, we’d use:

fieldName:text

eg: title:tea

Range searches:

timestamp:[1509909322,1572981321]

We can also search using wildcards:

dri?nk

would search for a single character in place of the wildcard “?”

d*k

searches for words starting with “d” and ending in “k”, with multiple characters in between.

uni*

will find words starting with “uni”.

We may also combine these queries and create more complex queries. And include logical operator like AND, NOT, OR:

title: "Tea in breakfast" AND "coffee"

More about query syntax here.

4. A Simple Application

Let’s create a simple application, and index some documents.

First, we’ll create an in-memory index, and add some documents to it:

...
Directory memoryIndex = new RAMDirectory();
StandardAnalyzer analyzer = new StandardAnalyzer();
IndexWriterConfig indexWriterConfig = new IndexWriterConfig(analyzer);
IndexWriter writter = new IndexWriter(memoryIndex, indexWriterConfig);
Document document = new Document();

document.add(new TextField("title", title, Field.Store.YES));
document.add(new TextField("body", body, Field.Store.YES));

writter.addDocument(document);
writter.close();

Here, we create a document with TextField and add them to the index using the IndexWriter. The third argument in the TextField constructor indicates whether the value of the field is also to be stored or not.

Analyzers are used to split the data or text into chunks, and then filter out the stop words from them. Stop words are words like ‘a’, ‘am’, ‘is’ etc. These completely depend on the given language.

Next, let’s create a search query and search the index for the added document:

public List<Document> searchIndex(String inField, String queryString) {
    Query query = new QueryParser(inField, analyzer)
      .parse(queryString);

    IndexReader indexReader = DirectoryReader.open(memoryIndex);
    IndexSearcher searcher = new IndexSearcher(indexReader);
    TopDocs topDocs = searcher.search(query, 10);
    List<Document> documents = new ArrayList<>();
    for (ScoreDoc scoreDoc : topDocs.scoreDocs) {
        documents.add(searcher.doc(scoreDoc.doc));
    }

    return documents;
}

In the search() method the second integer argument indicates how many top search results it should return.

Now let’s test it:

@Test
public void givenSearchQueryWhenFetchedDocumentThenCorrect() {
    InMemoryLuceneIndex inMemoryLuceneIndex 
      = new InMemoryLuceneIndex(new RAMDirectory(), new StandardAnalyzer());
    inMemoryLuceneIndex.indexDocument("Hello world", "Some hello world");
    
    List<Document> documents 
      = inMemoryLuceneIndex.searchIndex("body", "world");
    
    assertEquals(
      "Hello world", 
      documents.get(0).get("title"));
}

Here, we add a simple document to the index, with two fields ‘title’ and ‘body’, and then try to search the same using a search query.

6. Lucene Queries

As we are now comfortable with the basics of indexing and searching, let us dig a little deeper.

In earlier sections, we’ve seen the basic query syntax, and how to convert that into a Query instance using the QueryParser. 

Lucene provides various concrete implementations as well:

6.1. TermQuery

A Term is a basic unit for search, containing the field name together with the text to be searched for.

TermQuery is the simplest of all queries consisting of a single term:

@Test
public void givenTermQueryWhenFetchedDocumentThenCorrect() {
    InMemoryLuceneIndex inMemoryLuceneIndex 
      = new InMemoryLuceneIndex(new RAMDirectory(), new StandardAnalyzer());
    inMemoryLuceneIndex.indexDocument("activity", "running in track");
    inMemoryLuceneIndex.indexDocument("activity", "Cars are running on road");

    Term term = new Term("body", "running");
    Query query = new TermQuery(term);

    List<Document> documents = inMemoryLuceneIndex.searchIndex(query);
    assertEquals(2, documents.size());
}

6.2. PrefixQuery

To search a document with a “starts with” word:

@Test
public void givenPrefixQueryWhenFetchedDocumentThenCorrect() {
    InMemoryLuceneIndex inMemoryLuceneIndex 
      = new InMemoryLuceneIndex(new RAMDirectory(), new StandardAnalyzer());
    inMemoryLuceneIndex.indexDocument("article", "Lucene introduction");
    inMemoryLuceneIndex.indexDocument("article", "Introduction to Lucene");

    Term term = new Term("body", "intro");
    Query query = new PrefixQuery(term);

    List<Document> documents = inMemoryLuceneIndex.searchIndex(query);
    assertEquals(2, documents.size());
}

6.3. WildcardQuery

As the name suggests, we can use wildcards “*” or “?” for searching:

// ...
Term term = new Term("body", "intro*");
Query query = new WildcardQuery(term);
// ...

6.4. PhraseQuery

It’s used to search a sequence of texts in a document:

// ...
inMemoryLuceneIndex.indexDocument(
  "quotes", 
  "A rose by any other name would smell as sweet.");

Query query = new PhraseQuery(
  1, "body", new BytesRef("smell"), new BytesRef("sweet"));

List<Document> documents = inMemoryLuceneIndex.searchIndex(query);
// ...

Notice that the first argument of the PhraseQuery constructor is called slop, which is the distance in the number of words, between the terms to be matched.

6.5. FuzzyQuery

We can use this when searching for something similar, but not necessarily identical:

// ...
inMemoryLuceneIndex.indexDocument("article", "Halloween Festival");
inMemoryLuceneIndex.indexDocument("decoration", "Decorations for Halloween");

Term term = new Term("body", "hallowen");
Query query = new FuzzyQuery(term);

List<Document> documents = inMemoryLuceneIndex.searchIndex(query);
// ...

We tried searching for the text “Halloween”, but with miss-spelled “hallowen”.

6.6. BooleanQuery

Sometimes we might need to execute complex searches, combining two or more different types of queries:

// ...
inMemoryLuceneIndex.indexDocument("Destination", "Las Vegas singapore car");
inMemoryLuceneIndex.indexDocument("Commutes in singapore", "Bus Car Bikes");

Term term1 = new Term("body", "singapore");
Term term2 = new Term("body", "car");

TermQuery query1 = new TermQuery(term1);
TermQuery query2 = new TermQuery(term2);

BooleanQuery booleanQuery 
  = new BooleanQuery.Builder()
    .add(query1, BooleanClause.Occur.MUST)
    .add(query2, BooleanClause.Occur.MUST)
    .build();
// ...

7. Sorting Search Results

We may also sort the search results documents based on certain fields:

@Test
public void givenSortFieldWhenSortedThenCorrect() {
    InMemoryLuceneIndex inMemoryLuceneIndex 
      = new InMemoryLuceneIndex(new RAMDirectory(), new StandardAnalyzer());
    inMemoryLuceneIndex.indexDocument("Ganges", "River in India");
    inMemoryLuceneIndex.indexDocument("Mekong", "This river flows in south Asia");
    inMemoryLuceneIndex.indexDocument("Amazon", "Rain forest river");
    inMemoryLuceneIndex.indexDocument("Rhine", "Belongs to Europe");
    inMemoryLuceneIndex.indexDocument("Nile", "Longest River");

    Term term = new Term("body", "river");
    Query query = new WildcardQuery(term);

    SortField sortField 
      = new SortField("title", SortField.Type.STRING_VAL, false);
    Sort sortByTitle = new Sort(sortField);

    List<Document> documents 
      = inMemoryLuceneIndex.searchIndex(query, sortByTitle);
    assertEquals(4, documents.size());
    assertEquals("Amazon", documents.get(0).getField("title").stringValue());
}

We tried to sort the fetched documents by title fields, which are the names of the rivers. The boolean argument to the SortField constructor is for reversing the sort order.

8. Remove Documents from Index

Let’s try to remove some documents from the index based on a given Term:

// ...
IndexWriterConfig indexWriterConfig = new IndexWriterConfig(analyzer);
IndexWriter writer = new IndexWriter(memoryIndex, indexWriterConfig);
writer.deleteDocuments(term);
// ...

We’ll test this:

@Test
public void whenDocumentDeletedThenCorrect() {
    InMemoryLuceneIndex inMemoryLuceneIndex 
      = new InMemoryLuceneIndex(new RAMDirectory(), new StandardAnalyzer());
    inMemoryLuceneIndex.indexDocument("Ganges", "River in India");
    inMemoryLuceneIndex.indexDocument("Mekong", "This river flows in south Asia");

    Term term = new Term("title", "ganges");
    inMemoryLuceneIndex.deleteDocument(term);

    Query query = new TermQuery(term);

    List<Document> documents = inMemoryLuceneIndex.searchIndex(query);
    assertEquals(0, documents.size());
}

9. Conclusion

This article was a quick introduction to getting started with Apache Lucene. Also, we executed various queries and sorted the retrieved documents.

As always the code for the examples can be found over on Github.

Polymorphism in Java

$
0
0

1. Overview

All Object-Oriented Programming (OOP) languages are required to exhibit four basic characteristics: abstraction, encapsulation, inheritance, and polymorphism.

In this article, we cover two core types of polymorphism: static or compile-time polymorphism and dynamic or runtime polymorphism. Static polymorphism is enforced at compile time while dynamic polymorphism is realized at runtime.

2. Static Polymorphism

According to Wikipedia, static polymorphism is an imitation of polymorphism which is resolved at compile time and thus does away with run-time virtual-table lookups.

For example, our TextFile class in a file manager app can have three methods with the same signature of the read() method:

public class TextFile extends GenericFile {
    //...

    public String read() {
        return this.getContent()
          .toString();
    }

    public String read(int limit) {
        return this.getContent()
          .toString()
          .substring(0, limit);
    }

    public String read(int start, int stop) {
        return this.getContent()
          .toString()
          .substring(start, stop);
    }
}

During code compilation, the compiler verifies that all invocations of the read method correspond to at least one of the three methods defined above.

3. Dynamic Polymorphism

With dynamic polymorphism, the Java Virtual Machine (JVM) handles the detection of the appropriate method to execute when a subclass is assigned to its parent form. This is necessary because the subclass may override some or all of the methods defined in the parent class.

In a hypothetical file manager app, let’s define the parent class for all files called GenericFile:

public class GenericFile {
    private String name;

    //...

    public String getFileInfo() {
        return "Generic File Impl";
    }
}

We can also implement an ImageFile class which extends the GenericFile but overrides the getFileInfo() method and appends more information:

public class ImageFile extends GenericFile {
    private int height;
    private int width;

    //... getters and setters
    
    public String getFileInfo() {
        return "Image File Impl";
    }
}

When we create an instance of ImageFile and assign it to a GenericFile class, an implicit cast is done. However, the JVM keeps a reference to the actual form of ImageFile.

The above construct is analogous to method overriding. We can confirm this by invoking the getFileInfo() method by:

public static void main(String[] args) {
    GenericFile genericFile = new ImageFile("SampleImageFile", 200, 100, 
      new BufferedImage(100, 200, BufferedImage.TYPE_INT_RGB)
      .toString()
      .getBytes(), "v1.0.0");
    logger.info("File Info: \n" + genericFile.getFileInfo());
}

As expected, genericFile.getFileInfo() triggers the getFileInfo() method of the ImageFile class as seen in the output below:

File Info: 
Image File Impl

3. Other Polymorphic Characteristics in Java

In addition to these two main types of polymorphism in Java, there are other characteristics in the Java programming language that exhibit polymorphism. Let’s discuss some of these characteristics.

3.1. Coercion

Polymorphic coercion deals with implicit type conversion done by the compiler to prevent type errors. A typical example is seen in an integer and string concatenation:

String str = “string” + 2;

3.2. Operator Overloading

Operator or method overloading refers to a polymorphic characteristic of same symbol or operator having different meanings (forms) depending on the context.

For example, the plus symbol (+) can be used for mathematical addition as well as String concatenation. In either case, only context (i.e. argument types) determines the interpretation of the symbol:

String str = "2" + 2;
int sum = 2 + 2;
System.out.printf(" str = %s\n sum = %d\n", str, sum);

Output:

str = 22
str2 = 4

3.3. Polymorphic Parameters

Parametric polymorphism allows a name of a parameter or method in a class to be associated with different types. We have a typical example below where we define content as a String and later as an Integer:

public class TextFile extends GenericFile {
    private String content;
    
    public String setContentDelimiter() {
        int content = 100;
        this.content = this.content + content;
    }
}

It’s also important to note that declaration of polymorphic parameters can lead to a problem known as variable hiding where a local declaration of a parameter always overrides the global declaration of another parameter with the same name.

To solve this problem, it is often advisable to use global references such as this keyword to point to global variables within a local context.

3.4. Polymorphic Subtypes

Polymorphic subtype conveniently makes it possible for us to assign multiple subtypes to a type and expect all invocations on the type to trigger the available definitions in the subtype.

For example, if we have a collection of GenericFiles and we invoke the getInfo() method on each of them, we can expect the output to be different depending on the subtype from which each item in the collection was derived:

GenericFile [] files = {new ImageFile("SampleImageFile", 200, 100, 
  new BufferedImage(100, 200, BufferedImage.TYPE_INT_RGB).toString() 
  .getBytes(), "v1.0.0"), new TextFile("SampleTextFile", 
  "This is a sample text content", "v1.0.0")};
 
for (int i = 0; i < files.length; i++) {
    files[i].getInfo();
}

Subtype polymorphism is made possible by a combination of upcasting and late binding. Upcasting involves the casting of inheritance hierarchy from a supertype to a subtype:

ImageFile imageFile = new ImageFile();
GenericFile file = imageFile;

The resulting effect of the above is that ImageFile-specific methods cannot be invoked on the new upcast GenericFile. However, methods in the subtype override similar methods defined in the supertype.

To resolve the problem of not being able to invoke subtype-specific methods when upcasting to a supertype, we can do a downcasting of the inheritance from a supertype to a subtype. This is done by:

ImageFile imageFile = (ImageFile) file;

Late binding strategy helps the compiler to resolve whose method to trigger after upcasting. In the case of imageFile#getInfo vs file#getInfo in the above example, the compiler keeps a reference to ImageFile‘s getInfo method.

4. Problems with Polymorphism

Let’s look at some ambiguities in polymorphism that could potentially lead to runtime errors if not properly checked.

4.1. Type Identification During Downcasting

Recall that we earlier lost access to some subtype-specific methods after performing an upcast. Although we were able to solve this with a downcast, this does not guarantee actual type checking.

For example, if we perform an upcast and subsequent downcast:

GenericFile file = new GenericFile();
ImageFile imageFile = (ImageFile) file;
System.out.println(imageFile.getHeight());

We notice that the compiler allows a downcast of a GenericFile into an ImageFile, even though the class actually is a GenericFile and not an ImageFile.

Consequently, if we try to invoke the getHeight() method on the imageFile class, we get a ClassCastException as GenericFile does not define getHeight() method:

Exception in thread "main" java.lang.ClassCastException:
GenericFile cannot be cast to ImageFile

To solve this problem, the JVM performs a Run-Time Type Information (RTTI) check. We can also attempt an explicit type identification by using the instanceof keyword just like this:

ImageFile imageFile;
if (file instanceof ImageFile) {
    imageFile = file;
}

The above helps to avoid a ClassCastException exception at runtime. Another option that may be used is wrapping the cast within a try and catch block and catching the ClassCastException.

It should be noted that RTTI check is expensive due to the time and resources needed to effectively verify that a type is correct. In addition, frequent use of the instanceof keyword almost always implies a bad design.

4.2. Fragile Base Class Problem

According to Wikipedia, base or superclasses are considered fragile if seemingly safe modifications to a base class may cause derived classes to malfunction.

Let’s consider a declaration of a superclass called GenericFile and its subclass TextFile:

public class GenericFile {
    private String content;

    void writeContent(String content) {
        this.content = content;
    }
    void toString(String str) {
        str.toString();
    }
}
public class TextFile extends GenericFile {
    @Override
    void writeContent(String content) {
        toString(content);
    }
}

When we modify the GenericFile class:

public class GenericFile {
    //...

    void toString(String str) {
        writeContent(str);
    }
}

We observe that the above modification leaves TextFile in an infinite recursion in the writeContent() method, which eventually results in a stack overflow.

To address a fragile base class problem, we can use the final keyword to prevent subclasses from overriding the writeContent() method. Proper documentation can also help. And last but not least, composition should generally be preferred over inheritance.

5. Conclusion

In this article, we discussed the foundational concept of polymorphism, focusing on both advantages and disadvantages.

As always, the source code for this article is available over on GitHub.

Batch Processing in JDBC

$
0
0

1. Introduction

Java Database Connectivity (JDBC) is a Java API used for interacting with databases. Batch processing groups multiple queries into one unit and passes it in a single network trip to a database.

In this article, we’ll discover how JDBC can be used for batch processing of SQL queries.

For more on JDBC, you can check out our introduction article here.

2. Why Batch Processing?

Performance and data consistency are the primary motives to do batch processing.

2.1. Improved Performance

Some use cases require a large amount of data to be inserted into a database table. While using JDBC, one of the ways to achieve this without batch processing, is to execute multiple queries sequentially.

Let’s see an example of sequential queries sent to database:

statement.execute("INSERT INTO EMPLOYEE(ID, NAME, DESIGNATION) "
 + "VALUES ('1','EmployeeName1','Designation1')"); 
statement.execute("INSERT INTO EMPLOYEE(ID, NAME, DESIGNATION) "
 + "VALUES ('2','EmployeeName2','Designation2')");

These sequential calls will increase the number of network trips to database resulting in poor performance.

By using batch processing, these queries can be sent to the database in one call, thus improving performance.

2.2. Data Consistency

In certain circumstances, data needs to be pushed into multiple tables. This leads to an interrelated transaction where the sequence of queries being pushed is important.

Any errors occurring during execution should result in a rollback of the data pushed by previous queries if any.

Let’s see an example of adding data to multiple tables:

statement.execute("INSERT INTO EMPLOYEE(ID, NAME, DESIGNATION) "
 + "VALUES ('1','EmployeeName1','Designation1')"); 
statement.execute("INSERT INTO EMP_ADDRESS(ID, EMP_ID, ADDRESS) "
 + "VALUES ('10','1','Address')");

A typical problem in the above approach arises when the first statement succeeds and the second statement fails. In this situation there is no rollback of the data inserted by the first statement, leading to data inconsistency.

We can achieve data consistency by spanning a transaction across multiple insert/updates and then committing the transaction at the end or performing a rollback in case of exceptions, but in this case, we’re still hitting the database repeatedly for each statement.

3. How To Do Batch Processing

JDBC provides two classes, Statement and PreparedStatement to execute queries on the database. Both classes have their own implementation of the addBatch() and executeBatch() methods which provide us with the batch processing functionality.

3.1. Batch Processing Using Statement

With JDBC, the simplest way to execute queries on a database is via the Statement object

First, using addBatch() we can add all SQL queries to a batch and then execute those SQL queries using executeBatch().

The return type of executeBatch() is an int array indicating how many records were affected by the execution of each SQL statement.

Let’s see an example of creating and executing a batch using Statement:

Statement statement = connection.createStatement();
statement.addBatch("INSERT INTO EMPLOYEE(ID, NAME, DESIGNATION) "
 + "VALUES ('1','EmployeeName','Designation')");
statement.addBatch("INSERT INTO EMP_ADDRESS(ID, EMP_ID, ADDRESS) "
 + "VALUES ('10','1','Address')");
statement.executeBatch();

In the above example, we are trying to insert records into the EMPLOYEE and EMP_ADDRESS tables using Statement. We can see how SQL queries are being added in the batch to be executed.

3.2. Batch Processing Using PreparedStatement

PreparedStatement is another class used to execute SQL queries. It enables reuse of SQL statements and requires us to set new parameters for each update/insert.

Let’s see an example using PreparedStatement. First, we set up the statement using an SQL query encoded as a String:

String[] EMPLOYEES = new String[]{"Zuck","Mike","Larry","Musk","Steve"};
String[] DESIGNATIONS = new String[]{"CFO","CSO","CTO","CEO","CMO"};

String insertEmployeeSQL = "INSERT INTO EMPLOYEE(ID, NAME, DESIGNATION) "
 + "VALUES (?,?,?)";
PreparedStatement employeeStmt = connection.prepareStatement(insertEmployeeSQL);

Next, we loop through an array of String values and add a newly configured query to the batch.

Once the loop is finished, we execute the batch:

for(int i = 0; i < EMPLOYEES.length; i++){
    String employeeId = UUID.randomUUID().toString();
    employeeStmt.setString(1,employeeId);
    employeeStmt.setString(2,EMPLOYEES[i]);
    employeeStmt.setString(3,DESIGNATIONS[i]);
    employeeStmt.addBatch();
}
employeeStmt.executeBatch();

In the example shown above, we are inserting records into the EMPLOYEE table using PreparedStatement. We can see how values to be inserted are set in the query and then added to the batch to be executed.

4. Conclusion

In this article, we saw how batch processing of SQL queries are important while interacting with databases using JDBC.

As always, the code related to this article can be found over on Github.

Viewing all 4848 articles
Browse latest View live


<script src="https://jsc.adskeeper.com/r/s/rssing.com.1596347.js" async> </script>