Quantcast
Channel: Baeldung
Viewing all 4844 articles
Browse latest View live

Quick Guide on data.sql and schema.sql Files in Spring Boot

$
0
0

1. Overview

Spring Boot makes it really easy to manage our database changes in an easy way. If we leave the default configuration, it’ll search for entities in our packages and create the respective tables automatically.

But sometimes we’ll need some finer grained control over the database alterations. That’s when we can use the data.sql and schema.sql files in Spring.

2. The data.sql File

Let’s also make the assumption here that we’re working with JPA – and define a simple Country entity in our project:

@Entity
public class Country {

    @Id
    @GeneratedValue(strategy = IDENTITY)
    private Integer id;
    
    @Column(nullable = false)
    private String name;

    //...
}

If we run our application, Spring Boot will create an empty table for us, but won’t populate it with anything.

An easy way to do this is to create a file named data.sql:

INSERT INTO country (name) VALUES ('India');
INSERT INTO country (name) VALUES ('Brazil');
INSERT INTO country (name) VALUES ('USA');
INSERT INTO country (name) VALUES ('Italy');

When we run the project with this file on the classpath, Spring will pick it up and use it for populating the database.

3. The schema.sql File

Sometimes, we don’t want to rely on the default schema creation mechanism. In such cases, we can create a custom schema.sql file:

CREATE TABLE country (
    id   INTEGER      NOT NULL AUTO_INCREMENT,
    name VARCHAR(128) NOT NULL,
    PRIMARY KEY (id)
);

Spring will pick this file up and use it for creating a schema.

It’s also important to remember to turn off automatic schema creation to avoid conflicts:

spring.jpa.hibernate.ddl-auto=none

4. Conclusion

In this quick article, we saw how we can leverage schema.sql and data.sql files for setting up an initial schema and populating it with data.

Keep in mind that this approach is more suited for basic and simple scenarios, any advanced database handling would require more advanced and refined tooling like Liquibase or Flyway.

Code snippets, as always, can be found over on GitHub.


Customizing the Order of Tests in JUnit 5

$
0
0

1. Overview

By default, JUnit runs tests using a deterministic, but unpredictable order (MethodSorters.DEFAULT).

In most cases, that behavior is perfectly fine and acceptable; but there’re cases when we need to enforce a specific ordering.

2. Using MethodSorters.DEFAULT

This default strategy compares test methods using their hashcodes. In case of a hash collision, the lexicographical order is used:

@FixMethodOrder(MethodSorters.DEFAULT)
public class DefaultOrderOfExecutionTest {
    private static StringBuilder output = new StringBuilder("");

    @Test
    public void secondTest() {
        output.append("b");
    }

    @Test
    public void thirdTest() {
        output.append("c");
    }

    @Test
    public void firstTest() {
        output.append("a");
    }

    @AfterClass
    public static void assertOutput() {
        assertEquals(output.toString(), "cab");
    }
}

When we execute the tests in the class above, we will see that they all pass, including assertOutput().

3. Using MethodSorters.JVM

Another ordering strategy is MethodSorters.JVMthis strategy utilizes the natural JVM ordering – which can be different for each run:

@FixMethodOrder(MethodSorters.JVM)
public class JVMOrderOfExecutionTest {
    // same as above
}

Each time we execute the tests in this class, we get a different result.

4. Using MethodSorters.NAME_ASCENDING

Finally, this strategy can be used for running test in their lexicographic order:

@FixMethodOrder(MethodSorters.NAME_ASCENDING)
public class NameAscendingOrderOfExecutionTest {
    // same as above
    
    @AfterClass
    public static void assertOutput() {
        assertEquals(output.toString(), "abc");
    }
}

Similarly, when we execute the tests in this class, we see that they all pass, including assertOutput(), which confirms the execution order that we set with the annotation.

5. Conclusion

In this quick tutorial, we went through the ways of setting the execution order available in JUnit.

And, as always, the examples used in this article can be found over on GitHub.

Mock Final Classes and Methods with Mockito

$
0
0

1. Overview

In this short article, we’ll focus on how to mock final classes and methods – using Mockito.

As with other articles focused on the Mockito framework (like Mockito VerifyMockito When/Then, and Mockito’s Mock Methods) we’ll use the MyList class shown below as the collaborator in test cases.

We’ll add a new method for this tutorial:

public final class MyList extends AbstractList {
    final public int finalMethod() {
        return 0;
    }
}

And we’ll also extend it with a final subclass:

public final class FinalList extends MyList {

    @Override
    public int size() {
        return 1;
    }
}

2. Configure Mockito for Final Methods and Classes

Before Mockito can be used for mocking final classes and methods, it needs to be configured.

We need to add a text file to the project’s src/test/resources/mockito/extensions directory named org.mockito.plugins.MockMaker and add a single line of text:

mock-maker-inline

Mockito checks the extensions directory for configuration files when it is loaded. This file enables the mocking of final methods and classes.

3. Mock a Final Method

Once Mockito is properly configured, a final method can be mocked like any other:

@Test
public void whenMockFinalMethodMockWorks() {

    MyList myList = new MyList();

    MyList mock = mock(MyList.class);
    when(mock.finalMethod()).thenReturn(1);

    assertNotEquals(mock.finalMethod(), myList.finalMethod());
}

By creating a concrete instance and a mock instance of MyList, we can compare the values returned by both versions of finalMethod() and verify that the mock is called.

4. Mock a Final Class

Mocking a final class is just as easy as mocking any other class:

@Test
public void whenMockFinalClassMockWorks() {

    FinalList finalList = new FinalList();

    FinalList mock = mock(FinalList.class);
    when(mock.size()).thenReturn(2);

    assertNotEquals(mock.size(), finalList.size());
}

Similar to the test above, we create a concrete instance and a mock instance of our final class, mock a method and verify that the mocked instance behaves differently.

5. Conclusion

In this quick tutorial, we covered how to mock final classes and methods with Mockito by using a Mockito extension.

The full examples, as always, can be found over on GitHub.

Hibernate Inheritance Mapping

$
0
0

1. Overview

Relational databases don’t have a straightforward way to map class hierarchies onto database tables.

To address this, the JPA specification provides several strategies:

  • MappedSuperclass – the parent classes, can’t be entities
  • Single Table – the entities from different classes with a common ancestor are placed in a single table
  • Joined Table – each class has its table and querying a subclass entity requires joining the tables
  • Table-Per-Class – all the properties of a class, are in its table, so no join is required

Each strategy results in a different database structure.

Entity inheritance means that we can use polymorphic queries for retrieving all the sub-class entities when querying for a super-class.

Since Hibernate is a JPA implementation, it contains all of the above as well as a few Hibernate-specific features related to inheritance.

In the next sections, we’ll go over available strategies in more detail.

2. MappedSuperclass

Using the MappedSuperclass strategy, inheritance is only evident in the class, but not the entity model.

Let’s start by creating a Person class which will represent a parent class:

@MappedSuperclass
public class Person {

    @Id
    private long personId;
    private String name;

    // constructor, getters, setters
}

Notice that this class no longer has an @Entity annotation, as it won’t be persisted in the database by itself.

Next, let’s add an Employee sub-class:

@Entity
public class MyEmployee extends Person {
    private String company;
    // constructor, getters, setters 
}

In the database, this will correspond to one “MyEmployee” table with three columns for the declared and inherited fields of the sub-class.

If we’re using this strategy, ancestors cannot contain associations with other entities.

3. Single Table

The Single Table strategy creates one table for each class hierarchy. This is also the default strategy chosen by JPA if we don’t specify one explicitly.

We can define the strategy we want to use by adding the @Inheritance annotation to the super-class:

@Entity
@Inheritance(strategy = InheritanceType.SINGLE_TABLE)
public class MyProduct {
    @Id
    private long productId;
    private String name;

    // constructor, getters, setters
}

The identifier of the entities is also defined in the super-class.

Then, we can add the sub-class entities:

@Entity
public class Book extends MyProduct {
    private String author;
}
@Entity
public class Pen extends MyProduct {
    private String color;
}

3.1. Discriminator Values

Since the records for all entities will be in the same table, Hibernate needs a way to differentiate between them.

By default, this is done through a discriminator column called DTYPE which has the name of the entity as a value.

To customize the discriminator column, we can use the @DiscriminatorColumn annotation:

@Entity(name="products")
@Inheritance(strategy = InheritanceType.SINGLE_TABLE)
@DiscriminatorColumn(name="product_type", 
  discriminatorType = DiscriminatorType.INTEGER)
public class MyProduct {
    // ...
}

Here we’ve chosen to differentiate MyProduct sub-class entities by an integer column called product_type.

Next, we need to tell Hibernate what value each sub-class record will have for the product_type column:

@Entity
@DiscriminatorValue("1")
public class Book extends MyProduct {
    // ...
}
@Entity
@DiscriminatorValue("2")
public class Pen extends MyProduct {
    // ...
}

Hibernate adds two other pre-defined values that the annotation can take: “null” and “not null“:

  • @DiscriminatorValue(“null”) – means that any row without a discriminator value will be mapped to the entity class with this annotation; this can be applied to the root class of the hierarchy
  • @DiscriminatorValue(“not null”) – any row with a discriminator value not matching any of the ones associated with entity definitions will be mapped to the class with this annotation

Instead of a column, we can also use the Hibernate-specific @DiscriminatorFormula annotation to determine the differentiating values:

@Entity
@Inheritance(strategy = InheritanceType.SINGLE_TABLE)
@DiscriminatorFormula("case when author is not null then 1 else 2 end")
public class MyProduct { ... }

This strategy has the advantage of polymorphic query performance since only one table needs to be accessed when querying parent entities. On the other hand, this also means that we can no longer use NOT NULL constraints on sub-class entity properties.

4. Joined Table

Using this strategy, each class in the hierarchy is mapped to its table. The only column which repeatedly appears in all the tables is the identifier, which will be used for joining them when needed.

Let’s create a super-class that uses this strategy:

@Entity
@Inheritance(strategy = InheritanceType.JOINED)
public class Animal {
    @Id
    private long animalId;
    private String species;

    // constructor, getters, setters 
}

Then, we can simply define a sub-class:

@Entity
public class Pet extends Animal {
    private String name;

    // constructor, getters, setters
}

Both tables will have an animalId identifier column. The primary key of the Pet entity also has a foreign key constraint to the primary key of its parent entity. To customize this column, we can add the @PrimaryKeyJoinColumn annotation:

@Entity
@PrimaryKeyJoinColumn(name = "petId")
public class Pet extends Animal {
    // ...
}

The disadvantage of this inheritance mapping method is that retrieving entities requires joins between tables, which can result in lower performance for large numbers of records.

The number of joins is higher when querying the parent class as it will join with every single related child – so performance is more likely to be affected the higher up the hierarchy we want to retrieve records.

5. Table Per Class

The Table Per Class strategy maps each entity to its table which contains all the properties of the entity, including the ones inherited.

The resulting schema is similar to the one using @MappedSuperclass, but unlike it, table per class will indeed define entities for parent classes, allowing associations and polymorphic queries as a result.

To use this strategy, we only need to add the @Inheritance annotation to the base class:

@Entity
@Inheritance(strategy = InheritanceType.TABLE_PER_CLASS)
public class Vehicle {
    @Id
    private long vehicleId;

    private String manufacturer;

    // standard constructor, getters, setters
}

Then, we can create the sub-classes in the standard way.

This is not very different from merely mapping each entity without inheritance. The distinction is apparent when querying the base class, which will return all the sub-class records as well by using a UNION statement in the background.

The use of UNION can also lead to inferior performance when choosing this strategy. Another issue is that we can no longer use identity key generation.

6. Polymorphic Queries

As mentioned, querying a base class will retrieve all the sub-class entities as well.

Let’s see this behavior in action with a JUnit test:

@Test
public void givenSubclasses_whenQuerySuperclass_thenOk() {
    Book book = new Book(1, "1984", "George Orwell");
    session.save(book);
    Pen pen = new Pen(2, "my pen", "blue");
    session.save(pen);

    assertThat(session.createQuery("from MyProduct")
      .getResultList()).hasSize(2);
}

In this example, we’ve created two Book and Pen objects, then queried their super-class MyProduct to verify that we’ll retrieve two objects.

Hibernate can also query interfaces or base classes which are not entities but are extended or implemented by entity classes. Let’s see a JUnit test using our @MappedSuperclass example:

@Test
public void givenSubclasses_whenQueryMappedSuperclass_thenOk() {
    MyEmployee emp = new MyEmployee(1, "john", "baeldung");
    session.save(emp);

    assertThat(session.createQuery(
      "from com.baeldung.hibernate.pojo.inheritance.Person")
      .getResultList())
      .hasSize(1);
}

Note that this also works for any super-class or interface, whether it’s a @MappedSuperclass or not. The difference from a usual HQL query is that we have to use the fully qualified name since they are not Hibernate-managed entities.

If we don’t want a sub-class to be returned by this type of query, then we only need to add the Hibernate @Polymorphism annotation to its definition, with type EXPLICIT:

@Entity
@Polymorphism(type = PolymorphismType.EXPLICIT)
public class Bag implements Item { ...}

In this case, when querying for Items, the Bag records won’t be returned.

7. Conclusion

In this article, we’ve shown the different strategies for mapping inheritance in Hibernate.

The full source code of the examples can be found over on GitHub.

Java – Append Data to a File

$
0
0

1. Introduction

In this quick tutorial, we’ll see how we use Java to append data to the content of a file – in a few simple ways.

Let’s start with how we can do this using core Java’s FileWriter.

2. Using FileWriter

Here’s a simple test – reading an existing file, appending some text, and then making sure that got appended correctly:

@Test
public void whenAppendToFileUsingFileWriter_thenCorrect()
  throws IOException {
 
    FileWriter fw = new FileWriter(fileName, true);
    BufferedWriter bw = new BufferedWriter(fw);
    bw.write("Spain");
    bw.newLine();
    bw.close();
    
    assertThat(getStringFromInputStream(
      new FileInputStream(fileName)))
      .isEqualTo("UK\r\n" + "US\r\n" + "Germany\r\n" + "Spain\r\n");
}

Note that FileWriter’s constructor accepts a boolean marking if we want to append data to an existing file.

If we set it to false, then the existing content will be replaced.

3. Using FileOutputStream

Next – let’s see how we can do the same operation – using FileOutputStream:

@Test
public void whenAppendToFileUsingFileOutputStream_thenCorrect()
 throws Exception {
 
    FileOutputStream fos = new FileOutputStream(fileName, true);
    fos.write("Spain\r\n".getBytes());
    fos.close();
    
    assertThat(StreamUtils.getStringFromInputStream(
      new FileInputStream(fileName)))
      .isEqualTo("UK\r\n" + "US\r\n" + "Germany\r\n" + "Spain\r\n");
}

Similarly, the FileOutputStream constructor accepts a boolean that should be set to true to mark that we want to append data to an existing file.

4. Using java.nio.file

Next – we can also append content to files using functionality in java.nio.file – which was introduced in JDK 7:

@Test
public void whenAppendToFileUsingFiles_thenCorrect() 
 throws IOException {
 
    String contentToAppend = "Spain\r\n";
    Files.write(
      Paths.get(fileName), 
      contentToAppend.getBytes(), 
      StandardOpenOption.APPEND);
    
    assertThat(StreamUtils.getStringFromInputStream(
      new FileInputStream(fileName)))
      .isEqualTo("UK\r\n" + "US\r\n" + "Germany\r\n" + "Spain\r\n");
}

5. Using Guava

To start using Guava, we need to add its dependency to our pom.xml:

<dependency>
    <groupId>com.google.guava</groupId>
    <artifactId>guava</artifactId>
    <version>23.0</version>
</dependency>

Now, let’s see how we can start using Guava to append content to an existing file:

@Test
public void whenAppendToFileUsingFileWriter_thenCorrect()
 throws IOException {
 
    File file = new File(fileName);
    CharSink chs = Files.asCharSink(
      file, Charsets.UTF_8, FileWriteMode.APPEND);
    chs.write("Spain\r\n");
	
    assertThat(StreamUtils.getStringFromInputStream(
      new FileInputStream(fileName)))
      .isEqualTo("UK\r\n" + "US\r\n" + "Germany\r\n" + "Spain\r\n");
}

6. Using Apache Commons IO FileUtils

Finally – let’s see how we can append content to an existing file using Apache Commons IO FileUtils.

First, let’s add the Apache Commons IO dependency to our pom.xml:

<dependency>
    <groupId>commons-io</groupId>
    <artifactId>commons-io</artifactId>
    <version>2.6</version>
</dependency>

Now, let’s see a quick example that demonstrates appending content to an existing file using FileUtils:

@Test
public void whenAppendToFileUsingFiles_thenCorrect()
 throws IOException {
    File file = new File(fileName);
    FileUtils.writeStringToFile(
      file, "Spain\r\n", StandardCharsets.UTF_8, true);
    
    assertThat(StreamUtils.getStringFromInputStream(
      new FileInputStream(fileName)))
      .isEqualTo("UK\r\n" + "US\r\n" + "Germany\r\n" + "Spain\r\n");
}

7. Conclusion

In this article, we’ve seen how we can append content in multiple ways.

The full implementation of this tutorial can be found over on GitHub.

Introduction to OSGi

$
0
0

1. Introduction

Several Java mission-critical and middleware applications have some hard technological requirements.

Some have to support hot deploy, so as not to disrupt the running services – and others have to be able to work with different versions of the same package for the sake of supporting external legacy systems.

The OSGi platforms represent a viable solution to support this kind of requirements.

The Open Service Gateway Initiative is a specification defining a Java-based component system. It’s currently managed by the OSGi Alliance, and its first version dates back to 1999.

Since then, it has proved to be a great standard for component systems, and it’s widely used nowadays. The Eclipse IDE, for instance, is an OSGi-based application.

In this article, we’ll explore some basic features of OSGi leveraging the implementation provided by Apache.

2. OSGi Basics

In OSGi, a single component is called a bundle.

Logically, a bundle is a piece of functionality that has an independent lifecycle – which means it can be started, stopped and removed independently.

Technically, a bundle is just a jar file with a MANIFEST.MF file containing some OSGi-specific headers.

The OSGi platform provides a way to receive notifications about bundles becoming available or when they’re removed from the platform. This will allow a properly designed client to keep working, maybe with degraded functionality, even when a service it depends on, is momentarily unavailable.

Because of that, a bundle has to explicitly declare what packages it needs to have access to and the OSGi platform will start it only if the dependencies are available in the bundle itself or in other bundles already installed in the platform.

3. Getting the Tools

We’ll start our journey in OSGi by downloading the latest version of Apache Karaf from this link. Apache Karaf is a platform that runs OSGi-based applications; it’s based on the Apache‘s implementation of OSGi specification called Apache Felix.

Karaf offers some handy features on top of Felix that will help us in getting acquainted with OSGi, for example, a command line interface that will allow us to interact with the platform.

To install Karaf, you can follow the installation instruction from the official documentation.

4. Bundle Entry Point

To execute an application in an OSGi environment, we have to pack it as an OSGi bundle and define the application entry point, and that’s not the usual public static void main(String[] args) method.

So, let’s start by building an OSGi- based “Hello World” application.

We start setting up a simple dependency on the core OSGi API:

<dependency>
    <groupId>org.osgi</groupId> 
    <artifactId>org.osgi.core</artifactId>
    <version>6.0.0</version>
    <scope>provided</scope>
</dependency>

The dependency is declared as provided because it will be available in the OSGi runtime, and the bundle doesn’t need to embed it.

Let’s now write the simple HelloWorld class:

public class HelloWorld implements BundleActivator {
    public void start(BundleContext ctx) {
        System.out.println("Hello world.");
    }
    public void stop(BundleContext bundleContext) {
        System.out.println("Goodbye world.");
    }
}

BundleActivator is an interface provided by OSGi that has to be implemented by classes that are entry points for a bundle.

The start() method is invoked by the OSGi platform when the bundle containing this class is started. In the other hand stop() is invoked before just before the bundle is stopped.

Let’s keep in mind that each bundle can contain at most one BundleActivator. The BundleContext object provided to both methods allows interacting with the OSGi runtime. We’ll get back to it soon.

5. Building a Bundle

Let’s modify the pom.xml and make it an actual OSGi bundle.

First of all, we have to explicitly state that we’re going to build a bundle, not a jar:

<packaging>bundle</packaging>

Then we leverage the maven-bundle-plugin, courtesy of the Apache Felix community, to package the HelloWorld class as an OSGi bundle:

<plugin>
    <groupId>org.apache.felix</groupId>
    <artifactId>maven-bundle-plugin</artifactId>
    <version>3.3.0</version>
    <extensions>true</extensions>
    <configuration>
        <instructions>
            <Bundle-SymbolicName>
                ${pom.groupId}.${pom.artifactId}
            </Bundle-SymbolicName>
            <Bundle-Name>${pom.name}</Bundle-Name>
            <Bundle-Version>${pom.version}</Bundle-Version>
            <Bundle-Activator>
                com.baeldung.osgi.sample.activator.HelloWorld
            </Bundle-Activator>
            <Private-Package>
                com.baeldung.osgi.sample.activator
            </Private-Package>            
        </instructions>
    </configuration>
</plugin>

In the instructions section, we specify the values of the OSGi headers we want to include in the bundle’s MANIFEST file.

Bundle-Activator is the fully qualified name of the BundleActivator implementation that will be used to start and stop the bundle, and it refers to the class we’ve just written.

Private-Package is not an OSGi header, but it’s used to tell the plugin to include the package in the bundle but not make it available to other ones. We can now build the bundle with the usual command mvn clean install.

6. Installing and Running the Bundle

Let’s start Karaf by executing the command:

<KARAF_HOME>/bin/karaf start

where <KARAF_HOME> is the folder where Karaf is installed. When the prompt of the Karaf console appears we can execute the following command to install the bundle:

> bundle:install mvn:com.baeldung/osgi-intro-sample-activator/1.0-SNAPSHOT
Bundle ID: 63

This instructs Karaf to load the bundle from the local Maven repository. 

In return Karaf prints out the numeric ID assigned to the bundle that depends on the number of bundles already installed and may vary. The bundle is now just installed, we can now start it with the following command:

> bundle:start 63
Hello World

“Hello World” immediately appears as soon the bundle is started. We can now stop and uninstall the bundle with:

> bundle:stop 63
> bundle:uninstall 63

“Goodbye World” appears on the console, accordingly to the code in the stop() method.

7. An OSGi Service

Let’s go on writing a simple OSGi service, an interface that exposes a method for greeting people:

package com.baeldung.osgi.sample.service.definition;
public interface Greeter {
    public String sayHiTo(String name);
}

Let’s write an implementation of it that is a BundleActivator too, so we’ll be able to instantiate the service and register it on the platform when the bundle is started:

package com.baeldung.osgi.sample.service.implementation;
public class GreeterImpl implements Greeter, BundleActivator {

    private ServiceReference<Greeter> reference;
    private ServiceRegistration<Greeter> registration;

    @Override
    public String sayHiTo(String name) {
        return "Hello " + name;
    }

    @Override 
    public void start(BundleContext context) throws Exception {
        System.out.println("Registering service.");
        registration = context.registerService(
          Greeter.class, 
          new GreeterImpl(), 
          new Hashtable<String, String>());
        reference = registration
          .getReference();
    }

    @Override 
    public void stop(BundleContext context) throws Exception {
        System.out.println("Unregistering service.");
        registration.unregister();
    }
}

We use the BundleContext as a mean of requesting the OSGi platform to register a new instance of the service.

We should also provide the type of the service and a map of the possible configuration parameters, which aren’t needed in our simple scenario. Let’s now proceed with the configuration of the maven-bundle-plugin:

<plugin>
    <groupId>org.apache.felix</groupId>
    <artifactId>maven-bundle-plugin</artifactId>
    <extensions>true</extensions>
    <configuration>
        <instructions>
            <Bundle-SymbolicName>
                ${project.groupId}.${project.artifactId}
            </Bundle-SymbolicName>
            <Bundle-Name>
                ${project.artifactId}
            </Bundle-Name>
            <Bundle-Version>
                ${project.version}
            </Bundle-Version>
            <Bundle-Activator>
                com.baeldung.osgi.sample.service.implementation.GreeterImpl
            </Bundle-Activator>
            <Private-Package>
                com.baeldung.osgi.sample.service.implementation
            </Private-Package>
            <Export-Package>
                com.baeldung.osgi.sample.service.definition
            </Export-Package>
        </instructions>
    </configuration>
</plugin>

It’s worth noting that only the com.baeldung.osgi.sample.service.definition package has been exported this time, through the Export-Package header.

Thanks to this, OSGi will allow other bundles to invoke only the methods specified in the service interface. Package com.baeldung.osgi.sample.service.implementation is marked as private, so no other bundle will be able to access the members of the implementation directly.

8. An OSGi Client

Let’s now write the client. It simply looks up the service at startup and invokes it:

public class Client implements BundleActivator, ServiceListener {
}

Let’s implement the BundleActivator start() method:

private BundleContext ctx;
private ServiceReference serviceReference;

public void start(BundleContext ctx) {
    this.ctx = ctx;
    try {
        ctx.addServiceListener(
          this, "(objectclass=" + Greeter.class.getName() + ")");
    } catch (InvalidSyntaxException ise) {
        ise.printStackTrace();
    }
}

The addServiceListener() method allows the client to ask the platform to send notifications about the service that complies with the provided expression.

The expression uses a syntax similar to the LDAP’s one, and in our case, we’re requesting notifications about a Greeter service.

Let’s go on to the callback method:

public void serviceChanged(ServiceEvent serviceEvent) {
    int type = serviceEvent.getType();
    switch (type){
        case(ServiceEvent.REGISTERED):
            System.out.println("Notification of service registered.");
            serviceReference = serviceEvent
              .getServiceReference();
            Greeter service = (Greeter)(ctx.getService(serviceReference));
            System.out.println( service.sayHiTo("John") );
            break;
        case(ServiceEvent.UNREGISTERING):
            System.out.println("Notification of service unregistered.");
            ctx.ungetService(serviceEvent.getServiceReference());
            break;
        default:
            break;
    }
}

When some modification involving the Greeter service happens, the method is notified.

When the service is registered to the platform, we get a reference to it, we store it locally, and we then use it to acquire the service object and invoke it.

When the server is later unregistered, we use the previously stored reference to unget it, meaning that we tell the platform that we are not going to use it anymore.

We now just need to write the stop() method:

public void stop(BundleContext bundleContext) {
    if(serviceReference != null) {
        ctx.ungetService(serviceReference);
    }
}

Here again, we unget the service to cover the case in which the client is stopped before the service is being stopped. Let’s give a final look at the dependencies in the pom.xml:

<dependency>
    <groupId>com.baeldung</groupId>
    <artifactId>osgi-intro-sample-service</artifactId>
    <version>1.0-SNAPSHOT</version>
    <scope>provided</scope>
</dependency>
<dependency>
    <groupId>org.osgi</groupId>
    <artifactId>org.osgi.core</artifactId>
    <version>6.0.0</version>
</dependency>

9. Client and Service

Let’s now install the client and service bundles in Kafka by doing:

> install mvn:com.baeldung/osgi-intro-sample-service/1.0-SNAPSHOT
Bundle ID: 64
> install mvn:com.baeldung/osgi-intro-sample-client/1.0-SNAPSHOT
Bundle ID: 65

Always keep in mind that the identifier numbers assigned to each bundle may vary.

Let’s now start the client bundle:

> start 65

Therefore, nothing happens because the client is active and it’s waiting for the service, that we can start with:

> start 64
Registering service.
Service registered.
Hello John

What happens is that as soon as the service’s BundleActivator starts, the service is registered to the platform. That, in turn, notifies the client that the service it was waiting for is available.

The client then gets a reference to the service and uses it to invoke the implementation delivered through the service bundle.

10. Conclusion

In this article, we explored the essential features of OSGi with a straightforward example that it’s enough to understand the potential of OSGi.

In conclusion, whenever we have to guarantee that a single application has to be updated without any disservice, OSGi can be a viable solution.

The code for this post can be found over on GitHub.

Introduction to the Java ArrayDeque

$
0
0

1. Overview

In this tutorial, we’ll show how to use the Java’s ArrayDeque class – which is an implementation of Deque interface.

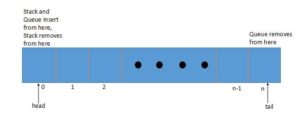
An ArrayDeque (also known as an “Array Double Ended Queue”, pronounced as “ArrayDeck”) is a special kind of a growable array that allows us to add or remove an element from both sides.

An ArrayDeque implementation can be used as a Stack (Last-In-First-Out) or a Queue(First-In-First-Out).

2. The API at a Glance

For each operation, we basically have two options.

The first group consists of methods that throw exception if the operation fails. The other group returns a status or a value:

Operation Method Method throwing Exception
Insertion from Head offerFirst(e) addFirst(e)
Removal from Head pollFirst() removeFirst()
Retrieval from Head peekFirst() getFirst()
Insertion from Tail offerLast(e) addLast(e)
Removal from Tail pollLast() removeLast()
Retrieval from Tail peekLast() getLast()

3. Using Methods

Let’s look at a few simple example of how we can make use of the ArrayDeque.

3.1. Using ArrayDeque as a Stack

We’ll start with an example of how we can treat the class as a Stack – and push an element:

@Test
public void whenPush_addsAtFirst() {
    Deque<String> stack = new ArrayDeque<>();
    stack.push("first");
    stack.push("second");
 
    assertEquals("second", stack.getFirst());
}

Let’s also see how we can pop an element from the ArrayDeque – when used as a Stack:

@Test
public void whenPop_removesLast() {
    Deque<String> stack = new ArrayDeque<>();
    stack.push("first");
    stack.push("second");
 
    assertEquals("second", stack.pop());
}

The pop method throws NoSuchElementException when a stack is empty.

3.2. Using ArrayDeque as a Queue

Let’s now start with a simple example showing how we can offer an element in an ArrayDeque – when used as a simple Queue:

@Test
public void whenOffer_addsAtLast() {
    Deque<String> queue = new ArrayDeque<>();
    queue.offer("first");
    queue.offer("second");
 
    assertEquals("second", queue.getLast());
}

And let’s see how we can poll an element from an ArrayDeque, also when used as a Queue:

@Test
public void whenPoll_removesFirst() {
    Deque<String> queue = new ArrayDeque<>();
    queue.offer("first");
    queue.offer("second");
 
    assertEquals("first", queue.poll());
}

The poll method returns a null value if a queue is empty.

4. How’s ArrayDeque implemented


Under the hood, the ArrayDeque is backed by an array which doubles its size when it gets filled.

Initially, the array is initialized with a size of 16. It’s implemented as a double-ended queue where it maintains two pointers namely a head and a tail.

Let’s see this logic in action – at a high level.

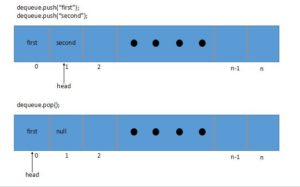
4.1. ArrayDeque as Stack


As can be seen, when a user adds in an element using the push method, it moves the head pointer by one.

When we pop an element, it sets the element at the head position as null so the element could be garbage collected, and then moves back the head pointer by one.

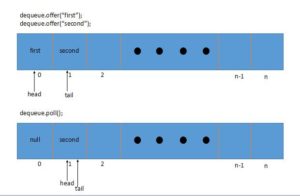
4.2. ArrayDeque as  a Queue


When we add in an element using the offer method, it moves the tail pointer by one.

While when user polls an element, it sets the element at the head position to null so the element could be garbage collected, and then moves the head pointer.

4.3. Notes on ArrayDeque

Finally, a few more notes worth understanding and remembering about this particular implementation:

  • It’s not thread-safe
  • Null elements are not accepted
  • Works significantly faster than the synchronized Stack
  • Is a faster queue than LinkedList due to the better locality of reference
  • Most operations have amortized constant time complexity
  • An Iterator returned by an ArrayDeque is fail-fast
  • ArrayDeque automatically doubles the size of an array when head and tail pointer meets each other while adding an element

5. Conclusion

In this short article, we illustrated the usage of methods in ArrayDeque.

The implementation of all these examples can be found in the GitHub project; this is a Maven-based project, so it should be easy to import and run as is.

Implementing the Template Method Pattern in Java

$
0
0

1. Overview

In this quick tutorial, we’ll see how to leverage the template method pattern – one of the most popular GoF patterns.

It makes it easier to implement complex algorithms by encapsulating logic in a single method.

2. Implementation

To demonstrate how the template method pattern works, let’s create a simple example which represents building a computer station.

Given the pattern’s definition, the algorithm’s structure will be defined in a base class that defines the template build() method:

public abstract class ComputerBuilder {
    
    // ...
    
    public final Computer buildComputer() {
        addMotherboard();
        setupMotherboard();
        addProcessor();
        return new Computer(computerParts);
    }
   
    public abstract void addMotherboard();
    public abstract void setupMotherboard();
    public abstract void addProcessor();
    
    // ...
}

The ComputerBuilder class is responsible for outlining the steps required to build a computer by declaring methods for adding and setting up different components, such as a motherboard and a processor.

Here, the build() method is the template method, which defines steps of the algorithm for assembling the computer parts and returns fully-initialized Computer instances.

Notice that it’s declared as final to prevent it from being overridden.

3. In Action

With the base class already set, let’s try to use it by creating two subclasses. One which builds a “standard” computer, and the other that builds a “high-end” computer:

public class StandardComputerBuilder extends ComputerBuilder {

    @Override
    public void addMotherboard() {
        computerParts.put("Motherboard", "Standard Motherboard");
    }
    
    @Override
    public void setupMotherboard() {
        motherboardSetupStatus.add(
          "Screwing the standard motherboard to the case.");
        motherboardSetupStatus.add(
          "Pluging in the power supply connectors.");
        motherboardSetupStatus.forEach(
          step -> System.out.println(step));
    }
    
    @Override
    public void addProcessor() {
        computerParts.put("Processor", "Standard Processor");
    }
}

And here’s the HighEndComputerBuilder variant:

public class HighEndComputerBuilder extends ComputerBuilder {

    @Override
    public void addMotherboard() {
        computerParts.put("Motherboard", "High-end Motherboard");
    }
    
    @Override
    public void setupMotherboard() {
        motherboardSetupStatus.add(
          "Screwing the high-end motherboard to the case.");
        motherboardSetupStatus.add(
          "Pluging in the power supply connectors.");
        motherboardSetupStatus.forEach(
          step -> System.out.println(step));
    }
    
    @Override
    public void addProcessor() {
         computerParts.put("Processor", "High-end Processor");
    }
}

As we can see, we didn’t need to worry about the whole assembly process but only for providing implementations for separate methods.

Now, let’s see it in action:

new StandardComputerBuilder()
  .buildComputer();
  .getComputerParts()
  .forEach((k, v) -> System.out.println("Part : " + k + " Value : " + v));
        
new HighEndComputerBuilder()
  .buildComputer();
  .getComputerParts()
  .forEach((k, v) -> System.out.println("Part : " + k + " Value : " + v));

4. Template Methods in Java Core Libraries

This pattern is widely used in the Java core libraries, for example by java.util.AbstractList, or java.util.AbstractSet.

For instance, Abstract List provides a skeletal implementation of the List interface.

An example of a template method can be the addAll() method, although it’s not explicitly defined as final:

public boolean addAll(int index, Collection<? extends E> c) {
    rangeCheckForAdd(index);
    boolean modified = false;
    for (E e : c) {
        add(index++, e);
        modified = true;
    }
    return modified;
}

Users only need to implement the add() method:

public void add(int index, E element) {
    throw new UnsupportedOperationException();
}

Here, it’s the responsibility of the programmer to provide an implementation for adding an element to the list at the given index (the variant part of the listing algorithm).

5. Conclusion

In this article, we showed the template method pattern and how to implement it in Java.

The template method pattern promotes code reuse and decoupling, but at the expense of using inheritance.

As always, all the code samples shown in this article are available over on GitHub.


Convert Date to LocalDate or LocalDateTime and Back

$
0
0

1. Overview

Starting with Java 8, we have a new Date API – java.time.

However, sometimes we still need to perform conversions between the new and the old APIs, and work with date representations from both.

2. Converting java.util.Date to java.time.LocalDate

Let’s start with converting the old date representation to the new one.

Here, we can take advantage of a new toInstant() method which was added to java.util.Date in Java 8.

When we’re converting an Instant object, it’s required to use a ZoneId, because Instant objects are timezone-agnostic – just points on the timeline.

The atZone(ZoneId zone) API from Instant object returns a ZonedDateTime – so we just need to extract LocalDate from it using the toLocalDate() method.

In our first example here, we’re using the default system ZoneId:

public LocalDate convertToLocalDateViaInstant(Date dateToConvert) {
    return dateToConvert.toInstant()
      .atZone(ZoneId.systemDefault())
      .toLocalDate();
}

A similar solution to the above one, but with a different way of creating an Instant object – using the ofEpochMilli() method:

public LocalDate convertToLocalDateViaMilisecond(Date dateToConvert) {
    return Instant.ofEpochMilli(dateToConvert.getTime())
      .atZone(ZoneId.systemDefault())
      .toLocalDate();
}

Before we move on, let’s also have a quick look at the old java.sql.Date class and how that can be converted to a LocalDate as well.

Starting with Java 8, we can find an additional toLocalDate() method on java.sql.Date – which also gives us an easy way of converting it to java.time.LocalDate.

In this case, we don’t need to worry about the timezone:

public LocalDate convertToLocalDateViaSqlDate(Date dateToConvert) {
    return new java.sql.Date(dateToConvert.getTime()).toLocalDate();
}

Very similarly, we can convert old Date object into a LocalDateTime object as well – let’s have a look at that next.

3. Converting java.util.Date to java.time.LocalDateTime

To get a LocalDateTime instance – we can similarly use an intermediary ZonedDateTime, and then using the toLocalDateTime() API.

Just like before, we can use two possible solutions of getting an Instant object from java.util.Date:

public LocalDateTime convertToLocalDateTimeViaInstant(Date dateToConvert) {
    return dateToConvert.toInstant()
      .atZone(ZoneId.systemDefault())
      .toLocalDateTime();
}

public LocalDateTime convertToLocalDateTimeViaMilisecond(Date dateToConvert) {
    return Instant.ofEpochMilli(dateToConvert.getTime())
      .atZone(ZoneId.systemDefault())
      .toLocalDateTime();
}

And, starting with Java 8, we can also use java.sql.Timestamp to obtain a LocalDateTime:

ocalDateTime convertToLocalDateTimeViaSqlTimestamp(Date dateToConvert) {
    return new java.sql.Timestamp(
      dateToConvert.getTime()).toLocalDateTime();
}

4. Convert java.time.LocalDate to java.util.Date

Now that we have a good understanding of how to convert form the old data representation to the new one, let’s have a look at converting in the other direction.

We’ll discuss two possible ways of converting LocalDate to Date.

In the first one, we use a new valueOf(LocalDate date) method provided in java.sql.Date object which takes LocalDate as a parameter:

public Date convertToDateViaSqlDate(LocalDate dateToConvert) {
    return java.sql.Date.valueOf(dateToConvert);
}

As we can see, it is effortless and intuitive. It uses local time zone for conversion (all is done under the hood, no need to worry).

In another, Java 8 example, we use an Instant object which we pass to the from(Instant instant) method of java.util.Date object:

public Date convertToDateViaInstant(LocalDate dateToConvert) {
    return java.util.Date.from(dateToConvert.atStartOfDay()
      .atZone(ZoneId.systemDefault())
      .toInstant());
}

You’ll notice we make use of an Instant object here, and that we also need to care about time zones when doing this conversion.

Next, let’s use a very similar solutions to convert a LocalDateTime to a Date object.

5. Convert java.time.LocalDateTime to java.util.Date

The easiest way of getting a java.util.Date from LocalDateTime is to use an extension to the java.sql.Timestamp – available with Java 8:

public Date convertToDateViaSqlTimestamp(LocalDateTime dateToConvert) {
    return java.sql.Timestamp.valueOf(dateToConvert);
}

But of course, an alternative solution is using an Instant object – which we obtain from ZonedDateTime:

Date convertToDateViaInstant(LocalDateTime dateToConvert) {
    return java.util.Date
      .from(dateToConvert.atZone(ZoneId.systemDefault())
      .toInstant());
}

6. Java 9 Additions

In Java 9, there’re new methods available which simplify conversion between java.util.Date and java.time.LocalDate or java.time.LocalDateTime.

LocalDate.ofInstant(Instant instant, ZoneId zone) and LocalDateTime.ofInstant(Instant instant, ZoneId zone) provide handy shortcuts:

public LocalDate convertToLocalDate(Date dateToConvert) {
    return LocalDate.ofInstant(
      dateToConvert.toInstant(), ZoneId.systemDefault());
}

public LocalDateTime convertToLocalDateTime(Date dateToConvert) {
    return LocalDateTime.ofInstant(
      dateToConvert.toInstant(), ZoneId.systemDefault());
}

7. Conclusion

In this tutorial, we covered possible ways of converting old java.util.Date into new java.time.LocalDate and java.time.LocalDateTime and another way around.

The full implementation of this article is available over on Github.

Introduction to the JSON Binding API (JSR 367) in Java

$
0
0

1. Overview

For a long time, there was no standard for JSON processing in Java. The most common libraries used for JSON processing are Jackson and Gson.

Recently, Java EE7 came with an API for parsing and generating JSON (JSR 353: Java API for JSON Processing).

And finally, with the release of JEE 8, there is a standardized API (JSR 367: Java API for JSON Binding (JSON-B)).

For now, its main implementations are Eclipse Yasson (RI) and Apache Johnzon.

2. JSON-B API

2.1. Maven Dependency

Let’s start by adding the necessary dependency.

Keep in mind that in many cases it’ll be enough to include the dependency for the chosen implementation and the javax.json.bind-api will be included transitively:

<dependency>
    <groupId>javax.json.bind</groupId>
    <artifactId>javax.json.bind-api</artifactId>
    <version>1.0</version>
</dependency>

The most recent version can be found at Maven Central.

3. Using Eclipse Yasson

Eclipse Yasson is the official reference implementation of JSON Binding API (JSR-367).

3.1. Maven Dependency

To use it, we need to include the following dependencies in our Maven project:

<dependency>
    <groupId>org.eclipse</groupId>
    <artifactId>yasson</artifactId>
    <version>1.0.1</version>
</dependency>
<dependency>
    <groupId>org.glassfish</groupId>
    <artifactId>javax.json</artifactId>
    <version>1.1.2</version>
</dependency>

The most recent versions can be found at Maven Central.

4. Using Apache Johnzon

Another implementation we can use is Apache Johnzon which complies with the JSON-P (JSR-353) and JSON-B (JSR-367) APIs.

4.1. Maven Dependency

To use it, we need to include the following dependencies in our Maven project:

<dependency>
    <groupId>org.apache.geronimo.specs</groupId>
    <artifactId>geronimo-json_1.1_spec</artifactId>
    <version>1.0</version>
</dependency>
<dependency>
    <groupId>org.apache.johnzon</groupId>
    <artifactId>johnzon-jsonb</artifactId>
    <version>1.1.4</version>
</dependency>

The most recent versions can be found at Maven Central.

5. API Features

The API provides annotations for customizing serialization/deserialization.

Let’s create a simple class and see how the example configuration looks like:

public class Person {

    private int id;

    @JsonbProperty("person-name")
    private String name;
    
    @JsonbProperty(nillable = true)
    private String email;
    
    @JsonbTransient
    private int age;
     
    @JsonbDateFormat("dd-MM-yyyy")
    private LocalDate registeredDate;
    
    private BigDecimal salary;
    
    @JsonbNumberFormat(locale = "en_US", value = "#0.0")
    public BigDecimal getSalary() {
        return salary;
    }
 
    // standard getters and setters
}

After serialization, an object of this class will look like:

{
   "email":"jhon@test.com",
   "id":1,
   "person-name":"Jhon",
   "registeredDate":"07-09-2019",
   "salary":"1000.0"
}

The annotations used here are:

  • @JsonbProperty – which is used for specifying a custom field name
  • @JsonbTransient – when we want to ignore the field during deserialization/serialization
  • @JsonbDateFormat – when we want to define the display format of the date
  • @JsonbNumberFormat – for specifying the display format for numeric values
  • @JsonbNillable – for enabling serialization of null values

5.1. Serialization and Deserialization

First of all, to obtain the JSON representation of our object, we need to use the JsonbBuilder class and its toJson() method.

To start, let’s create a simple Person object like this:

Person person = new Person(
  1, 
  "Jhon", 
  "jhon@test.com", 
  20, 
  LocalDate.of(2019, 9, 7), 
  BigDecimal.valueOf(1000));

And, instantiate the Jsonb class:

Jsonb jsonb = JsonbBuilder.create();

Then, we use the toJson method:

String jsonPerson = jsonb.toJson(person);

To obtain the following JSON representation:

{
    "email":"jhon@test.com",
    "id":1,
    "person-name":"Jhon",
    "registeredDate":"07-09-2019",
    "salary":"1000.0"
}

If we want to do the conversion the other way, we can use the fromJson method:

Person person = jsonb.fromJson(jsonPerson, Person.class);

Naturally, we can also process collections:

List<Person> personList = Arrays.asList(...);
String jsonArrayPerson = jsonb.toJson(personList);

To obtain the following JSON representation:

[ 
    {
      "email":"jhon@test.com",
      "id":1,
      "person-name":"Jhon", 
      "registeredDate":"09-09-2019",
      "salary":"1000.0"
    },
    {
      "email":"jhon1@test.com",
      "id":2,
      "person-name":"Jhon",
      "registeredDate":"09-09-2019",
      "salary":"1500.0"
    },
    ...
]

To convert from JSON array to List we’ll use the fromJson API:

List<Person> personList = jsonb.fromJson(
  personJsonArray, 
  new ArrayList<Person>(){}.getClass().getGenericSuperclass()
);

5.2. Custom Mapping with JsonbConfig

The JsonbConfig class allows us to customize the mapping process for all classes.

For example, we can change the default naming strategies or the properties order.

Now, we’ll use the LOWER_CASE_WITH_UNDERSCORES strategy:

JsonbConfig config = new JsonbConfig().withPropertyNamingStrategy(
  PropertyNamingStrategy.LOWER_CASE_WITH_UNDERSCORES);
Jsonb jsonb = JsonbBuilder.create(config);
String jsonPerson = jsonb.toJson(person);

To obtain the following JSON representation:

{
   "email":"jhon@test.com",
   "id":1,
   "person-name":"Jhon",
   "registered_date":"07-09-2019",
   "salary":"1000.0"
}

Now, we’ll change the property order with the REVERSE strategy. Using this strategy, the order of properties is in reverse order to lexicographical order.
This can also be configured at compile time with the annotation @JsonbPropertyOrder. Let’s see it in action:

JsonbConfig config 
  = new JsonbConfig().withPropertyOrderStrategy(PropertyOrderStrategy.REVERSE);
Jsonb jsonb = JsonbBuilder.create(config);
String jsonPerson = jsonb.toJson(person);

To obtain the following JSON representation:

{
    "salary":"1000.0",
    "registeredDate":"07-09-2019",
    "person-name":"Jhon",
    "id":1,
    "email":"jhon@test.com"
}

5.3. Custom Mapping with Adapters

When the annotations and the JsonbConfig class aren’t enough for us, we can use adapters.

To use them, we’ll need to implement the JsonbAdapter interface, which defines the following methods:

  • adaptToJson – With this method, we can use custom conversion logic for the serialization process.
  • adaptFromJson – This method allows us to use custom conversion logic for the deserialization process.

Let’s create a PersonAdapter to process the id and name attributes of the Person class:

public class PersonAdapter implements JsonbAdapter<Person, JsonObject> {

    @Override
    public JsonObject adaptToJson(Person p) throws Exception {
        return Json.createObjectBuilder()
          .add("id", p.getId())
          .add("name", p.getName())
          .build();
    }

    @Override
    public Person adaptFromJson(JsonObject adapted) throws Exception {
        Person person = new Person();
        person.setId(adapted.getInt("id"));
        person.setName(adapted.getString("name"));
        return person;
    }
}

Furthermore, we’ll assign the adapter to our JsonbConfig instance:

JsonbConfig config = new JsonbConfig().withAdapters(new PersonAdapter());
Jsonb jsonb = JsonbBuilder.create(config);

And we’ll get the following JSON representation:

{
    "id":1, 
    "name":"Jhon"
}

6. Conclusion

In this tutorial, we saw an example of how to integrate the JSON-B API with Java applications using the available implementations, along with examples of customizing serialization and deserialization at both compile and runtime.

The complete code is available, as always, over on Github.

Guide to java.util.Formatter

$
0
0

1. Overview

In this article, we’ll discuss the String formatting in Java using the java.util.Formatter class, which provides support for the layout justification and alignment.

2. How to Use the Formatter

Remember C’s printf? Formatting a String in Java feels very similar.

The format() method of the Formatter is exposed via a static method from the String class. This method accepts a template String and a list of arguments to populate the template with:

String greetings = String.format(
  "Hello Folks, welcome to %s !", 
  "Baeldung");

The resulting String is:

"Hello Folks, welcome to Baeldung !"

A template is a String that contains some static text and one or more format specifiers, which indicate which argument is to be placed at the particular position.

In this case, there’s a single format specifier %s, which gets replaced by the corresponding argument.

3. Format Specifiers

3.1. General Syntax

The syntax of format specifiers for General, Character, and Numeric type is:

%[argument_index$][flags][width][.precision]conversion

Specifiers argument_index, flag, width, and precision are optional. 

  • argument_index part is an integer i – indicating that the ith argument from the argument list should be used here
  • flags is a set of characters used for modifying the output format
  • width is a positive integer which indicates the minimum number of characters to be written to the output
  • precision is an integer usually used to restrict the number of characters, whose specific behavior depends on the conversion
  • is the mandatory part. It’s a character indicating how the argument should be formatted. The set of valid conversions for a given argument depends on the argument’s data type

In our example above, if we want to specify the number of an argument explicitly, we can write it using 1$ and 2$ argument indices.

Both these being the first and second argument respectively:

String greetings = String.format(
  "Hello %2$s, welcome to %1$s !", 
  "Baeldung", 
  "Folks");

3.2. For Date/Time Representation

%[argument_index$][flags][width]conversion

Again the argument_index, flags, and width are optional.

Let’s take an example to understand this:

@Test
public void whenFormatSpecifierForCalendar_thenGotExpected() {
    Calendar c = new GregorianCalendar(2017, 11, 10);
    String s = String.format(
      "The date is: %tm %1$te,%1$tY", c);

    assertEquals("The date is: 12 10,2017", s);
}

Here, for every format specifier, the 1st argument will be used, hence 1$. Here if we skip the argument_index for 2nd and 3rd format specifier, it tries to find 3 arguments, but we need to use the same argument for all 3 format specifiers.

So, it’s ok if we don’t specify argument _index for the first one, but we need to specify it for the other two.

The flag here is made up of two characters. Where the first character is always a ‘t’ or ‘T’. The second character depends on what part of Calendar is to be displayed.

In our example, the first format specifiers tm, indicates month formatted as two digits, te indicates the day of the month and tY indicated Year formatted as four digits.

3.3. Format Specifiers Without Arguments

%[flags][width]conversion

The optional flags and width are the same as defined in above sections.

The required conversion is a character or String indicating content to be inserted in the output. Currently, only the ‘%’ and newline ‘n’ can be printed using this:

@Test
public void whenNoArguments_thenExpected() {
    String s = String.format("John scored 90%% in Fall semester");
 
    assertEquals("John scored 90% in Fall semester", s);
}

Inside format(), if we want to print ‘%’ – we need to escape it by using ‘%%’.

4. Conversions

Let’s now dig into every detail of the Format Specifier syntax, starting with a conversion. Note that you can find all the details in the Formatter javadocs.

As we noticed in the above examples, conversion part is required in all format specifiers, and it can be divided into several categories.

Let’s take a look at each one by taking examples.

4.1. General 

Used for any argument type. The general conversions are:

  1. ‘b’ or ‘B’ – for Boolean values
  2. ‘h’ or ‘H’ – for HashCode
  3. ‘s’ or ‘S’ – for String, if null, it prints “null”, else arg.toString()

We’ll now try to display boolean and String values, using the corresponding conversions:

@Test
public void givenString_whenGeneralConversion_thenConvertedString() {
    String s = String.format("The correct answer is %s", false);
    assertEquals("The correct answer is false", s);

    s = String.format("The correct answer is %b", null);
    assertEquals("The correct answer is false", s);

    s = String.format("The correct answer is %B", true);
    assertEquals("The correct answer is TRUE", s);
}

4.2. Character 

Used for the basic types which represent Unicode characters: char, Character, byte, Byte, short, and ShortThis conversion can also be used for the types int and Integer when the Character.isValidCodePoint(int) returns true for them.

It can be written as ‘c’ or ’C’ based on the case we want.

Let’s try to print some characters:

@Test
public void givenString_whenCharConversion_thenConvertedString() {
    String s = String.format("The correct answer is %c", 'a');
    assertEquals("The correct answer is a", s);

    s = String.format("The correct answer is %c", null);
    assertEquals("The correct answer is null", s);

    s = String.format("The correct answer is %C", 'b');
    assertEquals("The correct answer is B", s);

    s = String.format("The valid unicode character: %c", 0x0400);
    assertTrue(Character.isValidCodePoint(0x0400));
    assertEquals("The valid unicode character: Ѐ", s);
}

Let’s take one more example of an invalid code point:

@Test(expected = IllegalFormatCodePointException.class)
public void whenIllegalCodePointForConversion_thenError() {
    String s = String.format("The valid unicode character: %c", 0x11FFFF);
 
    assertFalse(Character.isValidCodePoint(0x11FFFF));
    assertEquals("The valid unicode character: Ā", s);
}

4.3. Numeric – Integral

These are used for Java integral types: byte, Byte, short, Short, int and Integer, long, Long, and BigIntegerThere are three conversions in this category:

  1. ‘d’ – for decimal number
  2. ‘o’ – for octal number
  3. ‘X’ or ‘x’ – for hexadecimal number

Let’s try to print each of these:

@Test
public void whenNumericIntegralConversion_thenConvertedString() {
    String s = String.format("The number 25 in decimal = %d", 25);
    assertEquals("The number 25 in decimal = 25", s);

    s = String.format("The number 25 in octal = %o", 25);
    assertEquals("The number 25 in octal = 31", s);

    s = String.format("The number 25 in hexadecimal = %x", 25);
    assertEquals("The number 25 in hexadecimal = 19", s);
}

4.4. Numeric – Floating Point

Used for Java floating-point types: float, Float, double, Double, and BigDecimal

  1. ‘e’ or ‘E’ – formatted as a decimal number in computerized scientific notation
  2. ‘f’ – formatted as a decimal number
  3. ‘g’ or ‘G’based on the precision value after rounding, this conversion formats into computerized scientific notation or decimal format

Let’s try to print the floating point numbers:

@Test
public void whenNumericFloatingConversion_thenConvertedString() {
    String s = String.format(
      "The computerized scientific format of 10000.00 "
      + "= %e", 10000.00);
 
    assertEquals(
      "The computerized scientific format of 10000.00 = 1.000000e+04", s);
    
    String s2 = String.format("The decimal format of 10.019 = %f", 10.019);
    assertEquals("The decimal format of 10.019 = 10.019000", s2);
}

4.5. Other Conversions 

  • Date/Time – for Java types which are capable of encoding a date or time: long, Long, Calendar, Date and TemporalAccessor. For this, we need to use prefixed ‘t’ or ‘T’, as we saw earlier
  • Percent – prints a literal ‘%’ (‘\u0025’)
  • Line Separator – prints a platform-specific line separator

Let’s have a look at a simple example:

@Test
public void whenLineSeparatorConversion_thenConvertedString() {
    String s = String.format("First Line %nSecond Line");
 
    assertEquals("First Line \n" + "Second Line", s);
}

5. Flags

Flags, in general, are used to format the output. Whereas in case of date and time, they are used to specify which part of the date is to be displayed, as we saw in the Section 4 example.

A number of flags are available, a list of which can be found in the documentation.

Let’s see a flag example to understand it’s usage. ‘-‘ is used to format the output as left justified: 

@Test
public void whenSpecifyFlag_thenGotFormattedString() {
    String s = String.format("Without left justified flag: %5d", 25);
    assertEquals("Without left justified flag:    25", s);

    s = String.format("With left justified flag: %-5d", 25);
    assertEquals("With left justified flag: 25   ", s);
}

6. Precision

For general conversions, precision is just the maximum number of characters to be written to the output. Whereas, for the floating-point conversions the precision is the number of digits after the radix point.

The first statement is an example of precision with floating-point numbers, and the second one with general conversions:

@Test
public void whenSpecifyPrecision_thenGotExpected() {
    String s = String.format(
      "Output of 25.09878 with Precision 2: %.2f", 25.09878);
 
    assertEquals("Output of 25.09878 with Precision 2: 25.10", s);

    String s2 = String.format(
      "Output of general conversion type with Precision 2: %.2b", true);
 
    assertEquals("Output of general conversion type with Precision 2: tr", s2);
}

7. Argument Index

As mentioned previously, the argument_index is an integer that indicates the position of the argument in the argument list1$ indicates the first argument, 2$ the second argument, and so on.

Also, there is another way to reference arguments by position, by using the ‘<‘ (‘\u003c’) flag, which means the argument from the previous format specifier will be re-used. For example, these two statements would produce the identical output:

@Test
public void whenSpecifyArgumentIndex_thenGotExpected() {
    Calendar c = Calendar.getInstance();
    String s = String.format("The date is: %tm %1$te,%1$tY", c);
    assertEquals("The date is: 12 10,2017", s);

    s = String.format("The date is: %tm %<te,%<tY", c);
    assertEquals("The date is: 12 10,2017", s);
}

8. Other Ways of Using Formatter

Till now we saw the use of format() method of the Formatter class. We can also create a Formatter instance, and use that to invoke the format() method.

We can create an instance by passing in an Appendable, OutputStream, File or file name. Based on this, the formatted String is stored in an Appendable, OutputStream, File respectively.

Let’s see an example of using it with an Appendable. We can use it with others in the same way.

8.1. Using Formatter with Appendable

Let’s create a StringBuilder instance sb, and create a Formatter using it. Then we’ll invoke format() to format a String:

@Test
public void whenCreateFormatter_thenFormatterWithAppendable() {
    StringBuilder sb = new StringBuilder();
    Formatter formatter = new Formatter(sb);
    formatter.format("I am writting to a %s Instance.", sb.getClass());
    
    assertEquals(
      "I am writting to a class java.lang.StringBuilder Instance.", 
      sb.toString());
}

9. Conclusion

In this article, we saw the formatting facilities provided by the java.util.Formatter class. We saw various syntax that can be used to format the String and the conversion types that can be used for different data types.

As usual, the code for the examples we saw can be found over on Github.

Java Weekly, Issue 205

$
0
0

Here we go…

1. Spring and Java


>> JUnit 5 Meets AssertJ [blog.codeleak.pl]

Although JUnit5 is much more flexible than the previous version, AssertJ is still a must.

>> Binding applications to HashiCorp’s Vault with Spring in Cloud Foundry [spring.io]

A quick guide to binding a Spring application to a HashiCorp’s Vault service broker on Cloud Foundry.

>> How to Ensure Your Code Works With Older JDKs [blog.jooq.org]

The Animal Sniffer Maven Plugin can come in handy for complex scenarios.

>> Early Java EE 8 implementation in the November Liberty beta [developer.ibm.com]

An early Java EE 8 implementation is up for grabs 🙂

Also worth reading:

Webinars and presentations:

Time to upgrade:

2. Technical

>> Understanding Monads. A Guide for the Perplexed [infoq.com]

Monads are easier than you might think 🙂

Also worth reading:

3. Musings

>> How to become a Java Champion [vladmihalcea.com]

Some very cool insights into Vlad’s journey to becoming a Java Champion.

>> Making the most out of conferences [blog.frankel.ch]

Plan, go offline, take notes… but don’t overdo it.

>> Learning in a World Where Programming Skills Aren’t That Important [daedtech.com]

After a few years of commercial programming, it’s very easy to reach the plateau and career stagnation and highly advanced programming skills will not help you progress further.

Also worth reading:

4. Comics

And my favorite Dilberts of the week:

>> Worthless Financial Projections [dilbert.com]

>> Brain Scan [dilbert.com]

>> Initial Coin Offering [dilbert.com]

5. Pick of the Week

This week I’ve finally announced the new material that’s coming in my security course – all related to Spring Security 5 (along with the upcoming price change):

>> The upcoming new modules in Learn Spring Security

The SpringJUnitConfig and SpringJUnitWebConfig Annotations in Spring 5

$
0
0

1. Introduction

In this quick article, we’ll take a look at the new @SpringJUnitConfig and @SpringJUnitWebConfig annotations available in Spring 5.

These annotations are a composition of JUnit 5 and Spring 5 annotations that make test creation easier and faster.

2. @SpringJUnitConfig

@SpringJUnitConfig combines these 2 annotations:

  • @ExtendWith(SpringExtension.class) from JUnit 5 to run the test with the SpringExtension class and
  • @ContextConfiguration from Spring Testing to load the Spring context

Let’s create a test and use this annotation in practice:

@SpringJUnitConfig(SpringJUnitConfigTest.Config.class)
public class SpringJUnitConfigTest {

    @Configuration
    static class Config {}
}

Notice that, in contrast to the @ContextConfiguration, configuration classes are declared using the value attribute. However, resource locations should be specified with the locations attribute.

We can now verify that the Spring context was really loaded:

@Autowired
private ApplicationContext applicationContext;

@Test
void givenAppContext_WhenInjected_ThenItShouldNotBeNull() {
    assertNotNull(applicationContext);
}

Finally, here we have the equivalent code of @SpringJUnitConfig(SpringJUnitConfigTest.Config.class):

@ExtendWith(SpringExtension.class)
@ContextConfiguration(classes = SpringJUnitConfigTest.Config.class)

3. @SpringJUnitWebConfig

@SpringJUnitWebConfig combines the same annotations of @SpringJUnitConfig plus the @WebAppConfiguration from Spring testing – to load the WebApplicationContext.

Let’s see how this annotation works:

@SpringJUnitWebConfig(SpringJUnitWebConfigTest.Config.class)
public class SpringJUnitWebConfigTest {

    @Configuration
    static class Config {
    }
}

Like @SpringJUnitConfig, the configuration classes go in the value attribute and any resources are specified using the locations attribute.

Also, the value attribute of @WebAppConfiguration should now be specified using the resourcePath attribute. By default, this attribute is set to “src/main/webapp”.

Let’s now verify that the WebApplicationContext was really loaded:

@Autowired
private WebApplicationContext webAppContext;

@Test
void givenWebAppContext_WhenInjected_ThenItShouldNotBeNull() {
    assertNotNull(webAppContext);
}

Again, here we have the equivalent code without using @SpringJUnitWebConfig:

@ExtendWith(SpringExtension.class)
@WebAppConfiguration
@ContextConfiguration(classes = SpringJUnitWebConfigTest.Config.class)

4. Conclusion

In this brief tutorial, we showed how to use the newly introduced @SpringJUnitConfig and @SpringJUnitWebConfig annotations in Spring 5.

The full source code for the examples is available over on GitHub.

Comparator and Comparable in Java

$
0
0

1. Introduction

Comparisons in Java are quite easy – until they’re not.

When working with custom types, or trying to compare objects that aren’t directly comparable, we need to make use of a comparison strategy. We can build one simply, but making use of the Comparator or Comparable interfaces.

2. Setting Up the Example

Let’s take an example of a football team – where we want to line up the players by their rankings.

We’ll start by creating a simple Player class:

public class Player {
    private int ranking;
    private String name;
    private int age;
    
    // constructor, getters, setters  
}

Next, let’s create a PlayerSorter class to create our collection and make an attempt to sort it using Collections.sort:

public static void main(String[] args) {
    List<Player> footballTeam = new ArrayList<>();
    Player player1 = new Player(59, "John", 20);
    Player player2 = new Player(67, "Roger", 22);
    Player player3 = new Player(45, "Steven", 24);
    footballTeam.add(player1);
    footballTeam.add(player2);
    footballTeam.add(player3);

    System.out.println("Before Sorting : " + footballTeam);
    Collections.sort(footballTeam);
    System.out.println("After Sorting : " + footballTeam);
}

Here, as expected, this results in a compile-time error:

The method sort(List<T>) in the type Collections 
  is not applicable for the arguments (ArrayList<Player>)

Let’s understand what we did wrong here.

3. Comparable

As the name suggests, Comparable is an interface defining a strategy of comparing an object with other objects of the same type. This is called the class’s “natural ordering”.

Accordingly, in order to be able to sort – we must define our Player object as comparable by implementing the Comparable interface:

public class Player implements Comparable<Player> {
    
    //...
    @Override
    public int compareTo(Player otherPlayer) {
        return (this.getRanking() - otherPlayer.getRanking());
    }
}

The sorting order is decided by the return value of the compareTo() method.

The method returns a number indicating whether the object being compared is less than, equal to or greater than the object being passed as an argument.

Finally, when we run our PlayerSorter now, we can see our Players sorted by their ranking:

Before Sorting : [John, Roger, Steven]
After Sorting : [Steven, John, Roger]

Now that we have a clear understanding of natural ordering with Comparable, let’s see how we can use other types of ordering, in a more flexible manner than directly implementing an interface.

4. Comparator

The Comparator interface defines a compare(arg1, arg2) method with two arguments which represent compared objects and works similarly to the Comparable.compareTo() method.

4.1. Creating Comparators

To create a Comparator, we have to implement the Comparator interface.

In our first example, we’ll create a Comparator to use the ranking attribute of Player to sort the players:

public class PlayerRankingComparator implements Comparator<Player> {
 
    @Override
    public int compare(Player firstPlayer, Player secondPlayer) {
       return (firstPlayer.getRanking() - secondPlayer.getRanking());
    }
}

Similarly, we can create a Comparator to use the age attribute of Player to sort the players:

public class PlayerAgeComparator implements Comparator<Player> {
    @Override
    public int compare(Player firstPlayer, Player secondPlayer) {
       return (firstPlayer.getAge() - secondPlayer.getAge());
    }
}

4.2. Comparators in Action

To demonstrate the concept, let’s modify our PlayerSorter by introducing a second argument to the Collections.sort method which is actually the instance of Comparator we want to use.

Using this approach, we can override the natural ordering:

PlayerRankingComparator playerComparator = new PlayerRankingComparator();
Collections.sort(footballTeam, playerComparator);

Now, let’s run our PlayerRankingSorter to see the result:

Before Sorting : [John, Roger, Steven]
After Sorting by ranking : [Steven, John, Roger]

If we want a different sorting order, we only need to change the Comparator we’re using:

PlayerAgeComparator playerComparator = new PlayerAgeComparator();
Collections.sort(footballTeam, playerComparator);

Now, when we run our PlayerAgeSorter, we can see a different sort order by age:

Before Sorting : [John, Roger, Steven]
After Sorting by age : [Roger, John, Steven]

4.3. Java 8 Comparators

Java 8 provides new ways of defining Comparators by using lambda expressions and the comparing() static factory method.

Let’s see a quick example of how to use a lambda expression to create a Comparator:

Comparator<Player> byRanking 
 = (Player player1, Player player2) -> player1.getRanking() - player2.getRanking();

The Comparator.comparing method takes a method calculating the property that will be used for comparing items, and returns a matching Comparator instance:

Comparator<Player> byRanking = Comparator
  .comparing(Player::getRanking);
Comparator<Player> byAge = Comparator
  .comparing(Player::getAge);

You can explore the Java 8 functionality in-depth in our Java 8 Comparator.comparing guide.

5. Comparator Vs Comparable

The Comparable interface is a good choice when used for defining the default ordering or, in other words, if it’s the main way of comparing objects.

Then, we must ask ourselves why use a Comparator if we already have Comparable?

There are several reasons why:

  • Sometimes, we can’t modify the source code of the class whose objects we want to sort, thus making the use of Comparable impossible
  • Using Comparators allows us to avoid adding additional code to our domain classes
  • We can define multiple different comparison strategies which isn’t possible when using Comparable

6. Conclusion

In this tutorial, we explored the Comparable and Comparator interfaces and discussed the differences between them.

To understand more advanced topics of sorting, check out our other articles such as Java 8 Comparator, Java 8 Comparison with Lambdas.

And, as usual, the source code can be found over on Github.

Introduction to the JDBC RowSet Interface in Java

$
0
0

1. Overview

In this article, we’re reviewing the JDBC RowSet interface. A JDBC RowSet object holds tabular data in a style that makes it more adaptable and simpler to use than a result set.

Oracle has defined five RowSet interfaces for the most frequent uses of a RowSet:

  • JdbcRowSet
  • CachedRowSet
  • WebRowSet
  • JoinRowSet
  • FilteredRowSet

In this tutorial, we’ll review how to use these RowSet interfaces.

2. JdbcRowSet

Let’s start with the JdbcRowSet – we’ll simply create one by passing a Connection object to the JdbcRowSetImpl:

JdbcRowSet jdbcRS = new JdbcRowSetImpl(conn);
jdbcRS.setType(ResultSet.TYPE_SCROLL_INSENSITIVE);
String sql = "SELECT * FROM customers";
jdbcRS.setCommand(sql);
jdbcRS.execute();
jdbcRS.addRowSetListener(new ExampleListener());
while (jdbcRS.next()) {
    // each call to next, generates a cursorMoved event
    System.out.println("id = " + jdbcRS.getString(1));
    System.out.println("name = " + jdbcRS.getString(2));
}

In the above example, jdbcRs contained no data until we defined the SQL statement with the method setCommand and then ran the method execute.

Also notice how, in order to perform event handling, we added a RowSetListener into the JdbcRowSet.

JdbcRowSet is different than the other four RowSet implementations – because it’s always connected to the database and because of this it’s most similar to the ResultSet object.

3. CachedRowSet

CachedRowSet object is unique because it can operate without being connected to its data source. We call this a “disconnected RowSet object”.

CachedRowSet gets its name due to the fact it caches its data in memory so that it can operate on its own data instead of the data stored in a database.

As CachedRowSet interface is the super interface for all disconnected RowSet objects, the code we review below is also applicable to a WebRowSet, JoinRowSet, or FilteredRowSet just as well:

CachedRowSet crs = new CachedRowSetImpl();
crs.setUsername(username);
crs.setPassword(password);
crs.setUrl(url);
crs.setCommand(sql);
crs.execute();
crs.addRowSetListener(new ExampleListener());
while (crs.next()) {
    if (crs.getInt("id") == 1) {
        System.out.println("CRS found customer1 and will remove the record.");
        crs.deleteRow();
        break;
    }
}

4. WebRowSet

Next, let’s have a look at the WebRowSet.

This is also unique because, in addition to offering the capabilities of a CachedRowSet object, it can write itself to an XML document and can also read that XML document to convert itself back to a WebRowSet:

WebRowSet wrs = new WebRowSetImpl();
wrs.setUsername(username);
wrs.setPassword(password);
wrs.setUrl(url);
wrs.setCommand(sql);
wrs.execute();
FileOutputStream ostream = new FileOutputStream("customers.xml");
wrs.writeXml(ostream);

Using the writeXml method, we write the current state of a WebRowSet object to an XML document.

By passing the writeXml method an OutputStream object, we write in bytes instead of characters, which can be quite helpful to handle all forms of data.

5. JoinRowSet

JoinRowSet lets us create a SQL JOIN between RowSet objects when these are in memory. This is significant because it saves us the overhead of having to create one or more connections:

CachedRowSetImpl customers = new CachedRowSetImpl();
// configuration of settings for CachedRowSet
CachedRowSetImpl associates = new CachedRowSetImpl();
// configuration of settings for this CachedRowSet            
JoinRowSet jrs = new JoinRowSetImpl();
jrs.addRowSet(customers,ID);
jrs.addRowSet(associates,ID);

Because each RowSet object added to a JoinRowSet object needs a match column, the column on which the SQL JOIN is based, we specify “id” in the addRowSet method.

Note that, rather than using the column name, we could have also used the column number.

6. FilteredRowSet

Finally, the FilteredRowSet lets us cut down the number of rows that are visible in a RowSet object so that we can work with only the data that is relevant to what we are doing.

We decide how we want to “filter” the data using an implementation of the Predicate interface:

public class FilterExample implements Predicate {
    
    private Pattern pattern;
    
    public FilterExample(String regexQuery) {
        if (regexQuery != null && !regexQuery.isEmpty()) {
            pattern = Pattern.compile(regexQuery);
        }
    }
 
    public boolean evaluate(RowSet rs) {
        try {
            if (!rs.isAfterLast()) {
                String name = rs.getString("name");
                System.out.println(String.format(
                  "Searching for pattern '%s' in %s", pattern.toString(),
                  name));
                Matcher matcher = pattern.matcher(name);
                return matcher.matches();
            } else
                return false;
        } catch (Exception e) {
            e.printStackTrace();
            return false;
        }
    }
    
    // methods for handling errors
}

Now we apply that filter to a FilteredRowSet object:

RowSetFactory rsf = RowSetProvider.newFactory();
FilteredRowSet frs = rsf.createFilteredRowSet();
frs.setCommand("select * from customers");
frs.execute(conn);
frs.setFilter(new FilterExample("^[A-C].*"));
            
ResultSetMetaData rsmd = frs.getMetaData();
int columncount = rsmd.getColumnCount();
while (frs.next()) {
    for (int i = 1; i <= columncount; i++) {
        System.out.println(
          rsmd.getColumnLabel(i)
          + " = "
          + frs.getObject(i) + " ");
        }
    }

7. Conclusion

This quick tutorial covered the five standard implementations of the RowSet interface available in the JDK.

We discussed the configuration of each implementation and mentioned the differences between them.

As we pointed out, only one of the RowSet implementations is a connected RowSet object – the JdbcRowSet. The other four are disconnected RowSet objects.

And, as always, the full code for this article can be found over on Github.


Nested Classes in Java

$
0
0

1. Introduction

This tutorial is a quick and to-the-point introduction to nested classes in the Java language.

Simply put, Java allows us to define classes inside other classes. Nested classes enable us to logically group classes that are only used in one place, write more readable and maintainable code and increase encapsulation.

Before we get started, let’s have a look at the several types of nested classes available in the language:

  • Static nested classes
  • Non-static nested classes
  • Local classes
  • Anonymous classes

In the next sections, we’re going to discuss each of these in detail.

2. Static Nested Classes

Here are a few points to remember about static nested classes:

  • As with static members, these belong to their enclosing class, and not to an instance of the class
  • They can have all types of access modifiers in their declaration
  • They only have access to static members in the enclosing class
  • They can define both static and non-static members

Let’s see how we can declare a static nested class:

public class Enclosing {
    
    private static int x = 1;
    
    public static class StaticNested {

        private void run() {
            // method implementation
        }
    }
    
    @Test
    public void test() {
        Enclosing.StaticNested nested = new Enclosing.StaticNested();
        nested.run();
    }
}

3. Non-Static Nested Classes

Next, here are a few quick points to remember about non-static nested classes:

  • They are also called inner classes
  • They can have all types of access modifiers in their declaration
  • Just like instance variables and methods, inner classes are associated with an instance of the enclosing class
  • They have access to all members of the enclosing class, regardless of whether they are static or non-static
  • They can only define non-static members

Here’s how we can declare an inner class:

public class Outer {
    
    public class Inner {
        // ...
    }
}

To instantiate an inner class, we must first instantiate its enclosing class.

Let’s see how we can do that:

Outer outer = new Outer();
Outer.Inner inner = outer.new Inner();

In the next subsections, we’re going to show some special types of inner classes.

3.1. Local Classes

Local classes are a special type of inner classes – in which the class is defined inside a method or scope block.

Let’s see a few points to remember about this type of class:

  • They cannot have access modifiers in their declaration
  • They have access to both static and non-static members in the enclosing context
  • They can only define instance members

Here’s a quick example:

public class NewEnclosing {
    
    void run() {
        class Local {

            void run() {
                // method implementation
            }
        }
        Local local = new Local();
        local.run();
    }
    
    @Test
    public void test() {
        NewEnclosing newEnclosing = new NewEnclosing();
        newEnclosing.run();
    }
}

3.2. Anonymous Classes

Anonymous classes can be used to define an implementation of an interface or an abstract class without having to create a reusable implementation.

Let’s list a few points to remember about anonymous classes:

  • They cannot have access modifiers in their declaration
  • They have access to both static and non-static members in the enclosing context
  • They can only define instance members
  • They’re the only type of nested classes that cannot define constructors or extend/implement other classes or interfaces

To define an anonymous class, let’s first define a simple a simple abstract class:

abstract class SimpleAbstractClass {
    abstract void run();
}

Now let’s see how we can define an anonymous class:

public class AnonymousInnerTest {
    
    @Test
    public void whenRunAnonymousClass_thenCorrect() {
        SimpleAbstractClass simpleAbstractClass = new SimpleAbstractClass() {
            void run() {
                // method implementation
            }
        };
        simpleAbstractClass.run();
    }
}

4. Shadowing

The declaration of the members of an inner class shadow those of the enclosing class if they have the same name.

In this case, the this keyword refers to the instances of the nested class and the members of the outer class can be referred to using the name of the outer class.

Let’s see a quick example:

public class NewOuter {

    int a = 1;
    static int b = 2;

    public class InnerClass {
        int a = 3;
        static final int b = 4;

        public void run() {
            System.out.println("a = " + a);
            System.out.println("b = " + b);
            System.out.println("NewOuterTest.this.a = " + NewOuter.this.a);
            System.out.println("NewOuterTest.b = " + NewOuter.b);
            System.out.println("NewOuterTest.this.b = " + NewOuter.this.b);
        }
    }

    @Test
    public void test() {
        NewOuter outer = new NewOuter();
        NewOuter.InnerClass inner = outer.new InnerClass();
        inner.run();

    }
}

5. Serialization

To avoid a java.io.NotSerializableException while attempting to serialize a nested class, we should:

  • Declare the nested class as static
  • Make both the nested class and the enclosing class implement Serializable

6. Conclusion

In this article, we’ve seen what nested classes are and their different types. We also took a look at how field visibility and access modifiers differ across those different types.

As always, the full implementation of this tutorial can be found over on GitHub.

Writing Custom Gradle Plugins

$
0
0

1. Introduction

Gradle is a very popular build tool, which is often appreciated for the highly-customizable build process.

Today we’re going to show how to create custom Gradle plugins, that will allow us to modify the build process beyond what we can achieve with the standard configuration.

2. Plugin Source Location

We can place our code in a few different locations. All of them have some advantages and disadvantages.

2.1. Build Script

We can simply put the source code of our plugin inside the build script itself. This will give us automatic compilation and inclusion of the plugin.

It’s very simple, however, our plugin won’t be visible outside of the build script. Because of that, we can’t reuse it in other build scripts.

2.2. BuildSrc Folder

Another possibility that we can use is placing the source code of our plugin in the buildSrc/src/main/java folder.

When you run Gradle, it’ll check for the existence of the buildSrc folder. If that exists, Gradle will automatically build and include our plugin.

This will give us the possibility to share our plugin between various build scripts, but we still won’t be able to use it in other projects.

2.3. Standalone Project

Finally, we can create our plugin as a separate project which makes the plugin fully reusable in various projects.

However, to use it in an external project, we’ll need to bundle it in a jar file and add to a project.

3. Our First Plugin


Let’s start with the basics – every Gradle Plugin must implement the com.gradle.api.Plugin interface

The interface is generic, so we can parametrize it with various parameter types. Usually, the parameter type is org.gradle.api.Project.

However, we can use different type parameters so that the plugin is applied in different lifetime phases:

  • using org.gradle.api.Settings will result in applying the plugin to a settings script
  • using org.gradle.api.Gradle will result in applying the plugin to an initialization script

The simplest plugin we can create is a hello world application: 

public class GreetingPlugin implements Plugin<Project> {
    @Override
    public void apply(Project project) {
        project.task("hello")
          .doLast(task -> System.out.println("Hello Gradle!"));
    }
}

We can now apply it by adding a line inside our build script:

apply plugin: GreetingPlugin

Now, after calling gradle hello, we’ll see “Hello Gradle” message in logs.

4. Plugin Configuration

Most plugins will need an access to an external configuration from the build script.

We can do that by using extension objects:

public class GreetingPluginExtension {
    private String greeter = "Baeldung";
    private String message = "Message from the plugin!"
    // standard getters and setters
}

Let’s now add the new extension object to our plugin class:

@Override
public void apply(Project project) {
    GreetingPluginExtension extension = project.getExtensions()
      .create("greeting", GreetingPluginExtension.class);

    project.task("hello")
      .doLast(task -> {
          System.out.println(
            "Hello, " + extension.getGreeter());
          System.out.println(
            "I have a message for You: " + extension.getMessage());
      });
}

Now, when we call gradle hello, we’ll see the default message defined in our GreetingPluginExtension. 

But since we have created the extension, we can use a closure to do that inside the build script:

greeting {
    greeter = "Stranger"
    message = "Message from the build script" 
}

5. Standalone Plugin Project

For creating a standalone Gradle plugins, we need to do a little more work.

5.1. Setup

Firstly, we need to import the Gradle API dependency – which is quite straightforward:

dependencies {
    compile gradleApi()
}

Note that doing the same in Maven requires gradle-tooling-api dependency – from the Gradle repository:

<dependencies>
    <dependency>
        <groupId>org.gradle</groupId>
        <artifactId>gradle-tooling-api</artifactId>
        <version>3.0</version>
    </dependency>
    <dependency>
        <groupId>org.gradle</groupId>
        <artifactId>gradle-core</artifactId>
        <version>3.0</version>
        <scope>provided</scope>
    </dependency>
</dependencies>
<repositories>
    <repository>
        <id>repo.gradle.org</id>
        <url>https://repo.gradle.org/gradle/libs-releases-local/</url>
    </repository>
</repositories>

5.2. Wiring the Plugin

To allow Gradle to find the implementation of our standalone plugin, we need to create the properties file in the src/main/resources/META-INF/gradle-plugins.

The resource file needs to have a name that matches the plugin id. So if our plugin has an id of org.baeldung.greeting, the exact path of the file would be META-INF/gradle-plugins/org.baeldung.greeting.properties. 

Next, we can define the implementation class of the plugin:

    implementation-class=org.gradle.GreetingPlugin

The implementation-class should be equal to the full package name of our plugin class.

5.3. Creating the Plugin id

There are some rules and conventions that plugin ID must follow in Gradle. Most of them are similar to package name rules in Java:

  • They can contain only alphanumeric characters, “.” and “-“
  • The id has to have at least one “.” separating the domain name from the plugin name
  • Namespaces org.gradle and com.gradleware are restricted
  • An id cannot start or end with “.”
  • No two or more consecutive “.” characters are allowed

Finally, there’s a convention that plugin Id should be a lower case name that follows reverse domain name convention.

The main difference between Java package names and Gradle plugin names is that the package name is usually more detailed than the plugin ID.

5.4. Publishing Plugin

When we want to publish our plugin to be able to reuse it in external projects, we have two ways of achieving that.

Firstly, we can publish our plugin JAR to an external repository like Maven or Ivy.

Alternatively, we can use the Gradle Plugin Portal. This will allow our plugin to be accessible by wide Gradle Community. More on publishing projects to Gradle repository can be found in Gradle Plugin Portal Documentation.

5.5. Java Gradle Development Plugin

When we’re writing our plugins in Java, we can benefit from the Java Gradle Development Plugin. 

This will automatically compile and add gradleApi() dependencies. It will also perform plugin metadata validation as a part of the gradle jar task.

We can add plugin by adding following block to our build script:

plugins {
    id 'java-gradle-plugin'
}

6. Testing Plugins

To test that our plugin works properly and it’s properly applied to the Project, we can use org.gradle.testfixtures.ProjectBuilder to create an instance of the Project.

We can then check if the plugin was applied and proper tasks are present in our Project instance. We can use standard JUnit tests to do that:

@Test
public void greetingTest(){
    Project project = ProjectBuilder.builder().build();
    project.getPluginManager().apply("com.baeldung.greeting");
 
    assertTrue(project.getPluginManager()
      .hasPlugin("com.baeldung.greeting"));
 
    assertNotNull(project.getTasks().getByName("hello"));
}

7. Summary

In this article, we’ve shown the basics of writing custom plugins in Gradle. To go more in-depth into plugin creation, have a look at the Gradle Documentation.

And, as always, all the code samples can be found over on Github.

A Guide to Java Loops

$
0
0

1. Overview

In this article, we’ll look at a core aspect of the Java language – executing a statement or a group of statements repeatedly – using loops.

2. Intro to Loops

In programming languages, looping is a feature which facilitates the execution of a set of instructions until the controlling Boolean-expression evaluates to false.

Java provides different types of loops to fit any programming need. Each loop has its own purpose and a suitable use case to serve.

Here are the types of loops that we can find in Java:

  • Simple for loop
  • Enhanced for-each loop
  • While loop
  • Do-While loop

3. Simple for Loop

A for loop is a control structure that allows us to repeat certain operations by incrementing and evaluating a loop counter.

Before the first iteration, the loop counter gets initialized, then the condition evaluation is performed followed by the step definition (usually a simple incrementation).

The syntax of the for loop is:

for (initialization; Boolean-expression; step) 
  statement;

Let’s see it in a simple example:

for (int i = 0; i < 5; i++) {
    System.out.println("Simple for loop: i = " + i);
}

The initializationBoolean-expression and step used in for statement are optional. Here’s an example of an infinite for loop:

for ( ; ; ) {
    // Infinite for loop
}

3.1. Labeled for Loops

We can also have labeled for loops. It’s useful if we’ve got nested for loops so that we can break/continue from aspecific for loop:

aa: for (int i = 1; i <= 3; i++) {
    if (i == 1)
      continue;
    bb: for (int j = 1; j <= 3; j++) {
        if (i == 2 && j == 2) {
            break aa;
        }
        System.out.println(i + " " + j);
    }
}

4. Enhanced for Loop

Since Java 5, we have a second kind of for loop called the enhanced for which makes it easier to iterate over all elements in an array or a collection.

The syntax of the enhanced for loop is:

for(Type item : items)
  statement;

Since this loop is simplified in comparison to the standard for loop, we need to declare only two things when initializing a loop:

  1. The handle for an element we’re currently iterating over
  2. The source array/collection we’re iterating

Therefore, we can say that: For each element in items, assign the element to the item variable and run the body of the loop. 

Let’s have a look at the simple example:

int[] intArr = { 0,1,2,3,4 }; 
for (int num : intArr) {
    System.out.println("Enhanced for-each loop: i = " + num);
}

We can use it to iterate over various Java’s data structures:

Given a List<String> list  object – we can iterate it:

for (String item : list) {
    System.out.println(item);
}

We can similarly iterate over a Set<String> set:

for (String item : set) {
    System.out.println(item);
}

And, given a Map<String,Integer> map we can iterate over it as well:

for (Entry<String, Integer> entry : map.entrySet()) {
    System.out.println(
      "Key: " + entry.getKey() + 
      " - " + 
      "Value: " + entry.getValue());
}

4.1. Iterable.forEach()

Since Java 8, we can leverage for-each loops in a slightly different way. We now have a dedicated forEach() method in the Iterable interface that accepts a lambda expression representing an action we want to perform.

Internally, it simply delegates the job to the standard loop:

default void forEach(Consumer<? super T> action) {
    Objects.requireNonNull(action);
    for (T t : this) {
        action.accept(t);
    }
}

Let’s have a look at the example:

List<String> names = new ArrayList<>();
names.add("Larry");
names.add("Steve");
names.add("James");
names.add("Conan");
names.add("Ellen");

names.forEach(name -> System.out.println(name));

5. While Loop

The while loop is Java’s most fundamental loop statement. It repeats a statement or a block of statements while its controlling Boolean-expression is true.

The syntax of the while loop is:

while (Boolean-expression) 
    statement;

The loop’s Boolean-expression is evaluated before the first iteration of the loop – which means that if the condition is evaluated to false, the loop might not run even once.

Let’s have a look at a simple example:

int i = 0;
while (i < 5) {
    System.out.println("While loop: i = " + i);
}

6. Do-While Loop

The do-while loop works just like the while loop except for the fact that the first condition evaluation happens after the first iteration of the loop:

do {
    statement;
} while (Boolean-expression);

Let’s have a look at a simple example:

int i = 0;
do {
    System.out.println("Do-While loop: i = " + i++);
} while (i < 5);

7. Conclusion

In this quick tutorial, we showed the different types of loops that are available in the Java programming language.

We also saw how each loop serves a particular purpose given a suitable use case. We discussed the circumstances that are suitable for a given loop implementation.

As always, examples can be found over on GitHub.

Creating a MS PowerPoint Presentation in Java

$
0
0

1. Introduction

In this article, we’ll see how we can create a presentation using Apache POI.

This library gives us a possibility to create PowerPoint presentations, read existing ones, and to alter their content.

2. Maven Dependencies

To begin, we’ll need to add the following dependencies into our pom.xml:

<dependency>
    <groupId>org.apache.poi</groupId>
    <artifactId>poi</artifactId>
    <version>3.17</version>
</dependency>
<dependency>
    <groupId>org.apache.poi</groupId>
    <artifactId>poi-ooxml</artifactId>
    <version>3.17</version>
</dependency>

The latest version of both libraries can be downloaded from Maven Central.

3. Apache POI

The Apache POI library supports both .ppt and .pptx files, and it provides the HSLF implementation for the Powerpoint ’97(-2007) file format and the XSLF for the PowerPoint 2007 OOXML file format.

Since a common interface doesn’t exist for both implementations, we have to remember to use the XMLSlideShowXSLFSlide and XSLFTextShape classes when working with the newer .pptx file format.

And, when it’s required to work with the older .ppt format, use the HSLFSlideShowHSLFSlide and HSLFTextParagraph classes.

We’ll use the new .pptx file format in our examples, and the first thing we have to do is create a new presentation, add a slide to it (maybe using a predefined layout) and save it.

Once these operations are clear, we can then start working with images, text, and tables.

3.1. Create a New Presentation

Let’s first create the new presentation:

XMLSlideShow ppt = new XMLSlideShow();
ppt.createSlide();

3.2. Add a New Slide

When adding a new slide to a presentation, we can also choose to create it from a predefined layout. To achieve this, we first have to retrieve the XSLFSlideMaster that holds layouts (the first one is the default master):

XSLFSlideMaster defaultMaster = ppt.getSlideMasters().get(0);

Now, we can retrieve the XSLFSlideLayout and use it when creating the new slide:

XSLFSlideLayout layout 
  = defaultMaster.getLayout(SlideLayout.TITLE_AND_CONTENT);
XSLFSlide slide = ppt.createSlide(layout);

Let’s see how to fill placeholders inside a template:

XSLFTextShape titleShape = slide.getPlaceholder(0);
XSLFTextShape contentShape = slide.getPlaceholder(1);

Remember that each template has its placeholders, instances of the XSLFAutoShape subclass, which could differ in number from one template to another.

Let’s see how we can quickly retrieve all placeholders from a slide:

for (XSLFShape shape : slide.getShapes()) {
    if (shape instanceof XSLFAutoShape) {
        // this is a template placeholder
    }
}

3.3. Saving a Presentation

Once we’ve created the slideshow, the next step is to save it:

FileOutputStream out = new FileOutputStream("powerpoint.pptx");
ppt.write(out);
out.close();

4. Working with Objects

Now that we saw how to create a new presentation, add a slide to it (using or not a predefined template) and save it, we can start adding text, images, links, and tables.

Let’s start with the text.

4.1. Text

When working with text inside a presentation, as in MS PowerPoint, we have to create the text box inside a slide, add a paragraph and then add the text to the paragraph:

XSLFTextBox shape = slide.createTextBox();
XSLFTextParagraph p = shape.addNewTextParagraph();
XSLFTextRun r = p.addNewTextRun();
r.setText("Baeldung");
r.setFontColor(Color.green);
r.setFontSize(24.);

When configuring the XSLFTextRun, it’s possible to customize its style by picking the font family and if the text should be in bold, italic or underlined.

4.2. Hyperlinks

When adding text to a presentation, sometimes it can be useful to add hyperlinks.

Once we have created the XSLFTextRun object, we can now add a link:

XSLFHyperlink link = r.createHyperlink();
link.setAddress("http://www.baeldung.com");

4.3. Images

We can add images, as well:

byte[] pictureData = IOUtils.toByteArray(
  new FileInputStream("logo-leaf.png"));

XSLFPictureData pd
  = ppt.addPicture(pictureData, PictureData.PictureType.PNG);
XSLFPictureShape picture = slide.createPicture(pd);

However, without a proper configuration, the image will be placed in the top left corner of the slide. To place it properly, we have to configure its anchor point:

picture.setAnchor(new Rectangle(320, 230, 100, 92));

The XSLFPictureShape accepts a Rectangle as an anchor point, which allows us to configure the x/y coordinates with the first two parameters, and the width/height of the image with the last two.

4.4. Lists

Text, inside of a presentation, is often represented in the form of a list, numbered or not.

Let’s now define a list of bullet points:

XSLFTextShape content = slide.getPlaceholder(1);
XSLFTextParagraph p1 = content.addNewTextParagraph();
p1.setIndentLevel(0);
p1.setBullet(true);
r1 = p1.addNewTextRun();
r1.setText("Bullet");

Similarly, we can define a numbered list:

XSLFTextParagraph p2 = content.addNewTextParagraph();
p2.setBulletAutoNumber(AutoNumberingScheme.alphaLcParenRight, 1);
p2.setIndentLevel(1);
XSLFTextRun r2 = p2.addNewTextRun();
r2.setText("Numbered List Item - 1");

In case we’re working with multiple lists, it’s always important to define the indentLevel to achieve a proper indentation of items.

4.5. Tables

Tables are another key object in a presentation and are helpful when we want to display data.

Let’s start by creating a table:

XSLFTable tbl = slide.createTable();
tbl.setAnchor(new Rectangle(50, 50, 450, 300));

Now, we can add a header:

int numColumns = 3;
XSLFTableRow headerRow = tbl.addRow();
headerRow.setHeight(50);

for (int i = 0; i < numColumns; i++) {
    XSLFTableCell th = headerRow.addCell();
    XSLFTextParagraph p = th.addNewTextParagraph();
    p.setTextAlign(TextParagraph.TextAlign.CENTER);
    XSLFTextRun r = p.addNewTextRun();
    r.setText("Header " + (i + 1));
    tbl.setColumnWidth(i, 150);
}

Once the header is completed, we can add rows and cells to our table to display data:

for (int rownum = 1; rownum < numRows; rownum++) {
    XSLFTableRow tr = tbl.addRow();
    tr.setHeight(50);

    for (int i = 0; i < numColumns; i++) {
        XSLFTableCell cell = tr.addCell();
        XSLFTextParagraph p = cell.addNewTextParagraph();
        XSLFTextRun r = p.addNewTextRun();
        r.setText("Cell " + (i*rownum + 1));
    }
}

When working with tables, it’s important to remind that it’s possible to customize the border and the background of every single cell.

5. Altering a Presentation

Not always when working on a slideshow, we have to create a new one, but we have to alter an already existing one.

Let’s give a look to the one that we created in the previous section and then we can start altering it:

5.1. Reading a Presentation

Reading a presentation is pretty simple and can be done using the XMLSlideShow overloaded constructor that accepts a FileInputStream:

XMLSlideShow ppt = new XMLSlideShow(
  new FileInputStream("slideshow.pptx"));

5.2. Changing Slide Order

When adding slides to our presentation, it’s a good idea to put them in the correct order to have a proper flow of slides.

When this doesn’t happen, it’s possible to re-arrange the order of the slides. Let’s see how we can move the fourth slide to be the second one:

List<XSLFSlide> slides = ppt.getSlides();

XSLFSlide slide = slides.get(3);
ppt.setSlideOrder(slide, 1);

5.3. Deleting a Slide

It’s also possible to delete a slide from a presentation.

Let’s see how we can delete the 4th slide:

ppt.removeSlide(3);

6. Conclusion

This quick tutorial has illustrated how to use the Apache POI API to read and write PowerPoint file from a Java perspective.

The complete source code for this article can be found, as always, over on GitHub.

Varargs in Java

$
0
0

1. Introduction

Varargs were introduced in Java 5 and provide a short-hand for methods that support an arbitrary number of parameters of one type.

In this article, we’ll see how we can use this core Java feature.

2. Before Varargs

Before Java 5, whenever we wanted to pass an arbitrary number of arguments, we had to pass all arguments in an array or implement N methods (one for each additional parameter):

public String format() { ... }

public String format(String value) { ... }

public String format(String val1, String val2) { ... }

3. Use of Varargs

Varargs help us avoid writing boilerplate code by introducing new syntax that can handle an arbitrary number of parameters automatically – using an array under the hood.

We can define them using a standard type declaration, followed by an ellipsis:

public String formatWithVarArgs(String... values) {
    // ...
}

And now, we can call our method with an arbitrary number of arguments, like:

formatWithVarArgs();

formatWithVarArgs("a", "b", "c", "d");

As mentioned earlier, varargs are arrays so we need to work with them just like we’d work with a normal array.

4. Rules

Varargs are straightforward to use. But there’re a few rules we have to keep in mind:

  • Each method can only have one varargs parameter
  • The varargs argument must be the last parameter

5. Safe Use of Varargs

Using varargs can lead to so-called Heap Pollution.

Simply put, this means that Java handles varargs as generic Object instances which can lead to ClassCastExceptions later on.

This doesn’t mean that varargs aren’t safe. It’s safe when working with a concrete type like String, but utilizing generics might be not that straightforward.

As there’s a potential risk of a fatal runtime exception, the Java compiler or our IDE might show a warning like this one:

warning: [varargs] Possible heap pollution from parameterized vararg type T

If we ensure the method itself doesn’t do any malignant transformations or type-casts, we can use @SafeVarargs to suppress the warning.

6. Conclusion

Varargs can make a lot of boilerplate go away in Java.

And, thanks to their implicit autoboxing to and from Array, they play a role in future proofing our code.

As always, all code examples from this article can are available in our GitHub repository.

Viewing all 4844 articles
Browse latest View live


<script src="https://jsc.adskeeper.com/r/s/rssing.com.1596347.js" async> </script>