Quantcast
Channel: Baeldung
Viewing all 4703 articles
Browse latest View live

RxJava StringObservable

$
0
0

1. Introduction to StringObservable

Working with String sequences in RxJava may be challenging; luckily RxJavaString provides us with all necessary utilities.

In this article, we’ll cover StringObservable which contains some helpful String operators. Therefore, before getting started, it’s advised to have a look at the Introduction to RxJava first.

2. Maven Setup

To get started, let’s include RxJavaString amongst our dependencies:

<dependency>
  <groupId>io.reactivex</groupId>
  <artifactId>rxjava-string</artifactId>
  <version>1.1.1</version>
</dependency>

The latest version of rxjava-string is available over on Maven Central.

3. StringObservable

StringObservable is a handy operator for representing a potentially infinite sequence of encoded Strings.

The operator from reads an input stream creating an Observable which emits character-bounded sequences of byte arrays:

We can create an Observable straight from an InputStream using a from operator:

TestSubscriber testSubscriber = new TestSubscriber();
ByteArrayInputStream is = new ByteArrayInputStream("Lorem ipsum loream, Lorem ipsum lore".getBytes());
Observable<byte[]> observableByteStream = StringObservable.from(is);

// emits 8 byte array items
observableByteStream.subscribe(testSubscriber);

4. Converting Bytes into Strings

Encoding/decoding infinite sequences from different charsets can be done using decode and encode operators.

As their name may suggest, these will simply create an Observable that emits an encoded or decoded sequence of byte arrays or Strings, therefore, we could use it if we need to handle Strings in different charsets:

Decoding a byte array Observable:

TestSubscriber testSubscriber = new TestSubscriber();
ByteArrayInputStream is = new ByteArrayInputStream(
  "Lorem ipsum loream, Lorem ipsum lore".getBytes());
Observable<byte[]> byteArrayObservable = StringObservable.from(is);
Observable<String> stringObservable = StringObservable
  .decode(byteArrayObservable, StandardCharsets.UTF_8);

// emits UTF-8 decoded strings,"Lorem ipsum loream, Lorem ipsum lore"
stringObservable.subscribe(testSubscriber);

5. Splitting Strings

StringObservable has also some convenient operators for splitting String sequences: split and byLine, both create a new Observable which chunks input data outputting items following a pattern:

TestSubscriber testSubscriber = new TestSubscriber();
Observable<String> sourceObservable = Observable.just("Lorem ipsum loream,Lorem ipsum ", "lore");
Observable<String> splittedObservable = StringObservable.split(sourceObservable, ",");

// emits 2 strings "Lorem ipsum loream", "Lorem ipsum lore"
splittedObservable.subscribe(testSubscriber);

6. Joining Strings

Complementary to previous section’s operators are join and stringConcat which concatenate items from a String Observable emitting a single string given a separator.

Also, note that these will consume all items before emitting an output.

TestSubscriber testSubscriber = new TestSubscriber();
Observable<String> sourceObservable = Observable.just("Lorem ipsum loream", "Lorem ipsum lore");
Observable<String> joinedObservable = StringObservable.join(sourceObservable, ",");

// emits single string "Lorem ipsum loream,Lorem ipsum lore"
joinedObservable.subscribe(testSubscriber);

7. Conclusion

This brief introduction to StringObservable demonstrated a few use cases of String manipulation using RxJavaString.

Examples in this tutorial and other examples on how to use StringObservable operators can be found over on Github.


A Custom Task in Gradle

$
0
0

1. Overview

In this article, we’ll cover how to create a custom task in Gradle. We’ll show a new task definition using a build script or a custom task type.

For the introduction to the Gradle, please see this article. It contains the basics of Gradle and – what’s the most important for this article – the introduction to Gradle tasks.

2. Custom Task Definition inside build.gradle

To create a straightforward Gradle task, we need to add its definition to our build.gradle file:

task welcome {
    doLast {
        println 'Welcome in the Baeldung!'
    }
}

The main goal of the above task is just to print text “Welcome in the Baeldung!”. We can check if this task is available by running gradle tasks –all command:

gradle tasks --all

The task is on the list under the group Other tasks:

Other tasks
-----------
welcome

It can be executed just like any other Gradle task:

gradle welcome

The output is as expected – the “Welcome in the Baeldung!” message.

Remark: if option –all is not set, then tasks which belong to “Other” category aren’t visible. Custom Gradle task can belong to a different group than “Other” and can contain a description.

3. Set Group and Description

Sometimes it’s handy to group tasks by function, so they are visible under one category. We can quickly set group for our custom tasks, just by defining a group property:

task welcome {
    group 'Sample category'
    doLast {
        println 'Welcome on the Baeldung!'
    }
}

Now when we run Gradle command to list all available tasks (–all option isn’t needed anymore), we’ll see our task under new group:

Sample category tasks
---------------------
welcome

However, it’s also beneficial for others to see what a task is responsible for. We can create a description which contains short information:

task welcome {
    group 'Sample category'
    description 'Tasks which shows a welcome message'
    doLast {
        println 'Welcome in the Baeldung!'
    }
}

When we print a list of the available tasks the output will be as follow:

Sample category tasks
---------------------
welcome - Tasks which shows a welcome message

This kind of task definition is called ad-hoc definition.

Coming further, it’s beneficial to create a customizable task which definition can be reused. We’ll cover how to create a task from a type and how to make some customization available to the users of this task.

4. Define Gradle Task Type inside build.gradle

The above “welcome” task cannot be customized, thus, in most cases, it’s not very useful. We can run it, but if we need it in a different project (or subproject), then we need to copy and paste its definition.

We can quickly enable customization of the task by creating a task type. Merely, a task type is defined inside the build script:

class PrintToolVersionTask extends DefaultTask {
    String tool

    @TaskAction
    void printToolVersion() {
        switch (tool) {
            case 'java':
                println System.getProperty("java.version")
                break
            case 'groovy':
                println GroovySystem.version
                break
            default:
                throw new IllegalArgumentException("Unknown tool")
        }
    }
}

A custom task type is a simple Groovy class which extends DefaultTask – the class which defines standard task implementation. There are other task types which we can extend from, but in most cases, the DefaultTask class is the appropriate choice.

PrintToolVersionTask task contains tool property which can be customized by instances of this task:

String tool

We can add as many properties as we want – keep in mind it is just a simple Groovy class field.

Additionally, it contains method annotated with @TaskAction. It defines what this task is doing. In this simple example it prints version of installed Java or Groovy – depends on the given parameter value.

To run a custom task based on created task type we need to create a new task instance of this type:

task printJavaVersion(type : PrintToolVersionTask) {
    tool 'java'
}

The most important parts are:

  • our task is a PrintToolVersionTask type,  so when executed it’ll trigger the action defined in the method annotated with @TaskAction
  • we added a customized tool property value (java) which will be used by PrintToolVersionTask

When we run the above task the output is as expected (depends on the Java version installed):

> Task :printJavaVersion 
9.0.1

Now let’s create a task which prints the installed version of Groovy:

task printGroovyVersion(type : PrintToolVersionTask) {
    tool 'groovy'
}

It uses the same task type as we defined before, but it has a different tool property value. When we execute this task it prints the Groovy version:

> Task :printGroovyVersion 
2.4.12

If we have not too many custom tasks, then we can define them directly in the build.gradle file (like we did above). However, if there are more than a few then our build.gradle file becomes hard to read and understand.

Luckily, Gradle provides some solutions for that.

5. Define Task Type in the buildSrc Folder

We can define task types in the buildSrc folder which is located at the root project level. Gradle compiles everything that is inside and adds types to the classpath so our build script can use it.

Our task type which we defined before (PrintToolVersionTask) can be moved into the buildSrc/src/main/groovy/com/baeldung/PrintToolVersionTask.groovy. We have to only add some imports from Gradle API into a moved class.

We can define an unlimited number of tasks types in the buildSrc folder. It’s easier to maintain, read, and the task type declaration isn’t in the same place as the task instantiation.

We can use these types the same way we’re using types defined directly in the build script. We have to remember only to add appropriate imports.

6. Define Task Type in the Plugin

We can define a custom task types inside a custom Gradle plugin. Please refer to this article, which describes how to define a custom Gradle plugin, defined in the:

  • build.gradle file
  • buildSrc folder as other Groovy classes

These custom tasks will be available for our build when we define a dependency to this plugin. Please note that ad-hoc tasks are also available – not only custom task types.

7. Conclusion

In this tutorial, we covered how to create a custom task in Gradle. There are a lot of plugins available which you can use in your build.gradle file that will provide a lot of custom task types you need.

As always, code snippets are available over on Github.

Introduction to JSON-Java (org.json)

$
0
0

1. Introduction to JSON-Java

JSON (an acronym for JavaScript Object Notation) is a lightweight data-interchange format and is most commonly used for client-server communication. It’s both easy to read/write and language-independent. A JSON value can be another JSON object, array, number, string, boolean (true/false) or null.

In this tutorial, we’ll see how we can create, manipulate and parse JSON using one of the available JSON processing libraries, i.e., JSON-Java library is also known as org.json.

2. Pre-Requisite

Before we get started, we’ll need to add the following dependency in our pom.xml:

<dependency>
    <groupId>org.json</groupId>
    <artifactId>json</artifactId>
    <version>20180130</version>
</dependency>

The latest version can be found in the Maven Central repository.

Note that this package has already been included in Android SDK, so we shouldn’t include it while using the same.

3. JSON in Java [package org.json]

The JSON-Java library is also known as org.json (not to be confused with Google’s org.json.simple) provides us with classes that are used to parse and manipulate JSON in Java.

Furthermore, this library can also convert between JSON, XML, HTTP Headers, Cookies, Comma-Delimited List or Text, etc.

In this tutorial, we’ll have a look at:

  1. JSONObject – similar to Java’s native Map like object which stores unordered key-value pairs
  2. JSONArray – an ordered sequence of values similar to Java’s native Vector implementation
  3. JSONTokener – a tool that breaks a piece of text into a series of tokens which can be used by JSONObject or JSONArray to parse JSON strings
  4. CDL – a tool that provides methods to convert comma-delimited text into a JSONArray and vice versa
  5. Cookie – converts from JSON String to cookies and vice versa
  6. HTTP – used to convert from JSON String to HTTP headers and vice versa
  7. JSONException – this is a standard exception thrown by this library

4. JSONObject

JSONObject is an unordered collection of key and value pairs, resembling Java’s native Map implementations.

  • Keys are unique Strings that cannot be null
  • Values can be anything from a Boolean, Number, String, JSONArray or even a JSONObject.NULL object
  • JSONObject can be represented by a String enclosed within curly braces with keys and values separated by a colon, and pairs separated by a comma
  • It has several constructors with which to construct a JSONObject

It also supports the following main methods:

  1. get(String key) – gets the object associated with the supplied key, throws JSONException if the key is not found
  2. opt(String key)- gets the object associated with the supplied key, null otherwise
  3. put(String key, Object value) – inserts or replaces a key-value pair in current JSONObject. 

The put() method is an overloaded method which accepts a key of type String and multiple types for the value.

For the complete list of methods supported by JSONObject, visit the official documentation.

Let’s now discuss some of the main operations supported by this class.

4.1. Creating JSON Directly from JSONObject

JSONObject exposes an API similar to Java’s Map interface. We can use the put() method and supply the key and value as an argument:

JSONObject jo = new JSONObject();
jo.put("name", "jon doe");
jo.put("age", "22");
jo.put("city", "chicago");

Now our JSONObject would look like:

{"city":"chicago","name":"jon doe","age":"22"}

There are seven different overloaded signatures of JSONObject.put() method. While the key can only be unique, non-null String, the value can be anything.

4.2. Creating JSON from Map

Instead of directly putting key and values in a JSONObject, we can construct a custom Map and then pass it as an argument to JSONObject‘s constructor.

This example will produce same results as above:

Map<String, String> map = new HashMap<>();
map.put("name", "jon doe");
map.put("age", "22");
map.put("city", "chicago");
JSONObject jo = new JSONObject(map);

4.3. Creating JSONObject from JSON String

To parse a JSON String to a JSONObject, we can just pass the String to the constructor.

This example will produce same results as above:

JSONObject jo = new JSONObject(
  "{\"city\":\"chicago\",\"name\":\"jon doe\",\"age\":\"22\"}"
);

The passed String argument must be a valid JSON otherwise this constructor may throw a JSONException.

4.4. Serialize Java Object to JSON

One of JSONObject’s constructors takes a POJO as its argument. In the example below, the package uses the getters from the DemoBean class and creates an appropriate JSONObject for the same.

To get a JSONObject from a Java Object, we’ll have to use a class that is a valid Java Bean:

DemoBean demo = new DemoBean();
demo.setId(1);
demo.setName("lorem ipsum");
demo.setActive(true);

JSONObject jo = new JSONObject(demo);

The JSONObject jo for this example is going to be:

{"name":"lorem ipsum","active":true,"id":1}

Although we have a way to serialize a Java object to JSON string, there is no way to convert it back using this library.

If we want that kind of flexibility, we can switch to other libraries such as Jackson.

5. JSONArray

A JSONArray is an ordered collection of values, resembling Java’s native Vector implementation.

  • Values can be anything from a Number, String, Boolean, JSONArray, JSONObject or even a JSONObject.NULL object
  • It’s represented by a String wrapped within Square Brackets and consists of a collection of values separated by commas
  • Like JSONObject, it has a constructor that accepts a source String and parses it to construct a JSONArray

The following are the primary methods of the JSONArray class:

  1. get(int index) – returns the value at the specified index(between 0 and total length – 1), otherwise throws a JSONException
  2. opt(int index) – returns the value associated with an index (between 0 and total length – 1). If there’s no value at that index, then a null is returned
  3. put(Object value) – append an object value to this JSONArray. This method is overloaded and supports a wide range of data types

For a complete list of methods supported by JSONArray, visit the official documentation.

5.1. Creating JSONArray

Once we’ve initialized a JSONArray object, we can simply add and retrieve elements using the put() and get() methods:

JSONArray ja = new JSONArray();
ja.put(Boolean.TRUE);
ja.put("lorem ipsum");

JSONObject jo = new JSONObject();
jo.put("name", "jon doe");
jo.put("age", "22");
jo.put("city", "chicago");

ja.put(jo);

Following would be contents of our JSONArray(code is formatted for clarity):

[
    true,
    "lorem ipsum",
    {
        "city": "chicago",
        "name": "jon doe",
        "age": "22"
    }
]

5.2. Creating JSONArray Directly from JSON String

Like JSONObject the JSONArray also has a constructor that creates a Java object directly from a JSON String:

JSONArray ja = new JSONArray("[true, \"lorem ipsum\", 215]");

This constructor may throw a JSONException if the source String isn’t a valid JSON String.

5.3. Creating JSONArray Directly from a Collection or an Array

The constructor of JSONArray also supports collection and array objects as arguments.

We simply pass them as an argument to the constructor and it will return a JSONArray object:

List<String> list = new ArrayList<>();
list.add("California");
list.add("Texas");
list.add("Hawaii");
list.add("Alaska");

JSONArray ja = new JSONArray(list);

Now our JSONArray consists of:

["California","Texas","Hawaii","Alaska"]

6. JSONTokener

A JSONTokener takes a source String as input to its constructor and extracts characters and tokens from it. It’s used internally by classes of this package (like JSONObject, JSONArray) to parse JSON Strings.

There may not be many situations where we’ll directly use this class as the same functionality can be achieved using other simpler methods (like string.toCharArray()):

JSONTokener jt = new JSONTokener("lorem");

while(jt.more()) {
    Log.info(jt.next());
}

Now we can access a JSONTokener like an iterator, using the more() method to check if there are any remaining elements and next() to access the next element.

The tokens received from the previous example will be:

l
o
r
e
m

7. CDL

We’re provided with a CDL (Comma Delimited List) class to convert comma delimited text into a JSONArray and vice versa.

7.1. Producing JSONArray Directly from Comma Delimited Text

In order to produce a JSONArray directly from the comma-delimited text, we can use the static method rowToJSONArray() which accepts a JSONTokener:

JSONArray ja = CDL.rowToJSONArray(new JSONTokener("England, USA, Canada"));

Our JSONArray now consists of:

["England","USA","Canada"]

7.2. Producing Comma Delimited Text from JSONArray

In order to reverse of the previous step and get back the comma-delimited text from JSONArray, we can use:

JSONArray ja = new JSONArray("[\"England\",\"USA\",\"Canada\"]");
String cdt = CDL.rowToString(ja);

The String cdt now contains:

England,USA,Canada

7.3. Producing JSONArray of JSONObjects Using Comma Delimited Text

To produce a JSONArray of JSONObjects, we’ll use a text String containing both headers and data separated by commas.

The different lines are separated using a carriage return (\r) or line feed (\n).

The first line is interpreted as a list of headers and all the subsequent lines are treated as data:

String string = "name, city, age \n" +
  "john, chicago, 22 \n" +
  "gary, florida, 35 \n" +
  "sal, vegas, 18";

JSONArray result = CDL.toJSONArray(string);

The object JSONArray result now consists of (output formatted for the sake of clarity):

[
    {
        "name": "john",
        "city": "chicago",
        "age": "22"
    },
    {
        "name": "gary",
        "city": "florida",
        "age": "35"
    },
    {
        "name": "sal",
        "city": "vegas",
        "age": "18"
    }
]

Notice that in this example, both data and header were supplied within the same String. There’s an alternative way of doing this where we can achieve the same functionality by supplying a JSONArray that would be used to get the headers and a comma-delimited String working as the data.

Different lines are separated using a carriage return (\r) or line feed (\n):

JSONArray ja = new JSONArray();
ja.put("name");
ja.put("city");
ja.put("age");

String string = "john, chicago, 22 \n"
  + "gary, florida, 35 \n"
  + "sal, vegas, 18";

JSONArray result = CDL.toJSONArray(ja, string);

Here we’ll get the contents of object result exactly as before.

The Cookie class deals with web browser cookies and has methods to convert a browser cookie into a JSONObject and vice versa.

Here are the main methods of the Cookie class:

  1. toJsonObject(String sourceCookie) – converts a cookie string into a JSONObject
  2. toString(JSONObject jo) – this is reverse of the previous method, converts a JSONObject into a cookie String.

8.1. Converting a Cookie String into a JSONObject

To convert a cookie String to a JSONObject, well use the static method Cookie.toJSONObject():

String cookie = "username=John Doe; expires=Thu, 18 Dec 2013 12:00:00 UTC; path=/";
JSONObject cookieJO = Cookie.toJSONObject(cookie);

8.2. Converting a JSONObject into Cookie String

Now we’ll convert a JSONObject into cookie String. This is reverse of the previous step:

String cookie = Cookie.toString(cookieJO);

9. HTTP

The HTTP class contains static methods that are used to convert HTTP headers to JSONObject and vice versa.

This class also has two main methods:

  1. toJsonObject(String sourceHttpHeader) – converts a HttpHeader String to JSONObject
  2. toString(JSONObject jo) – converts the supplied JSONObject to String

9.1. Converting JSONObject to HTTP Header

HTTP.toString() method is used to convert a JSONObject to HTTP header String:

JSONObject jo = new JSONObject();
jo.put("Method", "POST");
jo.put("Request-URI", "http://www.example.com/");
jo.put("HTTP-Version", "HTTP/1.1");
String httpStr = HTTP.toString(jo);

Here, our String httpStr will consist of:

POST "http://www.example.com/" HTTP/1.1

Note that while converting an HTTP request header, the JSONObject must contain “Method”, “Request-URI” and “HTTP-Version” keys, whereas, for response header, the object must contain “HTTP-Version”, “Status-Code” and “Reason-Phrase” parameters.

9.2. Converting HTTP Header String Back to JSONObject

Here we will convert the HTTP string that we got in the previous step back to the very JSONObject that we created in that step:

JSONObject obj = HTTP.toJSONObject("POST \"http://www.example.com/\" HTTP/1.1");

10. JSONException

The JSONException is the standard exception thrown by this package whenever any error is encountered.

This is used across all classes from this package. The exception is usually followed by a message that states what exactly went wrong.

11. Conclusion

In this tutorial, we looked at a JSON using Java – org.json – and we focused on some of the core functionality available here.

The complete code snippets used in this article can be found over on GitHub.

Kotlin Dependency Injection with Kodein

$
0
0

1. Overview

In this article, we’ll introduce Kodein — a pure Kotlin dependency injection (DI) framework — and compare it with other popular DI frameworks.

2. Dependency

First, let’s add the Kodein dependency to our pom.xml:

<dependency>
    <groupId>com.github.salomonbrys.kodein</groupId>
    <artifactId>kodein</artifactId>
    <version>4.1.0</version>
</dependency>

Please note that the latest available version is available either on Maven Central or jCenter.

3. Configuration

We’ll use the model below for illustrating Kodein-based configuration:

class Controller(private val service : Service)

class Service(private val dao: Dao, private val tag: String)

interface Dao

class JdbcDao : Dao

class MongoDao : Dao

4. Binding Types

The Kodein framework offers various binding types. Let’s take a closer look at how they work and how to use them.

4.1. Singleton

With Singleton binding, a target bean is instantiated lazily on the first access and re-used on all further requests:

var created = false;
val kodein = Kodein {
    bind<Dao>() with singleton { MongoDao() }
}

assertThat(created).isFalse()

val dao1: Dao = kodein.instance()

assertThat(created).isFalse()

val dao2: Dao = kodein.instance()

assertThat(dao1).isSameAs(dao2)

Note: we can use Kodein.instance() for retrieving target-managed beans based on a static variable type.

4.2. Eager Singleton

This is similar to the Singleton binding. The only difference is that the initialization block is called eagerly:

var created = false;
val kodein = Kodein {
    bind<Dao>() with singleton { MongoDao() }
}

assertThat(created).isTrue()
val dao1: Dao = kodein.instance()
val dao2: Dao = kodein.instance()

assertThat(dao1).isSameAs(dao2)

4.3. Factory

With Factory binding, the initialization block receives an argument, and a new object is returned from it every time:

val kodein = Kodein {
    bind<Dao>() with singleton { MongoDao() }
    bind<Service>() with factory { tag: String -> Service(instance(), tag) }
}
val service1: Service = kodein.with("myTag").instance()
val service2: Service = kodein.with("myTag").instance()

assertThat(service1).isNotSameAs(service2)

Note: we can use Kodein.instance() for configuring transitive dependencies.

4.4. Multiton

Multiton binding is very similar to Factory binding. The only difference is that the same object is returned for the same argument in subsequent calls:

val kodein = Kodein {
    bind<Dao>() with singleton { MongoDao() }
    bind<Service>() with multiton { tag: String -> Service(instance(), tag) }
}
val service1: Service = kodein.with("myTag").instance()
val service2: Service = kodein.with("myTag").instance()

assertThat(service1).isSameAs(service2)

4.5. Provider

This is a no-arg Factory binding:

val kodein = Kodein {
    bind<Dao>() with provider { MongoDao() }
}
val dao1: Dao = kodein.instance()
val dao2: Dao = kodein.instance()

assertThat(dao1).isNotSameAs(dao2)

4.6. Instance

We can register a pre-configured bean instance in the container:

val dao = MongoDao()
val kodein = Kodein {
    bind<Dao>() with instance(dao)
}
val fromContainer: Dao = kodein.instance()

assertThat(dao).isSameAs(fromContainer)

4.7. Tagging

We can also register more than one bean of the same type under different tags:

val kodein = Kodein {
    bind<Dao>("dao1") with singleton { MongoDao() }
    bind<Dao>("dao2") with singleton { MongoDao() }
}
val dao1: Dao = kodein.instance("dao1")
val dao2: Dao = kodein.instance("dao2")

assertThat(dao1).isNotSameAs(dao2)

4.8. Constant

This is syntactic sugar over tagged binding and is assumed to be used for configuration constants — simple types without inheritance:

val kodein = Kodein {
    constant("magic") with 42
}
val fromContainer: Int = kodein.instance("magic")

assertThat(fromContainer).isEqualTo(42)

5. Bindings Separation

Kodein allows us to configure beans in separate blocks and combine them.

5.1. Modules

We can group components by particular criteria — for example, all classes related to data persistence — and combine the blocks to build a resulting container:

val jdbcModule = Kodein.Module {
    bind<Dao>() with singleton { JdbcDao() }
}
val kodein = Kodein {
    import(jdbcModule)
    bind<Controller>() with singleton { Controller(instance()) }
    bind<Service>() with singleton { Service(instance(), "myService") }
}

val dao: Dao = kodein.instance()
assertThat(dao).isInstanceOf(JdbcDao::class.java)

Note: as modules contain binding rules, target beans are re-created when the same module is used in multiple Kodein instances.

5.2. Composition

We can extend one Kodein instance from another — this allows us to re-use beans:

val persistenceContainer = Kodein {
    bind<Dao>() with singleton { MongoDao() }
}
val serviceContainer = Kodein {
    extend(persistenceContainer)
    bind<Service>() with singleton { Service(instance(), "myService") }
}
val fromPersistence: Dao = persistenceContainer.instance()
val fromService: Dao = serviceContainer.instance()

assertThat(fromPersistence).isSameAs(fromService)

5.3. Overriding

We can override bindings — this can be useful for testing:

class InMemoryDao : Dao

val commonModule = Kodein.Module {
    bind<Dao>() with singleton { MongoDao() }
    bind<Service>() with singleton { Service(instance(), "myService") }
}
val testContainer = Kodein {
    import(commonModule)
    bind<Dao>(overrides = true) with singleton { InMemoryDao() }
}
val dao: Dao = testContainer.instance()

assertThat(dao).isInstanceOf(InMemoryDao::class.java)

6. Multi-Bindings

We can configure more than one bean with the same common (super-)type in the container:

val kodein = Kodein {
    bind() from setBinding<Dao>()
    bind<Dao>().inSet() with singleton { MongoDao() }
    bind<Dao>().inSet() with singleton { JdbcDao() }
}
val daos: Set<Dao> = kodein.instance()

assertThat(daos.map {it.javaClass as Class<*>})
  .containsOnly(MongoDao::class.java, JdbcDao::class.java)

7. Injector

Our application code was unaware of Kodein in all the examples we used before — it used regular constructor arguments that were provided during the container’s initialization.

However, the framework allows an alternative way to configure dependencies through delegated properties and Injectors:

class Controller2 {
    private val injector = KodeinInjector()
    val service: Service by injector.instance()
    fun injectDependencies(kodein: Kodein) = injector.inject(kodein)
}
val kodein = Kodein {
    bind<Dao>() with singleton { MongoDao() }
    bind<Service>() with singleton { Service(instance(), "myService") }
}
val controller = Controller2()
controller.injectDependencies(kodein)

assertThat(controller.service).isNotNull

In other words, a domain class defines dependencies through an injector and retrieves them from a given container. Such an approach is useful in specific environments like Android.

8. Using Kodein with Android

In Android, the Kodein container is configured in a custom Application class, and later on, it is bound to the Context instance. All components (activities, fragments, services, broadcast receivers) are assumed to be extended from the utility classes like KodeinActivity and KodeinFragment:

class MyActivity : Activity(), KodeinInjected {
    override val injector = KodeinInjector()

    val random: Random by instance()

    override fun onCreate(savedInstanceState: Bundle?) {
        inject(appKodein())
    }
}

9. Analysis

In this section, we’ll see how Kodein compares with popular DI frameworks.

9.1. Spring Framework

The Spring Framework is much more feature-rich than Kodein. For example, Spring has a very convenient component-scanning facility. When we mark our classes with particular annotations like @Component, @Service, and @Named, the component scan picks up those classes automatically during container initialization.

Spring also has powerful meta-programming extension pointsBeanPostProcessor and BeanFactoryPostProcessor, which might be crucial when adapting a configured application to a particular environment.

Finally, Spring provides some convenient technologies built on top of it, including AOP, Transactions, Test Framework, and many others. If we want to use these, it’s worth sticking with the Spring IoC container.

9.2. Dagger 2

The Dagger 2 framework is not as feature-rich as Spring Framework, but it’s popular in Android development due to its speed (it generates Java code which performs the injection and just executes it in runtime) and size.

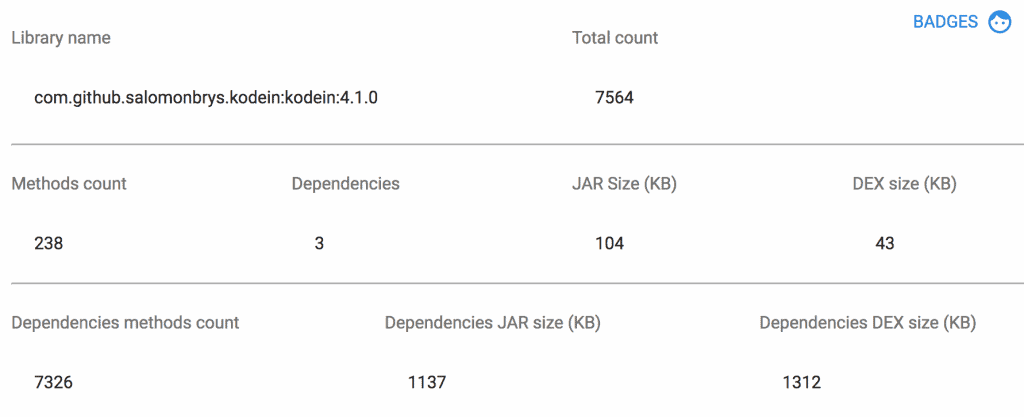
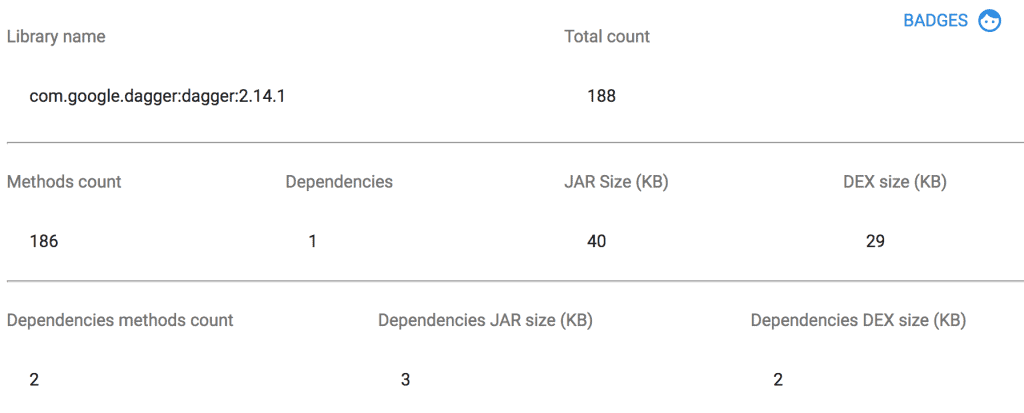
Let’s compare the libraries’ method counts and sizes:

Kodein:Note that the kotlin-stdlib dependency accounts for the bulk of these numbers. When we exclude it, we get 1282 methods and 244 KB DEX size.


Dagger 2:

We can see that the Dagger 2 framework adds far fewer methods and its JAR file is smaller.

Regarding the usage — it’s very similar in that the user code configures dependencies (through Injector in Kodein and JSR-330 annotations in Dagger 2) and later on injects them through a single method call.

However, a key feature of Dagger 2 is that it validates the dependency graph at compile time, so it won’t allow the application to compile if there is a configuration error.

10. Conclusion

We now know how to use Kodein for dependency injection, what configuration options it provides, and how it compares with a couple of other popular DI frameworks. However, it’s up to you to decide whether to use it in real projects.

As always, the source code for the samples above can be found over on GitHub.

Java Weekly, Issue 219

$
0
0

Let’s jump right in…

1. Spring and Java

>> Monitor your Java application with Datadog 

Optimize performance with end-to-end tracing and out-of-the-box support for popular Java frameworks, application servers, and databases. Try it free:


>> Using Spring Security 5 to integrate with OAuth 2-secured services such as Facebook and GitHub [spring.io]

One of the key features of Spring Security 5 is the significantly improved and streamlined OAuth2 support. This is quite a useful exploration of that functionality.

>> Event sourcing using Kafka [blog.softwaremill.com]

It’s clear that Kafka can be used as a solid base for implementing event-sourced systems, without a lot of effort.

>> Representing the Impractical and Impossible with JDK 10 “var” [benjiweber.co.uk]

Java 10’s “var” will make it possible to declare variables with types that were cumbersome and very impractical to represent before. Good stuff coming.


Also worth reading:


Webinars and presentations:


Time to upgrade:

2. Technical and Musings

>> Continuous Delivery Sounds Great, but Will It Work Here? [queue.acm.org]

A good, practical-minded intro to CD, along with a realistic look at adoption and challenges.

>> The Mercenary’s Guide to Should I Stay or Should I Go? [daedtech.com]

When the enthusiasms level go down and you stop caring about where and on what you are working on, it’s probably time to move on :). Also, don’t expect your current company to become what you’d want it to be like – that rarely happens.


Also worth reading:

3. Comics

And my favorite Dilberts of the week:

>> Elbonian Slave Labor [dilbert.com]

>> No Economic Value [dilbert.com]

>> Boss Loves Criticism [dilbert.com]

4. Pick of the Week

A very cool GitHub feature introduced a few months back and already useful:

>> Introducing security alerts on GitHub [blog.github.com]

Using Hamcrest Number Matchers

$
0
0

1. Overview

Hamcrest provides static matchers to help make unit test assertions simpler and more legible. You can get started exploring some of the available matchers here.

In this article, we’ll dive deeper into the number-related matchers.

2. Setup

To get Hamcrest, we just need to add the following Maven dependency to our pom.xml:

<dependency>
    <groupId>org.hamcrest</groupId>
    <artifactId>java-hamcrest</artifactId>
    <version>2.0.0.0</version>
</dependency>

The latest Hamcrest version can be found on Maven Central.

3. Proximity Matchers

The first set of matchers that we’re going to take a look at are the ones that check if some element is close to a value +/- an error.

More formally:

value - error <= element <= value + error

If the comparison above is true, the assertion will pass.

Let’s see it in action!

3.1. isClose with Double Values

Let’s say that we have a number stored in a double variable called actual. And, we want to test if actual is close to 1 +/- 0.5.

That is:

1 - 0.5 <= actual <= 1 + 0.5
    0.5 <= actual <= 1.5

Now let’s create a unit test using isClose matcher:

@Test
public void givenADouble_whenCloseTo_thenCorrect() {
    double actual = 1.3;
    double operand = 1;
    double error = 0.5;
 
    assertThat(actual, closeTo(operand, error));
}

As 1.3 is between 0.5 and 1.5, the test will pass. Same way, we can test the negative scenario:

@Test
public void givenADouble_whenNotCloseTo_thenCorrect() {
    double actual = 1.6;
    double operand = 1;
    double error = 0.5;
 
    assertThat(actual, not(closeTo(operand, error)));
}

Now, let’s take a look at a similar situation with a different type of variables.

3.2. isClose with BigDecimal Values

isClose is overloaded and can be used same as with double values, but with BigDecimal objects:

@Test
public void givenABigDecimal_whenCloseTo_thenCorrect() {
    BigDecimal actual = new BigDecimal("1.0003");
    BigDecimal operand = new BigDecimal("1");
    BigDecimal error = new BigDecimal("0.0005");
    
    assertThat(actual, is(closeTo(operand, error)));
}

@Test
public void givenABigDecimal_whenNotCloseTo_thenCorrect() {
    BigDecimal actual = new BigDecimal("1.0006");
    BigDecimal operand = new BigDecimal("1");
    BigDecimal error = new BigDecimal("0.0005");
    
    assertThat(actual, is(not(closeTo(operand, error))));
}

Please note that the is matcher only decorates other matchers without adding extra logic. It just makes the whole assertion more readable.

That’s about it for proximity matchers. Next, we’ll take a look at order matchers.

4. Order Matchers

As their name says, these matchers help make assertions regarding the order.

There are five of them:

  • comparesEqualTo
  • greaterThan
  • greaterThanOrEqualTo
  • lessThan
  • lessThanOrEqualTo

They’re pretty much self-explanatory, but let’s see some examples.

4.1. Order Matchers with Integer Values

The most common scenario would be using these matchers with numbers.

So, let’s go ahead and create some tests:

@Test
public void given5_whenComparesEqualTo5_thenCorrect() {
    Integer five = 5;
    
    assertThat(five, comparesEqualTo(five));
}

@Test
public void given5_whenNotComparesEqualTo7_thenCorrect() {
    Integer seven = 7;
    Integer five = 5;

    assertThat(five, not(comparesEqualTo(seven)));
}

@Test
public void given7_whenGreaterThan5_thenCorrect() {
    Integer seven = 7;
    Integer five = 5;
 
    assertThat(seven, is(greaterThan(five)));
}

@Test
public void given7_whenGreaterThanOrEqualTo5_thenCorrect() {
    Integer seven = 7;
    Integer five = 5;
 
    assertThat(seven, is(greaterThanOrEqualTo(five)));
}

@Test
public void given5_whenGreaterThanOrEqualTo5_thenCorrect() {
    Integer five = 5;
 
    assertThat(five, is(greaterThanOrEqualTo(five)));
}

@Test
public void given3_whenLessThan5_thenCorrect() {
   Integer three = 3;
   Integer five = 5;
 
   assertThat(three, is(lessThan(five)));
}

@Test
public void given3_whenLessThanOrEqualTo5_thenCorrect() {
   Integer three = 3;
   Integer five = 5;
 
   assertThat(three, is(lessThanOrEqualTo(five)));
}

@Test
public void given5_whenLessThanOrEqualTo5_thenCorrect() {
   Integer five = 5;
 
   assertThat(five, is(lessThanOrEqualTo(five)));
}

Makes sense, right? Please note how simple is to understand what the predicates are asserting.

4.2. Order Matchers with String Values

Even though comparing numbers makes complete sense, many times it’s useful to compare other types of elements. That’s why order matchers can be applied to any class that implements the Comparable interface.

Let’s see some examples with Strings:

@Test
public void givenBenjamin_whenGreaterThanAmanda_thenCorrect() {
    String amanda = "Amanda";
    String benjamin = "Benjamin";
 
    assertThat(benjamin, is(greaterThan(amanda)));
}

@Test
public void givenAmanda_whenLessThanBenajmin_thenCorrect() {
    String amanda = "Amanda";
    String benjamin = "Benjamin";
 
    assertThat(amanda, is(lessThan(benjamin)));
}

String implements alphabetical order in compareTo method from the Comparable interface.

So, it makes sense that the word “Amanda” comes before the word “Benjamin”.

4.3. Order Matchers with LocalDate Values

Same as with Strings, we can compare dates. Let’s take a look at the same examples we created above but using LocalDate objects:

@Test
public void givenToday_whenGreaterThanYesterday_thenCorrect() {
    LocalDate today = LocalDate.now();
    LocalDate yesterday = today.minusDays(1);
 
    assertThat(today, is(greaterThan(yesterday)));
}

@Test
public void givenToday_whenLessThanTomorrow_thenCorrect() {
    LocalDate today = LocalDate.now();
    LocalDate tomorrow = today.plusDays(1);
    
    assertThat(today, is(lessThan(tomorrow)));
}

It’s very nice to see that the statement assertThat(today, is(lessThan(tomorrow))) is close to regular English.

4.4. Order Matchers with Custom Classes

So, why not create our own class and implement Comparable? That way, we can leverage order matchers to be used with custom order rules.

Let’s start by creating a Person bean:

public class Person {
    String name;
    int age;

    // standard constructor, getters and setters
}

Now, let’s implement Comparable:

public class Person implements Comparable<Person> {
        
    // ...

    @Override
    public int compareTo(Person o) {
        if (this.age == o.getAge()) return 0;
        if (this.age > o.getAge()) return 1;
        else return -1;
    }
}

Our compareTo implementation compares two people by their age. Let’s now create a couple of new tests:

@Test
public void givenAmanda_whenOlderThanBenjamin_thenCorrect() {
    Person amanda = new Person("Amanda", 20);
    Person benjamin = new Person("Benjamin", 18);
 
    assertThat(amanda, is(greaterThan(benjamin)));
}

@Test
public void 
givenBenjamin_whenYoungerThanAmanda_thenCorrect() {
    Person amanda = new Person("Amanda", 20);
    Person benjamin = new Person("Benjamin", 18);
 
    assertThat(benjamin, is(lessThan(amanda)));
}

Matchers will now work based on our compareTo logic.

5. NaN Matcher

Hamcrest provides one extra number matcher to define if a number is actually, not a number:

@Test
public void givenNaN_whenIsNotANumber_thenCorrect() {
    double zero = 0d;
    
    assertThat(zero / zero, is(notANumber()));
}

6. Conclusions

As you can see, number matchers are very useful to simplify common assertions.

What’s more, Hamcrest matchers in general, are self-explanatory and easy to read.

All this, plus the ability to combine matchers with custom comparison logic, make them a powerful tool for most projects out there.

The full implementation of the examples from this article can be found in the GitHub project.

Injecting Prototype Beans into a Singleton Instance in Spring

$
0
0

1. Overview

In this quick article, we’re going to show different approaches of injecting prototype beans into a singleton instance. We’ll discuss the use cases and the advantages/disadvantages of each scenario.

By default, Spring beans are singletons. The problem arises when we try to wire beans of different scopes. For example, a prototype bean into a singleton. This is known as the scoped bean injection problem.

To learn more about bean scopes, this write-up is a good place to start.

2. Prototype Bean Injection Problem

In order to describe the problem, let’s configure the following beans:

@Configuration
public class AppConfig {

    @Bean
    @Scope(ConfigurableBeanFactory.SCOPE_PROTOTYPE)
    public PrototypeBean prototypeBean() {
        return new PrototypeBean();
    }

    @Bean
    public SingletonBean singletonBean() {
        return new SingletonBean();
    }
}

Notice that the first bean has a prototype scope, the other one is a singleton.

Now, let’s inject the prototype-scoped bean into the singleton – and then expose if via the getPrototypeBean() method:

public class SingletonBean {

    // ..

    @Autowired
    private PrototypeBean prototypeBean;

    public SingletonBean() {
        logger.info("Singleton instance created");
    }

    public PrototypeBean getPrototypeBean() {
        logger.info(String.valueOf(LocalTime.now()));
        return prototypeBean;
    }
}

Then, let’s load up the ApplicationContext and get the singleton bean twice:

public static void main(String[] args) throws InterruptedException {
    AnnotationConfigApplicationContext context 
      = new AnnotationConfigApplicationContext(AppConfig.class);
    
    SingletonBean firstSingleton = context.getBean(SingletonBean.class);
    PrototypeBean firstPrototype = firstSingleton.getPrototypeBean();
    
    // get singleton bean instance one more time
    SingletonBean secondSingleton = context.getBean(SingletonBean.class);
    PrototypeBean secondPrototype = secondSingleton.getPrototypeBean();

    isTrue(firstPrototype.equals(secondPrototype), "The same instance should be returned");
}

Here’s the output from the console:

Singleton Bean created
Prototype Bean created
11:06:57.894
// should create another prototype bean instance here
11:06:58.895

Both beans were initialized only once, at the startup of the application context.

3. Injecting ApplicationContext 

We can also inject the ApplicationContext directly into a bean.

To achieve this, either use the @Autowire annotation or implement the ApplicationContextAware interface:

public class SingletonAppContextBean implements ApplicationContextAware {

    private ApplicationContext applicationContext;

    public PrototypeBean getPrototypeBean() {
        return applicationContext.getBean(PrototypeBean.class);
    }

    @Override
    public void setApplicationContext(ApplicationContext applicationContext) 
      throws BeansException {
        this.applicationContext = applicationContext;
    }
}

Every time the getPrototypeBean() method is called, a new instance of PrototypeBean will be returned from the ApplicationContext.

However, this approach has serious disadvantages. It contradicts the principle of inversion of control, as we request the dependencies from the container directly.

Also, we fetch the prototype bean from the applicationContext within the SingletonAppcontextBean class. This means coupling the code to the Spring Framework.

4. Method Injection

Another way to solve the problem is method injection with the @Lookup annotation:

@Component
public class SingletonLookupBean {

    @Lookup
    public PrototypeBean getPrototypeBean() {
        return null;
    }
}

Spring will override the getPrototypeBean() method annotated with @Lookup. It then registers the bean into the application context. Whenever we request the getPrototypeBean() method, it returns a new PrototypeBean instance.

It will use CGLIB to generate the bytecode responsible for fetching the PrototypeBean from the application context.

5. javax.inject API

The setup along with required dependencies are described in this Spring wiring article.

Here’s the singleton bean:

public class SingletonProviderBean {

    @Autowired
    private Provider<PrototypeBean> myPrototypeBeanProvider;

    public PrototypeBean getPrototypeInstance() {
        return myPrototypeBeanProvider.get();
    }
}

We use Provider interface to inject the prototype bean. For each getPrototypeInstance() method call, the myPrototypeBeanProvider.get() method returns a new instance of PrototypeBean.

6. Scoped Proxy

By default, Spring holds a reference to the real object to perform the injection. Here, we create a proxy object to wire the real object with the dependent one.

Each time the method on the proxy object is called, the proxy decides itself whether to create a new instance of the real object or reuse the existing one.

To set up this, we modify the Appconfig class to add a new @Scope annotation:

@Scope(
  value = ConfigurableBeanFactory.SCOPE_PROTOTYPE, 
  proxyMode = ScopedProxyMode.TARGET_CLASS)

By default, Spring uses CGLIB library to directly subclass the objects. To avoid CGLIB usage, we can configure the proxy mode with ScopedProxyMode.INTERFACES, to use the JDK dynamic proxy instead.

7. ObjectFactory Interface

Spring provides the ObjectFactory<T> interface to produce on demand objects of the given type:

public class SingletonObjectFactoryBean {

    @Autowired
    private ObjectFactory<PrototypeBean> prototypeBeanObjectFactory;

    public PrototypeBean getPrototypeInstance() {
        return prototypeBeanObjectFactory.getObject();
    }
}

Let’s have a look at getPrototypeInstance() method; getObject() returns a brand new instance of PrototypeBean for each request. Here, we have more control over initialization of the prototype.

Also, the ObjectFactory is a part of the framework; this means avoiding additional setup in order to use this option.

8. Testing

Let’s now write a simple JUnit test to exercise the case with ObjectFactory interface:

@Test
public void givenPrototypeInjection_WhenObjectFactory_ThenNewInstanceReturn() {

    AbstractApplicationContext context
     = new AnnotationConfigApplicationContext(AppConfig.class);

    SingletonObjectFactoryBean firstContext
     = context.getBean(SingletonObjectFactoryBean.class);
    SingletonObjectFactoryBean secondContext
     = context.getBean(SingletonObjectFactoryBean.class);

    PrototypeBean firstInstance = firstContext.getPrototypeInstance();
    PrototypeBean secondInstance = secondContext.getPrototypeInstance();

    assertTrue("New instance expected", firstInstance != secondInstance);
}

After successfully launching the test, we can see that each time getPrototypeInstance() method called, a new prototype bean instance created.

9. Conclusion

In this short tutorial, we learned several ways to inject the prototype bean into the singleton instance.

As always, the complete code for this tutorial can be found on GitHub project.

Introduction to OpenCSV

$
0
0

1. Introduction

This quick article introduces OpenCSV 4, a fantastic library for writing, reading, serializing, deserializing, and/or parsing .csv files! Below, we’ll go through several examples demonstrating how to set up and use OpenCSV 4 for your endeavors.

2. Set-Up

Here’s how to add OpenCSV to your project by way of a pom.xml dependency:

<dependency>
    <groupId>com.opencsv</groupId>
    <artifactId>opencsv</artifactId>
    <version>4.1</version>
</dependency>

The .jars for OpenCSV can be found at the official site or through a quick search over at Maven Repository.

Our .csv file will be really simple, we’ll keep it to two columns and four rows:

colA, ColB
A, B
C, D
G, G
G, F

3. To Bean or Not to Bean

After adding OpenCSV to your pom.xml, we can implement CSV-handling methods in two convenient ways:

  1. using the handy CSVReader and CSVWriter objects (for simpler operations) or
  2. using CsvToBean to convert .csv files into beans (which are implemented as annotated plain-old-java-objects).

We’ll stick with synchronous (or blocking) examples for this article so we can focus on the basics.

Remember, a synchronous method will prevent surrounding or subsequent code from executing until it’s done. Any production environment will likely use asynchronous or (non-blocking) methods that will allow other processes or methods to complete while the asynchronous method finishes up.

We’ll dive into asynchronous examples for OpenCSV in a future article.

3.1. The CSVReader

CSVReader – through the supplied readAll() and readNext() methods! Let’s take a look at how to use readAll() synchronously:

public List<String[]> readAll(Reader reader) throws Exception {
    CSVReader csvReader = new CSVReader(reader);
    List<String[]> list = new ArrayList<>();
    list = csvReader.readAll();
    reader.close();
    csvReader.close();
    return list;
}

Then we can call that method by passing in a BufferedReader:

public String readAllExample() throws Exception {
    Reader reader = Files.newBufferedReader(
      ClassLoader.getSystemResource("csv/twoColumn.csv").toURI());
    return CsvReaderExamples.readAll(reader).toString();
}

Similarly, we can abstract readNext() which reads a supplied .csv line by line:

public List<String[]> oneByOne(Reader reader) throws Exception {
    List<String[]> list = new ArrayList<>();
    CSVReader csvReader = new CSVReader(reader);
    String[] line;
    while ((line = csvReader.readNext()) != null) {
        list.add(line);
    }
    reader.close();
    csvReader.close();
    return list;
}

And we can call that method here by passing in a BufferReader:

public String oneByOneExample() throws Exception {
    Reader reader = Files.newBufferedReader(
      ClassLoader.getSystemResource("csv/twoColumn.csv").toURI());
    return CsvReaderExamples.oneByOne(reader).toString();
}

For greater flexibility and configuration options you can alternatively use CSVReaderBuilder:

CSVParser parser = new CSVParserBuilder()
    .withSeparator(',')
    .withIgnoreQuotations(true)
    .build();

CSVReader csvReader = new CSVReaderBuilder(reader)
    .withSkipLines(0)
    .withCSVParser(parser)
    .build();

CSVReaderBuilder allows one to skip the column headings and set parsing rules through CSVParserBuilder.

Using CSVParserBuilder, we can choose a custom column separator, ignore or handle quotations marks, state how we’ll handle null fields, and how to interpret escaped characters. For more information on these configuration settings please refer to the official specification docs.

As always, please remember to close all your Readers to prevent memory leaks!

3.2. The CSVWriter

CSVWriter similarly supplies the ability to write to a .csv file all at once or line by line.

Let’s take a look at how to do write to a .csv line by line:

public String csvWriterOneByOne(List<String[]> stringArray, Path path) throws Exception {
    CSVWriter writer = new CSVWriter(new FileWriter(path.toString()));
    for (String[] array : stringArray) {
        writer.writeNext(array);
    }
    
    writer.close();
    return Helpers.readFile(path);
}

Now, let’s specify where we want to save that file and call the method we just wrote:

public String csvWriterOneByOne() throws Exception{
    Path path = Paths.get(
      ClassLoader.getSystemResource("csv/writtenOneByOne.csv").toURI()); 
    return CsvWriterExamples.csvWriterOneByOne(Helpers.fourColumnCsvString(), path); 
}

We can also write our .csv all at once by passing in a List of String arrays representing the rows of our .csv. :

public String csvWriterAll(List<String[]> stringArray, Path path) throws Exception {
     CSVWriter writer = new CSVWriter(new FileWriter(path.toString()));
     writer.writeAll(stringArray);
     writer.close();
     return Helpers.readFile(path);
}

And here’s how we call it:

public String csvWriterAll() throws Exception {
    Path path = Paths.get(
      ClassLoader.getSystemResource("csv/writtenAll.csv").toURI()); 
    return CsvWriterExamples.csvWriterAll(Helpers.fourColumnCsvString(), path);
}

That’s it!

3.3. Bean-Based Reading

OpenCSV is able to serialize .csv files into preset and reusable schemas implemented as annotated Java pojo beans. CsvToBean is constructed using CsvToBeanBuilder. As of OpenCSV 4, CsvToBeanBuilder is the recommended way to work with com.opencsv.bean.CsvToBean.

Here’s a simple bean we can use to serialize our two-column .csv from section 2.:

public class SimplePositionBean  {
    @CsvBindByPosition(position = 0)
    private String exampleColOne;

    @CsvBindByPosition(position = 1)
    private String exampleColTwo;

    // getters and setters
}

Each column in the .csv file is associated with a field in the bean. The mappings between .csv column headings can be performed using the @CsvBindByPosition or the @CsvBindByName annotations which specify a mapping by position or heading string match, respectively.

First, let’s create a superclass called CsvBean – this will allow us to reuse and generalize the methods we’ll build below:

public class CsvBean { }

An example child class:

public class NamedColumnBean extends CsvBean {

    @CsvBindByName(column = "name")
    private String name;

    @CsvBindByName
    private int age;

    // getters and setters
}

Let’s abstract a synchronously returned List using the CsvToBean:

 public List<CsvBean> beanBuilderExample(Path path, Class clazz) throws Exception {
     CsvTransfer csvTransfer = new CsvTransfer();
     ColumnPositionMappingStrategy ms = new ColumnPositionMappingStrategy();
     ms.setType(clazz);

     Reader reader = Files.newBufferedReader(path);
     CsvToBean cb = new CsvToBeanBuilder(reader)
       .withType(clazz)
       .withMappingStrategy(ms)
       .build();

    csvTransfer.setCsvList(cb.parse());
    reader.close();
    return csvTransfer.getCsvList();
}

We pass in our bean (clazz) and set that as the ColumnPositionMappingStrategy. In doing so, we associate the fields of our beans with the respective columns of our .csv rows.

We can call that here using the SimplePositionBean subclass of the CsvBean we wrote above:

public String simplePositionBeanExample() throws Exception {
    Path path = Paths.get(
      ClassLoader.getSystemResource("csv/twoColumn.csv").toURI()); 
    return BeanExamples.beanBuilderExample(path, SimplePositionBean.class).toString(); 
}

or here using the NamedColumnBean – another subclass of the CsvBean:

public String namedColumnBeanExample() throws Exception {
    Path path = Paths.get(
      ClassLoader.getSystemResource("csv/namedColumn.csv").toURI()); 
    return BeanExamples.beanBuilderExample(path, NamedColumnBean.class).toString();
}

3.4. Bean-Based Writing

Lastly, let’s take a look at how to use the StatefulBeanToCsv class to write to a .csv file:

public String writeCsvFromBean(Path path) throws Exception {
    Writer writer  = new FileWriter(path.toString());

    StatefulBeanToCsv sbc = new StatefulBeanToCsvBuilder(writer)
       .withSeparator(CSVWriter.DEFAULT_SEPARATOR)
       .build();

    List<CsvBean> list = new ArrayList<>();
    list.add(new WriteExampleBean("Test1", "sfdsf", "fdfd"));
    list.add(new WriteExampleBean("Test2", "ipso", "facto"));

    sbc.write(list);
    writer.close();
    return Helpers.readFile(path);
}

Here, we are specifying how we will delimit our data which is supplied as a List of specified CsvBean objects.

We can then call our method writeCsvFromBean() after passing in the desired output file path:

public String writeCsvFromBeanExample() {
    Path path = Paths.get(
      ClassLoader.getSystemResource("csv/writtenBean.csv").toURI()); 
    return BeanExamples.writeCsvFromBean(path); 
}

4. Conclusion

There we go – synchronous code examples for OpenCSV using beans, CSVReader, and CSVWriter. Check out the official docs here.

As always, the code samples are provided over on GitHub.


Working with JSON in Groovy

$
0
0

1. Introduction

In this article, we’re going to describe and see examples of how to work with JSON in a Groovy application.

First of all, to get the examples of this article up and running, we need to set up our pom.xml:

<build>
    <plugins>
        // ...
        <plugin>
            <groupId>org.codehaus.gmavenplus</groupId>
            <artifactId>gmavenplus-plugin</artifactId>
            <version>1.6</version>
        </plugin>
    </plugins>
</build>
<dependencies>
    // ...
    <dependency>
        <groupId>org.codehaus.groovy</groupId>
        <artifactId>groovy-all</artifactId>
        <version>2.4.13</version>
    </dependency>
</dependencies>

The most recent Maven plugin can be found here and the latest version of the groovy-all here.

2. Parsing Groovy Objects to JSON

Converting Objects to JSON in Groovy is pretty simple, let’s assume we have an Account class:

class Account {
    String id
    BigDecimal value
    Date createdAt
}

To convert an instance of that class to a JSON String, we need to use the JsonOutput class and make a call to the static method toJson():

Account account = new Account(
    id: '123', 
    value: 15.6,
    createdAt: new SimpleDateFormat('MM/dd/yyyy').parse('01/01/2018')
) 
println JsonOutput.toJson(account)

As a result, we’ll get the parsed JSON String:

{"value":15.6,"createdAt":"2018-01-01T02:00:00+0000","id":"123"}

2.1. Customizing the JSON Output

As we can see, the date output isn’t what we wanted. For that purpose, starting with version 2.5, the package groovy.json comes with a dedicated set of tools.

With the JsonGenerator class, we can define options to the JSON output:

JsonGenerator generator = new JsonGenerator.Options()
  .dateFormat('MM/dd/yyyy')
  .excludeFieldsByName('value')
  .build()

println generator.toJson(account)

As a result, we’ll get the formatted JSON without the value field we excluded and with the formatted date:

{"createdAt":"01/01/2018","id":"123"}

 2.2. Formatting the JSON Output

With the methods above we saw that the JSON output was always in a single line, and it can get confusing if a more complex object has to be dealt with.

However, we can format our output using the prettyPrint method:

String json = generator.toJson(account)
println JsonOutput.prettyPrint(json)

And we get the formatted JSON bellow:

{
    "value": 15.6,
    "createdAt": "01/01/2018",
    "id": "123"
}

3. Parsing JSON to Groovy Objects

We’re going to use Groovy class JsonSlurper to convert from JSON to Objects.

Also, with JsonSlurper we have a bunch of overloaded parse methods and a few specific methods like parseText, parseFile, and others.

We’ll use the parseText to parse a String to an Account class:

def jsonSlurper = new JsonSlurper()

def account = jsonSlurper.parseText('{"id":"123", "value":15.6 }') as Account

In the above code, we have a method that receives a JSON String and returns an Account object, which can be any Groovy Object.

Also, we can parse a JSON String to a Map, calling it without any cast, and with the Groovy dynamic typing, we can have the same as the object.

3.1. Parsing JSON Input

The default parser implementation for JsonSlurper is JsonParserType.CHAR_BUFFER, but in some cases, we’ll need to deal with a parsing problem.

Let’s look at an example for this: given a JSON String with a date property, JsonSlurper will not correctly create the Object because it will try to parse the date as String:

def jsonSlurper = new JsonSlurper()
def account = jsonSlurper.parseText('{"id":"123","createdAt":"2018-01-01T02:00:00+0000"}') as Account

As a result, the code above will return an Account object with all properties containing null values.

To resolve that problem, we can use the JsonParserType.INDEX_OVERLAY.

As a result, it will try as hard as possible to avoid creation of String or char arrays:

def jsonSlurper = new JsonSlurper(type: JsonParserType.INDEX_OVERLAY)
def account = jsonSlurper.parseText('{"id":"123","createdAt":"2018-01-01T02:00:00+0000"}') as Account

Now, the code above will return an Account instance appropriately created.

3.2 Parser Variants

Also, inside the JsonParserType, we have some other implementations:

  • JsonParserType.LAX will allow a more relaxed JSON parsing, with comments, no quote strings, etc.
  • JsonParserType.CHARACTER_SOURCE is used for large file parsing.

4. Conclusion

We’ve covered a lot of the JSON processing in a Groovy application with a couple of simple examples.

For more information about the groovy.json package classes we can have a look at the Groovy Documentation.

Check the source code of the classes used in this article, as well as some unit tests, in our GitHub repository.

Content Analysis with Apache Tika

$
0
0

1. Overview

Apache Tika is a toolkit for extracting content and metadata from various types of documents, such as Word, Excel, and PDF or even multimedia files like JPEG and MP4.

All text-based and multimedia files can be parsed using a common interface, making Tika a powerful and versatile library for content analysis.

In this article, we’ll give an introduction to Apache Tika, including its parsing API and how it automatically detects the content type of a document. Working examples will also be provided to illustrate operations of this library.

2. Getting Started

In order to parse documents using Apache Tika, we need only one Maven dependency:

<dependency>
    <groupId>org.apache.tika</groupId>
    <artifactId>tika-parsers</artifactId>
    <version>1.17</version>
</dependency>

The latest version of this artifact can be found here.

3. The Parser API

The Parser API is the heart of Apache Tika, abstracting away the complexity of the parsing operations. This API relies on a single method:

void parse(
  InputStream stream, 
  ContentHandler handler, 
  Metadata metadata, 
  ParseContext context) 
  throws IOException, SAXException, TikaException

The meanings of this method’s parameters are:

  • stream an InputStream instance created from the document to be parsed
  • handlerContentHandler object receiving a sequence of XHTML SAX events parsed from the input document; this handler will then process events and export the result in a particular form
  • metadata a Metadata object conveying metadata properties in and out of the parser
  • context a ParseContext instance carrying context-specific information, used to customize the parsing process

The parse method throws an IOException if it fails to read from the input stream, a TikaException if the document taken from the stream cannot be parsed and a SAXException if the handler is unable to process an event.

When parsing a document, Tika attempts to reuse existing parser libraries such as Apache POI or PDFBox as much as possible. As a result, most of the Parser implementation classes are just adapters to such external libraries.

In section 5, we’ll see how the handler and metadata parameters can be used to extract content and metadata of a document.

For convenience, we can use the facade class Tika to access the functionality of the Parser API.

4. Auto-Detection

Apache Tika can automatically detect the type of a document and its language based on the document itself rather than on additional information.

4.1. Document Type Detection

The detection of document types can be done using an implementation class of the Detector interface, which has a single method:

MediaType detect(java.io.InputStream input, Metadata metadata) 
  throws IOException

This method takes a document, and its associated metadata – then returns a MediaType object describing the best guess regarding the type of the document.

Metadata isn’t the only source of information on which a detector relies. The detector can also make use of magic bytes, which are a special pattern near the beginning of a file or delegate the detection process to a more suitable detector.

In fact, the algorithm used by the detector is implementation dependent.

For instance, the default detector works with magic bytes first, then metadata properties. If the content type hasn’t been found at this point, it will use the service loader to discover all available detectors and try them in turn.

4.2. Language Detection

In addition to the type of a document, Tika can also identify its language even without help from metadata information.

In previous releases of Tika, the language of the document is detected using a LanguageIdentifier instance.

However, LanguageIdentifier has been deprecated in favor of web services, which is not made clear in the Getting Started docs.

Language detection services are now provided via subtypes of the abstract class LanguageDetector. Using web services, you can also access fully-fledged online translation services, such as Google Translate or Microsoft Translator.

For the sake of brevity, we won’t go over those services in detail.

5. Tika in Action

This section illustrates Apache Tika features using working examples.

The illustration methods will be wrapped in a class:

public class TikaAnalysis {
    // illustration methods
}

5.1. Detecting Document Types

Here’s the code we can use to detect the type of a document read from an InputStream:

public static String detectDocTypeUsingDetector(InputStream stream) 
  throws IOException {
    Detector detector = new DefaultDetector();
    Metadata metadata = new Metadata();

    MediaType mediaType = detector.detect(stream, metadata);
    return mediaType.toString();
}

Assume we have a PDF file named tika.txt in the classpath. The extension of this file has been changed to try to trick our analysis tool. The real type of the document can still be found and confirmed by a test:

@Test
public void whenUsingDetector_thenDocumentTypeIsReturned() 
  throws IOException {
    InputStream stream = this.getClass().getClassLoader()
      .getResourceAsStream("tika.txt");
    String mediaType = TikaAnalysis.detectDocTypeUsingDetector(stream);

    assertEquals("application/pdf", mediaType);

    stream.close();
}

It’s clear that a wrong file extension can’t keep Tika from finding the correct media type, thanks to the magic bytes %PDF at the start of the file.

For convenience, we can re-write the detection code using the Tika facade class with the same result:

public static String detectDocTypeUsingFacade(InputStream stream) 
  throws IOException {
 
    Tika tika = new Tika();
    String mediaType = tika.detect(stream);
    return mediaType;
}

5.2. Extracting Content

Let’s now extract the content of a file and return the result as a String – using the Parser API:

public static String extractContentUsingParser(InputStream stream) 
  throws IOException, TikaException, SAXException {
 
    Parser parser = new AutoDetectParser();
    ContentHandler handler = new BodyContentHandler();
    Metadata metadata = new Metadata();
    ParseContext context = new ParseContext();

    parser.parse(stream, handler, metadata, context);
    return handler.toString();
}

Given a Microsoft Word file in the classpath with this content:

Apache Tika - a content analysis toolkit
The Apache Tika™ toolkit detects and extracts metadata and text ...

The content can be extracted and verified:

@Test
public void whenUsingParser_thenContentIsReturned() 
  throws IOException, TikaException, SAXException {
    InputStream stream = this.getClass().getClassLoader()
      .getResourceAsStream("tika.docx");
    String content = TikaAnalysis.extractContentUsingParser(stream);

    assertThat(content, 
      containsString("Apache Tika - a content analysis toolkit"));
    assertThat(content, 
      containsString("detects and extracts metadata and text"));

    stream.close();
}

Again, the Tika class can be used to write the code more conveniently:

public static String extractContentUsingFacade(InputStream stream) 
  throws IOException, TikaException {
 
    Tika tika = new Tika();
    String content = tika.parseToString(stream);
    return content;
}

5.3. Extracting Metadata

In addition to the content of a document, the Parser API can also extract metadata:

public static Metadata extractMetadatatUsingParser(InputStream stream) 
  throws IOException, SAXException, TikaException {
 
    Parser parser = new AutoDetectParser();
    ContentHandler handler = new BodyContentHandler();
    Metadata metadata = new Metadata();
    ParseContext context = new ParseContext();

    parser.parse(stream, handler, metadata, context);
    return metadata;
}

When a Microsoft Excel file exists in the classpath, this test case confirms that the extracted metadata is correct:

@Test
public void whenUsingParser_thenMetadataIsReturned() 
  throws IOException, TikaException, SAXException {
    InputStream stream = this.getClass().getClassLoader()
      .getResourceAsStream("tika.xlsx");
    Metadata metadata = TikaAnalysis.extractMetadatatUsingParser(stream);

    assertEquals("org.apache.tika.parser.DefaultParser", 
      metadata.get("X-Parsed-By"));
    assertEquals("Microsoft Office User", metadata.get("Author"));

    stream.close();
}

Finally, here’s another version of the extraction method using the Tika facade class:

public static Metadata extractMetadatatUsingFacade(InputStream stream) 
  throws IOException, TikaException {
    Tika tika = new Tika();
    Metadata metadata = new Metadata();

    tika.parse(stream, metadata);
    return metadata;
}

6. Conclusion

This tutorial focused on content analysis with Apache Tika. Using the Parser and Detector APIs, we can automatically detect the type of a document, as well as extract its content and metadata.

For advanced use cases, we can create custom Parser and Detector classes to have more control over the parsing process.

The complete source code for this tutorial can be found over on GitHub.

A Guide to Jdbi

$
0
0

1. Introduction

In this article, we’re going to look at how to query a relational database with jdbi.

Jdbi is an open source Java library (Apache license) that uses lambda expressions and reflection to provide a friendlier, higher level interface than JDBC to access the database.

Jdbi, however, isn’t an ORM; even though it has an optional SQL Object mapping module, it doesn’t have a session with attached objects, a database independence layer, and any other bells and whistles of a typical ORM.

2. Jdbi Setup

Jdbi is organized into a core and several optional modules.

To get started, we just have to include the core module in our dependencies:

<dependencies>
    <dependency>
        <groupId>org.jdbi</groupId>
        <artifactId>jdbi3-core</artifactId>
        <version>3.1.0</version>
    </dependency>
</dependencies>

Over the course of this article, we’ll show examples using the HSQL database:

<dependency>
    <groupId>org.hsqldb</groupId>
    <artifactId>hsqldb</artifactId>
    <version>2.4.0</version>
    <scope>test</scope>
</dependency>

We can find the latest version of jdbi3-core, HSQLDB and the other Jdbi modules on Maven Central.

3. Connecting to the Database

First, we need to connect to the database. To do that, we have to specify the connection parameters.

The starting point is the Jdbi class:

Jdbi jdbi = Jdbi.create("jdbc:hsqldb:mem:testDB", "sa", "");

Here, we’re specifying the connection URL, a username, and, of course, a password.

3.1. Additional Parameters

If we need to provide other parameters, we use an overloaded method accepting a Properties object:

Properties properties = new Properties();
properties.setProperty("username", "sa");
properties.setProperty("password", "");
Jdbi jdbi = Jdbi.create("jdbc:hsqldb:mem:testDB", properties);

In these examples, we’ve saved the Jdbi instance in a local variable. That’s because we’ll use it to send statements and queries to the database.

In fact, merely calling create doesn’t establish any connection to the DB. It just saves the connection parameters for later.

3.2. Using a DataSource

If we connect to the database using a DataSource, as is usually the case, we can use the appropriate create overload:

Jdbi jdbi = Jdbi.create(datasource);

3.3. Working with Handles

Actual connections to the database are represented by instances of the Handle class.

The easiest way to work with handles, and have them automatically closed, is by using lambda expressions:

jdbi.useHandle(handle -> {
    doStuffWith(handle);
});

We call useHandle when we don’t have to return a value.

Otherwise, we use withHandle:

jdbi.withHandle(handle -> {
    return computeValue(handle);
});

It’s also possible, though not recommended, to manually open a connection handle; in that case, we have to close it when we’re done:

Jdbi jdbi = Jdbi.create("jdbc:hsqldb:mem:testDB", "sa", "");
try (Handle handle = jdbi.open()) {
    doStuffWith(handle);
}

Luckily, as we can see, Handle implements Closeable, so it can be used with try-with-resources.

4. Simple Statements

Now that we know how to obtain a connection let’s see how to use it.

In this section, we’ll create a simple table that we’ll use throughout the article.

To send statements such as create table to the database, we use the execute method:

handle.execute(
  "create table project "
  + "(id integer identity, name varchar(50), url varchar(100))");

execute returns the number of rows that were affected by the statement:

int updateCount = handle.execute(
  "insert into project values "
  + "(1, 'tutorials', 'github.com/eugenp/tutorials')");

assertEquals(1, updateCount);

Actually, execute is just a convenience method.

We’ll look at more complex use cases in later sections, but before doing that, we need to learn how to extract results from the database.

5. Querying the Database

The most straightforward expression that produces results from the DB is a SQL query.

To issue a query with a Jdbi Handle, we have to, at least:

  1. create the query
  2. choose how to represent each row
  3. iterate over the results

We’ll now look at each of the points above.

5.1. Creating a Query

Unsurprisingly, Jdbi represents queries as instances of the Query class.

We can obtain one from a handle:

Query query = handle.createQuery("select * from project");

5.2. Mapping the Results

Jdbi abstracts away from the JDBC ResultSet, which has a quite cumbersome API.

Therefore, it offers several possibilities to access the columns resulting from a query or some other statement that returns a result. We’ll now see the simplest ones.

We can represent each row as a map:

query.mapToMap();

The keys of the map will be the selected column names.

Or, when a query returns a single column, we can map it to the desired Java type:

handle.createQuery("select name from project").mapTo(String.class);

Jdbi has built-in mappers for many common classes. Those that are specific to some library or database system are provided in separate modules.

Of course, we can also define and register our mappers. We’ll talk about it in a later section.

Finally, we can map rows to a bean or some other custom class. Again, we’ll see the more advanced options in a dedicated section.

5.3. Iterating Over the Results

Once we’ve decided how to map the results by calling the appropriate method, we receive a ResultIterable object.

We can then use it to iterate over the results, one row at a time.

Here we’ll look at the most common options.

We can merely accumulate the results in a list:

List<Map<String, Object>> results = query.mapToMap().list();

Or to another Collection type:

List<String> results = query.mapTo(String.class).collect(Collectors.toSet());

Or we can  iterate over the results as a stream:

query.mapTo(String.class).useStream((Stream<String> stream) -> {
    doStuffWith(stream)
});

Here, we explicitly typed the stream variable for clarity, but it’s not necessary to do so.

5.4. Getting a Single Result

As a special case, when we expect or are interested in just one row, we have a couple of dedicated methods available.

If we want at most one result, we can use findFirst:

Optional<Map<String, Object>> first = query.mapToMap().findFirst();

As we can see, it returns an Optional value, which is only present if the query returns at least one result.

If the query returns more than one row, only the first is returned.

If instead, we want one and only one result, we use findOnly:

Date onlyResult = query.mapTo(Date.class).findOnly();

Finally, if there are zero results or more than one, findOnly throws an IllegalStateException.

6. Binding Parameters

Often, queries have a fixed portion and a parameterized portion. This has several advantages, including:

  • security: by avoiding string concatenation, we prevent SQL injection
  • ease: we don’t have to remember the exact syntax of complex data types such as timestamps
  • performance: the static portion of the query can be parsed once and cached

Jdbi supports both positional and named parameters.

We insert positional parameters as question marks in a query or statement:

Query positionalParamsQuery =
  handle.createQuery("select * from project where name = ?");

Named parameters, instead, start with a colon:

Query namedParamsQuery =
  handle.createQuery("select * from project where url like :pattern");

In either case, to set the value of a parameter, we use one of the variants of the bind method:

positionalParamsQuery.bind(0, "tutorials");
namedParamsQuery.bind("pattern", "%github.com/eugenp/%");

Note that, unlike JDBC, indexes start at 0.

6.1. Binding Multiple Named Parameters at Once

We can also bind multiple named parameters together using an object.

Let’s say we have this simple query:

Query query = handle.createQuery(
  "select id from project where name = :name and url = :url");
Map<String, String> params = new HashMap<>();
params.put("name", "REST with Spring");
params.put("url", "github.com/eugenp/REST-With-Spring");

Then, for example, we can use a map:

query.bindMap(params);

Or we can use an object in various ways. Here, for example, we bind an object that follows the JavaBean convention:

query.bindBean(paramsBean);

But we could also bind an object’s fields or methods; for all the supported options, see the Jdbi documentation.

7. Issuing More Complex Statements

Now that we’ve seen queries, values, and parameters, we can go back to statements and apply the same knowledge.

Recall that the execute method we saw earlier is just a handy shortcut.

In fact, similarly to queries, DDL and DML statements are represented as instances of the class Update.

We can obtain one by calling the method createUpdate on a handle:

Update update = handle.createUpdate(
  "INSERT INTO PROJECT (NAME, URL) VALUES (:name, :url)");

Then, on an Update we have all the binding methods that we have in a Query, so section 6. applies for updates as well.url

Statements are executed when we call, surprise, execute:

int rows = update.execute();

As we have already seen, it returns the number of affected rows.

7.1. Extracting Auto-Increment Column Values

As a special case, when we have an insert statement with auto-generated columns (typically auto-increment or sequences), we may want to obtain the generated values.

Then, we don’t call execute, but executeAndReturnGeneratedKeys:

Update update = handle.createUpdate(
  "INSERT INTO PROJECT (NAME, URL) "
  + "VALUES ('tutorials', 'github.com/eugenp/tutorials')");
ResultBearing generatedKeys = update.executeAndReturnGeneratedKeys();

ResultBearing is the same interface implemented by the Query class that we’ve seen previously, so we already know how to use it:

generatedKeys.mapToMap()
  .findOnly().get("id");

8. Transactions

We need a transaction whenever we have to execute multiple statements as a single, atomic operation.

As with connection handles, we introduce a transaction by calling a method with a closure:

handle.useTransaction((Handle h) -> {
    haveFunWith(h);
});

And, as with handles, the transaction is automatically closed when the closure returns.

However, we must commit or rollback the transaction before returning:

handle.useTransaction((Handle h) -> {
    h.execute("...");
    h.commit();
});

If, however, an exception is thrown from the closure, Jdbi automatically rolls back the transaction.

As with handles, we have a dedicated method, inTransaction, if we want to return something from the closure:

handle.inTransaction((Handle h) -> {
    h.execute("...");
    h.commit();
    return true;
});

8.1. Manual Transaction Management

Although in the general case it’s not recommended, we can also begin and close a transaction manually:

handle.begin();
// ...
handle.commit();
handle.close();

9. Conclusions and Further Reading

In this tutorial, we’ve introduced the core of Jdbi: queries, statements, and transactions.

We’ve left out some advanced features, like custom row and column mapping and batch processing.

We also haven’t discussed any of the optional modules, most notably the SQL Object extension.

Everything is presented in detail in the Jdbi documentation.

The implementation of all these examples and code snippets can be found in the GitHub project – this is a Maven project, so it should be easy to import and run as is.

The @JvmSynthetic Annotation in Kotlin

$
0
0

1. Introduction

Kotlin is a programming language for the JVM and compiles directly to Java Bytecode. However, it’s a lot more concise than Java, and certain JVM features don’t directly fit into the language.

Instead, Kotlin provides a set of annotations that we can apply to our code to trigger these features. These all exist in the kotlin.jvm package within kotlin-stdlib.

One of the more esoteric of these is the @JvmSynthetic annotation.

2. What Does @JvmSynthetic Do?

This annotation is applicable to methods, fields, getters, and setters — and it marks the appropriate element as synthetic in the generated class file.

We can use this annotation in our code exactly the same as any other annotation:

@JvmSynthetic
val syntheticField: String = "Field"

var syntheticAccessor: String
  @JvmSynthetic
  get() = "Accessor"
  
  @JvmSynthetic
  set(value) {
  }

@JvmSynthetic
fun syntheticMethod() {
}

When the above code is compiled, the compiler assigns the ACC_SYNTHETIC attribute to the corresponding elements in the class file:

private final java.lang.String syntheticField;
  descriptor: Ljava/lang/String;
  flags: ACC_PRIVATE, ACC_FINAL, ACC_SYNTHETIC
  ConstantValue: String Field
  RuntimeInvisibleAnnotations:
    0: #9()

public final void syntheticMethod();
  descriptor: ()V
  flags: ACC_PUBLIC, ACC_FINAL, ACC_SYNTHETIC
  Code:
    stack=0, locals=1, args_size=1
       0: return
    LocalVariableTable:
      Start  Length  Slot  Name   Signature
          0       1     0  this   Lcom/baeldung/kotlin/SyntheticTest;
    LineNumberTable:
      line 20: 0

3. What Is the Synthetic Attribute?

The ACC_SYNTHETIC attribute is intended by the JVM Bytecode to indicate that an element wasn’t actually present in the original source code, but was instead generated by the compiler.

Its original intent was to support nested classes and interfaces in Java 1.1, but now we can apply it to any elements we may need it for.

Any element that the compiler marks as synthetic will be inaccessible from the Java language. This includes not being visible in any tooling, such as our IDE. However, our Kotlin code has no such restrictions and can both see and access these elements perfectly fine.

Note that if we have a Kotlin field annotated with @JvmSynthetic but not annotated with @JvmField, then the generated getter and setter are not considered synthetic methods and can be accessed just fine.

We can access synthetic elements from Java using the Reflection API if we’re able to locate them — for example, by name:

Method syntheticMethod = SyntheticClass.class.getMethod("syntheticMethod");
syntheticMethod.invoke(syntheticClass);

4. What Can I Use This For?

The only real benefits of this are hiding code from Java developers and tools, and as an indication to other developers as to the state of the code. It’s intended for working at a much lower level than most typical application code.

The intention of it is to support code generation, allowing the compiler to generate fields and methods that shouldn’t be exposed to other developers but that are needed to support the actual exposed interface. We can think of it as a level of protection beyond private or internal.

Alternatively, we can use it to hide code from other tools, such as code coverage or static analysis.

However, there’s no guarantee that any given tool will honor this flag, so it might not always be useful here.

5. Conclusion

The @JvmSynthetic annotation may not be the most useful tool available, but it does have uses in certain situations, as we’ve seen here.

As always, even though we may only rarely use it, another tool available in your developer toolbox can be quite beneficial. When the time comes that you have a need for this tool, it’s well worth knowing how it works.

Assertions in JUnit 4 and JUnit 5

$
0
0

1. Introduction

In this article, we’re going to explore in details the assertions available within JUnit.

Following the migrating from JUnit 4 to JUnit 5 and A Guide to JUnit 5 articles, we’re now going into details about the different assertions available in JUnit 4 and JUnit 5.

We’ll also highlight the enhancements made on the assertions with JUnit 5.

2. Assertions

Assertions are utility methods to support asserting conditions in tests; these methods are accessible through the Assert class, in JUnit 4, and the Assertions one, in JUnit 5.

In order to increase the readability of the test and of the assertions itself, it’s always recommended to import statically the respective class. In this way, we can refer directly to the assertion method itself without the representing class as a prefix.

Let’s start exploring the assertions available with JUnit 4.

3. Assertions in JUnit 4

In this version of the library, assertions are available for all primitive types, Objects, and arrays (either of primitives or Objects).

The parameters order, within the assertion, is the expected value followed by the actual value; optionally the first parameter can be a String message that represents the message output of the evaluated condition.

There’s only one slightly different in how is defined the assertThat assertions, but we’ll cover it later on.

Let’s start with the assertEquals one.

3.1. assertEquals

The assertEquals assertion verifies that the expected and the actual values are equal:

@Test
public void whenAssertingEquality_thenEqual() {
    String expected = "Baeldung";
    String actual = "Baeldung";

    assertEquals(expected, actual);
}

It’s also possible to specify a message to display when the assertion fails:

assertEquals("failure - strings are not equal", expected, actual);

3.2. assertArrayEquals

If we want to assert that two arrays are equals, we can use the assertArrayEquals:

@Test
public void whenAssertingArraysEquality_thenEqual() {
    char[] expected = {'J','u','n','i','t'};
    char[] actual = "Junit".toCharArray();
    
    assertArrayEquals(expected, actual);
}

If both arrays are null, the assertion will consider them equal:

@Test
public void givenNullArrays_whenAssertingArraysEquality_thenEqual() {
    int[] expected = null;
    int[] actual = null;

    assertArrayEquals(expected, actual);
}

3.3. assertNotNull and assertNull

When we want to test if an object is null we can use the assertNull assertion:

@Test
public void whenAssertingNull_thenTrue() {
    Object car = null;
    
    assertNull("The car should be null", car);
}

In the opposite way, if we want to assert that an object should not be null we can use the assertNotNull assertion.

3.4. assertNotSame and assertSame

With assertNotSame, it’s possible to verify if two variables don’t refer to the same object:

@Test
public void whenAssertingNotSameObject_thenDifferent() {
    Object cat = new Object();
    Object dog = new Object();

    assertNotSame(cat, dog);
}

Otherwise, when we want to verify that two variables refer to the same object, we can use the assertSame assertion.

3.5. assertTrue and assertFalse

In case we want to verify that a certain condition is true or false, we can respectively use the assertTrue assertion or the assertFalse one:

@Test
public void whenAssertingConditions_thenVerified() {
    assertTrue("5 is greater then 4", 5 > 4);
    assertFalse("5 is not greater then 6", 5 > 6);
}

3.6. fail

The fail assertion fails a test throwing an AssertionFailedError. It can be used to verify that an actual exception is thrown or when we want to make a test failing during its development.

Let’s see how we can use it in the first scenario:

@Test
public void whenCheckingExceptionMessage_thenEqual() {
    try {
        methodThatShouldThrowException();
        fail("Exception not thrown");
    } catch (UnsupportedOperationException e) {
        assertEquals("Operation Not Supported", e.getMessage());
    }
}

3.7. assertThat

The assertThat assertion is the only one in JUnit 4 that has a reverse order of the parameters compared to the other assertions.

In this case, the assertion has an optional failure message, the actual value, and a Matcher object.

Let’s see how we can use this assertion to check if an array contains particular values:

@Test
public void testAssertThatHasItems() {
    assertThat(
      Arrays.asList("Java", "Kotlin", "Scala"), 
      hasItems("Java", "Kotlin"));
}

Additional information, on the powerful use of the assertThat assertion with Matcher object, is available at Testing with Hamcrest.

4. JUnit 5 Assertions

JUnit 5 kept many of the assertion methods of JUnit 4 while adding few new ones that take advantage of the Java 8 support.

Also in this version of the library, assertions are available for all primitive types, Objects, and arrays (either of primitives or Objects).

The order of the parameters of the assertions changed, moving the output message parameter as the last parameter. Thanks to the support of Java 8, the output message can be a Supplier, allowing lazy evaluation of it.

Let’s start reviewing the assertions available also in JUnit 4.

4.1. assertArrayEquals

The assertArrayEquals assertion verifies that the expected and the actual arrays are equals:

@Test
public void whenAssertingArraysEquality_thenEqual() {
    char[] expected = { 'J', 'u', 'p', 'i', 't', 'e', 'r' };
    char[] actual = "Jupiter".toCharArray();

    assertArrayEquals(expected, actual, "Arrays should be equal");
}

If the arrays aren’t equal, the message “Arrays should be equal” will be displayed as output.

4.2. assertEquals

In case we want to assert that two floats are equals, we can use the simple assertEquals assertion:

@Test
public void whenAssertingEquality_thenEqual() {
    float square = 2 * 2;
    float rectangle = 2 * 2;

    assertEquals(square, rectangle);
}

However, if we want to assert that the actual value differs by a predefined delta from the expected value, we can still use the assertEquals but we have to pass the delta value as the third parameter:

@Test
public void whenAssertingEqualityWithDelta_thenEqual() {
    float square = 2 * 2;
    float rectangle = 3 * 2;
    float delta = 2;

    assertEquals(square, rectangle, delta);
}

4.3. assertTrue and assertFalse

With the assertTrue assertion, it’s possible to verify the supplied conditions are true:

@Test
public void whenAssertingConditions_thenVerified() {
    assertTrue(5 > 4, "5 is greater the 4");
    assertTrue(null == null, "null is equal to null");
}

Thanks to the support of the lambda expression, it’s possible to supply a BooleanSupplier to the assertion instead of a boolean condition.

Let’s see how we can assert the correctness of a BooleanSupplier using the assertFalse assertion:

@Test
public void givenBooleanSupplier_whenAssertingCondition_thenVerified() {
    BooleanSupplier condition = () -> 5 > 6;

    assertFalse(condition, "5 is not greater then 6");
}

4.4. assertNull and assertNotNull

When we want to assert that an object is not null we can use the assertNotNull assertion:

@Test
public void whenAssertingNotNull_thenTrue() {
    Object dog = new Object();

    assertNotNull(dog, () -> "The dog should not be null");
}

In the opposite way, we can use the assertNull assertion to check if the actual is null:

@Test
public void whenAssertingNull_thenTrue() {
    Object cat = null;

    assertNull(cat, () -> "The cat should be null");
}

In both cases, the failure message will be retrieved in a lazy way since it’s a Supplier.

4.5. assertSame and assertNotSame

When we want to assert that the expected and the actual refer to the same Object, we must use the assertSame assertion:

@Test
public void whenAssertingSameObject_thenSuccessfull() {
    String language = "Java";
    Optional<String> optional = Optional.of(language);

    assertSame(language, optional.get());
}

In the opposite way, we can use the assertNotSame one.

4.6. fail

The fail assertion fails a test with the provided failure message as well as the underlying cause. This can be useful to mark a test when it’s development it’s not completed:

@Test
public void whenFailingATest_thenFailed() {
    // Test not completed
    fail("FAIL - test not completed");
}

4.7. assertAll

One of the new assertion introduced in JUnit 5 is assertAll.

This assertion allows the creation of grouped assertions, where all the assertions are executed and their failures are reported together. In details, this assertion accepts a heading, that will be included in the message string for the MultipleFailureError, and a Stream of Executable.

Let’s define a grouped assertion:

@Test
public void givenMultipleAssertion_whenAssertingAll_thenOK() {
    assertAll(
      "heading",
      () -> assertEquals(4, 2 * 2, "4 is 2 times 2"),
      () -> assertEquals("java", "JAVA".toLowerCase()),
      () -> assertEquals(null, null, "null is equal to null")
    );
}

The execution of a grouped assertion is interrupted only when one of the executables throws a blacklisted exception (OutOfMemoryError for example).

4.8. assertIterableEquals

The assertIterableEquals asserts that the expected and the actual iterables are deeply equal.

In order to be equal, both iterable must return equal elements in the same order and it isn’t required that the two iterables are of the same type in order to be equal.

With this consideration, let’s see how we can assert that two lists of different types (LinkedList and ArrayList for example) are equal:

@Test
public void givenTwoLists_whenAssertingIterables_thenEquals() {
    Iterable<String> al = new ArrayList<>(asList("Java", "Junit", "Test"));
    Iterable<String> ll = new LinkedList<>(asList("Java", "Junit", "Test"));

    assertIterableEquals(al, ll);
}

In the same way of the assertArrayEquals, if both iterables are null, they are considered equal.

4.9. assertLinesMatch

The assertLinesMatch asserts that the expected list of String matches the actual list.

This method differs from the assertEquals and assertIterableEquals since, for each pair of expected and actual lines, it performs this algorithm:

  1. check if the expected line is equal to the actual one. If yes it continues with the next pair
  2. treat the expected line as a regular expression and performs a check with the String.matches() method. If yes it continues with the next pair
  3. check if the expected line is a fast-forward marker. If yes apply fast-forward and repeat the algorithm from the step 1

Let’s see how we can use this assertion to assert that two lists of String have matching lines:

@Test
public void whenAssertingEqualityListOfStrings_thenEqual() {
    List<String> expected = asList("Java", "\\d+", "JUnit");
    List<String> actual = asList("Java", "11", "JUnit");

    assertLinesMatch(expected, actual);
}

4.10. assertNotEquals

Complementary to the assertEquals, the assertNotEquals assertion asserts that the expected and the actual values aren’t equal:

@Test
public void whenAssertingEquality_thenNotEqual() {
    Integer value = 5; // result of an algorithm
    
    assertNotEquals(0, value, "The result cannot be 0");
}

If both are null, the assertion fails.

4.11. assertThrows

In order to increase simplicity and readability, the new assertThrows assertion allows us a clear and a simple way to assert if an executable throws the specified exception type.

Let’s see how we can assert a thrown exception:

@Test
void whenAssertingException_thenThrown() {
    Throwable exception = assertThrows(
      IllegalArgumentException.class, 
      () -> {
          throw new IllegalArgumentException("Exception message");
      }
    );
    assertEquals("Exception message", exception.getMessage());
}

The assertion will fail if no exception is thrown, or if an exception of a different type is thrown.

4.12. assertTimeout and assertTimeoutPreemptively

In case we want to assert that the execution of a supplied Executable ends before a given Timeout, we can use the assertTimeout assertion:

@Test
public void whenAssertingTimeout_thenNotExceeded() {
    assertTimeout(
      ofSeconds(2), 
      () -> {
        // code that requires less then 2 minutes to execute
        Thread.sleep(1000);
      }
    );
}

However, with the assertTimeout assertion, the supplied executable will be executed in the same thread of the calling code. Consequently, execution of the supplier won’t be preemptively aborted if the timeout is exceeded.

In case we want to be sure that execution of the executable will be aborted once it exceeds the timeout, we can use the assertTimeoutPreemptively assertion.

Both assertions can accept, instead of an Executable, ThrowingSupplier, representing any generic block of code that returns an object and that can potentially throw a Throwable.

5. Conclusion

In this tutorial, we covered all the assertions available in both JUnit 4 and JUnit 5.

We highlighted briefly the improvements made in JUnit 5, with the introductions of new assertions and the support of lambdas.

As always, the complete source code for this article is available over on GitHub.

Maven Dependency Scopes

$
0
0

1. Introduction

Maven is one of the most popular build tools in the Java ecosystem, and one of its core features is dependency management.

In this article, we’re going to describe and explore the mechanism that helps in managing transitive dependencies in Maven projects – dependency scopes.

2. Transitive Dependency

Simply put, there’re two types of dependencies in Maven direct and transitive.

Direct dependencies are the ones that are explicitly included in the project. These can be included in the project using <dependency> tags:

<dependency>
    <groupId>junit</groupId>
    <artifactId>junit</artifactId>
    <version>4.12</version>
</dependency>

Transitive dependencies, on the other hand, are dependencies required by our direct dependencies. Required transitive dependencies are automatically included in our project by Maven.

We can list all dependencies including transitive dependencies in the project using: mvn dependency:tree command.

3. Dependency Scopes

Dependency scopes can help to limit transitivity of the dependencies and they modify classpath for different built tasks. Maven has 6 default dependency scopes.

And it’s important to understand that each scope – except for import – does have an impact on transitive dependencies.

3.1. Compile

This is the default scope when no other scope is provided.

Dependencies with this scope are available on the classpath of the project in all build tasks and they’re propagated to the dependent projects.

More importantly, these dependencies are also transitive:

<dependency>
    <groupId>commons-lang</groupId>
    <artifactId>commons-lang</artifactId>
    <version>2.6</version>
</dependency>

3.2. Provided

This scope is used to mark dependencies that should be provided at runtime by JDK or a container, hence the name.

A good use case for this scope would be a web application deployed in some container, where the container already provides some libraries itself.

For example, a web server that already provides the Servlet API at runtime, thus in our project, those dependencies can be defined with the provided scope:

<dependency>
    <groupId>javax.servlet</groupId>
    <artifactId>servlet-api</artifactId>
    <version>2.5</version>
    <scope>provided</scope>
</dependency>

The provided dependencies are available only at compile-time and in the test classpath of the project; what’s more, they aren’t transitive.

3.3. Runtime

The dependencies with this scope are required at runtime, but they’re not needed for compilation of the project code. Because of that, dependencies marked with the runtime scope will be present in runtime and test classpath, but they will be missing from compile classpath.

A good example of dependencies that should use the runtime scope is a JDBC driver:

<dependency>
    <groupId>mysql</groupId>
    <artifactId>mysql-connector-java</artifactId>
    <version>6.0.6</version>
    <scope>runtime</scope>
</dependency>

3.4. Test

This scope is used to indicate that dependency isn’t required at standard runtime of the application, but is used only for test purposes. Test dependencies aren’t transitive and are only present for test and execution classpaths.

The standard use case for this scope is adding test library like JUnit to our application:

<dependency>
    <groupId>junit</groupId>
    <artifactId>junit</artifactId>
    <version>4.12</version>
    <scope>test</scope>
</dependency>

3.5. System

System scope is much similar to the provided scope. The main difference between those two scopes is that system requires us to directly point to specific jar on the system.

The important thing to remember is that building the project with system scope dependencies may fail on different machines if dependencies aren’t present or are located in a different place than the one systemPath points to:

<dependency>
    <groupId>com.baeldung</groupId>
    <artifactId>custom-dependency</artifactId>
    <version>1.3.2</version>
    <scope>system</scope>
    <systemPath>${project.basedir}/libs/custom-dependency-1.3.2.jar</systemPath>
</dependency>

3.6. Import

This scope was added in Maven 2.0.9 and it’s only available for the dependency type pom. We’re going to speak more about the type of the dependency in future articles.

Import indicates that this dependency should be replaced with all effective dependencies declared in it’s POM:

<dependency>
    <groupId>com.baeldung</groupId>
    <artifactId>custom-project</artifactId>
    <version>1.3.2</version>
    <type>pom</type>
    <scope>import</scope>
</dependency>

4. Scope and Transitivity 

Each dependency scope affects transitive dependencies in its own way. This means that different transitive dependencies may end up in the project with different scopes.

However, dependencies with scopes provided and test will never be included in the main project.

Then:

  • For the compile scope, all dependencies with runtime scope will be pulled in with the runtime scope, in the project and all dependencies with the compile scope will be pulled in with the compile scope, in the project
  • For the provided scope, both runtime and compile scope dependencies will be pulled in with the provided scope, in the project
  • For the test scope, both runtime and compile scope transitive dependencies will be pulled in with the test scope, in the project
  • For the runtime scope, both runtime and compile scope transitive dependencies will be pulled in with the runtime scope, in the project

5. Conclusion

In this quick tutorial, we focused on Maven dependency scopes, their purpose, and the details of how they operate.

If you want to dig deeper into Maven, the documentation is a great place to start.

A Guide to Unirest

$
0
0

1. Overview

Unirest is a lightweight HTTP client library from Mashape. Along with Java, it’s also available for Node.js, .Net, Python, Ruby, etc.

Before we jump in, note that we’ll use mocky.io for all our HTTP requests here.

2. Maven Setup

To get started, let’s add the necessary dependencies first:

<dependency>
    <groupId>com.mashape.unirest</groupId>
    <artifactId>unirest-java</artifactId>
    <version>1.4.9</version>
</dependency>

Check out the latest version here.

3. Simple Requests

Let’s send a simple HTTP request, to understand the semantics of the framework:

@Test
public void shouldReturnStatusOkay() {
    HttpResponse<JsonNode> jsonResponse 
      = Unirest.get("http://www.mocky.io/v2/5a9ce37b3100004f00ab5154")
      .header("accept", "application/json").queryString("apiKey", "123")
      .asJson();

    assertNotNull(jsonResponse.getBody());
    assertEquals(200, jsonResponse.getStatus());
}

Notice that the API is fluent, efficient and quite easy to read.

We’re passing headers and parameters with the header() and fields() APIs.

And the request gets invoked on the asJson() method call; we also have other options here, such as asBinary(), asString() and asObject().

To pass multiple headers or fields, we can create a map and pass them to .headers(Map<String, Object> headers) and .fields(Map<String, String> fields) respectively:

@Test
public void shouldReturnStatusAccepted() {
    Map<String, String> headers = new HashMap<>();
    headers.put("accept", "application/json");
    headers.put("Authorization", "Bearer 5a9ce37b3100004f00ab5154");

    Map<String, Object> fields = new HashMap<>();
    fields.put("name", "Sam Baeldung");
    fields.put("id", "PSP123");

    HttpResponse<JsonNode> jsonResponse 
      = Unirest.put("http://www.mocky.io/v2/5a9ce7853100002a00ab515e")
      .headers(headers).fields(fields)
      .asJson();
 
    assertNotNull(jsonResponse.getBody());
    assertEquals(202, jsonResponse.getStatus());
}

3.1. Passing Query Params

To pass data as a query String, we’ll use the queryString() method:

HttpResponse<JsonNode> jsonResponse 
  = Unirest.get("http://www.mocky.io/v2/5a9ce37b3100004f00ab5154")
  .queryString("apiKey", "123")

3.2. Using Path Params

For passing any URL parameters, we can use the routeParam() method:

HttpResponse<JsonNode> jsonResponse 
  = Unirest.get("http://www.mocky.io/v2/5a9ce37b3100004f00ab5154/{userId}")
  .routeParam("userId", "123")

The parameter placeholder name must be same as the first argument to the method.

3.3. Requests with Body

If our request requires a string/JSON body, we pass it using the body() method:

@Test
public void givenRequestBodyWhenCreatedThenCorrect() {

    HttpResponse<JsonNode> jsonResponse 
      = Unirest.post("http://www.mocky.io/v2/5a9ce7663100006800ab515d")
      .body("{\"name\":\"Sam Baeldung\", \"city\":\"viena\"}")
      .asJson();
 
    assertEquals(201, jsonResponse.getStatus());
}

3.4. Object Mapper

In order to use the asObject() or body() in the request, we need to define our object mapper. For simplicity, we’ll use the Jackson object mapper.

Let’s first add the following dependencies to pom.xml:

<dependency>
    <groupId>com.fasterxml.jackson.core</groupId>
    <artifactId>jackson-databind</artifactId>
    <version>2.9.4</version>
</dependency>

Always use the latest version over on Maven Central.

Now let’s configure our mapper:

Unirest.setObjectMapper(new ObjectMapper() {
    com.fasterxml.jackson.databind.ObjectMapper mapper 
      = new com.fasterxml.jackson.databind.ObjectMapper();

    public String writeValue(Object value) {
        return mapper.writeValueAsString(value);
    }

    public <T> T readValue(String value, Class<T> valueType) {
        return mapper.readValue(value, valueType);
    }
});

Note that setObjectMapper() should only be called once, for setting the mapper; once the mapper instance is set, it will be used for all request and responses.

Let’s now test the new functionality using a custom Article object:

@Test
public void givenArticleWhenCreatedThenCorrect() {
    Article article 
      = new Article("ID1213", "Guide to Rest", "baeldung");
    HttpResponse<JsonNode> jsonResponse 
      = Unirest.post("http://www.mocky.io/v2/5a9ce7663100006800ab515d")
      .body(article)
      .asJson();
 
    assertEquals(201, jsonResponse.getStatus());
}

4. Request Methods

Similar to any HTTP client, the framework provides separate methods for each HTTP verb:

POST:

Unirest.post("http://www.mocky.io/v2/5a9ce7663100006800ab515d")

PUT:

Unirest.put("http://www.mocky.io/v2/5a9ce7663100006800ab515d")

GET:

Unirest.get("http://www.mocky.io/v2/5a9ce7663100006800ab515d")

DELETE:

Unirest.delete("http://www.mocky.io/v2/5a9ce7663100006800ab515d")

PATCH:

Unirest.patch("http://www.mocky.io/v2/5a9ce7663100006800ab515d")

OPTIONS:

Unirest.delete("http://www.mocky.io/v2/5a9ce7663100006800ab515d")

5. Response Methods

Once we get the response, let check the status code and status message:

//...
jsonResponse.getStatus()

//...

Extract the headers:

//...
jsonResponse.getHeaders();
//...

Get the response body:

//...
jsonResponse.getBody();
jsonResponse.getRawBody();
//...

Notice that, the getRawBody(), returns a stream of the unparsed response body, whereas the getBody() returns the parsed body, using the object mapper defined in the earlier section.

6. Handling Asynchronous Requests

Unirest also has the capability to handle asynchronous requests – using java.util.concurrent.Future and callback methods:

@Test
public void whenAysncRequestShouldReturnOk() {
    Future<HttpResponse<JsonNode>> future = Unirest.post(
      "http://www.mocky.io/v2/5a9ce37b3100004f00ab5154?mocky-delay=10000ms")
      .header("accept", "application/json")
      .asJsonAsync(new Callback<JsonNode>() {

        public void failed(UnirestException e) {
            // Do something if the request failed
        }

        public void completed(HttpResponse<JsonNode> response) {
            // Do something if the request is successful
        }

        public void cancelled() {
            // Do something if the request is cancelled
        }
        });
 
    assertEquals(200, future.get().getStatus());
}

The com.mashape.unirest.http.async.Callback<T> interface provides three methods, failed(), cancelled() and completed(). 

Override the methods to perform the necessary operations depending on the response.

7. File Uploads

To upload or send a file as a part of the request, pass a java.io.File object as a field with name file:

@Test
public void givenFileWhenUploadedThenCorrect() {

    HttpResponse<JsonNode> jsonResponse = Unirest.post(
      "http://www.mocky.io/v2/5a9ce7663100006800ab515d")
      .field("file", new File("/path/to/file"))
      .asJson();
 
    assertEquals(201, jsonResponse.getStatus());
}

We can also use ByteStream:

@Test
public void givenByteStreamWhenUploadedThenCorrect() {
    try (InputStream inputStream = new FileInputStream(
      new File("/path/to/file/artcile.txt"))) {
        byte[] bytes = new byte[inputStream.available()];
        inputStream.read(bytes);
        HttpResponse<JsonNode> jsonResponse = Unirest.post(
          "http://www.mocky.io/v2/5a9ce7663100006800ab515d")
          .field("file", bytes, "article.txt")
          .asJson();
 
        assertEquals(201, jsonResponse.getStatus());
    }
}

Or use the input stream directly, adding the ContentType.APPLICATION_OCTET_STREAM as the second argument in the fields() method:

@Test
public void givenInputStreamWhenUploadedThenCorrect() {
    try (InputStream inputStream = new FileInputStream(
      new File("/path/to/file/artcile.txt"))) {

        HttpResponse<JsonNode> jsonResponse = Unirest.post(
          "http://www.mocky.io/v2/5a9ce7663100006800ab515d")
          .field("file", inputStream, ContentType.APPLICATION_OCTET_STREAM, "article.txt").asJson();
 
        assertEquals(201, jsonResponse.getStatus());
    }
}

8. Unirest Configurations

The framework also supports typical configurations of an HTTP client like connection pooling, timeouts, global headers etc.

Let’s set the number of connections and number maximum connections per route:

Unirest.setConcurrency(20, 5);

Configure connection and socket timeouts :

Unirest.setTimeouts(20000, 15000);

Note that the time values are in milliseconds.

Now let’s set  HTTP headers for all our requests:

Unirest.setDefaultHeader("X-app-name", "baeldung-unirest");
Unirest.setDefaultHeader("X-request-id", "100004f00ab5");

We can clear the global headers anytime:

Unirest.clearDefaultHeaders();

At some point, we might need to make requests through a proxy server:

Unirest.setProxy(new HttpHost("localhost", 8080));

One important aspect to be aware of is closing or exiting the application gracefully. Unirest spawns a background event loop to handle the operations, we need to shut down that loop before exiting our application:

Unirest.shutdown();

9. Conclusion

In this tutorial, we focused on the lightweight HTTP client framework – Unirest. We worked with some simple examples, both in a synchronous but also async modes.

Finally, we also used several advanced configurations – such as connection pooling, proxy settings etc.

As usual, the source code is available over on GitHub.


Chain of Responsibility Design Pattern in Java

$
0
0

1. Introduction

In this article, we’re going to take a look at a widely used behavioral design pattern: Chain of Responsibility.

We can find more design patterns in our previous article.

2. Chain of Responsibility

Wikipedia defines Chain of Responsibility as a design pattern consisting of “a source of command objects and a series of processing objects”.

Each processing object in the chain is responsible for a certain type of command, and the processing is done, it forwards the command to the next processor in the chain.

The Chain of Responsibility pattern is handy for:

  • Decoupling a sender and receiver of a command
  • Picking a processing strategy at processing-time

So, let’s see a simple example of the pattern.

3. Example

We’re going to use Chain of Responsibility to create a chain for handling authentication requests.

So, the input authentication provider will be the command, and each authentication processor will be a separate processor object.

Let’s first create an abstract base class for our processors:

public abstract class AuthenticationProcessor {

    public AuthenticationProcessor nextProcessor;
    
    // standard constructors

    public abstract boolean isAuthorized(AuthenticationProvider authProvider);
}

Next, let’s create concrete processors which extend AuthenticationProcessor:

public class OAuthProcessor extends AuthenticationProcessor {

    public OAuthProcessor(AuthenticationProcessor nextProcessor) {
        super(nextProcessor);
    }

    @Override
    public boolean isAuthorized(AuthenticationProvider authProvider) {
        if (authProvider instanceof OAuthTokenProvider) {
            return true;
        } else if (nextProcessor != null) {
            return nextProcessor.isAuthorized(authProvider);
        }
        
        return false;
    }
}
public class UsernamePasswordProcessor extends AuthenticationProcessor {

    public UsernamePasswordProcessor(AuthenticationProcessor nextProcessor) {
        super(nextProcessor);
    }

    @Override
    public boolean isAuthorized(AuthenticationProvider authProvider) {
        if (authProvider instanceof UsernamePasswordProvider) {
            return true;
        } else if (nextProcessor != null) {
            return nextProcessor.isAuthorized(authProvider);
        }
        return false;
    }
}

Here, we created two concrete processors for our incoming authorization requests: UsernamePasswordProcessor and OAuthProcessor.

For each one, we overrode the isAuthorized method.

Now let’s create a couple of tests:

public class ChainOfResponsibilityTest {

    private static AuthenticationProcessor getChainOfAuthProcessor() {
        AuthenticationProcessor oAuthProcessor = new OAuthProcessor(null);
        return new UsernamePasswordProcessor(oAuthProcessor);
    }

    @Test
    public void givenOAuthProvider_whenCheckingAuthorized_thenSuccess() {
        AuthenticationProcessor authProcessorChain = getChainOfAuthProcessor();
        assertTrue(authProcessorChain.isAuthorized(new OAuthTokenProvider()));
    }

    @Test
    public void givenSamlProvider_whenCheckingAuthorized_thenSuccess() {
        AuthenticationProcessor authProcessorChain = getChainOfAuthProcessor();
 
        assertFalse(authProcessorChain.isAuthorized(new SamlTokenProvider()));
    }
}

The example above creates a chain of authentication processors: UsernamePasswordProcessor -> OAuthProcessor. In the first test, the authorization succeeds, and in the other, it fails.

First, UsernamePasswordProcessor checks to see if the authentication provider is an instance of UsernamePasswordProvider.

Not being the expected input, UsernamePasswordProcessor delegates to OAuthProcessor.

Last, the OAuthProcessor processes the command. In the first test, there is a match and the test passes. In the second, there are no more processors in the chain, and, as a result, the test fails.

4. Implementation Principles

We need to keep few important principles in mind while implementing Chain of Responsibility:

  • Each processor in the chain will have its implementation for processing a command
    • In our example above, all processors have their implementation of isAuthorized
  • Every processor in the chain should have reference to the next processor
    • Above, UsernamePasswordProcessor delegates to OAuthProcessor
  • Each processor is responsible for delegating to the next processor so beware of dropped commands
    • Again in our example, if the command is an instance of SamlProvider then the request may not get processed and will be unauthorized
  • Processors should not form a recursive cycle
    • In our example, we don’t have a cycle in our chain: UsernamePasswordProcessor -> OAuthProcessor. But, if we explicitly set UsernamePasswordProcessor as next processor of  OAuthProcessor, then we end up with a cycle in our chain: UsernamePasswordProcessor -> OAuthProcessor -> UsernamePasswordProcessor. Taking the next processor in the constructor can help with this
  • Only one processor in the chain handles a given command
    • In our example, if an incoming command contains an instance of  OAuthTokenProvider, then only OAuthProcessor will handle the command

5. Usage in the Real World

In the Java world, we benefit from Chain of Responsibility every day. One such classic example is Servlet Filters in Java that allow multiple filters to process an HTTP request. Though in that case, each filter invokes the chain instead of the next filter.

Let’s take a look at the code snippet below for better understanding of this pattern in Servlet Filters:

public class CustomFilter implements Filter {

    public void doFilter(
      ServletRequest request,
      ServletResponse response,
      FilterChain chain)
      throws IOException, ServletException {

        // process the request

        // pass the request (i.e. the command) along the filter chain
        chain.doFilter(request, response);
    }
}

As seen in the code snippet above, we need to invoke FilterChain‘s doFilter method in order to pass the request on to next processor in the chain.

6. Disadvantages

And now that we’ve seen how interesting Chain of Responsibility is, let’s keep in mind some drawbacks:

  • Mostly, it can get broken easily:
    • if a processor fails to call the next processor, the command gets dropped
    • if a processor calls the wrong processor, it can lead to a cycle
  • It can create deep stack traces, which can affect performance
  • It can lead to duplicate code across processors, increasing maintenance

7. Conclusion

In this article, we talked about Chain of Responsibility and its strengths and weaknesses with the help of a chain to authorize incoming authentication requests.

And, as always, the source code can be found over on GitHub.

Java Weekly, Issue 220

$
0
0

Here we go…

1. Spring and Java

>> Monitor and troubleshoot Java applications and services with Datadog 

Optimize performance with end-to-end tracing and out-of-the-box support for popular Java frameworks, application servers, and databases. Try it free.

>> Testing auto-configurations with Spring Boot 2.0 [spring.io]

Cool – Spring Boot 2.0 provides a suite of new test helpers for easily configuring an ApplicationContext to simulate auto-configuration test scenarios.

>> How to customize the Jackson ObjectMapper used by Hibernate-Types [vladmihalcea.com]

The new configuration mechanism allows customizing an ObjectMapper used by hibernate-types and some useful other behaviors.

>> Feature lifecycle in Java [blog.frankel.ch]

A quick reminder what feature lifecycle in Java looks like.

>> Improve Launch Times On Java 10 With Application Class-Data Sharing [blog.codefx.org]

Application Class-Data Sharing is another interesting feature of Java 10 which can turbocharge Java applications start-up time.

Also worth reading:

Webinars and presentations:

Time to upgrade:

2. Technical and Musings

Also worth reading:

3. Comics

And my favorite Dilberts of the week:

>> Team Building Lunch [dilbert.com]

>> Boss The Bottleneck [dilbert.com]

>> Workload [dilbert.com]

4. Pick of the Week

>> The Evolution of Code Deploys at Reddit [redditblog.com]

Hamcrest Text Matchers

$
0
0

1. Overview 

In this tutorial, we’ll explore Hamcrest Text Matchers.

We discussed Hamcrest Matchers in general before in testing with Hamcrest, in this tutorial we’ll focus on Text Matchers only.

2. Maven Configuration

First, we need to add the following dependency to our pom.xml:

<dependency>
    <groupId>org.hamcrest</groupId>
    <artifactId>java-hamcrest</artifactId>
    <version>2.0.0.0</version>
    <scope>test</scope>
</dependency>

The latest version of java-hamcrest can be downloaded from Maven Central.

Now, we’ll dive right into Hamcrest Text Matchers.

3. Text Equality Matchers

We can, of course, check if two Strings are equal using the standard isEqual() matcher.

In addition, we have two matchers that are specific to String types: equalToIgnoringCase() and equalToIgnoringWhiteSpace().

Let’s check if two Strings are equal – ignoring case:

@Test
public void whenTwoStringsAreEqual_thenCorrect() {
    String first = "hello";
    String second = "Hello";

    assertThat(first, equalToIgnoringCase(second));
}

We can also check if two Strings are equal – ignoring leading and trailing whitespace:

@Test
public void whenTwoStringsAreEqualWithWhiteSpace_thenCorrect() {
    String first = "hello";
    String second = "   Hello   ";

    assertThat(first, equalToIgnoringWhiteSpace(second));
}

4. Empty Text Matchers

We can check if a String is blank, meaning it contains only whitespace, by using the blankString() and blankOrNullString() matchers:

@Test
public void whenStringIsBlank_thenCorrect() {
    String first = "  ";
    String second = null;
    
    assertThat(first, blankString());
    assertThat(first, blankOrNullString());
    assertThat(second, blankOrNullString());
}

On the other hand, if we want to verify if a String is empty, we can use the emptyString() matchers:

@Test
public void whenStringIsEmpty_thenCorrect() {
    String first = "";
    String second = null;

    assertThat(first, emptyString());
    assertThat(first, emptyOrNullString());
    assertThat(second, emptyOrNullString());
}

5. Pattern Matchers

We can also check if a given text matches a regular expression using the matchesPattern() function:

@Test
public void whenStringMatchPattern_thenCorrect() {
    String first = "hello";

    assertThat(first, matchesPattern("[a-z]+"));
}

6. Sub-String Matchers

We can determine if a text contains another sub-text by using the containsString() function or containsStringIgnoringCase():

@Test
public void whenVerifyStringContains_thenCorrect() {
    String first = "hello";

    assertThat(first, containsString("lo"));
    assertThat(first, containsStringIgnoringCase("EL"));
}

If we expect the sub-strings to be in a specific order, we can call the stringContainsInOrder() matcher:

@Test
public void whenVerifyStringContainsInOrder_thenCorrect() {
    String first = "hello";
    
    assertThat(first, stringContainsInOrder("e","l","o"));
}

Next, let’s see how to check that a String starts with a given String:

@Test
public void whenVerifyStringStartsWith_thenCorrect() {
    String first = "hello";

    assertThat(first, startsWith("he"));
    assertThat(first, startsWithIgnoringCase("HEL"));
}

And finally, we can check if a String ends with a specified String:

@Test
public void whenVerifyStringEndsWith_thenCorrect() {
    String first = "hello";

    assertThat(first, endsWith("lo"));
    assertThat(first, endsWithIgnoringCase("LO"));
}

7. Conclusion

In this quick tutorial, we explored Hamcrest Text Matchers.

As always, the full source code for the examples can be found over on GitHub.

Hamcrest File Matchers

$
0
0

1. Overview 

In this tutorial, we’ll discuss Hamcrest File Matchers.

We discussed Hamcrest Matchers in general before in the previous Testing with Hamcrest article. In the next sections, we’ll focus only File Matchers.

2. Maven Configuration

First, we need to add the following dependency to our pom.xml:

<dependency>
    <groupId>org.hamcrest</groupId>
    <artifactId>java-hamcrest</artifactId>
    <version>2.0.0.0</version>
    <scope>test</scope>
</dependency>

The latest version of java-hamcrest can be downloaded from Maven Central.

Let’s continue with exploring the Hamcrest File Matchers.

3. File Properties

Hamcrest provides several matchers that verify commonly used File properties.

Let’s see how we can verify the File name using aFileNamed() combined with a String Matcher:

@Test
public void whenVerifyingFileName_thenCorrect() {
    File file = new File("src/test/resources/test1.in");
 
    assertThat(file, aFileNamed(equalToIgnoringCase("test1.in")));
}

We can also assess the file path – again in combination with a String Matcher:

@Test
public void whenVerifyingFilePath_thenCorrect() {
    File file = new File("src/test/resources/test1.in");
    
    assertThat(file, aFileWithCanonicalPath(containsString("src/test/resources")));
    assertThat(file, aFileWithAbsolutePath(containsString("src/test/resources")));
}

Let’s also see a file’s size – in bytes:

@Test
public void whenVerifyingFileSize_thenCorrect() {
    File file = new File("src/test/resources/test1.in");

    assertThat(file, aFileWithSize(11));
    assertThat(file, aFileWithSize(greaterThan(1L)));;
}

Finally, we can check if a File is readable and writable:

@Test
public void whenVerifyingFileIsReadableAndWritable_thenCorrect() {
    File file = new File("src/test/resources/test1.in");

    assertThat(file, aReadableFile());
    assertThat(file, aWritableFile());        
}

4. Existing File Matcher

If we want to verify that a File or directory exists, we can use the anExistingFile() or anExistingDirectory() matchers:

@Test
public void whenVerifyingFileOrDirExist_thenCorrect() {
    File file = new File("src/test/resources/test1.in");
    File dir = new File("src/test/resources");
    
    assertThat(file, anExistingFile());
    assertThat(dir, anExistingDirectory());
    assertThat(file, anExistingFileOrDirectory());
    assertThat(dir, anExistingFileOrDirectory());
}

The anExistingFileOrDirectory() matcher that combines the two is also available.


5. Conclusion

In this quick article, we went through Hamcrest File Matchers and their use.

As always, the full source code for the examples is available over on GitHub.

Guide to Externalizable Interface

$
0
0

1. Introduction

In this tutorial, we’ll have a quick look at java’s java.io.Externalizable interface. The main goal of this interface is to facilitate custom serialization and deserialization.

Before we go ahead, make sure you check out the serialization in Java article. The next chapter is about how to serialize a Java object with this interface.

After that, we’re going to discuss the key differences compared to the java.io.Serializable interface.

2. The Externalizable Interface

Externalizable extends from the java.io.Serializable marker interface. Any class that implements Externalizable interface should override the writeExternal(), readExternal() methods. That way we can change the JVM’s default serialization behavior.

2.1. Serialization

Let’s have a look at this simple example:

public class Country implements Externalizable {
  
    private static final long serialVersionUID = 1L;
  
    private String name;
    private int code;
  
    // getters, setters
  
    @Override
    public void writeExternal(ObjectOutput out) throws IOException {
        out.writeUTF(name);
        out.writeInt(code);
    }
  
    @Override
    public void readExternal(ObjectInput in) 
      throws IOException, ClassNotFoundException {
        this.name = in.readUTF();
        this.code = in.readInt();
    }
}

Here, we’ve defined a class Country that implements the Externalizable interface and implements the two methods mentioned above.

In the writeExternal() method, we’re adding the object’s properties to the ObjectOutput stream. This has standard methods like writeUTF() for String and writeInt() for the int values.

Next, for deserializing the object, we’re reading from the ObjectInput stream using the readUTF(), readInt() methods to read the properties in the same exact order in which they were written.

It’s a good practice to add the serialVersionUID manually. If this is absent, the JVM will automatically add one.

The automatically generated number is compiler dependent. This means it may cause an unlikely InvalidClassException.

Let’s test the behavior we implemented above:

@Test
public void whenSerializing_thenUseExternalizable() 
  throws IOException, ClassNotFoundException {
       
    Country c = new Country();
    c.setCode(374);
    c.setName("Armenia");
   
    FileOutputStream fileOutputStream
     = new FileOutputStream(OUTPUT_FILE);
    ObjectOutputStream objectOutputStream
     = new ObjectOutputStream(fileOutputStream);
    c.writeExternal(objectOutputStream);
   
    objectOutputStream.flush();
    objectOutputStream.close();
    fileOutputStream.close();
   
    FileInputStream fileInputStream
     = new FileInputStream(OUTPUT_FILE);
    ObjectInputStream objectInputStream
     = new ObjectInputStream(fileInputStream);
   
    Country c2 = new Country();
    c2.readExternal(objectInputStream);
   
    objectInputStream.close();
    fileInputStream.close();
   
    assertTrue(c2.getCode() == c.getCode());
    assertTrue(c2.getName().equals(c.getName()));
}

In this example, we’re first creating a Country object and writing it to a file. Then, we’re deserializing the object from the file and verifying the values are correct.

The output of the printed c2 object:

Country{name='Armenia', code=374}

This shows we’ve successfully deserialized the object.

2.2. Inheritance

When a class inherits from the Serializable interface, the JVM automatically collects all the fields from sub-classes as well and makes them serializable.

Keep in mind that we can apply this to Externalizable as well. We just need to implement the read/write methods for every sub-class of the inheritance hierarchy.

Let’s look at the Region class below which extends our Country class from the previous section:

public class Region extends Country implements Externalizable {
 
    private static final long serialVersionUID = 1L;
 
    private String climate;
    private Double population;
 
    // getters, setters
 
    @Override
    public void writeExternal(ObjectOutput out) throws IOException {
        super.writeExternal(out);
        out.writeUTF(climate);
    }
 
    @Override
    public void readExternal(ObjectInput in) 
      throws IOException, ClassNotFoundException {
 
        super.readExternal(in);
        this.climate = in.readUTF();
    }
}

Here, we added two additional properties and serialized the first one.

Note that we also called super.writeExternal(out), super.readExternal(in) within serializer methods to save/restore the parent class fields as well.

Let’s run the unit test with the following data:

Region r = new Region();
r.setCode(374);
r.setName("Armenia");
r.setClimate("Mediterranean");
r.setPopulation(120.000);

Here’s the deserialized object:

Region{
  country='Country{
    name='Armenia',
    code=374}'
  climate='Mediterranean', 
  population=null
}

Notice that since we didn’t serialize the population field in Region class, the value of that property is null.

3. Externalizable vs Serializable

Let’s go through the key differences between the two interfaces:

  • Serialization Responsibility 

The key difference here is how we handle the serialization process. When a class implements the java.io.Serializable interface, the JVM takes full responsibility for serializing the class instance. In case of Externalizable, it’s the programmer who should take care of the whole serialization and also deserialization process.

  • Use Case

If we need to serialize the entire object, the Serializable interface is a better fit. On the other hand, for custom serialization, we can control the process using Externalizable.

  • Performance

The java.io.Serializable interface uses reflection and metadata which causes relatively slow performance. By comparison, the Externalizable interface gives you full control over the serialization process.

  • Reading Order

While using Externalizable, it’s mandatory to read all the field states in the exact order as they were written. Otherwise, we’ll get an exception.

For example, if we change the reading order of the code and name properties in the Country class, a java.io.EOFException will be thrown.

Meanwhile, the Serializable interface doesn’t have that requirement.

  • Custom Serialization

We can achieve custom serialization with the Serializable interface by marking the field with transient keyword. The JVM won’t serialize the particular field but it’ll add up the field to file storage with the default value. That’s why it’s a good practice to use Externalizable in case of custom serialization.

4. Conclusion

In this short guide to the Externalizable interface, we discussed the key features,  advantages and demonstrated examples of simple use. We also made a comparison with the Serializable interface.

As usual, the full source code of the tutorial is available over on GitHub.

Viewing all 4703 articles
Browse latest View live


<script src="https://jsc.adskeeper.com/r/s/rssing.com.1596347.js" async> </script>