Quantcast
Channel: Baeldung
Viewing all 4709 articles
Browse latest View live

Session Attributes in Spring MVC

$
0
0

1. Overview

When developing web applications, we often need to refer to the same attributes in several views. For example, we may have shopping cart contents that need to be displayed on multiple pages.

A good location to store those attributes is in the user’s session.

In this tutorial, we’ll focus on a simple example and examine 2 different strategies for working with a session attribute:

  • Using a scoped proxy
  • Using the @SessionAttributes annotation

2. Maven Setup

We’ll use Spring Boot starters to bootstrap our project and bring in all necessary dependencies.

Our setup requires a parent declaration, web starter, and thymeleaf starter.

We’ll also include the spring test starter to provide some additional utility in our unit tests:

<parent>
    <groupId>org.springframework.boot</groupId>
    <artifactId>spring-boot-starter-parent</artifactId>
    <version>2.0.0.RELEASE</version>
    <relativePath/>
</parent>
 
<dependencies>
    <dependency>
        <groupId>org.springframework.boot</groupId>
        <artifactId>spring-boot-starter-web</artifactId>
    </dependency>
    <dependency>
        <groupId>org.springframework.boot</groupId>
        <artifactId>spring-boot-starter-thymeleaf</artifactId>
     </dependency>
    <dependency>
        <groupId>org.springframework.boot</groupId>
        <artifactId>spring-boot-starter-test</artifactId>
        <scope>test</scope>
    </dependency>
</dependencies>

The most recent versions of these dependencies can be found on Maven Central.

3. Example Use Case

Our example will implement a simple “TODO” application. We’ll have a form for creating instances of TodoItem and a list view that displays all TodoItems.

If we create a TodoItem using the form, subsequent accesses of the form will be prepopulated with the values of the most recently added TodoItem. We’ll use this feature to demonstrate how to “remember” form values that are stored in session scope.

Our 2 model classes are implemented as simple POJOs:

public class TodoItem {

    private String description;
    private LocalDateTime createDate;

    // getters and setters
}
public class TodoList extends ArrayDeque<TodoItem>{

}

Our TodoList class extends ArrayDeque to give us convenient access to the most recently added item via the peekLast method.

We’ll need 2 controller classes: 1 for each of the strategies we’ll look at. They’ll have subtle differences but the core functionality will be represented in both. Each will have 3 @RequestMappings:

  • @GetMapping(“/form”) – This method will be responsible for initializing the form and rendering the form view. The method will prepopulate the form with the most recently added TodoItem if the TodoList is not empty.
  • @PostMapping(“/form”) – This method will be responsible for adding the submitted TodoItem to the TodoList and redirecting to the list URL.
  • @GetMapping(“/todos.html”) – This method will simply add the TodoList to the Model for display and render the list view.

4. Using a Scoped Proxy

4.1. Setup

In this setup, our TodoList is configured as a session-scoped @Bean that is backed by a proxy. The fact that the @Bean is a proxy means that we are able to inject it into our singleton-scoped @Controller.

Since there is no session when the context initializes, Spring will create a proxy of TodoList to inject as a dependency. The target instance of TodoList will be instantiated as needed when required by requests.

For a more in-depth discussion of bean scopes in Spring, refer to our article on the topic.

First, we define our bean within a @Configuration class:

@Bean
@Scope(
  value = WebApplicationContext.SCOPE_SESSION, 
  proxyMode = ScopedProxyMode.TARGET_CLASS)
public TodoList todos() {
    return new TodoList();
}

Next, we declare the bean as a dependency for the @Controller and inject it just as we would any other dependency:

@Controller
@RequestMapping("/scopedproxy")
public class TodoControllerWithScopedProxy {

    private TodoList todos;

    // constructor and request mappings
}

Finally, using the bean in a request simply involves calling its methods:

@GetMapping("/form")
public String showForm(Model model) {
    if (!todos.isEmpty()) {
        model.addAttribute("todo", todos.peekLast());
    } else {
        model.addAttribute("todo", new TodoItem());
    }
    return "scopedproxyform";
}

4.2. Unit Testing

In order to test our implementation using the scoped proxy, we first configure a SimpleThreadScope. This will ensure that our unit tests accurately simulate runtime conditions of the code we are testing.

First, we define a TestConfig and a CustomScopeConfigurer:

@Configuration
public class TestConfig {

    @Bean
    public CustomScopeConfigurer customScopeConfigurer() {
        CustomScopeConfigurer configurer = new CustomScopeConfigurer();
        configurer.addScope("session", new SimpleThreadScope());
        return configurer;
    }
}

Now we can start by testing that an initial request of the form contains an uninitialized TodoItem:

@RunWith(SpringRunner.class) 
@SpringBootTest
@AutoConfigureMockMvc
@Import(TestConfig.class) 
public class TodoControllerWithScopedProxyTest {

    // ...

    @Test
    public void whenFirstRequest_thenContainsUnintializedTodo() throws Exception {
        MvcResult result = mockMvc.perform(get("/scopedproxy/form"))
          .andExpect(status().isOk())
          .andExpect(model().attributeExists("todo"))
          .andReturn();

        TodoItem item = (TodoItem) result.getModelAndView().getModel().get("todo");
 
        assertTrue(StringUtils.isEmpty(item.getDescription()));
    }
}

We can also confirm that our submit issues a redirect and that a subsequent form request is prepopulated with the newly added TodoItem:

@Test
public void whenSubmit_thenSubsequentFormRequestContainsMostRecentTodo() throws Exception {
    mockMvc.perform(post("/scopedproxy/form")
      .param("description", "newtodo"))
      .andExpect(status().is3xxRedirection())
      .andReturn();

    MvcResult result = mockMvc.perform(get("/scopedproxy/form"))
      .andExpect(status().isOk())
      .andExpect(model().attributeExists("todo"))
      .andReturn();
    TodoItem item = (TodoItem) result.getModelAndView().getModel().get("todo");
 
    assertEquals("newtodo", item.getDescription());
}

4.3. Discussion

A key feature of using the scoped proxy strategy is that it has no impact on request mapping method signatures. This keeps readability on a very high level compared to the @SessionAttributes strategy.

It can be helpful to recall that controllers have singleton scope by default.

This is the reason why we must use a proxy instead of simply injecting a non-proxied session-scoped bean. We can’t inject a bean with a lesser scope into a bean with greater scope. 

Attempting to do so, in this case, would trigger an exception with a message containing: Scope ‘session’ is not active for the current thread.

If we’re willing to define our controller with session scope, we could avoid specifying a proxyMode. This can have disadvantages, especially if the controller is expensive to create because a controller instance would have to be created for each user session.

Note that TodoList is available to other components for injection. This may be a benefit or a disadvantage depending on the use case. If making the bean available to the entire application is problematic, the instance can be scoped to the controller instead using @SessionAttributes as we’ll see in the next example.

5. Using the @SessionAttributes Annotation

5.1. Setup

In this setup, we don’t define TodoList as a Spring-managed @Bean. Instead, we declare it as a @ModelAttribute and specify the @SessionAttributes annotation to scope it to the session for the controller.

The first time our controller is accessed, Spring will instantiate an instance and place it in the Model. Since we also declare the bean in @SessionAttributes, Spring will store the instance.

For a more in-depth discussion of @ModelAttribute in Spring, refer to our article on the topic.

First, we declare our bean by providing a method on the controller and we annotate the method with @ModelAttribute:

@ModelAttribute("todos")
public TodoList todos() {
    return new TodoList();
}

Next, we inform the controller to treat our TodoList as session-scoped by using @SessionAttributes:

@Controller
@RequestMapping("/sessionattributes")
@SessionAttributes("todos")
public class TodoControllerWithSessionAttributes {
    // ... other methods
}

Finally, to use the bean within a request, we provide a reference to it in the method signature of a @RequestMapping:

@GetMapping("/form")
public String showForm(
  Model model,
  @ModelAttribute("todos") TodoList todos) {
 
    if (!todos.isEmpty()) {
        model.addAttribute("todo", todos.peekLast());
    } else {
        model.addAttribute("todo", new TodoItem());
    }
    return "sessionattributesform";
}

In the @PostMapping method, we inject RedirectAttributes and call addFlashAttribute before returning our RedirectView. This is an important difference in implementation compared to our first example:

@PostMapping("/form")
public RedirectView create(
  @ModelAttribute TodoItem todo, 
  @ModelAttribute("todos") TodoList todos, 
  RedirectAttributes attributes) {
    todo.setCreateDate(LocalDateTime.now());
    todos.add(todo);
    attributes.addFlashAttribute("todos", todos);
    return new RedirectView("/sessionattributes/todos.html");
}

Spring uses a specialized RedirectAttributes implementation of Model for redirect scenarios to support the encoding of URL parameters. During a redirect, any attributes stored on the Model would normally only be available to the framework if they were included in the URL.

By using addFlashAttribute we are telling the framework that we want our TodoList to survive the redirect without needing to encode it in the URL.

5.2. Unit Testing

The unit testing of the form view controller method is identical to the test we looked at in our first example. The test of the @PostMapping, however, is a little different because we need to access the flash attributes in order to verify the behavior:

@Test
public void whenTodoExists_thenSubsequentFormRequestContainsesMostRecentTodo() throws Exception {
    FlashMap flashMap = mockMvc.perform(post("/sessionattributes/form")
      .param("description", "newtodo"))
      .andExpect(status().is3xxRedirection())
      .andReturn().getFlashMap();

    MvcResult result = mockMvc.perform(get("/sessionattributes/form")
      .sessionAttrs(flashMap))
      .andExpect(status().isOk())
      .andExpect(model().attributeExists("todo"))
      .andReturn();
    TodoItem item = (TodoItem) result.getModelAndView().getModel().get("todo");
 
    assertEquals("newtodo", item.getDescription());
}

5.3. Discussion

The @ModelAttribute and @SessionAttributes strategy for storing an attribute in the session is a straightforward solution that requires no additional context configuration or Spring-managed @Beans.

Unlike our first example, it’s necessary to inject TodoList in the @RequestMapping methods.

In addition, we must make use of flash attributes for redirect scenarios.

6. Conclusion

In this article, we looked at using scoped proxies and @SessionAttributes as 2 strategies for working with session attributes in Spring MVC. Note that in this simple example, any attributes stored in session will only survive for the life of the session.

If we needed to persist attributes between server restarts or session timeouts, we could consider using Spring Session to transparently handle saving the information. Have a look at our article on Spring Session for more information.

As always, all code used in this article’s available over on GitHub.


Introduction to Apache Curator

$
0
0

1. Introduction

Apache Curator is a Java client for Apache Zookeeper, the popular coordination service for distributed applications.

In this tutorial, we’ll introduce some of the most relevant features provided by Curator:

  • Connection Management – managing connections and retry policies
  • Async – enhancing existing client by adding async capabilities and the use of Java 8 lambdas
  • Configuration Management – having a centralized configuration for the system
  • Strongly-Typed Models – working with typed models
  • Recipes – implementing leader election, distributed locks or counters

2. Prerequisites

To start with, it’s recommended to take a quick look at the Apache Zookeeper and its features.

For this tutorial, we assume that there’s already a standalone Zookeeper instance running on 127.0.0.1:2181; here are instructions on how to install and run it, if you’re just getting started.

First, we’ll need to add the curator-x-async dependency to our pom.xml:

<dependency>
    <groupId>org.apache.curator</groupId>
    <artifactId>curator-x-async</artifactId>
    <version>4.0.1</version>
    <exclusions>
        <exclusion>
            <groupId>org.apache.zookeeper</groupId>
            <artifactId>zookeeper</artifactId>
        </exclusion>
    </exclusions>
</dependency>

The latest version of Apache Curator 4.X.X has a hard dependency with Zookeeper 3.5.X which is still in beta right now.

And so, in this article, we’re going to use the currently latest stable Zookeeper 3.4.11 instead.

So we need to exclude the Zookeeper dependency and add the dependency for our Zookeeper version to our pom.xml:

<dependency>
    <groupId>org.apache.zookeeper</groupId>
    <artifactId>zookeeper</artifactId>
    <version>3.4.11</version>
</dependency>

For more information about compatibility, please refer to this link.

3. Connection Management

The basic use case of Apache Curator is connecting to a running Apache Zookeeper instance.

The tool provides a factory to build connections to Zookeeper using retry policies:

int sleepMsBetweenRetries = 100;
int maxRetries = 3;
RetryPolicy retryPolicy = new RetryNTimes(
  maxRetries, sleepMsBetweenRetries);

CuratorFramework client = CuratorFrameworkFactory
  .newClient("127.0.0.1:2181", retryPolicy);
client.start();
 
assertThat(client.checkExists().forPath("/")).isNotNull();

In this quick example, we’ll retry 3 times and will wait 100 ms between retries in case of connectivity issues.

Once connected to Zookeeper using the CuratorFramework client, we can now browse paths, get/set data and essentially interact with the server.

4. Async

The Curator Async module wraps the above CuratorFramework client to provide non-blocking capabilities using the CompletionStage Java 8 API.

Let’s see how the previous example looks like using the Async wrapper:

int sleepMsBetweenRetries = 100;
int maxRetries = 3;
RetryPolicy retryPolicy 
  = new RetryNTimes(maxRetries, sleepMsBetweenRetries);

CuratorFramework client = CuratorFrameworkFactory
  .newClient("127.0.0.1:2181", retryPolicy);

client.start();
AsyncCuratorFramework async = AsyncCuratorFramework.wrap(client);

AtomicBoolean exists = new AtomicBoolean(false);

async.checkExists()
  .forPath("/")
  .thenAcceptAsync(s -> exists.set(s != null));

await().until(() -> assertThat(exists.get()).isTrue());

Now, the checkExists() operation works in asynchronous mode, not blocking the main thread. We can also chain actions one after each other using the thenAcceptAsync() method instead, which uses the CompletionStage API.

5. Configuration Management

In a distributed environment, one of the most common challenges is to manage shared configuration among many applications. We can use Zookeeper as a data store where to keep our configuration.

Let’s see an example using Apache Curator to get and set data:

CuratorFramework client = newClient();
client.start();
AsyncCuratorFramework async = AsyncCuratorFramework.wrap(client);
String key = getKey();
String expected = "my_value";

client.create().forPath(key);

async.setData()
  .forPath(key, expected.getBytes());

AtomicBoolean isEquals = new AtomicBoolean();
async.getData()
  .forPath(key)
  .thenAccept(data -> isEquals.set(new String(data).equals(expected)));

await().until(() -> assertThat(isEquals.get()).isTrue());

In this example, we create the node path, set the data in Zookeeper, and then we recover it checking that the value is the same. The key field could be a node path like /config/dev/my_key.

5.1. Watchers

Another interesting feature in Zookeeper is the ability to watch keys or nodes. It allows us to listen to changes in the configuration and update our applications without needing to redeploy.

Let’s see how the above example looks like when using watchers:

CuratorFramework client = newClient()
client.start();
AsyncCuratorFramework async = AsyncCuratorFramework.wrap(client);
String key = getKey();
String expected = "my_value";

async.create().forPath(key);

List<String> changes = new ArrayList<>();

async.watched()
  .getData()
  .forPath(key)
  .event()
  .thenAccept(watchedEvent -> {
    try {
        changes.add(new String(client.getData()
          .forPath(watchedEvent.getPath())));
    } catch (Exception e) {
        // fail ...
    }});

// Set data value for our key
async.setData()
  .forPath(key, expected.getBytes());

await()
  .until(() -> assertThat(changes.size()).isEqualTo(1));

We configure the watcher, set the data, and then confirm the watched event was triggered. We can watch one node or a set of nodes at once.

6. Strongly Typed Models

Zookeeper primarily works with byte arrays, so we need to serialize and deserialize our data. This allows us some flexibility to work with any serializable instance, but it can be hard to maintain.

To help here, Curator adds the concept of typed models which delegates the serialization/deserialization and allows us to work with our types directly. Let’s see how that works.

First, we need a serializer framework. Curator recommends using the Jackson implementation, so let’s add the Jackson dependency to our pom.xml:

<dependency>
    <groupId>com.fasterxml.jackson.core</groupId>
    <artifactId>jackson-databind</artifactId>
    <version>2.9.4</version>
</dependency>

Now, let’s try to persist our custom class HostConfig:

public class HostConfig {
    private String hostname;
    private int port;

    // getters and setters
}

We need to provide the model specification mapping from the HostConfig class to a path, and use the modeled framework wrapper provided by Apache Curator:

ModelSpec<HostConfig> mySpec = ModelSpec.builder(
  ZPath.parseWithIds("/config/dev"), 
  JacksonModelSerializer.build(HostConfig.class))
  .build();

CuratorFramework client = newClient();
client.start();

AsyncCuratorFramework async 
  = AsyncCuratorFramework.wrap(client);
ModeledFramework<HostConfig> modeledClient 
  = ModeledFramework.wrap(async, mySpec);

modeledClient.set(new HostConfig("host-name", 8080));

modeledClient.read()
  .whenComplete((value, e) -> {
     if (e != null) {
          fail("Cannot read host config", e);
     } else {
          assertThat(value).isNotNull();
          assertThat(value.getHostname()).isEqualTo("host-name");
          assertThat(value.getPort()).isEqualTo(8080);
     }
   });

The whenComplete() method when reading the path /config/dev will return the HostConfig instance in Zookeeper.

7. Recipes

Zookeeper provides this guideline to implement high-level solutions or recipes such as leader election, distributed locks or shared counters.

Apache Curator provides an implementation for most of these recipes. To see the full list, visit the Curator Recipes documentation.

All of these recipes are available in a separate module:

<dependency>
    <groupId>org.apache.curator</groupId>
    <artifactId>curator-recipes</artifactId>
    <version>4.0.1</version>
</dependency>

Let’s jump right in and start understanding these with some simple examples.

7.1. Leader Election

In a distributed environment, we may need one master or leader node to coordinate a complex job.

This is how the usage of the Leader Election recipe in Curator looks like:

CuratorFramework client = newClient();
client.start();
LeaderSelector leaderSelector = new LeaderSelector(client, 
  "/mutex/select/leader/for/job/A", 
  new LeaderSelectorListener() {
      @Override
      public void stateChanged(
        CuratorFramework client, 
        ConnectionState newState) {
      }

      @Override
      public void takeLeadership(
        CuratorFramework client) throws Exception {
      }
  });

// join the members group
leaderSelector.start();

// wait until the job A is done among all members
leaderSelector.close();

When we start the leader selector, our node joins a members group within the path /mutex/select/leader/for/job/A. Once our node becomes the leader, the takeLeadership method will be invoked, and we as leaders can resume the job.

7.2. Shared Locks

The Shared Lock recipe is about having a fully distributed lock:

CuratorFramework client = newClient();
client.start();
InterProcessSemaphoreMutex sharedLock = new InterProcessSemaphoreMutex(
  client, "/mutex/process/A");

sharedLock.acquire();

// do process A

sharedLock.release();

When we acquire the lock, Zookeeper ensures that there’s no other application acquiring the same lock at the same time.

7.3. Counters

The Counters recipe coordinates a shared Integer among all the clients:

CuratorFramework client = newClient();
client.start();

SharedCount counter = new SharedCount(client, "/counters/A", 0);
counter.start();

counter.setCount(counter.getCount() + 1);

assertThat(counter.getCount()).isEqualTo(1);

In this example, Zookeeper stores the Integer value in the path /counters/A and initializes the value to 0 if the path has not been created yet.

8. Conclusion

In this article, we’ve seen how to use Apache Curator to connect to Apache Zookeeper and take benefit of its main features.

We’ve also introduced a few of the main recipes in Curator.

As usual, sources can be found over on GitHub.

How to Make a Deep Copy of an Object in Java

$
0
0

1. Introduction

When we want to copy an object in Java, there’re two possibilities that we need to consider — a shallow copy and a deep copy.

The shallow copy is the approach when we only copy field values and therefore the copy might be dependant on the original object. In the deep copy approach, we make sure that all the objects in the tree are deeply copied, so the copy isn’t dependant on any earlier existing object that might ever change.

In this article, we’ll compare these two approaches and learn four methods to implement the deep copy.

2. Maven Setup

We’ll use three Maven dependencies — Gson, Jackson, and Apache Commons Lang — to test different ways of performing a deep copy.

Let’s add these dependencies to our pom.xml:

<dependency>
    <groupId>com.google.code.gson</groupId>
    <artifactId>gson</artifactId>
    <version>2.8.2</version>
</dependency>
<dependency>
    <groupId>commons-lang</groupId>
    <artifactId>commons-lang</artifactId>
    <version>2.6</version>
</dependency>
<dependency>
    <groupId>com.fasterxml.jackson.core</groupId>
    <artifactId>jackson-databind</artifactId>
    <version>2.9.3</version>
</dependency>

The latest versions of Gson, Jackson, and Apache Commons Lang can be found on Maven Central.

3. Model

To compare different methods to copy Java objects, we’ll need two classes to work on:

class Address {

    private String street;
    private String city;
    private String country;

    // standard constructors, getters and setters
}
class User {

    private String firstName;
    private String lastName;
    private Address address;

    // standard constructors, getters and setters
}

4. Shallow Copy

A shallow copy is one in which we only copy values of fields from one object to another:

@Test
public void whenShallowCopying_thenObjectsShouldNotBeSame() {

    Address address = new Address("Downing St 10", "London", "England");
    User pm = new User("Prime", "Minister", address);
    
    User shallowCopy = new User(
      pm.getFirstName(), pm.getLastName(), pm.getAddress());

    assertThat(shallowCopy)
      .isNotSameAs(pm);
}

In this case pm != shallowCopy, which means that they’re different objects, but the problem is that when we change any of the original address’ properties, this will also affect the shallowCopy‘s address.

We wouldn’t bother about it if Address was immutable, but it’s not:

@Test
public void whenModifyingOriginalObject_ThenCopyShouldChange() {
 
    Address address = new Address("Downing St 10", "London", "England");
    User pm = new User("Prime", "Minister", address);
    User shallowCopy = new User(
      pm.getFirstName(), pm.getLastName(), pm.getAddress());

    address.setCountry("Great Britain");
    assertThat(shallowCopy.getAddress().getCountry())
      .isEqualTo(pm.getAddress().getCountry());
}

5. Deep Copy

A deep copy is an alternative that solves this problem. Its advantage is that at least each mutable object in the object graph is recursively copied.

Since the copy isn’t dependent on any mutable object that was created earlier, it won’t get modified by accident like we saw with the shallow copy.

In the following sections, we’ll show several deep copy implementations and demonstrate this advantage.

5.1. Copy Constructor

The first implementation we’ll implement is based on copy constructors:

public Address(Address that) {
    this(that.getStreet(), that.getCity(), that.getCountry());
}
public User(User that) {
    this(that.getFirstName(), that.getLastName(), new Address(that.getAddress()));
}

In the above implementation of the deep copy, we haven’t created new Strings in our copy constructor because String is an immutable class.

As a result, they can’t be modified by accident. Let’s see if this works:

@Test
public void whenModifyingOriginalObject_thenCopyShouldNotChange() {
    Address address = new Address("Downing St 10", "London", "England");
    User pm = new User("Prime", "Minister", address);
    User deepCopy = new User(pm);

    address.setCountry("Great Britain");
    assertNotEquals(
      pm.getAddress().getCountry(), 
      deepCopy.getAddress().getCountry());
}

5.2. Cloneable Interface

The second implementation is based on the clone method inherited from Object. It’s protected, but we need to override it as public.

We’ll also add a marker interface, Cloneable, to the classes to indicate that the classes are actually cloneable.

Let’s add the clone() method to the Address class:

@Override
public Object clone() {
    try {
        return (Address) super.clone();
    } catch (CloneNotSupportedException e) {
        return new Address(this.street, this.getCity(), this.getCountry());
    }
}

And now let’s implement clone() for the User class:

@Override
public Object clone() {
    User user = null;
    try {
        user = (User) super.clone();
    } catch (CloneNotSupportedException e) {
        user = new User(
          this.getFirstName(), this.getLastName(), this.getAddress());
    }
    user.address = (Address) this.address.clone();
    return user;
}

Note that the super.clone() call returns a shallow copy of an object, but we set deep copies of mutable fields manually, so the result is correct:

@Test
public void whenModifyingOriginalObject_thenCloneCopyShouldNotChange() {
    Address address = new Address("Downing St 10", "London", "England");
    User pm = new User("Prime", "Minister", address);
    User deepCopy = (User) pm.clone();

    address.setCountry("Great Britain");

    assertThat(deepCopy.getAddress().getCountry())
      .isNotEqualTo(pm.getAddress().getCountry());
}

6. External Libraries

The above examples look easy, but sometimes they don’t apply as a solution when we can’t add an additional constructor or override the clone method.

This might happen when we don’t own the code, or when the object graph is so complicated that we wouldn’t finish our project on time if we focused on writing additional constructors or implementing the clone method on all classes in the object graph.

What then? In this case, we can use an external library. To achieve a deep copy, we can serialize an object and then deserialize it to a new object.

Let’s look at a few examples.

6.1. Apache Commons Lang

Apache Commons Lang has SerializationUtils#clone, which performs a deep copy when all classes in the object graph implement the Serializable interface.

If the method encounters a class that isn’t serializable, it’ll fail and throw an unchecked SerializationException.

Because of that, we need to add the Serializable interface to our classes:

@Test
public void whenModifyingOriginalObject_thenCommonsCloneShouldNotChange() {
    Address address = new Address("Downing St 10", "London", "England");
    User pm = new User("Prime", "Minister", address);
    User deepCopy = (User) SerializationUtils.clone(pm);

    address.setCountry("Great Britain");

    assertThat(deepCopy.getAddress().getCountry())
      .isNotEqualTo(pm.getAddress().getCountry());
}

6.2. JSON Serialization with Gson

The other way to serialize is to use JSON serialization. Gson is a library that’s used for converting objects into JSON and vice versa.

Unlike Apache Commons Lang, GSON does not need the Serializable interface to make the conversions.

Let’s have a quick look at an example:

@Test
public void whenModifyingOriginalObject_thenGsonCloneShouldNotChange() {
    Address address = new Address("Downing St 10", "London", "England");
    User pm = new User("Prime", "Minister", address);
    Gson gson = new Gson();
    User deepCopy = gson.fromJson(gson.toJson(pm), User.class);

    address.setCountry("Great Britain");

    assertThat(deepCopy.getAddress().getCountry())
      .isNotEqualTo(pm.getAddress().getCountry());
}

6.3. JSON Serialization with Jackson

Jackson is another library that supports JSON serialization. This implementation will be very similar to the one using Gson, but we need to add the default constructor to our classes.

Let’s see an example:

@Test
public void whenModifyingOriginalObject_thenJacksonCopyShouldNotChange() throws IOException {
    Address address = new Address("Downing St 10", "London", "England");
    User pm = new User("Prime", "Minister", address);
    ObjectMapper objectMapper = new ObjectMapper();
    
    User deepCopy = objectMapper
      .readValue(objectMapper.writeValueAsString(pm), User.class);

    address.setCountry("Great Britain");

    assertThat(deepCopy.getAddress().getCountry())
      .isNotEqualTo(pm.getAddress().getCountry());
}

7. Conclusion

Which implementation should we use when making a deep copy? The final decision will often depend on the classes we’ll copy and whether we own the classes in the object graph.

As always, the complete code samples for this tutorial can be found over on Github.

Introduction to Akka Actors in Java

$
0
0

1. Introduction

Akka is an open-source library that helps to easily develop concurrent and distributed applications using Java or Scala by leveraging the Actor Model.

In this tutorial, we’ll present the basic features like defining actors, how they communicate and how we can kill them. In the final notes, we’ll also note some best practices when working with Akka.

2. The Actor Model

The Actor Model isn’t new to the computer science community. It was first introduced by Carl Eddie Hewitt in 1973, as a theoretical model for handling concurrent computation.

It started to show its practical applicability when the software industry started to realize the pitfalls of implementing concurrent and distributed applications.

An actor represents an independent computation unit. Some important characteristics are:

  • an actor encapsulates its state and part of the application logic
  • actors interact only through asynchronous messages and never through direct method calls
  • each actor has a unique address and a mailbox in which other actors can deliver messages
  • the actor will process all the messages in the mailbox in sequential order (the default implementation of the mailbox being a FIFO queue)
  • the actor system is organized in a tree-like hierarchy
  • an actor can create other actors, can send messages to any other actor and stop itself or any actor is has created

2.1. Advantages

Developing concurrent application is difficult because we need to deal with synchronization, locks and shared memory. By using Akka actors we can easily write asynchronous code without the need for locks and synchronization.

One of the advantages of using message instead of method calls is that the sender thread won’t block to wait for a return value when it sends a message to another actor. The receiving actor will respond with the result by sending a reply message to the sender.

Another great benefit of using messages is that we don’t have to worry about synchronization in a multi-threaded environment. This is because of the fact that all the messages are processed sequentially.

Another advantage of the Akka actor model is error handling. By organizing the actors in a hierarchy, each actor can notify its parent of the failure, so it can act accordingly. The parent actor can decide to stop or restart the child actors.

3. Setup

To take advantage of the Akka actors we need to add the following dependency from Maven Central:

<dependency>
    <groupId>com.typesafe.akka</groupId>
    <artifactId>akka-actor_2.12</artifactId>
    <version>2.5.11</version>
</dependency>

4. Creating an Actor

As mentioned, the actors are defined in a hierarchy system. All the actors that share a common configuration will be defined by an ActorSystem.

For now, we’ll simply define an ActorSystem with the default configuration and a custom name:

ActorSystem system = ActorSystem.create("test-system");

Even though we haven’t created any actors yet, the system will already contain 3 main actors:

  • the root guardian actor having the address “/” which as the name states represent the root of the actor system hierarchy
  • the user guardian actor having the address “/user”. This will be the parent of all the actor we define
  • the system guardian actor having the address “/system”. This will be the parent for all the actors defined internally by the Akka system

Any Akka actor will extend the AbstractActor abstract class and implement the createReceive() method for handling the incoming messages from other actors:

public class MyActor extends AbstractActor {
    public Receive createReceive() {
        return receiveBuilder().build();
    }
}

This is the most basic actor we can create. It can receive messages from other actors and will discard them because no matching message patterns are defined in the ReceiveBuilder. We’ll talk about message pattern matching later on in this article.

Now that we’ve created our first actor we should include it in the ActorSystem:

ActorRef readingActorRef 
  = system.actorOf(Props.create(MyActor.class), "my-actor");

4.1. Actor Configuration

The Props class contains the actor configuration. We can configure things like the dispatcher, the mailbox or deployment configuration. This class is immutable, thus thread-safe, so it can be shared when creating new actors.

It’s highly recommended and considered a best-practice to define the factory methods inside the actor object that will handle the creation of the Props object.

To exemplify, let’s define an actor the will do some text processing. The actor will receive a String object on which it’ll do the processing:

public class ReadingActor extends AbstractActor {
    private String text;

    public static Props props(String text) {
        return Props.create(ReadingActor.class, text);
    }
    // ...
}

Now, to create an instance of this type of actor we just use the props() factory method to pass the String argument to the constructor:

ActorRef readingActorRef = system.actorOf(
  ReadingActor.props(TEXT), "readingActor");

Now that we know how to define an actor, let’s see how they communicate inside the actor system.

5. Actor Messaging

To interact with each other, the actors can send and receive messages from any other actor in the system. These messages can be any type of object with the condition that it’s immutable.

It’s a best practice to define the messages inside the actor class. This helps to write code that is easy to understand and know what messages an actor can handle.

5.1. Sending Messages

Inside the Akka actor system messages are sent using methods:

  • tell()
  • ask()
  • forward()

When we want to send a message and don’t expect a response, we can use the tell() method. This is the most efficient method from a performance perspective:

readingActorRef.tell(new ReadingActor.ReadLines(), ActorRef.noSender());

The first parameter represents the message we send to the actor address readingActorRef.

The second parameter specifies who the sender is. This is useful when the actor receiving the message needs to send a response to an actor other than the sender (for example the parent of the sending actor).

Usually, we can set the second parameter to null or ActorRef.noSender(), because we don’t expect a reply. When we need a response back from an actor, we can use the ask() method:

CompletableFuture<Object> future = ask(wordCounterActorRef, 
  new WordCounterActor.CountWords(line), 1000).toCompletableFuture();

When asking for a response from an actor a CompletionStage object is returned, so the processing remains non-blocking.

A very important fact that we must pay attention to is error handling insider the actor which will respond. To return a Future object that will contain the exception we must send a Status.Failure message to the sender actor.

This is not done automatically when an actor throws an exception while processing a message and the ask() call will timeout and no reference to the exception will be seen in the logs:

@Override
public Receive createReceive() {
    return receiveBuilder()
      .match(CountWords.class, r -> {
          try {
              int numberOfWords = countWordsFromLine(r.line);
              getSender().tell(numberOfWords, getSelf());
          } catch (Exception ex) {
              getSender().tell(
               new akka.actor.Status.Failure(ex), getSelf());
               throw ex;
          }
    }).build();
}

We also have the forward() method which is similar to tell(). The difference is that the original sender of the message is kept when sending the message, so the actor forwarding the message only acts as an intermediary actor:

printerActorRef.forward(
  new PrinterActor.PrintFinalResult(totalNumberOfWords), getContext());

5.2. Receiving Messages

Each actor will implement the createReceive() method, which handles all incoming messages. The receiveBuilder() acts like a switch statement, trying to match the received message to the type of messages defined:

public Receive createReceive() {
    return receiveBuilder().matchEquals("printit", p -> {
        System.out.println("The address of this actor is: " + getSelf());
    }).build();
}

When received, a message is put into a FIFO queue, so the messages are handled sequentially.

6. Killing an Actor

When we finished using an actor we can stop it by calling the stop() method from the ActorRefFactory interface:

system.stop(myActorRef);

We can use this method to terminate any child actor or the actor itself. It’s important to note stopping is done asynchronously and that the current message processing will finish before the actor is terminated. No more incoming messages will be accepted in the actor mailbox.

By stopping a parent actor, we’ll also send a kill signal to all of the child actors that were spawned by it.

When we don’t need the actor system anymore, we can terminate it to free up all the resources and prevent any memory leaks:

Future<Terminated> terminateResponse = system.terminate();

This will stop the system guardian actors, hence all the actors defined in this Akka system.

We could also send a PoisonPill message to any actor that we want to kill:

myActorRef.tell(PoisonPill.getInstance(), ActorRef.noSender());

The PoisonPill message will be received by the actor like any other message and put into the queue. The actor will process all the messages until it gets to the PoisonPill one. Only then the actor will begin the termination process.

Another special message used for killing an actor is the Kill message. Unlike the PoisonPill, the actor will throw an ActorKilledException when processing this message:

myActorRef.tell(Kill.getInstance(), ActorRef.noSender());

7. Conclusion

In this article, we presented the basics of the Akka framework. We showed how to define actors, how they communicate with each other and how to terminate them.

We’ll conclude with some best practices when working with Akka:

  • use tell() instead of ask() when performance is a concern
  • when using ask() we should always handle exceptions by sending a Failure message
  • actors should not share any mutable state
  • an actor shouldn’t be declared within another actor
  • actors aren’t stopped automatically when they are no longer referenced. We must explicitly destroy an actor when we don’t need it anymore to prevent memory leaks
  • messages used by actors should always be immutable

As always, the source code for the article is available over on GitHub.

Multipart Uploads in Amazon S3 with Java

$
0
0

1. Overview

In this tutorial, we’ll see how to handle multipart uploads in Amazon S3 with AWS Java SDK.

Simply put, in a multipart upload, we split the content into smaller parts and upload each part individually. All parts are re-assembled when received.

Multipart uploads offer the following advantages:

  • Higher throughput – we can upload parts in parallel
  • Easier error recovery – we need to re-upload only the failed parts
  • Pause and resume uploads – we can upload parts at any point in time. The whole process can be paused and remaining parts can be uploaded later

Note that when using multipart upload with Amazon S3, each part except the last part must be at least 5 MB in size.

2. Maven Dependencies

Before we begin, we need to add the AWS SDK dependency in our project:

<dependency>
    <groupId>com.amazonaws</groupId>
    <artifactId>aws-java-sdk</artifactId>
    <version>1.11.290</version>
</dependency>

To view the latest version, check out Maven Central.

3. Performing Multipart Upload

3.1. Creating Amazon S3 Client

First, we need to create a client for accessing Amazon S3. We’ll use the AmazonS3ClientBuilder for this purpose:

AmazonS3 amazonS3 = AmazonS3ClientBuilder
  .standard()
  .withCredentials(new DefaultAWSCredentialsProviderChain())
  .withRegion(Regions.DEFAULT_REGION)
  .build();

This creates a client using the default credential provider chain for accessing AWS credentials.

For more details on how default the credential provider chain works, please see the documentation. If you’re using a region other than the default (US West-2), make sure you replace Regions.DEFAULT_REGION with that custom region.

3.2. Creating TransferManager for Managing Uploads

We’ll use TransferManagerBuilder to create a TransferManager instance.

This class provides simple APIs to manage uploads and downloads with Amazon S3 and manages all related tasks:

TransferManager tm = TransferManagerBuilder.standard()
  .withS3Client(amazonS3)
  .withMultipartUploadThreshold((long) (5 * 1024 * 1025))
  .build();

Multipart upload threshold specifies the size, in bytes, above which the upload should be performed as multipart upload.

Amazon S3 imposes a minimum part size of 5 MB (for parts other than last part), so we have used 5 MB as multipart upload threshold.

3.3. Uploading Object

To upload object using TransferManager we simply need to call its upload() function. This uploads the parts in parallel:

String bucketName = "baeldung-bucket";
String keyName = "my-picture.jpg";
String file = new File("documents/my-picture.jpg");
Upload upload = tm.upload(bucketName, keyName, file);

TransferManager.upload() returns an Upload object. This can be used to check the status of and manage uploads. We’ll do so in the next section.

3.4. Waiting For Upload to Complete

TransferManager.upload() is a non-blocking function; it returns immediately while the upload runs in the background.

We can use the returned Upload object to wait for the upload to complete before exiting the program:

try {
    upload.waitForCompletion();
} catch (AmazonClientException e) {
    // ...
}

3.5. Tracking the Upload Progress

Track the progress of the upload is quite a common requirement; we can do that with the help of a ProgressListener instance:

ProgressListener progressListener = progressEvent -> System.out.println(
  "Transferred bytes: " + progressEvent.getBytesTransferred());
PutObjectRequest request = new PutObjectRequest(
  bucketName, keyName, file);
request.setGeneralProgressListener(progressListener);
Upload upload = tm.upload(request);

The ProgressListener we created will simply continue to print the number of bytes transferred until the upload completes.

3.6. Controlling Upload Parallelism

By default, TransferManager uses a maximum of ten threads to perform multipart uploads.

We can, however, control this by specifying an ExecutorService while building TransferManager:

int maxUploadThreads = 5;
TransferManager tm = TransferManagerBuilder.standard()
  .withS3Client(amazonS3)
  .withMultipartUploadThreshold((long) (5 * 1024 * 1025))
  .withExecutorFactory(() -> Executors.newFixedThreadPool(maxUploadThreads))
  .build();

Here, we used a lambda for creating a wrapper implementation of ExecutorFactory and passed it to withExecutorFactory() function.

4. Conclusion

In this quick article, we learned how to perform multipart uploads using AWS SDK for Java, and we saw how to control some aspects of upload and to keep track of its progress.

As always, the complete code of this article is available over on GitHub.

Spring Data with Spring Security

$
0
0

1. Overview

Spring Security provides a good support for integration with Spring Data. While the former handles security aspects of our application, the latter provides convenient access to the database containing the application’s data.

In this article, we’ll discuss how Spring Security can be integrated with Spring Data to enable more user-specific queries.

2. Spring Security + Spring Data Configuration

In our introduction to Spring Data JPA, we saw how to setup Spring Data in a Spring project. To enable spring security and spring data, as usual, we can adopt either the Java or XML-based configuration.

2.1. Java Configuration

Recall that from Spring Security Login Form (sections 4 & 5), we can add Spring Security to our project using the annotation based configuration:

@EnableWebSecurity
public class WebSecurityConfig extends WebSecurityConfigurerAdapter {
    // Bean definitions
}

Other configuration details would include the definition of filters, beans, and other security rules as required.

To enable Spring Data in Spring Security, we simply add this bean to WebSecurityConfig:

@Bean
public SecurityEvaluationContextExtension securityEvaluationContextExtension() {
    return new SecurityEvaluationContextExtension();
}

The above definition enables activation of automatic resolving of spring-data specific expressions annotated on classes.

2.2. XML Configuration

The XML-based configuration begins with the inclusion of the Spring Security namespace:

<beans:beans xmlns="http://www.springframework.org/schema/security"
  xmlns:beans="http://www.springframework.org/schema/beans"
  xmlns:xsi="http://www.w3.org/2001/XMLSchema-instance"
  xsi:schemaLocation="http://www.springframework.org/schema/beans
  http://www.springframework.org/schema/beans/spring-beans-4.3.xsd
  http://www.springframework.org/schema/security
  http://www.springframework.org/schema/security/spring-security.xsd">
...
</beans:beans>

Just like in the Java-based configuration, for the XML or namespace based configuration, we’d add SecurityEvaluationContextExtension bean to the XML configuration file:

<bean class="org.springframework.security.data.repository
  .query.SecurityEvaluationContextExtension"/>

Defining the SecurityEvaluationContextExtension makes all the common expressions in Spring Security available from within Spring Data queries.

Such common expressions include principal, authentication, isAnonymous(), hasRole([role]), isAuthenticated, etc.

3. Example Usage

Let’s consider some use cases of Spring Data and Spring Security.

3.1. Restrict AppUser Field Update

In this example, we’ll look at restricting AppUser‘s lastLogin field update to the only currently authenticated user.

By this, we mean that anytime updateLastLogin method is triggered, it only updates the lastLogin field of the currently authenticated user.

To achieve this, we add the query below to our UserRepository interface:

@Query("UPDATE AppUser u SET u.lastLogin=:lastLogin WHERE" 
  +" u.username = ?#{ principal?.username }")
public void updateLastLogin (Date lastLogin);

Without Spring Data and Spring Security integration, we’d normally have to pass the username as an argument to updateLastLogin.

In a case where the wrong user credentials are provided, the login process will fail and we do not need to bother about ensuring validation of access.

3.2. Fetch Specific AppUser’ Content with Pagination

Another scenario where Spring Data and Spring Security work perfectly hand-in-hand is a case where we need to retrieve content from our database that is owned by the currently authenticated user.

For instance, if we have a tweeter application, we may want to display tweets created or liked by current user on their personalized feeds page.

Of course, this may involve writing queries to interact with one or more tables in our database. With Spring Data and Spring Security, this is as simple as writing:

public interface TweetRepository extends PagingAndSortingRepository<Tweet, Long> {
    @Query("select twt from Tweet twt  JOIN twt.likes as lk where lk ="+
      " ?#{ principal?.username } or twt.owner = ?#{ principal?.username }")
    Page<Tweet> getMyTweetsAndTheOnesILiked(Pageable pageable);
}

Because we want our results paginated, our TweetRepository extends PagingAndSortingRepository in the above interface definition.

4. Conclusion

Spring Data and Spring Security integration bring a lot of flexibility to managing authenticated states in Spring applications.

In this session, we’ve had a look at how to add Spring Security to Spring Data. More about other powerful features of Spring Data or Spring Security can be found in our collection of Spring Data and Spring Security articles.

As usual, code snippets can be found over on GitHub.

Java 8 Math New Methods

$
0
0

1. Introduction

Usually, when we think about the new features that came with version 8 of Java, functional programming and lambda expressions are first things that come to mind.

Nevertheless, besides those big features there’re others, maybe having a smaller impact but also interesting and many times not really well known or even covered by any review.

In this tutorial, we’ll enumerate and give a little example of each of the new methods added to one of the core classes of the language: java.lang.Math.

2. New *exact() Methods

First, we have a group of new methods that extend some of the existing and most common arithmetic operations.

As we’ll see, they’re quite self-explanatory, as they have exactly the same functionality than the methods they derive from but with the addition of throwing an exception in case, the resulting value overflows the max or min values of their types.

We can use these methods with both integers and longs as parameters.

2.1. addExact()

Adds the two parameters, throwing an ArithmeticException in case of overflow (which goes for all *Exact() methods) of the addition:

Math.addExact(100, 50);               // returns 150
Math.addExact(Integer.MAX_VALUE, 1);  // throws ArithmeticException

2.2. substractExact()

Substracts the value of the second parameter from the first one, throwing an ArithmeticException in case of overflow of the subtraction:

Math.subtractExact(100, 50);           // returns 50
Math.subtractExact(Long.MIN_VALUE, 1); // throws ArithmeticException

2.3. incrementExact()

Increments the parameter by one, throwing an ArithmeticException in case of overflow:

Math.incrementExact(100);               // returns 101
Math.incrementExact(Integer.MAX_VALUE); // throws ArithmeticException

2.4. decrementExact()

Decrements the parameter by one, throwing an ArithmeticException in case of overflow:

Math.decrementExact(100);            // returns 99
Math.decrementExact(Long.MIN_VALUE); // throws ArithmeticException

2.5. multiplyExact()

Multiply the two parameters, throwing an ArithmeticException in case of overflow of the product:

Math.multiplyExact(100, 5);            // returns 500
Math.multiplyExact(Long.MAX_VALUE, 2); // throws ArithmeticException

2.6. negateExact()

Changes the sign of the parameter, throwing an ArithmeticException in case of overflow.

In this case, we have to think about the internal representation of the value in memory to understand why there’s an overflow, as is not as intuitive as the rest of the “exact” methods:

Math.negateExact(100);               // returns -100
Math.negateExact(Integer.MIN_VALUE); // throws ArithmeticException

The second example requires an explanation as it’s not obvious:  The overflow is due to the Integer.MIN_VALUE being −2.147.483.648, and on the other side the Integer.MAX_VALUE being 2.147.483.647 so the returned value doesn’t fit into an Integer by one unit.

3. Other Methods

3.1. floorDiv()

Divides the first parameter by the second one, and then performs a floor() operation over the result, returning the Integer that is less or equal to the quotient:

Math.floorDiv(7, 2));  // returns 3

The exact quotient is 3.5 so floor(3.5) == 3.

Let’s look at another example:

Math.floorDiv(-7, 2)); // returns -4

The exact quotient is -3.5 so floor(-3.5) == -4.

3.2. modDiv()

This one is similar to the previous method floorDiv(), but applying the floor() operation over the modulus or remainder of the division instead of the quotient:

Math.modDiv(5, 3));  // returns 2

As we can see, the modDiv() for two positive numbers is the same as % operator. Let’s look at a different example:

Math.modDiv(-5, 3));  // returns 1

It returns 1 and not 2 because floorDiv(-5, 3) is -2 and not -1.

3.3. nextDown()

Returns the immediately lower value of the parameter (supports float or double parameters):

float f = Math.nextDown(3);  // returns 2.9999998
double d = Math.nextDown(3); // returns 2.999999761581421

4. Conclusion

In this article, we’ve described briefly the functionality of all the new methods added to the class java.lang.Math in the version 8 of the Java platform and also seen some examples of how to use them.

As always, the full source code is available over on GitHub.

REST-assured with Groovy

$
0
0

1. Overview

In this tutorial, we’ll take a look at using the REST-assured library with Groovy.

Since REST-assured uses Groovy under the hood, we actually have the opportunity to use raw Groovy syntax to create more powerful test cases. This is where the framework really comes to life.

For the setup necessary to use REST-assured, check out our previous article.

2. Groovy’s Collection API

Let’s start by taking a quick look at some basic Groovy concepts – with a few simple examples to equip us with just what we need.

2.1. The findAll method

In this example, we’ll just pay attention to methods, closures and the it implicit variable. Let’s first create a Groovy collection of words:

def words = ['ant', 'buffalo', 'cat', 'dinosaur']

Let’s now create another collection out of the above with words with lengths that exceed four letters:

def wordsWithSizeGreaterThanFour = words.findAll { it.length() > 4 }

Here, findAll() is a method applied to the collection with a closure applied to the method. The method defines what logic to apply to the collection and the closure gives the method a predicate to customize the logic.

We’re telling Groovy to loop through the collection and find all words whose length is greater than four and return the result into a new collection.

2.2. The it variable

The implicit variable it holds the current word in the loop. The new collection wordsWithSizeGreaterThanFour will contain the words buffalo and dinosaur.

['buffalo', 'dinosaur']

Apart from findAll(), there are other Groovy methods.

2.3. The collect iterator

Finally, there is collect, it calls the closure on each item in the collection and returns a new collection with the results of each. Let’s create a new collection out of the sizes of each item in the words collection:

def sizes = words.collect{it.length()}

The result:

[3,7,3,8]

We use sum, as the name suggests to add up all elements in the collection. We can sum up the items in the sizes collection like so:

def charCount = sizes.sum()

and the result will be 21, the character count of all the items in the words collection.

2.4. The max/min operators

The max/min operators are intuitively named to find the maximum or minimum number in a collection :

def maximum = sizes.max()

The result should be obvious, 8.

2.5. The find iterator

We use find to search for only one collection value matching the closure predicate.

def greaterThanSeven=sizes.find{it>7}

The result, 8, the first occurrence of the collection item that meets the predicate.

3. Validate JSON with Groovy

If we have a service at http://localhost:8080/odds, that returns a list of odds of our favorite football matches, like this:

{
    "odds": [{
        "price": 1.30,
        "status": 0,
        "ck": 12.2,
        "name": "1"
    },
    {
        "price": 5.25,
        "status": 1,
        "ck": 13.1,
        "name": "X"
    },
    {
        "price": 2.70,
        "status": 0,
        "ck": 12.2,
        "name": "0"
    },
    {
        "price": 1.20,
        "status": 2,
        "ck": 13.1,
        "name": "2"
    }]
}

And if we want to verify that the odds with a status greater than 1 have prices 1.20 and 5.25, then we do this:

@Test
public void givenUrl_whenVerifiesOddPricesAccuratelyByStatus_thenCorrect() {
    get("/odds").then().body("odds.findAll { it.status > 0 }.price",
      hasItems(5.25f, 1.20f));
}

What is happening here is this; we use Groovy syntax to load the JSON array under the key odds. Since it has more than one item, we obtain a Groovy collection. We then invoke the findAll method on this collection.

The closure predicate tells Groovy to create another collection with JSON objects where status is greater than zero.

We end our path with price which tells groovy to create another list of only prices of the odds in our previous list of JSON objects. We then apply the hasItems Hamcrest matcher to this list.

4. Validate XML with Groovy

Let’s assume we have a service at http://localhost:8080/teachers, that returns a list of teachers by their id, department and subjects taught as below:

<teachers>
    <teacher department="science" id=309>
        <subject>math</subject>
        <subject>physics</subject>
    </teacher>
    <teacher department="arts" id=310>
        <subject>political education</subject>
        <subject>english</subject>
    </teacher>
</teachers>

Now we can verify that the science teacher returned in the response teaches both math and physics:

@Test
public void givenUrl_whenVerifiesScienceTeacherFromXml_thenCorrect() {
    get("/teachers").then().body(
      "teachers.teacher.find { it.@department == 'science' }.subject",
        hasItems("math", "physics"));
}

We have used the XML path teachers.teacher to get a list of teachers by the XML attribute, department. We then call the find method on this list.

Our closure predicate to find ensures we end up with only teachers from the science department. Our XML path terminates at the subject tag.

Since there is more than one subject, we will get a list which we validate with the hasItems Hamcrest matcher.

5. Conclusion

In this article, we’ve seen how we can use the REST-assured library with the Groovy language.

For the full source code of the article, check out our GitHub project.


Mapping LOB Data in Hibernate

$
0
0

1. Overview

LOB or Large OBject refers to a variable length datatype for storing large objects.

The datatype has two variants:

  • CLOB – Character Large Object will store large text data
  • BLOB – Binary Large Object is for storing binary data like image, audio, or video

In this tutorial, we’ll show how we can utilize Hibernate ORM for persisting large objects.

2. Setup

For example, we’ll use Hibernate 5 and H2 Database. Therefore we must declare them as dependencies in our pom.xml:

<dependency>
    <groupId>org.hibernate</groupId>
    <artifactId>hibernate-core</artifactId>
    <version>5.2.12.Final</version>
</dependency>
<dependency>
    <groupId>com.h2database</groupId>
    <artifactId>h2</artifactId>
    <version>1.4.196</version>
</dependency>

The latest version of the dependencies is in Maven Central Repositories.

For a more in-depth look at configuring Hibernate please refer to one of our introductory articles.

3. LOB Data Model

Our model “User” has id, name, and photo as properties. We’ll store an image in the User‘s photo property, and we will map it to a BLOB:

@Entity
@Table(name="user")
public class User {

    @Id
    private String id;
	
    @Column(name = "name", columnDefinition="VARCHAR(128)")
    private String name;
	
    @Lob
    @Column(name = "photo", columnDefinition="BLOB")
    private byte[] photo;

    // ...
}

The @Lob annotation specifies that the database should store the property as Large Object. The columnDefinition in the @Column annotation defines the column type for the property.

Since we’re going to save byte array, we’re using BLOB.

4. Usage

4.1. Initiate Hibernate Session

session = HibernateSessionUtil
  .getSessionFactory("hibernate.properties")
  .openSession();

Using the helper class, we will build the Hibernate Session using the database information provided in hibernate.properties file.

4.2. Creating User Instance

Let’s assume the user uploads the photo as an image file:

User user = new User();
		
InputStream inputStream = this.getClass()
  .getClassLoader()
  .getResourceAsStream("profile.png");

if(inputStream == null) {
    fail("Unable to get resources");
}
user.setId("1");
user.setName("User");
user.setPhoto(IOUtils.toByteArray(inputStream));

We convert the image file into the byte array by using the help of Apache Commons IO library, and finally, we assign the byte array as part of the newly created User object.

4.3. Persisting Large Object

By storing the User using the Session, the Hibernate will convert the object into the database record:

session.persist(user);

Because of the @Lob annotation declared on the class User, Hibernate understands it should store the “photo” property as BLOB data type.

4.4. Data Validation

We’ll retrieve the data back from the database and using Hibernate to map it back to Java object to compare it with the inserted data.

Since we know the inserted Users id, we will use it to retrieve the data from the database:

User result = session.find(User.class, "1");

Let’s compare the query’s result with the input User‘s data:

assertNotNull(
  "Query result is null", 
  result);
 
assertEquals(
  "User's name is invalid", 
  user.getName(), result.getName() );
 
assertTrue(
  "User's photo is corrupted", 
  Arrays.equals(user.getPhoto(), result.getPhoto()) );

Hibernate will map the data in the database to the Java object using the same mapping information on the annotations.

Therefore the retrieved User object will have the same information as the inserted data.

5. Conclusion

LOB is datatype for storing large object data. There’re two varieties of LOB which is called BLOB and CLOB. BLOB is for storing binary data, while CLOB is for storing text data.

Using Hibernate, we have demonstrated how it’s quite easy to map the data to and from Java objects, as long as we’re defining the correct data model and the appropriate table structure in the database.

As always the code for this article is available over on GitHub.

How to Find and Open a Class with Eclipse

$
0
0

1. Introduction

In this article, we’re going to take a look at a number of ways to find a class in Eclipse. All the examples are based on Eclipse Oxygen.

2. Overview

In Eclipse, we often need to look for a class or an interface. We have many ways to do that:

  • The Open Type dialog
  • The Open Resource dialog
  • The Package Explorer view
  • The Open Declaration function
  • The Type Hierarchy view

3. Open Type

One of the most powerful ways to do this is with the Open Type dialog.

3.1. Accessing the Tool

We can access it in three ways:

  1. Using the keyboard shortcut, which is Ctrl + Shift + T on a PC or Cmd + Shift + T on a Mac.
  2. Opening the menu under Navigate > Open Type
  3. Clicking on the icon in the main toolbar:

3.2. Using It to Find a Class

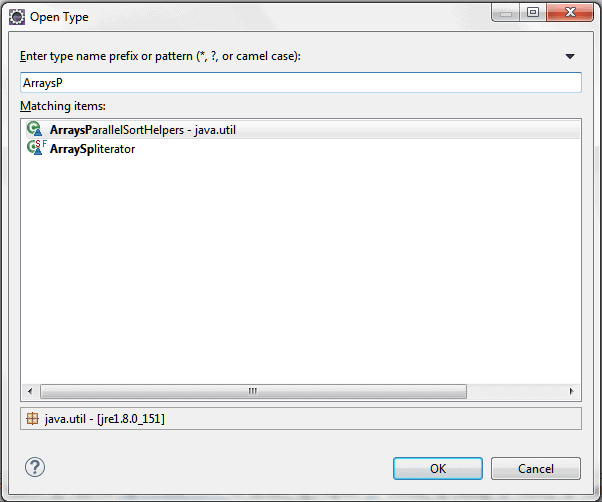
Once we have Open Type up, we simply need to start typing, and we’ll see results:

The results will contain classes in the build path of our open projects, which includes project classes, libraries, and the JRE itself.

In addition, it shows the package and its location in our environment.

As we can see in the image, the results are any classes whose name starts with what we typed. This type of search is not case sensitive.

We can search in camel case too. For example, to find the class ArraysParallelSortHelpers we could just type APSH or ArrayPSH. This type of search is case sensitive.

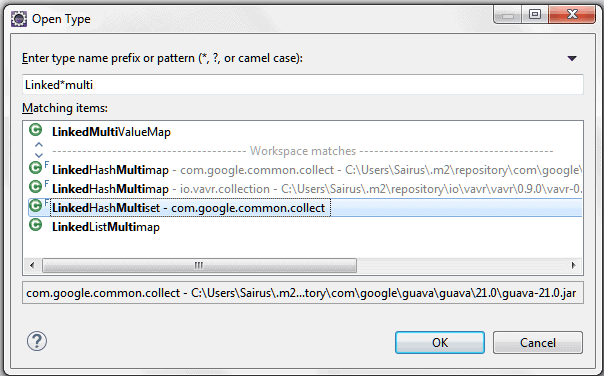
In addition, it’s also possible to use the wildcard characters “*” or “?” in the search text. “*” is for any string, including the empty string and “?” for any character, excluding the empty string.

So, for example, let’s say we would like to find a class that we remember contains Linked, and then something else, and then Multi. “*” comes in handy:

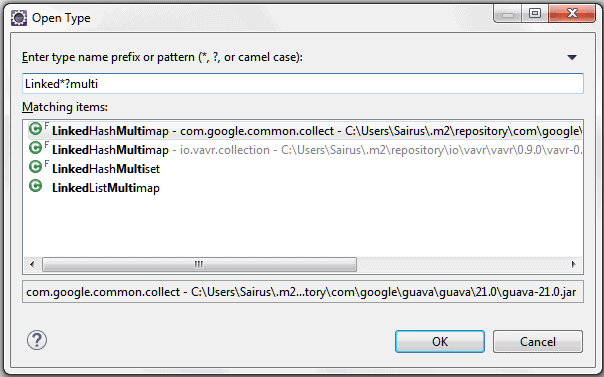
Or if we add a “?”:

The “?” here excludes the empty string so LinkedMultiValueMap is removed from the results.

Note also that there is an implicit “*” at the end of every input, but not at the beginning.

4. Open Resource

Another simple way to find and open a class in Eclipse is Open Resource.

4.1. Accessing the Tool

We can access it in two ways:

  • Using the keyboard shortcut, which is Ctrl + Shift + R on a PC or Cmd + Shift + R on a Mac.
  • Opening the menu under Navigate > Open Resource

4.2. Using It to Find a Class

Once we have the dialog up, we simply need to start typing, and we’ll see results:

The results will contain classes as well as all other files in the build path of our open projects.

For usage details about wildcards and camel case search, check out the Open Type section above.

5. Package Explorer

When we know the package to which our class belongs, we can use Package Explorer.

5.1. Accessing the Tool

If it isn’t already visible, then we can open this Eclipse view through the menu under Window > Show View > Package Explorer.

5.2. Using the Tool to Find a Class

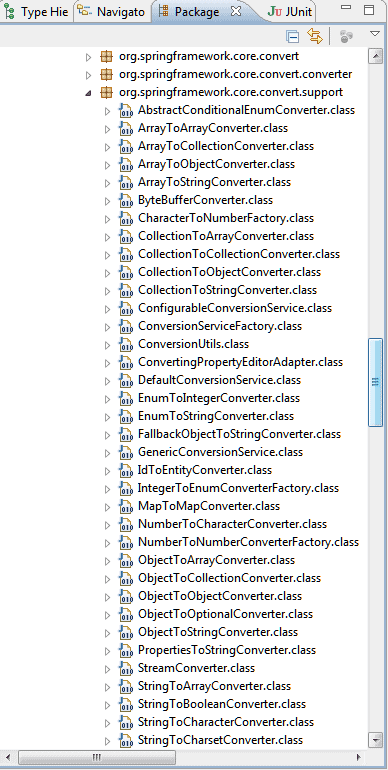
Here the classes are displayed in alphabetical order:

If the list is very long, we can use a trick: we click anywhere on the package tree and then we start typing the name of the class. We’ll see the selection scrolling automatically among the classes until it matches our class.

There’s also the Navigator view, which works nearly the same way.

The main difference is that while Package Explorer shows classes relative to packages, Navigator shows classes relative to the underlying file system.

To open this view, we can find it in the menu under Window > Show View > Navigator.

6. Open Declaration

In the case where we’re looking at code that references our class, Open Declaration is a very quick way to jump to it.

6.1. Accessing the Tool

There are three ways to access this function:

  1. Clicking anywhere on the class name that we want to open and pressing F3
  2. Clicking anywhere on the class name and going to the menu under Navigate > Open Declaration
  3. While keeping the Ctrl button pressed, mousing over the class name and then just clicking on it

6.2. Using It to Find a Class

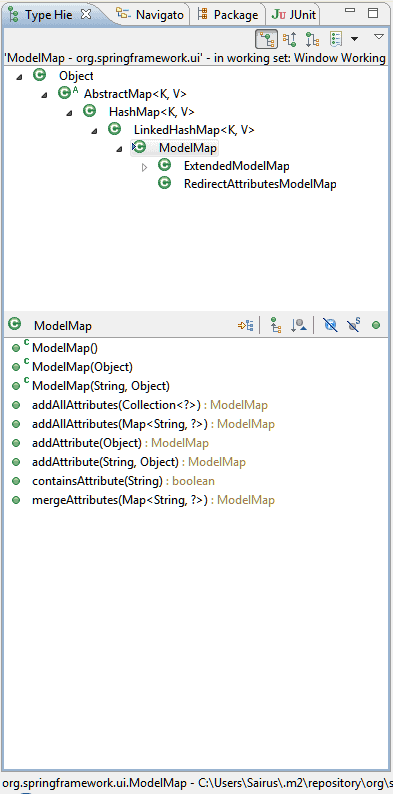
Thinking about the screenshot below, if we press Ctrl and hover over ModelMap, then a link appears:

Notice that the color changed to light blue and it became underlined. This indicates that it is now available as a direct link to the class. If we click the link, Eclipse will open ModelMap in the editor.

7. Type Hierarchy

In an object-oriented language like Java, we can also think about types relative to their hierarchy of super- and sub classes.

Type Hierarchy is a view similar to Package Explorer and Navigator, this time focused on hierarchy.

7.1. Accessing the Tool

We can access this view in three ways:

  1. Clicking anywhere in a class name and then pressing F4
  2. Clicking anywhere in a class name and going to the menu under Navigate > Open Type Hierarchy
  3. Using the Open Type in Hierarchy dialog

The Open Type in Hierarchy dialog behaves just like Open Type we saw in section 3.

To get there, we go to the menu under Navigate > Open Type in Hierarchy or we use the shortcut: Ctrl + Shift + H on a PC or Cmd + Shift + H on a Mac.

This dialog is similar to the Open Type dialog. Except for this time when we click on a class, then we get the Type Hierarchy view.

7.2. Using the Tool to Find a Class

Once we know a superclass or subclass of the class we want to open, we can navigate through the hierarchy tree, and look for the class there:

If the list is very long, we can use the same trick we used with Package Explorer: we click anywhere on the tree and then we start typing the name of the class. We’ll see the selection scrolling automatically among the classes until it matches our class.

8. Conclusion

In this article, we looked at the most common ways to find and open a Java class with the Eclipse IDE including Open Type, Open Resource, Package Explorer, Open Declaration, and Type Hierarchy.

Using Guava CountingOutputStream

$
0
0

1. Overview

In this tutorial, we’re going to look at the CountingOutputStream class and how to use it.

The class can be found in popular libraries like Apache Commons or Google Guava. We’re going focus on the implementation in the Guava library.

2. CountingOutputStream

2.1. Maven Dependency

CountingOutputStream is part of Google’s Guava package.

Let’s start by adding the dependency to the pom.xml:

<dependency>
    <groupId>com.google.guava</groupId>
    <artifactId>guava</artifactId>
    <version>24.1-jre</version>
</dependency>

The latest version of the dependency can be checked here.

2.2. Class Details

The class extends java.io.FilterOutputStream, overrides the write() and close() methods, and provides the new method getCount().

The constructor takes another OutputStream object as an input parameter. While writing data, the class then counts the number of bytes written into this OutputStream.

In order to get the count, we can simply call getCount() to return the current number of bytes:

/** Returns the number of bytes written. */
public long getCount() {
    return count;
}

3. Use Case

Let’s use CountingOutputStream in a practical use case. For the sake of example, we’re going to put the code into a JUnit test to make it executable.

In our case, we’re going to write data to an OutputStream and check if we have reached a limit of MAX bytes.

Once we reach the limit, we want to break the execution by throwing an exception:

public class GuavaCountingOutputStreamTest {
    static int MAX = 5;

    @Test(expected = RuntimeException.class)
    public void givenData_whenCountReachesLimit_thenThrowException()
      throws Exception {
 
        ByteArrayOutputStream out = new ByteArrayOutputStream();
        CountingOutputStream cos = new CountingOutputStream(out);

        byte[] data = new byte[1024];
        ByteArrayInputStream in = new ByteArrayInputStream(data);
        
        int b;
        while ((b = in.read()) != -1) {
            cos.write(b);
            if (cos.getCount() >= MAX) {
                throw new RuntimeException("Write limit reached");
            }
        }
    }
}

4. Conclusion

In this quick article, we’ve looked at the CountingOutputStream class and its usage. The class provides the additional method getCount() that returns the number of bytes written to the OutputStream so far.

Finally, as always, the code used during the discussion can be found over on GitHub.

Displaying Money Amounts in Words

$
0
0

1. Overview

In this tutorial, we’ll see how we can convert a monetary amount into words-representation in Java.

We’ll also see how a custom implementation could look like, via an external library – Tradukisto.

2. Implementation

Let’s first start with our own implementation. The first step is to declare two String arrays with the following elements:

public static String[] ones = { 
  "", "one", "two", "three", "four", 
  "five", "six", "seven", "eight", 
  "nine", "ten", "eleven", "twelve", 
  "thirteen", "fourteen", "fifteen", 
  "sixteen", "seventeen", "eighteen", 
  "nineteen" 
};

public static String[] tens = {
  "",          // 0
  "",          // 1
  "twenty",    // 2
  "thirty",    // 3
  "forty",     // 4
  "fifty",     // 5
  "sixty",     // 6
  "seventy",   // 7
  "eighty",    // 8
  "ninety"     // 9
};

When we receive an input, we’ll need to handle the invalid values (zero and negative values). Once a valid input is received, we can extract the number of dollars and cents into variables:

 long dollars = (long) money;
 long cents = Math.round((money - dollars) * 100);

If the number given is less than 20, then we’ll get the appropriate ones’ element from the array based on the index:

if (n < 20) {
    return ones[(int) n];
}

We’ll use a similar approach for numbers less than 100, but now we have to use tens array as well:

if (n < 100) {
    return tens[(int) n / 10] 
      + ((n % 10 != 0) ? " " : "") 
      + ones[(int) n % 10];
}

We do this similarly for numbers that are less than one thousand.

Next, we use recursive calls to deal with numbers that are less than one million, as shown below:

if (n < 1_000_000) {
    return convert(n / 1000) + " thousand" + ((n % 1000 != 0) ? " " : "") 
      + convert(n % 1000);
}

The same approach is used for numbers that are less than one billion, and so on.

Here is the main method that can be called to do this conversion:

 public static String getMoneyIntoWords(double money) {
    long dollars = (long) money;
    long cents = Math.round((money - dollars) * 100);
    if (money == 0D) {
        return "";
    }
    if (money < 0) {
        return INVALID_INPUT_GIVEN;
    }
    String dollarsPart = "";
    if (dollars > 0) {
        dollarsPart = convert(dollars) 
          + " dollar" 
          + (dollars == 1 ? "" : "s");
    }
    String centsPart = "";
    if (cents > 0) {
        if (dollarParts.length() > 0) {
            centsPart = " and ";
        }
        centsPart += convert(cents) + " cent" + (cents == 1 ? "" : "s");
    }
    return dollarsPart + centsPart;
}

Let’s test our code to make sure it works:

@Test
public void whenGivenDollarsAndCents_thenReturnWords() {
    String expectedResult
     = "nine hundred twenty four dollars and sixty cents";
    
    assertEquals(
      expectedResult, 
      NumberWordConverter.getMoneyIntoWords(924.6));
}

@Test
public void whenTwoBillionDollarsGiven_thenReturnWords() {
    String expectedResult 
      = "two billion one hundred thirty three million two hundred" 
        + " forty seven thousand eight hundred ten dollars";
 
    assertEquals(
      expectedResult, 
      NumberWordConverter.getMoneyIntoWords(2_133_247_810));
}

@Test
public void whenThirtyMillionDollarsGiven_thenReturnWords() {
    String expectedResult 
      = "thirty three million three hundred forty eight thousand nine hundred seventy eight dollars";
    assertEquals(
      expectedResult, 
      NumberWordConverter.getMoneyIntoWords(33_348_978));
}

Let’s also test some edge cases, and make sure we have covered them as well:

@Test
public void whenZeroDollarsGiven_thenReturnEmptyString() {
    assertEquals("", NumberWordConverter.getMoneyIntoWords(0));
}

@Test
public void whenNoDollarsAndNineFiveNineCents_thenCorrectRounding() {
    assertEquals(   
      "ninety six cents", 
      NumberWordConverter.getMoneyIntoWords(0.959));
}
  
@Test
public void whenNoDollarsAndOneCent_thenReturnCentSingular() {
    assertEquals(
      "one cent", 
      NumberWordConverter.getMoneyIntoWords(0.01));
}

3. Using a Library

Now that we’ve implemented our own algorithm, let’s do this conversion by using an existing library.

Tradukisto is a library for Java 8+, which can help us convert numbers to their word representations. First, we need to import it into our project (the latest version of this library can be found here):

<dependency>
    <groupId>pl.allegro.finance</groupId>
    <artifactId>tradukisto</artifactId>
    <version>1.0.1</version>
</dependency>

We can now use MoneyConverters‘s asWords() method to do this conversion:

public String getMoneyIntoWords(String input) {
    MoneyConverters converter = MoneyConverters.ENGLISH_BANKING_MONEY_VALUE;
    return converter.asWords(new BigDecimal(input));
}

Let’s test this method with a simple test case:

@Test
public void whenGivenDollarsAndCents_thenReturnWordsVersionTwo() {
    assertEquals(
      "three hundred ten £ 00/100", 
      NumberWordConverter.getMoneyIntoWords("310"));
}

We could also use the ICU4J library to do this, but it’s a large one and comes with many other features that are out of the scope of this article.

However, have a look at it if Unicode and globalization support is needed.

4. Conclusion

In this quick article, we saw two approaches on how to do the conversion of a sum of money into words.

The code for all the examples explained here, and much more can be found over on GitHub.

Getting Started with Java and Zookeeper

$
0
0

1. Overview

Apache ZooKeeper is a distributed coordination service which eases the development of distributed applications. It’s used by projects like Apache Hadoop, HBase and others for different use cases like leader election, configuration management, node coordination, server lease management, etc.

Nodes within ZooKeeper cluster store their data in a shared hierarchal namespace which is similar to a standard file system or a tree data structure.

In this article, we’ll explore how to use Java API of Apache Zookeeper to store, update and delete information stored within ZooKeeper.

2. Setup

The latest version of the Apache ZooKeeper Java library can be found here:

<dependency>
    <groupId>org.apache.zookeeper</groupId>
    <artifactId>zookeeper</artifactId>
    <version>3.4.11</version>
</dependency>

3. ZooKeeper Data Model – ZNode

ZooKeeper has a hierarchal namespace, much like a distributed file system where it stores coordination data like status information, coordination information, location information, etc. This information is stored on different nodes.

Every node in a ZooKeeper tree is referred to as ZNode.

Each ZNode maintains version numbers and timestamps for any data or ACL changes. Also, this allows ZooKeeper to validate the cache and to coordinate updates.

4. Installation

4.1. Installation

Latest ZooKeeper release can be downloaded from here. Before doing that we need to make sure we meet the system requirements described here.

4.2. Standalone Mode

For this article, we’ll be running ZooKeeper in a standalone mode as it requires minimal configuration. Follow the steps described in the documentation here.

Note: In standalone mode, there’s no replication so if ZooKeeper process fails, the service will go down.

5. ZooKeeper CLI Examples

We’ll now use the ZooKeeper Command Line Interface (CLI) to interact with ZooKeeper:

bin/zkCli.sh -server 127.0.0.1:2181

Above command starts a standalone instance locally. Let’s now look at how to create a ZNode and store information within ZooKeeper:

[zk: localhost:2181(CONNECTED) 0] create /MyFirstZNode ZNodeVal
Created /FirstZnode

We just created a ZNode ‘MyFirstZNode’ at the root of ZooKeeper hierarchical namespace and written ‘ZNodeVal’ to it.

Since we’ve not passed any flag, a created ZNode will be persistent.

Let’s now issue a ‘get’ command to fetch the data as well as metadata associated with a ZNode:

[zk: localhost:2181(CONNECTED) 1] get /FirstZnode

“Myfirstzookeeper-app”
cZxid = 0x7f
ctime = Sun Feb 18 16:15:47 IST 2018
mZxid = 0x7f
mtime = Sun Feb 18 16:15:47 IST 2018
pZxid = 0x7f
cversion = 0
dataVersion = 0
aclVersion = 0
ephemeralOwner = 0x0
dataLength = 22
numChildren = 0

We can update the data of an existing ZNode using the set operation.

For example:

set /MyFirstZNode ZNodeValUpdated

This will update the data at MyFirstZNode from ZNodeVal to ZNodeValUpdated.

6. ZooKeeper Java API Example

Let’s now look at Zookeeper Java API and create a node, update the node and retrieve some data.

6.1. Java Packages

The ZooKeeper Java bindings are composed mainly of two Java packages:

  1. org.apache.zookeeper: which defines the main class of the ZooKeeper client library along with many static definitions of the ZooKeeper event types and states
  2. org.apache.zookeeper.data: that defines the characteristics associated with ZNodes, such as Access Control Lists (ACL), IDs, stats, and so on

There’s also ZooKeeper Java APIs are used in server implementation such as org.apache.zookeeper.server, org.apache.zookeeper.server.quorum, and org.apache.zookeeper.server.upgrade.

However, they’re beyond the scope of this article.

6.2. Connecting to a ZooKeeper Instance

Let’s now create ZKConnection class which will be used to connect and disconnect from an already running ZooKeeper:

public class ZKConnection {
    private ZooKeeper zoo;
    CountDownLatch connectionLatch = new CountDownLatch(1);

    // ...

    public ZooKeeper connect(String host) 
      throws IOException, 
      InterruptedException {
        zoo = new ZooKeeper(host, 2000, new Watcher() {
            public void process(WatchedEvent we) {
                if (we.getState() == KeeperState.SyncConnected) {
                    connectionLatch.countDown();
                }
            }
        });

        connectionLatch.await();
        return zoo;
    }

    public void close() throws InterruptedException {
        zoo.close();
    }
}

To use a ZooKeeper service, an application must first instantiate an object of ZooKeeper class, which is the main class of ZooKeeper client library.

In connect method, we’re instantiating an instance of ZooKeeper class. Also, we’ve registered a callback method to process the WatchedEvent from ZooKeeper for connection acceptance and accordingly finish the connect method using countdown method of CountDownLatch.

Once a connection to a server is established, a session ID gets assigned to the client. To keep the session valid, the client should periodically send heartbeats to the server.

The client application can call ZooKeeper APIs as long as its session ID remains valid.

6.3. Client Operations

We’ll now create a ZKManager interface which exposes different operations like creating a ZNode and saving some data, fetching and updating the ZNode Data:

public interface ZKManager {
    public void create(String path, byte[] data)
      throws KeeperException, InterruptedException;
    public Object getZNodeData(String path, boolean watchFlag);
    public void update(String path, byte[] data) 
      throws KeeperException, InterruptedException;
}

Let’s now look at the implementation of the above interface:

public class ZKManagerImpl implements ZKManager {
    private static ZooKeeper zkeeper;
    private static ZKConnection zkConnection;

    public ZKManagerImpl() {
        initialize();
    }

    private void initialize() {
        zkConnection = new ZKConnection();
        zkeeper = zkConnection.connect("localhost");
    }

    public void closeConnection() {
        zkConnection.close();
    }

    public void create(String path, byte[] data) 
      throws KeeperException, 
      InterruptedException {
 
        zkeeper.create(
          path, 
          data, 
          ZooDefs.Ids.OPEN_ACL_UNSAFE, 
          CreateMode.PERSISTENT);
    }

    public Object getZNodeData(String path, boolean watchFlag) 
      throws KeeperException, 
      InterruptedException {
 
        byte[] b = null;
        b = zkeeper.getData(path, null, null);
        return new String(b, "UTF-8");
    }

    public void update(String path, byte[] data) throws KeeperException, 
      InterruptedException {
        int version = zkeeper.exists(path, true).getVersion();
        zkeeper.setData(path, data, version);
    }
}

In the above code, connect and disconnect calls are delegated to the earlier created ZKConnection class. Our create method is used to create a ZNode at given path from the byte array data. For demonstration purpose only, we’ve kept ACL completely open.

Once created, the ZNode is persistent and doesn’t get deleted when the client disconnects.

The logic to fetch ZNode data from ZooKeeper in our getZNodeData method is quite straightforward. Finally, with the update method, we’re checking the presence of ZNode on given path and fetching it if it exists.

Beyond that, for updating the data, we first check for ZNode existence and get the current version. Then, we invoke the setData method with the path of ZNode, data and current version as parameters. ZooKeeper will update the data only if the passed version matches with the latest version.

7. Conclusion

When developing distributed applications, Apache ZooKeeper plays a critical role as a distributed coordination service. Specifically for use cases like storing shared configuration, electing the master node, and so on.

ZooKeeper also provides an elegant Java-based API’s to be used in client-side application code for seamless communication with ZooKeeper ZNodes.

And as always, all sources for this tutorial can be found over on Github.

Java Weekly, Issue 221

$
0
0

Here we go…

1. Spring and Java

>> Monitor and troubleshoot Java applications and services with Datadog 

Optimize performance with end-to-end tracing and out-of-the-box support for popular Java frameworks, application servers, and databases. Try it free.

>> Java 10 Released [infoq.com]

Yes. Java 10 is out. Nuff said.

>> Java 11 Will Include More Than Just Features [blog.takipi.com]

The next Java release will be the first LTS release after Java 8.

>> Micrometer: Spring Boot 2’s new application metrics collector [spring.io]

Spring Boot 2.0 features a new metrics collector – this is a good opportunity to explore the new functionality.

>> Java Environment Management [blog.frankel.ch]

Nowadays, given we might need to switch between different JDKs a lot – this tool might come in handy.

>> JUnit 5 Tutorial: Writing Assertions With JUnit 5 Assertion API [petrikainulainen.net]

JUnit 5 features a slightly revised way of writing assertions. Good stuff.

>> Servlet and Reactive Stacks in Spring Framework 5 [infoq.com]

“Going reactive” isn’t just about using new APIs – the reactive stack handles higher concurrency with fewer hardware resources.

Also worth reading:

Webinars and presentations:

Time to upgrade:

2. Technical and Musings

>> Mock? What, When, How? [blog.codecentric.de]

Be careful what you mock, sometimes it might make your codebase un-refactorable.

Also worth reading:

3. Comics

And my favorite Dilberts of the week:

>> Unplugged Server [dilbert.com]

>> Bob is Proud of His Flip Phone [dilbert.com]

>> Tina Wants to Borrow Wally’s Phone [dilbert.com]

4. Pick of the Week

>> Get specific! [sivers.org]

A Guide to Flips for Spring

$
0
0

1. Overview

In this tutorial, we’ll have a look at Flips, a library that implements feature flags in the form of powerful annotations for Spring Core, Spring MVC, and Spring Boot applications.

Feature flags (or toggles) are a pattern for delivering new features quickly and safely. These toggles allow us to modify application behavior without changing or deploying new code. Martin Fowler’s blog has a very informative article about feature flags here.

2. Maven Dependency

Before we get started, we need to add the Flips library to our pom.xml:

<dependency>
    <groupId>com.github.feature-flip</groupId>
    <artifactId>flips-core</artifactId>
    <version>1.0.1</version>
</dependency>

Maven Central has the latest version of the library, and the Github project is here.

Of course, we also need to include a Spring:

<dependency>
    <groupId>org.springframework.boot</groupId>
    <artifactId>spring-boot-starter-web</artifactId>
    <version>1.5.10.RELEASE</version>
</dependency>

Since Flips isn’t yet compatible with Spring version 5.x, we’re going to use the latest version of Spring Boot in the 4.x branch.

3. A Simple REST Service for Flips

Let’s put together a simple Spring Boot project for adding and toggling new features and flags.

Our REST application will provide access to Foo resources:

public class Foo {
    private String name;
    private int id;
}

We’ll simply create a Service that maintains a list of Foos:

@Service
public class FlipService {

    private List<Foo> foos;

    public List<Foo> getAllFoos() {
        return foos;
    }

    public Foo getNewFoo() {
        return new Foo("New Foo!", 99);
    }
}

We’ll refer to additional service methods as we go, but this snippet should be enough to illustrate what FlipService does in the system.

And of course, we need to create a Controller:

@RestController
public class FlipController {

    private FlipService flipService;

    // constructors

    @GetMapping("/foos")
    public List<Foo> getAllFoos() {
        return flipService.getAllFoos();
    }
}

4. Control Features Based on Configuration

The most basic use of Flips is to enable or disable a feature based on configuration. Flips has several annotations for this.

4.1. Environment Property

Let’s imagine we added a new capability to FlipService; retrieving Foos by their id.

Let’s add the new request to the controller:

@GetMapping("/foos/{id}")
@FlipOnEnvironmentProperty(
  property = "feature.foo.by.id", 
  expectedValue = "Y")
public Foo getFooById(@PathVariable int id) {
    return flipService.getFooById(id)
      .orElse(new Foo("Not Found", -1));
}

The @FlipOnEnvironmentProperty controls whether or not this API is available.

Simply put, when feature.foo.by.id is Y, we can make requests by Id. If it isn’t (or not defined at all) Flips will disable the API method.

If a feature isn’t enabled, Flips will throw FeatureNotEnabledException and Spring will return “Not Implemented” to the REST client.

When we call the API with the property set to N, this is what we see:

Status = 501
Headers = {Content-Type=[application/json;charset=UTF-8]}
Content type = application/json;charset=UTF-8
Body = {
    "errorMessage": "Feature not enabled, identified by method 
      public com.baeldung.flips.model.Foo
      com.baeldung.flips.controller.FlipController.getFooById(int)",
    "className":"com.baeldung.flips.controller.FlipController",
    "featureName":"getFooById"
}

As expected, Spring catches the FeatureNotEnabledException and returns status 501 to the client.

4.2. Active Profile

Spring has long given us the ability to map beans to different profiles, such as devtest, or prod. Expanding on this capability to mapping feature flags to the active profile makes intuitive sense.

Let’s see how features are enabled or disabled based on the active Spring Profile:

@RequestMapping(value = "/foos", method = RequestMethod.GET)
@FlipOnProfiles(activeProfiles = "dev")
public List getAllFoos() {
    return flipService.getAllFoos();
}

The @FlipOnProfiles annotation accepts a list of profile names. If the active profile is in the list, the API is accessible.

4.3. Spring Expressions

Spring’s Expression Language (SpEL) is the powerful mechanism for manipulating the runtime environment. Flips has us a way to toggle features with it as well.

@FlipOnSpringExpression toggles a method based on a SpEL expression that returns a boolean.

Let’s use a simple expression to control a new feature:

@FlipOnSpringExpression(expression = "(2 + 2) == 4")
@GetMapping("/foo/new")
public Foo getNewFoo() {
    return flipService.getNewFoo();
}

4.4. Disable

To disable a feature completely, use @FlipOff:

@GetMapping("/foo/first")
@FlipOff
public Foo getFirstFoo() {
    return flipService.getLastFoo();
}

In this example, getFirstFoo() is completely inaccessible.

As we’ll see below, we can combine Flips annotations, making it possible to use @FlipOff to disable a feature based on the environment or other criteria.

5. Control Features with Date/Time

Flips can toggle a feature based on a date/time or the day of the week. Tying the availability of a new feature to the day or date has obvious advantages.

5.1. Date and Time

@FlipOnDateTime accepts the name of a property that is formatted in ISO 8601 format.

So let’s set a property indicating a new feature that will be active on March 1st:

first.active.after=2018-03-01T00:00:00Z

Then we’ll write an API for retrieving the first Foo:

@GetMapping("/foo/first")
@FlipOnDateTime(cutoffDateTimeProperty = "first.active.after")
public Foo getFirstFoo() {
    return flipService.getLastFoo();
}

Flips will check the named property. If the property exists and the specified date/time have passed, the feature is enabled.

5.2. Day of Week

The library provides @FlipOnDaysOfWeek, which is useful for operations such as A/B testing:

@GetMapping("/foo/{id}")
@FlipOnDaysOfWeek(daysOfWeek={DayOfWeek.MONDAY, DayOfWeek.WEDNESDAY})
public Foo getFooByNewId(@PathVariable int id) {
    return flipService.getFooById(id).orElse(new Foo("Not Found", -1));
}

getFooByNewId() is only available on Mondays and Wednesdays.

6. Replace a Bean

Switching methods on and off is useful, but we may want to introduce new behavior via new objects. @FlipBean directs Flips to call a method in a new bean.

A Flips annotation can work on any Spring @Component. So far, we’ve only modified our @RestController, let’s try modifying our Service.

We’ll create a new service with different behavior from FlipService:

@Service
public class NewFlipService {
    public Foo getNewFoo() {
        return new Foo("Shiny New Foo!", 100);
    }
}

We will replace the old service’s getNewFoo() with the new version:

@FlipBean(with = NewFlipService.class)
public Foo getNewFoo() {
    return new Foo("New Foo!", 99);
}

Flips will direct calls to getNewThing() to NewFlipService. @FlipBean is another toggle that is most useful when combined with others. Let’s look at that now.

7. Combining Toggles

We combine toggles by specifying more than one. Flips evaluates these in sequence, with implicit “AND” logic. Therefore all of them must be true to toggle the feature on.

Let’s combine two of our previous examples:

@FlipBean(
  with = NewFlipService.class)
@FlipOnEnvironmentProperty(
  property = "feature.foo.by.id", 
  expectedValue = "Y")
public Foo getNewFoo() {
    return new Foo("New Foo!", 99);
}

We’ve made use of the new service configurable.

8. Conclusion

In this brief guide, we created a simple Spring Boot service and toggled APIs on and off using Flips annotations. We saw how features are toggled using configuration information and date/time, and also how features can be toggled by swapping beans at runtime.

Code samples, as always, can be found over on GitHub.


Hamcrest Bean Matchers

$
0
0

1. Overview

Hamcrest is a library that provides methods, called matchers, to help developers write simpler unit tests. There are plenty of matchers, you can get started by reading about some of them here.

In this article, we’ll explore beans matchers.

2. Setup

To get Hamcrest, we just need to add the following Maven dependency to our pom.xml:

<dependency>
    <groupId>org.hamcrest</groupId>
    <artifactId>java-hamcrest</artifactId>
    <version>2.0.0.0</version>
    <scope>test</scope>
</dependency>

The latest Hamcrest version can be found on Maven Central.

3. Bean Matchers

Bean matchers are extremely useful to check conditions over POJOs, something that is frequently required when writing most unit tests.

Before getting started, we’ll create a class that will help us through the examples:

public class City {
    String name;
    String state;

    // standard constructor, getters and setters

}

Now that we’re all set, let’s see beans matchers in action!

3.1. hasProperty

This matcher is basically to check if certain bean contains a specific property identified by the property’s name:

@Test
public void givenACity_whenHasProperty_thenCorrect() {
    City city = new City("San Francisco", "CA");
    
    assertThat(city, hasProperty("state"));
}

So, this test will pass because our City bean has a property named state.

Following this idea, we can also test if a bean has certain property and that property has certain value:

@Test
public void givenACity_whenHasPropertyWithValueEqualTo_thenCorrect() {
    City city = new City("San Francisco", "CA");
        
    assertThat(city, hasProperty("name", equalTo("San Francisco")));
}

As we can see, hasProperty is overloaded and can be used with a second matcher to check a specific condition over a property.

So, we can also do this:

@Test
public void givenACity_whenHasPropertyWithValueEqualToIgnoringCase_thenCorrect() {
    City city = new City("San Francisco", "CA");

    assertThat(city, hasProperty("state", equalToIgnoringCase("ca")));
}

Useful, right? We can take this idea one step further with the matcher that we’ll explore next.

3.2. samePropertyValuesAs

Sometimes when we have to do checks over a lot of properties of a bean, it may be simpler to create a new bean with the desired values. Then, we can check for equality between the tested bean and the new one. Of course, Hamcrest provides a matcher for this situation:

@Test
public void givenACity_whenSamePropertyValuesAs_thenCorrect() {
    City city = new City("San Francisco", "CA");
    City city2 = new City("San Francisco", "CA");

    assertThat(city, samePropertyValuesAs(city2));
}

This results in fewer assertions and simpler code. Same way, we can test the negative case:

@Test
public void givenACity_whenNotSamePropertyValuesAs_thenCorrect() {
    City city = new City("San Francisco", "CA");
    City city2 = new City("Los Angeles", "CA");

    assertThat(city, not(samePropertyValuesAs(city2)));
}

Next, well see a couple of util methods to inspect class properties.

3.3. getPropertyDescriptor

There’re scenarios when it may come in handy being able to explore a class structure. Hamcrest provides some util methods to do so:

@Test
public void givenACity_whenGetPropertyDescriptor_thenCorrect() {
    City city = new City("San Francisco", "CA");
    PropertyDescriptor descriptor = getPropertyDescriptor("state", city);

    assertThat(descriptor
      .getReadMethod()
      .getName(), is(equalTo("getState")));
}

The object descriptor retrieves a lot of information about the property state. In this case, we’ve extracted the getter’s name and assert that it is equal to some expected value. Note that we can also apply other text matchers.

Moving on, the last method we will explore is a more general case of this same idea.

3.4. propertyDescriptorsFor

This method does basically the same as the one in the previous section, but for all the properties of the bean. We also need to specify how high we want to go in the class hierarchy:

@Test
public void givenACity_whenGetPropertyDescriptorsFor_thenCorrect() {
    City city = new City("San Francisco", "CA");
    PropertyDescriptor[] descriptors = propertyDescriptorsFor(
      city, Object.class);
 
    List<String> getters = Arrays.stream(descriptors)
      .map(x -> x.getReadMethod().getName())
      .collect(toList());

    assertThat(getters, containsInAnyOrder("getName", "getState"));
}

So, what we did here is: get all the property descriptors from the bean city and stop at the Object level.

Then, we just used Java 8’s features to filter the getter methods.

Finally, we used collections matchers to check something over the getters list. You can find more information about collections matchers here.

4. Conclusion

Hamcrest matchers consist of a great set of tools to be used across every project. They’re easy to learn and become extremely useful in short time.

Beans matchers in particular, provide an effective way of making assertions over POJOs, something that is frequently required when writing unit tests.

To get the complete implementation of this examples, please refer to the GitHub project.

A Quick Guide to the Spring @Lazy Annotation

$
0
0

1. Overview

By default, Spring creates all singleton beans eagerly at the startup/bootstrapping of the application context. The reason behind this is simple: to avoid and detect all possible errors immediately rather than at runtime.

However, there’re cases when we need to create a bean, not at the application context startup, but when we request it.

In this quick tutorial, we’re going to discuss Spring’s @Lazy annotation.

2. Lazy Initialization

The @Lazy annotation has been present since Spring version 3.0. There’re several ways to tell the IoC container to initialize a bean lazily.

2.1. @Configuration Class

When we put @Lazy annotation over the @Configuration class, it indicates that all the methods with @Bean annotation should be loaded lazily.

This is the equivalent for the XML based configuration’s default-lazy-init=“true attribute.

Let’s have a look here:

@Lazy
@Configuration
@ComponentScan(basePackages = "com.baeldung.lazy")
public class AppConfig {

    @Bean
    public Region getRegion(){
        return new Region();
    }

    @Bean
    public Country getCountry(){
        return new Country();
    }
}

Let’s now test the functionality:

@Test
public void givenLazyAnnotation_whenConfigClass_thenLazyAll() {

    AnnotationConfigApplicationContext ctx
     = new AnnotationConfigApplicationContext();
    ctx.register(AppConfig.class);
    ctx.refresh();
    ctx.getBean(Region.class);
    ctx.getBean(Country.class);
}

As we see, all beans are created only when we request them for the first time:

Bean factory for ...AnnotationConfigApplicationContext: 
...DefaultListableBeanFactory: [...];
// application context started
Region bean initialized
Country bean initialized

To apply this to only a specific bean, let’s remove the @Lazy from a class.

Then we add it to the config of the desired bean:

@Bean
@Lazy(true)
public Region getRegion(){
    return new Region();
}

2.2 With @Autowired

Before going ahead, check out these guides for @Autowired and @Component annotations.

Here, in order to initialize a lazy bean, we reference it from another one.

The bean that we want to load lazily:

@Lazy
@Component
public class City {
    public City() {
        System.out.println("City bean initialized");
    }
}

And it’s reference:

public class Region {

    @Lazy
    @Autowired
    private City city;

    public Region() {
        System.out.println("Region bean initialized");
    }

    public City getCityInstance() {
        return city;
    }
}

Note, that the @Lazy is mandatory in both places.

With the @Component annotation on the City class and while referencing it with @Autowired:

@Test
public void givenLazyAnnotation_whenAutowire_thenLazyBean() {
    // load up ctx appication context
    Region region = ctx.getBean(Region.class);
    region.getCityInstance();
}

Here, the City bean is initialized only when we call the getCityInstance() method.

3. Conclusion

In this quick tutorial, we learned the basics of Spring’s @Lazy annotation. We examined several ways to configure and use it.

As usual, the complete code for this guide is available over on GitHub.

Working with Kotlin and JPA

$
0
0

1. Introduction

One of Kotlin’s characteristics is the interoperability with Java libraries, and JPA is certainly one of these.

In this tutorial, we’ll explore how to use Kotlin Data Classes as JPA entities.

2. Dependencies

To keep things simple, we’ll use Hibernate as our JPA implementation; we’ll need to add the following dependencies to our Maven project:

<dependency>
    <groupId>org.hibernate</groupId>
    <artifactId>hibernate-core</artifactId>
    <version>5.2.15.Final</version>
</dependency>
<dependency>
    <groupId>org.hibernate</groupId>
    <artifactId>hibernate-testing</artifactId>
    <version>5.2.15.Final</version>
    <scope>test</scope>
</dependency>

We’ll also use an H2 embedded database to run our tests:

<dependency>
    <groupId>com.h2database</groupId>
    <artifactId>h2</artifactId>
    <version>1.4.196</version>
    <scope>test</scope>
</dependency>

For Kotlin we’ll use the following:

<dependency>
    <groupId>org.jetbrains.kotlin</groupId>
    <artifactId>kotlin-stdlib-jdk8</artifactId>
    <version>1.2.30</version>
</dependency>

Of course, the most recent versions of Hibernate, H2, and Kotlin can be found in Maven Central.

3. Compiler Plugins (jpa-plugin)

To use JPA, the entity classes need a constructor without parameters.

By default, the Kotlin data classes don’t have it, and to generate them we’ll need to use the jpa-plugin:

<plugin>
    <artifactId>kotlin-maven-plugin</artifactId>
    <groupId>org.jetbrains.kotlin</groupId>
    <version>1.2.30</version>
    <configuration>
        <compilerPlugins>
        <plugin>jpa</plugin>
        </compilerPlugins>
        <jvmTarget>1.8</jvmTarget>
    </configuration>
    <dependencies>
        <dependency>
        <groupId>org.jetbrains.kotlin</groupId>
        <artifactId>kotlin-maven-noarg</artifactId>
        <version>1.2.30</version>
        </dependency>
    </dependencies>
    <!--...-->
</plugin>

4. JPA with Kotlin Data Classes

After the previous setup is done, we’re ready to use JPA with data classes.

Let’s start creating a Person data class with two attributes – id and name, like this:

@Entity
data class Person(
    @Id
    @GeneratedValue(strategy = GenerationType.IDENTITY)
    val id: Int,
    
    @Column(nullable = false)
    val name: String
)

As we can see, we can freely use the annotations from JPA like @Entity, @Column and @Id.

To see our entity in action, we’ll create the following test:

@Test
fun givenPerson_whenSaved_thenFound() {
    doInHibernate(({ this.sessionFactory() }), { session ->
        val personToSave = Person(0, "John")
        session.persist(personToSave)
        val personFound = session.find(Person::class.java, personToSave.id)
        session.refresh(personFound)

        assertTrue(personToSave == personFound)
    })
}

After running the test with logging enabled, we can see the following results:

Hibernate: insert into Person (id, name) values (null, ?)
Hibernate: select person0_.id as id1_0_0_, person0_.name as name2_0_0_ from Person person0_ where person0_.id=?

That is an indicator that all is going well.
It is important to note that if we don’t use the jpa-plugin in runtime, we are going to get an InstantiationException, due to the lack of default constructor:

javax.persistence.PersistenceException: org.hibernate.InstantiationException: No default constructor for entity: : com.baeldung.entity.Person

Now, we’ll test again with null values. To do this, let’s extend our Person entity with a new attribute email and a @OneToMany relationship:

    //...
    @Column(nullable = true)
    val email: String? = null,

    @Column(nullable = true)
    @OneToMany(cascade = [CascadeType.ALL])
    val phoneNumbers: List<PhoneNumber>? = null

We can also see that email and phoneNumbers fields are nullable, thus are declared with the question mark.

The PhoneNumber entity has two attributes – id and number:

@Entity
data class PhoneNumber(
    @Id
    @GeneratedValue(strategy = GenerationType.IDENTITY)
    val id: Int,

    @Column(nullable = false)
    val number: String
)

Let’s verify this with a test:

@Test
fun givenPersonWithNullFields_whenSaved_thenFound() {
    doInHibernate(({ this.sessionFactory() }), { session ->
        val personToSave = Person(0, "John", null, null)
        session.persist(personToSave)
        val personFound = session.find(Person::class.java, personToSave.id)
        session.refresh(personFound)

        assertTrue(personToSave == personFound)
    })
}

This time, we’ll get one insert statement:

Hibernate: insert into Person (id, email, name) values (null, ?, ?)
Hibernate: select person0_.id as id1_0_1_, person0_.email as email2_0_1_, person0_.name as name3_0_1_, phonenumbe1_.Person_id as Person_i1_1_3_, phonenumbe2_.id as phoneNum2_1_3_, phonenumbe2_.id as id1_2_0_, phonenumbe2_.number as number2_2_0_ from Person person0_ left outer join Person_PhoneNumber phonenumbe1_ on person0_.id=phonenumbe1_.Person_id left outer join PhoneNumber phonenumbe2_ on phonenumbe1_.phoneNumbers_id=phonenumbe2_.id where person0_.id=?

Let’s test one more time but without null data to verify the output:

@Test
fun givenPersonWithFullData_whenSaved_thenFound() {
    doInHibernate(({ this.sessionFactory() }), { session ->
        val personToSave = Person(
          0, 
          "John", 
          "jhon@test.com", 
          Arrays.asList(PhoneNumber(0, "202-555-0171"), PhoneNumber(0, "202-555-0102")))
        session.persist(personToSave)
        val personFound = session.find(Person::class.java, personToSave.id)
        session.refresh(personFound)

        assertTrue(personToSave == personFound)
    })
}

And, as we can see, now we get three insert statements:

Hibernate: insert into Person (id, email, name) values (null, ?, ?)
Hibernate: insert into PhoneNumber (id, number) values (null, ?)

5. Conclusion

In this quick article, we saw an example of how to integrate Kotlin data classes with JPA using the jpa-plugin and Hibernate.

As always, the source code is available over on GitHub.

Build an MVC Web Application with Grails

$
0
0

1. Overview

In this tutorial, we’ll learn how to create a simple web application using Grails.

Grails (more precisely it’s latest major version) is a framework built on top of the Spring Boot project and uses the Apache Groovy language to develop web apps.

It’s inspired by the Rails Framework for Ruby and is built around the convention-over-configuration philosophy which allows reducing boilerplate code.

2. Setup

First of all, let’s head over to the official page to prepare the environment. At the time of this tutorial, the latest version is 3.3.3.

Simply put, there are two ways of installing Grails: via SDKMAN or by downloading the distribution and adding binaries to the PATH environment variable.

We won’t cover the setup step by step because it is well documented in the Grails Docs.

3. Anatomy of a Grails App

In this section, we will get a better understanding of the Grails application structure. As we mentioned earlier, Grails prefers convention over configuration, therefore the location of files defines their purpose. Let’s see what we have in the grails-app directory:

  • assets – a place where we store static assets files like styles, javascript files or images
  • conf – contains project configuration files:
    • application.yml contains standard web app settings like data source, mime types, and other Grails or Spring related settings
    • resources.groovy contains spring bean definitions
    • logback.groovy contains logging configuration
  • controllers – responsible for handling requests and generating responses or delegating them to the views. By convention, when a file name ends with *Controller, the framework creates a default URL mapping for each action defined in the controller class
  • domain – contains the business model of the Grails application. Each class living here will be mapped to database tables by GORM
  • i18n – used for internationalization support
  • init – an entry point of the application
  • services – the business logic of the application will live here. By convention, Grails will create a Spring singleton bean for each service
  • taglib – the place for custom tag libraries
  • views – contains views and templates

4. A Simple Web Application

In this chapter, we will create a simple web app for managing Students. Let’s start by invoking the CLI command for creating an application skeleton:

grails create-app

When the basic structure of the project has been generated, let’s move on to implementing actual web app components.

4.1. Domain Layer

As we are implementing a web application for handling Students, let’s start with generating a domain class called Student:

grails create-domain-class com.baeldung.grails.Student

And finally, let’s add the firstName and lastName properties to it:

class Student {
    String firstName
    String lastName
}

Grails applies its conventions and will set up an object-relational mapping for all classes located in grails-app/domain directory.

Moreover, thanks to the GormEntity trait, all domain classes will have access to all CRUD operations, which we’ll use in the next section for implementing services.

4.2. Service Layer

Our application will handle the following use cases:

  • Viewing a list of students
  • Creating new students
  • Removing existing students

Let’s implement these use cases. We will start by generating a service class:

grails create-service com.baeldung.grails.Student

Let’s head over to the grails-app/services directory, find our newly created service in the appropriate package and add all necessary methods:

@Transactional
class StudentService {

    def get(id){
        Student.get(id)
    }

    def list() {
        Student.list()
    }

    def save(student){
        student.save()
    }

    def delete(id){
        Student.get(id).delete()
    }
}

Note that services don’t support transactions by default. We can enable this feature by adding the @Transactional annotation to the class.

4.3. Controller Layer

In order to make the business logic available to the UI, let’s create a StudentController by invoking the following command:

grails create-controller com.baeldung.grails.Student

By default, Grails injects beans by names. It means that we can easily inject the StudentService singleton instance into our controller by declaring an instance variable called studentsService.

We can now define actions for reading, creating and deleting students.

class StudentController {

    def studentService

    def index() {
        respond studentService.list()
    }

    def show(Long id) {
        respond studentService.get(id)
    }

    def create() {
        respond new Student(params)
    }

    def save(Student student) {
        studentService.save(student)
        redirect action:"index", method:"GET"
    }

    def delete(Long id) {
        studentService.delete(id)
        redirect action:"index", method:"GET"
    }
}

By convention, the index() action from this controller will be mapped to the URI /student/index, the show() action to /student/show and so on.

4.4. View Layer

Having set up our controller actions, we can now proceed to create the UI views. We will create three Groovy Server Pages for listing, creating and removing Students.

By convention, Grails will render a view based on controller name and action. For example, the index() action from StudentController will resolve to /grails-app/views/student/index.gsp

Let’s start with implementing the view /grails-app/views/student/index.gsp, which will display a list of students. We’ll use the tag <f:table/> to create an HTML table displaying all students returned from the index() action in our controller.

By convention, when we respond with a list of objects, Grails will add the “List” suffix to the model name so that we can access the list of student objects with the variable studentList:

<!DOCTYPE html>
<html>
    <head>
        <meta name="layout" content="main" />
    </head>
    <body>
        <div class="nav" role="navigation">
            <ul>
                <li><g:link class="create" action="create">Create</g:link></li>
            </ul>
        </div>
        <div id="list-student" class="content scaffold-list" role="main">
            <f:table collection="${studentList}" 
                properties="['firstName', 'lastName']" />
        </div>
    </body>
</html>

We’ll now proceed to the view /grails-app/views/student/create.gsp, which allows the user to create new Students. We’ll use the built-in <f:all/> tag, which displays a form for all properties of a given bean:

<!DOCTYPE html>
<html>
    <head>
        <meta name="layout" content="main" />
    </head>
    <body>
        <div id="create-student" class="content scaffold-create" role="main">
            <g:form resource="${this.student}" method="POST">
                <fieldset class="form">
                    <f:all bean="student"/>
                </fieldset>
                <fieldset class="buttons">
                    <g:submitButton name="create" class="save" value="Create" />
                </fieldset>
            </g:form>
        </div>
    </body>
</html>

Finally, let’s create the view /grails-app/views/student/show.gsp for viewing and eventually deleting students.

Among other tags, we’ll take advantage of <f:display/>, which takes a bean as an argument and displays all its fields:

<!DOCTYPE html>
<html>
    <head>
        <meta name="layout" content="main" />
    </head>
    <body>
        <div class="nav" role="navigation">
            <ul>
                <li><g:link class="list" action="index">Students list</g:link></li>
            </ul>
        </div>
        <div id="show-student" class="content scaffold-show" role="main">
            <f:display bean="student" />
            <g:form resource="${this.student}" method="DELETE">
                <fieldset class="buttons">
                    <input class="delete" type="submit" value="delete" />
                </fieldset>
            </g:form>
        </div>
    </body>
</html>

4.5. Unit Tests

Grails mainly takes advantage of Spock for testing purposes. If you are not familiar with Spock, we highly recommend reading this tutorial first.

Let’s start with unit testing the index() action of our StudentController. 

We’ll mock the list() method from StudentService and test if index() returns the expected model:

void "Test the index action returns the correct model"() {
    given:
    controller.studentService = Mock(StudentService) {
        list() >> [new Student(firstName: 'John',lastName: 'Doe')]
    }
 
    when:"The index action is executed"
    controller.index()

    then:"The model is correct"
    model.studentList.size() == 1
    model.studentList[0].firstName == 'John'
    model.studentList[0].lastName == 'Doe'
}

Now, let’s test the delete() action. We’ll verify if delete() was invoked from StudentService and verify redirection to the index page:

void "Test the delete action with an instance"() {
    given:
    controller.studentService = Mock(StudentService) {
      1 * delete(2)
    }

    when:"The domain instance is passed to the delete action"
    request.contentType = FORM_CONTENT_TYPE
    request.method = 'DELETE'
    controller.delete(2)

    then:"The user is redirected to index"
    response.redirectedUrl == '/student/index'
}

4.6. Integration Tests

Next, let’s have a look at how to create integration tests for the service layer. Mainly we’ll test integration with a database configured in grails-app/conf/application.yml. 

By default, Grails uses the in-memory H2 database for this purpose.

First of all, let’s start with defining a helper method for creating data to populate the database:

private Long setupData() {
    new Student(firstName: 'John',lastName: 'Doe')
      .save(flush: true, failOnError: true)
    new Student(firstName: 'Max',lastName: 'Foo')
      .save(flush: true, failOnError: true)
    Student student = new Student(firstName: 'Alex',lastName: 'Bar')
      .save(flush: true, failOnError: true)
    student.id
}

Thanks to the @Rollback annotation on our integration test class, each method will run in a separate transaction, which will be rolled back at the end of the test.

Take a look at how we implemented the integration test for our list() method:

void "test list"() {
    setupData()

    when:
    List<Student> studentList = studentService.list()

    then:
    studentList.size() == 3
    studentList[0].lastName == 'Doe'
    studentList[1].lastName == 'Foo'
    studentList[2].lastName == 'Bar'
}

Also, let’s test the delete() method and validate if the total count of students is decremented by one:

void "test delete"() {
    Long id = setupData()

    expect:
    studentService.list().size() == 3

    when:
    studentService.delete(id)
    sessionFactory.currentSession.flush()

    then:
    studentService.list().size() == 2
}

5. Running and Deploying

Running and deploying apps can be done by invoking single command via Grails CLI.

For running the app use:

grails run-app

By default, Grails will setup Tomcat on port 8080.

Let’s navigate to http://localhost:8080/student/index to see what our web application looks like:

If you want to deploy your application to a servlet container, use:

grails war

to create a ready-to-deploy war artifact.

6. Conclusion

In this article, we focused on how to create a Grails web application using the convention-over-configuration philosophy. We also saw how to perform unit and integration tests with the Spock framework.

As always, all the code used here can be found over on GitHub.

Introduction to RxRelay for RxJava

$
0
0

1. Introduction

The popularity of RxJava has led to the creation of multiple third-party libraries that extend its functionality.

Many of those libraries were an answer to typical problems that developers were dealing with when using RxJava. RxRelay is one of these solutions.

2. Dealing with a Subject

Simply put, a Subject acts as a bridge between Observable and Observer. Since it’s an Observer, it can subscribe to one or more Observables and receive events from them.

Also, given it’s at the same time an Observable, it can reemit events or emit new events to its subscribers. More information about the Subject can be found in this article.

One of the issues with Subject is that after it receives onComplete() or onError() – it’s no longer able to move data. Sometimes it’s the desired behavior, but sometimes it’s not.

In cases when such behavior isn’t desired, we should consider using RxRelay.

3. Relay

A Relay is basically a Subject, but without the ability to call onComplete() and onError(), thus it’s constantly able to emit data.

This allows us to create bridges between different types of API without worrying about accidentally triggering the terminal state.

To use RxRelay we need to add the following dependency to our project:

<dependency>
  <groupId>com.jakewharton.rxrelay2</groupId>
  <artifactId>rxrelay</artifactId>
  <version>1.2.0</version>
</dependency>

4. Types of Relay

There’re three different types of Relay available in the library. We’ll quickly explore all three here.

4.1. PublishRelay

This type of Relay will reemit all events once the  Observer has subscribed to it.

The events will be emitted to all subscribers:

public void whenObserverSubscribedToPublishRelay_itReceivesEmittedEvents() {
    PublishRelay<Integer> publishRelay = PublishRelay.create();
    TestObserver<Integer> firstObserver = TestObserver.create();
    TestObserver<Integer> secondObserver = TestObserver.create();
    
    publishRelay.subscribe(firstObserver);
    firstObserver.assertSubscribed();
    publishRelay.accept(5);
    publishRelay.accept(10);
    publishRelay.subscribe(secondObserver);
    secondObserver.assertSubscribed();
    publishRelay.accept(15);
    firstObserver.assertValues(5, 10, 15);
    
    // second receives only the last event
    secondObserver.assertValue(15);
}

There’s no buffering of events in this case, so this behavior is similar to a cold Observable.

4.2. BehaviorRelay

This type of Relay will reemit the most recent observed event and all subsequent events  once the Observer has subscribed:

public void whenObserverSubscribedToBehaviorRelay_itReceivesEmittedEvents() {
    BehaviorRelay<Integer> behaviorRelay = BehaviorRelay.create();
    TestObserver<Integer> firstObserver = TestObserver.create();
    TestObserver<Integer> secondObserver = TestObserver.create();
    behaviorRelay.accept(5);     
    behaviorRelay.subscribe(firstObserver);
    behaviorRelay.accept(10);
    behaviorRelay.subscribe(secondObserver);
    behaviorRelay.accept(15);
    firstObserver.assertValues(5, 10, 15);
    secondObserver.assertValues(10, 15);
}

When we’re creating the BehaviorRelay we can specify the default value, which will be emitted, if there’re no other events to emit.

To specify the default value we can use createDefault() method:

public void whenObserverSubscribedToBehaviorRelay_itReceivesDefaultValue() {
    BehaviorRelay<Integer> behaviorRelay = BehaviorRelay.createDefault(1);
    TestObserver<Integer> firstObserver = new TestObserver<>();
    behaviorRelay.subscribe(firstObserver);
    firstObserver.assertValue(1);
}

If we don’t want to specify the default value, we can use the create() method:

public void whenObserverSubscribedToBehaviorRelayWithoutDefaultValue_itIsEmpty() {
    BehaviorRelay<Integer> behaviorRelay = BehaviorRelay.create();
    TestObserver<Integer> firstObserver = new TestObserver<>();
    behaviorRelay.subscribe(firstObserver);
    firstObserver.assertEmpty();
}

4.3. ReplayRelay

This type of Relay buffers all events it has received and then reemits it to all subscribers that subscribe to it:

 public void whenObserverSubscribedToReplayRelay_itReceivesEmittedEvents() {
    ReplayRelay<Integer> replayRelay = ReplayRelay.create();
    TestObserver<Integer> firstObserver = TestObserver.create();
    TestObserver<Integer> secondObserver = TestObserver.create();
    replayRelay.subscribe(firstObserver);
    replayRelay.accept(5);
    replayRelay.accept(10);
    replayRelay.accept(15);
    replayRelay.subscribe(secondObserver);
    firstObserver.assertValues(5, 10, 15);
    secondObserver.assertValues(5, 10, 15);
}

All elements are buffered and all subscribers will receive the same events, so this behavior is similar to the cold Observable.

When we’re creating the ReplayRelay we can provide maximal buffer size and time to live for events.

To create the Relay with limited buffer size we can use the createWithSize() method. When there’re more events to be buffered than the set buffer size, previous elements will be discarded:

public void whenObserverSubscribedToReplayRelayWithLimitedSize_itReceivesEmittedEvents() {
    ReplayRelay<Integer> replayRelay = ReplayRelay.createWithSize(2);
    TestObserver<Integer> firstObserver = TestObserver.create();
    replayRelay.accept(5);
    replayRelay.accept(10);
    replayRelay.accept(15);
    replayRelay.accept(20);
    replayRelay.subscribe(firstObserver);
    firstObserver.assertValues(15, 20);
}

We can also create ReplayRelay with max time to leave for buffered events using the createWithTime() method:

public void whenObserverSubscribedToReplayRelayWithMaxAge_thenItReceivesEmittedEvents() {
    SingleScheduler scheduler = new SingleScheduler();
    ReplayRelay<Integer> replayRelay =
      ReplayRelay.createWithTime(2000, TimeUnit.MILLISECONDS, scheduler);
    long current =  scheduler.now(TimeUnit.MILLISECONDS);
    TestObserver<Integer> firstObserver = TestObserver.create();
    replayRelay.accept(5);
    replayRelay.accept(10);
    replayRelay.accept(15);
    replayRelay.accept(20);
    Thread.sleep(3000);
    replayRelay.subscribe(firstObserver);
    firstObserver.assertEmpty();
}

5. Custom Relay

All types described above extend the common abstract class Relay, this gives us an ability to write our own custom Relay class.

To create a custom Relay we need to implement three methods: accept(), hasObservers() and subscribeActual(). 

Let’s write a simple Relay that will reemit event to one of the subscribers chosen at random:

public class RandomRelay extends Relay<Integer> {
    Random random = new Random();

    List<Observer<? super Integer>> observers = new ArrayList<>();

    @Override
    public void accept(Integer integer) {
        int observerIndex = random.nextInt() % observers.size();
        observers.get(observerIndex).onNext(integer);
    }

    @Override
    public boolean hasObservers() {
        return observers.isEmpty();
    }

    @Override
    protected void subscribeActual(Observer<? super Integer> observer) {
        observers.add(observer);
        observer.onSubscribe(Disposables.fromRunnable(
          () -> System.out.println("Disposed")));
    }
}

We can now test that only one subscriber will receive the event:

public void whenTwoObserversSubscribedToRandomRelay_thenOnlyOneReceivesEvent() {
    RandomRelay randomRelay = new RandomRelay();
    TestObserver<Integer> firstObserver = TestObserver.create();
    TestObserver<Integer> secondObserver = TestObserver.create();
    randomRelay.subscribe(firstObserver);
    randomRelay.subscribe(secondObserver);
    randomRelay.accept(5);
    if(firstObserver.values().isEmpty()) {
        secondObserver.assertValue(5);
    } else {
        firstObserver.assertValue(5);
        secondObserver.assertEmpty();
    }
}

6. Conclusion

In this tutorial, we had a look at RxRelay, a type similar to Subject but without the ability to trigger the terminal state.

More information can be found in the documentation. And, as always all the code samples can be found over on GitHub.

Viewing all 4709 articles
Browse latest View live


<script src="https://jsc.adskeeper.com/r/s/rssing.com.1596347.js" async> </script>